A basic slab box is just a handful of flat planes, but it can turn into almost anything once you start playing with lids, edges, and surface. Here are my favorite slab box ideas that take that simple little cube-and-lid setup and make it feel totally personal.
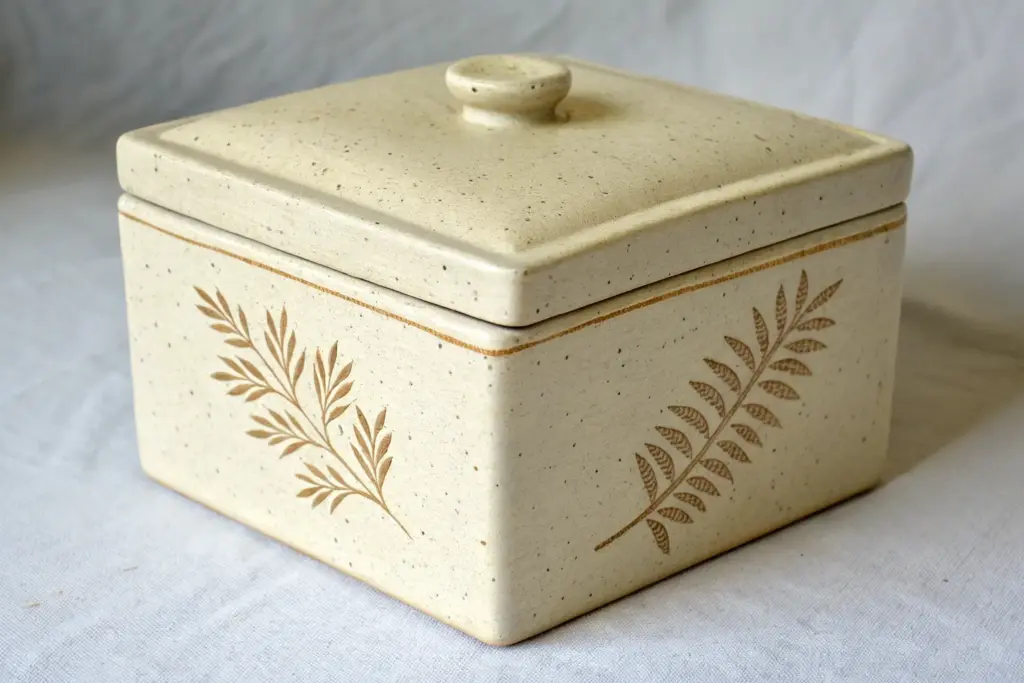
Classic Lidded Keepsake Box With A Gallery Rim
This project creates a serene, square keepsake box characterized by its clean lines and an exposed raw clay gallery rim that frames the lid beautifully. The understated speckled white glaze contrasts with the warm, toasted edges for a timeless, organic aesthetic.
Step-by-Step Tutorial
Materials
- Speckled Stoneware Clay (mid-range)
- Rolling pin and thicker guide sticks (approx. 1/4 inch)
- Fettling knife or needle tool
- Serrated metal rib or scoring tool
- Slip (clay mixed with water)
- Carpenter’s square or ruled cutting mat
- Flat wooden paddle
- Satin White Glaze
- Wax resist
- Soft paintbrush
Step 1: Creating the Basic Form
-
Roll the slab:
Begin by wedging your speckled stoneware clay to remove air bubbles. Roll out a consistent slab using guide sticks to ensure an even thickness of about 1/4 inch throughout. -
Compress the clay:
Use a rubber rib to smooth and compress the surface of the slab on both sides. This aligns the clay particles and helps prevent warping later during the firing process. -
Measure and cut components:
Using your square or ruler, cut out your panels. You will need one bottom square (e.g., 4×4 inches) and four side walls. Cut the lid square slightly larger than the base to account for the gallery inset later. -
Bevel the edges:
For the crispest corners, cut the vertical edges of your side walls and the edges of your base at a 45-degree angle. This mitering technique creates stronger, cleaner joints than a butt joint. -
Score and slip:
Rough up all beveled edges with your serrated tool and apply a generous amount of slip. Join the walls to the base and to each other, pressing firmly to bond. -
Reinforce the seams:
Roll a very thin coil of clay and press it into the interior corners of the box. Smooth this coil out completely so it disappears, strengthening the structure. -
Paddle the shape:
Once the box is assembled, gently tap the exterior walls with a flat wooden paddle. This squares up the form, sharpens the corners, and ensures the walls are perfectly straight.
Step 2: The Gallery Rim & Lid
-
Create the gallery strips:
From your remaining slab, cut four narrow strips of clay, about 1/2 inch wide. These will form the interior ledge that holds the lid. -
Attach the gallery:
Score and slip the inside top edge of your box. Attach the strips so they protrude slightly above the wall line as shown in the photo, or sit flush depending on your preference. The image shows a rim that acts as a visual border. -
Refine the lid fit:
Take your pre-cut lid slab and test the fit against your gallery rim. Trim or sand the edges until it sits comfortably within the rim with a tiny bit of wiggle room to account for glaze thickness. -
Rounded refinement:
Use a damp sponge to gently soften the sharp 90-degree angle of the lid’s top edge. This creates the pillowy, soft look seen in the reference photo.
Warping fix
If your lid wobbles after the bisque fire, use a flat sanding block or wet-sand paper on a flat surface to grind the high spots down until it sits flush.
Step 3: Finishing and Glazing
-
Bisque fire:
Allow the piece to dry slowly under plastic to prevent warping. Once bone dry, bisque fire it according to your clay body’s specifications. -
Wax crucial areas:
Apply wax resist carefully to the exposed rim of the box (the gallery edge) and the outer edge of the lid. This is the key step to achieving that raw clay border effect. -
Applying the glaze:
Dip or brush a satin white glaze onto the box. If dipping, hold the box by the foot and submerge quickly. Ensure the glaze doesn’t pool in the interior corners. -
Clean up:
Even with wax resist, little droplets of glaze can stick. Use a damp sponge to wipe the waxed rim and lid edge perfectly clean to reveal the raw clay speckles. -
Final smooth:
Before the final firing, briefly rub the raw clay areas with a finger to remove any burrs, ensuring the unglazed areas will be pleasant to touch. -
Glaze fire:
Fire the kiln to the maturity temperature of your clay and glaze (likely Cone 5 or 6 for stoneware). Note that the speckles in the clay often bleed through white glaze beautifully.
Level Up: Texture
Before assembling, gently roll a textured fabric (like canvas or linen) over the moist slab to add a subtle tactile quality that glaze will break over.
This simple yet elegant box makes for a perfect jewelry holder or a sophisticated addition to your desk.


Rectangular Butter-Style Slab Box With A Lift-Off Lid
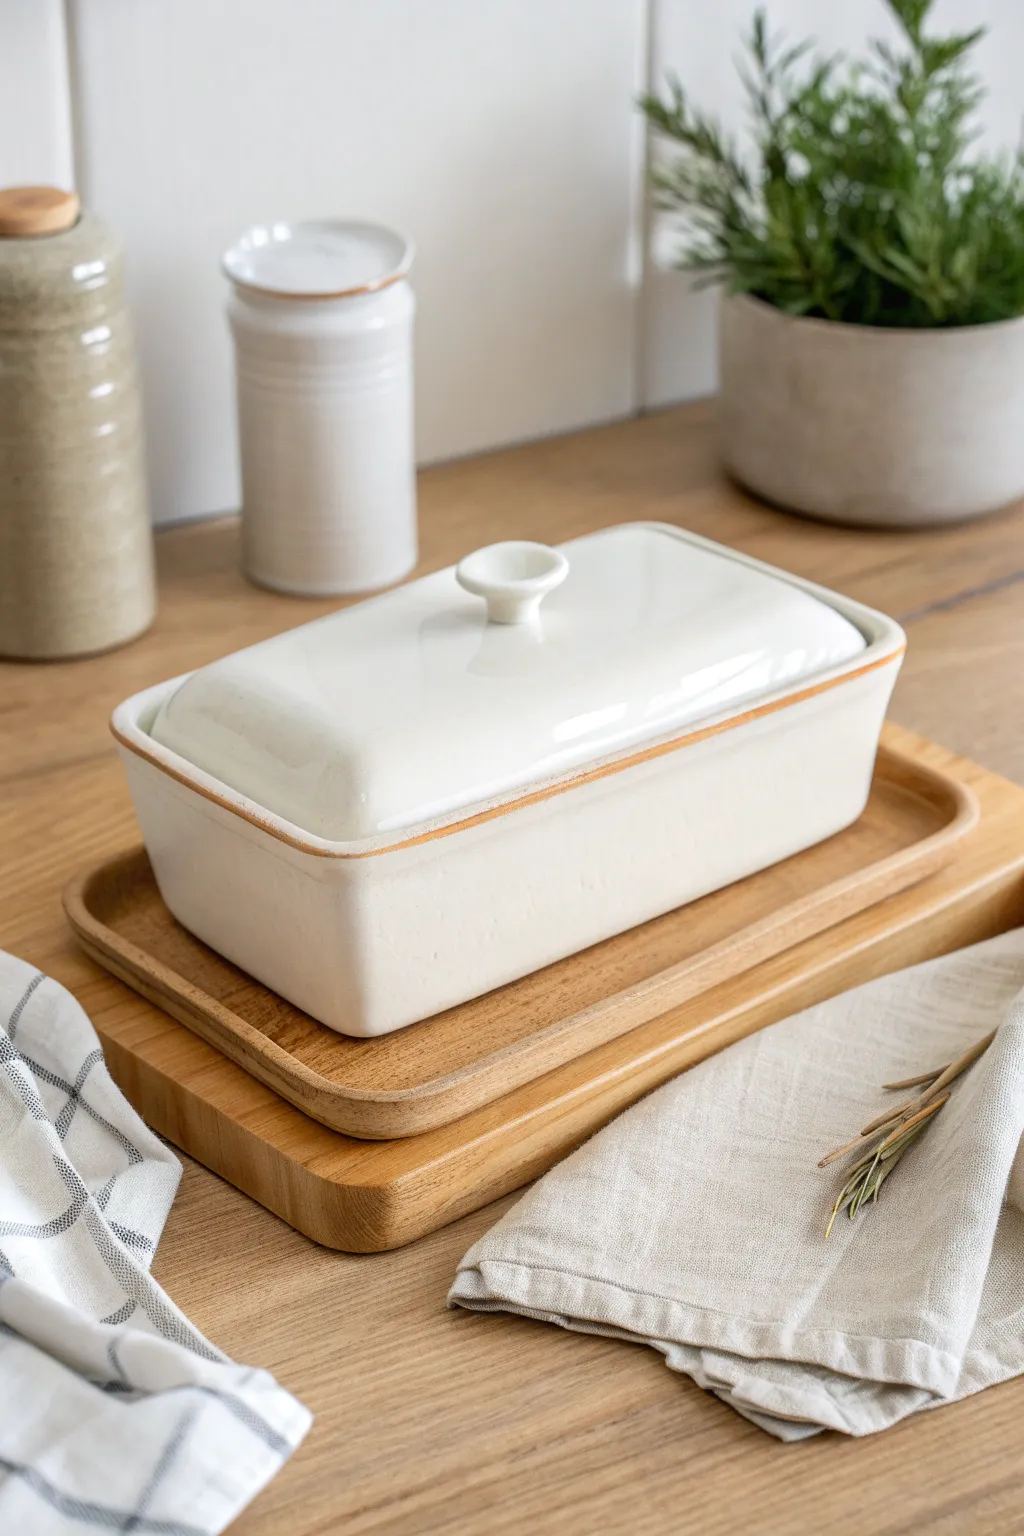
This charming project features a clean, rectangular lidded box perfect for storing butter or small treasures. Its glossy white glaze and warm, exposed clay edges give it a timeless, modern farmhouse aesthetic.
How-To Guide
Materials
- Mid-fire white stoneware clay
- Rolling pin with guide strips (approx. 1/4 inch)
- Fettling knife or needle tool
- Serrated rib and rubber rib
- Scoring tool or fork
- Slip (clay slurry)
- Ruler
- Sponge
- Clear or white glossy glaze
- Red iron oxide wash (optional)
Step 1: Creating the Base and Walls
-
Roll the Slabs:
Begin by rolling out your slab of clay to a consistent 1/4-inch thickness. Compress the clay on both sides with a rubber rib to smooth the surface and align the clay particles, which helps prevent warping later. -
Measure and Cut:
Using your ruler, measure out a rectangle for the base (e.g., 6×3 inches). Cut this out cleanly. Leave the rest of the slab prepared for the walls. -
Cut the Wall Strips:
Cut long strips of clay for the walls, measuring the same height for all pieces (about 2.5 inches tall). You will need two long sides and two short sides that match your base perimeter. -
Allow to Stiffen:
Let your cut pieces sit until they reach a ‘leather-hard’ state. They should be firm enough to hold their shape without slumping but soft enough to join. -
Bevel the Edges:
For a cleaner corner, cut 45-degree bevels on the vertical edges where the walls will meet. This increases the surface area for a stronger join. -
Score and Slip:
Rough up the edges of the base and the bottom of your wall pieces with a scoring tool. Apply a generous amount of slip to the scored areas. -
Assemble the Box:
Attach the walls to the base top, pressing firmly. Reinforce the inside seams by rolling a tiny coil of soft clay and smoothing it into the corners with your finger or a wooded tool.
Warped Walls?
If your long walls are bowing inward while drying, place a piece of soft foam or crumpled newspaper inside the box to support the shape until bone dry.
Step 2: Fabricating the Lid and Finishing
-
Cut the Lid Slab:
Measure the outer dimensions of your now-assembled box. Cut a rectangle for the lid that is slightly larger (about 1/8 inch overhang) to account for shrinkage and fit. -
Form the Flange:
To keep the lid from sliding off, you’ll need a flange. Roll a small coil or cut a narrow strip and attach it to the *underside* of the lid, measuring carefully so it fits just inside the box walls. -
Shape the Lid Curve:
While supporting the lid on foam, gently press from the underside or pinch the edges to give the top a very slight, soft dome shape rather than leaving it perfectly flat. -
Create the Knob:
Roll a small ball of clay and flatten it slightly into a disc. Pinch a short stem underneath it. Score and slip the center of the lid, then attach this knob firmly. -
Refine the Rim:
Use a damp sponge to smooth the rim of the box and the edges of the lid. I find that softening the sharp angles now makes the glaze break beautifully over the edges later. -
Bisque Fire:
Allow the piece to dry slowly under plastic to prevent warping. Once bone dry, bisque fire the box and lid according to your clay body’s specifications.
Step 3: Glazing
-
Apply Oxide Wash:
If you want that toasted edge look, wipe a diluted iron oxide wash onto the rim of the box and the edge of the lid, then sponge mostly off so only a stain remains. -
Wax the Feet:
Apply wax resist to the bottom of the box and the flange area where the lid touches the box to prevent them from fusing during the firing. -
Dip and Fire:
Dip the entire piece in a glossy white glaze. Check for drips and clean the waxed areas. Fire to the final glaze temperature.
Make it a Set
Create a matching wooden tray by sanding a small plank of oak or maple and sealing it with food-safe oil, sized perfectly to hold your new ceramic box.
Now you have a functional, artisan-style container that looks beautiful on any kitchen counter


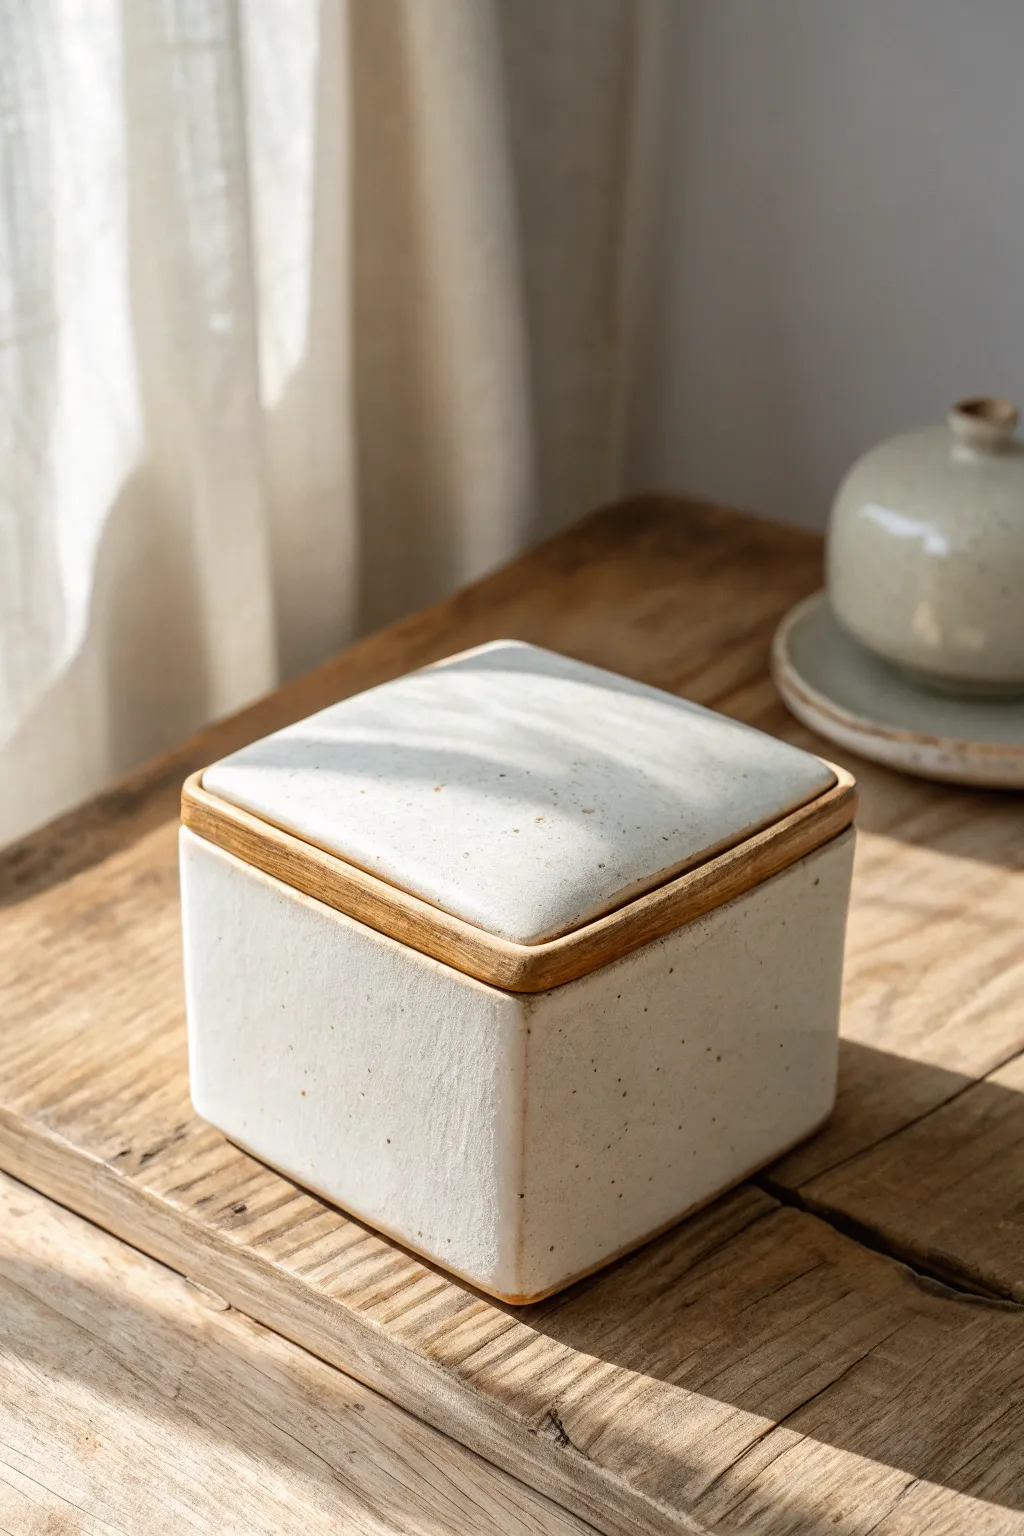
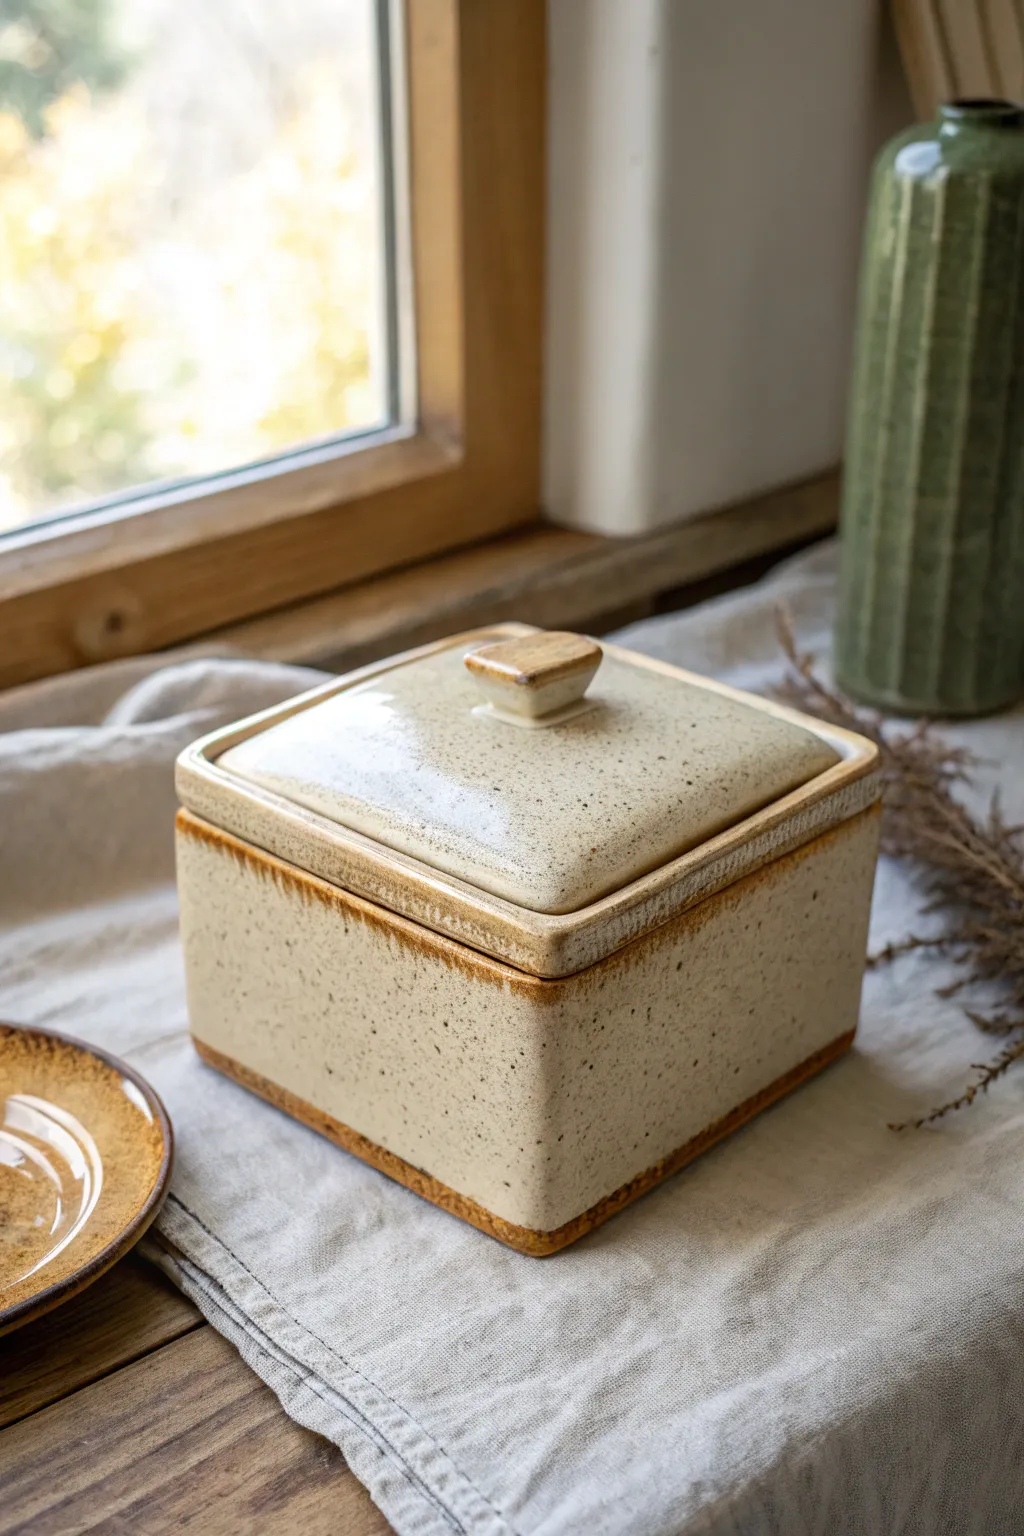
Apothecary Slab Box With A Rounded Shoulder Lid
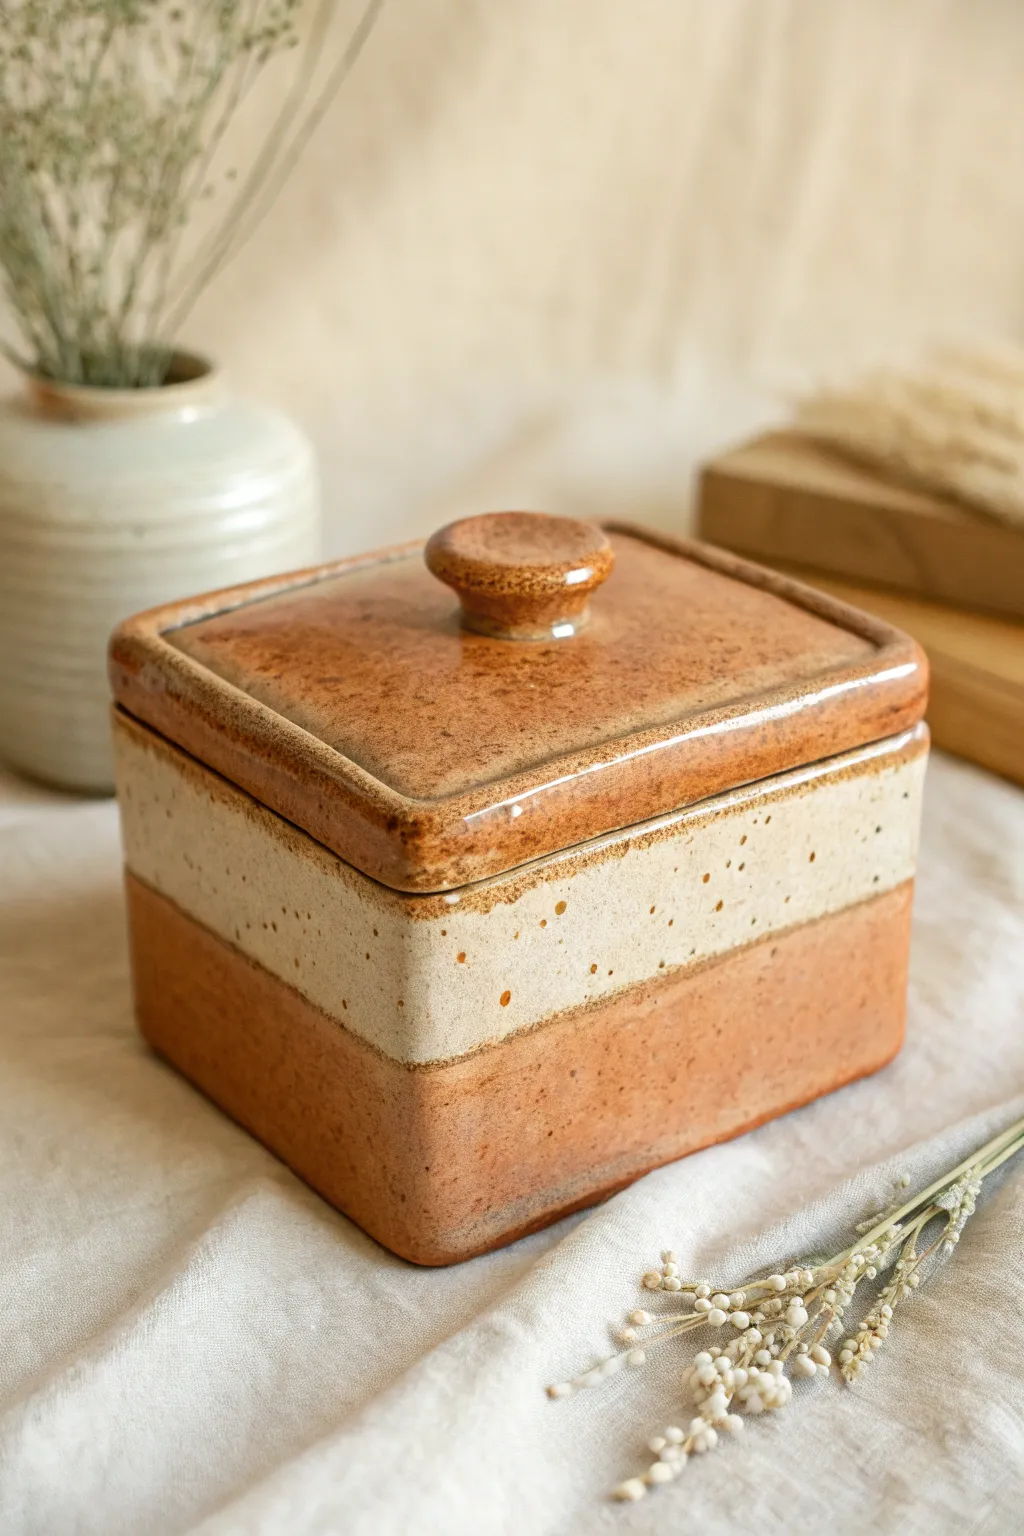
This charming, square apothecary box features a distinct three-layer glazing effect that mimics a beautiful sunset horizon. Its sturdy slab-built form is softened by rounded shoulders on the lid and a comfortable, hand-shaped knob, making it perfect for storing tea or small treasures.
Step-by-Step Guide
Materials
- Stoneware clay (smooth or with grog)
- Slab roller or rolling pin with thickness strips
- Fettling knife
- Scoring tool or serrated rib
- Slip (clay and water slurry)
- Miter cutter (optional but helpful)
- Small wooden paddle
- Sponge
- Glossy amber/rust glaze
- Matte cream/speckled white glaze
- Wax resist
Step 1: Creating the Base Box
-
Roll your slabs:
Start by rolling out a consistent slab of clay, approximately 1/4 inch thick. Compress the clay on both sides with a rib to align the particles and prevent warping later. -
Cut the components:
Cut out one square for the base (e.g., 4×4 inches) and four rectangular walls. The walls should be slightly taller than a perfect cube to account for visual balance. -
Miter the edges:
For the crispest corners, bevel the vertical edges of your wall pieces and the edges of your base at a 45-degree angle. If you don’t have a miter tool, straight butt joints work too, but require more blending. -
Assemble the walls:
Score the beveled edges thoroughly and apply slip. Stand the walls up on the base, pressing the corners together firmly. I like to use a small set square here to ensure the box remains perfectly rectangular. -
Reinforce the seams:
Roll a very thin coil of clay and press it into the interior seams. Smooth this coil out completely so it disappears, ensuring a watertight and strong bond.
Lid Fit Pro-Tip
Dry the lid on top of the box with a piece of paper towel in between. This ensures they shrink at the exact same rate and prevents the box opening from warping out of square.
Step 2: Fabricating the Lid and Gallery
-
Measure the lid slab:
Cut a square slab that is exactly the same dimensions as the outer perimeter of your box. This will be the top surface of the lid. -
Create the rounded shoulders:
Instead of sharp corners on the lid, gently tap the edges with a wooden paddle or smooth them with a damp sponge to create a soft, rounded ‘shoulder’ as seen in the photo. -
Add the gallery flange:
Flip the lid slab over. Attach a smaller square of slab or distinct strips of clay to the underside, inset about 1/4 inch from the edge. This flange will sit inside the box to keep the lid from sliding off. -
Throw or sculpt the knob:
Hand-build a small, mushroom-shaped knob. Ensure it has a slight undercut at the stem so fingers can grip it easily. Score and slip it onto the center of the lid. -
Refine the surface:
Once leather hard, use a serrated metal rib followed by a smooth rib to clean up the surfaces. Pay special attention to the corners of the box, softening them slightly so they aren’t razor-sharp.
Textural Level Up
Before glazing, gently sponge away a bit of the clay surface on the cream band to expose the grog or sand. This enhances the speckled, rustic apothecary aesthetic.
Step 3: Glazing and Finishing
-
Bisque fire:
Let the piece dry slowly under plastic to prevent warping, then fire to bisque temperature (usually Cone 04). -
Wax the gallery:
Apply wax resist to the flange on the lid and the interior rim of the box where the lid sits. This prevents the lid from fusing to the box during firing. -
Dip the base glaze:
Dip the entire box and lid into a warm, rusty-orange or amber glaze. This provides the base color for the bottom section and the lid. -
Apply the resist band:
Once the base glaze is dry, use wax resist or latex to cover the bottom third of the box and the entire lid (including the rim). You want to expose only the middle horizontal band. -
Layer the cream glaze:
Dip the middle section into a matte cream or speckled white glaze. The wax will protect the orange areas, creating that distinct sharp line between the colors. -
Clean up:
Wipe away any stray droplets of cream glaze that may have beaded up on the waxed areas. Check the bottom of the foot to ensure it is completely clean. -
Glaze fire:
Fire the piece to maturity (Cone 5/6 is common for stoneware). If your glazes are runny, place the lid separately on the kiln shelf rather than on the box.
Once fired, you will have a durable and beautifully layered vessel ready for your countertop


Matchbox-Style Slab Box With A Sliding Tray
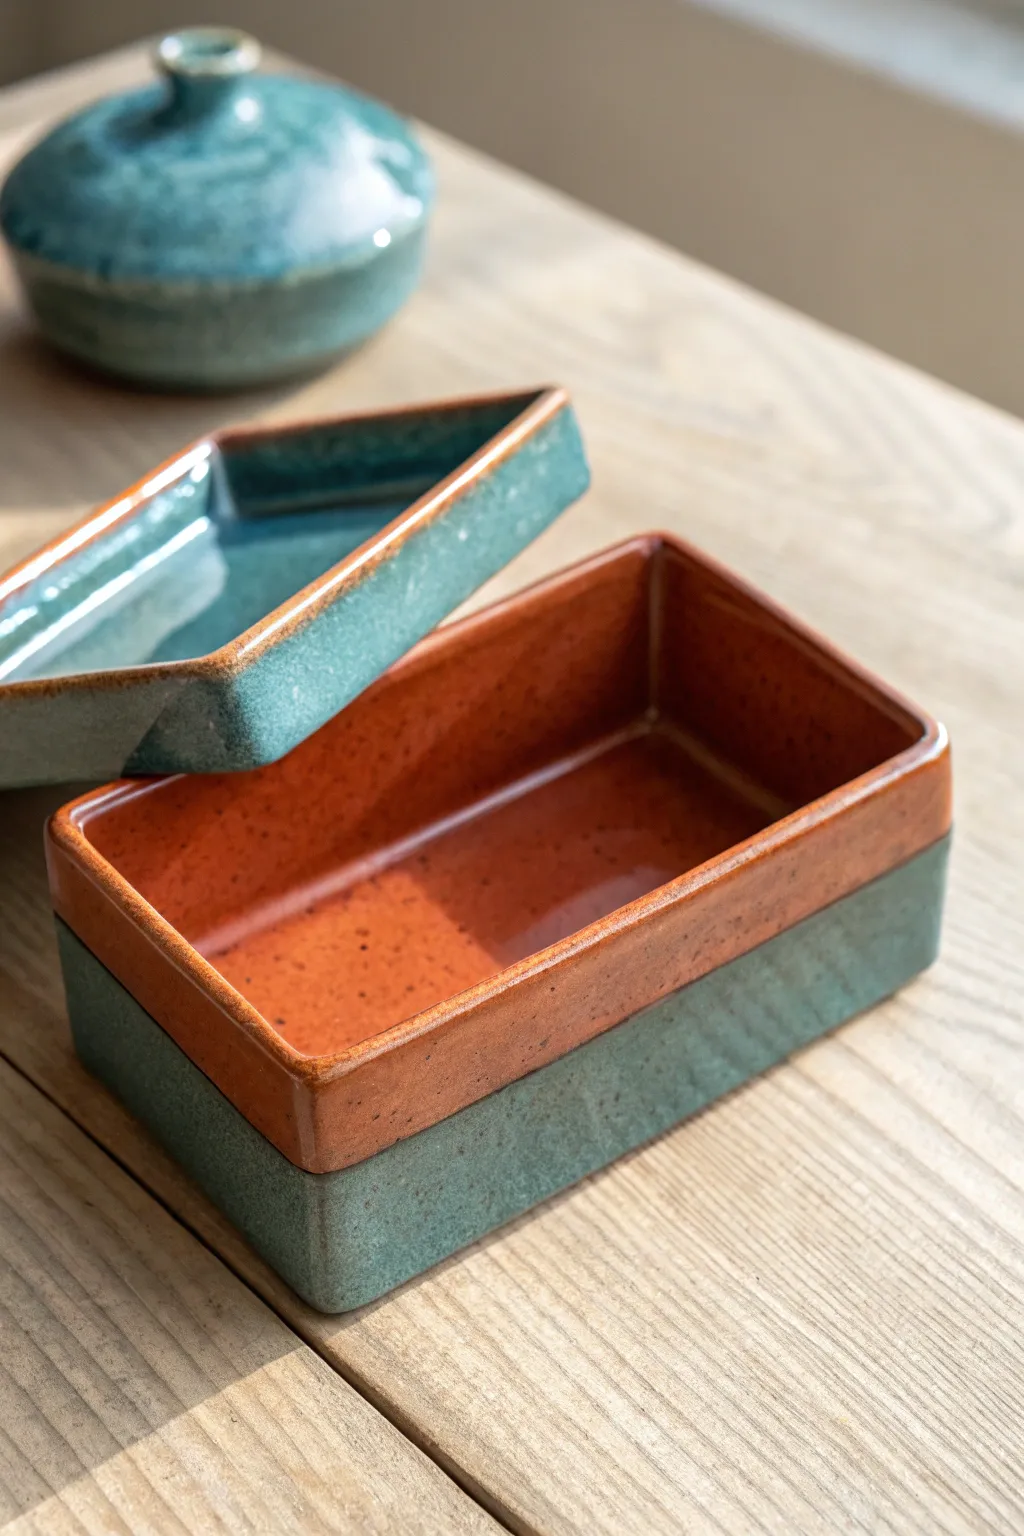
This elegant ceramic box combines a smooth, earthy terracotta interior with a striking teal exterior, creating a beautiful contrast that immediately catches the eye. The rectangular form features a fitted drop-in lid, making it perfect for storing small keepsakes or serving as a standalone decorative piece.
Detailed Instructions
Materials
- Mid-fire stoneware clay (smooth or light speckle)
- Rolling pin with texture guides
- Fettling knife
- Slab roller (optional)
- Scoring tool or serrated rib
- Slip (clay and water slurry)
- Beveled cutting tool (45-degree angle)
- Wooden paddle
- Sponge
- Speckled teal glaze (cone 5/6)
- Glossy terracotta/orange glaze (cone 5/6)
- Ruler
- Cardstock for templates
- Kiln
Step 1: Planning and Slab Preparation
-
Create templates:
Begin by deciding on the dimensions of your finished box. Cut templates from cardstock for the bottom, four walls, and the lid. Remember to account for the shrinkage rate of your specific clay body, which is usually around 10-12%. -
Roll the slab:
Roll out a consistent slab of clay, aiming for a thickness of about 1/4 inch. If you don’t have a slab roller, use wooden guides on either side of your rolling pin to ensure an even surface. -
Compress the clay:
Run a rubber rib tool firmly over the surface of your slab on both sides. This compresses the clay particles, reducing the chance of warping during the firing process and aligning the surface for a cleaner finish. -
Cut the components:
Place your paper templates onto the leather-hard slab. Using a sharp fettling knife or needle tool, carefully cut out the base, the four side walls, and the lid piece.
Warping Woes
If the lid rocks after firing, use a circular motion to grind the lid against the box rim with a little grinding paste. This levels high spots.
Step 2: Assembling the Box
-
Create 45-degree miters:
For seamless corners, cut a 45-degree angle on the vertical edges of your four wall pieces. I prefer using a specialized bevel tool for this, but a steady hand and a sharp knife work well too. -
Score and slip:
Heavily score (scratch) the mitered edges and the perimeter of the base slab. Apply a generous amount of slip to these roughened areas to act as your glue. -
Construct the walls:
Attach the walls to the base and to each other. Press the mitered corners together firmly. You can gently tap the outside corners with a wooden paddle to ensure a tight bond and sharpen the rectangular shape. -
Reinforce the seams:
Roll a very thin coil of clay and press it into the interior corners of the box. Smooth this coil down with a modeling tool or your finger to reinforce the joints without adding too much bulk. -
Clean the edges:
Use a damp sponge to smooth away any excess slip that has squeezed out of the seams. Pay special attention to the rim, ensuring it is perfectly flat so the lid will sit correctly.
Step 3: Creating the Fitted Lid
-
Measure the opening:
Accurately measure the interior opening of your assembled box. You need to create a flange that will fit snugly inside this space. -
Build the flange:
Cut a strip of clay slab slightly smaller than your interior dimensions. Attach this strip to the underside of your lid slab, inset just enough so that the lid rests on the box walls while the flange drops inside preventing it from sliding off. -
Dry slowly:
Place the lid on the box. Wrap the entire piece loosely in plastic. Drying them together is crucial as it helps the lid and box warp together (if they warp at all) so they still fit after firing. -
Bisque fire:
Once the piece is bone dry, fire it to cone 04 (or your clay’s specific bisque temperature) in the kiln.
Clean Lines
Use automotive detailing tape for the glaze line between the interior orange and exterior teal. It creates a crisp, professional edge.
Step 4: Glazing and Finishing
-
Wax resist application:
Apply wax resist to the bottom of the box, the area where the lid touches the box rim, and the corresponding contact points on the lid itself. This prevents the lid from fusing to the box during the glaze firing. -
Glaze the interior:
Pour the glossy terracotta/orange glaze into the interior of the box. Swirl it quickly to coat all walls evenly and pour out the excess. Wipe any drips off the rim immediately. -
Glaze the exterior:
Brush or dip the exterior of the box and the top of the lid with the speckled teal glaze. Apply 2-3 coats if brushing to achieve the opacity seen in the reference image. -
Glaze the interior rim:
Carefully brush the orange glaze onto the interior vertical walls of the box right up to the rim edge, creating that clean separation of color. -
Glaze fire:
Fire the piece to cone 5/6. Ensure the lid is fired separately or on stilts if you aren’t confident in your wax resist application.
Enjoy using your custom slab box to organize your desk or as a handmade gift for someone special

The Complete Guide to Pottery Troubleshooting
Uncover the most common ceramic mistakes—from cracking clay to failed glazes—and learn how to fix them fast.
Hinged-Look Slab Box With A Coil “Hardware” Detail
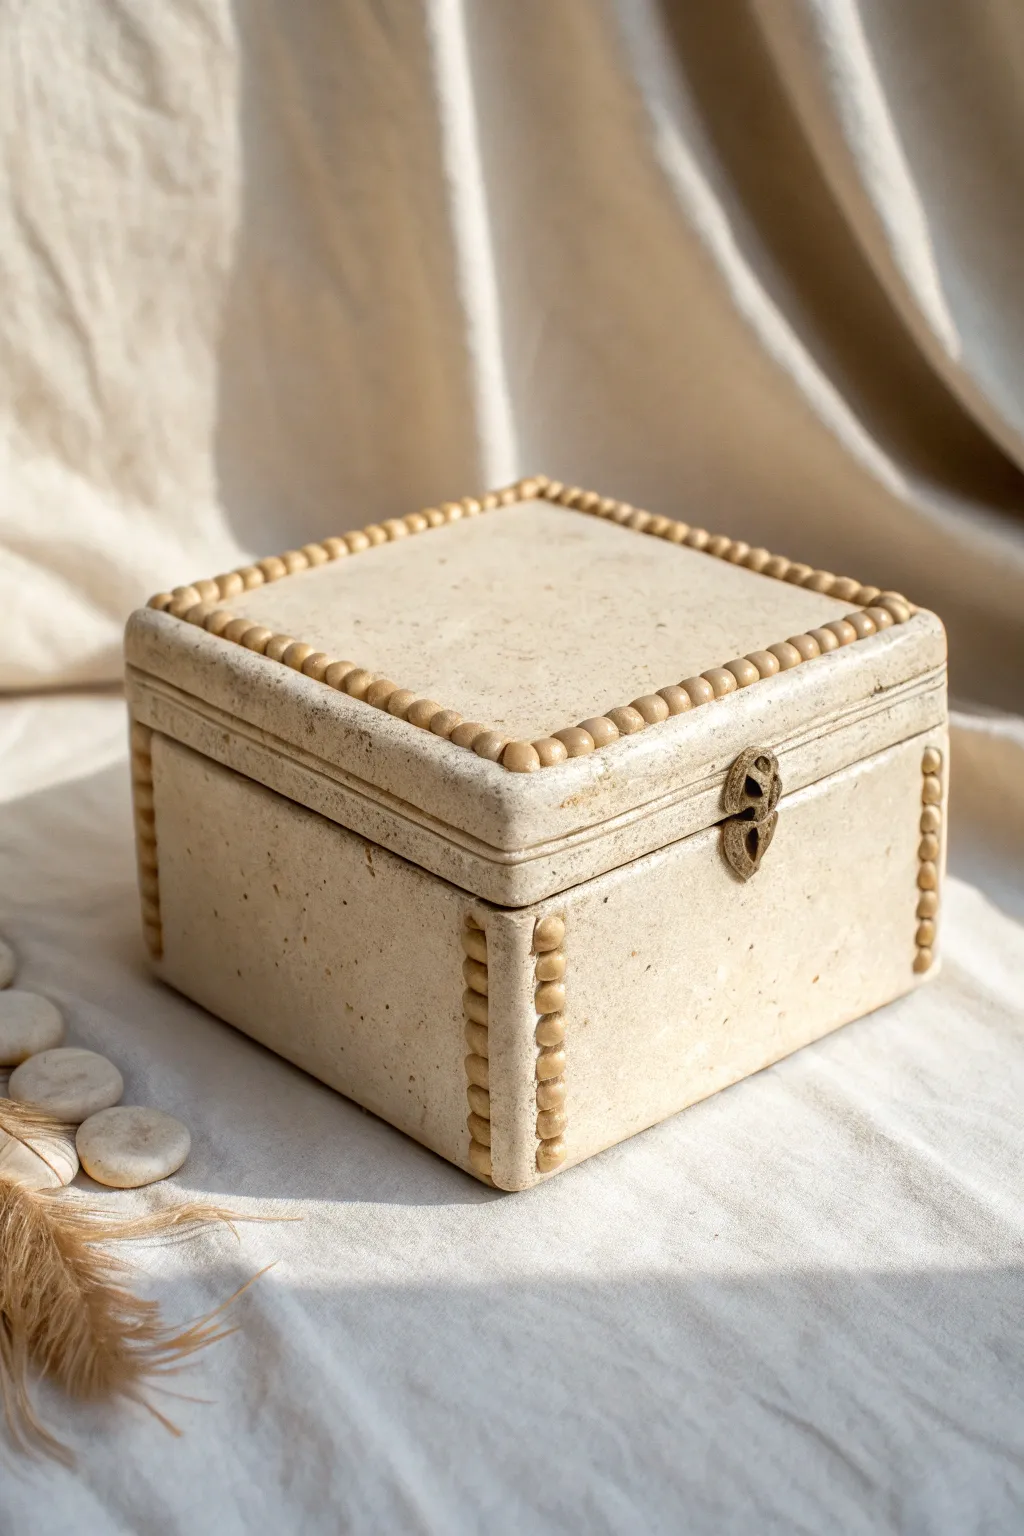
This elegant lidded box mimics the look of carved stone with its speckled, matte finish and precise beaded detailing. Constructed from simple clay slabs, it features a clever notched corner design that houses spherical clay beads for a sophisticated, tactile border.
Step-by-Step
Materials
- Speckled stoneware clay (beige or light tan)
- Slab roller or rolling pin with thickness strips
- Fettling knife or craft knife
- Ruler
- Scoring tool or serrated rib
- Slip (clay mixed with water)
- Small decorative metal latch
- Super glue or epoxy (for attaching hardware)
- Matte clear glaze (optional)
- Small sponge
- Canvas or ware board
Step 1: Creating the Slabs
-
Roll the clay:
Begin by rolling out a consistent slab of speckled stoneware clay to approximately 1/4 inch thickness. Ensure the surface is smooth and free of air bubbles by compressing it with a soft rib. -
Cut the base and lid:
Using your ruler and knife, cut two identical squares. Let’s aim for 5×5 inches for a nice medium-sized box. Set one aside for the lid and the other as the base. -
Cut the walls:
Measure and cut four rectangular strips for the walls. These should be the same length as your base sides (5 inches) and about 3 inches tall. Be precise with your measurements to ensure square corners. -
Cut the lid rim:
Cut four narrow strips, roughly 1/2 inch tall, to form the vertical rim of the lid.
Pro Tip: Consistent Beads
To make perfectly uniform beads, roll a long coil of clay first, then slice it into equal small segments before rolling them into balls.
Step 2: Assembling the Box
-
Miter the edges:
For the cleanest joints, bevel the vertical edges of your wall pieces and the edges of your base at a 45-degree angle. This creates stronger seams and sharper corners. -
Score and slip:
Score the beveled edges thoroughly and apply a generous amount of slip. I find that applying slip to both sides of the joint creates the strongest bond. -
Construct the main body:
Attach the four walls to the base slab. Press the walls together firmly at the corners. Use a small coil of clay on the interior seams to reinforce them, smoothing it out completely. -
Build the lid:
Repeat the process for the lid, attaching the narrow strips to the lid slab. Ensure the lid fits loosely over the box body; clay shrinks during drying, and you don’t want it to warp and become too tight.
Level Up: Recessed Latch
Before firing, carve a shallow recess into the clay where the metal latch will sit. This allows the hardware to sit flush for a high-end look.
Step 3: Adding the Beaded Detail
-
Prepare the corners:
Once the box is leather hard, use a carving tool to gently gouge or notch out a shallow channel along the four vertical corners of the box body. Do the same around the top perimeter edge of the lid. -
Roll clay beads:
Roll many small, uniform spheres of clay. These should be sized to fit snugly into the channels you just carved—roughly the size of a pea. -
Attach the beads:
Score the channel and the bottom of each bead. Apply slip and press the beads into the recessed corners and lid edge in a straight, tidy line. They should look like they are embedded in the form. -
Refine the surface:
Smooth out any slip that squeezed out from under the beads with a damp brush. Compress the flat surfaces of the box again with a rib to remove fingerprints.
Step 4: Finishing and firing
-
Dry slowly:
Place the lid on the box with a piece of paper towel in between to prevent sticking. loosely cover with plastic to let it dry slowly and evenly, which prevents warping. -
Bisque fire:
Once bone dry, fire the piece to bisque temperature (usually Cone 04). -
Glaze application:
To maintain the stone-like appearance, apply a thin coat of matte clear glaze, or leave the exterior unglazed if your clay body is vitrified and beautiful on its own. If glazing, wipe the bottom of the beads carefully so detail isn’t lost. -
Final firing:
Glaze fire the piece to the temperature appropriate for your clay body (e.g., Cone 5 or 6). -
Install hardware:
After the final firing, attach your metal latch hardware centered on the front using strong epoxy. Hold it in place with painter’s tape while the glue cures completely.
Enjoy using your new heirloom-quality box to store precious keepsakes or jewelry
Footed Slab Box With Little Ball Or Block Feet
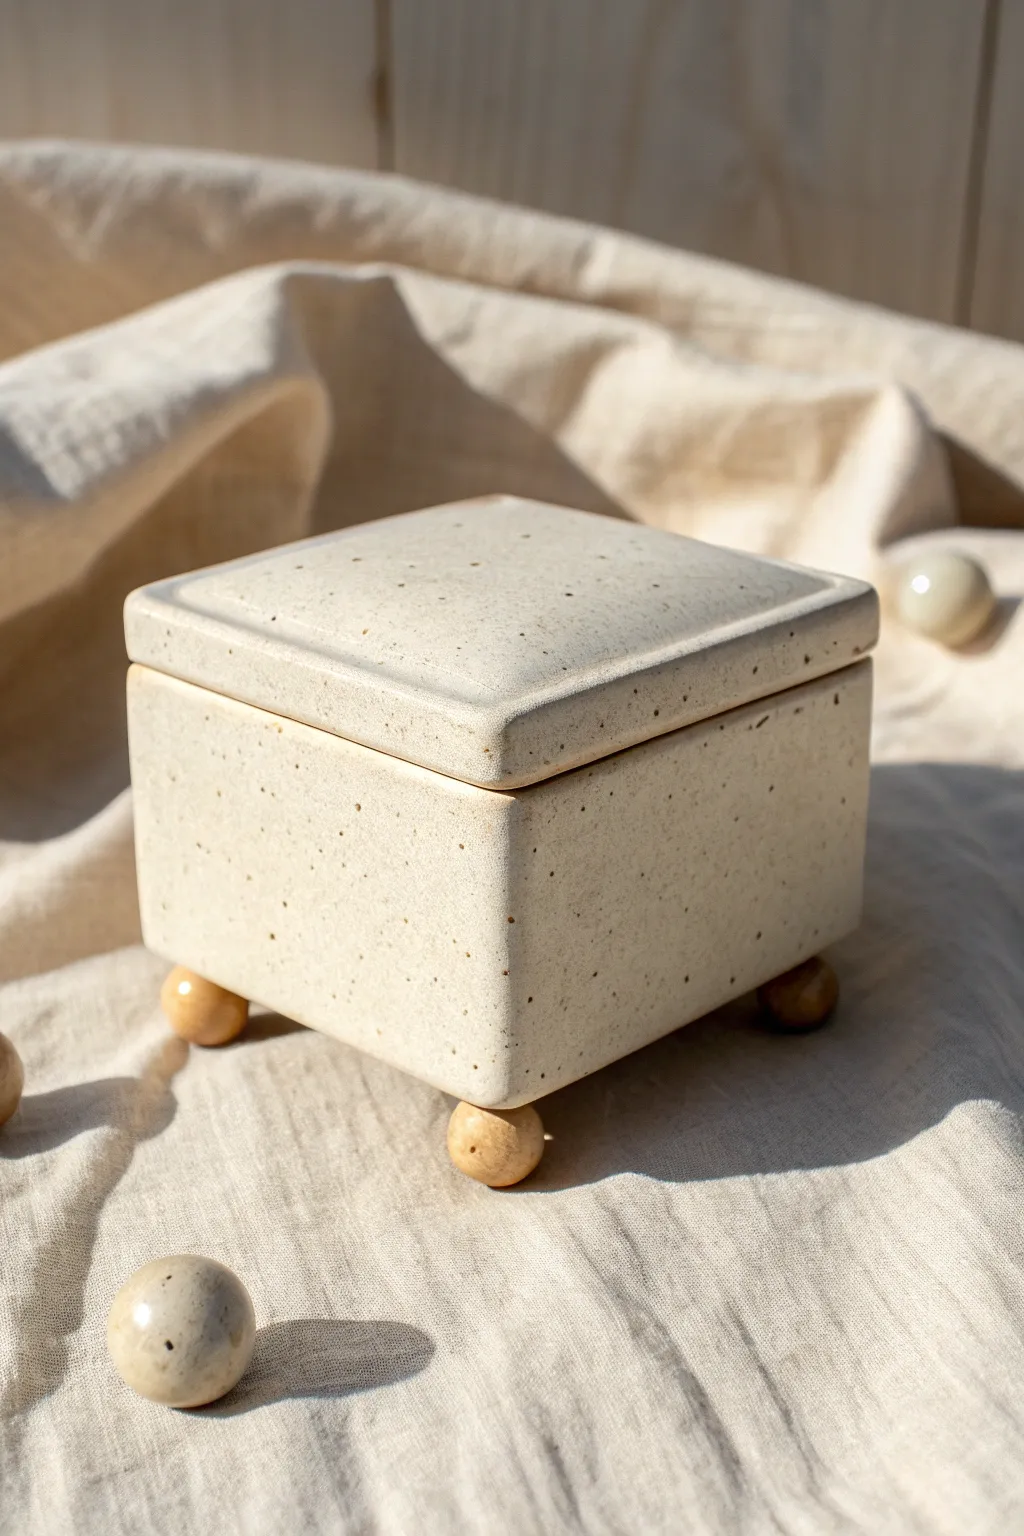
This charming slab-built box features a creamy speckled clay body, a gently domed lid, and playful spherical feet that give it a whimsical lift. It’s a perfect project for practicing precision with slabs while adding organic touches.
Step-by-Step Guide
Materials
- Speckled cream stoneware clay (cone 5/6 suggested)
- Rolling pin with texture-free surface
- Pricing strips or thickness guides (1/4 inch or 6mm)
- Fettling knife or X-Acto blade
- Metal rib and flexible rubber rib
- Bevel cutting tool (45-degree angle)
- Serrated rib or scoring tool
- Slip (made from the same clay body)
- Ruler or set square
- Paddle tool
- Clear matte or satin glaze
- Small sponge
Step 1: Preparing the Slabs
-
Roll the clay:
Begin by wedging your speckled clay to remove air bubbles. Roll out a large slab using 1/4 inch thickness guides to ensure a consistent wall thickness for the entire box. -
Compress the surface:
Use a flexible rubber rib to compress the slab on both sides. This aligns the clay particles to prevent warping and creates that smooth, refined surface texture visible in the photo. -
Measure and cut components:
Using a ruler and fettling knife, cut four identical rectangles for the walls (e.g., 4×3 inches) and two squares (e.g., 4×4 inches) for the floor and lid. Let these slabs stiffen to a soft leather-hard stage before moving on.
Wobbly Box?
If the box rocks after attaching feet, place a wooden board on the rim while the clay is soft and tap it gently. This forces the higher feet down until all four touch evenly.
Step 2: Assembling the Box
-
Bevel the edges:
For crisp, invisible seams, use a bevel tool or hold your knife at a 45-degree angle to cut mitered edges on the sides of the wall pieces and the base where they will join. -
Score the clay:
Aggressively score all the beveled surfaces using a serrated rib. Apply a generous amount of slip to the scored areas. -
Join the walls:
Attach the four walls to the base slab first, pressing the beveled edges firmly together. Then, join the vertical corners of the walls. -
Reinforce seams:
Roll a very thin coil of clay and press it into the interior corners of the box. Smooth this coil out completely with a wooden modeling tool or your finger to ensure a strong bond. -
Padding flat:
I like to use a wooden paddle to gently tap the exterior walls. This straightens any warping that happened during handling and sharpens the corner angles.
Pro Tip: Sharp Corners
When smoothing the exterior, avoid over-sponging the corners. Instead, run a metal rib lightly over the flat planes to keep those box edges crisp and architectural.
Step 3: Creating the Lid and Feet
-
Shape the lid:
Take your second square slab and cut a bevel inward on the underside edges. To create the gentle dome seen in the photo, place the slab on a piece of foam and gently press a smooth stone or pounce bag into the center. -
Add a flange:
To keep the lid secure, add a small coil or square slab inset on the underside of the lid, measuring just inside the box’s opening dimensions. -
Roll the feet:
Roll four small balls of clay, roughly the size of large marbles. Roll them in your palms until they are perfectly spherical. -
Attach the feet:
Flip the main box body upside down. Score and slip the four corners of the base and one side of each ball foot. Press the feet firmly onto the corners. -
Level the box:
Flip the box back onto its feet immediately. Press down gently on the rim to ensure all four feet are touching the table and the box sits level.
Step 4: Finishing and Glazing
-
Smooth the exterior:
Once the box is leather hard, use a slightly damp sponge to clean up any sharp edges or rough seams, being careful not to wash away the clay’s speckled texture. -
Bisque fire:
Let the piece dry slowly under loose plastic to prevent uneven shrinkage. Fire to bisque temperature (usually Cone 04/06). -
Glaze application:
Dip the box and lid into a clear satin or matte glaze. This transparency is crucial to let the natural speckles of the clay body shine through. -
Wipe the feet:
Thoroughly wipe all glaze off the bottom of the spherical feet to prevent them from sticking to the kiln shelf. -
Final firing:
Fire the piece to maturity (Cone 5 or 6 depending on your clay). Once cooled, the speckles typically darken and show through the milky glaze beautifully.
Now you have a sleek, speckled container ready for storing your tiny treasures


What Really Happens Inside the Kiln
Learn how time and temperature work together inside the kiln to transform clay into durable ceramic.
Sgraffito Pattern Slab Box With Bold Graphic Panels
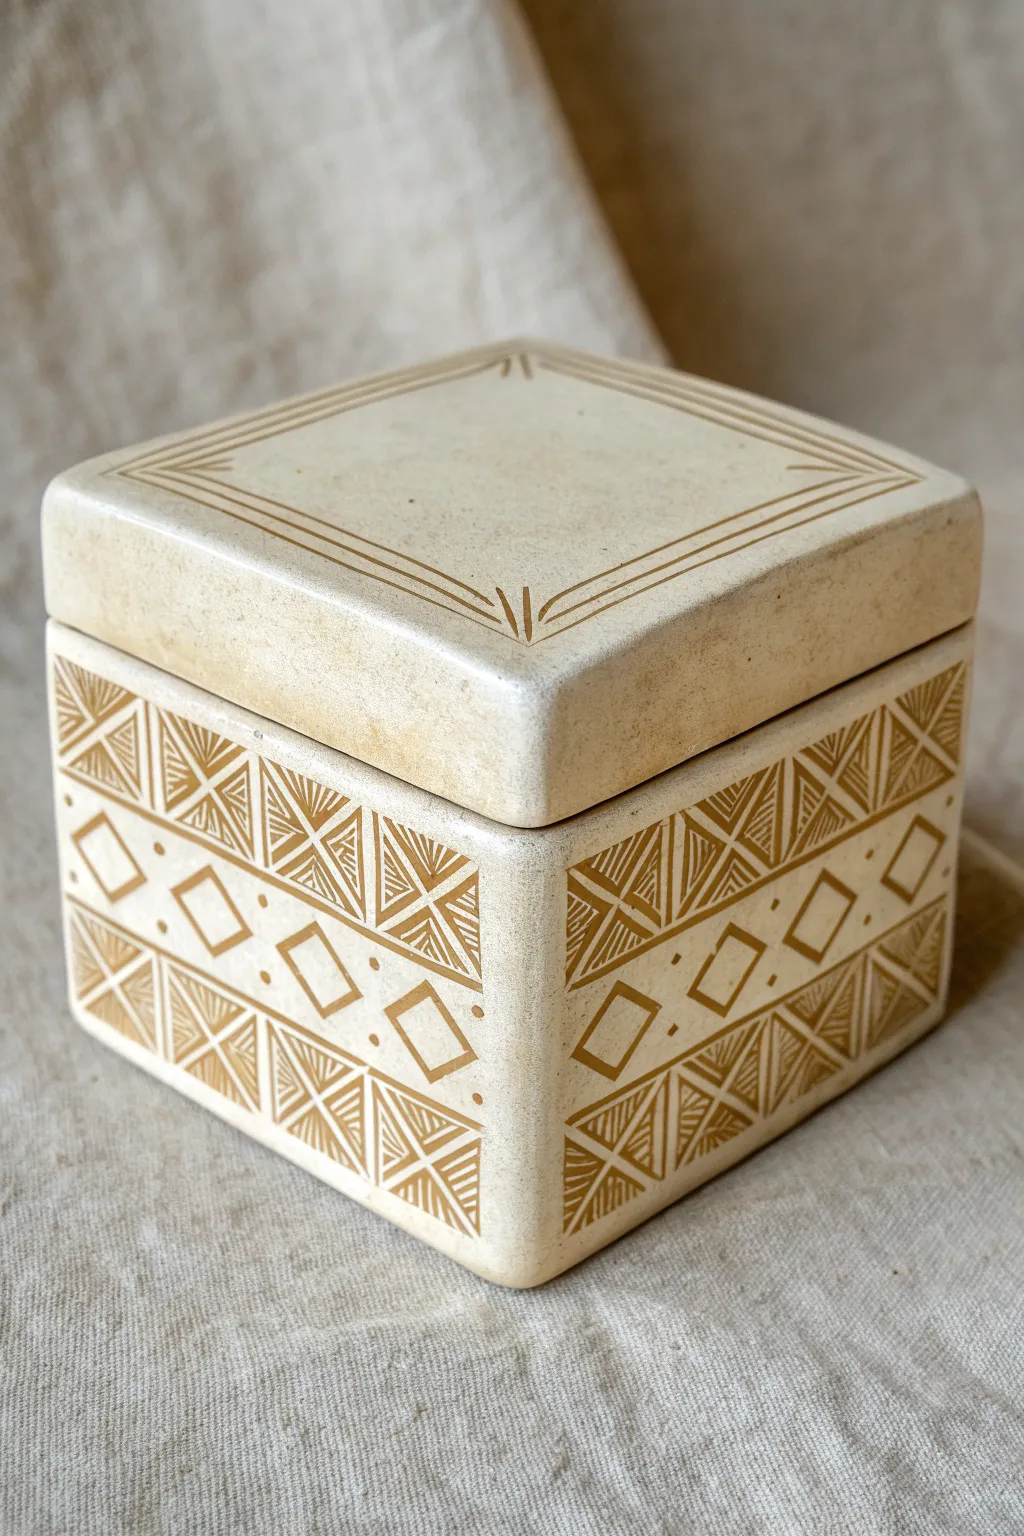
This elegant square box combines precise slab construction with bold, rhythmic sgraffito detailing. The warm contrast between the raw clay body and the rich amber underglaze creates a striking piece perfect for holding trinkets or treasures.
Step-by-Step Guide
Materials
- Stoneware clay (smooth or groggy)
- Terra sigillata or amber underglaze
- Rolling pin
- Two wooden guide slats (approx. 1/4 inch thick)
- Fettling knife
- Ruler and protractor
- Scoring tool and slip
- Loop tool (for beveling)
- Sgraffito tool or sharp needle tool
- Soft paintbrush
- Paddle (optional)
Step 1: Constructing the Box
-
Roll the slabs:
Begin by wedging your clay to remove air bubbles. Roll out a large, even slab using wooden guide slats to ensure consistent thickness (about 1/4 inch). Compress the slab on both sides with a rib to prevent warping. -
Measure and cut components:
Once the slab is leather hard—stiff enough to hold its shape but soft enough to cut—measure your pieces. You will need four identical rectangular walls, one square base, and a slightly larger square for the lid. -
Miter the edges:
For crisp corners like the ones in the image, cut looking-glass 45-degree angles (miters) on the vertical sides of your wall pieces. This allows the seams to meet cleanly without exposing end grain. -
Score and slip:
Aggressively score the mitered edges and apply a generous amount of slip. Join the four walls together on top of the base slab to form the box body. Use a coil on the interior seams for added reinforcement. -
Refine the form:
Once assembled, paddle the walls gently to ensure they are perfectly straight and square. Clean up exterior seams with a rib so the surface is smooth and the joins are invisible. -
Construct the lid:
The lid in this piece has a significant rim. Cut a square slab slightly larger than your box opening. Add a deep flange or inner rim underneath so it sits securely without sliding off. -
Round the lid edges:
Soften the sharp top edges of the lid using a sponge or chamois. The goal is a pillowy, rounded transition rather than a sharp 90-degree angle, giving it that soft stone look.
Clean Lines
Wait until the underglaze is dry to the touch but the clay is still leather hard before carving. If the clay is too wet, the lines will be mushy; too dry, and it will chip.
Step 2: Surface Decoration
-
Apply the color layer:
When the box is clearly leather hard, apply an even coat of amber-colored underglaze or a terra sigillata over the entire exterior. I prefer two thin coats to ensure solid coverage. -
Transfer the grid:
Lightly mark your design lines using a ruler and a soft pencil. Divide the side panels horizontally into three bands: a top border, a middle diamond band, and a bottom border. -
Carve the main dividers:
Using a sgraffito tool, carve the horizontal lines first to establish your bands. Use firm, confident strokes to cut through the colored layer and reveal the raw clay body underneath. -
Detail the diamonds:
In the middle band, carve the repeating diamond shapes. Inside the remaining spaces of the diamonds, add a small central dot to mimic the reference image. -
Create the triangle borders:
For the top and bottom bands, draw alternating squares divided by X’s. This creates four triangles per square. Fill these triangles with fine parallel lines, alternating the direction for each triangle. -
Add lid details:
On the lid’s top surface, carve a large square frame inset slightly from the edge. Add small radiating lines at the corners and midpoints to echo the geometric theme of the body. -
Clean up burrs:
Allow the piece to dry until bone dry. Gently brush away any clay crumbs or ‘burrs’ created during carving using a dry, soft brush. Be careful not to smudge the lines. -
Bisque fire:
Fire the piece to cone 04 (or your clay’s bisque temperature). -
Glaze and final fire:
Since the design relies on the matte texture of the clay, dip only the interior in a clear liner glaze to make it functional. Leave the exterior unglazed (or use a matte clear) and fire to temperature.
Depth Effect
For a richer finish, apply a dark wash (like iron oxide) after bisque firing and wipe it back. It will settle into your carved crevices, making the sgraffito pop.
Now you have a timeless, geometric vessel ready to stand out on any shelf
Stamped Texture Slab Box With A Framed Border
This charming lidded box combines clean geometric lines with the warmth of rustic stoneware. Featuring a speckled clay body and caramel-toned edging, it makes for a perfect kitchen container or keepsake box.
How-To Guide
Materials
- Speckled Stoneware Clay (e.g., Lagana or Cinnamon speckle)
- Rolling pin and guide sticks (approx. 1/4 inch)
- Slab roller (optional)
- Fettling knife or creative cutter
- Ruler and square
- Scoring tool (serrated rib or needle tool)
- Slip (clay slurry)
- Paddle tool
- Sponge
- Soft bristle brush for glazing
- Clear gloss glaze
- Iron oxide wash or rutile stain
Step 1: Creating the Slabs
-
Roll the clay:
Start by wedging your speckled stoneware clay thoroughly to remove air bubbles. Roll out a large, even slab approximately 1/4 inch thick using guide sticks or a slab roller to ensure uniformity. -
Smooth the surface:
Before cutting, run a soft rib over the slab surface in multiple directions. This compresses the clay particles, preventing warping later, and creates that smooth canvas for the speckles to shine through. -
Let it stiffen:
Allow the slab to dry to a ‘soft leather-hard’ stage. You want it firm enough to hold its shape when stood up, but flexible enough to be scored and joined without cracking.
Step 2: Constructing the Box
-
Measure and cut:
Using your ruler and square, cut four identical rectangular walls and one square base. Be precise here—if your measurements are off, the box won’t be square. -
Miter the edges (optional):
For a seamless look, cut the vertical edges of your wall pieces at a 45-degree angle. Alternatively, use a butt joint if you prefer a simpler construction method. -
Score and slip:
Generously score (scratch) the edges you intend to join and apply a thick layer of slip. It acts as the glue for your clay. -
Assemble the walls:
Attach the walls to the base first, then join the walls to each other. Press firmly to ensure a strong bond. -
Reinforce the interior:
Roll a very thin coil of clay and press it into the bottom interior seams. Smooth it out with a modeling tool or your finger to ensure the box is watertight and sturdy. -
Refine the shape:
Once assembled, gently paddle the outside walls with a wooden paddle to sharpen the corners and correct any bowing.
Warped Walls?
If walls bow inward while drying, stuff the box lightly with crumpled newspaper or foam to support the shape until it reaches the leather-hard stage.
Step 3: Making the Lid & Finishing
-
Cut the lid slab:
Cut a square slab slightly larger than your box opening to account for the gallery or flange system you choose. -
Create the flange:
Cut a smaller square slab or strips that fit exactly *inside* the box opening. Score and slip these onto the underside of your lid slab. This prevents the lid from sliding off. -
Shape the lid profile:
Gently press the center of the lid upwards from the underside to give it a slight dome, or bevel the top edges for a softer look as seen in the photo. -
Add the handle:
Fashion a small, rectangular knob from a scrap of clay. Score and slip it onto the center of the lid. I find creating a slight undercut on the knob makes it easier to grip. -
Smooth the rims:
Use a damp sponge to round over the sharp edges of the box rim and the lid. Sharp edges tend to chip easily after firing. -
Dry slowly:
Place the lid on the box with a piece of paper or plastic in between to prevent sticking. Wrap the whole project loosely in plastic to dry slowly and evenly.
Pro Tip: Sharp Edges
After the final glaze firing, check the bottom with your finger. If the unglazed foot implies roughness, sand it lightly with wet diamond sandpaper.
Step 4: Glazing
-
Bisque fire:
Once fully bone dry, bisque fire your piece to cone 04 (or your clay body’s recommendation). -
Apply oxide wash:
Mix iron oxide or rutile with water. Brush this wash onto the edges of the box, the rim of the lid, and the handle. Wipe away any excess with a sponge, leaving the color concentrated on the corners. -
Dip or brush clear glaze:
Apply a clear or semi-transparent gloss glaze over the entire piece. This will seal the clay and allow the natural speckles and the oxide accents to show through vividly. -
Glaze fire:
Fire the piece a second time to the maturation temperature of your clay and glaze (often Cone 5 or 6 for stoneware).
Once cooled, your box is ready to hold tea, jewelry, or simply sit beautifully on a sunlit sill

TRACK YOUR CERAMIC JOURNEY
Capture glaze tests, firing details, and creative progress—all in one simple printable. Make your projects easier to repeat and improve.
Color-Blocked Slab Box With Clean Masked Edges
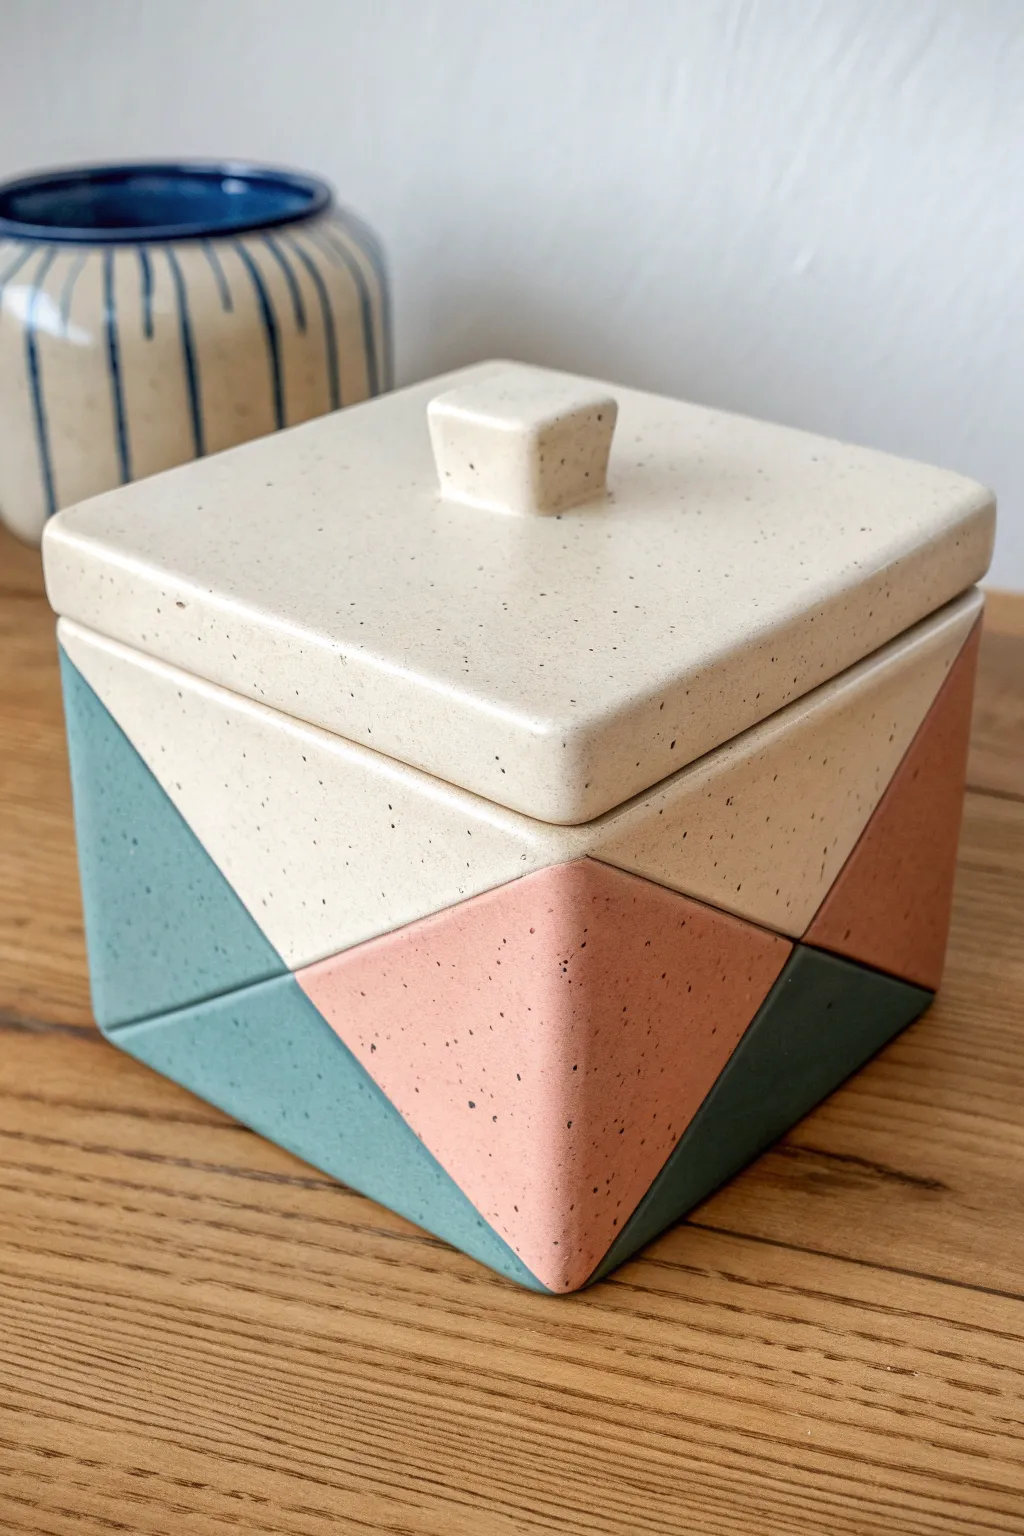
This charming ceramic box combines sharp, architectural lines with soft, speckled matte glazes for a modern look. The satisfying color-block design is achieved through careful masking, creating crisp boundaries between the raw clay body and muted pastel tones.
Step-by-Step
Materials
- Speckled cone 5/6 stoneware clay
- Rolling pin with texture-free surface
- Two 1/4-inch thick wooden guide strips
- Needle tool
- Fettling knife
- Rectangular template (cardstock or paper)
- Scoring tool (serrated rib)
- Slip (made from your clay body)
- Painter’s tape or automotive striping tape (various widths)
- Underglazes in teal, coral/pink, and charcoal/dark green
- Clear matte glaze (optional, or leave raw if clay isvitrified)
- Soft fan brush
- Small square sponge
Step 1: Creating the Slabs
-
Roll the clay:
Begin by wedging your speckled clay to remove air bubbles. Place the clay between your two wooden guide strips on a canvas board. Roll the clay out into a large, even slab using the rolling pin. I like to flip the slab once or twice during rolling to prevent warping. -
Smooth the surface:
Using a soft rubber rib, compress the clay on both sides. This aligns the clay particles, reducing the chance of cracking later, and creates a pristine surface for your future glazing. -
Cut the components:
Using your cardstock templates, cut out your pieces: one square for the base, four identical rectangles for the walls, and a slightly larger square for the lid. For the lid knob, cut a small square or shape a small cube by hand. -
Bevel the edges:
For the strongest and cleanest corners, hold your fettling knife at a 45-degree angle and bevel the vertical edges of your four wall pieces. Bevel the edges of the base piece as well to create a mitered joint.
Crisp Paint Lines
For razor-sharp lines, paint a thin layer of clear glaze or wax resist over the tape edge before applying your color. This seals the tape so no color can seep underneath.
Step 2: Assembling the Box
-
Score and slip:
Generously score all the beveled edges that will join together using your serrated rib. Apply a good amount of slip to these scored areas. -
Attach the walls:
Stand the walls up on the base. Press the corners together firmly but gently. The beveled edges should fit together like a picture frame. Use your thumb to smooth the inside seams so they are seamless. -
Refine the exterior:
On the outside corners, use a paddle or a flat wooden tool to gently tap the joints, sharpening the 90-degree angle and compressing the seam. Clean up any excess slip with a damp sponge. -
Construct the lid:
Take your lid slab. If you want a flange to keep it in place, attach four small coils or strips of clay to the underside, measuring just inside the box’s opening. Score and slip the small cube handle to the center of the top. -
Dry slowly:
Place the lid on the box with a piece of paper towel in between to prevent sticking. Cover loosely with plastic and let it dry very slowly to the leather-hard stage to ensure the lid and box shrink together without warping.
Uneven Lid?
If the lid wobbles after the bisque firing, use wet sanding paper or a grinding stone on a flat surface. Gently sand the rim of the box and the lid underside until they sit flush.
Step 3: Decoration & Glazing
-
Bisque fire:
Once bone dry, fire the piece to bisque temperature (usually cone 04). Wipe the bisqued piece with a damp sponge to remove dust. -
Map out the design:
Using a pencil, lightly sketch your geometric triangles onto the box. The pencil lines will burn off in the kiln. -
Apply masking tape:
Apply your tape firmly along the pencil lines. Run your fingernail along the edge of the tape to ensure a tight seal, which prevents underglaze from bleeding underneath. -
Paint the first color:
Apply 2-3 coats of your teal underglaze to the designated triangle sections. Let each coat dry until it’s no longer shiny before applying the next. -
Switch colors:
Repeat the process for the coral/pink and dark green sections. Be careful not to paint over the tape edges into neighboring sections unless you’ve masked them off separately. -
Remove the tape:
Once the underglaze is dry to the touch, carefully peel back the tape. If you have any small bleeds or ragged edges, gently scrape them away with a clean needle tool or exacto knife. -
Final glaze and fire:
If you want a glossy finish, dip the entire piece in clear glaze. For a matte look similar to the image, you can leave the underglazed areas unglazed (if using a vitrifying clay) or use a matte clear glaze. Fire to your clay’s maturity temperature (e.g., cone 6).
Enjoy using your sleek new box for tea bags, jewelry, or simply as a stunning display piece
Cheese Block Slab Box With Hole Texture And Tiny Details
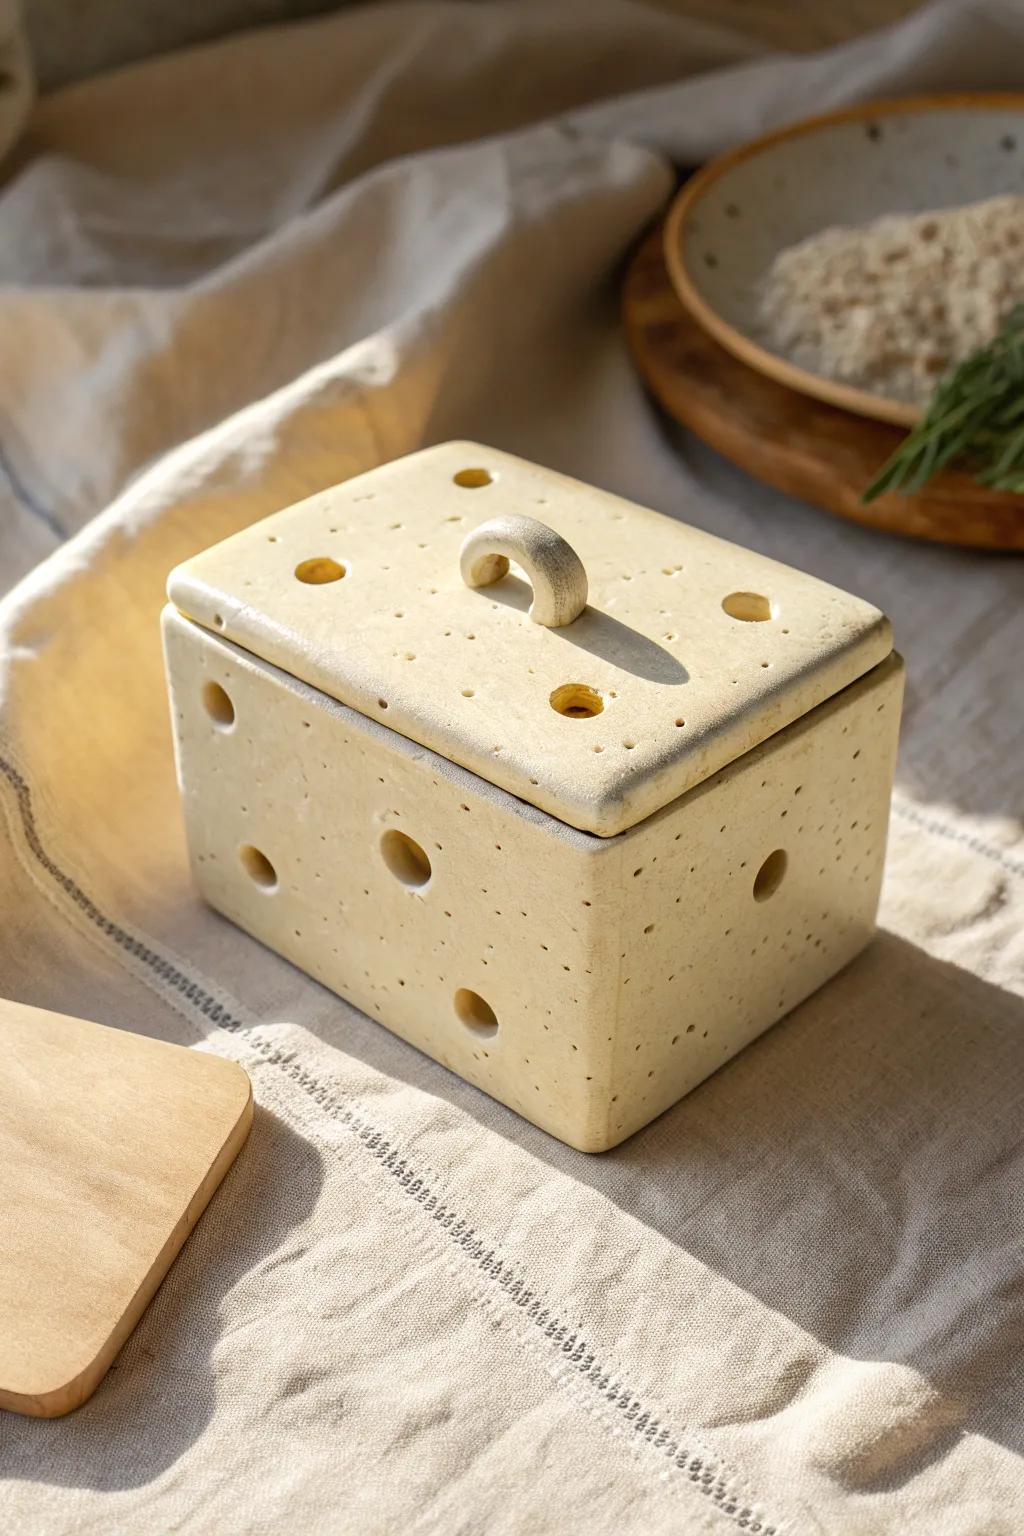
This whimsical storage solution mimics the iconic look of Swiss cheese with its playful perforations and creamy, speckled glaze. Perfect for storing trinkets or even, fittingly, wrapped cheese, this slab-built project combines precise construction with organic textural details.
Detailed Instructions
Materials
- Light-colored stoneware clay (speckled or plain)
- Rolling pin
- Guide sticks or slats (approx. 1/4 inch thick)
- Fettling knife or craft knife
- Serrated rib and smooth rubber rib
- Various circle cutters (different diameters)
- Needle tool
- Slip and scoring tool
- Sponge
- Matte cream or pale yellow glaze
Step 1: Preparing the Slabs
-
Roll out the clay:
Begin by rolling out your clay on a canvas surface. Use your guide sticks to ensure an even thickness of about 1/4 inch across the entire slab. -
Smooth the surface:
Compress the clay on both sides using a smooth rubber rib. This removes canvas texture and aligns the clay particles to prevent warping later. -
Texture the surface:
Before cutting, gently tap the entire surface with a stiff brush or lightly roll a textured sponge over it. This creates the subtle, organic surface noise seen on real cheese rind. -
Cut the components:
Using paper templates or a ruler, cut out your pieces: a base rectangle, four walls, and a lid that is slightly larger than the base to account for the overhang. Let these slabs stiffen to a soft leather-hard state.
Warping Walls?
If your box walls start bowing inward while working, the clay is too soft. Stuff the inside lightly with crumpled newspaper to support the shape until it stiffens up.
Step 2: Construction
-
Bevel the edges:
For a seamless look, cut the vertical edges of your wall pieces at a 45-degree angle. This miter joint creates cleaner corners than a butt joint. -
Score and slip:
Rough up the edges you intend to join with a scoring tool and apply a liberal amount of slip. -
Assemble the walls:
Attach the walls to the base first, pressing firmly. Then, join the walls to each other, wiping away excess slip from the interior as you go. -
Reinforce the joints:
Roll tiny coils of clay and press them into the interior seams. Smooth these out completely with a modeling tool or your fingertip to ensure structural integrity. -
Refine the shape:
Once assembled, paddle the exterior gently with a flat wooden paddle to sharpen the corners and ensure the box is perfectly rectangular.
Step 3: Adding cheesy details
-
Create the holes:
Use various sizes of circle cutters to punch holes through the walls and lid. Place them randomly for a natural look. Don’t preserve the cut-outs; pop them out cleanly. -
Soften the edges:
The sharp edges left by the cutter don’t look like cheese. Use a damp sponge or your finger to round over the rims of every hole, making them look soft and molded. -
Add surface dimples:
Using a ball stylus or the back of a paintbrush, press shallow dents into the surface without breaking through. These mimic air pockets. -
Poke tiny pores:
Take a needle tool and prick tiny, scattered holes across the surface. This adds that crucial micro-texture seen in the reference photo. -
Create the handle:
Roll a small coil, arch it into a ‘U’ shape, and attach it to the center of the lid using the score and slip method. Smooth the connection points so it appears to grow out of the lid.
Level Up: The Mouse
Sculpt a tiny ceramic mouse peeking out of one of the larger holes or resting on the lid handle. Use a very fine brush to paint pink inside its ears after the bisque firing.
Step 4: Finishing
-
Bisque fire:
Allow the piece to dry slowly under loose plastic to prevent warping, then bisque fire it according to your clay body’s specifications. -
Glazing:
Apply a matte cream or pale yellow glaze. Avoid thick, glossy glazes which might fill in your tiny needle textures. If you want the speckled look and your clay isn’t speckled, flick a little iron oxide wash over the glaze before firing. -
Final wipe:
Wipe the foot of the box clean and dry carefully before the final glaze firing.
Once fired, you’ll have a delightfully quirky piece of functional art ready to serve on your table or organize your shelf
Monster Mouth Slab Box With Cutout Teeth Lid Line
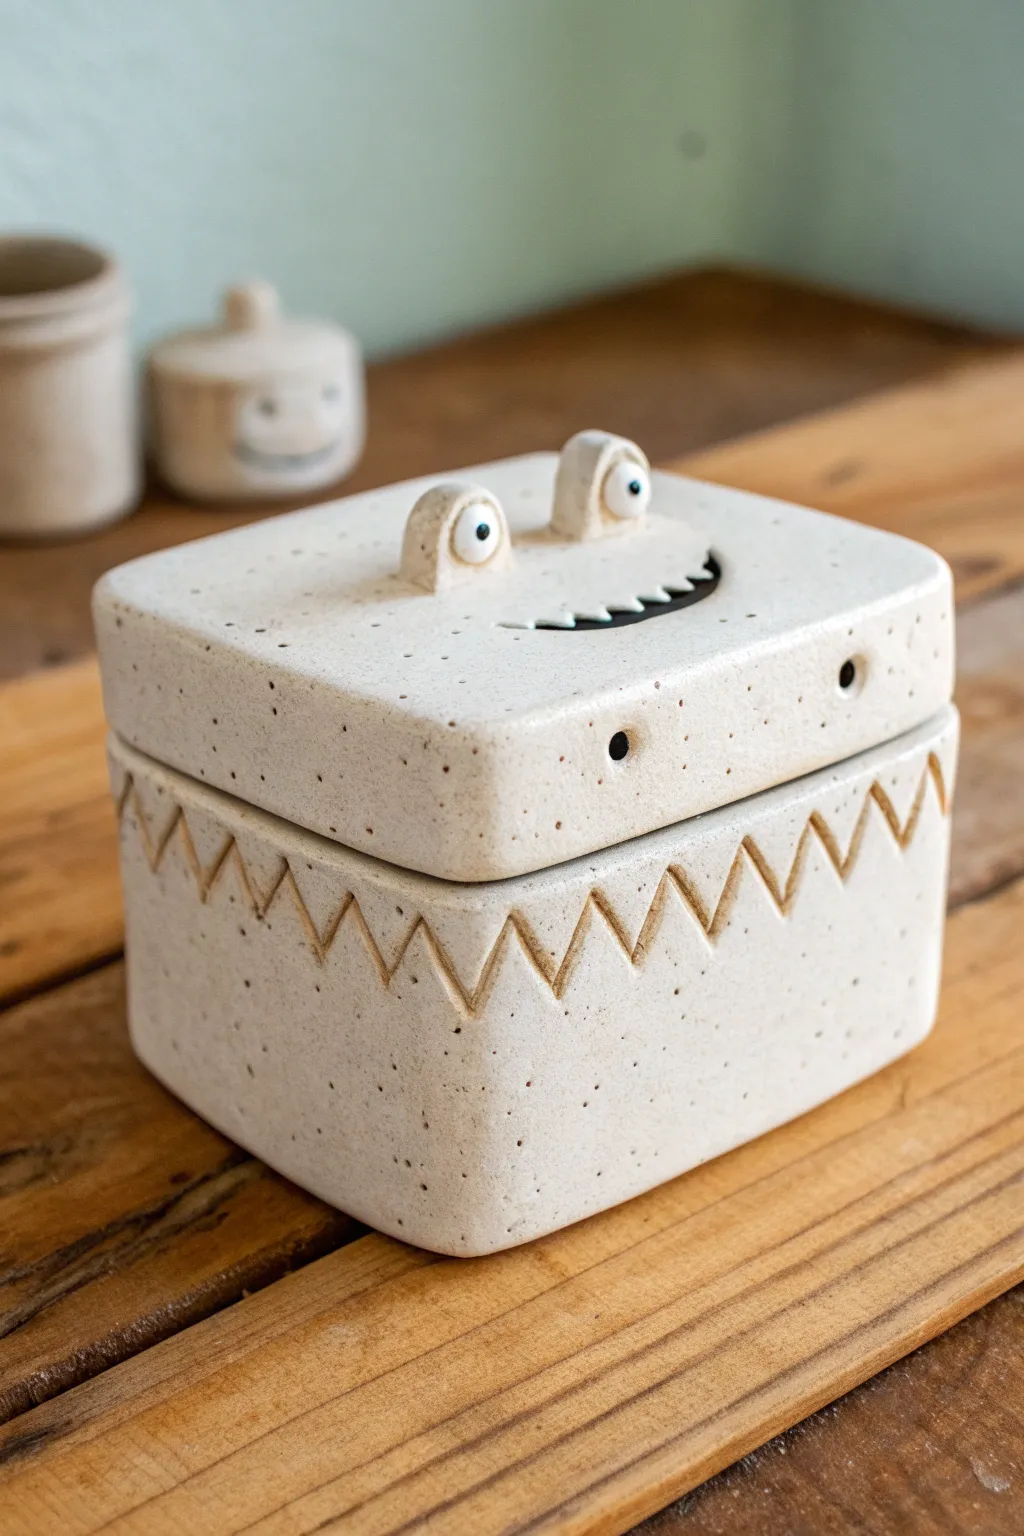
Create a whimsical storage container that smiles back at you with this ceramic slab-building project. Featuring amusing pop-up eyes and a jagged etched pattern, this monster box combines functional lidding techniques with playful sculptural elements.
Step-by-Step Tutorial
Materials
- Speckled clay body (stoneware recommended)
- Rolling pin
- Guide sticks or slats (approx. 1/4 inch thick)
- Fettling knife or needle tool
- Serrated rib or scoring tool
- Slip (clay mixed with water)
- Ruler/straight edge
- Loop tool (for carving)
- Small paintbrush
- Underglaze (black and white)
- Clear glaze
Step 1: Preparing Slabs and Base Construction
-
Roll your clay:
Begin by rolling out a consistent slab of speckled clay using guide sticks to ensure an even 1/4 inch thickness throughout. -
Cut template pieces:
Measure and cut out your slab pieces. You will need four identical rectangular walls (approximately 4×3 inches), a square base (4×4 inches), and a slightly larger square for the lid (4.25×4.25 inches). -
Dry to leather hard:
Allow your cut slabs to stiffen up to a leather-hard state. This is crucial for structural integrity; if the clay is too soft, the box walls will slump. -
Miter the edges:
For clean corners, cut the vertical edges of your wall pieces at a 45-degree angle. This allows them to join seamlessly without exposing end grain. -
Score and slip:
Aggressively score the mitered edges and the perimeter of your base slab. Apply a generous amount of slip to these rough areas. -
Assemble the box:
Press the walls onto the base and against each other. Use a wooden tool or your finger to smooth the interior seams. I like to add a tiny coil of clay into the inside corners for extra reinforcement.
Step 2: Decorating the Body
-
Smooth the exterior:
Use a rib tool to smooth the outside walls, slightly rounding the sharp corners to match the soft, pillowy look of the reference image. -
Map out the zigzag:
Using a needle tool, lightly sketch a zigzag line around the upper third of the box walls. The points should face up and down like sharp teeth. -
Carve the pattern:
Using a U-shaped loop tool or a carving tool, gouge out the zigzag line. Make the groove deep enough to shadow, but be careful not to puncture through the wall.
Warping Woes
If your lid rocks or doesn’t sit flat after drying, try drying the lid directly on the box body with a piece of paper towel in between to key them together.
Step 3: Creating the Monster Lid
-
Form the lid flange:
Flip your lid slab over. Create a smaller square slab or coil that fits snugly *inside* the box opening and attach it to the underside of the lid to prevent it from sliding off. -
Shape the lid:
Flip the lid right-side up. Gently paddle or smooth the edges to give it a soft, slightly domed appearance similar to the box body. -
Carve the mouth:
Sketch a curved smile in the center of the lid. Using a sharp knife, cut out the mouth shape carefully. -
Add teeth details:
Inside the mouth opening, you can either cut serrated teeth directly into the negative space or attach small triangular distinct bits of clay inside the opening to simulate the monster’s bite. -
Sculpt the eye sockets:
Roll two small balls of clay and hollow them slightly to create eyelids. Attach these securely to the top of the lid, positioned above the mouth. -
Insert the eyeballs:
Roll two smaller spheres of white clay (or the same body clay) and place them inside the eyelids. Score and slip them into place so they don’t pop out during firing. -
Create nostrils:
Use the back of a paintbrush or a small hole cutter to punch two distinct circular holes near the front edge of the lid for nostrils.
Clean Lines
When carving the zigzag teeth, wait until the clay is firmly leather-hard. If it’s too soft, the loop tool will drag creates messy burrs instead of clean cuts.
Step 4: Finishing and Glazing
-
Bisque fire:
Allow the entire piece to dry slowly under plastic to prevent warping, especially the lid. Once bone dry, bisque fire the piece to the appropriate cone for your clay. -
Apply underglaze:
Paint the eyeballs with white underglaze (if you didn’t use white clay) and add small black dots for pupils. Paint the interior of the mouth cutout black to add depth. -
Glaze application:
Dip or brush a clear, matte, or satin glaze over the entire exterior to let the speckles show through. Ensure the flange area is wiped clean of glaze so the lid doesn’t fuse to the pot. -
Final firing:
Fire the piece a second time to your clear glaze’s maturation temperature.
Fill your new monster friend with trinkets or candy and enjoy that goofy grin every day.
Mini Diorama-Topped Slab Box With A Tiny Scene On The Lid
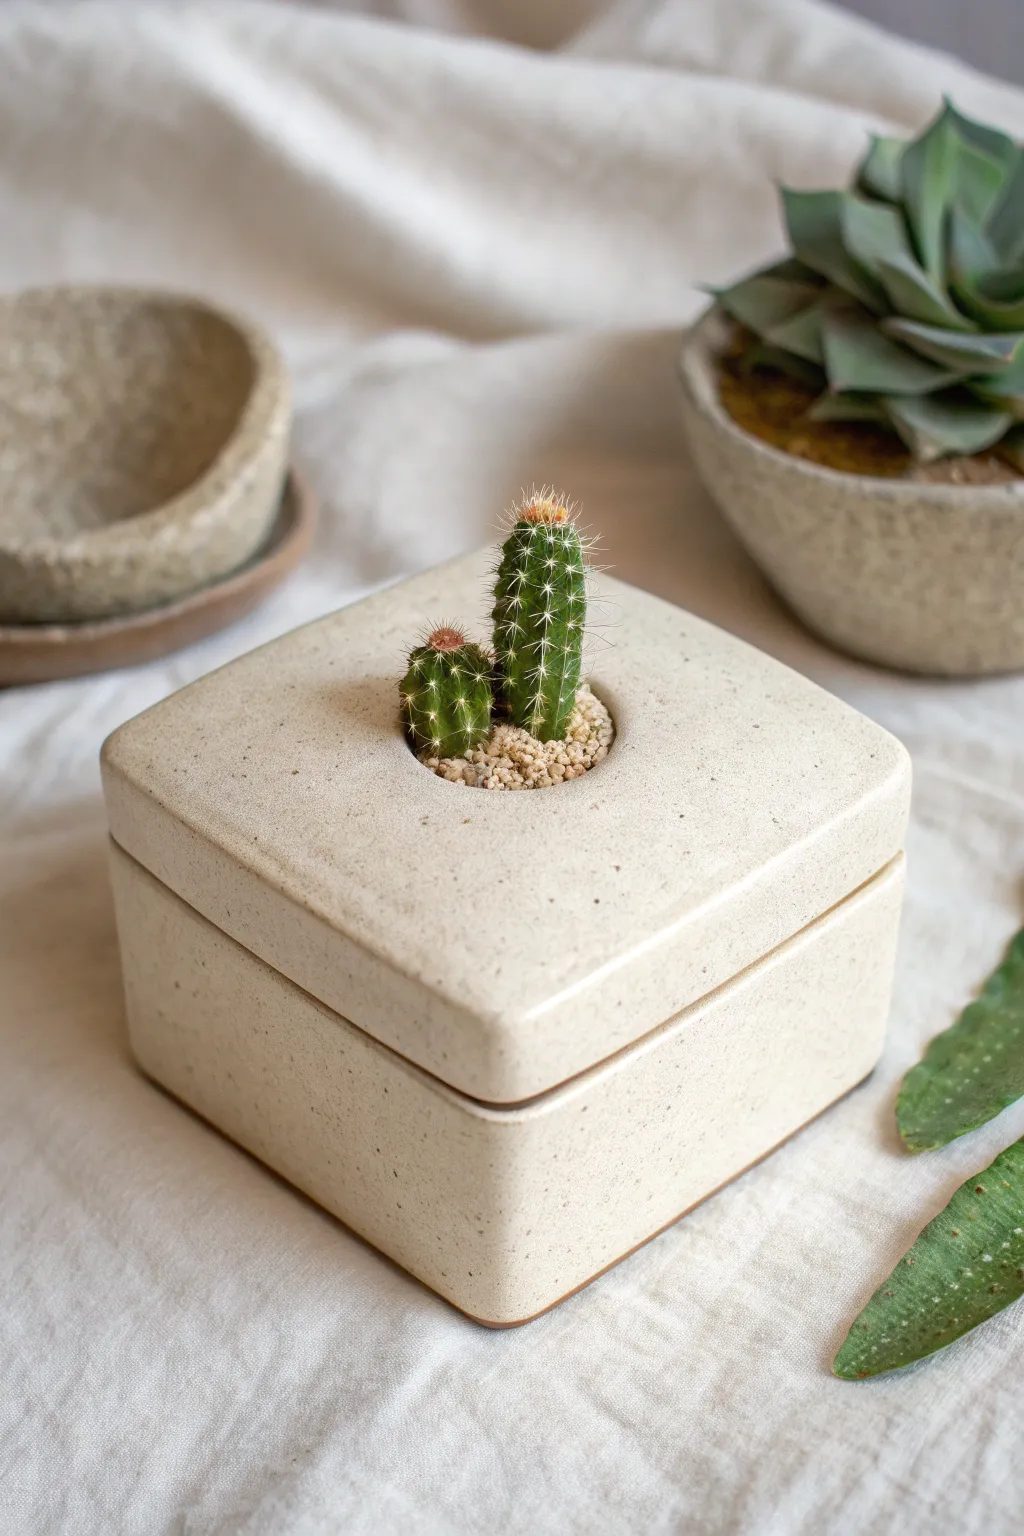
Merge functionality with living art by crafting this serene slab-built box that features a built-in planter within its lid. The creamy, speckled glaze finish gives it a polished, minimalist stone look that perfectly complements the rugged texture of tiny cacti.
Detailed Instructions
Materials
- Stoneware clay (speckled or buff)
- Rolling pin
- Canvas work surface or slab mat
- Two thickness strips (guide sticks, approx. 1/4 inch)
- Fettling knife
- Needle tool
- Ruler
- Serrated rib or scoring tool
- Slip (clay mixed with water)
- Circle cutter (approx. 1.5 – 2 inches)
- Soft detail sponge
- Matte cream/white speckled glaze
- Kiln access
- Small cacti and gravel for planting
Step 1: Creating the Slabs
-
Roll the clay:
Begin by wedging your clay to remove air bubbles, then flatten it slightly by hand. Place it between your thickness strips on the canvas and roll it out into a large, even slab. -
Compress the slab:
Use a rubber rib to smooth the surface of the clay in both directions. This compression step is crucial to prevent warping later and aligns the clay particles. -
Let it firm up:
Allow the slab to dry to a ‘leather-hard’ state. This means it is stiff enough to hold its shape when lifted but still dark in color and cold to the touch. I find patience here is the biggest secret to sharp geometric corners. -
Cut the components:
Using a ruler and fettling knife, cut out your pieces. You will need: one square for the base (e.g., 4×4 inches), four identical rectangles for the sides (e.g., 4×3 inches), and one square for the lid (slightly larger, e.g., 4.25×4.25 inches to account for fitting). -
Add the drop-lid flange:
Cut four smaller strips (about 0.5 inches tall) that will act as the interior flange for the lid to sit securely.
Clean Corner Tip
When smoothing outer seams, use a paddle to gently tap the walls straight. This compresses the joints without distorting the square’s geometry.
Step 2: Assembling the Box
-
Miter or butt joint:
Decide on your joinery. For this clean look, bevel the edges of your side walls at a 45-degree angle. If that feels too tricky, a standard butt joint works fine, just adjust your measurements slightly. -
Score and slip:
Rough up the connection points on the base and the bottom of the walls with your serrated tool. Apply a generous amount of slip. -
Construct the walls:
Press the walls onto the base and against each other. Use a small wooden coil or ‘snake’ of clay on the interior seams to reinforce the joints, blending it smooth. -
Attach the lid system:
On the underside of your lid slab, score and attach the four small flange strips. Measure carefully to ensure they fit snugly inside the box walls when the lid is placed on top. -
Create the planter well:
In the center of the lid, use your circle cutter to remove a round hole. Then, attach a small cylinder (a mini pinch pot or a rolled tube with a bottom) underneath this hole to create a suspended cup that will hold the soil.
Level Up: Hidden Drainage
Add a tiny hole to the bottom of the internal planter cup. It lets excess water drip into the main box, keeping roots rot-free without a saucer.
Step 3: Finishing and Glazing
-
Refine the edges:
Once the box is fully leather hard, use a rasp or sponge to soften the sharp corners slightly. This creates that soft, pillow-like silhouette seen in the photo. -
Bisque fire:
Let the piece dry completely (bone dry) before firing it in the kiln to bisque temperature (usually Cone 04). -
Glaze application:
Wipe the bisque ware with a damp sponge to remove dust. Pour a matte cream glaze inside, swirl, and dump out. Then, dip or brush the exterior. Avoid glazing the flange area where the lid touches the box to prevent them fusing together. -
Glaze fire:
Fire the piece again to the maturation temperature of your clay and glaze (often Cone 5 or 6). Use kiln wash or stilts to protect your kiln shelves. -
Planting:
Once cool, fill the small center well with cactus soil. Carefully use tweezers to place your mini cacti and top dress with neutral-colored gravel.
Place your finished planter box on a sunny windowsill where the tiny green life can thrive against the warm ceramic tones