High school ceramics is the sweet spot where your skills level up fast and your ideas get seriously personal. These ceramic ideas for high school are structured enough for a classroom schedule but open-ended enough for real student self-expression.
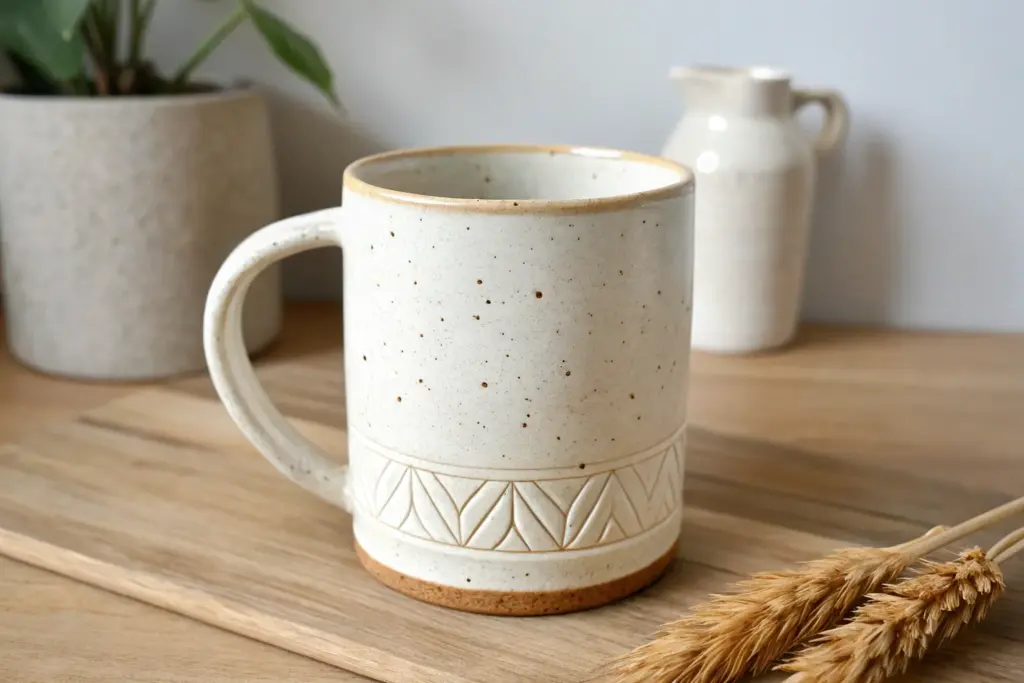
Textured Pinch Mug That Feels Like You
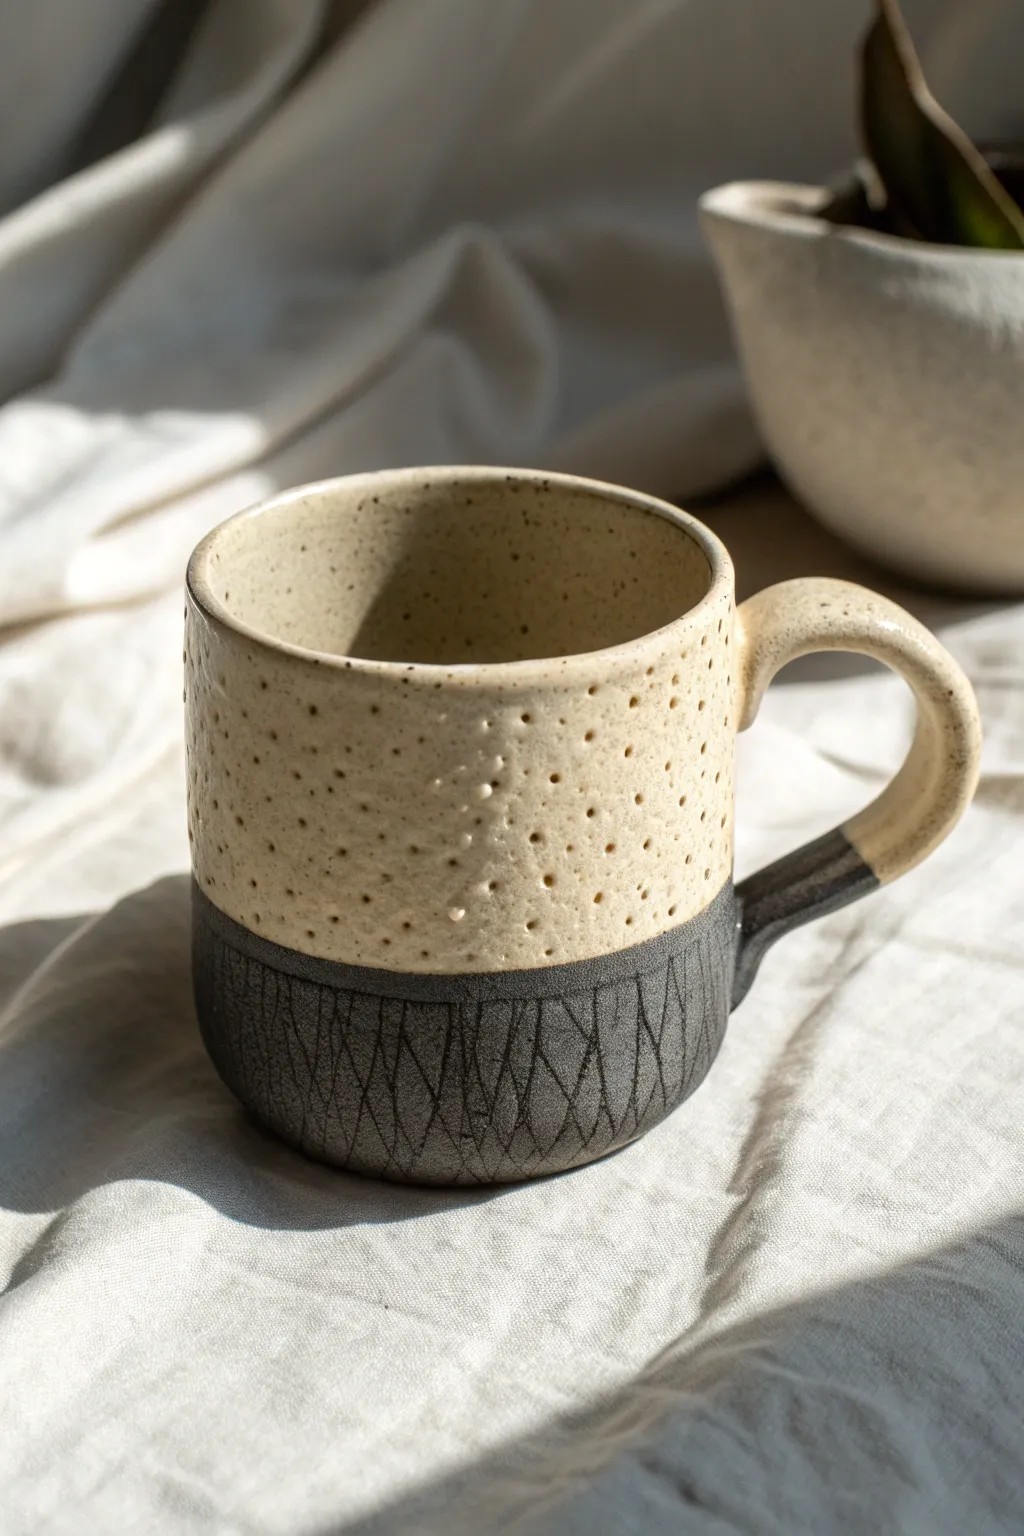
This project combines the rustic charm of hand-building with modern surface design, featuring a distinct two-tone aesthetic. The upper half boasts a creamy speckled glaze with dimpled texture, while the base grounds the piece with raw, darkened clay etched with linear patterns.
Step-by-Step Guide
Materials
- Speckled buff stoneware clay
- Pin tool or needle tool
- Serrated rib or scoring tool
- Slip (clay mixed with water)
- Wooden modeling tool
- Small sponge
- Black underglaze (or black slip)
- Clear or translucent white matte glaze
- Carving tool (small loop or sgraffito tool)
- Kiln
Step 1: Forming the Base
-
Wedging the Clay:
Begin with a ball of clay roughly the size of a large orange. Wedge it thoroughly to remove air bubbles and align the clay particles, ensuring a strong foundation for your mug. -
Opening the Pinch Pot:
Hold the clay ball in one hand and press your thumb into the center, stopping about a half-inch from the bottom. This thickness is crucial for the stability of your base. -
Pinching the Walls:
Gently pinch between your thumb (inside) and fingers (outside), rotating the clay as you go. Work from the bottom up, aiming for an even wall thickness of about 1/4 inch throughout the cylinder. -
Refining the Shape:
Once you have the height, place the pot on a table and gently paddle the sides with a wooden spoon or flat tool to straighten the walls. I like to keep the cylinder fairly straight-sided for this specific design. -
Smoothing the Rim:
Run a damp chamois or a tightly squeezed sponge over the rim to compress the clay particles. This prevents future cracking and makes the mug pleasant to drink from.
Pro Tip: Clean Lines
Use automotive masking tape to create a perfectly straight separation line between the textured top and the black bottom before applying underglaze.
Step 2: Adding the Handle
-
Pulling a Handle:
Pull a strap of clay or roll a coil that matches the thickness of your mug walls. Curve it into an ear shape and let it set up until it’s ‘leather hard’—firm enough to hold its shape but soft enough to bend. -
Attaching the Handle:
Score the mug surface and the ends of your handle aggressively with a needle tool. Apply slip to both areas, press the handle firmly onto the mug body, and smooth the seams with a wooden tool until they disappear.
Level Up: Handle Comfort
Add a thumb rest to the top of the handle. Just press your thumb into the top curve while the clay is soft for an ergonomic, custom fit.
Step 3: Texture & Surface Treatment
-
Creating the Dimples:
On the upper two-thirds of the mug, use the rounded end of a paintbrush or a small modeling tool to gently press indentations into the clay. Scatter them randomly but densely to create the stippled effect shown in the photo. -
Applying Underglaze:
Once the mug is bone dry, apply two coats of black underglaze or slip to the bottom third of the mug and the lower section of the handle. -
Sgraffito Carving:
When the underglaze is dry to the touch, use a carving tool to scratch through the black layer, revealing the raw clay body underneath. Create intersecting vertical and diagonal lines to mimic the geometric, etched pattern seen on the base. -
Bisque Firing:
Load your mug into the kiln for the first firing (bisque fire), usually to Cone 04. This solidifies the form and prepares it for glazing.
Step 4: Glazing & Finishing
-
Waxing the Bottom:
Apply wax resist carefully over the black, carved bottom section. This ensures that when you dip the mug, the glaze won’t adhere to your detailed carving work. -
Glazing the Interior:
Pour your chosen creamy matte glaze into the mug, swirl it around to coat the entire interior, and pour out the excess. Wipe any drips off the rim immediately. -
Glazing the Exterior:
Dip the top two-thirds of the mug into the glaze, stopping right where the black underglaze begins. The wax resist should help create a clean line, but you can tidy it up with a sponge if needed. -
Final Firing:
Fire the mug again to the maturation temperature of your clay and glaze (typically Cone 5 or 6 for stoneware). This melts the glaze into that smooth, speckled finish.
Now you have a stunning, functional piece of art that invites you to wrap your hands around it and enjoy a warm drink


Classic Cereal Bowl With Carved Pattern
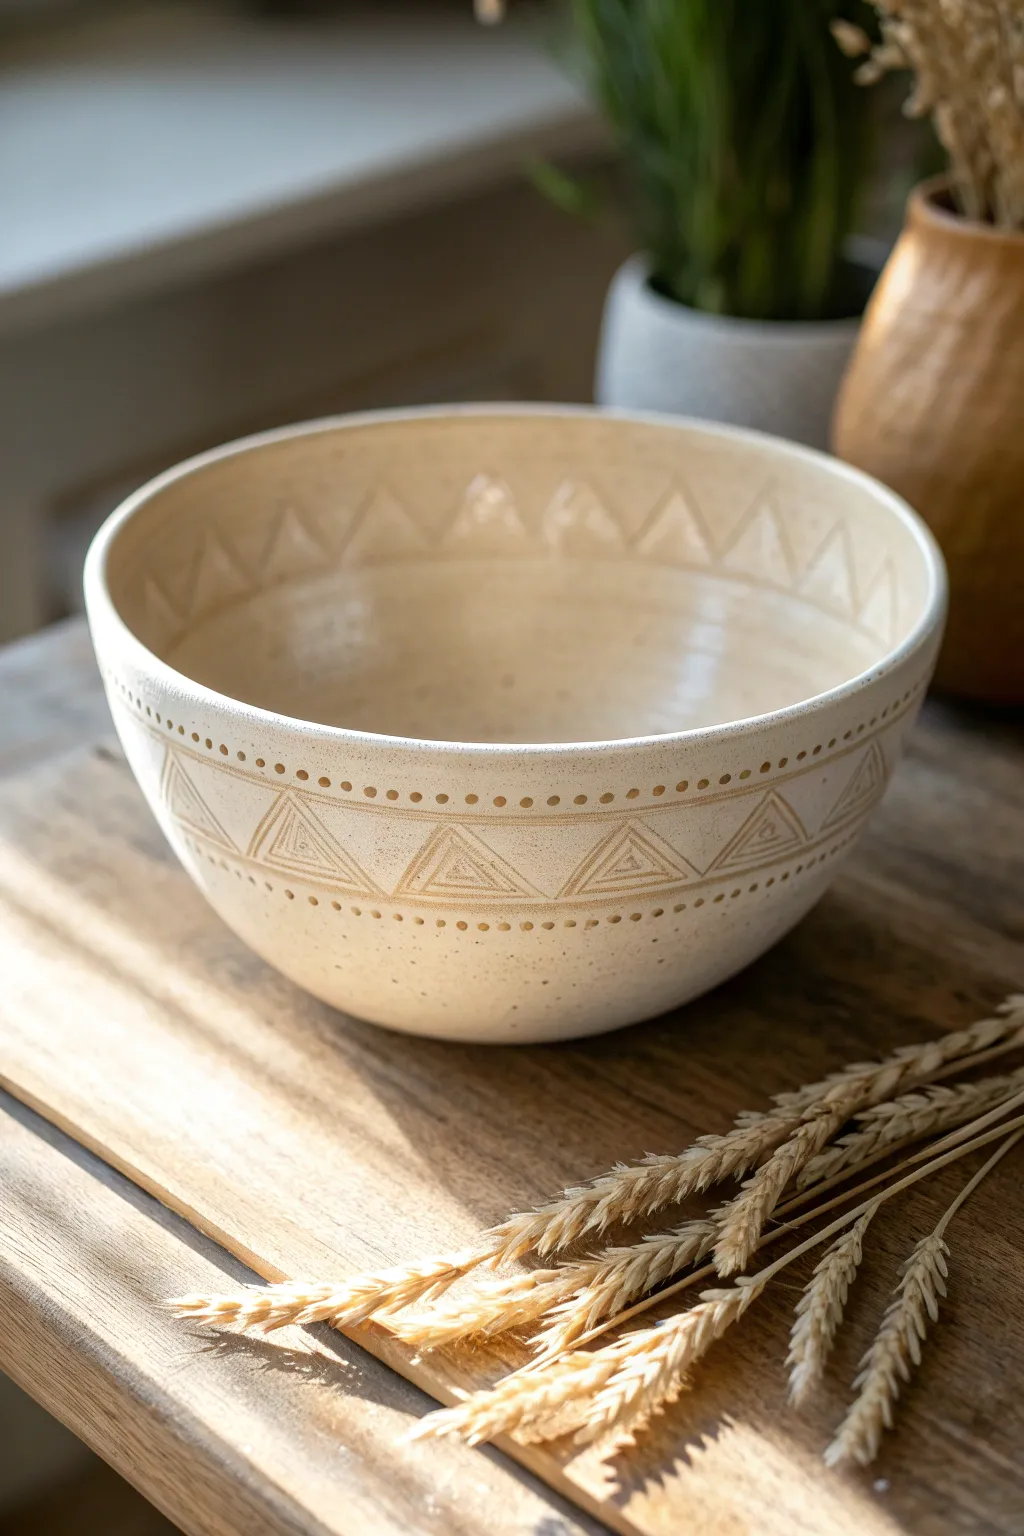
This project transforms a simple wheel-thrown or hand-built vessel into a stunning piece of functional pottery using the sgraffito or mishima-style carving technique. The creamy, speckled glaze finish highlights the precise geometric triangles and dotted border, giving it a warm, rustic-modern appeal perfect for your morning routine.
Detailed Instructions
Materials
- Light-colored stoneware clay (speckled clay recommended)
- Pottery wheel (or coil/slab building tools)
- Loop tools for trimming
- Pin tool or needle tool
- Small loop carving tool or stylus
- Ribs (metal and wooden)
- Sponge
- Clear or translucent satin glaze
- Kiln
Step 1: Forming the Bowl
-
Prepare your clay:
Begin by wedging about 1.5 to 2 lbs of clay to remove air bubbles. Since this bowl relies on carving, ensuring a consistent texture without air pockets is crucial. -
Center and open:
Throw the clay on the wheel, centering carefully. Open the clay to establish a floor that is roughly 4-5 inches wide, creating a flat bottom inside. -
Pull the walls:
Pull the walls up and slightly outward to create a classic U-shape or deep V-shape. Aim for a wall thickness of about 1/4 inch; you need enough thickness to carve later without puncturing the wall, but not so thick that it feels heavy. -
Refine the curve:
Use a smooth wooden or metal rib on the inside while supporting the outside with a sponge. This compresses the clay and removes throwing lines, creating that perfect, smooth canvas for your pattern. -
Wait for leather hard:
Cut the bowl from the bat and allow it to dry slowly to a leather-hard stage. The clay should be firm enough to handle without warping but soft enough to carve easily.
Clean Lines Pro-Tip
Don’t flick away clay crumbs while carving! Let them dry slightly, then brush them off with a soft paintbrush. Smearing wet crumbs ruins the crisp surface texture.
Step 2: Trimming and Planning
-
Trim the foot:
Place the leather-hard bowl upside down on the wheel. Center it and attach it with soft clay lugs. Use a loop tool to trim away excess weight from the base and define a clean foot ring. -
Smooth the exterior:
Run a metal rib over the exterior one last time to remove any trimming chatter marks. The surface needs to be perfectly smooth for the geometric lines to look sharp. -
Establish guidelines:
While the bowl is spinning slowly on the wheel, use a needle tool to very lightly score two horizontal parallel lines around the mid-section of the bowl. These will serve as the top and bottom boundaries for your triangle pattern. -
Mark additional borders:
Add another light guideline about a half-inch below the rim and a half-inch above the foot if you want decorative dot borders there as well.
Step 3: Carving the Pattern
-
Sketch the triangles:
Working within your central band, use a pencil (the graphite burns off in the kiln) to lightly sketch a zigzag line that forms a row of connected triangles. -
Carve the main lines:
Using a stylus or a fine carving tool, trace over your pencil lines. Apply steady pressure to create a clean groove. Clear away the clay burrs as you go. -
Create the nesting effect:
Inside each large triangle, carve smaller, concentric triangles. Try to keep the spacing between lines consistent for a professional look. I personally find it helpful to do all the ‘left side’ lines first, then switch to do all the ‘right side’ lines. -
Add the dotted borders:
Using a slightly blunted tool or the back of a small drill bit, press a row of dots along the top and bottom of your main triangle band. Spacing is key here—aim for uniform gaps. -
Clean up:
Once dry, gently rub the surface with a soft scour pad or your finger to knock off any sharp clay crumbs created during carving. Be gentle to avoid smoothing out your crisp lines.
Uneven Spacing?
If your triangle pattern doesn’t meet perfectly at the end, don’t panic. Just smudge the last two triangles slightly wider or narrower to hide the discrepancy.
Step 4: Glazing and Firing
-
Bisque fire:
Load the bone-dry bowl into the kiln for a bisque firing (usually Cone 04 or 06). This prepares the clay to accept glaze. -
Wipe down:
After the kiln cools, wipe the bowl with a damp sponge to remove any dust, which could cause pinholes in your glaze. -
Apply the glaze:
Dip the bowl into a transparent or semi-transparent satin glaze. A glaze that ‘breaks’ (thins) over edges is best, as it will pool slightly in the carved lines, darkening them and making the pattern pop. -
Wipe the foot:
Ensure the bottom of the foot ring is completely free of glaze to prevent it from fusing to the kiln shelf. -
Final firing:
Fire the bowl to the maturity temperature of your clay (typically Cone 5 or 6 for stoneware).
Now you have a beautifully textured bowl ready for your favorite morning meal


Slab-Built Plate With Bold Rim Design
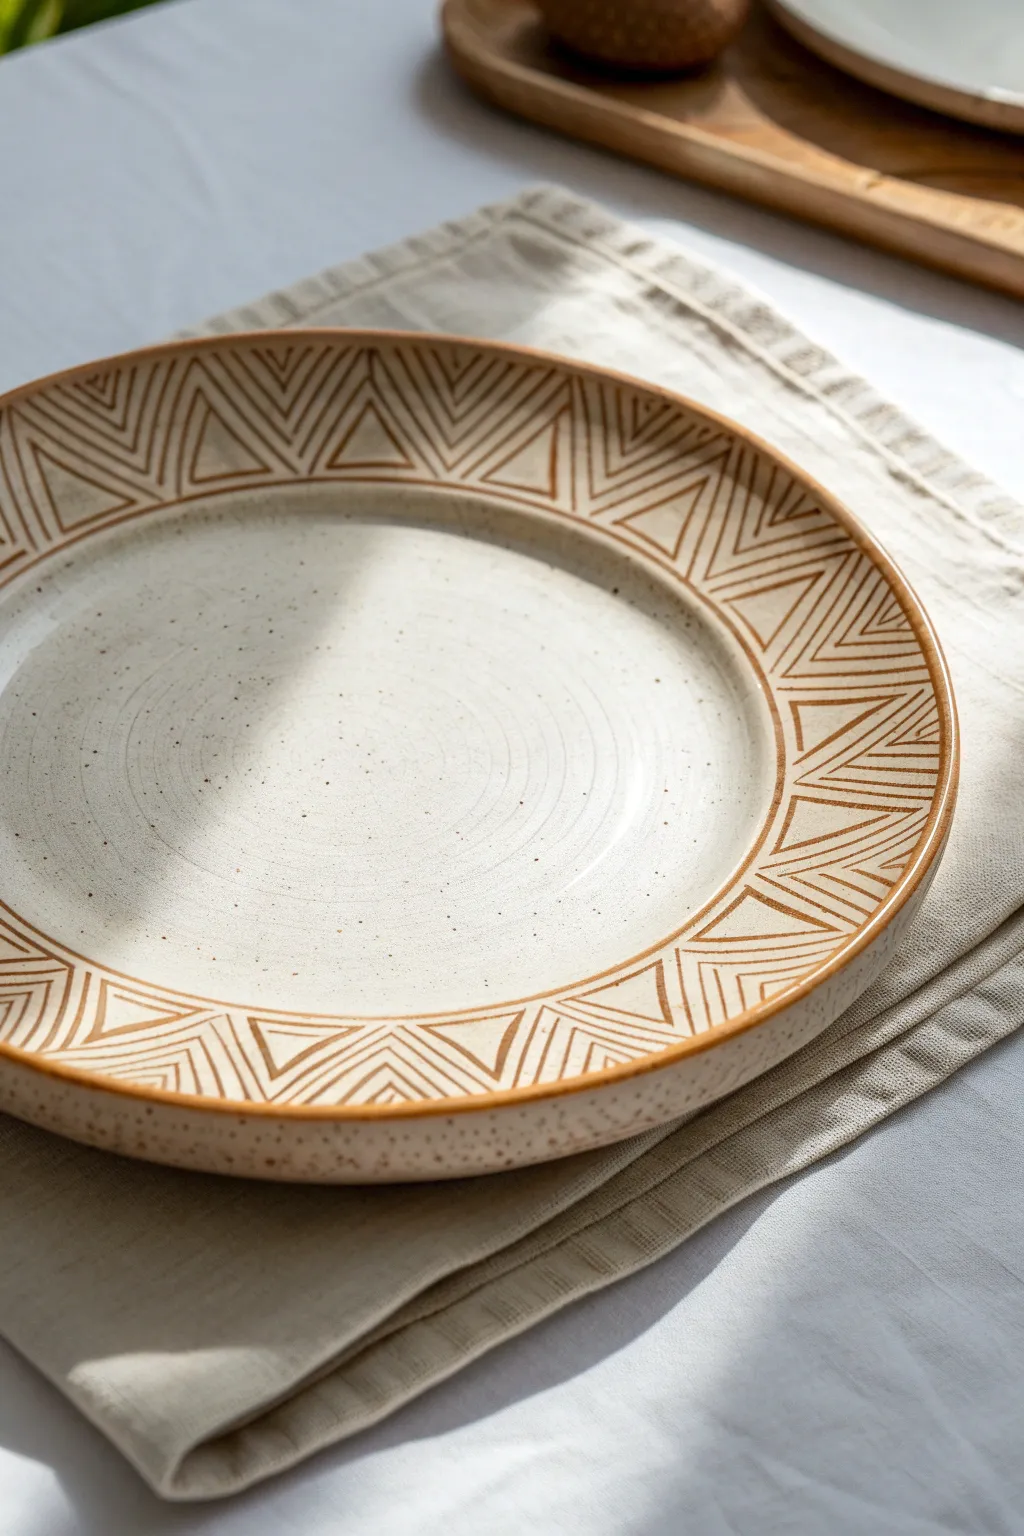
This project transforms a simple slab of clay into a sophisticated dining piece using a clean geometric pattern. The contrast between the raw, speckled clay body and the sharp, rust-orange linework creates a modern yet earthy aesthetic.
Step-by-Step Tutorial
Materials
- Speckled stoneware clay body (mid-fire)
- Rolling pin
- Canvas mat or slab roller
- Round plate mold or drape mold (approx 10-12 inches)
- Needle tool
- Fettling knife
- Sponge
- Underglaze pencil or fineline applicator bottle (Rust/Terracotta)
- Clear transparent glaze (gloss or satin)
- Ruler or flexible straight edge
- Rib tool (metal and rubber)
- Weighted bag or sandbag (for mold pressing)
Step 1: Forming the Plate
-
Prepare the slab:
Begin by rolling out a slab of speckled stoneware clay to a consistent thickness of about 1/4 inch. If you are rolling by hand, be sure to flip and rotate the clay frequently to keep it even. -
Smooth the surface:
Before cutting, take a rubber rib and compress the surface of the clay in all directions. This removes canvas texture and aligns the clay particles to prevent warping later. -
Cut the circle:
Place your template or mold upside down on the slab and trace around it with a needle tool to cut out a perfect circle. -
Refine the edge:
Once cut, run a damp sponge or your finger along the cut edge to soften the sharpness. A sharp edge is prone to chipping after firing. -
Transfer to mold:
Gently lift the slab and drape it over your hump mold, or press it into a slump mold depending on what you have available. Center it carefully. -
Define the rim:
Use a damp sponge to firmly press the clay against the mold. If your mold has a defined rim transition, emphasize this area with your fingers to ensure the plate has a clear separation between the eating surface and the rim. -
Let it stiffen:
Allow the clay to dry to a leather-hard state on the mold. This is crucial; if you remove it too early, the rim will flop and lose its shape.
Step 2: Designing the Geometric Rim
-
Remove and clean:
Pop the plate off the mold. Check the rim again and use a semi-damp sponge to clean up any rough spots or marks left by the mold. -
Mark spacing:
Using a needle tool very lightly, mark even intervals around the outer edge of the rim. You can estimate this or use a decorator’s wheel for precision. -
Create the triangles:
Connect your rim marks to a central imaginary line on the inner rim to create a series of large triangular sections. I usually just mark the corners lightly first to ensure the spacing looks right before committing. -
Apply the underglaze:
Fill a fineline applicator bottle with rust or terracotta-colored underglaze. Ensure the consistency is fluid enough to flow but thick enough to stand up slightly. -
Line work:
Trace over your geometric markings with the applicator. Draw a continuous line along the outer rim edge and the inner rim transition first to frame the design. -
Fill the pattern:
Inside each large triangle, draw smaller nested triangles (chevrons) pointing outward. Keep your hand steady and maintain consistent pressure on the bottle for even lines. -
Clean up smudges:
If you make a mistake, let the underglaze dry completely before trying to scratch it off. Wiping it while wet will just smear the pigment into the clay pores.
Steady Hands
Rest your pinky finger on the center of the plate while drawing the rim details. This anchors your hand and acts as a pivot point for smoother lines.
Step 3: Glazing and Firing
-
Bisque fire:
Once the plate is bone dry, fire it to cone 04 (or your clay’s bisque temperature). This sets the shape and makes the underglaze permanent. -
Wipe down:
After the kiln cools, wipe the bisque ware with a damp sponge to remove any dust that settled during firing, which can cause pinholes in your glaze. -
Apply clear glaze:
Dip the entire plate into a bucket of clear transparent glaze. Alternatively, you can brush on three even coats of a brushing clear glaze. -
Check thickness:
Make sure the clear glaze isn’t applied too thickly over the rim, or it might obscure the crispness of your geometric lines. -
Wipe the foot:
Clean the bottom foot ring of the plate thoroughly with a sponge so it doesn’t stick to the kiln shelf. -
Glaze fire:
Fire the plate to the maturation temperature of your clay and glaze (likely Cone 5 or 6). Allow the kiln to cool naturally.
Wax Resist Method
After bisque firing, apply wax resist over your underglaze lines before dipping in the clear glaze. This creates a matte texture on the lines while the rest stays glossy.
Now you have a durable, stylish plate perfect for serving dinner or displaying as a centerpiece


Coil Vase With Exposed Coil Texture
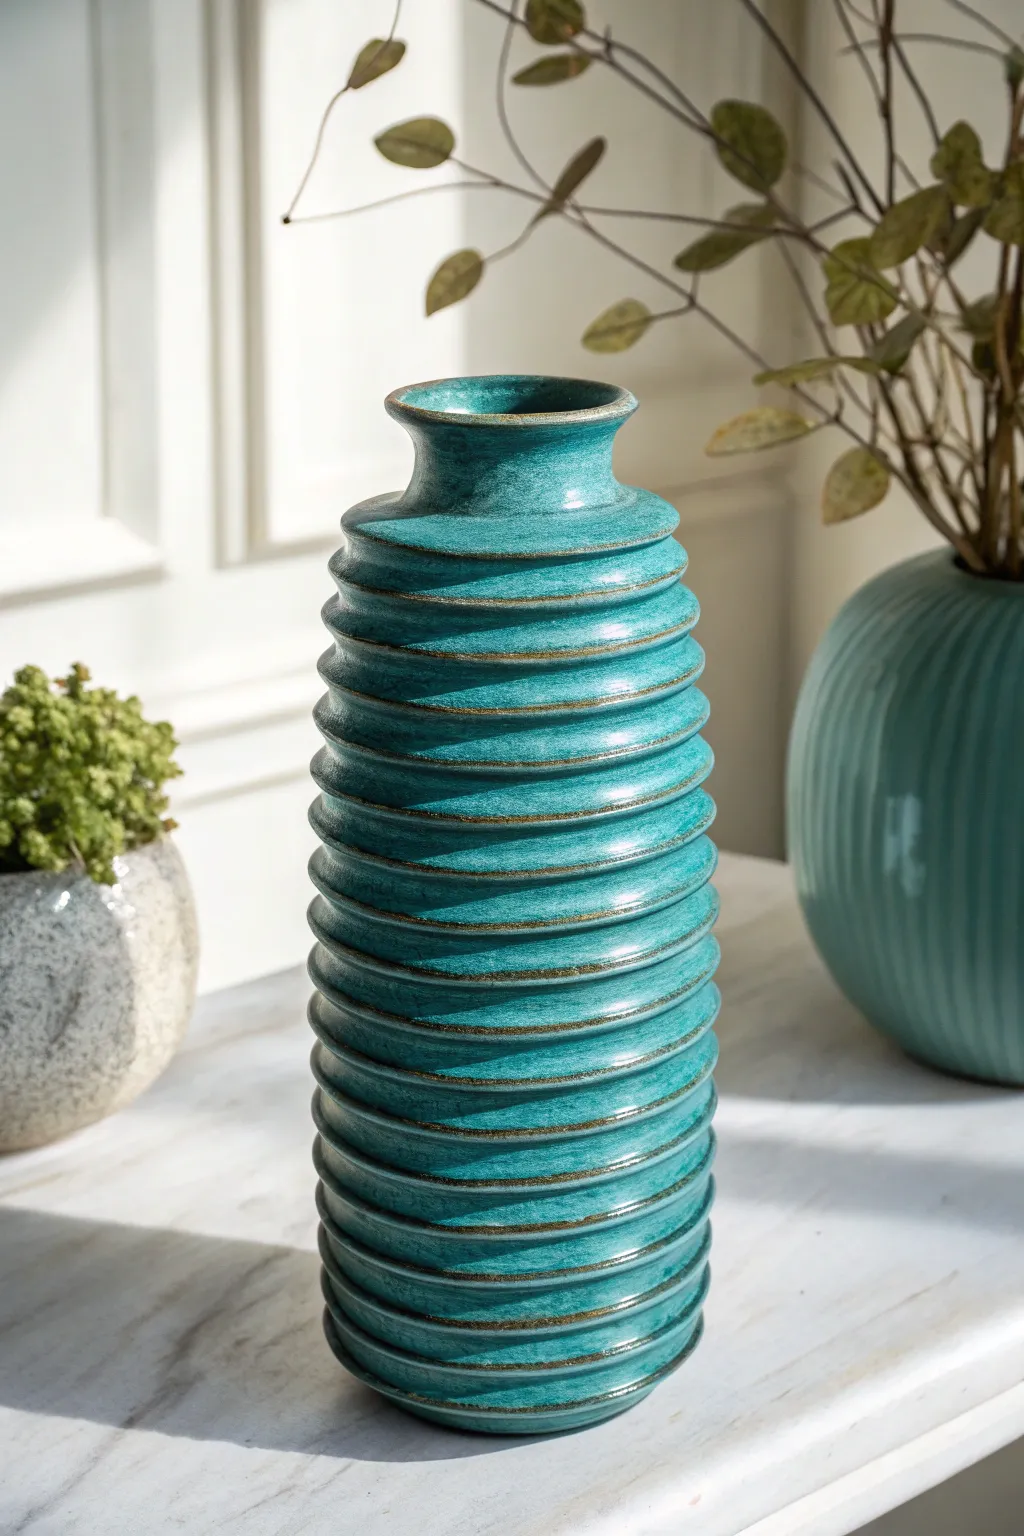
This elegant vase project celebrates the natural beauty of the coiling process by leaving the texture visible rather than smoothing it away. The result is a striking, rhythmic design emphasized by a teal glaze that pools in the recesses and breaks over the high points.
Step-by-Step Guide
Materials
- Stoneware clay body (white or buff specifically)
- Scoring tool or serrated rib
- Slip (clay slurry)
- Wooden modeling tool
- Sponge
- Small banding wheel
- Potter’s needle tool
- Teal reactive glaze
- Kiln for firing
Step 1: Building the Base
-
Prepare the slab:
Begin by rolling out a slab of clay approximately 1/4 to 1/2 inch thick. This will serve as the foundation for your vase. -
Cut the circle:
Use a needle tool or a circular template to cut a perfect circle for the base, roughly 4-5 inches in diameter. -
Score the edge:
Take your scoring tool and roughen the outer perimeter of the base where the first coil will sit. Apply a generous amount of slip to the scored area.
Crack Control
If you see horizontal hairline cracks appearing between coils as it dries, the clay was too dry when joined. Score deeper and add more slip next time.
Step 2: Coiling the Form
-
Roll consistent coils:
Roll out several long ropes of clay on a table. Aim for a thickness of about a finger’s width, ensuring they are uniform to create that even, ribbed look seen in the photo. -
Attach the first coil:
Place your first coil onto the slipped edge of the base. Gently press it down. -
Blend the inside only:
Here is the crucial part: use your wooden tool or thumb to smear the clay from the coil downwards onto the base *only on the inside*. Do not touch the outside texture. -
Build upward:
Score and slip the top of your first coil, then add the next loop. Continue stacking coils directly on top of one another to build a straight vertical wall. -
Shape the subtle curve:
As you reach the middle height, place the coils slightly inward to start tapering the neck. The vase in the example has a gentle shoulder, so transition slowly. -
Maintain the ridge:
After every 2-3 layers, pause to check the exterior. If you accidentally smashed a coil, use a damp sponge or finger to round it back out, reinforcing the horizontal groove. -
Smooth the interior:
Periodically stop building to reach inside and smooth the inner wall completely. A smooth interior is vital for structural integrity since the outside seams are left open.
Level Up: Oxide Wash
Before glazing, wipe a black iron oxide wash over the bisque ware and sponge it off. It stays in the cracks, adding intense depth and an antique look.
Step 3: Refining the Neck and Rim
-
Construct the neck:
Narrow the opening significantly by placing the next few coils further inward. This creates the bottleneck shape. -
Widen the rim:
For the final two coils, flare them slightly outward again to create a lip. This gives the piece a finished, professional silhouette. -
Finish the lip:
Use a damp sponge or a piece of chamois leather to compress and smooth the very top rim so it is pleasant to the touch. -
Dry slowly:
Cover the vase loosely with plastic. Because the coils aren’t blended on the outside, uneven drying can cause cracks between layers. Let it dry very slowly over several days.
Step 4: Glazing and Firing
-
Bisque fire:
Once bone dry, fire the piece to bisque temperature (usually cone 04 or 06) to prepare it for glazing. -
Select the glaze:
Choose a reactive or semi-transparent teal glaze. These types of glazes result in ‘breaking,’ where the color is lighter on the raised ridges and darker in the crevices. -
Apply the glaze:
Dip or brush the glaze onto the vase. I find that brushing allows better control to ensure the glaze gets deep into those coil crevices without running too thick at the bottom. -
Wipe the foot:
Clean the bottom inch/centimeter of the vase with a sponge to prevent the glaze from running onto the kiln shelf during firing. -
Final fire:
Fire to the maturation temperature of your specific clay and glaze combination (often Cone 5 or 6 for stoneware).
Place your finished vase near a window where the light can catch the beautiful ridges you created.

The Complete Guide to Pottery Troubleshooting
Uncover the most common ceramic mistakes—from cracking clay to failed glazes—and learn how to fix them fast.
Slab Planter With Drainage and Stamped Surface
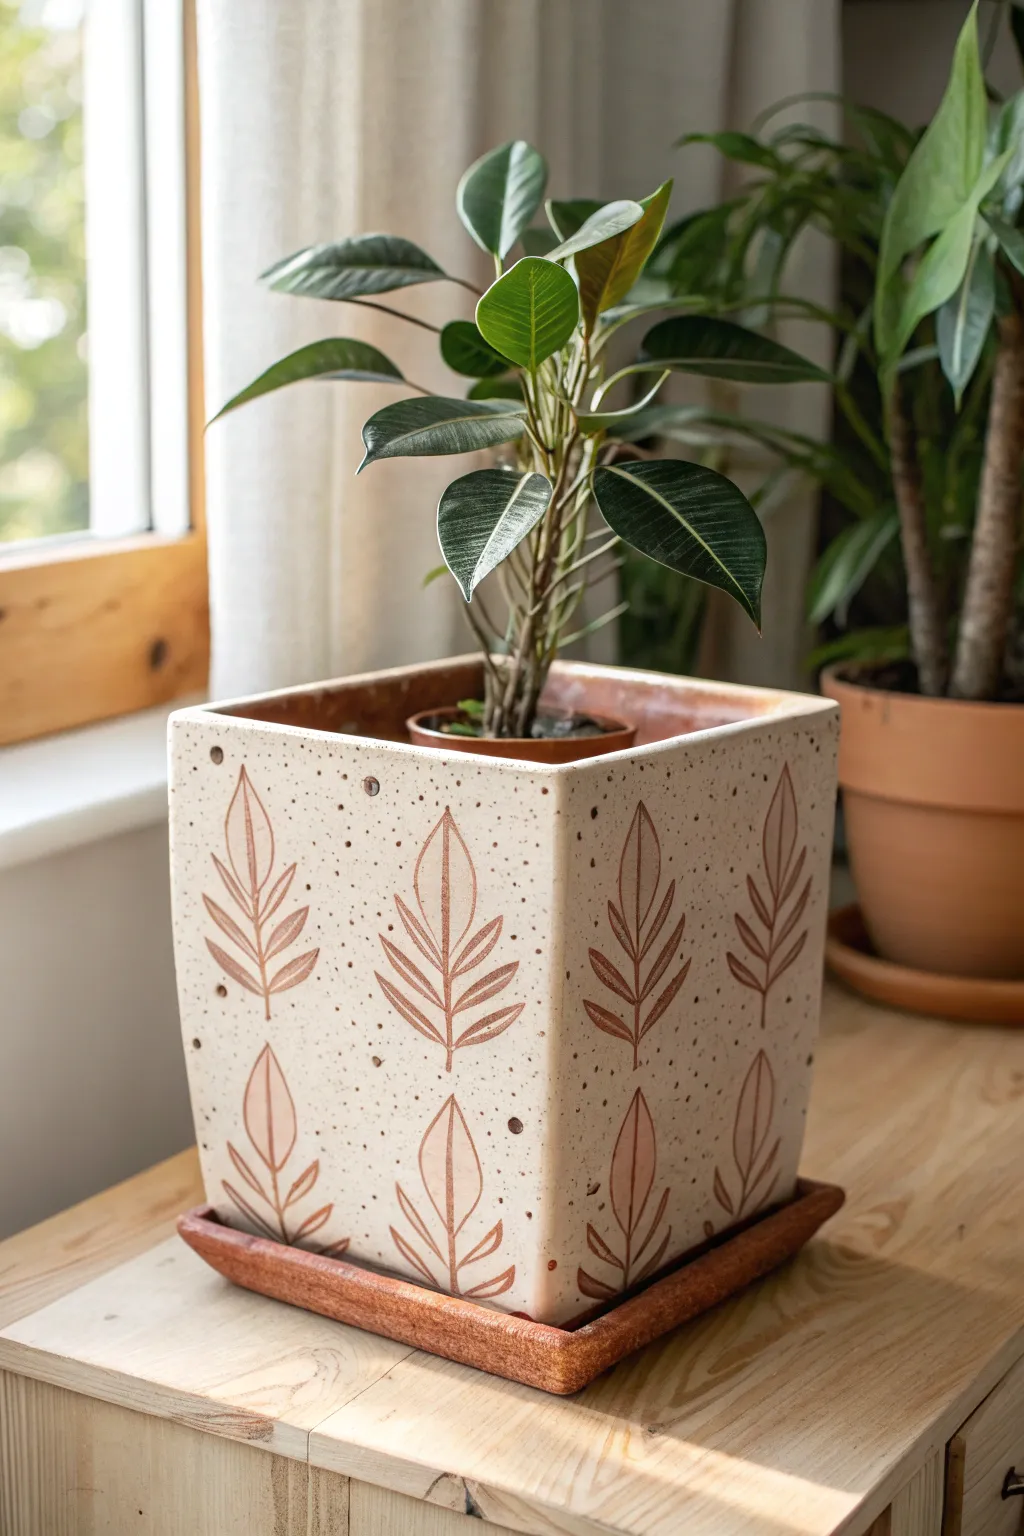
This elegant square planter brings a touch of nature indoors with its warm, creamy glaze and delicate reddish-brown botanical motifs. Constructed using slab-building techniques, it features a tapered shape and a matching saucer, making it a perfect home for your favorite houseplant.
Detailed Instructions
Materials
- High-fire speckle clay body (or standard stoneware with speckles added)
- Rolling pin and guide sticks (approx. 1/4 inch thick)
- Fettling knife or needle tool
- Paper templates (trapezoid for sides, square for base)
- Scoring tool or serrated rib
- Slip (clay mixed with water)
- Leaf stamp (commercial or handmade from bisque clay)
- Red iron oxide wash or terracotta underglaze
- Sponge and bucket of water
- Semi-matte white or cream glaze
- Kiln
Step 1: Preparing the Slabs
-
Roll out the clay:
Begin by wedging your speckled clay to remove air bubbles. Roll it out into a large, even slab using guide sticks to maintain a consistent 1/4 inch thickness. -
Cut the shapes:
Using your paper templates, cut out four identical trapezoids for the walls and one square for the base. Don’t forget to cut a separate square slab for the saucer, slightly larger than the planter’s base. -
Hardening phase:
Let the slabs sit on a ware board until they reach a ‘leather-hard’ state. They should be firm enough to hold their shape but still flexible enough to not crack when bent slightly.
Step 2: Assembling the Form
-
Bevel the edges:
For a clean corner joint, cut the vertical edges of your four wall pieces at a 45-degree angle. This mitering technique ensures a stronger bond and a sharper aesthetic. -
Score and slip:
Rough up the beveled edges and the perimeter of the base with your scoring tool. Apply a generous amount of slip to these textured areas. -
Construct the walls:
Attach the first wall to the base, pressing firmly. Add the adjacent wall, ensuring the mitered corners meet perfectly. Continue until all four walls are attached and the cube is closed. -
Reinforce the seams:
Support the walls from the outside with one hand while smoothing a thin coil of soft clay into the interior corners to strengthen the joints. -
Shape the saucer:
Take your saucer slab and gently curve up the edges to create a shallow rim. Smooth the rim with a damp sponge.
Clean Corner Pro-Tip
After assembling the walls, use a rubber kidney tool to compress and smooth the outside corners. This sharpens the square profile and erases the visible join line.
Step 3: Decorating and Finishing
-
Apply the pattern:
While the pot is still leather hard, press your leaf stamp firmly into the clay. Create a repeating pattern, aligning the leaves vertically. -
Bisque fire:
Allow the planter and saucer to dry completely slowly to avoid warping. Start with a slow candling warm-up, then bisque fire to cone 04. -
Inlay the design:
Mix red iron oxide with water or use a terracotta underglaze. Brush this into the stamped leaf impressions. I find it helpful to be messy here—get it deep into the grooves. -
Wipe back:
Using a clean, damp sponge, wipe away the excess oxide from the surface, leaving the color only inside the depressed leaf lines. -
Glazing:
Dip or brush the entire piece in a semi-matte cream glaze. The iron oxide pattern should show through, and the natural speckles of the clay will interact with the glaze. -
Final wipe and fire:
Wipe the bottom of the pot and saucer clean of glaze so they don’t stick to the kiln shelf. Glaze fire to the temperature recommended for your specific clay body (likely cone 5 or 6).
Troubleshooting Warping
If your walls are bowing inward or outward, the clay was likely too soft during assembly. Stuff the pot with crumpled newspaper to support the walls while they dry.
Once cooled, your custom planter is ready to show off a favorite fern or rubber tree
Themed Lidded Box for Tiny Treasures
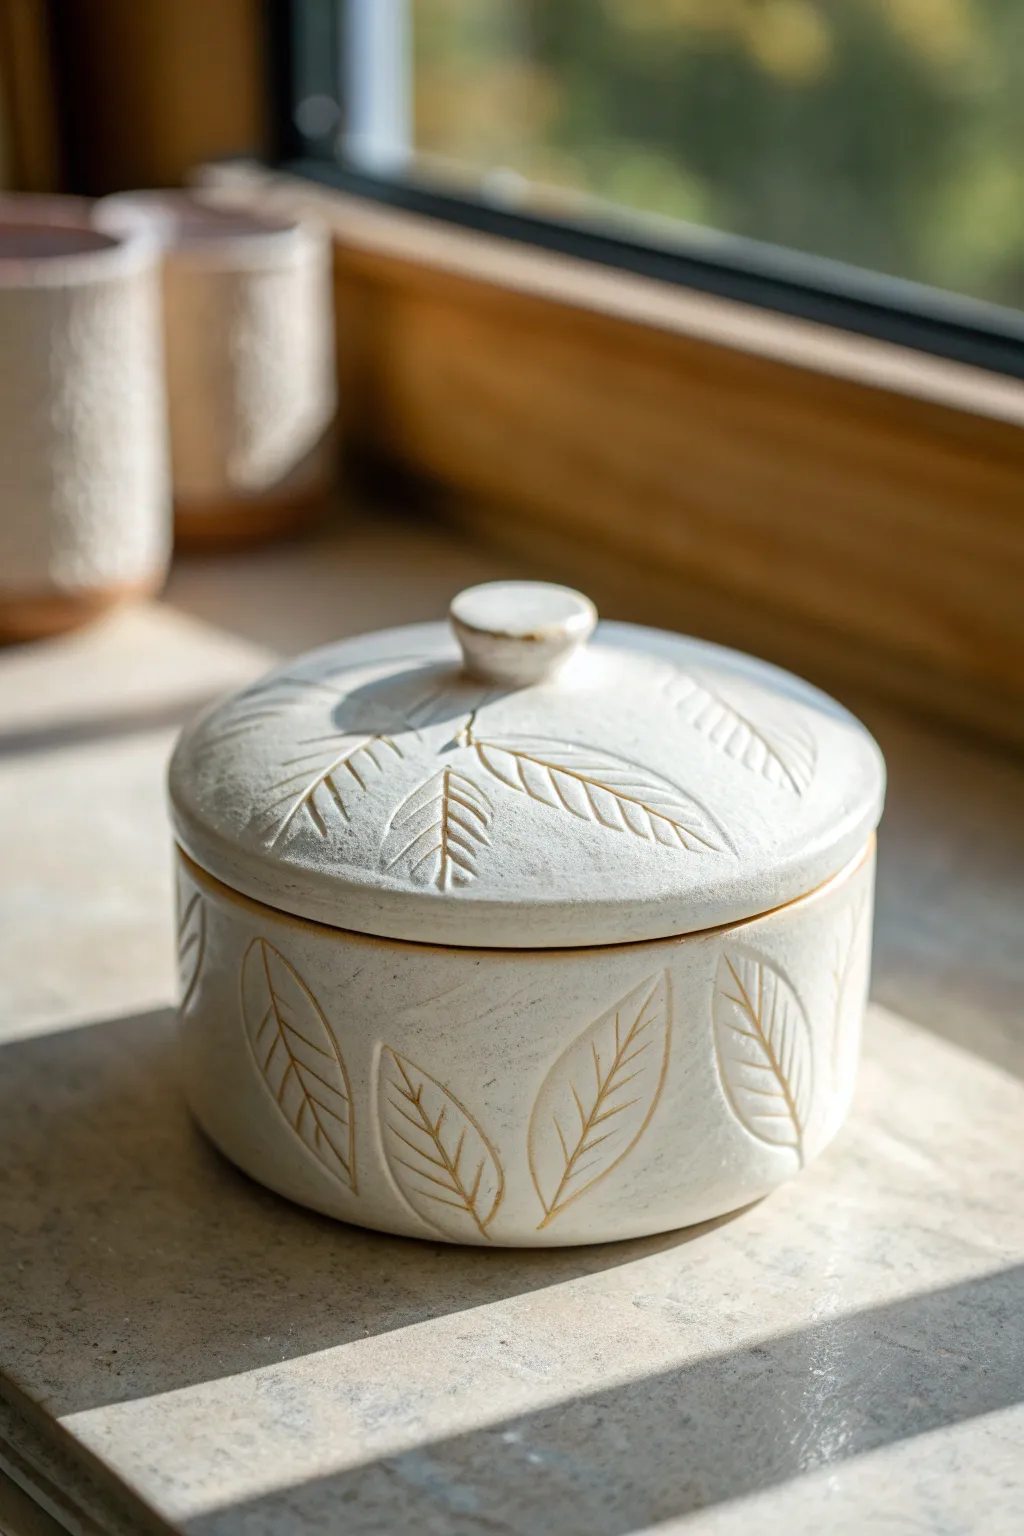
This elegant ceramic box features delicate leaf motifs carved into the surface, revealing the raw clay beneath a smooth, creamy glaze. Its simple cylindrical form and fitted lid make it perfect for storing small treasures or serving dry goods.
How-To Guide
Materials
- Stoneware clay (buff or speckled)
- Rolling pin and guide sticks (1/4 inch)
- Circle templates (paper or cookie cutters)
- Needle tool
- Fettling knife
- Scoring tool or fork
- Slip (clay slurry)
- Loop carving tool (small U-shape)
- Sponge
- Matte white glaze
- Wax resist
Step 1: Forming the Base
-
Roll the slab:
Begin by wedging your clay to remove air bubbles, then roll out a slab to an even 1/4-inch thickness using guide sticks. -
Cut the components:
Using your templates, cut out two circles of the same size (one for the base, one for the lid). Measure the circumference of your base circle to determine the length needed for the wall. -
Cut the wall strip:
Cut a rectangular strip for the wall based on your measurement, keeping the height around 2.5 to 3 inches. -
Assemble the cylinder:
Score the short ends of the rectangular strip and apply slip. Curve the strip into a cylinder, overlap the ends slightly, and press them firmly together to create a seam. -
Attach the base:
Score and slip the bottom edge of the cylinder and the outer edge of the base circle. Press the cylinder onto the base, smoothing the clay connection on both the inside and outside.
Clean Lines
For sharper leaf veins, wait until the clay is on the firmer side of leather-hard. Soft clay tends to drag and create messy, jagged edges.
Step 2: Creating the Lid
-
Create the flange:
Roll a small coil or cut a thin strip of clay. Score and slip it onto the underside of your lid circle, inset about 1/4 inch from the edge, to keep the lid from sliding off. -
Shape the lid:
Gently press the center of the lid upwards from the inside to create a slight dome shape, which adds elegance and strength. -
Add the knob:
Form a small ball of clay and slightly flatten it. Score and slip the center of the lid, then attach the knob, smoothing the transition so it looks seamless. -
Dry to leather hard:
Cover both pieces loosely with plastic and let them dry to a leather-hard state. This is crucial for clean carving.
Lid Fit Issues
If the lid doesn’t fit after the bisque fire, use sandpaper or a grinding stone to gently shave down the flange until it sits comfortably.
Step 3: Carving and Finishing
-
Sketch the design:
Lightly sketch your leaf pattern onto the leather-hard surface using a needle tool or pencil. Don’t worry about erasing; pencil marks burn off in the kiln. -
Carve the leaves:
Using a small loop tool, carve out the leaf shapes. Vary the pressure to create tapered ends for the leaves. -
Add vein details:
With a needle tool or a very sharp, thin carving tool, scratch in the central veins and side veins inside each leaf outline. -
Clean up burrs:
Once the clay is bone dry, use a slightly damp sponge to gently wipe away any sharp clay burrs from the carving without erasing the texture. -
Bisque fire:
Fire the piece to cone 04 (or your clay body’s bisque temperature). -
Wax resist:
Apply wax resist carefully to the carved areas if you want the raw clay to show through clearly, or rely on the glaze breaking over the texture. -
Glaze application:
Dip or brush on a matte white glaze. If you didn’t wax the carving, gently wipe the glaze off the raised textures with a damp sponge to reveal the pattern. -
Final wipe:
Ensure the bottom of the pot and the rim where the lid sits are completely free of glaze before firing. -
Glaze fire:
Fire the finished piece to the maturity temperature of your clay and glaze (typically cone 5 or 6 for stoneware).
Place this charming box on a sunny windowsill or use it to hold precious jewelry


What Really Happens Inside the Kiln
Learn how time and temperature work together inside the kiln to transform clay into durable ceramic.
Spoon Rest or Sponge Holder for Everyday Use
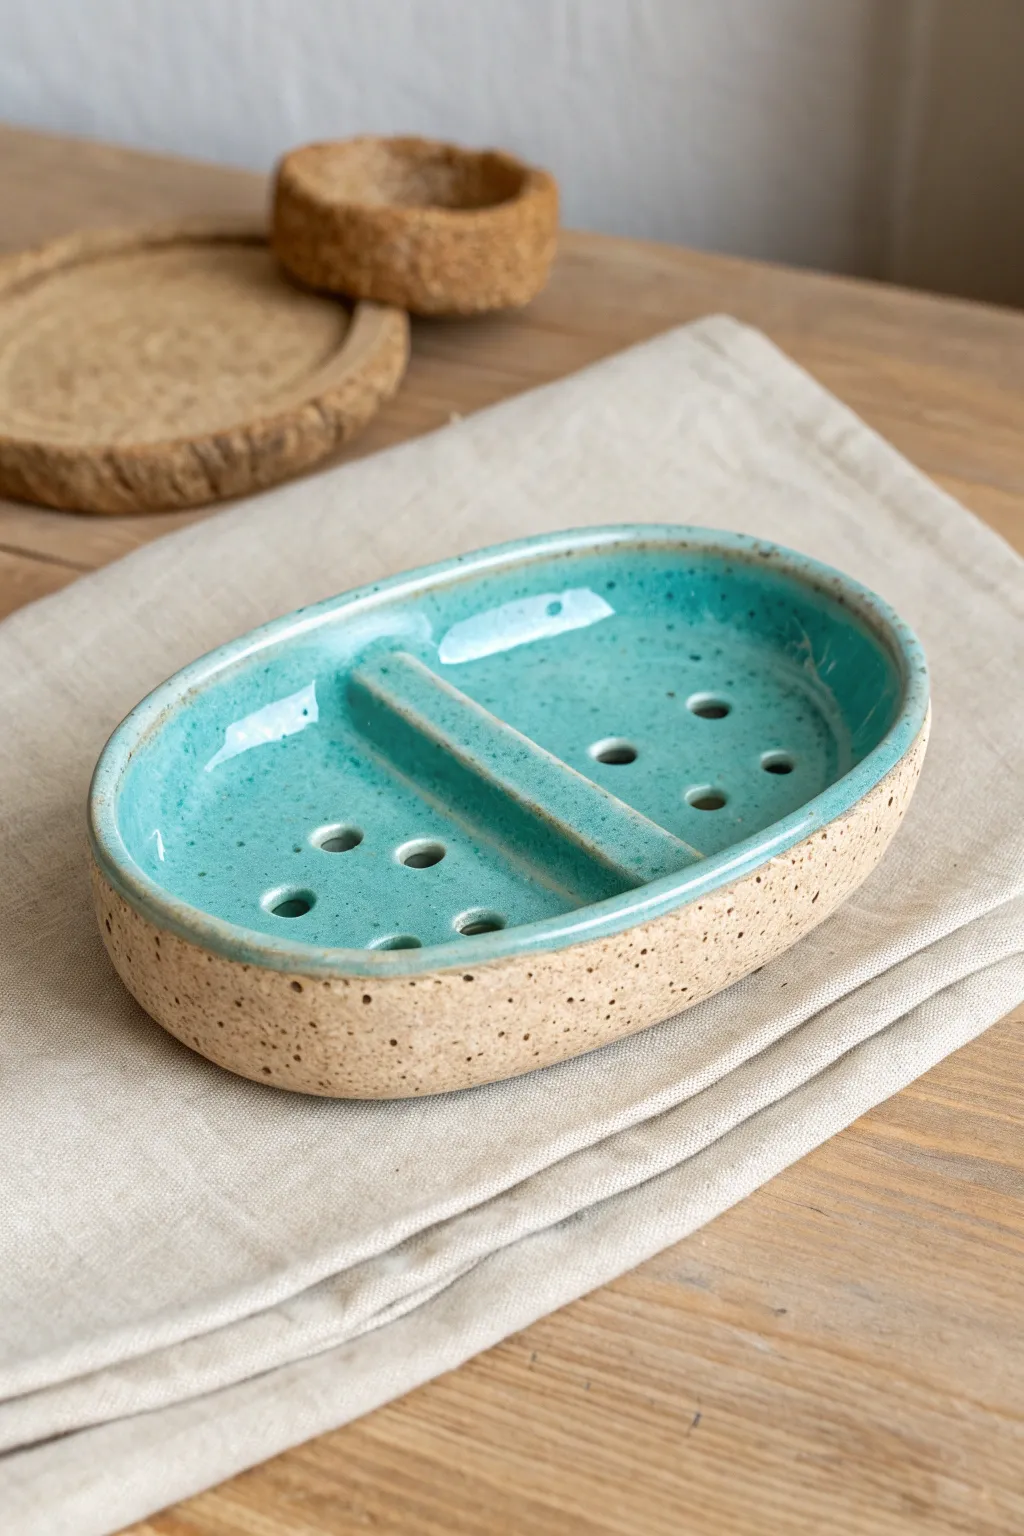
This project combines functional design with rustic charm, featuring a classic oval shape divided into two separate compartments for sponges or scrubbers. The contrast between the raw, speckled clay exterior and the glossy, vibrant teal interior makes it a standout piece for any kitchen sink.
Step-by-Step Tutorial
Materials
- Speckled stoneware clay (mid-fire)
- Oval template (paper or craft foam)
- Clay slab roller or rolling pin
- Guide sticks (1/4 inch thick)
- Fettling knife
- Potter’s needle tool
- Ribs (metal and rubber)
- Small hole cutter or drill bit tool
- Sponge
- Score and slip tool (or serrated kidney)
- Teal glossy glaze (cone 5/6 compatible)
- Wax resist
- Glaze brush
Step 1: Forming the Base
-
Roll the Slab:
Begin by wedging your speckled stoneware clay to remove air bubbles. Using a slab roller or a rolling pin with guide sticks, roll out a consistent slab about 1/4 inch thick. Smooth both sides with a rubber rib to compress the clay particles. -
Cut the Base:
Place your oval template onto the smooth slab. Trace around it with a needle tool and carefully cut out the oval shape. This will be the floor of your sponge holder. -
Prepare the Wall Strip:
From the remaining slab, cut a long strip of clay approximately 1 to 1.5 inches tall. This strip needs to be long enough to wrap around the entire circumference of your oval base. -
Score and Slip:
Score the top edge of the oval base and one long edge of your wall strip. Apply slip generously to the scored areas. This creates the glue that holds your pot together. -
Attach the Wall:
Place the strip onto the base, pressing firmly to adhere. Cut the excess length where the strip meets itself, score and slip that vertical seam, and blend it smooth so the join is invisible.
Warping Woes?
If your oval turns into a wobbly egg during drying, weigh it down gently. Place a small bag of sand or rice inside the piece while it dries to keep the floor perfectly flat.
Step 2: Adding Internal Details
-
Create the Divider:
Roll a coil or cut a thick strip of clay to act as the central divider. It should be slightly shorter than the walls. Shape it into a rectangular bar or rounded ridge. -
Install the Divider:
Score a line across the center of the interior floor. Apply slip and press the divider firmly into place. Use a damp brush or a small modeling tool to seal the edges where the divider meets the floor and walls. -
Smooth the Connections:
Add a tiny coil of clay to the interior seams—both around the floor perimeter and the divider base—and smooth it out to ensure a watertight and sturdy bond. -
Refine the Rim:
Using a damp sponge or piece of chamois, smooth the top rim of the wall. Rounding it off, as seen in the photo, prevents chipping later and feels better to the touch. -
Add Drainage Holes:
Locate a small hole cutter or circular punch. Create a triangular pattern of three holes on each side of the divider. These holes allow water to drain from wet sponges.
Step 3: Drying and Firing
-
Slow Drying:
Loosely cover the piece with plastic to let it dry slowly. This is crucial for slab-built pieces to prevent warping, especially with the drainage holes weakening the floor slightly. -
Bisque Fire:
Once bone dry, fire the piece to a bisque temperature (usually Cone 04). Cleaning up any sharp edges with a sanding sponge before firing is something I always recommend. -
Apply Wax Resist:
Wipe the bisqued piece with a damp sponge to remove dust. Paint liquid wax resist carefully on the entire exterior wall, the underside, and the rim. This ensures the raw speckled clay stays visible. -
Glaze the Interior:
Pour a glossy teal glaze into the interior. Swirl it around ensuring it covers the floor, divider, and inner walls completely. Pour the excess back out. -
Clean Up:
Use a damp sponge to wipe any stray glaze droplets off the waxed exterior or rim. The line between the glaze and the raw clay should be crisp and clean. -
Final Fire:
Load the kiln and fire to the maturity temperature of your clay and glaze (typically Cone 5 or 6). Ensure no glaze is on the bottom to prevent it sticking to the kiln shelf.
Creative Upgrade
Make a matching set! Create a separate, smaller circular dish without holes to sit underneath this one. It will catch the drips, protecting your counter while keeping the rustic aesthetic.
Once cooled, your sponge holder is ready to bring a splash of color and organization to your washing area
Ceramic Paint Palette for Art Class
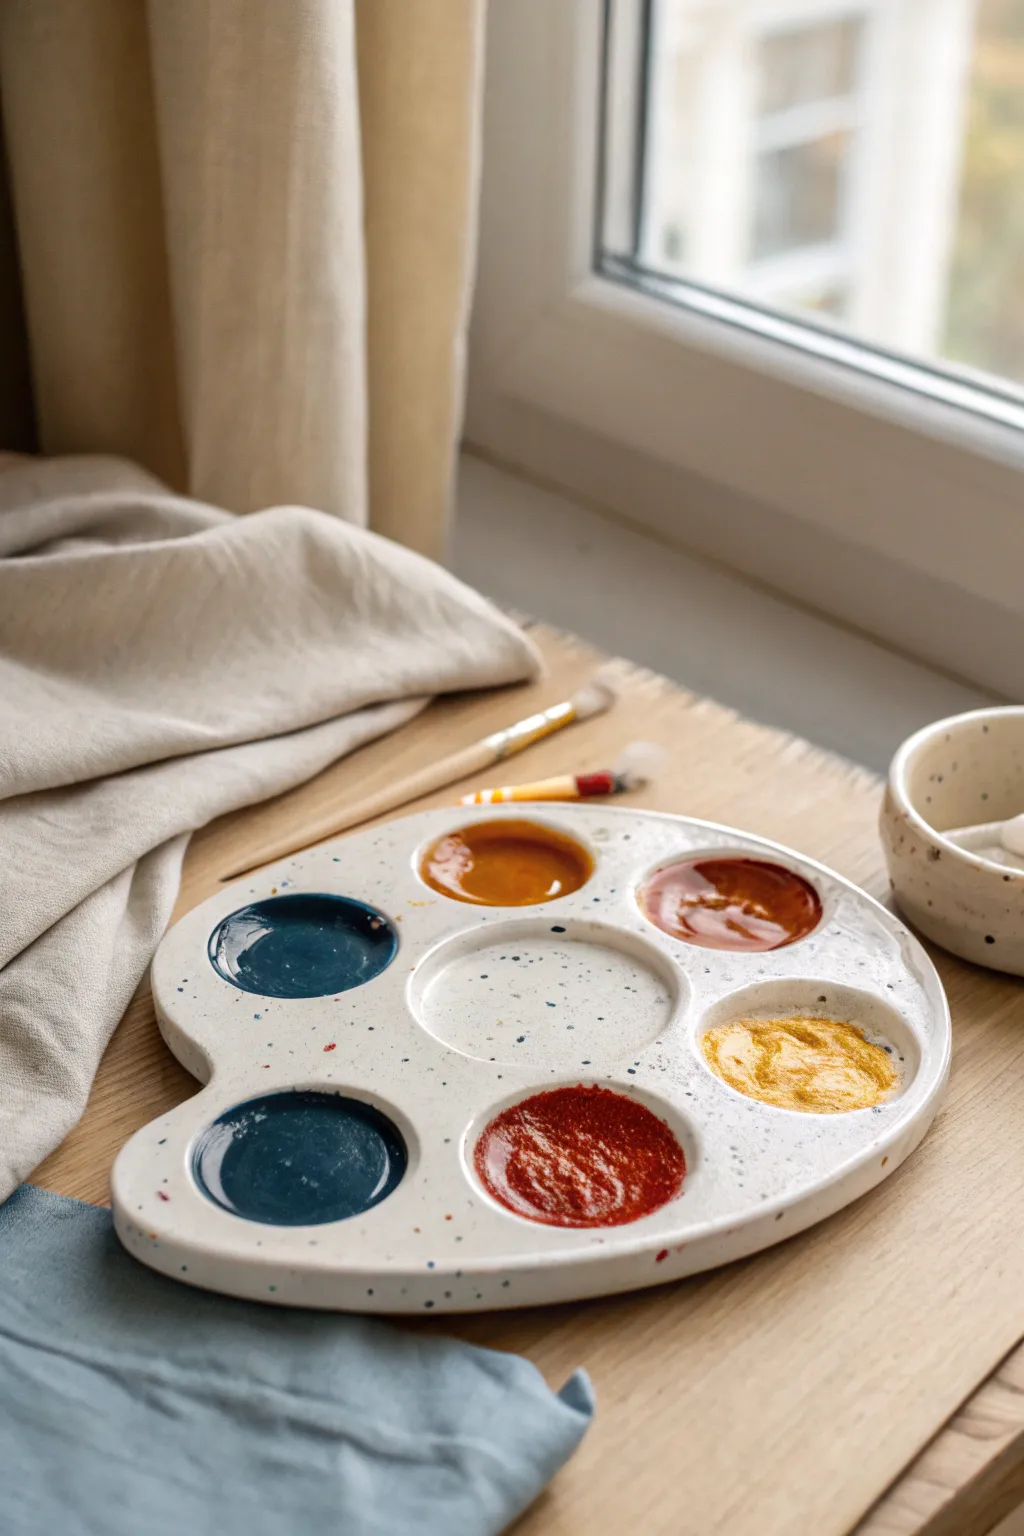
This charming ceramic project creates a functional art tool that is as beautiful as the paintings it will help produce. Using speckled clay and a simple slab-building technique, you’ll craft a bespoke six-well palette with a glossy, professional finish.
How-To Guide
Materials
- White speckled stoneware clay
- Rolling pin
- Two 1/4 inch wooden guide strips (slab sticks)
- Kidney shape template cut from paper
- Needle tool or fettling knife
- Smoothing rib (rubber or metal)
- Small round measuring spoon or melon baller (for shaping wells)
- Clean sponge and water bowl
- Clear transparent glaze
- Kiln (bisque and glaze firing capability)
Step 1: Preparing the Slab
-
Wedge the Clay:
Begin by thoroughly wedging a ball of speckled stoneware clay to remove any air bubbles and ensure an even consistency. -
Set Up Your Guides:
Place your wooden guide strips on either side of your clay ball on a canvas work surface. These will ensure your slab is a perfectly uniform thickness. -
Roll Out the Slab:
Using your rolling pin, roll the clay out until the pin rests on the guide strips. Roll in multiple directions to compress the clay platelets, which helps prevent warping later. -
Smooth the Surface:
Take your rubber or metal rib and gently compress the surface of the slab. I like to do this on both sides to create a really smooth canvas for the glaze later.
Warping Issues
If the palette curls up while drying, flip it over daily and place a small weight (like a sandbag) on the center area to help it dry flat.
Step 2: Shaping the Form
-
Cut the Shape:
Place your paper template onto the slab. Using a needle tool, trace and cut around the template to create the kidney-bean or oval shape of the palette. -
Soften the Edges:
Dip your finger or a sponge in a little water and run it along the cut edges to round them off. Sharp edges can become brittle after firing, so aim for a soft, rounded rim. -
Mark Well Placements:
Lightly mark the positions for your six paint wells and the central mixing area. Arranging six around the perimeter and one in the center is a classic, functional layout.
Pro Tip
Use a clear glaze specifically formulated to be zinc-free if your speckles are distinct; some glazes can cloud or blur the natural clay spots.
Step 3: Creating the Wells
-
Form the Indentations:
Use the back of a measuring spoon or a specialized rounding tool to press firmly into the clay at your marked spots. Press straight down, rotating slightly to create a clean, spherical depression. -
Refine the Walls:
The pressure will displace clay and might raise the edges around each well. Use your thumb to gently smooth this raised clay back down, blending it seamlessly into the flat surface. -
Check Depth:
Ensure your wells are deep enough to hold a good amount of liquid paint, but not so deep that they compromise the structural integrity of the base. -
Final Smoothing:
Give the entire piece one last wipe with a barely damp sponge to remove any fingerprints or tool marks. The surface should be pristine.
Step 4: Drying and Firing
-
Slow Drying:
Place the palette on a board and cover it loosely with plastic. Let it dry slowly over several days to preventing warping, eventually uncovering it until it is bone dry. -
Bisque Fire:
Load the bone-dry piece into the kiln for a bisque firing (typically Cone 04 or 06). This prepares the clay to accept glaze. -
Glazing:
Once cooled, wipe the bisqued palette with a damp sponge to remove dust. Apply 2-3 coats of clear transparent glaze. This will seal the clay while letting those beautiful speckles shine through. -
Wipe the Foot:
Flip the palette and meticulously wipe any glaze off the bottom surface that will touch the kiln shelf. Any leftover glaze will stick the piece to the shelf permanently. -
Glaze Fire:
Fire the piece again to the maturation temperature of your specific clay and glaze (often Cone 5 or 6 for stoneware). Allow the kiln to cool completely before opening.
Once cooled, fill your new palette with watercolor or gouache and admire how the white ceramic makes mixing true colors a breeze

TRACK YOUR CERAMIC JOURNEY
Capture glaze tests, firing details, and creative progress—all in one simple printable. Make your projects easier to repeat and improve.
Glaze Test Tile Set That Doubles as Wall Art
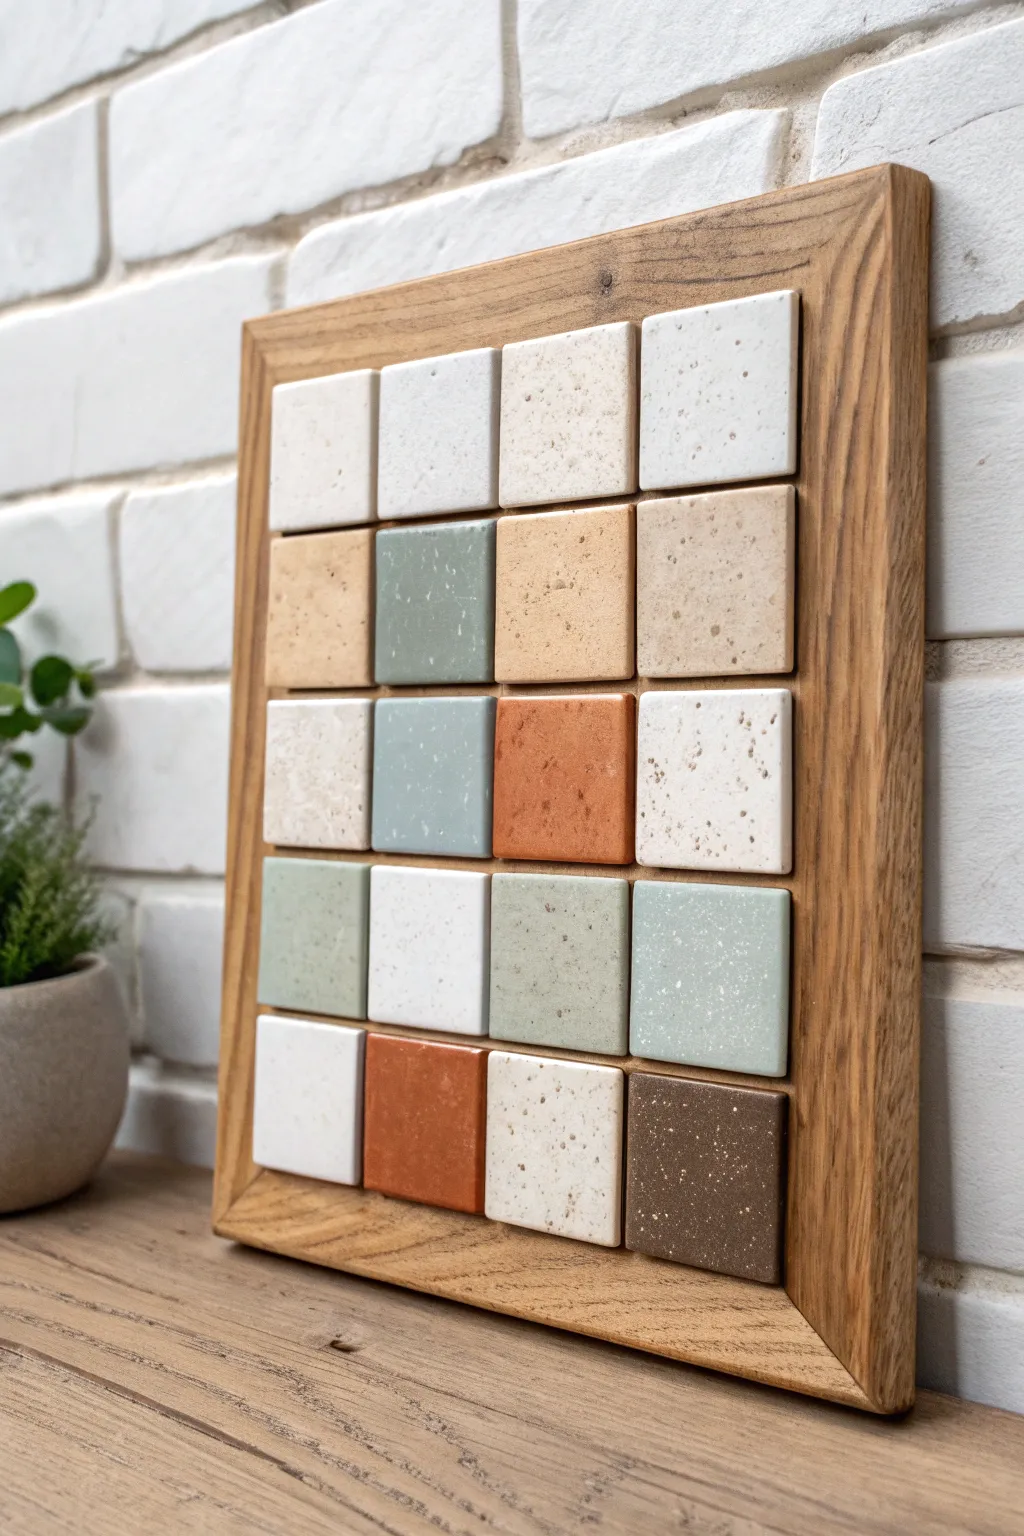
Turn the necessity of glaze testing into a beautiful, functional piece of classroom decor. This project displays a warm, earthy palette of ceramic test tiles mounted cleanly within a simple wooden frame, creating a reference chart that doubles as minimalist art.
Step-by-Step Tutorial
Materials
- Cone 5-6 Stoneware Clay (white or speckled)
- Square Clay Cutter (2-inch)
- Wooden Bat or Canvas Board
- Rolling Pin with Thickness Guides (1/4 inch)
- Fettling Knife
- Various Stoneware Glazes (matte white, terracotta, sage green, speckled oatmeal, brown)
- Kiln
- Solid Oak or Ash Wood Frame (open back or deep shadow box style)
- Mounting Board (MDF or Plywood cut to frame size)
- Strong Construction Adhesive (e.g., Liquid Nails or E6000)
- High-Grit Sandpaper
- Ruler
Step 1: Creating the Tiles
-
Prepare your clay slab:
Begin by wedging your stoneware clay thoroughly to remove air bubbles. Roll it out into an even slab using 1/4 inch thickness guides or slats to ensure perfectly uniform tiles. -
Cut the squares:
Use a 2-inch square clay cutter to punch out your tiles. You will need 20 tiles for a 4×5 grid like the one shown, but I always recommend cutting at least 25 to account for warping or cracking. -
Refine the edges:
Once the clay is leather-hard, use a slightly damp sponge or your finger to smooth the sharp edges of each square. Sharp edges can cause glaze to break or crawl later. -
Bisque fire:
Allow the tiles to dry completely to the bone-dry stage. Load them into the kiln and bisque fire them to Cone 04 (or your clay body’s specific requirement).
Reference Guide Tip
Before gluing, take a high-res photo of the backs of the tiles. Print this out and tape it to the back of the frame so you always have a key for which glaze is which.
Step 2: Glazing Process
-
Select your palette:
Choose a cohesive color palette. The example uses earthy tones: matte whites, speckled oatmeals, soft sage greens, terracotta oranges, and deep browns. -
Clean the bisque:
Wipe each bisque tile with a damp sponge to remove kiln dust. This helps the glaze adhere properly and prevents pinholing. -
Dip or brush glaze:
Apply your glazes. Dipping typically yields the smoothest surface, but brushing works well for smaller batches. Ensure you mark the back of each tile with an underglaze pencil code so you know which glaze is which after firing. -
Create variation:
Don’t glaze every tile the same way. Leave some tiles matte, use a gloss on others, or layer two glazes to see how they interact. The goal is to create a visual library. -
Clean the backs:
Meticulously wipe the bottom of every tile so they are free of glaze. Since these will be glued down, they need a flat, clean ceramic surface. -
Glaze fire:
Fire the tiles to maturity (likely Cone 5 or 6). Ensure they aren’t touching in the kiln.
Step 3: Assembly and Framing
-
Prepare the backing board:
Cut a piece of sturdy MDF or plywood to fit snugly inside your wooden frame. It should be rigid enough to support the weight of the ceramic tiles. -
Dry layout:
Before gluing, arrange your fired tiles on the backing board. Play with the composition, scattering the colors to balance the visual weight—mix the dark browns and bright oranges evenly among the neutrals. -
Measure the grid:
Use a ruler to lightly mark a grid on the board. You want a very tight spacing, perhaps only 1-2mm between tiles, to replicate the grouted look without actually using grout. -
Apply adhesive:
Apply a dollop of strong construction adhesive (like E6000 or Liquid Nails) to the back of the first tile. Do not use hot glue, as tiles can pop off over time. -
Place the tiles:
Press the tile firmly onto the board according to your grid marks. Continue placing them row by row. Using a straight edge can help keep your lines perfectly straight as you work. -
Allow to cure:
Let the adhesive cure flat for at least 24 hours. If the tiles are heavy, you can place a book on top to ensure good contact. -
Frame the piece:
Insert the tile-mounted board into the wooden frame. Secure it from the back using glazier points or small nails. -
Install hanging hardware:
Attach heavy-duty D-rings and wire to the back of the frame. Remember, ceramic is heavy, so standard sawtooth hangers may not be sufficient.
Level Up: Texture
Before the first firing, press textures into a few raw clay tiles using burlap, lace, or stamps. This shows students how glazes ‘break’ over textured surfaces.
Now you have a stunning piece of wall art that doubles as a permanent glaze library for your studio
Hand Sculpture Holding an Unexpected Object
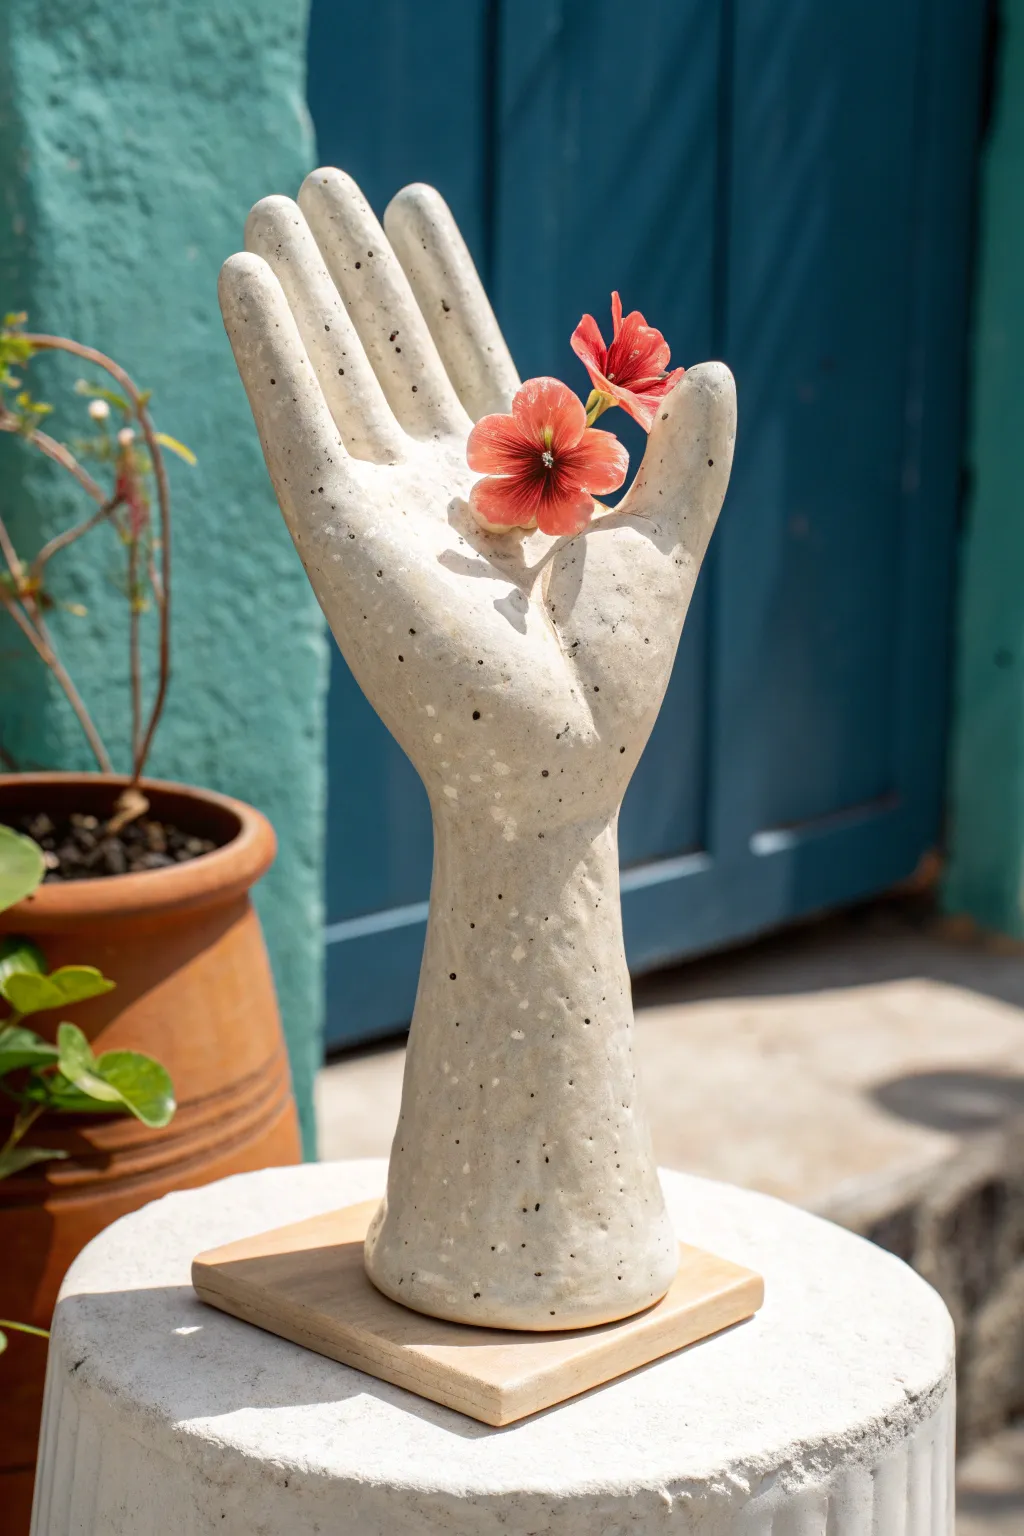
Sculpt a graceful ceramic hand held upright on a secure base, designed to cradle small treasures like fresh flowers or crystals. The finish features a creamy, speckled glaze that gives the piece an organic, stone-like quality perfect for garden or home decor.
Detailed Instructions
Materials
- Speckled cream clay (stoneware)
- Small wooden board (for base)
- Pottery knife or fettling knife
- Pin tool
- Rib tool (kidney)
- Slip and scoring tool
- Sponge
- Clear or translucent white matte glaze
- Kiln
- Small amount of newspaper
Step 1: Forming the Base Arm
-
Roll the coil:
Begin with a substantial amount of wedged speckled clay. Roll out a thick, tapered coil that is roughly the width of your own wrist at the top and flares out slightly wider at the bottom for stability. -
Hollow the form:
Unless you are building solid to hollow later (which is risky for beginners), use your thumb to create an opening at the bottom and pinch the walls upwards, creating a hollow cylinder that tapers like a forearm. -
Create the wrist transition:
Narrow the top of your cylinder slightly to mimic the anatomy of a wrist, ensuring the clay walls remain even—about 1/4 inch thick is ideal.
Step 2: Sculpting the Hand
-
Flatten the palm:
Add a slab of clay to the top of the wrist to form the palm. Smooth it thoroughly into the wrist coil so no seam is visible, creating a seamless transition. -
Block out the fingers:
Cut five basic rectangles from a slab of clay for the fingers and thumb. Make them slightly longer than you think you need, as clay shrinks during drying and firing. -
Attach the fingers:
Score and slip each finger onto the palm. I like to attach them while the palm is still quite soft so I can blend the clay deeply for a strong bond. -
Shape the pose:
Gently curve the fingers inward to create a cupped shape. The thumb should be extended slightly away from the palm, while the four fingers curve gently together. -
Refine anatomy:
Use your modeling tools to smooth the connections between fingers. Add small coils of clay to build up the ‘meaty’ parts of the palm and the knuckles. -
Add separation:
Ensure there is clear definition between each finger, using a pin tool to clean up the gaps so glaze doesn’t fuse them together later.
Use Your Own Hand
Use your own non-dominant hand as a constant visual reference while sculpting. Look at how your knuckles bend and where the thumb muscle connects to the wrist.
Step 3: Finishing and Firing
-
Support the shape:
Crumple a small amount of newspaper and tuck it gently inside the cupped palm. This supports the fingers and keeps them from drooping while the clay dries. -
Smooth the surface:
Once leather hard, use a slightly damp sponge to wipe the entire surface. This brings the ‘grog’ or speckles to the surface and removes any sharp tool marks. -
Dry slowly:
Cover the hand loosely with plastic to let it dry slowly over several days. Fast drying can cause thin fingers to crack away from the thicker palm. -
Bisque fire:
Fire the bone-dry piece in the kiln to cone 04 (or your clay’s specific bisque temperature). -
Glaze application:
Dip the bisqued hand into a clear or semi-opaque white matte glaze. If your clay isn’t naturally speckled, use a glaze that contains iron speckles. -
Final firing:
Glaze fire the piece to the maturity temperature of your clay (usually cone 5 or 6 for stoneware). Ensure the base is wiped clean of glaze before loading.
Make it Surreal
Instead of normal fingertips, sculpt the ends of the fingers morphing into tree branches, roots, or abstract shapes for a surrealist twist.
Step 4: Mounting
-
Prepare the mount:
Select a simple wooden square base. Sand it smooth and seal it with a clear varnish if desired. -
Adhere the sculpture:
Using a strong two-part epoxy, glue the fired ceramic base to the center of the wooden square for permanent display.
Now you have a serene, sculptural piece ready to hold a daily bloom or stand alone as art
Fantasy Mini House (Mushroom Hut or Tiny Cabin)
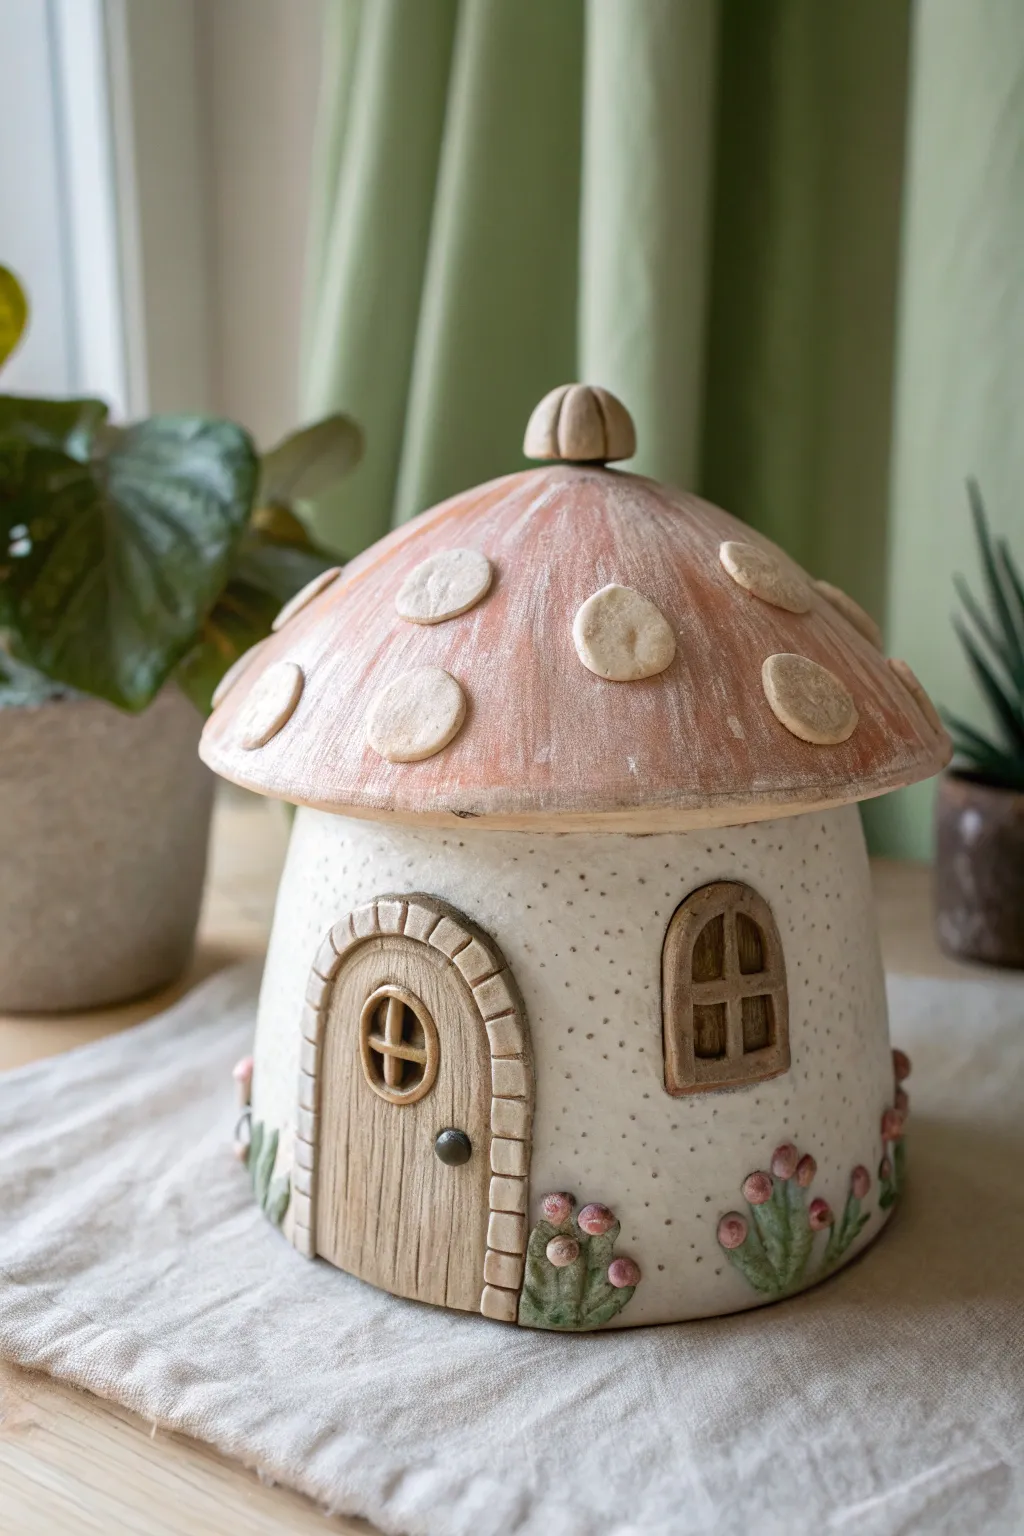
Bring a touch of fairy tale magic to your shelf with this delightful ceramic mushroom hut that doubles as a lidded jar. The project features slab-building techniques, detailed relief work, and a charming rustic finish achieved through careful glazing and washes.
Step-by-Step
Materials
- White or speckled stoneware clay
- Rolling pin and guide sticks (approx. 1/4 inch)
- Circle template or compass
- Fettling knife
- Scoring tool and slip
- Wooden modeling tools
- Needle tool
- Underglaze (Terracotta or Rust Orange)
- Clear matte glaze
- Small sponges and paintbrushes
Step 1: Building the Base Structure
-
Prepare the Floor:
Roll out a slab of clay to about 1/4 inch thick. Cut out a circle approximately 4-5 inches in diameter to serve as the floor of your house. -
Create the Walls:
Roll a rectangular slab firmly to create the walls. Measure the circumference of your base circle to ensure the rectangle is long enough to wrap around it completely with a little overlap. -
Join the Cylinder:
Score and slip the edges of the base circle and the bottom edge of your rectangular slab. Carefully wrap the slab around the base, joining the vertical seam first by scoring, slipping, and blending the clay together to make a smooth cylinder. -
Shape the Form:
Once the cylinder is attached to the base, gently push from the inside out to give the walls a slightly rounded, organic ‘belly’ shape, rather than perfectly straight sides.
Pro Tip: Lid Fit
Check the lid fit constantly while sculpting! Clay shrinks as it dries, so keep the lid on the base (with a paper strip between to prevent sticking) during the leather-hard drying phase.
Step 2: Sculpting the Mushroom Cap Lid
-
Mold the Cap:
Create a pinch pot or drape a slab over a rounded mold (like a small bowl covered in plastic) to form the mushroom cap. Ensure it is slightly wider than your house base to create an overhang. -
Add the Flange:
On the underside of the cap, add a coil of clay positioned to fit just inside the rim of the house base. This flange will keep the lid securely in place. -
Refine the Shape:
Smooth out the top surface of the cap. Roll a small ball of clay, score it, and attach it to the very center top to act as a knob or stem tip.
Level Up: Interior Surprise
Carve a small sleeping mouse or a tiny fireplace on the INSIDE floor of the jar so it’s only visible when the mushroom cap is removed.
Step 3: Adding Details and Texture
-
Doorway Construction:
Roll a small oval slab for the door. Score the house wall and attach the door. Use a needle tool to scratch vertical wood grain lines into it. -
The Stone Arch:
Form tiny rectangular blocks of clay and attach them one by one around the door to create a stone archway. Keep the edges slightly irregular for a rustic look. -
Window Work:
Cut a small arched window shape from a thin slab. Attach a tiny coil border and cross-pieces to form the window panes, then score and slip it onto the wall. -
Floral Touches:
At the base of the house, attach small flattened tear-drop shapes for leaves. Add tiny spheres of clay clustered together to mimic small berry bushes or flowers growing against the cottage wall. -
Roof Texture:
Roll out thin, flat circles of clay in varying sizes. Score the mushroom cap and press these ‘spots’ onto the roof, smoothing the edges down slightly so they look integrated. -
Final Surface Prep:
Use a needle tool to gently poke random tiny holes or indentations all over the white parts of the house walls to create a porous, stone-like texture.
Step 4: Glazing and Finishing
-
Initial Firing:
Let the piece dry slowly under plastic to prevent warping, especially the lid. Bisque fire the piece once it is bone dry. -
Roof Treatment:
Brush a terracotta or rust-orange underglaze over the entire mushroom cap. I like to wipe it back slightly with a damp sponge so the color stays strongest in the recesses and textures. -
Painting Details:
Carefully paint the door and window frames with a light brown underglaze. Use soft pinks and greens for the floral details at the base. -
Applying the Wash:
Apply a very watered-down dark wash (like iron oxide or black mason stain) over the textured white walls, then wipe it off almost immediately. This will settle into your needle-tool textures and highlight the speckles. -
Final Glaze:
Dip or brush the entire piece in a clear matte glaze to seal it without making it too shiny, preserving the natural, earthy aesthetic.
Now you have a charming little hideaway perfect for storing trinkets or just admiring on your desk
Pierced Luminary Lantern With Patterned Light
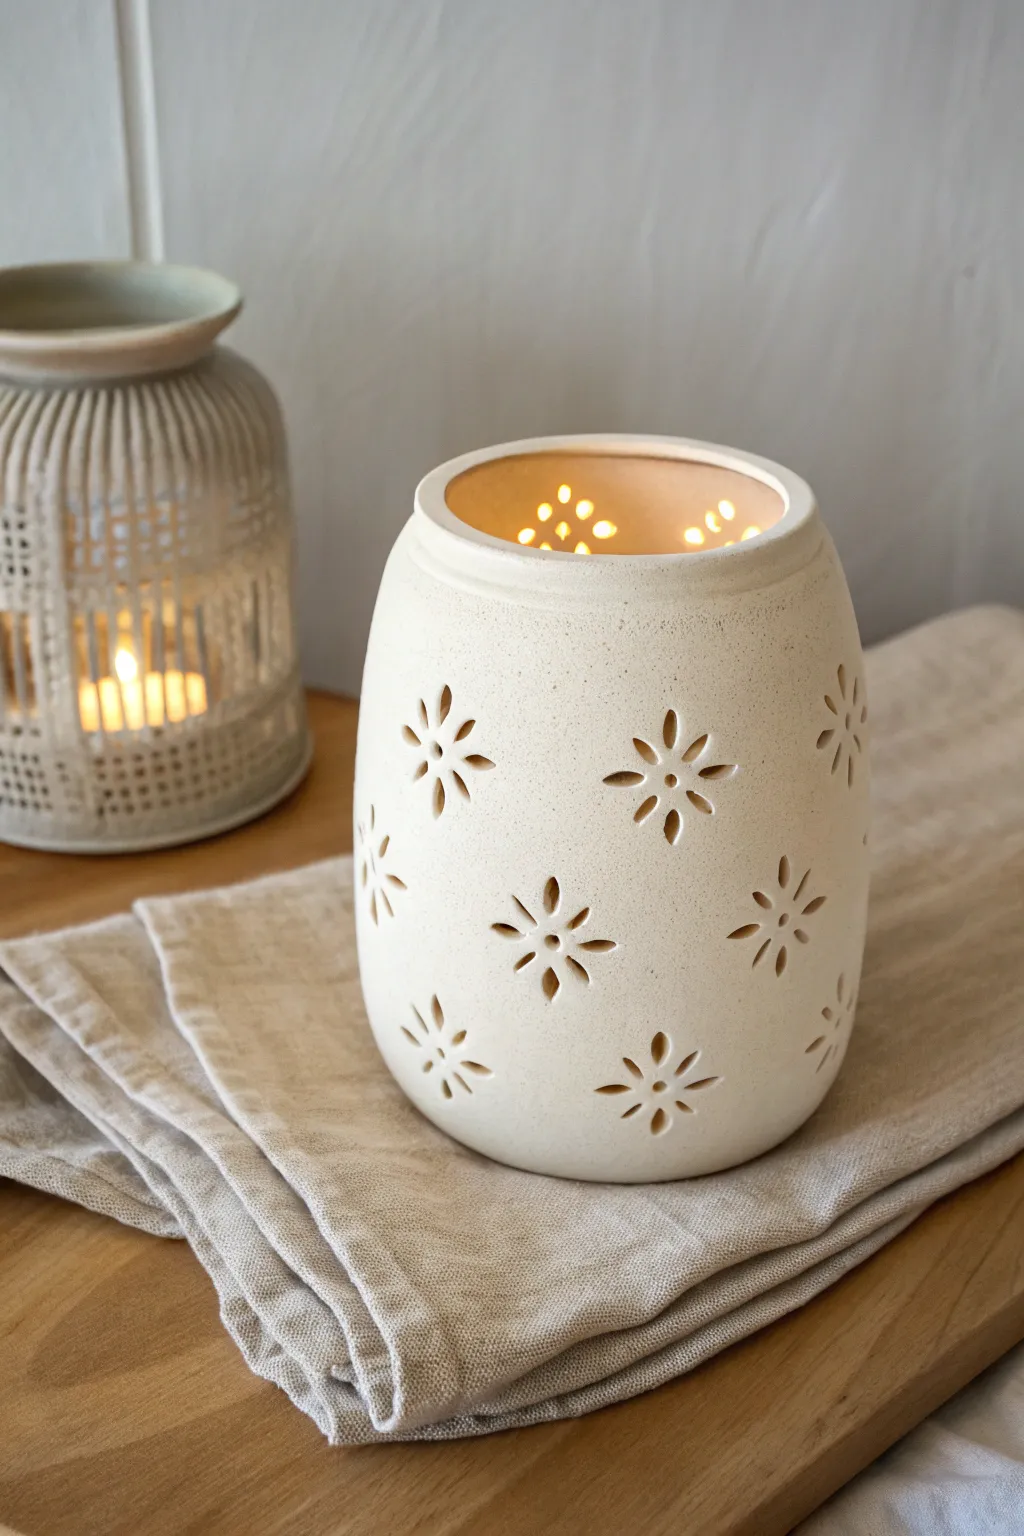
This elegant project transforms a simple clay cylinder into a glowing centerpiece using traditional piercing techniques. The creamy, matte finish and delicate flower petal cutouts allow warm candlelight to cast enchanting shadows around the room.
How-To Guide
Materials
- White or cream stoneware clay body
- Rolling pin or slab roller
- Canvas work surface
- Cylindrical form or PVC pipe (approx. 4-5 inches diameter)
- Fettling knife
- Needle tool
- Small teardrop shaped hole cutter or exacto knife
- Serrated rib and smooth rib
- Small sponge
- Slip or vinegar
- Transparent matte glaze (optional)
Step 1: Forming the Cylinder
-
Prepare the slab:
Begin by wedging your clay to remove air bubbles. Roll out a consistent slab that is roughly 1/4 inch thick. A uniform thickness is crucial here so the light shines through evenly later. -
Cut to size:
Measure and cut a rectangle from your slab. The length should equal the circumference of your desired cylinder plus a little overlap, and the height should be about 6-7 inches. -
Bevel the edges:
On the short ends of your rectangle, cut 45-degree bevels in opposite directions. This allows the seam to overlap smoothly without creating a thick lump. -
Shape the vessel:
Wrap the slab around your cylindrical mold or PVC pipe. Ensure the canvas or a layer of newspaper is between the clay and the mold to prevent sticking. -
Join the seam:
Score the beveled edges and apply a bit of slip or vinegar. Press the edges together firmly and smooth the seam inside and out with a rib tool until it disappears. -
Create the curve:
Once the cylinder can stand on its own, remove the mold. Gently collar (squeeze inward) the top rim and the base slightly to create that soft, barrel-like curve depicted in the image. -
Attach the base:
Roll a small separate slab for the floor. Place your cylinder on it, trace around the edge, cut it out, and score-and-slip to attach the bottom securely.
Cracked while cutting?
If the clay cracks while piercing, it’s too dry. Spritz it lightly with water, wrap it tightly in plastic, and let it rest for a few hours to rehydrate before trying again.
Step 2: Piercing the Pattern
-
Leather hard stage:
Let the piece dry slowly under loose plastic until it reaches a solid leather-hard state. It needs to be firm enough to cut without warping, but soft enough to slice cleanly. -
Map out the grid:
Lightly sketch a grid or placement dots on the surface with a needle tool to ensure your flower motifs are spaced evenly around the circumference. -
Mark the centers:
Mark the center point for each flower. I find spacing them in a staggered brick pattern creates the most pleasing rhythm. -
Cut the petals:
Using a small teardrop hole cutter or a sharp exacto knife, carefully remove the clay to form the six petals around each center dot. Aim for clean, sharp edges. -
Refine the centers:
Punch or cut a small circular hole in the very center of each flower cluster to complete the blossom look.
Clean Cuts Pro Tip
Wait until the piece is bone dry to sand away rough edges inside the cutouts. Sanding wet or leather-hard clay often just smears the design and accidentally fills the holes.
Step 3: Finishing and Firing
-
Smoothing the cuts:
Once the clay is bone dry, very gently use a dry brush or a slightly damp sponge to clean up any ‘crumbs’ or sharp burrs left from the cutting process. -
Bisque fire:
Fire the piece to cone 04 (or your clay’s specific bisque temperature). This hardens the ware for glazing. -
Glazing:
For the look in the photo, apply a thin coat of matte transparent glaze, or leave the exterior unglazed if your clay body is vitrified and smooth. The interior can be glazed to reflect more candlelight. -
Final wipe down:
Ensure the bottom is free of glaze and that no glaze has clogged your beautiful piercing holes. -
Final firing:
Fire onto cone 5 or 6 (mid-range stoneware) to finish the piece. Once cool, place a tea light inside to test the glow.
Now light a candle inside and enjoy the warm, patterned atmosphere you have created in your space