Whenever you’re craving a creative win, simple clay ideas are my favorite way to go from “blah” to “I made that” in one sitting. Think easy shapes, cute details, and little projects that actually fit into real life—on your desk, your keys, or your shelf.
Tiny Trinket Dish With a Sweet Rim
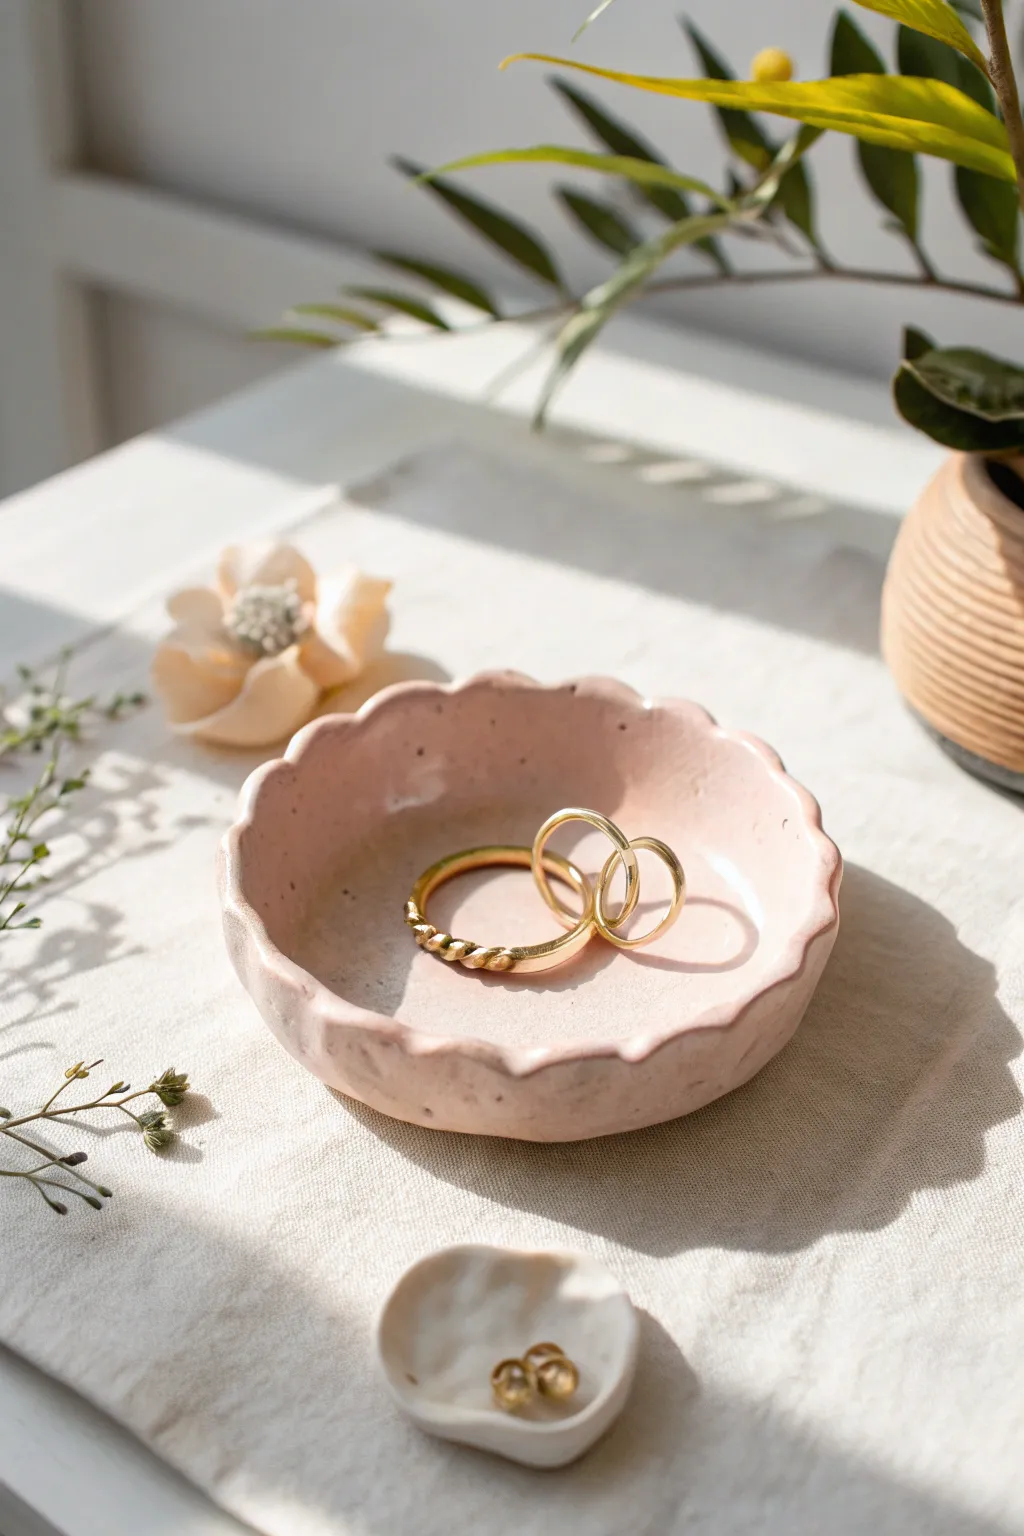
This charming little jewelry dish features a soft pink hue and a delicately pinched rim that mimics the organic shape of a flower. Its imperfect, handmade texture gives it a warm, rustic feel perfect for holding your favorite rings by the bedside.
Step-by-Step Tutorial
Materials
- Air-dry clay or polymer clay (white or light neutral)
- Acrylic paint (soft pastel pink)
- Small rolling pin
- Circle cutter (around 3-4 inches) or a bowl to trace
- Fine-grit sandpaper
- Glossy varnish or glaze
- Small paintbrush
- Sponge (optional for texturing)
- Parchment paper or canvas mat
Step 1: Shaping the Base
-
Prepare your clay:
Start with a ball of clay about the size of a clementine. Knead it in your hands until it becomes warm, soft, and pliable, which helps prevent cracks later on. -
Roll out the slab:
Place your clay on a piece of parchment paper or a canvas mat. Using your rolling pin, roll the clay out evenly until it is approximately 1/4 inch thick. Try to keep the thickness consistent across the entire surface. -
Cut the circle:
Press your circle cutter firmly into the clay to create a clean disc. If you don’t have a cutter, place a small bowl upside down on the clay and trace around it with a needle tool or knife, then peel away the excess clay. -
Soften the edges:
Dip your finger in a tiny bit of water and run it along the cut edge of the circle. This smooths out any sharpness or burrs left by the cutting tool.
Natural Pinching Tip
Instead of pinching sharply, try using the side of your knuckle to press the clay outward. This creates a softer, more rolling wave pattern rather than sharp peaks.
Step 2: Creating the Ruffled Rim
-
Lift the edges:
Gently cup the clay circle in the palm of your hand. Use your thumb to deeply press the center down slightly, encouraging the edges to curve upward to form a shallow bowl shape. -
Pinch the scallops:
Using your thumb and forefinger, gently pinch the rim at regular intervals. I like to support the outside with my index finger while pressing from the inside with my thumb to create a soft, outward curve. -
Refine the shape:
Go around the rim a second time to even out the spacing of your scallops. You aren’t looking for perfection here; the organic, uneven look is part of the charm. -
Smooth the interior:
Check the inside of the bowl for any fingernail marks or rough patches. Use a slightly damp sponge or your fingertip to buff these out gently without distorting the rim. -
Dry the piece:
Place your dish on a flat surface to dry. If using air-dry clay, let it sit for 24-48 hours until fully hard and white. For polymer clay, bake according to the manufacturer’s instructions.
Fixing Cracks
If you see tiny cracks forming while the clay dries (common with air-dry types), mix a tiny bit of fresh clay with water to make a paste and fill the cracks, then smooth over.
Step 3: Finishing Touches
-
Sand for smoothness:
Once fully cured or dry, take your fine-grit sandpaper and very gently sand the rim and the bottom of the dish to remove any sharp points or unevenness. -
Dust off:
Wipe the dish down with a slightly damp cloth or a dry brush to remove all the sanding dust before painting. -
Mix your color:
Squeeze out a small amount of white acrylic paint and add just a drop of red or pink to create a very pale, milky pink shade. -
Apply the first coat:
Paint the entire interior and exterior of the dish. Don’t worry if it looks streaky; thin layers are better than thick ones. -
Add texture (optional):
To mimic the speckled, stone-like look in the image, you can flick a toothbrush dipped in diluted brown paint over the dish, or simply leave the brushstrokes slightly visible for texture. -
Seal the dish:
After the paint is completely dry, apply a coat of glossy varnish or glaze. This not only protects the paint but gives it that finished ceramic look. -
Let it cure:
Allow the varnish to dry completely according to the bottle’s instructions before placing any jewelry inside.
Enjoy styling your new handmade dish on your vanity or dresser


Kawaii Fruit Charms With Simple Faces
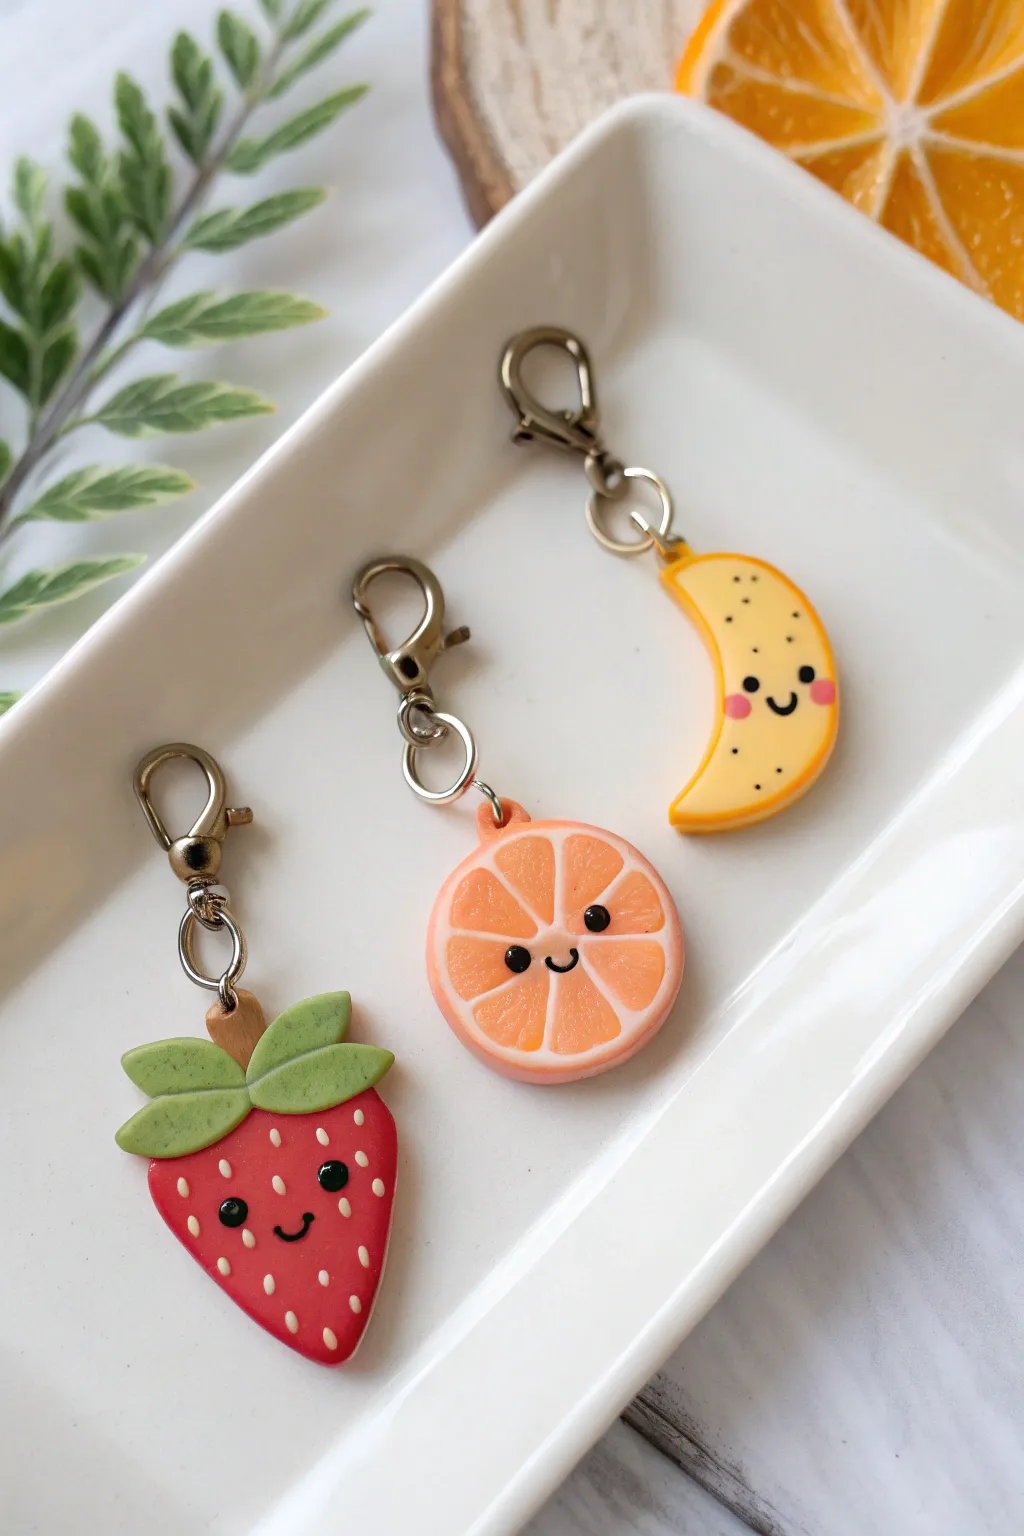
Brighten up your keyring or zipper pull with these adorable miniature fruit charms made from polymer clay. This trio features a sweet strawberry, a juicy orange slice, and a cheerful banana, all sporting signature kawaii smiles and rosy cheeks.
Step-by-Step Guide
Materials
- Polymer clay (Red, Green, Orange, White, Translucent White, Yellow, Brown/Tan)
- Lobster clasp keychain findings with jump rings
- Eye pins (silver or gold tone)
- Clay roller or pasta machine
- Small circle cutter (approx. 1 inch)
- X-Acto knife or clay blade
- Needle tool or dotting tool
- Black acrylic paint
- Pink acrylic paint or pink chalk pastel
- Fine detail paintbrush or toothpick
- Gloss glaze (UV resin or polyurethane varnish)
- Oven for baking
Step 1: Sculpting the Strawberry
-
Shape the base:
Condition a piece of red clay and roll it into a ball about the size of a large marble. Gently pinch one end and flatten the overall shape slightly to form a classic strawberry silhouette. -
Prepare the leaves:
Roll out a thin sheet of green clay. Use a small cutter or your knife to cut out three or four teardrop shapes. Use a needle tool to press a central vein down the middle of each leaf. -
Assemble the top:
Create a tiny brown stem and attach it to the top center of the red base. Arrange your green leaves around this stem, pressing them gently so they bond with the red clay. -
Insert hardware:
Trim an eye pin to size and insert it straight down through the stem into the body of the strawberry.
Step 2: Crafting the Orange Slice
-
Create the segments:
Roll a log of orange clay. Wrap this log in a thin sheet of white clay. Slice this cane into 8 small triangular wedges to form the segments. -
Assemble the slice:
Arrange the wedges in a circle. Wrap the entire circle in a thin layer of white clay, followed by a thicker layer of orange clay to form the rind. -
Refine the shape:
Gently compress and roll the cane to fuse the layers, then slice a thick disk off the end. You want a flat, round slice representing a cut orange. -
Texture the fruit:
Use a needle tool to gently poke texture into the orange segments to mimic pulp. Leave the center and the white rind smooth. -
Add the hardware:
Carefully insert an eye pin through the top rind area, ensuring it doesn’t distort the round shape.
Loose Eye Pins?
If your eye pins pull out after baking, pull them all the way out, add a tiny drop of super glue to the metal shaft, and slide them back into the existing hole.
Step 3: Creating the Banana Moon
-
Form the curve:
Condition yellow clay and roll it into a tapered log. Bend it into a crescent moon or banana shape, flattening the front and back surfaces so it looks uniform. -
Square the edges:
Use your fingers or a flat tool to tap the edges, giving them a slightly squared-off look rather than a perfect cylinder. This makes it look like a stylized fruit slice. -
Attach the pin:
Insert your eye pin into the top point of the curve.
Pro Tip: Cane Technique
For the orange, let the cane ‘rest’ for an hour before slicing. Cool clay is much firmer and slices cleanly without squishing the intricate segments design.
Step 4: Baking and Detailing
-
Bake the charms:
Place all three pieces on a tile or parchment-lined tray. Bake according to your clay manufacturer’s instructions (usually 275°F/135°C for 15-30 minutes). Let them cool completely. -
Paint the faces:
Using a very fine dotting tool or toothpick dipped in black paint, add two wide-set eyes and a small ‘U’ mouth to each fruit. Establish the personality by placing the features low on the shape for maximum cuteness. -
Add rosy cheeks:
Dip a fresh toothpick into pink paint (or use dry pastel dust) and dab small cheeks right next to the eyes. -
Detail the strawberry:
Use white paint on a needle tip to add tiny seed dots all over the red surface of the strawberry, avoiding the face area. -
Detail the banana:
Add tiny brown or black speckles randomly on the banana skin to give it a ripe, organic texture. -
Seal:
Once the paint is fully dry, coat the charms with a gloss glaze or UV resin to protect the paint and give them a shiny, ceramic-like finish. -
Final assembly:
Open the jump ring on your lobster clasps and attach one to the eye pin loop on each charm.
Clip these cheerful fruity friends onto your backpack or purse to keep sunny vibes with you all day


Easy Octopus Buddy From Balls and Coils
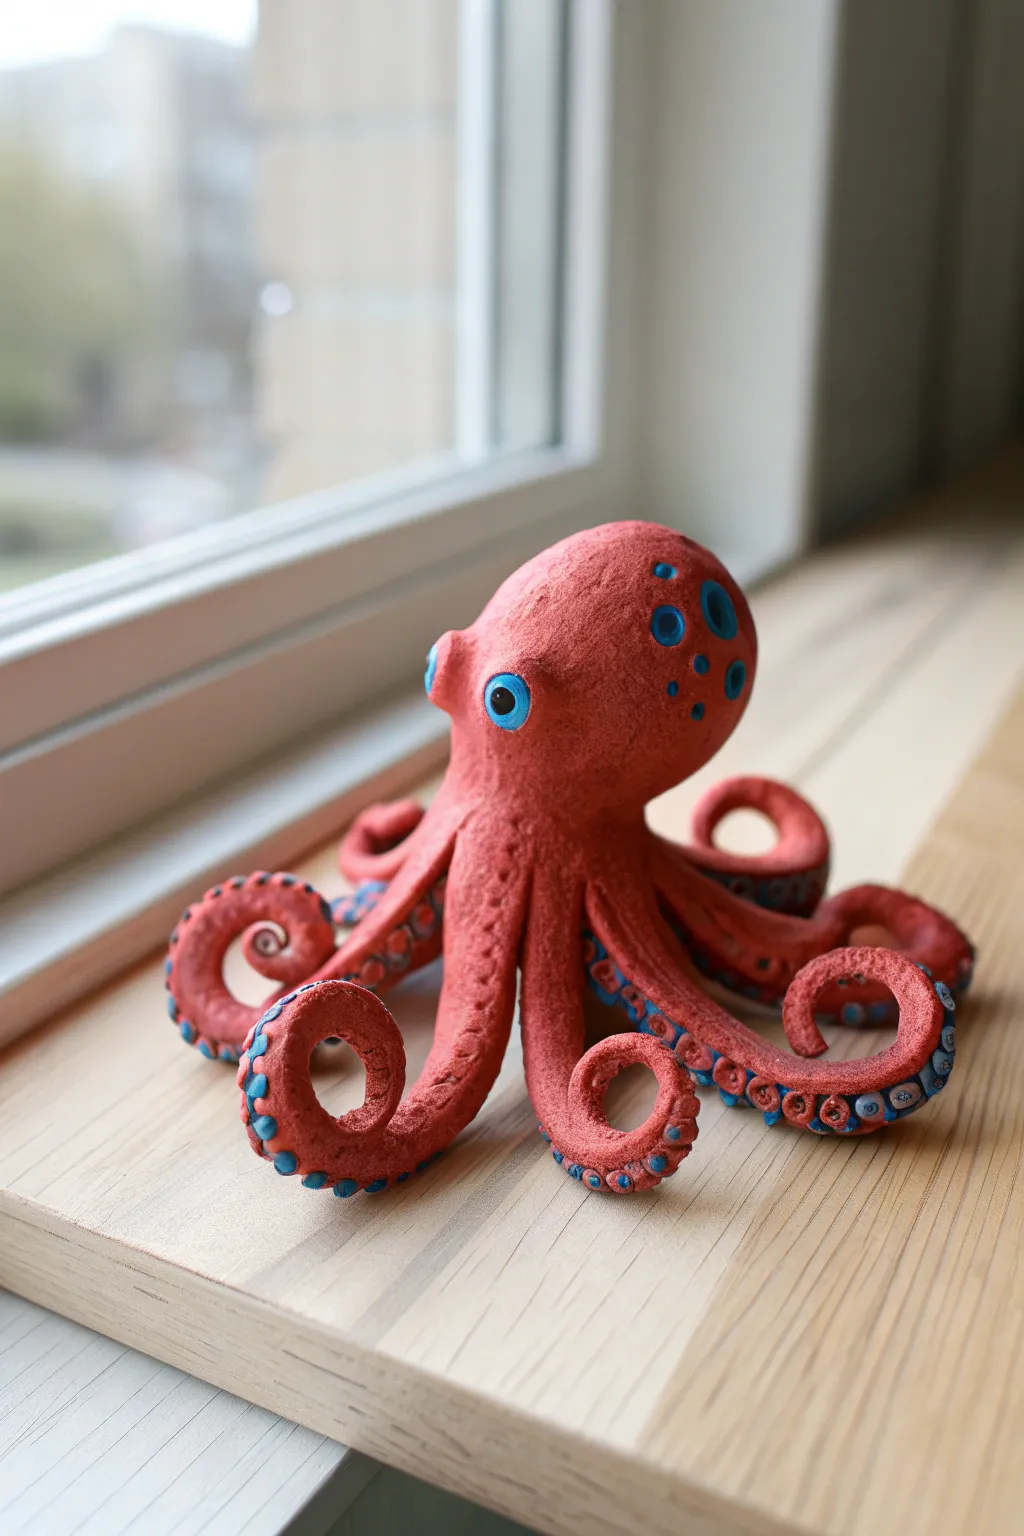
Sculpt a charming, eight-legged friend using basic shapes and simple textures. This rusty-red octopus features whimsical curled tentacles and bright blue accents that bring its personality to life.
Step-by-Step
Materials
- Reddish-brown air-dry clay or polymer clay (terracotta color)
- Blue acrylic paint or light blue clay (for details)
- Black acrylic paint or clay (for pupils)
- Clay sculpting tools (needle tool, ball stylus)
- Small paintbrush (if painting details)
- Water (for smoothing)
- Clear matte varnish (optional)
Step 1: Forming the Base
-
Create the head:
Start with a lime-sized ball of reddish-brown clay. Roll it firmly between your palms until it is smooth and free of cracks, then gently shape it into a slightly elongated egg shape for the octopus’s mantle. -
Prepare tentacle coils:
Roll out eight even snakes or coils of clay. They should be thicker at one end (where they attach to the body) and taper down to a gentle point at the tips. -
Attach the tentacles:
Turn the head upside down. Score the bottom slightly, then attach the thick ends of your eight coils in a rough circle underneath the head. Blend the clay upwards into the head so the seams disappear completely.
Step 2: Shaping and Character
-
Pose the legs:
Flip the octopus back over. Arrange the tentacles so they fan out radials. Gently curl the tips of each tentacle upward or inward to create a dynamic, flowing movement. -
Add eye sockets:
Using your thumbs or a large ball stylus, press two indentations into the front of the head where the eyes will go. Make these fairly prominent to give him a cute expression. -
Sculpt the eyes:
Roll two small balls of white or light blue clay (or use red clay and paint later). Press them into the sockets. Flatten slightly but leave them bulging out a bit. -
Create the siphon:
Add a tiny tube or small cone shape to the side of the head for the siphon (the breathing tube), blending it smoothly into the main body.
Texturing Tip
To get that ‘rough’ organic skin texture shown in the photo, gently tap the surface of the damp clay with a stiff toothbrush before baking or drying.
Step 3: Adding Texture and Details
-
Indent sucker details:
Along the underside and curled edges of each tentacle, use a small ball tool or the end of a paintbrush to press rows of small circular indentations. These represent the suckers. -
Detail the head:
On the side of the head, behind the eye, press a few random circular indentations of varying sizes to mimic natural skin texture or spots. -
Refine the surface:
Dip your finger in a little water (if using air-dry clay) or baby oil (if using polymer) and gently smooth out any fingerprints on the head and tops of the tentacles.
Drooping Tentacles?
If the legs won’t hold their curl while wet, prop them up with crumpled aluminum foil or plastic wrap supports until the clay stiffens enough to hold its shape.
Step 4: Drying and Painting
-
Let it cure:
Allow your sculpture to dry completely according to the package instructions. If using polymer clay, bake it now. -
Paint the suckers:
Using a bright sky-blue paint, carefully fill in the heavy indentations you made on the tentacles. You don’t need to be perfect; a little overspill adds to the organic look. -
Paint the spots:
Use the same blue to fill in the decorative indents on the side of the head. -
Define the eyes:
Paint the main eye circle blue. Once dry, add a black pupil in the center. I find adding a tiny white dot for a highlight really wakes up the character. -
Seal the piece:
Once all paint is dry, apply a coat of clear matte varnish to protect the finish and give the ‘skin’ a subtle, realistic sheen.
Place your finished cephalopod on a sunny windowsill where his bright eyes can watch the world go by


Simple Clay Ring Cone for Your Sink
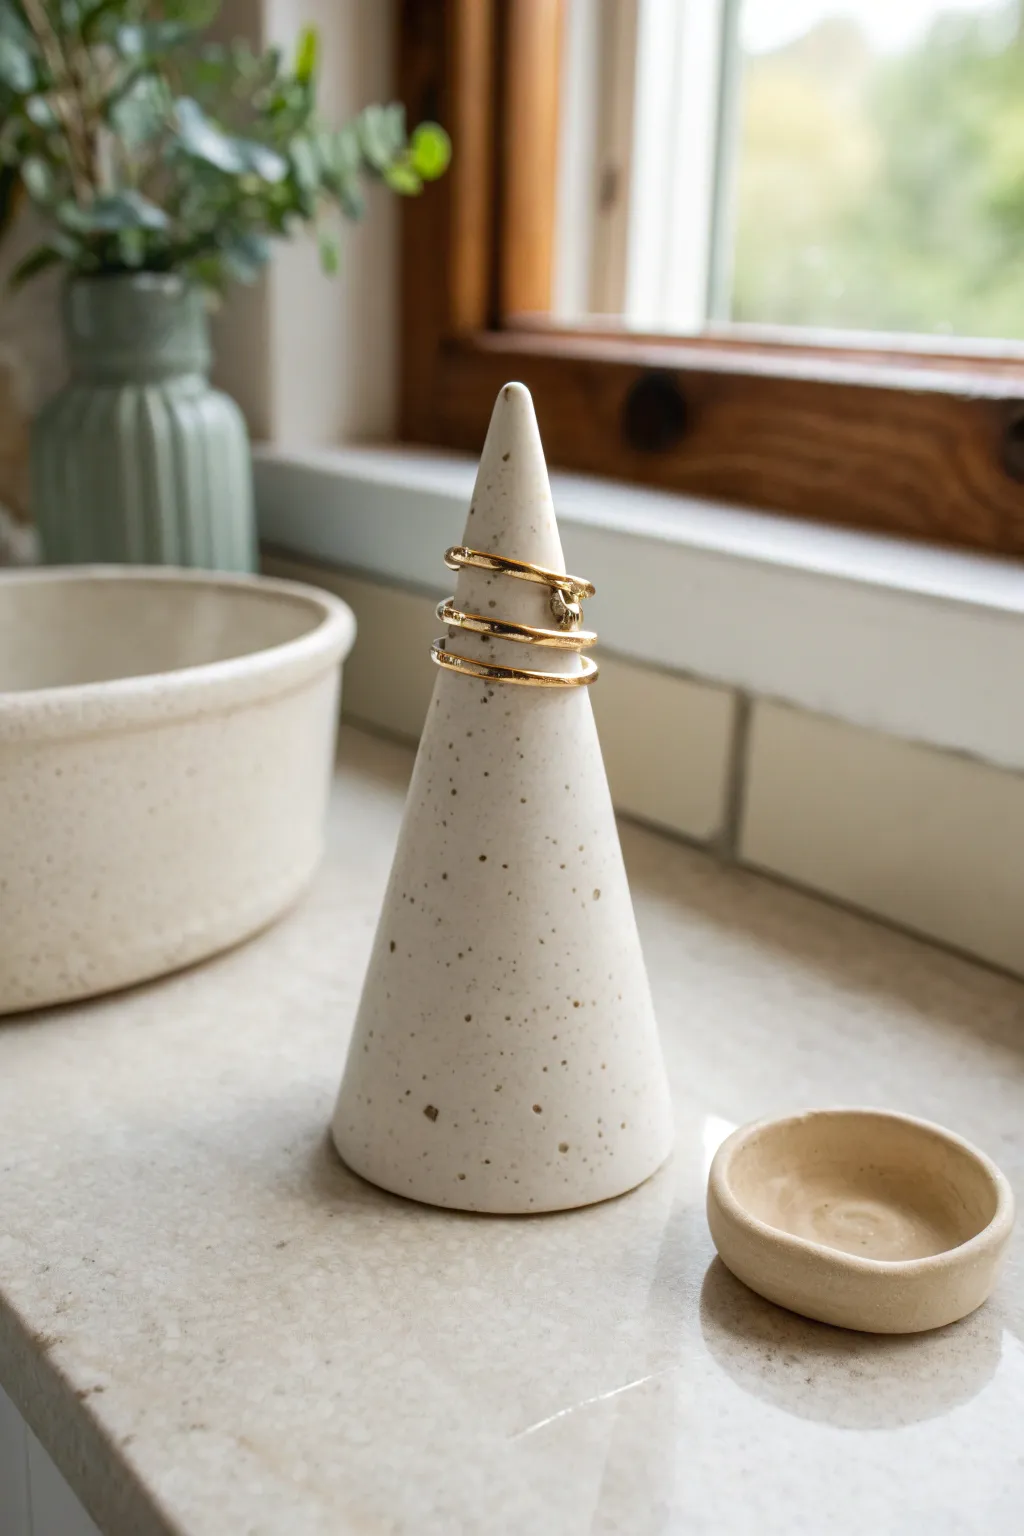
This elegant ring cone serves as both a practical organizer and a sculptural piece of decor. Crafted from speckled stoneware-style clay, its minimalist conical shape keeps your jewelry safe while you wash dishes or get ready for bed.
Step-by-Step Guide
Materials
- Speckled stoneware clay (or white air-dry clay)
- Black pepper or dried coffee grounds (for faux speckles if using plain clay)
- Rolling pin
- Fettling knife or X-Acto blade
- Paper cone template (DIY)
- Water and sponge
- Serrated rib tool or fork
- Clear matte varnish or glaze
Step 1: Prepping the Clay
-
Create speckles:
If you are using standard white air-dry or polymer clay and want that organic stoneware look, begin by kneading in a small pinch of cracked black pepper or dried coffee grounds until evenly distributed. -
Roll it out:
Take a chunk of your clay and roll it into a flat slab, aiming for an even thickness of about 1/4 inch. A consistent thickness ensures the cone stands up straight later. -
Make a template:
Cut a simple quarter-circle shape out of cardstock or stiff paper. The radius of the circle determines the height of your cone, so aim for about 4-5 inches depending on how tall you want the final piece.
Step 2: Forming the Cone
-
Trace and cut:
Place your paper template onto the rolled clay slab. Using your fettling knife or blade, carefully cut around the edges to create a clay fan shape. -
Join the edges:
Score the two straight edges of your clay piece using a serrated tool or a fork. Apply a small amount of water (slip) to these roughed-up areas to act as glue. -
Shape the cone:
Gently lift the clay and curve it around your finger or a tool handle to bring the scored edges together. The clay should naturally form a cone shape. -
Seal the seam:
Press the seam together firmly but gently. I like to use a wooden modeling tool to drag a little clay across the seam line, blending the two sides until the join is invisible. -
Smooth the interior:
Don’t forget the inside; use a dowel or a long paintbrush handle to gently press against the inner seam to ensure it is secure.
Seam Smoothing Secret
Use a barely damp paintbrush to smooth the exterior seam. The bristles can blend the clay more softly than a finger without leaving prints.
Step 3: Refining and Drying
-
Level the base:
Stand your cone upright on a flat surface. If it wobbles, gently tap the base against the table to flatten it, or slice off any uneven bits with your knife so it sits perfectly flush. -
Define the point:
Use your fingers to lightly shape the very top tip. It shouldn’t be dangerously sharp, but distinctively rounded and neat. -
Initial smoothing:
Dip a sponge in a little water and wipe down the exterior. This removes fingerprints and brings the ‘speckles’ (or grit) to the surface for texture. -
Let it dry:
Allow the cone to dry extensively. If using air-dry clay, wait 24-48 hours; if using oven-bake, follow the package instructions. -
Sand for perfection:
Once fully cured, use fine-grit sandpaper to buff away any remaining imperfections or bumps along the seam line.
Level-Up: Gold Accents
For a luxe touch, paint just the very tip of the cone with liquid gold leaf after sealing to match your gold jewelry.
Step 4: Finishing Touches
-
Clean up dust:
Wipe the piece with a slightly damp cloth to remove any sanding dust before sealing. -
Apply finish:
Brush on a coat of clear matte varnish or glaze. This is crucial if the cone will live near a sink, as it protects the clay from water splashes. -
Final cure:
Let the varnish dry completely according to manufacturer instructions before placing your favorite rings on top.
Now you have a chic, handmade spot to keep your rings safe while you work

The Complete Guide to Pottery Troubleshooting
Uncover the most common ceramic mistakes—from cracking clay to failed glazes—and learn how to fix them fast.
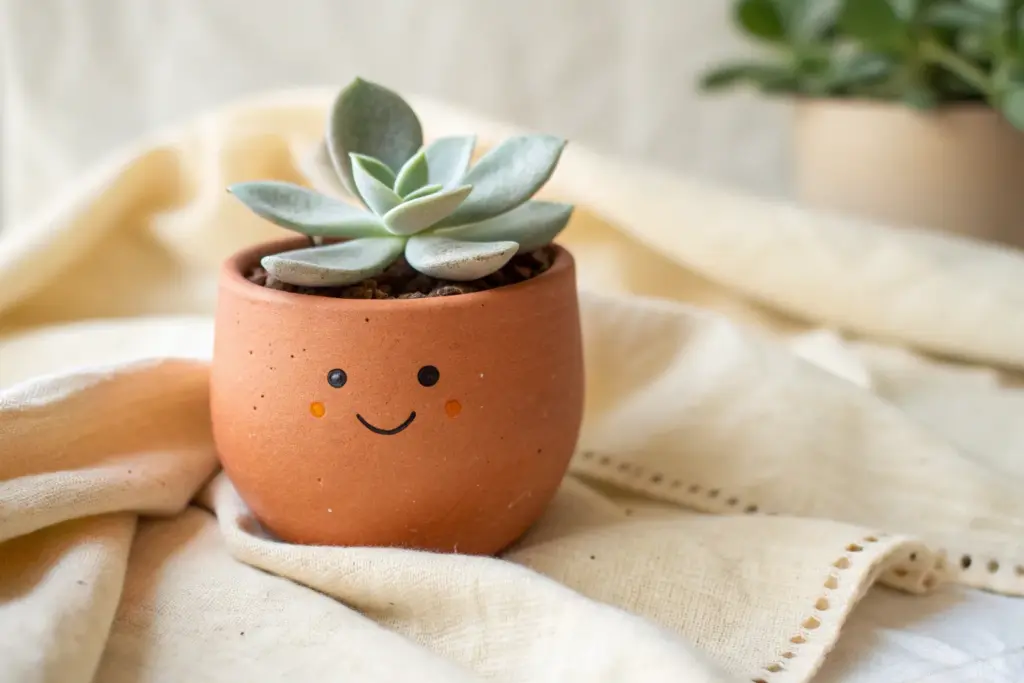
Cute Cactus Pinch Pot Planter (No Fuss)
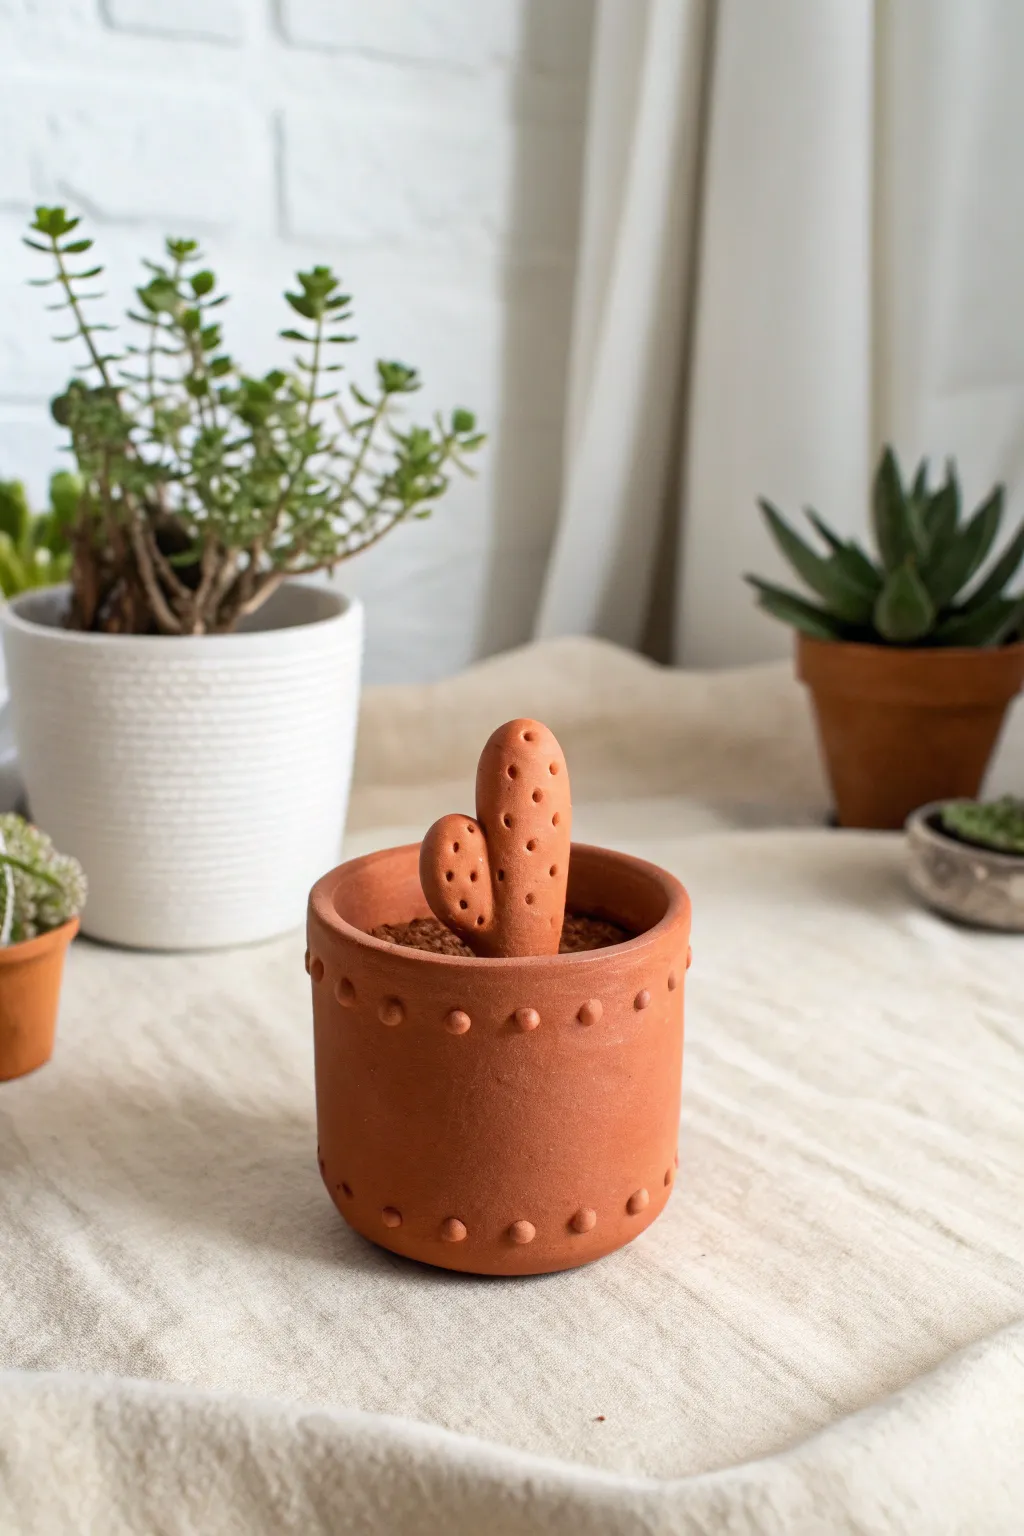
Bring the desert indoors with this adorable, zero-maintenance clay planter featuring its own permanent prickly pear occupant. Made from an earthy terracotta-colored clay, this pinch pot design uses simple raised dots and textured details to create a modern, minimalist piece that adds warmth to any shelf.
Step-by-Step
Materials
- Terracotta-colored air-dry clay (or polymer clay)
- Small rolling pin
- Needle tool or toothpick
- Small circular cutter (or a makeshift cap)
- Clay slip (or water for joining)
- Small sponge
- Fine-grit sandpaper
Step 1: Shaping the Base Vessel
-
Prepare the clay:
Start by conditioning a large ball of terracotta clay in your hands until it’s soft, pliable, and free of cracks. -
Create the base:
Flatten a portion of clay into a thick circle, about 1/4 inch thick, to serve as the bottom of your pot. Use a circular cutter to ensure the edges are crisp and even. -
Build the walls:
Roll a long, rectangular slab of clay for the walls. Cut it to your desired height (about 3 inches) and long enough to wrap around the circumference of your base. -
Assemble the cylinder:
Wrap the rectangular slab around the base circle. Score and slip (scratch and wet) the edges where the wall meets the base and where the vertical seam joins. -
Smooth the seams:
Use your finger or a modelling tool to blend the seams on both the inside and outside until they are invisible, ensuring a solid cylindrical shape. -
Refine the rim:
Gently smooth the top rim with a wet finger or sponge to round off any sharp edges created during cutting.
Cracked Seams?
If cracks appear while drying, mix a tiny bit of clay with water to make a paste (slip) and fill the crack. Smooth it over and let it dry again.
Step 2: Adding Decorative Details
-
Make the dots:
Roll out a thin rope of clay and slice it into tiny, equal-sized pieces. Roll each piece into a small sphere between your fingers. -
Attach the top row:
Score small spots around the upper exterior rim of the pot. Attach a sphere to each spot, spacing them evenly, and press gently to adhere without flattening them completely. -
Attach the bottom row:
Repeat this process along the very bottom edge of the pot, creating a mirror image of the dotted pattern on the top.
Step 3: Sculpting the Cactus
-
Shape the main stem:
Take a medium-sized lump of clay and roll it into a thick sausage shape with a rounded top, leaning slightly to one side for a natural look. -
Add a branch:
Form a smaller, similar shape and attach it to the side of the main stem using the score and slip method. Blend the clay at the join so it looks like one organic piece. -
Texture the cactus:
Using a needle tool or toothpick, gently press shallow holes all over the cactus surface to mimic the spots where spines would grow. -
Prepare the ‘soil’:
Create a flat disk of clay that fits snugly just inside the pot, sitting slightly below the rim. Texture the top surface roughly with a toothbrush or crumpled foil to look like dirt. -
Plant the cactus:
Score the bottom of your cactus sculpture and the center of the textured ‘soil’ disk. Press them together firmly. -
Final assembly:
If you want the lid removable, let it dry separately. If permanent, slip the soil disk (with cactus attached) into the pot now and seal the edges against the inner pot wall.
Go Green
Instead of terracotta clay for the cactus, use green polymer clay for the plant and dark brown for the soil to create a colorful, realistic contrast.
Step 4: Finishing Touches
-
Dry slowly:
Place your creation in a cool, dry place away from direct sunlight. Slow drying prevents cracking, especially where the dots connect. -
Sand and smooth:
Once fully cured, use fine-grit sandpaper to gently buff away any fingerprints or rough textures on the smooth parts of the pot, avoiding the dots and the textured cactus.
Enjoy the calm desert vibes your new handmade sculpture brings to your space
Happy Face Magnets in Bold Colors
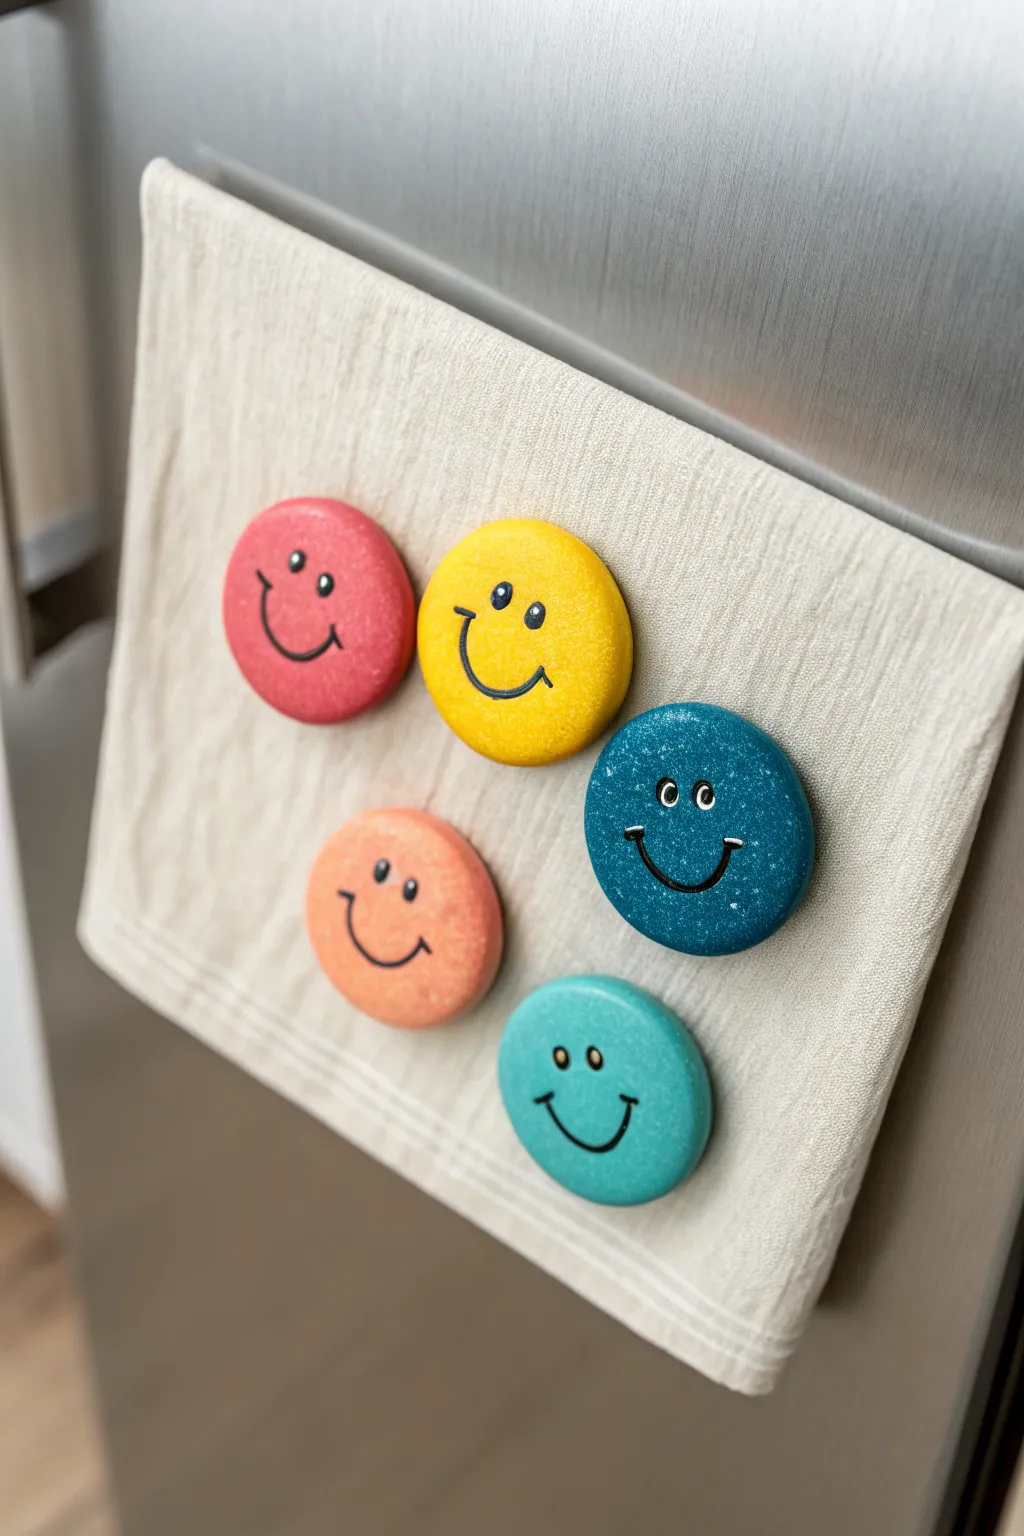
Brighten up your kitchen with these impossibly cheerful, chunky smiley face magnets. With their bold, matte colors and simple black line work, they add a pop of personality to any refrigerator door while keeping your notes secure.
Step-by-Step Tutorial
Materials
- Polymer clay (pink, yellow, peach, teal, light blue)
- Round cookie cutter (approx. 2 inches)
- Rolling pin or acrylic roller
- Parchment paper
- Black acrylic paint
- Fine detail paintbrush (size 00 or 0)
- White acrylic paint or paint pen (for eye highlights)
- Dotting tool or toothpick
- Strong round ceramic or neodymium magnets
- Super glue or E6000 adhesive
- Matte spray varnish (optional)
Step 1: Shaping the Base
-
Condition the clay:
Start by taking a chunk of your first color of polymer clay. Knead it thoroughly in your hands until it becomes soft, warm, and pliable. This conditioning step is crucial to prevent cracks later on. -
Roll it out:
Place the conditioned clay onto a sheet of parchment paper. Use your rolling pin to flatten it into an even slab. You want these magnets to be chunky, so aim for a thickness of about 1/4 inch (6mm). -
Cut the circle:
Press your round cookie cutter firmly into the clay slab. Give it a little wiggle to ensure a clean cut, then lift the cutter. Peel away the excess clay from the outside. -
Smooth the edges:
Gently pick up your clay circle. Run your finger lightly around the cut edge to smooth down any sharp ridges or burrs left by the cutter, giving it a nice rounded finish. -
Repeat for all colors:
Repeat the conditioning, rolling, cutting, and smoothing process for the yellow, peach, teal, and light blue clays until you have five smooth discs.
Step 2: Baking and Prepping
-
Bake the discs:
Arrange your clay circles on a parchment-lined baking sheet. Bake them according to the manufacturer’s instructions on your specific package of clay—usually around 275°F (135°C) for 15-30 minutes. -
Cool down completely:
Once baked, remove the tray from the oven and let the clay discs cool completely. Don’t rush this; painting on warm clay can make the paint dry too fast and clump up. -
Surface check:
Inspect your cooled discs. If there are any fingerprints or imperfections, you can lightly sand them with fine-grit sandpaper, wiping away the dust with a damp cloth afterward.
Uneven Eyes?
Don’t panic! If painting ovals is hard, use the eraser end of a pencil as a stamp. Dip it in black paint and stamp perfect circles, then add the white dot once dry.
Step 3: Painting the Features
-
Draft the face (optional):
If you’re nervous about freehanding, use a pencil to very lightly sketch the placement of the eyes and the curve of the smile directly onto the baked clay. -
Paint the smile:
Dip your fine detail brush into black acrylic paint. With a steady hand, paint a simple, wide ‘U’ shape for the smile. I like to stabilize my hand by planting my pinky finger on the table while I paint. -
Add the smile lines:
At each end of the ‘U’ shape, add a tiny, short vertical stroke perpendicular to the smile line to create those cute cheek dimples. -
Paint the eyes:
Paint two small vertical ovals for the eyes above the smile. Keep them somewhat close to the smile line to maintain that friendly proportions look. -
Add the highlights:
Once the black paint is completely dry, dip a dotting tool or the tip of a toothpick into white paint. Place a tiny white dot in the upper corner of each black eye oval to bring the face to life. -
Seal the surface:
For durability, take your matte spray varnish and give all the faces a light, even coat. This protects the paint from scratching off over time.
Textured Look
Before baking, gently press a piece of sandpaper or a toothbrush onto the raw clay surface to give it a stone-like texture, mimicking the finish in the photo.
Step 4: Assembly
-
Apply adhesive:
Flip the clay discs over so the back is facing up. Place a pea-sized dot of super glue or E6000 in the center of each disc. -
Attach magnets:
Press a magnet firmly into the glue. If you are using strong neodymium magnets, make sure the discs are far apart from each other while drying so they don’t snap together. -
Final cure:
Allow the glue to cure fully—usually 24 hours for E6000—before sticking them onto your fridge to hold up your favorite photos.
Now you have a cheerful set of magnets ready to greet you every time you open the fridge


What Really Happens Inside the Kiln
Learn how time and temperature work together inside the kiln to transform clay into durable ceramic.
Beginner Bead-Rim Coasters
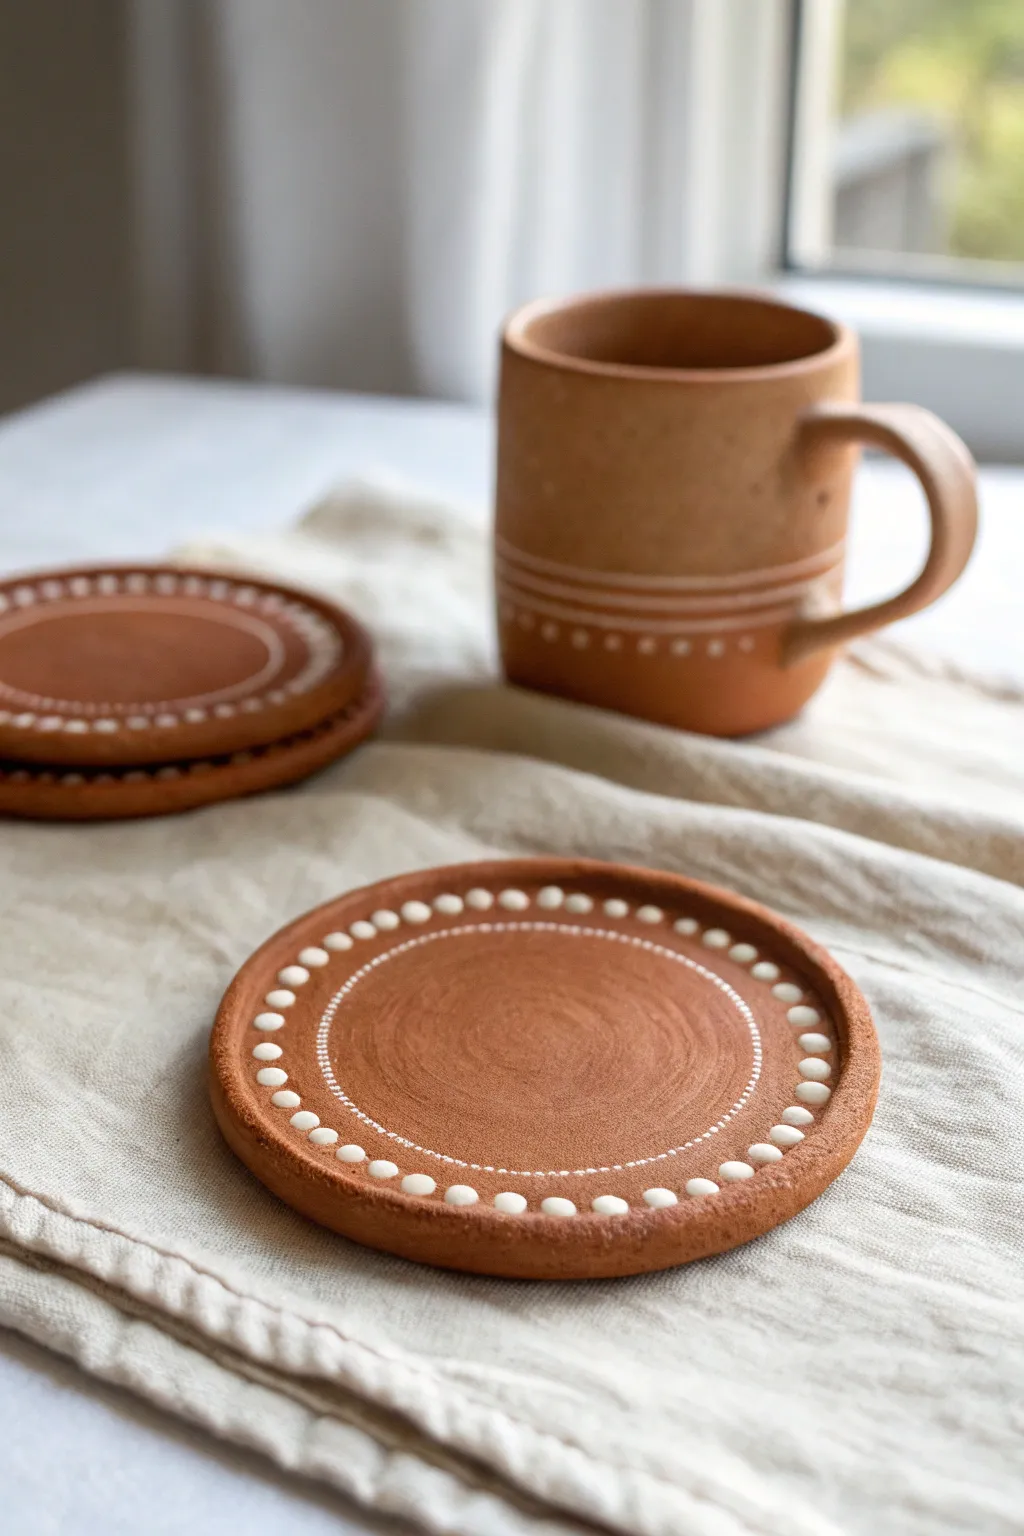
These charming coasters combine the rustic warmth of natural terra cotta with delicate, crisp white details for a modern bohemian look. The design features a gentle rim accented with hand-painted dots and a subtle inner circle that perfectly frames your favorite mug.
Step-by-Step
Materials
- Air-dry clay (terra cotta color) or polymer clay in terra cotta
- Rolling pin
- Round cookie cutter (approx. 4 inches) or a bowl to trace
- Craft knife
- Small bowl with water
- Sponge or smoothing tool
- Fine-grit sandpaper
- White acrylic paint
- Small round paintbrush (size 0 or 1)
- Dotting tool or the back end of a small paintbrush
- Matte varnish or sealant (optional but recommended)
Step 1: Shaping the Base
-
Condition the clay:
Start by kneading your terra cotta clay until it is soft, pliable, and free of cracks. If you are using air-dry clay, keep your hands slightly damp to prevent it from drying out while you work. -
Roll it out:
Place the clay on a smooth surface or canvas mat. Use a rolling pin to flatten the clay to an even thickness of about 1/4 inch. Try to keep the thickness consistent so the coaster sits flat. -
Cut the circles:
Press your round cookie cutter firmly into the clay. If you don’t have a cutter large enough, place a bowl upside down on the clay and trace around it with a craft knife to get a clean circle. -
Smooth the edges:
Dip your finger or a small sponge into water and gently run it around the cut edge of the circle. This removes any sharpness or loose bits of clay left by the cutter.
Step 2: Creating the Rim
-
Mark the rim:
Lightly press a slightly smaller circle cutter or bowl into the center of your clay disk—don’t cut through, just make an indentation to guide where your rim will start. -
Pinch the edge:
Using your thumb and forefinger, gently pinch the outer edge of the clay circle upwards to create a slight lip. Work your way around the circumference slowly. -
Shape the depression:
While pinching up the rim, use your other thumb to gently press down the center area. This creates a subtle depression that will catch any condensation from your drink. -
Refine the surface:
Go back over the surface with a barely damp sponge. I find this is the best time to erase any fingerprints left during the pinching process before the clay starts to set. -
Dry completely:
Allow the coasters to dry according to your clay package instructions. For air-dry clay, turning them over halfway through the drying process helps prevent warping. -
Sand for smoothness:
Once fully dry and hard, take a piece of fine-grit sandpaper and lightly buff the edges and surface to ensure a professional, smooth finish.
Uneven Dots?
If your dots look messy or uneven, let the paint dry completely, then gently scrape the mistake off with a craft knife or sandpaper before trying again.
Step 3: Painting the Details
-
Prepare your paint:
Squeeze a small amount of white acrylic paint onto a palette. You want the consistency to be creamy but not too watery, so the dots stay raised and opaque. -
Paint the inner line:
Using a fine detail brush, paint a dashed line around the inner circle where the flat base meets the raised rim. These should be tiny, thin dashes resembling stitching. -
Start the dot border:
Dip a dotting tool or the handle end of a paintbrush into the white paint. Practice on a scrap piece of paper first to gauge the size of the dots. -
Apply rim dots:
Press the dotting tool gently onto the raised rim. Space the dots evenly around the entire circumference. Reload your tool with paint every 2-3 dots to keep them consistent in size. -
Let paint cure:
Allow the white paint to dry completely. Acrylics usually dry to the touch quickly, but give it an hour to be safe so you don’t smudge your hard work. -
Seal the coaster:
Apply a coat of matte varnish or sealant over the entire top surface. This protects the clay from moisture and prevents the paint from chipping over time.
Make it a Set
Create a matching mug by using ceramic-safe paint on a store-bought terra cotta mug to mimic the dashed lines and dots pattern.
Enjoy your beautiful new handmade coasters with a warm cup of coffee or tea
Little Leaf Dish With Pressed Veins
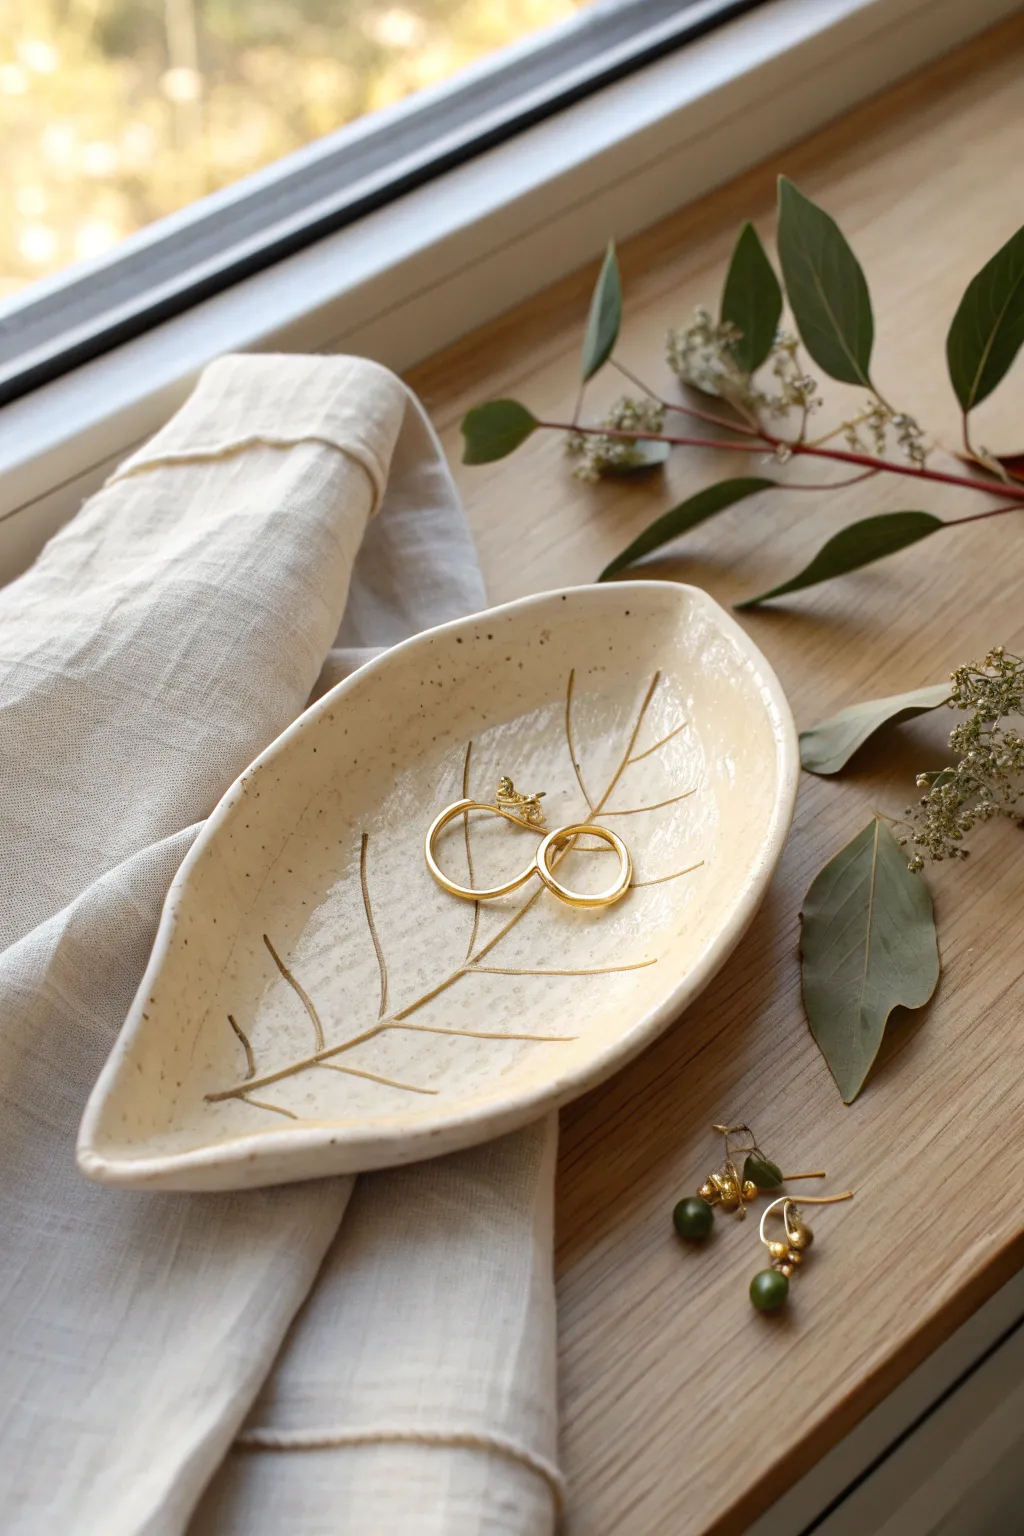
This charming, nature-inspired trinket dish captures the delicate shape of a leaf with veins that are highlighted to dramatic effect. Its speckled cream finish and organic lines make it a perfect, understated home for your favorite rings and earrings.
Step-by-Step Tutorial
Materials
- Air-dry clay (stone or white color)
- Small rolling pin
- Real leaf with prominent veins (or a leaf-shaped cookie cutter)
- X-Acto knife or clay tool
- Small bowl or sponge
- Fine-grit sandpaper (200-400 grit)
- Acrylic paints: cream/off-white and brown/burnt umber
- Old toothbrush (for speckling)
- Gold paint or wax paste (optional, for vein accents)
- Glossy varnish or sealant (Mod Podge or similar)
- Paintbrushes
Step 1: Shaping the Clay
-
Condition the CLay:
Begin by taking a handful of air-dry clay and kneading it in your hands until it becomes warm, soft, and pliable. This prevents cracking later on. -
Roll it Out:
Place the clay on a smooth surface or canvas mat. Use your rolling pin to flatten it into an even slab, aiming for a thickness of about 1/4 inch. -
Create the Shape:
If you have a large, sturdy leaf from outside, press it vein-side down into the clay and roll over it gently to imprint the veins and shape. If not, use a leaf-shaped cutter or freehand a simple almond shape with a knife. -
Cut the Outline:
Using your X-Acto knife or needle tool, carefully trace around your leaf template or cutter to remove the excess clay. Smooth the raw edges immediately with a slightly damp finger. -
Define the Veins:
If your leaf impression wasn’t deep enough, or if you are freehanding, use a needle tool to gently carve a central line from stem to tip. Add diagonal lines branching out to create the vein structure. -
Adding Curve:
To give the dish its cupped form, gently lift the clay leaf and place it inside a small bowl or curve it over a rolled-up towel. Press the center down slightly so the edges curl upward. -
Drying Time:
Let the piece dry completely in this curved position. This usually takes 24-48 hours depending on humidity. Flip it occasionally once the top is firm to help the bottom dry.
Fixing Cracks
If hairline cracks appear while drying, mix a tiny bit of fresh clay with water to make a paste (slip). Fill the crack, smooth it over, and let it re-dry.
Step 2: Painting and Finishing
-
Sand and Smooth:
Once fully dry and hard, use fine-grit sandpaper to gently smooth any rough edges around the rim. Wipe away the dust with a dry cloth. -
Base Coat:
Apply two coats of cream or off-white acrylic paint to the entire dish, front and back. Allow the first coat to dry completely before applying the second. -
Highlight the Veins:
Mix a watery wash of brown paint. Brush this into the carved vein lines. Before it dries, wipe the surface with a damp paper towel, leaving the dark paint trapped only in the deepest crevices. -
Create the Speckles:
Dip an old toothbrush into thinned brown paint. Hold it over the dish and run your thumb across the bristles to flick tiny speckles across the surface. I find practicing on paper first helps control the splatter size. -
Optional Gilded Touch:
For a bit of luxury, you can carefully trace the main vein lines with a very fine brush and gold paint, or rub a tiny amount of gold wax over the raised textures. -
Seal the piece:
Protect your work by applying two thin coats of glossy varnish or sealant. This gives it that ceramic-like shine shown in the photo. -
Final Cure:
Let the varnish cure for at least 24 hours before placing any jewelry in the dish to ensure it doesn’t feel tacky.
Natural Texture
For realistic texture, press a piece of coarse linen or canvas into the clay slab before cutting out your leaf shape.
Place your finished dish on a sunny windowsill or vanity to admire your handcrafted work

TRACK YOUR CERAMIC JOURNEY
Capture glaze tests, firing details, and creative progress—all in one simple printable. Make your projects easier to repeat and improve.
Minimal Photo Holder With a Slit Base
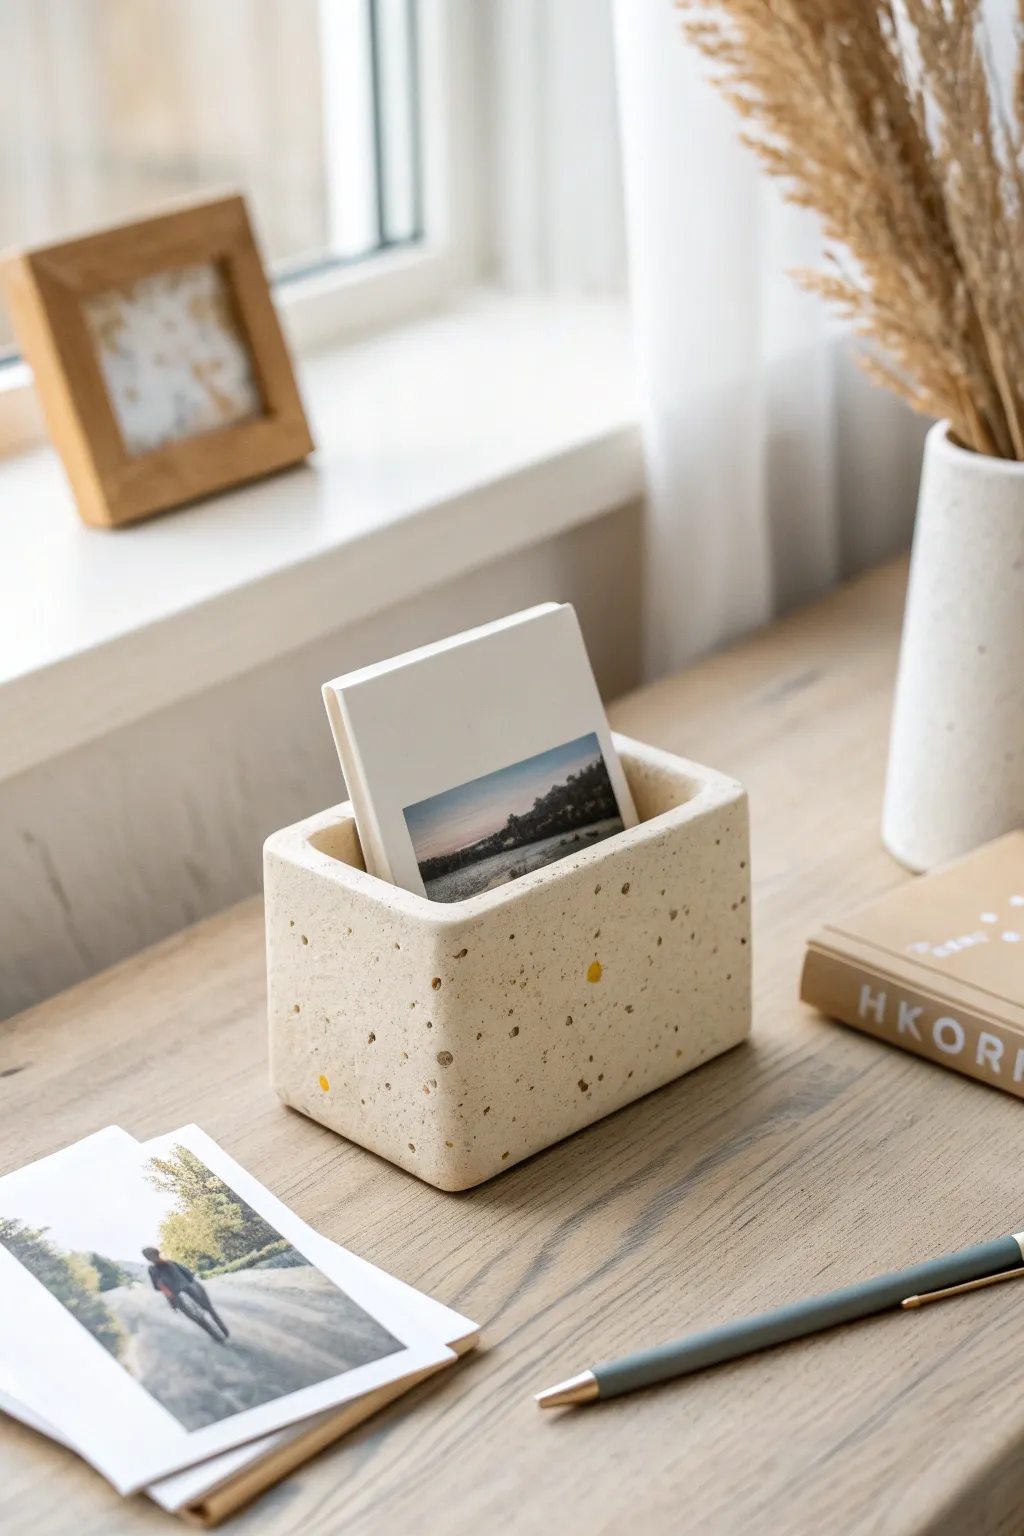
This minimalist rectangular vessel serves as both a stylish catch-all and an upright photo display, featuring a warm, sandy texture and subtle speckled details. It brings an earthy, organic feel to your desk while keeping cherished memories front and center.
Step-by-Step
Materials
- Air-dry clay (white or cream)
- Sand or coffee grounds (for texture)
- Acrylic paints (yellow ochre, brown, black)
- Rolling pin
- Ruler
- Craft knife or clay cutter
- Cardboard or foam core (for the mold)
- Tape
- Fine-grit sandpaper
- Matte sealant or varnish
- Small paintbrush or toothpick
Step 1: Preparing the Speckled Clay
-
Condition the clay:
Start with a generous block of white or cream air-dry clay. Knead it thoroughly in your hands until it becomes soft, pliable, and free of any initial cracks. -
Add texture:
To achieve that natural, stony look, sprinkle a small amount of fine sand or even dried coffee grounds onto the flattened clay. Fold the clay over and knead it again to distribute the particles evenly throughout the mass. -
Roll it out:
Place your clay on a smooth surface or a silicone mat. Use a rolling pin to flatten it into a large slab. Aim for a thickness of about 1/4 inch (6mm) to ensure the walls are sturdy enough to stand up.
Natural Stone Hack
Mix just a tiny drop of brown or beige paint into your white clay before rolling. Don’t mix it fully; leave it slightly marbled for a realistic earthy stone effect.
Step 2: Constructing the Box
-
Cut the base:
Using a ruler and a craft knife, measure and cut a rectangular base piece. A good size for standard photos is approximately 4 inches long by 2.5 inches wide. -
Cut the walls:
Measure and cut two long side panels (matching the length of your base) and two short side panels (matching the width of your base). Make the height of all walls around 2.5 to 3 inches. -
Score the edges:
Take a needle tool or toothpick and scratch crisscross patterns (scoring) onto all the edges that will join together. This roughens the surface for a stronger bond. -
Apply slip:
Dab a little water or ‘slip’ (a watery clay paste) onto the scored areas. This acts as the glue for your clay pieces. -
Assemble the box:
Press the walls onto the base and join the corners together. I find it helpful to place a simple cardboard box or block inside temporarily to help the walls keep their straight shape while I work. -
Smooth the seams:
Use your finger or a smoothing tool to blend the clay at the seams on both the inside and outside until the join lines disappear entirely. -
Round the corners:
Gently gently stroke the sharp corners and the top rim with a wet finger to create a soft, rounded aesthetic rather than a sharp, machined look.
Step 3: Finishing Details
-
Add indentations:
Before the clay dries, take a tool with a small round tip or a toothpick and press random, tiny indentations into the surface to simulate natural stone pitting. -
Dry thoroughly:
Let the piece dry completely. This usually takes 24-48 hours depending on humidity. Rotate it occasionally to ensure airflow to the bottom. -
Sand the surface:
Once bone dry, use fine-grit sandpaper to smooth out any unintentional bumps or rough fingerprints, but preserve the intentional texture you created. -
Add the speckles:
Project splatter paint onto the surface by loading a toothbrush with watered-down brown or grey acrylic paint and flicking the bristles. Alternatively, use a fine brush to dot on specific speckles. -
The yellow accents:
Dip a toothpick into yellow ochre paint and carefully fill a few of the larger indentations you made earlier. This pop of color mimics mineral deposits found in real stone. -
Seal the piece:
Apply a coat of matte varnish or sealant to protect the clay and the paint. A matte finish is crucial here to maintain the natural, stone-like appearance.
Preventing Warping
If the bottom starts to curve up while drying, gently weigh it down with a small bag of rice or sand placed inside the box to keep the base flat.
Place your favorite prints inside and enjoy the modern, grounded vibe this piece brings to your space
Mini Dinosaur Figurine With Chunky Shapes
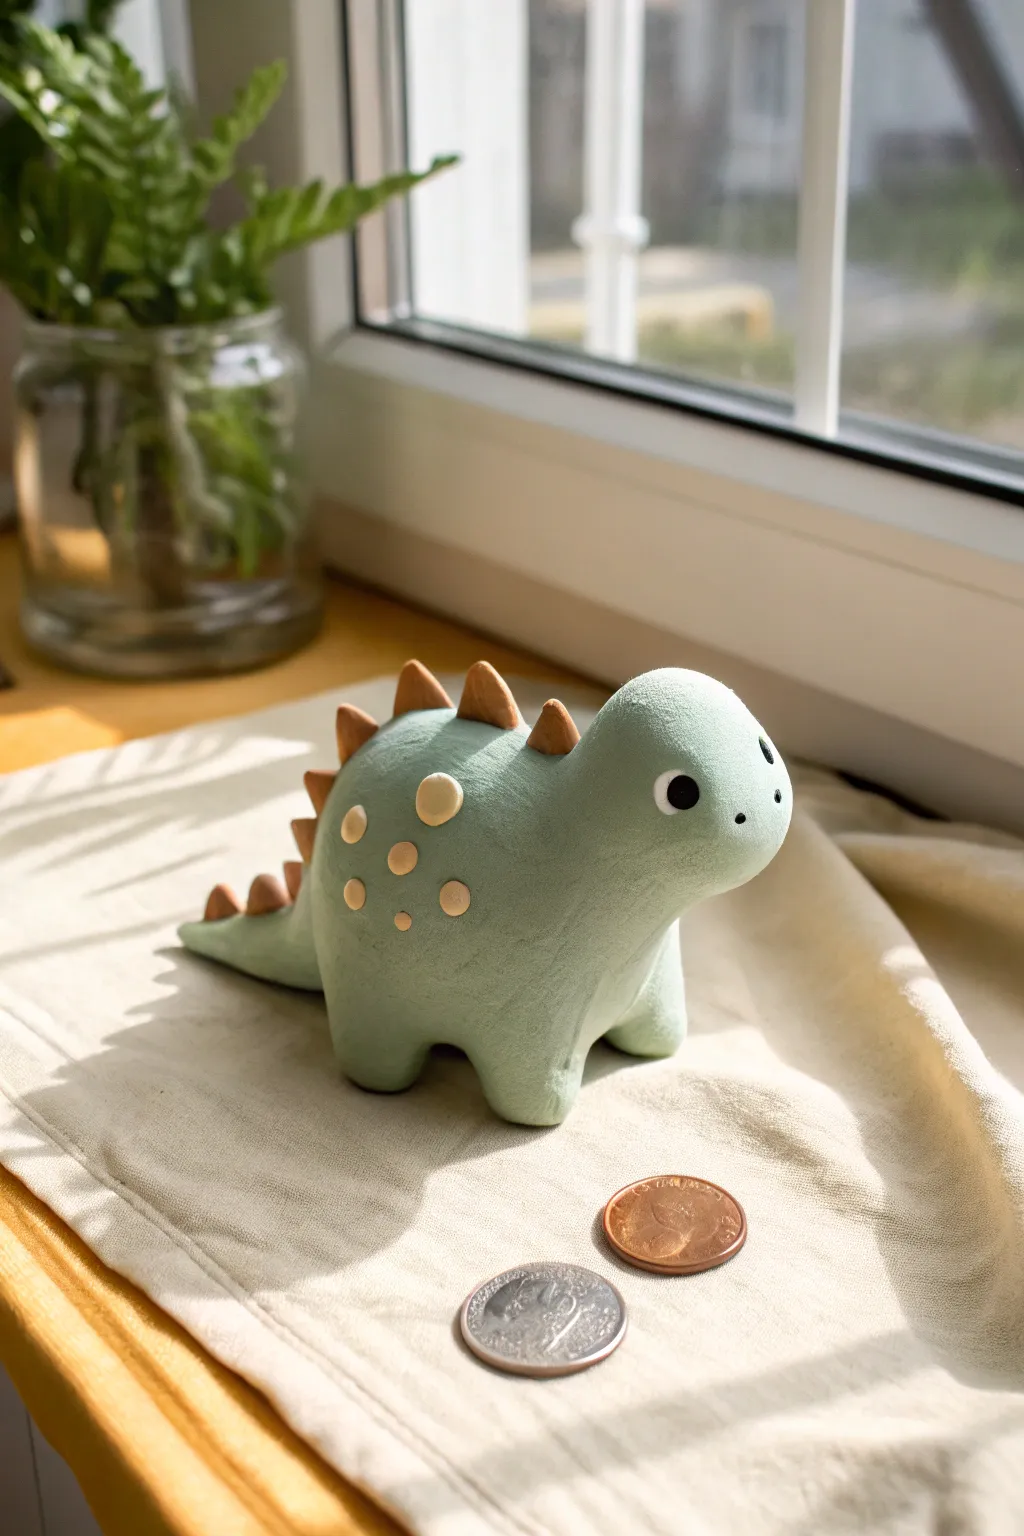
This adorable mini dinosaur figurine features rounded, exaggerated shapes and a soft matte finish that makes it irresistibly cute. Perfect for beginners, this project focuses on simple geometry to build a character with tons of personality.
Detailed Instructions
Materials
- Polymer clay (light sage green, caramel brown, cream/beige, and black)
- Clean work surface (ceramic tile or glass)
- Basic sculpting tools (ball stylus, needle tool)
- Blade or craft knife
- Aluminum foil (optional, for filler)
- Oven (for baking polymer clay)
- Matte varnish (optional)
Step 1: Forming the Body
-
Condition the clay:
Start by warming up your sage green clay in your hands. Knead and roll it until it is soft, pliable, and free of any cracks or air bubbles. -
Shape the torso:
Roll a large ball of green clay, about the size of a golf ball. Gently taper one end slightly to create a very subtle teardrop shape, but keep it mostly rounded and chubby. -
Create the legs:
Roll four smaller balls of green clay of equal size. Gently press them onto the bottom of the body. Blending the seams is optional here; for this chunky look, simply pressing them firmly so the body looks like it’s resting on stumps works well. -
Refine the stance:
Press the entire figure down gently onto your work surface to flatten the bottoms of the feet and ensure the dinosaur stands stably on its own.
Clean Slate
Keep baby wipes or hand sanitizer nearby. Clean your hands thoroughly between colors, especially before handling the light beige clay, to avoid murky smudges.
Step 2: Head and Tail Details
-
Form the head:
Roll another ball of green clay, slightly smaller than the body. Press it onto the higher end of your body shape. Use your thumb to smooth the clay downward, blending the neck seam so the head flows seamlessly into the back. -
Make the tail:
Pull a small amount of clay from the rear of the body to form a short, pointed tail. You can also add a small cone of clay and blend the seams if pulling the clay distorts the body too much. -
Curve the tail:
Gently curve the tip of the tail to one side to give the figure a bit of movement and life. -
Smooth the surface:
I find that doing a once-over with a fingertip dipped very lightly in cornstarch or baby oil helps remove any fingerprints before adding details.
Floppy Head Syndrome?
If the head droops before baking, insert a piece of toothpick or a crumpled core of aluminum foil inside the neck area to act as an internal armature.
Step 3: Adding Character
-
Create the spikes:
Condition your caramel brown clay. Roll a thin snake, then cut it into small, even segments. -
Shape triangles:
Roll each segment into a ball, then pinch the top to form a soft triangle or cone shape. You will need about 7-9 spikes depending on the size of your dino. -
Attach the spikes:
Starting at the top of the head and working down to the tail, press the brown spikes firmly along the classic ‘spine’ line. Make the ones on the back slightly larger and the ones on the tail smaller. -
Add spots:
Roll tiny balls of cream or beige clay. Flatten them into discs and press them randomly onto the dinosaur’s flank. I like to group a larger spot with two smaller ones for visual interest. -
Texture the spots:
For a flush finish, gently roll your finger over the spots to embed them slightly into the green body clay.
Step 4: Face and Finish
-
Place the eyes:
Roll two very small balls of black clay. Press them onto the face, spacing them wide apart for a ‘kawaii’ look. Flatten them slightly against the head. -
Add eyelights (optional):
If you want extra sparkle, add a microscopic dot of white clay to the upper corner of each black eye. -
Nostrils:
Use a needle tool or a small ball stylus to poke two tiny holes near the front of the snout for nostrils. -
Bake:
Place your figurine on a ceramic tile or baking sheet. Bake according to your polymer clay manufacturer’s instructions (usually 275°F/135°C for 15-30 minutes depending on thickness). -
Cool down:
Let the figure cool completely in the oven with the door cracked open. This gradual cooling helps prevent cracking.
Now you have a charming prehistoric companion to guard your desk or windowsill
Toothbrush Holder Creature With a Big Smile
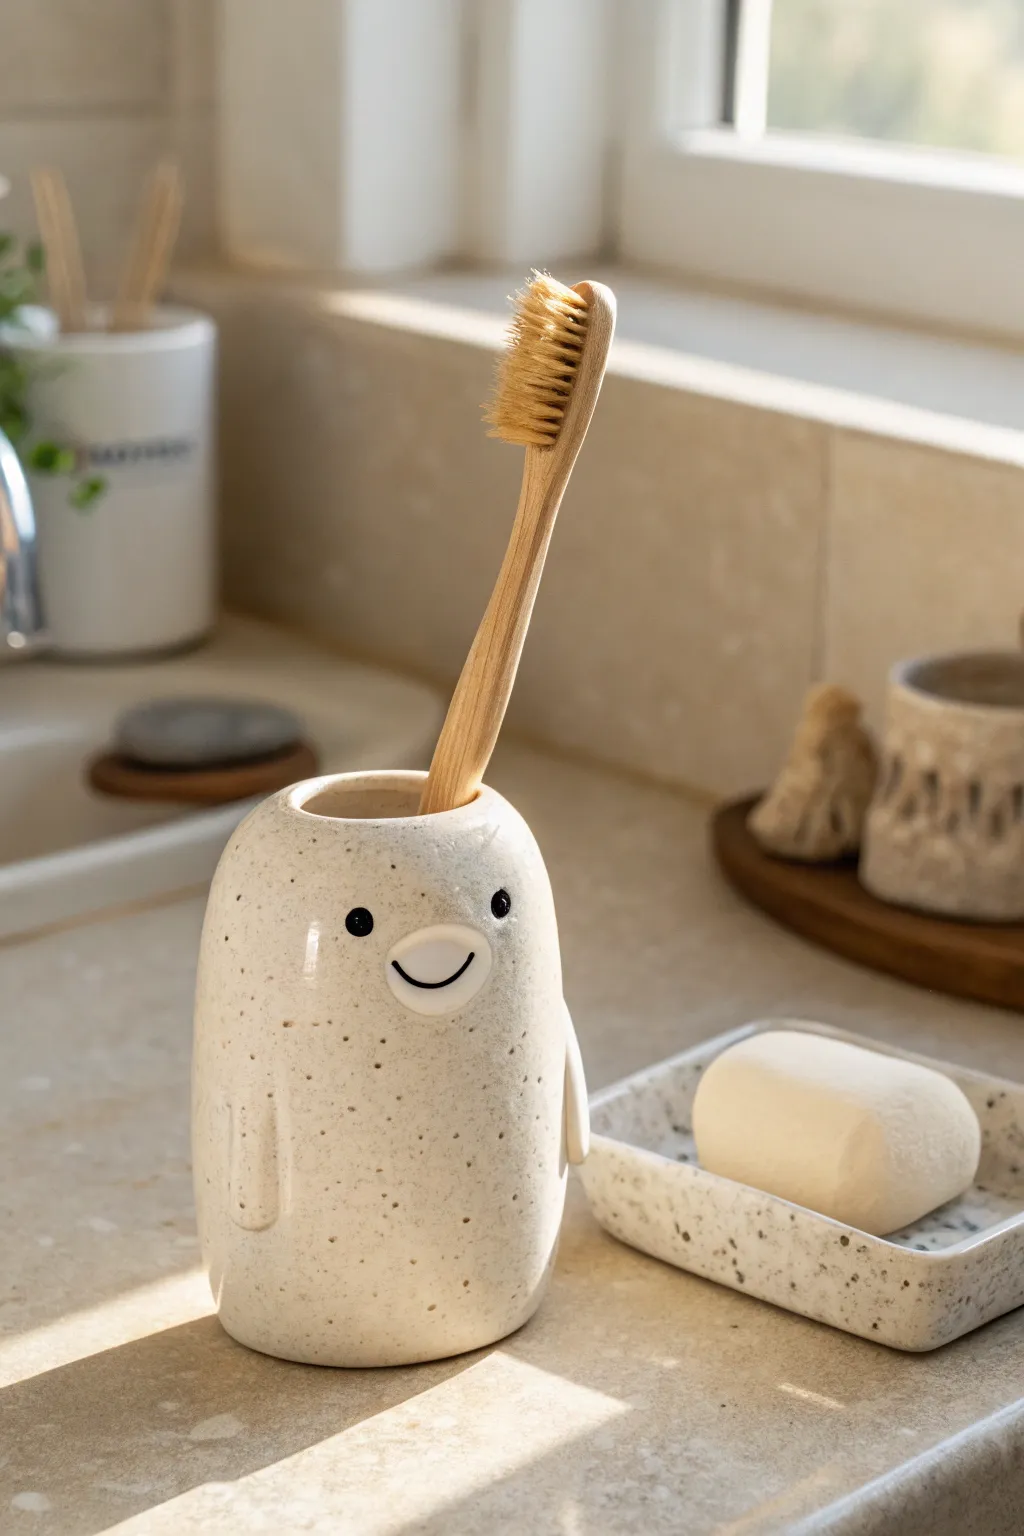
Bring a touch of whimsy to your bathroom sink with this adorable creature toothbrush holder. Featuring a speckled finish, tiny flippers, and a cheerful grin, this functional sculpture is designed to hold a single toothbrush while brightening your morning routine.
Step-by-Step Tutorial
Materials
- White stoneware or polymer clay (oven-bake)
- Wooden sculpting tools
- Rolling pin
- Toothbrush (for sizing)
- Black underglaze (or acrylic paint)
- Small detail paintbrush
- Sponge
- Clear speckled glaze (if firing) or faux-stone spray sealant (if using polymer)
- Needle tool
Step 1: Forming the Body
-
Prepare the Clay:
Begin by wedging your clay to remove any air bubbles. Roll it into a smooth, solid cylinder that feels substantial in your hand, roughly 4-5 inches tall and 2.5 inches wide. -
Shape the Base:
Tap the bottom of your cylinder gently against your work surface to create a flat, stable base so the holder won’t wobble. -
Round the Top:
Use your palms to gently dome the top of the cylinder, creating a smooth, rounded head shape similar to a penguin or ghost. -
Create the Opening:
Take your needle tool or the handle of a paintbrush to mark the center of the top. Press down vertically to create a hole deep enough to hold a toothbrush securely—usually about 2-3 inches deep. Wiggle the tool slightly to widen it. -
Refine the interior:
Smooth the interior walls of the hole with a small moist brush or your pinky finger to ensure there are no sharp burrs that could catch on a toothbrush handle.
Step 2: Adding Character
-
Make the Flippers:
Roll two small, equal-sized tear-drop shapes of clay. Flatten them slightly to resemble little wings or flippers. -
Attach the Flippers:
Score the sides of the body where you want the arms to sit. Add a tiny dab of slip (or liquid clay), press the flippers on, and blend the upper connection point seamlessly into the body using a modeling tool. -
Create the Snout:
Roll a very small flattened oval of clay. Attach this to the center of the ‘face’ area, blending the edges very gently so it looks like a slight protrusion rather than a stuck-on piece. -
Smooth Everything Out:
Take a damp sponge and wipe down the entire piece. This removes fingerprints and softens any harsh tool marks, giving it that organic, professionally finished look.
Wobbly Wings?
If the little flippers keep sliding down while attaching, place a small piece of folded paper or foam under them for support until the connection stiffens or the clay dries.
Step 3: Face & Finish
-
Paint the Eyes:
Using the handle end of a paintbrush dipped in black underglaze (or paint), dot two small eyes just above the snout area. They should be wide-set for maximum cuteness. -
Draw the Smile:
With a very fine liner brush and black pigment, paint a simple semi-circle smile directly onto the raised snout area. -
Drying:
Let the piece dry completely. If using air-dry or polymer clay, follow package instructions. If using ceramic clay, cover loosely with plastic to let it dry slowly to the bone-dry stage. -
Bisque Fire (Ceramics Only):
If working with pottery clay, fire the piece to bisque temperature (usually Cone 04) to prepare it for glazing. -
Apply Speckled Glaze:
Dip or brush on a clear glaze that contains speckles (often called ‘Speckled Buff’ or ‘Quail Egg’). Ensure the interior hole is glazed to make it water-resistant. -
Final Fire or Seal:
Fire the piece again to the glaze’s required temperature. If you used polymer clay, use a spray sealant with a faux-stone effect to mimic the speckled ceramic look shown in the photo.
Clean Lines
For the perfectly round smile, lightly sketch the curve with a dull pencil first. The graphite burns off in the kiln or can be painted over easily.
Place your new friendly toothbrush guardian on your sink ledge and enjoy the smile it brings to your daily routine
Wavy Painted Catchall Bowl for Color Lovers

Bring a splash of artistic flair to your entryway with this charmingly imperfect catchall bowl. Featuring a hand-formed organic shape and bold, painterly stripes in terracotta and navy, it’s the perfect spot to toss your keys and loose change.
Step-by-Step
Materials
- Air-dry clay (white or light grey)
- Rolling pin
- Small bowl (to use as a slump mold)
- Plastic wrap
- Sponge
- Bowl of water
- Pottery tool or butter knife
- Fine-grit sandpaper
- Acrylic paints: Terracotta/burnt orange, Navy blue, Cream/off-white
- Flat paintbrush (medium width)
- Small round paintbrush
- High-gloss varnish or sealant
Step 1: Shaping the Clay Base
-
Prepare your workspace:
Lay down a canvas cloth or non-stick mat on a flat surface to prevent the clay from sticking as you work. -
Roll out the clay:
Take a generous handful of air-dry clay and knead it briefly to warm it up. Roll it out into an even slab, aiming for a thickness of about 1/4 inch. -
Cut the circle:
Using a bowl or round template slightly larger than your desired finished size, trace and cut out a circle from your clay slab using a pottery tool or knife. -
Create the form:
Take a small bowl from your kitchen and cover the inside with plastic wrap. This will act as your mold. -
Slump the clay:
Gently lift your clay circle and press it into the lined bowl. Don’t worry about getting it perfectly smooth against the sides; a little unevenness adds character.
Cracks while crying?
If small cracks appear as the clay dries, mix a tiny amount of fresh clay with water to make a ‘slip’ paste. Fill the cracks, smooth with a finger, and let dry again.
Step 2: Refining the Form
-
Shape the rim:
Use your fingers to pinch and manipulate the rim of the clay. Create a gentle, wavy undulation rather than a perfect circle to mimic the organic look in the photo. -
Smooth the surfaces:
Dip a sponge lightly in water and run it over the interior and the rim to smooth out any harsh tool marks or fingerprints. -
Let it dry:
Allow the clay to dry inside the mold for at least 24 hours. Once it’s leather-hard, pop it out of the mold and let it dry completely (another 24-48 hours) until it turns chalky white. -
Sand for perfection:
Once bone dry, take fine-grit sandpaper and gently sand the rim and exterior to remove any sharp edges or rough spots. Wipe away the dust with a slightly damp cloth.
Make it a set
Create a nesting trio by using three different sizes of kitchen bowls as your molds. Keep the color palette consistent but vary the stripe thickness for each one.
Step 3: Painting the Design
-
Apply the base coat:
Cover the entire bowl (inside and out) with a coat of cream or off-white acrylic paint. You may need two coats for opaque coverage. Let this dry completely. -
Paint the rim:
Using the terracotta paint and a medium flat brush, paint a thick band around the exterior rim. Bring this color over the top edge and slightly into the interior rim to create a border. -
Add terracotta stripes:
Start painting wide, organic stripes from the center of the bowl extending upwards toward the rim. Leave gaps between them for the blue stripes. -
Fill the center:
Ensure the very bottom center of the bowl is filled with the terracotta color, connecting the base of your stripes. -
Add navy accents:
Switch to your navy blue paint. Between the orange stripes, paint thinner, expressive blue lines that curve slightly to follow the bowl’s shape. -
Refine the strokes:
I like to keep the brushstrokes slightly rough at the edges rather than taping them off; the visible brush texture enhances the handmade vibe.
Step 4: Finishing Touches
-
Seal the piece:
Once the paint is thoroughly dry, apply a coat of high-gloss varnish. This protects the paint from chipping and gives it that shiny, ceramic-like glaze finish. -
Add a second coat:
For extra durability and shine, apply a second coat of varnish after the first one is dry. -
Test the finish:
Let the varnish cure for the time recommended on the bottle before placing any coins or keys inside to avoid tackiness.
Place your finished bowl on a console table or dresser to keep your daily essentials organized in style
Mini Food Trio: Corn, Carrot, and Pepper Characters
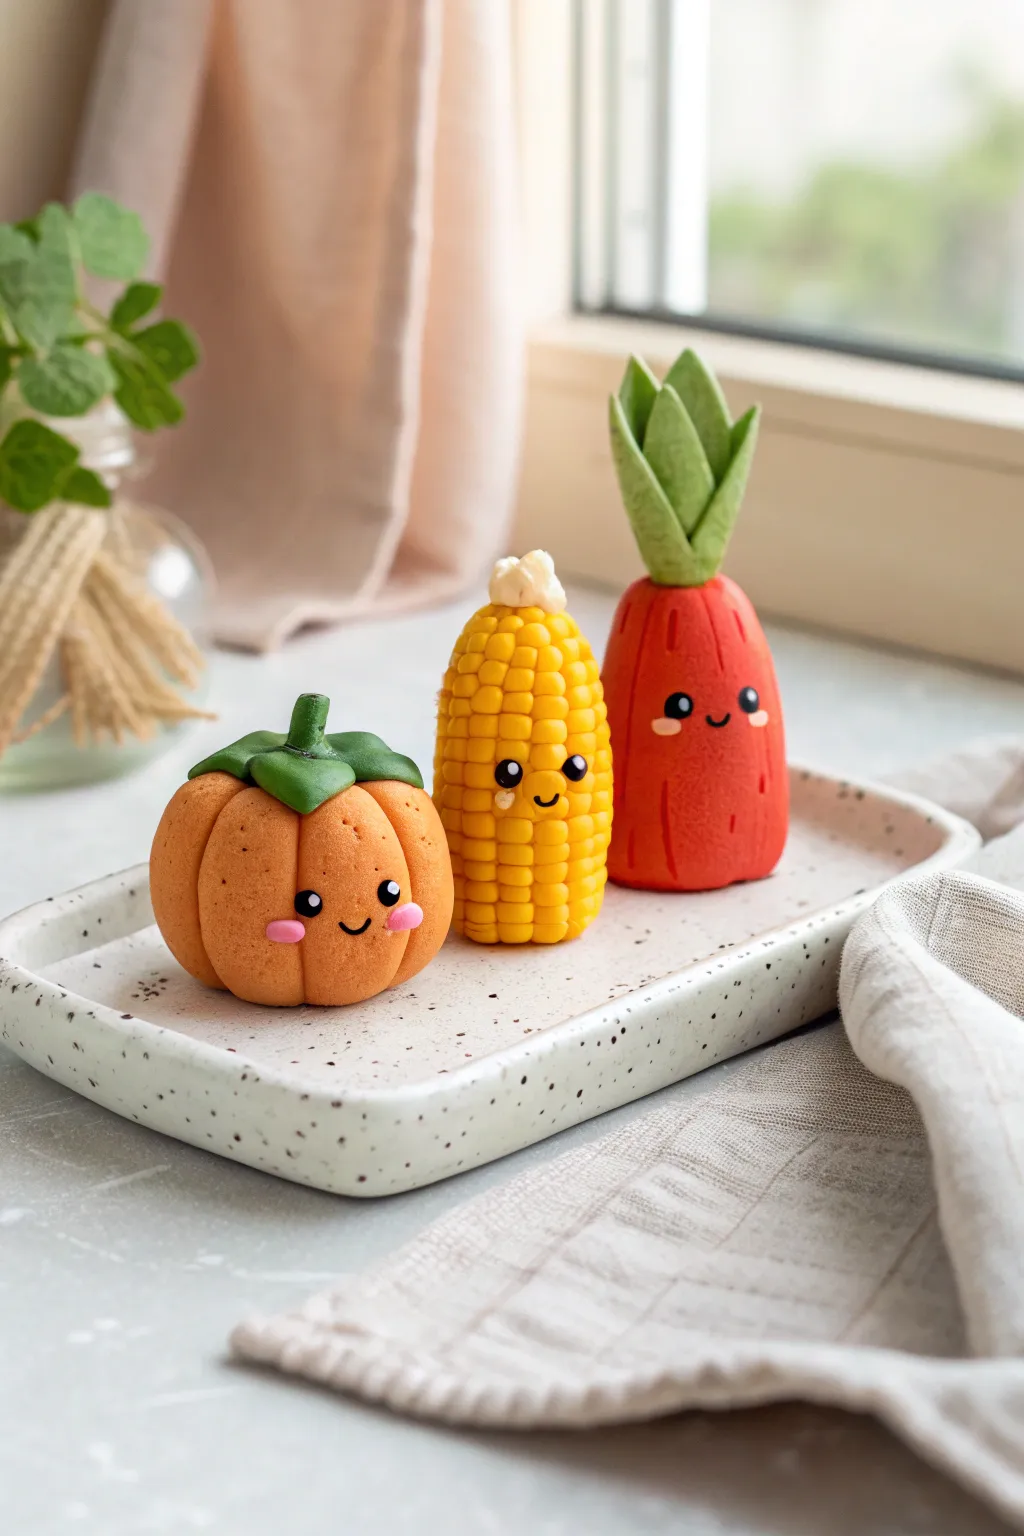
Brighten up your desk or windowsill with this adorable set of handmade clay companions. These three friends—a round pumpkin, a textured corn cob, and a leafy red pepper—feature sweet, smiling faces that add personality to any small space.
How-To Guide
Materials
- Polymer clay (Orange, Yellow, Red, Green, White, Black)
- Clay sculpting tools (needle tool, ball tool, knife tool)
- Acrylic rolling pin
- Parchment paper or baking tile
- Soft pastel chalks (pink)
- Small paintbrush
- Liquid clay or bake and bond (optional)
- Oven for baking
Step 1: Creating the Pumpkin Pal
-
Shape the Base:
Start by conditioning a ball of orange clay about the size of a walnut. Roll it until it is perfectly smooth with no cracks, then flatten the bottom slightly against your work surface so it sits upright. -
Add Segments:
Use a needle tool or the back of a knife tool to press vertical indentations all around the ball. These lines create the classic pumpkin ribs. Gently smooth the edges of these lines with your finger so they look soft and organic. -
Form the Stem:
Take a small pinch of green clay and flatten it into a rough star shape for the calyx. Press this onto the top of your pumpkin. Roll a tiny snake of green clay for the stem and attach it to the center of the star. -
Make the Face:
Use a small dotting tool to create two indentations for eye sockets. Roll two tiny beads of black clay and press them in. Add a very thin string of black clay for a smile. -
Blush Details:
For the finishing touch, roll two small flattened ovals of pink clay and press them onto the cheeks just below the eyes.
Step 2: Crafting the Corn Cob
-
Form the Body:
Roll yellow clay into a cylinder shape that tapers slightly at the top, creating a classic corn cob silhouette. Flatten the base so it stands. -
Texture the Kernels:
This step requires patience. Use a blunt tool or a straw cut in half to press a grid pattern all over the yellow body. Alternatively, you can roll tiny individual balls of yellow clay and attach them in rows, though pressing a grid is much faster. -
Add the Butter:
Mix a tiny amount of white and yellow clay to make a pale butter color. Roughly texture a small dollop and place it right on top of the cob’s head. -
Face Alignment:
Choose a smooth spot near the middle-bottom for the face. Attach two black clay eyes and a tiny smile, similar to the pumpkin.
Sticky Situation?
If your clay is too soft and sticky, leach it by placing rolled sheets between plain printer paper for an hour. This removes excess plasticizer and makes it firmer to sculpt.
Step 3: Sculpting the Red Pepper
-
Shape the Pepper:
Condition red clay and roll it into a tall, tapered cone shape with a rounded top and a flat bottom. It should be slightly taller than the pumpkin but shorter than the corn. -
Vertical Texturing:
Use a needle tool to drag vertical lines down the red body to give it a slightly fibrous, organic texture. Keep the pressure light so you don’t distort the shape. -
Leafy Top:
Roll out green clay and cut several pointed leaf shapes. I like to curve them slightly outward before attaching them. Arrange these leaves standing upright in a cluster on top of the red body. -
Adding Personality:
Place the black clay eyes wider apart on this character. Add a tiny U-shaped mouth right between them.
Make Them Shine
After baking and cooling, apply a coat of semi-gloss polyurethane varnish or UV resin. This protects the clay from dust and gives the veggies a professional, ceramic-like finish.
Step 4: Baking and Finishing
-
Highlight Eyes:
Use white acrylic paint or a tiny speck of white clay to add a ‘catchlight’ reflection to the upper corner of each black eye. This brings them to life. -
Final Inspection:
Check all three figures for fingerprints. You can gently buff them away with a drop of baby oil or rubbing alcohol before baking. -
Bake:
Place your trio on a baking tile or parchment paper. Bake according to your clay manufacturer’s instructions (usually 275°F/130°C for 15-30 minutes per 1/4 inch of thickness). -
Cool Down:
Let the figures cool completely in the oven before moving them to prevent cracking.
Enjoy displaying your delightful little garden crew on a shelf or giving them as a cute handmade gift
Pocket-Size Desk Totem From Stacked Shapes
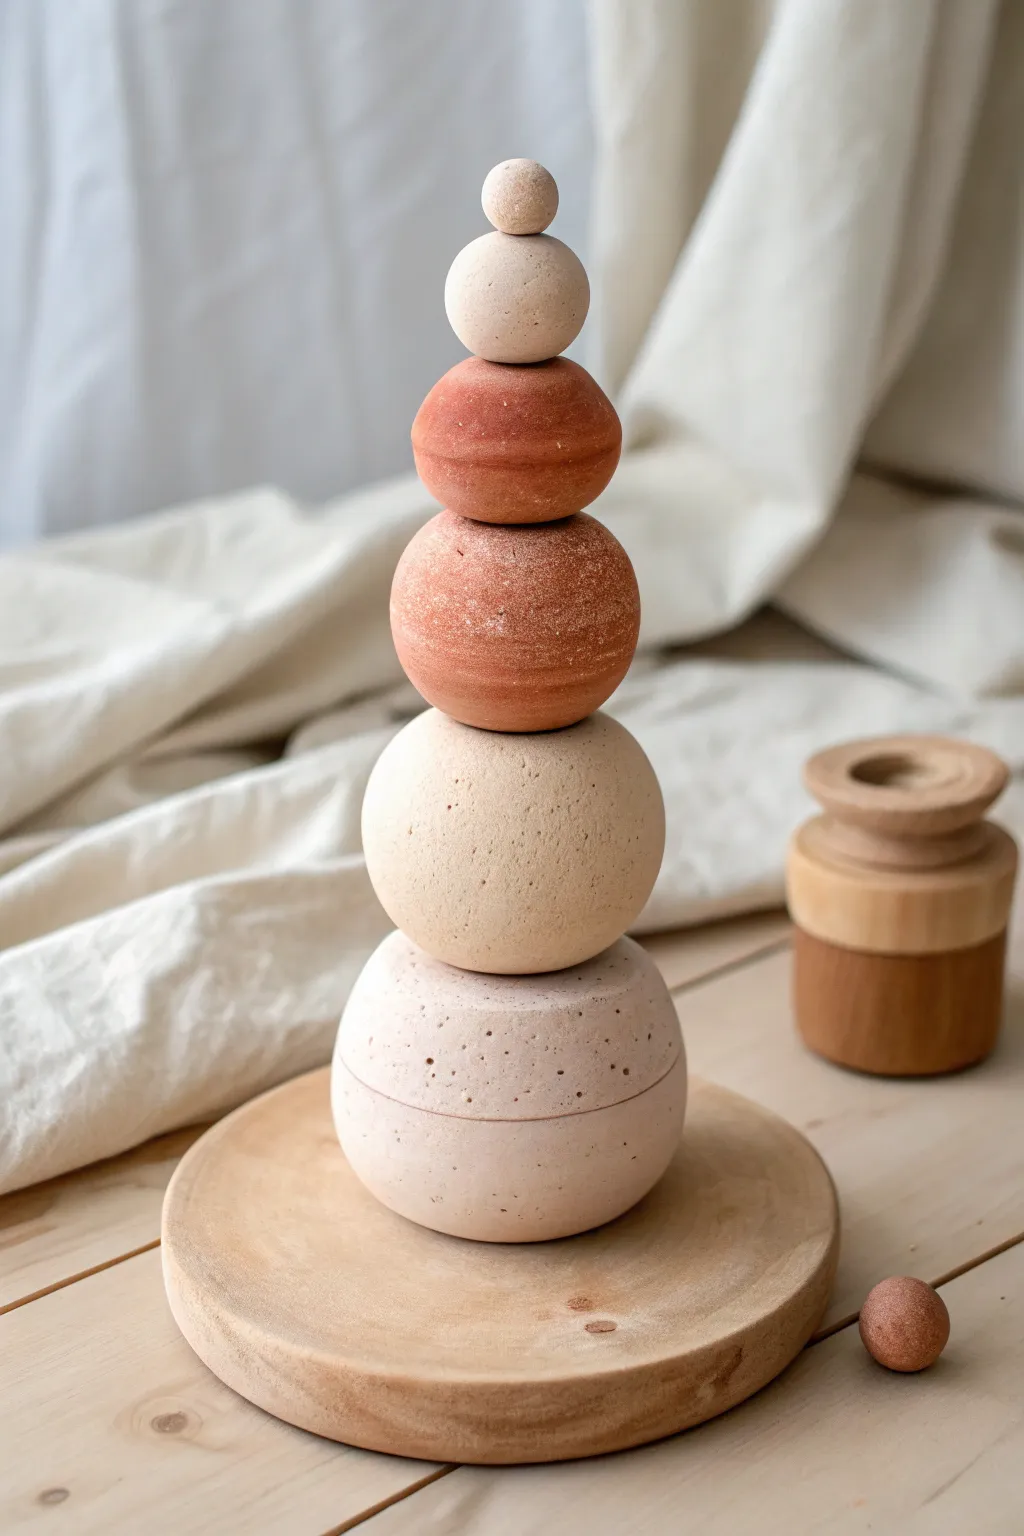
This meditative sculpture combines simple geometric forms with the raw, textural beauty of clay to create a calming focal point for your workspace. The gradient of earthy tones, from deep terracotta to soft sandstone, mimics natural rock formations, bringing a grounding element to any interior.
Step-by-Step Tutorial
Materials
- Air-dry clay (terracotta, white, and stone/granite effect)
- Acrylic paints (burnt sienna, ochre, cream, brown)
- Sponge or textured foam piece
- Rolling pin
- Wooden skewer or strong metal wire (for internal support)
- Sandpaper (fine and medium grit)
- Round wooden coaster or wood slice (for the base)
- Strong craft glue or epoxy
- Matte finish varnish
Step 1: Shaping the Orbs
-
Prepare your clay sizes:
Begin by portioning out your clay. You will need six distinct balls of clay, graduating in size from a large base sphere (about the size of an orange) to a tiny crowning sphere (the size of a marble). -
Form the base sphere:
Roll the largest portion of clay into a smooth ball. Gently press it into a slightly flattened, wheel-like shape rather than a perfect sphere to ensure stability at the bottom. -
Sculpt the middle sections:
Create the next three spheres, making each slightly smaller than the last. For the third shape from the bottom (the reddish one), flatten it significantly more into a disc or ‘flying saucer’ shape for visual variety. -
Finish the top pieces:
Roll the final two smallest spheres. Keep the second-to-top one quite round, and let the very top piece be a perfect, tiny sphere. -
Create the pass-through hole:
While the clay is still soft, carefully pierce the center of every piece *except* the very top small sphere using your wooden skewer. Wiggle it slightly to ensure the hole is wide enough for your support rod.
Cracking Clay?
If you see cracks forming as the clay dries, don’t panic. Mix a small amount of fresh clay with water to make a paste (slip) and fill in the cracks, then smooth over with a damp finger.
Step 2: Texturing and Coloring
-
Add surface texture:
Before the clay dries, take a dry sponge or a crumpled ball of foil and gently press it against the surface of the spheres. This creates that natural, pitted stone look, especially on the lighter colored pieces. -
Dry the components:
Allow all clay pieces to dry completely. This can take 24-48 hours depending on thickness. Flip them occasionally so the bottoms dry evenly. -
Refine the shapes:
Once fully rigid, use sandpaper to smooth out any unwanted harsh ridges or fingerprints, but try to leave the intentional sponged texture intact. -
Mix your palette:
Prepare a gradient of colors. You want a deep burnt sienna for the middle disc, a lighter terracotta for the sphere above it, and varying shades of cream and sandstone for the top and bottom pieces. -
Apply the base coats:
Paint each bead individually. For the bottom-most large bead, I like to use a very pale beige with tiny speckles of brown flicks to mimic granite. -
create the terracotta tones:
Paint the flattened disc shape with a solid coat of burnt sienna mixed with a touch of red. Use a dry brush technique to highlight the texture with a slightly lighter orange tone. -
Detail the speckling:
Dilute some dark brown paint with water. Dip an old toothbrush into it and run your thumb across the bristles to spray fine speckles over the dried lighter-colored spheres.
Step 3: Assembly and Mounting
-
Prepare the base:
Locate the center of your wooden coaster base. Drill a small hole or use strong glue to secure your skewer or metal wire vertically in the center. -
Stack the foundation:
Slide the largest, lightest sphere onto the rod first. Apply a dab of glue between the wood and the clay to prevent spinning. -
Build the gradient:
Thread the next large beige sphere, followed by the dark terracotta disc, and then the lighter terracotta sphere. Rotate them until you find the most pleasing alignment. -
Add the top section:
Place the second-smallest beige sphere onto the stack. Ensure the rod isn’t poking out; if it is, trim it with wire cutters so it sits flush with the top of this bead. -
Crown the totem:
Take the final, un-pierced tiny sphere. Apply a generous dot of glue to its bottom and press it firmly onto the top of the stack, covering the rod end. -
Seal the work:
Once the paint and glue are dry, coat the entire sculpture with a matte varnish. This protects the paint and enhances the earthy, matte aesthetic of the faux stone.
Color Shift
Instead of earthy tones, try a monochromatic look using shades of indigo or charcoal, or use gold leaf on just one of the discs for a striking modern accent.
Now you have a unique, zen-inspired sculpture ready to bring a touch of balance to your home