If you’re craving a clay project that feels sweet and personal, cute couple clay makes the perfect little keepsake. I love how simple matching shapes, cozy poses, and tiny details can turn two mini sculptures into a whole love story.
Matching Heart Split Keychains
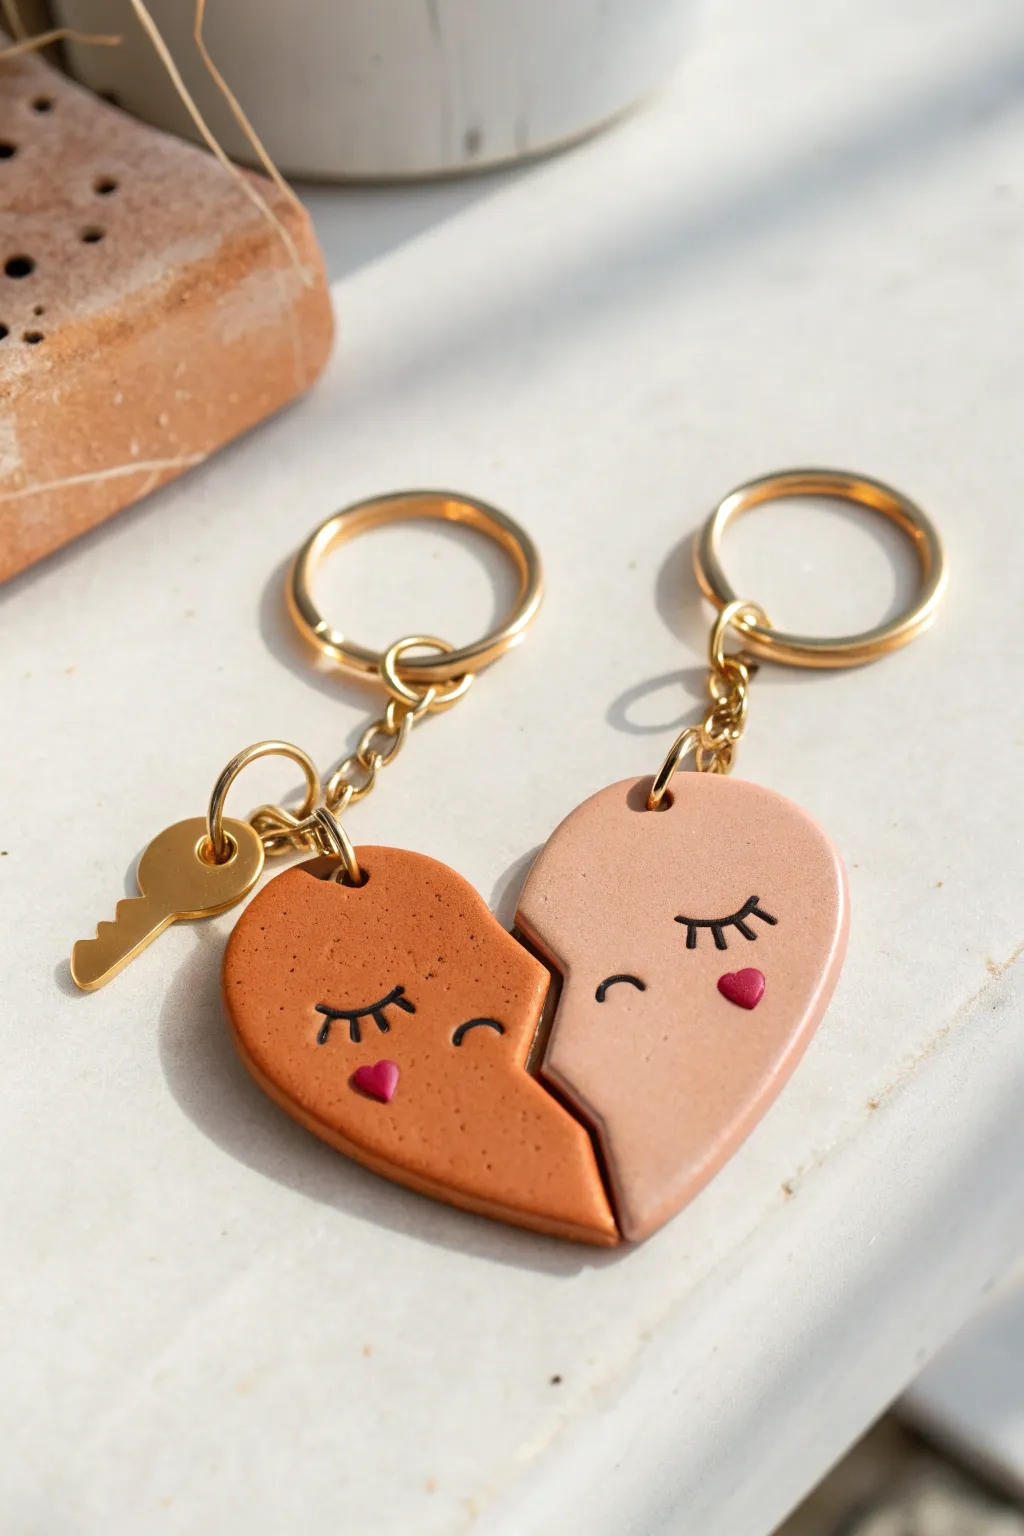
Celebrate your connection with these adorable matching keychains that fit perfectly together like two puzzle pieces. Crafted from polymer clay in warm, earthy tones, these durable charms feature sweet sleeping faces and elegant gold hardware for a polished finish.
Detailed Instructions
Materials
- Polymer clay (terracotta/burnt orange)
- Polymer clay (beige/pale pink)
- Polymer clay (red or dark pink for cheeks)
- Black acrylic paint or fine-tip permanent marker
- Rolling pin or clay roller
- Heart-shaped clay cutter (approx. 2 inches wide)
- X-Acto knife or sharp crafting blade
- Small dotting tool or toothpick
- Gold jump rings (6mm or 8mm)
- Gold keychain rings with chains
- Small gold key charm (optional)
- Glossy glaze or UV resin (optional)
- Small jewelry pliers
- Parchment paper or ceramic tile
Step 1: Shaping the Base
-
Condition the clay:
Start by kneading both the terracotta and beige clay blocks separately until they are soft, pliable, and free of any cracks. -
Roll it flat:
Roll out both colors of clay onto a flat surface to an even thickness of about 1/4 inch (6mm). You want them thick enough to be sturdy as keychains. -
Create the two-tone canvas:
Use your clay blade to cut a straight line down one side of each rolled slab. Push these two fresh-cut edges together gently so the colors touch side-by-side but don’t overlap. -
Cut the heart shape:
Position your heart cutter directly over the seam where the two colors meet. Press down firmly to cut out a single heart that is half terracotta and half beige. -
Separate the halves:
Carefully slice along the seam line again with your blade to separate the two colors. Now, use your blade to cut a jagged, zig-zag pattern along the straight edge of one half, then gently press it into the other half to create a puzzle-piece fit. If you prefer the look in the photo, simply create a curved, interlocking wave cut down the middle. -
Refine the edges:
Gently smooth the cut edges with your fingertip to remove any harsh angles or burrs, ensuring the two pieces still nestle together nicely.
Step 2: Adding Details & Baking
-
Make the heart cheeks:
Take a tiny amount of red clay and roll two impossibly small balls. Flatten them slightly and shape them into tiny hearts using a needle tool or the tip of your knife. -
Apply the cheeks:
Press one tiny red heart onto the lower cheek area of the terracotta half, and the other onto the beige half. They should sit flush with the surface. -
Pierce holes for hardware:
Use a toothpick or small straw to punch a hole near the top outer curve of each heart half. Ensure the hole is large enough for your jump rings but not too close to the edge. -
Bake the clay:
Preheat your oven according to the clay manufacturer’s instructions (usually around 275°F/135°C). Place the halves on a ceramic tile or parchment-lined tray and bake for roughly 15-30 minutes. -
Cool down:
Let the pieces cool completely inside the oven with the door open. This gradual cooling helps prevent brittleness.
Uneven Seams?
If the two heart halves aren’t fitting together perfectly post-bake, gently sand the meeting edges with a fine-grit nail file until they slot together smoothly.
Step 3: Finishing Touches
-
Paint facial features:
Once cool, use a very fine brush with black acrylic paint or a fine-tip marker to draw the sleepy closed eyes with eyelashes and a small curved nose just above the cheek hearts. -
Seal the surface:
I like to protect the paint by applying a thin layer of matte or glossy varnish over the front. This is crucial if you used acrylic paint so it doesn’t scratch off. -
Attach jump rings:
Using your pliers, twist open two gold jump rings sideways. Loop one through the hole of the terracotta half and the other through the beige half. -
Assemble the hardware:
Before closing the jump rings, slide on the last link of the keychain chain. For the terracotta side, also slide on the small gold key charm for that extra decorative touch. -
Secure the closure:
Use the pliers to twist the jump rings back into a closed circle, ensuring the ends meet perfectly so the chain cannot slip out.
Pro Tip: Clean Cuts
Chill your rolled clay in the fridge for 10 minutes before cutting the squiggly or curved line. Firmer clay resists dragging and yields a much sharper, cleaner puzzle edge.
Give one half to your favorite person and keep the other as a daily reminder of your bond


Puzzle Piece Couple Charms That Fit Together
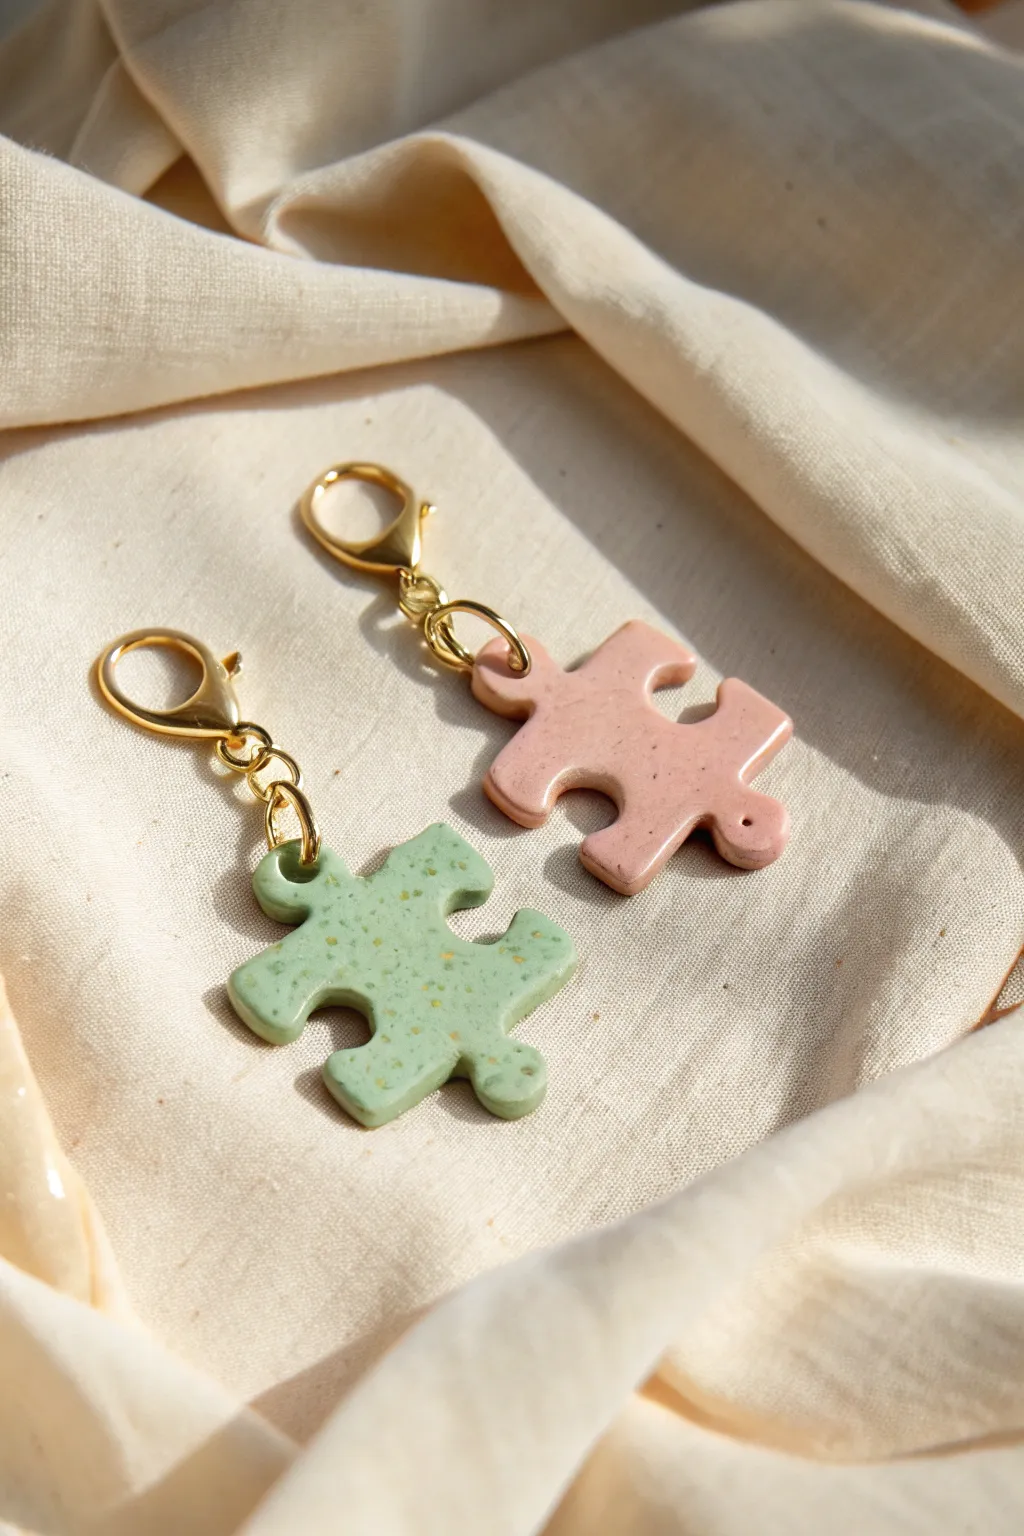
Create a meaningful keepsake with these perfectly matching puzzle piece charms, designed to fit snugly together just like you and your loved one. Their soft pastel colors and speckled faux-stone finish give them a polished, professional look while remaining delightfully handmade.
How-To Guide
Materials
- Polymer clay (pale pink and pale sage green)
- Faux granite or speckled polymer clay (translucent or white based)
- Small puzzle piece cookie cutter (or X-Acto knife)
- Rolling pin or pasta machine
- Gold screw-eye pins (small)
- Gold jump rings (4-6mm)
- Gold lobster claw clasps
- Glossy polymer clay varnish or UV resin
- Small paintbrush
- Oven (for baking)
- Parchment paper
- Jewelry pliers (round nose and flat nose)
- Sandpaper (fine grit, 400-800)
Step 1: Preparing the Patterned Clay
-
Condition the base colors:
Start by thoroughly conditioning your pale pink and sage green polymer clays separately until they are soft and pliable. Warm clay is much less likely to crack during shaping. -
Mix in speckles:
To achieve that lovely stone effect, take a small amount of speckled effect clay (often called ‘granite’ or pepper’) and mix it into each of your base colors. Knead until the specks are evenly distributed but the base color remains distinct. -
Roll out slabs:
Use a rolling pin or a clay pasta machine to roll out each color into a slab. Aim for a thickness of about 4-5mm—you want them sturdy enough to be charms but not too chunky.
Step 2: Shaping the Puzzle Pieces
-
Cut the shapes:
If you have a puzzle piece cutter, press it firmly into the clay. If you are cutting freehand, it helps to lightly sketch the shape onto the clay using a needle tool first, ensuring the ‘outie’ connector of one piece will fit the ‘innie’ of the other. -
Test the fit:
This is crucial: gently slide the two raw clay pieces together to check the fit. Wiggle them slightly to create a tiny bit of clearance so they won’t scratch each other later, then separate them for baking. -
Soften the edges:
Dip your finger in a little bit of cornstarch or baby oil and gently rub the edges of your cutouts. This rounds them off nicely and removes sharp cutting angles for a smoother finish. -
Insert hardware:
Carefully screw a small gold screw-eye pin into the top edge of each puzzle piece. I find it safest to remove the pin, add a tiny dot of liquid clay or bake-and-bond to the threads, and re-insert it to ensure it stays put permanently.
Clean Cuts Pro Tip
Place a sheet of plastic wrap over the clay before using your cutter. This creates a naturally beveled, rounded edge on your puzzle piece, saving you sanding time later.
Step 3: Baking and Finishing
-
Bake the pieces:
Place your charms on parchment paper or a ceramic tile. Bake according to your specific clay brand’s instructions (usually around 275°F/130°C for 15-30 minutes). -
Cool down:
Let the pieces cool completely inside the oven with the door slightly ajar to prevent them from becoming brittle due to thermal shock. -
Sand imperfections:
Once cool, check the edges. If there are any rough spots, gently wet-sand them under running water with fine-grit sandpaper until buttery smooth. -
Seal the surface:
Apply a thin, even coat of glossy polymer clay varnish or UV resin to the front and sides of the charms. This mimics the shine seen in the photo and brings out the contrast of the speckles. -
Cure the sealant:
Allow the varnish to dry fully or cure the UV resin under a UV lamp until it is hard and non-tacky.
Level Up: Hidden Messages
Before baking, use tiny letter stamps to impress initials or a secret date into the back side of each puzzle piece for a personalized surprise only the wearer knows about.
Step 4: Assembly
-
Open jump rings:
Using two pairs of pliers, twist open your gold jump rings. Remember to twist the ends away from each other (front to back) rather than pulling them apart, to maintain the circle shape. -
Attach the clasp:
Loop the open jump ring through the eye of the screw pin embedded in the clay. Slide the lobster clasp onto the jump ring as well. -
Secure the closure:
Twist the jump ring closed again, ensuring the ends meet perfectly flush so the hardware doesn’t slip off. -
Final test:
Ideally, give the hardware a gentle tug to ensure everything is secure. Connect the two puzzle pieces together one last time to admire your perfect match.
Now snap your charms onto keys or bags and carry a piece of each other wherever you go.


Chibi Couple Figurines Holding Hands
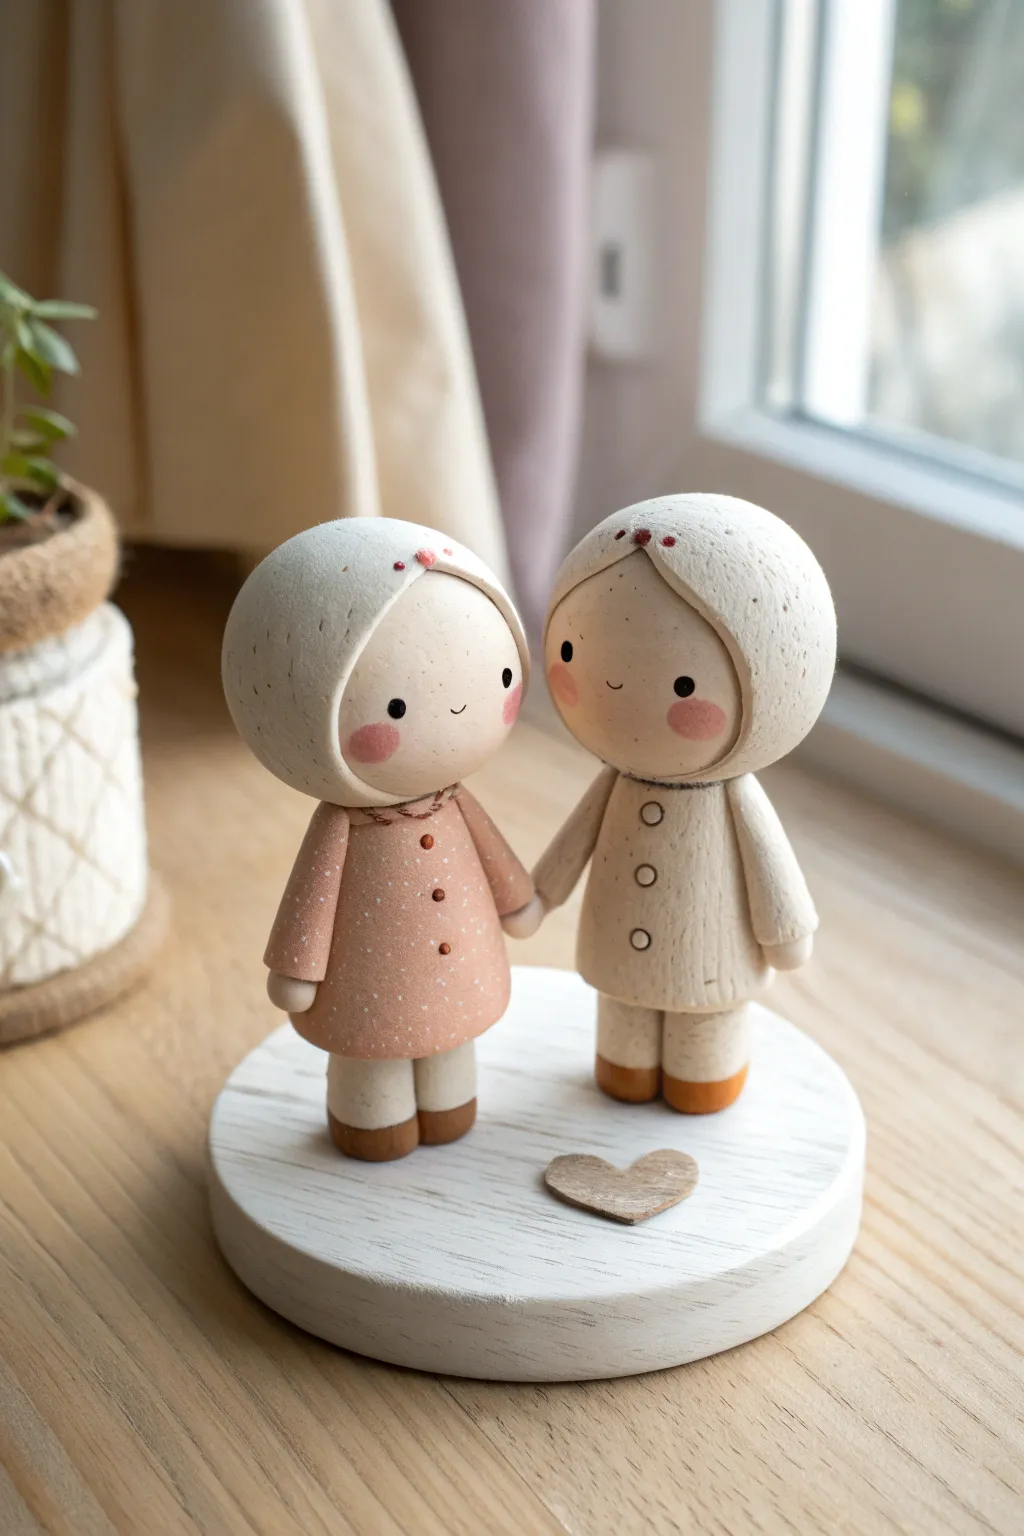
These adorable hooded figures are the perfect minimalist keepsake, featuring soft textures and a sweet hand-holding pose. Their rounded forms and speckled finish give them a charming, handmade ceramic look without needing a kiln.
Step-by-Step Guide
Materials
- Air-dry clay (stone or white)
- Acrylic paints (pale pink, cream, dark brown, rose)
- Fine-grit sandpaper
- Small styrofoam balls (optional, for head armature)
- Wooden circular base
- Needle tool or toothpick
- Old toothbrush (for speckling)
- Matte varnish
- Strong craft glue
- Small wooden heart cutout
Step 1: Sculpting the Bodies
-
Form the Base Shapes:
Start with two lumps of clay to create the bodies. Roll them into truncated cone shapes—flatter at the bottom and slightly tapered at the top. The ‘boy’ figure should be slightly straighter, while the ‘girl’ figure can have a slightly more A-line shape for her dress. -
Create the Legs:
Roll four small cylinders for the legs. Attach two to the bottom of each body piece using a dab of water and smoothing the seams. Keep the feet simple and rounded. -
Shape the Heads:
Roll two smooth spheres for the heads. To keep them lightweight, you can wrap a thin layer of clay around a small styrofoam ball. Ensure the surface is perfectly smooth by rolling it gently in your palms. -
Sculpt the Hoods:
Roll out a thin sheet of clay and cut two circles. Drape one over each head sphere, smoothing it down the back and sides to create a hood. Leave the face area exposed and circular. Blend the back of the hood into the neck area if you want a seamless look, or leave a slight overhang. -
Attach Heads to Bodies:
Insert a toothpick or wire into the neck of the body for support, then press the hooded head onto it. Use a little clay slurry (clay mixed with water) to bond them securely.
Cracks while drying?
Mix a tiny amount of fresh clay with water to make a paste. Fill the crack, smooth it over with a damp finger, and let it dry again before painting.
Step 2: Adding Details & Refining
-
Add the Arms:
Roll two small sausage shapes for each figure. Attach them to the sides of the bodies. Position the inner arms so they reach towards each other to hold hands. You can merge the clay at the ‘hand’ point to make the connection strong. -
Refine the Clothing:
Use a needle tool to gently imprint a vertical line down the center of the boy’s coat for the buttons. For the girl, flatten the bottom edge of her coat slightly to create a hemline. -
Smooth and Dry:
Wipe the figures down with a damp finger or sponge to remove fingerprints. Let the figures dry completely for 24-48 hours. I find rotating them occasionally helps them dry evenly.
Pro Tip: Blush Effect
Instead of paint, use real powder cosmetic blush for the cheeks. Apply it with a small Q-tip before sealing the clay for a very soft, natural gradient.
Step 3: Painting & Assembly
-
Sand for Texture:
Once bone dry, lightly sand the figures. You don’t want them perfectly plastic-smooth; a little texture adds to the stone-like effect. -
Base Coat Painting:
Paint the girl’s outfit a soft, dusty pink and the boy’s outfit a warm cream or oatmeal color. Paint the hoods and heads the same cream color, or slightly lighter. -
Adding the Speckles:
Dilute a tiny amount of brown paint with water. Dip an old toothbrush in it and flick the bristles with your thumb to spray fine speckles over the dried paint. This mimics a ceramic glaze finish. -
Painting the Faces:
Use the handle end of a paintbrush dipped in black or dark brown to dot on the wide-set eyes. Add rosy cheeks using a dry brush with a tiny amount of pink paint, swirling gently. Add a tiny curved line for the smile. -
Painting Details:
Paint small brown circles for the buttons on both coats. Add tiny white dots to the girl’s dress for a polka-dot pattern. -
Prepare the Base:
Paint your wooden circular base with a whitewash (white paint mixed with water) so the wood grain shows through slightly. -
Final Assembly:
Glue the wooden heart cutout to the base first. Then, use strong craft glue to attach the figures to the base, standing side-by-side with their joined hands centered.
Seal your charming couple with a matte varnish to protect that faux-ceramic finish for years to come


Hugging Bear Couple Mini Sculptures
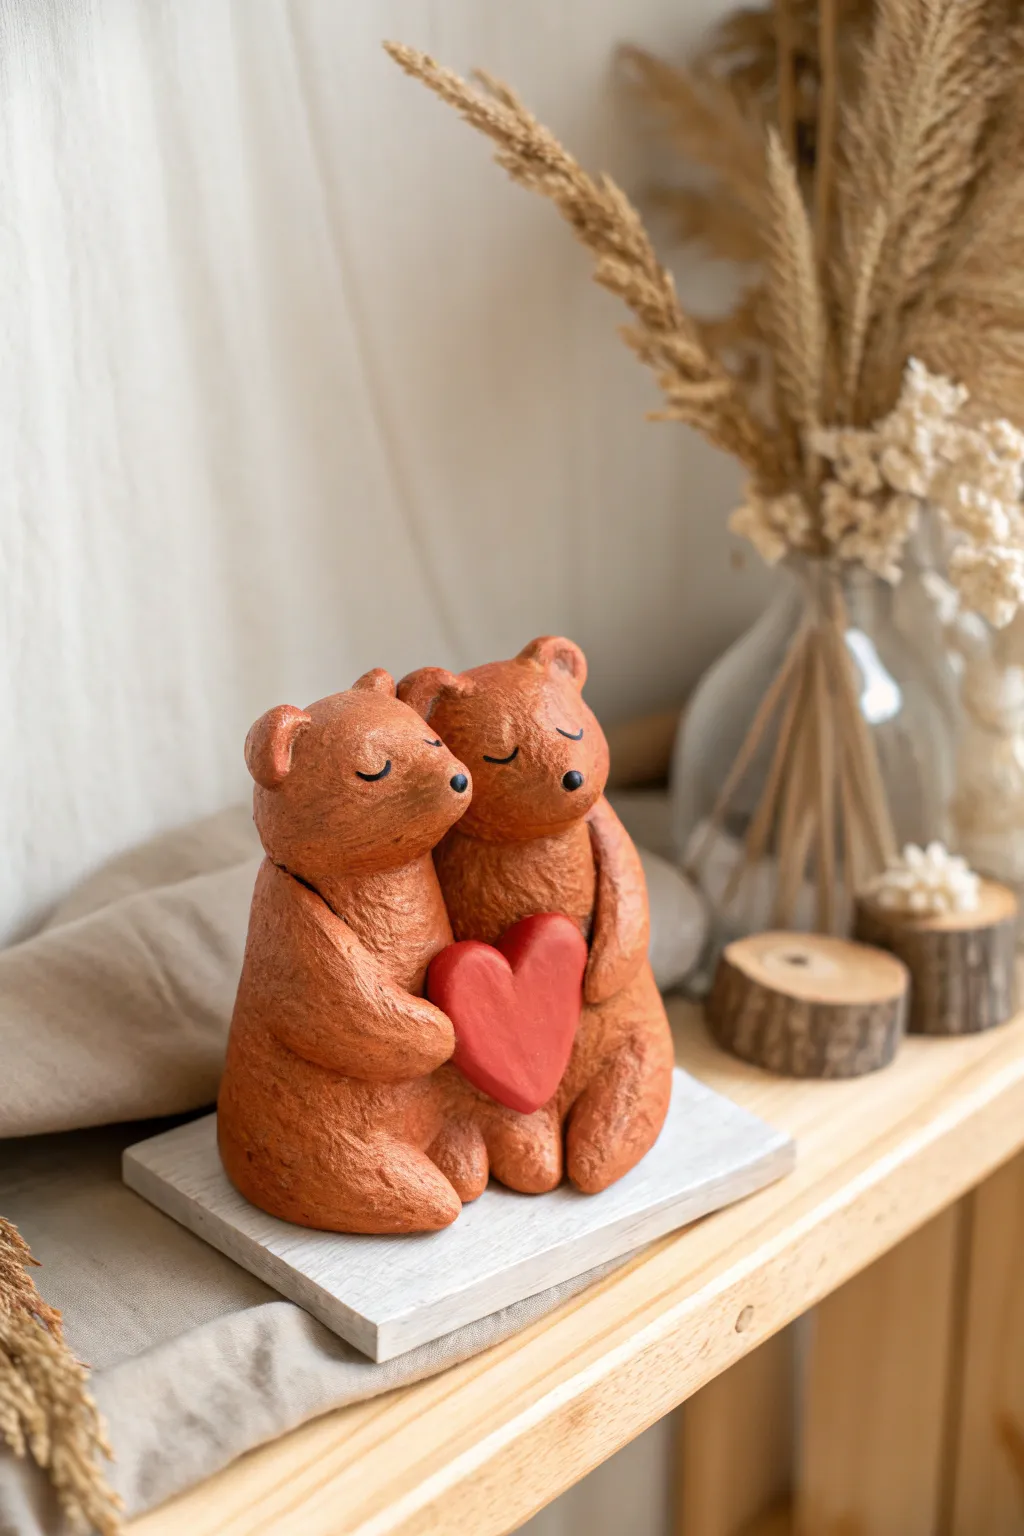
This heartwarming sculpture features two stylized bears sharing a quiet moment while holding a vibrant red heart between them. The textured, terracotta-style finish gives the piece a rustic, handmade charm perfect for a mantle or bookshelf display.
Step-by-Step
Materials
- Air-dry clay or polymer clay (white or terracotta colored)
- Acrylic paints (terracotta/burnt sienna, dark brown, bright red, black)
- Sculpting tools (needle tool, ball stylus)
- Aluminum foil (for armatures)
- Toothbrush or stiff bristle brush (for texturing)
- Paintbrushes (flat brush and fine detail brush)
- Water based varnish (matte or satin)
- Small rectangular wooden base
- White acrylic paint (for the base)
- Water cup and paper towels
Step 1: Forming the Base Structure
-
Create foil cores:
To save clay and reduce weight, scrunch two balls of aluminum foil into pear shapes. One should be slightly larger than the other to represent the different bear sizes. These will form the main bodies. -
Cover with clay:
Roll out a sheet of your clay to about 1/4 inch thickness. Wrap the clay around each foil core, smoothing the seams completely with a bit of water or baby oil until you have two smooth, pear-shaped mounds. -
Shape the heads:
Pinch and gently pull the top of each pear shape to define a head area. You want a seamless transition from the body to the head, avoiding a distinct neck for that cute, chunky look. -
Position the bears:
Press the two bodies together side-by-side. Lean them slightly inward so their heads touch affectionately. Press the bottoms onto a flat surface to ensure they sit stably.
Step 2: Adding Details and Limbs
-
Attach the ears:
Roll four small balls of clay. Flatten them slightly and press them onto the sides of the heads. Use a ball stylus or the end of a paintbrush handle to create the indents within the ears. -
Form the snouts:
Add a small, flattened oval of clay to the front of each face for the snout area. Smooth the edges into the main head shape so it protrudes just slightly. -
Sculpt the legs:
Roll two thick logs of clay for the outer legs. Attach one to the outer side of each bear, blending the clay at the hip and curving the foot forward. The bears’ inner legs can be omitted as they are hidden by the hugging pose. -
Create the arms:
Roll two sausage shapes for the arms. Attach them at the shoulder area, bending them forward as if they are reaching for something in the center of their chests. -
Insert the heart:
Shape a plump heart from a piece of clay. Press it firmly between the two bears’ chests. Carefully mold the bears’ hands (the ends of the arm coils) to curve over the edges of the heart, securing it in place.
Texture Secret
If you don’t have a stiff brush, a ball of crinkled aluminum foil pressed repeatedly into the raw clay creates fantastic, random fur texture.
Step 3: Texturing and Finishing
-
Apply fur texture:
This is crucial for the rustic look. I like to use an old toothbrush or a stiff stipple brush to tap firmly all over the bears (avoiding the heart). This creates a rough, stone-like or furry texture. -
Refine facial features:
Use a needle tool to gently scribe two curved, sleeping eye lines on each bear. Add a tiny ball of clay for the nose tip on each snout. -
Dry the sculpture:
Allow the clay to dry completely according to the package instructions. If using air-dry clay, this might take 24-48 hours given the thickness. -
Paint the base coat:
Paint the bears with a mix of burnt sienna and a touch of dark brown to create that warm terracotta color. Paint the heart a solid, bright red. -
Add dimension:
Once the base coat is dry, use a ‘dry brush’ technique with a lighter orange-brown to highlight the raised texture of the fur. Use a fine brush to paint the noses and the sleeping eye lines black. -
Prepare the wooden base:
While the paint sets, take your small wooden rectangle and paint it white. You can create a ‘whitewash’ effect by watering down the acrylic paint slightly so the wood grain shows through. -
Final assembly:
Glue the finished bear sculpture securely onto the center of the painted wooden base. Seal the clay with a matte varnish to protect the paint job.
Personalize It
Carve initials or a special date into the back of the clay heart or the wooden base before the paint dries for a memorable anniversary gift.
Place your adorable bear couple on a shelf where they can spread a little love every day

The Complete Guide to Pottery Troubleshooting
Uncover the most common ceramic mistakes—from cracking clay to failed glazes—and learn how to fix them fast.
Cuddly Cat Couple With Tails Making a Heart
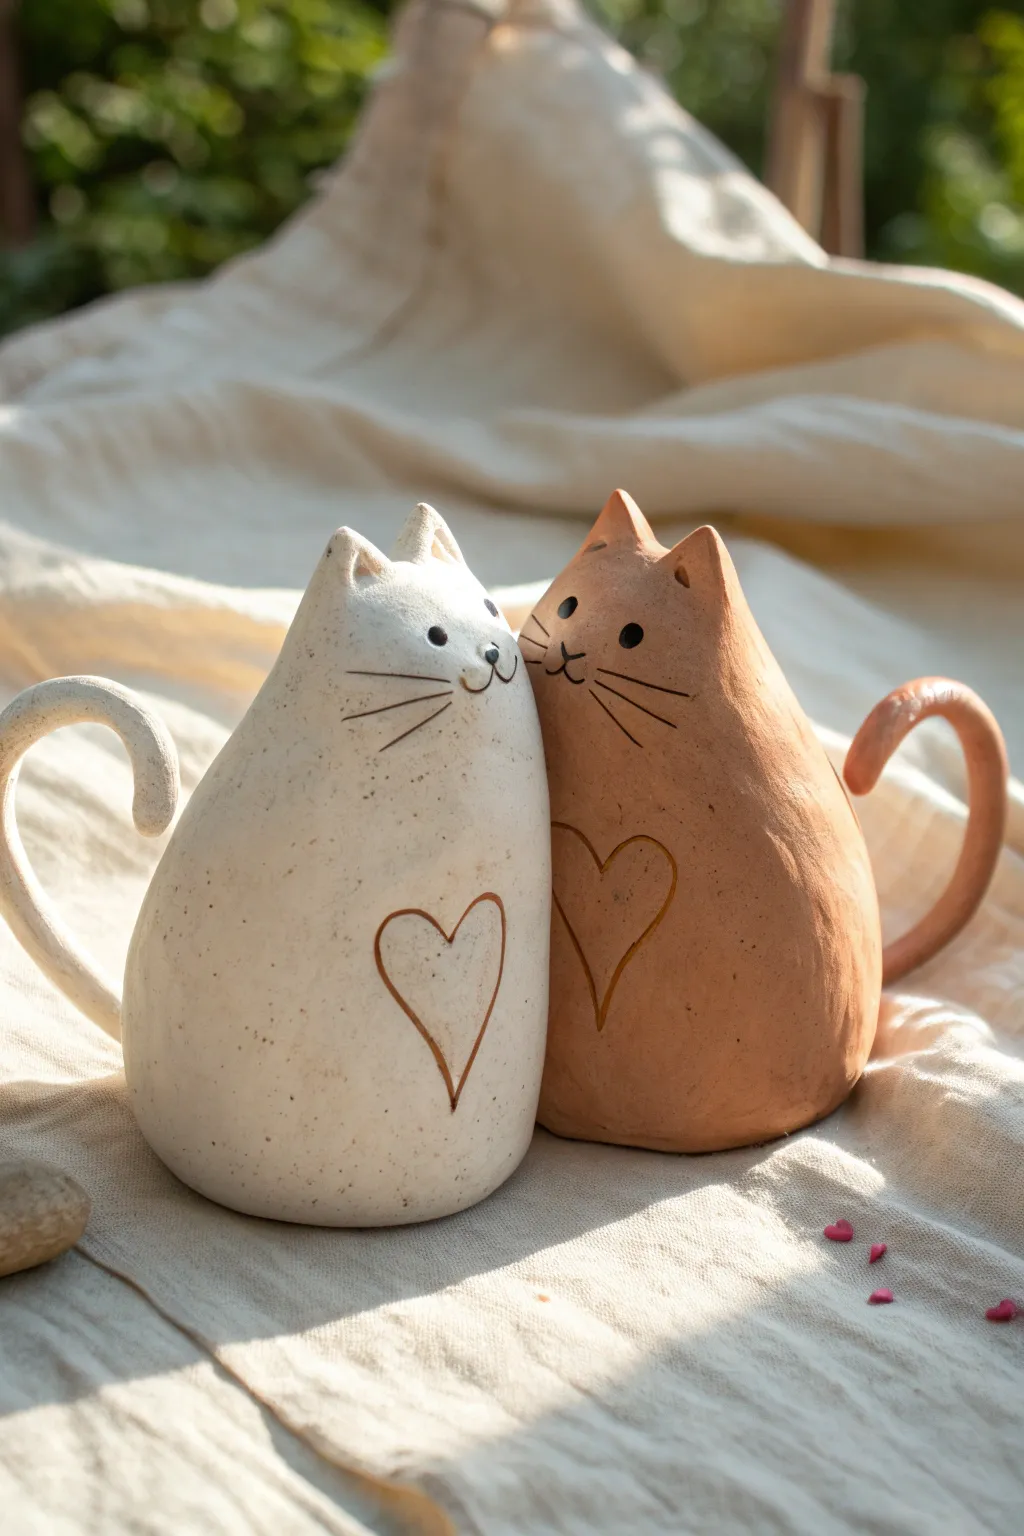
Celebrate affection with this adorable pair of handmade clay cats, perfect for a shelf or mantelpiece. With their gently speckled finish and swooping tails, these minimalist felines snuggle together to create a heartwarming display.
How-To Guide
Materials
- Speckled cream clay body (stoneware or polymer)
- Terracotta or red-brown clay body
- Rolling pin
- Pointed sculpting tool or needle tool
- Slip and scoring tool (if using ceramic clay)
- Sponge and water
- Black underglaze or acrylic paint (for details)
- Fine detail paintbrush
- Clear matte glaze or varnish
Step 1: Shaping the Bodies
-
Prepare the clay:
Begin by wedging both your speckled cream clay and your terracotta clay separately to remove any air bubbles. You will need roughly a fist-sized ball for each cat. -
Form the base cone:
Take the cream clay and roll it into a smooth ball, then gently taper the top half to form a rounded cone shape. The base should be wide and stable, while the top will become the head. -
Sculpt the ears:
Instead of attaching separate ears, pinch the top of the cone upwards. Use your thumb and forefinger to pull two small triangles from the clay itself, smoothing the area between them to create the forehead. -
Create the second cat:
Repeat the previous steps with the terracotta clay. Try to make this cat roughly the same height and width so they look like a matched set when placed together. -
Refine the shape:
With a damp sponge (for ceramic) or your finger (for polymer), smooth out any fingerprints. The bodies should be predominantly round and teardrop-shaped, leaning slightly toward each other.
Smooth Seams
When attaching the tail, use a small coil of clay around the connection point and blend it outward. This reinforcement prevents cracks during drying.
Step 2: Adding Tails & Details
-
Roll the tails:
Roll out two clay snakes, one in each color. These should be thick enough to support their own weight but taper slightly at the ends. -
Attach the cream tail:
Score and slip the back of the cream cat (or use liquid clay for polymer). Attach the thick end of the tail near the base. Curve it upwards and outwards in a large loop. -
Attach the terracotta tail:
Attach the terracotta tail in the same manner. Position it so that when the cats sit side-by-side, the two tails curve away from each other symmetrically, resembling mug handles. -
Carve the hearts:
Using your needle tool or a small carving loop, gently etch a simple heart outline onto the chest of each specific cat. The lines should be deep enough to see but not cut through the wall. -
Add facial features:
Before baking or firing, you can lightly impress the eyes and nose area if you want a guide. Otherwise, ensure the face area is very smooth and clean.
Interlocking Love
Make the tails longer and curve them inwards toward each other so that when the cats sit together, the negative space between the tails forms a heart.
Step 3: Finishing Touches
-
Fire or bake:
Follow the curing instructions for your specific material. If using ceramic stoneware, bisque fire the pieces now. -
Paint the whiskers:
Dip a fine detail brush into black underglaze (or acrylic if post-baking polymer). Carefully paint three whiskers on each cheek, a small triangular nose, and two curved lines for the mouth. -
Define the eyes:
Dot two small black circles for the eyes. I find that placing them slightly wide apart gives them that innocent, sweet expression shown in the reference. -
Highlight the heart:
Use a darker brown or copper oxide wash to fill the carved heart lines, wiping away the excess so the color only remains in the recessed grooves. -
Final glaze:
Apply a clear matte glaze to the entire surface to seal the paint and clay. If using ceramics, fire the pieces a final time to vitrify the clay and set the glaze.
Place these sweet felines on a sunny windowsill where their charming expressions can greet you every day
Avocado Soulmates With a Shared Heart Pit

Sculpt the perfect pair of avocado halves that fit together as sweetly as you and your partner. These glossy, pastel-green figurines feature charming closed-eye expressions and a delightful detail where one avocado’s pit holds a secret heart.
Step-by-Step
Materials
- Polymer clay (avocado green, brown, translucent/white for mixing)
- Acrylic paints (black, pink, red)
- Gloss varnish or resin
- Aluminum foil
- Sculpting tools (ball styluses, needle tool)
- Smooth work surface/ceramic tile
- Fine grit sandpaper
- Small paintbrush
Step 1: Creating the Avocado Bodies
-
Form the foil cores:
Crumple aluminum foil into two pear shapes—one slightly larger than the other—to save clay and reduce baking weight. Compress the foil tightly so there are no large air pockets. -
Prepare the green clay:
Condition your avocado green polymer clay until it’s soft and pliable. If the green is too dark, I like to mix in a little translucent or white clay to achieve that creamy, pastel avocado shade seen in the photo. -
Cover the cores:
Roll the green clay into a sheet about 1/4 inch thick. Wrap the clay completely around your foil bases, smoothing the seams together with your fingers until invisible. -
Shape and smooth:
Roll the covered forms gently on your work surface to create a smooth, pear-like silhouette. Taper the top slightly more than the bottom to mimic a real avocado shape. -
Flatten the base:
Gently tap the bottom of each avocado against your work surface so they can stand upright independently without wobbling.
Smooth Operator
Before baking, lightly brush the unbaked clay with a little extensive baby oil or clay softener. This melts away fingerprints and creates a flawlessly smooth surface.
Step 2: Adding Pits and Details
-
Indent the bellies:
Use a large ball tool or your thumb to press a circular indentation into the lower center of each avocado’s belly. This is where the seed will sit. -
Shape the seeds:
Roll two balls of brown clay. Flatten them slightly into domes that fit snugly into the indentations you just made. Press them in ensuring the edges adhere well to the green body. -
Create the heart pit:
On the smaller avocado, use a small sculpting tool to gently carve a shallow heart shape directly into the center of the brown pit. -
Form the accessory heart:
With leftover white or light tan clay, cut out a small heart shape to create the little accessory piece shown near the base. Press a tiny red clay heart into its center, or save this step for painting later. -
Create the tops:
Use a needle tool or small ball stylus to make a tiny indentation at the very peak of each avocado, simulating where the stem would attach. -
Initial bake:
Bake the pieces according to your polymer clay manufacturer’s instructions (usually 275°F/135°C for 15-30 minutes). Let them cool completely.
Step 3: Painting and Finishing
-
Paint the hidden heart:
Once cool, carefully paint the carved heart on the smaller avocado’s pit with bright red acrylic paint. Use a very fine brush to stay inside the lines. -
Paint the faces:
Using a thin detail brush and black acrylic paint, draw two downward-curving crescents for the closed eyes. Add a small ‘u’ shape for a sweet, simple smile. -
Add rosy cheeks:
Dip a stylus or the back of a paintbrush handle into pink paint. Dot two small circles onto the ‘face’ area, just below the outer corners of the eyes. -
Paint decorative hearts:
If desired, paint tiny red or pink hearts floating near the cheeks on the smaller avocado for extra cuteness. -
Seal with gloss:
Apply two or three coats of high-gloss varnish or UV resin. This is crucial for achieving that ceramic-like shine shown in the reference image. -
Final drying:
Allow the varnish to cure fully in a dust-free area before handling or displaying your new little couple.
Make Them Magnets
Embed small, strong neodymium magnets into the sides of the avocados before baking. This way, the two halves will physically snap together when placed side-by-side.
Place these sweet sculpted soulmates on a shelf or desk where they can always smile back at you


What Really Happens Inside the Kiln
Learn how time and temperature work together inside the kiln to transform clay into durable ceramic.
Strawberry and Cream “Perfect Match” Pair
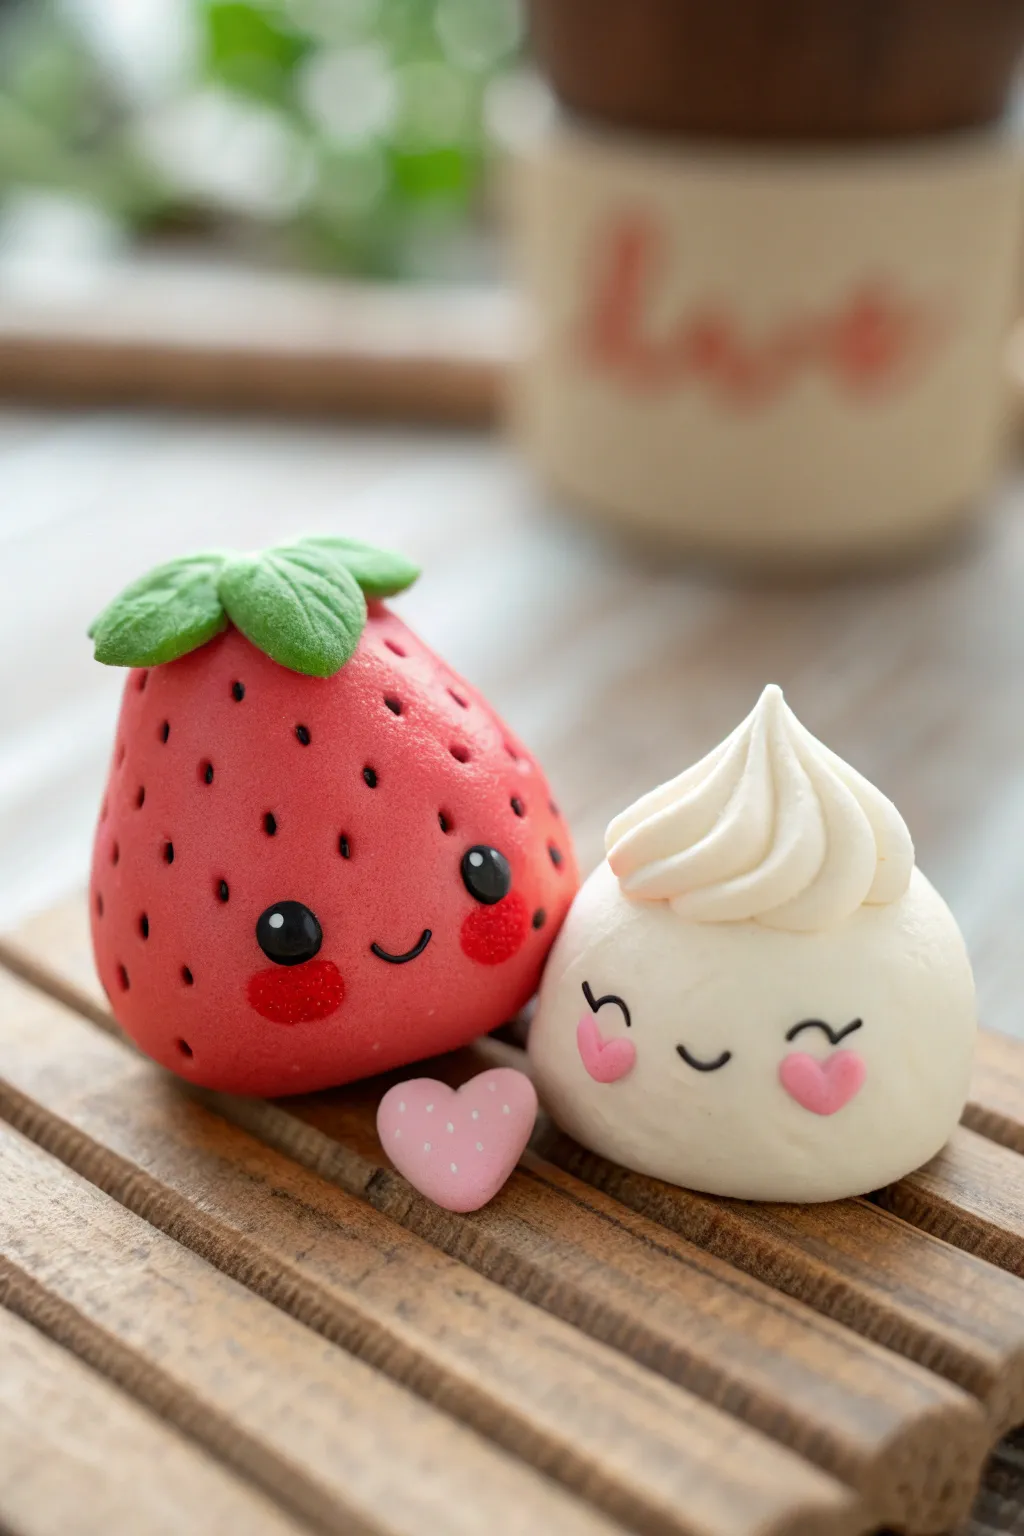
These adorable desk buddies prove that some things are just meant to be together. With their rosy cheeks and complementary shapes, this kawaii strawberry and cream dollop make the perfect beginner-friendly sculpting project.
Step-by-Step Guide
Materials
- Polymer clay (Red, White, Green, Black, Pink)
- Modeling tools (ball tool, needle tool)
- Acrylic rolling pin
- Liquid clay or bake and bond
- Soft pastel chalks (pink/red for blushing)
- Small paintbrush
- Aluminum foil (for core)
- Gloss glaze (optional)
Step 1: Shaping the Strawberry Body
-
Form the Base:
Start by conditioning your red clay until it’s soft and pliable. Roll a ball of aluminum foil about the size of a walnut to use as a core, which saves clay and helps with baking. -
Cover the Core:
Flatten your red clay into a sheet and wrap it completely around the foil ball. Smooth out any seams by gently rubbing them with your thumb until the surface is flawless. -
Refine the Shape:
Roll the red ball between your palms, applying slightly more pressure to the top to create a gentle taper. You want a rounded, soft triangular strawberry shape with a flattened bottom so it sits stable. -
Add Texture:
Using a needle tool or a small dotting tool, gently press tiny scattered indents all over the red surface. These mimic seed pockets; try not to make them too uniform for a more organic look.
Clean Clay Tip
White clay picks up lint easily. Use a piece of scotch tape to dab dust off your clay before baking, or wipe your hands with a baby wipe before handling the white cream section.
Step 2: Creating the Cream Dollop
-
Shape the Mochi Base:
Take a portion of white clay slightly smaller than your strawberry. Roll it into a smooth, slightly flattened ball (like a mochi or bun shape) that sits comfortably next to its partner. -
Twist the Top:
Roll a separate snake of white clay. Gently coil it on top of the base ball, tapering it to a point to mimic piped whipped cream. -
Texture the Swirl:
Technical note: Use a shaping tool to blend the bottom of the coil into the base so it looks like one piece. Then, use a needle tool to deepen the spiral grooves of the ‘piped’ section for better definition.
Step 3: Bringing Faces to Life
-
Indent Eye Sockets:
Use a medium-sized ball tool to press two innovative shallow indents on the front of both characters where the eyes will go. This helps the eyes sit flush rather than bugging out. -
Insert Strawberry Eyes:
Roll two tiny glossy black clay balls and press them into the strawberry’s sockets. Add a minuscule white speck of clay to each eye as a highlight. -
Draw the Faces:
For the cream character, roll very thin black snakes of clay. Curve them into ‘happy’ crescents for the eyes. Do the same for the mouth, placing a tiny ‘u’ shape between the eyes. -
Add Strawberry Smile:
Use a thin snake of black clay to create a simple, happy smile for the strawberry, centered just below the eyes. -
Rosy Cheeks:
Create the blush! For the strawberry, shape two small, flattened circles of darker red or pink clay and place them under the eyes. For the cream, shape tiny pink hearts instead.
Magnetize It
Before baking, press a strong neodymium magnet into the back of each figure. Bake them with the magnets embedded to turn this duo into adorable fridge magnets.
Step 4: Final Details & Baking
-
Leafy Crown:
Flatten a small piece of green clay. Cut out small teardrop shapes or use a mini leaf cutter. Arrange 3-4 leaves on top of the strawberry, pressing them down so they curve over the ‘shoulders’ of the fruit. -
Leaf Veins:
Use your needle tool to gently score a central vein down each green leaf for added texture. -
The Center Heart:
Roll a tiny bit of pink clay into a ball, flatten it, and indent the top to form a heart. Add three tiny white dots for detail. Place this loose heart between the two figures. -
Bake:
Place your figures and the heart on a ceramic tile or baking sheet. Bake according to your specific clay package instructions (usually 275°F/135°C for 15-30 minutes). I prefer to tent foil over them to prevent scorching. -
Finish:
Once cool, you can apply a tiny dot of gloss glaze to the black eyes and the heart cheeks to make them shine.
Enjoy displaying your sweet little pair on your desk or gifting them to your significant other
Mini Couple Mug Toppers With Tiny Faces
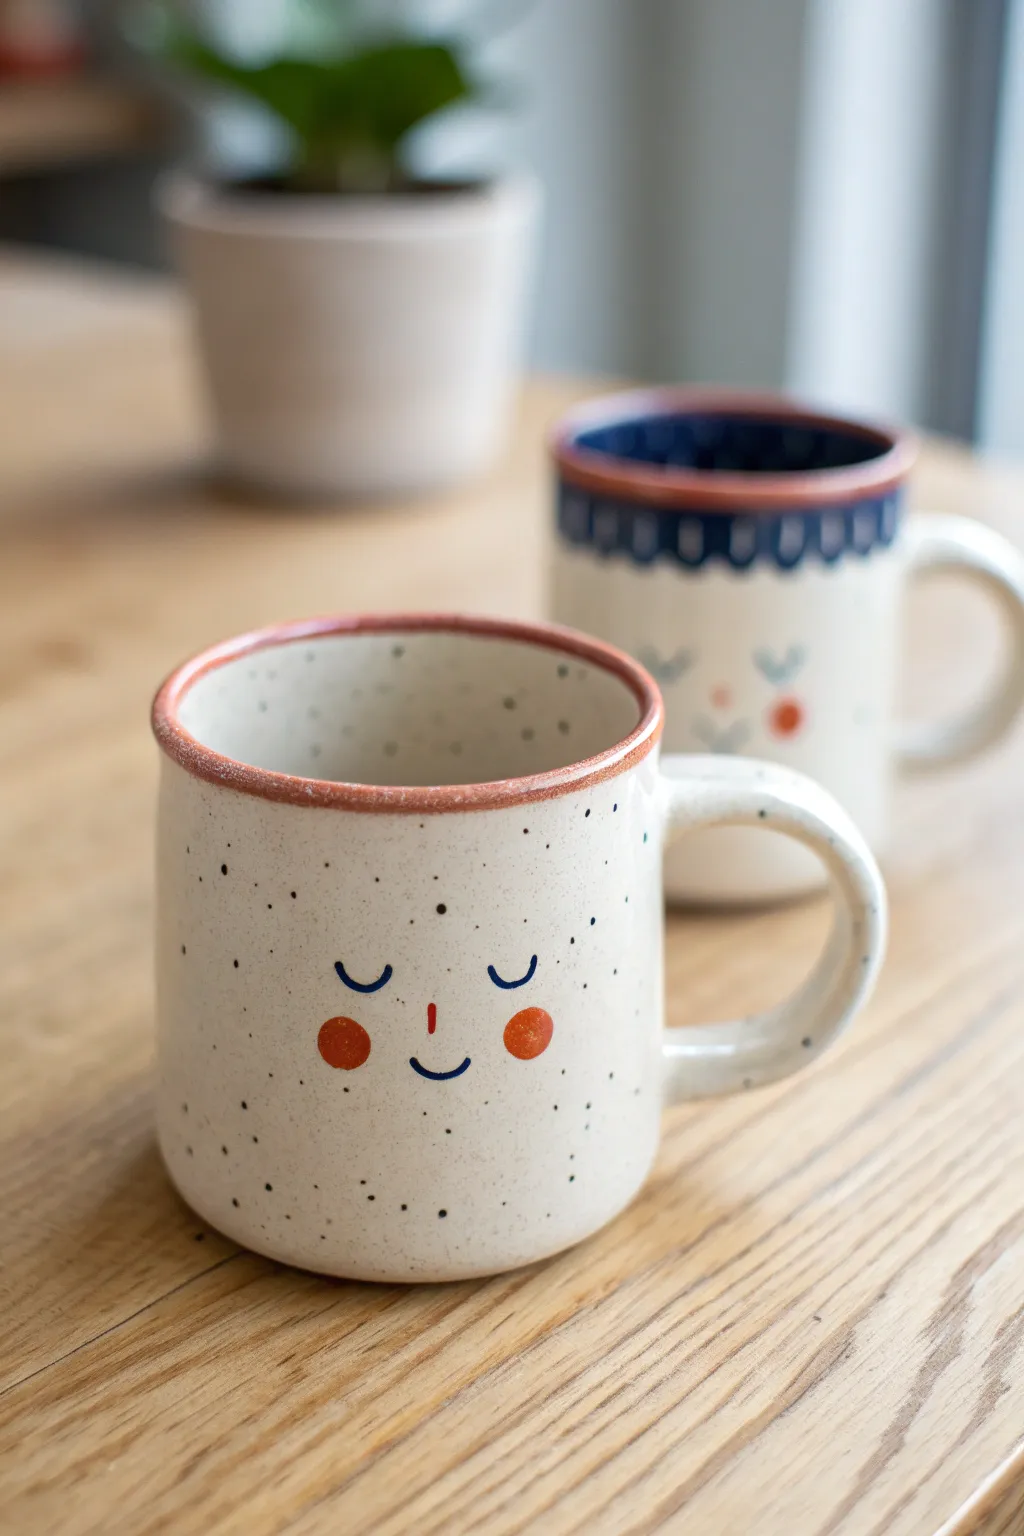
These adorable face mugs bring a charming personality to your morning routine with their speckled ceramic finish and sweet, sleepy expressions. The simple yet expressive painted features make them perfect for beginners looking to add character to their pottery collection without needing complex illustration skills.
How-To Guide
Materials
- Speckled stoneware clay (or beige clay with grog)
- Wheel throwing equipment (or hand-building tools: rolling pin, slab mat)
- Loop tool for trimming
- Modeling tool or rib
- Scoring tool and slip
- Sponge
- Underglazes: Navy Blue, Bright Orange-Red
- Fine detail brush (size 0 or 00)
- Small round brush (size 2)
- Clear transparent glaze (cone 5/6 or match your clay)
- Kiln
Step 1: Forming the Mug Body
-
Prepare your clay:
Begin by wedging your speckled stoneware clay thoroughly to remove air bubbles. Weigh out two equal balls of clay, approximately 1 lb each, to ensure your couple mugs are similar in size. -
Throw or build the cylinders:
If using a wheel, center the clay and pull a cylinder with straight walls, aiming for about 3.5 to 4 inches in height. If hand-building, roll a slab to 1/4 inch thickness, cut a rectangle, and form a cylinder, smoothing the seam invisible. -
Shape the rim:
Create a slightly thickened, rounded rim. This adds to the cozy aesthetic and makes it comfortable for drinking. Compress the rim with a chamois or sponge to prevent cracking. -
Refine the surface:
Use a rib tool to smooth the interior and exterior walls. For that distinct handmade look seen in the photo, ensure the walls aren’t perfectly mechanical; slight variations add charm. -
Trim the base:
Once the clay is leather hard, trim away excess weight from the bottom. Create a clean foot ring or a flat bottom depending on your preference, smoothing away any sharp trimming marks.
Speckle Magic
If you don’t have speckled clay, mix 2-3% granular manganese or ilmenite into plain white clay to get that ‘cookies and cream’ texture.
Step 2: Adding the Handle
-
Pull the handle:
Pull a strap of clay or roll a coil for the handle. Aim for a comfortable thickness that tapers slightly. Shape it into a ‘C’ or ear shape and let it set up until it holds its form but is still flexible. -
Attach the handle:
Score the mug body and the attachment points of the handle heavily. Apply slip to both areas. Press the handle firmly onto the mug, ensuring it sits straight. I usually attach the top handle joint about an inch below the rim. -
Reinforce the joints:
Use a small coil of clay around the connection points if needed, blending it seamlessly into the mug body and handle with a modeling tool or your thumb.
Smudged Lines?
If you mess up a painted line on raw clay, wait for it to dry completely, then gently scratch it off with a needle tool rather than wiping it wet.
Step 3: Painting the Faces
-
Sketch the design:
Lightly trace the face design onto the leather-hard clay with a needle tool or pencil. For the foreground mug: draw two downward curves for sleepy eyes, a tiny vertical dash for a nose, and a small upward curve for a smile. Mark two circles for cheeks. -
Paint the eyes and mouth:
Using a fine detail brush and navy blue underglaze, carefully paint over your traced eye lines and the small mouth smile. Keep the lines thin and uniform. -
Add the nose:
Dip just the tip of your detail brush into the orange-red underglaze. paint a small, precise vertical line for the nose right in the center. -
Create the rosy cheeks:
Switch to the small round brush. Load it with the orange-red underglaze and paint two solid circles for the cheeks. You may need two coats here to ensure the color is opaque against the speckled clay. -
Rim detail:
For the rim accent, thin your orange-red underglaze slightly with water. Use a steady hand or a banding wheel to paint a thin band along the very top edge of the rim. -
Alternative face design:
If making the background mug, paint a scalloped blue pattern around the top rim instead of a solid line, and add small blue ‘v’ shapes for open eyes or eyelashes. -
Bisque fire:
Allow the mugs to dry completely. This usually takes a few days. Once bone dry, load them into the kiln for a bisque firing (usually cone 04 or 06).
Step 4: Glazing and Finishing
-
Clean the bisque:
Wipe the bisqued mugs with a damp sponge to remove any dust, which can cause glaze defects. -
Apply clear glaze:
Dip the entire mug into a clear, transparent glaze. A dipping glaze works best for an even coat. Shake gently to remove excess drips. -
Clean the foot:
Wipe the bottom of the mug and the foot ring completely clean of glaze with a wet sponge to prevent it from sticking to the kiln shelf. -
Final Fire:
Fire the mugs to the maturation temperature of your clay and glaze (typically cone 5 or 6 for stoneware). This will melt the glaze and bring out the speckles in the clay body.
Once cooled, fill your new handmade mugs with coffee or tea and handle them with pride.

TRACK YOUR CERAMIC JOURNEY
Capture glaze tests, firing details, and creative progress—all in one simple printable. Make your projects easier to repeat and improve.
Lovebird Couple Sitting on a Heart Base
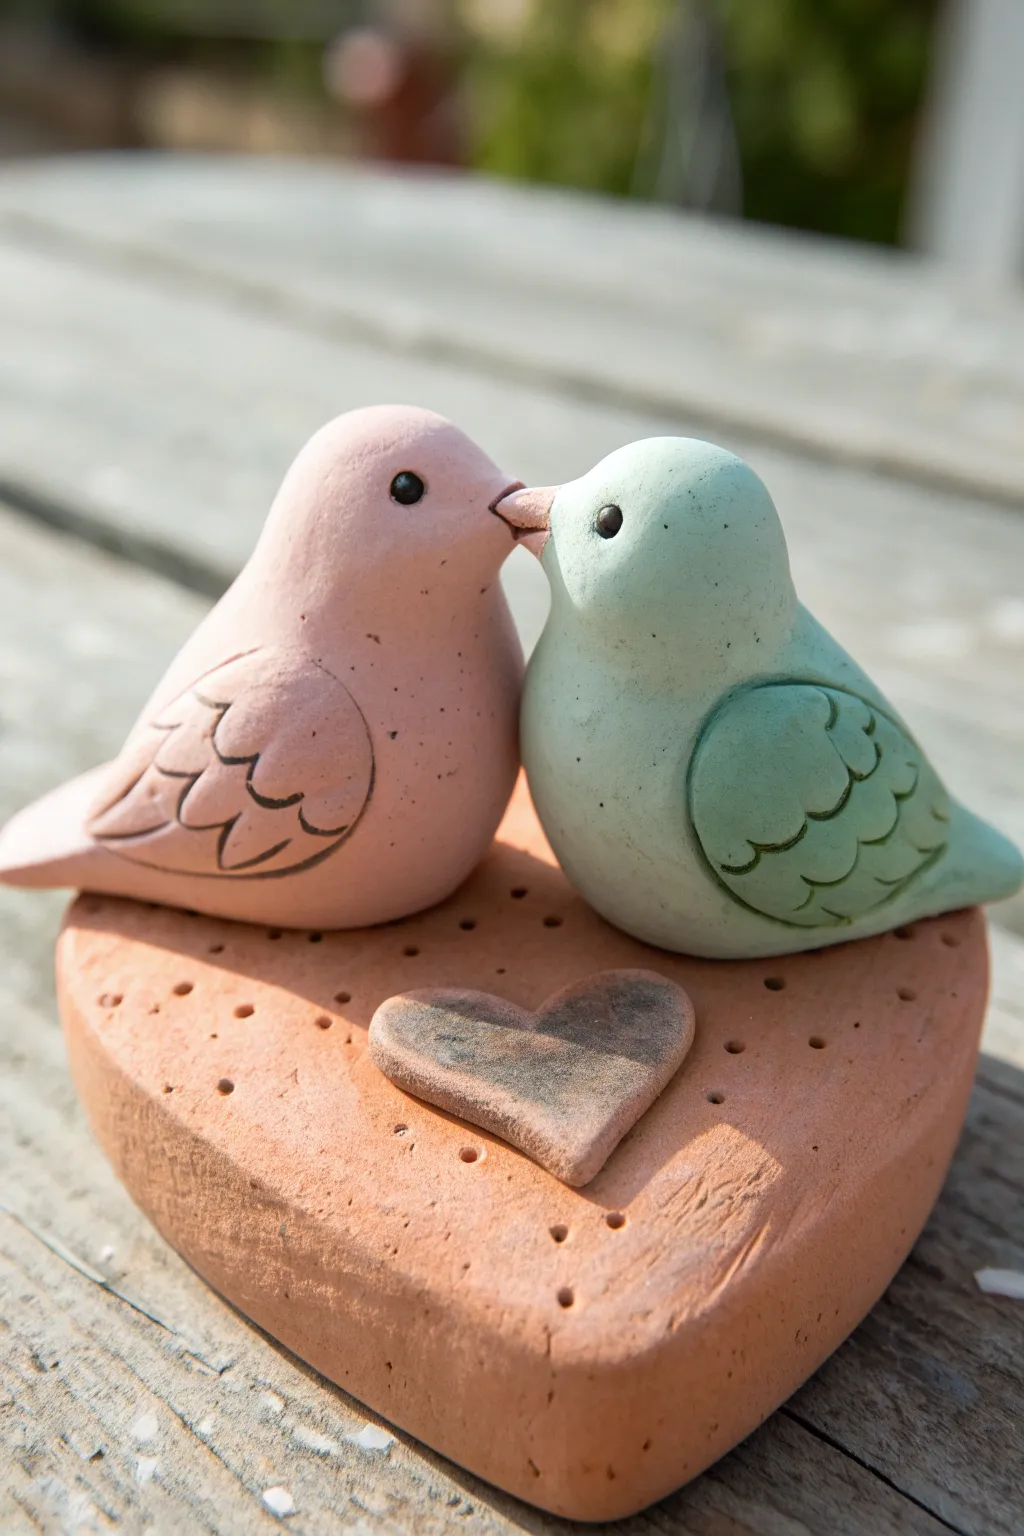
Capture a sweet moment of affection with this charming clay project featuring two kissing lovebirds perched atop a rustic heart base. The gentle pastel pink and teal tones create a lovely contrast against the warm terracotta-colored stand, making it a perfect keepsake or gift.
Step-by-Step
Materials
- Polymer clay or air-dry clay (terracotta color for base, white for birds)
- Acrylic paints (pastel pink, pastel teal, black, brown)
- Small rolling pin
- Heart-shaped cookie cutter (large)
- Needle tool or toothpick
- Modelling tools (blending tool, small knife)
- Clay adhesive or score-and-slip slurry (if using air-dry)
- Fine grit sandpaper
- Matte varnish or sealant
Step 1: Creating the Rustic Base
-
Roll the base slab:
Begin by conditioning your terracotta-colored clay until it’s pliable. Roll it out into a slab that is approximately 1/2 inch thick to provide a sturdy foundation. -
Cut the heart shape:
Use your large heart-shaped cookie cutter to press out the main platform. Smooth the edges with your finger to remove any harsh cutting lines. -
Add texture:
Using a needle tool or the blunt end of a toothpick, randomly poke small holes across the surface of the heart base to create a porous, stone-like texture. -
Create the mini heart:
Shape a very small, flat heart from a scrap of clay. Since this piece sits loose on top, you can texture it slightly or leave it smooth, but ensure it’s proportional to fit comfortably in front of where the birds will sit.
Unwanted Fingerprints?
Before baking polymer clay, lightly brush the surface with a tiny amount of baby oil or cornstarch. This helps smooth out fingerprints without ruining the detail.
Step 2: Sculpting the Birds
-
Form the bodies:
Take two equal balls of white clay (about the size of a walnut). Roll each into a teardrop shape. -
Shape the heads:
Gently pinch and stroke the rounded end of the teardrop to distinguish a head shape, curving the tapered end up slightly to form the tail. -
Define the beaks:
Pinch the very front of the face to pull out a small, triangular beak. Keep the beaks slightly open or pointed appropriately so they can ‘kiss’ when placed together. -
Sculpt the wings:
Roll two smaller teardrops of clay for each bird and flatten them. Press these onto the sides of the bodies to form wings. -
Add wing details:
Using a needle tool or small knife, gently carve three scallops or ‘U’ shapes into the bottom of the wings to simulate feathers. -
Dry fit the pose:
Place the two birds on the base facing each other so their beaks touch. Adjust their posture until they look natural, then set them aside.
Add a Personal Touch
Carve your initials and a ‘+’ sign into the small loose heart (like ‘A + B’) before baking to turn this cute decoration into a customized anniversary gift.
Step 3: Assembly and Baking
-
Attach the birds:
If using polymer clay, press the birds firmly onto the base to bond them. I find a little liquid clay helps here. If using air-dry clay, score the bottom of the birds and the base, add a little water or slip, and press down. -
Place the small heart:
Position the small clay heart on the base in front of the birds. -
Final texture check:
Look over your piece; if handling the clay smoothed out your bird’s feather details or the base texture, re-carve them now. -
Cure the clay:
Bake (for polymer) or air-dry your piece strictly according to the manufacturer’s package instructions.
Step 4: Painting and Finishing
-
Base coat the birds:
Paint one bird entirely in pastel pink and the other in pastel teal. Depending on your paint opacity, you may need two thin coats. -
Highlight the wings:
Use a slightly darker shade of pink and teal (or water down some grey/brown paint) to fill in the carved lines on the wings, wiping away excess so the dark color only stays in the grooves. -
Add facial features:
Using the smallest detail brush or a toothpick end, dot a tiny black eye onto each bird. -
Paint the small heart:
Paint the small loose heart in a dusty grey-brown, giving it a weathered look to contrast with the colorful birds. -
Seal the project:
Once all paint is completely dry, apply a coat of matte varnish to protect the surface without adding unnatural shine.
Now you have a timeless symbol of affection to brighten your shelf or gift to a loved one
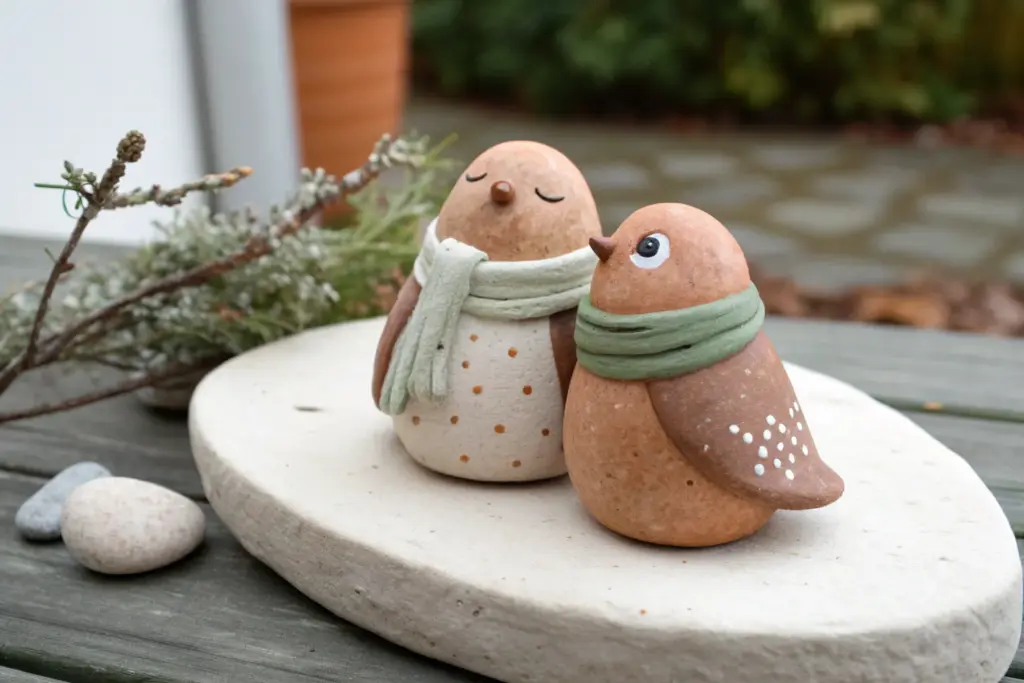
Penguin Couple With a Shared Scarf
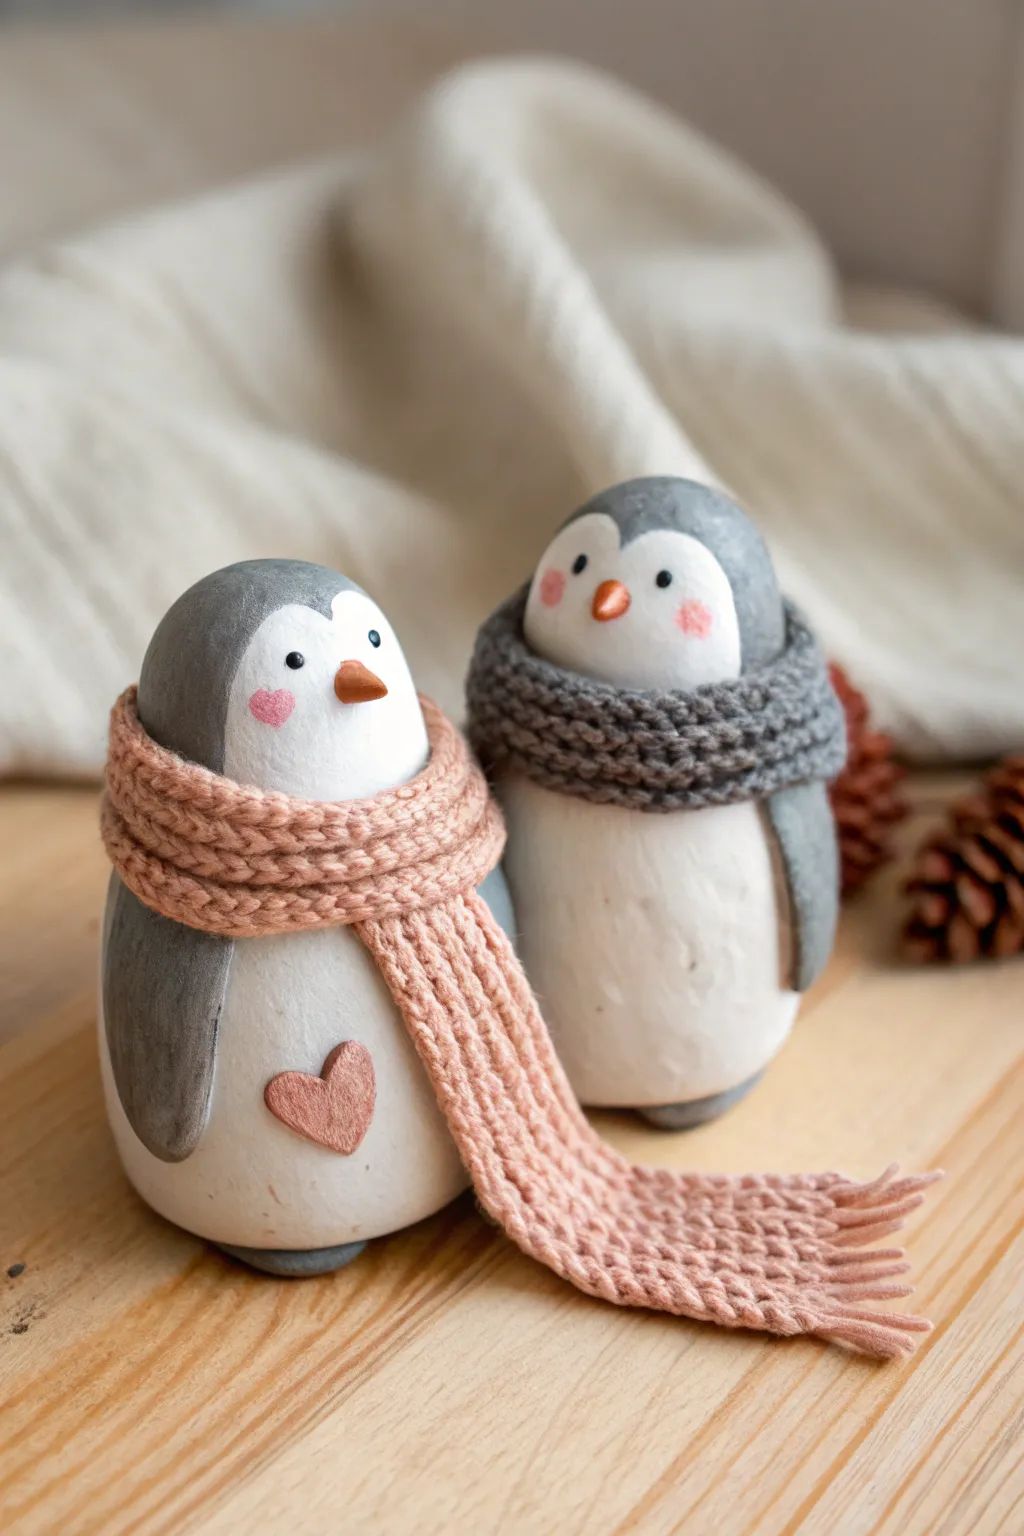
These adorable desk buddies bring a touch of winter warmth with their textured clay bodies and cozy knit-effect scarves. The simple shapes make this an accessible project for beginners, while the painted details add a sweet, personalized character.
How-To Guide
Materials
- White polymer clay (approx. 2 blocks)
- Grey polymer clay
- Orange polymer clay (small amount for beaks)
- Pink polymer clay (for scarf and cheeks)
- Dark grey polymer clay (for scarf)
- Acrylic paints (black, white, pink)
- Basic sculpting tools (needle tool, ball stylus)
- Fine detail paintbrush
- Aluminum foil (for armature)
- Sandpaper (fine grit)
- Matte varnish (optional)
Step 1: Shaping the Bodies
-
Create the core:
Ball up two pieces of aluminum foil into rough egg shapes, one slightly taller than the other. This saves clay and makes the figures lighter. -
Condition the white clay:
Knead your white polymer clay until it is soft and pliable. Roll it into a sheet about 1/4 inch thick. -
Cover the armature:
Wrap the white clay sheet around your foil eggs. Smooth the seams completely with your thumb so the surface is seamless and resembles a smooth, upright egg. -
Flatten the base:
Gently tap the bottom of each egg on your work surface to create a flat base so the penguins stand up straight without wobbling.
Texturing Tip
For an even deeper knit texture, gently roll a needle tool perpendicular across your twisted clay ropes before attaching them.
Step 2: Adding Markings and Appendages
-
Create the grey hood:
Roll out the grey clay thinly. Cut a large oval shape and drape it over the back and top of the penguin’s head, leaving the face area white. -
Smooth the transition:
Use a modeling tool or your finger to blend the grey clay edges into the white body so it looks like markings rather than a separate layer. -
Form the wings:
Shape two teardrop pieces of grey clay. Flatten them slightly and attach them to the sides of the body, curving them to hug the penguin’s belly. -
Add the beak:
Roll a tiny cone of orange clay. Press it gently into the center of the face area. You can curve it slightly downwards for a cute expression. -
Sculpt the heart detail:
For the left penguin, take a tiny piece of pink clay (or paint it later) and shape a small, flat heart. Press it onto the chest area.
Step 3: The Knit Scarf Technique
-
Prepare scarf strands:
Extrude or roll very thin snakes of pink clay. Twist two strands together tightly to create a rope look. -
Build the texture:
Lay these twisted ropes side-by-side to form a flat strip. This mimics the look of a chunky knit sweater. Repeat this process with dark grey clay for the second scarf. -
Wrap the penguins:
Drape the textured strips around the penguins’ necks. For the pink one, let the ends trail down dramatically to the table surface. -
Add fringe:
Cut tiny individual bits of clay snakes and attach them to the ends of the scarf to simulate fringe tassels.
Fixing Fingerprints
Before baking, lightly brush the white clay with a tiny bit of baby oil or cornstarch to smooth out any accidental fingerprints.
Step 4: Baking and Painting
-
Bake the figures:
Bake the penguins according to your clay manufacturer’s instructions (usually 275°F/130°C for 15-30 minutes). Let them cool completely. -
Paint the eyes:
Using a very fine dotting tool or toothpick end, dip into black acrylic paint and place two small dots for eyes wide apart on the face. -
Add rosy cheeks:
Dry brush a tiny amount of pink paint onto the cheeks. I find dabbing most of the paint off onto a paper towel first gives the softest blush effect. -
Finish the heart:
If you didn’t use colored clay, paint the raised heart on the chest a soft, dusty pink. -
Seal the work:
Once all paint is dry, apply a coat of matte varnish to protect your new friends and give them a professional, low-sheen finish.
Place these cozy little friends on a shelf or gift them to your significant other as a sweet keepsake.
Tiny Octopus Couple With Coordinated Colors
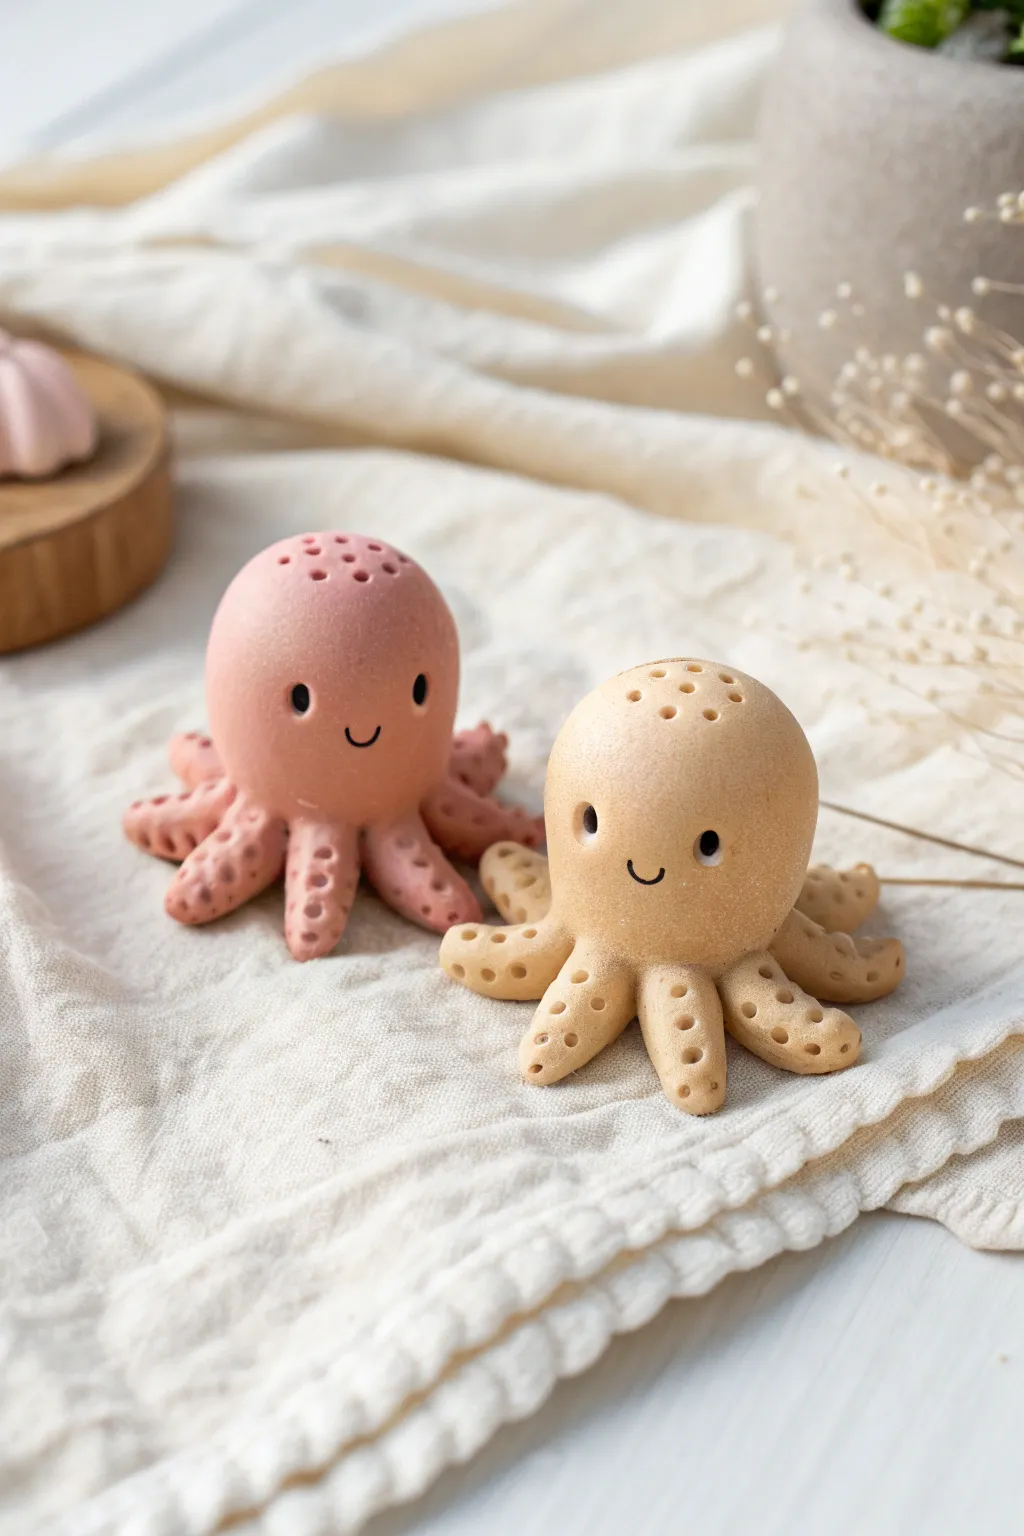
These adorable desktop companions bring a touch of ocean whimsy to your space with their smooth matte finish and cheerful expressions. Sculpted from polymer clay in complementary dusty rose and sandy beige tones, this project is perfect for beginners looking to practice simple shapes and facial details.
Step-by-Step Tutorial
Materials
- Polymer clay (Dusty Rose/Pink)
- Polymer clay (Sandy Beige/Yellow Ochre)
- Black acrylic paint or black polymer clay (very small amount)
- Needle tool or toothpick
- Ball stylus tool (small and medium sizes)
- Clean work surface (ceramic tile or glass)
- Oven for baking
- Aluminum foil
- Soft paintbrush
Step 1: Forming the Body Bases
-
Condition the clay:
Begin by kneading your pink and beige clay separately until they are soft and pliable. Warm clay prevents cracking later on. -
Roll the main shapes:
Create two large spheres, one of each color, about the size of a golf ball or slightly smaller. These will become the heads. -
Smooth the surface:
Roll the spheres gently between your palms to ensure there are absolutely no seams or fingerprints. A smooth start is crucial for that matte, finished look. -
Shape the head dom:
Slightly elongate the spheres so they look a bit like an egg, but keep the top very rounded. This forms the classic octopus head shape.
Smudged Eye Fix
If black clay smudges onto the light face during application, use a Q-tip dipped in rubbing alcohol or nail polish remover to gently wipe the stain away before baking.
Step 2: Creating Tentacles
-
Portion the legs:
For each octopus, roll out eight smaller balls of matching clay. Try to keep them consistent in size, roughly peanut-sized. -
Shape the tapered logs:
Roll each small ball into a tapered log or cone shape. One end should be thicker (to attach to the body) and the other slightly pointy. -
Attach the first legs:
Turn the head upside down. Press four legs onto the base in a cross pattern (north, south, east, west). Blend the seams where the clay meets the head using your thumb or a smoothing tool. -
Fill in the gaps:
Place the remaining four legs in the spaces between the first four. Again, blend the clay upwards into the head so the connection is seamless and strong. -
Position the pose:
Turn the octopus right-side up. Gently curl the tips of the tentacles upward or outward to create movement. They shouldn’t lie perfectly flat; give them a little wave.
Step 3: Adding texture and Details
-
Texture the tentacles:
Using a small ball stylus or the blunt end of a toothpick, press small indentations along the tops of the tentacles to mimic suction cups. I like to do two rows of tiny dots or one row of larger ones. -
Add head details:
On the very top of each head, use a needle tool to gently poke a cluster of tiny holes for a decorative, porous texture. -
Create eye sockets:
Use a medium ball tool to press two indentations into the face area where you want the eyes to sit. Place them wide apart for maximum cuteness. -
Insert the eyes:
Roll two minuscule balls of black clay and press them into the eye sockets. Flatten them slightly so they don’t bulge out too much. -
Carve the smile:
Use a specialized curved tool or the edge of a small straw cut in half to press a gentle U-shape smile between the eyes. Keep it small and centered. -
Final smoothing check:
Before baking, do a final pass with your finger dipped in a tiny bit of baby oil or cornstarch to smooth away any accidental fingerprints. -
Bake carefully:
Place your octopuses on a baking sheet lined with foil or parchment paper. Bake according to your clay manufacturer’s instructions (usually around 275°F/135°C for 15-30 minutes). -
Cool down:
Let them cool completely inside the oven with the door slightly ajar to prevent thermal shock cracks.
Matte Finish Secret
To get that soft, realistic stone texture seen in the photo, gently pat the raw clay with an old toothbrush or a piece of crumpled aluminum foil before baking.
Once cooled, place your little sea creatures on a shelf or desk where they can happily keep you company all day long
Marshmallow Couple by a Mini Campfire Scene

Capture the cozy spirit of camping with this adorable polymer clay scene featuring two marshmallow friends roasting by a tiny fire. This beginner-friendly project makes a charming desk ornament or a sweet gift for your favorite travel buddy.
Step-by-Step
Materials
- White polymer clay
- Brown polymer clay (caramel or tan shade)
- Dark brown or terracotta polymer clay (for logs)
- Orange and red polymer clay
- Black acrylic paint or fine-tip black marker
- Pink chalk pastel or blush
- Small paintbrush
- Needle sculpting tool
- Craft knife or clay blade
- Round wooden slice coaster (for the base)
- Strong craft glue (E6000 or super glue)
- Oven for baking clay
Step 1: Creating the Marshmallow Bases
-
Shape the bodies:
Start by conditioning your white polymer clay until it’s soft and pliable. Roll two equal-sized balls, roughly 1 inch in diameter, and gently press them against your work surface to flatten the bottoms. -
Form the cylinder:
Using your fingers, flatten the top of each ball slightly to create a cylindrical marshmallow shape. Keep the edges rounded and soft rather than sharp. -
Texture the top:
For one of the marshmallows, you can create a ‘roasted’ or ‘burst’ effect by using a needle tool to gently impress a small star or cross shape into current of the head. -
Dust the tops:
To give them a slightly toasted look, you can lightly encourage a dusting of brown chalk pastel on the very top edges, though this is optional if you prefer them fresh out of the bag.
Step 2: Sculpting the Wood Slabs
-
Prepare the seat clay:
Take your light brown or tan clay and roll it into a thick sheet, about 1/4 inch thick. Cut two squares or rectangles slightly larger than your marshmallows. -
Shape the planks:
Round the edges of your clay rectangles to make them look like finished wood pieces or small cutting boards. -
Add wood grain:
Use a needle tool or craft knife to gently score parallel lines across the surface. Vary the pressure to create a realistic wood grain texture. -
Position the seats:
Place these clay slabs onto your main wooden coaster base to test fit, but don’t glue them yet. Just ensure there is room for the fire in front.
Pro Tip: Clean Clay
White clay picks up dust easily. Wipe your hands and work surface with a wet wipe or use hand sanitizer before handling the white clay to keep your marshmallows pristine.
Step 3: Building the Campfire
-
Roll the logs:
Using the dark brown clay, roll out a thin snake about the thickness of a matchstick. Cut this into 5-6 small segments, each about half an inch long. -
Arrange the stack:
Stack the little logs in a crisscross or teepee formation directly on the wooden base (or a baking tile) to create the fire pit structure. -
Sculpt the flames:
Mix a tiny bit of red and orange clay, but don’t blend them fully create a marbled effect. Shape a small teardrop, pinch the top, and curve it slightly to mimic a lick of flame. -
Assemble the heat:
Nestle the flame shape into the center of your log pile. I like to use a dotting tool to blend the bottom of the flame into the logs so it stays secure.
Level Up: Night Mode
Hide a tiny LED tea light or fairy light underneath the campfire logs (hollow out the bottom) to make the fire actually glow warmly in the dark.
Step 4: The Cute Details
-
Add faces:
Roll tiny spheres of black clay for the eyes and press them firmly onto the marshmallows. Alternatively, you can paint these on after baking. -
Create the smiles:
For the mouth, roll an incredibly thin snake of black clay and curve it into a ‘U’ shape, pressing it gently between the eyes. -
Apply blush:
Dip a small brush into pink chalk pastel shavings and gently tap two rosy cheeks onto each marshmallow face.
Step 5: Finishing and Assembly
-
Bake the clay:
Arrange all your clay pieces (marshmallows, seats, fire) on a baking sheet. Bake according to your clay package instructions (usually 275°F for 15-30 minutes). -
Cool down:
Let the pieces cool completely before handling them, as warm clay is fragile. -
Final glue up:
Apply a dab of strong craft glue to the bottom of the wood slabs and adhere them to your coaster base. Then glue the marshmallows onto the slabs and the fire in front.
Set this adorable duo on your desk to remind you of warm summer nights and sweet treats
“His and Hers” Ring Dishes With Matching Motifs
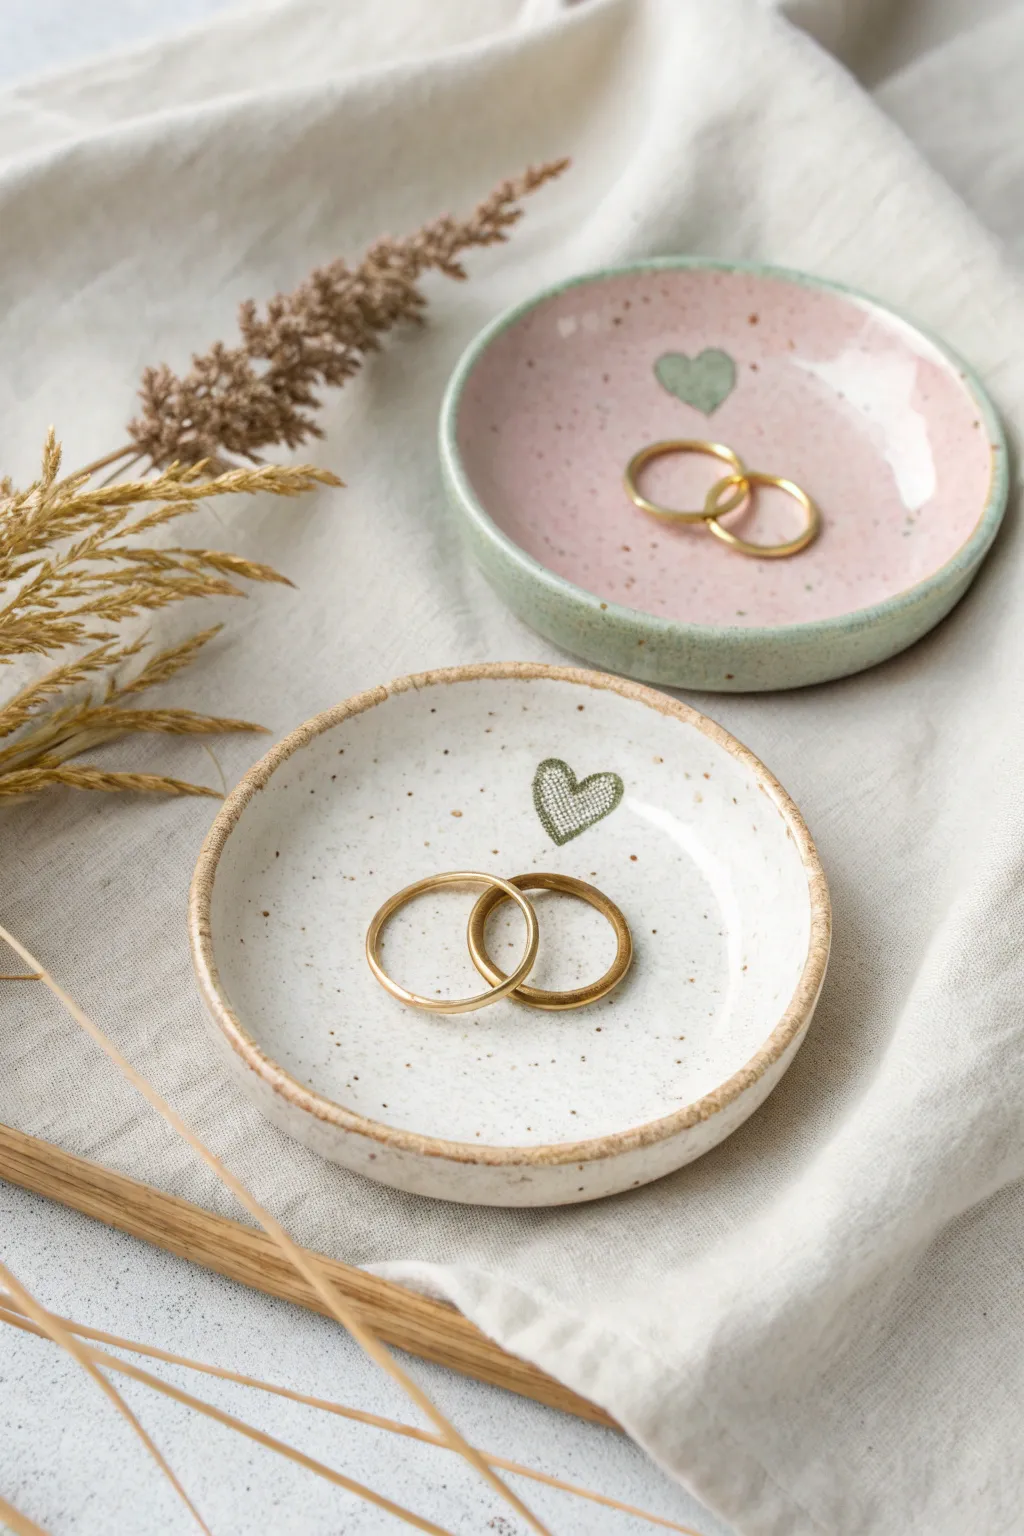
These charming his-and-hers ring dishes feature soft glazes and matching green heart motifs that tie the set together. Their organic, speckled finish and imperfect rims give them a beautiful handmade quality perfect for a bedside table.
Step-by-Step Tutorial
Materials
- White stoneware clay (preferably speckled)
- Small rolling pin
- Circle cookie cutter (approx. 3-4 inches) or a bowl rim
- Canvas mat or cloth for rolling
- Small sponge
- Pottery needle tool or toothpick
- Underglaze (dark green)
- Fine detail paintbrush (size 0 or 00)
- Speckled white glaze (low-fire or cone 5/6 depending on clay)
- Pink glaze (semi-opaque)
- Clear transparent glaze (optional, for the heart)
- Kiln access (or use air-dry clay + acrylics/resin for a decorative-only version)
Step 1: Shaping the Dishes
-
Prepare the slab:
Begin by rolling out a chunk of your white stoneware clay on a canvas mat. You want an even slab that is roughly 1/4 inch thick. Turn the clay occasionally as you roll to prevent sticking. -
Cut the circles:
Using a large circular cookie cutter or by tracing around a small bowl with a needle tool, cut two identical circles from your slab. These will form the base of your dishes. -
Smooth the edges:
Dip your finger or a small piece of sponge in water and gently run it along the cut edge of the circles. This removes any sharp burrs or drag marks left by the cutter. -
Create the curve:
Place the clay circles onto a piece of foam or cup them gently in your palm. Press your thumb into the center and slightly pinch the edges upward to create a shallow dish shape. You aren’t building a wall, just a gentle slope. -
Refine the rim:
For that organic look shown in the photo, don’t worry about the rim being perfectly level. Smooth it with a damp sponge, letting it retain a slightly wavy, natural feel. -
Dry to leather hard:
Set the dishes aside to dry slowly. Cover them loosely with plastic for a few hours until they reach the ‘leather hard’ stage, where they remain firm but still contain moisture.
Step 2: Decorating and Glazing
-
Paint the hearts:
While the clay is leather hard, use your needle tool to very lightly trace a small heart shape in the center of each dish. Using a fine detail brush and green underglaze, fill in the heart. -
Add the grid detail:
The hearts in the image have a specific texture. Once the green base is dry, use a darker green underglaze or a fine underglaze pencil to draw a tiny cross-hatch grid pattern over the painted heart. -
Bisque fire:
Allow the dishes to dry completely (bone dry) before loading them into the kiln for a bisque firing according to your clay body’s specifications. -
Wipe down:
After the bisque firing, wipe the pieces with a damp sponge to remove any kiln dust. This ensures the glaze adheres properly. -
Wax resist (optional):
If you want the heart motif to remain crisp beneath a translucent glaze, apply a tiny amount of wax resist directly over the painted heart. -
Glaze the pink dish:
Pour a small amount of pink glaze into the first dish, swirl it to coat the interior, and pour the excess back out. Use a brush to tidy up the rim, ensuring the pink meets the edge neatly. -
Glaze the white dish:
Repeat the process for the second dish using a speckled white glaze. If your glaze doesn’t have pre-mixed speckles, you can splatter a tiny bit of darker glaze onto the wet white surface with a stiff brush. -
Wipe the bottoms:
Thoroughly wipe away any glaze from the bottom foot of the dishes so they don’t fuse to the kiln shelf. -
Final firing:
Fire the pieces a second time to the temperature required by your glaze (typically cone 5/6 for stoneware). I always double-check the temperature rating on my glaze bottles just to be safe.
Warped Rims?
If your rims warp excessively during drying, weight the centers down with a small sandbag during the leather-hard stage to keep the base flat.
Add Gold Accents
For a luxe finish, apply a rim of gold luster overglaze after the second firing and fire a third time at a very low temperature (around cone 018).
Place these lovely dishes on your bedside table or gift them to a favorite couple for a truly personal touch
Couple Spoon Rests That Nest Together
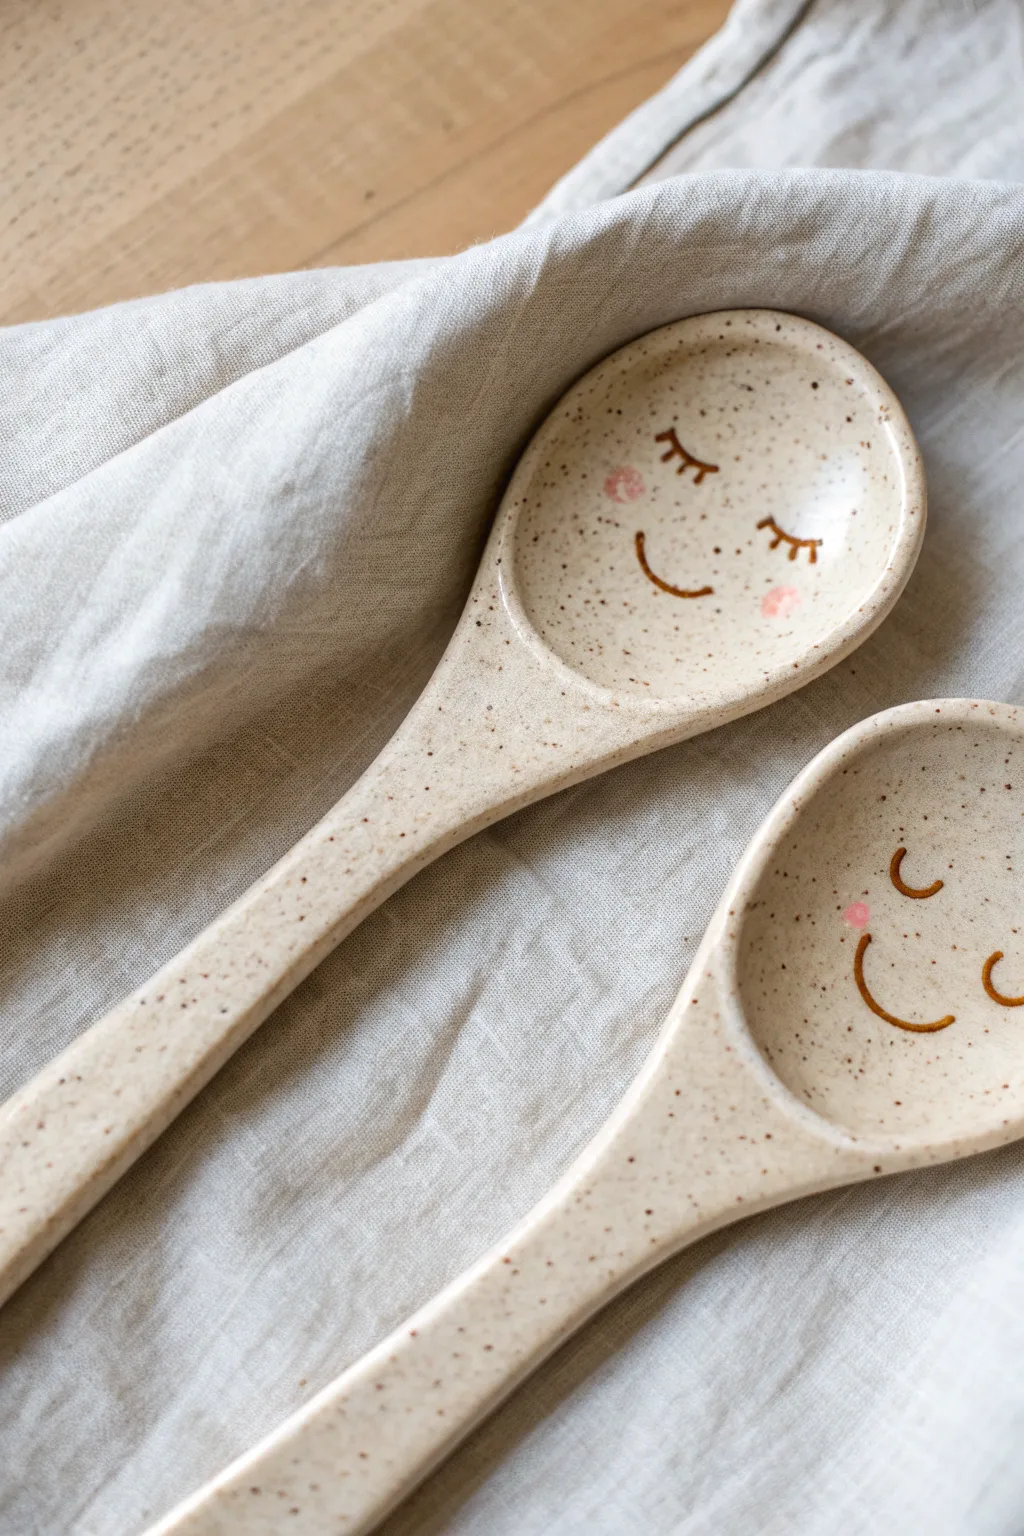
These charming ceramic spoons add a dash of personality to your kitchen with their sleepy and smiling faces. The natural speckled clay body combined with simple, illustrative line work creates a cozy, handmade aesthetic perfect for stirring morning coffee or serving dessert.
Step-by-Step Guide
Materials
- Speckled stoneware clay (cone 5 or 6)
- Spoon template or paper
- Rolling pin
- Guide sticks or slats (approx. 1/4 inch)
- Needle tool or fettling knife
- Small sponge
- Rib tool (kidney)
- Modeling tool or wooden spoon handle (for shaping)
- Underglaze pencil or fine liner brush
- Dark brown underglaze
- Pink underglaze (for cheeks)
- Clear or transparent milky white glaze
- Kiln access
Step 1: Shaping the Spoons
-
Prepare the clay:
Begin by wedging your speckled stoneware clay thoroughly to remove air bubbles. This clay body is essential for achieving that natural, spotted texture seen in the final piece. -
Roll out the slab:
Place the clay between two guide sticks on a canvas board. Roll it out into an even slab, aiming for a thickness of about 1/4 inch. I find this thickness perfect—sturdy enough to use, but elegant. -
Cut the shape:
Using a paper template or sketching freehand lightly on the clay surface, outline a spoon shape with a long handle and a wide, oval bowl. Use your needle tool to cut cleanly around the outline. -
Smooth the edges:
Dip your finger or a small sponge in water and run it along the cut edges of the spoon. You want to round off the sharp corners so the final piece feels soft in the hand. -
Form the bowl:
Gently press your thumb into the oval part of the slab to create the spoon’s concavity. You can also press the clay bowl onto a form, like a tennis ball or the back of a measuring spoon, to get a uniform curve. -
Refine the handle:
Run a damp sponge down the length of the handle to ensure it is smooth. If you want a slight curve to the handle, prop the end up on a small piece of foam or rolled clay while it dries. -
Initial drying:
Allow the spoons to dry slowly to the leather-hard stage. This usually takes a day or so depending on humidity. They should be firm enough to handle without bending but still cold to the touch.
Step 2: Decorating & Glazing
-
Smooth the surface:
Once leather hard, take a slightly damp sponge and wipe the entire surface to bring the fine grit of the speckles to the surface and ensure a perfectly smooth canvas for painting. -
Paint the eyes:
Using a very fine liner brush and dark brown underglaze, carefully paint the facial features in the center of the spoon bowl. For the sleepy spoon, paint two downward curves with small lash lines. For the happy spoon, paint upward curves. -
Add the mouth:
Paint a small, simple upwards curve for the smile below the eyes. Keep the lines thin and delicate to match the minimalist style. -
Blush the cheeks:
Dip a small round brush or even a Q-tip into pink underglaze. Dab it gently onto the clay to create soft, round rosy cheeks on either side of the smile. Don’t worry if it’s not perfectly opaque; a little transparency looks sweet. -
Bisque fire:
Let the underglaze dry completely, then load the bone-dry spoons into the kiln for a bisque firing (usually Cone 04). This sets the shape and makes the pottery porous for glazing. -
Wax the bottom:
After the bisque fire, apply wax resist to the back of the spoon handle or wherever it will rest on the kiln shelf to prevent sticking. -
Apply clear glaze:
Dip the spoon into a transparent or milky white glaze. Shake off any excess gently. You want a glaze that is clear enough to show off the clay’s natural speckles and your painted design. -
Clean up:
Wipe away any glaze drips from the waxed area with a sponge. Check that the facial features aren’t obscured by an overly thick drip of glaze. -
Final firing:
Fire the spoons again to the temperature required by your clay and glaze (likely Cone 5 or 6). Once cooled, your spoons are ready to bring a smile to your table.
Warping Woes
Spoon handles can warp easily. Dry them very slowly under loose plastic and avoid handling them by the very end of the handle while wet.
Dynamic Duos
Paint different expressions on a whole set of spoons to represent every member of your family or friend group for a custom gift set.
Now you have a delightful pair of ceramic friends ready to help with cooking or serving
Faceless Couple Silhouette on a Mini Keepsake Plaque

Capture a sweet moment with this minimalist polymer clay keepsake. The soft, textured arch and subtle gold accents give it an earthy, romantic feel that fits perfectly on any shelf.
How-To Guide
Materials
- White polymer clay (approx. 2-3 oz)
- Small amount of terracotta or light brown polymer clay
- Rolling pin or acrylic roller
- Large circle cutter (approx. 4-inch diameter)
- Needle tool or clay knife
- Texture tool (soft toothbrush or sponge)
- Small wooden slice base
- Gold acrylic paint
- Fine detail paintbrush (size 0 or 00)
- Strong craft glue (e.g., E6000)
- Oven and baking tray
Step 1: Shaping the Base
-
Condition the clay:
Begin by warming the white polymer clay in your hands until it becomes soft and pliable. This conditioning step prevents cracks later on. -
Roll the slab:
Roll the white clay out on a clean, flat surface to a uniform thickness of about 1/4 inch. It needs to be thick enough to stand upright. -
Cut the arch shape:
Use your large circle cutter to punch out a circle. Then, use a long blade or knife to slice off the bottom third of the circle to create a flat base, forming a distinct arch or ‘D’ shape. -
Soften the edges:
Gently tap the cut edges with your fingertip to smooth out the sharpness, giving the piece a stone-like, organic look. -
Add texture:
Using a clean toothbrush or a coarse sponge, lightly stipple the surface of the clay to remove fingerprints and add a subtle, matte texture.
Step 2: Sculpting the Figures
-
Create the bodies:
Roll out a thinner sheet of white clay (about 1/8 inch). Using a needle tool, cut two simple, elongated rounded rectangle shapes for the torsos. The figure on the right should be slightly taller and broader for the shoulders. -
Position the couple:
Place the two torso shapes onto the center of the arch, pressing very gently so they adhere. They should overlap slightly to show closeness, with the shorter figure nestled against the taller one. -
Sculpt the taller figure’s head:
Roll a small ball of white clay, flatten it into an oval, and place it on the taller torso. Use your needle tool to carve vertical lines to represent short hair texture. -
Sculpt the shorter figure’s hair:
Create a slightly triangular shape for the second head. I like to use the needle tool to draw deeper lines flowing downward to mimic longer hair. -
Refine the forms:
Use a silicone shapers or your finger to smooth the seams where the heads meet the bodies, ensuring they look like cohesive silhouettes.
Clean Clay Tip
Keep baby wipes nearby! White clay picks up dust easily. Clean your hands and tools constantly to keep the white pristine before baking.
Step 3: Adding Details & Baking
-
Make the hearts:
Take a tiny pinch of the terracotta or light brown clay. Roll it flat and cut out two small hearts—one slightly larger than the other. Press these gently into the clay above the couple’s heads. -
Add clay botanical accents (optional):
If you want 3D texture for the side plants, roll tiny tapered snakes of clay and press them onto the sides. Otherwise, save this for the painting phase. -
Bake the piece:
Place your creation on a parchment-lined baking tray. Bake according to your clay package instructions (usually 275°F or 130°C for 15-30 minutes). Let it cool completely before moving.
Make it Personal
Etch a tiny date or initials into the bottom hem of the figures’ ‘clothes’ before baking for a hidden personalized detail.
Step 4: Finishing Touches
-
Paint the foliage:
Dip your fine detail brush into the gold acrylic paint. On either side of the couple, paint delicate stems with small, V-shaped dashes climbing up, resembling wheat or lavender stalks. -
Add sparkle:
Using the tip of a toothpick or the very end of your brush, add tiny dots of gold paint scattered randomly around the open space for a magical, starry effect. -
Mount neatly:
Once the paint is dry, apply a strong adhesive to the flat bottom edge of your clay arch and press it firmly onto the center of the wooden slice. -
Secure the hold:
Prop the arch up against a heavy book while the glue sets to ensure it dries perfectly straight.
Place your beautiful little sculpture on a nightstand or desk as a sweet reminder of love
Couple Photo Frame Corners With Mini Characters
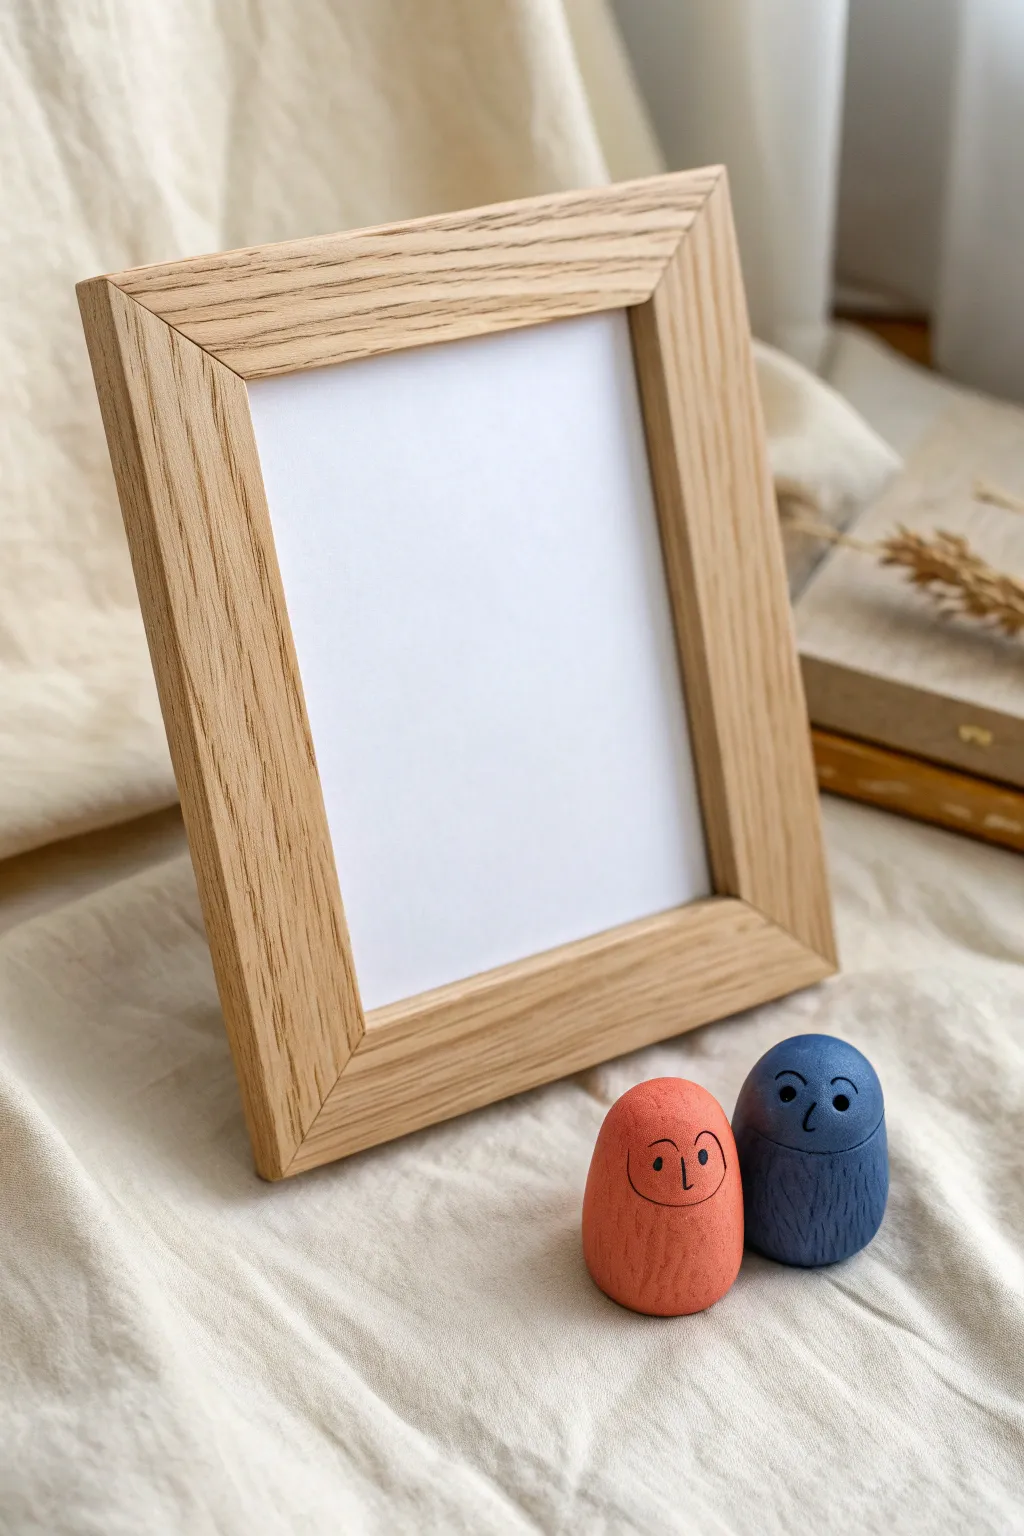
Add a touch of whimsy to your favorite memories with these adorable, minimalist clay egg characters. These small, friendly figures sit perfectly alongside a wooden frame, creating a sweet and subtle decorative pairing.
Step-by-Step Tutorial
Materials
- Polymer clay or air-dry clay (terracotta/orange and deep blue)
- Small fine-grit sandpaper
- Fine-point black permanent marker or fine liner paint pen
- Wooden picture frame (light oak finish)
- Matte sealant or varnish (optional)
- Sculpting tool or needle tool (for texture)
- Soft cloth
Step 1: Shaping the Base Forms
-
Prepare the clay:
Begin by conditioning your clay. If using polymer clay, knead the orange and blue chunks separately until they are soft and pliable. If using air-dry clay, ensure it is moist enough to work without cracking. -
Form the spheres:
Roll each color into a smooth ball about the size of a large grape or small walnut. Aim for them to be roughly equal in volume so the characters look like a pair. -
Create the egg shape:
Gently gently roll the top half of each ball between your fingers to taper it slightly, creating a rounded egg-like silhouette. The bottom should remain wider to provide stability. -
Flatten the base:
Press the bottom of each egg shape firmly against your work surface. This creates a flat bottom essential for them to stand upright next to your frame without tipping over. -
Refine the surface:
I like to smooth out any fingerprints or bumps using a tiny bit of water (for air-dry clay) or baby oil (for polymer clay). The surface needs to be relatively smooth for the face drawing later.
Step 2: Adding Texture and Curing
-
Add subtle texture:
Using a needle tool or a stiff bristled brush, gently scratch vertical, hair-like lines starting from the lower third of the body down to the base. Leave the face area completely smooth. -
Bake or dry:
If using polymer clay, bake according to the manufacturer’s instructions (usually 275°F/135°C for 15-30 minutes). If using air-dry clay, place them in a dry spot for 24-48 hours until fully hardened. -
Sand for perfection:
Once fully cured and cooled, inspect the smooth face area. If there are any stray bumps, very lightly buff them away with fine-grit sandpaper. -
Clean dust:
Wipe the figures down thoroughly with a damp soft cloth to remove any sanding dust before drawing. The surface must be clean for the ink to adhere crisp and black.
Ink Bleeding Issues?
If your marker bleeds into the clay, the surface might be too porous. Try sealing the clay with a thin layer of matte varnish *before* drawing the face, let it dry, then draw on top.
Step 3: Adding Personality
-
Draft the faces:
Practice drawing the minimalist faces on paper first. The design relies on two small dots for eyes and a simple line for the nose/mouth connection. -
Draw the orange character:
On the orange figure, use your fine-point marker to draw two widely spaced dots for eyes. Add a small ‘L’ shape nose in the center, and a subtle curved smile line just below it. -
Draw the blue character:
For the blue figure, place the eyes slightly closer together. Draw a small vertical line for the nose, and perhaps nice rounded eyebrows to give a different expression. -
Set the ink:
Let the ink dry completely to prevent smudging. If you used a paint pen, giving it an hour is usually safe. -
Seal the work:
The matte finish is key to this look, so brush on a thin layer of matte varnish to protect the clay and the ink without adding unnatural shine. -
Arrange display:
Place your wooden frame on the surface first. Position the two figures close together near the bottom corner of the frame, angled slightly toward each other as if they are looking at the viewer.
Pro Tip: Weighted Bases
To prevent your little figures from falling over easily, press a small metal washer or a tiny magnetic disc into the bottom of the clay before baking or drying to lower the center of gravity.
Now you have a charming little couple to keep your favorite photo company
Interlocking “Pinkie Promise” Hand Charms
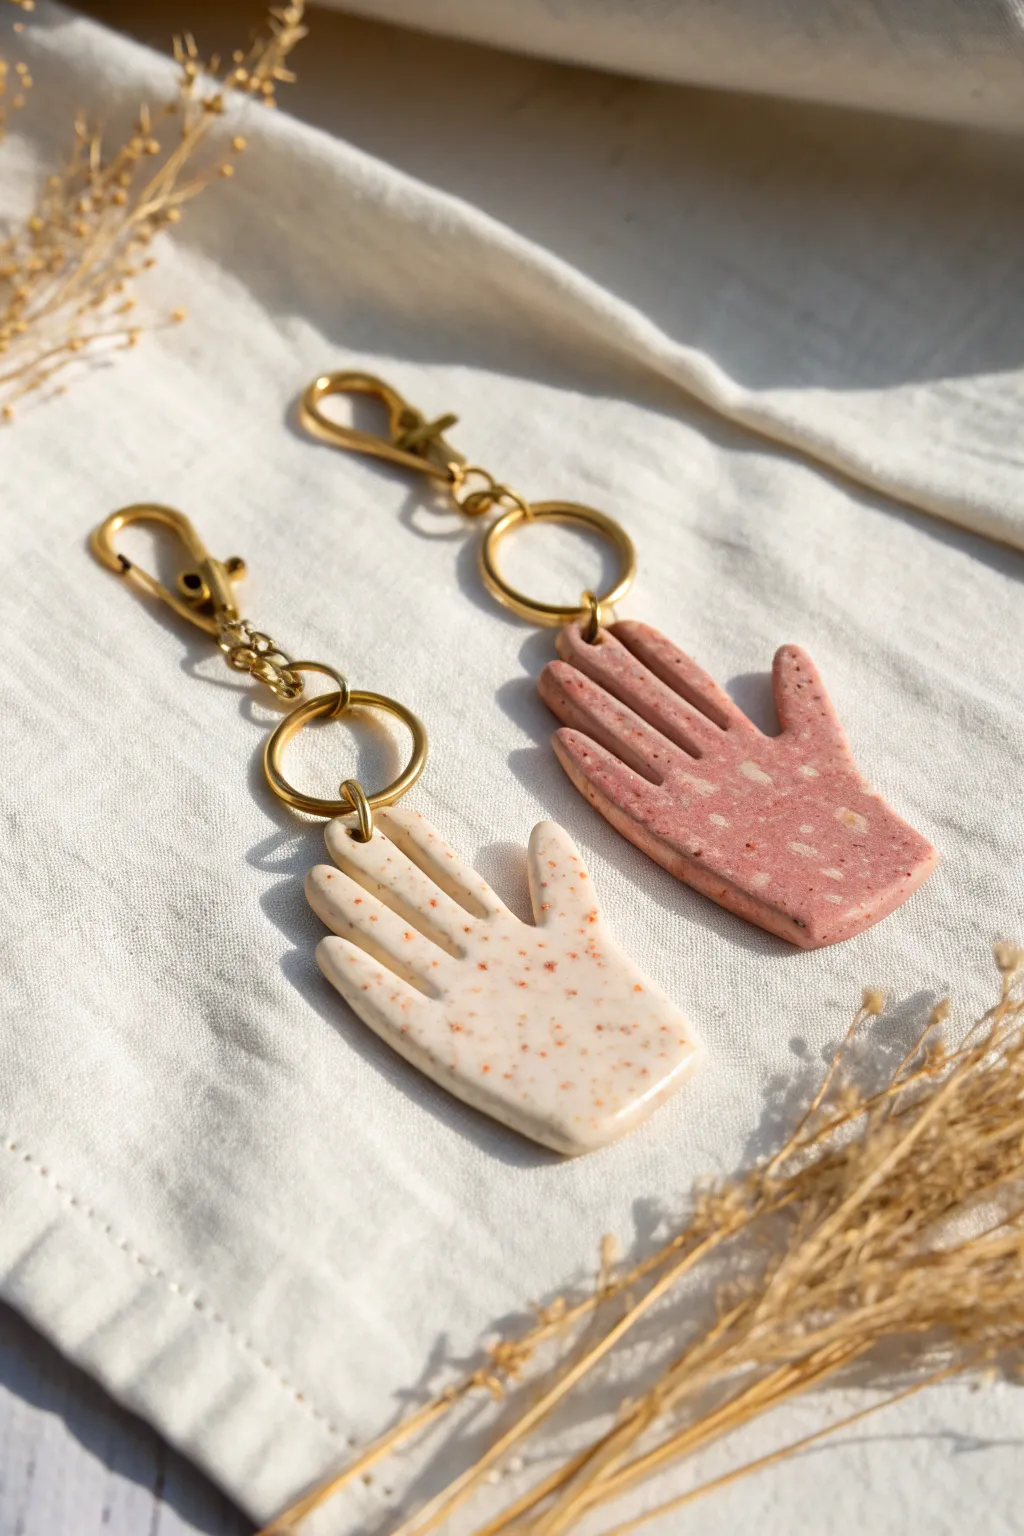
These charming polymer clay hands are perfect as a set of friendship or couple keychains, designed to look like a sweet high-five or a reached-out hand. The terrazzo-style speckling gives them a modern, ceramic look without the need for a kiln.
Step-by-Step Guide
Materials
- Polymer clay (cream/beige)
- Polymer clay (dusty pink/terracotta)
- Polymer clay (orange for speckles)
- Polymer clay (white for speckles)
- Acrylic rolling pin or pasta machine
- X-Acto knife or craft blade
- Hand-shaped clay cutter (approx. 2 inches) or a paper template
- Small circle cutter (for the key ring hole)
- Fine-grit sandpaper (400 to 1000 grit)
- UV resin or polyurethane gloss varnish (optional)
- 2 Gold keyrings with chains
- 2 Gold lobster clasps
- Jump rings and jewelry pliers
- Oven and baking sheet
Step 1: Prepping the Clay Base
-
Condition the Clay:
Begin by thoroughly kneading your main base colors—the cream and the dusty pink—separately until they are soft and pliable. This prevents cracking later on. -
Create the Speckles:
Take a very small amount of orange clay and chop it into tiny, irregular crumbs using your craft blade. Do the same with a small amount of white clay for the contrasting speckle. -
Apply Speckles to Cream Base:
Sprinkle the orange clay crumbs onto your flattened cream clay. Fold the clay over once and roll it out again to embed the speckles, but don’t over-mix or the colors will muddy. -
Apply Speckles to Pink Base:
Repeat the process with the dusty pink clay, sprinkling the white clay crumbs onto it. Roll slightly to press them into the surface. -
Roll to Final Thickness:
Roll both slabs of clay out to an even thickness, roughly 1/4 inch (about 6mm). You want them sturdy enough to survive being tossed in a bag as a keychain.
Sticky Situation?
If clay sticks to your cutter or work surface, dust the area lightly with cornstarch or use a piece of plastic wrap on top of the clay before cutting for rounded edges.
Step 2: Cutting and Shaping
-
Cut the Hands:
Use your hand-shaped cutter to punch out one hand from each color. If you are using a paper template, lay it gently on the clay and trace around it carefully with your X-Acto blade. -
Create Interlocking Illusion (Optional):
If you want them to fit together perfectly, flip one template or cutter over so you have a left and a right hand. -
Smooth the Edges:
Gently run your finger dipped in a little cornstarch or water around the raw cut edges to soften any sharp corners left by the blade. -
Punch the Hardware Hole:
Using a small circle cutter or a drinking straw, punch a hole near the wrist area of the hand. Ensure there is at least 3mm of clay between the hole and the edge so it doesn’t break.
Step 3: Baking and Finishing
-
Bake:
Place the hands on a parchment-lined baking sheet. Bake according to your brand of clay’s instructions (usually 275°F/135°C for 30 minutes). I recommend tenting them with foil to prevent browning. -
Cool Down:
Let the pieces cool completely in the oven with the door slightly ajar. Sudden temperature changes can sometimes cause brittleness. -
Sand for Smoothness:
Once cool, wet-sand the edges and surface with fine-grit sandpaper under running water to remove any fingerprints or rough texture. -
Seal (Optional):
For a glossy finish like ceramic, coat the front and back with a thin layer of UV resin (cure under UV lamp) or a water-based polyurethane varnish. Let dry completely.
Make It Magnetic
Embed small neodymium magnets into the palm side of the clay before baking (cover them with a thin clay layer) so the hands physically snap together when close.
Step 4: Assembly
-
Prepare Jump Rings:
Using two pairs of pliers, twist (don’t pull) your jump rings open. -
Attach Hardware:
Thread the jump ring through the clay hole and attach the keychain loop. Close the jump ring securely so there is no gap. -
Add the Clasp:
At the top of the keychain assembly, attach the gold lobster clasp using another jump ring if necessary.
Now you have a durable, personalized set of keychains ready to gift or keep
Couple Planter Buddies That Share One Pot
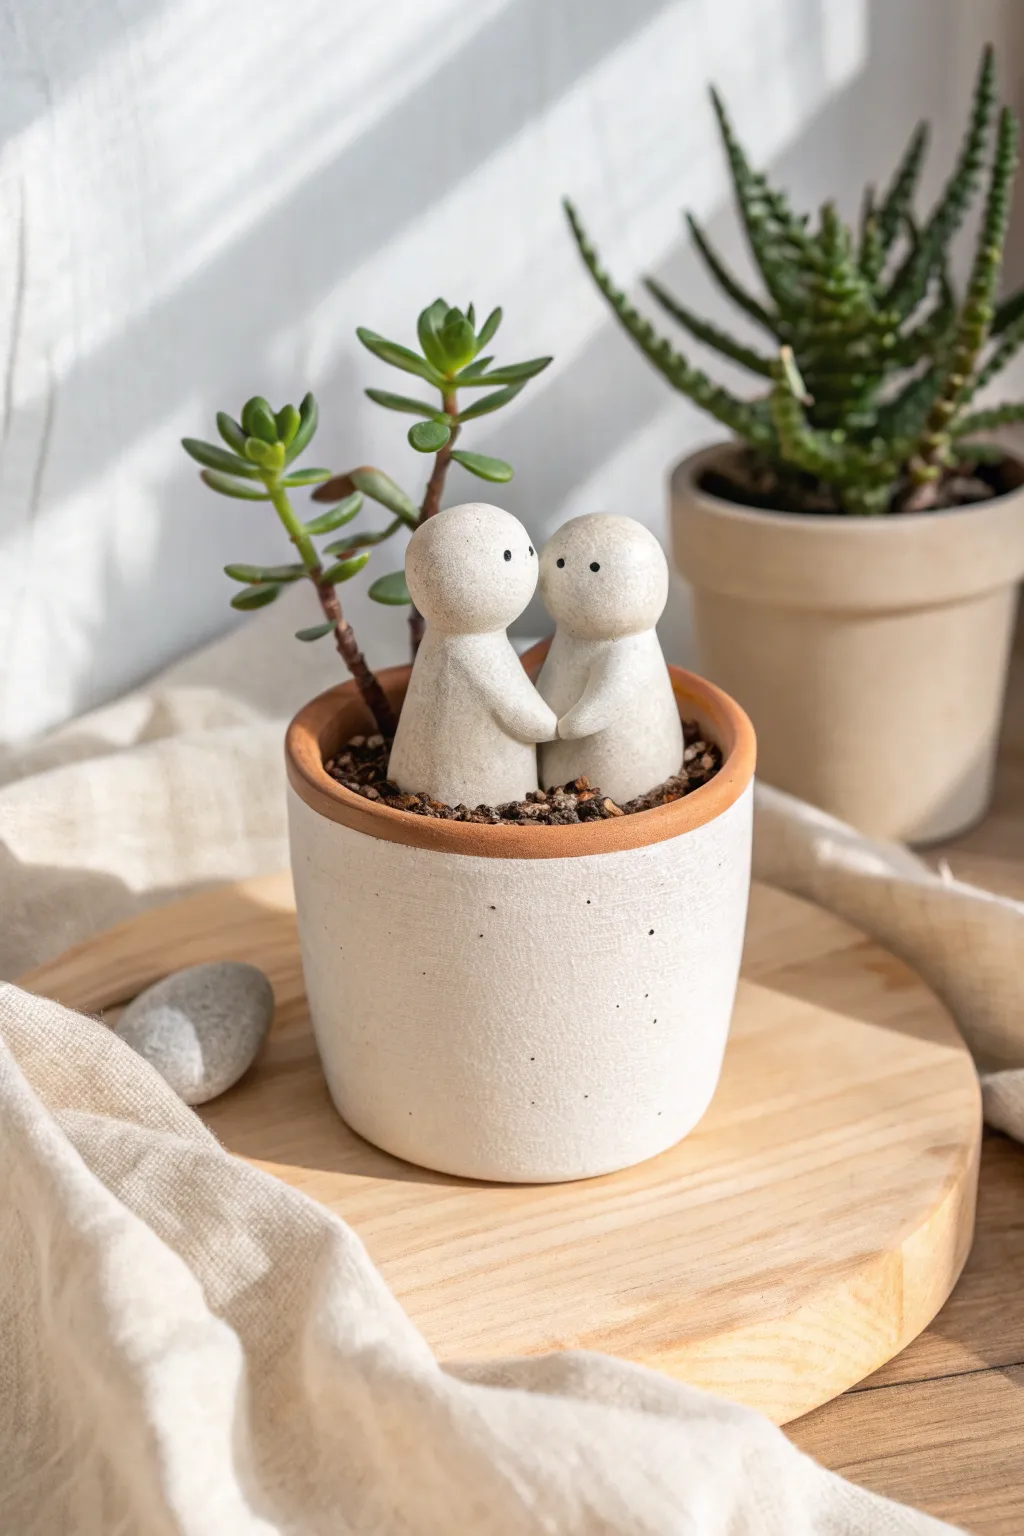
Create a heartwarming addition to your indoor garden with these minimalist clay companions that sit snugly inside a planter. Their faux-stone finish and simple embrace bring a sweet, serene vibe to any succulent display.
How-To Guide
Materials
- Polymer clay (white or light grey)
- Acrylic paint (granite or stone texture spray, optional)
- Acrylic paint (matte white, light cream)
- Acrylic paint (black)
- Fine grit sandpaper
- Small dotting tool or toothpick
- Aluminum foil
- Small terracotta or ceramic pot (approx. 4 inches)
- Succulent potting soil
- Small stem succulent (like a Jade or Sedum)
- Clear matte varnish (water-resistant)
Step 1: Shaping the Couple
-
Create the armatures:
Crumple two small pieces of aluminum foil into rough cone shapes. This saves clay and keeps the figures lightweight so they don’t sink into the soil later. -
Form the bases:
Roll out a sheet of white polymer clay to about 1/4 inch thickness. Wrap this around your foil cones, smoothing the seams at the back to create two smooth, conical body shapes. -
Add the heads:
Roll two spheres of clay, approximately the size of large marbles. Place one on top of each cone body. I find that gently blending the clay at the neck downward helps them stay secure. -
Pose the bodies:
Press the two figures side-by-side so their bodies naturally touch. Lean their heads slightly toward each other to create that affectionate, intimate look seen in the photo. -
Sculpt the arms:
Roll two small snakes of clay for the arms. Unlike a full anatomy sculpt, these are stylized bumps that merge into a single joined handhold between them. -
Attach the embrace:
Blend the arm pieces onto the torsos, ensuring the ‘hands’ meet in the middle. Smooth the clay so the arms look like they are emerging seamlessly from the bodies. -
Check fit:
Before baking, quickly test the fit inside your intended pot to ensure they aren’t too tall or too wide for the opening.
Stability Check
If figures tip over in loose soil, glue a flat plastic disc or a large coin to the bottom of the sculpture before planting to create a wider, stable base.
Step 2: Finishing and Planting
-
Bake the clay:
Bake the figures according to your clay package instructions (usually 275°F for 15-30 minutes). Let them cool completely. -
Sand for texture:
Lightly sand the surface with fine-grit sandpaper. This removes fingerprints and creates a slightly rough, stone-like tooth for the paint. -
Apply base coat:
Paint the figures with a matte off-white or light cream acrylic. Stippling the paint on with a sponge rather than brushing it gives a more natural, ceramic texture. -
Add stone speckle:
To mimic the speckled look, dip a toothbrush in diluted grey or brown paint and flick tiny droplets onto the figures. Keep this very subtle. -
Paint the eyes:
Using a dotting tool or the tip of a toothpick, carefully place two tiny black dots on each face. Position them low on the head for maximum cuteness. -
Seal the piece:
Coat the entire sculpture in a water-resistant matte varnish. This is crucial since they will be sitting in damp soil. -
Prep the pot:
Fill your small planter about 3/4 full with succulent soil mix. If you want the white-dipped pot look, paint the bottom half of a terracotta pot white before starting. -
Plant the greenery:
Insert your succulent stem towards the back or side of the pot, leaving enough open space in the center for the figures. -
Position the figures:
Nestle the clay couple into the soil next to the plant. You can bury the base slightly so they look like they are growing out of the earth.
Make it Mossy
For an aged garden look, dab a tiny bit of watered-down green acrylic paint near the bottom of the figures to mimic moss growth.
Now you have a sweet little scene that brings a touch of romance to your bright windowsill
Hidden Message Couple Capsules With Tiny Notes
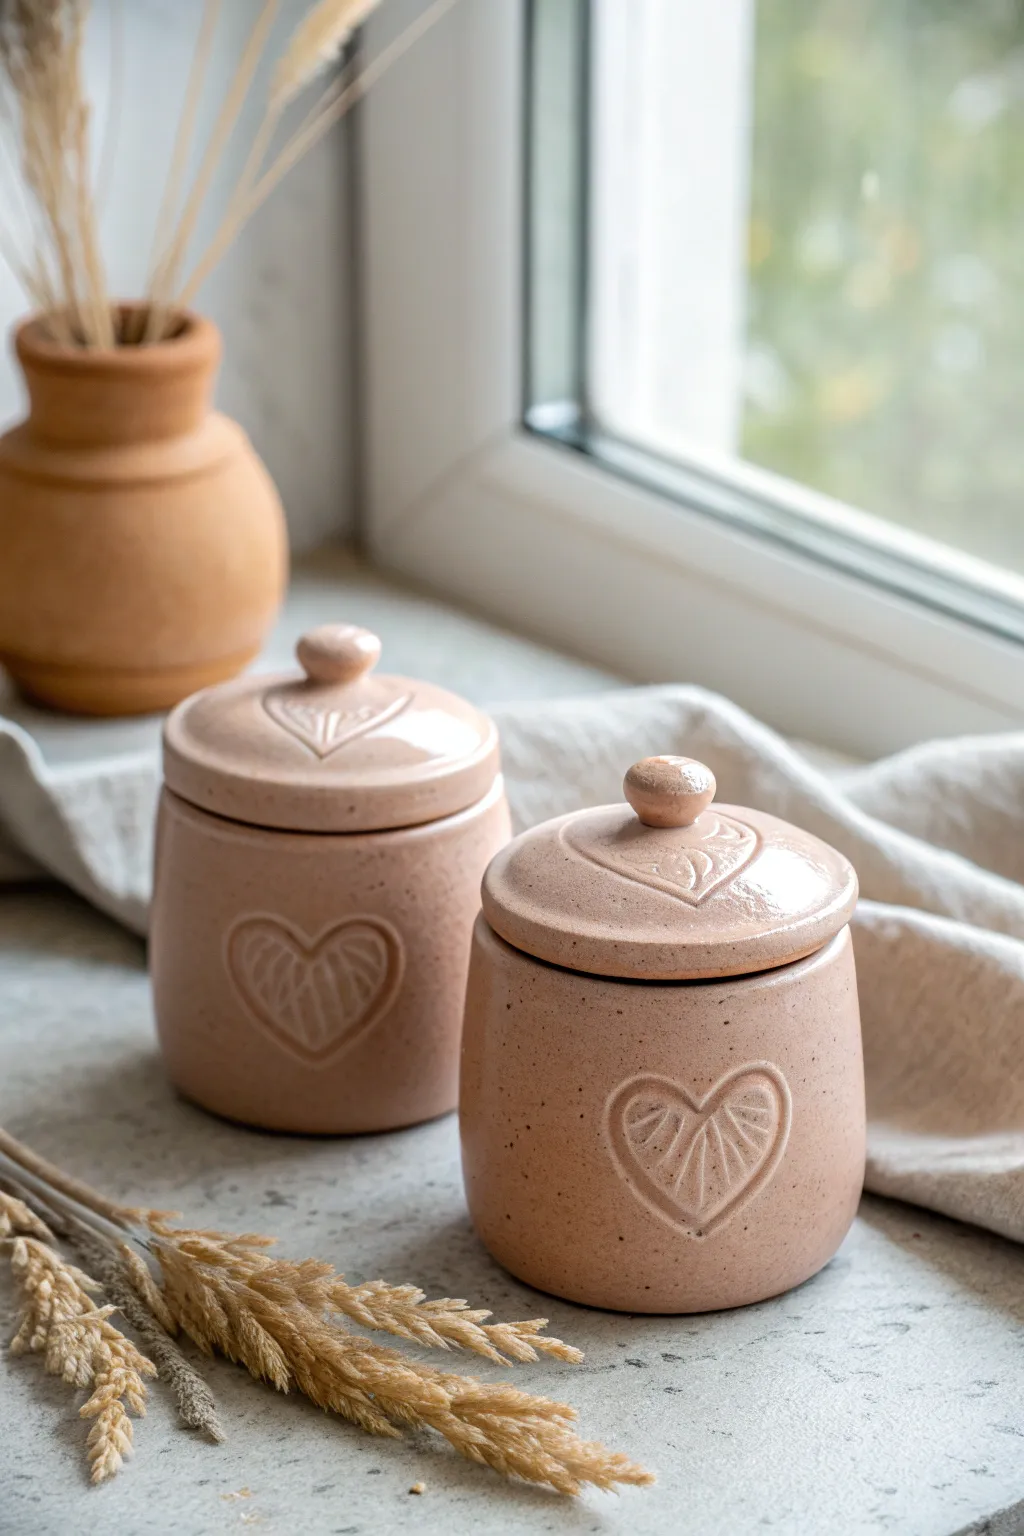
These charming blush-pink ceramic jars are perfect for hiding sweet notes or tiny treasures for your significant other. With their glossy speckled finish and raised heart motifs, they offer a cozy, handmade touch to any keepsake collection.
Detailed Instructions
Materials
- Stoneware clay (buff or white with grog)
- Pottery wheel (or slab roller for hand-building)
- Needle tool
- Ribs (metal and rubber)
- Wire clay cutter
- Carving tools or small loop tool
- Sponge
- Blush pink stoneware glaze (glossy)
- Speckled clay additive (if clay isn’t naturally speckled)
- Kiln
- Small rolling pin (if hand-building lids)
Step 1: Forming the Jars
-
Measure your clay:
Start with two equal balls of stoneware clay, roughly 1 lb each. Wedging the clay thoroughly is crucial to remove air bubbles and ensure even consistency. -
Center specifically:
If throwing on the wheel, center the clay into a low, wide mound. You want a stable base for a jar that is slightly wider at the bottom than the top. -
Pull the walls:
Open the clay and pull the walls up to create a cylinder about 3-4 inches high. Keep the walls roughly 1/4 inch thick for durability. -
Shape the gentle curve:
Using a rib tool inside the pot, gently push outward to create a subtle belly, narrowing slightly at the rim to form the classic jar silhouette seen in the photo. -
Create the gallery:
At the rim, use a wooden modeling tool to press down a small ledge (gallery) on the inside. This is where the lid will sit securely.
Uneven Lids?
If your lid wobbles after firing, apply a dab of grinding paste to the gallery and rotate the lid back and forth to sand it into a perfect fit.
Step 2: Crafting the Lids
-
Measure the opening:
Use calipers to measure the exact diameter of the gallery you just created. This ensures your lids will fit perfectly snug. -
Throw or slab the lids:
You can throw the lids off the hump on the wheel or cut a circle from a rolled slab. The lid should be slightly domed. -
Trim the underside:
Once the lids are leather hard, flip them over and trim away excess weight. Create a small flange underneath that fits inside the jar gallery. -
Add the knob:
Score and slip a small ball of clay onto the center of each lid. Smooth it into a comfortable, rounded knob shape.
Secret Text
Before the clay dries, use a tiny alphabet stamp set to press a hidden word or date onto the underside of the lid for an extra romantic surprise.
Step 3: Detailing and Design
-
Create the relief heart:
Wait until the jars are leather hard. You have two options here: carefully carve *around* a heart shape to make it protrude, or attach a thin slab cut-out of a heart using score and slip (sprigging). The image suggests an attached relief. -
Refine the heart:
Smooth the edges of the raised heart onto the body of the jar so it looks integrated. Repeat this process on the top of the lid. -
Carve the interior lines:
Using a fine needle tool or small carving tool, gently incise the stylized vein pattern inside the hearts. Draw a center line and curved ribs branching out. -
Smooth imperfections:
Wipe down the entire piece with a damp sponge to remove any sharp burrs or clay crumbs from the carving process.
Step 4: Glazing and Firing
-
Bisque fire:
Place the bone-dry jars and lids into the kiln for a bisque firing (usually cone 04). This prepares them for glazing. -
Wax the contact points:
Apply wax resist to the bottom of the jars and the points where the lid touches the jar (the gallery and lid flange) to prevent sticking. -
Apply the glaze:
Dip the jars and lids into a glossy blush-pink glaze. I find that a quick dip ensures an even coat that won’t obscure the carved details. -
Clean up edges:
Wipe away any stray glaze drips effectively near the foot or rim. -
Glaze fire:
Fire the pieces to maturity (likely cone 5 or 6 for stoneware). The heat will melt the glaze and bring out those lovely speckles.
Once cooled, these delicate jars are ready to hold your heartfelt messages on any windowsill or bedside table