I keep a bin of clay beads in my studio because a good keychain project is the fastest way to scratch the creative itch and end up with something you’ll actually use. These clay bead keychain ideas are all about fun color stacks, cute focal beads, and those little finishing touches that make them look gift-ready.
Classic Heishi Bead Wristlet With Name Beads
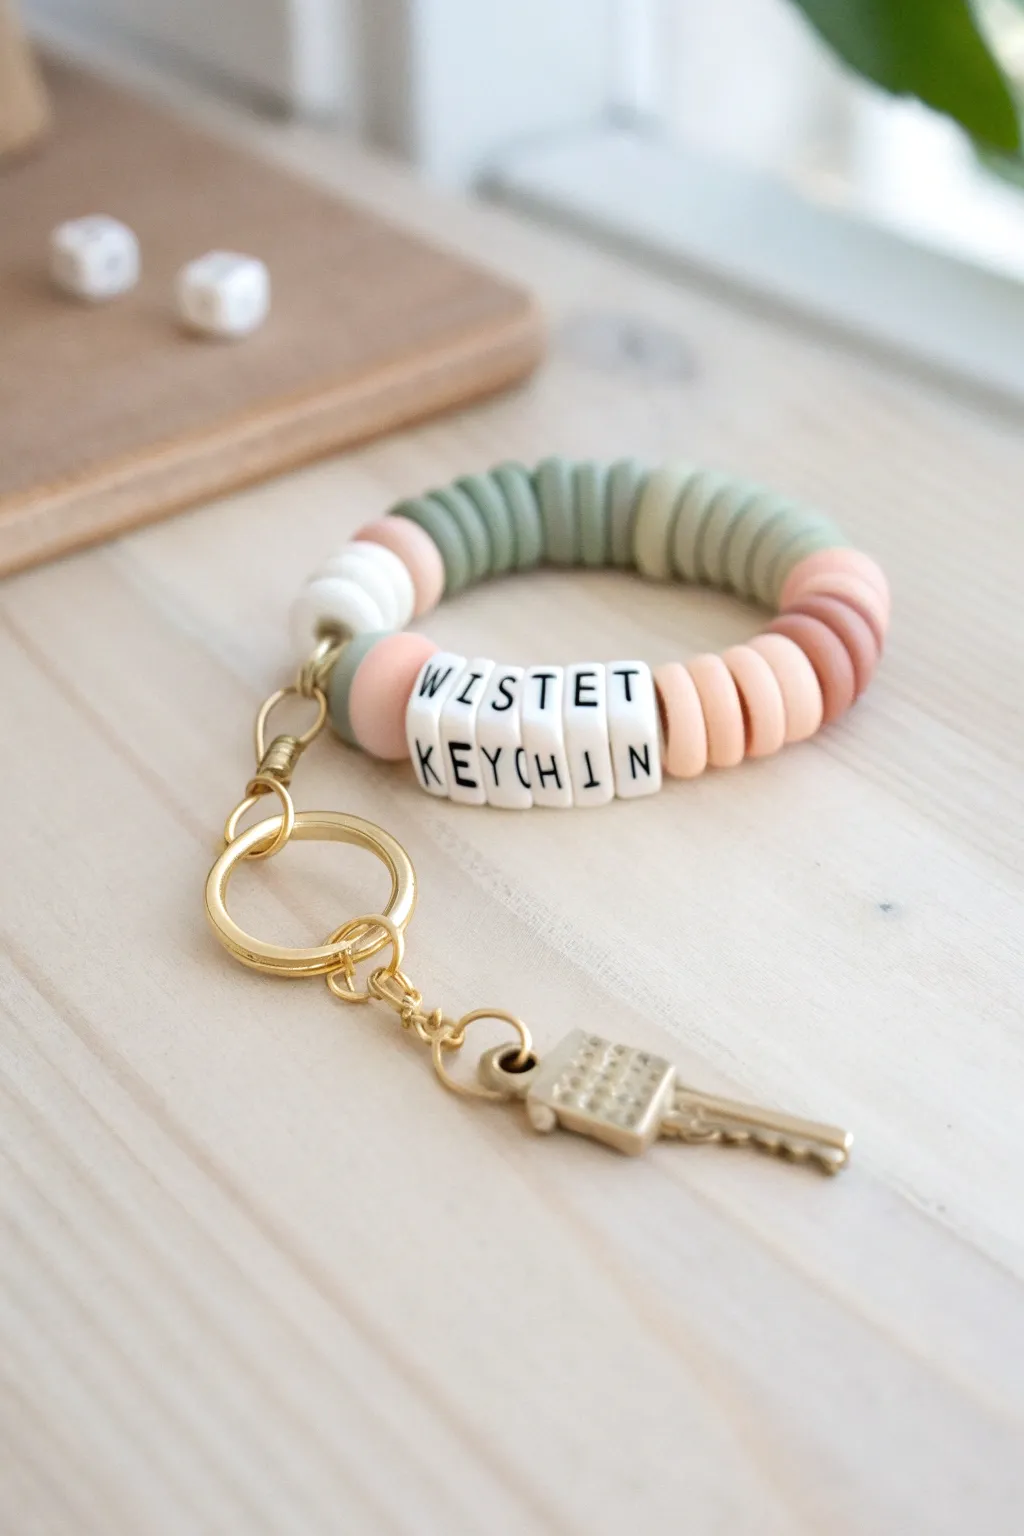
This trendy wristlet combines the soft, matte texture of polymer clay heishi beads with a personalized message for a functional accessory that’s totally giftable. The muted sage greens and dusty pinks create a sophisticated bohemian palette that pairs perfectly with warm gold hardware.
Step-by-Step Tutorial
Materials
- Polymer clay heishi disc beads (specifically in sage green, dusty pink, terracotta, white, and grey-green)
- Square white alphabet beads with black lettering
- Gold tone keychain hardware (large split ring)
- Small gold jewelry chain (curb or rolo style)
- Gold tone jump rings (open style)
- Gold decorative key charm
- Elastic stretch cord (0.8mm or 1mm thickness recommended)
- Jewelry glue or clear nail polish
- Scissors
- Jewelry pliers (chain nose and flat nose)
Step 1: Planning Your Design
-
Map out your message:
Begin by selecting the alphabet beads for your phrase. In this project, select the letters for ‘WRISTLET’ and ‘KEYCHAIN’ to stack them in two rows. -
Sort your color palette:
Separate your heishi beads into piles of sage green, grey-green, white, light pink, and terracotta to make stringing faster. -
Determine sizing:
Wrap a piece of empty cord loosely around your wrist to estimate the length needed, adding about 4 inches extra for tying knots.
Needle Trick
If your elastic is fraying, paint the tip with clear nail polish and let it harden. It creates a built-in ‘needle’ that makes threading tiny bead holes effortless.
Step 2: Stringing the Beads
-
Start the main loop:
Cut your elastic cord length. Thread on a small section of mixed sage and grey-green beads to start, creating a block of color regarding 1.5 inches long. -
Add separation beads:
Slide on three to five white heishi beads. These act as a visual spacer between your color blocks and the text area. -
Thread the first word:
String the letters for ‘WRISTLET’ in order. Ensure they are all facing the same direction so the text is legible. -
Create the midpoint:
Since this is a double-stacked design, you need a flexible turn. Thread about 1 inch of the terracotta and light pink beads here. -
Thread the second word:
Now string the letters for ‘KEYCHAIN’. Double-check that these letters are oriented correctly relative to the first word if the bracelet were folded. -
Finish the bead pattern:
Complete the loop by adding more pink and terracotta beads until the strand reaches your desired wristlet size.
Mix Your Metals
Try using rose gold hardware instead of yellow gold. It complements the blush and terracotta tones in the clay beads beautifully for a softer, warmer finish.
Step 3: Assembly and Hardware
-
Secure the loop:
Bring the two ends of your elastic cord together. Tie a strict surgeon’s knot (right over left, left over right) to secure the circle. -
Reinforce the knot:
I always place a tiny dab of jewelry glue on the knot for extra security and let it dry for a minute before trimming the excess cord close to the knot. -
Hide the mechanism:
Gently pull the elastic until the knot slips inside one of the larger heishi beads to hide it from view. -
Prepare the jump ring:
Using your two pairs of pliers, grip a large gold jump ring on either side of the opening. Twist one hand away and one toward you to open it without distorting the circle shape. -
Attach the hardware base:
Slip the open jump ring around the elastic cord between two beads. Add the large gold split ring (keychain ring) onto this jump ring before closing it tightly with your pliers. -
create the charm extension:
Cut a short length of gold chain, roughly 1.5 to 2 inches long. -
Connect the chain:
Use a small jump ring to attach one end of this chain to the main split ring you just installed. -
Add the charm:
Open a final jump ring, thread it through the top of your gold key charm, and attach it to the bottom link of the hanging chain. -
Final check:
Close the jump ring securely. Give the chain a gentle tug to ensure all metal connections are solid before using.
Now clip your keys onto this stylish wristlet and enjoy having your hands free


Short Fob Clay Bead Keychain With Tassel Finish
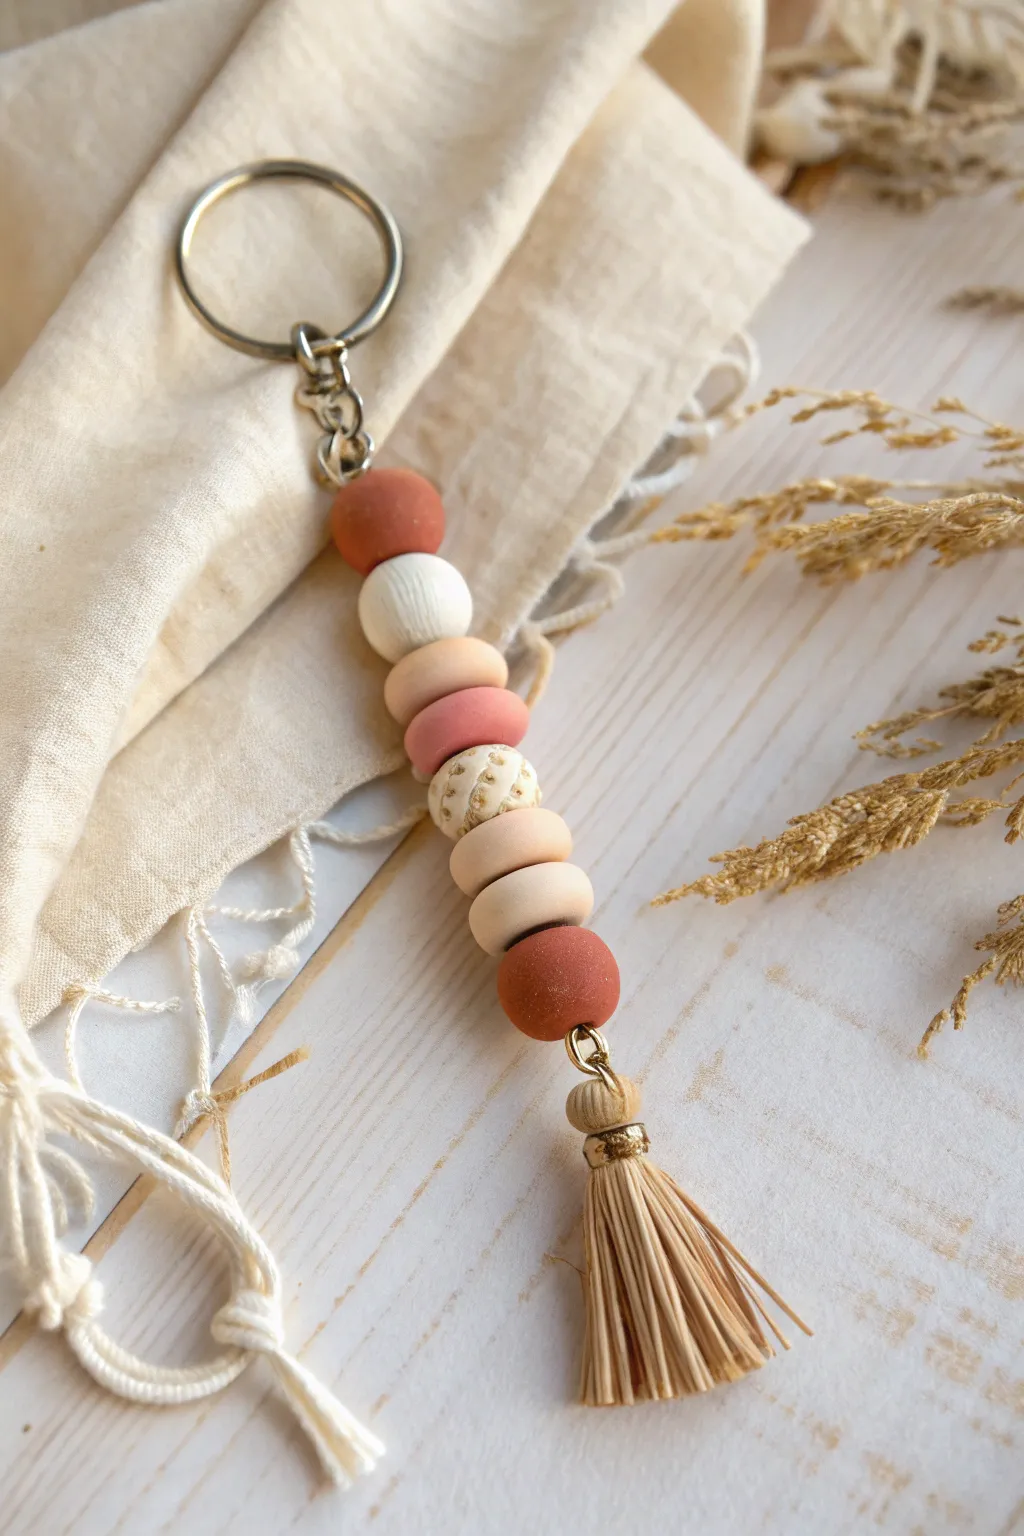
This earthy, bohemian keychain combines the smooth matte texture of polymer clay with the natural softness of a raffia-style tassel. The warm terracotta and cream color palette makes it a subtle yet stylish accessory for your daily keys.
Step-by-Step Guide
Materials
- Polymer clay (terracotta/burnt orange)
- Polymer clay (cream/white)
- Polymer clay (beige/sand)
- Small amount of gold leaf or gold paint (optional for speckled bead)
- Needle tool or toothpick
- Baking sheet and parchment paper
- Oven
- Waxed cotton cord or sturdy beading thread (cream)
- Metal key ring with chain extender
- Gold jump ring (approx 6-8mm)
- Small premade tassel (bast/straw/raffia style with gold cap)
- Scissors
Step 1: Making the Clay Beads
-
Condition the Clay:
Begin by kneading each color of polymer clay separately until they are soft and pliable. This step is crucial to prevent cracking later. -
Form the Base Sizes:
Roll your clay into balls. You will need two round beads (terracotta), one round bead (cream), three disc/lentil shapes (beige and pink), and one round bead for the speckled accent. -
Create the Disc Shapes:
For the three flattened beads in the center, take your balls of beige and pink clay and gently press them between your thumb and forefinger to create a lentil or disc shape. -
Detail the Speckled Bead:
For the central cream bead, lightly texture the surface with a needle tool. If you want the metallic look shown, press tiny flecks of gold leaf into the raw clay or save this step to paint after baking. -
Pierce the Holes:
Using your needle tool or a toothpick, carefully pierce a hole through the center of each bead. I like to rotate the bead while piercing to keep the hole straight and clean. -
Bake the Beads:
Arrange your beads on a baking sheet lined with parchment paper. Bake according to your brand of polymer clay’s instructions (usually 275°F/135°C for 15-30 minutes). Let them cool completely.
Uneven Clay Beads?
If fingerprints are visible on your raw beads, gently buff them with a little cornstarch or baby oil before baking to smooth the surface perfectly.
Step 2: Assembling the Keychain
-
Prepare the Cord:
Cut a length of your waxed cotton cord, approximately 12 inches long. This gives you plenty of room to work with for knots. -
Attach to Key Ring:
Fold the cord in half. Thread the loop end through the bottom link of your key ring’s chain. Pass the loose ends through the loop and pull tight to create a lark’s head knot securing the cord to the metal. -
String the First Bead:
Thread your first terracotta round bead onto both tail ends of the cord and push it up snugly against the knot. -
Add the Cream Round:
Next, string the round cream bead. Ensure the hole is large enough to accommodate the double thickness of the cord. -
Layer the Discs:
Add the three disc-shaped beads in order: beige, pink, then the speckled/textured bead, followed by the remaining two beige discs. -
Add the Final Bead:
Finish the bead stack with the second terracotta round bead. -
Secure the Bottom:
Ideally, tie a tight overhand knot right below the final bead to keep everything secure. Alternatively, you can crimp a small metal bead if your cord is thin. -
Attach the Tassel:
Open your gold jump ring using pliers. Thread it through the loop of your tassel and the bottom loop of your cord (or around the cord itself just below the knot). -
Close and Trim:
Close the jump ring securely. Trim any excess cord tail that might be showing, tucking it back up into the bottom bead if possible for a clean finish.
Scented Beads Upgrade
Use untreated wood beads for the tassel cap or spacers and add a drop of essential oil to turn this keychain into a portable aromatherapy diffuser.
Now you have a beautifully handcrafted accessory ready to organize your keys with style


Sweet Pastel Color Palette Heishi Bead Stack
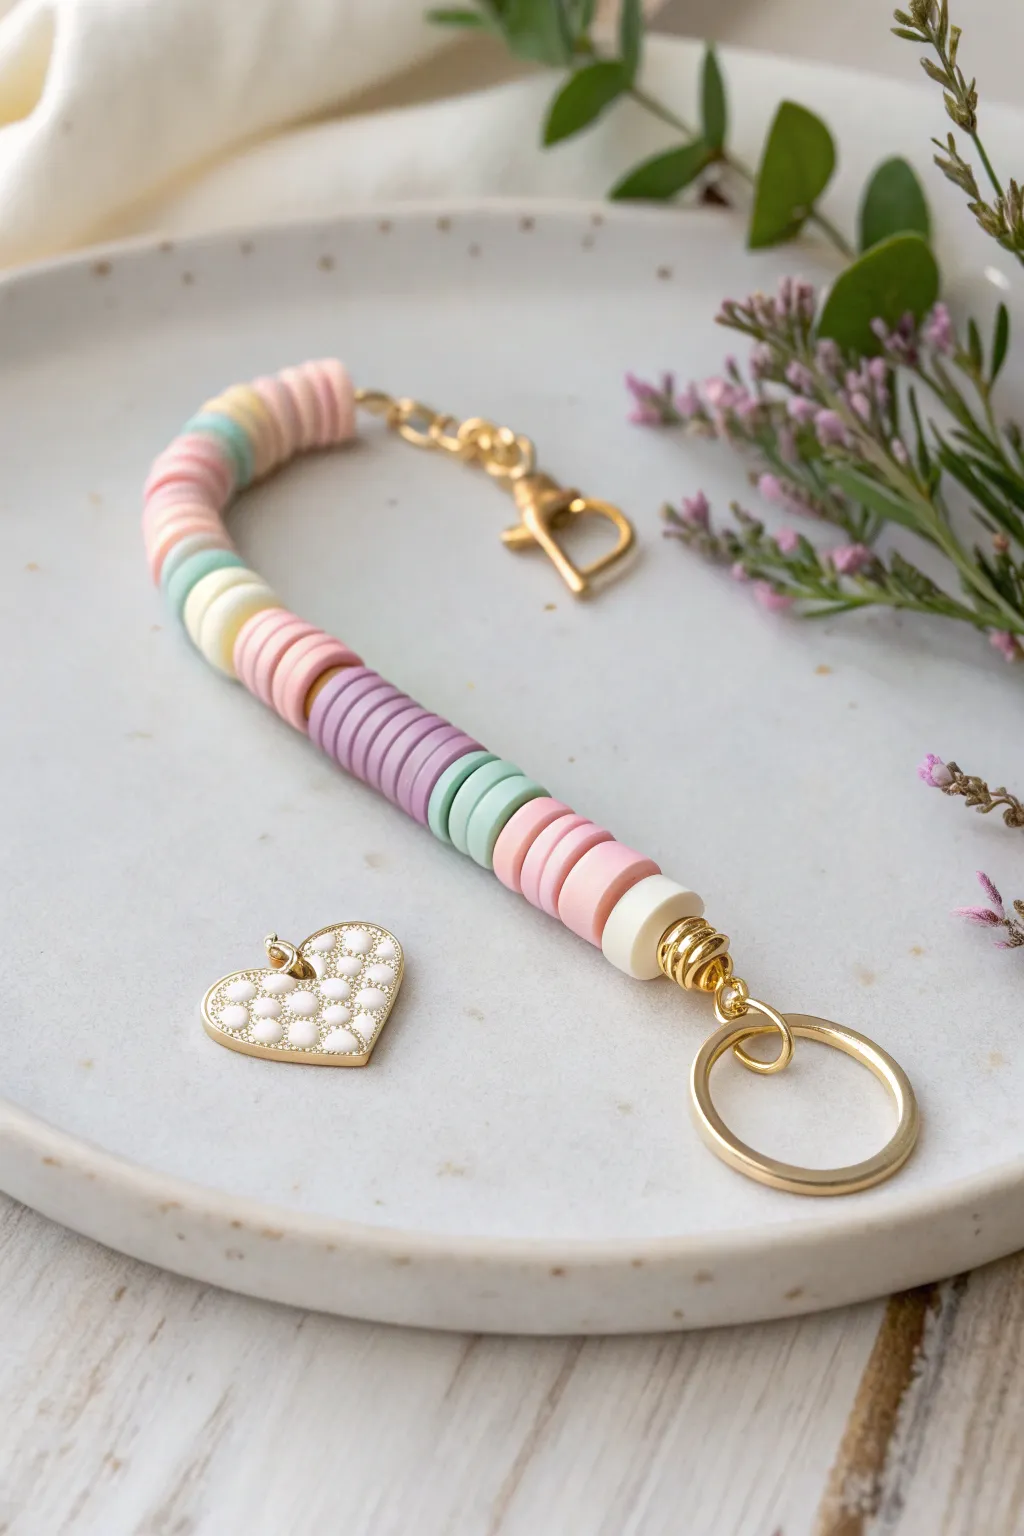
Embrace the sweetest side of crafting with this delightful heishi bead keychain featuring a soft, candy-colored palette. The smooth clay discs are perfectly paired with bright gold accents and a charming enameled heart pendant for a result that looks like charming jewelry for your keys.
Step-by-Step
Materials
- Polymer clay heishi beads (6mm or 8mm) in pastel pink, peach, lilac, mint, cream, and soft yellow
- Gold tone keyring (split ring)
- Gold tone lobster clasp
- Gold tone cable chain (small links)
- Gold craft wire (20 or 22 gauge) OR a long gold eye pin
- Gold wire wrapping coil (optional, for decorative finish)
- Gold enamel heart charm with white polka dots
- Gold jump ring (4mm or 5mm)
- Jewelry pliers (round nose and flat nose)
- Wire cutters
Step 1: Preparing the Base
-
Cut the Wire:
Cut a piece of gold craft wire approximately 6 inches long. If you are using a pre-made eye pin, you can skip this step, but standard wire gives you more flexibility with length. -
Create the First Loop:
Using your round nose pliers, grasp one end of the wire about 1/4 inch from the tip. Rotate the pliers to curl the wire into a small, closed loop. This will hold your chain later. -
Secure the Wrap:
If you want extra security, wrap the tail of the wire around the main stem once or twice before trimming the excess. Otherwise, simply ensure the loop is closed tightly so the chain won’t slip out.
Step 2: Beading the Pattern
-
Begin with Cream:
Start threading your beads. I like to begin with a neutral stopper, so slide on one cream or white heishi bead first to sit against your wire loop. -
Start the Pink Section:
Add about 4-5 beads in a soft pastel pink. The varying thickness of heishi beads adds a nice organic feel, so don’t worry if they aren’t all uniform. -
Transition to Peach:
Thread on 4-5 beads in a warm peach tone. This creates a gentle gradient effect next to the pink. -
Add Lilac Tones:
Follow the peach with a stack of lilac or light purple beads. Keep the count consistent—around 4 to 5 beads per color block creates the best visual rhythm. -
Introduce Mint Green:
Slide on your mint green beads next. This cool tone provides a refreshing contrast to the warmer pinks and purples. -
Repeat the Pattern:
Continue adding blocks of color. Depending on your desired length, you might add a second pink section, followed by a buttery yellow section, and finish with a bit of teal or light blue. -
Finish the Stack:
End your bead stack just like you started, with a single cream or white bead to bookend the design.
Wire Tension Tip
Keep the wire slightly slack inside the beads. If you wrap the final loop too tightly against the beads, the keychain will be stiff and rigid instead of flexible.
Step 3: Attaching Hardware
-
Create the Top Loop:
Using your pliers, bend the remaining wire at a 90-degree angle right above the last bead. Create a loop with your round nose pliers, leaving enough space to attach the keychain ring. -
Add the Decorative Coil:
Before closing the loop entirely, slide on a decorative gold wire coil if you have one. This hides the connection point and adds a professional polish found in high-end accessories. -
Attach the Keyring:
Slide the large gold split ring onto the loop you just created. Use your pliers to wrap the wire tail securely around the stem below the loop to lock everything in place. -
Connect the Chain:
Go back to the bottom loop you created at the very beginning. Open a small jump ring (or open the wire loop slightly) and attach a short length of gold chain (about 1.5 inches). -
Attach the Lobster Clasp:
At the end of that short chain, attach your gold lobster clasp using a jump ring. This allows the keychain to clip onto bags easily.
Upgrade Your Hardware
Add a tassel made of suede cord or embroidery floss in a matching pastel pink to the main ring for extra texture and movement.
Step 4: Adding the Charm
-
Prep the Charm:
Locate your gold heart charm. If it doesn’t have a jump ring attached, create one using a small piece of gold wire or use a pre-made jump ring. -
Position the Charm:
Decide where you want the heart to hang. You can attach it to the large keyring itself for a clustered look, or hook it onto the bottom wire loop alongside the chain. -
Secure the Charm:
Twist the jump ring open laterally (not pulling apart), slide the charm and the attachment point onto it, and twist it closed securely so there is no gap. -
Final Check:
Gently tug on all connections to ensure the wire wraps are tight and jump rings are flush.
Now you have a sweet, personalized accessory ready to brighten up your keys or backpack


Bold Rainbow Color-Blocked Clay Bead Keychain
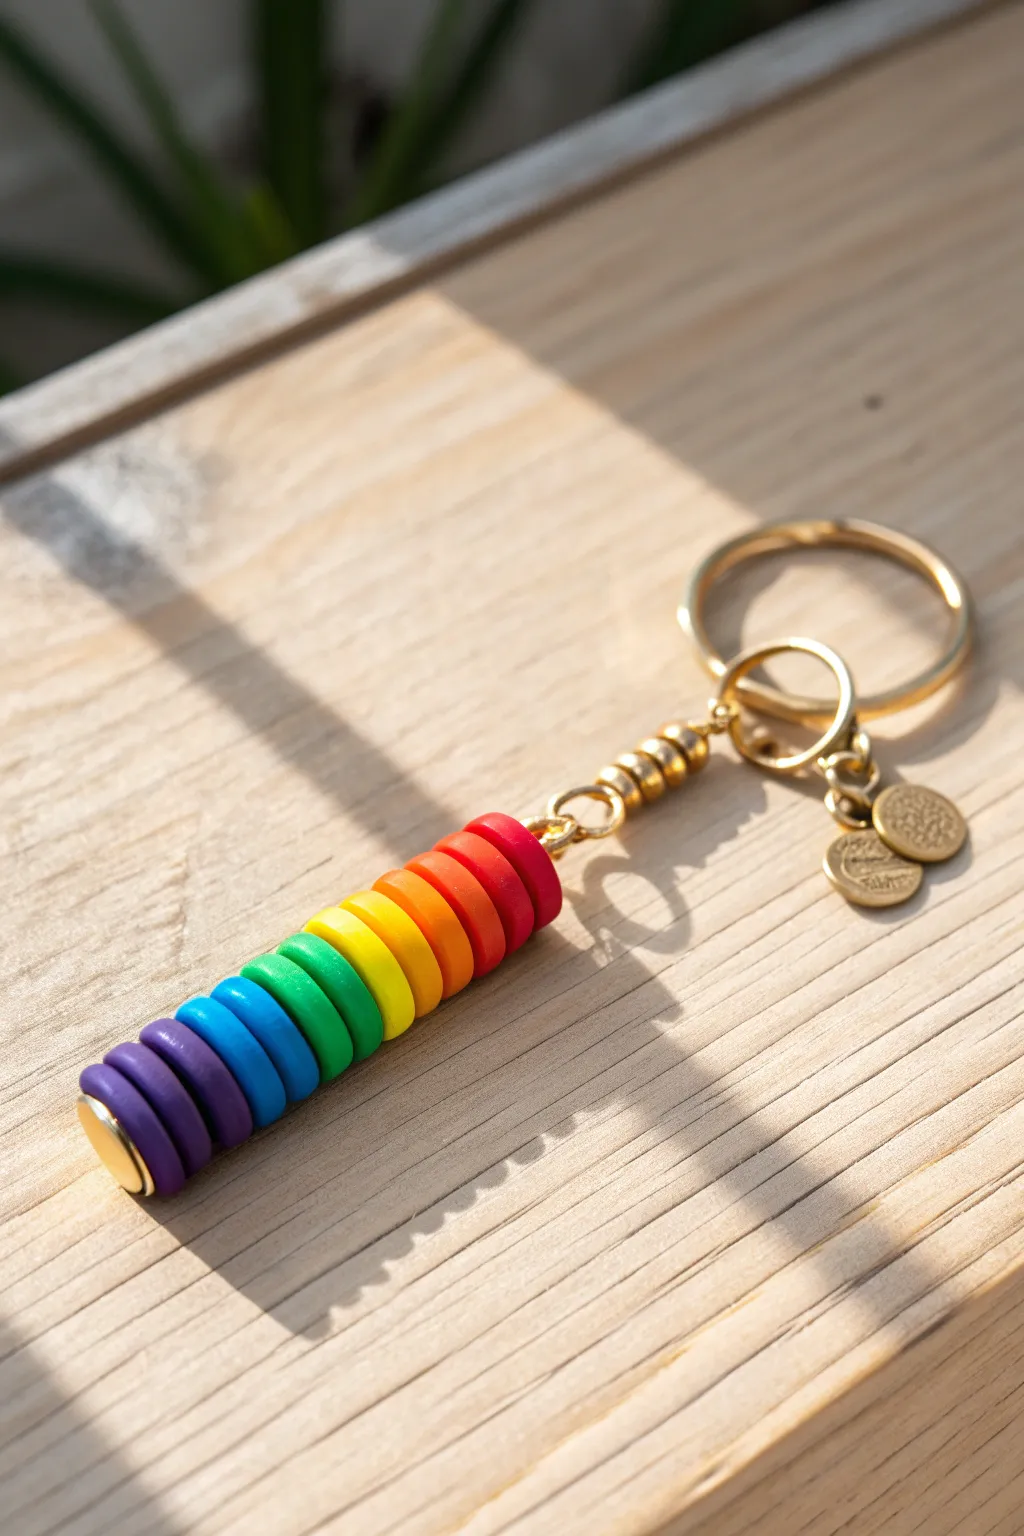
Brighten up your keys with this sleek, architectural stack of vibrant clay discs. Using distinct color blocking and polished gold accents creates a keychain that feels modern, cheerful, and incredibly satisfying to hold.
Step-by-Step Guide
Materials
- Polymer clay in rainbow colors (red, orange, yellow, green, blue, indigo/purple)
- Small round clay cutter (approx. 10-12mm)
- Acrylic roller or pasta machine
- Eye pin (gold finish)
- Gold seed beads or small gold spacer beads (3-4mm)
- Large gold split ring (keyring)
- Small jump rings
- Gold finish decorative charms (optional)
- Gold finish bottom cap or bead stopper
- Jewelry pliers (round nose and chain nose)
- Wire cutters
- Oven for baking
- Toothpick or bead piercing tool
Step 1: Prepping the Clay Discs
-
Condition the clay:
Start by warming up each color of polymer clay in your hands. Knead them individually until they are soft and pliable to prevent cracking later. -
Roll out sheets:
Using your acrylic roller or pasta machine, roll each color into a slab of even thickness. Aim for a thickness of about 3-4mm per sheet to get chunky, distinct discs. -
Cut the circles:
Take your small round cutter and punch out circles from each color slab. You will need about 2-3 discs of each color to recreate the height shown in the image. -
Smooth the edges:
Pick up each raw clay circle and gently run your finger around the circumference to smooth out any harsh seams or drag marks left by the cutter. -
Pierce the holes:
Use a toothpick or a bead piercing pin to create a central hole in each disc. I prefer to twist the tool gently as I push through to avoid distorting the circle’s shape. -
Bake the beads:
Arrange your clay discs on a baking sheet lined with parchment paper or a ceramic tile. Bake according to the manufacturer’s instructions for your specific brand of clay. -
Cool down:
Once baked, allow the beads to cool completely before handling. They will harden fully as they return to room temperature.
Step 2: Assembling the Stack
-
Prepare the headpin:
Take a long gold headpin or eye pin. If using an eye pin, you may want to place a small gold stopper bead or a flat gold cap at the very bottom to hold the clay stack in place. -
Begin the rainbow:
Thread your cooled clay beads onto the pin. Start with the purple/indigo shades at the bottom, stacking about 3-4 discs. -
Build the gradient:
Continue adding beads in rainbow order: move to the blues, then greens, yellows, oranges, and finally reds. Ensure the colors are grouped in solid blocks rather than mixed. -
Check the stack:
Compress the stack gently with your fingers to ensure there are no unintended gaps between the discs, but don’t force them too tight. -
Add the topper:
Once the clay stack is complete, thread on three of your gold seed beads or spacer beads immediately above the final red clay disc.
Uneven Stack?
If your clay discs aren’t sitting flat against each other, lightly sand the top and bottom of each baked bead on a piece of fine-grit sandpaper placed on a flat surface.
Step 3: Attaching the Hardware
-
Trim the wire:
Using wire cutters, trim the excess wire extending from the top of the gold spacer beads, leaving about 1cm of wire exposed. -
Create a loop:
Use your round nose pliers to grasp the tip of the wire and roll it backward towards the beads to create a secure, closed loop. -
Connect the keyring:
Open a jump ring using two pairs of pliers (twist sideways, don’t pull apart). Slide on your new colorful bead pendant and the large split keyring. -
Add charms:
If you have extra decorative gold charms, slide them onto the same jump ring or add a secondary small jump ring to attach them to the main keyring base. -
Final closure:
Twist the jump ring back into a closed position, ensuring the ends meet perfectly flush so your keys don’t slip off.
Level Up: Texture
Before baking, gently roll the side of your round cutter or a textured tool along the edge of the raw clay discs to create ridges or patterns on the outside of the cylinder.
Clip this vibrant accessory to your bag or keys and enjoy a pop of color every day

The Complete Guide to Pottery Troubleshooting
Uncover the most common ceramic mistakes—from cracking clay to failed glazes—and learn how to fix them fast.
Neutral Stone-Inspired Clay Bead Keychain With Metallic Accents
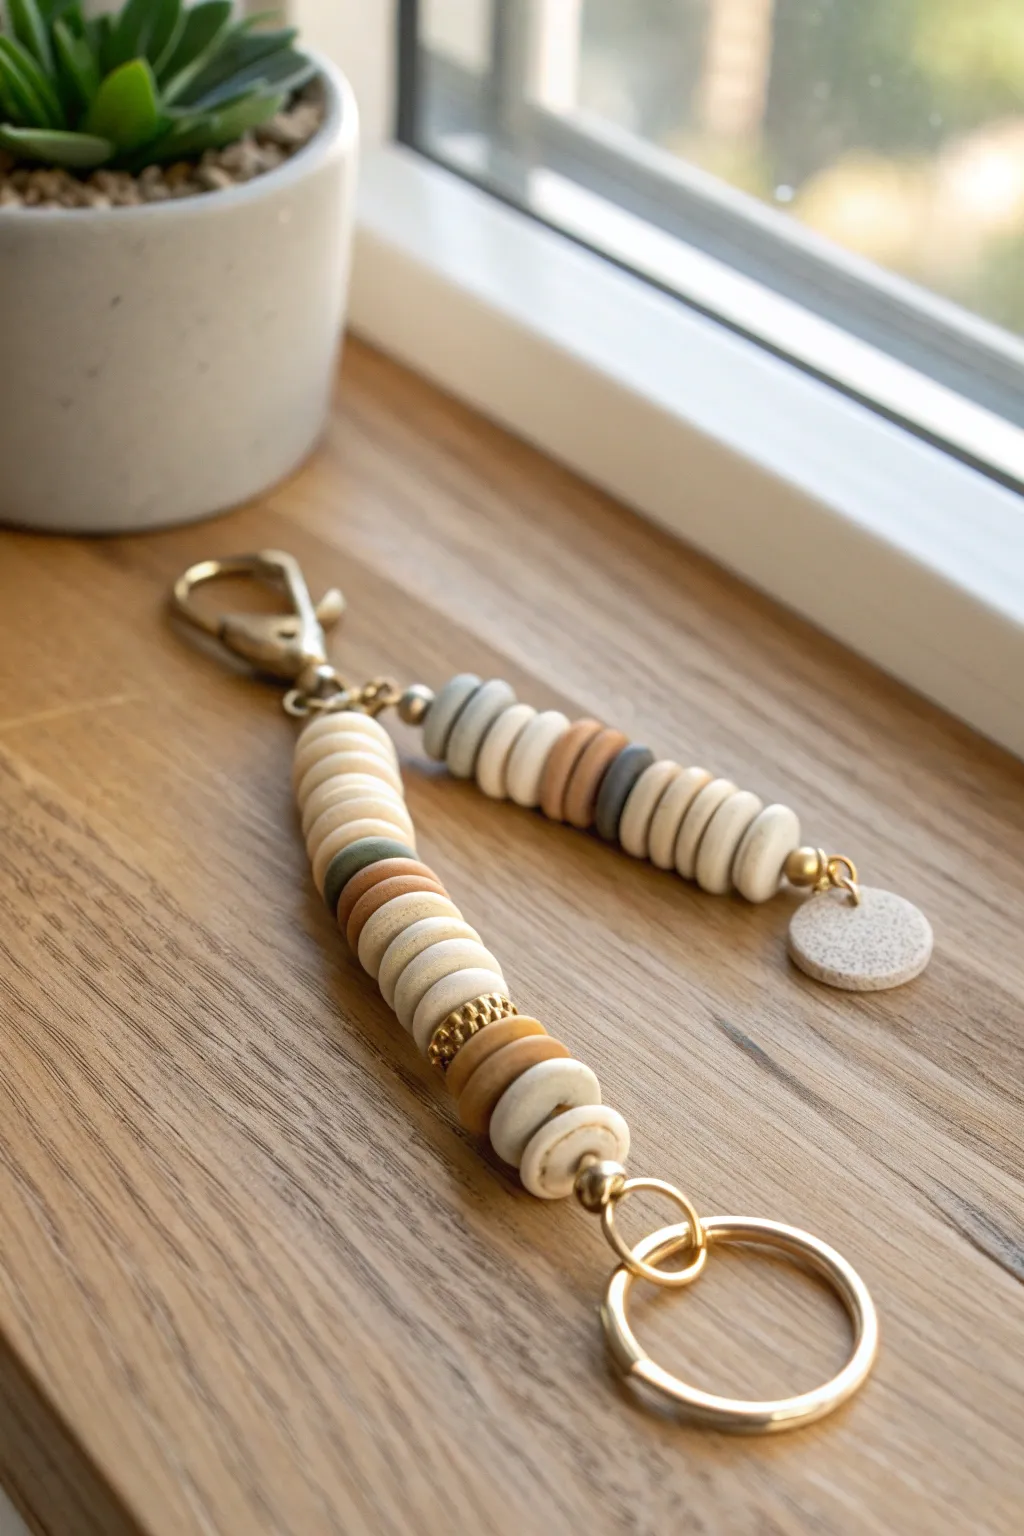
This elegant keychain combines earthy clay tones and metallic gold accents for a sophisticated, minimalist accessory. The stone-like texture and soft neutral palette make it a perfect functional art piece for your keys or bag.
How-To Guide
Materials
- Polymer clay in neutral colors (white, beige, tan, sage green, charcoal)
- Granite or speckled effect polymer clay
- Gold metallic polymer clay or gold acrylic paint
- Round clay cutters (various small sizes)
- Toothpick or bead piercing tool
- Gold beading wire or strong nylon cord
- Gold lobster clasp
- Large gold keyring
- Gold spacer beads
- Gold crimp beads
- Gold jump rings (assorted sizes)
- Jewelry pliers (flat nose and round nose)
- Baking sheet and parchment paper
- Oven
Step 1: Creating the Clay Beads
-
Condition the clay:
Start by warming up your polymer clay blocks in your hands until they are soft and pliable. Use white, beige, tan, sage green, and charcoal colors to match the palette. -
Mix custom shades:
To achieve the natural, stony look, try marbling a bit of white into your solid colors. Don’t overmix; you want subtle streaks to verify the organic aesthetic. -
Roll out sheets:
Roll your conditioned clay into even sheets, approximately 3-4mm thick. A pasta machine works wonders for uniform thickness, but a standard acrylic roller works just fine too. -
Cut the discs:
Using a small round cutter (about 1cm diameter), punch out numerous discs from each color. You will need roughly 40-50 beads total for a substantial keychain. -
Create the textured accent:
For the flat charm at the end, cut one slightly larger circle from the speckled granite-effect clay. Gently press a piece of sandpaper or a textured sponge onto the surface to give it a stone-like finish. -
Pierce the beads:
Carefully poke a hole through the center of each disc using a bead piercing pin or toothpick. I gently twist the tool as I push through to prevent the bead from squashing. -
Pierce the charm:
For the flat textured charm, pierce a hole slightly off-center near the top edge so it can hang properly. -
Bake the clay:
Arrange all your beads on a parchment-lined baking sheet. Bake according to the manufacturer’s instructions for your specific brand of clay (usually around 275°F/135°C for 15-30 minutes). -
Cool down:
Allow the beads to cool completely before handling. They harden fully as they return to room temperature.
Uneven Bead Edges?
If your beads have rough edges after baking, lightly sand them with a fine-grit nail file or sandpaper block. This gives them that professional, smooth Heishi finish.
Step 2: Assembly
-
Prepare the cord:
Cut a length of beading wire or strong cord, approximately 12 inches long. This gives you plenty of room to work. -
Secure the top clasp:
Fold the wire in half. Thread the loop through the bottom ring of your gold lobster clasp. Secure it with a crimp bead right at the top, pinching it tight with pliers. -
String the top section:
Thread both ends of the wire through a gold spacer bead, followed by a series of about 5-6 clay beads. Mix your colors (e.g., grey, cream, tan) to create a nice pattern. -
Split the strands:
Separate the two wire tails. You will now bead each side independently to create the ‘Y’ shape. -
Bead the left strand (long side):
On the first wire, thread a longer sequence of beads. In the example, this side features a prominent gold textured bead toward the bottom. Finish with a few cream discs. -
Attach the large keyring:
Thread the end of this wire through a crimp bead, then through the large gold keyring. Loop back through the crimp bead and pull tight. Flatten the crimp bead with pliers to lock the ring in place. -
Bead the right strand (short side):
On the second wire, thread a shorter sequence of beads (about 8-10 discs). End this strand with a gold bead. -
Finish the short strand:
Use a crimp bead to create a small loop at the end of the wire. Snip off any excess wire close to the crimp. -
Attach the charm:
Open a small gold jump ring using two pairs of pliers. Slide on your textured granite charm and hook it onto the loop you just made at the end of the short strand. Close the jump ring securely.
Gold Accent Hack
Don’t have a textured gold metal bead? Make one! Roll a clay bead in gold leaf or paint it with metallic acrylics after baking, then seal with a glossy glaze.
Clip this onto your keys and enjoy the satisfying tactile feel of your handmade creation
Minimal Monochrome Heishi Bead Keychain
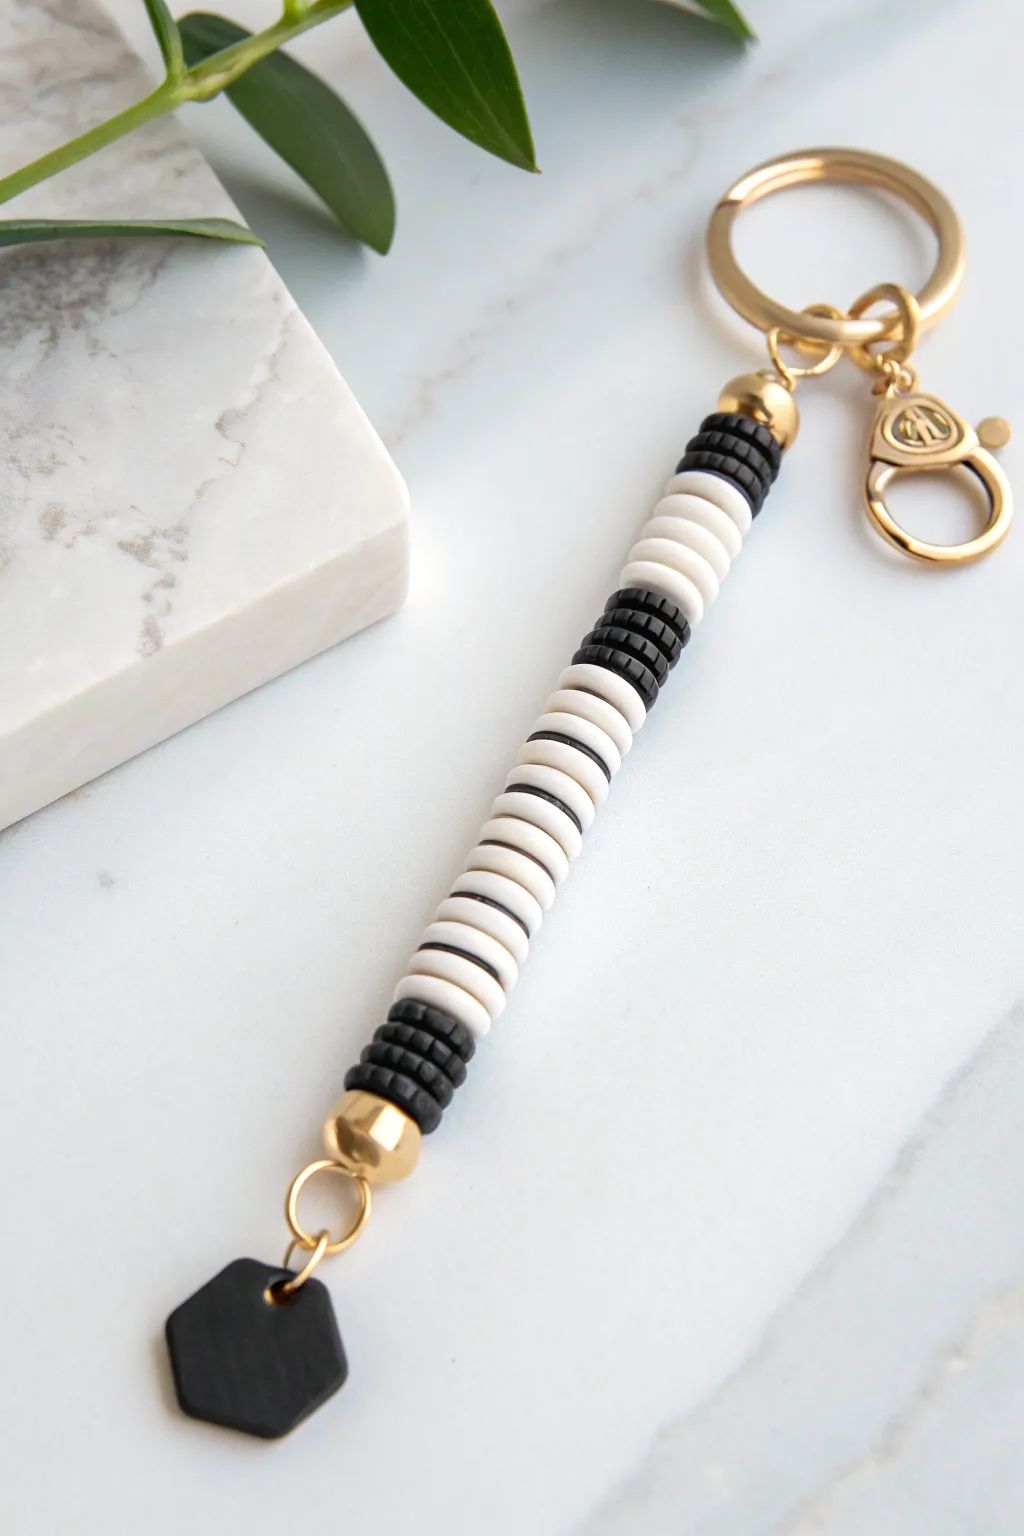
Embrace minimalist design with this sophisticated black and white keychain, featuring classic heishi disk beads accented by gleaming gold hardware. The clean lines and contrasting monochromatic palette make this accessory both modern and timeless, perfect for organizing your keys or dressing up a simple bag.
Step-by-Step Tutorial
Materials
- Black polymer clay heishi beads (disk beads)
- White polymer clay heishi beads (disk beads)
- Gold spherical spacer beads (approx. 6mm or 8mm)
- Gold keychain ring with lobster clasp accent
- Nylon beading cord or strong jewelry wire
- Gold crimp beads
- Crimp bead covers (gold)
- Jump rings (gold)
- Black geometric hexagon charm
- Jewelry pliers (flat nose and cutting pliers)
- Scissors
Step 1: Preparing the Base
-
Cut the Cord:
Cut a length of your nylon cord or jewelry wire, measuring about 12-14 inches. You want plenty of excess to make tying knots and securing the ends easier. -
Secure the First End:
Thread one gold crimp bead onto the cord, followed by a gold jump ring. Loop the cord back through the crimp bead to create a secure loop holding the jump ring. -
Clamp the Crimp:
Use your flat nose pliers to firmly flatten the crimp bead, locking the wire in place. For a polished look, place a gold crimp cover over the flattened bead and gently squeeze it shut until it looks like a round bead. -
Attach the Charm:
Open the jump ring you just secured using two pairs of pliers to twist it sideways. Slide on your black geometric hexagon charm and twist the ring closed again.
Loose Beads?
If your beads look uneven or wobbly, try using a slightly thicker gauge wire or cord. Adding seed beads between the heishi disks can also help stabilize them.
Step 2: Beading the Pattern
-
Start with Gold:
Thread the loose end of your cord through a large gold spherical spacer bead. Slide it all the way down to sit directly on top of your crimp cover/charm assembly. -
First Black Section:
Begin your pattern by threading on approximately 4-5 black heishi disk beads. Push them down snugly against the gold sphere. -
White Contrast Block:
Switch to white beads. Add about 6-7 white heishi beads. This section acts as a bright separator between the darker blocks. -
Second Black Accent:
Add a smaller group of black beads, creating a narrower stripe. Use about 3-4 beads here to vary the visual rhythm. -
The Main White Section:
Create the longest central section using white beads. Thread on roughly 15-20 white heishi disks. This will be the bright focal point of the strand. -
Third Black Accent:
Mirror the earlier pattern by adding another small group of 3-4 black beads. -
White Spacer Block:
Add another block of 6-7 white beads, matching the size of the first white block you created. -
Final Black Section:
Finish the clay bead sequence with a final set of 4-5 black heishi beads. -
Top Gold Cap:
Cap off the entire bead stack by threading on your second large gold spherical spacer bead.
Step 3: Final Assembly
-
Prepare the Top Loop:
Thread a gold crimp bead onto the remaining wire, followed by the jump ring attached to your main gold keyring hardware. -
Create Tension:
Loop the wire back down through the crimp bead and pull it tight. I find it helpful to pull snugly enough that there are no gaps between beads, but not so tight that the strand becomes stiff and rigid. -
Secure the Knot:
Flatten the crimp bead securely with your pliers. Trim the excess wire tail close to the bead. -
Cover the Crimp:
Place a final gold crimp cover over the top crimp bead and gently close it with pliers to hide the mechanics. -
Check Connections:
Give the keychain a gentle tug to ensure all crimps are holding firm and the jump rings are fully closed.
Pro Tip: Glue Reinforcement
Before clamping your final crimp bead, add a tiny dot of jewelry glue or superglue inside the bead or on the knot for extra security against daily wear.
Your stylish black and white keychain is now ready to add a touch of modern elegance to your daily routine


What Really Happens Inside the Kiln
Learn how time and temperature work together inside the kiln to transform clay into durable ceramic.
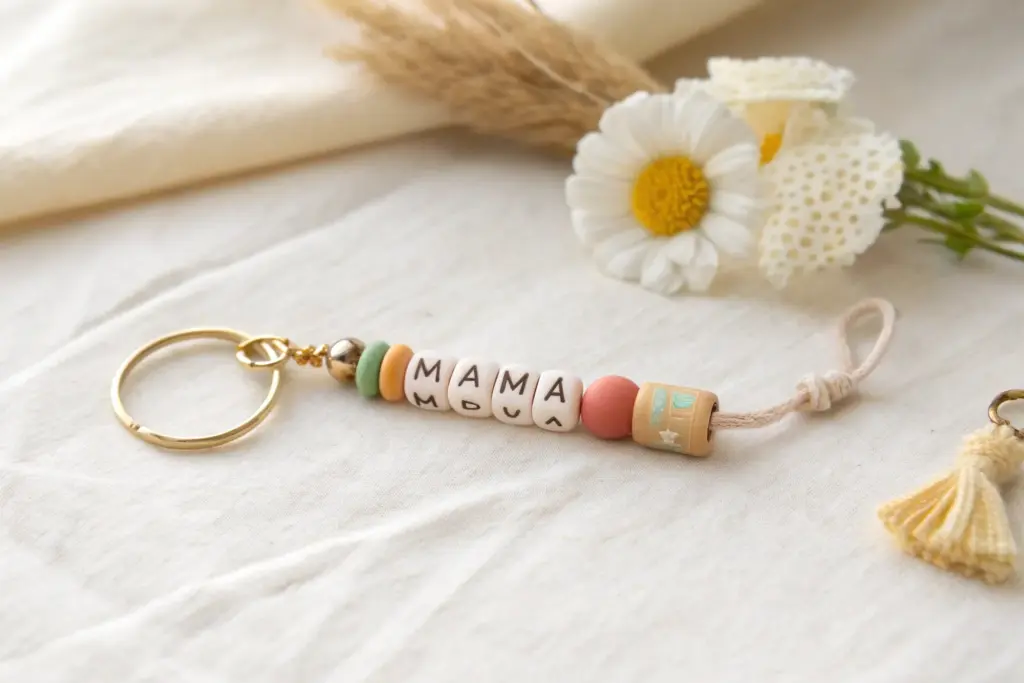
Daisy Focal Bead Clay Bead Keychain
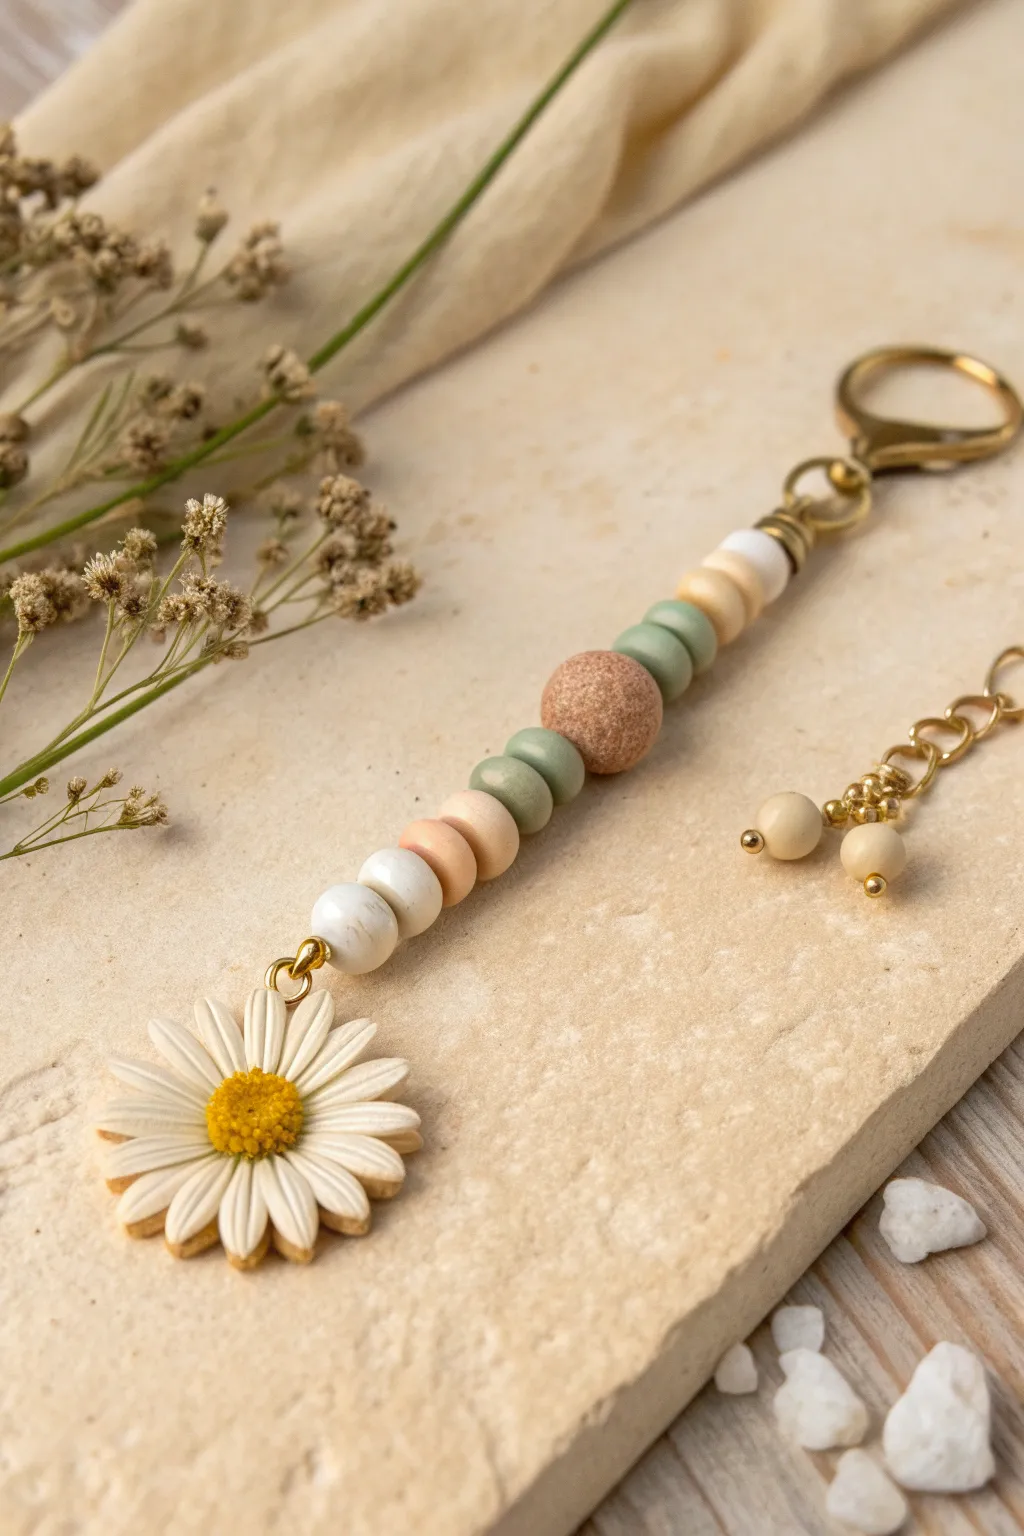
This charming keychain captures a delicate bohemian spirit with its earthy palette of sage, peach, and cream leading down to a handcrafted daisy focal bead. It combines the tactile joy of polymer clay sculpting with simple jewelry assembly for a functional piece of art.
Step-by-Step
Materials
- White polymer clay
- Yellow or gold polymer clay
- Sage green, peach, off-white, and textured brown polymer clay (for spacer beads)
- Gold lobster clasp keychain finding
- Gold jewelry chain (small links)
- Gold eye pins and head pins
- Gold jump rings (4mm and 6mm)
- Needle tool or toothpick
- Clay sculpting tools (optional)
- Small round cutter (approx. 1 inch)
- Jewelry pliers (round nose, chain nose, wire cutters)
- Oven for baking clay
Step 1: Sculpting the Daisy Focal Bead
-
Prepare the daisy base:
Start by conditioning your white polymer clay until soft. Roll it out to a medium thickness (about 4mm) and use your round cutter to punch out a circle. This will be the base for your flower petals. -
Shape individual petals:
Rolling small logs of white clay, slice them into equal little segments. Roll each segment into a teardrop shape, flattening them slightly. You’ll need about 12-14 petals depending on your base size. -
Arrange the petals:
Press the wide end of each teardrop petal onto the outer edge of your circular base, radiating inward. Use a modeling tool or your finger to gently merge the clay at the center, leaving the tips distinctive and rounded. -
Add petal texture:
Take a needle tool or toothpick and gently press a line down the center of each petal, starting from the center and fading out toward the tip. This simple detail brings the flower to life. -
Create the center:
Roll a ball of yellow or gold clay. Flatten it slightly into a dome and press it firmly into the center of your petals to cover the join points. -
Texture the center:
Stipple the yellow center repeatedly with a needle tool or a stiff brush to create a pollen-like texture. -
Insert hardware:
Carefully insert a gold eye pin through the top of one petal, pushing it deep into the flower structure so the loop sits just at the edge. Add a touch of liquid clay to the pin shaft for extra security if you have it.
Step 2: Creating the Spacer Beads
-
Roll the bead shapes:
Condition your various colors of clay. Roll small, uniform spheres for the spacer beads—you will need roughly 10-12 beads in graduating sizes. -
Form the lentil beads:
For the specific look in the photo, flatten the sage green and peach spheres slightly into ‘lentil’ or disc shapes rather than perfect rounds. -
Make the feature bead:
Create one larger bead from brown or granite-textured clay to serve as the visual center of the strand. -
Pierce the beads:
Using a bead piercing tool or toothpick, carefully poke a hole through the center of each bead. I find twisting the tool while pushing helps prevent the bead from squishing out of shape. -
Bake the clay:
Arrange all your beads and the daisy on a baking sheet lined with parchment paper. Bake according to your polymer clay package instructions (usually 275°F/130°C for 15-30 minutes). Let them cool completely.
Uneven Petals?
If your petals look irregular, create a long, even log of clay first. Mark equal increments with a ruler before slicing to ensure every petal starts with the same volume of clay.
Step 3: Assembly
-
String the main body:
Take a long gold eye pin. Thread the beads onto it, creating a pattern. The image shows: white, peach, sage, brown (center), sage, peach, and white. -
Close the loop:
Using round nose pliers, create a loop at the open end of the eye pin to secure the beads. Trim excess wire if necessary. -
Attach the daisy:
Use a jump ring to connect the loop on your daisy focal bead to the bottom loop of your beaded strand. -
Connect to clasp:
Attach the top loop of your beaded strand directly to the gold lobster clasp using another sturdy jump ring. -
Create the side charm:
Thread two or three tiny leftover beads onto head pins and create loops at the top. Attach these to a short length of gold chain (about 1 inch long). -
Final touches:
Attach this small decorative chain to the same jump ring that connects the main strand to the lobster clasp for a layered, professional finish.
Level Up: Scent it!
Make your keychain multisensory! Use a drop of essential oil on the textured ‘pollen’ center of the baked daisy or on a raw wood bead if you swap one in. It acts as a diffuser.
With your daisy securely attached, you now have a beautiful, sun-inspired accessory ready to brighten up any set of keys or bag zipper
Heart-And-Star Charm Mix Clay Bead Keychain
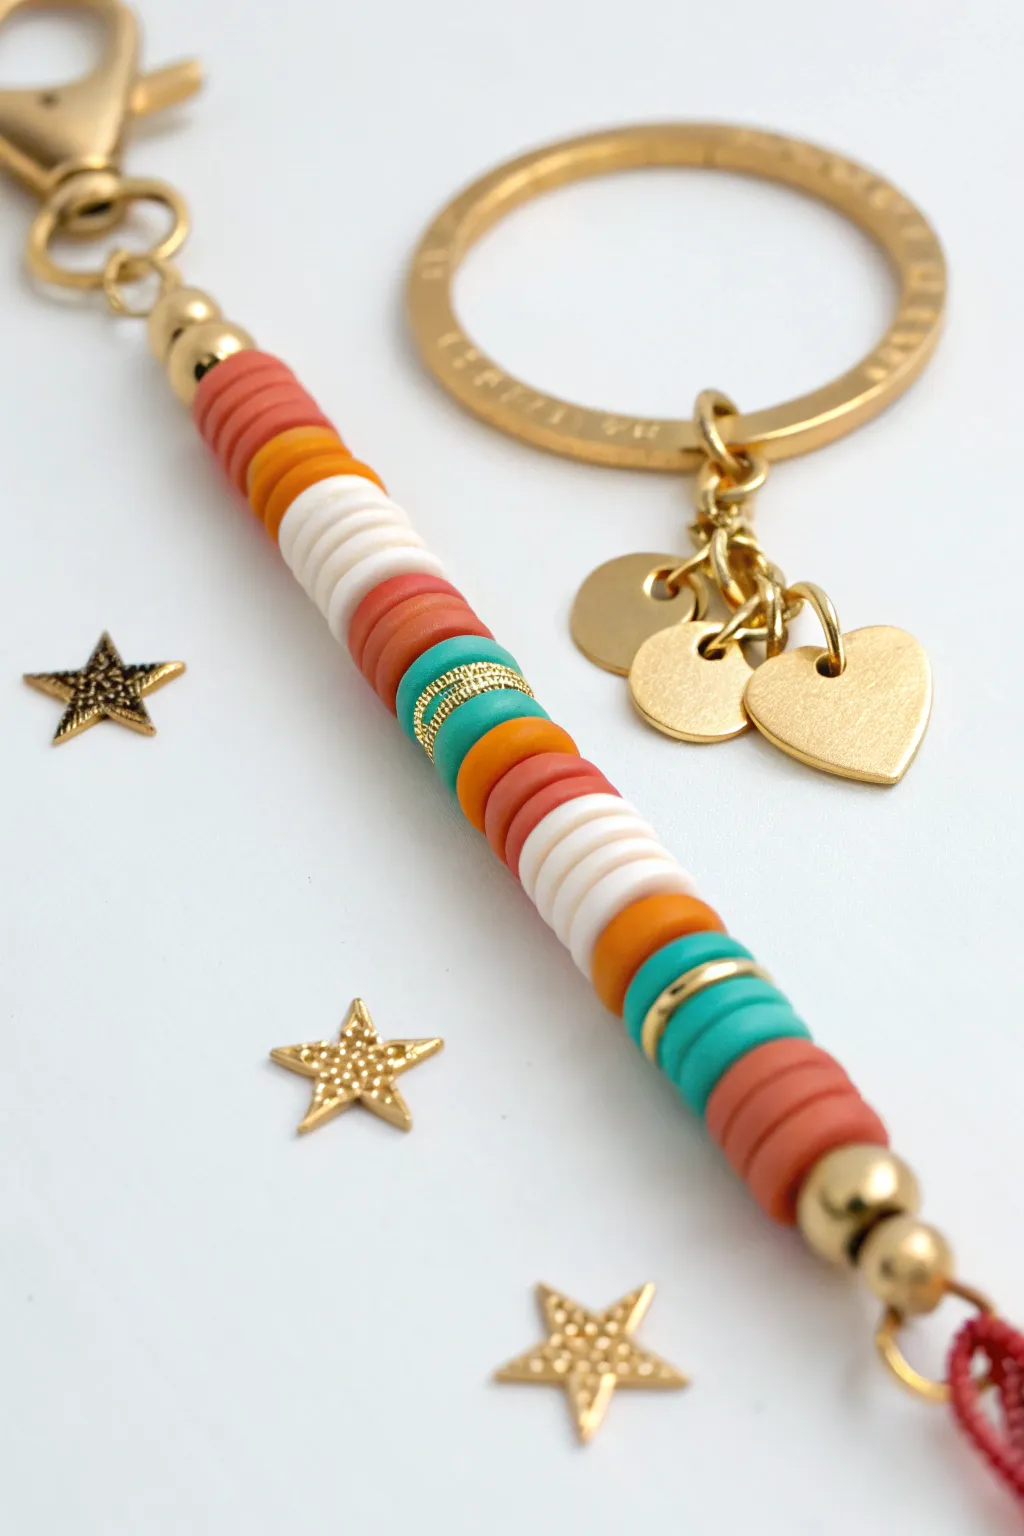
This stylish keychain combines trendy polymer clay heishi beads in a warm, earthy palette with elegant gold hardware. The addition of personalized charms creates a custom accessory perfect for gifting or keeping your keys organized.
Detailed Instructions
Materials
- Polymer clay heishi beads (terracotta/rust red, burnt orange, white, teal)
- Small gold disc spacer beads (heishi style)
- Gold-plated split keyring (flat profile)
- Gold swivel lobster clasp
- Gold heart charm
- Two small gold circle charms (blank stamping tags)
- Gold jump rings (assorted sizes)
- Durable beading cord (nylon or jewelry wire)
- Jewelry pliers (chain nose and flat nose)
- Scissors
- Crimp beads (if using wire) or lighter (if using nylon)
- Gold spherical spacer beads (approx 6mm)
Step 1: Creating the Beaded Strand
-
Prepare your cord:
Cut a length of your beading cord approximately 10-12 inches long. This gives you plenty of slack to work with. If you are using nylon cord, melt one end slightly to prevent fraying and make threading easier. -
Secure the clasp:
Thread your cord through the bottom loop of the gold swivel lobster clasp. Fold the cord back on itself and secure it. If using nylon, tie a sturdy knot; if using wire, use a crimp bead and clamp it shut with your pliers. -
Start the pattern:
Begin threading your beads. Start with a medium-sized gold spherical bead to act as a decorative anchor at the top. -
First red segment:
String about 6-7 terracotta/rust red clay beads. Push them snugly up against the gold sphere. -
Add orange tones:
From the red, transition into a burnt orange section. Thread on approximately 4-5 of these beads. -
White and teal block:
Add a crisp contrast with about 6 white clay beads, followed by 4-5 terracotta ones again to frame the center. -
The golden center:
Thread on a small section of teal beads (about 3). Then, add a decorative gold textured or heishi spacer bead, centered between two teal beads, to create a metallic focal point. -
Mirror the pattern:
Continue the pattern down the strand. Follow the teal with burnt orange, then a small block of red, and a longer section of white beads. -
Lower color block:
Add a few burnt orange beads, followed by a teal section that is interrupted by a gold spacer bead for visual interest. -
Finish the strand:
Complete the beading with a final block of terracotta beads. Cap off the strand with another medium gold spherical bead. -
Secure the bottom:
Thread the cord through a small loop or jump ring (which will hold the tassel later if desired, or just to close the loop). Tie a secure double knot or use a crimp bead to lock everything in place, trimming any excess wire.
Step 2: Assembling the Charms
-
Prepare the main ring:
Take your large, flat gold split ring. This is the main structure for your keys. -
Attach the beaded strand:
Using a sturdy jump ring, connect the top of your beaded strand (near the lobster clasp) to the large split ring. Close the jump ring securely using two pairs of pliers to twist it shut without warping the shape. -
open small jump rings:
Using your pliers, gently twist open three small jump rings. Remember to twist the ends away from each other rather than pulling them apart, which weakens the metal. -
Add the charms:
Slide your gold heart charm onto one jump ring, and the two small circle tags onto the others. I find it helpful to lay them out first to decide the order. -
Attach charms to ring:
Hook the jump rings containing the charms directly onto the small loop connector at the base of the large split ring, or onto a small dedicated chain if your ring has one attached. -
Cluster them:
Ensure the charms are clustered together so they jingle pleasantly. Close all jump rings tightly so the thin charms don’t slip off. -
Final check:
Give the keychain a gentle tug to ensure all knots and crimps are holding firm and that the jump rings are fully flush.
Loose Beads?
If your clay heishi beads look uneven or loose, check your knot tension. The cord should be pulled tight enough to keep beads flush, but not so tight the strand becomes stiff.
Stay Shiny
Coat your gold spacers and charms with a thin layer of clear nail polish or jewelry sealant before assembly. This prevents tarnishing and keeps the gold finish bright for longer.
Clip this vibrant accessory onto your favorite bag for an instant pop of color and personality

TRACK YOUR CERAMIC JOURNEY
Capture glaze tests, firing details, and creative progress—all in one simple printable. Make your projects easier to repeat and improve.
Checkerboard Pattern Heishi Bead Keychain
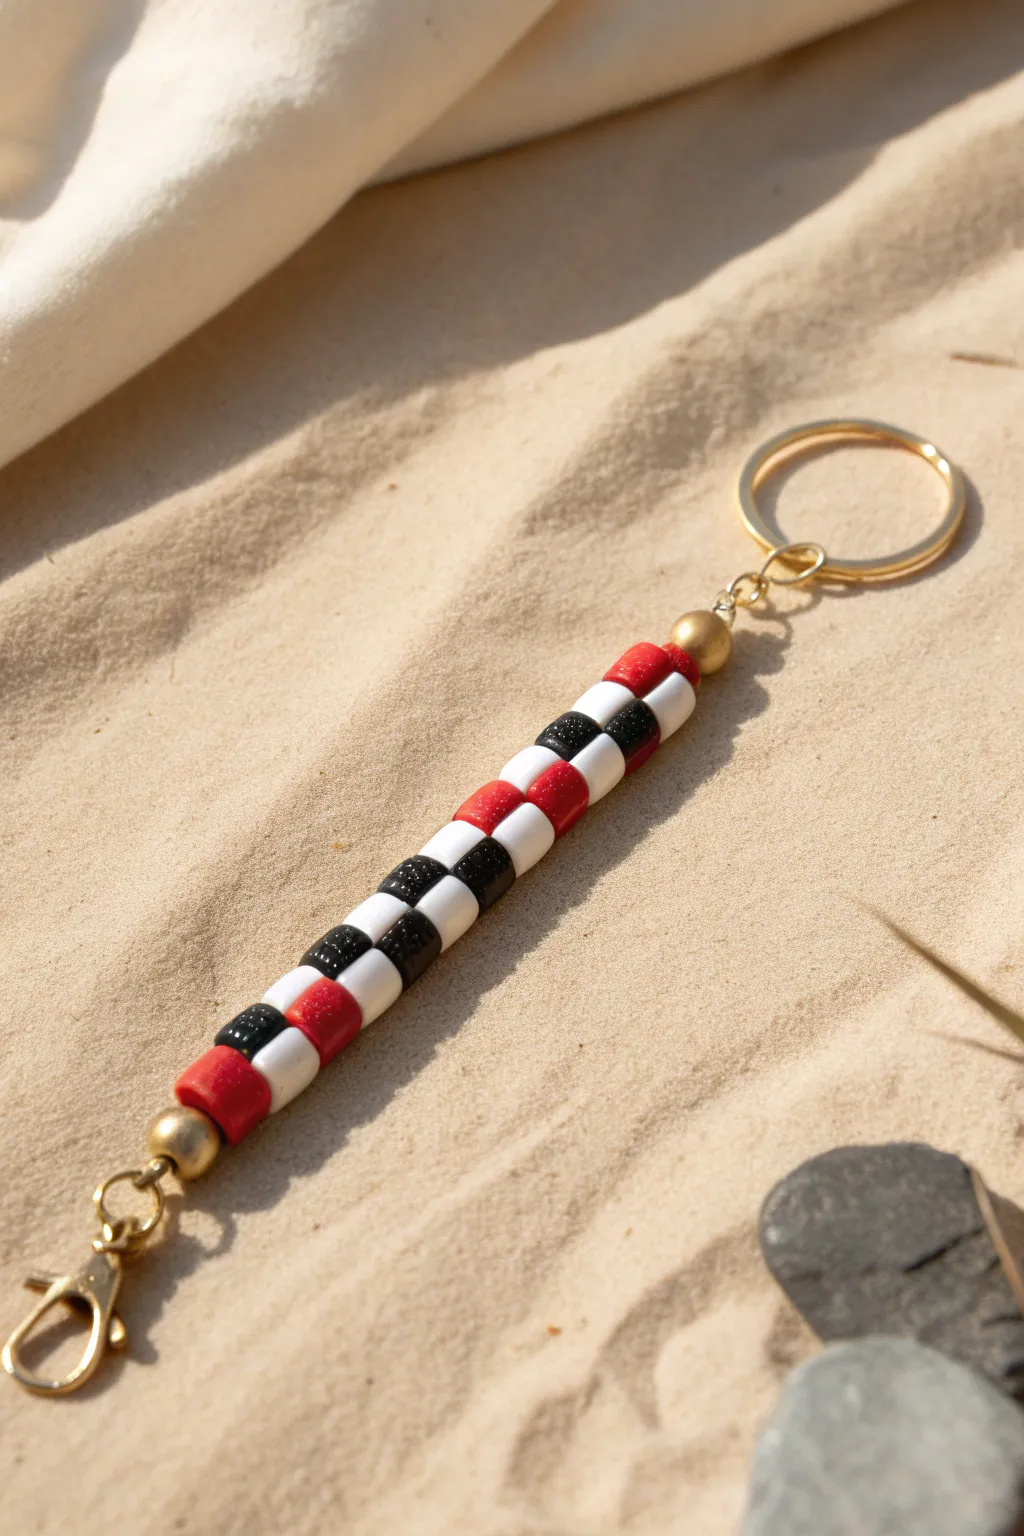
Create a striking accessory with this bold checkerboard pattern keychain, featuring vibrant red, crisp white, and deep black heishi beads. The gold hardware adds a touch of elegance, making it perfect for your keys or as a bag charm.
Step-by-Step
Materials
- Red polymer clay heishi beads (approx. 6mm)
- White polymer clay heishi beads (approx. 6mm)
- Black polymer clay heishi beads (approx. 6mm)
- 2 Gold round spacer beads (approx. 6-8mm)
- Gold split key ring
- Gold lobster clasp
- Nylon beading cord or strong jewelry wire
- 2 Crimp beads (gold)
- Jewelry pliers (flat nose and crimping pliers)
- Scissors
Step 1: Preparation
-
Measure and Cut:
Cut a piece of nylon beading cord about 12 inches long. This gives you plenty of extra room to work with the knots and crimps without feeling cramped. -
Secure the First End:
Thread one crimp bead onto the cord, followed by your gold lobster clasp. -
Loop and Crimp:
Loop the cord back through the crimp bead to create a small loop holding the clasp. Slide the crimp bead close to the clasp, but leave just enough wiggle room for movement. -
Fasten:
Use your crimping pliers to flatten the crimp bead securely. Give the wire a gentle tug to ensure it holds firmly.
Tighten Up
When crimping the final end, use pliers to pull the wire tail tight while pushing the crimp bead down. This removes slack so your beads don’t slide around.
Step 2: Creating the Pattern
-
Start with Gold:
Thread one gold round spacer bead onto the cord. Slide it down to cover the crimped end, hiding the hardware connection for a polished look. -
Row 1: Red and White:
For the first row of the checkerboard, thread two red heishi beads followed by two white heishi beads. This grouping acts as your first ‘block’. -
Row 2: Black and White:
Next, add two black heishi beads followed by two white heishi beads. -
Row 3: Red and White:
Thread on two red beads and two white beads. You are essentially alternating the colored blocks (red/black) while keeping the white blocks consistent. -
Row 4: Black and White:
String two black beads followed by two white beads. -
Row 5: Red and White:
Add two red beads followed by two white beads. -
Row 6: Black and White:
Add two black beads followed by two white beads. -
Row 7: Red and White:
Add two red beads followed by two white beads. -
Row 8: Black and White:
Add two black beads followed by two white beads. -
Row 9: Red Start:
To cap off the pattern symmetrically, finish by adding two red beads and two white beads one more time. -
Final Gold Accent:
Thread the second gold round spacer bead onto the cord. Push all beads snugly together so there are no gaps in the pattern.
Step 3: Finishing Touches
-
Add the Key Ring:
Thread a new crimp bead onto the remaining wire, followed by the gold split key ring. -
Create the Final Loop:
Pass the wire back down through the crimp bead and through the top gold spacer bead if possible. -
Secure and Trim:
Pull everything taut so the key ring sits close to the gold ball bead. Use your pliers to flatten the crimp bead securely. -
Cut Excess Wire:
Trim any excess wire as close to the crimp bead as possible using sharp scissors or wire cutters.
Double Checker
Make the keychain double-sided! Instead of a single strand, loop the wire through the keyring first and bead two identical strands downward, joining them at the clasp.
You now have a stylish, patterned keychain ready to organize your keys or gift to a friend
Marbled Clay Bead Keychain With Coordinated Charm
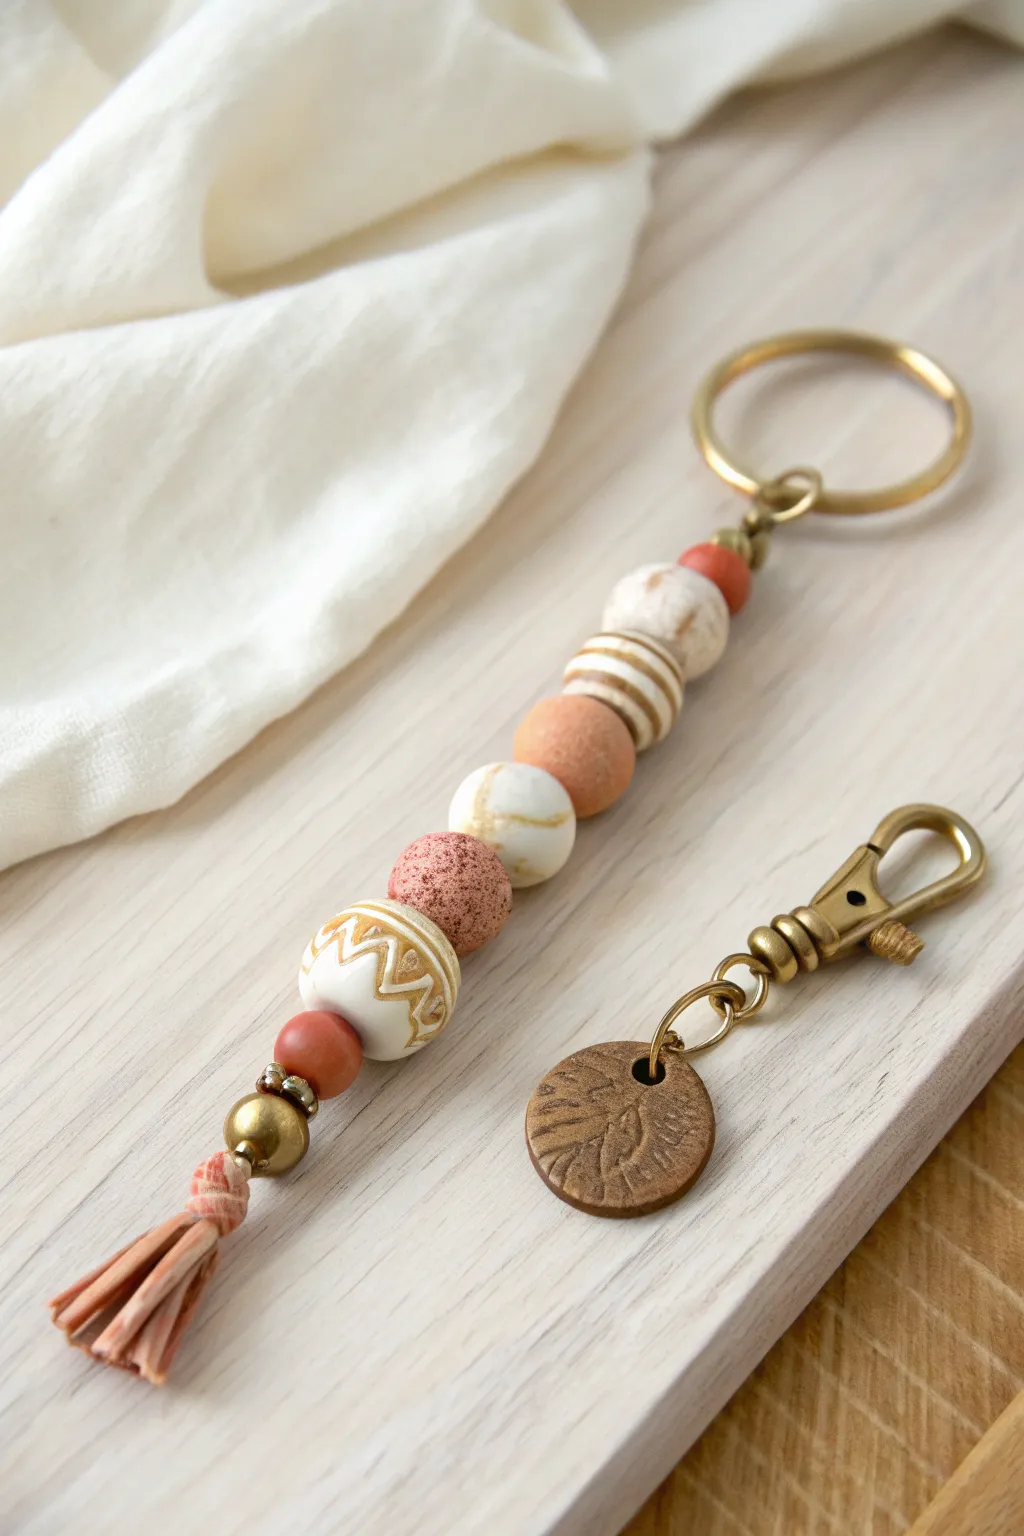
Embrace earthy tones and varied textures with this sophisticated beaded keychain project. The mix of marbled, textured, and solid clay beads, finished with a suede tassel, creates a stylish accessory perfect for your keys or bag.
Step-by-Step Tutorial
Materials
- Polymer clay (white, terracotta/burnt orange, gold metallic, beige)
- Bead roller (optional)
- Toothpick or bead drying rack
- Gold acrylic paint or gold leaf pen (for accents)
- Small stiff paintbrush
- Gloss glaze or varnish
- Thick beading cord or waxed cotton cord
- Large brass split keyring
- Small brass lobster clasp
- Brass jump rings (various sizes)
- Brass spacer beads (gold tone)
- Faux suede lace (terracotta color)
- Round texture stamp or clay tool
- Jewelry pliers
- Scissors
Step 1: Crafting the Clay Beads
-
Condition the clay:
Start by warming and kneading your polymer clay blocks until they are soft and pliable. You’ll need white, terracotta, beige, and a touch of gold. -
Create the marbled bead:
Twist ropes of white, beige, and a tiny sliver of gold clay together. Fold and twist repeatedly until the colors swirl but don’t blend completely. Roll into a smooth, round ball. -
Form the solid accent beads:
Roll small balls of pure terracotta and white clay. Keep the terracotta beads slightly smaller than your focal beads for visual balance. -
Sculpt the textured focal bead:
Roll a large ball of white clay. Using a fine-tip clay tool, carefully carve a zig-zag pattern around the center circumference. -
Add carved details:
Above and below your zig-zag line, press small vertical indentations to create a border. This adds a lovely tribal-inspired touch. -
Make the striped bead:
Take a base ball of beige clay. Roll very thin snakes of white clay and press them gently around the beige ball to create stripes, then roll the entire bead in your palms to smooth the surface until the stripes are embedded. -
Texture the granite-look bead:
Roll a ball of terracotta clay mixed with some black specks or use granite-effect clay. Gently tap the surface with a stiff brush or toothbrush to give it a rough, pitted stone texture. -
Pierce the beads:
Carefully insert a toothpick or piercing tool through the center of each bead. Rotate the tool as you push to prevent flattening the bead’s shape. -
Bake carefully:
Arrange your beads on a baking sheet or bead rack. Bake according to your customized clay package instructions—usually around 275°F (135°C) for 15-30 minutes.
Smooth Operator
To remove fingerprints before baking, gently brush your raw clay beads with a tiny amount of baby oil or cornstarch. Buff gently.
Step 2: Applying Finishes
-
Paint the inlay:
Once cool, use a fine brush to apply gold paint into the carved zig-zag and vertical grooves of your white focal bead. Wipe away any excess on the surface with a damp paper towel immediately. -
Seal the beads:
Apply a thin coat of satin or matte varnish to the beads to protect them and give them a professional sheen. Let them dry completely. -
Create the clay charm:
Roll a small disk of brown or bronze clay. Press a leaf stamp or texture mat into the surface. Bake this flat piece alongside your beads and cure.
Level Up: Scent Diffuser
Leave the terracotta-colored clay bead unsealed and unvarnished. You can drop essential oils onto it to act as a portable diffuser!
Step 3: Keyring Assembly
-
Prepare the cord:
Cut a length of thick beading cord, about 12 inches long. Fold it in half and loop it onto the large brass split keyring using a lark’s head knot. -
String the beads:
Thread your beads onto both strands of the cord. Start with small terracotta spacers, then layer your larger beads: marble, striped, solid, granite-texture, and finally the gold-inlaid bead. -
Add spacers:
Insert small brass spacer beads between the larger clay beads occasionally to add metallic shine and separate the colors. -
Create the tassel:
Cut 4-5 strips of suede lace, roughly 3 inches long. Bundle them at the bottom of your bead stack, placing the main cord ends in the center of the bundle. -
Secure the tassel:
Wrap a separate piece of suede lace tightly around the top of the bundle to form the tassel head. Secure with a dab of super glue and trim the ends neatly. -
Assemble the side charm:
Using jewelry pliers, open a large jump ring. Thread on your flat leaf charm and attach it to the loop of the brass lobster clasp. Close the ring securely.
Clip your new handmade accessory onto your purse or keys and enjoy the beautiful textures every day.
Terrazzo Speckle Heishi Bead Keychain
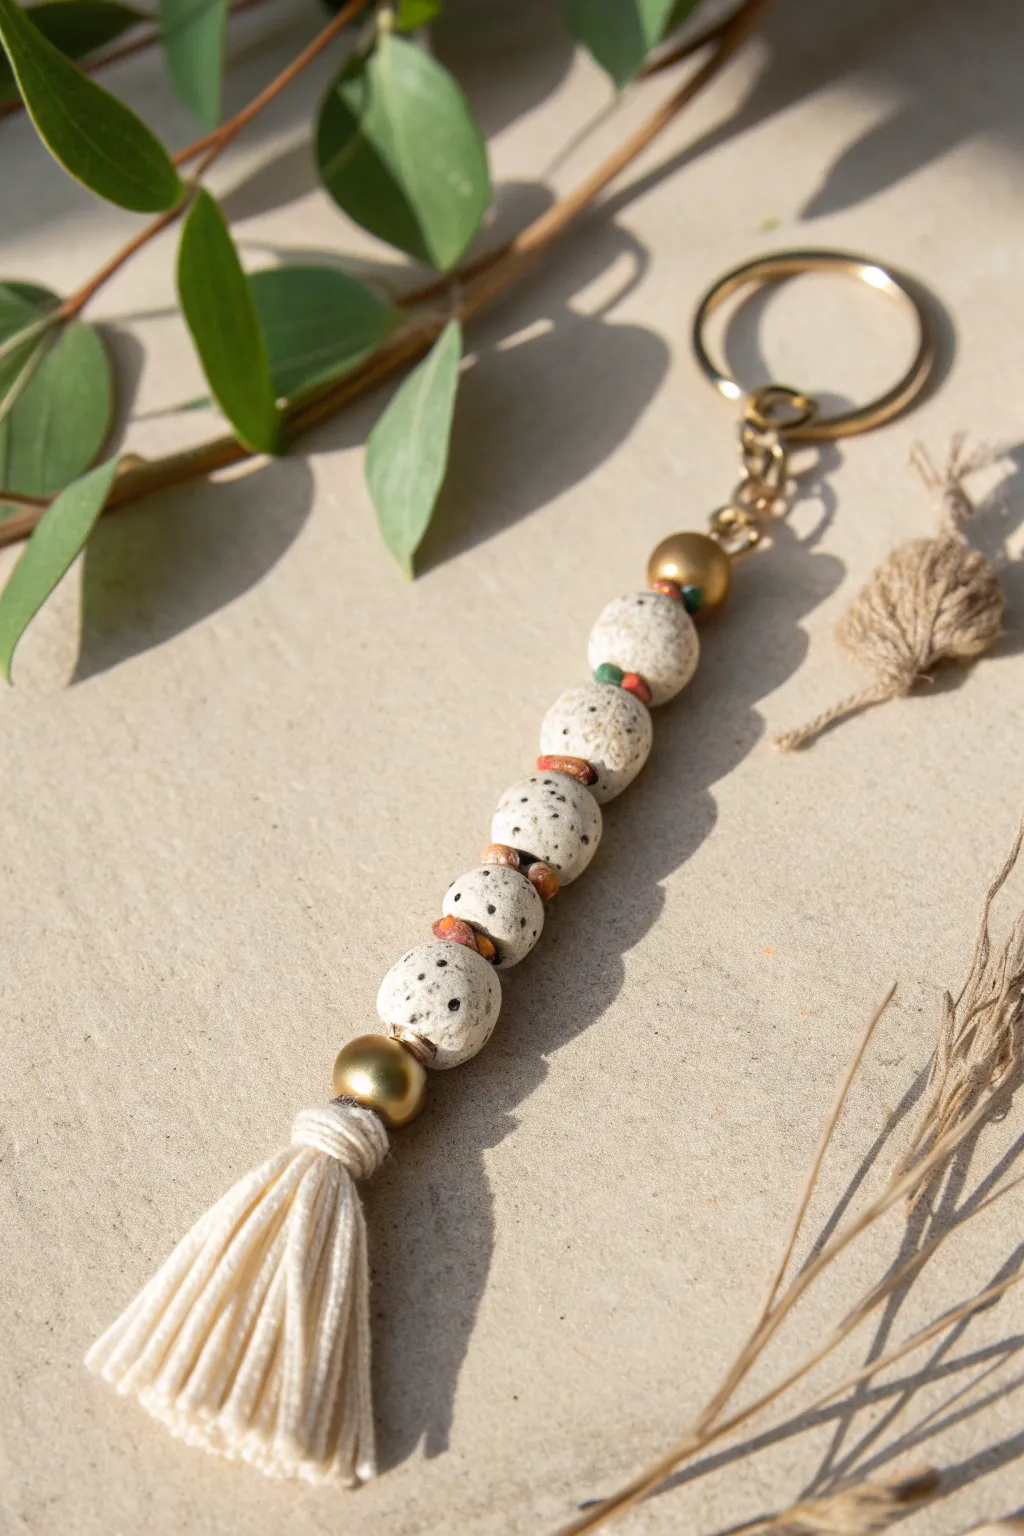
Create a boho-chic accessory with this sophisticated speckled clay keychain. Featuring a warm ‘cookies and cream’ terrazzo effect, gold accents, and a soft handmade tassel, this project is perfect for keeping your keys organized in style.
Step-by-Step
Materials
- White polymer clay
- Black polymer clay (or black pepper for organic speckles)
- Small colorful glass seed beads (red, orange, teal)
- Two large gold-tone accent beads
- Gold keychain split ring with jump ring chain
- Cream or off-white cotton macrame cord or embroidery floss
- Jewelry wire or eye pin
- Pliers (round nose and flat nose)
- Wire cutters
- Baking sheet and parchment paper
- Clay roller or acrylic rod
- Needle tool or toothpick
Step 1: Creating the Terrazzo Beads
-
Prepare the base:
Condition a block of white polymer clay by kneading it until it is soft and pliable. -
Make the speckles:
Take a very tiny amount of black clay and chop it into microscopic crumbs using a tissue blade or craft knife. Alternatively, cracked black pepper creates a fantastic natural texture. -
Mix the clay:
Sprinkle the black crumbs (or pepper) over the flattened white clay. Fold the clay over and roll it out, repeating until the speckles are evenly distributed throughout the mass without blending into gray. -
Form the spheres:
Divide the speckled clay into five equal portions. Roll each piece between your palms to create smooth, round spheres about 1-1.5 cm in diameter. -
Pierce the holes:
Using a needle tool or toothpick, carefully pierce a hole through the center of each bead. I like to rotate the bead slightly as I push to prevent the exit hole from distorting. -
Bake the clay:
Place your beads on a parchment-lined baking sheet. Bake according to your polymer clay manufacturer’s instructions (usually 275°F/135°C for 15-30 minutes) and let them cool completely.
Natural Speckles
Instead of black clay, use dried coffee grounds or vanilla bean specks mixed into the white clay for an organic look and faint scent
Step 2: Making the Tassel
-
Wind the cord:
Cut a 6-inch piece of cord and set it aside. Wrap the remaining cord around your four fingers or a piece of cardboard about 20-30 times, depending on how full you want the tassel. -
Tie the top:
Slide the wrapped bundle off your hand. Thread the reserved 6-inch cord through the loop at the top and double knot it tightly to secure the bundle. -
Create the neck:
Cut another piece of cord about 12 inches long. Wrap it tightly around the bundle about 1/2 inch below the top knot to create the tassel ‘head’. Tie it off securely and tuck the ends inside. -
Trim the fringe:
Cut the bottom loops of the bundle and trim the straight ends so they are even and uniform.
Step 3: Assembly
-
Prepare the wire:
Cut a length of jewelry wire or use a long eye pin. If using wire, create a secure loop at one end using your round nose pliers. -
Attach the tassel:
Thread the bottom loop of your wire through the top tie of your tassel, securing it in place. -
Begin beading:
Thread the first large gold bead onto the wire so it sits directly atop the tassel, covering the knot. -
Stack the pattern:
Slide on one speckled clay bead. Follow it with 2-3 colorful seed beads acting as spacers. Repeat this pattern for all five clay beads. -
Finish the stack:
Top the stack with the second large gold bead. -
Create the top loop:
Using your round nose pliers, bend the remaining wire at the top into a loop. Wrap the excess wire around the base of the loop for extra security (‘wire wrapping’) if desired, then trim any sharp excess. -
Attach the hardware:
Open the jump ring at the end of your gold keychain finding. Hook it through your wire loop and close it securely with flat nose pliers.
Level It Up
Add a drop of essential oil to the finished unglazed clay beads to turn your keychain into a portable aromatherapy diffuser
Clip this beautiful handmade piece to your purse or keys and enjoy the tactile charm of your new accessory
Fruit Slice Accent Clay Bead Keychain

Brighten up your keys or backpack with this refreshing citrus-inspired keychain that combines custom clay work with simple assembly. Featuring a handmade blood orange slice and coordinating textured beads, this accessory captures the vibrant warmth of summer fruit.
How-To Guide
Materials
- Polymer clay (translucent white, orange, deep red, yellow, opaque white)
- Gold-finish lobster clasp keychain hardware
- Gold beading wire or strong jewelry cord
- Gold crimp beads (2)
- Small gold spacer beads (optional)
- Gold jump rings (6mm)
- Clay roller or pasta machine
- Circle clay cutters (small)
- Needle tool or toothpick
- Clay blade or craft knife
- Jewelry pliers (flat nose and round nose)
- Wet sandpaper (fine grit)
- Gloss glaze (optional)
Step 1: Creating the Citrus Slice Cane
-
Mix the flesh color:
Start by mixing translucent white clay with a small amount of orange and a tiny touch of deep red to create a semi-translucent blood orange color. Condition it until soft and uniform. -
Form the segments:
Roll the colored clay into a log, then wrap it in a thin sheet of opaque white clay. Gently stretch this log until it’s smaller, about the thickness of a pencil. -
Shape the wedges:
Cut the log into 8 equal lengths. Pinch one side of each length to form a teardrop or wedge shape, maintaining the white ‘pith’ on the outside. -
Assemble the core:
Roll a very thin snake of white clay for the center. Arranges your 8 wedges around this center strand to form the full circle of fruit segments. -
Wrap the cane:
Wrap the assembled circle in a slightly thicker sheet of white clay (the inner rind), followed by a sheet of the deep red/orange mixed clay (the outer peel). -
Reduce to size:
Gently squeeze and roll the cane to reduce its diameter, ensuring all layers adhere. Slice a thick coin (about 4-5mm) for your charm. -
Pierce securely:
Use a needle tool to create a loop or hole at the very top of the rind for hanging. Ensure the hole is large enough for your jump ring.
Sticky Situation?
If clay gets too soft and sticky while rolling tiny spheres, pop it in the fridge for 10 minutes. This firms it up, making it easier to pierce holes without distorting the round shape.
Step 2: Making the Coordinating Beads
-
Color mixing:
Prepare small amounts of clay in sunshine yellow, pale orange, deep red, and white. You want a gradient that matches your fruit slice. -
Roll the spheres:
Hand-roll approximately 7-8 small beads in varying sizes (6mm to 10mm). Keep them roughly spherical but organic. -
Add texture:
I like to vary the finish here. Leave the white ones smooth, but take a needle tool or toothpick to the yellow and red beads, pressing vertical lines around the circumference for a ribbed look. -
Create holes:
While the clay is raw, carefully pierce the center of each bead with your needle tool. Twist gently as you push through to avoid squishing the shape. -
Bake the batch:
Place your fruit slice and all beads on a tile or parchment-lined baking sheet. Bake according to your clay manufacturer’s instructions (usually 275°F/135°C for 15-30 minutes). -
Cool and refine:
Let the pieces cool completely. If any fingerprints are visible on the smooth beads, lightly buff them away with fine-grit wet sandpaper.
Step 3: Assembly
-
Prepare the wire:
Cut a 6-inch length of gold beading wire. Thread one end through a crimp bead, loop it through the bottom ring of your lobster clasp hardware, and pass it back through the crimp bead. -
Secure the top:
Use flat nose pliers to squash the crimp bead firmly, securing the wire to the clasp. -
String the beads:
Thread your clay beads onto the wire. Follow the pattern in the photo: yellow, red, white, white, textured yellow, orange, yellow. -
Add gold accents:
For a professional touch, place small gold spacer beads between the larger clay beads occasionally, particularly near the bottom. -
Finish the strand:
Thread a crimp bead onto the end of the wire. Loop the wire through a closed 6mm jump ring, then back up through the crimp bead and into the last few clay beads. -
Attach the fruit:
Flatten the final crimp bead with pliers and trim excess wire. Finally, use a second jump ring to connect your baked fruit slice charm to the jump ring at the bottom of the bead strand.
Glazing Tip
Only glaze the ‘flesh’ part of the fruit slice with gloss varnish. Leaving the rind and the textured beads matte creates a realistic contrast.
Clip this sunny accessory onto your bag to carry a little piece of summer wherever you go
Smiley Face Centerpiece Heishi Bead Keychain
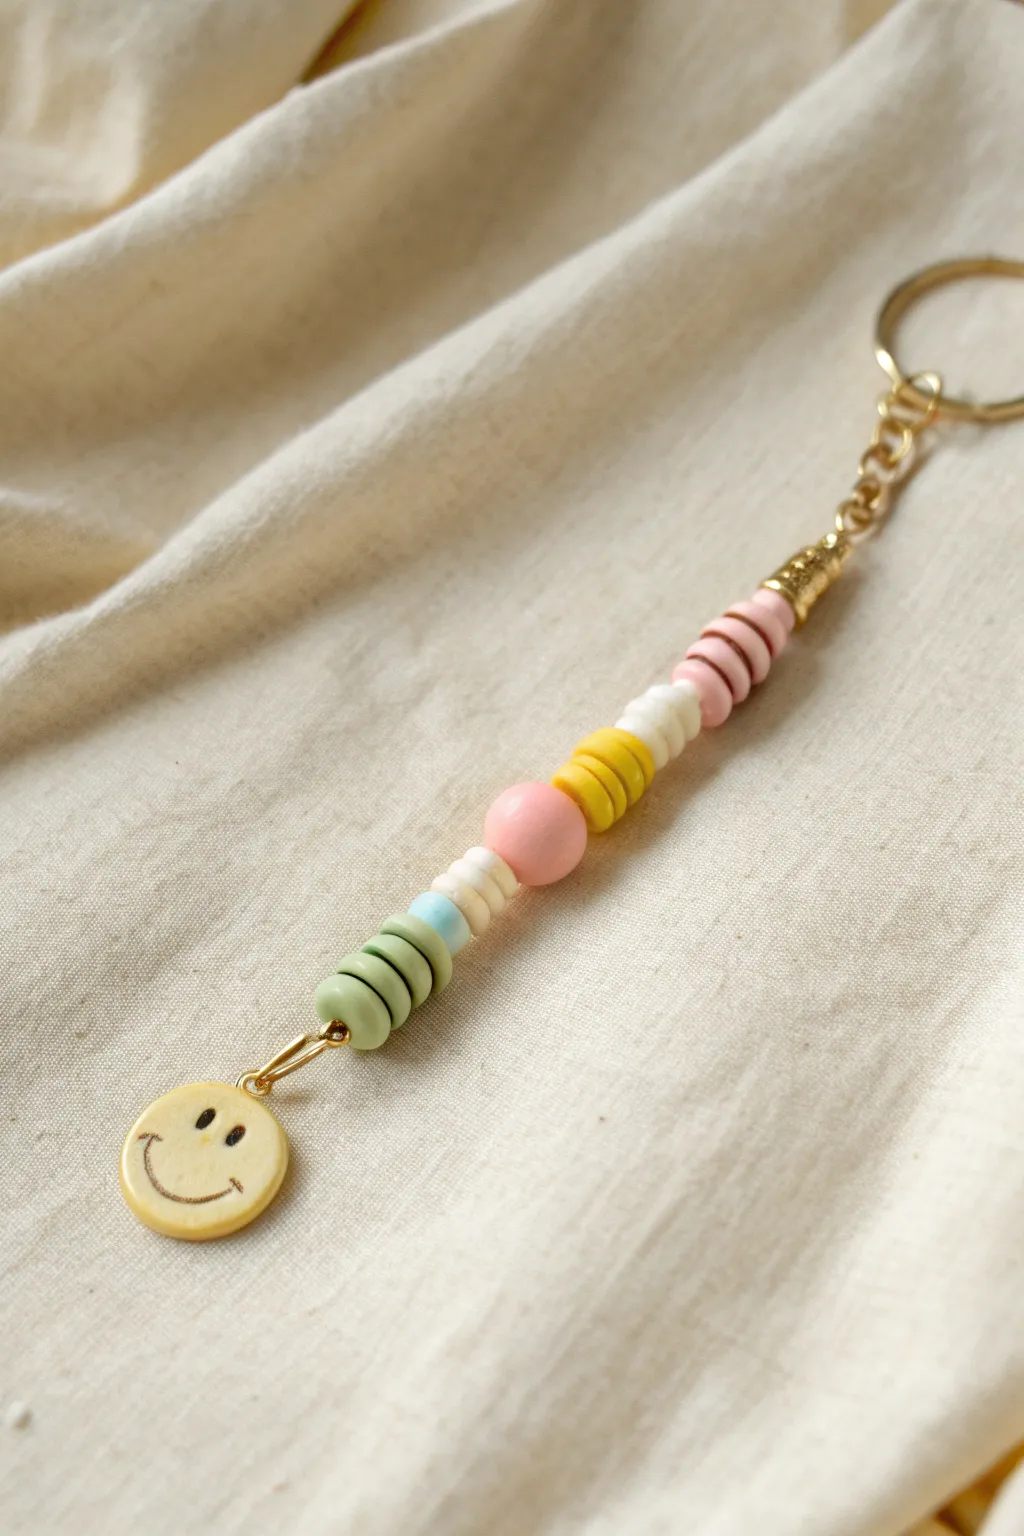
Brighten your keys or backpack with this cheerful beaded accessory featuring a mix of textures and a sunny disposition. The combination of stacked heishi discs, round wood beads, and a smiley face charm creates a playful, retro-inspired aesthetic.
Step-by-Step Tutorial
Materials
- Gold keyring with attached small chain extender
- Gold bead cone or bell end cap
- Gold beading wire or strong nylon beading cord
- Gold crimp beads
- Gold jump ring (small, approx 4-6mm)
- Yellow smiley face charm (ceramic or acrylic)
- Pink polymer clay heishi beads (disc shape)
- White polymer clay heishi beads (disc shape)
- Yellow polymer clay heishi beads (disc shape)
- Green polymer clay heishi beads (disc shape)
- Light blue polymer clay heishi bead (single)
- Pink round wooden bead (approx 8-10mm)
- Jewelry pliers (flat nose and round nose)
- Scissors or wire cutters
Step 1: Preparation & First Connection
-
Cut the cord:
Cut a piece of beading wire or cord approximately 8 to 10 inches long. You want plenty of excess to make tying knots or crimping easier later on. -
Attach the charm:
Slip a crimp bead onto one end of your wire. Thread the wire through the loop of your smiley face charm. -
Secure the bottom loop:
Pass the wire back through the crimp bead to create a snug loop around the charm. Use your flat nose pliers to flatten the crimp bead securely. -
Hide the tail:
Trim the short tail of the wire slightly, ensuring it’s short enough to be tucked into the first few beads you string.
Step 2: Stringing the Pattern
-
Start with green:
Thread on three green heishi beads first, sliding them down to cover the crimp and wire tail. -
Add a pop of blue:
Add a single light blue heishi bead for a subtle color break. -
White accent:
Slide on two white heishi beads next. -
The centerpiece bead:
String the large pink round wooden bead. This change in shape adds great visual interest to the stack. -
Yellow section:
Add three yellow heishi beads above the pink round bead. -
White spacer:
Thread on another two white heishi beads. -
Pink stack:
Finish the bead pattern by adding four pink heishi beads to the top of the stack.
Loose Beads?
If the beads wobble, use a tiny dab of jewelry glue inside the final crimp before flattening. This prevents the wire from slipping over time.
Step 3: Finishing the Hardware
-
Secure the top:
Slide a crimp bead onto the wire, right on top of the last pink heishi bead. Flatten it with pliers to lock all the beads in place so they don’t slide around while you work on the hardware. -
Add the cap:
Thread the gold cone or bell cap onto the wire so the wide end covers your top crimp bead. -
Form the top loop:
Add another crimp bead on top of the cone cap. Thread the wire through the bottom link of your keychain’s gold chain extension. -
Close the loop:
Pass the wire back down through that top crimp bead. Pull it tight so the loop is small and hidden inside or just above the cone cap. -
Final crimp:
Use your pliers to flatten this final crimp bead securely. I like to double-check the tension here to make sure the beads aren’t too loose. -
Trim excess:
Cut off any remaining wire cleanly with your wire cutters. -
Double check connections:
Give the charm and the keyring a gentle tug to ensure all crimps are holding firm.
Level Up: Lettering
Swap the central pink round bead for a cube letter bead to add an initial. Use gold spacers on either side of the letter for a polished look.
Now you have a charming, handmade accessory ready to keep your keys organized in style
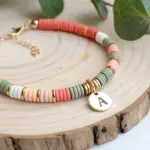
Initial Bead Pop Clay Bead Keychain
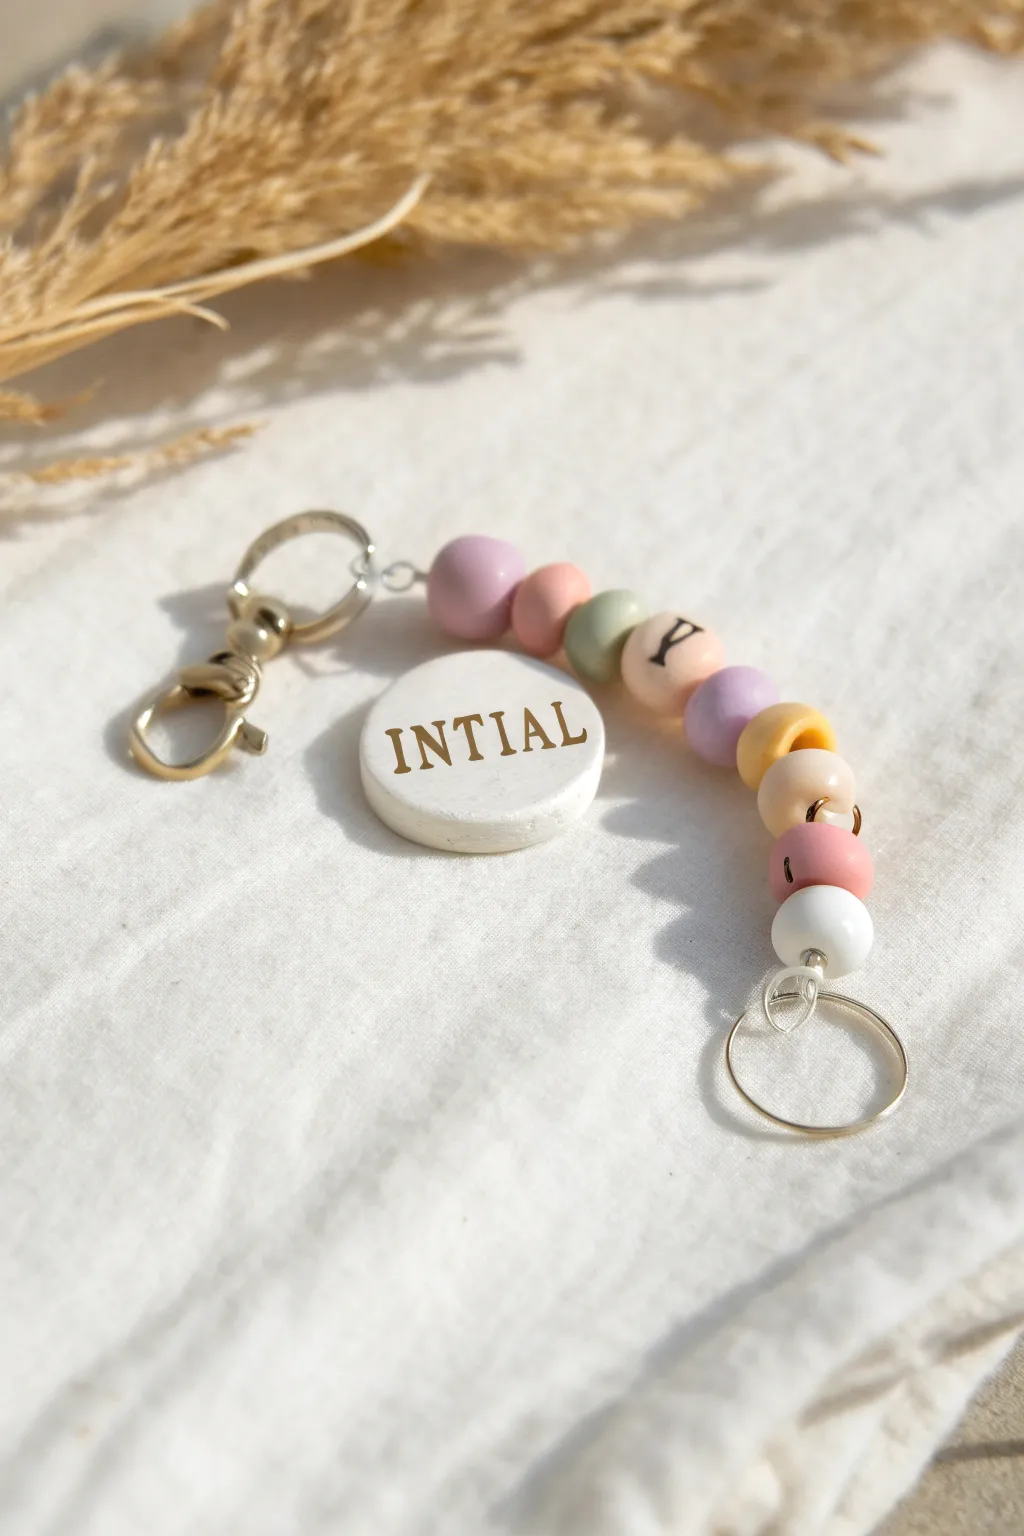
This charming keychain combines soft pastel hues with a bold statement piece to create a truly personalized accessory. Featuring a hand-stamped clay disc and a coordinating string of beads, it adds a lovely bespoke touch to any set of keys or bag.
Detailed Instructions
Materials
- White polymer clay
- Rolling pin or clay machine
- Circle clay cutter (approx. 1.5 inches)
- Small eye pin
- Alphabet stamp set
- Gold acrylic paint or metallic paste
- Q-tip or small cloth
- Gold swivel lobster clasp
- Standard keyring loop
- Nylon cord or durable beading string (white)
- Assorted polymer clay beads (lavender, pink, sage green, white)
- Wooden letter beads (optional)
- Scissors
Step 1: Crafting the Clay Disc
-
Condition the clay:
Start by warming the white polymer clay in your hands, kneading it until it is soft and pliable to prevent cracking during baking. -
Roll it out:
Using a rolling pin or clay machine, flatten the clay into a smooth slab about 1/4 inch thick. A slightly thicker slab gives the keychain a high-quality, substantial feel. -
Cut the shape:
Press your circle cutter firmly into the clay to create a clean, perfect round disc. -
Stamp the text:
Arrange your alphabet stamps to spell your chosen word or initial. Gently but firmly press them into the center of the soft clay disc to create a clear impression. -
Add attachment point:
Carefully insert a small eye pin into the top edge of the clay disc, ensuring it goes in straight and doesn’t poke out through the sides. I like to add a tiny dab of liquid clay to the pin’s shaft for extra grip. -
Bake the piece:
Bake the clay disc according to your package instructions, usually around 275°F (135°C) for 15-30 minutes, then let it cool completely.
Clean Edges Trick
Before baking, gently smooth the edges of your clay cutout with a fingertip dipped in cornstarch or baby oil. This removes rough cutting lines and fingerprints.
Step 2: Adding the Gold Detail
-
Apply gold paint:
Once the disc is cool, brush gold acrylic paint or rub metallic paste over the stamped letters, ensuring the indentations are filled. -
Wipe away excess:
Quickly take a slightly damp cloth or Q-tip and wipe over the surface of the clay, removing the paint from the high flat areas but leaving the gold shining inside the stamped letters. -
Seal (Optional):
If desired, apply a thin coat of matte or satin glaze over the disc to protect the white surface from dirt.
Step 3: Assembling the Keychain
-
Prepare the cord:
Cut a length of nylon cord, about 10-12 inches long. Fold it in half to create a loop at the bottom. -
Attach the keyring:
Thread the folded loop end through the standard keyring loop and pull the tails through the cord loop to secure it with a lark’s head knot. -
String the beads:
Begin threading your beads onto the double cord. Start with a smaller white bead, then alternate your pastel colors (pink, sage, lavender) and any letter beads you wish to include. -
Attach the main clasp:
Once your bead strand is the desired length, thread both cord ends through the bottom loop of the gold swivel lobster clasp. -
Secure the knot:
Tie a very tight double or triple knot right against the clasp to hold the beads in place. -
Hide the tails:
Thread the loose cord tails back down through the top one or two beads to hide them, then trim any excess cord closely. -
Connect the disc:
Finally, use a small jump ring or the loop of the eye pin itself to attach your finished white clay disc to the ring of the swivel clasp so it hangs alongside the beads.
Texture Twist
Mix granite-effect clay into your white base or add sparse specs of gold leaf into the raw clay before rolling for a sophisticated, stone-like finish.
Enjoy using your new custom accessory or gift it to someone special to brighten their day
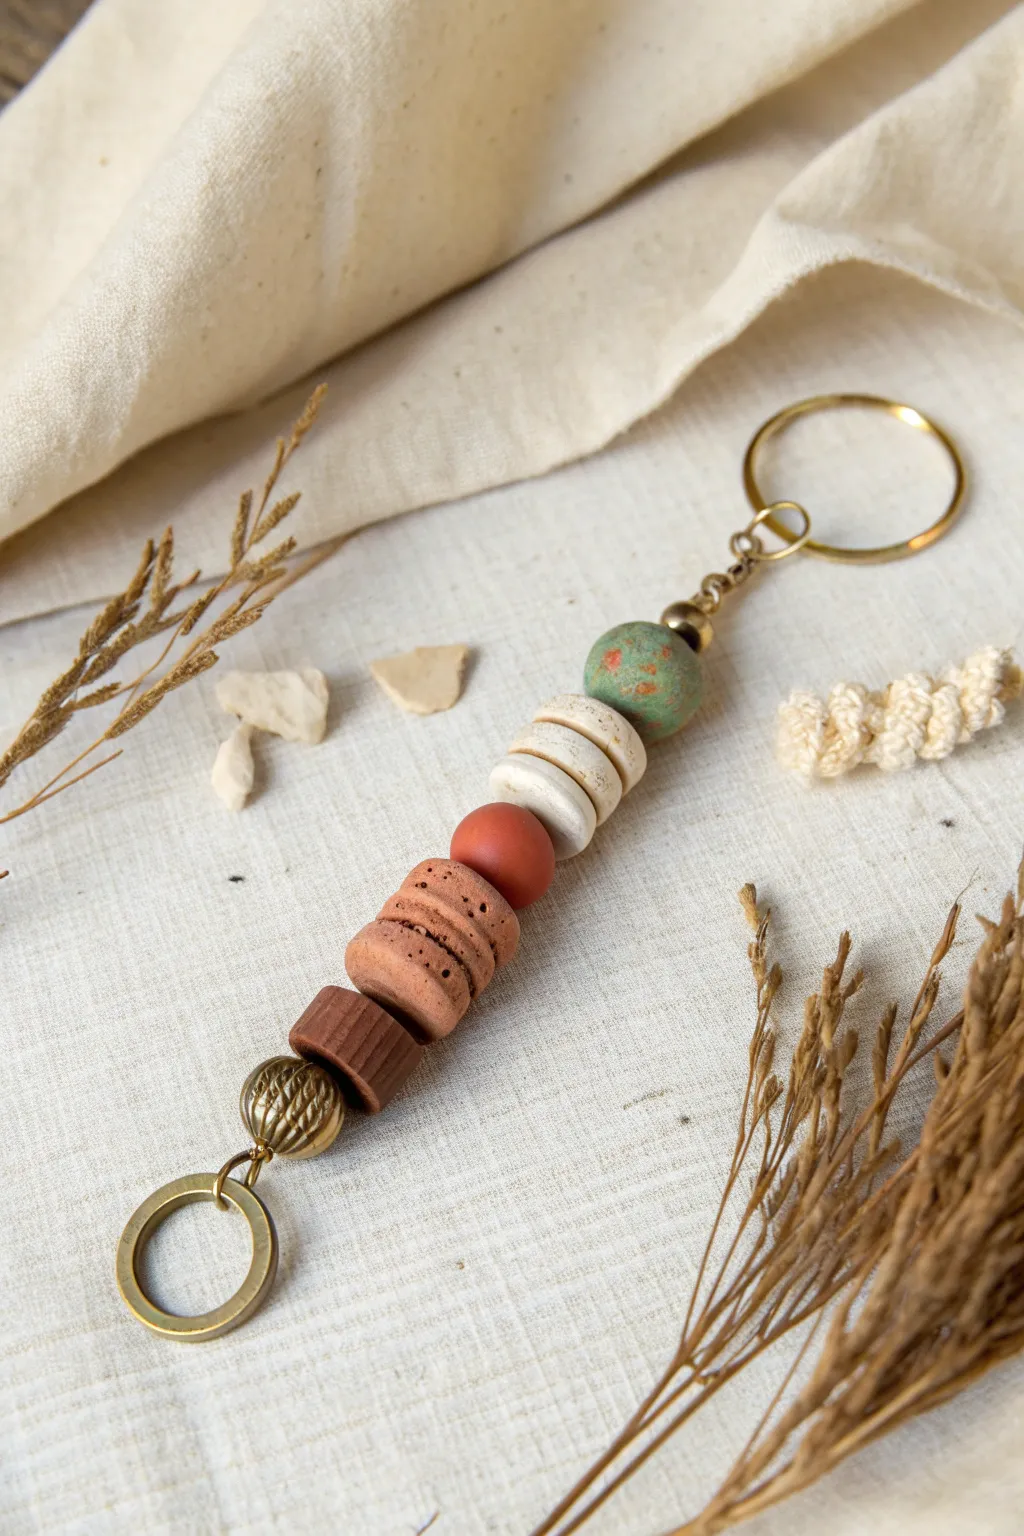
Hidden Knot Finish Under a Statement Bead
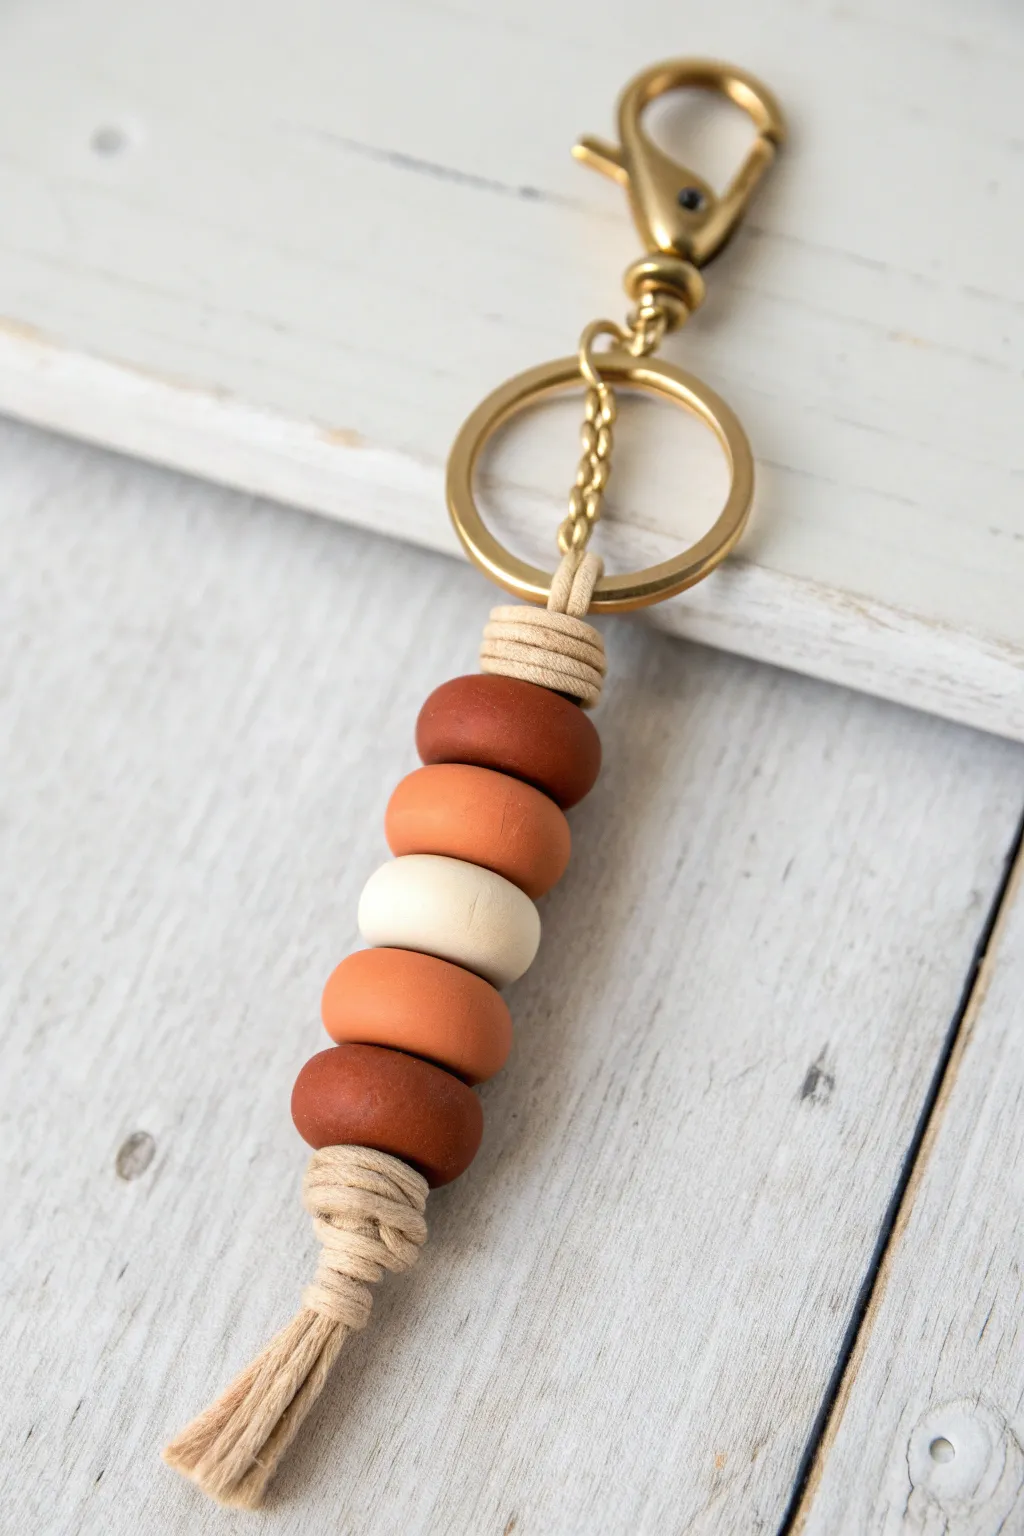
This earthy, minimalist keychain combines warm terra cotta tones with cream accents for a sophisticated bohemian look. The hidden knot technique used here creates a clean, professional finish that keeps the focus on the beautiful clay bead stack.
Step-by-Step
Materials
- Polymer clay in burnt sienna, rust orange, and cream/ecru
- Cotton cord or macrame cord (approx. 2mm thick) in beige
- Gold swivel lobster clasp
- Gold split ring key ring (approx. 25-30mm)
- Small gold jump ring (optional, depending on clasp style)
- Clay roller or pasta machine
- Small round clay cutter (approx. 1.5 cm diameter)
- Toothpick or skewer (for piercing beads)
- Baking sheet and oven
- Finishing sand paper (fine grit)
Step 1: Crafting the Clay Beads
-
Condition the Clay:
Begin by kneading each color of polymer clay separately until they are soft and pliable. This prevents cracking and ensures a smooth finish on your beads. -
Roll out Sheets:
Roll each color into a thick slab, aiming for a consistent thickness of about 4-5mm. I find using guides or a pasta machine helps keep everything uniform. -
Cut the Shapes:
Using your small round cutter, punch out circles from your clay slabs. For this specific design, you need two dark burnt sienna circles, two rust orange circles, and one cream circle. -
Smooth the Edges:
Gently pick up each circle and use your finger to smooth the sharp edges created by the cutter. You want them to look like soft, rounded discs or “abacus” style beads rather than sharp cylinders. -
Create the Holes:
Using a toothpick or skewer, pierce a hole directly through the center of each bead. Make sure the hole is wide enough to accommodate a double strand of your chosen cord—wiggle the tool a bit to widen it. -
Bake:
Arrange the beads on a baking sheet lined with parchment paper. Bake according to the manufacturer’s instructions on your clay package (usually around 275°F/135°C for 15-30 minutes). Let them cool completely.
Step 2: Assembling the Keychain
-
Prepare the Hardware:
Attach your swivel lobster clasp to the large gold split ring. If your clasp doesn’t clip directly onto the ring, use a small jump ring to connect them securely. -
Cut and Thread Cord:
Cut a length of beige cotton cord, approximately 18-20 inches long. Fold it in half to find the center point. -
Attach to Ring:
Attach the cord to the gold split ring using a Lark’s Head knot. To do this, push the folded loop through the ring, then pull the loose tail ends through that loop and tighten it against the metal. -
Start the Wrap Knot:
We need to create the decorative wrapping at the top. Hold the two hanging strands taut. Take a second, shorter piece of cord (about 8 inches) and form a loop against the main strands, pointing down. -
Wrap the Neck:
Wrap the long tail of this new cord tightly around the main strands and the loop you just made, working your way down. Do this about 4-5 times to create a neat coil. -
Secure the Wrap:
Thread the end of the wrapping cord through the loop sticking out at the bottom. Pull the top tail of the wrapping cord upwards; this will pull the loop (and the bottom tail) underneath your coils. Trim the excess ends close to the coil. -
String the Beads:
Thread both main strands of the cord through your cooled clay beads. Follow the pattern: dark burnt sienna, rust orange, cream, rust orange, dark burnt sienna. -
Bottom Knotting:
Just below the final bead, repeat the wrapping knot technique you used at the top. Use a separate piece of cord to wrap around the main strands, creating a matching coil to secure the beads in place. -
Final Trim:
Once the bottom coil is secure and ends are hidden, trim the main tail cords. Leave about an inch or two to create a tassel effect. -
Fray the Ends:
Use a comb or a needle to gently untwist and brush out the cord ends below the bottom coil, creating a soft, fringed finish.
Tight Fit?
If threading the cord through the baked beads is difficult, wrap a piece of scotch tape tightly around the cord ends to create a stiff ‘needle’ that slides through easily.
Texture Play
Before baking, roll your raw clay beads over sandpaper or a textured fabric to give them a stone-like surface instead of a smooth finish.
Clip this onto your keys or purse for an instant touch of handmade warmth
Adjustable Sliding-Knot Clay Bead Keychain
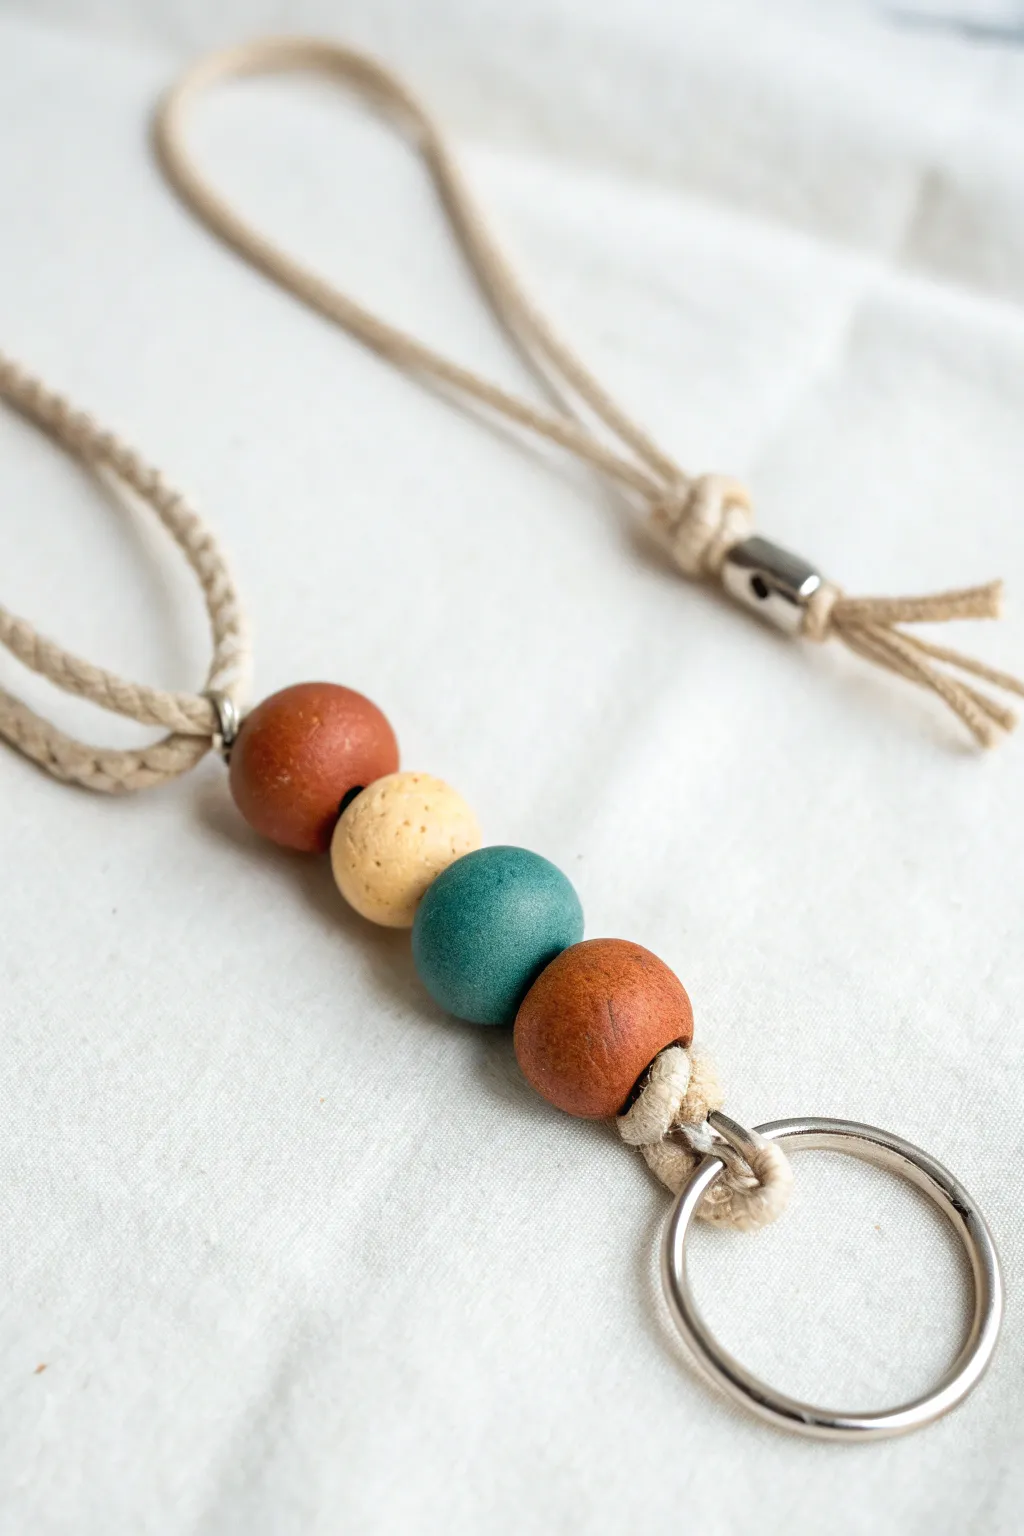
This earthy, minimalist keychain combines the rustic texture of clay beads with a clever sliding knot design usually reserved for jewelry. Featuring a soft cotton cord and a warm, desert-inspired color palette, this functional accessory makes finding your keys a stylish affair.
Detailed Instructions
Materials
- 4 large round polymer clay or ceramic beads (approx. 16-20mm) – two terracotta, one cream, one teal
- Thick cotton macrame cord or rope (approx. 3-4mm thickness)
- Small metal tube bead or large-hole crimp bead (for the sliding mechanism)
- Standard metal split keyring (silver tone)
- Scissors
- Masking tape or clips (optional)
- Toothpick or awl (for checking bead holes)
Step 1: Preparing the Cord and Ring
-
Cut the cord:
Begin by cutting a length of your cotton cord about 24 inches long. It’s always better to have a bit too much than too little when dealing with folded knots. -
Attach the keyring:
Fold your cut cord exactly in half to find the center loop. Feed this loop through your metal split keyring. -
Secure the ring:
Pull the two loose ends of the cord through the loop you just pushed through the ring (a Larkshead knot), tightening it securely against the metal. -
Create a base knot:
Just below the Larkshead knot on the ring, tie a simple overhand knot with both cords together. This acts as a stopper to keep your beads from hitting the metal ring and adds a nice decorative bump.
Tight Fit?
If the clay bead holes are too small for doubled cord, wiggle a round file or a folded piece of sandpaper inside the hole to gently widen it without cracking the bead.
Step 2: Stringing the Clay Beads
-
Prepare the ends:
If your cord ends are frayed, wrap a tiny piece of masking tape tightly around the tips to create a makeshift needle. This makes threading much easier. -
Thread the first bead:
Slide one of the reddish-brown/terracotta beads onto both cords simultaneously. -
Add the teal bead:
Follow immediately with the teal (green-blue) bead. Push it snug against the first one. -
Add the cream bead:
Next, thread the cream or yellow-toned bead onto the dual cords. -
Finish the pattern:
Finally, add the second terracotta bead to complete the four-bead sequence shown in the example. -
Secure with a knot:
Push all beads down toward the keyring. Tie another strong overhand knot with both cords right above the last bead to lock them in place. Pull tight so there’s no slack.
Knot Security
Add a tiny drop of clear craft glue or fabric cement inside your final knots before pulling them tight. This ensures they won’t slip loose over time with daily use.
Step 3: The Sliding Adjuster Mechanism
-
Prepare for the slider:
At this point, you have two long tails coming out of your bead stack. We will create a loop mechanism rather than just cutting them off. -
Thread the slider bead:
Take your small metal tube bead. Thread *both* cord ends through it in the *same direction*. Slide it down, but leave a large loop of cord (about 4 inches long) between the top knot of your clay beads and this metal slider. -
Tie the stopper knot:
Right above where the metal tube bead sits, tie a final overhand knot with both cords. This knot must be larger than the hole in your metal tube bead so it catches. -
Trim the excess:
Cut off any remaining cord tail past your final knot, leaving about half an inch of fringe for a rustic look. -
Fray the ends:
Use your fingers or a comb to gently unravel the cut ends of the cotton cord, creating a cute little tassel effect at the very top.
Now you have a sturdy, stylish keychain that’s easy to spot inside your bag
Mixed Shape Stack: Discs, Tubes, and Rondelles
Embrace the beauty of varied textures and natural hues with this eclectic keychain project. By mixing smooth, speckled, and ribbed clay beads in an earthy palette, you’ll create a sophisticated accessory that feels both rustic and modern.
Step-by-Step Tutorial
Materials
- Polymer clay (terracotta, white, sage green, rust red, deep brown)
- Brass keychain ring (large)
- Brass jump ring (large)
- Brass headpin or eye pin (approx. 3-4 inches long)
- Small brass spacer beads or crimp covers
- Large ornate brass bead (textured sphere)
- Texturing tools (combs, needle tools, or scrubbing pad)
- Acrylic roller or pasta machine
- Circle cutters (various small sizes)
- Baking tile or parchment paper
- Jewelry pliers (round nose, chain nose, flush cutters)
- Wet sandpaper (optional)
Step 1: Sculpting the Geometric Beads
-
Condition the Clay:
Begin by thoroughly kneading each color of polymer clay until it is soft and pliable. This prevents cracking later on. -
Form the Green Sphere:
Take a chunk of sage green clay and mix in tiny flecks of rust or brown clay to create a faux-stone look. Roll it into a perfect sphere, approximately 1.5cm in diameter. -
Create the Off-White Discs:
Roll out white or cream clay into a thick sheet. Cut two circles, then gently smooth the edges with your finger to give them a rounded, organic ‘donut’ shape rather than a sharp cylinder. Flatten them slightly. -
Shape the Rust Accent:
Roll a small amount of rust-red clay into a smooth, simple round ball, slightly smaller than your green bead. -
Texture the Terracotta:
Form two thick discs from terracotta clay. Using a needle tool, poke random small holes into the surface to simulate a lava stone or porous ceramic texture. Stack these two discs together. -
Make the Ribbed Brown Tube:
Roll deep brown clay into a short, thick cylinder. Use the edge of a credit card or a clay blade to press evenly spaced vertical indentations around the circumference to create a ribbed effect. -
Pierce the Beads:
Using a piercing tool or a toothpick, carefully create a hole through the center of every bead. Twist the tool gently as you push through to avoid distorting the beads’ shapes.
Uneven Holes?
If bead holes shrink during baking, gently re-drill them with a small hand drill or twisting manual drill bit. Do not force the wire through, as cured clay can crack under pressure.
Step 2: Baking and Assembly
-
Bake the Components:
Arrange your beads on a baking tile or parchment-lined tray. Bake according to your clay manufacturer’s specific instructions (usually 275°F/135°C for 15-30 minutes). Let them cool completely. -
Prepare the Base Pin:
Take your long brass headpin or wire. Because we want a large ring at the bottom, form a large loop at one end of the wire using round-nose pliers, or attach a sturdy jump ring to the bottom eyelet if using an eye pin. -
Attach the Bottom Ring:
Slide the large brass jump ring onto the bottom loop you just created. This hangs freely at the bottom of the stack. -
Begin the Stack:
Thread the large, ornate brass bead onto the wire first. It will sit directly above the bottom ring assembly. -
Layer the Clay Beads:
Slide on your clay beads in this order: the ribbed brown cylinder, the two textured terracotta discs, the smooth rust ball, the two cream discs, and finally the green faux-stone sphere. -
Add Top Spacers:
Place a small brass spacer bead or a crimp cover on top of the green sphere to finish the stack neatly. -
Create the Top Loop:
Use chain-nose pliers to bend the remaining wire 90 degrees just above the top spacer. Trim the wire with flush cutters, leaving about 1cm. -
Secure the Loop:
Using round-nose pliers, roll that 1cm tail back towards the beads to create a secure, closed loop. -
Attach the Keychain:
Open the small jump ring attached to the main keychain ring. Slide it through your newly formed top wire loop and close it securely.
Add Scent
Since the terracotta beads are textured and porous, you can add a drop of essential oil to them after baking. This turns your keychain into a subtle, portable aromatherapy diffuser.
Now you have a stunning, tactile accessory ready to organize your keys or decorate a bag
Friendship Pair Clay Bead Keychain Set With Matching Color Stories
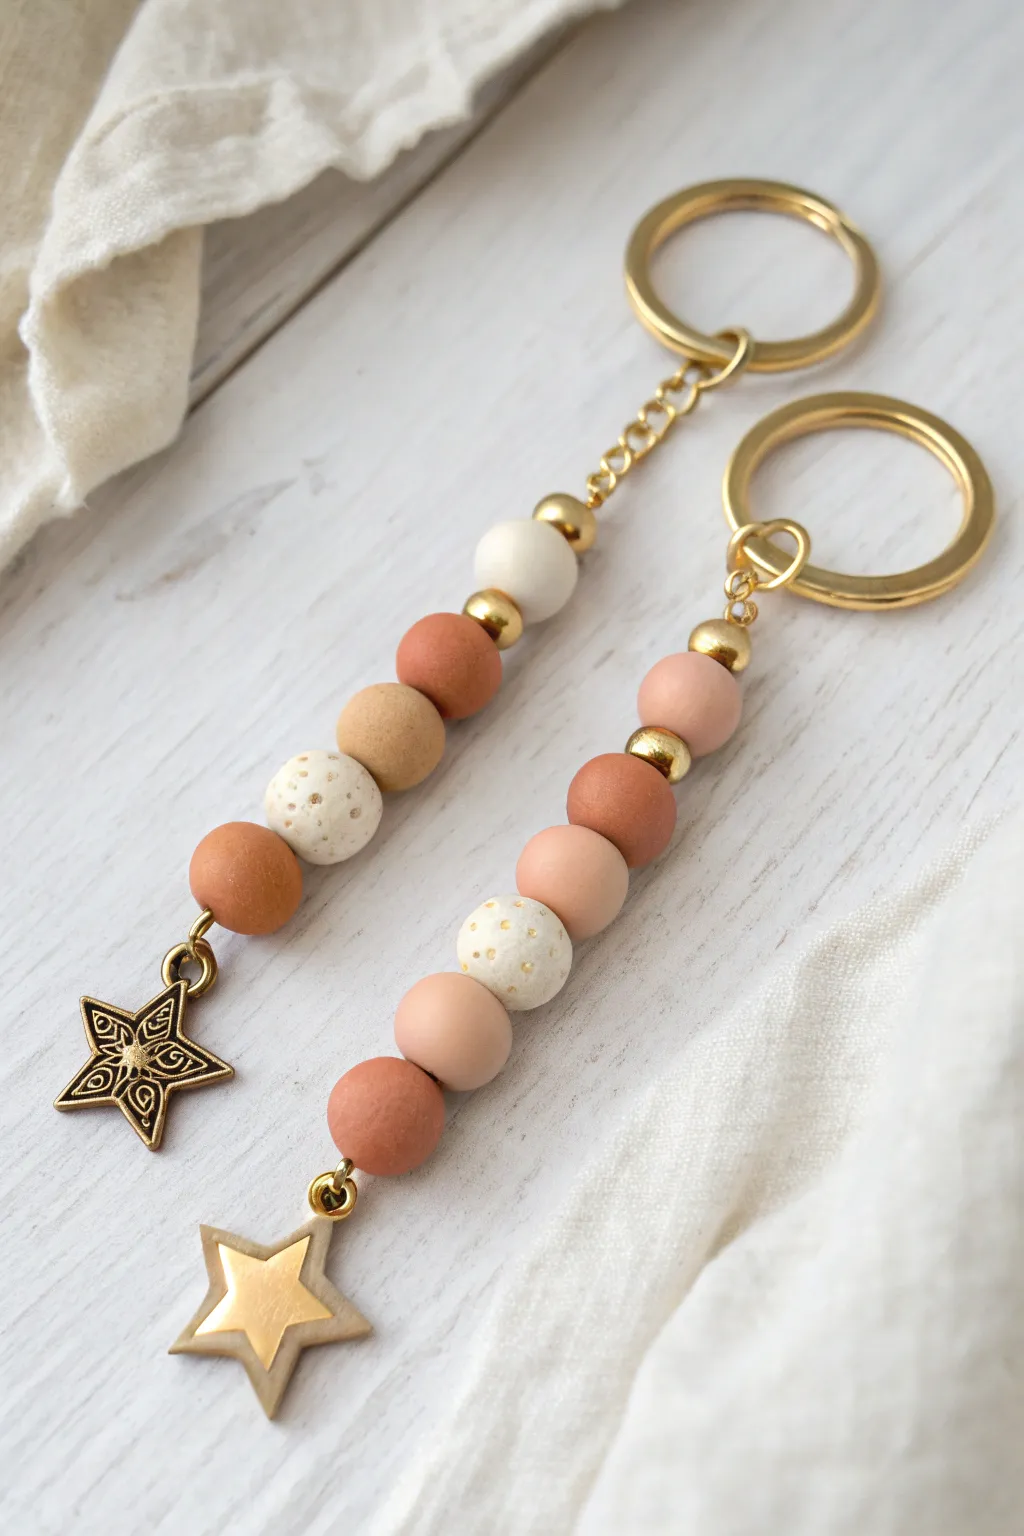
These twin keychains feature a soft, earthy palette of terra cotta, beige, and cream beads accented with gold hardware for a chic boho look. With complimenting but distinct color stories, they make the perfect sophisticated friendship set.
Step-by-Step Guide
Materials
- Polymer clay (terracotta, beige, peach, translucent white, gold leaf)
- Gold tone keyrings with chain extension
- Gold tone eye pins or head pins
- Gold spacer beads (small rounds)
- Small metal star charm (filigree style)
- Clay cutter (star shape) or craft knife
- Bead reamer or toothpick
- Round nose pliers
- Chain nose pliers
- Wire cutters
- Oven for baking
Step 1: Creating the Clay Beads
-
Mix your colors:
Start by conditioning your polymer clay. You’ll need four distinct colors for this set: a deep terracotta, a lighter peach/skin tone, a darker beige/sand, and a speckled white. -
Create the speckled effect:
To make the speckled white bead shown in the image, take a small amount of white or translucent white clay and mix in tiny flecks of black pepper or real vanilla bean specks. Roll it until the specks are evenly distributed. -
Roll the rounds:
Pinch off equal amounts of clay for each color. Roll them between your palms to create smooth, uniform spheres about 1-1.5cm in diameter. You will need roughly 5-6 beads per keychain. -
Pierce the holes:
Using a bead reamer or a toothpick, carefully pierce a hole through the center of each sphere. Use a gentle twisting motion to avoid squashing the bead’s round shape. -
Make the star charm:
Roll out a small slab of beige clay. Use a small star cutter to punch out a shape. For the metallic inset look, press a smaller gold metal star or a piece of gold foil firmly into the center of the raw clay star. -
Add a hanging loop:
Insert a small eye pin into the top of your clay star charm before baking so you can attach it later. -
Bake the clay:
Arrange all your beads and the star charm on a baking sheet or tile. Bake according to your customized clay package instructions (usually 275°F/130°C for 15-30 minutes). Let them cool completely.
Uneven Holes?
If your bead holes distort while piercing raw clay, wait until AFTER baking. Use a small hand drill or a rotary tool to drill clean holes through the hardened clay.
Step 2: Assembly
-
Prepare the pin:
Take a long gold eye pin. If you are using a head pin, you’ll work from the bottom up; if using wire, create a loop at one end using your round nose pliers. -
Start the sequence:
For the first keychain (left in image), thread on your beads. Start with the metallic gold spacer, then the terracotta bead, a speckled white bead, a beige bead, a terracotta bead, and finally a white bead. -
Add gold accents:
Place a small gold spacer bead between every clay bead. I find this really elevates the look from a simple craft to jewelry-quality work. -
Build the second strand:
For the matching pair (right in image), use a slightly different order: terracotta, peach, peach, speckled white, peach. Don’t forget the gold spacers in between each one. -
Close the loop:
Once your beads are strung, use your wire cutters to trim the excess wire, leaving about 1cm at the top. Use round nose pliers to roll this tail into a secure loop. -
Attach the keyring:
Open the loop of your bead strand slightly or use a jump ring to connect it to the chain of your large gold keyring. Close the loop securely. -
Attach the bottom charms:
At the bottom of the bead strand, open the loop you created (or the eye pin loop). Attach the metal filigree star to one keychain and your handmade clay star to the other. -
Final check:
Give everything a gentle tug to ensure all jump rings and loops are tightly closed so your beautiful beads stay safe.
Add Scent
Since these use porous or unglazed clay beads, add a drop of essential oil to the terracotta or speckled beads. They act as passive diffusers for your keys.
Now you have a stunning set of coordinated accessories ready to gift to your best friend