Whenever I’m staring at a fresh lump of clay, I like to remind myself that small projects can still feel totally magical. Here are my favorite clay ideas—from classic, useful little makes to quirky mini pieces that’ll keep your hands busy and your brain happy.
Easy Trinket Dishes With Texture
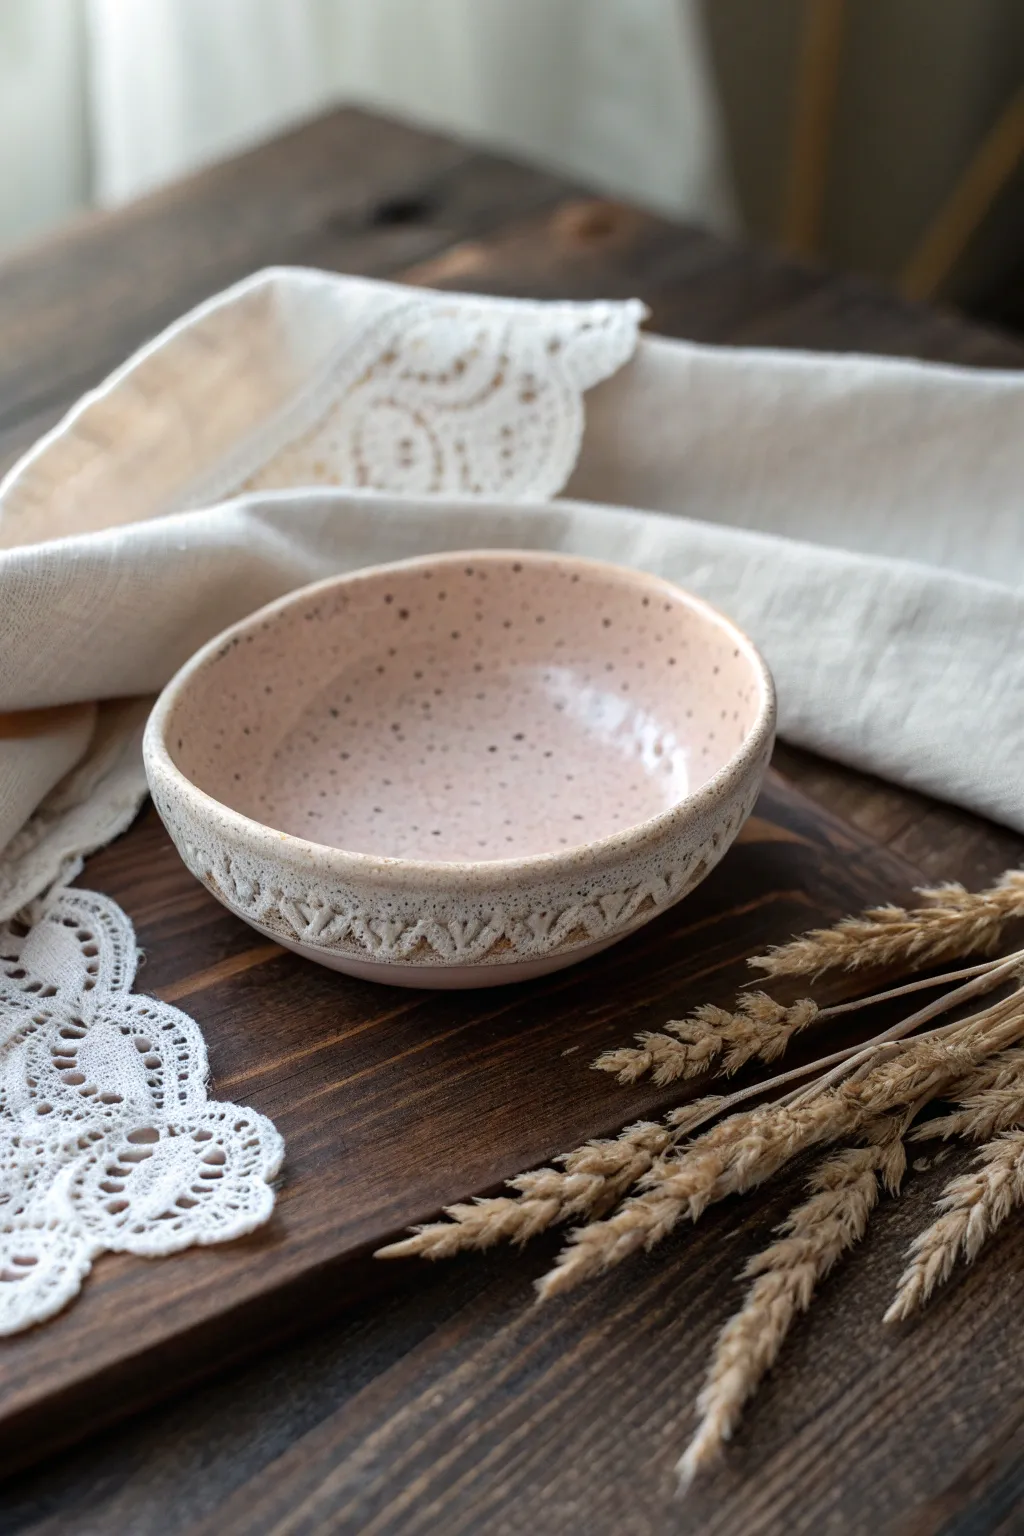
Capture a touch of vintage charm with this beautifully textured trinket dish. The speckled pink interior contrasts perfectly with the raw, lace-imprinted exterior, making it a sweet spot for jewelry or keys.
Step-by-Step Tutorial
Materials
- Speckled stoneware clay (or white clay with speckles)
- Small piece of vintage lace or a lace doily
- Rolling pin
- Canvas mat or cloth for rolling
- Small bowl for use as a mold (slump mold technique)
- Pottery knife or needle tool
- Rib tool (kidney) or sponge
- Bisque firing kiln access
- Pink speckled glaze
- Clear matte or satin glaze (optional for exterior)
- Paintbrush
Step 1: Shaping the Clay
-
Prepare the slab:
Start by taking a manageable wedge of speckled stoneware clay. Using your palms, flatten it slightly onto your canvas mat. -
Roll it out:
Use your rolling pin to roll the clay into an even slab, aiming for a thickness of about 1/4 inch. Rotate the clay occasionally to ensure it doesn’t stick and stays uniform. -
Adding texture:
Place your piece of lace or doily directly onto the clay slab where you intend to cut the rim. Gently roll the pin over the lace once firmly to imprint the pattern deep into the surface. -
Peel and reveal:
Carefully lift the lace away from the clay to reveal the intricate texture below. I always find this part so satisfying as the pattern emerges clearly. -
Cut the shape:
Place a circular template or a small plate over the textured area. Using your needle tool or knife, cut a clean circle around the template. -
Smooth the edge:
Dip your finger in a little water and run it gently along the cut edge to soften any sharp corners without erasing your beautiful lace texture.
Step 2: Forming the Bowl
-
Prepare the mold:
Select a small bowl to use as a slump mold. If you are worried about sticking, you can cover the bowl with thin plastic wrap or a piece of cheesecloth. -
Slump the clay:
Gently lift your clay circle and lay it inside the mold, textured side facing heavily toward the mold wall if you want the texture on the outside, or drape it over an upside-down bowl (hump mold) to ensure the texture is on the exterior. -
Secure the form:
Since we want the texture on the outside, draping it over an upside-down bowl is best. Press the clay gently against the form so it takes the shape of the bowl. -
Refine the rim:
While the clay is on the mold, check the rim. You can gently push it slightly inward or outward to create that organic, handmade curvature seen in the photo. -
Drying to leather hard:
Let the clay sit on the mold until it becomes leather hard—stiff enough to hold its shape but still cool to the touch. This usually takes a few hours depending on humidity. -
Remove and refine:
Pop the bowl off the mold. Use a damp sponge to smooth out the interior surface perfectly, removing any marks from the mold or handling.
Help! Texture Too Faint?
If the lace didn’t leave a deep mark, your clay might be too dry. Mist the slab lightly with water, let it absorb a moment, and try rolling again with firm pressure.
Step 3: Firing and Glazing
-
Bisque fire:
Allow the bowl to dry completely (bone dry) before firing it in a bisque kiln according to your clay manufacturer’s cone rating. -
Glaze the interior:
Once bisque fired, pour a pink speckled glaze into the interior of the bowl. Swirl it around to coat the inside evenly and pour out the excess. -
Clean the rim:
Use a damp sponge to carefully wipe any glaze off the textured rim. The goal is to leave the lace texture raw or very lightly stained to highlight the relief. -
Optional exterior accent:
If you want the texture to pop more, you can brush a very thin wash of oxide or dark stain over the lace pattern and sponge it off, leaving color only in the deep crevices. -
Glaze fire:
Place the bowl back in the kiln for the final glaze firing. Make sure the bottom is impeccably clean of glaze so it doesn’t fuse to the kiln shelf.
Level Up: Gold Rim
After the final glaze firing, apply a gold luster specifically to the very top edge of the rim and fire a third time for a luxurious, metallic finish.
This lovely little dish is now ready to hold your delicate treasures or simply sit pretty on a shelf


Cute Ring Dish With a Mini Sculpted Icon
This sweet little jewelry holder brings a touch of handmade charm to your dresser with its organic shape and speckled finish. The star of the show is a tiny, copper-colored heart pressed gently into the center, making it the perfect resting spot for your favorite treasures.
Step-by-Step Guide
Materials
- Speckled white stoneware clay (or polymer clay with faux speckles)
- Small rolling pin
- Heart-shaped stamp or small cutter
- Sponge
- Needle tool
- Loop tool (optional for trimming)
- Clear glaze (if firing) or gloss varnish
- Copper or rose gold metallic paint/glaze
- Fine detail brush
- Small bowl of water
Step 1: Shaping the Dish
-
Prepare the clay:
Start with a ball of clay roughly the size of a golf ball or slightly larger. Knead it briefly to remove air bubbles and warm it up, then pat it into a smooth sphere. -
Flatten the base:
Using the palm of your hand, gently flatten the ball into a thick patty. You can use a small rolling pin to get an even thickness, aiming for about 1/4 inch thick. -
Pinch the walls:
Cradle the clay in one hand. With your other hand, gently pinch the edges upward to create the walls of the dish. Work your way around the circle slowly, turning the clay as you go to keep the height consistent. -
Smooth the interior:
Wet your finger slightly and run it along the inside curve where the wall meets the base. Smooth out any severe creases or fingerprints to create a seamless transition. -
Refine the rim:
The rim in the photo has a lovely organic wave. Soften the top edge by running a damp sponge or your finger over it, embracing the slight unevenness rather than trying to make it perfectly flat.
Step 2: Adding the Heart Icon
-
Position the heart:
Locate the exact center of your dish. If your clay is still very soft, let it firm up for about 10-15 minutes so it doesn’t warp when you press down. -
Create the impression:
Take your small heart stamp and press it gently but firmly into the center of the dish floor. You want a distinct indentation, but be careful not to push all the way through the bottom. -
Clean up edges:
If the stamping process pushed up little ridges of clay around the heart outline, use a rubber smoothing tool or a soft, damp brush to gently flatten them back down. -
Final drying (if ceramic):
Allow your piece to dry slowly to the leather-hard stage. Once fully bone dry, it will need to go through a bisque fire in a kiln. -
Baking (if polymer):
If using polymer clay, bake the dish according to the manufacturer’s instructions on the package.
Stamp Alternative
Don’t have a heart stamp? Gently carve the outline with a needle tool, then scoop out a shallow layer of clay inside the lines for the same recessed effect.
Step 3: Glazing and Finishing
-
Initial glazing:
For ceramic pottery, dip or brush the entire dish with a glossy clear glaze. Wipe the bottom of the foot clean with a sponge so it doesn’t stick to the kiln shelf. -
Painting the heart:
Once the clear glaze is dry (or after firing if using overglaze), use a fine detail brush to carefully fill the heart indentation with a copper metallic luster or glaze. -
Applying the rim accent:
The dish in the image features a subtle darker rim. You can achieve this by lightly dry-brushing a bit of the metallic glaze or an oxide wash just along the very top edge of the rim. -
Final wipe:
Check for any drips of glaze on the outside walls and clean them up with a damp finger for a professional finish. -
Final firing:
Fire the piece again according to your glaze instructions. If you used polymer clay, simply seal the painted heart and rim with a gloss varnish after the paint dries.
Level Up: Gold Luster
For a truly luxurious finish on real ceramic, use real gold luster for the heart. It requires a third, lower-temperature firing but shines brilliantly.
Place this little dish on your nightstand to keep your rings safe and stylish


Polymer Clay Earrings in Simple Geometric Shapes
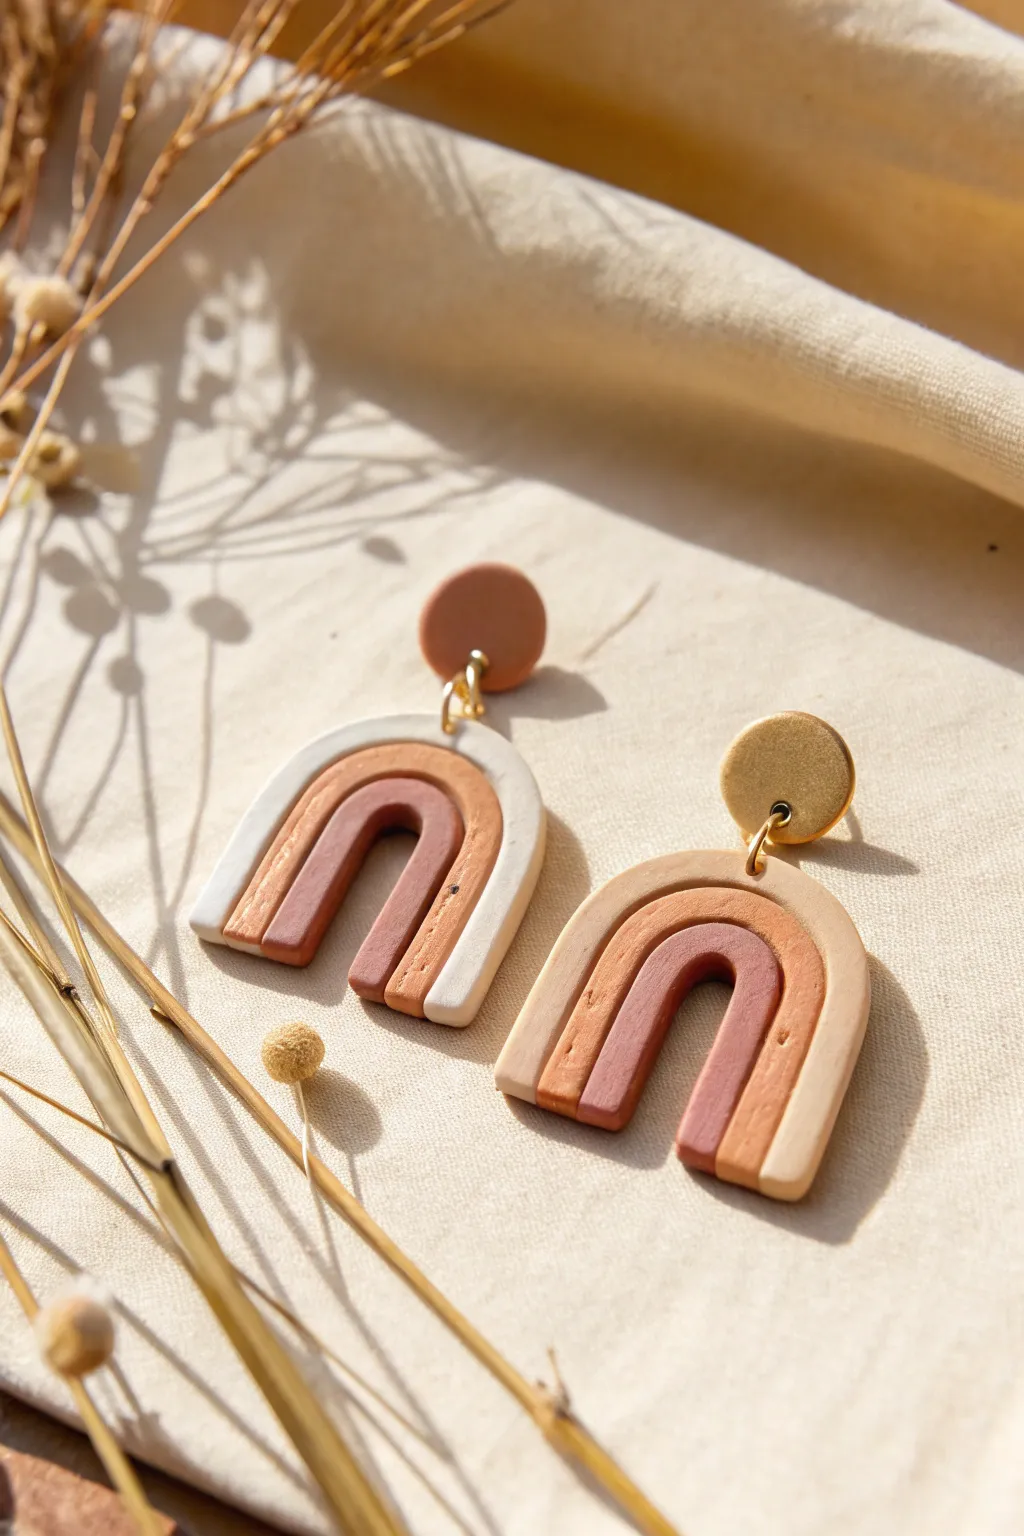
These charming polymer clay earrings capture a warm, bohemian aesthetic with their layered arch design and muted, earthy color palette. The combination of terracotta, dusty rose, beige, and cream tones creates a soft gradient that pairs beautifully with minimalist gold hardware.
Step-by-Step
Materials
- Polymer clay in four shades: deep terracotta, dusty rose/mauve, beige, and cream/white (or custom mix these colors)
- Polymer clay in gold or metallic bronze for one stud top (optional)
- Acrylic roller or pasta machine
- Tissue blade or sharp craft knife
- A smooth ceramic tile or glass work surface
- Small circular cutter (approx. 10-12mm)
- Smallest circular cutter (approx. 2-3mm) or a straw/needle tool for holes
- Jump rings (gold finish)
- Earring posts and backs
- Super glue or heavy-body gel glue
- Parchment paper
- Needle nose pliers
- Liquid polymer clay (clear or translucent)
- Sandpaper (fine grit)
Step 1: Preparing the Clay
-
Conditioning:
Start by conditioning your clay thoroughly. Knead each color—terracotta, dusty rose, beige, and cream—until it is soft, pliable, and free of air bubbles. -
Color Mixing:
If you don’t have the exact shades shown, mix a little translucent clay into standard colors to mute them, or add a touch of brown to pinks to get that lovely dusty rose tone. -
Rolling Snakes:
Take a small portion of the innermost color (the dusty rose/mauve) and roll it into a snake on your work surface. -
Consistent Sizing:
Roll snakes for the middle color (terracotta) and the outer color (beige or cream). Aim for an even thickness of about 3-4mm for all strands, using an acrylic block to gently roll them out. -
Creating the Stack:
Curve the innermost snake into a tight ‘U’ shape. Gently press the next color around it, followed by the third outer layer. You want them to stick together but not deform.
Gaps Between Arches?
If your snakes aren’t sticking, rush a tiny bit of liquid polymer clay between the strands before pressing them together. It acts as a bakeable grout to fill gaps.
Step 2: Shaping and Refining
-
Flattening the Arch:
Once your three snakes are curved together, very gently roll over the top with your acrylic roller just once or twice to flatten the surface slightly and bond the strands. -
Cutting the Base:
Use your sharp tissue blade to make a clean, straight cut across the bottom of the arches so they sit flush. Do this while the clay is still on your tile to avoid distortion. -
Smoothing Seams:
I find it helpful to gently run a finger or a silicone tool along the seams on the back of the earring to ensure the arches are securely bonded together. -
Making the Second Earring:
Repeat the process for the second earring. Note that the original image features mismatched colors—one uses a cream outer layer and the other uses beige. Have fun mixing it up like this, or make them identical. -
Cutting the Stud Tops:
Roll out a small slab of clay (terracotta for one, metallic gold for the other) to about 2-3mm thick. Use your small circle cutter to punch out two stud circles. -
Adding Holes:
Use a needle tool or the smallest cutter to create a hole at the very top center of each arch and at the bottom edge of each circle stud. Ensure the holes are large enough for your jump rings.
Add Some Texture
Before baking, gently press a piece of coarse sandpaper or a toothbrush onto the clay surface. This gives it a beautiful stone-like texture similar to the image.
Step 3: Baking and Assembly
-
Baking:
Place your pieces on a ceramic tile or a baking tray lined with parchment paper. Bake according to your clay manufacturer’s instructions (usually 275°F/135°C for 30-45 minutes). -
Cooling Down:
Let the pieces cool completely in the oven. Removing them while hot can cause warping or breakage. -
Sanding Edges:
Once cool, use fine-grit sandpaper to gently smooth the bottom straight edge and any rough spots on the sides. You can do this under water to prevent dust. -
Attaching Posts:
Apply a small dot of super glue or gel glue to the back of the circle studs and press the earring post pad onto it. Let it dry fully. -
Securing with Clay:
For extra durability, smear a tiny bit of liquid polymer clay over the post pad on the back and bake again for 10-15 minutes or cover with a small disk of clay and glue. -
Connecting Pieces:
Using your needle nose pliers, carefully open a gold jump ring. Thread it through the hole in the arch and the hole in the stud, then close the ring securely. -
Final Polish:
Wipe the finished earrings with a soft cloth or a tiny bit of baby oil to remove any sanding dust or fingerprints.
Enjoy wearing your handcrafted arches, a perfect subtle statement piece for any outfit


Mini Bud Vase for Single Stems
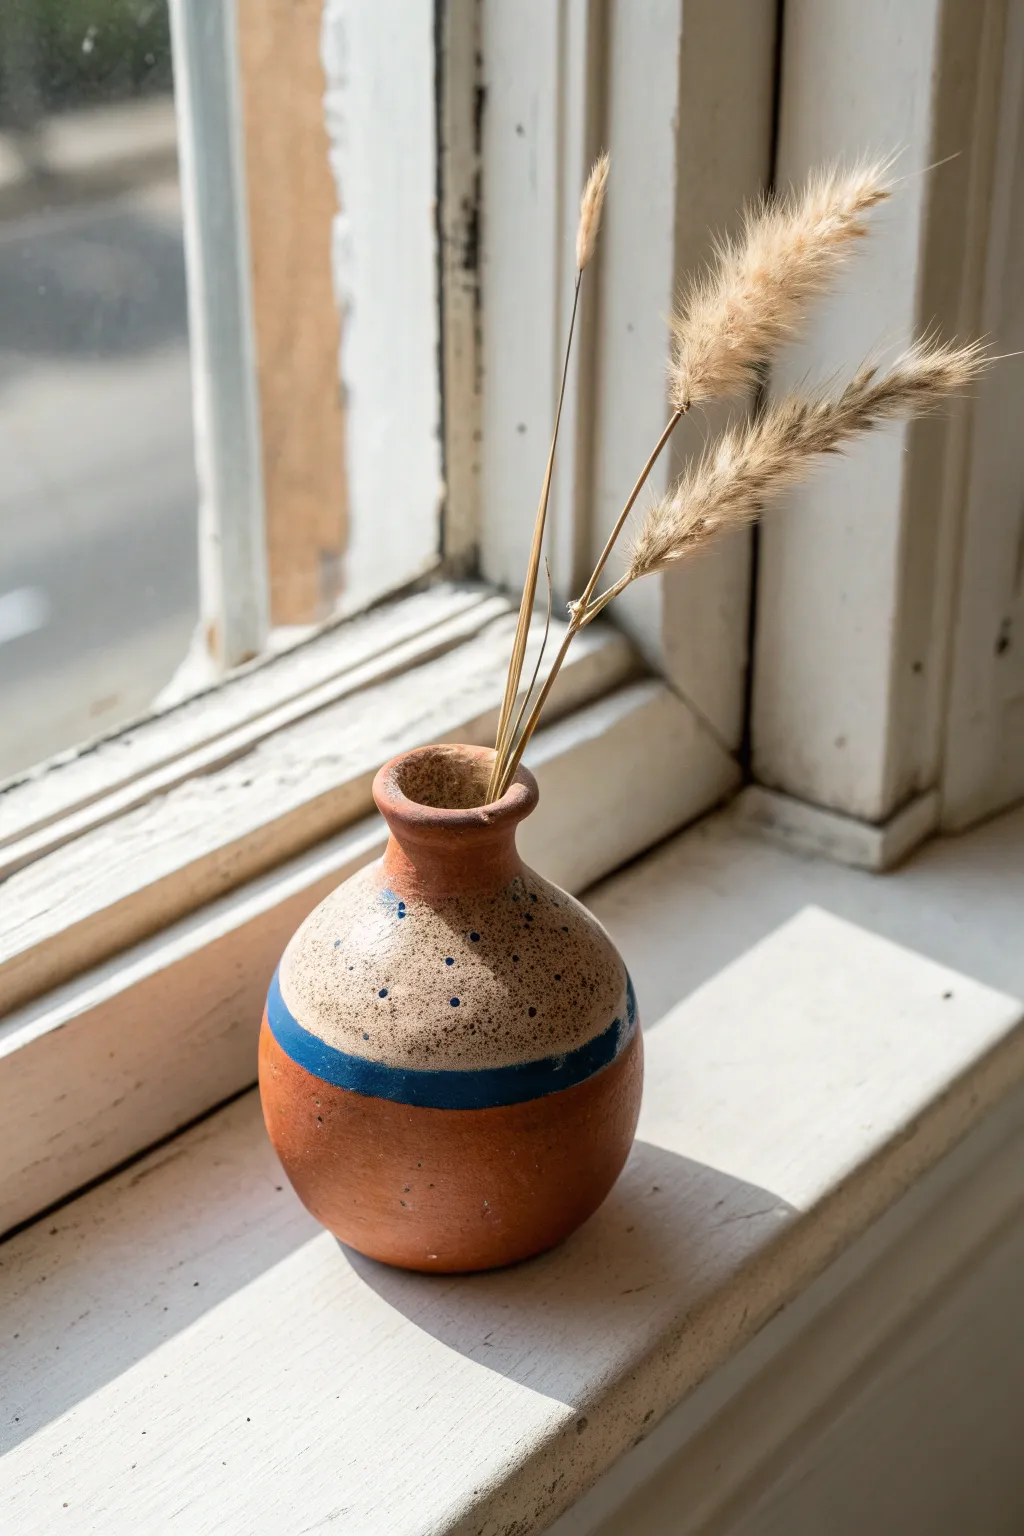
Bring a touch of organic warmth to your windowsill with this charming miniature bud vase. Featuring a classic spherical body, a flared rim, and a playful speckled glaze design, it is the perfect vessel for displaying dried grasses or a single wildflowers.
Step-by-Step Tutorial
Materials
- Red earthenware or terracotta clay
- Pottery wheel (or coil/pinch construction tools)
- Sponge
- Wire clay cutter
- Loop tool for trimming
- White or cream matte glaze
- Cobalt blue underglaze
- Small paintbrush
- Stiff-bristled toothbrush (for speckling)
- Clear glaze (optional for bottom half)
- Kiln
Step 1: Forming the Vase
-
Prepare the clay:
Begin by wedging a small ball of red earthenware clay, roughly the size of a tennis ball, to remove air bubbles and ensure consistency. -
Center on the wheel:
Throw the clay onto the center of the pottery wheel. Using wet hands and steady pressure, cone the clay up and down until it runs perfectly true in the middle. -
Open the form:
Press your thumb into the center to create the opening, leaving about a quarter-inch of clay at the bottom for the base. Pull the floor outwards slightly to establish the width. -
Pull the walls:
Gently pull the cylinder walls up. Since this is a bud vase, keep the form relatively small and thick enough to support shaping. -
Shape the belly:
Using a rib tool or your fingers inside the pot, push the clay outward while supporting the outside to create a round, bulbous ‘belly’ shape. -
Collar the neck:
With wet hands gently encircling the top third of the pot, slowly apply inward pressure to narrow the neck. Do this gradually to avoid buckling the clay. -
Flare the rim:
Once the neck is sufficiently narrowed, use your fingertips to gently flare the very top edge outward, creating a distinct lip. -
Refine and cut:
Smooth the surface with a damp sponge or rib to remove finger marks. Run a wire cutter underneath the vase to release it from the bat.
Clean Lines
Use wax resist on the bottom half of the vase before dipping the white glaze. This creates a crisp, automatic line and saves you from needing to wipe away excess glaze later.
Step 2: Trimming and Bisque
-
Leather hard drying:
Allow the vase to dry until it reaches the leather-hard stage—firm enough to handle but still cool to the touch. -
Trim the foot:
Place the vase upside down on the wheel (secured with clay lugs) and use a loop tool to trim away excess weight from the bottom, creating a neat foot ring. -
Bisque fire:
Let the piece dry completely to the bone-dry stage. Load it into the kiln for a bisque firing according to your clay body’s specifications.
Texture Twist
Before the clay dries, gently press a piece of coarse linen or burlap against the belly of the pot. The glaze will break beautifully over the subtle fabric texture.
Step 3: Glazing and Decorating
-
Apply the top glaze:
Dip the top half of the bisque-fired vase into a matte white or jagged cream glaze. Hold it at an angle so the glaze line is roughly horizontal but organic. -
Clean the line:
If the dip line is too messy, use a damp sponge to tidy up the bottom edge of the white glaze where it meets the bare clay. -
Paint the stripe:
Using a small brush loaded with cobalt blue underglaze, paint a thick band directly along the bottom edge of the white glaze. Don’t worry about making it perfectly straight; a slightly wavering line adds character. -
Create the speckles:
Dip a stiff toothbrush into the blue underglaze. Hold it near the top of the vase and run your thumb across the bristles to flick tiny splatters onto the white section. -
Final touches:
Leave the bottom third of the vase as bare, unglazed clay to highlight the terracotta warmth. Ensure no glaze is on the very bottom foot. -
Glaze fire:
Load the vase into the kiln for the final glaze firing. Ensure it doesn’t touch other pots, as the speckles can sometimes flux.
Once cooled, fill your new rustic creation with dried grasses for an effortless slice of cottage style

The Complete Guide to Pottery Troubleshooting
Uncover the most common ceramic mistakes—from cracking clay to failed glazes—and learn how to fix them fast.
Coasters With Pressed Botanicals
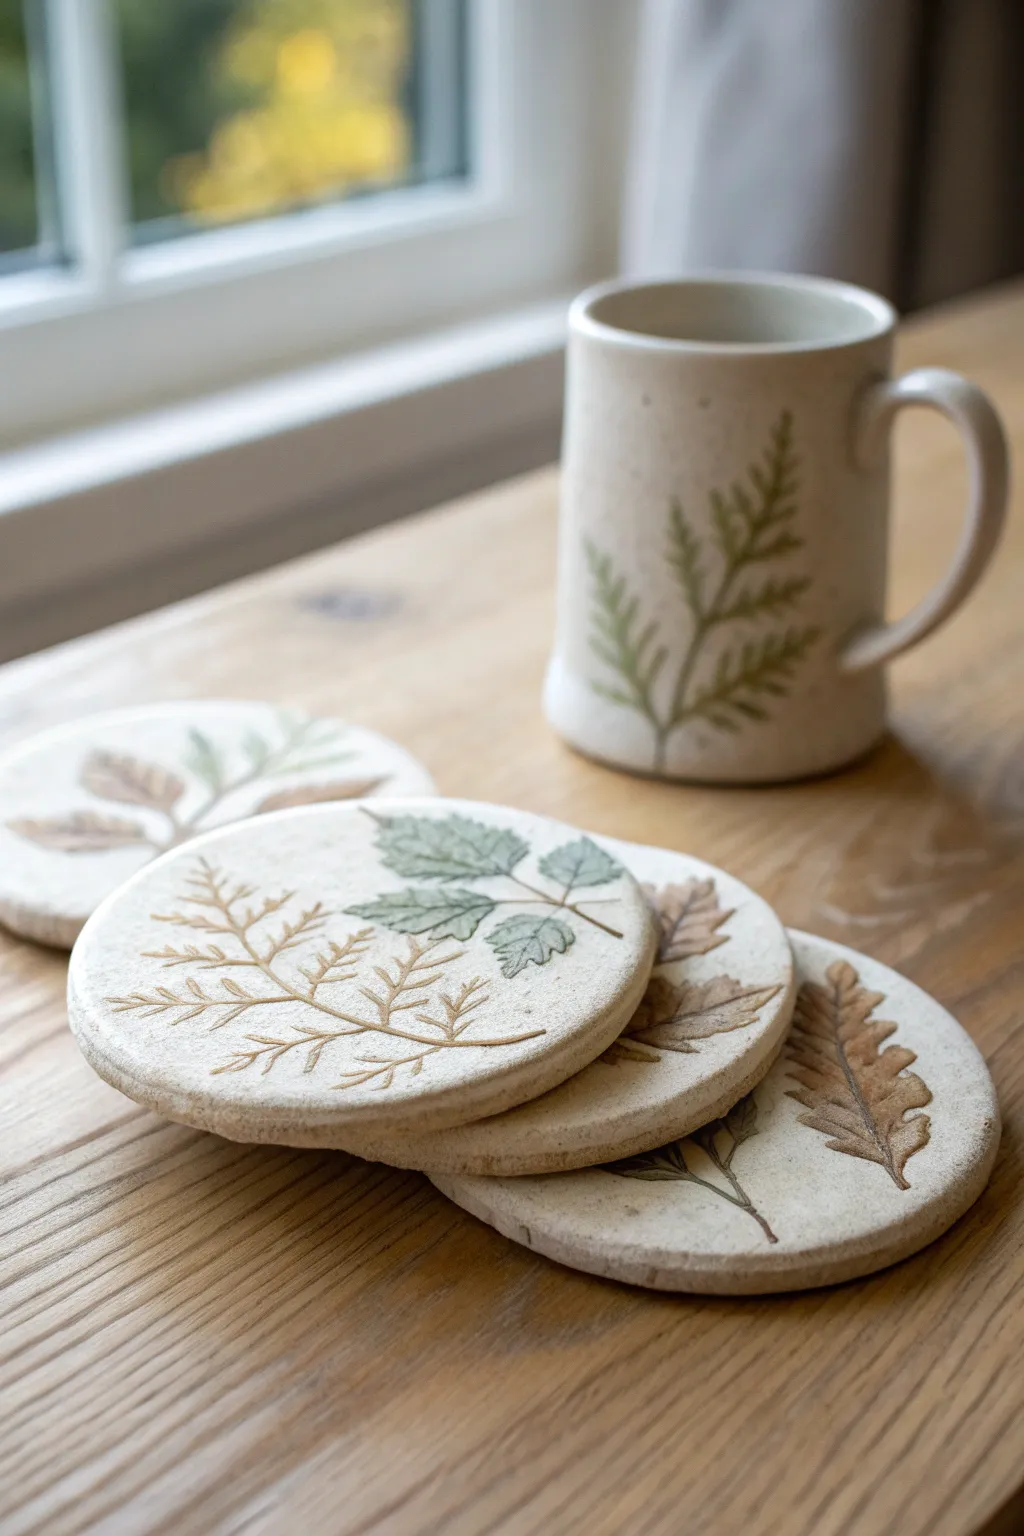
Bring the outdoors in with these rustic, nature-inspired coasters features delicate leaf impressions. The natural clay texture combined with subtle rubbed-in color creates a timeless, heirloom quality that looks beautiful on any table.
Step-by-Step
Materials
- Light-colored stoneware clay (speckled variety recommended)
- Fresh leaves or ferns (sturdy varieties work best)
- Rolling pin
- Two wooden guide strips (approx. 1/4 inch thick)
- Round cookie cutter (approx. 4 inches diameter)
- Fettling knife or needle tool
- Ware board or canvas-covered board
- Sponge
- Underglaze (greens and browns)
- Small paintbrush
- Clear matte glaze (optional)
- Kiln (or access to a firing service)
Step 1: Preparation & Impression
-
Prepare the Clay:
Begin by wedging your clay thoroughly to remove air bubbles. Since we want a uniform look for a set, ensure you have enough clay prepared for at least 4-6 coasters. -
Roll the Slab:
Place your wooden guide strips on either side of the clay on your canvas board. Roll the clay out until the rolling pin rests on the guides, ensuring an even thickness across the entire slab. -
Arrange Botanicals:
Select your leaves or fern fronds. Place them vein-side down onto the clay slab. The vein side has more texture and will leave a crisper impression. -
Press designs:
Gently roll your rolling pin over the leaves once firmly. You want to press them deep enough to leave a mark, but not so deep that the clay distorts significantly. -
Cut Shapes:
Position your round cutter over the pressed botanical designs to frame them pleasingly. Press down firmly to cut the coaster shape. -
Remove Excess:
Peel away the excess clay from outside the circles first, then carefully lift the coasters. Now, using the tip of a needle tool or tweezers, gently lift the leaf material out of the clay.
Step 2: Refining & Drying
-
Smooth Edges:
Use a slightly damp sponge to soften the sharp top edge of the rim. Don’t use too much water, or you’ll wash away the fine texture of the leaf veins. -
Slow Drying:
Place the coasters on a ware board. To prevent curling—a common issue with flat slabs—I like to flip them over every few hours or sandwich them between drywall boards for even drying. -
Bone Dry:
Allow the coasters to dry completely to the bone-dry stage. This usually takes a few days depending on humidity. -
Bisque Fire:
Load the bone-dry coasters into the kiln and fire to cone 04 (or your clay body’s specified bisque temperature).
Prevent Warping
Flat slabs love to curl while drying. Weigh them down with a small board or bag of rice during the leather-hard stage to keep them perfectly flat.
Step 3: Decoration & Glazing
-
Clean Bisqueware:
Once fired and cooled, wipe the coasters with a damp sponge to remove any kiln dust. -
Apply Underglaze:
Dilute your green and brown underglazes slightly with water. Paint the color into the depressed leaf impressions, allowing it to pool in the veins. -
Wipe Back:
Using a clean, damp sponge, wipe across the surface of the coaster. This removes the color from the raised surface clay but leaves it trapped in the intricate leaf details. -
Glaze Application:
For a raw, stone-like feel similar to the image, you might choose to leave the clay unglazed if it vitrifies fully. However, applying a thin coat of clear matte glaze protects the surface from coffee stains. -
Wipe the Base:
Ensure the bottom of each coaster is completely free of glaze so it doesn’t stick to the kiln shelf. -
Final Fire:
Fire the coasters again to the maturation temperature of your specific clay body (e.g., cone 5 or 6). Let them cool completely before handling.
Add Color Depth
Layer two shades of underglaze (like dark green and scorched earth) before wiping back to create a realistic, dimensional leaf look.
Stack your new set of coasters on the coffee table and enjoy the organic touch they add to your morning routine
Photo or Place Card Holders With a Simple Slot
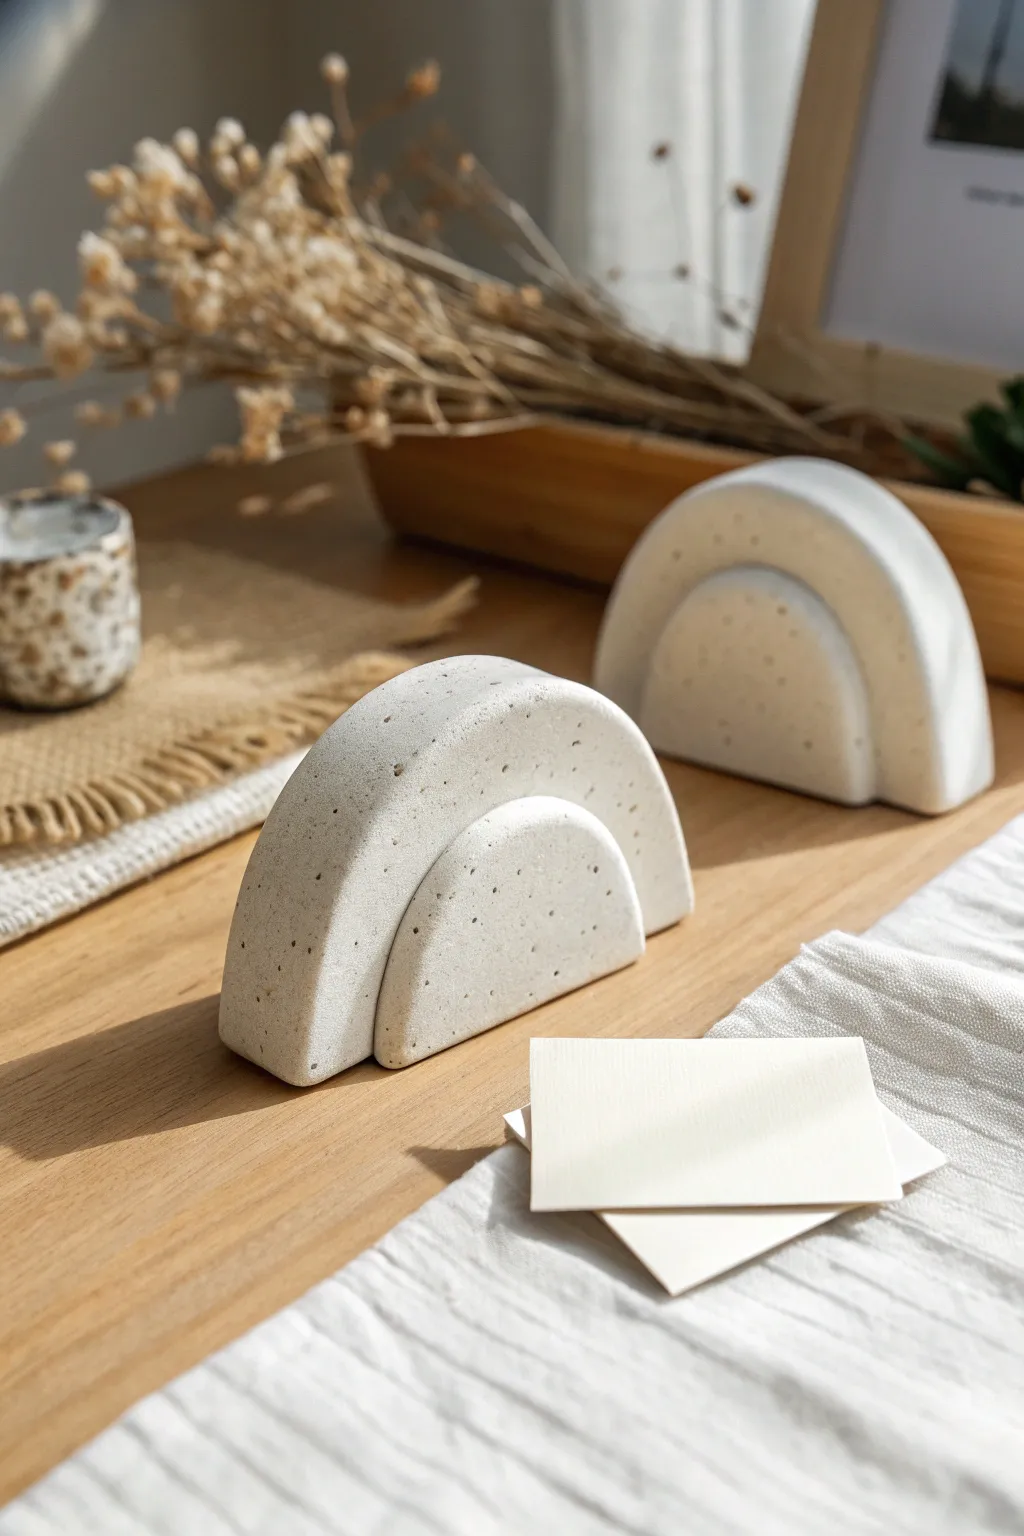
Embrace the minimalism of modern Scandinavian design with these slotted rainbow arches. Crafted to look like speckled stone, these sturdy holders add a touch of texture and elegance as place card holders or photo displays.
How-To Guide
Materials
- White air-dry clay or polymer clay
- Fine grit black sand or ground black pepper
- Rolling pin
- Sharp craft knife or scalpel tool
- Circle cutters (large and medium) or sturdy circular templates
- Fine-grit sandpaper (400-600 grit)
- Small bowl of water
- Parchment paper or non-stick craft mat
- Matte spray varnish
Step 1: Preparing the Speckled Clay
-
Condition the clay:
Begin by kneading your white clay thoroughly until it is soft, pliable, and free of any air bubbles. -
Add the speckles:
Flatten the clay slightly and sprinkle a small pinch of fine black sand or ground pepper into the center. -
Mix it in:
Fold the clay over the speckles and knead repeatedly to distribute the particles evenly. I like to add them gradually to ensure I don’t darken the white base too much. -
Roll it out:
Once the speckles are integrated, roll the clay out onto your parchment paper until it is a uniform slab, approximately 3/4-inch to 1-inch thick. Thickness is key here for stability.
Step 2: Cutting the Arched Segments
-
Cut the outer arch:
Use your largest circle cutter (or place a bowl upside down and trace) to cut a perfect circle from the slab. -
Halve the circle:
Using your craft knife and a straight edge, slice the circle directly in half to create two large semi-circles. -
Cut the inner arch:
Repeat the process with a smaller circle cutter or template. Cut a smaller circle from the slab and slice it in half to create the inner semi-circles. -
Check fit:
Place the smaller semi-circle against the larger one to ensure they nestle together nicely, resembling a segmented rainbow.
Cracking Up?
If you see hairline cracks while drying, it’s drying too fast. Rub a tiny bit of fresh clay slurry (clay + water mix) into the crack and smoothen.
Step 3: Creating the Slots
-
Mark the slot:
If you intend to hold cards between the pieces, you actually need to create a flat bonding surface first. -
Actually, separate pieces:
Looking closely at the design, these are two separate semi-circles standing one in front of the other. The ‘slot’ is the gap between them. -
Refine the edges:
Dip your finger in a little water and smooth down any sharp edges or drag marks left by the knife on both curved and flat sides. -
Dry partially:
Let the pieces air dry for about an hour so they firm up but aren’t fully hard.
Level Up: Terrazzo Twist
Instead of fine speckles, mix in chopped-up chunks of dried colored clay before rolling out your slab for a bold, chunky terrazzo pattern.
Step 4: Finishing Touches
-
Final drying:
Allow the clay to dry completely according to package directions. For thick slabs like this, it may take 24-48 hours. -
Sand for stone effect:
Once bone dry, take your fine-grit sandpaper and gently buff the surface. This exposes more of the black speckles and creates that smooth, stone-like feel. -
Optional assembly:
To permanently join them as a single unit with a slot, apply a strong craft glue to the bottom back of the small arch and bottom front of the large arch, leaving a tiny gap between them for the card. -
Or keep separate:
Functionally, you can simply stand the smaller arch in front of the larger one and slip the card between them without glue, which allows for versatile styling. -
Seal the piece:
Finish with a light coat of matte spray varnish to protect the surface from dust and fingerprints without making it look plastic.
Place your favorite photo or name card in the slot and enjoy your chic new desk accessory


What Really Happens Inside the Kiln
Learn how time and temperature work together inside the kiln to transform clay into durable ceramic.
Toothbrush or Pen Holder With a Friendly Face
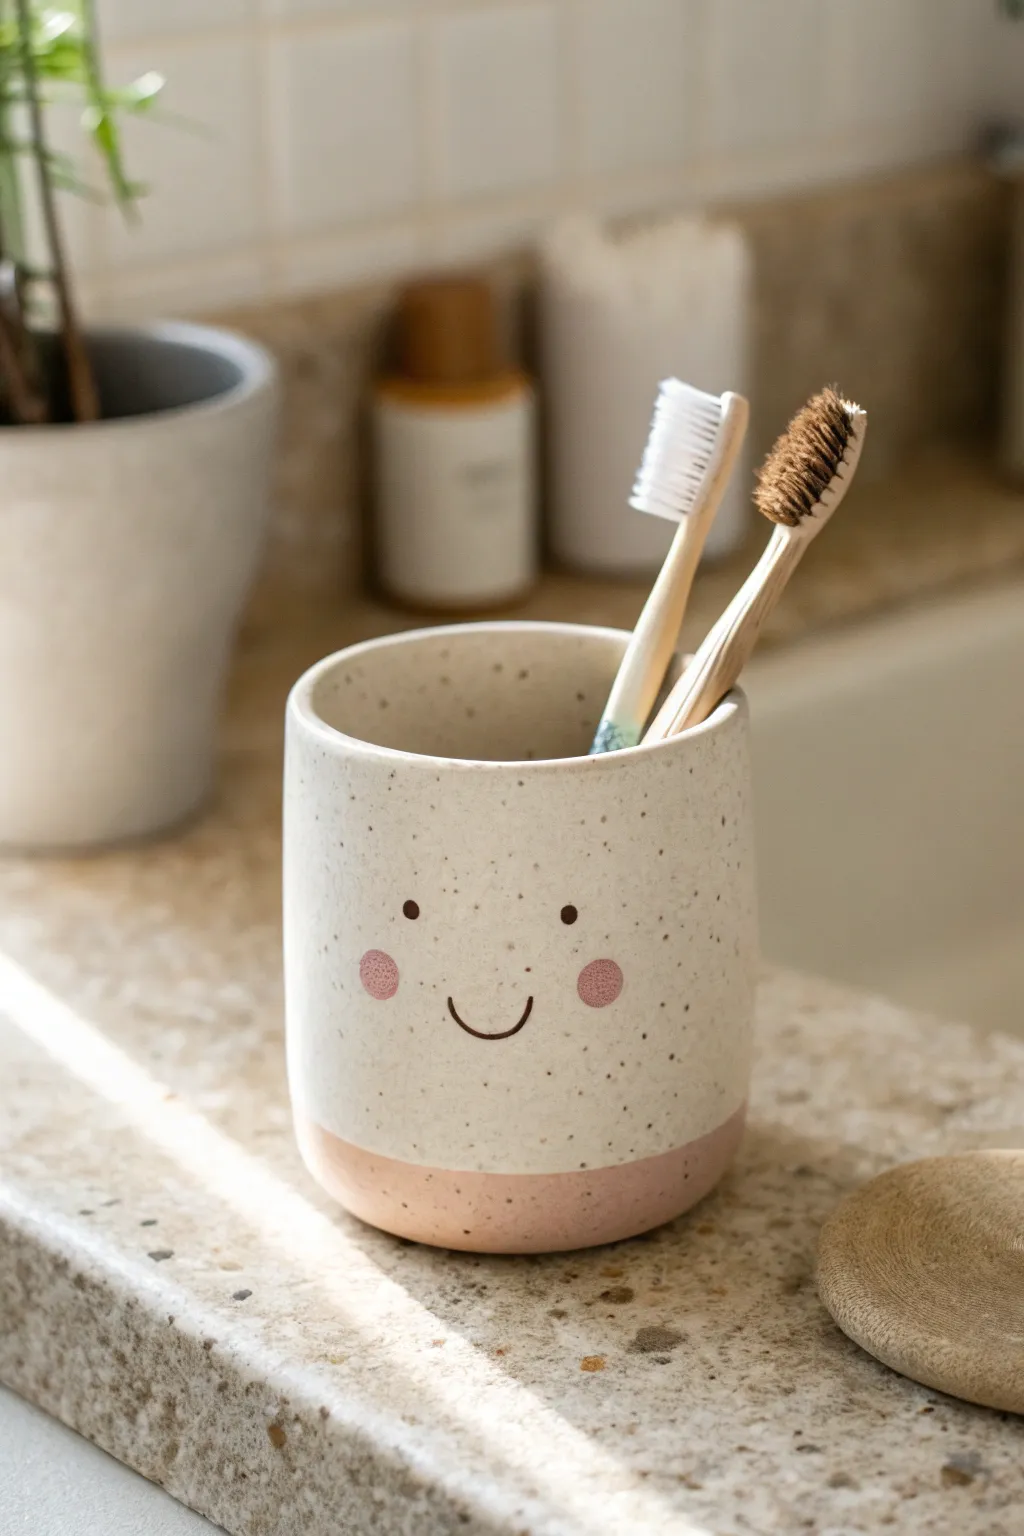
Add a touch of whimsy to your bathroom sink with this charming, smiling toothbrush holder. Featuring a speckled clay body, a dipped pink base, and a simple hand-painted face, it’s a functional piece of art that makes morning routines a little brighter.
Step-by-Step Tutorial
Materials
- Speckled pottery clay (stoneware or polymer clay with granite effect)
- Rolling pin
- Clay cutting tool or craft knife
- Slip and scoring tool (if using ceramic clay)
- Small sponge
- Cylindrical form or mandrel (for shaping)
- Underglaze or acrylic paint (Soft Pink and Dark Brown)
- Small round paintbrush
- Clear glaze (food safe if firing) or varnish (if polymer)
Step 1: Forming the Cylinder
-
Roll your slab:
Begin by wedging your speckled clay to remove air bubbles. Roll it out into a consistent slab about 1/4 inch thick. I find using guide sticks on either side helps keep the thickness perfectly even across the whole piece. -
Cut the rectangle:
Measure and cut a rectangle from your slab. The height should be approximately 4-5 inches, and the length must be the circumference of your desired tube plus a small allowance for the seam overlap. -
Create the base:
Cut a circle from the remaining clay slab that matches the diameter of the cylinder you are about to create. This will be the floor of your cup. -
Shape the walls:
Carefully wrap your rectangular slab around a cylindrical form or mandrel to create the tube shape. If you don’t have a mandrel, you can gently shape it by hand, checking regularly for roundness. -
Join the seam:
Score the edges where the clay meets and apply a little slip (or liquid clay). Press the edges together firmly to create a vertical seam. Blend the clay with a modeling tool or your finger until the seam is invisible both inside and out. -
Attach the bottom:
Score and slip the bottom edge of your cylinder and the outer edge of your circular base. Press the cylinder onto the base. -
Smooth the connection:
Use a wooden modeling tool to drag a tiny bit of clay from the wall down to the base to lock them together, then smooth the joint completely with a damp sponge. -
Rim refinement:
Smooth the top rim with a damp sponge or chamois leather. Ensure it is rounded and soft, not sharp, as this will need to be comfortable to touch.
Wobbly seam?
If your vertical seam keeps splitting during drying, you didn’t score deeply enough. Use a needle tool to aggressively cross-hatch the edges before adding fresh slip and pressing them together again.
Step 2: Adding the Personality
-
Paint the dipped base:
Once the clay is leather hard (or baked/cured if using polymer), mark a line about an inch up from the bottom. Paint the lower section with soft pink underglaze or acrylic to create the ‘dipped’ effect. -
Position the face:
Lightly visualize where the face will go. It should be centered vertically on the unpainted top section. The eyes should be wide-set for that cute ‘kawaii’ look. -
Dot the eyes:
Using a small detail brush dipped in dark brown, dab two small, solid circles for the eyes. I like to twist the brush slightly upon contact to keep the circles neat. -
Add rosy cheeks:
Mix a slightly diluted version of your base pink. Paint two larger circles directly under and slightly outside the eyes to form the blushing cheeks. These should be softer and larger than the eyes. -
Draw the smile:
With your finest brush and the dark brown color, paint a simple, thin ‘U’ shape exactly centered between the cheeks for the smile. -
Let it dry:
Allow all surface decoration to dry completely. If you move to glazing too fast, you risk smearing the delicate facial features.
Step 3: Finishing
-
Glaze application:
For ceramic clay, dip the entire piece in a clear glaze. For polymer clay, apply a coat of satin or gloss varnish to seal the paint and protect the surface from water splashes. -
Final firing or curing:
Fire the piece in a kiln according to your clay’s specific temperature cone requirements, or let the varnish cure fully based on manufacturer instructions.
Clean cheeks
To fix a messy cheek circle, wait for the paint to dry completely, then gently scrape away the excess ‘mistake’ paint with a sharp craft knife before applying the clear glaze layer.
Your new countertop friend is ready to hold your toothbrush with a smile every morning
Keychain Charms With Smooth, Glossy Color Blocks
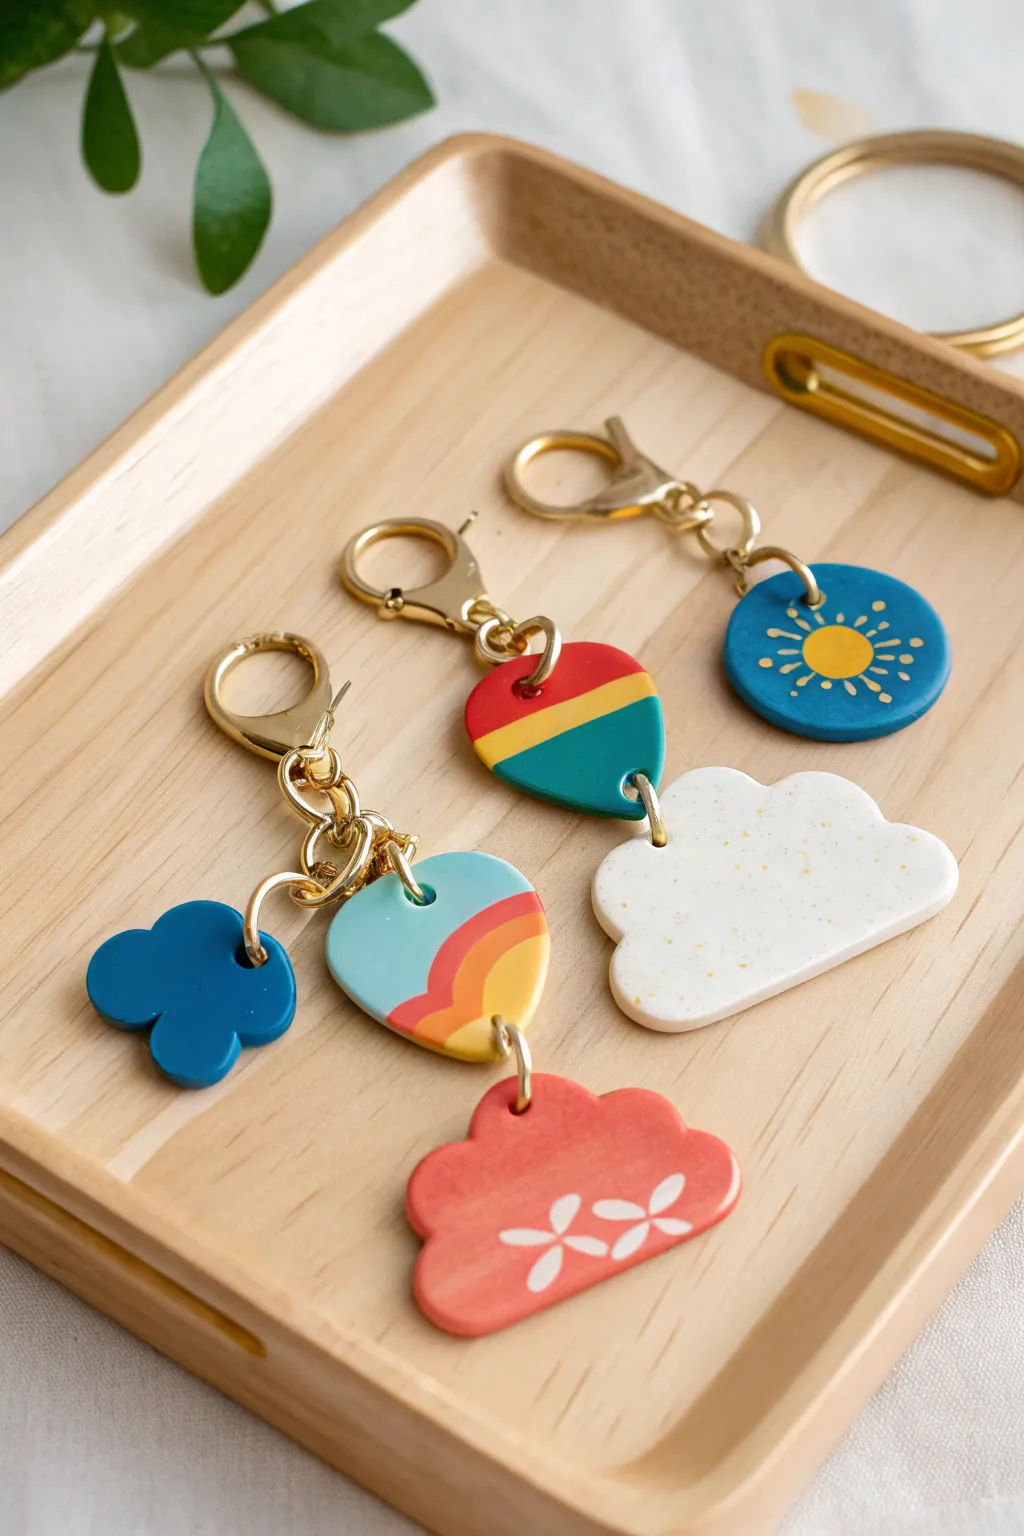
Brighten up your keys with these charming, weather-inspired polymer clay keychains featuring glossy finishes and playful shapes. From sunny skies to fluffy clouds, you can mix and match components to create accessories that are uniquely yours.
Detailed Instructions
Materials
- Polymer clay (white, navy blue, sky blue, red/coral, yellow, teal green)
- Acrylic rolling pin
- Clay cutters (circle, teardrop, scalloped/cloud shapes)
- Small circle cutter or straw (for jump ring holes)
- X-Acto knife or clay blade
- Jewelry pliers (round nose and flat nose)
- Gold tone jump rings (various sizes)
- Gold tone lobster clasp keychains
- Sandpaper (fine grit)
- UV resin or polyurethane gloss varnish
- UV lamp (if using resin)
- Small paintbrush
Step 1: Prepping the Clay Shapes
-
Condition and Roll:
Start by conditioning your clay colors until they are soft and pliable. Roll each color out into a sheet approximately 3mm to 4mm thick. Ensure the thickness is consistent so your charms dangle evenly. -
Cut the Cloud Shapes:
For the cloud pieces, use your scalloped cutters. Cut one large cloud from white clay (you can mix in tiny specks of gold glitter or sand-colored clay for the speckled stone effect shown). Cut a smaller, simpler scalloped shape from the deep blue clay. -
Create the Striped Teardrops:
To make the striped teardrop charms, you’ll need to create a slab first. Lay strips of rolled clay (sky blue, coral, yellow) next to each other. Gently roll over them to fuse the seams without distorting the straight lines too much. -
Cut the Teardrops:
Position your teardrop cutter over the joined stripes to capture the color blocking pattern you like best, then press down firmly to cut. Repeat this process with teal, yellow, and red clay for the second style of teardrop. -
Make the Sun Charm:
Cut a simple circle from the blue clay. Roll a very small ball of yellow clay, flatten it, and press it gently into the center of the blue circle to create the sun’s core. -
Detail the Pink Cloud:
Cut another scalloped cloud shape from the coral/pink clay. For the flower detail, roll tiny ropes of white clay, cut them into small seed shapes, and arrange them into little petals directly on the raw pink clay. Press gently to adhere.
Clean Slates
Wipe your clay tools with baby wipes or rubbing alcohol between colors. This is crucial when switching to white clay to avoid transferring lint or dark pigments.
Step 2: Finishing and Assembly
-
Pierce Holes:
Before baking, use a small tool or straw to punch clear holes at the top (and bottom, if connecting multiple pieces) of each charm. Make sure the hole isn’t too close to the edge to prevent breakage. -
Sun Ray Details:
For the sun charm, you can either paint the rays on after baking or carefully etch tiny lines radiating from the yellow center now using a needle tool. -
Bake the Pieces:
Arrange all your clay pieces on a parchment-lined baking sheet or ceramic tile. Bake according to your specific brand of clay’s instructions (usually around 275°F for 15-30 minutes). -
Sand the Edges:
Once the pieces are fully cooled, inspect the edges. I like to use a bit of fine-grit sandpaper here to smooth out any roughness or lint, giving the edges a professional finish. -
Add the Gloss:
Apply a thin layer of UV resin to the front of each charm for that glassy, high-shine look. Cure under a UV lamp for a few minutes. Alternatively, apply two coats of gloss varnish, letting it dry fully between coats. -
Paint the Sun Rays (Optional):
If you didn’t etch the sun rays earlier, use a fine paintbrush and yellow or gold acrylic paint to add delicately dashed lines around the sun now. -
Connect the Chains:
Use your pliers to open the jump rings. For the single charms, attach a large jump ring through the clay hole and connect it directly to the lobster clasp. -
Assemble the Multi-Charm Chain:
For the long, dangling keychain, use jump rings to chain the pieces together vertically: blue cloud, then the striped teardrop, then the pink flower cloud at the bottom. -
Final Check:
Give all your jump rings a final squeeze with the pliers to ensure they are completely closed so you don’t lose your lovely handiwork.
Texture Twist
Mix black pepper or dried tea leaves into the white cloud clay before rolling it out. This creates a trendy ‘faux stone’ or granite effect instantly.
Hook these onto your bag or keys and enjoy a little handmade sunshine wherever you go

TRACK YOUR CERAMIC JOURNEY
Capture glaze tests, firing details, and creative progress—all in one simple printable. Make your projects easier to repeat and improve.
Anthropomorphic Fruit Mini Figures
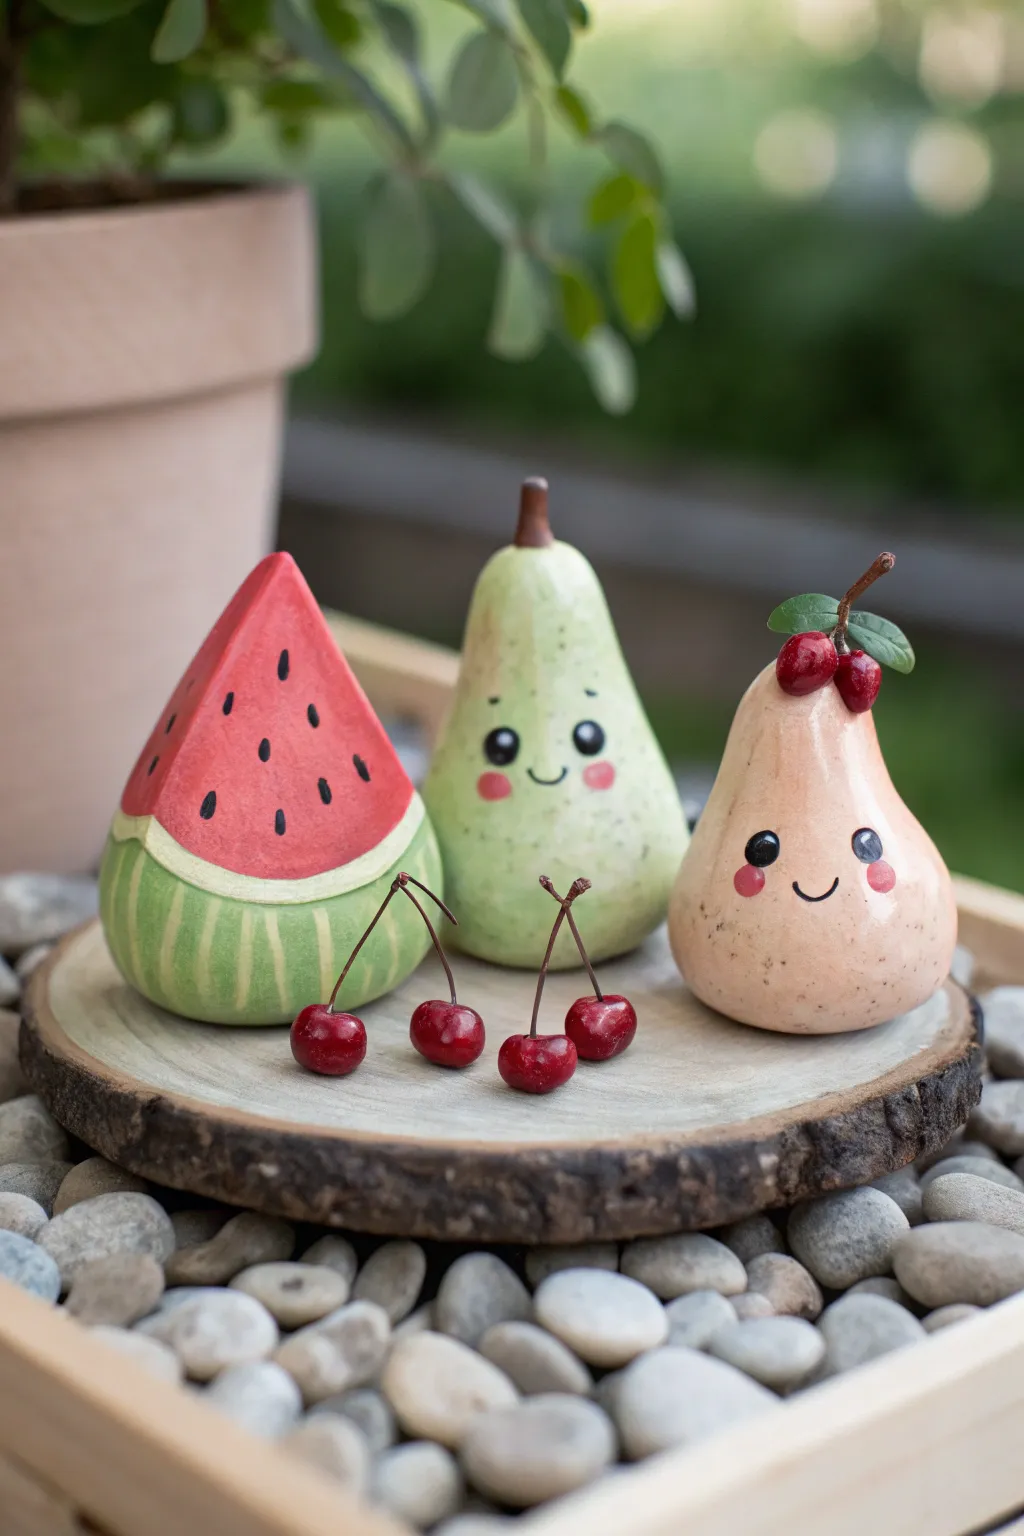
Bring a touch of sweetness to your shelf with these adorable fruit-shaped characters. These hand-painted clay figurines—a juicy watermelon wedge and two smiling pears—feature simple kawaii faces that add instant personality to any display.
How-To Guide
Materials
- Air-dry clay or polymer clay (white base recommended)
- Acrylic paints (red, sap green, light green, cream/beige, pink, black, brown)
- Fine detail paintbrushes (including a liner brush)
- Sculpting tools (needle tool and smoothing tool)
- Aluminum foil (for armature)
- Small stems (dried grape stems or thin twigs)
- Small artificial leaves (optional)
- Wire (thin gauge for cherries)
- Clear matte varnish or sealant
- Sandpaper (fine grit)
Step 1: Sculpting the Base Shapes
-
Prepare foil cores:
To save clay and reduce weight, scrunch aluminum foil into tight, rough shapes: a cone for the watermelon and two pear shapes (one slightly taller and slimmer than the other). -
Cover the watermelon:
Roll out a sheet of white clay about 1/4 inch thick. Wrap it around the cone-shaped foil, trimming excess. Shape it into a smooth teardrop form, flipping it upside down so the wide, round part is the bottom and it tapers to a soft point at the top. -
Sculpt the pears:
Cover the pear-shaped foil cores with clay. Roll the clay between your palms to smooth it, ensuring the bottom is wide and heavy while the neck tapers gently. Flatten the bottoms of all fruits by pressing them firmly onto your work surface so they stand independently. -
Refining the surface:
Use a little water (for air-dry clay) or baby oil (for polymer) on your finger to smooth out any seams or fingerprints. For the watermelon, keep the surface smooth. -
Texturing the pears:
I like to take a stiff bristle brush or a crumpled ball of aluminum foil and gently tap it against the wet clay of the pears. This adds a subtle, organic skin texture rather than a perfectly smooth finish. -
Adding stems:
While the clay is still soft, press your chosen twigs or stems into the top of each pear to create a hole. Remove the stem for now (you’ll glue it in after painting) so it doesn’t get messy. -
Creating the cherries:
Roll four tiny spheres of clay for the cherries. Insert a small loop of thin wire into each for the stems before they dry. -
Drying:
Let all pieces dry completely according to your clay manufacturer’s instructions. Air-dry clay may take 24-48 hours.
Uneven Standing?
If your dried fruit wobbles, tape sandpaper to a flat table and rub the bottom of the figure against it in a circular motion until completely flat.
Step 2: Painting & Details
-
Sand and prime:
Once dry, lightly sand any rough spots. If you used colored clay, you can skip this, but for white clay, checking smoothness is key. -
Painting the watermelon rind:
Mix a light sap green with a touch of white. Paint the bottom third of the cone shape. Then, use a darker green to paint vertical stripes along the rind section. -
Painting the watermelon interior:
Paint the upper two-thirds of the cone with a vibrant red. Leave a thin strip of unpainted white clay between the red fruit and the green rind to mimic the pith. -
Painting the pears:
Paint the taller pear a soft lime green. For the shorter pear, mix flesh tone with a tiny drop of pink for a blush-colored skin. You can stipple the paint slightly to enhance the texture you made earlier. -
Speckling details:
Dilute some brown paint with water and flick it off a toothbrush onto the green pear for realistic speckles. Add tiny black seeds to the red section of the watermelon using a fine liner brush. -
Painting the cherries:
Paint the small cherry spheres deep red. Use dark brown for the wire stems. -
Drawing the faces:
Using your finest brush or a black paint pen, draw two small arched eyes (or round dots) and a simple ‘U’ shaped smile on each fruit. Place the features relatively low on the shape for maximum cuteness. -
Adding blush:
Dip a rounded tool or the back of a paintbrush into pink paint. Dot cheeks on either side of the smile. For the beige pear, use a darker rose color so it stands out.
Weighted Base
Make the foil core slightly smaller and pack more clay at the very bottom. A heavier base prevents your figures from tipping over easily.
Step 3: Assembly
-
Final assembly:
Glue the stems back into the holes on the pears. You can glue tiny artificial leaves near the stem of the blush pear for variety. -
Attaching cherries:
Arrange the loose cherries at the base of the figures or glue them together in pairs. -
Varnishing:
Apply a coat of clear matte varnish to protect the paint. A glossy varnish on the eyes can make them look ‘wet’ and alive.
Arrange your cheerful fruit family on a windowsill or desk to brighten your daily routine
Simple Animal Sculptures Using Basic Shapes
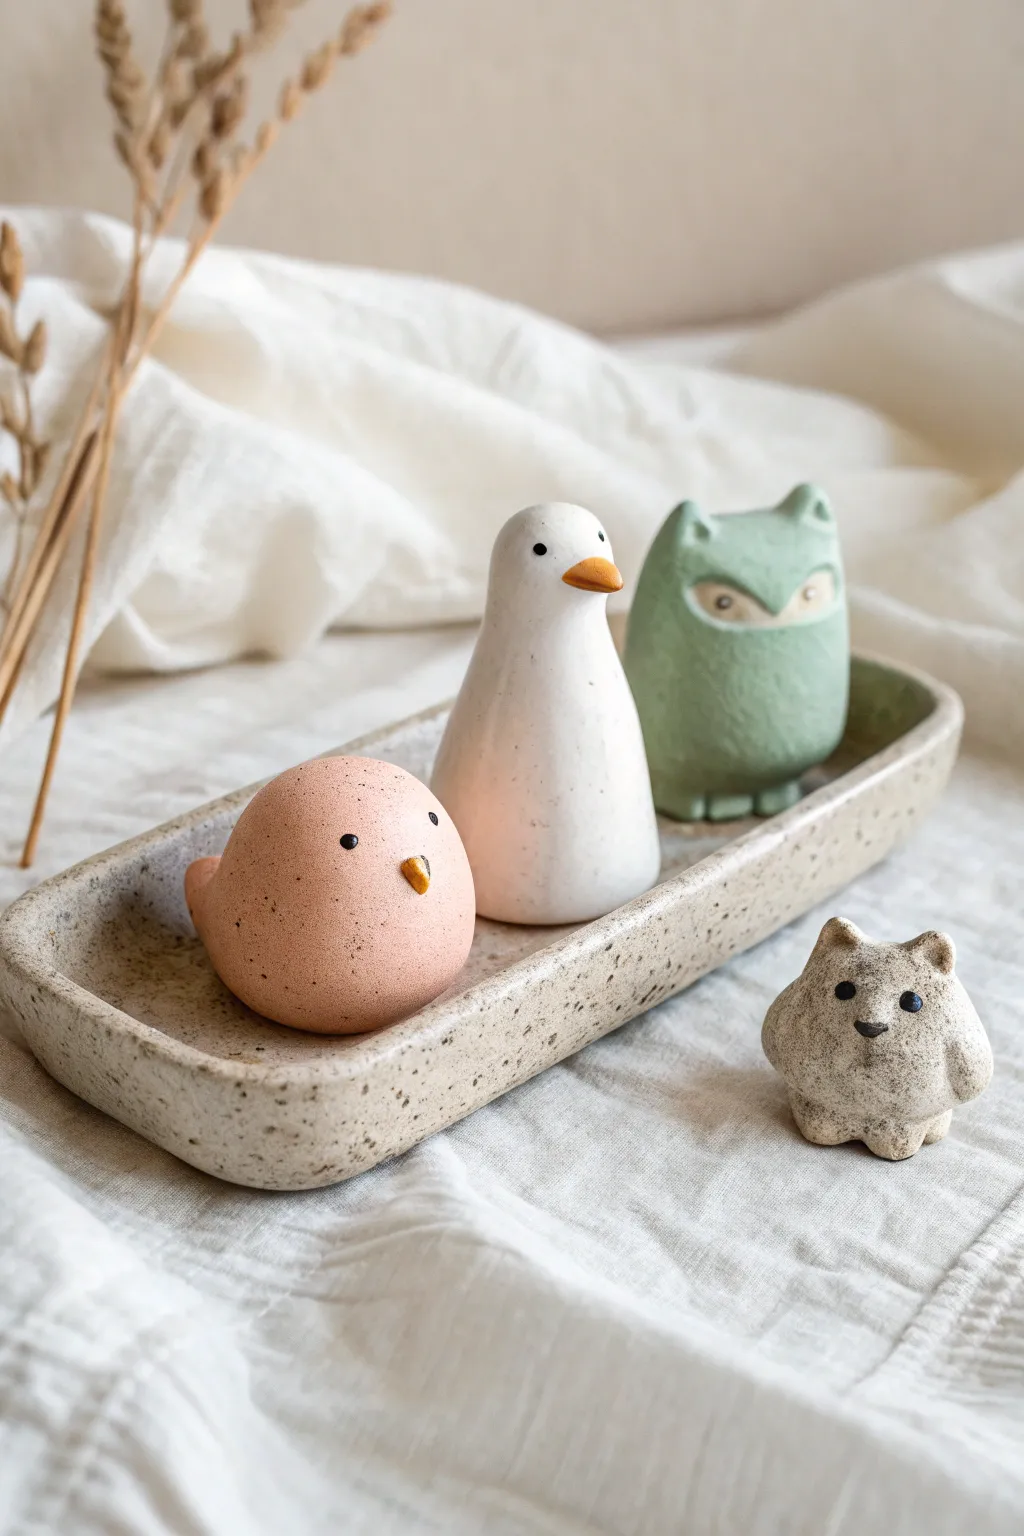
These charming, minimalist animal figures rely on simple round forms and soft, matte glazes to create a serene aesthetic resembling polished river stones. Perfect for beginners, this project focuses on smooth curves and subtle speckling to achieve a modern organic look.
Step-by-Step Tutorial
Materials
- Polymer clay (Peach, White, Pale Sage Green, and Stone Grey)
- Black clay (very small amount for eyes)
- Orange/yellow clay (small amount for beaks)
- Needle tool or toothpick
- Ball stylus tool
- Coarse black pepper or dried coffee grounds (for speckling effect)
- Smooth work surface (ceramic tile or glass)
- Oven (for baking polymer clay) or air-drying setup
- Matte varnish (optional)
Step 1: Basic Preparation
-
Conditioning the Clay:
Begin by kneading your chosen clay colors until they are soft and pliable. If the clay feels stiff, warm it in your hands for a few minutes to prevent cracking later. -
Adding Texture:
To achieve the stone-like speckled effect seen in the tray and the peach bird, mix a tiny pinch of coarse black pepper or dried coffee grounds into your clay. Knead thoroughly until the specks are evenly distributed. -
Checking Consistency:
Ensure there are no air bubbles trapped inside the clay by slicing your conditioned ball in half and pressing it back together firmly.
Step 2: Sculpting the Round Bird (Peach)
-
Forming the Body:
Roll a ping-pong ball sized amount of peach speckled clay into a smooth sphere. Gently tap the bottom on your work surface to create a flat base so it sits without rolling. -
Creating the Tail:
Pinch a very small section at the back of the sphere and gently pull it outward and upward to create a subtle, pointed tail. Smooth the transition with your thumb. -
Adding Faces:
Use a ball stylus to make two shallow indentations for eyes. Press tiny balls of black clay into these spots. Add a small triangular piece of yellow clay for the beak.
Stone Texture Trick
To remove the ‘plastic’ look of polymer clay, gently rub the raw surface with an old toothbrush or a crumpled ball of aluminum foil before baking. This mimics natural stone pore texture.
Step 3: Sculpting the Tall Bird (White)
-
Shaping the Cone:
Roll white clay into a ball, then roll one side between your hands to elongate it into a tall, soft cone shape with a rounded top. -
Defining the Head:
About one-third of the way down from the top, gently indent the ‘neck’ area with your thumb and forefinger to distinguish the head from the body without creating a sharp line. -
Placement:
Tap the base firmly to flatten it. Position the beak (a small orange cone) lower on the face than you might expect, giving it a calm, downward gaze.
Fixing Cracks
If you spot cracks after baking polymer clay, mix a tiny bit of raw clay with liquid clay designated for baking to make a paste. Fill the crack, smooth it, and re-bake for 15 minutes.
Step 4: Sculpting the Forest Cat (Green)
-
Blocking the Shape:
Form a sturdy cylinder with the sage green clay. Flatten the top slightly and tap the bottom to create a stable seat. -
Ears and Face:
Pinch the two top corners upward to form triangular ears. Use your thumb to press a shallow depression into the front of the cylinder to suggest a face area. -
Adding Feet:
Roll two tiny balls of green clay and flatten them slightly.Attach them to the bottom front of the cylinder for paws, blending the back edges into the body. -
Carving Details:
Use a needle tool or small knife to carve slanted eye markings. Since I like a playful look, I sometimes leave these hollow or fill them with a contrasting lighter clay.
Step 5: Creating the Tray
-
Rolling the Slab:
Take a larger amount of speckled stone-colored clay and roll it into a long, thick oval slab, about 1/4 inch thick. -
Building the Rim:
Roll a long snake of clay. Place it on top of the slab’s edge, following the oval perimeter. Smear the clay downward on the inside and outside to join the rim to the base seamlessly. -
Smoothing:
Use your finger or a damp sponge (if using water-based clay) to smooth out all seams on the tray until it looks like a single carved piece of stone.
Step 6: Finishing Touches
-
Final Inspection:
Before baking or drying, run a finger dipped in baby oil (for polymer) or water (for air-dry) over the sculptures to remove fingerprints. -
Curing:
Bake according to your clay package instructions. If using air-dry clay, allow 24-48 hours for full drying. -
Sealing:
Once cool or dry, apply a coat of matte varnish to protect the surface while maintaining that natural, stony appearance.
Arrange your trio in their new tray for a peaceful decorative accent that fits perfectly on a desk or shelf
Pencil Toppers With Cute Character Heads
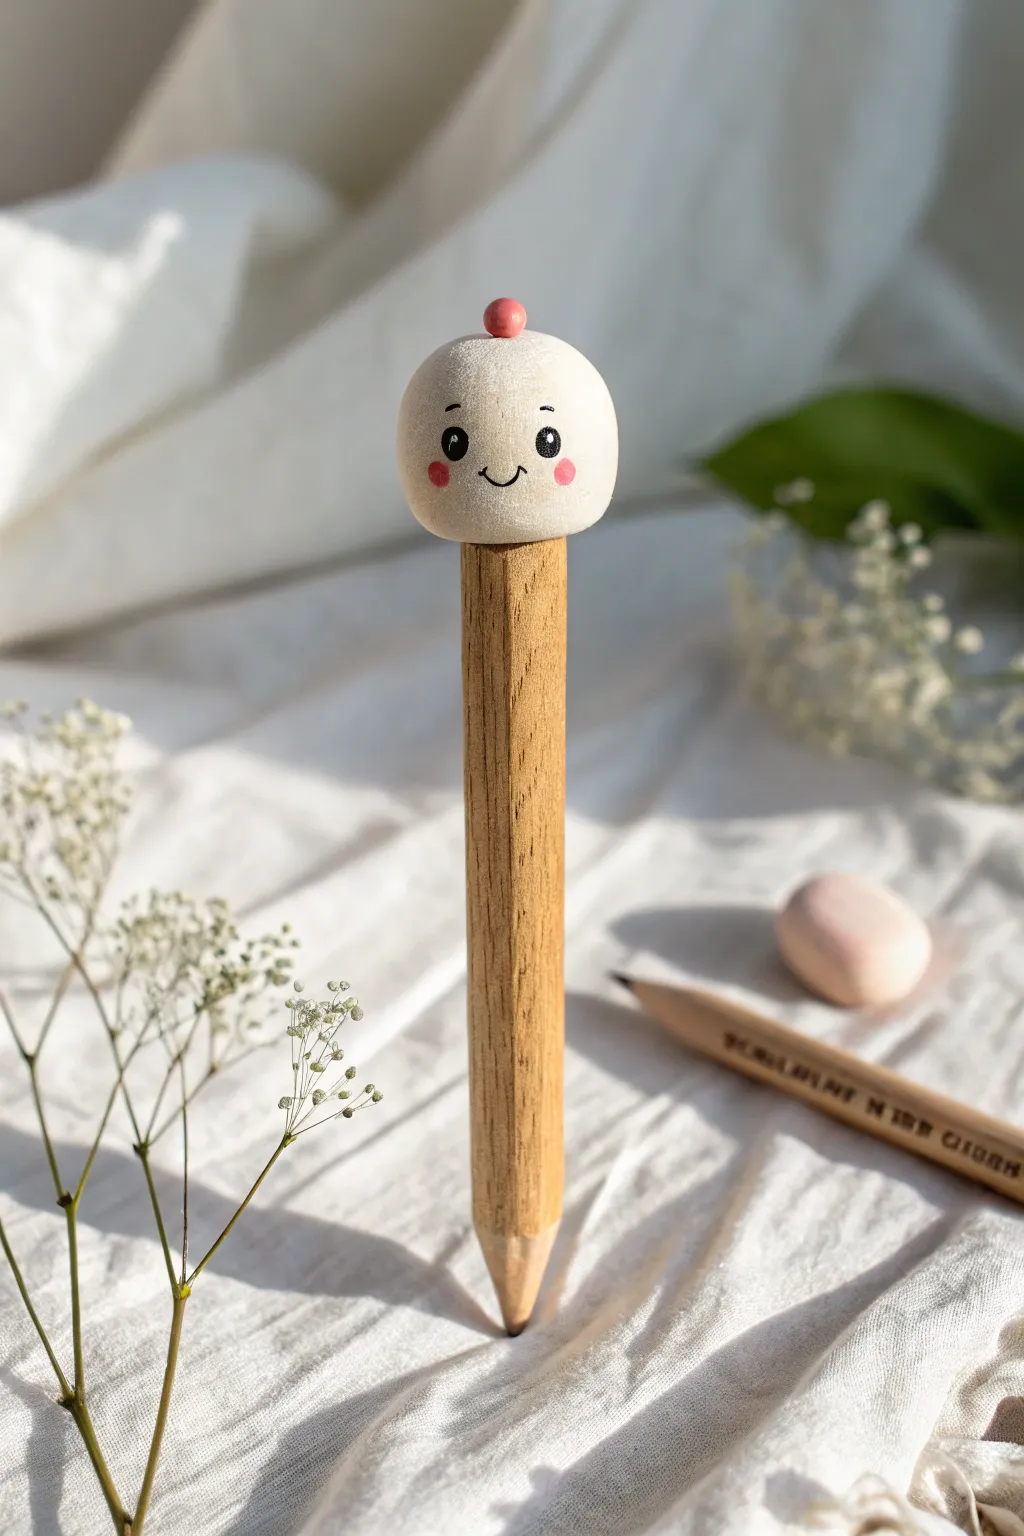
Transform a plain wooden pencil into an adorable writing companion with this simple yet charming project. This sweet little dumpling character features a smooth, rounded face and a tiny pink top knot, adding a touch of whimsy to your daily sketches.
Step-by-Step
Materials
- White polymer clay (or air-dry clay)
- Pink polymer clay (or acrylic paint)
- Wooden pencil (unpainted wood finish looks best)
- Black acrylic paint
- Pink acrylic paint (soft blush tone)
- Fine detail paintbrush or dotting tool
- Needle tool or toothpick
- Gloss glaze (optional)
Step 1: Shaping the Head
-
Prepare the base:
Cut a small block of white polymer clay and condition it in your hands until it becomes soft and pliable. This ensures there are no cracks later. -
Form the sphere:
Roll the conditioned clay into a smooth ball. I like to aim for a size slightly larger than a marble, about 1 inch in diameter. -
Attach to the pencil:
Take your wooden pencil and gently press the blunt end into the bottom of the clay sphere. Push it in about halfway to ensure a secure fit, then gently reshape the clay around the wood so it sits flush. -
Flatten the base:
Carefully press the bottom edge of the clay against the pencil shaft to create a neat transition. The goal is a slightly flattened bottom on the sphere rather than a perfectly round one.
Clean Connection
Add a drop of liquid clay or strong glue to the pencil tip before pushing it into the clay ball. This ensures the topper won’t wiggle loose after baking.
Step 2: Adding Details
-
Create the top knot:
Take a tiny pinch of pink clay—no bigger than a peppercorn—and roll it into a small ball. -
Secure the decorative top:
Place this tiny pink ball directly on the very top center of the white head. Press down gently to adhere it without squashing its shape. -
Check the silhouette:
Rotate the pencil to ensure the head is symmetrical and the top knot is centered. Smooth out any fingerprints with a light touch. -
Bake or dry:
If using polymer clay, bake the pencil with the topper attached according to the manufacturer’s instructions. Note: wooden pencils are generally safe to bake at low temperatures, but keep the heat low (around 265°F/130°C). If using air-dry clay, let it sit for 24 hours.
Step 3: Painting the Face
-
Prepare the surface:
Once the clay is completely cool or dry, ensure the surface is clean. If you didn’t use pink clay for the top knot, paint it pink now. -
Paint the eyes:
Using a fine detail brush or a larger dotting tool, dip into black acrylic paint. Create two small, solid black circles for the eyes, spacing them comfortably apart. -
Add the smile:
With the finest brush tip or a toothpick, draw a tiny, shallow ‘U’ shape between the eyes for a gentle smile. -
Create the cheeks:
Dip a small dotting tool or the wooden end of a brush into soft pink paint. Stamp a small dot just below and to the outside of each eye to give it a rosy blush. -
Add highlights:
Once the black eye paint is dry, use a toothpick with a speck of white paint to add a tiny ‘glint’ or reflection in the upper right corner of each eye. -
Seal the deal:
For longevity, brush a coat of matte or gloss varnish over the clay parts only. This protects the paint from rubbing off during use.
Make It a Set
Create a whole family of pencil toppers by varying the top knot colors or adding tiny clay ears to make bears, cats, or bunnies.
Your new cheerful pencil friend is ready to assist with all your writing tasks
Tiny Magnet Set With Matching Expressions
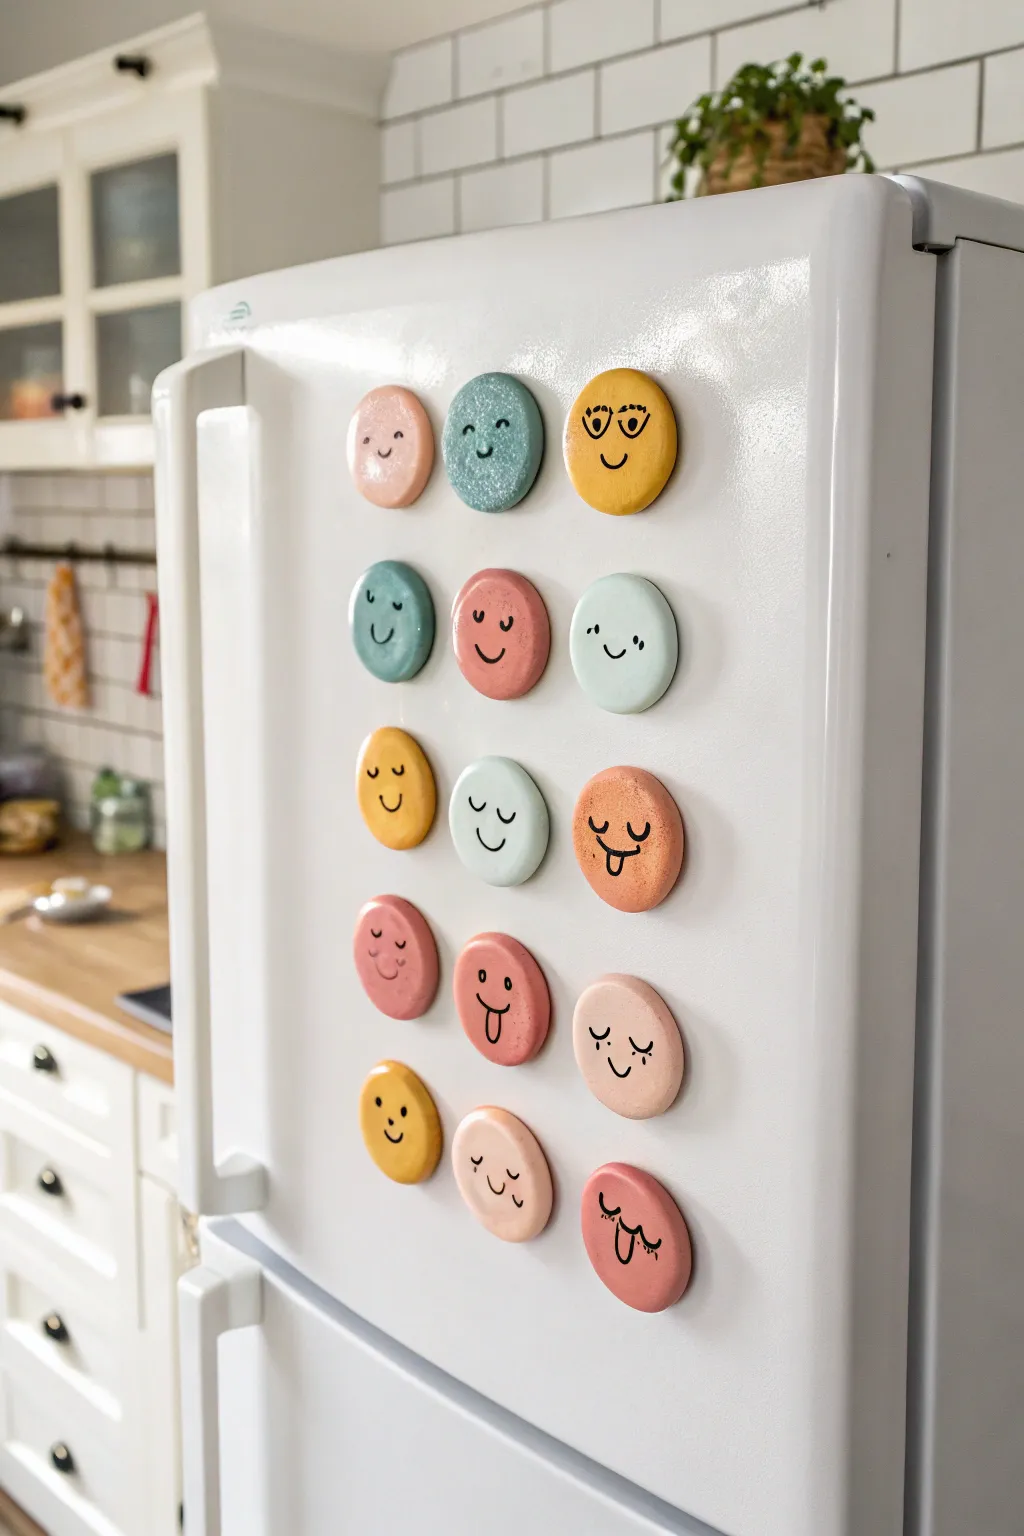
Brighten up your kitchen with these charming, hand-sculpted magnets featuring a variety of quirky expressions. The soft, muted color palette and simple line art give them a modern, playful feel perfect for holding up your favorite photos.
Step-by-Step Tutorial
Materials
- Air-dry clay (white)
- Acrylic paints (muted pink, teal, mustard yellow, coral, sage green)
- Fine-grit sandpaper
- Rolling pin
- Small round cookie cutter (approx. 1.5 inch diameter)
- Fine-point black permanent marker or black acrylic paint pen
- Small round magnets
- Strong craft glue (E6000 or similar)
- Matte spray varnish or sealant
- Paintbrushes
- Bowl of water
Step 1: Sculpting the Base
-
Condition the clay:
Start by taking a chunk of air-dry clay and kneading it in your hands until it plays soft and pliable. This warmth helps prevent cracks later on. -
Roll out the slab:
Using a rolling pin, flatten the clay on a smooth work surface to a consistent thickness of about 1/4 inch. You want them substantial enough to hold the magnet but not too heavy. -
Cut the shapes:
Press your round cookie cutter firmly into the clay to create uniform circles. Create about 15 circles to replicate the full set shown. -
Smooth the edges:
Dip your finger in a little water and gently run it along the cut edges of each circle to smooth out any roughness or sharp corners left by the cutter. -
Flatten slightly:
Gently press the center of each circle with your palm just once to give it a slightly organic, handmade feel rather than a perfect factory-made disc. -
Dry completely:
Lay the clay circles on a flat surface lined with parchment paper. Let them dry for 24-48 hours, flipping them halfway through to ensure even drying on both sides.
Cracked Clay?
If small cracks appear as the clay dries, don’t panic. Mix a tiny bit of fresh clay with water to make a paste and fill the cracks, then sand smooth once dry.
Step 2: Adding Color & Character
-
Sand for perfection:
Once fully dry, take a piece of fine-grit sandpaper and lightly buff the surface and edges. This creates a professional, smooth canvas for your paint. -
Base coat application:
Mix your acrylic paints to achieve soft, muted tones. I like to add a tiny drop of white to bright colors to create that pastel matte look. -
Painting the faces:
Paint the front and sides of each circle. You’ll need about 2-3 coats for solid coverage, letting each layer dry for 15 minutes in between. -
Practice expressions:
While the final coat of paint dries, sketch out some simple faces on a piece of paper. Test out winking eyes, sticking-out tongues, and side-smirks. -
Draw the details:
Using a fine-point black paint pen or permanent marker, carefully draw the faces onto the dried painted clay. Use light pressure to keep lines crisp. -
Seal the artwork:
Take the magnets outside or to a well-ventilated area and spray them with a matte varnish. This protects the paint from chipping and keeps the marker from fading.
Step 3: Final Assembly
-
Attach the magnets:
Flip the clay circles over. Place a pea-sized dot of strong craft glue in the center of the back of each piece. -
Press and hold:
Press a round magnet firmly into the glue. Hold it for 10-15 seconds to ensure an initial bond is formed. -
Cure time:
Allow the glue to cure fully according to the package instructions (usually overnight) before sticking them to your fridge.
Level Up: 3D Texture
Before the clay dries, gently press small stamps or texture tools into the surface for a tactile finish, or add tiny clay noses for a 3D relief effect.
Now your fridge is ready to greet you with a whole range of cheerful emotions every time you reach for a snack
Incense Holder With a Wavy, Sculptural Base
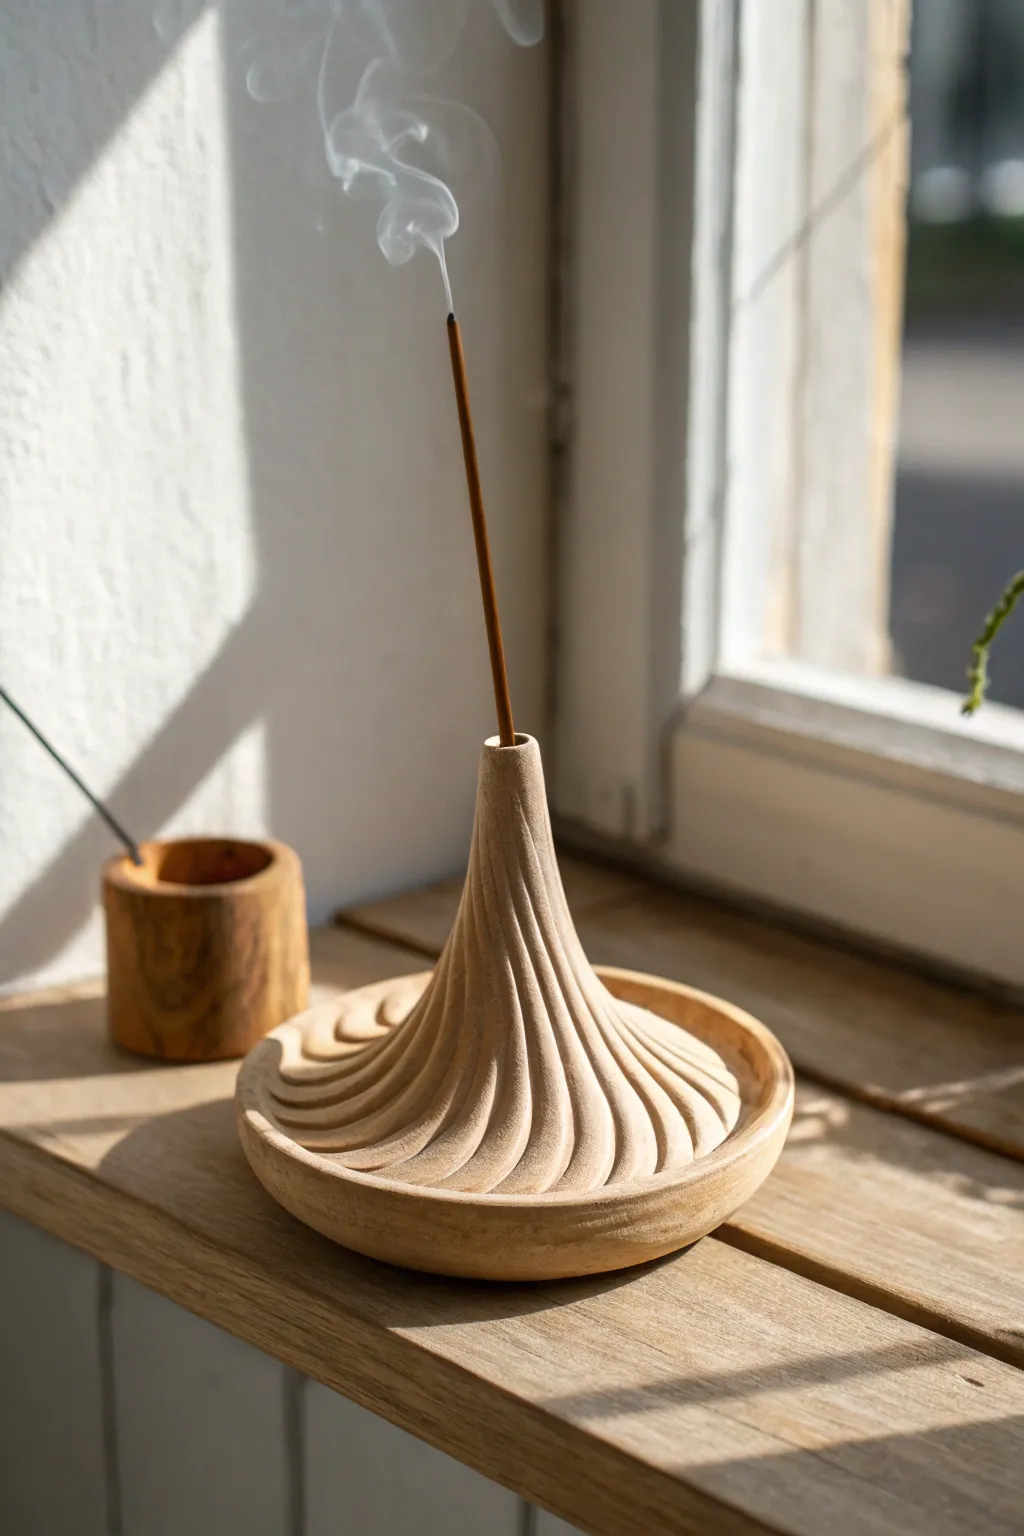
This elegant incense holder features a distinctive swirling design that mimics the curves of flowing water or a nautilus shell. Its sculptural form serves a functional purpose by catching falling ash in the wide basin while the central neck supports the stick.
Step-by-Step Guide
Materials
- Air-dry clay or polymer clay (terracotta or wood-tone preferred)
- Pottery carving tools (specifically a ribbon tool and needle tool)
- Rolling pin
- Small sponge
- Water in a small dish
- Sandpaper (fine grit)
- Clay adhesive or heavy slip
- Incense stick (for sizing)
Step 1: Forming the Base Dish
-
Prepare the clay:
Begin by conditioning your clay until it is soft and malleable. If you are using air-dry clay, ensure you wedge it well to remove air bubbles. -
Roll the slab:
Roll out a slab of clay to approximately 1/4 inch thickness. Use a guide or spacers to keep it even if you have them. -
Cut the circle:
Use a round cookie cutter or trace a bowl rim (about 4-5 inches wide) with a needle tool to cut a perfect circle from the slab. -
Curve the rim:
Gently gently pinch and lift the edges of the circle upwards to create a shallow lip. Smooth the rim with a damp finger or sponge to ensure it’s nice and rounded.
Keep it clean
Keep a barely damp sponge handy while carving. Wiping the tool tip after every few strokes prevents clay buildup and keeps your spiral lines crisp.
Step 2: Sculpting the Spiral Core
-
Create a cone:
Take a separate lump of clay and roll it into a thick cone shape. The base should be wide enough to sit stably in the center of your dish, tapering to a narrower point at the top. -
Attach the cone:
Score the center of your dish and the bottom of the cone. Apply slip or clay adhesive, press the cone firmly into place, and blend the clay at the seam so it looks like one continuous piece. -
Refine the shape:
Smooth the transition curve between the dish and the cone. You want a seamless slope, like a volcano rising from the flat base. -
Size the hole:
Using the blunt end of an incense stick or a needle tool, poke a vertical hole straight down into the tip of the cone. Wiggle it slightly to ensure the incense will fit loosely enough to slide in.
Terrazzo Twist
Knead tiny contrasting bits of dried clay into your wet clay before sculpting to create a faux-stone or terrazzo effect once sanded.
Step 3: Carving the Texture
-
Mark sketch lines:
Before carving deep, lightly drag a needle tool from the tip of the cone down to the edge of the dish in a spiraling, S-curve motion. Repeat this around the entire form to plan your ridges. -
Carve the first channel:
Using a ribbon tool or looped sculpting tool, follow your guide lines and carve out clay between the planned ridges. Start shallow. -
Deepen the spirals:
Go back over your channels, carving deeper to accentuate the high ridges. I find it helps to rotate the piece on a lazy susan or piece of paper while carving to keep the flow consistent. -
Smooth the ridges:
The carving will leave rough edges. Dip your finger or a small brush in water and gently rub the high points of the ridges to round them off. -
Refine the valleys:
Use a damp sponge to clean up the carved valleys, removing any clay crumbs or sharp burrs.
Step 4: Finishing Touches
-
Dry partially:
Let the piece dry until it is leather-hard. This makes the final smoothing easier without warping the shape. -
Check the fit:
Gently test your hole size again with an incense stick to ensure the clay hasn’t shrunk too tight during the initial drying. -
Final dry:
Allow the piece to dry completely according to your clay manufacturer’s instructions (usually 24-48 hours for air-dry). -
Sand it down:
Once fully cured, use fine-grit sandpaper to buff the surface. This mimics the smooth, sanded wood look in the inspiration photo. -
Seal (Optional):
If desired, apply a matte varnish to protect the clay from ash stains, or leave it raw for a more earthy texture.
Place on a sunny windowsill and watch the smoke dance around your new sculpture.
Mini Nature Scene Inside a Little Bowl
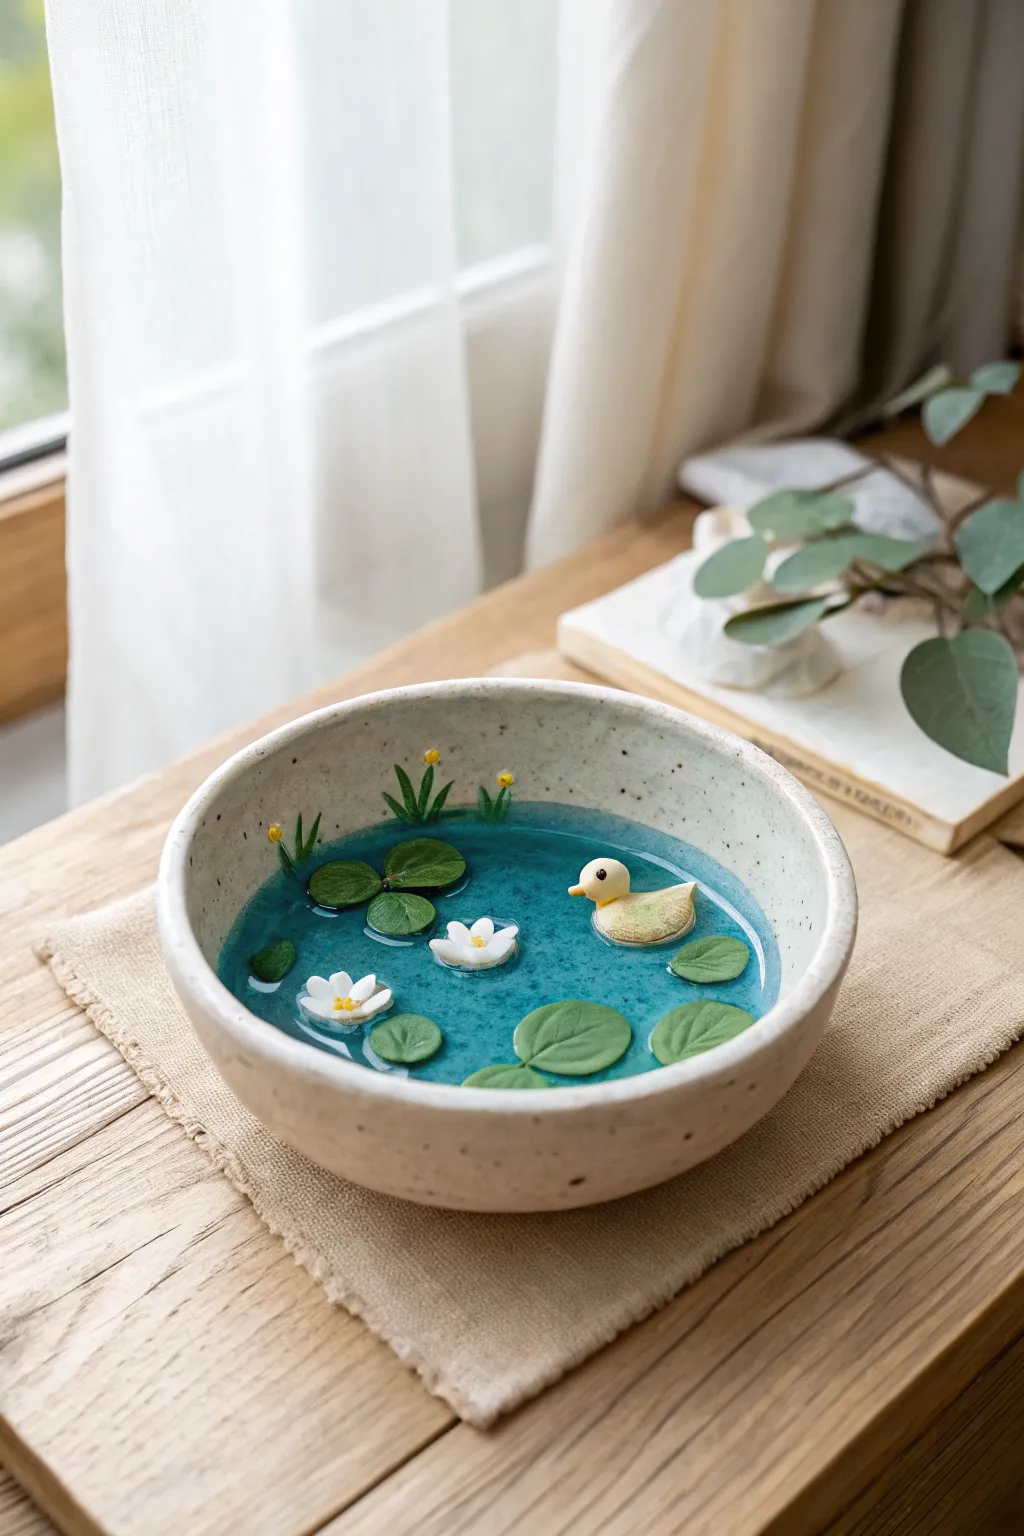
Create your own pocket-sized sanctuary with this calming resin and clay project. By layering translucent blue resin with delicately sculpted lily pads and a friendly duck, you’ll craft a permanent, peaceful water scene right inside a ceramic vessel.
Detailed Instructions
Materials
- Small ceramic bowl (shallow, light speckled style)
- Polymer clay (white, yellow, green, brown/black)
- Epoxy resin or UV resin
- Blue alcohol ink or resin dye (transparent)
- Small dotting tool or toothpick
- X-acto knife or clay blade
- UV lamp (if using UV resin)
- Gloss glaze (for the clay figures)
- Mixing cups and stir sticks
Step 1: Sculpting the Residents
-
Shape the duck’s body:
Start with a small ball of white clay, lightly tinted yellow if you prefer a realistic look. Form it into a teardrop shape for the body. -
Add the head:
Roll a smaller ball for the head and gently press it onto the rounded end of the teardrop. Smooth the seam with a silicone tool or your finger. -
Detail the beak and eyes:
Attach a tiny cone of yellowish-orange clay for the beak. Use a needle tool or toothpick to indent small holes for eyes, then fill them with microscopic bits of black clay. -
Create the wing texture:
Take a flat oval of clay for the wing and press it onto the side of the body. Use a blade to gently score feather lines for texture. -
Make the lily pads:
Roll out green clay into a thin sheet. Use a small circle cutter or your blade to cut varying sizes of circles. Cut a small ‘V’ wedge out of each circle to create the classic lily pad shape. -
Sculpt the flowers:
Create tiny water lilies by flattening minuscule white teardrops and arranging them in a star shape. Add a tiny yellow center using a textured dot of clay. -
Form the reeds:
Roll very thin snakes of green clay. Cut them into short lengths (about 1-2 cm). Add tiny yellow dots to the tips of a few stalks to mimic flowering wetland grass. -
Bake the clay pieces:
Arrange all your clay components on a baking tile. Bake according to your brand’s instructions (usually 275°F/135°C for 15-30 minutes). Let them cool completely.
Step 2: Setting the Scene
-
Clean the bowl:
Ensure your ceramic bowl is completely clean and dry. Any dust will be permanently trapped in the resin. -
Secure the reeds:
Use a tiny dab of superglue or a drop of UV resin to fix the green reed stalks against the inner wall of the bowl, making them look like they are growing out of the water line. -
Mix the water:
Mix your two-part epoxy resin or prepare your UV resin. Add a SINGLE drop of blue alcohol ink. You want a very pale, transparent teal color so the bottom of the bowl is still visible. -
First pour:
Pour a thin base layer of resin into the bowl, filling it about halfway to your desired depth. Pop any bubbles with a lighter or heat gun. -
Initial cure:
If using UV resin, cure this layer under the lamp. If using epoxy, let it set until it reaches a thick, gel-like consistency (usually 3-4 hours). -
Place the floating elements:
Once the base layer is tacky or cured, carefully arrange your lily pads and the duck on the surface. This prevents them from sinking to the bottom. -
Final pour:
Mix a fresh batch of clear resin (no dye this time, or very little). Pour it carefully around the objects until the water level reaches the sides of the duck and the top of the pads. -
Surface tension:
Be careful not to pour over the duck’s back. I like to use a toothpick to drag the resin right up to the edges of the clay so it bonds without submerging the figures. -
Final cure:
Allow the project to cure completely in a dust-free area for 24 hours (for epoxy) or under the lamp (for UV resin).
Cloudy Resin?
If your resin looks milky, it might be due to moisture or humidity. Work in a dry room. Also, if using UV resin, ensure thin layers so the UV light can penetrate fully.
Ripple Effect
As the final resin layer cures and gets thick, use a toothpick to swirl gentle ripples around the duck’s base. This creates a realistic movement effect.
Place your little pond near a sunny window and enjoy the play of light through the water
Seasonal Mini Ornaments You Can Batch Make
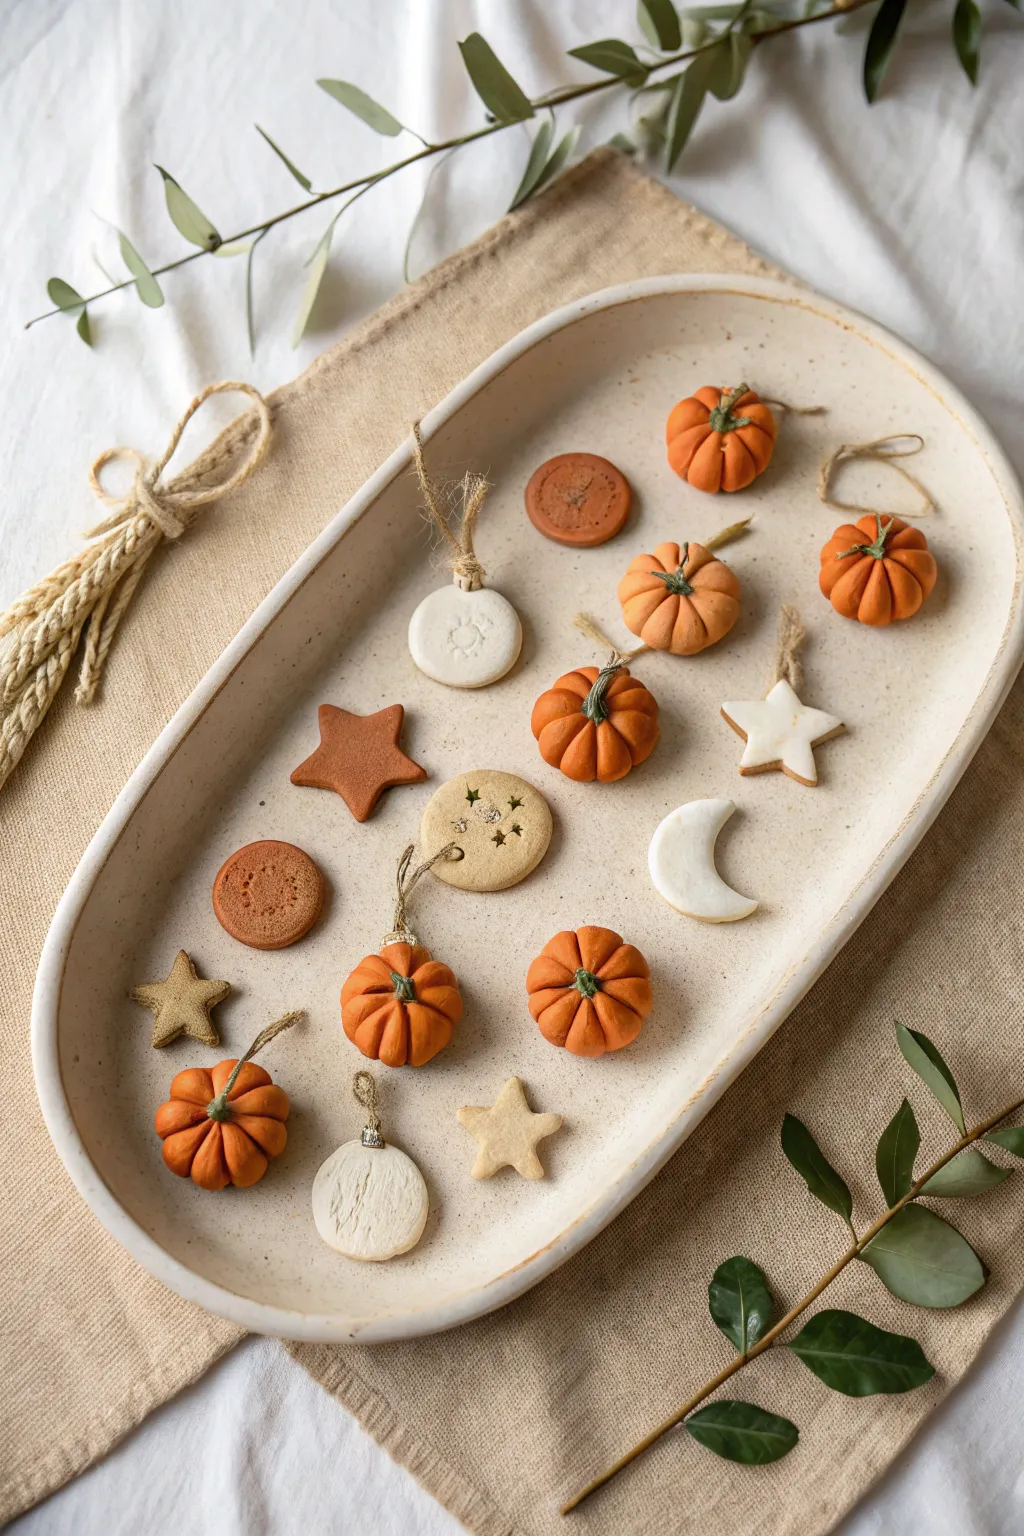
Celebrate the changing seasons by crafting a collection of delicate clay ornaments in cozy autumn shapes. These miniature pumpkins, stars, and moons combine earthy terracotta tones with creamy white accents for a charming, rustic display.
How-To Guide
Materials
- Air-dry clay (white and terracotta/orange colored)
- Acrylic paint (orange, sage green, cream, metallic gold)
- Small rolling pin
- Pointed sculpting tool or toothpick
- Small cookie cutters (star, circle, moon)
- Jute twine or hemp cord
- Paintbrushes (fine detail)
- Gloss or matte varnish (optional)
- Sandpaper (fine grit)
Step 1: Sculpting the Pumpkins
-
Create the base:
Roll small balls of terracotta-colored clay, each about the size of a large marble or walnut. Vary the sizes slightly for a natural look. -
Form the ridges:
Using a sculpting tool or the side of a toothpick, press vertical indents around the outside of the ball, moving from the top center to the bottom center, creating the pumpkin’s segments. -
Flatten and shape:
Gently press down on the top and bottom of each pumpkin to maintain that squat, organic pumpkin shape rather than a perfect sphere. -
Insert the stem:
For the pumpkins that will hang, create a small hole in the center top. You can either mold a tiny stem from green clay and attach it now, or insert a small loop of twine directly into the wet clay.
Step 2: Crafting Cut-Out Shapes
-
Roll the clay:
Take your white clay and roll it out into an even slab, approximately 1/4 inch thick. I find using guides on either side of the rolling pin helps keep the thickness consistent. -
Cut the shapes:
Use your mini cookie cutters to punch out stars, crescent moons, and circles. If you have terracotta clay left, you can cut some stars from that as well for color variety. -
Add texture:
Before the clay dries, press a stamp or texture tool into some of the circles or moons to add interest. For the circle ornaments shown, you can poke small star patterns or use a stamp. -
Create hanging holes:
Use a toothpick to carefully poke a hole near the top of each flat ornament. Ensure the hole is wide enough for your twine to pass through later. -
Dry the batch:
Arrange all your pieces on a flat surface lined with parchment paper. Let them dry completely for 24-48 hours, flipping them halfway through to prevent curling.
Cracks when drying?
If you see small cracks forming as the pumpkins dry, mix a tiny bit of clay with water to make a paste perfectly suited to smooth over and fill the gaps.
Step 3: Painting and Finishing
-
Refine the edges:
Once fully dry, gently sand any rough edges on the cut-out shapes with fine-grit sandpaper for a polished look. -
Enhance the pumpkins:
If you used uncolored clay, paint the pumpkins with orange acrylics. For pre-colored clay, you can dry brush a slightly lighter orange on the ridges to highlight the texture. -
Paint the stems:
Paint the sculpted stems a muted sage green. Be careful not to get green paint on the pumpkin body. -
Glaze the white ornaments:
For the white stars and moons, you can leave them raw for a matte finish or add a sheer pearlescent glaze. -
Attach the twine:
Cut short lengths of hemp or jute twine. Thread them through the holes of the flat ornaments and tie a secure knot to create a loop. -
Stem wrapping detail:
For a rustic touch on the pumpkins, wrap a tiny bit of twine around the base of the painted stem and glue it in place.
Pro Tip: Scented Clay
Add a drop of cinnamon or clove essential oil into the clay while kneading during the first step to give your ornaments a subtle autumnal fragrance.
Arrange your finished miniatures on a tray or string them up on a branch for a lovely seasonal touch
A Collector-Style Tray of Tiny Minis in One Theme
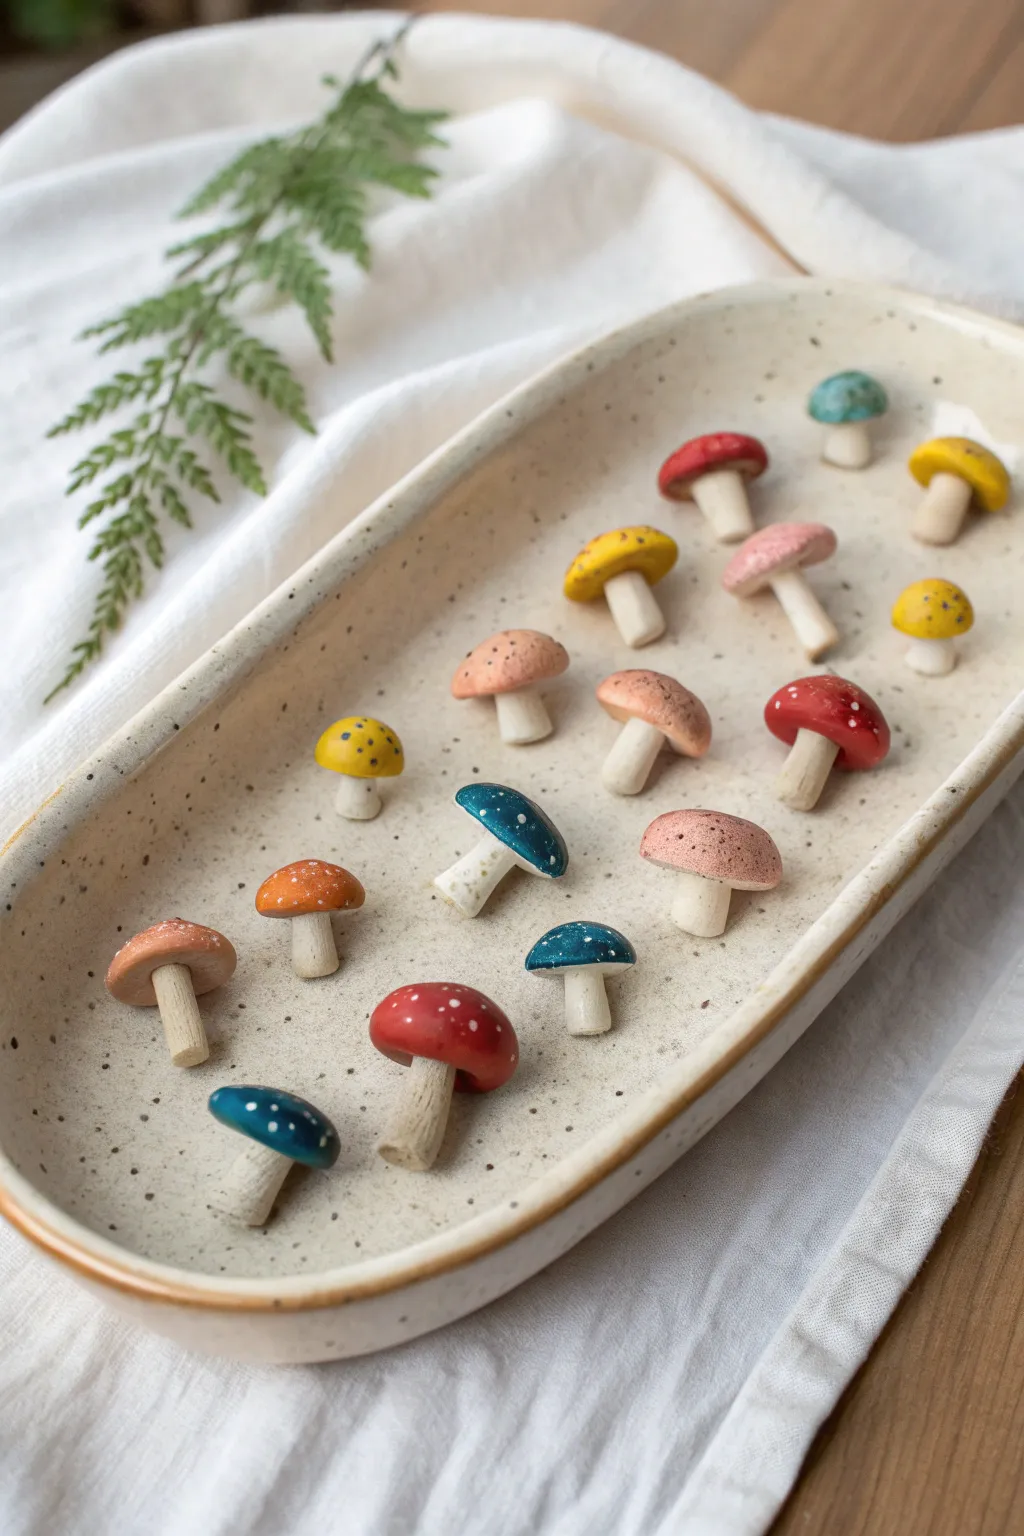
Create a delightful forest foraging scene with these charming, tiny clay mushrooms displayed on a custom speckled tray. Each miniature fungus features unique caps and stems, making them perfect for practicing precision sculpting and detailed painting.
Step-by-Step Tutorial
Materials
- Polymer clay (white, beige, or translucent)
- Air-dry clay (for the tray, optional)
- Acrylic paints (red, yellow, orange, blue, pink, brown, white)
- Fine-grit sandpaper
- Small rolling pin
- Modeling tools (dotting tool, needle tool)
- Small paintbrush (size 0 or 00)
- Matte or satin varnish
- Toothbrush (for speckling)
- Baking sheet and parchment paper
- Craft glue (optional)
Step 1: Sculpting the Tray
-
Base Preparation:
Begin by conditioning a large ball of white or beige clay until it’s pliable. Roll it out into an oval slab approximately 1/4 inch thick. -
Forming the Lip:
Gently lift the edges of the oval slab upwards to create a shallow rim. Smooth the transition between the base and the wall using your thumb or a modeling tool to ensure a seamless curve. -
Adding Texture:
To mimic the speckled stoneware look, you can mix in tiny bits of black pepper or dried coffee grounds into the clay before rolling, or simply splatter paint it later. Smooth the surface with a little water or baby oil to remove fingerprints.
Uneven Standing?
If mushrooms won’t stand upright, gently sand the bottom of the baked stems against fine-grit sandpaper until they are perfectly flat.
Step 2: Creating the Mushrooms
-
Stem Preparation:
Roll thin snakes of beige or off-white clay. Cut them into small segments varying from 1/4 inch to 1/2 inch long. -
Shaping Stems:
Roll each segment slightly between your fingers to round the edges. Some can be straight, while others can be slightly curved or thicker at the base for variety. -
Forming Caps:
Roll tiny balls of clay for the caps. Flatten them slightly to create different shapes: domes, flat tops, or slightly upturned edges like the yellow and blue ones in the image. -
Attaching Parts:
Press the stems gently into the undersides of the caps. If using polymer clay, blend the clay slightly at the connection point or use a dab of liquid clay for a secure bond. -
Baking or Curing:
Arrange the tray and all mushroom pieces on a parchment-lined baking sheet. Bake according to your specific clay manufacturer’s instructions—usually around 275°F (135°C) for 15-30 minutes.
Step 3: Painting and Finishing
-
Base Coating:
Once cooled, paint the mushroom caps in a variety of earthy and bright tones. Use watered-down acrylics for a stained look or full-strength paint for opaque coverage. -
Adding Details:
Use a very fine brush or a toothpick to add tiny white dots to the red and blue mushrooms. For the yellow and orange caps, create subtle speckles with a slightly darker shade of the base color. -
Tray Speckling:
Dilute brown or black acrylic paint with water. Dip an old toothbrush into the mixture and flick the bristles with your thumb to spray fine speckles across the tray’s surface. -
Final Assembly:
I like to arrange the mushrooms loosely on the tray first to find the best layout. Once happy, use a tiny dot of strong craft glue on the base of each stem to fix them permanently to the tray. -
Sealing:
Finish the entire piece with a coat of matte varnish to protect the paint and give it a realistic ceramic feel.
Realistic Texture
Before baking, gently press a piece of coarse fabric or sandpaper against the mushroom caps to give them an organic, non-plastic texture.
Now you have a charming collection of fungi that captures the beauty of a woodland walk on a shelf