A plain terracotta pot is basically a blank canvas, and I never get tired of watching it turn into something with real personality. Here are my favorite clay pot ideas—starting with the classics you’ll want to make on repeat, then sliding into the weirder, more “how is that even a pot?” territory.
Classic Color-Blocked Painted Clay Pots
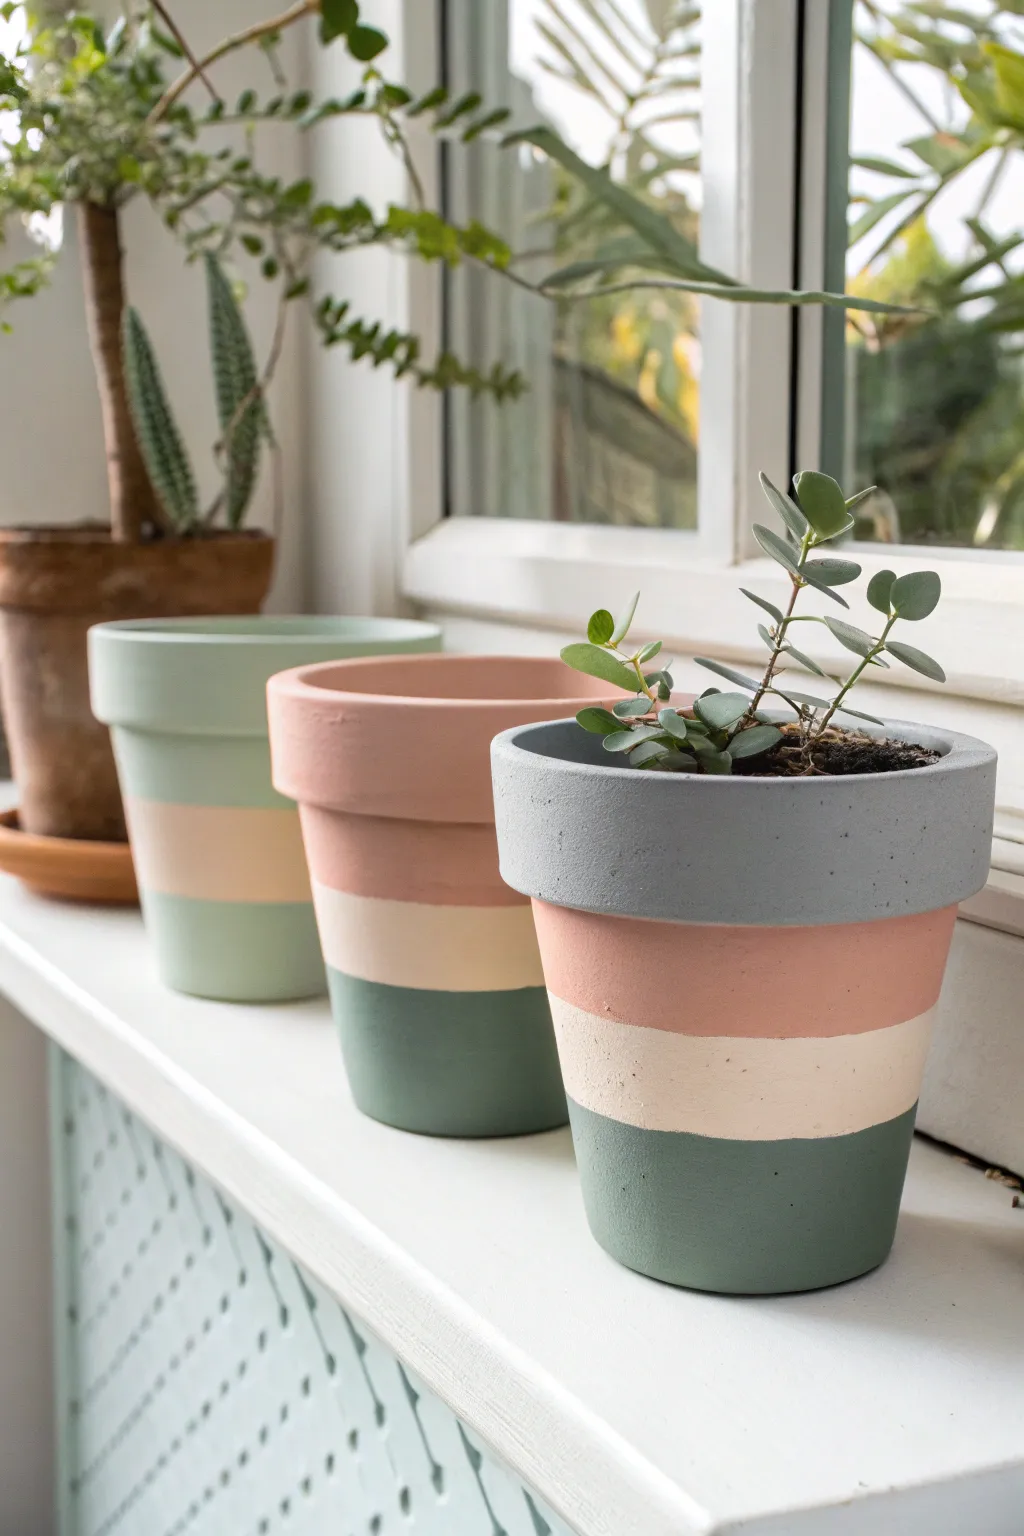
Transform standard terracotta into modern decor pieces with this soothing, Nordic-inspired color blocking technique. The matte finish and soft palette of sage, salmon, cream, and grey create a cohesive trio that looks effortlessly stylish on any windowsill.
Step-by-Step Guide
Materials
- 3 standard terracotta pots (various sizes)
- Acrylic craft paints (matte finish): Sage Green, Salmon Pink, Cream/Off-White, Cool Grey, Mint Green
- Painter’s tape (various widths)
- Flat paintbrushes (medium and large)
- Small detail brush
- Pencil
- Ruler or measuring tape
- Water cup and paper towels
- Clear matte sealer spray (optional)
Step 1: Preparation and Base Coat
-
Clean surface:
Begin by wiping down your terracotta pots with a damp cloth to remove any dust or debris. Let them dry completely, as moisture can prevent the paint from adhering properly. -
Seal the inside (optional):
If you plan to plant directly into the pots, consider painting the inside with a waterproof sealer or a coat of acrylic paint to prevent water from seeping through and bubbling your exterior design later. -
Base coat application:
Paint the entire exterior of each pot with a coat of white or cream paint. This acts as a primer, ensuring your final pastel colors pop and don’t get muddied by the orange terracotta undertone. -
Dry time:
Allow the base coat to dry fully. I usually give this about 30 minutes to an hour to ensure a solid foundation.
Bleeding Lines?
If paint bleeds under your tape, let it dry completely. Then, use a stiff brush dipped in the background color to gently paint over the bleed for a sharp fix.
Step 2: Designing the Pot in the Foreground
-
Marking the sections:
For the front pot, use a pencil and ruler to lightly mark three horizontal sections below the rim. The rim itself will be one color, followed by a top band, a middle stripe, and a bottom section. -
Painting the rim:
Paint the thick rim of the pot with the Cool Grey acrylic paint. Use a flat brush to get a smooth, even finish, carefully cutting in along the bottom edge where the rim meets the body. -
Painting the top band:
Apply the Salmon Pink paint to the section directly beneath the grey rim. You can freehand this line if you have a steady hand, or wait for the grey to dry and use tape. -
Painting the bottom:
Paint the bottom third of the pot with the Sage Green paint. Leave a gap in the middle for the cream stripe. -
Adding the cream stripe:
Once the pink and green sections are dry to the touch, fill in the middle stripe with Cream paint. You may need two coats here to get full coverage over the base.
Step 3: Creating the Middle and Background Pots
-
Middle pot layout:
For the second pot, the design varies slightly. Paint the entire rim and top half of the body in the Salmon Pink shade. -
Middle pot stripes:
Below the pink section, paint a Cream stripe similar in width to the first pot. -
Middle pot base:
Finish the bottom section of this pot with the Sage Green paint, creating a visual link to the first pot. -
Background pot layout:
For the third pot in the back, start by painting the rim and the top body section with Mint Green. -
Background pot accent:
Add a Salmon Pink stripe below the mint section. This ties the color palette together across all three vessels. -
Background pot base:
Complete the third pot by painting the bottom section with Mint Green again, sandwiching the pink stripe.
Make It Texture
Mix a teaspoon of baking soda into your acrylic paint before applying. This creates a trendy, gritty ceramic texture that looks like expensive stoneware.
Step 4: Finishing Touches
-
Clean up lines:
Inspect your stripes. If any lines look shaky, use a small detail brush with the appropriate color to touch up edges and create crisp boundaries between hues. -
Rim interior:
Paint the inner top inch of the pots (inside the rim) with the same color as the exterior rim. This gives a professional look when the pot is filled with soil. -
Final drying:
Let all pots dry overnight to ensure the paint cures and hardens completely. -
Sealing:
Spray the exterior of the pots with a clear matte sealer. This protects the paint from scratches and water damage without adding unwanted shine.
Now you have a stunning set of custom planters ready to house your favorite succulents or herbs


Simple Stenciled Patterns on Terracotta
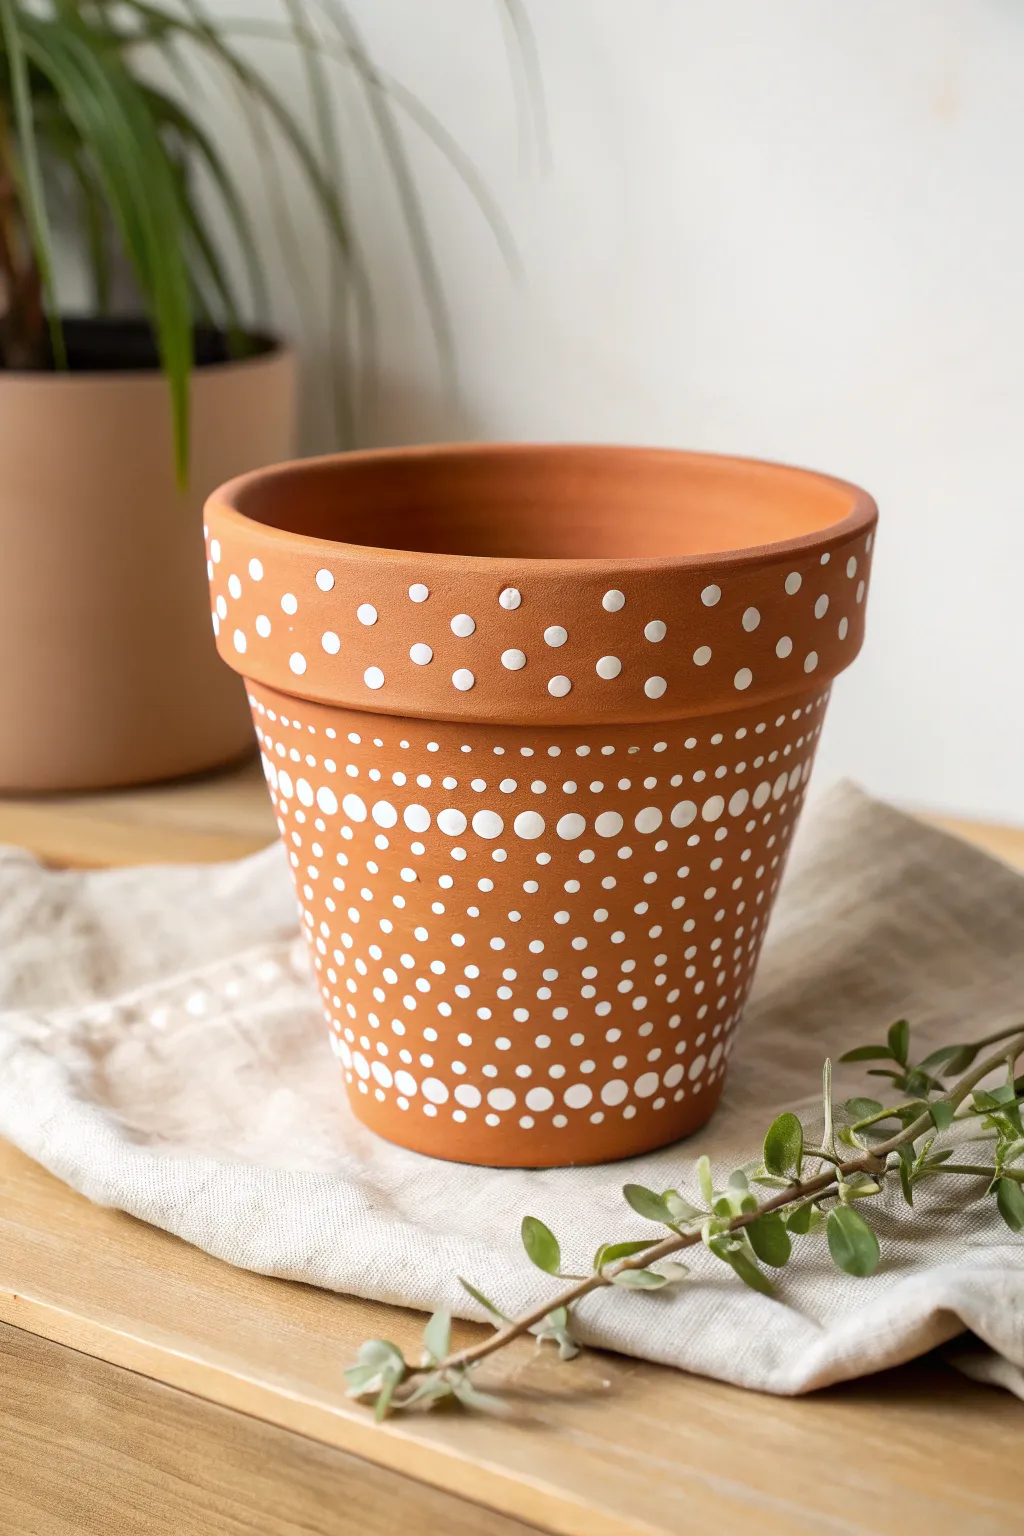
Transform a plain clay pot into a charming bohemian accent piece with nothing but white paint and a few simple tools. The rhythmic pattern of dots creates a lovely texture that feels both modern and handmade.
Step-by-Step
Materials
- Standard terracotta pot (cleaned and dried)
- White acrylic craft paint (outdoor formula recommended)
- Dotting tools (various sizes) or household substitutes like pencil erasers and brush handles
- Paper plate or palette
- Damp paper towel
- Clear matte sealer spray (optional)
Step 1: Preparing the Canvas
-
Clean surface:
Ensure your terracotta pot is completely free of dust and stickers. Wipe it down with a damp cloth and let it dry fully before starting. -
Set up paint:
Squeeze a generous dollop of white acrylic paint onto your paper plate. You want a creamy consistency that isn’t too runny so the dots hold their shape. -
Test your tools:
Before touching the pot, practice making dots on a scrap piece of paper. Experiment with different tools—like the flat end of a pencil eraser for large dots or a toothpick for tiny ones—to see what sizes they create.
Step 2: Designing the Rim
-
Start the top row:
Begin on the rim of the pot. Using a medium-sized dotting tool, place your first dot near the upper edge. -
Space the top dots:
Continue placing medium dots around the upper circumference of the rim, spacing them about a half-inch apart. Try to keep them level. -
Add lower rim dots:
Now, create a second row of dots on the lower part of the rim. Position these dots directly below the spaces of the first row to create a staggered, zigzag effect. -
Fill the gaps:
Switch to a slightly smaller tool. Place a smaller dot in the triangular space between three of the larger rim dots to add density to the pattern.
Paint Consistency Hack
If your paint leaves pointy peaks on the dots, it’s too thick. Mix in a single drop of water or pouring medium to help the dots settle into perfect circles.
Step 3: Creating the Body Pattern
-
Define the neckline:
Move to the main body of the pot just under the rim. Use a small tool to create a dense, straight horizontal line of small dots wrapping all the way around. -
Start the swoops:
Below this ‘neckline’, you will create a draped or scalloped pattern. Start by placing a large dot about two inches down from the neckline. -
Build the curve:
Working outward and upward from that central large dot, place slightly smaller dots in a curved line that reaches back up toward the neckline row. -
Complete the V-shape:
Repeat the curve on the other side of the large dot, creating a ‘V’ or ‘U’ shape similar to a necklace drape. -
Repeat around the pot:
Create these draped sections all around the circumference of the pot. Don’t worry if they aren’t perfectly identical; the variation adds charm. -
Fill the interiors:
Inside each ‘drape’ shape you just created, add another row of dots following the same curve but using a tool one size smaller. -
Continue filling:
Keep adding concentric curved rows inside the shapes until the space is filled with a dense field of dots. I find it helpful to switch to smaller tools as the space gets tighter. -
Anchor the bottom:
Near the base of the pot where the curves meet, use your largest dotter to place bold accent dots for visual weight.
Make It Pop
Try painting the entire terracotta pot a dark color like navy, black, or forest green first. The white dots will stand out incredibly well against a dark base.
Step 4: Finishing Touches
-
Check for gaps:
Look over the entire pot. If you see empty spaces that look accidental, fill them with tiny ‘micro-dots’ using a toothpick. -
Dry properly:
Let the paint dry completely for at least 24 hours. Acrylic on terracotta can take a moment to set as the clay is porous. -
Seal the work:
If this pot will live outdoors or hold a real plant requiring water, spray it with a clear matte sealer to protect your beautiful dot work from moisture.
Now you have a custom planter ready to showcase your favorite greenery with style


Ombre Dip-Dyed Clay Pots
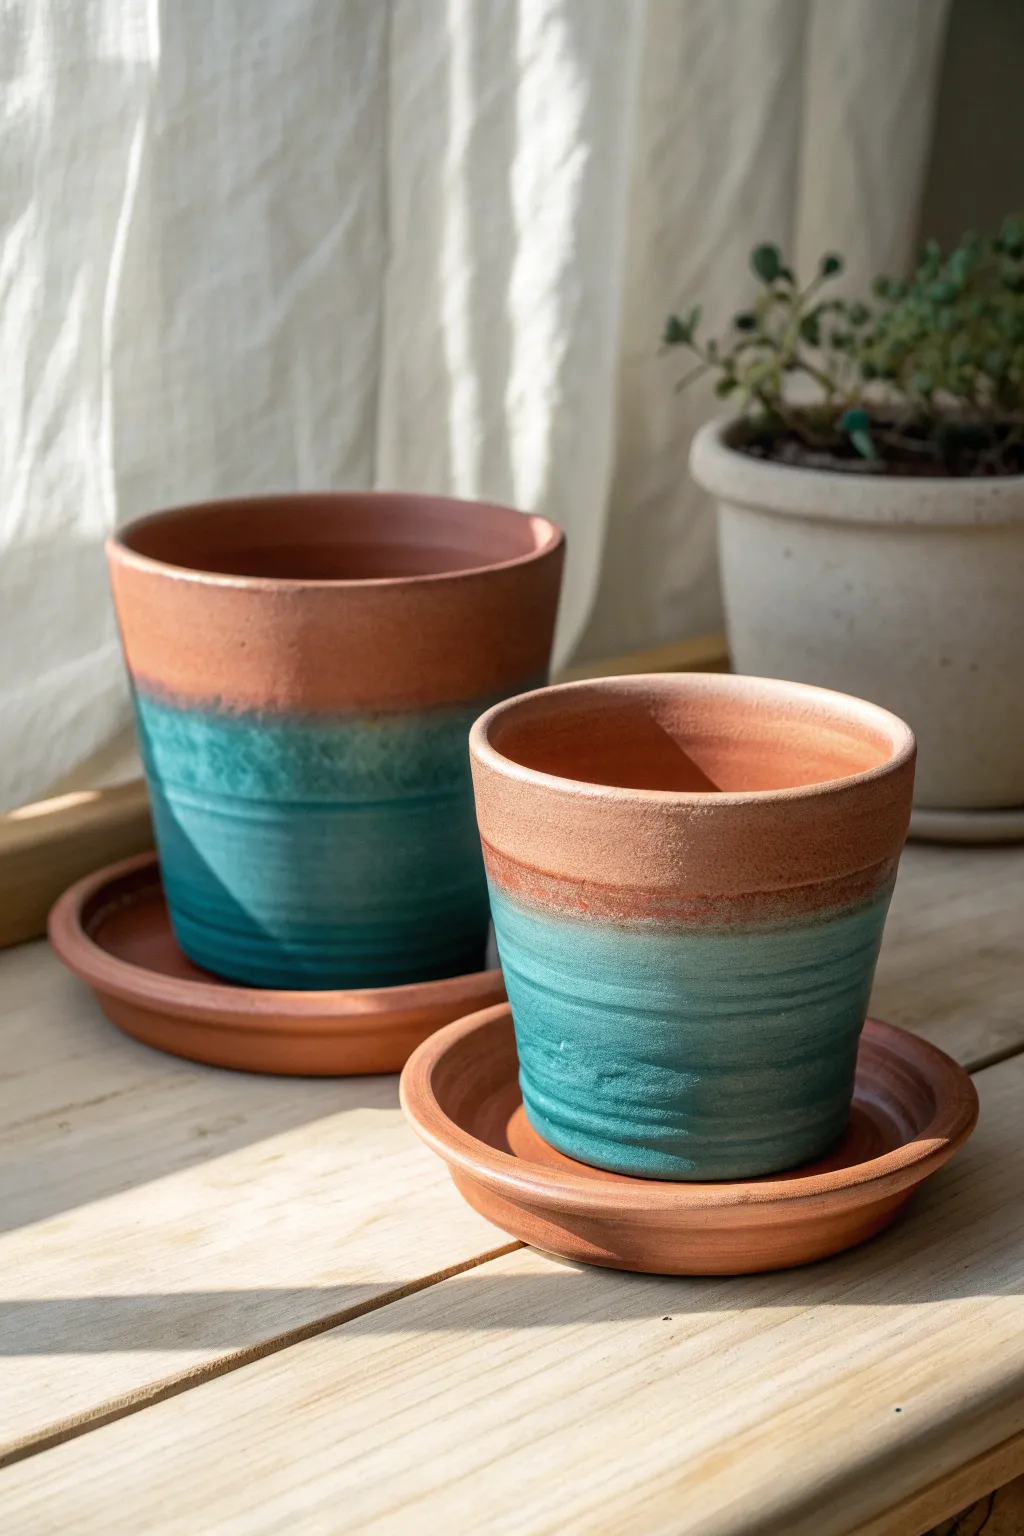
Transform standard terra cotta planters into coastal-inspired treasures with this simple dip-dyeing technique. The blend of raw clay and vibrant teal creates a beautiful, rustic ombre effect that mimics the horizon where the sea meets the sand.
Step-by-Step Tutorial
Materials
- Terra cotta pots with matching saucers
- Acrylic paint (teal or turquoise)
- Water
- Large plastic bucket or wide container (deep enough to submerge half the pot)
- Clean rag or sponge
- Clear matte spray sealer (optional)
- Stir stick
- Drop cloth or newspaper
Step 1: Preparation
-
Clean the surface:
Begin by wiping down your terra cotta pots with a damp rag. These pots often come with a fine layer of dust from the store, and removing this ensures the paint adheres properly to the clay pores. -
Soak the pots:
Submerge your pots in clear water for about 30 minutes before starting. Saturating the clay prevents it from sucking all the moisture out of your paint mixture too quickly, giving you more time to work with the ombre effect. -
Prepare your workspace:
Lay down a drop cloth or old newspaper on your work surface. This process can get a little drippy, so protecting your table is a good idea. -
Mix the dye bath:
In your large plastic container, combine your teal acrylic paint with water. I usually aim for a ratio of about 1 part paint to 3 parts water. You want a milky consistency that is pigmented but fluid.
Uneven Color Fix
If the paint looks patchy, your pot might have been too dry. Simply re-wet the clay and apply a second wash of your paint-water mixture to even it out.
Step 2: Creating the Dip-Dye Effect
-
The first dip:
Take your damp pot and hold it upside down. Slowly lower it into the paint mixture until about two-thirds of the pot is submerged. Hold it there steady for about 10 seconds to let the color soak in. -
Lift and check:
Smoothly lift the pot out of the water. You should see a soft wash of color. If it’s too faint, stir in a bit more paint to your mixture before proceeding. -
Deepen the gradient:
Dip the pot again, but this time stop slightly lower than your first dip line. This creates a layered effect where the color becomes more intense towards the bottom. -
Create the darkest section:
Repeat the process a third time, dipping only the bottom third of the pot (which is currently the top, since you are holding it upside down). Hold it here the longest, perhaps 20-30 seconds. -
Softening the edge:
While the paint is still wet, use a damp sponge to gently dab the top edge of the paint line where it meets the raw terra cotta. This helps blur any harsh lines for a softer, more natural transition. -
Address the saucer:
While the pot dries, repeat the dipping process with the saucer. You can dip the whole saucer for a solid color, or just dip one side for a matching asymmetric look.
Step 3: Finishing Touches
-
Let it dry completely:
Set the pots upside down on your protected surface to dry. Because the clay was soaked, this may take overnight. The color will lighten slightly as the moisture evaporates. -
Adding texture (optional):
If you want the weathered look seen in the photo, take a piece of fine-grit sandpaper and lightly scuff the painted area once it is fully dry. This reveals bits of the orange clay underneath. -
Seal the interior:
If you plan to plant directly in the pot, apply a sealer to the inside. This prevents water from constantly seeping through and bubbling your exterior paint job over time. -
Seal the exterior:
For longevity, spray the outside with a matte clear coat. This protects the finish without making it look glossy or plastic.
Metallic Accent
Once the ombre is dry, paint a thin gold or copper stripe right at the transition line where the teal meets the raw clay for a chic, modern touch.
Place your favorite succulents inside to complete this serene, beachy look


Hand-Drawn Mandala and Line Art Pots

Transform a standard terracotta vessel into a charming piece of home decor with nothing more than white paint and a steady hand. This project combines simple looping patterns with botanical doodles for a sweet, hand-drawn aesthetic that perfectly frames your succulents.
Detailed Instructions
Materials
- Clean terracotta pot (standard rimmed shape)
- White acrylic paint (matte finish)
- White oil-based paint marker (fine tip)
- White oil-based paint marker (medium tip, optional)
- Flat paintbrush (medium size)
- Pencil for sketching
- Paper, wet cloth, or eraser
- Clear matte sealer spray (optional)
Step 1: Base Preparation
-
Clean the Surface:
Begin by wiping down your terracotta pot with a damp cloth to remove any warehouse dust or oils. Let it dry completely so the paint adheres properly. -
Paint the Bottom White:
Using your flat paintbrush and white acrylic paint, cover the bottom third of the pot. Don’t worry about a perfectly straight horizon line yet; we will refine this later. -
Apply a Second Coat:
Terracotta is thirsty and absorbs paint quickly. Once the first layer is dry to the touch, apply a second coat of white to ensure a solid, opaque background. -
Paint the Rim (Optional):
If you want a cleaner look inside, paint just inside the top rim about an inch down, but keep the exterior rim natural terracotta for this specific design.
Pen Acting Up?
If the paint marker tip clogs on the raw clay, press it onto a piece of scrap cardboard to get the ink flowing again before returning to the pot.
Step 2: Designing the Rim
-
Sketch the Loops:
Lightly use a pencil to draw a continuous looping pattern around the center of the pot’s rim. The loops should look like a long, stretched cursive ‘e’ repeated. -
Trace with Paint Pen:
Using your fine-tip white paint marker, carefully trace over your pencil sketch. I find it helpful to rotate the pot slowly with my non-dominant hand while keeping the pen hand steady. -
Thicken the Line:
Go over the loop pattern a second time if the white line looks too faint against the dark clay.
Add Dimension
Mix a tiny drop of gold paint into the white acrylic for the bottom section to give the base a subtle shimmer that catches the sunlight.
Step 3: Botanical Details
-
Define the Horizon:
Where the white painted base meets the raw terracotta, use your paint pen to draw a solid line, creating a separation border. -
Add a Dashed Border:
Just above your solid horizon line, add a second line consisting of small dashes or dots to create visual interest. -
Draw Central Flowers:
On the white painted section, use the paint pen to draw a large, five-petaled flower. Since you are drawing white on white, outline the petals first, then use dots or shading to make them visible, or let the texture of the pen create a subtle relief effect. -
Draw Upper Stems:
Allow the flower stems to grow upward, crossing from the white section into the orange terracotta section. Draw varying heights of stems with small leaves attached. -
Create Contrast Flowers:
At the top of these stems (on the orange clay), draw open-petaled flowers. The white ink will pop beautifully against this darker background. -
Fill with Accents:
Add small clusters of dots or tiny ‘v’ shapes floating around the main flowers to fill empty negative space. -
Lettering:
If desired, hand-letter a simple word like ‘POT’ or the plant’s name in the space between foliage. Keep the letters thin and slightly whimsical to match the line art style. -
Add Texture Details:
Go back to your large flower on the white base. Use a darker color or simply press harder with the pen to create stamen circles in the center of the flower for definition.
Step 4: Finishing
-
Erase Sketches:
Once you are certain the ink is 100% dry (give it at least an hour), very gently erase any visible pencil marks. -
Seal the Work:
Take the pot to a well-ventilated area and spray it with a clear matte sealer. This protects your handiwork from water damage when you water your plant.
Pop in your favorite succulent and enjoy the fresh, bright look of your new custom planter

The Complete Guide to Pottery Troubleshooting
Uncover the most common ceramic mistakes—from cracking clay to failed glazes—and learn how to fix them fast.
Modern Speckled Faux-Glazed Clay Pots
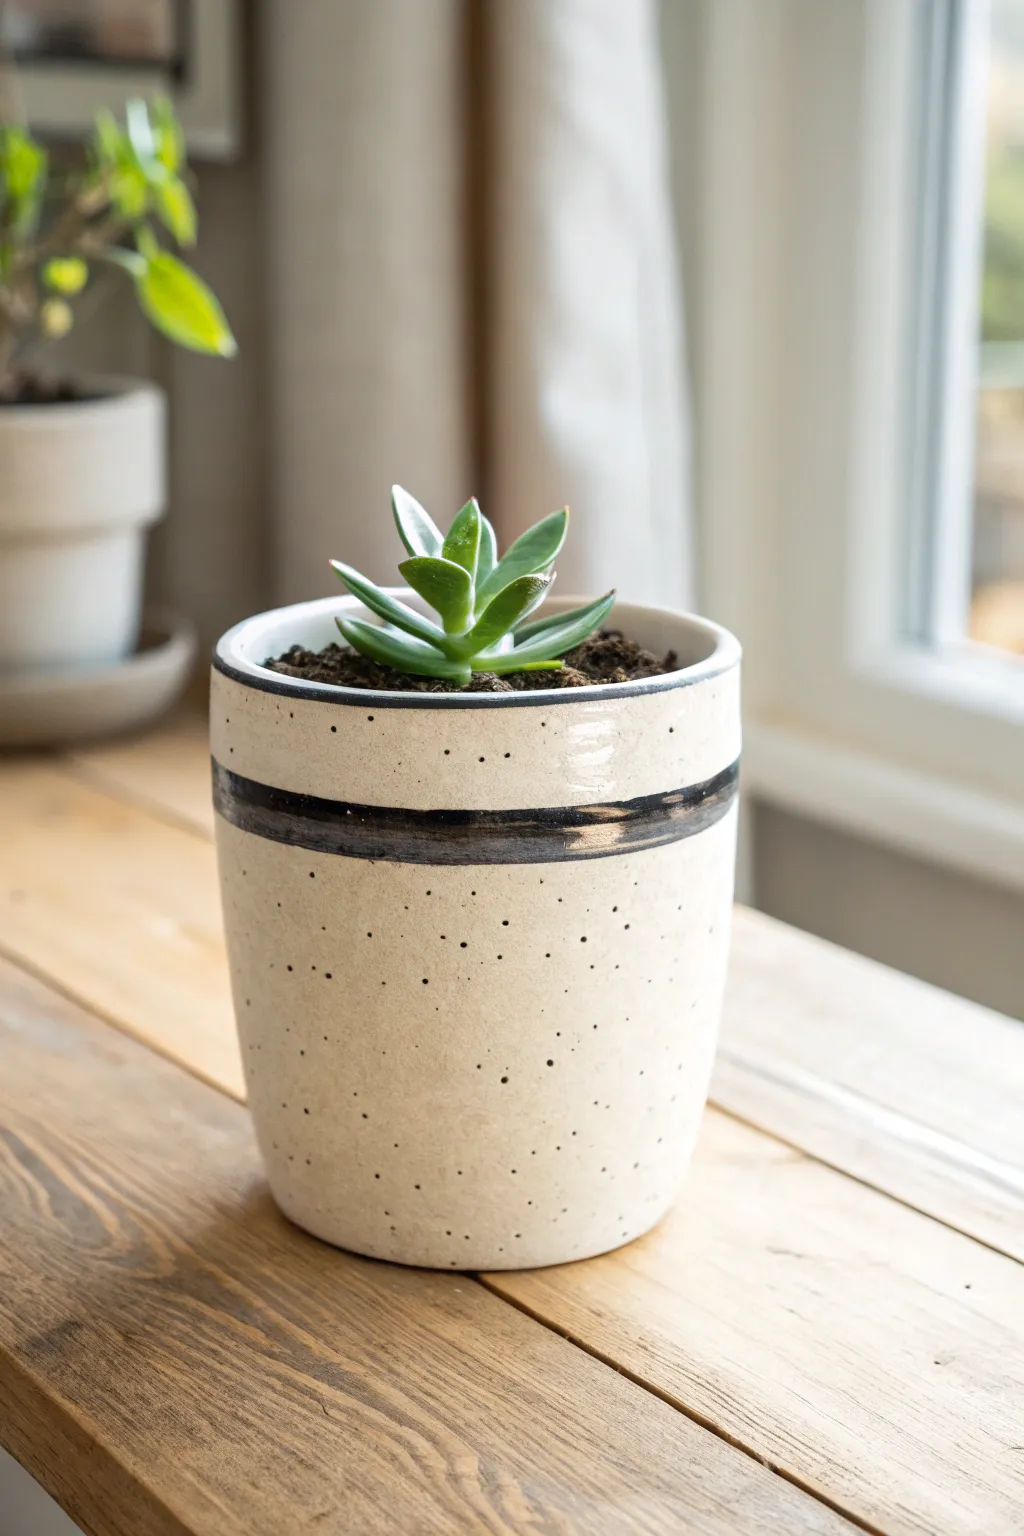
Transform an inexpensive terracotta planter into a high-end ceramic look-alike with this simple faux-glaze technique. The creamy, speckled finish paired with a bold charcoal stripe adds a touch of modern minimalism to any windowsill garden.
Step-by-Step Tutorial
Materials
- Terracotta pot (clean and dry)
- Cream or off-white acrylic paint (matte or satin)
- Black acrylic paint
- High-gloss polyurethane varnish or spray sealer
- Medium flat paintbrush
- Small round detail brush
- Old toothbrush or stiff bristle brush
- Painter’s tape (optional)
- Paper plate or palette
- Cardboard box or drop cloth (for splatter protection)
Step 1: Base Coat Application
-
Prep the surface:
Begin with a terracotta pot that is completely clean and dry. If you’re reusing an old pot, scrub it thoroughly to remove mineral deposits and let it dry overnight. -
Paint the interior rim:
Using your medium flat brush and the cream acrylic paint, coat just the top inch of the inside rim. This ensures the terracotta won’t show through once filled with soil. -
Apply the first base layer:
Paint the entire exterior of the pot with your cream color. Use smooth, horizontal strokes to minimize brush texture. -
Let it dry completely:
Allow this first coat to dry for at least 30 minutes. Terracotta is porous and will soak up the first layer quickly. -
Add a second coat:
Apply a second layer of cream paint for full, opaque coverage. If you can still see the orange clay tone, a third coat might be necessary. -
Dry thoroughly:
Set the pot aside until it is bone dry to the touch before moving on to the next phase.
Flick It Good
For varied speckle sizes, alternate between a toothbrush (fine mist) and a stiff paintbrush (larger dots) when flicking the paint.
Step 2: Creating the Speckles
-
Prepare your workspace:
Place the pot inside a cardboard box or on a wide drop cloth. The speckling process can get messy, and this protects your surrounding area. -
Load the tool:
Squeeze a small amount of black acrylic paint onto your palette and add a tiny drop of water to thin it slightly. Dip the bristles of an old toothbrush into the mixture. -
Test the splatter:
Before hitting the pot, run your thumb across the bristles to flick paint onto a piece of scrap paper. Ensure the dots are fine and misty, not large globs. -
Sprinkle the pot:
Hold the toothbrush about 6-10 inches away from the pot. Use your thumb to flick the bristles, spraying a fine mist of black speckles evenly around the surface. -
Rotate and repeat:
Turn the pot slowly as you flick, ensuring consistent coverage on all sides. I like to let this dry for just a minute before checking if any bald spots need more speckles.
Step 3: Adding the Stripe & Finish
-
Dry the speckles:
Wait until the black speckles are completely dry to avoid smearing them during the next step. -
Paint the accent stripe:
Using a small round brush and unthinned black paint, hand-paint a horizontal band around the upper third of the pot. Aim for a loose, organic line rather than a perfect geometric stripe to mimic hand-thrown pottery. -
Refine the line:
Go over the black stripe a second time to ensure opacity. The hand-painted imperfection is part of the charm, so don’t stress about a perfectly straight edge. -
Paint the rim detail:
Using the very tip of your brush, add a thin, delicate line of black paint along the very top edge of the pot’s rim for a finished look. -
Apply the faux glaze:
Once all paint is fully cured (give it a few hours), apply a coat of high-gloss polyurethane or spray sealer. This gives the surface that shiny, kiln-fired ceramic appearance. -
Final cure:
Let the sealer cure according to the manufacturer’s instructions—usually 24 hours—before planting your succulent.
Two-Tone Twist
Leave the bottom third of the pot unpainted raw terracotta for a dipped look that contrasts the modern speckle with natural clay texture.
Place your favorite succulent inside and enjoy the chic, artisan vibe of your new planter
Decoupage Floral Napkin Clay Pots
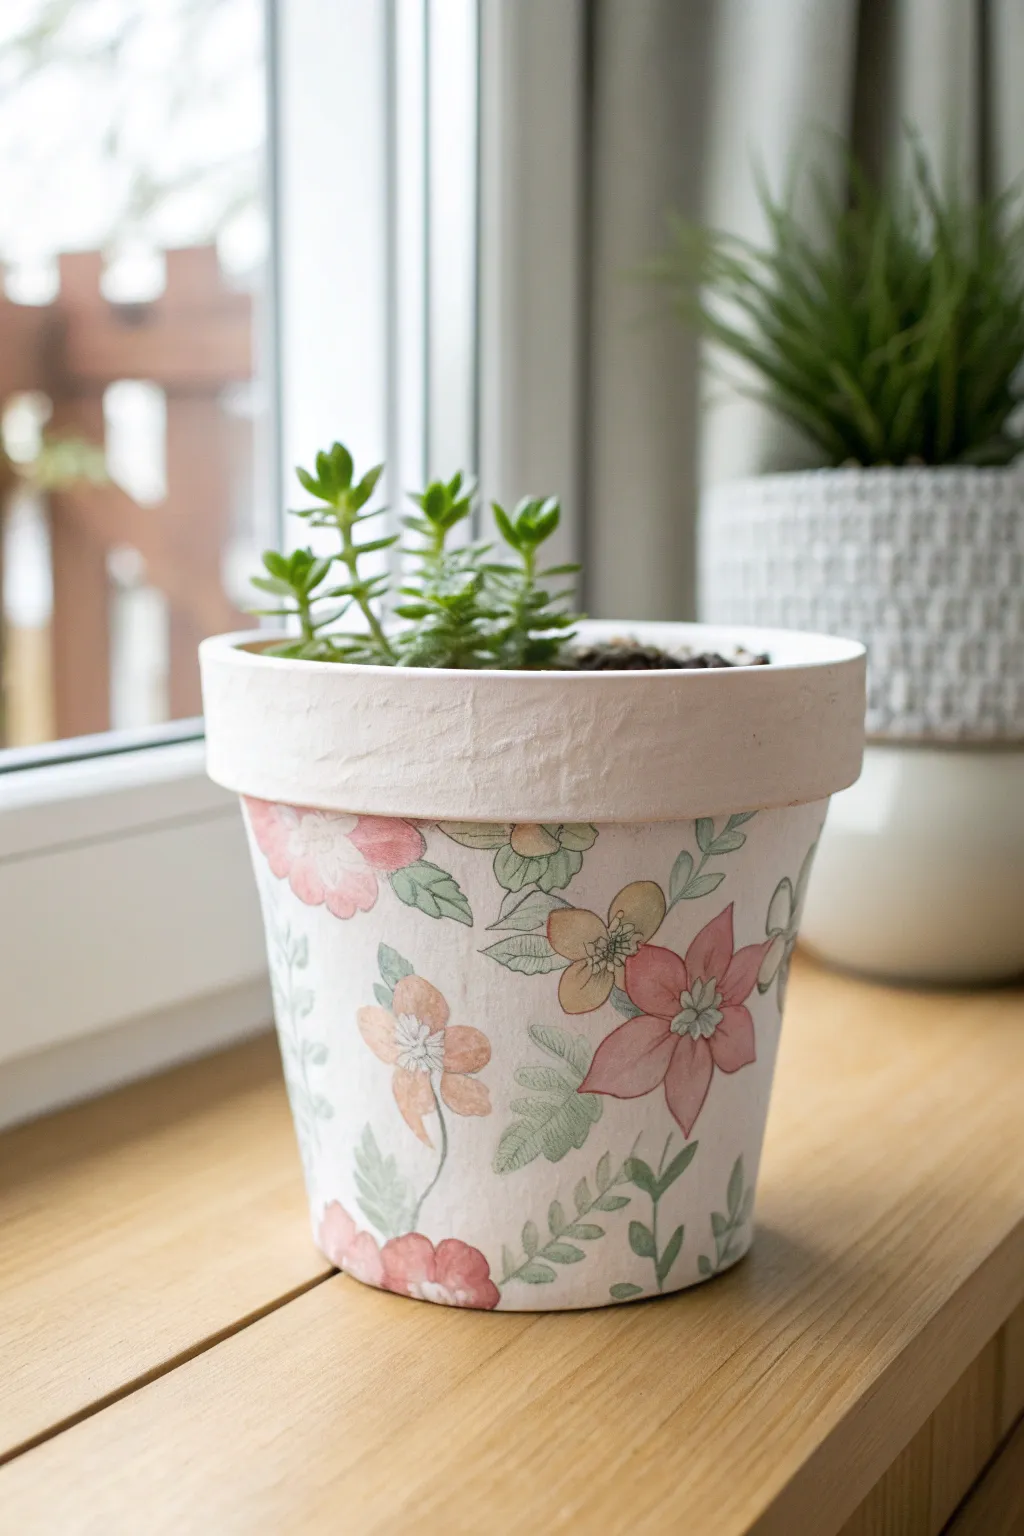
Transform a standard terracotta vessel into a charming, vintage-inspired planter with this simple decoupage technique. The soft watercolor effect of the floral napkin art creates a gentle, hand-painted look that brightens up any windowsill.
How-To Guide
Materials
- Standard terracotta pot (cleaned)
- White acrylic paint or chalk paint
- Paper napkins with floral designs (watercolor style preferred)
- Mod Podge (Matte finish)
- Foam brush or soft flat paintbrush
- Small detail scissors
- Sealant spray (matte or satin)
- Sandpaper (fine grit)
- Water and paper towels
Step 1: Preparation and Base Coat
-
Clean surface:
Begin by thoroughly cleaning your terracotta pot to remove any dust or oils. If it’s an old pot, scrub it well and let it dry completely to ensure the paint adheres properly. -
Apply base white:
Using a foam brush, paint the exterior of the pot with white acrylic or chalk paint. You don’t need a perfectly opaque layer yet; a slightly uneven texture adds to the charm. -
Paint the rim:
Extend the white paint over the top rim and a few inches down the inside of the pot. This ensures the terracotta color doesn’t peek through once soil is added. -
Dry and repeat:
Allow the first coat to dry for about 20 minutes. Apply a second coat to get a solid, bright white background, which will make your napkin colors pop. -
Texture the rim:
For the specific look in the photo, apply a slightly thicker layer of white paint to the rim in a dabbing motion to create a rough, stucco-like texture.
Wrinkle Rescue
If the napkin wrinkles badly while gluing, don’t panic. Gently tap it down with a damp finger. The texture often blends into the painted background once dry.
Step 2: Preparing the Napkin Art
-
Select flowers:
Examine your floral napkin and choose the specific flowers and leaves you want to feature. Look for a mix of large blooms and trailing vines. -
Rough cut:
Cut out the selected designs loosely with scissors first. It’s easier to handle smaller pieces than a whole napkin. -
Separate plies:
This is crucial: carefully peel away the back white layers of the napkin. You must be left with only the single, ultra-thin top sheet with the printed design. -
Detail cutting:
Now, use your small detail scissors to cut closer to the floral edge. You don’t need to be perfect; the white background of the pot will hide minor white edges on the paper.
Step 3: Applying the Design
-
Plan layout:
Before gluing, dry-fit your cutouts against the pot. I like to arrange larger flowers first and fill gaps with leaves, but ensure they don’t overlap too much. -
Apply medium:
Brush a thin layer of Mod Podge onto a small section of the pot where your first flower will go. -
Place design:
Gently place the napkin cutout onto the wet glue. Start from the center of the design and lightly tap it down outward to minimize wrinkles. -
Seal edges:
Dip your finger in a tiny bit of Mod Podge and gently tap the edges of the napkin to blend them into the pot surface. -
Continue pattern:
Repeat this process around the pot. Rotate the pot frequently to ensure the design looks balanced from all angles. -
Address the rim:
Keep the rim largely white to match the reference image, but feel free to let a trailing leaf or vine slightly cross over the line for a natural look.
Vintage Patina
To age the pot, lightly sand the dried decoupage in random spots, then rub a tiny amount of diluted brown paint or antique wax over the surface for a worn look.
Step 4: Finishing Touches
-
Top coat:
Once all cutouts are dry (about 30 minutes), gently brush a final layer of Mod Podge over the entire exterior to seal the paper and the paint. -
Dry completely:
Let this cure for several hours. The glue will go from milky to completely clear. -
Final seal:
Spray the pot with a clear matte or satin acrylic sealer. This protects the project from water splashes when you water your plant.
Fill your new creation with a lovely succulent and enjoy the splash of art on your windowsill


What Really Happens Inside the Kiln
Learn how time and temperature work together inside the kiln to transform clay into durable ceramic.
Fabric-Wrapped Clay Pots With Clean Seams

Transform a standard terracotta pot into a charming décor piece with this soft, tailored fabric wrap. Featuring clean folded edges and a decorative drawstring accent, this cover adds warmth and texture without requiring a single stitch.
Step-by-Step
Materials
- Standard terracotta pot (4-6 inch diameter)
- Cotton or linen fabric with a botanical print
- Fabric measuring tape
- Fabric scissors
- Iron and ironing board
- Hem tape or fabric glue (permanent hold)
- Natural cotton cord or twine (approx. 24 inches)
- Large safety pin or bodkin (optional)
- Pencil or tailor’s chalk
Step 1: Measuring and Cutting
-
Measure pot circumference:
Wrap your measuring tape around the widest part of the pot’s rim. Add 2 inches to this measurement for overlap and seam allowance. -
Determine the height:
Measure the height of the pot from base to rim. Multiply this number by 1.5. This extra height allows for the fabric to cover the bottom slightly and creates the generous fold-over cuff at the top. -
Mark the fabric:
Lay your fabric face down on a flat surface. Using your pencil or tailor’s chalk, draw a rectangle using the dimensions you just calculated. -
Cut the rectangle:
Carefully cut out your fabric rectangle along the marked lines, keeping your edges as straight as possible.
Loose Fabric?
If the fabric slides down the smooth clay, place a thick rubber band around the pot first. The fabric will grip the rubber texture and stay perfectly in place.
Step 2: Creating Clean Edges
-
Press the side hems:
Fold the two shorter sides (the vertical edges) of the rectangle in by 1/2 inch toward the unprinted side. Press clearly with a hot iron to create a crease. -
Secure the sides:
Place a strip of hem tape or a thin line of fabric glue under these folds and press again to seal them. This prevents fraying and gives that professional finish seen in the photo. -
Press top and bottom hems:
Repeat the folding and pressing process for the long top and bottom edges, folding them in about 1/2 inch and securing them with your adhesive of choice. -
Final press:
Give the entire piece of fabric one last press to ensure it is perfectly flat and the glue is set.
Seasonal Zwitch
Make this design reversible! Glue two different fabrics back-to-back before starting. You’ll have a different pattern peeking out from the cuff lining.
Step 3: Forming the Shape
-
Wrap the pot:
Stand your terracotta pot in the center of the fabric strip. Wrap the fabric around the pot so the ends overlap at the back. -
Adjust the fit:
Pull the fabric snug. You want it tight enough to stay up, but loose enough to slide the pot in and out. -
Glue the cylinder:
Apply a strong line of fabric glue vertically along the overlap seam at the back. Hold it firmly in place for a minute or two until it bonds securely.
Step 4: Styling the Cuff
-
Create the cuff:
Once dry, fold the top edge of the fabric cylinder down over itself. Aim for a cuff that is about 1.5 to 2 inches wde, revealing the printed side of the fabric. -
Shape the base:
Tuck the excess fabric at the bottom underneath the pot. The weight of the pot will hold these folds in place on your shelf. -
Prepare the cord:
Cut a piece of natural cotton cord measuring about 24 inches long. Tie a small knot at each end of the cord to prevent fraying. -
Position the tie:
Wrap the cord around the fabric cover, positioning it just below the folded cuff. This acts as both decoration and a way to cinch the fabric slightly. -
Tie the bow:
Tie a simple shoelace bow at the front center. I find that adjusting the loops to be slightly floppy adds to the relaxed, organic look. -
Final adjustments:
Fluff the cuff slightly so it stands away from the rim of the pot, creating volume, and straighten the bow.
Your plant now has a custom, tailored outfit that softens the hard edges of the clay pot
Chalky Distressed Farmhouse Clay Pots
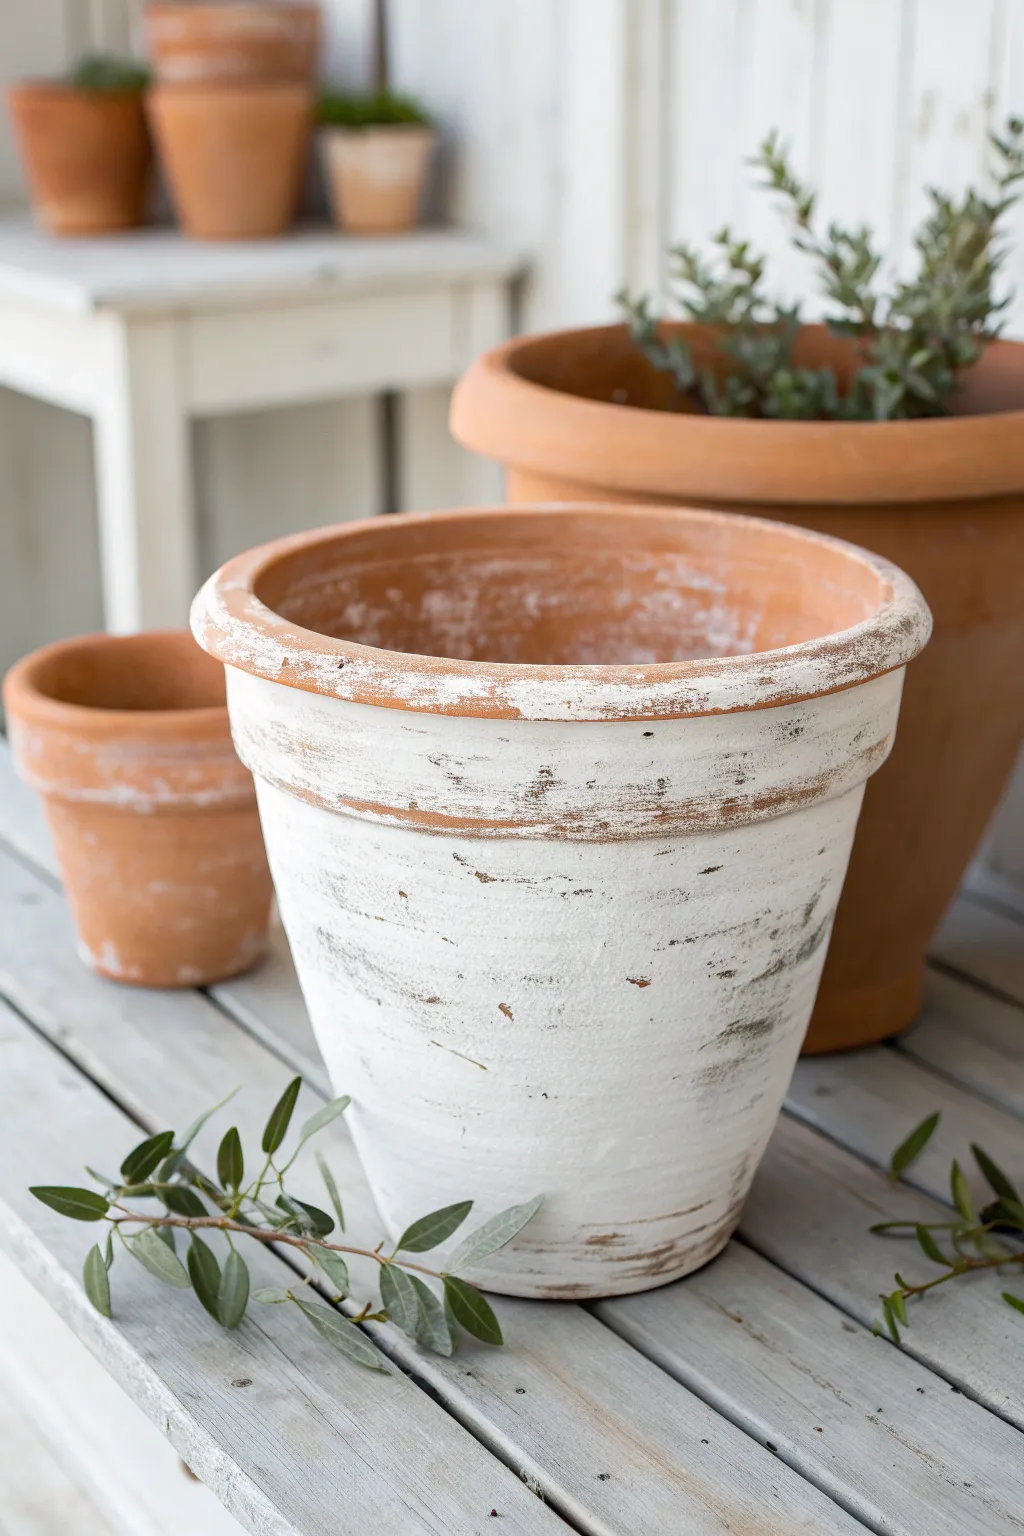
Transform ordinary terra cotta into rustic, farmhouse-style decor with this simple distressing technique. The bright white finish contrasting against the raw clay creates a timeless, aged look that feels effortlessly elegant.
Step-by-Step Guide
Materials
- Terra cotta pot (clean and dry)
- White chalk paint or matte acrylic paint
- Paintbrush (bristle or chip brush works best)
- Medium-grit sandpaper (100-150 grit)
- Clean rag or paper towel
- Water based matte sealer (optional)
Step 1: Preparation and Base Coat
-
Clean surface:
Begin by ensuring your terra cotta pot is free of dust and stickers. Wipe it down with a damp cloth and let it dry completely so the paint adheres properly. -
Load the brush:
Dip your paintbrush into the white chalk paint. You want a decent amount of paint on the brush, but not so much that it’s dripping. -
Apply first strokes:
Start applying the paint horizontally around the main body of the pot. Don’t worry about perfect coverage; a little bit of streakiness adds to the charm later. -
Paint the rim:
Paint the upper rim of the pot. Pay attention to the top edge and the inside lip, going down about an inch inside so the clay color doesn’t show when soil is added. -
Dry brush technique:
As your brush starts to run out of paint, drag it lightly over the surface. This creates a thinner layer in some spots which will make distress sanding easier. -
Let it dry:
Allow the paint to dry completely. Chalk paint dries quickly, usually within 20-30 minutes, but it must be fully set before you start sanding.
Step 2: Distressing and Finishing
-
Start sanding:
Take a piece of medium-grit sandpaper and begin sanding the painted surface. Use a firm, back-and-forth motion. -
Focus on high points:
Concentrate your sanding on areas that would naturally weather over time, like the raised protruding ring below the rim. -
Expose the clay:
Sand aggressively in random patches on the body of the pot until the orange terra cotta clearly shows through the white paint. The goal is a patchy, worn appearance. -
Create scratches:
Use the edge of your sandpaper or a coarse sanding block to create horizontal scratch marks around the circumference, mimicking years of wear. -
Distress the rim:
go around the top rim and sand away significant portions of paint. The rim usually takes the most abuse in real life, so don’t be shy here. -
Check balance:
Step back and look at your pot. If it looks too white, go back in and sand more areas to reveal the base clay color. -
Clean up dust:
Use a dry cloth or a soft bristle brush to sweep away all the paint dust created by sanding. -
Wipe down:
I find it helpful to wipe the pot with a barely damp rag just once to remove the finest dust particles and brighten the white paint. -
Seal (optional):
If you plan to use this outdoors, apply a coat of matte water-based sealer to protect the finish without adding unwanted shine.
Paint Peeling Too Much?
If large flakes of paint chip off instead of sanding smoothly, your paint layer might be too thick. Try lighter coats next time or use a finer grit sandpaper.
Add a Mossy Touch
Dab a tiny bit of watered-down green acrylic paint into the crevices and distressed areas to mimic natural moss growth on aged garden pottery.
Now you have a beautifully weathered pot ready for your favorite herbs or succulents

TRACK YOUR CERAMIC JOURNEY
Capture glaze tests, firing details, and creative progress—all in one simple printable. Make your projects easier to repeat and improve.
Cute Face Planters With Painted Expressions
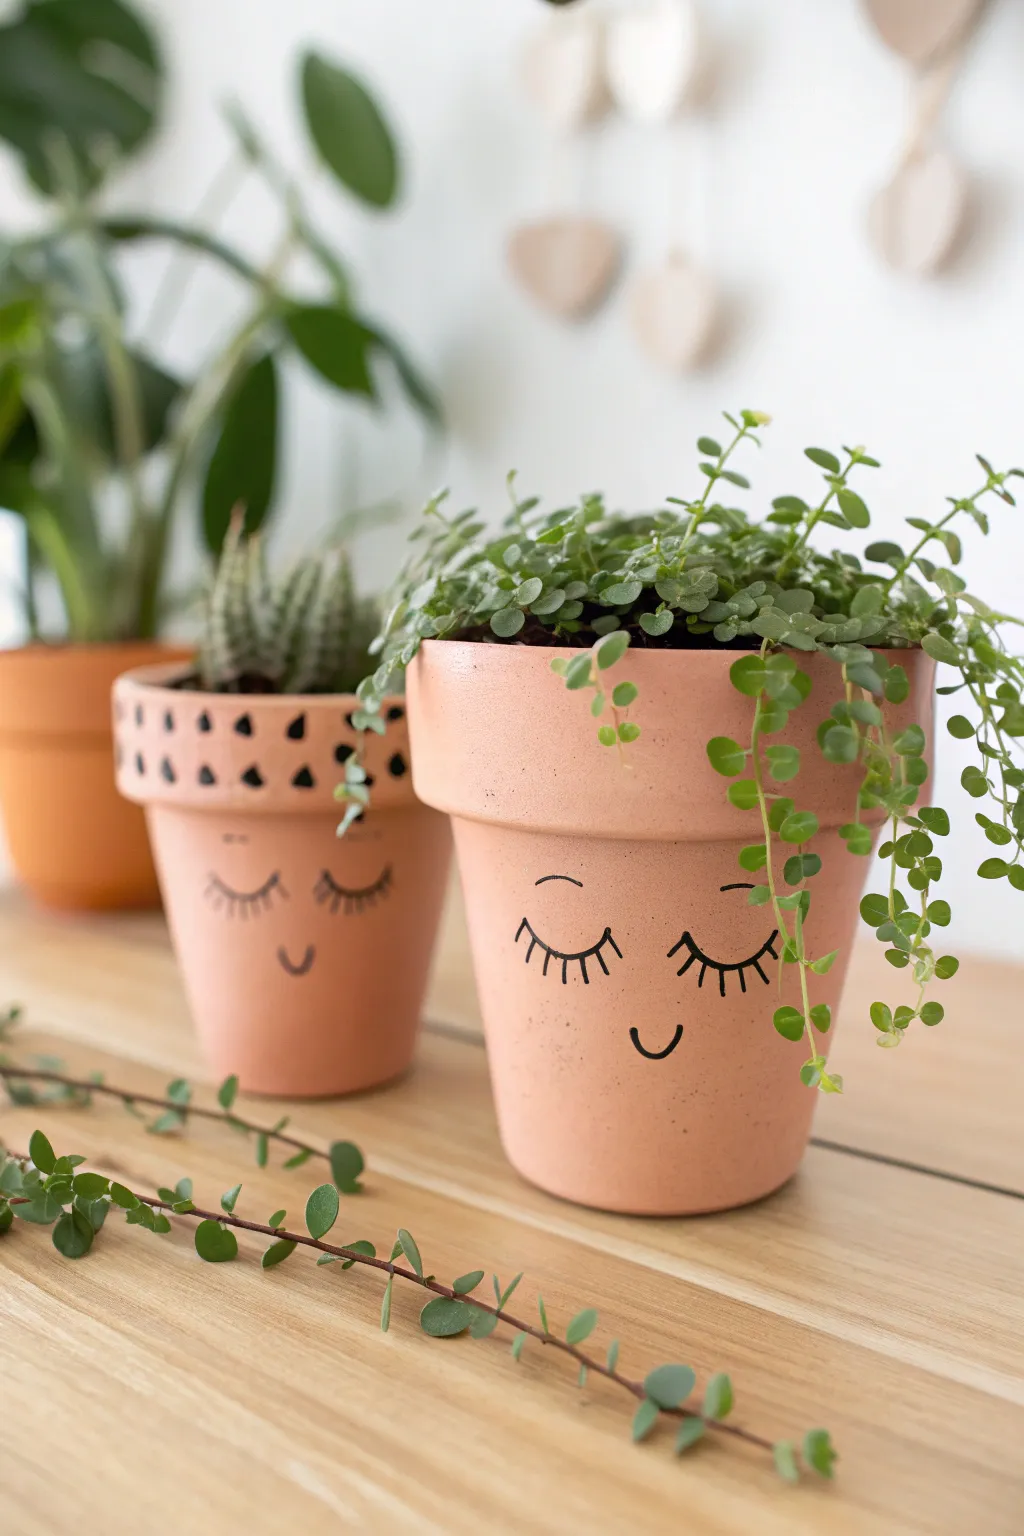
Transform standard garden center pots into charming companions with just a few strokes of paint. These sleepy-faced planters add a whimsical touch to any shelf, featuring simple line art expressions and optional rim decorations.
Detailed Instructions
Materials
- Terracotta pots (cleaned and dried)
- Black acrylic craft paint or a black permanent paint marker
- Small round paintbrush (size 1 or 2)
- Pale pink or peach acrylic paint (optional for base)
- Pencil with eraser
- Paper towels
- Clear matte sealer spray
Step 1: Preparation & Base Coat
-
Clean the surface:
Begin by thoroughly wiping down your terracotta pots with a damp cloth to remove any dust or nursery residue. Let them dry completely before applying any paint. -
Mix a custom base color:
To achieve the soft, uniform peachy-terra cotta look seen in the photo, mix a small amount of white paint into your terracotta-colored craft paint. This creates a smoother canvas than raw clay. -
Apply the base layer:
Paint the entire exterior of the pot with your mixed color. Use long, horizontal strokes to minimize brush marks. I usually find that one coat is enough to still let the clay texture show through. -
Let it cure:
Allow the base coat to dry fully for at least 30 minutes. The surface must be non-tacky before you start drawing the details.
Fixing Mistakes
If you smudge the black paint, wipe it immediately with a damp cotton swab. If it’s already dry, paint over the mistake with your base terracotta color and try again.
Step 2: Drawing the Faces
-
Sketch the placement:
Using a pencil very lightly, mark where the eyes will go. Position them slightly lower than the center of the pot’s body for a cuter proportion. -
Draw the main curves:
Sketch two downward-curving arcs for the closed eyelids. Make sure they are level with each other and evenly spaced. -
Curved mouth:
Add a small, simple ‘u’ shape centered below the eyes for the smiling mouth. -
Load your brush:
Dip your fine round brush into the black acrylic paint. You want the paint to be fluid but not drippy; add a tiny drop of water if it feels too thick. -
Paint the eyelids:
Carefully trace over your pencil lines for the eyelids. Use the very tip of the brush and keep your hand steady by resting your pinky finger on the pot’s rim. -
Add the lashes:
Paint 5 to 7 small vertical lines extending downward from each eyelid arc. Vary the angles slightly so they fan out like real eyelashes. -
Finish the smile:
Trace the small mouth curve with a single confident stroke.
Level Up
Add rosy cheeks by dabbing a tiny amount of diluted pink paint on your finger and pressing it gently onto the ends of the smile for a blushing effect.
Step 3: Rim Decoration & Finishing
-
Plan the rim pattern:
For the patterned pot, choose a geometric design for the rim. The example uses irregular triangles pointing upwards. -
Paint the triangles:
Using your small brush, paint small black triangles along the top band of the pot. Space them loosely for a hand-drawn, organic feel. -
Add a second row:
Paint a second row of triangles in the spaces between the first row, creating a staggered effect. -
Clean up sketches:
Once the black paint is absolutely dry (give it an hour), gently erase any visible pencil marks with a clean eraser. -
Seal the artwork:
Take the pots outside and apply a light coat of clear matte sealer spray. This protects the face design from water damage when you water your plants.
Now you have a sweet set of character pots ready to hold your favorite succulents or trailing vines
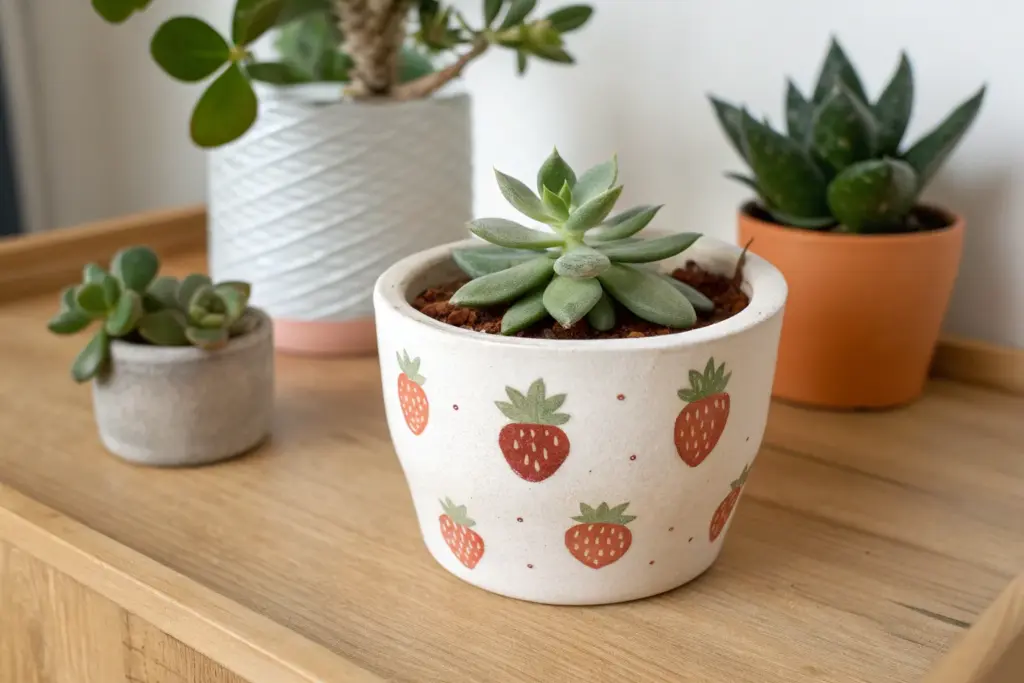
Fruit-Themed Pots: Strawberry, Watermelon, and Pineapple
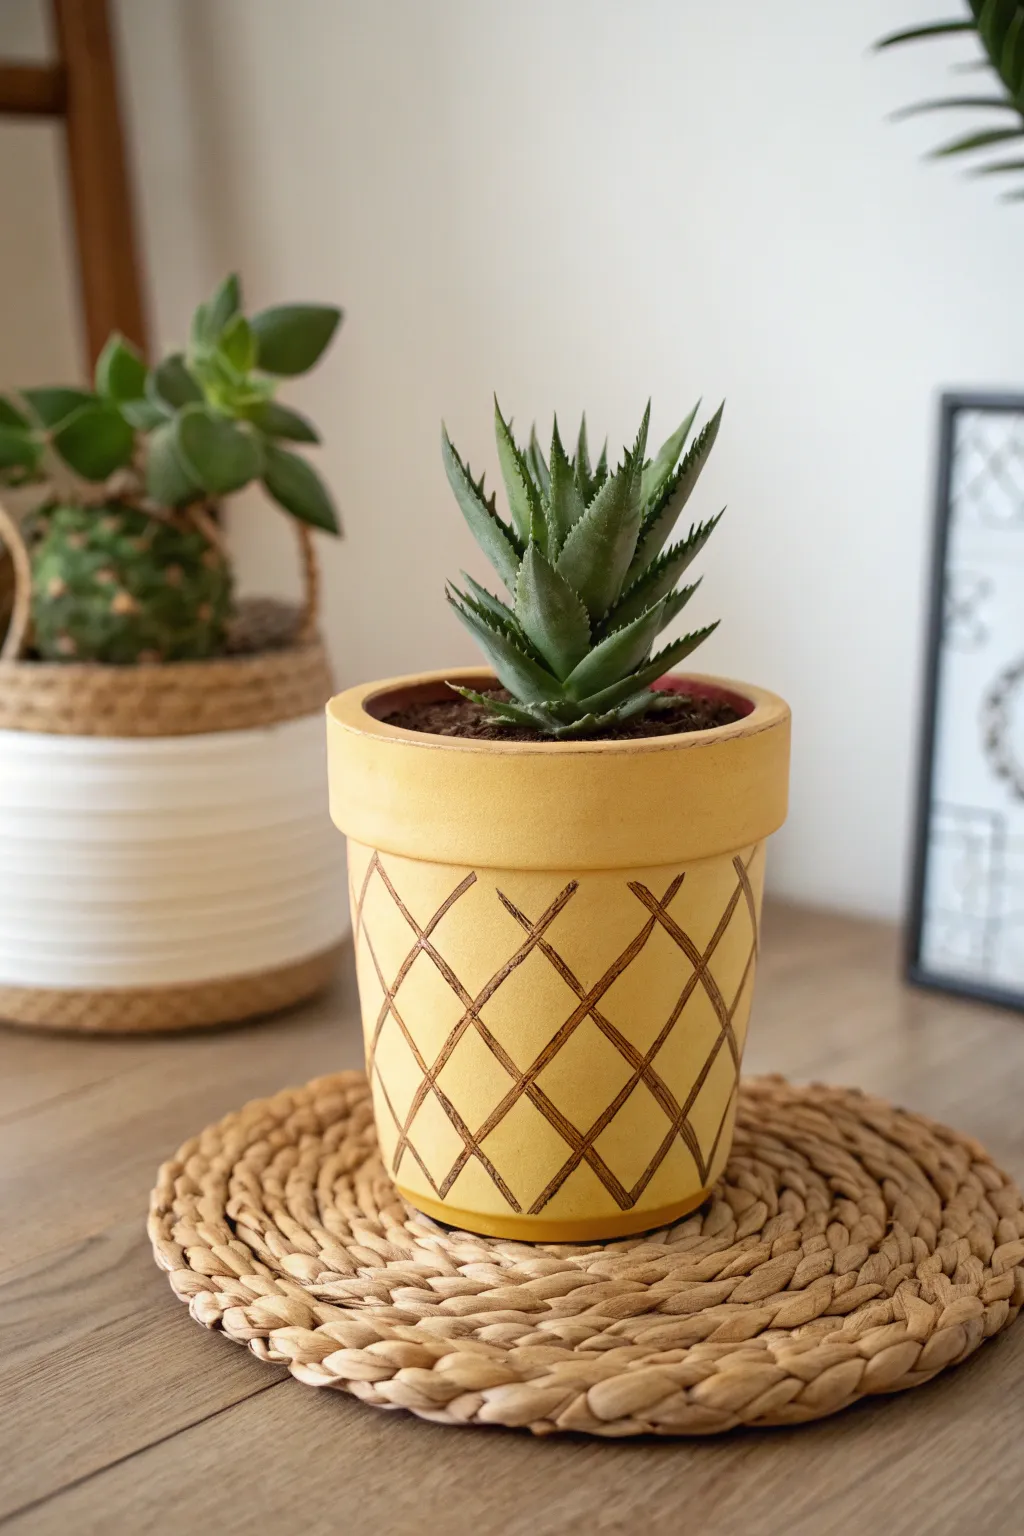
Transform a standard terracotta planter into a sweet and spiky pineapple home for your favorite succulent. This cheerful project uses cross-hatched lines and a warm yellow base to mimic the texture of the fruit, perfectly complemented by a spiky aloe plant as the crown.
Step-by-Step Tutorial
Materials
- Standard terracotta pot (4-6 inch diameter works best)
- Mustard yellow acrylic paint (matte or satin finish)
- Brown acrylic paint (burnt umber or dark chocolate shade)
- Flat paintbrush (medium width)
- Fine liner brush (size 0 or 1)
- Pencil
- Ruler or flexible measuring tape
- Clear spray sealant (optional)
- Spiky succulent (like Aloe or Haworthia)
Step 1: Base Preparation
-
Clean the surface:
Begin by wiping down your terracotta pot with a damp cloth to remove any dust or store shelf grime. Let it dry completely so the paint adheres properly. -
Apply the first coat:
Squeeze out your mustard yellow paint. Using the medium flat brush, apply a smooth, even base coat over the entire exterior of the pot, including the rim. -
Paint the inner rim:
Don’t forget to paint about an inch down inside the rim. Since soil won’t fill the pot to the very top, this ensures the illusion holds up once planted. -
Let it dry:
Terracotta is porous and drinks up paint quickly. Allow this first layer to dry for about 20-30 minutes. -
Second coat coverage:
Apply a second layer of yellow to get that solid, opaque look shown in the photo. If your yellow is a bit sheer, a third thin coat might be necessary for maximum vibrancy.
Straight Line Secret
Struggling with wobbly lines? Use thin washi tape or painter’s tape to mask off your diamond grid. Paint the brown lines in the gaps, then peel for crisp edges.
Step 2: Creating the Pineapple Texture
-
Mark the rim guide:
Once the base is fully dry, grab your pencil. Lightly mark the underside of the pot’s rim at regular intervals, spacing them about 1.5 inches apart. -
Mark the bottom guide:
Make corresponding marks along the very bottom edge of the pot, aligning them vertically with the marks under the rim. -
Draw diagonal guidelines:
Using a flexible ruler (or just freehanding if you feel confident), lightly sketch diagonal lines connecting your top marks to the bottom marks, angling them to the right. -
Complete the diamond pattern:
Now draw a second set of diagonal lines angling to the left, intersecting with the first set. This creates the classic diamond grid pattern characteristic of a pineapple skin. -
Load the fine brush:
Dip your fine liner brush into the brown acrylic paint. You want the paint to be fluid but not watery, so mix in a tiny drop of water if it feels too thick to drag smoothly. -
Paint the first diagonal set:
Carefully trace over your pencil lines, painting all the diagonals that slant one direction first. Keep your pressure consistent to maintain an even line width. -
Cross-hatch the pattern:
Once the first set is tacky or dry—I find this prevents smearing—paint the opposing diagonal lines to finish the grid. -
Add texture accents (optional):
For extra realism, you can add small, short line accents or tiny dots in the center of a few diamonds to mimic the rough skin texture, though the clean grid looks great on its own.
Step 3: Finishing Touches
-
Clean up edges:
Check the rim and the very bottom edge. If your brown lines went a little wild, touch them up with a dab of the yellow base paint. -
Seal the work:
To protect your paint from water damage during watering, apply a coat of clear spray sealant (matte finish looks most natural) over the exterior. -
Prepare for planting:
Ensure the pot is totally dry for at least 24 hours before introducing moisture. -
Plant the crown:
Pot your spiky aloe or succulent. The plant acts as the green ‘crown’ of the pineapple, so choose one with upright, pointed leaves for the best effect.
Paint Peeling?
If the paint bubbles or peels when the pot gets wet, you likely need a primer. Seal the inside of the terracotta first to stop moisture from pushing the paint off.
Now you have a refreshing splash of tropical decor that looks charming on any sunny windowsill
Animal-Inspired Clay Pots (Whale, Owl, or Cat)
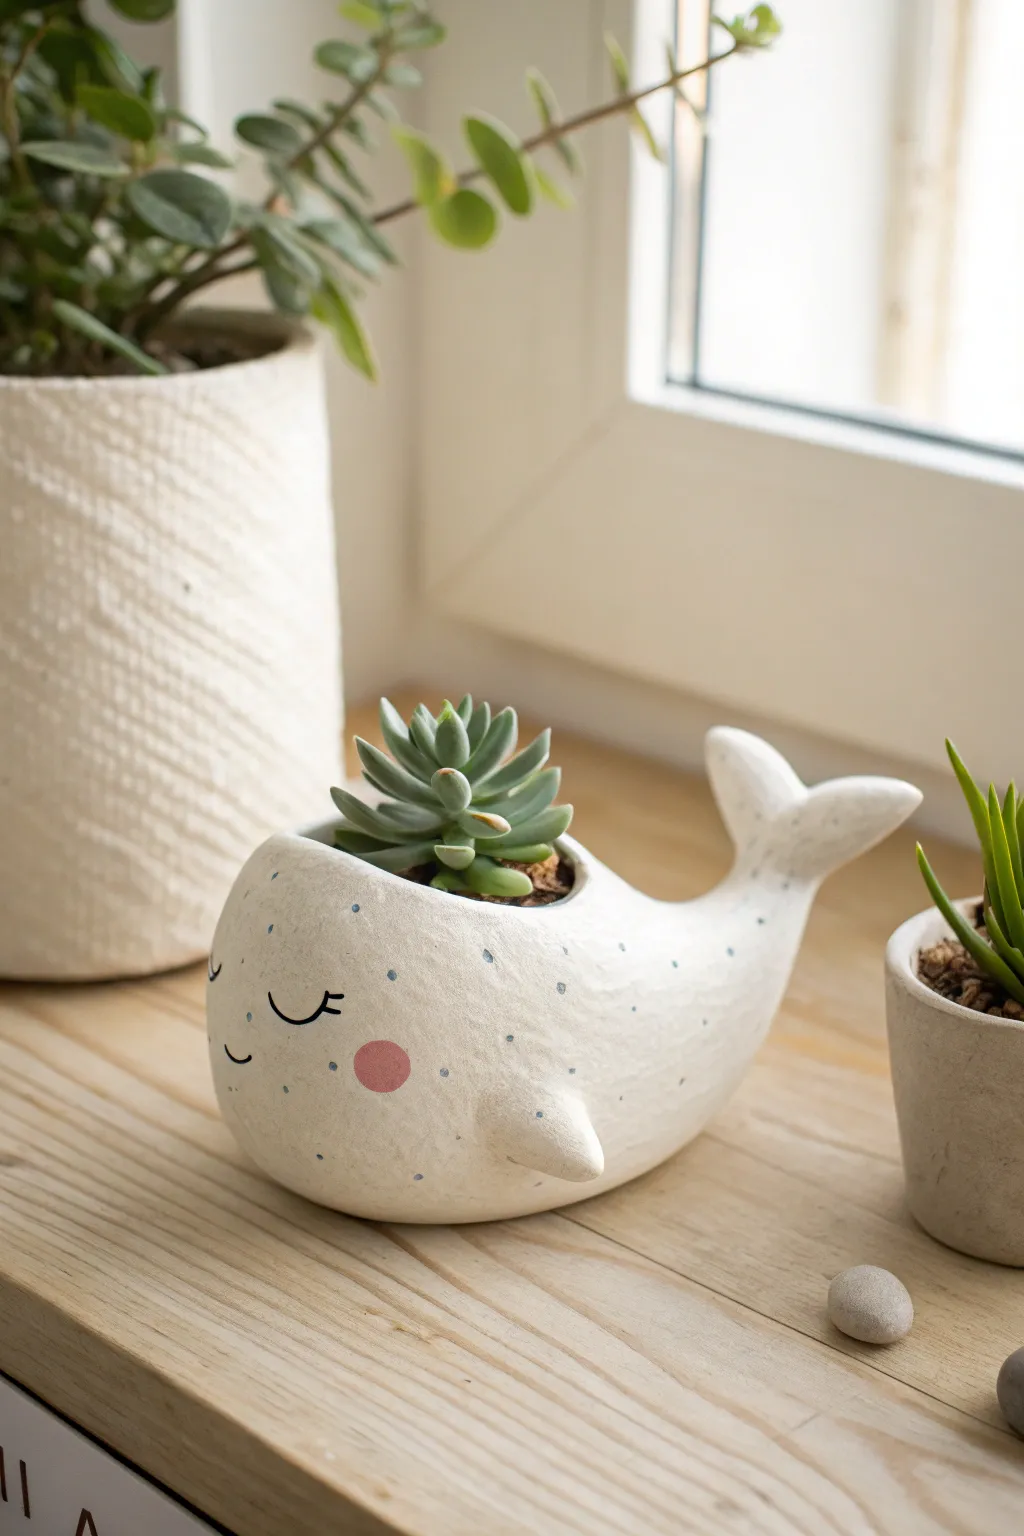
Bring a splash of the ocean to your windowsill with this adorable hand-sculpted whale pot. Its smooth white finish, speckled detailing, and sweet sleeping face make it the perfect gentle guardian for your favorite small succulent.
How-To Guide
Materials
- Air-dry clay (white) or polymer clay
- Clay sculpting tools (needle tool, smoother)
- Small rolling pin
- Water (for smoothing)
- Acrylic paints (white, black, pastel pink, soft blue)
- Fine-grit sandpaper
- Fine detail paintbrushes
- Dotting tool or toothpick
- Matte sealant/varnish (water-resistant)
Step 1: Shaping the Whale Body
-
Condition the Clay:
Begin by kneading a fist-sized ball of white clay until it is warm, pliable, and free of cracks. If you are using air-dry clay, keep your hands slightly damp to prevent it from drying out too quickly. -
Form the Base:
Roll the clay into a smooth, slightly elongated oval shape, similar to a potato. This will serve as the main body of the whale. -
Create the Pot Opening:
Using your thumbs, gently press into the top center of the oval to create a hollow space. Work your way around the inside, pinching the walls to an even thickness of about 1/4 inch. Ensure the floor of the pot is thick enough to support the soil. -
Sculpt the Tail:
Pinch a portion of clay at the back end of the body and gently pull it upwards and outwards to form the tail stalk. Flatten the very tip and use a knife or needle tool to split it down the middle, shaping two distinct flukes that curve slightly upward. -
Attach the Fins:
Roll two small, equal-sized cones of clay for the side fins. Score (scratch) the side of the body and the base of the fins, add a dab of water or liquid clay (slip), and press them firmly onto the lower sides of the whale. Smooth the seams until they are invisible. -
Refine the Shape:
Look at the whale from all angles. Smooth out any fingerprints or bumps using a little water on your finger or a clay smoothing tool. I like to gently tap the bottom on a flat surface to create a stable base so it won’t roll over.
Cracks while drying?
Mix a tiny bit of fresh clay with water to make a paste (slip). Fill any cracks, let dry, and sand smooth again.
Step 2: Drying and Refining
-
Dry Completely:
Allow your clay creation to dry. For air-dry clay, this usually takes 24-48 hours depending on humidity. Flip it occasionally to ensure the bottom dries evenly. If using polymer clay, bake according to the package instructions. -
Sand for Smoothness:
Once fully cured and dry, use fine-grit sandpaper to gently buff the surface. Focus on the rim of the pot and the tail edges to remove any sharp or rough spots, creating that smooth, ceramic-like finish. -
Base Coat:
Calculate how porous your clay is; you may need a layer of gesso first. Then, apply two to three thin coats of white acrylic paint to get a solid, opaque look. Let each layer dry completely before adding the next.
Make it a family
Create a whole pod by making two smaller whales. Vary the tail positions or change the speckle colors to distinct hues.
Step 3: Adding Personality
-
Paint the Face:
Using your finest detail brush and black paint, draw two small ‘U’ shapes for the closed sleeping eyes. Add little eyelashes if you like. Just below and between the eyes, paint a tiny curved smile. -
Add Rosy Cheeks:
Mix a soft pastel pink paint. Dip the tip of your finger or a round brush into the paint, dab off the excess, and gently press a perfect circle onto the cheek area to give the whale a blushing look. -
Create the Speckles:
Dilute a small amount of soft blue paint with a drop of water. Dip a toothbrush or stiff brush into it and flick the bristles with your thumb to spray tiny speckles across the whale’s back. Alternatively, use a toothpick to carefully place individual dots for more control. -
Seal the Pot:
Since this will hold a plant, sealing is crucial. Apply two coats of a water-resistant matte varnish inside and out. This creates a barrier against moisture and protects your paint job. -
Plant Your Succulent:
Once the varnish is cured, fill the cavity with cactus soil and tuck your succulent inside. A rosette-shaped succulent works best as it mimics a water spout.
Place your sleeping whale in a bright spot and enjoy the peaceful vibe it brings to your space
Clay Pot Mushrooms for Whimsical Garden Beds
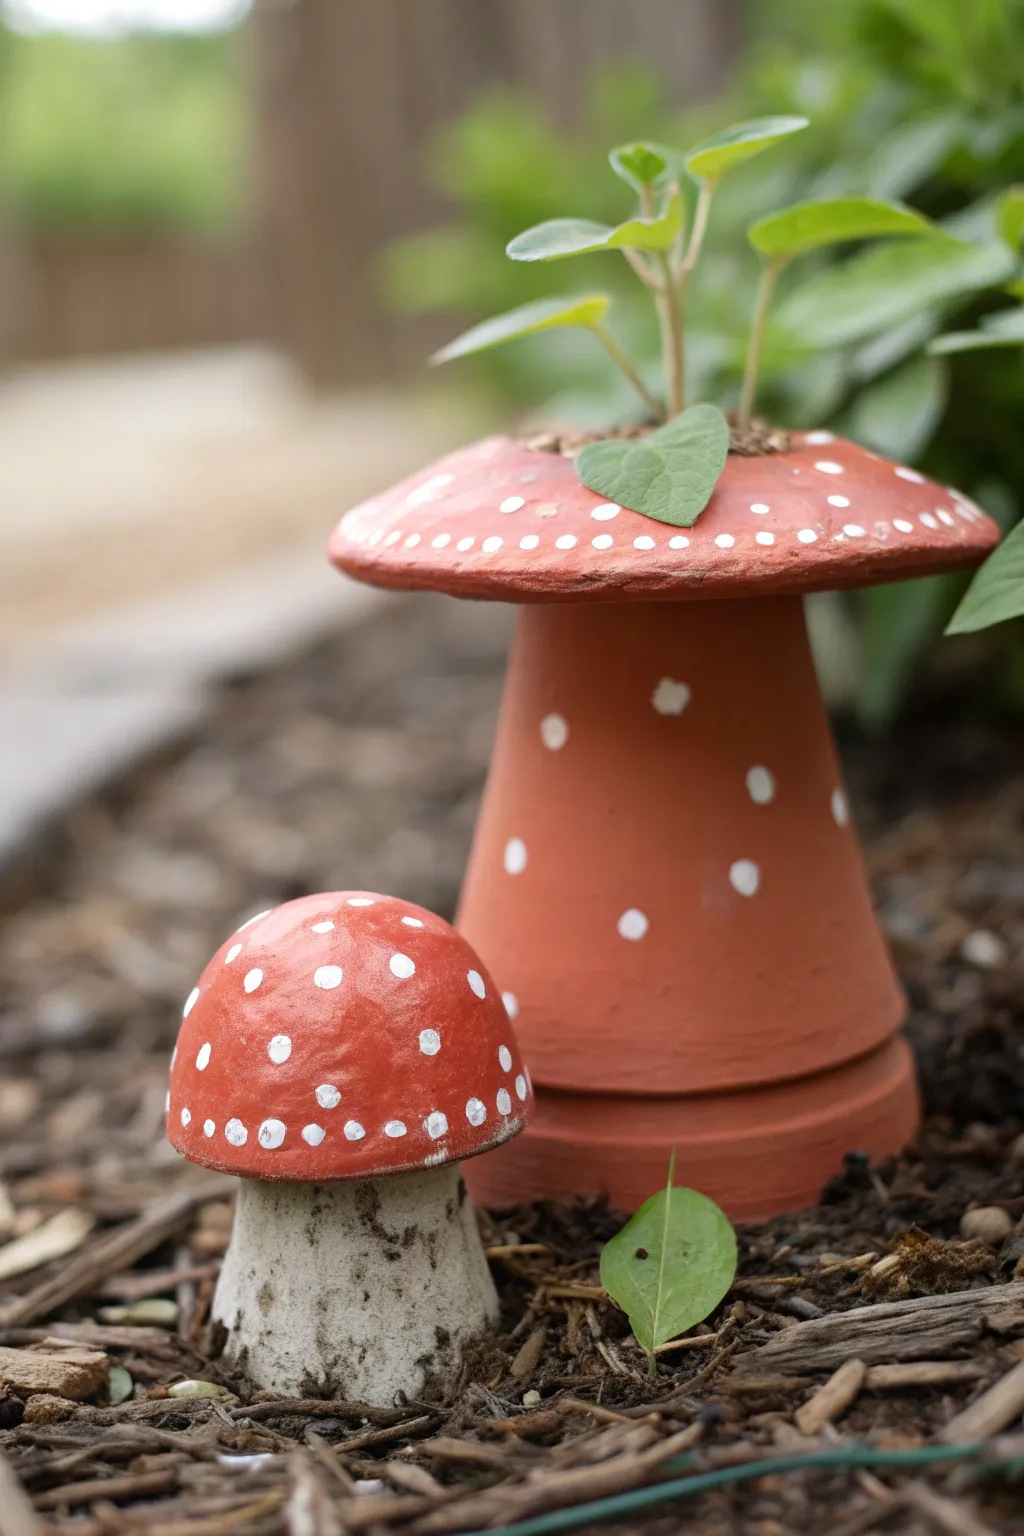
Transform humble clay pots and saucers into charming garden toadstools that add a splash of color to your flower beds. This tiered project not only serves as garden decor but creates a unique, elevated planter for small greenery.
Step-by-Step Guide
Materials
- 4-inch terra cotta pot
- 6-inch terra cotta saucer
- Outdoor acrylic craft paint (Red, White)
- Strong outdoor adhesive (e.g., E6000 or silicone)
- Small foam brush
- Fine-point paintbrush or dotting tool
- Clear matte outdoor sealer spray
- Potting soil
- Small plant (herbs or succulents work well)
Step 1: Preparation & Base Painting
-
Clean the surfaces:
Before starting, wipe down your terra cotta pot and saucer with a damp cloth to remove any dust or nursery stickers. Let them dry completely so the paint adheres properly. -
Flip and position:
Turn your terra cotta pot upside down. This flared shape will serve as the stem of your mushroom. -
Paint the stem:
Using a foam brush, apply a coat of red outdoor acrylic paint to the outside of the upside-down pot. Don’t forget to paint the rim, which is now at the bottom. -
Paint the cap:
Take the terra cotta saucer and paint the bottom side (the convex side) entirely red. This will become the mushroom cap. -
Apply a second coat:
Once the first layer is dry to the touch, apply a second coat of red to both pieces to ensure rich, opaque coverage, especially over the porous clay.
Perfect Polka Dots
Use a round sponge pouncer instead of a brush for perfectly circular, uniform spots on the mushroom cap.
Step 2: Adding Details & Assembly
-
Create the spots:
Dip a fine-point brush or a dotting tool into white acrylic paint. Alternatively, the handle end of a paintbrush works perfectly for this. -
Decorate the cap:
Add white polka dots all over the red saucer. Vary the spacing and create a ring of smaller dots near the rim for a classic toadstool look. -
Decorate the stem:
Add a few scattered white dots to the red pot stem. I prefer to keep these more sparse than the cap to keep the design balanced. -
Let everything dry:
Allow the paint to cure fully for at least an hour, or according to your paint bottle’s instructions. -
Seal the paint:
Take the pieces to a well-ventilated area and spray them with a clear matte outdoor sealer. This protects the color from rain and sun fading. -
Prepare the adhesion surface:
Once sealed and dry, place the pot upside down on your workspace. -
Apply glue:
Apply a generous ring of strong outdoor adhesive (like E6000) to the flat top of the upside-down pot. -
Attach the cap:
Center the saucer (right side up) on top of the glue. The bottom of the saucer sits on the bottom of the pot. -
Cure the bond:
Let the glue cure for at least 24 hours before moving the mushroom outside. This ensures it won’t topple over in wind.
Step 3: Planting
-
Fill the saucer:
Once the glue is solid, fill the open saucer created by the cap with potting soil. -
Add your greenery:
Plant a small seedling directly into the saucer. Since saucers are shallow, choose plants with small root systems like succulents or small herbs. -
Place in the garden:
Nestle your new mushroom planter into the mulch or soil of your garden bed to complete the whimsical scene.
Glow in the Dark
Mix glow-in-the-dark medium into your white paint for the spots so your mushrooms illuminate the garden path at night.
Enjoy watching your colorful creation bring a touch of magic to your backyard landscape
Stacked Clay Pot Lighthouse Garden Sculpture
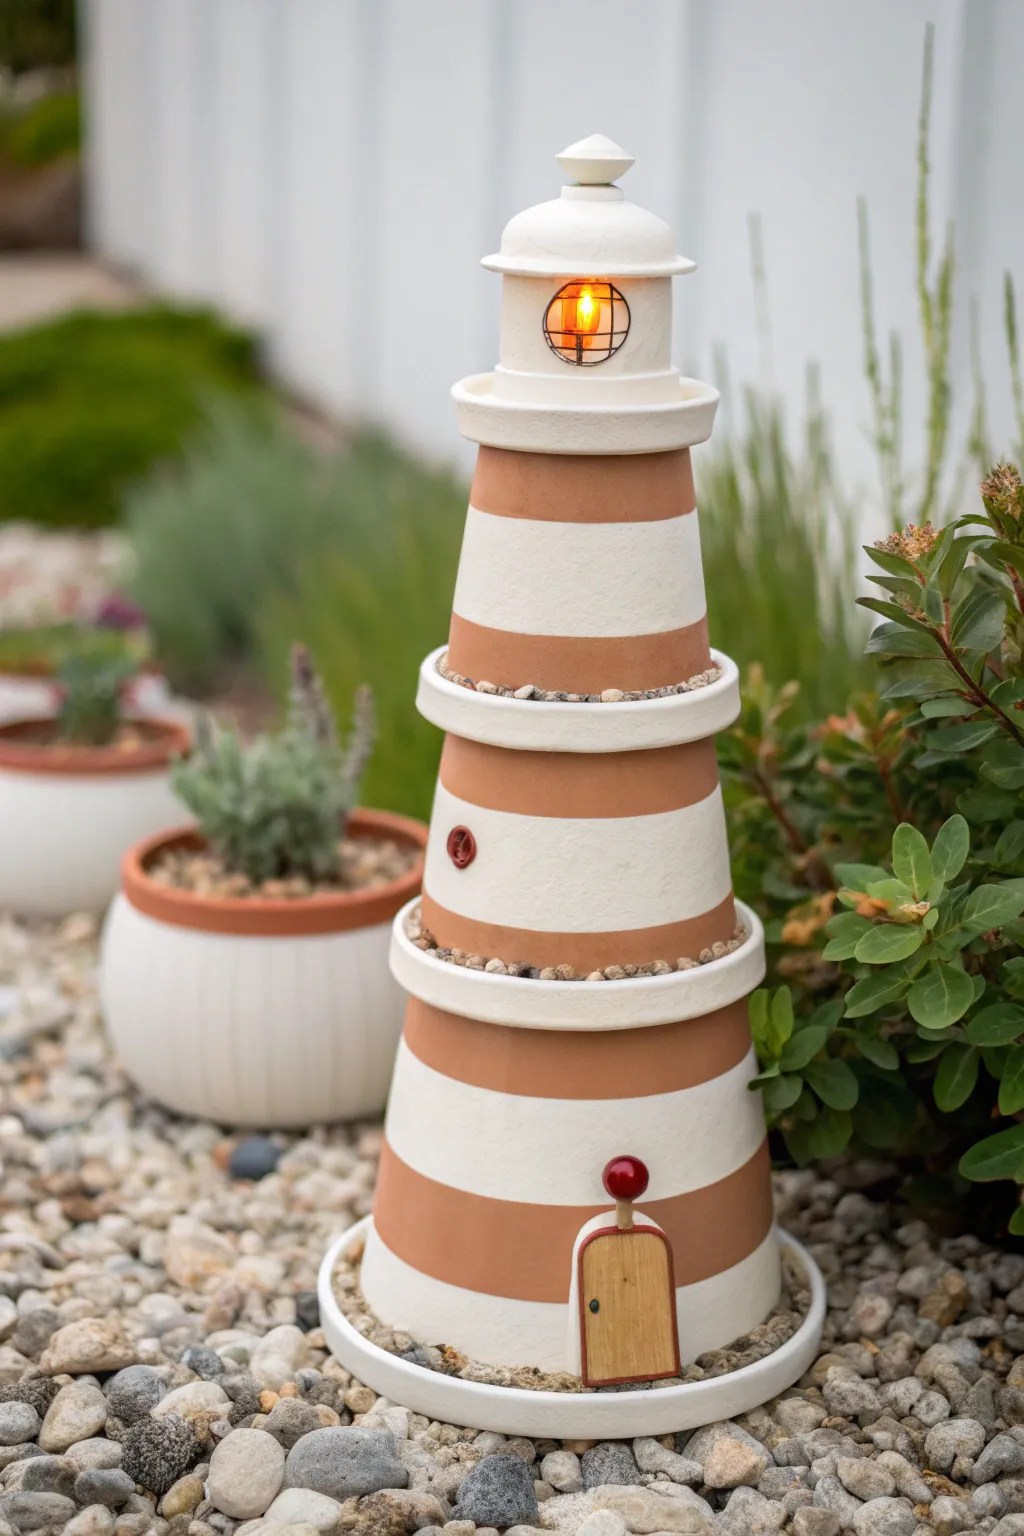
Bring the seaside to your garden with this charming lighthouse sculpture constructed from simple terracotta pots. The classic striped design and glowing lantern top make it a delightful focal point for any flowerbed or patio corner.
How-To Guide
Materials
- 3 Terra cotta pots (graduated sizes, e.g., 8-inch, 6-inch, 4-inch)
- 2 Terra cotta saucers matching the larger pots
- 1 Smallest terra cotta saucer (for the top)
- Strong craft adhesive or construction glue (e.g., E6000)
- White outdoor acrylic paint
- Painter’s tape
- Small decorative pebbles or gravel
- Miniature wooden door
- Red wooden bead (for doorknob/accent)
- Small battery-operated lantern or solar tea light
- Small glass votive holder (optional, for the lantern housing)
- Small drawer knob or finial (for the very top)
- Small red decorative accent (for the porthole)
Step 1: Preparation and Base Coat
-
Clean the pots:
Begin by thoroughly wiping down all your terra cotta pots and saucers with a damp cloth to remove any dust or manufacturing residue. Let them dry completely, as moisture will prevent the paint from adhering properly. -
First white coat:
Paint the exterior of all three pots and the rims of all saucers with white outdoor acrylic paint. You don’t need to paint the inside unless it will be visible. -
Build opacity:
Terra cotta is thirsty and absorbs paint quickly, so apply a second or third coat of white paint until you have a solid, opaque finish. Allow ample drying time between layers.
Uneven Stacking?
If your pots wobble when stacked, the saucer bottoms might not be perfectly flat. Use a thick bead of silicone adhesive to fill gaps and level everything out as it dries.
Step 2: Creating the Stripes
-
Tape the design:
Once the white base is fully cured, use painter’s tape to mark off horizontal stripes. I find that pressing the tape edges down firmly with a fingernail prevents paint from bleeding underneath. -
Paint the terracotta bands:
Instead of painting red stripes, we actally want to leave some areas appearing as natural clay or painted a terra cotta color. If you painted the whole pot white, mix a warm terra cotta acrylic shade and paint the exposed bands between your tape lines. -
Define the structure:
Ensure the rims of the pots utilize the color pattern effectively. For this look, keep the thick projecting rims of the pots white to act as visual dividers between the levels. -
Remove tape:
Carefully peel off the painter’s tape while the paint is still slightly tacky to achieve the crispest lines. If any paint bled through, touch it up with a small detail brush.
Step 3: Assembly and Details
-
Prepare the base:
Take the largest saucer and place it upside down (or right side up depending on preference) to act as the foundation. Apply a strong adhesive to the bottom rim of the largest pot and center it on this saucer. -
Stack the second level:
Apply adhesive to the top rim of the largest pot. Place the medium-sized saucer on top, then glue the medium pot onto that saucer. This creates a tiered ‘gallery’ look typical of lighthouses. -
Add pebbles:
Before the glue sets fully, sprinkle small decorative pebbles into the exposed adhesive around the base of the medium pot. This hides the glue seam and adds a nice textural element. -
Final tier:
Repeat the stacking process with the smallest saucer and smallest pot. Again, add a ring of adhesive and cover it with small pebbles for consistency. -
Attach the door:
Glue the miniature wooden door to the bottom pot. Adhere a small red bead above it to serve as a whimsical light or architectural detail. -
Add the porthole:
On the middle pot, glue a small red ring or washer-shaped object to simulate a porthole window. This breaks up the stripes and adds character.
Solar Power Upgrade
Instead of a battery tea light, disassemble a cheap solar pathway light. Glue the solar panel/light portion into the top tier for automatic nightly illumination.
Step 4: The Lantern Top
-
Create the lantern housing:
For the light room, use a small clear glass votive holder or a specialized miniature lantern piece. Place your battery-operated tea light inside. -
Cap it off:
Glue the final, smallest saucer upside down on top of the glass housing to act as the roof. -
Add the finial:
Finish the structure by gluing a small wooden drawer knob or decorative finial to the very center of the roof saucer. Paint this white to match the rest of the trim. -
Final seal:
To protect your hard work from the elements, spray the entire finished lighthouse with a clear, UV-resistant outdoor sealer.
Place your new nautical beacon in a bed of gravel or succulents and enjoy the cozy glow at twilight
Mini Fairy House Planters Made From Pots and Saucers
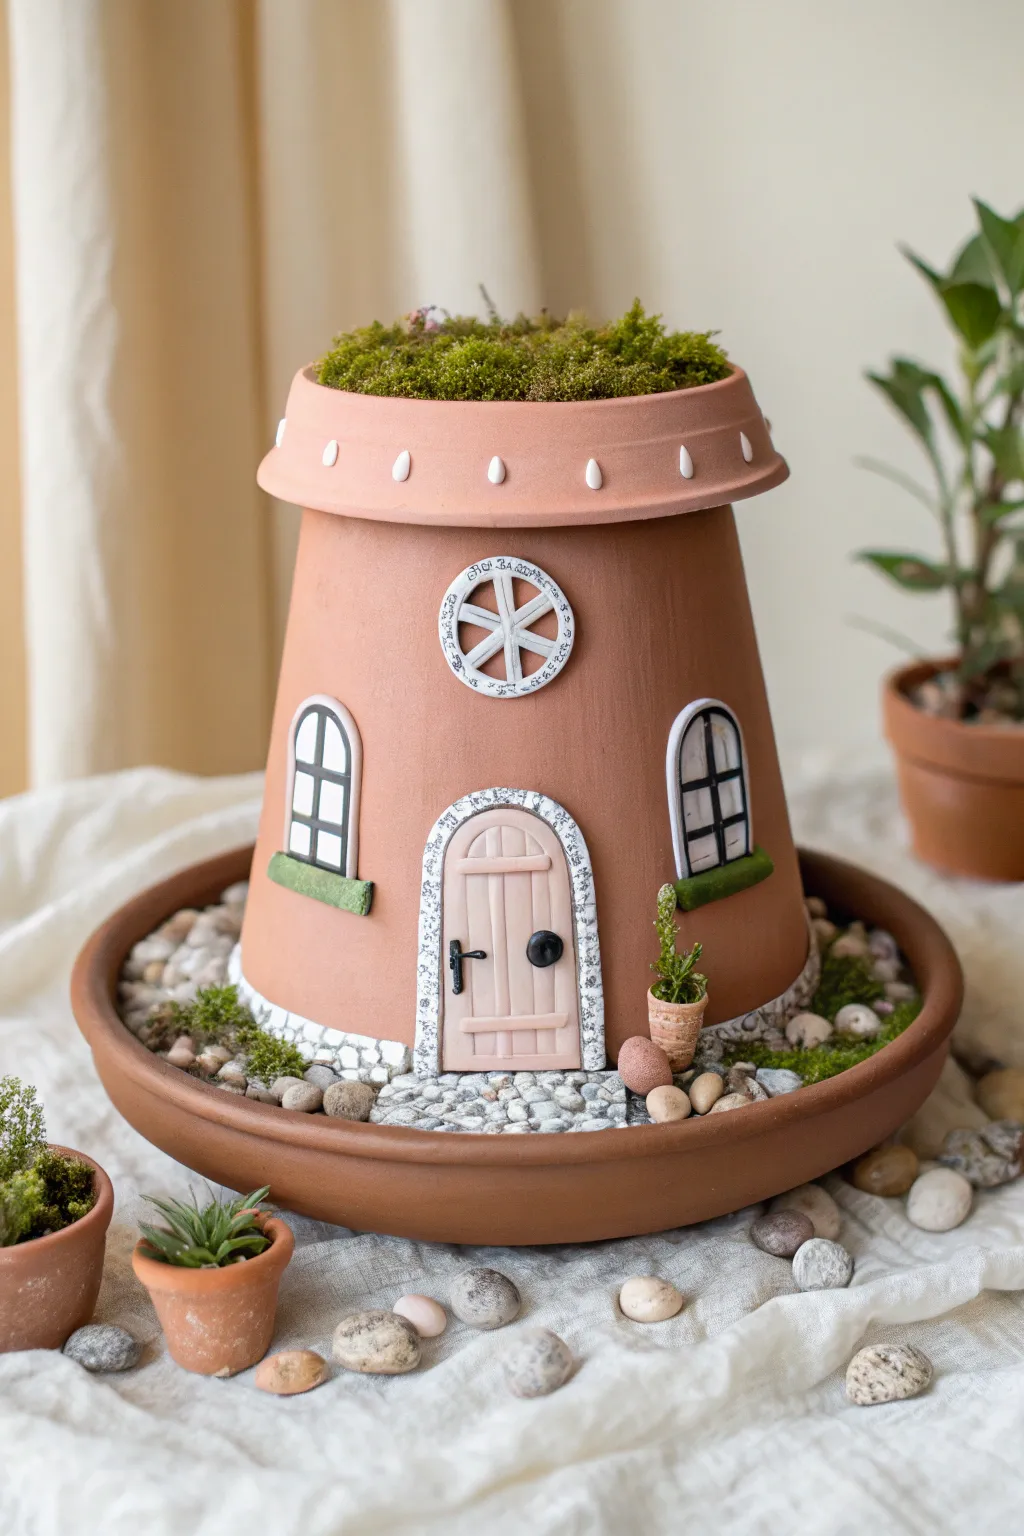
Transform ordinary terra cotta into an enchanting abode for your garden fairies with this delightful stacked-pot project. This rustic windmill-style house features hand-painted details, miniature stonework, and a lush rooftop garden that brings the whole scene to life.
Detailed Instructions
Materials
- 1 medium terra cotta pot (standard shape)
- 1 large terra cotta saucer (base)
- 1 small-medium terra cotta saucer (roof)
- White and black acrylic paint
- Light beige/cream acrylic paint
- Green acrylic paint (olive or moss tone)
- Small flat brushes and fine detail brushes
- Polymer clay (white/grey) or air-dry clay
- Strong waterproof adhesive (E6000 or similar)
- Small pebbles or aquarium gravel
- Preserved moss or live sheets of moss
- Small succulents or low-growing plants
- Potting soil
Step 1: Preparing the Structure
-
Clean surface:
Begin by wiping down all terra cotta pieces with a damp cloth to remove any dust or nursery price tags. Let them dry completely to ensure the paint adheres properly. -
Invert the main pot:
Flip your medium terra cotta pot upside down. This tapering shape forms the main tower of your fairy house. -
Test the fit:
Place the smaller saucer on top of the inverted pot (the pot’s original bottom) to ensure it fits as a roof. It should overhang slightly. Set it aside for now. -
Position on base:
Center the inverted pot on the large saucer base. You can choose to glue it down now for stability or leave it loose to make planting easier later. I prefer gluing it for a permanent display.
Use Outdoor Paint
If this house will live outside, use Patio Paint or seal your acrylic work with a matte spray varnish to prevent fading from the sun.
Step 2: Painting the Details
-
Outline the door:
Using a pencil, lightly sketch an arched door shape near the bottom of the inverted pot. Draw a thick border around it for the stone archway. -
Paint the door:
Fill in the inner door shape with a light beige or cream acrylic paint. You may need two coats for opaque coverage. -
Add door texture:
Once the beige is dry, mix a tiny bit of brown or grey into your beige. Paint vertical lines to simulate wood planks and two horizontal bands for hinges. -
Create the windows:
Sketch two arched windows on either side of the door and a circular window near the top. Paint the frames white and fill the ‘glass’ panes with black or dark grey paint. -
Detail the frames:
Use your finest brush and black paint to carefully outline the window panes and add grill lines. Add small green rectangles under the side windows to serve as flower boxes. -
Paint the stonework:
Paint the door archway white. While it’s still slightly wet, stipple in subtle grey spots to mimic granite texture. Do the same for a band of ‘foundation stones’ along the very bottom rim of the pot.
Step 3: Sculpted Accents & Assembly
-
Add clay details:
Roll tiny teardrop shapes of white polymer or air-dry clay. Glue these vertically along the rim of the roof saucer to create decorative architectural scallops. -
Make the wheel:
If you want a 3D effect for the top circular window, create a spoked wheel shape from clay, paint it white with grey weathering, and glue it over your painted circle. -
Hardware installation:
Fashion a microscopic door handle and hinges from black clay or a dab of black hot glue. Attach these to the door for a realistic touch. -
Create the path:
Spread adhesive on the large saucer base leading from the door to the edge. Press small, flat pebbles into the glue to create a cobblestone walkway. -
Landscape the base:
Fill the rest of the saucer moat with potting soil. Plant small patches of moss and tiny succulents around the base, tucking them between larger accent rocks. -
Plant the roof:
Fill the top roof saucer with soil. Plant a dense layer of low-growing sedum or pack it tightly with preserved green moss for a ‘living roof’ look. -
Final assembly:
Place the planted roof saucer onto the inverted pot. The weight of the soil usually holds it in place, but you can secure it with adhesive if you don’t plan on changing the plants.
Glue Not Holding?
Terra cotta is porous. If heavy pieces slide, sand the contact points lightly to create grip, or use a two-part epoxy for a permanent bond.
Now you have a charming focal point ready to welcome magical guests to your garden corner
Tiered Clay Pot Herb Garden Tower
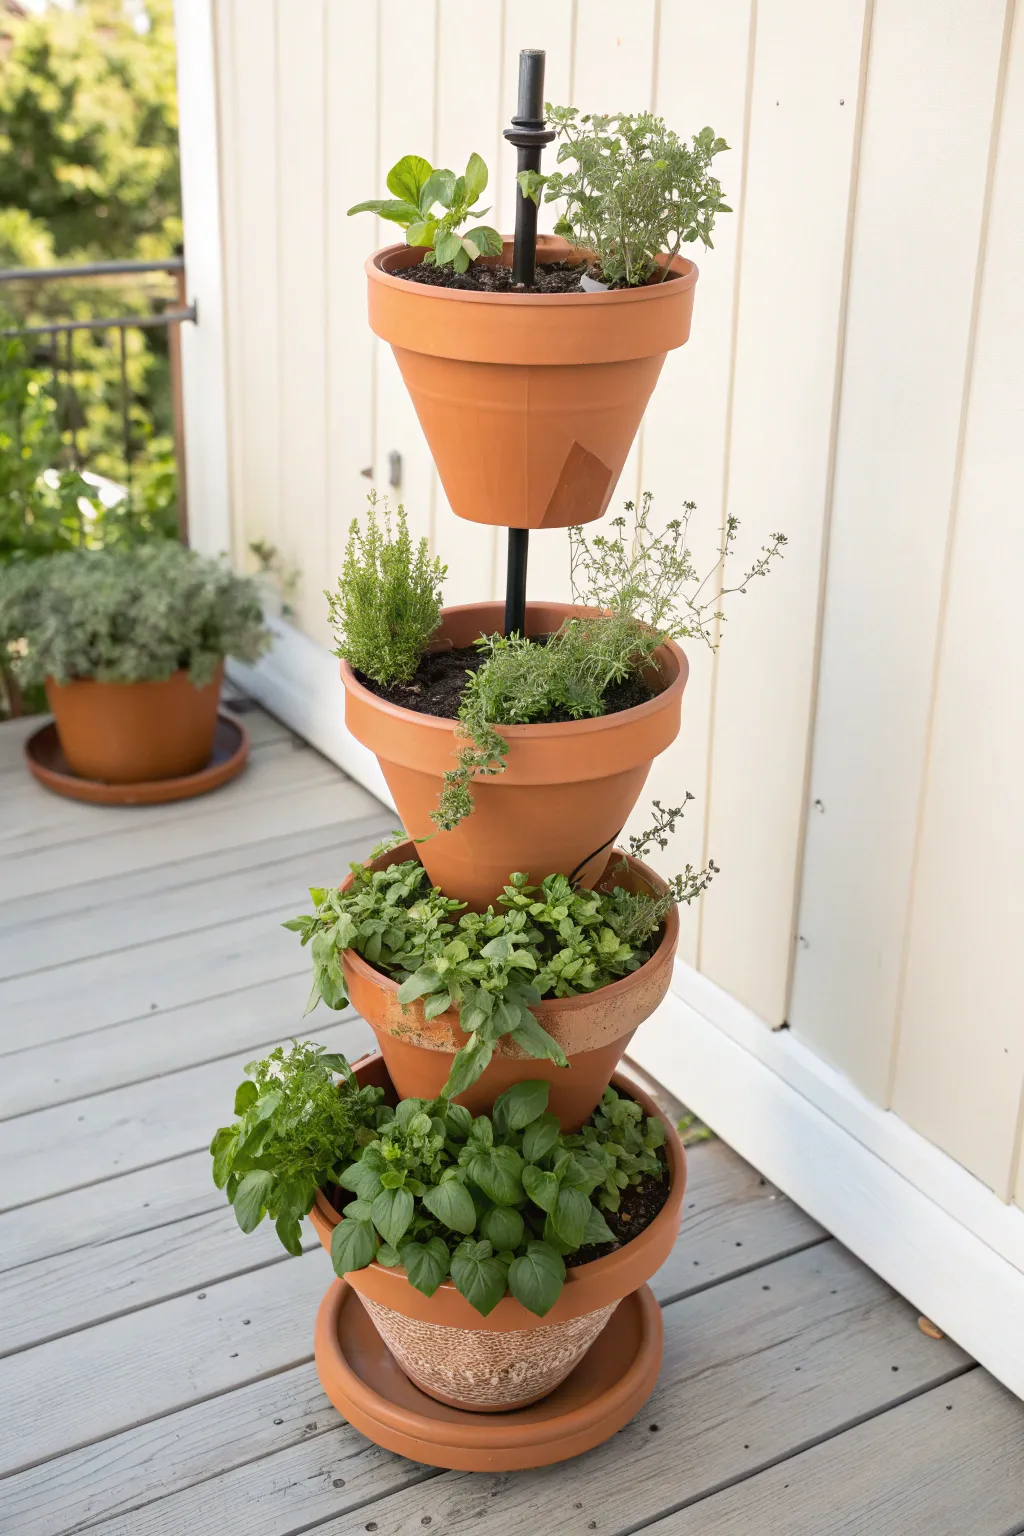
Maximize your vertical growing space with this clever interlocking terracotta tower that turns a small footprint into a lush cascade of fresh herbs. The graduated pots create visual interest while the central support ensures your aromatic garden stays upright and secure.
Step-by-Step Tutorial
Materials
- 4 terracotta pots in graduated sizes (e.g., 14-inch, 12-inch, 10-inch, 8-inch)
- 1 large terracotta saucer (sized for the largest pot)
- 4-foot piece of sturdy rebar or threaded metal rod (ensure diameter fits pot drainage holes)
- Potting soil mix
- Assorted herb plants (basil, thyme, oregano, parsley)
- Small gravel or pottery shards for drainage
- Spray paint or outdoor sealant (optional)
- Rubber mallet or hammer
- Measuring tape
- Permanent marker
Step 1: Preparation & Base Assembly
-
Select your location:
Choose the final resting spot for your tower carefully before you begin assembly. Once filled with soil and water, this tower will be extremely heavy and difficult to move, so build it right where it will live. -
Position the saucer:
Place your largest terracotta saucer on the ground or deck surface. Ensure it is level; if your deck is slanted, use small shims to get it perfectly flat to prevent leaning later. -
Prepare the base pot:
Take your largest terracotta pot (the 14-inch one) and place it directly in the center of the saucer. Double-check that the drainage hole is clear. -
Install the support rod:
Insert your rebar or metal rod through the drainage hole of the base pot. Drive it firmly into the ground if placing on soil; if on a deck, you will rely on the soil weight to hold it, so hold it upright manually for the next step.
Step 2: Building the Tiers
-
Fill the base:
While holding the rod straight (a helper is useful here), fill the bottom pot with potting mix. Pack the soil down firmly around the rod to help stabilize it, leaving about 2 inches of space from the rim. -
Thread the second pot:
Take your next largest pot (the 12-inch size). Thread it onto the rod through its drainage hole and slide it down. Instead of nesting it flat, tilt it slightly on the soil of the pot below so it rests at an angle. -
Secure the second tier:
Add soil to the bottom pot around the base of the new pot to lock it into that tilted position. Then, fill this second pot with soil, packing it around the rod again for stability. -
Add the third pot:
Slide the third pot (10-inch) onto the rod. Tilt this one in the opposite direction of the second pot to create a zigzag pattern, which balances the weight and looks more dynamic. -
Stabilize and fill:
Fill the third pot with soil, again packing it firmly. Check your rod periodically to ensure it hasn’t started leaning too far to one side. -
Top it off:
Place the final, smallest pot (8-inch) onto the rod. You can tilt this one or place it straight upright like a finial. Fill it with soil.
Lean Prevention
If your tower feels wobbly, don’t rely solely on soil. Slide a metal washer and a nut onto the rod inside each pot to mechanically clamp them at specific heights for rigid spacing.
Step 3: Planting the Garden
-
Water before planting:
I highly recommend watering the soil in the tower thoroughly before adding plants. This settles the dirt and reveals if you need to top up any levels that sink. -
Select plant positions:
Plan your layout. Moisture-loving plants like basil do well near the bottom where water trickles down, creates a humid microclimate. Mediterranean herbs like thyme prefer the drier, sunnier top spots. -
Plant the pockets:
Dig small holes in the exposed soil sections of each tilted pot. Gently tease out the roots of your herb starts and tuck them into these pockets. -
Fill the gaps:
Add extra soil around the base of each plant to cover exposed roots. Ensure the soil level is about an inch below the rim to prevent runoff when watering. -
Clean up:
Use a soft brush or cloth to wipe away any loose soil from the terracotta rims for a polished, finished look. -
Final watering:
Give the newly planted herbs a gentle shower to help them establish in their new vertical home.
Sun-Kissed Herbs
Rotate the entire tower structure 180 degrees every two weeks. This ensures that the herbs on the ‘back’ or shaded side of the tilt get equal sunlight and grow evenly.
Now you have a stunning, space-saving herb garden that serves as both a culinary resource and a beautiful patio centerpiece
Hanging Clay Pot Planters With Corded Hangers
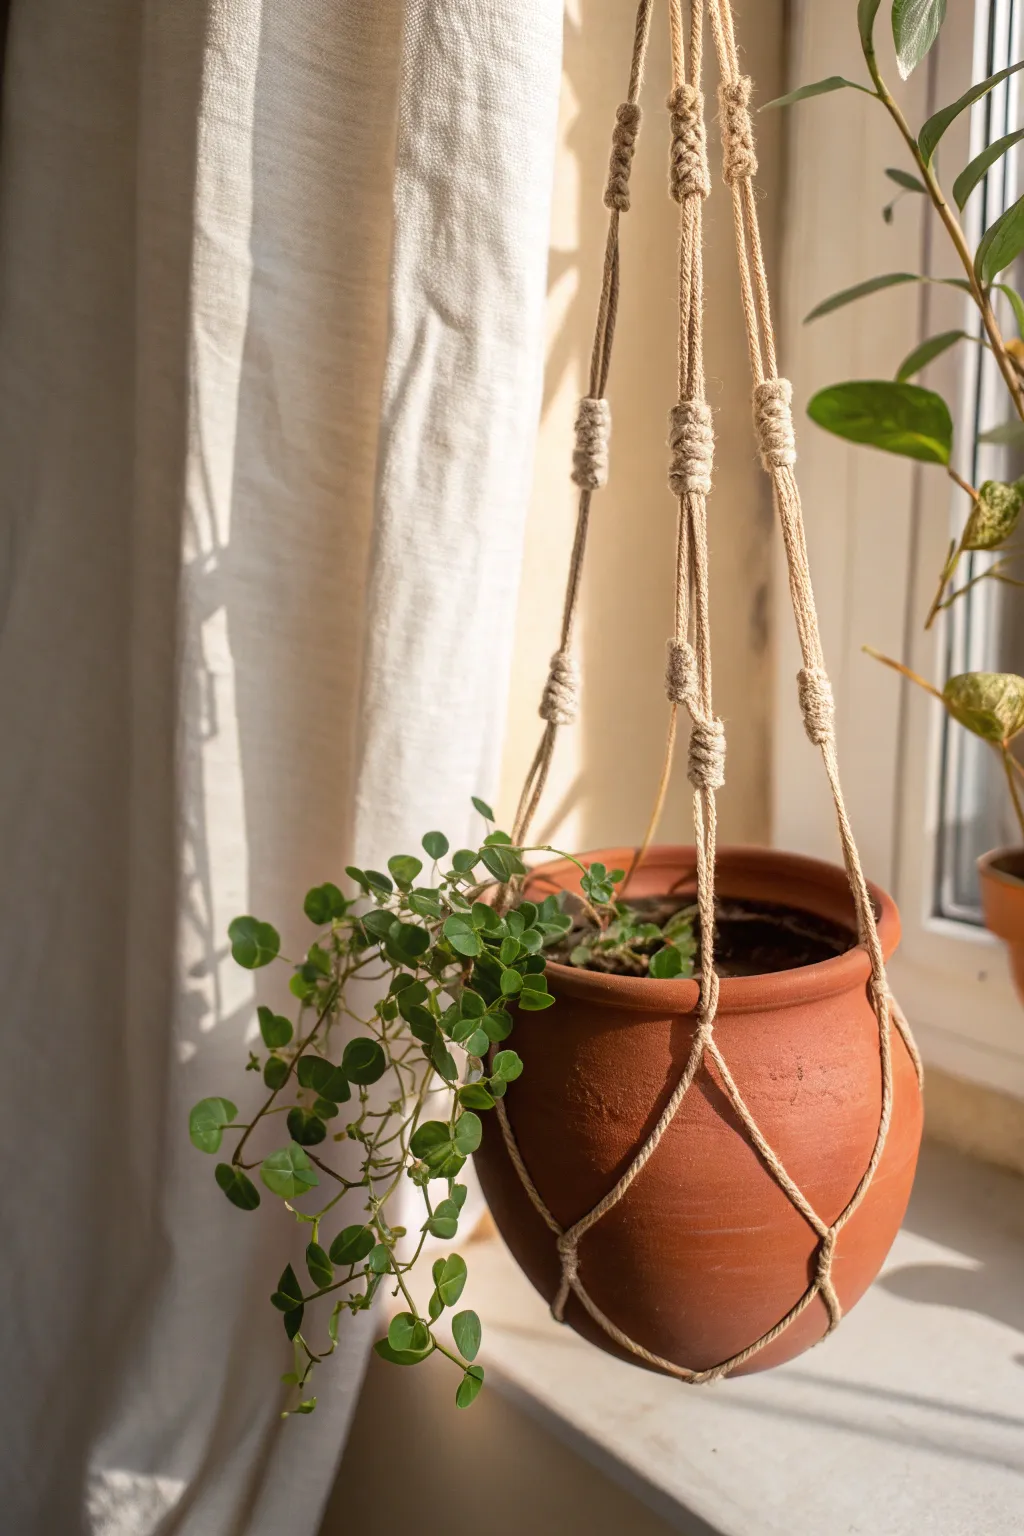
Transform a simple terracotta pot into a charming hanging display using natural jute twine and basic macrame knots. This project combines the earthy warmth of clay with the airy texture of a knotted hanger, perfect for trailing plants like Creeping Jenny or ivy.
Step-by-Step Guide
Materials
- Terracotta pot (approx. 6-8 inch diameter)
- Natural jute twine or hemp cord (medium thickness)
- Scissors
- Measuring tape
- Metal or wooden ring (for hanging)
- Small potted trailing plant
- Potting soil
Step 1: Planning and Preparation
-
Measure the cords:
Cut 8 lengths of jute twine, each measuring approximately 6 to 8 feet long. It is always better to have extra length than to run short, especially for the wrapped knots. -
Prepare the anchor:
Pull all 8 strands through your hanging ring so that the ring sits at the halfway point of the cords. You should now have 16 strands hanging down. -
Create the top wrap:
Cut a separate piece of twine about 2 feet long. Gather your 16 hanging strands just below the ring. Lay one end of the separate piece against the bundle to form a loop, then wrap the long end tightly around everything multiple times creating a ‘gathering knot’. -
Secure the wrap:
Thread the end of your wrapping cord through the loop you left at the bottom. Pull the top end of the wrapping cord upwards to pull the loop and the securing knot underneath the wrapped section. Trim any excess ends.
Knot Consistency
To keep your planter level, use a piece of tape or a marker on the strings to mark exactly where each knot needs to be before you tie it.
Step 2: Knotting the Strands
-
Divide the cords:
Separate the 16 strands into 4 equal groups of 4 strands each. These groups will form the four arms of your planter hanger. -
Begin the first arm:
Take one group of 4 strands. Measure down about 6-8 inches from the top gathering knot. Here, create a decorative ‘barrel knot’ or a series of square knots. To mimic the photo, wrapping a section with a separate piece of twine (similar to the top knot) creates that distinct cylindrical look. -
Repeat for all arms:
Repeat the decorative knot or wrap on the other three groups of strands, ensuring they all sit at exactly the same height so the pot hangs level. -
Create the second tier:
Measure down another 4-5 inches from your decorative knots. This is typically where the rim of the pot will sit. -
Interconnect the strands:
Take two strands from one group and two strands from the adjacent group. Bring them together and tie a simple overhand knot or a square knot about 2 inches below the previous decorative section. -
Complete the net:
Continue around the circle, tying adjacent groups of strands together. You should have a new row of 4 knots that bridges the gaps between the original arms. -
Add a third tier:
Measure down roughly 2 inches from your last row of knots. Again, take two strands from one knot and connect them with two strands from the neighboring knot using an overhand knot.
Add Some Color
For a modern twist, dip-dye the bottom tassel of the jute in a color that matches your room decor, or paint a geometric shape on the pot itself.
Step 3: Assembly and Finishing
-
Test the fit:
Before tying off the bottom, slip your clay pot into the netting to ensure it sits securely. The last row of knots should hug the curve of the pot’s belly. -
Tie off the base:
Gather all strands directly under the center of the pot. Ensure the tension is even on all sides. -
Final gathering knot:
Cut another separate length of twine (2 feet). Create a final gathering knot around all the strands at the base of the pot, securing exactly as you did at the top ring. -
Trim the tassel:
Cut the remaining hanging cords to your desired length to create a neat tassel at the bottom. -
Add your plant:
Place your terracotta pot back into the hanger. Fill it with potting soil and your chosen trailing plant, arranging the vines to cascade through the jute openings.
Hang your new creation near a sunny window to enjoy the beautiful shadow play created by the cords
Upside-Down Clay Pot Bell Wind Chime

Transform humble garden pots into a charming, rustic wind chime that adds a gentle melody to your porch or garden. This design features earthy terracotta tones paired with soft sage green accents, all strung together with natural jute and wooden beads for a relaxed, bohemian aesthetic.
Step-by-Step
Materials
- 4 Small terracotta pots (approx. 2-3 inches diameter)
- Acrylic paint (sage green or soft teal)
- Thick jute twine
- Large wooden beads (varying sizes, approx. 12mm – 20mm)
- Painter’s tape
- Paintbrush (flat)
- Scissors
- Hot glue gun and glue sticks (optional)
- Clear sealant spray (matte or satin)
Step 1: Preparation and Painting
-
Clean the pots:
Wipe down all four terracotta pots with a damp cloth to remove any dust or debris. Let them dry completely, as moisture will prevent the paint from adhering properly. -
Tape the design:
For the two pots destined to be green, apply a strip of painter’s tape around the rim or create horizontal stripes if you want to replicate the ring detail seen in the image. This helps keep lines crisp. -
Paint the first coat:
Using your flat brush, apply a coat of sage green acrylic paint to two of the pots. Leave the other two in their natural terracotta state. If the paint looks streaky, don’t worry—the second coat will fix it. -
Add weathered details:
Once the green paint is dry, you can lightly sand certain areas to distress them, or use a very dry brush with a darker brown paint to add faux weathering rings around the pot bodies, mimicking the image. -
Seal the pots:
Once you are happy with the paint job, spray all four pots (inside and out) with a clear matte sealant. This protects them from the elements if you plan to hang the chime outdoors.
Uneven Hanging?
If the pots hang crookedly, the knot inside might be uneven. Tie the knot around a small washer or button inside the pot to help it sit flat against the drainage hole.
Step 2: Assembling the Chime Strands
-
Cut the twine:
Cut two long lengths of jute twine, each about 3 to 4 feet long. You’ll fold these in half to create the hanging mechanism. -
Create the main loop:
Fold both pieces of twine in half. Gather the looped ends together and tie a sturdy overhand knot about 2 inches down from the fold. This loop will be used to hang the chime. -
Secure the top beads:
Thread a large bead or two onto all four strands of twine just below the main knot. This acts as a spacer and helps separate the strings. -
Separate the strands:
Divide the four strands into two pairs. One pair will hold the top tier of pots, and the other pair will hold the lower tier. This staggered height is key to the look.
Step 3: Strung Construction
-
Thread the first pot:
Take one pair of strings and thread them through the drainage hole of one of the unpainted terracotta pots. The pot should hang upside down. -
Secure the pot:
Slide a wooden bead onto the strings inside the pot and push it up snugly against the drainage hole. Tie a knot underneath the bead to hold the pot at your desired height. -
Add the clapper:
Thread another wooden bead onto the strings about 1-2 inches below the pot rim. This bead acts as the ‘clapper’ that hits the sides to make sound. Secure it with a knot below. -
Create the tassel end:
Leave 2-3 inches of twine below the last bead. Unravel the ply of the jute twine to create a fluffy tassel effect, trim it neatly, and tie it off. -
Repeat for the second top pot:
Repeat the threading and securing process with the second unpainted pot on the other pair of strings, adjusting the height so it hangs slightly differently than the first. -
Attach the lower tier:
Now, thread the green painted pots onto the ends of the longer twine strands. You may need to tie additional lengths of twine if your original pieces are too short, hiding the knots inside the upper beads. -
Final assembly:
Repeat the bead-locking and clapper process for the green pots. Ensure the clappers are positioned correctly to strike the rim of the green pots. -
Secure everything:
Double-check all your knots. For extra security, I like to add a tiny dab of hot glue inside the knots that hold the heavy pots to prevent slipping over time.
Level Up: Metallic Touch
Paint the decorative horizontal rings on the pots with metallic gold or copper paint instead of leaving them plain. It adds a subtle shimmer when the wind blows.
Hang your new creation in a breezy spot and enjoy the soft clanking sound of terracotta.
Clay Pot Bird Feeder Built From Stacked Pots
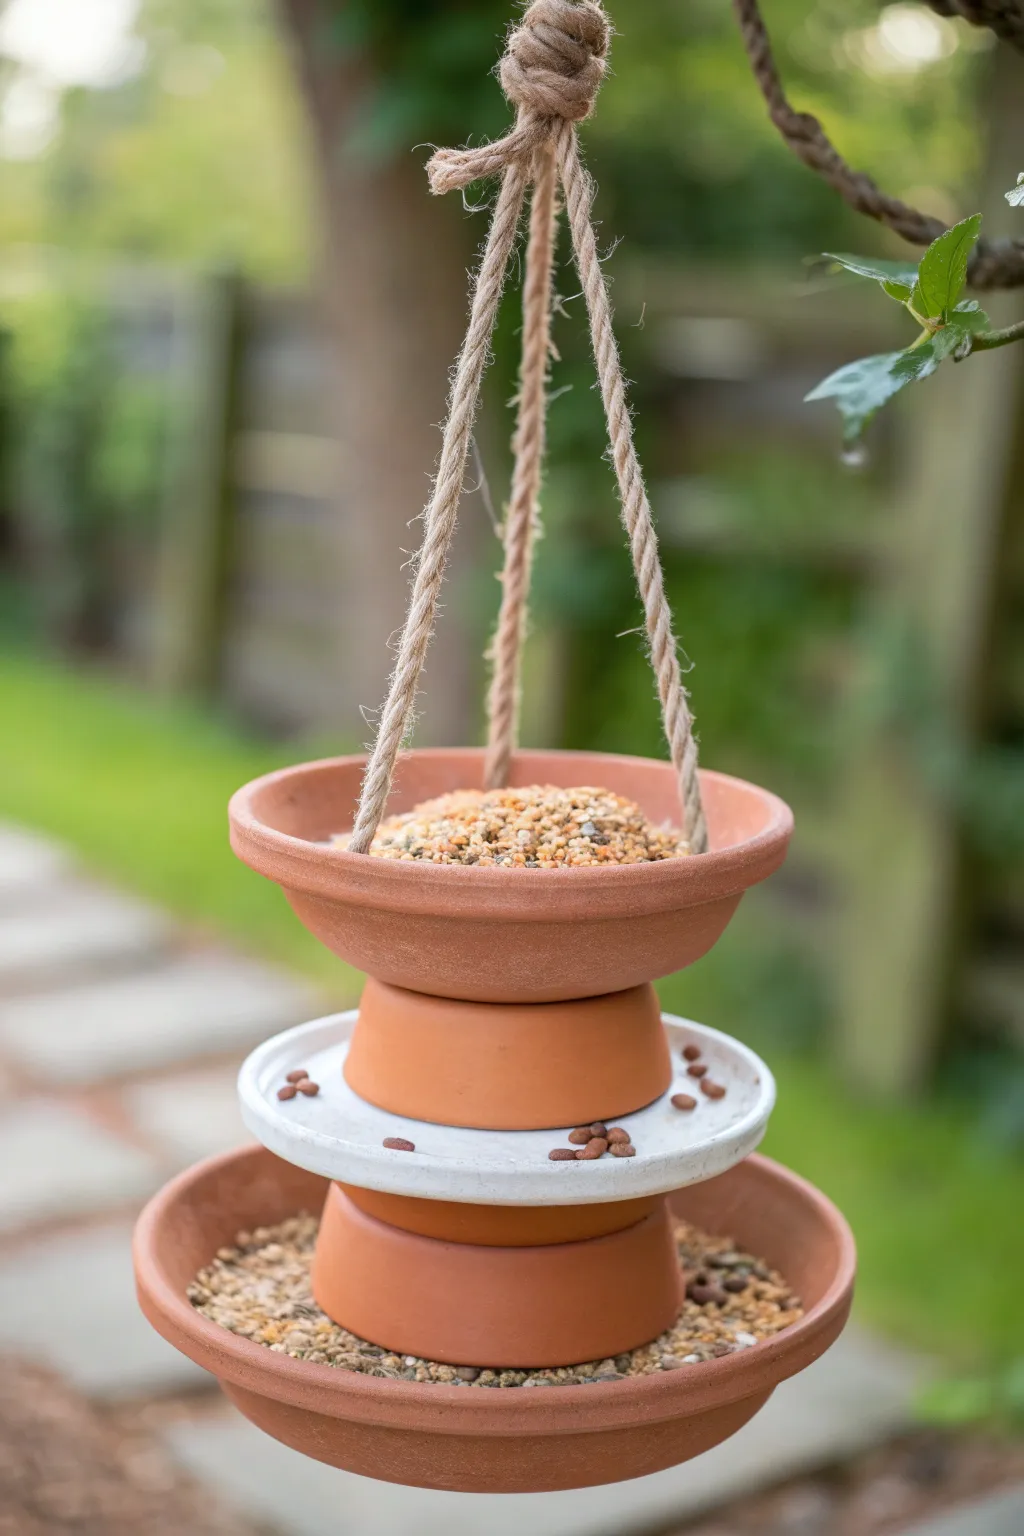
Transform simple garden staples into a stunning multi-level bird feeder that acts as a functional garden sculpture. This stacked design features three tiers for seed distribution, utilizing inverted pots as innovative spacers to create height and visual interest.
Step-by-Step Tutorial
Materials
- 2 Medium terracotta saucers (approx. 6-8 inches diameter)
- 1 Small terracotta saucer (approx. 4-5 inches diameter, glazed or painted white optional)
- 2 Small terracotta pots (approx. 3-4 inch high)
- Thick jute or sisal rope (approx. 1/4 inch thickness)
- Power drill with masonry bit (sized to match rope thickness)
- Painter’s tape
- Pencil or marker
- Heavy-duty construction adhesive (like E6000 or similar outdoor glue)
- Scissors
- Bird seed (mixed seed and shelled peanuts)
Step 1: Preparation & Drilling
-
Mark the top saucer:
Take one of your medium terracotta saucers, which will serve as the top bowl. Using a pencil, mark three equidistant points around the rim. Think of a clock face: mark 12, 4, and 8 for even spacing. -
Apply safety tape:
Place a small piece of painter’s tape over each pencil mark on the rim. This helps prevent the clay from cracking or slipping while you drill. -
Drill the hanging holes:
Carefully drill through the tape at your three marked points using a masonry bit. Go slowly and let the drill do the work to avoid shattering the terracotta. -
Clean and prep surfaces:
Wipe away all terracotta dust with a damp cloth. Ensure all pots and saucers are completely dry and free of dirt before attempting to glue anything.
Drilling Disaster?
If a saucer cracks while drilling, don’t worry. Use a slightly larger bit next time, apply less pressure, and ensure you keep the drill speed slow and steady.
Step 2: Assembling the Stack
-
Prepare the base:
Start with the second medium terracotta saucer. This will be the very bottom tray. Place it on your work surface, concave side facing up. -
Glue the first spacer:
Take one of the small terracotta pots and apply a generous ring of construction adhesive to its bottom rim (the smaller end). Ideally, I like to rough up the surface slightly with sandpaper first for a better grip. -
Invert and attach:
Turn the small pot upside down and press it firmly into the center of the bottom saucer. The wide opening of the pot should be facing down against the saucer floor. -
Add adhesive to the spacer top:
Apply a ring of adhesive to the top of this inverted pot (which is actually the pot’s bottom). -
Place the middle tier:
Center the small saucer (the white one in the photo, or plain terracotta if you prefer) on top of the glue. Press down firmly to ensure a solid bond. -
Attach the second spacer:
Repeat the process with the second small pot. Apply glue to its rim, invert it, and adhere it strictly to the center of the middle saucer tier. -
Final assembly:
Apply adhesive to the top of the second inverted pot. Place the drilled top saucer onto this glue, centering it perfectly. Ensure the drilled holes are unobstructed. -
Curing time:
This is crucial: allow the entire glue assembly to cure for at least 24 hours without moving it. The bond needs to be rock-hard to support the weight of the seed.
Pro Tip
To attract the widest variety of birds, use different seed mixes on each level: sunflower hearts on the bottom, peanuts in the middle, and millet on top.
Step 3: Rigging the Suspension
-
Cut the rope:
Cut three equal lengths of jute rope, about 3 feet long each. It’s better to have them too long than too short. -
Thread the ropes:
Feed one end of a rope length through one of the drilled holes in the top saucer, going from the inside to the outside and up. Tie a large, secure knot on the *underside* of the saucer rim so the rope can’t pull through. -
Repeat for all holes:
Do the same for the remaining two holes. You should now have three ropes extending upward from the top bowl. -
Gather and knot:
Gather all three ropes together at the top centered above the feeder. Adjust their lengths until the feeder hangs perfectly level. -
Create the hanging loop:
Once level, tie all three ropes together into a large overhand knot. This knot creates the loop you will use to hang the feeder from a branch. -
Fill and hang:
Take your masterpiece outside. Fill the bottom and middle tiers with seeds or nuts, and the top with finer seed. Hang it securely from a sturdy branch.
Enjoy watching your feathered friends flock to your handmade tiered dining station
Mixed-Media Character Totems Using Multiple Pots
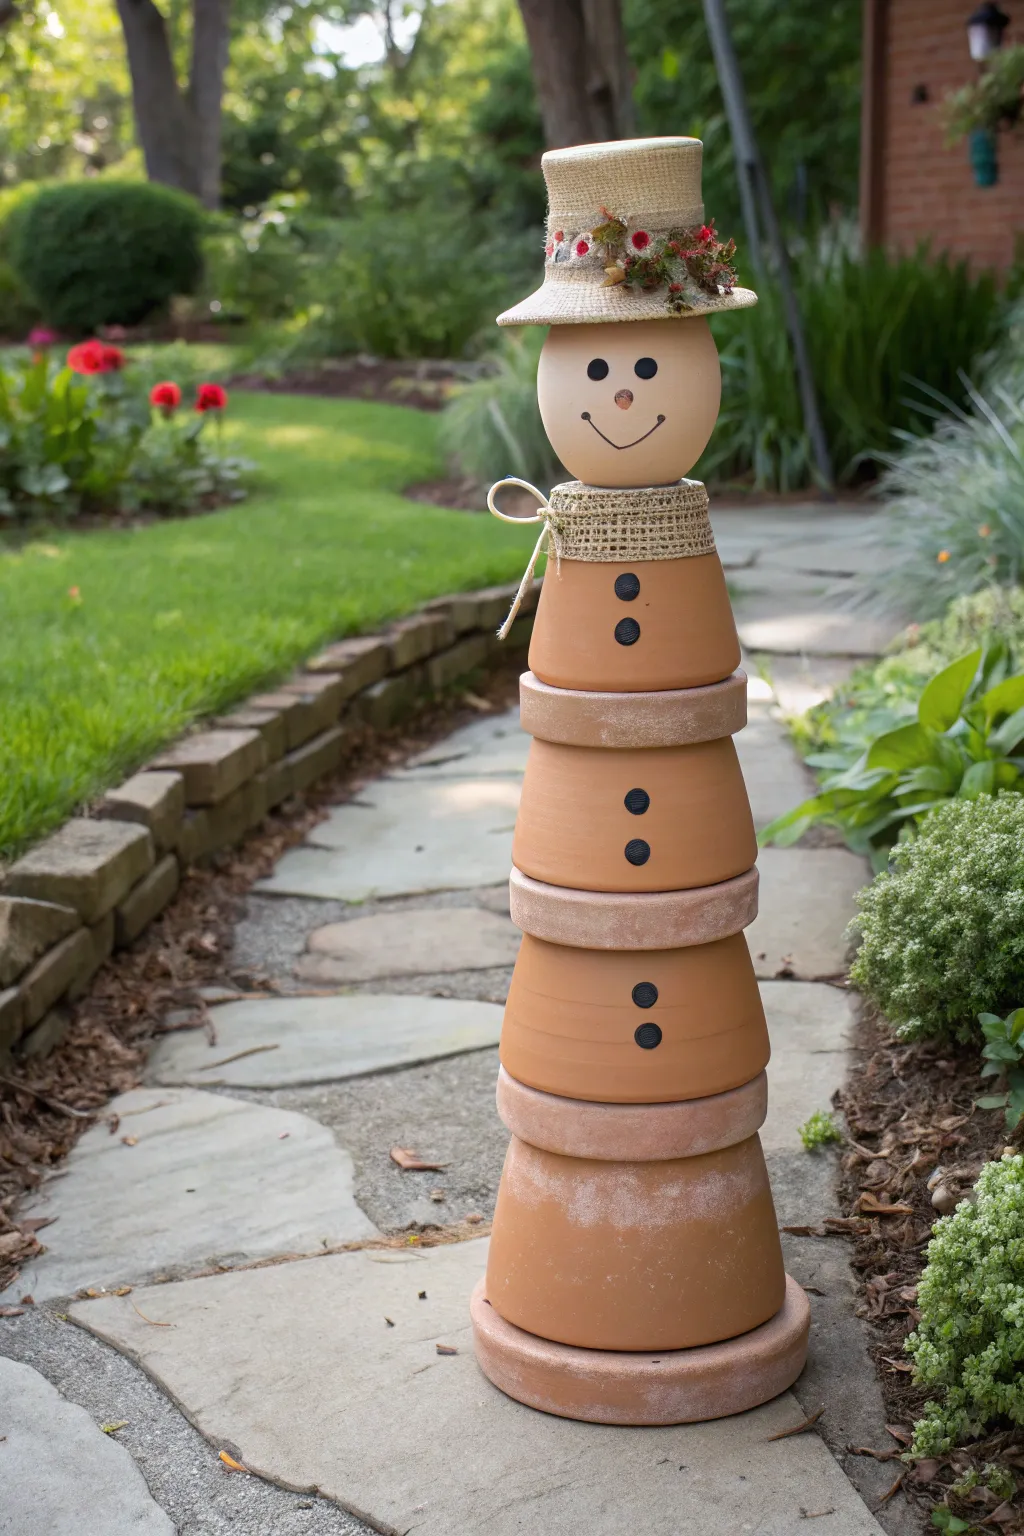
Transform standard terracotta pots into a charming garden guardian that stands tall among your flowers. This whimsical character combines simple stacking techniques with painted details for a rustic yard decoration.
Detailed Instructions
Materials
- 4 terracotta pots (graduated sizes: large, medium-large, medium, small)
- 4 terracotta saucers (sized to match the pots’ bases)
- 1 small round clay pot or styrofoam ball (for the head)
- Strong outdoor adhesive (E6000 or similar)
- Acrylic craft paints (black, orange, pink)
- Small paintbrush
- Straw hat
- Artificial flowers or garland
- Burlap ribbon or twine
- Hot glue gun and glue sticks
- Clear outdoor sealant spray (matte or satin)
Step 1: Planning and Stacking
-
Test the stack:
Before applying any glue, arrange your pots and saucers to check the fit. Place the largest pot upside down, then its saucer right-side up on top of it. Repeat this pattern with the next sizes up, creating a tapered tower. -
Clean surfaces:
Wipe down all terracotta surfaces with a damp cloth to remove dust and debris. Let them dry completely, as moisture will prevent the adhesive from bonding correctly. -
Glue the base:
Apply a generous ring of heavy-duty outdoor adhesive to the bottom rim of the largest overturned pot. Center the largest saucer on top and press firmly. -
Build the body:
Apply adhesive to the bottom of the second-largest pot and press it firmly onto the center of the first saucer. Continue this pattern—pot, saucer, pot—until you have stacked all four main body segments. -
Allow to cure:
Let the adhesive cure for at least 24 hours. I prefer to leave it undisturbed in a garage or safe spot so the heavy terracotta doesn’t shift while drying.
Bottom Heavy is Best
If you live in a windy area, glue the initial large pot to a heaving paving stone or fill the bottom cavity with gravel before glueing the next layer to prevent tipping.
Step 2: Creating the Face
-
Prepare the head:
Take your round clay pot or styrofoam ball. If using a pot, turn it upside down so the flat bottom becomes the top of the head. -
Paint the eyes:
Using black acrylic paint and a small round brush, dab two solid circles for eyes on the upper third of the head. -
Add the nose:
Paint a small, triangular or oval nose in the center using orange paint. A burnt orange shade looks especially nice against the clay color. -
Paint the mouth:
Use a fine liner brush and black paint to draw a thin, simple smile line. Add small perpendicular ‘stitch’ marks at the corners of the mouth for character. -
Add rosy cheeks:
Dilute a tiny drop of pink paint with water. Lightly dab this onto the cheeks for a subtle, weathered blush effect. -
Seal the face:
Once the paint is fully dry, spray the entire head piece with a clear outdoor sealant to protect the painted details from rain and sun.
Drifting Stack?
If the pots slide around while the glue is wet, use strips of painter’s tape to hold the layers in alignment until the adhesive grips.
Step 3: Assembly and Decoration
-
Paint buttons:
On the body stack, paint two large black circles on each pot section to represent buttons. You want them to look like coal or large fasteners running down the front. -
Attach the head:
Glue the painted head securely to the top of the final saucer on your stack using the heavy-duty adhesive. -
Create the scarf:
Cut a length of wide burlap ribbon. Wrap it snugly around the ‘neck’ area where the head meets the body stack. -
Secure the scarf:
Tie the burlap in a knot or use hot glue to secure it in place. Fray the ends slightly to enhance the rustic look. -
Tie on twine:
Wrap a piece of thin twine or raffia over the burlap collar and tie a simple bow for added texture. -
Decorate the hat:
Take the small straw hat and hot glue a ring of artificial autumn flowers or greenery around the brim. -
Final placement:
Apply a ring of adhesive to the top of the head and press the decorated hat firmly into place. Let everything dry completely before moving your new friend to the garden.
Place your warm and welcoming terracotta figure near a pathway or front porch to greet your guests with a smile