If you’ve ever rolled a little ball of clay and thought, “Okay… now what?”, making clay animals is the sweetest next step. I love animal projects because you can build them from simple shapes and still end up with something totally adorable and recognizable.
Classic Chibi Bunny With Teardrop Ears
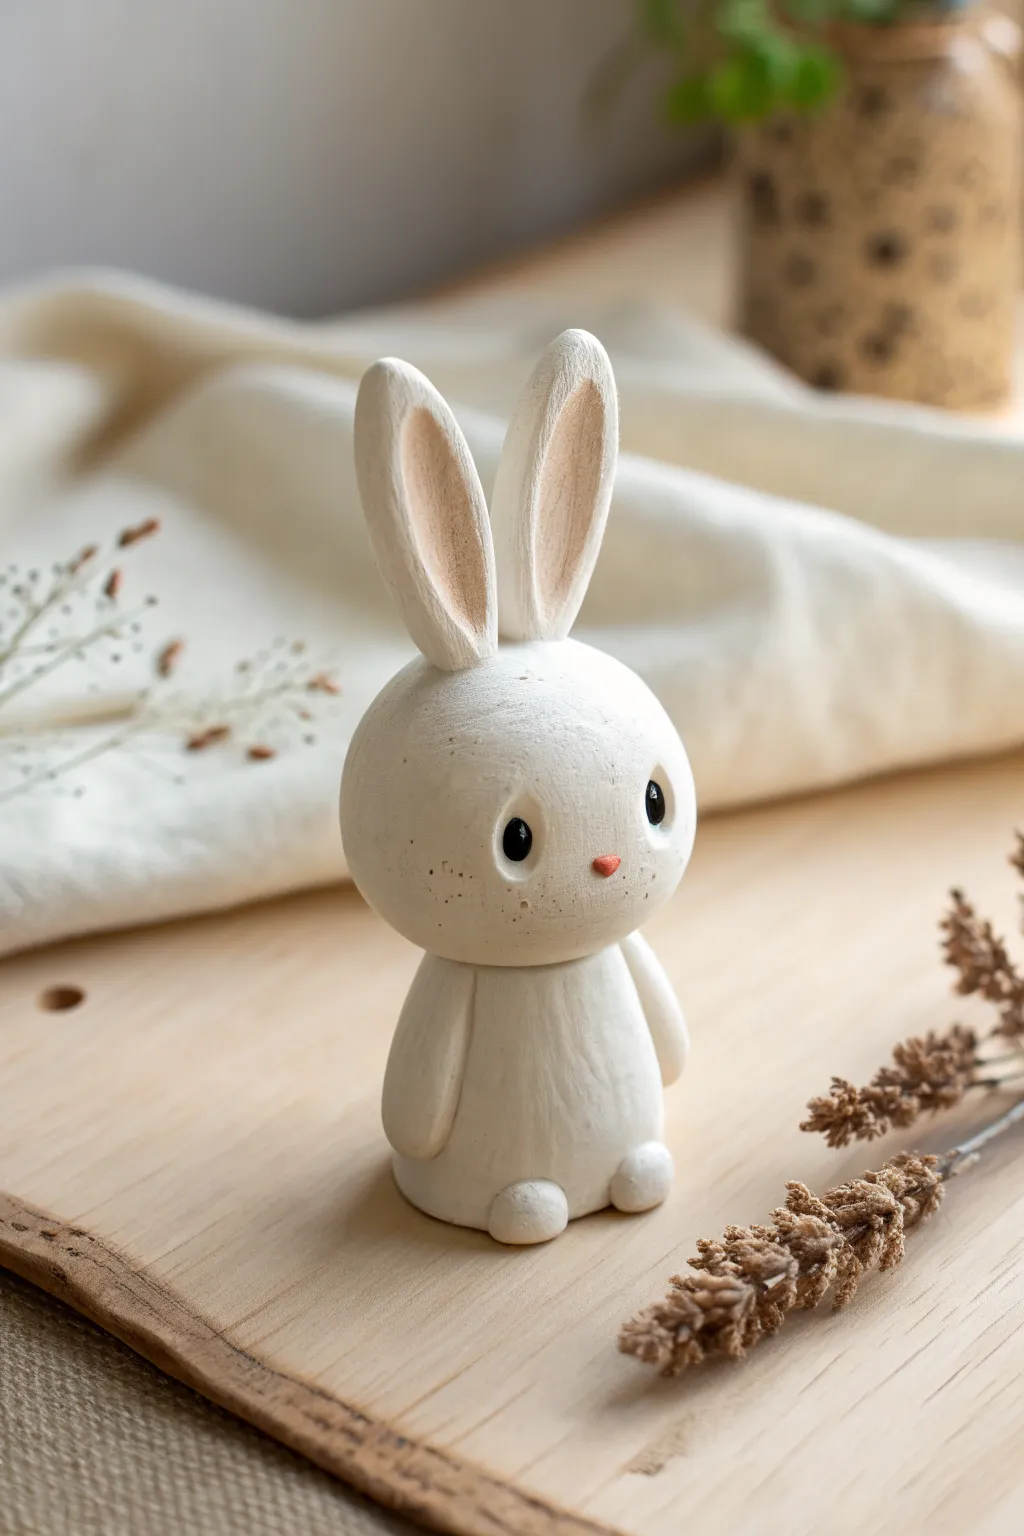
This adorable figurine captures the essence of innocence with its classic chibi proportions and oversized, expressive ears. The smooth, matte white finish combined with delicate speckling gives it a charming, rustic ceramic look without needing a kiln.
How-To Guide
Materials
- White polymer clay (or air-dry clay)
- Black clay (tiny amount for eyes)
- Soft pink pastel chalk or blush
- Acrylic paint (warm pink/terracotta)
- Brown acrylic paint (for speckles)
- Dotting tool or toothpick
- Old toothbrush or stiff bristle brush
- Needle tool
- Liquid clay or PVA glue
- Matte varnish
Step 1: Shaping the Body
-
Form the base:
Start by conditioning a chunk of white clay until it’s pliable and smooth. Roll it into a smooth ball, then gently taper the top half slightly to create a very subtle pear shape. This forms the bunny’s torso. -
Flatten the bottom:
Tap the wider bottom of your pear shape onto your work surface. You want the figurine to stand securely on its own, so ensure this base is perfectly flat. -
Create the head:
Roll a second ball of white clay, slightly larger than the top of the body piece. This bunny has a large, rounded head typical of the chibi style. Flatten the bottom slightly where it will join the neck. -
Attached head to body:
Insert a short piece of wire or a toothpick into the body for support if you like. Add a dab of liquid clay or glue, then press the head firmly onto the body, smoothing the seam if you prefer a one-piece look, or leaving the definition for a segmented toy aesthetic.
Step 2: Adding the Features
-
Shape the arms:
Roll two small, identical logs of white clay. Round off one end of each log. Press these vertically against the sides of the body, blending the top shoulder area slightly into the torso so they look integrated but distinct. -
Form the feet:
Create two small, slightly flattened balls for the feet. Place them at the front base of the body, positioning them close together so the bunny looks polite and tidy. -
Sculpt the ears:
Roll two equal-sized logs of white clay, tapering them at the top to create a long teardrop shape. Use your thumb or a modeling tool to create a shallow, elongated indentation running up the center of each ear. -
Color the inner ears:
Before attaching, use a soft brush to dust some pink pastel powder or blush into the indentations you just made. This creates a soft, diffused gradient that looks more natural than solid paint. -
Attach the ears:
Press the bottom of the ears onto the top of the head. Position them upright and close together. Use a modeling tool to blend the clay at the attachment point so the ears are secure.
Clean Clay Tip
White clay attracts dust like a magnet. Keep a pack of baby wipes or rubbing alcohol nearby to constantly clean your hands and tools while sculpting.
Step 3: Face and Finishing Details
-
Create eye sockets:
Using a large ball tool or the rounded end of a paintbrush, press two indentations into the face. Step back to check symmetry; wide-set eyes usually look cuter. -
Insert the eyes:
Roll two small balls of black clay. Press them firmly into the sockets. They should fill the hole but bulge out slightly for a friendly expression. -
Add eye highlights:
Tiny details matter, so I usually take a needle tool and place a microscopic dot of white paint or clay on the upper right side of each black eye. -
Paint the nose:
dip a toothpick into warm pink or terracotta acrylic paint. Place a tiny triangular dot right between and slightly below the eyes. -
Add speckles:
Dilute a tiny amount of brown paint with water. Dip a stiff brush or toothbrush into it, wipe most of it off on a paper towel, and gently flick the bristles to spatter tiny freckles across the cheeks and nose area. -
Final Bake or Dry:
If using polymer clay, bake according to the package instructions (usually 275°F/135°C for 15-30 minutes). If using air-dry clay, let it sit in a dry, room-temperature spot for at least 24 hours. -
Varnish:
Once fully cured or dry, apply a coat of matte varnish to protect the surface while maintaining that soft, velvety texture seen in the photo.
Texture Shift
Before baking, gently press a piece of coarse sandpaper or a stiff brush against the entire surface to give the bunny a stone-like, rustic texture.
Now you have a sweet, serene bunny companion ready to brighten up any shelf or desk


Simple Sleeping Cat With Curled Tail
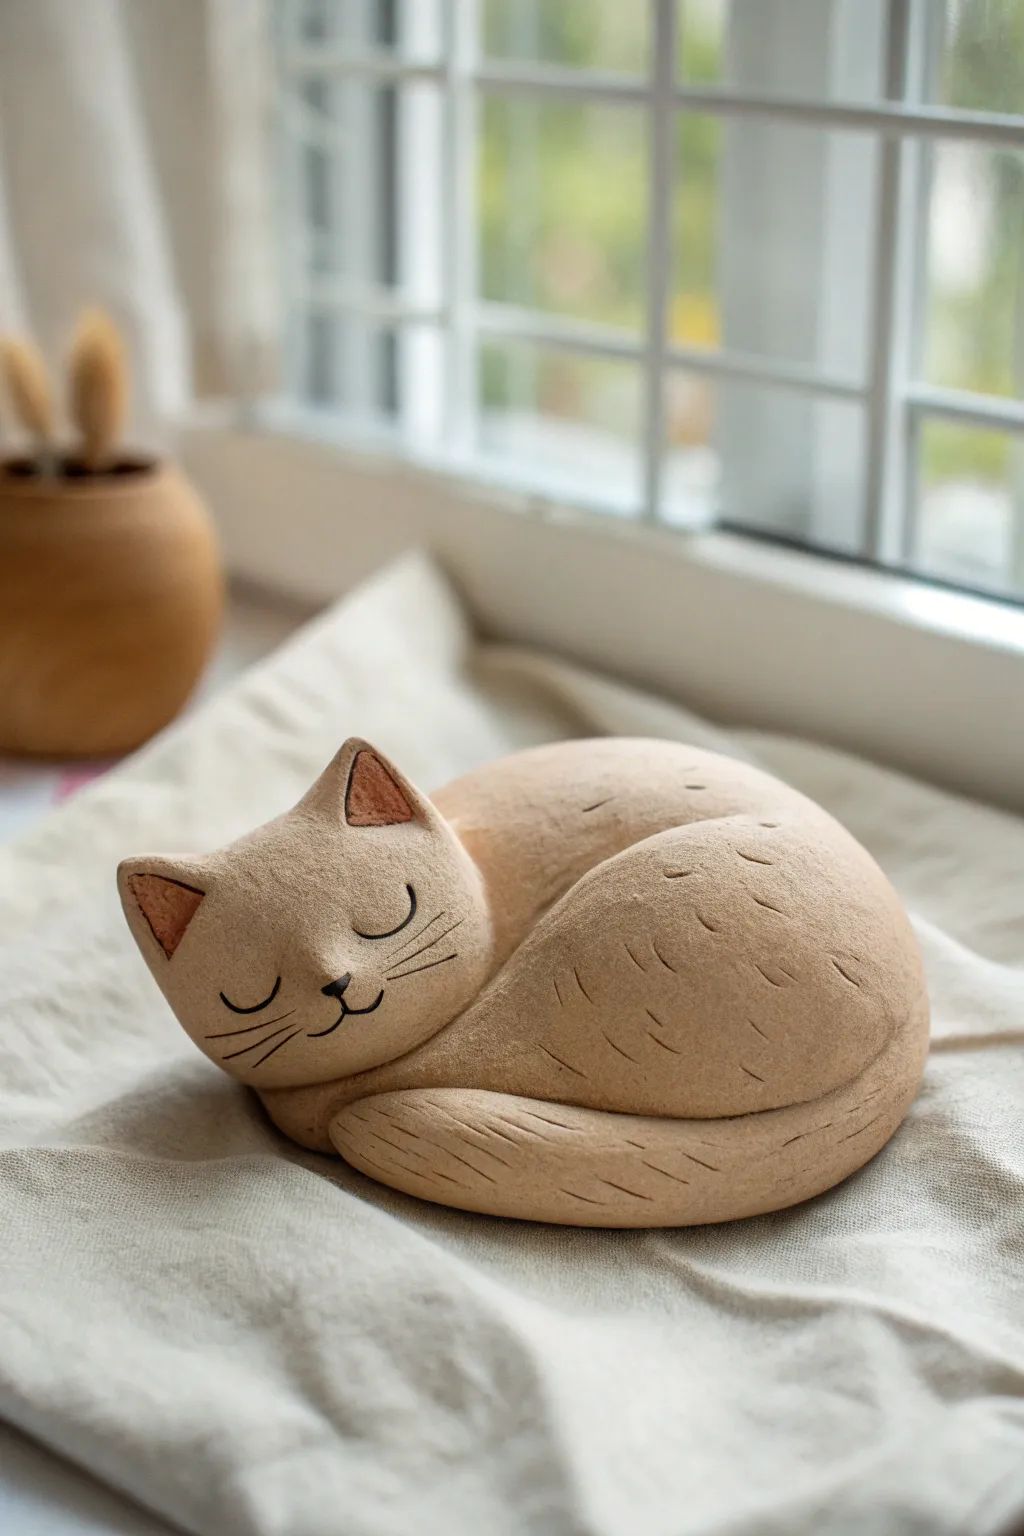
Capture the peaceful essence of a sleeping feline with this smooth, minimalist clay project. Using simple shapes and subtle texturing, you’ll create a charming sculpture that looks perfectly content resting on any windowsill.
Step-by-Step Tutorial
Materials
- Air-dry clay (stone or light terracotta color)
- Clay modeling tools (needle tool, smooth wooden spatula)
- Small cup of water
- Acrylic paint (black and warm brown)
- Fine detail paintbrush
- Sponge or soft cloth
- Clear matte varnish (optional)
Step 1: Shaping the Base
-
Form the main body:
Start with a large ball of clay about the size of an orange. Gently flatten it slightly into a smooth, oval-like bun shape to create the curled-up body of the cat. -
Create the head:
Roll a smaller ball of clay for the head. Shape it into a slightly flattened sphere, making it proportionate to the body. -
Attach the head:
Score the clay surfaces (make scratch marks) where the head will join the body—specifically at one end of the oval. Dab a little water on the scored areas and press the head firmly onto the body. -
Blend the seams:
Using a modeling tool or your wetted thumb, smooth out the clay where the neck meets the body so the transition looks seamless. The head should appear tucked into the body comfortably.
Smooth Surface Secret
Use a slightly damp sponge during the smoothing phase instead of just fingers. This removes fingerprints and creates that polished, stone-like texture visible in the photo.
Step 2: Adding Key Features
-
Shape the ears:
Pinch two small, triangular pieces of clay. Attach them to the top of the head using the slip and score method. I like to press the centers slightly with a rounded tool to create depth. -
Form the tail:
Roll a thick snake of clay, slightly tapered at one end. Curve it around the bottom edge of the body, creating a ‘C’ shape that hugs the cat’s form. -
Attach the tail:
Score and wet the side of the body and the inner side of the tail. Press the tail against the body, blending the upper seam gently so it looks like it’s resting snugly against the fur. -
Refine the shape:
Walk your hands around the entire sculpture, smoothing away any fingerprints with a slightly damp sponge. The surface should feel rounded and stone-like.
Step 3: Texturing and Details
-
Add fur texture:
Take a needle tool or a sharp toothpick. Gently etch short, dashed lines across the back and tail of the cat. Keep the strokes sparse and directional to suggest soft fur without overcrowding the surface. -
Define the tail separation:
Deepen the groove between the tail and the body using a modeling tool to ensure the tail looks distinct from the main torso. -
Carve the face:
Carefully draw two U-shaped curves for closed eyes. Add a small triangle nose below them and two curved lines extending outward for the mouth. -
Add whiskers:
Lightly etch three long lines on each cheek area for the whiskers. Keep a steady hand here; these lines should be thin and delicate. -
Smooth rough edges:
Check your carvings for any ‘crumbs’ of clay. Lightly brush them away with a soft, dry brush or your finger.
Make It a Planter
Before drying, hollow out a circle in the cat’s back to create a space for a small air plant or succulent. The curled shape makes a perfect natural pot.
Step 4: Finishing Touches
-
Let it dry:
Allow the sculpture to dry completely in a well-ventilated area for 24-48 hours until it is hard and lighter in color. -
Paint facial details:
Using a very fine brush and black acrylic paint, carefully trace inside the carved lines for the eyes, nose, mouth, and whiskers to make them pop. -
Color the ears:
Mix a small amount of warm brown or terracotta paint with water to make a translucent wash. Paint the inside triangles of the ears. -
Seal the piece:
Once the paint is dry, apply a coat of clear matte varnish to protect the clay and give it a finished, professional look.
Place your sleeping cat in a sunny spot to enjoy its eternal nap


Round Pig With A Button Snout
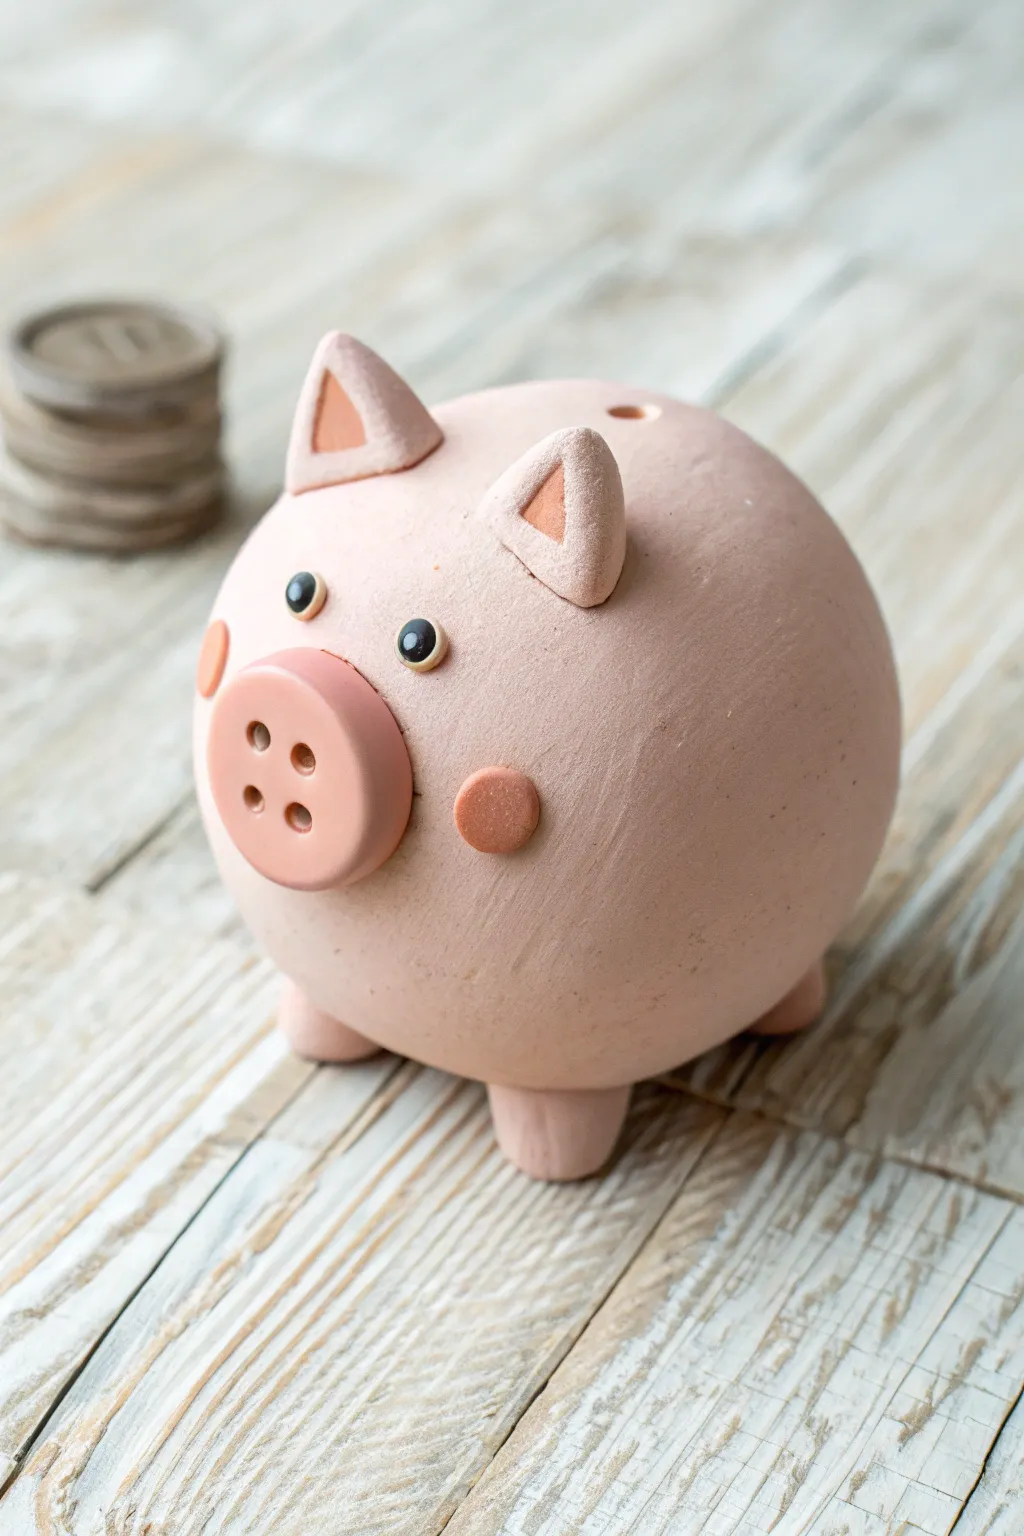
This adorable, spherical little piggy features a charming button nose and soft, earthy pink tones that give it a rustic yet sweet appearance. With its simple shapes and distinct personality, it makes for a delightful desk companion or a whimsical start to a savings collection.
Detailed Instructions
Materials
- Polymer clay or air-dry clay (light pink or terracotta)
- Small amount of darker pink or reddish-brown clay (for inner ears and cheeks)
- Standard beige or cream non-flat 4-hole button (approx. 1 inch)
- Two small black beads or small balls of black clay (for eyes)
- Mod Podge or clear matte varnish
- Clay sculpting tools (specifically a smoothing tool and a needle tool)
- Aluminum foil (for armature core)
- Strong craft glue (like E6000 or super glue)
Step 1: Forming the Body base
-
Create the core:
Begin by crumpling aluminum foil into tight ball, roughly the size of a tennis ball. This saves clay and keeps the figurine lighter. -
Condition the main clay:
Take a large chunk of your light pink clay and knead it thoroughly until it is warm, pliable, and free of cracks. -
Wrap the core:
Flatten the clay into a pancake and wrap it completely around the foil ball. Roll it centered between your palms to smooth out any seams until you have a perfect sphere. -
Texture check:
The pig in the image has a slightly matte, earthy texture. If your clay is too smooth or shiny, you can lightly tap the surface with a piece of sandpaper or a toothbrush for a subtle matte finish.
Cracking Clay?
If you see cracks forming while shaping the sphere, dip your finger in a tiny bit of water (for air-dry) or baby oil (for polymer) and smooth them out immediately.
Step 2: Adding the Features
-
Prepare the snout:
Take your beige button. If you don’t have a button, you can sculpt a flat circle of clay and poke four holes in it to mimic the look. -
Attach the snout foundation:
Roll a small ball of pink clay, flatten it slightly, and press it onto the front center of the face to act as a glue pad. -
Place the snout:
Press the button firmly onto that clay pad so the clay slightly squishes up through the button holes, creating a seamless connection. I prefer doing this while the clay is wet to ensure a tight bond. -
Make the ears:
Roll two small balls of pink clay and shape them into thick triangles. -
Detail the ears:
Take tiny pinched triangles of the darker pink clay and press them into the center of your main ear shapes to create the inner ear detail. -
Attach the ears:
Press the ears onto the top of the head, spacing them widely apart. Use a sculpting tool to blend the base of the ears into the main body so they don’t fall off. -
Create the cheeks:
Roll two small circles of the darker pink clay (about half the size of a dime) and press them onto the cheeks, just below where the eyes will go.
Step 3: Finishing Touches
-
Position the eyes:
Press your two small black beads into the clay above the snout but slightly wider than the button’s width. Push them deep enough so they don’t pop out later. -
Create the legs:
Roll four equal-sized cylinders of pink clay. These should be short and stout to support the weight of the round body. -
Attach the legs:
Flip the pig over gently. Score the attachment points and press the four legs onto the bottom, ensuring they are level so the pig doesn’t wobble. -
Coin slot (Option):
If you want this to function as a bank, use a flat blade or craft knife to carefully cut a slot in the very top of the sphere, between the ears. -
Bake or Dry:
If using polymer clay, bake according to the package instructions (usually 275°F for 15-30 minutes). If using air-dry clay, let it sit in a dry spot for 24-48 hours. -
Final seal:
Once fully cured or dry, apply a coat of matte varnish to protect the surface while keeping that natural look.
Curly Tail Upgrade
Don’t forget the back! Roll a very thin snake of clay and wrap it around a toothpick to create a spiral. Attach this corkscrew tail to the rear of the pig.
Place your little round pig on a shelf where its sweet expression can greet you every day


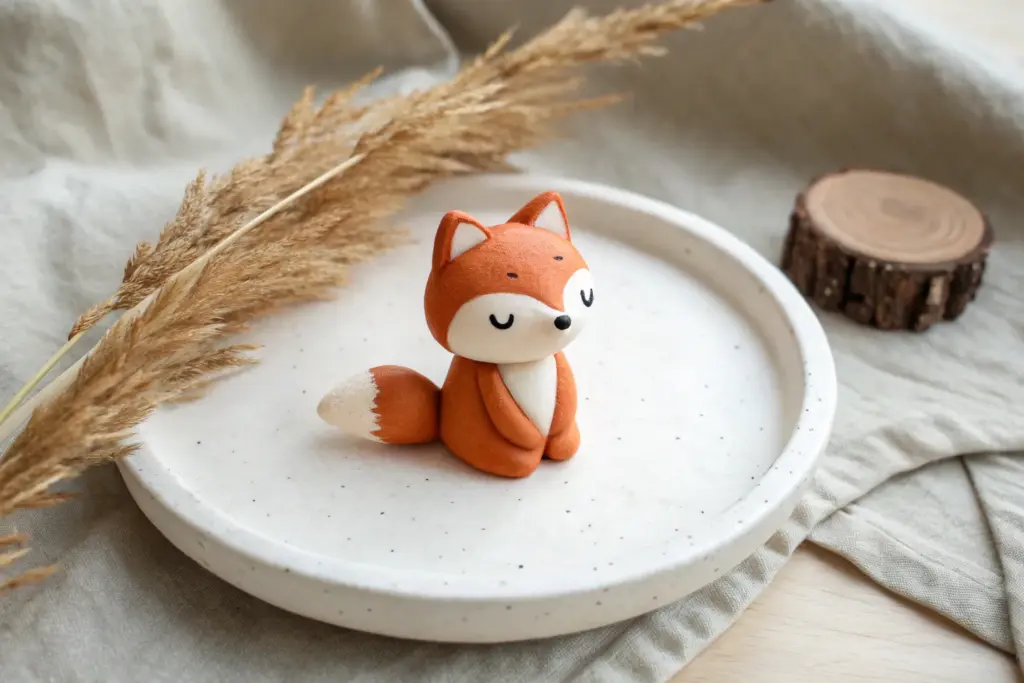
Tiny Fox With Big Ears And A White Chest
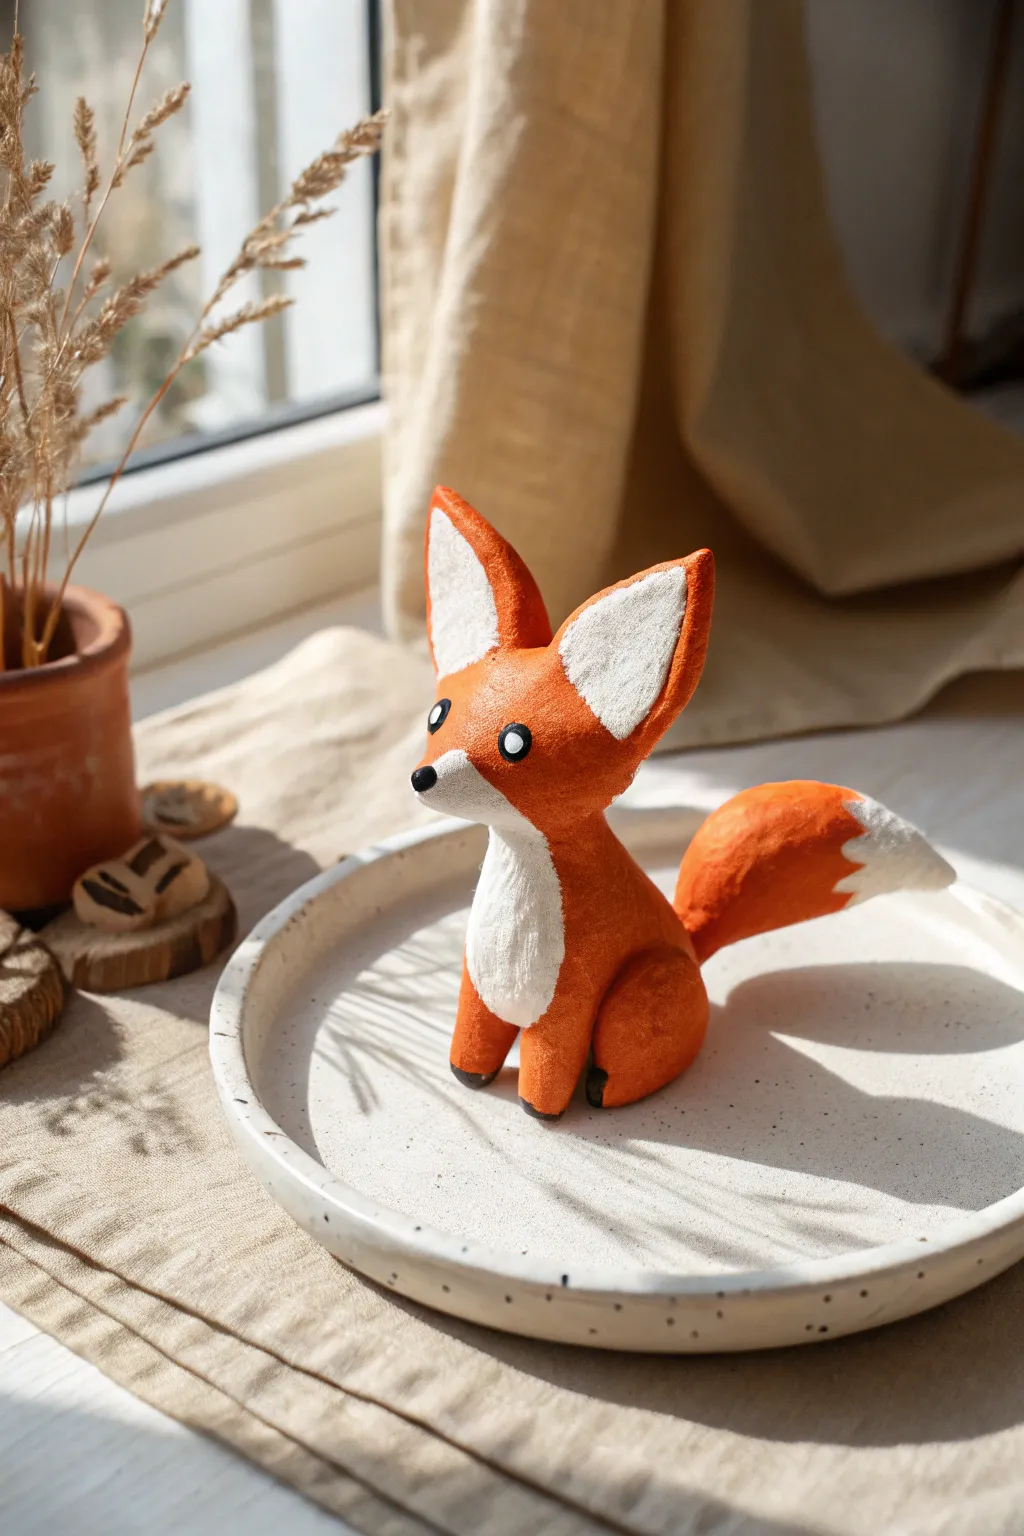
This charming little figurine features oversized ears and a focused expression that gives it plenty of personality. The textured, matte finish makes it look almost soft to the touch, perfect for adding a woodland vibe to any shelf.
Step-by-Step
Materials
- White air-dry clay
- Acrylic paints (bright orange, white, black)
- Small detail brushes
- Basic sculpting tools (or a toothpick)
- Fine-grit sandpaper
- Water cup
Step 1: Shaping the Body and Head
-
Form the torso:
Start with a medium ball of clay about the size of a golf ball. Roll it into a smooth pear shape, slightly flattening the bottom so it sits stably. This will form the fox’s seated body. -
Shape the head:
Roll a slightly smaller ball for the head. Gently pinch the front to pull out a pointed snout, keeping the top rounded. -
Attach the head:
Score the top of the body and the bottom of the head with a sculpting tool or toothpick. Dab a little water on the scored areas and press the head firmly onto the body, blending the clay at the neck seam until smooth. -
Create the ears:
Form two large triangles for the ears—these should be quite prominent. Pinch them to be slightly concave on the inner face. -
Mount the ears:
Score and slip the ears onto the top of the head. I like to position them facing slightly outward and forward for an alert look. Blend the seams carefully so they don’t look stuck on.
Ears Drooping?
If the heavy ears keep falling during sculpting, prop them up with bits of crumpled paper or foam. Leave these supports in place until the clay is remarkably firm or fully dry.
Step 2: Limbs and Tail
-
Make the front legs:
Roll two small, equal-sized logs of clay. Attach these vertically to the front of the chest, blending the top portion into the chest while leaving the little paws distinct at the bottom. -
Form the haunches:
Create two flattened teardrop shapes for the rear legs. Attach these to the sides of the lower body, curving them forward to suggest the seated position. -
Sculpt the tail:
Roll a generous log of clay that tapers at both ends, making one end quite fluffy and thick. Curve it into a gentle ‘S’ shape or a simple upward curve. -
Attach the tail:
Secure the thinner end of the tail to the lower back of the fox. Blend the join thoroughly, ensuring the tail rests against the body or the ground for extra support while drying. -
Refine the texture:
Before the clay hardens, you might want to gently dab the surface with a stiff brush or a textured sponge to avoid a ‘plastic’ smooth look, mimicking the matte texture in the image.
Pro Tip: Texture
To get that specific ‘fuzzy’ look shown in the photo, don’t use varnish. Instead, dab your final paint layer with a dry sponge to leave a slightly rough, matte stippled effect.
Step 3: Drying and Painting
-
Let it dry:
Allow your sculpture to dry completely. For air-dry clay of this thickness, this usually takes 24 to 48 hours. Turn it occasionally if the bottom stays damp. -
Sand imperfections:
Once bone dry, use fine-grit sandpaper to gently smooth out any unintentional bumps or fingerprints, especially around the ear tips and paws. -
Base coat:
Paint the entire fox with an opaque layer of bright orange acrylic paint. You may need two coats for full, vibrant coverage. -
Add white details:
Using a smaller brush, carefully paint the inner triangles of the ears, the tip of the tail, and the chest patch in white. Extend the white chest patch slightly onto the snout for that classic fox mask. -
Paint the eyes:
Dab two small circles of white for the eyes. Once dry, add a smaller black dot in the center of each, and a tiny white reflection highlight to bring them to life. -
Final touches:
Use the very tip of a fine brush to paint a small black nose on the end of the snout and to color the very tips of the paws if you want a dipped-ink look.
Place your finished fox near a window or beside a plant pot to showcase its woodland charm

The Complete Guide to Pottery Troubleshooting
Uncover the most common ceramic mistakes—from cracking clay to failed glazes—and learn how to fix them fast.
Mini Panda With Simple Black Patches

This adorable mini panda figurine captures the essence of cuteness with smooth, simple shapes and classic black-and-white styling. It’s an ideal beginner project that results in a charming desk companion sitting patiently on its little paws.
Step-by-Step Guide
Materials
- White polymer clay (or air-dry clay)
- Black polymer clay
- Clean work surface (ceramic tile or glass)
- Small ball stylus tool
- Needle tool or toothpick
- Wet wipes (essential for clean white clay)
- Oven (if using polymer clay)
Step 1: Shaping the Base
-
Clean Your Hands:
Before starting with white clay, thoroughly wash your hands and clean your surface. White clay picks up every speck of dust, so I like to keep a wet wipe nearby to clean my fingers constantly. -
Form the Body:
Take a walnut-sized chunk of white clay. Roll it firmly in your palms to warm it up, then shape it into a smooth, slightly tapered egg shape. This teardrop form will be the panda’s seated body. -
Create the Head:
Roll a slightly smaller ball of white clay for the head. Instead of a perfect sphere, gently press it into a rounded oval shape so the face is slightly wide rather than tall. -
Connect Head and Body:
Place the head onto the narrower top part of the body. If the clay is fresh, it should stick, but you can gently press them together or insert a small piece of toothpick between them for internal support. -
Smooth the Seam:
Using your finger or a smoothing tool, verify the head sits securely. You don’t need to blend the neck perfectly as the panda’s ‘chin’ will slightly overhang the body.
Clean Clay Tip
White clay gets dirty instantly. Keep a scrap piece of white clay next to you; roll it in your hands before touching your main project to pick up lint and dust first.
Step 2: Adding the Limbs
-
Shape the Legs:
Switch to black clay. Wipe your hands first! Roll two small balls of black clay and flatten them slightly into thick discs or rounded stub shapes for the feet. -
Attach the Legs:
Press these black discs onto the bottom front of the white body. Position them slightly apart so the panda looks stable and seated. -
Form the Arms:
Roll two elongated teardrop shapes from black clay. These should be smooth and tapered at one end. -
Position the Arms:
Attach the wider end of the teardrop to the ‘shoulder’ area of the white body. Gently curve the arm so it rests down the side of the belly, blending the top seam into the white clay just slightly for a strong bond.
Step 3: The Face Details
-
Make Eye Patches:
Roll two very small balls of black clay. Flatten them into thin ovals. These are the signature panda eye patches. -
Place the Patches:
Press the black ovals onto the face, angling them slightly downward towards the nose area to create a sweet, sad-puppy look. -
Add the Ears:
Create two small black balls for ears. Press your ball stylus tool into the center of each to cup them slightly, then attach them to the top corners of the head. -
The Nose and Mouth:
Roll a tiny speck of black clay into a triangle or oval for the nose and place it between the eyes. For the mouth, roll an extremely thin snake of black clay and shape a small ‘w’ or anchor shape beneath the nose. -
The Eye Sparkle:
This step brings it to life. Roll two microscopic balls of white clay. Press these gently into the upper section of the black eye patches to act as the reflection.
Bamboo Snack
Make a tiny green cylinder and add lines with a needle tool to create a bamboo shoot. Glue it to one of the panda’s paws after baking for extra storytelling.
Step 4: Finishing Up
-
Final Check:
Look over your panda from all angles. Smooth out any unintentional fingerprints, especially on the white areas, using a light touch. -
Bake or Dry:
If using polymer clay, bake according to the package instructions (usually 275°F/130°C for 15-30 minutes). If using air-dry clay, leave it in a safe, dry spot for 24-48 hours.
Once fully cured, your mini panda is ready to bring a calm presence to your shelf
Penguin Made From Two Ovals And A Beak
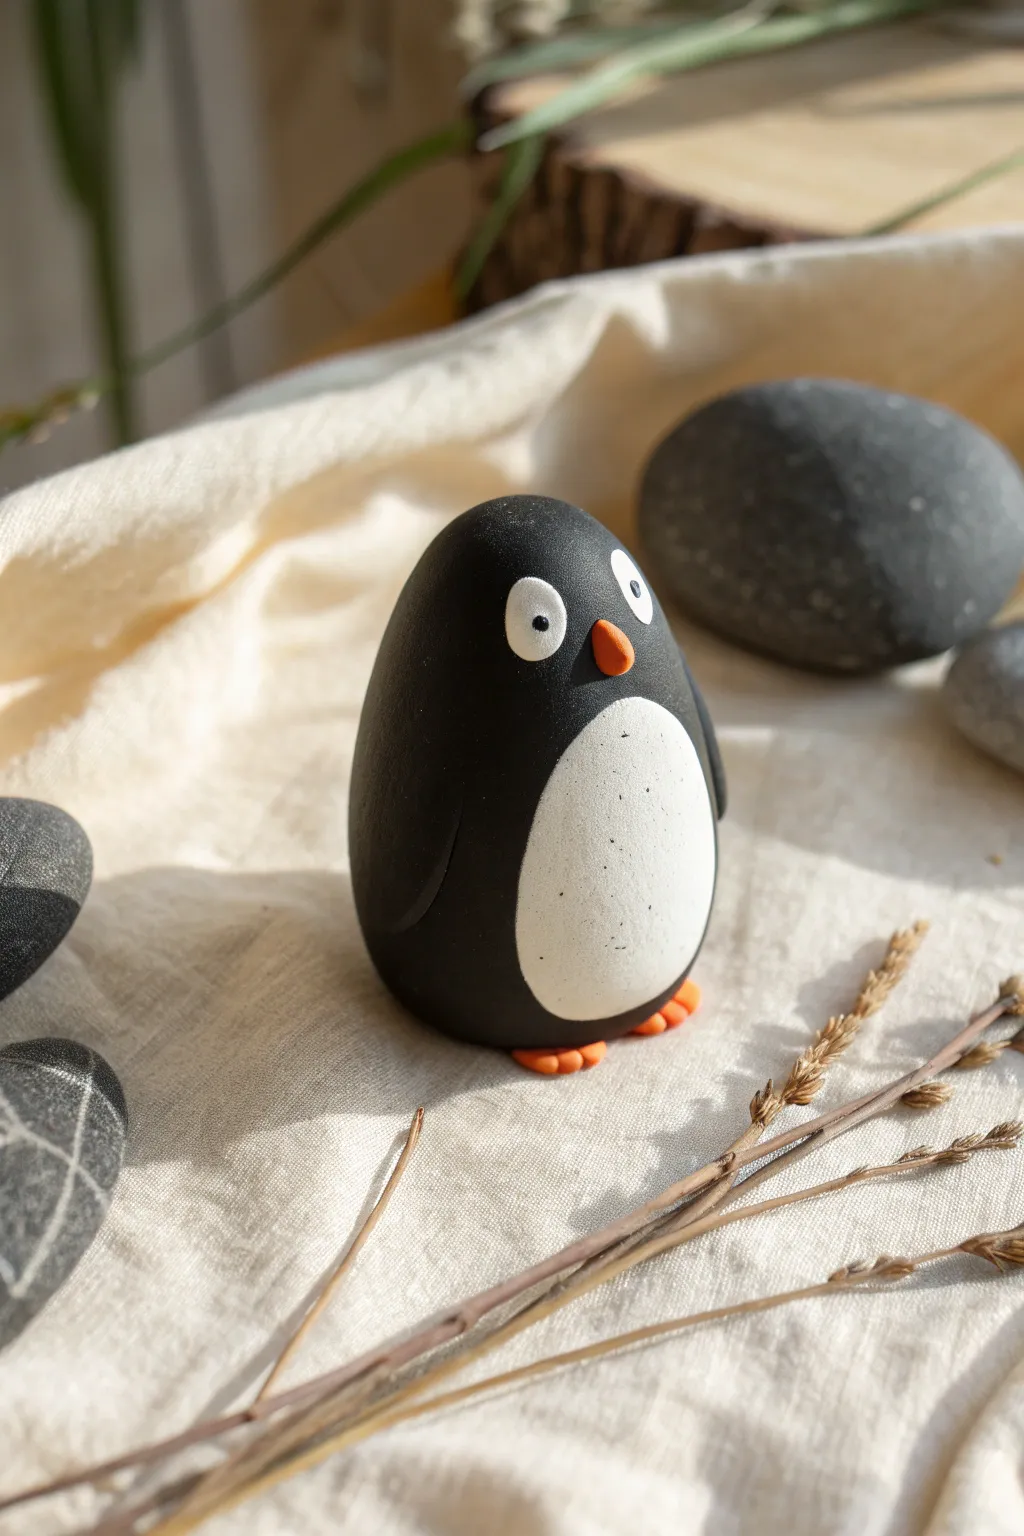
This charming, minimalist penguin brings a touch of polar cuteness to any shelf with its sleek, egg-shaped body and wide-eyed expression. Its smooth, matte finish and simple geometric design make it an ideal project for beginners looking to master basic shaping and joining techniques.
Step-by-Step
Materials
- Black polymer clay or air-dry clay (pre-colored or paintable)
- White polymer clay or air-dry clay
- Orange polymer clay or air-dry clay
- Rolling pin or smooth round object
- Clay sculpting tools (needle tool, smoothing tool)
- Sandpaper (fine grit, if using air-dry clay)
- Matte varnish (optional)
Step 1: Shaping the Body
-
Prepare the black clay:
Start by conditioning your black clay until it is soft and pliable. If using air-dry clay, knead it briefly to remove air bubbles. Roll it into a smooth, seamless ball about the size of a large egg. -
Form the main oval:
Gently shape the ball into a tapered oval. The bottom should be slightly wider and flatter to ensure it stands upright without wobbling, while the top should narrow gently for the head area. -
Smooth the surface:
Inspect the body for any fingerprints or uneven spots. Use your thumb or a smoothing tool to gently buff the surface until it’s perfectly matte and uniform. This sleek black base is crucial for the final look. -
Create the belly indention:
Using your thumb, press very lightly into the lower front center of the body to create a subtle depression. This will help the white belly patch sit flush rather than looking stuck on top.
Step 2: Adding the Belly
-
Roll the white clay:
Take a smaller amount of white clay and roll it into a ball, then flatten it into a thin, elongated oval shape using a rolling pin. -
Shape the belly patch:
Trim or mold the white oval so it is slightly narrower at the top and wider at the bottom, mimicking the curve of the penguin’s body. -
Attach the belly:
Place the white oval into the slight depression you made earlier. Gently press from the center outwards to remove trapped air. -
Blend the edges:
Use a soft blending tool or your fingertip to smooth the edges of the white clay so it transitions seamlessly into the black body. You want it to look like a single unit, not a layer.
Uneven Belly?
If the white belly patch looks lumpy or won’t lay flat, try rolling it thinner. You can also lightly sand the finished piece (if using air-dry clay) to perfectly flush the transition.
Step 3: Wings and Face
-
Form the wings:
Roll two small, equal-sized pieces of black clay into flattened teardrop shapes. These should be quite subtle, almost blending into the body’s silhouette. -
Attach the wings:
Press the wings onto the sides of the body, positioning them so the pointed ends curve slightly backward and downward. Blend the top edge completely into the shoulder area. -
Create the eyes:
Roll two very small balls of white clay. Flatten them into circles and place them high on the face, spaced slightly apart. They should look a bit oversized for that cute, cartoony effect. -
Add the pupils:
I find using the tip of a needle tool or a very fine brush handle works best here to place tiny dots of black clay or paint into the center of the white eyes. -
Make the break:
Take a tiny amount of orange clay and roll it into a small cone. Attach it horizontally right below and between the eyes so it points outward.
Give Him a Scarf
For a winter theme, roll a thin snake of red or green clay and wrap it around the penguin’s neck before baking. Tap texture into the scarf ends to mimic wool.
Step 4: Feet and Finishing
-
Shape the feet:
Create two small, flat ovals from orange clay. Use a needle tool or knife to make two small indentations in the front of each oval to create three toes. -
Position the feet:
Place the penguin body on top of the feet so they just peek out from underneath the belly. Press down gently to secure the bond. -
Final inspection:
Check your penguin from all angles. Smooth out any last accidental fingerprints or marks. -
Bake or Dry:
Follow the manufacturer’s instructions for your specific clay. If baking polymer clay, ensure you don’t overcook it to maintain the colours. -
Matte finish:
Once cool or dry, the clay naturally has a matte finish similar to the reference photo. If you want extra durability without shine, apply a coat of ultra-matte varnish.
Now you have a delightful little clay companion to decorate your desk or gift to a friend


What Really Happens Inside the Kiln
Learn how time and temperature work together inside the kiln to transform clay into durable ceramic.
Turtle With A Domed Shell And Little Flippers
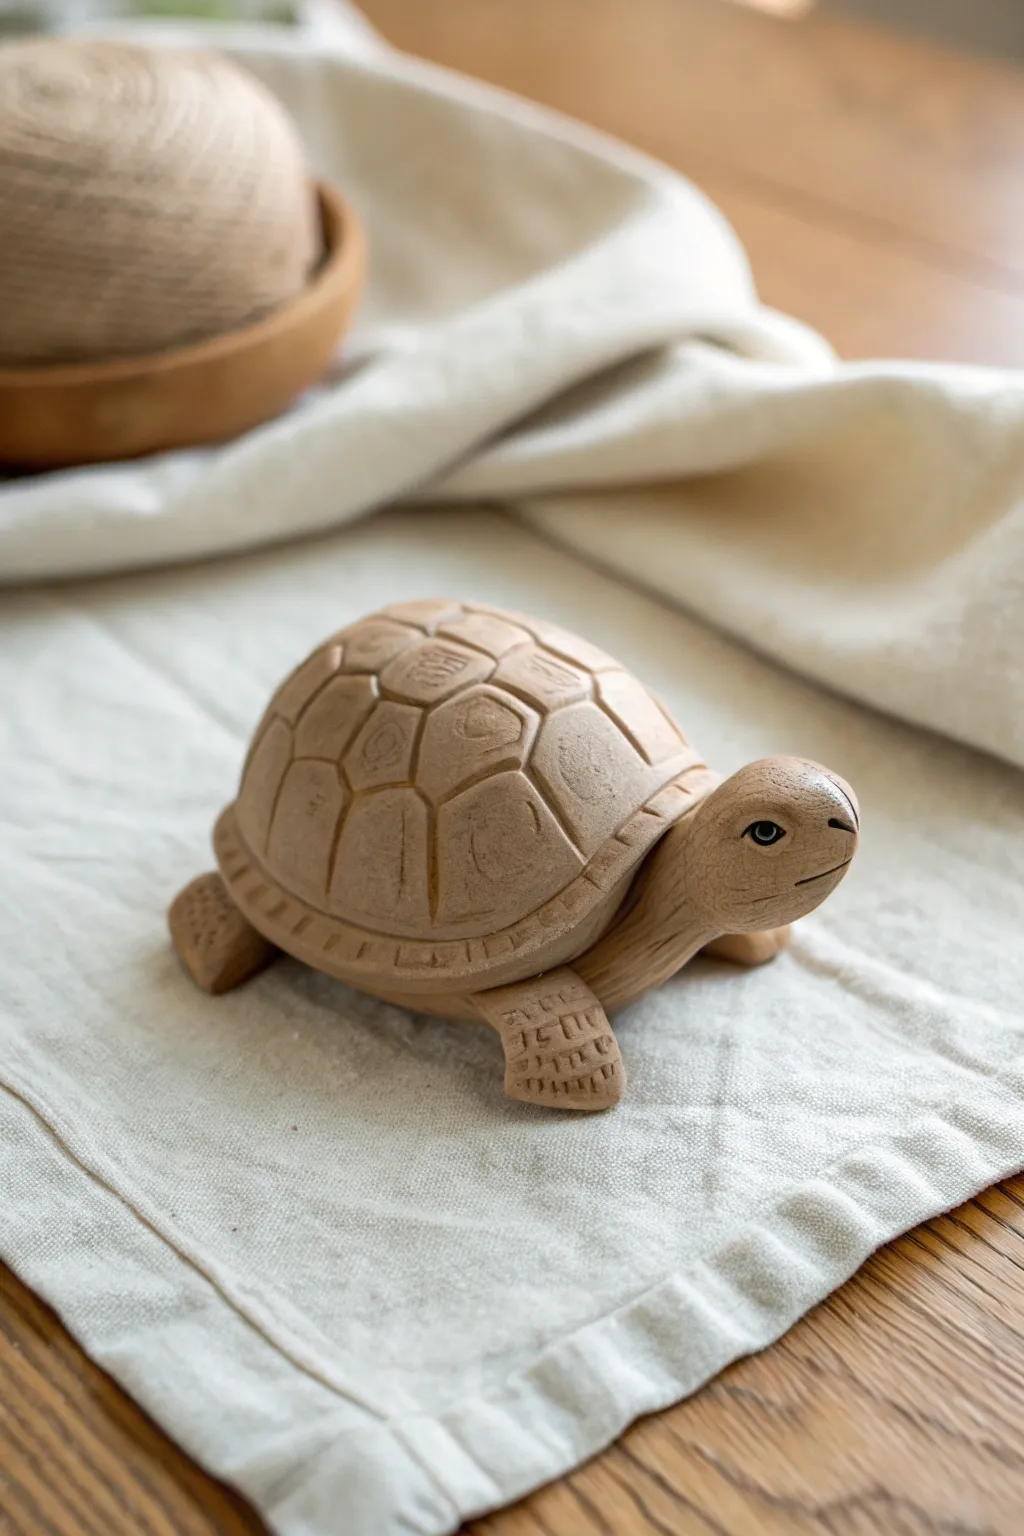
This charming little turtle features a high, beautifully domed shell and textured flippers, giving it a timeless, hand-carved appearance. Perfect for beginners and advanced sculptors alike, this project uses natural-toned clay to create a peaceful, organic desk companion.
How-To Guide
Materials
- Beige or tan polymer clay (approx. 2 oz)
- Small rolling pin
- Ball stylus tool
- Needle tool or toothpick
- Clay carving tool or hobby knife
- Black acrylic paint
- Fine detail paintbrush
- Aluminum foil (for the core)
- Gloss glaze (optional)
Step 1: Foil Core & Shell Base
-
Form the foil core:
Crumple a small piece of aluminum foil into a tight half-sphere shape, roughly the size of a walnut. This reduces weight and saves clay. -
Prepare the shell clay:
Condition a generous portion of your tan clay until soft, then flatten it into a thick pancake, about 1/4 inch thick. -
Cover the core:
Drape the clay pancake over your foil dome. Gently smooth it down properly, tucking the edges underneath to encase the foil completely. -
Smooth the dome:
Roll the domed shape in your palms to eliminate fingerprints and ensure a perfect, smooth spherical curve on top.
Step 2: Adding the Body Parts
-
Create the plastron:
Flatten a smaller oval of clay for the turtle’s belly (plastron) and press the domed shell firmly onto it. -
Shape the head:
Roll a medium-sized ball of clay into a teardrop shape. Bend the narrower end slightly upward to form the neck. -
Attach the head:
Push the wider end of the teardrop firmly under the front edge of the shell. Use a blending tool to smooth the seam where the neck meets the underside of the shell. -
Form the flippers:
Make four smaill teardrop shapes. Flatten them slightly to create paddles for the legs. -
Attach the flippers:
Position two flippers near the front and two at the back. Blend the seams underneath so they look like they are emerging naturally from the shell. -
Create the tail:
Add a very tiny, pointed cone of clay at the rear center for a cute little tail.
Fixing Soft Clay
If your clay is getting too soft and warm to hold detail, pop the turtle in the fridge for 10 minutes. The chilled clay will be much easier to carve without squishing the shape.
Step 3: Detailing & Texture
-
Outline the shell rim:
Use a needle tool or knife to gently score a line all the way around the bottom edge of the shell, creating a distinct rim. -
Carve the central scutes:
Lightly sketch, then carve, hexagon shapes along the very top ridge of the shell using your carving tool. Don’t worry if they aren’t geometric perfection; distinct hand-carved lines add character. -
Carve the side scutes:
Carve pentagon or trapezoid shapes down the sides of the shell that connect to the top hexagons. -
Score the rim details:
Make small vertical hatch marks all along the bottom rim you created earlier to simulate the marginal scutes. -
Texture the flippers:
Use your needle tool to press a grid or cross-hatch pattern onto the tips of each flipper to mimic reptile scales. -
Sculpt the face:
Use a needle tool to press in a horizontal line for the mouth, curving it up slightly at the end for a smile. Poke two small holes for nostrils.
Level Up: Antique Look
After baking, apply a wash of diluted brown acrylic paint over the shell and wipe it off quickly. The paint will stay in the carved crevices, highlighting the shell’s texture.
Step 4: Finishing Touches
-
Bake the clay:
Bake your turtle according to the clay manufacturer’s instructions. Usually, this is around 275°F (135°C) for 15-30 minutes. -
Cool down:
Allow the piece to cool completely before handling so the clay hardens fully. -
Paint the eyes:
Dip a fine detail brush or a toothpick into black acrylic paint. Carefully dot two eyes onto the side of the head. -
Add the highlights:
Once the black paint is dry, I find adding a tiny white speck to each eye really brings the character to life.
Place your little stone-colored friend on a shelf or desk for a touch of slow-living inspiration
Easy Elephant With A Curved Trunk
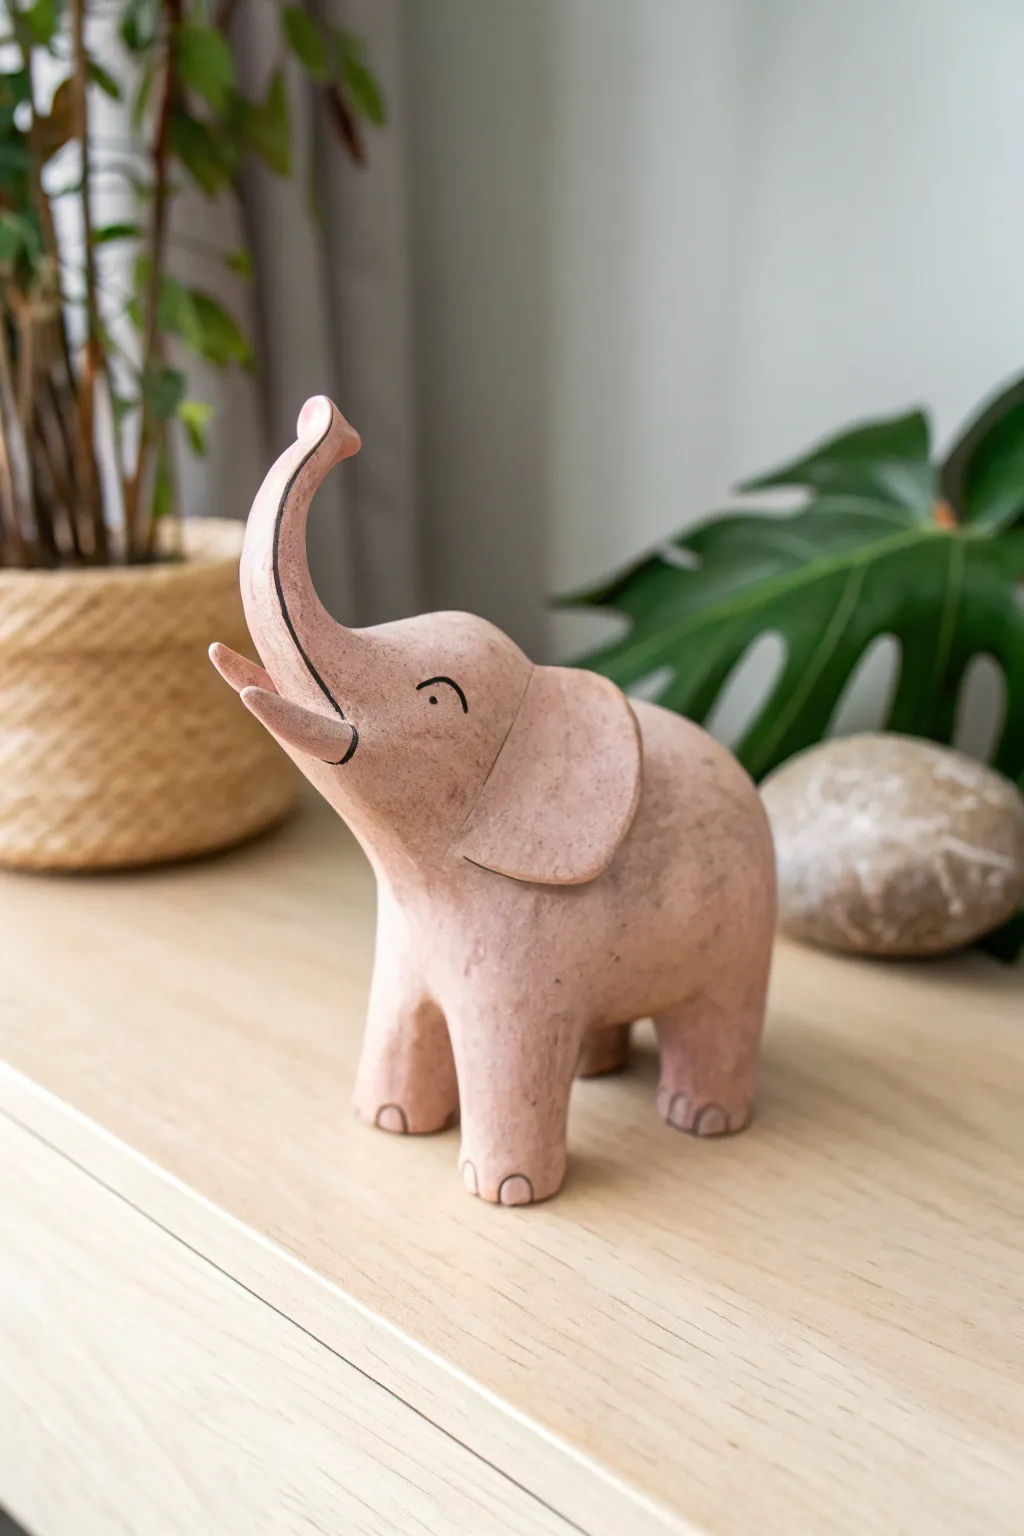
Sculpt a charming, rosy-hued elephant with a happily curved trunk and textured finish. This delightful figurine stands proudly on four sturdy legs, featuring simple painted details that give it a friendly personality.
Step-by-Step
Materials
- Polymer clay (pale pink or beige)
- Acrylic paint (soft pink, black)
- Matte varnish or sealant
- Sculpting tools (needle tool, small ball stylus)
- Fine grit sandpaper
- Aluminum foil (for armature core)
- Fine detail paintbrush
Step 1: Forming the Body Structure
-
Create the core:
Crumple a small piece of aluminum foil into a compact oval shape. This will serve as the inner core for the body, saving clay and reducing baking time. -
Wrap the core:
Roll out a thick sheet of your base clay and wrap it fully around the foil core. Smooth the seams until you have a solid, seamless egg-like shape which will become the main torso. -
Shape the legs:
Roll four equal-sized cylinders of clay for the legs. They should be thick and sturdy, slightly wider at the top where they will join the body. -
Attach the legs:
Position the four legs under the body. Blend the clay from the top of the legs seamlessly into the torso using your thumb or a modeling tool so there are no visible join lines. -
Check balance:
Stand the figure on your work surface and press down gently to flatten the bottom of the feet, ensuring the elephant stands stable and level.
Trunk Drooping?
If the trunk sags while sculpting, insert a small piece of bent wire or a toothpick inside the clay to act as an internal support while it hardens.
Step 2: Sculpting the Head and Trunk
-
Form the head shape:
Roll a ball of clay slightly smaller than the body. Pinch and pull one side to begin elongating it into the trunk shape. -
Refine the trunk curve:
Roll the trunk section between your fingers to lengthen it, tapering it towards the tip. Gently curve it upwards in an ‘S’ shape for that cheerful, trumpet-like pose seen in the photo. -
Attach the head:
Place the head onto the front of the body. Use a blending tool to smooth the clay at the neck area, merging the head and body into a continuous form. -
Add tusks:
Create two small, pointed cones of clay. Attach them on either side of the trunk base, pointing upwards parallel to the trunk. -
Create the ears:
Flatten two balls of clay into teardrop shapes. Attach the narrower ends to the side of the head, pressing them flat against the body so they look relaxed.
Step 3: Detailing and Finishing
-
Add textured details:
Using a needle tool or small blade, gently impress lines at the bottom of the feet to suggest toes. -
Create surface texture:
To mimic the slightly rustic look of the original, lightly dab the surface with a crumpled piece of sandpaper or a toothbrush before baking. I find this gives it a lovely, stone-like quality. -
Harden the clay:
Bake or air-dry your sculpture according to the specific instructions on your package of clay. Allow it to cool completely. -
Apply base color:
Paint the entire figure with a wash of soft pink acrylic paint. Using a watered-down wash helps settling into the textures we created. -
Paint facial features:
With a very fine brush and black paint, add a simple curved line for the eye and a thin line running up the underside of the trunk for emphasis. -
Seal the work:
Once the paint is fully dry, apply a coat of matte varnish to protect the finish without making it too shiny.
Rustic Speckle Effect
Mix tiny pinch of black pepper or dried tea leaves into the clay before sculpting. This creates organic speckles that mimic natural stone.
Place your cheerful elephant on a shelf near a plant for a lovely decorative touch

TRACK YOUR CERAMIC JOURNEY
Capture glaze tests, firing details, and creative progress—all in one simple printable. Make your projects easier to repeat and improve.
Happy Cow With Spot Patches And Tiny Horns
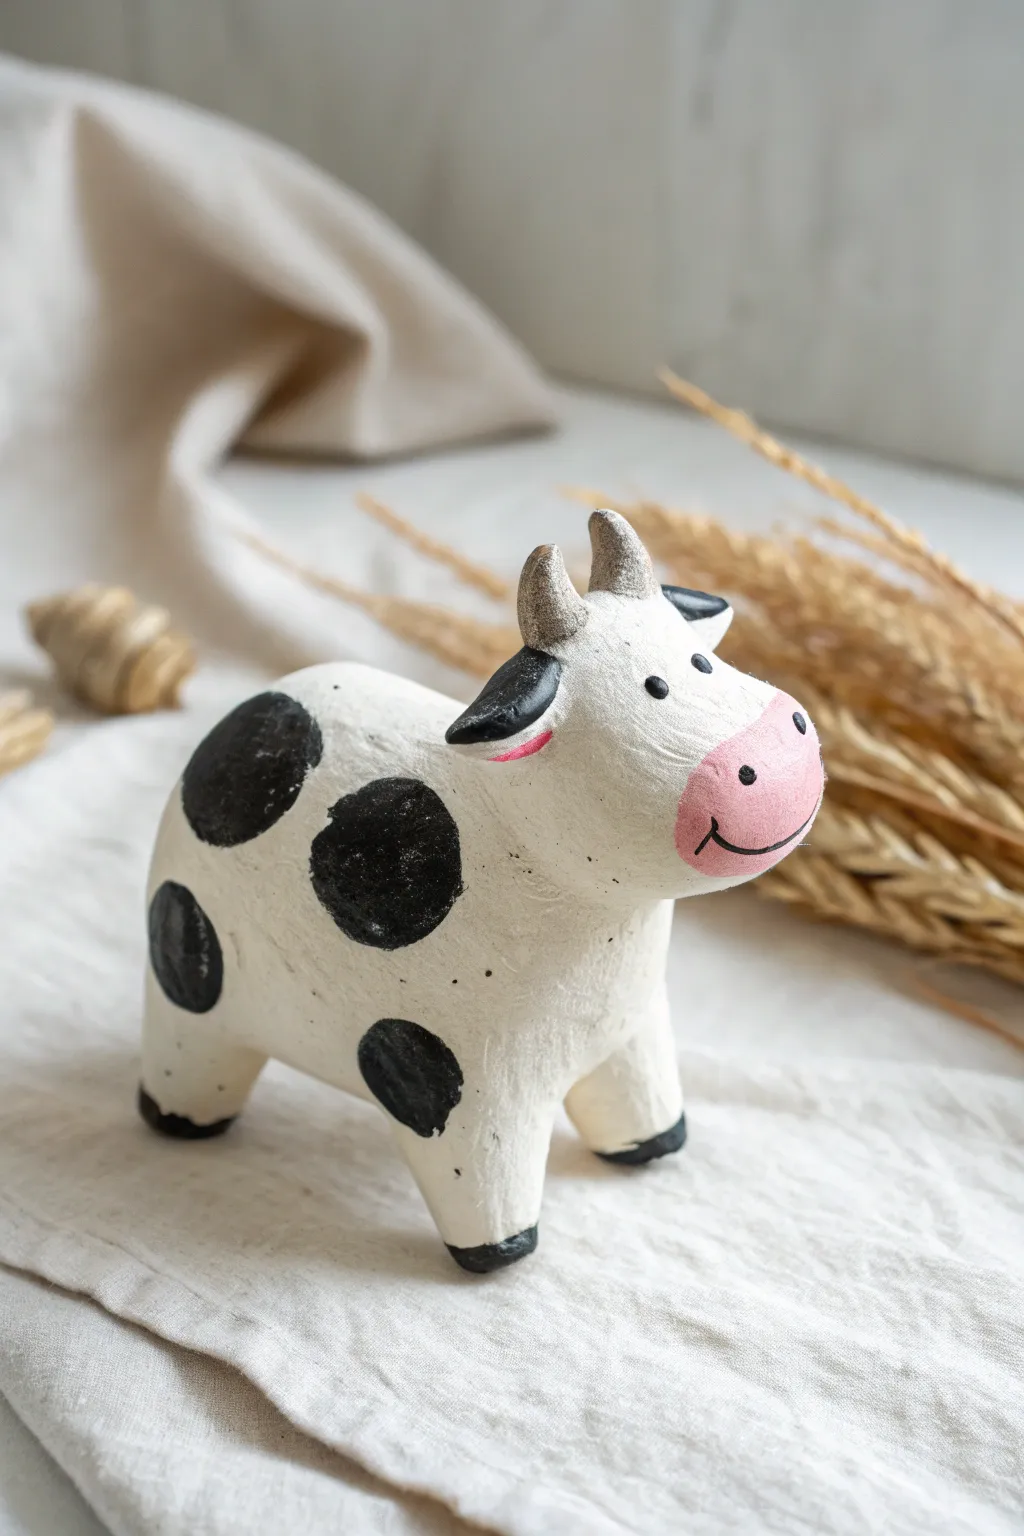
This charming little bovine features a delightful, slightly textured finish that gives it a rustic farmhouse feel. With its oversized pink snout and classic black patches, it makes for a cheerful addition to any desk or shelf.
Step-by-Step Tutorial
Materials
- White cosmetic air-dry clay or polymer clay
- Rolling pin
- Aluminum foil (for armature)
- Modeling tools (or a toothpick)
- Small cup of water (for smoothing)
- Acrylic paints: Black, White, Soft Pink, Grey
- Fine detail paintbrush
- Small round paintbrush
- Matte varnish or sealant
Step 1: Sculpting the Body Base
-
Form the foil core:
Begin by scrunching a piece of aluminum foil into a fat, rounded capsule shape about the size of a lemon. This saves clay and keeps the figurine light. -
Cover with clay:
Roll out a thick slab of white clay and drape it over your foil ball. Use your thumbs to press and smooth the clay until the foil is completely hidden and the surface is relatively even. -
Refine the shape:
Gently roll the clay body on your work surface to create a smooth, potato-like oblong shape. One end should be slightly higher for the head area.
Seamless Blending
Use a wet finger to smooth out fingerprints before texturing. If the clay cracks while joining legs, fill the gap with a wet slurry of clay and water.
Step 2: Adding Main Features
-
Create the legs:
Roll four short, sturdy cylinders of clay. They should be thick to support the body, looking a bit like marshmallows. -
Attach the legs:
Score the top of each leg and the attachment points on the body belly. Apply a dab of water (or slip) and press them firmly into place, blending the seams upward with a modeling tool so they look seamless. -
Shape the head:
Add a smaller ball of clay to the ‘neck’ end of the body. You want it integrated smoothly, so blend the clay downward into the chest without creating a strict neck joint. -
Form the snout:
Flatten a small oval of clay and attach it to the front of the face area. This should protrude slightly to give that classic cow profile.
Step 3: Adding Details
-
Make the ears:
Shape two small teardrops of clay. Flatten them slightly and attach them to the sides of the head, just behind where the horns will go. -
Sculpt the horns:
Roll two very small cones of clay. Attach these to the top of the head, curving them inward just a tiny bit for character. -
Texture the surface:
Using a stiff bristle brush or a crumpled ball of foil, gently dab the surface of the cow. I find this creates that lovely matte, organic texture seen in the photo. -
Dry thoroughly:
Let the cow dry completely. For air-dry clay, this might take 24-48 hours. Rotate it occasionally so the belly dries too.
Accessorize Your Herd
Make a tiny clay bell painted gold to hang around its neck on a piece of twine, or sculpt a small yellow bird to perch on its back.
Step 4: Painting
-
Base coat:
Paint the entire cow with a coat of creamy white acrylic to ensure an even canvas, covering any greyish clay tones. -
Paint the snout:
Mix a soft, bubblegum pink and carefully paint the raised snout area. Let this dry before adding facial details. -
Add the spots:
Using black paint and a round brush, dab on large, irregular circular patches. Place a few on the back, one on the flank, and perhaps one near the rump. -
Paint the details:
Paint the hooves black. Paint the horns a soft grey. Add a small black patch over one ear for an asymmetrical cute look. -
Draw the face:
Using your finest brush, dot two small black eyes wide apart. Add two tinier dots on the pink snout for nostrils and draw a thin, curved smile line connecting them. -
Seal the work:
Once the paint is fully bone-dry, apply a layer of matte varnish to protect your new barnyard friend without making it look glossy or plastic.
Place your happy cow near some dried wheat or flowers to complete the rustic look
Hedgehog With Quick Pressed Spines
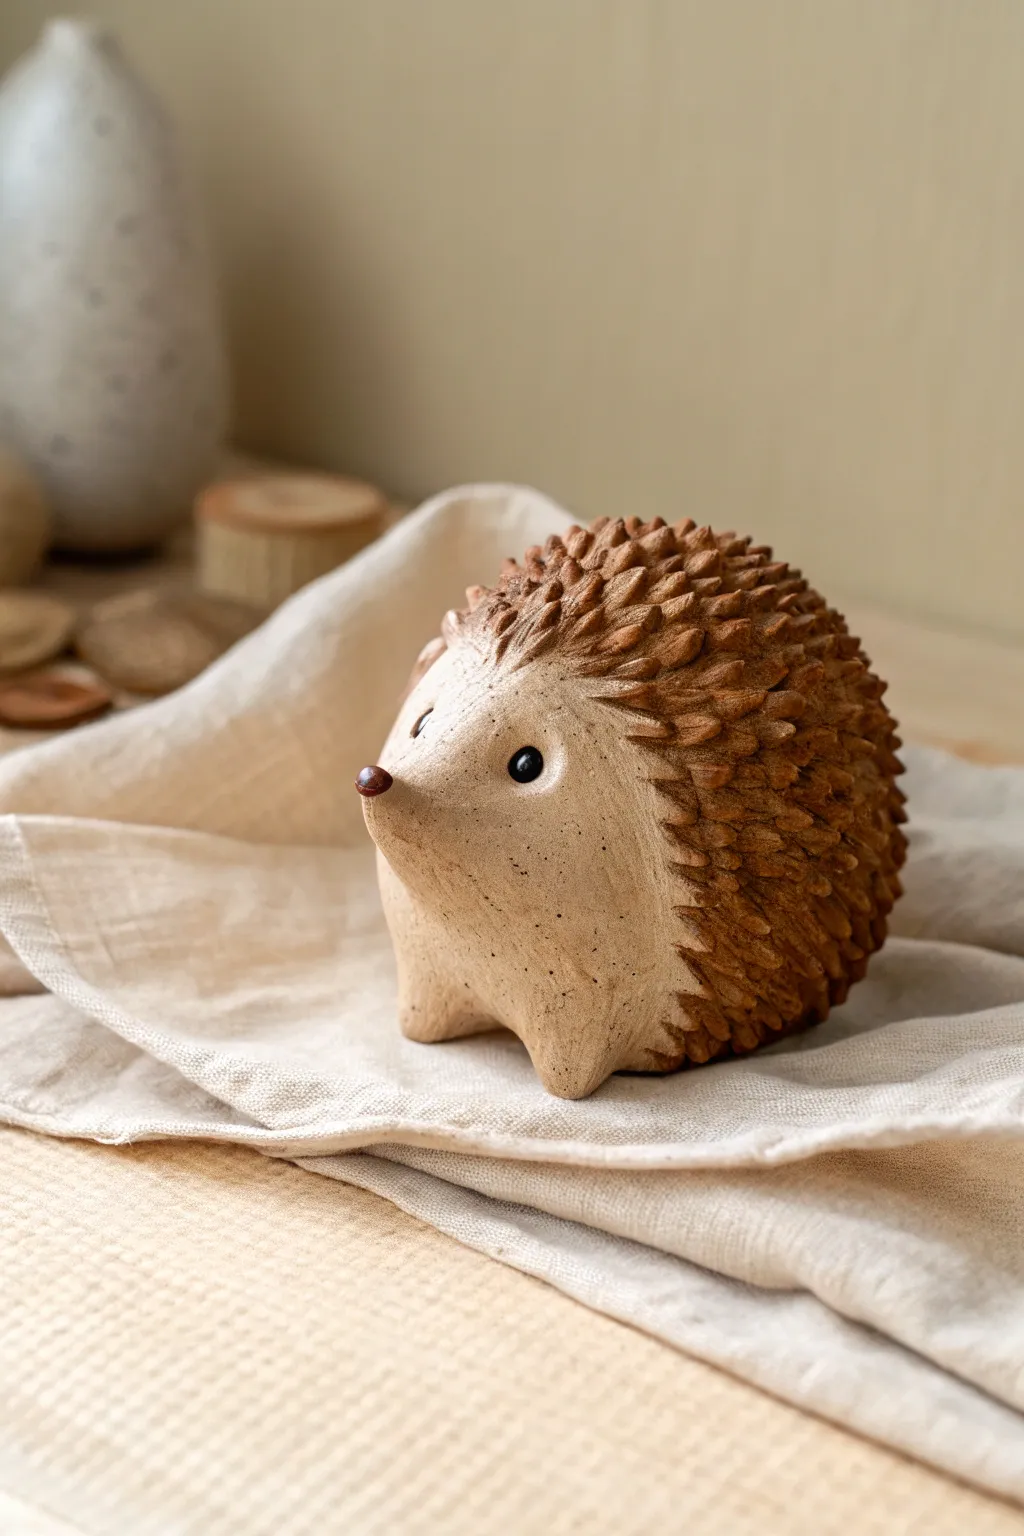
This adorable clay hedgehog combines smooth, soft curves with a tactile, spiky back that looks intricate but is surprisingly simple to achieve. By using a single tool to press patterns into the clay, you can create a charming woodland friend with minimal fuss.
Detailed Instructions
Materials
- Polymer clay or air-dry clay (light beige/ecru color)
- Polymer clay or air-dry clay (warm medium brown color)
- Small ball tool or detail stylus
- Teardrop-shaped loop tool or a small, curved spatula
- Black clay tiny beads (for eyes)
- Dark reddish-brown clay (for nose)
- Needle tool
- Soft brush (for smoothing)
- Matte finish varnish (optional)
Step 1: Shaping the Base
-
Mix the Core:
Start by conditioning a ball of light beige clay roughly the size of a tangerine. This will form the main body of your hedgehog. -
Form the Teardrop:
Roll the ball on your work surface, applying slightly more pressure on one side to taper it into a thick, rounded teardrop shape. This tapered end will become the snout. -
Lift the Snout:
Gently gently curve the tapered end upward. Use your thumb to smooth the transition so the nose points slightly towards the sky, giving the hedgehog an inquisitive look. -
Flatten the Base:
Press the bottom of the shape firmly against your table to create a flat, stable base so the figure doesn’t roll over. -
Pull the Legs:
Using your fingers, pinch and pull four small nubs from the bottom edge of the clay to form short, stubby legs. Smooth these into the main body so there are no seams.
Clean Pressing
If your tool sticks to the clay while making spines, dip the tip into a little cornstarch or water before pressing to keep the points sharp.
Step 2: Creating the Spiny Back
-
Prepare the Brown Clay:
Condition a piece of warm brown clay. Roll it flat into a sheet about 1/4 inch thick. -
Drape the Back:
Lay the brown clay sheet over the back of your beige base, starting just behind the forehead and covering the rear. Trim away excess clay around the bottom edge. -
Blend the Seams:
Use your fingers or a smoothing tool to feather the brown clay into the beige clay, ensuring they are firmly bonded, especially along the side lines. -
Start the Texture:
Starting at the very back bottom edge, use your teardrop loop tool or curved spatula. Press the tip into the brown clay and drag slightly downward to create a triangular, raised ‘spine’ impression. -
Layer the Spines:
Moving upward in rows, repeat this pressing motion. Offset each row slightly—like bricklaying—so the new spines sit between the gaps of the row below. -
Refine the Edges:
As you get closer to the face, make the impressions slightly smaller and lighter. This creates a natural gradation where the fur meets the face.
Autumn Vibes
Before baking, press a tiny clay mushroom or a fallen leaf into the hedgehog’s spines as if it picked up a stowaway while foraging.
Step 3: Detailing the Face
-
Mark Eye Sockets:
Use a small ball tool to make two shallow indentations on either side of the snout where the eyes will go. -
Insert Eyes:
Roll two tiny spheres of black clay. Press them gently into the sockets you just made. -
Add the Highlights:
For extra life, I find that adding a microscopic dot of white paint or clay to the black eyes instantly wakes up the character. -
Place the Nose:
Roll a very small ball of reddish-brown clay. Attach it to the very tip of the upturned snout. -
Freckle Texture:
Use a needle tool or stiff brush to gently tap tiny dots onto the beige cheeks and snout area for a subtle, porous stone texture. -
Final Adjustments:
Check the balance of your hedgehog. If you see any fingerprints on the smooth beige areas, buff them away gently with a drop of baby oil. -
Bake or Dry:
Follow the manufacturer’s instructions for your specific clay type to bake or air-dry the figurine thoroughly.
Enjoy the cozy charm of your new handcrafted hedgehog companion
Snail With A Swirled Shell And A Smiley Face
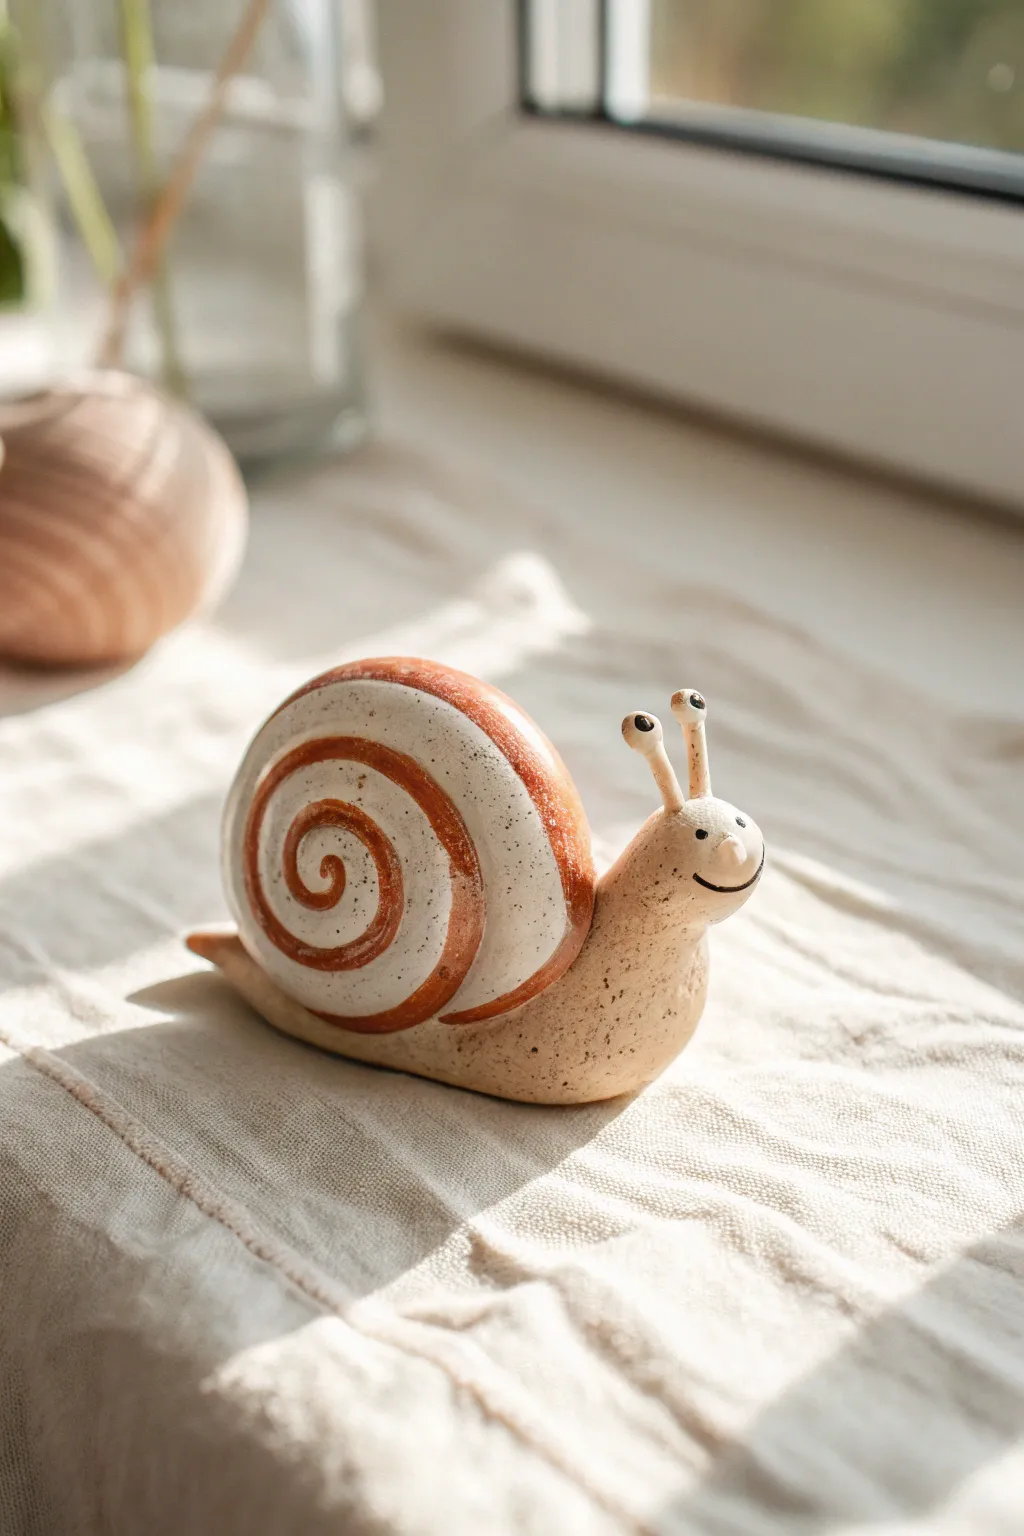
This charming little figurine features a speckled clay body and a prominent shell decorated with a warm, spiraling pattern. With its perky eye stalks and friendly grin, it brings a cheerful, handmade touch to any windowsill, perfectly capturing the slow and steady sweetness of garden life.
How-To Guide
Materials
- Speckled stoneware clay (beige/buff with grog)
- Small rolling pin
- Pottery tool set (needle tool, sponge, modeling tool)
- Slip (clay and water mixture)
- Underglaze (Terracotta or Russet Orange)
- Underglaze (Black for eyes)
- Clear transparent glaze
- Small round paintbrush
- Clean water
Step 1: Sculpting the Body
-
Prepare the clay:
Begin by wedging your speckled stoneware clay thoroughly to remove any air bubbles. Divide the clay into two main portions: one larger piece for the shell and a slightly smaller, elongated piece for the body. -
Form the base:
Roll the smaller piece of clay into a thick, slug-like cylinder. Taper one end gently to create the tail. -
Lift the neck:
On the opposite end of the cylinder, gently bend the clay upward to define the neck and head area. Smooth the transition so it curves naturally rather than forming a sharp angle. -
Shape the head:
Round off the top of the upright section into a bulbous head shape. I like to keep this distinctive and slightly oversized for a cartoony look. -
Create the shell connection:
On the back of the body where the shell will sit, use your thumb to press a gentle concave indentation. This ‘saddle’ will help the round shell sit securely.
Step 2: Building the Shell
-
Roll the shell coil:
Take your larger clay portion and roll it into a long, even tapered snake. It should be thicker at one end and gradually get thinner. -
Wind the spiral:
Starting with the thinnest tip, begin coiling the clay snake flat against itself to form a tight spiral disk. Keep winding until you reach the thickest end. -
Dome the shell:
Gently press your thumb into the center of the spiral from one side to push it outward, creating a domed, 3D snail shell shape rather than a flat coaster. Smooth the interior seams if necessary. -
Attach the shell:
Score the bottom of the shell and the saddle area on the body deeply with a needle tool. Apply slip generously to both scored areas. -
Secure the join:
Press the shell firmly onto the body. Use a modeling tool to blend the clay from the underside of the shell down onto the body so they become one solid unit. Smooth this seam with a damp sponge.
Head Drooping?
If the neck sags while forming, use a small piece of sponge or crumpled paper towel to prop up the head under the chin. Leave it there until the clay stiffens.
Step 3: Adding Details
-
Make the eye stalks:
Roll two very small, thin coils of clay. Attach them to the top of the head using the score-and-slip method. Ensure they are upright and parallel. -
Add the eyes:
Roll two tiny spheres of clay and attach them to the tips of the stalks. Flatten the fronts slightly where the pupils will be painted later. -
Carve the smile:
Using a needle tool or a small carving tool, slice a curved line into the side of the head to create a deep, happy smile. Clean up any clay crumbs with a soft brush. -
Dry slowly:
Loosely cover the snail with plastic and allow it to dry slowly over several days to the bone-dry stage. This prevents cracking, especially around the neck. -
Bisque fire:
Once completely dry, fire the piece in a kiln to cone 04 (or your clay’s specific bisque temperature).
Make it a Planter
Instead of a closed shell, pinch a small bowl shape and attach it sideways. This hollow ‘shell’ can hold a tiny air plant or succulent.
Step 4: Glazing and Finishing
-
Paint the swirl:
Using a terracotta or russet orange underglaze and a steady hand, paint a continuous spiral line following the sculpted coil of the shell. Start from the center and work your way out. -
Detail the face:
Use a fine liner brush and black underglaze to paint small dots on the clay eyes for pupils. Carefully trace inside the carved mouth line to define the smile. -
Apply clear glaze:
Once the underglaze is dry, dip the entire sculpture into a clear transparent glaze, or brush on three even coats. -
Final wipe:
Wipe the very bottom of the snail clean with a sponge to ensure no glaze touches the kiln shelf. -
Glaze fire:
Fire the piece again, this time to the maturity temperature of your clay and glaze (typically cone 5 or 6 for stoneware).
Place your finished ceramic friend in a sunny spot to enjoy the light reflecting off its playful shell
Octopus With Stubby Tentacles That Actually Stand Up
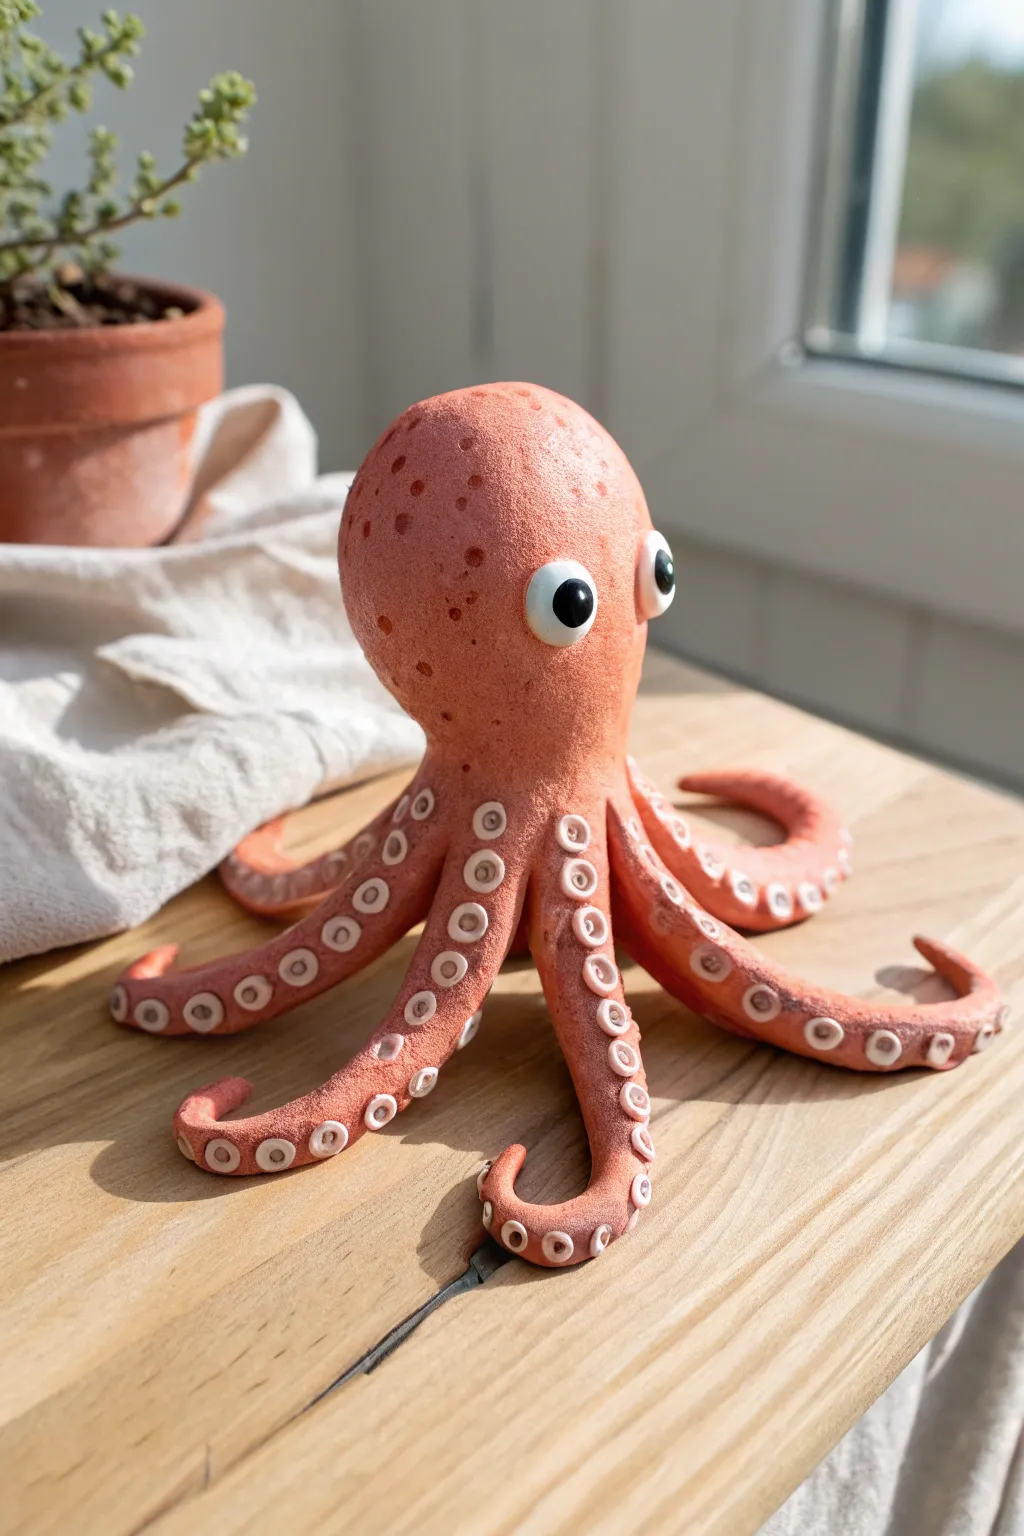
Create a charming sea creature companion that stands proudly on your desk without flopping over. This terracotta-toned octopus features textured skin and distinctive suckers, giving it a playful yet artisanal look.
Detailed Instructions
Materials
- Terracotta-colored polymer clay (or air-dry clay painted terracotta)
- White polymer clay
- Black polymer clay
- Aluminum foil
- Clay sculpting tools (specifically a small ball stylus)
- Needle tool or toothpick
- Stiff bristle brush (e.g., an old toothbrush)
- Acrylic roller
- Oven (if using polymer caly)
- Gloss varnish (optional for eyes)
Step 1: Sculpting the Core
-
Form the foil core:
Start by scrunching a piece of aluminum foil into an egg shape. This saves clay and keeps the head lightweight so the tentacles can support it. -
Cover the head:
Condition a large portion of terracotta clay until it is soft and pliable. Roll it into a flat sheet and wrap it completely around your foil egg, smoothing the seams until you have a seamless, bulbous head shape. -
Prepare the tentacles:
Roll out eight thick logs of terracotta clay. They should be thicker at the base and taper gently toward the tips, but keep them relatively stubby to support the weight. -
Attach the legs:
Turn the head upside down and attach the thick ends of the tentacles to the base of the head. Use your thumb or a modeling tool to blend the clay of the legs smoothly into the head so they don’t break off later. -
Pose the octopus:
Flip the octopus right-side up. Arrange the tentacles in a radial pattern. Curl the tips upwards or sideways to create movement, ensuring the base is stable enough to hold the head upright.
Pro Texture Tip
Work the texturing brush in overlapping circles rather than just stamping it down. This hides tool marks and makes the skin look naturally porous rather than mechanically patterned.
Step 2: Adding Texture and Details
-
Texturize the skin:
To mimic the sandy texture seen in the photo, gently tap a stiff bristle brush or an old toothbrush over the entire surface of the head and the tops of the tentacles. Avoid the areas where the eyes and suckers will go. -
Add head spots:
Use a small ball stylus or the end of a paintbrush to press random shallow indentations into the top of the head for extra organic texture. -
Create the suckers:
Roll out a thin snake of white clay. Slice it into many small, equal-sized discs. -
Apply the suckers:
Press the white discs in two rows along the underside of each tentacle. Start with larger discs near the body and use smaller ones toward the tips. -
Detail the suckers:
Take your small ball stylus and press into the center of each white disc. This creates the ‘cup’ shape and permanently bonds the white clay to the terracotta leg.
Drooping Tentacles?
If the legs sag under the head’s weight before baking, prop them up with crumpled paper towels or batting. This acts as a scaffold during baking and can be removed once the clay hardens.
Step 3: Bringing it to Life
-
Make the eyes:
Roll two medium-sized balls of white clay and flatten them slightly into thick discs. Shape two much smaller balls of black clay for the pupils. -
Attach the eyes:
Press the white discs firmly onto the sides of the head. Then, press the black pupils onto the white bases. I find placing the pupils slightly off-center gives the octopus a funkier, more expressive personality. -
Final inspection:
Check your sculpture from all angles. Smooth out any accidental fingerprints and make sure the texturing looks consistent. -
Bake or dry:
If using polymer clay, bake according to the manufacturer’s instructions (usually 275°F/135°C for 15-30 minutes per 1/4 inch thickness). If using air-dry clay, let it sit undisturbed for at least 24-48 hours. -
Finish:
Once cooled or fully dried, you can apply a tiny dot of gloss varnish to the eyes to make them look wet and alive, contrasting nicely with the matte, textured body.
Place your new eight-legged friend on a shelf or windowsill where it can keep watch over your room
Rainbow Caterpillar Built From Tiny Clay Balls
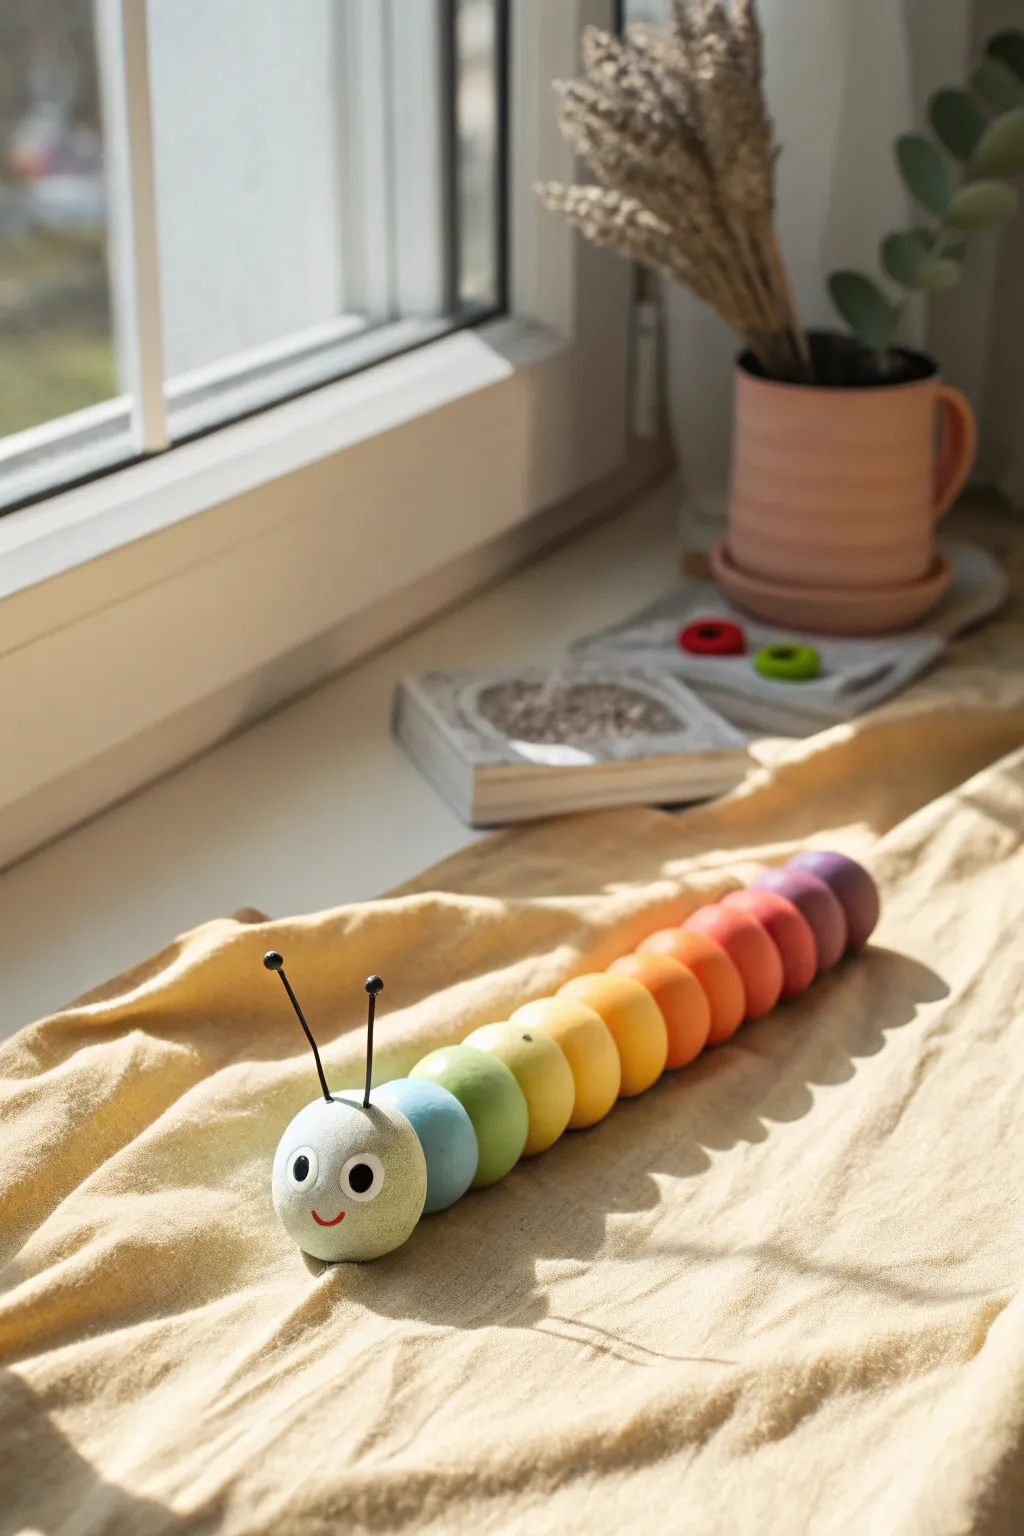
Brighten up any windowsill with this cheerful, segmented caterpillar made from smooth clay spheres. Its gradient body transitions beautifully from cool greens to warm purples, making it a perfect project for mastering color mixing and consistent shaping.
Step-by-Step Tutorial
Materials
- Polymer clay or air-dry clay (white + rainbow colors)
- Acrylic paints (if using white clay)
- Matte sealant or varnish
- Thin crafting wire (black)
- Small black beads (for antennae tips)
- Strong craft glue (E6000 or superglue)
- Needle tool or toothpick
- Fine-grit sandpaper
- Black and red fine-tip markers or paint pens
Step 1: Shaping the Segments
-
Prepare your palette:
If using pre-colored clay, lay out your spectrum: light blue, mint green, lime green, yellow, yellow-orange, orange, red-orange, red, magenta, and purple. You’ll need about 12-13 distinct shades. -
Portion the clay:
Cut equal-sized chunks of clay for the body segments. The head should be just slightly larger than the body pieces. I like to use a small cookie cutter or a dedicated clay slicer to keep the volume consistent. -
Roll spheres:
Roll each chunk into a perfectly smooth ball between your palms. Take your time here to eliminate any cracks or seams, as these will show up in the final piece. -
Verify the gradient:
Line up your spheres in order on your work surface to check the color transition. It should flow naturally from the pale blue head through the greens, yellows, reds, and finally to purple. -
Flatten the bottoms:
Gently press each sphere onto a flat surface just enough to create a small flat spot. This ensures your caterpillar will sit upright without rolling away.
Smooth Operator
To remove stubborn fingerprints from polymer clay before baking, lightly brush the raw spheres with a little baby oil or cornstarch.
Step 2: Creating the Head
-
Tint the head:
For the head sphere, use a very pale, speckled mint or light blue color. If you want that stone-like texture seen in the photo, mix in a tiny pinch of black pepper or dried tea leaves into the clay. -
Form the eyes:
Roll two small circles of white clay and flatten them into discs. Press these firmly onto the front of the head sphere. -
Add pupils:
Roll two tiny black clay balls or use beads. Press them into the center of the white discs to create the pupils. -
Poke antenna holes:
Using your needle tool, poke two small holes near the top center of the head where the antennae will go later.
Step 3: Assembly and Finishing
-
Connect the segments:
If using polymer clay, press the spheres gently against each other in a line so they adhere before baking. If using air-dry clay, create scratch marks (scoring) on the contact points and use a dab of water or clay slip. -
Curving the body:
Arrange the connected line into a gentle ‘S’ curve or wiggle shape rather than a straight line to give the caterpillar a sense of movement. -
Cure the clay:
Bake (for polymer) or dry (for air-dry) your sculpture according to the manufacturer’s specific instructions. Ensure it is fully set before moving to the next step. -
Construct antennae:
Cut two 1-inch pieces of black craft wire. Glue a small black bead onto one end of each wire piece. -
Attach antennae:
Dip the bottom end of the wires into strong craft glue and insert them into the pre-made holes on the head. -
Paint features:
Use a fine-tip red marker or paint pen to draw a simple, curved smile below the eyes. -
Seal the piece:
Apply a coat of matte varnish over the entire caterpillar. This protects the clay, evens out the finish, and prevents the marker features from smudging.
Make It Wobble
Instead of gluing the segments rigidly together, thread them onto a piece of elastic cord. This creates a flexible toy that can actually wiggle.
Place your finished friend in a sunny spot to enjoy the full effect of the rainbow gradient
Animal Charm Set For Keychains Or Jewelry
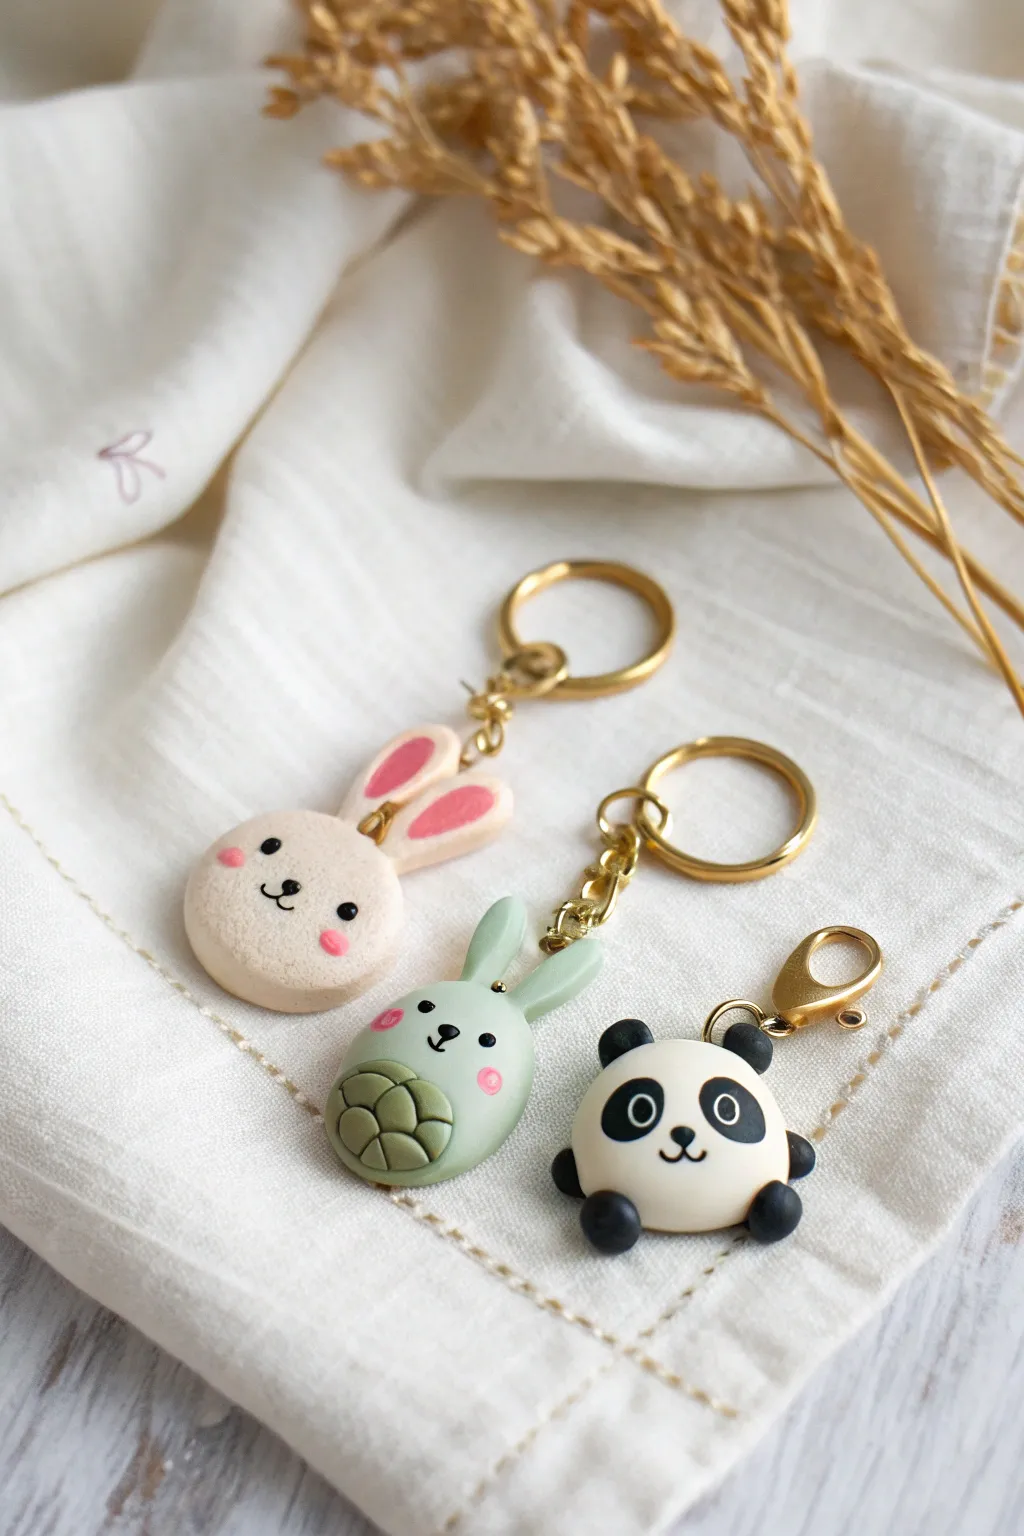
Learn to craft an adorable set of polymer clay charms featuring a sweet bunny, a whimsical turtle-rabbit hybrid, and a classic panda. These tiny friends are perfect for adding a touch of cuteness to your keys or as personalized zipper pulls.
How-To Guide
Materials
- Polymer clay (white, beige/light peach, sage green, black, pink)
- Gold keychain rings and lobster clasps
- Jump rings and gold eye pins
- Dotting tools or ball stylus (various sizes)
- Needle tool or toothpick
- Clay blade or craft knife
- Rolling pin (acrylic)
- Small round cutter (approx. 1 inch)
- Gloss glaze (optional)
Step 1: Shaping the Bases
-
Prepare the clay:
Begin by conditioning your beige, sage green, and white clay until they are soft and pliable. This prevents cracks during baking. -
Form the main shapes:
Roll each color into a smooth ball. For the bunny and panda, flatten the balls slightly into thick discs using your palm or an acrylic block to create a rounded, marshmallow-like shape. -
Shape the green creature:
For the green figure, roll the ball into a slightly more elongated oval to accommodate the belly detail later. -
Insert hardware:
Gently insert a gold eye pin into the top center of each shape. I like to add a tiny dab of liquid clay or bake-and-bond on the pin shaft for extra security.
Sticky Situation?
If fingerprints are clouding your work, lightly brush the unbaked clay with a little baby oil or cornstarch. This smooths out ridges instantly.
Step 2: Detailing the Bunny
-
Make the ears:
Roll two small logs of beige clay and flatten them into teardrop shapes. Press a smaller pink teardrop inside each ear for the inner detail. -
Attach the ears:
Press the ears firmly onto the top of the beige head, blending the clay at the seam with a silicone tool or your finger to ensure they stick. -
Add face details:
Use a tiny ball of black clay for the nose and very thin snakes of black clay to form the mouth. Press two small black balls on for eyes and secure pink circles for blushing cheeks.
Step 3: Crafting the Green Hybrid
-
Create the belly shell:
Flatten a small ball of darker green or brown clay and press it onto the creature’s tummy. Use a needle tool to score a grid or shell pattern onto this circle. -
Add the ears:
From the sage green clay, form two long, rabbit-like ears and attach them to the top of the head, similar to the beige bunny. -
Finish the face:
Add small black clay eyes, a tiny nose, and pink cheeks using the same technique as before to give it personality.
Make It Glossy
After baking, coat the eyes and noses with UV resin or a gloss glaze. This makes the features pop and look wet, adding a professional finish.
Step 4: Assembling the Panda
-
Add the ears:
Roll two tiny black balls and press them onto the top sides of the white disc for ears. Indent the centers slightly with a small ball tool. -
Create the panda eyes:
Flatten two small black ovals for the eye patches. Place a smaller white dot on top of each, then finish with a tiny black pupil in the center. -
Add limbs:
Attach two small black balls to the bottom of the white body to represent little feet. -
Final touches:
Add a small triangular black nose and a simple mouth line to complete the panda’s expression.
Step 5: Baking and Finishing
-
Bake the charms:
Place your creations on a tile or parchment-lined baking sheet. Bake according to your specific clay brand’s instructions (usually around 275°F/135°C for 15-30 minutes). -
Cool down:
Allow the charms to cool completely in the oven or on a wire rack before handling them. -
Attach the keychain:
Use pliers to open a jump ring, thread it through the eye pin loop on your charm, and attach it to the gold keychain ring or lobster clasp.
Hook these sweet little companions onto your bag and enjoy your handmade charm collection
Food-Hybrid Animals Like A Strawberry Bear
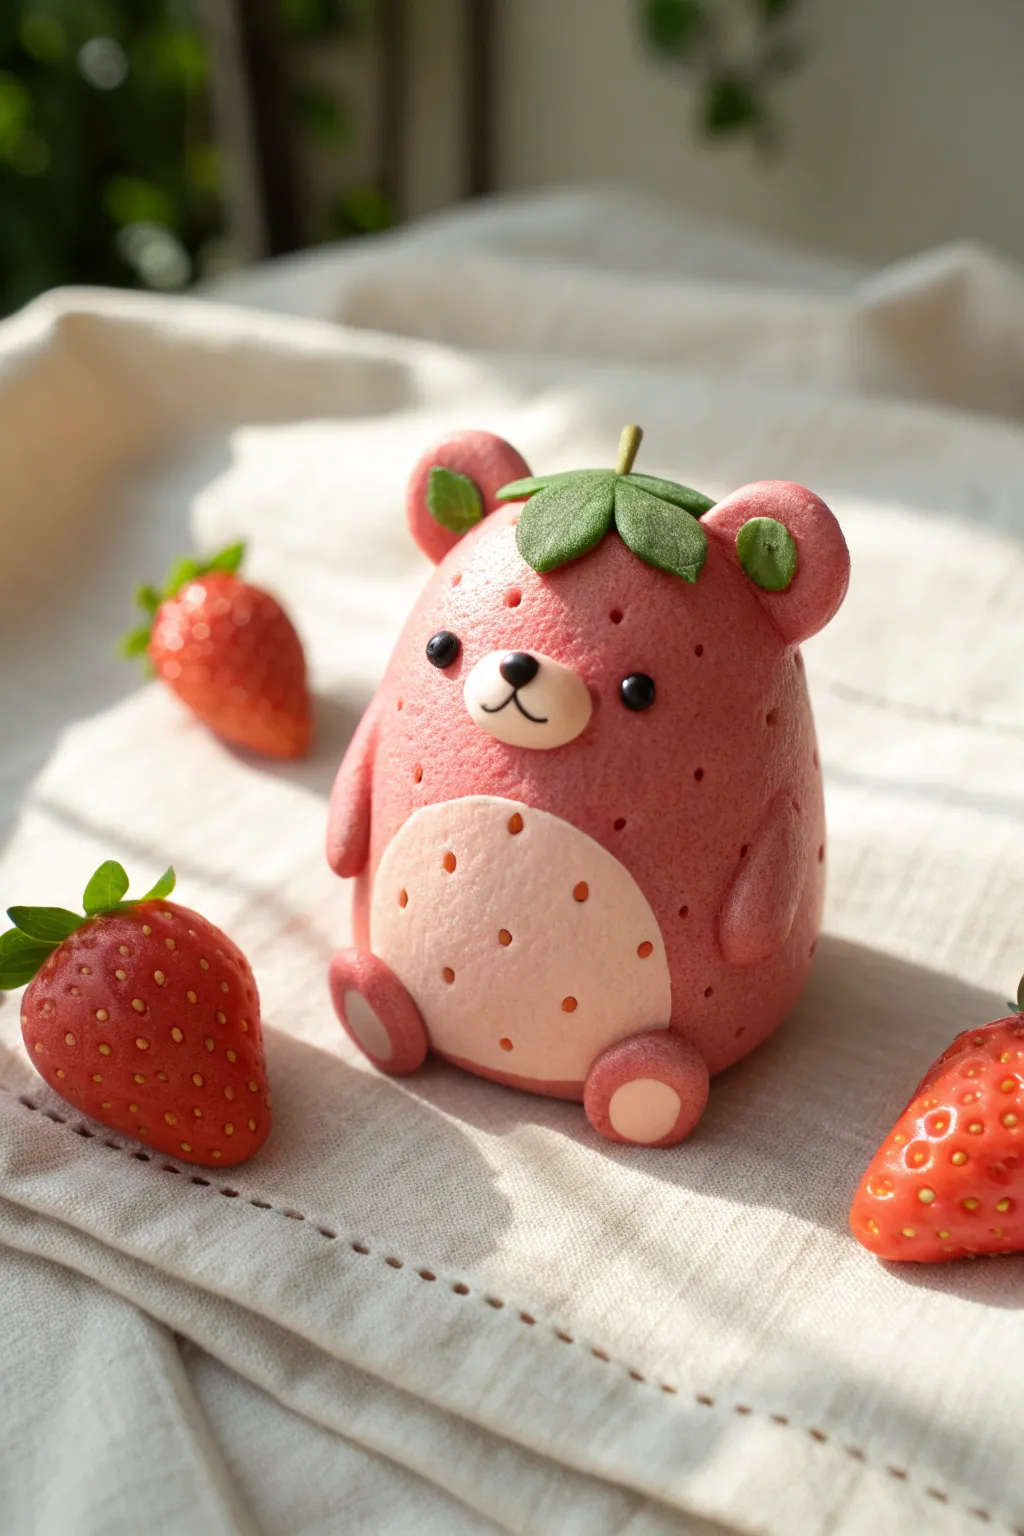
This adorable polymer clay project combines the charm of a teddy bear with the fresh textures of a strawberry. With its textured pink body, leafy green stem hat, and cute little paws, this figurine makes a perfect desk companion or a gift for fruit lovers.
Step-by-Step
Materials
- Polymer clay (Berry Pink, Light Pink/Peach, Leaf Green, Black, White)
- Clean work surface or ceramic tile
- Pointed detailing tool or needle tool
- Ball stylus tool (small)
- Blending tool or silicone shaper
- Liquid polymer clay (optional, for adhesion)
- Oven for baking
Step 1: Sculpting the Base Body
-
Conditioning:
Start by conditioning your berry pink clay until it is soft and pliable. Roll it into a smooth, seamless ball to ensure there are no cracks. -
Shaping the torso:
Gently shape the ball into a rounded teardrop or pear shape. The bottom needs to be slightly wider to create a sturdy base for the bear to sit. If you tap the bottom on your work surface, it will flatten just enough to stand on its own. -
Adding texture:
Using a needle tool or a small pointed stylus, gently poke small, shallow indentations all over the pink body to mimic strawberry seeds. Leave a clear space on the front belly area where the lighter patch will go. -
Creating the belly:
Flatten a small ball of light pink or peach clay into an oval. Press this firmly onto the lower front of the body. You can use your thumb or a rolling tool to smooth the edges so it merges seamlessly with the darker pink body. -
Texturing the belly:
Continue your seed texture pattern onto the light belly patch, spacing the holes slightly further apart for a softer look.
Step 2: Adding Character Features
-
Making the ears:
Roll two small balls of the berry pink clay. Press them gently onto the top corners of the head. Use a ball stylus to create a small indentation in the center of each ear. -
Inner ear detail:
Fill the ear indentations with tiny flattened discs of green clay to match the stem theme. This little pop of color ties the design together beautifully. -
Sculpting the muzzle:
Take a very small ball of the light pink/peach clay and flatten it slightly into an oval. Place this in the center of the face, just above the belly patch. -
Adding facial details:
Press a tiny ball of black clay onto the top of the muzzle for the nose. For the eyes, press two small black balls into the clay on either side of the muzzle. I prefer to make slight indentations with a ball tool first so the eyes sit flush rather than bulging out. -
Drawing the mouth:
Using a very sharp needle tool or a craft knife, carefully etch a small anchor shape or inverted ‘Y’ extending down from the nose to create the mouth.
Seed Realism
For extra detail, instead of just poking holes, fill the indentations with tiny teardrops of yellow or white clay to look like actual strawberry seeds sitting in the flesh.
Step 3: Arms, Legs, and Toppings
-
Forming the arms:
Roll two small sausages of pink clay for the arms. Curved them slightly and attach them to the sides of the body. Blend the top shoulder area into the body using a silicone tool so they don’t fall off. -
Attaching the legs:
Create two small, thick discs or balls for the feet. Press these onto the bottom front of the body. Add tiny circles of the light pink clay to the soles of the feet for paw pads. -
Creating the stem hat:
Flatten a piece of green clay and cut or shape it into a 5-point star or flower shape. Place this directly on top of the bear’s head, curving the leaves down to hug the curve of the skull. -
Adding the stem:
Roll a tiny log of green clay or lighter green/yellow clay and attach it to the center of the leaf hat. If you want it extra secure, a tiny dab of liquid clay here helps. -
Leaf details:
Use a needle tool to gently impress a central vein line down the middle of each green leaf on the hat for added realism. -
Final check:
Look over your bear for any fingerprints. You can smooth them away with a tiny bit of baby oil on your finger or a soft brush before baking. -
Baking:
Bake the figurine according to your specific brand of clay’s package instructions (usually 230°F – 275°F for 15-30 minutes). Let it cool completely before handling.
Glossy Finishes
After baking and cooling, coat just the eyes and nose with a UV resin or high-gloss varnish. This makes the character look bright-eyed and alive without glazing the whole piece.
Once baked and cooled, your berry sweet bear is ready to display alongside your favorite fruit bowl
Mythical Mashup Animals Like A Tiny Dragon Cat

This whimsical project combines the peaceful expression of a napping cat with the spiky charm of a dragon. Sculpted from clay and painted in soft sage greens and terracotta oranges, this hybrid creature makes a delightful guardian for your windowsill plants.
Step-by-Step Tutorial
Materials
- Air-dry clay or polymer clay (white or grey base)
- Acrylic paints (Sage green, Terracotta/Orange, Dark Grey/Black)
- Sculpting tools (needle tool, blending tool, rubber shaper)
- Water cup and sponge (for smoothing)
- Fine grit sandpaper
- Small paintbrushes (flat and fine liner)
- Matte varnish or sealant
Step 1: Forming the Base Body
-
Shape the torso:
Start with a medium ball of clay and roll it into a pear shape. Flatten the bottom gently so it sits stably on your work surface. This will be the cat’s seated body. -
Create the head:
Roll a slightly smaller ball for the head. It should be roughly spherical but slightly flattened on the front for the face. Attach this to the top of the body. -
Secure the join:
Use a blending tool or your thumb to drag clay across the seam between the head and body, smoothing it out completely so the neck transition looks seamless and sturdy. -
Add front legs:
Roll two small sausages of clay. Attach them vertically to the front of the body, blending the top edges into the chest so they look like integrated front legs rather than stuck-on pieces. -
Form the tail:
Roll a tapered cone of clay for the tail. attach the thicker end to the base of the back, curving it slightly to one side. Blend the join thoroughly.
Smooth Seams Tip
If using air-dry clay, keep a small dish of ‘slip’ (clay dissolved in water to a paste) nearby. Painting this into cracks before blending ensures invisible, strong joints.
Step 2: Sculpting the Features
-
Add cat ears:
Shape two small triangles. Score the bottom of each and slip (add water) if using air-dry clay, then press them onto the top of the head. I find using a rubber shaper helps blend these tricky angles without distorting the ear shape. -
Create the dragon spikes:
Make a series of small triangles, graduating in size from large to small. Attach them in a line starting from the top of the head (between the ears), running down the back, and finishing at the tip of the tail. -
Refine the face:
Using a needle tool or a small wooden stylus, gently carve the sleeping eyes (two U-shapes), the small nose, and the mouth. Keep the lines clean and simple. -
Add whisker details:
Carefully press three short horizontal lines into each cheek for whiskers. Ensure they are deep enough to hold paint later but not so deep they crack the clay. -
Smooth the surface:
Dip your finger or a sponge in a tiny bit of water and run it over the entire sculpture to remove fingerprints. Let the piece dry completely according to your clay’s instructions (usually 24-48 hours for air-dry). -
Sand imperfections:
Once fully bone dry, use fine-grit sandpaper to gently smooth out any remaining bumps or rough patches.
Step 3: Painting and Finishing
-
Base coat:
Paint the entire body with a pale sage green acrylic paint. You may need two thin coats for opaque coverage. Avoid painting the spikes if you want to keep colors clean, or just paint over them if your orange is opaque enough. -
Paint the spikes:
Using a smaller brush, carefully paint each back spike and the insides of the ears with a warm terracotta or burnt orange color. -
Detail the paws:
Use the same terracotta orange to paint small semi-circles at the bottom of the front legs to represent paws/toes. -
Adding spots:
Dip the back end of a paintbrush into the orange paint and dot small spots along the flank of the body for extra texture. -
Define the face:
Thicken a dark grey or black paint slightly (or use a fine tip marker if painting is daunting). Fill in the etched lines for the eyes, whiskers, and mouth. Paint a small orange dot for the nose. -
Seal the work:
Once all paint is dry, apply a coat of matte varnish. This replicates the ceramic look of the original image and protects your paint job.
Make it a Planter
Before drying, hollow out the back and top of the head to create a small cavity. Once sealed, you can tuck a tiny air plant inside the dino-cat’s back.
Place your finished hybrid creature near a sunny window to enjoy its peaceful vibe