Clay time with kids is basically pure magic: squishy, colorful, and full of “I made this!” pride. Here are my favorite clay ideas for kids—easy wins first, then a few playful twists once you’re warmed up.
Googly-Eyed Clay Monsters
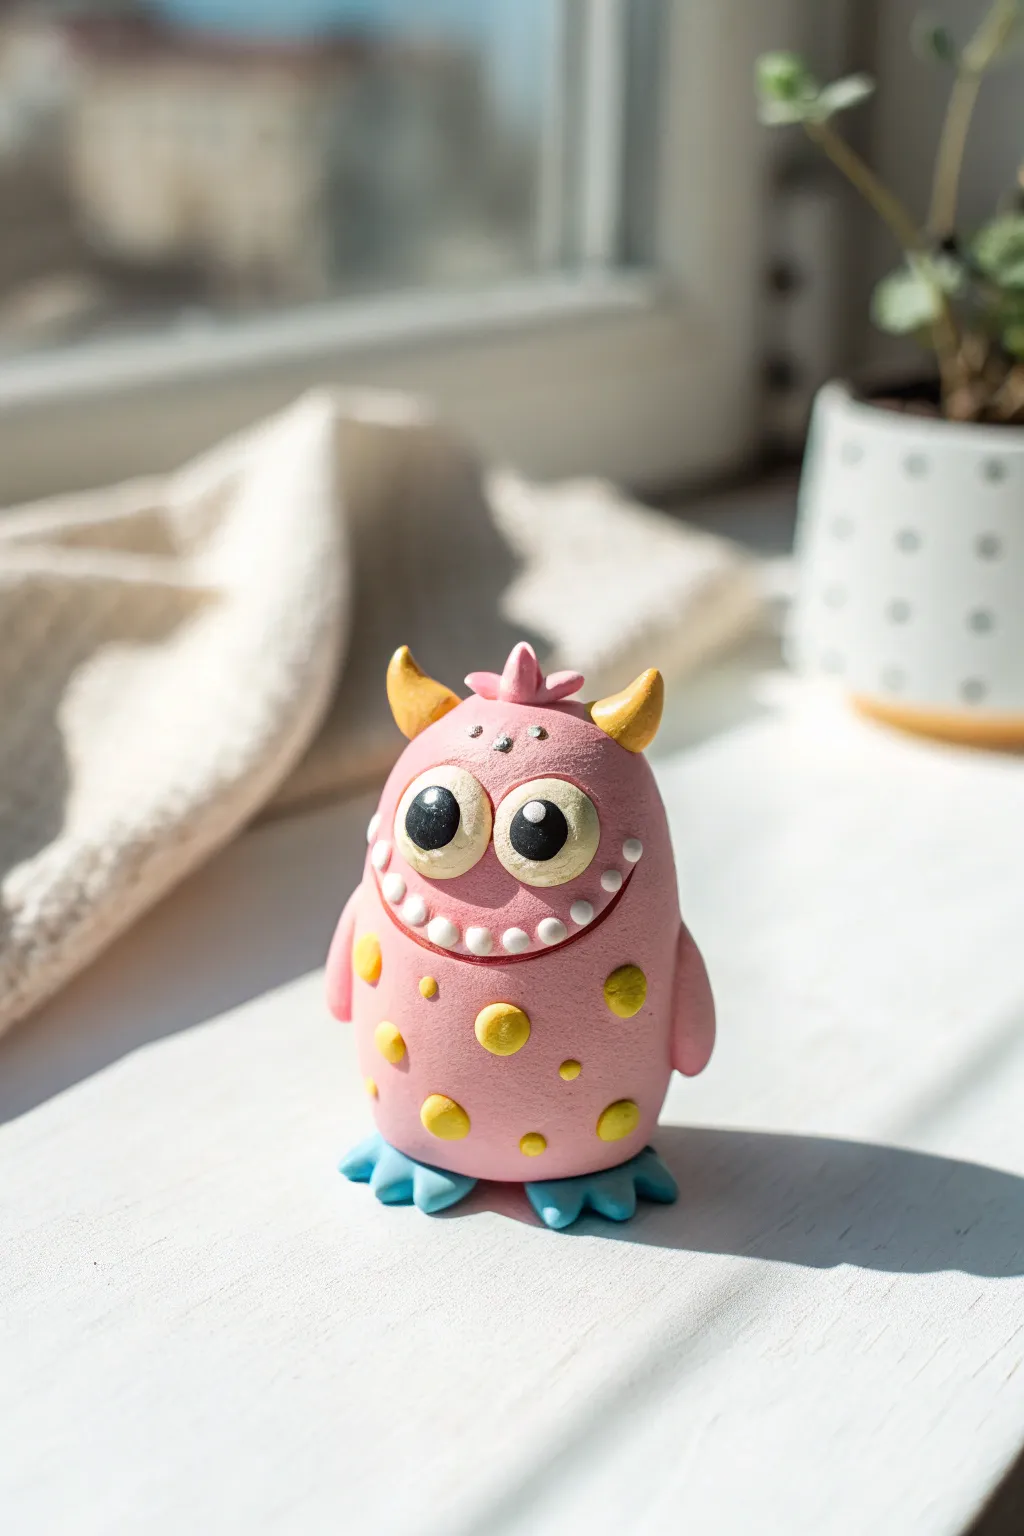
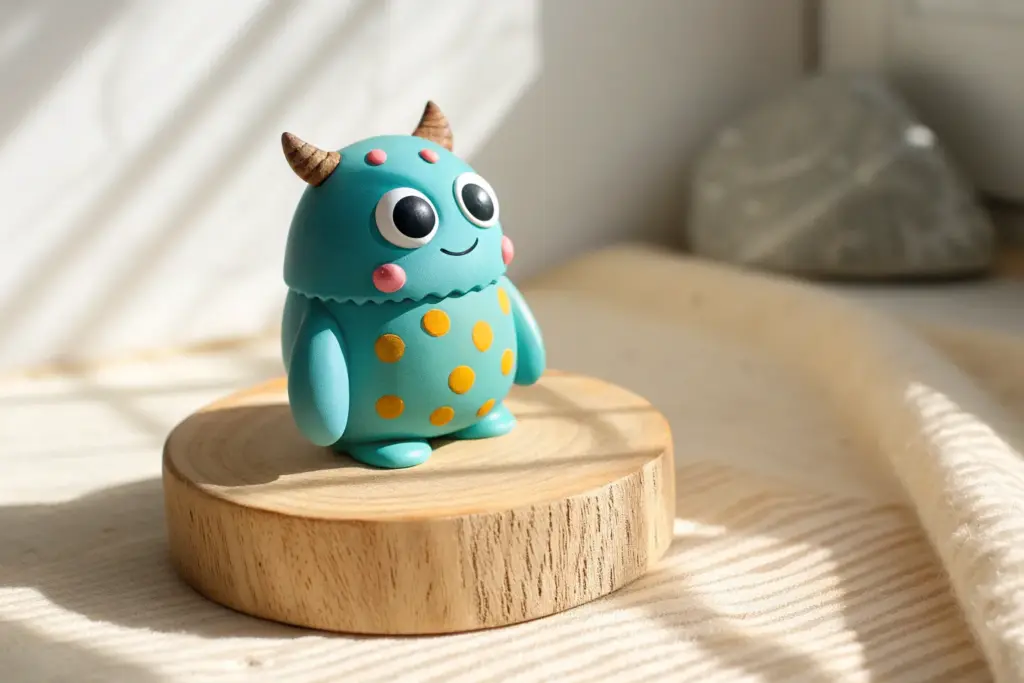
Create this adorable, egg-shaped monster friend with just a few colors of polymer or air-dry clay. Its textured pink skin, oversized eyes, and tiny blue feet give it a goofy charm that’s perfect for a windowsill companion.
Step-by-Step
Materials
- Pink modeling clay (polymer or air-dry)
- Yellow modeling clay
- Light blue modeling clay
- White modeling clay
- Black modeling clay
- Aluminum foil (optional core)
- Dotting tool or toothpick
- Clean work surface (rolling mat)
Step 1: Shaping the Body
-
Form the base:
Start with a large ball of pink clay. If you want to save clay, you can wad up a small ball of aluminum foil first and cover it with a layer of pink clay. Roll it firmly between your palms until smooth. -
Create the egg shape:
Gently taper the top of the ball so the shape becomes slightly narrower at the top and wider at the bottom, resembling a sturdy egg. Press the bottom flat against your work surface so it stands upright on its own. -
Add texture:
Using a stiff bristled toothbrush or a crumpled ball of aluminum foil, gently tap the entire surface of the pink body to create a subtle, pitted skin texture. -
Attack the arms:
Roll two small sausage shapes from pink clay for the arms. Press them vertically onto the sides of the body, blending the top seam smooth so they look attached.
Clay Won’t Stick?
If your added pieces (like spots or eyes) keep falling off, use a drop of ‘liquid clay’ or a dab of white glue as an adhesive before pressing them on.
Step 2: Face and Features
-
Make the eye sockets:
Using your thumb or a large ball tool, press two shallow indentations near the top center of the face where the eyes will go. -
Create the whites:
Roll two balls of cream or white clay. Flatten them slightly into thick discs and press them into the sockets you just made. They should be touching in the middle. -
Add pupils:
Roll two smaller balls of black clay. Press them onto the white discs. Place them slightly cross-eyed or looking in different directions for a goofier expression. -
Highlight the eyes:
For that spark of life, add a tiny speck of white clay to the upper corner of each black pupil. -
Carve the mouth:
Use a clay knife or a curved tool to cut a wide, U-shaped smile just below the eyes. Gently press inwards to open the mouth cavity slightly. -
Insert teeth:
Roll tiny, consistent balls of white clay. Press them gently into the gum line of the mouth you just carved. I find it easiest to start from the center and work outward.
Make it a Bank
Make the body hollow using a pinch-pot method instead of a solid ball. Cut a slot in the back before baking to turn your monster into a coin bank.
Step 3: Horns, Spots, and Feet
-
Form the horns:
Roll two small cones of yellow clay. Curve the tips slightly and press them onto the sides of the monster’s head. -
Add the crest:
Create three tiny pink teardrop shapes and cluster them on the very top of the head like a little tuft of hair. -
Decorate with spots:
Roll various sizes of small yellow balls. Flatten them onto the monster’s belly and sides to create polka dots. Press them firmly so they adhere well. -
Sculpt the feet:
Take two pieces of light blue clay and flatten them into triangular shapes. Use a knife to cut two notches into the front of each, creating three toes. -
Attach the feet:
Position the feet pointing outward and place the monster body on top of them. Press down gently to secure the connection. -
Final touches:
Add two tiny silver or white dots above the eyes for eyebrows. If using polymer clay, bake according to the package instructions; otherwise, let it air dry completely.
Now define a spot on your shelf for your new spotted friend to sit and smile


Classic Pinch Pot Treasure Bowls
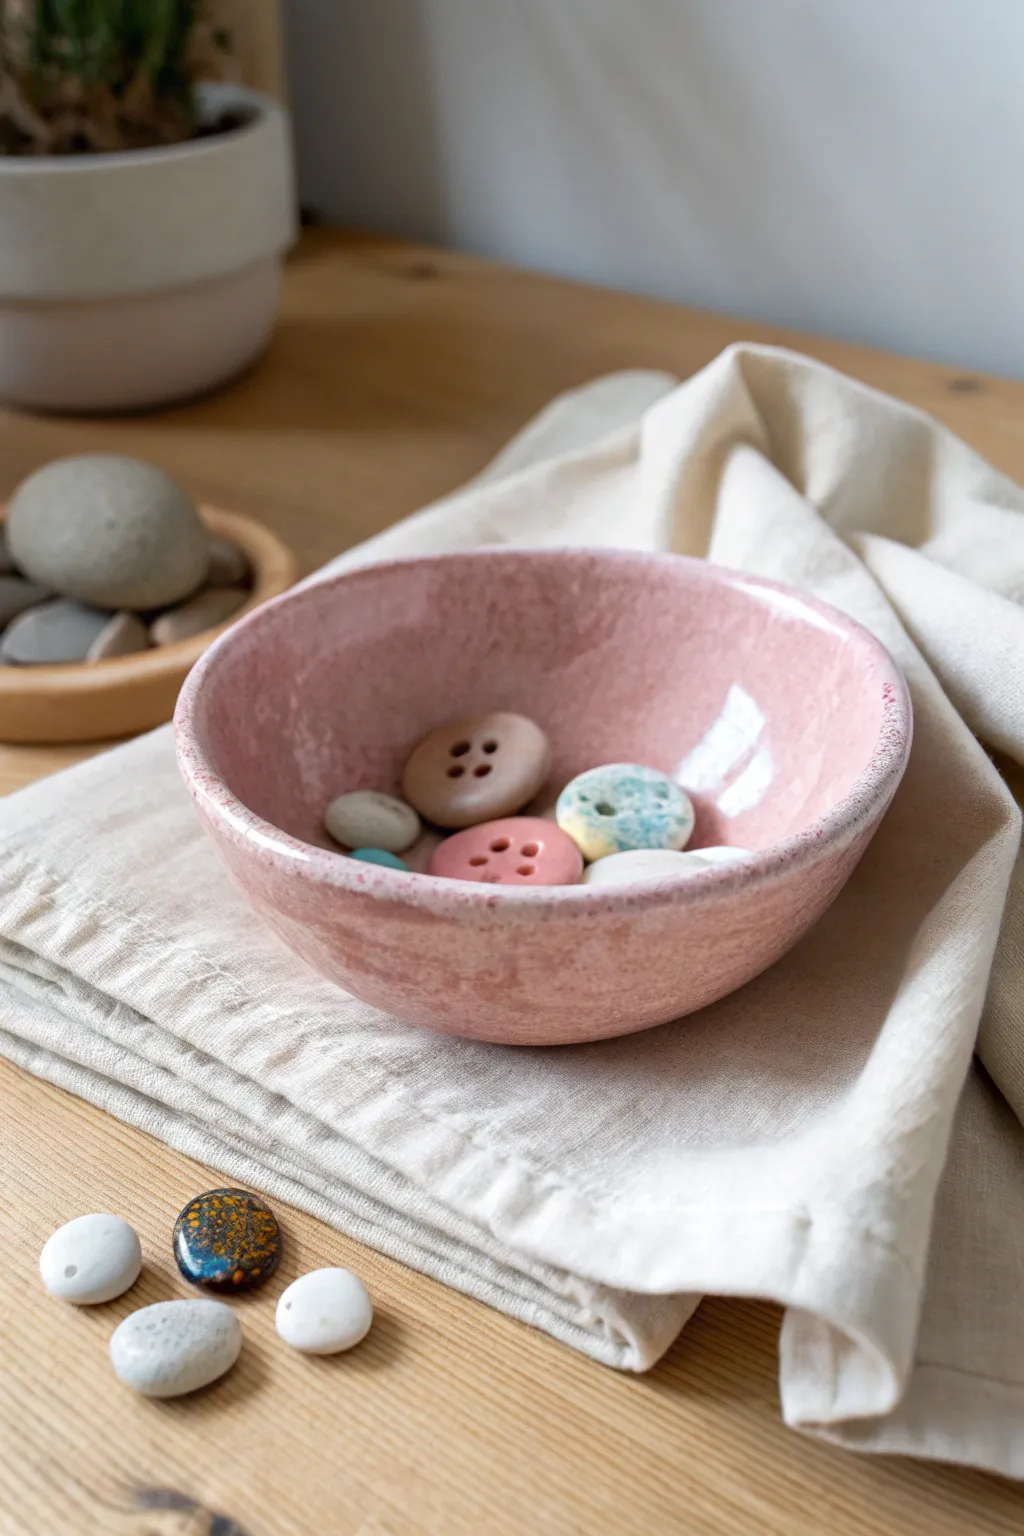
This charming, imperfectly perfect little bowl features a soft pink glaze and a classic handmade shape that feels wonderful to hold. It is the ideal size for keeping tiny treasures like buttons, beads, or smooth stones safe and displayed beautifully.
How-To Guide
Materials
- Air-dry clay (white) or polymer clay
- Small bowl relative to hand size
- Water in a small cup
- Sponge or smoothing tool
- Pink acrylic paint or ceramic glaze (if using kiln-fire clay)
- Clear gloss varnish or sealant (Mod Podge works well)
- Paintbrush
- Fine-grit sandpaper
Step 1: Forming the Base Shape
-
Prepare the clay:
Start with a ball of clay about the size of a tangerine. Squeeze and knead it in your hands to warm it up and ensure it is smooth and free of air bubbles. -
Create the opening:
Hold the clay ball in the palm of your non-dominant hand. Gently press your thumb into the very center of the ball, pushing down until you are about a half-inch from the bottom. -
Pinch the walls:
With your thumb still inside the hole and your fingers on the outside, begin a gentle pinching motion. Rotate the ball slightly after each pinch to ensure even thickness. -
Widen the bowl:
Continue pinching and turning, working your way from the bottom up towards the rim. Aim for a wall thickness of about a quarter-inch throughout the piece. -
Shape the rim:
As the bowl widens, pay attention to the rim. It doesn’t need to be perfectly straight—the wavy, organic edge adds character—but try to keep the thickness consistent. -
Flatten the bottom:
Gently tap the bowl onto your table surface to create a small, flat base so it sits stable without wobble.
Cracks Appearing?
If small cracks form while drying, mix a tiny bit of fresh clay with water to make a paste (slip) and fill them in, then sand smooth once dry.
Step 2: Smoothing and Drying
-
Smooth the interior:
Dip your finger or a small piece of sponge into water. Gently rub the inside of the bowl to erase any deep fingerprints or cracks. -
Refine the exterior:
Repeat the smoothing process on the outside. Ideally, you want a texture that looks handmade but feels smooth to the touch. -
Initial dry:
Set the bowl aside in a dry, room-temperature spot. If usng air-dry clay, let it sit for 24-48 hours until completely hard and white. -
Sanding:
Once fully dry, take a piece of fine-grit sandpaper and lightly buff away any sharp ridges or rough patches on the rim and sides. -
Dust off:
Wipe the bowl down with a slightly damp cloth or a dry brush to remove all the clay dust before painting.
Speckled Pottery Look
Flick the bristles of an old toothbrush dipped in brown paint over the pink base coat to create realistic faux-ceramic speckles.
Step 3: Adding Color and Shine
-
Mix your paint:
Squeeze out some pink acrylic paint. To get that soft, speckled pottery look, I like to mix a tiny drop of white or a slightly darker pink into it but not blend it completely. -
Paint the inside:
Start painting the interior of the bowl. Use smooth strokes that follow the curve of the clay. -
Paint the outside:
Paint the exterior walls. Don’t worry if the color looks slightly uneven; this mimics the look of real ceramic glaze. -
Detail the rim:
Dab a little extra paint along the rim. You can even use a slightly darker shade here to define the edge. -
Let paint dry:
Allow the paint to dry completely. This usually takes about 20-30 minutes for acrylics. -
Apply gloss:
Apply a coat of clear high-gloss varnish or sealant. This is the secret step that makes air-dry clay look like fired ceramic. -
Final cure:
Let the varnish cure according to the bottle’s instructions before placing your buttons or treasures inside.
Now your bowl is ready to hold a collection of curious finds or everyday items


Easy Clay Animals Made From Balls and Snakes
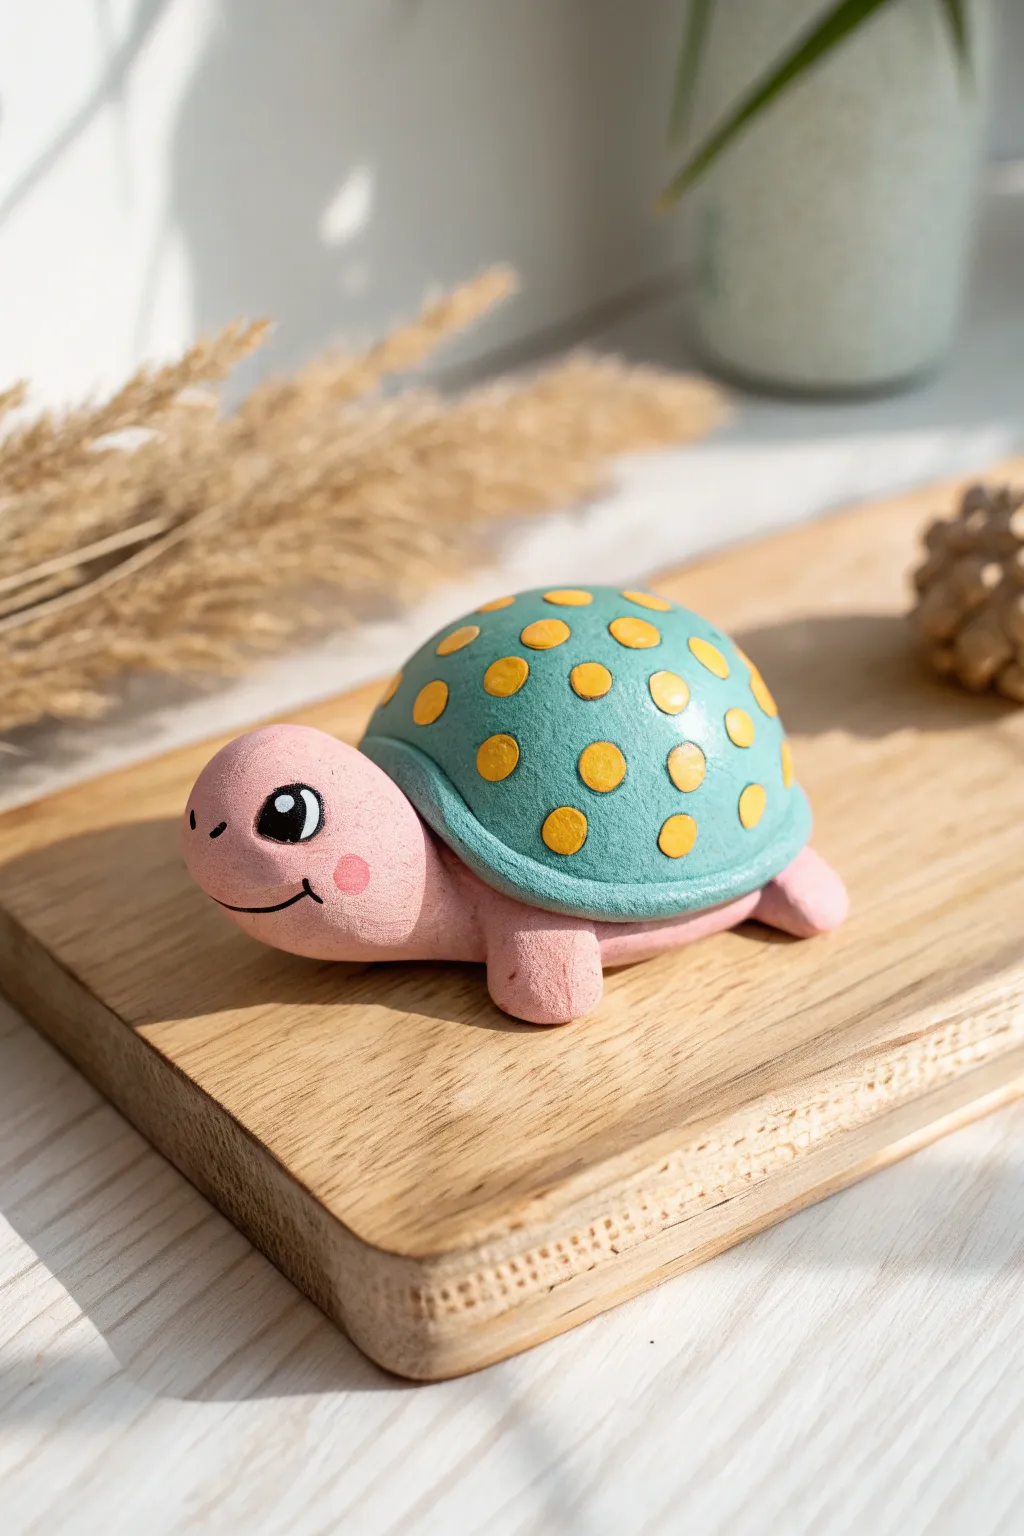
This friendly little turtle combines simple shapes with cheerful colors for a project that’s perfect for beginners. With a teal shell dotted in sunny yellow and a soft pink body, he’s ready to crawl his way into your heart.
Step-by-Step Tutorial
Materials
- Air-dry clay (white or terracotta)
- Acrylic paints: Teal/Turquoise, Pastel Pink, Sunny Yellow, Black, White
- Paintbrushes: Medium flat brush, small detail brush
- Water cup and paper towels
- Modeling tool or toothpick
- Clear matte varnish (optional)
Step 1: Sculpting the Body
-
Form the main body:
Start with a chunk of clay about the size of a golf ball. Roll it into a smooth sphere, then gently flatten it into an oval shape to create the turtle’s main torso. -
Create the head:
Take a slightly smaller piece of clay and roll another ball. Smoothly attach this to one end of your oval body, blending the clay at the neck seam so it’s secure. -
Make the legs:
Roll four small, equal-sized balls of clay. These will be the flippers or legs. -
Attach the legs:
Press the four small balls onto the underside of the body—two near the front and two near the back. Gently squash them slightly so the turtle sits flat. -
Shape the tail:
Pinch a tiny bit of clay into a small cone shape and attach it to the rear of the body for a cute little tail.
Smooth Surface Trick
Before the clay dries, lightly brush the surface with a tiny bit of water on your finger. This acts like fine sandpaper, removing fingerprints for a professional look.
Step 2: Creating the Shell
-
Form the shell dome:
Roll a medium-sized ball of clay. Place it on a flat surface and press it down to create a half-sphere or dome shape that fits over the turtle’s back. -
Add the rim:
Roll a long, thin snake of clay. Wrap this snake around the bottom edge of your shell dome. Flatten it slightly to create a distinct rim. -
Attach shell to body:
Place the finished shell on top of the oval body. Press down gently but firmly to join them. I like to use a tiny bit of water here as ‘glue’ to help them stick. -
Smoothing:
Use a damp finger to smooth out any cracks or fingerprints on the clay surface. -
Dry time:
Let your turtle dry completely according to your clay package’s instructions. This usually takes 24-48 hours depending on thickness.
Step 3: Painting and Details
-
Base coat the body:
Once dry, paint the head, legs, and tail with pastel pink acrylic paint. You might need two coats for opaque coverage. -
Paint the shell:
Carefully paint the dome of the shell with a teal or turquoise color. Try to keep a clean line where the shell meets the pink body. -
Let base colors dry:
Allow the pink and teal paints to dry completely before adding decorations. -
Add the polka dots:
Dip a small round brush or the back end of a paintbrush into yellow paint. Dot spots all over the teal shell. -
Paint the face:
Using a very fine detail brush and black paint, draw an oval eye and a curved smile line. Add two tiny dots for nostrils. -
Eye highlights:
Add a tiny white dot inside the black eye oval to bring your turtle to life. -
Rosy cheeks:
Dab a very faint circle of slightly darker pink on the cheek area for a rosy blush effect. -
Seal (optional):
For extra durability, finish with a coat of clear matte varnish once all paint is dry.
Make it a Family
Create a whole family by varying the sizes of your clay balls. Try painting each shell a different bright color to make a rainbow turtle team.
Your adorable turtle is now ready to brighten up any shelf or desk


Rainbow Coil Pots With Twisty “Snakes”
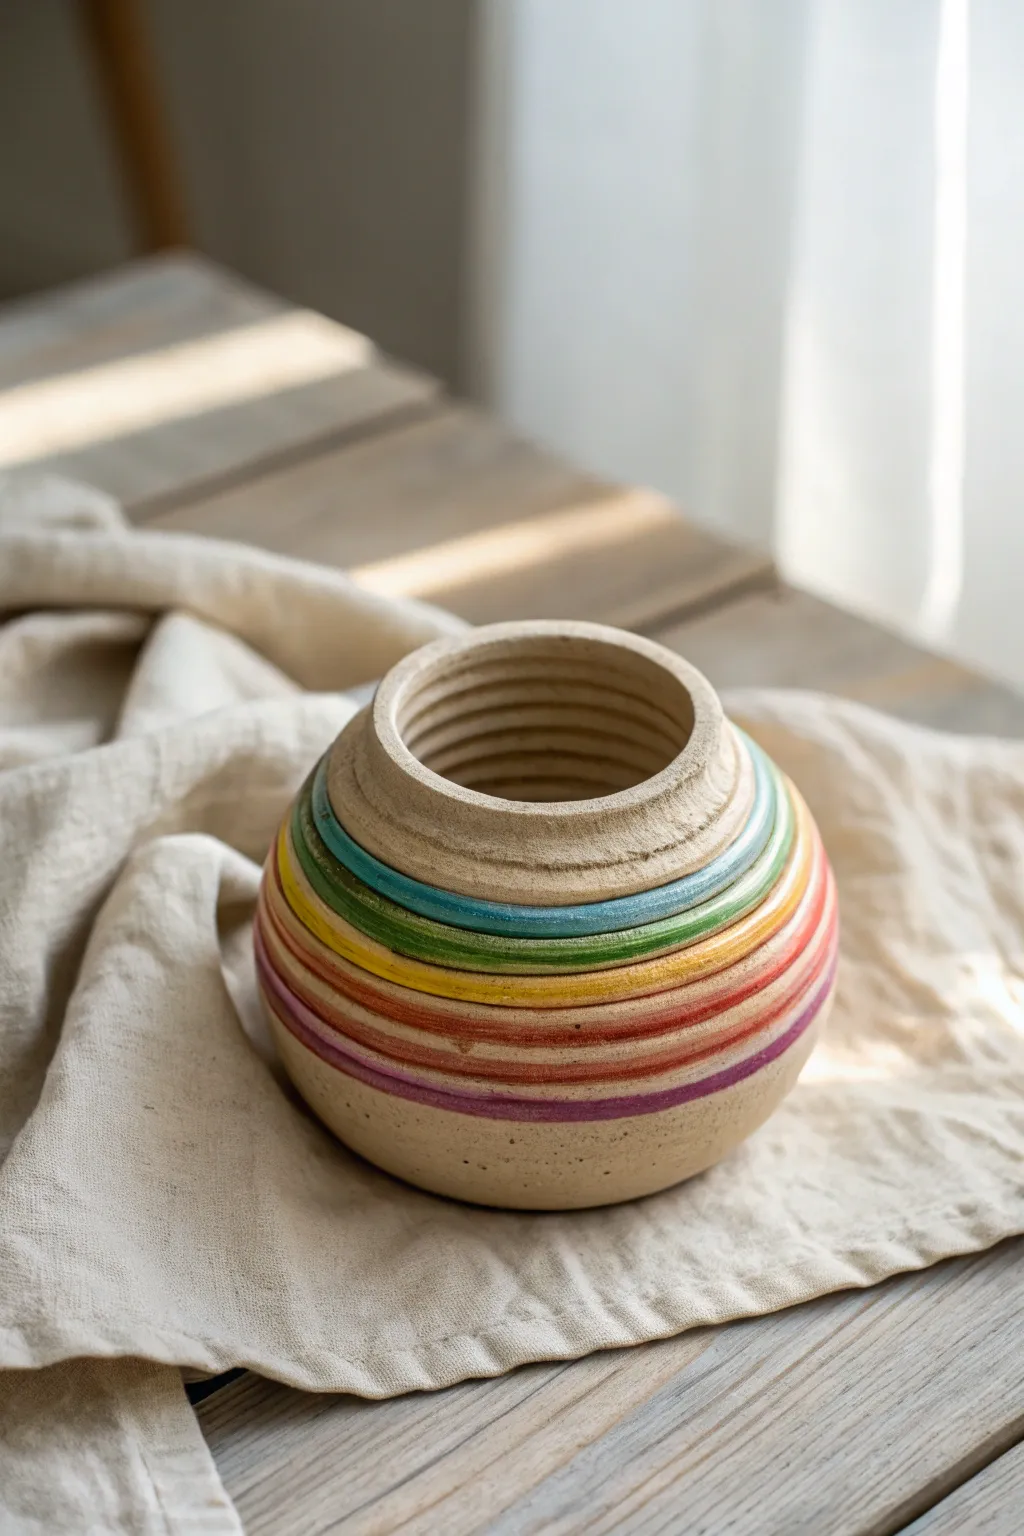
This charming little vessel puts a colorful spin on the classic coil pot technique by highlighting each ring with a vibrant stripe. It’s a fantastic way to practice rolling even snakes of clay while creating a functional piece of art that looks lovely on any windowsill.
Step-by-Step Guide
Materials
- Air-dry clay (or kiln-fire clay if you have access to a kiln)
- Acrylic paints (primary colors + purple)
- Fine-tipped paintbrush
- Small cup of water
- Rolling pin (optional)
- Canvas mat or parchment paper
- Scoring tool or toothpick
- Clear acrylic sealer or varnish (matte or satin finish)
Step 1: Forming the Base
-
Prepare your clay:
Start by kneading a tennis-ball-sized amount of clay to warm it up and remove air bubbles. This ensures your pot won’t crack as it dries. -
Create the bottom slab:
Pinch off a small piece of clay and roll it into a ball about the size of a golf ball. Flatten this ball gently with your palm against your work surface. -
Refine the circle:
Use a rolling pin or just your hands to flatten the disk until it’s about 1/4 inch thick. Aim for a diameter between 3 and 4 inches. -
Smooth the edges:
Run your finger along the rim of your clay disk to smooth out any rough patches or cracks. This will be the foundation for your coils.
Crack Control
If you see tiny cracks forming while the clay dries, smooth a small amount of ‘slip’ (a mixture of clay and water that looks like mud paste) over the crack to repair it immediately.
Step 2: Building the Walls
-
Roll your first snake:
Take a fresh chunk of clay and roll it back and forth on the table with the palms of your hands. Apply even pressure to create a long, uniform ‘snake’ or coil about the thickness of a pinky finger. -
Score the connection point:
Use a toothpick or scoring tool to scratch rough hatch marks all around the top edge of your base disk. Dab a tiny bit of water on the scratches—this acts as glue. -
Attach the first coil:
Lay your clay snake onto the scored edge of the base. When you complete the circle, cut off the excess and gently smudge the two ends together so they join seamlessly. -
Blend the inside:
For structural strength, reach inside the pot and smooth the clay from the coil down onto the base. I usually leave the outside coils visible for that textured look shown in the photo. -
Stack and shape:
Continue rolling coils and stacking them. To make the pot curve outward and look rounder, place each new coil slightly toward the outer edge of the one below it. -
Curve inward:
Once you reach the widest part of the belly, start placing your coils slightly toward the inner edge of the previous ring. This will taper the neck of the pot inward. -
Finish the rim:
Add your final coil for the rim. You can smooth this one gently with a wet finger for a polished look, but keep the ridges distinct on the sides. -
Dry thoroughly:
Let the pot sit in a safe, dry place. Depending on the humidity and clay thickness, this can take 24 to 48 hours for air-dry clay. It must be completely bone dry before painting.
Go Geometric
Instead of circles, try shaping your initial base into a square or triangle. As you stack the coils, maintain the corners to build a unique geometric vessel.
Step 3: Adding the Rainbow
-
Select your palette:
Prepare your paints. You’ll need light blue, green, yellow, orange, red, and purple. Pour a coin-sized amount of each onto a palette or paper plate. -
Paint the top stripes:
Start near the top third of the pot. Dip a fine-tipped brush into the light blue paint. Carefully paint along the ridge of a single coil, letting the brush follow the curve of the clay. -
Continue the pattern:
Move to the coil immediately below the blue one and paint it green. Continue working downward with yellow, then orange, then red. -
Finish with purple:
Paint the purple stripe below the red one. The messy, slightly washed look of the paint enhances the rustic clay aesthetic, so focus on the prominent outer ridges rather than getting paint deep in the cracks. -
Seal the piece:
Allow the paint to dry completely. For protection and a slight sheen, apply a coat of clear acrylic varnish over the entire outside of the pot.
Now you have a cheerful handmade pot ready to hold trinkets or dried flowers

The Complete Guide to Pottery Troubleshooting
Uncover the most common ceramic mistakes—from cracking clay to failed glazes—and learn how to fix them fast.
Handprint or Thumbprint Keepsake Plaques
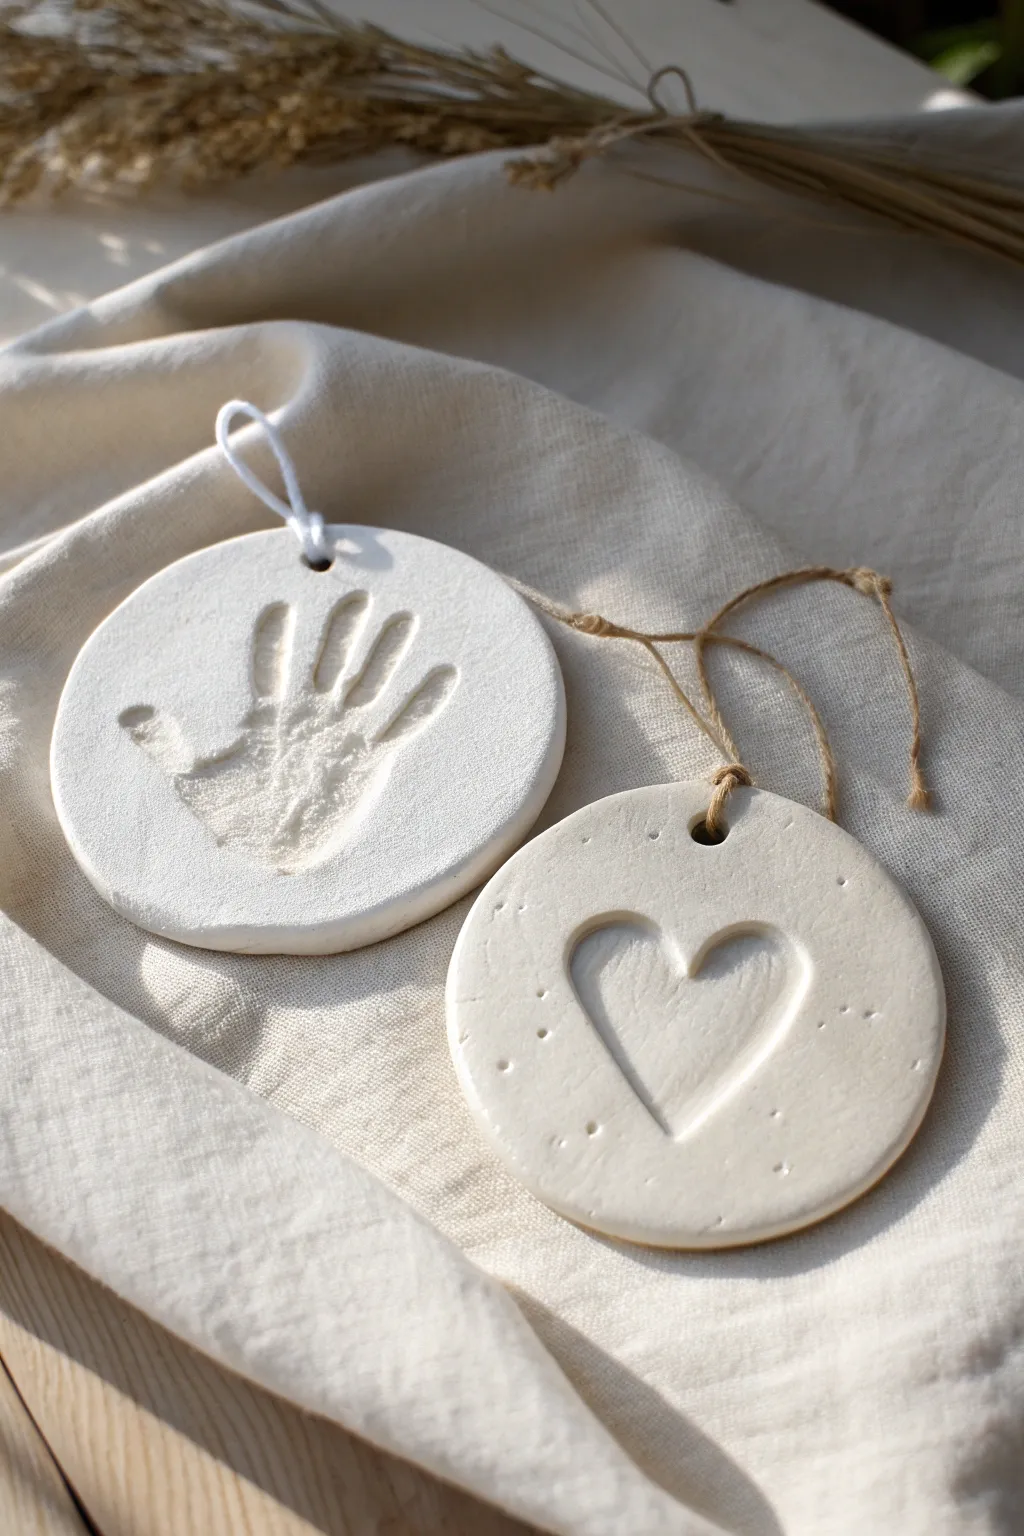
Capture a moment in time with these sweet, earthy keepsake plaques featuring a child’s handprint or a simple heart motif. Crafted from white air-dry clay, they offer a clean, minimalist aesthetic that looks beautiful hanging anywhere in the home.
How-To Guide
Materials
- White air-dry clay or salt dough
- Rolling pin
- Parchment paper or canvas mat
- Round cookie cutter (approx. 4-5 inches) or a bowl and knife
- Straw or skewer (for hole punching)
- Sandpaper (fine grit)
- White cotton cord
- Jute twine
- Small heart stamp or cookie cutter (optional)
- Water in a small cup
Step 1: Preparing the Clay Base
-
Knead the clay:
Begin by taking a generous handful of air-dry clay and kneading it in your hands to warm it up. This helps remove air bubbles and makes the texture pliable and smooth. -
Roll it out:
Place the clay on a sheet of parchment paper or a canvas mat to prevent sticking. Use your rolling pin to flatten the clay to an even thickness of about 1/4 to 1/2 inch. Avoid making it too thin, as it needs to be sturdy enough for an impression. -
Cut the shape:
Press a large round cookie cutter firmly into the rolled clay. If you don’t have a cutter large enough simply place a small bowl upside down on the clay and trace around it with a butter knife to cut out your circle. -
Smooth the edges:
Dip your finger into a little water and run it gently around the cut edge of the clay circle. This smooths out any jagged bits or sharpness left by the cutting tool.
Tip: Smoothness is Key
For a silky finish like the photo, dip your finger in water and smooth the clay surface *before* making the impression. This erases the texture of the rolling pin.
Step 2: Creating the Impressions
-
Make the handprint:
For the handprint plaque, position your child’s hand over the center of the circle. Instruct them to spread their fingers slightly. Gently but firmly press down on their palm and each individual finger to ensure a deep, clear impression. -
Lift carefully:
Slowly peel the hand away from the clay to avoid dragging the material. If the print isn’t clear, you can simply re-roll the clay and try again. -
Create the heart design:
For the second design, press a heart-shaped cookie cutter deeply into the center of a fresh clay circle. Don’t cut all the way through; just press deep enough to create a strong outline. -
Add texture (optional):
To mimic the speckled look in the photo, you can lightly prick the surface around the heart randomly with the tip of a toothpick or a stiff bristle brush. -
Punch the hanging hole:
Use a sturdy straw or a skewer to punch a clean hole near the top edge of each circle. Make sure the hole is largely enough to fit your chosen cord or twine once dried.
Troubleshooting: Cracking
If you see tiny cracks forming while drying, mix a small amount of clay with water to make a paste (slip) and smooth it over the cracks with your finger.
Step 3: Drying and Finishing
-
Allow to dry:
Place the clay pieces on a flat, dry surface or a wire cooling rack. Let them air dry for 24-48 hours. I find turning them over halfway through the drying process helps them dry evenly and prevents curling. -
Check for hardness:
The clay should turn a stark white and feel hard to the touch when fully cured. Ensure there are no cool, damp spots in the center. -
Sand the surfaces:
Once completely dry, take a piece of fine-grit sandpaper and very gently buff the edges and the surface. This removes any rough spots and gives the piece a professional, matte finish. -
Clean off dust:
Wipe the ornaments down with a dry cloth or a soft brush to remove any clay dust generated by the sanding. -
Attach the white cord:
For the handprint plaque, cut a length of white cotton cord. Thread it through the hole and tie a secure knot at the loop’s end to create a hanger. -
Attach the jute twine:
For the heart plaque, cut a piece of rustic jute twine. Thread it through the hole and tie it off, leaving enough length to hang it easily.
Hang these charming keepsakes on a wall or hook to enjoy a personalized piece of art that freezes time
Texture Stamps With Leaves, Lace, and Found Objects
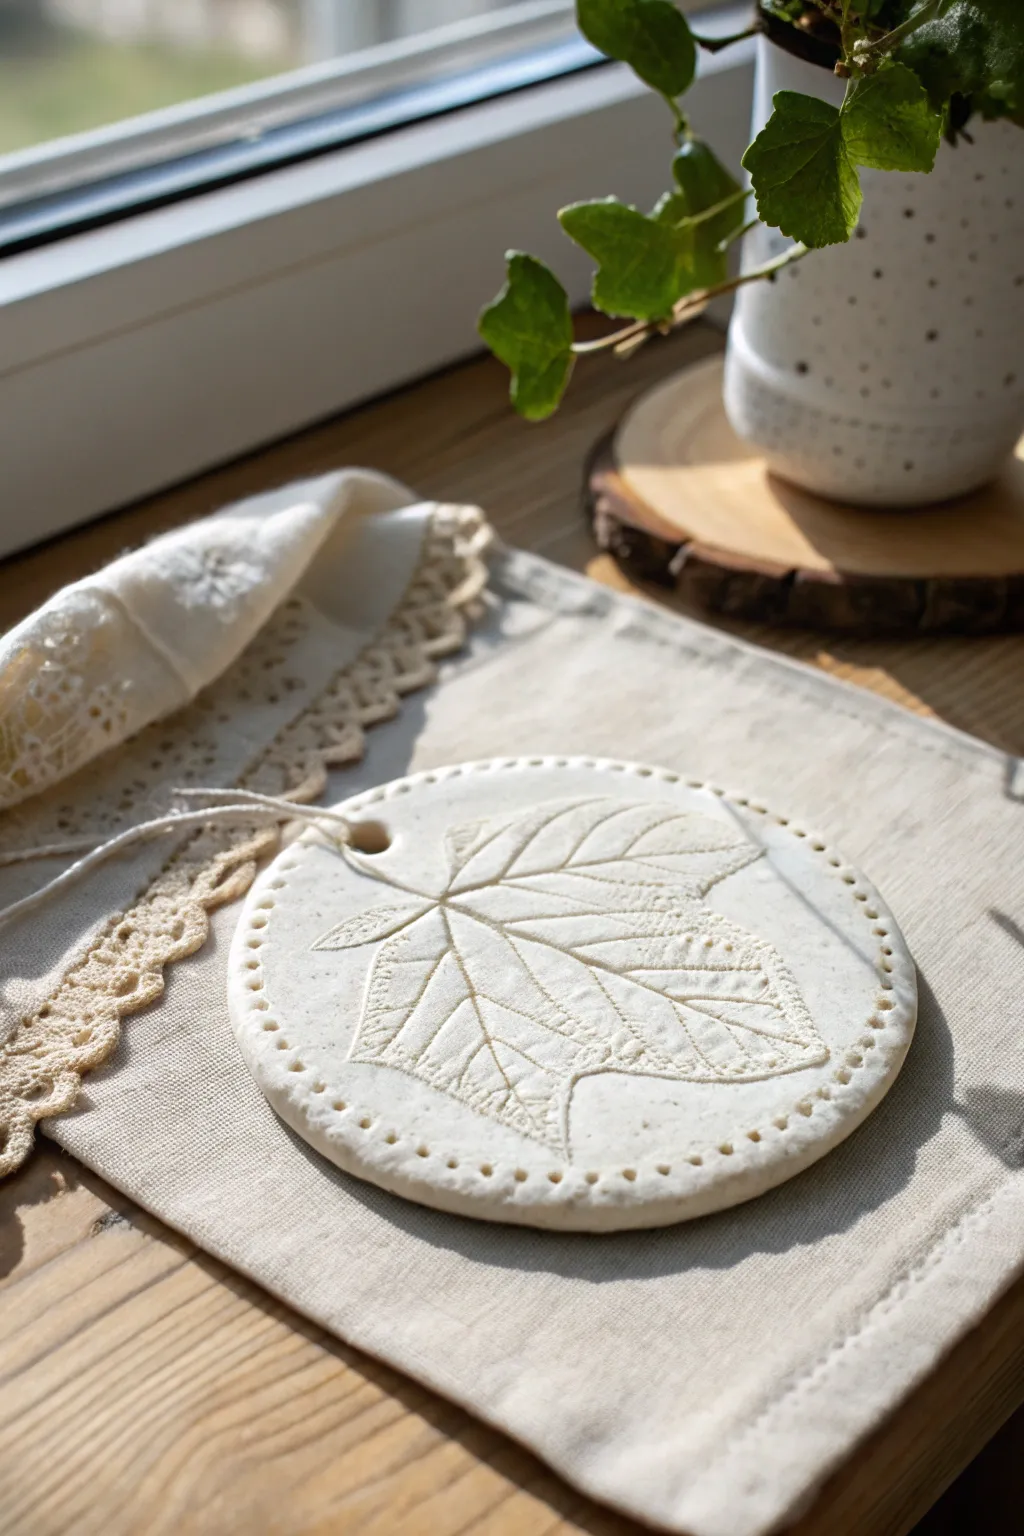
Capture the delicate veins of nature with this simple yet elegant project that transforms a piece of white air-dry clay into a stunning botanical relief. The result is a smooth, cream-colored disc featuring a central maple leaf impression framed by a charming dotted border.
Step-by-Step Tutorial
Materials
- White cosmetic-grade air-dry clay (or salt dough)
- Fresh, sturdy leaf with prominent veins (like maple or sycamore)
- Rolling pin
- Large circular cookie cutter (approx. 4-5 inches) or a bowl rim
- Wooden skewer or toothpick
- Wax paper or parchment paper
- Fine-grit sandpaper (optional)
- Gloss or matte sealant (optional)
Step 1: Preparation & Rolling
-
Prepare your surface:
Lay down a sheet of parchment or wax paper to protect your table and prevent sticking. This also makes it easier to move the project later without distorting the shape. -
Condition the clay:
Take a handful of white air-dry clay and knead it gently in your hands until it is warm, pliable, and free of cracks. -
Form a ball:
Roll the clay into a smooth, tight sphere between your palms. -
Flatten the dough:
Place the ball on your parchment paper and press it down with your palm to start the flattening process. -
Roll to thickness:
Use your rolling pin to roll the clay out evenly. Aim for a consistent thickness of about 1/4 inch—not too thin, or it might crack; not too thick, or it will take forever to dry.
Problem: Curling Edges?
If the edges lift while drying, gently weigh them down with a heavy book placed over a paper towel during the final drying phase.
Step 2: Creating the Impression
-
Cut the circle:
Press your large circular cutter or bowl rim firmly into the clay to create a clean, perfect circle. Remove the excess clay from around the edges. -
Smooth the edges:
Dip your finger in a tiny bit of water and gently run it along the cut edge of the circle to smooth out any roughness or sharp ridges. -
Position the leaf:
Select your leaf—ensure it is clean and dry. Place it vein-side down exactly in the center of your clay circle. -
Press the veins:
Gently roll over the leaf once with your rolling pin to press it initially. Then, use your fingers to press firmly along the spine and main veins to ensure a deep, crisp impression. -
Reveal the design:
Carefully lift the leaf by the stem and peel it away slowly to reveal the textured imprint underneath. I always love this part—it feels like magic every time.
Step 3: Detailing & Drying
-
Add the border:
Take your wooden skewer or a blunted toothpick. Press the blunt end gently into the clay about 1/8 inch from the edge to create small, evenly spaced dots all the way around the perimeter. -
Create a hanging hole:
If you plan to hang this as an ornament, use a straw or the thicker end of a chopstick to punch a clean hole near the top edge. -
Begin the drying process:
Leave the clay on the parchment paper and place it in a safe spot away from direct heat sources. Let it air dry for 24-48 hours. -
Flip for even drying:
About halfway through the drying time, carefully flip the disc over so the bottom can dry evenly prevent curling. -
Sand imperfections:
Once fully cured and hard, use very fine-grit sandpaper to gently buff away any rough spots on the rim. -
Seal (optional):
To protect the white finish from dust or moisture, you can apply a thin coat of matte or gloss varnish.
Vein Definition Tip
For sharper details, choose ‘older’ leaves. Fresh spring leaves are often too soft; autumn leaves have rigid, prominent veins that stamp best.
Hang your finished piece in a sunny window or use it as a coaster to bring a touch of the outdoors inside


What Really Happens Inside the Kiln
Learn how time and temperature work together inside the kiln to transform clay into durable ceramic.
Clay Beads for Bracelets and Necklaces
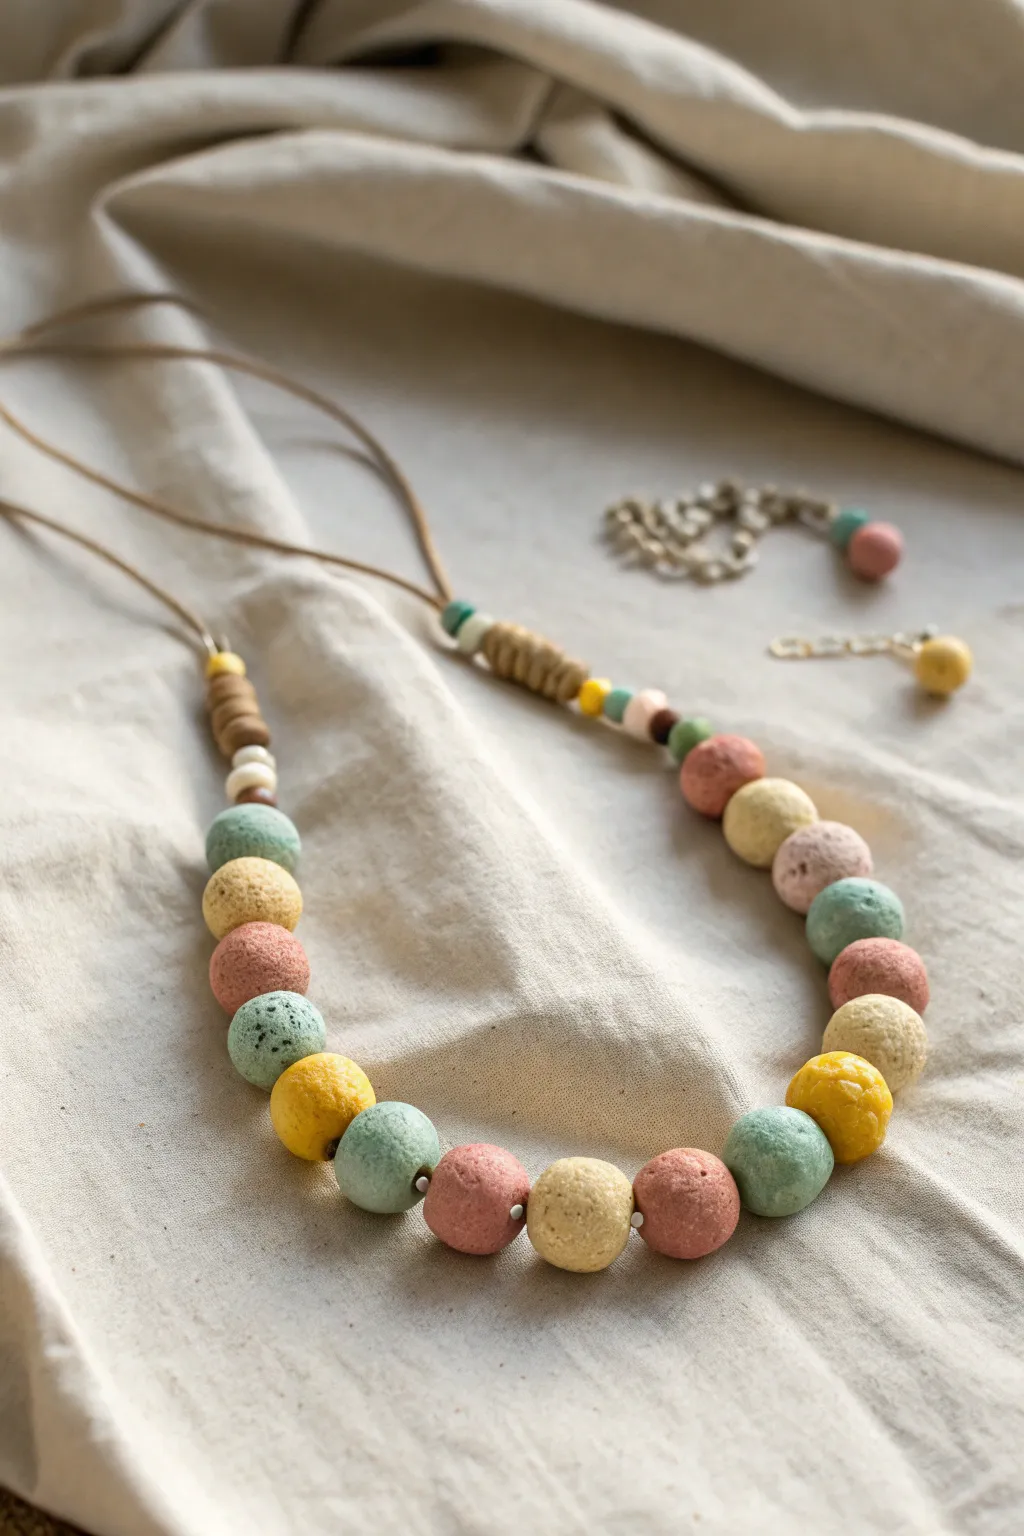
Create a stunning nature-inspired necklace using simple air-dry clay and soft earthy tones. This project features chunky, textured beads in muted yellows, pinks, and sea-foam greens strung on a natural cord for a relaxed, bohemian look.
Step-by-Step
Materials
- Air-dry clay (white or terracotta)
- Acrylic paints (pastel yellow, dusty rose, sage green/teal)
- Small sponge or rough sandpaper (for texturing)
- Wooden skewers or toothpicks
- Leather or waxed cotton cord (tan or brown)
- Small wooden spacer beads
- Paintbrush
- Matte sealant or varnish (optional)
- Scissors
Step 1: Shaping the Beads
-
Prepare the clay:
Pinch off small chunks of air-dry clay. You will need about 15 to 20 pieces for the main beads. Roll them between your palms to create rough spheres approximately 1 inch in diameter. -
Add texture:
Instead of smoothing them perfectly, gently dab the surface of each wet bead with a dry sponge or piece of rough sandpaper. This creates the stone-like, pitted texture seen in the photo. -
Create holes:
While the clay is still soft, carefully push a skewer through the center of each sphere to create a hole. Wiggle it slightly to ensure the hole is wide enough for your cord. -
Make smaller beads:
Roll a few tiny pieces of clay into small cylinder or disk shapes to act as spacers near the necklace clasp area. Poke smaller holes in these using a toothpick. -
Dry completely:
Slide the beads off the skewers and let them dry on a piece of paper towel for 24-48 hours. I find flipping them halfway through helps them dry evenly.
Step 2: Painting and Finishing
-
Mix your palette:
Prepare your acrylic paints. Aim for soft, matte earth tones: a pale mustard yellow, a dusty salmon pink, and a muted sage or sea-foam green. -
Apply base color:
Paint each bead in solid colors, painting about 5-6 beads per color group. Use a dabbing motion with your brush to get the paint into the textured crevices without filling them in completely. -
Add speckled details:
Once the base coat is dry, dilute a tiny amount of black or dark brown paint with water. Dip an old toothbrush or stiff brush into it and flick tiny specks onto a few of the teal and yellow beads for a realistic stone effect. -
Seal the beads:
For durability, coat the beads with a matte varnish. Avoid glossy finishes to maintain the natural, raw ceramic look.
Clean Beading Holes
As the clay dries, it shrinks slightly. Re-insert the skewer through the holes when the clay is semi-dry (leather hard) to ensure they stay open and clean.
Step 3: Assembly
-
Cut the cord:
Cut a length of leather or waxed cotton cord, approximately 30 inches long, depending on how low you want the necklace to hang. -
Arrange the pattern:
Lay your beads out on a table to plan the sequence. A nice pattern is alternating colors: pink, yellow, teal, pink, yellow, teal. -
String the beads:
Thread the beads onto the cord according to your pattern. If the holes are tight, wrap a piece of tape around the end of the cord to make a stiff ‘needle’. -
Add spacer details:
At the ends of your main bead section, thread on the smaller wooden beads or the tiny clay spacers you made earlier. -
Knot the accents:
Create a decorative coiled knot above the bead section on both sides. To do this, wrap the cord around itself 4-5 times and tuck the end through the loop, pulling tight to secure a barrel knot. -
Finish the ends:
Tie the two loose ends of the necklace cord together with a strong double knot or adjustable sliding knot to finish the piece.
Scent Diffuser Upgrade
Leave the clay unvarnished or just wax the back. The porous clay can absorb drops of essential oils, turning your beautiful necklace into a wearable aromatherapy diffuser.
Now you have a charming, handmade accessory that adds a touch of earthy elegance to any outfit
Food With Faces (Cute Snacks in Clay)
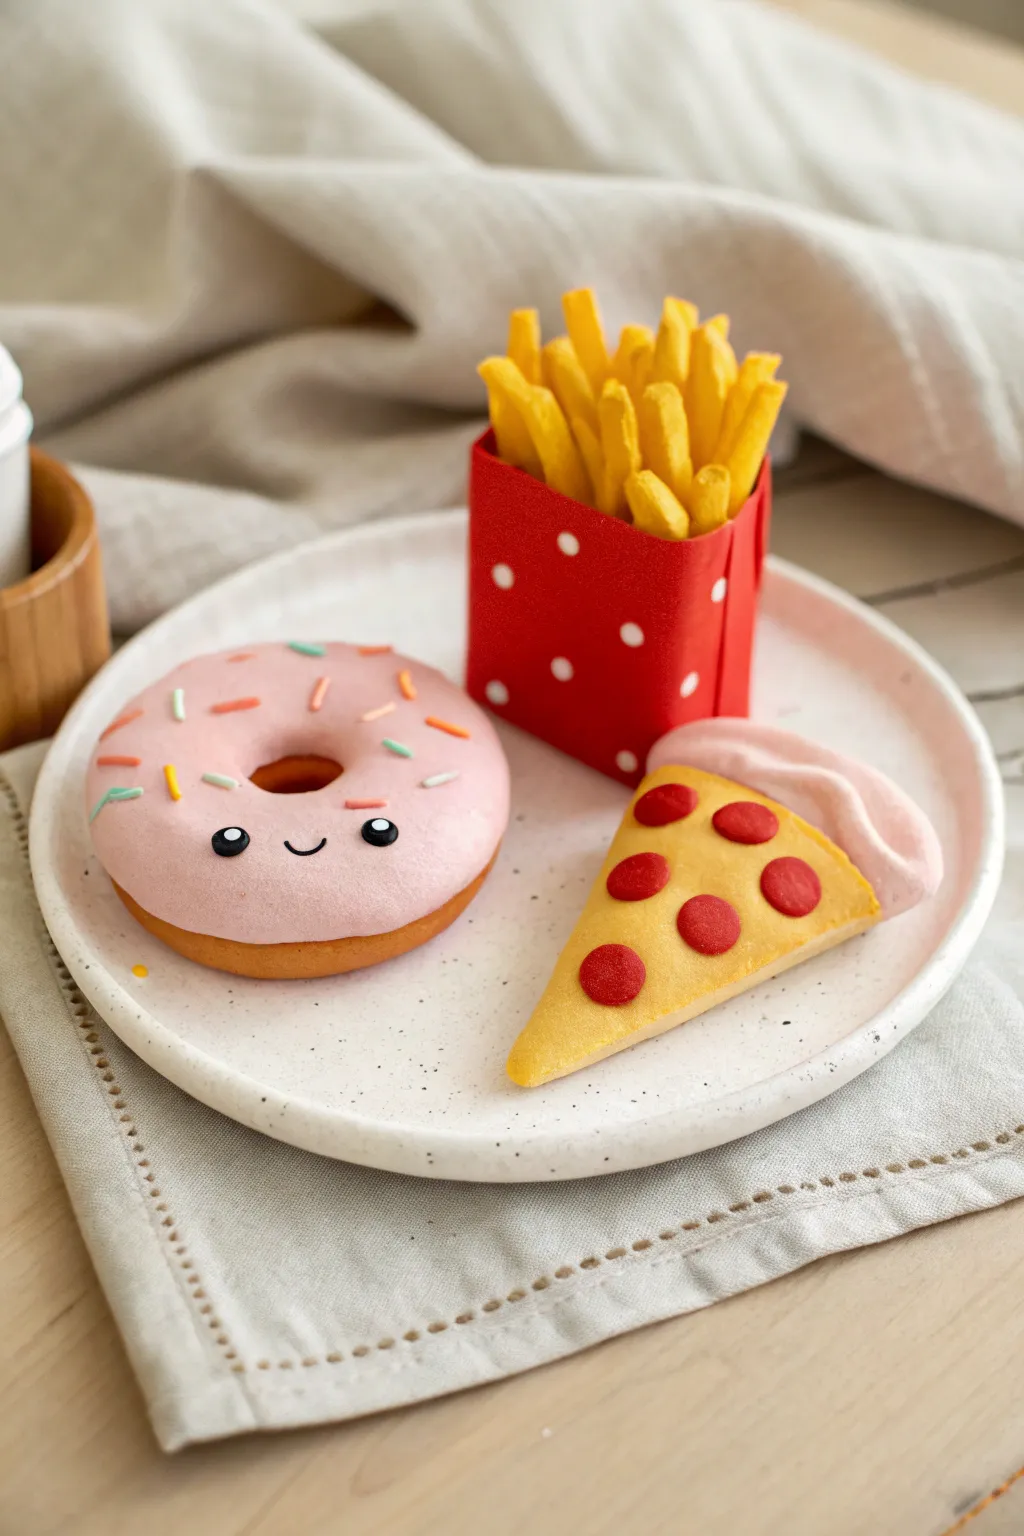
Transform simple clay into an adorable trio of fast-food favorites that look good enough to eat. This project features a happy pink donut, a classic slice of pepperoni pizza, and a carton of crispy golden fries, all sized perfectly for a playful display.
Step-by-Step Tutorial
Materials
- Polymer clay or air-dry clay (tan/dough color, pink, yellow, red, white, black, pastel green/orange for sprinkles)
- Clay sculpting tools (needle tool, ball tool)
- Small rolling pin
- Blade or plastic knife
- Red cardstock or thick paper
- Scissors and glue (for the fry box)
- Toothbrush or texturing tool
- Glaze (optional, for a shiny finish)
Step 1: The Happy Donut
-
Form the base:
Roll a ball of tan dough-colored clay and flatten it slightly into a thick disk. Use your thumb or a large ball tool to gently press an indentation in the center, then poke a hole through the middle to create the classic ring shape. -
Frost it pink:
Roll out a thin sheet of pink clay. Cut a circle slightly larger than your donut hole but smaller than the outer edge. Place this on top of the tan base. -
Soften the edges:
Gently press and smooth the edges of the pink clay down onto the tan base to make it look like poured icing. You can make the edges wavy for a more natural drippy look. -
Add a face:
Roll two tiny balls of black clay for eyes and press them onto the front of the donut. Roll a very thin, tiny snake of black clay and curve it into a ‘U’ shape for the smile, placing it centered between the eyes. -
Sprinkle time:
Roll extremely thin snakes of pastel green, orange, and yellow clay. Cut them into tiny segments and gently press them randomly onto the pink frosting.
Sticky Situation?
If clay gets too soft or sticky, pop it in the fridge for 10 minutes. Clean hands with baby wipes between colors to keep the pastel shades bright.
Step 2: Golden Crispy Fries
-
Create the fries:
Roll yellow clay into a sheet about 1/4 inch thick. Use your blade to cut this sheet into long, thin strips to resemble french fries. -
Texture the potatoes:
I like to use a toothbrush to gently tap the surface of the fries to give them a realistic, fried texture. Cut them to varying lengths for variety. -
Construct the box:
Cut a strip of red cardstock. Fold it into a rectangular box shape (open at the top) or a simple pouch. Glue the sides securely. -
Decorate the box:
Add small white polka dots to your red box using paint or tiny circles of white paper. -
Assemble the order:
Place a small scrap of clay inside the bottom of the box to act as a brightly colored anchor, then press your yellow clay fries into it so they stick up and spill out naturally.
Make It a Charm
Insert a metal eye pin into the top of the donut or pizza slice before baking or drying to turn these into adorable keychains or jewelry.
Step 3: Pepperoni Pizza Slice
-
Shape the crust:
Form a triangle from tan clay. Pinch the wide end to create a raised crust edge. -
Add texture:
Use a toothbrush to texture the tan clay, specifically focusing on the crust area to make it look baked. -
Cheese layer:
Roll out a thin layer of yellow clay and cut it into a triangle slightly smaller than your base. Place it on the flat part of the slice. -
Crust stuffing:
Roll a thick snake of pale pink clay to represent a stuffed crust or ham detail and curve it along the back edge of the crust. -
Toppings:
Punch or cut small circles of red clay for pepperoni. Press these firmly into the yellow cheese layer. -
Final shading:
If you have soft pastels, brush a little orange or brown chalk dust over the crust and cheese edges for a baked effect.
Arrange your finished snacks on a small plate for a permanent picnic scene that never expires

TRACK YOUR CERAMIC JOURNEY
Capture glaze tests, firing details, and creative progress—all in one simple printable. Make your projects easier to repeat and improve.
Mini Donuts and Cookies for Pretend Play
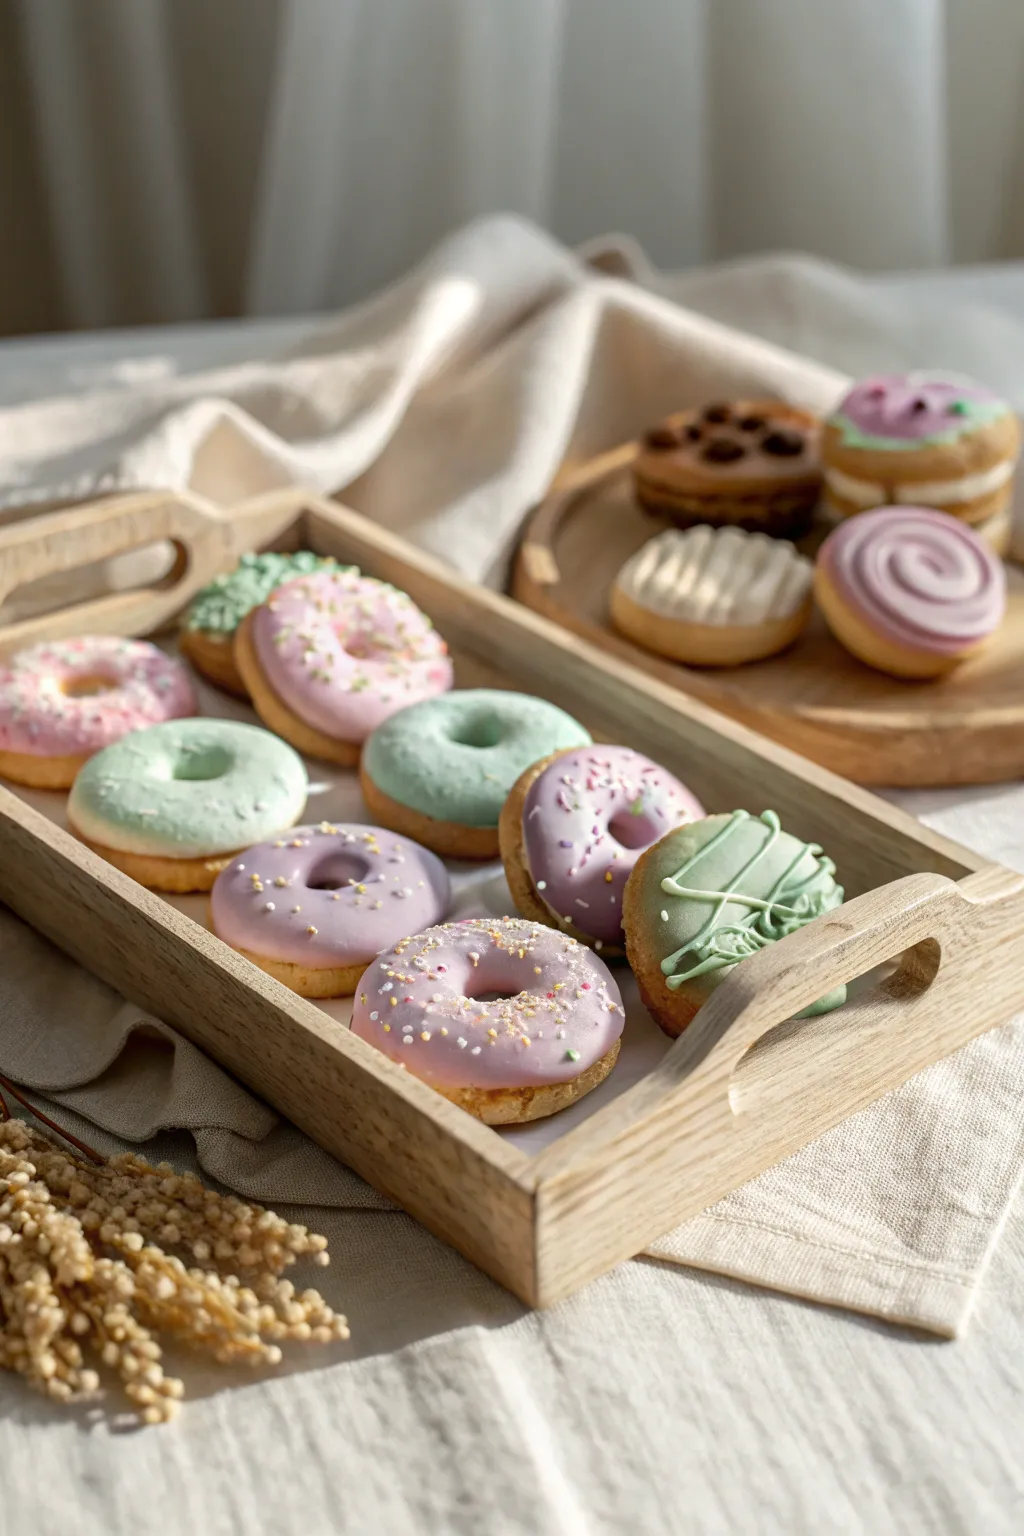
Transform simple clay into a charming assortment of miniature donuts and cookies perfect for imaginative pretend play. These sweet treats feature realistic pastel frostings and tiny sprinkles, all resting on a rustic wooden tray for a cozy bakery feel.
Detailed Instructions
Materials
- Polymer clay (beige/tan for dough, plus pastel pink, mint, lavender, cream, and brown)
- Clay sculpting tools (dotting tool, needle tool)
- Small round cutter (approx. 1-1.5 inches)
- Smaller round cutter or straw (for donut holes)
- Liquid polymer clay (Translucent)
- Soft pastel chalks (oranges and browns for shading)
- Small paintbrush
- Gloss glaze (optional)
- Baking sheet and parchment paper
- Oven (if using polymer clay)
Step 1: Shaping the Donut Bases
-
Condition the dough:
Start by mixing beige and a tiny bit of yellow and white polymer clay to creating a realistic ‘baked dough’ color. Condition it by kneading until soft and pliable. -
Roll and cut:
Roll the clay into a thick sheet, about 1/2 inch high. Use your larger round cutter to punch out circles for the donut bases. -
Create the hole:
Use the smaller cutter or a drinking straw to punch out the center of each circle. Gently smooth the inner and outer edges with your finger to remove any sharp cut marks. -
Add texture:
Take a toothbrush or a ball of crinkled aluminum foil and gently tap it all over the surface of the donuts. This mimics the porous texture of fried dough. -
Pre-bake shading:
Shave some orange and light brown soft pastel chalk into a powder. Use a dry brush to dust the edges and bottoms of the donuts to give them a golden-brown, baked appearance.
Realistic Texture Tip
Use a toothbrush to gently tap the ‘dough’ parts of the raw clay before baking. This simple trick instantly mimics the airy texture of real cake or fried dough.
Step 2: Creating the Cookies
-
Form cookie shapes:
Using the same dough color, roll small balls and flatten them slightly into thick discs. These will become your macarons or sandwich cookies. -
Add filling:
Roll a small ball of white or cream clay, flatten it, and sandwich it between two cookie discs. Press gently so they adhere without squishing the shape. -
Texture the feet:
For macaron-style cookies, use a needle tool to scratch and texture the clay right at the seam where the cookie meets the filling, creating the classic ‘pied’ or foot. -
Chocolate chip detail:
If making choc-chip style cookies, press tiny irregular chunks of dark brown clay into the surface of a flattened beige disc.
Step 3: Frosting and Decorating
-
Prepare the frosting:
Mix your pastel clay colors (pink, mint, lavender) with a few drops of liquid polymer clay in separate small containers. Stir until you achieve a thick, frosting-like consistency. -
Apply the glaze:
Carefully spread the liquid clay mixture over the top of your donuts using a toothpick or small tool. Let it drip slightly down the sides for a natural look, but keep it controlled. -
Add sprinkles:
Before the liquid clay sets, sprinkle on tiny pre-baked clay snakes cut into bits (to look like jimmies) or small non-pareil balls. You can create these by rolling very thin threads of colored clay and chopping them finely. -
Drizzle designs:
For the decorative drizzle seen on the green and purple donuts, load a toothpick with a contrasting liquid clay color and drag it quickly back and forth across the wet frosting. -
Swirl effects:
For the swirled cookie topping, pipe or carefully lay a coil of two different colored clays (like pink and white) in a spiral pattern on top of a cookie base.
Frosting Too Runny?
If your liquid clay mix is dripping off the donut too fast, let it sit open to the air for 15 minutes to thicken, or mix in a tiny bit more solid clay.
Step 4: Baking and Finishing
-
Arrangement:
Place all your finished pieces on a baking sheet lined with parchment paper, ensuring they aren’t touching. -
Bake:
Bake according to your clay manufacturer’s instructions (usually 275°F or 130°C for 15-30 minutes). I monitor the oven closely to ensure the light colors don’t scorch. -
Cool down:
Allow the pieces to cool completely on the tray before handling. They are fragile while hot. -
Optional gloss:
If you want a glazed donut look, apply a thin coat of water-based gloss varnish to the frosting areas only. -
Final display:
Arrange your cured treats on a small wooden tray or plate for the ultimate play-kitchen setup.
Enjoy serving up these adorable, zero-calorie treats in your next pretend tea party
Dinosaur Fossil Impressions
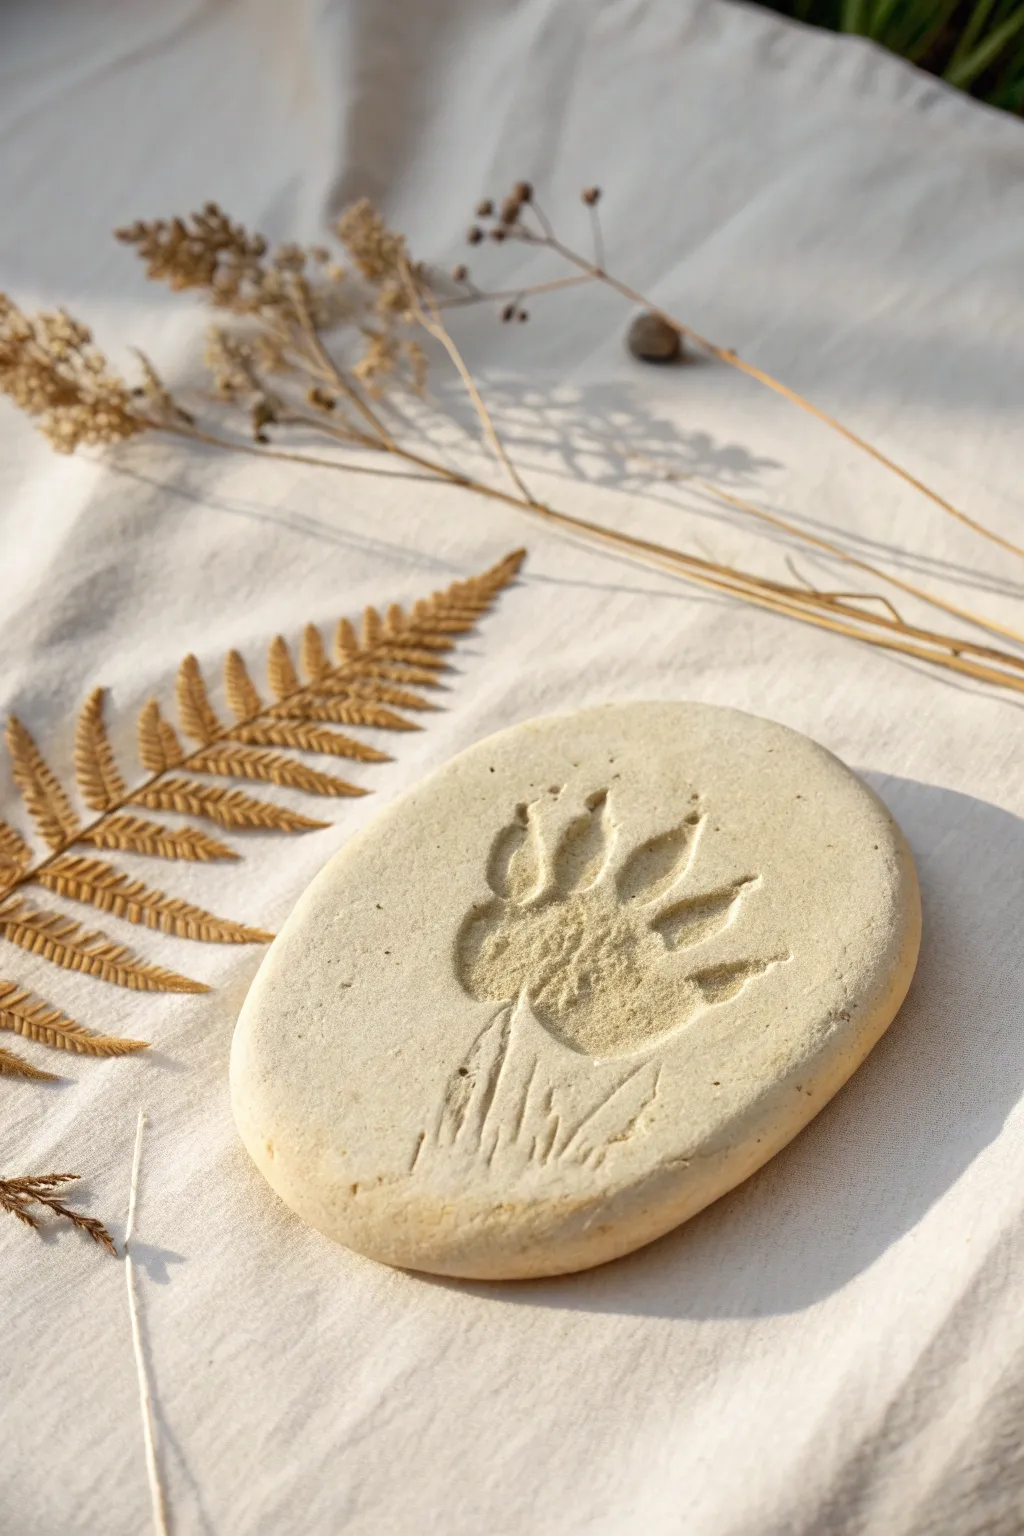
Create your own prehistoric artifact with this simple and satisfying fossil impression project. The result is a smooth, stone-like disc featuring a deep, textured paw print that looks wonderfully authentic.
Step-by-Step
Materials
- Air-dry clay (stone, white, or terracotta color)
- Parchment paper or a smooth work surface
- Rolling pin
- A small cup of water
- Toy dinosaur foot or a sculpting tool
- A small, thin stick or toothpick
- Fine-grit sandpaper (optional)
Step 1: Preparing the Base
-
Portion the clay:
Start by grabbing a handful of air-dry clay, roughly the size of a tennis ball. Knead it in your hands for a minute to warm it up and make it pliable. -
Form a sphere:
Roll the clay between your palms to create a smooth, round ball. Try to eliminate any major cracks or creases. -
Flatten the shape:
Place your clay ball onto a sheet of parchment paper. Use the palm of your hand to gently press it down until it is about half an inch thick. -
Smooth the edges:
Dip your finger into a small cup of water. Run your damp finger along the outer edge of the oval to smooth out any cracks that formed while flattening. -
Refine the surface:
If the top isn’t perfectly flat, give it a very light roll with your rolling pin, just enough to even it out without making it too thin.
Crack Control
If deep cracks appear while drying, mix a tiny bit of fresh clay with water to make a paste and fill them in.
Step 2: Creating the Impression
-
Make the main pad:
Using your thumb on a diagonal angle, press firmly into the center-left of the oval to create the main ‘pad’ of the paw print. Rock your thumb slightly to widen the impression. -
Add texture:
Before moving on, tap the inside of the thumb impression gently with a scrap of rough fabric or a stiff bristle brush. This gives the ‘fossil’ that gritty, ancient look seen in the photo. -
Sculpt the toes:
Using your pinky finger or the rounded end of a sculpting tool, press four distinct oval shapes above the main pad. Arrange them in a slight fan shape. -
Add claws:
At the very tip of each toe impression, use a toothpick or small stick to press a tiny, sharp triangular divot. This creates the look of claws digging into the mud. -
Clean up the print:
If the clay pushed up around the edges of the print, gently pat it back down with a damp finger so the surface remains relatively flat.
Step 3: Adding Details and Finishing
-
Etch the grass:
Take your toothpick or a thin stick. Beneath the main paw pad, scratch several sets of vertical, slightly curved lines. -
Vary the lines:
Make some lines shorter and some longer to resemble blades of grass that were flattened under the dinosaur’s weight. -
Let it dry:
Move the parchment paper with the clay to a safe, dry location. Allow the clay to dry completely, which usually takes 24 to 48 hours depending on thickness. -
Flip for even drying:
I find it helpful to carefully flip the piece over halfway through the drying process. This ensures the bottom dries evenly and prevents warping. -
Sand the surface:
Once fully hard and dry, take a piece of fine-grit sandpaper and very gently rub the top surface. This removes fingerprints and gives the clay a true stone-like finish. -
Dust off:
Use a dry, soft brush to sweep away any clay dust from the sanding, making sure to clean out the grooves of the paw print.
Ancient Aging
Once dry, dilute brown acrylic paint with lots of water. Brush it over the stone and wipe it off quickly to stain the grooves.
Now you have a perfect prehistoric specimen to display on your shelf or hide in the sandbox for a dig
Fairy or Gnome Houses With Nature Details
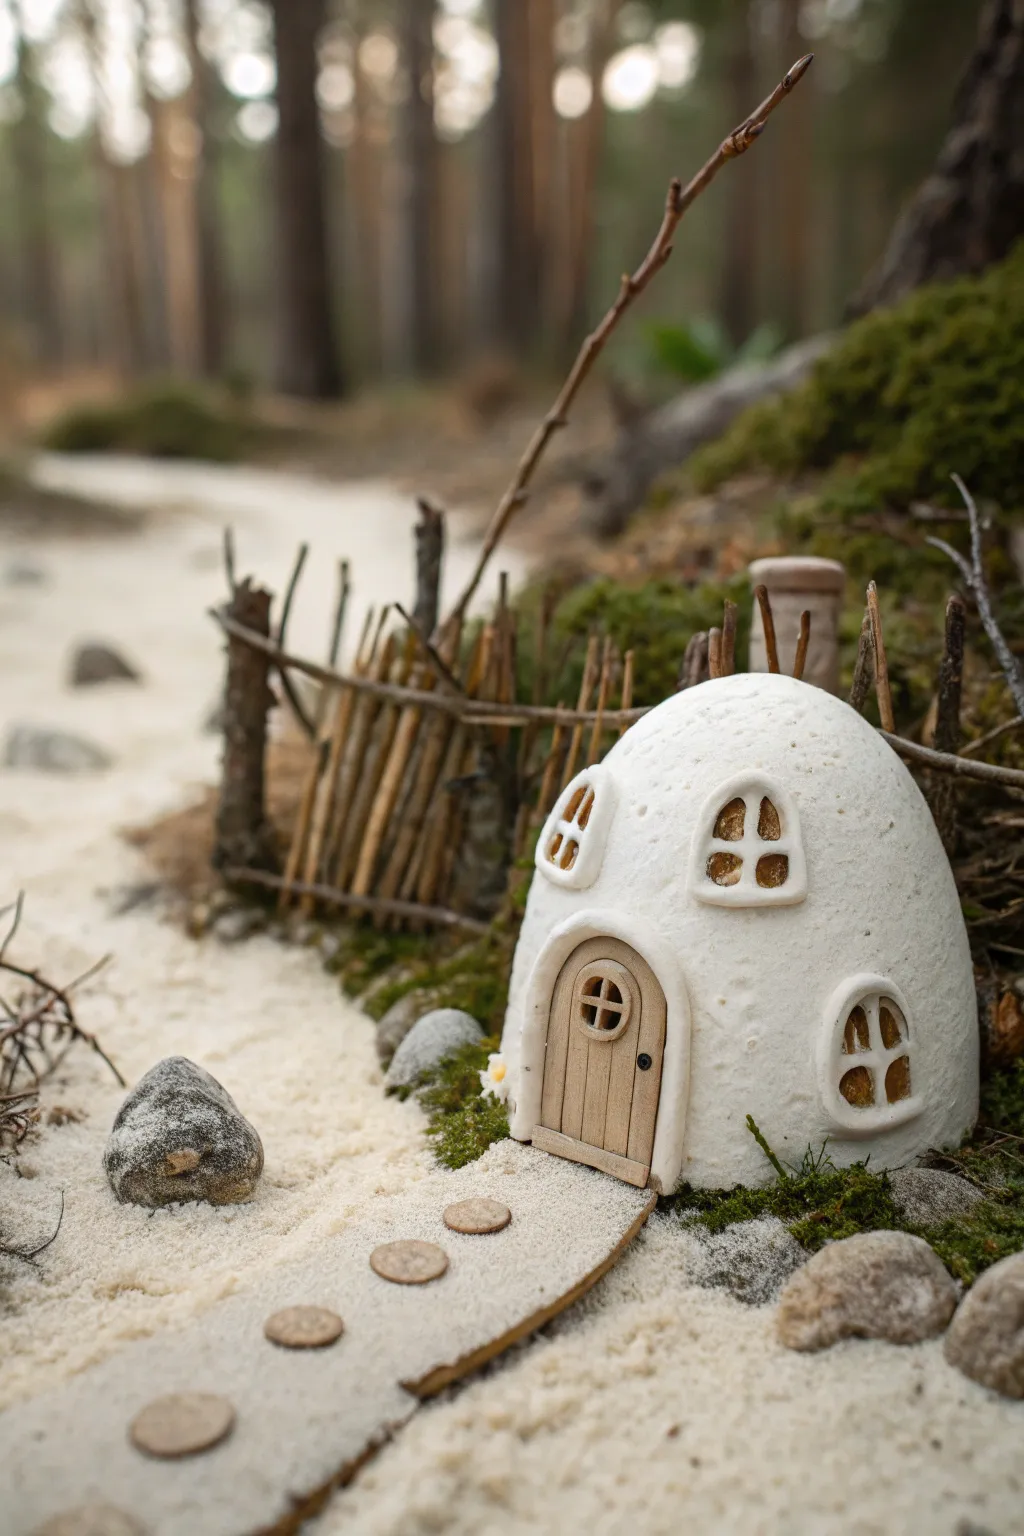
This charming project combines crisp white clay with rustic twigs to create a cozy, pebble-shaped dwelling perfect for a gnome or fairy. Its simple domed structure and adorable arched door make it an approachable yet magical sculpting project for kids.
Detailed Instructions
Materials
- White air-dry clay (or polymer clay)
- Small twigs and sticks (collected from nature)
- Beige or light brown cardstock (for the path/door)
- Fine-point black marker or pen
- Sculpting tool or plastic knife
- Brown paint (acrylic or watercolor)
- Small paintbrush
- Textured stone or stiff brush (for texturing)
- Small round buttons or clay disks (for path stones)
- Sand or glitter (optional for ground cover)
- Craft glue
Step 1: Sculpting the House
-
Shape the Base:
Start by rolling a large ball of white clay. Gently tap the bottom on your work surface to flatten it, then shape the top into a rounded, slightly elongated dome shape, resembling a large egg or river stone. -
Hollow or Solid:
You can keep the house solid for stability, or careful hollow out the inside with a spoon if you want to save on clay. If solid, ensure the core is tightly packed so it cracks less while drying. -
Add Texture:
Before the clay hardens, take a real stone or a stiff-bristled brush and gently press it all over the surface of the dome. This gives the clay a realistic, stucco-like texture instead of being perfectly smooth. -
Cut the Doorway:
Use a plastic knife or sculpting tool to cut an arched indentation near the bottom center for the door. You don’t need to cut all the way through, just create a recessed area where the door will sit.
Step 2: Adding Architectural Details
-
Form Window Frames:
Roll thin snakes of white clay. Shape these into small arches to create the window frames. You’ll need about three or four depending on the size of your house. -
Attach Frames:
Score the back of the clay snakes and the spot on the house where they will go, add a dab of water or slip, and press the frames firmly onto the upper part of the dome. -
Create Window Panes:
Inside the window frames, press the clay down slightly to create depth. You can paint the inside brown later, or use tiny bits of amber-colored glass or dried glue if you’re feeling adventurous. -
Shape the Chimney:
Roll a small cylinder of clay for the chimney. Flatten the top and attach it to the side or back of the roof. Use a tool to scratch vertical lines into it to mimic wood or brick texture. -
Drying Time:
Set the clay house aside to dry completely. Air-dry clay usually takes 24-48 hours depending on thickness. I like to rotate it occasionally so the bottom dries evenly.
Cracked Clay?
If small cracks appear as the dome dries, mix a tiny bit of fresh clay with water to make a paste and smooth it over the cracks like spackle
Step 3: Creating the Door and Path
-
Make the Door:
Cut an arched shape out of beige cardstock or flattened brown clay that fits perfectly into your recessed doorway. -
Draw Door Details:
Using a fine-point black marker or a sculpting tool, draw vertical lines on the door to look like wood planks. Add a tiny dot for the doorknob. -
Window Crossbars:
Roll incredibly thin threads of clay or use tiny snippets of wire to create the cross shape (mullions) inside each window. Glue these in place carefully. -
Prepare the Path:
Cut a long, winding strip of beige cardstock or roll out a thin sheet of beige clay to serve as the walkway leading to the house. -
Add Stepping Stones:
Glue small, flat round discs (buttons, clay circles, or small pebbles) onto the path in a line.
Try This!
Add a battery-operated tea light underneath (if you made it hollow) to make the windows glow warmly in the evening
Step 4: The Nature Scene Assembly
-
Set the Ground:
Prepare a base surface with sand. You can spread craft glue on a piece of cardboard and sprinkle fine white sand over it to mimic the forest floor shown in the project. -
Fence Posts:
Break your collected twigs into varying lengths, roughly 2-3 inches long. These will be the fence posts. -
Build the Fence:
Arrange the twigs vertically around the side of your scene. Use a bit of clay or hot glue at the base to make them stand upright in the sand. -
Wattle Weaving:
Ideally, weave thinner, flexible distinct vines between the upright twigs, or simply glue a horizontal twig across them to hold the rustic fence together. -
Final Placement:
Position your dried clay house on the sandy base. Lay the path leading up to the door. Add a few loose moss clumps or extra pebbles around the perimeter for a finished look.
Place your little dwelling on a shelf or near a potted plant to invite some magic into your room
Clay Mini Planters With Simple Succulents

Create a trendy, modern home for your favorite succulent using simple air-dry clay. This project uses a clever painting technique to mimic the look of expensive speckled stoneware and features a stylish color-blocked design.
Step-by-Step Guide
Materials
- White air-dry clay
- Rolling pin
- Empty tin can or glass jar (to use as a mold)
- Plastic wrap
- Clay tool or butter knife
- Fine-grit sandpaper
- Acrylic paints: White, Black, and Coral/Salmon
- Old toothbrush
- Paintbrushes
- Waterproof varnish (Mod Podge or spray sealer)
Step 1: Shaping the Cylinder
-
Prepare the mold:
Select a small tin can or jar to act as your form. Wrap it completely in plastic wrap to ensure the clay doesn’t stick to the metal or glass later. -
Condition the clay:
Take a large handful of air-dry clay and knead it in your hands until it feels warm, soft, and pliable. -
Roll it out:
Using a rolling pin, flatten the clay into a long rectangular slab. Aim for a consistent thickness of about 1/4 inch. -
Measure and cut walls:
Lay your wrapped can on the clay to estimate size. Cut a long rectangular strip that is tall enough to match the can’s height and long enough to wrap all the way around it with a slight overlap. -
Create the base:
From the remaining clay scraps, cut a circle that matches the diameter of the bottom of your can. -
Assemble the form:
Wrap the rectangular strip around the plastic-covered can. Where the ends meet, score (scratch) the edges, add a dab of water, and press them firmly together to join. -
Attach the bottom:
Place the clay-wrapped can on top of the circle base. Use your thumb or a clay tool to smooth the clay from the walls down onto the base, sealing the seam completely.
Pro Tip: Make Drainage
If using real succulents, poke a hole in the bottom center of the soft clay before drying. This prevents root rot by letting water escape.
Step 2: Refining and Drying
-
Smooth the surface:
Dip your finger in a little water and run it over the vertical seam and the bottom join until they are invisible. -
Remove the mold:
I usually like to let the clay sit for about 30 minutes to firm up slightly before gently sliding the can out. -
Fix the rim:
Once the can is removed, check the top rim. If it warped, shape it back into a perfect circle and smooth the edges with a wet finger. -
Dry completely:
Place the pot in a cool, dry spot. Let it cure for at least 24 to 48 hours until it is bone dry and turns white. -
Sand for perfection:
Use fine-grit sandpaper to gently buff the outside of the pot. This removes fingerprints and creates that smooth, machine-made look.
Troubleshooting: Cracks?
Air-dry clay sometimes cracks as it shrinks. Make a ‘slip’ paste (clay + water) and fill any cracks, let dry, then sand smooth.
Step 3: Painting the Stone Look
-
Base coat:
Paint the entire exterior and the inside rim of the pot with solid white acrylic paint. You may need two coats for opaque coverage. -
Create speckles:
Water down a tiny bit of black paint. Dip an old toothbrush into it, point the bristles at the pot, and run your thumb over the bristles to flick tiny black specks onto the white surface. -
Mix the color:
While the speckles dry, mix red, white, and a touch of yellow paint to create a soft coral or salmon pink shade. -
Paint the dip:
Paint the bottom half of the pot with your coral color. -
Distress the edge:
Instead of painting a straight line, use a ‘dry brush’ technique for the top edge of the pink section. Use very little paint and lightly drag the brush to create a rough, textured transition. -
Seal it up:
Apply a coat of waterproof varnish to protect your paint job, especially if you plan to put real soil inside.
Pop in your little succulent and enjoy the sleek, natural vibe this planter adds to your room
Animal Pencil Holders for Desk Pride
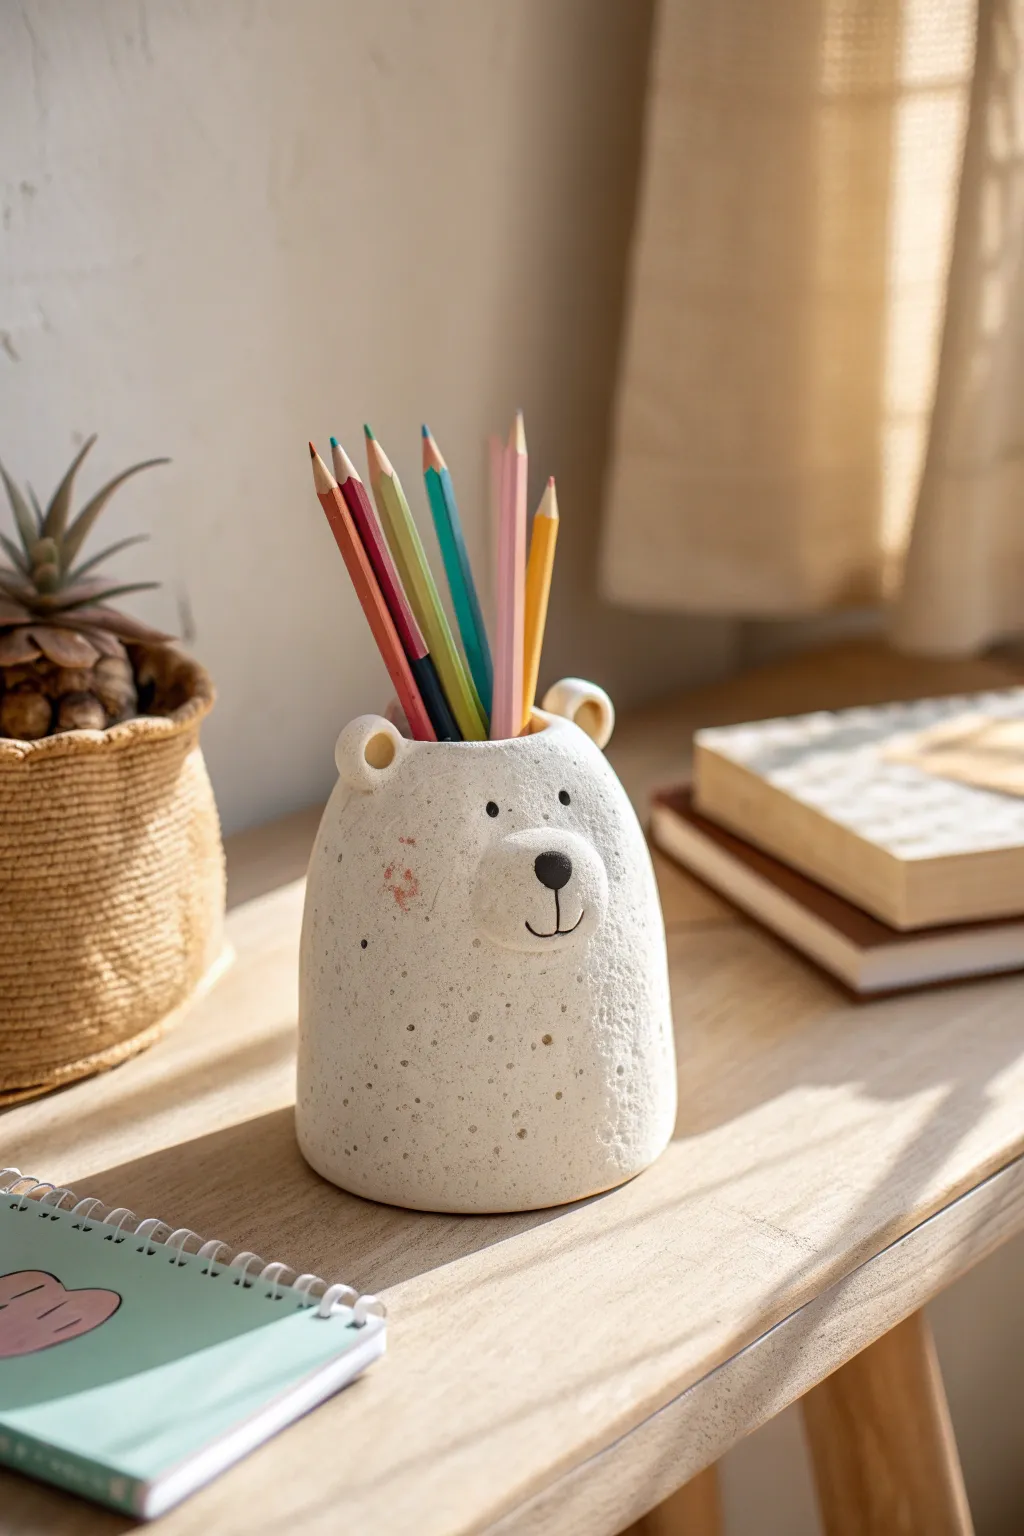
Brighten up any study session with this charming polar bear pencil holder that looks just like expensive ceramic. With its gentle speckled finish, rosy cheeks, and simple features, this friendly desk buddy is both functional and adorably stylish.
Detailed Instructions
Materials
- Air-dry clay (white)
- Acrylic paints (black, pink, optional beige/sand)
- Modeling tool or butter knife
- Rolling pin
- Empty toilet paper roll or cardboard tube
- Toothbrush or stiff bristle brush
- Fine-grit sandpaper
- Small paintbrush
- Clear matte varnish (optional)
- Water cup
Step 1: Shaping the Base
-
Prepare the core:
Cut your cardboard tube to your desired height, around 4 to 5 inches tall. This will act as the internal structure to keep your bear sturdy and hollow. -
Roll the slab:
Roll out a slab of white air-dry clay to about 1/4 inch thickness. Ensure the strip is long enough to wrap completely around the circumference of your cardboard tube and slightly taller than the tube itself. -
Wrap the form:
Carefully wrap the clay slab around the tube. Where the ends meet, score the edges (scratch cross-hatch marks) and add a drop of water to join them seamlessly. -
Smooth the seam:
Use your fingers or a modeling tool to blend the seam until it disappears completely, creating a smooth cylinder. -
Create the dome:
Gently push the excess clay at the top inward to curve over the rim of the tube slightly, softening the edge so it looks like a rounded ceramic jar rather than a sharp cylinder.
Clay Cracking?
If small cracks appear while drying, don’t panic! Create a ‘slip’ by mixing a little clay with water until it’s like a paste, and fill in the cracks. Smooth it over with a damp finger.
Step 2: Adding Features
-
Attach the ears:
Roll two small balls of clay and flatten them slightly. Press your thumb into the center of each to create a cup shape. Attach these to the top rim of the bear’s head using the score-and-slip method. -
Form the snout:
Create a slightly larger flattened oval of clay for the snout area. Press this gently onto the front center of the cylinder, blending the edges smoothly into the main body so it doesn’t look like a separate lump. -
Sculpt the nose:
Roll a very tiny ball of clay for the nose tip and press it firmly onto the upper center of the snout area you just created.
Make It a Family
Make a shorter, wider version to be a ‘mama bear’ paperclip holder, or paint the clay brown or grey to create a grizzly or koala version for a complete forest set.
Step 3: Creating the Texture
-
Speckle effect:
To mimic the speckled pottery look in the photo, recreate the texture by taking an old toothbrush and flicking tiny droplets of watered-down beige or grey paint onto the wet clay, or gently press coarse sand into the surface. -
Dry properly:
Let the sculpture dry completely. This can take 24-48 hours depending on humidity. Avoid direct heat to prevent cracking. -
Refine the surface:
Once fully dry, lightly sand any rough fingerprints or sharp edges with fine-grit sandpaper for that professional smooth finish.
Step 4: Painting and Finishing
-
Paint the nose:
Using a small detail brush and black acrylic paint, carefully color the raised nose button. -
Draw the mouth:
Paint a simple vertical line coming down from the nose, connecting to a gentle ‘W’ shape or simple curved line for the mouth. -
Add the eyes:
Dot two small black eyes just above the snout. Keep them relatively wide-set to capture that sweet, innocent bear expression. -
Rosy cheeks:
For the cheeks, mix a very pale pink paint. I like to dab most of the paint off onto a paper towel first (dry brushing) before gently swirling circles on the cheeks for a soft, crayon-like effect. -
Seal the deal:
Finish with a coat of matte varnish to protect your new friend from pencil marks and dust.
Now you have a sturdy and sweet companion ready to keep your desk organized
Fridge Magnets: Mini Shapes and Tiny Characters
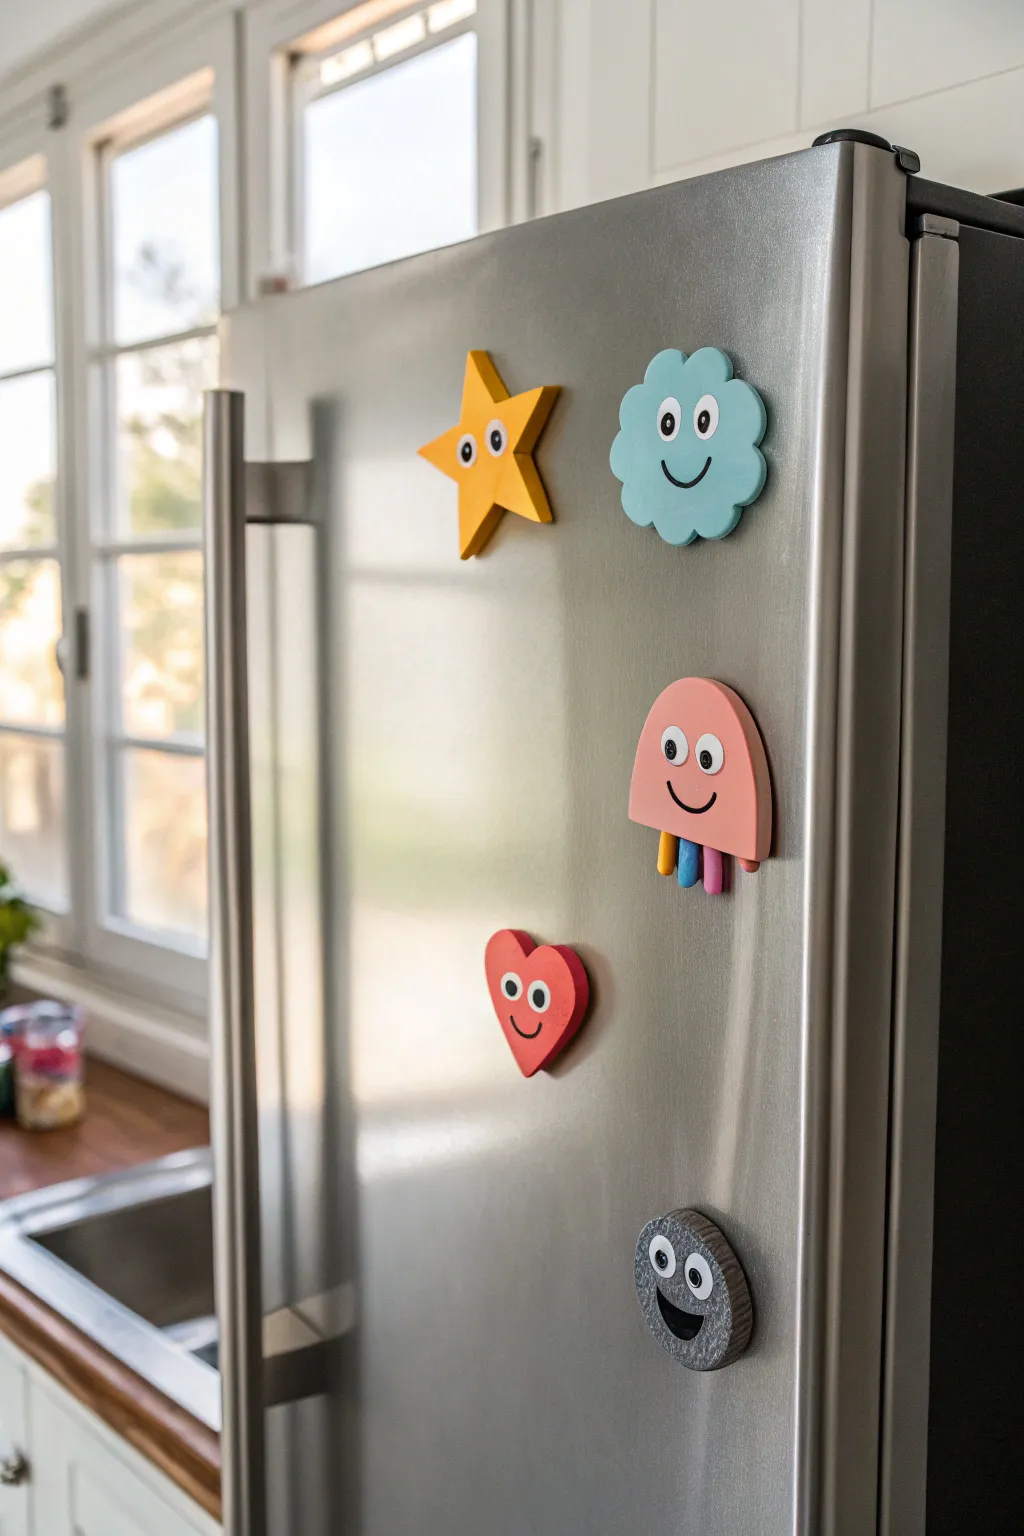
Brighten up your appliance with these cheerful, chunky magnets shaped like simple weather and sea friends. With their googly eyes and sweet smiles, this star, cloud, jellyfish, heart, and rock are a perfect beginner clay project.
Step-by-Step
Materials
- Polymer clay (yellow, light blue, pink, red, grey, plus small scraps of orange/purple/blue for tentacles)
- Googly eyes (small adhesive ones or glue-on)
- Strong craft glue (e.g., E6000 or super glue)
- Round magnets (neodymium or ceramic)
- Clay roller or rolling pin
- Cookie cutters (optional: star, cloud, heart) or a craft knife
- Black permanent marker or fine-tip black paint pen
- Baking sheet and parchment paper
- Oven (for baking polymer clay)
Step 1: Prepping the Shapes
-
Condition the yellow clay:
Start with the star. Warm up a chunk of yellow polymer clay in your hands until it is soft and pliable, then roll it into a ball. -
Roll out the slab:
Flatten the ball onto your work surface using a rolling pin. Aim for a thickness of about 1/4 inch so the magnet feels substantial. -
Cut the star shape:
Use a star-shaped cookie cutter to punch out your shape. Alternatively, use a craft knife to freehand a simple five-point star, smoothing the edges with your finger. -
Create the cloud:
Repeat the conditioning and rolling process with light blue clay. Use a scalloped cutter or manually shape small balls of clay together and flatten them to form a fluffy cloud outline. -
Form the heart:
Take the red clay, roll it out, and cut a classic heart shape. I like to gently round the edges with my fingertip so it looks soft rather than sharp. -
Make the rock:
For the grey rock magnet, roll a ball of grey clay and flatten it into a thick, slightly irregular circle. Texture is key here—tap the surface lightly with a crumpled ball of foil or a toothbrush to give it a stony look. -
Shape the jellyfish body:
Roll out pink clay and cut a dome shape (half-circle with straight bottom). This will be the main body of the jellyfish.
Glue Woes?
If magnets pop off later, the clay surface might be too smooth. Scratch the back of the clay with sandpaper before gluing to create a better grip.
Step 2: Adding Details & Baking
-
Make jellyfish tentacles:
Roll three tiny snakes of clay in contrasting colors like yellow, blue, and purple. Attach them securely to the bottom edge of the pink dome, pressing firmly so they fuse. -
Check thickness:
Ensure all your shapes are roughly the same thickness for even baking. If any edges got squashed during cutting, gently reshape them now. -
Prepare for baking:
Place all your finished clay shapes onto a baking sheet lined with parchment paper. -
Bake the clay:
Bake according to your specific polymer clay package instructions. This is usually around 275°F (135°C) for 15-30 minutes depending on brand and thickness. -
Cool down:
Remove the tray from the oven and let the pieces cool completely before handling. They harden as they cool.
Step 3: Face & Assembly
-
Add the smiles:
Once cool, use a black permanent marker or a fine paint pen to draw a simple, curved smile on each character. Keep it centered for that cute look. -
Attach the eyes:
Peel the backing off adhesive googly eyes or use a tiny drop of craft glue to attach them above the smile. Place them close together for extra cuteness. -
Glue the magnets:
Flip each character over. Apply a dab of strong craft glue to a round magnet and press it firmly onto the center of the back. -
Let it cure:
Allow the glue to dry completely—usually overnight is best to ensure those magnets stay stuck forever.
Glitter Power
Knead a pinch of fine glitter into the yellow or blue clay before rolling. It adds a magical shimmer to the star and cloud without any mess.
Now your fridge is ready to host this adorable cast of colorful characters
Story Tiles for Make-Believe Adventures
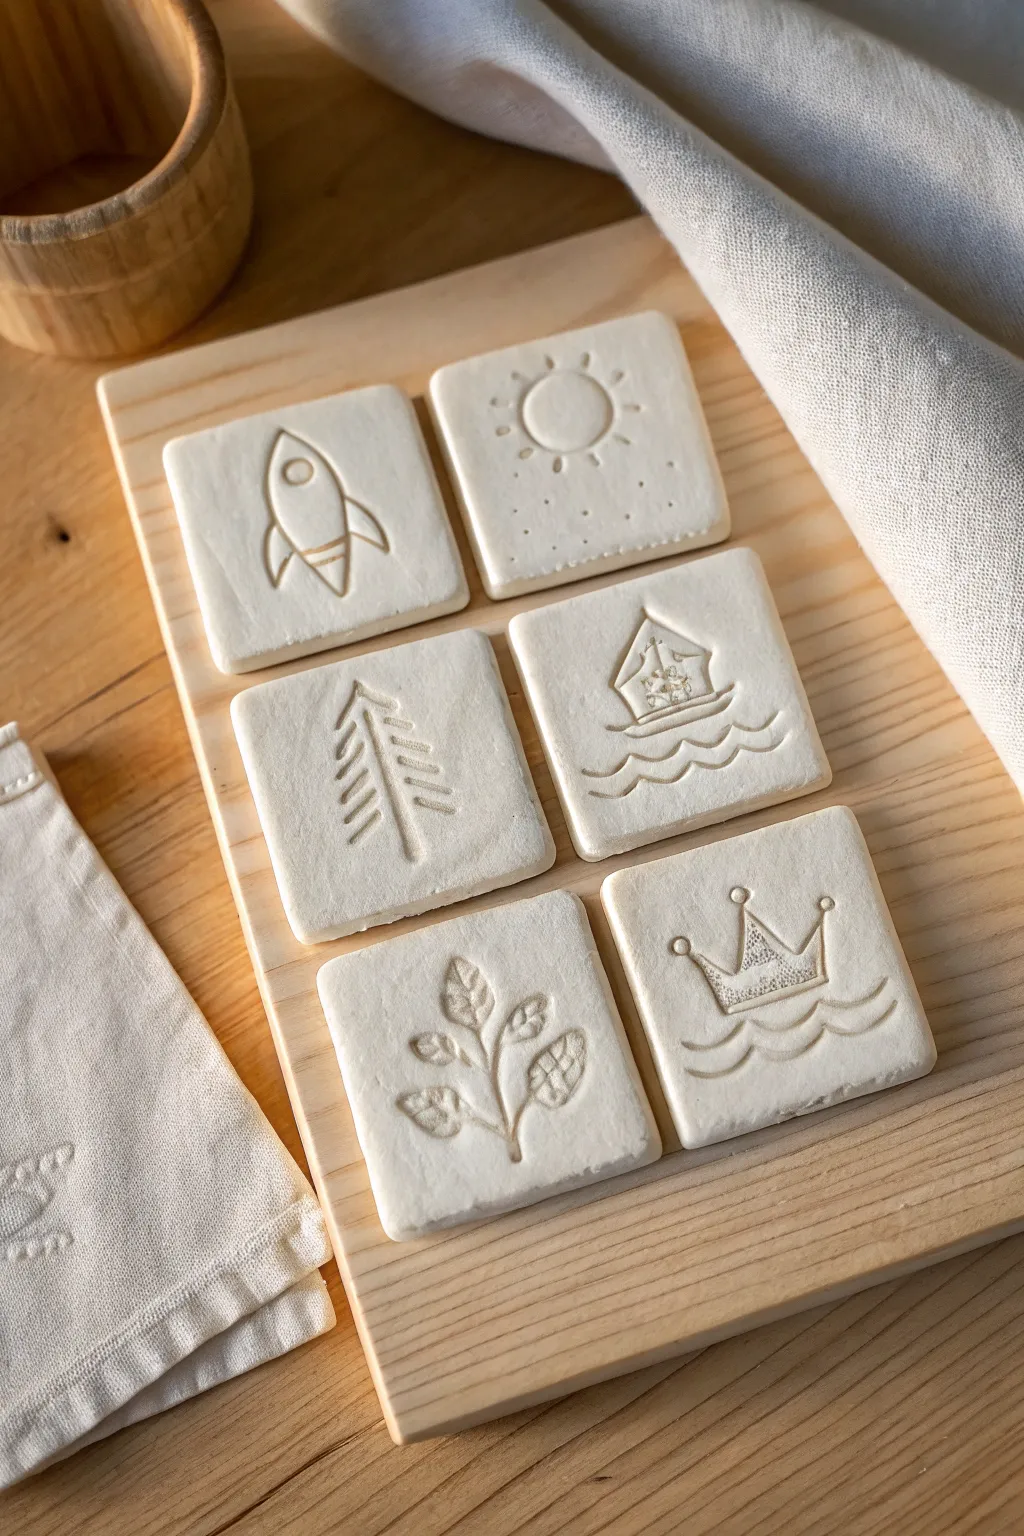
These charming, soft-white clay tiles serve as tactile prompts for imaginative storytelling, featuring simple embossed symbols like ships, rockets, and nature motifs. Perfect for little hands, this project turns basic air-dry clay into a reusable game of make-believe adventures.
Step-by-Step Guide
Materials
- White stone clay or high-quality air-dry clay
- Rolling pin
- Square cookie cutter (approx. 2-3 inches)
- Wooden skewers or clay needle tools
- Fine-grit sandpaper
- Small bowl of water
- Canvas mat or parchment paper (for rolling)
- Clear matte acrylic sealer (optional)
Step 1: Preparing the Canvas
-
Condition the clay:
Begin by taking a large chunk of white clay and kneading it in your hands until it feels warm, pliable, and free of cracks. -
Roll it out:
Place the clay on a canvas mat or parchment paper to prevent sticking. Use a rolling pin to flatten the clay into an even slab, aiming for a consistent thickness of about 1/4 inch. -
Smooth the surface:
Before cutting, run a slightly damp finger or a soft rib tool over the surface of the clay slab to remove any canvas texture or fingerprints, creating a pristine white base. -
Cut the shapes:
Press a square cookie cutter firmly into the clay to create your tiles. Cut as many squares as you want for your story set—six is a great starting number. -
Soften the edges:
Carefully lift the squares. Dip your finger in a little water and gently run it along the cut edges of each square to round them off slightly, removing the sharp ‘cookie cutter’ look.
Cracked Clay?
If small cracks appear while drying, mix a tiny amount of clay with water to make a paste (slip) and fill the cracks, then sand smooth once dry.
Step 2: Etching the Stories
-
Draft your designs:
Plan simple, iconic symbols for your tiles. Good options include a rocket ship, a sun, a pine tree, a sailboat, a leafy branch, and a crown. -
Begin the rocket tile:
For the rocket, use a needle tool or skewer to lightly sketch an oval with a pointed top. Deepen the lines once you are happy with the shape, and add two small triangles at the bottom for fins. -
Add nature elements:
For the tree tile, draw a vertical line for the trunk first. Then, press the tool in at an angle repeatedly down both sides of the trunk to create the pine branches. -
Create the sailboat:
Draw a small triangle atop a semi-circle for the boat. Underneath, scratch wavy lines to represent the ocean; I find using a slightly duller tool helps make these waves look softer. -
Detail the sun and crown:
For the sun, press a small circular object (like a pen cap) gently into the center, then draw radiating lines. For the crown, draw a ‘W’ shape with a bottom line and add tiny circles at the points. -
Carve the leaf sprig:
Draw a central curved stem. Press the side of your tool gently into the clay on either side of the stem to create leaf impressions rather than just drawing outlined leaves. -
Clean up crumbs:
As you carve, small crumbs of clay will accumulate known as ‘burrs.’ Wait for the clay to dry slightly (about 15 minutes) and then brush these away with a soft, dry paintbrush so you don’t smear the design.
Add Color
Once dry, dilute watercolor paint with lots of water and wash it over the tiles. Wipe the surface with a sponge so color remains only in the etched grooves.
Step 3: Finishing Touches
-
Initial dry time:
Place the tiles on a flat wire rack to ensure air circulates underneath. Let them dry undisturbed for at least 24 hours. -
Flip for even drying:
Halfway through the drying process, flip the tiles over gently. This prevents the corners from curling upward as the moisture evaporates. -
Sand the surface:
Once bone dry (the clay will turn bright white and feel hard), use fine-grit sandpaper to gently smooth the edges and surface one last time. -
Optional sealing:
To protect the tiles from dirty fingers during play, apply a very thin coat of clear matte acrylic sealer. This keeps the natural look but adds durability.
Now you have a beautiful set of story stones ready to spark creative conversations
Tiny Clay Critters for “Small World” Play
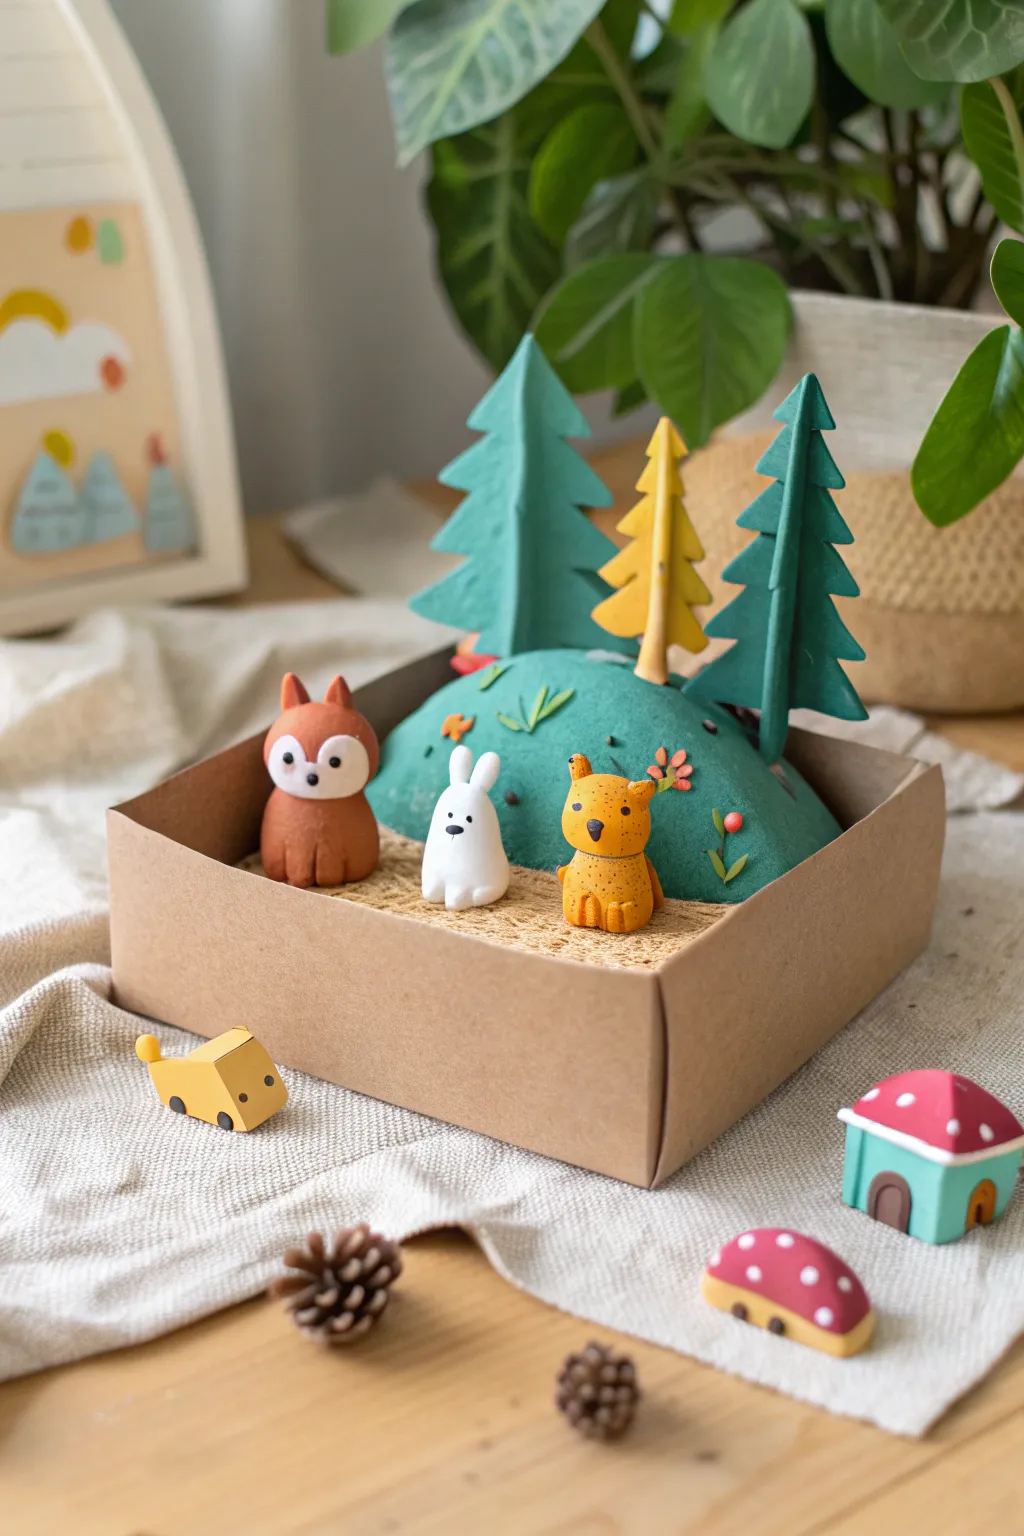
Create a charming miniature woodland scene inside a simple cardboard tray, featuring handmade clay animals and a rolling green hill. This adorable “small world” setup is perfect for imaginative play or as a sweet decoration for a child’s shelf.
Detailed Instructions
Materials
- Air-dry clay (terracotta, white, yellow/ochre, green, dark green)
- Small cardboard box or lid (approx. 6×6 inches)
- Acrylic paints (black, white, pink, red, turquoise)
- Fine detail paintbrush
- Sculpting tools or toothpicks
- Textured fabric or sandpaper (for the ground base)
- Craft glue
- Real mini pinecones (optional decoration)
Step 1: Setting the Scene
-
Prepare the base:
Find a sturdy shallow cardboard box or a shoebox lid. If the inside isn’t a neutral color, you can line the bottom with beige textured fabric, burlap, or even sandpaper to mimic the forest floor. -
Shape the hill:
Take a large lump of green clay and shape it into a smooth, rounded mound. This will be the grassy hill at the back of your scene. -
Position the hill:
Place the clay hill into the back corner or center-back of your box while the clay is still fresh. Press the edges down gently so it sits flat against the bottom. -
Add grassy texture:
Using a toothpick or a small sculpting tool, poke tiny holes or scratches into the green hill to give it an earthy, grassy texture. Add small flattened teardrop shapes of lighter green clay to look like sprouting plants.
Step 2: Sculpting the Trees
-
Create tree trunks:
Roll out two or three thin cylinders of clay to serve as trunks. I like to use yellow or light brown clay for contrast against the green foliage. -
Cut the foliage shapes:
Roll out a slab of dark green clay and a smaller piece of yellow clay. Use a craft knife (with adult supervision) or a clay tool to cut out flat, jagged triangle shapes that resemble pine trees. -
Assemble the trees:
Attach the flat foliage shapes onto the trunks. If the clay is dry, use a dab of water or glue to secure them. Make 2-3 trees of varying heights. -
Plant the forest:
Press the base of your tree trunks into the fresh clay hill. If the hill has already hardened, simply glue the trees in place once they are dry.
Floppy Trees?
If your flat clay trees keep bending over, insert a toothpick inside the trunk for internal support before attaching the foliage layers.
Step 3: Making the Critters
-
Shape the fox body:
Roll a ball of terracotta or brown clay into a chubby teardrop shape for the body. Flatten the bottom so it stands up on its own. -
Add fox details:
Add a white heart-shaped patch to the face area. Attach two small triangles for ears. Use a dotting tool or toothpick to indent eyes and a nose, which we will paint later. -
Sculpt the bunny:
Using white clay, form a smaller, slightly narrower teardrop shape. Add two long, rounded ears to the top of the head. -
Create the yellow bear:
Form a rounded body with yellow or ochre clay. Add tiny rounded ears and shape little arms resting against its belly. -
Texture the fur:
Before the clay dries, use a stiff brush or a needle tool to gently scratch the surface of the fox and bear to mimic fur texture. Keep the bunny smooth. -
Dry the animals:
Set all your little critters aside on a piece of parchment paper to dry completely. This usually takes 24 hours depending on the brand of clay.
Seasonal Switch
Make loose accessories like tiny clay pumpkins, white snowballs, or flowers. Swap them out to change the season of your diorama!
Step 4: Final Touches
-
Paint facial features:
Once dry, use a fine brush with black paint to add eyes and noses to your animals. Add a tiny pink blush to the fox’s cheeks. -
Add speckled details:
For the yellow bear, use the tip of a toothpick dipped in brown paint to add tiny speckles all over its body for a textured look. -
Create mini houses:
Roll small cubes of teal or yellow clay and top them with red rounded roofs. Paint white dots on the roofs to make them look like toadstools. -
Assemble the scene:
Arrange your finished animals in the foreground of the box. Glue them down if you want a permanent display, or leave them loose for movable play. -
Scatter elements:
Finish the look by placing mini pinecones and your tiny clay houses around the box perimeter to expand the world beyond the walls.
Now you have a whimsical pocket-sized world ready for storytelling and display
Glow-Style Night Sky Charms and Stars
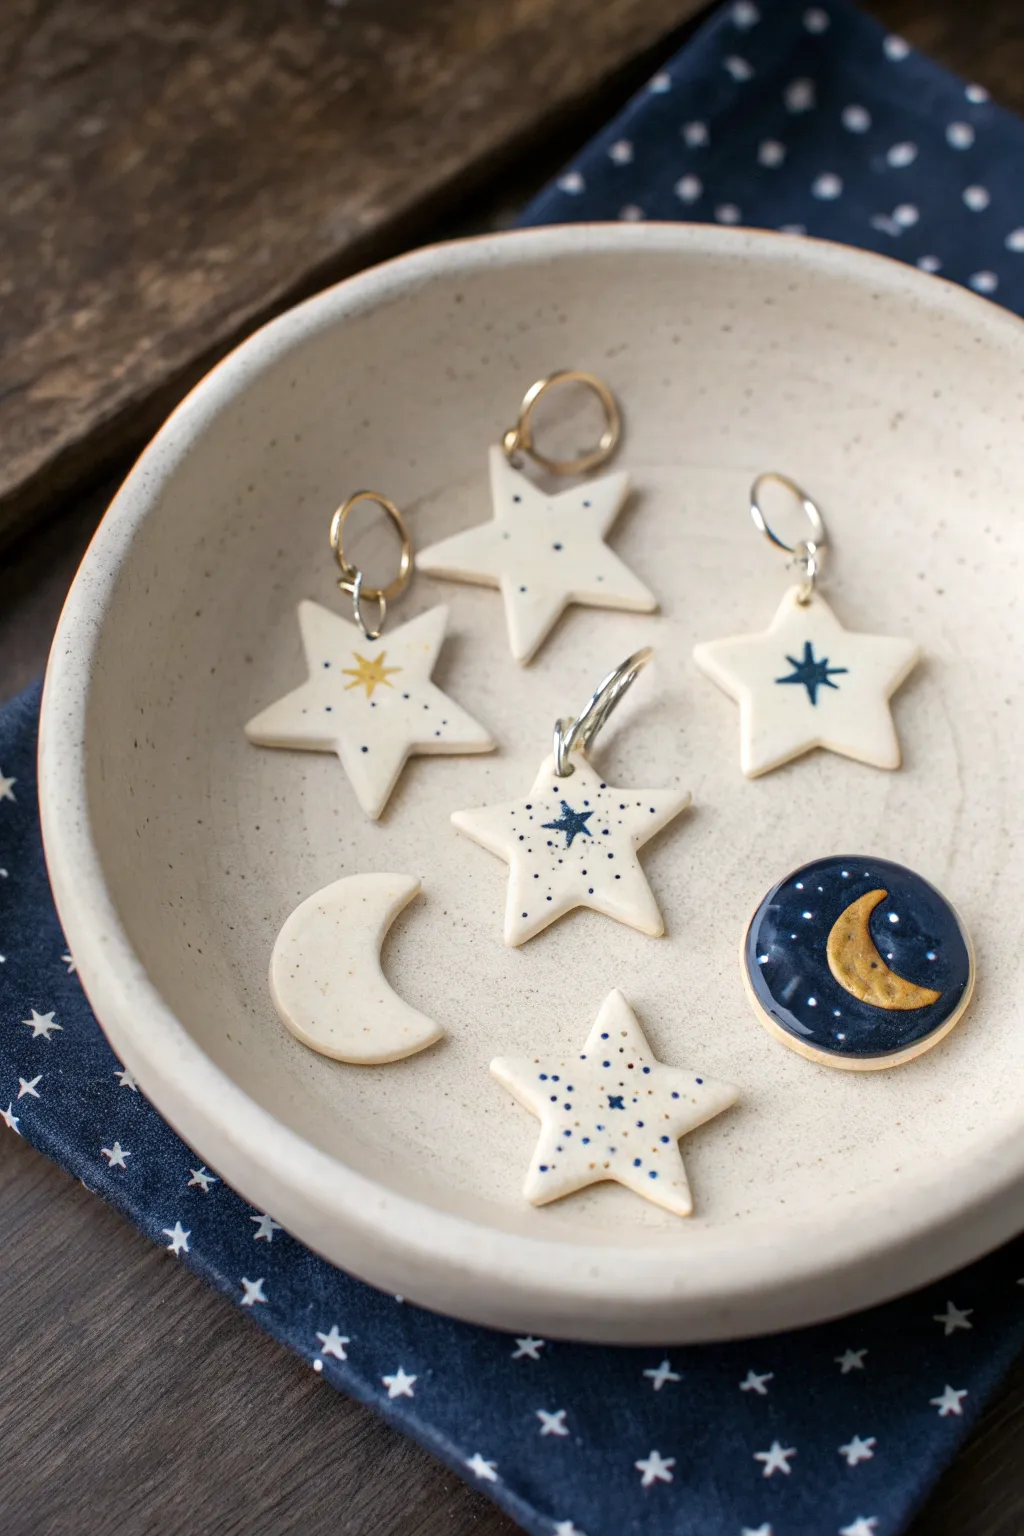
Capture the magic of the night sky with these delightful ceramic-style charms. Featuring golden moons, starry constellations, and deep midnight blues, these simple shapes make perfect jewelry pendants or decorative accents.
How-To Guide
Materials
- White air-dry clay or polymer clay
- Rolling pin
- Star and circle cookie cutters (small)
- Small craft knife or plastic clay tool
- Sandpaper (fine grit)
- Acrylic paints (dark blue, gold, white)
- Fine detail paintbrushes
- Toothpick or embossing tool
- Jump rings (silver or gold)
- Gloss varnish or glaze
Step 1: Shaping the Heavens
-
Condition the Clay:
Begin by warming up a handful of white clay in your hands, kneading it until it is soft, pliable, and free of cracks. -
Roll it Out:
Roll the clay onto a clean, flat surface until it is an even slab, approximately 1/4 inch thick. Consider using spacers or playing cards on either side of the roller to ensure even thickness. -
Cut the Stars:
Use your star-shaped cutter to punch out several shapes. If the clay sticks inside the cutter, gently push it out using a soft tool or your finger. -
Create the Moon:
To make a crescent moon, cut a circle first. Then, move the circle cutter slightly over and cut again to slice away a crescent shape. Alternatively, you can shape this by hand for a more organic look. -
Make the Night Disc:
Cut one perfect circle to serve as the background for the deep blue night sky charm. -
Smooth the Edges:
Dip your finger in a tiny bit of water and run it gently around the cut edges of each charm to smooth out any roughness or loose bits of clay. -
Add Hanging Holes:
While the clay is still wet, use a toothpick or a straw to pierce a hole near the top of any shape you plan to turn into jewelry. Make sure the hole is big enough for your jump rings.
Smooth Operator
To get that super smooth ceramic look without a kiln, use a damp sponge to wipe your air-dry clay before it dries. It removes fingerprints instantly.
Step 2: Decorative Details
-
Dry Completely:
Allow your clay pieces to dry fully according to the package instructions. Air-dry clay usually needs 24-48 hours, while polymer clay will need to be baked. -
Sand for Smoothness:
Once solid, gently sand the edges and surface with fine-grit sandpaper to create a professional, porcelain-like finish. -
Paint the Night Sky:
For the round disc, paint the entire surface with a thick coat of dark midnight blue acrylic paint. You may need two coats for full opacity. -
Add Star Patterns:
On the white stars, use your finest brush to paint tiny central stars. Try a mix of gold and blue. Simple crossed lines or five-point stars work best here. -
Create Speckles:
Dip a toothpick into blue or gold paint and gently dot the surface of the white stars to create a constellated, speckled effect around the central design. -
Gild the Moon:
Paint a small gold crescent moon onto the dark blue disc once the blue base is dry. Add tiny white or silver dots around it to represent distant stars.
Step 3: Finishing Touches
-
Seal the Work:
Apply a coat of gloss varnish or glaze over the painted areas. This not only protects the paint but gives the charms that shiny, ceramic look visible in the photo. -
Attach Hardware:
Using jewelry pliers, carefully open a jump ring and thread it through the hole you created earlier. -
Close the Ring:
Twist the jump ring closed securely. Your celestial charms are now ready to be strung onto a necklace or bracelet.
Cosmic Sparkle
Mix a tiny pinch of extra-fine holographic glitter into your gloss glaze before sealing. It adds a magical, subtle shimmer when the light hits.
Enjoy wearing your own little piece of the galaxy or gifting these starry treasures to a friend
Under-the-Sea Clay Reef Tile

Capture the magic of an underwater world with this charming relief tile project, perfect for young artists. Using a simple slab technique and cut-out shapes, you will create a dimensional reef scene featuring coral, fish, and sea plants on a dreamy teal background.
Step-by-Step Tutorial
Materials
- Air-dry clay (white)
- Rolling pin
- Square cookie cutter or knife and ruler
- Clay carving tools or plastic knife
- Acrylic paints (teal, coral pink, dark blue, white)
- Small paintbrushes (flat and detail shaders)
- Cup of water
- Old toothbrush (optional for texture)
- Matte varnish or sealant
Step 1: Creating the Base
-
Prepare the Clay:
Start by kneading a large ball of air-dry clay until it is soft and conditioned. This prevents cracks later on. -
Roll the Slab:
Roll out the clay into an even slab, aiming for a thickness of about 1/2 to 3/4 inch. It needs to be thick enough to stand independently once dry. -
Cut the Square:
Use a square cookie cutter or a ruler and knife to cut a perfect square shape from your slab. Smooth the cut edges with a little water on your finger. -
Add Texture:
Before adding details, tap the surface gently with an old toothbrush or a crumpled ball of foil to give the ‘water’ a slightly porous, sandy texture.
Clay Shrinkage
If the tile curls up at the corners while drying, flip it over gently halfway through the drying process to let the bottom breathe.
Step 2: Sculpting Sea Life
-
Form the Coral:
Roll thin ‘snakes’ of clay for the large coral tree. Arrange them on the left side of the tile, branching upwards and outwards. Press them gently onto the base to adhere. -
The Main Fish:
Flatten a small piece of clay and cut out an oval shape with a tail. Place this near the top right. Use a tool to impress lines for fins and gills. -
Seaweed and Starfish:
Roll tapered coils for the dark seaweed on the bottom right and arrange them vertically. Create a tiny starfish shape for the bottom left corner. -
Extra Details:
Add a small teardrop shape near the top fish and a tiny fish silhouette in the center. Don’t forget to push a small hole for the fish eye. -
Secure the Pieces:
If the clay is getting dry, use a tiny dab of water or ‘slip’ (watery clay) to glue your relief pieces firmly to the background square. -
Refine Edges:
Go around your raised shapes with a modeling tool to ensure they look clean and distinct from the background. -
Drying Time:
Let the entire tile dry completely. Since the base is thick, I recommend leaving it for at least 24-48 hours in a dry spot.
Step 3: Painting the Ocean
-
Base Color:
Once bone dry, paint the entire square background (and sides!) with a matte teal or aqua acrylic paint. Use a smaller brush to paint carefully around your raised clay shapes. -
Coral and Friends:
Paint the large coral tree, the main fish, the small fish, and the starfish in a soft coral-pink shade. You may need two coats for opaque coverage. -
Deep Sea Plants:
Use a dark navy or deep teal paint for the seaweed cluster on the right and the small teardrop shape at the top. -
Splatter Effect:
Thicken some white paint slightly. dip a toothbrush in it, and flick the bristles with your thumb to spray tiny white ‘bubbles’ across the background. -
Fish Details:
Use a tiny dot of dark blue paint to fill in the eye of the main fish. -
Protecting the Work:
Finish by applying a coat of matte varnish to seal the paint and protect your underwater masterpiece.
Clean Lines
If you accidentally get teal paint on your pink fish, wait for it to dry completely, then paint over the mistake with the pink again.
Display your ocean tile on a shelf or use it as a heavy paperweight to keep your drawings safe
Marbled Clay “Swirl” Beads and Pendants

Capture the beauty of natural stone with this striking marbled pendant project. Using a mix of teal, rust, and cream polymer clay, you will create organic swirl patterns that look like polished agate or jasper.
Detailed Instructions
Materials
- Polymer clay (colors: Teal/Turquoise, Rust/Terracotta, Cream/Beige)
- Acrylic rolling pin or glass jar
- Oval clay cutter or small cookie cutter
- Tool for poking holes (straw, toothpick, or awl)
- Blade or craft knife
- Wet/dry sandpaper (various grits: 400, 600, 800)
- Medium-grit sandpaper for rough shaping (optional)
- Buffing cloth (denim or soft cotton)
- Waxed cotton cord (dark green or black)
- Oven for baking
Step 1: Preparing the Colors
-
Condition the clay:
Start by warming up your clay. Knead each color—teal, rust, and cream—separately in your hands until they are soft, pliable, and easy to work with. -
Create clay snakes:
Roll each color into a long, thin cylinder or ‘snake’ about the thickness of a pencil. Make two teal snakes, one rust snake, and one thinner cream snake to match the color ratio in the photo. -
Combine the strands:
Gather all your clay snakes and twist them together into one large rope. Fold this rope in half and twist it again. Repeat this twist-and-fold process about 3-4 times. Be careful not to over-twist, or the colors will turn muddy instead of distinct. -
Compact into a log:
Roll your twisted rope firmly on your work surface to compress it into a solid, smooth log. You want the air pockets gone and the colors tightly packed together.
Don’t Over-Mix!
Stop twisting the colors sooner than you think. If you mix too much, the distinct teal and rust definition disappears and becomes a bland brown. Keep the streaks bold.
Step 2: Shaping and Cutting
-
Flatten the slab:
Using your acrylic rolling pin, flatten the marbled log into a sheet about 1/4 inch thick. I find rolling in different directions helps stretch the swirls into interesting elongated shapes. -
Inspect the pattern:
Look closely at your clay sheet. Locate the area with the most pleasing swirl pattern that captures the balance of teal and rust you want for the pendant. -
Cut the shape:
Press your oval cutter firmly into the chosen spot. Wiggle it slightly to ensure a clean cut, then lift the cutter away. Remove the excess clay from around the oval. -
Smooth the edges:
Gently rub your finger along the cut edge of the oval to soften any sharp ridges left by the cutter. This makes sanding easier later. -
Create the hole:
Use a straw or a small round tool to punch a hole near the top of the oval. Make sure the hole is distinct and clean, large enough for your cord to pass through. -
Make matching beads:
Take the leftover scrap clay from the cutting step and roll it into balls to create matching spherical beads, poking a hole through the center of each with a toothpick.
Step 3: Baking and Finishing
-
Bake the clay:
Place your pendant and beads on a baking sheet lined with parchment paper or cardstock. Bake according to the specific temperature and time instructions on your package of polymer clay. -
Cool down completely:
Once baking is complete, let the pieces cool completely before handling them. Polymer clay is fragile when hot and hardens fully as it cools. -
Wet sanding:
Dip your coarse (400 grit) wet/dry sandpaper in water and sand the surface of the pendant. Sand in a circular motion to remove fingerprints. Repeat with the finer grits (600, then 800) for a silky smooth feel. -
Buff to a sheen:
Rub the dry pendant vigorously with a piece of denim or soft cotton cloth. The friction creates heat, which brings out a natural, subtle sheen on the clay surface without needing varnish. -
String it up:
Cut a length of waxed cotton cord. Fold it in half to find the center, thread the loop through the pendant hole, and pull the tails through the loop to create a lark’s head knot. -
Add beads (optional):
If you made matching beads, you can thread them onto the cord tails or use them for a separate bracelet.
High-Gloss Finish
For a glass-like shine instead of a matte stone look, skip the buffing and coat your baked pendant with a layer of UV resin or glossy water-based polyurethane varnish.
Enjoy wearing your unique piece of wearable art that looks just like polished gemstones
Silly Clay Robots With Button Details
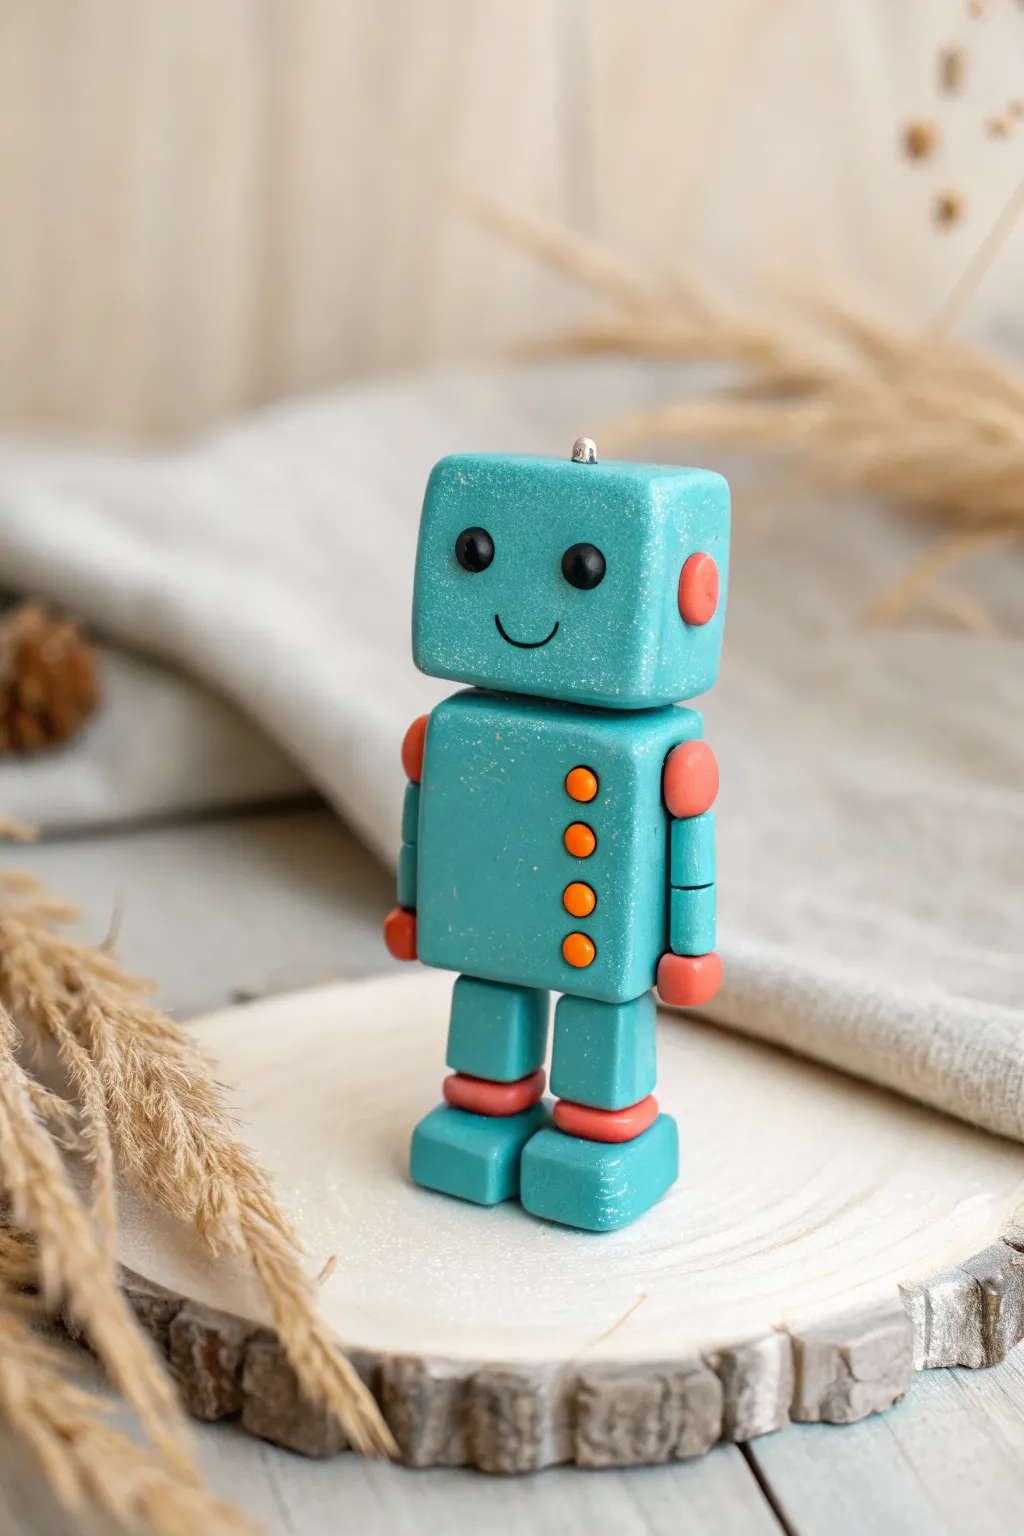
This adorable blocky robot brings a retro-futuristic charm to your desk or shelf with its shimmery turquoise finish and coral orange accents. Constructed from simple geometric shapes, it’s a fantastic project for mastering clean edges and precise assembly.
Step-by-Step
Materials
- Turquoise polymer clay (with sparkly/metallic effect)
- Coral or light orange polymer clay
- Black polymer clay
- Silver eye pin (optional, for hanging)
- Clay blade or craft knife
- Needle tool or toothpick
- Smoothing tool
- Acrylic roller
- Gloss glaze (optional)
Step 1: Building the Head and Torso
-
Shape the Head:
Start with a portion of the turquoise clay. Roll it into a smooth ball first to remove air bubbles, then press it against your work surface to form a cube. Use your blade to gently tap all six sides to make them flat and sharp. -
Round the Corners:
While you want a cube shape, you don’t want razor-sharp edges. Softly tap the corners with your finger to give them a slightly rounded, friendly look. -
Form the Body:
Create a second block for the torso using the same technique, but make it slightly taller and narrower than the head block. Ensure the top surface is flat so the head sits securely. -
Connect the Pieces:
Place the head centered on top of the body. Wiggle it very slightly to bond the clay, or insert a piece of toothpick between the two for extra internal stability.
Clean Cube Trick
To get perfectly sharp edges on your cubes without distorting the shape, try pressing the clay against a small mirror or piece of glass while shaping it.
Step 2: Adding the Face and Buttons
-
Make the Eyes:
Take two tiny pinches of black clay and roll them into spheres. Flatten them slightly against the robot’s face. Place them wide apart for a cuter expression. -
Create the Smile:
Roll a very thin snake of black clay. Cut a small curved section and carefully press it onto the face with a needle tool to form a simple U-shaped smile. -
Add Ear Details:
Roll two small balls of coral orange clay. Flatten them into discs and press one onto each side of the head. -
Attach the Chest Buttons:
Create four tiny balls of coral clay. Line them up vertically on the right side of the robot’s chest and press them flat. Use a needle tool to poke a tiny indentation in the center of the top button for texture.
Metallic Magic
Before baking, brush dry mica powder (pearl or silver) over the turquoise clay. This enhances the shimmer and gives it a real metallic robot sheen.
Step 3: Constructing the Limbs
-
Make the Shoulder Joints:
Roll two medium balls of coral clay. Attach these to the upper corners of the torso block to act as flexible shoulders. -
Shape the Arms:
Roll two cylinders of turquoise clay. Press them gently onto the coral shoulder joints so they hang straight down. -
Add Wrist Details:
Use your blade to gently indent a line a few millimeters from the bottom of each arm to create a segmented look. -
Form the Hands:
Roll two small coral balls for hands and attach them to the bottom of the turquoise arm cylinders.
Step 4: Legs and Final Assembly
-
Create Leg Blocks:
Form two small rectangular blocks from turquoise clay for the upper legs. Attach these to the bottom of the torso. -
Add Knee Joints:
Make two flat discs of coral clay—slightly wider than the leg blocks—and press them onto the bottom of the legs. -
Sculpt the Feet:
Create two square block shapes for the feet using turquoise clay through the same flattening method used for the head. Attach these under the coral knee joints. -
Insert Hardware:
If you want to turn this into an ornament or charm, insert a silver eye pin into the top center of the head now. -
Smoothing Check:
Before baking, look over the robot for any fingerprints. I lightly brush the surface with a tiny bit of baby oil on my finger to smooth these away perfectly. -
Bake:
Bake according to your polymer clay package instructions (usually 275°F/135°C for 15-30 minutes). Let it cool completely before handling.
Once baked, your little robot is ready to stand guard on your desk or hang out as a quirky decoration