Air dry clay is one of my favorite go-to materials for kids because it feels like real clay but stays totally beginner-friendly. These ideas are all about simple shapes, big imagination, and satisfying little keepsakes kids can actually use or proudly display.
Pinch Pot Animal Bowls
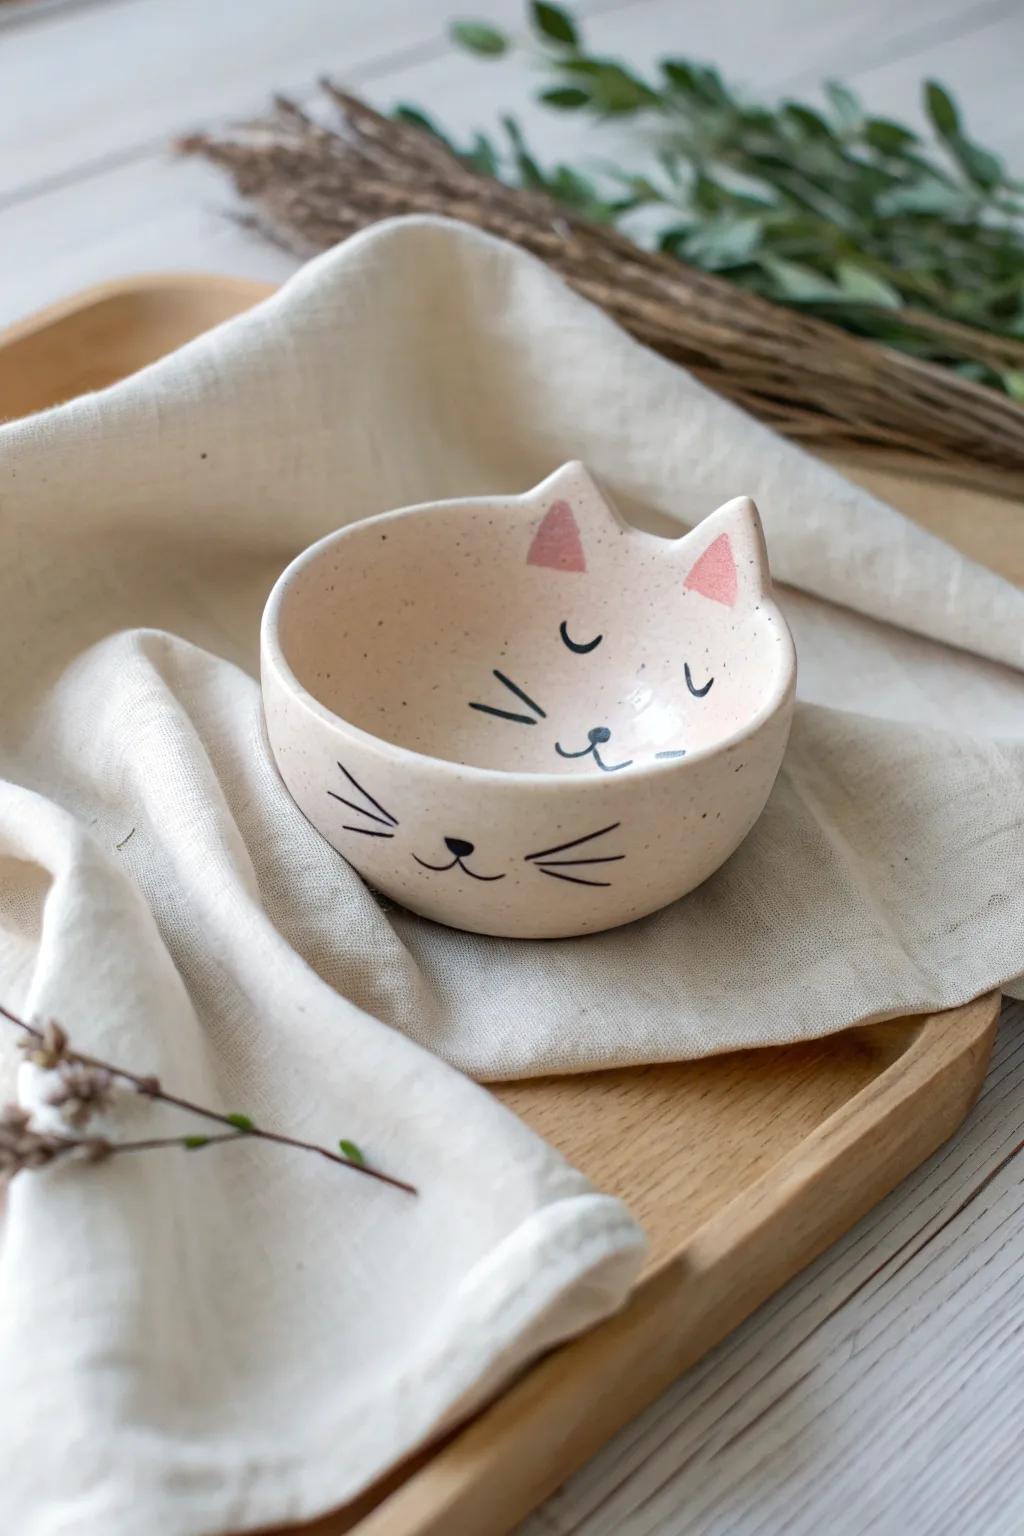
This adorable ceramic-style bowl features a sweet sleepy kitty face on the inside and a curious whiskered face on the outside. Its speckled clay finish and gentle triangular ears make it a charming catch-all dish for trinkets or treasures.
Detailed Instructions
Materials
- Air dry clay (white or light beige)
- Acrylic paint (black and soft pink)
- Clear varnish or sealant (glossy)
- Fine-point paintbrush
- Small bowl of water
- Sponge or old toothbrush (for speckling)
- Brown acrylic paint (diluted, for speckling)
- Smoothing tool or spoon back
- Fine grit sandpaper
Step 1: Forming the Bowl
-
Roll the ball:
Start by taking a chunk of air dry clay about the size of a tennis ball. Roll it between your palms until it forms a smooth, crack-free sphere. -
Create the opening:
Hold the ball in one hand and push your thumb into the center of the sphere. Press down until your thumb is about a half-inch from the bottom. -
Pinch the walls:
Using your thumb on the inside and fingers on the outside, gently pinch and rotate the clay. Work your way from the bottom up to the rim, aiming for an even thickness of about a quarter-inch. -
Smooth the surface:
Dip your finger in a tiny bit of water and rub it over any small cracks or uneven spots. This is a great time to make sure the rim is nice and level. -
Pull up the ears:
Choose one side of the rim to be the front. Gently pinch a section of the rim upward to form a triangular ear, then do the same a short distance away for the second ear. -
Refine the shape:
Smooth the transition between the ears and the rim so they look integrated, not just stuck on. Use your thumb to create a slight curve inside the ear shape.
Cracked Clay?
If cracks appear while forming, dip your finger in a slurry of clay and water (called slip) and massage it into the crack to seal it seamlessly.
Step 2: Adding Texture and Details
-
Initial drying:
Set your cat bowl aside to dry until it is leather hard—firm but still slightly cool to the touch. This usually takes a few hours. -
Sand it smooth:
Once the clay is fully dry (typically 24-48 hours), use fine-grit sandpaper to gently buff away any rough fingerprints or bumps, paying special attention to the rim. -
Create the speckled look:
Dilute a tiny drop of brown paint with water until it’s very runny. Dip an old toothbrush or stiff brush into the mix and flick the bristles with your thumb to spray tiny speckles all over the bowl, mimicking stoneware clay. -
Paint the inner ears:
Using your fine brush and soft pink paint, carefully fill in the front triangular face of each ear.
Make it Functional
Want to use this for jewelry? Skip the paint speckles and glue felt to the bottom after sealing to prevent it from scratching your dresser.
Step 3: Painting the Faces
-
Map out the design:
I find it helpful to very lightly sketch the face placement with a pencil before committing with paint. -
Paint the interior sleeping face:
On the inside curve of the bowl, paint two downward-curving ‘U’ shapes for sleepy eyes. Add tiny eyelashes if you like. -
Add the inner nose and mouth:
Just below the sleepy eyes, paint a small nose connected to a smiling mouth curve. -
Paint the exterior whiskered face:
On the outside of the bowl, paint a second face. Draw two simple eyes, a cute triangular nose, and long confident whiskers sweeping backward. -
Seal the project:
Once all paint is completely dry, apply a glossy varnish over the entire bowl. This protects the paint and gives it that shiny ceramic look.
Now you have a charming little feline friend to hold your small treasures


Handprint Keepsake Dishes
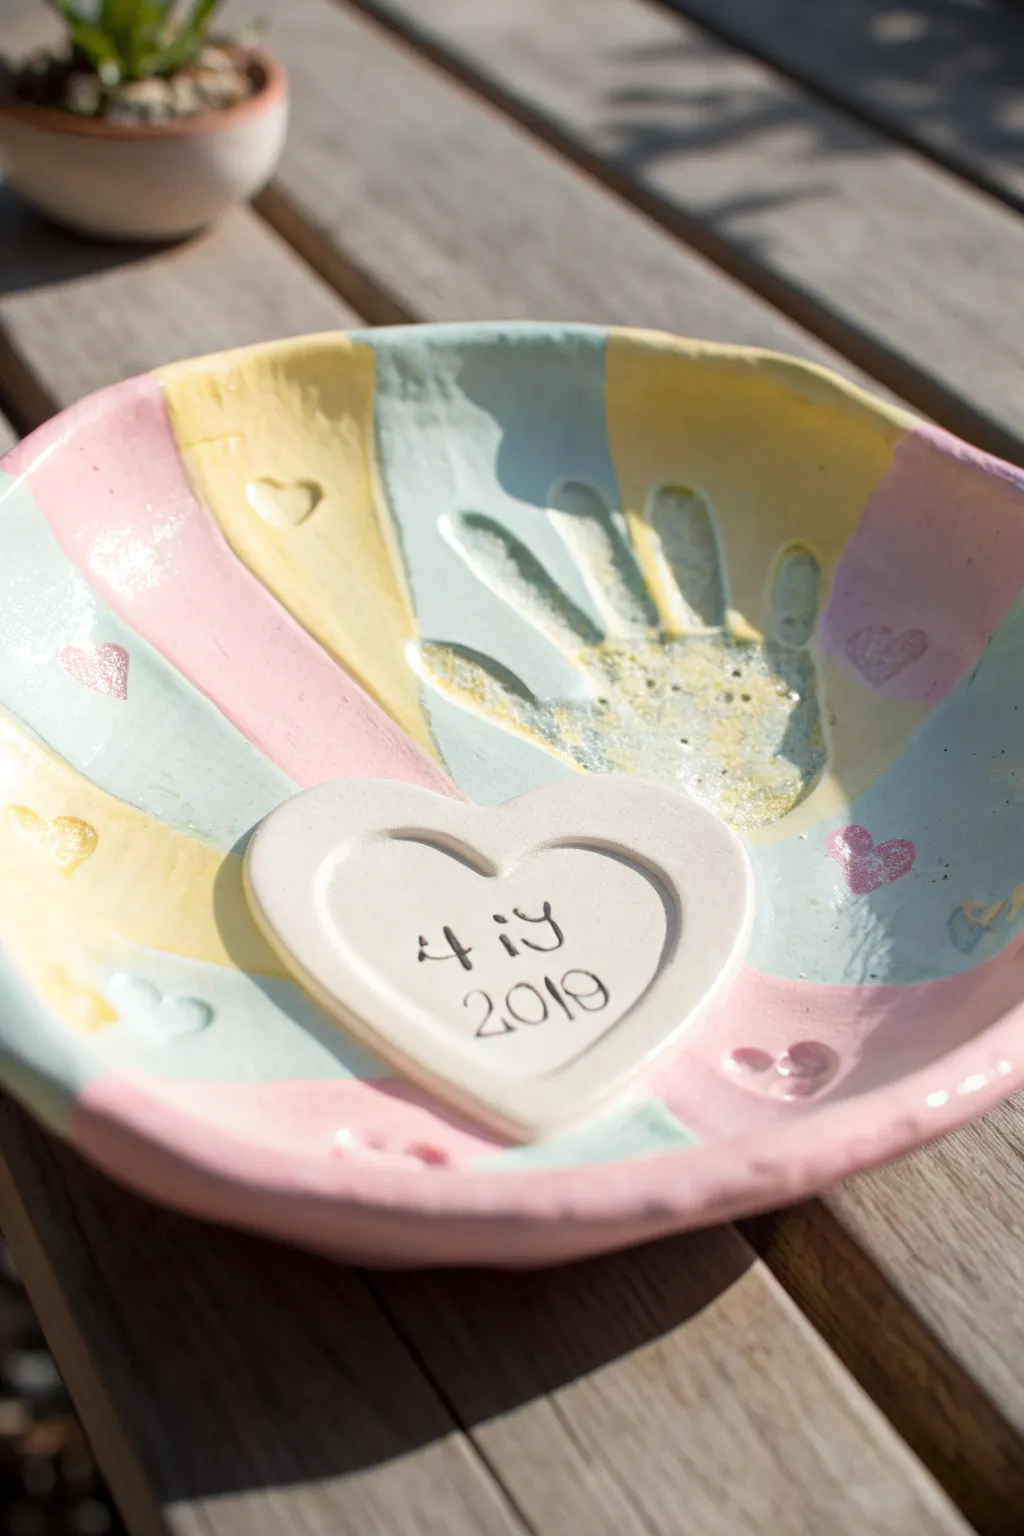
This sweet keepsake dish captures a moment in time with a precious handprint and a personalized heart tag. Featuring gentle pastel stripes in pink, yellow, and blue, it makes a perfect gift or a lovely catch-all for small trinkets.
Step-by-Step
Materials
- White air-dry clay (approx. 500g)
- Rolling pin
- Small bowl (for use as a mold)
- Plastic wrap (cling film)
- Small knife or clay cutting tool
- Small sponge and water
- Acrylic paints (pastel pink, pastel yellow, light blue)
- Stamp set (letters and numbers)
- Heart-shaped cookie cutter
- Small loose heart stamp (optional)
- Paintbrushes
- Clear acrylic sealer or varnish
Step 1: Shaping the Base
-
Roll the clay:
Begin by taking a large ball of white air-dry clay and rolling it out on a smooth surface until it is about 1/4 inch thick. Ensure the thickness is even to prevent cracking later. -
Cut the circle:
Place your mold bowl upside down on the clay to use as a template. Cut around the rim with a knife to create a perfect circle, then remove the excess clay. -
Create the handprint:
While the clay is still flat, have the child press their hand firmly into the center. Help them push down each finger and the palm to get a deep, clear impression. -
Stamp tiny details:
If you have small decorative stamps like the little hearts seen in the image, gently press them randomly around the empty spaces of the clay circle now. -
Form the bowl shape:
Line the inside of your mold bowl with plastic wrap. Gently lift your clay circle and place it inside the bowl, pressing it softly against the sides so it takes on the curved shape. -
Smooth the edges:
Dip your finger or a small sponge in water and run it along the rim of the clay to smooth out any rough cutting marks or sharp edges.
Step 2: Adding the Heart Tag
-
Cut the heart:
Roll out a small scrap of leftover clay. Use a heart-shaped cookie cutter to create the tag piece that will sit at the bottom of the handprint. -
Personalize the tag:
Using your letter stamps, gently press the child’s name or age (like ‘4 iy’ for 4 years) and the year into the center of the heart. -
Create an inset border:
To mimic the look in the photo, use a smaller heart cutter or a blunt tool to gently press an indentation inside the border of the heart, framing the text. -
Attach the heart:
Score the back of the heart and the spot on the bowl where it will sit (near the palm). Add a dab of water (slip) and press the heart firmly onto the bowl. -
Let it dry:
Leave the bowl inside the mold for at least 24 hours. Then, remove it from the mold and remove the plastic wrap, letting it dry completely for another 24-48 hours until white and hard.
Cracks happen!
If small cracks appear while drying, mix a tiny bit of fresh clay with water to make a paste. Fill the cracks, smooth with a wet finger, and let dry again.
Step 3: Painting and Finishing
-
Plan the stripes:
Visualize thick stripes radiating from the center of the bowl. You don’t need tape; freehand painting gives it that charming, handmade look. -
Paint the yellow stripes:
Start with pastel yellow acrylic paint. Paint wide sections radiating outward, covering parts of the handprint and background. -
Add pink sections:
Next, fill in adjacent sections with pastel pink. Allow the colors to meet naturally; it’s okay if the lines aren’t perfectly straight. -
Fill in with blue:
Complete the pattern with light blue paint in the remaining sections. I find using a flat brush helps keep the stripe edges relatively neat. -
Highlight the details:
If you stamped small hearts earlier, you can gently dab a little contrasting paint into the impressions to make them pop. -
Paint the text:
Use a very fine brush or a black paint pen to carefully fill in the stamped letters and numbers on the heart tag so they stand out clearly. -
Seal the piece:
Once all paint is fully dry, apply a coat of clear acrylic varnish or sealer (glossy or matte, per your preference) to protect the finish and give it a professional sheen.
Glitter Glam
While the sealer is wet, sprinkle fine iridescent glitter into the handprint depression for a magical, sparkling touch that kids will love.
Now you have a timeless, colorful memento to cherish for years that freezes a moment of childhood in place.


Clay Bead Necklaces and Bracelets
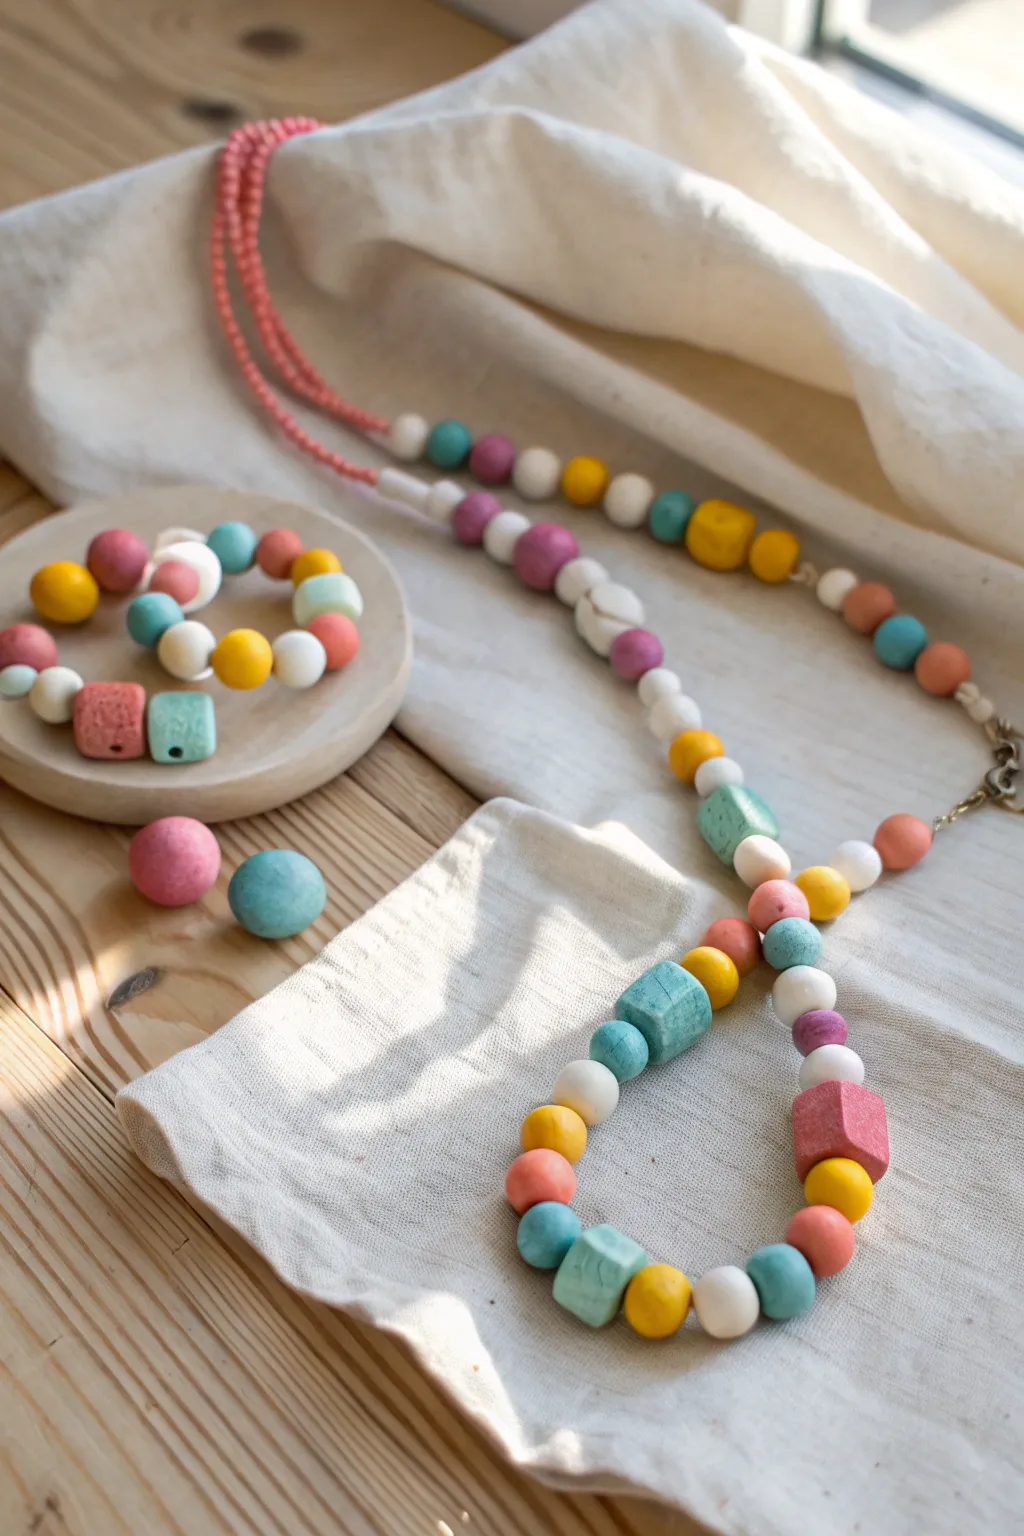
Create a stunning statement with these cheerful, handmade beads that combine simple geometric shapes with a soft, playful color palette. This project transforms basic air dry clay into wearable art featuring chunky cubes and classic rounds strung together for a unique, boutique-style look.
Detailed Instructions
Materials
- Air dry clay (white)
- Acrylic paints (pastel pink, teal, yellow, white, purple)
- Wooden skewers or toothpicks
- Sandpaper (fine grit)
- Paintbrushes
- Sealant (matte varnish or Mod Podge)
- Beading cord or heavy waxed cotton thread
- Jewelry clasps and jump rings
- Small pink seed beads (for the nape of the necklace)
Step 1: Shaping the Beads
-
Condition the clay:
Start by taking a chunk of white air dry clay and kneading it in your hands until it feels soft, warm, and pliable to prevent cracking later. -
Roll spheres:
Pinch off small pieces of clay about the size of a marble and roll them between your palms to create smooth, round beads. -
Vary the sizes:
Make a variety of sizes, keeping some quite small (pea-sized) and others larger (grape-sized) to create visual interest in your final strand. -
Form cubes:
To make the geometric accents, roll a ball of clay first, then gently tap each side against your work surface to flatten the faces until you have a soft cube or rectangular prism. -
Create holes:
While the clay is still wet, carefully push a skewer or toothpick through the center of each bead, twisting gently as you go to keep the shape intact. -
Double-check openings:
Once the skewer pokes through, pierce it again from the opposite side to ensure the hole is clean and large enough for your cord.
Step 2: Refining and Painting
-
Dry completely:
Set your beads aside on a clean surface or drying rack for at least 24-48 hours, turning them occasionally so they dry evenly. -
Sand imperfections:
Once fully hard, inspect your beads and use fine-grit sandpaper to smooth out any fingerprints or rough edges around the bead holes. -
Base colors:
Paint your beads in solid blocks of color—pink, teal, yellow, purple, and white—using acrylic paint, leaving them on skewers to make painting all sides easier. -
Add texture:
For the speckled stone look seen on the teal and pink cubes, dilute a tiny bit of darker paint or ink and flick it onto the bead with an old toothbrush, or stipple it on with a nearly dry brush. -
Seal the beads:
Protect your paint job by applying a coat of matte varnish or sealant, which gives the beads a finished look without making them too shiny.
Smooth Moves
dip your finger in water and run it over the wet clay beads before drying. This smooths out tiny cracks and fingerprints instantly.
Step 3: Assembly
-
Plan your design:
Lay out your dry beads on a table to determine the pattern, I usually like to alternate shapes and colors to keep the rhythm playful and balanced. -
Prepare the cord:
Cut a length of beading cord or waxed cotton thread to your desired necklace or bracelet length, adding a few extra inches for knotting. -
Start stringing:
Thread your clay beads onto the cord, following the pattern you laid out. -
Add seed beads:
For the back section of the necklace (the part that sits on the neck), switch to stringing the small pink seed beads for a delicate finish and better drape. -
Attach hardware:
Tie the ends of your cord securely to jump rings and attach your clasp, adding a dab of glue to the knots for extra security. -
Bracelet alternative:
If making the bracelet, simply string the clay beads onto elastic cord and tie a secure surgeon’s knot to finish.
Pattern Play
Before the clay dries, press textures into the cube beads using lace, leaves, or mesh fabric for an embossed tactile element.
Wear your colorful geometric creations with pride or wrap them up as a thoughtful handmade gift


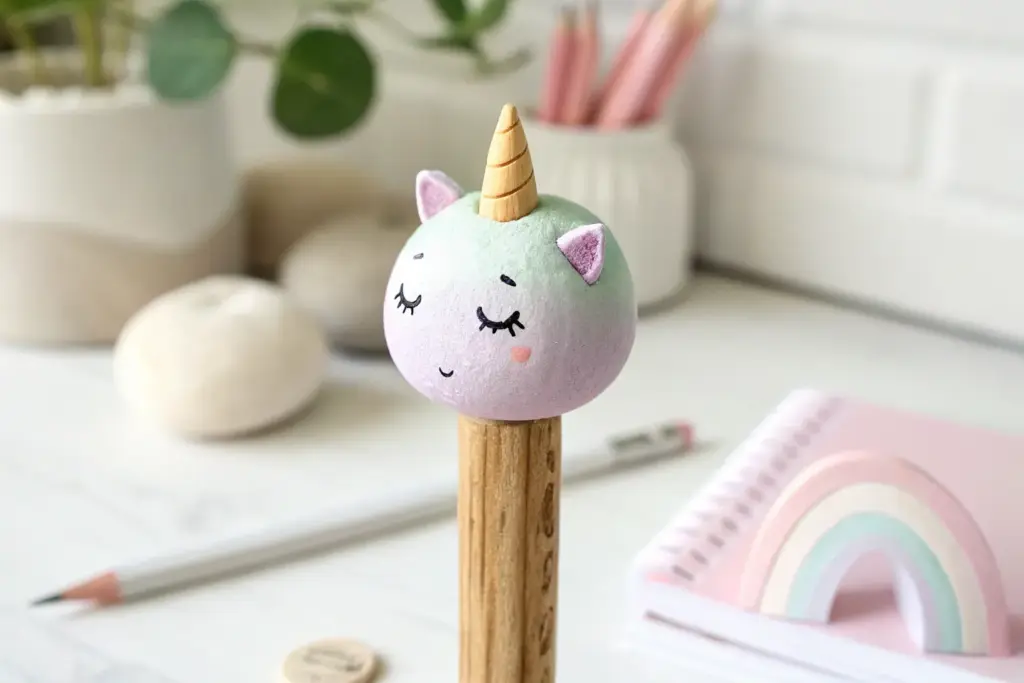
Rainbow Pencil Toppers
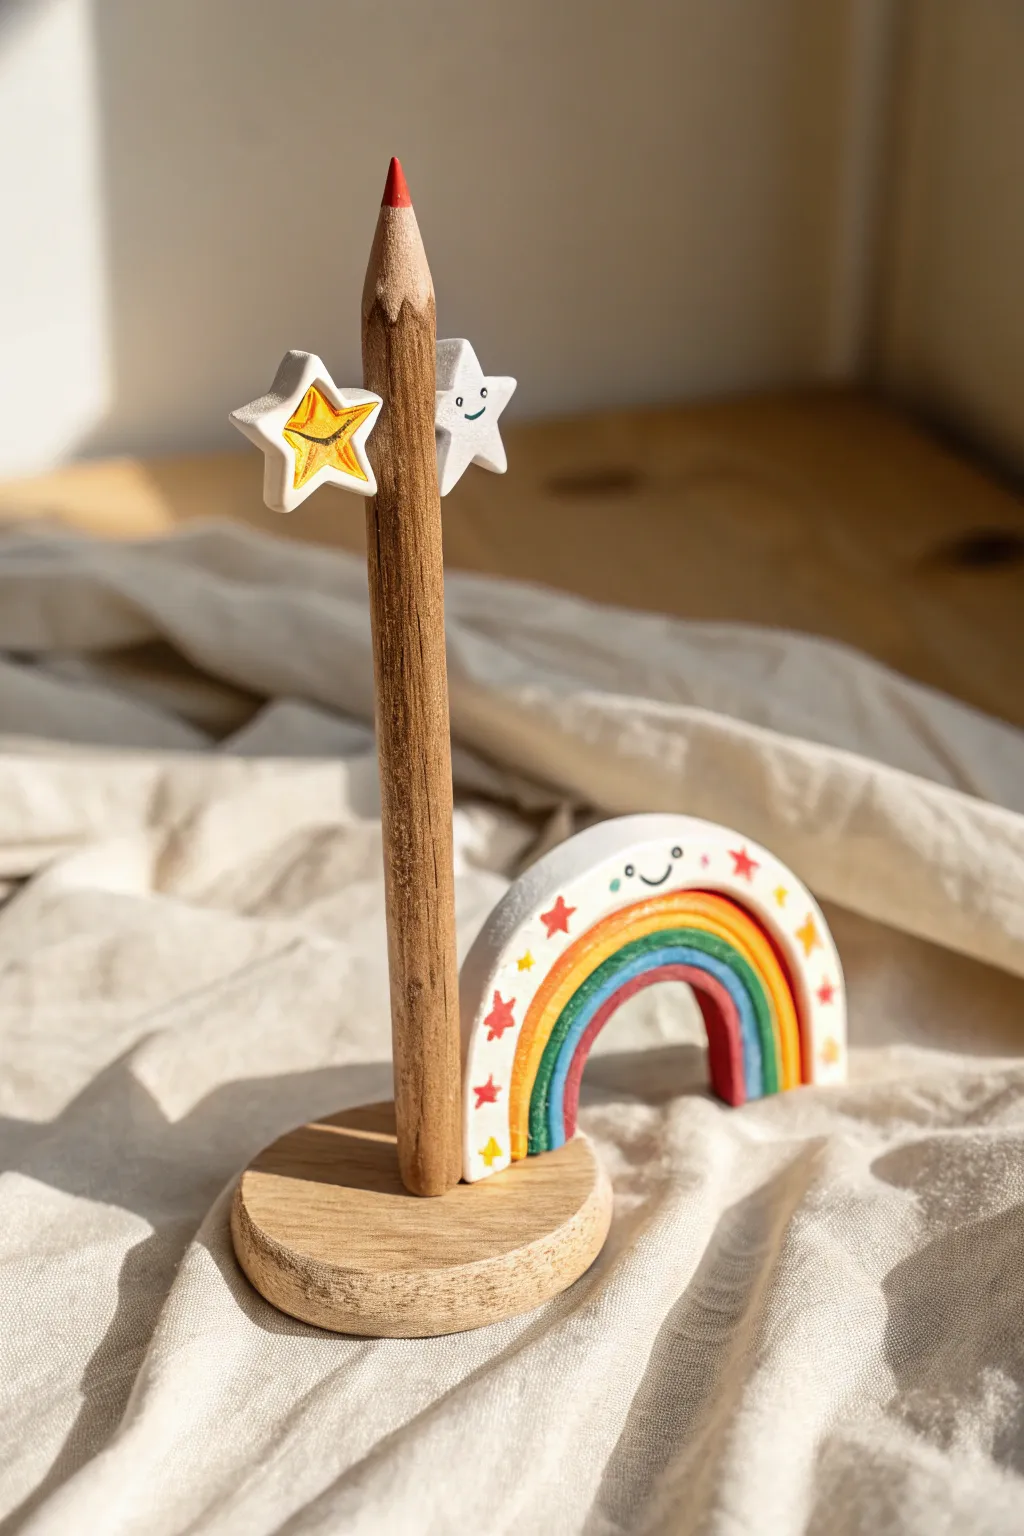
Brighten up any homework station with this cheerful duo featuring a smiling star pencil topper and a matching free-standing rainbow arch. These simple air dry clay creations add a touch of handcrafted magic to everyday writing supplies.
Step-by-Step Guide
Materials
- White cosmetic-grade air dry clay
- Wooden pencil
- Acrylic paints (red, orange, yellow, green, blue, black, white)
- Fine detail paintbrush
- Rolling pin
- Craft knife or clay tool
- Small cup of water
- Matte varnish or sealant (optional)
Step 1: Sculpting the Shapes
-
Roll the clay:
Start by conditioning a small ball of air dry clay until it is soft and pliable, then use your rolling pin to flatten it to an even thickness of about 1/4 inch. -
Cut the rainbow arch:
Using a craft knife or clay tool, cut out a semi-circle shape. Use a smaller round object (like a bottle cap) to cut out the inner arch, creating a thick rainbow tunnel shape. -
Smooth the rainbow:
Dip your finger in a tiny bit of water and run it along the cut edges of your rainbow to smooth out any roughness or jagged bits. -
Cut the star topper:
From the remaining flattened clay, cut out two identical small star shapes. Can use a small cookie cutter if you have one, or cut freehand for a quirky look. -
Assemble the topper:
Place the top of your wooden pencil between the two clay stars. Gently press the edges of the stars together to sandwich the pencil tip inside, sealing the seams with a little water. -
Shape the attachment:
Ensure the clay hugs the wood tightly so it won’t slide off later. You may want to gently twist the pencil while the clay is wet to ensure it can be removed later if desired, or let it dry permanently attached. -
Dry thoroughly:
Set both the rainbow arch and the pencil topper aside in a warm, dry spot. Allow them to dry completely for at least 24-48 hours until hard and white.
Step 2: Painting and Details
-
Sketch guidelines:
Once fully dry, lightly use a pencil to mark where your rainbow stripes and the little faces will go. -
Paint the rainbow stripes:
Begin painting the inner arches of the rainbow. Start with the blue inner arch, then green, yellow, orange, and finally the red outer stripe. -
Leave a white border:
Be sure to leave the outermost edge and the front face of the rainbow white, as shown in the inspiration photo. -
Add rainbow stars:
On the white front face of the rainbow arch, paint tiny red and yellow stars scatter-pattern style. -
Paint the pencil star:
For the pencil topper, paint a smaller yellow star shape inside the clay star, leaving a white border around the edges. I find a very fine brush works best here. -
Add the faces:
Using your finest brush or a black fine-liner pen, draw a simple smiley face on the white section of the rainbow arch and on the star topper. -
Paint rosy cheeks:
New dab a tiny dot of pink or diluted red paint next to the smile on both the rainbow and the star to create cute cheeks. -
Seal the deal:
If you want your pencil pals to last longer, apply a coat of matte varnish over both pieces once the paint is completely dry to protect them from chipping.
Fixing Cracks
If small cracks appear as the clay dries, mix a tiny bit of fresh clay with water to make a paste (slip) and fill them in before painting.
Pro Tip: Sharp Lines
For super crisp rainbow stripes, use thin washi tape to mask off sections as you paint layers nearby.
Now you have a charming set of desk accessories ready to spark some creativity during your next writing session

The Complete Guide to Pottery Troubleshooting
Uncover the most common ceramic mistakes—from cracking clay to failed glazes—and learn how to fix them fast.
Goofy Monster Magnets With Big Eyes
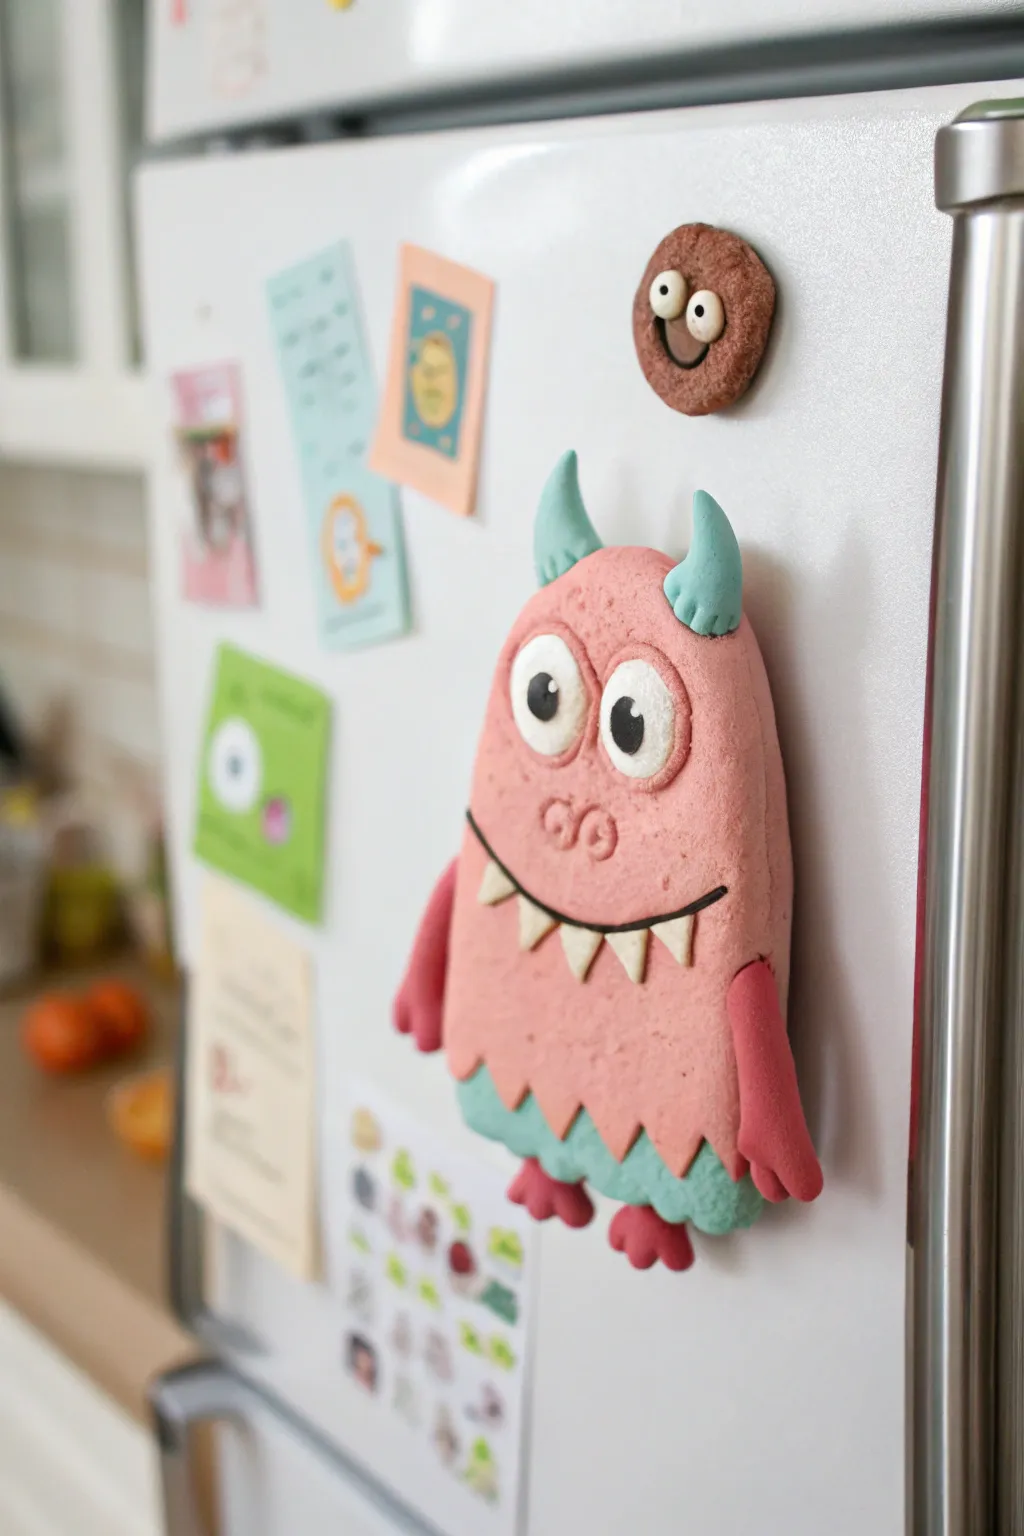
This friendly fellow is the perfect way to guard your grocery list or showcase your latest drawing on the fridge. With his jagged teal fur, little horns, and wide-eyed stare, he’s more silly than scary and makes for a fantastic afternoon project.
Step-by-Step
Materials
- Air dry clay (pink, teal, white, black, brown)
- Strong round magnet or magnetic strip
- Rolling pin
- Plastic knife or clay sculpting tool
- Super glue or strong craft glue
- Texture tool (optional: toothbrush or aluminum foil ball)
- Parchment paper (for work surface)
Step 1: Sculpting the Body Base
-
Roll the main shape:
Start by taking a generous amount of pink air dry clay and conditioning it between your hands until it’s soft and pliable. Roll it into a smooth oval ball. -
Flatten the body:
Place the ball on your parchment paper and use a rolling pin or the palm of your hand to flatten it into an oblong, pill-like shape about 1/2 inch thick. Smooth out the edges with your finger. -
Create the texture:
To give the monster that slightly fuzzy, matte look shown in the photo, gently dab the surface with a crumpled ball of aluminum foil or a texture sponge. Don’t press too hard; you just want a surface finish that isn’t perfectly slick. -
Cut the zigzag line:
Using a plastic knife or clay tool, cut a jagged, zigzag line across the bottom third of the pink body. Remove the bottom piece of pink clay—this empty space is where the teal fur will go.
Clay Cracking?
If you see hairline cracks while drying, smooth a tiny bit of fresh clay mixed with water (slip) over the crack with your finger to seal it shut.
Step 2: Adding Fur and Limbs
-
Form the teal bottom:
Take a piece of teal clay and flatten it to the same thickness as the body. Cut a matching zigzag pattern on the top edge so it fits puzzle-like into the pink body. -
Join the sections:
Press the teal piece firmly against the pink cut edge. You can use a little water on your finger to help smooth the seam on the back, but leave the front seam distinct so it looks like layers of fur. -
Shape the arms:
Roll two small sausages of pink clay for the arms. Flatten one end of each slightly to create ‘hands’ (or just blunt nubs) and attach them to the sides of the body, blending the clay at the shoulder attachment point. -
Add the feet:
Create three tiny balls of pink clay for each foot. Press them together in a cluster and attach these two foot-clusters to the bottom of the teal section.
Weight Distribution
Because the clay can get heavy, glue two smaller magnets at the top and bottom instead of one in the center to prevent sliding.
Step 3: Face and Details
-
Make the eyes:
Roll two medium-sized balls of white clay and flatten them into circles. Place them near the top center of the head, pressing them side-by-side so they touch. -
Add pupils:
Roll two tiny black balls for pupils. Press them onto the white eyes. I like to place them slightly off-center or looking in different directions to boost the goofy factor. -
Sculpt the horns:
Shape two small cones out of teal clay. Curve the tips slightly and attach them to the very top of the monster’s head. -
Create the mouth smile:
Roll a very thin ‘snake’ of black clay. Gently press this into a wide, U-shaped smile across the middle of the face. -
Add the teeth:
Form tiny triangles out of white clay. Carefully place these pointed-side-down along the bottom edge of the black smile line. -
Nose details:
For the nose, make a small oval of pink clay and press it between the eyes and mouth. Use a small tool to poke two nostrils into it.
Step 4: Finishing Up
-
Dry completely:
Let your monster sit on the parchment paper undisturbed. Air dry clay can take 24 to 48 hours to fully cure depending on humidity. -
Attach the magnet:
Once the clay is rock hard, flip the monster over. Apply a strong dab of super glue or heavy-duty craft glue to the back and press your magnet firmly into place. -
Bonus Cookie Magnet:
If you have leftover brown clay, make the little cookie friend! Flatten a brown ball, poke a hole in the center, texturize it, and add two tiny white eyes with black pupils.
Now your fridge has a colorful new guardian to hold up all your important notes
Leaf and Flower Nature Print Ornaments
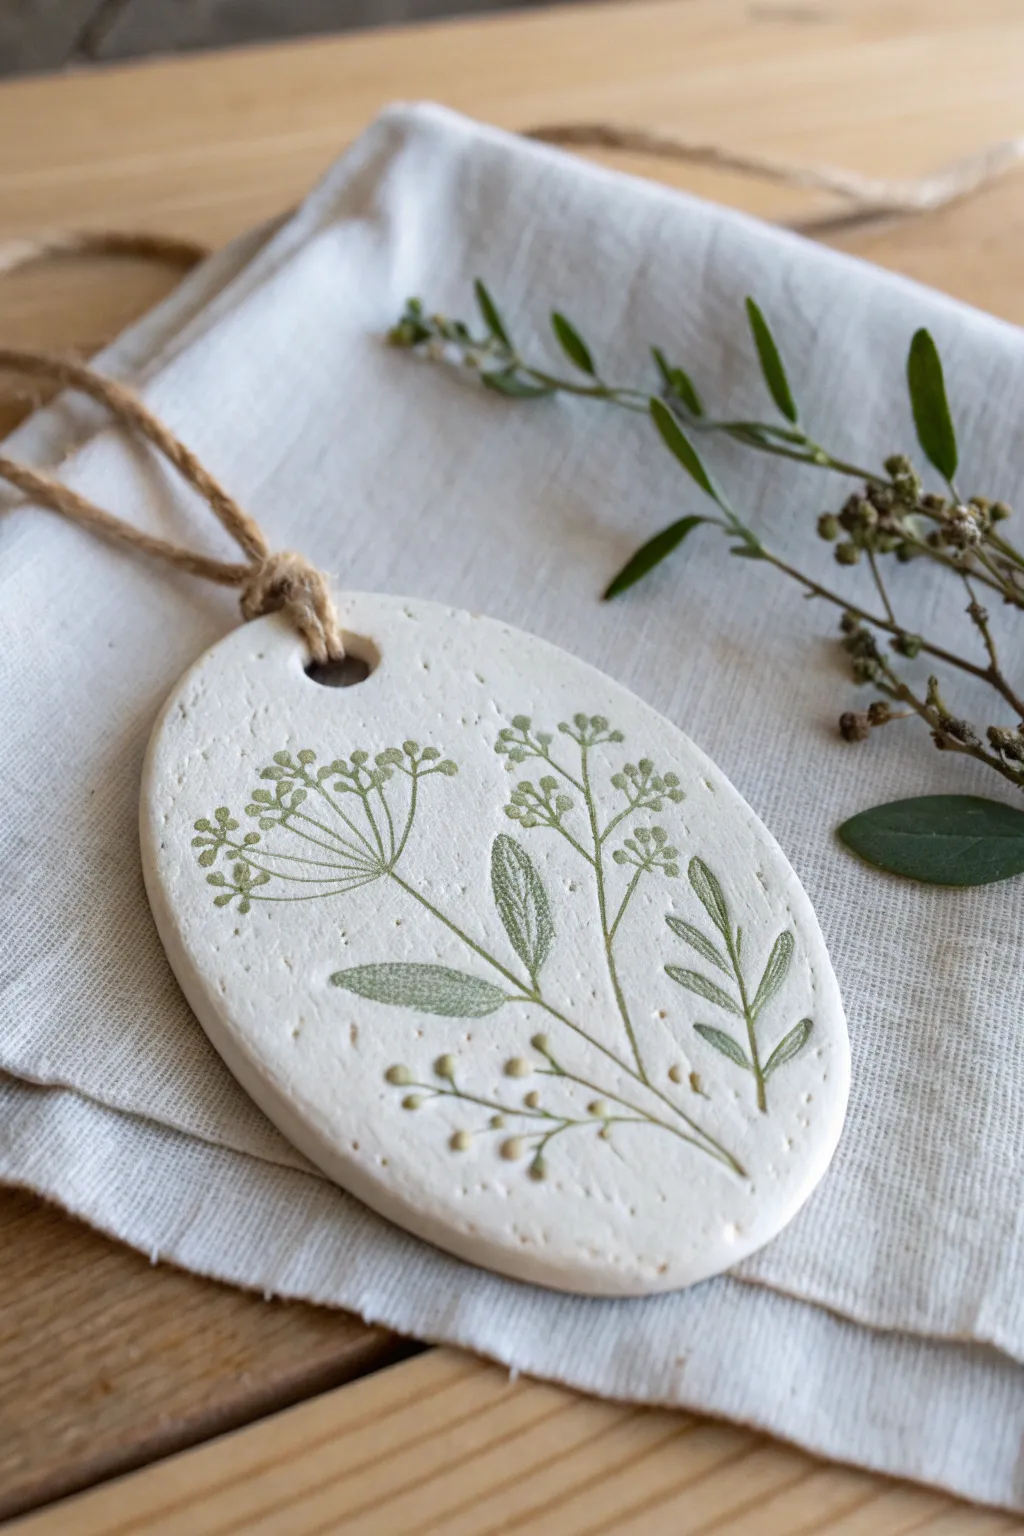
These elegant ornaments capture the delicate details of nature in white air dry clay, featuring subtle green prints of wildflowers and leaves. They make beautiful hanging decorations or charming gift tags that bring a touch of the outdoors inside.
Detailed Instructions
Materials
- White classic air dry clay
- Rolling pin
- Parchment paper or non-stick craft mat
- Oval cookie cutter (approx. 3-4 inches)
- Fresh wildflowers, weeds, or leafy stems (like Queen Anne’s Lace or grasses)
- Green acrylic paint (sage or moss green)
- Small foam sponge or flat paintbrush
- Straw or wooden skewer
- Jute twine
- Fine grit sandpaper (optional)
Step 1: Preparing the Clay Base
-
Condition the Clay:
Take a handful of air dry clay and warm it up in your hands by kneading it gently. This makes it pliable and prevents cracking. If it feels too stiff, just dip your fingers in a tiny bit of water. -
Roll it Out:
Place the clay on parchment paper to prevent sticking. Use your rolling pin to flatten the clay into an even slab, aiming for about 1/4 inch thickness. Consistent thickness helps it dry evenly without warping. -
Cut the Shape:
Press your oval cookie cutter firmly into the clay. Give it a little wiggle before lifting it up to ensure a clean cut. Remove the excess clay from around the shape and set it aside for another project. -
Smooth the Edges:
Dip your finger in a little water and run it gently around the cut edge of the oval to smooth out any roughness or loose bits of clay.
Fresh is Best
Use fresh, green leaves rather than dried ones. Dried leaves will crumble when you roll over them, leaving debris stuck in your clay instead of a clean print.
Step 2: Creating the Botanical Print
-
Select Your Botanicals:
Choose your fresh plant clippings. Lay them out on a scrap piece of paper first to arrange a composition you like. For this look, aim for a mix of delicate seed heads and simple leaves. -
Apply Paint to Plants:
Squeeze a small amount of sage green acrylic paint onto a palette or plate. Using a foam sponge or a flat brush, lightly dab paint onto the *front* side of your plant cutting. You want a thin, even coat—too much paint will create a globby print. -
Place the Botanical:
Carefully pick up the painted stem and place it paint-side down onto your clay oval. Once it touches the clay, try not to shift it sideways or the image will smear. -
Press for Impression:
Place a scrap piece of parchment paper over the botanical. Using your rolling pin, roll gently over the paper covering the plant. This presses the plant into the clay, transferring the paint and creating a slight texture simultaneously. -
Reveal the Print:
Lift the parchment paper, then carefully peel the plant stem off the clay. You should be left with a beautiful, stamped green impression. -
Add More details:
Repeat the painting and pressing process with smaller leaves or stems to fill in empty spaces, creating a balanced bouquet effect like the one in the photo. -
Add Texture (Optional):
If you want that rustic, speckled look seen in the image, you can lightly flick a stiff toothbrush with diluted brown paint over the surface, or gently prick random dots with a needle tool.
Step 3: Finishing Touches
-
Create the Hanging Hole:
While the clay is still wet, use a straw or a wooden skewer to punch a clear hole near the top of the oval. Make sure it’s not too close to the edge so the clay doesn’t break later. -
Let it Dry:
Place the ornament on a flat surface away from direct heat. Let it dry for at least 24-48 hours. I find flipping it over halfway through the drying time helps prevent the edges from curling up. -
Sand for Smoothness:
Once fully hard, check the edges again. If they feel sharp or rough, very lightly sand them with fine-grit sandpaper for a professional finish. -
Seal (Optional):
To protect the paint, you can brush on a coat of matte varnish or Mod Podge, though leaving it raw gives it a lovely natural stone texture. -
Attach the Hanger:
Cut a length of natural jute twine. Thread it through the hole and tie a simple loop knot at the top to complete your ornament.
Watercolor Effect
Instead of acrylic paint, press the bare leaves into the clay first, let it dry, and then wash diluted watercolors into the debossed grooves for a softer look.
Now you have a permanent piece of nature to display in your home or share with a friend


What Really Happens Inside the Kiln
Learn how time and temperature work together inside the kiln to transform clay into durable ceramic.
Name Initial Letter Charms
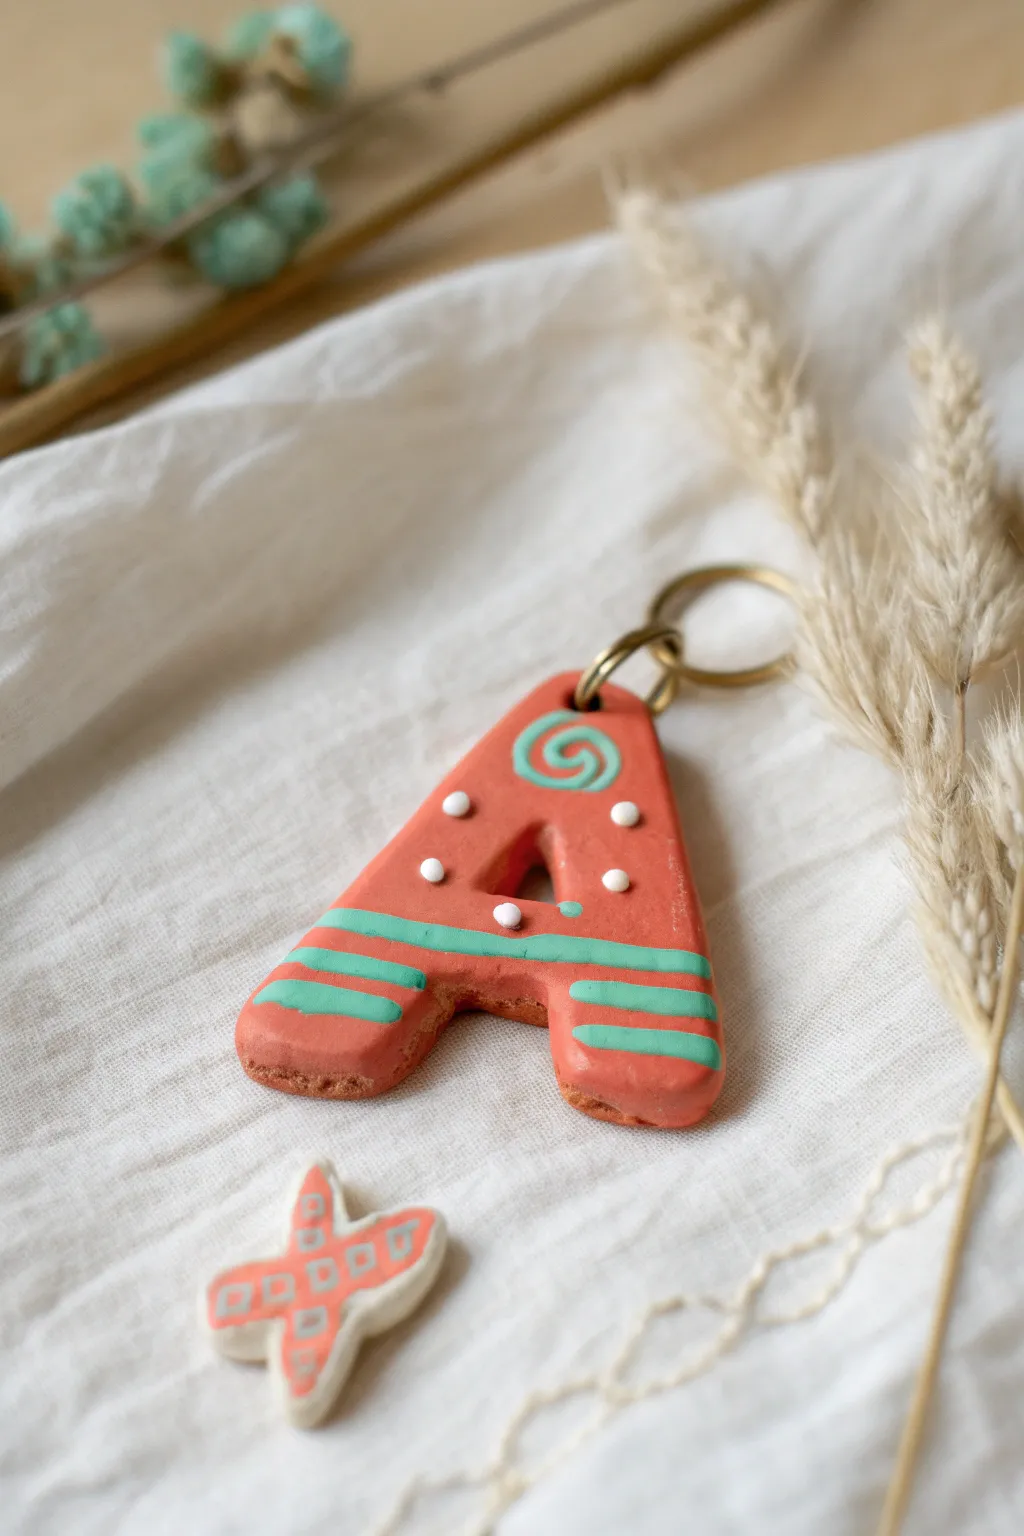
Create a personalized accessory that looks like it came from a boutique with this simple yet stylish initial charm. Using warm terracotta tones accented with teal and white, you’ll sculpt a chunky letter that makes for a perfect backpack tag or keychain gift.
Step-by-Step
Materials
- Air dry clay (white or terracotta)
- Acrylic paints (terracotta/coral pink, teal/mint green, white)
- Rolling pin
- Clay sculpting tools or a craft knife
- Sandpaper (fine grit)
- Fine detail paintbrush
- Jump ring and keyring hardware
- Water bonding slip (clay mixed with water)
- Gloss varnish or sealant (optional)
Step 1: Sculpting the Letter
-
Condition the clay:
Start by taking a chunk of air dry clay and kneading it in your hands until it is soft, pliable, and free of cracks. If it feels too dry, add a tiny drop of water. -
Roll out the slab:
Using a rolling pin, flatten the clay into an even slab. Aim for a thickness of about 1/4 inch (6mm) so the keychain is sturdy enough to handle daily use without breaking. -
Cut the Initial:
You can either freehand cut your letter with a craft knife or lightly trace a stencil onto the clay first. Cut out the outline of your chosen letter, ensuring the lines are clean. -
Cut the inner details:
For letters with inner holes like ‘A’, ‘B’, or ‘O’, carefully use a small tool or knife to remove the center clay. -
Smooth the edges:
Dip your finger in a little water and run it along the cut edges of the fresh clay to smooth out any sharpness or roughness from the knife. -
Create the hole:
Before the clay dries, use a straw or a sculpting tool to poke a hole at the top of the letter. Make sure it’s not too close to the edge, or the clay might snap later. -
Dry completely:
Place the letter on a flat surface to dry. Turn it over halfway through the drying process to prevent warping. This usually takes 24-48 hours depending on humidity.
Too brittle?
If your dried clay snaps while drilling or sanding, it was likely too thin. Next time, keep your slab at least 6-8mm thick for better durability.
Step 2: Painting & Decoration
-
Sand imperfections:
Once bone dry, take a piece of fine-grit sandpaper and gently buff the edges and surface to create a super smooth canvas for your paint. -
Base coat:
Paint the entire letter, including the sides and back, with the terracotta or coral pink acrylic paint. You might need two coats for full opacity; let the first coat dry before adding the second. -
Paint the stripes:
Using a fine detail brush and your teal paint, carefully draw horizontal stripes across the bottom legs of the letter. I find resting my wrist on the table helps keep the lines steady. -
Add the swirl:
With the same teal paint, add a small, decorative spiral or swirl at the top corner of the letter. -
Dotted details:
Dip the back end of your paintbrush (the non-bristle side) into white paint. Gently dot it onto the letter to create perfect little white circles around the center hole. -
Dry and seal:
Allow all paint to dry completely. Apply a coat of gloss varnish or sealant to protect the paint from scratching and to give it a finished sheen. -
Assembly:
Open a jump ring with pliers, slide it through the hole in the clay, and attach your keyring hardware. Close the jump ring securely
Level Up: Texture
Before drying, gently press a piece of lace or a textured rolling pin onto the clay surface to add an embossed pattern before you even start painting.
Now you have a charming custom initial ready to organize your keys or decorate a bag
Mini Trinket Dishes for Tiny Treasures
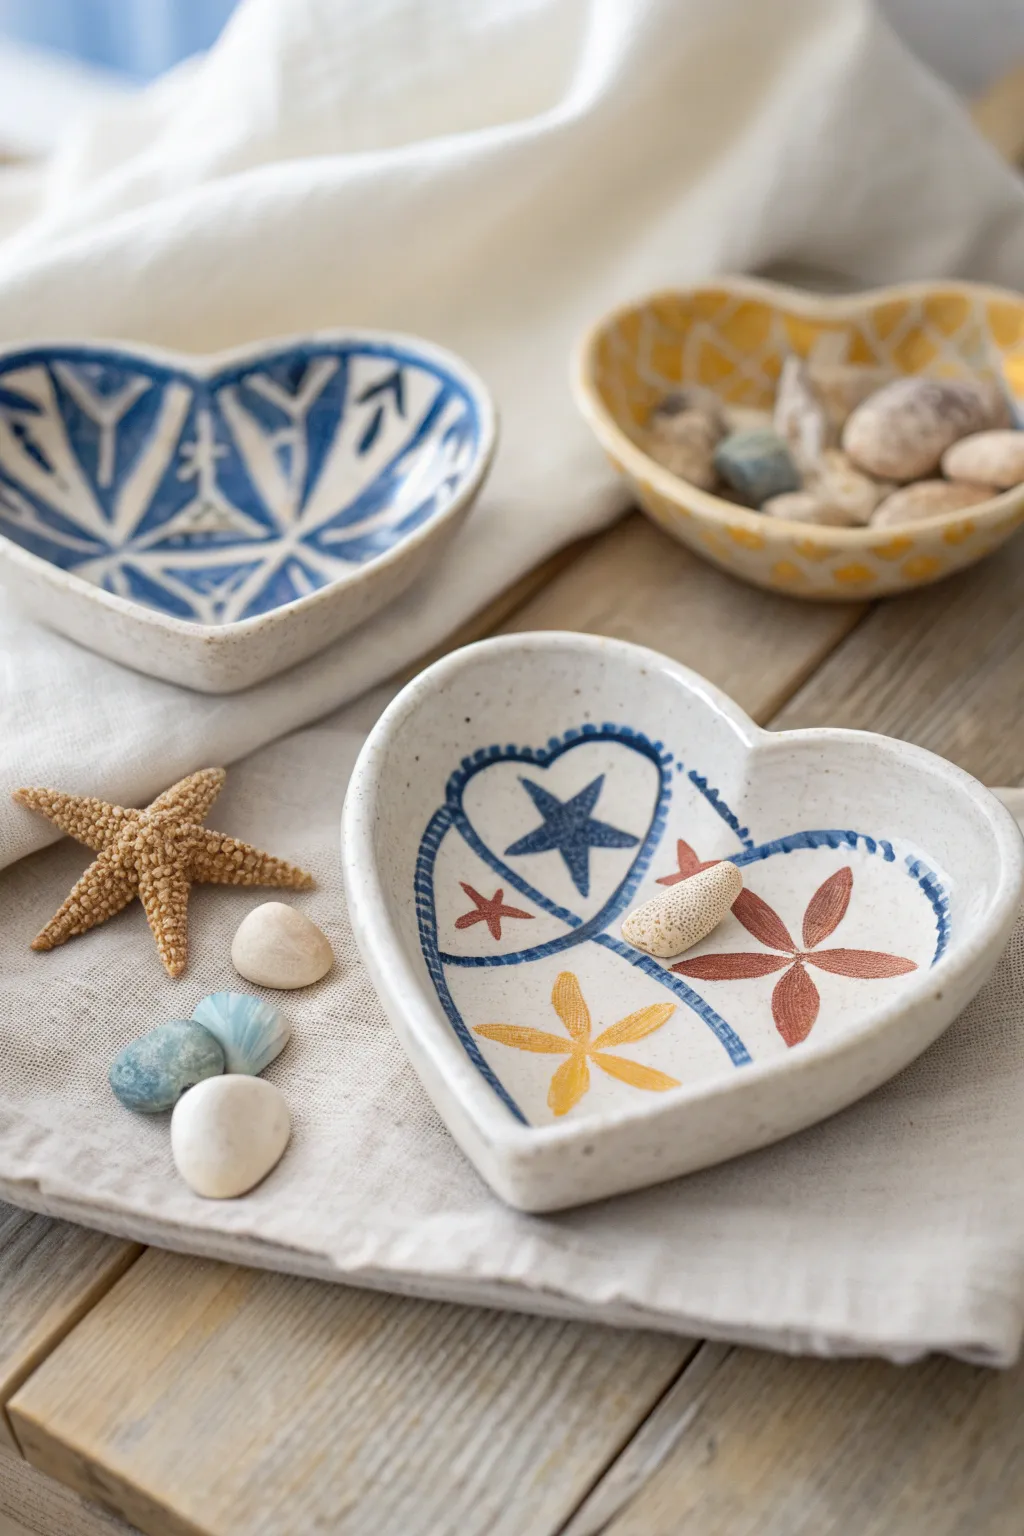
Capture the magic of a beach day with these adorable heart-shaped bowls, perfect for holding small treasures like sea glass or rings. The speckled clay look combined with simple, hand-painted nautical motifs gives them a lovely artisanal charm that’s surprisingly easy to achieve.
How-To Guide
Materials
- White or natural air-dry clay
- Rolling pin
- Heart-shaped cookie cutter (large) or paper template
- Small bowl of water
- Sandpaper (fine grit)
- Acrylic paints (navy blue, mustard yellow, reddish-brown)
- Fine-tipped paintbrush
- Matte or glossy varnish (optional)
- Toothbrush (for speckling)
- Brown watercolor paint (watered down)
Step 1: Shaping the Clay
-
Roll the slab:
Begin by taking a handful of air-dry clay and kneading it until soft. Roll it out on a smooth surface to an even thickness of about 1/4 inch. -
Cut the heart:
Press a large heart-shaped cookie cutter firmly into the clay. If you don’t have a cutter, place a paper template on top and trace around it with a craft knife. -
Soften edges:
Dip your finger in a little water and gently run it along the cut edges of the heart to smooth out any roughness or sharp corners. -
Curve the form:
To give the dish its bowl shape, gently pinch and lift the edges of the heart upwards. You can cup the clay in your palm to help mold the curve. -
Refine the rim:
Work your way around the rim, pressing and smoothing with wet fingers until the walls stand up slightly and look uniform. -
Dry completely:
Set the dish aside in a safe spot to dry. Depending on humidity, this usually takes 24-48 hours. Flip it occasionally to ensure the bottom dries evenly. -
Sand for smoothness:
Once fully hard and white, use fine-grit sandpaper to buff away any uneven spots on the rim or surface, wiping away the dust with a barely damp cloth.
Crack Control
If small cracks appear while drying, don’t restart! Mix a tiny bit of fresh clay with water to make a paste and smooth it into the cracks, then let dry again.
Step 2: Adding the Faux-Ceramic Finish
-
Create the speckles:
To mimic the look of speckled stoneware clay shown in the photo, dilute a tiny drop of brown paint with water. Dip an old toothbrush into it and flick the bristles with your thumb to spray tiny dots over the dried white clay. -
Outline the interior:
Using a very fine brush and navy blue acrylic paint, paint a smaller heart shape inside the bowl. Instead of a solid line, use small dashes to create a stitched effect. -
Divide the space:
Using the same dashed blue line style, draw a line from the dip of the inner heart straight down to the point, creating distinct sections for your designs. -
Paint the blue star:
In the top section of the heart, paint a simple five-pointed star using the navy blue paint. I find it easiest to paint a ‘V’ shape first for the top points. -
Add the yellow sun:
In the bottom-left section, paint a five-pointed shape using mustard yellow paint. Make these arms thinner and longer, resembling a splashing sun or sea urchin. -
Create the floral star:
In the remaining section, use reddish-brown paint to create a geometric flower or sand dollar design. Paint four elongated loops that meet in the center. -
Add tiny details:
If you are feeling steady, add tiny red stars or dots in the empty spaces to balance the composition. -
Seal the piece:
Allow the paint to dry completely. For protection and a finished look, apply a coat of matte or glossy varnish over the entire dish.
Texture Twist
Before curving the sides up, press a piece of lace or burlap into the wet clay slab. This leaves a beautiful imprinted texture on the bottom of your dish.
These sweet little hearts make wonderful handmade gifts for friends or hold your own special beach finds on a sunny windowsill

TRACK YOUR CERAMIC JOURNEY
Capture glaze tests, firing details, and creative progress—all in one simple printable. Make your projects easier to repeat and improve.
Coil Snakes and Spiral Critters
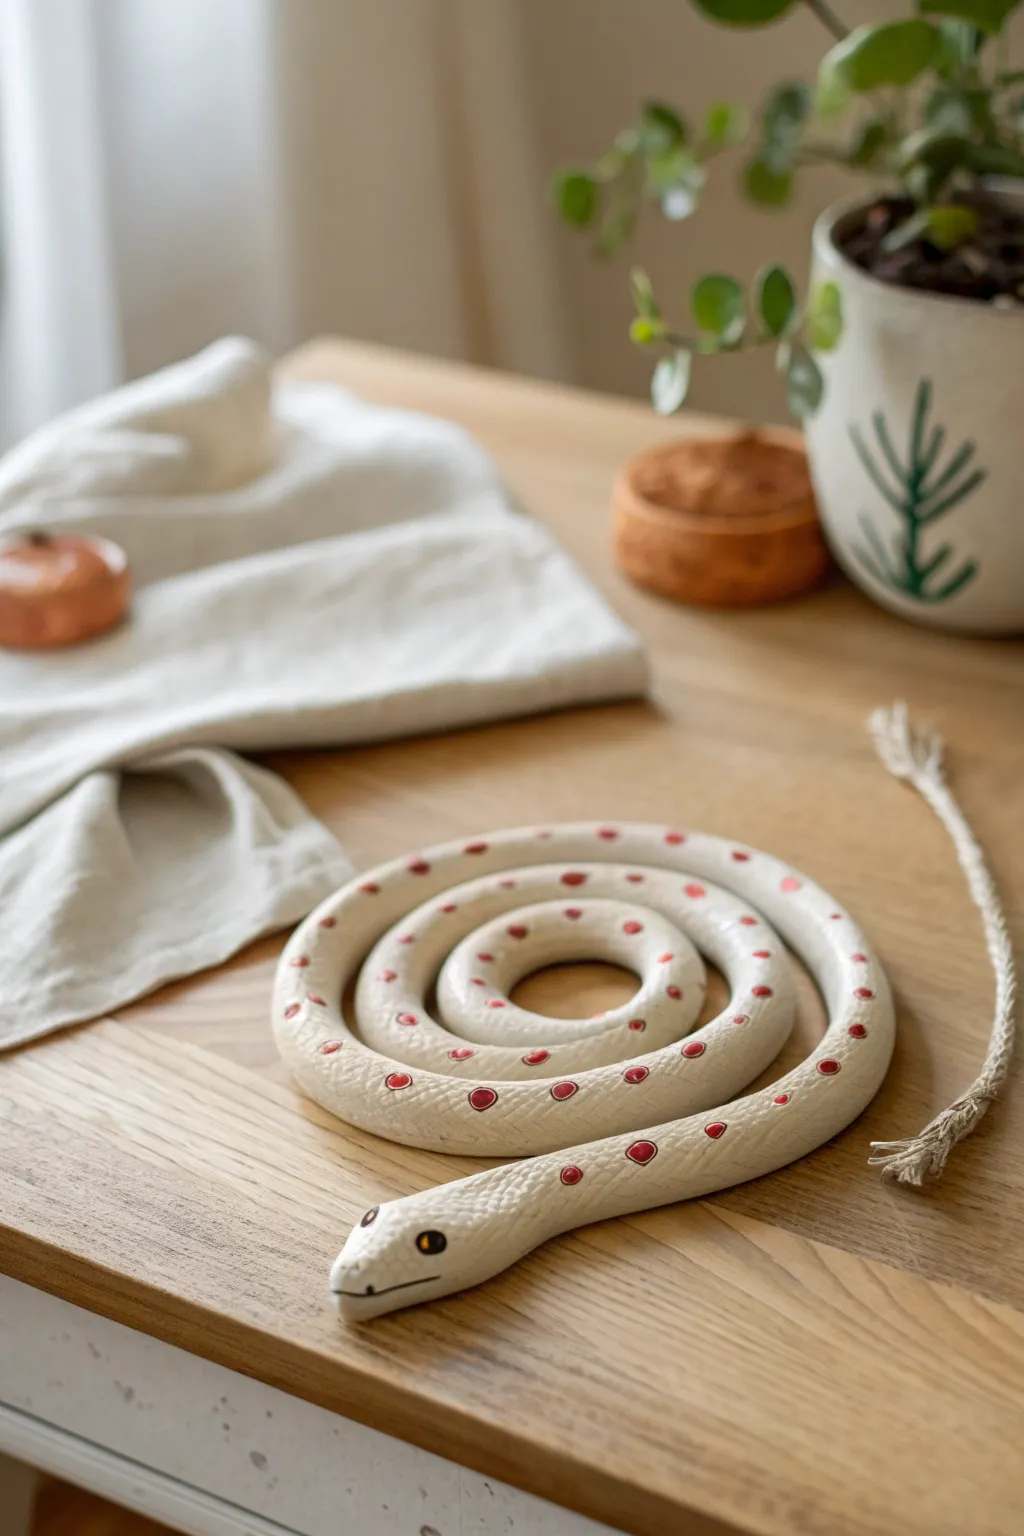
Transform a simple rope of air dry clay into a charming, stylized serpent with this classic coil technique. This project results in a smooth, creamy-white snake decorated with playful red spots and distinct yellow eyes, perfect for a desk companion or shelf decoration.
Step-by-Step Tutorial
Materials
- White polymer clay or air dry clay (smooth finish)
- Acrylic paints (Red, Yellow, Black)
- Fine detail paintbrush (size 0 or 1)
- Small round sculpting tool or ball stylus
- Rolling pin or smooth surface for rolling
- Cup of water (for smoothing)
- Gloss or matte varnish (optional)
Step 1: Forming the Body
-
Prepare the Clay:
Start with a large handful of white air dry clay. Knead it thoroughly in your hands until it becomes warm, pliable, and free of any cracks. -
Roll the Cylinder:
Place the clay on a clean, flat surface. Using the palms of your hands, begin rolling the clay back and forth to create a long, sausage-like cylinder. -
Elongate the Coil:
Continue rolling outward from the center towards the ends. You want a consistent thickness of about 3/4 of an inch along the entire length. -
Taper the Tail:
As you reach one end of the coil, apply slightly more pressure to taper it into a gentle point. This will be the snake’s tail. -
Form the Head:
Leave the other end slightly thicker and blunted. Gently flatten this end into a rounded diamond shape to distinguish the head from the body. -
Texture the Skin:
Before coiling, if you want a subtle scale texture like the photo, gently press a piece of textured fabric or a mesh bag against the surface, or leave it smooth for a modern look.
Keep it Smooth
If your clay starts cracking while rolling the long coil, wet your hands slightly. Too much water makes slime, but just damp hands act like a soothing balm for the clay.
Step 2: Shaping the Pose
-
Begin the Coil:
Take the tapered tail end and curl it inward tight to start the spiral. Lay this flat on your workspace. -
Wrap the Body:
Gently wrap the rest of the long clay rope around this center point. Keep the coils close together but not fused completely; you want to see the separation lines. -
Position the Head:
When you reach the head, don’t press it into the spiral. Instead, extend it slightly outward and rest it on the table surface, looking forward. -
Refine the Shape:
Smooth out any fingerprints using a tiny drop of water on your finger. Check that the snake lies flat and the head is lifted just enough to have character. -
Add Facial Features:
Using a sculpting tool or a dull pencil, gently carve a thin horizontal line for the mouth around the front of the snout.
Make it a Rattler
Before the clay dries, enclose a small geometric bead or dried bean inside the hollow of the tail coil. It won’t be loud, but it adds a fun hidden sensory element.
Step 3: Drying and Decoration
-
Dry Completely:
Let the sculpture sit undisturbed. I usually recommend at least 24-48 hours for a coil of this thickness to ensure the center is fully hardened. -
Map the Spots:
Once dry, identify where you want your spots. The snake in the image features a single row of evenly spaced dots running down the spine. -
Paint the Spots:
Dip a fine round brush into red acrylic paint. Carefully dab circular spots along the top center of the coil, spacing them about an inch apart. -
Paint the Eyes:
Paint two small ovals on the sides of the head using yellow ochre or gold paint. -
Add Eye Pupils:
Once the yellow is dry, use the very tip of your smallest brush to add a black vertical slit or round dot for the pupil. -
Highlight the Eyes:
For extra life, add a tiny white speck to the black pupil to simulate a reflection. -
Seal the Work:
Protect your painting by applying a thin coat of varnish over the entire snake. A satin or matte finish looks most natural.
Now you have a friendly clay companion ready to guard your desk treasures
Butterflies With Texture Stamps
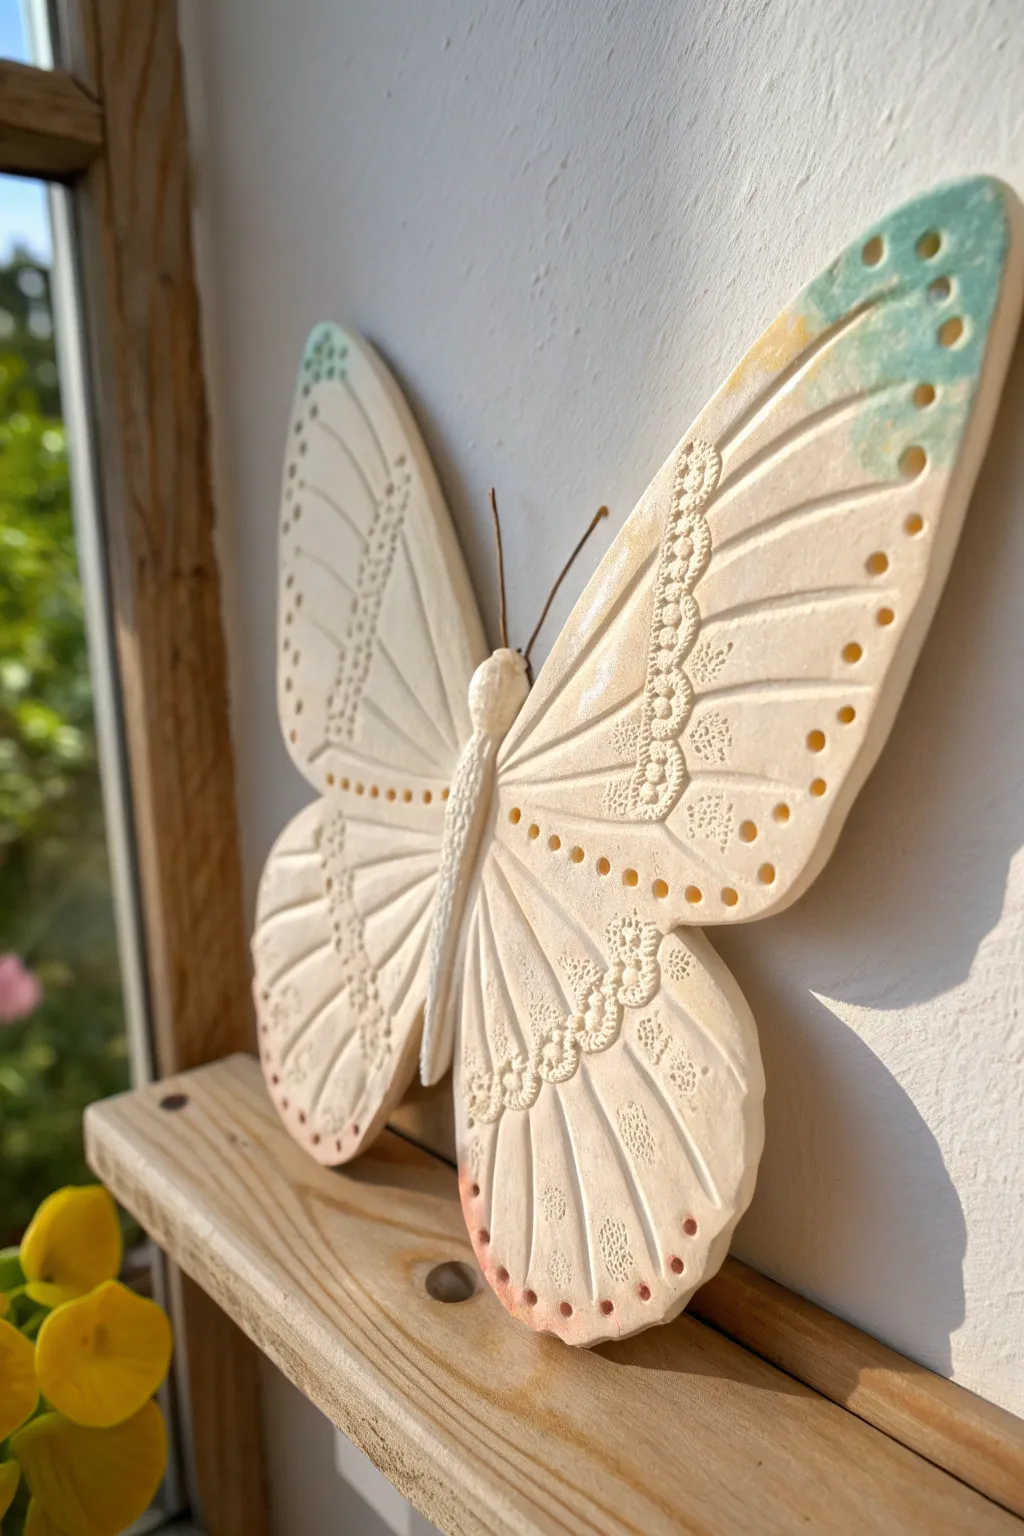
These delicate clay butterflies capture the whimsical beauty of nature with intricate textures created by simple household items. The soft, pastel watercolors add a dreamy finish, making them perfect for brightening up a window ledge or bookshelf.
Detailed Instructions
Materials
- White air-dry clay or polymer clay
- Rolling pin
- Butterfly wing template (paper or card)
- Small lace doily or textured trim
- Modeling tool or butter knife
- Thin floral wire or jewelry wire (brown or copper)
- Watercolor paints or diluted acrylics (Teal, Yellow, Pink)
- Small round paintbrush
- Parchment paper or wax paper
- Small cup of water
Step 1: Shaping the Wings
-
Roll the clay:
Start by kneading a ball of white air-dry clay to soften it. Roll it out on a non-stick surface or parchment paper until it is about 1/4 inch thick. You want it smooth and even, without being too thin or fragile. -
Cut the outline:
Place your butterfly template on the clay. Carefully trace around the wings with a modeling tool or knife to cut out the basic shape, then smooth any rough edges with a damp finger. -
Separate the wings:
Gently cut the butterfly shape in half vertically down the center so you have two separate wings. This allows us to angle them later for a more dimensional look.
Step 2: Adding Texture
-
Create the lace pattern:
Take a piece of lace trim or a doily and press it firmly into the clay running vertically down the center of each wing. Lift it carefully to reveal the detailed impression. -
Add veining details:
Using a modeling tool or a toothpick, draw long, curved lines radiating from the center of the wing outward toward the edges to mimic veins. Press deeply enough to see the lines but not so hard that you cut through. -
Punch decorative holes:
Use the blunt end of a small paintbrush or a dedicated dotting tool to press a row of circular indentations along the outer edge of both wings. I like to vary the sizes slightly for a natural look. -
Texture the body:
Roll a small, separate snake of clay for the butterfly’s body. Use a tool to press tiny dents or cross-hatch marks into it to give it texture, resembling a thorax and abdomen.
Stamp Master
Don’t have lace? Use the caps of markers, bottoms of patterned glasses, or even leaves from the garden to press unique textures into your clay wings.
Step 3: Assembly and Painting
-
Pre-drying assembly:
While the clay is still wet, gently press the two wings onto the back of the textured body piece. Prop up the wings with crumpled paper towels or sponges so they dry at an upward angle rather than lying flat. -
Insert antennae:
Cut two short pieces of thin wire (about 1.5 inches long). Carefully push them into the top of the head area while the clay is soft. If the clay is too dry, you can glue them later, but inserting them now is sturdier. -
Dry completely:
Let the butterfly sit undisturbed for 24-48 hours. The thicker parts, especially where the wings join the body, need plenty of time to harden fully. -
Prepare the wash:
Mix your watercolor paints or dilute acrylics with plenty of water. You want a very sheer, transparent consistency to let the white clay show through. -
Paint the wing tips:
Dip your brush in the teal wash and lightly dab just the upper outer corner of the right wing and the left wing tip. Let the color fade naturally as you move inward. -
Add warmth:
Clean your brush and pick up the yellow wash. Apply this near the teal sections but slightly lower, blending the edges softly where they might meet. -
tint the bottom:
Apply a touch of diluted pink to the very bottom edges of the lower wings. The color should be subtle, looking almost like a blush on the clay. -
Seal (Optional):
If you want to protect the paint, apply a very light coat of matte varnish once the paint is bone dry. This is helpful if the butterfly will be handled often.
Make it Sparkle
While the paint is still wet, sprinkle a tiny pinch of superfine iridescent glitter over the textured lace area to mimic the shimmer of real butterfly scales.
Once dry, you can attach a small hook or magnet to the back to display your creation anywhere you like
Story Stones for Make-Believe Games
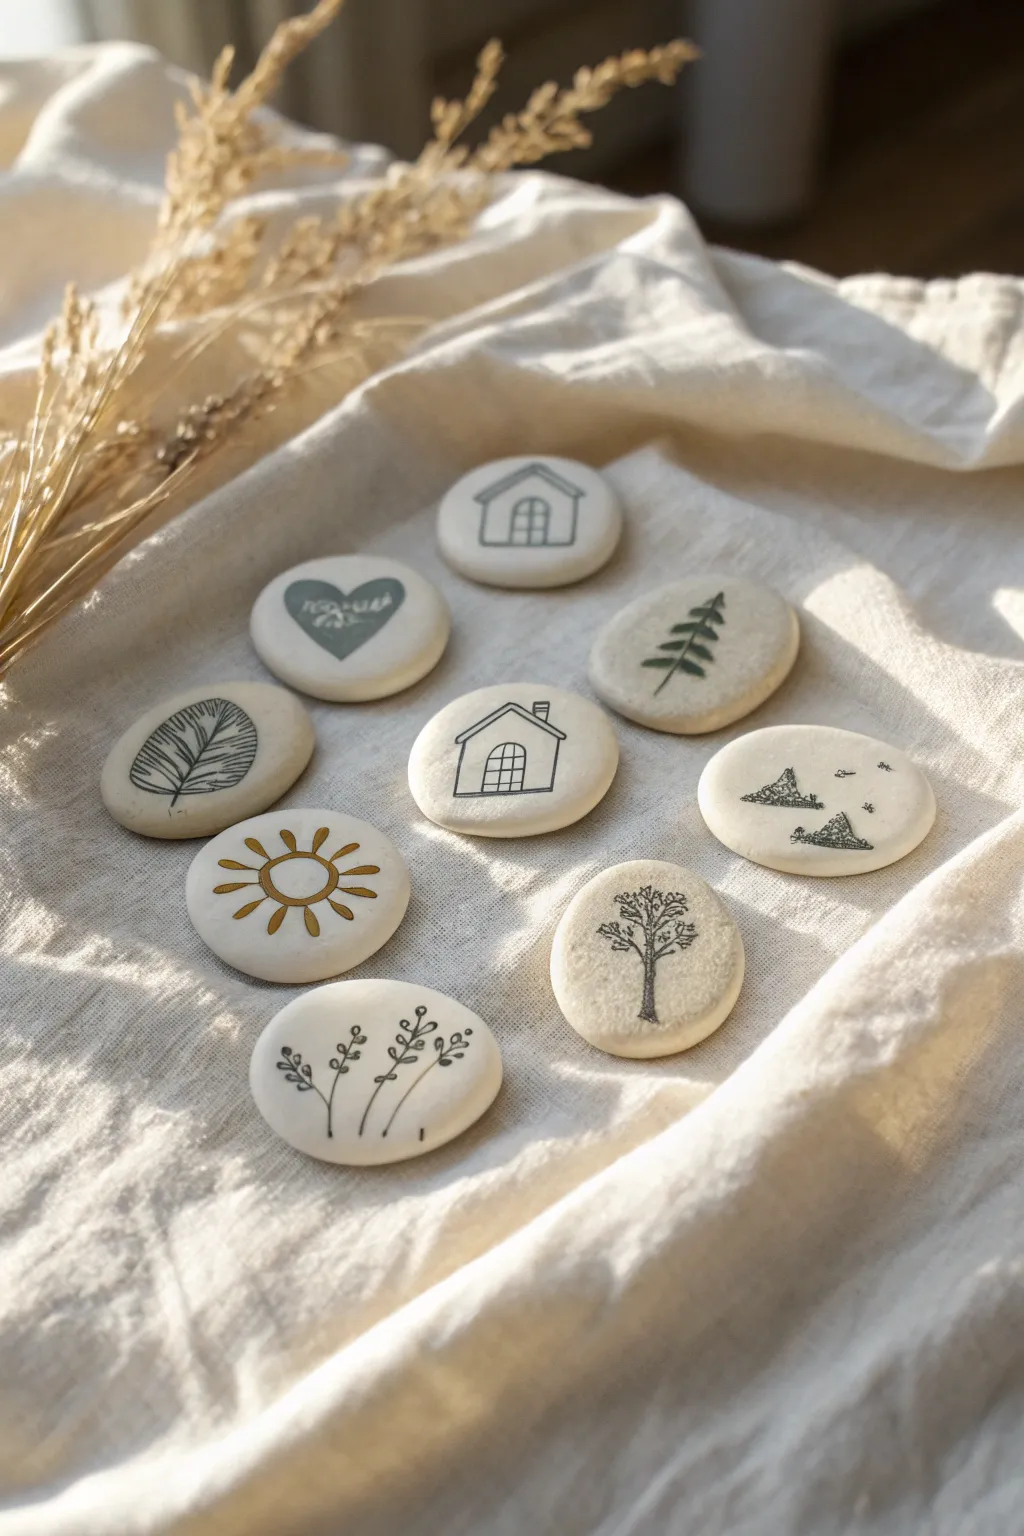
These charming, smooth story stones are perfect for sparking imagination and creating endless fairy tales with your little ones. Made from simple air-dry clay and decorated with minimalist nature motifs, they have a lovely, organic feel that fits perfectly in small hands.
Step-by-Step Tutorial
Materials
- White smooth air-dry clay (e.g., DAS or Crayola)
- Small rolling pin or smooth glass jar
- Round cookie cutter (approx. 2 inches) or a small glass
- Fine grit sandpaper (optional)
- Black fine-liner pens (permanent and water-resistant)
- Gold or metallic marker pens (for sun/details)
- Sage green marker or acrylic paint pen
- Small bowl of water
- Parchment paper or non-stick mat
- Matte spray varnish or Mod Podge (for sealing)
Step 1: Shaping the Stones
-
Condition the Clay:
Begin by taking a handful of white air-dry clay. Knead it in your hands for a minute or two until it becomes soft, pliable, and free of cracks. -
Roll Out the Slab:
Place the clay on a piece of parchment paper to prevent sticking. Use a rolling pin to flatten the clay to a uniform thickness of about 1/4 to 1/2 inch. You want them thick enough to feel like real stones. -
Cut the Shapes:
Use your round cookie cutter or the rim of a small glass to cut out circles. For a more organic, stone-like look, you can also just roll balls of clay and flatten them with your palm. -
Soften the Edges:
Dip your finger into a small bowl of water and gently run it around the cut edges of each circle. This smooths out any harsh lines or ragged bits left by the cutter. -
Create Variations:
While most should be round, feel free to gently squeeze a few into slight ovals to mimic natural river rocks. The diversity makes the set look more authentic. -
Let Them Dry:
Arrange the clay stones on a flat surface away from direct heat. Let them dry completely, which usually takes 24-48 hours depending on humidity. Flip them over halfway through to ensure the bottom dries evenly.
Step 2: Refining and Drawing
-
Sand for Smoothness:
Once bone dry, check the surfaces. If there are any bumps or fingerprints, lightly buff them away with fine-grit sandpaper until the surface is silky smooth. -
Sketch the Designs:
Before committing to ink, you might want to lightly sketch your designs with a pencil. Plan a mix of nature elements: a simple house, a sun, a leaf, a tree, mountains, and wild grasses. -
Draw the Outlines:
Using a fine-tip black permanent marker, carefully trace over your pencil lines. Keep the style simple and illustrative—think storybook sketches. -
Add Green Accents:
Select a muted sage green marker or paint pen. Color in specific elements like the heart shape or the pine tree. The limited color palette keeps the set looking cohesive and modern. -
Add Gold Details:
Use a gold metallic marker to draw the sun stone. I also like to add tiny gold dots or accents to the other stones for a bit of magical shimmer. -
Create Texture:
For the tree and leaf designs, use short, precise strokes to mimic veins and bark. Don’t worry about perfection; shaky lines add character. -
Let Ink Set:
Allow the ink to dry completely for at least an hour to prevent smearing during the sealing process.
Pro Tip: Weight Tricks
Want them to feel like real rocks? Press a small, clean pebble into the center of your clay ball before flattening it. This adds a satisfying weight to the finished piece.
Step 3: Finishing Touches
-
Seal the Artwork:
To protect your drawings from fading or smudging during play, apply a thin coat of matte varnish or clear sealant. A spray works best to avoid dragging the ink. -
Dry and Cure:
Let the sealant dry according to the manufacturer’s instructions. Once cured, your story stones are ready for their first adventure.
Troubleshooting: Curling Edges
If your clay circles start curling up at the edges while drying, place a lightweight book or board on top of them (sandwiching them between parchment paper) to keep them flat.
Gather your finished stones in a small cloth bag and watch as new stories unfold with every draw
Mini Dino Figures From Basic Shapes
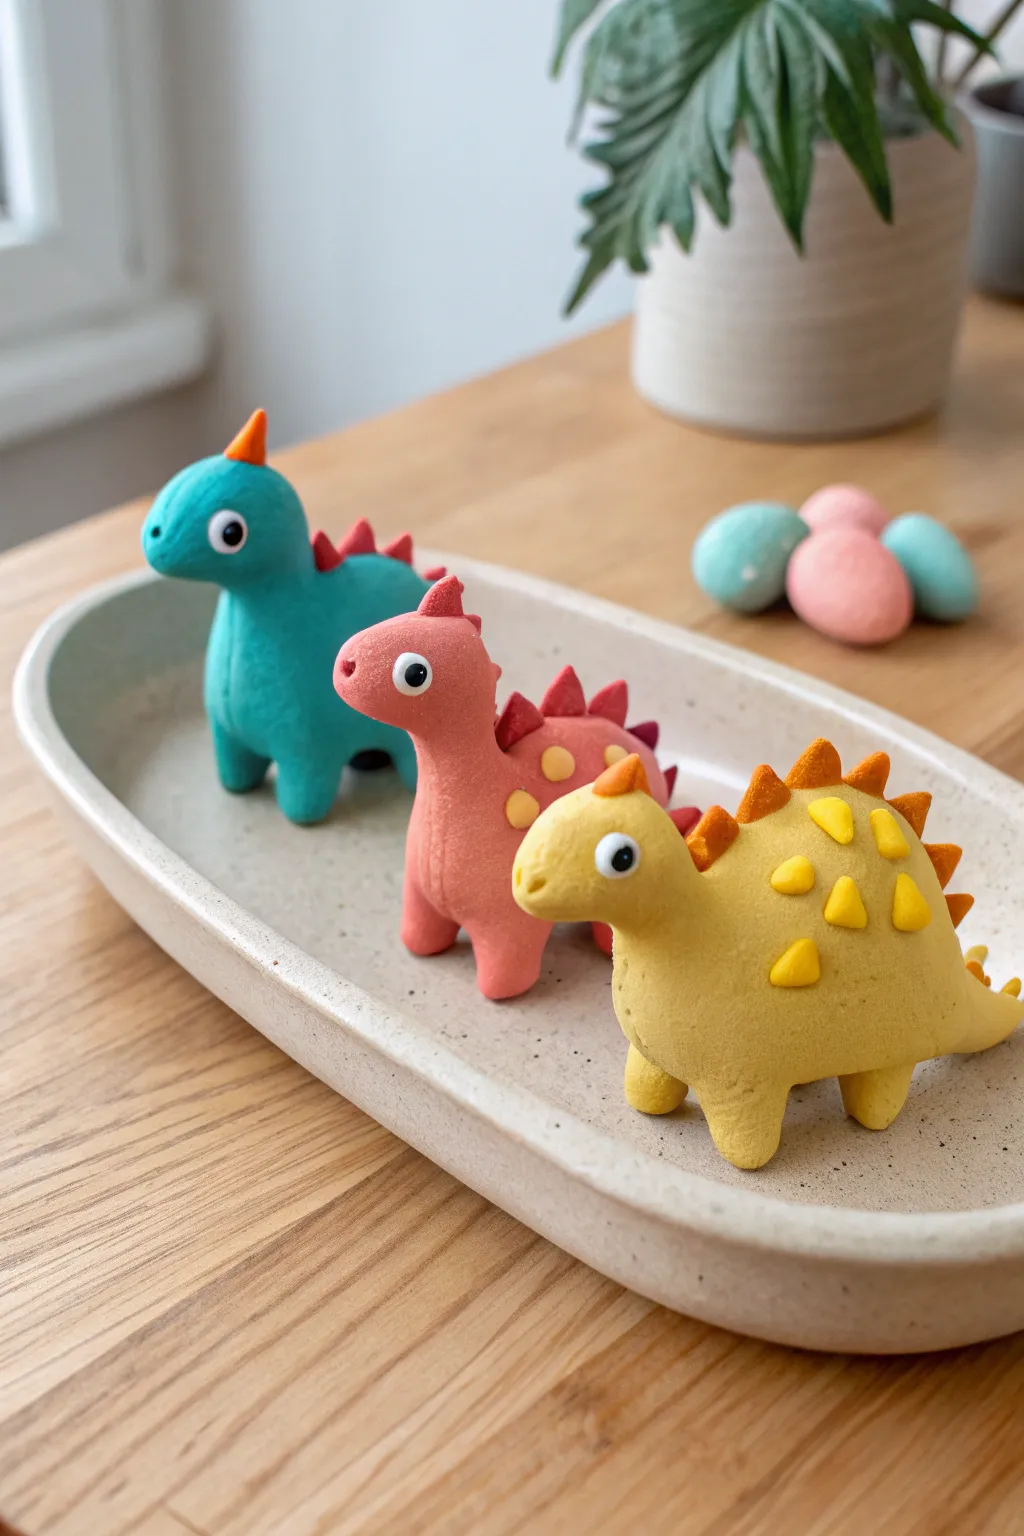
These adorable mini dinosaur figures prove that you don’t need complex sculpting tools to create something magical. With their soft, matte finish and simple geometric spikes, they make perfect desk buddies or play figures for young paleontologists.
Step-by-Step Guide
Materials
- Air dry clay (teal, coral pink, mustard yellow, orange, red, white, black)
- Clay sculpting tools (basic plastic knife or needle tool)
- Small rolling pin
- Water in a small cup
- Parchment paper or silicone mat
- Toothpick (optional, for internal support)
Step 1: Forming the Body Bases
-
Create the teal dino body:
Start with a golf-ball-sized amount of teal clay. Roll it into a smooth ball, then gently elongate one side into a teardrop shape for the tail, and pill the other side up into a thick neck. -
Create the pink dino body:
Repeat the process with coral pink clay, aiming for a slightly shorter, steeper neck shape than the teal one. Keep the bodies plump and rounded. -
Create the yellow dino body:
For the yellow stegosaurus-style dino, roll a larger oval shape. Instead of a vertical neck, pull the head forward horizontally so the body stays low and long. -
Smooth the surfaces:
Dip your finger in a tiny bit of water and gently rub away any fingerprints or cracks on all three body shapes until they look seamless.
Collapsing Neck?
If the long necks droop while working, insert half a toothpick into the body and slide the neck clay over it for an invisible internal skeleton.
Step 2: Adding Legs and Heads
-
Attach chubby legs:
Roll four small, equal cylinders for each dinosaur. Press them firmly onto the underside of the bodies, blending the clay seams upward with your finger or a plastic tool. -
Check stability:
Stand each figure up on your work surface. If they tip over, gently tap them down to flatten the bottoms of the feet slightly. -
Refine the heads:
For the teal and pink dinos, shape a rounded knob at the top of the neck. For the yellow one, ensure the front snout is somewhat pointed but blunt. -
Indent the nostrils:
Use a small ball tool or the tip of a paintbrush handle to press two tiny nostrils into the front of each snout.
Step 3: Spikes and Scales
-
Make the coral spikes:
Take tiny bits of red or dark coral clay. Pinch them into small triangles. Attach these running down the back of the pink dinosaur. -
Add side details:
Roll tiny yellow balls, flatten them into discs, and press them onto the sides of the pink dinosaur for spots. -
Create teal dino spikes:
Use orange clay to make a single horn for the nose and a row of small triangular spikes running from the back of the head down to the tail. -
Design the stegosaurus plates:
For the yellow dino, mix orange and yellow clay to get a two-tone effect. Create numerous triangle plates and press them in two staggered rows along the spine. -
Secure the attachments:
I always use a tiny dab of water like glue when attaching these small spikes to ensure they don’t fall off once dry.
Texture Trick
To get the soft, matte look shown in the photo, lightly dust your finished (but still wet) clay with cornstarch using a fluffy makeup brush.
Step 4: The Finishing Touches
-
Make the eyes:
Roll tiny spheres of white clay and press them flat onto the sides of the heads. Add even tighter pupils made of black clay to the center of each white circle. -
Add highlight reflection:
For that extra cute factor, place a microscopic dot of white clay onto the black pupil to simulate a light reflection. -
Final smooth:
Give the figures one last look over, smoothing any accidental dents created while attaching the spikes. -
Dry completely:
Let the dinosaurs sit undisturbed on parchment paper for at least 24-48 hours. Turn them over gently halfway through if the bottoms feel damp.
Now you have a trio of prehistoric friends ready for a miniature adventure
Painted Texture Tiles for Kids’ Rooms
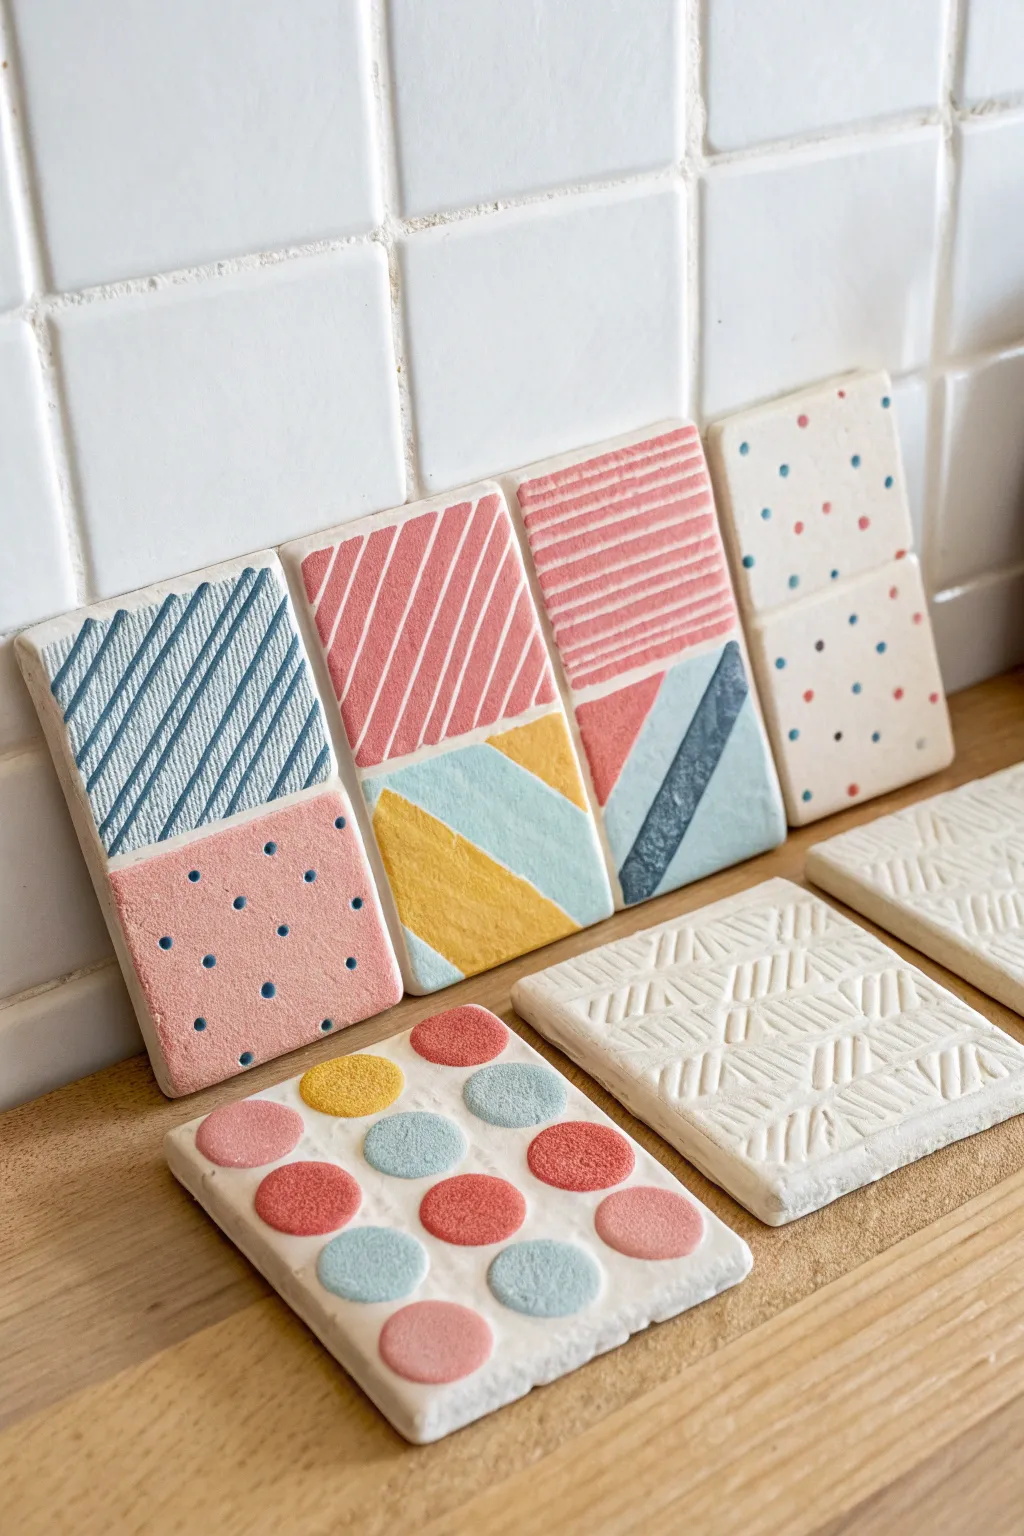
These charming, modern tiles turn simple air dry clay into a canvas for patterns and color. With raised circles, etched stripes, and bold painted blocks, they make perfect wall decor or coasters for a kid’s room.
Detailed Instructions
Materials
- White polymer clay or air dry clay (smooth finish)
- Clay roller or rolling pin
- Square cookie cutter or ruler and knife
- Modeling tools (or household items like forks, toothpicks)
- Small round cutter (for circle details)
- Acrylic paints (pastel pink, teal, yellow, dark blue, coral)
- Fine-grit sandpaper
- Small flat paintbrush
- Detail paintbrush
- Matte sealant or varnish
Step 1: Shaping the Base
-
Prepare the Clay:
Start by conditioning your clay. If using polymer, knead it until warm and pliable. If using air dry clay, take a chunk out of the package and knead it briefly to remove air bubbles. -
Roll It Out:
Roll the clay onto a clean, flat surface to a uniform thickness of about 1/4 inch. Using depth guides or two stacks of playing cards on either side can help you get an even surface. -
Cut the Squares:
Using a square cookie cutter or a sharp knife with a ruler, cut out four identical squares. Gently smooth the edges with your finger to remove any sharp burrs.
Fixing the Curl
If your air-dry clay tiles start curling up at the corners while drying, gently weigh them down with a heavy book placed on top of a sheet of parchment paper.
Step 2: Creating Texture
-
Diagonal Etching:
For the first tile, use a modeling tool or a dull knife to gently score diagonal lines across the top half. Don’t cut all the way through; just create visible grooves. -
Indented Dots:
On the bottom section of that same tile, use the rounded end of a paintbrush handle to press small, evenly spaced divots into the clay. -
Raised Circles:
For the circle-patterned tile, roll out a separate, thinner piece of clay. Use a small round cutter to punch out roughly 12 circles. -
Attaching Details:
Score the back of each small circle and the surface of the square tile. Dab a tiny bit of water (for air dry clay) or liquid clay (for polymer) on the scored areas and press the circles firmly onto the square in a grid pattern. -
Linear Patterns:
On another tile, create horizontal stripes by pressing the side of a ruler into the clay repeatedly on the top half.
Magnetic Personality
Turn these art pieces into functional decor by glueing strong craft magnets to the back once they are fully dry and sealed.
Step 3: Drying and Refining
-
Let It Dry:
Allow your air dry clay tiles to dry completely for 24-48 hours. Turn them over occasionally to prevent warping. If using polymer clay, bake according to the package instructions. -
Sand the Edges:
Once fully cured or dry, use fine-grit sandpaper to gently smooth the outer edges and corners of the tiles for a professional finish. -
Clean the Surface:
Wipe away any clay dust with a slightly damp cloth or a dry soft brush before you start painting.
Step 4: Adding Color
-
Painting Grooves:
For the etched textures, like the diagonal lines, dip a fine brush in slightly watered-down paint (teal or coral). Run the paint into the grooves, wiping away excess from the surface if needed. -
Block Painting:
Use a small flat brush to paint solid blocks of color. I prefer using painter’s tape to get crisp straight lines, especially for the diagonal color blocks on the striped tile. -
Painting the Dots:
Carefully fill in the indented dots with a contrasting color, like dark blue, using your smallest detail brush. -
Highlighting Raised Areas:
Paint the raised circles on the dedicated tile. Alternate colors like yellow, blue, coral, and pink for a playful look. -
Finishing Touches:
Let the paint dry completely. If the colors look streaky, apply a second thin coat. -
Seal:
Protect your artwork by applying a coat of matte sealant or varnish, which will also deepen the colors slightly.
Now you have a set of custom-designed, tactile art pieces ready to brighten up a shelf or desk
Little Cactus Sculptures in Tiny Pots
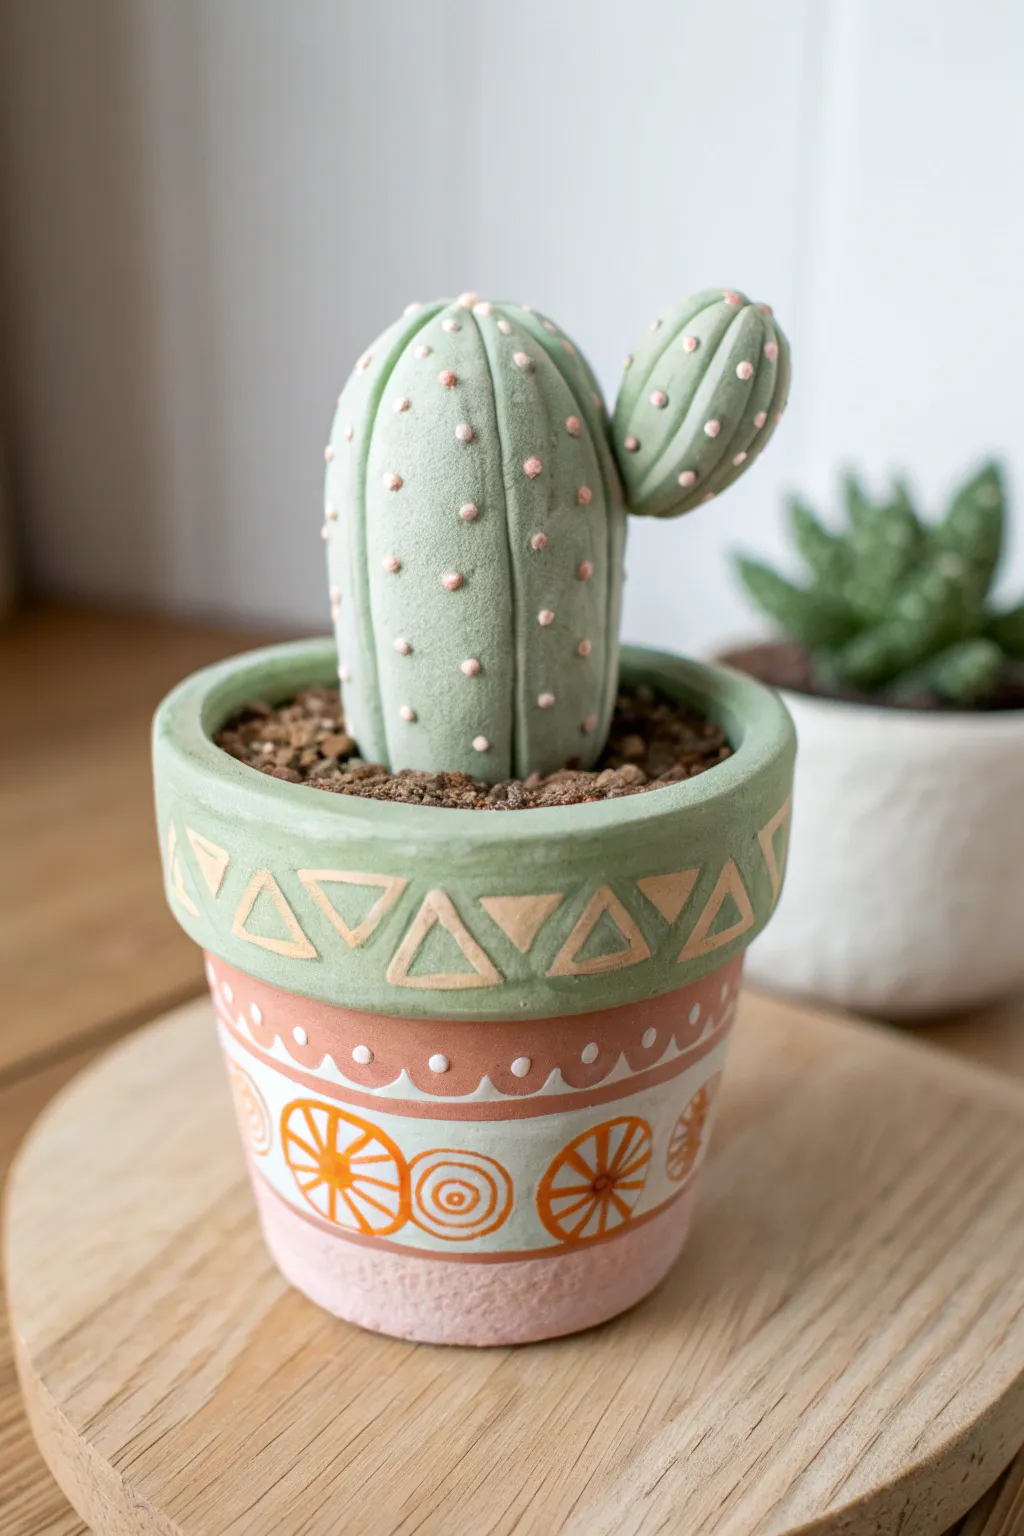
This adorable faux-plant project creates a gentle, textured cactus that never needs watering. With its pastel color palette and detailed pot painting, it mimics the look of a cozy ceramic decoration perfect for a sunny windowsill.
Step-by-Step Guide
Materials
- White or light grey air dry clay
- Small terracotta pot (approx 2-3 inches)
- Acrylic paints (sage green, pastel pink, terra cotta, white, orange)
- Small paintbrushes (fine detail and medium round)
- Sculpting tools or a dull butter knife
- Toothpick (for texture)
- Dried coffee grounds or brown decorative sand
- Strong craft glue or hot glue
- Mod Podge or matte varnish
Step 1: Sculpting the Cactus
-
Form the main body:
Start with a ball of clay about the size of a golf ball (depending on your pot size). Roll it into a smooth cylinder with a rounded top, tapering it slightly so it looks like a chubby cucumber. -
Add the vertical ribs:
Using a blunt sculpting tool or the back of a butter knife, gently press vertical indentations from the top center down to the bottom. Create 5-6 distinct segments around the cactus body. -
Shape the side arm:
Take a smaller piece of clay, rolling it into a marble-sized ball and slightly elongating it. Indent lines onto this piece just like the main body to match the segmented look. -
Attach the arm:
Score (scratch) the side of the main body and the bottom of the small arm. Add a dab of water to the scratched areas and press the arm firmly onto the cactus shoulder, smoothing the seam with your finger. -
Create the texture:
Before the clay dries, use the tip of a toothpick or a small needle tool to poke tiny, shallow holes all over the ridges. This mimics the fuzzy texture where the spines will go later. -
Let it dry:
Set your cactus sculpture aside in a safe, dry place. I usually wait 24-48 hours until the clay feels room temperature to the touch, not cool.
Cracks in the clay?
If small hairline cracks appear as your clay dries, mix a tiny bit of fresh clay with water to make a paste (slip) and smooth it into the cracks with your finger.
Step 2: Decorating the Pot
-
Base coat the rim:
While the clay dries, start on your pot. Paint the thick rim with a soft sage green acrylic paint. You might need two coats for opaque coverage. -
Add rim details:
Once the green is dry, mix a creamy beige color. Paint small triangles around the rim, some pointing up and some pointing down, outlining them carefully. -
Paint the middle band:
Paint a band of terracotta or warm reddish-brown just below the rim. Add a decorative scalloped white line along the bottom edge of this band, placing dots above the scallops. -
Detail the lower section:
Paint the main body of the pot off-white or light cream. Using orange paint and a fine brush, draw wheel or citrus slice patterns—circles with spokes inside. -
Paint the base:
Finish the very bottom section of the pot with a soft, dusty pink color to ground the design.
Step 3: Assembly & Finishing
-
Green up the cactus:
Once the clay is rock hard, paint the entire cactus surface with a pale sage green. This should be slightly lighter than the pot’s rim color. -
Highlight the ridges:
Mix a tiny bit of white into your green paint. Gently dry brush this lighter shade just on the center of each vertical segment to make the shape pop. -
Add the ‘spines’:
Dip the very tip of a toothpick or smallest brush into pale pink paint. Create small raised dots in neat vertical rows down the center of each ridge, mimicking soft spines. -
Prepare the soil base:
Fill your pot almost to the top with a filler like crumpled paper or extra clay to save weight. Create a flat surface about a half-inch below the rim. -
Plant the cactus:
Glue the bottom of your painted cactus firmly into the center of the pot. Ensure it stands straight. -
Add dirt texture:
Brush generous amounts of glue around the base of the cactus, covering the filler material. Sprinkle dried coffee grounds or brown sand over the glue to simulate potting soil. -
Seal the work:
Protect your painting with a layer of matte varnish or Mod Podge, being careful not to smudge the fine details.
Make it bloom
Level up by adding a tiny ball of hot pink or yellow clay to the top of the cactus before drying to create a permanent flowering cactus bud.
Place your everlasting succulent on a display shelf and enjoy the pop of greenery that stays perfect all year round
Under-the-Sea Coral Reef Plaque
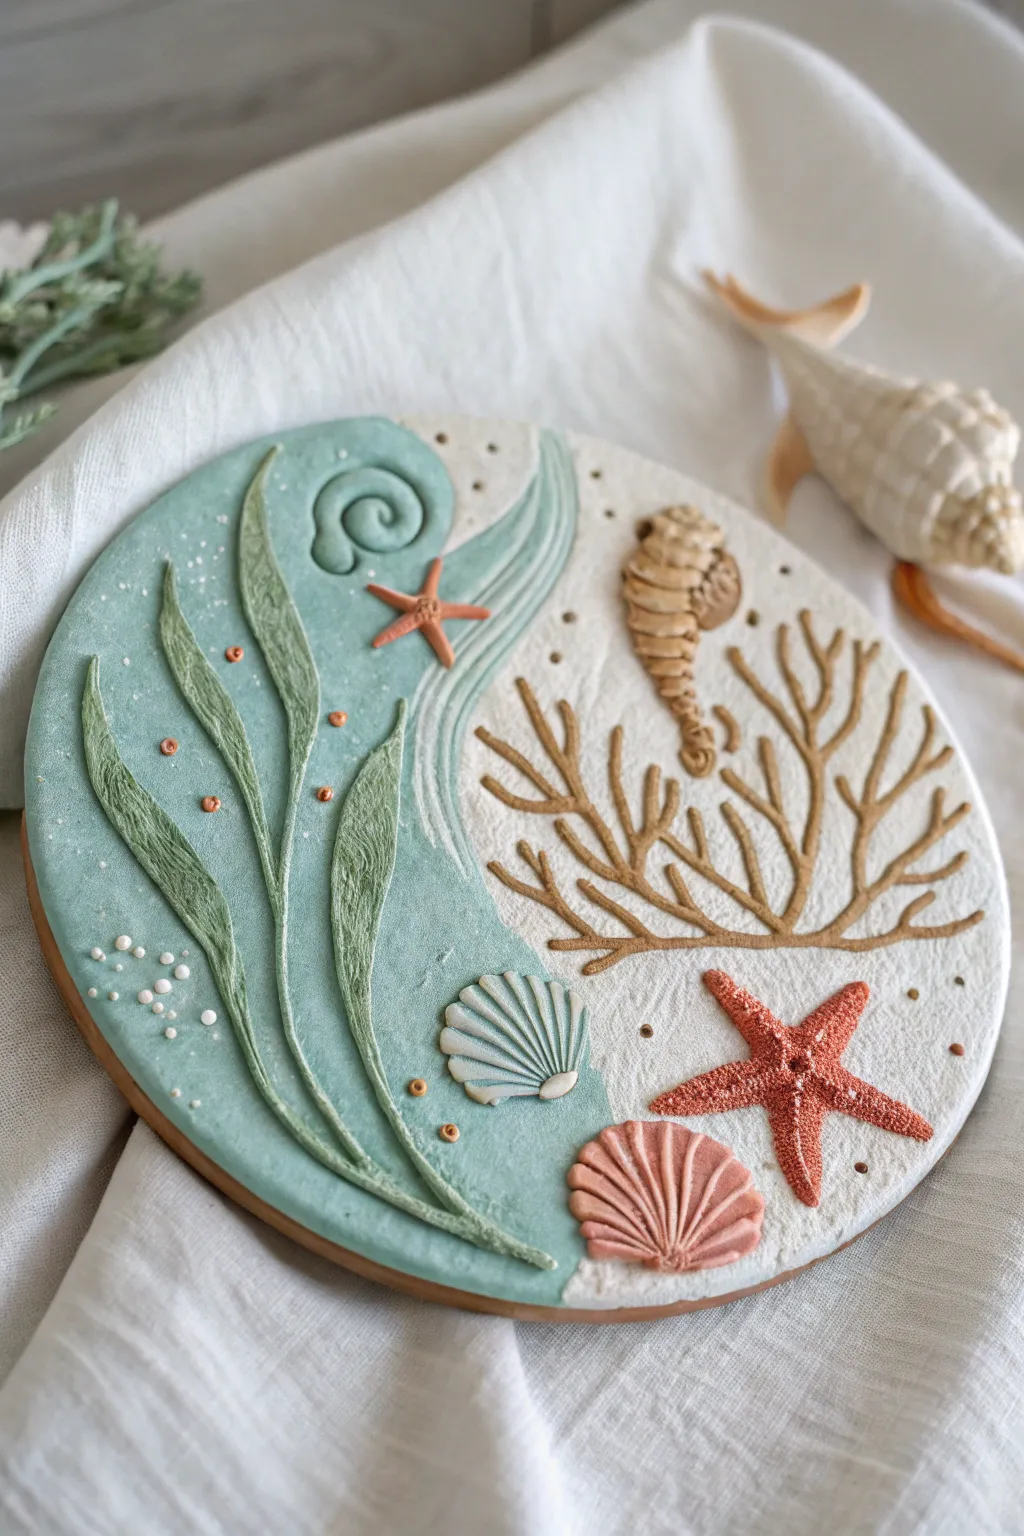
Dive into creativity with this stunning textured ocean scene that transforms simple clay into a mesmerizing underwater world. Using a mix of smooth rolling, gentle texturing, and delicate appliqué techniques, you’ll create a keepsake plaque featuring swirling currents, swaying seaweed, and sandy seabeds.
How-To Guide
Materials
- White air-dry clay (smooth texture)
- Circular rolling guide or cookie cutter (approx. 6-8 inches)
- Acrylic paints (teal, sage green, coral pink, sandy brown, orange)
- Rolling pin
- Clay sculpting tools (needle tool, small ball tool)
- Clean toothbrush or stiff bristle brush
- Small paintbrush
- Textured fabric or sandpaper (optional for sand effect)
- Water in a small cup
- Varnish or sealant (matte)
Step 1: Creating the Base
-
Roll the foundation:
Begin by rolling out a ball of white air-dry clay until it is about 1/4 inch thick. Use a large circular cutter or trace a bowl with a craft knife to create a perfect circle. -
Define the water line:
Using a needle tool, lightly sketch a curved, wave-like line down the center of the circle to separate the ‘water’ area from the ‘sand’ area. -
Texture the sand:
On the right side of your curved line, press a clean toothbrush or a piece of coarse sandpaper gently into the damp clay. This stippling creates a realistic sandy seabed texture. -
Color blocking:
Once the clay is slightly firm but not dry, paint the left side (water) with a soft teal or aqua acrylic paint. Paint the textured right side (sand) with white, possibly mixing in a tiny drop of brown for an off-white warmth, and let this base layer dry completely.
Clay Cracking?
If small cracks appear as the clay dries, mix a tiny bit of fresh clay with water to make a paste (slip). Smooth this over the cracks with your finger or a brush.
Step 2: Sculpting the Flora
-
Form seaweed ribbons:
Roll thin, tapered snakes of clay and flatten them gently to create seaweed strands. I like to curve them slightly as I lay them down to mimic movement in the water. -
Texture the seaweed:
Before attaching, use a needle tool to scratch vertical lines along the length of the seaweed ribbons for a fibrous look. Paint them a muted sage green. -
Attach the seaweed:
Apply a tiny amount of water to the back of your seaweed pieces and press them onto the teal ‘water’ section, allowing them to overlap the curved dividing line. -
Pipe the coral:
Roll very thin coils of clay (or use an extruder if you have one) to create the branching coral on the sandy side. Arrange them in a tree-like structure. -
Detail the coral:
Gently press the coils onto the sandy base. Paint this coral structure with a light brown or tan color to contrast against the white sand.
Step 3: Adding Sea Creatures
-
Sculpt the seahorse:
Shape a small ‘S’ curve of clay for the seahorse body. Use a tool to press horizontal ridges across the body for segments and curl the tail tight. -
Detail the seahorse head:
Add a tiny snout and a small eye detail, then paint the seahorse a golden brown before attaching it near the top right of the coral. -
Mold the starfish:
Create two starfish shapes—one tiny and one medium. Use a needle tool to prick the surface of the larger one for a bumpy texture. -
Paint and place starfish:
Paint the small starfish orange and the larger one a reddish-coral tone. Attach the small one floating in the teal water and the large one resting on the sand at the bottom right. -
Create scallop shells:
Roll small balls of clay, flatten them into fans, and use a knife tool to press ridges radiating from the bottom center. Make one white/teal and one pinkish-coral. -
Final assembly:
Attach the shells near the bottom of the plaque. Add tiny balls of white clay in the water area to represent bubbles.
Sparkle Effect
While the paint is wet on the starfish or ‘sand’ area, sprinkle a pinch of ultra-fine iridescent glitter to mimic the way sunlight hits the ocean floor.
Step 4: Finishing Touches
-
Swirl accents:
For extra dimension, add a small spiral of clay near the top of the water section to suggest a current or wave, painting it to match the teal background. -
Wave lines:
Using white paint and a very fine brush, paint delicate curved lines following the border between the sand and water to emphasize the wave shape. -
Highlighting:
Dry brush a tiny bit of white paint over the top of the coral branches and the seahorse ridges to make the texture pop. -
Seal:
Once the entire piece is fully dry (usually 24 hours), apply a matte varnish to protect the paint and clay.
Now you have a serene piece of ocean art ready to display on a shelf or wall
Fairy Garden Door and Tiny House Pieces
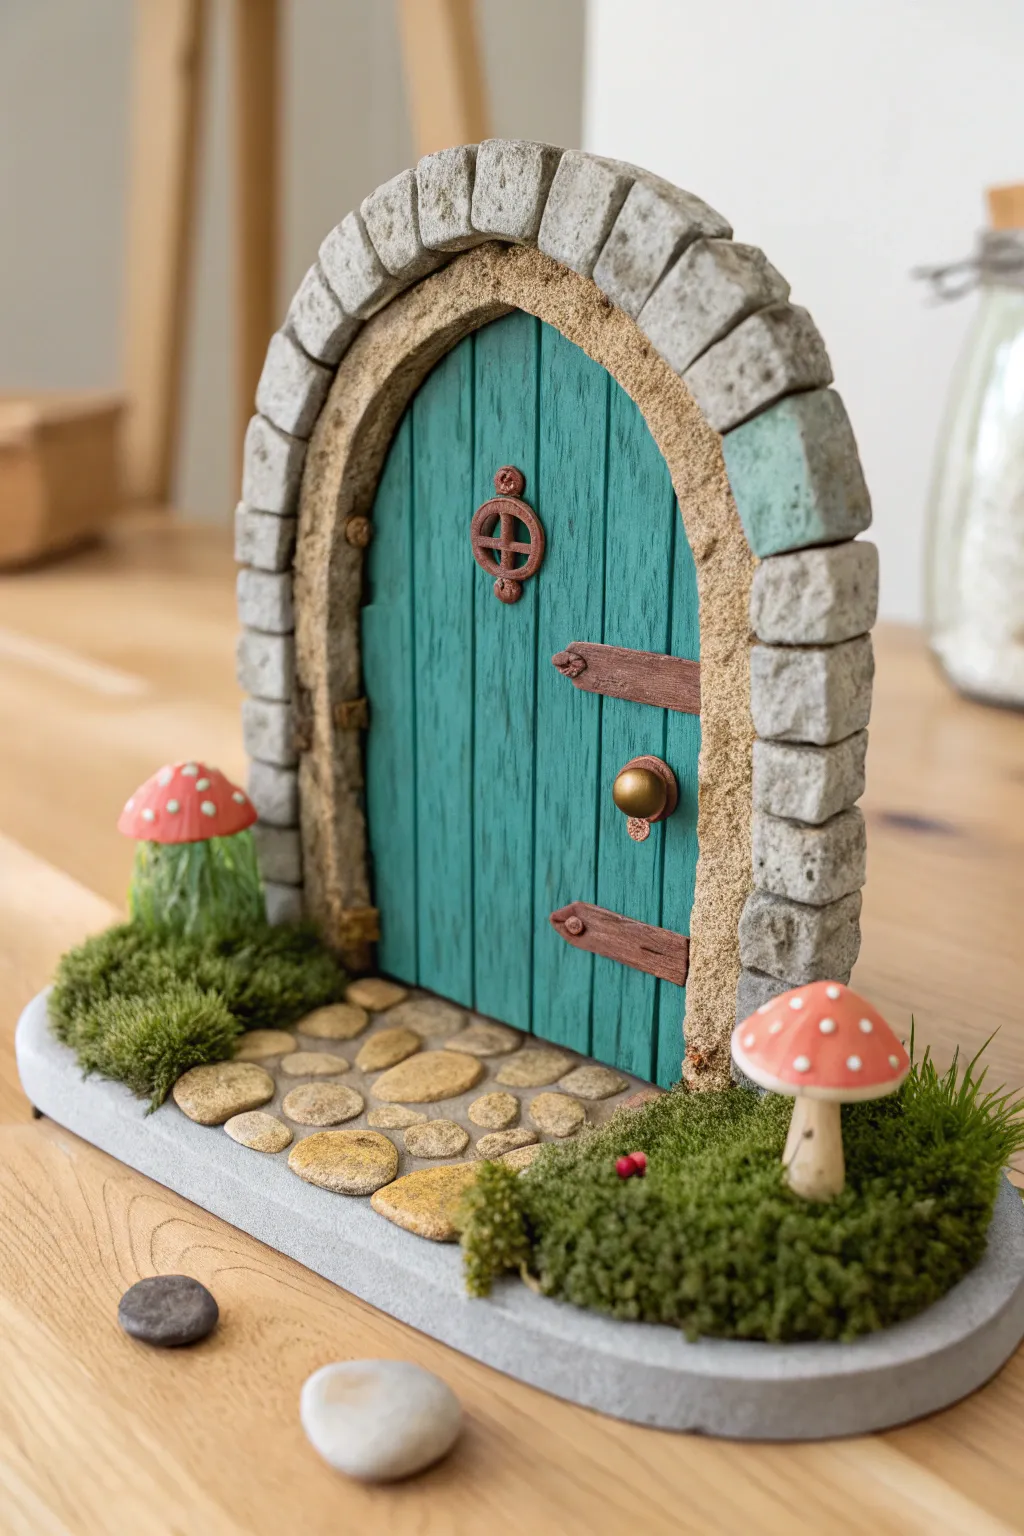
Step into a world of magic with this adorable miniature fairy door, featuring realistic stone textures and a vibrant teal entrance. The charming details, from the tiny mushrooms to the mossy doorstep, make this a perfect centerpiece for any bookshelf or planter.
Step-by-Step
Materials
- Air dry clay (grey, white, or terracotta)
- Acrylic paints (teal, various greys, beige, white, red, metallic bronze/gold)
- Texturing tools (old toothbrush, toothpick, crumpled aluminum foil)
- Rolling pin
- Cutting tool or clay knife
- Strong craft glue or PVA glue
- Cardboard or thin wood backing (optional for structure)
- Faux moss
- Sand or fine grit texture medium
- Oval cutter (optional)
Step 1: Base and Door Construction
-
Form the main slab:
Start by rolling out a thick slab of grey air dry clay to form the base. It should be an elongated oval shape, roughly half an inch thick, to serve as the sturdy foundation for your scene. -
Shape the door backing:
Roll out a separate piece of clay into an upright arch shape. If you want extra stability, you can cut a piece of cardboard into an arch and layer the clay over it, but solid clay works well if it’s thick enough. -
Carve the wood planks:
Use a clay knife or a ruler to press vertical lines into the arch shape to mimic wooden planks. Don’t worry about making them perfectly straight; a little unevenness adds rustic charm. -
Add wood grain texture:
Take a toothpick or a wire tool and gently scratch wavy lines and knots into the ‘planks’ to create a realistic wood grain effect. -
Create the inner frame:
Roll a long snake of clay and flatten it slightly. Wrap this around the edge of your wooden door piece to create the inner sandy-colored frame seen in the photo. Press textured rock or a toothbrush against it for roughness.
Step 2: Stonework and Hardware
-
Cut the stones:
Roll out grey clay and cut small, somewhat rectangular blocks. These don’t need to be uniform; vary the sizes slightly to look like hand-cut cobblestones. -
Assemble the arch:
Apply a little water or slip (clay mixed with water) to the back of your designated ‘stones’ and press them around the outer edge of the inner frame, stacking them to create the main archway. I like to press a crumpled ball of aluminum foil onto each stone now to give it a weathered rock texture. -
Craft the hinges and knob:
Mold very tiny pieces of clay into two strap hinges, a round doorknob, and a small circular window frame. Attach these to the door using a dab of water. -
Lay the pathway:
Create smooth, flat pebble shapes from leftover clay. Press them into the main base slab leading up to the door, leaving small gaps between them. -
Sculpt tiny mushrooms:
Roll tiny stems and attach distinct red caps. Place one or two on the sides of the base. For the gills underneath, use a craft knife to make tiny striations. -
Allow to dry:
Let the entire structure dry completely. This usually takes 24-48 hours depending on thickness. Flip it occasionally if possible to ensure the bottom dries too.
Cracking Up?
If you see cracks forming as the clay dries, mix a tiny bit of fresh clay with water to make a paste and smooth it into the cracks. Let it dry again before painting.
Step 3: Painting and Final Details
-
Paint the door:
Paint the wooden plank area with a vibrant teal or turquoise acrylic. To make it look aged, you can dilute some black paint with water and wash it over the dried teal, wiping away the excess. -
Color the stonework:
Paint the arch stones in shades of light grey. Once dry, dry-brush a lighter white or beige over the high points to highlight the texture. -
Detail the hardware:
Use metallic bronze or gold paint for the hinges, doorknob, and window grille. A tiny dot of darker brown in the crevices makes them look like old iron. -
Paint the inner frame:
Paint the inner border (between the door and the stones) with a sandy beige color. You can mix real sand into the paint for authentic grit. -
Finish the mushrooms and path:
Paint the mushroom caps red with white dots, stems beige. Paint the pathway stones in warm earth tones like tan and brown. -
Apply the greenery:
Once all paint is dry, apply spots of craft glue around the base of the door and between the path stones. Press faux moss or static grass into the glue to bring the garden to life.
Make It Glow
Before the clay dries, poke a hole through the window area. Once finished, place a small battery-operated LED tea light behind the door for a magical nighttime glow.
Now you have an enchanting portal ready for any passing fairies to move right in
Recycled Mosaic Clay Frames
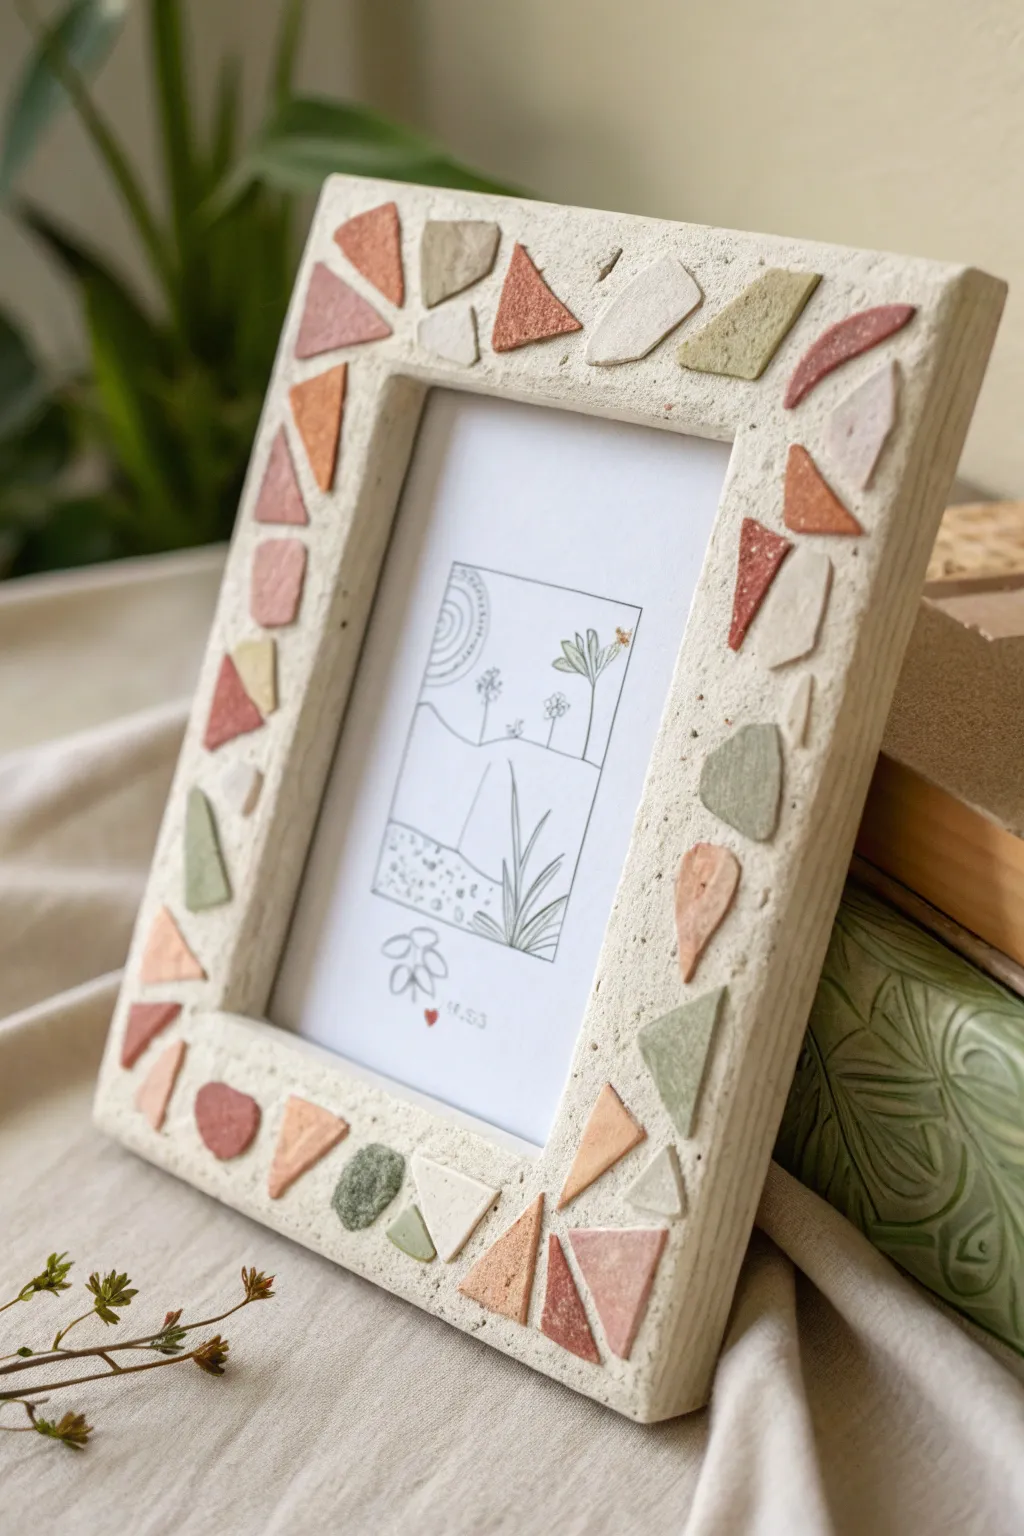
Give an old picture frame a playful, modern makeover using colorful bits of air dry clay to create a faux-terrazzo mosaic effect. The textured, matte finish and soft earth tones make this a sophisticated project that’s still simple enough for kids to enjoy.
Step-by-Step Tutorial
Materials
- Wooden picture frame (flat profile preferred)
- Air dry clay (white)
- Acrylic paints (terracotta, sage green, blush pink, beige)
- Rolling pin
- Clay cutting tool or craft knife
- Sandpaper (fine grit)
- White craft glue or heavy gel medium
- Matte paint (cream or off-white) for the frame base
- Texture paste or baking soda (optional, for frame texture)
- Tweezers (optional)
- Clear matte varnish
- White cardstock
- Black fine-liner pen
Step 1: Preparing the Mosaic Tiles
-
Color your clay:
Divide your white air dry clay into four small portions. Mix a small drop of acrylic paint into each ball—terracotta, sage green, blush pink, and beige—kneading until the color is uniform. -
Roll it out:
Roll each colored ball of clay flat until it is about 1/8 inch thick. Try to keep the thickness consistent across all colors so the final mosaic feels level. -
Cut geometric shapes:
Using a clay tool or craft knife, cut random geometric shapes from the flattened clay. Create a mix of triangles, jagged shards, and semi-circles. -
Let them dry:
Place your cut shapes onto a piece of parchment paper or a drying rack. Allow them to dry completely, which usually takes about 24 hours depending on the brand.
Loose Tiles?
If clay pieces pop off after drying, the frame surface might be too slick. Scuff the spot with sandpaper and re-glue using superglue for a stronger hold.
Step 2: Prepping the Frame
-
Sand the surface:
While the tiles dry, give your wooden frame a light sanding to help the paint adhere better. -
Create texture (optional):
To match the stone-like look in the photo, mix a little baking soda into your cream-colored acrylic paint before applying it. This creates a gritty, plaster-like finish. -
Paint the base:
Paint the entire front and sides of the frame with your cream (or textured) paint. I usually apply two coats to ensure the wood grain doesn’t peek through. -
Dry fully:
Allow the painted frame to dry completely before attempting to attach any clay pieces.
Add Sparkle
Mix a pinch of gold glitter or gold leaf flakes into the white base paint for the frame. It adds a subtle shimmer that mimics quartz in real terrazzo stone.
Step 3: Assembling the Mosaic
-
Plan your layout:
Before gluing, lay your dried clay shards onto the frame to test the arrangement. Aim for a balanced scatter, ensuring colors are distributed evenly without clumping. -
Glue the pieces:
Lift one piece at a time, apply a dab of strong white craft glue to the back, and press it firmly onto the frame. -
Clean edges:
If any glue squishes out from under the tiles, wipe it away immediately with a damp cotton swab or toothpick. -
Let the glue set:
Allow the project to sit undisturbed for at least an hour so the bond becomes secure.
Step 4: Final Touches
-
Seal the work:
Apply a coat of clear matte varnish over the entire frame, including the clay tiles. This protects the porous clay and unifies the sheen of the different materials. -
Draw the artwork:
Cut a piece of white cardstock to fit your frame. Use a black fine-liner pen to draw a simple, minimalist landscape with lines similar to the reference photo. -
Assemble the frame:
Once the varnish is dry to the touch, insert the glass (if using), your drawing, and the backing board into the frame.
Now you have a trendy, handcrafted piece of decor that looks like expensive stone terrazzo
Mini Desk Pet Creatures With Pipe-Cleaner Details
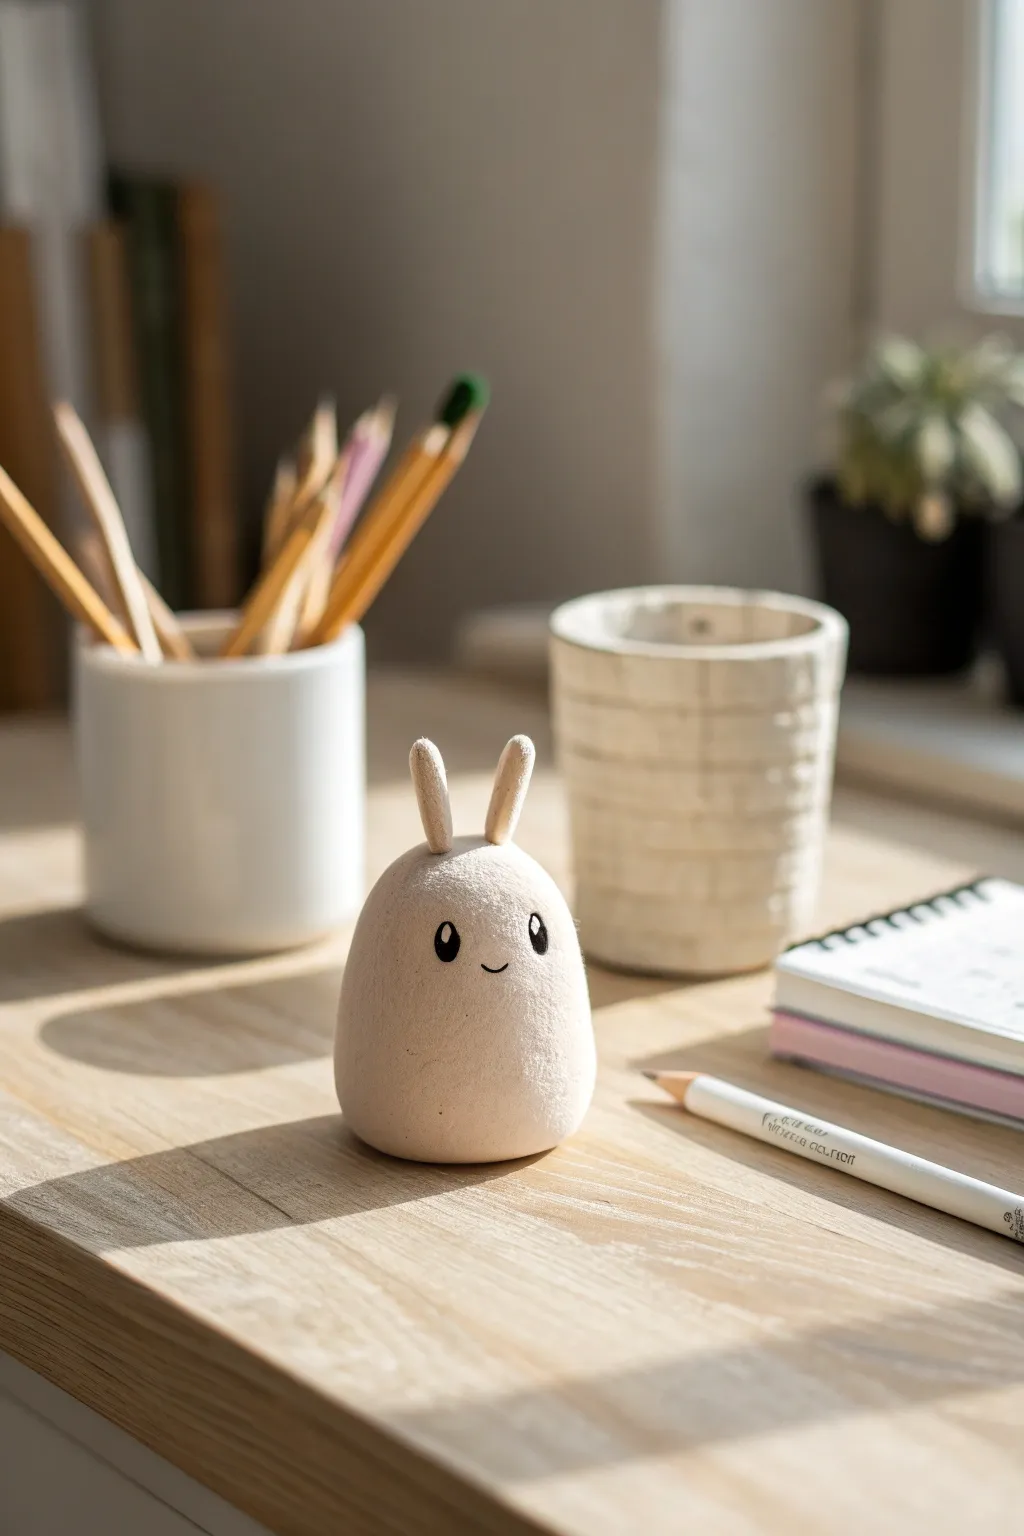
This adorable, minimalist desk pal brings a touch of calm to any workspace with its smooth, stone-like finish and sweet expression. It is a fantastic beginner project that focuses on achieving a perfectly gentle, rounded shape with minimal details.
Detailed Instructions
Materials
- White or cream air-dry clay
- Water in a small cup
- Fine-grit sandpaper (220 grit or higher)
- Black acrylic paint
- Fine detail paintbrush (size 0 or 00)
- Small rolling pin (optional)
- White highlight pen or tiny dotting tool
Step 1: Shaping the Base
-
Condition the CLay:
Start by taking a handful of air-dry clay roughly the size of a tangerine. Knead it in your hands until it is warm, pliable, and free of any air pockets. -
Form the Body:
Roll the clay into a smooth ball between your palms. Once round, gently tap the bottom against your work surface to create a flat base so it stands upright. -
Refine the Shape:
Use your fingers to gently smooth the sides upwards, creating a soft, gumdrop or egg-like silhouette. The top should be rounded, not pointy. -
Smooth the Surface:
Dip your finger in a tiny bit of water and run it over the entire surface of the body. This ‘slip’ will help erase fingerprints and create that stone-smooth texture.
Cracks Appearing?
If small cracks form while drying, mix a tiny bit of fresh clay with water to make a paste. Fill the cracks, smooth it over, and let it dry again.
Step 2: Adding the Ears
-
Roll Small Coils:
Take two very small pieces of clay, each about the size of a pea. Roll them into small, elongated teardrop shapes. -
Check Symmetry:
Place the two ear pieces side-by-side on the table to ensure they are roughly the same length and thickness before attaching them. -
Score the Attachment Points:
Lightly scratch the top of the body where the ears will go, and scratch the bottom of each ear piece. This rough texture helps the clay bond. -
Attach the Ears:
Press the ears gently onto the top of the head. Use a small tool or your fingernail to blend the clay at the seam downwards into the head so they don’t fall off. -
Final Smoothing:
Use a damp finger to smooth out the seams completely until the ears look like they grew naturally out of the head.
Pro Tip: Weighted Base
To give your pet a satisfying weight, press a small, clean stone or a marble into the center of the clay ball when you first start shaping the body.
Step 3: Drying and Refining
-
Slow Drying:
Place your bunny in a cool, dry spot away from direct sunlight. Let it dry for at least 24-48 hours. I usually rotate it once halfway through so the bottom dries evenly. -
Sanding:
Once fully hard, take your fine-grit sandpaper and very gently buff the surface. Focus on any bumps or fingerprints to get that matte, porcelain-like finish. -
Dust Clean:
Wipe the figure down with a dry cloth or a soft brush to remove all the sanding dust before painting.
Step 4: Painting the Details
-
Sketch First:
Lightly use a pencil to mark where the eyes and mouth will go. Keep the face low on the body to enhance the cute factor. -
Paint the Eyes:
Using your finest brush and black acrylic paint, carefully fill in the oval eye shapes. Keep your hand steady and use very little paint. -
Paint the Mouth:
Paint a tiny, curved line between the eyes for the smile. A single, confident stroke works best here. -
Add Highlights:
Once the black paint is bone dry, use a white paint pen or a toothpick dipped in white paint to add a tiny ‘sparkle’ dot to the top of each eye. -
Seal (Optional):
If you want to protect your desk pet, apply a thin layer of matte varnish, though leaving it raw gives it a nice natural texture.
Now you have a quiet little companion to keep you company while you work or study