Clay ornaments are my favorite way to make the holidays feel personal—just a little bit of clay can turn into keepsakes you’ll want to bring out every year. I pulled together these clay ornament ideas the way I’d share them across my studio table: classic crowd-pleasers first, then the fun “wait, you can do that?” twists.
Classic Clay Star Ornaments
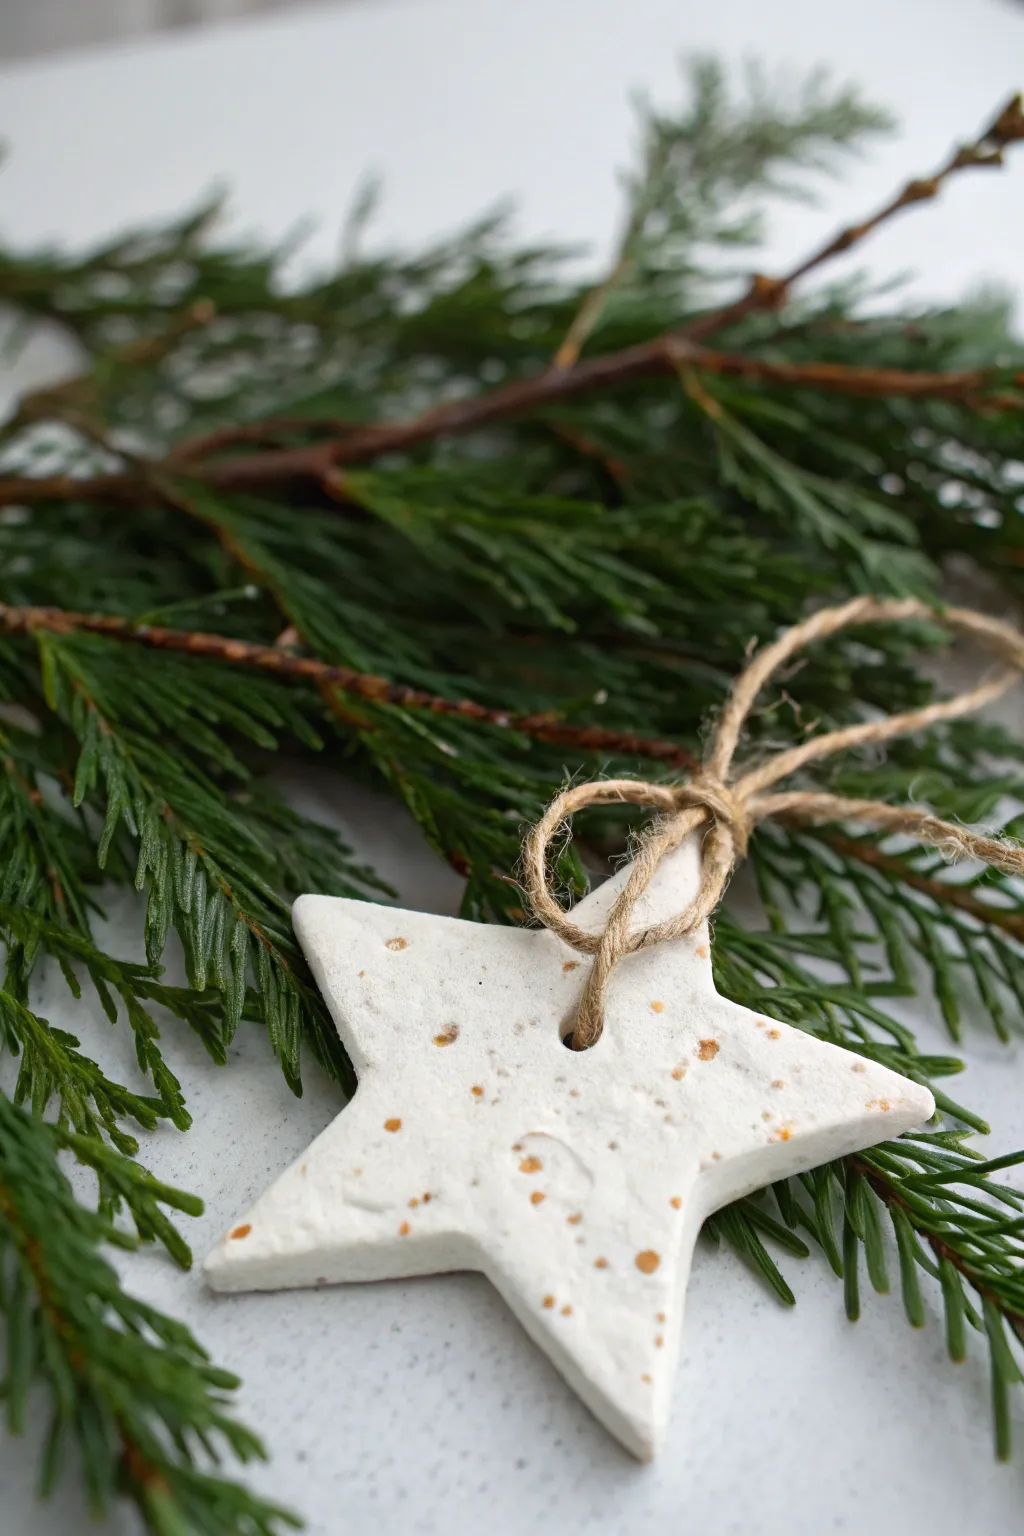
These rustic yet elegant clay stars bring a touch of natural beauty to your holiday decor with their clean white finish and subtle golden flecks. The rough, textured edges and simple jute tie give them a charming handmade quality that contrasts beautifully with fresh evergreen branches.
Detailed Instructions
Materials
- White classic air-dry clay (or homemade salt dough)
- Star-shaped cookie cutter (medium size)
- Rolling pin
- Parchment paper or non-stick silicone mat
- Gold acrylic paint or liquid gold leaf
- Old toothbrush or stiff bristle brush
- Drinking straw or small circular tool
- Fine grit sandpaper (optional)
- Natural jute twine
- Scissors
Step 1: Shaping the Stars
-
Prepare your workspace:
Lay down a sheet of parchment paper or a silicone mat on a flat surface to prevent sticking. -
Condition the clay:
Take a handful of white air-dry clay and knead it in your hands for a minute until it feels soft and pliable. -
Roll it out:
Place the clay on your mat and roll it out evenly until it is about 1/4 inch thick. You want it substantial enough to be sturdy, but not too heavy. -
Cut the shape:
Press your star-shaped cookie cutter firmly into the clay. Give it a tiny wiggle to ensure a clean cut, then lift the cutter away. -
Remove excess clay:
Peel away the scrap clay from around the star shape. You can ball this up to use for the next ornament. -
Softening the edges:
Dip your finger in a tiny bit of water and run it gently along the cut edges of the star to smooth down any sharpness, though leaving them slightly imperfect adds to the rustic charm. -
Create the hanging hole:
Use a drinking straw to punch a hole near the top point of the star. Twist the straw as you pull it out to get a clean circle.
Clean Splatters
Does the splatter technique feel too messy? Place your stars inside a deep cardboard box before flicking the paint to contain the spray and keep your counters clean.
Step 2: Drying and Decorating
-
Let it dry completely:
Place the star on a wire rack or leave it on parchment paper to dry. Depending on humidity and clay thickness, this usually takes 24-48 hours. Is flip them halfway through to ensure the back dries evenly. -
Check for smoothness:
Once fully hard and white, check the edges. If there are any jagged bits you dislike, give them a very light pass with fine-grit sandpaper. -
Prepare the splatter paint:
Squeeze a small amount of gold acrylic paint onto a palette or scrap paper. If the paint is very thick, mix in a drop or two of water to make it more fluid. -
Load the brush:
Dip the bristles of an old toothbrush or a stiff paintbrush into the thinned gold paint. -
Test the splatter:
Practice first on a piece of scrap paper by running your thumb across the bristles to flick the paint. You’re looking for random, organic speckles. -
Apply the gold speckles:
Hold the brush over your clay star and flick the bristles to shower the surface with gold dots. Add as much or as little as you like. -
Allow paint to set:
Let the paint dry completely, which should only take about 15-20 minutes since the droplets are small.
Step 3: Finishing Touches
-
Cut the twine:
Cut a piece of natural jute twine roughly 8-10 inches long. -
Thread the ornament:
Push one end of the twine through the hole in the star. -
Tie the knot:
Bring the ends together and tie a simple overhand knot or a bow, tightening it close to the top of the star so it hangs securely.
Scented Dough Upgrade
If making your own salt dough instead of using clay, add cinnamon or a few drops of essential clove oil into the mix for ornaments that smell like Christmas.
Now you have a timeless, handcrafted ornament ready to adorn your tree or gift to a friend


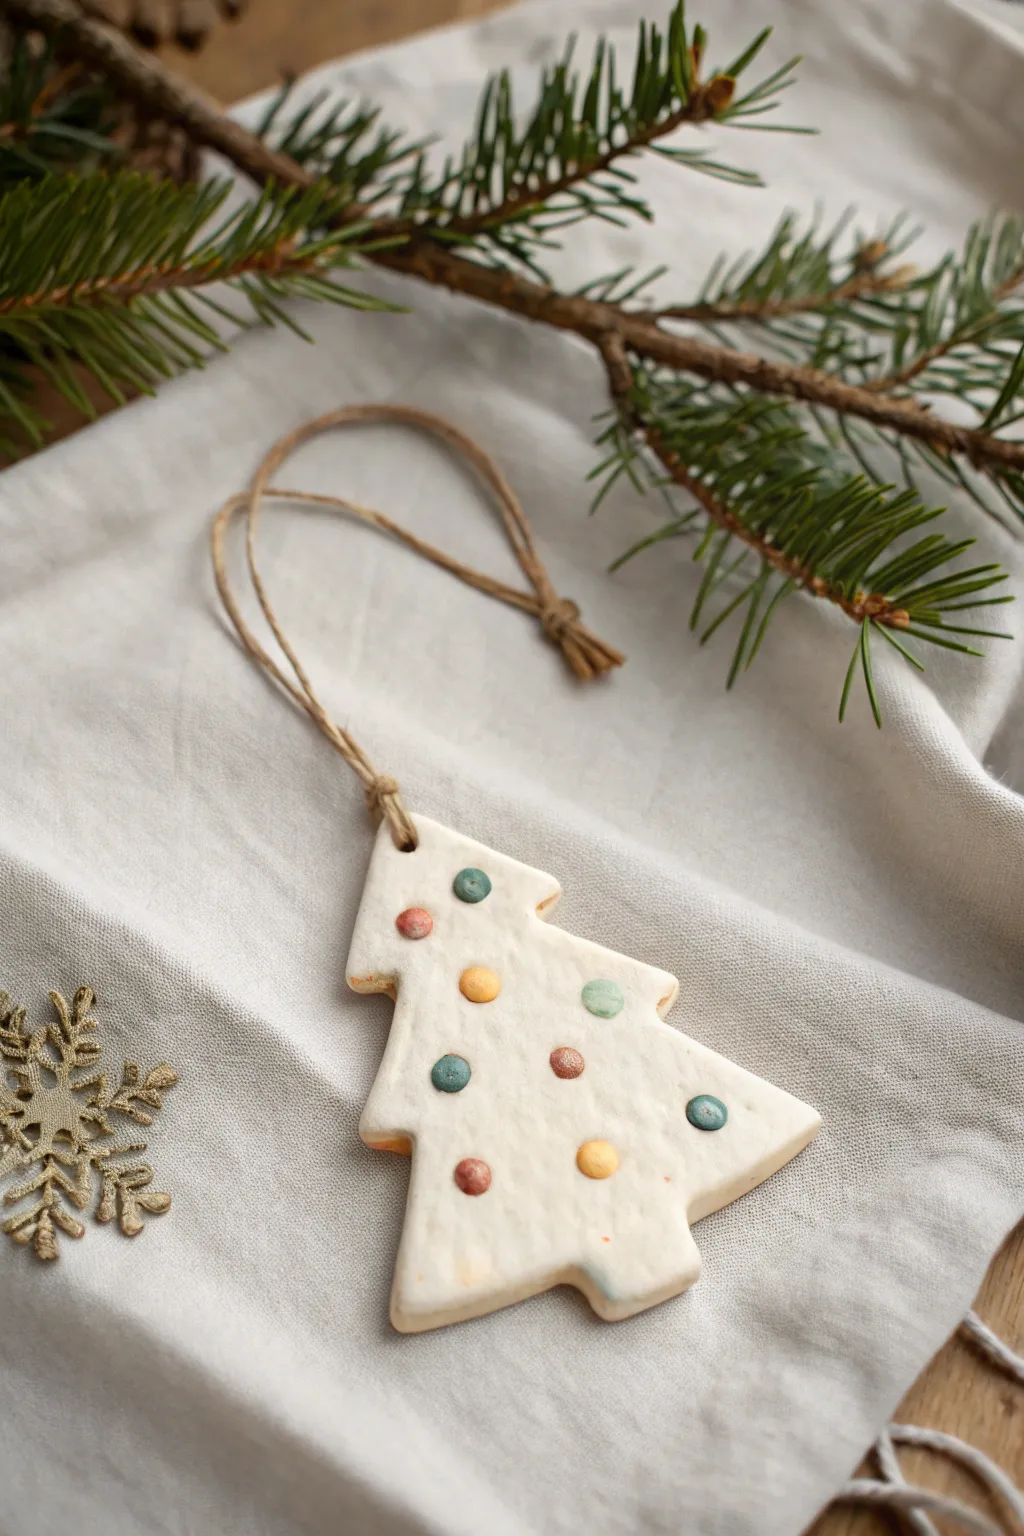
Mini Clay Tree Cutout Ornaments
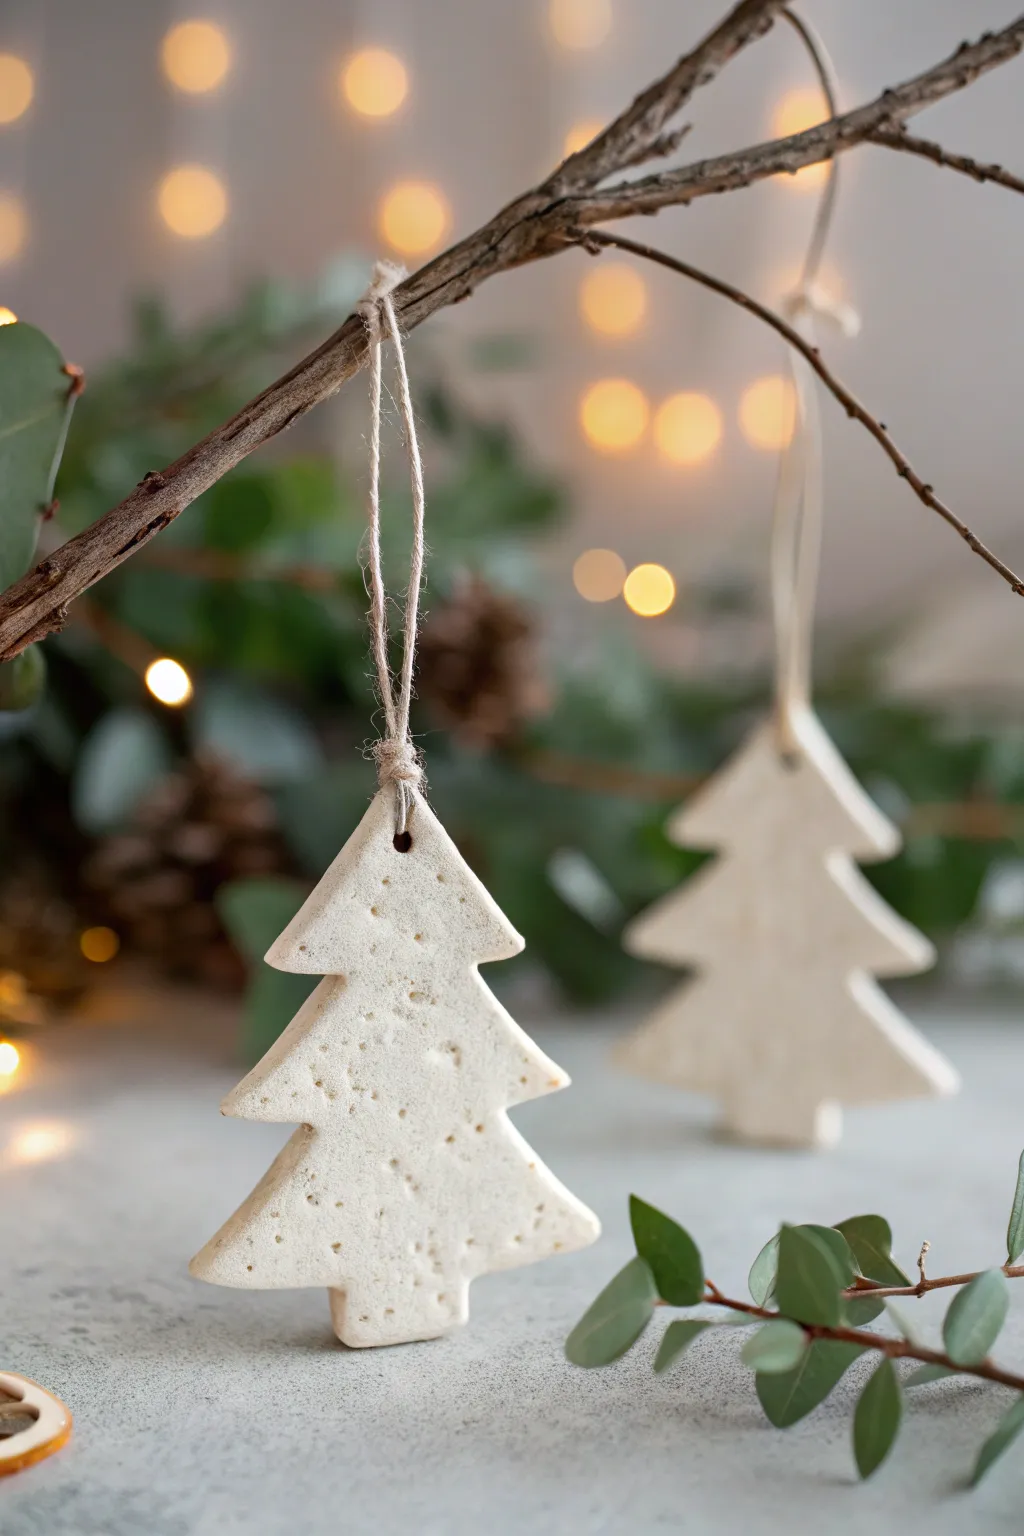
These charmingly simple ornaments capture the essence of a cozy, rustic holiday with their textured, off-white finish and minimalist shape. Made from durable air-dry clay or salt dough, they feature a lovely speckled surface that mimics stone or ceramic, perfect for adding a natural touch to your evergreen boughs.
Step-by-Step Tutorial
Materials
- White air-dry clay (or homemade salt dough)
- Christmas tree cookie cutter (small to medium size)
- Rolling pin
- Parchment paper or silicone mat
- Jute twine or hemp string
- Straw or skewer (for hole punching)
- Fine-grit sandpaper
- Dried coffee grounds or cinnamon (for speckling)
- Small bowl of water
- Scissors
Step 1: Preparing the Clay
-
Condition the clay:
Begin by taking a handful of white air-dry clay. Knead it thoroughly in your hands for about 3-5 minutes until it is warm, pliable, and free of any cracks. -
Add texture:
To achieve that natural, stony look seen in the photo, sprinkle a very small pinch of dried coffee grounds or cinnamon onto your clay ball. Keep the amount minimal to maintain the white base color. -
Incorporate the flecks:
Fold the clay over the speckles and knead again until the particles are evenly distributed throughout the mass. Add more if you want a denser texture, but start slow. -
Prepare your surface:
Lay down a sheet of parchment paper or a silicone mat. This prevents the clay from sticking and makes it easier to lift the delicate shapes later without distorting them.
Step 2: Shaping the Ornaments
-
Roll out the slab:
Roll the clay out to an even thickness of approximately 1/4 inch (about 5-6mm). I find that if it’s too thin, the ornaments become fragile, but too thick and they take ages to dry. -
Cut the shapes:
Press your Christmas tree cookie cutter firmly into the clay. Give it a tiny wiggle to ensure it cuts all the way through, then lift straight up. -
Clean the edges:
Gently peel away the excess clay from around the tree shapes. If the edges look a bit rough from the cutter, dip your fingertip in water and lightly smooth them down. -
Create the hanging hole:
Use a drinking straw or a thick skewer to punch a hole near the top tip of the tree. Make sure the hole isn’t too close to the edge to prevent the clay from snapping later. -
Check the hole size:
Ensure the hole is wide enough to accommodate your jute twine. Remember that clay shrinks slightly as it dries, so making the hole a tiny bit larger than necessary is a smart move.
Adding Scent
For a sensory treat, mix a drop of essential oil (like pine or peppermint) into the clay during the kneading phase. Your tree will smell as festive as it looks.
Step 3: Drying and Finishing
-
Initial drying:
Transfer the parchment paper with the ornaments to a flat board or baking sheet. Place them in a cool, dry area away from direct sunlight. -
Flip for even drying:
After about 12 hours, when the tops feel dry to the touch, gently flip the trees over. This helps prevent curling and ensures the underside dries evenly. -
Complete the drying process:
Allow them to dry for another 24-48 hours until they are completely hard and turn a lighter, chalky white color. -
Sand imperfections:
Once fully dry, take a piece of fine-grit sandpaper and very gently buff the edges of the tree to remove any sharp burrs or irregularities. -
Cut the twine:
Cut a length of jute twine, approximately 6-8 inches long, depending on how low you want the ornament to hang. -
Thread the loop:
Fold the twine in half and push the looped end through the hole in the ornament from front to back. -
Secure the hanger:
Pull the loose ends of the twine through the loop and tighten it gently against the top of the tree, creating a lark’s head knot as shown in the image. -
Knot the ends:
Tie a simple overhand knot at the very end of the twine tails to create the hanging loop that will go over the branch.
Preventing Cracking
If your edges start curling up while drying, place a lightweight book on top (with parchment in between) once the surface is no longer tacky to keep them flat.
Hang these natural beauties on a sturdy branch or use them as unique gift tags to elevate your holiday wrapping


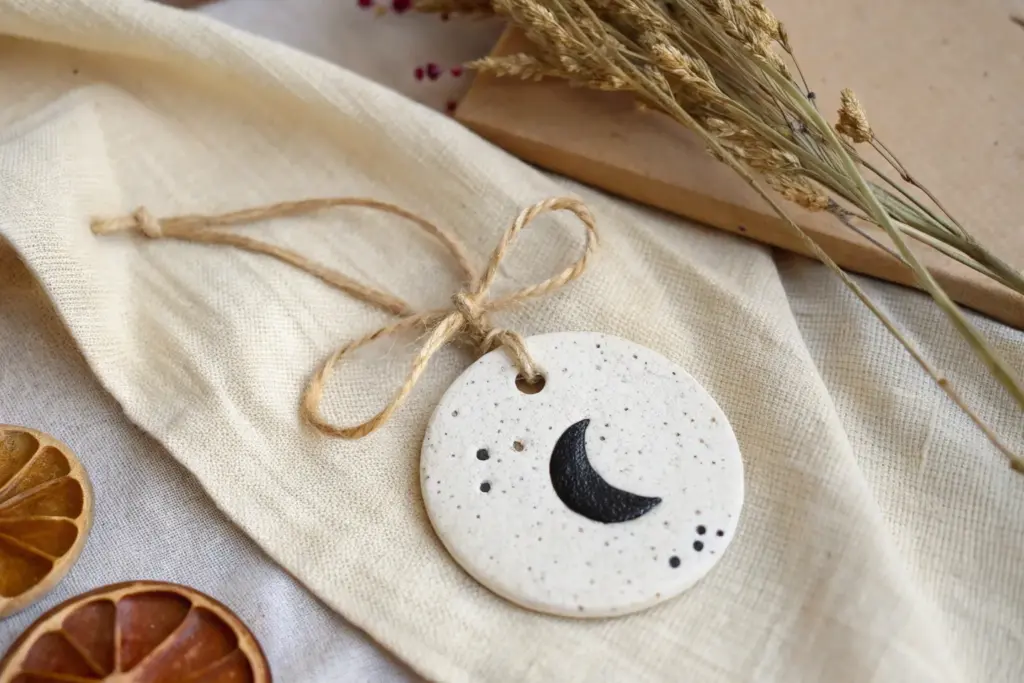
Snowflake Imprint Disc Ornaments
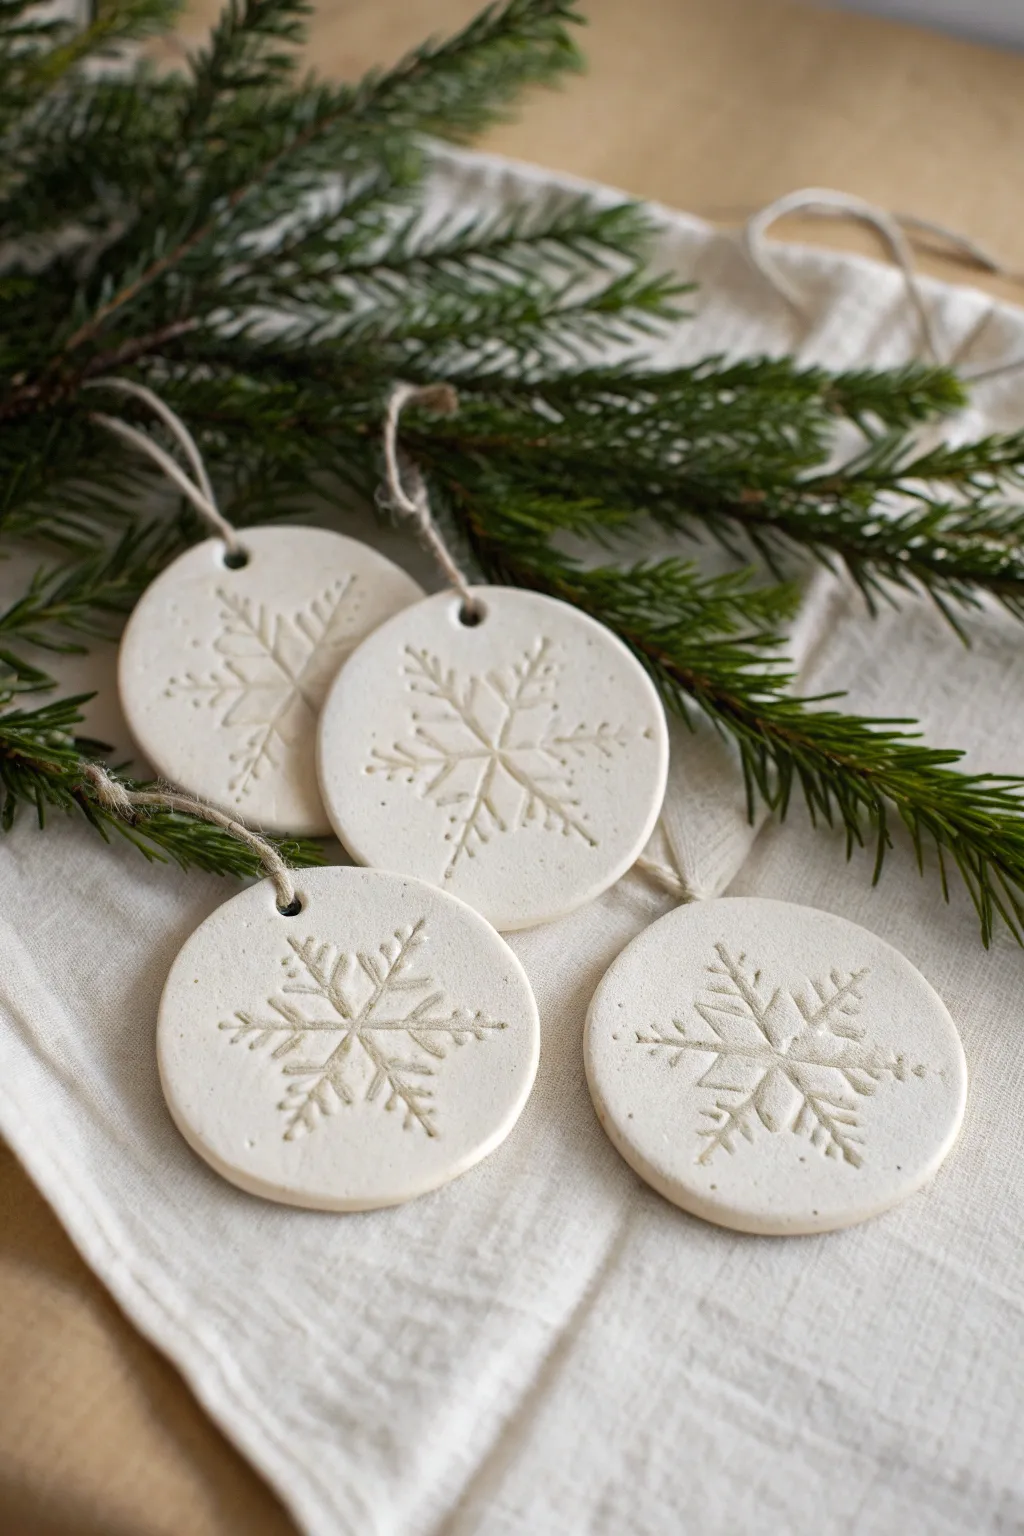
Capture the delicate beauty of falling snow with these minimalist clay discs featuring embossed snowflake patterns. Their matte white finish and rustic texture create a lovely contrast against fresh evergreen branches for a Scandinavian-inspired holiday look.
Step-by-Step
Materials
- Air-dry clay or salt dough (white)
- Snowflake cookie stamps or embossers (plunger style works best)
- Round cookie cutter (approximately 2.5 – 3 inches)
- Rolling pin
- Parchment paper or non-stick mat
- Jute twine or rustic string
- Drinking straw or small circular too (for hole punching)
- Fine-grit sandpaper (optional)
- Acrylic rolling strippers or wooden shims (optional, for even thickness)
Step 1: Preparing the Clay Base
-
Condition the material:
Begin by taking a handful of your air-dry clay or prepared salt dough. Knead it in your hands for a minute or two until it feels warm, pliable, and free of any cracks. -
Prepare your surface:
Lay down a sheet of parchment paper or a non-stick silicon mat to work on. This prevents the clay from sticking and makes it easier to move the delicate shapes later without distortion. -
Roll it out:
Using your rolling pin, flatten the clay to a uniform thickness. Aim for about 1/4 inch (6mm) thick. If you have rolling guides or shims, place them on either side of the dough to ensure the slab is perfectly level. -
Cut the circles:
Press your round cookie cutter firmly into the rolled clay to cut out your disc shapes. Give it a tiny wiggle before lifting to ensure a clean cut. -
Remove excess clay:
Peel away the scrap clay from around your circles rather than trying to lift the circles themselves. This keeps their round shape perfectly intact.
Stamp Release Trick
If your snowflake stamp keeps sticking to the moist clay, lightly dust the stamp face with cornstarch or flour before pressing it down for a clean release.
Step 2: Embossing and Shaping
-
Position the stamp:
Select your snowflake plunger cutter or stamp. Center it visually over one of the clay discs. -
Detailed impression:
Press the stamp down gently but firmly. You want to go deep enough to leave a crisp impression of the snowflake veins, but not so deep that you cut all the way through or severely deform the outer edge. -
Release carefully:
Pull the stamp straight up. If it sticks slightly, give a very gentle puff of air or a tiny wiggle. Repe this for all your discs. -
Punch the hanging hole:
Using a drinking straw or a small circular tool, press a hole near the top edge of the ornament. Make sure it’s not too close to the rim—leave at least a few millimeters of clay for strength. -
Clean the hole:
Twist the straw slightly as you lift it out to remove the small plug of clay cleanly. -
Smooth the edges:
Dip your finger in a tiny bit of water and run it gently around the perimeter of the disc to smooth out any rough distinct ridges left by the cutter.
Step 3: Drying and Finishing
-
Initial drying:
Carefully transfer the parchment paper with the ornaments to a flat board or baking sheet. Place them in a safe, draft-free area to begin drying. -
Flip for flatness:
After about 12 hours, or once the top feels dry to the touch, gently flip the ornaments over. This is a step I always prioritize because it prevents the edges from curling upward as moisture evaporates. -
Full cure time:
Let them dry completely for another 24-48 hours. The clay should turn a chalky, bright white and feel hard when tapped. -
Sanding imperfections:
If there are any sharp jagged edges on the rim or around the hanging hole, very lightly buff them away with fine-grit sandpaper. -
Looping the twine:
Cut a length of jute twine about 8 inches long. Fold it in half to create a loop. -
Securing the hanger:
Feed the folded loop end through the hole from the front to the back. Pass the loose ends through that loop and pull tight to create a lark’s head knot, just like in the reference image.
Add a Little Sparkle
For an icy effect, brush a thin layer of white glue specifically into the snowflake grooves and sprinkle fine iridescent glitter into the crevice.
Hang your new wintry creations on the tree or use them as charming gift toppers to share the season’s joy


Gingerbread-Inspired Clay People Ornaments

Create the warmth of holiday baking without even turning on the oven with this hyper-realistic clay gingerbread man. This project uses polymer clay to mimic the texture of a perfectly baked cookie, complete with dimensional icing details that look good enough to eat.
Step-by-Step Guide
Materials
- Terracotta or Gingerbread-colored polymer clay
- Liquid polymer clay (White)
- Liquid polymer clay (Green)
- Gingerbread man cookie cutter
- Rolling pin or pasta machine
- Texture tool (toothbrush or sandpaper)
- Soft pastels (dark brown and orange)
- Needle tool or toothpick
- Eye pin or small wire loop
- Green satin ribbon (1/4 inch wide)
- Baking sheet and parchment paper
- Small detail brush
Step 1: Baking the Base
-
Prepare the Clay:
Condition your terracotta or gingerbread-colored polymer clay until it is soft and pliable. If the color is too bright, mix in a tiny bit of brown or translucent clay to mute it slightly for a more natural baked look. -
Roll to Thickness:
Roll out the clay to a uniform thickness of about 1/4 inch (6mm). You want it substantial enough to look like a cookie, not a thin cracker. -
Cut the Shape:
Press your gingerbread man cookie cutter firmly into the clay. Wiggle it slightly before lifting to ensuring a clean cut, then gently push the shape out. -
Soften the Edges:
Real cookies puff up when baked, so they don’t have sharp 90-degree edges. Use your finger to gently tap and round off the cut edges all around the figure. -
Add Texture:
To mimic the crumb of a cookie, gently press a clean toothbrush or a piece of course sandpaper all over the surface. Do this lightly; you want a subtle matte texture, not deep gouges. -
Shade the Edges:
Grate some dark brown and orange soft pastels into a powder. Using a soft brush, dust the edges of the ‘cookie’ to simulate the golden-brown browning that happens in an oven. I find focusing on the tips of the hands and feet adds the most realism. -
Insert the Hardware:
Insert a small metal eye pin into the top of the head. Secure it by pushing a tiny bit of clay around the entry point to lock it in. -
First Bake:
Place the clay man on a parchment-lined baking sheet and bake according to your specific clay package instructions. Let is cool completely before moving to the decoration phase.
Step 2: Icing & Assembly
-
Prepare White Icing:
Take your white liquid polymer clay. If it’s too runny, let it sit open for an hour to thicken, or mix in a tiny pinch of white clay to give it body. It should hold a line without spreading. -
Face Details:
Carefully pipe or paint two small dots for eyes and a curved line for the smile using the white liquid clay. A needle tool dipped in the liquid clay works great for precision here. -
The Squiggles:
Add the classic decorative squiggles on the wrists and ankles. Use a steady hand to create wavy lines with the white liquid clay. -
Prepare Green Icing:
For the buttons and bowtie, use green liquid polymer clay. If you don’t have green liquid clay, mix a small amount of green solid clay with liquid gel until it reaches a frosting consistency. -
Add Green Details:
Place three small dots of green down the center for buttons. For the bowtie, place two triangles meeting in the center just below the neck. -
Refine the Bowtie:
While the green clay is wet, use a needle tool to gently imprint a small line in the center of the bowtie triangles to give them a fabric-like crease. -
Final Cure:
Return the ornament to the oven for a second, shorter bake (usually about 15-20 minutes) to set the liquid clay ‘icing’. Watch carefully to ensure the white doesn’t yellow. -
Cool Down:
Allow the ornament to cool completely on a flat surface to prevent warping. -
Finishing Touch:
Thread a length of dark green satin ribbon through the eye pin loop and tie a knot to create the hanger.
Secret Texture Tip
For ultra-realism, mix actual cinnamon or nutmeg spices directly into your clay block before rolling. It adds speckles and smells amazing while baking.
Is Your Icing Spreading?
If your liquid clay lines are drooping, pop the ornament in the freezer for 5 minutes before baking. This preserves the sharp piping details.
Now you have a charming keepsake that captures the sweetness of the season without the expiration date

The Complete Guide to Pottery Troubleshooting
Uncover the most common ceramic mistakes—from cracking clay to failed glazes—and learn how to fix them fast.
Reindeer Face Clay Ornament Medallions
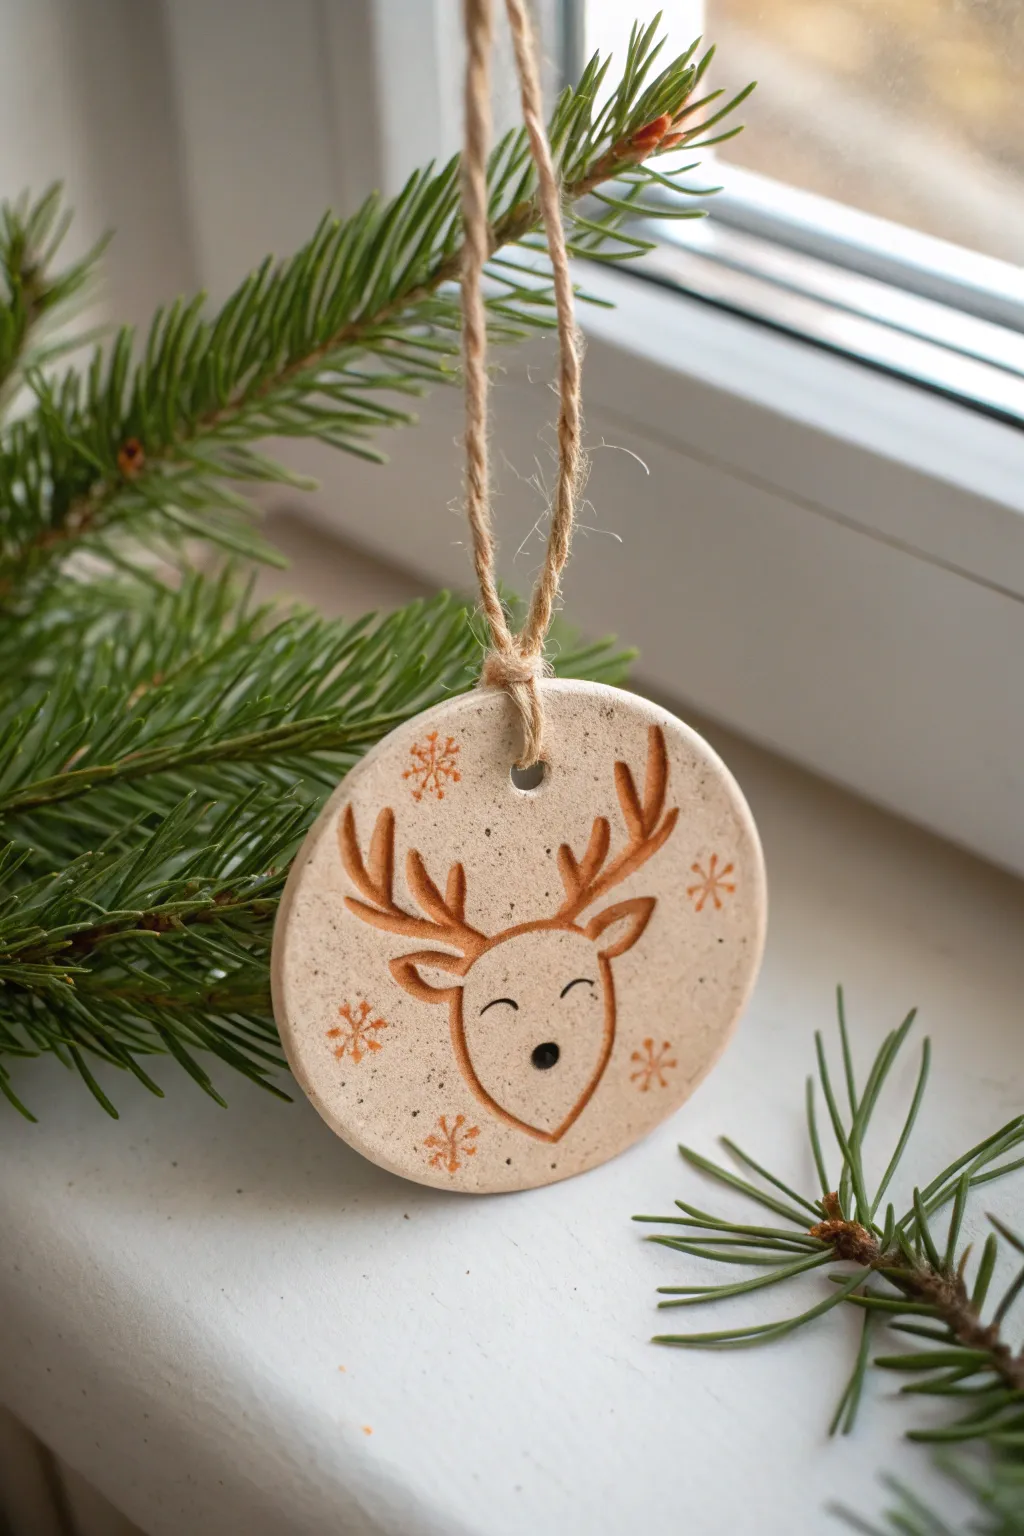
These charming clay ornaments feature a simple, sweetly engraved reindeer face that’s perfect for rustic holiday decor. The speckled clay body gives them a cozy, natural look, while the orange-tinted engraving adds a subtle pop of festive color.
Step-by-Step Tutorial
Materials
- Speckled pottery clay or air-dry clay (e.g., DAS stone effect)
- Rolling pin
- Round cookie cutter (approx. 3 inches)
- Straw or small circular tool (for creating the hole)
- Needle tool or sharp toothpick
- Small carving tool (optional, for deeper lines)
- Orange-brown underglaze or acrylic paint (burnt sienna)
- Black acrylic paint or fine-tip permanent marker
- Small detail paintbrush
- Damp sponge
- Jute twine
Step 1: Shaping the Base
-
Prepare the Clay:
Begin by kneading a small handful of speckled clay until it is pliable and smooth. If you are using plain air-dry clay, you can mix in some coarse sand or cracked pepper to mimic the speckled texture seen in the photo. -
Roll the Slab:
Roll out the clay to an even thickness of about 1/4 inch. I like to use guide sticks on either side of the rolling pin to ensure the surface is perfectly level. -
Cut the Shape:
Press your round cookie cutter firmly into the clay slab. Wiggle it slightly before lifting to ensure a clean cut. -
Smooth the Edges:
Dip your finger in a little water and gently run it around the circumference of the circle to soften any sharp ridges left by the cutter. -
Create the Hanger Hole:
Use a heavy-duty straw or a small circular punch tool to create a hole near the top edge. Ensure it’s centered and not too close to the rim to prevent cracking.
Keep it Clean
If your sponge wiping smears paint everywhere, wait for it to fully dry, then lightly sand the surface with fine-grit sandpaper to reveal the clean clay again.
Step 2: Engraving the Design
-
Outline the Head:
Using a needle tool, lightly sketch an inverted teardrop shape in the center of the circle for the reindeer’s head. -
Sketch the Ears:
Add two leaf-shaped ears extending from the top corners of the head shape, pointing slightly outward. -
Draw the Antlers:
Above the ears, sketch branching antlers. Keep the lines simple—a main stem with two or three smaller points works best for this stylized look. -
Detail the Face:
Mark two small, downward-curved arcs for the sleeping eyes. Leave the nose area blank for now. -
Stamp the Snowflakes:
Using a very small stamp or by free-handing with your needle tool, add simple snowflake asterisks in the negative space around the reindeer. -
Trace and Deepen:
Once you are happy with the sketch, go over your lines with a slightly thicker tool or press firmer with the needle tool to create distinct grooves. The clay needs to be indented enough to hold paint later.
Make it Shine
Before adding the twine, brush a layer of satin or gloss varnish over the nose to make it look wet, or add a tiny dot of white paint for a highlight.
Step 3: Finishing Touches
-
Dry the Clay:
Allow the ornament to dry completely according to your clay’s instructions. If using kiln-fire clay, this is where you would do your bisque fire. -
Fill the Lines:
Dip a fine brush into watered-down orange-brown paint (Burnt Sienna is a great choice). Flooded the carved grooves of the reindeer and the snowflakes with the color. -
Wipe the Surface:
Before the paint dries completely on the surface, take a damp sponge and wipe across the top of the ornament. This removes excess paint from the flat surface but leaves the pigment trapped in the engraved lines. -
Add the Nose:
Using black paint or a fine-tip permanent marker, draw a small, solid black circle at the bottom point of the face for the nose. -
String It Up:
Cut a length of jute twine, fold it in half, and thread the loop end through the hole. -
Secure the Loop:
Pass the loose ends of the twine through the loop and pull tight to create a lark’s head knot, then tie the ends together to finish the hanger.
Hang your new reindeer friend on the tree or use it as a special gift tag for someone dear
Snowman Clay Ornaments With Simple Carved Details
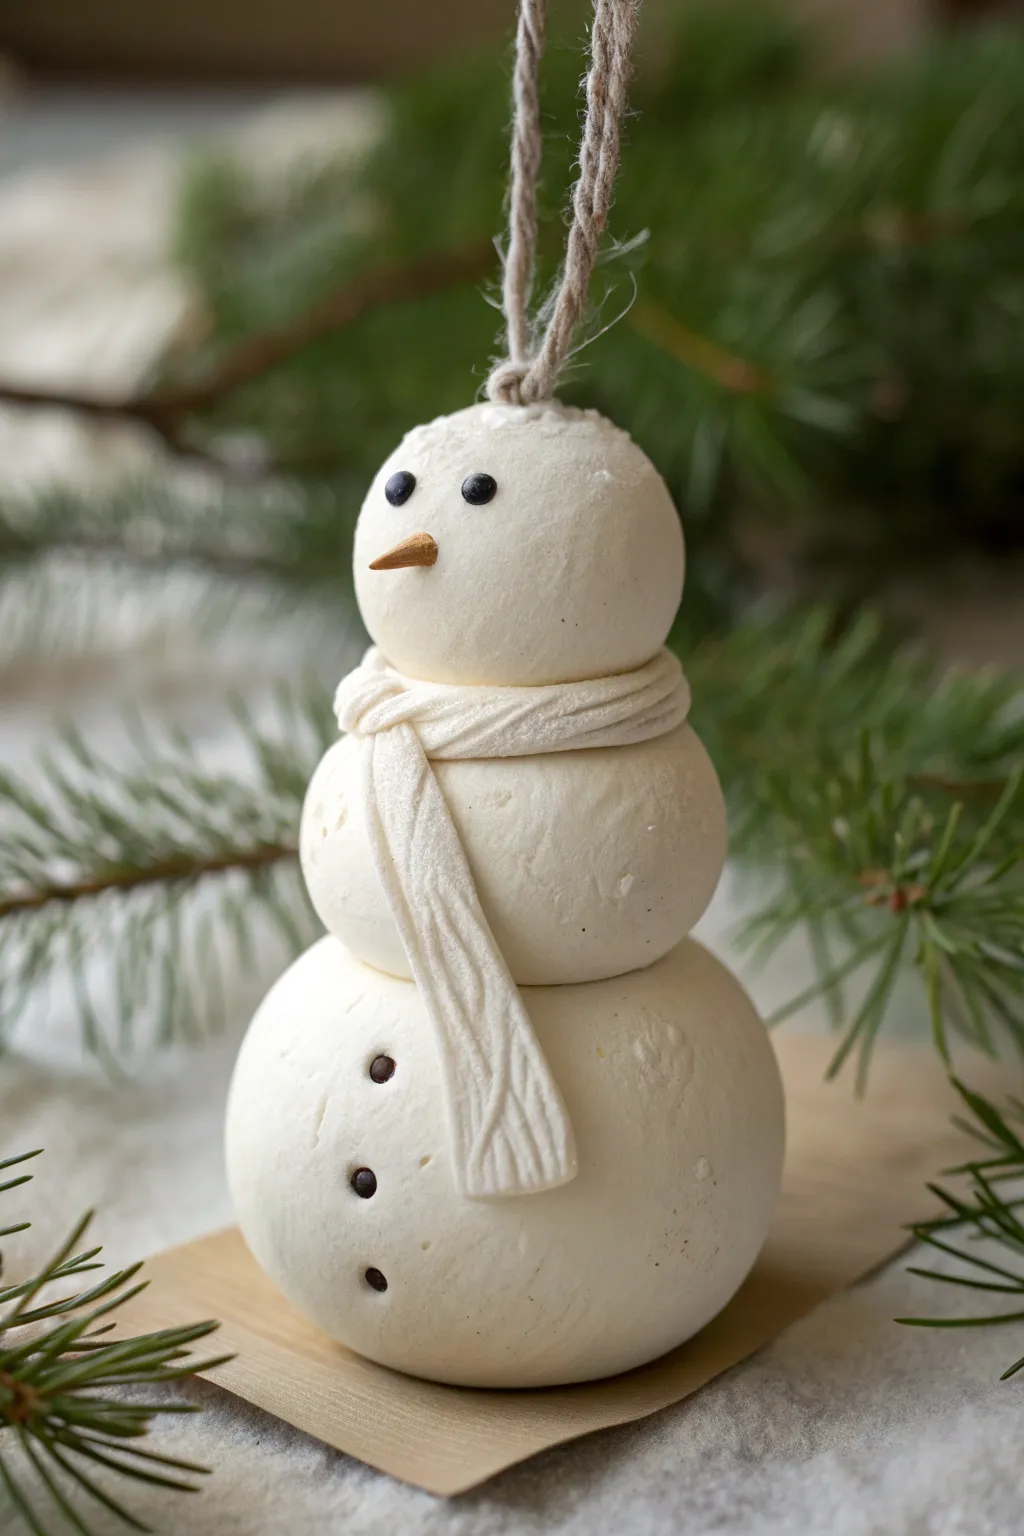
This charming, monochrome snowman ornament combines rustic texture with refined details for a classic winter look. The project uses simple white clay to create a clean, minimalist figure accented by a delicately carved scarf and tiny facial features.
Detailed Instructions
Materials
- White polymer clay or air-dry clay (smooth texture)
- Small amount of orange clay (for nose)
- Small black beads or black clay
- Jute twine or hemp cord
- Needle tool or toothpick
- Small sculpting tool or plastic knife
- Strong craft glue (e.g., E6000 or superglue gel)
- Parchment paper
- Rolling pin
- Texture sponge or stiff brush (optional)
Step 1: Forming the Body
-
Create the base spheres:
Start by rolling three smooth balls of white clay in graduated sizes. You’ll need a large one for the base (about the size of a golf ball), a medium one for the torso, and a slightly smaller one for the head. -
Texture the surface:
Before stacking, gently roll the balls against a piece of parchment paper or tap them lightly with a stiff brush. You want a matte, slightly organic surface rather than a perfectly slick, shiny finish. -
Stack the segments:
Press the largest ball onto your work surface so it sits flat. Place the medium ball on top, centering it carefully, and press down gently to adhere. Finish the stack by adding the head. -
Secure the structure:
If using air-dry clay, you can moisten the contact points with a little water. For polymer clay, insert a toothpick vertically through all three spheres (trimming it so it doesn’t poke out the top) to act as an internal armature.
Step 2: Adding the Scarf
-
Roll the scarf coil:
Roll a thin snake of white clay, roughly 3-4 inches long and about 1/4 inch thick. Flatten it slightly with your finger or a rolling pin so it looks like a ribbon. -
Wrap the neck:
Drape the flattened strip around the snowman’s neck, right where the head meets the torso. Cross the ends over each other at the front, letting one end hang down longer than the other. -
Carve the ribbing:
Using a needle tool or the tip of a knife, gently press vertical lines into the scarf clay. I like to vary the pressure slightly to mimic the look of a cozy, knitted rib pattern. -
Detail the fringe:
At the very ends of the scarf hanging down, make small vertical cuts to simulate fringe.
Troubleshooting: Sagging Shapes
If your snowman starts leaning or squishing under its own weight, bake the body segments for 10 minutes to harden them before adding the details and re-baking.
Step 3: Facial Features
-
Make the eyes:
Press two small black beads into the head for eyes. If you don’t have beads, roll tiny specks of black clay into balls and press them in firmly. -
Form the carrot nose:
Take a tiny pinch of orange clay—less is more here—and roll it into a slender cone shape. -
Attach the nose:
Press the wide end of the cone onto the center of the face. Use your needle tool to gently blend the base of the nose into the white clay so it stays put. -
Add the buttons:
Press three small black beads or clay balls down the front of the bottom sphere to create the coat buttons.
Level Up: Sparkly Frost
Brush the finished (baked and cooled) snowman with a thin layer of matte varnish and immediately sprinkle liberally with fine white glitter for a frosty, snow-dusted effect.
Step 4: Finishing Touches
-
Insert the hanger:
Take a loop of jute twine and tie a knot at the end. Push this knot deep into the top of the snowman’s head using your needle tool. Close the clay over the hole to trap the knot inside. -
Final inspection:
Give your snowman a once-over. Smooth out any fingerprints on the round body segments using a soft brush, being careful not to smudge the scarf texture. -
Bake or dry:
Follow the instructions for your specific clay. If baking polymer clay, tent it with aluminum foil to prevent the white clay from scorching or yellowing. -
Cool and reinforce:
If you used polymer clay, let it cool completely. If any parts like the nose or scarf feel loose after baking, apply a tiny dot of superglue to secure them permanently.
Hang your frosty friend on the tree and enjoy the handmade charm he adds to your branches


What Really Happens Inside the Kiln
Learn how time and temperature work together inside the kiln to transform clay into durable ceramic.
Botanical Pressed Clay Ornaments
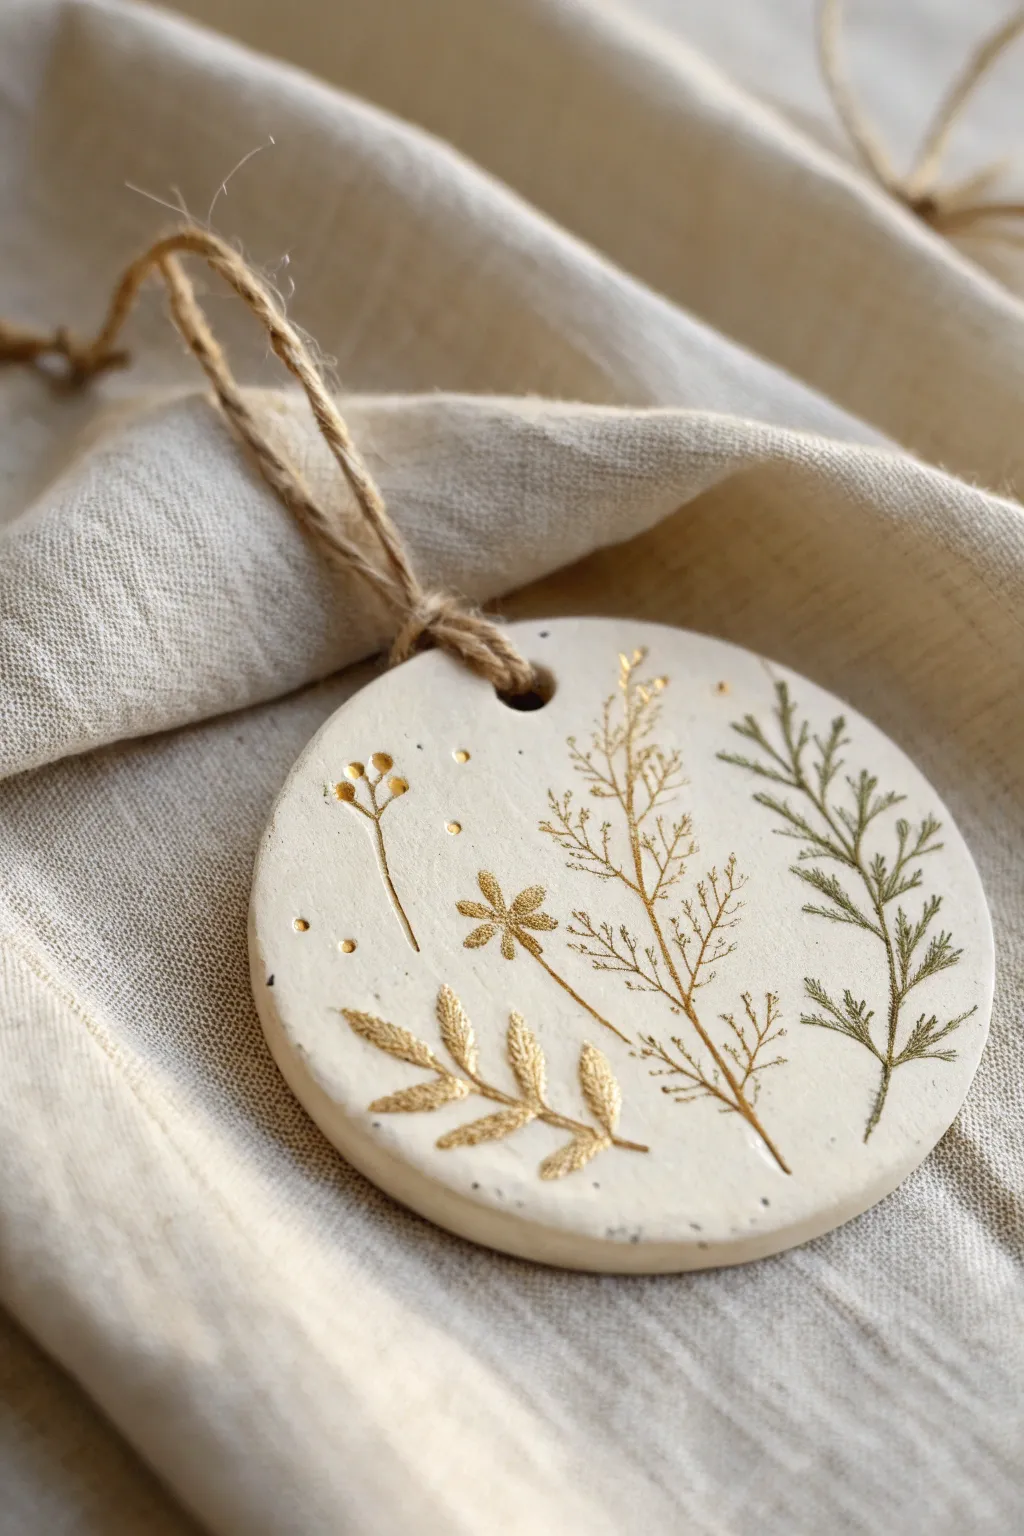
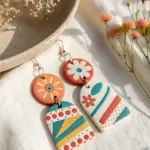
Capture the delicate beauty of nature with this elegant clay ornament, featuring impressed wildflowers and ferns highlighted in stunning metallic gold. The contrast between the matte white clay and the shimmering botanical details creates a sophisticated, heirloom-quality decoration perfect for any season.
Step-by-Step
Materials
- White air-dry clay (or polymer clay)
- Small rolling pin
- Circle cookie cutter (approx. 3-4 inches)
- Fresh or dried botanical sprigs (fern, tiny flowers, leaves)
- Parchment paper or silicone mat
- Straw or small circular tool (for the hanging hole)
- Gold acrylic paint or metallic gilding wax
- Fine-point paintbrush
- Fine-grit sandpaper (optional)
- Jute twine or rustic string
- Clear sealant spray (optional)
Step 1: Preparation and Impression
-
Condition the Clay:
Begin by taking a handful of white air-dry clay. Knead it in your hands until it is warm, pliable, and free of cracks. -
Roll the Slab:
Place the clay on a piece of parchment paper to prevent sticking. Roll it out evenly to a thickness of about 1/4 inch (6mm). Aim for a smooth surface without dips. -
Arrange Your Botanicals:
Select your plant materials. Place a fern frond, a small stemmed flower, and tiny leaf sprigs gently onto the clay surface to plan your composition. Leave space near the top for the hole. -
Press the Design:
Once satisfied with the placement, use the rolling pin to firmly roll *over* the plants once. Apply enough pressure to embed them flush with the clay surface, but not so deep that the clay distorts significantly. -
Remove the Plant Material:
Carefully lift the botanicals out of the clay using tweezers or the tip of a craft knife. Do this slowly to preserve the fine vein details impressed in the clay.
Fixing Shallow Prints
If your plant impression is too faint, don’t re-roll as it creates ‘ghost’ images. Instead, flip the clay slab over, smooth it out, and start fresh on the reverse side.
Step 2: Shaping and Drying
-
Cut the Shape:
Position your circle cookie cutter over the impressed design. Press down firmly to cut the ornament shape, ensuring your botanical pattern is centered or artistically off-center. -
Create the Hanging Point:
Use a straw to punch a clean hole near the top edge of the circle. Twist the straw slightly as you pull it out to remove the clay core neatly. -
Smooth the Edges:
Dip your finger in a little water and gently run it along the cut edge of the circle to smooth out any roughness or burrs left by the cutter. -
Allow to Dry:
Let the clay dry completely according to the package instructions. This usually takes 24-48 hours. Turn the ornament over halfway through the drying process to prevent curling. -
Sand Imperfections:
Once fully cured and hard, use fine-grit sandpaper to lightly buff the edges or surface if any rough spots remain. Wipe away the dust with a dry cloth.
Step 3: Gilding and Finishing
-
Prepare the Gold:
Dispense a small amount of liquid gold leaf or metallic gold acrylic paint onto a palette. If using paint, ensure it is opaque and highly metallic for the best effect. -
Paint the Deepest Impressions:
Dip a very fine-point brush into the gold. Carefully paint into the deep grooves of the stem and main leaf veins. The liquid will naturally want to settle in these recesses. -
Highlight Fine Details:
For the feathery fern textures, use a ‘dry brush’ technique. Wipe most of the paint off the brush and lightly drag it over the textured area so the gold catches just the details. -
Add Decorative Dots:
Using the tip of a toothpick or a dotting tool, add tiny gold dots loosely around the botanical elements to mimic pollen or scattered seeds, adding charm to the empty space. -
Seal the Work:
If desired, apply a matte spray sealant to protect the clay from moisture and prevent the gold from tarnishing over time. -
Attach the Twine:
Cut a length of jute twine, fold it in half, pass the loop through the hole, and pull the tails through the loop to create a secure lark’s head knot.
Pro Tip: Liquid Gold
For the most vibrant metallic look shown here, use an alcohol-based liquid gilding product rather than standard acrylic paint. It sits brighter on the porous clay surface.
Now you have a timeless piece of nature-inspired art ready to hang or gift to a loved one
Name And Date Stamped Clay Tag Ornaments
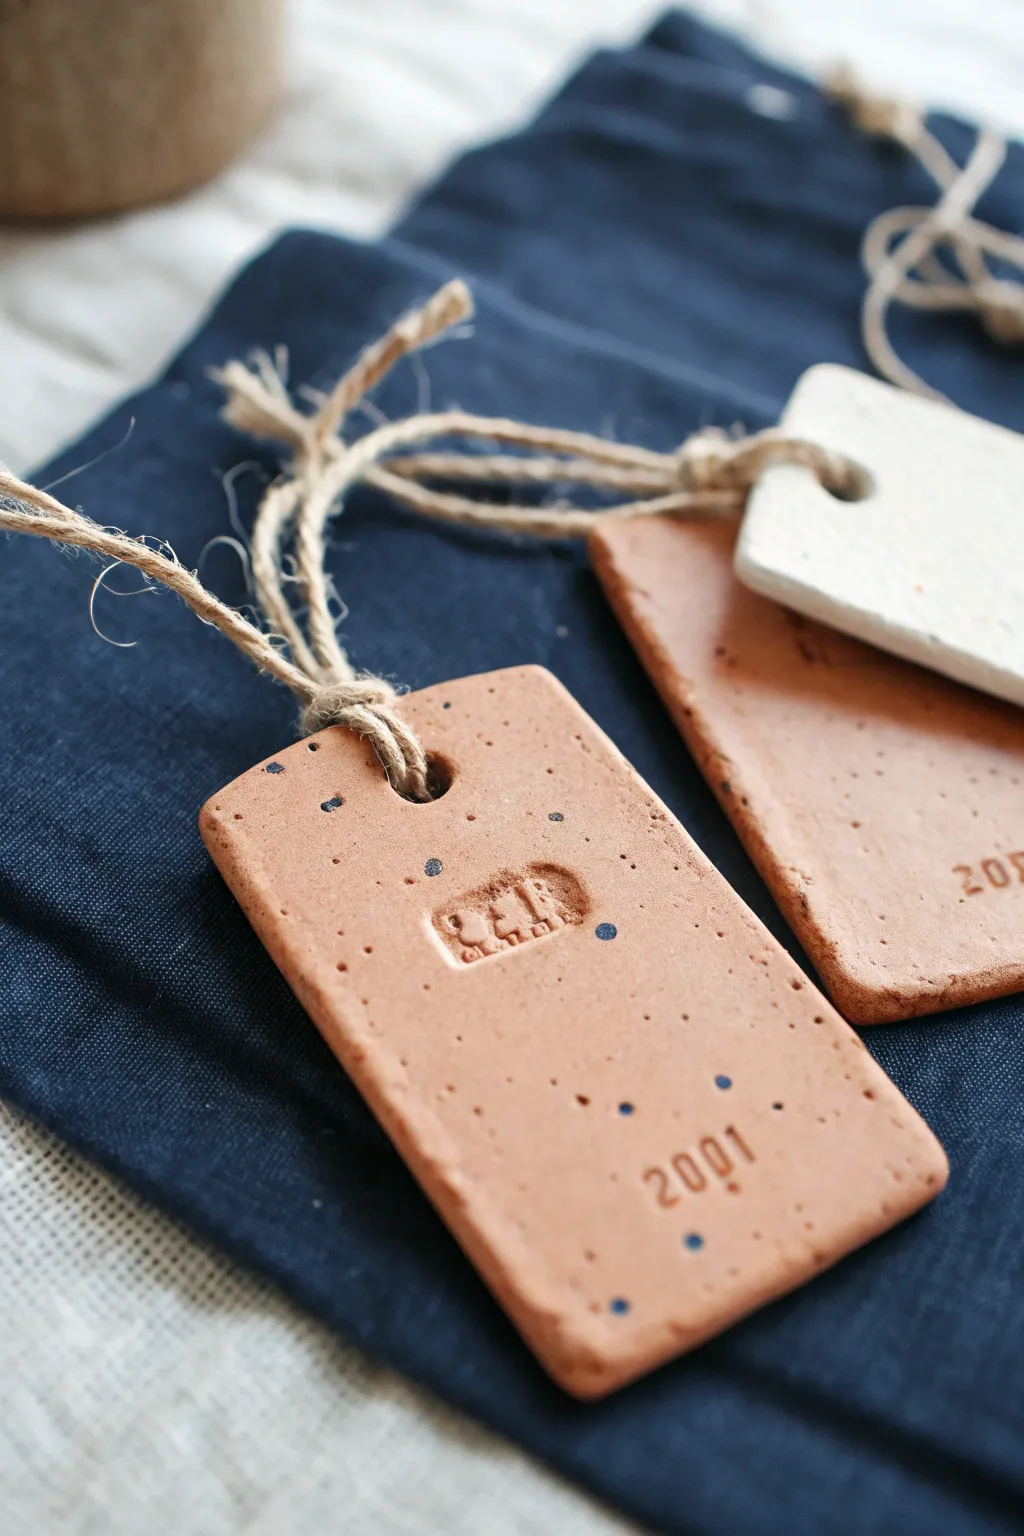
These charming terracotta-colored tags capture a rustic, handmade aesthetic perfect for marking special years or naming gifts. The simple rectangular shape is elevated with custom stamping and delicate blue speckles that add a touch of artistic flair.
Detailed Instructions
Materials
- Terracotta-colored air-dry clay or polymer clay
- White air-dry clay or polymer clay (optional, for variation)
- Rolling pin
- Rectangular clay cutter (or ruler and craft knife)
- Set of small alphabet and number stamps
- Decorative mini stamp (rectangular motif)
- Dark blue acrylic paint
- Fine-grit sandpaper
- Jute twine or hemp cord
- Straw or cocktail stick (for the hole)
- Small paintbrush or toothbrush (for speckling)
- Parchment paper or non-stick work mat
Step 1: Shaping the Base
-
Prepare the Clay:
Begin by conditioning your terracotta clay until it is soft and pliable. If you are using air-dry clay, knead it briefly to remove air bubbles; for polymer clay, work it in your hands until it warms up. -
Roll it Out:
Place the clay on a non-stick surface or parchment paper. Use a rolling pin to flatten the clay to an even thickness of approximately 1/4 inch (about 5-6mm). You want it thick enough to be sturdy but thin enough to look delicate. -
Cut the Shape:
Using a rectangular clay cutter, press firmly into the rolled slab to create your tag shape. Alternatively, use a ruler and a sharp craft knife to measure and cut precise rectangles, smoothing the edges with your finger afterward. -
Create the Hanging Hole:
Before the clay hardens, take a drinking straw or a cocktail stick and punch a hole near the top center of the rectangle. Twist the tool gently as you pull it out to ensure a clean opening.
Clean Edges Tip
Dip your cutter in cornstarch or baby powder before pressing into the clay. This prevents sticking and ensures your rectangle has crisp, sharp edges every time.
Step 2: Adding the Details
-
Stamp the Center Motif:
Select a decorative stamp for the center feature. In the example, a small rectangular design is used. Press the stamp firmly into the center of the soft clay, deep enough to leave a clear impression but not so deep that it distorts the tag’s flatness. -
Add the Date:
Arrange your number stamps to form the desired year (e.g., 2001). Carefully align them near the bottom edge of the tag and press down evenly. I find it helpful to look directly from above to ensure the numbers stay straight. -
Inspect and Refine:
Look over the tag for any accidental fingernail marks or rough edges. Gently smooth these out with a damp fingertip or a soft, damp brush. -
Drying or Baking:
If using air-dry clay, let the tags dry on a flat wire rack for 24-48 hours, flipping them halfway through. If using polymer clay, bake according to the manufacturer’s instructions on the package. -
Sand the Edges:
Once fully cured and cooled, use fine-grit sandpaper to gently buff the edges and corners. This gives the tag a professional, finished feel and removes any sharp burs.
Step 3: The Finishing Touches
-
Prepare the Speckle Paint:
Squeeze a small amount of dark blue acrylic paint onto a palette. add a drop or two of water to thin it slightly—it should be fluid enough to flick but not watery. -
Apply the Speckles:
Dip a stiff-bristled brush or an old toothbrush into the thinned paint. Hold the brush over the tags and run your thumb across the bristles to flick tiny droplets of paint onto the clay surface. Aim for a random, scattered look. -
Clean Up Mistakes:
If a droplet lands where you don’t want it, use a damp Q-tip to dab it away immediately before it dries. -
Let the Paint Dry:
Allow the speckled paint to dry completely. This usually takes only about 15-20 minutes since the droplets are so small. -
Seal (Optional):
For extra durability, you can apply a thin coat of matte varnish over the tag, though leaving the raw clay texture looks wonderful and authentically rustic. -
Attach the Twine:
Cut a length of natural jute twine or hemp cord, roughly 8 inches long. Fold it in half to create a loop. -
Secure the Loop:
Push the folded loop end through the hole in the tag from front to back. Then, pass the loose ends through the loop and pull tight to secure it with a lark’s head knot.
Warped Tags?
If your air-dry clay tags start curling up while drying, place a heavy book (protected by parchment paper) on top of them once they are partially dry to flatten them back out.
Now your custom-dated tags are ready to preserve a memory or adorn a special gift beautifully

TRACK YOUR CERAMIC JOURNEY
Capture glaze tests, firing details, and creative progress—all in one simple printable. Make your projects easier to repeat and improve.
Lace-Textured Clay Ornaments

These charming heart ornaments capture the intricate beauty of lace in a permanent, stone-like finish. The bright white clay highlights every subtle floral detail, making them perfect for rustic or minimalist decor.
Step-by-Step Guide
Materials
- Air-dry clay (white) or polymer clay
- Rolling pin
- Piece of floral lace or a lace doily
- Heart-shaped cookie cutter
- Parchment paper or non-stick craft mat
- Straw or small circular cutter (for the hole)
- Fine-grit sandpaper (optional)
- Jute twine or natural hemp cord
- Scissors
- Small bowl of water (for smoothing)
Step 1: Preparing the Clay Base
-
Condition the clay:
Begin by taking a handful of white air-dry or polymer clay. Knead it thoroughly in your hands until it feels warm, pliable, and free of cracks. -
Set up your workspace:
Lay down a sheet of parchment paper or a non-stick craft mat. This prevents the clay from sticking to your table and makes lifting the delicate shapes easier later. -
Roll the first pass:
Use your rolling pin to flatten the clay into an even slab. Aim for a thickness of about 1/4 inch (6mm). It doesn’t need to be perfectly smooth yet, as we will be rolling it again.
Clean Impressions
If your lace sticks to the fresh clay, lightly dust the clay surface with cornstarch or baby powder before laying the fabric down. This acts as a release agent.
Step 2: Texturing and Cutting
-
Place the lace:
Lay your piece of lace or doily directly onto the clay slab. Position it carefully so the most interesting floral motifs will land where you plan to cut your heart shape. -
Imprint the texture:
Gently roll over the lace with your rolling pin. Press firm enough to embed the fabric pattern deep into the clay, but not so hard that you make the slab paper-thin. One smooth, continuous pass is usually best to avoid shifting. -
Reveal the pattern:
Carefully peel back the lace from one corner to reveal the embossed design. If any clay stuck to the lace, just pick it off gently. -
Cut the shape:
Position your heart-shaped cookie cutter over the most detailed part of the texture. Press straight down firmly, give it a tiny wiggle to separate the edges, and lift the cutter up. -
Remove excess clay:
Peel away the scrap clay from around the outside of the heart, leaving the cutout shape on the parchment. -
Smooth the edges:
Dip your finger in a little bit of water and run it gently along the cut edge of the heart to soften any sharp ridges or burrs left by the cutter. -
Create the hanging hole:
Use a drinking straw or a small circular tool to punch a hole near the top center of the heart. Make sure it isn’t too close to the edge, so the clay remains strong.
Step 3: Finishing and Assembly
-
Let it dry completely:
Allow the ornament to dry according to your clay’s package instructions. For air-dry clay, I usually leave mine for 24-48 hours, flipping it halfway through to ensure even drying. -
Sand for perfection:
Once fully cured and hard, inspect the edges. If there are any rough spots, gently buff them away with fine-grit sandpaper for a professional finish. -
Cut the twine:
Cut a length of jute twine, approximately 8 to 10 inches long, depending on how low you want the ornament to hang. -
Thread the loop:
Fold the twine in half to create a loop. Push the folded end through the hole in the heart from front to back. -
Secure the hanger:
Pull the two loose tails of the twine through the loop you just pushed through the hole. This creates a secure lark’s head knot that sits flat against the clay. -
Knot the ends:
Bring the two loose ends of the twine together and tie a simple overhand knot at the top to close the loop.
Add a Wash
After drying, lightly brush watered-down acrylic paint (brown or grey) over the texture and wipe it back immediately. The color stays in the grooves, making the lace pop.
Hang your textured heart on a seasonal branch or wrap it as a gift tag to enjoy its simple elegance
Sweater-Pattern Texture Clay Ornaments
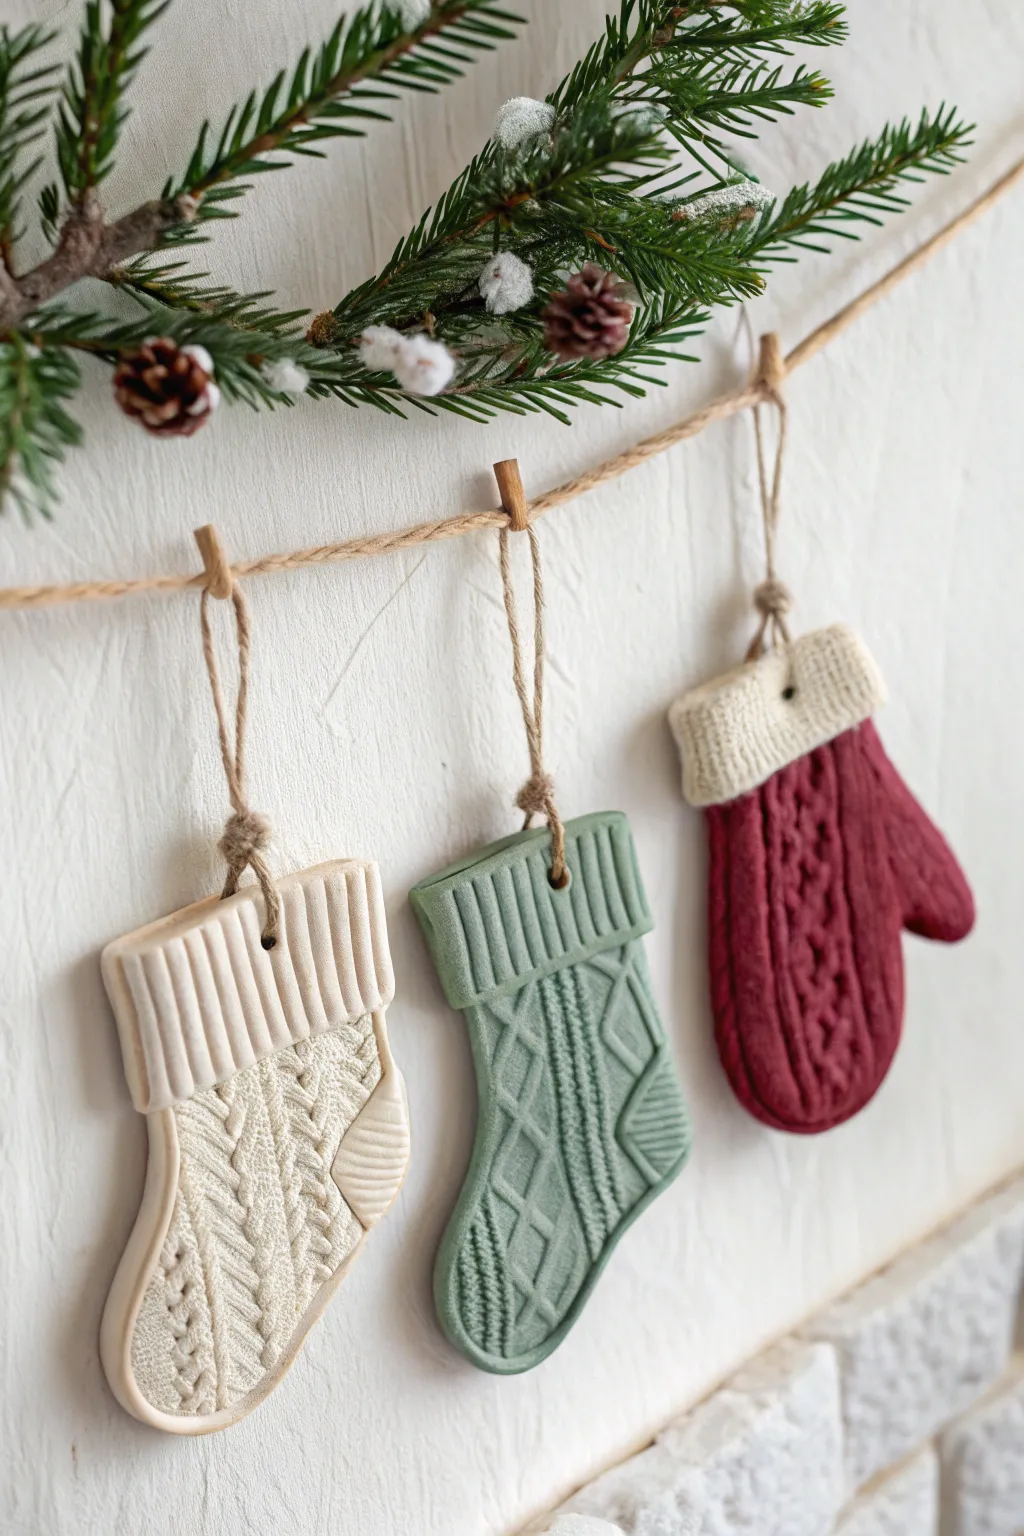
Capture the warmth of a favorite winter sweater in these charming clay ornaments. With realistic cable-knit textures and soft, muted colors, these stocking and mitten shapes add a cozy, handmade touch to your holiday decor.
How-To Guide
Materials
- White polymer clay or air-dry clay
- Rolling pin
- Stocking and mitten cookie cutters
- Old sweater, cable-knit fabric scrap, or silicone knitting texture mat
- Mod Podge or clear sealant
- Acrylic paints (Burgundy, Sage Green, Beige/Cream)
- Fine grit sandpaper
- Twine or jute string
- Small wooden clothespins (optional for display)
- Drinking straw or skewer (for making holes)
Step 1: Preparation & Texture
-
Condition the clay:
Begin by kneading your clay until it is soft, pliable, and free of cracks. If you are using polymer clay, warm it in your hands for a few minutes to make it easier to work with. -
Roll out the slab:
Use your rolling pin to flatten the clay into an even sheet. Aim for a thickness of about 1/4 inch (6mm) to ensure the ornaments are sturdy but not too heavy. -
Create the texture:
Lay your piece of cable-knit fabric or texture mat directly on top of the clay slab. Firmly roll over it with the rolling pin once to imprint the pattern deeply. -
Check the impression:
Carefully peel back the fabric to reveal the design. If the impression is too faint, re-roll the clay and try again with more pressure.
Step 2: Cutting & Shaping
-
Cut the shapes:
Position your cookie cutters over the textured clay. Press down firmly to cut out your stocking and mitten shapes, trying to align the ‘cables’ of the knit pattern vertically for realism. -
Create cuffs:
For added detail, cut a separate small rectangular strip of textured clay for the cuff. Using a ribbed texture specifically for this top part mimics the ribbing on real socks and mittens. -
Attach the cuffs:
Gently press this strip onto the top of your cut-out shape. I find scoring the back of the strip slightly helps it adhere better to the main body. -
Smooth the edges:
Dip your finger in a little water (for air-dry clay) or baby oil (for polymer) and run it along the cut edges to smooth out any ragged bits from the cutter. -
Make the hanging hole:
Use a drinking straw or a skewer to punch a clean hole at the top of the ornament. Make sure it’s not too close to the edge to prevent breaking later.
Sticky Situation?
If the clay sticks to your sweater fabric, dust the clay surface lightly with cornstarch or baby powder before pressing the texture in. Brush it off after cutting.
Step 3: Finishing
-
Bake or dry:
Follow the manufacturer’s instructions for your specific clay. Bake polymer clay in the oven on a parchment-lined sheet, or let air-dry clay sit undisturbed for 24-48 hours. -
Sand imperfections:
Once fully cured and hard, lightly sand the edges with fine-grit sandpaper if there are any sharp spots remaining. -
Paint the base:
Paint the entire ornament in your chosen colors—deep red for the mitten, sage green, and cream for the stockings. You’ll want an opaque, matte finish. -
Dry and seal:
Allow the paint to dry completely. Finish with a coat of matte varnish or Mod Podge to protect the paint without making it look plasticky. -
Add the hanger:
Cut a length of rustic twine, loop it through the hole, and tie a secure knot. For the look in the photo, create a larger loop so they hang lower on the garland.
Make it Pop
After the base paint dries, use a dry brush with a tiny bit of white paint to lightly dust the raised ‘knit’ ridges. This highlights the texture beautifully.
Hang these textured treasures on a garland or the tree for a cozy winter vibe
Fingerprint Light String Tree Ornaments
Capture the magic of the holidays with this charming and personalized clay keepsake. Featuring a classic tree silhouette adorned with colorful, thumb-pressed “lights,” this ornament makes a simple yet heartfelt addition to your festive decor.
Step-by-Step Tutorial
Materials
- White air-dry clay or salt dough
- Rolling pin
- Christmas tree cookie cutter (approx. 4-5 inches)
- Small straw or skewer
- Fine-grit sandpaper
- Acrylic paints (red, green, blue, yellow, orange)
- Small round paintbrush
- Jute twine or rustic string
- Clear matte sealant spray (optional)
- Parchment paper
Step 1: Shaping the Base
-
Prepare your workspace:
Lay down a sheet of parchment paper on a flat surface to prevent the clay from sticking as you work. -
Condition the clay:
Take a handful of white air-dry clay and knead it gently in your hands until it feels soft, warm, and pliable. -
Roll it out:
Using your rolling pin, flatten the clay to an even thickness of about 1/4 inch; you want it sturdy but not too heavy. -
Cut the shape:
Press your Christmas tree cookie cutter firmly into the rolled clay and wiggle it slightly before lifting to separate the shape. -
Smooth the edges:
Dip your finger in a little bit of water and run it along the cut edges of the tree to smooth out any roughness or loose bits of clay. -
Create the hanging hole:
Use a straw to punch a clean hole at the very top point of the tree, ensuring it’s not too close to the edge to prevent breaking.
Clean Edges Pro-Tip
Work a tiny drop of lotion into your hands before kneading. This smooths your fingerprints out of the clay and helps keep the edges significantly cleaner while cutting.
Step 2: Creating the Texture
-
Make the impressions:
This is the fun part where I like to get creative with placement. Use the tip of your pinky finger or a dull rounded tool to press small, shallow indentations scattered across the tree surface. -
Dry the ornament:
Place the clay tree on a flat surface away from direct heat and let it dry completely according to the package instructions, usually 24-48 hours. -
Sand for perfection:
Once fully hard, gently brush the edges with fine-grit sandpaper if there are any remaining sharp points or uneven areas.
Cracking Clay?
If you notice small cracks forming as the clay dries, mix a tiny bit of fresh clay with water to make a paste and fill the cracks, then smooth over with a damp finger.
Step 3: Painting and Finishing
-
Prepare your palette:
Squeeze small dots of your acrylic paint colors onto a palette or paper plate. -
Fill the lights:
Using a small round brush, carefully paint fill each indented dot with a different color to resemble Christmas lights. -
Add dimension:
For a vintage look, you can leave the paint slightly thicker in the center of the dot to create a textured, raised effect. -
Let the paint set:
Allow the painted dots to dry completely, which should take about 20 to 30 minutes. -
Seal the piece:
If desired, give the ornament a light coat of clear matte sealant spray to protect the paint and clay from moisture. -
Prepare the hanger:
Cut a length of jute twine approximately 8 inches long. -
Thread the twine:
Feed one end of the twine through the hole at the top of the tree. -
Secure the loop:
Bring the ends of the twine together and tie a tight overhand knot near the ends to form a hanging loop.
Now hang your beautiful handmade creation on the tree and enjoy the holiday sparkle
Mini Clay Wreath Ornaments
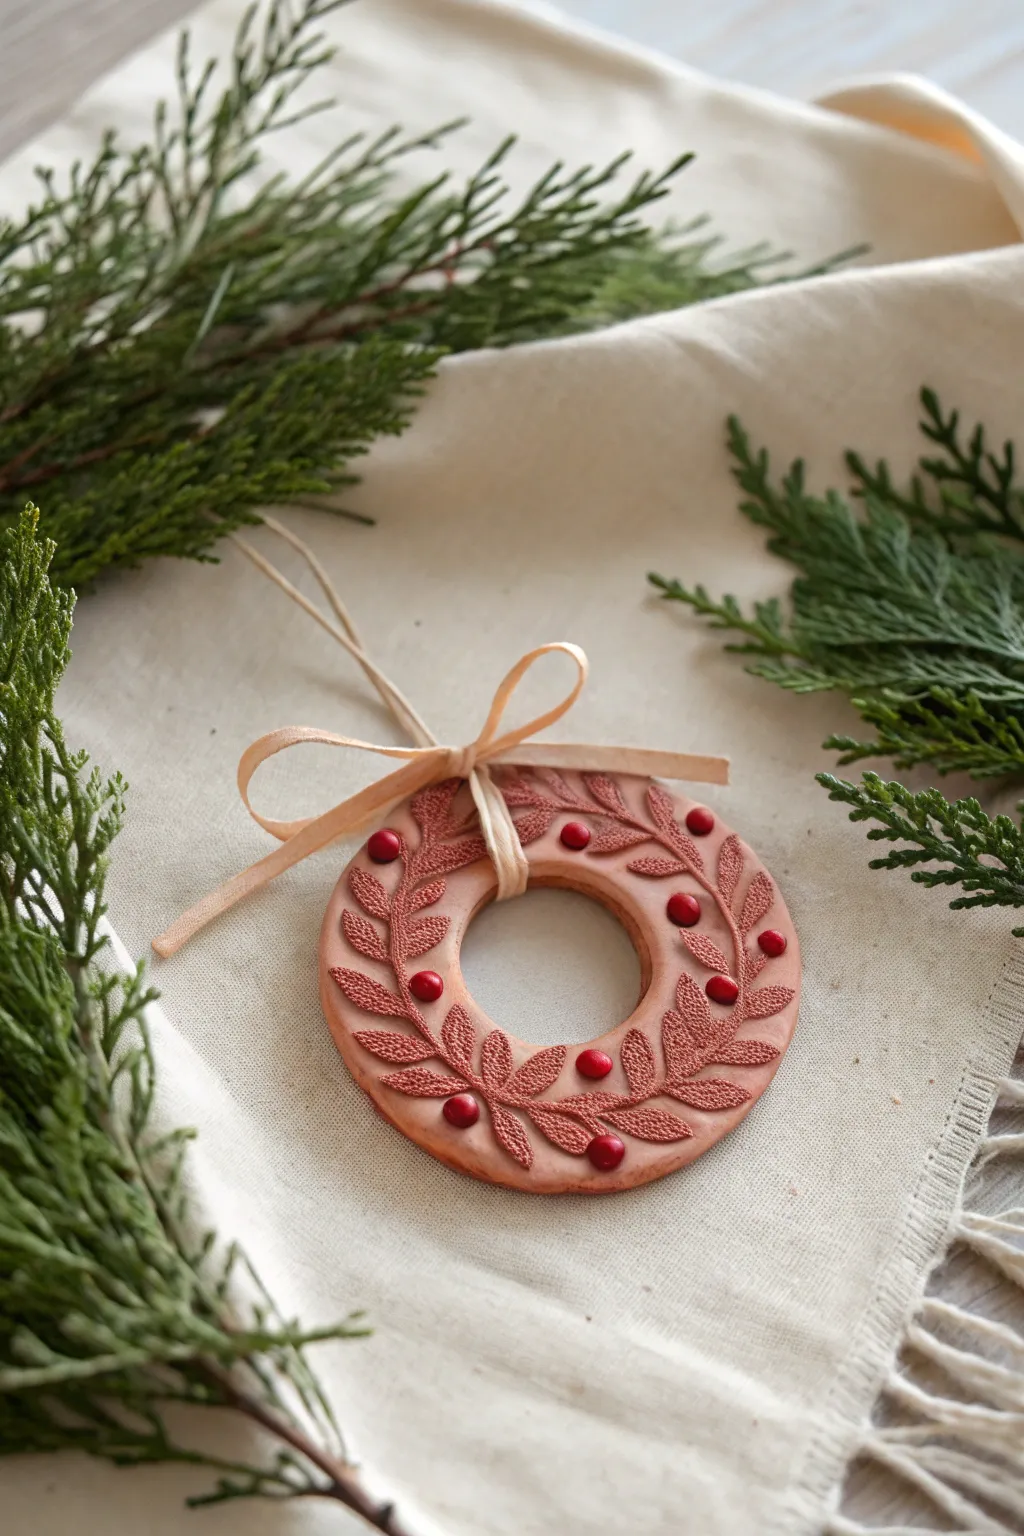
This rustic, nature-inspired ornament captures the warmth of the holidays with its terracotta hue and delicate botanical wreath design. The simple yet elegant impression of evergreen sprigs and bright holly berries creates a timeless piece perfect for hanging on the tree or gifting.
How-To Guide
Materials
- Terracotta-colored polymer clay (or air-dry clay tinted with acrylics)
- Round cookie cutter (approx. 3-inch diameter)
- Smaller round cutter (approx. 1-inch diameter)
- Fresh cedar, cypress, or fern sprigs (for stamping)
- Red acrylic paint
- Small dotting tool or toothpick
- Rolling pin
- Parchment paper or clay mat
- Straw or skewer (for hole punching)
- Beige raffia or thin satin ribbon
- Baking sheet and oven (if using polymer clay)
Step 1: Shaping the Base
-
Prepare the Clay:
Start by conditioning your terracotta polymer clay in your hands until it is soft and pliable. If you are using white air-dry clay, knead in a small amount of brown and orange acrylic paint to achieve that warm earthy tone. -
Roll it Out:
Place the clay on a sheet of parchment paper. Use your rolling pin to flatten the clay into an even slab, aiming for a thickness of about 1/4 inch so the ornament feels substantial. -
Cut the Outer Circle:
Press your larger round cookie cutter firmly into the clay to create the main shape of your ornament. Do not remove the excess clay around the edges just yet, as it helps keep the shape stable during stamping. -
Cut the Center:
Use the smaller round cutter to remove the very center of the circle, creating the classic doughnut wreath shape. Carefully lift out the center clay plug.
Clean Impressions
Dust your greenery sprigs lightly with cornstarch or baby powder before pressing them into the clay. This acts as a release agent and prevents the leaves from sticking.
Step 2: Texturing the Wreath
-
Choose Your Botanicals:
Select small, sturdy sprigs of cedar or cypress. Fresh greenery works best because dried leaves can crumble into the clay. -
Position the Greenery:
Lay the sprigs onto the clay ring in a curved pattern, mimicking the flow of a real wreath. The stem ends should all point in roughly the same direction around the circle. -
Create the Impression:
Gently roll over the greenery with your rolling pin. Apply enough pressure to embed the texture deep into the surface, but be careful not to distort the circle’s shape. -
Reveal the Design:
Using tweezers or a needle tool, very carefully peel the greenery away from the clay. I find lifting from the stem end usually prevents tearing the delicate clay surface. -
Clean Up Edges:
Now, peel away the excess clay from the outside of the ring. Smooth any rough edges on the inner or outer rim with your fingertip dipped in a tiny bit of water (or baby oil for polymer clay). -
Add Suspension Hole:
Use a straw or skewer to poke a hole at the top of the wreath for hanging later. Ensure the hole is wide enough for your chosen ribbon.
Gilded Glamour
After baking, create an antique finish by lightly brushing a metallic gold wax or dry-brushing gold paint over the raised leaf textures.
Step 3: Adding Details
-
Form the Berries:
Roll tiny spheres of leftover clay, about the size of a peppercorn. If you are using polymer clay, you can use red clay here; otherwise, use the same base color and we will paint them later. -
Attach the Berries:
Press these tiny spheres gently onto the wreath surface, spacing them out unevenly for a natural look. If the clay is dry, use a dab of liquid clay or water to help them stick. -
Bake or Dry:
Follow the manufacturer instructions for your specific clay. For polymer clay, bake on a parchment-lined sheet at the recommended temperature (usually 275°F/135°C). For air-dry clay, let it sit undisturbed for 24-48 hours.
Step 4: Finishing Touches
-
Cool Down:
Allow the ornament to cool completely if baked. This hardens the clay and prepares it for any painting. -
Paint the Berries:
If you used terracotta-colored clay for the berries, take a fine detail brush and carefully paint just the raised berry dots with bright red acrylic paint. Two coats will give them a nice pop. -
Attach the Ribbon:
Cut a length of beige raffia or satin ribbon. Thread it through the hole you created earlier. -
Tie the Bow:
Tie the ends into a simple shoelace bow right at the base of the loop, trimming the tails to a length that complements the size of the wreath.
Hang your handcrafted wreath on a sturdy branch and enjoy the rustic charm it adds to your holiday decor
Clay Bell Ornaments With Glossy Finish
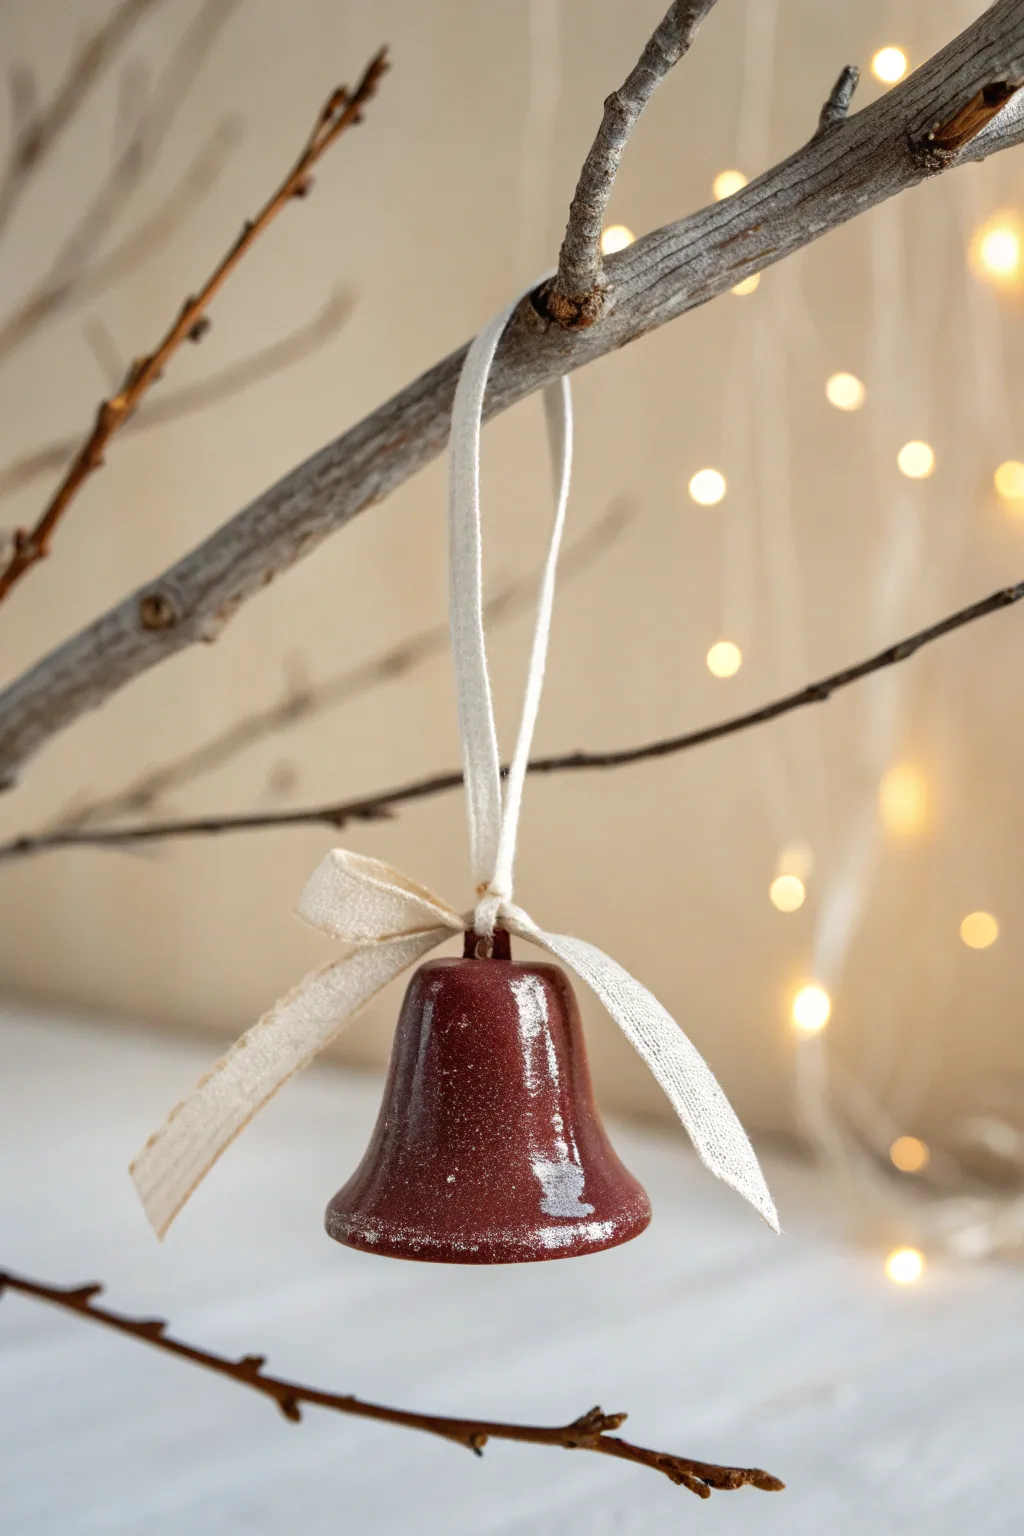
These charming bell ornaments bring a rich, classic feel to your holiday decor with their deep burgundy glaze and delicate textured details. The imperfect, handmade shape and glossy finish mimic the look of traditional kiln-fired pottery without requiring any specialized equipment.
Step-by-Step Guide
Materials
- Air-dry clay (white or terracota)
- Small rolling pin
- Bell-shaped cookie cutter (optional) or craft knife
- Small styrofoam ball or rounded mold
- Sandpaper (fine grit)
- Acrylic paint (deep burgundy/maroon)
- Glossy varnish or glaze (polyurethane or Mod Podge Gloss)
- White texture paste or white acrylic paint
- Small sponge or stiff paintbrush
- Twine or ribbon for hanging
- Awl or toothpick
- Thin fabric ribbon (cream or white)
Step 1: Shaping the Clay
-
Prepare the Clay:
Start by conditioning a ping-pong ball sized amount of air-dry clay. Knead it in your hands until it is soft, pliable, and free of cracks. -
Roll it Out:
Roll the clay flat on a smooth surface to a thickness of about 1/4 inch. If the clay sticks, you can dust your surface lightly with cornstarch. -
Cut the Basic Shape:
Cut out a circle approximately 3-4 inches in diameter. You don’t need a perfect circle; a slightly organic edge adds to the rustic charm. -
Form the Dome:
Drape your creative clay circle over a small ball, egg cup, or rounded form to create the bell’s dome shape. Gently smooth the sides down so they flare out slightly at the bottom rim. -
Create the Hanger Loop:
Roll a very small snake of clay and form it into a small loop. Attach this securely to the very top of your bell using a dab of water to slip and score the connection. Ensure the hole is wide enough for your ribbon. -
Refine the Edges:
Dip your finger in water and run it along the bottom rim and the surface to smooth out any fingerprints or harsh cracks. I find this step crucial for getting that professional ceramic look. -
Dry Completely:
Set the bell aside to dry in a safe place. This usually takes 24-48 hours depending on humidity. Rotate it occasionally so the inside dries as well.
Smooth Operator
Use a damp makeup sponge to smooth your clay before it dries. It works better than fingers for erasing prints and creates a porcelain-smooth surface.
Step 2: Painting and Finishing
-
Sand Imperfections:
Once fully dry, lightly sand any rough spots or sharp edges with fine-grit sandpaper. Wipe away all dust with a slightly damp cloth. -
Base Coat:
Paint the entire exterior of the bell with a deep burgundy acrylic paint. Apply thin, even layers. Let the first coat dry completely before adding a second to ensure opaque coverage. -
Add Texture Details:
To create the weathered, snowy look seen in the photo, dip a dry sponge or stiff brush lightly into white texture paste or thick white paint. Dab off the excess on a paper towel. -
Apply the Frosting:
Gently stipple the white paint onto the bottom rim and randomly on the side of the bell. You want a distressed effect, not solid coverage, to mimic frost or worn glaze. -
Gloss Steps:
Once the paint is thoroughly dry, apply a high-gloss varnish over the entire bell. This mimics the shine of fired ceramic glaze and protects the paint. -
Second Gloss Coat:
For an extra glassy shine, apply a second coat of varnish after the first one has cured. This depth really elevates the finished piece. -
Attach Ribbon:
Cut a length of cream-colored fabric ribbon. Thread it through the clay loop at the top of the bell. -
Tie the Bow:
Tie the ribbon into a loop for hanging, and then tie a separate small bow right at the base of the loop, securing it with a dot of glue if necessary so it sits perfectly atop the bell.
Make it Ring
Before drying, punch a small hole inside the top of the bell. Later, hang a wooden bead on a string inside to make a functional clapper that actually chimes.
Enjoy hanging your handcrafted bell on the tree or gifting it as a sophisticated holiday keepsake
Tiny Clay House Ornaments For A Village Tree Theme
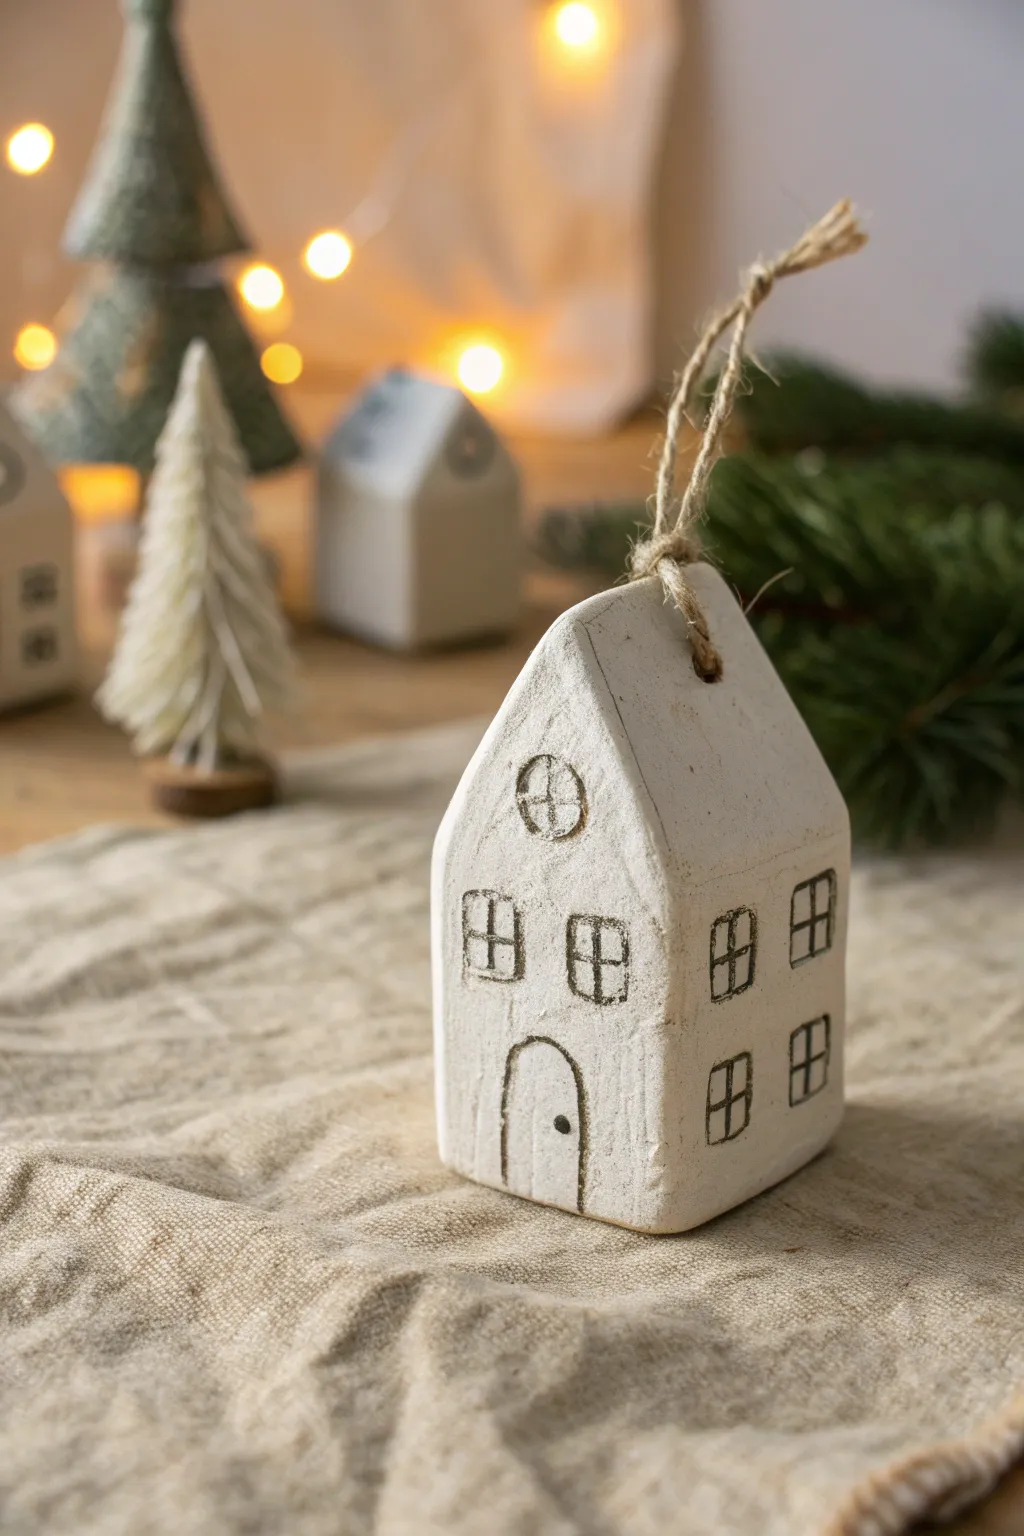
Create a charming, hygge-inspired village for your tree with these simple white clay house ornaments. Featuring hand-carved details and a textured, matte finish, they bring a cozy and modern handcrafted feel to your holiday decor.
How-To Guide
Materials
- White creativity air-dry clay or polymer clay
- Rolling pin
- Sharp crafting knife (X-Acto)
- Ruler or straight edge
- Needle tool or toothpick
- Water in a small cup
- Sandpaper (fine grit)
- Black acrylic paint
- Small paintbrush
- Paper towel or rag
- Jute twine for hanging
- Cookie cutters (optional, for basic house shape)
Step 1: Shaping the Structure
-
Condition the clay:
Begin by kneading a chunk of your white clay until it is soft, pliable, and free of cracks. Warm hands help this process go faster. -
Form the block:
Instead of rolling it flat, shape the clay into a thick, rectangular block. You want this ornament to have significant depth, roughly 1 to 1.5 inches thick, to mimic a 3D building rather than a flat cutout. -
Refine the sides:
Tap the block gently on your work surface to flatten the bottom so it stands upright on its own. Use your ruler to press against the sides, ensuring they are straight and boxy. -
Cut the roof pitch:
Determine the center point of the top of your block. Using your sharp crafting knife, slice downwards at an angle from the center point to the side walls to create a steep, pitched roof shape. -
Smooth the surfaces:
Dip your finger in a little bit of water and run it over the cut edges of the roof to soften any harsh sharpness. The goal is a smooth, handmade stone look. -
Add texture:
To achieve the slightly weathered, stone-like texture seen in the photo, gently pat the surface with a crumpled ball of aluminum foil or a stiff paintbrush. Ideally, keep it subtle.
Step 2: Carving Details
-
Outline the door:
Using a needle tool or a sharp toothpick, lightly scratch an arched doorway onto the front center of the house. Once satisfied with the placement, press deeper to engrave the line. -
Carve the attic window:
Near the peak of the roof, carve a small circle. Add a cross inside for the window panes. I find dragging the tool slowly creates a cleaner line than trying to gouge it out quickly. -
Add main windows:
Carve two rectangular windows on the front facade and two on the side wall. Add the cross-pane details to each rectangle. -
Deepen the engravings:
Go over all your carved lines a second time to ensure they are deep enough to hold paint later. The clay may shrink slightly as it dries, so a deeper groove is better. -
Add a doorknob:
Press the tip of your needle tool into the door area to create a small, distinct dot for the handle. -
Create the hanging hole:
Insert a skewer or large needle tool straight through the peak of the roof, from front to back. Wiggle it slightly to ensure the hole is wide enough for your jute twine.
Uneven Clay Texture?
If the clay creates sharp ridges when you carve, wait 15 minutes for it to firm up slightly, or dip your tool in water before slicing.
Step 3: Finishing Touches
-
Dry the ornament:
Allow the clay to dry completely according to the package instructions. For air-dry clay of this thickness, this may take 24-48 hours. Turn it occasionally for even drying. -
Sand imperfections:
Once fully cured, use fine-grit sandpaper to gently smooth any rough burrs on the edges or corners, but leave some texture for character. -
Apply the dark wash:
Dilute a small amount of black acrylic paint with water until it’s very thin. Paint this wash into the carved grooves of the windows and door. -
Wipe away excess:
Immediately use a damp paper towel to wipe the surface of the clay. The black paint should stay trapped in the carved lines while the surface returns to white, creating a high-contrast sketch effect. -
Clean up stains:
If the paint stained the surface too much, use a clean, damp cloth or very light sanding to brighten the white areas back up. -
Attach the hanger:
Cut a length of jute twine. Thread it through the hole in the roof and tie a secure knot at the base of the loop.
Vintage Patina Tip
For an aged look, mix a tiny drop of brown paint into your black wash. It softens the contrast and warms up the finished ornament.
Hang your little clay cottage on a prominent branch and enjoy the cozy atmosphere it brings to your tree
Photo Holder Clay Frame Ornaments
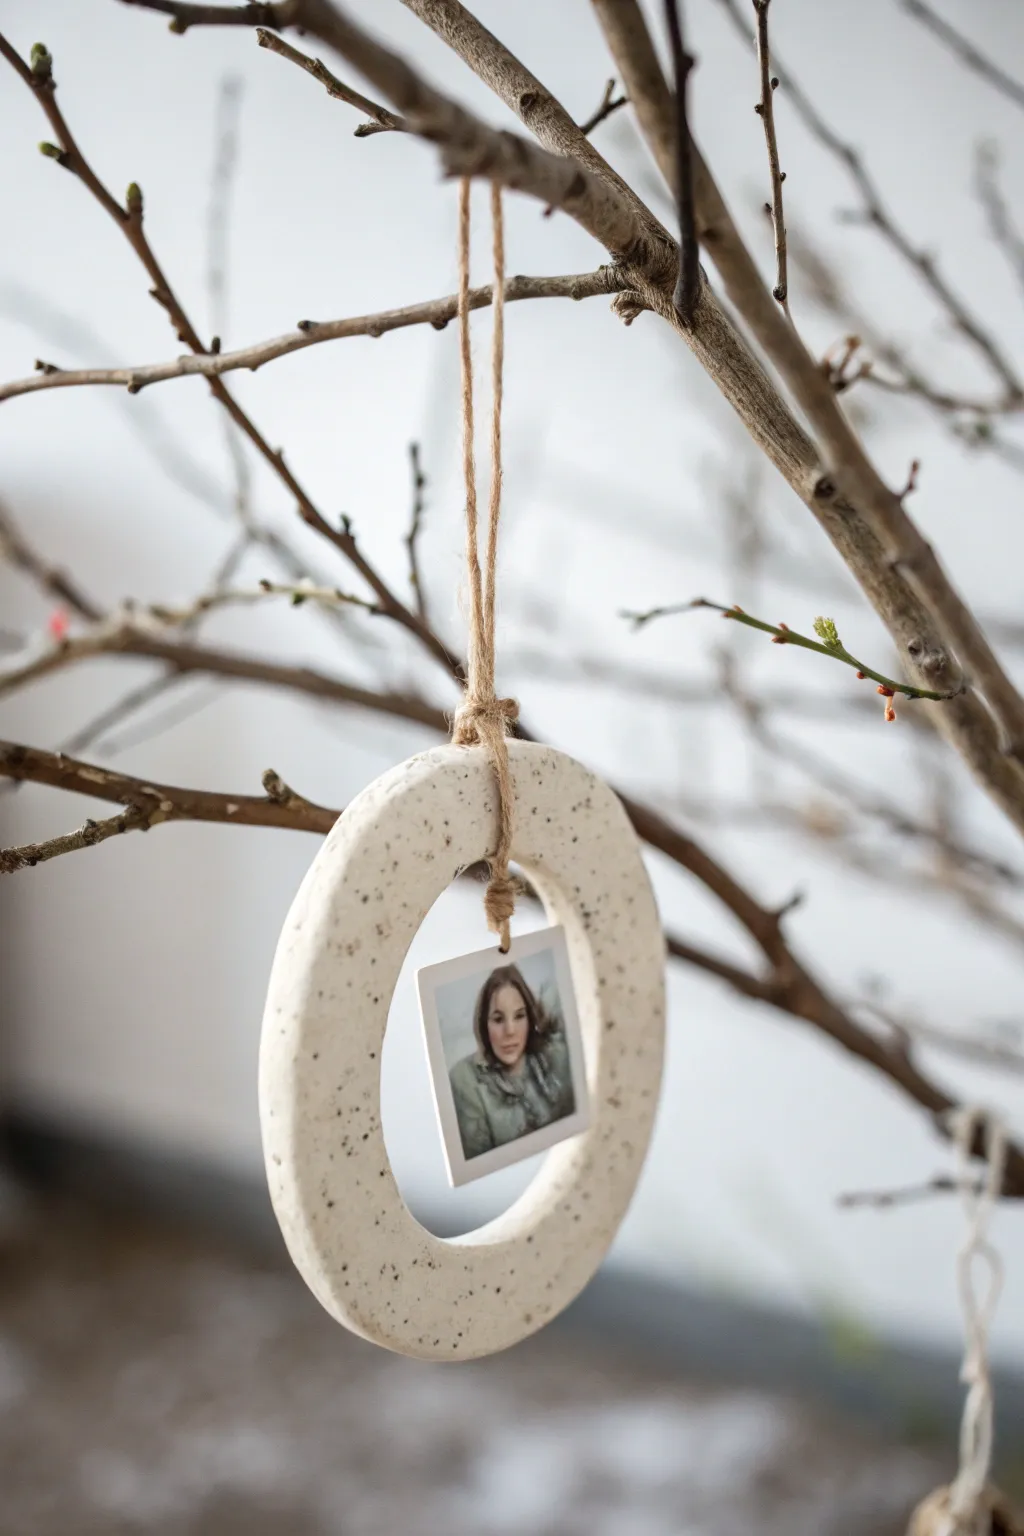
Showcase your favorite memories with this minimalist, modern clay ornament that features a unique suspended photo design. The speckled clay texture gives it a beautiful, organic stoneware look without needing a kiln, perfect for hanging on a decorative branch or holiday tree.
Step-by-Step Guide
Materials
- White air-dry clay (or polymer clay)
- Black pepper or dried coffee grounds (for speckling)
- Rolling pin
- Two circle cutters (one large approx. 3-4 inches, one smaller approx. 2 inches)
- Jute twine or hemp cord
- Instant photo prints or small square photos
- White cardstock (optional)
- Craft glue or tape
- Toothpick or skewer
- Sandpaper (fine grit)
- Matte varnish or sealant
Step 1: Preparing the Speckled Clay
-
Condition the clay:
Start by taking a handful of white air-dry clay. Knead it thoroughly in your hands until it becomes warm, soft, and pliable to prevent cracking later. -
Add the texture:
To achieve that trendy speckled stoneware look, sprinkle a generous pinch of coarse black pepper or dried used coffee grounds onto the clay. -
Incorporate the speckles:
Fold the clay over the speckles and knead again until they are evenly distributed throughout the white base. Add more if you want a denser pattern. -
Roll it out:
Place the clay on a smooth surface. Use your rolling pin to flatten it to an even thickness of about 1/4 inch (6mm). Using depth guides or two stacks of playing cards on either side can help keep it perfectly level.
Step 2: Shaping the Frame
-
Cut the outer circle:
Press your larger circle cutter firmly into the rolled clay to create the outside edge of your ornament. Remove the excess clay from around the cutter before lifting. -
Cut the inner circle:
Center the smaller circle cutter inside the shape you just made. Press down to cut out the middle, creating a donut or ring shape. -
Smooth the edges:
Dip your finger in a tiny bit of water and gently run it along the cut edges to smooth out any roughness or sharp bits left by the cutters. -
Create the hanging holes:
Using a toothpick or skewer, poke a hole through the top of the ring (passing from the outer rim to the inner rim) so the string can wrap around it securely later. Alternatively, just ensure there is enough clearance to tie a knot around the ring itself.
Clean Cuts Pro-Tip
To keep the clay from sticking to your circle cutters, lay a piece of plastic wrap loosely over the clay slab before pressing the cutter down. It creates soft, rounded edges instantly.
Step 3: Drying and Finishing
-
Let it dry:
Place the clay ring on a flat surface lined with parchment paper. Let it dry for 24-48 hours, flipping it halfway through to ensure even drying on both sides. -
Sand for perfection:
Once fully dry and hard, lightly sand the edges with fine-grit sandpaper to remove any remaining imperfections. -
Seal the clay:
Apply a coat of matte varnish or sealant to protect the clay and the organic speckles from moisture. I like to do two thin coats for extra durability.
Level Up: Glossy Finish
Instead of a matte sealer, use a high-gloss glaze or UV resin on just the front face of the ring. This makes the pepper speckles pop and look like high-end fired ceramic glaze.
Step 4: Assembly
-
Prepare the photo:
Take your small instant photo or print. If using a regular photo, trim it to a small square and glue it onto a slightly larger piece of white cardstock to mimic the polaroid border. -
Attach the inner string:
Cut a short length of jute twine. Glue one end specifically to the back of your photo frame, centered at the top. -
Tie the main hanger:
Cut a longer piece of jute twine (about 12 inches). Fold it in half to create a loop. -
Secure the suspension:
Place the folded loop of the main hanger around the top of the clay ring. Before tightening it, thread the short string attached to your photo underneath the main loop’s knot against the clay. -
Final knotting:
Pull the main hanger tight (creating a lark’s head knot around the ring) which will trap the photo string securely against the clay. Tie a small knot on the photo string to ensure it hangs at the right height in the center of the ring. -
Trim excess:
Snip off any loose ends of the twine close to the knots for a clean, professional finish.
Hang your new personalized frame on a bright branch to catch the light and enjoy your memories
Faux Marble Clay Ornament Baubles
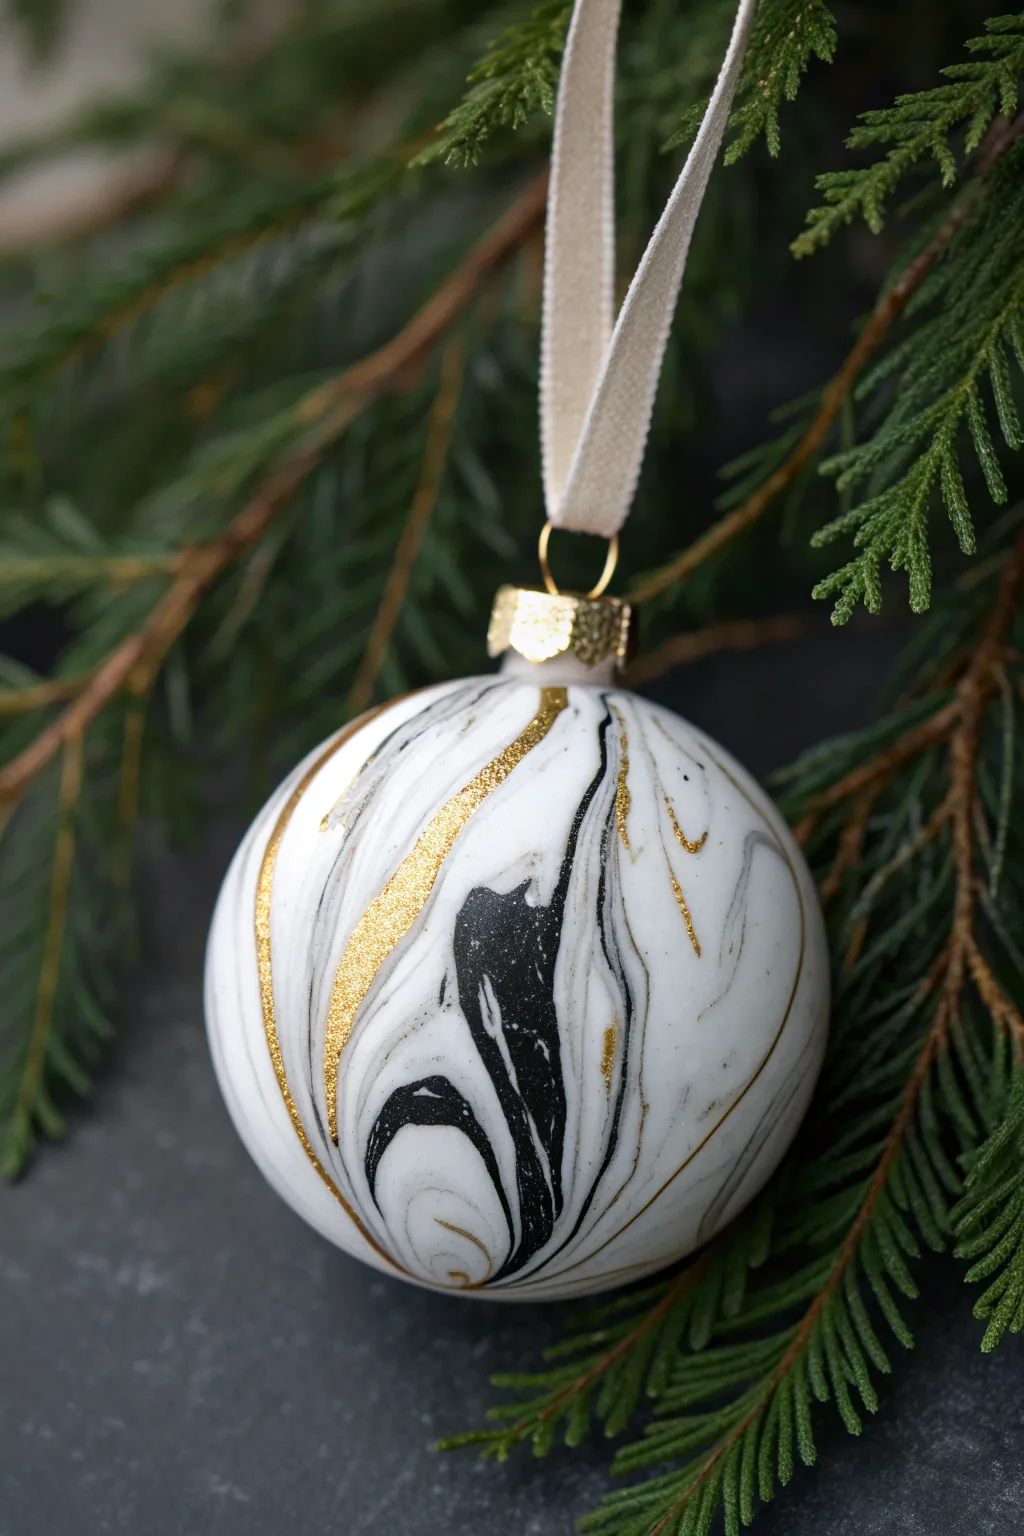
These sophisticated ornaments bring a touch of modern luxury to your tree, combining stark white and black marbling with brilliant flashes of gold. The process mimics real stone, creating a seamless, high-end finish that looks far more expensive than it actually is.
Detailed Instructions
Materials
- White polymer clay
- Black polymer clay
- Gold polymer clay or metallic gold leaf flakes
- Gold leaf adhesive (if using flakes)
- Round ornament base (glass or old bauble) OR lightweight filler for solid clay
- Acrylic rolling pin
- Clay slicing blade
- Gold ornament cap with hook
- Cream ribbon
- Gloss glaze (water-based polyurethane)
- Soft paintbrush
- Oven for baking
Step 1: Preparing the Marbling
-
Condition the base:
Start by taking a generous amount of white polymer clay. Knead it in your hands until it is soft, warm, and pliable. -
Roll the white log:
Roll the conditioned white clay into a thick log, about 1 inch in diameter and 3-4 inches long. -
Prepare accent colors:
Condition a small amount of black clay and roll it into very thin ‘snakes’. Do the same with your gold clay if you are using metallic clay for the gold veins. -
Apply the veins:
Lay the thin black snakes randomly along the length of the white log. If using gold clay, add those strands now as well. I like to twist them slightly for a more organic look. -
Twist and fold:
Gently twist the entire white log like a candy cane to begin swirling the colors. Fold the log in half, roll it smooth, and twist again. -
Don’t overmix:
Repeat the twist-and-fold process only 2-3 times. You want distinct streaks of black, not a grey mush. Stop when you see beautiful, clear lines.
Cold Hands Trick
If the clay gets too soft and sticky while smoothing, pop the ornament in the fridge for 5 minutes. The firm surface will be easier to buff smooth without adding fingerprints.
Step 2: Shaping the Ornament
-
Create a sheet:
Roll your marbled clay log into a ball, then use an acrylic rolling pin to flatten it into a sheet about 1/8 inch thick. Observe the pattern and choose the section with the best movement. -
Wrap the form:
Carefully drape the clay sheet over your round ornament base or balled-up foil core. Gently smooth the clay down the sides. -
Trim excess:
Gather the clay at the bottom and trim away the excess with your slicing blade. Pinch the seams together. -
Smooth the seams:
Roll the ball gently between your palms in a circular motion. The heat from your hands will help fuse the seams and make them disappear. -
Attach the cap holder:
If your ornament form doesn’t have a neck, create a small collar of clay at the top where the metal cap will eventually sit. Press it firmly onto the sphere.
Step 3: Finishing Touches
-
Bake the clay:
Place your ornaments on a baking sheet lined with cardstock or a bed of batting to prevent flat spots. Bake according to your specific clay package instructions (usually 275°F for 15-30 minutes). -
Cool completely:
Allow the ornaments to cool fully before handling them. The clay hardens as it returns to room temperature. -
Add gold leaf:
If you didn’t use gold clay earlier, paint thin, jagged lines of sizing adhesive over existing black veins. Wait for it to get tacky, then press gold leaf flakes onto the adhesive. -
Remove excess leaf:
Use a dry, soft brush to dust away the loose gold flakes, leaving only the sharp gilded lines behind. -
Glaze the surface:
Apply a coat of gloss glaze over the entire ornament. This mimics polished stone and protects the gold leaf from tarnishing. -
Assemble hardware:
Once dry, gently squeeze the prongs of the gold ornament cap and insert it into the clay neck. -
String the ribbon:
Feed a length of cream ribbon through the bail of the cap. Tie a secure knot at the ends to create a loop for hanging.
Muddy Colors?
If your black and white turned grey, you over-kneaded the marbling log. Start fresh, and remember: twist and fold only two or three times maximum for crisp lines.
Hang your new faux marble creation near a light source to catch the glimmer of the gold veins