If you’ve got a lump of clay and a few minutes, you’ve got everything you need to make something adorable. These easy clay sculpture ideas are all about simple shapes, quick wins, and that satisfying moment when a blob turns into a real little character.
Tiny Pinch-Pot Animal Figurines
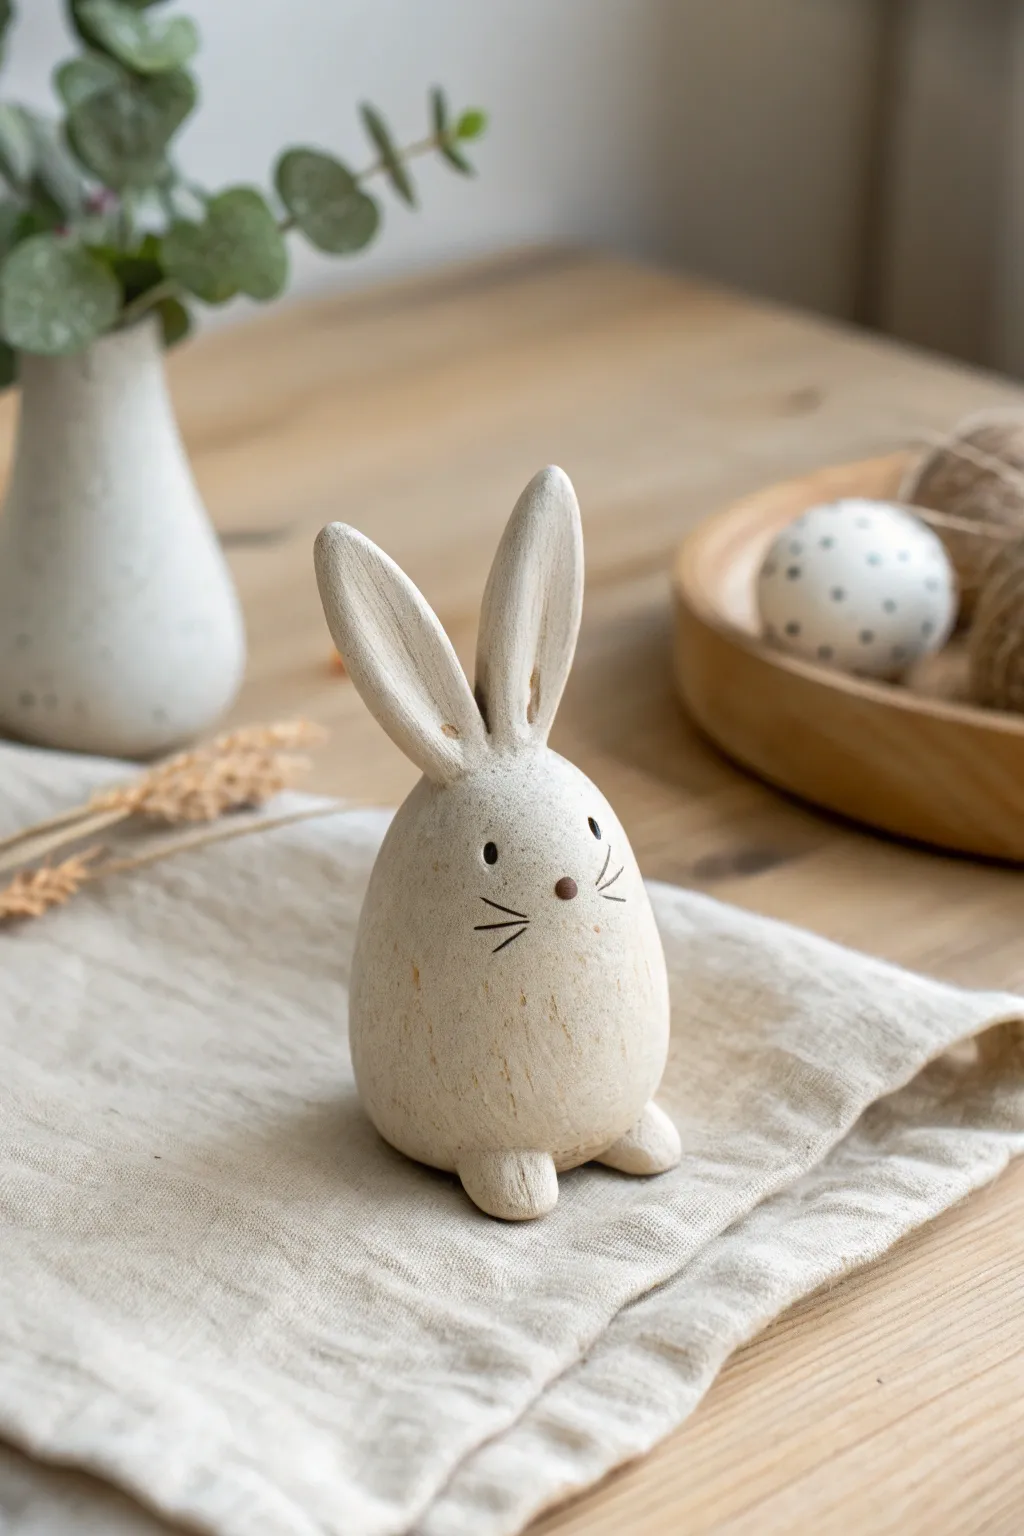
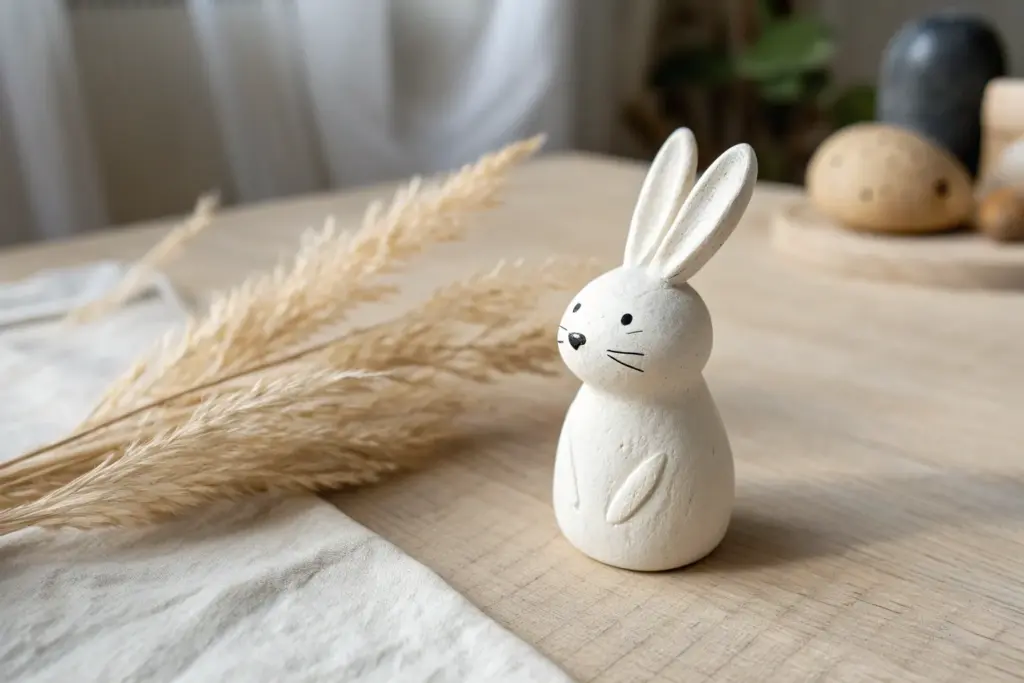
This charming, egg-shaped rabbit figurine brings a touch of organic farmhouse style to any display. Using a simple pinch-pot sculpting technique and a distressed paint finish, you’ll create a timeless piece that looks like carved wood.
Detailed Instructions
Materials
- Air-dry clay (white or cream)
- Small rolling pin
- Water in a small cup
- Modelling tools or a wooden skewer
- Fine-grit sandpaper (220 grit)
- Acrylic paints: Cream/Off-white, Deep Brown, Black
- Soft flat paintbrush
- Fine detail brush (size 0 or 00)
- Paper towel or rag
- Matte varnish (optional)
Step 1: Sculpting the Base Shape
-
Prepare the Clay:
Start by conditioning a fist-sized ball of air-dry clay. Knead it in your hands until it is warm, pliable, and free of cracks. Roll it into a smooth sphere. -
Form the Body:
Gently press and roll the sphere on your work surface to elongate it slightly into a fat egg shape. The bottom should be wider than the top to give the bunny a grounded, heavy look. -
Flatten the Base:
Tap the wider end of your egg shape firmly against the table. This creates a flat surface for the bunny to sit on without rolling over. -
Smooth the Surface:
Dip your finger in a little water and run it over the clay to smooth out any fingerprints or minor cracks. The goal is a uniform, organic surface.
Step 2: Adding Features
-
Shape the Ears:
Roll two smaller logs of clay, about 1.5 inches long. Flatten them gently to create elongated oval shapes, tapering them slightly at the point where they will attach to the head. -
Detail the Ears:
I like to use a modeling tool or the handle of a paintbrush to press a shallow groove down the center of the inner ear, giving them depth and dimension. -
Attach the Ears:
Score (scratch) the top of the head and the base of the ears. Add a dot of water (slip) and press the ears firmly onto the head. Blend the seams downward into the body so they look seamless. -
Positioning:
Gently bend one ear slightly forward or sideways to give the bunny some personality. They shouldn’t be perfectly symmetrical. -
Make the Feet:
Form two tiny marble-sized balls of clay. Flatten the bottoms slightly and attach them to the front base of the body, just peeking out. -
Blend the Feet:
Use your tool to blend the back edge of the feet into the body, leaving the front rounded and distinct. -
Drying:
Set the bunny aside to dry completely. Depending on humidity and clay thickness, this usually takes 24–48 hours. Turn it occasionally to ensure the bottom dries too.
Cracks while drying?
If hairline cracks appear as the clay shrinks, mix a tiny bit of fresh clay with water to make a paste (slip) and fill the cracks. Smooth over and let dry again.
Step 3: Painting and Finishing
-
Sanding:
Once fully dry, use fine-grit sandpaper to gently smooth any rough ridges. Don’t over-sand; a little texture adds to the rustic charm. -
Base Coat:
Apply two coats of cream or off-white acrylic paint to the entire sculpture. Let the first coat dry completely before adding the second for opaque coverage. -
Distressing Technique:
To mimic the wood-texture look in the photo, mix a very watery wash of light brown paint. Brush it over the bunny and immediately wipe almost all of it off with a paper towel, leaving pigment only in the crevices and clay textures. -
Paint the Nose:
Using the tip of a small brush or a toothpick, dot a small oval for the nose using brown paint. Place it centrally, about midway up the body. -
Draw the Face:
With your finest detail brush and black paint, add two small dots for eyes above the nose. Paint three very thin, straight whiskers radiating out from each side of the nose area. -
Final Texture:
For extra stone-like texture, you can flick a toothbrush dipped in watered-down grey paint lightly over the surface to create tiny speckles. -
Seal:
Protect your work with a layer of matte varnish to finish the piece without adding unwanted shine.
Add a fluffy tail
Glue a tiny white pom-pom or a small tuft of natural raw wool to the back of the bunny for a soft, tactile contrast against the painted clay surface.
Now you have a sweet woodland creature ready to nestle into your home decor


Easy Turtle With A Textured Shell Dome
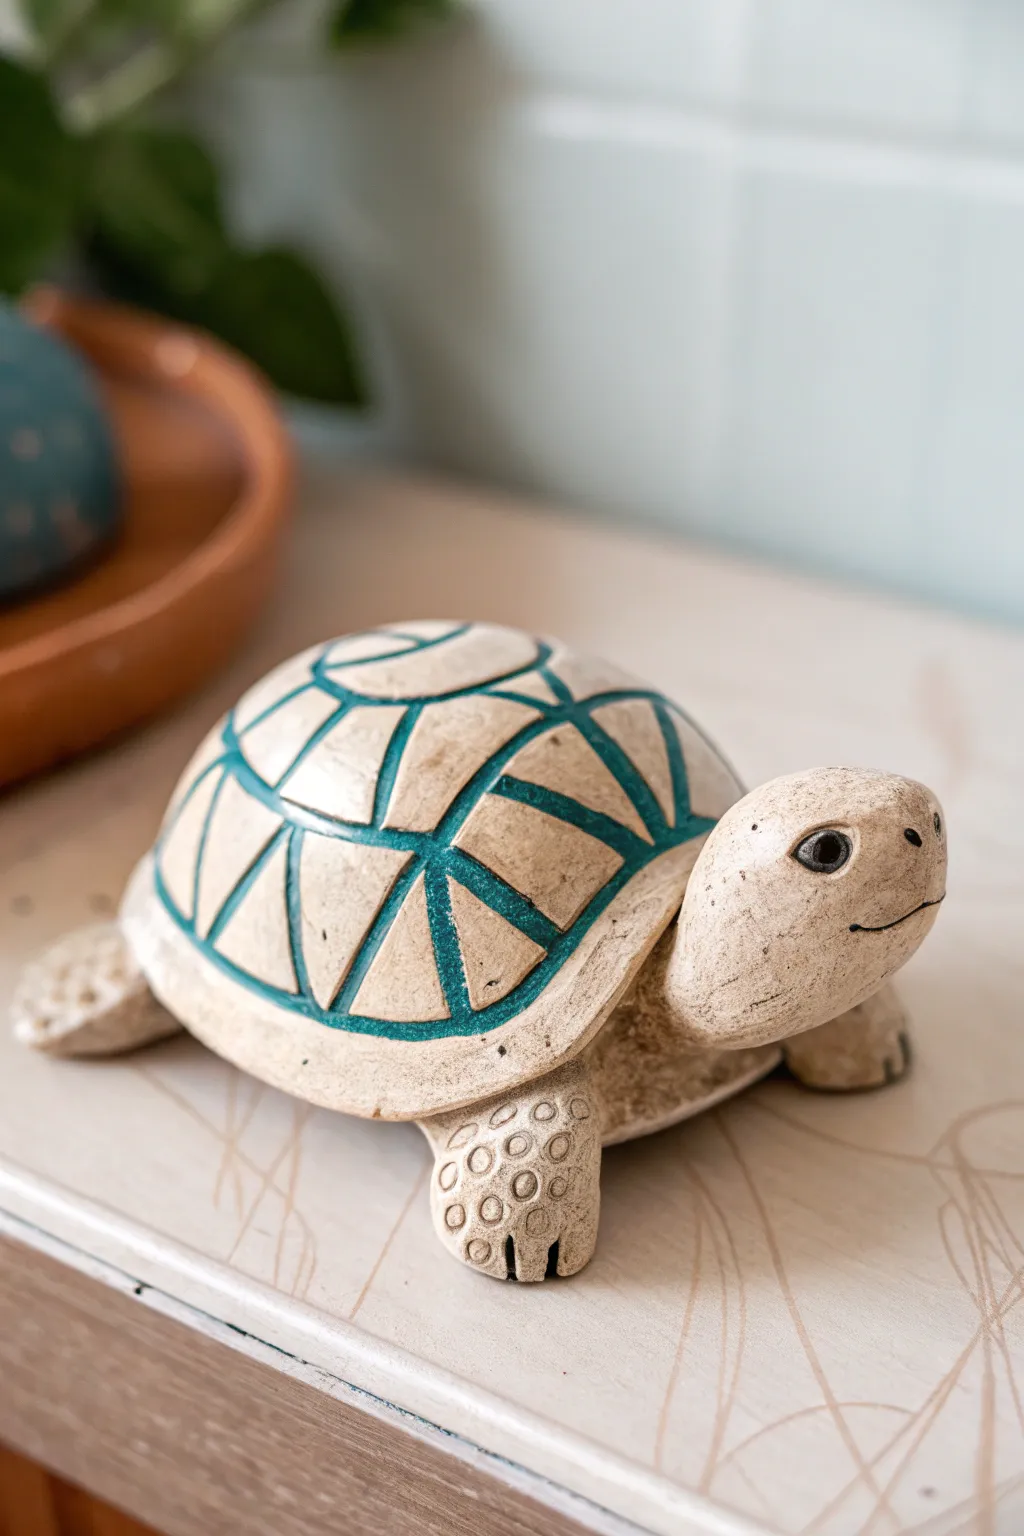
This charming little turtle features a satisfyingly smooth domed shell contrasted by striking geometric grooves painted in teal. Its friendly expression and textured legs make it a delightful project for sculptors of all skill levels.
How-To Guide
Materials
- White air-dry clay or polymer clay (beige/stone color preferred)
- Fimo or sculpting tools (specifically a needle tool and a small ball stylus)
- Small rolling pin
- Sponge or sandpaper (for smoothing)
- Acrylic paint (Teal/Turquoise and Black)
- Fine detail paintbrush
- Gloss varnish (optional)
Step 1: Sculpting the Body
-
Form the shell base:
Start with a large ball of clay roughly the size of a tangerine. Flatten the bottom against your work surface and smooth the top into a perfect half-sphere dome. -
Smooth the surface:
Dip your finger in a little water (if using air-dry clay) or baby oil (for polymer) and run it over the dome to remove any fingerprints or cracks, ensuring a pristine finish. -
Create the plastron ridge:
Roll a snake of clay and flatten it into a long strip. Wrap this strip around the base of the dome to create the rim of the shell, blending the bottom seam but leaving the top edge distinct. -
Shape the head:
Roll a smaller ball of clay into a smooth egg shape. Gently flatten one end where it will attach to the body. -
Attach the head:
Score the clay surfaces (make scratch marks) where the head meets the shell, apply a dab of water or clay purpose glue, and press the head firmly into place under the rim. -
Form the limbs:
Create four equal-sized, flattened teardrop shapes for the flippers. Position two near the front and two near the back, tucking them slightly under the shell’s rim.
Step 2: Adding Texture and Detail
-
Design the shell pattern:
Using a needle tool, lightly sketch your geometric pattern onto the shell first. Start with a central circle at the top, radiating lines outward, and connecting arches to create segments. -
Carve the grooves:
Once you are happy with the sketch, go over the lines more deeply with a sculpting tool to create wide, distinct channels. Keep the edges of these channels clean. -
Add leg texture:
Take a small ball stylus or the end of a paintbrush and press small circles into the top surface of the front flippers to simulate scales. -
Define the toes:
Use a knife tool or credit card edge to make two or three vertical indentations at the very tips of the flippers for toes. -
Sculpt the face:
Use a small ball tool to press indentations for the eyes. Use a needle tool to carve a simple, curved smile line under the nose area. -
Refine and dry:
Do a final check for rough spots, smoothing them out with a damp sponge or finger. Let the clay dry completely (24-48 hours for air-dry) or bake according to package instructions.
Clean Lines Hack
If you struggle to paint only inside the grooves, paint the whole shell teal first, then wipe the raised surfaces clean with a damp sponge, leaving color in the cracks.
Step 3: Painting and Finishing
-
Paint the grooves:
Using a fine brush, carefully paint the inside of the carved shell channels with teal acrylic paint. I find it helps to dilute the paint slightly so it flows into the cracks easier. -
Clean up edges:
If any teal paint gets on the raised shell segments, wipe it away immediately with a damp cloth or cotton swab before it dries. -
Paint the eyes:
Paint the inside of the eye sockets black. Once dry, add a tiny white dot for a reflection to bring the turtle to life. -
Highlight the texture:
Optional: lightly dry-brush a bit of darker beige paint over the leg scales to make the circular indentations pop. -
Seal the piece:
Finish by applying a coat of matte or gloss varnish to protect the paint and give the shell a ceramic-like sheen.
Make It a Box
Make the shell separate from the body base to turn this sculpture into a secret trinket box for hiding keys or jewelry.
Place your new geometric turtle on a desk or shelf to add a slow and steady vibe to your decor


Simple Snail With A Swirled Coil Shell
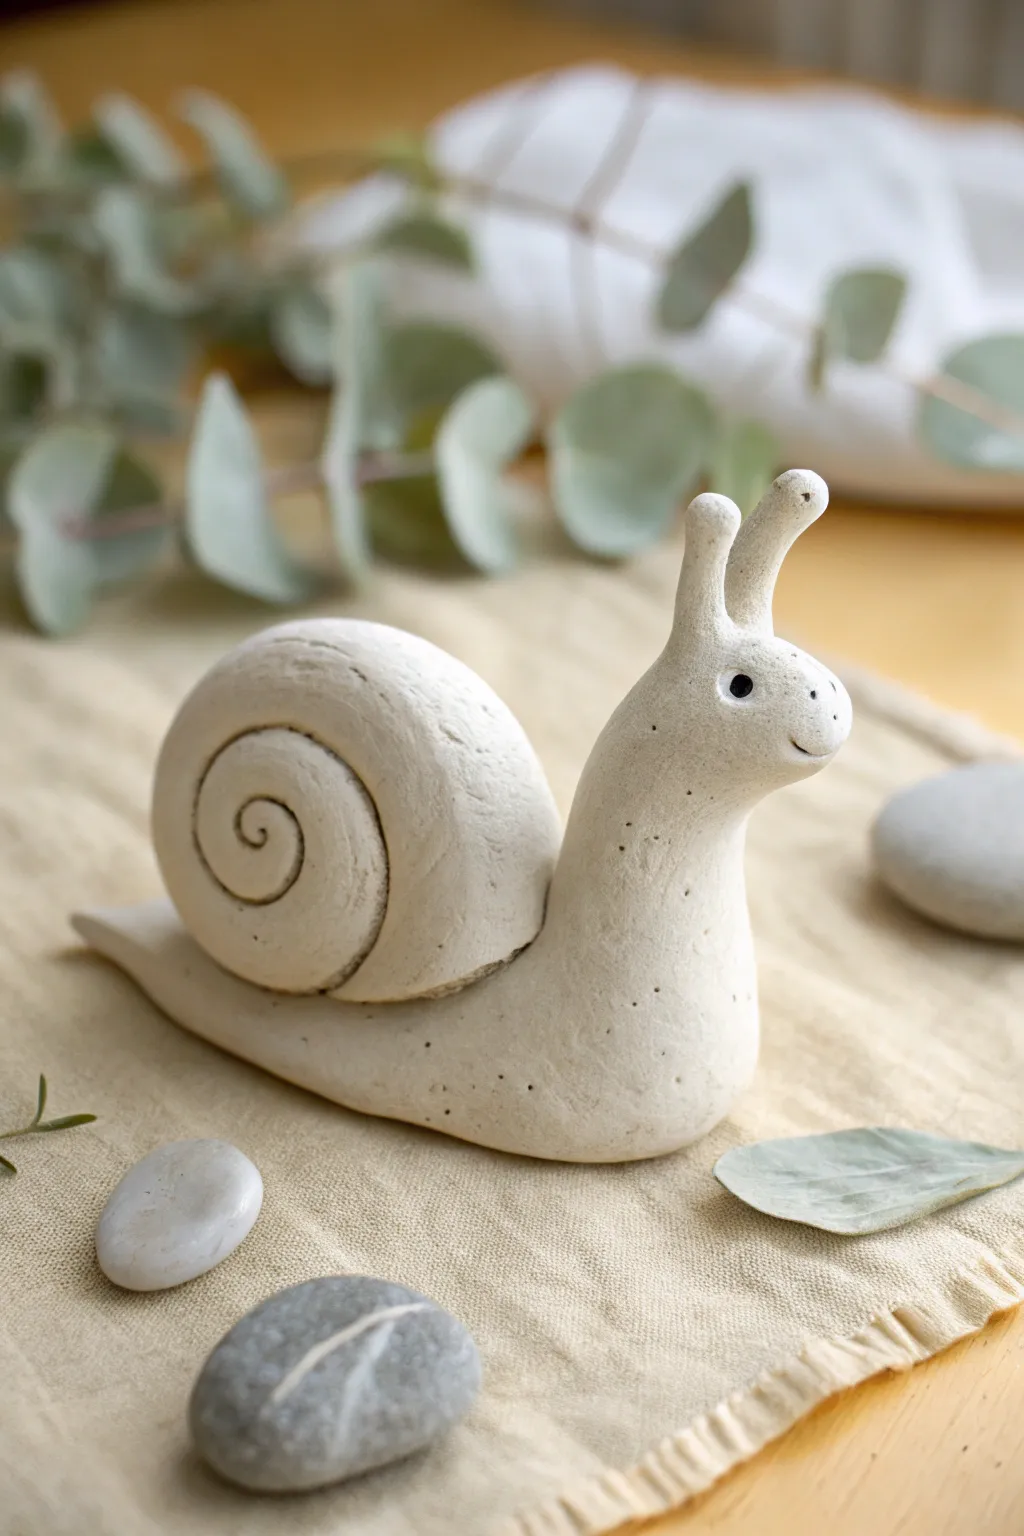
This charming, minimalist snail sculpture is characterized by its smooth, matte finish and clean lines. Its speckled, stone-like appearance gives it a natural, earthy feel perfect for desk decor or garden accents.
Step-by-Step
Materials
- White polymer clay or air-dry clay (preferably with a stone/speckled effect)
- Clay sculpting tools (needle tool, modeling tool)
- Small rolling pin
- Clean work surface (ceramic tile or silicone mat)
- Aluminum foil (optional for core)
- Water (for smoothing if using air-dry clay)
- Fine-grit sandpaper
Step 1: Sculpting the Body
-
Prepare the clay:
Start by conditioning your clay thoroughly. Knead it in your hands until it becomes soft, pliable, and free of cracks. If you are using a speckled clay, this ensures the speckles are evenly distributed. -
Form the base log:
Roll a large portion of the clay into a thick log or cylinder. This piece needs to be substantial enough to form the entire length of the snail’s body, from head to tail. -
Taper the tail:
Gently roll one end of the log against your work surface to create a tapered point. This will become the tail of the snail. Flatten the bottom of the log slightly so it sits stably without tipping over. -
Lift the neck:
On the opposite end from the tail, gently bend the clay upward to create the neck and head. Smooth the transition curve with your thumb so it looks natural and fluid rather than a sharp angle. -
Shape the head:
Round off the top of the upright section to form the head. It should be slightly bulbous but seamlessly connected to the neck area.
Step 2: Creating the Shell
-
Roll a coil:
Take a separate, large ball of clay and roll it into a long, even snake. The thickness should be consistent, roughly the width of your thumb, to match the chunky style of the snail shown. -
Start the spiral:
Tightly curl one end of the snake inward to begin the shell pattern. Continue rolling the coil around this center point, keeping the layers flush against each other. -
Finish the shell shape:
Once you have a tight, round spiral disc, gently smooth the outer seam where the coil ends so it blends into the shell’s side. The shell should look like a flattened cinnamon roll. -
Attach the shell:
Score the back of the snail’s body and the bottom of the shell (scratch cross-hatch marks). If using air-dry clay, dab a little water here. Press the shell firmly onto the snail’s back. -
Blend the seams:
I find it helpful to use a modeling tool to gently drag a small amount of clay from the bottom of the shell down onto the body to lock it in place, then smooth over the join so it’s invisible.
Clean Connection
When attaching the eye stalks, use a tiny drop of liquid clay or ‘slip’ (clay mixed with water) as glue. This prevents these delicate parts from falling off after drying.
Step 3: Adding Details & Finishing
-
Create eye stalks:
Roll two small, thin logs of clay for the antennae. Round off the tips. Attach these to the top of the head, blending the clay at the base so they stand upright and sturdy. -
Add facial features:
Using a needle tool or small dotting tool, press two small indentations for the eyes on the side of the head. Use the same tool to carve a simple, curved line for a smiling mouth. -
Refine the spiral:
Use a needle tool or a clay carving tool to deepen the spiral groove on the shell if it became flattened during handling. This emphasizes the swirl pattern. -
Initial smoothing:
Dip your finger in a tiny bit of water (for air-dry) or baby oil (for polymer) and gently rub over the entire sculpture to remove fingerprints and bumps. -
Drying or baking:
Follow the manufacturer’s instructions for your specific clay. If baking polymer clay, tent it with foil to prevent scorching. If air-drying, let it sit undisturbed for at least 24-48 hours. -
Sanding:
Once completely cured or dry, use fine-grit sandpaper to buff away any remaining rough spots, giving the piece that smooth, stone-like finish seen in the photo. -
Painting eyes:
Using a fine-tip brush or a black paint pen, carefully fill in the eye indentations with black paint to bring your snail to life.
Texture Twist
Before baking or drying, gently press a piece of coarse sandpaper or a toothbrush against the clay surface to enhance the natural, stone-like texture.
Place your finished snail among some potted plants or smooth river stones to complete the serene scene


Minimalist Penguin With A Cozy Scarf
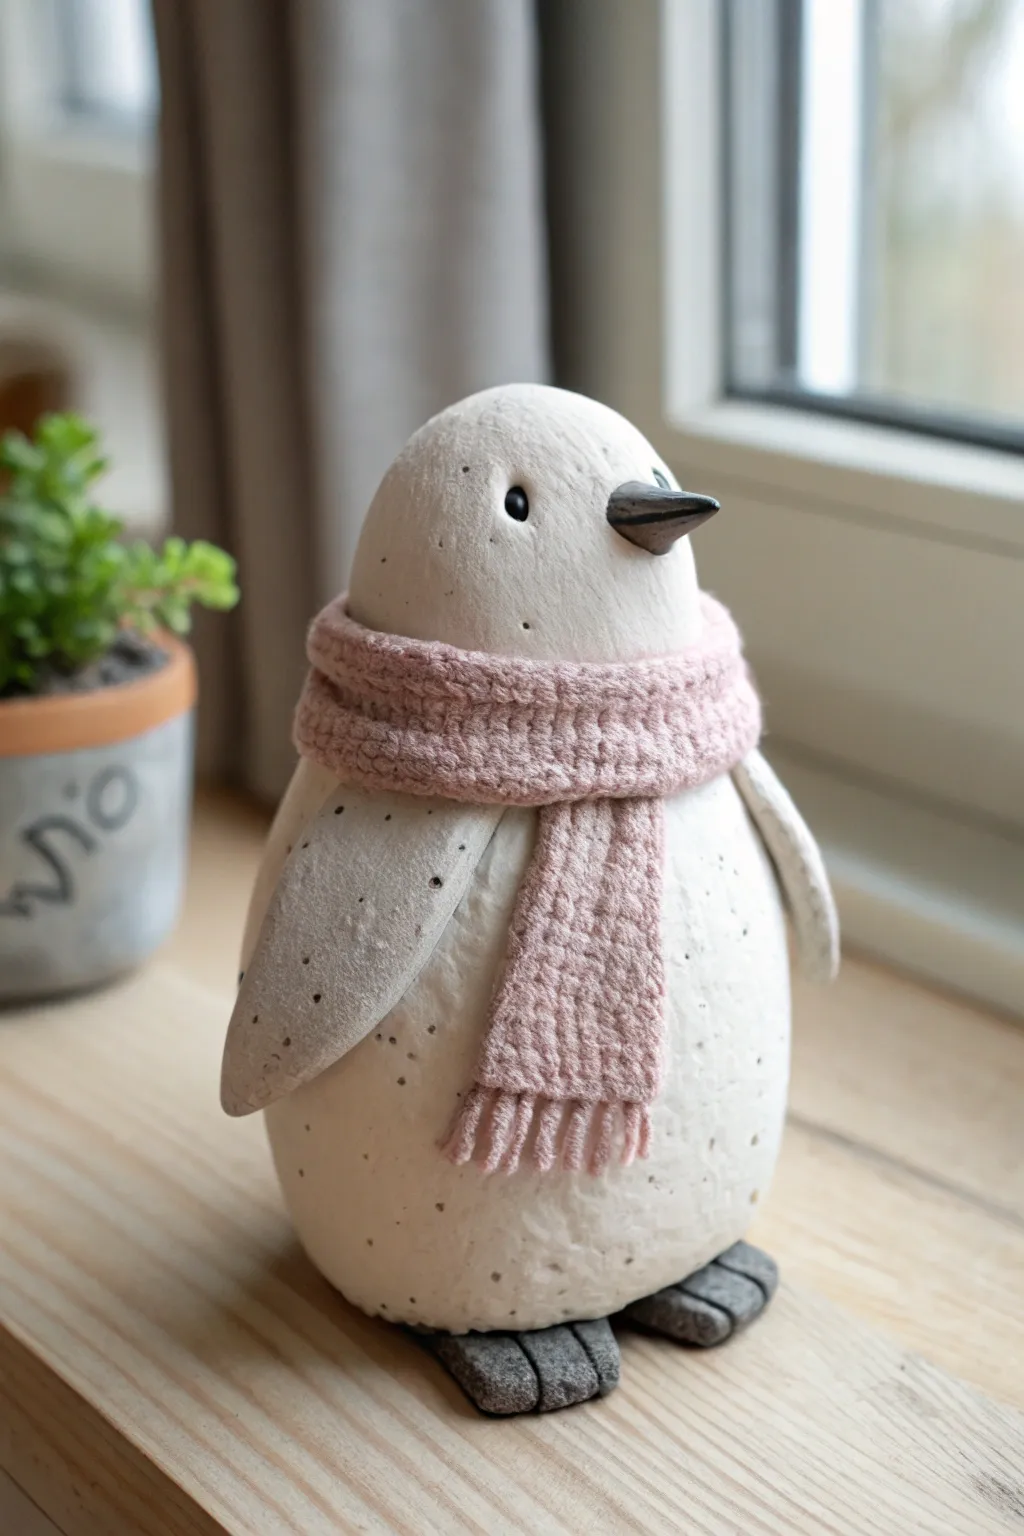
Create this adorable winter companion using simple shapes and clever texturing techniques. The speckled finish gives it a charming, stone-like ceramic quality, perfectly complemented by a handcrafted clay scarf that looks surprisingly soft.
How-To Guide
Materials
- White air-dry clay or polymer clay
- Aluminum foil (for armature)
- Acrylic paints (Cream/Off-White, Black, Dusty Pink)
- Speckled granite spray paint or toothbrush for splatter
- Clay sculpting tools (needle tool, modeling tool)
- Small piece of fabric or sweater texture mat (optional)
- Matte varnish
- Super glue
Step 1: Sculpting the Base Form
-
Form the core:
Begin by crumpling aluminum foil into a tight egg shape. This saves clay and keeps the sculpture lightweight while preventing cracking during drying. -
Cover with clay:
Roll out a slab of white clay about 1/4 inch thick. Wrap this entirely around your foil egg, smoothing the seams together with a bit of water (if using air-dry) or blending tools until invisible. -
Shape the body:
Roll the clay-covered egg on your work surface to smooth it. Gently taper the top slightly to define the head area within the continuous body shape, but keep it very subtle—minimalist blobs are the goal here. -
Flatten the base:
Tap the bottom of the egg firmly on the table to create a flat, stable base so your penguin stands upright without wobbling.
Clean Texture
Before drying, gently wipe your clay with a damp sponge or baby wipe. This smooths out fingerprints and gives the surface a professional, ceramic-like finish.
Step 2: Adding Appendages
-
Create flippers:
Roll two small balls of clay and flatten them into teardrop shapes. Attaching them now allows them to integrate seamlessly. -
Attach the wings:
Score the sides of the body and the back of the flippers. Add a drop of water or liquid clay (slip) and press the wide end of the teardrops onto the body. -
Shape the feet:
Form two small rectangles of clay. Use a knife or modeling tool to press two indentations into the front of each, creating three toes per foot. -
Secure the feet:
Place the feet under the front of the body. You want them just peeking out, giving the penguin a cute, planted stance. -
Add the beak:
Roll a tiny cone of clay for the beak. Press it gently into the center of the ‘face’ area, slightly lower than you might think, to enhance the cute factor. -
Eyes:
Use a small ball tool or the rounded end of a paintbrush to make two small indentations for the eyes. Do not fill them yet; we will paint them later.
Step 3: Crafting the Scarf
-
Roll the coil:
Roll a long, thin snake of clay. Flatten it gently with a roller until it mimics a scarf strip. -
Texturize:
This is the magic step. Press a piece of coarse fabric, denim, or even a real knitted swatch into the soft clay strip to imprint a realistic fabric texture. -
Wrap it up:
Drape the clay strip around the penguin’s neck area. Cross one end over the other, letting the ‘tail’ of the scarf hang down the front. -
Add fringe details:
Use a needle tool or craft knife to cut vertical slits into the ends of the scarf to resemble yarn fringe.
Drooping Scarf?
If the scarf ends keep gravity-sliding down while the clay is wet, prop them up with a small crumpled piece of paper towel or foam until the clay hardens.
Step 4: Finishing Touches
-
Dry completely:
Allow the sculpture to dry fully. For air-dry clay, I generally leave it for 24-48 hours depending on humidity. -
Base coat:
Paint the entire body (not the scarf or feet) with a creamy off-white acrylic paint. Two thin coats are better than one thick one. -
Speckling effect:
Dip an old toothbrush into watered-down black or dark grey paint. Run your thumb over the bristles to flick tiny specks onto the body for that stone-like texture. -
Paint details:
Paint the feet and beak a dark charcoal grey. Carefully paint the eyes solid black, adding a tiny white dot for a catchlight if desired. -
Color the scarf:
Paint the scarf a soft dusty pink. Dry brushing a slightly lighter pink over the raised texture helps the ‘knit’ pattern pop. -
Seal:
Finish with a coat of matte varnish to protect the paint and uncheck the clay without making it look plasticky.
Place your finished penguin on a shelf or windowsill to add a touch of handcrafted winter warmth to your home

The Complete Guide to Pottery Troubleshooting
Uncover the most common ceramic mistakes—from cracking clay to failed glazes—and learn how to fix them fast.
Round Duck Figurine With A Tiny Beak
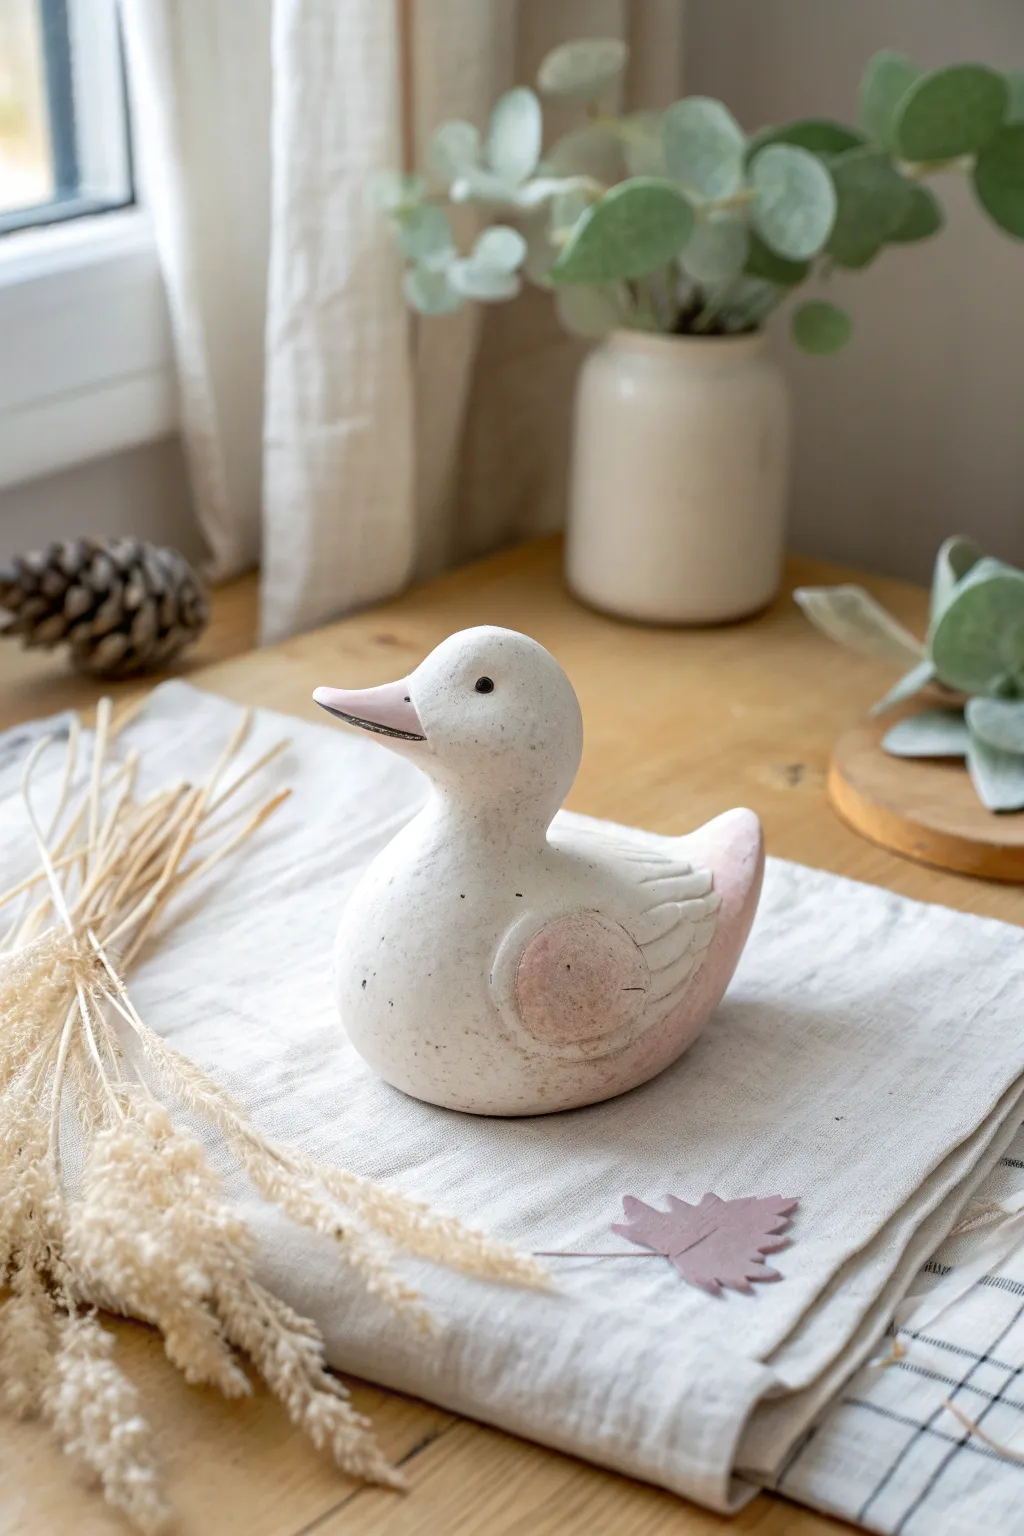
This charming little waterfowl features a wonderfully rounded body and soft, pastel pink accents that give it a gentle, nursery-ready aesthetic. The project focuses on simple organic shapes and a textured, matte finish that mimics the look of stoneware pottery.
Step-by-Step
Materials
- Air-dry clay (white or light grey)
- Acrylic paints (white, soft pink, black)
- Small paintbrush
- Sculpting tools (or a toothpick)
- Fine-grit sandpaper
- Matte varnish or sealant
- Small sponge (optional for texture)
- Water cup
Step 1: Shaping the Base
-
Create the body:
Start with a ball of clay roughly the size of a tangerine. Roll it in your palms to smooth out cracks, then gently coax it into a slightly elongated teardrop shape to form the main body. -
Form the head:
Roll a smaller ball of clay, about a third of the body’s size. Place this on the wider, upper end of your teardrop shape. -
Merge the parts:
Use your thumb or a modeling tool to drag clay from the neck area down onto the body and up onto the head, smoothing the seam until the head and body look like one solid piece. -
Refine the posture:
Gently press the base onto your work surface to flatten it slightly so the duck sits stably without tipping over.
Step 2: Adding Details
-
Sculpt the beak:
Pinch a very small amount of clay into a flattened triangle. Attach this to the front of the head, smoothing the seams carefully so it flows naturally from the face. -
Curve the beak:
Use your finger to gently curve the beak slightly upwards, giving the duck a happy expression. Use a knife tool to indent a line separating the upper and lower beak. -
Create the wings:
Roll two small balls of clay and flatten them into oval discs. Attach one to each side of the body. -
Detail the feathers:
Using a needle tool or toothpick, score three or four horizontal lines into the back of each wing to suggest flight feathers. -
Shape the tail:
Pinch the rear of the body to extend it into a short, pointed tail that curves slightly upward. -
Add surface texture:
Before the clay dries, lightly tap the surface with a dry sponge or a toothbrush to create a subtle pitted texture, avoiding the beak area. -
Dry completely:
Allow your sculpture to air dry for 24-48 hours. I find turning it over halfway through helps the bottom dry evenly.
Cracking Up?
If you see small cracks forming as the clay dries, mix a tiny bit of fresh clay with water to make a paste (slip) and fill them in immediately.
Step 3: Finishing Touches
-
Sand the surface:
Once bone dry, lightly rub the duck with fine-grit sandpaper to remove any sharp fingerprints or rough burrs, while keeping the sponge texture intact. -
Apply base coat:
Paint the entire duck with an off-white or cream acrylic paint. Applying it thinly allows some of the natural clay texture to show through. -
Add pink accents:
Mix a diluted wash of soft pink paint. Gently brush this onto the tail, the wings, and the beak. Wipe away excess with a paper towel immediately for a faded look. -
Paint the eye:
Dip the non-brush end of a paintbrush into black paint and dot a small, single eye on either side of the head. -
Speckling effect:
Flick a stiff brush loaded with watery grey or brown paint at the duck to create tiny speckles, enhancing the stone effect. -
Seal the piece:
Finish with a coat of matte varnish to protect the paint and give it a unified, professional sheen.
Soft Blush
For the pink areas, you can actually use real powdered makeup blush instead of paint. Apply it with a soft brush before sealing for a soft, diffused glow.
Place your finished duck on a shelf or windowsill to add a touch of calm whimsy to the room
Cute Clay Monsters That Embrace Imperfection
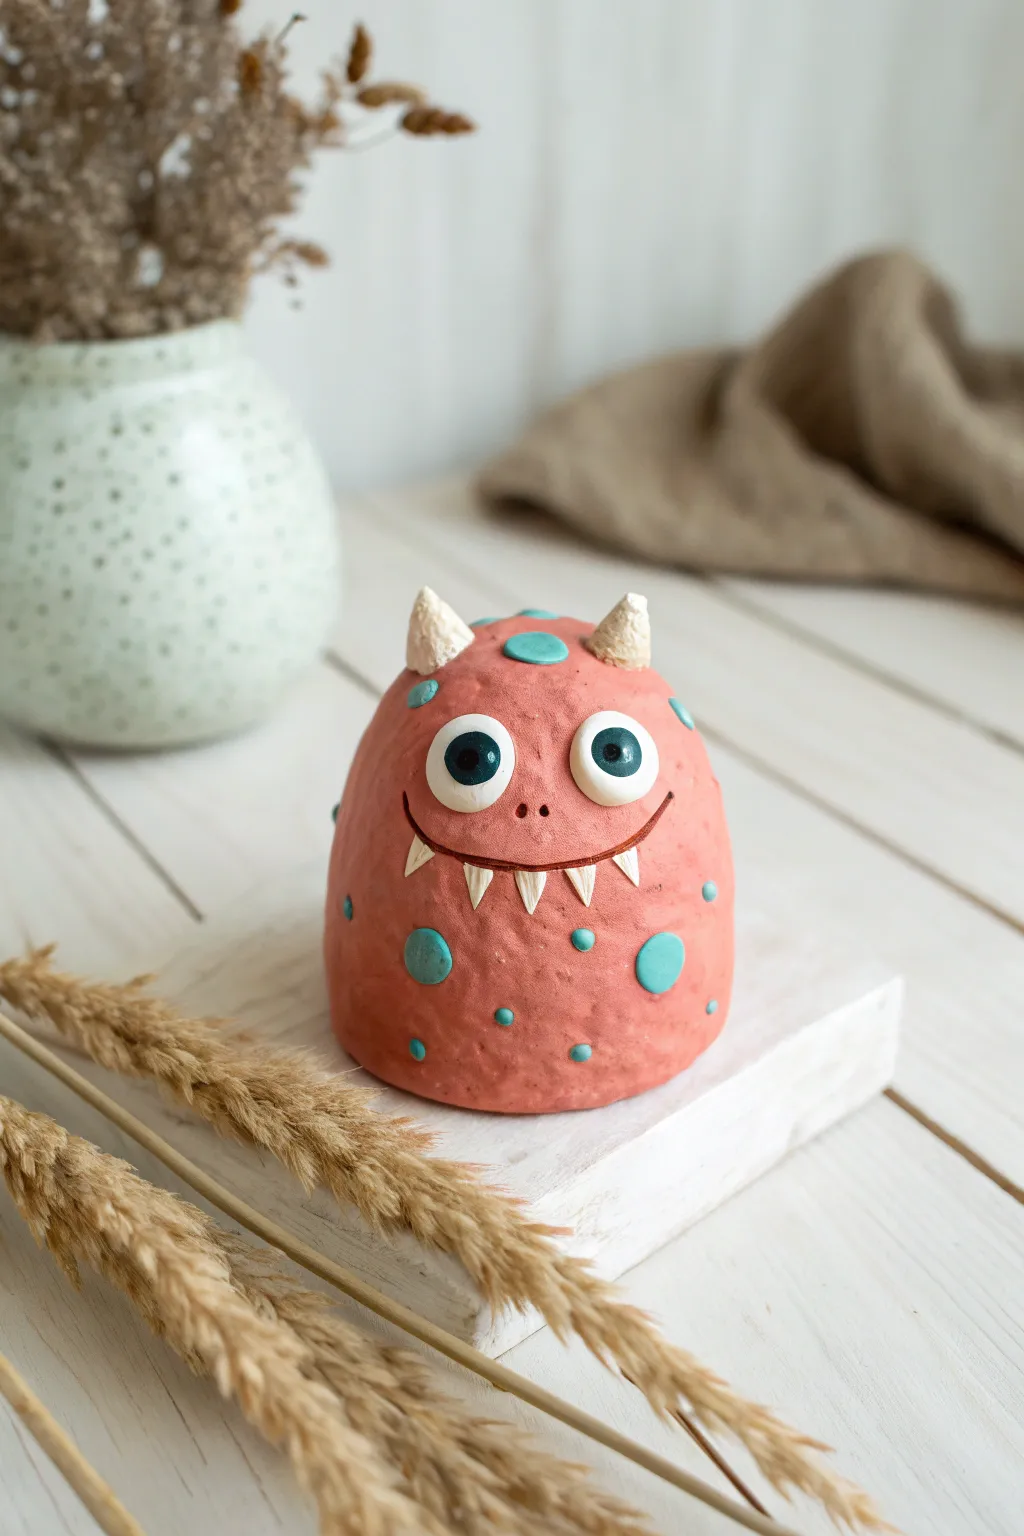
This charming, dome-shaped creature is the perfect introduction to clay sculpting because its wonky smile and uneven texture are part of the appeal. With big cartoonish eyes and playful turquoise spots, this little monster proves that imperfection is cute.
Step-by-Step
Materials
- Air-dry clay (terra cotta color or paintable white)
- Acrylic paints (pastel pink/terra cotta, turquoise, white, black)
- Small rolling pin
- Modeling tools (needle tool, small spatula)
- Small bowl of water
- Fine-grit sandpaper
- Clear matte varnish (optional)
Step 1: Shaping the Base Body
-
Form the main dome:
Start with a ball of clay about the size of a tennis ball. Gently roll and press it against your work surface to flatten the bottom, creating a smooth, stable dome shape. -
Refine the surface:
Dip your finger in a little water and smooth out the dome. Don’t worry if it isn’t perfectly symmetrical; a little unevenness adds character to your monster. -
Create the horn bases:
Pinch off two very small pieces of clay and roll them into cones. Score the bottom of the cones and the top of the monster’s head with a needle tool to rough up the clay. -
Attach the horns:
Dab a tiny bit of water or slip (clay mixed with water) onto the scored areas and press the horns firmly onto the head. Smooth the seams with a modeling tool so they looked fused.
Cracks while drying?
Common with air-dry clay. Create a ‘slip’ by mixing a little clay with water into a paste, fill the crack, and smooth it over with a wet finger
Step 2: Adding Facial Features
-
Make the eye sockets:
Using your thumb or a rounded tool, press two shallow indentations into the upper half of the face where you want the eyes to sit. -
Form the eyeballs:
Roll two balls of white clay (or paint them white later) and press them into the sockets. Flatten them slightly so they look like discs rather than spheres. -
Carve the mouth:
Use a needle tool or a dull knife to slice a wide, curved smile across the face. Gently pull the clay downward slightly to open the smile just a bit. -
Add the teeth:
Roll tiny, sharp triangles of clay. Carefully press these onto the lower lip of your smile line, spacing them out unevenly for a goofy look. -
Sculpt the nostrils:
Right between the eyes, use a small dotting tool or the end of a paintbrush to poke two tiny holes for the nose.
Step 3: Surface Details & Texture
-
Create the spots:
Instead of painting spots later, we can sculpt them. Press small, flattened circles of clay onto the body in random locations. -
Add texture:
Take a rough sponge or a crumpled ball of foil and gently tap it all over the monster’s ‘skin’ (avoiding the eyes and teeth) to create a pitted, organic texture. -
Drying time:
Let your sculpture dry completely. This usually takes 24-48 hours depending on the thickness. Look for the clay to turn a lighter color.
Level Up: Glossy Eyes
Make the monster feel more alive by using a high-gloss varnish ONLY on the eyeballs while keeping the rest of the body matte
Step 4: Painting & Finishing
-
Base coat:
If you didn’t use colored clay, paint the main body a dusty pink or terra cotta shade. I prefer using a dry brush technique here to let the texture we made earlier show through. -
Paint the spots:
Using a fine brush, carefully fill in the raised circle spots with a bright turquoise or teal paint. -
Paint the eyes:
Paint the main eye discs white. Once dry, add large black pupils. Wait for the black to dry, then add a tiny white dot in each pupil for a sparkling reflection. -
Highlight the horns:
Paint the horns an off-white or cream color. You can add a little brown wash at the base to make them look weathered. -
Define the smile:
Use a very thin brush with dark brown paint to trace the smile line, making the mouth pop. -
Varnish:
Once all paint is dry, apply a coat of matte varnish to protect your new friend.
Place your little monster on a shelf or desk to bring a smile to your face every day


What Really Happens Inside the Kiln
Learn how time and temperature work together inside the kiln to transform clay into durable ceramic.
Face Pinch Pot Planter Buddy
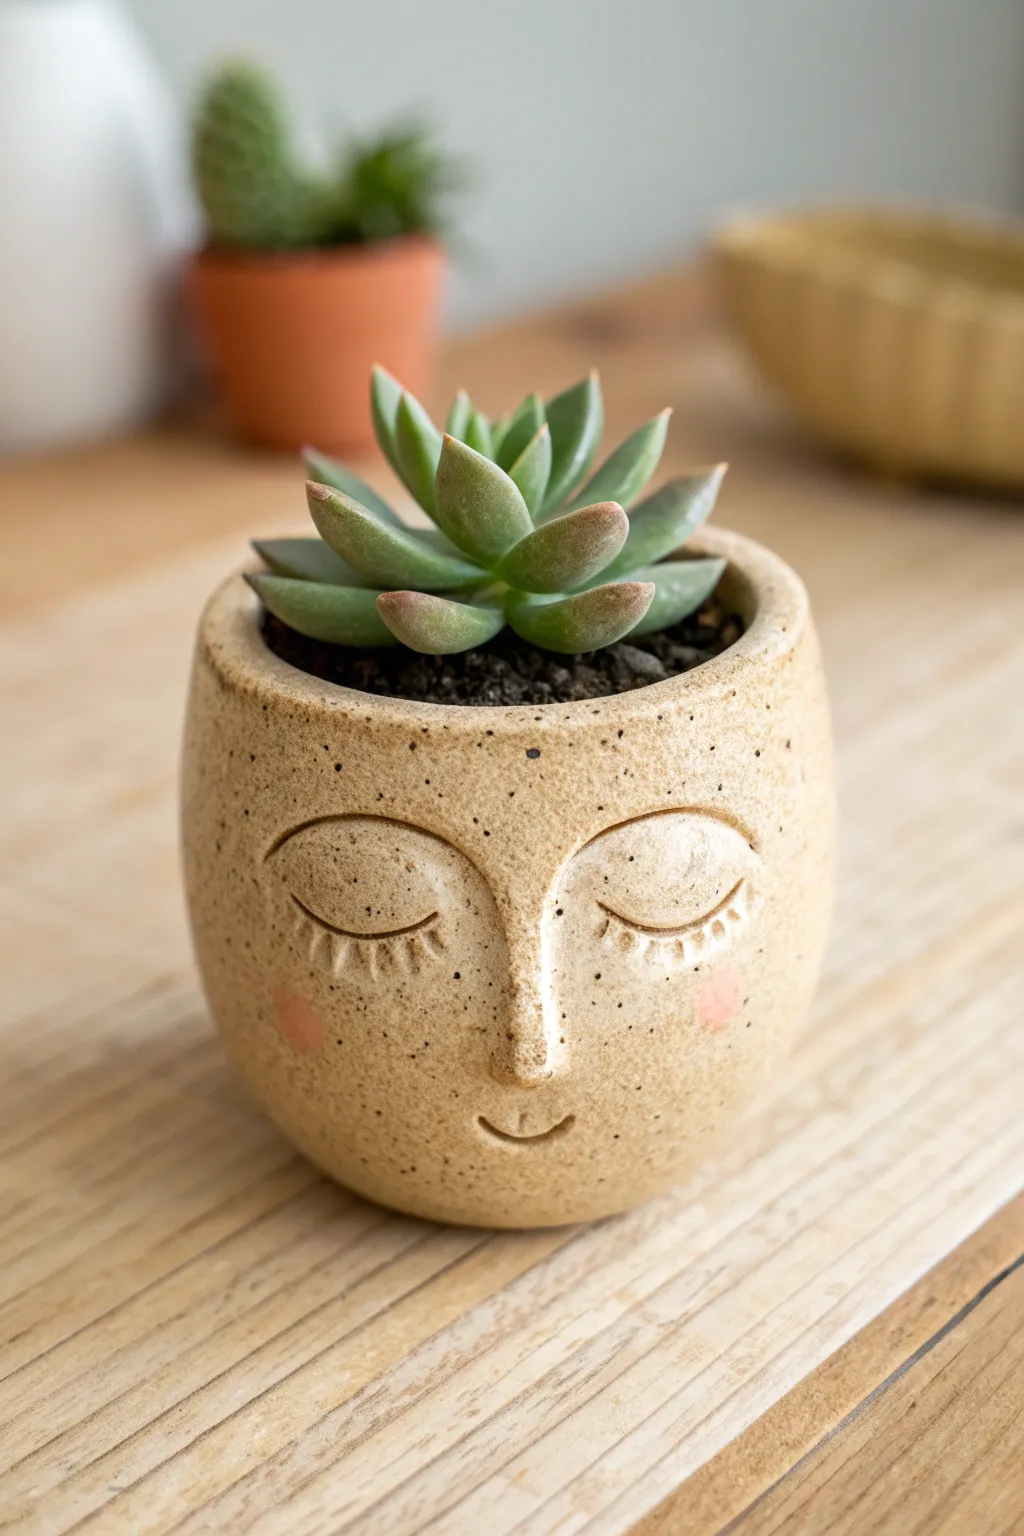
Transform a simple ball of clay into a serene little planter buddy that radiates calm. This speckled, sandy-textured pot features softly sculpted eyes and blushed cheeks, making it the perfect peaceful home for a small succulent.
Step-by-Step Guide
Materials
- Speckled buff stoneware clay (or air-dry clay)
- Small sponge
- Loop tool or small spoon
- Needle tool
- Wooden modeling tool
- Water slip (liquid clay)
- Pink underglaze or acrylic paint (for cheeks)
- Clear matte glaze (if firing)
Step 1: Forming the Base
-
Prepare the Clay:
Start with a ball of speckled clay about the size of a large orange. Wedge it well to remove air bubbles, then pat it into a smooth, round sphere using your palms. -
Begin the Pinch Pot:
Push your thumb firmly into the center of the ball, stopping about half an inch from the bottom. This thickness is crucial so the base doesn’t crack later. -
Pinch the Walls:
Using your thumb on the inside and fingers on the outside, gently pinch and rotate the clay. Work your way from the bottom up to create even walls, aiming for about a quarter-inch thickness all around. -
Shape the Cylinder:
As you pinch, guide the walls upward rather than outward to create a slightly tall, vertical shape rather than a wide bowl. Tap the base gently on the table to create a stable, flat bottom. -
Smooth the Surface:
Use a slightly damp sponge to wipe the exterior walls smooth, erasing your fingerprints while keeping that nice speckled texture visible.
Eye Symmetry Trick
Cut a semi-circle out of paper to use as a stencil. Flip it over to trace the second eye, ensuring perfect symmetry for that peaceful sleeping expression.
Step 2: Sculpting the Features
-
Outline the Eyes:
Lightly sketch two large semi-circles for the closed eyes using a needle tool. Place them fairly low on the pot to give it a cute, ‘chibi’ style proportion. -
Add Clay for Eyelids:
I like to roll two very thin coils of clay and score/slip them onto the arc lines you sketched. This adds a subtle 3D relief to the eyelids. -
Smooth the Eyelids:
Use a wooden modeling tool to blend the upper edge of the coil into the pot’s forehead, leaving the bottom edge distinctive to create the eyelid crease. -
Create Lashes:
Use your needle tool or a small knife to gently press tiny vertical indents along the bottom edge of the eyelids to simulate soft eyelashes. -
Form the Nose:
Roll a small, teardrop-shaped piece of clay. Score the center of the face between the eyes and attach the nose, blending the edges seamlessly into the pot so it looks like it emerges naturally. -
Carve the Smile:
Directly below the nose, use the rounded end of a small tool to press a tiny, gentle ‘U’ shape for the smiling mouth.
Step 3: Finishing Touches
-
Refine the Rim:
Check the top rim of the pot. If it looks uneven, level it with a needle tool or simply smooth it down with a damp sponge for a softer, organic look. -
Add Drainage (Optional):
If you plan to plant directly inside, use a straw or hole cutter to pop a drainage hole in the bottom center. -
Slow Drying:
Let the pot dry slowly under loose plastic for a day or two to prevent cracking. -
Apply Blush:
Once bone dry (or after bisque firing if using a kiln), dab two small circles of pink underglaze or diluted acrylic paint onto the cheeks for a rosy glow. -
Glaze and Fire:
If using ceramic clay, apply a clear matte glaze to the exterior to let the speckles show through, or use a satin varnish for air-dry clay projects.
Cracking at the folds?
If small cracks appear where you attached the nose or eyelids, smooth a tiny amount of water or vinegar slip into the crevice with a soft brush to heal it.
Pop in your favorite succulent and enjoy the calming presence of your new clay friend
Wavy Trinket Dish That Still Feels Sculptural
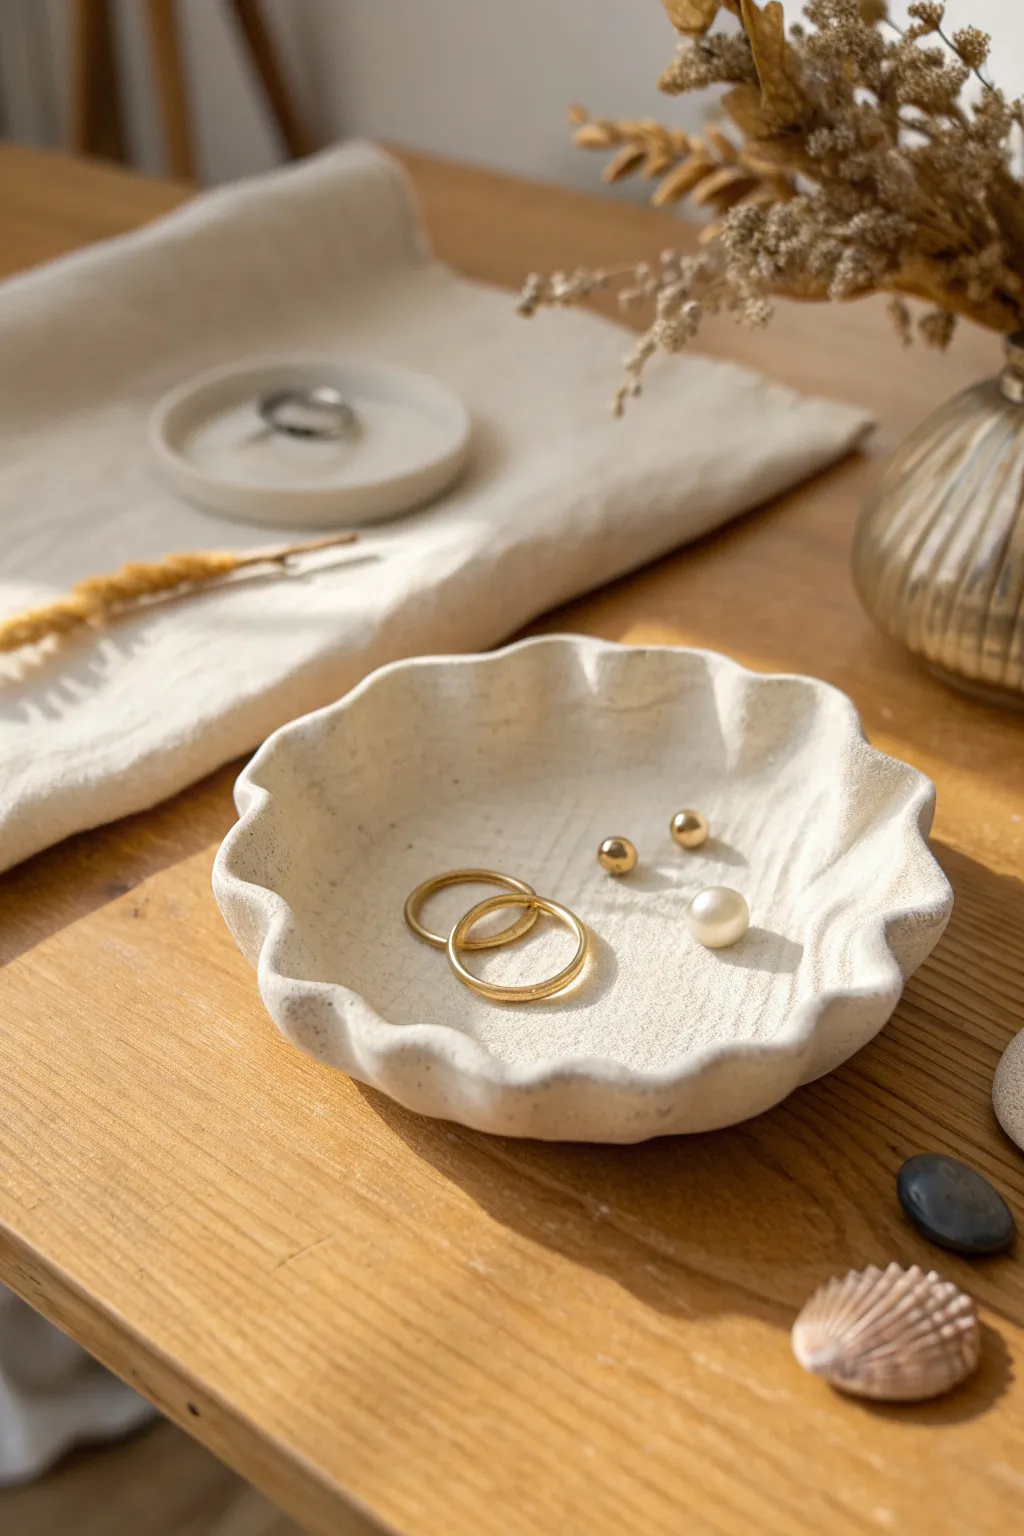
This elegant dish combines a playful, ruffled rim with a sophisticated limestone texture, perfect for holding your favorite rings and studs. The organic, uneven edge gives it a distinctly sculptural feel, making it look more like a discovered artifact than a simple craft.
How-To Guide
Materials
- White polymer clay or air-dry stoneware clay
- Rolling pin or acrylic roller
- Small bowl (for use as a drape mold)
- Parchment paper
- Texture sponge or coarse sandpaper
- Circular cookie cutter or jar lid (approx. 4-5 inches)
- Craft knife
- Brown and black acrylic paint (optional for speckling)
- Old toothbrush (optional)
- Matte varnish
Step 1: Preparing the Base
-
Condition the Clay:
Begin by warming up a generous handful of white clay in your hands. Knead it thoroughly until it becomes pliable and free of cracks. -
Roll it Out:
Place the clay between two sheets of parchment paper to prevent sticking. Roll it out into an even slab, aiming for a thickness of about 1/4 inch so it feels substantial. -
Cut the Circle:
Use your circular cutter or trace around a jar lid with a craft knife to cut a clean, round base from your slab. -
Soften the Edges:
Dip your finger in a little water (for potter’s clay) or baby oil (for polymer) and run it gently along the cut edge to round it off and remove sharp angles.
Natural Texture
For a truly organic surface, press a piece of rough linen or canvas into the wet clay before shaping. The fabric weave leaves a beautiful, subtle imprint that mimics stone.
Step 2: Creating the Texture
-
Add Initial Roughness:
To mimic the stone look seen in the photo, gently press a coarse sponge or a crumpled ball of aluminum foil all over the surface of the flat circle. -
Refine the Grain:
I like to lightly drag a piece of coarse sandpaper across the surface in a cross-hatch pattern to create those subtle, fibrous scratch marks visible in the center. -
Optional Speckling:
If your clay is pure white, you can knead in a tiny pinch of black pepper or dried tea leaves before rolling to get those natural flecks, or wait to paint them later.
Gold Accents
After the matte varnish dries, paint just the very edge of the wavy rim with liquid gold leaf. This creates a stunning contrast between the rough ‘stone’ and the metallic edge.
Step 3: Sculpting the Form
-
Form the Bowl Shape:
Gently lift your clay circle and drape it inside a small bowl that is lined with parchment paper. This will support the curved bottom while you work on the rim. -
Begin the Waves:
Using your thumb and forefinger, gently pinch sections of the rim upward and outward to create soft undulations. -
Detailing the Ruffles:
Create regular intervals for the waves—aim for about 7 or 8 peaks around the circumference to match the photo’s style. -
Enhance the Rim:
Press slightly into the valleys between the waves to exaggerate the curves, making the dish look more dynamic and floral. -
Smooth the Inside:
Check the interior surface for any unwanted fingerprints you might have made while pinching the rim, and smooth them out with a soft brush.
Step 4: Finishing Touches
-
Dry or Bake:
Follow the manufacturer instructions for your specific clay. If baking polymer clay, leave it in the supporting bowl (make sure the bowl is oven-safe!) to maintain the shape. -
Cool and Sand:
Once fully cured and cooled, take a piece of fine-grit sandpaper to the very edge of the rim to ensure it feels smooth to the touch. -
Stone Effect Paint:
If you didn’t add speckles earlier, dilute a tiny drop of brown paint with water. Dip a toothbrush in it and flick the bristles to mist the dish with microscopic speckles. -
Dry Paint:
Allow any paint speckles to dry completely before sealing. -
Seal the Piece:
Apply a thin coat of matte varnish. Avoid glossy finishes, as the matte look is crucial for achieving that authentic limestone or plaster aesthetic.
Place your new sculptural dish on a bedside table to add a touch of serene, organic beauty to your room

TRACK YOUR CERAMIC JOURNEY
Capture glaze tests, firing details, and creative progress—all in one simple printable. Make your projects easier to repeat and improve.
Ring Cone Holder With A Sculpted Twist
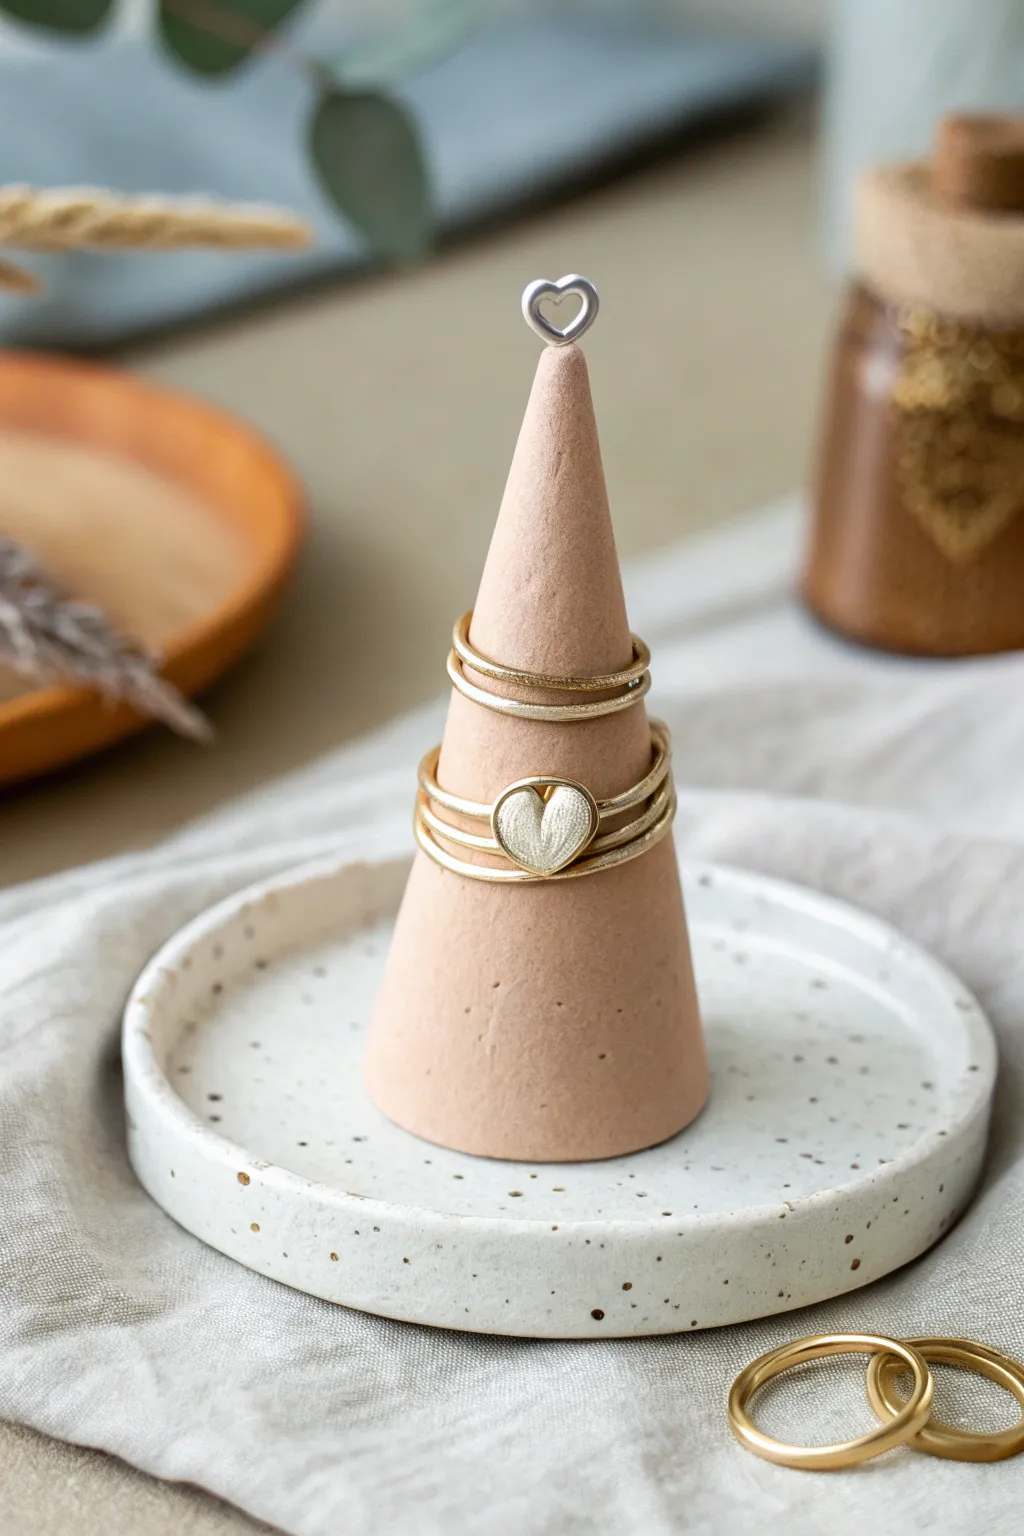
Elevate your jewelry storage with this minimalist, cone-shaped ring holder featuring a sweet wire heart detail emerging from the top. Its smooth, earthy tone and speckled base create a modern, handmade aesthetic that doubles as functional decor.
Detailed Instructions
Materials
- Polymer clay (terracotta or beige color)
- Polymer clay (white or cream)
- Speckled clay (or black pepper/sand for DIY speckles)
- Silver wire (approx. 18-20 gauge)
- Wire cutters
- Pliers (round-nose and flat-nose)
- Rolling pin or acrylic roller
- Circle cutter or small bowl (for the base)
- Smooth work surface
- Sandpaper (fine grit)
- Oven for baking
Step 1: Shaping the Cone
-
Prepare the Clay:
Begin by conditioning your terracotta or beige polymer clay by kneading it in your hands until it is soft, pliable, and free of cracks. -
Roll a Ball:
Roll the conditioned clay into a smooth, seamless ball roughly the size of a golf ball or slightly larger, depending on how tall you want your final cone. -
Create the Cone Shape:
Place the ball on your work surface. Using the flat of your palm or a flat acrylic tool, begin rolling the clay back and forth while applying more pressure to one side to taper it. -
Refine the Form:
Stand the cone upright. Gently tap the base against the table to flatten it so it stands straight. Use your fingers to smooth out any fingerprints or bumps, aiming for a sleek, uniform taper. -
Smooth the Tip:
Ensure the very top is slightly blunted rather than needle-sharp; this provides a more stable spot for the wire insert later.
Uneven Cone?
If your cone looks lumpy, verify looking from the top down. Roll it gently against a flat surface like a rolling pin rather than your hand to even out bumps.
Step 2: Adding the Wire Heart
-
Form the Heart:
Cut a short length of silver wire (about 2 inches). Using round-nose pliers, bend the center into a V-shape, then curl the ends inward to form the two lobes of a heart. -
Create the Stem:
Twist the remaining ends of the wire together at the bottom of the heart to create a straight stem that will insert into the clay. -
Insert the Wire:
Carefully push the wire stem into the very top center of your clay cone. I suggest doing this gently to avoid squishing the cone shape you just perfected. -
Final Adjustments:
If the cone distorted slightly during insertion, gently roll it again or smooth it with your fingers to realign the silhouette.
Step 3: Creating the Speckled Dish
-
Mix the Speckles:
Take your white or cream clay. If you don’t have pre-speckled clay, knead in a tiny pinch of coarse black pepper or black sand to create a faux-ceramic speckled look. -
Roll the Slab:
Roll this speckled clay out into a slab approximately 1/4 inch thick. Try to keep the thickness even across the surface. -
Cut the Circle:
Using a circle cutter or a small bowl as a template, cut out a perfect circle from the slab. This will be the tray for the cone. -
Raise the Rim:
Gently pinch the edges of the circle upward to create a slight lip or rim. You can smooth the rim with a wet finger to round off harsh edges.
Smooth Operator
Before baking, brush a tiny amount of baby oil or clay softener over the surface with your finger. This melts away fingerprints and creates a silky finish.
Step 4: Baking and Finishing
-
Preheat the Oven:
Set your oven to the temperature recommended on your specific brand of polymer clay packaging (usually between 230°F to 275°F). -
Arrange for Baking:
Place both the cone (with the wire inside) and the speckled dish on a ceramic tile or baking sheet lined with parchment paper. -
Bake:
Bake the pieces for the time specified by the manufacturer (typically 15-30 minutes per 1/4 inch of thickness). -
Cool Down:
Turn off the oven and let the pieces cool completely inside with the door slightly ajar. This gradual cooling helps prevent cracks. -
Secure the Connection:
Once cool, apply a strong adhesive (like E6000 or super glue) to the bottom of the cone and press it firmly into the center of the speckled dish. -
Final Sanding:
Check for any rough spots or fingerprints. If found, lightly wet-sand them with fine-grit sandpaper for a professional, matte finish.
Your stylish ring holder is now ready to display your favorite treasures on your vanity
Easy Candle Holder With Cutout Shapes

Create a cozy atmosphere with this textured cylindrical candle holder featuring elegant geometric cutouts. The natural sandstone look and clever negative space allow the candlelight to cast beautiful, dancing shadows on your table.
Step-by-Step Tutorial
Materials
- Air-dry clay (stone or sand effect preferred)
- Rolling pin
- Rolling guides or wooden slats (approx. 1/4 inch thick)
- Cylindrical form (like a jar or sturdy cardboard tube)
- Clay knife or fettling knife
- Small oval clay cutter (or bottle cap)
- Small arch cutter (optional)
- Sandpaper (medium to fine grit)
- Slip (clay mixed with water)
- Sponge
- Parchment paper
Step 1: Preparation and Slab Rolling
-
Prepare your workspace:
Lay down a piece of parchment paper to prevent sticking. Knead your air-dry clay briefly to warm it up and ensure it’s pliable and free of air bubbles. -
Roll the slab:
Place your clay between two wooden slats or guides. This ensures your slab is an even thickness throughout. Roll the clay out into a long rectangle, roughly 1/4 inch thick. -
Measure the circumference:
Wrap a piece of string or paper around your cylindrical form to find the circumference. Add about half an inch to this measurement for the overlap seam. -
Cut the rectangle:
Using the measurement from the previous step, cut your clay slab into a neat rectangle. Use a ruler and your clay knife to get sharp, straight edges.
Step 2: Cutting the Pattern
-
Mark the design:
While the clay is flat, lightly plan your cutout placement. The design features a row of arches along the bottom edge and scattered oval shapes above them. -
Cut the ovals:
Use a small oval cutter or a shaped bottle cap to punch holes through the clay. Twist the cutter gently as you lift it to remove the clay plug cleanly. -
Cut freehand shapes:
For the varied organic shapes shown in the image, you might prefer using a needle tool or small knife to cut freehand ovals if you don’t have exact cutters. -
Create the bottom arches:
Cut arch shapes along the bottom strip. You can leave the bottom edge flat or cut the actual hem into scallops; the image shows the arches as cutouts slightly above a flat base rim. -
Add small details:
Use a straw or a small detailing tool to poke tiny circular holes between the larger cutouts for extra texture and light variation. -
Smooth the edges:
Dip your finger in a little water and gently run it around the inside edges of all your cutouts to smooth away any roughness or burrs.
Slumping Cylinder?
If the clay walls sag when you remove the mold, the clay is too wet. Put the mold back in and let it firm up for another hour before removing.
Step 3: Construction
-
Wrap the form:
Cover your cylindrical form with a layer of parchment paper. This is crucial so the clay doesn’t stick to the mold as it dries. -
Form the cylinder:
Carefully lift your clay rectangle and wrap it around the form. Bring the two short ends together. -
Score and slip:
Score (scratch) the edges where the clay will overlap. Apply a little water or slip (clay slurry) to the scored areas to act as glue. -
Seal the seam:
Press the overlapping edges together firmly. Use a modeling tool or your thumb to blend the seam until it disappears, smoothing both the outside and inside if reachable. -
Refine the shape:
Once the seam is secure, gently adjust the cylinder to ensure it hasn’t warped. I prefer to let it sit on the form for about an hour to stiffen slightly.
Pro Tip: Texture
To get that gritty sandstone look, use a clay body containing grog, or gently press coarse sandpaper into the slab surface before cutting your shapes.
Step 4: Finishing Touches
-
Remove the form:
Carefully slide the cylindrical form out of the clay tube. Let the clay stand on its own to dry completely. For air-dry clay, this usually takes 24-48 hours. -
Check for cracks:
As it dries, keep an eye out for tiny cracks. If you spot one, smooth a tiny bit of wet clay over it immediately. -
Sand for texture:
Once fully dry, use sandpaper to smooth the top rim and any sharp edges. Sanding also enhances the stone-like texture of the clay. -
Clean up:
Wipe away any sanding dust with a slightly damp sponge or cloth.
Place a tea light inside and enjoy the warm glow of your handmade creation
Tiny House Charm With Simple Roof And Door Details
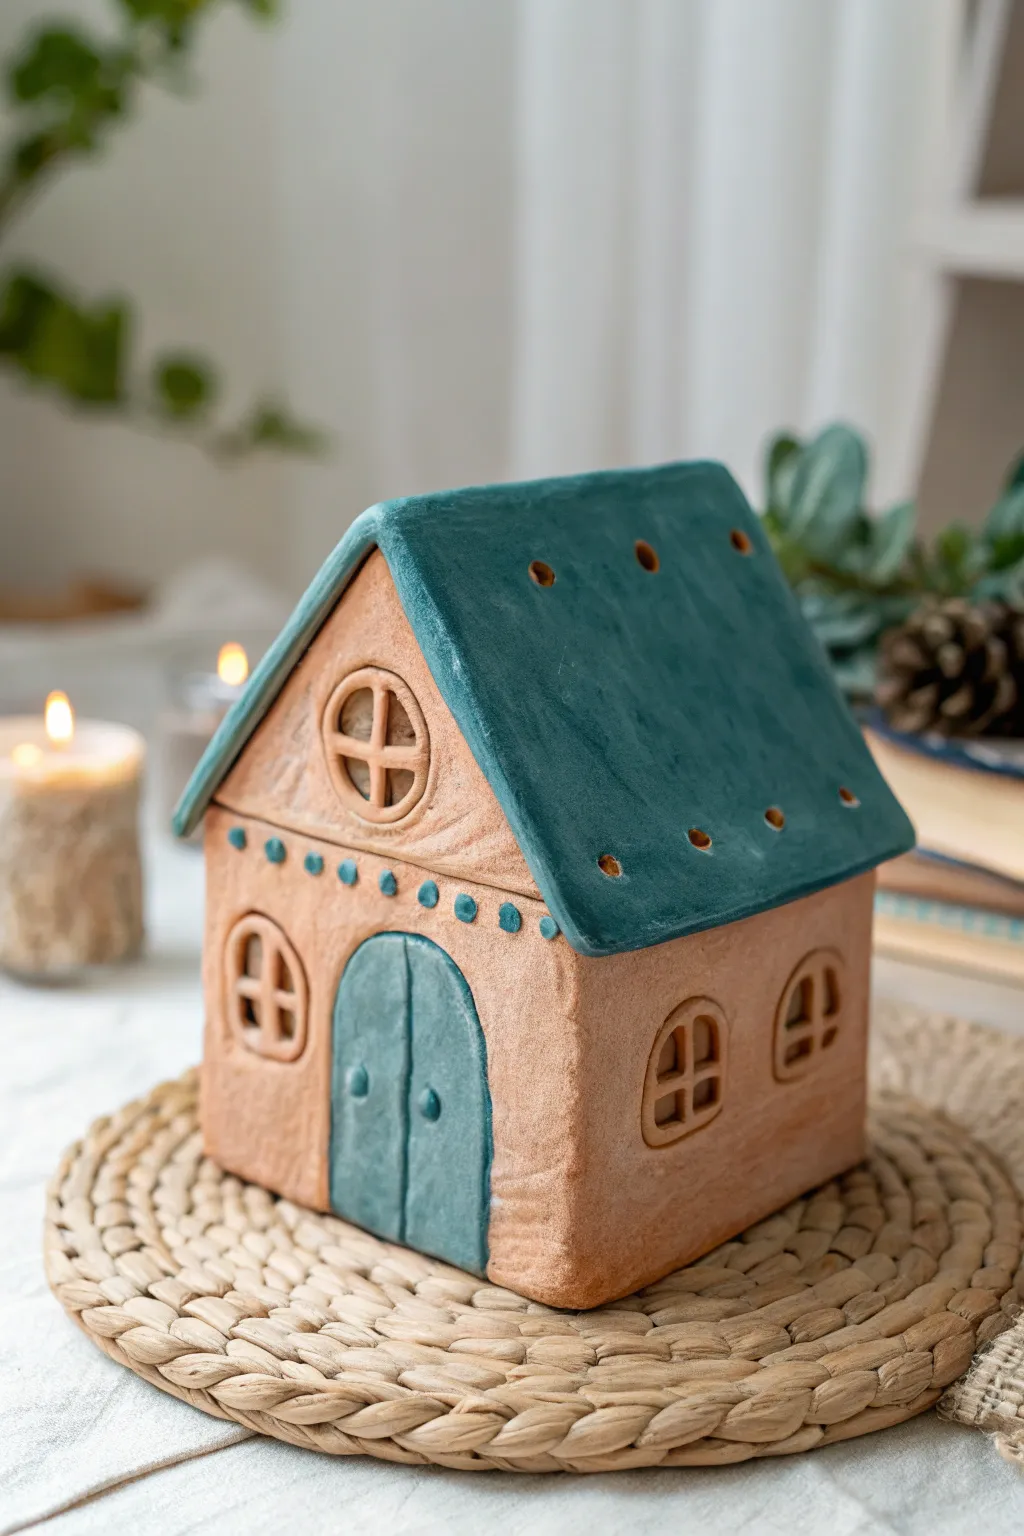
This charming little abode captures the warmth of a rustic cottage with its textured walls and deep teal accents. Its hollow construction allows it to serve as a cozy luminary, perfect for holding an LED tea light that casts a gentle glow through the windows and roof vents.
Step-by-Step
Materials
- Air-dry clay or polymer clay (terracotta or white)
- Acrylic paints (terracotta orange, deep teal/cyan)
- Rolling pin
- Craft knife or scalpel
- Ruler
- Cardboard (for templates)
- Slip (clay mixed with water) or scoring tool
- Small round cutter or straw
- Paintbrushes (flat and fine detail)
- Sandpaper (fine grit)
- Matte varnish (optional)
Step 1: Planning and Cutting Walls
-
Draft your templates:
Begin by drawing your house shapes on cardboard and cutting them out. You will need two rectangles for the side walls, two pentagon shapes (rectangle bottom with triangle top) for the front and back, and two rectangles for the roof panels that are slightly wider than the building to create an overhang. -
Roll out the clay:
Knead your clay until it is pliable and smooth. Roll it out into an even slab, approximately 1/4 inch thick. I find using guides on either side of my rolling pin helps keep the thickness perfectly consistent. -
Cut the components:
Place your cardboard templates onto the clay slab. Using a sharp craft knife, carefully trace around each template to cut out your four walls and two roof pieces. Keep the excess clay wrapped up so it doesn’t dry out. -
Add surface texture:
Before assembly, gently press texturing materials or use a crumpled ball of aluminum foil against the clay surfaces to create a stucco-like, rustic finish. Avoid texturing the edges where you will be joining pieces.
Step 2: Assembling the Structure
-
Cut the windows:
On the front and side wall panels, use a small cutter or your knife to remove arched window shapes. Save the cutout clay. Roll tiny snakes of clay to form the crossbars and gently press them into the window openings from the back. -
Score and slip:
Score (scratch) the side edges of your walls where they will connect. Apply a little water or clay slip to these roughened areas to act as glue. -
Construct the base:
Stand the four walls up, pressing the scored seams together firmly. Use a modeling tool or your finger to smooth the clay on the inside seams to reinforce the bond. Ensure the corners are square. -
Attach the roof:
Score the top angled edges of your front and back walls. Place the roof panels on top, ensuring they meet at the peak and overhang the sides slightly. Blend the seam at the very top ridge so it becomes one solid unit.
Clean Cuts Matter
Let the clay dry for about 20-30 minutes after rolling but before cutting the windows. Slightly firmer clay cuts much cleaner and won’t warp as easily as fresh, wet clay.
Step 3: Adding Details
-
Create the front door:
Fashion a flat, arched shape from leftover clay that fits the scale of the front wall. Score the back of it and press it firmly onto the center of the front panel. Use a knife to lightly scribe a vertical line down the middle for the double doors. -
Add decorative dots:
Roll tiny spheres of clay and attach them in a horizontal row right where the wall meets the roof line on the front facade. Press them flat slightly to secure them. -
Ventilate the roof:
Using a straw or a small circular tool, punch several holes through the roof panels. These aren’t just decorative; they allow heat to escape if you place a candle inside. -
Final smoothing:
Check over the entire piece. Smooth out any unintentional fingerprints with a slightly damp brush or sponge. Let the clay dry completely according to the package instructions (usually 24-48 hours).
Make it Shine
Mix a tiny amount of glitter into the varnish for the roof only. It will give the appearance of frost or morning dew on the tiles when the light hits it.
Step 4: Painting and Finishing
-
Base coat the walls:
If you didn’t use terracotta-colored clay, paint the walls with a warm terracotta acrylic paint. You can dilute the paint slightly with water to create a wash that settles into the texture you added earlier. -
Paint the roof and door:
Using a deep teal or cyan acrylic, paint the entire roof and the front door. Be careful around the edges where the roof meets the walls for a crisp line. -
Highlight the details:
Use a fine detail brush to paint the small decorative dots above the door in the same teal color. Add tiny teal dots as doorknobs on the double doors. -
Seal the project:
Once the paint is fully dry, apply a coat of matte varnish to protect the surface and give it a finished, professional look without making it too shiny.
Place your finished cottage on a shelf or mantelpiece to bring a touch of handmade architectural charm to your home
Feather-Texture Bird Using Layered “Scales”
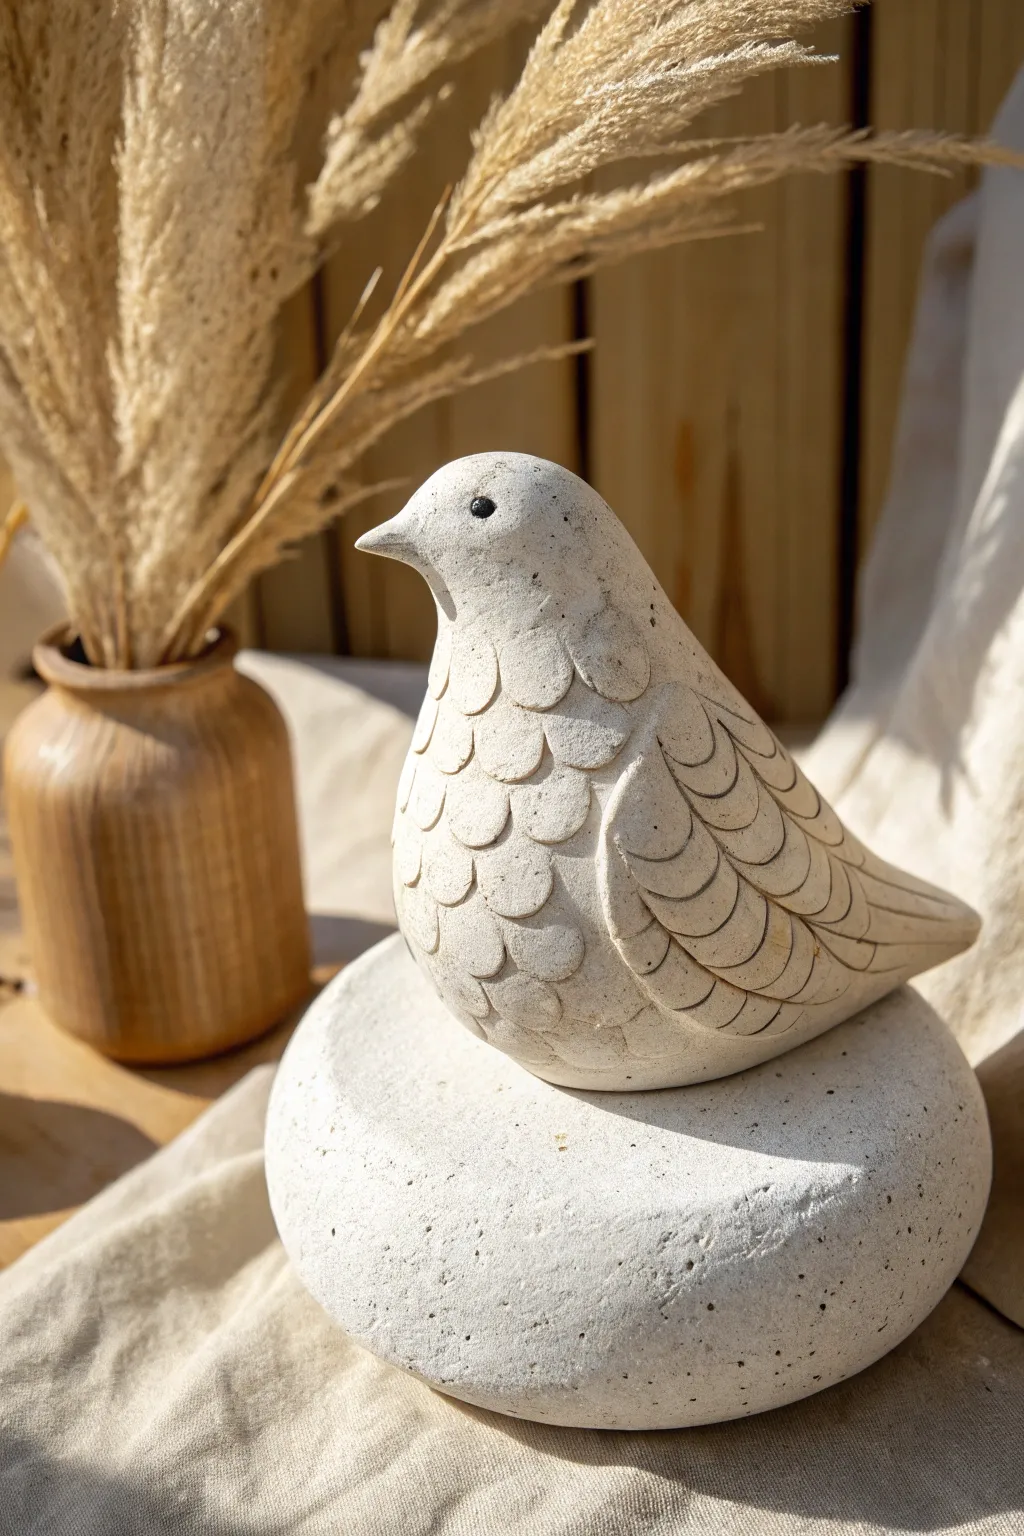
Create a serene, minimalist bird sculpture that mimics the look of carved limestone. This project uses simple layering techniques to build a beautifully textured breast and elegant wing details.
Step-by-Step Guide
Materials
- Air-dry clay (stone or white color)
- Small rolling pin
- Circle cutter (approx. 0.5 inch / 1.5 cm)
- Needle tool or toothpick
- Modeling tool (spoon shape)
- Water and sponge for smoothing
- Fine-grit sandpaper
- Black acrylic paint (for eyes)
- Speckled stone spray paint (optional)
Step 1: Shaping the Base Form
-
Form the body armature:
Start with a large ball of clay roughly the size of a grapefruit. Gently elongate one side to form a tail and pull the other side up and forward to create the neck and head. -
Refine the silhouette:
Smooth the clay into a classic dove shape. The back should slope gently down to the tail, while the chest should be plump and rounded. Ensure the bottom is flattened so it sits stable. -
Pinch the beak:
At the front of the head, carefully pinch a small amount of clay to form a short, pointed beak. Blend the transition area back into the head so it doesn’t look like an added piece. -
Create the platform:
Take a separate, large chunk of clay and form a thick, flattened disc. This will serve as the stone perch. Texture it by patting it with a real rock or a crumpled foil ball for a rugged look.
Scaling Secrets
Make the scales slightly smaller as you move up the neck. This graduation in size creates a more realistic and organic feather growth pattern.
Step 2: Applying Feather Texture
-
Prepare the scales:
Roll out a thin sheet of clay, about 1/8 inch thick. Use your small circle cutter to punch out two dozen small circles. Cut each circle in half to create semi-circle scales. -
Apply the first row:
Starting at the very bottom of the bird’s chest, score and slip the area. Press a row of semi-circles into the clay, curved side down. -
Build the texture upward:
Add a second row of scales slightly above the first, overlapping them so the seams of the bottom row are covered. Continue this process, moving up the chest toward the neck. -
Blend and smooth:
As you place each scale, gently press the top straight edge into the body clay to blend it seamlessly, leaving the bottom curved edge slightly raised for dimension. -
Fade out the texture:
Stop layering once you reach the midpoint of the neck. Use a damp finger or sponge to smooth the top edge of the final row so it disappears naturally into the smooth head.
Step 3: Sculpting Wings and Details
-
Define the wing shape:
Use a modeling tool to lightly outline a teardrop shape on the side of the bird’s body, representing the folded wing. This area should remain scale-free. -
Carve wing feathers:
Using a needle tool, carve deep, curved u-shaped lines into the wing area. I find it best to start near the front of the wing and sweep backward to mimic overlapping long feathers. -
Detail the tail:
On the tail section, draw horizontal straight lines extending from the wing tips to the end of the tail to suggest stiff flight feathers. -
Add the eyes:
Use a small ball tool or the end of a paintbrush handle to make a small indentation on either side of the head for the eyes.
Cracking Clay?
If you see hairline cracks forming while drying, mix a tiny bit of fresh clay with water to make a paste and fill them in immediately, then smooth over.
Step 4: Finishing Touches
-
Final smoothing:
Check the smooth areas of the head and back. Use a barely damp sponge to wipe away any fingerprints or stray crumbles. -
Dry thoroughly:
Let the bird and base dry separately. This can take 24-48 hours depending on humidity. Rotate them occasionally for even drying. -
Sand for stone effect:
Once bone dry, lightly sand the smooth areas to mimic a honed stone surface. Be gentle around the scale texture. -
Paint the eyes:
Using a fine brush, paint a simple black dot inside the eye indentation. This high contrast brings the character to life. -
Optional speckling:
To get the exact look in the photo, flick a toothbrush loaded with watered-down brown or grey paint over the sculpture to create tiny faux-stone speckles. -
Assembly:
Glue the finished bird securely onto the textured base using a strong craft adhesive.
Place your finished stone bird near a window or plant to highlight the lovely shadows cast by the feathered texture