I love how succulents can turn even the simplest pot into a tiny piece of living sculpture. Here are my favorite succulent planter ideas—starting with the classics and working our way into the fun, unexpected showstoppers.
Classic Terra Cotta Pot With Pebble Top Dressing

This elegant arrangement combines the timeless warmth of terra cotta with a diverse mix of succulent textures and colors. By using a shallow bowl and a clean pebble top dressing, you create a polished, desert-inspired centerpiece that is perfect for bright windowsills.
Detailed Instructions
Materials
- Shallow terra cotta bowl (approx. 6-8 inches diameter)
- Well-draining succulent/cactus potting mix
- Small white/beige river pebbles or pea gravel
- 1 Large rosette succulent (Echeveria, approx. 3-4 inch)
- Small clump of trailing sedum or similar bright green succulent
- 1 Spiky succulent (like an Aloe or Haworthia)
- 2-3 Small rosette succulents (Sempervivum or similar)
- Small shovel or spoon
- Soft bristle brush (optional, for cleaning)
Step 1: Preparation and Base Layer
-
Prepare the pot:
Start with a clean, dry terra cotta bowl. Ensure the drainage hole at the bottom is clear. If the hole is very large, cover it with a small piece of mesh screen or a broken pottery shard to keep soil in while letting water out. -
Add first soil layer:
Fill the bowl with your cactus potting mix, but only about halfway to two-thirds full. You need to leave plenty of room to arrange the root balls of your plants comfortably. -
Create a slight mound:
I like to create a very subtle mound in the center of the soil rather than keeping it perfectly flat. This helps with drainage and adds a nice dimension to the final look.
Step 2: Planting the Arrangement
-
Prepare the feature plant:
Take your largest rosette succulent (the Echeveria) out of its nursery pot. Gently massage the root ball to loosen the soil and remove any dead leaves from the base. -
Position the centerpiece:
Place this large rosette slightly off-center in the bowl. It serves as the focal point, so position it where it draws the eye but leaves room for friends. -
Insert the spiky texture:
Take your spiky succulent (like the darker Haworthia shown on the right) and nestle it next to the main rosette. This provides a contrast in both shape and color. -
Add height and greenery:
Place your taller, greener succulent (like the Sedum clavatum or similar) on the opposite side to balance the arrangement. Angle it slightly outward so it looks like it’s reaching for the sun. -
Fill the gaps:
Use the smaller rosette succulents to fill in the front and remaining gaps. These act like little ground covers that tie the bigger plants together. -
Secure the roots:
once everyone is in their designated spot, use a small spoon or scoop to backfill with more cactus soil. Gently tuck soil around the roots, ensuring there are no large air pockets. -
Firm the soil:
Press down gently on the soil with your fingers to secure the plants. The soil level should be about half an inch below the rim of the pot to make room for watering and rocks.
Clean Sweep
Struggling to get soil out of tight rosette leaves? Use a clean, soft makeup brush or a straw to gently blow the dirt away without damaging the delicate farina coating.
Step 3: Finishing Touches
-
Add top dressing:
Carefully pour your white or beige river pebbles over the exposed soil. Use a spoon to guide the rocks under the leaves of the succulents. -
Cover completely:
Make sure you cover all visible dirt with the pebbles. This not only looks professional but prevents soil from splashing up onto the leaves when you water. -
Clean up:
Use a soft bristle brush or a gentle puff of air to sweep away any stray soil grains or dust from the leaves of the succulents. -
Initial care:
Wait about a week before watering to allow any damaged roots to heal and callus over, preventing rot.
Color Pop
Swap the neutral beige pebbles for black lava rocks or crushed terracotta chips to create a dramatic, high-contrast look that makes the green plants really pop.
Now you have a stunning, drought-tolerant centerpiece ready to brighten up any sunny corner of your home


Shallow Succulent Bowl Centerpiece
This elegant centerpiece transforms a simple shallow bowl into a lush miniature landscape, perfect for brightening up a dining table or coffee nook. The project combines the rustic charm of stone-textured ceramic with the vibrant greens and soothing pastels of diverse succulent varieties.
Step-by-Step
Materials
- Shallow ceramic bowl (speckled white/cream finish, approx. 10-12 inches diameter)
- Cactus and succulent potting mix
- Perlite or pumice
- Small gravel or hydro balls (for drainage layer)
- Assorted succulents (Echeveria, Aloe, Sedum varieties)
- Small decorative top-dressing stones or river rocks
- Small brush (for cleaning leaves)
- Spoon or soil scoop
- Spray bottle
Step 1: Preparation & Base
-
Choose the vessel:
Select a broad, shallow bowl. A speckled ceramic finish like the one shown adds a lovely textural contrast to the smooth plants. Ensure it has a drainage hole; if not, you’ll need to be extra careful with the drainage layer. -
Create drainage:
Pour a layer of small gravel or hydro balls into the bottom of the bowl, filling it about 1 inch deep. This prevents the delicate roots from sitting in standing water. -
Mix the soil:
Combine your cactus soil with perlite in a 2:1 ratio. I prefer adding a bit of extra perlite to ensure the mix is extremely airy and fast-draining. -
Add the soil layer:
Scoop the soil mixture into the bowl over the drainage rocks, filling it until it is about 1 inch below the rim. Shape the soil so it mounds slightly in the center for a natural look.
Step 2: Arrangement & Planting
-
Remove plants from pots:
Gently squeeze the nursery pots to loosen the root balls. Carefully remove each succulent, shaking off excess loose soil to expose the roots slightly. -
Plan the placement:
Before digging, set the plants on top of the soil to test your arrangement. Place taller varieties like the Aloe off-center for asymmetry, and group rosette shapes like Echeveria nearby. -
Plant the anchor:
Start with your largest plant (the focal point). Dig a small hollow in the soil, place the roots in, and gently firm the soil around the base. -
Add texture:
Add the moss-like or creeping varieties (like Sedum) near the edges or between larger rosettes. These fill gaps beautifully and create a lush carpet effect. -
Group rosettes:
Nestle the pale blue-green Echeverias together. Planting them in odd-numbered groups usually looks more natural than placing them in straight rows. -
Fill the gaps:
Use smaller succulent cuttings or pups to fill in any tight spaces between the larger plants. A spoon handle helps to tuck roots into these narrow crevices. -
Secure the plants:
Once all plants are in, gently press down on the soil surface around each plant to eliminate large air pockets and stabilize them.
Root Rescue
Don’t water immediately after planting. Waiting a few days allows accidental root damage to heal and callouse over, preventing root rot.
Step 3: Finishing Touches
-
Apply top dressing:
Carefully scatter decorative rocks or pebbles over the exposed soil. This not only looks polished but keeps soil off the leaves during watering. -
Clean the arrangement:
Take a small dry paintbrush and whisk away any stray soil granules that may have fallen into the crevices of the succulent rosettes. -
Final check:
Rotate the bowl to ensure it looks balanced from all angles, adjusting any leaning plants if necessary. -
Initial watering:
Wait about 3-5 days before watering to allow any broken roots to callous over. Afterward, water sparingly near the base of the plants, avoiding the leaves.
Color Pop
Succulents losing color? They need more light. Move the bowl closer to a window to bring back those vibrant pink and purple stress colors.
Place your new living centerpiece in a bright spot and enjoy the calming greenery


Set of Three Mini Succulent Pots
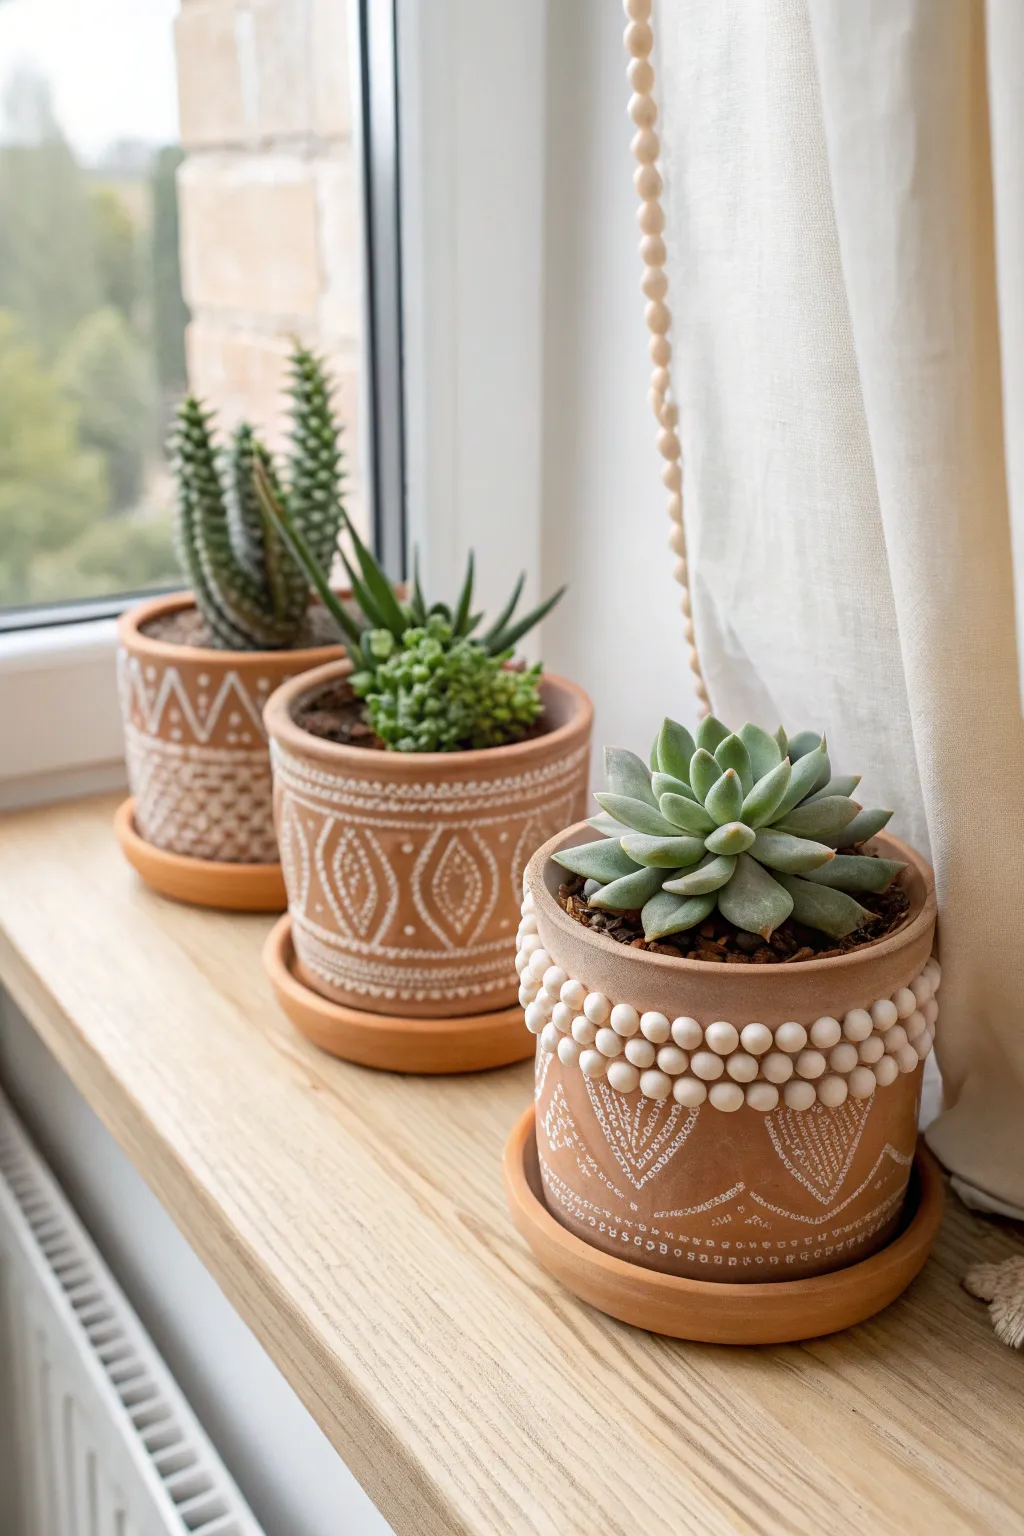
Transform ordinary garden center terracotta pots into a cohesive, boutique-style set using nothing more than paint and beads. This project combines delicate geometric linework with tactile textures to create striking homes for your favorite succulents.
Step-by-Step Tutorial
Materials
- 3 small terracotta pots with matching saucers (approx. 4-inch diameter)
- White acrylic paint (matte finish works best)
- Fine detail paintbrushes (size 0 and 00)
- White wooden craft beads (10mm or similar size)
- Strong craft glue or hot glue gun
- Pencil
- Ruler or measuring tape
- Paper towel
- Palette or small dish
- Clear matte sealant spray (optional)
Step 1: Preparation and Base Design
-
Clean surface:
Ensure your terracotta pots are completely clean and dry. Wipe them down with a damp cloth to remove any clay dust that might interfere with paint adhesion. -
Plan the spacing:
On the first pot (the background one in the image), use a pencil to lightly mark vertical guidelines around the circumference. Divide the pot into roughly eight equal sections. -
Sketch the zig-zags:
Around the upper rim of the first pot, sketch a continuous zig-zag pattern. Below that, draw horizontal lines to create bands where you will add more detailed patterns. -
Outline the leafy pot:
For the middle pot, lightly sketch large leaf or petal shapes. These should be upright ovals with pointed tips, containing smaller concentric shapes inside them. -
Plan the beaded pot:
For the foreground pot, leave the upper rim blank for now as this is where the beads will go. Sketch downward-pointing triangular geometric shapes on the main body.
Paint Wipe-Out
Make a mistake with the paint? Don’t panic. Since terracotta is porous, quickly wipe it with a wet paper towel. If it stains, you can lightly sand the spot with fine sandpaper once dry.
Step 2: Painting the Details
-
Load the brush:
Dip your fine detail brush into the white acrylic paint. You want a creamy consistency—if it’s too thick, add a tiny drop of water. -
Paint the background pot rim:
Start with the first pot. Paint the zig-zag line on the upper rim. Add small dots or dashes between the ‘V’ shapes for extra interest. -
Create the lower pattern:
On the lower section of the first pot, paint a mesh or cross-hatch pattern using small ‘x’ shapes or intersecting diagonal lines to create a textured look. -
Paint the middle pot:
Moving to the second pot, carefully paint over your leaf sketches. Use series of small dashes or dots to outline the shapes rather than solid lines, giving it a hand-stitched appearance. -
Fill the details:
Inside the leaf shapes on the middle pot, paint smaller diamond or oval outlines, keeping the lines delicate. -
Decorate the foreground pot:
On the third pot, paint the downward-pointing triangles. Embellish them with internal lines that mimic veins or geometric fill patterns. -
Add the tiny text:
Paint a very fine line of tiny dots or extremely small letters/symbols along the bottom edge of the design on the foreground pot for a microscopic detail band. -
Let it dry:
Allow all paint to dry completely. Acrylics on terracotta dry fast, but give it about 20-30 minutes to be safe so you don’t smudge your hard work.
Make It Pop
For a bolder look, paint the bead rim in a contrasting color like sage green or burnt orange before gluing, or use natural wood beads and stain them dark walnut for high contrast.
Step 3: Adding Texture and Finishing
-
Prepare the beads:
Gather your white wooden beads. Test the fit around the rim of the third pot to estimate how many you will need. -
Apply the first row:
Apply a generous dab of glue to the rim of the pot or the back of a bead. Press the bead firmly against the terracotta just below the lip. I find hot glue works fastest here. -
Complete the first ring:
Continue gluing beads side-by-side all the way around the circumference until the ring is complete. -
Add the second row:
Glue a second row of beads directly beneath the first row. Try to align them directly under the beads above for a stacked grid look, or offset them slightly for a honeycomb effect. -
Clean up:
Gently pull away any strings of hot glue or erase any visible pencil marks that weren’t covered by paint. -
Seal (Optional):
If these pots will be outside, spray them with a clear matte sealant to protect the paint and wood beads from moisture. -
Pot your plants:
Fill your new custom pots with cactus soil and plant your succulents, ensuring the soil level is just below the decorative rims.
Now arrange your trio on a sunny windowsill where the natural light highlights your intricate handiwork


Simple Cylinder Planters With Clean Lines
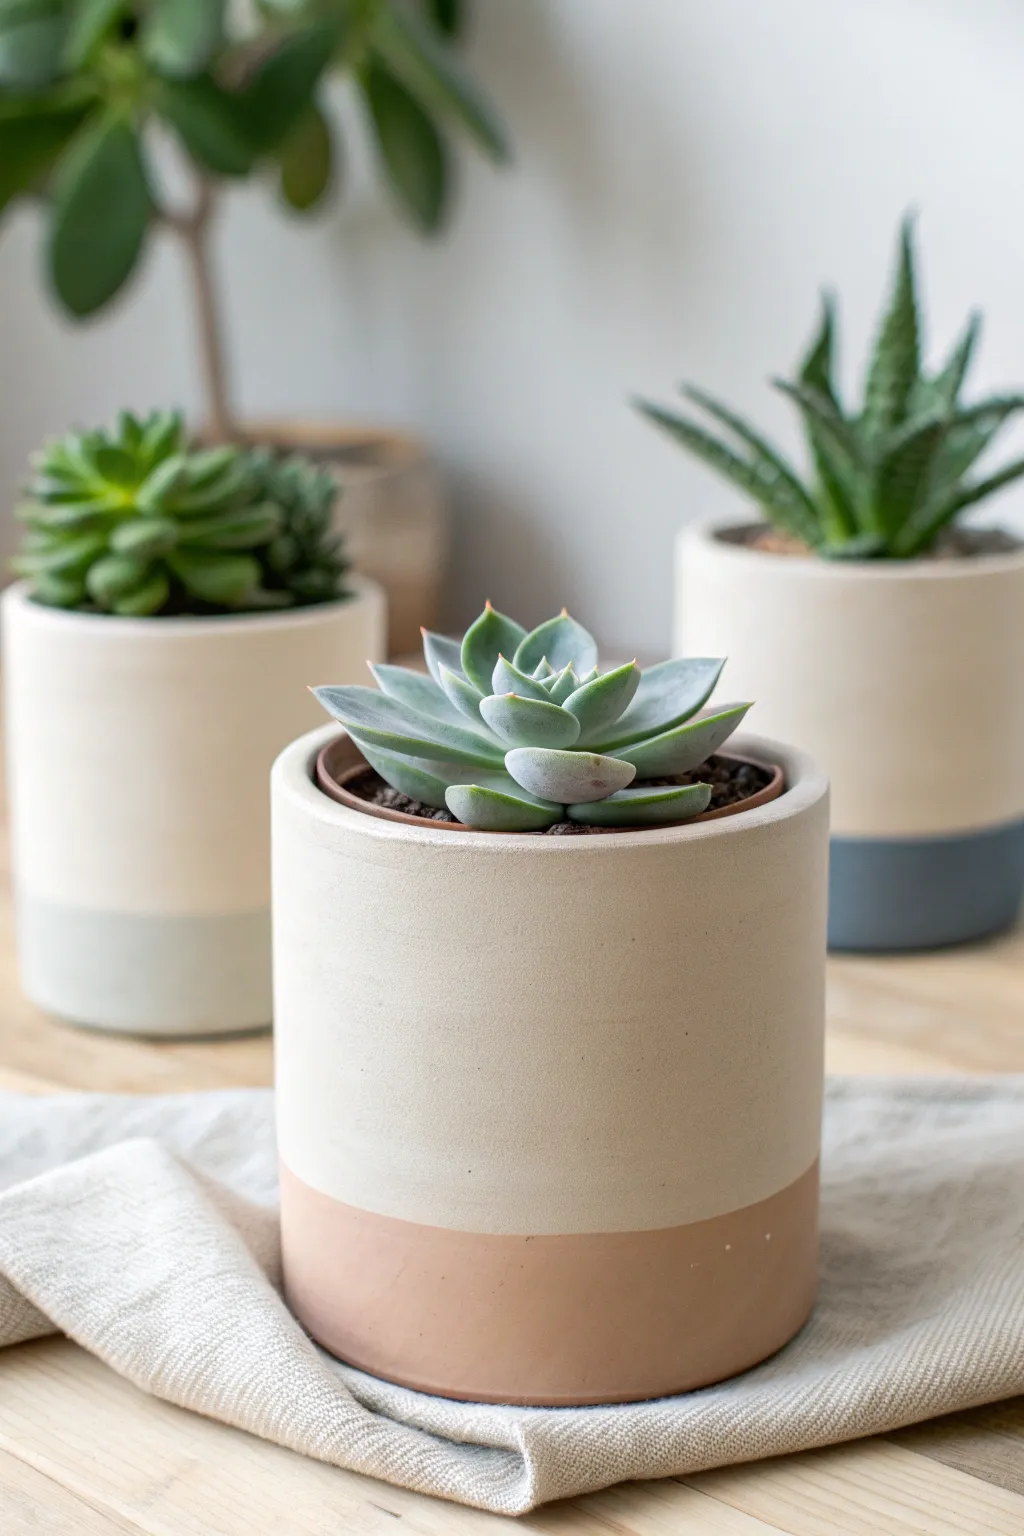
Elevate ordinary cylindrical pots into chic, minimalist homes for your succulents with a classic color-blocking technique. By combining raw, matte terracotta or concrete textures with soft, dipped hues, you create a timeless aesthetic that lets the plants steal the show.
Step-by-Step
Materials
- Straight-sided cylinder terracotta pots (unglazed)
- Acrylic craft paints (creamy beige, dusty rose, slate blue)
- Painter’s tape (high-quality, multi-surface)
- Foam brushes or flat synthetic bristle brushes
- Matte spray sealer or clear acrylic varnish
- Newspaper or drop cloth
- Light sandpaper (220 grit)
- Ruler
Step 1: Preparation & Base Coat
-
Clean surface:
Begin by thoroughly wiping down your cylinder pots with a damp cloth to remove any manufacturing dust or oils. Let them dry completely, as any moisture trapped inside will cause the paint to bubble later. -
Examine for imperfections:
Check the exterior for any rough bumps or sharp ridges. If you find any, gently smooth them down with 220-grit sandpaper so you have a sleek, uniform canvas. -
Apply the top color:
Squeeze out your creamy beige paint. Using a foam brush, paint the upper portion of the pot. Don’t worry about a straight line at the bottom yet—just ensure you cover enough area so the top 2/3 of the pot is fully coated. -
Coat the rim:
Carry that same beige color over the top lip and about an inch into the interior of the pot. This ensures a finished look even when soil levels settle. -
Second layer:
Allow the first coat to dry for about 20 minutes. Apply a second coat of beige to ensure opacity and eliminate any brush strokes. -
Full dry:
Let the top color cure completely for at least 2-3 hours. If the paint is even slightly tacky, the tape in the next step will ruin your finish.
Smooth Seams
Is the tape leaving a ridge? Lightly sanding the paint edge after removing the tape helps blend the two colored sections seamlessly.
Step 2: Creating the Clean Line
-
Measure the dip:
Decide where you want your color shift to happen. For the pictured look, measure about one-third of the way up from the bottom of the pot and make tiny pencil marks at several points around the circumference. -
Tape firmly:
Apply painter’s tape horizontally around the pot, connecting your pencil marks. The bottom edge of the tape should align with your marks. -
Seal the edge:
Run your fingernail or a credit card firmly along the bottom edge of the tape. This is crucial for preventing paint bleed and achieving that crisp line. -
Initial seal trick:
I like to lightly brush a tiny amount of the *base* color (beige) along the tape edge first. This fills any microscopic gaps with the top color, blocking the accent color from bleeding under.
Bleeding Lines
If paint bled under the tape, use a damp Q-tip immediately to wipe it away, or cover the mistake with a thin gold strip for accidental flair.
Step 3: Adding the Accent Color
-
Paint the bottom:
Choose your accent color—either the dusty rose or slate blue. Paint the exposed bottom third of the pot, brushing downward away from the tape to minimize seepage. -
Second accent coat:
Let the first coat dry to the touch, then apply a second layer for a rich, solid finish. -
Remove tape:
Pull the tape off while the second coat of accent paint is still slightly wet. Peel it slowly at a 45-degree angle away from the paint line for the sharpest edge. -
Clean up:
If there are any tiny bleeds, wait for the paint to dry fully, then gently scrape them away with a craft knife or touch them up with a small brush and the base color. -
Final seal:
Once the entire pot is dry (preferably overnight), mist the exterior with a matte spray sealer. This protects the finish from water damage when you water your succulents.
Now you have a set of custom planters ready to complement the subtle greens of your favorite succulents

The Complete Guide to Pottery Troubleshooting
Uncover the most common ceramic mistakes—from cracking clay to failed glazes—and learn how to fix them fast.
Hand-Painted Geometric Succulent Pots
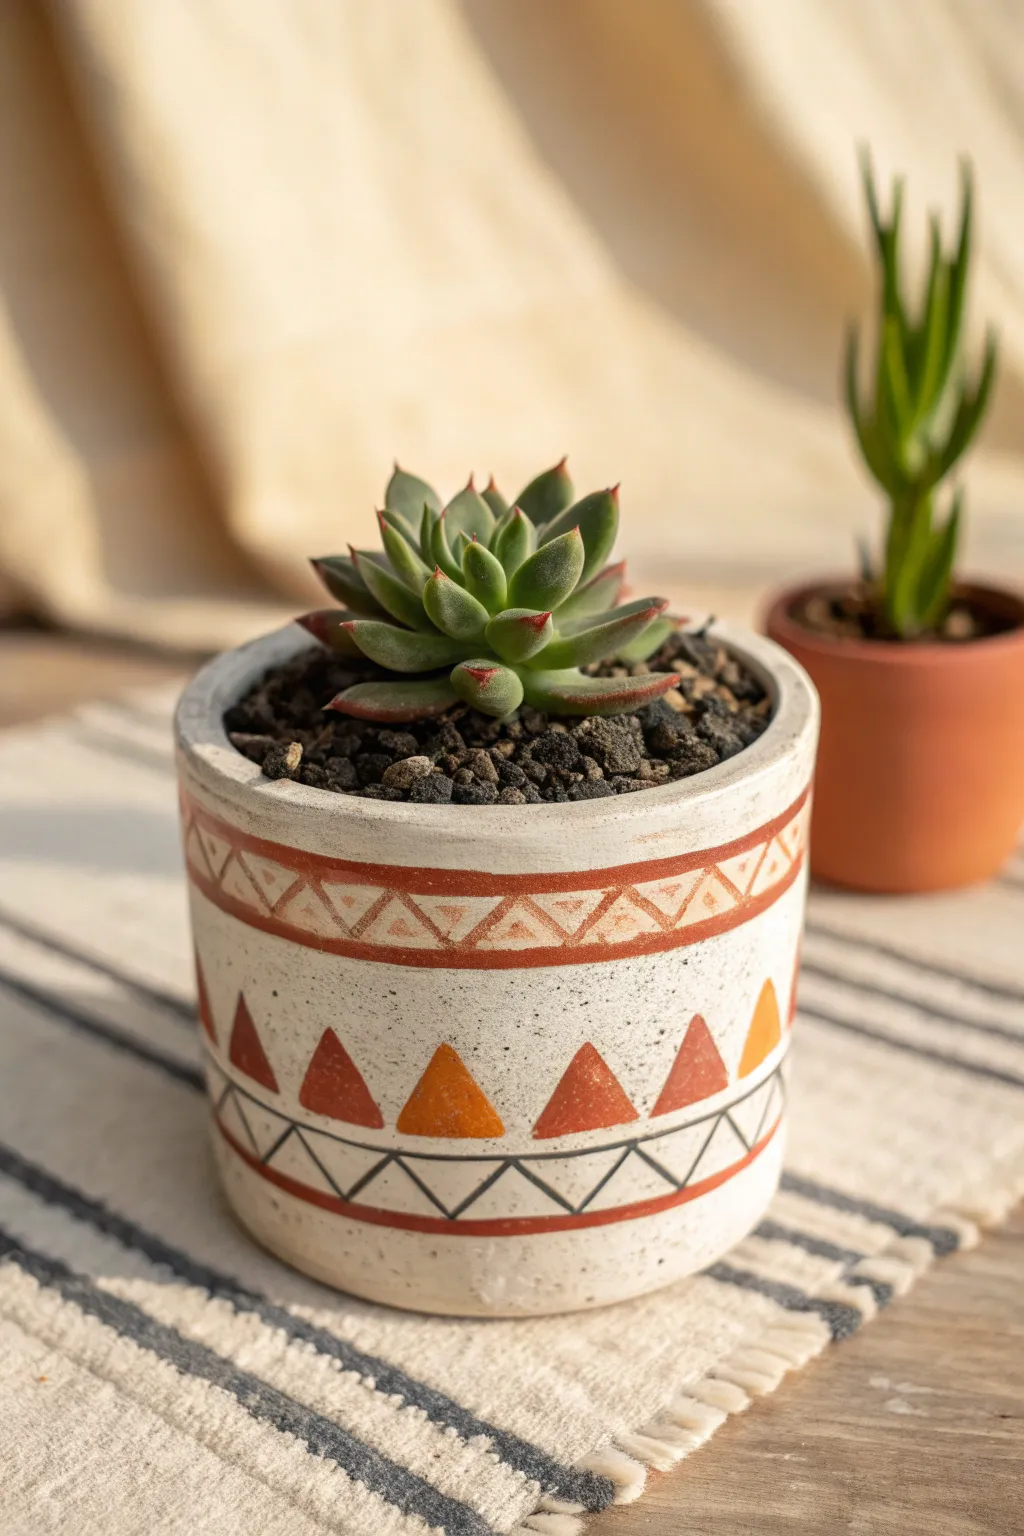
Bring desert warmth to your plant collection with this stunning hand-painted geometric pot. The combination of clean white space and rustic terracotta triangles creates a modern bohemian look that perfectly complements succulent greenery.
Step-by-Step Tutorial
Materials
- Cylindrical white ceramic or concrete pot (approx. 4-6 inches)
- Acrylic paint in ‘Terracotta’ or ‘Burnt Sienna’
- Acrylic paint in ‘Mustard Yellow’ or ‘Ochre’
- Acrylic paint in ‘Black’
- Small flat brush (size 4 or 6)
- Fine detail brush (size 0 or 1)
- Ruler or measuring tape
- Pencil
- Clear matte acrylic sealer spray or varnish
Step 1: Preparation & Base Guidelines
-
Clean surface:
Begin by wiping down your white pot with a damp cloth to remove any dust or oils that might prevent the paint from adhering properly. Let it dry completely. -
Mark horizontal sections:
Using your ruler and pencil, lightly mark horizontal bands around the pot. You will need a band near the top rim (about 1 inch wide), a large central space for the triangles, and a lower band near the bottom (about 0.5 inches wide). -
Draw band guidelines:
Connect your pencil marks to create continuous, straight horizontal guide lines around the entire circumference of the pot. Keeping your pencil hand steady while rotating the pot on a lazy susan or table works best. -
Pencil in the top pattern:
Within the top horizontal band, lightly sketch a zig-zag line that spans the full width of the band, creating a row of connected triangles. -
Sketch the main triangles:
In the central open space, pencil in a row of evenly spaced, standalone triangles. These should be larger than the top pattern and sit on a hypothetical baseline about an inch above the bottom band. -
Outline the bottom zig-zag:
For the bottom-most design, draw a similar zig-zag line as you did for the top, but slightly more compressed vertically.
Wobbly Lines?
If freehand painting lines is tricky, use masking tape or painter’s tape to block off the horizontal bands. This guarantees crisp, straight edges every time.
Step 2: Painting the Terracotta Bands
-
Top band borders:
Load your small flat brush with terracotta paint. Carefully paint two solid horizontal lines: one defining the top edge of your upper band and one defining the bottom edge. -
Fill upper triangles:
Using the same brush, fill in the zig-zag pattern between your borders. For a washed look like the photo, you can dilute your paint slightly with water, creating a semi-transparent effect inside the triangles. -
Bottom border line:
Paint a sold terracotta line horizontally underneath your main row of large triangles, and another one near the very bottom of the pot to frame the lower design.
Step 3: Adding the Central Motifs
-
Mix your colors:
Create a varied palette by keeping some pure terracotta paint and mixing a small amount of mustard yellow into another dollop of terracotta to create a lighter, warmer burnt orange. -
Paint main triangles:
Using the flat brush, fill in the large central triangles. I like to alternate between the pure terracotta shade and the mixed burnt orange shade to give the pattern depth and visual interest. -
Double coats:
If the coverage looks streaky after the first layer dries, apply a second coat to these main triangles to ensure the colors pop against the white background.
Pro Tip
Mix a tiny drop of water into your acrylics improves flow significantly. This helps eliminate visible brush strokes for that smooth, professional ceramic finish.
Step 4: Fine Details & Sealing
-
Switch to fine brush:
Switch to your size 0 or 1 fine detail brush and load it with black acrylic paint. Ensure the consistency is fluid, like ink, for smooth lines. -
Paint thin zig-zag:
Carefully trace the pencil zig-zag line on the bottom band with the black paint. Keep your pressure light to maintain a thin, delicate line. -
Add vertical dividers:
Inside the bottom black zig-zag, paint a tiny vertical line extending from each bottom point up to the middle of the triangle above it, creating a geometric arrow effect. -
Cleanup lines:
Check your work for any pencil marks that are still visible. Once the paint is bone dry, gently erase any stray graphite lines. -
Apply sealer:
To protect your artwork from water damage when watering your plant, finish by spraying the entire exterior with a clear matte sealant. Apply two light coats, letting it dry in between.
Pop in your favorite prickly succulent and enjoy the instant warmth this custom piece adds to your space
Scalloped or Fluted Rim Succulent Planter

This elegant arrangement brings texture and life to any sun-drenched corner, featuring a trio of distinct succulents nestled in a classic fluted bowl. The contrast between the rough, sandy stone texture of the planter and the smooth, vibrant leaves creates a sophisticated, desert-inspired centerpiece.
Step-by-Step Guide
Materials
- Shallow concrete or ceramic planter with scalloped/fluted rim (approx. 6-8 inches diameter)
- Succulent potting mix (fast-draining)
- Small white/beige decorative pebbles or gravel
- Medium-sized tumbled river stones (grey and white)
- Echeveria pulidonis (or similar rosette succulent with red edges)
- Small Echeveria or Graptopetalum (pale green/grey rosette)
- Haworthia or sedum variety (for textural contrast)
- Small planting trowel or spoon
- Soft bristle brush
- Watering can with narrow spout
Step 1: Preparing the Foundation
-
Check drainage:
Begin by inspecting your scalloped planter. Ensure there is a drainage hole at the bottom. If the pot is sealed, add a thin layer of activated charcoal or large gravel at the very bottom to act as a drainage reservoir. -
Add base soil:
Fill the planter about two-thirds full with your specialized succulent potting mix. Create a slight mound in the center to help display the plants better. -
Dampen the soil:
Lightly mist the soil with water. I find that slightly damp soil holds the plants in place better while you arrange them, preventing them from tipping over before the roots are buried.
Tilt for Drama
Plant the succulents slightly higher in the center and angled toward the rim. This ‘mounded’ technique makes the arrangement look fuller and more professional.
Step 2: Arranging the Succulents
-
Position the focal point:
Remove the largest succulent (the green rosette with red tips) from its nursery pot. Gently tease the roots to loosen them. -
Plant the anchor:
Place this main rosette on the right side of the bowl. Nestle it in at a slight angle so the face of the plant looks outward and upward, rather than straight up. -
Add the center rosette:
Take the smaller, pale rosette succulent. Position it slightly off-center to the left of your main plant. It should sit slightly lower than the large one to create depth. -
Introduce texture:
Place the textural plant (the bumpy sedum or Haworthia) in the back left space. This fills the gap and provides a visual backdrop for the smoother rosettes in front. -
Secure the roots:
Use your spoon or small trowel to backfill with more soil around the root balls. Gently press down with your fingers to eliminate air pockets and ensure stability.
Loose Leaf Fix
If a healthy leaf snaps off during planting, don’t throw it out! Let the end dry for two days, then place it on top of soil to propagate a brand new baby plant.
Step 3: The Finishing Touches
-
Clean the surface:
Brush away any loose soil that may have landed on the leaves using a soft, dry bristle brush. This keeps the arrangement looking crisp and professional. -
Add large stones:
Tuck two or three medium-sized river stones between the plants. Place a grey one near the center rosette and a lighter one near the back to create natural variance. -
Pour the top dressing:
Carefully pour the small beige decorative gravel over the exposed soil. Use a spoon to guide the pebbles under the leaves, covering every patch of brown dirt. -
Level the gravel:
Smooth out the gravel layer so it sits just below the scalloped rim. This prevents water from washing the stones out later. -
Final dusting:
Give the plants one last check for dust or grit. Use a straw to gently blow any stubborn pebbles out of the rosette centers. -
Initial watering:
Wait about a week before doing a deep watering. This allows any roots damaged during transplanting to callus over, preventing rot.
Place your finished planter in a bright, sunny spot to keep those red tips vibrant and enjoy the view


What Really Happens Inside the Kiln
Learn how time and temperature work together inside the kiln to transform clay into durable ceramic.
Hanging Ceramic Succulent Planter
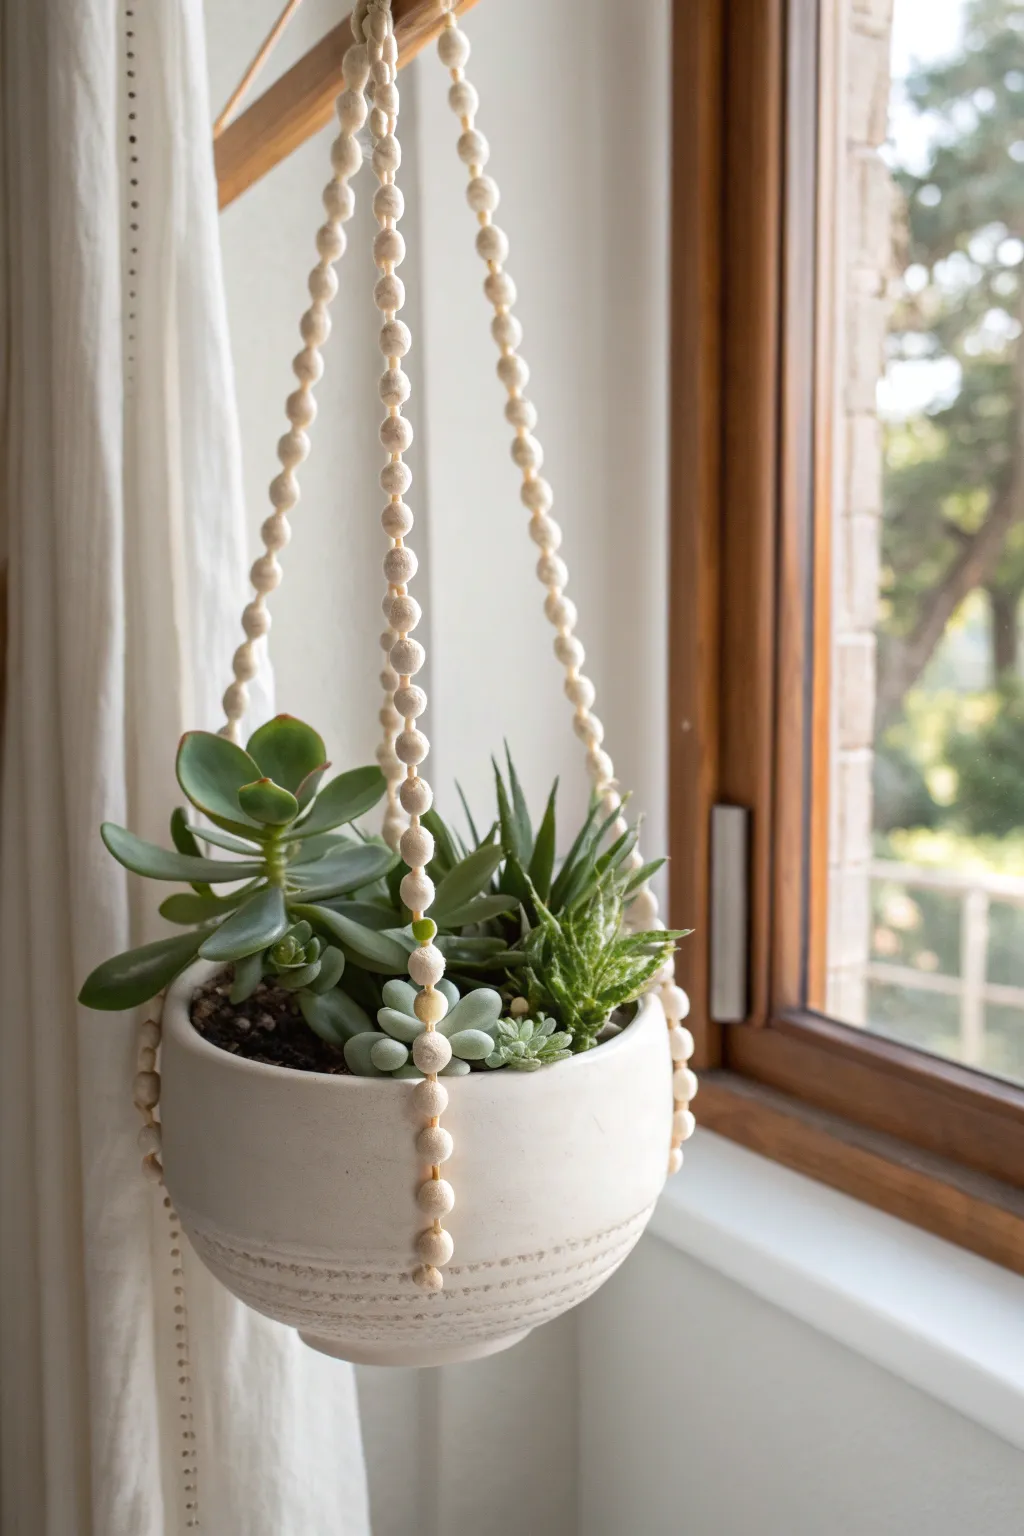
Elevate your indoor garden with this serene, bohemian-style hanging planter. Featuring natural wooden beads and a clean white ceramic bowl, this project combines minimalist design with organic textures to beautifully showcase your favorite succulents.
Step-by-Step Tutorial
Materials
- White ceramic bowl (approx. 6-8 inches diameter) with a rounded bottom
- Natural wooden beads (10mm to 12mm size)
- Strong cotton cord, hemp twine, or nylon macrame cord (white or cream)
- Scissors
- Tape (masking or painter’s tape)
- Succulent potting mix
- Assorted succulents (e.g., Echeveria, Haworthia, Sedum)
- A metal or wooden ring for hanging (optional)
Step 1: Creating the Hanger
-
Measure and cut cords:
Cut six lengths of cord, each measuring about 2.5 to 3 times the desired hanging length. It’s always better to have extra length than to run short, so aim for around 4-5 feet per strand for a standard window hanger. -
Secure the top loop:
Gather all six strands together. Fold them in half if you want a loop made of the cord itself, or simply thread all six ends through a hanging ring. Knot them securely together near the top to create the main anchor point. -
Separate into groups:
Separate the cords into three distinct pairs. These three pairs will form the main arms of the hanger that cradle the bowl. -
Begin beading:
Take the first pair of cords and thread a wooden bead onto both strands simultaneously. Slide it all the way up to the top knot. -
Continue the pattern:
Continue threading beads onto this pair of cords. You want a continuous line of beads that covers the entire length of the strap. I like to tape the ends of the cord with a bit of masking tape to make threading the beads easier and faster. -
Repeat for all arms:
Repeat the beading process on the other two pairs of cords. Ensure all three beaded ‘arms’ are the exact same length so your planter hangs level. -
Secure the ends:
Once you have reached the length needed to touch the rim of your bowl, tie a strong overhand knot at the end of each beaded strand to keep the beads in place.
Step 2: Assembling the Cradle
-
Create the base connection:
Now you need to join the three arms together to hold the pot. Take one cord from the first arm and one cord from the adjacent arm. -
Add connecting beads:
Thread these two adjacent cords through a new wooden bead. This bead will sit lower than the main arms, beginning to form the net shape. -
Tie under the bead:
Tie a knot directly underneath this connecting bead to secure it. Repeat this process around the circle until all arms are connected to their neighbors. -
Gather the bottom:
Bring all the remaining loose cord ends together at the center bottom point where the bowl will rest. -
Final large knot:
Tie one large, sturdy knot with all strands combined. This knot will sit directly under the center of the ceramic bowl, supporting its weight. -
Trim the tassel:
Trim the excess cord hanging below the final knot to your desired tassel length. You can unravel the ends if you prefer a fringe look.
Easy Threading Trick
Wrap tape tightly around cord tip to make a stiff ‘needle’. This prevents fraying and makes sliding on stubborn wooden beads a breeze.
Step 3: Planting and Display
-
Prepare the bowl:
If your ceramic bowl doesn’t have a drainage hole, add a layer of small rocks or activated charcoal at the bottom to prevent root rot. -
Add soil:
Fill the bowl about three-quarters full with succulent-specific potting mix, which drains quickly and keeps plants healthy. -
Arrange your plants:
Remove your succulents from their nursery pots. Gently loosen the root balls and arrange them in the bowl. Place taller varieties like Haworthia near the back or center, and trailing or rosette types like Echeveria near the edges. -
Fill in gaps:
Add more soil around the roots, pressing down gently to secure the plants. Leave a little space below the rim so water doesn’t spill over. -
Place the pot:
Carefully insert your planted bowl into the beaded hanger. Adjust the strands so they assume equal weight and sit evenly around the bowl’s exterior. -
Hang it up:
Find a sunny spot near a window, hang your new creation, and enjoy the beautiful play of light through the beads and leaves.
Paint Dipped Look
For a pop of color, paint the bottom half of the wooden beads in a color that matches your room’s decor before stringing them.
Step back and admire how the natural wood tones perfectly complement the fresh greenery in your window
Wall-Mounted Pocket Planter Grid
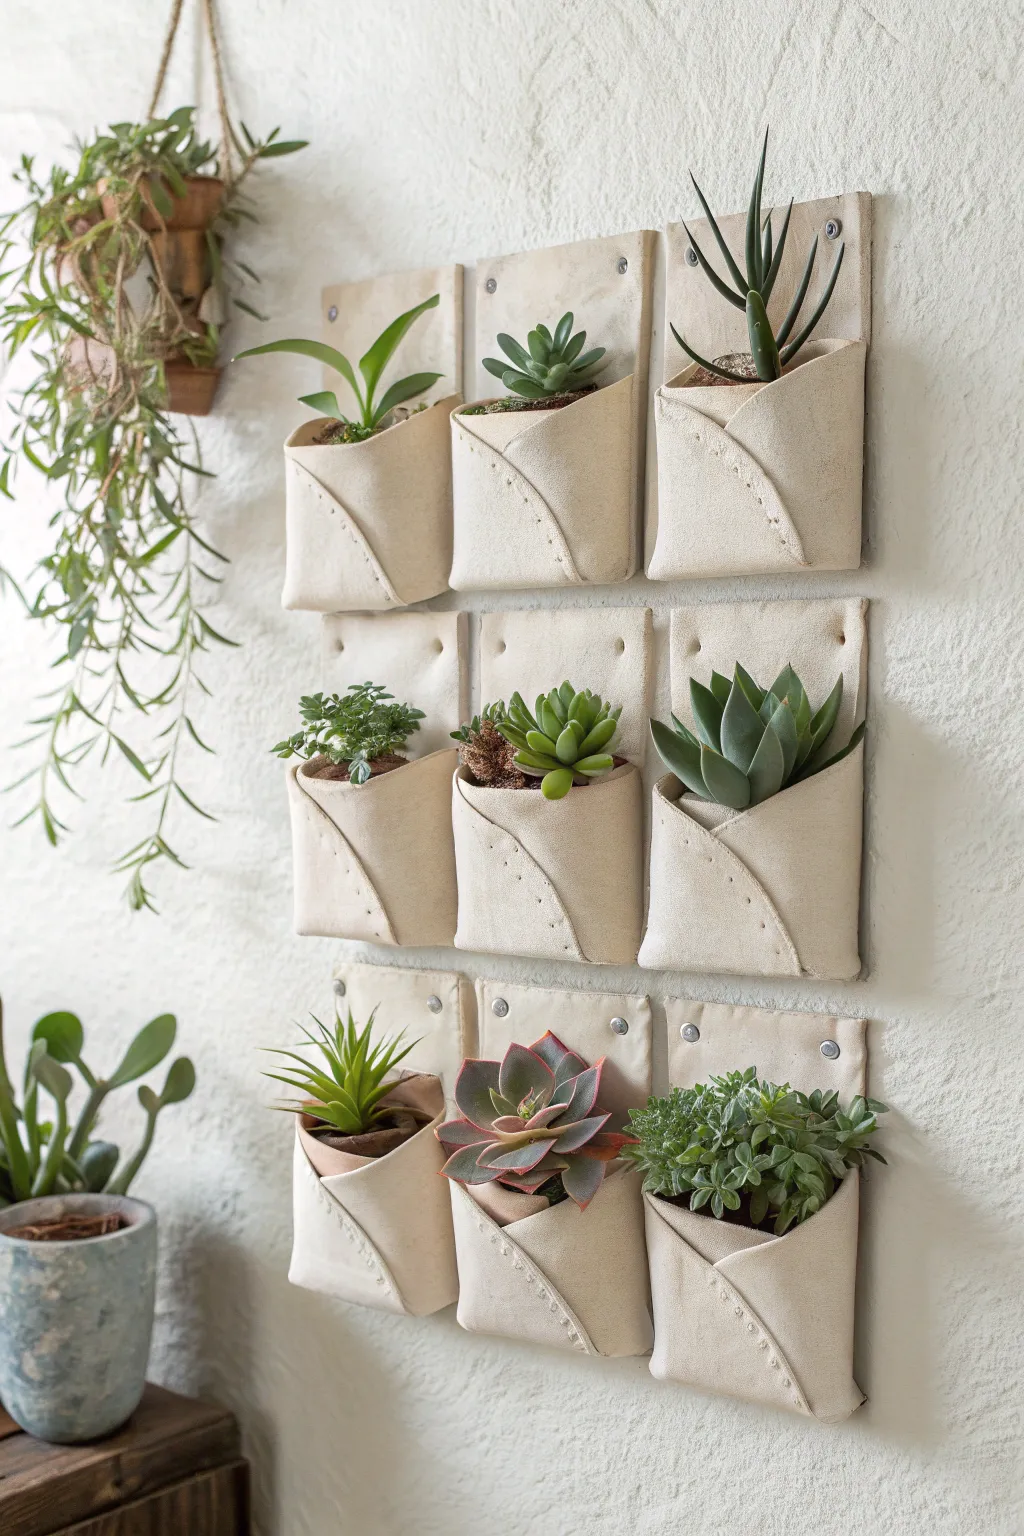
Transform a blank wall into a vertical desert oasis with this grid of structured canvas pockets. The clean lines of the folded fabric create a modern, minimalist display that lets the textures of your succulents take center stage.
Step-by-Step
Materials
- Heavyweight canvas or faux leather (cream/beige)
- Plywood backing board (approx. 24″ x 36″)
- White or cream paint (for backing board)
- Heavy-duty thread (matching color)
- Sewing machine (with heavy-duty needle)
- Decorative silver upholstery tacks or screws with washers
- Small plastic pot liners (3-4 inch diameter)
- Succulent potting mix
- Assorted succulents
- Ruler and fabric pencil
- Scissors
Step 1: Preparing the Base
-
Cut the Backing:
Cut your plywood board to your desired dimensions. A 24-inch by 36-inch board works well for a 3×3 grid, but you can adjust based on your wall space. -
Paint the Backdrop:
Apply two coats of white or cream paint to the plywood to create a textured, plaster-like look that matches the wall behind it. Let it dry completely. -
Mark the Grid:
Using a pencil and ruler, lightly mark the positions for your nine pockets on the dried board. Ensure 2-3 inches of spacing between where each pocket will sit.
Watering Wisdom
Always remove the plastic liners from the pockets before watering. Let the plants drain completely in the sink before placing them back to keep the canvas stain-free.
Step 2: Creating the Pockets
-
Cut Fabric Rectangles:
Cut nine rectangles from your heavyweight canvas. Each piece should be approximately 10 inches wide by 16 inches tall to allow for the folding. -
Hem the Edges:
Fold over the raw edges on all four sides by half an inch and stitch them down to create a clean, finished look. I find ironing the hems first makes this much easier. -
Fold the Pocket Body:
Fold the bottom third of the fabric up to create the pocket pouch. The front panel should be slightly lower than the back panel. -
Create the Diagonal Flap:
Take the top right corner of the front pocket panel and fold it diagonally downward to the left. This creates that distinctive triangular opening shown in the photo. -
Stitch the Shape:
Sew along the side edges to close the pocket. Then, run a decorative stitch along the diagonal fold you just made to hold it in place and add texture. -
Add Decorative Accents:
For extra detail, you can add a second line of stitching or hand-embroider small dashes along the diagonal fold to mimic the look in the image.
Step 3: Assembly & Planting
-
Attach Pockets to Board:
Position your first pocket on the grid marks. Use decorative upholstery tacks or screws with washers at the top two corners of the pocket backing to secure it to the wood. -
Secure the Bottoms:
For added stability, you can add a small dab of strong adhesive or a hidden tack inside the bottom of the pocket to keep it from swinging. -
Repeat for All Pockets:
Continue attaching all nine pockets, ensuring they hang straight and level with uniform spacing. -
Mount the Board:
Install hanging hardware on the back of your plywood board and mount it securely to your wall. Ensure your anchors are rated for the weight of the soil and plants. -
Line the Pockets:
Insert small plastic pot liners or cut-down plastic cups into each canvas pocket. This is crucial to prevent water from staining the fabric. -
Plant the Succulents:
Fill the liners with succulent potting mix and gently plant your succulents. Choose a variety of shapes—rosettes, trailers, and upright spikes—for visual interest. -
Final Arrangement:
Place the planted liners into the pockets. Arrange trailing plants like ‘String of Bananas’ on the left side to drape down, and spiky aloes near the top for height.
Leather Luxe Upgrade
Swap the canvas for vegetable-tanned leather. It ages beautifully, darkening over time, and requires a leather needle but creates a high-end, durable finish.
Step back and admire how this living art piece brings a calm, organic texture to your room

TRACK YOUR CERAMIC JOURNEY
Capture glaze tests, firing details, and creative progress—all in one simple printable. Make your projects easier to repeat and improve.
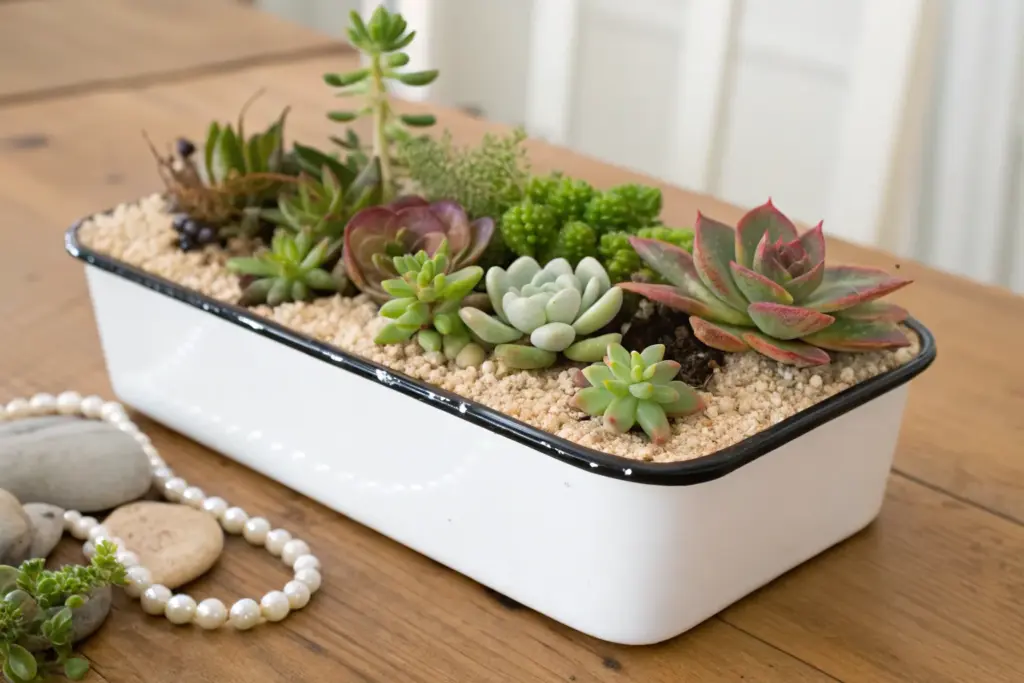
Long Trough Planter for a Succulent Row
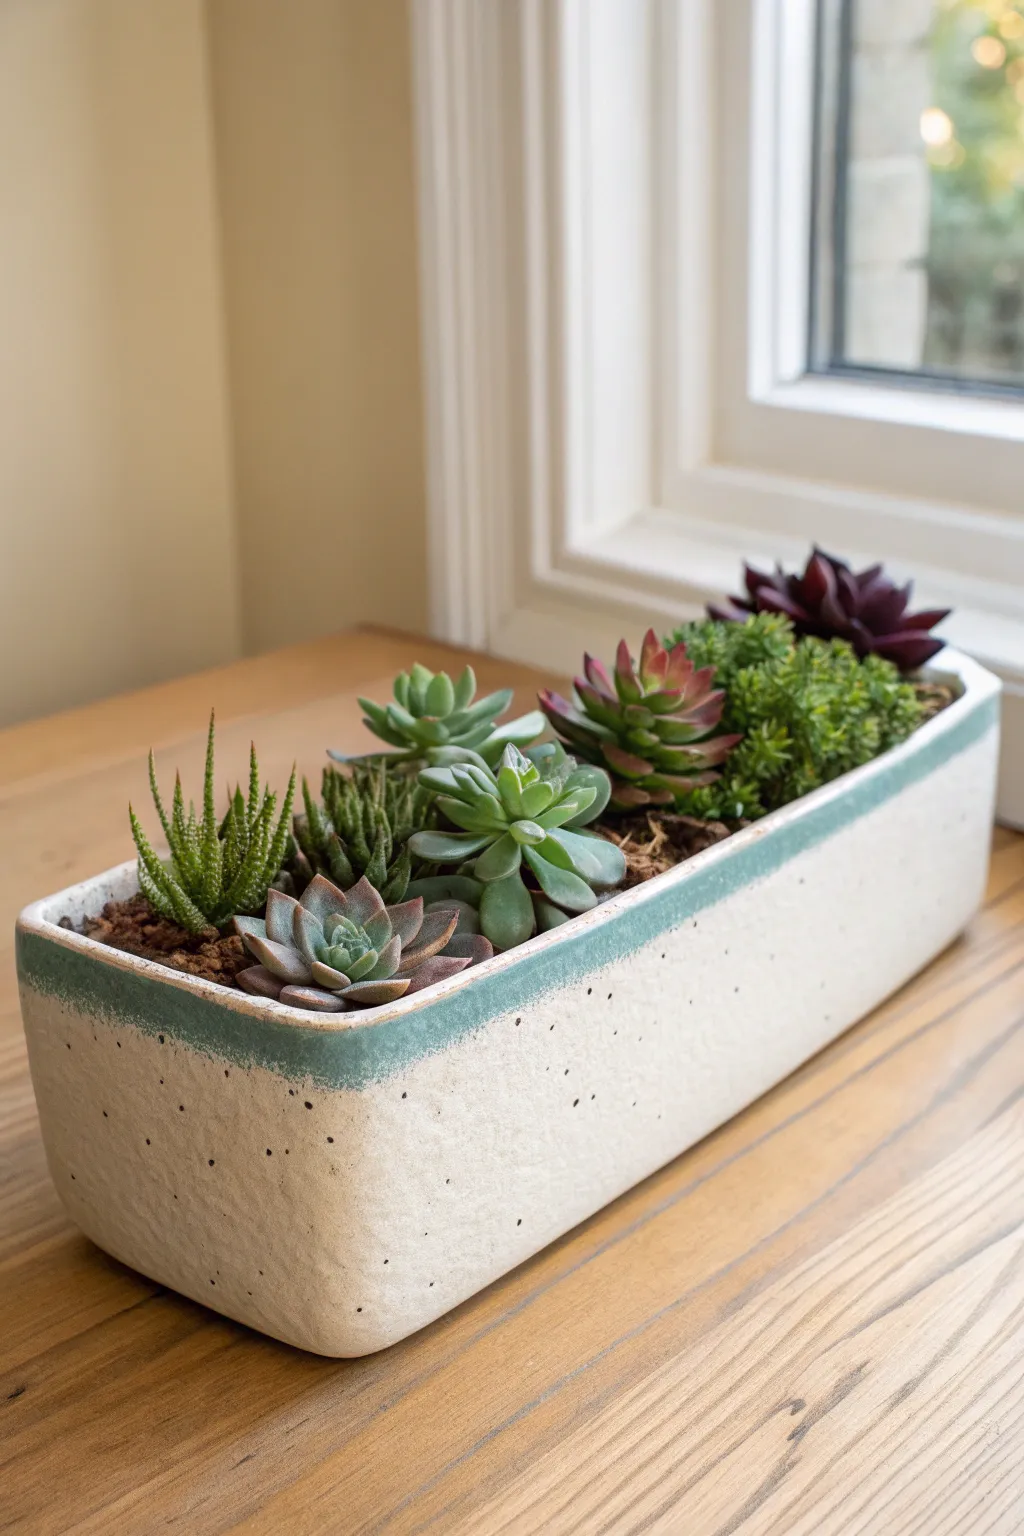
This elegant rectangular arrangement brings a lovely line of texture to any bright spot in your home. By combining different succulent varieties in a single long trough, you create a mini desert landscape that fits perfectly on a tabletop or deep windowsill.
Detailed Instructions
Materials
- Long rectangular ceramic planter (approximately 12-16 inches long), ideally cream with a teal rim
- Succulent potting soil mix
- Small gravel or pottery shards (for drainage layer)
- Small Haworthia fasciata (Zebra Plant)
- Small Echeveria rosette (blue-green variety)
- Small Echeveria rosette (purple/red tinged variety)
- Small Sedum variety (bright green)
- Small Echeveria Black Prince or similar dark variety
- Small gardening spoon or scoop
- Soft paintbrush (for cleaning leaves)
- Spray bottle or watering can with a narrow spout
Step 1: Preparation
-
Clean and inspect the container:
Start by wiping out the inside of your ceramic trough planter to ensure it is free of dust or debris. Check for drainage holes at the bottom; if none exist, be prepared to be extremely careful with watering later. -
Create a drainage layer:
Pour a thin layer of small gravel or broken pottery shards across the bottom of the planter. This helps keep the soil from clogging the holes or, if the pot has no holes, provides a tiny reservoir for excess water away from the roots. -
Prepare the soil base:
Fill the planter about halfway with your succulent-specific potting soil. Smooth it out gently but don’t pack it down too tightly yet.
Loose fit?
If plants keep falling over while potting, use small stones or chopsticks as temporary props. Once the roots establish in a few weeks, you can remove them.
Step 2: Designing the Layout
-
Unbox the plants:
Remove your succulents from their nursery pots. Gently massage the root balls to loosen the old, compacted soil, being careful not to damage the delicate roots. -
Dry run arrangement:
Before planting, set the succulents on top of the soil to gauge spacing. I usually like to alternate textures and heights—placing the spiky Haworthia on one end and the darker, dramatic Echeveria on the other creates visual balance. -
Adjust plant positions:
Ensure there is about an inch of space between each plant to allow for future growth and airflow, which is crucial for succulent health.
Water Wisdom
Only water when the soil feels completely dry all the way through. The ‘soak and dry’ method is best—drench the soil, then let it fully dry out before the next drink.
Step 3: Planting
-
Plant the first end:
Start with the spiky Haworthia (Zebra Plant) on the far left. Dig a small depression, place the root ball in, and add soil around it to stabilize it upright. -
Add the middle rosettes:
Moving towards the center, plant the blue-green Echeveria next. Its wider rosette shape contrasts nicely with the upright Zebra Plant. -
Layering textures:
Nestle a small, lower-profile succulent or a different colored Echeveria next to the previous one to create a low-high-low rhythm. -
Introduce color:
Plant the reddish-tinged Echeveria next. This splash of color acts as a beautiful focal point in the middle-right of the trough. -
Add the lush greens:
Place the bright green Sedum cluster next. These tiny leaves add a ‘fluffy’ texture that softens the structural look of the rosettes. -
Anchor the end:
Finish the row on the far right with the dark purple Echeveria. Its deep color visually weighs down the end of the planter, completing the arrangement.
Step 4: Finishing Touches
-
Fill in the gaps:
Use your spoon or scoop to carefully add more soil between the plants. Fill the planter until the soil level is just about a half-inch below the rim. -
Secure the roots:
Gently press down on the soil around the base of each succulent with your fingers or the back of the spoon to eliminate large air pockets. -
Clean the foliage:
During potting, soil often gets stuck in the leaves. Take a soft, dry paintbrush and gently dust off any dirt from the rosette centers and crevices. -
Check stability:
Give each plant a very gentle nudge to ensure they are firmly rooted. If one wobbles, add a pinch more soil to the base. -
Initial watering care:
Wait about 3-5 days before watering. This allows any roots that were damaged during transplanting to callus over, preventing rot. When you do water, target the soil directly, not the leaves. -
Placement:
Move your new planter to its final home. A spot with bright, indirect light is perfect to keep the colors vibrant without scorching the leaves.
Enjoy the calming view of your beautifully organized succulent row
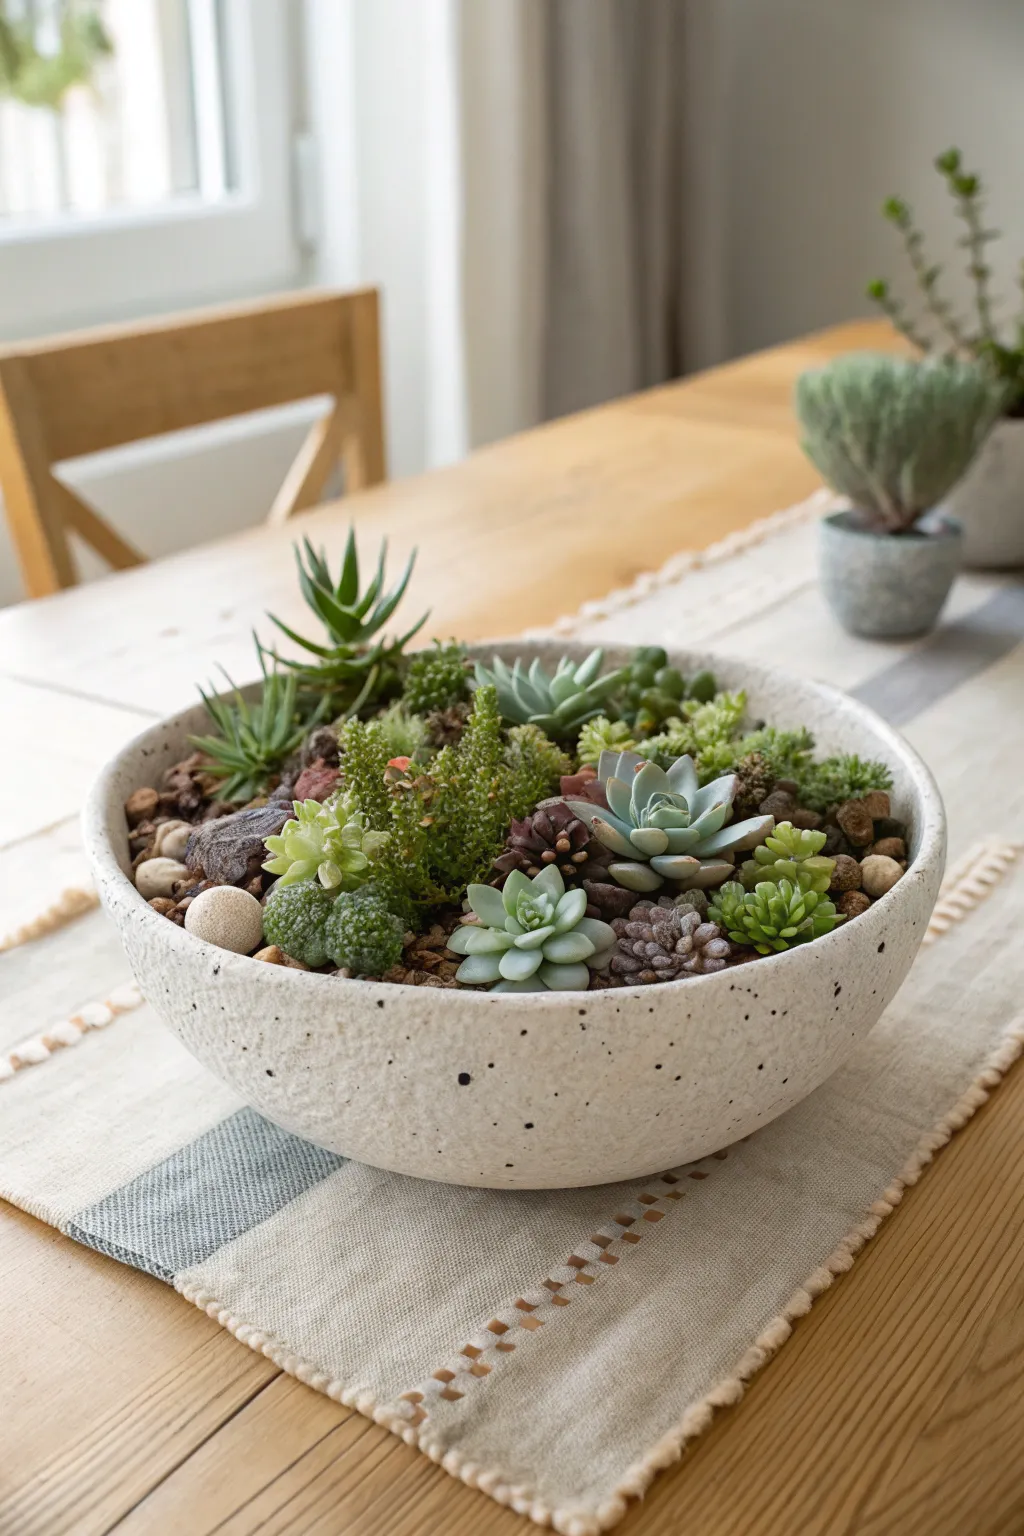
Mini Desert Landscape Dish With Stones
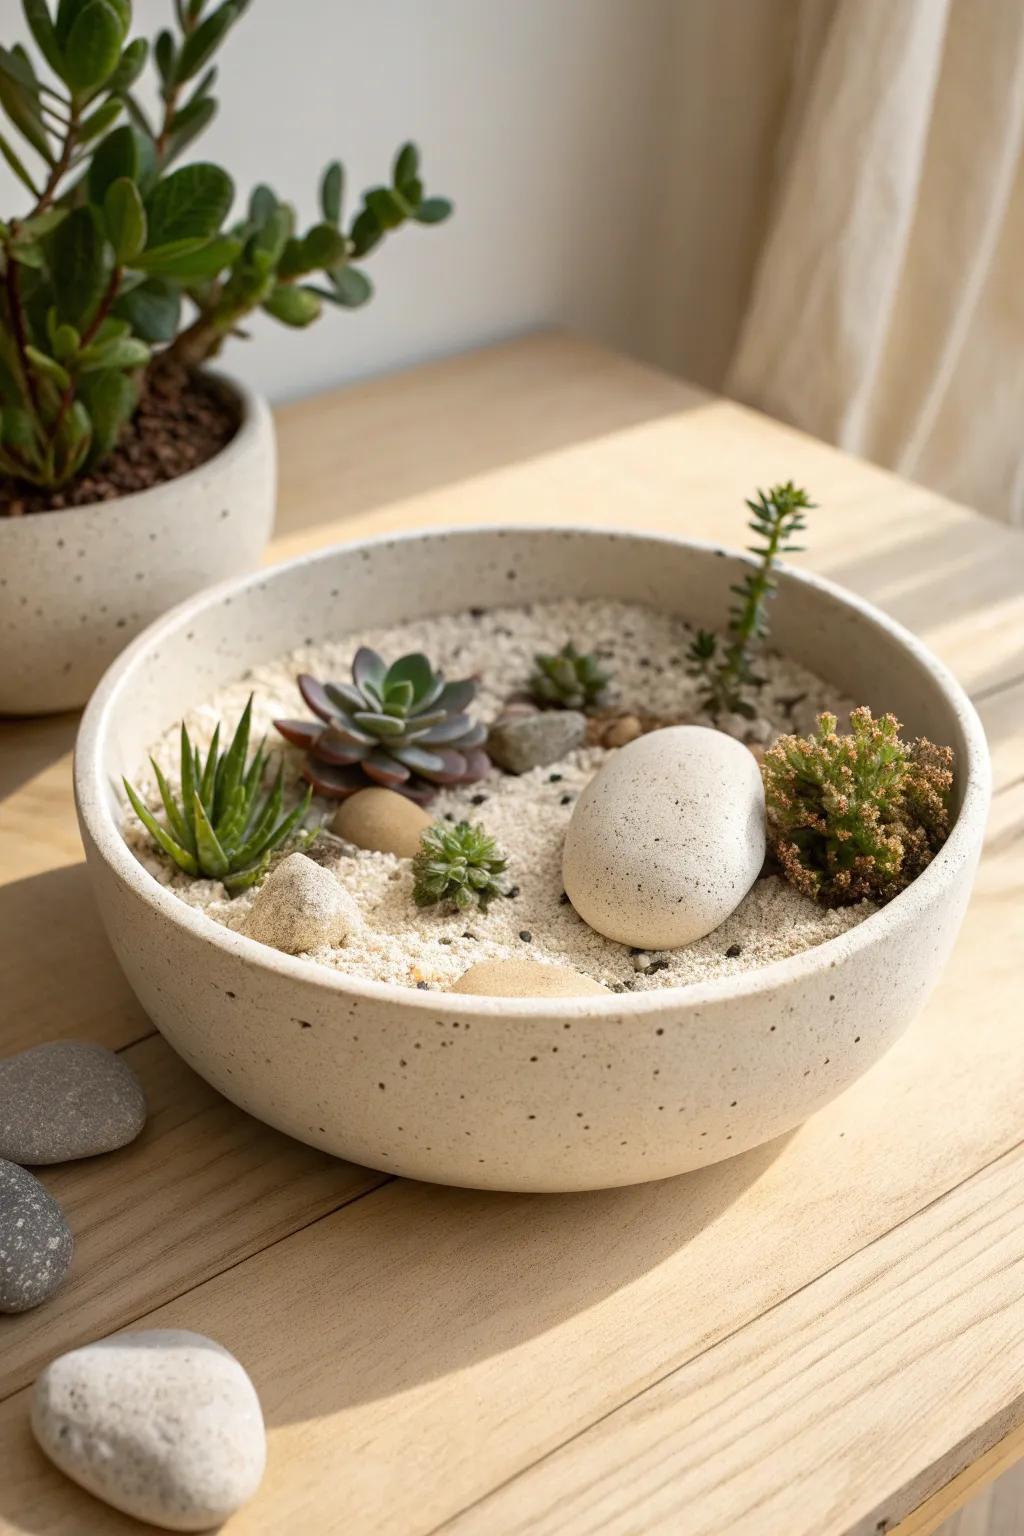
Transform a shallow speckled dish into a serene, miniature arid landscape that feels like a tiny slice of the desert floor. This project focuses on balance and minimalism, using neutral stones and fine sand to highlight the sculptural beauty of just a few carefully chosen succulents.
Step-by-Step Guide
Materials
- Shallow, round ceramic bowl (speckled beige/white finish)
- Small succulents (e.g., Echeveria, Haworthia, Sedum)
- Cactus potting mix
- Fine white sand (top dressing)
- Activated charcoal
- One large, smooth white river stone (focal point)
- Assorted smaller river stones (grey and beige)
- Small shovel or spoon
- Soft brush (makeup or paintbrush)
- Chopstick or tweezers
Step 1: Preparation & Foundation
-
Select the perfect container:
Choose a shallow, round bowl made of heavy ceramic or concrete with a speckled, matte glaze. Ensure it has a drainage hole; if not, you’ll need to drill one or be extremely careful with watering. -
Create a drainage layer:
If your bowl is deep enough, add a very thin layer of gravel or pebbles at the bottom to assist with water flow. -
Add activated charcoal:
Sprinkle a thin layer of activated charcoal over the bottom. This is particularly helpful in shallow dishes to keep the soil fresh and prevent mold buildup. -
Fill with planting mix:
Scoop in your cactus potting mix, filling the bowl until it is about 1 to 1.5 inches below the rim. You want enough depth for roots but plenty of clearance for the sand layer. -
Smooth the surface:
Use the back of your spoon or your hand to gently pat down the soil, creating a relatively flat, even surface on which to build your landscape.
Step 2: Planting the Scene
-
Plan your layout:
Before digging, place your potted succulents on top of the soil to visualize the spacing. I like to group them slightly off-center rather than perfectly symmetrical for a more natural look. -
Plant the anchor succulent:
Start with your largest plant (like the Echeveria rosette). Gently remove it from its nursery pot, loosen the roots, and nestle it into the soil towards the back-left quadrant. -
Add textural variety:
Place a spiky succulent (like a Haworthia or Aloe) near the front edge to create contrast against the smooth sand. -
Incorporate height:
Plant a taller, stem-like succulent (such as a Sedum or Crassula) towards the back right to add vertical interest. -
Fill the gaps:
Add one or two very small accent plants, like a tiny clump of Sedum, in the remaining open spaces, ensuring they aren’t crowded against the others. -
Secure the roots:
Backfill small amounts of soil around the root balls and press down firmly with your fingers or a chopstick to remove air pockets.
Clean Sand Hack
Use a paper funnel or a small spoon to pour the sand precisely around the plants. This prevents the sand from getting stuck in the tight rosettes of the succulents.
Step 3: Styling the Landscape
-
Apply the sand layer:
Carefully spoon the fine white sand over the exposed potting soil. Aim for a distinct layer about 1/4 to 1/2 inch thick that completely hides the dark dirt underneath. -
Clean the leaves:
Use a soft, dry brush to gently sweep away any stray grains of sand or soil that landed on the succulent leaves during the pouring process. -
Place the feature stone:
Position your large, smooth white stone. Place it deliberately in an open area of sand to act as a ‘boulder’ that balances the visual weight of the plants. -
Arrange secondary stones:
Scatter a few smaller grey and beige river rocks around the base of the larger plants. This mimics how rocks naturally gather around vegetation in the wild. -
Final adjustments:
Use a pair of tweezers or a chopstick to nudge any tiny stones into place and smooth out any disturbances in the sand for a pristine finish. -
Initial care:
Wait about a week before the first watering to allow any damaged roots to callous over, then water sparingly near the base of each plant.
Level Up: Zen Patterns
Use a miniature rake or a fork to draw simple, wavy lines in the open sand areas around the large stone for a calming, Japanese zen garden effect.
Place your finished desert bowl in a bright spot and enjoy the peaceful simplicity it brings to your space
Color-Blocked Succulent Arrangement by Shades
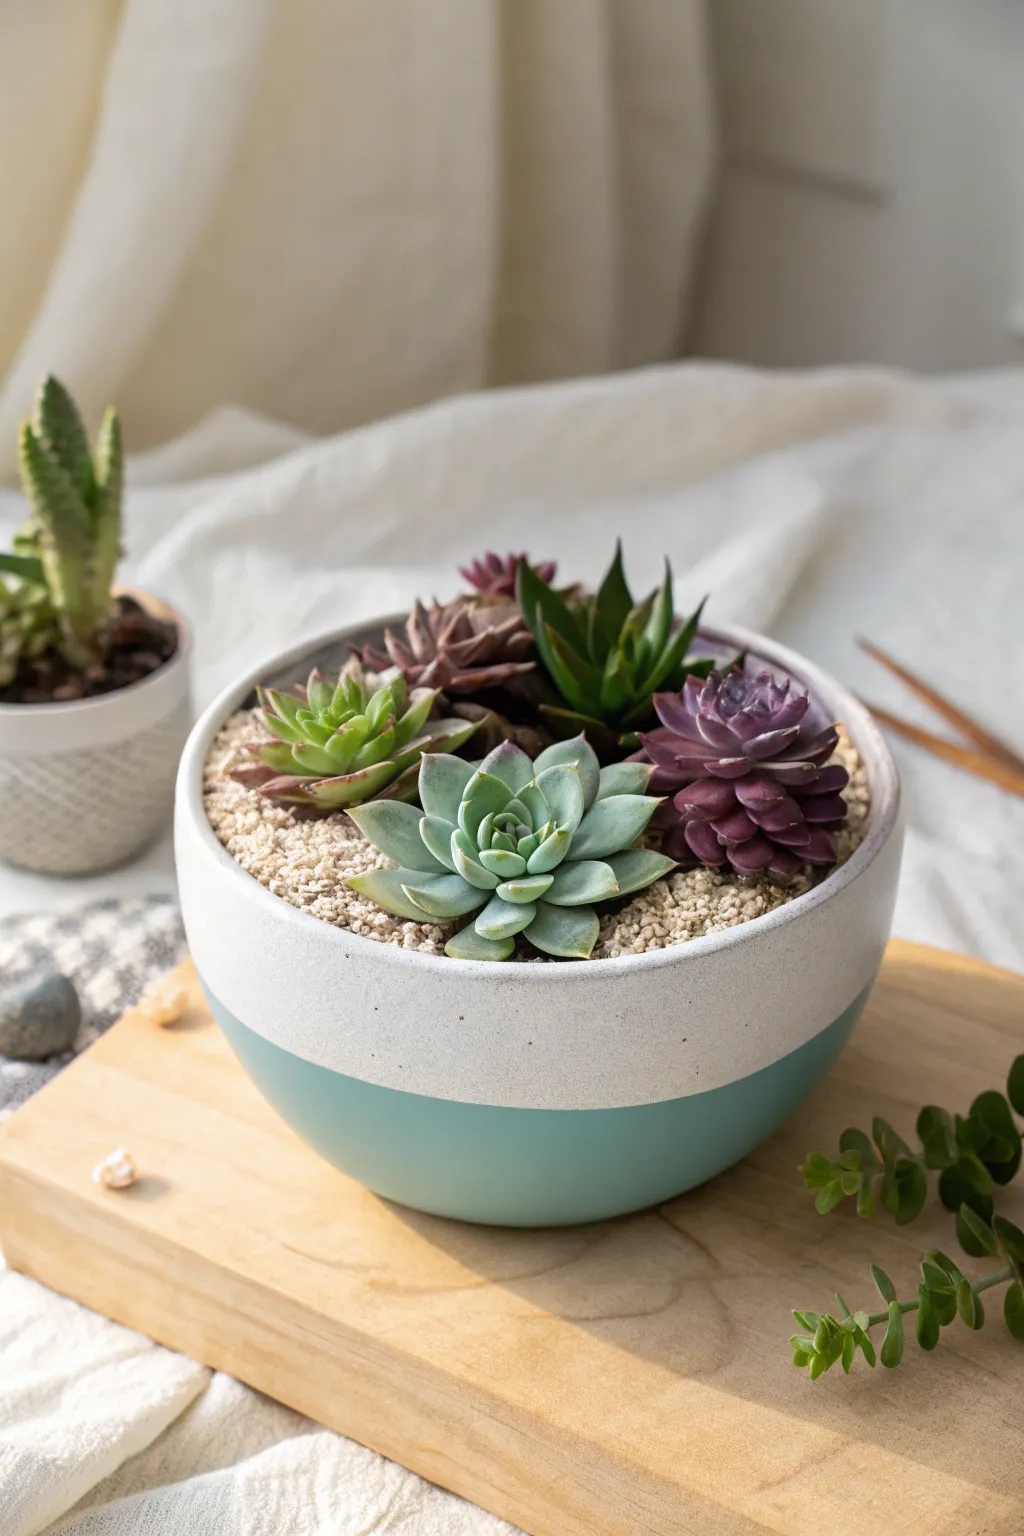
Bring a modern pop of color to your indoor garden with this serene, two-toned succulent bowl. By combining a minimalist, color-dipped vessel with a carefully curated mix of rosette-forming succulents, you create a living centerpiece that balances clean lines with natural textures.
Detailed Instructions
Materials
- Round ceramic bowl (white or cream finish)
- Painter’s tape
- Teal or aqua acrylic craft paint (satin finish)
- Foam paintbrush
- Succulent potting soil mix
- Light beige top dressing gravel or pumice
- Assorted succulents (e.g., Echeveria ‘Lola’, Echeveria ‘Black Prince’, Sempervivum)
- Small shovel or spoon
- Soft bristle brush (for cleaning leaves)
Step 1: Preparing the Vessel
-
Clean surface:
Begin by wiping down the exterior of your white ceramic bowl with rubbing alcohol or a damp cloth to remove any oils or dust. This ensures the paint adheres perfectly. -
Apply tape line:
Apply a strip of painter’s tape horizontally around the bowl. Position it just slightly below the halfway mark to create a visual anchor at the base. Press the edges of the tape down firmly with your fingernail to prevent paint bleed. -
First coat:
Using a foam paintbrush, apply the teal acrylic paint to the bottom section of the bowl below the tape line. Use long, horizontal strokes to minimize brush marks. -
Dry and repeat:
Let the first coat dry for about 20-30 minutes. Apply a second coat to ensure simple, opaque coverage without any streaks. -
Reveal the line:
While the second coat is still slightly tacky (but not wet), carefully peel away the painter’s tape at a 45-degree angle. This helps create that crisp, razor-sharp edge between the white and teal sections. -
Full cure:
Allow the paint to cure fully for at least 2-3 hours before you begin handling the pot for planting.
Clean Lines Pro-Tip
If paint bleeds under the tape, wait for it to dry completely, then gently scrape the excess off the ceramic with a wooden toothpick for a perfect edge.
Step 2: Planting the Composition
-
Base layer:
Fill the bowl with succulent potting soil until it is about 1.5 inches from the top rim. I like to pat the soil down gently to remove large air pockets without compacting it too much. -
Select the focal point:
Choose your largest, most symmetrical rosette succulent (like the pale blue-green Echeveria in the foreground) and unpot it. Gently loosen the root ball. -
Position the center:
Plant this main succulent slightly off-center in the front. This establishes the visual weight of the arrangement. -
Add contrast:
Select a darker plant, such as a purple or deep red Echeveria or Sempervivum. Nest it behind and to the right of your focal plant to create depth through color contrast. -
Fill the gaps:
Add 2-3 smaller succulents in remaining spaces. Use taller varieties (like Haworthia) in the back for height, and smaller rosettes on the sides. -
Secure plants:
Spoon additional soil around the root balls of all plants, ensuring they are seated firmly but the leaves remain above the soil line.
Step 3: Finishing Touches
-
Apply top dressing:
Using a spoon, carefully scoop the light beige gravel onto the exposed soil. Cover the surface completely, tucking the stones under the leaves of the succulents. -
Level surface:
Gently shake the bowl or tap it on the table to help the gravel settle evenly into a flat layer. -
Clean up:
Take a soft bristle brush or a small paintbrush and dust off any soil or gravel particles that may have gotten stuck in the rosette centers or on leaves.
Level Up Your Design
Echo the color blocking by choosing a top dressing stone that matches the painted base color (teal aquarium gravel) for a bold monochromatic look.
Now you have a stylish, dual-tone planter that perfectly frames your botanical collection while sitting calmly on your shelf
Face Planter With “Hair” Succulents

Bring a touch of personality to your indoor garden with this charming face planter project. By customizing a plain terracotta or ceramic vessel and crowning it with a colorful array of succulents, you create a whimsical character that adds a peaceful presence to any shelf.
How-To Guide
Materials
- Rounded ceramic or terracotta pot (apricot/beige tone)
- Pencil
- Brown acrylic paint (burnt umber shade)
- Fine detail paintbrush (size 0 or 00)
- Small carving tool or awl (optional, for engraving)
- Succulent soil mix
- Small gravel or pumice tailored for succulents
- Echeveria ‘Agavoides’ (green rosette)
- Small red succulent (like Echeveria ‘Romeo’ or similar hybrid)
- Clear matte sealant spray
Step 1: Designing the Face
-
Clean surface:
Begin by wiping down your chosen pot with a damp cloth to remove any dust or oils. Let it dry completely so your design adheres well. -
Visual placement:
Visualize where the features will go. The eyes should sit roughly in the middle of the pot’s vertical height to leave room for the nose and mouth below. -
Sketch the eyebrows:
Using a pencil very lightly, draw two long, arched lines for the eyebrows. These lines effectively frame the face and create that serene, sleeping expression. -
Outline the nose:
Extend a line down from between the eyebrows to form a long, slender triangular shape for the nose. Keep the bottom edge flat for a stylized look. -
Draft the sleeping eyes:
Draw two U-shaped curves beneath the eyebrow arches. These are the closed eyelids. Add short, vertical tick marks below these curves to represent eyelashes. -
Add the mouth:
Sketch a simple, small mouth near the bottom. A gentle curve for the lower lip and a slightly pointed upper lip creates a subtle smile.
Steady Hand Trick
Rest your pinky finger on the pot surface while painting fine lines like eyelashes. It acts as a stabilizer and prevents shaky strokes.
Step 2: Painting and Detailing
-
Carve details (optional):
For a textured look like the example, use a carving tool to gently scratch over your pencil lines, creating shallow grooves. This adds depth before painting. -
Prepare the paint:
Squeeze a small amount of burnt umber acrylic paint onto a palette. Add a drop of water if the paint feels too thick; you want it to flow smoothly into the grooves. -
Paint the eyebrows:
Carefully trace the arched eyebrow lines with your fine detail brush. Use light pressure to keep the line thin and elegant. -
Define the nose:
Fill in the nose shape completely with the brown paint. This solid block of color acts as a central anchor for the face’s design. -
Detail the lashes:
Paint the curved eyelid lines creates earlier. Then, with a very steady hand, flick the brush downwards to create the individual lashes. I find holding my breath for a second helps steady the stroke. -
Finish the lips:
Paint the lips, filling them in solidly like the nose. Ensure the corners taper off cleanly for a neat finish. -
Add faux freckles:
Dip the very tip of your brush (or a toothpick) into the paint and gently dot random spots around the nose and cheeks to mimic ceramic speckling. -
Seal the art:
Once the paint is fully dry (wait at least an hour), spray the exterior with a clear matte sealant to protect your work from water damage.
Step 3: Planting the ‘Hair’
-
Create drainage layer:
Add a small layer of gravel to the bottom of the pot to ensure water doesn’t pool at the roots. -
Add soil base:
Fill the pot about three-quarters full with your specialist succulent soil mix. Press it down lightly but don’t pack it tight. -
Position the green rosette:
Take your green Echeveria and nestle it on the left side of the pot. Angle it slightly forward so the rosette face is visible. -
Position the red succulent:
Place the spiky red succulent on the right side, snuggling it close to the green one. The contrast in color and texture acts as a funky, two-tone hairstyle. -
Top dressing:
Fill any remaining gaps with more soil, then cover the exposed dirt with a thin layer of decorative small gravel for a polished look.
Blush Effect
Dry-brush a tiny amount of diluted pink paint onto the cheeks before sealing. It gives the face a sweet, rosy glow.
Place your new serene friend in a bright spot and enjoy the calm vibes.
Undersea Clamshell Succulent Planter
Bring a touch of the ocean indoors with this elegant arrangement that mimics a coral reef tucked inside a white shell. The ridged, fan-shaped planter creates a clean, coastal aesthetic that highlights the vibrant rosette forms of the succulents.
Step-by-Step
Materials
- Clam shell shaped planter (ceramic or concrete, approx. 6-8 inches wide)
- Succulent potting soil (well-draining)
- Echeveria ‘Perle von Nurnberg’ or similar large pink rosette succulent
- Small Echeveria rosette (green/pink tips)
- Small Haworthia or Sedum (spiky variety)
- Small sedum rosette (tiny green variety)
- Adhesive mesh drywall tape (optional, for drainage hole)
- Smooth river stones (black and grey mix)
- Small scoop or spoon
- Soft brush (for cleaning leaves)
- Water spray bottle or squeeze bottle
Step 1: Preparing the Base
-
Check drainage:
Inspect your shell planter for a drainage hole. If one sits at the very bottom, great. If the hole is large enough for soil to fall through, cut a small square of mesh drywall tape and place it over the hole to keep soil in while letting water out. -
Add base soil:
Fill the planter about two-thirds full with your specialized succulent soil. This type of soil usually contains perlite, pumice, or sand, which prevents root rot. -
Create a slope:
Mound the soil slightly higher towards the back or center of the shell. This creates a small hill that will allow your main succulent to sit prominently above the rim.
Sun Stress for Color
To get those vibrant pink tips on your Echeveria, ensure the planter gets plenty of bright, indirect sunlight. Low light keeps them green; gentle stress brings out the blush.
Step 2: Planting the Showstopper
-
Prepare the main succulent:
Take your largest rosette (the pink-tipped Echeveria) out of its nursery pot. Gently massage the root ball to loosen the tightly packed soil without breaking the delicate roots. -
Position the focal point:
Nestle this large succulent into the soil mound, slightly off-center towards the back right. It should sit high enough that its lower leaves clear the rim of the planter. -
Secure the plant:
Use your fingers to tuck soil firmly around the base of the stem, ensuring the plant stands upright and doesn’t wobble.
Step 3: Adding the Supporting Cast
-
Place the medium rosette:
Prepare the second-largest Echeveria just like the first. Position it to the front left of the main plant. I like to angle this one slightly outward so it looks like it’s growing towards the sun. -
Add texture contrast:
Take the spiky Haworthia or similar sharp-leafed succulent and plant it behind the main rosette on the right side. The vertical spikes provide a wonderful contrast to the soft curves of the shell. -
Plant the tiny accent:
Find a small pocket of soil near the front right edge and tuck in the tiniest sedum rosette. This little detail fills the gap and balances the composition. -
Backfill with soil:
Use a small spoon to carefully add more soil into the gaps between the plants. Fill the planter until the soil level is just below the scalloped rim.
Root Rot Prevention
If your shell planter has no hole and you can’t drill one, be extremely careful with watering. Use a syringe to add water drop by drop only when the soil is bone dry.
Step 4: Finishing Touches
-
Clean the leaves:
Inevitably, some soil will land on the leaves during planting. Use a soft, dry brush to gently sweep any dirt off the rosettes. Blowing on them gently also works wonders. -
Water carefully:
Using a squeeze bottle with a narrow spout, water the soil directly around the base of the plants, avoiding the leaves themselves. Do this sparingly to settle the soil. -
Prepare the display area:
Arrange a bed of smooth black and grey river stones on the surface where you plan to display the planter. The dark stones create a striking contrast against the white ceramic. -
Final placement:
Set your completed shell planter on top of the river stones. Adjust the stones so the planter sits level but slightly nestled into the rock bed.
Step back and enjoy your tidy little oceanic garden that requires very little maintenance