Whenever I’m in the mood for a quick, satisfying make, I reach for polymer clay because it turns simple shapes into the cutest little keepsakes. Here are my favorite easy polymer clay ideas that feel totally doable, even if you’re brand new and just want a fun win today.
Polymer Clay Arch Earrings With Simple Cutout Shapes
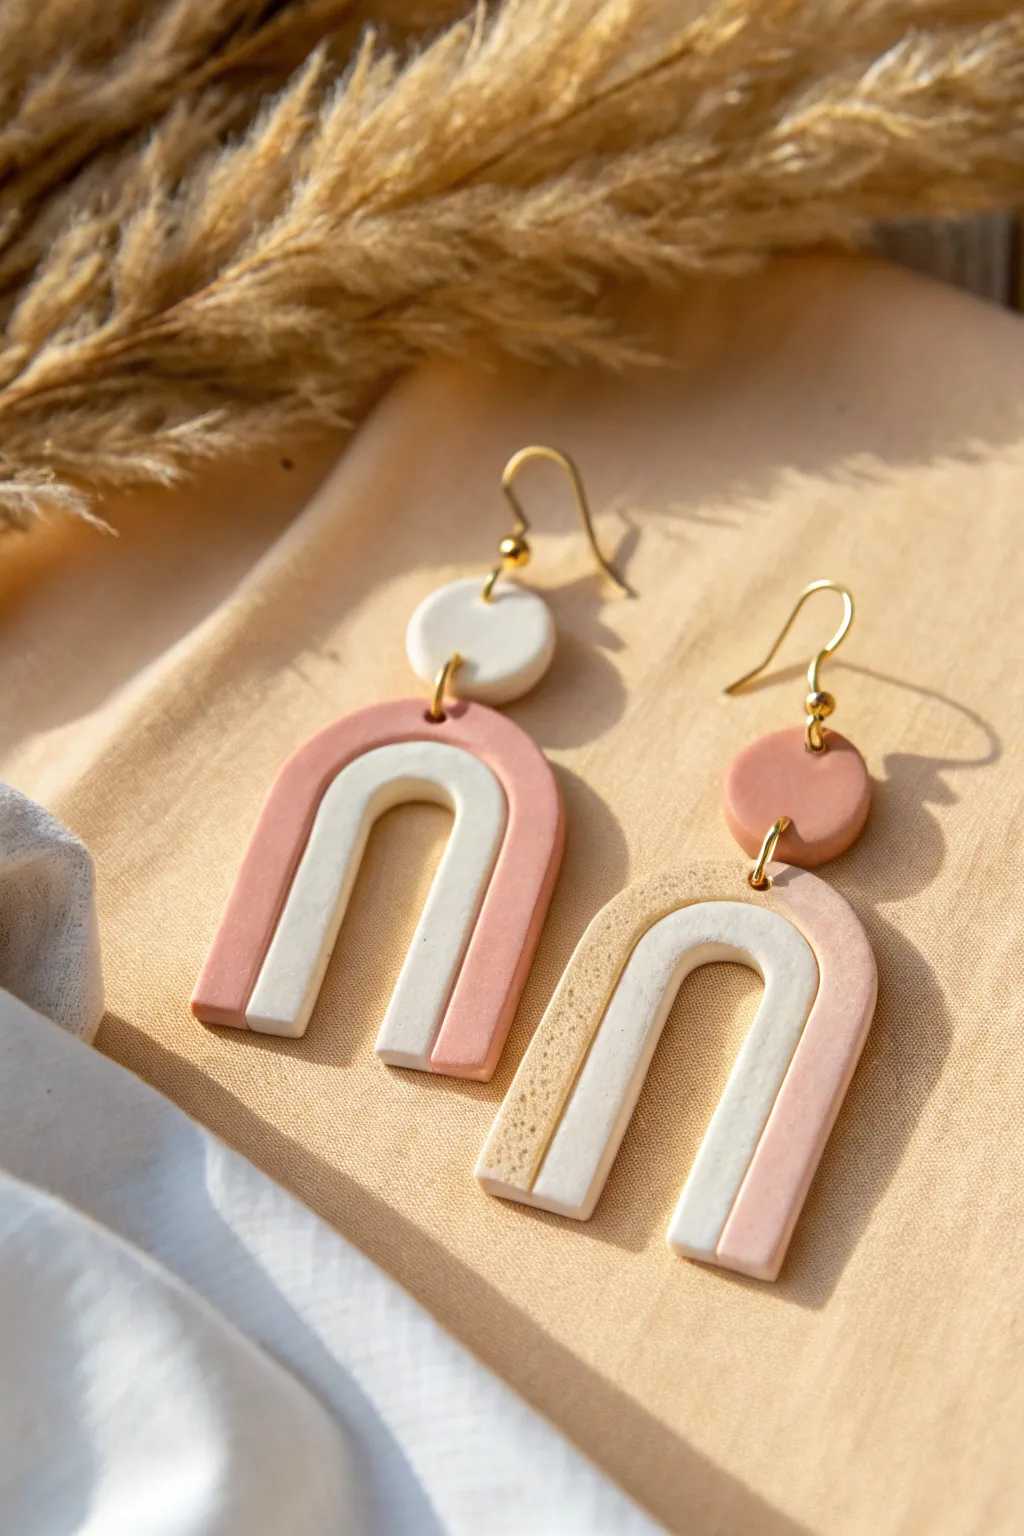
These boho-chic polymer clay earrings feature a sleek, concentric arch design that plays with soft pastels and textured neutrals. They are surprisingly lightweight and perfect for adding a touch of modern art to your everyday wardrobe.
Step-by-Step
Materials
- Polymer clay in blush pink, white, and translucent or beige (for the speckle effect)
- Black pepper or fine sand (for the speckled texture)
- Acrylic roller or pasta machine
- U-shaped clay cutters (specifically an arch nesting set)
- Small circle cutter (approx. 10mm)
- Needle tool or toothpick
- Jump rings (gold finish)
- Fish hook ear wires (gold finish)
- Jewelry pliers (flat nose and round nose)
- Super glue or liquid clay
- Parchment paper or ceramic tile
Step 1: Prepping the Clay
-
Condition the Clay:
Begin by thoroughly kneading your white and blush pink clays separately until they are soft and pliable. This conditioning prevents cracking later on. -
Create the Speckled Blend:
To make the textured beige seen on the right earring, take a small amount of beige or translucent clay. Flatten it out and sprinkle a tiny pinch of ground black pepper or very fine sand onto it. -
Mix the Texture:
Fold the clay over the inclusions and knead repeatedly until the specks are evenly distributed throughout the batch. -
Roll Flat Sheets:
Using your acrylic roller or pasta machine, roll out sheets of the white, blush pink, and speckled beige clay. Aim for a thickness of about 3mm—thick enough to be sturdy but not heavy.
Step 2: Cutting and Assembling
-
Cut the Base Arches:
Select your medium-sized arch cutter. Press firmly into the pink clay sheet to cut one shape, and into the speckled beige sheet to cut the other. -
Cut the Inner Arches:
Using a slightly smaller nesting arch cutter, cut pieces from your white clay sheet. You will need two of these white arches total. -
Create the Negative Space:
Now, take the smaller white arches you just cut. Use an even smaller arch cutter (or a craft knife) to remove the very center, turning them into rainbow-shaped outlines rather than solid blobs. -
Nest the Shapes:
Carefully place the white U-shaped outline on top of your pink arch base. Gently press them together so they adhere without distorting the shape. Repeat for the speckled beige arch. -
Refine the Edges:
If I notice any uneven seams, I gently run my finger along the sides to smooth the transition between the layers. -
Cut the Top Studs:
Use your small circle cutter to punch out two circles. Make one white (to match the pink earring) and one pink (to match the speckled earring) for that asymmetrical mismatched look. -
Make Pierce Holes:
Before baking, use a needle tool to poke holes at the very top center of each arch and at the bottom edge of each circle stud. Ensure the hole goes all the way through.
Smooth Seams Trick
Use a tiny bit of liquid clay between the white arch layer and the colored base layer before baking. It acts as a permanent glue and prevents layers from popping off later.
Step 3: Baking and Assembly
-
Bake the Pieces:
Arrange your pieces on a ceramic tile or parchment-lined baking sheet. Bake according to your clay package instructions (usually 275°F/135°C for 15-30 minutes). -
Cool Down:
Allow the pieces to cool completely before handling. Polymer clay is strongest once fully cooled. -
Sand the Edges:
If there are any rough spots, lightly sand the edges with high-grit sandpaper or a Dremel tool for a professional finish. -
Attach Jump Rings:
Using your pliers, twist open a gold jump ring. Thread it through the hole in the arch and the hole in the circle stud, then twist it closed securely. -
Add Ear Wires:
Open the loop at the bottom of your fish hook ear wire. Attach it to the jump ring (or directly to the hole in the circle stud if you prefer), ensuring the earring faces forward.
Uneven Surfaces?
If your clay has fingerprints, dip a q-tip in acetone (nail polish remover) and gently wipe the unbaked clay surface to smooth it out perfectly.
Pair these modern geometric beauties with a simple white tee to let the design really shine


Tiny Kawaii Food Charms With Smiley Faces
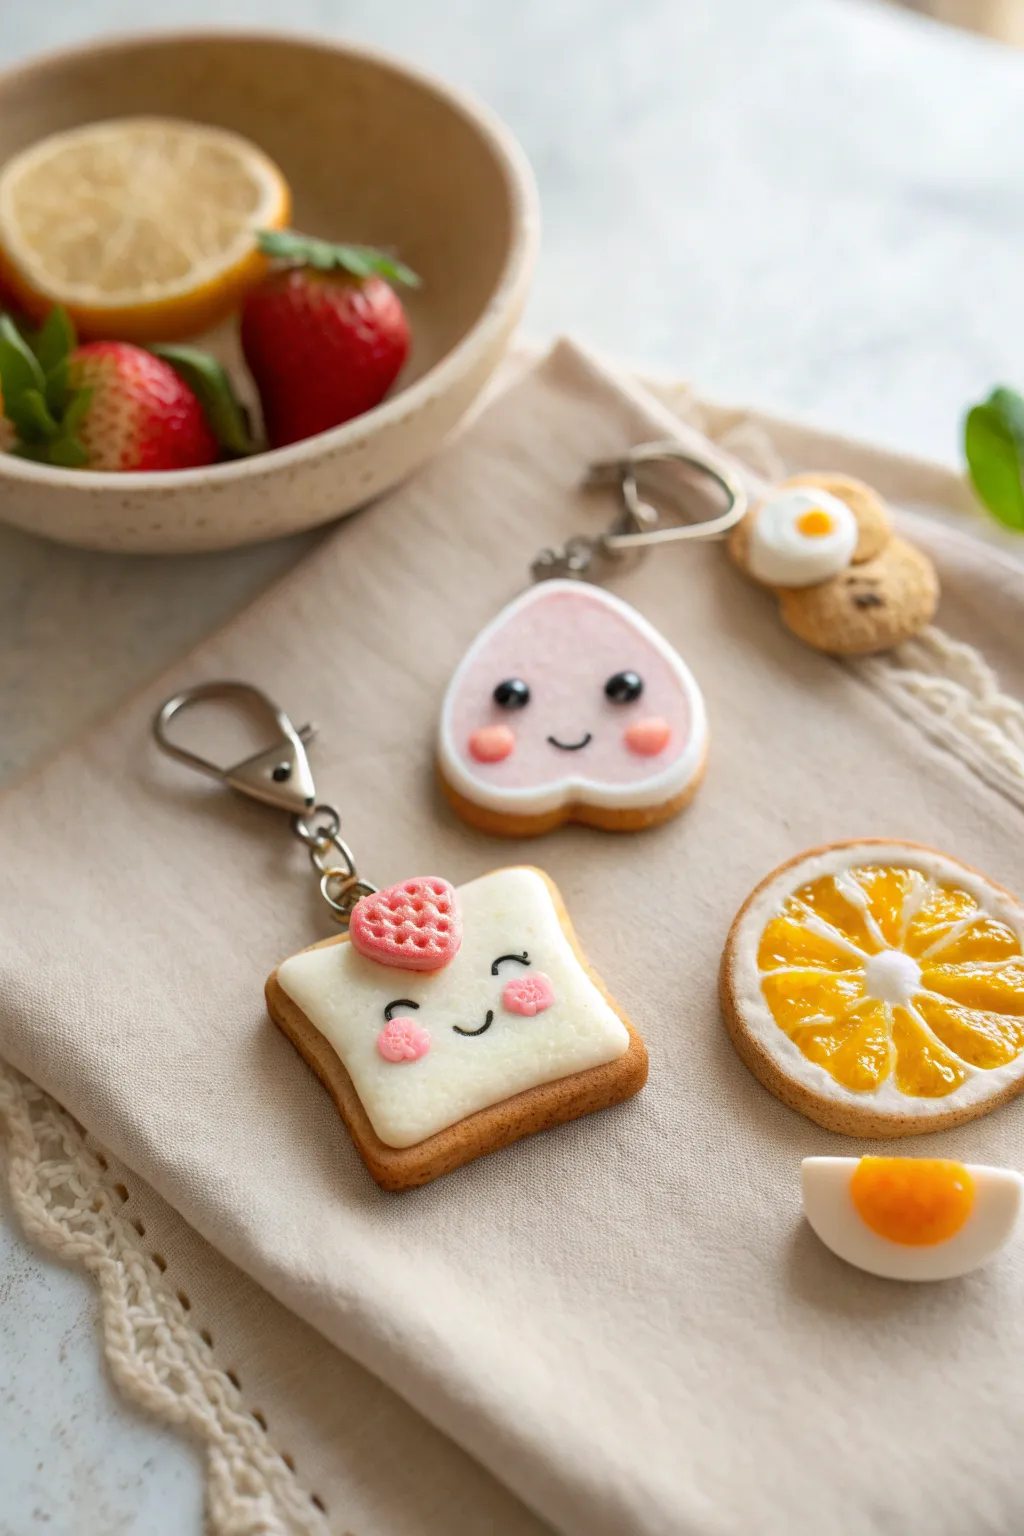
Brighten up your keyring with these adorable polymer clay charms that look good enough to eat but are definitely just for show. This project features a happy slice of toast topped with a strawberry heart and a blushing heart-shaped cookie, both finished with a glossy resin shine.
Step-by-Step Guide
Materials
- Polymer clay (tan/ochre, white, baby pink, hot pink, black)
- Liquid polymer clay (translucent or white)
- UV resin or polyurethane gloss varnish
- Soft pastel chalks (orange, reddish-brown) for shading
- Square and heart-shaped clay cutters
- Dotting tools or needle tool
- Texture sponge or toothbrush
- Eye screws and keyring hardware
- UV lamp (if using resin)
- Small paintbrush
- Craft knife
Step 1: Baking the Base
-
Mix the dough color:
Start by conditioning your tan or ochre clay. If the color is too dark, mix in a generous amount of white clay until you achieve a realistic, light-baked cookie or bread dough shade. -
Cut the shapes:
Roll the clay out to a thick slab, about 5-6mm thick. Use your square cutter for the toast and the heart cutter for the cookie. Smooth the edges gently with your finger to remove any sharp cut lines. -
Texturize the surface:
Using a toothbrush or a coarse texture sponge, gently tap the sides and top edges of your shapes. This mimics the porous texture of baked goods. -
Add baked shading:
Scrape a little orange and reddish-brown soft pastel into a powder. With a dry paintbrush, gently dust the edges of the clay shapes to give them a golden-brown, toasted appearance. -
Insert hardware:
Screw an eye screw into the top center of each shape. Adding a dab of liquid clay to the screw threads before inserting helps bond it permanently during baking.
Step 2: Adding the Layers
-
Create the frosting:
For the toast, roll out a thin sheet of white clay. Cut a square slightly smaller than your bread base. Soften the corners so they look round and organic, like melted cheese or cream cheese. -
Apply the heart icing:
Repeat the process for the heart charm using baby pink clay, cutting a smaller heart shape that leaves a rim of the ‘cookie’ visible underneath. -
Attach layers:
Apply a thin smear of liquid polymer clay to the baked bases and press the frosting layers on top. Gently smooth them down so there are no air bubbles trapped underneath. -
Make the strawberry garnish:
Take a tiny ball of hot pink clay and shape it into a small heart. Using a needle tool, poke tiny indents all over the surface to create strawberry seeds. -
Place the garnish:
Position the strawberry heart on the top left corner of the white toast frosting. I find a little dot of liquid clay helps keep this secure.
Sticky Situation?
If your clay gets too soft and fingerprints are showing, pop the tray in the fridge for 10 minutes. Cold clay holds detail better and is easier to smooth.
Step 3: Kawaii Faces & Finishing
-
Sculpt the eyes:
Roll tiny balls of black clay for the eyes. For the heart charm, make them slightly larger. Place them wide apart on the face area and press them flat gently. -
Add eye highlights:
Roll microscopic specks of white clay and place one or two on each black eye to bring the character to life. -
Form the mouths:
Roll a very thin snake of black clay. Cut tiny segments and curve them into a ‘U’ shape. Press these centrally between the eyes. -
Add rosy cheeks:
For the toast, use tiny flattened discs of pink clay pressed onto the cheeks. For the heart, use a larger pink oval. You can texture these slightly with a needle tool for a fuzzy look. -
Final bake:
Bake the charms again according to your clay package instructions (usually 275°F/135°C for 15-30 minutes). Let them cool completely. -
Glazing:
Apply a layer of UV resin or gloss varnish over the ‘icing’ and face parts, avoiding the toasted crust edges to keep the texture contrast. Cure under a UV lamp or let air dry. -
Assembly:
Once dry, use jump rings to attach your shiny new charms to the keychain hardware.
Pro Tip: Realistic Look
Don’t glaze the ‘crust’ edges! Keeping the brown edges matte while making the icing glossy creates a realistic contrast tactile finish.
Now you have a set of delightfully sweet accessories to keep your keys company


Easy Mini Animal Figurines Made From Ovals and Balls
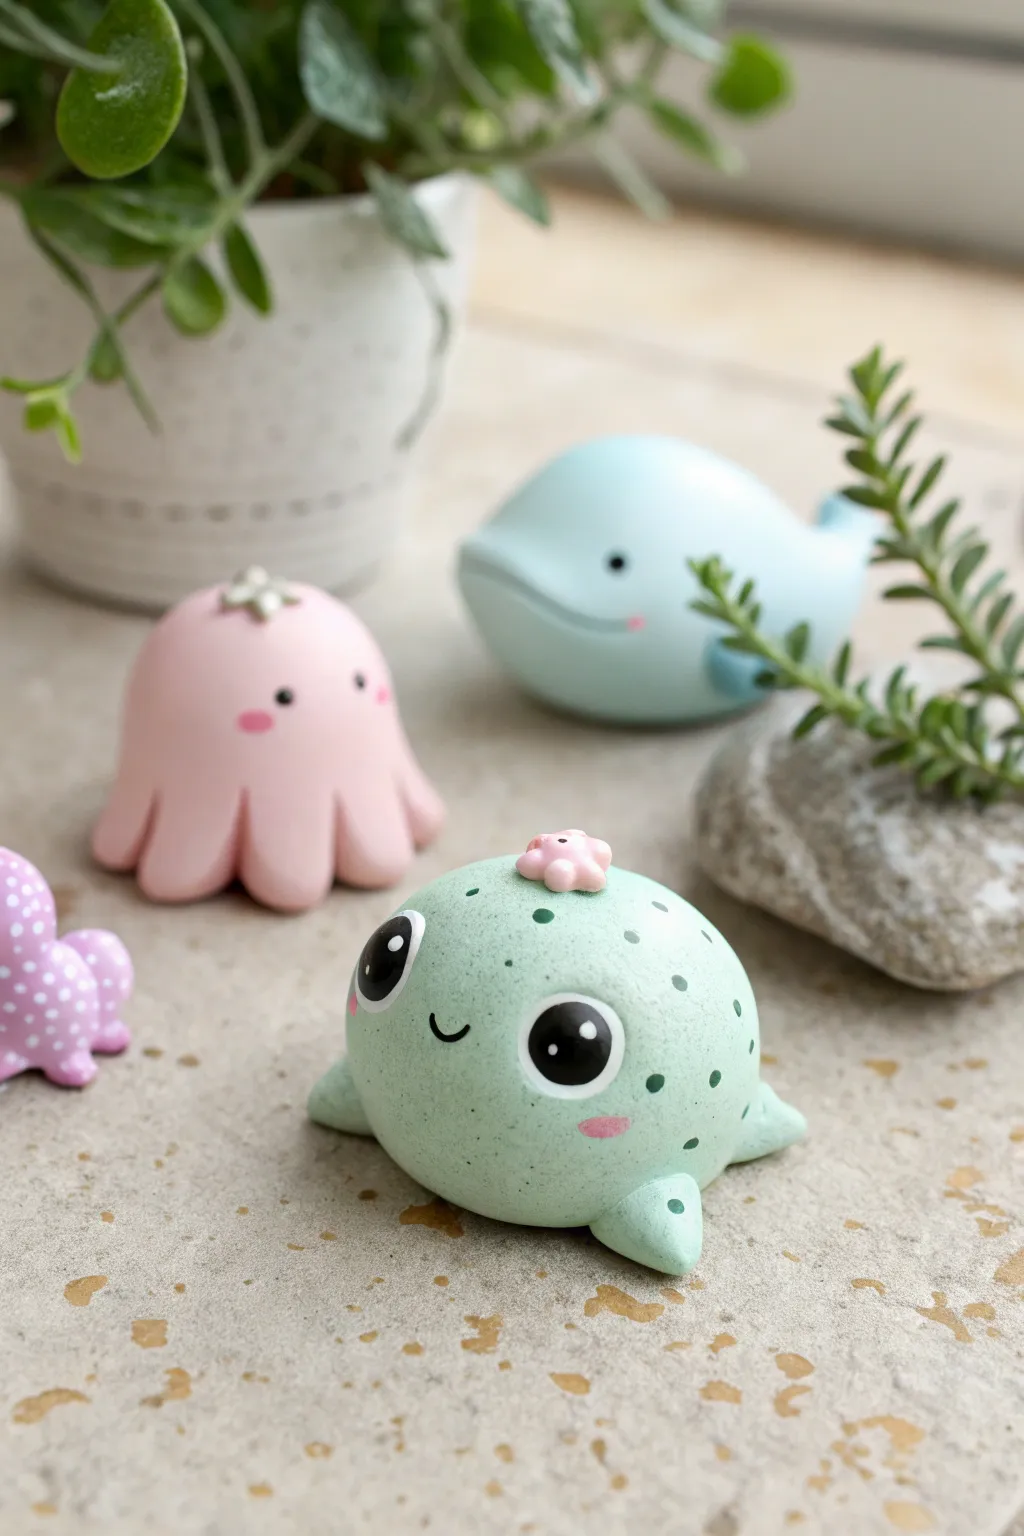
These adorable ocean creatures start with simple shapes to create charming personalities for your desk or shelf. By using basic balls and ovals, you can form a mint-green seal, a bubbly pink octopus, and a serene blue whale in no time.
Step-by-Step
Materials
- Polymer clay (mint green, pale pink, baby blue, white, black, dark green)
- Small dotting tool or toothpick
- Rolling pin or acrylic roller
- X-acto knife or clay blade
- Baking sheet and parchment paper
- Oven (for baking according to clay package instructions)
- Gloss glaze (optional)
Step 1: The Mint Green Seal
-
Create the base:
Roll a medium-sized ball of mint green clay. Gently press it onto your work surface so the bottom flattens slightly, creating a dome shape that sits sturdily. -
Form the flippers:
Make two small, tear-drop shapes from the same mint clay. Press these onto the lower sides of the body, pointing downwards to act as front flippers. -
Add spots:
Take tiny pinches of dark green clay and roll them into minuscule balls. Press these randomly onto the seal’s back and head, flattening them flush with the surface for a spotted texture. -
Sculpt the face:
Use a ball tool or your thumb to make slight indentations for the eyes. Insert small balls of black clay, then add tiny white specks for reflection. -
Fine details:
Roll a tiny pink oval for a blush mark under the eye. Use a toothpick to gently carve a small, U-shaped smile. -
Top decoration:
Create a tiny pink flower shape using five micro-balls of pink clay arranged in a circle. Place this little hat on top of the seal’s head.
Step 2: The Pink Octopus
-
Shape the head:
Roll a ball of pale pink clay, similar in size to the seal. Gently pinch up the top center just a bit if you want a slightly taller, gumdrop silhouette. -
Create tentacles:
Roll a long sausage of pink clay and cut it into 6-8 equal segments. Round the ends of each segment. -
Attach the legs:
Press the segments around the base of the head, blending the clay upwards so the seams disappear but the rounded bottoms remain distinct. -
Add the face:
Use a dotting tool to place two small black eyes wide apart. Add tiny pink oval cheeks underneath for a blushing look. -
Star accessory:
Form a tiny star shape from white or silver clay and press it securely onto the top of the octopus’s head.
Clean Hands, Clean Clay
Lighter clay colors like mint and pink pick up dust easily. Keep a pack of baby wipes nearby and clean your hands thoroughly between switching colors to keep your pastels bright.
Step 3: The Blue Whale
-
Form the body:
Roll a ball of baby blue clay and elongate it slightly into a fat teardrop or egg shape. Lay it on its side. -
Shape the tail:
Pinch the tapered end to flatten it vertically, then use a tool to split and shape it into two tail flukes. -
Add side fins:
Create two small blue triangles. Attach them to the sides of the body, blending the connection point smooth. -
Face features:
Place tiny black beads for eyes wide on the sides of the head. Use a tool to carve a long, gentle curve across the front for the mouth. -
Bake and finish:
Arrange all your creatures on a parchment-lined baking sheet. Bake according to your specific clay brand’s temperature and time instructions. Once cool, you can apply a gloss glaze to the eyes for extra shine.
Fixing Fingerprints
If you notice fingerprints on your smooth domes before baking, lightly brush the clay with a tiny amount of baby oil or cornstarch to smooth the texture out.
Once baked and cooled, arrange your new tiny aquatic friends together for a display that brings a smile to any space


Speckled Confetti Pendant Necklaces on Simple Shapes
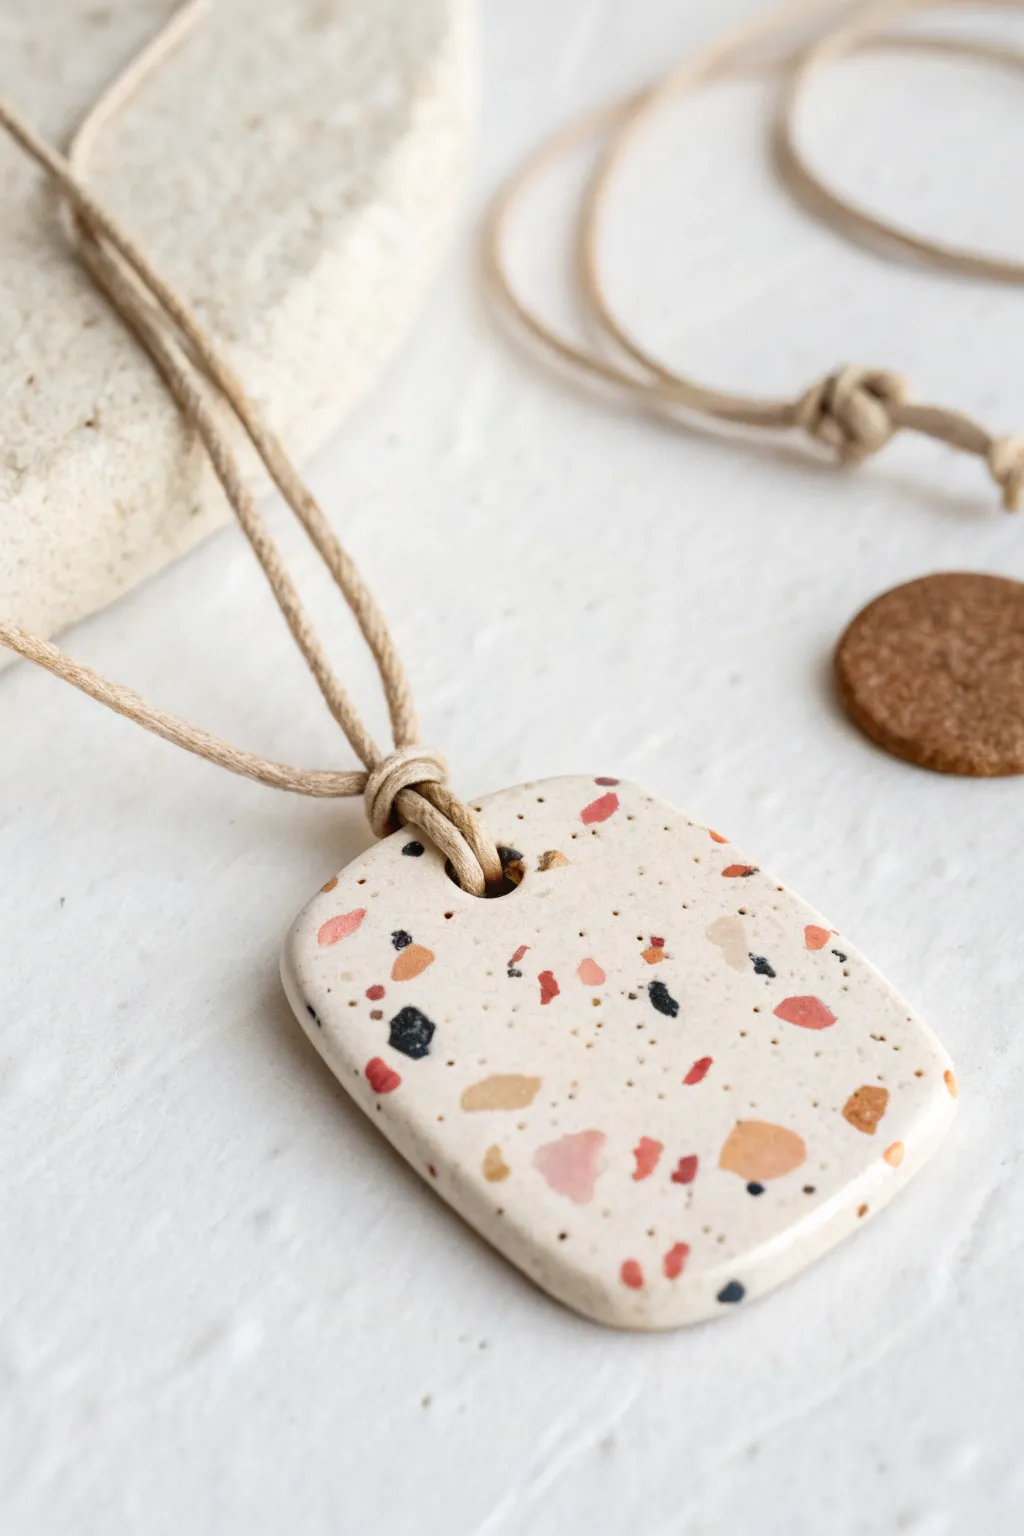
These charming pendants mimic the look of classic terrazzo flooring with a modern, speckled twist. Using simple polymer clay techniques, you’ll create a sophisticated, polished accessory that looks far more complex than it actually is to make.
Step-by-Step Tutorial
Materials
- White or cream polymer clay (base color)
- Small amounts of colored polymer clay (coral/red, black/navy, tan/gold)
- Acrylic rolling pin
- Rectangle clay cutter (with rounded corners) or a craft knife
- Small circle cutter or straw (for the hole)
- Parchment paper or ceramic tile (work surface)
- Wet/dry sandpaper (400 to 1000 grit)
- Beige cord or waxed cotton string
- Polymer clay varnish (optional)
Step 1: Preparing the Clay Confetti
-
Condition the colors:
Start by conditioning your small bits of colored clay—coral, black, and tan—until they are soft and pliable. -
Roll thin sheets:
Roll each colored piece into a very thin sheet. You want these to be almost paper-thin so they embed easily into the base clay. -
Create the chips:
Tear the thin colored sheets into tiny, irregular fragments. Aim for a variety of sizes, from mere specks to slightly larger chunks, to get that authentic confetti look. -
Organize your palette:
Keep your pile of colorful chips nearby on a clean surface so they are ready to sprinkle.
Pro Tip: Clean Cuts
Before cutting your final shape, protect the clay with a sheet of plastic wrap. Cutting through the plastic creates softly rounded, pillow-like edges.
Step 2: Creating the Terrazzo Slab
-
Prepare the base:
Condition a larger block of white or cream clay. Roll it out to a medium thickness, roughly 1/4 inch (about 5-6mm). -
Add the speckles:
Gently place your colored clay chips onto the white slab. I find it helpful to start with the larger pieces and fill in the gaps with the tiny specks. -
Embed the pattern:
Once you are happy with the distribution, cover the clay with a piece of parchment paper to prevent sticking. -
Roll smooth:
Use your acrylic roller to firmly roll over the parchment paper. This presses the colored chips flat into the base clay, creating a smooth, unified surface. -
Check the surface:
Peel back the paper. If the surface isn’t perfectly flush yet, roll it a bit more until the slab is uniform.
Step 3: Cutting and Finishing
-
Cut the shape:
Position your rounded rectangle cutter over the section of the slab with the most pleasing pattern and press down firmly to cut your pendant shape. -
Create the hole:
Use a small circle cutter or a sturdy straw to punch a hole near the top center of the pendant for the cord. -
Smooth the edges:
Gently run your finger along the cut edges to soften any sharp ridges left by the cutter. -
Bake the piece:
Place the pendant on a baking sheet or tile. Bake according to your brand of polymer clay’s instructions (usually 275°F/130°C for 15-30 minutes). -
Cool down:
Let the piece cool completely before handling it, as warm clay can be brittle. -
Sand for perfection:
Dip your sandpaper in water and gently sand the surface and edges. This reveals the crispness of the terrazzo chips and gives a professional matte finish. -
Seal (optional):
If you prefer a glossy look, apply a thin layer of polymer clay glaze. For a natural stone look, leave it sanded and matte. -
Attach the cord:
Cut a length of beige cord. Fold it in half and push the loop through the pendant hole from front to back. -
Secure the knot:
Pass the loose ends of the cord through the loop and pull tight to create a lark’s head knot against the pendant. -
Finish the necklace:
Tie the loose ends of the cord together at your desired length to complete your necklace.
Level Up: Stone Effects
Mix a tiny amount of translucent clay or black pepper into your white base clay before rolling it out to give the background a realistic, stony texture.
Now you have a stunning, custom piece of jewelry ready to wear or gift.

The Complete Guide to Pottery Troubleshooting
Uncover the most common ceramic mistakes—from cracking clay to failed glazes—and learn how to fix them fast.
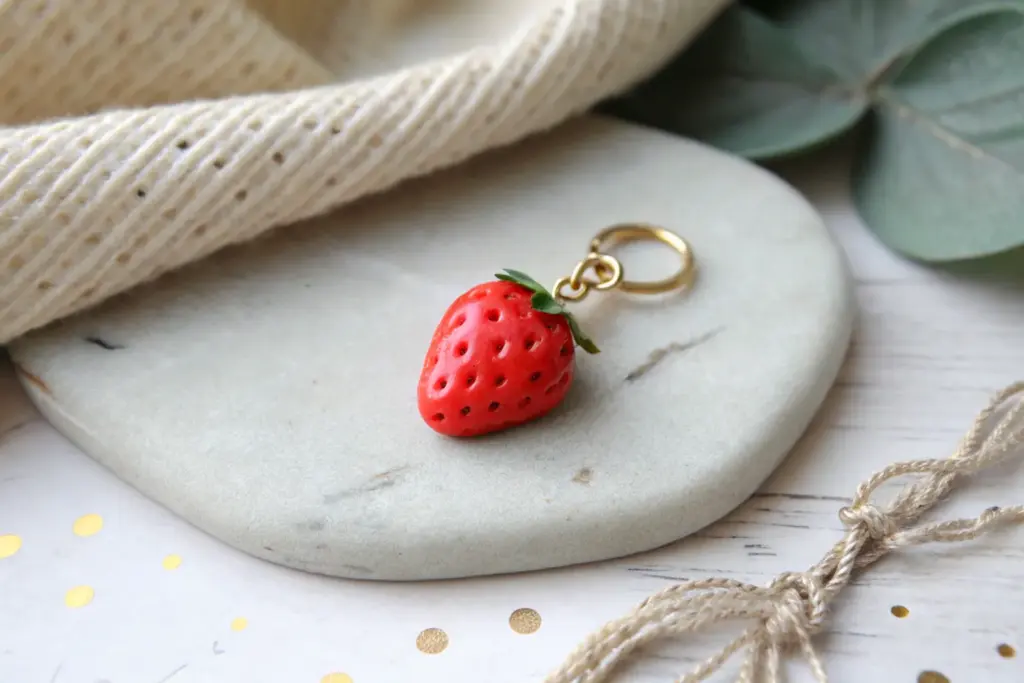
Personalized Keychain Tags With Letter Impressions
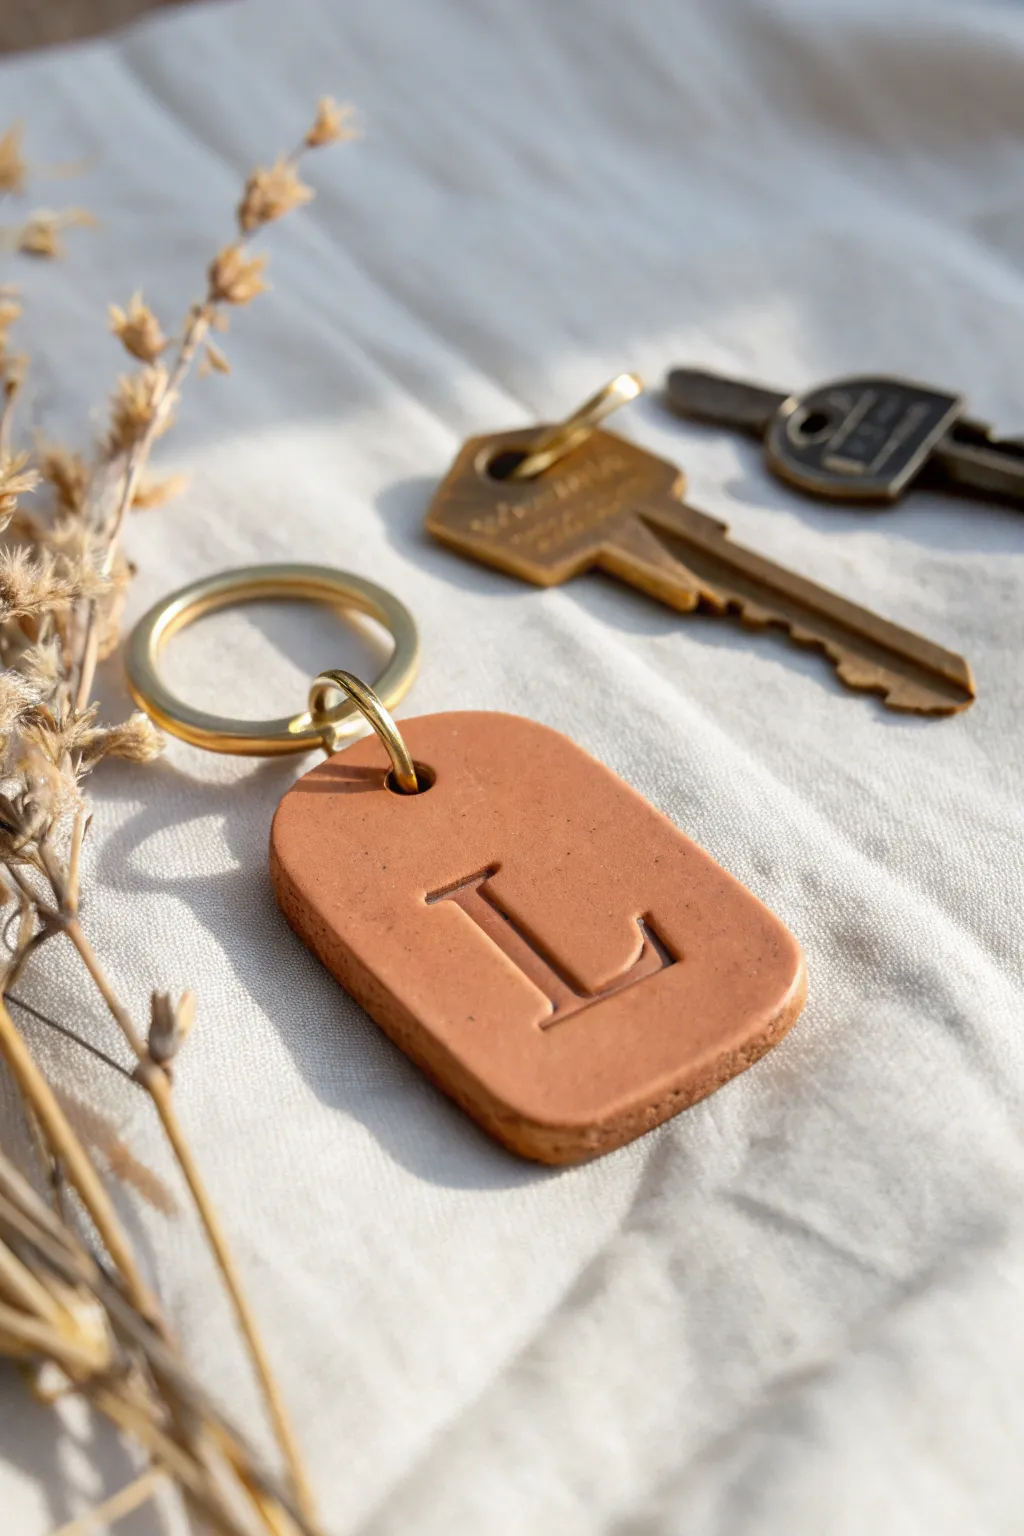
Create a personalized, minimalist accessory with this simple polymer clay project that mimics the look of raw terracotta pottery. The deep letter impression and warm clay tones make these tags a stylish addition to any set of keys.
Detailed Instructions
Materials
- Terracotta-colored polymer clay
- Rolling pin or acrylic roller
- Small oval or rectangular clay cutter
- Letter stamp set (individual letter stamps)
- Small toothpick or awl
- Brass jump rings (approx. 8-10mm)
- Brass split key ring
- Two sets of needle-nose pliers
- Fine-grit sandpaper (optional)
- Oven baking sheet and parchment paper
Step 1: Shaping the Clay
-
Condition:
Start by taking a chunk of your terracotta-colored polymer clay. Knead it thoroughly in your hands until it becomes soft, pliable, and warm to the touch. -
Roll:
Place the conditioned clay on a smooth, clean work surface. Use your roller to flatten the clay to an even thickness of about 1/4 inch (6mm). Avoid rolling it too thin, as you want a substantial, durable tag. -
Cut:
Press your oval or rectangular cutter firmly into the clay sheet. Wiggle it slightly to ensure a clean cut all the way through, then lift the cutter away. -
Smooth:
Gently gently rub your finger along the cut edges of the fresh shape to soften any sharp corners. I find this much easier to do now while the clay is raw than sanding it later.
Stamp Release Trick
To prevent your letter stamp from pulling the clay up when you lift it, lightly dust the stamp face with a tiny bit of cornstarch or dip it in water before pressing it down.
Step 2: Adding Details
-
Punch hole:
Use a toothpick or a small awl to create a hole at the top center of your shape. Make sure the hole is large enough to accommodate your jump ring and isn’t too close to the edge to prevent tearing. -
Position stamp:
Select your desired letter stamp. Hover it over the center of the clay shape to visualize the placement before committing. -
Impress:
Press the stamp firmly and evenly into the clay. You want a deep impression for that engraved look, but be careful not to push all the way through to the work surface. -
Clean up:
If the stamping process distorted the shape of the tag slightly, gently reshape the sides with your fingers.
Step 3: Baking and Assembly
-
Bake:
Transfer your clay tag to a baking sheet lined with parchment paper. Bake according to your specific clay brand’s package instructions—usually around 275°F (135°C) for 15-30 minutes. -
Cool:
Remove from the oven and let the piece cool completely. Do not attempt to handle it while hot, as polymer clay is slightly flexible until fully cooled. -
Inspect:
Once cool, check the edges. If there are any rough spots or fingerprints, you can lightly sand them away with fine-grit sandpaper. -
Open ring:
Using two pairs of pliers, grip a brass jump ring on either side of the split. Twist one hand forward and the other back to open the ring sideways (never pull it apart outwards). -
Attach:
Slide the open jump ring through the hole you created in the clay tag. -
Add key ring:
Before closing the jump ring, loop the larger brass split key ring onto it as well. -
Close:
Use the pliers to twist the jump ring back into a closed position, ensuring the two ends meet perfectly flush so nothing slips off.
Make It Pop
After baking, brush a little white or gold acrylic paint into the letter impression, then wipe the surface clean. The paint will stay in the grooves, making the letter stand out clearly.
Attach your house keys and enjoy the organized, earthy vibe of your new accessory
Quick Refrigerator Magnets in Rainbow and Heart Shapes
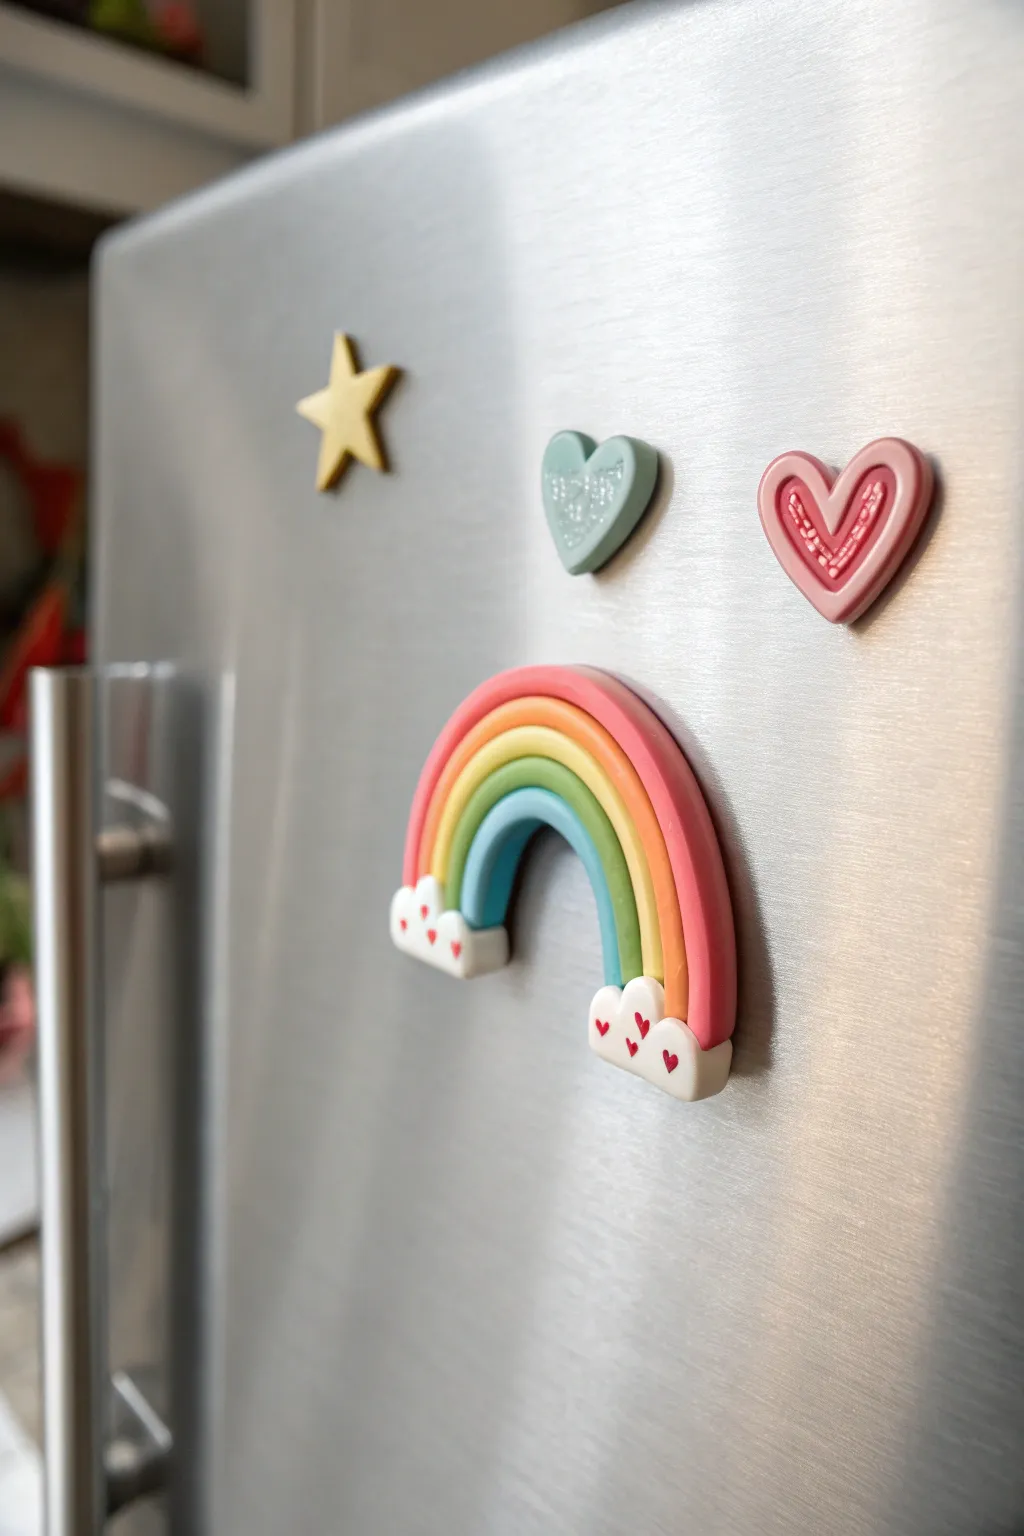
Brighten up your kitchen with this cheerful collection of polymer clay magnets, featuring a classic pastel rainbow and sweet heart accents. The smooth, dimensional finish gives them a professional store-bought look while retaining handmade charm.
Step-by-Step Tutorial
Materials
- Polymer clay (white, pastel pink, orange, yellow, green, blue)
- Clay roller or pasta machine
- Clay cutting blade or craft knife
- Small heart-shaped cutter (optional)
- Small magnets
- Superglue or strong adhesive
- Clean work surface (ceramic tile or glass mat)
- Needle tool or toothpick
- Acrylic paint (red, white)
- Gloss glaze or varnish
Step 1: Shaping the Rainbow Arches
-
Condition the Green:
Start by conditioning a small amount of light green clay in your hands until it is soft and malleable. Roll it into a smooth, even snake about 3 inches long. -
Form the Blue Arch:
Repeat the rolling process with blue clay, making this snake slightly shorter than the green one. Gently curve it into an arch shape on your work surface. -
Assemble the Inner Arches:
Curve the green snake over the blue arch, pressing them gently together along the seam so they stick without flattening the round profile. -
Add Yellow and Orange:
Roll out yellow and orange snakes. Layer the yellow over the green, and the orange over the yellow, maintaining that consistent arch shape. I find gently nudging the sides inward helps keep the curve tight. -
Create the Outer Layer:
Finish the rainbow with a final snake of pink clay on the very outside. Ensure all the strands are pressed snugly together side-by-side. -
Trim the Ends:
Use your clay blade to cut straight across the bottom of the rainbow legs so all colors end at the exact same flat line.
Uneven Arches?
If your rainbow arches separate or gap during bending, curve them around a round object like a cookie cutter or jar lid first to get the shape right before pressing them together.
Step 2: Creating Clouds & Details
-
Form Cloud Bases:
Condition white clay and roll it into two small, thick logs that are roughly the width of the rainbow’s legs. -
Shape the Fluff:
Gently press indentations into the top of the white logs to create a bumpy, cloud-like texture, or mold small balls of white clay together for a bubbly effect. -
Attach Clouds:
Press a cloud firmly onto the bottom of each rainbow leg. The clay should bond, but you can use a tiny drop of liquid clay if needed for security. -
Paint Heart Accents:
Before baking (or after, depending on preference), carefully paint tiny red hearts onto the white clouds using a fine-point brush or a needle tool dipped in paint.
Step 3: Sculpting the Heart Trio
-
Make the Blue Heart:
Roll a small ball of light blue clay and flatten it slightly. Use a small heart cutter or shape it by hand, then texture the surface with a piece of sandpaper or a toothbrush for a glittery look. -
Layer the Pink Heart:
Create a larger heart from pink clay. Roll a very thin snake of darker pink clay and press it into the center of the heart to create an inner outline detail. -
Shape the Star:
Flatten a piece of yellow clay and cut out a simple five-point star shape. Gently pinch the center of each point to give it a slightly raised, 3D effect.
Make it Sparkle
For the blue heart, mix glitter directly into the raw clay before shaping. This embeds the sparkle inside the clay so it won’t flake off over time like surface glitter.
Step 4: Baking & Assembly
-
Bake the Clay:
Place all your pieces on a ceramic tile or baking sheet lined with parchment paper. Bake according to your polymer clay package instructions (usually 275°F/135°C for 15-30 minutes). -
Cool Down:
Allow the pieces to cool completely inside the oven or on a wire rack. They will harden fully as they cool. -
Seal:
Apply a coat of gloss glaze to the rainbow and hearts if you want that shiny, ceramic-like finish shown in the photo. -
Attach Magnets:
Flip the cured pieces over. Apply a dab of superglue to the back of each shape and press a magnet firmly into place. Let dry completely.
Pop these on your fridge to hold your favorite photos or important notes


What Really Happens Inside the Kiln
Learn how time and temperature work together inside the kiln to transform clay into durable ceramic.
Simple Desk Cable Clips and Cord Keepers
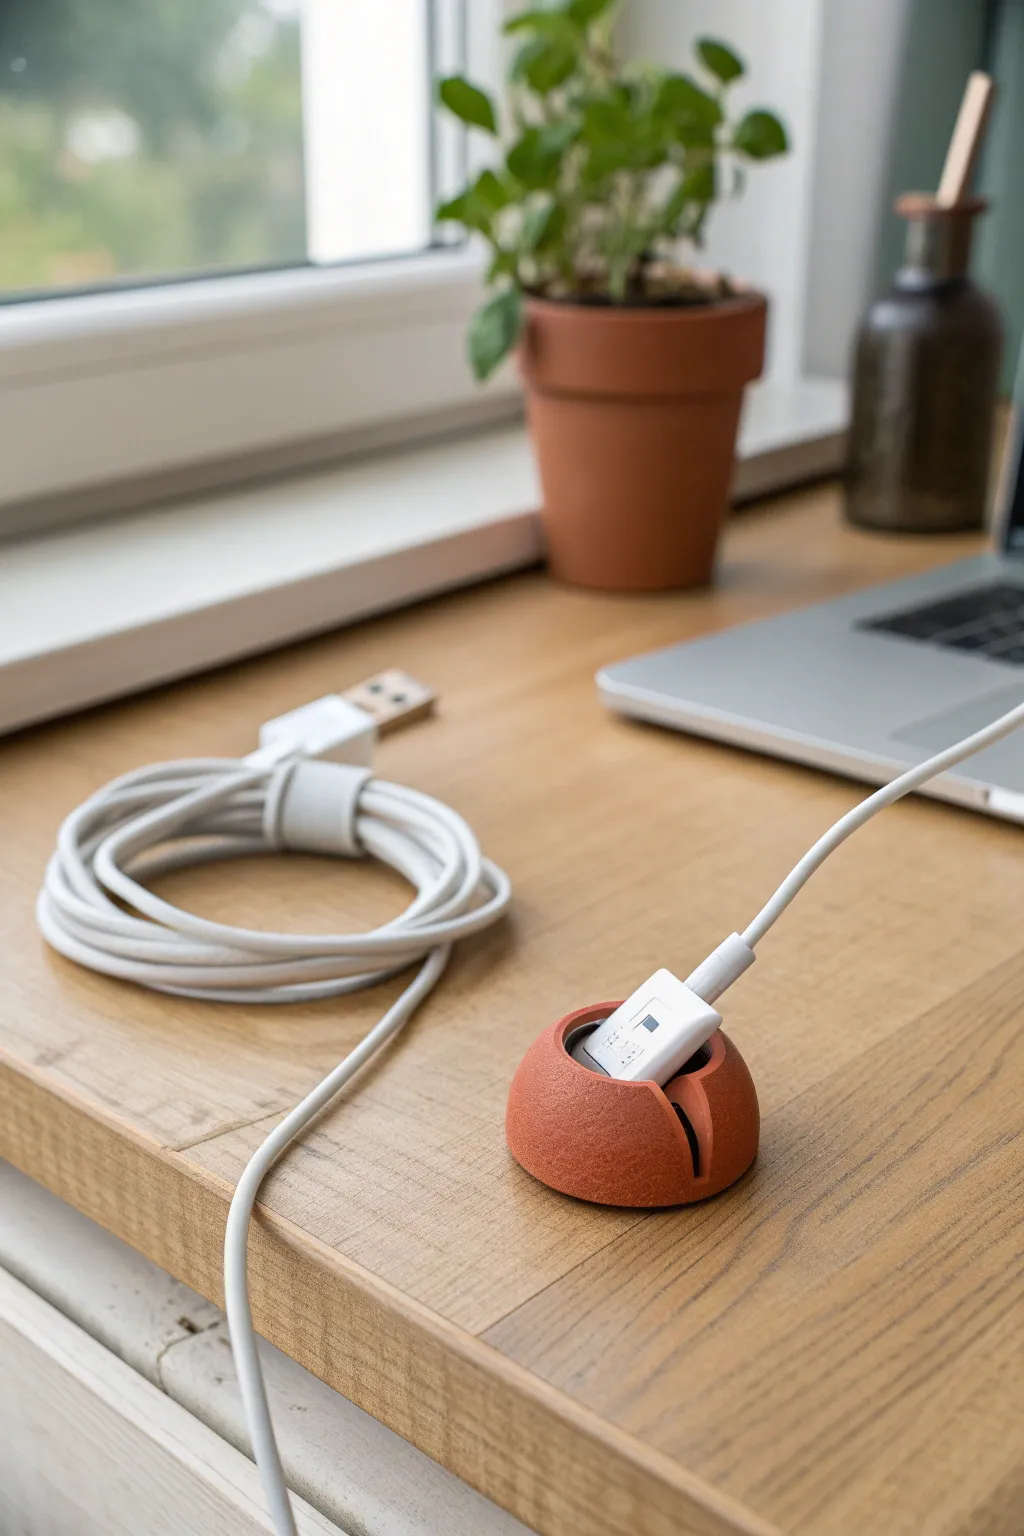
Keep your desk tidy with this minimalist, stone-effect cable organizer that blends perfectly with natural decor. This clever little dome features a weighted core to stay put and a simple slot to catch your charger cables before they slip away.
Detailed Instructions
Materials
- Terracotta or rust-colored polymer clay
- Coarse salt or pepper (for texture)
- Wide metal washer or large coin (for weight)
- Circle cutter or small jar lid
- Craft knife or scalpel
- A thick marker or dowel (approx. 1/2 inch diameter)
- Sandpaper (medium grit)
- Acrylic roller
- Oven for baking
Step 1: Prepping the Clay
-
Condition the clay:
Start by warming up your polymer clay in your hands. Knead it thoroughly until it is soft, pliable, and free of any cracks. -
Add texture:
To achieve that organic, stone-like finish seen in the photo, sprinkle a pinch of coarse salt or ground black pepper onto your flattened clay. Fold the clay over and knead it again to distribute these speckles evenly throughout. -
Form the base ball:
Roll the conditioned clay into a smooth, tight ball about the size of a ping-pong ball. Ensure there are no air bubbles trapped inside.
Sliding Around?
If your finished holder slides on your smooth desk, glue a small circle of foam or rubber grip pad to the bottom for extra traction.
Step 2: Shaping the Dome
-
Insert the weight:
Flatten the bottom of your clay ball slightly. Press your metal washer or coin firmly into the bottom center. This hidden weight is crucial for keeping the holder stable on your desk. -
Seal the weight:
Pull the clay edges over the washer to completely enclose it. Smooth the bottom against your work surface again to ensure it sits perfectly flat. -
Create the dome:
Place the ball on your work surface and gently cup your hands over it. Smooth it downwards to create a nice, even hemisphere or dome shape. -
Initial hole punch:
Take your thick marker or dowel and press it vertically into the top center of the dome. Don’t go all the way through; stop about halfway down. This creates the central well where the plug head will rest. -
Widen the opening:
Gently wiggle the marker in a circular motion to widen the opening slightly, ensuring it’s large enough to hold the head of your thickest charging cable comfortably.
Step 3: Refining the Slot
-
Cut the cable channel:
Using your craft knife, cut a straight vertical slice from the edge of the central hole down the side of the dome to the base. This slit needs to be wide enough for a wire but narrower than the plug head. -
Widen the channel:
Make a second cut parallel to the first one, removing a small sliver of clay. The gap should look like a keyhole from the top—a circle in the center with a channel exiting the side. -
Smooth the edges:
Dip your finger in a little water or baby oil and gently smooth the cut edges of the slot and the top rim. You want rounded, soft edges so they don’t damage your cables. -
Check the fit:
I always grab a spare cable at this stage to test the fit. The cord should slide into the slot easily, but the plastic connector head should catch and sit in the center well.
Make it Magnetic
Embed a strong neodymium magnet in the base instead of a washer. It will snap securely to metal desk legs or computer towers.
Step 4: Finishing Touches
-
Final texturing:
Roll a crumpled ball of aluminum foil or heavy-grit sandpaper lightly over the entire outer surface. This enhances the matte, earthy look. -
Bake:
Place your dome on a baking sheet lined with parchment paper. Bake according to your clay manufacturer’s instructions (usually around 275°F/130°C for 15-30 minutes depending on thickness). -
Cool and rinse:
Let the piece cool completely. If you used salt for texture, rinse the piece under water now to dissolve the surface salt crystals, leaving behind realistic little pits. -
Sand the base:
Rub the bottom of the dome on a piece of sandpaper placed flat on the table to ensure it is perfectly level and won’t wobble.
Your new desktop companion is ready to organize your cables with style.
Polymer Clay Cane Slices for Fruit and Sprinkle Patterns
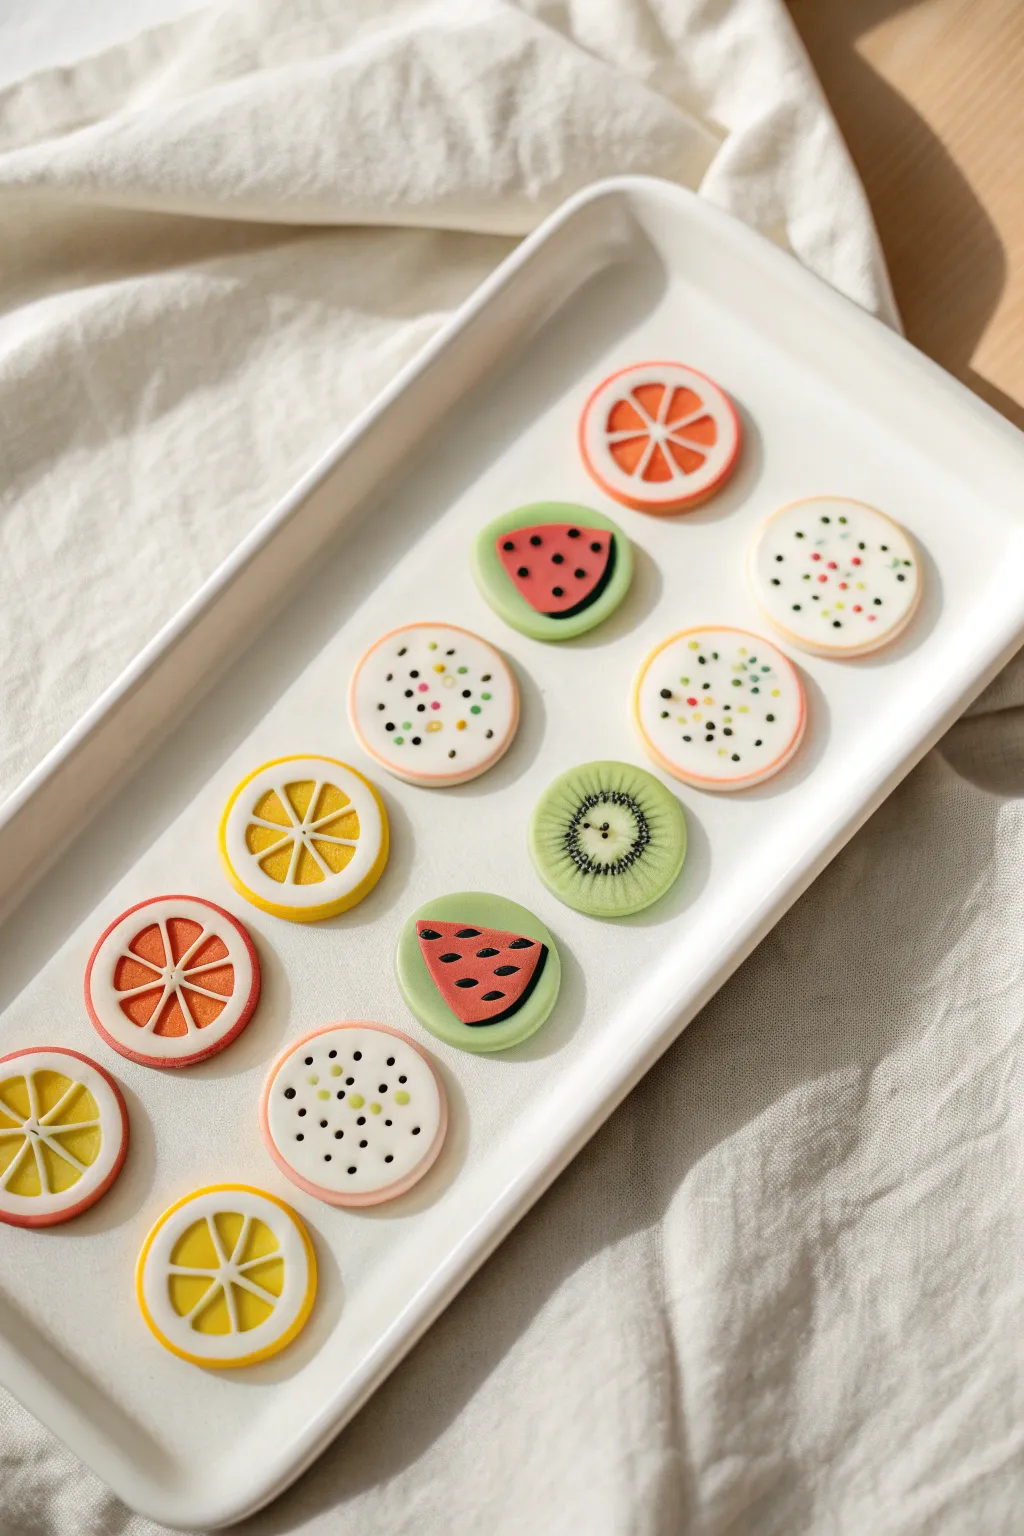
These miniature polymer clay fruit slices are bursting with color and charm, perfect for jewelry or decorating other crafts. With just a few basic cane-making techniques, you can build an entire orchard of citrus, melons, and exotic fruits.
Detailed Instructions
Materials
- Polymer clay (white, translucent, red, orange, yellow, green, black)
- Clay roller or pasta machine
- Tissue blade or very sharp craft knife
- Small circle cutter (optional)
- Clean work surface (glass or tile)
- Oven for baking
Step 1: Citrus Canes (Orange, Lemon, Lime)
-
Create the segments:
Start by rolling a log of the fruit’s flesh color (orange or yellow). Flatten a thin sheet of white clay and wrap it around the log. -
Shape the wedge:
Pinch one side of the wrapped log to create a teardrop or triangular ‘wedge’ shape. Stretch this log out until it’s quite long and thin. -
Cut and assemble:
Cut the long wedge into 6 to 8 equal lengths. Arrange them in a circle with the pointy ends meeting in the center to form the wheel. -
Add the pith:
Wrap this new bundle in a layer of white clay to create the inner pith. -
Add the rind:
Finally, wrap a thin sheet of the original fruit color (or green for lime) around the outside for the skin. -
Reduce carefully:
Squeeze and roll the cane gently from the center outwards to reduce its diameter without distorting the pattern.
Chill Before Slicing
Warm clay squishes easily. Put your finished canes in the fridge for 15-20 minutes before cutting to get perfect, crisp slices without distortion.
Step 2: Watermelon Slices
-
Form the center:
Roll a thick log of red or dark pink clay. -
Add the rind layers:
Wrap the red log in a very thin sheet of white clay, followed by a slightly thicker sheet of light green clay. -
Shape the cane:
Compress the cane to your desired size. Once reduced, you can slice the round cane into discs first. -
Add seeds:
For the seeds, I find it easiest to roll tiny teardrops of black clay and press them onto the surface of the cut slice, rather than building them into the cane itself for this simple version. -
Cut wedges:
If you want the semi-circle look shown in the photo, cut your round slices in half or thirds before baking.
Step 3: Kiwi & Dragon Fruit
-
Prepare the core:
For the kiwi, make a white center log. For dragon fruit, you’ll need a larger white core. -
Mixing seeds:
Mix a small amount of black clay bits or black pepper into translucent or white clay to create a ‘seeded’ look. -
Assemble the kiwi:
Wrap the white core with the seeded mixture, then wrap that with translucent green clay, and finish with a brown skin layer. -
Create dragon fruit dots:
For the speckled white fruit, simply press tiny balls of various colored clays (pink, yellow, green) into a white clay disc to mimic sprinkles or exotic seeds. -
Texture the kiwi:
Use a needle tool on the sliced kiwi cane to drag lines from the center outward, creating that fibrous fruit texture.
Smudged Colors?
If colors smear across the white face when slicing, wipe your blade with alcohol or a baby wipe between every single cut to keep the pattern clean.
Step 4: Baking and Finishing
-
Slice evenly:
Use your tissue blade to cut thin, uniform slices from your finished canes. -
Arrange and bake:
Place all your slices on a tile or parchment-lined tray. Follow your clay package instructions for baking temperature and time.
Once baked and cooled, these adorable slices are ready to be glued onto earrings or embedded into resin crafts