If you’ve been craving a cute clay bracelet moment, those flat heishi beads are basically instant happiness on a string. In my studio, these are the go-to color “recipes” and charm combos that make clay bead bracelets feel extra special without getting fussy.
Classic Rainbow Heishi Order Bracelet
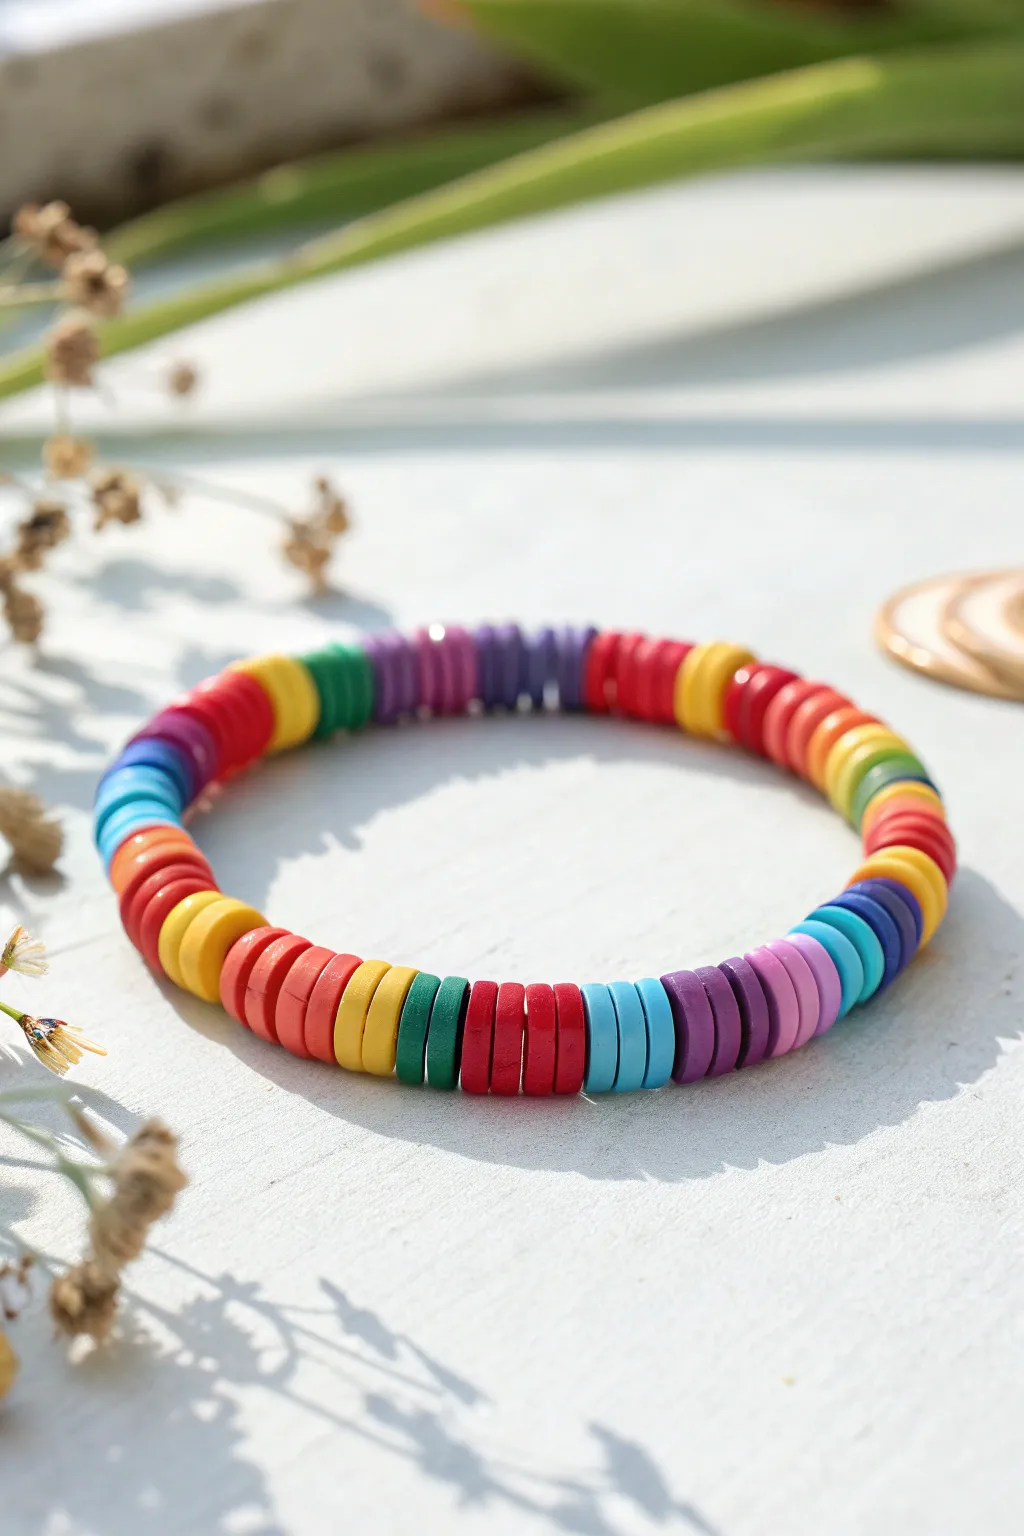
This vibrant bracelet captures the joy of a classic rainbow with a modern twist, using distinct blocks of color separated by contrasting hues. The flat, disc-shaped heishi beads create a smooth, comfortable texture that sits perfectly against the wrist.
Step-by-Step Guide
Materials
- Polymer clay heishi beads (6mm or similar) in: Red, Orange, Yellow, Green (light & dark), Blue (light & dark), Purple, Pink
- Elastic stretch cord (0.8mm clear)
- Scissors or jewelry snips
- Jewelry glue or clear nail polish
- Bead stopper or simple masking tape
- Tape measure or ruler
Step 1: Preparation
-
Measure your wrist:
Wrap a flexible tape measure around your wrist to find your size. For a comfortable fit that isn’t too tight, add about half an inch to your measurement. -
Cut the cord:
Cut a piece of elastic cord about 10-12 inches long. This extra length is crucial so you have plenty of room to tie the knot later without struggling. -
Pre-stretch the elastic:
Hold the cord firmly at both ends and give it several gentle tugs. Pre-stretching prevents the bracelet from loosening up and sagging after you’ve worn it a few times. -
Secure the end:
Attach a bead stopper to one end of the cord, or simply fold a piece of masking tape over the tip, to stop beads from sliding off while you work.
Step 2: Creating the Pattern
-
Sort your colors:
Organize your heishi beads into piles by color. The charm of this design comes from using solid ‘blocks’ of 3-5 beads of the same color, rather than alternating single beads. -
Start with a red block:
Thread 3 red beads onto the cord. Using odd numbers for your color blocks often creates a more visually pleasing rhythm. -
Add a yellow segment:
Follow the red with a block of 3 yellow beads. The high contrast between these primary colors gives the bracelet its bold, playful look. -
Continue the rainbow:
Add a block of 3 green beads, followed by 3 blue beads. I like to mix shades here, perhaps using a teal green or a sky blue to add depth. -
Create a purple section:
Thread on 3-4 purple beads. Notice how the flat discs stack snugly together; ensure they are facing the same way if they have a slightly curved side. -
Incorporate variations:
Break up the perfect rainbow order occasionally. Try adding a small section of pink or orange, or vary the block size to 2 or 5 beads for an organic feel. -
Check the length:
Periodically wrap the beaded cord around your wrist to check the fit. Ideally, the ends should just touch without stretching the elastic. -
Refine the pattern:
Continue adding color blocks until you reach your desired length. Aim to finish with a color that contrasts well with your starting red block for a seamless join.
Clean Color Blocks
For the crispest look, ensure all beads in a single color block are the exact same thickness. Discard any visibly thinner or warped discs.
Step 3: Finishing Touches
-
Prepare the knot:
Remove the bead stopper or tape carefully, holding both ends of the elastic securely so no beads escape. -
Tie the first knot:
Tie a simple overhand knot, pulling the elastic tight enough so there are no gaps between beads, but not so tight that the bracelet luckles. -
Secure with a surgeon’s knot:
Make a second knot, but loop the end through twice before pulling tight. This is a surgeon’s knot and is much more secure for slippery elastic. -
Glue the knot:
Dab a tiny drop of jewelry glue or clear nail polish directly onto the knot. Let it dry completely before moving on. -
Trim the ends:
Once dry, use your scissors to trim the excess cord ends close to the knot. Be careful not to nick the main cord. -
Hide the knot:
Gently pull adjacent beads over the knot. If the beads have large enough holes, the knot will slip inside one, disappearing completely from view.
Knot Slipping?
If your knot keeps coming undone before you can glue it, try clamping it with a small binder clip or hemostat while you apply the adhesive.
Now slip on your colorful creation and enjoy a burst of cheer on your wrist


Soft Pastel Palette With Gold Spacer Beads
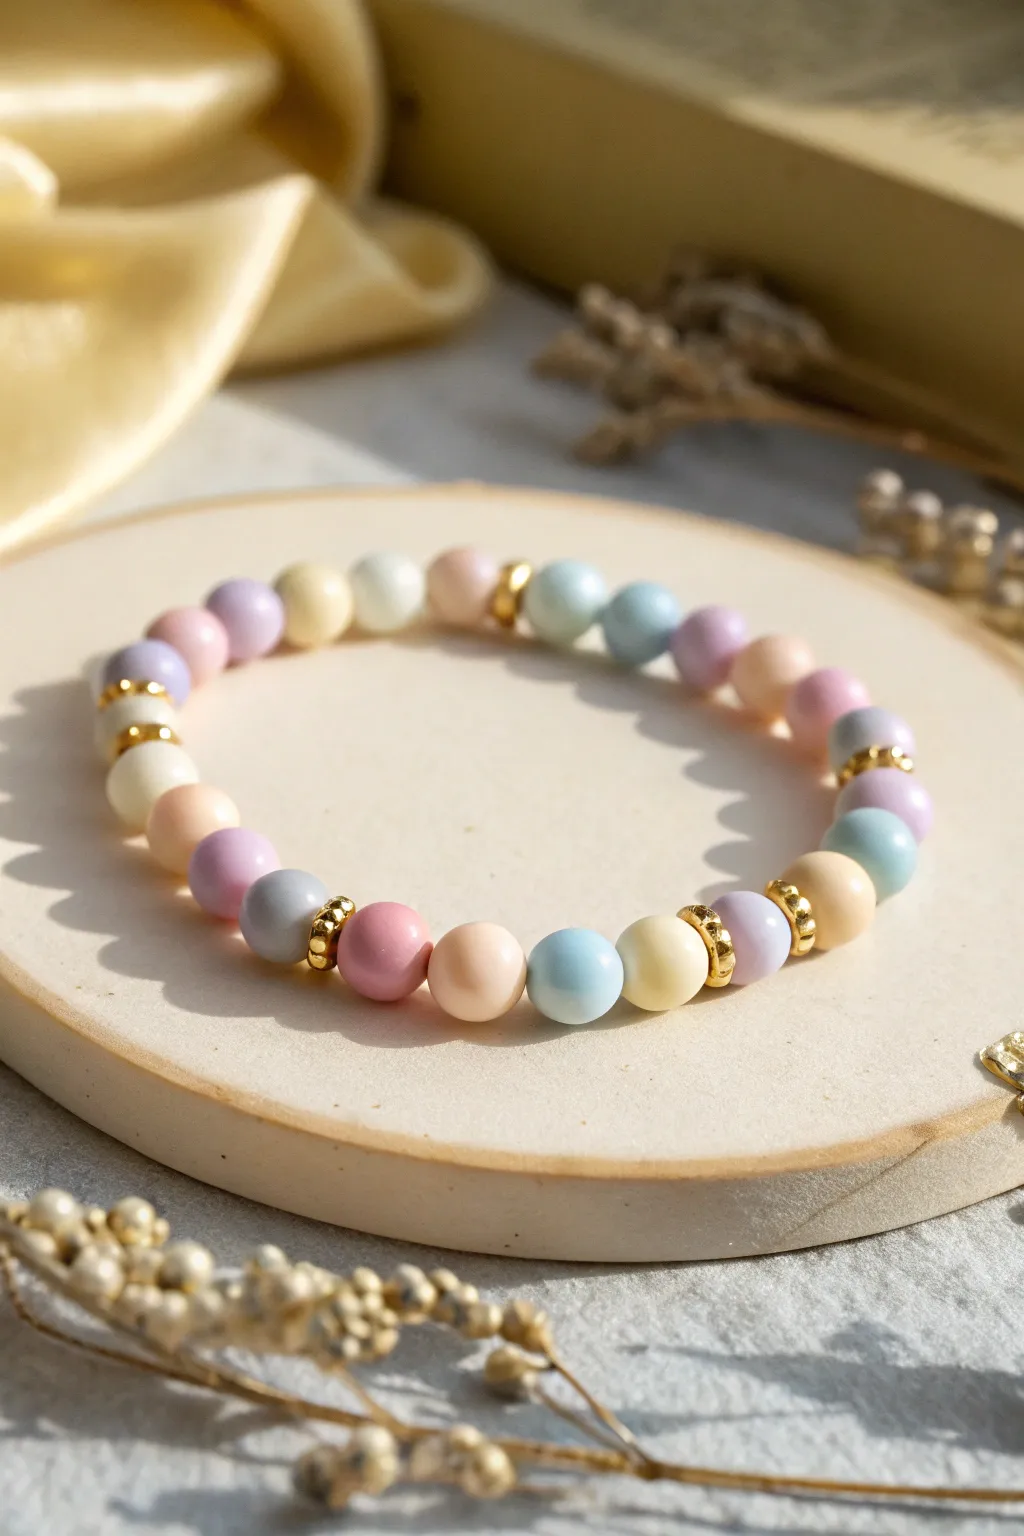
Capture the soft hues of a sunrise with this charming polymer clay bracelet, where gentle pastel tones meet the warm luxury of gold. The alternating matte clay beads and shining spacers create a delicate rhythm perfect for stacking or wearing solo.
Step-by-Step Tutorial
Materials
- Polymer clay in pastel shades: Baby Blue, Soft Pink, Lavender, Peach, Cream, Butter Yellow, and Light Grey
- Gold finish spacer beads (rondelle or disc shape, 4-5mm)
- Bead rolling tool or acrylic block
- Needle tool or toothpick
- Elastic beading cord (0.7mm or 0.8mm)
- Super glue or jewelry cement
- Oven for baking
- Baking tile or parchment paper
- Scissors
Step 1: Preparing the Clay Palette
-
Condition the clay:
Start by warming up each color of polymer clay in your hands. Knead them individually until they are soft, pliable, and free of any cracks or air bubbles. -
Portion the clay:
Pinch off small, equal-sized pieces of clay from each color block. Aim for pieces that will roll into roughly 6mm to 8mm spheres. Keeping the sizes consistent now saves time later. -
Roll spheres:
Roll each portion between your palms first to get a rough sphere shape. -
Refine the shape:
For perfectly round beads, place your rough spheres on a flat surface and use an acrylic block or bead roller in a gentle circular motion to smooth them out completely. -
Piercing the beads:
Hold a bead gently without squishing it. Using a needle tool, carefully pierce the center. I like to twist the needle as I push through to prevent the clay from dragging. -
Check the holes:
Pierce through from the opposite side as well to ensure a clean exit hole, which makes stringing much easier once they are baked.
Smooth Perfection
Before baking, lightly dust your clay beads with cornstarch. This helps smooth out fingerprints and leaves a lovely soft, matte texture after baking.
Step 2: Baking & Finishing
-
Arrange for baking:
Place your pierced beads on a ceramic baking tile or a tray lined with parchment paper. To avoid flat spots, you can string them on a stiff wire suspended over a foil tray. -
Bake the clay:
Bake the beads in a preheated oven according to the manufacturer’s instructions for your specific brand of clay (usually 265°F-275°F for 15-30 minutes). -
Cool down:
Allow the beads to cool completely inside the oven or on a wire rack before handling; polymer clay is fragile while hot. -
Plan the pattern:
Lay out your cooled beads on a bead board or towel. The pattern shown uses a random mix of pastels, grouped in sets of 2 or 3 clay beads between gold spacers. -
Insert spacers:
Arrange the gold spacer beads. Notice how the original design doesn’t put gold between *every* bead, but rather uses them as accents to break up small color clusters.
Texture Twist
For a varied look, try mixing in a few ‘stone’ effect polymer clays like granite or speckled quartz alongside your solid pastels.
Step 3: Assembly
-
Pre-stretch the cord:
Cut a length of elastic cord about 10 inches long. Pull it firmly a few times to pre-stretch it; this prevents the bracelet from loosening up after you wear it. -
String the beads:
Thread your pattern onto the elastic. Start with a clay bead rather than a metal spacer, as the knot will hide better inside the larger hole of the clay bead. -
Check the fit:
Wrap the strung beads around your wrist to check the size. Add or remove beads to ensure a comfortable fit that isn’t too tight. -
Tie the knot:
Tie a surgeon’s knot (right over left twice, then left over right twice) and pull it tight. The elastic should be taut against the beads. -
Secure the design:
Apply a tiny dot of jewelry glue to the knot. Let it dry for a moment before trimming the excess cord ends. -
Hide the knot:
Gently tug the bracelet so the knot slides inside the nearest clay bead, concealing it fully for a seamless professional finish.
Enjoy styling your soft pastel creation with your favorite light and airy outfits


All-White “Clean Girl” Clay Bracelet With Pearl Accents
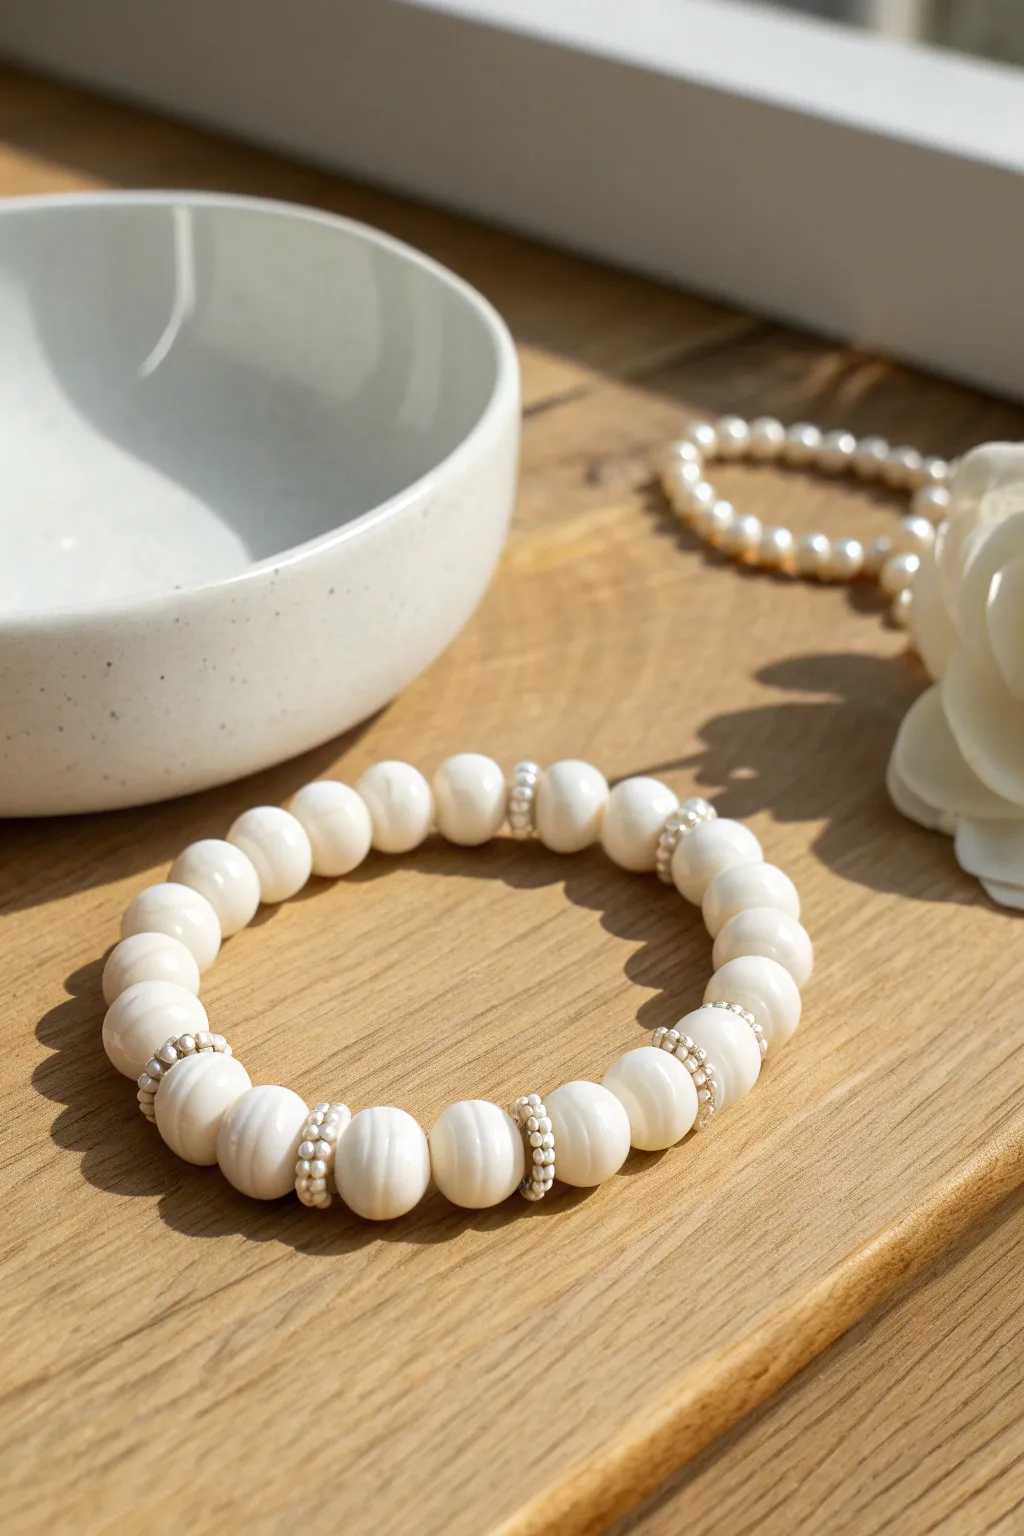
Embrace the “clean girl” aesthetic with this stunning all-white bracelet that combines the smooth texture of handmade clay beads with the delicate shimmer of miniature pearl accents. The subtle grooved detailing on the main beads adds a sophisticated touch that mimics high-end jewelry.
Step-by-Step Guide
Materials
- White polymer clay (cernit or fimo)
- Tiny silver or white seed beads (size 11/0 or 15/0)
- Strong elastic jewelry cord (0.8mm)
- Modeling tool or toothpick
- Cornstarch or baby powder
- Gloss or satin varnish (optional)
- Needle or bead piercing pin
- Super glue (gel type)
- Oven for baking
- Sandpaper (fine grit)
Step 1: Crafting the Clay Beads
-
Condition the clay:
Start by warming a block of white polymer clay in your hands. Knead it thoroughly until it is soft, pliable, and free of any air bubbles. -
Roll into a log:
Roll the conditioned clay into a smooth, even log on your work surface. Aim for a thickness of about 1/2 inch (roughly 1.2 cm). -
Cut equal segments:
Using a blade, slice the log into equal segments to ensure your beads are uniform in size. You will need about 18-20 segments for a standard wrist. -
Shape spheres:
Take each segment and roll it between your palms to form a smooth, perfect sphere. Lightly dusting your hands with cornstarch helps prevent fingerprints. -
Pierce the holes:
Gently twist a needle or piercing pin through the center of each sphere. Rotate the bead as you pierce to keep the shape round and the hole centered. -
Add texture:
Using a modeling tool or the side of a toothpick, gently press vertical indentations around the circumference of each bead. This creates the carved, organic look seen in the photo. -
Refine the surface:
Smooth out any rough edges around the holes with your fingertip. I like to inspect each bead now, as fixing flaws is harder after baking. -
Bake the beads:
Arrange the beads on a baking sheet or tile. Bake according to the manufacturer’s instructions for your specific brand of clay (usually 230°F-275°F for 15-30 minutes).
Keep it Clean
White clay picks up dust instantly. Wipe your hands and work surface with a baby wipe or alcohol before starting to keep your white clay pristine.
Step 2: Creating the Spacer Rings
-
Prepare the spacers:
While the clay beads are cooling, prepare your accent spacers. You will be threading multiple tiny seed beads to act as a single spacer unit. -
Select your accents:
Choose small seed beads that mimic tiny pearls or silver metallic tones. You’ll need enough to create about 5-6 spacer groupings.
Uneven Grooves?
If your texture lines look messy, re-roll the bead into a smooth ball and try again. Use a lighter touch; you only want surface indentations, not deep cuts.
Step 3: Assembly
-
Cool and finish:
Once the clay beads are fully cooled, you can lightly sand them if needed. Apply a thin coat of satin varnish if you want a slight sheen, then let dry. -
Cut the cord:
Cut a length of elastic cord about 10-12 inches long. This gives you plenty of extra room for tying the finishing knot. -
Pre-stretch:
Give the elastic cord a few firm tugs. This pre-stretching step prevents the bracelet from becoming loose and saggy after the first few wears. -
Start stringing:
Thread on three to four large clay beads to start your pattern. -
Add the first accent:
Thread on a grouping of 3-4 tiny seed beads. These act as the decorative spacer ring shown in the design. -
Continue the pattern:
Repeat the sequence: string 3-4 clay beads, followed by a seed bead ring. Continue until the bracelet reaches your desired length. -
Check the fit:
Wrap the unfinished strand around your wrist to check the size. Add or remove beads as necessary to get a comfortable fit. -
Tie the knot:
Tie a secure surgeon’s knot (right over left, left over right, loop through twice). Pull tightly to secure. -
Secure and trim:
Add a tiny drop of gel super glue to the knot. Let it dry completely, then trim the excess cord, tucking the knot inside one of the large clay beads.
Now you have a chic, minimalist accessory that pairs perfectly with everything in your wardrobe


Solid Color Bracelet With One Charm Center
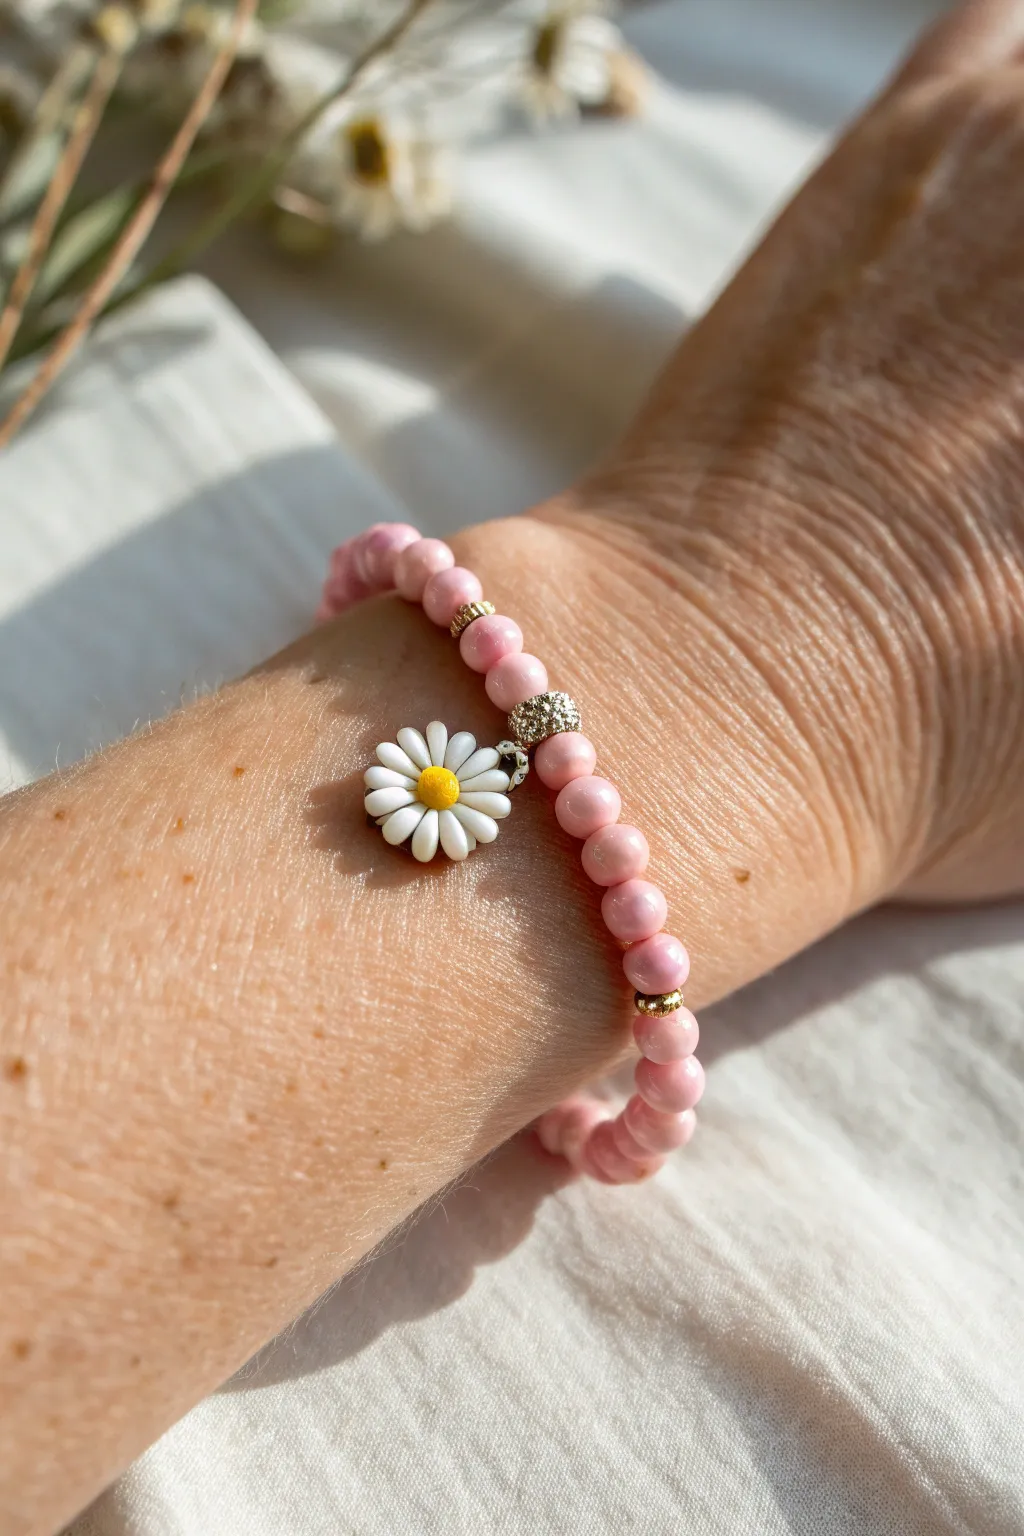
This sweet and simple bracelet brings a touch of spring to your wrist with its soft pink hue and adorable daisy focal point. The combination of smooth clay beads with metallic accents and a cheerful flower charm creates a playful accessory perfect for everyday wear.
Detailed Instructions
Materials
- Pink polymer clay (or pre-made 6mm pink clay beads)
- White polymer clay
- Yellow polymer clay
- Stretch cord (0.8mm elastic)
- 2 small gold spacer beads
- 1 textured silver or crystal rondelle bead
- Small jump ring (around 4-6mm)
- Jewelry pliers
- Needle tool or toothpick
- Super glue or jewelry adhesive
- Baking tray and parchment paper
Step 1: Making the Clay Beads
-
Prepare the pink clay:
Condition your pink polymer clay by kneading it in your hands until it is soft and pliable. -
Roll spheres:
Pinch off small, equal-sized pieces of pink clay and roll them between your palms to create smooth, round spheres about 6mm in diameter. You will need roughly 20-25 beads depending on wrist size. -
Create holes:
Using a needle tool or toothpick, carefully pierce the center of each pink sphere to create a hole for stringing. Make sure the hole is wide enough for your elastic cord. -
Form the daisy petals:
For the charm, take small bits of white clay and roll them into tiny teardrop shapes. Arrange them in a circle with points meeting in the center to form the flower petals. -
Add the center:
Roll a tiny ball of yellow clay. Flatten it slightly and press it gently into the center of the white petals to bond them together. -
Texture the center:
Use your needle tool to gently stipple the yellow center to give it a pollen-like texture. -
Add a loop:
Embed a small metal eye pin or manipulate a small clay snake into a loop at the top of one petal so you can hang the charm later. -
Bake the clay:
Arrange all your pink beads and the daisy charm on a parchment-lined baking sheet. Bake according to the manufacturer’s instructions (usually 275°F for 15-30 minutes). -
Cool down:
Let the beads cool completely before handling them to ensure they harden properly.
Smooth Rolling
To avoid fingerprints on your spherical beads, gently roll them under a flat piece of acrylic or glass on your work surface for an ultra-smooth finish.
Step 2: Assembly
-
Attach the charm:
Once cooled, use your pliers to open the jump ring, slide on the daisy charm, and loop it onto the textured silver spacer bead. Close the jump ring securely. -
Cut the cord:
Cut a piece of stretch cord about 10-12 inches long. I like to pre-stretch the cord slightly by pulling on it a few times to prevent it from loosening later. -
Begin stringing:
Start threading your pink clay beads onto the elastic cord. String about half of your total beads. -
Add the accents:
Slide on one gold spacer bead, followed by the silver spacer with the attached daisy charm, and then the second gold spacer bead. -
Finish stringing:
Thread the remaining pink clay beads onto the cord until the bracelet reaches your desired length. -
Check the fit:
Wrap the unfinished strand around your wrist to ensure it fits comfortably without being too tight or too loose. -
Tie the knot:
Tie a surgical knot (left over right, right over left) or a strong square knot. Pull it tight. -
Secure the knot:
Place a tiny drop of super glue on the knot to ensure it doesn’t slip. Let it dry for a minute. -
Hide the knot:
Trim the excess cord ends carefully. If the hole of a neighboring bead is large enough, gently tug the knot inside to hide it.
Mix It Up
Try marbling two shades of pink clay together before rolling your beads for a subtle, stony texture instead of a solid color.
Now you have a charming accessory ready to brighten up any outfit

The Complete Guide to Pottery Troubleshooting
Uncover the most common ceramic mistakes—from cracking clay to failed glazes—and learn how to fix them fast.
Preppy Color Block Stripe Bracelet
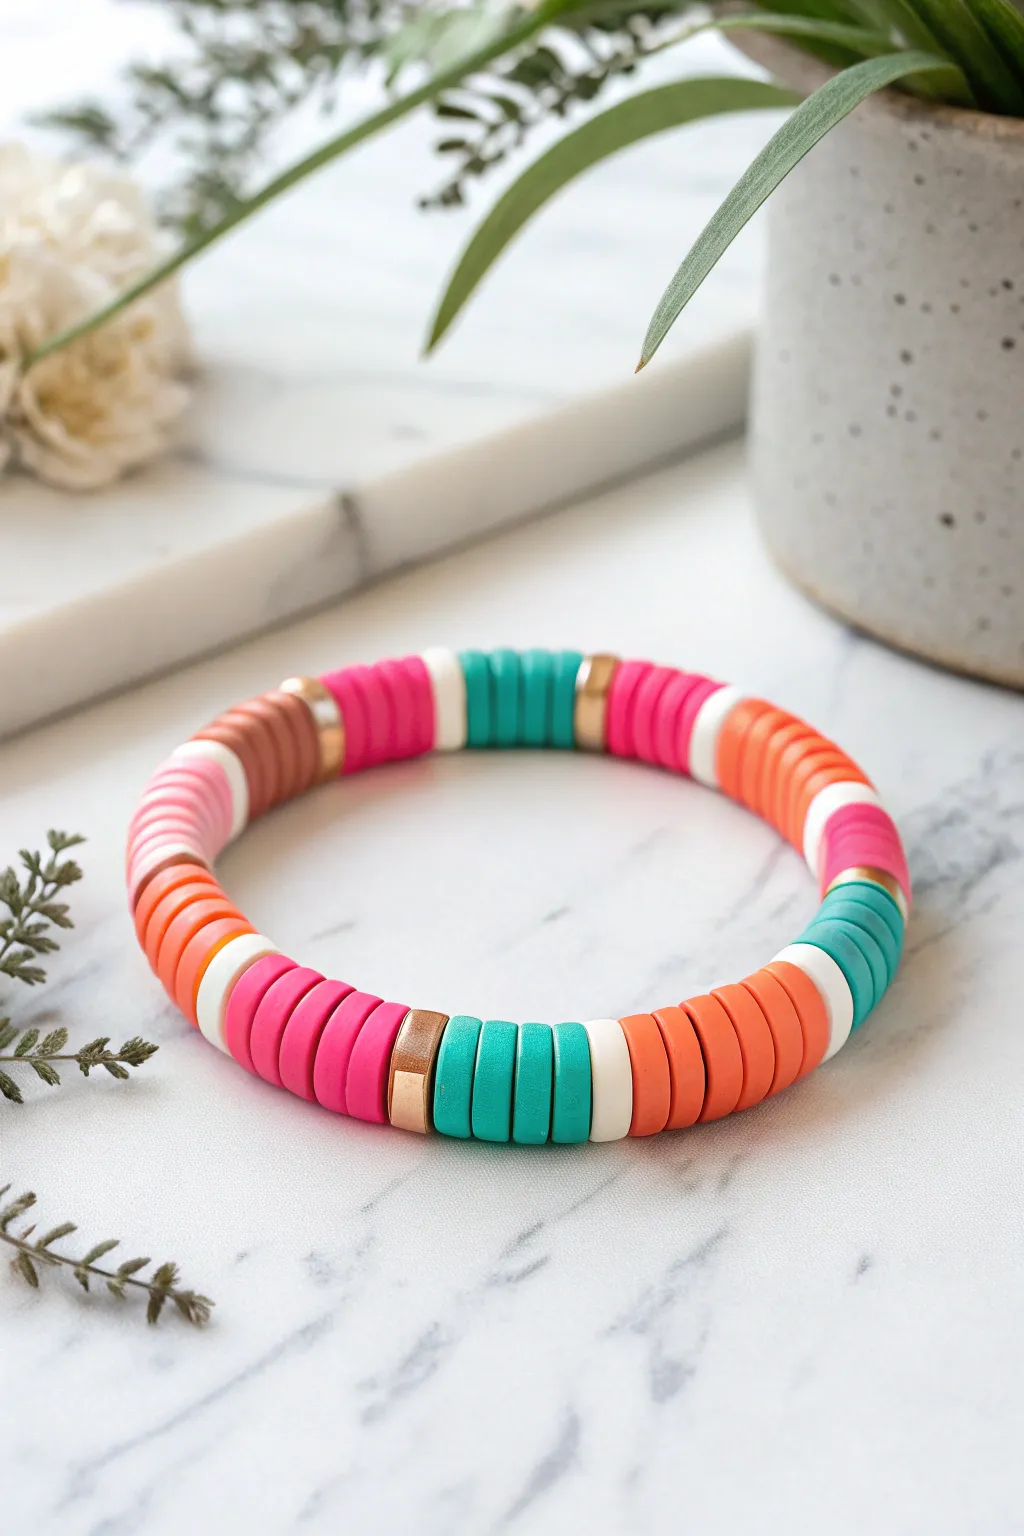
Embrace the vibrant energy of summer with this preppy-style bracelet featuring bold color-blocked sections. This design combines classic polymer heishi beads in hot pink, teal, orange, and white with elegant gold spacers for a polished finish.
Step-by-Step
Materials
- 6mm Polymer clay heishi beads (hot pink, teal, orange, white, coral/terra-cotta)
- 6mm Gold disc spacer beads (heishi style)
- 0.8mm clear elastic stretch cord
- Super glue or jewelry cement
- Scissors
- Bead stopper or tape
- Measuring tape
Step 1: Preparation
-
Measure your wrist:
Wrap a measuring tape comfortably around your wrist to find your size. Add about 0.5 inches to this measurement for a comfortable fit that isn’t too tight. -
Prepare the cord:
Cut a piece of elastic cord about 10-12 inches long. This extra length helps immensely when tying the knot later. -
Secure the end:
Attach a bead stopper to one end of the cord, or simply tape it down to your work surface so your beads don’t slide off while you work. -
Pre-stretch the cord:
Hold the cord at both ends and give it a few gentle pulls. This ‘pre-stretching’ technique prevents the bracelet from sagging or expanding permanently after you wear it a few times.
Knot Slipping?
If your elastic knot keeps coming undone, try tying it while the cord is under tension. Use a ‘surgeon’s knot’ (loop through twice) and pull very tight before gluing.
Step 2: Designing the Pattern
-
Plan your blocks:
This design relies on repeating blocks of color separated by white and gold. The specific pattern shown is roughly 6-8 beads of a main color, followed by 1 white bead, 6-8 beads of a contrasting color, and occasionally punctuated by a gold spacer. -
Start with teal:
Let’s begin the sequence shown in the center. Thread on about 5-6 teal beads. -
Add a separator:
Slide on a single white bead to create a crisp definition between the color blocks. -
Add the orange section:
Thread on approximately 6 bright orange beads. -
Transition with white:
Add another single white bead after the orange section. -
Create the teal accent:
Add a small block of teal beads, perhaps 3-4 beads this time, followed by a gold spacer bead for a metallic pop. -
Thread the pink section:
Add a longer section of hot pink beads, roughly 6-8 discs. -
Incorporate earth tones:
To balance the neon, add a gold spacer, then a small block (3 beads) of terra-cotta or brown, followed by a white bead. -
Continue the pattern:
Repeat these color blocking variations until you reach your desired length. Feel free to vary the number of beads in each block slightly to keep the look organic. -
Check the fit:
Wrap the beaded cord around your wrist to verify the size. The two ends should meet comfortably without gaps showing between the beads.
Add a Charm
Make it personal by attaching a small gold initial charm or a tiny tassel to one of the gold spacer beads using a jump ring for extra movement.
Step 3: Finishing Up
-
Prepare to tie:
Remove the bead stopper or tape carefully, holding both ends on the cord securely so no beads escape. -
Tie the first knot:
Cross the left end over the right and pull tight to create a simple overhand knot. Pull the cord ends firmly to remove any slack between beads. -
Tie a surgeon’s knot:
For the second knot, loop the cord through twice instead of once before pulling tight. This extra loop adds significant security handling the stretch. -
Secure with glue:
I like to apply a tiny dab of jewelry cement or super glue directly onto the knot. Let it dry for a minute or two. -
Hide the knot:
Once the glue is tacky but not fully hard, try to slide the knot inside the hole of the nearest bead to conceal it. -
Trim the excess:
Use your scissors to trim the excess cord ends, being careful not to cut too close to the knot if it isn’t fully hidden inside a bead.
Your colorful new accessory is ready to stack with other bracelets or shine on its own
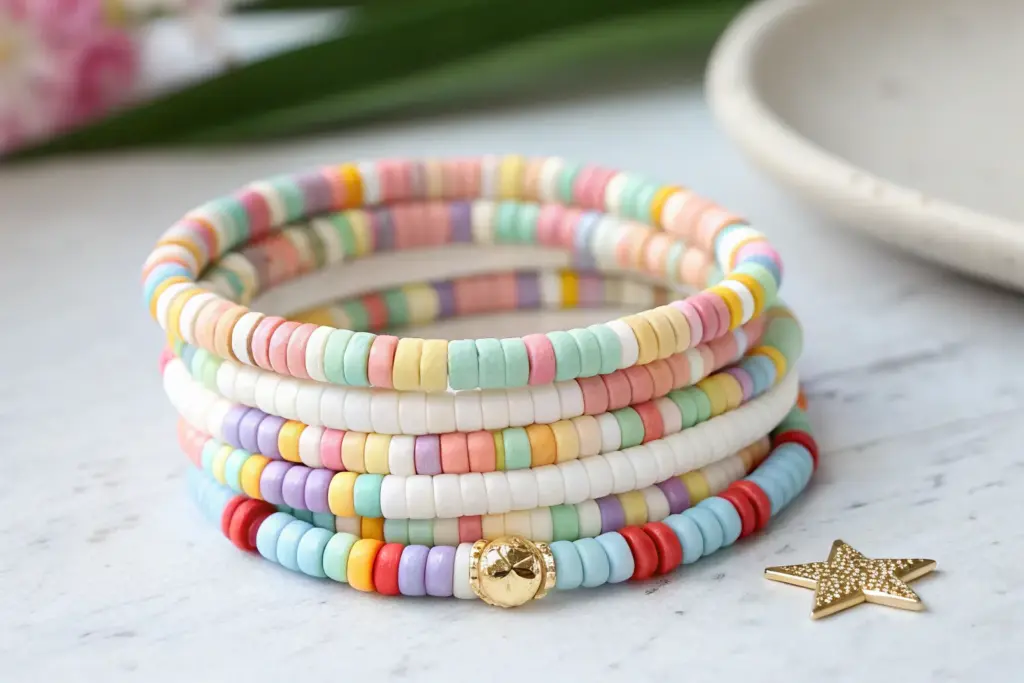
Confetti Mix Candy-Color Bracelet
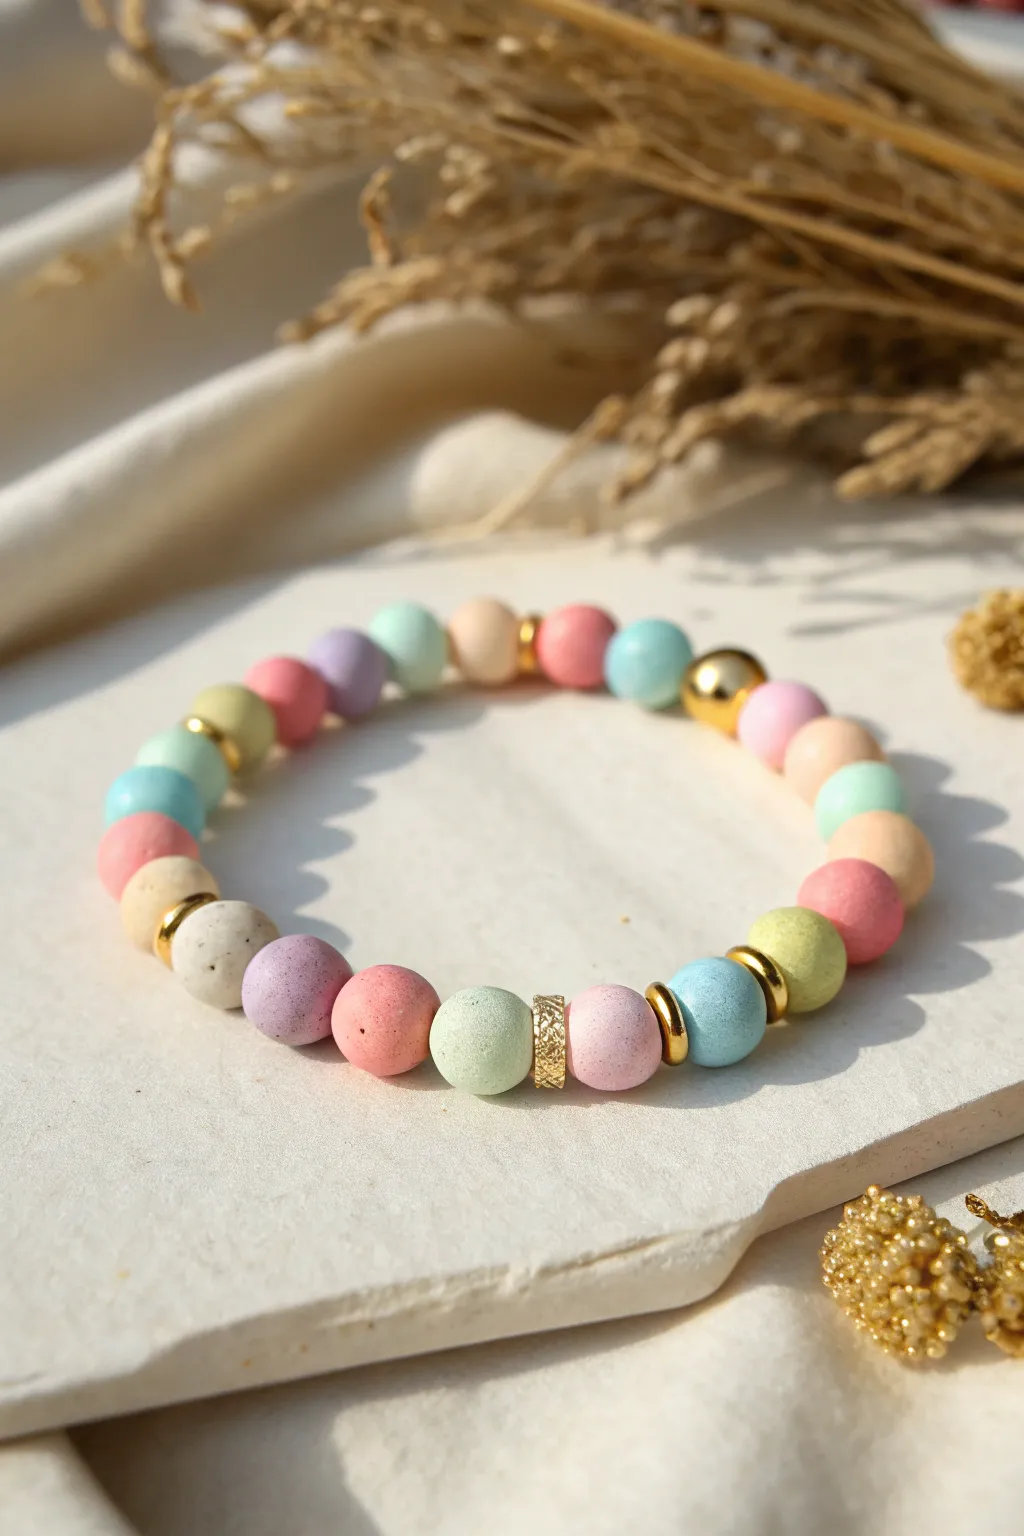
Capture the sweetness of a candy shop with this delightful polymer clay bracelet. Featuring matte, hand-rolled beads in softer-than-soft pastel hues and punctuated by elegant gold accents, this accessory is like wearing a gentle scoop of confetti on your wrist.
Step-by-Step Guide
Materials
- Polymer clay in pastel colors (baby pink, mint green, lavender, pale yellow, sky blue, cream)
- Black pepper or dried vanilla bean specks (optional for texture)
- Elastic beading cord (0.7mm or 0.8mm)
- Gold spacer beads (small discs and rounds)
- One larger gold accent bead
- One textured gold cylinder bead
- Polymer clay roller or pasta machine
- Small round circle cutter (approx. 1cm diameter)
- Needle tool or toothpick
- Super glue or jewelry cement
- Baking sheet and parchment paper
- Oven
Step 1: Creating the Clay Beads
-
Condition the Clay:
Begin by warming up each color of polymer clay in your hands. Knead them individually until they are soft and pliable, ensuring there are no air bubbles trapped inside. -
Add Texture (Optional):
For the speckled ‘cookies and cream’ look on the white or cream beads, mix in a tiny pinch of coarse black pepper or vanilla bean specks. Knead thoroughly until the specks are evenly distributed. -
Roll Sheets:
Roll each color out into a sheet of uniform thickness. I find using a pasta machine on a medium setting guarantees every bead will start with the same amount of clay, keeping sizes consistent. -
Cut Circles:
Use your small circle cutter to punch out an equal number of rounds from each pastel color sheet. This creates the perfect volume of clay for consistent bead sizes. -
Shape the Beads:
Take each punched circle and roll it firmly between your palms. Use a circular motion to create a smooth, spherical bead. Aim for a matte, organic finish rather than a perfectly glossy sphere. -
Pierce the Holes:
Gently hold a bead between your thumb and forefinger to avoid squashing it. Carefully insert your needle tool or toothpick through the center to create the stringing hole. Rotate the tool slightly as you pull it out to keep the hole clean. -
Refine the Shape:
After piercing, the bead might be slightly distorted. Give it one more gentle roll between your fingers to gently correct the shape without closing the hole. -
Bake the Clay:
Arrange your raw beads on a parchment-lined baking sheet. Bake according to your specific polymer clay package instructions (usually around 275°F/135°C for 15-30 minutes). Let them cool completely before handling.
Smooth Operator
To remove fingerprints from raw clay beads before baking, lightly brush them with a little cornstarch or baby powder. It smooths the surface beautifully.
Step 2: Assembling the Bracelet
-
Plan Your Pattern:
Lay out your cooled beads on a bead board or cloth. Create a random ‘confetti’ mix by alternating colors—pink, blue, yellow, lavender, mint. Avoid placing two of the same color next to each other. -
Insert Gold Accents:
Intersperse the gold spacer beads irregularly throughout the pattern. Place the larger gold ball bead and the textured cylinder bead at opposite sides or focal points to break up the pastel rhythm. -
Measure the Cord:
Cut a length of elastic cord about 10-12 inches long. This gives you plenty of extra slack for tying knots later. Pre-stretch the elastic by pulling it firmly a few times to prevent sagging later. -
Start Stringing:
Thread your beads onto the elastic cord following your laid-out design. If you are using a textured gold cylinder, you might want to flank it with two matching matte pastel beads for symmetry. -
Check the Fit:
Wrap the strung beads around your wrist to check the size. Add or remove beads as necessary to ensure a comfortable fit that isn’t too tight. -
Tie the Knot:
Tie a surgeon’s knot (right over left twice, then left over right twice). Pull the elastic tight to secure the beads close together, removing any gaps. -
Secure the Knot:
Place a tiny drop of super glue or jewelry cement directly onto the knot. Let it dry for a few moments to ensure it won’t slip. -
Hide the Knot:
If possible, gently tug the elastic so the knot slides inside the hole of the nearest large bead or one of the gold spacers. -
Trim Excess:
Using sharp scissors, trim the excess elastic cord close to the bead, being careful not to nick the knot itself.
Scented Jewelry
Mix a drop of essential oil into the clay while conditioning used for the ‘porous’ beads (like the speckled ones). They will act as a gentle diffuser.
Enjoy the playful pop of color your new custom accessory brings to any outfit.


What Really Happens Inside the Kiln
Learn how time and temperature work together inside the kiln to transform clay into durable ceramic.
Ombre Gradient Bracelet in One Color Family
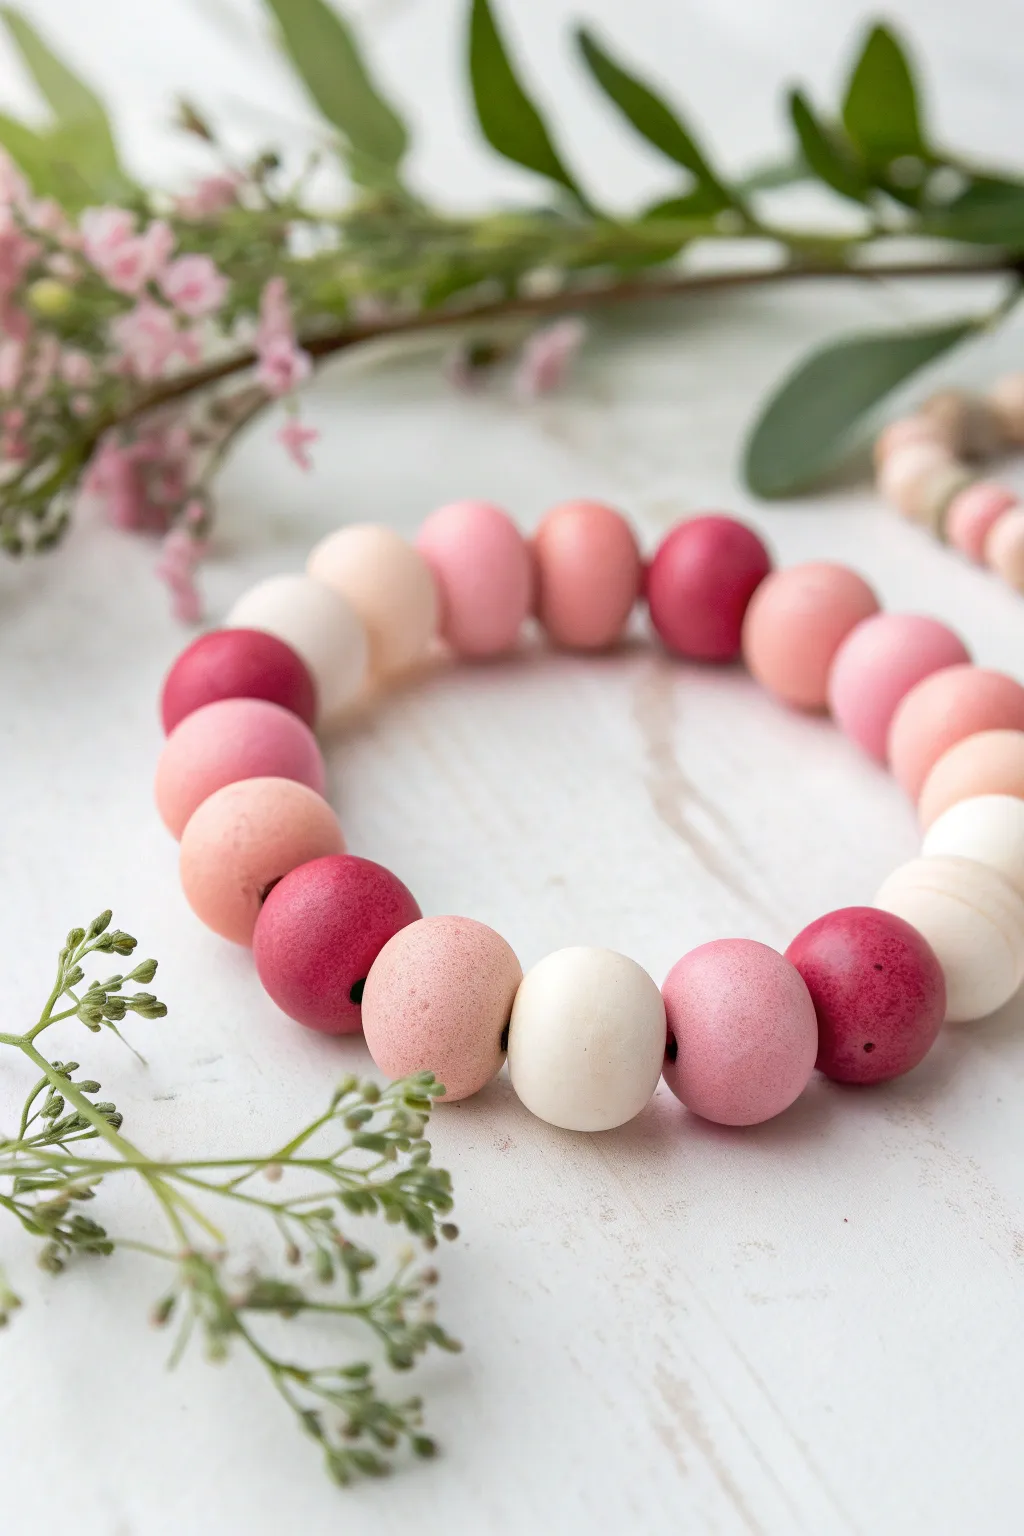
This delightful bracelet captures soft romance with its seamless transition from creamy white to deep berry tones. By hand-rolling and mixing your own custom clay shades, you can create a gentle ombre effect that looks professionally made yet feels uniquely personal.
Detailed Instructions
Materials
- Polymer clay (White, Magenta/Deep Pink, Pale Pink)
- Stretch cord or elastic jewelry string
- Bead piercing tool or toothpick
- Ceramic tile or glass work surface
- Acrylic roller or pasta machine (optional but helpful)
- Ruler
- Sharp tissue blade or knife
- Jewelry glue
- Wet sandpaper (fine grit)
- Oven
Step 1: Mixing the Gradient Palette
-
Condition the base colors:
Begin by thoroughly kneading your white, pale pink, and deep magenta polymer clays separately until they are soft, pliable, and warm to the touch. -
Create the lightest shades:
Take a large portion of white clay and add a tiny speck of pale pink. Mix thoroughly to create an off-white, blushing cream color. This will be your lightest bead. -
Mix the mid-tones:
Combine white and pale pink in equal parts to create a soft baby pink. For the next shade, mix pale pink with a very small dot of magenta to deepen it slightly. -
Blend the darker hues:
Mix equal parts pale pink and magenta for a rich rose color. Finally, reserve a portion of the pure magenta clay for your darkest accent beads. -
Organize your spectrum:
Line up small balls of your mixed clays in order from white to dark magenta to ensure you have a satisfying, gradual transition before you start rolling the actual beads.
Fingerprints Everywhere?
If your beads have stubborn fingerprints, lightly dust your palms with cornstarch before rolling. You can also buff them out with denim fabric after baking.
Step 2: Rolling and Forming Beads
-
Portion the clay:
Roll each color blend into a consistent snake shape of equal thickness. Use your blade to cut these `snakes` into equal-sized segments so your final beads will be uniform in size. -
Roll spheres:
Take a cut segment and roll it between your palms using a gentle circular motion. Aim for a perfectly smooth sphere. I find looking away or closing my eyes helps me feel imperfections better than seeing them. -
Refine the shape:
Place the sphere on your work surface and gently roll it under a flat acrylic block or stiff coaster to smooth out any fingerprints. -
Repeat for all colors:
Continue rolling spheres for all your color gradient piles. You will need roughly 18-22 beads for a standard wrist, so plan your color distribution accordingly (e.g., 3 beads of each shade). -
Texture check:
Inspect the beads. The beads in the inspiration image have a lovely matte, slightly earthy texture. If you want this look, you can gently roll the raw clay beads over a piece of fine sandpaper or canvas before baking.
Step 3: Piercing and Baking
-
Pierce the holes:
Hold a clay sphere gently between your thumb and finger. Insert your piercing pin or toothpick into the center, rotating it as you push through to avoid squishing the bead. -
Refine the exit hole:
Once the tool pokes through the other side, remove it and re-insert it from that exit hole to ensure the channel is clean and open on both ends. -
Bake carefully:
Arrange the beads on a dedicated baking tile or a parchment-lined tray. Follow the temperature instructions on your specific brand of polymer clay, usually baking for about 45-60 minutes to ensure durability. -
Cool and finish:
Allow the beads to cool completely. If there are any rough spots around the holes, wet sand them gently with fine-grit sandpaper for a professional finish.
Add Subtle Sparkle
Knead in a very small amount of translucent or pearl clay into your mid-tone pinks. It adds depth without changing the matte finish of the overall bracelet.
Step 4: Assembly
-
Layout the design:
Lay your beads out on a table or bead board. Arrange them to flow from the singular white bead, through the pinks, to the dark magenta, and back again to create a loop gradient. -
String the beads:
Cut a piece of elastic cord about 10 inches long. Pre-stretch it by pulling firmly on both ends. This prevents the bracelet from loosening later. -
Thread the pattern:
Thread your beads onto the elastic in your decided order. Double-check the gradient flow before tying off. -
Secure the knot:
Tie a strong surgeon’s knot (right over left, left over right, repeat). Add a tiny drop of jewelry glue to the knot for security. -
Hide the knot:
Trim the excess cord ends and gently tug the knot so it slips inside the hole of the nearest bead, hiding it from view.
Enjoy wearing your custom-blended accessory that showcases the beautiful versatility of polymer clay
Sweetheart Stripes in Pink, Red, and White
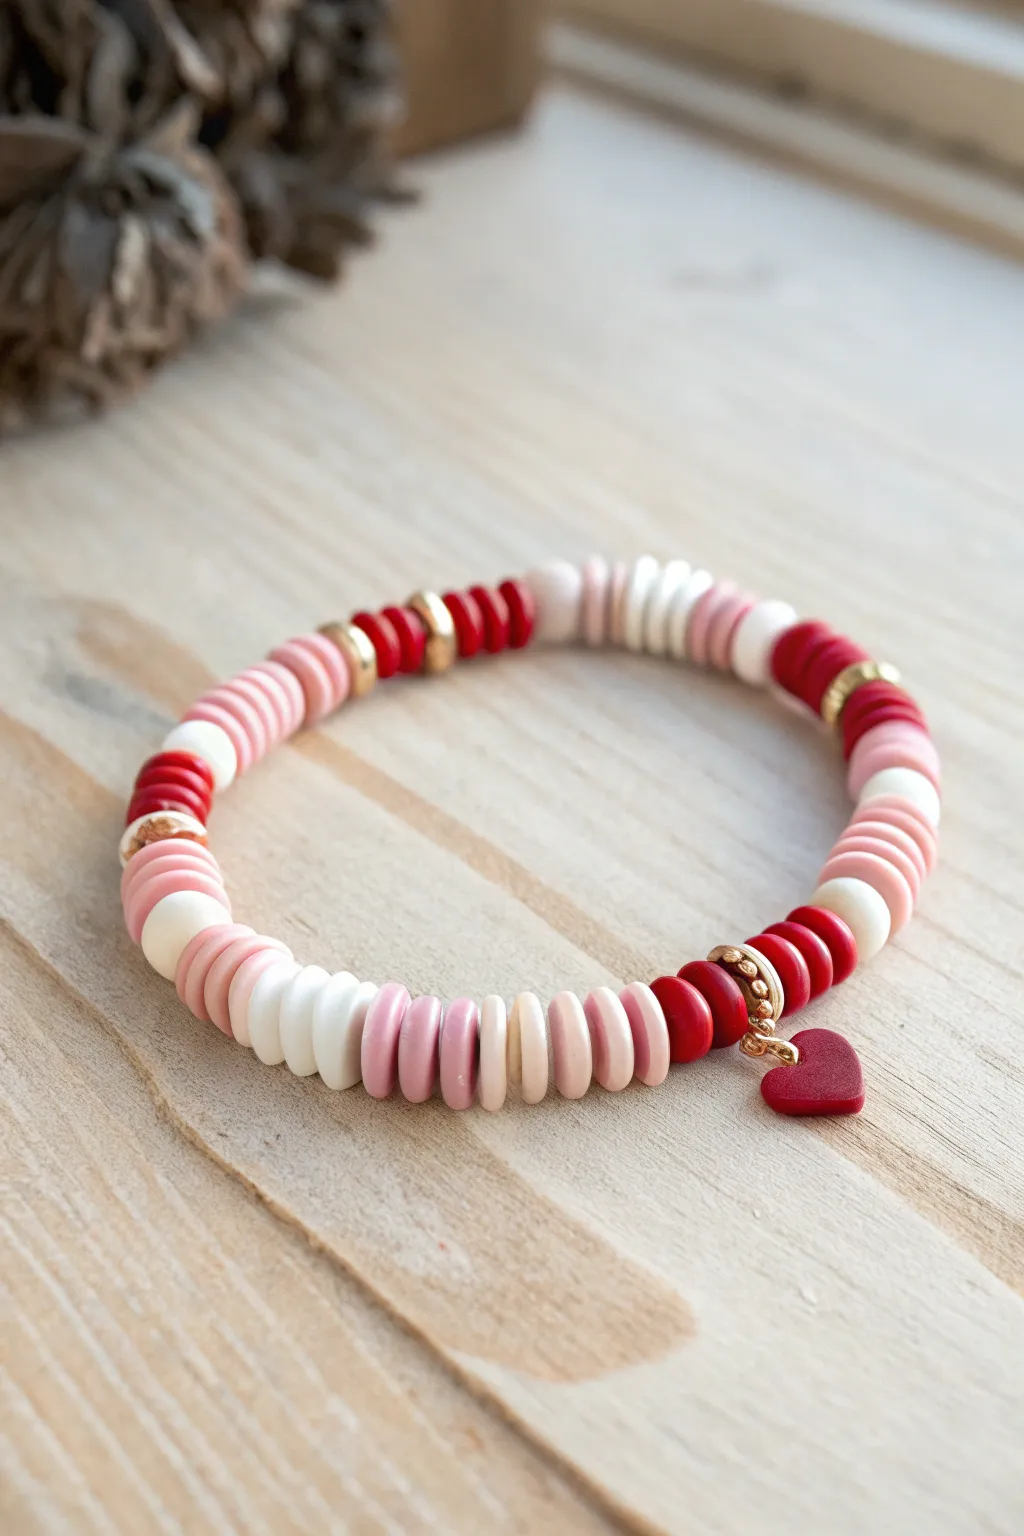
This charming bracelet combines classic Valentine’s hues in a playful, striped pattern that feels fresh all year round. Featuring flat polymer clay heishi beads in bold reds, soft pinks, and crisp whites, it’s accented with touches of gold and a dainty heart charm for the perfect finishing touch.
Step-by-Step Guide
Materials
- Polymer clay heishi beads (6mm disk beads) in red
- Polymer clay heishi beads in hot pink or coral
- Polymer clay heishi beads in light baby pink
- Polymer clay heishi beads in white
- Gold spacer beads or small gold jump rings used as spacers
- Small red heart charm
- Gold jump ring (4-6mm)
- Elastic stretch cord (0.8mm recommended)
- Jewelry glue or clear nail polish
- Scissors
Step 1: Planning and Stringing
-
Measure your wrist:
Cut a piece of elastic cord about 10-12 inches long. This gives you plenty of extra room to tie knots later without struggling. -
Pre-stretch the cord:
Give your cut piece of elastic a few gentle tugs. This helps prevent the bracelet from stretching out and becoming loose after you wear it for the first time. -
Secure the end:
Place a piece of tape or a binder clip on one end of the string to stop beads from sliding off while you work. -
Start with the focal section:
Begin by threading the small red heart charm onto a gold jump ring. Close the ring securely using pliers if needed, then slide the jump ring onto your elastic cord. This will be the center point acting as your charm holder. -
Build the first red block:
On one side of the charm, thread on about 4 to 5 red heishi beads. This creates a solid block of color to anchor the charm. -
Add a gold accent:
Slide on a single gold spacer bead or a gold decorative ring. These metallic breaks add a nice shine and separate the color blocks. -
Create a pink sequence:
Thread on a section of pink beads. I like to use about 5-6 beads here. You can alternate between the hot pink and light pink shades to create a gradient effect or keep them solid. -
Insert white contrast:
Add a small section of white beads, perhaps 3 or 4. The white really makes the red and pink pop and keeps the pattern looking crisp. -
Repeat the pattern:
Continue adding beads in sections: red block, gold spacer, pink block, white block. Don’t worry about being perfectly symmetrical; a random organic pattern often looks best. -
Check the fit:
Wrap the beaded string around your wrist periodically. You want the beads to touch comfortably without gaps, but not feel tight. -
Finish the strand:
Continue beading until you reach the desired length, ensuring your pattern ends in a way that will look good when joined to the start (for example, don’t end with a red block if you started with one, unless you want a double-wide section).
Clean Cuts Pro Tip
When trimming the elastic, leave about 1-2mm of tail rather than cutting flush against the knot. If the knot slips slightly as it settles, the tail prevents it from coming undone completely.
Step 2: Finishing Touches
-
Prepare to tie:
Remove the tape or clip from the end. Hold both ends of the elastic firmly, ensuring no beads slip off. -
Tie the first knot:
Cross the ends and tie a simple overhand knot. Pull it tight, bringing the two ends of the bracelet together. -
Secure with a surgeon’s knot:
For the second knot, loop the elastic through twice before pulling tight. This is a surgeon’s knot and it is much more secure for stretchy jewelry. -
Reinforce the knot:
Add a tiny drop of jewelry glue or clear nail polish directly onto the knot. This prevents it from slipping over time. -
Hide the knot:
While the glue is still slightly tacky but not wet, slide a nearby bead over the knot if the hole allows, hiding it inside the bead work. -
Trim the excess:
Once the glue is fully dry, trim the excess elastic cord carefully with scissors, getting close to the knot but being careful not to cut the main cord.
Level Up: Pattern Play
Swap the random striping for an ombre effect. Arrange beads from darkest red to lightest pink to white, then reverse strictly around the bracelet for a sophisticated gradient design.
Now slip on your new accessory and enjoy the pop of color it brings to your outfit

TRACK YOUR CERAMIC JOURNEY
Capture glaze tests, firing details, and creative progress—all in one simple printable. Make your projects easier to repeat and improve.
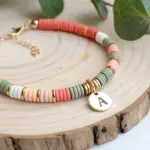
Centered Letter Beads With Color-Matched Surrounding Beads
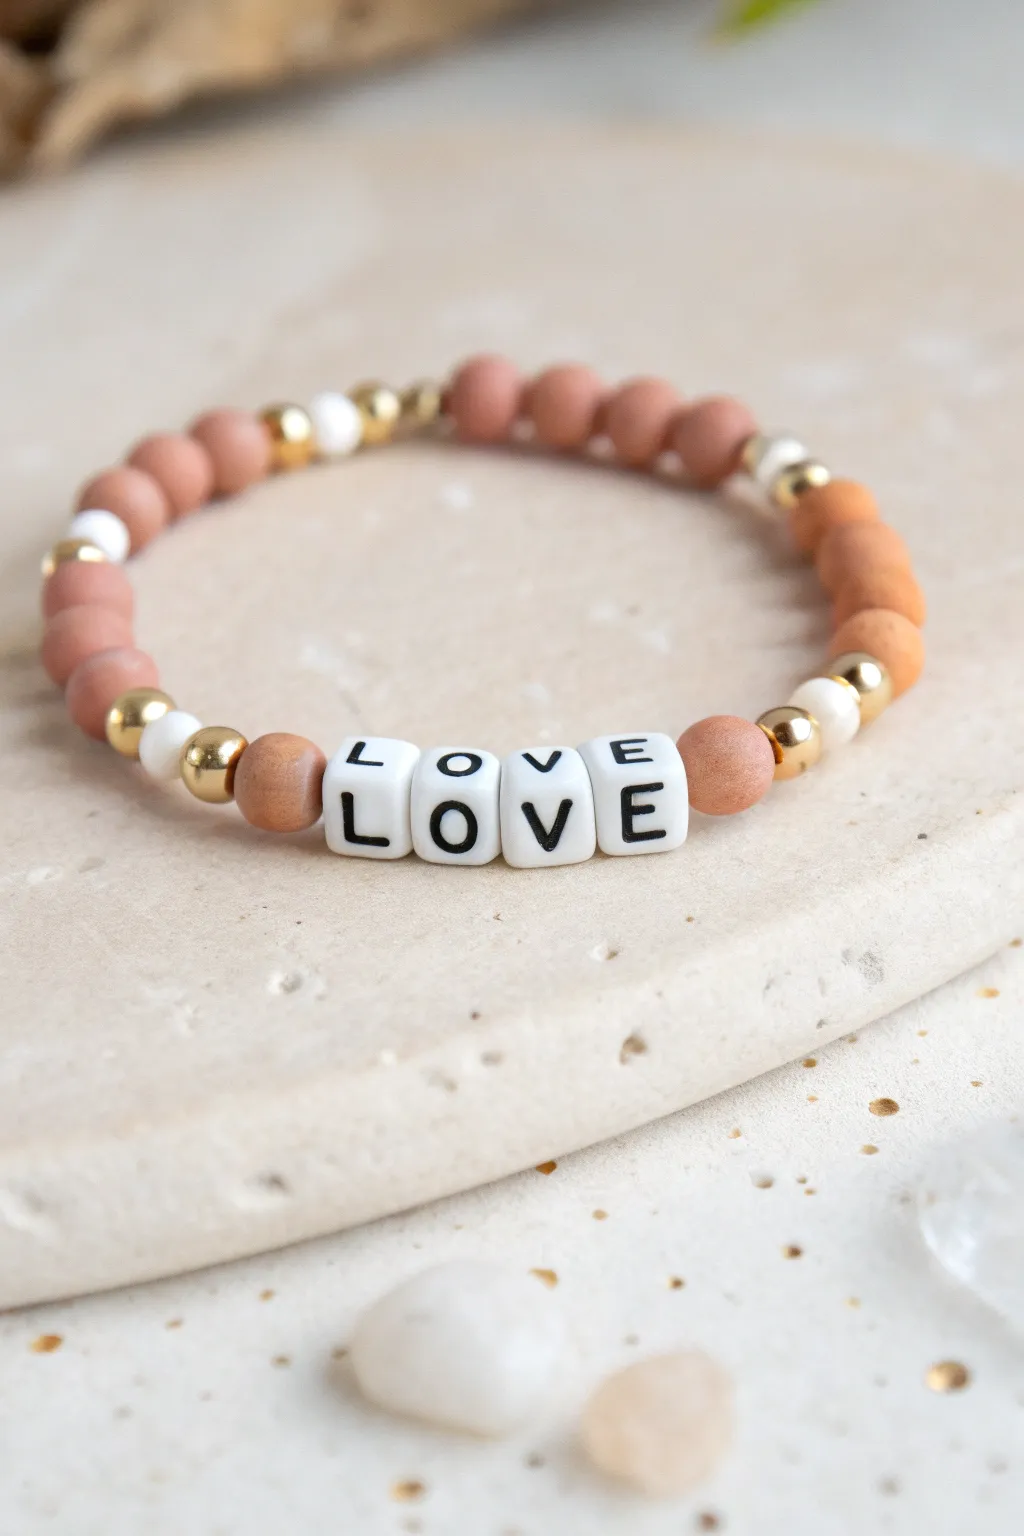
This charming bracelet combines natural textures with simple messaging to create a piece that feels both grounded and sweet. By centering the white letter beads amongst warm terracotta tones and metallic accents, the final result is a balanced, minimalist accessory perfect for everyday wear.
How-To Guide
Materials
- Elastic stretch cord (0.7mm or 0.8mm)
- White cube letter beads (L, O, V, E)
- Matte terracotta/dusty rose round clay beads (6mm)
- Gold round spacer beads (4mm and 6mm)
- White or cream round accent beads (5mm)
- Jewelry glue or clear nail polish
- Scissors
Step 1: Planning and Setup
-
Measure your wrist:
Before cutting anything, wrap a piece of string or measuring tape around your wrist to determine the desired length. Add about an inch for comfortable movement and knot tying. -
Cut the cord:
Cut a piece of elastic stretch cord to your measured length plus a little extra working room. I usually cut about 10-12 inches to be safe. -
Pre-stretch the cord:
Gently tug on the elastic cord several times. This pre-stretching prevents the bracelet from drooping or becoming loose immediately after you finish making it. -
Secure the end:
Place a piece of tape or a bead stopper clip on one end of the cord so your beads don’t slide off while you are stringing them.
Keep It Taut
When tying your final knot, ask a friend to hold the first loop of the knot down with their finger. This keeps the tension tight while you finish the second loop.
Step 2: Stringing the Core
-
Start with the center:
Thread the four letter beads onto the cord in reverse order: E, V, O, then L. This ensures that when you string the rest, the word reads correctly from the center outward. -
Add immediate side accents:
On the left side of the ‘L’ bead, thread one terracotta clay bead and one 6mm gold bead. Repeat this exact pattern on the right side of the ‘E’ bead.
Step 3: Building the Pattern
-
Create the symmetry:
Working outward from both sides to keep the word centered, add a cream accent bead next to the large gold beads on both ends. -
Add small gold spacers:
Slide a smaller 4mm gold spacer bead next to each of the cream beads you just placed. -
Start the main clay section:
On the left side, thread four to five terracotta clay beads. Repeat the same number on the right side to maintain perfect symmetry. -
Add a visual break:
After that block of clay beads, add a small 4mm gold spacer, followed by a cream bead, and another small gold spacer on both sides. -
Continue the pattern:
Thread another four terracotta beads onto each side. Check sizing against your wrist at this point to see if you need more length. -
Finish the back section:
If you need more length, add your final sequence: a gold spacer, a cream bead, and another gold spacer, followed by enough terracotta beads to close the loop comfortably around your wrist.
Mix Your Finishes
Swap the polished gold spacers for brushed brass or rose gold beads. The mix of shiny metal against matte clay adds a sophisticated, designer feel.
Step 4: Finishing Touches
-
Prepare to tie:
Remove the tape or clip from the end of the cord. Bring both ends together carefully so the beads don’t spill. -
Tie the surgeon’s knot:
Tie a standard overhand knot, but loop the end through twice instead of once before pulling tight. This creates a secure surgeon’s knot. -
Tighten securely:
Pull the clear elastic ends firmly to tighten the knot close to the beads, ensuring there are no gaps in the loop. -
Seal the knot:
Apply a tiny drop of jewelry glue or clear nail polish directly onto the knot. Let this dry for a few minutes to ensure it won’t slip. -
Hide the mechanism:
Trim the excess cord ends close to the knot, then carefully slide an adjacent bead over the knot to hide it inside.
Wear your new bracelet alone for a simple statement or stack it with gold bangles for a textured look
Single Smiley Face Focal Bead Bracelet
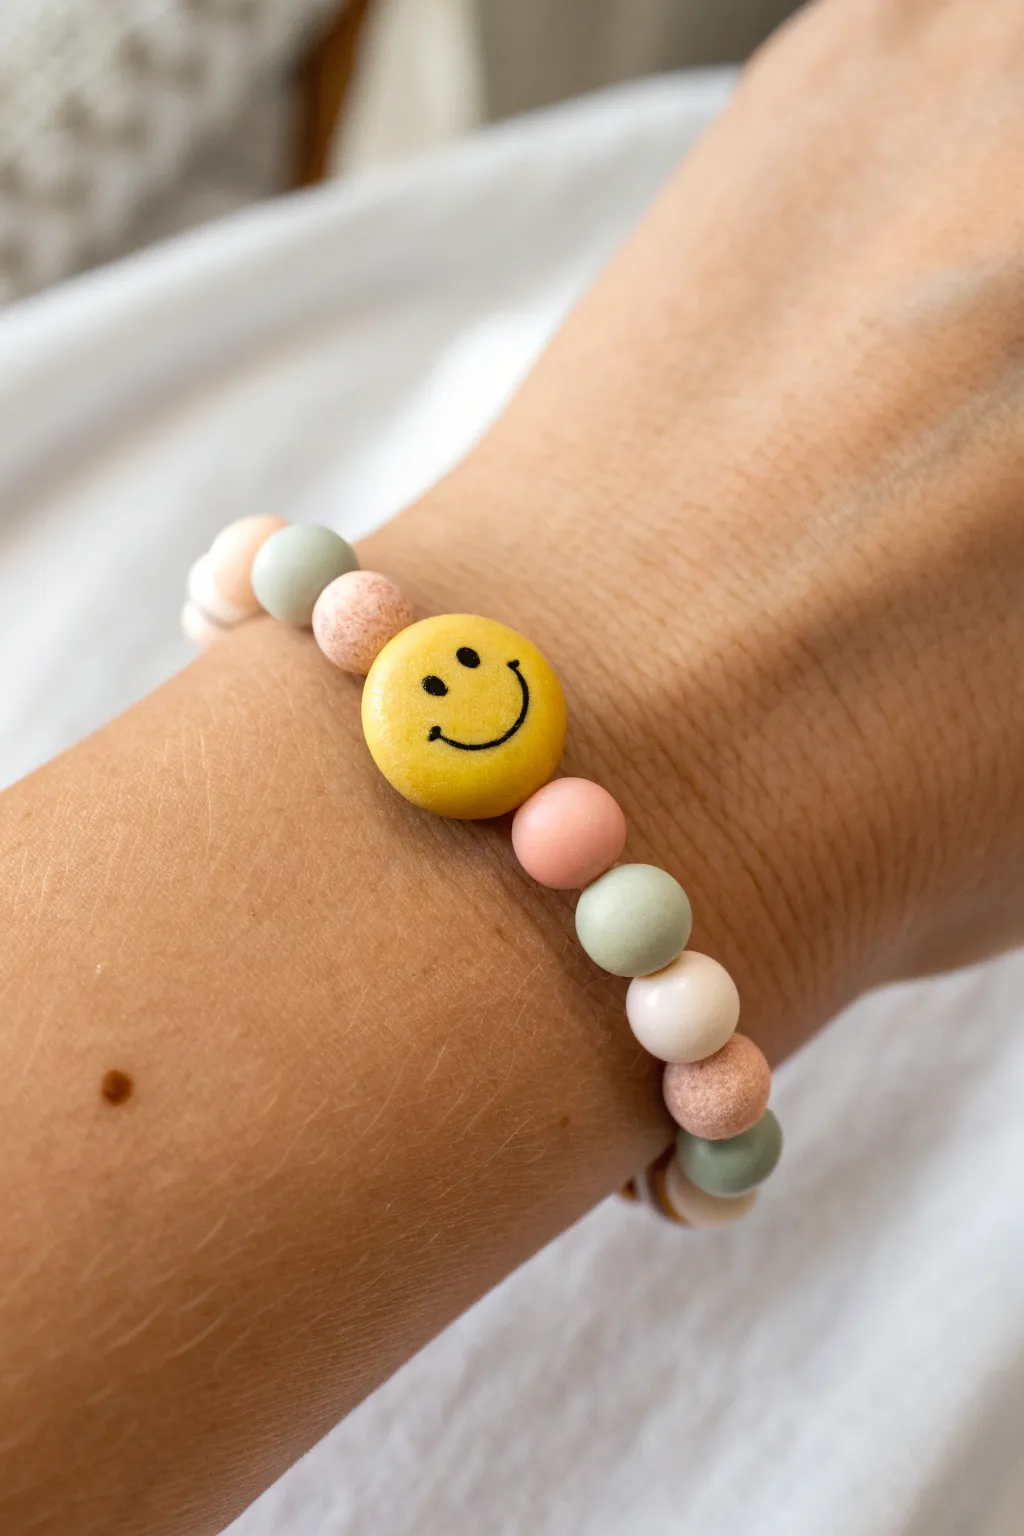
This charming bracelet features a cheerful yellow smiley face centerpiece surrounded by soft, matte polymer clay beads in earthy pastels. It’s a quick and satisfying project that combines custom bead-making with simple stringing for a trendy, personalized accessory.
Step-by-Step
Materials
- Polymer clay in yellow, black, dusty pink, sage green, white/cream, and light brown
- Coarse salt or sandpaper (for texturing)
- Elastic beading cord (0.8mm or 1mm)
- Clay roller or pasta machine
- Small round cutter (approx. 10-12mm)
- Toothpick, needle tool, or bead piercing pins
- Baking sheet and parchment paper
- Super glue or jewelry cement
- Wet/dry sandpaper (optional for finishing)
- Acrylic sealer (optional)
Step 1: Creating the Clay Beads
-
Condition the clay:
Start by thoroughly kneading each color of your polymer clay until it is soft and pliable. This conditioning step prevents cracking later on. -
Mix custom colors:
To achieve the muted, matte look seen in the photo, mix a small amount of white into your green and pink clays to soften them into pastels. I like to add a tiny dot of brown to the pink to make it ‘dusty’. -
Create the speckled mix:
For the textured beads, mix a small amount of light brown clay with white clay but don’t blend them fully; leave it slightly marbled or add tiny specks of darker clay. -
Roll the smiley base:
Roll your conditioned yellow clay into a sheet about 4-5mm thick. Use your small round cutter to punch out a perfect circle for the focal bead. -
Shape the round beads:
Roll the remaining pink, green, white, and speckled clays into small, uniform balls. Aim for about 6-8mm in diameter for a delicate look. -
Add texture:
Take the speckled/brown beads and gently roll them over coarse salt or lightly press sandpaper against them to create a rough, stone-like surface. -
Pierce the beads:
Carefully poke a hole through the center of each round bead using a toothpick or piercing tool. Gently twist the tool as you push through to avoid squashing the sphere. -
Drill the smiley bead:
Piercing the flat disc bead horizontally is tricky. Carefully insert your piercing tool through the side edge, ensuring it travels straight through the middle without bulging the top or bottom surfaces. -
Smooth fingerprints:
Before baking, lightly brush the beads with a little cornstarch or baby oil to smooth away any fingerprints left during handling.
Step 2: Adding the Face and Finishing
-
Form the smile:
Roll a tiny, hair-thin snake of black clay. Cut a small curved piece for the smile and two tiny dots for the eyes. -
Apply the features:
Gently press the black clay pieces onto the yellow disc. You can use a needle tool to help position them perfectly without smudging. -
Bake the beads:
Arrange all your beads on a parchment-lined baking sheet. Follow the temperature and time instructions on your specific brand of polymer clay packaging. -
Cool down:
Let the beads cool completely on the tray. If you used salt for texture, rinse the textured beads under water now to dissolve the salt crystals. -
Sand for matte finish:
For that ultra-smooth matte look on the pastel beads, lightly buff them with wet/dry sandpaper under running water. -
Measure the cord:
Cut a piece of elastic cord about 10 inches long. This gives you plenty of extra room for tying the knot later. -
String the beads:
Thread your beads onto the elastic. Start with the smiley face in the center, then alternate colors on either side (e.g., pink, green, white, textured pink) to create a balanced pattern. -
Check the fit:
Wrap the strung beads around your wrist to check the size. Add or remove beads until it sits comfortably without stretching the elastic too much. -
Tie the knot:
Tie a surgeon’s knot (a square knot with an extra loop through) to secure the bracelet. Pull it tight. -
Secure and trim:
Add a tiny drop of super glue to the knot. Let it dry for a few seconds, then trim the excess cord ends close to the knot and hide the knot inside a bead hole.
Hole Perfection Pro-Tip
Bake your beads on a bed of cornstarch or baking soda. This prevents flat spots on the bottom of round beads and keeps them perfectly spherical.
Level Up: Glossy Contrast
Apply a high-gloss UV resin or glaze only to the yellow smiley face bead while keeping the other pastel beads matte for a cool texture contrast.
Wear your new bracelet stacked with others or alone as a happy little reminder to smile throughout the day
Mini Fruit Charms for an Extra-Cute Pop
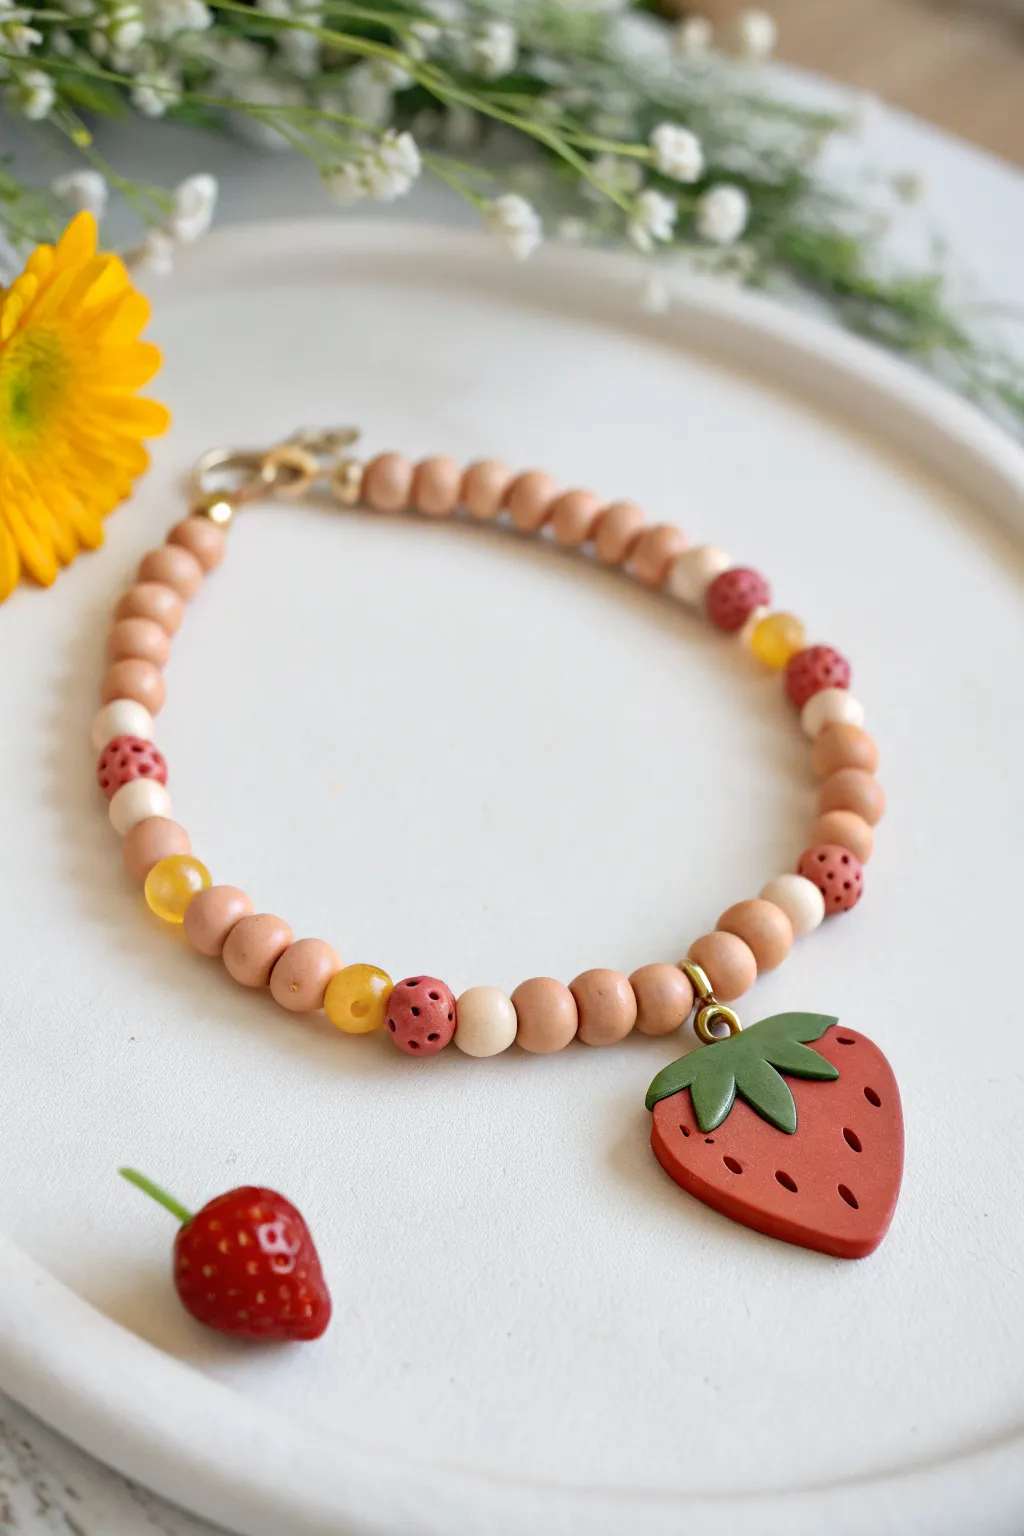
Embrace cottage-core charm with this handmade polymer clay bracelet featuring a large, statement strawberry pendant and coordinated berry spacer beads. The soft, earthy pinks and translucent accents give it a sophisticated yet playful look perfect for summer accessorizing.
How-To Guide
Materials
- Polymer clay in terracotta pink, beige/cream, deep red, leaf green, and translucent amber
- Jewelry wire or beading elastic
- Gold jump rings
- Gold screw-eye pin (small)
- Clasp and jump ring (gold finish)
- Needle tool or toothpick
- Dotting tool (small)
- Clay roller or pasta machine
- Oven for baking
- Gloss glaze (optional)
Step 1: Sculpting the Main Charm
-
Shape the Base:
Begin by conditioning a chunk of deep red clay. Roll it into a smooth ball about the size of a quarter, then flatten it slightly and pinch the bottom into a gentle point to form the strawberry silhouette. -
Texture the Surface:
Using a needle tool, press small, teardrop-shaped indentations across the surface of the strawberry to mimic seed pockets. Be random but evenly spaced. -
Create the Leaves:
Roll out a small amount of leaf green clay until it’s quite thin. Cut a rough star shape or simply mold three to four individual teardrop shapes and flatten them. -
Attach the Stem:
Press the green leaves onto the top flat edge of your strawberry. Smooth the edges down gently so they bond with the red clay. -
Insert Hardware:
Carefully screw the small gold screw-eye pin into the center top of the strawberry, right through the green leaves. Ensure it’s straight and secure.
Step 2: Creating Custom Beads
-
Roll the Base Beads:
Mix the terracotta pink clay to achieve a soft blush tone. Roll numerous small, uniform spheres (approx. 6-8mm) to serve as your main bead strand. -
Make the Cream Spacers:
Create a few slightly smaller beads using the beige or cream clay to act as visual breaks in the pattern. -
Form the Berry Beads:
Using the same deep red clay from the charm, roll 4-5 small spherical beads. Use your needle tool to poke tiny holes all over them, giving them a pitted, berry-like texture. -
Add Amber Accents:
Roll small beads from the translucent amber clay. These add a lovely honey-like glow when light hits them. -
Pierce the Beads:
Carefully pierce a hole through the center of every bead using your needle tool. I find twisting the tool while pushing prevents the bead from squashing. -
Bake the Components:
Arrange all beads and the charm on a parchment-lined baking sheet. Bake according to your clay package instructions (usually 275°F/135°C for 15-30 minutes) and let them cool completely.
Baking Pro-Tip
To keep your round beads from getting flat spots in the oven, bake them on a bed of cornstarch or accordion-folded cardstock so they don’t touch a flat tray surface.
Step 3: Assembly
-
Attach the Jump Ring:
Using two pairs of pliers, open a gold jump ring. Slide it through the screw-eye on your cooled strawberry charm and close it securely. -
Start Stringing:
Cut a length of jewelry wire or elastic. Secure one end (with a clamp or piece of tape) and begin threading your beads. -
Create the Pattern:
Thread the beads in a symmetrical pattern. Start with the main pink beads, interspersing the cream spacers, textured berry beads, and amber beads occasionally for variety. -
Add the Centerpiece:
Once you reach the middle of your strand, slide on the strawberry charm so it hangs centrally. -
Finish the Strand:
Mirror your bead pattern on the other side of the charm until the bracelet reaches your desired length. -
Secure the Ends:
Attach crimp beads and your clasp components to the ends of the wire. If using elastic, tie a secure surgeon’s knot and hide it inside a bead.
Sweet Variations
Swap the strawberry for a lemon slice or peach! Change the main bead color to pale yellow or soft orange to match your new fruit theme.
Enjoy wearing your handcrafted berry bracelet or gifing it to someone sweet
Dainty Daisy Pattern With White-and-Yellow Beads
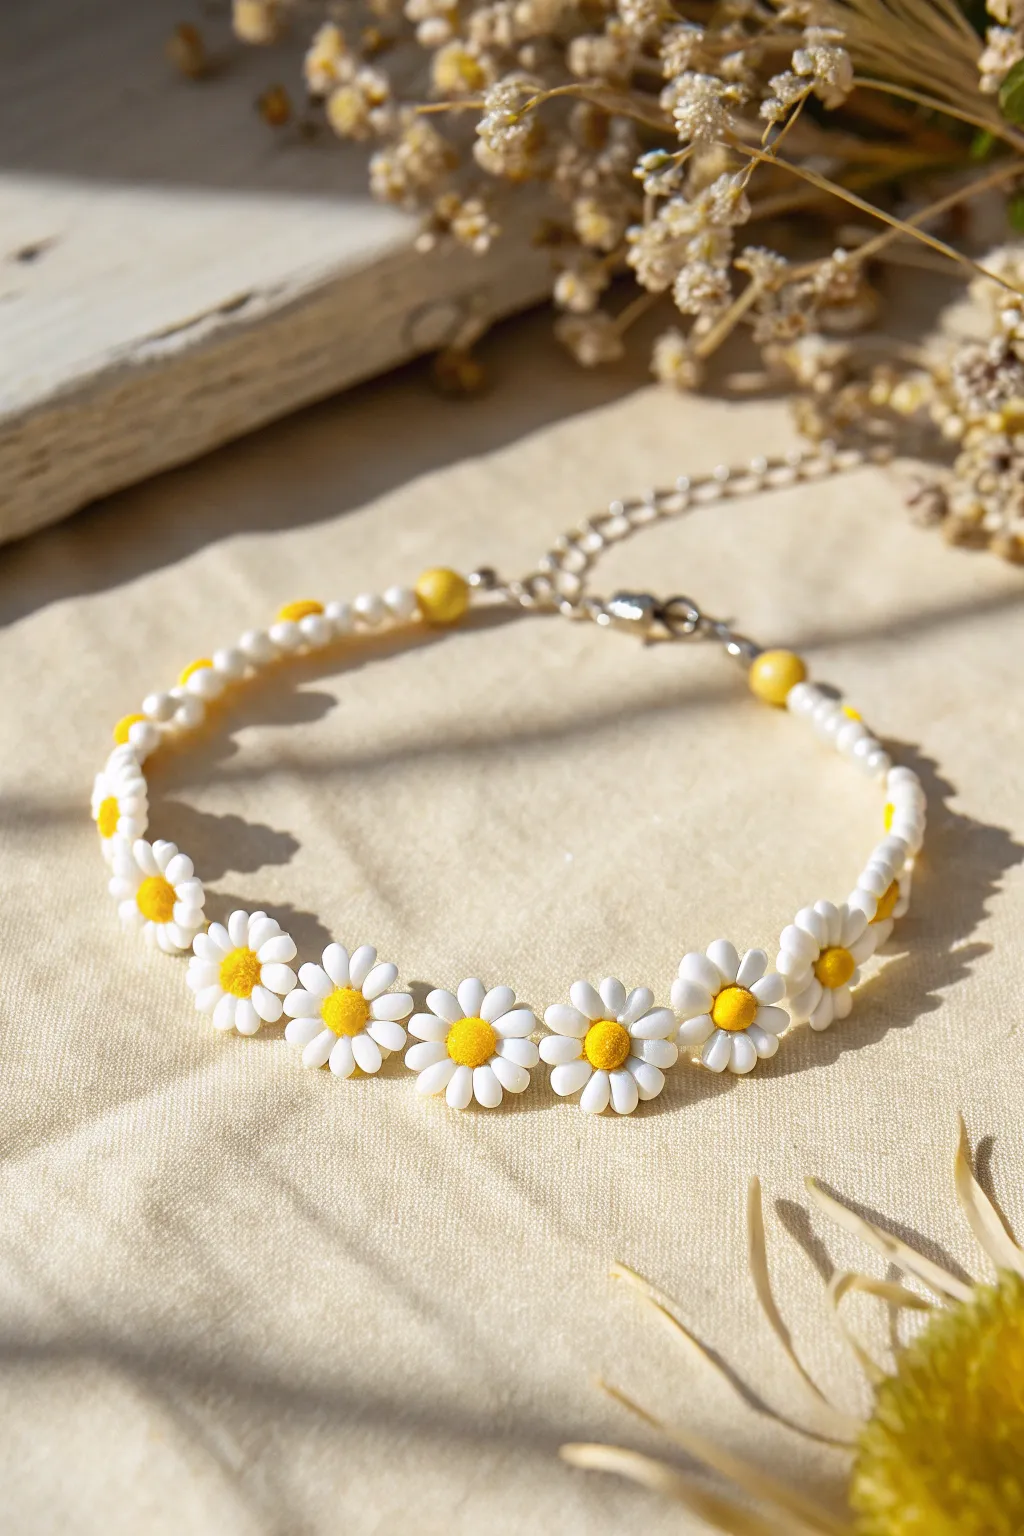
Brighten up your accessory collection with this cheerful bracelet that captures the essence of a summer meadow. Featuring delicate polymer clay daisy charms interspersed with tiny seed beads, this piece is dainty enough for everyday wear but eye-catching enough to make a statement.
Step-by-Step Guide
Materials
- White polymer clay
- Yellow polymer clay
- Yellow seed beads (size 11/0 or 8/0)
- White seed beads (size 11/0 or 8/0)
- Beading wire or strong nylon thread (approx. 10 inches)
- 2 crimp beads
- 2 crimp covers (optional but recommended for a polished look)
- Silver lobster clasp
- Silver jump ring
- Silver extender chain (about 1-2 inches)
- Jewelry pliers (needle nose and flat nose)
- Wire cutters
- Beading needle (if using nylon thread)
- Needle tool or toothpick (for piercing clay)
Step 1: Creating the Clay Daisies
-
Condition the clay:
Start by warming up your white and yellow polymer clay in your hands until it is soft and pliable. -
Form the petals:
Roll tiny balls of white clay, roughly 2-3mm in diameter. You will need about 7 or 8 balls for a single flower. -
Arrange the flower base:
Press the tiny white balls together in a circle on your work surface to form the petals. Gently flatten them slightly so they stick together but retain their rounded shape. -
Add the center:
Roll a slightly larger ball of yellow clay and press it firmly into the center of your ring of petals. -
Texture the center:
I like to take a needle tool or an old toothbrush and gently stipple the yellow center to give it a realistic, pollen-like texture. -
Pierce the charm:
Using a needle tool, carefully poke a hole horizontally through the side of the flower. Ensure the hole goes through the solid part of the petals or behind the center so it doesn’t break easily. -
Repeat and bake:
Make about 6-8 daisies, depending on your wrist size. Bake them according to your clay manufacturer’s instructions (usually around 275°F for 15 minutes) and let them cool completely.
Clay Strength Tip
For stronger flower charms, use a tiny drop of liquid polymer clay or ‘Bake & Bond’ between the petals and the yellow center before baking.
Step 2: Assembling the Bracelet
-
Prepare the wire:
Cut a length of beading wire approximately 10 inches long to give yourself plenty of room to work. -
Secure the first end:
Thread a crimp bead onto one end of the wire, followed by the jump ring attached to your extender chain. Loop the wire back through the crimp bead. -
Crimp firmly:
Use your flat nose pliers to smash the crimp bead flat, securing the wire. Trim the excess short tail close to the bead. -
Start the bead pattern:
Begin stringing your beads. Thread on a pattern of approximately 4 white seed beads, followed by 1 yellow seed bead, and then another 4 white seed beads. -
Add the first daisy:
Slide one of your cooled clay daisies onto the wire. Orient it so the flower faces outward. -
Continue the pattern:
Before the next daisy, add a spacer section. I prefer using just 1 or 2 white seed beads between flowers to keep the daisies clustered closely together in the center section. -
Finish the center section:
Continue stringing daisies with single white spacer beads in between until all your flowers are on the wire. -
Mirror the end:
Finish the strand by mirroring the start: string 4 white seed beads, 1 yellow seed bead, and 4 white seed beads. -
Attach the clasp:
Thread on a crimp bead and then your lobster clasp. Loop the wire back through the crimp bead and pull it taut (but not too tight, or the bracelet will be stiff). -
Final crimp:
Flatten the final crimp bead with your pliers and trim the excess wire. If you have crimp covers, gently close them over the flattened crimps for a professional finish.
Make It Sparkle
Swap the plain white seed beads for pearlescent or iridescent glass beads. The subtle shimmer mimics dew drops on the petals.
Enjoy wearing your new floral accessory or gift it to a friend to brighten their day
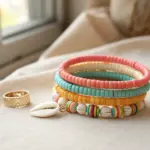
Beachy Blues With a Shell Charm Center
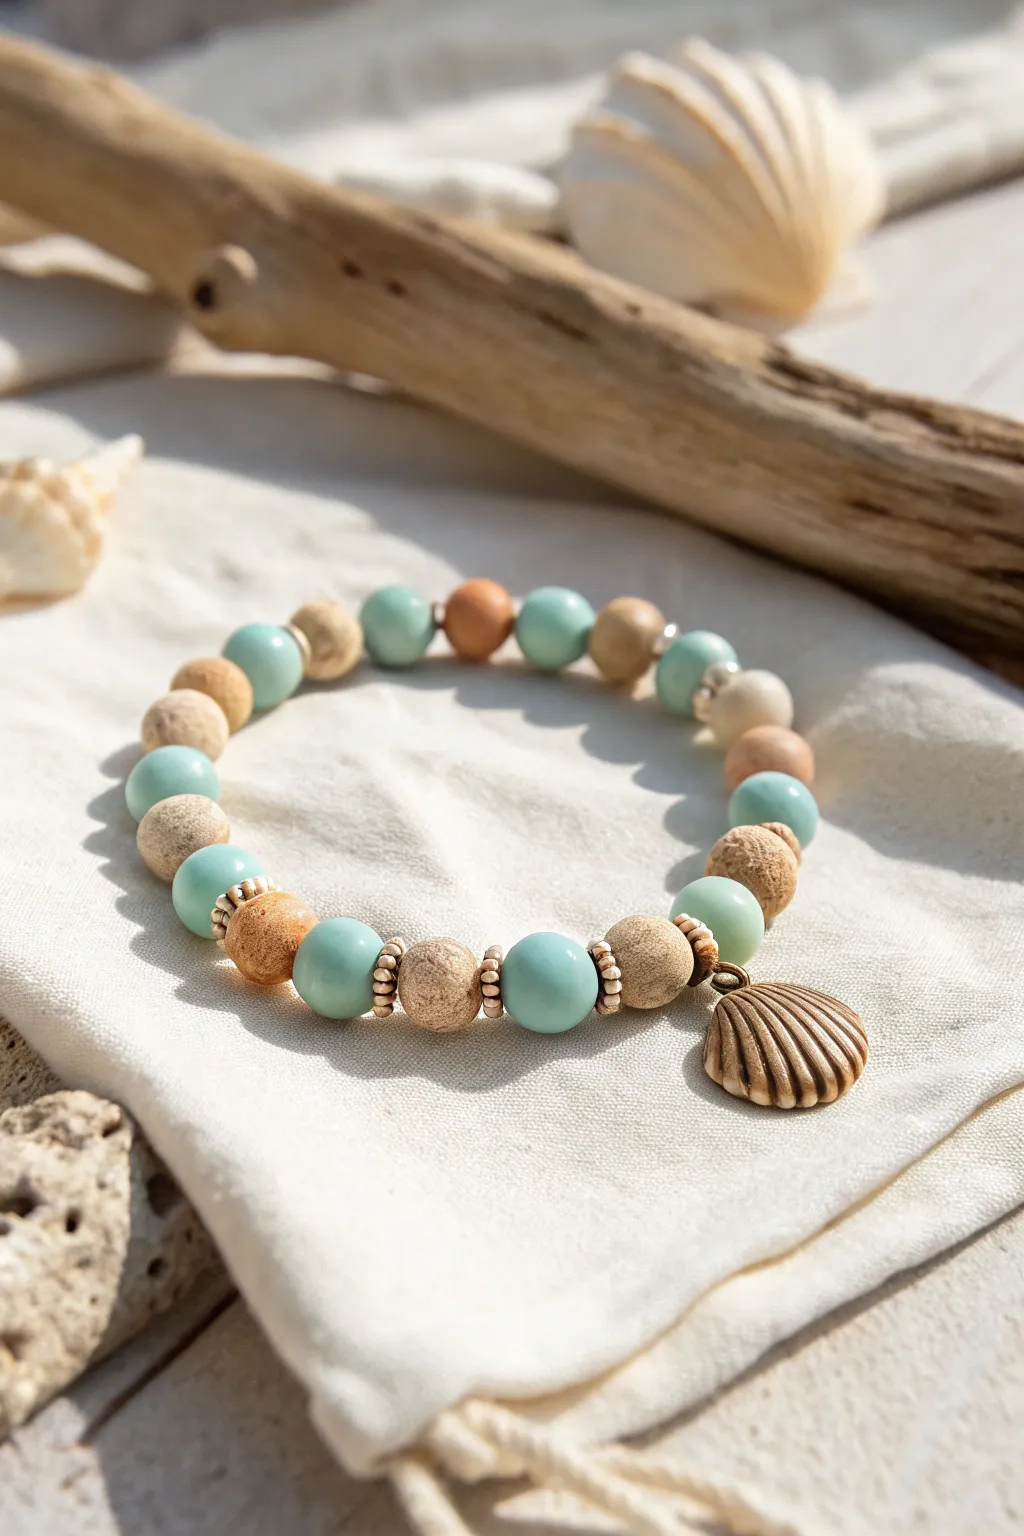
Capture the relaxing essence of the shore with this textured bead bracelet, featuring calming turquoise tones and earthy neutrals. This project combines smooth and rough textures centered around a beautiful shell charm for a perfect summer accessory.
How-To Guide
Materials
- Polymer clay in turquoise/sky blue
- Polymer clay in beige, tan, and light brown
- Texturing tool (sandpaper, toothbrush, or salt)
- Elastic beading cord (0.8mm or 1mm)
- Gold or brass shell charm
- Small gold spacer beads (daisy spacers or tiny rounds)
- Jump ring (gold/brass)
- Bead piercing tool or toothpick
- Oven for baking clay
- Super glue or jewelry adhesive
- Scissors
Step 1: Crafting the Beads
-
Mix the blue hues:
Start by conditioning your turquoise and sky blue polymer clay. You can mix them slightly to create a marbled effect or keep them solid for a polished stone look. -
Roll blue spheres:
Pinch off equal amounts of the blue clay and roll them between your palms to create smooth, uniform spheres approximately 8-10mm in diameter. -
Prepare sandy tones:
Condition your beige and tan clays. I like to mix a little translucent clay into the beige to give it a more natural, sandy depth. -
Form the earth beads:
Roll the neutral clay into spheres of the same size as your blue beads. Create a few in slightly darker tan shades for variety. -
Add texture:
To mimic the look of cork or porous stone on the tan beads, gently roll them over a piece of rough sandpaper or tap them lightly with a toothbrush bristles. -
Create the piercing hole:
While the beads are still raw, carefully pierce the center of each bead with your piercing tool. rotate the tool as you push through to avoid squashing the bead’s shape. -
Check the fit:
Ensure the holes are large enough to accommodate your elastic cord comfortably, keeping in mind that the clay won’t shrink significantly. -
Bake the beads:
Arrange the beads on a baking sheet or specialized bead rack. Bake according to the manufacturer’s instructions for your specific brand of clay, usually around 275°F (135°C) for 30 minutes. -
Cool down:
Allow the beads to cool completely before handling. This hardens the clay and prevents fingerprints or distortion.
Uneven Holes?
If your bead holes distorted during baking, use a small hand drill or a round file to gently clean up the openings before stringing your elastic cord.
Step 2: Assembly
-
Prepare the elastic:
Cut a length of elastic cord about 10-12 inches long. Pre-stretch the cord by pulling it gently a few times; this prevents the bracelet from stretching out later. -
Secure one end:
Place a piece of tape or a bead stopper on one end of the cord so your beads don’t slide off while you work. -
Attach the charm:
Open a jump ring with pliers and attach it to your shell charm. Slide the jump ring onto the center of your cord. -
Start the pattern:
On either side of the charm, thread a gold spacer bead, followed by a textured tan bead. The metal spacers frame the focal point beautifully. -
Continue beading:
Thread the rest of your beads, alternating between the smooth blue beads and the textured tan beads. Insert a gold spacer occasionally between the tan and blue transitions for a polished look. -
Check the length:
Wrap the strand around your wrist to check the sizing. Add or remove beads as needed to ensure a comfortable fit. -
Tie the knot:
Remove the tape and bring the ends together. Tie a strong surgeon’s knot (right over left twice, then left over right twice) and pull tight. -
Secure the knot:
Apply a tiny drop of super glue or jewelry adhesive to the knot. Let it dry for a few seconds. -
Hide the knot:
Trim the excess cord close to the knot, then gently tug the bracelet to pull the knot inside the hole of one of the neighboring beads.
Ocean Sparkle
Brush a light layer of mica powder or pearlescent pigment onto the blue beads before baking to give them a shimmering, sun-kissed water effect.
Enjoy wearing your handcrafted piece of the beach wherever you go
Neon Pop Bracelet With Black-and-White Balancers
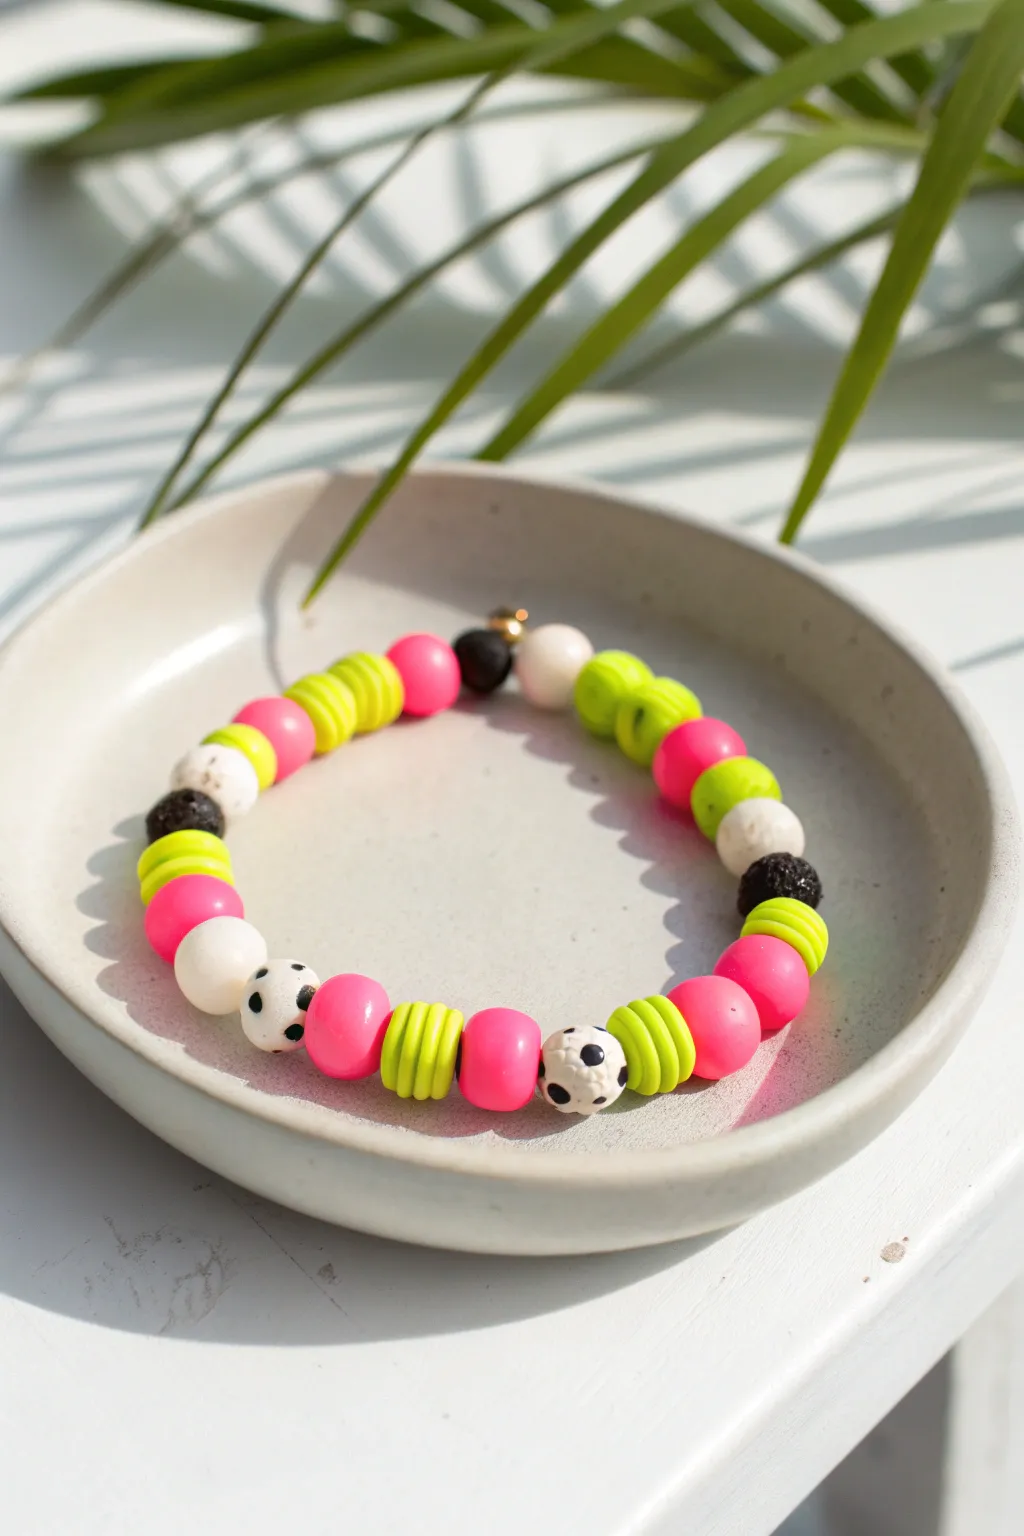
Brighten up any outfit with this vibrant stretch bracelet featuring a sporty mix of neon pinks, electric limes, and graphic black-and-white accents. The playful combination of smooth round beads, textured spacers, and porous lava beads creates a fun, tactile accessory that is perfect for summer.
Step-by-Step Tutorial
Materials
- Polymer clay (neon pink, neon yellow/lime green, white, black)
- Black acrylic paint
- Stiff bristled toothbrush or coarse sponge
- Elastic jewelry cord (0.8mm or 1mm)
- Bead rolling tool (optional but helpful)
- Needle tool or toothpick
- Clay slicing blade
- Oven for baking
- Super glue or jewelry knot cement
- Small gold crimp bead cover (optional)
Step 1: Creating the Beads
-
Condition the clay:
Begin by conditioning each color of polymer clay separately until it is soft and malleable. Wash your hands between colors, especially after handling the black clay, to keep the neon colors bright. -
Form the pink rounds:
Roll the neon pink clay into a log and slice off equal-sized portions. Roll these between your palms to create smooth, uniform round beads. You will need about eight to ten of these. -
Create lime disc stacks:
Roll a log of neon lime clay. Instead of rounds, slice this log into thin, even discs. For the distinctive textured look in the bracelet, stack 3-4 of these discs together to form a single cylindrical bead unit. -
Texture the white beads:
Roll white clay into round beads similar in size to the pink ones. To create a lava-rock texture, gently press a stiff toothbrush or a ball of crumpled foil against the surface of the raw clay. -
Make the speckled bead:
Take one of your white textured beads and set it aside. Mix a tiny crumb of black clay into white clay (very partially) or lightly dab black paint onto the white clay before baking for a splatter effect. Alternatively, create a ‘cow print’ by pressing tiny flat bits of black clay onto a white bead. -
Form the black accents:
Create a few small round beads using the black clay. Texture these heavily with your toothbrush to mimic the look of porous lava stone. -
Add bead holes:
Carefully pierce the center of each bead with a needle tool or toothpick. I like to rotate the tool while pushing through to prevent the bead from squashing. -
Bake the beads:
Arrange all beads on a parchment-lined baking sheet or a dedicated bead baking rack. Bake according to the temperature and time instructions on your specific brand of polymer clay packaging. -
Cool and finish:
Allow the beads to cool completely. If you didn’t add speckles with clay earlier, you can now use a fine brush to flick tiny dots of black acrylic paint onto a few of the white beads to mimic the pattern in the photo.
Uneven Holes?
If bead holes close up during baking, use a small hand drill or a bead reamer gently on the finished, hardened clay to widen them perfectly for the cord.
Step 2: Assembly
-
Cut the elastic:
Cut a piece of elastic cord about 10-12 inches long. This gives you plenty of extra room for tying knots without struggling. -
Pre-stretch the cord:
Give the elastic cord a few firm tugs. This pre-stretching step is crucial as it prevents the bracelet from drooping or stretching out permanently after the first wear. -
Plan your pattern:
Lay out your beads on a surface to finalize the design. The example uses a pattern of: Pink Round, Lime Stack, Pink Round, Spotted/White/Black accent cluster. Repeating this sequence creates a balanced look. -
String the beads:
Thread the beads onto the elastic cord one by one, following your planned arrangement. A piece of tape on the tail end of the cord can stop beads from sliding off as you work. -
Check the fit:
Wrap the strung beads around your wrist to check the size. Add or remove beads as necessary to ensure a comfortable fit that isn’t too tight. -
Tie the knot:
Tie the ends together using a surgeon’s knot (loop the cord through twice on the first pass of the knot). Pull it tight. -
Secure the knot:
Apply a tiny drop of super glue or jewelry cement directly onto the knot. Let it dry for a moment. -
Hide the knot:
If possible, gently tug the elastic so the knot slides inside the hole of a neighboring bead. If using a gold crimp cover (like the small gold bead in the image), place it over the knot and gently squeeze it shut with pliers. -
Final trim:
Trim the excess cord tails close to the knot (or crimp cover) with sharp scissors.
Scent Infusion
Use actual black lava stone beads instead of clay for the black accents. You can then add a drop of essential oil to them, turning your bracelet into a diffuser.
Now you have a bold, custom accessory ready to add a pop of color to your day
Half Gold Spacer Beads, Half Clay Discs
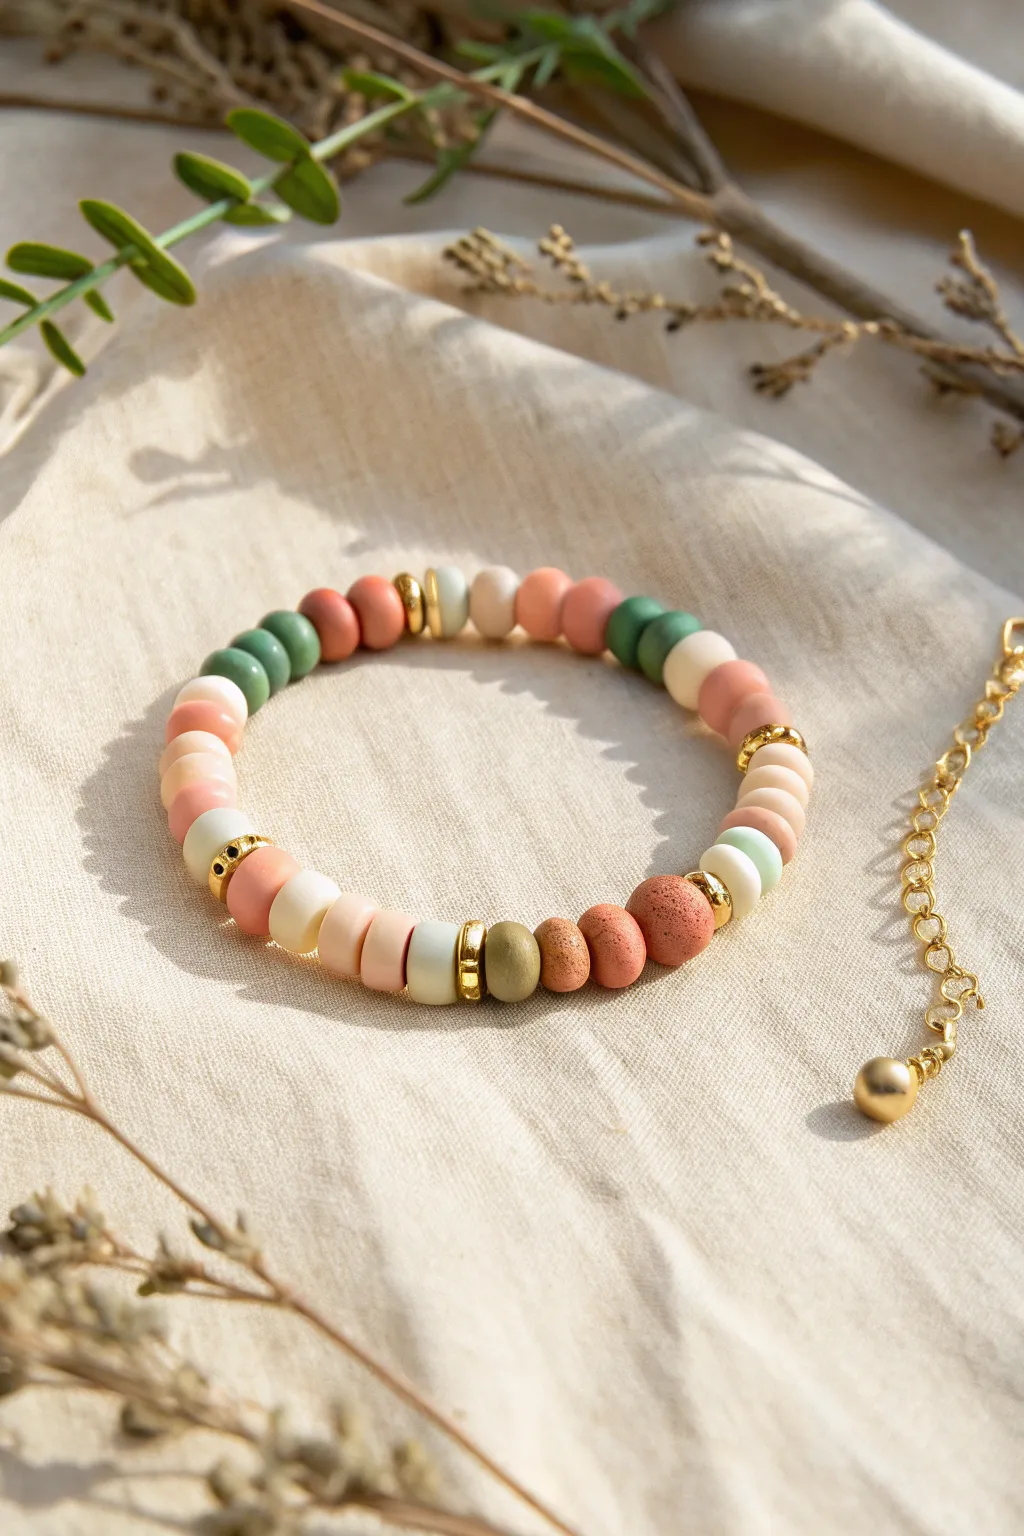
This trendy bracelet design balances the matte, organic texture of earthy clay discs with the sleek shine of gold accents. The color palette of terracotta, sage, oatmeal, and blush pink creates a versatile accessory perfect for stacking or wearing solo.
Step-by-Step Guide
Materials
- Polymer clay heishi beads (flat discs) in sage green, olive green, terracotta/rust, light peach/blush, and cream/oatmeal
- Gold tone metal spacer beads (ring shape)
- Small gold bead caps or textured spacers (optional for detail)
- Strong elastic stretch cord (0.7mm or 0.8mm)
- Jewelry glue (e.g., G-S Hypo Cement)
- Scissors
- Tape or binder clip
- Beading needle (collapsible eye is best)
Step 1: Planning the Pattern
-
Select your palette:
Gather your clay heishi beads. This specific look relies on a sophisticated ‘boho’ palette, so mix muted, dusty tones rather than bright primaries. -
Prepare the workspace:
Lay out a bead design board or a piece of felt cloth. This prevents the lightweight flat discs from rolling away while you plan your mesmerizing pattern. -
Determine segment length:
This design features color blocking. Plan to group 2 to 4 beads of the same color together before switching shades.
Step 2: Stringing the Beads
-
Cut the cord:
Cut a piece of elastic cord about 10-12 inches long. This generous length gives you plenty of room to tie the knot later without frustration. -
Pre-stretch the elastic:
Give the cord a few gentle tugs. This is a crucial step I always do to prevent the bracelet from stretching out and becoming loose after the first wear. -
Secure the end:
Attach a piece of tape or a binder clip to one end of the cord so beads don’t slide off as you work. -
Thread the needle:
If using a collapsible eye needle, thread the elastic through. This makes picking up the thin disc beads much faster than using bare fingers. -
Start with a color block:
Begin adding your first group of clay beads. For example, add three terracotta beads followed by two slightly lighter rust beads giving a nice gradient effect. -
Add a gold accent:
Slide on a gold spacer bead. In the reference image, the gold spacers act as separators between major color shifts, like moving from the warm reds to the cool greens. -
Create the green section:
Add a sequence of sage green and darker olive beads. Try varying the count; maybe do two dark green followed by three light green discs. -
Insert focal gold elements:
Occasionally, use a slightly thicker or textured gold spacer to break up the rhythm. Place these roughly at the ‘corners’ of the bracelet if you imagine it as a circle. -
Continue the pattern:
Keep stringing, alternating blocks of cream, peach, and earth tones. Don’t worry about perfect symmetry—randomness adds to the organic charm. -
Check the fit:
Once you have about 6.5 to 7 inches beaded (or your specific wrist size), wrap it around your wrist to check the fit. It should sit comfortably without digging in.
Sticky Situation?
If the elastic knot keeps slipping before you can glue it, ask a friend to hold a finger on the first loop of the knot while you tie the second part.
Step 3: Finishing Touches
-
Prepare for the knot:
Remove the tape or clip and holding both ends of the elastic securely. Ensure there are no gaps between the beads, but don’t pull so tight that the bracelet puckers. -
Tie a surgeon’s knot:
Cross the ends, wrap one side around the other twice, and pull tight. Repeat this process to secure the knot firmly. -
Apply adhesive:
Dab a tiny drop of jewelry glue (like G-S Hypo Cement) directly onto the knot. This prevents the slick elastic from slowly untying itself. -
Hide the knot:
While the glue is still slightly tacky, slide one of the beads (preferably a clay one with a larger hole) over the knot to conceal it. -
Trim the excess:
Once the glue is fully dry, trim the excess elastic tails close to the beads using sharp precision scissors.
Level Up
Add a small gold charm or a letter bead in the center of a color block to personalize the bracelet with initials or a tiny hanging leaf motif for extra flair.
Now your wrist has a lovely touch of earthy elegance to enjoy every day
Tiny Charm Cluster Centerpiece Bracelet

This earthy, bohemian bracelet combines the matte texture of polymer clay beads with the shine of gold accents for a beach-ready accessory. A playful cluster of charms—a starfish, heart, and coin—acts as the focal point, giving it distinct character without being overly flashy.
Step-by-Step
Materials
- Polymer clay (terracotta, beige, teal, white)
- Gold spacer beads (small discs or rings)
- Gold jump rings (assorted sizes)
- Gold starfish charm
- Small beige heart charm (can be handmade from clay)
- Green enamel coin charm or pendant
- Beading wire or strong jewelry elastic
- Gold crimp beads and clasp (lobster claw)
- Small extender chain with gold ball end
- Needle tool or toothpick (for piercing beads)
- Jewelry pliers (round nose and flat nose)
- Oven for baking clay
Step 1: Making the Clay Beads
-
Prepare your clay colors:
Condition your polymer clay by kneading it until soft. You will need a terracotta orange, a soft beige or tan, a muted teal blue, and white. -
Roll the base spheres:
Pinch off small amounts of clay and roll them into smooth spheres. Aim for beads that are roughly 6-8mm in diameter. You’ll need about 10-12 terracotta, 8-10 beige, and 4-6 teal beads. -
Create the textured white beads:
For the white accent beads, roll spheres similar in size to the others. Take a stiff brush, sandpaper, or a ball of aluminum foil and roll the bead over the texture to create a pitted, lava-rock effect. -
Pierce the beads:
the most crucial part is making the holes. Gently twist a needle tool or toothpick through the center of each bead. Twist as you push to avoid squishing the perfectly round shape. -
Bake the beads:
arrange your beads on a baking sheet or tile. I like to bury them slightly in cornstarch or use a bead rack to prevent flat spots. Bake according to your clay manufacturer’s instructions (usually 275°F/135°C for 15-30 minutes). -
Make the heart charm (optional):
If you don’t have a pre-made heart charm, flatten a small piece of beige clay, cut a tiny heart shape, texture it to look like stone, pierce a hole at the top, and bake it with your beads.
Uneven Bead Holes?
If your bead holes shrunk during baking and the wire won’t fit, use a small hand drill or pin vise to gently re-ream the holes without cracking the clay.
Step 2: Assembling the Bracelet
-
Plan your pattern:
Lay out your bead design on a bead board or soft towel. Start with the beige beads at the back (near where the clasp will be), transitioning into the terracotta beads, then the teal and white accents near the front center. -
Insert spacers:
Place gold spacer beads between the color transitions—specifically where the teal meets the white, and where the white meets the terracotta. These metallic flashes elevate the look instantly. -
Determine charm placement:
Identify exactly which spaces between beads will hold your charms. In the photo, the charms hang between the central beads rather than on a single central ring. -
String the beads:
Cut a length of beading wire. Secure one end with a crimp bead and one half of your clasp. Thread your beads according to your layout. -
Add jump rings while stringing:
When you reach the designated spots for your charms, thread a closed jump ring onto the wire just like a bead. This provides a secure anchor point that won’t slide over the larger clay beads. -
Finish the strand:
Once all beads are strung, add a crimp bead and the extender chain to the other end. Thread the wire back through the crimp and the last few beads, pull tight, and flatten the crimp bead with pliers.
Level Up: Scent Diffuser
Leave the white textured beads unsealed. You can add a drop of essential oil to these ‘lava’ style beads, turning your bracelet into a subtle personal diffuser.
Step 3: Attaching the Charms
-
Prepare the starfish:
Open a gold jump ring by twisting it sideways with two pairs of pliers. Slide on the gold starfish charm and hook it onto the first anchor ring you placed on the left side of the center. -
Attach the heart:
Connect the small beige heart to the middle anchor point using a slightly smaller jump ring so it hangs just a bit higher than the starfish. -
Add the coin:
Finally, attach the green enamel coin charm to the right-side anchor point. Ensure all jump rings are closed completely flush so the charms don’t slip off. -
Final check:
Wiggle the bracelet to ensure the charms move freely and the wire isn’t too stiff. Trim any excess wire tails for a clean finish.
Enjoy wearing your handcrafted piece of coastal charm anywhere you go
Mixed Shapes: Discs Plus Tubes for Extra Texture
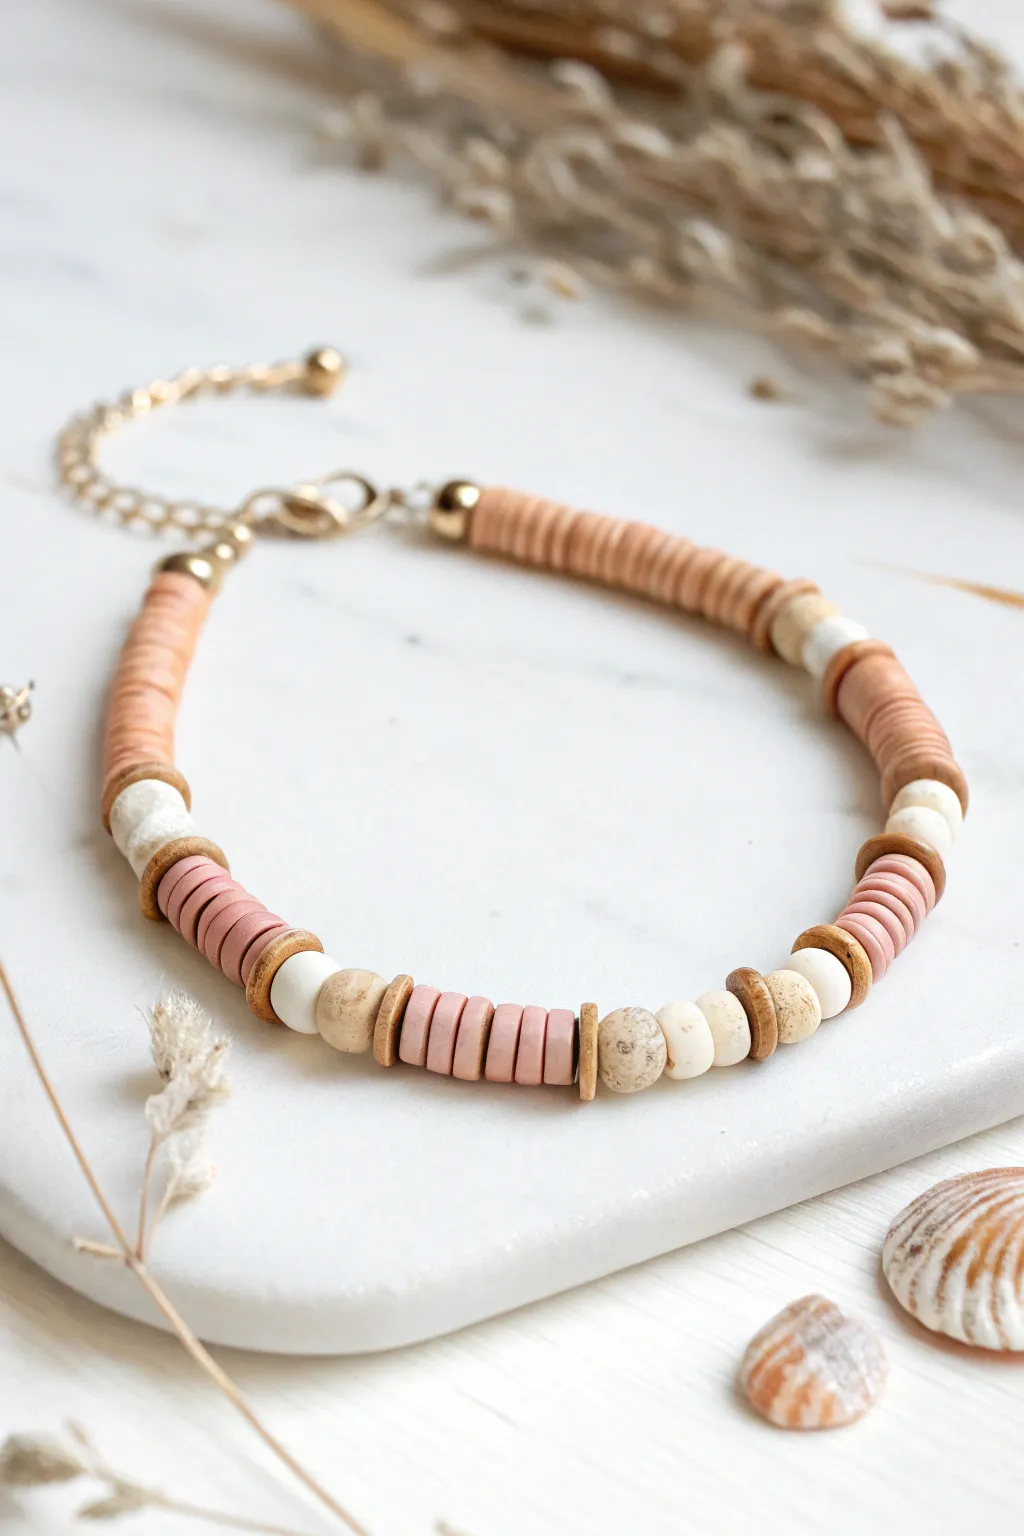
Embrace earthy tones and varied textures with this charming clay disc bracelet. By mixing flat heishi beads with round accent beads and natural wood spacers, you’ll create a piece that feels both organic and modern.
Step-by-Step Tutorial
Materials
- Polymer clay heishi beads (flat discs) in terracotta/peach
- Polymer clay heishi beads in soft pink
- Round cream/white stone or ceramic beads (approx. 6mm)
- Round speckled beige beads (approx. 6mm)
- Flat wooden spacer beads or coconut shell discs
- Gold crimp beads (2mm)
- Gold jump rings (4-5mm)
- Gold lobster clasp
- Gold extension chain with teardrop charm (optional)
- Beading wire (flexible, 7-strand or 19-strand)
- Wire cutters
- Chain nose pliers
- Crimping pliers
Step 1: Preparation & Planning
-
Measure your wrist:
Start by measuring your wrist with a flexible tape measure. Add about half an inch to this measurement to determine your final bracelet length, ensuring a comfortable fit. -
Cut the wire:
Cut a piece of beading wire roughly 9-10 inches long. Having extra length makes it much easier to finish the ends without struggling. -
Secure one end:
Thread a crimp bead onto one end of the wire, followed by a jump ring or the loop of your extension chain. Loop the wire back through the crimp bead. -
Crimp firmly:
Using crimping pliers, flatten the crimp bead securely to lock the wire in place. I always give a gentle tug here just to make sure it’s holding tight. -
Hide the tail:
Trim the excess short tail of the wire, or leave about half an inch to tuck into the first few beads for extra security.
Step 2: Creating the Pattern
-
Start with a gold accent:
String on a small gold bead or straight clay bead to cover part of the crimp connection if desired, creating a polished start. -
Build the terracotta base:
Thread on approximately 1.5 to 2 inches of the terracotta/peach colored heishi disc beads. This forms the solid color blocks on the sides of the bracelet. -
Add first transition:
Slide on a round cream bead, followed by a flat wooden spacer. This marks the transition from the solid color block to the patterned center. -
Create a pink segment:
Add a small stack of pink heishi beads—about 5 or 6 discs is perfect to create a distinct stripe of color. -
Insert second transition:
Follow the pink stack with another flat wooden spacer, then a round cream bead, then a round speckled beige bead. -
Make the center focal point:
For the very center, thread a wooden spacer, a stack of 5-6 pink heishi beads, another wooden spacer, and finally a speckled beige center bead. This creates the symmetrical heart of the design. -
Mirror the pattern:
Now work backwards to mirror your design: a wooden spacer, stack of pink discs, wooden spacer, round cream bead. -
Complete the symmetry:
Finish the patterned section by adding the final transition: a round speckled bead (if needed for length) or just the wooden spacer and round cream bead to match the other side. -
Finish with terracotta:
Fill the rest of the wire with the terracotta/peach heishi beads until you reach your desired total length.
Uneven Tension?
If the bracelet feels stiff or kinks, you’ve pulled the wire too tight. Leave a millimeter of slack before the final crimp to keep it fluid.
Step 3: Finishing Touches
-
Add final crimp bead:
Thread a crimp bead onto the end of your wire. -
Attach the clasp:
Slide the lobster clasp (or a jump ring connecting to it) onto the wire after the crimp bead. -
Loop back:
Thread the wire back through the crimp bead and through the last few terracotta beads you strung. -
Pull tight:
Pull the wire taut so there are no large gaps between beads, but leave just a tiny bit of wiggle room so the bracelet remains flexible and drapes nicely. -
Secure and trim:
Use your crimping pliers to flatten the crimp bead. Trim the excess wire tail cleanly with flush cutters right up against the beads.
Design Symmetry
Lay your beads out on a bead board or towel before stringing. This lets you confirm the symmetry of the center pattern before committing.
Wear your new bracelet stacked with others or let it shine solo as a stylish statement piece
Terrazzo Speckled Clay Bead Bracelet

Embrace the earthy, speckled charm of natural stone with this terrazzo-inspired clay bracelet. By mixing polymer clay with varied inclusions, you’ll create a sophisticated accessory that looks high-end but feels wonderfully handmade.
Detailed Instructions
Materials
- Polymer clay in various colors (white/cream, terracotta, teal/sage green, mustard yellow)
- Black pepper or black embossing powder (for speckles)
- Fine glitter or dried herbs (optional inclusions)
- Bead rolling tool or acrylic sheet
- Pin or bead reamer
- Elastic cord (0.7mm or 0.8mm)
- Small silver spacer beads
- Oven for baking
- Gloss or matte varnish (optional)
- Super glue (gel type)
Step 1: Preparing the Clay Base
-
Condition the clay:
Start by conditioning your polymer clay blocks. Knead each color separately until it is soft, pliable, and warm to the touch. -
Create the base colors:
For this project, you want muted, earthy tones. If your colors are too bright, mix in a tiny amount of beige or grey to desaturate them. -
Add the ‘terrazzo’ speckles:
Flatten a piece of your conditioned clay. Sprinkle a pinch of coarse black pepper or black embossing powder onto the surface. This creates that authentic stone look. -
Incorporate the inclusions:
Fold the clay over the speckles and knead thoroughly. Continue folding and rolling until the black specks are evenly distributed throughout the clay body. Repeat this for each color you intend to use.
Peppery Texture
Using black pepper creates real texture! If you want a smoother finish but still want the look, use black acrylic paint splattered onto the clay sheet before rolling.
Step 2: Forming the Beads
-
Section the clay:
Roll each color into a consistent log or snake shape, roughly 1/2 inch in diameter. -
Cut equal portions:
Using a blade or craft knife, slice the logs into equal-sized segments. Keeping the slices uniform ensures your beads will be the same size. -
Roll into spheres:
Take a clay segment and roll it between your palms using a circular motion. Apply gentle pressure initially, then lighten your touch to smooth out any fingerprints. -
Refine the shape:
For perfectly round beads, I find using a clear acrylic block to roll the balls on a flat surface works wonders to eliminate uneven spots. -
Pierce the holes:
While the clay is still raw, gently push a pin or bead reamer through the center of each sphere. Rotate the bead as you push to prevent flattening perfectly round shape. -
Check the fit:
Ensure the hole is large enough for your elastic cord. If it seems tight, wiggle the pin slightly to widen the channel.
Step 3: Baking and Finishing
-
Prepare for baking:
Arrange your beads on a baking sheet lined with parchment paper. Alternatively, string them on a wire suspended over a foil tray to prevent flat spots. -
Bake the clay:
Bake according to the manufacturer’s instructions for your specific brand of polymer clay (usually around 275°F/135°C for 15-30 minutes). -
Cool down:
Allow the beads to cool completely in the oven with the door cracked open. This helps toughen the clay. -
Seal (Optional):
If you want a polished stone look, lightly brush each bead with a matte or satin varnish. Let them dry fully before stringing.
Granite Effect
Mix translucent clay into your base colors (about a 1:3 ratio). This adds depth and makes the beads look more like genuine polished river stones.
Step 4: Assembly
-
Layout your design:
Arrange your beads on a bead board or towel. Alternate the colors (cream, sage, terracotta, mustard) randomly to achieve an organic look. -
Insert spacers:
Place a small silver spacer bead between every clay bead. This adds a nice metallic contrast and separates the colors. -
String the beads:
Cut a piece of elastic cord about 10 inches long. Pre-stretch the cord by pulling it firmly a few times to prevent it from sagging later. Thread your beads and spacers onto the cord. -
Tie the knot:
Check the size against your wrist. Tie a strong surgeon’s knot (right over left twice, pull tight; left over right twice, pull tight). -
Secure the knot:
Add a tiny drop of gel super glue to the knot. Let it dry for a few seconds before trimming the excess cord close to the knot. -
Hide the knot:
Gently pull the elastic so the knot slides inside the hole of one of the clay beads, completely hiding it from view.
Wear your new bracelet stacked with others for a stylish bohemian vibe
Build a Matching Bracelet Stack With One Theme
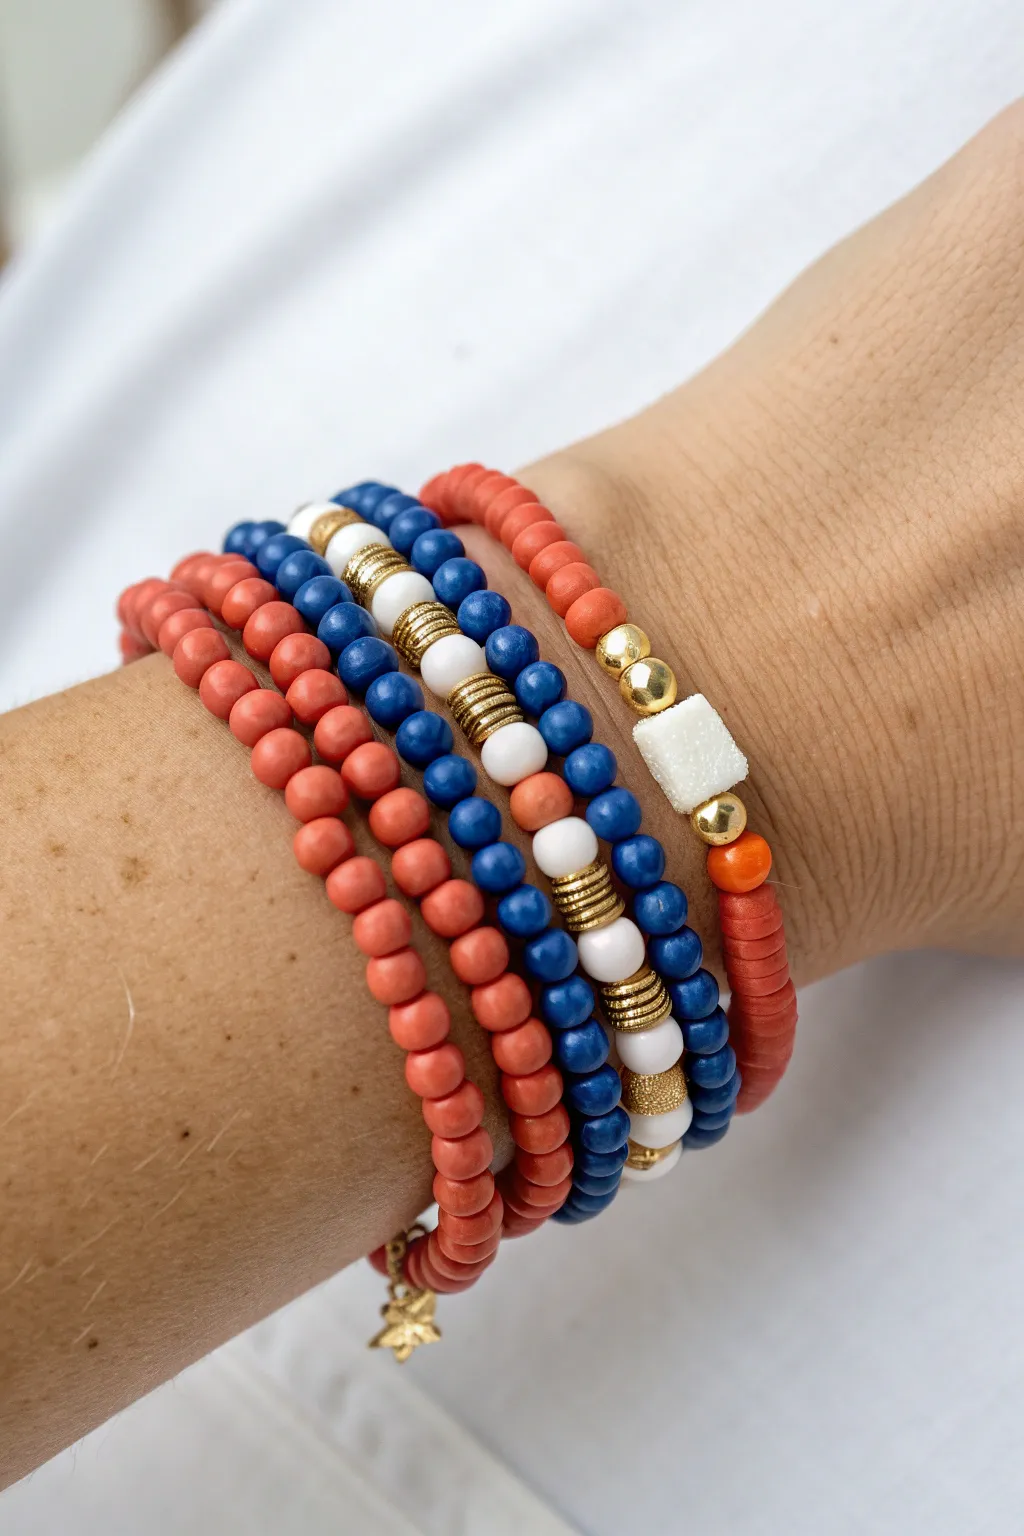
This vibrant stack captures the essence of summer with a classic nautical palette of coral red, deep navy, and crisp white. By using varied textures—like matte clay beads, gleaming gold accents, and heishi spacers—you’ll create a layered look that feels both curated and effortless.
Detailed Instructions
Materials
- Matte coral/orange round beads (approx. 4-6mm)
- Deep navy blue round wood or clay beads (approx. 4-6mm)
- White round beads (approx. 6mm)
- Small gold ribbed spacer beads or heishi beads
- Larger gold ball beads (approx. 6mm)
- White irregular square bead (sugar cube style)
- Gold star charm
- Flat disc heishi beads in coral red
- Strong elastic beading cord
- Beading glue or clear nail polish
- Scissors
Step 1: The Solid Coral Strands
-
Cut the Elastic:
Cut a piece of elastic cord about 10-12 inches long. This gives you plenty of extra room to tie knots comfortably. -
Pre-stretch the Cord:
Give your elastic a few gentle tugs. Pre-stretching prevents the bracelet from loosening up after you wear it for the first time. -
String the Beads:
Thread your matte coral round beads onto the cord until the beaded section measures about 6.5 to 7 inches, or fits comfortably around your wrist. -
Add the Charm:
Before tying it off, slide your small gold star charm onto the cord so it can dangle freely. -
Secure the Knot:
Tie a secure surgeon’s knot (right over left, left over right). Pull it tight. -
Repeat for Volume:
Create a second identical strand using the same coral beads, but skip the charm this time to keep the stack balanced.
Use Tape
Tape one end of your elastic cord to your table before stringing. This prevents beads from sliding off the back end while you work.
Step 2: The Navy & White Pattern
-
Start the Pattern:
On a new piece of elastic, start stringing your navy blue beads. Thread about 15-20 beads to form the back section of the bracelet. -
Introduce Gold Spacers:
Add a gold ribbed spacer, followed by a white round bead, and then another gold ribbed spacer. -
Continue the Motif:
Add two navy beads, then repeat the gold-white-gold sequence. Continue this alternating pattern for the front-facing section of the bracelet. -
Finish the Loop:
Finish stringing with navy beads until you reach the desired length, then knot and secure the strand.
Step 3: The Mixed Texture Accent
-
Begin with Heishi:
Cut a final piece of cord. Start stringing the flat coral heishi disc beads for about half the length of the bracelet. -
Add Large Gold Accents:
Slide on two larger gold ball beads to act as a shiny transition point. -
Place the Focal Bead:
Thread on the textured white square bead. This acts as the centerpiece of this specific strand. -
Mirror the Design:
Add one more large gold ball bead, followed by a single coral round bead, then finish the rest of the strand with more heishi discs. -
Final Knotting:
Tie off this final bracelet with a strong knot.
Mix Metals
Swap the gold spacers for silver or rose gold to change the vibe, or add a freshwater pearl instead of the white square bead for elegance.
Step 4: Final Touches
-
Glue the Knots:
Apply a tiny dab of beading glue or clear nail polish to every knot in your stack to ensure they never slip. -
Hide the Knots:
If holes allow, gently pull the elastic so the knot slides inside a neighboring bead for a seamless look. -
Trim Excess:
Once the glue is fully dry, trim the excess elastic tails close to the knot.
Wear your new stack all together for a bold statement or mix and match individual strands depending on your outfit