When I’m craving an easy, feel-good jewelry project, I always reach for blue clay beads—they’re instantly calming and somehow still pop. Here are my favorite blue clay bead bracelet ideas, starting with the classic looks everyone loves and ending with a few playful twists.
Classic Monochrome Blue Heishi Bracelet
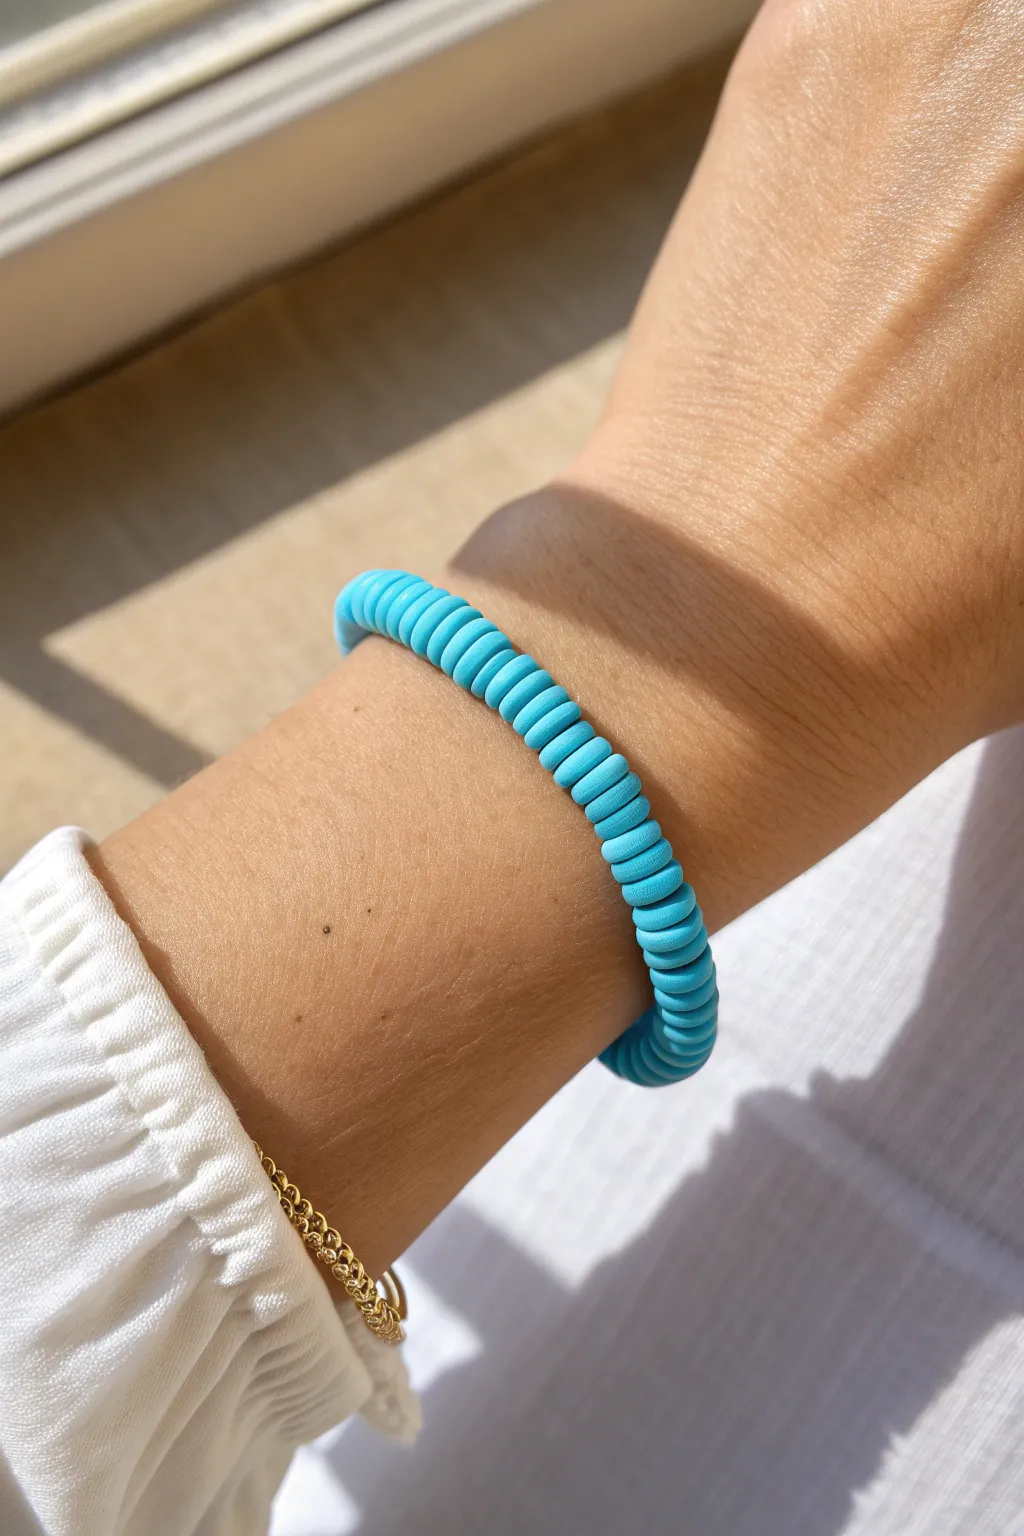
Embrace the beauty of simplicity with this vibrant monochrome bracelet featuring bright turquoise clay beads. The uniform disc shape creates a sleek, satisfying texture that looks clean and modern on the wrist.
Detailed Instructions
Materials
- Turquoise or cyan flat polymer clay heishi beads (6mm or 4mm)
- Strong elastic bead cord (0.8mm recommended)
- Scissors
- Super glue or jewelry cement
- Tape or a bead stopper clip
- Ruler or measuring tape
Step 1: Preparation
-
Measure your wrist:
Wrap a measuring tape comfortably around your wrist where you want the bracelet to sit. Note this measurement. -
Calculate length:
Add about 0.5 inches to your wrist measurement if you prefer a snug fit, or up to 1 inch for a looser, bangle-style drape. -
Pre-stretch the cord:
Cut a piece of elastic cord about 10-12 inches long. Before threading perfectly, hold both ends and give it a few firm tugs to pre-stretch it; this prevents the bracelet from loosening up later. -
Secure the end:
Place a bead stopper clip on one end of your cord, or simply tape it securely to your table surface to stop beads from sliding off.
Step 2: Stringing the Beads
-
Inspect your beads:
Pour a small pile of your turquoise heishi beads onto a work surface. Quickly scan them for any broken or unevenly thick discs to ensure a uniform stack. -
Start threading:
Begin sliding the beads onto the cord one by one. I find it easiest to pick them up directly with the cord tip rather than using my fingers. -
Check the stack:
Since heishi beads are quite thin, you can string 5-10 at a time before sliding them down to the bottom. Watch for any that flip sideways. -
Continue building:
Keep adding beads until the beaded section matches your calculated length from the preparation phase. -
Verify the fit:
Carefully wrap the strand around your wrist to check the size. Remember the knot will take up a tiny bit of space, but the elastic will stretch.
Knot Slipping?
If your elastic knot feels slick and won’t hold tight, try pulling it taut and then adding a third simple knot on top before gluing.
Step 3: Finishing Touches
-
Prepare for the knot:
Remove the tape or bead stopper. Bring the two ends of the cord together, ensuring there are no gaps between the beads. -
Tie the first loop:
Tie a simple overhand knot, pulling it gently so the beads sit flush against each other but aren’t bunching or buckling. -
Create a surgeon’s knot:
For the second knot, loop the cord through twice instead of once before pulling tight. This extra pass adds significant security. -
Apply adhesive:
Place a tiny drop of super glue or jewelry cement directly onto the knot. Be careful not to glue the beads to the cord, just the knot itself. -
Let it cure:
Allow the glue to dry completely according to the package instructions—usually a few minutes is sufficient. -
Trim the tails:
Use your scissors to trim the excess cord ends, leaving about 2-3mm of tail. -
Hide the knot:
Gently stretch the bracelet and slide the knot inside the hole of the nearest heishi bead to conceal it for a seamless finish.
Pro Tip: Seamless Look
Use a bead reamer or a large needle to slightly widen the hole of the bead adjacent to your knot; this makes it much easier to hide the knot inside.
Now you have a stunning pop of blue ready to brighten up any outfit


Blue Ombre Gradient Stack
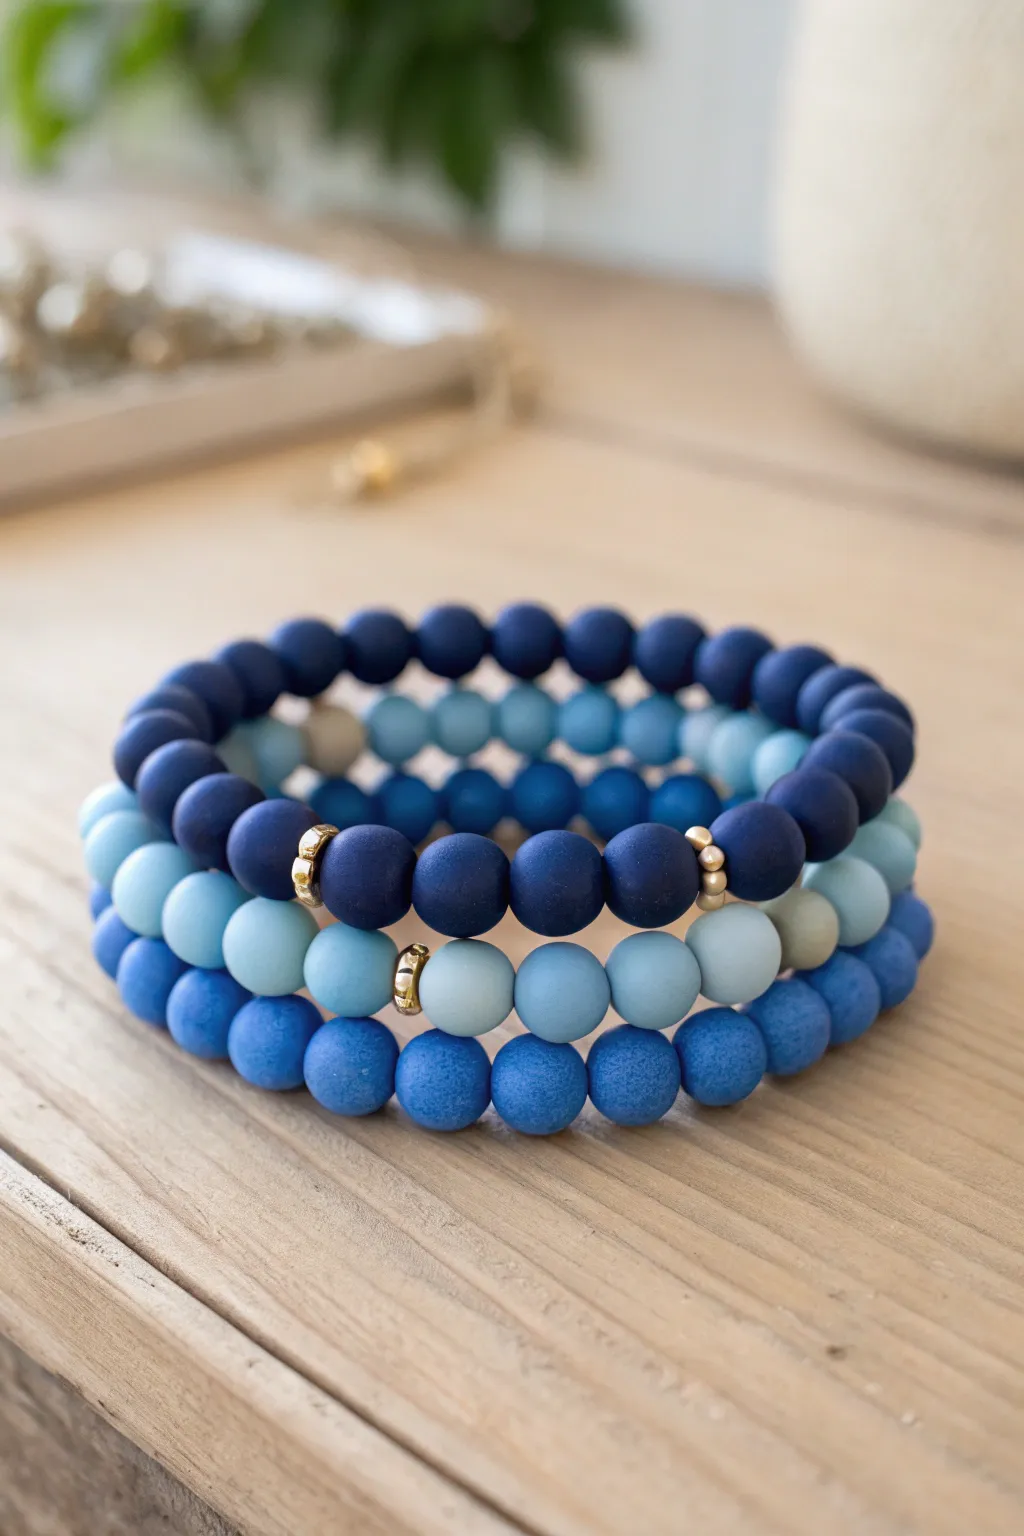
Achieve a sophisticated monochromatic look with this trio of textured clay bead bracelets ranging from deep indigo to soft powder blue. The matte finish of the beads contrasts beautifully with shiny gold accents, creating an elegant stack perfect for daily wear.
Step-by-Step Tutorial
Materials
- Matte round polymer clay or silicone beads (approx. 8-10mm) in dark navy
- Matte round polymer clay or silicone beads (approx. 8-10mm) in medium bright blue
- Matte round polymer clay or silicone beads (approx. 8-10mm) in light powder blue
- Elastic stretch cord (0.8mm or 1mm)
- Small gold disc spacer beads or heishi beads
- Gold tone accent beads (small gold balls or rondelles)
- Scissors
- Jewelry glue or clear nail polish
- Bead stopper or tape
- Ruler or measuring tape
Step 1: Planning and Prep
-
Measure your wrist:
Wrap a measuring tape loosely around your wrist to determine the circumference. Add about 0.5 to 1 inch to this measurement depending on how loose you like your fit. -
Prepare the cord:
Cut three lengths of elastic cord, each about 10-12 inches long. This extra length makes tying the final knots much easier. -
Secure the ends:
Attach a bead stopper or a piece of tape to one end of each cord string to prevent beads from slipping off while you work.
Step 2: The Dark Navy Strand
-
Start the pattern:
Begin threading the dark navy matte beads onto your first cord. This strand features a minimalist focal point. -
Add the gold accent:
Thread approximately half of your required beads. Then, add one gold disc spacer, followed by one dark navy bead, and another gold disc spacer to create a subtle metallic break. -
Finish the strand:
Continue adding dark navy beads until the bracelet reaches your desired length. Check the fit by wrapping it around your wrist before tying.
Pre-Stretching Tip
Before stringing any beads, give your elastic cord a few firm tugs. Pre-stretching prevents the bracelet from sagging or loosening up after the first few wears.
Step 3: The Powder Blue Strand
-
Create the light layer:
For the second bracelet, use the light powder blue beads. Start threading them onto your second cord. -
Insert gold spacers:
Similar to the first bracelet, add a gold accent element midway. I prefer to use a slightly different gold spacer here, like a small gold ball or a thicker rondelle, to add variety to the stack. -
Complete the length:
Fill the rest of the cord with powder blue beads until it matches the length of your first navy bracelet.
Texture Play
Mix up the textures by swapping one of the matte strands for glossy glass beads or rough lava stones in the same color for a tactile, varied experience.
Step 4: The Medium Blue Strand
-
Thread the middle tone:
Using the medium bright blue beads, begin threading your third and final bracelet. This color bridges the gap between the dark and light tones. -
Add visual interest:
You can stick to the single focal point method or scatter 2-3 single gold spacers randomly throughout this strand for a more playful look. -
Final check:
Once strung, hold all three bracelets together to ensure they are the same length and form a pleasing gradient when stacked.
Step 5: Securing the Bracelets
-
Top off the strands:
Remove the bead stoppers carefully from each cord. -
Tie the surgeon’s knot:
For each bracelet, bring the ends together and tie a standard overhand knot. Follow this with a surgeon’s knot (looping the cord through twice) for extra security. -
Tighten securely:
Pull the cords firmly to tighten the knot. You want the beads to touch snugly but not be so tight that the bracelet buckles. -
Add adhesive:
Dab a tiny drop of jewelry glue or clear nail polish onto the knot. Let it dry completely before moving on. -
Trim and hide:
Trim the excess cord ends close to the knot. Gently tug the bracelet so the knot slides inside the hole of a neighboring bead to hide it.
Stack these beauties together to show off your seamless blue gradient styling


Navy and White Nautical Stripe Pattern
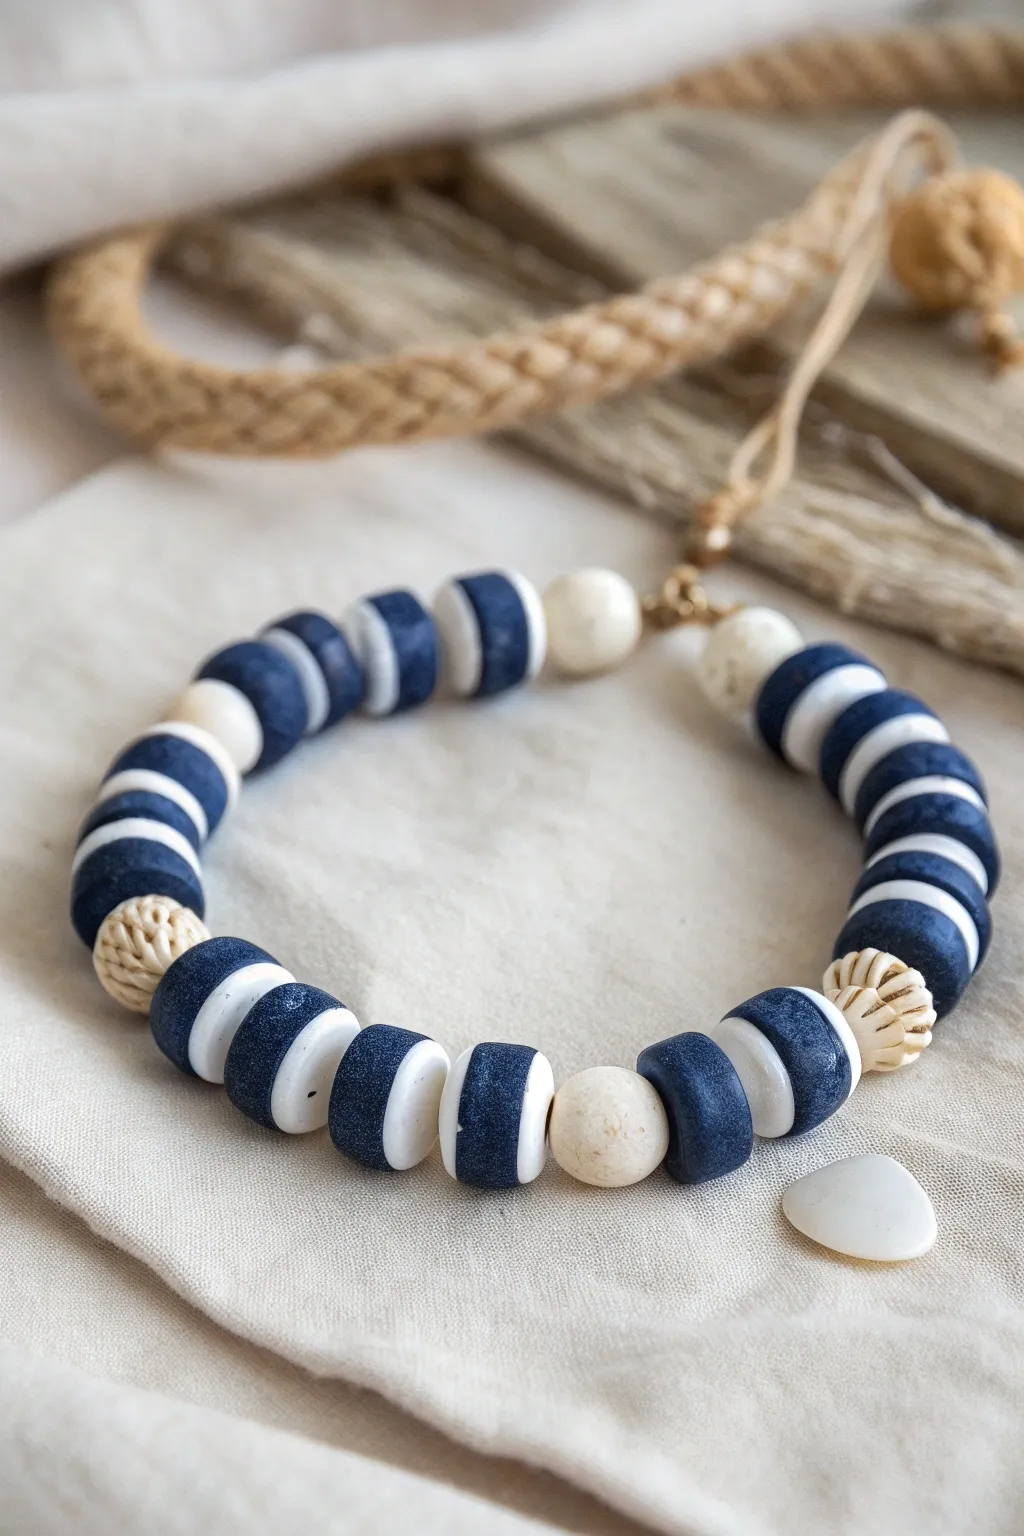
Capture the essence of a seaside holiday with this chunky navy and white striped bracelet. Using alternating polymer clay disk beads and textured cream accents, this design creates a crisp nautical aesthetic perfect for casual summer wear.
Step-by-Step
Materials
- Navy blue polymer clay disk beads (heishi style, approx. 10mm)
- White or cream polymer clay disk beads (heishi style, approx. 10mm)
- 2 Large textured cream beads (carved bone style or ribbed clay)
- 2 Smooth round cream spacer beads (approx. 8mm)
- 1.5mm waxed cotton cord or hemp cord (natural tan color)
- Scissors
- Hypo cement or jewelry glue
- Tape or clipboard
Step 1: Preparing the Cord
-
Measure and Cut:
Cut a length of your waxed cotton cord to about 18 inches. This generous length gives you plenty of room to knot comfortably without running out of space. -
Create the Loop Closure:
Fold the cord in half. At the folded end, tie an overhand knot to create a small loop roughly 1/2 inch long. This loop will serve as part of your closure mechanism. -
Secure Work Surface:
Tape the loop end of your cord down to your table or clip it into a clipboard. Keeping tension on the cord makes stringing these larger-hole beads much easier.
Clay Texture Tip
If making your own accent beads, roll a ball of cream clay and gently press a toothpick into the sides to create the ribbed ‘pumpkin’ texture before baking.
Step 2: Starting the Pattern
-
First Anchor Bead:
Thread a smooth, round cream spacer bead onto both tail ends of the cord. Push it all the way up to the knot you just made. -
Begin the Stripes:
Start your main pattern by threading one navy disk bead followed by one white disk bead. Repeat this navy-white pairing three times total. -
Lengthening the Section:
Continue the alternating pattern until you have a segment of about 1.5 to 2 inches of striped beads. -
Adding Texture:
Add your first feature bead: one of the large, textured cream beads. These beads break up the visual rhythm and add that organic, crafted look.
Step 3: Building the Main Body
-
The Central Stretch:
Return to your navy and white alternating pattern. Thread another substantial section of striped disks, aiming for about 3 to 3.5 inches in length depending on your wrist size. -
Midpoint Check:
Wrap the bracelet around your wrist to check the sizing. The beads should cover the top and sides of your wrist comfortably. -
The Second Accent:
Thread the second textured cream bead onto the cords. This creates a symmetrical frame around the central striped section. -
Final Striped Section:
Add a final short section of alternating navy and white disks, mirroring the length of the very first section you created.
Stiffness Fix
If the bracelet feels too stiff after knotting, gently roll it back and forth between your palms to loosen the spacing between the disk beads.
Step 4: Finishing the Closure
-
Final Spacer:
Finish the beading sequence with the second smooth round cream spacer bead. -
Knotting the End:
Tie an overhand knot with both cords tight against the final bead. Ensure there is no slack in the bead line, but don’t pull so tight that the bracelet becomes stiff. -
Create the Button Knot:
Tie a second overhand knot about 1/2 inch away from the previous knot. This gap creates a ‘button’ effect that will fit through your starting loop. -
Trimming:
I like to trim the excess cord ends, leaving just a small partially frayed tassel for a rustic look. -
Secure with Glue:
Apply a tiny dot of hypo cement or jewelry glue to the structural knots to ensure they don’t slip over time. Let it dry completely before wearing.
Enjoy the classic maritime charm of your new handmade accessory


Turquoise Blue and Gold Spacer Bead Rhythm
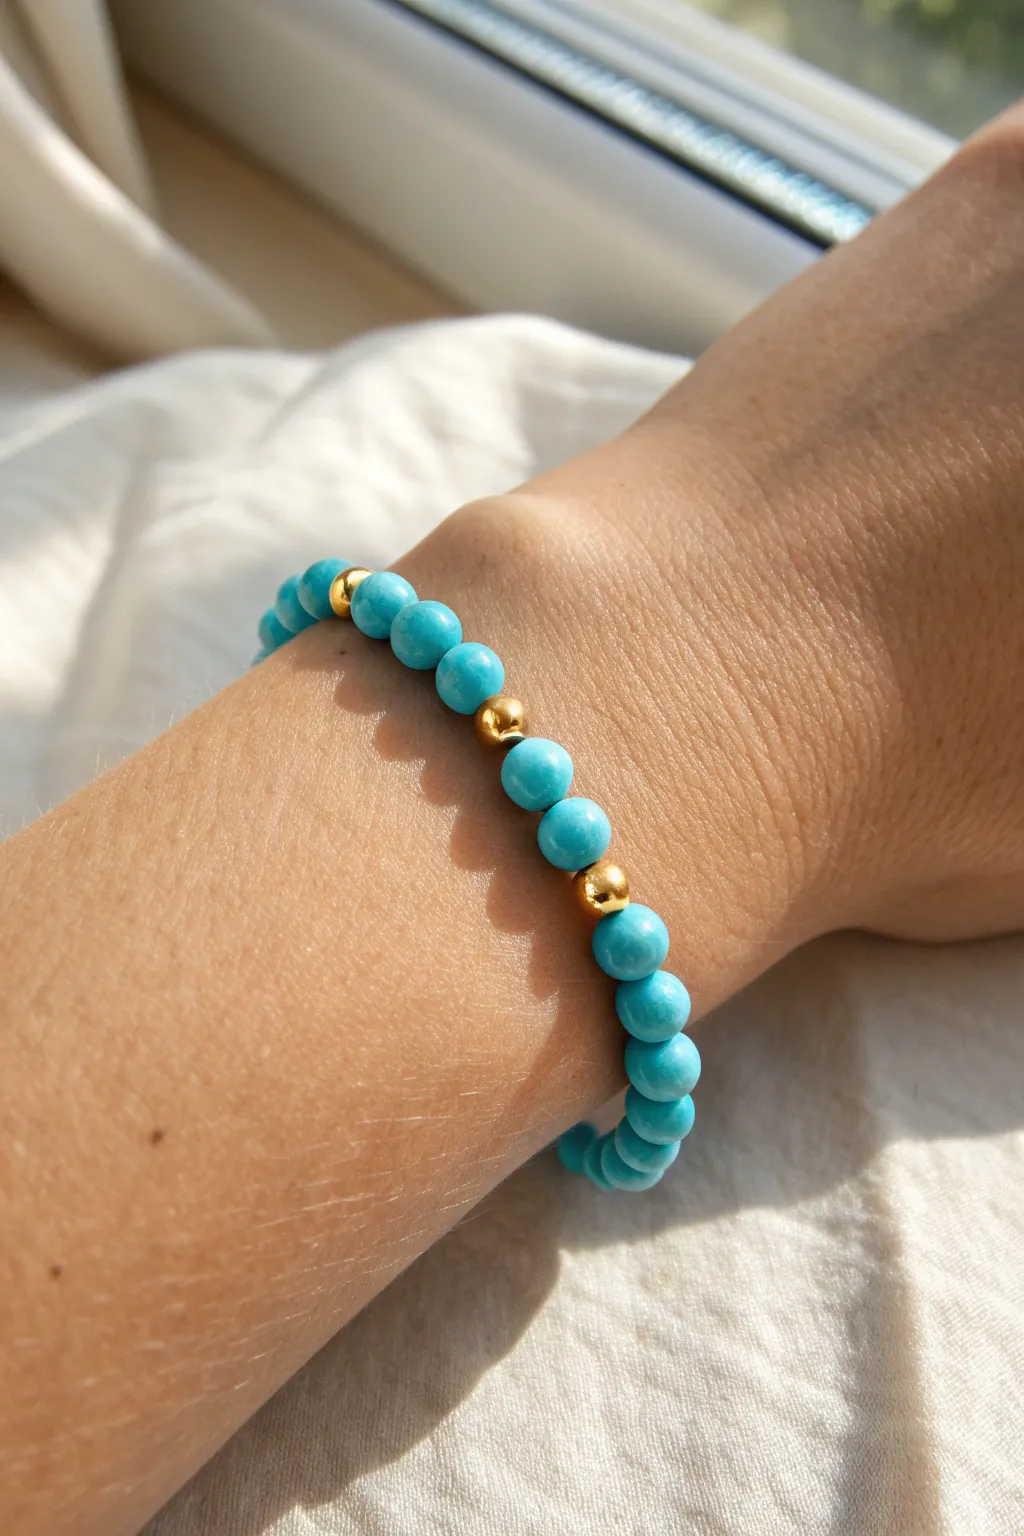
Capture the essence of a sunlit Mediterranean getaway with this simple yet elegant beaded bracelet. The vibrant turquoise blue beads are punctuated by gleaming gold spacers in a consistent rhythm, creating a piece that feels both classic and effortlessly beachy.
Detailed Instructions
Materials
- Turquoise blue round gemstone or clay beads (6mm or 8mm)
- Gold stainless steel or brass spacer beads (smooth finish, 3mm or 4mm)
- Strong elastic bead cord (0.8mm clear)
- Jewelry glue or clear nail polish
- Scissors
- Bead stopper or masked tape
- Ruler or measuring tape
Step 1: Planning and Prep
-
Measure your wrist:
Start by measuring your wrist circumference with a measuring tape. Add about half an inch to this measurement to find your total bracelet length so it sits comfortably without pinching. -
Cut the cord:
Cut a piece of elastic cord roughly 10 inches long. I find having this extra length makes the final knotting process so much less frustrating than trying to tie tiny ends. -
Secure the end:
Place a bead stopper at one end of the cord, or simply fold a piece of tape over the end to prevent your beautiful pattern from sliding off while you work. -
Stretch the elastic:
Give your elastic cord a few gentle tugs before you start beading. This pre-stretching helps prevent the bracelet from loosening up and sagging immediately after you wear it.
Knot Slipping Out?
If the knot won’t stay hidden inside the bead hole, your beads might have holes that are too small. Try hiding it inside a gold bead instead, as metal beads often have larger openings.
Step 2: Creating the Pattern
-
Establish the rhythm:
The charm of this piece lies in its specific pattern. Based on the reference image, the rhythm is a set of three turquoise beads followed by a single gold spacer. -
First sequence:
Thread three of your turquoise blue beads onto the elastic cord. -
Add the accent:
Slide on one gold spacer bead. Ensure the gold bead is smaller than the turquoise ones to let the color dominate while the gold acts as a subtle highlight. -
Repeat the pattern:
Continue this sequence: three blue beads, one gold bead. Keep the tension consistent as you slide them down. -
Check the length:
Periodically wrap the strand around your wrist to check the fit. You want the ends to meet comfortably without gaps in the pattern. -
Adjusting for size:
If you reach the end and your pattern doesn’t fit perfectly, you can adjust the final sequence. Sometimes I’ll just use two blue beads at the very end, or four, to make the circumference perfect without breaking the visual flow.
Pro Tip: Gold longevity
To keep the gold spacers shiny, coat them with a thin layer of clear nail polish before stringing. This prevents tarnishing from skin oils or water.
Step 3: Finishing Touches
-
Prepare to tie:
Once you have the desired length, carefully remove the bead stopper or tape. Hold both ends of the elastic securely. -
The surgeon’s knot:
Cross the ends to make a simple overhand knot, but don’t pull tight yet. Make a second loop through the center (like a surgeon’s knot) for extra security. -
Tighten securely:
Pull the cords tight. You should feel the elastic stretch slightly as the knot cinches down between the beads. -
Apply adhesive:
Dab a tiny drop of jewelry glue or clear nail polish directly onto the knot. This prevents it from slipping over time. -
Hide the knot:
Before the glue fully hardens, pull the elastic so the knot slides inside the hole of the nearest turquoise bead. -
Trim the excess:
Wait for the glue to dry completely—usually a few minutes—then trim the excess cord ends as close to the bead hole as possible without cutting the knot.
Now you have a vibrant accessory ready to add a pop of color to any outfit

The Complete Guide to Pottery Troubleshooting
Uncover the most common ceramic mistakes—from cracking clay to failed glazes—and learn how to fix them fast.
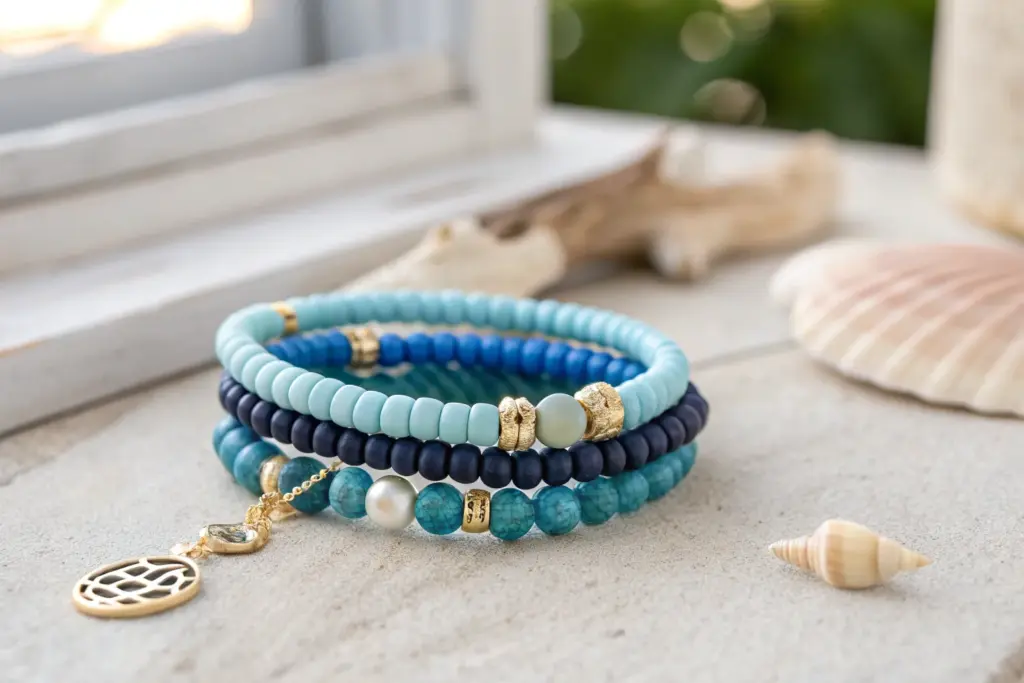
Blue Clay Beads With White Pearl Breaks
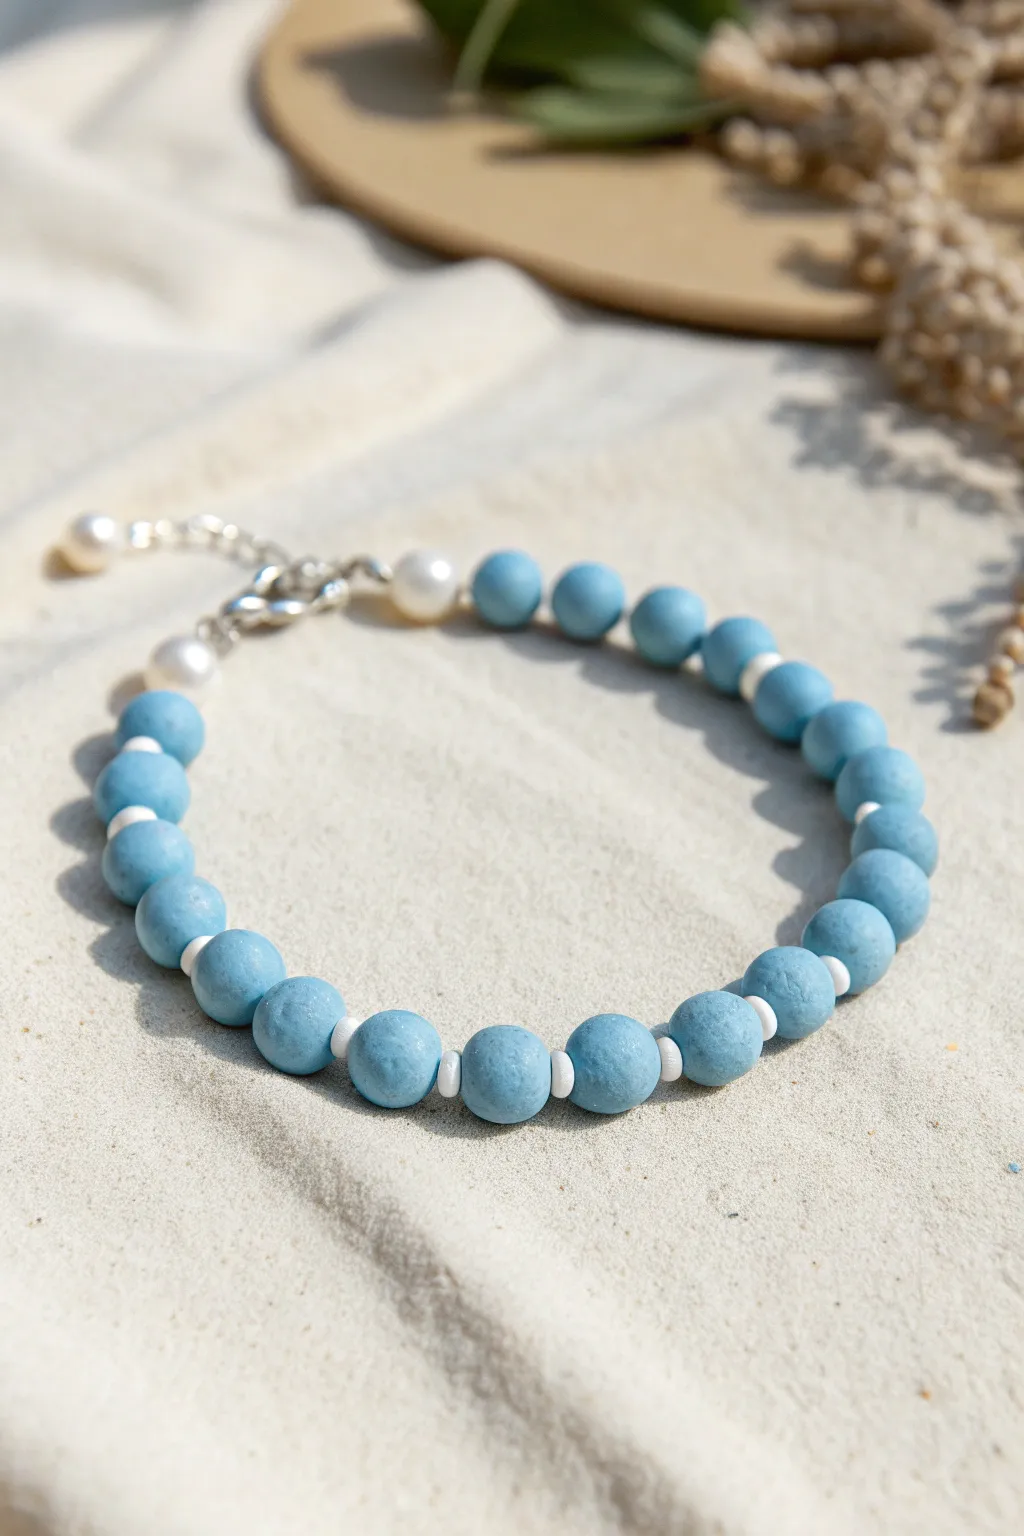
Bring the serene colors of the seaside to your wrist with this refreshing design. By combining matte, textured blue clay beads with lustrous freshwater pearls and tiny white spacers, you achieve a sophisticated balance of rugged and refined textures.
Step-by-Step Guide
Materials
- Matte blue round polymer clay beads (8mm or 10mm)
- Small white disc spacer beads (heishi style or cylinder)
- Freshwater pearls (approx 6-8mm, white or cream)
- Silver lobster clasp
- Silver jump rings (open)
- Silver extension chain with charm (optional)
- Flexible beading wire (e.g., Tiger Tail, 0.38mm or 0.45mm)
- 2 Silver crimp beads
- Wire cutters
- Chain-nose pliers
- Crimping pliers (optional but recommended)
Step 1: Planning the Pattern
-
Lay out the design:
Begin by arranging your beads on a bead board or a soft piece of fabric to prevent rolling. Observe the pattern in the reference: the main body consists of blue clay beads separated by tiny white disc spacers. -
Establish the sequence:
Set up a repeating sequence of one blue clay bead followed by one thin white spacer. Continue this until you have enough length to cover about 80% of your desired wrist size. -
Design the ends:
For the closure ends, transition from the clay texture to something elegant. Place one or two freshwater pearls at each end of your blue bead strand. This creates a beautiful ‘break’ before the clasp. -
Check the length:
Measure the laid-out design against your wrist or a ruler, remembering that the clasp and extension chain will add about an inch to the total length.
Hiding the Wire
Use crimp covers (small C-shaped metal beads) over your flattened crimps. Gently close them with pliers to make the connection look like just another silver bead.
Step 2: Stringing the Beads
-
Cut the wire:
Cut a piece of beading wire approximately 10-12 inches long. This gives you plenty of extra room to work with the clasps without struggling. -
Secure the first end:
Thread a crimp bead onto one end of the wire, followed by a jump ring or the lobster clasp directly. Loop the wire back through the crimp bead to create a secure loop. -
Crimp strictly:
Use your crimping pliers to flatten the crimp bead securely, locking the wire in place. If using varying pliers, ensure the crimp is folded or flattened neatly so it doesn’t scratch the skin. -
Start stringing:
Begin threading your beads. I usually start with the freshwater pearl section to keep the design symmetrical. Thread the tail of your wire through the first few beads to hide it. -
The main body:
Continue stringing the main pattern: Blue Clay Bead -> White Spacer -> Blue Clay Bead. Repeat this rhythm carefully. -
Maintain tension:
Occasionally lift the wire by the secured end to let gravity settle the beads closer together, ensuring there are no unsightly gaps between the spacers and the clay. -
Add the final pearls:
Once the main blue section is complete, finish the stringing process by adding the final freshwater pearl(s) to match the beginning of the strand.
Go Asymmetrical
Instead of centering the pearls at the clasp, try placing a cluster of 3 pearls off-center amongst the blue beads for a more organic, modern look.
Step 3: Finishing Touches
-
Prepare the closure:
Thread a crimp bead onto the remaining open wire end. -
Add the chain connector:
Slide a closed jump ring or the connector for your extension chain onto the wire after the crimp bead. -
Create the loop:
Take the end of the wire and feed it back down through the crimp bead and into the first pearl (and potentially the first clay bead) to form a loop. -
Tighten everything:
Pull the wire taut so the loop is small and the beads are snug. Be careful not to make it so tight the bracelet becomes stiff; it needs a little movement to drape nicely. -
Final crimp:
Flatten the final crimp bead securely with your pliers. -
Trim the excess:
Use your wire cutters to snip the excess wire tail as close to the bead hole as possible so it doesn’t poke out. -
Attach the hardware:
Use your chain-nose pliers to open a jump ring and attach the extension chain to the loop you just created. If you haven’t attached the lobster clasp yet, do so on the other side using a jump ring. -
Add a charm:
For a professional finish, attach a tiny pearl or bead to the very end of the extension chain using a headpin or small jump ring.
Slip on your new bracelet and enjoy the cool, coastal vibe it brings to any outfit
Sky Blue Letter Bead Word Bracelet
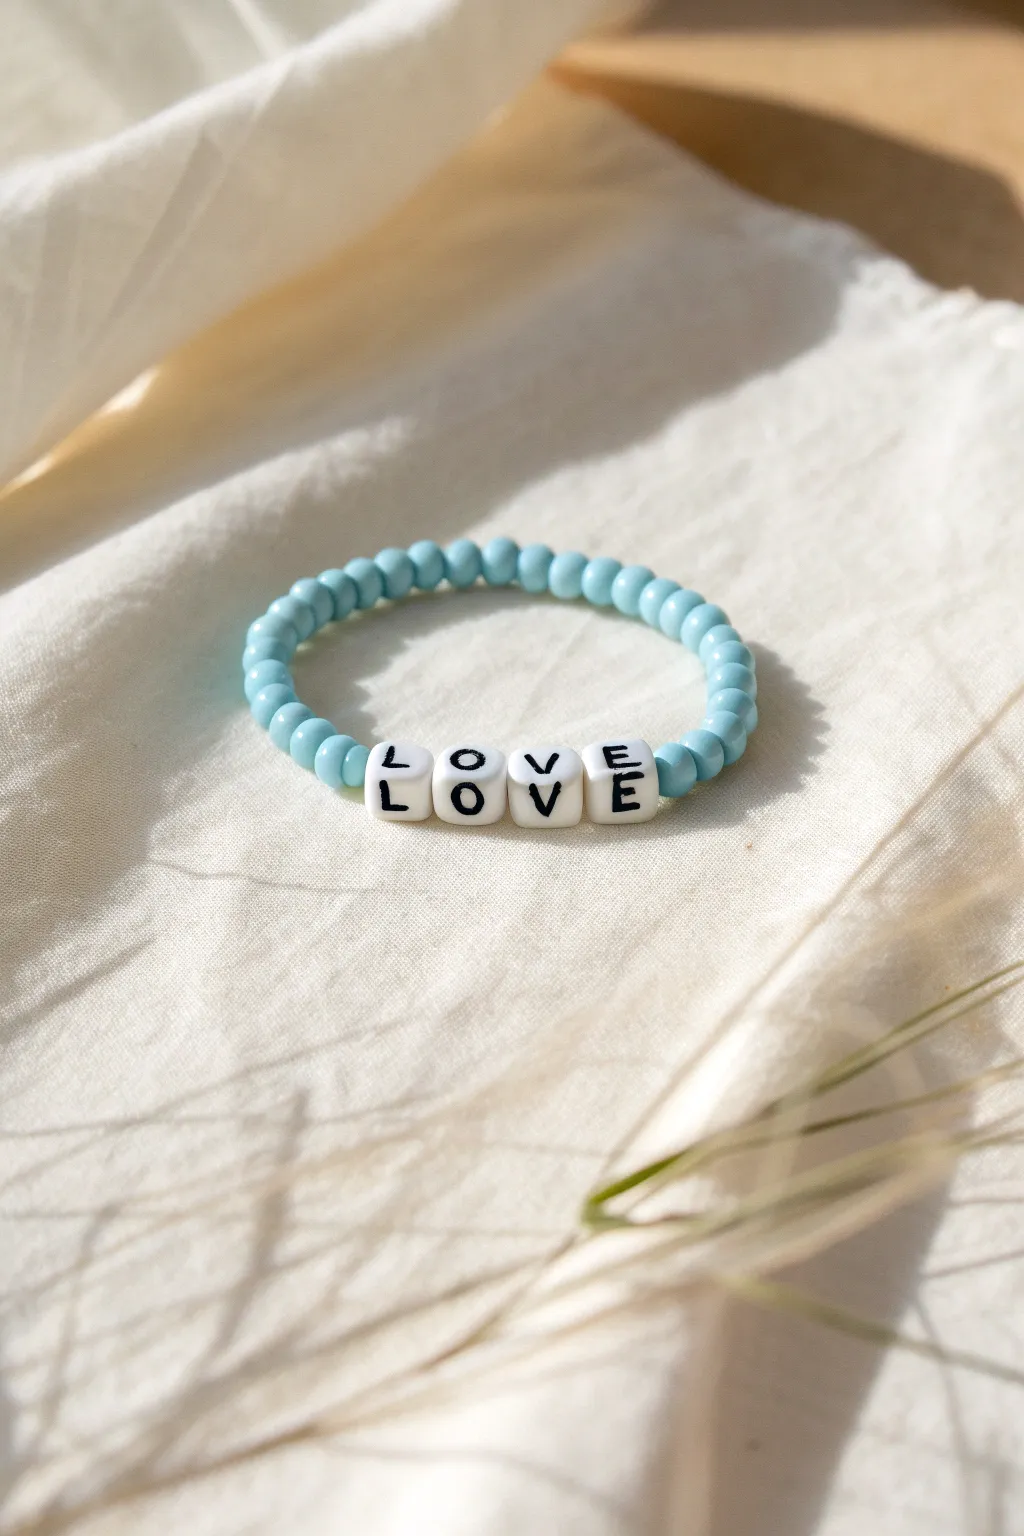
Capture the serene feeling of a clear day with this simple yet meaningful bracelet design. Featuring smooth sky-blue beads and stark white letter cubes, this piece spells out “LOVE” in a charmingly understated way.
Detailed Instructions
Materials
- Light blue round beads (approx 4mm-6mm, glass or acrylic)
- White square alphabet beads with black letters spelling L, O, V, E
- Clear elastic jewelry cord (0.5mm or strong stretchy string)
- Scissors
- Jewelry glue or clear nail polish
- Beading needle (optional)
- Tape or bead stopper
Step 1: Preparation
-
Measure your wrist:
Wrap a piece of string or a soft measuring tape around your wrist to find your size. Add about half an inch to this measurement to ensure the bracelet fits comfortably without being too tight. -
Cut the cord:
Cut a length of elastic cord about 10-12 inches long. It’s always better to have extra cord to work with for tying knots than to struggle with ends that are too short. -
Secure the end:
Attach a piece of tape or a bead stopper to one end of your cut cord. This prevents your beads from sliding right off while you are focused on stringing them. -
Layout your design:
Lay out your beads on a flat surface or bead board. Place the letter beads L-O-V-E in the center, and then arrange the blue beads evenly on either side until the total length matches your target size.
Step 2: Stringing
-
Start with blue beads:
Begin by threading the first half of your sky-blue round beads onto the elastic cord. If the holes are small, threading the cord through a beading needle first can make this process much faster. -
Add the first letter:
Slide on the ‘L’ cube bead. Make sure it is facing the correct direction so it reads properly when worn. -
Continue the word:
Thread the ‘O’, ‘V’, and ‘E’ beads in order. Double-check the orientation of each bead as you go to ensure the word doesn’t end up jumbled or upside down. -
Finish the blue beads:
String the remaining half of the sky-blue beads onto the cord after the letter ‘E’. The word should now be perfectly centered between the two sections of colored beads. -
Check the fit:
Wrap the strung beads around your wrist to check the size. If it feels too loose, remove a couple of blue beads from each end; if it’s too tight, add a few more.
Knot Security
When tightening your final knot, pull all four strands (the two loose ends and the two bead sides) simultaneously to lock it tight.
Step 3: Finishing Touches
-
Pre-stretch the cord:
Before tying, gently pull on both ends of the elastic cord a few times. This pre-stretching step is crucial because it helps prevent the bracelet from loosening up permanently after you wear it. -
Tie the first knot:
Remove the tape or stopper and bring the two ends of the cord together. Tie a simple overhand knot, pulling it snug against the beads but not so tight that the bracelet puckers. -
Secure with a surgeon’s knot:
For the second knot, I prefer to use a surgeon’s knot for extra security. Loop the cord through twice instead of once before pulling tight. This extra friction holds the elastic much better than a standard square knot. -
Add adhesive:
Dab a tiny drop of jewelry glue or clear nail polish directly onto the knot. This seals the connection and ensures your hard work won’t unravel. -
Hide the knot:
While the glue is still slightly tacky but not wet, pull the elastic so the knot slides inside the hole of the nearest blue bead. If the hole is too small, just ensure the knot is trimmed neatly. -
Trim the excess:
Once the glue is fully dry, use your scissors to trim the excess cord ends as close to the knot (or the bead hiding the knot) as possible without cutting the main structural cord.
Spacer Style
Add tiny gold or silver spacer beads between the blue beads and the letter cubes to add a touch of metallic shine to the design.
Now you have a sweet, custom accessory to stack with other favorites or gift to a friend


What Really Happens Inside the Kiln
Learn how time and temperature work together inside the kiln to transform clay into durable ceramic.
Preppy Blue Stack With Mixed Blue Shades
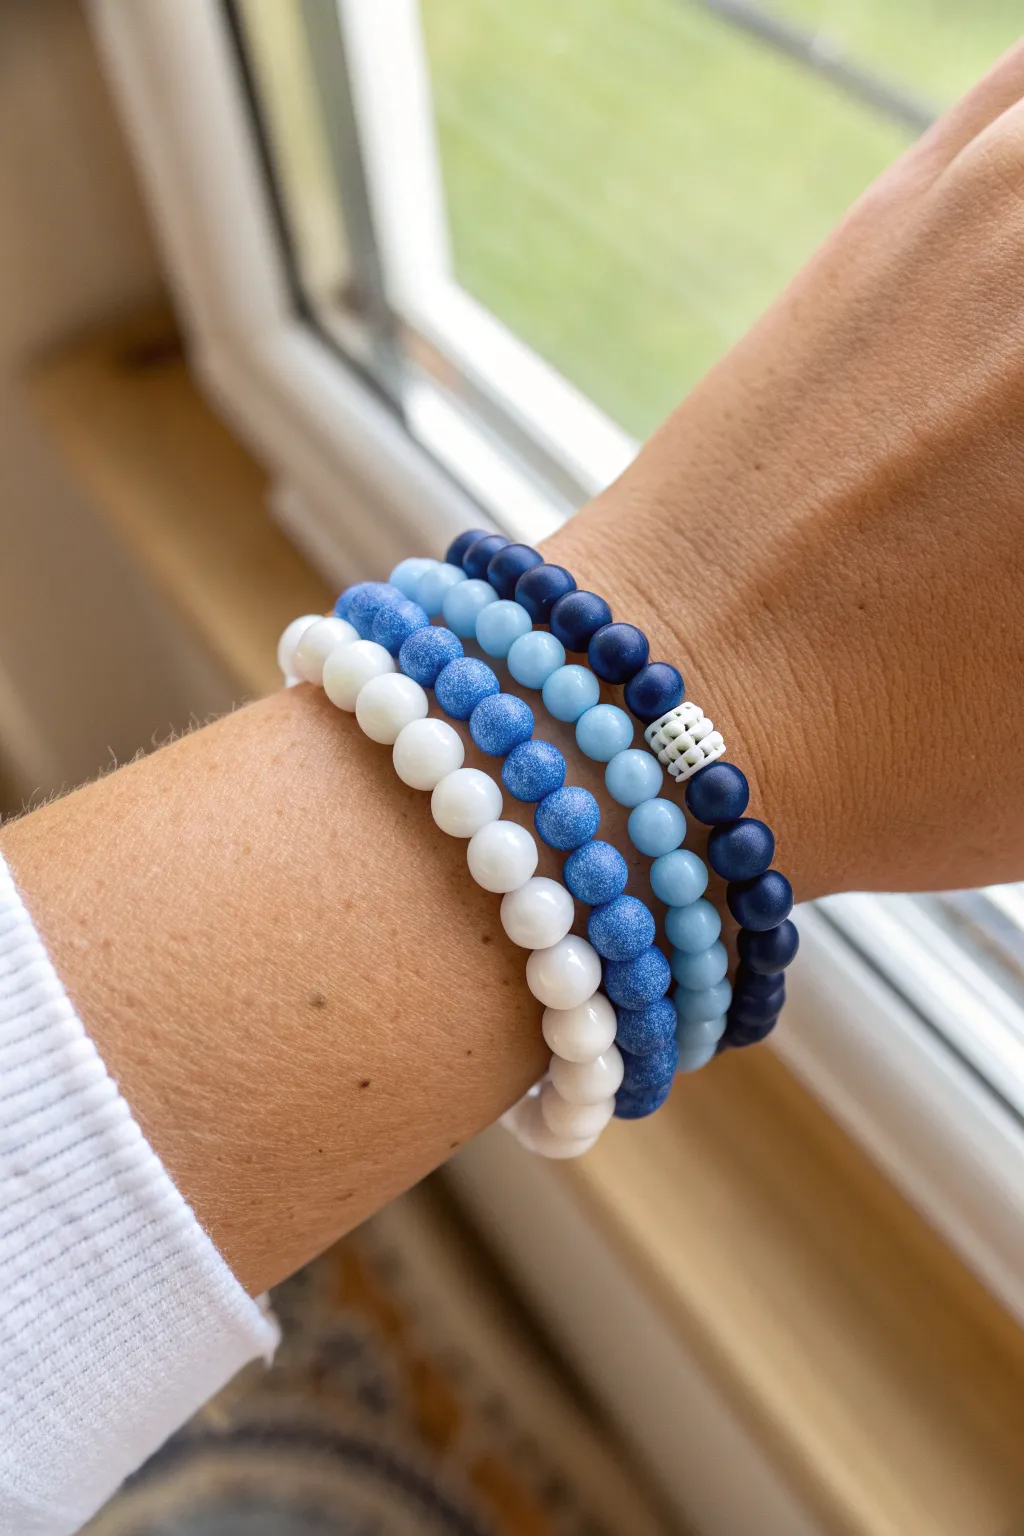
Capture the serene vibes of the ocean with this preppy four-piece bracelet stack that transitions from crisp white to deep navy. Mixing matte, frosted, and smooth textures gives this blue-hued set a sophisticated, store-bought look that is surprisingly simple to string together at home.
Step-by-Step Guide
Materials
- 8mm white jade or polished agate beads
- 8mm speckled or frosted denim blue beads
- 6mm or 8mm light blue matte amazonite or chalcedony beads
- 8mm dark navy blue matte agate or sodalite beads
- One white textured focal bead (barrel or drum shape)
- Strong elastic cord (0.8mm or 1mm recommended)
- Jewelry adhesive or clear nail polish
- Scissors
Step 1: Planning Your Designs
-
Measure your wrist:
Before cutting any string, wrap a piece of string around your wrist to find your comfortable size. Add about 1/2 to 1 inch to this measurement depending on how loose you like your fit. -
Pre-cut the elastic:
Cut four strands of elastic cord, making each strand about 3-4 inches longer than your final wrist measurement to allow plenty of room for tying secure knots. -
Pre-stretch the cord:
Gently give each piece of elastic a few tugs. This pre-stretching step helps prevent the bracelets from sagging or loosening up immediately after you finish them.
Hide the Knot
To get that professional finish, try to gently pull your knot inside the hole of the nearest bead before the glue fully hardens. This hides the mechanics completely.
Step 2: Creating the Solid White Strand
-
String the beads:
Thread your smooth white beads onto the first piece of elastic until you reach your desired length. -
Check the fit:
Wrap the strand around your wrist to ensure it meets end-to-end comfortably without squeezing your skin. -
Tie the knot:
Tie a standard surgeon’s knot (right over left, left over right, and pull tight) or a square knot. -
Secure and trim:
Dab a tiny drop of jewelry glue on the knot, let it dry for a moment, and then trim the excess tail ends close to the knot.
Gold Accents
Elevate the look by adding a single gold spacer bead or a gold heishi disc between every few blue stones for a touch of metallic shine.
Step 3: Creating the Textured Denim Blue Strand
-
Select your texture:
For the second bracelet, use the speckled or frosted denim-colored beads. These usually have a slightly rougher, stone-like texture that contrasts nicely with the smooth white beads. -
String completely:
Fill the second elastic strand entirely with just these blue textured beads. -
Knot and finish:
Secure this bracelet with the same knotting and gluing method used for the white strand.
Step 4: Creating the Light Blue Matte Strand
-
Choose the softest blue:
Use your lightest blue beads for the third layer. Matte amazonite works beautifully here to bridge the gap between the white and dark navy tones. -
String the strand:
Thread these beads onto your third piece of elastic until it matches the length of the previous two bracelets. -
Double-check size:
I always like to compare the unknotted strand against the finished ones to ensure consistency before tying it off. -
Finalize:
Knot, glue, and trim the excess cord.
Step 5: Creating the Navy Focal Strand
-
Start the stringing:
Begin threading your dark navy matte beads onto the final elastic chord. -
Add the focal point:
Once you have strung about half of the beads, slide on your white textured barrel bead. This will act as the centerpiece of your stack. -
Finish the loop:
Continue adding the navy beads until the bracelet is complete, ensuring the white focal bead sits opposite where your knot will be. -
Secure the final piece:
Tie your final secure knot, apply adhesive, and trim the ends carefully to complete your set.
Enjoy wearing your new gradient stack solo or mixed with your other favorite jewelry pieces
Blue Smiley Focal Bead Bracelet
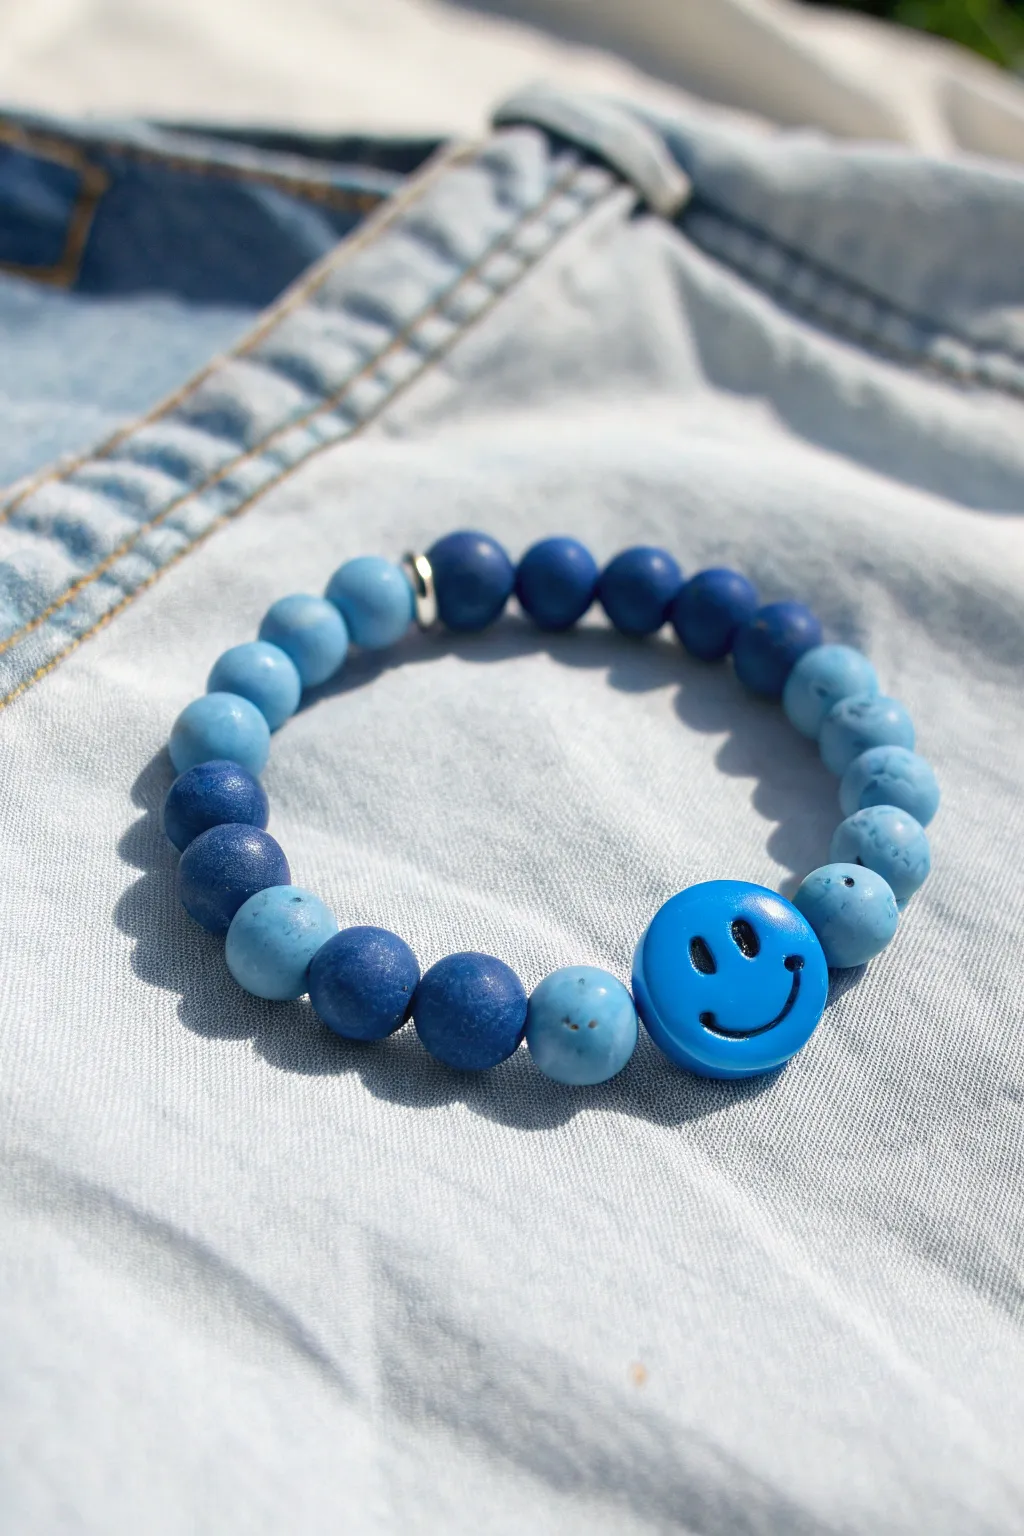
This cheerful accessory combines the soothing tones of ocean waves with a pop of happiness. Featuring a repeating pattern of light and dark blue matte beads centered around a bright smiley face focal, it’s a simple yet stylish project perfect for a quick crafting session.
Step-by-Step Tutorial
Materials
- Elastic stretch cord (0.8mm or 1mm thickness)
- Dark blue round matte stone or clay beads (8mm-10mm)
- Light blue/turquoise round matte stone or clay beads (8mm-10mm)
- Flat round blue smiley face bead
- Silver spacer bead or crimp cover (optional)
- Jewelry glue or clear nail polish
- Scissors
Step 1: Planning and Preparation
-
Measure the cord:
Cut a length of elastic cord about 10-12 inches long. It’s always better to have too much cord than too little, as it makes tying the final knot much easier. -
Pre-stretch the elastic:
Hold the cord firmly at both ends and give it several gentle tugs. This pre-stretching technique ensures the bracelet won’t sag or loosen up immediately after you wear it. -
Secure the end:
Attach a piece of tape or a binder clip to one end of your cord. This acts as a stopper so your beads don’t slide right off while you are stringing them. -
Layout your pattern:
Before stringing, lay your beads out on a bead board or a soft towel. Create a repeating pattern of two dark blue beads followed by two light blue beads. Arrange enough to cover about 6.5 to 7 inches, or your desired wrist circumference.
Knot Strength
For maximum security, refrain from stretching the bracelet vigorously for at least 24 hours to allow the glue to fully cure inside the knot.
Step 2: Stringing the Design
-
Start the sequence:
Begin stringing your beads, following the pattern you laid out. I find it easiest to start with the beads that will end up at the back of the wrist, opposite the focal point. -
Add the first half:
String approximately half of your patterned beads onto the cord. -
Check the spacing:
Pause to make sure the beads are sitting snugly next to each other but not so tight that they buckle. -
Placement of the focal bead:
Thread the large blue smiley face bead onto the cord. Ensure the face is oriented correctly so it won’t be upside down when worn. -
Balance the design:
Continue stringing the remaining patterned beads on the other side of the smiley face. Mirror the pattern from the first half to keep the bracelet symmetrical. -
Add the accent bead:
Depending on your wrist size, you may have a small gap at the back. Add a small silver spacer bead here if desired, which also helps hide the knot later.
Step 3: Finishing Touches
-
Final sizing check:
Wrap the unfinished strand around your wrist to check the fit. It should be comfortable but not loose enough to roll completely over your hand. -
Prepare to knot:
Remove the tape or clip from the end. Bring the two ends of the cord together, ensuring there is no slack in the bead line. -
Tie a surgeon’s knot:
Make a simple overhand knot (right over left), but don’t pull it tight yet. Then, make another loop and pass the end through twice. Pull all four strands (the two tails and the two loop sides) tight to secure it. -
Secure the knot:
Apply a tiny drop of jewelry glue or clear nail polish directly onto the knot. Let this dry for a few minutes to ensure it won’t slip. -
Trim the excess:
Once the glue is dry, use your scissors to trim the excess cord tails close to the knot. Be careful not to snip the main cord. -
Hide the knot:
Ideally, gently tug the bracelet so the knot slides inside the hole of the nearest bead. This gives your project a truly professional, seamless finish.
Texture Play
Mix it up by using wood or lava stone beads for the dark sections. Lava stones are porous and can absorb essential oils for a wearable diffuser.
Slip your new smiley bracelet on and enjoy the cool blue vibes all day long

TRACK YOUR CERAMIC JOURNEY
Capture glaze tests, firing details, and creative progress—all in one simple printable. Make your projects easier to repeat and improve.
Ocean Palette Mix: Teal, Aqua, and Deep Blue
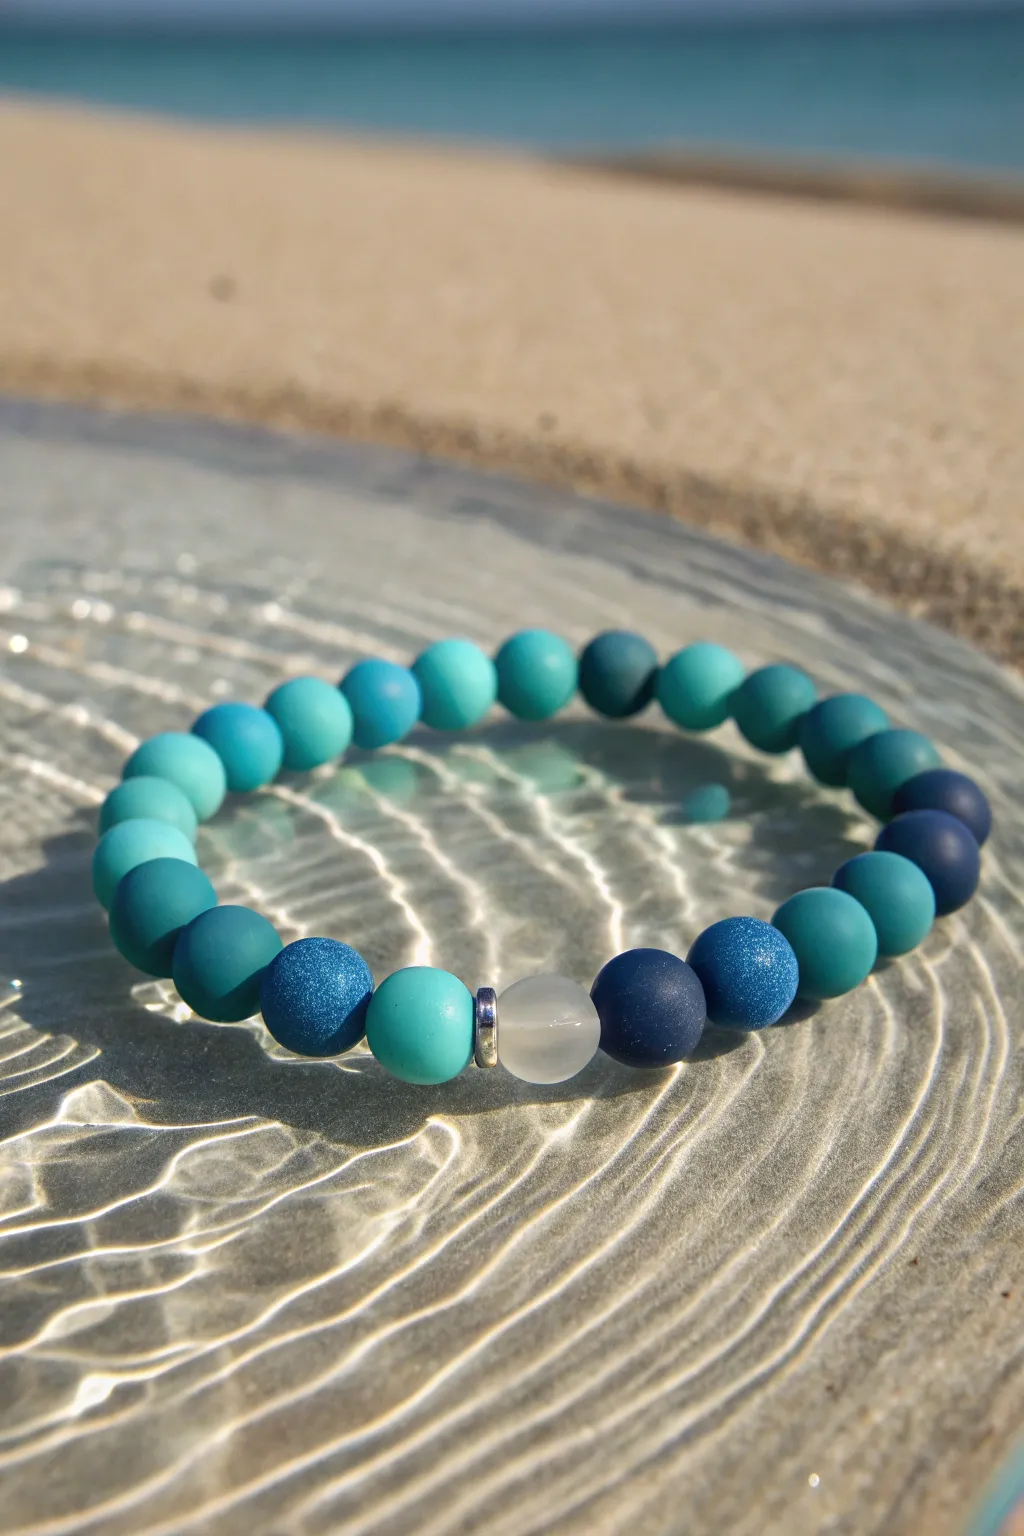
Capture the essence of a tranquil day at the beach with this stunning bracelet featuring a gradient of ocean hues. The mix of matte, frosted, and speckled beads creates a tactile and visual masterpiece that perfectly mimics the shifting colors of coastal waters.
Step-by-Step Tutorial
Materials
- Matte round beads (8-10mm) in varied shades: teal, aqua, turquoise, light blue, and deep navy
- One translucent white frosted glass bead (distal focal bead)
- Small metal spacer rings (silver tone)
- Strong elastic beading cord (0.8mm or 1mm recommended)
- Bead design board or a soft towel
- Scissors
- Jewelry glue or clear nail polish
- Tape or binder clip
Step 1: Planning the Gradient
-
Prepare your workspace:
Lay out your bead design board or a soft towel. Using a design board is helpful because the channels keep round beads from rolling away while you visualize the pattern. -
Analyze the color palette:
Sort your beads by color. Notice that this design relies on an ombré or gradient effect rather than a strict repeating pattern. You have light aquas transitioning into deeply saturated navies. -
Establish the focal point:
Locate the single translucent white frosted bead. This will act as the glowing centerpiece of the bracelet, representing sea glass or a drop of pure water. -
Arrange the darker section:
Select your darkest navy blue beads (some may have a subtle sparkle or speckled finish). Place one on either side of where the focal points will eventually meet at the bottom. -
Build the transition:
Working outwards from the dark navy beads, begin placing the medium teal and turquoise matte beads. Aim for a flow that moves from dark to light as you go around the circle. -
Complete with light hues:
Finish the top of the circle with the lightest aqua and sky-blue beads. Step back and look at the arrangement; adjust the beads until the color transition feels smooth and natural.
Step 2: Stringing the Design
-
Cut the cord:
Cut a piece of elastic cord about 10-12 inches long. This gives you plenty of extra room for tying knots without struggling against tension. -
Secure the end:
Place a piece of tape or a binder clip on one end of the elastic cord to prevent beads from slipping off as you work. -
Start with the focal section:
Thread the translucent white bead onto the cord first. Immediately follow it with a small silver spacer ring. -
Add the first color:
Based on your layout, thread a bright teal bead next to the spacer. This creates a pop of color right next to the white focal point. -
String the remaining beads:
Follow your planned pattern carefully. I find it easiest to pick up beads one by one from the design board to maintain the exact gradient you created. -
Add the final spacer:
Before you close the circle, add the second silver spacer ring so it sits on the other side of the white focal bead when the bracelet is tied. -
Check the fit:
Wrap the strand around your wrist. It should sit comfortably without pinching or gaps. Add or remove a bead from the back section (the lightest colors) if sizing adjustments are needed.
Sticky Fix
If the knot won’t disappear inside a bead, widen the bead hole slightly with a bead reamer tool, or ensure your knot is pulled extremely tight before gluing.
Step 3: Finishing Touches
-
Pre-stretch the cord:
Hold both ends of the elastic and give the bracelet a gentle tug. This pre-stretching prevents the bracelet from becoming loose immediately after wearing it. -
Tie the knot:
Tie a surgeon’s knot (right over left, left over right) or a strong square knot. Pull the elastic tight so the beads nestle closely together. -
Secure the knot:
Apply a tiny dab of jewelry glue to the knot. Let it dry completely according to the glue manufacturer’s instructions. -
Hide the mechanics:
Once the glue is dry, trim the excess elastic carefully. If possible, gently tug the knot so it slides inside the hole of the large translucent bead or one of its neighbors.
Texture Tip
Mix bead textures intentionally! Combine smooth matte rubber-coated beads with slightly rougher ‘sugar’ texture beads to mimic the feeling of sand and sea.
Slip on your new bracelet and enjoy the calming coastal vibes it brings to your outfit
Blue and White Checkerboard Clay Bead Pattern
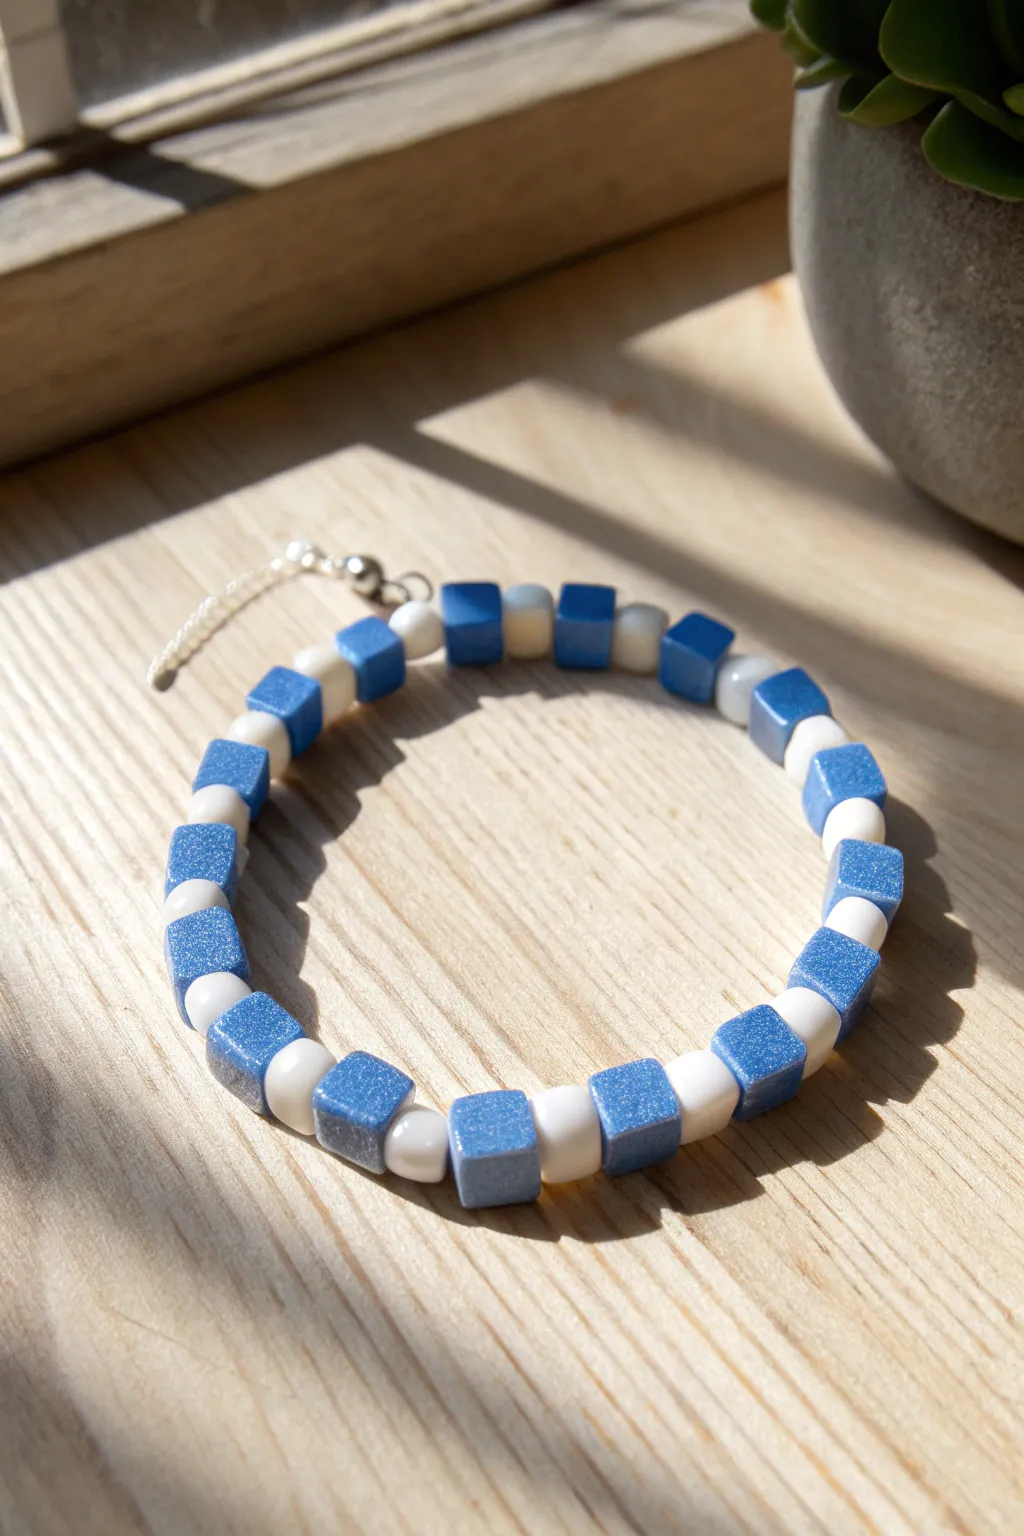
This charming bracelet combines geometric blue cube beads with simple white spacers to create a crisp checkerboard effect. The sparkling blue cubes catch the light beautifully, making this a perfect accessory for sunny days.
How-To Guide
Materials
- 10mm Blue glitter cube beads (about 16-18 count)
- 6mm White round or polymer clay disc spacer beads (about 16-18 count)
- Strong elastic bead cord (0.8mm clear)
- Scissors
- Hypo cement or clear jewelry glue
- Tape or bead stopper
- Measuring tape
- Optional: Crimp bead cover (silver)
Step 1: Preparation
-
Measure your wrist:
Wrap a measuring tape comfortably around your wrist to determine the needed length. Add about 1 inch (2.5 cm) to this measurement to account for the bulk of the cube beads. -
Cut the cord:
Cut a piece of elastic cord approximately 10-12 inches long. Having extra length makes the final knotting process much easier. -
Secure the end:
Attach a piece of tape or a bead stopper to one end of your elastic cord to prevent beads from slipping off while you work. -
Pre-stretch the cord:
Give the elastic several firm tugs along its length. Pre-stretching prevents the bracelet from sagging or expanding permanently after you wear it for the first time.
Step 2: Beading the Pattern
-
Start with a spacer:
Thread one white round spacer bead onto the cord first. Starting with a smaller bead often makes hiding the final knot easier. -
Add a cube:
Slide on one blue glitter cube bead. Ensure the hole is centered if these are handmade clay beads, so they sit evenly. -
Establish the rhythm:
Add another white spacer bead, followed by another blue cube. Push them down to meet the first beads. -
Continue the pattern:
Repeat the alternating sequence: one white spacer, one blue cube. I find it helpful to lay out my beads beforehand to ensure I have enough of each to complete the loop. -
Check the length:
Periodically wrap the strand around your wrist. Stop adding beads when the ends meet comfortably without stretching the elastic tight. -
Verify the pattern end:
Ensure your last bead is a blue cube. Since you started with a white spacer, ending with a cube will maintain the continuous alternating pattern when joined.
Knot Security Tip
When tightening your final knot, pull on all four strands (the two tails and the two loop sides) individually to ensure maximum tightness.
Step 3: Finishing Touches
-
Prepare for the knot:
Remove the tape or bead stopper carefully while holding both ends of the elastic firmly. -
Tie the first knot:
Cross the ends and tie a simple overhand knot. Pull it tight enough to bring the beads together but not so tight that the bracelet puckers. -
Secure with a surgeon’s knot:
For the main security knot, wrap the elastic around twice before pulling through (a surgeon’s knot). Pull the cords firmly to cinch the knot down small. -
Add adhesive:
Dab a tiny drop of Hypo cement or clear jewelry glue directly onto the knot. Let it dry for a few minutes. -
Hide the knot:
If the hole of your blue cube bead is large enough, gently tug the elastic so the knot slides inside the bead to conceal it. -
Trim excess:
Once the glue is fully cured, use sharp scissors to trim the excess elastic tails close to the knot. -
Final inspection:
Gently stretch the finished bracelet to ensure the knot is holding and the beads are sitting flush against each other.
Two-Tone Twist
Try using two different shades of blue cubes for a gradient effect, or swap the white spacers for small silver beads for a metallic look.
Your sparkling checkerboard bracelet is complete and ready to add a cool pop of color to any outfit
Denim-Inspired Blue Bracelet With Washed Tones
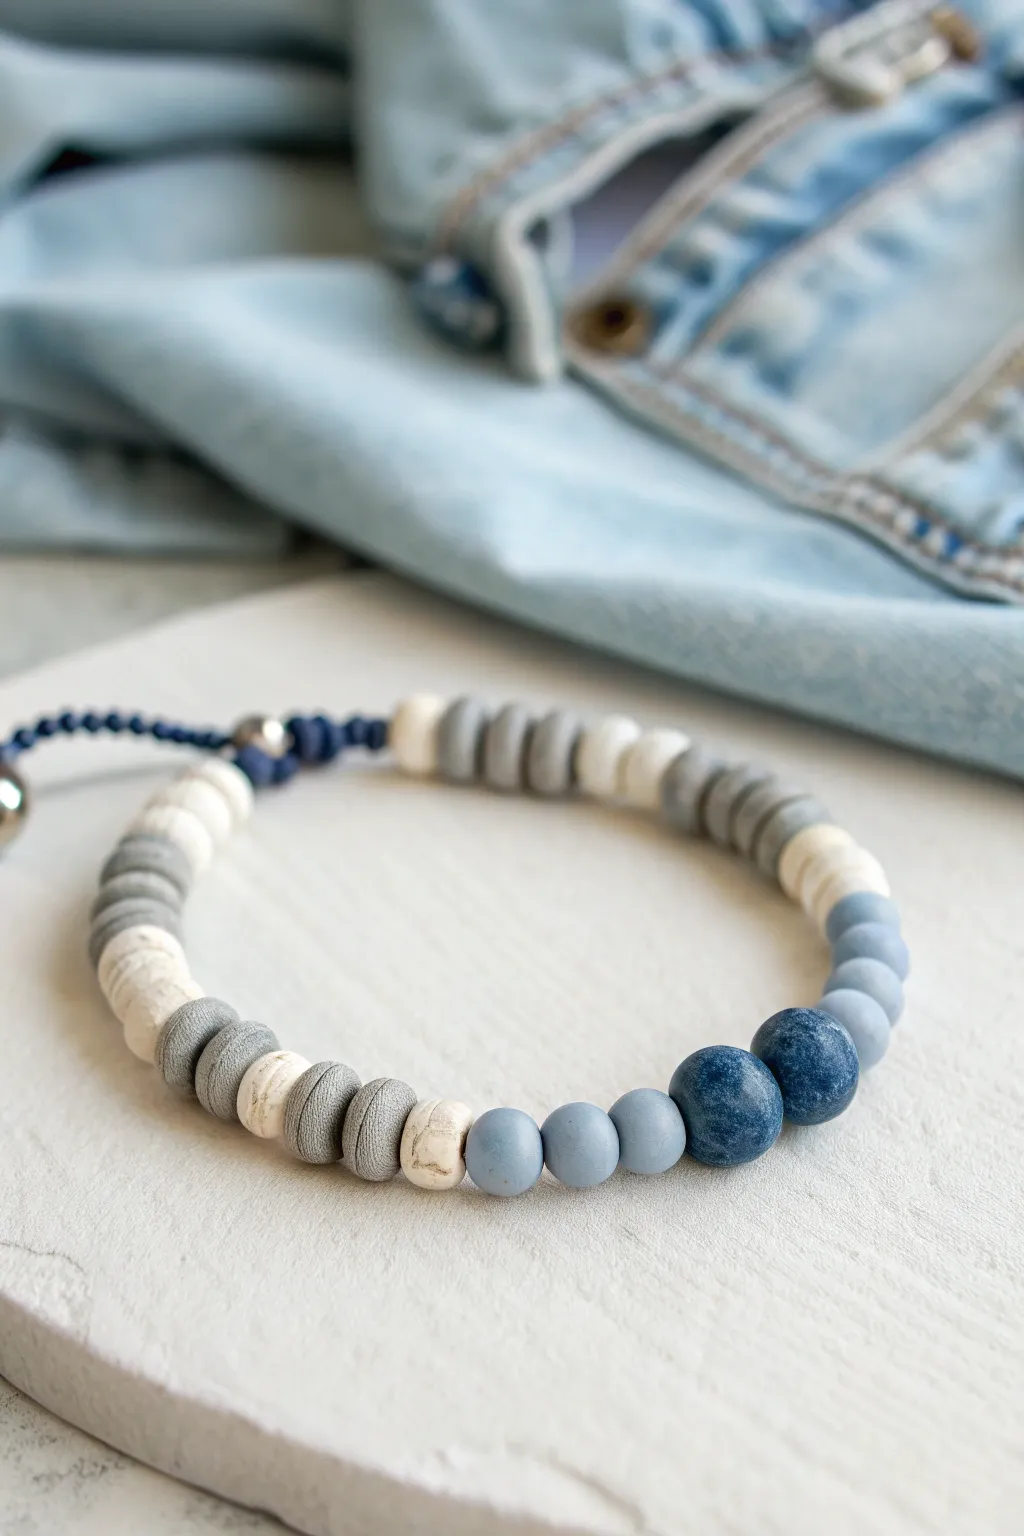
Capture the casual elegance of your favorite pair of jeans with this beautifully textured bracelet. Combining matte clay discs in grey and white with distinct denim-blue rounds, this piece offers a relaxed, washed-out color palette perfect for everyday wear.
Step-by-Step
Materials
- Grey polymer clay heishi beads (approx. 6mm)
- White or cream speckled heishi beads (approx. 6mm)
- Light blue matte round beads (6mm or 8mm)
- Dark denim-blue speckled/stone-look round beads (10mm)
- Dark navy blue nylon cord (0.8mm or 1mm)
- Scissors
- Lighter (for sealing cord ends)
- Design board or ruler
- Beading needle (optional, large eye)
Step 1: Preparing the Cord
-
Measure and cut:
Cut a length of navy blue nylon cord roughly 20 inches long. This generous length allows plenty of room for knotting the adjustable closure later. -
Seal just one end:
Briefly run a lighter flame over one end of the cord to melt it into a stiff needle-like point. This makes stringing the beads much easier without fraying. -
Tie a temporary stop knot:
About 4 inches from the unsealed end, tie a simple loose overhand knot. This prevents your beads from sliding off while you design your pattern.
Tight Knotting Trick
When tying the final knots against the beads, insert a sewing needle into the loop of the knot. Push the knot down flush against the bead with the needle before pulling tight.
Step 2: Designing the Pattern
-
Start with the focal point:
Locate your two large, dark denim-blue round beads. Place these side-by-side in the center of your design board to anchor the look. -
Add the transition beads:
On either side of the dark focal beads, place three light blue matte round beads. This creates a soft gradient from the heavy focal point to the lighter sides. -
Begin the disc sections:
Next to the light blue rounds on the left side, adds a single white speckled heishi bead, followed by three grey heishi beads, then another white speckled bead. -
Mirror the right side:
Repeat that exact sequence on the right side: one white speckled, three grey, one white speckled. -
Create the grey block:
Moving outward on the left, add a solid blocks of grey heishi beads. Use about 5-6 beads here to create a definitive section of neutral color. -
Alternate for texture:
Follow the grey block with a pattern of alternating: one white, one grey, one white, one grey. I like to do this for about an inch of length to break up the visual weight. -
Finish the strand:
Continue adding grey and white heishi beads in small groups until the beaded portion measures about 6 to 6.5 inches, or fits comfortably around your wrist with a little gap.
Add Silver Accents
Insert thin silver spacer discs between the blue round beads and the clay heishi sections. It adds a subtle metallic shine that mimics the rivets on jeans.
Step 3: Stringing and Assembly
-
Thread the beads:
Using the stiffened end of your cord, transfer your beads from the board to the string, following the pattern exactly. -
Check the fit:
Wrap the beaded section around your wrist. The ends of the beadwork should almost touch, leaving room for the knot mechanism. -
Secure the ends:
Tie an overhand knot tightly against the last bead on both sides of the bracelet to lock the beads in place. Ensure no gaps are showing between beads.
Step 4: Creating the Closure
-
Cross the cords:
Lay the bracelet in a circle so the two cord tails cross over each other parallel. -
Prepare the sliding knot:
Cut a separate 8-inch piece of the navy cord. Lay it under the two crossed tail cords. -
Tie the square knot:
Create a macramé square knot around the crossed tails. Loop the left cord over, the right cord over that, then under and through the loop. Pull tight. -
Continue knotting:
Repeat the square knot motion, alternating starting sides (left, then right), for about half an inch creates a sturdy slider. -
Trim and melt:
Cut off the excess cord from the square knots (not the bracelet tails!) and carefully melt the tips with a lighter to fuse the knot so it doesn’t unravel. -
Finish the tails:
Tie a small knot at the very end of each bracelet tail cord and melt the tips. You can add a small metal bead before the knot for a polished look.
Now you have a versatile accessory that pairs perfectly with your favorite denim jacket
Blue Shell Charm Beach Bracelet
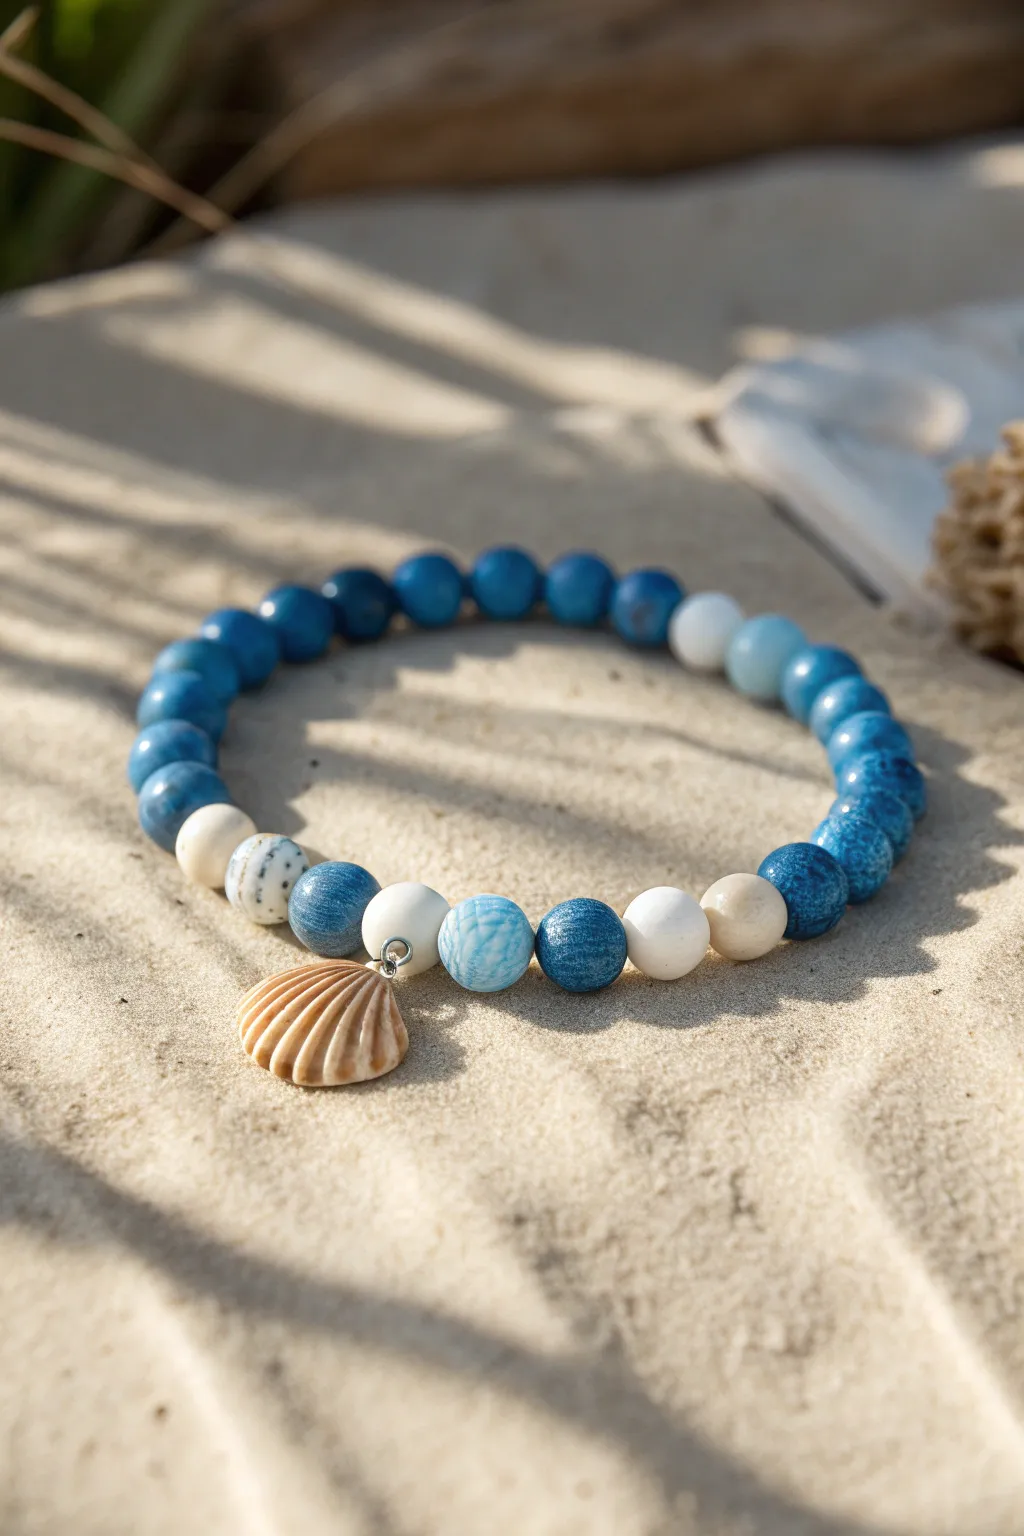
Capture the essence of a serene day at the beach with this textured blue and white stone bead bracelet. Featuring a delightful natural shell charm as the focal point, this piece mixes marbled blue tones with sandy whites for a perfect summer accessory.
Detailed Instructions
Materials
- 8mm dark blue marbled stone or clay beads
- 8mm white stone or clay beads
- 8mm light blue/sky blue speckled bead (focal)
- 8mm white speckled/dalmatian style bead (focal)
- Natural scallop shell charm with silver jump ring attached
- 0.8mm clear elastic stretch cord
- Jewelry adhesive (e.g., G-S Hypo Cement)
- Scissors
Step 1: Preparation
-
Measure your wrist:
Before cutting any cord, wrap a measuring tape around your wrist to find your size. Add about half an inch to this measurement for a comfortable fit that isn’t too tight. -
Cut the cord:
Cut a piece of elastic cord roughly 10-12 inches long. I always like to give myself plenty of extra slack to make the final knotting process much easier. -
Secure the end:
Attach a piece of tape or a bead stopper to one end of your cut cord. This crucial step prevents your beads from sliding right off onto the floor while you are stringing them.
Knot Slipping?
If your elastic knot feels loose, try tying a second surgeon’s knot on top of the first. Pull all four strands (two tails, two loops) to tighten well.
Step 2: Designing the Focal Section
-
Start the center pattern:
Begin by threading the specific focal beads that will frame the charm. Slide on the 8mm light blue speckled bead, followed by one plain white bead. -
Add the charm:
Thread the elastic through the jump ring of your scallop shell charm. Ensure the concave side of the shell is facing the direction you want it to rest against the wrist. -
Complete the center:
Immediately follow the charm with another plain white bead, and then the white speckled bead on the other side. This creates a symmetrical frame for the shell.
Add Sparkle
Intersperse tiny silver spacer beads or discs between the blue stones to give the bracelet a touch of metallic shimmer that catches the light.
Step 3: Stringing the Band
-
Begin the blue gradient:
On the side with the white speckled bead, add one dark blue marbled bead. -
Add contrast:
Follow that dark blue bead with a plain white bead. This white accent helps separate the focal section from the rest of the bracelet. -
String the primary color:
Thread approximately 8 to 10 of the dark blue marbled beads onto this side of the cord. The number will depend on your wrist size. -
Work the other side:
Remove the bead stopper or tape (carefully!) and repeat the process on the other end: add one dark blue bead, then one plain white bead. -
Finish the loop:
Fill the rest of this side with dark blue beads until the bracelet reaches your desired length. -
Check the fit:
Bring the two ends together around your wrist to ensure the size is correct. The beads should touch comfortably without gaps, but shouldn’t pinch your skin.
Step 4: Finishing Touches
-
Pre-stretch the cord:
Give the ends of the elastic a firm but gentle pull. Pre-stretching helps prevent the bracelet from loosening up significantly after the first few times you wear it. -
Tie the knot:
Tie a surgeon’s knot (a square knot with an extra loop through) to secure the bracelet. Pull the threads tight until you feel the elasticity lock the knot in place. -
Apply adhesive:
Dab a tiny drop of jewelry glue or G-S Hypo Cement directly onto the knot. Let this dry for a few minutes; it ensures the knot won’t slip undone over time. -
Hide the knot:
Once the glue is tacky but set, trim the excess cord ends close to the knot. Gently tug the bracelet so the knot slides inside the hole of the nearest large bead to hide it.
Now you have a beautiful piece of seaside jewelry ready to wear on your next adventure
Blue Marble Swirl Polymer Clay Bead Look
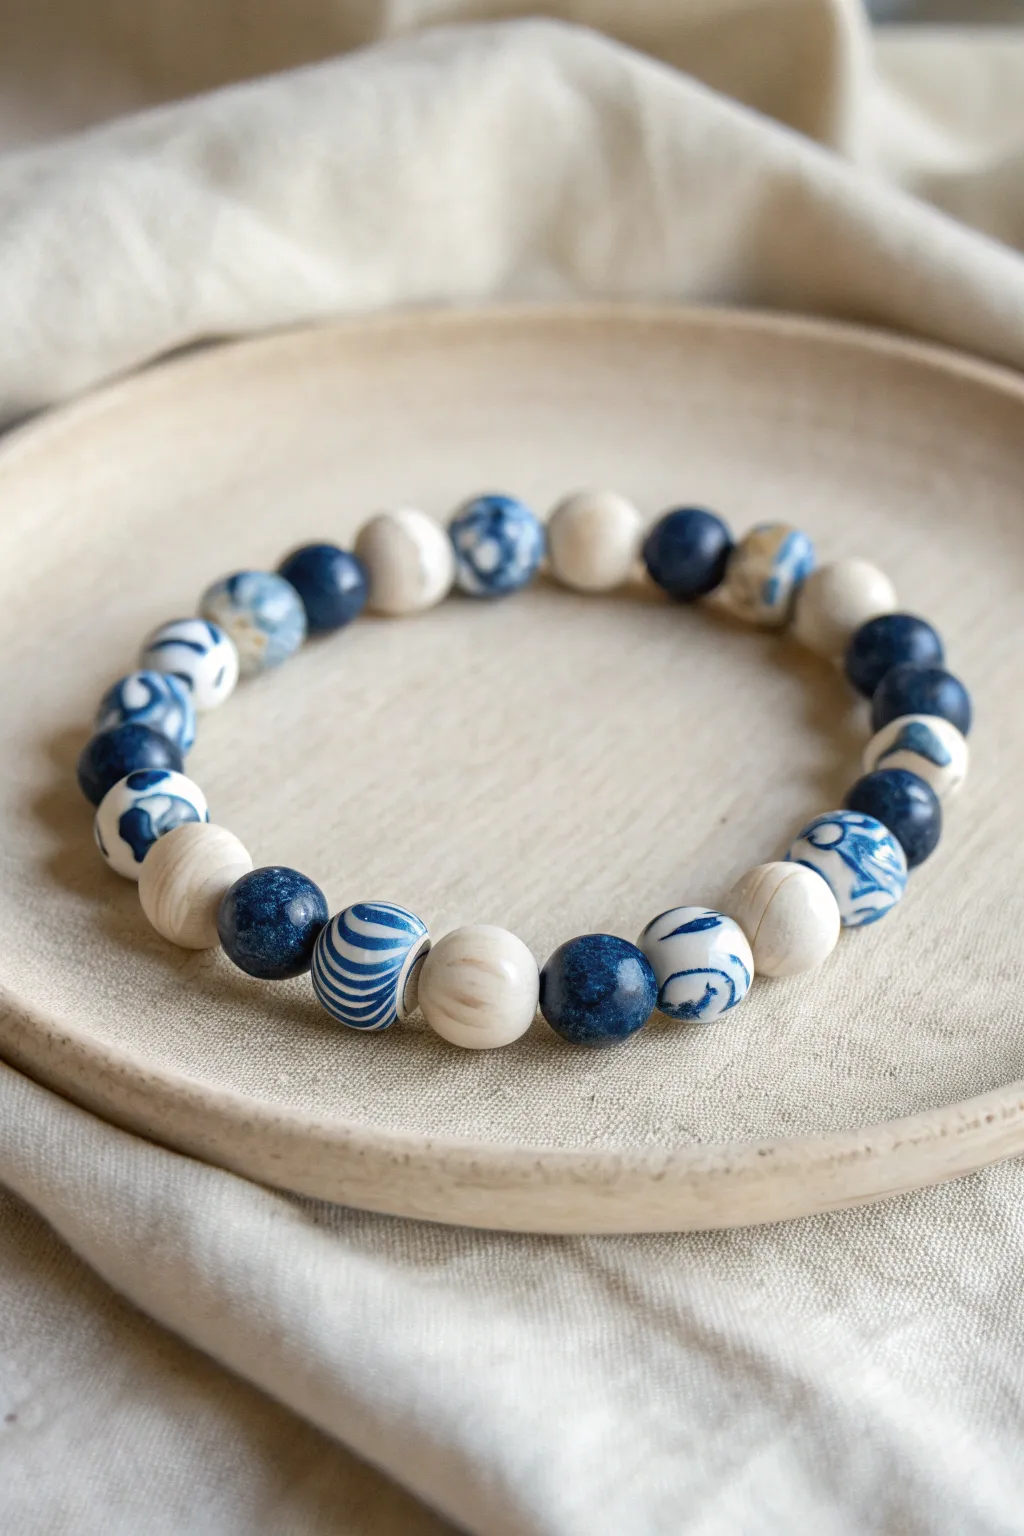
Capture the serene essence of ocean waves with this elegant polymer clay bracelet. Featuring a stunning mix of solid indigo, creamy white, and intricately swirled beads, this project creates a wearable piece of art that mimics high-end ceramic jewelry.
How-To Guide
Materials
- Polymer clay in Indigo Blue
- Polymer clay in White or Light Cream
- Acrylic roller or pasta machine
- Clay blade or tissue blade
- Bead rolling tool (optional but helpful for uniform size)
- Bead piercing pins or toothpicks
- Baking sheet and parchment paper
- Elastic jewelry cord (0.7mm or 0.8mm)
- Jewelry glue (GS Hypo Cement recommended)
- Wet/dry sandpaper (400, 600, 800 grit)
- Gloss water-based polyurethane varnish or resin (optional for shine)
Step 1: Preparing the Clay
-
Condition the clay:
Start by warming the white and indigo clay separately in your hands. Knead them until they are soft, pliable, and free of cracks. -
Create base logs:
Roll each color into a smooth log of relatively equal thickness. This makes it easier to portion out consistent amounts of clay.
Muddy colors?
Clean hands/rollers between colors! If blue smudges your white clay, wipe it off with a baby wipe or a bit of rubbing alcohol before baking.
Step 2: Creating the Bead Designs
-
Cut portions for solid beads:
Use your blade to cut equal-sized segments from the white log for your solid cream beads. Do the same with the blue log for solid indigo beads. Set these designated pile aside. -
Prepare the marble mix:
To create the marbled effect, take a portion of white clay and a smaller portion of blue clay. Roll them into thin snakes. -
Twist and fold:
Twist the white and blue snakes together like a candy cane. Fold the twisted log in half and twist again. Repeat this folding and twisting process 3-4 times, but stop before the colors blend completely into a new light blue shade. -
Form the swirl log:
Roll this marbled mixture back into a log shape. -
Slice marbled segments:
Slice segments from this marbled log. Check the cross-section of each slice; this is where the beautiful swirl pattern lives. -
Create distinct patterned beads:
For beads with distinct stripes (like the one in the center foreground), layer thin sheets of white and blue, stack them, and cut slices to wrap around a core ball of scrap clay.
Go Geometric
Instead of round spheres, try hand-cutting heishi or cube shapes for a modern twist on this classic blue and white palette.
Step 3: Rolling and Baking
-
Roll spheres:
Take each cut segment and roll it between your palms to form a smooth sphere. I find using a light circular motion prevents flattening the sides. -
Check sizes:
Line up your raw beads to ensure they are roughly the same diameter. Adjust by adding or removing tiny bits of clay if needed. -
Texture the white beads (optional):
If you want the bone-like texture seen in the photo, lightly scratch the surface of your solid white beads with sandpaper before baking. -
Pierce the holes:
Gently insert a bead pin or toothpick through the center of each sphere. Rotate the pin as you push to avoid distorting the sphere shape. -
Bake carefully:
Arrnage the beads on a parchment-lined baking sheet. Bake according to your clay manufacturer’s instructions (usually 275°F/135°C for 15-30 minutes per 1/4 inch thickness). -
Cool down:
Allow the beads to cool completely in the oven or on a wire rack before handling. They are fragile while warm.
Step 4: Finishing and Assembly
-
Sand and buff:
Using wet sandpaper, gently sand any fingerprints or imperfections off the beads under running water. Start with 400 grit and work up to 800 for a satin finish. -
Varnish (Optional):
If you prefer the glossy, ceramic look shown in some of the swirled beads, apply a thin coat of gloss varnish or UV resin and let cure. -
Plan your layout:
Arrange your finished beads on a bead board or towel. Alternate patterns: try a sequence like solid white, solid blue, swirl, solid white to maximize contrast. -
String the beads:
Cut a piece of elastic cord about 10 inches long. Pre-stretch it by pulling on it gently a few times. Thread your beads onto the cord. -
Check the fit:
Wrap the strand around your wrist to check the size. Add or remove beads until it sits comfortably. -
Tie the knot:
Tie a strong surgeon’s knot (right over left twice, then left over right). Pull tight to secure. -
Secure and hide:
ide the knot inside one of the larger beads. Add a tiny dot of jewelry glue to the knot before pulling it inside the bead hole.
Enjoy styling your new handcrafted accessory with your favorite denim or summer linen
Blue Terrazzo Speckled Clay Bead Bracelet
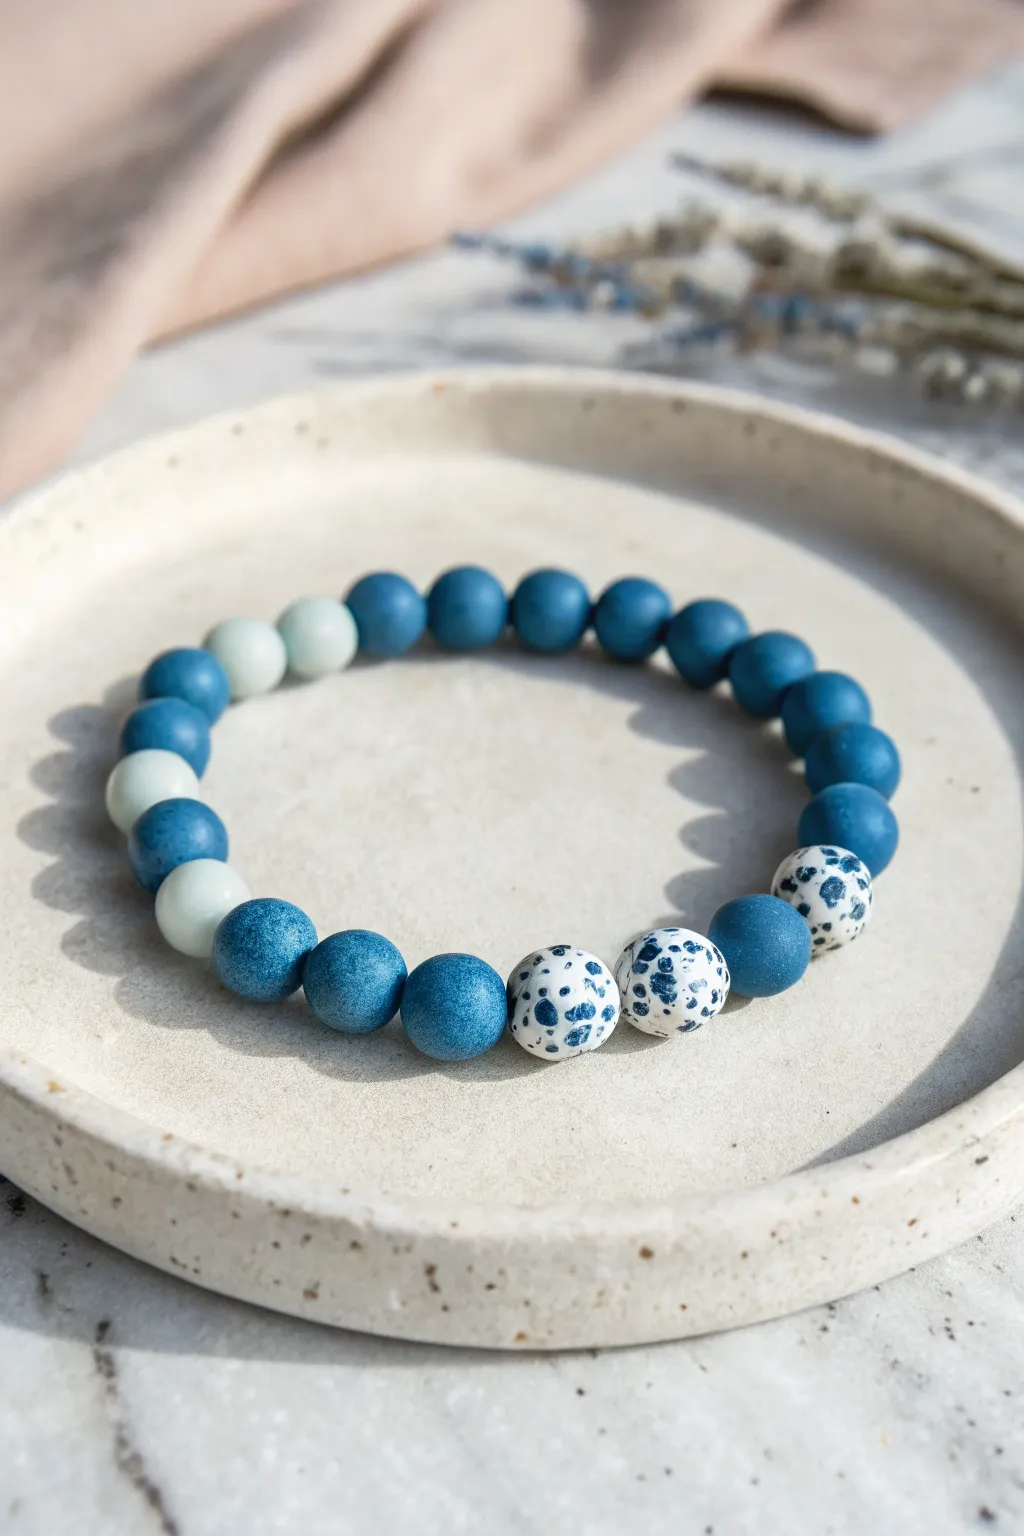
Embrace cool, calming tones with this stylish polymer clay bracelet featuring a mix of solid matte hues and eye-catching terrazzo patterns. The contrasting speckled beads add a modern, artistic touch to the classic blue palette, making it a perfect accessory for everyday wear.
Detailed Instructions
Materials
- Polymer clay in deep navy blue
- Polymer clay in medium denim blue
- Polymer clay in light mint or pale blue
- Polymer clay in white
- Bead rolling tool or acrylic block
- Needle tool or toothpick
- Elastic stretch cord (0.7mm or 0.8mm)
- Super glue or jewelry cement
- Scissors
- Parchment paper and baking tray
Step 1: Creating the Solid Beads
-
Condition the clay:
Start by kneading your deep navy, denim blue, and light mint clays separately until they are soft and pliable. This conditioning step prevents cracks during baking. -
Portion the clay:
Pinch off small pieces of each solid color. Aim for portions that will roll into balls roughly 8mm to 10mm in diameter. -
Roll the spheres:
Place a portion of clay between your palms or use a bead roller to shape it into a perfectly smooth sphere. Repeat this process until you have around 10-12 deep blue/denim beads and 3-4 light mint beads. -
Pierce the holes:
While the clay is still raw, gently insert a needle tool or toothpick through the center of each sphere. I find rotating the tool while pushing helps keep the bead round.
Sticky Situation?
If fingerprints are ruining your smooth round beads, lightly dust your palms with cornstarch before rolling. You can also wipe raw beads with baby oil to smooth prints.
Step 2: Making the Terrazzo Beads
-
Prepare the base:
Condition and roll out your white polymer clay into small spheres, just like you did for the solid colors. You need three of these base beads. -
Create the speckles:
Take a tiny amount of your deep blue clay and chop it into very fine, uneven crumbs using a blade. -
Apply the pattern:
Gently roll the white spheres into the pile of blue crumbs so the bits stick to the surface. -
Embed the flecks:
Roll the speckled bead between your palms again. Apply gentle pressure to smooth surface; this forces the blue crumbs flat into the white clay creating that terrazzo look. -
Pierce the speckled beads:
Carefully poke a hole through the center of your three terrazzo beads, ensuring you don’t distort the new pattern.
Texture Twist
Before baking, roll your solid blue beads gently over coarse sandpaper or use a scouring pad to give them a stone-like texture that contrasts with the smooth terrazzo.
Step 3: Baking and Assembly
-
Bake the beads:
Arrange all your beads on a baking tray lined with parchment paper. Bake according to your clay manufacturer’s instructions (usually around 275°F/135°C for 15-30 minutes). -
Cool down:
Allow the beads to cool completely before determining your layout. They harden fully as they cool. -
Plan the design:
Lay out your design on a bead board or towel. Recreate the photo by grouping the three terrazzo beads together, followed by the deep blue solids, and placing the light mint beads as an accent section on the opposite side. -
String the beads:
Cut a piece of elastic cord about 10 inches long. Thread your beads onto the cord in your chosen pattern. -
Test the size:
Wrap the strand around your wrist to check the fit. Add or remove solid blue beads if necessary for a comfortable fit. -
Tie the knot:
Tie a standard square knot and pull it tight. I like to stretch the elastic slightly before tying the final pull to prevent future sagging. -
Secure the knot:
Add a tiny drop of super glue or jewelry cement to the knot to lock it in place. -
Hide the end:
Once the glue is dry, trim the excess cord and gently tug the layout helps slip the knot inside the hole of a neighboring bead.
Enjoy wearing your handcrafted accessory that brings a splash of artistic blue to any outfit
Icy Blue and Clear Accent “Frozen” Bracelet
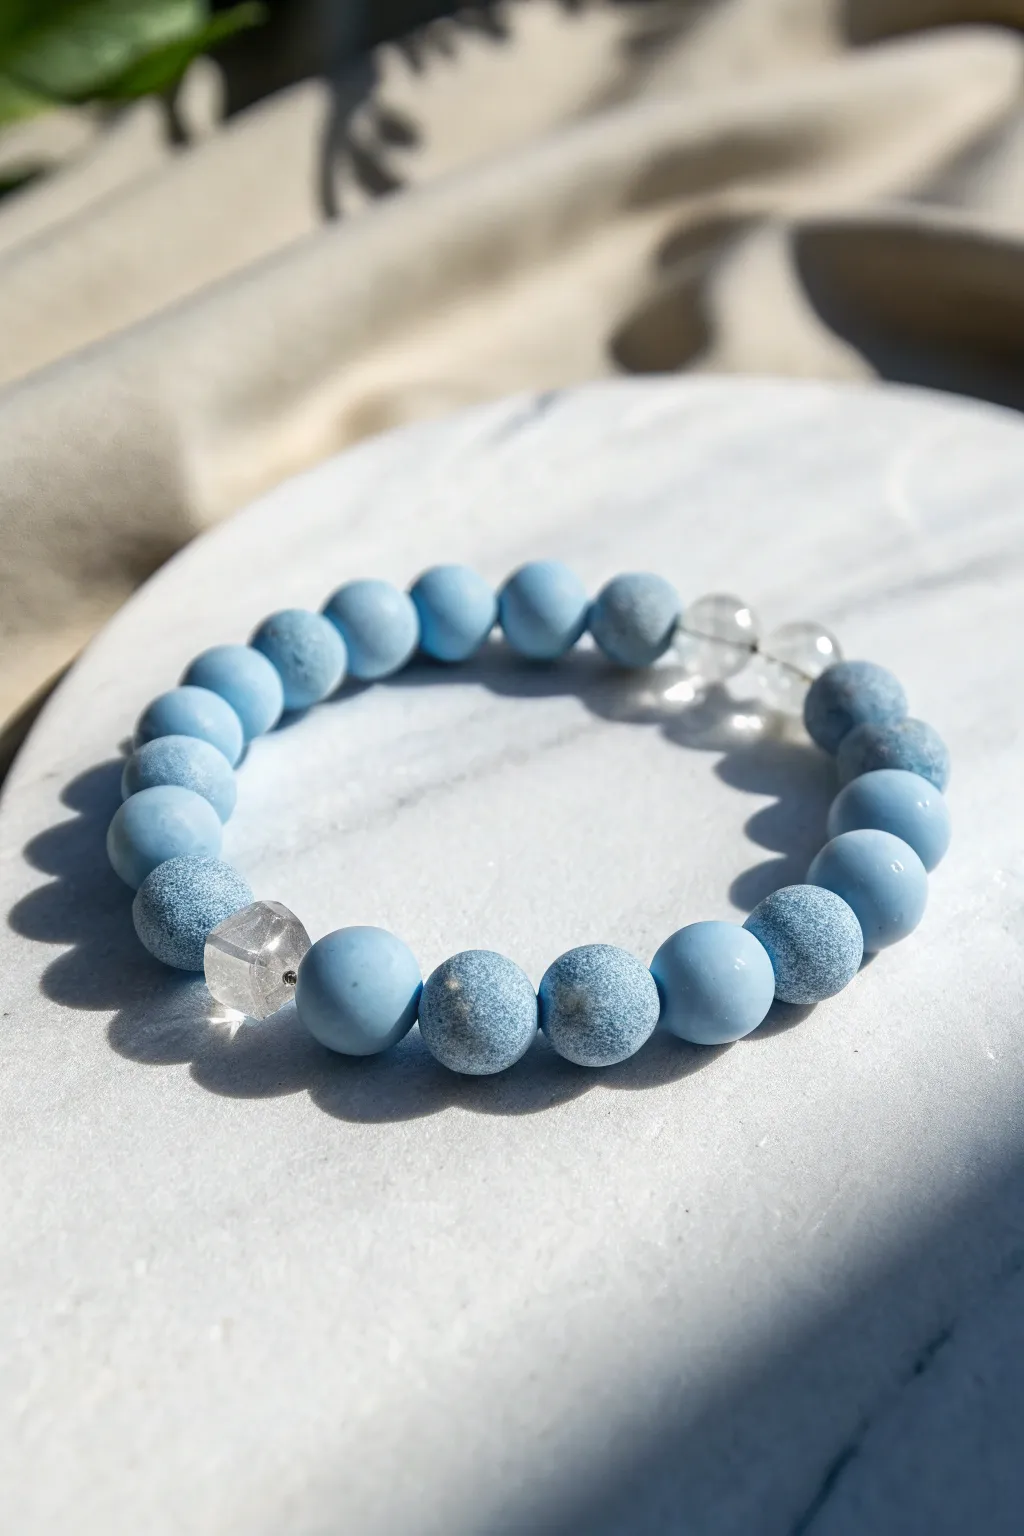
Capture the serene chill of winter with this elegant beaded bracelet that mixes textures for visual interest. The combination of smooth matte blue, textured stone-like beads, and sparkling clear crystals creates a sophisticated “frozen” aesthetic perfect for any season.
Step-by-Step Guide
Materials
- 8mm matte powder blue round beads (approx. 10-12)
- 8mm textured blue round beads (frosted or speckled finish, approx. 6-8)
- 8mm clear quartz or glass crackle beads (3)
- 6mm clear spacer beads (optional)
- High-quality elastic cord (0.8mm recommended)
- Beading glue or clear nail polish
- Scissors
- Bead stopper or tape
- Measuring tape
Step 1: Preparation
-
Measure Your Wrist:
Wrap your measuring tape comfortably around your wrist where you want the bracelet to sit. Add about half an inch to this measurement to ensure the bracelet isn’t too tight once the beads are on. -
Cut the Cord:
Cut a length of elastic cord about 10-12 inches long. This extra length might seem excessive, but I find it makes the final knot-tying process much less frustrating. -
Pre-stretch the Elastic:
Hold the cord firmly at both ends and give it several gentle tugs. Pre-stretching prevents the bracelet from loosening up and becoming baggy after you wear it a few times. -
Secure the End:
Place a bead stopper or a piece of tape on one end of the cord to stop your beads from sliding right off as you work.
Choosing Texture
Look for “frosted agate” or “matte amazonite” to get that specific stone-like texture shown in the photo. It mimics ice much better than standard glossy plastic beads.
Step 2: Design and Stringing
-
Plan Your Pattern:
Lay your beads out on a designated bead board or a soft towel. The design shown uses an alternating pattern: groups of smooth matte blue beads separated by textured blue beads, with a focal point of clear crystals. -
Start with Smooth Blue:
Begin threading by adding about 3 or 4 of the smooth matte powder blue beads onto the elastic. -
Add Texture:
Thread on one of the textured blue beads. These beads add that stone-like, frosty depth to the piece. -
Create the Crystal Cluster:
This is the signature ‘frozen’ element. Thread on your clear quartz or glass beads. You can group two or three together to mimic a chunk of ice. -
Continue the Pattern:
Resume with your blue beads. Try to mirror the start of your pattern, perhaps adding a textured bead followed by a run of smooth ones. -
Mix Up the Rhythm:
Don’t feel the need to be perfectly symmetrical. As seen in the reference, alternating between a single textured bead and a pair of smooth beads creates an organic feel. -
Check the Fit:
Once you have strung enough beads to match your wrist measurement, wrap the unfinished strand around your wrist to check the sizing. It should touch your skin without digging in.
Knot Slipping?
If your knot slips out of the bead hole, the hole might be too small. Try re-tying next to a bead with a larger drilling hole or use a bead reamer to gently widen it.
Step 3: Finishing
-
Prepare the Knot:
Remove the bead stopper carefully, holding both ends of the elastic securely. -
Tie the First Loop:
Cross the ends and make a simple overhand knot. Pull it tight, allowing the beads to snuggle up against each other. -
The Surgeon’s Knot:
For the second knot, wrap the elastic end through the loop twice instead of once before pulling tight. This extra friction holds the knot securely in place. -
Apply Adhesive:
Ideally, locate a bead with a larger hole near the knot. Before sliding the knot inside, dab a tiny drop of jewelry glue onto the knot itself. -
Hide the Knot:
While the glue is wet, pull the elastic firmly so the knot slips inside the adjacent bead. This hides the mechanics and protects the knot from wear. -
Trim the Ends:
Once the glue has set for a minute, use your scissors to trim the excess elastic cord close to the bead hole. Be very careful not to nick the main cord.
Now you have a cool, refreshing accessory ready to complement your winter wardrobe or cool down a summer outfit
Midnight Blue Galaxy Bracelet With Star Accents
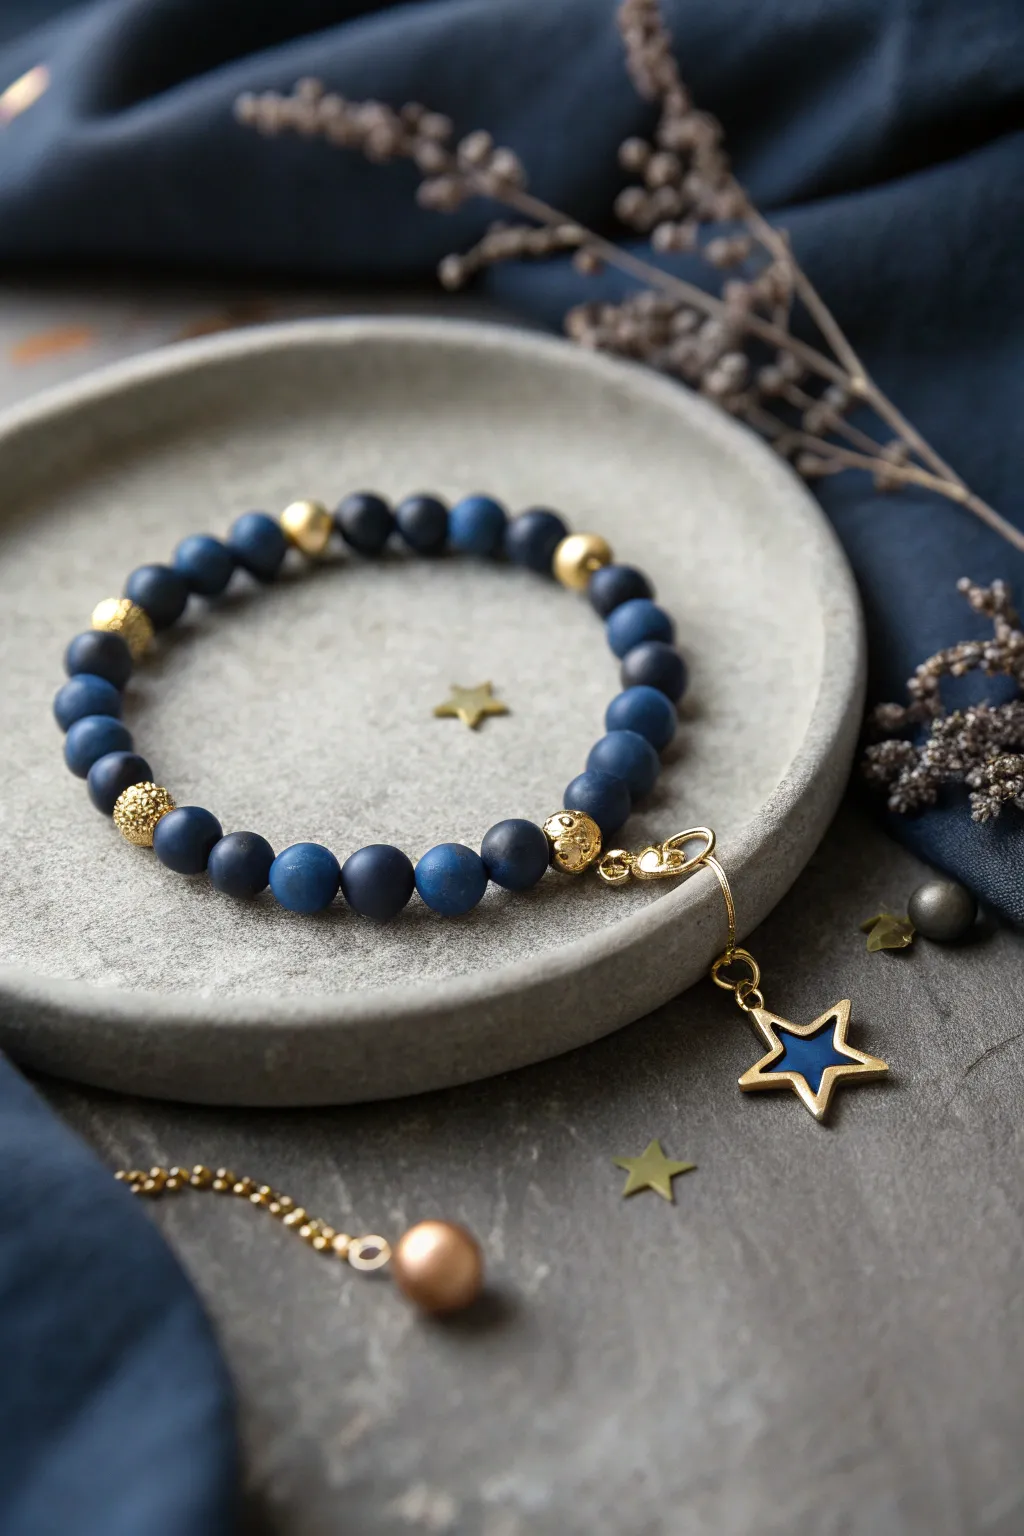
Capture the magic of a starry night sky with this elegant beaded bracelet featuring deep matte blue hues and gleaming gold accents. The dangling star charm adds a playful celestial touch, perfect for dreamers and stargazers alike.
Step-by-Step
Materials
- Matte dark blue clay or agate beads (8mm round)
- Gold tone textured spacer beads (6mm or 8mm)
- Smooth gold spacer beads (round, small 4-6mm)
- Gold tone star charm with blue enamel inlay
- Elastic stretch cord (0.8mm clear, strong)
- Gold jump ring (open, 6mm)
- Jewelry pliers (flat nose and round nose)
- Scissors
- Hypo cement or strong jewelry glue
- Bead stopper or tape
Step 1: Preparing Your Galaxy Design
-
Measure and Cut Cord:
Cut a piece of elastic cord about 10-12 inches long. This generous length gives you plenty of room to knot it securely later without struggling. -
Pre-stretch the Elastic:
Give the elastic cord a few firm tugs before you begin stringing. This pre-stretching process is crucial because it prevents the bracelet from sagging or becoming loose after you wear it a few times. -
Secure the End:
Attach a bead stopper to one end of your cord, or simply tape it down to your work surface so your beads don’t roll away into the abyss while you work. -
Plan Your Pattern:
Lay out your beads on a bead board or a soft cloth. The pattern shown uses a dominant sequence of about five or six matte blue beads, separated by a gold accent. Alternate between the smooth gold spacers and the larger textured gold beads for visual interest.
Step 2: Stringing the Beads
-
Start the Sequence:
Begin threading your beads onto the cord. I like to start with a standard blue bead rather than a gold accent, as the knot hides better inside the hole of a clay or stone bead. -
Add Texture:
After your first run of 4-6 blue beads, thread on one of the textured gold focal beads. These act like little planets or stars amidst the blue void. -
Continue the Pattern:
Add the next set of blue beads. Keep the count consistent between spacers for a symmetrical look, or vary it slightly for an organic feel. -
Insert Smooth Spacers:
For the next break in the blue beads, use a smaller, smooth gold spacer bead. This variation keeps the design from looking too heavy. -
Check the Length:
Periodically wrap the strand around your wrist to check the fit. Aim for about 7 inches for an average wrist, adding or removing blue beads to adjust the size.
Knot Slipping?
If your elastic knot feels insecure, try clamping a bead directly over the knot with a clamp or clothespin while the glue dries to keep tension tight.
Step 3: Adding the Charm and Finishing
-
Prepare the Jump Ring:
Using two pairs of pliers, gently twist the gold jump ring open. The motion should be a twist forward and back, not pulling it apart sideways, to maintain its circle shape. -
Attach the Star:
Slide your blue enamel star charm onto the open jump ring. Then, loop the jump ring around the bracelet cord—specifically next to one of the large textured gold beads for a balanced anchor point. -
Close the Jump Ring:
Using your pliers, twist the jump ring closed again until the two ends meet perfectly flush. Ensure there is no gap where the cord could slip out. -
Tie the Knot:
Remove your bead stopper. Bring the two ends of the elastic cord together. Tie a surgeon’s knot: this is like a standard overhand knot, but you loop the end through twice before pulling tight. -
Secure with Glue:
Pull the knot tight so there are no gaps between beads. Apply a tiny dot of Hypo cement or jewelry glue directly onto the knot. -
Final Trim:
Allow the glue to dry for a few minutes. Then, trim the excess cord ends close to the knot. -
Hide the Knot:
Gently gently tug the bracelet so the knot slides inside the hole of the nearest blue bead, making the finish completely invisible.
Level Up: Cosmic Dust
Add tiny gold seed beads between every single blue bead to create a ‘stardust’ effect that makes the bracelet shimmer more in the light.
Now you have a stunning piece of jewelry that captures the depth of the night sky on your wrist