
Polymer clay is basically my favorite “instant gratification” clay—soft, colorful, and perfect for tiny projects you can finish in an afternoon. If you’re brand-new, these polymer clay ideas for beginners will help you build confidence fast with simple shapes, easy textures, and cute results you’ll actually want to use.
Mini Donut Charms With Sprinkles
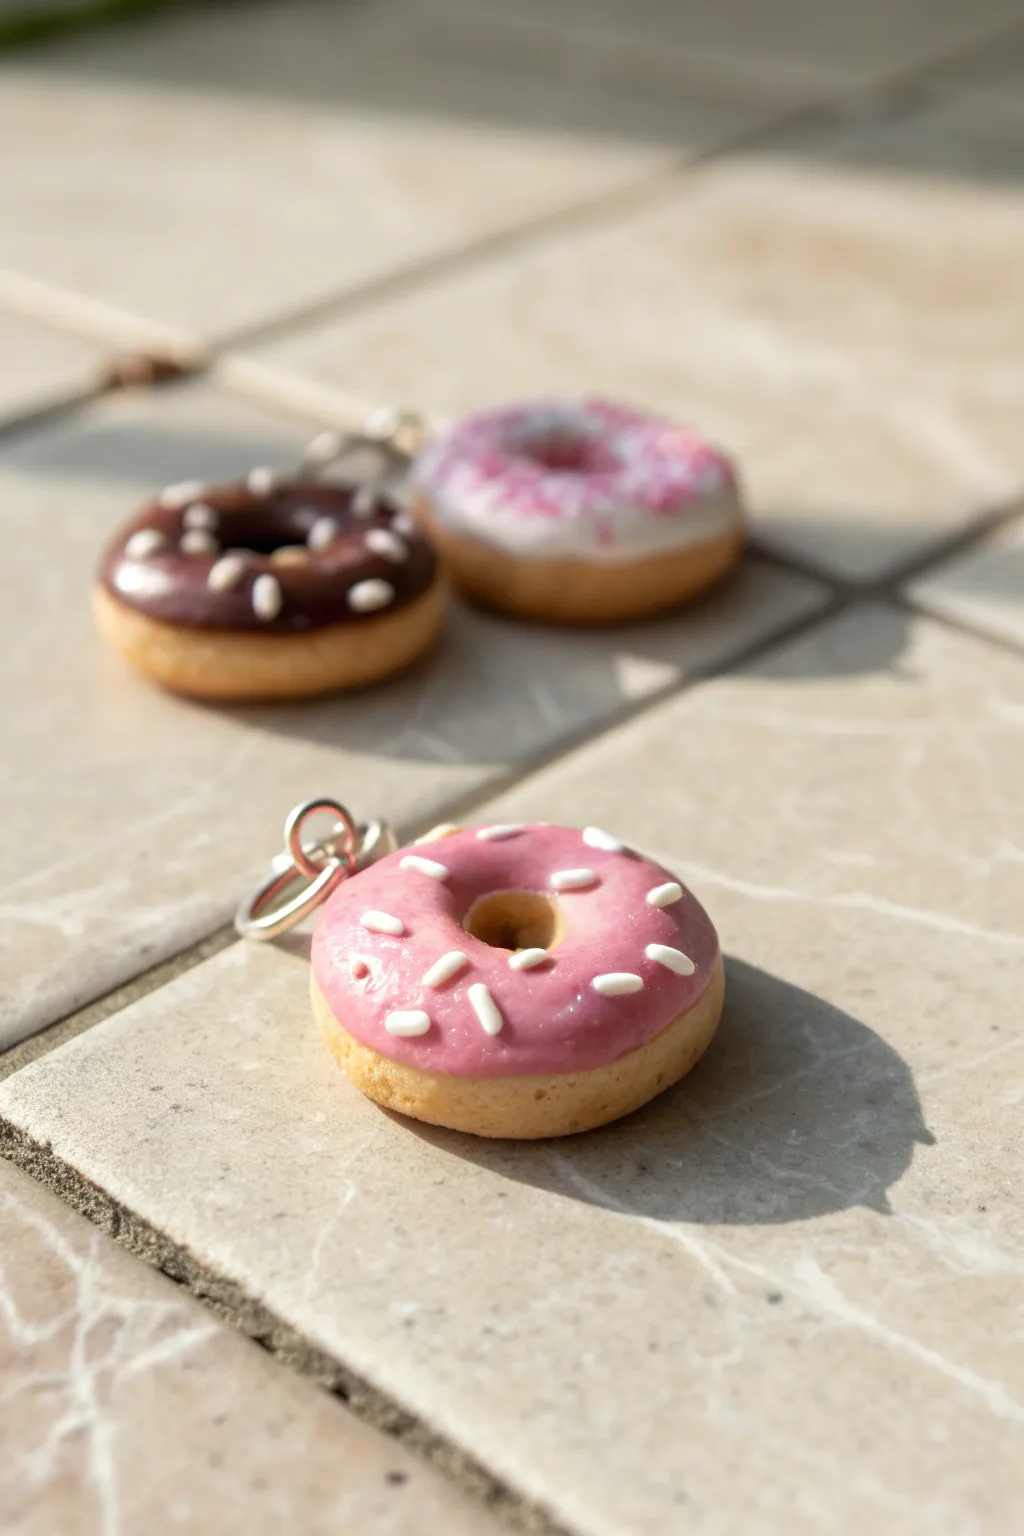
These adorable mini donuts look good enough to eat with their golden-baked dough and shiny pink glaze. Perfect for beginners, this project teaches you how to create realistic food textures and add tiny details like sprinkles.
Detailed Instructions
Materials
- Beige or tan polymer clay
- Pink polymer clay
- White polymer clay
- Liquid polymer clay (Translucent or White)
- Pastel chalks (ochre, orange, light brown)
- Small paintbrush
- Toothbrush or texturing tool
- Dotting tool or small round cutter
- Needle tool
- Eye pins
- Gloss glaze or UV resin
- Clay roller
- Oven
Step 1: Shaping the Dough Base
-
Condition the clay:
Start by taking a small amount of beige clay and conditioning it in your hands until it’s soft and pliable. Roll it into a smooth ball free of cracks. -
Form the shape:
Gently press the ball down onto your work surface to flatten it slightly into a thick disc shape, resembling a classic donut. -
Create the center hole:
Use a dotting tool or the back of a small paintbrush to poke a hole directly through the center. Wiggle the tool slightly to widen the hole and smooth the inner edges so they look round and natural. -
Add texture:
Take an old toothbrush and gently tap it all over the surface of the beige clay, including the sides. This stippling effect mimics the airy texture of real cake donuts. -
Create the baked effect:
For that golden-brown look, scrape some pastel chalk dust (ochre and light brown) onto a piece of paper. Use a dry paintbrush to lightly dust the edges and top of the donut, focusing on areas that would naturally brown in an oven.
Texturing Secret
Use a ball of aluminum foil instead of a toothbrush for a deeper, more rugged texture. Roll the foil gently over the clay before shading with chalks.
Step 2: Glazing and Decorating
-
Prepare the icing:
Mix a small amount of pink clay with liquid polymer clay in a small container or on a tile. Stir until you achieve a consistency similar to thick frosting or heavy cream. -
Apply the icing:
Using a needle tool or toothpick, carefully spread the pink mixture onto the top of your textured donut. Let it drip slightly down the sides for a natural, gravity-affected look, but keep the center hole clear. -
Make the sprinkles:
Roll a tiny snake of white polymer clay as thin as a thread. Bake this snake for just 5 minutes to harden it slightly, which makes it easier to cut. -
Cut the sprinkles:
Once the white snake is cool, use a craft blade to chop it into tiny, equal-sized pieces to create your sprinkles. -
Decorate:
Using tweezers or a slightly damp finger, pick up the tiny white sprinkles and press them gently into the wet pink icing. Arrange them randomly for the best effect.
Flavor Variations
Try mixing brown liquid clay for chocolate glaze, or use translucent liquid clay tinted with yellow alcohol ink for a classic honey-glazed look.
Step 3: Finishing Touches
-
Insert hardware:
If you plan to use this as a charm, trim an eye pin to the right length and insert it into the side of the donut. You can add a dab of liquid clay to the pin’s shaft for extra security. -
Bake carefully:
Preheat your oven according to your clay manufacturer’s instructions (usually 275°F/130°C). Place your donuts on a tile or parchment paper and bake for about 15-20 minutes. -
Cool down:
Allow the donuts to cool completely before handling them. The clay is still fragile when hot. -
Add shine:
Paint a thin layer of gloss glaze or clear nail polish strictly over the pink icing area. This makes the frosting look wet and sweet while keeping the dough matte. -
Final assembly:
Once the glaze is dry, attach a jump ring to the eye pin, and your donut is ready to hang on a necklace or keychain.
Now you have a batch of sweet charms ready to wear or share with friends


Classic Flat Circle Stud Earrings
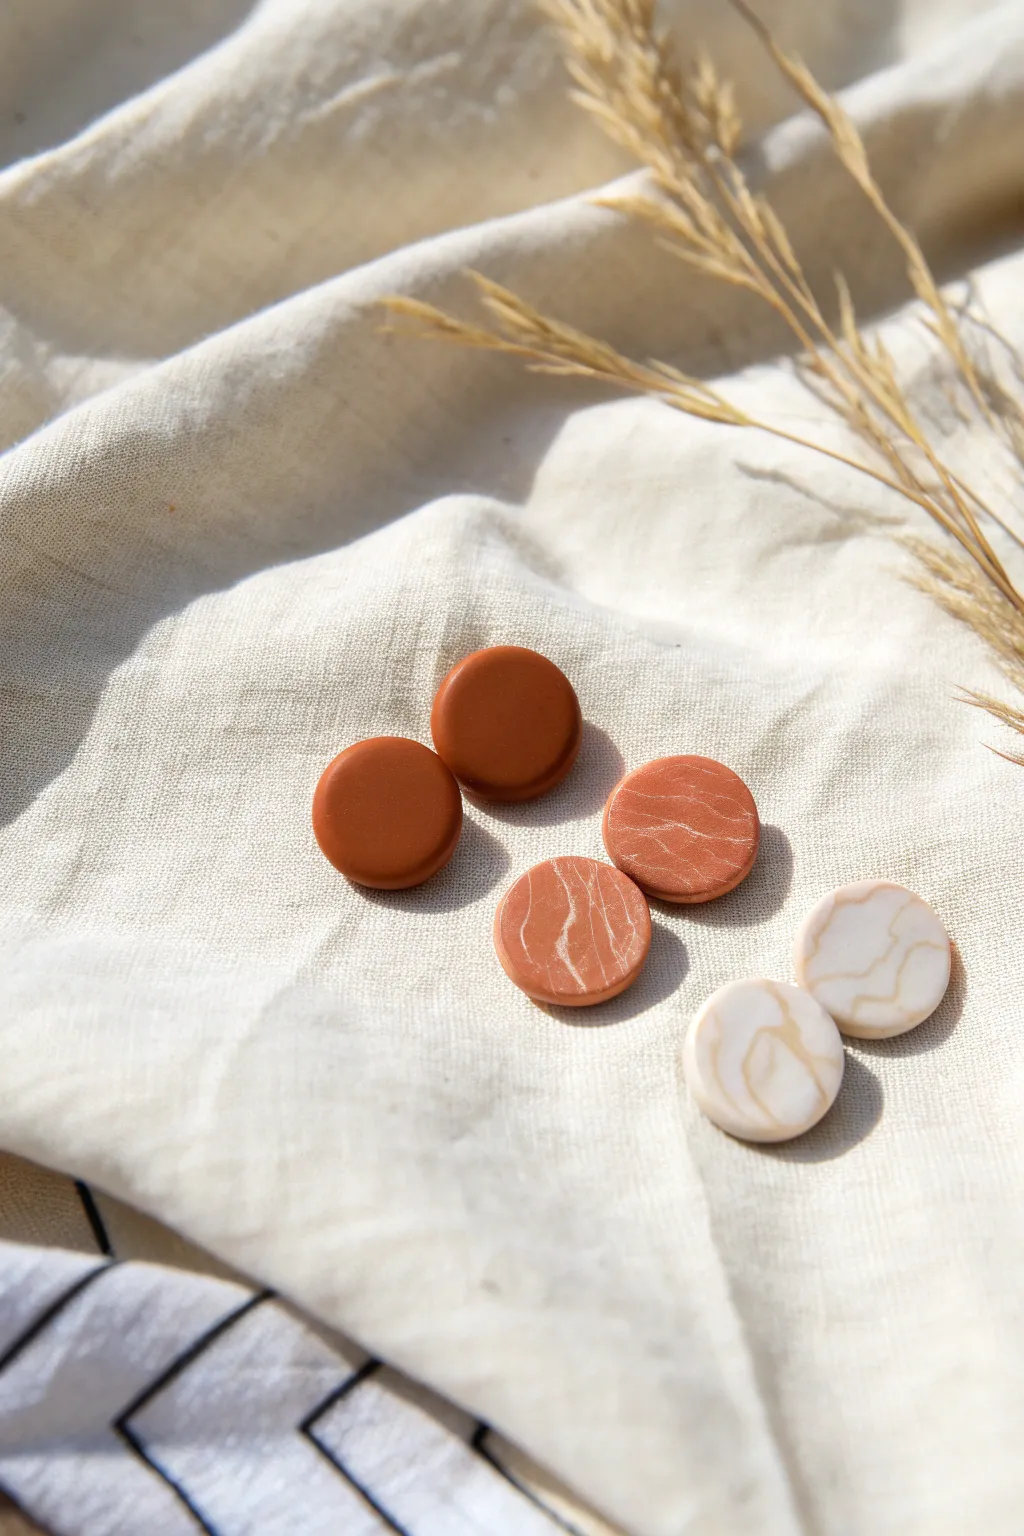
Simple yet sophisticated, these flat circle stud earrings are the perfect starting point for your polymer clay journey. You will learn to create three distinct finishes—solid terracotta, stone-like marble, and creamy agate—all using just a few basic colors.
Step-by-Step Guide
Materials
- Polymer clay in Terracotta (burnt orange)
- Polymer clay in White
- Polymer clay in Beige or translucent
- Small circular clay cutter (approx. 10mm-12mm)
- Acrylic rolling pin or pasta machine
- Flat blade or tissue blade
- Ceramic tile or baking sheet with parchment paper
- Earring posts and backs (surgical steel or gold-plated)
- Strong jewelry glue (e.g., E6000 or Loctite Gel)
- Optional: Fine grit sandpaper (400-1000 grit)
- Optional: UV resin or matte varnish for finishing
Step 1: Conditioning & Solid Pair
-
Prepare the terracotta clay:
Begin by taking a chunk of your terracotta-colored clay. Work it in your hands, kneading and rolling it until it is soft, pliable, and free of cracks. This conditioning step is crucial for strength. -
Roll the slab:
Using your acrylic roller or pasta machine on a medium setting (approx. 3mm thick), roll the conditioned terracotta clay into a smooth, even sheet. Ensure there are no air bubbles trapped underneath. -
Cut the solid circles:
Take your small circle cutter and firmly press it into the clay sheet to cut out two circles. Twist slightly before lifting to ensure a clean cut. -
Smooth the edges:
Gently gently rub the edges of the raw clay circles with your fingertip to smooth out any harsh lines or burrs left by the cutter. Set these aside on your baking tile.
Use Plastic Wrap
Place a piece of plastic wrap (cling film) over the clay slab before cutting. The cutter presses the plastic into the clay, creating a lovely domed, rounded edge (‘pillow effect’) instead of a sharp edge.
Step 2: Creating the Marbled Pairs
-
Prepare the marble mix:
Take a small ball of the remaining terracotta clay and a much smaller ball of white clay. Roll both into thin snake shapes. -
Twist and fold:
Twist the two snakes together like a candy cane. Fold the twisted log in half, roll it out, and twist again. Repeat this process until you see fine streaks of white running through the orange. -
Stop mixing early:
It is important to stop before the colors blend completely into a light orange. You want distinct white veins. Roll this marbled clay into a ball. -
Flatten and cut:
Roll the marbled ball into a sheet of the same thickness as your first pair. Position your cutter over an area with striking vein patterns and cut out two circles. -
Create the beige agate pair:
Clean your roller or workspace to avoid color transfer. Repeat the marbling process using a large portion of beige clay and a very tiny sliver of terracotta or translucent clay for a subtle stone effect. -
Review and refine:
Cut your final two circles from the beige mix. Inspect all six cutouts on your baking surface. Use a cotton swab dipped in a little rubbing alcohol to gently wipe away any fingerprints or lint.
Bubbles in the slab?
If you see tiny air bumps after rolling, slice into them gently with your blade to release the air, then smooth over with your finger or re-roll the slab to flatten it perfectly.
Step 3: Baking & Assembly
-
Bake the pieces:
Place your tile in the oven. Bake according to the manufacturer’s instructions for your specific brand of clay—usually 275°F (135°C) for about 30 minutes. I prefer to use an oven thermometer to ensure the temperature is accurate. -
Cool down:
Once baked, turn off the oven and let the pieces cool completely inside or on the counter. Do not attempt to handle them while hot, as they are fragile until fully cooled. -
Sand edges (Optional):
If there are any rough spots on the sides, dip your sandpaper in water and gently sand the edges in a circular motion for a professional finish. -
Prepare the earring posts:
Apply a tiny dab of strong jewelry glue to the flat pad of your earring post. -
Attach the posts:
Press the glued post firmly onto the center of the back of each clay circle. Ensure good contact between the metal and the clay. -
Let it cure:
Allow the glue to dry completely—usually 24 hours for maximum strength—before wearing the earrings.
Now you have a stunning trio of handmade studs that look earthy, modern, and professionally crafted.


Tiny Fruit Slices in Kawaii Style
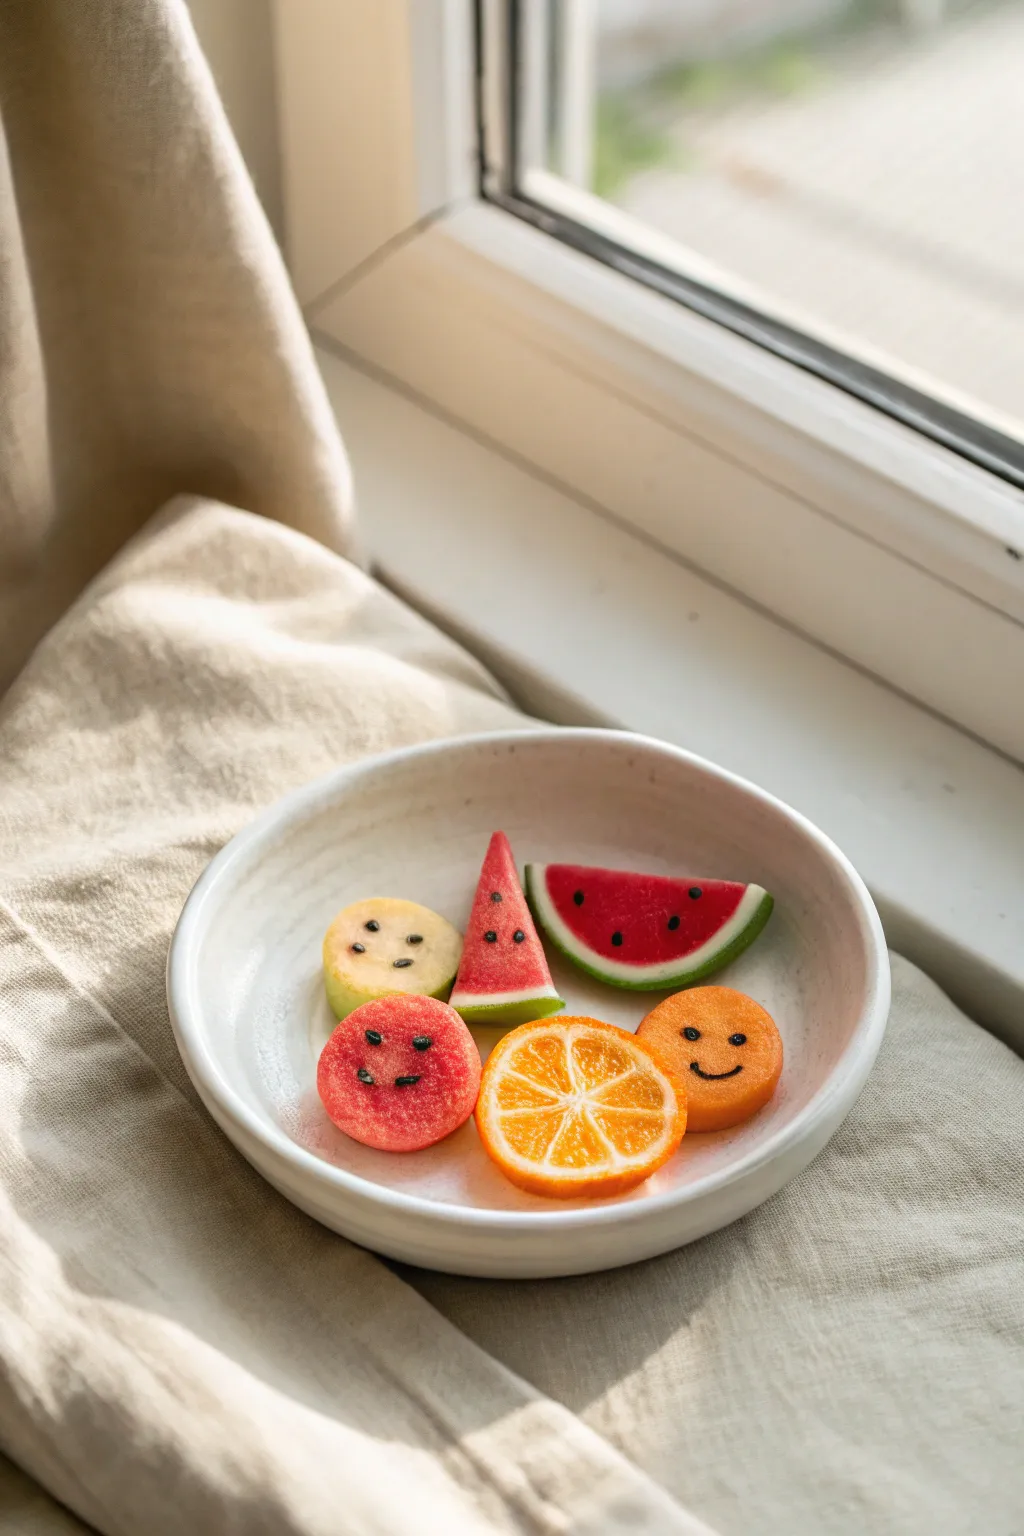
Brighten up your day with this adorable bowl of miniature fruit slices, each crafted with a sweet, smiling face. Using polymer clay and simple texturing techniques, you can create these tiny, realistic-looking watermelon, orange, and mixed fruit pieces perfect for dollhouses or charm bracelets.
Step-by-Step
Materials
- Polymer clay (red, green, white, pale yellow, translucent orange, translucent yellow)
- Black acrylic paint or thin black marker
- Fine-point needle tool or toothpick
- Small round cutter (approx. 1-2 cm)
- Craft knife or tissue blade
- Old toothbrush or stiff bristle brush (for texturing)
- Gloss varnish (optional)
Step 1: Creating the Watermelon Slices
-
Form the red center:
Start by conditioning a small ball of red polymer clay. Roll it into a smooth log about the thickness of a thick marker. -
Add the rind layers:
Roll out a thin sheet of white clay and wrap it around the red log. Trim the excess so the seam meets perfectly without overlapping. -
Add the green skin:
Roll out a slightly thicker sheet of green clay and wrap this over the white layer. Smooth the log gently to bond the layers together. -
Slice the log:
Using a sharp tissue blade, slice the log into thin rounds. Cut some of these rounds in half to create classic watermelon wedges, as seen in the photo. -
Texture the surface:
Gently tap the surface of the red clay with an old toothbrush or a ball of aluminum foil to give it a realistic, fruity texture. -
Paint the seeds:
Using a fine-point needle tool dipped in black acrylic paint, add three small dots to create the seeds, arranging them in a triangular pattern on the wedges.
Smudged Paint?
If your painted faces or seeds smudge, quickly wipe the baked clay with a Q-tip dipped in rubbing alcohol. It removes the surface paint without harming the cured clay underneath.
Step 2: Crafting the Citrus & Round Fruits
-
Mix the orange cane colors:
Mix translucent orange clay with a tiny bit of white to create a segmented look. Roll this into a log. -
Wrap the segments:
Wrap this orange log in a very thin sheet of white clay. Gently stretch and roll the log until it gets longer and thinner. -
Cut and reassemble:
Cut the long orange log into 6-8 equal lengths. Stack them together into a bundle to form the segments of the orange. -
Final orange wrap:
Wrap the entire bundle in a sheet of white clay, followed by a sheet of orange clay for the rind. Compress and roll the cane to smooth it out. -
Make the yellow fruit:
For the pale yellow slice, simply roll a log of pale yellow clay and wrap it in a slightly darker yellow or green skin. -
Make the red round fruit:
Roll a small ball of red clay and flatten it into a thick disk. Texture the surface aggressively with your toothbrush to mimic the look of a fuzzy berry or melon ball.
Frosted Effect
To make the fruit look like sugared candies or fruit jellies, roll the unbaked slices in fine white glitter or clear embossing powder before baking for a sparkling finish
Step 3: Adding Kawaii Details
-
Bake the pieces:
Arrange all your slices on a baking sheet lined with parchment paper. Bake according to your clay manufacturer’s instructions (usually 275°F/135°C for 15-30 minutes). -
Cool completley:
Allow the pieces to cool fully before handling; warm clay is fragile and can distort. -
Draw the faces:
Using a very fine black marker or paint, draw tiny smiley faces on the round carrot-colored slice and the red berry slice. Two dots for eyes and a small curved line for the mouth create that cute kawaii look. -
Paint the seeds on yellow fruit:
On the pale yellow slice, add three tiny black dashes to represent seeds. -
Varnish (Optional):
If you want a juicy look, brush a thin layer of gloss varnish over the cut surfaces of the fruit, avoiding the rinds/skins.
Now you have a charming collection of fruit slices ready to be turned into magnets or jewelry


Simple Cat Face Charms From Basic Shapes
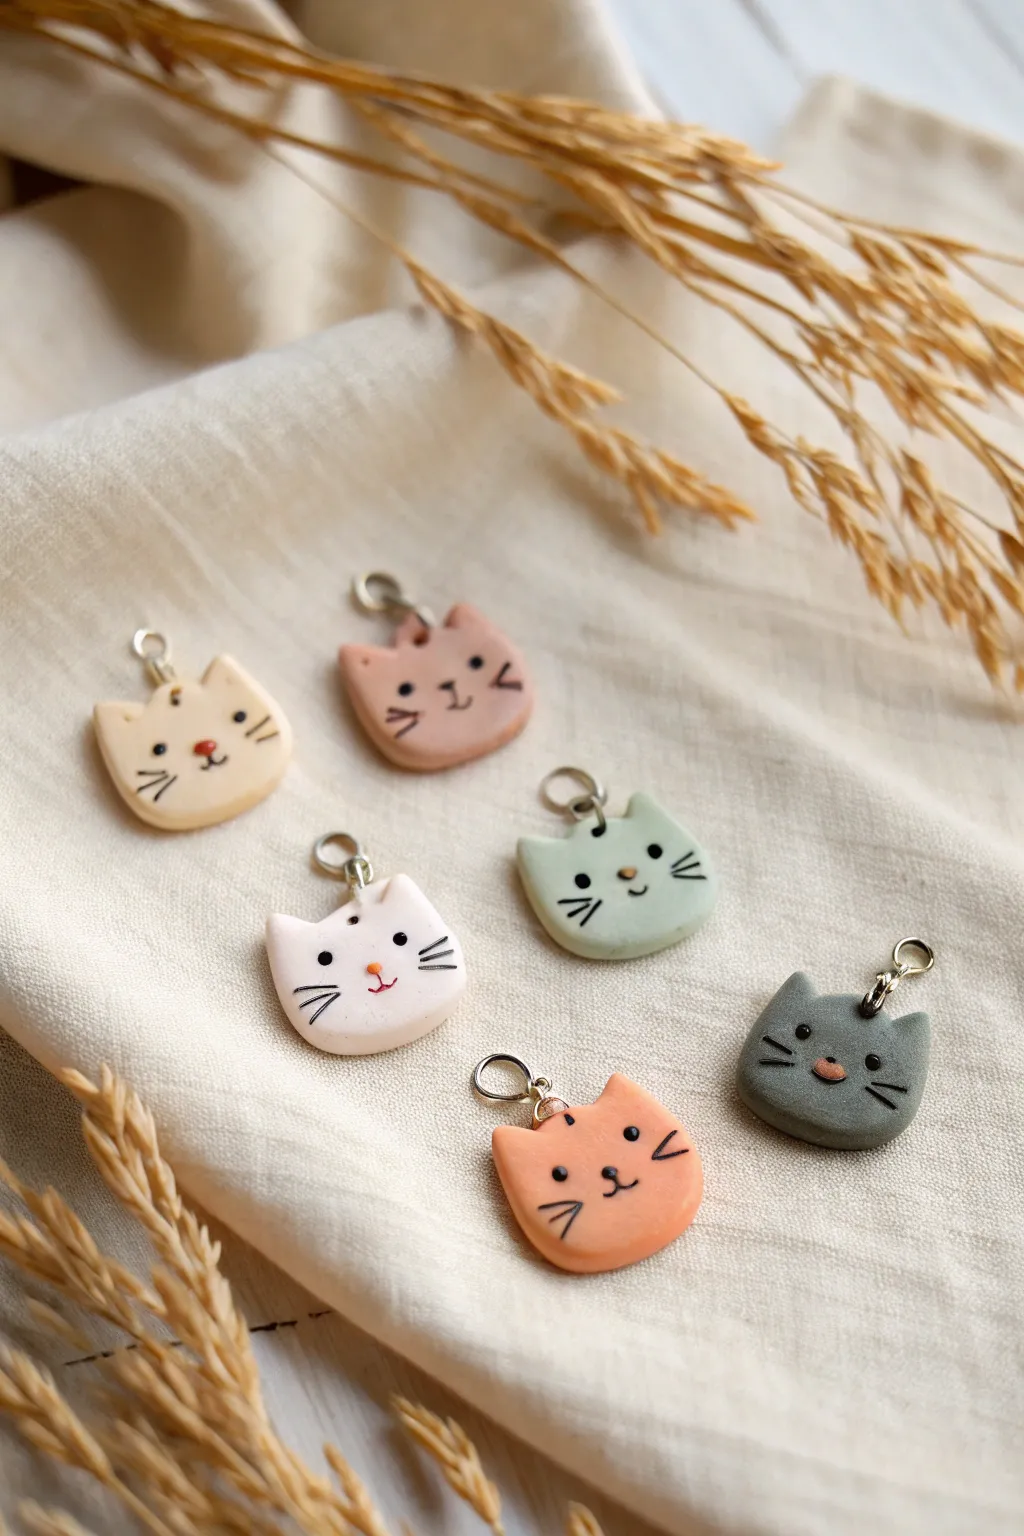
These adorable, minimalist cat charms are the ultimate beginner project because they rely on essentially one basic shape. With soft pastel colors and sweet, simple expressions, they make delightful zipper pulls, stitch markers, or jewelry pendants.
How-To Guide
Materials
- Polymer clay in pastel colors (cream, blush pink, sage green, gray, soft orange)
- Black polymer clay or black acrylic paint (for details)
- Small jump rings (silver or gold tone)
- Needle tool or toothpick
- Rolling pin or smooth glass jar
- Small round cutter (approx. 1 inch) or template
- X-acto knife or clay blade
- Gloss glaze (optional)
- Fine-grit sandpaper (optional)
- Headpins or eye pins (optional alternative to drilling)
Step 1: Shaping the Base
-
Condition the clay:
Start by picking your favorite pastel color. Knead the clay thoroughly in your hands until it is soft, pliable, and warm. -
Roll it out:
Using your acrylic roller or a smooth glass jar, roll the clay into a flat sheet about 3/16 inch (4-5mm) thick. You want them sturdy enough to be durable charms. -
Cut the base circle:
Press your small round cutter firmly into the clay to create a clean circle. If you don’t have a cutter, trace a bottle cap and cut around it with your blade. -
Pinch the ears:
Now, transform the circle into a cat face. Gently pinch the top left and right edges of the circle upwards to form two small triangles. -
Refine the shape:
Smooth out the pinched areas with your fingertips so the ears blend seamlessly into the head. The top of the head between the ears should be slightly curved, not perfectly flat. -
Soften the edges:
Run your finger lightly around the entire perimeter of the distinct shape to soften any sharp cutting edges or fingerprints.
Sticky Situation?
If your clay gets too soft and fingerprints are everywhere, pop the unbaked cat in the fridge for 10 minutes to firm it up before smoothing.
Step 2: Adding the Details
-
Insert the hardware:
Take a small screw-eye pin or a regular eye pin trimmed short. Push it gently into the exact center of the top of the head, between the ears. -
Secure the pin:
Once inserted, gently squeeze the clay around the pin stem to ensure it handles the tension of being a charm. -
Create the nose:
Take a microscopic speck of a contrasting color (like pink or orange) and roll it into a tiny oval. Press this firmly into the center of the face. -
Add the eyes:
You can either use tiny bits of black clay rolled into balls or press small indentations now to paint later. I find using tiny clay balls pressed flat gives a nice dimension. -
Make the whiskers:
For the whiskers, roll out extremely thin snakes of black clay. Cut six tiny segments. -
Apply whiskers:
Carefully place three whisker segments on each cheek area using your needle tool to help position them without squishing the face. -
Draw the mouth:
Use your needle tool to gently scribe a small ‘w’ shape or a simple vertical line coming down from the nose to form the mouth. -
Texture check:
Before baking, give the charm one last look. Wipe away any lint or dust with a bit of rubbing alcohol on a cotton swab.
Step 3: Baking and Finishing
-
Bake carefully:
Place your cats on a tile or parchment-lined baking sheet. Bake according to your specific clay brand’s instructions (usually 275°F/135°C for 15-30 minutes). -
Cool down:
Allow the charms to cool completely inside the oven or on the counter. Do not touch them while hot as the clay is still fragile. -
Paint details (Alternative):
If you didn’t use black clay for the face, now creates the perfect time to paint the eyes and whiskers with a fine detail brush and black acrylic paint. -
Seal the piece:
To protect the face, apply a thin layer of matte or gloss glaze, focusing especially on any painted areas. -
Add jump ring:
Once the glaze is dry, use pliers to open a jump ring, thread it through the eye pin loop, and close it securely.
Spotty Patterns
Mix tiny scraps of white, tawny, and black clay into your base color before rolling to create a calico or tortoiseshell effect!
Attach your new feline friends to a keychain or necklace and show off your handiwork.

The Complete Guide to Pottery Troubleshooting
Uncover the most common ceramic mistakes—from cracking clay to failed glazes—and learn how to fix them fast.
Tiny Mushroom Charms With Cute Faces
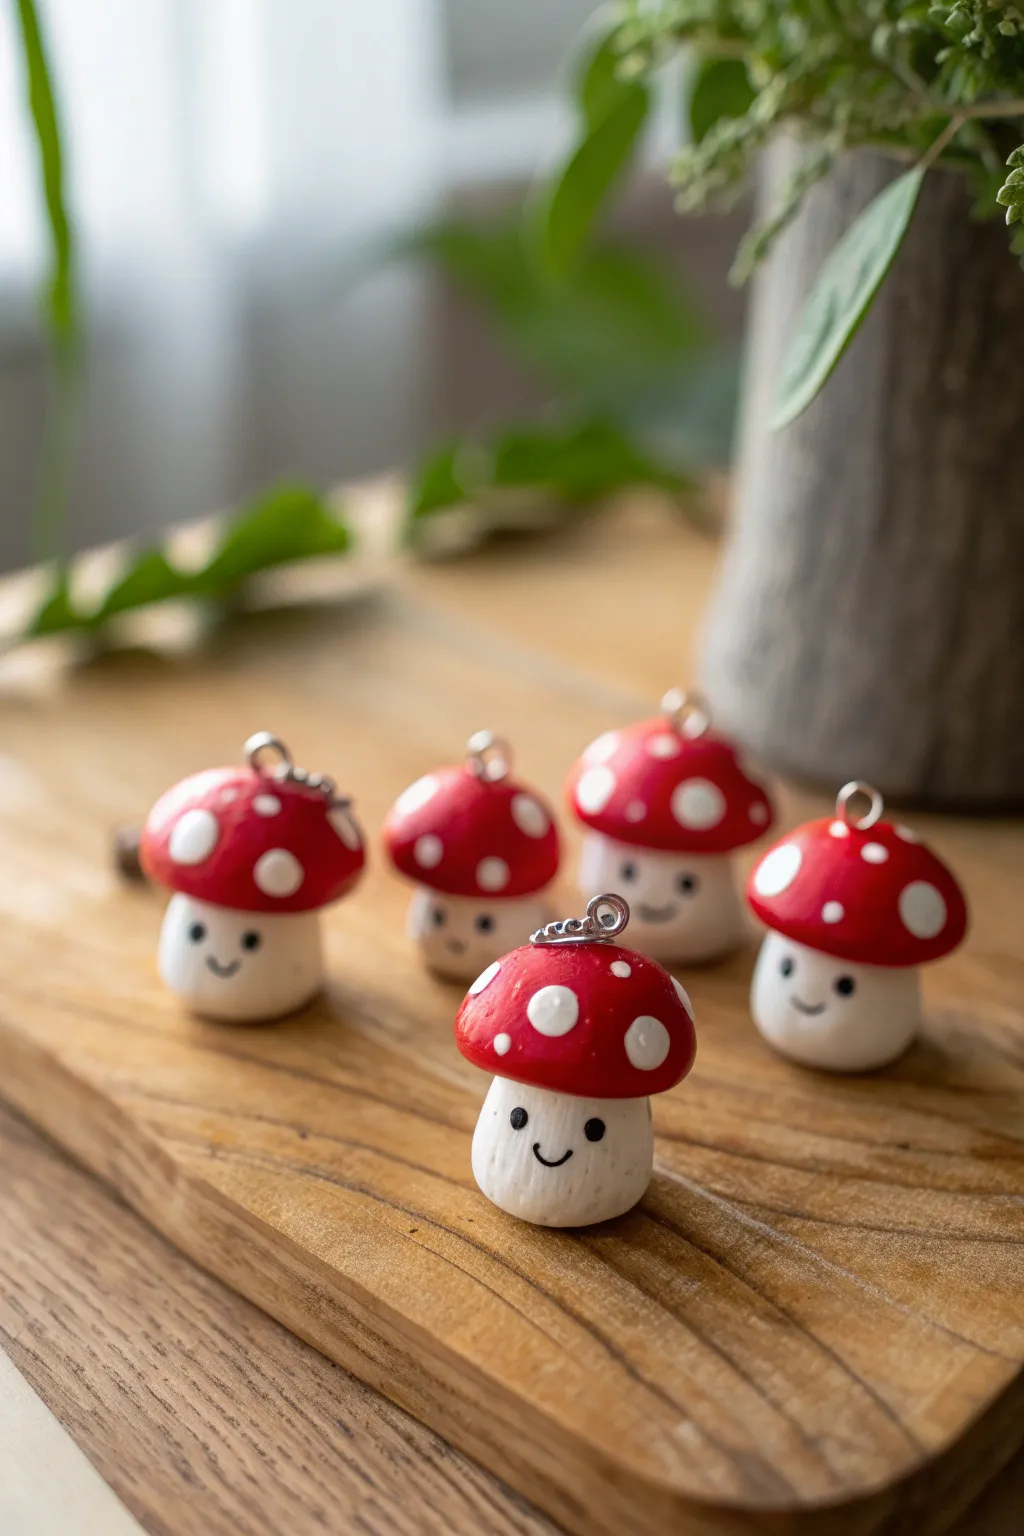
These adorable red-capped mushroom charms are a perfect beginner project that bring a touch of fairytale charm to your keychain or necklace. With their bright colors and sweet little smiles, they are incredibly satisfying to make and require only basic sculpting techniques.
Step-by-Step
Materials
- White polymer clay
- Red polymer clay
- Liquid polymer clay (optional but recommended)
- Eye pins (silver or gold tone)
- Black acrylic paint or a fine-tip permanent marker
- High-gloss glaze or varnish
- Small paintbrush or dotting tool
- Needle tool or toothpick
- Clean work surface (tile or glass mat)
- Oven for baking
Step 1: Sculpting the Shapes
-
Condition the white clay:
Start by kneading a small amount of white polymer clay until it is soft and pliable. This conditioning step is crucial to prevent cracking later. -
Form the stem base:
Roll the white clay into a smooth ball, roughly the size of a large marble, then gently roll it into a short, thick cylinder. The bottom should be slightly flatter so it can stand up. -
Round the bottom:
Use your finger to gently soften the bottom edge of the cylinder, giving the stem a slightly rounded, organic ‘marshmallow’ shape rather than a harsh cylinder. -
Prepare the red cap:
Take a slightly larger amount of red clay and condition it well. Roll it into a smooth ball. -
Shape the mushroom cap:
Press the red ball gently onto your work surface to flatten the bottom, creating a hemisphere. Use your fingers to smooth the dome until it’s perfectly round. -
Connect the parts:
Apply a tiny drop of liquid polymer clay (or simply press firmly if the clay is sticky enough) to the top of the white stem. Center the red cap on top and press down gently to secure the bond without squishing the shapes.
Clean Clay Tip
Red clay pigment can easily stain white clay. Always wash your hands or wipe them with a baby wipe thoroughly after handling the red cap before touching the white stem or spots.
Step 2: Adding Details & Hardware
-
Create the polka dots:
Roll very tiny bits of white clay into balls. Flatten them extremely thin between your fingers to make little discs of varying sizes. -
Attach the spots:
Press these white discs randomly all over the red cap. Ensure you press them flat enough that they don’t look like bumps, but rather like painted spots. -
Insert the hardware:
Take a metal eye pin and trim close to the loop if the stem is too long. Push the straight end down through the center of the red cap until the loop sits flush against the clay. -
Secure the pin:
I sometimes twist the pin slightly as I insert it, which helps the metal grab the raw clay better. -
Bake carefully:
Place your mushrooms on a baking sheet or tile. Bake according to your clay manufacturer’s instructions—usually around 275°F (135°C) for 15-20 minutes depending on thickness. -
Cool down completely:
Let the mushrooms cool entirely before handling. Polymer clay is fragile when warm and reaches its full strength only after cooling.
Step 3: Finishing Touches
-
Paint the face:
Using a very fine detail brush and black acrylic paint (or a permanent marker for ease), carefully dot two eyes onto the white stem. -
Add a smile:
Paint a tiny, shallow ‘U’ shape between the eyes for a sweet smile. Keep the lines thin for the cutest look. -
Glaze the cap:
Once the paint is dry, apply a coat of high-gloss glaze or varnish specifically to the red cap. This makes the mushroom look wet and magical. -
Matte finish for the stem:
Leave the white stem unglazed for a natural texture, or use a matte varnish if you want to seal the painted face without adding shine.
Make it a Set
Create a whole forest family by varying the sizes! Try making a tiny baby mushroom for earrings or a wider, flatter one for a unique pendant.
Now you have a charming little keepsake ready to be added to a bracelet or gifted to a friend
Tiny Heart and Star Charm Set
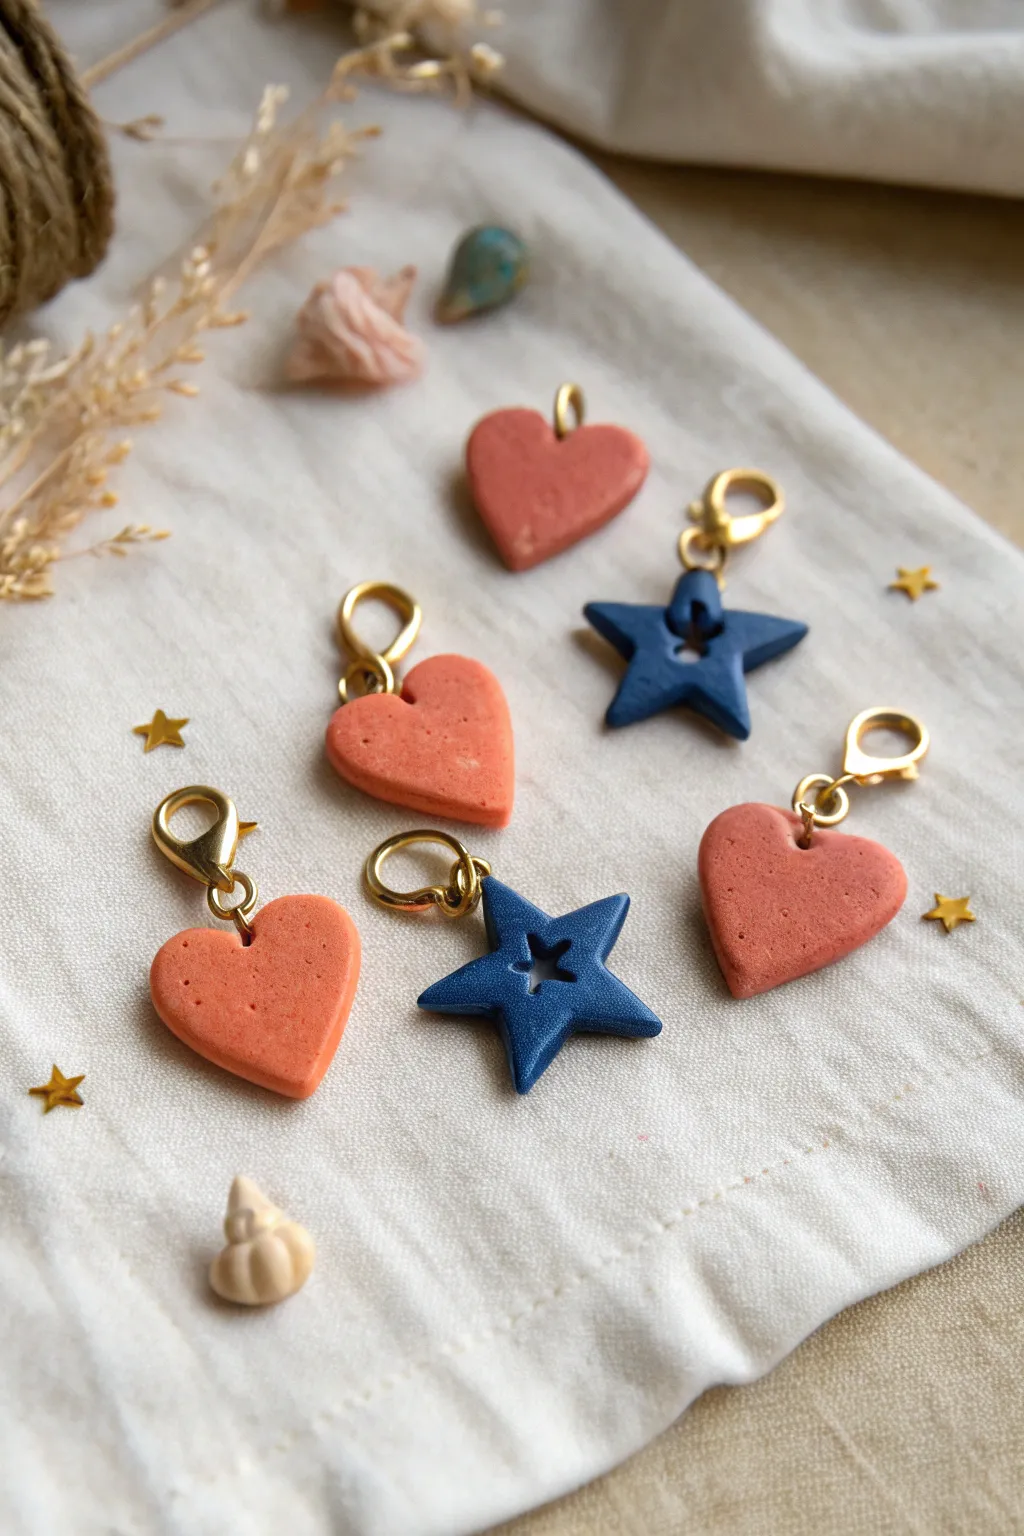
These adorable, bite-sized charms are the perfect beginner project, combining simple shapes with professional-looking hardware. The textured coral hearts and deep indigo stars make a striking pair, perfect for zipper pulls, stitch markers, or sweet handmade gifts.
Step-by-Step Guide
Materials
- Polymer clay in coral/salmon pink
- Polymer clay in deep indigo or navy blue
- Small heart-shaped clay cutter (approx. 1 inch)
- Small star-shaped clay cutter (approx. 1 inch)
- Tiny star plunger cutter or toothpick (for cutouts)
- Acrylic rolling pin
- Gold jump rings (6mm or 8mm)
- Gold lobster clasps
- Jewelry pliers (round nose and flat nose)
- Needle tool or small drill bit
- Parchment paper or ceramic tile for baking
- Texture sponge or sandpaper (optional)
Step 1: Prepping and Cutting the Clay
-
Condition the clay:
Start by warming the coral pink clay in your hands. Knead and fold it repeatedly until it becomes soft, pliable, and free of any crumbly texture. Do the same for the navy blue clay, but be sure to wash your hands between colors to avoid staining the lighter pink. -
Roll out the slab:
Place the conditioned pink clay on a smooth surface or ceramic tile. Using your acrylic rolling pin, roll it out to an even thickness of about 4mm to 5mm. We want these to be sturdy, chunky charms rather than thin wafers. -
Add gentle texture:
If you want that slightly organic, stone-like matte finish seen in the photo, lightly press a piece of sandpaper or a coarse sponge against the surface of the raw clay slab. If you prefer a smooth look, skip this step. -
Cut the heart shapes:
Press your heart-shaped cutter firmly into the pink slab. Give it a tiny wiggle to ensure it separates cleanly, then lift. Repeat for as many hearts as you need. -
Prepare the blue stars:
Roll out the navy blue clay to the same 4mm-5mm thickness. Cut out your star shapes. If the clay sticks to the cutter, you can dip the cutter in cornstarch or water before pressing down. -
Create the center cutout:
For the stars, use a tiny star-shaped plunger cutter to remove the very center of the shape. If you don’t have a tiny cutter, you can carefully freehand this with an X-Acto knife or leave them solid.
Step 2: Piercing and Baking
-
Smooth the edges:
Before baking, run your finger gently around the cut edges of each charm to soften any sharp ridges left by the cutter. This professional touch makes a huge difference. -
Pierce the holes:
Using a needle tool or toothpick, carefully poke a hole through the top of each heart (near the cleft) and one point of each star. Make the hole slightly larger than your jump ring wire, as it may shrink slightly during baking. -
Bake the batch:
Arrange your charms on a parchment-lined baking sheet or ceramic tile. Bake according to your specific brand’s package instructions—usually around 275°F (135°C) for 15-30 minutes depending on thickness. -
Cool down completely:
Once baked, turn off the oven and let the charms cool down slowly inside, or remove them and let them rest comfortably on a wire rack. Do not handle them while hot, as they are still fragile.
Texture Technique
For the speckled ‘stone’ look on the pink hearts, mix in a tiny pinch of black pepper or craft sand into the clay condition phase before rolling.
Step 3: Assembly
-
Open the jump rings:
I find it easiest to use two pairs of pliers for this. Grip one side of the gold jump ring with flat-nose pliers and the other side with round-nose pliers. Twist—don’t pull—the ends away from each other (one forward, one back) to open the gap. -
Attach the clasp:
Slide a gold lobster clasp onto the open jump ring. -
Connect the charm:
Hook the open jump ring (which now holds the clasp) through the hole you created in your clay charm. -
Close the ring:
Using your two pliers again, twist the jump ring ends back toward each other until they meet perfectly flush with no gap. Listen for a tiny ‘click’ or feel them grind slightly to know they are secure. -
Repeat for the set:
Continue this process for all your hearts and stars until your full set is assembled and ready to use.
Level Up: Glossy Finish
After baking, apply a coat of UV resin or polyurethane gloss varnish to make the colors pop and give them a ceramic-like shine.
Clip your new charms onto a planner, keychain, or zipper for an instant touch of handmade personality


What Really Happens Inside the Kiln
Learn how time and temperature work together inside the kiln to transform clay into durable ceramic.
Mini Avocado Charms With a Smiley Pit
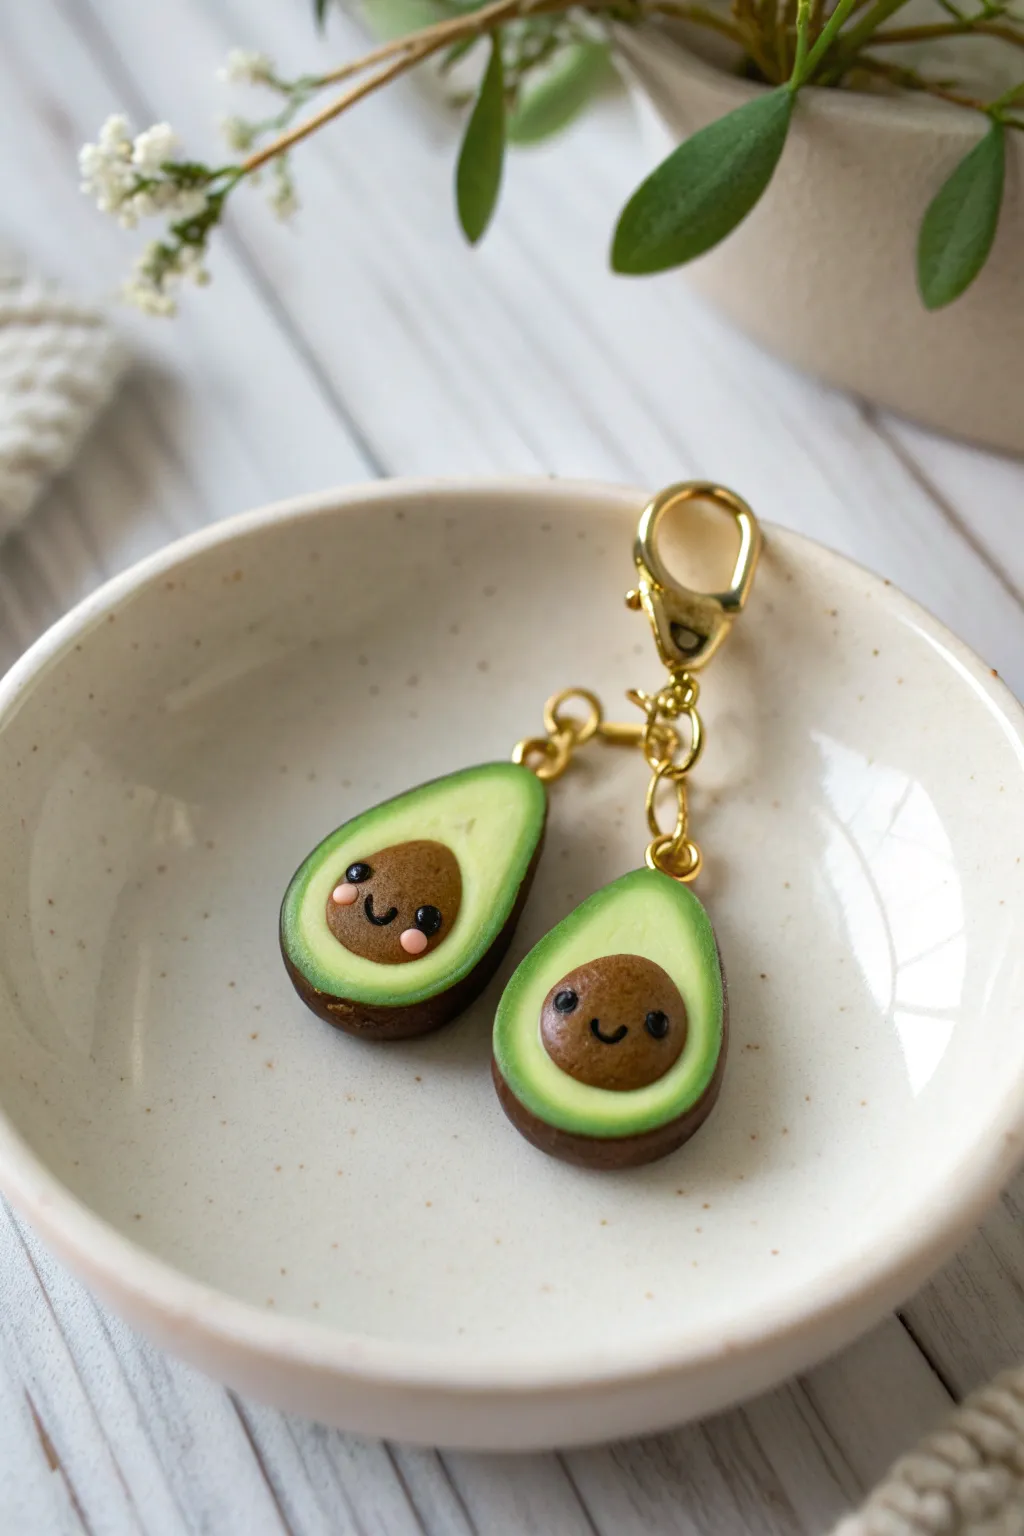
These adorable kawaii-style avocado charms feature a gradient green interior and a happy little pit that’s sure to brighten your day. Perfect for keychains or stitch markers, this beginner-friendly project teaches basic blending and shaping techniques.
How-To Guide
Materials
- Polymer clay (dark brown, forest green, white, pale yellow)
- Black liquid clay or black acrylic paint
- Pink clay or pink acrylic paint
- Dotting tool or toothpick
- Needle tool
- Eye pins (gold)
- Jump rings and lobster clasp (gold)
- Gloss glaze or UV resin (optional)
- X-acto knife or clay blade
- Rolling pin or pasta machine
Step 1: Prepping the Colors
-
Mix the Light Green:
Start by conditioning your clay. Mix a large amount of white with a small amount of forest green and a tiny pinch of yellow to create a soft, creamy avocado-flesh color. -
Mix the Darker Green:
Take some of your forest green clay and mix in just a little white. You want a distinct contrast between this rim color and the pale center flesh. -
Create the Gradient Log:
Form the pale green clay into a thick log. Roll the darker green clay into a flat sheet. Wrap the dark green sheet completely around the pale log, smoothing the seam so the colors bond without trapping air. -
Add the Skin:
Roll out a sheet of dark brown clay (for the avocado skin). Wrap this around your green log just like the previous step. You should now have a cane with three layers: pale center, green rim, brown skin.
Fixing Fingerprints
If you see fingerprints on your raw clay, lightly brush the surface with a little baby oil or cornstarch before baking to smooth them out effortlessly.
Step 2: Shaping the Avocado
-
Reduce and Slice:
Gently roll and squeeze the log to reduce its diameter to your desired avocado size. Once reduced, use your blade to slice off two equal disks, about 1/4 inch thick. -
Pinch the Pear Shape:
Take a disk and gently pinch one side between your thumb and forefinger to create the tapered top of the avocado. Round out the bottom to form that classic pear silhouette. -
Smooth the Edges:
Run your finger along the brown edge to slightly round off the sharp cut marks. This gives the charm a more organic, realistic feel.
Step 3: Creating the Smiley Pit
-
Form the Pits:
Roll two small balls of light brown clay. Flatten them slightly into domes. I like to press them gently onto the center of the avocado halves to check the size before attaching. -
Attach the Pits:
Once satisfied with the size, press the light brown domes firmly into the center of the pale green area. Ensure they adhere well. -
Add the Eyes:
Using a small ball tool or a needle, make two tiny indentations on the pit for eyes. Fill these with a tiny drop of black liquid clay or insert tiny balls of black clay. -
Draw the Mouth:
Roll an incredibly thin snake of black clay for the smile, or use a needle tool to paint a tiny ‘U’ shape with black acrylic paint after baking. Place it centered between the eyes. -
Blush Cheeks:
Add two minuscule dots of pink clay just under the eyes for rosy cheeks. Press them flat so they don’t look like bumps. -
Insert Hardware:
Take a gold eye pin and trim it if necessary. Insert it into the top tapered end of the avocado. Add a drop of liquid clay on the shaft of the pin before inserting for extra security.
Texture It Up
Before baking, gently tap the dark outer skin with a toothbrush or scrunched aluminum foil to give it that realistic bumpy avocado skin texture.
Step 4: Finishing Up
-
Bake:
Place your charms on a tile or parchment paper. Bake according to your brand of clay’s instructions (usually 275°F/135°C for 15-30 minutes). -
Cool and Glaze:
Let the charms cool completely. For a protective shine, coat the green flesh and the pit with a gloss glaze or UV resin, leaving the outer brown skin matte for texture contrast. -
Assemble Keychain:
use jump rings to attach the eye pins of both avocado halves to your gold lobster clasp chain.
Now you have a sweet set of friendship charms designed to share with your favorite person
French Fry and Burger Minis With Easy Layering
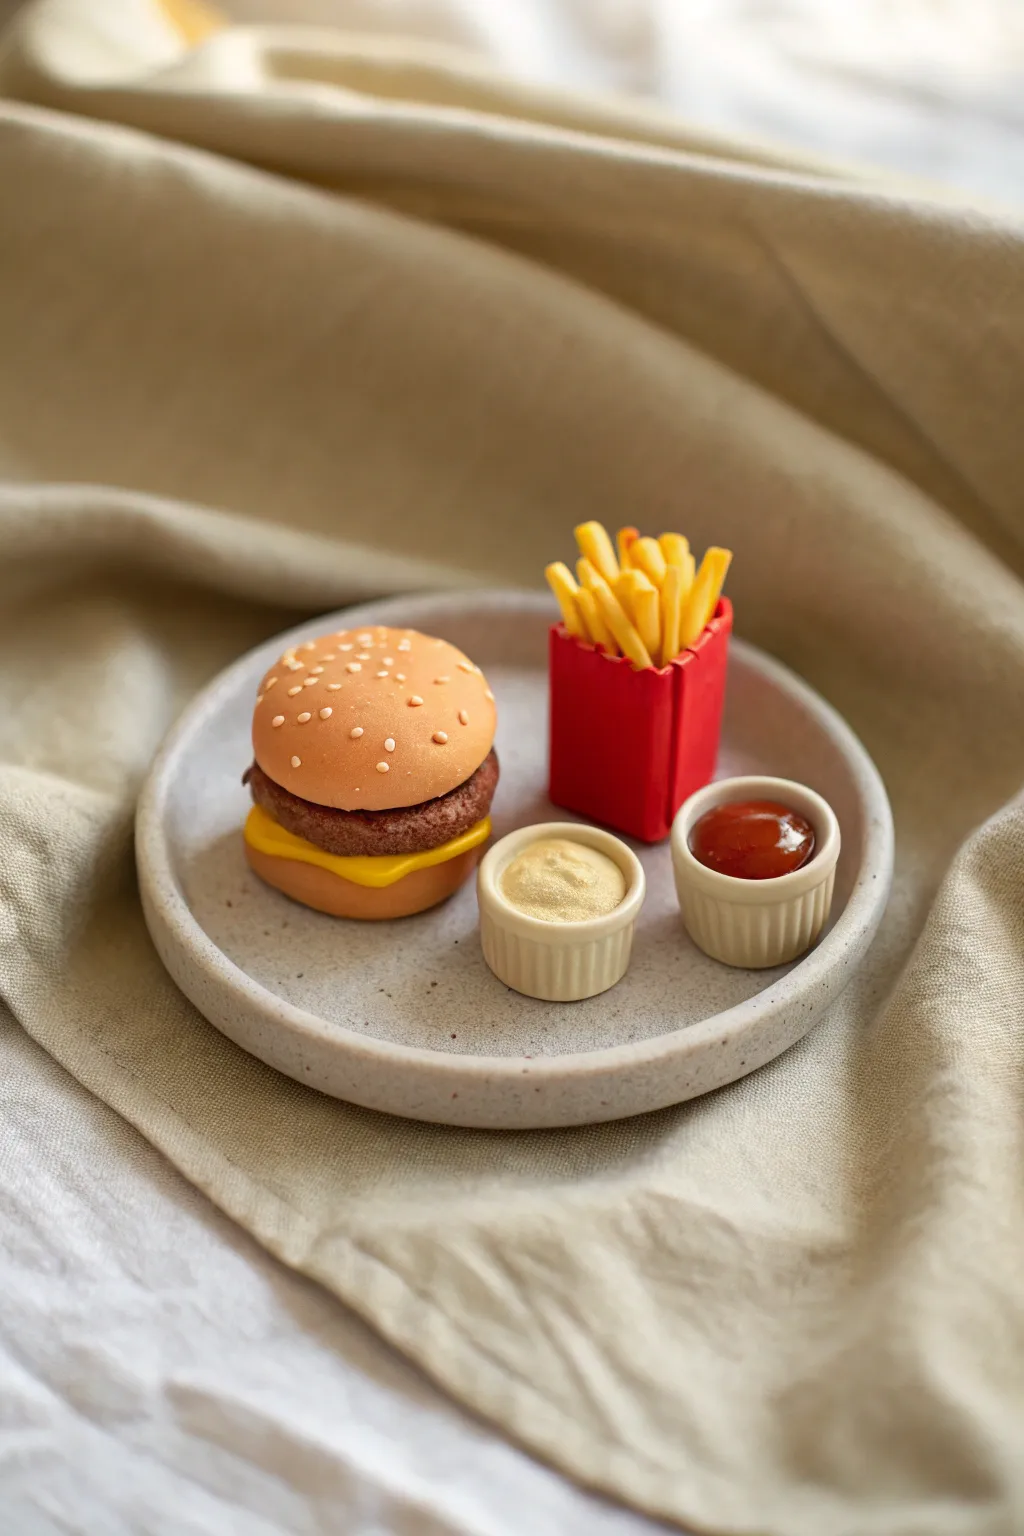
Recreate the charm of a fast-food meal using simple polymer clay layering techniques to craft a tiny, realistic burger and fries set. This beginner-friendly project focuses on texture and color matching to achieve a delightful miniature feast perfect for display.
Detailed Instructions
Materials
- Polymer clay (tan, dark brown, yellow, red, translucent white, translucent yellow/orange)
- Liquid polymer clay (translucent)
- Red soft pastel or chalk
- Texture tools (needle tool, toothbrush, or balled aluminum foil)
- Small circle cutters (various sizes)
- Craft knife or scalpel
- Rolling pin
- Gloss glaze or UV resin
- Small ceramic or clay plate for display
Step 1: Crafting the Burger
-
Mix the Bun Color:
Start by mixing tan clay with a tiny amount of translucent white and a pinhead of yellow to get a realistic baked bread color. Roll this into a smooth ball. -
Form the Buns:
Slice the ball in half. Flatten the bottom half slightly for the base bun. Shape the top half into a dome, smoothing the edges downward to create that classic burger bun curve. -
Texture the Buns:
Using a toothbrush or a ball of crinkled aluminum foil, gently tap the surface of the top bun to give it a baked, porous texture. Do the same for the edges of the bottom bun. -
Shade the Top Bun:
Scrape some ochre or light brown pastel into a powder. Apply this gently to the very top of the dome with a soft brush to simulate a golden-brown baked crust. -
Add Sesame Seeds:
Roll tiny, almost microscopic specks of white or light tan clay into teardrops. Press them gently onto the top bun. I find using a needle tool helps position them without squashing the bun’s shape. -
Create the Patty:
Roll dark brown clay into a ball and flatten it into a thick disc. Use a needle tool to aggressively poke and scrape the sides and top to create a rough, meaty texture. -
Melt the Cheese:
Roll out yellow clay very thinly. Cut a square slightly larger than your patty. Place it on the patty and gently press the corners down so they drape naturally, looking melted. -
Assemble the Burger:
Stack the bottom bun, the cheesy patty, and the top bun. Press gently to adhere the layers without losing their individual shapes.
Realistic Textures
For the most realistic meat texture, mix sand or black pepper into your brown clay before shaping. The tiny specks mimic the grit and char of a real grilled burger patty.
Step 2: Making the Fries
-
Mix Potato Color:
Combine yellow clay with a fair amount of translucent clay and a touch of white. This gives the fries that slightly waxy, deep-fried look rather than being opaque yellow. -
Cut the Fries:
Roll the clay into a thin sheet or log. Use a sharp blade to cut varying lengths of thin, rectangular strips. Keep them imperfect; real fries aren’t identical. -
Build the Fry Box:
Roll out a sheet of red clay. Cut a rectangular strip and fold it into a box shape with an open top. Pinch the back side slightly higher than the front for that classic carton look. -
Score the Box:
Use the back of your knife to gently press vertical lines on the sides of the red box to mimic folded cardboard ridges. -
Fill the Carton:
Fill the bottom of the box with scrap clay to save material. Then, arrange your yellow strips sticking out the top, varying their angles and heights for a full, overflowing appearance. -
Season the Fries:
Lightly dust the tips of a few fries with orange-yellow pastel powder to make them look crispy and golden.
Level Up: The Tray
Create a checkered paper liner! Roll a very thin sheet of white clay, paint a grid with acrylics, bake it briefly, then crumple it under your burger for an authentic diner vibe.
Step 3: Sauces and Finishing
-
Make Ramekins:
Form two small balls of white or cream clay. Indent the centers with a ball tool to make little cups. Use a needle tool to press vertical ridges around the outside. -
Mix and Pour Ketchup:
Mix liquid polymer clay with red pastel shavings or a drop of red alcohol ink. Carefully drip this into one of the ramekins until it looks full. -
Mix and Pour Mustard:
Repeat the process with yellow pastel shavings or ink for the second ramekin. You can add a speck of brown to tone down the brightness for a more realistic mustard tone. -
Bake the Set:
Place all your pieces on a ceramic tile. Bake according to your brand of polymer clay instructions (usually 275°F/135°C for 15-30 minutes). Let them cool completely before handling. -
Final Glaze:
Add a touch of gloss glaze or UV resin specifically to the ketchup to make it look wet and shiny.
Arrange these tiny savory treats on a plate and enjoy the permanent deliciousness of your work

TRACK YOUR CERAMIC JOURNEY
Capture glaze tests, firing details, and creative progress—all in one simple printable. Make your projects easier to repeat and improve.
Pressed Texture Tags for Simple Pendants
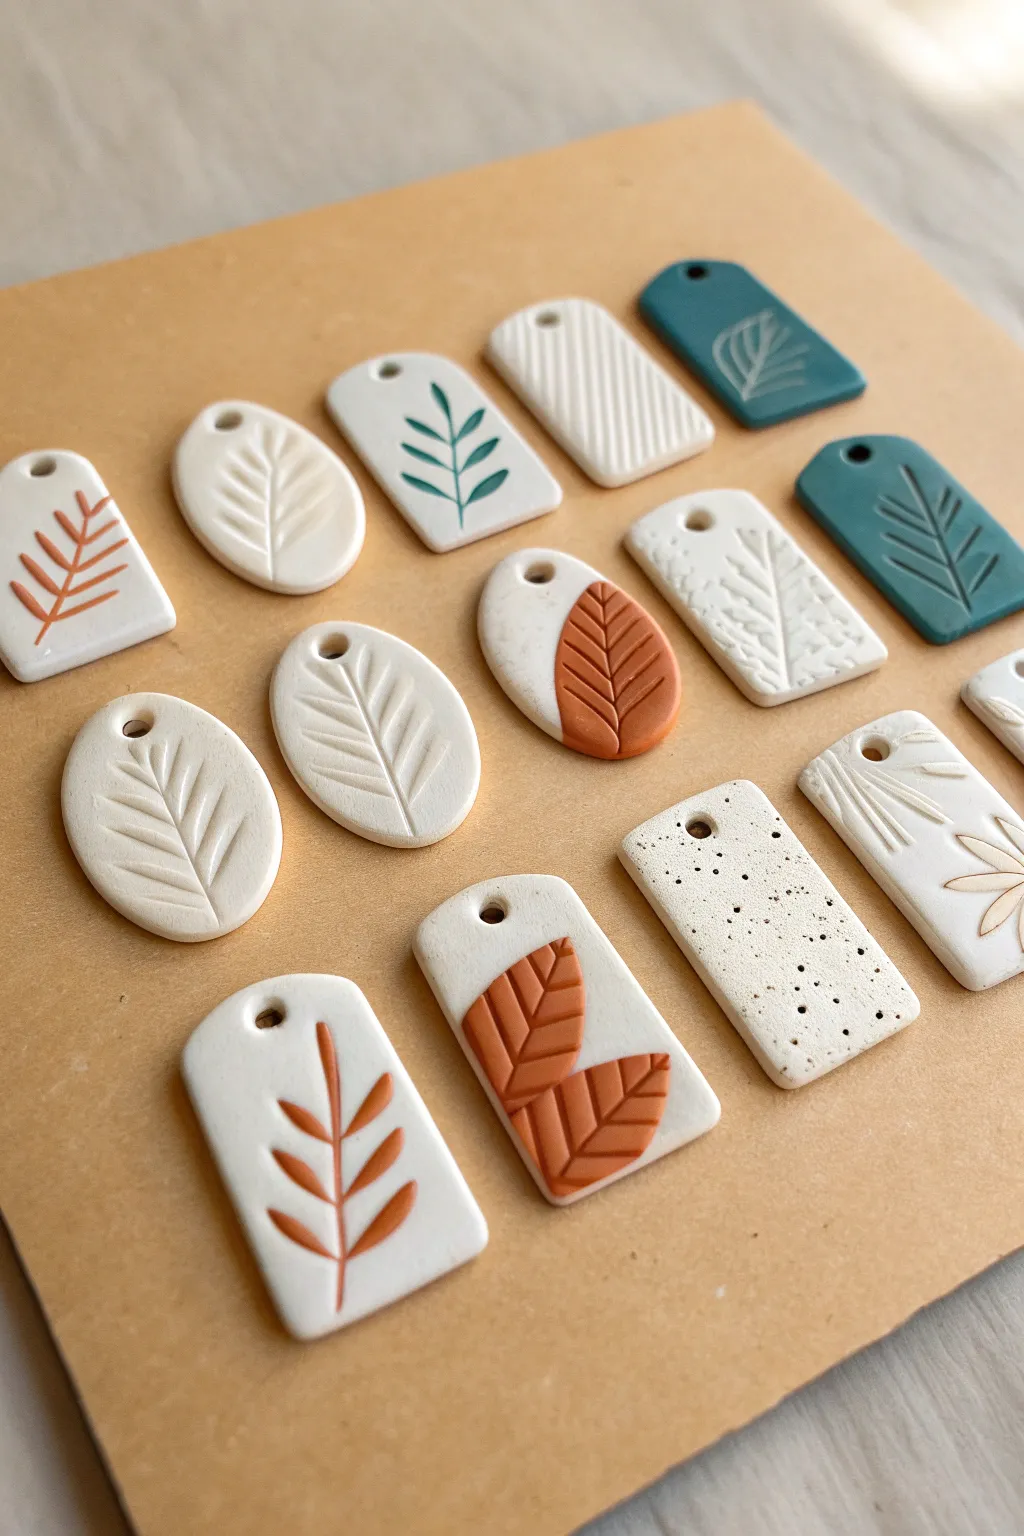
These charming, minimalist pendants combine the smooth finish of polymer clay with organic, botanical textures. With a mix of imprinted designs, raised appliqués, and subtle speckling, they make perfect personalized gift tags or statement jewelry pieces.
Step-by-Step Tutorial
Materials
- Polymer clay (white, terracotta/rust, teal/blue)
- Acrylic rolling pin or pasta machine
- Clay cutters (rectangle and oval shapes)
- Small round cutter or straw (for hanging holes)
- Texture tools (needle tool, rubber stamps, or real leaves)
- Speckle paint (acrylic black paint + old toothbrush) or crushed peppercorns mixed into clay
- Parchment paper or ceramic tile
Step 1: Preparing the Base
-
Condition the clay:
Begin by warming the white polymer clay in your hands, kneading it until it is soft and pliable. If the clay feels too stiff, a drop of clay softener or baby oil can help loosen it up. -
Roll the slab:
Using an acrylic roller or pasta machine, roll the white clay out into an even slab, approximately 3mm to 4mm thick. You want it sturdy enough to hold its shape but not too heavy. -
Add speckles (optional):
For the speckled stone look seen in some tags, sprinkle a tiny amount of black pepper or crushed dried herbs onto the clay and roll over it once more to embed the particles. -
Cut the shapes:
Press your rectangle and oval cutters firmly into the clay slab. Wiggle them slightly before lifting to ensure a clean cut. -
Smooth the edges:
Gently rub the edges of each cut shape with your fingertip to remove any harsh lines or burrs left by the cutter. -
Create holes:
Use a small circular cutter, a straw, or the end of a paintbrush to punch a hole at the top of each tag for stringing.
Fixing sticky cutters
If clay sticks inside your cutter, dip the cutter into cornstarch or water before pressing it into the slab. It will release instantly without distorting.
Step 2: Creating Textures & Designs
-
Imprint leaf veins:
For the simple white imprinted designs, take a needle tool or a dull knife. Gently press a central line down the middle of the shape, then press angled lines branching off to create a fern or leaf skeleton. -
Stamp textures:
For the textured tags, lightly press a rubber stamp into the raw clay to leave a subtle pattern. Alternatively, drag a needle tool diagonally to create the lined texture seen on the top center tag. -
Create raised leaves:
To make the terracotta appliqué leaves, roll a very thin sheet of rust-colored clay. Cut tiny leaf shapes freehand with a craft knife or ues tiny cutters. -
Attach appliqués:
Gently press the rust leaves onto the white base tags. They should stick on their own, but a tiny dab of liquid clay can ensure a permanent bond. Use your needle tool to press vein details into these added leaves. -
Paint sunken designs:
For the two-tone look (like the white tag with green leaves), imprint the design deeply first. You can fill these grooves with a tiny bit of acrylic paint *after* baking, or press very thin snakes of colored clay into the grooves now and roll flat. -
Make solid color tags:
Repeat the cutting and texturing process with the teal clay to create the dark, solid-colored tags shown in the set.
Make it a necklace
Add jump rings to the holes and attach to a simple gold chain, or use leather cord for a rustic look. These also make great essential oil diffusers.
Step 3: Finishing Touches
-
Final inspection:
Check all your pieces for fingerprints. A little rubbing alcohol on a q-tip works wonders to smooth these out before baking. -
Bake:
Arrange the pieces on a parchment-lined baking sheet or ceramic tile. Bake according to your clay manufacturer’s instructions (usually 275°F/135°C for 15-30 minutes depending on thickness). -
Cool down:
Allow the pieces to cool completely in the oven or on a wire rack. While still warm, the clay is fragile. -
Sand and buff:
Once cool, use fine-grit sandpaper to smooth any remaining rough edges. I find wet-sanding under running water keeps the dust down and produces a smoother finish. -
Seal (optional):
If you want a glossy look or need to protect surface paint, apply a thin coat of water-based polyurethane varnish.
You now have a beautiful collection of botanical tags ready to be worn or gifted
Flat Arch Dangle Earrings in Two Colors

Embrace a warm, desert-inspired aesthetic with these minimalist flat arch earrings. The simple nested U-shape design pairs creamy white clay with earthy tones for a modern, sophisticated dangle that’s surprisingly easy to construct.
Detailed Instructions
Materials
- Polymer clay in three colors: terracotta/brick red, beige/sand, and creamy white
- Acrylic rolling pin or clay machine
- U-shaped clay cutters (two sizes: one large, one medium to nest inside)
- Rigid tissue blade or craft knife
- Smooth ceramic tile or glass work surface
- Parchment paper
- Hand drill or small clay piercing tool
- 4 jump rings (gold finish)
- 2 earring hooks (gold finish)
- Flat nose pliers
- Oven thermometer
- Fine grit sandpaper (optional)
Step 1: Preparing the Clay
-
Condition the clay:
Begin by warming up your clay. Take a portion of the terracotta clay and knead it in your hands until it becomes soft, pliable, and free of any crumbly texture. -
Repeat for all colors:
Do the same conditioning process for your beige/sand color and the creamy white clay. Ensure your hands are clean between colors to avoid smudging, especially before handling the white. -
Roll out slabs:
Using your acrylic roller or pasta machine on a medium-thick setting (approx. 3-4mm), roll out a flat slab for each color. Aim for consistent thickness across all slabs so the arches sit flush.
Smooth Seams Trick
Apply a tiny drop of liquid polymer clay or ‘Bake & Bond’ to the inner edge of the large arch before inserting the small one. This ensures they fuse permanently.
Step 2: Cutting and Assembling
-
Cut the outer arches:
Place your large U-shaped cutter onto the terracotta slab. Press down firmly to cut the first shape. Repeat this on the beige slab to create the second outer arch. -
Create the inner space:
Now, take your smaller U-shaped cutter. Center it perfectly inside the terracotta arch you just cut and press down to remove the inner section, leaving just a rainbow-shaped frame. -
Repeat the frame cut:
Do exactly the same for the beige arch, removing the center to create the second frame. -
Cut the inner arches:
Move to your creamy white slab. Using that same smaller U-shaped cutter, punch out two solid white arches. These will become the centers of your design. -
Nest the shapes:
Gently lift the terracotta frame and place it on your baking tile. Carefully pick up a white inner arch and nest it inside the terracotta frame. They should fit snugly like puzzle pieces. -
Check the fit:
Repeat this nesting process with the beige frame and the second white inner arch. Use your finger to gently smooth the seam where the two colors meet, ensuring they bond slightly without distorting the shape. -
Add holes:
Using a needle tool or toothpick, create a hole at the very top center of each outer arch. Make sure the hole is big enough for your jump rings but not too close to the edge. -
Final smooth:
Give the surface one last check for fingerprints. I like to lightly brush a little cornstarch over the surface if smoothing is needed, or just use a baby wipe to clean up any lint.
Texture Time
Before baking, try pressing a piece of coarse sandpaper or a toothbrush onto the clay surface. This gives it a trendy stone-like or speckled finish.
Step 3: Baking and Finishing
-
Bake the pieces:
Place your tile with the clay pieces into the oven. Bake according to your brand’s specific instructions (usually 275°F/130°C for about 30 minutes). Use an oven thermometer to ensure accurate heat. -
Cool down:
Once the time is up, turn off the oven and open the door slightly, letting the pieces cool down slowly inside. This helps prevent cracking. -
Sand edges (optional):
If your edges feel a bit sharp or rough after baking, use fine-grit sandpaper wet with a little water to gently buff the sides until smooth. -
Open jump rings:
Using your flat nose pliers, twist a jump ring open sideways (never pull it apart outwards). -
Attach the hook:
Slide the jump ring through the hole you made in the clay arch, then add the earring hook onto the ring. -
Close the ring:
Twist the jump ring back using the pliers until the ends meet perfectly flush. Repeat this assembly for the second earring.
Now you have a stylish, lightweight pair of geometric earrings ready to wear or gift
Tiny Ghost Charms for Easy Seasonal Practice
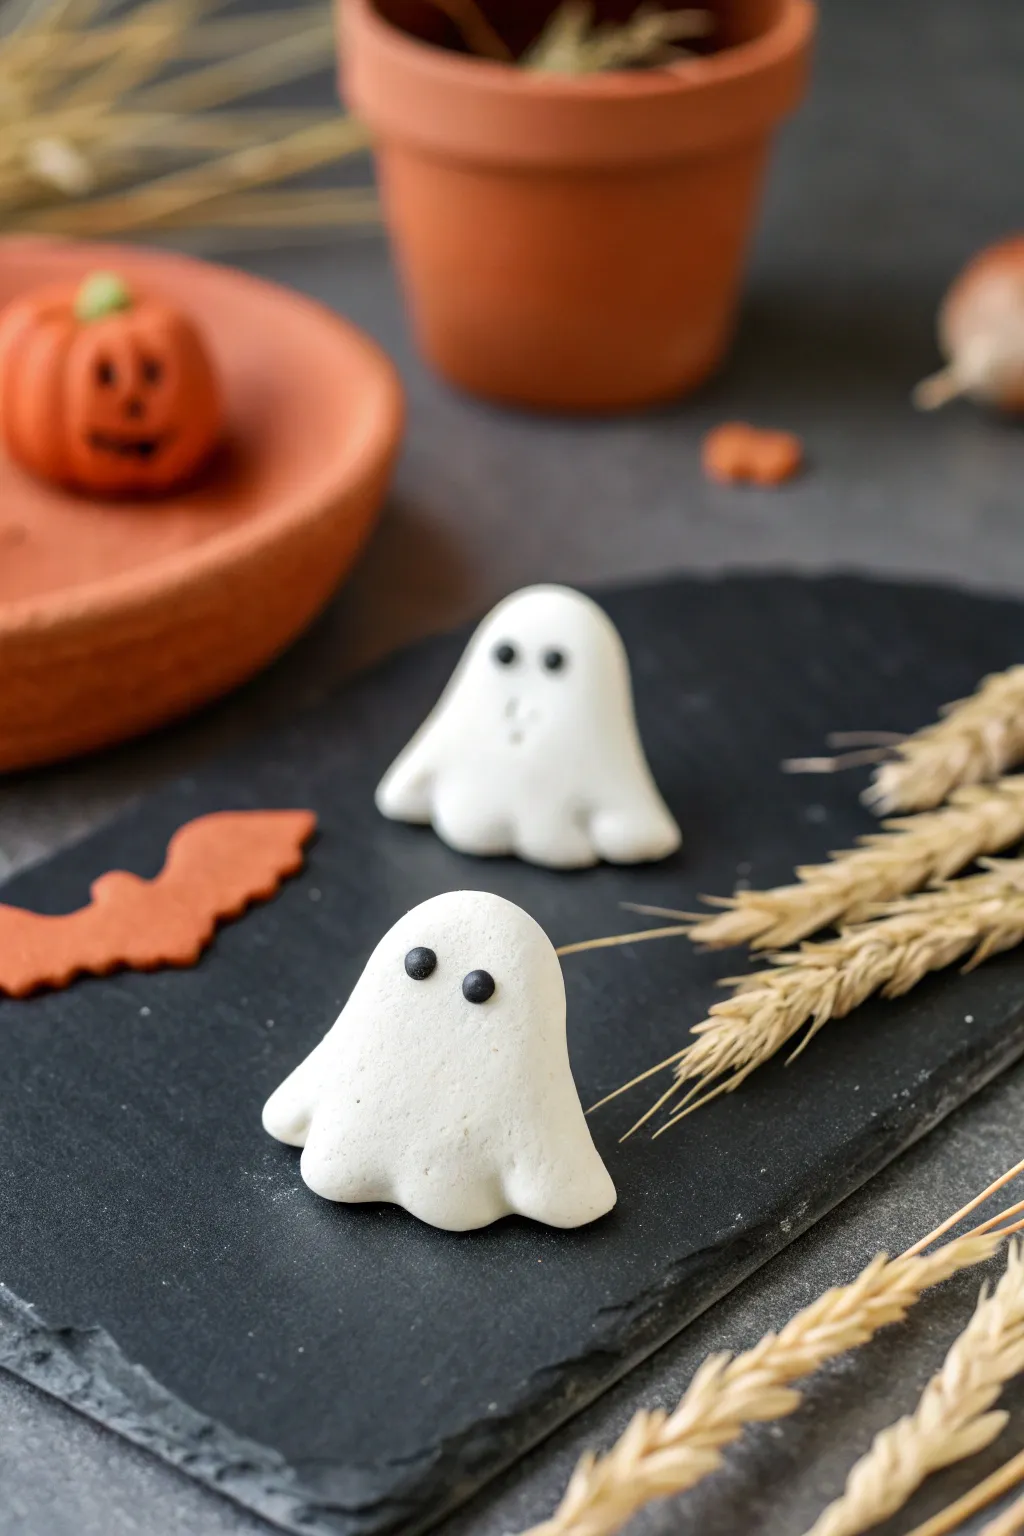
These adorable tiny ghosts are perfect for Halloween decorating or making into simple jewelry charms. Their smooth, draped shapes are incredibly forgiving for beginners, making this an ideal first project to build your confidence with polymer clay.
Detailed Instructions
Materials
- White polymer clay
- Black polymer clay
- Terracotta or orange polymer clay (optional for accessories)
- Small ball tool or toothpick
- Smooth work surface (glass or tile)
- Clay blade or craft knife
- Wet wipes (for cleaning hands)
- Oven for baking
Step 1: Shaping the Ghost Body
-
Condition the white clay:
Start by taking a chunk of white polymer clay and kneading it thoroughly in your hands until it becomes soft, warm, and pliable. This conditioning step is crucial to prevent cracks later on. -
Form a ball:
Roll the conditioned clay into a smooth, crack-free ball about the size of a large marble or a small walnut on your work surface. -
Create a teardrop shape:
Place the ball on your surface and gently roll one side of it with your finger to elongate it into a fat teardrop or gumdrop shape. You want a rounded top and a slightly wider base. -
Flatten the base:
Stand the teardrop up on its widest end. Gently tap the top to flatten the bottom against your work surface so the ghost stands independently without wobbling. -
Pull out the hem:
Using your thumb and forefinger, gently pinch and pull the bottom edge of the clay outwards to create the ‘sheet’ effect. Go around the entire circumference. -
Ruffle the edges:
To make the ghost look like draped fabric, use a toothpick or a modeling tool to gently press indentations into the flared bottom edge, pushing some parts in and pulling others out to create soft waves. -
Smooth the surface:
Check for any fingerprints. I find that lightly brushing the surface with a tiny bit of cornstarch or baby oil can help smooth these out perfectly before baking.
Keep it Clean
White clay attracts dust like a magnet. Wipe your work surface and tools with alcohol or a baby wipe immediately before starting to ensure your ghosts stay bright white.
Step 2: Adding the Face and Details
-
Clean your hands:
Before touching the black clay, wipe your hands thoroughly. Black clay pigment is strong and will easily smudge onto your pristine white ghost. -
Roll tiny black eyes:
Pinch off a microscopic amount of black clay. Roll two tiny balls, trying to keep them roughly the same size. These should be very small compared to the head. -
Place the eyes:
Gently press the two black balls onto the upper portion of the ghost’s head. You can place them close together for a cute look or wider apart for a goofy expression. -
Flatten the eyes:
Use the flat side of a tool or your finger to gently press the eyes flat against the face so they don’t look like they are popping out. -
Optional: Make the bat:
Condition a small piece of terracotta or orange clay. flattened it into a sheet about 3mm thick. -
Cut the bat shape:
Use a craft knife to cut a simple silhouette of a bat or use a tiny cutter if you have one. Smooth the raw edges with your finger. -
Texture the bat:
Use a toothbrush or a crumpled ball of foil to tap texture onto the surface of the bat for a rustic look.
Step 3: Baking and Finishing
-
Preheat the oven:
Set your oven to the temperature recommended on your specific brand of polymer clay packaging (usually around 230°F – 275°F or 110°C – 135°C). -
Arrange on tile:
Place your ghosts and any accessories on a ceramic tile or a baking sheet lined with parchment paper. -
Bake the pieces:
Bake for approximately 15-20 minutes depending on the thickness of your clay figures. Do not raise the temperature to speed it up, as white clay scorches easily. -
Cool completely:
Remove from the oven and let them cool down fully before handling. The clay is fragile when hot but hardens as it cools.
Burnt Ghosts?
If your white clay yellows in the oven, it got too hot. Next time, create a ‘tent’ of aluminum foil over your pieces to shield them from direct heat.
Once cooled, your little spectral friends are ready to haunt your desk or be gifted to someone special
Squishy Blob Animals With Painted-On Faces
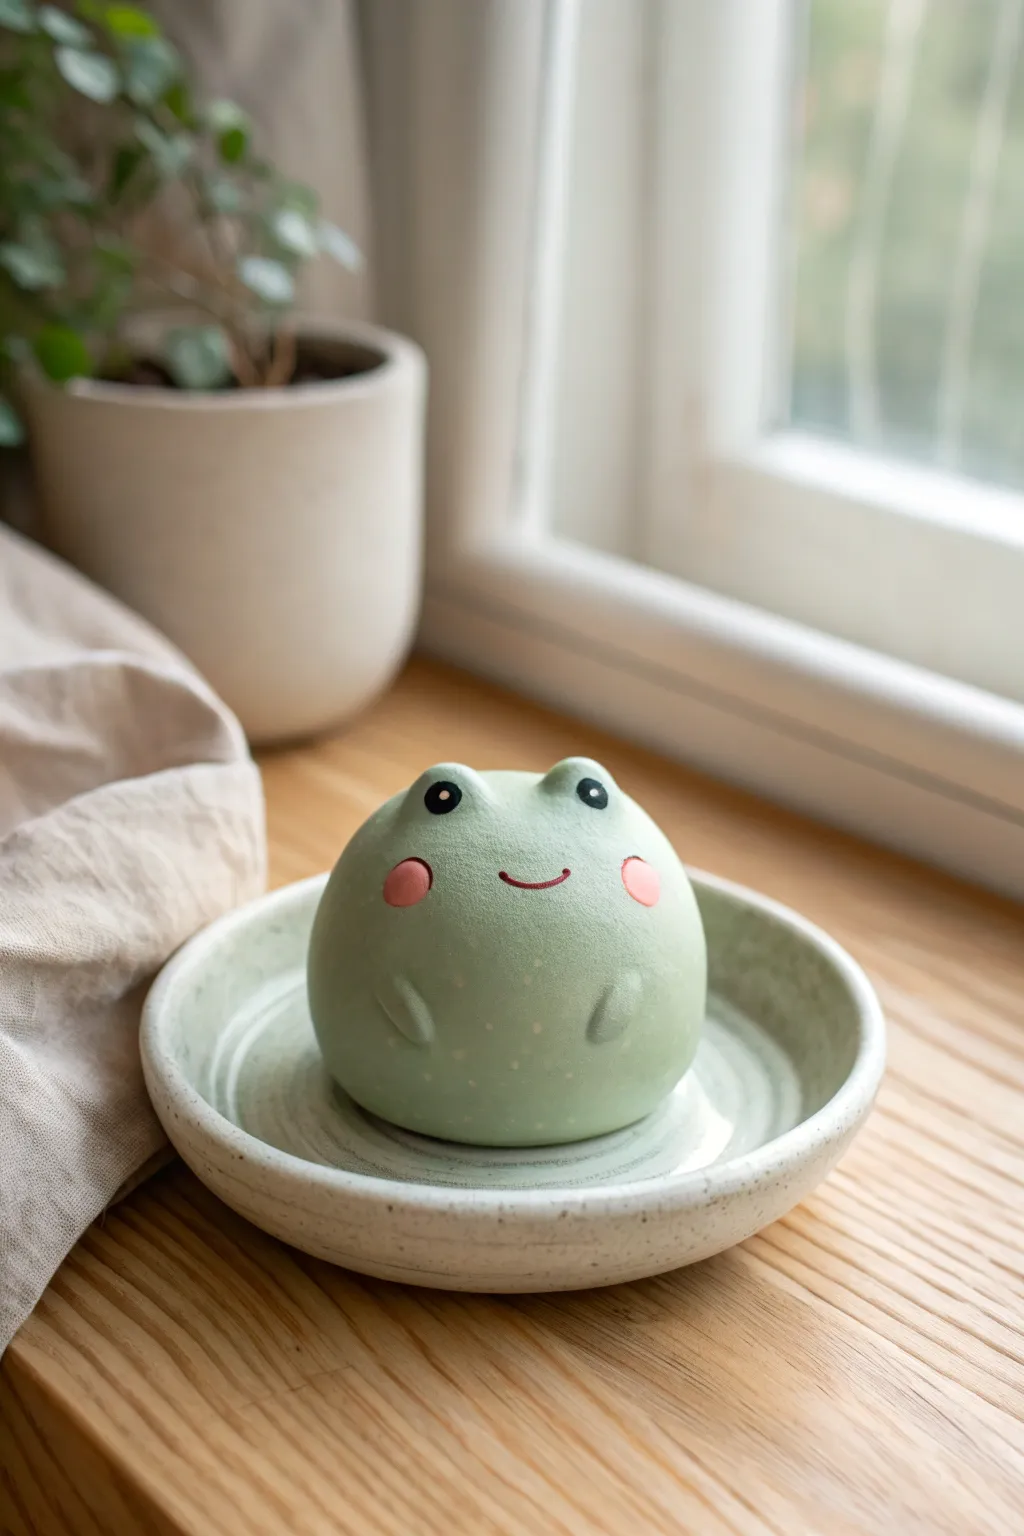
This adorable, chubby frog brings a sense of serenity to any windowsill. With its smooth, matte finish and simple expression, it’s the perfect starter project for mastering round, organic shapes in polymer clay.
How-To Guide
Materials
- Light sage green polymer clay
- Translucent liquid clay (optional for smoothing)
- Acrylic paint (black, white, pink, brown/dark red)
- Fine detail paintbrush (00 or 000 size)
- Dotting tool or ball stylus
- Soft pastel chalks in a lighter green or cream (optional)
- Matte varnish or sealant
- Clay roller
- Smooth work surface (glass or tile)
Step 1: Shaping the Base
-
Condition the clay:
Begin by kneading your sage green clay thoroughly until it is soft, pliable, and free of air bubbles or cracks. Warm clay is easier to smooth. -
Form the main body:
Roll a large portion of the clay into a smooth, even ball. Gently press it down onto your work surface so it has a flat bottom but retains a tall, rounded dome shape. -
Create the eye sockets:
Take two smaller, equal-sized pieces of green clay and roll them into balls. Place them on top of the dome, spacing them slightly apart to form the frog’s protruding eyes. -
Blend the seams:
Use a silicone tool or your finger to carefully blend the bottom of the eye balls into the main body. The transition should be seamless, so it looks like one continuous piece rather than attached spheres. -
Shape the arms:
I like to roll two very small, teardrop-shaped pieces of clay for the arms. Press these onto the front lower section of the body, curving them slightly inward to hug the belly. -
Final smoothing:
Before baking, inspect the entire surface. If you see fingerprints, gently buff them out with a tiny amount of baby oil on your finger or brush on a thin layer of translucent liquid clay.
Clean Clay Pro Tip
Keep a pack of baby wipes nearby. Clean your hands and tools constantly to stop dust or lint from getting stuck in the light green clay.
Step 2: Baking and Texturing
-
Bake the figurine:
Place your frog on a baking tile covered with parchment paper. Bake according to your specific clay brand’s instructions (usually around 275°F/135°C for 15-30 minutes per 1/4 inch thickness). -
Cool down completely:
Let the piece cool gradually inside the oven if possible to prevent thermal shock cracks. The clay must be completely room temperature before painting.
Step 3: Painting the Face
-
Paint the cheeks:
Dip a small round brush or a large dotting tool into pink acrylic paint. Dab two generous circles below the eyes for the rosy cheeks. -
Draw the smile:
Using your thinnest detail brush and brown or dark red paint, carefully sweep a small, curved line between the cheeks for the mouth. Keep the line thin and delicate. -
Paint the eye base:
Fill in the front face of the protruding eye mounds with solid black paint. You can use a large dotting tool to keep the circle perfect. -
Add eye highlights:
Once the black paint is fully dry, dip a fine point tool into white paint. Add a small white dot to the upper right area of each black pupil to give the frog life. -
Create subtle speckles:
To mimic the texture in the photo, mix a very watery light green or white paint. Flick the bristles of an old toothbrush or stiff brush to spatter tiny, almost invisible speckles across the lower body. -
Seal the piece:
Finish by applying a coat of matte varnish over the entire frog. This protects the paint and gives the clay that soft, velvety look seen in the original image.
Fingerprint Trouble?
If fingerprints are stubborn, lightly brush the raw clay with a bit of cornstarch before the final smoothing to create a silky, print-free surface.
Now you have a sweet little desk companion to keep you company while you work
Mini Breakfast Charms: Toast, Egg, and Pancake Stack
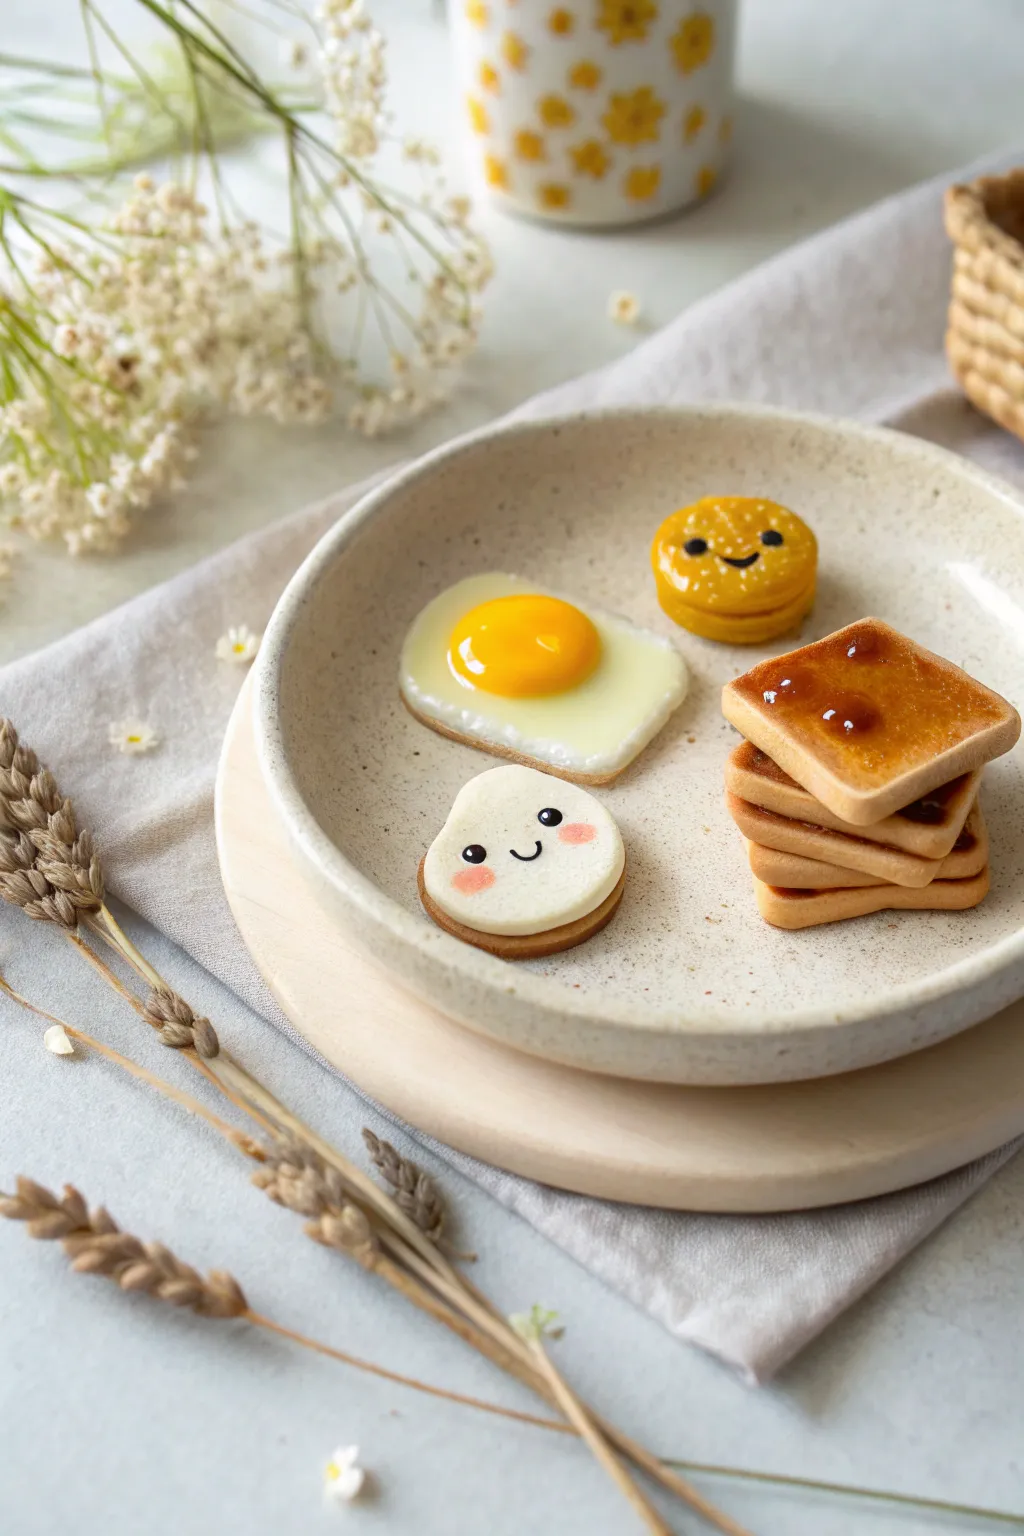
Brighten your crafting day with this adorable miniature breakfast spread made entirely from polymer clay. This beginner-friendly project features realistic textures, cute kawaii faces, and a tiny stack of toast glazed to perfection.
Step-by-Step Guide
Materials
- Polymer clay (white, translucent, yellow, ochre, terra cotta/brown)
- Liquid polymer clay (translucent and brown)
- Chalk pastels (orange, brown, yellow)
- Soft paintbrush for shading
- Rolling pin or pasta machine
- Small round cutters (various sizes)
- Square cutter (small)
- Needle tool or toothpick
- Ball tool
- Black acrylic paint and fine detail brush
- Gloss glaze or UV resin
- Toothbrush or sandpaper (for texturing)
Step 1: Golden Toast Stack
-
Mix and Cut:
Mix white clay with a small amount of ochre to create a dough color. Roll it out to about 3mm thickness and cut out 3-4 small squares. Use your fingers to gently soften the sharp corners for a more baked look. -
Add Texture:
Press a clean toothbrush or piece of sandpaper gently against the surface of each square to create a bread-like porous texture. -
Shade the Crusts:
Scrape some brown and orange chalk pastel into dust. Use a soft, dry brush to apply the powder around the edges of each slice to simulate a golden-brown crust. I like to add a tiny bit to the center for a toasted effect. -
Jam Glaze:
Mix translucent liquid clay with a tiny scraping of reddish-brown pastel or a drop of alcohol ink. Apply this ‘jam’ generously to the top slice, letting it pool slightly. -
Stack and Bake:
Stack the unglazed slices slightly askew, placing the jammed slice on top. Bake according to your clay manufacturer’s instructions.
Sticky Situation?
If your clay gets too soft and fingerprints are showing, pop the pieces in the fridge for 10 minutes before texturing. Cold clay holds detail much better.
Step 2: Sunnyside Up Egg
-
Form the White:
Mix white clay with a tiny bit of translucent clay for a realistic egg white finish. Flatten an irregular blob, keeping edges slightly thicker than the center. -
Create the Yolk:
Roll a small ball of sunny yellow clay. Press it gently into the center of your egg white, smoothing the seam just slightly so it looks integrated but still raised. -
Toast the Edges:
Use a light brown pastel dust on the very edges of the egg white to give it a crispy, fried appearance.
Step 3: Kawaii Biscuit & Pancake
-
Biscuit Base:
Roll out terra cotta or light brown clay for the biscuit base and cut a circle. Roll out white clay slightly thinner and cut a matching circle to place on top. -
Adding Personality:
Use a dotting tool or end of a paintbrush to make indentations for eyes on the white layer. Use a needle tool to press a small curved smile. -
Blushing Cheeks:
With a Q-tip or small brush, dab a tiny amount of pink pastel dust onto the cheeks of the biscuit for a sweet, blushing look. -
Yellow Pancake Stack:
Create two thick discs of yellow-orange clay. Stack them and smooth the edges so the seam is visible but tidy. -
Texturing the Pancake:
Use a needle tool to poke tiny, shallow dots all over the surface of the top pancake to mimic air bubbles in batter. -
Face Details:
Add a smile and eye indents to the pancake stack, similar to the biscuit. Bake all remaining pieces (egg, biscuit, pancake). -
Final Paint:
Once cool, use a fine detail brush and black acrylic paint to fill in the eyes and mouths on the biscuit and pancake. -
Finishing Glaze:
Coat the egg yolk and the jam section of the toast with gloss glaze or UV resin to make them shine like real food.
Pro Tip: Realistic Jam
Add tiny chunks of translucent solid clay into your liquid clay jam mixture. It simulates fruit pieces and adds convincing texture to the spread.
Arrange your tiny breakfast feast on a plate and enjoy the cuteness