Functional pottery is my favorite kind of clay project because you get that cozy “I made this” feeling every time you actually use it. Here are some practical pieces you can create that still leave plenty of room for glaze play, texture, and your own style.
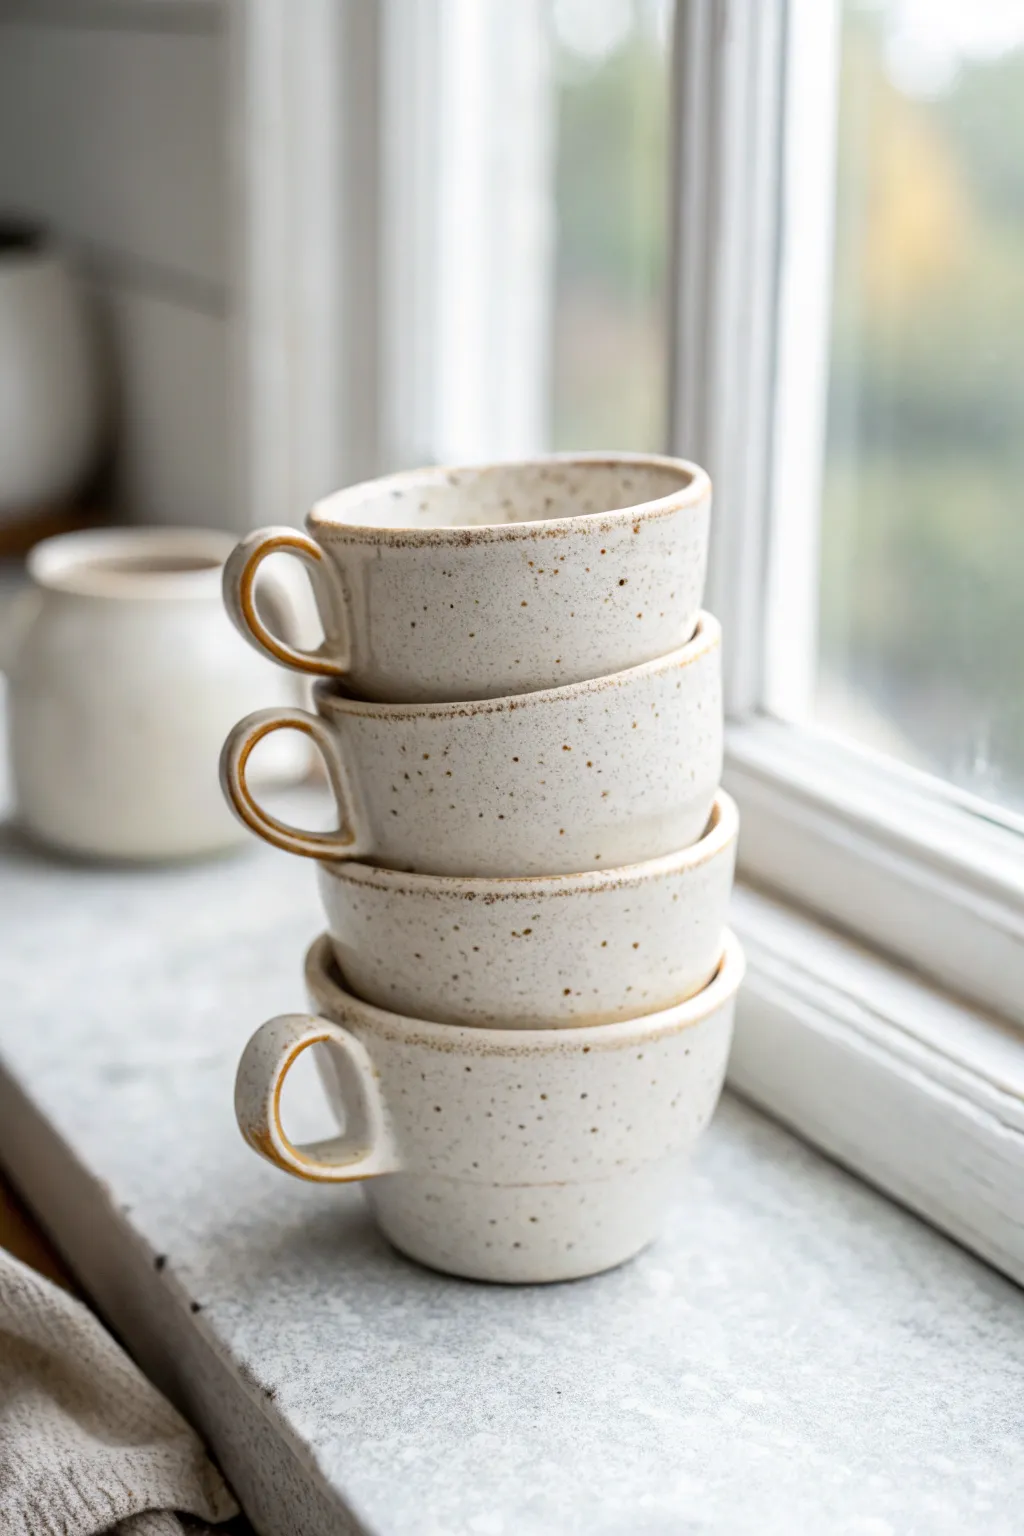
Everyday Mugs With Comfortable Handles
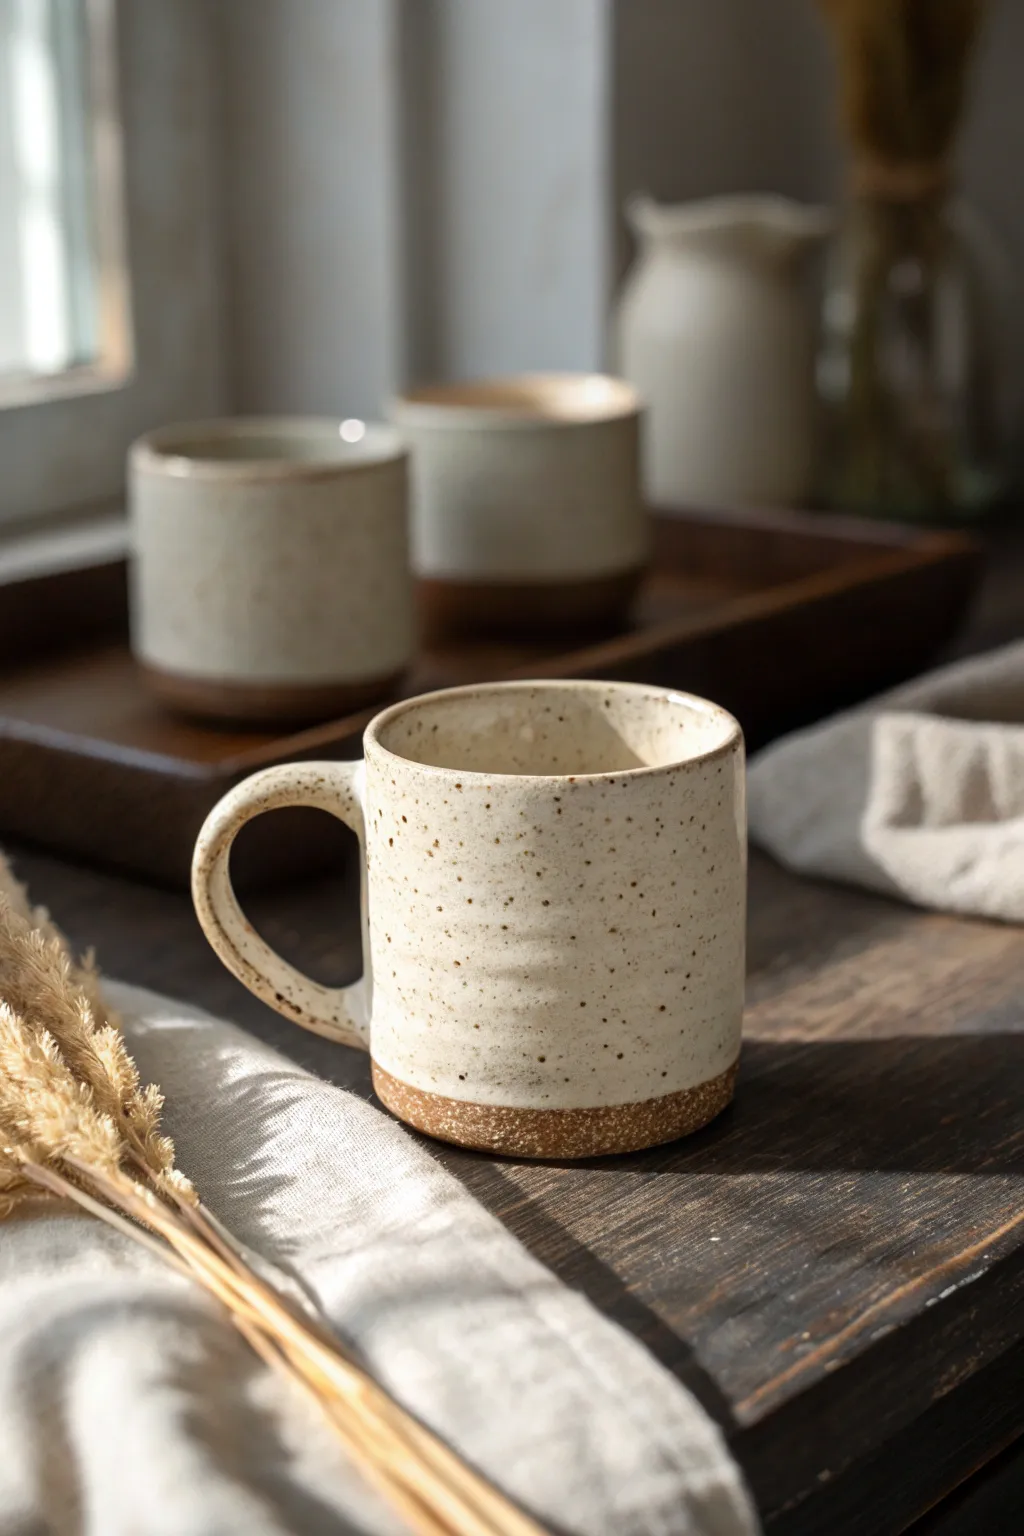
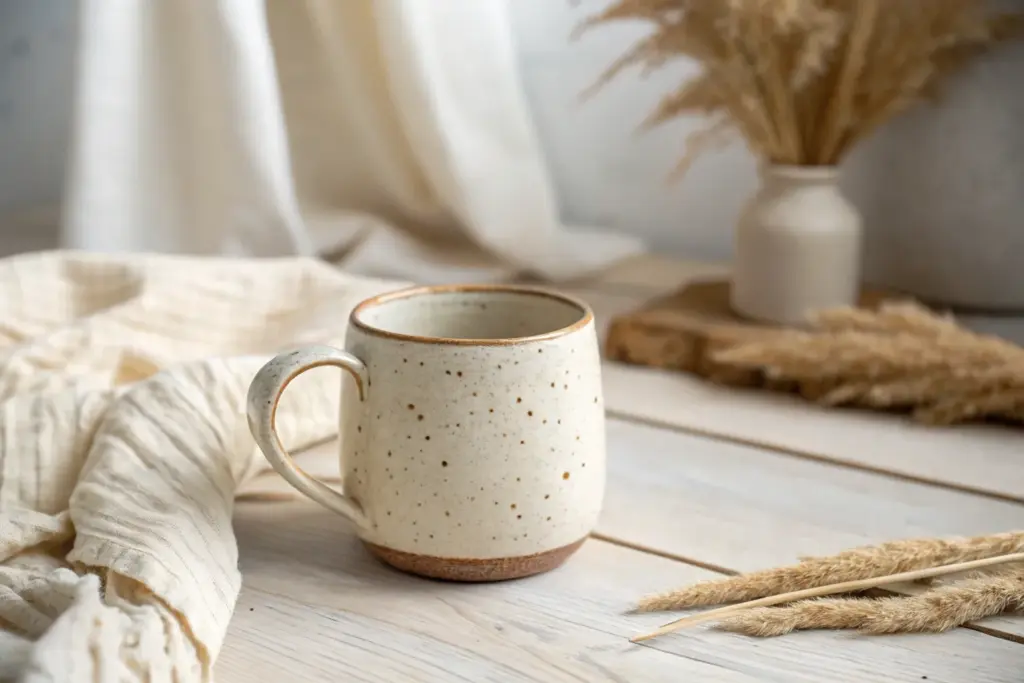
Capture the warmth of a cozy morning with this rustic, hand-thrown stoneware mug, featuring a simple cylindrical form and a generous, comfortable handle. The natural speckled clay body bleeds through a creamy satin glaze, creating a timeless, earthy aesthetic perfect for daily use.
Step-by-Step
Materials
- Speckled buff stoneware clay (approx. 1 lb)
- Pottery wheel
- Throwing sponge
- Needle tool
- Wire cutter
- Wooden rib tool
- Metal kidney rib
- Tracing tool / Wooden knife
- Bucket of water
- Creamy white satin/matte glaze (cone 5/6 compatible)
- Kiln
Step 1: Throwing the Form
-
Prep the clay:
Start by thoroughly wedging about one pound of speckled stoneware clay to remove air bubbles and align the particles. Form it into a smooth ball before slamming it onto the center of your wheel head. -
Center the clay:
With the wheel spinning at a moderate-high speed, use wet hands to cone the clay up and push it back down until it runs perfectly smooth and centered without wobbling. -
Open the vessel:
Press your thumbs into the center of the mound to open it, leaving about a half-inch of thickness at the bottom for the floor. Compress the floor with a flat finger or tool to prevent S-cracks later. -
Pull the walls:
Slow the wheel down slightly. Create a groove at the base and pull the clay upward between your fingers to create a cylinder. Aim for even walls, roughly 1/4 inch thick. Perform 2-3 pulls to reach the desired height of about 3.5 to 4 inches. -
Shape the subtle curve:
This mug isn’t perfectly straight; it has a very slight swell. Use a wooden rib on the outside while pushing gently from the inside to create a soft, barely-there curve in the profile. -
Texture the surface (optional):
If you want the subtle throwing rings visible in the photo, ease off on the final ribbing. Allow the natural finger marks from your last pull to remain on the surface for texture. -
Finish the rim:
Use a chamois or a small strip of plastic to compress and round the rim so it will be comfortable to drink from. -
Undercut and wire off:
Use a wooden knife to trim excess clay from the base of the cylinder on the wheel. Run a wire cutter underneath to separate it from the bat, then set it aside to dry to a leather-hard state.
Iron Speckle Magic
To get more dramatic specks, choose a clay with heavy iron content or grog. The reduction atmosphere isn’t needed; oxidation firing works great for these specks.
Step 2: Trimming and Handling
-
Trimming the foot:
Once leather hard, center the mug upside down on the wheel. Trim the bottom to create a distinct, unglazed foot ring, removing excess weight from the base. -
Pulling a handle:
Take a small nugget of fresh clay. wetted generously. Hold it vertically and stroke downward with wet fingers, pulling it into a long, tapered strip with an oval cross-section. -
Forming the curve:
Curve the pulled strip into an ear shape and set it down on a board for 10-15 minutes to firm up so it can hold its shape when attached. -
Attach the handle:
Score the mug surface and the handle ends where they will join. Apply slip. Press the handle firmly onto the mug, blending the clay seams smoothly with a wooden tool or your thumb. -
Adjust handle alignment:
Look at the mug from multiple angles to ensure the handle is straight vertically. I find it helpful to look into a mirror while holding the mug to spot asymmetry. -
Slow drying:
Cover the mug loosely with plastic to ensure the handle (which dries faster) and the body dry at the same rate. Let it dry completely to the bone-dry stage.
Step 3: Glazing and Firing
-
Bisque fire:
Load the bone-dry mug into the kiln and fire to Cone 04 (or your clay’s bisque temperature). This hardens the clay and prepares it for glazing. -
Wax the foot:
Apply wax resist to the bottom foot ring and about 1/4 inch up the side of the mug. This creates the exposed raw clay band seen at the bottom of the finished piece. -
Apply glaze:
Dip the mug into a bucket of Creamy White Satin glaze. Hold it by the foot (or use tongs) and submerge it for 3 seconds. Shake off excess drips as you pull it out. -
Clean up:
Use a damp sponge to wipe any stray glaze droplets off the wax resist area at the bottom. The transition line between glaze and raw clay should be clean and sharp. -
Glaze fire:
Fire the mug to Cone 5 or 6 (approx. 2200°F). This higher temperature vitrifies the stoneware and allows the iron speckles in the clay to burn through the white glaze. -
Sand the bottom:
Once cool, check the unglazed foot. If it feels rough, lightly sand it with wet sandpaper to ensure it won’t scratch your table surface.
S-Crack Savior
If you get cracks in the bottom (S-cracks), you likely didn’t compress the floor enough. spend extra time pressing down the floor during the opening step.
Enjoy your morning coffee knowing you’ve crafted a durable, beautiful vessel with your own hands


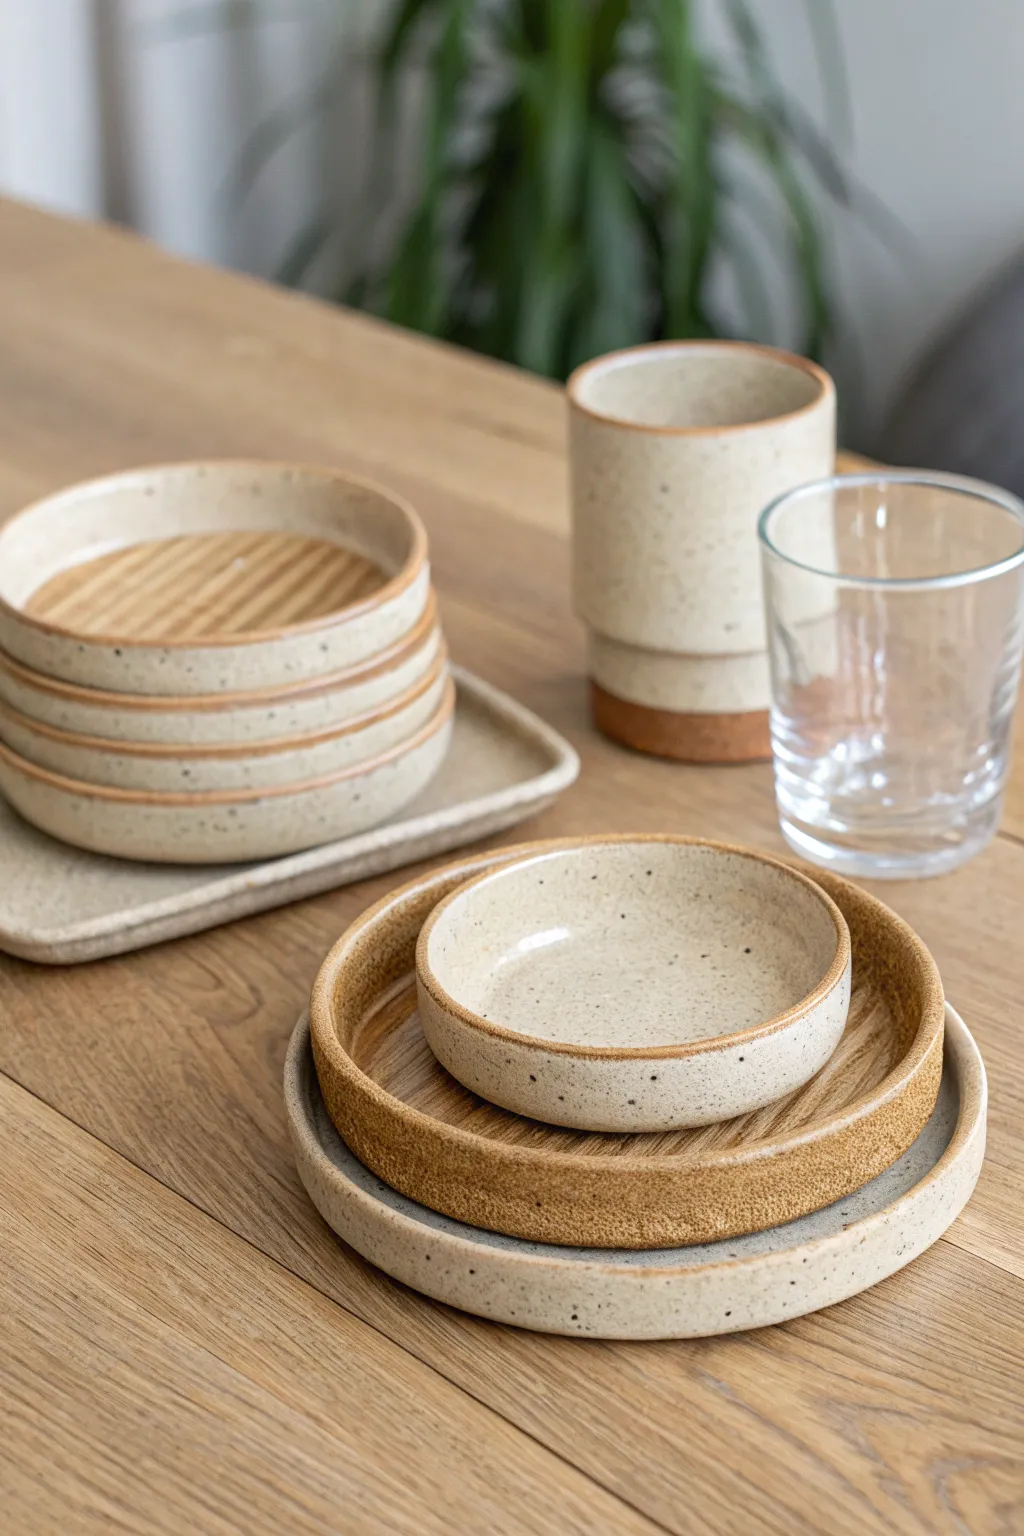
Stackable Cereal-and-Soup Bowls
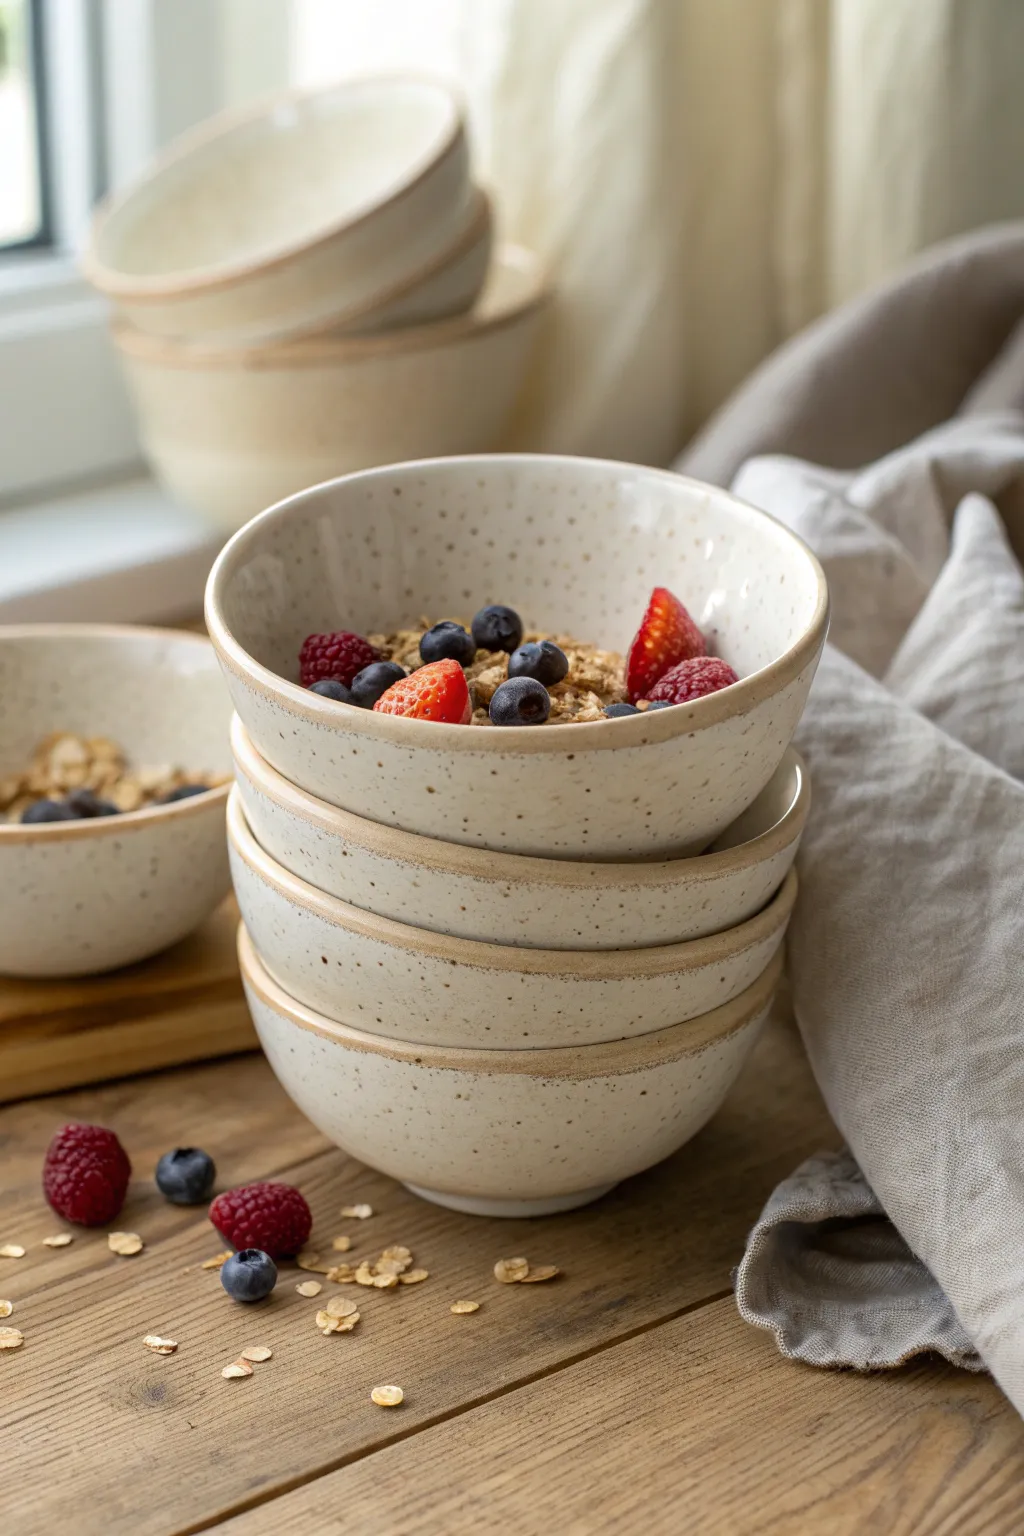
These wheel-thrown bowls strike the perfect balance between rustic charm and modern utility, featuring a creamy, speckled oatmeal glaze and a defined, unglazed rim. Their wide, steep-sided shape creates an easily stackable profile that looks beautiful on open shelving or a breakfast table.
Step-by-Step Tutorial
Materials
- Speckled Stoneware Clay (buff or white based with heavy grog/speckles)
- Pottery Wheel
- Throwing Tools (sponge, rib, needle tool, wire)
- Trimming Tools (large and small loop tools)
- Calipers (optional but recommended for consistency)
- Cream/Oatmeal Matte Glaze (food safe)
- Wax Resist
- Kiln
Step 1: Throwing the Form
-
Prepare Clay Balls:
Weigh out approximately 1.25 to 1.5 lbs of speckled clay for each bowl. Wedge them thoroughly to remove air bubbles and ensure particle alignment. -
Center the Clay:
Secure a clay ball to the wheel head and center it using water and firm pressure. Aim for a wide, flat puck shape rather than a tall cone, as these bowls have a wide base. -
Open the Floor:
Open the clay down to about a 1/4-inch thickness. Compress the floor with a rib or sponge to prevent S-cracks later, making sure to pull the floor out wide to establish the bowl’s bottom curve. -
Pull the Walls:
Pull the walls up, focusing on a steep, continuous curve. Unlike a V-shaped bowl, you want a U-shape that transitions gently from the floor to the wall. Keep the rim slightly thick for durability. -
Shape with a Rib:
Use a kidney-shaped metal or wooden rib on the inside of the bowl while supporting the outside with your hand. Press outward gently to define that generous, rounded curve visible in the photo. -
Define the Rim:
Before finishing, compress the rim with a chamois or sponge. I like to give it a slight outward bevel, which helps the bowls nest comfortably without locking together. -
Measure for Consistency:
If making a set, use calipers to measure the rim diameter of your first bowl. Check subsequent bowls against this measurement to ensure they will stack uniformly. -
Wire Off:
Run a wire tool under the base and set the bowl aside on a ware board. Repeat for the remaining clay balls.
Wobbly Stack?
If bowls wobble when stacked, your foot rings may be too narrow or the floor curve inconsistent. Ensure the foot ring is wide enough to sit on the gentle slope of the bowl beneath it.
Step 2: Trimming & Bisque Firing
-
Dry to Leather Hard:
Allow the bowls to dry slowly until they are leather hard. The rim should be firm enough to support the bowl’s weight when flipped over. -
Center and Lug:
Place a bowl upside down on the wheel head. Center it perfectly and use small coils of soft clay to secure it in place. -
Trim the Foot Ring:
Using a sharp loop tool, carve away excess clay from the lower third of the bowl to mirror the interior curve. Carve a distinct foot ring so the bowl has a defined lift from the table. -
Refine the Surface:
Use a smooth metal rib to burnish away any grog that got dragged up during trimming, leaving a smooth surface on the exterior bottom. -
Bisque Fire:
Let the bowls dry completely to the bone-dry stage. Load them into the kiln and bisque fire to Cone 04 (or your clay body’s specifications).
Color Pop
Before glazing, paint a thin band of underglaze (like cobalt blue or oxide wash) just below the waxed rim area. This adds a subtle pinstripe of color to the exposed clay edge.
Step 3: Glazing & Final Firing
-
Clean the Bisque:
Wipe the fired bowls with a damp sponge to remove any kiln dust, which can cause glaze crawling. -
Wax the Foot and Rim:
Apply wax resist to the bottom foot ring. Crucially, strictly apply a thin line of wax to the very top edge of the rim. This creates the exposed clay detail seen in the image. -
Glaze Interior:
Pour your creamy oatmeal glaze into the bowl, swirl to coat the entire interior, and pour out the excess. Wipe any drips immediately. -
Glaze Exterior:
Hold the bowl by the foot (or use tongs) and dip the exterior into the glaze bucket. The wax on the rim will repel the glaze, leaving that crisp clay line. -
Clean Up:
Use a sponge to clean any stray glaze droplets off the waxed rim and foot. If the glaze is thick, you may need to gently sponge the rim edge to make the line sharp. -
Final Fire:
Load the glazed bowls into the kiln. Fire to the maturity temperature of your clay and glaze (typically Cone 5 or 6 for stoneware). Allow the kiln to cool completely before unloading.
Once cooled, fill your new stackable set with fresh fruit or warm oatmeal and enjoy the handmade warmth they bring to your morning routine


Dinner Plates With Slightly Raised Rims
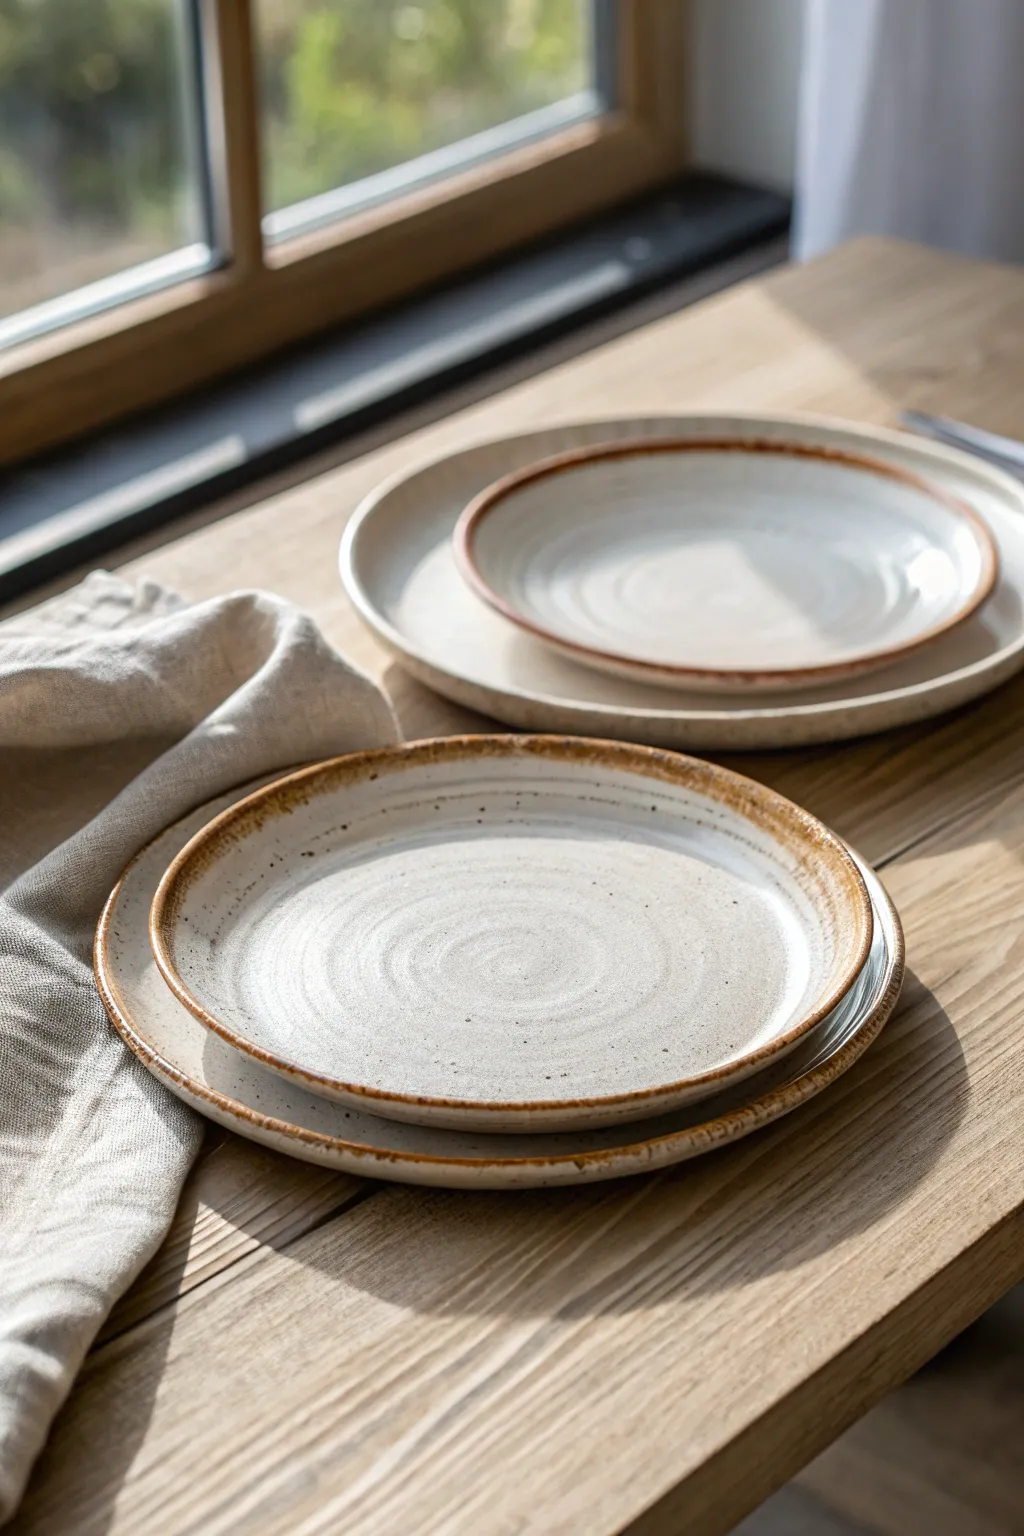
These elegant dinner plates strike the perfect balance between modern minimalism and rustic charm, featuring a subtle speckle and a warm, toasted rim. The slightly upturned edge is not only stylish but practical, keeping sauces contained while allowing for easy stacking.
Step-by-Step
Materials
- Speckled stoneware clay (mid-fire)
- Pottery wheel
- Bat system
- Rib tool (wood or rubber)
- Needle tool
- Wire cutter
- Sponge
- Trimming tools
- Clear matte or satin glaze
- Iron oxide wash or Rutile glaze for rim
Step 1: Throwing the Form
-
Prepare the clay:
Begin by wedging about 2-3 pounds of speckled stoneware clay for a dinner-sized plate. Ensure the clay is free of air bubbles, as flat forms are prone to S-cracks if not properly compressed. -
Center wide and low:
Center your clay on the wheel, focusing on driving it down into a puck shape rather than a cone. Gently open the clay all the way down, leaving about a ¼-inch thickness for the floor. -
Compress the floor:
Using a damp sponge or a wooden rib, compress the floor of the plate by moving from the center out to the rim multiple times. This is crucial for preventing cracks during drying. -
Establish the rim:
Pull the clay out towards the edge of the bat. When you reach the desired diameter (account for 12% shrinkage), stop pulling outward. -
Raise the edge:
Instead of leaving the plate completely flat, use your fingers to gently lift the outer inch of the clay upward to create a distinct, raised vertical rim about half an inch high. -
Define the transition:
I like to use a rib tool to create a sharp, distinct accumulation of clay right where the flat eating surface meets the rising wall, giving the plate visual definition. -
Clean the distinct rim:
Use a chamois or a small piece of plastic to smooth the very top edge of the rim, making it comfortable to touch but keeping that crisp, straight profile. -
Wire off:
Run a wire tool under the plate while the wheel is spinning very slowly to separate it from the bat, then set it aside to dry to leather-hard.
Bat Maintenance
Use a wooden bat for plates. Wood absorbs moisture from the bottom, helping the wide, flat floor dry evenly coupled with the rim, reducing warping.
Step 2: Trimming and Finishing
-
Center for trimming:
Once leather-hard, flip the plate onto the wheel head. Use a Giffin Grip or clay lugs to secure it. -
Trim the foot:
Carve away excess clay from the bottom, creating a distinct foot ring. A defined foot adds elevation and makes the plate look more professional on the table. -
Smooth the surface:
After trimming, run a slightly damp sponge over any rough grog that might have been dragged up by the trimming tool to ensure a smooth bottom. -
Bisque fire:
Load the bone-dry plates into the kiln and bisque fire them according to your clay body’s specifications (usually Cone 04 or 06).
Stacking Style
Ensure your foot rings are all trimmed to the exact same diameter. This allows the plates to nest perfectly and safely inside the rim of the plate below.
Step 3: Glazing
-
Wipe down:
Wipe the bisqued plates with a damp sponge to remove any kiln dust and ensure the glaze adheres properly. -
Apply the main glaze:
Dip the plate or pour a clear matte or satin glaze over the entire interior and exterior. This lets the natural speckles of the clay body shine through. -
Accent the rim:
Dip a sponge or a small brush into an iron oxide wash or a toasted orange glaze. Carefully run this along just the very top edge of the raised rim. -
Create the break:
Allow the rim glaze to drip slightly or overlap with the white glaze; this reaction creates that beautiful brownish-orange halo effect seen in the photo. -
Final wipe:
Clean the foot ring thoroughly with a sponge to prevent the plate from fusing to the kiln shelf. -
Glaze fire:
Fire the plates to maturity (likely Cone 5 or 6 depending on your clay). Slow cooling can sometimes help develop better satin textures.
Set your table with your new handmade dinnerware and enjoy the warmth they bring to every meal


Serving Platters That Double as Wall Art
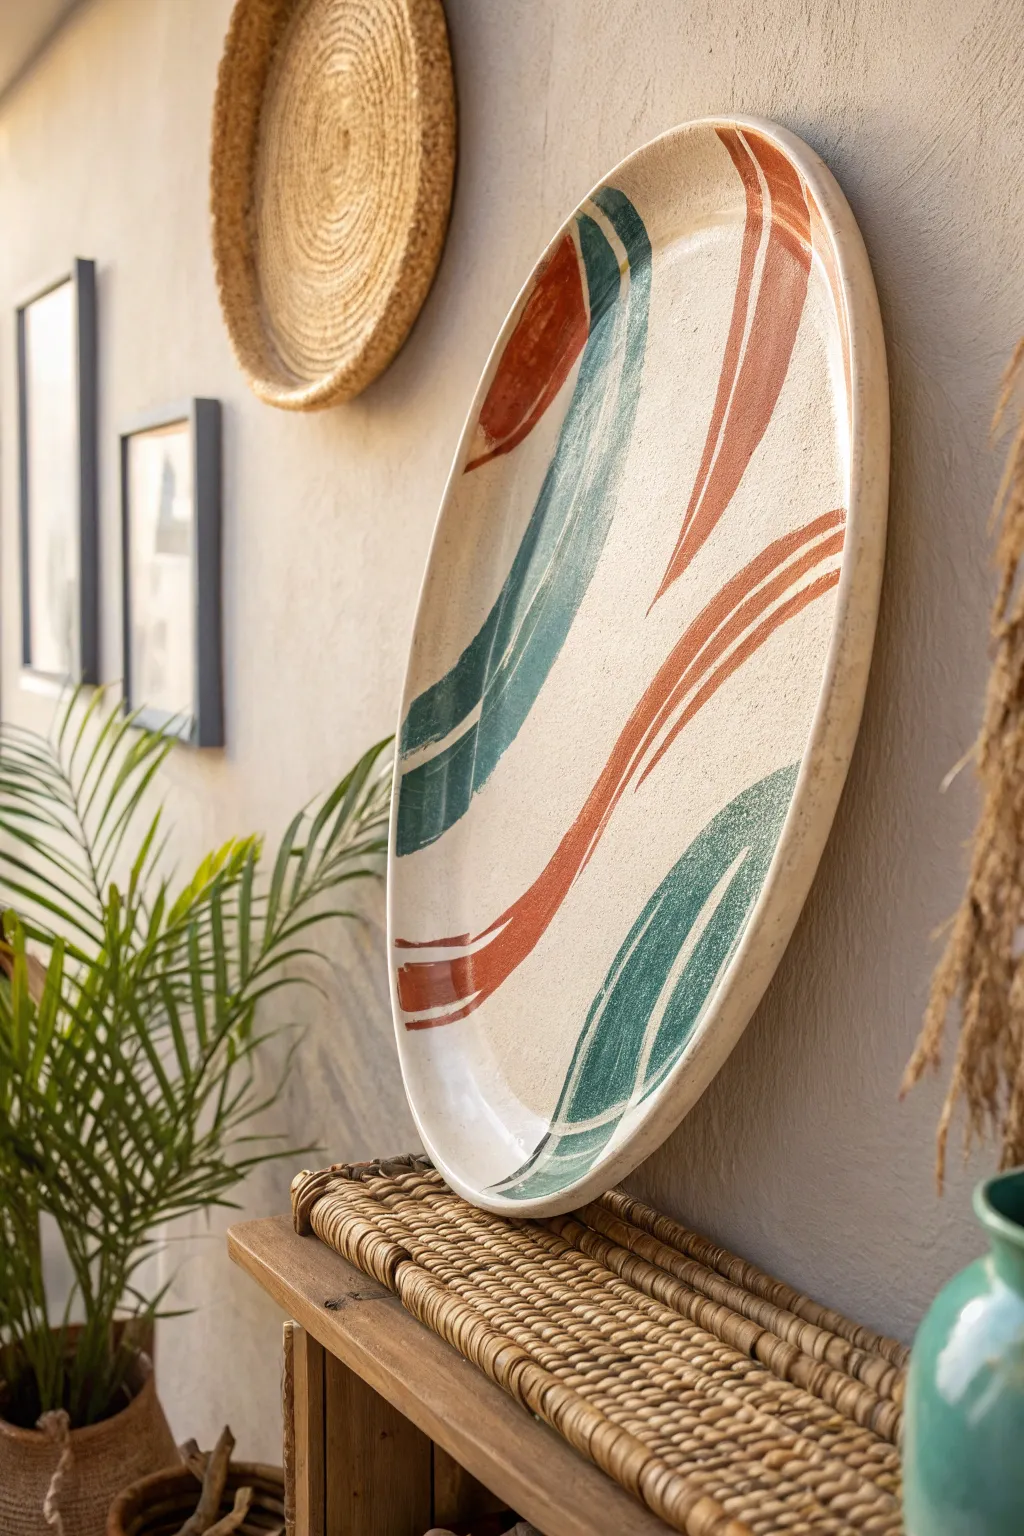
This large, oval platter bridges the gap between kitchenware and gallery wall art. With its earthy cream base and sweeping, organic strokes of terracotta and teal, it brings a modern, bohemian energy to any tablescape or empty wall.
Step-by-Step Guide
Materials
- Large oval bisque-fired ceramic platter (approx. 18-20 inches)
- Matte cream or sand-colored underglaze
- Terracotta or rust-colored underglaze
- Deep teal or sea-green underglaze
- Wide hake brush (for base coat)
- Medium round watercolor-style brush (size 10 or 12)
- Small stiff bristle brush
- Clear matte or satin glaze (food safe)
- Sponge and water bucket
- Kiln access
Step 1: Base Preparation
-
Clean the bisque:
Before any glazing begins, take a damp sponge and thoroughly wipe down your bisque-fired platter. This removes any kiln dust or oils from handling that could repel the underglaze. -
Mix the base color:
Stir your matte cream underglaze well. If it feels too thick, add a drop or two of water; you want a consistency similar to heavy cream for smooth application. -
Apply the first base coat:
Using a wide hake brush, apply a generous layer of the cream underglaze across the entire front surface of the platter. Use long, horizontal strokes to minimize texture marks. -
Layer for opacity:
Allow the first coat to dry until it’s chalky to the touch. Apply a second and, if necessary, a third coat to ensure the raw clay color doesn’t show through. Let this base layer dry completely.
Fixing Smudges
If you mess up a stroke, don’t wipe it! Wet wiping spreads pigment into the clay pores. Instead, let the mistake dry, scrape it off gently with a knife, then patch the cream base.
Step 2: Painting the Design
-
Plan your composition:
Visualize the sweeping curves before you paint. The design relies on large, confident ‘C’ and ‘S’ curves that mimic leaves or wind. You can lightly sketch these placement lines with a soft pencil if you’re nervous; the graphite will burn off in the kiln. -
Load the teal brush:
Dip your medium round brush into the deep teal underglaze. Fully load the bristles, but don’t let it drip. You need enough pigment to create a long, uninterrupted stroke. -
Create the teal curves:
Starting near the bottom left edge, press the brush down firmly to widen the stroke, then sweep upward and inward, lifting the pressure as you end the stroke to create a tapered point. Repeat this for the large curve on the left side. -
Add secondary teal strokes:
Paint a second, smaller teal curve mirroring the bottom right edge. Use the same press-and-lift motion to keep the style consistent. -
Switch to terracotta:
Rinse your brush thoroughly or switch to a clean one. Load it generously with the terracotta or rust underglaze. -
Paint the accent curves:
Paint a large, sweeping curve starting from the top right, moving down toward the center. This stroke should nestle near the teal but leave negative space between them. -
Balance the composition:
Add a final, smaller rust-colored stroke near the bottom left, intersecting or closely following your initial teal curve to create dynamic tension. -
Add texture scraping:
While the colored strokes are damp but not wet, take a stiff, dry bristle brush or a scraping tool. Gently drag it through the thickest parts of the colored strokes to reveal hints of the cream base underneath, adding a weathered, painterly look. -
Clean the edges:
Use a damp sponge to carefully wipe any errant smudges off the rim or the back of the platter. A clean rim makes the piece look professionally finished.
Level Up: Mix Glazes
For more depth, layer a slightly transparent, reactive glaze over just the colored strokes. This can create interesting breaks and color variations where the pigment is thickest.
Step 3: Finishing and Firing
-
Bisque fire (optional):
Some potters prefer to do a second bisque firing here to set the underglaze decoration permanently before glazing. If you skip this, handle the piece very gently in the next steps. -
Apply clear glaze:
Once the artwork is bone dry (or bisqued), apply two coats of clear food-safe glaze over the entire front. I prefer a matte finish for this design to maintain that rustic, earthen aesthetic. -
Check for pinholes:
Inspect the clear glaze layer. If you see tiny bubbles, gently rub them out with your finger to ensure a smooth, hygienic surface for food service. -
Final wipe:
Ensure the foot ring on the back of the platter is completely free of glaze so it doesn’t fuse to the kiln shelf. -
Final firing:
Fire the platter in the kiln according to the temperature requirements of your chosen clay and glaze (typically Cone 5 or 6 for durability).
Now you have a stunning centerpiece that is equally beautiful serving salads or hanging above your sideboard.

What Really Happens Inside the Kiln
Learn how time and temperature work together inside the kiln to transform clay into durable ceramic.
Pinch-Pot Snack Bowls for Everyday Grazing

Embrace the rustic charm of exposed clay with these simple yet elegant snack bowls. Featuring a creamy, speckled glaze that stops halfway down, the design highlights the natural warmth of the stoneware for a grounded, tactile finish.
How-To Guide
Materials
- Buff or toasted stoneware clay (speckled clay body recommended)
- Pottery wire cutter
- Rib tool (wooden or silicone)
- Sponge
- Loop trimming tool
- Creamy matte white glaze (food safe)
- Wax resist (optional)
- Kiln access
Step 1: Forming the Bowl
-
Wedging and prepping:
Begin by wedging your clay thoroughly to remove air bubbles. Separate a ball of clay roughly the size of a large orange; this amount is perfect for a generous single-serving snack bowl. -
Opening the pinch pot:
Hold the clay ball in your non-dominant hand. Press your thumb into the center, stopping about a half-inch from the bottom. Gently pinch the clay between your thumb and fingers, rotating the ball as you go to thin the walls. -
Establishing the curve:
Continue pinching upward and outward to create a gentle, hemispherical curve. Aim for an even wall thickness of about 1/4 inch throughout the form. -
Smoothing the rim:
Use a damp sponge or your fingers to compress and round the rim. I like to spend extra time here, as a well-compressed rim prevents future cracking and feels better on the lips. -
Refining the interior:
Take a flexible rib tool and smooth the inside of the bowl. This removes finger marks and compresses the clay particles, making the surface cleaner for glazing later. -
Drying to leather hard:
Set the bowl aside to dry until it reaches the leather-hard stage. It should be firm enough to handle without deforming but still cool to the touch and carvable.
Step 2: Trimming and Finishing
-
Trimming the base:
Turn the bowl upside down. Using a loop tool, trim away excess weight from the bottom area to create a rounded profile that transitions smoothly into the foot. -
Creating a small foot:
Carve a shallow ring into the base to create a defined foot. This lifts the bowl slightly off the table and gives the heavy bottom a lighter visual appearance. -
Smoothing texture:
Once trimming is complete, use a soft rib or a slightly damp sponge to smooth out any rough tooling marks on the exterior clay body. -
Bisque firing:
Let the bowl dry completely to the bone-dry stage. Fire it in the kiln to bisque temperature (usually cone 04 or 06, depending on your clay instructions).
Uneven Glaze Line?
If your dipped line is wobbly, lightly touch it up with a damp sponge while the glaze is powdery dry. Gently nudge the line straight rather than wiping it off completely.
Step 3: Glazing Process
-
Preparing for dipping:
Wipe the bisque-fired bowl with a damp sponge to remove any dust. If you prefer a crisp line, you can apply wax resist to the bottom third of the exterior, but free-hand dipping creates a lovely organic look. -
Mixing the glaze:
Thoroughly mix your creamy white glaze. If you are using a non-speckled clay but want the look in the photo, choose a glaze with iron speckles added. -
Main dip:
Hold the bowl by the foot. Rapidly submerge the entire bowl into the glaze to coat the inside, then immediately lift it out. -
Exterior dip:
Turn the bowl over and dip the rim down into the glaze again, stopping about halfway down the exterior wall. Hold for three seconds and lift straight up. -
Cleanup:
Allow the glaze to dry. If you didn’t use wax resist, use a damp sponge to meticulously wipe any splashes off the exposed clay bottom and the foot ring. -
Final firing:
Load the bowl into the kiln for the glaze firing, likely to cone 5 or 6 for stoneware. Ensure it doesn’t touch other pots.
Smooth Pinching
To avoid lumpy walls, keep your pinching rhythm consistent. Rotate the clay a quarter-turn after every single pinch to ensure the walls thin out perfectly evenly.
Fill your new bowl with healthy snacks and enjoy the feeling of handmade pottery
Utensil Crocks That Actually Fit Your Tools
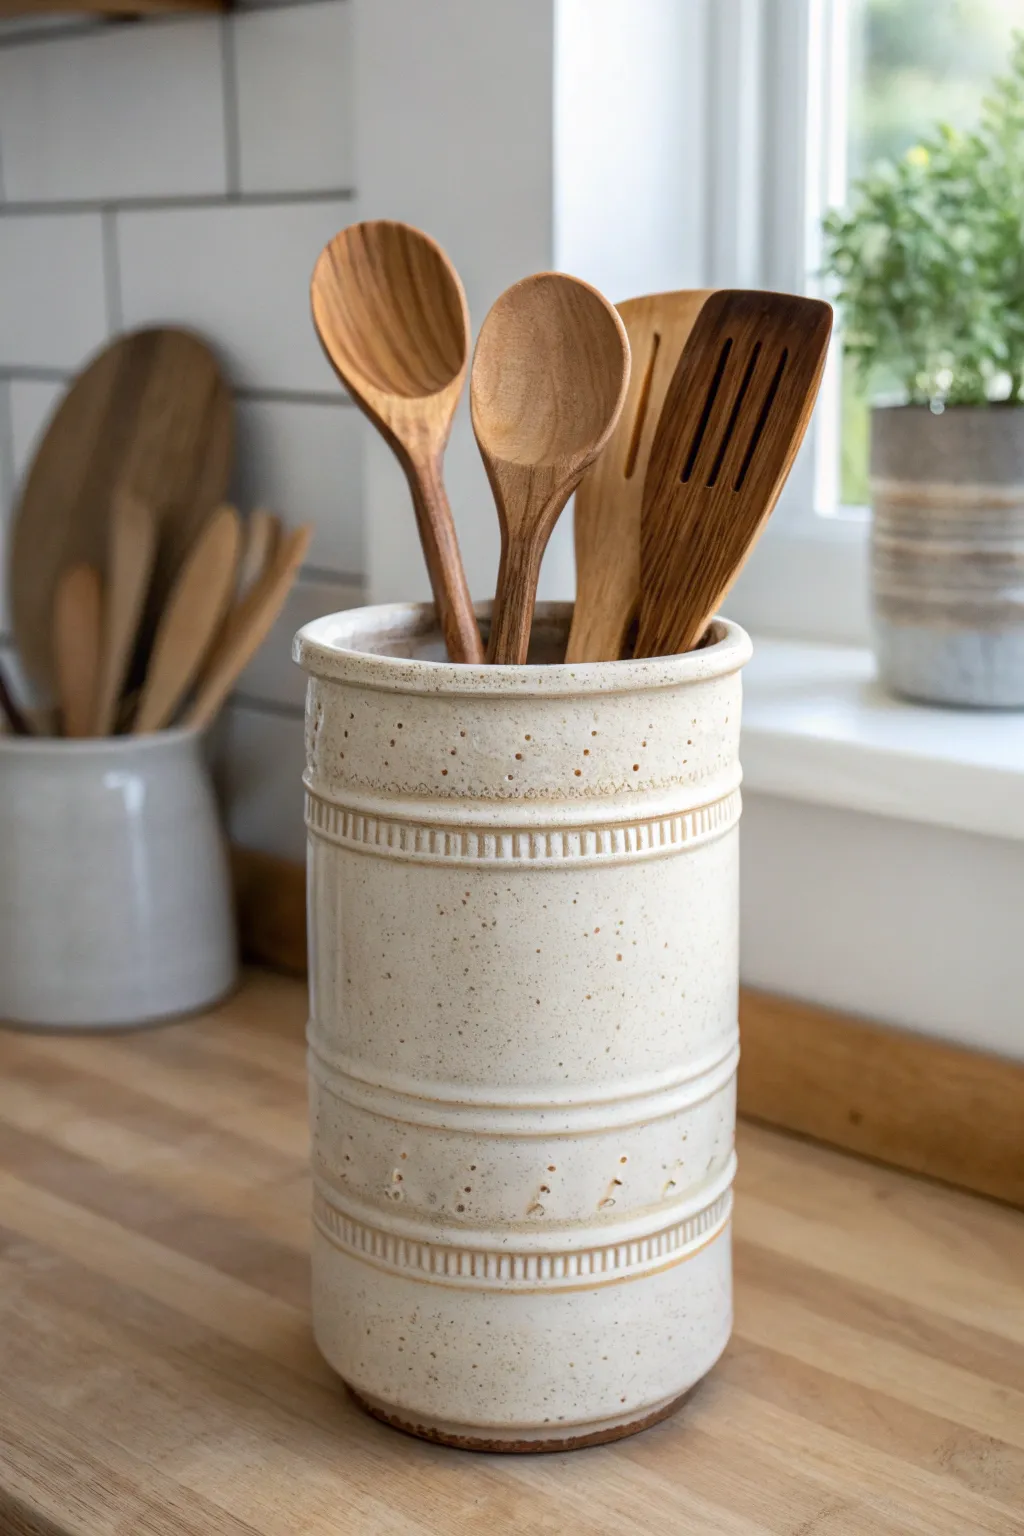
This sturdy, speckled utensil crock combines rustic charm with practical storage, featuring subtle stamped details and notched rims that add visual interest without overwhelming the form. Its generous height ensures your longest ladles and spatulas stay upright while the wide base keeps everything stable.
Step-by-Step Guide
Materials
- Stoneware clay (speckled or buff)
- Pottery wheel
- Throwing tools (sponge, wire cutter, ribs)
- Needle tool
- Wooden modeling tool (flat edge)
- Small round punch tool or drill bit (for texture)
- Calipers
- Satin matte white glaze
- Kiln
- Bats
Step 1: Throwing the Cylinder
-
Center the clay:
Start with about 3-4 lbs of speckled stoneware clay. Center it firmly on the wheel head, ensuring a wide base to prevent tipping later. -
Open the floor:
Open the clay to create a floor about 5 inches wide. Compress the bottom thoroughly with a rib to prevent S-cracks during drying. -
Pull the walls:
Pull the walls straight up into a cylinder. Aim for an even thickness of about 1/4 inch. The final height should be around 7-8 inches to accommodate standard wooden spoons. -
Define the rim:
Compress the rim with a chamois or your sponge. Give it a slight outward bevel to visually separate the inside from the outside. -
Smooth the surface:
Use a metal rib to remove throwing lines and smooth the exterior walls. This clean canvas is crucial for the texture work to come.
Stamp Clarity
Wait until the clay is leather hard before stamping the dot patterns. If the clay is too wet, the tool will stick and create mushy, undefined edges.
Step 2: Creating the Texture
-
Mark banding lines:
While the wheel spins slowly, use a needle tool or the corner of a wooden rib to incise horizontal guide lines. Create bands near the rim, the middle, and the base. -
Build raised bands:
Alternatively, if you didn’t throw thick bands, you can add small coils to the surface and blend them on, creating raised rings to define the sections. -
Create the notch texture:
Stop the wheel. Using a flat-edged wooden tool, press vertical notches into the raised bands. Space them evenly to create a ‘gear-like’ or dental molding effect. -
Add pierced details:
Between the notched bands, use a small round tool to stamp tiny indentations. I find a random scatter pattern looks more organic than a grid here. -
Refine the foot:
Undercut the base slightly with your wooden knife tool to create a shadow line that lifts the pot off the table surface visually.
Warping Walls?
If your cylinder creates an oval shape during drying, you likely pulled the clay too thin near the bottom. Leave slightly more weight at the base for tall forms.
Step 3: Glazing and Firing
-
Bisque fire:
Once bone dry, bisque fire the piece to Cone 04 (or your clay body’s recommendation). -
Wax the foot:
Apply a clean line of wax resist to the bottom and about 1/4 inch up the side to prevent glaze from running onto the kiln shelf. -
Pour the interior:
Pour a satin white glaze into the interior, swirl to coat, and pour out quickly to ensure an even lining. -
Dip the exterior:
Holding the base (or using tongs), dip the exterior into the same satin white glaze. A semi-opaque glaze is best as it allows the dark clay specks and texture to show through essentially ‘breaking’ over the high points. -
Clean up details:
Gently rub the textured bands with your finger or a sponge to thin the glaze on the high points, highlighting the notches. -
Glaze fire:
Fire the piece to maturity (likely around Cone 5 or 6 for stoneware). Allow the kiln to cool naturally.
Place your finished crock on the counter and enjoy organized, accessible utensils with a handmade touch


The Complete Guide to Pottery Troubleshooting
Uncover the most common ceramic mistakes—from cracking clay to failed glazes—and learn how to fix them fast.
Spoon Rests With a Deep Bowl and Raised Edge

This project transforms a simple vessel into a multifunctional kitchen essential that works beautifully as a deep spoon rest or a serving bowl. The design features elegant vertical fluting on the exterior and a warm, speckled cream glaze highlighted by a toasted rim.
How-To Guide
Materials
- Stoneware clay (speckled or buff preferred)
- Pottery wheel
- Throwing tools (sponge, wire cutter, ribs)
- Trimming tools
- Fluting tool or loop tool
- Cream or oatmeal speckled glaze
- Iron oxide wash or brown underglaze
- Soft fan brush
- Kiln
Step 1: Throwing and Shaping
-
Center the clay:
Start with about 1.5 to 2 pounds of wedged stoneware clay. Slam it onto the wheel head and center it thoroughly, ensuring a steady mound before proceeding to open. -
Open the form:
Press your thumbs into the center to open the clay, pulling outwards to establish a floor about 3-4 inches wide. Compress the floor well with a rib to prevent S-cracks later. -
Pull the walls:
Pull the walls up and slightly outward to create a gentle curve. Aim for a bowl shape that is wider at the top than the bottom, but keeps deep, vertical sides to hold utensils securely. -
Thicken the rim:
Leave the very top rim slightly thicker than the walls. Use a chamois or a piece of plastic to compress and round the rim, giving it a soft, substantial feel that resists chipping. -
Refine the curve:
Use a metal or wooden rib on the interior to smooth out throwing lines and ensure a continuous, flowing curve from the floor to the rim. -
Cut and dry:
Wire the pot off the wheel head, but leave it on a bat if possible to avoid warping. Let it dry to a solid leather-hard state.
Clean Fluting Tip
Carve your flutes when the clay is on the stiffer side of leather-hard. If it’s too soft, the tool will drag and create ragged, messy edges.
Step 2: Trimming and Texturing
-
Center for trimming:
Once leather hard, place the bowl upside down on the wheel. Secure it with clay lugs and tap it into center. -
Trim the foot:
Trim away excess weight from the bottom, carving a clean foot ring. Defined feet help glaze terminate neatly and add elegance to the profile. -
Mark vertical guides:
Before texturing, I find it helpful to lightly mark vertical lines around the exterior with a needle tool to ensure the spacing of my flutes stays consistent. -
Carve the flutes:
Using a U-shaped loop tool or a specialized fluting tool, carve vertical channels from just below the rim down toward the foot. Press evenly to maintain consistent depth for each groove. -
Soften the edges:
Once carved, run a damp sponge or a soft rib over the fluted texture to knock down any sharp burrs or rough clay crumbs without losing the definition. -
Bisque fire:
Allow the bowl to dry completely (bone dry) before loading it into the kiln for a bisque firing (usually Cone 04 or 06).
Glaze Covering Texture?
If your glaze is too opaque and hides the carving, try thinning it slightly with water or apply it by spraying rather than dipping for a lighter coat.
Step 3: Glazing and Firing
-
Clean the bisque:
Wipe the bisque-fired bowl with a damp sponge to remove dust, which can prevent glaze from adhering properly. -
Apply the oxide rim:
Dip a small brush into iron oxide wash or a dark brown underglaze. carefully paint a thin band along the rim, allowing it to slightly bleed down the textured sides. -
Wipe back the oxide:
Using a clean glorious sponge, gently wipe the oxide off the very top of the rim, leaving the color primarily in the crevices and staining the clay body. -
Glaze interior and exterior:
Dip the entire bowl into a cream or oatmeal speckled glaze. Hold it upside down for a few seconds to let excess glaze drip off. -
Reveal the texture:
If your glaze is thick, the fluting might disappear. You may want to gently wipe the glaze thinner on the high points of the exterior ridges to let the clay color break through during firing. -
Clean the foot:
Thoroughly wipe all glaze off the foot ring and the very bottom of the pot to prevent it from fusing to your kiln shelf. -
Final firing:
Load into the kiln for the glaze firing (typically Cone 5 or 6 for stoneware). Ensure the piece doesn’t touch others.
Place this substantial bowl near your stovetop to catch drips and keep your counters clean in style
Butter Dishes With a Snug-Fitting Lid
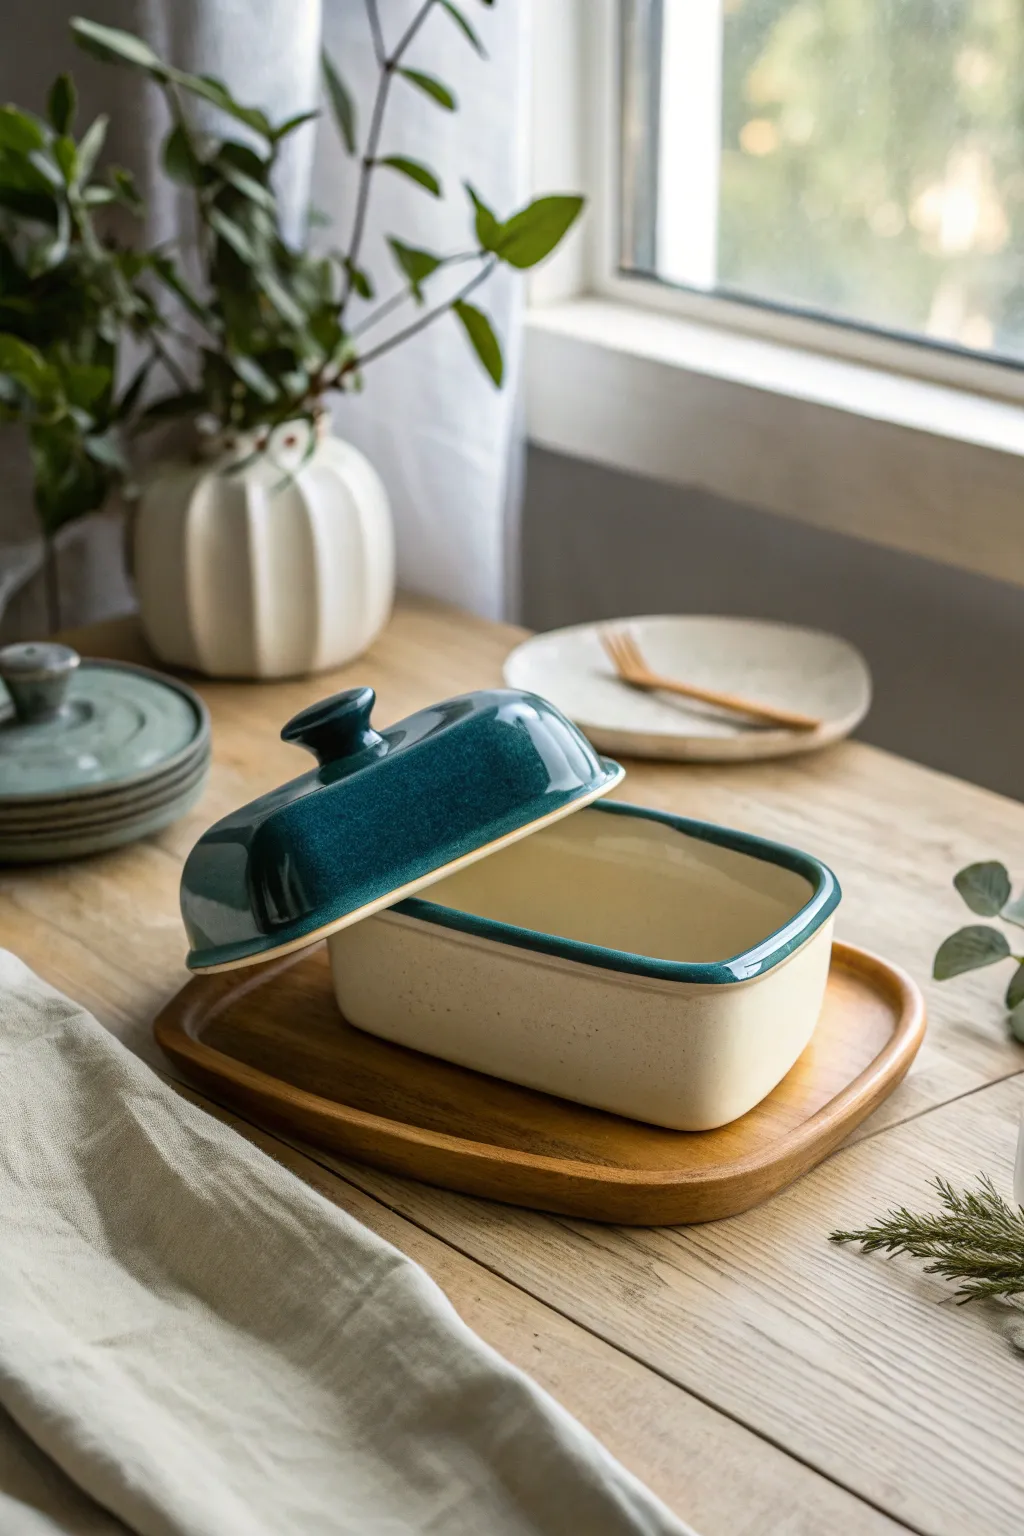
This elegant butter dish combines a creamy, speckled stone-white base with a rich, glossy teal lid for a striking contrast. Its rectangular form features a perfectly snug-fitting lid with a comfortable knob handle, designed to keep your butter fresh and reachable.
Step-by-Step Guide
Materials
- Speckled stoneware clay (approx. 2-3 lbs)
- Rolling pin and guide strips (1/4 inch thickness)
- Rectangular template (cardstock or paper)
- Guide templates for walls
- Fettling knife
- Scoring tool or serrated rib
- Slip
- Modeling tool for smoothing
- Small sponge
- Flat wooden board or bat
- Deep teal glossy glaze
- Transparent clear or white matte glaze (optional for interior)
Step 1: Forming the Base
-
Roll the slabs:
Start by rolling out your speckled clay on a canvas surface. Use guide strips to ensure an even 1/4-inch thickness throughout. Smooth the surface with a soft rib to compress the clay particles. -
Cut the base floor:
Using your rectangular paper template (sized slightly larger than a standard butter stick), cut out the floor of the dish. Wait until the clay is leather-hard enough to hold its shape but still workable. -
Cut the walls:
Cut long strips for the walls, approximately 2.5 inches high. You’ll need enough length to wrap around the perimeter of your base. Beveled cuts at 45 degrees on the ends will make for cleaner corners. -
Attach walls to base:
Score the edges of the base and the bottom of your wall strips thoroughly. Apply slip, then press the walls onto the base. Working on a banding wheel helps here. -
Reinforce the joints:
Roll a very thin coil of clay and press it into the interior seam where the wall meets the floor. Smooth it completely so it disappears, ensuring a watertight seal. -
Refine the rim:
Once the box is constructed, gently flare the rim outward slightly if desired, or keep it vertical. Use a chamois cloth to smooth the lip so it’s pleasant to touch.
Step 2: Creating the Gallery & Lid
-
Measure for the lid:
The lid needs to sit effectively. You can either make a ‘gallery’ (a ledge inside the rim) on the base or build the lid slightly larger to sit over a flange. For this look, we will build a lid that rests on the rim with an inner flange preventing it from sliding. -
Construct the lid slab:
Cut a rectangular slab that perfectly matches the outer dimensions of your base box. This will be the top of the lid. -
Add lid walls:
Build short walls (about 1.5 to 2 inches) attaching them to your lid slab, creating an inverted box shape. This gives the lid the height shown in the image. -
Create the fit mechanism:
Add a small downward-facing flange or lugs on the underside of the lid slab, located just inside where the base walls will sit. This locks the lid in place so it doesn’t slide off. -
Throw or model a knob:
Form a solid knob shape separately. You can hand-build this by pinching a ball of clay into a mushroom shape or throw it off the hump on the wheel for precision. -
Attach the knob:
Score and slip the center of the lid roof and the bottom of the knob. Press firmly to attach. I usually clean up excess slip immediately with a brush.
Warping Warriors
If your lid rocks after drying, try drying it weighted down with a small sandbag. Only glaze the lid separately if you use stilts; otherwise, fire together.
Step 3: Refining and Glazing
-
Slow drying:
Place the lid on the base with a thin piece of paper between them to prevent sticking. Wrap the whole piece in plastic to let moisture equalize. This prevents warping. -
Bisque fire:
Once bone dry, fire the piece to bisque temperature (usually cone 04 or 06). -
Wax resist application:
Apply wax resist to the bottom of the base and the contact points where the lid touches the base (the rim of the base and the underside rim of the lid). -
Glaze the base:
Pour or brush a clear or white glaze inside the base. Then, carefully dip the very top rim of the base into the deep teal glaze to create that matching accent line. -
Glaze the lid:
Dip the entire exterior of the lid into the deep teal glossy glaze. Ensure you have a firm grip on the inside flange or use glazing tongs. -
Final wipe and fire:
Check all waxed areas for stray glaze droplets and wipe them clean with a damp sponge. Fire to the maturity temperature of your clay body (likely cone 5/6).
Dual-Tone Design
Leave the exterior of the base unglazed raw clay to highlight the speckles, focusing the color pop purely on the lid and the rim line.
Once cooled, slice some fresh butter and enjoy the clean lines of your handmade functional ware

TRACK YOUR CERAMIC JOURNEY
Capture glaze tests, firing details, and creative progress—all in one simple printable. Make your projects easier to repeat and improve.
Oil or Vinegar Bottles With Drip-Catching Lips

These elegant, speckled stoneware bottles bring a rustic farmhouse charm to any kitchen counter. Featuring a functional drip-catching rim and a beautiful two-toned glaze finish in amber and creamy white, they are perfect for dispensing oil or vinegar with style.
Step-by-Step
Materials
- Speckled stoneware clay (approx. 1-1.5 lbs per bottle)
- Pottery wheel
- Throwing tools (sponge, needle tool, rib, cutting wire)
- Trimming tools
- Calipers (for sizing the spout opening)
- Wax resist
- Glossy white glaze
- Amber or honey celadon glaze
- Stainless steel pouring spouts with cork or silicone stoppers
- Kiln
Step 1: Throwing the Form
-
Center the clay:
Start with a well-wedged ball of speckled stoneware clay. Center it firmly on the wheel head, ensuring it runs smooth and vibration-free. -
Open the floor:
Open the clay down to the bat, leaving about a 1/4 inch thickness for the base. Widen the floor just slightly to establish the width of the bottle’s foot. -
Pull the walls:
Pull the walls up into a tall cylinder. Focus on keeping the base slightly wider and tapering inward as you go up, ensuring even thickness throughout the walls. -
Collar the neck:
Using both hands and plenty of slip or water, gently collar the top 2/3 of the cylinder inward. Do this gradually to avoid buckling the clay, compressing the rim after each collaring pass. -
Shape the belly:
Use a rib on the outside and your fingers on the inside to gently push the bottom section out, creating a soft, rounded belly for the bottle. -
Refine the neck:
Continue collaring until the neck is narrow and elegant. Leave enough thickness at the very top to form the gallery and spout lip. -
Form the drip-catching rim:
Carefully flair the very top rim outward, then use a tool handle or your finger to create a slight undercut or gallery. This flared lip is crucial for catching drips before they run down the lovely glaze. -
Check the opening size:
I always use calipers here to measure your metal pouring spout stopper. Ensure the bottle opening is the correct diameter to fit the stopper snugly, accounting for about 12% shrinkage during firing.
Drip Troubles?
If the spout opening warped during firing and the stopper won’t seal, use a diamond sanding bit on a rotary tool to gently rounds out the hole.
Step 2: Trimming and Firing
-
Dry to leather hard:
Allow the bottles to dry slowly until leather hard. If the neck dries faster than the belly, loosely cover the top with plastic. -
Trim the foot:
Invert the bottle into a chuck or use a foam bat to support the delicate neck. Trim the base to create a clean foot ring that mirrors the curve of the bottle’s belly. -
Smooth the surface:
Use a smooth kidney rib or a damp sponge to remove any trimming marks or rough texture, highlighting the natural speckled clay body. -
Bisque fire:
Once bone dry, load the bottles into the kiln and bisque fire to Cone 04 (or your clay’s specific bisque temperature).
Creative Twist
Swap the amber top glaze for a floating blue or tenmoku. The layering over white often creates stunning movement and breaks on the edges.
Step 3: Glazing and Finishing
-
Wax the foot:
Apply wax resist to the bottom foot ring and slightly up the side wall to create a clean line where the glaze stops. -
Dip the base coat:
Dip the entire bottle (up to the rim) into the glossy white glaze. Hold it there for a few seconds to get an opaque coat, then shake off excess drips. -
Apply the second color:
Once the white glaze is dry to the touch, dip just the top neck portion and shoulder into the amber or honey celadon glaze. Overlap the white glaze slightly to create that beautiful interaction line. -
Clean the rim:
Wipe the very top edge of the rim if you want raw clay exposed, or ensure the glaze isn’t too thick inside the opening so the stopper will still fit. -
Glaze fire:
Fire the bottles to Cone 6 (or your clay’s maturity temperature). Ensure bottles aren’t touching in the kiln so the glazes don’t fuse together. -
Assemble:
Once cooled, insert your cork or silicone stoppers with the metal spouts. If the fit is tight, a little sanding of the ceramic opening might be needed.
Now fill your new cruets with your favorite olive oil and balsamic vinegar to dispense delicious flavor at your next dinner party
Nesting Measuring Cups Made From Mini Cups
These charming, stackable mini cups combine warm, speckled stoneware with a functional nesting design perfect for measuring ingredients or serving espresso. The natural oatmeal glaze and exposed clay rims give them a cozy, rustic aesthetic that looks beautiful simply sitting on a shelf.
Step-by-Step Tutorial
Materials
- Speckled buff stoneware clay (about 2 lbs)
- Pottery wheel
- Throwing tools (sponge, wire cutter, needle tool)
- Small wooden rib
- Trimming tools
- Serrated rib or scoring tool
- Caliper set (optional but helpful)
- Cream/Oatmeal semi-matte glaze
- Kiln
Step 1: Throwing the Forms
-
Weigh and prep clay balls:
Begin by wedging your speckled clay thoroughly to remove air bubbles. Divide the clay into four graduated amounts. For measuring cups, aim for roughly 4 oz, 6 oz, 8 oz, and 10 oz balls of clay to account for the size differences. -
Center the first ball:
Secure the largest ball of clay to the wheel head. Center it using firm pressure, ensuring it spins true without wobbling. -
Open and compress:
Open the clay down to the bat, leaving about a 1/4 inch floor. Compress the floor well with a sponge or wooden tool to prevent cracking later. -
Pull the walls:
Pull the walls up into a short, wide cylinder. I like to keep the shape slightly tapered at the bottom and wider at the top to facilitate stacking. -
Shape the profile:
Use a small wooden rib to introduce a gentle curve to the wall, creating a slight ‘belly’ near the bottom but maintaining a wide, open rim. This defines the distinct silhouette shown in the photo. -
Establish the rim:
Compress the rim significantly with a chamois or your sponge. A slightly thicker, rounded rim is essential for durability and matches the rustic aesthetic. -
Measure for nesting:
Before cutting the cup off the wheel, measure the interior diameter of the rim. When you throw the next (smaller) cup, its *exterior* foot diameter needs to be just smaller than this measurement so it sits inside. -
Repeat for all sizes:
Throw the remaining three cups, reducing the size incrementally. Constantly check your measurements or use calipers to ensure they will nest comfortably.
Step 2: Handles and Trimming
-
Trim the feet:
Once the cups are leather hard, trim a distinct foot ring on each. Keep the foot narrow enough to fit inside the rim of the next largest cup. This functional detail is key to the stability of the stack. -
Pull handles:
Pull a long strap of clay for handles. For these mini cups, you want a small, loop-style handle that fits one or two fingers. -
Cut and shape handles:
Cut the strap into four small sections. Curve them into ‘C’ shapes or tight ears. Let them stiffen slightly until they hold their shape without collapsing. -
Attach the handles:
Score and slip both the cup body and the handle attachment points. Press the handle firmly onto the cup, blending the clay seamlessly at the join. Position them relatively low on the body so they don’t interfere with the nesting balance.
Wobbly Stack?
If cups rock when stacked, the foot of the upper cup is likely hitting the curved inner wall of the lower cup. Trim feet slightly deeper/taller to give them clearance.
Step 3: Glazing and Firing
-
Bisque fire:
Load the thoroughly dried greenware into the kiln and bisque fire to cone 04 (or your clay body’s specification). -
Wax resist application:
Apply wax resist to the bottom foot ring. Crucially, also carefully wipe away any glaze that lands on the very top rim later, or apply wax to the rim now if you want a precise exposed clay line. -
Dip or pour glaze:
Dip each cup into a cream or oatmeal semi-matte glaze. Ensure an even coat. -
Reveal the rim:
If you didn’t wax the rim, take a damp sponge and firmly wipe the glaze off the very top edge of the lip. This exposes the speckled clay body, creating the brown halo effect seen in the reference image. -
Final glaze fire:
Fire the pieces to maturity (usually cone 6 for stoneware). Ensure the cups are not touching inside the kiln. -
Sand the bottoms:
Once cooled, lightly sand the unglazed foot rings to ensure they are smooth and won’t scratch the glaze of the cup beneath them when stacked.
Calibrating Volume
To make true measuring cups, throw them thicker than needed. Verify volume with water at leather hard stage, then trim away excess clay to reach exact 1/4, 1/3, 1/2 cup volumes.
Enjoy using your custom set for baking or simply admiring the stack on your kitchen sill
Berry Bowls With Built-In Drainage Holes

This charming, rustic berry bowl set features a functional colander with drainage holes and a matching catch-plate to protect your table. The natural speckled clay body and soft satin-white glaze give it a timeless farmhouse aesthetic perfect for rinsing and serving fresh fruit.
Step-by-Step
Materials
- Speckled stoneware clay (mid-fire)
- Pottery wheel
- Throwing tools (sponge, rib, needle tool, wire cutter)
- Hole cutter tool or drill bit (approx. 5-7mm)
- Trimming tools
- Satin white glaze
- Kiln
Step 1: Throwing the Set
-
Center the clay:
Start with two balls of speckled stoneware clay. Use a slightly larger amount (approx. 2 lbs) for the bowl and a smaller amount (approx. 1 lb) for the saucer. Wedge well to remove air bubbles before centering on the wheel. -
Open the bowl form:
For the bowl, open the centered clay wide and pull up the walls into a standard bowl shape. Aim for a generous curve at the bottom rather than a flat floor, which helps berries nestle together. -
Refine the rim:
Clean up the rim with a chamois or sponge. Keep the walls even, but leave the rim slightly thicker to withstand potential chipping during daily use. -
Throw the matching saucer:
Open the second ball of clay into a flat, wide plate shape. Pull up a short, vertical rim about 0.5 to 1 inch high. Ensure the diameter of the saucer’s flat interior is slightly wider than the foot of your bowl. -
Check the fit:
Use calipers to measure the foot of your bowl (while still wet or using your best estimate) and compare it to the saucer’s interior. You want a comfortable fit with room to spare.
Stuck in the Holes?
If you struggle to clear glaze from small holes, use a pipe cleaner or a small twist drill bit (held in your hand, not a drill) to gently ream them out while the glaze is powdery and dry.
Step 2: Trimming and Altering
-
Dry to leather hard:
Allow both pieces to dry slowly to a leather-hard state. They should be firm enough to handle without deforming but soft enough to cut cleanly. -
Trim the foot rings:
Center the bowl upside down on the wheel and trim a defined foot ring. Repeat this for the saucer. A clean foot ring lifts the piece visually and physically. -
Plan the drainage holes:
While the bowl is still inverted, lightly sketch your hole pattern with a needle tool. I like to do a central hole, a ring of holes around the bottom, and a ring of holes up the sides. -
Punch the drainage holes:
Using a hole cutter or a specialized drill tool, gently punch through the clay walls at your marked spots. Support the wall from the inside with your hand to prevent collapsing. -
Clean the edges:
Once the holes are cut, go back over each one with a damp sponge or a soft brush to smooth away any sharp burrs or clay crumbs.
Level Up: Handles
Before the clay dries too much, pull two small loop handles and attach them to the rim of the bowl. This creates a traditional colander look and makes shaking off water easier.
Step 3: Glazing and Firing
-
Bisque fire:
Load the bone-dry pieces into the kiln and bisque fire them according to your clay body’s specifications (usually Cone 04 or 06). -
Wipe down:
After the kiln cools, wipe the bisque ware with a damp sponge to remove dust, focusing on the drainage holes where dust tends to collect. -
Apply wax resist:
Brush wax resist onto the foot rings of both the bowl and the saucer. This prevents glaze from adhering to the bottom and ruining your kiln shelves. -
Dip into glaze:
Dip the pieces into a satin white glaze. The glaze should be thin enough to let the natural speckles of the clay body show through, which creates that lovely spotted eggshell texture. -
Clear the holes:
Check every single drainage hole. If glaze has filled them, gently re-open them with a twisting motion of a small fettling knife or clean tool. -
Glaze fire:
Load the kiln again for the final glaze firing (often Cone 5 or 6 for mid-fire stoneware). Ensure the bowl is not sitting inside the saucer during firing, as the glaze will fuse them together.
Enjoy using your new set to wash and serve fresh summer berries directly from the garden to the table
Soap Dishes With Ridges to Keep Bars Dry

This charming soap dish features a delightful contrast between raw, toasted clay and a glossy, deep teal interior glaze. Its prominent fluted ridges not only add texture and visual rhythm but serve the crucial function of holding your soap while allowing excess water to drain away from the bar.
Step-by-Step Guide
Materials
- Stoneware clay body (buff or speckled)
- Pottery wheel
- Throwing bats
- Wooden modeling tool
- Ribs (metal and rubber)
- Wire cutter
- Carving tool (fluting tool or U-gouge)
- Small loop tool (for trimming)
- Deep teal or turquoise gloss glaze
- Wax resist
- Sponge and bucket
Step 1: Throwing the Form
-
Wedging and Centering:
Begin by thoroughly wedging about 1 to 1.5 pounds of stoneware clay to remove air bubbles. Slam it onto the wheel head and center it using steady pressure and water. -
Opening:
Open the clay down to the bat, leaving about a half-inch floor thickness to allow for deep trimming later. Compress the floor well with your fingers or a flat tool to prevent S-cracks. -
Pulling the Walls:
Pull the walls up and slightly outward to create a low, wide bowl shape. The walls should be slightly thicker than a standard drinking cup to accommodate the deep carving you’ll do later. -
Shaping the Rim:
Use a chamois or your fingertips to gently round and compress the rim. A slightly inward-curving rim helps contain the soap. -
Refining the Curve:
Use a kidney-shaped metal rib on the inside to smooth the curve and remove throwing marks. This creates the pristine surface that the glaze will pool into. -
Cutting Off:
Run a wire cutter under the pot to release it from the bat. I like to set the piece aside until it reaches a sturdy leather-hard state.
Clay Too Dry?
If the clay is chipping or crumbling while you carve the flutes, it’s too dry. Mist it with water, wrap it in plastic for an hour to rehydrate the surface, and try again.
Step 2: Carving and Trimming
-
Centering for Trimming:
Once leather hard, invert the bowl onto the wheel head. Secure it with small clay lugs or use a Giffin Grip if you have one. -
Defining the Foot:
Trim the base to create a clean, rounded foot ring. Remove excess weight from the bottom corners, following the interior curve of the bowl. -
Mapping the Flutes:
Lightly mark vertical lines around the exterior using a needle tool to guide your spacing. Aim for even intervals, though slight variation adds organic charm. -
Carving the Exterior:
Using a U-shaped gouge or fluting tool, carve vertical channels from the rim down toward the foot. Press firmly to create deep grooves, as these will be highlighted by the glaze break later. -
Notching the Rim:
Continue the carving action slightly over the rim and into the interior top edge. This creates the scalloped effect seen along the lip. -
Smoothing Edges:
Once the carving is complete, use a damp sponge or your finger to soften any sharp burrs created by the carving tool. Don’t erase the definition, just remove the sharpness. -
Bisque Fire:
Allow the piece to dry slowly and completely before loading it into the kiln for a bisque firing (usually to Cone 04).
Dual-Tone Effect
To enhance the exterior texture, wipe a dark oxide wash (like iron oxide) over the outside before glazing. Sponge it off the high points, leaving color in the deep carved grooves.
Step 3: Glazing and Finishing
-
Waxing the Exterior:
Apply wax resist to the entire exterior surface and the foot ring. Be careful to stop exactly at the rim’s peak; we want the raw clay texture to remain visible on the outside. -
Pouring the Glaze:
Pour a glossy deep teal glaze into the interior of the bowl. Quickly swirl it to coat the entire inner surface and dump the excess out. -
Cleaning the Rim:
If any glaze dripped over the rim onto the waxed exterior, wipe it away immediately with a clean, damp sponge. The wax should repel most of it, but tidy up any beads. -
Glaze Firing:
Load the piece into the kiln for the final glaze firing (often Cone 5 or 6, depending on your clay and glaze choice). -
Sanding the Bottom:
After firing and cooling, engage in a little quality control. If the unglazed foot feels rough, sand it lightly with wet sandpaper to protect your countertops.
Place your favorite bar of soap inside and enjoy the pop of color on your vanity.
Toothbrush Cups and Bathroom Tumblers in Sets
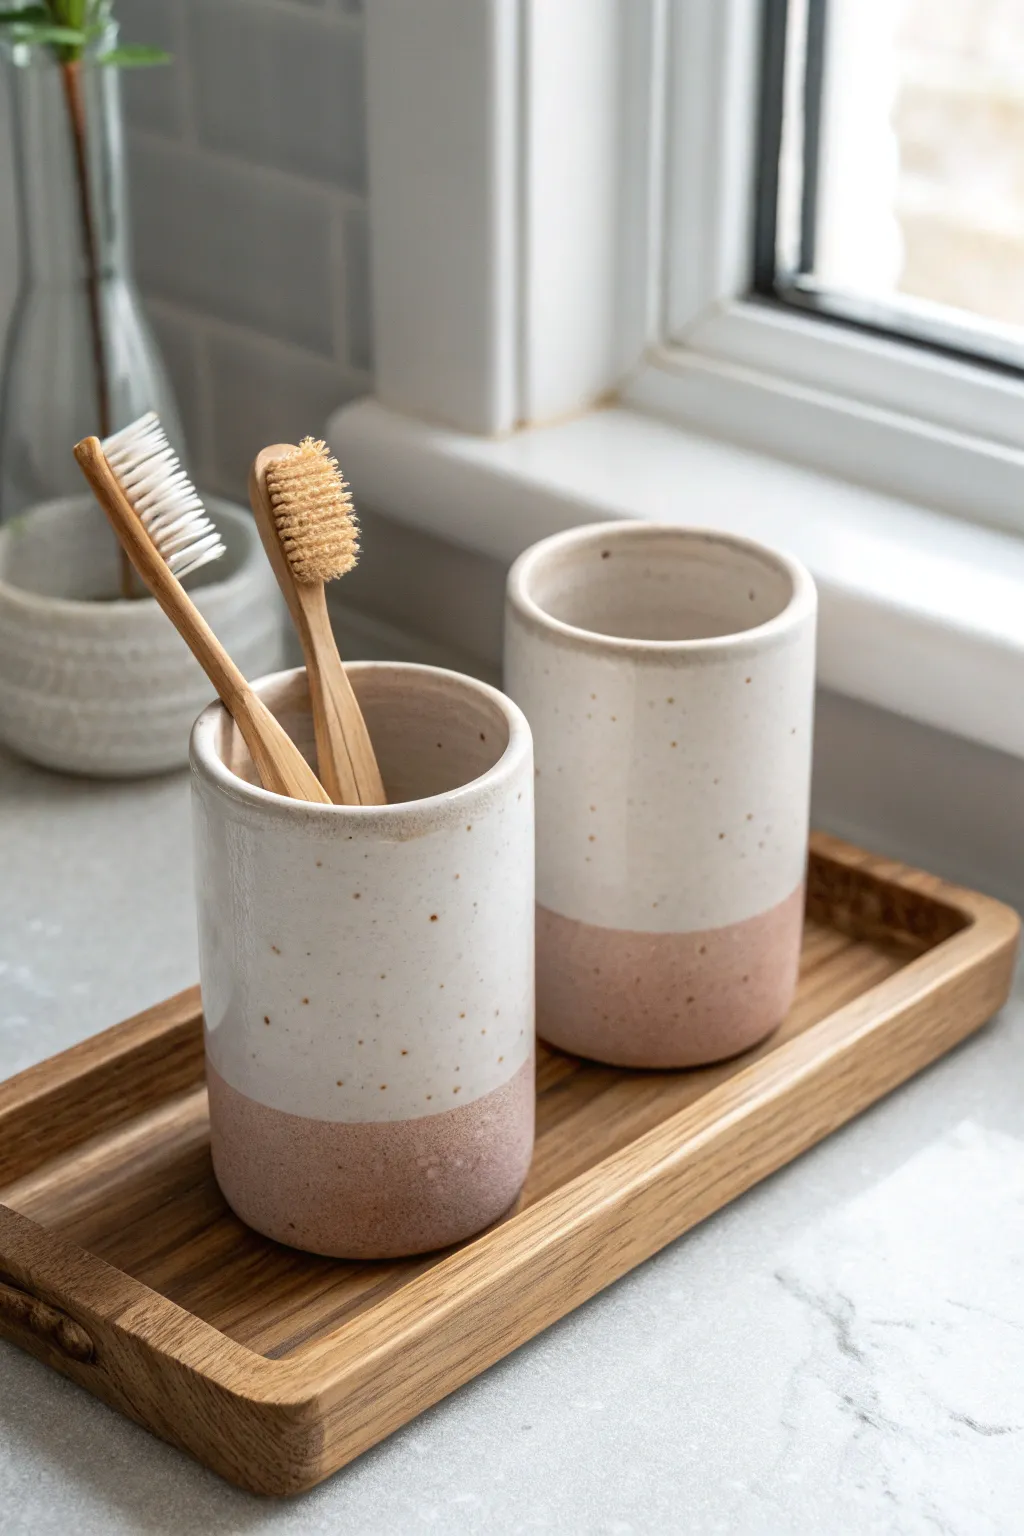
Bring a touch of modern minimalism to your bathroom vanity with this handcrafted tumbler set. Featuring a warm, speckled cream glaze over a raw or matte-stained clay body, these cylindrical cups offer a perfect balance of texture and sleek form.
Step-by-Step
Materials
- Stoneware clay (smooth or lightly groggy)
- Pottery wheel
- Throwing tools (sponge, wire cutter, rib)
- Trimming tools
- Speckled cream glaze (cone 6 or compatible with your clay)
- Mason stain (pink or coral) if clay isn’t naturally colored
- Wax resist
- Kiln
- Wooden tray (optional, for display)
Step 1: Throwing the Forms
-
Prepare the clay:
Begin by wedging two balls of clay, roughly 1 to 1.5 pounds each. It is crucial to weigh them precisely so your final tumblers are identical in size. -
Center on the wheel:
Throw the first ball onto the wheel head and center it. You want a relatively narrow base for a toothbrush holder, roughly 3 inches in diameter. -
Open and pull:
Open the hole, leaving about a quarter-inch for the floor. Pull the walls straight up to create a cylinder. Aim for a height of about 4.5 to 5 inches, keeping the walls even and vertical. -
Refine the rim:
Compress the rim with a chamois or your finger to make it smooth and rounded. A slightly thickened rim adds durability for daily bathroom use. -
Shape with a rib:
Use a straight metal or wooden rib on the outside while supporting the inside. This ensures the sides are perfectly straight and removes throwing lines for that clean, modern look prominent in the photo. -
Repeat for the second cup:
Cut the first pot off the wheel and repeat the process with the second ball of clay, matching the height and width of the first as closely as possible.
Step 2: Trimming and Finishing
-
Dry to leather hard:
Allow the pots to dry slowly until they are leather hard. They should be firm enough to handle without deforming but still cool to the touch. -
Secure for trimming:
Place the cup upside down on the wheel head. Use small lugs of clay to secure it, or use a foam bat or chuck if you have one. -
Trim the base:
Trim the bottom to create a flat, stable foot. You can add a very small bevel at the bottom edge to give it a little lift visually. -
Smooth the surface:
If you want the bottom section to be incredibly smooth like the reference, run a smooth rib over the clay one last time while it spins. -
Bisque fire:
Once fully bone dry, load the pieces into the kiln for the bisque firing (usually Cone 04).
Uneven Glaze Line?
If your hand shakes while waxing, stabilize your arm on a stack of books or a brick while spinning the banding wheel. A steady arm creates a perfect horizon line.
Step 3: Glazing
-
Prepare the resist:
Decide on your glaze line. In the image, the glaze covers the top 2/3rds. Mark this line lightly with a pencil if needed. -
Apply wax resist:
Paint liquid wax resist on the bottom third of the tumbler and the entire underside. I prefer to use a banding wheel here to get a crisp, straight horizontal line as I rotate the pot. -
Let the wax dry:
Wait for the wax to dry completely. It should feel tacky or hard, not wet. -
Dip or pour glaze:
Mix your speckled cream glaze thoroughly. Using tongs or your hand (if the inside is waxed), dip the tumbler into the glaze, submerging it past the wax line. The wax will repel the glaze on the bottom. -
Clean the edges:
Immediately use a damp sponge to wipe away any tiny beads of glaze that stick to the waxed area. This ensures a sharp transition between the raw clay and the glossy top. -
Glaze fire:
Load the kiln for your final glaze firing (often Cone 6). Ensure the bare clay bottoms don’t touch each other.
Pro Tip: Textured Clay
If you don’t have speckled glaze, add 1-2 teaspoons of granular ilmenite or manganese to white glaze to create those lovely faux-iron spots.
Place your finished tumblers on a wooden tray for a spa-like presentation that organizes your vanity beautifully
Ring Dishes and Trinket Catch-Alls for Nightstands
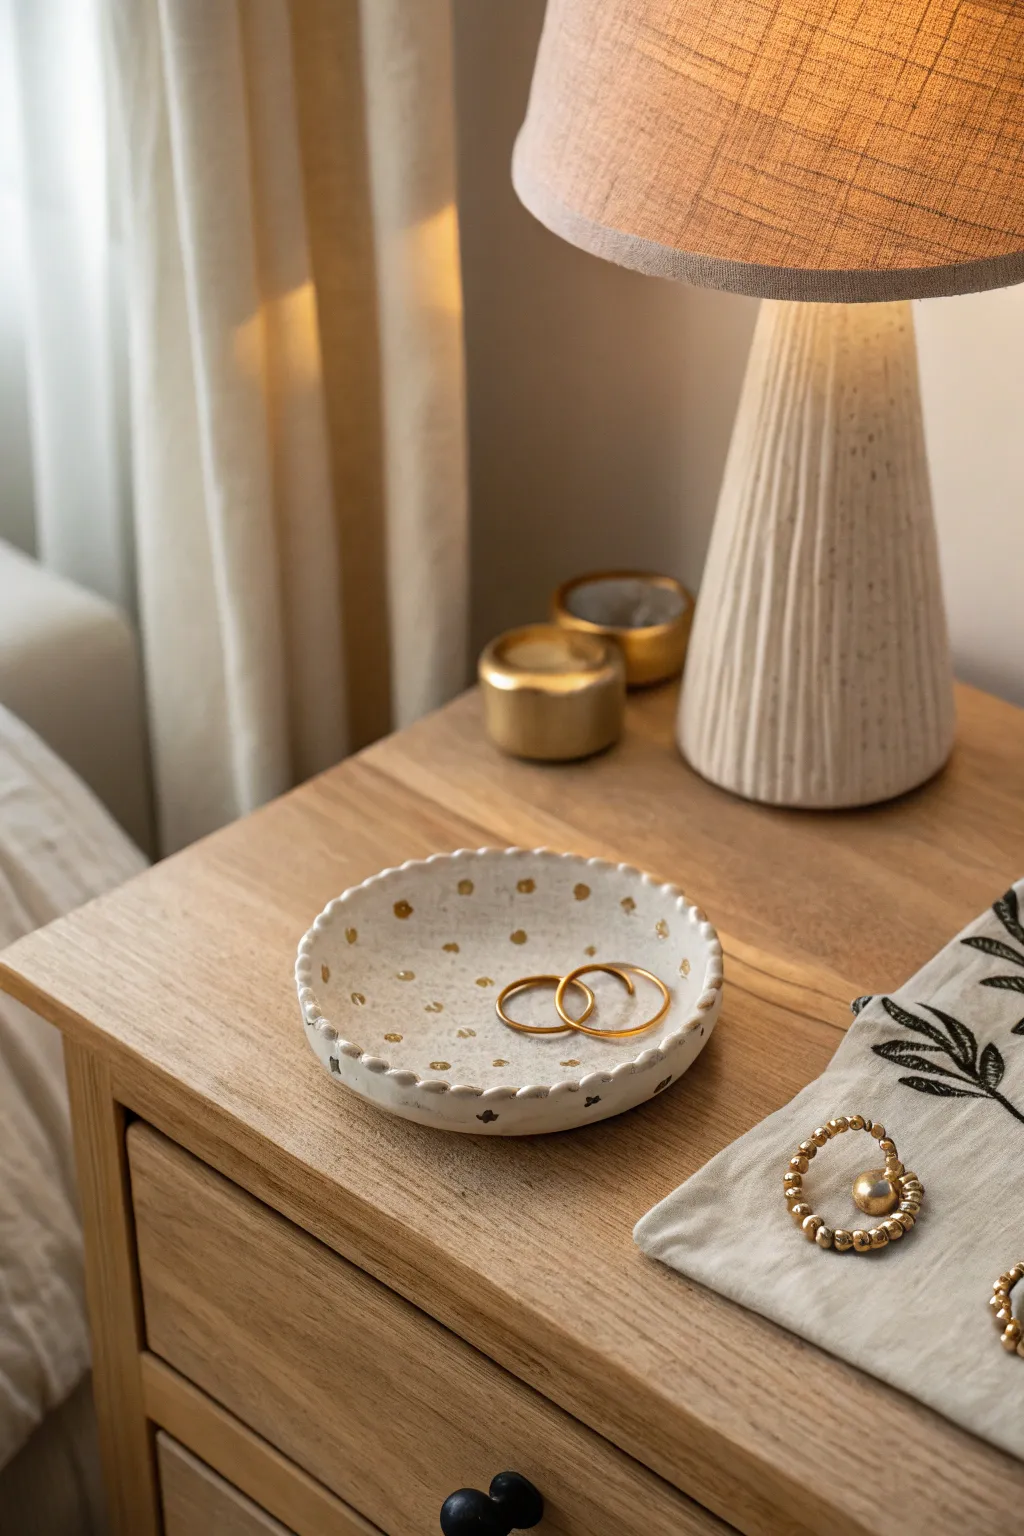
This charming trinket dish combines a classic creamy speckled glaze with a playful, hand-built texture. The delicate scalloped rim, formed by individual clay spheres, frames a galaxy of tiny gold lustre accents that catch the light beautifully.
Step-by-Step Guide
Materials
- White stoneware clay (preferably speckled)
- Rolling pin
- Canvas board or mat
- Round cookie cutter or template (approx. 4-5 inches)
- Rib tool (flexible rubber or metal)
- Scoring tool or needle tool
- Slip (clay mixed with water)
- Cream/White speckled glaze
- Gold lustre overglaze
- Small round detail brush
- Kiln access
Step 1: Forming the Base
-
Prep the clay:
Begin by wedging a softball-sized piece of white stoneware clay to remove air bubbles and ensure uniform consistency. -
Roll out the slab:
Roll your clay out on a canvas board to an even thickness of about 1/4 inch. If you want a perfectly level surface, use guide sticks on either side of the rolling pin. -
Cut the circle:
Place your round cutter or template onto the slab and cut out a clean circle. Remove the excess clay around the edges. -
Smooth the surface:
Take a flexible rib tool and gently compress the surface of the clay circle to smooth out any canvas texture, working from the center outward. -
Curve the edges:
Gently lift the edges of the circle with your fingers or place it inside a shallow slump mold to create a slight curve. It shouldn’t be a deep bowl, just enough to keep jewelry contained.
Step 2: Creating the Scalloped Rim
-
Roll small spheres:
Pinch off small pieces of leftover clay and roll them into tiny, uniform balls, roughly the size of dried peas or small beads. -
Score the rim:
Using a serrated rib or needle tool, rough up the very edge of your dish where the beads will attach. -
Apply slip:
Brush a generous amount of slip onto the scored edge of the dish. I prefer to do this in sections so the slip doesn’t dry out before I place the beads. -
Attach the beads:
Press each small clay sphere firmly onto the rim, placing them side-by-side. Ensure they are well-adhered to both the dish and their neighbors. -
Blend lightly:
Flip the dish over carefully and gently smudge the bottom of the beads into the dish base just slightly to ensure a strong bond, or use a modeling tool to reinforce the connection without losing the round shape on top. -
Dry slowly:
Loosely cover the dish with plastic to let it dry slowly to the leather-hard stage, then uncover to bone dry before bisque firing.
Rim Stability
When attaching the bead rim, score the bottom of each tiny ball individually before placing it on the slipped rim. This takes longer but prevents beads from popping off.
Step 3: Glazing and Gold Accents
-
Bisque fire:
Fire the piece to cone 04 (or your clay’s specific bisque temperature). -
Apply base glaze:
Dip or brush your cream-colored speckled glaze over the entire piece. Ensure the glaze doesn’t pool too thickly around the bead indentations. -
Wipe the foot:
Clean off the bottom of the dish with a damp sponge so it won’t stick to the kiln shelf. -
Glaze fire:
Fire the glazed piece to maturity (usually cone 5 or 6 depending on your clay body). -
Add gold lustre:
Once the piece has been fired and cooled, use a very small brush to dab tiny dots or ‘stars’ of gold lustre onto the interior surface and occasional spots on the rim beads. -
Third firing:
Place the piece back in the kiln for a third, lower-temperature firing (typically cone 018 or 019) to set the gold.
Lustre Safety
Gold lustre has strong fumes. Always apply it in a very well-ventilated area or wear a proper respirator, and never fire it in a kiln located in your living space.
Now you have a delicate, custom catch-all ready to hold your favorite rings and earrings beside your bed.
Bud Vases for Single Stems and Tiny Cuttings
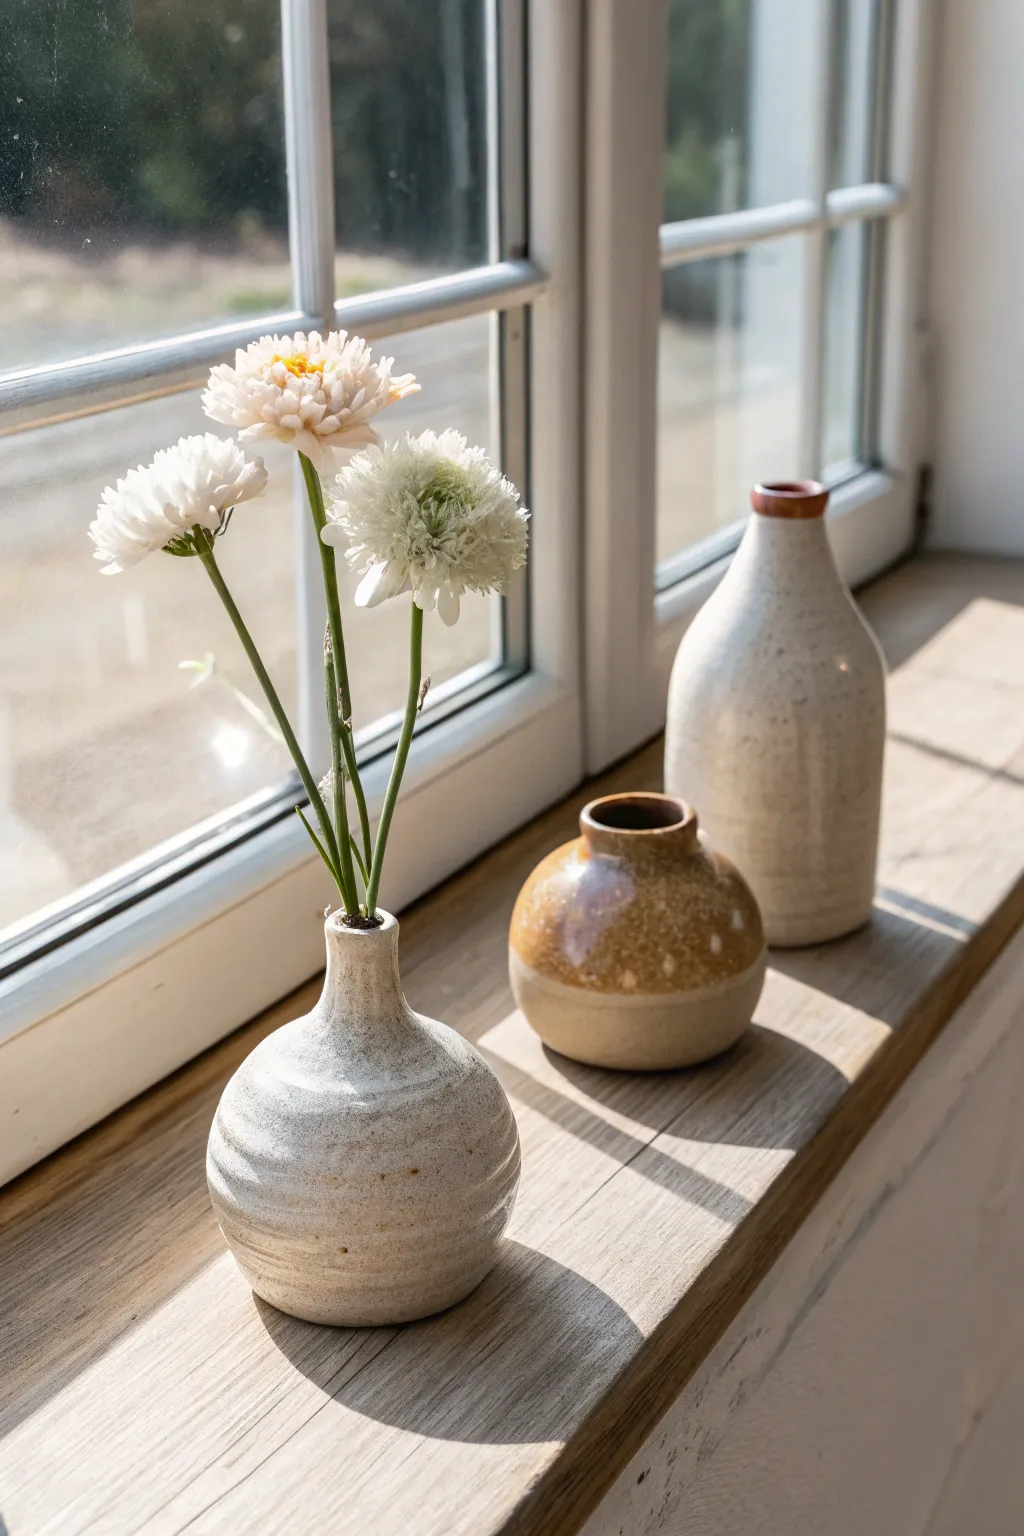
These charming, understated bud vases are perfect for showcasing single stems or tiny cuttings from your garden. With their speckled clay bodies and warm, contrasting necks, they bring a cozy, handmade feel to any windowsill.
Step-by-Step
Materials
- Speckled stoneware clay (e.g., Cone 5/6)
- Pottery wheel (or can be hand-built)
- Needle tool
- Ribs (metal and wooden)
- Sponge
- Wire cutter
- Trimming tools
- White or clear matte glaze
- Iron oxide wash or dark brown underglaze
- Kiln
- Paintbrush for glazing
Step 1: Throwing the Forms
-
Prep the Clay:
Begin by wedging small balls of speckled stoneware clay. Since these are bud vases, you only need about 1 to 1.5 pounds of clay per vase. Ensure there are absolutely no air bubbles. -
Center and Open:
Throw the ball onto the wheel head and center it securely. Open the clay, keeping the floor relatively narrow, about 2 inches wide, as these vessels have a tight footprint. -
Pull the Cylinder:
Pull the walls up into a tall, narrow cylinder first. Don’t worry about the curves yet; focus on getting even wall thickness from bottom to top. -
Shape the Belly:
Using a rib on the inside and your hand on the outside, gently push the clay outward near the bottom third to create a bulbous, rounded belly. For the shorter vase, make this belly wider and lower. -
Collar the Neck:
Gently collar the top third of the clay inward to narrow the opening. Use your thumbs and index fingers to compress the clay as you bring it in, preventing ripples. This is crucial for that elegant bloom-holding shape. -
Refine the Rim:
Finish the rim by using a chamois or a piece of plastic to smooth the lip. Aim for a slightly thickened, rounded rim that will protect the edges from chipping.
Collaring Success
When narrowing the neck, increase wheel speed slightly and keep the clay wet. Move hands upward quickly to prevent the walls from twisting or collapsing.
Step 2: Trimming and Drying
-
Leather Hard Stage:
Allow the vases to dry to a leather-hard state. The clay should be firm enough to handle without deforming but still cool to the touch. -
Trim the Foot:
Place the vase upside down on the wheel (using a chuck or clay lugs to secure it). Trim away excess weight from the bottom and carve a neat foot ring. I like to leave slight trimming lines on the belly for added texture. -
Smooth the Surface:
Use a damp sponge to smooth out any rough transition marks, but avoid over-smoothing if you want to keep the rustic character of the speckled clay showing through later. -
Bisque Fire:
Once fully bone dry, load the vases into the kiln for a bisque firing. This prepares the clay for the glazing process.
Layered Glazing
Try dipping the top half in a second, sheer glaze color. The overlap creates a third tone and interesting drips that emphasize the pot’s curve.
Step 3: Glazing and Finishing
-
Wax the Foot:
Apply a coat of wax resist to the bottom foot of each vase to prevent glaze from sticking to the kiln shelf. -
Dip the Body:
For the main body, dip the vase into a satin or matte white glaze. If you prefer the look of the shorter vase in the photo, dip only the top half, leaving the raw speckled clay exposed at the bottom. -
Clean the Rim:
If you want the contrasting rim look shown on the taller vase, wipe the glaze off the very top edge of the lip with a damp sponge. -
Apply Oxide Accent:
Paint a thin band of iron oxide wash or dark brown underglaze onto the exposed rim or neck. This creates that warm, toasted detail seen in the reference photo. -
Final Fire:
Load the glazed pieces into the kiln for the final glaze firing (Cone 5 or 6, depending on your clay body specifications). -
Sand the Bottoms:
After the kiln has cooled and you’ve unloaded, use a diamond sanding pad to briefly smooth the unglazed foot ring so it won’t scratch your windowsill.
Now align your finished trio on a sunny ledge and fill them with fresh wildflowers from the garden
Self-Watering Planters With a Separate Reservoir
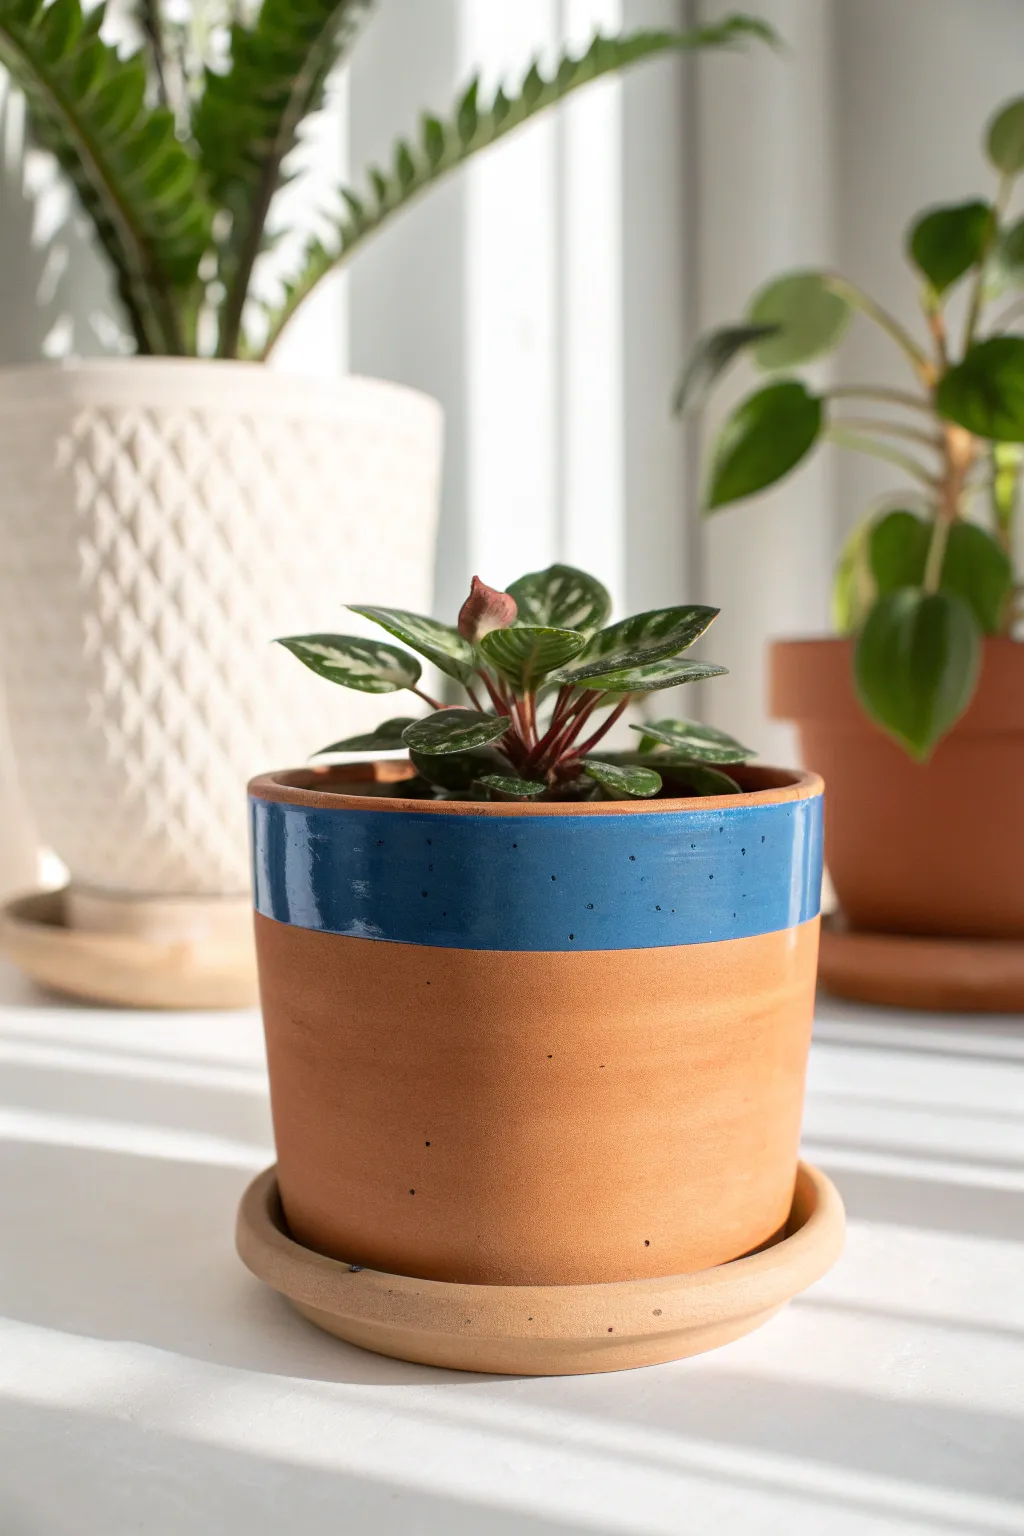
Embrace the natural warmth of red clay with this straightforward yet elegant wheel-thrown planter set. The contrast between the raw, earthy body and the glossy blue rim creates a striking visual balance perfect for highlighting small houseplants.
Detailed Instructions
Materials
- Terracotta or red earthenware clay (approx. 2-3 lbs)
- Potter’s wheel
- Throwing tools (sponge, needle tool, wire tool, ribs)
- Trimming tools
- Glossy blue glaze (cone 04-06 generally for earthenware)
- Wax resist or masking tape
- Paintbrush for glazing
- Kiln
Step 1: Throwing the Pot and Saucer
-
Center the clay:
Start with two balls of clay: a larger one for the pot (about 1.5 lbs) and a smaller one for the saucer (about 0.5 lbs). Begin with the larger ball on the wheel, coning up and down until fully centered. -
Open the floor:
Open the centered clay to create a flat floor. Since this is a planter, ensure the floor isn’t too thin, leaving enough thickness to trim a foot ring later. -
Pull the walls:
Pull the walls up into a simple cylinder shape. Aim for a slightly tapered form that is wider at the top than the base, maintaining an even wall thickness. -
Refine the rim:
Compress the rim with a chamois or sponge to make it smooth and rounded. A clean, distinct rim is crucial since this area will be the focal point of the glazing. -
Throw the saucer:
Remove the pot and center the smaller ball of clay. Flatten it into a disc slightly wider than the base of your pot, then pull up a short, shallow wall to catch water. -
Dry to leather hard:
Wire both pieces off the bat and let them dry slowly until they reach a leather-hard state, where the clay is stiff but can still be carved.
Clean Lines Pro-Tip
For a razor-sharp glaze line, use automotive masking tape instead of wax resist. Press the tape firmly onto the bisque, glaze quickly, and peel the tape off immediately before the glaze fully dries.
Step 2: Trimming and Finishing
-
Trim the pot:
Center the leather-hard pot upside down on the wheel. Trim away excess weight from the base and carve a shallow foot ring. -
Add drainage:
While the pot is inverted, use a hole cutter or drill tool to create a central drainage hole. I usually smooth the edges of the hole with a damp sponge to prevent sharp snags. -
Trim the saucer:
Trim the saucer upside down to clean up the bottom and create a matching foot ring that mirrors the style of the pot. -
Bisque fire:
Once bone dry, load both pieces into the kiln for a bisque firing. This initial firing hardens the clay and prepares it for glazing.
Step 3: Glazing the Rim
-
Clean the bisque:
Wipe the bisqueware down with a damp sponge to remove any kiln dust, which can prevent glaze from adhering properly. -
Mark the glaze line:
Place the pot on a banding wheel. Hold a pencil steady against the pot about one-third of the way down from the rim and spin the wheel to create a perfectly level guide line. -
Apply wax resist:
Carefully paint wax resist below your pencil line, covering the entire bottom two-thirds of the pot’s exterior and the foot. This ensures the glaze line remains crisp and straight. -
Dip or brush glaze:
Invert the pot and dip the rim into your glossy blue glaze up to the wax line. The wax will repel the glaze, leaving a sharp edge. Alternatively, brush the glaze on carefully if you don’t have enough for dipping. -
Clean up drips:
If any glaze beads up on the waxed area, wipe it away immediately with a damp sponge. Check the interior; you can glaze the inside fully for water retention or leave it raw for breathability. -
Glaze firing:
Load the pieces back into the kiln for the final glaze firing. Make sure the unglazed saucer doesn’t touch the glazed rim of the pot during firing.
Level Up: Texture
Before the clay dries, gently press a stamp or create chattering marks on the unglazed lower section. The raw texture will contrast beautifully against the smooth, glossy blue rim.
Once cooled, pot up your favorite greenery and enjoy the striking color block effect on your windowsill
Coasters and Trivets With Textured Non-Slip Bases
These minimal, speckled ceramic coasters feature a practical rim to catch condensation and a clever textured interior base that prevents cups from sticking. The raw clay accents and straight-walled design create a clean, modern aesthetic perfect for any coffee table.
Step-by-Step
Materials
- Speckled buff stoneware clay
- Pottery wheel
- Bat system
- Needle tool
- Wire texturing tool or serrated rib
- Flat trimming tool
- Sponge
- Rib tool (wooden or silicone)
- Clear or translucent matte glaze
- Measuring calipers
Step 1: Throwing the Coasters
-
Preparation:
Begin by wedging your speckled clay thoroughly to remove air pockets. Weigh out several balls of clay at exactly 250g each to ensure your coasters will be uniform in size. -
Centering:
Attach a ball of clay to the wheel head and center it low and wide. Compression is key here, so make several passes on the top face to discourage future cracking. -
Opening the floor:
Open the mound until you have a flat floor about 4 inches in diameter. Don’t go too thin; you need enough thickness to carve texture into the floor later. -
Establishing the walls:
Pull up a short, vertical wall about 0.75 inches high. Use a rib to keep the walls extremely straight and perpendicular to the wheel head, distinct from a bowl shape. -
Creating the textured base:
Before removing from the wheel, use a serrated rib or a thick wire tool to gently drag lines across the interior floor. This creates the non-stick grid pattern seen in the example. -
Smoothing the rim:
Use a chamois or a damp sponge to compress the rim, keeping it flat and square rather than rounded. This helps with the stackable look. -
Removing the piece:
Use calipers to measure the diameter to ensure consistency with the next coaster. Wire the piece off the bat and set aside to leather hard.
Warping Issues?
Flat objects like coasters love to warp. Dry them very slowly by keeping them under loose plastic for a few days, and maybe weight them down gently while drying.
Step 2: Trimming and Refining
-
Trimming setup:
Once leather hard, center the coaster upside down on the wheel. Secure it using damp lugs of clay. -
Refining the profile:
Trim the exterior walls to be perfectly vertical. Remove excess weight from the bottom edge, creating a sharp 90-degree angle where the wall meets the table. -
Defining the foot:
Carve a shallow foot ring if desired, or simply smooth the flat bottom. I prefer to burnish the bottom with a flat stone or the back of a spoon to make it smooth enough for wooden tables. -
Wax resist application:
Since we want exposed raw clay accents, apply wax resist to the top rim and the exterior bottom half inch of the coaster.
Step 3: Glazing and Firing
-
Bisque firing:
Fire the bone-dry coasters to cone 04 (or your clay’s specific bisque temperature). Stack them carefully if space is limited. -
Glazing:
Dip the coaster quickly into a clear or semi-opaque white glaze. The wax resist you applied earlier will keep the rim and base raw. -
Cleaning:
Use a damp sponge to wipe away any bead of glaze that stuck to the waxed areas. The lines should be crisp and clean. -
Final firing:
Load the kiln for the final glaze firing to cone 5/6. Ensure the coasters aren’t touching, as the raw clay rims might flux slightly depending on the body. -
Sanding:
Once cool, use high-grit wet-dry sandpaper (400 grit) to briefly sand the raw clay bottom and rim. This ensures the exposed clay is satiny soft to the touch.
Clean Lines
For that sharp contrast between glaze and raw clay, use automotive detailing tape instead of liquid wax resist. It gives a perfectly crisp straight edge.
Now you have a stylish set of functional coasters ready to protect your furniture.
Ceramic Paint Palettes With Mixing Wells
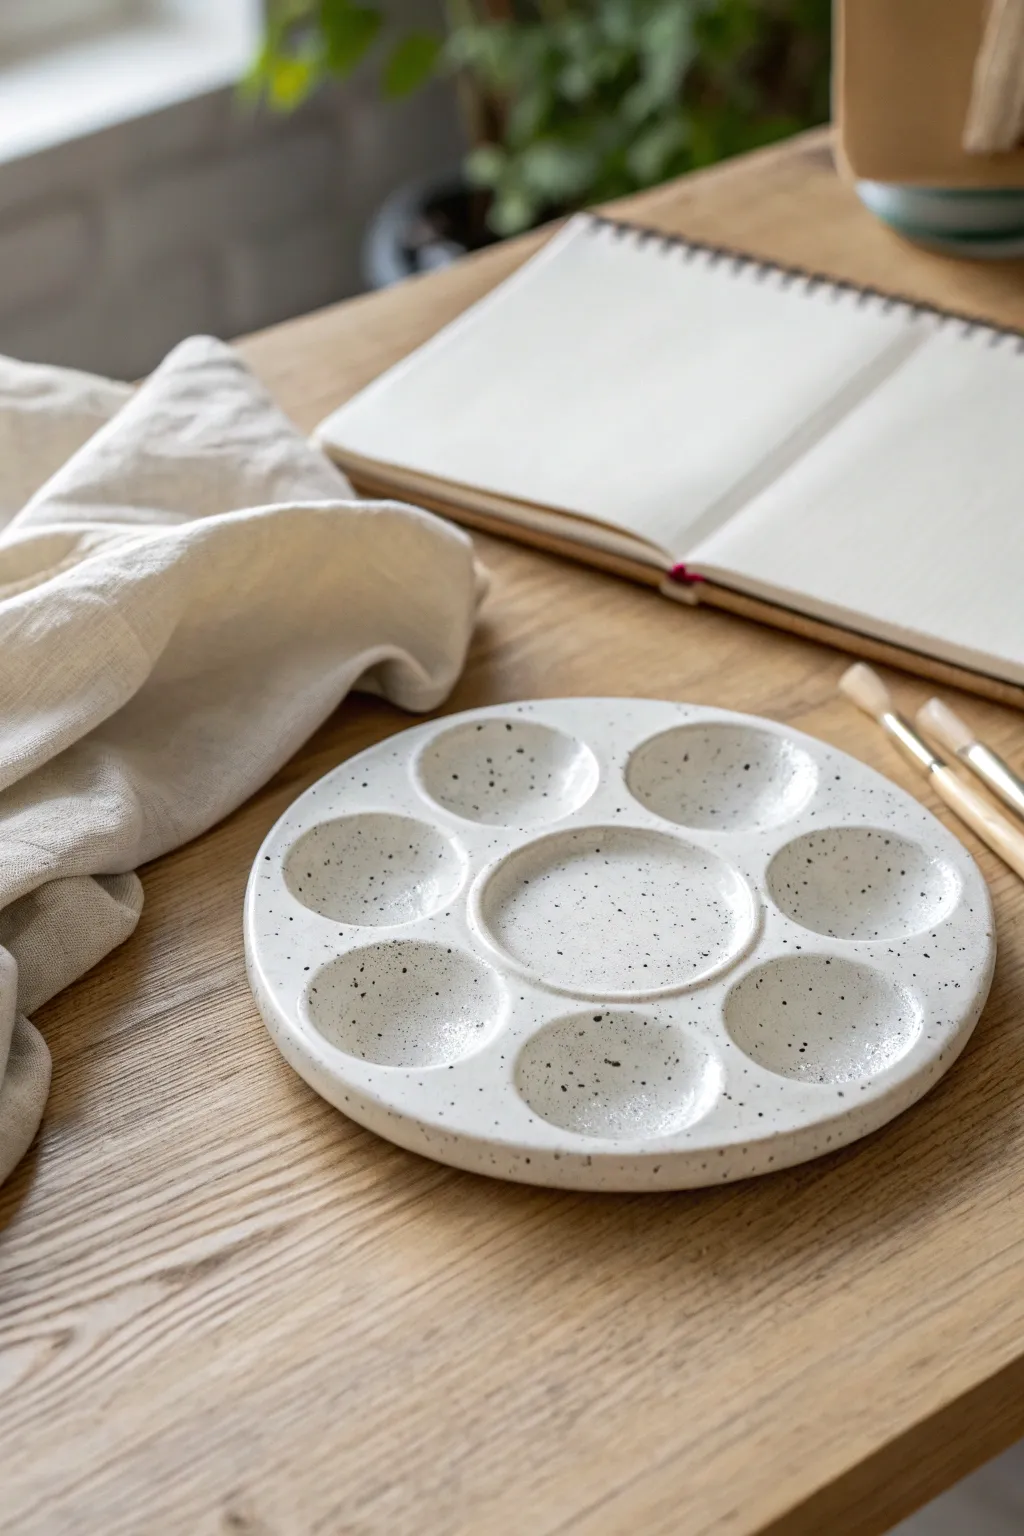
This elegant ceramic paint palette combines functionality with a minimalist aesthetic, featuring a speckled glaze finish that mimics natural stone. Its smooth, shallow wells are perfect for mixing watercolors or gouache without wasting precious pigment.
Step-by-Step Tutorial
Materials
- White stoneware clay body (cone 5 or 6)
- Pottery wheel
- Throwing bats
- Needle tool
- Loop trimming tool (small and medium)
- Small sponge
- Rib tool (wooden and rubber)
- Cutting wire
- Speckled white glossy glaze (food safe recommended)
- Kiln
Step 1: Throwing the Base Form
-
Prepare the Clay:
Begin by wedging about 1.5 to 2 pounds of white stoneware clay. Ensure it is air-bubble free and forms a tight, confident ball before heading to the wheel. -
Center the Clay:
Secure the clay to the bat and center it low and wide. You are aiming for a plate-like form, so don’t cone it up too high; keep the mass controlled and spread horizontally. -
Open the Form:
Open the clay all the way down, leaving about a 1/2-inch thickness for the floor. This thickness is crucial because you will be carving the wells directly into this base later. -
Establish the Diameter:
Pull the clay out to form a flat, thick disc approximately 6 to 7 inches in diameter. I like to compress the rim with a piece of chamois to keep it distinct and smooth. -
Refine the Profile:
Use a wooden rib to ensure the top surface is perfectly flat and level. The edges should be slightly rounded but vertical. Wire cut the piece from the bat and set it aside to stiffen to a leather-hard state.
Step 2: Carving the Wells
-
Mark the Layout:
Once leather-hard, place the disc back on a banding wheel. Lightly trace a circle in the exact center using a needle tool. Then, lightly mark six evenly spaced circles around the perimeter for the surrounding wells. -
Carve the Center Well:
Using a medium loop tool, begin carving out the central mixing area. Work from the center outward, creating a shallow, consistent depression. Keep the bottom curve smooth to prevent paint from getting stuck in corners. -
Carve the Surrounding Wells:
Switch to a slightly smaller loop tool if necessary. Carve out the six perimeter wells, ensuring they are deep enough to hold liquid but have walls thick enough to maintain structural integrity. -
Smooth the Transitions:
Use your finger or a soft rubber rib to compress and smooth the ridges between the wells. The separation walls should be rounded and comfortable to the touch. -
Refine the Texture:
Taking a slightly damp sponge, go over every carved area. This erases tool marks and creates that distinctively soft, organic look seen in the photo.
Smooth Operator
Burnish the wells with the back of a spoon when leather-hard. This compresses the clay particles, making the surface incredibly smooth for easier paint mixing later.
Step 3: Trimming and Glazing
-
Trim the Foot:
Flip the leather-hard piece over and center it on the wheel. Trim away excess weight from the bottom, carving a defined foot ring to give the palette a slight lift off the table surface. -
Bisque Fire:
Allow the piece to dry slowly and completely to avoid warping. Load it into the kiln for a bisque fire to roughly Cone 04 (depending on your clay body). -
Clean the Bisqueware:
Wipe the fired piece with a damp sponge to remove any dust or debris that could interfere with glaze application. -
Apply the Glaze:
Pour or dip the palette into a speckled white glossy glaze. If brushing, apply 2-3 even coats, allowing drying time between layers. Ensure the glaze pools slightly in the wells for a smooth finish, but not so thick it obscures the shape. -
Wipe the Foot:
Carefully sponge away any glaze from the foot ring and the very bottom of the piece to prevent it from fusing to the kiln shelf. -
Glaze Fire:
Fire the palette to the glaze’s recommended temperature (typically Cone 5 or 6). Let the kiln cool naturally before unloading. -
Final Polish:
Once cool, check the bottom for any rough spots. Sand the foot ring lightly with high-grit sandpaper to ensure it won’t scratch your table surface.
Warping Woes?
Flat objects like palettes warp easily. Dry it very slowly! loosely cover with plastic for the first few days, and dry it on a wire rack for even airflow.
Now you have a stunning, professional-grade palette ready for your next watercolor session
Modular Desk Organizers for Pens, Clips, and Notes
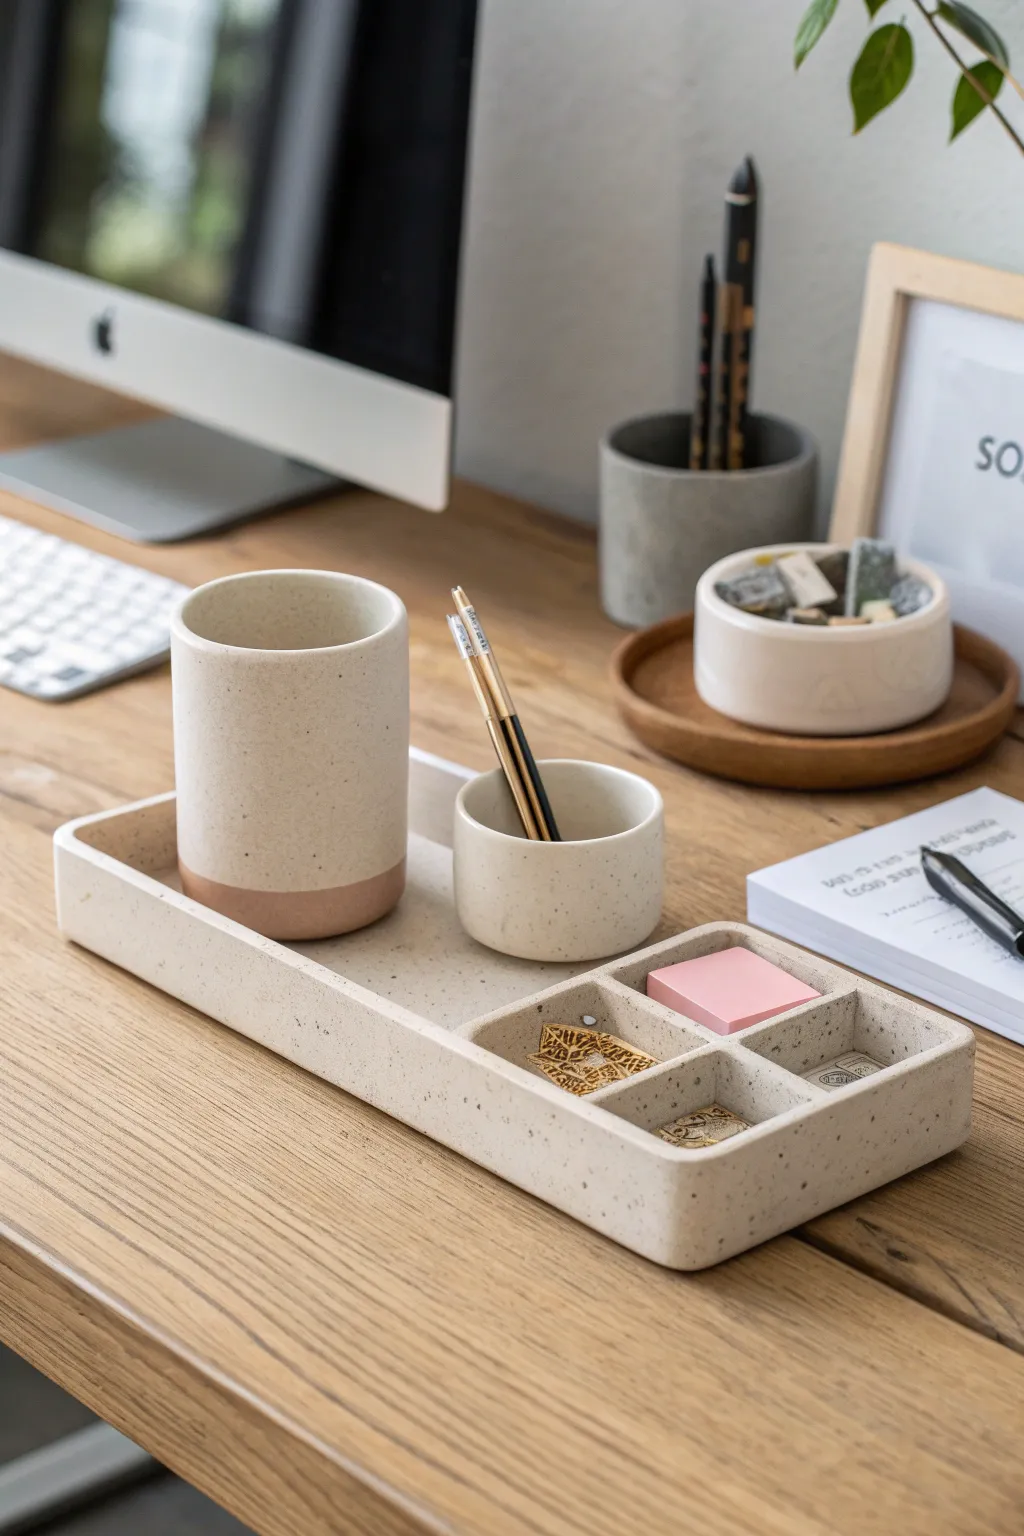
Bring earthy order to your workspace with this modular desk organizer set featuring a classic speckled clay finish. This project combines a compartmentalized base tray with matching removable vessels, striking a perfect balance between sculptural beauty and office utility.
Detailed Instructions
Materials
- Speckled stoneware clay (cream or light buff)
- Rolling pin
- Canvas work surface or slab mat
- Wooden guide slats (approx. 1/4 inch thick)
- Fettling knife or scalpel
- Ruler
- Scoring tool or serrated rib
- Slip (made from your clay body)
- Wooden modeling tools
- Sponge
- Matte transparent glaze (or satin white)
- Terracotta colored underglaze (optional, for the cup base)
Step 1: Forming the Base Tray
-
Roll the main slab:
Begin by wedging your speckled clay to remove air bubbles, then throw it onto your canvas. Use the guide slats on either side to roll out a perfectly even slab, aiming for about 1/4 inch thickness. -
Cut the base:
Using a ruler and your fettling knife, measure and cut a long rectangle for the bottom of the tray. A size of 10×4 inches works well for most desks, but adjust to your needs. -
Create the walls:
Cut long strips from the remaining slab for the exterior walls. These should be roughly 1 inch tall to create a low profile tray. -
Attach the walls:
Score the perimeter of your base rectangle and the bottom edge of your wall strips. Apply slip generously, then press the walls onto the base. Reinforce the inside seams with a thin coil of soft clay, smoothing it down with a wooden tool. -
Round the corners:
Once the walls are upright, gently press curves into the corners with your thumb rather than keeping them sharp; this matches the soft aesthetic of the reference piece.
Warping Walls?
If the long walls of the tray bow inward while drying, place a few temporary blocks of styrofoam inside the tray to hold the shape until it’s leather hard.
Step 2: Adding Compartments
-
Measure the inserts:
Decide on your layout. The image shows a large open area on the left and a grid of four small squares on the right. Cut flexible strips of clay to create these dividers. -
Install the dividers:
Score and slip the contact points where the dividers will meet the tray walls and floor. Slide them into place, ensuring the walls are vertical. -
Refine the connections:
I like to use a small damp sponge on a stick or a paintbrush to clean up excess slip in those tight interior corners immediately, as it’s hard to reach later. -
Smooth the exterior:
Run a damp rib or sponge across the entire exterior to compress the clay and reveal the grog or speckles, softening the top rim to a gentle curve.
Step 3: Creating the Vessels
-
Cut cylinder components:
Roll out a fresh slab. You will need a circular base and a rectangular body wall for both the tall pencil cup and the short clip cup. Measure the circumference of your intended base to know how long the wall strip needs to be. -
Assemble the tall cup:
Form the wall strip into a cylinder, beveling the edges where they overlap for a cleaner seam. Score, slip, and join the cylinder to the circular base. -
Form the short cup:
Repeat the process for the small vessel, making the walls about half the height of the tall cup. Ensure the diameter allows it to sit comfortably within the large open section of your tray if desired. -
Refine the rims:
Once the clay is leather hard, run a damp chamois or sponge over the rims of both vessels to ensure they are smooth to the touch.
Custom Fit
Make the small square compartments specific sizes to fit your favorite items—measure a sticky note pad or a specific eraser before placing your dividers.
Step 4: Finishing and Glazing
-
Bisque fire:
Allow all pieces to dry very slowly under loose plastic to prevent warping, then bisque fire them to your clay’s specification (usually Cone 04). -
Apply the band details:
Use masking tape to create a crisp line near the bottom of the tall cup. Paint the bottom section with a terracotta underglaze to achieve that dipped, two-tone look seen in the photo. -
Glaze application:
Dip or brush a clear matte or satin white glaze over the entire set. This allows the natural speckles of the clay body to shine through as the primary texture. -
Final firing:
Glaze fire the pieces to maturity (typically Cone 5 or 6 for stoneware). Check that the bottoms are wiped clean of glaze before loading the kiln.
Once cooled, arrange your new custom modular set on your desk and enjoy the serene organization it provides.