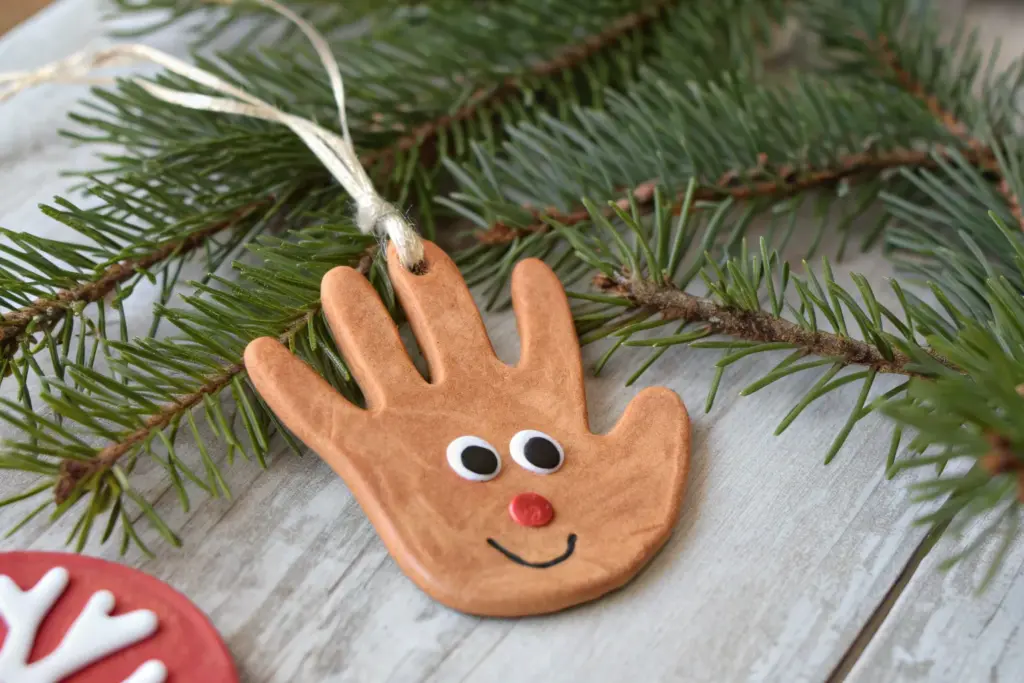
There’s just something magical about turning a tiny handprint ornament into a holiday keepsake you’ll pull out year after year. These ideas are all about capturing that sweet little hand and dressing it up as Christmas tree decor that feels personal, cozy, and totally doable at home.
Hand-Shaped Air-Dry Clay Handprint Ornament
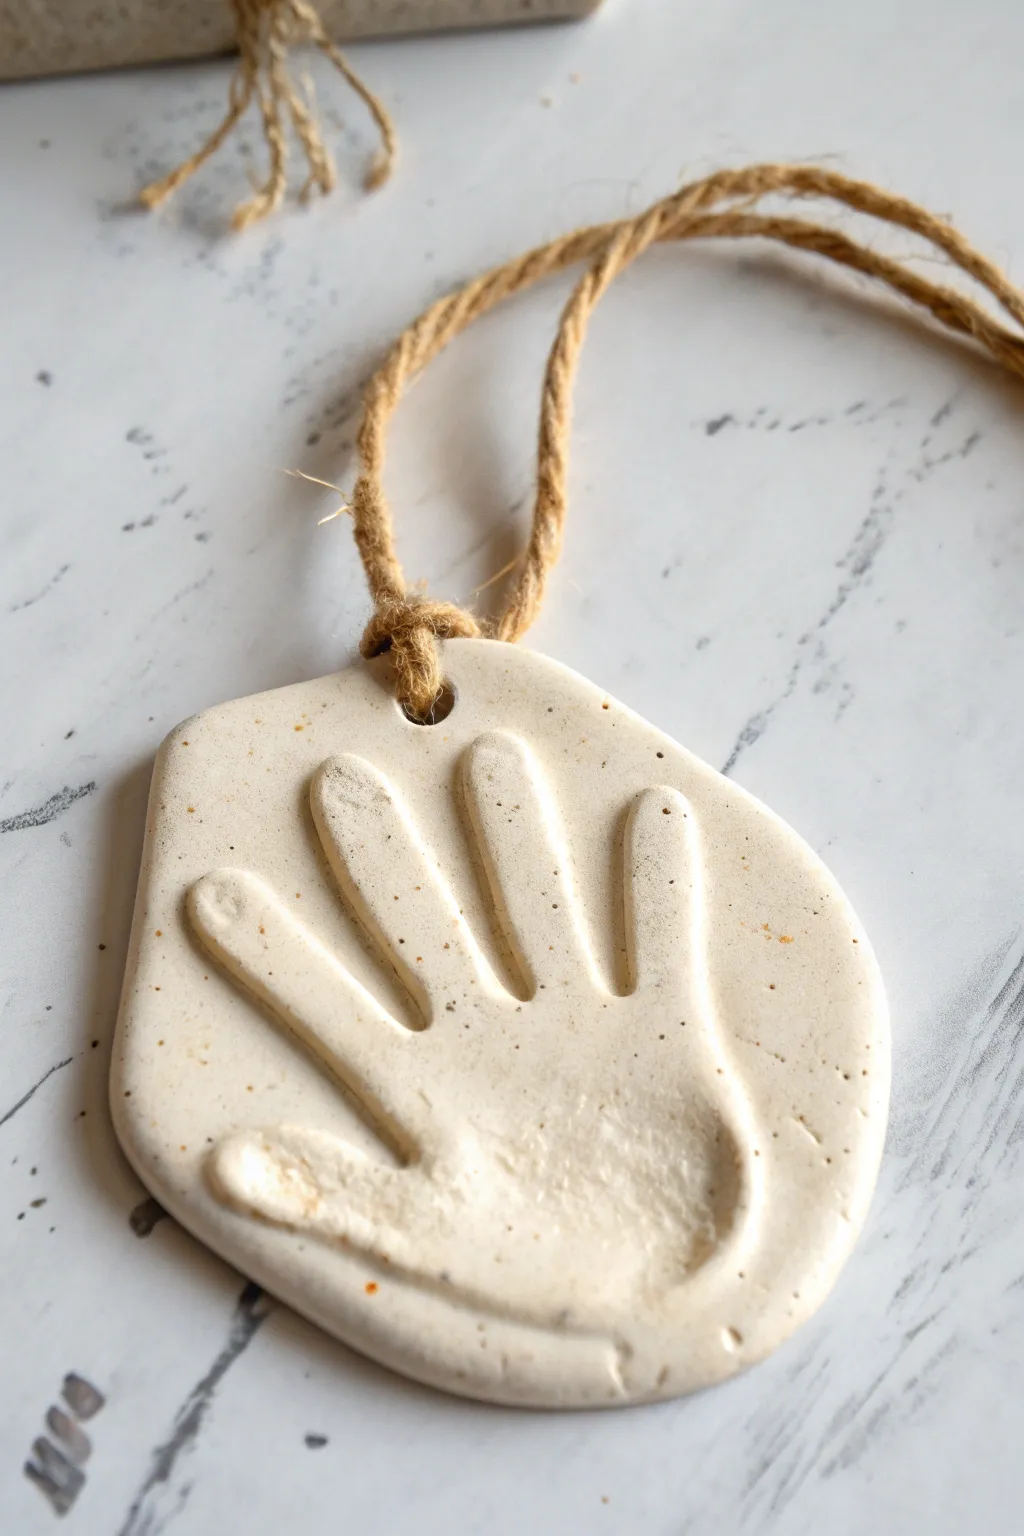
Capture a moment in time with this rustic and charming handprint ornament made from speckled air-dry clay. The natural, stone-like finish and jute hanger give it a timeless, organic look perfect for gifting or hanging on your own tree.
How-To Guide
Materials
- White or speckled air-dry clay
- Rolling pin
- Parchment paper or non-stick mat
- Butter knife or clay cutting tool
- Straw or skewer (for the hole)
- Jute twine or rustic string
- Fine-grit sandpaper (optional)
- Small bowl of water
- Clear matte sealant (optional)
Step 1: Preparation and Impression
-
Prepare your workspace:
Lay down a sheet of parchment paper or a silicone craft mat on a flat surface. This prevents the clay from sticking and makes it easier to move later without distorting the shape. -
Condition the clay:
Take a generous handful of air-dry clay and knead it in your hands until it feels soft, warm, and pliable. If the clay feels too dry or cracks easily, dampen your hands slightly with water while kneading. -
Roll the slab:
Place the clay ball on your parchment paper. Use a rolling pin to flatten it into a smooth slab. Aim for a thickness of about 1/4 to 1/2 inch; if it’s too thin, the impression won’t be deep enough, and the ornament might be fragile. -
Smooth the surface:
Check the surface for any unwanted textures or wrinkles. Dip your finger in a little water and gently glide it over the clay to smooth out any imperfections before making the print. -
Position the hand:
Have the child spread their fingers comfortably. Gently guide their hand onto the center of the clay slab. Ensure there is enough clay border around all fingers and the palm. -
Make the impression:
Press down firmly on each finger and the center of the palm. You want a distinct, deep impression, so don’t be afraid to apply steady pressure. I find it helpful to press down on the knuckles specifically to get good definition. -
Remove the hand:
Carefully lift the hand straight up and away from the clay. If the hand sticks slightly, peel the clay back gently. Wash the child’s hand immediately while the clay is still wet.
Step 2: Shaping and Finishing
-
Cut the shape:
Using a butter knife or a clay tool, cut around the handprint. You don’t need to trace every finger perfectly; instead, cut a soft, organic shape that follows the general outline of the hand, leaving about a half-inch border. -
Refine the edges:
Dip your finger in water again and run it along the cut edges of the ornament. This rounds off sharp corners and gives the piece a professional, finished look similar to the photo. -
Create the hanging hole:
Use a drinking straw to punch a clean hole at the top of the ornament, centered above the middle finger or palm area. Twist the straw as you pull it out to remove the plug of clay cleanly. -
Begin the drying process:
Leave the ornament on the parchment paper to dry in a safe spot away from direct heat sources. Flip the ornament over carefully after about 12 hours to ensure the bottom dries evenly. -
Check for dryness:
Allow the clay to dry fully for 24 to 48 hours. The clay will turn a lighter shade of white or cream and feel hard to the touch when it is completely ready. -
Sand imperfections:
Once fully dry, inspect the edges. If there are any rough spots or sharp burrs, lightly sand them away with fine-grit sandpaper for a smooth finish. -
Add a speckled effect (optional):
If your clay wasn’t pre-speckled, you can flick a toothbrush dipped in diluted brown acrylic paint over the surface to mimic the stone-like texture shown in the image. -
Seal the piece:
To protect the ornament from moisture and handling over the years, apply a thin coat of clear matte sealant or Mod Podge over the front and back. -
Attach the hanger:
Cut a length of jute twine or rustic string. Fold it in half, push the loop through the hole, and pull the tails through the loop to create a secure lark’s head knot, or simply tie it off at the top.
Clean Cuts
To get a super clean hole for the twine, pinch the end of a drinking straw flat, push it through, and twist. The clay plug stays inside the straw!
Add a Vintage Touch
After drying, rub a tiny bit of brown wax or watered-down brown paint into the crevices of the handprint and wipe off the excess to highlight the texture.
Hang your beautiful keepsake on a branch or wrap it as a heartfelt gift for a grandparent


“Baby’s First Christmas” Handprint Plaque
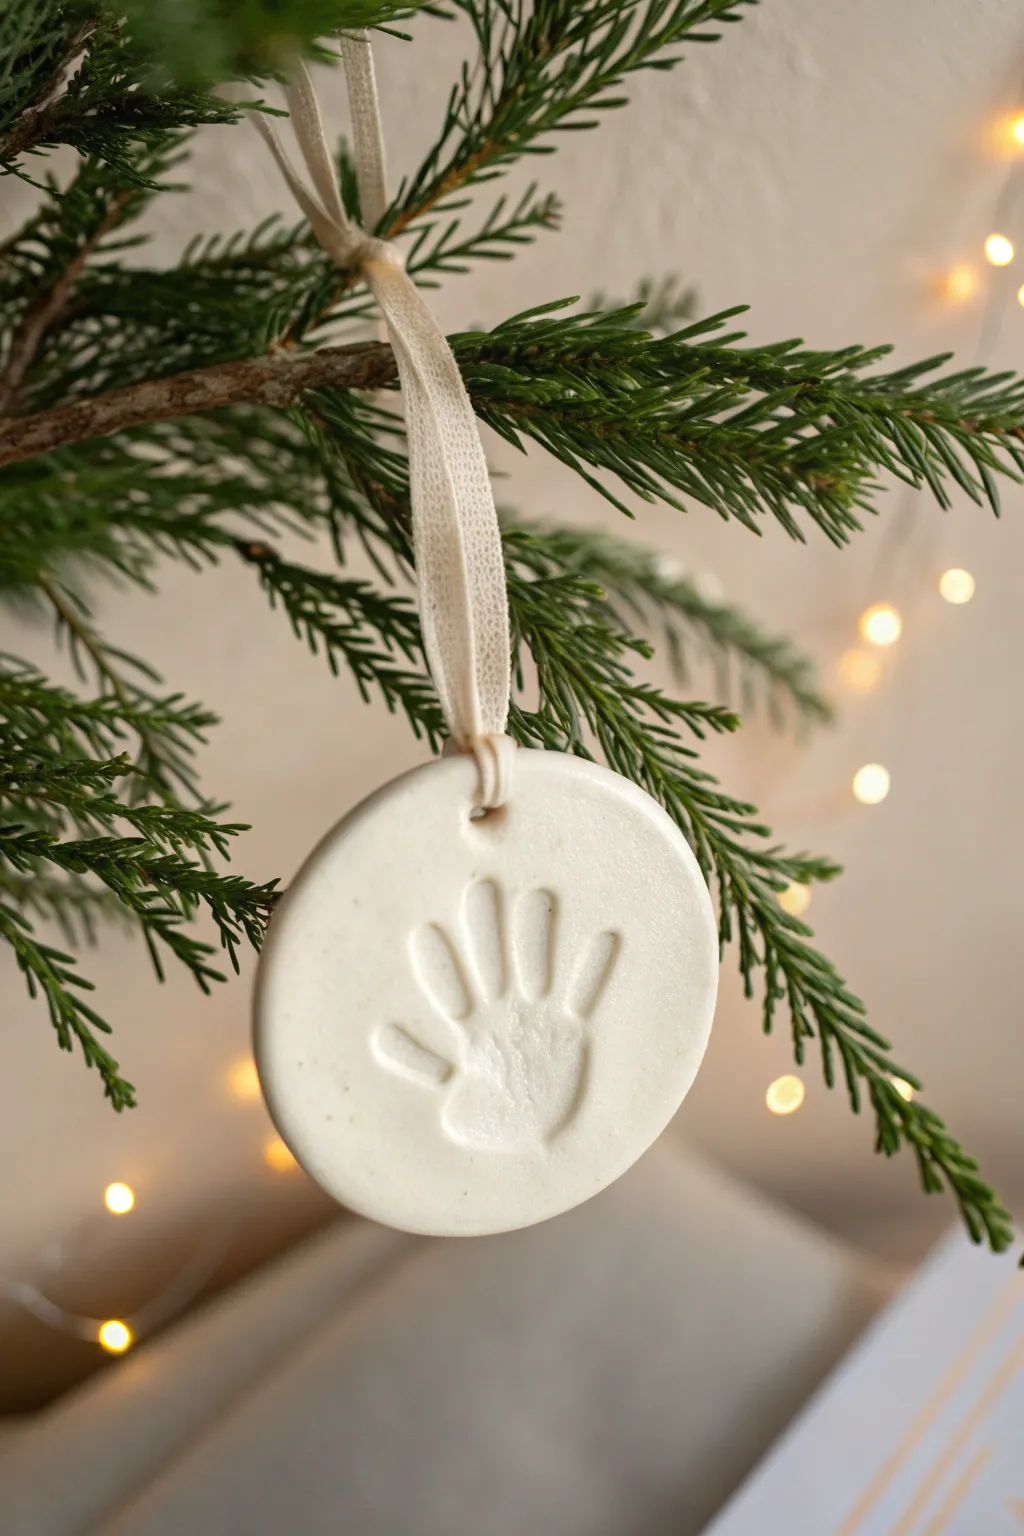
Capture the fleeting tininess of a little one’s hand with this elegant, monochromatic ornament. The smooth, porcelain-like finish of white clay focuses entirely on the texture of the print, making it a timeless addition to any holiday decor.
Step-by-Step Guide
Materials
- Air-dry clay (white) or polymer clay
- Rolling pin or smooth glass jar
- Round cookie cutter (approx. 4 inches)
- Straw or skewer (for hole punching)
- Fine-grit sandpaper (400-600 grit)
- Cream or off-white cotton ribbon (1/4 inch width)
- Parchment paper or non-stick silicone mat
- Small bowl of water
- Matte white acrylic paint (optional)
- Matte spray sealant
Step 1: Prepping clearly
-
Prepare your workspace:
Lay down a sheet of parchment paper or a silicone mat on a flat, stable surface. This ensures the clay won’t stick and can be moved easily without distortion. -
Condition the clay:
Take a handful of your white clay and knead it thoroughly in your hands. You want it to be warm, pliable, and free of any air bubbles before you start rolling. -
Roll the slab:
Using your rolling pin, flatten the clay into a smooth slab. Aim for a thickness of about 1/4 inch—too thin and it might crack; too thick and it becomes heavy. -
Smooth the surface:
Dip your finger lightly in water and gently glide it over the surface of the clay slab to erase any tiny cracks or fingerprints.
Cracked Clay Fix
If tiny cracks appear while drying, don’t panic. Make a paste with a little clay and water, fill the crack, let dry, and sand smooth.
Step 2: Creating the impression
-
Position the hand:
Bring your little one to the table. Gently guide their open hand toward the center of the rolled clay slab. I find it helpful to practice this motion on a plain table first. -
Press firmly:
Press down significantly on the palm and each individual finger. You need firm pressure to get a deep, shadow-catching impression like the photo. -
Lift carefully:
Peel the baby’s hand away quickly but vertically to avoid dragging the clay. If the print looks smeared, simply ball up the clay and re-roll it for a second try. -
Cut the shape:
Center your round cookie cutter over the handprint. Press down firmly to cut the circle, then gently pull away the excess clay from the outside. -
Softening edges:
Run a slightly damp finger around the raw cut edge of the circle. This rounds it off slightly, giving it that finished, professional pottery look. -
Add the hanger hole:
Use a straw to punch a clean hole at the very top of the circle. Make sure it isn’t too close to the edge to prevent tearing later.
Step 3: Finishing touches
-
Let it dry completely:
Place the ornament in a safe, dry spot away from direct heat. It typically takes 24-48 hours for air-dry clay to cure fully. Flip it over halfway through. -
Sand for perfection:
Once bone dry, take your fine-grit sandpaper and very gently buff the edges and surface. This removes any tiny burrs or uneven texture. -
Optional color correction:
If your clay dried slightly off-white or gray, apply a thin coat of matte white acrylic paint. Dab it into the crevices of the handprint and wipe excess away for depth. -
Seal the piece:
Spray the entire ornament with a matte sealant. This protects the porous clay from humidity and handling over the years without adding artificial shine. -
Prepare the ribbon:
Cut a length of cream cotton ribbon, approximately 8-10 inches long. Angle the ends for a neat finish. -
Create the loop:
Fold the ribbon in half and push the folded loop end through the hole from the front to the back. -
Secure the hanger:
Thread the loose tails of the ribbon through the loop you just pushed through the hole (a lark’s head knot) and pull gently to tighten it against the clay. -
Final tie:
Tie the two loose ends of the ribbon together in a simple knot at the top to complete the hanger loop.
Add Subtle Sparkle
Before drying, lightly dust the inside of the handprint with pearlescent mica powder for a subtle shimmer that catches the tree lights.
Now you have a serene, handcrafted memory ready to hang on the tree for years to come


Painted Handprint Outline for Extra Contrast
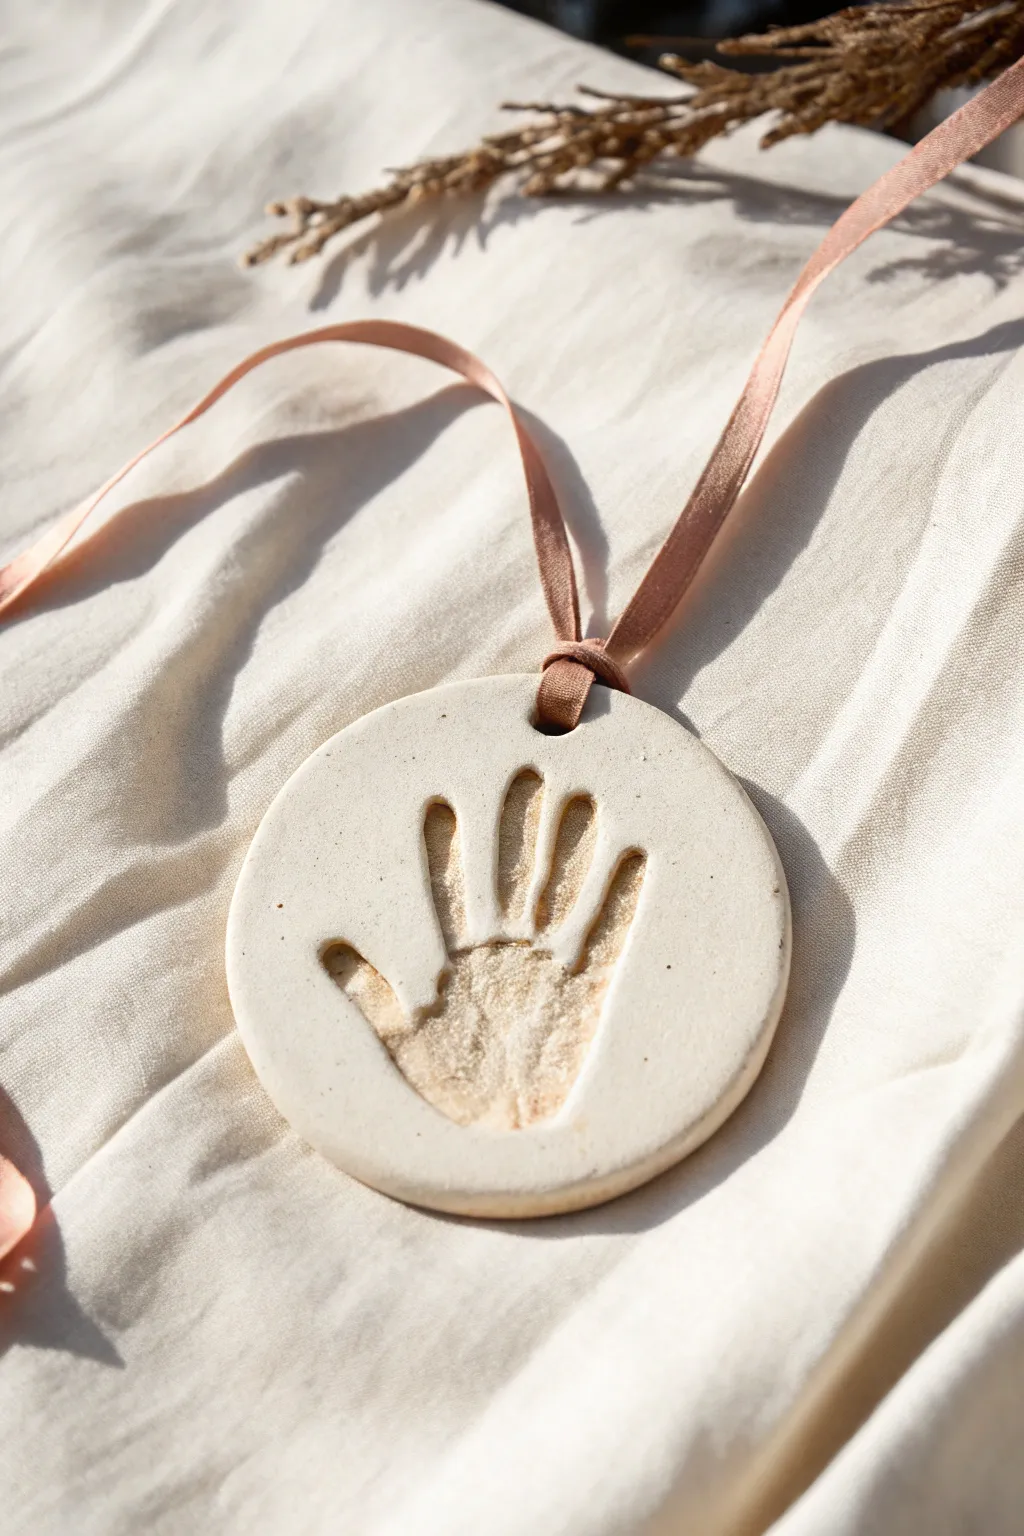
This elegant keepsake captures a moment in time with a deep, textured impression set into smooth white clay. The natural finish highlights the shadow and depth of the handprint without relying on heavy colors, making it a timeless addition to any decor.
Step-by-Step Tutorial
Materials
- White air-dry clay or polymer clay (oven-bake)
- Rolling pin
- Circle cookie cutter (approx. 4-5 inches)
- Parchment paper or silicone mat
- Small straw or skewer
- Fine-grit sandpaper
- Beige or diluted gold acrylic paint (optional wash)
- Small paintbrush
- Paper towel
- Matte sealant spray or Mod Podge
- Pink satin or silk ribbon
Step 1: Preparation & Impression
-
Prepare the workspace:
Lay down a sheet of parchment paper or a silicone mat on a flat, stable surface to prevent the clay from sticking. -
Condition the clay:
Take a handful of white clay and knead it in your hands until it becomes soft, pliable, and free of cracks. I usually work it for about 2-3 minutes to ensure it’s perfectly smooth. -
Roll out the slab:
Shape the clay into a ball, place it on your mat, and use the rolling pin to flatten it into an even slab about 1/4 to 1/2 inch thick. -
Create the handprint:
Guide the child’s hand onto the center of the clay. Press firmly on the palm and each individual finger to create a deep, distinct impression. -
Release the hand:
Gently lift the hand straight up to avoid smudging the edges of the print. If the impression is too shallow, simply ball up the clay and start again. -
Cut the shape:
Position your large circle cutter over the handprint, centering it nicely, and press down firmly to cut the ornament shape. -
Add the hanging hole:
Use a straw to punch a clean hole near the top edge of the circle. Make sure it isn’t too close to the edge to prevent cracking. -
Smooth the edges:
Dip your finger in a tiny bit of water and run it along the cut edge of the circle to smooth out any roughness from the cutter.
Fixing Cracks
If small hairline cracks appear as the clay dries, mix a tiny bit of fresh wet clay with water to make a paste. Fill the cracks, smooth with a finger, and let dry again.
Step 2: Finishing & Detailing
-
Dry the ornament:
Allow the clay to dry completely according to the package instructions. For air-dry clay, flip it over halfway through the drying process, which usually takes 24-48 hours, to prevent curling. -
Sand for smoothness:
Once fully cured, use fine-grit sandpaper to gently buff the surface and edges, removing any fingerprints or stubborn rough spots. -
Create a wash (optional):
To mimic the subtle contrast in the photo, mix a very small amount of beige or gold paint with water to create a thin, watery wash. -
Apply the wash:
Paint the wash into the crevices of the handprint. It should pool slightly in the deepest parts. -
Wipe back the excess:
Immediately use a damp paper towel to wipe the surface paint away. This leaves pigment only in the textured depths of the print, enhancing the shadow effect. -
Seal the piece:
Apply a thin coat of matte sealant or matte Mod Podge to protect the clay from moisture and dirt without adding an artificial shine. -
Prepare the ribbon:
Cut a length of soft pink ribbon, approximately 18 inches long. -
Attach the hanger:
Fold the ribbon in half, thread the loop through the hole from front to back, and pull the tails through the loop to create a lark’s head knot. -
Secure the knot:
Gently tighten the ribbon knot so it sits flush against the top of the ornament.
Pro Tip: Clean Prints
Before pressing the hand into the clay, lightly dust the child’s palm with cornstarch. This acts as a release agent and prevents the clay from sticking to sticky skin.
Now you have a beautifully simple keepsake ready to hang or gift to a loved one


Glitter-Filled Handprint Impression Ornament
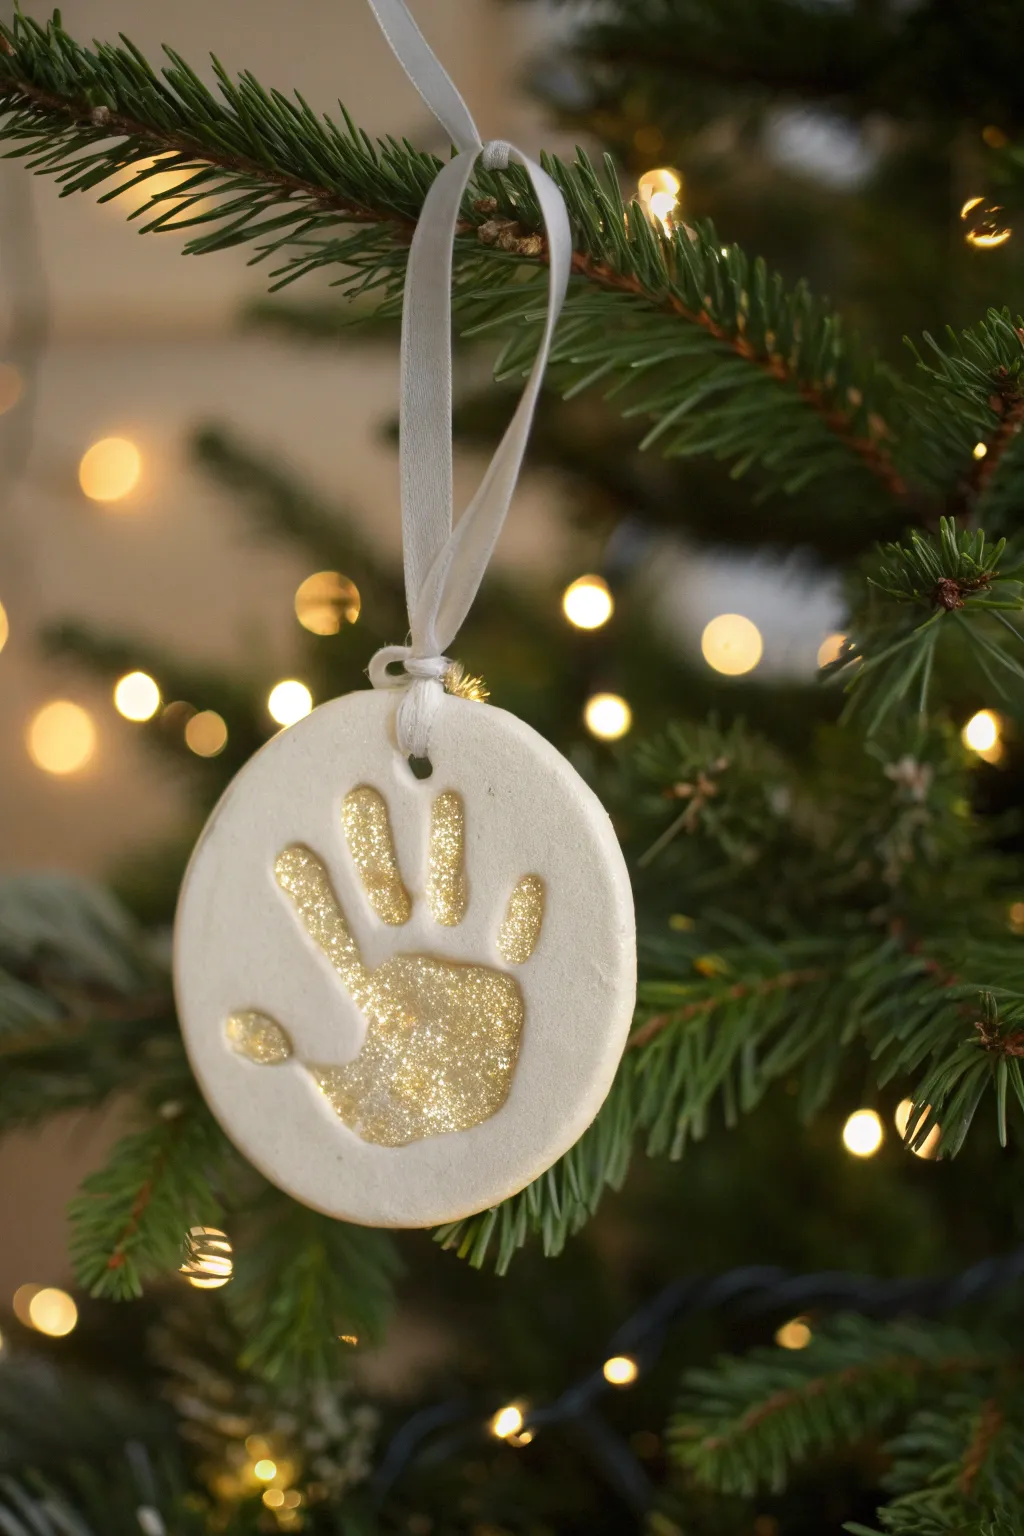
Capture a special moment in time with this elegant white clay ornament featuring a delicate handprint impression. The recessed print is filled with shimmering gold glitter, creating a stunning contrast against the matte white finish on your Christmas tree.
How-To Guide
Materials
- White air-dry clay or salt dough ingredients (flour, salt, water)
- Circle cookie cutter (large enough for the hand) or a drinking glass
- Rolling pin
- Parchment paper
- Drinking straw or skewer
- Fine gold glitter
- Mod Podge or white craft glue
- Small paintbrush
- White ribbon (approx. 1/4 inch width)
- Sandpaper (fine grit)
Step 1: Preparing the Clay Base
-
Roll out the clay:
Begin by kneading your white air-dry clay or homemade salt dough until it is smooth and pliable. Place it on a sheet of parchment paper and roll it out to an even thickness of about 1/4 to 1/2 inch. -
Cut the shape:
Using a large circle cookie cutter or the rim of a wide jar, press firmly into the clay to cut out your round ornament base. Remove the excess clay from around the circle. -
Smooth the edges:
Dip your finger in a tiny bit of water and run it gently around the cut edge of the circle to smooth out any roughness or stray clay bits. -
Create the hanging hole:
Take a drinking straw or a small wooden skewer and poke a clean hole near the top edge of the circle. This is where your ribbon will eventually go, so make sure it isn’t too close to the very rim.
Clean Edges Pro-Tip
Before drying, dip your finger in water and gently run it along the edges of the handprint impression. This smooths out tiny cracks for a cleaner look.
Step 2: Making the Impression
-
Position the hand:
Have the child spread their fingers comfortably. Guide their hand over the center of the clay circle. -
Press firmly:
Press the hand down firmly and evenly into the clay. Be sure to press on each finger and the palm individually to ensure a deep, clear impression without pushing all the way through the clay. -
Lift straight up:
Lift the hand straight up and away from the clay to avoid smudging the edges of the print. If the print is too light, simply ball up the clay and start the rolling process again. -
Dry the ornament:
Allow the ornament to dry completely according to your clay’s package instructions. I find that flipping it over halfway through the drying process helps keep it flat.
Step 3: Adding the Glitter
-
Sand imperfections:
Once fully hard and dry, inspect the edges. If there are any rough spots, lightly sand them with fine-grit sandpaper for a professional finish. -
Apply adhesive:
Pour a small amount of Mod Podge or white craft glue into a dish. Using a small paintbrush, carefully paint the glue *only* inside the recessed handprint area. -
Coat with glitter:
While the glue is wet, generously pour fine gold glitter over the entire handprint area. Don’t worry about being neat here; you want maximum coverage. -
Shake off excess:
Wait a minute for the glitter to grip the glue, then turn the ornament over and tap it gently to shake off the loose glitter onto a piece of paper (which lets you funnel it back into the jar). -
Clean the surface:
If stray glitter stuck to the flat white surface of the ornament, use a clean, dry paintbrush to whisk those specks away before the glue sets fully. -
Seal the glitter (optional):
To prevent shedding later, you can dab a very thin top coat of Mod Podge over the glittered area once the first layer is dry.
Level Up: Date It
Use a small stamp set or a toothpick to scratch the year into the back of the ornament before drying so you never forget when those hands were so small.
Step 4: Finishing Touches
-
Cut the ribbon:
Cut a length of white ribbon approximately 8-10 inches long. -
Thread the loop:
Fold the ribbon in half and push the folded loop end through the hole in the ornament from front to back. -
Secure the knot:
Pass the loose ends of the ribbon through the loop and pull tight to create a lark’s head knot right at the ornament. -
Tie for hanging:
Tie the loose ends of the ribbon together in a simple knot at the top to create the hanger loop.
Hang your beautiful keepsake on a sturdy branch where the lights can catch the gold glitter

The Complete Guide to Pottery Troubleshooting
Uncover the most common ceramic mistakes—from cracking clay to failed glazes—and learn how to fix them fast.
Santa Handprint Ornament (Fingers as Beard)
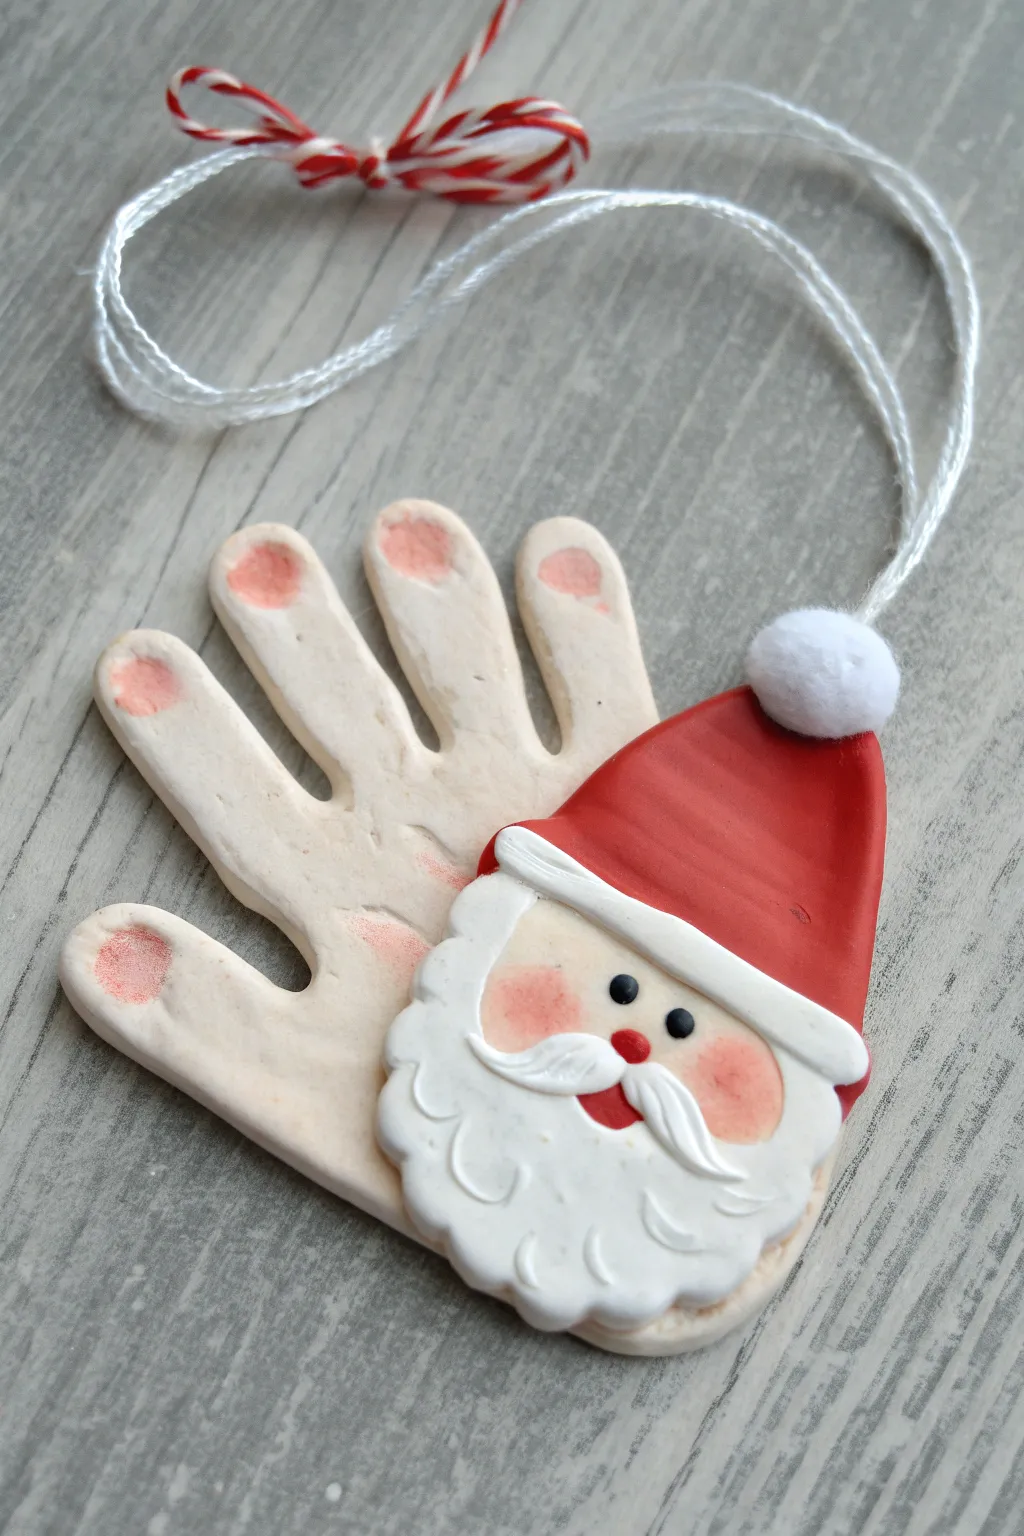
Capture a moment in time with this adorable Santa ornament that transforms a simple handprint into jolly St. Nick. The thumb and palm become Santa’s merry face, while the fingers create a unique backdrop for this festive hanging decoration.
Detailed Instructions
Materials
- Salt dough (flour, salt, water) or air-dry clay (white)
- Acrylic paints: red, flesh tone/pale peach, white, black
- Rolling pin
- Parchment paper
- Butter knife or clay tool
- Small round paintbrushes
- White yarn or twine
- Small white pom-pom
- Hot glue gun or strong craft glue
- Clear sealant spray (glossy or matte)
- Red and white bakers twine (optional for bow)
Step 1: Shaping the Handprint
-
Prepare your dough:
Mix your salt dough or condition your air-dry clay until it is smooth and pliable. Roll it out on a piece of parchment paper to an even thickness of about 1/4 to 1/2 inch to ensure durability. -
Make the impression:
Gently but firmly press the child’s hand into the rolled dough. Ensure the fingers are spread slightly apart to create distinct shapes. -
Cut out the shape:
Use a butter knife or clay cutting tool to carefully trace around the handprint, leaving a small border of dough around the fingers and palm. Smooth any rough edges with a slightly damp finger. -
Create the hanging hole:
Before the clay dries, use a straw or skewer to poke a hole near the top of the ornament. Position it between the index and middle finger area, or wherever the balance feels right for hanging. -
Dry completely:
Allow the ornament to dry. If using salt dough, bake at a low temperature (200°F) for several hours. For air-dry clay, let it sit for 24-48 hours until fully hardened and white.
Step 2: Painting Santa’s Face
-
Plan the design:
Orient the handprint so the fingers point upward. The thumb area and the base of the palm will become Santa’s face. You can lightly sketch the hat and beard line with a pencil if you wish. -
Paint the hat base:
Using bright red acrylic paint, fill in the area starting from the wrist/palm bottom and curving up towards the thumb side. This creates the classic stocking cap shape. -
Add the face tone:
Mix a small amount of pale peach or flesh-colored paint. Apply this to the round area just below the red hat brim line, forming the skin of Santa’s face. -
Detail the beard:
With white paint, create the beard. I find it works best to paint a fluffy, cloud-like shape encompassing the lower palm area. Use swirling brush strokes to simulate textured hair. -
Create the hat brim:
Paint a thick white band separating the red hat from the face. Make the line slightly wavy to mimic fur or fabric texture. -
Finger details:
For a cute touch shown in the reference, dab a little watered-down pink or peach paint onto the very tips of the four upright fingers.
Smoother Dough Trick
Knead a tiny drop of vegetable oil into salt dough before rolling. This prevents cracking edges and creates a porcelain-smooth surface for painting.
Step 3: Bringing Santa to Life
-
Rosy cheeks:
Dip a dry brush into a tiny bit of red or dark pink paint, dab off the excess on a paper towel, and gently stipple rosy circles onto Santa’s cheeks. -
Facial features:
Using a fine-tip brush or the end of a toothpick, dot two small black eyes. Add a small cherry-red nose in the center, and a tiny red mouth peeking through the beard. -
Mustache details:
Paint a stylized white mustache over the beard area, just under the nose. Adding small grey or light blue lowlights can give the white hair more dimension. -
Attach the pom-pom:
Once the paint is fully dry, hot glue a small white pom-pom to the very tip of the red hat area for a 3D effect. -
Seal the ornament:
Spray the entire front of the ornament with a clear acrylic sealer. This protects the paint from chipping and gives it a finished sheen. -
String it up:
Thread a length of white yarn or twine through the hole you made earlier. Tie it securely in a loop. -
Final flourish:
Tie a small bow using red and white bakers twine and glue it near the hanging loop or on the twine itself for an extra festive accent.
Fixing Cracks
If hairline cracks appear during drying, mix a small paste of flour (or clay) and water. Rub it into the crack, smooth with a wet finger, and let re-dry.
Hang your cheerful Santa on the tree and enjoy the handmade holiday charm for years to come
Snowman Family Handprint Ornament (One Snowman per Finger)
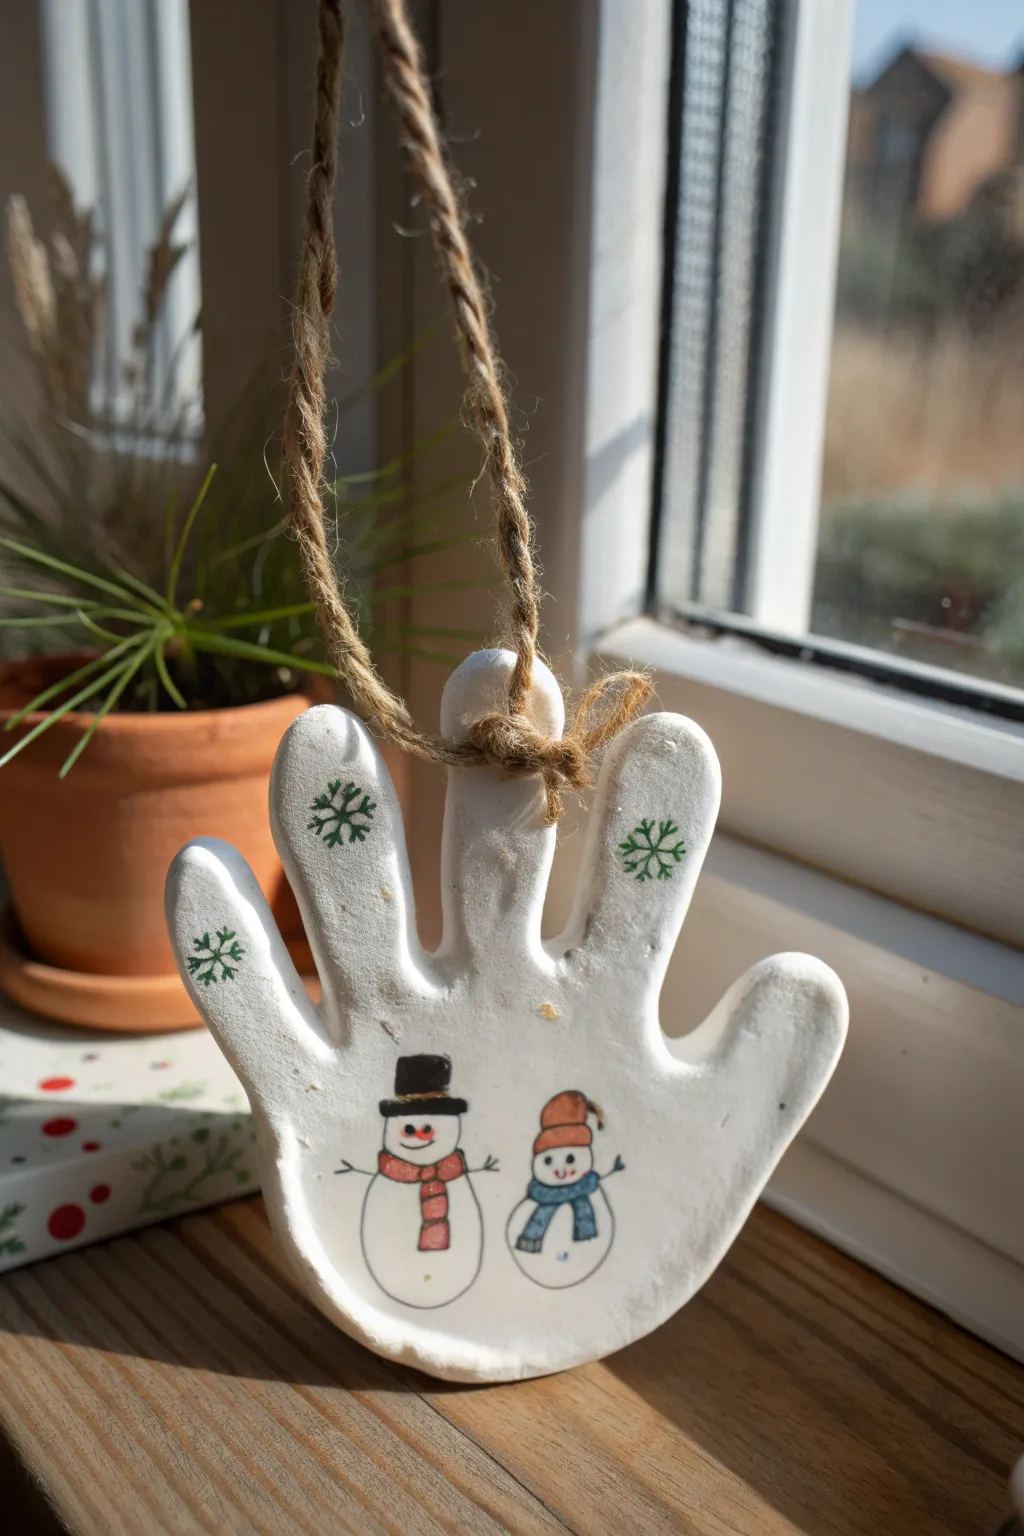
Treasure those tiny hands forever with this charming salt dough ornament featuring a sweet snowman duo. The bright white finish and simple illustrated details make this a timeless addition to your holiday decor.
Detailed Instructions
Materials
- 2 cups all-purpose flour
- 1 cup salt
- 1 cup warm water
- Rolling pin
- Baking sheet with parchment paper
- Knife or craft knife
- Drinking straw (for the hole)
- White acrylic paint
- Fine tip permanent markers (black, orange, red, blue)
- Gloss varnish or Mod Podge (optional)
- Jute twine or ribbon
- Fine grit sandpaper
Step 1: Crafting the Dough Canvas
-
Mix the Dough:
In a large mixing bowl, combine the flour and salt. Slowly add the warm water while stirring until a stiff dough forms. Knead the mixture on a flat surface for about 5-10 minutes until it is smooth, pliable, and no longer sticky. -
Roll It Out:
Lightly flour your surface and rolling pin. Roll the dough out to an even thickness of approximately 1/4 inch. If it’s too thin, it may crack; too thick, and it will take forever to dry. -
Make the Impression:
Have the child press their hand firmly into the center of the rolled dough. Help them spread their fingers slightly so there is space between each digit. Press down gently on the palm and each finger to ensure a deep, clear impression. -
Cut the Shape:
Using a small kitchen knife or craft knife, careful cut around the handprint, leaving a small border (about 1/4 inch) around the fingers and palm to create a smooth outline. Remove the excess dough. -
Create a Hanging Hole:
Before baking, use a plastic drinking straw to punch a hole near the top center of the palm or slightly up the middle finger area. Twist the straw to remove the dough cleanly. -
Bake to Garden:
Place the handprint on a parchment-lined baking sheet. Bake at a very low temperature, around 200°F (95°C), for 2-3 hours. The goal is to dry it out, not cook it. Flip it over halfway through the drying time. -
Cool and Smooth:
Let the ornament cool completely. Once cool, I like to run a piece of fine-grit sandpaper gently over the edges to remove any sharp burrs or rough spots.
Smooth Surface Secret
If your dough looks lumpy after rolling, dip your finger in water and gently smooth the surface before pressing the hand down.
Step 2: Decorating the Scene
-
Apply the Base Coat:
Paint the entire front and sides of the handprint with white acrylic paint. You may need two coats to get a solid, opaque white finish. Let this dry fully before moving on. -
Outline the Snowmen:
Using a fine-tip black permanent marker or a very fine paint brush, draw the outlines of two snowmen on the palm area. Stack two circles for each snowman—a smaller one for the head and a larger one for the body. -
Add Facial Features:
Dot two black eyes on each snowman face. Use an orange marker to draw a small triangular ‘carrot’ nose pointing slightly to the side. Draw a simple curved line or dots for a smiling mouth. -
Dress the Left Snowman:
Draw a black top hat on the left snowman. Using a red marker, draw a striped scarf around its neck and color it in, leaving thin white stripes if possible. -
Dress the Right Snowman:
On the second snowman, draw a cozy beanie hat using an orange outline. Add a blue scarf with hanging tails, coloring it in solid blue or adding a pattern. -
Draw Arms:
Sketch thin, stick-like arms coming from the sides of each snowman body using the black fine liner. Add tiny forks at the ends for twig fingers. -
Add Snowflakes:
On the fingers of the handprint, draw small green snowflakes. Create a simple ‘X’ shape with a vertical line through it, then add tiny ‘v’ shapes at the end of each line for detail. -
Seal the Ornament:
Once the ink is completely dry, brush a thin layer of clear gloss varnish or Mod Podge over the entire surface to protect the artwork and give it a polished look. -
Attach the Hanger:
Cut a length of jute twine or ribbon, thread it through the hole you made earlier, and tie a secure knot to create a loop for hanging.
Yearly Tradition
Write the child’s name and the current year on the back of the ornament with a black marker so you never forget when those hands were this small.
Hang this precious memory on your tree or in a window to enjoy throughout the winter season


What Really Happens Inside the Kiln
Learn how time and temperature work together inside the kiln to transform clay into durable ceramic.
Handprint Wreath Ornament (Handprint as Greenery)
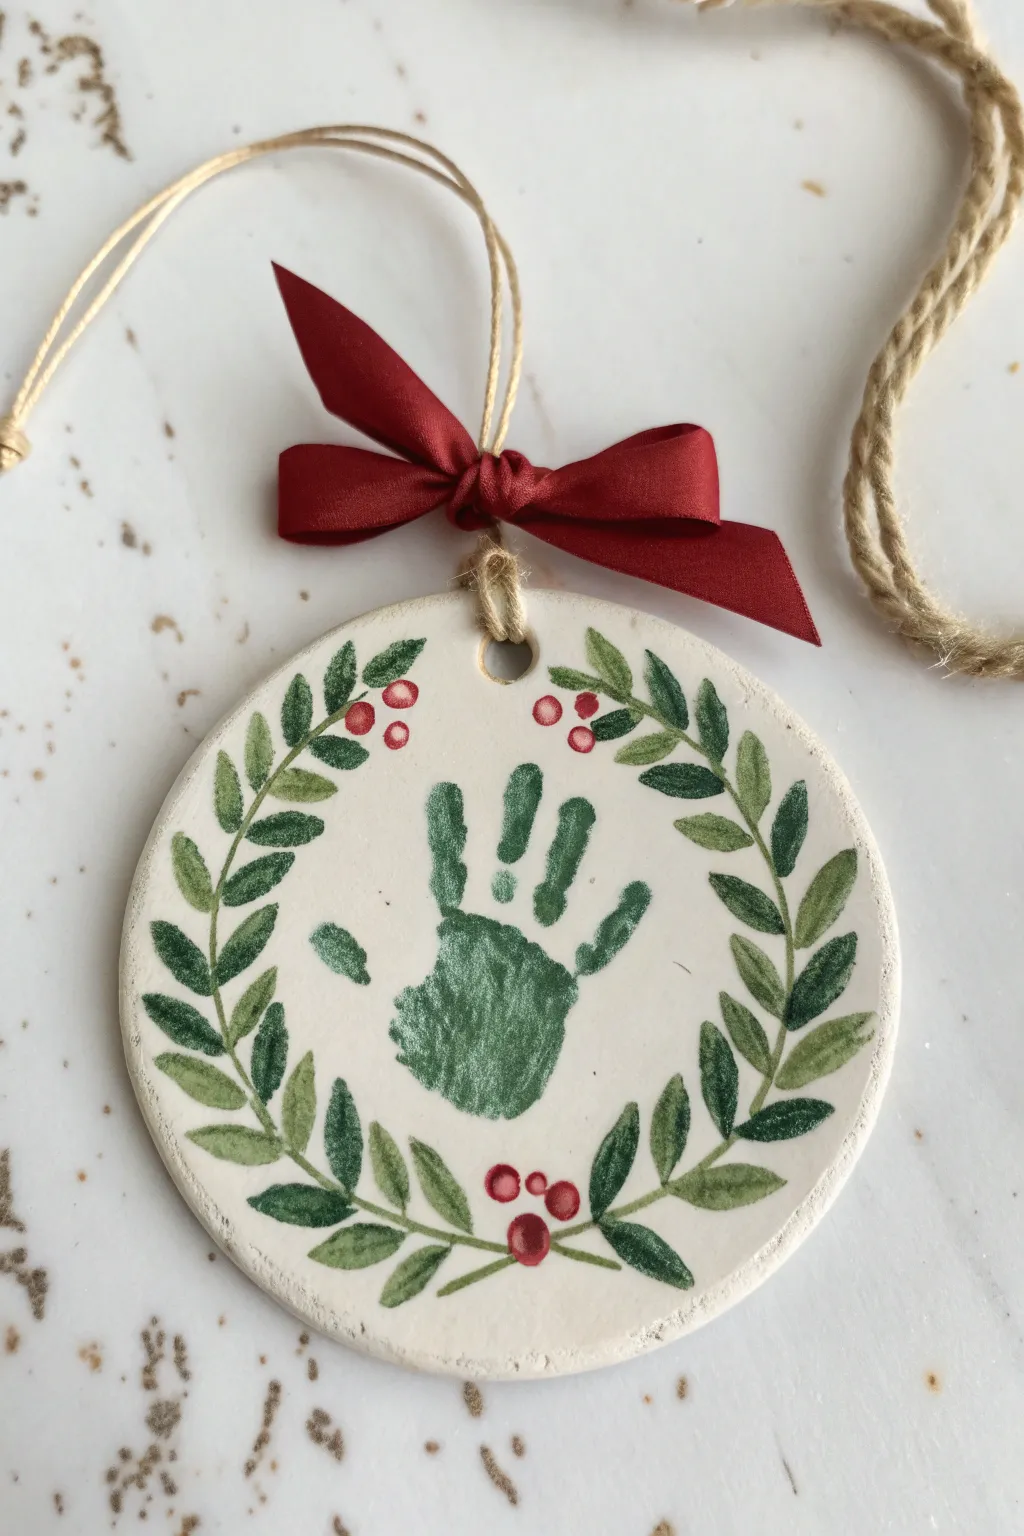
This elegant keepsake transforms a simple handprint into the centerpiece of a festive holiday wreath. By surrounding the print with delicate painted foliage and bright red berries, you create a timeless ceramic-style ornament that captures a moment in time.
Step-by-Step Tutorial
Materials
- Air-dry clay (white) or salt dough
- Circle cookie cutter (large) or a bowl to trace
- Rolling pin
- Straw or skewer (for the hole)
- Sandpaper (fine grit)
- Green acrylic paint (two shades: sage and forest green)
- Red acrylic paint
- Small round paintbrush (size 2 or 4)
- Detail paintbrush (0 or 00)
- Red satin ribbon (1/4 inch width)
- Jute twine or thin cord
- Clear matte or satin sealant spray
Step 1: Creating the Clay Base
-
Prepare the clay:
Begin by kneading your air-dry clay or salt dough until it is smooth and pliable. This removes air bubbles and prevents cracking later. -
Roll it out:
Roll the clay out on a flat, clean surface to a thickness of about 1/4 inch. If the clay sticks, you can use a little parchment paper underneath. -
Cut the shape:
Use a large circle cookie cutter or place a small bowl upside down on the clay and trace around it with a knife to cut out your ornament base. -
Make the impression:
Here I like to gently guide the child’s hand. Press their hand firmly into the center of the circle to create the print. Ensure the palm and fingers leave a clear indentation, but don’t push all the way through. -
Create the hanging hole:
Use a straw to punch a clean hole near the top edge of the circle. This ensures you have a perfect spot for the twine later. -
Dry completely:
Set the ornament aside to dry. Depending on the thickness and your climate, this can take 24 to 48 hours. Flip it occasionally to ensure even drying on both sides. -
Smooth the edges:
Once fully hard and dry, take a piece of fine-grit sandpaper and gently smooth the outer rim of the circle to remove any rough jagged bits.
Fixing Cracks
If small hairline cracks appear as the clay dries, make a paste of clay and water (slurry) and smooth it into the cracks with your finger, then let dry again.
Step 2: Painting the Design
-
Paint the handprint:
Using a slightly diluted sage green acrylic paint, fill in the recessed handprint area. The wash technique helps the texture of the print show through. -
Start the wreath stems:
With your detail brush and forest green paint, draw a thin, curved line starting from the bottom center and reaching up the left side, then repeat on the right side. These are the main stems for your wreath. -
Add base leaves:
Using the darker forest green, paint small, oval-shaped leaves branching off your main stems. Angle them upwards to mimic natural growth. -
Layer lighter leaves:
Mix a little white into your green or use the sage shade to paint a second layer of leaves interspersed with the dark ones. This adds depth and makes the wreath look lush. -
Paint the berries:
Dip the end of a paintbrush handle or use a small dotting tool into red acrylic paint. Dot clusters of three berries at the bottom center and near the top of the wreath branches. -
Add berry highlights:
Once the red dots dry, add a tiny speck of white or lighter red to each berry to give them a rounded, shiny appearance.
Step 3: Finishing Touches
-
Seal the artwork:
Spray the entire front of the ornament with a clear matte or satin sealant. This protects the clay from moisture and keeps the paint colors vibrant. -
Attach the hanger:
Cut a length of jute twine, thread it through the hole at the top, and tie a secure knot to create the hanging loop. -
Add the bow:
Tie a small, neat bow using the red satin ribbon. Thread one of the bow tails through the loop of the jute twine right at the base of the ornament hole and secure it, or tiny dab of glue can hold the bow flat against the top of the clay.
Add Sparkle
While the red berry paint is still wet, sprinkle a tiny amount of ultra-fine red glitter on them for a festive shimmer.
Now you have a beautifully preserved memory ready to hang on the tree for years to come
Candy-Cane Striped Handprint Ornament
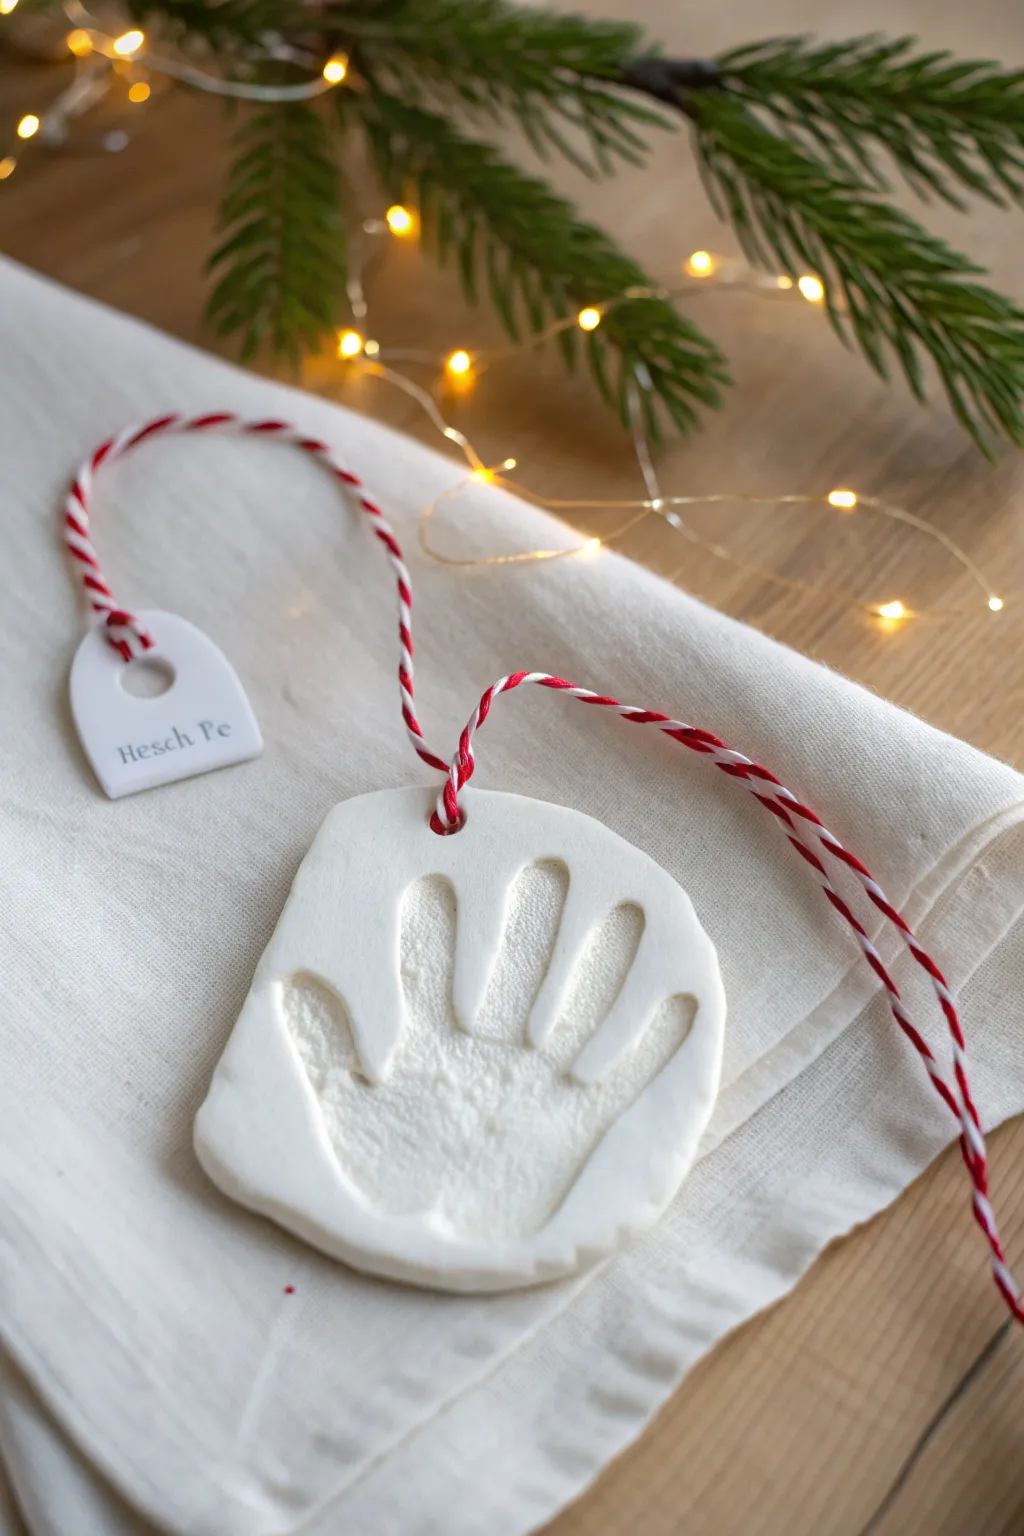
Capture a moment in time with this classic white clay handprint ornament, tied together with festive red and white baker’s twine. The clean, minimalist look focuses entirely on the precious impression, making it a timeless addition to any tree.
Step-by-Step Guide
Materials
- White air-dry clay or polymer clay
- Rolling pin
- Parchment paper or non-stick mat
- Circle cutter or a butter knife
- Drinking straw or small stirrer
- Alphabet stamp set (small)
- Red and white baker’s twine
- Fine-grit sandpaper (optional)
- Clear matte sealant (optional)
Step 1: Preparation and Impression
-
Prepare your workspace:
Lay down a sheet of parchment paper or a non-stick silicone mat on a flat surface to prevent the clay from sticking. -
Condition the clay:
Take a handful of white clay and knead it in your hands until it becomes soft, pliable, and free of cracks. -
Roll the slab:
Using a rolling pin, flatten the clay into a smooth slab. Aim for a distinct thickness of about 1/4 inch to ensure the ornament is sturdy enough to hang. -
Smooth the surface:
Check the surface for any lint or large bumps. Lightly run a slightly damp finger over the clay to smooth out imperfections before making the print. -
Make the handprint:
Gently guide your child’s hand onto the center of the clay slab. Press down firmly on the palm and each individual finger to get a deep, clear impression. -
Lift carefully:
Lift the hand straight up and off the clay to avoid dragging or smudging the edges of the print.
Step 2: Shaping and Details
-
Cut the shape:
Use a dull knife or a sculpting tool to cut a soft, organic shape around the handprint, leaving about a half-inch border. You can smooth these cut edges with a finger dipped in water. -
Make the tag:
With the leftover clay, roll a small, thin piece and cut it into a small tombstone or tag shape, roughly 1 inch wide. -
Stamp the text:
Using small alphabet stamps, gently press a name, date, or initials into the small clay tag. I find that rocking the stamp slightly helps get a crisp letter. -
Create hanging holes:
Use a drinking straw to punch a clean hole at the top center of the handprint slab. Do the same near the top of the name tag.
Cracking Clay?
If you see tiny hairline cracks as the clay dries, mix a tiny bit of fresh clay with water to make a paste and smooth it over the cracks like spackle.
Step 3: Finishing Touches
-
Dry the clay:
Allow the clay pieces to dry completely according to the package instructions. For air-dry clay, this usually takes 24-48 hours. Flip them halfway through for even drying. -
Sand edges:
Once fully hard, gently rub the edges with fine-grit sandpaper if there are any sharp or rough spots from cutting. -
Seal (Optional):
For longevity, brush a thin coat of clear matte sealant over the front and back to protect the porous clay from moisture. -
Cut the twine:
Cut a generous length of red and white baker’s twine, roughly 12-15 inches long. -
Attach the tag:
Thread one end of the twine through the small tag and tie a small knot so it hangs securely at one end. -
Assemble the ornament:
Thread the rest of the twine through the main handprint ornament. Create a loop large enough to fit over a tree branch. -
Final knot:
Tie the two ends of the twine together securely, trimming any excess fraying for a neat finish.
Add Some sparkle
Before the clay dries, lightly dust the inside of the hand impression with clear or iridescent glitter for a subtle, snowy shimmer.
Now you have a charming, handmade memory ready to hang upon your tree

TRACK YOUR CERAMIC JOURNEY
Capture glaze tests, firing details, and creative progress—all in one simple printable. Make your projects easier to repeat and improve.
Handprint Present Ornament (Ribbon Wrap Illusion)
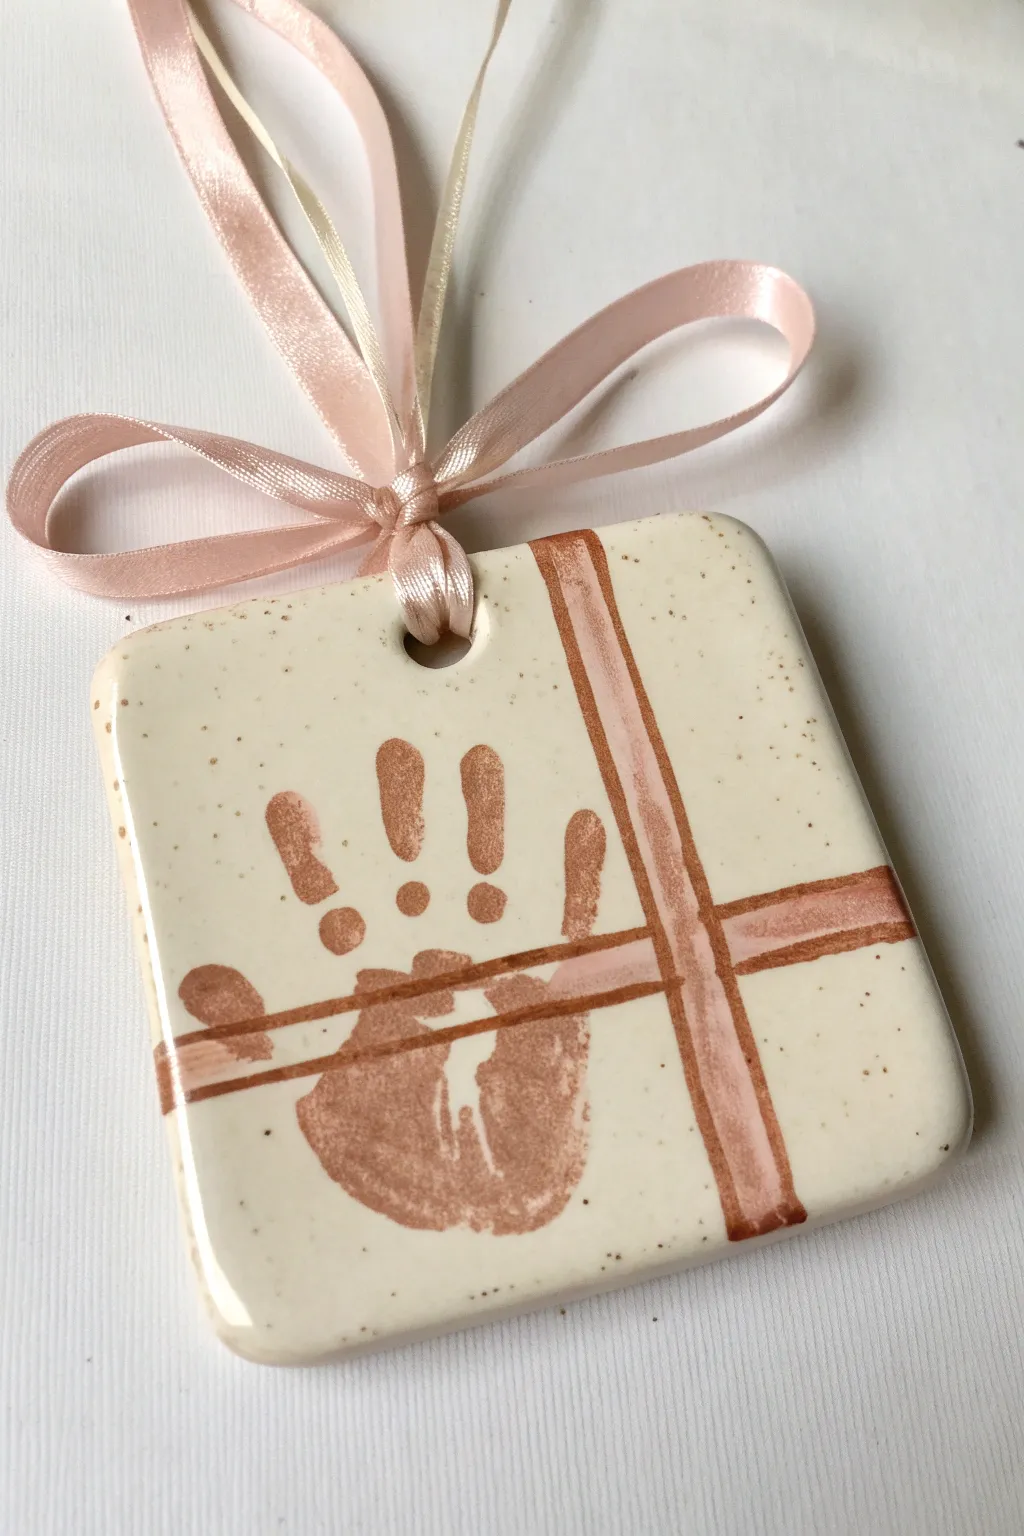
Turn a simple handprint into a precious gift using this clever trompe-l’œil ribbon design. The warm copper tones and speckled ceramic finish give this keepsake a sophisticated, heirloom quality that looks lovely on any tree.
Step-by-Step
Materials
- Square ceramic bisqueware tile or polymer clay square (approx 4×4 inches)
- Speckled cream glaze (or cream acrylic paint + toothbrush for splattering)
- Copper or rust-colored ceramic underglaze (or acrylic paint)
- Flat shader brush (medium width)
- Fine liner brush
- Sponge or foam pouncer
- Clear gloss aesthetic glaze/varnish
- Pink satin ribbon (1/4 inch width)
- Drill (if creating holes yourself)
- Wipes or damp cloth for cleanup
Step 1: Preparation & Base
-
Prepare the surface:
If using a ready-made bisque tile, wipe it down with a damp sponge to remove dust. If working with polymer clay, roll it out into a smooth square about 1/4 inch thick and smooth the edges with your finger. -
Create the hanging hole:
Before doing any painting or baking, use a straw or small round tool to punch a hole in the top center of the square. Position it slightly down from the edge so it’s sturdy. -
Apply the base coat:
Coat the entire front surface with your speckled cream glaze. If you are using acrylics on baked clay, paint a solid cream layer first. -
Add the speckled effect:
If your base glaze or paint doesn’t have speckles built-in, dip an old toothbrush into diluted brown paint. Run your thumb over the bristles to gently flick tiny specks across the surface. Let this base layer dry completely.
Step 2: The Handprint
-
Coat the hand:
Using a sponge or large brush, apply an even coat of the copper/rust color to the child’s hand. Avoid globs of paint, as these will smudge the details. -
Position the print:
Guide the hand to the center of the square. The fingers should point upward toward the hole, but leave enough space around the edges for our ‘ribbon’ design later. -
Press and lift:
Press down firmly on the palm and each finger to ensure good contact. Lift the hand straight up—don’t drag it—to reveal a crisp print. Wipe the child’s hand immediately. -
Clean up edges:
If there are any little smudges outside the main print, use a damp cotton swab or the corner of a clean cloth to carefully wipe them away before the paint sets.
Smudge Savior
Messy print? If working on unbaked clay, just wipe the surface with a baby wipe and re-smooth. If using bisque, wash it off quickly under water and dry thoroughly before retrying.
Step 3: Painting the Faux Ribbon
-
Plan the cross:
Visualize a cross shape that intersects behind the handprint. You want one vertical line ideally running slightly off-center (to the right of the hand) and one horizontal line running across the palm. -
Paint the vertical stripe:
Using your flat shader brush loaded with the copper color, paint a straight vertical stripe from the top edge to the bottom edge. IMPORTANT: When you reach the handprint, stop the brush and ‘jump’ over it, continuing the line on the other side. Do not paint over the handprint. -
Paint the horizontal stripe:
Repeat the process horizontally. Paint from left to right, lifting your brush when you hit the handprint and resuming on the other side. This creates the illusion that the hand is resting on top of the ribbon. -
Add the outline detail:
Switch to your fine liner brush with a slightly darker version of your copper paint. Carefully outline the edges of your painted ribbons to give them definition. -
Create the overlapping effect:
Where the vertical and horizontal ribbons intersect, paint the vertical lines of the upright ribbon right over the horizontal ribbon. This small detail makes it look like one ribbon is woven over the other.
Straight Lines Secret
Use painter’s tape to mask off the ribbon paths before painting. Just remember to press the tape down gently so it doesn’t disturb the soft clay or peel up the base paint layer.
Step 4: Finishing Touches
-
Dry and fire/seal:
If using ceramic glazes, now is the time to fire the piece in the kiln according to your glaze instructions. If using acrylics on clay or wood, let the paint cure for 24 hours. -
Apply gloss finish:
For the acrylic version, brush on a high-gloss varnish. This mimics the shine of fired ceramic and protects that precious little print. -
Thread the ribbon:
Cut a length of pink satin ribbon. Fold it in half and push the loop through the hole from front to back. -
Tie the bow:
Thread the loose ends through the loop and pull tight to secure it to the ornament. Then, tie a classic bow at the base of the ribbon, right against the ornament top.
Hang this charming gift-wrapped memory on a prominent branch where the lights can catch that beautiful glossy finish
Layered Polymer Clay Handprint Frame Ornament
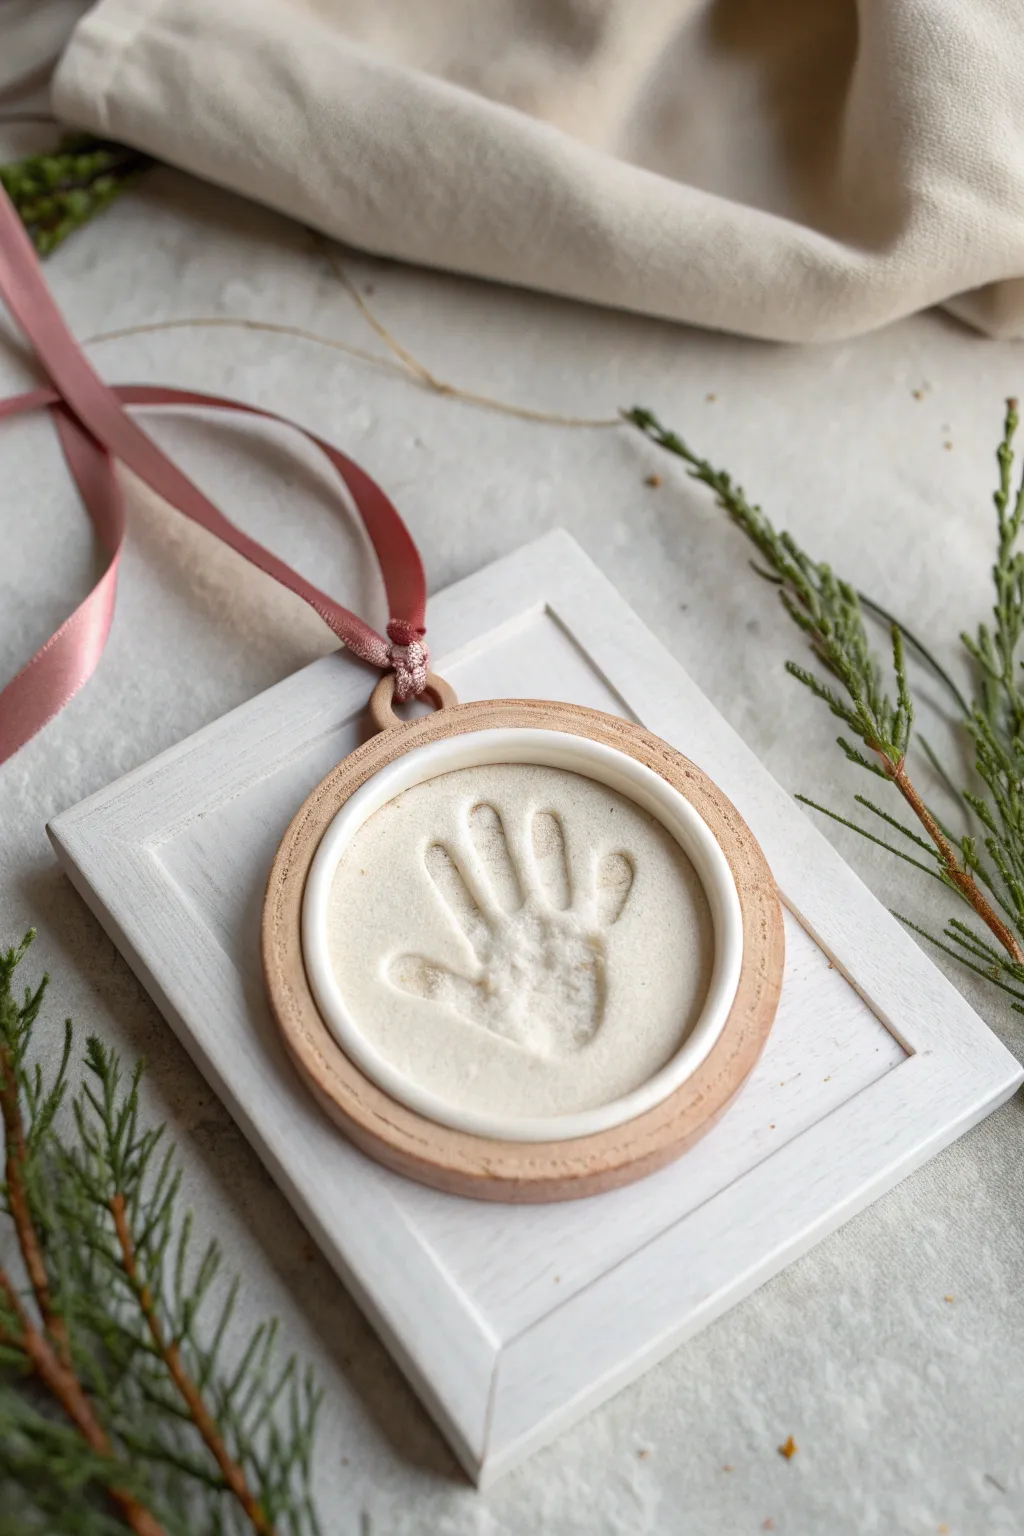
Elevate a simple clay impression by mounting it on a secondary frame for a sophisticated, layered look. This project combines the natural warmth of wood with the delicate texture of a white clay handprint, creating an heirloom-quality ornament.
Detailed Instructions
Materials
- White polymer clay (oven-bake) or air-dry clay
- Small wooden embroidery hoop (3-4 inches diameter)
- Square wooden plaque or frame backer (slightly larger than hoop)
- White acrylic paint
- Paintbrush
- Rolling pin
- Parchment paper
- Strong craft glue (E6000 or wood glue)
- Sandpaper (fine grit)
- Pink satin ribbon (1/4 inch width)
- Cookie cutter (circle same size as hoop interior) or craft knife
- Small screw eye hook (optional, for hanging)
Step 1: Preparing the Clay Impression
-
Condition the clay:
Begin by kneading your white clay until it is soft, pliable, and free of cracks. Warm hands help this process significantly. -
Roll it out:
Place the clay between two sheets of parchment paper to prevent sticking. Roll it out to a thickness of about 1/4 inch, ensuring it is even throughout. -
Cut the circle:
Take the inner ring of your wooden embroidery hoop and use it as a guide. Press it gently into the clay to mark the size, then use a craft knife to cut a clean circle just inside this line so it fits snugly later. -
Capture the print:
Gently press the child’s hand into the center of the clay circle. Apply firm, even pressure on the palm and each finger to ensure a clear impression without pushing all the way through. -
Smooth the edges:
Dip your finger in a tiny bit of water (for air-dry clay) or baby oil (for polymer) and gently smooth out any rough edges or fingerprints on the rim of the circle. -
Cure the clay:
If using polymer clay, bake according to package instructions (usually 275°F for 15-30 mins). If using air-dry clay, let it sit undisturbed for 24-48 hours until fully hard.
Cracking Clay?
If air-dry clay cracks while drying, mix a tiny amount of fresh clay with water to make a paste and fill the cracks, then smooth.
Step 2: Preparing the Frames
-
Paint the square base:
Take your square wooden plaque. Apply a coat of white acrylic paint. I personally prefer a matte finish here to keep it looking soft. -
Create a distressed look:
Once the white paint is fully dry, lightly sand the edges and corners with fine-grit sandpaper to reveal a bit of the wood grain underneath. -
Prep the hoop:
Separate the embroidery hoop rings. You will only need the inner ring for this project. Leave it natural wood or apply a very light whitewash if you want it paler. -
Clean the hardware:
If your square plaque has any hanging hardware already attached, ensure it is secure. If not, screw a small eye hook into the top edge center.
Step 3: Assembly and Finishing
-
Fit the clay:
Test the fit of your cured clay circle inside the wooden hoop ring. If it’s too tight, sand the clay edges slightly. If loose, the glue will fill the gap. -
Glue the hoop:
Apply a thin bead of strong craft glue to the inside edge of the wooden ring and press the clay circle inside. Wipe away excess glue immediately. -
Mount to the plaque:
Apply glue to the back of the wooden hoop/clay assembly. Center it perfectly on the painted square plaque and press down firming. Place a heavy book on top while it dries to ensure a flat bond. -
Add the ribbon:
Cut a length of pink satin ribbon. Loop it through the eye hook at the top (or glue it creating a loop if using a flat backer). -
Secure the loop:
Tie a small knot at the base of the ribbon near the hardware to secure it, allowing the long ends to serve as the hanger.
Date It
Use a small stamp set to impress the year or the child’s name into the clay near the palm curve before baking for a timeless record.
Now you have a beautifully layered piece of art ready to hang on the tree or wrap as a gift
Marbled Clay Handprint Ornament with a Glossy Finish
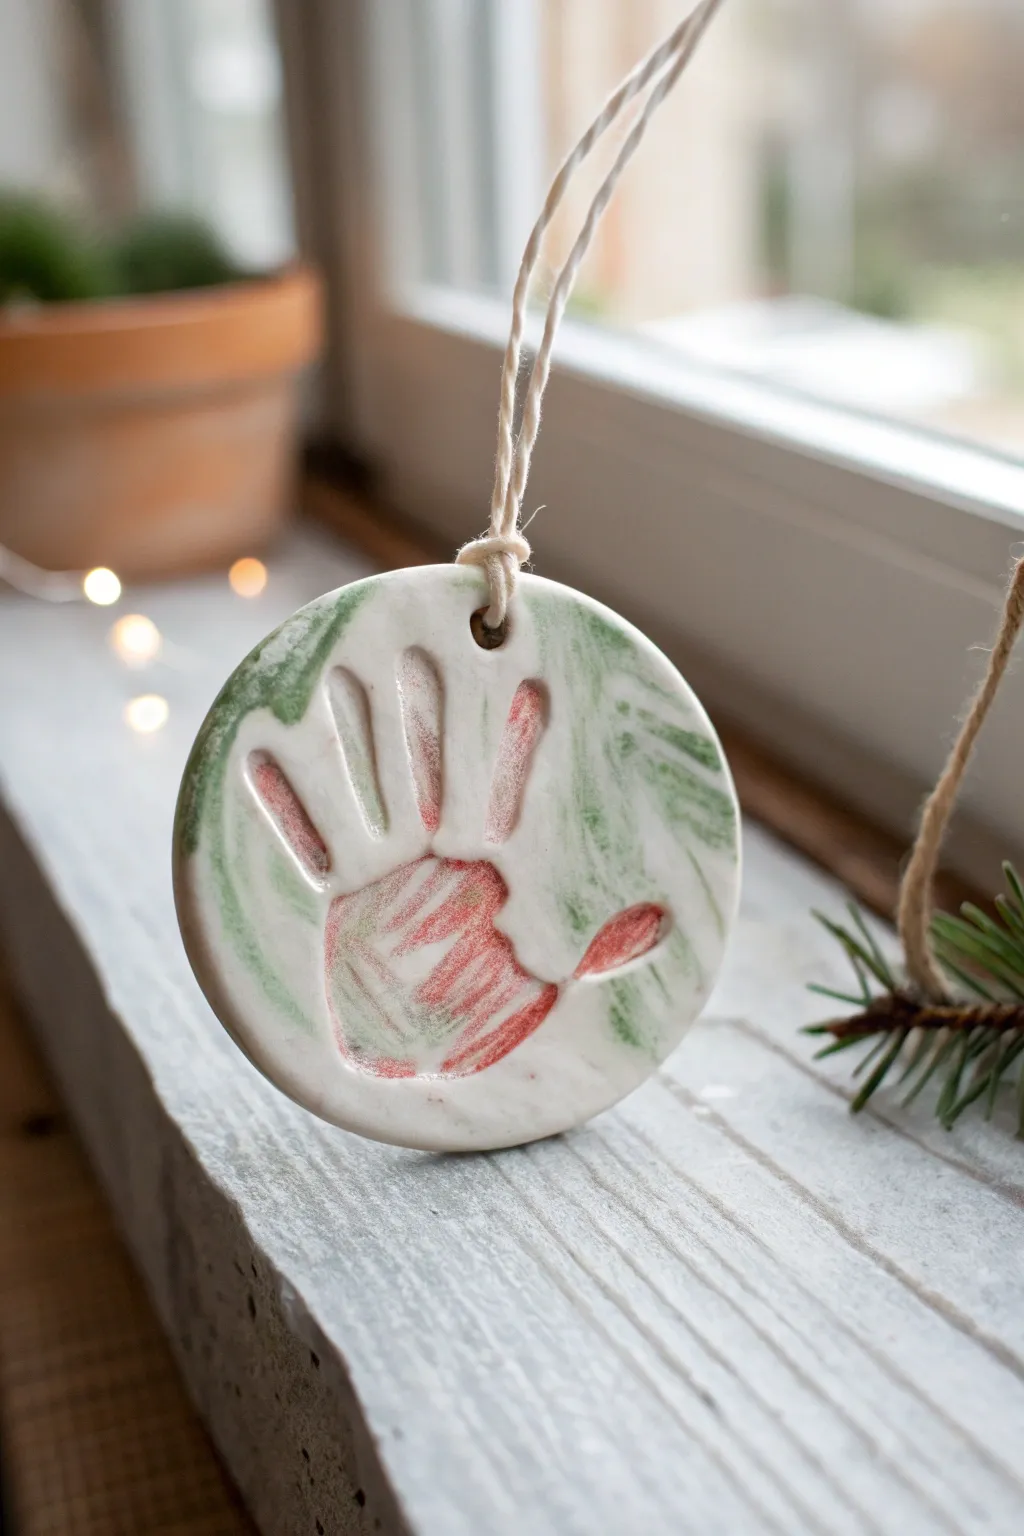
Capture a moment in time with this elegant marbled clay ornament, featuring soft green swirls and a distinct, glossy handprint impression. This project combines the classic charm of a childhood keepsake with polished ceramic aesthetics, perfect for hanging in a window or on the tree.
Step-by-Step Tutorial
Materials
- White air-dry clay or polymer clay
- Green acrylic paint
- Red or pink acrylic paint
- High-gloss varnish or clear glaze
- Rolling pin
- Circular cookie cutter (large enough for the hand)
- Straw or skewer (for the hole)
- Small paintbrush
- Baker’s twine or ribbon
- Parchment paper or craft mat
- Fine-grit sandpaper
Step 1: Prepare the Clay Base
-
Condition the clay:
Start by taking a large handful of white clay. Knead it thoroughly in your hands until it becomes warm, soft, and pliable. Getting rid of any initial stiffness helps prevent cracks later on. -
Add color for marbling:
Flatten the white clay slightly and add a few very small drops of green acrylic paint onto the surface. Don’t overdo it—you want swirls, not solid green clay. -
Create the marble effect:
Fold the clay over the paint and knead it gently. Twist and fold the clay repeatedly just until you see streaks of green running through the white. Stop before the colors blend completely to keep that distinct marbled look. -
Roll it out:
Place your marbled clay ball onto parchment paper. Use a rolling pin to flatten it into a smooth slab, aiming for about 1/4 to 1/2 inch thickness. I like to rotate the clay slightly between rolls to ensure an even circle.
Step 2: Make the Impression
-
Safety check:
Ensure the surface is smooth and free of air bubbles or debris before inviting your little helper over. -
Press the hand:
Gently guide the child’s hand onto the center of the clay slab. Press down firmly on the palm and each individual finger to ensure a deep, clear impression. -
Lift away:
Carefully lift the hand straight up to avoid smudging the edges of the print. If the print isn’t deep enough, simply re-roll the clay and try again. -
Cut the shape:
Once you are happy with the handprint, center your large circular cookie cutter over the impression and press down to cut out the ornament shape. Remove the excess clay from around the edges.
Fixing Cracks
If small hairline cracks appear while drying, mix a tiny bit of fresh clay with water to make a paste and fill them in before painting.
Step 3: Finishing Details
-
Add a hanging hole:
Use a drinking straw or a skewer to poke a hole near the top edge of the circle. Make sure it isn’t too close to the edge, or the clay might break when hung. -
Smooth the edges:
Dip your finger in a little bit of water and run it gently around the outer rim of the circle to smooth down any rough cuts or jagged bits. -
Allow to dry:
Place the ornament on a flat surface to dry completely. Depending on the clay used, this can take 24 to 48 hours. Flip it over halfway through the drying process to ensure the bottom dries evenly and prevents curling. -
Sand imperfections:
Once fully dry and hard, use fine-grit sandpaper to lightly buff the edges or surface if any rough spots remain.
Add Sparkle
Sprinkle a pinch of ultra-fine glitter into the wet varnish inside the handprint for a magical, shimmering finish.
Step 4: Painting and Glazing
-
Highlight the print:
Dilute a small amount of red or pink acrylic paint with water to create a wash. Use a small brush to paint inside the recessed handprint area. -
Wipe back excess:
Immediately use a damp paper towel to wipe across the surface. This leaves the pigment settled deep in the crevices of the print while cleaning off the high points, making the handprint pop. -
Seal with gloss:
Apply a coat of high-gloss varnish or clear glaze over the entire front of the ornament. This gives it that ceramic-like shine shown in the photo and protects the paint. -
Attach the hanger:
Cut a length of baker’s twine or ribbon. Thread loop through the hole at the top and knot it securely.
Hang your beautiful new creation in a sunny spot to let the glossy finish catch the light
Negative-Space Handprint Window Ornament
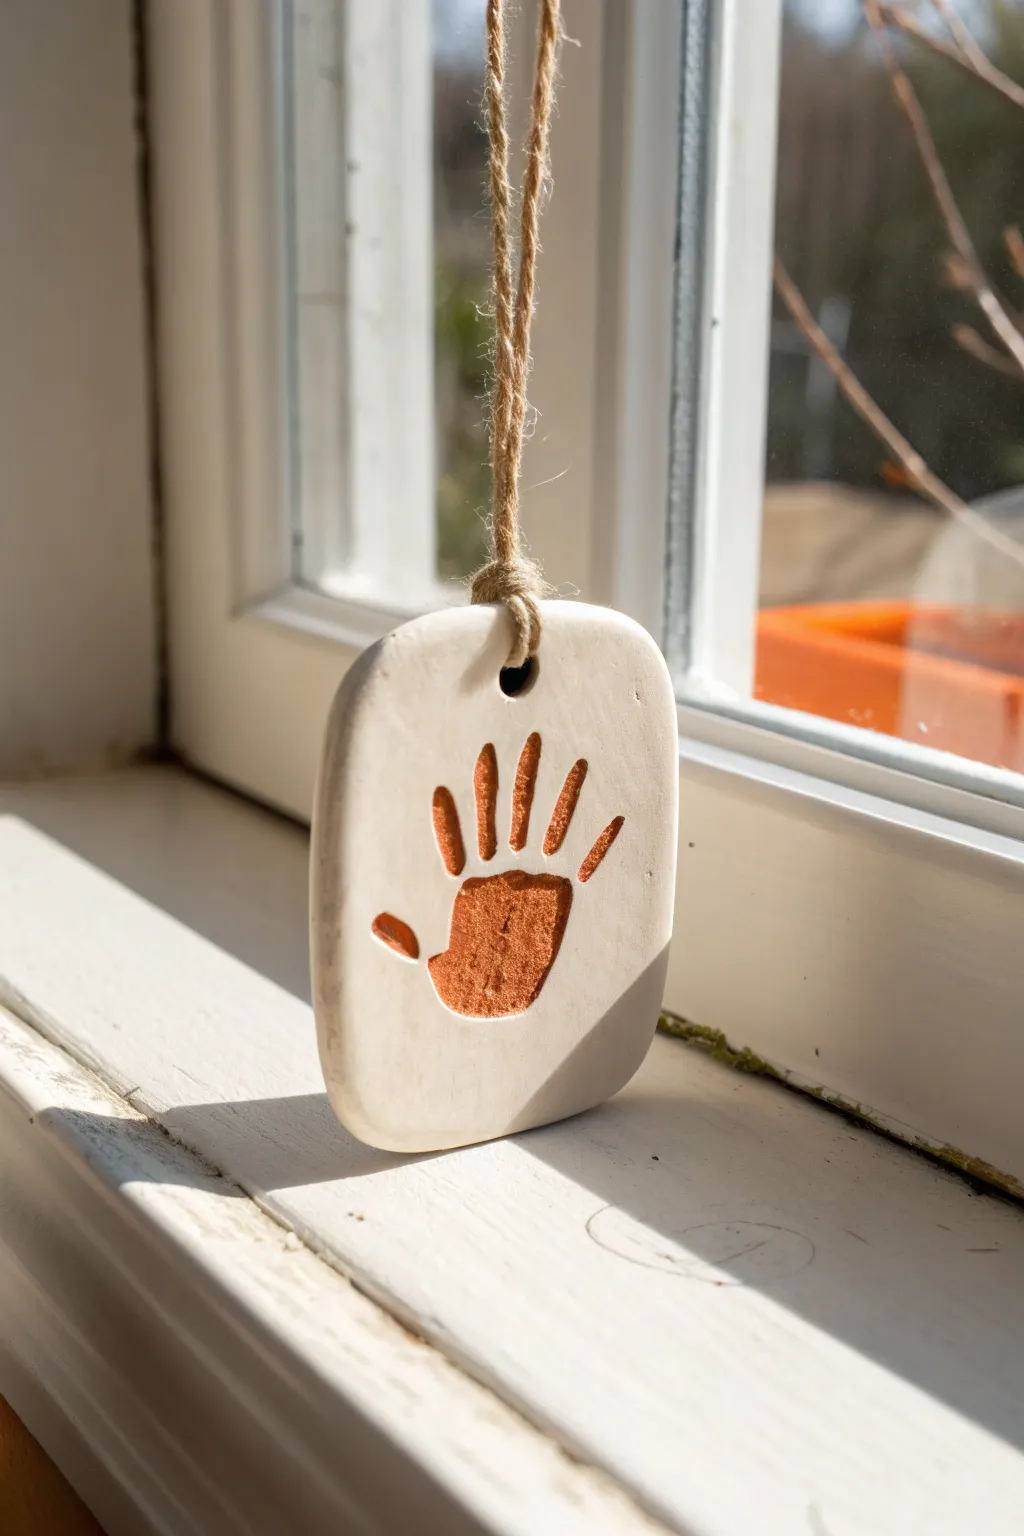
Capture a moment in time with this elegant, minimalist ornament that lets the light shine through a delicate handprint impression. The white clay contrasts beautifully with a warm, translucent terracotta glaze, creating a stunning effect when hung in a sunny window.
Detailed Instructions
Materials
- White air-dry clay or polymer clay
- Rolling pin
- sharp knife or clay cutting tool
- Rectangle cookie cutter (optional, rounded corners)
- Sandpaper (fine grit)
- Straw or skewer (for the hole)
- Terracotta or amber acrylic paint
- Water
- Small paintbrush
- Paper towel or sponge
- Clear matte sealant spray
- Jute twine
Step 1: Shaping the Clay
-
Prepare the workspace:
Lay down a sheet of parchment paper or a silicone workspace mat to prevent sticking. Take a generous handful of white air-dry clay and knead it until it’s soft and pliable. -
Roll the slab:
Use your rolling pin to flatten the clay into a smooth slab. Aim for a thickness of about 1/4 inch—thick enough to be sturdy, but thin enough not to become too heavy. -
Cut the shape:
Cut out a rectangle with rounded corners. You can use a specific cookie cutter for this, or freehand it with a clay knife. I find smoothing the corners with a little water on my fingertip helps achieve that soft, organic look. -
Make the impression:
Gently press the hand onto the center of the clay slab. Press firmly enough to create a distinct indentation for the palm and fingers, but be careful not to push all the way through the slab. -
Create the hanging hole:
Using a drinking straw or a thick skewer, punch a clean hole centered near the top edge of the rectangle. Twist the tool slightly as you remove it to keep the edges neat. -
Initial smoothing:
Inspect the edges of the ornament. If cutting created any jagged bits, use a damp finger to smooth them down now before the clay begins to set.
Cracked Clay?
If small hairline cracks appear during drying, mix a tiny bit of fresh clay with water to make a paste (slip) and fill the cracks. Smooth it over and let dry again.
Step 2: Drying and Refining
-
Let it dry:
Place the ornament on a flat surface away from direct heat. Allow it to air dry for 24-48 hours, flipping it over halfway through to ensure even drying and prevent warping. -
Sand for smoothness:
Once fully rigid and dry, take a piece of fine-grit sandpaper. Gently sand the edges and the flat surface of the ornament to remove any fingerprints or imperfections from the rolling process. -
Clear dust:
Wipe the entire piece down with a slightly damp cloth or a dry tack cloth to remove all sanding dust. A clean surface is crucial for the paint to adhere properly.
Add Sparkle
Mix a tiny pinch of gold mica powder into your paint wash. When the sun hits the window ornament, the handprint will shimmer subtly.
Step 3: Adding Color and Texture
-
Mix a wash:
Squeeze a small amount of terracotta or amber acrylic paint onto a palette. Dilute it with water until it reaches a thin, ink-like consistency. -
Paint the impression:
Carefully paint the watered-down color into the recessed handprint. The liquid should naturally pool in the deeper parts of the impression. -
Wipe away excess:
Immediately use a paper towel or sponge to wipe across the top surface of the ornament. This technique leaves the color trapped in the handprint while revealing the white clay on the raised surface. -
Repeat if needed:
If the color is too faint, let it dry briefly and apply a second wash, repeating the wipe-back method until you have the desired depth of color. -
Seal the work:
Once the paint is completely dry, take the ornament outside or to a well-ventilated area. Spray it with a clear matte sealant to protect the finish and prevent the clay from yellowing over time.
Step 4: Final Assembly
-
Prepare the cord:
Cut a length of jute twine, approximately 12-15 inches long, depending on how low you want the ornament to hang. -
Thread and loop:
Fold the twine in half to create a loop. Push the folded end through the hole in the ornament from front to back. -
Secure the knot:
Thread the loose ends of the twine through the loop you just pushed through the hole and pull tight (a lark’s head knot). Alternatively, just thread a single strand through and tie a secure double knot at the base. -
Tie the top:
Tie the two loose ends of the twine together at the top to create the hanger loop.
Hang your beautiful keepsake in a bright window and enjoy the warm glow it casts into the room