A good bowl is the kind of piece you end up using constantly, so it’s worth giving it a little personality. These pottery bowl ideas are all about easy-to-try shapes, surfaces, and finishing touches that make your bowls feel handmade in the best way.
Classic Everyday Bowl With Glossy Glaze
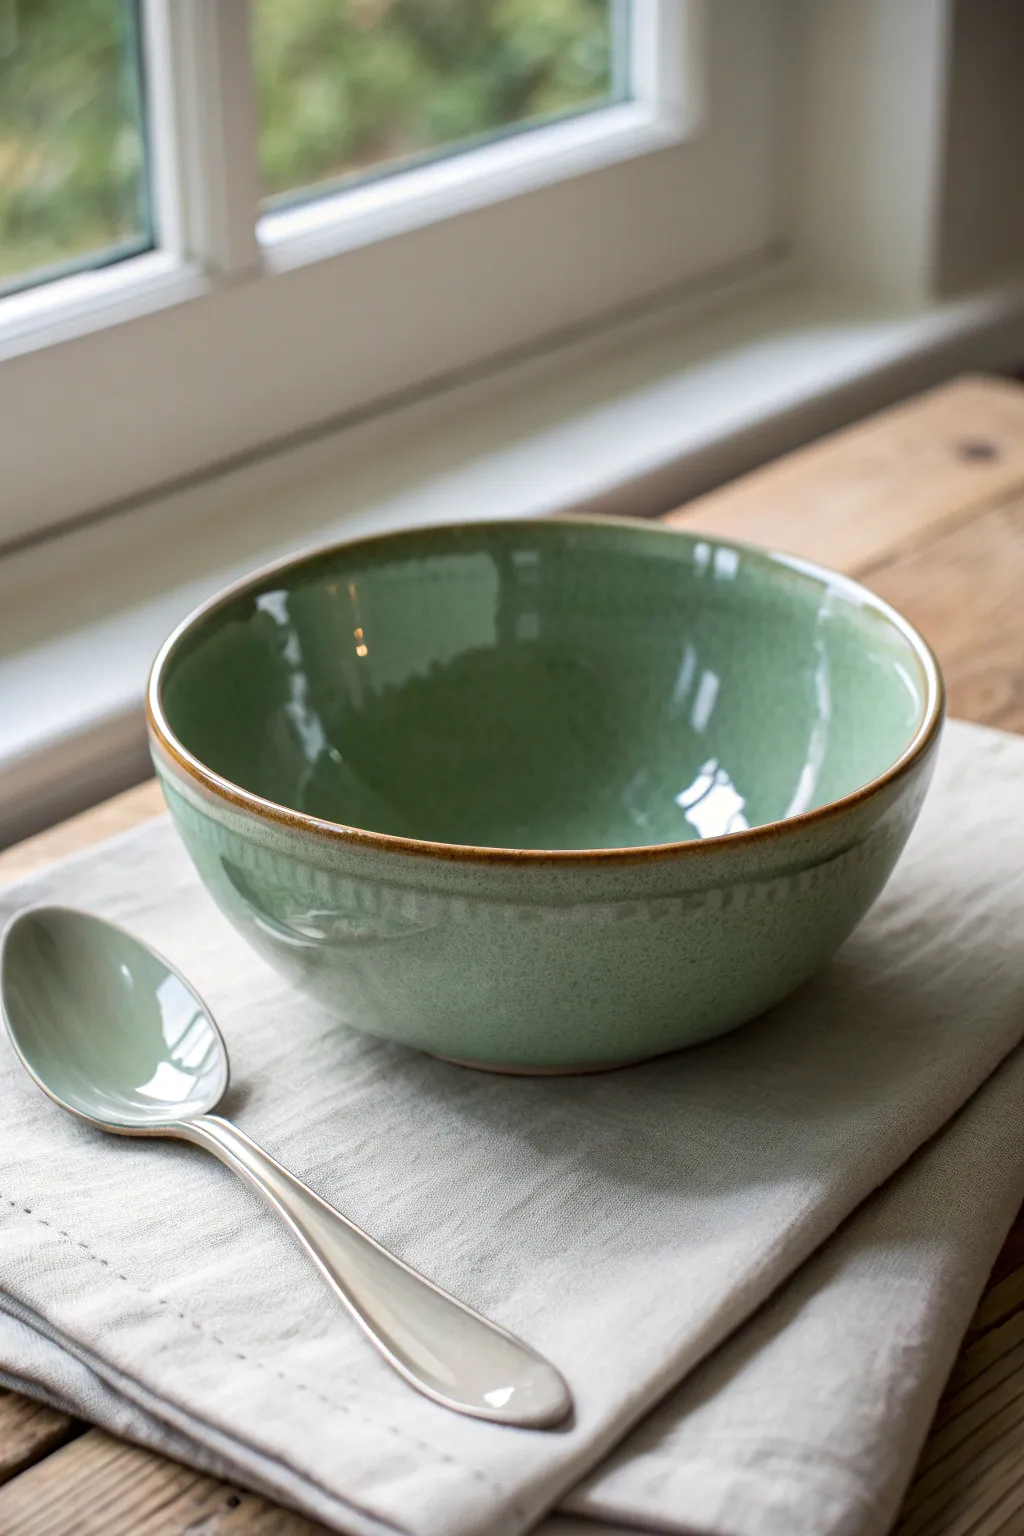
This project captures the essence of functional everyday pottery with a calming sage green glossy glaze and a warm, exposed rim. The deep, gently curved form is perfect for soups or cereals, offering both durability and timeless style.
Detailed Instructions
Materials
- Stoneware clay (smooth body recommended)
- Pottery wheel
- Throwing sponge
- Needle tool
- Wooden throwing ribs
- Wire cutter
- Trimming tools (pear-shaped and flat)
- Sage green dipping glaze (gloss finish)
- Iron oxide wash (optional for rim definition)
- Wax resist
- Soft fan brush
Step 1: Throwing the Form
-
Prepare the clay:
Begin by thoroughly wedging about 1.5 to 2 pounds of stoneware clay to remove air bubbles and ensure consistency. -
Center specifically for bowls:
Slam the clay onto your wheel head and center it into a medium-width puck rather than a tall cone, setting the foundation for a wider base. -
Open the clay:
Open the centered clay, leaving about 3/8 of an inch of thickness at the bottom for the foot ring you will trim later. -
Establish the curve:
Pull the initial floor curve. Instead of a flat bottom like a mug, create a continuous, smooth bowl interior right from the start. -
Pull the walls:
Slowly pull the walls up and outward. Aim for a 45-degree angle initially to maintain strength before shaping the final slope. -
Shape with a rib:
Use a wooden rib on the interior to compress the clay and refine that sweeping internal curve. This removes finger ridges and ensures the glaze will flow smoothly. -
Define the rim:
Compress the rim firmly with a shammy or sponge. Gently round it over to create a thickened lip, which adds durability and matches the style in the photo. -
Undercut and wire off:
Use a wooden knife to undercut the base, then slice through with your wire tool. Slide the bat off or lift the bowl gently with lifters to dry to leather-hard.
Step 2: Trimming the Foot
-
Center specifically for trimming:
Once the rim is firm enough to support weight, center the bowl upside down on the wheel and secure it with small clay lugs. -
Define the exterior profile:
Trim excess clay from the lower outer walls to mirror the interior curve, removing weight and refining the shape. -
Carve the foot ring:
Carve out a distinct foot ring. I prefer a slightly taller foot here to give the bowl a bit of lift off the table. -
Smooth the exterior texture:
Run a smooth metal rib over the trimmed area while the wheel spins to remove grog marks and chatter, essential for a clean glossy finish. -
Bisque fire:
Allow the bowl to dry completely (bone dry) before loading it into the kiln for a bisque firing to cone 04.
Uneven Rim?
If your rim wobbles during throwing, use a needle tool to trim the very top edge while the wheel spins slowly. Re-compress with a sponge immediately.
Step 3: Glazing
-
Clean the bisque:
Wipe the bisqued bowl with a damp sponge to remove any dust that might resist the glaze. -
Apply wax resist:
Carefully paint wax resist on the bottom of the foot ring and slightly up the outer edge to prevent sticking to the kiln shelf. -
Glaze the interior:
Pour the sage green glaze inside, swirl it quickly to coat the entire inner surface, and pour the excess back out rapidly. -
Dip the exterior:
Hold the bowl by the foot (or use tongs) and dip the exterior into the bucket, stopping just below the rim if you want a lot of exposed clay, or submerging fully for the look in the photo. -
Accentuate the rim:
Once the glaze is dry to the touch, use a damp sponge to gently wipe a tiny line of glaze off the very edge of the rim. This exposes the brown clay body, creating that distinct halo effect. -
Final wipe:
Check the foot ring one last time to ensure no glaze droplets are on the waxed area. -
Glaze fire:
Fire the bowl to cone 5 or 6 (depending on your clay and glaze specifications) in an oxidation atmosphere.
Enhance the Edge
To darken the exposed clay rim like the photo, brush a very light wash of iron oxide on the rim before wiping clean. It stains the clay slightly red-brown.
Now you have a beautifully simple bowl ready for your next cozy meal


Simple Two-Tone Dipped Glaze Bowl
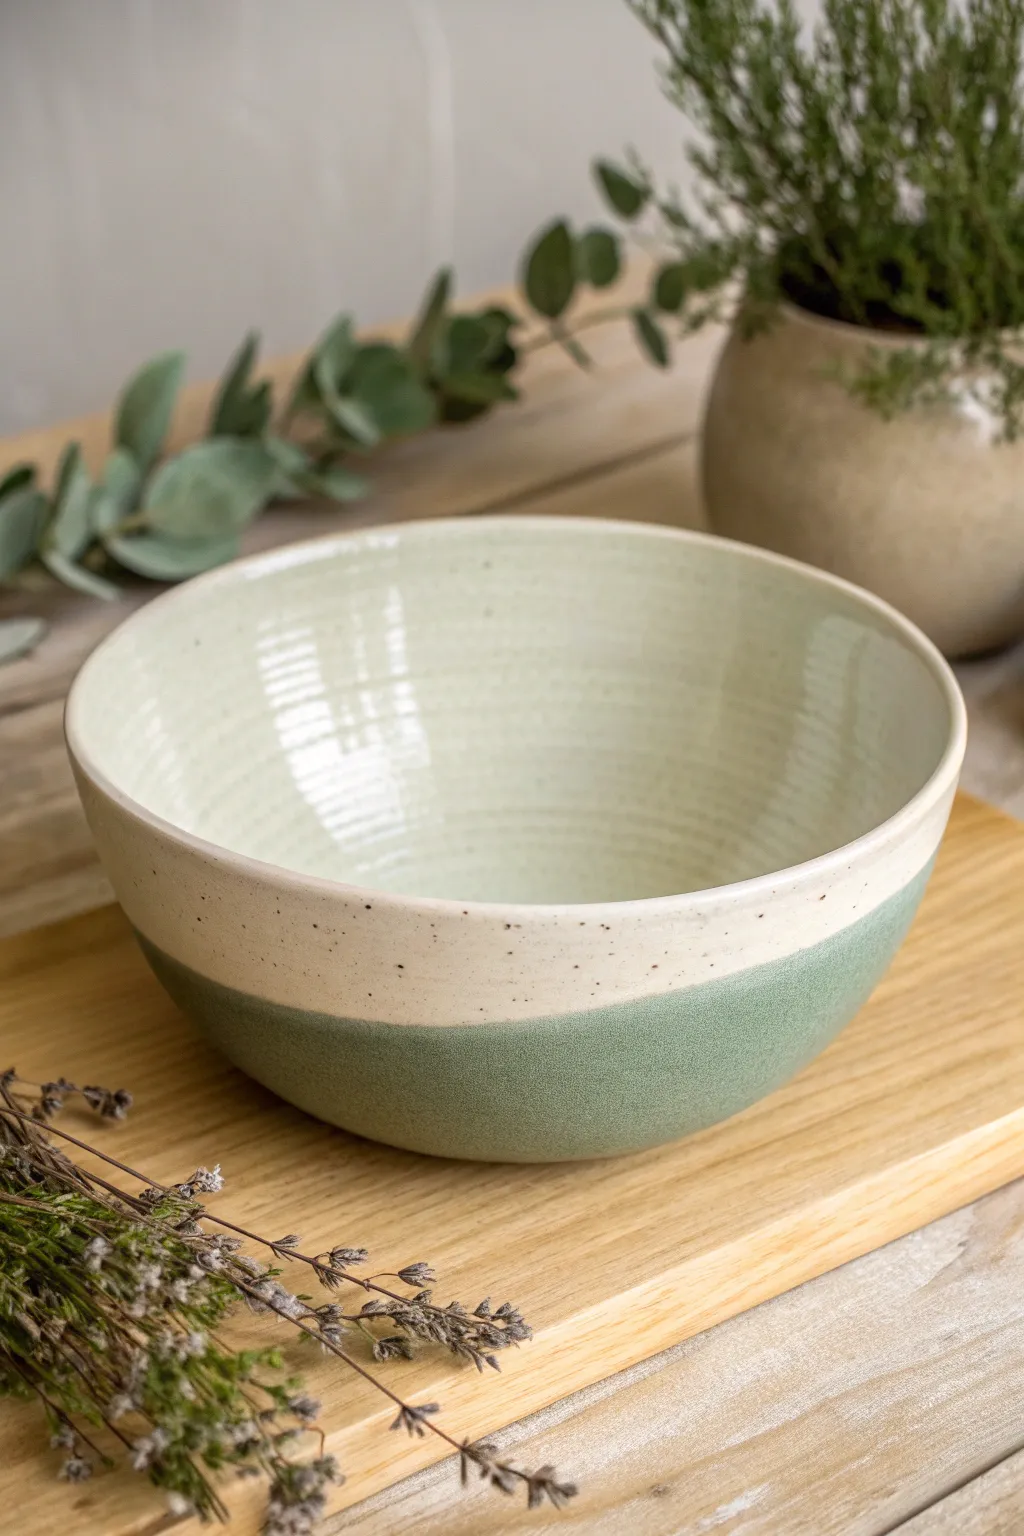
This rustic yet modern bowl features a beautiful two-tone design achieved by dipping a speckled clay body into a soft sage green glaze. The result is a piece that feels grounded and earthy, perfect for showcasing the natural beauty of the ceramic material.
Step-by-Step Guide
Materials
- Speckled clay body (stoneware)
- Pottery wheel
- Throwing tools (sponge, rib, wire cutter)
- Trimming tools
- Bisque kiln firing
- Wax resist
- Sponge or brush for wax
- Sage green satin or matte dipping glaze
- Clear transparent glaze (optional)
- Glaze firing kiln
Step 1: Throwing and Shaping
-
Center the Clay:
Begin with a well-wedged ball of speckled stoneware clay. Secure it to the center of your wheel head and use your palms to cone it up and down until fully centered. -
Open the Form:
Create a well in the center of the clay, diving down until you are about a half-inch from the bat. Slowly open the floor, compressing it well to prevent s-cracks later. -
Pull the Walls:
Using a steady pincer grip, pull the walls upward. Keep the walls somewhat thick near the base for stability and taper slightly as you reach the rim, aiming for a classic hemispherical bowl shape. -
Refine the Curve:
Use a kidney-shaped rib on the inside of the bowl while supporting the outside with your hand. Press gently to create a smooth, continuous interior curve, removing throwing lines if a cleaner look is desired. -
Finish the Rim:
Use a chamois or a small piece of plastic to compress the rim. This makes it smooth to the touch and resistant to chipping. -
Cut and Dry:
Wire the bowl off the bat and set it aside to dry to a leather-hard state.
Step 2: Trimming and Bisque
-
Trim the Foot:
Once leather-hard, center the bowl upside down on the wheel. Trim away excess clay from the base, carving a neat foot ring that defines the bottom of the vessel. -
Smooth the Surface:
Check the exterior for any unwanted grog or drag marks from trimming. Use a damp sponge or a smooth rib to burnish the surface slightly, ensuring the speckles sit flush. -
Bisque Fire:
Load the bone-dry bowl into the kiln and fire to cone 04 (or your clay’s specific bisque temperature).
Clean Lines
To get a perfectly straight dipping line instead of an organic wave, use tape or wax resist to mark the line before dipping. Peel the tape immediately after dipping.
Step 3: Glazing Technique
-
Clean the Bisqueware:
Wipe the fired bowl with a damp sponge to remove any kiln dust, which can cause pinholes in the glaze. -
Wax the Foot:
Apply a coat of wax resist to the very bottom foot ring to prevent glaze from sticking to the kiln shelf. -
Glaze the Interior:
Pour your chosen clear or white liner glaze into the bowl. Swirl it quickly to coat the entire interior up to the rim, then pour out the excess immediately. -
Clean the Rim:
If any interior glaze dripped onto the outside rim, wipe it away cleanly with a damp sponge. -
Dip the Exterior:
Hold the bowl upside down by the foot. Prepare your bucket of sage green glaze. Dip the bowl straight down into the glaze, stopping about halfway up the exterior wall. -
Hold and Count:
I usually hold the dip for about 3 seconds to ensure an even coat without making the glaze layer too thick. -
Lift and Shake:
Lift the bowl straight up out of the bucket. Give it a gentle shake to remove the last drip before flipping it right-side up. -
Tidy the Line:
Inspect the dipping line. If it’s uneven, you can carefully wipe it with a damp finger, but the organic dipping line is part of the charm. -
Final Fire:
Load the bowl into the glaze kiln and fire to the maturity temperature of your clay and glaze combination (typically Cone 5 or 6 for stoneware).
Drips & Runs
If the glaze looks too thick on the dip, use a damp sponge to thin out the very edge of the glaze line. This prevents a heavy bead from forming and running during firing.
Now you have a stunning, functional piece of pottery that beautifully balances raw clay texture with smooth color


Botanical Impressions Leaf-Pressed Bowl
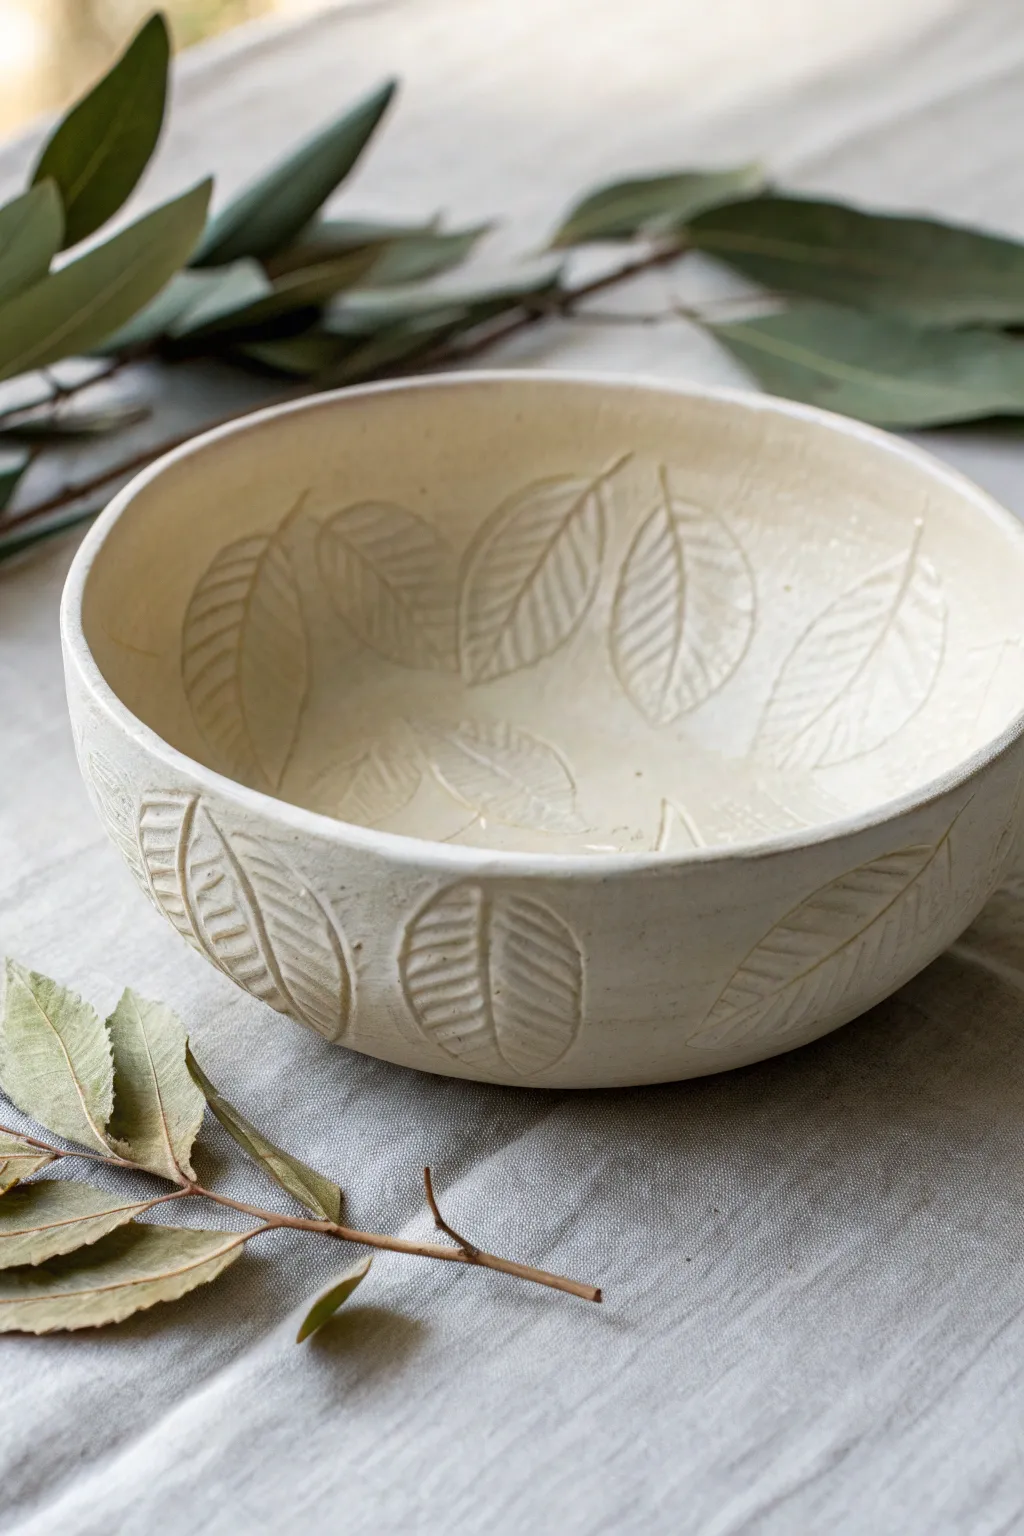
Capture the delicate veins and organic shapes of nature permanently in clay with this beautiful leaf-pressed bowl. By pressing fresh leaves directly into a slab, you create a rustic yet elegant vessel that celebrates botanical textures inside and out.
Step-by-Step
Materials
- White stoneware or porcelain clay body
- Rolling pin
- Canvas texturing mat or smooth work surface
- Fresh leaves with prominent veins (e.g., beech, laurel, or similar)
- Bowl mold or a simple kitchen bowl for forming
- Fettling knife or needle tool
- Sponge
- Rib tool (flexible rubber or metal)
- Clear or white satin glaze
- Kiln
Step 1: Preparing the Slab
-
Wedge the clay:
Begin by wedging your white stoneware clay thoroughly to remove any air bubbles, ensuring the consistency is uniform and pliable. -
Roll out the slab:
Roll the clay onto a canvas-covered surface until you have an even slab that is approximately 1/4 inch thick. Rotate the clay occasionally to keep the shape circular. -
Smooth the surface:
Use a flexible rib tool to compress the clay on both sides, removing any canvas texture and creating a smooth, blank canvas for your leaves.
Pro Tip: Vein Definition
For higher contrast, rub a dark underglaze or oxide wash into the leaf impressions and sponge off the excess before the final glaze firing to make the veins pop.
Step 2: Adding Botanical Texture
-
Select and arrange leaves:
Choose fresh leaves that are sturdy and not too dry. Arrange them on top of your slab in a pleasing pattern, ensuring the vein side is facing down against the clay for the sharpest impression. -
Press the leaves:
Gently roll your rolling pin over the leaves once to firmly embed them into the clay surface. You want them flush with the clay but not so deep that the slab gets too thin. -
Cut the circle:
Using a needle tool and a circular template (or freehand if you prefer a wabi-sabi look), cut a large circle out of the slab, cutting right through any leaves that extend past the edge. -
Remove the leaves:
Carefully peel away the leaves by lifting the stems to reveal the detailed impressions left behind. If a leaf tears, use a needle tool to gently lift the fragments.
Level Up: Organic Rims
Instead of cutting a perfect circle, let the natural shapes of the pressed leaves dictate an uneven, organic rim for a more sculptural, forest-floor aesthetic.
Step 3: Forming the Bowl
-
Prepare the mold:
Dust your mold (or a kitchen bowl) with a little cornstarch or cover it with thin plastic to prevent sticking. -
Drape the slab:
Carefully lift your textured slab and drape it *into* the mold if you want the texture inside, or *over* a hump mold if you want the texture outside. For the look in the photo, you will likely need to double-press or use a slump mold technique. -
Alternative: Double-sided texture:
To achieve the look in the image where leaves are on both sides, flip the slab over after the first pressing and repeat the leaf process on the back before forming it into the bowl. -
Shape the vessel:
Press the clay gently into the curve of the mold. use a damp sponge to smooth the rim, ensuring it is rounded and comfortable to the touch. -
Dry slowly:
Allow the clay to dry to leather-hard consistency while still in the mold to maintain its shape. This prevents wrapping or slumping.
Step 4: Firing and Finishing
-
Bisque fire:
Once the piece is bone dry, fire it in the kiln to cone 04 (or your clay’s specific bisque temperature). -
Apply glaze:
Dip or brush a thin layer of satin clear or white glaze over the piece. I like to keep the glaze application light so it doesn’t pool in the leaf veins and obscure the texture. -
Glaze fire:
Fire the bowl a second time to the maturation temperature of your clay and glaze (typically cone 5 or 6 for stoneware). -
Sand the foot:
After the final firing, use sandpaper to smooth distinct rough spots on the bottom of the bowl to protect your table surfaces.
Now you have a stunning, nature-inspired vessel ready for display or daily use


Minimal Geometric Pattern Rim Band Bowl
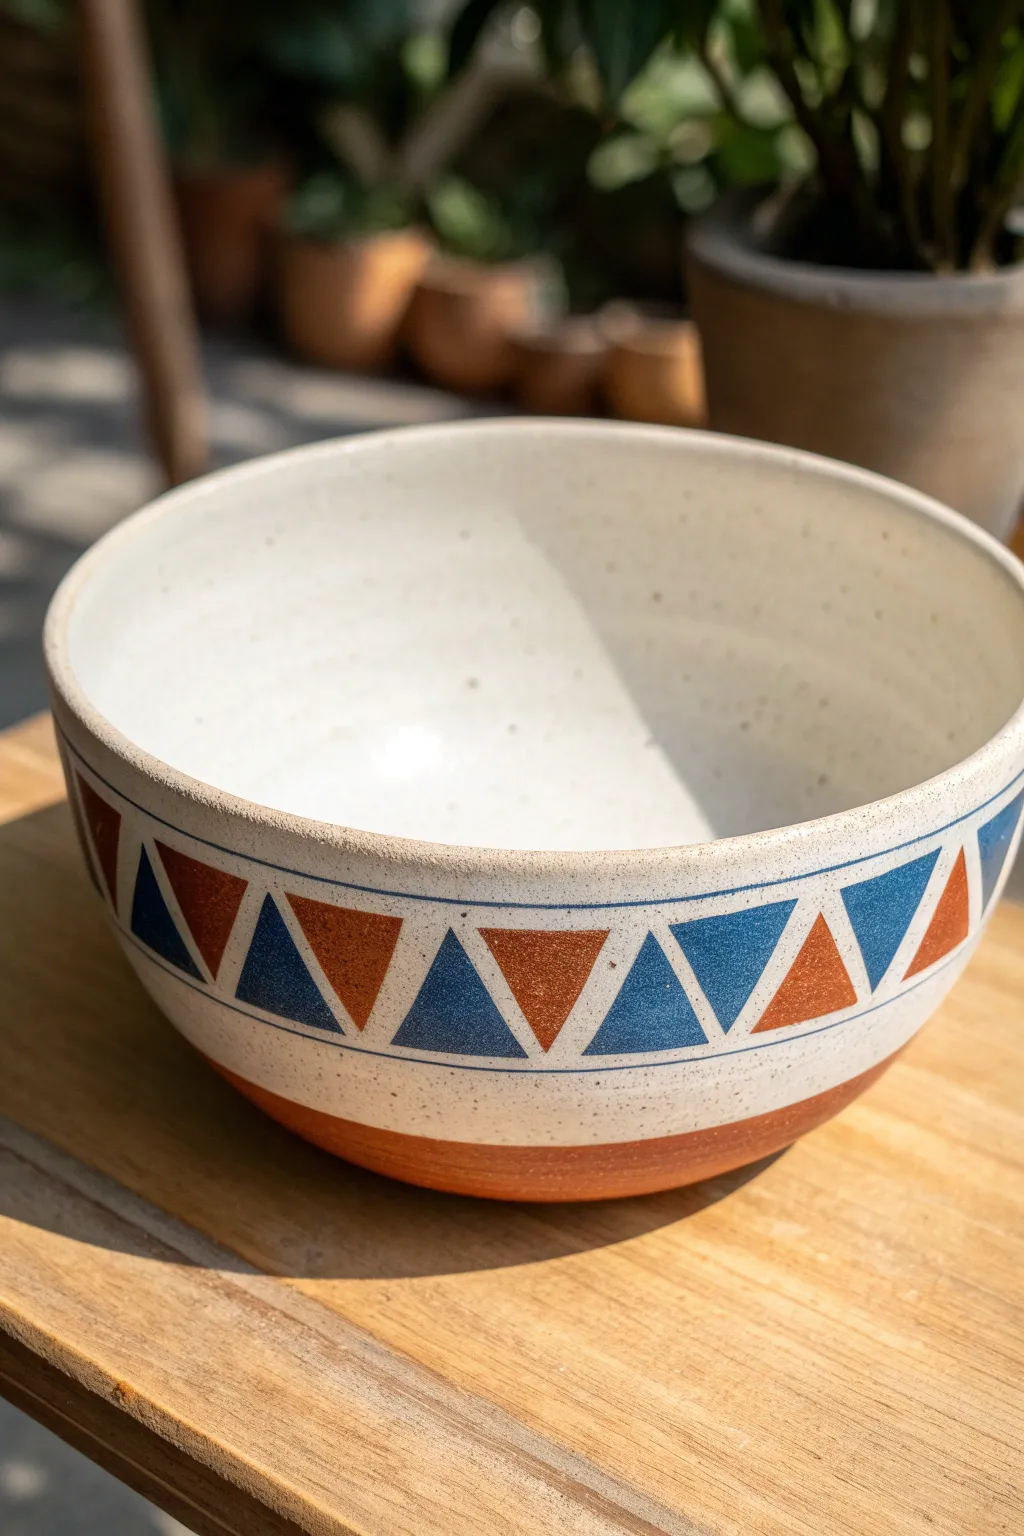
This project emphasizes clean lines and repeating patterns, balancing the warmth of raw clay with crisp geometric design. The result is a modern, speckled vessel featuring a striking band of alternating terracotta and navy triangles that encircle the form.
Detailed Instructions
Materials
- Stoneware clay (buff or speckled)
- Pottery wheel
- Throwing tools (sponge, rib, wire cutter)
- Trimming tools
- Ruler or measuring tape
- Soft pencil or needle tool
- Underglaze (Navy Blue and Terracotta/Red-Brown)
- Small flat shader brush
- Detail liner brush
- Wax resist
- Clear or transparent white speckled glaze
Step 1: Throwing and Shaping
-
Center and open:
Begin with about 2-3 pounds of wedged stoneware clay firmly centered on the wheel. Open the clay to establish a flat, wide interior floor. -
Pull the walls:
Pull the walls up and outward to create a gentle, hemispherical bowl shape. Aim for a consistent thickness, tapering slightly thinner at the rim. -
Refine the curve:
Use a kidney rib, specifically a soft rubber one, to smooth the interior curve and remove any throwing lines while pressing outwards against your supporting hand. -
Define the rim:
Compress the rim with a chamois or sponge to ensure it is rounded and smooth, preventing future chipping. -
Dry to leather hard:
Wire the bowl off the bat and let it dry slowly until it reaches a sturdy leather-hard state.
Don’t Smudge the Lines
If your underglaze smears into the raw clay while cleaning up edges, let it dry completely, then gently scrape the smear off with an X-Acto knife.
Step 2: Trimming and Planning
-
Trim the foot:
Center the bowl upside down on the wheel. Use a loop tool to trim away excess weight from the base, creating a defined foot ring. -
Burnish the exterior:
While the pot is spinning, use the smooth back of a spoon or a metal rib to gently burnish the exterior wall where your design will go. -
Mark the band borders:
With the pot centered and spinning slowly, use a needle tool or pencil to scribe two horizontal lines around the bowl: one about an inch below the rim and another parallel line about 1.5 inches below that. -
Measure the circumference:
Measure the circumference of the band. Divide this number by how many triangles you want to determine the width of each segment. -
Mark vertical guides:
Make small tick marks along the top and bottom lines at these calculated intervals to guide your triangle peaks and valleys.
Step 3: Painting the Design
-
Outline the triangles:
Connect your tick marks with a pencil to lightly sketch the alternating triangles (one pointing up, one pointing down) within the band. -
Apply navy underglaze:
Using a small flat brush, fill in the downward-pointing triangles with navy blue underglaze. I find it helps to do the edges first with a steady hand. -
Apply terracotta underglaze:
Fill the alternating upward-pointing triangles with the terracotta or reddish-brown underglaze. Apply 2-3 coats for solid opacity. -
Outline for crispness (optional):
If you want ultra-sharp edges like the image, use a very thin liner brush with a slightly darker blue or black underglaze to paint fine lines separating the triangles. -
Clean up edges:
Use a damp cleanup tool or a stiff brush with water to gently scratch away any underglaze that strayed outside your scribed borders.
Use Tape for Precision
Struggling with straight lines? Use thin automotive distinct-line tape or crafting washi tape to mask off the triangles before painting.
Step 4: Glazing and Firing
-
Bisque fire:
Once bone dry, bisque fire the bowl to cone 04 (or your clay’s specific bisque temperature). -
Wax the pattern:
Apply wax resist carefully over your painted triangle band. This is crucial—it prevents the dipping glaze from obscuring your hard work. -
Wax the foot:
Apply wax to the bottom foot ring and the lower portion of the bowl if you want that exposed clay look shown in the photo. -
Dip in finish glaze:
Dip the entire bowl into a transparent or semi-transparent white speckled glaze. The wax will protect the pattern and foot. -
Wipe away droplets:
Use a damp sponge to wipe any beads of glaze off the waxed areas. -
Glaze fire:
Fire the bowl to maturity (likely cone 5 or 6 depending on your clay and glaze choice).
Once cooled, your bowl is ready to bring a touch of artisan geometry to your table

The Complete Guide to Pottery Troubleshooting
Uncover the most common ceramic mistakes—from cracking clay to failed glazes—and learn how to fix them fast.
Crisp Stripe Bowl With Wax-Resist Lines
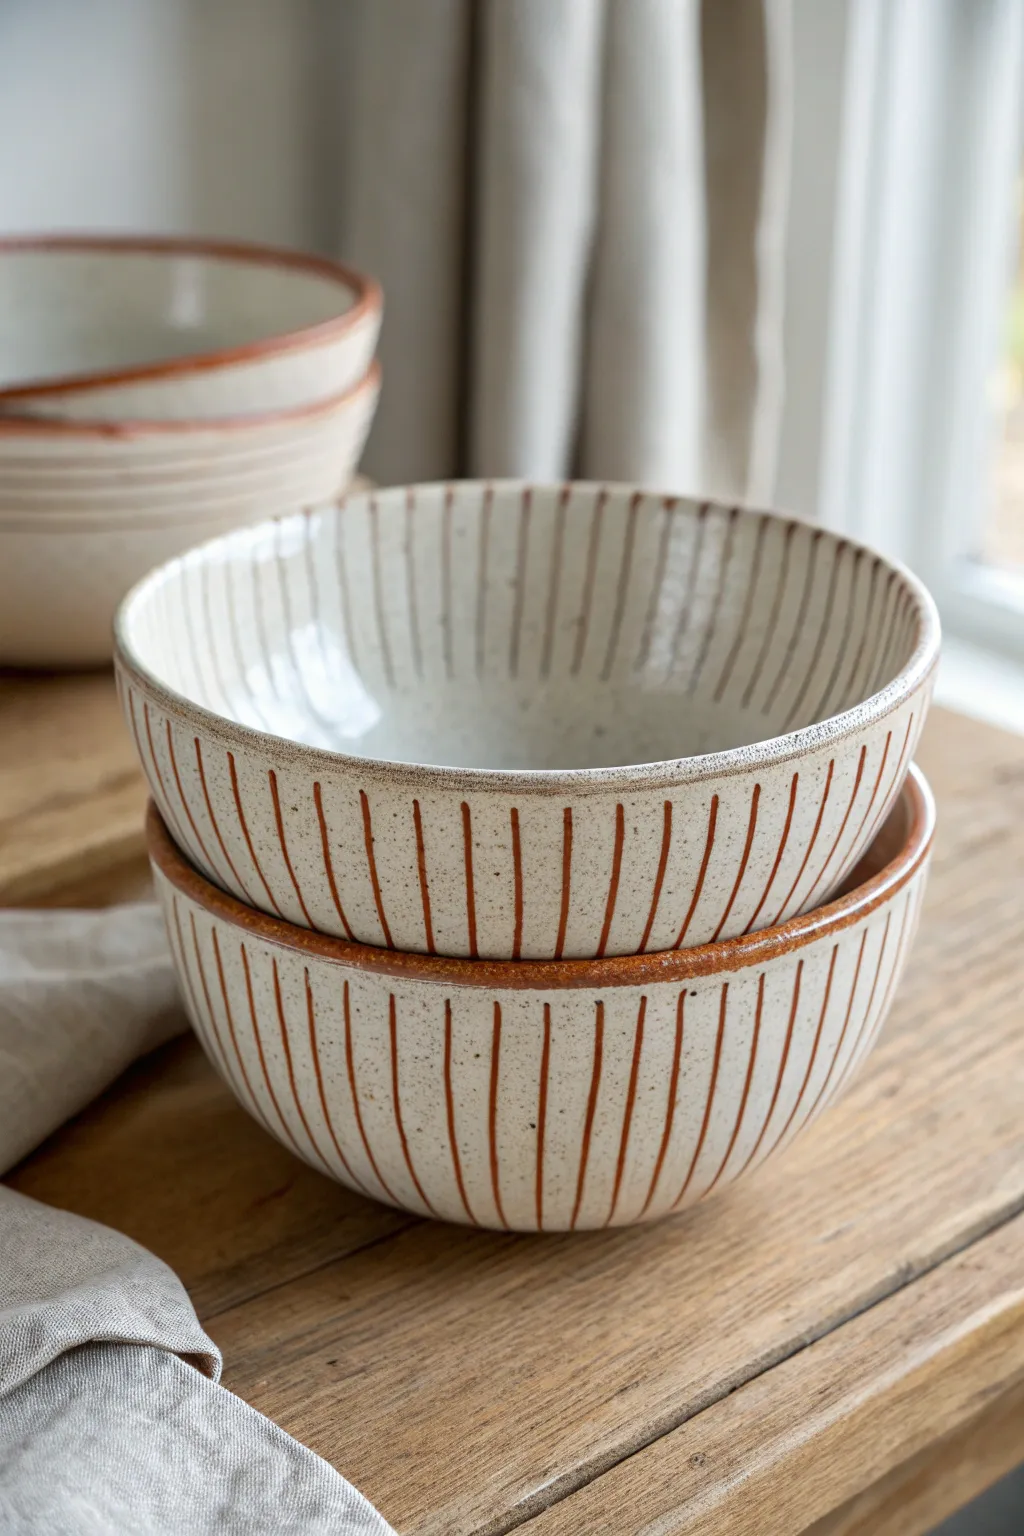
These charming bowls showcase the natural beauty of clay through a clever use of wax resist, creating crisp vertical lines that break up a creamy, speckled glaze. The result is a rustic yet modern aesthetic perfect for everyday dining or display.
How-To Guide
Materials
- Stoneware clay (speckled or buff)
- Pottery wheel
- Throwing tools (sponge, rib, wire cutter)
- Trimming tools
- Wax resist emulsion
- Fine-tip brush or brush-on wax applicator
- Cream or white speckled glaze (glossy or satin)
- Red iron oxide wash (optional, for enhancing lines)
- Sponge for wiping
- Kiln
Step 1: Throwing and Shaping
-
Center the Clay:
Begin with a well-wedged ball of stoneware clay. Center it firmly on the wheel head, ensuring it spins true without wobbling. -
Open the Form:
Open the centered clay and pull up the walls to create a simple, rounded bowl shape. A wide, open curve works best to display the vertical stripes effectively. -
Refine the Curve:
Use a flexible rib (metal or rubber) on the interior to smooth the curve and compress the clay floor. This ensures a seamless inside surface that is pleasant to use. -
Compress the Rim:
Pay special attention to the rim. Compress it gently with a chamois or your sponge to round it off, making it durable and chip-resistant. -
Cut and Dry:
Wire the bowl off the bat and set it aside until it reaches a leather-hard state, firm enough to be handled without deforming.
Waxy Mess?
If wax drips where you don’t want it, let it dry and scrape it off carefully with a needle tool. Sanding it lightly off the bisque works too, but re-bisquing is the only way to 100% remove mistake wax.
Step 2: Trimming and Preparation
-
Trim the Foot:
Once leather-hard, center the bowl upside down on the wheel. Trim a clean foot ring to give the bowl lift and definition. -
Smooth the Exterior:
After trimming, run a damp sponge or a smooth rib over the exterior surface to remove any grog drag marks or trimming lines, creating a blank canvas for your stripes. -
Re-moisten the Rim (Optional):
I like to wipe the rim with a damp sponge one last time to ensure it is perfectly rounded before the decorating phase begins. -
Bisque Fire:
Load the trimmed and dried bowls into the kiln for a bisque firing (typically Cone 04 or 06) to prepare them for glazing.
Iron Oxide Boost
For darker, rustier lines, paint a red iron oxide wash over the wax lines *after* glazing but before firing. The wash will settle into the unglazed clay texture.
Step 3: Wax Resist Application
-
Clean the Bisque:
Wipe the bisque-fired bowl with a damp sponge to remove any kiln dust. This prevents the wax from lifting or bubbling. -
Plan Your Spacing:
Visualise the spacing for your vertical lines. You can make light pencil marks (which will burn off) to guide your hand if you aren’t confident doing it freehand. -
Apply the Vertical Stripes:
Using a fine-tip brush loaded with wax resist, paint clear, confident vertical lines from the rim down to the foot. Keep the pressure consistent for even line width. -
Apply the Rim Band:
Paint a thin band of wax along the very top edge of the rim if you want raw clay exposed there, or leave it for the glaze to cover. -
Wax the Foot:
Don’t forget to wax the bottom foot ring to prevent the bowl from sticking to the kiln shelf during the final firing. -
Let the Wax Set:
Allow the wax resist to dry completely. It should feel firm and dry to the touch, usually taking about 15-30 minutes.
Step 4: Glazing and Finishing
-
Prepare the Glaze:
Stir your cream or white speckled glaze thoroughly. You want a consistency similar to heavy cream for good coverage. -
Dip the Bowl:
Using tongs or your hand (if careful), dip the entire bowl into the glaze bucket. Hold it submerged for a few seconds (count to three) and lift it out swiftly. -
Shake Off Excess:
Give the bowl a gentle shake as you lift it out to encourage excess glaze to drip off and to prevent pooling inside. -
Clean the Resist:
The wax should repel the glaze, but small beads may stick. Immediately wipe the waxed stripes gently with a damp sponge to reveal the clean clay lines underneath. -
Final Firing:
Place the glazed bowl in the kiln and fire to your clay body’s maturity temperature (e.g., Cone 6 or Cone 10). The heat will melt the glaze around the raw clay stripes, locking in the design.
Once cooled, your bowls are ready to bring a touch of artisan craftsmanship to your table
Playful Polka Dot Confetti Bowl
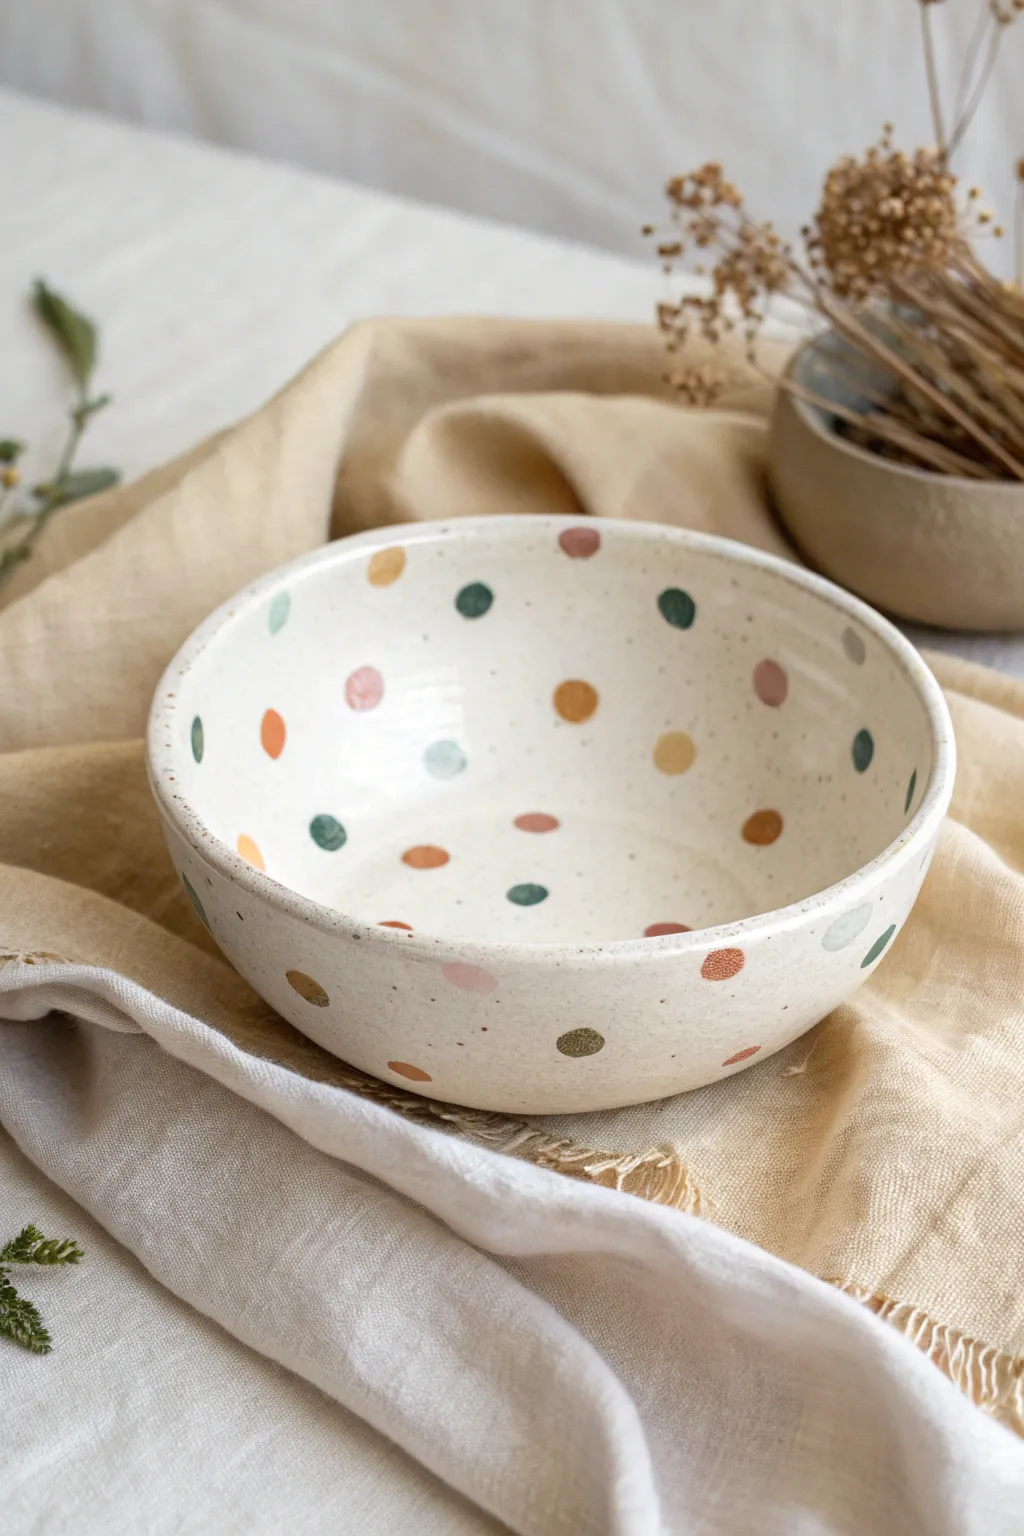
Brighten up your table with this cheerful pottery project featuring random polka dots in soft, earthy pastels. The natural speckled clay body peeks through a clear glaze, giving the finished piece a cozy, handcrafted charm.
Step-by-Step
Materials
- Speckled buff stoneware clay
- Pottery wheel (or slab roller for hand-building)
- Throwing tools (sponge, needle tool, rib, wire cutter)
- Trimming tools
- Underglazes (Sage Green, Burnt Orange, Mustard Yellow, Pale Pink, Rust)
- Small round paintbrush or sponge dauber
- Clear transparent glaze
- Kiln
Step 1: Forming the Bowl
-
Prepare the Clay:
Begin by thoroughly wedging about 1.5 to 2 lbs of speckled buff clay. This removes air bubbles and ensures the clay particles are aligned, which is crucial for easier throwing. -
Center on the Wheel:
Slam your clay onto the center of the wheel head. Using moistened hands and steady pressure, center the clay into a smooth mound. -
Open the Form:
Press your thumbs into the center of the mound to open it up, leaving about a half-inch of clay at the bottom for the foot. Pull the floor out toward you to establish the width of the bowl. -
Pull the Walls:
Slowly pull the walls upward. I like to keep a slight curve from the very first pull to shape the bowl naturally. Aim for even thickness from bottom to top. -
Refine the Shape:
Use a kidney rib on the inside of the bowl to compress the clay and smooth out any throwing lines. Gently push the walls out to create a generous, rounded curve. -
Finish the Rim:
Compress the rim with a piece of chamois or your sponge to make it smooth and rounded, which is much nicer for drinking or eating. -
Wire Off:
Run a wire cutter underneath the bowl to separate it from the wheel head. Let it dry to leather-hard consistency.
Smudgy Spots?
If underglaze smears when applying clear glaze, lightly sponge the bisque-fired dots with water first, or dab the glaze on rather than brushing swiftly.
Step 2: Trimming & Decoration
-
Trim the Foot:
Once leather-hard, center the bowl upside down on the wheel. Trim away excess clay from the bottom to create a neat foot ring that elevates the bowl slightly. -
Smooth the Surface:
Wipe the trimmed areas with a slightly damp sponge to remove any grog or rough texture left by the trimming tools. -
Plan Your Dots:
Visualize a random scatter pattern. The charm of this bowl is the irregularity, so don’t worry about perfect spacing. -
Apply Underglaze Dots:
Using a small round brush or a sponge dauber, apply circles of underglaze. Dip your brush into your first color (e.g., Sage Green) and press gently to create a solid dot. -
Rotate Colors:
Switch colors frequently—move to Burnt Orange, then Mustard, then Pink—scattering them randomly across both the interior and exterior surfaces. Avoid placing same-colored dots right next to each other. -
Layering the Dots:
For opacity, you may need a second coat on each dot once the first layer is dry to the touch. This ensures the colors pop against the speckled clay. -
Bisque Fire:
Allow the bowl to dry completely. Load it into the kiln for a bisque firing (usually to Cone 04 or 06, depending on your clay).
Step 3: Glazing & Final Fire
-
Review the Bisque:
Take the bowl out after firing. Wipe it down with a damp sponge to remove any kiln dust, which can cause pinholes in the final glaze. -
Clear Glaze Application:
Pour clear transparent glaze inside the bowl, roll it around to coat the entire interior, and pour out the excess. For the outside, hold the bowl by the foot and dip it into the glaze bucket. -
Wipe the Foot:
Use a sponge to wipe the glaze completely off the foot ring so it doesn’t fuse to the kiln shelf. -
Glaze Fire:
Fire the bowl to the maturity temperature of your clay and glaze (typically Cone 5 or 6 for stoneware). This final firing will turn the clay into a durable stone-like material and make the glaze glossy.
Make It Pop
Try leaving the exterior raw (unglazed) for a tactile matte finish, while keeping the inside glossy and food-safe. The contrast feels amazing.
Once cooled, your confetti bowl is ready to bring a touch of playful elegance to your everyday meals


What Really Happens Inside the Kiln
Learn how time and temperature work together inside the kiln to transform clay into durable ceramic.
Bright Fruit Trompe-L’Oeil Watermelon-Style Bowl
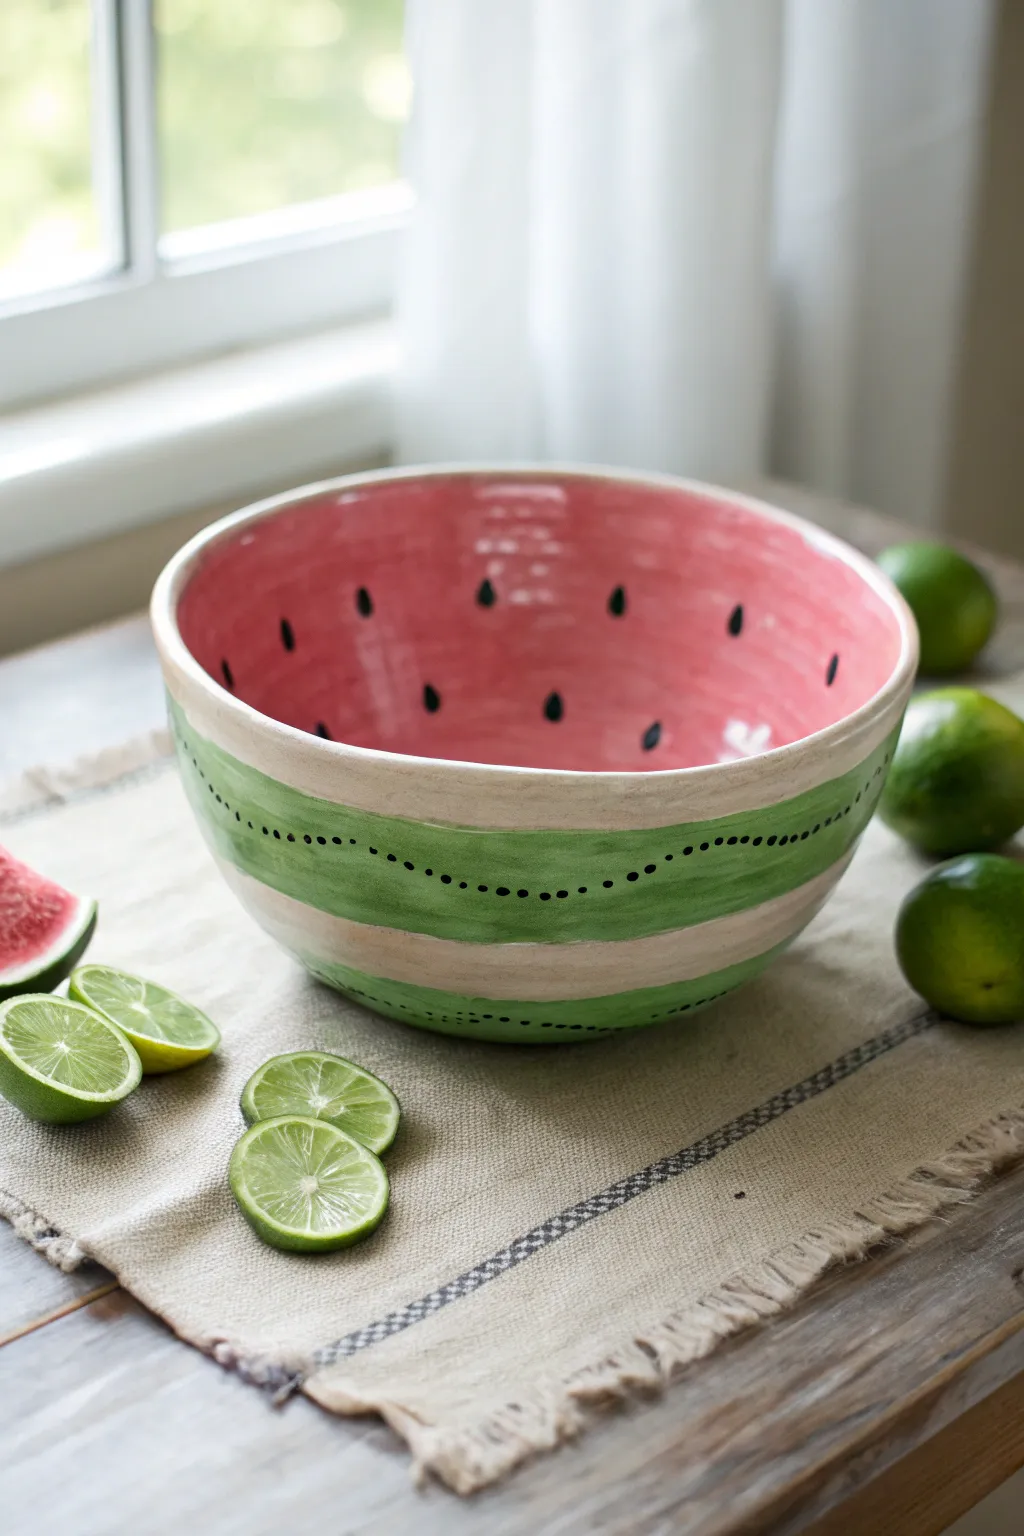
Bring a fresh slice of summer to your table with this delightful trompe-l’oeil bowl that captures the juicy spirit of a watermelon. The design features a vibrant, seed-speckled pink interior contrasted by a textured green rind exterior, making it a perfect centerpiece for fruit salads.
Step-by-Step Guide
Materials
- Bisqueware bowl (medium to large size)
- Underglaze in Bright Pink or Watermelon Red
- Underglaze in Lime Green
- Underglaze in Dark Forest Green
- Underglaze in Jet Black
- Clear dipping glaze or brush-on clear glaze
- Fan brush (for broad coverage)
- Medium round brush (size 6 or 8)
- Fine liner brush (size 0 or 1)
- Sponge
- Bowl of water
- Pencil (optional for sketching)
- Kiln access
Step 1: Prepping and Painting the Interior
-
Wipe the bisque:
Start by taking a slightly damp sponge and wiping down your entire bisqueware bowl. This removes any kiln dust that might repel the glaze and ensures a smooth application surface. -
Apply the first pink coat:
Using a soft fan brush, apply a generous coat of Bright Pink underglaze to the entire inside of the bowl. Bring the color all the way up to the very edge of the rim, but try to keep the top lip clean for now. -
Layer for vibrancy:
Let the first coat dry until it’s chalky to the touch. Apply a second and third coat of pink to ensure the color will be solid and vibrant after firing. I find three thin coats usually work better than one thick, gloopy one. -
Clean the rim:
Once the interior is dry, take a damp sponge and carefully clean any pink smudges off the top rim. You want a crisp transition where the ‘fruit’ meets the ‘rind’.
Pro Tip: The Pith Stripe
Don’t paint the entire exterior green! Leave a stripe of unpainted bisque between the pink interior and the green exterior. After clear glazing, this raw clay turns into the perfect white ‘rind’ color.
Step 2: Creating the Rind Exterior
-
Paint the base rind:
Moving to the exterior, use a medium round brush to paint a horizontal band of Lime Green. This strip should sit in the middle of the bowl’s exterior, leaving raw bisque exposed above and below it to mimic the white pith of the melon. -
Add the bottom green:
Paint another band of Lime Green at the very bottom of the bowl. Don’t worry about making the edges perfectly straight; a slightly organic, wavy edge looks more natural. -
Build opacity:
Apply 2-3 coats of the Lime Green to these sections, allowing brief drying time between layers so you don’t drag the previous paint off. -
Mix the dark tone:
For the darker stripes, you can use pure Forest Green or mix a little Black into your Lime Green for a custom shade. -
Paint the dark stripes:
Using your medium brush, paint a thinner horizontal stripe of Dark Forest Green directly on top of your Lime Green bands. This creates that classic variegated watermelon rind look. -
Blend softly:
While the green layers are still slightly damp, you can gently feather the edges with a clean, moist brush to make the transition between light and dark green feel more organic.
Level Up: Texture Play
Before painting, use a carving tool to gently etch the lines for the rind stripes. The glaze will pool slightly in the grooves, adding tactile texture to your watermelon skin.
Step 3: Detailing and Glazing
-
Dot the rind details:
Take your fine liner brush and dip it into the Jet Black underglaze. Paint a series of tiny, spaced-out dots along the dark green stripe on the exterior. Follow the curve of the stripe to emphasize the roundness. -
Paint the seeds:
Inside the pink bowl, paint small teardrop shapes using the Black underglaze and your liner brush. Scatter them randomly, but keep the pointed ends facing generally toward the center bottom of the bowl. -
Add seed highlights:
For an extra touch of realism, you can add a tiny speck of white underglaze to the top of each black seed once they are dry, though the clear glaze will often create natural highlights on its own. -
Dry thoroughly:
Allow the entire piece to dry completely, preferably overnight. The underglaze should feel bone dry and room temperature. -
Apply clear glaze:
Dip the bowl into a clear dipping glaze. If you don’t have a dipping setup, brush on two coats of clear glaze, being careful not to smear the black seeds. Dabbing the brush rather than dragging it helps protect the design. -
Stilt and fire:
Wipe the foot of the bowl clean of any glaze so it doesn’t stick to the kiln shelf. Consult your glaze instructions for the correct cone temperature (usually Cone 06 or Cone 6) and fire.
Once cooled from the kiln, fill your new bowl with limes or candy and enjoy the permanent summer vibes
Centered Mandala Design Inside the Bowl
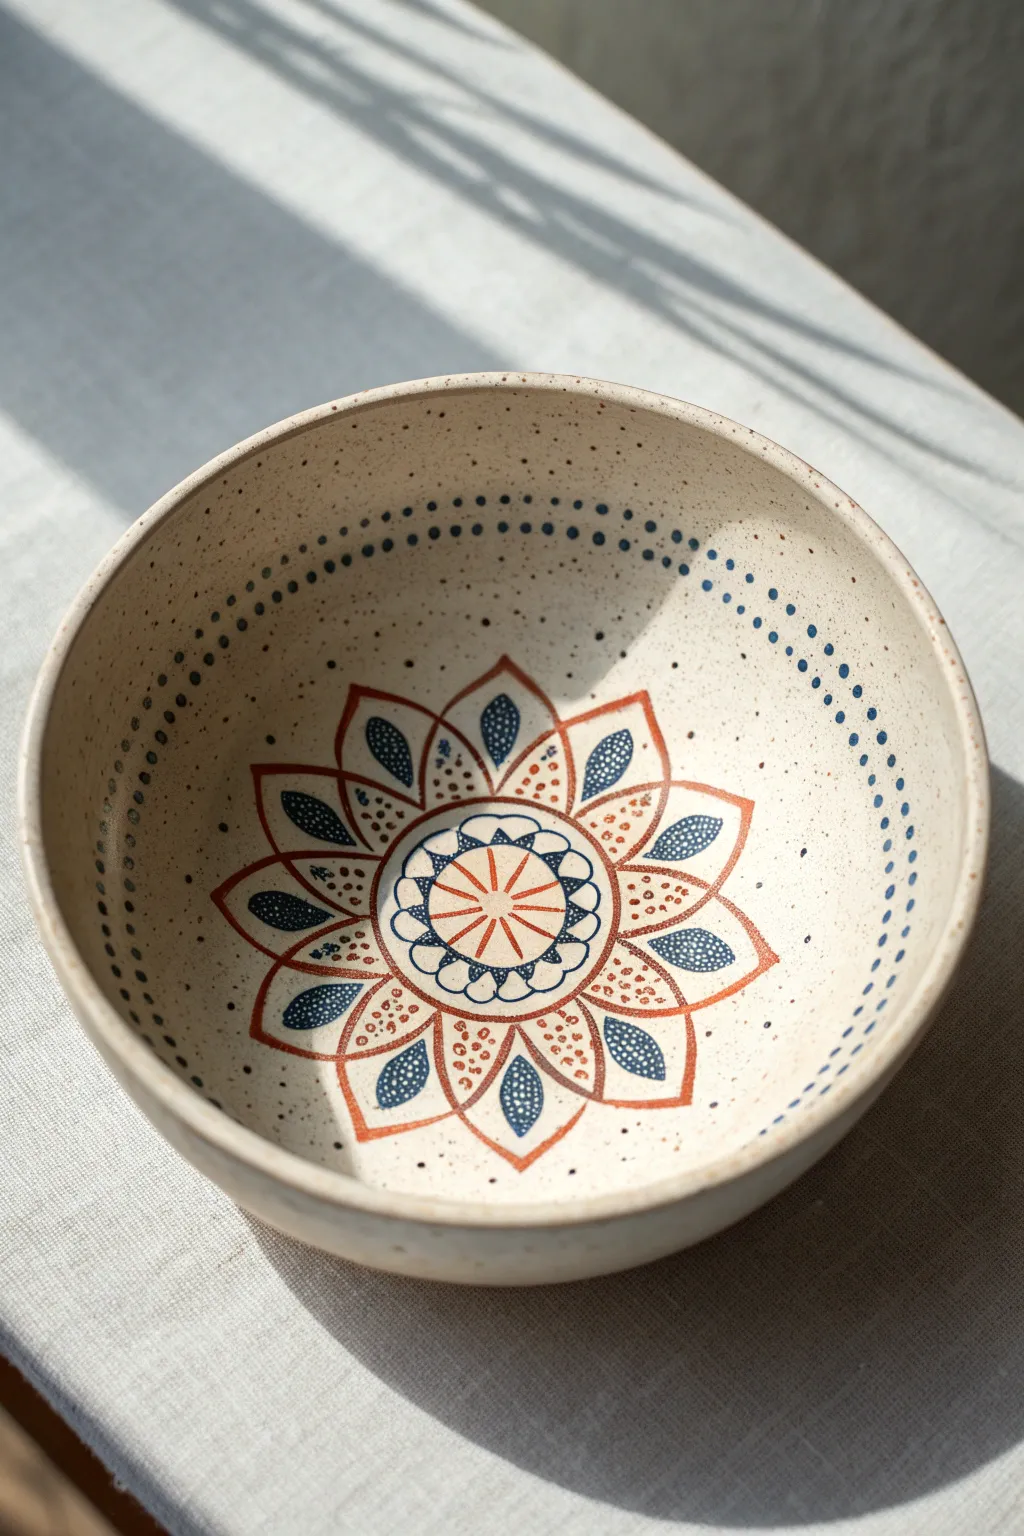
Transform a simple pottery piece into a mesmerizing focal point with this intricate sunburst mandala design. The combination of earthy rust tones and deep navy blue creates a striking contrast against speckled beige clay, resulting in a piece that feels both grounded and artistic.
How-To Guide
Materials
- Bisque-fired ceramic bowl (preferably speckled clay body)
- Underglaze (Rust/Terracotta Orange)
- Underglaze (Navy Blue)
- Clear dipping glaze or brush-on clear glaze
- Fine liner brush (size 0 or 00)
- Small round brush (size 2)
- Pencil
- Banding wheel (for rotation)
- Damp sponge
Step 1: Preparation and Mapping
-
Clean the Bisque:
Start by wiping down your bisque-fired bowl with a damp sponge. This removes any kiln dust or oils from your hands that might resist the glaze. -
Center the Bowl:
Place your bowl on a banding wheel. Spin the wheel to ensure the bowl is perfectly centered, which is crucial for concentric circles. -
Sketch the Center:
Lightly sketch a small circle in the very center of the bowl’s interior using a pencil. Don’t worry about marks; the graphite will burn off in the kiln. -
Draft the Petal Rings:
Draw two larger concentric circles around your center point to guide where the tips of your main petals will land. Divide the circle into eight equal sections to help space out the petals evenly.
Wobbly Lines?
If your hand shakes, rest your pinky finger on the bowl surface (if dry) or use a maulstick to stabilize your painting hand against the table.
Step 2: Painting the Core
-
Outline the Center Star:
Using your fine liner brush and the Rust underglaze, paint the eight-pointed starburst in the center circle. Start from the middle and pull your strokes outward to create sharp points. -
Add Inner Details:
Switch to Navy Blue and paint a scalloped ring around the central starburst. Keep your hand steady and use the curve of the bowl to guide your brush. -
Create the First Petal Layer:
With the Rust underglaze, outline the first row of eight rounded petals surrounding the navy scallops. Ensure the tips touch the pencil guideline you drew earlier. -
Decorate Inner Petals:
Inside each rust petal, use the Navy Blue to paint a small, solid teardrop shape at the base. -
Add Texture Dots:
Using the very tip of your brush or a needle tool dipped in Rust underglaze, add tiny stippling dots inside the rust petals, filling the space around the navy teardrops.
Step 3: Expanding the Mandala
-
Draft Outer Petals:
Paint the second, larger layer of petals using the Rust underglaze. These should sprout from the intersection points of the previous petal layer. -
Fill Outer Petal Details:
Similar to the inner ring, paint a larger Navy Blue teardrop shape inside each outer petal. I find that reloading the brush frequently helps keep these shapes opaque. -
Stipple the Outer Ring:
Fill the remaining space inside the large rust petals with more Rust-colored stippling dots. -
Clean Up Lines:
Go back over your rust outlines if they look thin. You want a solid, definitive line weight to contain the design.
Add Wax Resist
Apply wax resist over the finished mandala before dipping in a colored darker glaze rather than clear for a dramatic wax-resist reveal effect.
Step 4: Finishing Touches
-
The Dotted Rim:
Spin the banding wheel slowly. Hold your brush loaded with Navy Blue steady about an inch below the rim to create a continuous ring of small dots. -
Second Dot Ring:
Repeat the process just below the first ring to create a double row of navy dots. Varying the spacing slightly adds to the hand-painted charm. -
Final Inspection:
Check for any smudges or stray drops of underglaze. Because underglaze dries fast, you can carefully scratch away mistakes with a clean needle tool. -
Glazing:
Once the underglaze is bone dry, dip the entire bowl into clear glaze. Ensure an even coat, shake off the excess gently, and let it dry before the final firing.
Opening the kiln to reveal your perfectly centered, crisp mandala design is always a rewarding moment

TRACK YOUR CERAMIC JOURNEY
Capture glaze tests, firing details, and creative progress—all in one simple printable. Make your projects easier to repeat and improve.
High-Contrast Sgraffito Linework Bowl
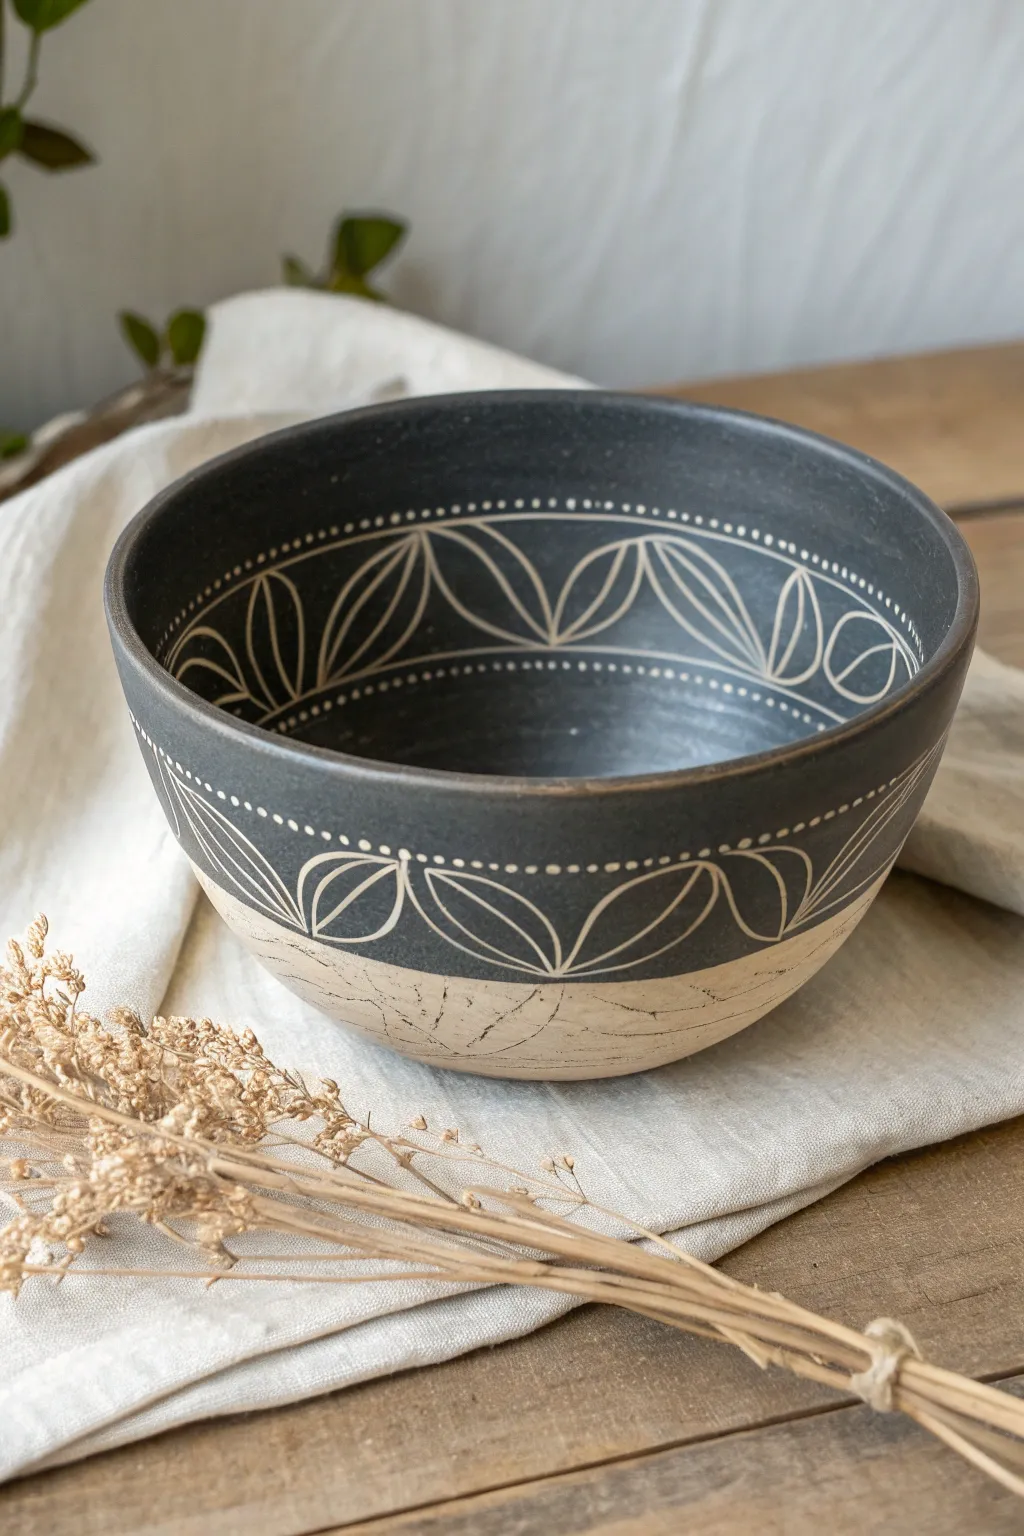
Achieve a striking graphic look with this bowl project that utilizes the ancient technique of sgraffito. By carving through a layer of matte black slip to reveal the pale stoneware beneath, you’ll create high-contrast floral patterns that wrap seamlessly from the exterior to the interior.
Step-by-Step Tutorial
Materials
- Light-colored stoneware clay (speckled optional)
- Black underglaze or decorative slip
- Pottery wheel (or slab roller for hand-building)
- Small loop tool or carving stylus
- Soft fan brush
- Sponge
- Clear matte glaze (inner only, optional)
Step 1: Shaping the Vessel
-
Throw the form:
Begin by centering about 2-3 pounds of light stoneware clay on your wheel. Pull up a medium-sized bowl with a smooth, continuous curve. Aim for a distinct separation between a narrower foot and a wider rim. -
Finish the rim:
Compress the rim carefully with a chamois or sponge. A slightly thickened rim looks great with this design and adds durability. -
Initial dry:
Allow the piece to dry to a firm leather-hard stage. It needs to be sturdy enough to handle without warping, but moist enough to carve easily. -
Trim the foot:
Turn the bowl over and trim a clean, defined foot ring. Keep the surface smooth, as any grog or roughness will interrupt your carving later.
Step 2: Applying Contrast
-
Planning the horizon:
Decide where your black section will end. On the exterior, visualize a line roughly halfway down the bowl. The bottom portion will remain raw clay. -
Apply the exterior slip:
While spinning the wheel slowly, apply 2-3 coats of black underglaze or slip to the top half of the exterior. Use a soft fan brush to ensure smooth, opaque coverage without streaks. -
Coat the interior:
Continue applying the black underglaze to the entire interior of the bowl. I find it easiest to pour a small amount inside and swirl it, or brush it on evenly while the wheel turns. -
Wait for the sheen to leave:
Let the underglaze dry until it is no longer shiny and feels cool to the touch. If you carve too soon, the lines will be messy; too late, and the clay will chip.
Keep it Clean
Keep your hands clean! Black underglaze powder loves to migrate to the raw clay section at the bottom. Wash hands frequently to keep the bottom clay pristine.
Step 3: Carving the Design
-
Border guidelines:
Using a needle tool, lightly etch a horizontal ring around the exterior and interior to define the bottom edge of your pattern band. -
Establish the lattice:
Begin carving the main leaf shapes. Start with pairs of curved lines that meet at a point, creating almond or leaf shapes. Try to make the tips of the leaves touch the top rim and your bottom guideline. -
Connect the arcs:
Ensure the leaves connect in a flowing, continuous wave pattern. The negative space between the leaves should form inverted triangles. -
Internal details:
Inside each large leaf shape, carve a central spine line. Then, radiate smaller lines outward from the center spine to mimic veins, curving them slightly to follow the leaf’s contour. -
Add the dots:
Using the tip of a small round tool or a drill bit twisted by hand, create a row of small dots along the bottom border line you etched earlier. This adds a delicate finish to the transition. -
Cleanup:
Once the carving is complete, use a soft, dry brush to gently sweep away the clay crumbs (burrs). Do not wipe with a wet sponge, or you will smudge the black slip into the white lines.
Chipping Lines?
If your carving tool is chipping the clay rather than slicing it, the clay is too dry. Mist it lightly with water, wrap it in plastic, and wait an hour before trying again.
Step 4: Finishing
-
Bisque fire:
Allow the bowl to dry completely to the bone-dry stage. Load it into the kiln for a bisque firing. -
Sponge and wax:
After the bisque, wipe the piece down quickly with a damp sponge to remove dust. Wax the foot ring. -
Glazing:
For the interior, pour in a clear matte glaze to make it food-safe while preserving the graphic quality. On the exterior, you can leave the raw slip matte or apply a very thin coat of clear matte glaze. -
Final fire:
Fire the piece to the maturity temperature of your clay body (likely Cone 5 or 6). This will vitrify the clay and seal the design.
Enjoy using your new bowl for serving or simply displaying it as a striking piece of modern art
Inlaid Mishima Dot-and-Dash Pattern Bowl
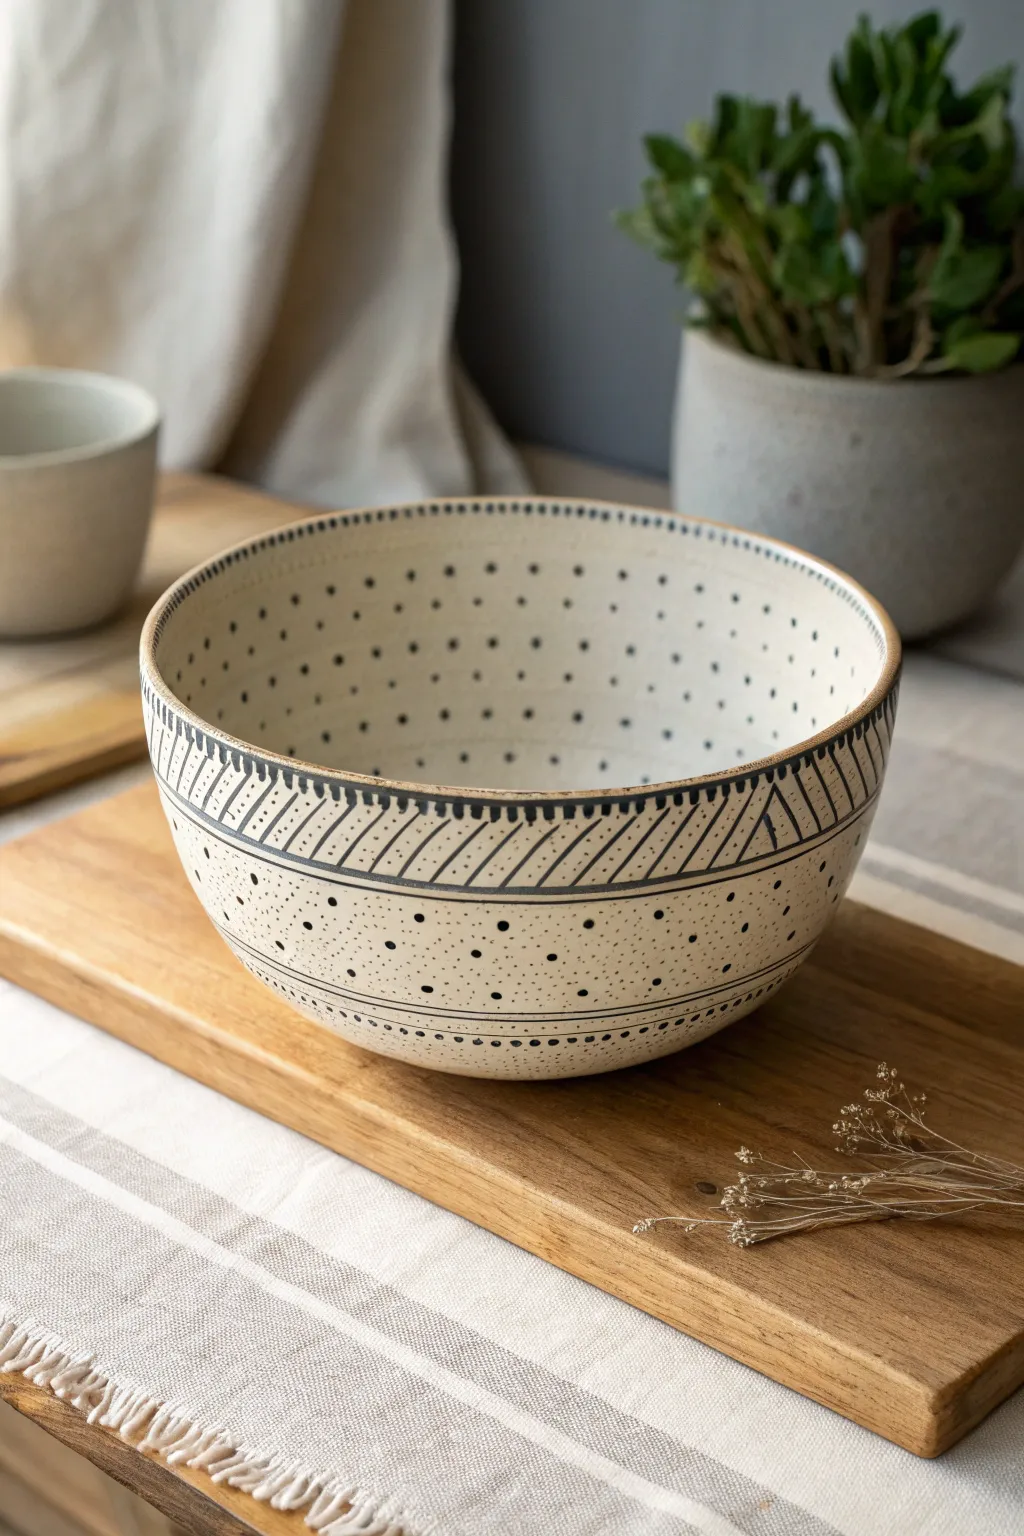
Discover the intricate beauty of Mishima, a traditional Korean slip-inlay technique that creates sharp, graphic lines flush with the clay surface. This deep bowl features a satisfying rhythm of diagonal hatching and playful scattered dots, all brought to life with contrasting black underglaze against a creamy, speckled clay body.
Step-by-Step
Materials
- White or light stoneware clay (ideally with fine grog)
- Black underglaze or black slip
- Pottery wheel (or slab roller for hand-building)
- Needle tool or sharp carving tool (X-acto knife)
- Small loop tool for trimming
- Metal rib or stiff plastic rib
- Wax resist (liquid)
- Sponge
- Clear matte or satin glaze
- Fine paintbrush
Step 1: Forming the Canvas
-
Throw the bowl form:
Begin by centering about 2-3 lbs of clay on your wheel. Open the mound and pull the walls up and out to create a generous, semi-hemispherical bowl shape. Aim for a slightly thicker rim to support the carving later. -
Define the profile:
Use a rib to smooth the interior curve and exterior wall, removing throwing rings. The surface needs to be pristine and smooth for the Mishima technique to look its best. -
Dry to leather hard:
Allow the bowl to dry slowly until it reaches a solid leather-hard state. It should be firm enough to handle without deforming but soft enough to carve into easily. -
Trim the foot:
Flip the bowl, center it on the wheel, and trim a clean foot ring. Smooth the surface one final time with a soft rib to compress the clay particles.
Clean Lines Pro-Tip
Carve your lines slightly deeper than you think you need to. During the scraping phase, you remove surface clay, which makes shallow lines disappear.
Step 2: Carving the Design
-
Map out the bands:
Using a needle tool while the wheel spins slowly, lightly incise two parallel horizontal lines about an inch and a half below the rim on the exterior. This creates the ‘track’ for your diagonal patterns. -
Apply wax resist:
This is a crucial step often skipped: paint a thin coat of wax resist over the entire area you plan to carve. I find this prevents the underglaze from staining the raw clay surface in the next steps. -
Carve the diagonal hatching:
Once the wax is dry, use a sharp needle tool or fine carving tool to cut diagonal lines between your two horizontal borders. Apply firm pressure to cut through the wax and into the clay surface. -
Carve the triangle motifs:
Break up the diagonal pattern occasionally with a ‘V’ shape or triangle pointing upwards, filling the negative space with opposing diagonal lines for visual interest. -
Add the dot patterns:
Using a slightly blunter tool or the tip of a small drill bit, press small divots into the clay below the banded area. Varry the density, keeping them clustered near the band and spreading out towards the bottom. -
Detail the interior:
Don’t forget the inside! Carefully carve rows of dots around the upper interior rim, and scatter random larger dots deeper into the bowl’s curve.
Step 3: Inlay and Finishing
-
Apply the contrasting slip:
Generously paint black underglaze or slip over all your carved lines and dots. Don’t worry about being messy; the goal is to fill the depressions completely. -
Wait for stiffening:
Let the black slip dry until it is no longer distinctively wet or shiny. It needs to set up inside the grooves. -
Scrape back the surface:
Using a sharp metal rib or a specialized loop tool, gently scrape away the excess slip from the surface. The wax resist layer helps the excess flake off easily, leaving clean, sharp black lines inlaid in the clay. -
Clean with a sponge:
Wipe the surface with a barely damp sponge to remove any lingering smoky haze of black pigment, ensuring the main clay body looks bright and clean. -
Bisque fire:
Fire the piece to cone 04 (or your clay’s bisque temperature). This sets the form and the inlaid decoration permanently. -
Glaze application:
Dip or brush a clear matte or satin glaze over the entire piece. A glossy glaze can sometimes cause the inlaid lines to bleed, so a matte finish is often safer for crisp lines. -
Final firing:
Load the kiln carefully and glaze fire to the maturity temperature of your clay body (likely cone 5 or 6).
Level Up: Colored Inlays
Mix Mason stains with white slip to create multicolored inlays. Try teal dots with black dashed lines for a vibrant, modern twist on this classic look.
Now you have a stunning, graphic vessel that feels as good to hold as it looks solely because the texture is perfectly smooth
Warm Speckled Stoneware Snack Bowl

These charming, rustic bowls rely on the natural beauty of speckled stoneware clay to create a warm, earthy aesthetic perfect for morning raspberries. With a gently flared rim and a toasted, bare clay exterior, this project focuses on simple forms and clean glazing to let the raw material shine through.
Step-by-Step Tutorial
Materials
- Speckled buff stoneware clay (about 1 lb per bowl)
- Potter’s wheel
- Throwing sponge
- Wooden or metal rib tool
- Wire cutter
- Trimming tools (pear shaped and flat)
- Satin white glaze
- Opaque tan or honey-colored glaze (optional for rim)
- Small glaze brush
- Clean water
Step 1: Throwing the Form
-
Center the Clay:
Begin by slamming your ball of speckled clay onto the wheel head. Use your palms to cone the clay up and push it back down until it is perfectly centered and running smooth. -
Open the Well:
Drill your thumbs into the center of the clay mound, stopping about 1/2 inch from the bottom to create the initial floor. -
Pull the Floor:
Gently pull the clay outward to establish a flat interior bottom, roughly 3 to 4 inches wide. Compress the floor thoroughly with your sponge to prevent S-cracks later. -
First Pull:
Using a pincer grasp, bring the walls up into a basic cylinder shape. Keep the walls thick at this stage to allow for shaping. -
Shape the Curve:
From the inside, apply gentle pressure outwards with one hand while supporting the outside with the other. Create a continuous, rounded curve that flares slightly at the top. -
Define the Rim:
Flatten the rim slightly with your finger or a chamois cloth. The bowl in the photo has a distinct, slightly squared-off lip, so don’t make it too sharp. -
Refine the Interior:
I like to run a curved metal rib along the inside of the bowl while the wheel spins slowly. This removes throwing lines and ensures a smooth, uninterrupted curve. -
Undercut and Wire Off:
Use a wooden knife to trim away excess clay at the base, creating a slight undercut. Slide your wire tool under the pot and carefully lift it off the wheel onto a ware board.
Uneven Speckles?
If your glaze is too thick, it will hide the clay’s speckles. Thin your white satin glaze slightly with water so the iron spots can burn through during firing.
Step 2: Trimming and Drying
-
Dry to Leather Hard:
Allow the bowl to dry slowly until it reaches a leather-hard state. It should be firm enough to handle without deforming but cool to the touch and able to be carved. -
Center for Trimming:
Place the bowl upside down on the wheel. Secure it with small lugs of fresh clay. -
Trim the Profile:
Using a sharp loop tool, trim the exterior wall to match the interior curve. The wall thickness should be even from rim to foot. -
Carve the Foot Ring:
Carve out a distinct foot ring. This bowl features a clean lift, so trim away enough material so the bowl appears to float slightly when sitting on a table. -
Smooth the Exterior:
Burnish the trimmed areas slightly with a damp sponge or a rubber rib to smooth out any grog that the trimming tool dragged up. This ensures the unglazed exterior feels nice in the hand. -
Bisque Fire:
Once fully bone dry, load the bowl into the kiln for a bisque firing (usually Cone 04) to prepare it for glazing.
Step 3: Glazing
-
Wax the Exterior:
Apply wax resist to the entire exterior of the bowl, stopping right at the rim line. This ensures the raw speckled clay remains visible on the outside. -
Pour the Interior:
Pour a satin white glaze into the bowl. Roll it around quickly to coat the entire interior surface, then pour the excess back into your bucket. -
Clean the Rim:
If any white glaze dripped onto the waxed exterior, wipe it away immediately with a damp sponge. The transition line should be crisp. -
Add Rim Detail:
Dip a small brush into a honey or tan glaze (or simply use a thinner coat of the white glaze) and lightly paint just the very top edge of the rim. This creates that toasted halo effect seen in the photo. -
Final Fire:
Fire the bowl to maturity (typically Cone 5 or 6 for stoneware). The heat will cause the iron speckles in the clay to bleed through the white glaze, creating the signature look.
Try an Iron Wash
Mix red iron oxide with water and brush it lightly onto the rim before glazing. This guarantees a dark, toasty brown edge that contrasts beautifully.
Fill your new bowl with fresh fruit and enjoy the simple pleasure of handmade ceramics
Flowy Reactive Glaze Pooling Bowl
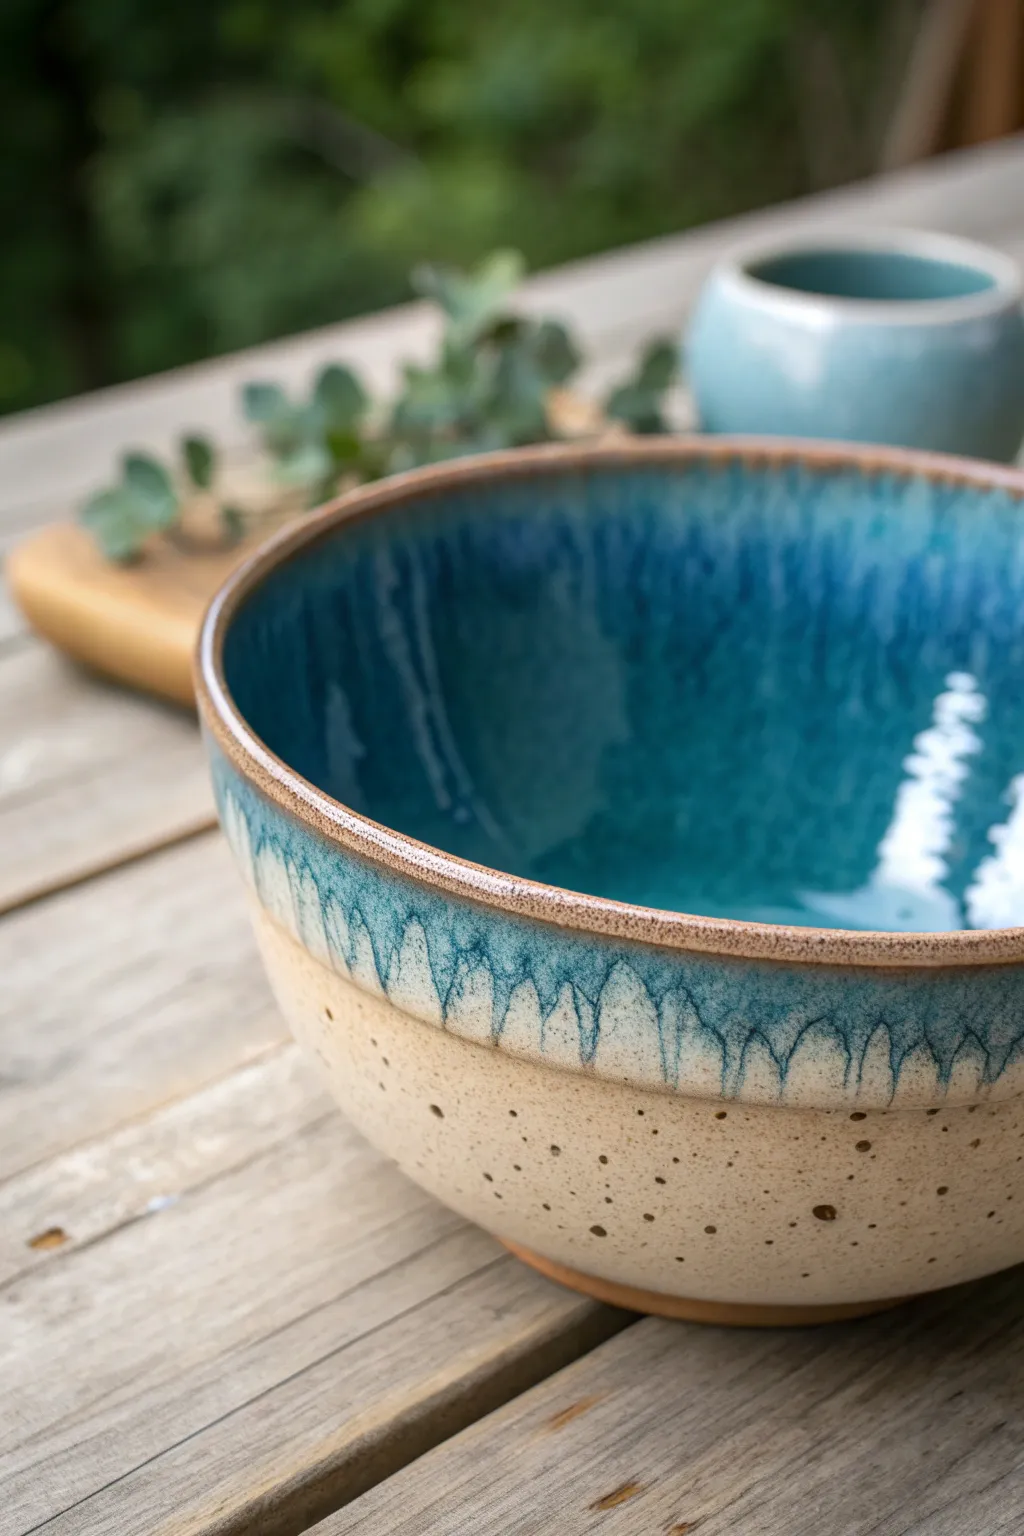
Capture the essence of crashing waves meeting sandy shores with this stunning two-tone ceramic bowl. The magic lies in the reactive glaze application, which creates unique, organic drips over a warm, speckled clay body.
How-To Guide
Materials
- Speckled stoneware clay (mid-fire)
- Pottery wheel and tools (sponge, wire cutter, ribs)
- Trimming tools
- Bisque firing kiln
- Glaze firing kiln (Cone 5/6 typically)
- Wax resist
- Clear matte glaze (optional)
- Dark teal or turquoise reactive glaze
- Light blue or rutile float glaze (for layering)
- Wide glazing brush or fan brush
Step 1: Throwing the Form
-
Prepare the Clay:
Begin by thoroughly wedging about 2-3 pounds of speckled stoneware clay to remove air bubbles and align the particles. -
Center on the Wheel:
Secure the clay to the wheel head and center it using water and steady pressure until it feels perfectly balanced in your hands. -
Open the Mound:
Press your thumbs into the center to open the floor, leaving about a half-inch of thickness at the bottom for later trimming. -
Pull the Walls:
Gently pull the clay upward to create height, focusing on maintaining an even thickness from bottom to top. -
Shape the Curve:
Use a rib tool on the inside to push the walls outward, creating a generous, rounded belly for the bowl while keeping the rim slightly tapered. -
Refine the Rim:
Compress the rim with a chamois or your sponge to ensure it is smooth and durable, as this will be a focal point for the glaze. -
Wire Off:
Run a wire cutter underneath the bowl to release it, then carefully lift it off the wheel to dry to a leather-hard state.
Use Gravity Wisely
For longer, more dramatic drips, add a flux-heavy clear glaze right over the thickest part of the colored rim glaze before firing.
Step 2: Trimming and Bisque
-
Secure for Trimming:
Once leather hard, center the bowl upside down on the wheel and secure it with clay lugs or a Giffin Grip. -
Define the Foot:
Carve away excess clay from the base to create a clean, distinct foot ring, which lifts the bowl and adds elegance. -
Smooth the Exterior:
Use a smooth metal rib to burnish the exterior slightly if you want the speckles to really pop against the bare clay. -
Bisque Fire:
Load the bone-dry bowl into the kiln and bisque fire it to the appropriate temperature (usually Cone 04) to prepare it for glazing.
Step 3: Glazing the Ocean Effect
-
Wax the Foot:
Apply wax resist to the foot ring and the bottom few millimeters of the bowl to prevent glaze from fusing it to the kiln shelf. -
Interior Glazing:
Pour your primary dark teal glaze inside the bowl, swirl it to coat the entire interior evenly, and pour out the excess. -
Clean the Rim:
Wipe the rim with a damp sponge if any interior glaze dripped excessively, though a little overlap is desirable. -
Exterior “Dip”:
Hold the bowl by the foot and dip just the top 2-3 inches of the exterior rim into the teal glaze. Alternatively, brush this band on thickly. -
Add Reactive Layer:
I like to dab a second, lighter blue or rutile-heavy glaze just along the very top edge of the rim; this encourages that beautiful downward movement and mingling colors. -
Let it Run:
Allow the glazes to dry completely. The thick application at the rim is crucial, as gravity will pull it down during firing to create the dripping teeth effect. -
Leave the Body Bare:
Ensure the bottom half of the exterior remains unglazed to show off the natural speckled clay body. -
Glaze Fire:
Fire to Cone 5 or 6 (depending on your clay/glaze instructions). Ensure you use a cookie or drip tray under the pot in the kiln just in case the glaze runs too enthusiastically.
Level Up: Texture Pop
Before bisque firing, gently press a rasp or serrated rib against the exterior clay. The glaze will break beautifully over the rough texture.
Now you have a functional piece of art that brings a calm, seaside aesthetic to your table
Swirled Marbled Slip Interior Bowl
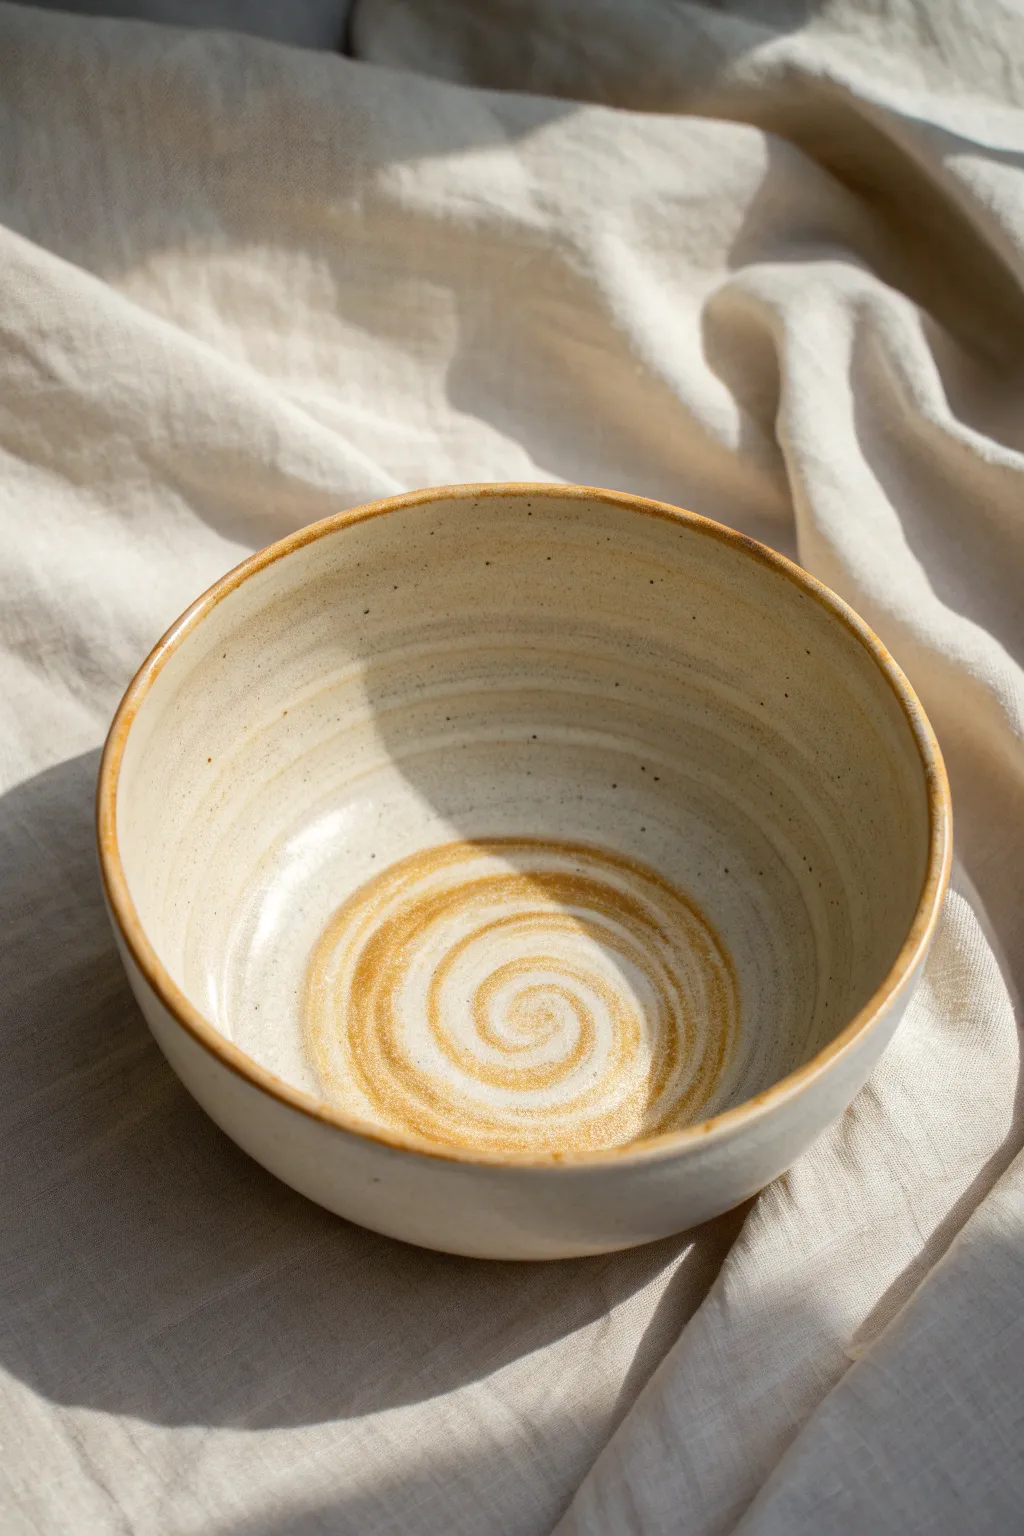
This charming wheel-thrown bowl features a mesmerizing caramel-colored spiral at its center, evoking the warmth of a sunny afternoon. The contrast between the natural speckled clay body and the rich, swirled slip decoration creates a piece that feels both rustic and intentionally designed.
Step-by-Step
Materials
- Light-colored stoneware clay with speckles (e.g., buff speckled clay)
- Pottery wheel
- Throwing tools (sponge, rib, wire cutter)
- Trimming tools
- Caramel/ochre colored slip or underglaze
- Soft fan brush or squirrel hair brush
- Clear or transparent matte glaze
- Potter’s bat
- Kiln
Step 1: Throwing the Form
-
Center the Clay:
Begin by wedging about 1.5 to 2 lbs of your speckled clay. Secure it onto the wheel head and center it thoroughly using the coning up and down method to ensure even particle distribution. -
Open the Mound:
Drill your thumbs into the center of the clay mound, opening it up to leave a floor thickness of about a quarter-inch. Compress the floor well with a sponge to prevent S-cracks later. -
Pull the Walls:
Slowly pull the walls upward and outward to create a gentle curve. Aim for a wide, open bowl shape rather than a tall cylinder, keeping the rim slightly thicker than the walls for durability. -
Refine the Curve:
Use a smooth kidney rib on the interior of the bowl to remove throwing lines and create a seamless, continuous curve from the floor to the rim. This smooth canvas is crucial for the swirl effect. -
Finish the Rim:
Compress the rim with a chamois or your sponge to round it off softly. Wire the bowl off the bat but leave it on the bat to firm up until leather-hard.
Slip Dragging?
If the brush creates jagged lines instead of a smooth swirl, your wheel speed is too fast or your slip is too dry. Add a drop of water to the slip and slow the wheel down.
Step 2: Creating the Spiral
-
Preparing the Slip:
Ensure your caramel-colored slip or underglaze is the consistency of heavy cream. If it’s too thick, the brush will drag; too thin, and the color won’t be rich enough. -
Load the Brush:
While the bowl is still centered on the wheel (or re-centered if you moved it), load a soft brush generously with the slip. I prefer a fan brush here because it holds plenty of liquid. -
Spin and Apply:
Get the wheel spinning at a slow, steady moderate speed. Place the tip of your brush in the absolute center of the bowl’s floor. -
Spiral Outward:
Ideally in one fluid motion, slowly pull the brush tip outward towards the walls while the wheel spins. This naturally creates the tight, rhythmic spiral pattern seen in the center. -
Define the Rim:
Dip your brush again and hold it steadily against the rim of the spinning bowl to deposit a matching band of caramel color, framing the piece. -
Drying:
Allow the slip decoration to dry slowly with the bowl. Cover it loosely with plastic if your studio is dry to ensure the slip and pot shrink at the same rate and don’t peel.
Pro Tip: Depth of Color
Apply the spiral when the clay is leather hard rather than freshly thrown. The slip sits on top better and the color remains more opaque after firing.
Step 3: Trimming and Glazing
-
Trimming the Foot:
Once leather hard, flip the bowl over onto a foam bat or chuck. Trim a neat foot ring that mirrors the curve of the interior, removing excess weight from the bottom. -
Bisque Fire:
Load the bone-dry bowl into the kiln for a bisque firing (usually to Cone 04 or 06). This prepares the clay for the final glaze application. -
Clean and Prep:
Wipe the bisque-fired bowl with a damp sponge to remove any kiln dust. This ensures the clear glaze will adhere properly without crawling. -
Apply Clear Glaze:
Dip the entire bowl into a clear, transparent glaze. A matte or satin finish works best to preserve the earthy look of the slip without creating distracting high-gloss reflections. -
Wipe the Foot:
Clean the glaze off the foot ring thoroughly with a sponge so nothing fuses to the kiln shelf. -
Final Firing:
Fire the bowl to the maturity temperature of your clay body (likely Cone 5 or 6 for stoneware) and allow the kiln to cool naturally.
The result is a beautifully centered piece that highlights the natural motion of the potter’s wheel
Soft Ombre Fade Wash Bowl

Capture the soft, warm hues of early morning with this wheel-thrown bowl featuring a delicate ombre fade. The interior transitions seamlessly from a dusty coral rim to a creamy center, while the exterior keeps a grounded, natural feel with subtle texture.
Step-by-Step Guide
Materials
- Stoneware clay (buff or light speckle recommended)
- Pottery wheel
- Throwing tools (sponge, ribs, wire cutter)
- Trimming tools
- Underglaze (Coral or Salmon Pink)
- Underglaze (White or Cream)
- Wide hake brush or soft fan brush
- Sponge for blending
- Clear transparent glaze
- Kiln
Step 1: Throwing the Form
-
Prepare the Clay:
Begin by wedging about 3-4 lbs of stoneware clay. You want enough clay to create a substantial, wide bowl without the walls becoming too thin or floppy. -
Center and Open:
Center your clay on the wheel head. Open up the clay wider than you would for a cylinder, establishing a curved bottom right from the start rather than a flat floor. -
Pull the Walls:
Pull the walls up and out. Aim for a 45-degree angle initially. I like to keep the rim slightly thicker than the walls to prevent warping during the firing. -
Shape the Curve:
Using a metal or wooden rib on the inside, gently push the belly of the bowl out while supporting the exterior with a sponge. Create a continuous, smooth curve from the center to the rim. -
Refine the Rim:
Finish the rim with a chamois or a small strip of plastic to ensure it is smooth and rounded. Cut the bowl from the bat with a wire tool. -
Initial Drying:
Allow the bowl to dry to a leather-hard state. It needs to be firm enough to handle without deforming but soft enough to trim.
Streak-Free Fades
If brush marks are too visible in your gradient, use a slightly wetter sponge to dab the transition lines rather than brushing them. This creates a softer, cloud-like blend.
Step 2: Trimming and Exterior Texture
-
Center for Trimming:
Invert the bowl on the wheel head. Secure it with clay lugs or a chuck if the rim is delicate. -
Define the Foot:
Trim away excess clay from the bottom third of the bowl, shaping a modest foot ring that visually lifts the bowl off the table. -
Add Exterior Texture:
While the wheel is spinning slowly, hold a trimming tool lightly against the exterior wall to create subtle chatter marks or horizontal ridges. This mimics the texture seen in the reference photo’s lower half. -
Smooth the Surface:
Run a damp sponge over the trimmed area to soften any sharp ridges, leaving a tactile but gentle surface.
Step 3: Creating the Ombre Wash
-
Prepare Underglazes:
Pour a small amount of Coral underglaze and White underglaze onto a palette. Ideally, create a third ‘mid-tone’ mix by blending the two together. -
Apply the Rim Color:
With the bowl stationary or spinning very slowly, apply the pure Coral underglaze to the top 2 inches of the interior rim. Let the strokes be loose and fluid. -
Apply the Mid-Tone:
Below the coral band, apply your mixed mid-tone color. Overlap it slightly with the coral section above. -
Apply the Lightest Tone:
Paint the White/Cream underglaze below the mid-tone, fading it out as you reach the center bottom of the bowl. Leave the very center as bare clay or a very thin wash. -
Blend the Transition:
Dip a damp sponge or clean brush in water and remove excess moisture. Gently drag it horizontally across the boundary lines of the colors to blur them. I find a light touch works best here to avoid wiping the color off completely. -
Add Exterior Accent:
Dilute a tiny bit of the Coral underglaze with water to make a thin wash. Paint a loose, uneven band just below the exterior rim, allowing the natural texturing to break up the brushstroke. -
Bisque Fire:
Once fully dry, load the greenware bowl into the kiln and bisque fire to Cone 04 (or your clay’s specific bisque temperature).
Speckled Clay Magic
Use a clay body with iron speckles (like Speckled Buff). The dark spots will bleed through the sheer ombre wash, adding rustic character and depth to the final piece.
Step 4: Glazing and Final Fire
-
Apply Clear Glaze:
Wipe the bisque-fired bowl with a damp sponge to remove dust. Dip the entire bowl into a clear, transparent glaze. A dipping tongs tool helps prevent finger marks. -
Clean the Foot:
Thoroughly wipe the glaze off the foot ring and about 1-2mm up the side to prevent the pot from sticking to the kiln shelf. -
Glaze Fire:
Fire the bowl to the maturity temperature of your clay and glaze (typically Cone 5 or 6 for stoneware). The clear glaze will brighten the underglaze colors and seal the surface.
Enjoy the peaceful process of blending these colors and anticipating the beautiful reveal from the kiln
Wabi-Sabi Organic Rim Pinched Bowl
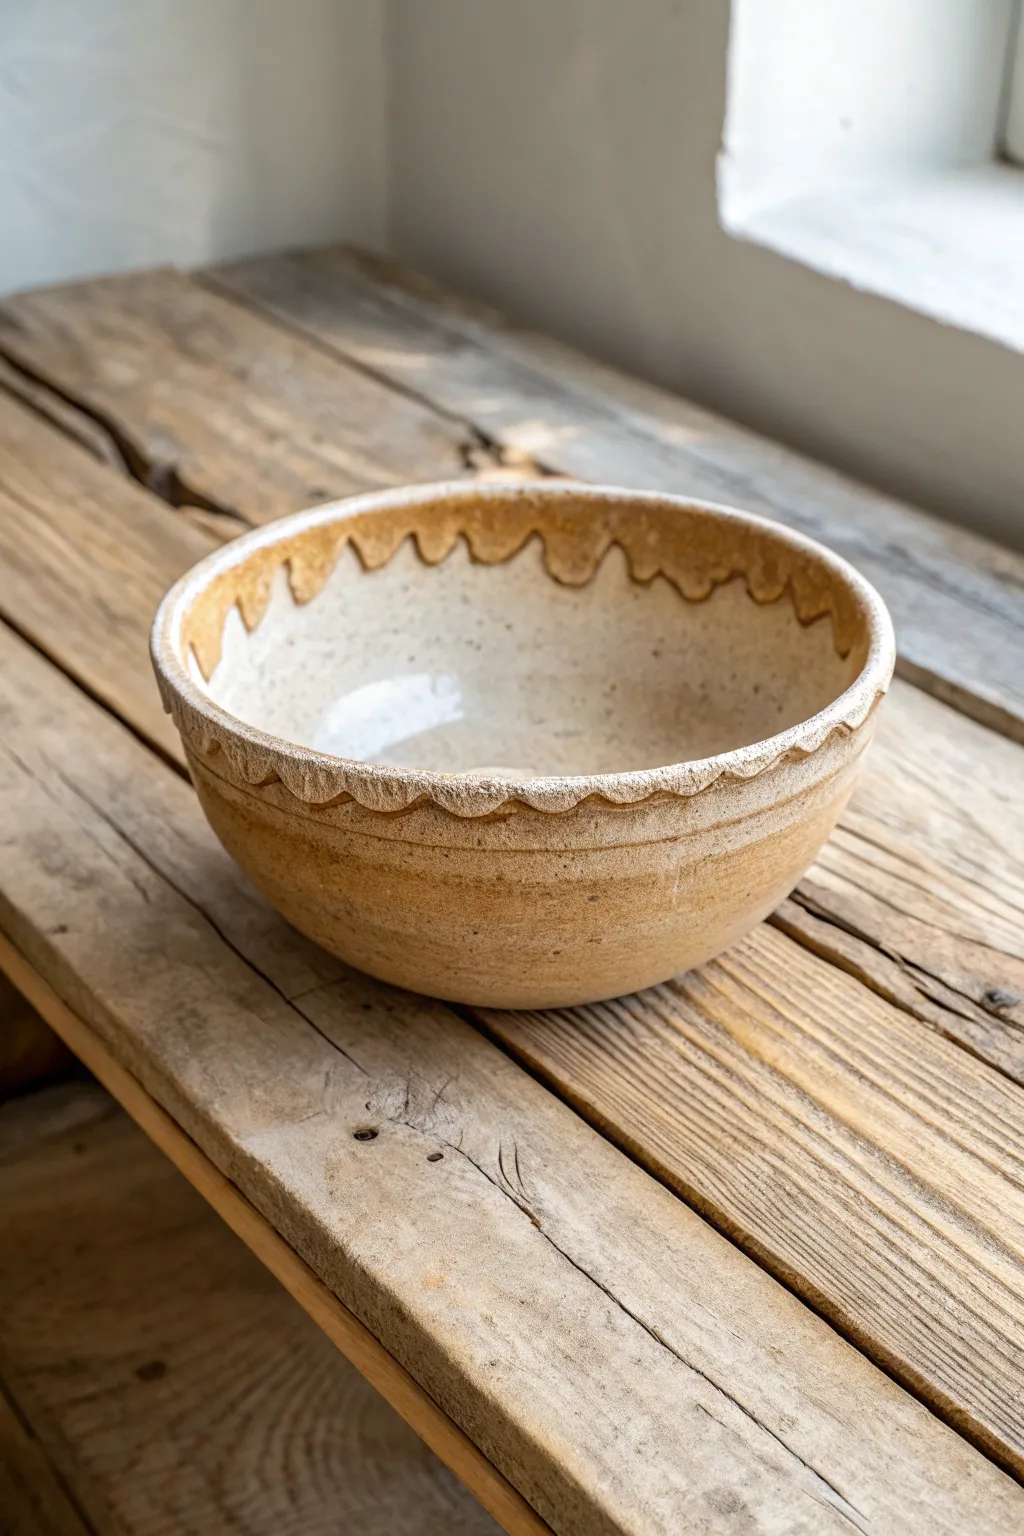
This handmade ceramic bowl embraces imperfection with its textural, organic pinched rim and earthy color palette. The contrast between the smooth, glossy interior glaze and the raw, unglazed exterior creates a rustic piece perfect for display or daily use.
Step-by-Step
Materials
- Stoneware clay (speckled or warm buff)
- Pottery wheel
- Throwing sponge
- Wooden throwing rib
- Pin tool
- Wire cutter
- Trimming tools
- White or cream dipping glaze
- Wax resist
- Brush for wax
- Kiln
Step 1: Throwing the Base Form
-
Prepare your clay:
Begin by thoroughly wedging about 2-3 pounds of stoneware clay to remove air bubbles. Center the clay on your wheel head with firm, consistent pressure, ensuring it doesn’t wobble. -
Open the clay:
Drill down into the center of the mound, leaving about half an inch of clay at the bottom for the foot. Carefully pull the clay outward to establish the floor of your bowl. -
Pull up the walls:
Slow the wheel speed down. Using wet hands, compress the clay and pull the walls upward. Aim for a gentle, rounded curve rather than straight vertical walls. -
Create the voluminous shape:
Use a wooden rib on the inside of the bowl while supporting the outside with your hand to push the belly of the bowl out, creating that nice, full curve you see in the image. -
Refine the rim thickness:
Before stopping the wheel, ensure your rim is slightly thicker than the walls. This extra clay provides the necessary material for the deep pinching technique later. -
Cut from the wheel:
Run a wire cutter underneath the pot to separate it from the bat. Slide it onto a ware board and let it firm up to leather-hard consistency.
Clean Scallops
For a more consistent scallop, use the handle of a large paintbrush instead of your finger to press the rim. This creates uniform, rounded indentations.
Step 2: Sculpting and Trimming
-
Mark the scallop points:
Once the rim is firm enough to hold its shape but soft enough to manipulate (soft leather-hard), lightly mark even intervals around the rim where you want your indentations to be. -
Pinched rim technique:
Using your thumb and forefinger, or the side of a wooden tool, press firmly downward and outward at your marked intervals. Create a deep, deliberate wave pattern that exposes the messy, organic nature of the clay. -
Smooth the peaks:
Gently soften any sharp edges on the high points of the scallops with a damp sponge or your finger, but leave the texture rough if you prefer the wabi-sabi look. -
Trim the foot:
When the base is leather-hard, center the bowl upside down on the wheel. Trim excess weight from the bottom and carve a clean foot ring that mirrors the curve of the bowl. -
Specific detailing:
While trimming, use a tool to incise two subtle horizontal lines just below the rim on the exterior, adding shadow and definition to the form. -
Bisque fire:
Allow the bowl to dry slowly and completely. Load it into the kiln for a bisque firing (typically Cone 04 or 06).
Step 3: Glazing and Finishing
-
Wax the exterior:
Wipe down the bisque ware with a damp sponge. Apply wax resist to the entire exterior of the bowl, stopping right at the undulating edge of your scalloped rim. This ensures the outside stays raw clay. -
Protect the foot:
Don’t forget to wax the bottom foot ring as well to prevent the pot from sticking to the kiln shelf. -
Pour the interior:
Pour a creamy white or oatmeal glaze into the bowl. Roll it around to coat the entire interior surface thoroughly. -
Create the drip effect:
Quickly pour the excess glaze out. As you pour, let the glaze natural pool slightly in the valleys of the scalloped rim. I like to let just a tiny bit overlap the edge to create that beautiful interaction between glaze and raw clay. -
Clean up:
Use a sponge to wipe away any unwanted glaze drips on the exterior walls, keeping that sharp contrast line. -
Glaze fire:
Fire the piece to maturity (Cone 5, 6, or 10 depending on your clay body). The heat will melt the glaze, causing it to break beautifully over the textured rim.
Add Speckles
If you don’t have speckled clay, mix a small amount of granular ilmenite or manganese into your white clay body before throwing to get those rustic spots.
Enjoy the simple beauty of your new bowl as it holds your morning oatmeal or sits elegantly on your table
Functional Berry Bowl With Drainage Holes
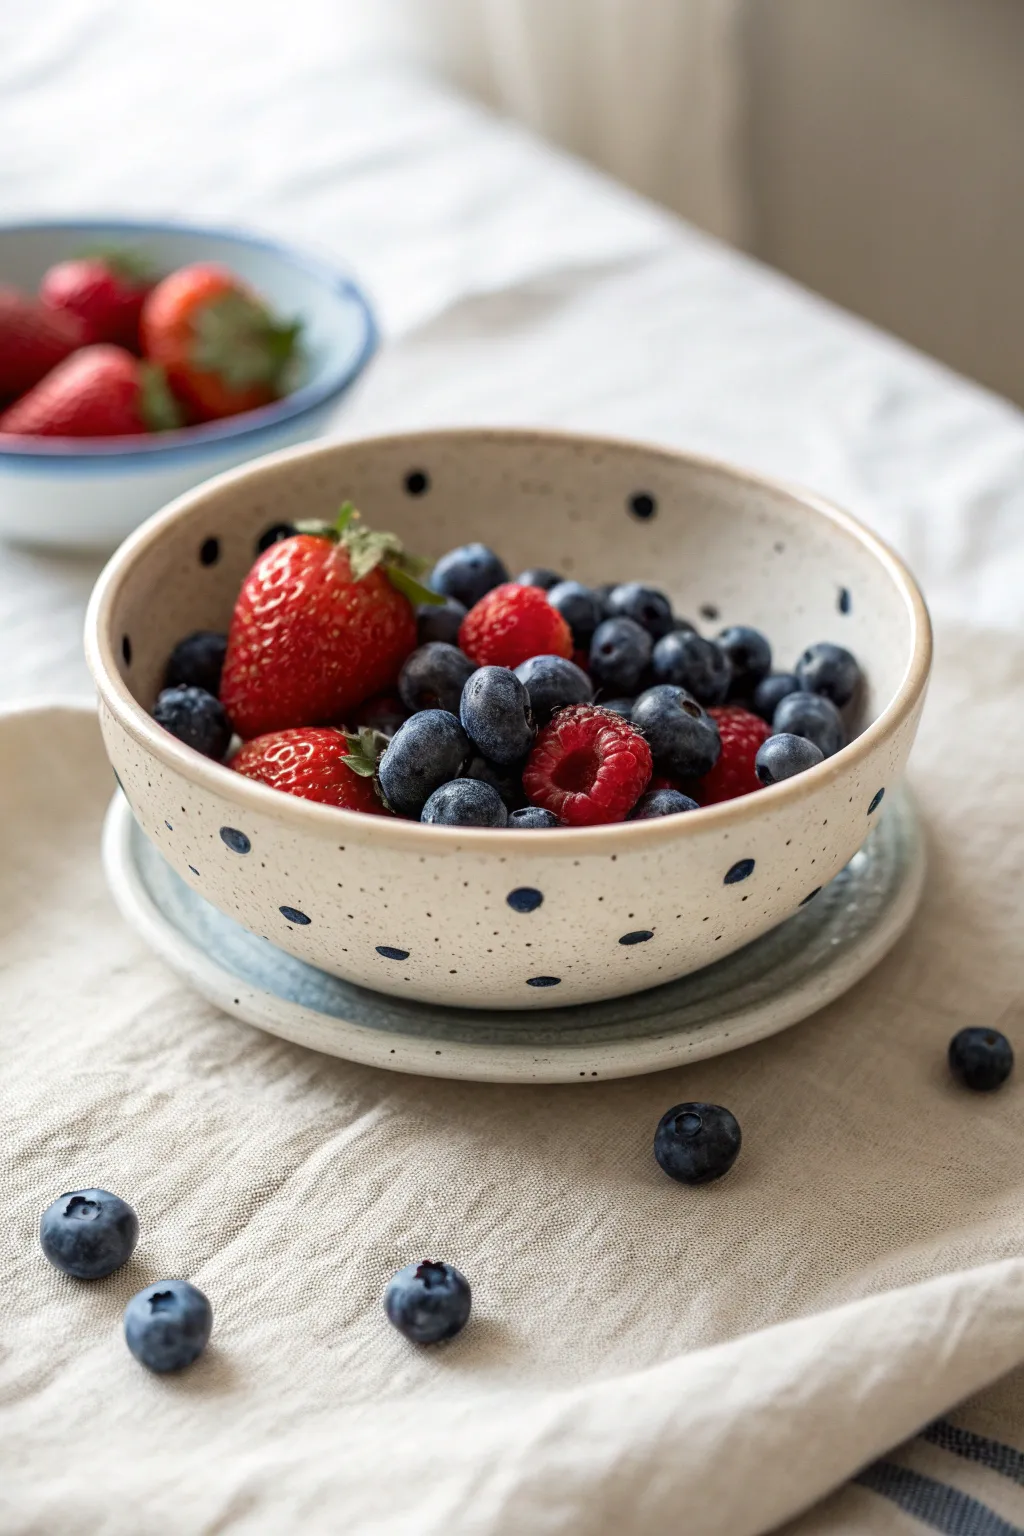
This charming, rustic berry bowl combines creamy speckled stoneware with whimsical blue polka dots for a playful yet functional piece. The matching saucer catches excess water, making it perfect for rinsing and serving fresh fruit directly at the table.
How-To Guide
Materials
- Speckled buff stoneware clay (approx 2 lbs)
- Pottery wheel
- Throwing tools (sponge, needle tool, rib, wire cutter)
- Trimming tools
- Small hole punch or drill bit (for drainage)
- Underglaze (Navy Blue or Cobalt)
- Round artist brush (size 6 or 8)
- Clear transparent glaze (food safe)
- Kiln
Step 1: Throwing the Bowl and Saucer
-
Center the clay:
Start by wedging your clay thoroughly to remove air pockets. Place about 1.5 lbs of clay on the wheel head and center it using firm, steady pressure. Cone it up and down twice to align the clay particles. -
Open the form:
Open the centered clay to create the floor. For a berry bowl, you want a gentle curve rather than a flat bottom, so compress the floor well but keep a slight interior roundness to help the berries nestle. -
Pull the walls:
Pull the walls up and outward, aiming for a classic hemispherical bowl shape. Keep the rim slightly thickened for durability against chipping. Smooth the interior with a soft rib to erase throwing lines. -
Create the saucer:
With the remaining 0.5 lb of clay, throw a small, shallow plate or saucer. Ensure the foot measurement matches the foot of your bowl so they stack comfortably. This saucer will catch the drips after rinsing. -
Dry to leather hard:
Wire the pieces off the bats and let them dry slowly to a leather-hard state. This usually takes day or two depending on humidity, but the clay should be firm enough to handle without deforming.
Step 2: Trimming and Altering
-
Trim the foot:
Center the bowl upside down on the wheel. Trim a clean, defined foot ring. I find a taller foot provides better drainage and air circulation for the fruit. -
Refine the saucer:
Trim the saucer’s foot to match. Test the fit by placing the upside-down bowl (gently) onto the upside-down saucer to ensure the proportions look balanced. -
Add drainage holes:
While the bowl is still leather hard, use a small hole punch tool or a drill bit to create the drainage pattern. Create a central cluster of holes or a star pattern at the very bottom of the bowl. -
Clean the edges:
Smooth both sides of every hole with a damp sponge or fingertip. Sharp edges here can tear delicate berry skins later, so take your time softening them.
Hole Tip
Make your drainage holes slightly larger than you think you need. Glaze tends to run during firing and can shrink the opening significantly.
Step 3: Decorating and Glazing
-
Bisque fire:
Load the bone-dry greenware into the kiln and bisque fire to approximately Cone 04. This hardens the clay and prepares it for glazing. -
Paint the dots:
Wipe the bisqueware with a damp sponge to remove dust. Using navy blue underglaze and a round brush, paint freehand polka dots around the exterior. Vary the vertical placement slightly for a hand-painted, organic feel. -
Wax resist the foot:
Apply wax resist to the bottom foot ring of both the bowl and the saucer to prevent glaze from adhering to the kiln shelf. -
Apply clear glaze:
Dip the entire bowl and saucer into a clear, glossy glaze. Shake gently to remove excess drips. The clear coat will seal the clay and make those delightful speckles in the clay body pop. -
Clean up:
Sponge off any glaze that may have gotten onto the waxed foot rings. Check the drainage holes to ensure no glaze has bridged across them; clear them with a needle tool if necessary. -
Glaze fire:
Load the kiln again for the final glaze firing (usually Cone 5 or 6 for stoneware). Ensure the bowl and saucer are not touching each other during this firing.
Rim Upgrade
For a vintage enamelware look, paint a thin band of the same blue underglaze along the very rim of the bowl and saucer before applying the clear glaze.
Once cooled, your set is ready to bring fresh farm-market colors to your kitchen counter
Cohesive Nesting and Stackable Bowl Set
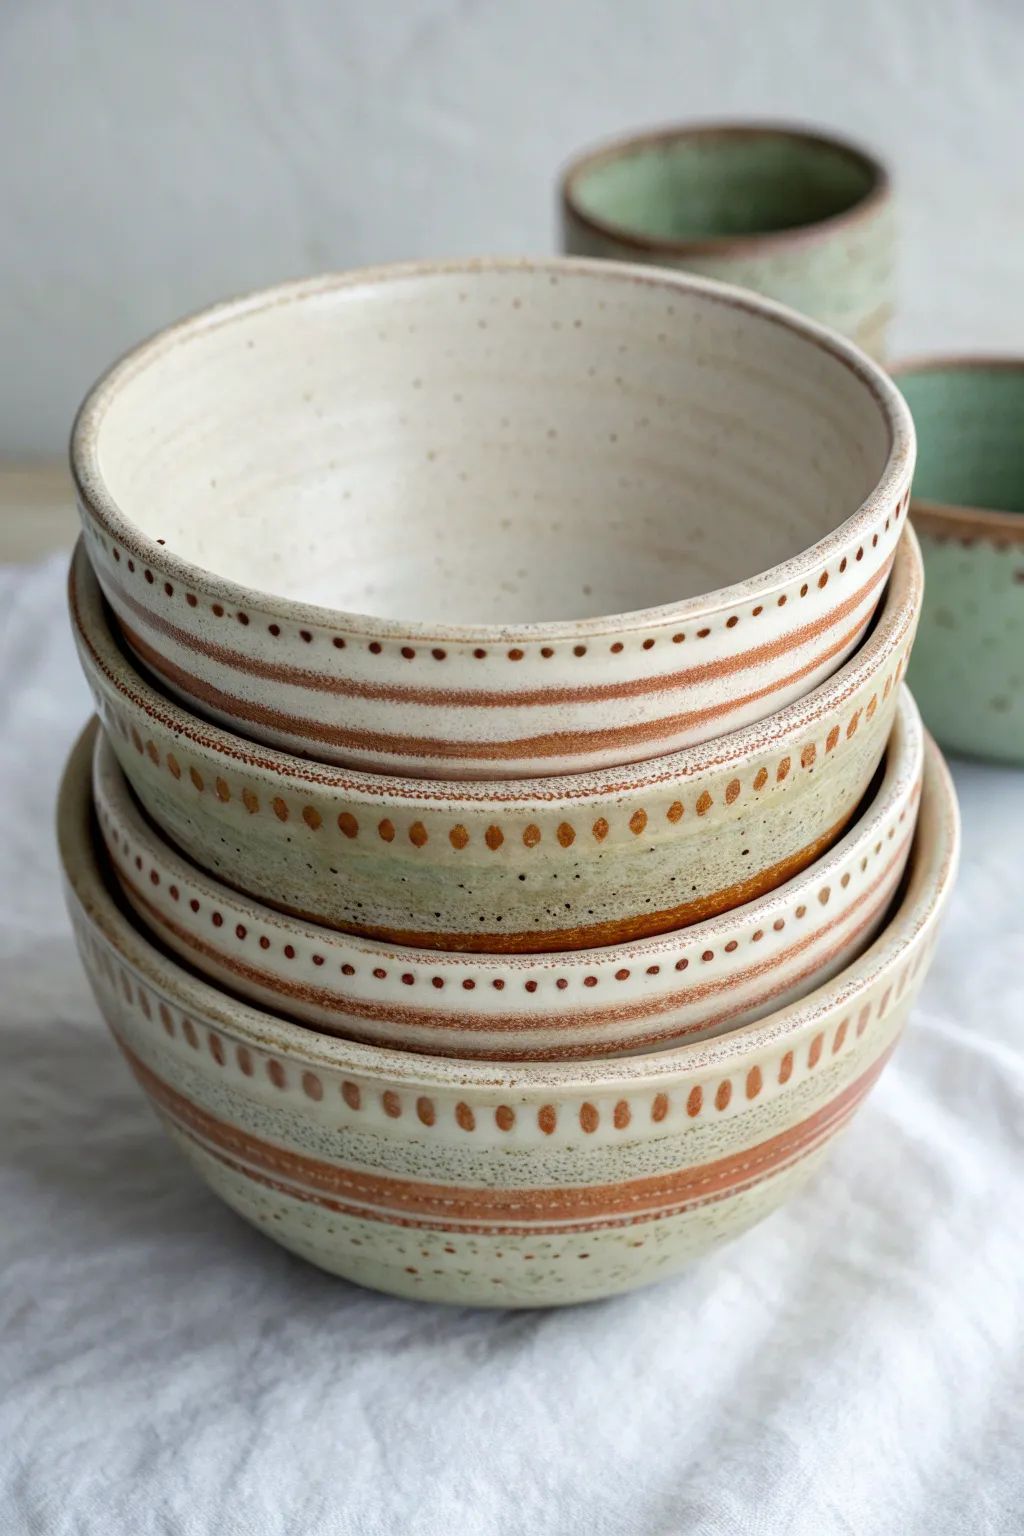
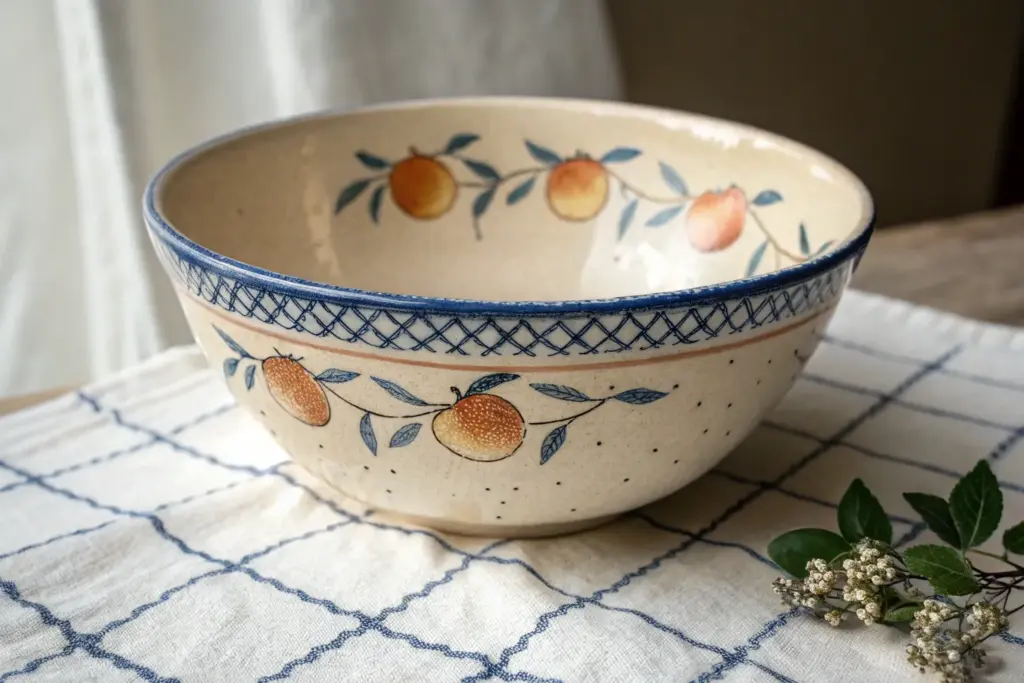
These charming nesting bowls combine the natural beauty of speckled stoneware with precise, repetitive decorative elements. The result is a cohesive set that feels both modern and handmade, featuring earthy terracotta-hued bands and delicate dot work against a creamy glaze.
Step-by-Step Tutorial
Materials
- Speckled buff stoneware clay (approx. 4 lbs total)
- Pottery wheel
- Throwing tools (sponge, wire cutter, rib, needle tool)
- Trimming tools
- Underglaze pencil or fineline applicator (terracotta/rust color)
- Small round paintbrush
- Iron oxide wash (or a rust-colored underglaze)
- Clear or transparent cream glaze (matte finish)
- Calipers (essential for sizing)
- Banding wheel
Step 1: Throwing the Set
-
Prepare your clay:
Wedging is crucial here. Divide your clay into four balls of decreasing weight (e.g., 1.5 lbs, 1.25 lbs, 1 lb, 0.75 lbs) to ensure a natural size progression for the nesting set. -
Throw the largest bowl:
Center the largest ball of clay on the wheel. Open it up and pull the walls into a simple, rounded U-shape. Aim for a rim that is slightly thickened and rounded, not sharp. -
Measure for nesting:
Once the first bowl is thrown, measure the interior width and height with calipers. This is your baseline. Write these measurements down or lock your calipers to the interior width. -
Throw the subsequent bowls:
Proceed to throw the next three bowls. As you shape each one, check with your calipers to ensure the *exterior* width of the new bowl is at least 1/2 inch smaller than the *interior* width of the previous bowl to allow for comfortable nesting. -
Refine the shape:
Use a flexible rib on the inside of each bowl to compress the clay and remove throwing lines if you want a smoother surface, though leaving faint spiral marks adds character to this rustic style. -
Drying to leather hard:
Set all four bowls aside to dry slowly. Cover them loosely with plastic so the rims don’t dry out before the bases are ready for trimming.
Wobbly Stripes?
If your painted bands look shaky, you aren’t spinning the banding wheel fast enough. Speed utilizes centrifugal force to keep your hand steady and the line straight.
Step 2: Trimming and Decorating
-
Trim the foot rings:
Once leather hard, center each bowl upside down on the wheel. Trim a tidy foot ring on each base. I find that mirroring the curve of the interior on the exterior creates the most pleasing weight. -
Clean the surface:
Wipe the exterior of the bowls with a slightly damp sponge to remove any burrs or rough crumbs of clay from the trimming process. -
Marking the bands:
Place a bowl on a banding wheel. While spinning it slowly, use a needle tool to very lightly score two horizontal lines around the belly of the bowl where your main colored band will go. -
Applying the oxide stripe:
Mix your iron oxide wash or rust underglaze. Using a medium brush and the banding wheel’s momentum, paint a solid, thick band between your scored lines. Don’t worry if it’s not perfectly opaque; transparency adds depth. -
Adding the dots:
Using a fine brush or a slip trailer bottle, carefully apply a row of small dots just above the painted band. Spacing is key here—keep them close but distinct. -
Adding the dash marks:
On the alternating bowls (as seen in the image), replace the dots with small vertical dashes. Use a short, confident brushstroke for these, creating a ‘stitch’ effect around the rim area. -
Creating the variation:
Change up the pattern slightly for each bowl in the stack. One might have dots on the rim; another might have dashes on the belly. This variety keeps the set interesting while the color palette unifies it. -
Bisque firing:
Once fully bone dry, load the bowls into the kiln for a bisque fire (usually Cone 04). Ensure they are not touching.
Pro Tip: Shrinkage Math
Remember clay shrinks about 12-14%. If you need specific nesting dimensions, calculate this shrinkage into your initial throwing size or the bowls might not fit.
Step 3: Glazing and Finishing
-
Wax the decoration:
If you want the raw clay texture of the painted bands to shine through, carefully apply wax resist over the oxide bands and dots. Alternatively, simply use a glaze that is translucent enough to show the design underneath. -
Apply the main glaze:
Dip each bowl into a clear or semi-transparent cream matte glaze. If you waxed the decoration, wipe off any glaze beads that stick to the resist. -
Wipe the feet:
Thoroughly sponge off any glaze from the foot rings to prevent the bowls from fusing to your kiln shelves. -
Glaze firing:
Fire the bowls to maturity (Cone 5 or 6 for most stoneware). Avoid nesting them during the glaze firing; they must be fired separately side-by-side. -
Sanding the bottoms:
After the kiln cools and the bowls are removed, use high-grit sandpaper or a diamond pad to smooth the unglazed foot rings so they won’t scratch your table.
Stack these beauties on your open shelving to add a touch of warm, artisan texture to your kitchen.