If you’re craving that extra-sweet kawaii vibe, clay is basically the perfect playground. I’m sharing a bunch of cute clay ideas that stay simple, mini, and totally doable—so you can make a whole little world of tiny smiling things.
Classic Kawaii Animal Charms With Dot Eyes
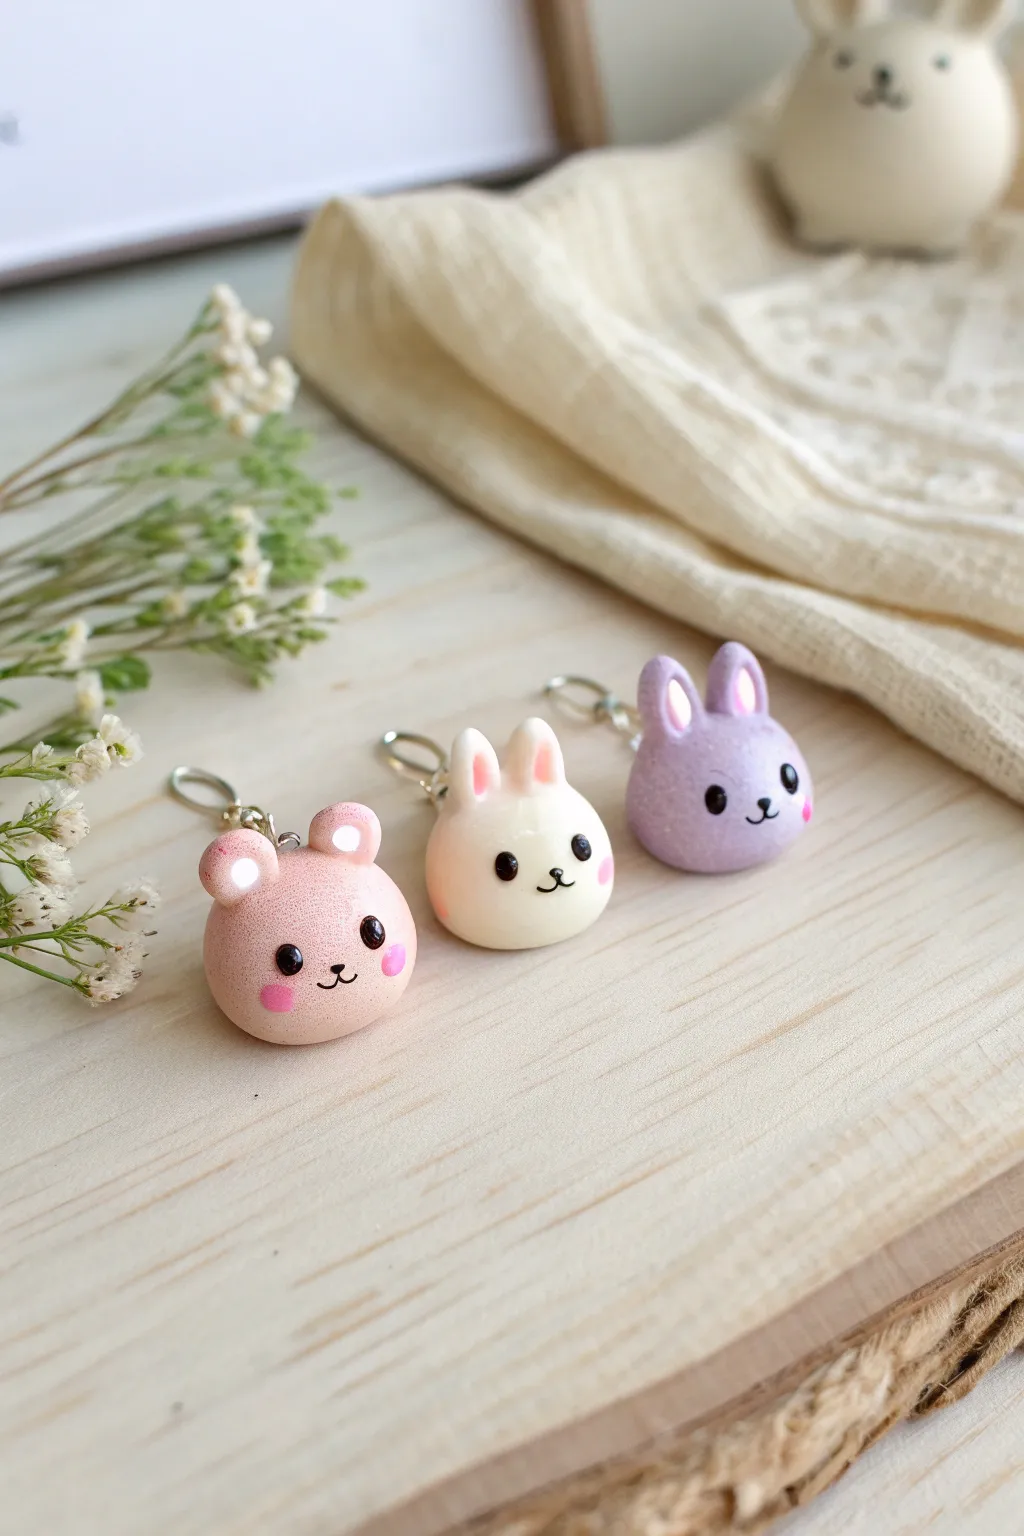
Create a set of irresistibly shiny and sweet animal charms that capture the essence of kawaii style. These round, pastel-colored friends feature simple dot eyes and a durable, glassy finish that makes them perfect for keychains or stitch markers.
How-To Guide
Materials
- Polymer clay (Pastel Pink, Cream/White, Pastel Purple)
- Black polymer clay or black acrylic paint
- UV resin or glossy polyurethane varnish
- Eye pins (silver or gold tone)
- Dotting tool or ball stylus (small and medium sizes)
- Clean ceramic tile or baking sheet
- UV lamp (if using resin)
- Isopropyl alcohol and q-tips (for cleaning)
- Needle tool or toothpick
Step 1: Shaping the Base
-
Condition the clay:
Start with your pastel pink clay. Knead it thoroughly in your hands until it is warm, pliable, and free of cracks. Repeat this process later for the cream and purple clays. -
Form the head:
Roll a small amount of clay (about the size of a large marble or a grape) into a smooth, perfect sphere. Place it gently on your work tile and press down just slightly to create a stable base so it doesn’t roll away. -
Insert hardware:
Take a metal eye pin and trim the stem to about half an inch if it’s too long. If you want extra security, bend the very tip of the wire into a tiny hook. -
Secure the pin:
Push the eye pin vertically into the top center of the sphere until the loop sits flush against the clay. Smooth the clay around the entry point with your finger or a silicone tool to seal it.
Sticky Situation?
If your resin finish feels tacky after curing, wipe it with alcohol or place it in direct sunlight for 10 minutes to finish the hardening process.
Step 2: Adding Ears & Features
-
Shape bear ears:
For the pink bear, roll two tiny balls of pink clay. Press them gently onto the top sides of the head using a dotting tool to blend the seam where the ear meets the head. -
Shape bunny ears:
For the cream and purple bunnies, roll two small teardrop shapes instead of balls. Flatten them slightly and attach them to the top of the head, pointing upwards. -
Indent the ears:
Using a small ball stylus, gently press into the center of each ear to create a little cup shape. This adds depth and character to the animals. -
Fill the inner ears:
Take extremely tiny bits of white or lighter pink clay and press them into the ear indentations you just made. Smooth them out so they look like soft inner ear fur.
Step 3: Creating the Kawaii Face
-
Mark eye placement:
Before adding clay or paint, use a needle tool to lightly mark two small dots where the eyes will go. I find this helps ensure symmetry before committing to the placement. -
Add the eyes:
Roll two minuscule balls of black clay and press them onto your marked spots. Flatten them gently so they become little discs. Alternatively, you can paint these on after baking. -
Add the snout area:
Roll a tiny oval of white clay for the snout (for the bunnies) or stick directly to drawing the mouth (for the bear) depending on your preference. The charms in the photo have the mouth painted directly on the face color. -
Clean up:
Before baking, wipe the surface of your charms very gently with a q-tip dipped in a little rubbing alcohol. This removes fingerprints and dust specks. -
Bake carefully:
Bake the charms according to your clay manufacturer’s instructions (usually 275°F/135°C for 15-30 minutes). Let them cool completely before handling.
Sparkle Upgrade
Mix a pinch of ultrafine iridescent glitter into your translucent clay or into the final resin coat for a subtle, magical shimmer effect.
Step 4: Detailing & Glazing
-
Paint the mouth:
Using a very fine detail brush or a toothpick dipped in black acrylic paint, draw a tiny ‘w’ shape or a simple curved smile between the eyes. -
Add rosy cheeks:
Dip a dotting tool into pink paint and add two sweet circles just below the outer corners of the eyes for blushing cheeks. -
Highlight the eyes:
With the smallest tip of a toothpick and white paint, add a tiny white reflection dot to the upper corner of each black eye. This brings them to life. -
Apply the glaze:
Once the paint is fully dry, coat the entire charm in UV resin. Use a brush or silicone tool to spread it evenly, ensuring no bare spots remain. -
Cure the finish:
Place the coated charms under a UV lamp for 2-3 minutes until the surface is hard, glassy, and tack-free. If using polyurethane varnish, apply two coats and let dry overnight.
Attach these glossy little friends to a zipper pull or jewelry chain to carry a bit of cuteness wherever you go


Chubby Kawaii Frogs In Pastel Greens
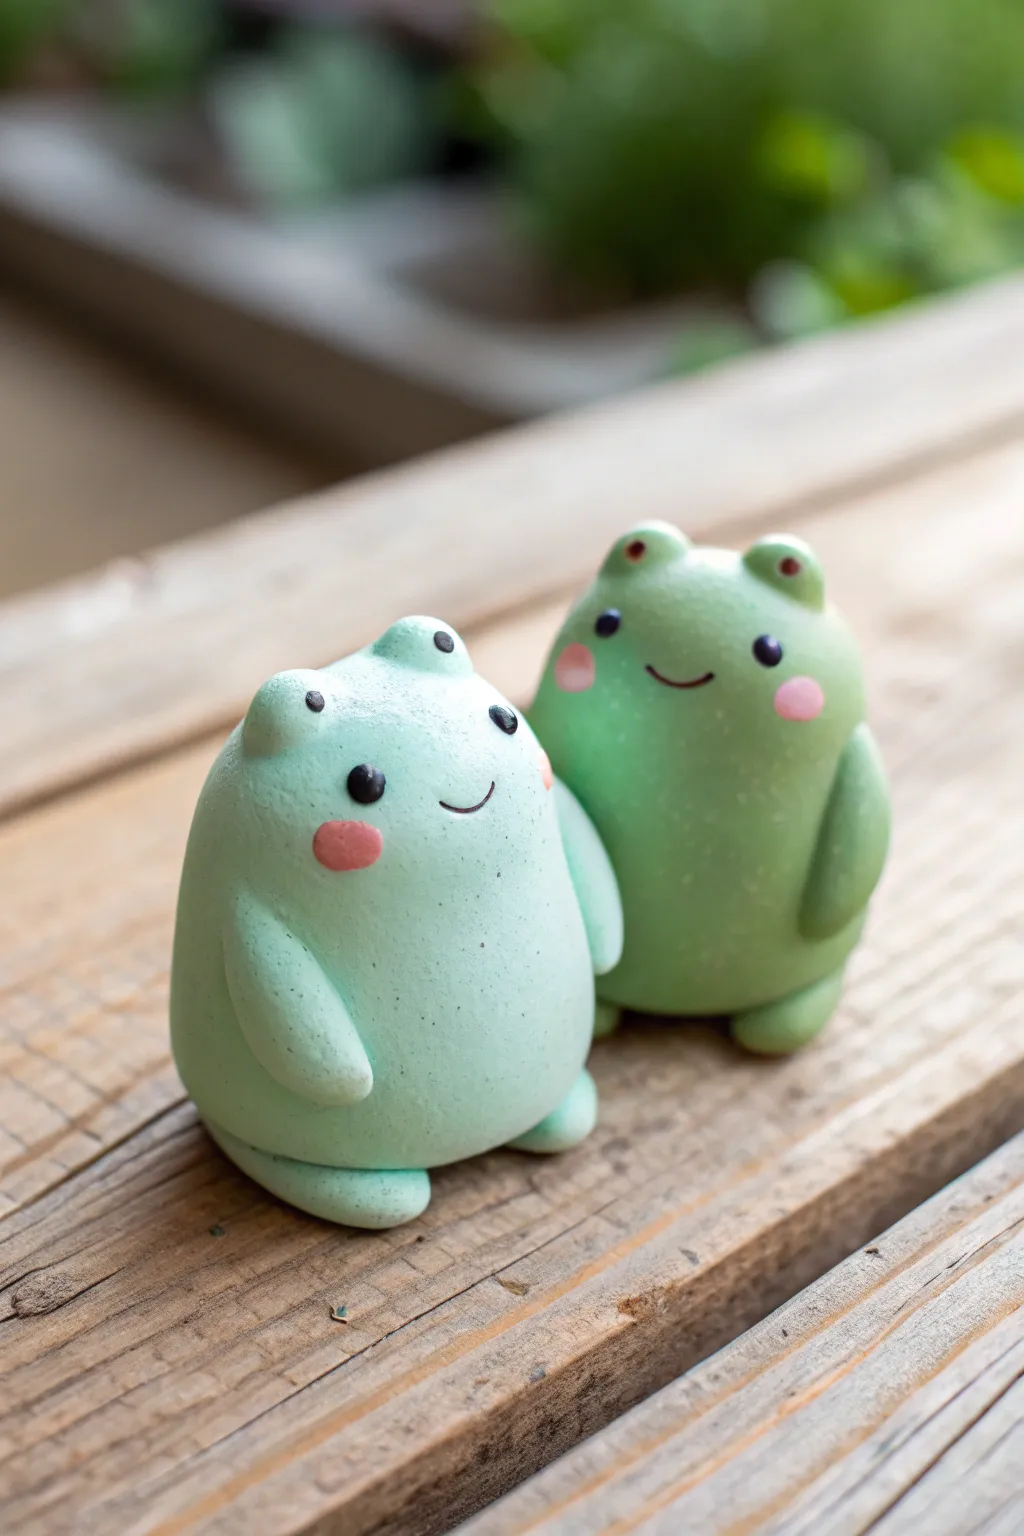
These delightfully chubby frog companions bring a soft touch of whimsy to any desk or shelf with their soothing pastel tones and minimalist expressions. Their rotund shapes and tiny, understated limbs make them a perfect beginner project for mastering smooth, seamless clay sculpting.
Step-by-Step
Materials
- Polymer clay in pastel mint green
- Polymer clay in pastel matcha/leaf green
- Polymer clay in pale pink (for cheeks)
- Black acrylic paint or a black POSCA marker
- Small ball tool or dotting tool
- Needle tool or toothpick
- Gloss glaze (optional for eyes)
- Matte varnish (optional for body)
- Aluminum foil (for core)
- Baking sheet and parchment paper
Step 1: Foil Core & Main Body
-
Create a foil base:
Crumple a small piece of aluminum foil into a tight, egg-shaped ball about the size of a walnuts. This saves clay and prevents the frog from being too heavy. -
Condition the clay:
Take your mint green block and knead it thoroughly in your hands until it becomes soft and pliable. Warm clay is much easier to smooth later. -
Cover the core:
Flatten the conditioned clay into a pancake and wrap it completely around your foil egg. Roll it gently between your palms to smooth out any seams until you have a perfect, chubby teardrop shape. -
Shape the bottom:
Gently tap the wider bottom of the teardrop against your work surface to create a flat base so the frog sits upright without wobbling. -
Repeat for the friend:
Do the exact same process with the matcha green clay to create the second frog body.
Clean Clay Pro Tip
Keep baby wipes handy! Clean your hands thoroughly between switching from the darker matcha green to the lighter mint to avoid color contamination.
Step 2: Adding Features & Limbs
-
Form the eye sockets:
Using two tiny balls of the same body color clay, attach them to the top of the head for the eye bumps. Blend the bottom edges seamless into the head using your finger or a silicone tool. -
Make the arms:
Roll two small sausage shapes of green clay, slightly tapered at one end. These should be short and stubby to match the chubby aesthetic. -
Attach the arms:
Press the arms onto the sides of the body, curving them slightly forward. Blend the shoulder connection point upwards so it disappears into the body mass. -
Create the feet:
Roll two small flattened ovals for the feet. Slide them under the front of the body so just the tips are peeking out. -
Add rosy cheeks:
Take two tiny specks of pale pink clay, roll them into balls, and flatten them into thin discs. Press these onto the face area, slightly below where the eyes will go.
Step 3: Finishing Touches
-
Texture check:
Inspect your frogs for fingerprints. I like to use a little baby oil on my finger to buff away any stray prints before baking. -
Bake the frogs:
Place the frogs on parchment paper and bake according to your clay manufacturer’s instructions (usually 275°F/135°C for 15-30 minutes). -
Cool down:
Let the figures cool completely before painting; painting on hot clay can make the paint dry clumpy. -
Paint the eyes:
Using a dotting tool dipped in black paint (or a marker), place two widely spaced dots on the front of the face, aligned under the eye bumps. -
Draw the smile:
With a fine needle tool or a very thin brush, paint a tiny, shallow ‘u’ shape between the blush marks for the mouth. -
Add highlights:
Once the black paint is dry, you can add a tiny white dot to the eyes for extra sparkle, though the original look is simple matte black. -
Seal the work:
Apply a matte varnish to the body if you want to protect the surface, or leave it natural for that soft clay texture.
Dust Trouble?
If dust gets stuck in your clay, dip a Q-tip in nail polish remover (acetone) and gently rub the raw clay surface to dissolve the top layer and remove debris.
Now you have a pair of adorable amphibious friends ready to keep you company on your desk


Kawaii Bubble Tea Cups With Tiny Faces
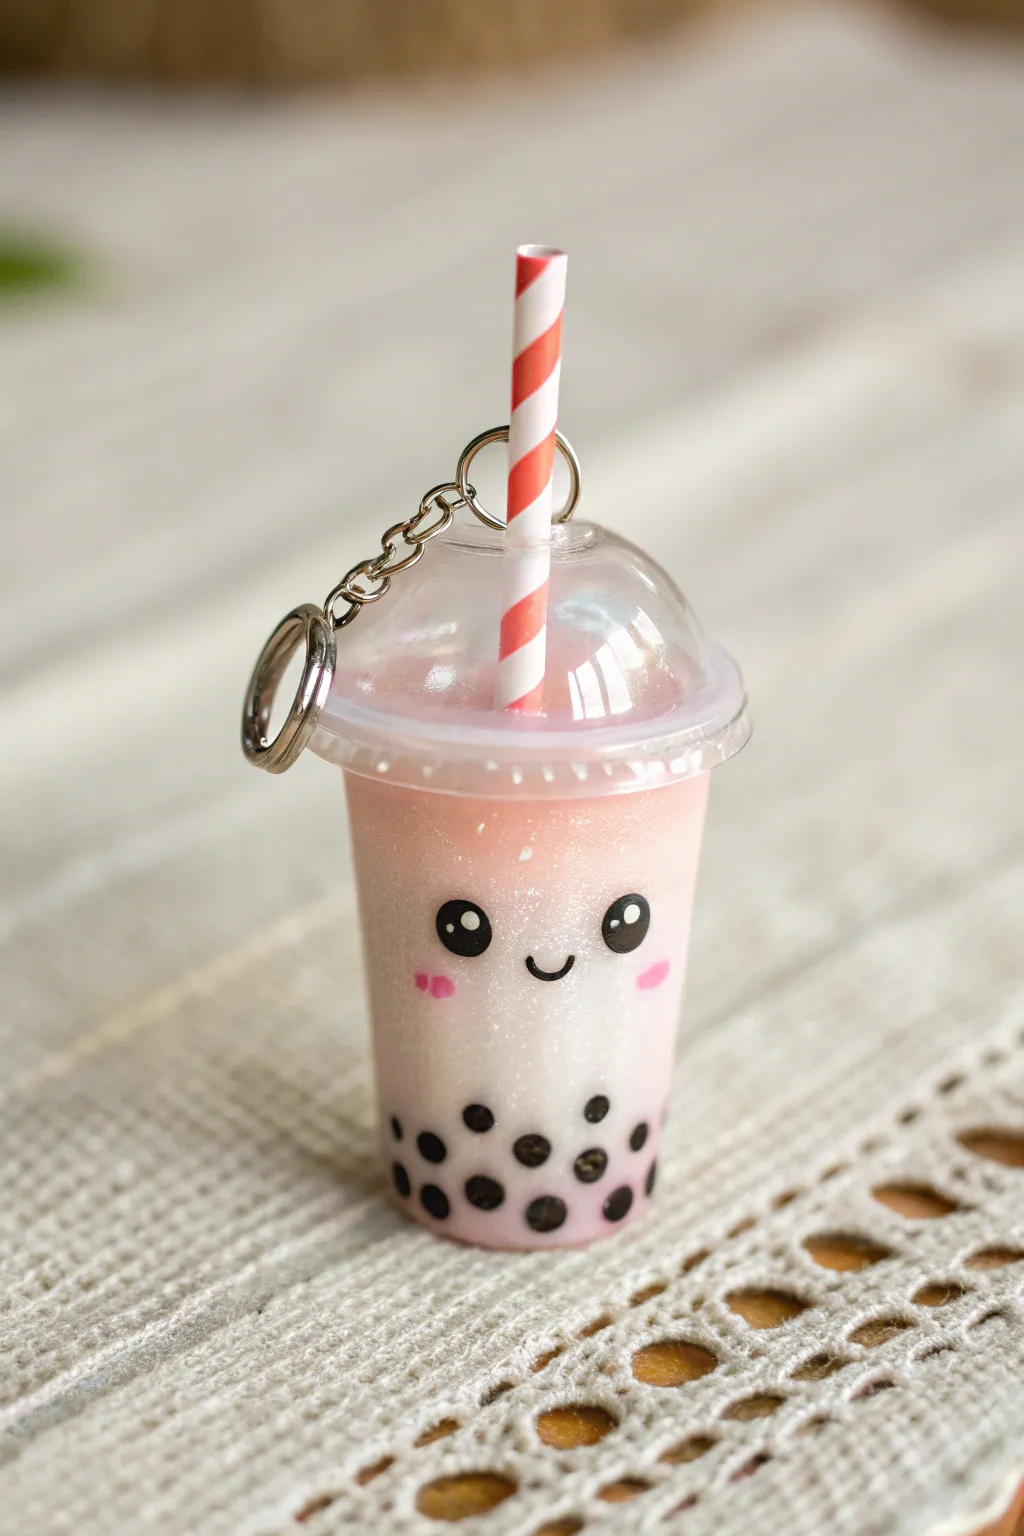
This adorable miniature bubble tea cup features a dreamy pink gradient, sparkling glitter inclusions, and a tiny, happy face. With its realistic straw and boba pearls, it makes for a perfectly sweet keychain accessory to tote around.
Step-by-Step
Materials
- Miniature plastic bubble tea cup and dome lid (with keychain loop)
- UV resin (clear)
- UV lamp
- Pink mica powder or resin dye
- Fine iridescent glitter
- Black polymer clay (for pearls)
- Miniature paper straw (red and white stripe)
- Black acrylic paint
- Pink acrylic paint
- Fine detail paintbrush or dotting tool
- Toothpick
- Jump ring and keychain hardware
- Oven (for clay)
Step 1: Preparing the Inclusions
-
Make the boba pearls:
Roll tiny balls of black polymer clay, approximately 2-3mm in diameter. You will need roughly 15-20 pearls to fill the bottom area of the cup properly. -
Bake the clay:
Place your tiny clay pearls on a baking sheet and bake according to the package instructions. Since they are very small, keep a close eye on them to prevent burning. -
Size the straw:
Take your miniature paper straw and cut it to a length that will allow it to stick out of the dome lid comfortably, roughly 1.5 inches depending on your cup size.
Step 2: Creating the Drink
-
Mix the first layer:
In a small mixing cup, combine clear UV resin with a tiny amount of pink mica powder and a generous pinch of fine iridescent glitter. Keep the pink very pale and translucent. -
Place the pearls:
Pour a small amount of clear resin into the bottom of the plastic cup. Drop in your baked clay pearls, using a toothpick to push some against the walls so they are clearly visible from the outside. -
Cure the base:
Cure this bottom layer under your UV lamp for about 60 seconds to lock the pearls in place. This prevents them from floating up later. -
Pour the pink gradient:
Pour your glittery pink resin mix into the cup, filling it about 3/4 of the way full. I prefer to tilt the cup slightly while pouring to avoid trapping large air bubbles. -
Create the milky effect:
To get that ‘milk tea’ look, you can add a drop of white opaque resin dye to the top portion of the pink mixture in the cup and swirl it gently with a toothpick before curing. -
Insert the straw:
Place your cut straw into the center of the resin. You may need to hold it steady or prop it up. -
Full cure:
Cure the entire cup under the UV lamp for 2-3 minutes until completely hard. Ensure the UV light reaches all angles.
Sticky Resin?
If your resin feels tacky after curing, wipe the surface with rubbing alcohol or place the piece in direct sunlight for 15 minutes to finish the hardening process.
Step 3: Assembly and Details
-
Attach the lid:
Apply a thin rim of clear UV resin to the top edge of the cup. Slide the dome lid over the straw and press it firmly onto the cup. -
Secure the lid:
Flash cure the connection point for 30 seconds to bond the lid to the cup permanently. -
Paint the eyes:
Using a fine paintbrush or a large dotting tool, dab two circles of black acrylic paint on the front of the cup for the eyes. Add a small ‘U’ shape between them for the smile. -
Add eye highlights:
Once the black paint is dry, use a toothpick to add a tiny white dot inside each black eye circle to give it that sparkling ‘kawaii’ look. -
Blush cheeks:
Dip a small dotting tool into pink paint and add small oval blush marks underneath each eye. -
Seal the face:
Carefully brush a very thin layer of clear UV resin over just the painted face area and cure immediately. This protects the paint from scratching off. -
Attach hardware:
Open a jump ring using pliers, thread it through the loop on the dome lid, and attach your keychain clasp. Close the jump ring securely.
Shake It Up
Instead of curing the pink resin solid, fill the cup with baby oil and seal the lid with UV resin to create a ‘shaker’ charm where the pearls and glitter move.
Clip this sparkling charm onto your bag or keys for a daily dose of sweetness


Kawaii Donut Charms With Sprinkles And Blush
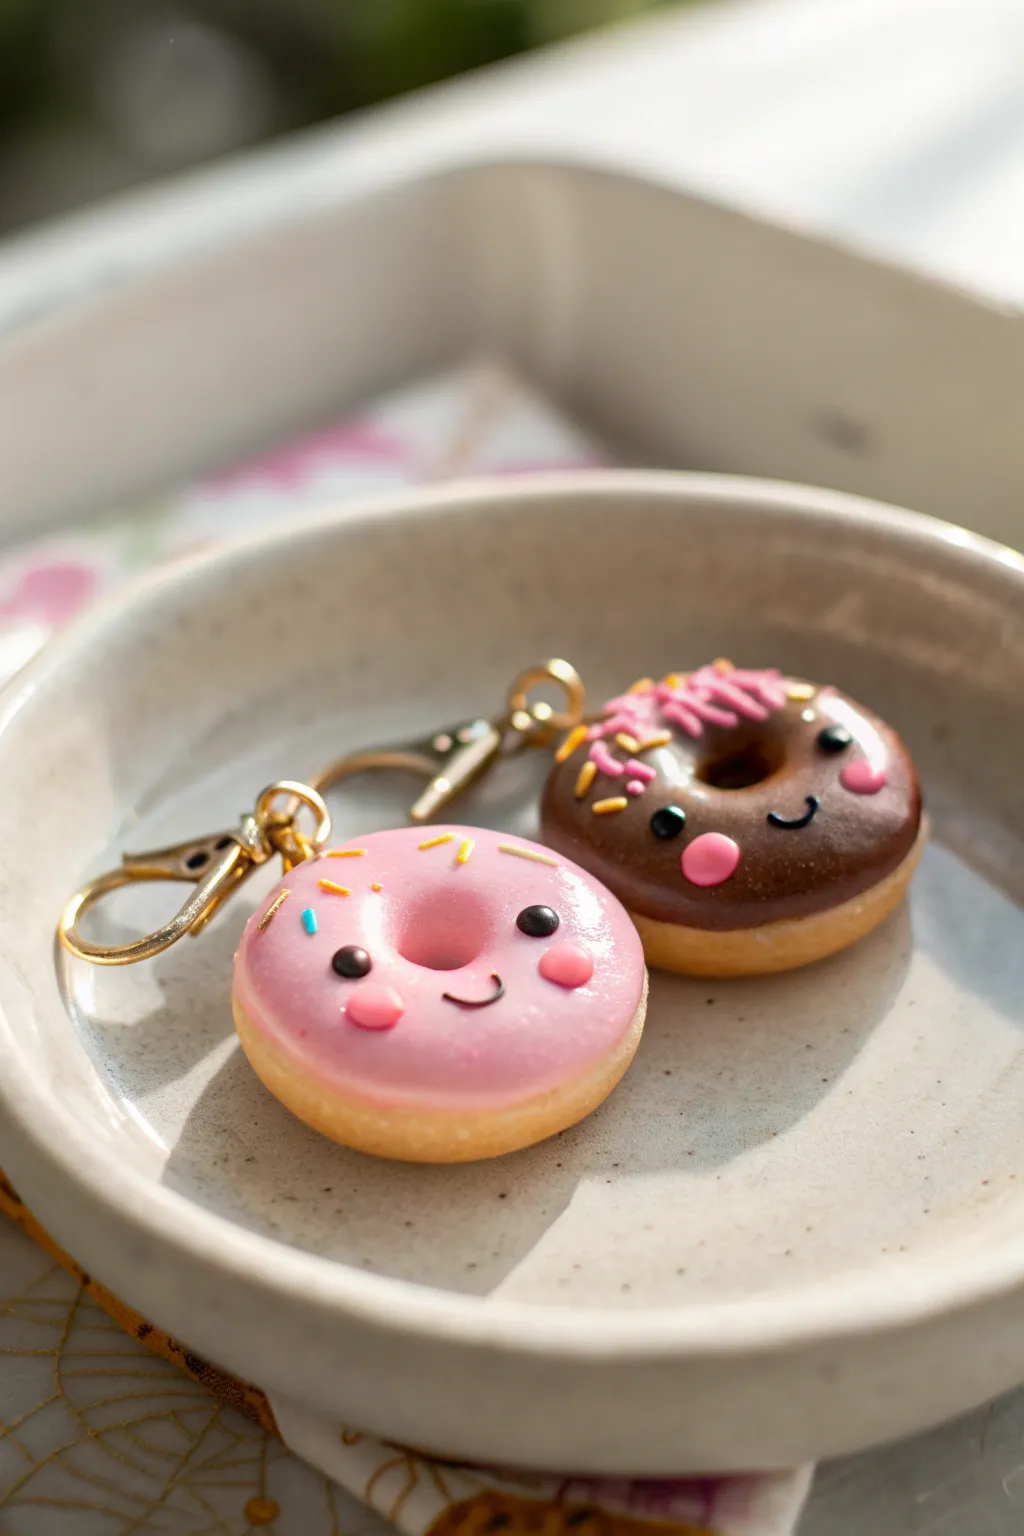
Create this irresistibly sweet pair of donut charms featuring a perfect glossy glaze and adorable blushing faces. These petite polymer clay treats strike the right balance between simplicity and charm, making them an ideal project for creating matching keychains or zipper pulls.
Detailed Instructions
Materials
- Polymer clay (Tan/Beige, Pink, Chocolate Brown, Black)
- Liquid polymer clay (Translucent or mixed with clay)
- Gloss glaze or UV resin
- Ball stylus tool
- Needle tool or toothpick
- Small round cutter (approx. 1 inch)
- Tiny round cutter (for the donut hole)
- Gold screw eye pins (2 small)
- Gold lobster clasps (2)
- Jump rings
- Soft pastel chalks (golden brown/orange for shading)
- Soft brush
- Oven for curing
Step 1: Shaping the Base
-
Condition the dough:
Start by conditioning your tan or beige polymer clay until it is soft and pliable. Roll it into a smooth ball free of any cracks. -
Form the shape:
Flatten the ball gently into a thick disc shape. Use your fingers to round off the edges so it looks like a puffy, baked pastry rather than a sharp cylinder. -
Create the hole:
Use a tiny round cutter to remove the center, or poke a hole through the middle with a large tool and widen it by gently rotating the tool. -
Texture and shade:
Gently press a toothbrush or sandpaper against the surface to create a bread-like texture. Using a soft brush, dust golden brown pastel chalk around the edges to give it a ‘baked’ look. -
Repeat for the pair:
Make a second donut base exactly like the first so you have a matching set ready for glazing.
Step 2: Applying the Glaze
-
Mix the icing:
Mix liquid polymer clay with a small amount of solid pink clay for the strawberry donut, and chocolate brown clay for the chocolate one. You want a consistency that flows slowly but holds its shape. -
Drizzle the pink:
Apply the pink mixture onto the top of the first donut. Use a needle tool to drag the icing down slightly in wavy patterns to look like a natural drippy glaze. -
Drizzle the chocolate:
Repeat the process with the chocolate mixture on the second donut, ensuring the ‘baked’ tan dough is still visible around the bottom rim. -
Add basic sprinkles:
Roll extremely thin snakes of yellow and pink clay. Cut them into tiny segments and place them gently onto the wet liquid clay using a needle tool.
Glaze Too Runny?
If your liquid clay glaze is dripping off the donut too fast, let it sit on a piece of paper for 10 minutes to leach out some oils, or mix in a tiny bit more solid clay to thicken it.
Step 3: Adding the Kawaii Face
-
Place the eyes:
Roll two minuscule balls of black clay for each donut. Place them wide apart on the glaze, pressing them in slightly so they bond well. -
Add eye highlights:
Add a tiny speck of white paint or a microscopic ball of white clay to the upper corner of each black eye for that sparkling look. -
Create the smile:
Roll a very thin thread of black clay. Cut a tiny U-shape and position it centered between the eyes for the smile. -
Cheeky blush:
Flatten two small balls of pink clay into discs. Press these onto the donut cheeks, just below the eyes. I find this 3D blush adds more character than paint. -
Insert hardware:
Before baking, screw a small gold eye pin into the top of each donut. Ensure it goes deep enough to be secure but doesn’t poke through the center hole.
Pro Tip: Realistic Texture
For ultra-realistic pastry texture, use an old toothbrush to gently stipple the tan dough area *before* baking. Avoid texturing the area where the face will go so it stays smooth.
Step 4: Finishing Touches
-
Bake carefully:
Bake the charms according to your clay manufacturer’s instructions (usually 275°F/135°C for 15-30 minutes). -
Cool down:
Let the donuts cool completely before handling. They will be slightly soft when hot but harden as they cool. -
Add the shine:
Apply a coat of UV resin or glossy polyurethane varnish over the icing area (including the eyes and blush) to make it look wet and sugary. Cure under UV light or let dry. -
Assembly:
Use pliers to open a jump ring, attach your gold lobster clasp to the eye pin, and close the ring securely.
Now you have a delightful set of sweet accessories ready to brighten up your keychain or gift to a friend

The Complete Guide to Pottery Troubleshooting
Uncover the most common ceramic mistakes—from cracking clay to failed glazes—and learn how to fix them fast.
Kawaii Fruit Slices With Happy Faces
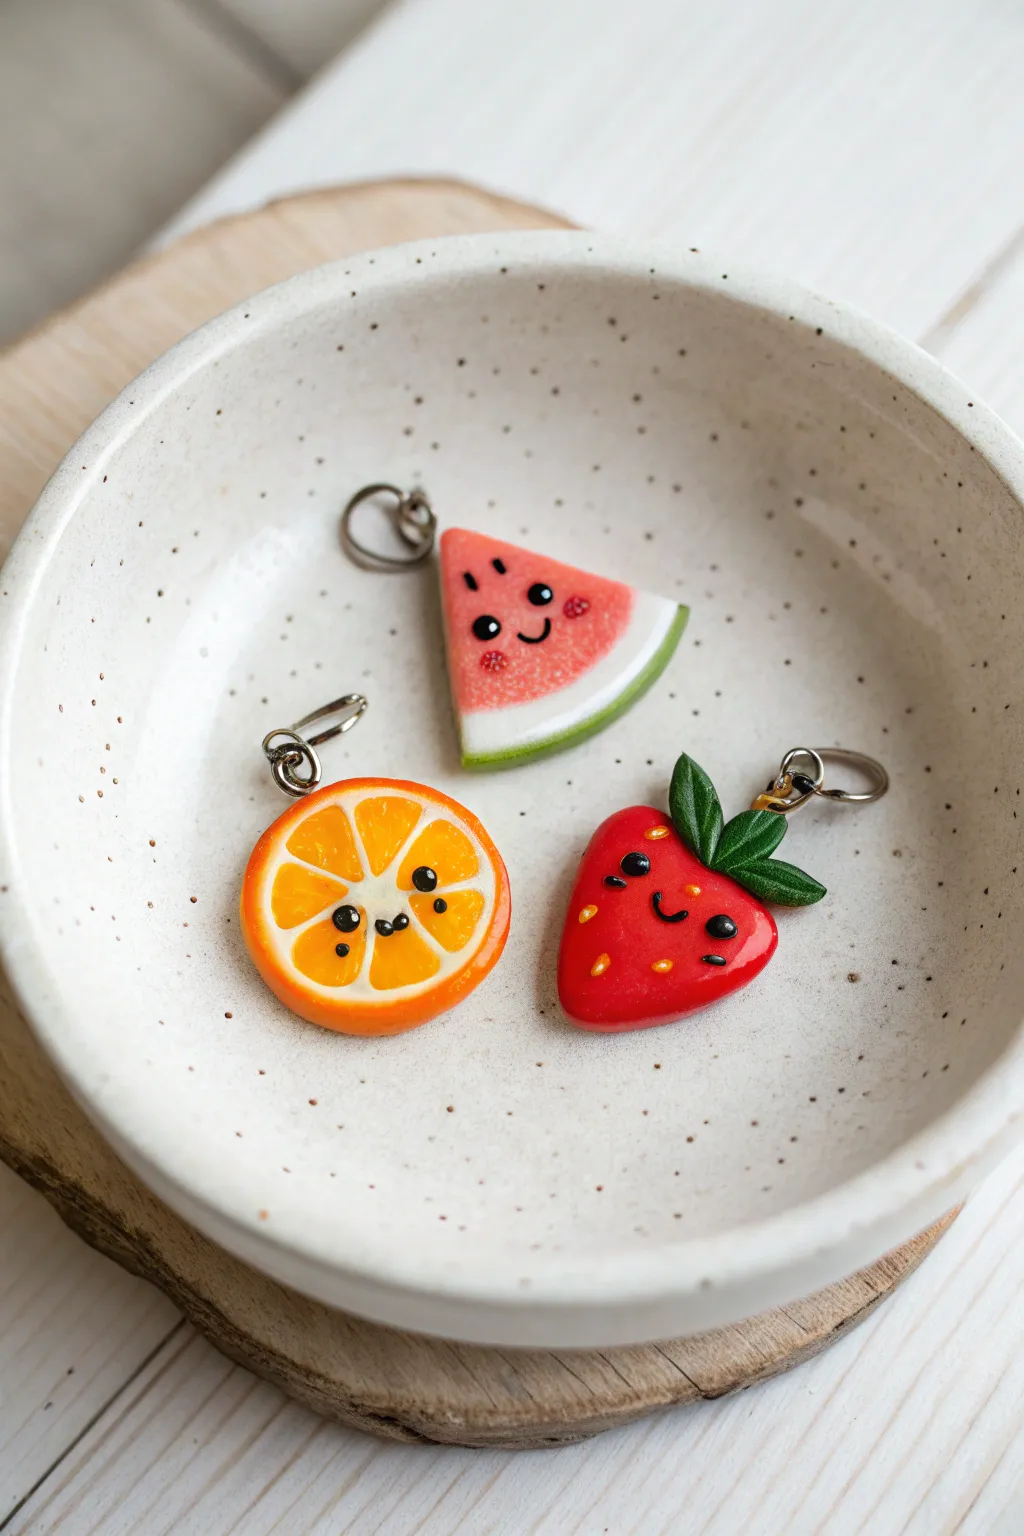
Bring a burst of sweetness to your jewelry collection with these adorable, smiling fruit charms. This trio features a juicy watermelon slice, a zesty orange, and a plump strawberry, all crafted from polymer clay with charming kawaii faces.
Detailed Instructions
Materials
- Polymer clay (red, white, green, orange, translucent orange, black, pink)
- Liquid polymer clay (translucent)
- Eye pins or screw eyes
- Jump rings
- Pliers
- Needle tool or toothpick
- Dotting tool (small)
- X-acto knife or clay blade
- Gloss glaze or UV resin (optional)
- Rolling pin or pasta machine
Step 1: Creating the Watermelon Slice
-
Prepare the core:
Start by conditioning a small ball of red clay mixed with a tiny bit of translucent clay to give it a juicy look. Shape this into a thick triangle with rounded corners. -
Add the rind layers:
Roll out a very thin sheet of white clay and a slightly thicker sheet of light green clay. Wrap the white clay around the bottom curved edge of your red triangle, trimming the excess. -
Green skin:
Apply the green strip over the white layer, smoothing the seams gently with your finger so the layers bond without distorting the shape. -
Texturing:
Use a needle tool or an old toothbrush to gently tap the red surface, creating a realistic, porous fruit texture.
Fixing “Dirty” Clay
White clay picks up dust easily. Keep baby wipes nearby to clean your hands and tools often. If you see lint on raw clay, remove it gently with a piece of scotch tape or a cotton swab dipped in rubbing alcohol.
Step 2: Sculpting the Orange Slice
-
Make the cane center:
Roll a log of translucent orange clay. Wrap this log in a thin sheet of white clay. -
Form the segments:
Gently stretch and reduce this log, then cut it into 8 equal lengths. Pinch each length into a teardrop shape to resemble orange segments. -
Assemble the slice:
Arrange the teardrops in a circle, points facing inward. Fill the very center with a tiny snake of white clay to hold them together. -
Wrap the rind:
Wrap the entire circle in a thin layer of white clay, followed by a thicker layer of solid orange clay for the peel. Gently roll the whole cane to compress the layers. -
Cut the slice:
Use your sharpest blade to slice a thick coin from your cane. This is your charm base.
Pro Tip: Juicy Texture
For the watermelon and orange, mix a tiny amount of translucent clay into your fruit colors. This adds depth that mimics real fruit flesh much better than solid opaque colors alone.
Step 3: Shaping the Strawberry
-
Base shape:
Roll a ball of red clay and gently taper one end to create a soft, rounded triangle or strawberry shape. Flatten it slightly so it isn’t too bulky. -
Leafy top:
Create three small teardrops from green clay. Flatten them and use a needle tool to impress a central vein on each leaf. Press these onto the top, wide part of the strawberry. -
Seed details:
Using a needle tool, poke tiny, shallow divots all over the red surface. Make tiny specks of yellow or light orange clay and press them into these indentations.
Step 4: Bringing Them to Life
-
Adding the faces:
For all three fruits, use a small dotting tool dipped in black liquid clay (or tiny balls of black clay) to place two eyes halfway down the fruit. -
Sweet smiles:
Roll extremely thin snakes of black clay for the mouths. Curve them into a ‘U’ shape and press them gently between the eyes using a needle tool. -
Blushing cheeks:
Take the tiniest amount of pink clay, or use a dry paintbrush with pink chalk pastel, to add rosy cheeks just under the eyes for that extra kawaii effect. -
Attaching hardware:
Insert an eye pin or screw eye into the top of each fruit. I usually add a dab of liquid clay to the pin’s shaft before inserting it to ensure it bakes in securely. -
Baking:
Bake the charms according to your clay manufacturer’s instructions, typically around 275°F (130°C) for 15-20 minutes. -
Finishing touch:
Once cooled, coat the fruits with a gloss glaze or UV resin to make them look wet and juicy. Attach a jump ring to the eye pin to finish.
Now you have a trio of fruity friends ready to turn into earrings, keychains, or stitch markers
Kawaii Mushroom Friends With Chibi Proportions
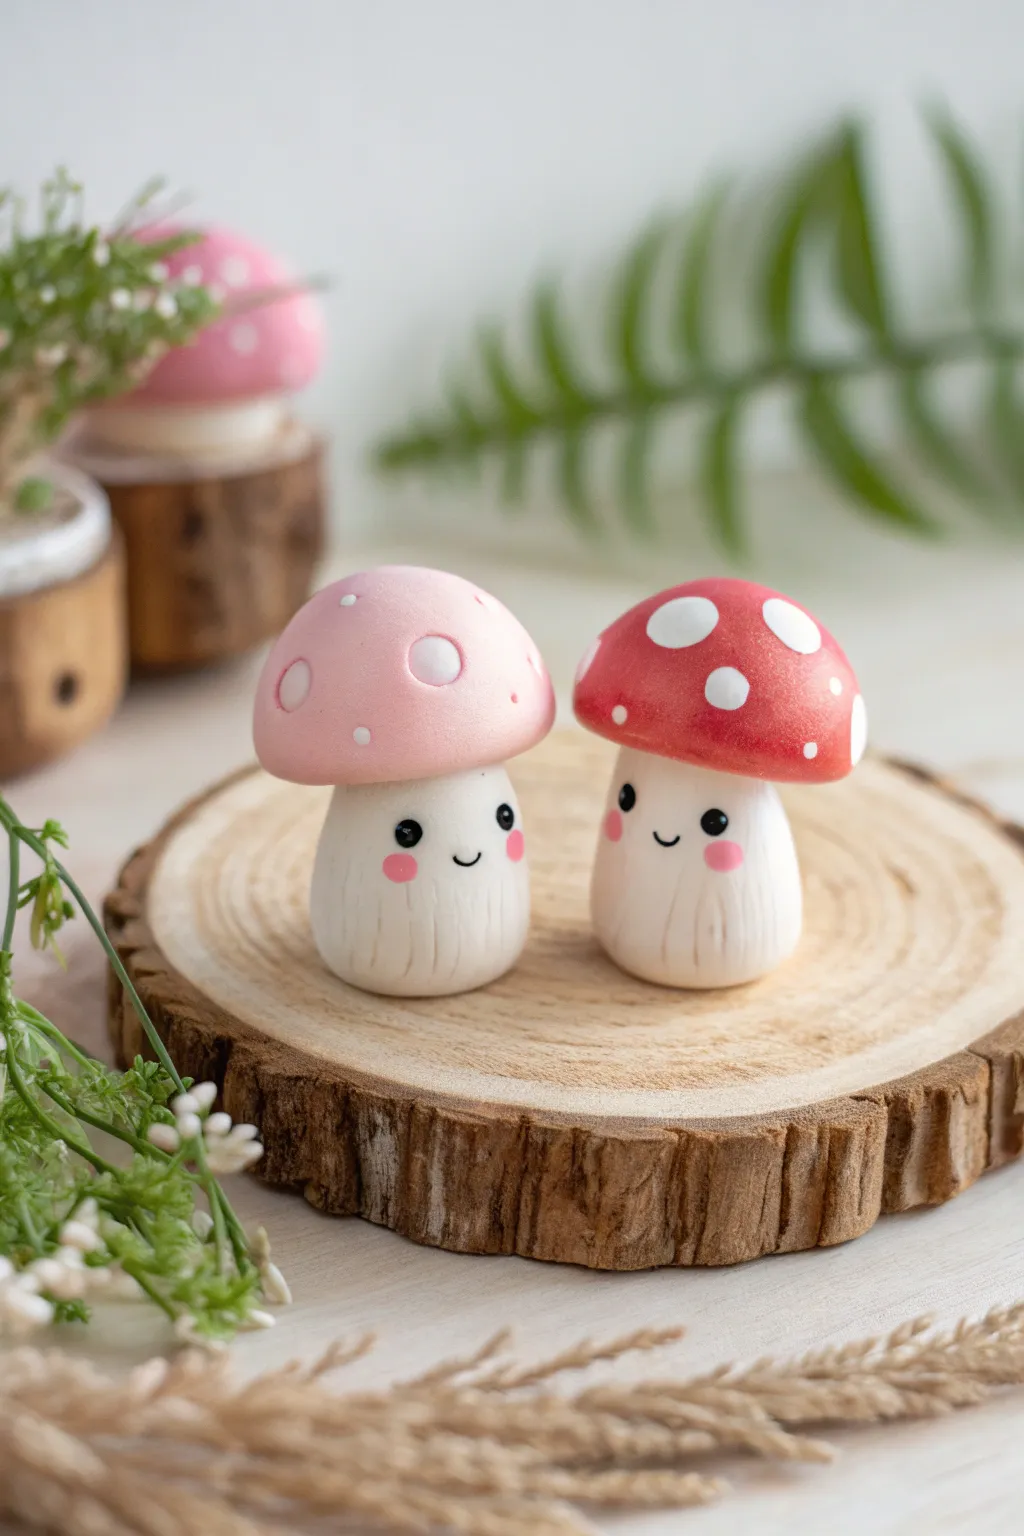
These delightfully chubby mushroom figures feature pastel and vibrant caps sitting atop delightfully squat, textured stems. Their tiny, simple faces bring a heartwarming dose of personality to any desk or shelf display.
Detailed Instructions
Materials
- Polymer clay (white, baby pink, bright red, black)
- Acrylic rolling pin
- Dotting tools or ball stylus (various sizes)
- Needle tool or toothpick
- Soft pastel chalks (pink/red) for blush
- Small soft paintbrush
- Liquid clay (optional, for bonding)
- Gloss glaze or polyurethane varnish
Step 1: Shaping the Stems
-
Prepare the White Clay:
Start by conditioning your white polymer clay until it is soft and pliable. Roll two equal-sized balls, roughly 1 inch in diameter, to serve as the base for your mushroom stems. -
Form the Base Shape:
Gently roll each ball into a short, stout cylinder or a gumdrop shape. You want the base to be slightly wider than the top to give them that cute, stable ‘chibi’ look. -
Adding Texture:
Using a needle tool or a toothpick, gently press vertical lines all around the sides of the white stems. Vary the length and depth of these lines slightly to create a natural stalk texture, but leave the very top smooth where the cap will sit.
Clean Clay Pro Tip
Always use baby wipes or wash your hands thoroughly between handling red/black clay and white clay to prevent accidental color transfer and staining.
Step 2: Creating the Caps
-
Rolling the Colors:
Condition a piece of baby pink clay and a piece of bright red clay. Roll each into a ball slightly larger than your white stem balls. -
Shaping the Domes:
Press your thumb into the center of the colored ball while cupping the outside with your fingers to hollow it out, creating a smooth dome shape. Check the fit against the stems often; they should overhang slightly like an umbrella. -
Adding the Polka Dots:
Roll out a very thin sheet of white clay. Use a small round cutter or a straw to punch out tiny circles, or simply roll tiny balls of white clay and flatten them. -
Applying the Pattern:
Press the white circles gently onto the pink and red caps. For a smooth finish, I like to gently roll the entire cap in my palm again to embed the dots flush with the surface.
Step 3: Assembly and Features
-
Attach Cap to Stem:
Place the caps onto the textured stems. If the clay feels dry, add a small drop of liquid clay to the connection point to ensure a strong bond during baking. -
Creating the Eye Sockets:
Use a medium-sized dotting tool to press two small indentations into the white stem where you want the eyes to go. Placing them lower on the stalk usually makes them look cuter. -
Inserting the Eyes:
Roll tiny balls of black clay and press them into the sockets. Add microscopic specs of white clay to the upper corners of the black eyes for that lively ‘sparkle’ effect. -
Drawing the Smile:
Use the very tip of your needle tool to carefully carve a tiny, shallow ‘U’ shape between the eyes for the mouth. Keep the touch light so you don’t drag the clay. -
Applying Blush:
Scrape a little pink soft pastel chalk into a powder. Use a soft brush to gently dust rosy cheeks right under the eyes for a soft, airbrushed look.
Level Up: Forest Bases
Glue your finished mushrooms onto small wooden craft slices and glue dried moss around the bottom for an instant mini-diorama vibe.
Step 4: Finishing Up
-
Baking:
Bake the figures according to your clay manufacturer’s instructions (usually 275°F/135°C for 15-30 minutes). Let them cool completely before handling. -
Glazing:
Once cool, apply a coat of gloss glaze to the colored caps and the black eyes to make them shine. Leave the white stems matte for a nice contrast in texture.
Place these cheerful little fungi among your house plants or on a windowsill to brighten your day


What Really Happens Inside the Kiln
Learn how time and temperature work together inside the kiln to transform clay into durable ceramic.
Kawaii Stars And Clouds In Dreamy Pastels
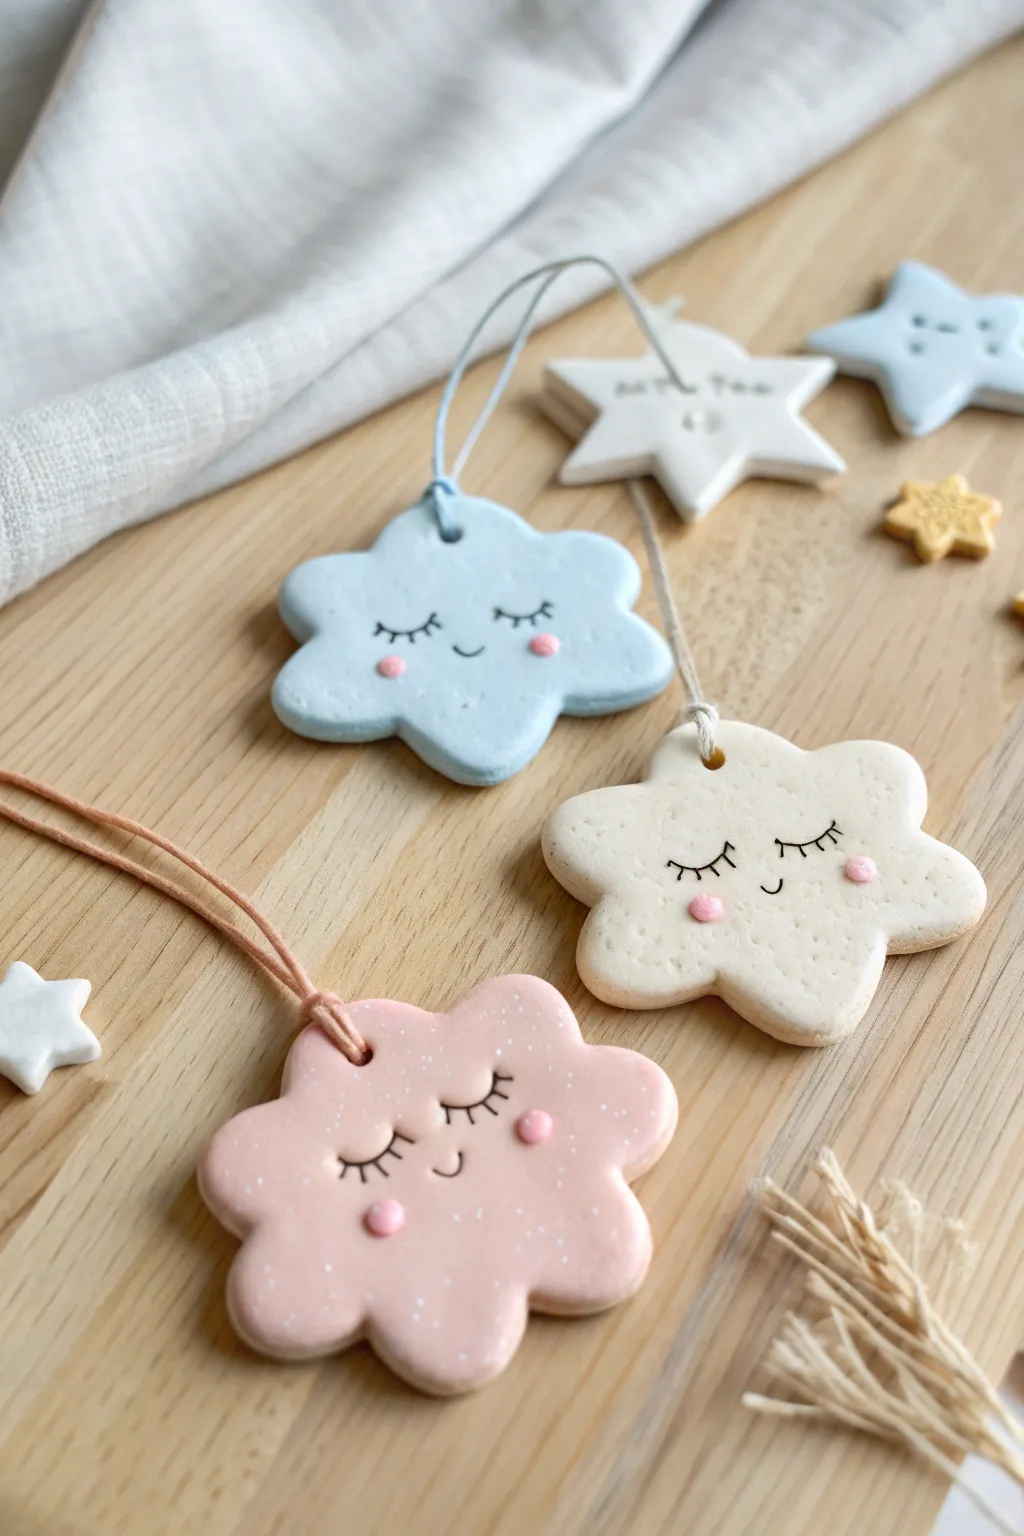
Drift away into a world of crafting whimsy with these soft, sleepy cloud ornaments. Finished in gentle shades of blue, cream, and pink with speckled details and blushing cheeks, they make the perfect additions to a nursery or a thoughtful handmade gift.
Step-by-Step Tutorial
Materials
- Polymer clay or air-dry clay (pastel blue, pastel pink, white)
- Rolling pin
- Cloud-shaped cookie cutter (approx. 2-3 inches)
- Straw or toothpick (for the hole)
- Fine grit sandpaper
- Acrylic paints (black, pink, white)
- High-gloss varnish or matte sealer (optional)
- Fine liner paintbrush or black fine-tip marker
- Old toothbrush (for speckling)
- Cord or twine for hanging
Step 1: Shaping the Clouds
-
Condition the Clay:
Begin by kneading your chosen clay colors until they are soft, pliable, and free of cracks. If you are mixing custom pastel shades, do this now by blending small amounts of colored clay into white clay until you achieve a soft dreamlike hue. -
Roll it Out:
Use your rolling pin to flatten the clay to an even thickness of about 1/4 inch (6mm). Using depth guides or playing cards stacked on either side can help ensure the surface is perfectly level. -
Cut the Shapes:
Press your cloud-shaped cookie cutter firmly into the rolled clay. If the clay sticks, you can dip the cutter in a bit of cornstarch or water first. Gently lift the cutter and push the clay shape out carefully. -
Smooth the Edges:
Dip your finger in a little bit of water and run it gently around the raw edges of your clay cloud to smooth out any sharp cuts or stray bits of clay. This gives the finished piece a polished, professional look. -
Create the Hanging Hole:
Use a straw to punch a clean hole near the top center of the cloud. A drinking straw creates a perfect uniform circle, but a toothpick wiggled in a circular motion works too if you want a smaller opening.
Step 2: Drying and Refining
-
Let it Dry:
Place your clay clouds on a flat surface lined with parchment paper. If using air-dry clay, let them sit for 24-48 hours, flipping them occasionally to prevent curling. If using polymer clay, bake according to the manufacturer’s instructions. -
Sanding:
Once fully cured or dry, inspect the edges. If there are any rough spots, gently buff them away with fine-grit sandpaper until the cloud feels smooth to the touch.
Pro Tip: Smooth Surface
Before drying, gently wipe the raw clay surface with a baby wipe or a damp sponge. This removes fingerprints and dust, saving you sanding time later.
Step 3: Adding the Kawaii Face
-
Plan the Features:
Before painting, lightly mark where you want the eyes and mouth using a pencil. Aim for the center-lower portion of the cloud to get that classic cute proportion. -
Paint the Eyelashes:
Using a very fine liner brush and black acrylic paint slightly thinned with water, paint two small U-shapes for closed eyes. Add three tiny lashes to the outer corner of each eye. Alternatively, a high-quality fine-tip permanent marker works if you aren’t confident with a brush. -
Add a Smile:
Paint a tiny, simple U-shape right between the eyes for the mouth. Keep it small and centered to maintain the sweet expression. -
Blush the Cheeks:
Dip the rounded end of a paintbrush handle or a dotting tool into pastel pink paint. Gently stamp a small circle under each eye to create rosy cheeks. If the paint is too thick, it will leave a raised bump, so try to keep the dot flat.
Level Up: Starry Night
Create small star charms from leftover clay and thread them onto the same hanging cord just above the cloud for a cute mobile effect.
Step 4: Finishing Touches
-
Add Speckles:
For the textured look seen in the photo, dilute a small amount of white acrylic paint with water. Dip an old toothbrush into the mixture, aim it at the clay pieces, and run your thumb across the bristles to flick tiny speckles over the surface. -
Seal the Work:
Once all paint is completely dry, apply a coat of matte or satin varnish to protect the clay and the painted details from scratching or fading. -
String it Up:
Cut a length of cord or twine—about 8 inches is usually good. Fold it in half, thread the loop through the hole in the cloud, and pass the loose ends through the loop to create a lark’s head knot. Tie off the ends to finish.
Hang your sleepy clouds near a window or shelf to bring a soft touch of calm to your space
Kawaii Cat Paws And Bean-Toe Charms
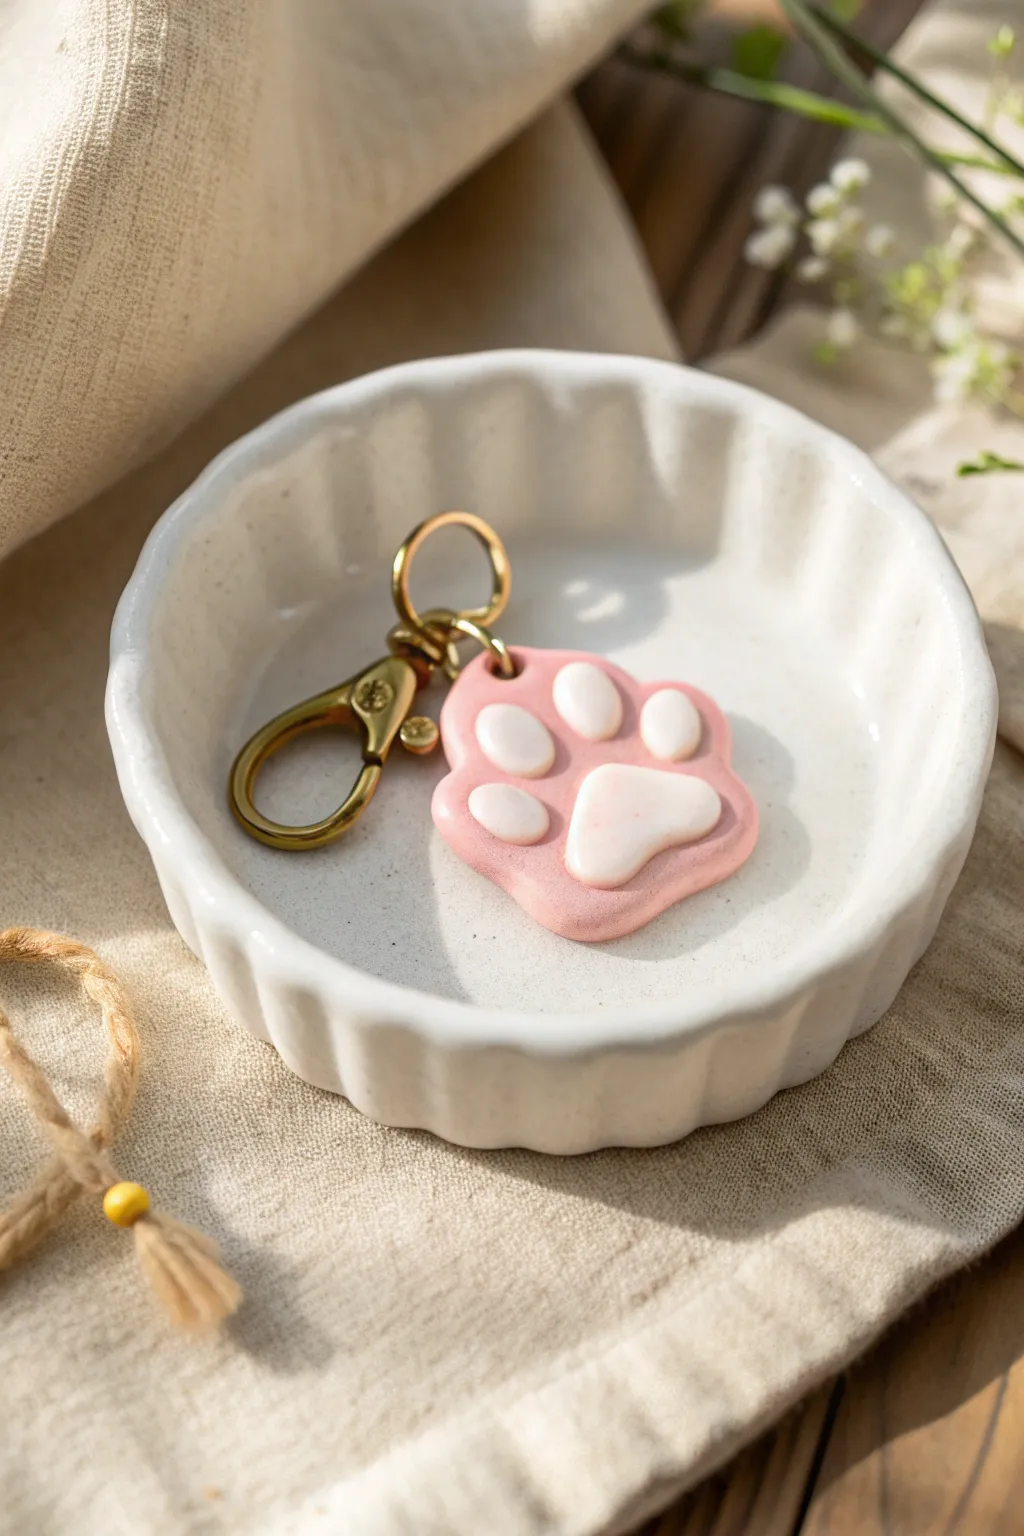
This adorable cat paw charm combines soft pastel pink with bright white toe beans for the ultimate kawaii accessory. Crafted from polymer clay, the finished piece has a sweet, puffy look that’s perfect for keychains or bag zippers.
Step-by-Step
Materials
- Pastel pink polymer clay
- White polymer clay
- Rolling pin or acrylic roller
- Paw print cookie cutter (small) or X-Acto knife
- Dotting tools or ball stylus tool
- Eye pin (gold finish)
- Gold lobster clasp keychain hardware
- Jump rings (gold finish)
- Pliers (round nose and flat nose)
- Gloss glaze or UV resin (optional for shine)
- Oven for baking
Step 1: Shaping the Base
-
Condition the Clay:
Start by kneading your pastel pink polymer clay until it is soft, pliable, and free of any air bubbles. This ensures a smooth surface later. -
Roll the Base:
Roll the pink clay into a smooth ball, then flatten it slightly with your acrylic roller until it is about 1/4 inch thick. You want it substantial enough to hold the hardware. -
Cut the Shape:
Press your paw print cutter firmly into the pink clay. If you don’t have a cutter, you can freehand a rounded triangular shape with three bumps at the top using a craft knife. -
Smooth the Edges:
Gently run your finger along the cut edges of the paw to soften any sharp corners left by the cutter. I find this gives the piece a friendlier, softer appearance.
Clean Clay Tip
Keep wet wipes handy! Polymer clay attracts dust easily. Wipe your hands and tools before switching from pink to white clay to keep the toe beans pristine.
Step 2: Adding the Toe Beans
-
Create Indentations:
Use a large ball stylus or the rounded end of a paintbrush handle to press shallow divots into the pink base where the toe pads will go—one large central pad and four smaller toe pads. -
Prepare White Clay:
Condition a small amount of white clay. Roll four tiny balls for the toes and one slightly larger, triangular-shaped ball for the main pad. -
Place the Main Pad:
Take the larger white piece and shap it into a soft triangle with rounded corners. Press it gently into the large central indentation on the pink base. -
Add the Toes:
Place the four smaller white spheres into the toe indentations. Press them down slightly so they stick, but leave them puffy and dimensional. -
Insert the Hardware:
Take a gold eye pin and carefully push the straight end into the top of the paw shape (between two toes). Make sure it goes deep enough to be secure.
Texture Twist
Before baking, use a clean toothbrush to gently tap the pink area only. This creates a flocked, fuzzy texture that looks just like real fur.
Step 3: Baking and Assembly
-
Bake the Charm:
Place your charm on a tile or parchment-lined baking sheet. Bake according to your clay manufacturer’s instructions (usually around 275°F/135°C for 15-30 minutes). -
Cool Down:
Let the piece cool completely inside the oven or on a wire rack before handling. Polymer clay is fragile while hot. -
Secure the Pin:
Once cool, gently tug the eye pin. If it feels loose, pull it out, add a dab of superglue, and reinsert it for extra durability. -
Open the Jump Ring:
Use two pairs of pliers to twist open a gold jump ring. Avoid pulling the ends apart; twist them sideways to maintain the circle shape. -
Attach the Keychain:
Slide the open jump ring through the loop of the eye pin on your charm, and then hook on the gold lobster clasp assembly. -
Close the Ring:
Use pliers to twist the jump ring back into a closed position, ensuring the ends meet perfectly flush so nothing slips out. -
Optional Glaze:
If you want a shiny finish like wet paw prints, brush a thin layer of gloss glaze or apply UV resin over the white pads and cure it.
This charming little paw is now ready to tag along on your daily adventures

TRACK YOUR CERAMIC JOURNEY
Capture glaze tests, firing details, and creative progress—all in one simple printable. Make your projects easier to repeat and improve.
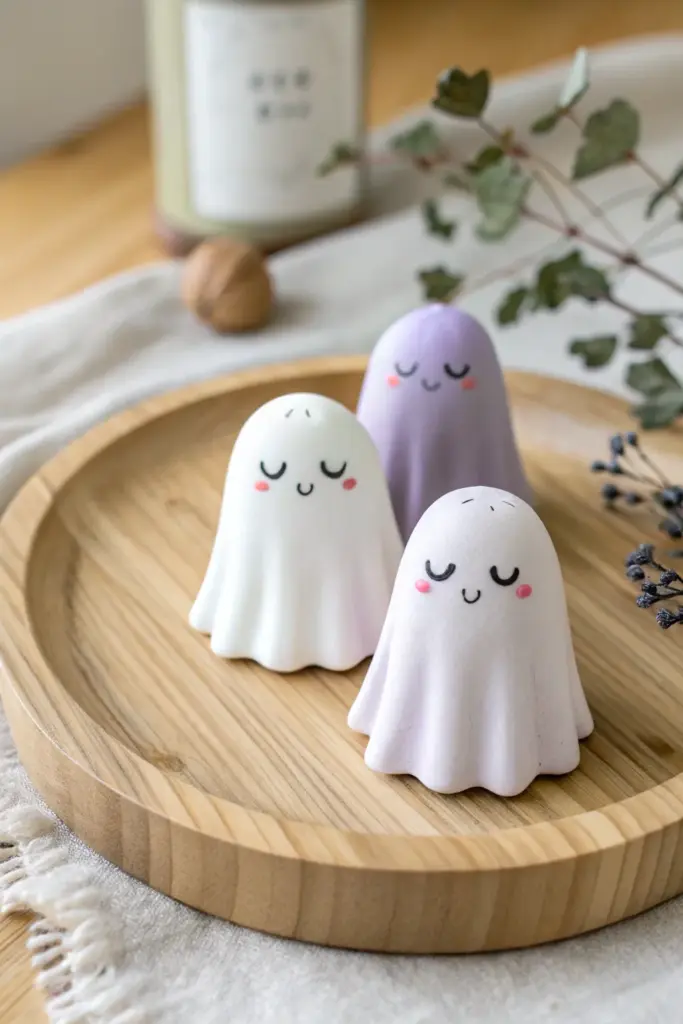
Kawaii Little Ghosts With Shy Expressions

Create a hauntingly adorable set of miniature ghosts with soft, sleepy expressions and gentle pastel hues. These smooth, minimalist figures are perfect for adding a touch of spooky-sweet charm to your desk or shelf.
Detailed Instructions
Materials
- White polymer clay (or air-dry clay)
- Pastel purple polymer clay (or mix white with a tiny bit of purple)
- Basic clay sculpting tools (rolling pin, ball tool)
- Black acrylic paint
- Pink acrylic paint or soft pink pastel chalk
- Fine detail paintbrush (size 0 or 00)
- Dotting tool or toothpick
- Matte varnish (optional)
Step 1: Shaping the Ghost Body
-
Prepare the clay:
Begin by conditioning your white clay until it is soft and pliable. For the purple ghost, mix a small amount of purple into white clay to achieve a very soft, milky lavender shade. -
Form the base cylinder:
Roll a ball of clay about the size of a walnut, then gently roll it on your work surface into a thick, short cylinder or dome shape. -
Round the head:
Smooth out the top of the cylinder into a perfect, rounded dome. This will be the ghost’s head, so make sure there are no fingerprints or cracks. -
Create the drape effect:
Using your thumb and forefinger, gently pinch and pull the bottom edge of the cylinder outwards to create a flared skirt. -
Add folds:
Use the handle of a paintbrush or a rounded modeling tool to press vertical indentations gently into the skirt area. I like to do this from the bottom up to simulate the look of draped fabric. -
Refine the wavy hem:
Go around the very bottom edge and pinch the clay between your indentations to create a wavy, undulating hemline that allows the ghost to stand stable. -
Smooth the surface:
Check the entire figure for fingerprints. Lightly brush a little bit of baby oil or cornstarch over the clay to smooth out any imperfections before baking or drying.
Smoothing Secret
Before baking, lightly brush your clay with a tiny drop of baby oil. It melts away fingerprints and creates a professional, seamless finish.
Step 2: Adding the Face Details
-
Bake or dry:
If using polymer clay, bake according to the package instructions (usually 275°F/135°C for 15-30 minutes). If using air-dry clay, let the figures sit for 24-48 hours until fully hard. -
Paint the closed eyes:
Dip your finest detail brush into black acrylic paint. Carefully paint two small ‘U’ shapes for the closed, sleeping eyes. Keep the lines thin and positioned slightly lower on the face for a cute look. -
Add eyelashes:
For extra charm, add a single tiny lash flick to the outer corner of each eye curve. -
Paint the smile:
Paint a tiny, shallow ‘U’ shape right between the eyes for the mouth. It should be smaller than the eyes to maintain the shy expression. -
Add rosy cheeks:
Using a dotting tool or the end of a toothpick, dip into pink paint and place two small dots just outside and below the eyes. -
Alternative cheek method:
For a softer look, scrape a bit of pink pastel chalk into a powder and brush it onto the cheek area with a dry, soft brush instead of using paint.
Paint Woes?
If your painted eyes look shaky, wait for the paint to dry and gently scratch off the mistake with a needle tool, then try again.
Step 3: Finishing Touches
-
Add tiny eyebrows:
Use the very tip of your brush to add two microscopic vertical dashes or dots high on the forehead, just like in the photo, to give them a surprised or innocent expression. -
Seal the piece:
Once the paint is completely dry, apply a thin coat of matte varnish. This protects the paint and gives the ghost that smooth, finished ceramic look shown in the image.
Arrange your little ghost family together on a wooden tray for the coziest supernatural display