If you can roll a ball, pinch a bowl, and smooth an edge, you can make something you’ll genuinely love with clay. These easy clay ideas for beginners are the kind of low-stress projects I teach when you want quick wins and cute results without fancy tools.
Cute Face Magnets (Dots-and-Smile Style)
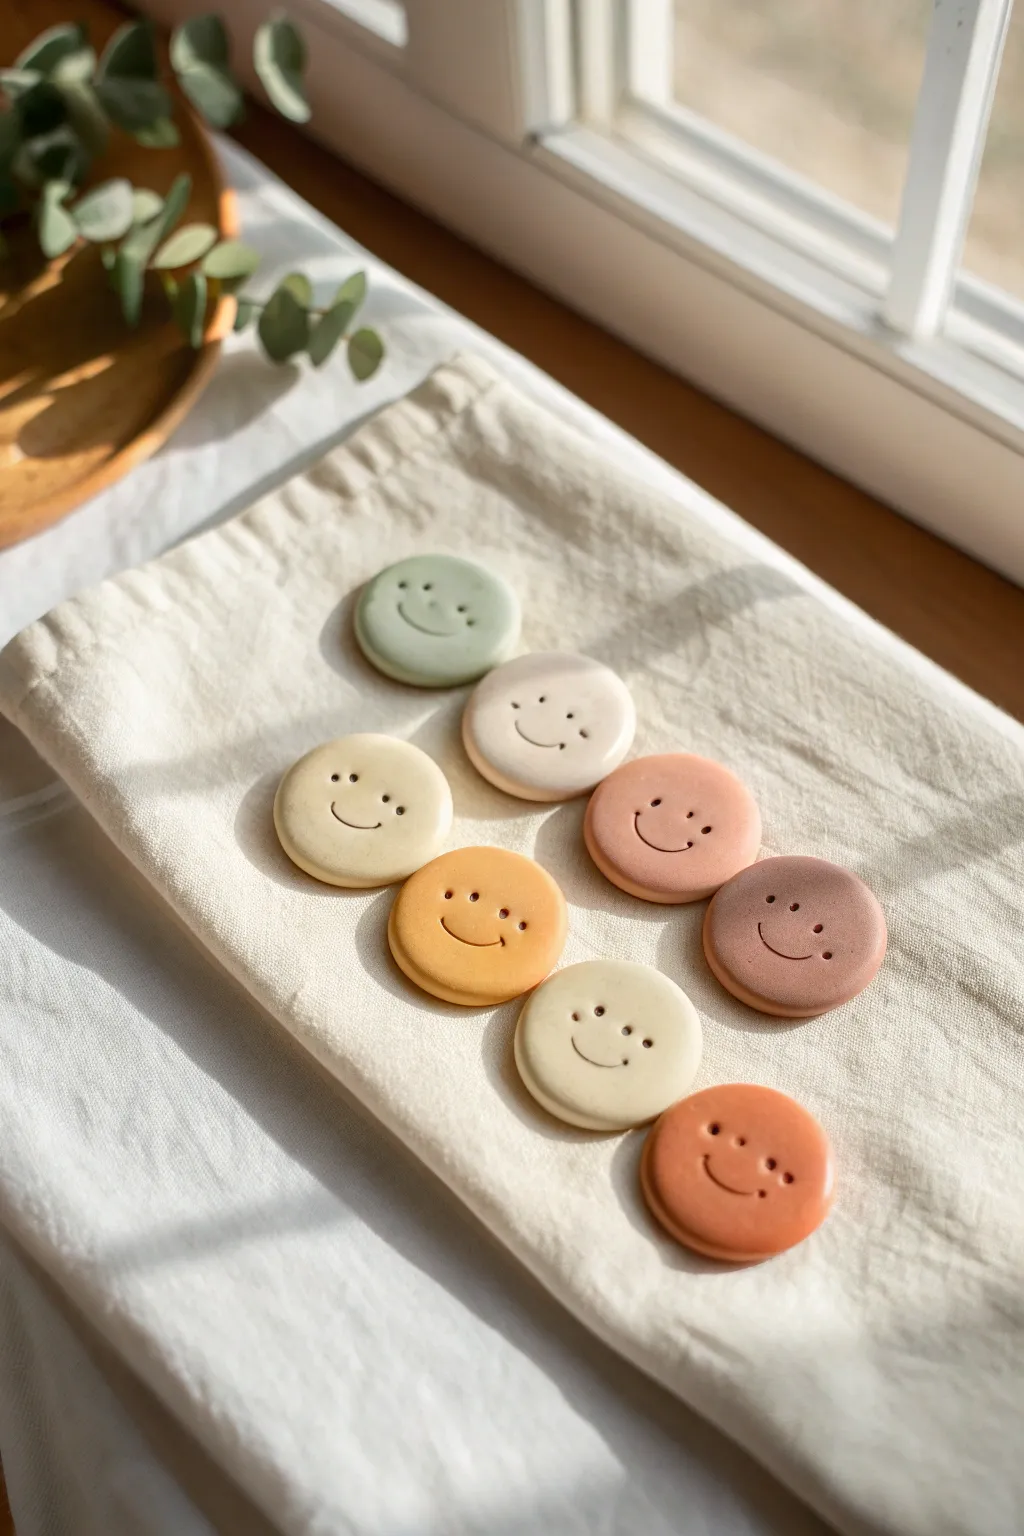
These charming little magnets bring a sweet touch of personality to your fridge or whiteboard with their muted, earthy tones and simple expressions. The project relies on creating smooth, perfect circles and adding tiny, minimalist faces for a modern yet playful look.
Detailed Instructions
Materials
- Polymer clay in various earthy tones (sage, cream, mustard, terracotta, mauve)
- Circle cookie cutter (approx. 1.5 – 2 inches)
- Acrylic rolling pin or glass jar
- Parchment paper or ceramic tile
- Small dotting tool or toothpick
- Curved modeling tool or a snippet of a drinking straw
- Strong craft glue (E6000 recommended)
- Small round magnets
- Fine-grit sandpaper (optional)
- Matte varnish (optional)
Step 1: Preparing the Clay
-
Condition the clay:
Begin by warming up your polymer clay in your hands. Knead each color separately until it is soft and pliable, which prevents cracking later. -
Mix custom colors:
To achieve the muted, earthy palette seen in the photo, try mixing a tiny bit of white or brown into bright standard colors to tone them down. -
Roll out a slab:
Place your clay on parchment paper. Use your rolling pin to roll it out to a consistent thickness of about 1/4 inch (6mm). You want them thick enough to cover the magnet but not bulky.
Step 2: Shaping the Faces
-
Cut the circles:
Press your circle cutter firmly into the clay. Give it a little wiggle before lifting to ensure a clean cut. -
Smooth the edges:
After cutting, gently run your finger around the circumference of each circle to soften the sharp edge left by the cutter for a more organic, finished look. -
Create the eyes:
Using a small dotting tool or the blunt end of a toothpick, press two small indentations into the upper half of the circle. Keep them relatively wide apart for that cute ‘kawaii’ aesthetic. -
Add the cheeks:
Just outside and slightly lower than the eyes, press two smaller, shallower dots to represent dimples or cheeks. -
Form the smile:
For the perfect curved smile, use a curved modeling tool. Alternatively, cut a plastic drinking straw in half lengthwise and use the curved edge to leave an impression. Press gently; you don’t need to cut all the way through. -
Refine the surface:
Inspect each face for fingerprints. Sometimes I lightly brush the surface with a tiny bit of cornstarch or baby oil on my fingertip to smooth them out before baking.
Uneven Smile?
If using a tool creates lopsided grins, try lightly sketching the curve with a needle tool first. Once you like the shape, go over it deeply with your curved tool.
Step 3: Baking and Assembly
-
Bake according to instructions:
Transfer your parchment paper onto a baking sheet. Bake the pieces according to your specific brand of clay’s temperature and time settings—usually around 275°F (135°C) for 15-30 minutes. -
Cool completely:
Let the clay discs cool down completely inside the oven with the door open, or remove them and wait. Don’t handle them while hot as they can be slightly fragile. -
Sand the edges (Optional):
If there are any rough spots on the sides, gently buff them with fine-grit sandpaper under running water (to keep dust down). -
Seal (Optional):
For a protected finish that isn’t too shiny, apply a thin layer of matte varnish. This preserves the earthy matte look of the original inspiration. -
Attach the magnets:
Flip the faces over. Apply a dab of strong craft glue to the center of the back. -
Press and set:
Press your magnet firmly into the glue. Let the adhesive cure fully (usually 24 hours) before sticking them to your fridge.
Avoid Lint
Light-colored clay loves to pick up dust. Keep a pack of baby wipes nearby to clean your hands and tools strictly between every color switch.
Now you have a collection of cheerful, modern magnets ready to hold up your photos and notes


Face Pencil Cup (Pinch Pot With Personality)
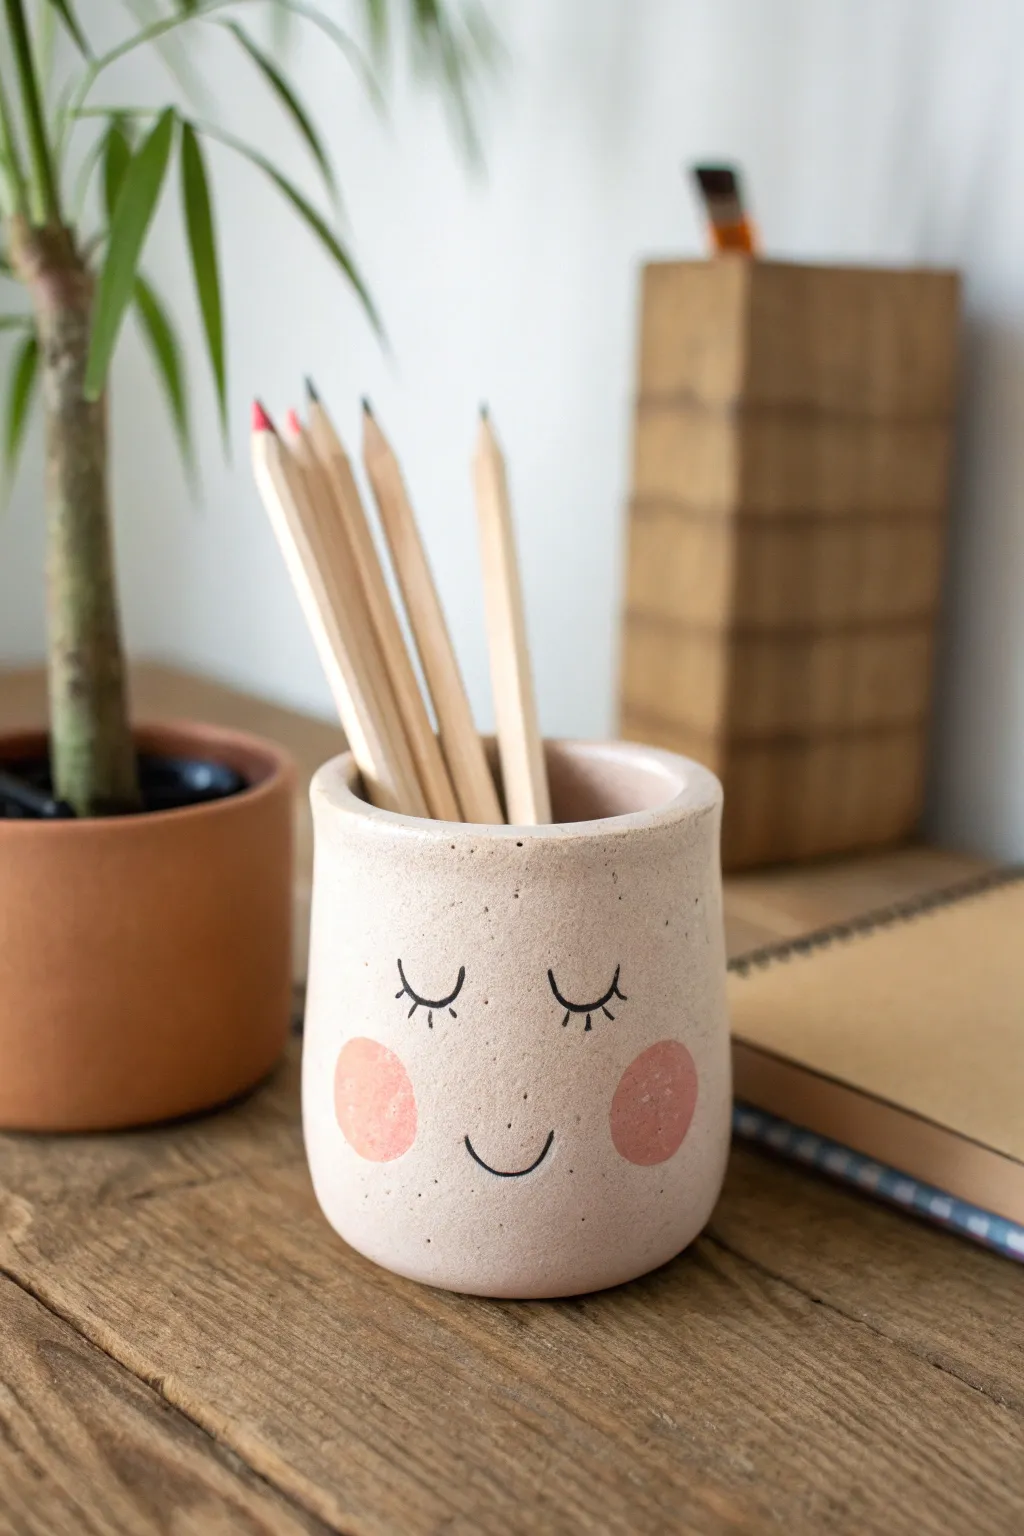
This charming, blush-toned pencil holder adds a touch of whimsy to any desk layout with its softly speckled texture and serene expression. The simple cylindrical shape is perfect for beginners, letting the sweet hand-drawn face and prominent rosy cheeks take center stage.
Step-by-Step Guide
Materials
- Air-dry clay (white or light beige)
- Acrylic rolling pin
- Clay knife or craft knife
- Small sponge
- Water cup
- Fine-grit sandpaper
- Acrylic paints (black, coral pink)
- Fine detail paintbrush or black paint marker
- Round sponge blotter or stiff stencil brush
- Matte varnish or sealant
- Ruler
Step 1: Forming the Cup
-
Prepare your clay:
Start with a fist-sized ball of air-dry clay. Knead it thoroughly to remove air bubbles and warm it up, ensuring it’s pliable and smooth. -
Start the pinch pot base:
Press your thumb into the center of the ball, stopping about half an inch from the bottom. This thickness is crucial for a stable base that won’t tip over easily. -
Pinch the walls:
Gently pinch the clay between your thumb and fingers, rotating the ball as you go. Work from the bottom up to thin out the walls evenly. -
Shape the cylinder:
Instead of flaring the walls outward like a bowl, focus on pulling the clay straight upward. Use a ruler occasionally to check that your sides are staying vertical. -
Refine the rim:
Once you reach a height of about 4-5 inches, flatten the top rim. I like to flip the cup upside down on the table and gently tap it to create an even, flat edge. -
Smooth the surface:
Dip your finger or a small sponge in water and run it over the exterior and interior. Smooth out any fingerprints, cracks, or uneven bumps to create a clean canvas for the face. -
Let it dry completely:
Place your cup in a safe, dry spot away from direct sunlight to prevent cracking. Allow it to cure fully for 24-48 hours until it feels room temperature and looks chalky.
Cracks Appearing?
If small cracks appear while drying, mix a tiny bit of fresh clay with water to make a paste (slip) and fill them in. Smooth over with a sponge.
Step 2: Decoration and Details
-
Sand for perfection:
Once fully dry, take a piece of fine-grit sandpaper and gently buff the surface. Focus on the rim and the main face area to ensure the paint goes on smoothly. -
Create the speckled effect:
To mimic the stone-like texture in the photo, dilute a tiny drop of brown or grey paint with water on an old toothbrush. Flick the bristles with your thumb to mist tiny speckles over the cup. -
Sketch the face:
Using a light pencil, very faintly mark where you want the eyes and mouth. Aim for the center-bottom half of the cup to give it that cute, ‘chibi’ proportion. -
Paint the rosy cheeks:
Dip a round sponge blotter or a stiff stencil brush into coral pink paint. Dab off most of the excess on a paper towel, then press firmly onto the clay to create perfect, soft circles. -
Draw the sleeping eyes:
Using a fine detail brush or a black paint marker, draw two downward curves for closed eyelids. Add three small lashes to each eye for personality. -
Add the smile:
Paint a small, simple ‘U’ shape between the cheeks for the mouth. Keep the line thin and delicate to match the eyes. -
Seal the project:
Protect your work with a coat of matte varnish. This seals the clay and prevents the paint from chipping, while keeping that natural, non-glossy finish seen in the image.
Add 3D Ears
Before drying, attach two small triangles of clay to the rim to turn this into a sleeping cat or bear cup. Score the joints well.
Now your workspace has a serene little guardian to hold your tools


Keychain Charm Made From Balls and Snakes
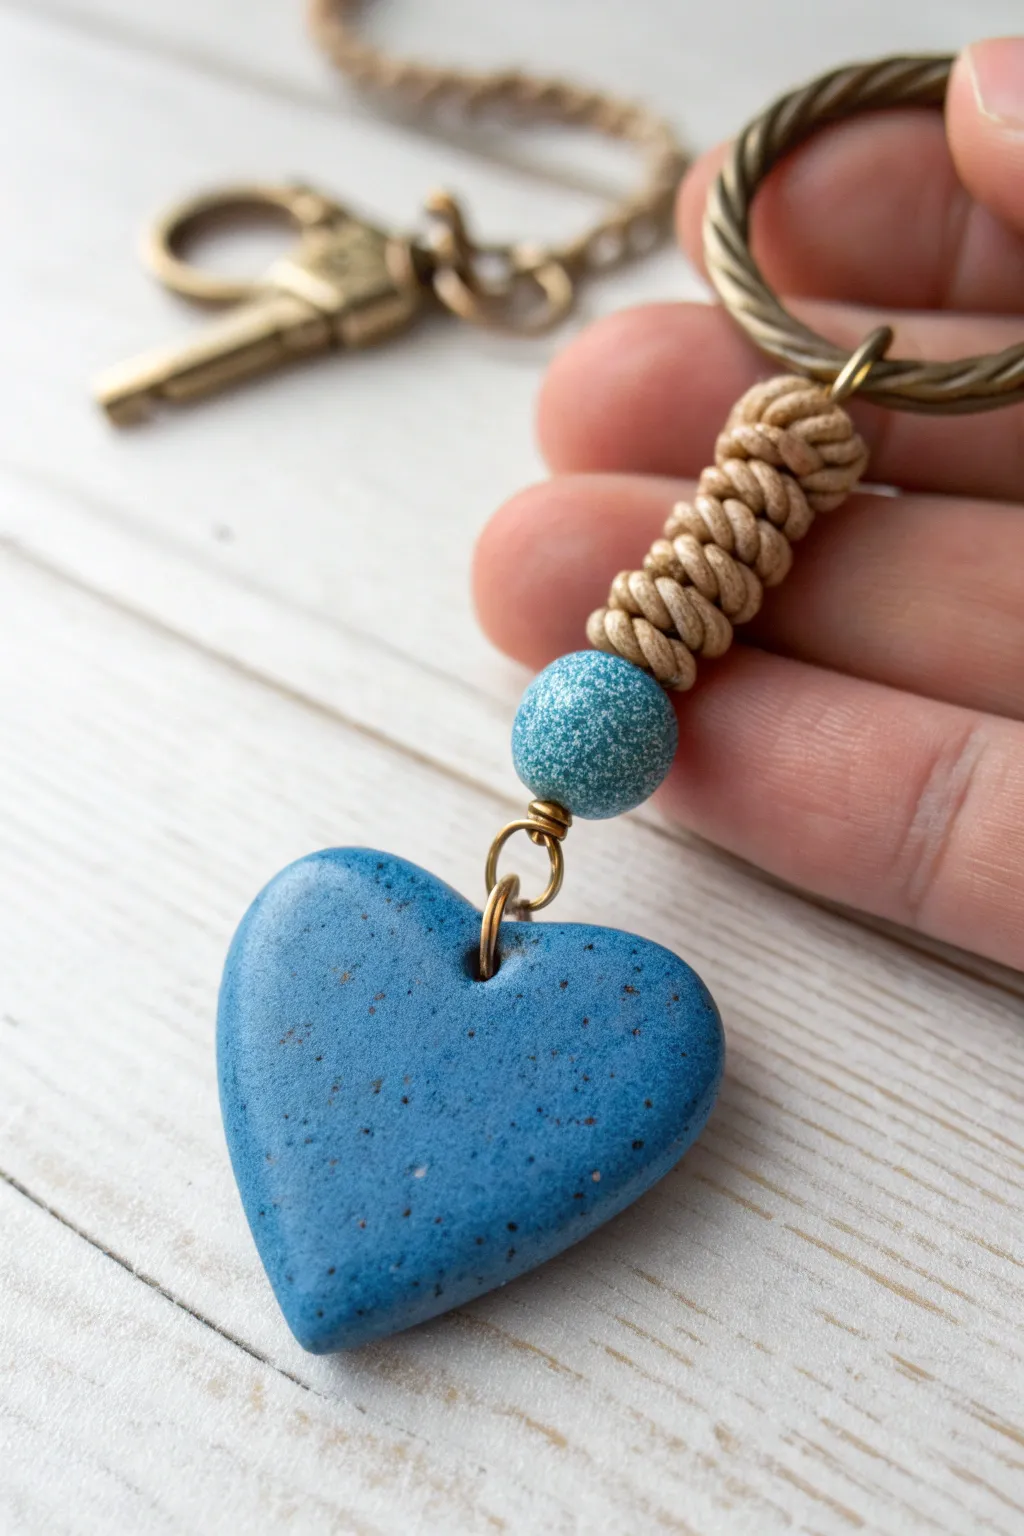
Combine simple clay techniques with basic knotting to create this charming, rustic keychain. The focal point is a lovely blue speckled clay heart paired with a braided cord accent that feels both earthy and modern.
Detailed Instructions
Materials
- Polymer clay (blue, turquoise, and black/brown for speckling)
- Beige waxed cotton cord or leather cord (approx. 2mm)
- Bronze keyring hardware with jump rings
- Headpin or eye pin (bronze tone)
- Toothpick or needle tool
- Clay roller
- Heart-shaped clay cutter (small/medium)
- Jewelry pliers (round nose and flat nose)
- Sandpaper (optional, fine grit)
- Oven for baking clay
Step 1: Shaping the Clay Elements
-
Mix the speckled clay:
Start by conditioning your blue polymer clay until soft. To create the stone-like effect, grate a tiny amount of black or dark brown clay into dust or very fine crumbs and knead it into the blue clay just enough to distribute the speckles without blending the color completely. -
Cut the heart shape:
Roll your speckled blue clay out to a thickness of about 4mm or 5mm—you want it sturdy enough for a keychain. Press your heart cutter firmly into the clay. If you don’t have a cutter, shape a ball into a flat teardrop and indent the top with a tool. -
Create the heart hole:
Use a toothpick or a small straw to pierce a hole near the top center of the heart. Make sure the hole is large enough for a jump ring to move freely, and wiggle the tool slightly to ensure clean edges. -
Form the accent bead:
Take a separate piece of turquoise clay (mix in white speckles for contrast if desired) and roll it into a neat, round ball about 1cm in diameter. -
Pierce the bead:
Carefully push a toothpick through the heavy center of the turquoise ball to create a bead hole. Spin the bead gently on the toothpick to keep it round. -
Bake the pieces:
Place your heart and bead on a baking sheet or tile. Bake according to your brand of polymer clay’s instructions—usually around 275°F (135°C) for 15-30 minutes. Let them cool completely before handling.
Sticky Fingerprints?
If you see fingerprints on your raw clay before baking, lightly brush the surface with a tiny amount of baby oil or cornstarch to smooth them out instantly.
Step 2: Knotting the Cord
-
Prepare the cord:
Cut a length of beige cord, approximately 12-15 inches long. Fold it in half and loop the folded end through your bronze keyring. Pull the loose ends through the loop to create a lark’s head knot securing it to the ring. -
Start the coil knot:
This decorative section is made using a ‘snake knot’ or a simple wrapping technique. For the easiest version, hold the two hanging cords taut. Take a second, separate piece of cord and lay it horizontally behind the main cords. -
Wrap the coil:
Take the right end of your separate wrapping cord and loop it over the main cords, then under the left end. Pull tight. Continue creating a series of tight loops or macramé square knots for about 1.5 inches down the length. -
Secure the ends:
Once your coiled section is long enough, trim the excess wrapping cord very close to the knot. A tiny dab of superglue on the cut ends will keep the wrapping from unraveling. -
Trim the main cords:
Trim the two main vertical cords so only about an inch protrudes below the wrapped section. You can use a lighter to carefully singe the ends if using synthetic cord to prevent fraying.
Step 3: Final Assembly
-
Attach the bead:
Take your bronze headpin or wire and thread it through the baked turquoise bead. Create a loop at the top of the bead using round-nose pliers. -
Connect bead to cord:
I like to attach this bead directly to the bottom of the cord section. If you can’t thread the cord through the bead loop, use a small jump ring to connect the bead’s wire loop to the cord ends you trimmed earlier. -
Attach the heart:
Open a large bronze jump ring using two pairs of pliers—twist it open sideways, don’t pull apart. Loop it through the hole in your blue clay heart. -
Link everything together:
Hook the jump ring (with the heart attached) onto the bottom loop of the bead’s wire. Close the jump ring securely by twisting it back into place so the gap disappears. -
Double check connections:
Give the keychain a gentle tug to ensure all jump rings are fully closed and the knots are secure before attaching your keys.
Texture Twist
Before baking, gently press a piece of coarse sandpaper or a stiff toothbrush onto the clay surface. This enhances the stone-like look and reduces shine.
Now you have a handmade accessory that looks like polished stone but carries your personal creative touch


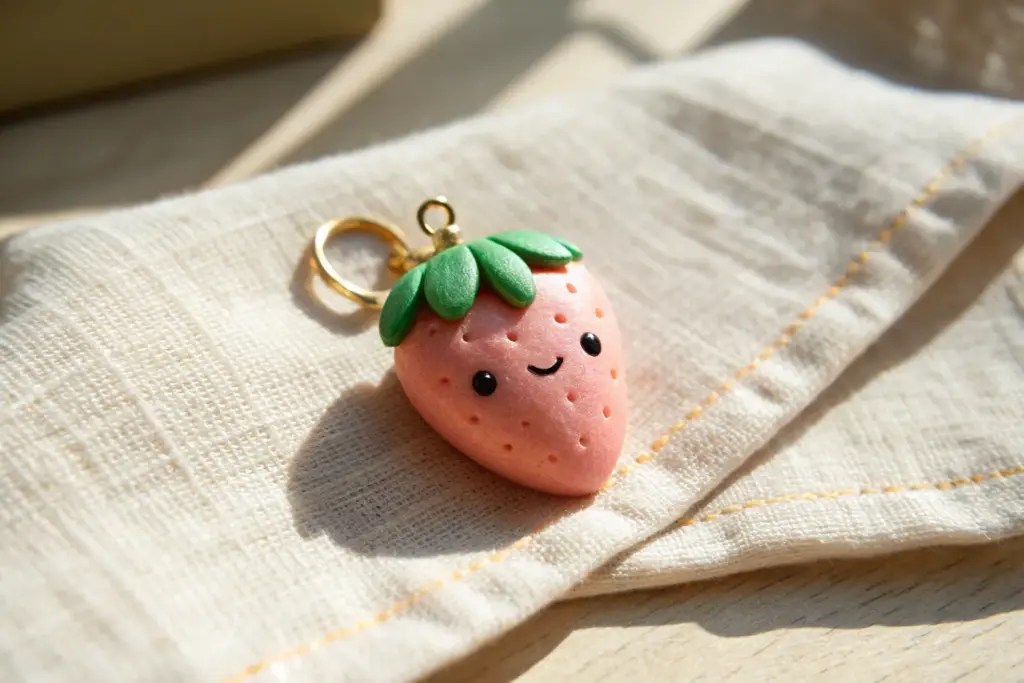
Kawaii-Style Food Charms (Donut, Fruit Slice, Toast)

Brighten up your keyring with this adorable breakfast-themed set featuring a happy slice of toast, a juicy orange wheel, and a classic pink donut. These kawaii-style charms are perfect for practicing basic shaping and detailing techniques with polymer clay.
Step-by-Step Tutorial
Materials
- Polymer clay (tan/beige, white, translucent orange, pink, black)
- Liquid polymer clay (optional, for connecting)
- Gloss glaze or UV resin
- Gold keychain ring with chain links and jump rings
- Eye pins (miniature screw-style or standard)
- Dotting tools or ball stylus
- Needle tool or toothpick
- Clay roller or pasta machine
- X-acto knife or clay blade
- Small circle cutter (approx. 1 inch)
- Soft pastel chalks (brown/orange) for shading
- Small paintbrush
Step 1: The Happy Toast
-
Shape the base:
Start by conditioning the tan clay and rolling it into a slab about 1/4 inch thick. Cut out a square shape, then gently round the bottom corners and slightly indent the top edge to create that classic bread loaf silhouette. -
Texture the crust:
Use an old toothbrush or a crumpled ball of aluminum foil to gently tap along the outer edges of the toast, giving it a realistic baked texture. -
Add the spread:
Roll out a very thin layer of white clay. Cut a shape slightly smaller than your toast and place it on top to look like cream cheese or butter, softening the edges so it looks spreadable. -
Create the face:
Using a tiny dotting tool, press two small indentations for eyes. Fill these with tiny balls of black clay. Roll a super-thin snake of black clay for the smile and press it into place between the eyes. -
Shade the edges:
Shave some brown soft pastel into a powder. With a dry paintbrush, gently dust the outer crust edges of the toast to give it a golden-brown, toasted appearance. -
Cheeky details:
Add two tiny flattened circles of pink clay just below the eyes for blushing cheeks. Insert an eye pin into the top center of the toast.
Sticky Situation?
If your clay gets too soft and fingerprints are showing, pop it in the fridge for 10 minutes. This firms it up, making it easier to smooth out imperfections.
Step 2: The Orange Slice
-
Create the Cane:
Form a log of translucent orange clay. Wrap this log in a thin sheet of white clay. This will become the individual fruit segments. -
Assemble the segments:
Stretch the log until it’s thin, then cut it into 8 equal lengths. Pinch each length into a teardrop shape. -
Form the wheel:
Arrange the 8 teardrops in a circle, points meeting in the center. Wrap the entire bundle in a thin sheet of white clay (the pith) and then a slightly thicker sheet of darker orange clay (the rind). -
Slice and texture:
Carefully slice a thick coin from your cane. Use a needle tool to scratch tiny radial lines into the translucent orange sections for a juicy texture. Insert an eye pin into the rind.
Level Up: Scented!
Mix a tiny drop of vanilla or citrus essential oil into the clay while conditioning. Your charms will smell like real pastries and fruit for weeks.
Step 3: The Pink Donut
-
Form the dough:
Roll a ball of tan clay and flatten it slightly into a thick disc. Use a small tool or the back of a paintbrush to poke a hole through the center, smoothing the edges to create the donut shape. -
Apply the glaze:
Flatten a piece of pink clay into an irregular circle with wavy edges. Place this over the donut base and gently press down the sides to mimic dripping icing. Re-poke the center hole if needed. -
Add sprinkles:
Roll incredibly thin snakes of various clay colors (or use real craft sprinkles). Cut tiny segments and gently press them onto the pink icing. -
Character details:
Just like the toast, add two tiny black eyes. I find adding a tiny speck of white paint to the eyes after baking makes them look extra lively. Insert your eye pin.
Step 4: Assembly & Finishing
-
Bake:
Bake all three charms according to your clay package instructions (usually 275°F for 15-30 minutes). Let them cool completely. -
Glaze:
Coat the orange slice and the donut icing with a glossy glaze or UV resin to make them look wet and sweet. Leave the toast matte for a bread-like finish. -
Connect:
Using pliers, open the jump rings and attach each charm to the chain links on your gold keychain ring.
Now you have a sweet set of accessories to keep your keys organized and stylish

The Complete Guide to Pottery Troubleshooting
Uncover the most common ceramic mistakes—from cracking clay to failed glazes—and learn how to fix them fast.
Chibi Animal Figurines (Bear, Bunny, or Chick)
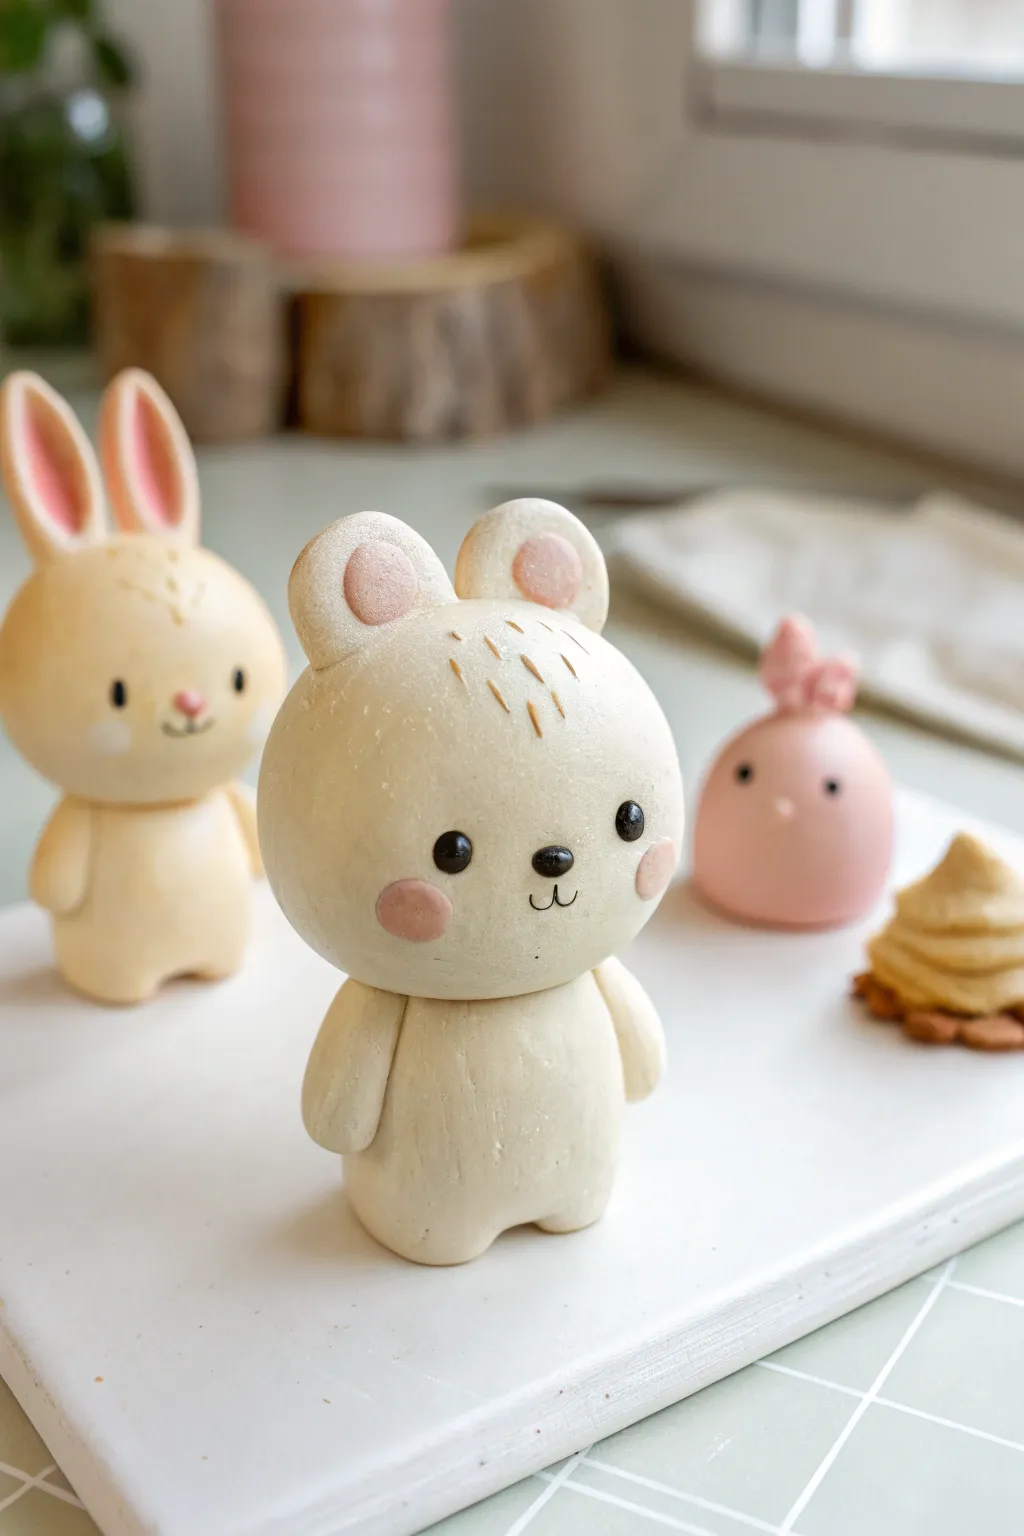
These adorable, round-bellied chibi figurines capture the essence of woodland magic with their soft pastel tones and sweet expressions. Whether you choose to sculpt the gentle bear or the perky bunny, you’ll end up with a smooth, whimsical keepsake perfect for a desk buddy.
Detailed Instructions
Materials
- Polymer clay or air-dry clay (white, beige, pink)
- Acrylic paints (black, brown, white)
- Fine-tipped paintbrush or dotting tool
- Modeling tools (ball tool, smoothing tool)
- Clear matte varnish (optional)
- Toothpicks or wire (for internal support)
- Needle tool
Step 1: Shaping the Core
-
Form the head sphere:
Start with a generous amount of white or light beige clay. Roll it firmly between your palms to create a smooth, seamless sphere. This chibi style relies on a slightly oversized head, so make this ball about the size of a golf ball or slightly larger. -
Create the body cylinder:
Take a slightly smaller amount of the same clay and roll it into a thick, short cylinder. Ideally, the body should be about two-thirds the height of the head to maintain that cute, squat chibi proportion. -
Connect the pieces:
Insert a half-toothpick or a small piece of wire into the center of the body cylinder leaving some exposed. Carefully press the head sphere onto the support, joining it to the body. Gently smooth the seam with your finger or a clay tool if you want them unified, or leave a slight indentation for a defined neck. -
Shape the legs:
The legs are integrated into the body shape rather than attached separately. Using your thumb and forefinger, gently pinch and pull the bottom corners of the body cylinder to form two stubby, rounded legs. Flatten the bottom so the figure stands stably.
Clean Clay Pro-Tip
White clay picks up dust instantly! Keep a pack of wet wipes nearby and clean your hands and tools thoroughly before handling white clay to keep your bear pristine.
Step 2: Adding Charming Details
-
Attach the arms:
Roll two small sausage shapes for the arms. Press them onto the sides of the body, angling them slightly forward or resting against the belly. Blend the shoulder seam into the body with a smoothing tool for a clean look. -
Form the bear ears:
For the bear, roll two small balls of clay and flatten them slightly into thick discs. Press a smaller ball of pink clay into the center of each disc to create the inner ear. -
Attach the ears:
Press the ears firmly onto the top of the head, spacing them wide apart for a gentle expression. Use a clay shaper to blend the back of the ears into the head for durability. -
Sculpt the bunny ears (optional):
If you are making the bunny version shown in the background, roll two long teardrop shapes instead. Flatten the pink inner ear clay onto the front surface and attach them upright on top of the head.
Step 3: Defining the Face
-
Indent eye sockets:
Use a medium-sized ball tool to press two shallow indentations where the eyes will go. Placing them lower on the face—below the horizontal midline—instantly increases the ‘cute’ factor. -
Add the eyes:
Roll two tiny balls of black clay and press them into the sockets you just made. Flatten them gently so they don’t bulge out too much. -
Create the nose:
Roll a minuscule oval of black or dark brown clay. Place it exactly between the eyes, slightly lower down. It should be very small compared to the eyes. -
Blush those cheeks:
Take two small balls of soft pink clay. Flatten them into thin circles and press them onto the cheeks, just outside and below the eyes. I like to feather the edges slightly so they look like soft makeup.
Level Up: Accessories
Make a tiny accessory like the pink chick blob or a mini macaron for your bear to hold. It adds storytelling context and color contrast to your display.
Step 4: Finishing Touches
-
Add texture details:
Using a needle tool or a very fine brush with brown paint, create small hatch marks on the forehead to simulate fur texture. Keep these strokes light and minimal. -
Paint the mouth:
With your finest brush and diluted black or brown paint, draw a tiny ‘w’ shape directly under the nose. Keep the lines incredibly thin. -
Add highlights:
Dip the tip of a toothpick into white acrylic paint. Dot a tiny highlight onto the upper right corner of each black eye to bring the character to life. -
Smooth and inspect:
Before curing (if using polymer) or drying (if using air-dry), give the whole figure a final check. Smooth out any fingerprints with a drop of baby oil or water. -
Cure or dry:
Follow your clay manufacturer’s instructions for baking or air-drying. Ensure it is fully hardened before handling. -
Seal (optional):
Once fully cool or dry, a coat of matte varnish will protect your painting and give the clay a professional finish.
Place your finished figurines on a shelf or gift them to a friend to spread a little handmade joy