If you’re brand new to clay, slab building is one of the easiest ways to make pottery that looks intentional—even when it’s a little imperfect. These beginner-friendly slab pottery ideas are all about simple shapes, forgiving textures, and that satisfying moment when flat clay turns into something you can actually use.
Classic Slab Plate With a Soft Lifted Rim
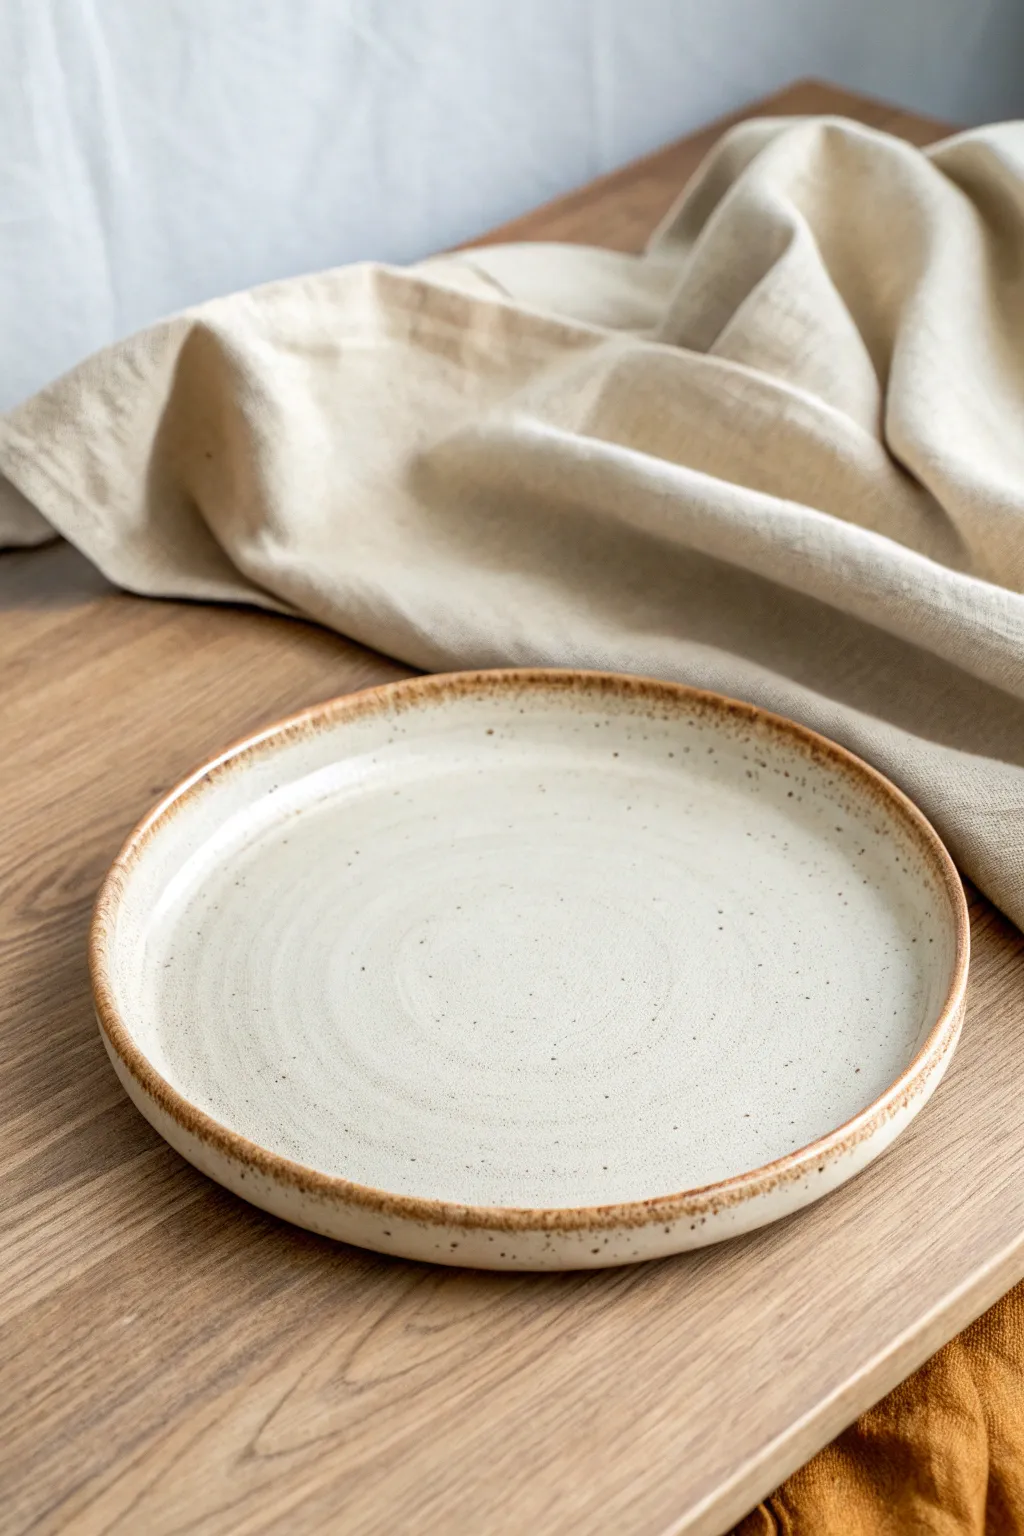
This project produces a timeless, functional dinner plate featuring a speckled stoneware body and a distinctive toasted rim. The gentle, barely-there curve of the lip creates a modern silhouette that looks professional yet retains the warmth of handmade pottery.
Detailed Instructions
Materials
- Speckled stoneware clay (mid-fire)
- Rolling pin
- Thickness strips or guides (approx. 1/4 inch or 6mm)
- Canvas mat or slab roller
- Large round plate template (or a dinner plate to trace)
- Needle tool
- Potter’s rib (soft yellow or red)
- Sponge
- Foam bat or large cushion for shaping
- Glossy white glaze
- Iron oxide wash (optional, for rim enhancement)
- Kiln
Step 1: Rolling and Cutting
-
Wedge the clay:
Begin by thoroughly wedging your speckled stoneware clay. This removes air bubbles and ensures the clay particles are aligned, which helps prevent warping later during the drying process. -
Set up your workspace:
Lay down your canvas mat to prevent sticking. Place your thickness strips on either side of the clay ball. For a dinner plate like this, 1/4 inch (about 6mm) is the ideal thickness—sturdy enough for daily use but elegant. -
Roll the slab:
Using your rolling pin, roll the clay out smoothly. Turn the slab occasionally as you roll to ensure even compression. I find that flipping the slab once or twice helps create a more uniform surface tension. -
Rib the surface:
Before cutting, take your soft potter’s rib and compress the surface of the slab firmly. Swipe in multiple directions to smooth out the canvas texture and align the clay particles again. -
Trace the shape:
Place your circular template or an existing dinner plate upside down on the slab. Using your needle tool, cut vertically around the template to get a clean, perfect circle.
Step 2: Forming the Profile
-
Smooth the edges:
Once the circle is cut, run a damp sponge or your finger along the sharp cut edge to round it over slightly. This prevents chipping later and gives that finished professional look. -
Transfer to foam:
Carefully lift your clay circle and place it onto a piece of soft forming foam or a specialized plate mold. If you don’t have these, a shallow, wide bowl lined with a t-shirt works as a slump mold. -
Define the rim:
Gently press the center of the plate downwards into the foam. You aren’t trying to make a deep bowl; just apply enough pressure so the outer inch of the clay lifts upward slightly, creating that soft, lifted rim. -
Refine the curve:
Use a damp sponge to smooth the transition between the flat eating surface and the lifted rim. The transition should be seamless and fluid, not a sharp angle. -
Slow drying:
Loose-cover the plate with plastic to let it dry very slowly. Uneven drying causes warping in flat plates. Once it’s leather hard, you can clean up the bottom and sign your work.
Rim Stability
To prevent the rim from slumping during firing, add a tiny bit of grog to your clay or ensure the rim is slightly thicker than the center.
Step 3: Glazing and Finishing
-
Bisque fire:
Fire the bone-dry plate to a bisque temperature (usually Cone 04) to prepare it for glazing. -
Wax the foot:
Apply wax resist to the bottom foot ring (or the flat bottom if you didn’t trim a foot) to prevent the plate from sticking to the kiln shelf. -
Apply base glaze:
Dip or brush a glossy white glaze over the entire plate. The semi-translucent nature of some white glazes will allow the dark speckles of the clay body to show through beautifully. -
Detail the rim:
To achieve that toasted brown edge, wipe the glaze off the very top lip of the rim with a damp sponge. Alternatively, paint a thin line of iron oxide wash along the edge. -
Glaze fire:
Load the plate into the kiln for the final glaze firing (match the temperature to your clay body, likely Cone 5 or 6). Ensure no other pots are touching the rim.
Textured Underside
Before rolling your final slab, press a piece of lace or textured fabric into the clay mat to give the underside a hidden decorative surprise.
Now you have a durable, custom dinner plate ready for your next meal.


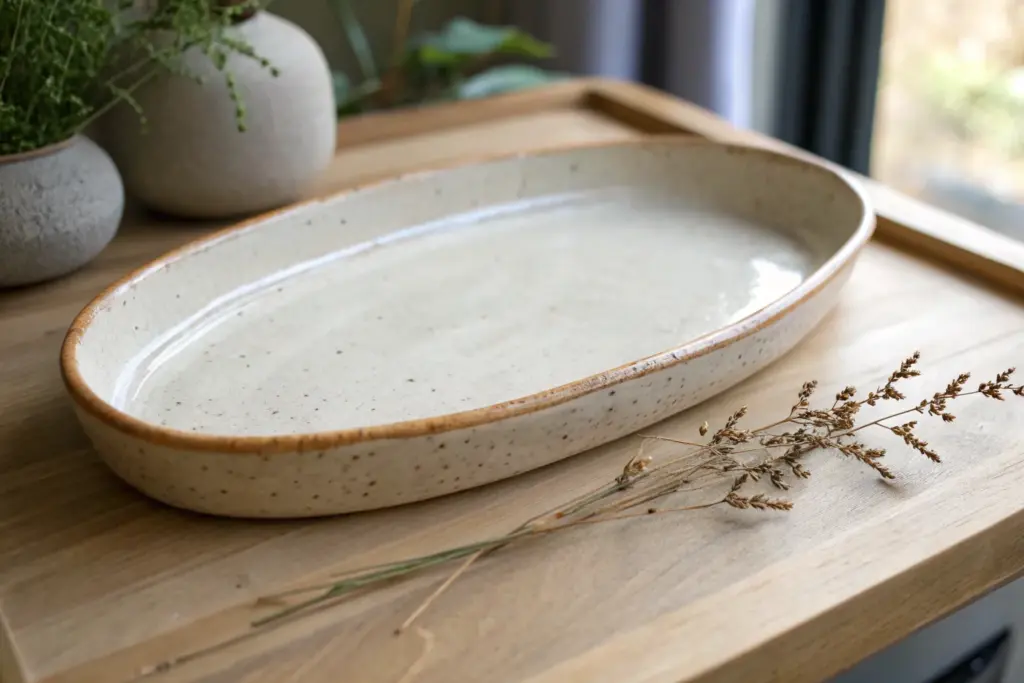
Draped Wavy Bowl Using a Simple Mold

This charming project creates a deeply ruffled bowl that captures light and shadow beautifully with its undulating rim. By draping a simple slab over a mold, you can achieve an effortless organic shape that looks professionally thrown but is completely beginner-friendly.
Step-by-Step Tutorial
Materials
- Speckled stoneware clay (mid-fire)
- Hump mold (or a simple rounded kitchen bowl)
- Rolling pin
- Canvas mat or slab roller
- Pin tool or potter’s knife
- Wooden rib tool
- Soft yellow mud sponge
- Newspaper or thin plastic sheet
- Matte white/cream speckle glaze
- Wax resist (optional)
Step 1: Prepping and Rolling the Slab
-
Prepare the workspace:
Set up your canvas mat and ensure your rolling pin is clean. Wedge your speckled stoneware clay thoroughly to remove air bubbles, aiming for a ball roughly the size of a grapefruit. -
Flatten the clay:
Press the clay ball onto the canvas with the palm of your hand to create a thick patty. This initial compression helps orient the clay particles. -
Roll out the slab:
Using your rolling pin, roll the clay out into an even slab. Aim for a thickness of about 1/4 inch; anything thinner might be too fragile for the deep waves we plan to make. -
Compress the slab:
Take a rubber or wooden rib and firmly drag it across the surface of the clay in multiple directions. This compression step is crucial for preventing future cracks. -
Cut the circle:
Place a circular template (a plate works well) onto the clay. Using your needle tool, cut vertically around the template to create your base circle.
Slumping Issues?
If the waves flatten out, the clay was likely too wet. Support the ruffles with small chunks of foam or crumpled paper towels until the clay stiffens enough to hold its own weight.
Step 2: Forming the Bowl
-
Prepare your mold:
If you are using a non-porous kitchen bowl as a hump mold, cover it with a layer of newspaper or thin plastic so the clay doesn’t stick. -
Drape the clay:
Carefully lift your clay circle and center it over the mold. Let gravity do the initial work, allowing the edges to fall naturally. -
Shape the walls:
Starting from the center bottom, gently smooth the clay down the sides of the mold with a damp sponge. Avoid pulling or stretching the clay too much. -
Create the waves:
This is the fun part. Using your fingers, gently lift sections of the rim and press in between them to create a deep, undulating ruffle. Aim for consistent spacing, but keep it organic. -
Refine the rim edge:
Run a damp chamois or very soft finger along the very edge of the wavy rim. This compresses the clay and ensures the final drinking or serving edge won’t be sharp. -
Initial drying:
Allow the clay to stiffen to a ‘leather hard’ state while still on the mold. I usually wait until the rim holds its shape without drooping before removing it.
Level Up: Texture
Before cutting your circle, press a piece of lace or burlap into the slab. When you drape it, the texture will stretch slightly, adding a stunning tactile element to the bowl’s exterior.
Step 3: Finishing and Glazing
-
Remove from mold:
Once leather hard, flip the mold over and gently release the bowl. The newspaper or plastic should peel away easily. -
Smooth the interior:
Use a damp sponge to smooth out any wrinkles or marks on the interior surface that may have occurred during the draping process. -
Bisque fire:
Let the bowl dry completely (bone dry) before loading it into the kiln for a bisque firing. -
Wax the rim (optional):
To recreate the look in the photo where the clay body shows at the edge, carefully apply wax resist to the very peak of the wavy rim. -
Apply glaze:
Dip or brush your matte cream speckled glaze onto the bowl. If you waxed the rim, the glaze will bead off that area; otherwise, wipe the rim clean with a damp sponge. -
Final wipe:
Always clean the foot of the bowl thoroughly with a sponge so no glaze drips onto your kiln shelf. -
Glaze fire:
Fire the bowl to the maturity temperature of your specific clay and glaze combination.
Now you have a stunning, food-safe vessel perfect for displaying fruit or serving warm dishes


Easy Soap Dish With Drain Holes
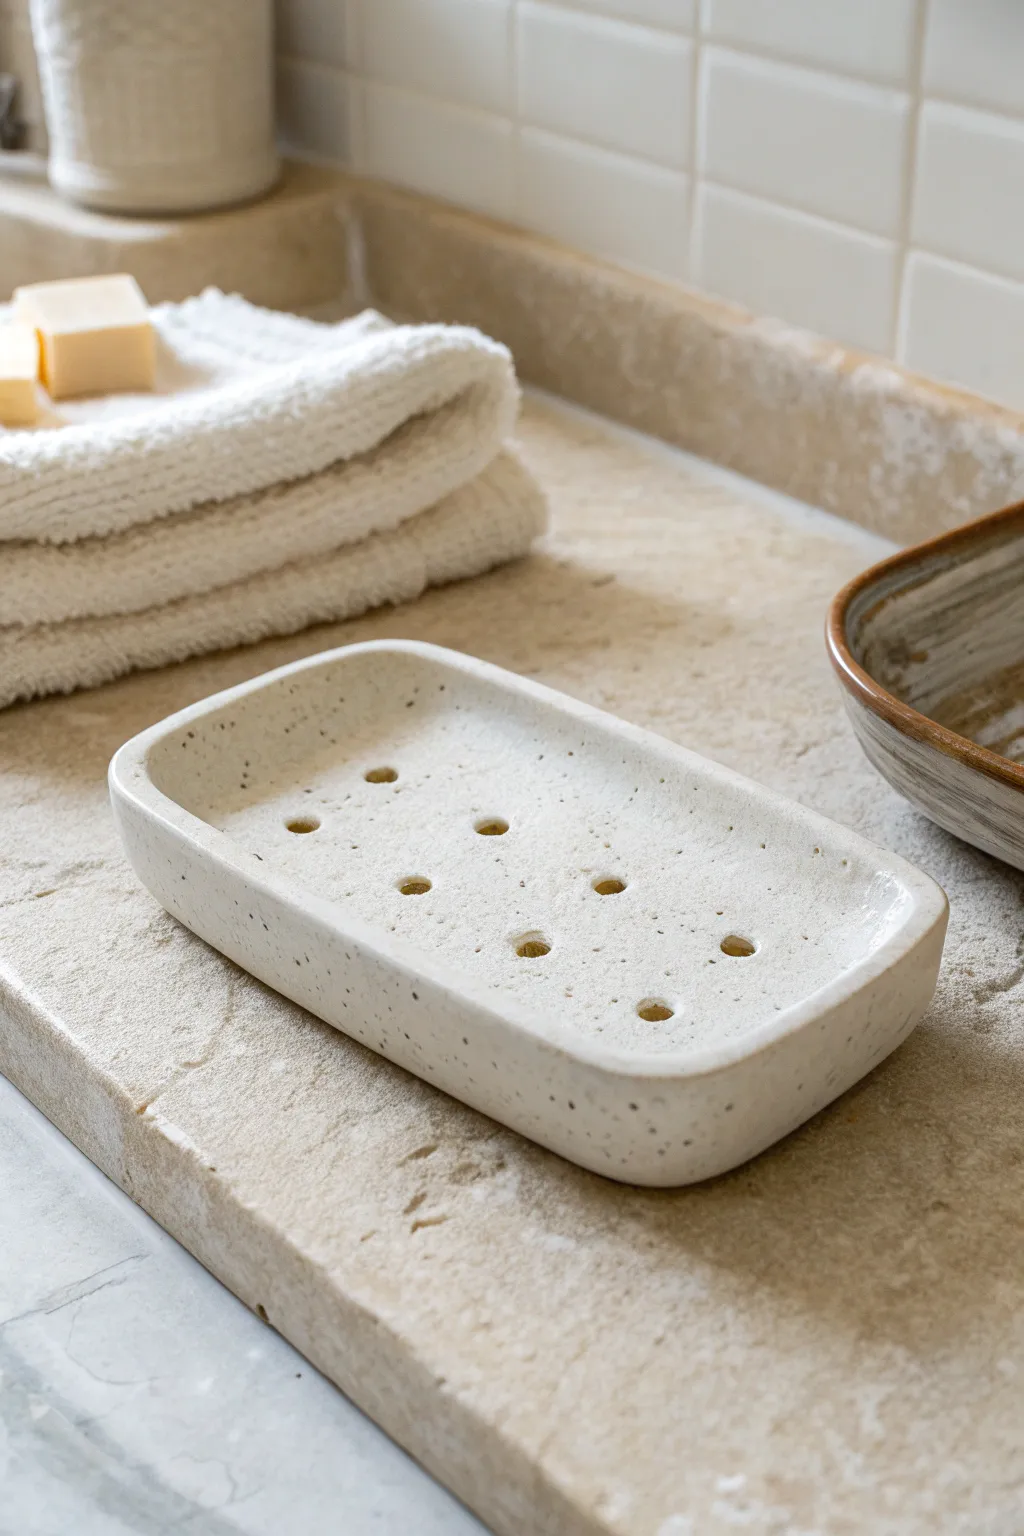
This rustic, functional soap dish utilizes a simple slump mold technique to achieve its gentle curve and raised edges. The speckled stoneware clay body gives it a natural, earthy finish that looks beautiful unglazed or with a simple clear coat.
How-To Guide
Materials
- Speckled stoneware clay (mid-fire)
- Rolling pin
- Two 1/4 inch wooden guide strips
- Canvas or slab mat
- Oblong/Rectangular biscuit cutter (or paper template)
- Small circular hole punch or straw
- Pottery sponge
- Soft rubber rib
- Fettling knife
- Cornstarch or canvas pouch
Step 1: Preparing the Slab
-
Wedge the clay:
Start by wedging a pound of speckled stoneware clay to remove air bubbles and ensure a uniform consistency. -
Set up guides:
Place your slab mat on a flat surface and position the 1/4 inch wooden guide strips on either side of your clay ball. -
Roll the slab:
Using the rolling pin, roll the clay out until the pin rests on both guide strips, ensuring an even thickness throughout the slab. I like to flip the slab once during rolling to prevent sticking. -
Compress the clay:
Take your soft rubber rib and gently drag it across the surface of the clay in multiple directions to align the clay particles and remove canvas texture.
Step 2: Shaping and Forming
-
Cut the shape:
Using an oblong biscuit cutter or a paper template with a fettling knife, cut out the main rounded rectangular shape of the soap dish. -
Create the rim:
Gently lift the edges of the slab with your fingers to curve them upward, creating shallow walls that will contain the soap. -
Smooth the edges:
Dip your finger or a pottery sponge in a tiny amount of water and round over the sharp cut edges of the rim for a professional finish. -
Prepare for holes:
Allow the dish to stiffen slightly to a soft leather-hard state; this prevents the clay from dragging or warping when you punch the holes.
Use a Foam Support
To shape the curved walls easily, press your fresh slab onto a piece of soft upholstery foam. The foam offers resistance, helping curve the edges naturally.
Step 3: Adding Details and Finishing
-
Mark hole positions:
Lightly mark a grid pattern for your drainage holes in the center of the dish, creating three rows. -
Punch drainage holes:
Using a small circular clay hole punch or a simple drinking straw, press straight down to create the drainage holes. -
Clean the holes:
Once the holes are punched, remove any clay burrs or debris from the underside using a clean, dry finger or a tool. -
Refine the surface:
Run your rubber rib over the interior surface one last time to ensure the area around the holes is perfectly smooth and flat. -
Create a slight recessed bottom:
If you want the dish to sit slightly elevated, use your thumb to gently press an indentation into the bottom center, or attach small feet (optional). -
Dry slowly:
Place the finished dish deeply under plastic to dry very slowly, which helps prevent the flat bottom from warping as moisture evaporates. -
Bisque fire:
Once bone dry, bisque fire the piece to the temperature recommended for your specific clay body (usually Cone 04). -
Glaze application:
Apply a clear or matte white glaze, or leave the exterior raw to show off the speckles, then fire to maturity (usually Cone 5/6).
Uneven Drying Warps
Flat slabs love to warp. If your dish curls up while drying, flip it over and place a small weighted bag of sand or rice on the center to flatten it back out.
Enjoy using your custom soap saver, which brings a spa-like tranquility to your bathroom sink


Minimal Jewelry Tray With Pinched Corners
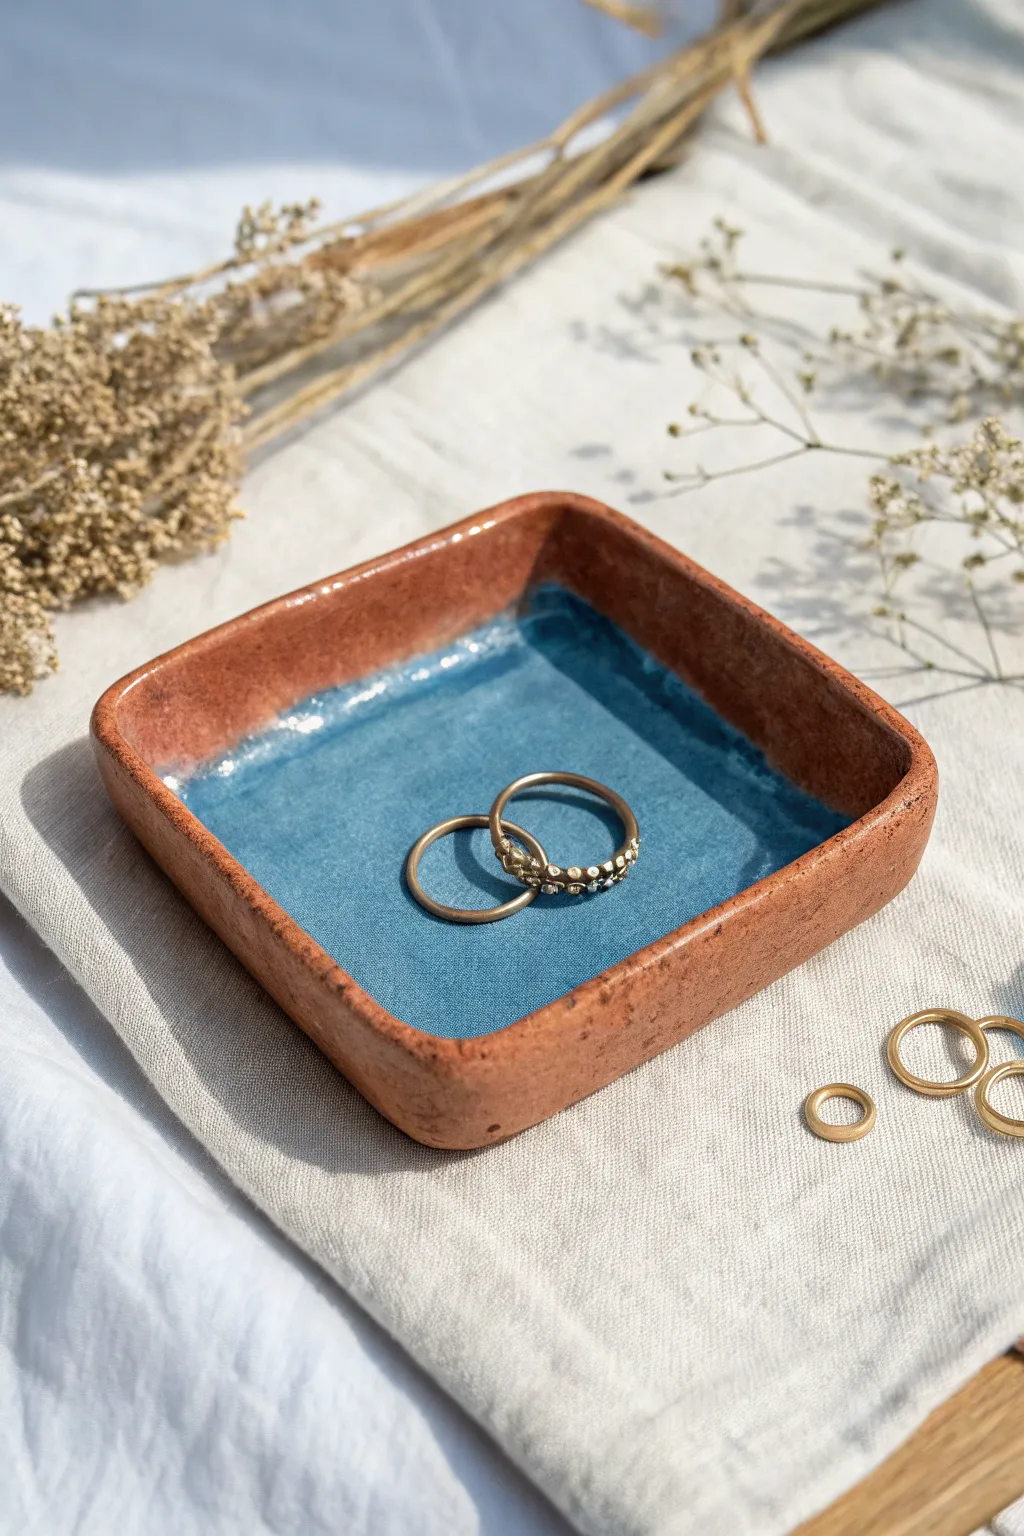
This rustic yet elegant jewelry tray combines the warmth of raw red clay with the cool splash of a glossy blue glaze. The simple square form with gently lifted corners makes it a perfect starter project for learning slab techniques.
Step-by-Step
Materials
- Red stoneware or terracotta clay (low to mid-fire)
- Rolling pin
- Two wooden guide strips (approx. 1/4 inch thick)
- Fettling knife or needle tool
- Square paper template (approx. 4×4 inches)
- Smoothing rib (rubber or wood)
- Sponge and water
- Glossy turquoise or sky blue glaze
- Soft fan brush
- Wax resist (optional)
Step 1: Creating the Slab Base
-
Prepare the workspace:
Start by setting up a clean canvas board or cloth-covered table to prevent the clay from sticking. Place your two wooden guide strips parallel to each other, slightly wider than your intended slab. -
Roll the clay:
Take a manageable chunk of your red clay and begin rolling it out between the guide strips. The guides ensure an even thickness across the entire slab. -
Compress the slab:
Once rolled, take your smoothing rib and firmly run it across the surface of the clay in multiple directions. This compression step is crucial—it aligns the clay particles to prevent warping later. -
Cut the square:
Place your 4×4 inch paper template gently on the smooth slab. Using your fettling knife or needle tool, cut vertically along the edges of the template to create a clean square. -
Soften the edges:
With a slightly damp sponge or just your finger, gently run over the freshly cut edges to remove sharpness and any clay burrs.
Uneven Drying?
If your corners start cracking as they dry, your clay might be drying too fast. Cover the piece loosely with plastic wrap for the first 24 hours to slow down the process.
Step 2: Shaping and Refining
-
Lift the corners:
This is the defining moment for the shape. Gently lift one corner of the square and pinch it lightly to create a curved, upright wall. I find it helpful to support the underside with one hand while shaping with the other. -
Form the walls:
Repeat the lifting process on all four corners. Use your thumb to smooth the interior curve where the wall meets the floor of the tray, ensuring a seamless transition. -
Level the rim:
Look at the tray from eye level. If the corners are uneven, gently tap the rim upside down on the table or adjust them with your fingers until symmetrical. -
Dry partially:
Let the piece dry to a ‘leather hard’ state. This means it is firm enough to handle without deforming but still cool to the touch. -
Clean and bisque:
Use a damp sponge to do a final smoothness check, blotting out any imperfections. Allow to bone dry completely before firing in the kiln to bisque temperature (usually Cone 04).
Smooth Operator
Don’t skip the rib compression! Compressing both sides of your slab before cutting significantly reduces warping during the firing process.
Step 3: Glazing and Finishing
-
Clean the bisque:
Wipe the fired bisque ware with a damp sponge to remove any kiln dust, which can prevent glaze from adhering properly. -
Wax the exterior:
To achieve the look in the photo, apply wax resist to the entire outer shell and the very top edge of the rim. This ensures the raw red clay remains visible. -
Apply the glaze:
Load a soft fan brush with your turquoise or sky blue glaze. Apply a generous coat to the interior of the tray only. -
Add a second coat:
Once the first coat is dry to the touch, apply a second layer. For that pooled effect seen in the bottom, you can let the glaze be slightly thicker in the corners. -
Check the rim:
Use a damp sponge to wipe back any glaze that may have dripped onto the rim or outside walls, keeping that sharp contrast between the blue interior and terracotta exterior. -
Final Fire:
Fire the piece again according to the glaze manufacturer’s instructions (typically Cone 5 or 6 for stoneware).
Once cooled, your tray is ready to hold your favorite rings or simply sit as a beautiful accent piece on your dresser.

The Complete Guide to Pottery Troubleshooting
Uncover the most common ceramic mistakes—from cracking clay to failed glazes—and learn how to fix them fast.
Slab Tumbler Cup With a Slight Taper
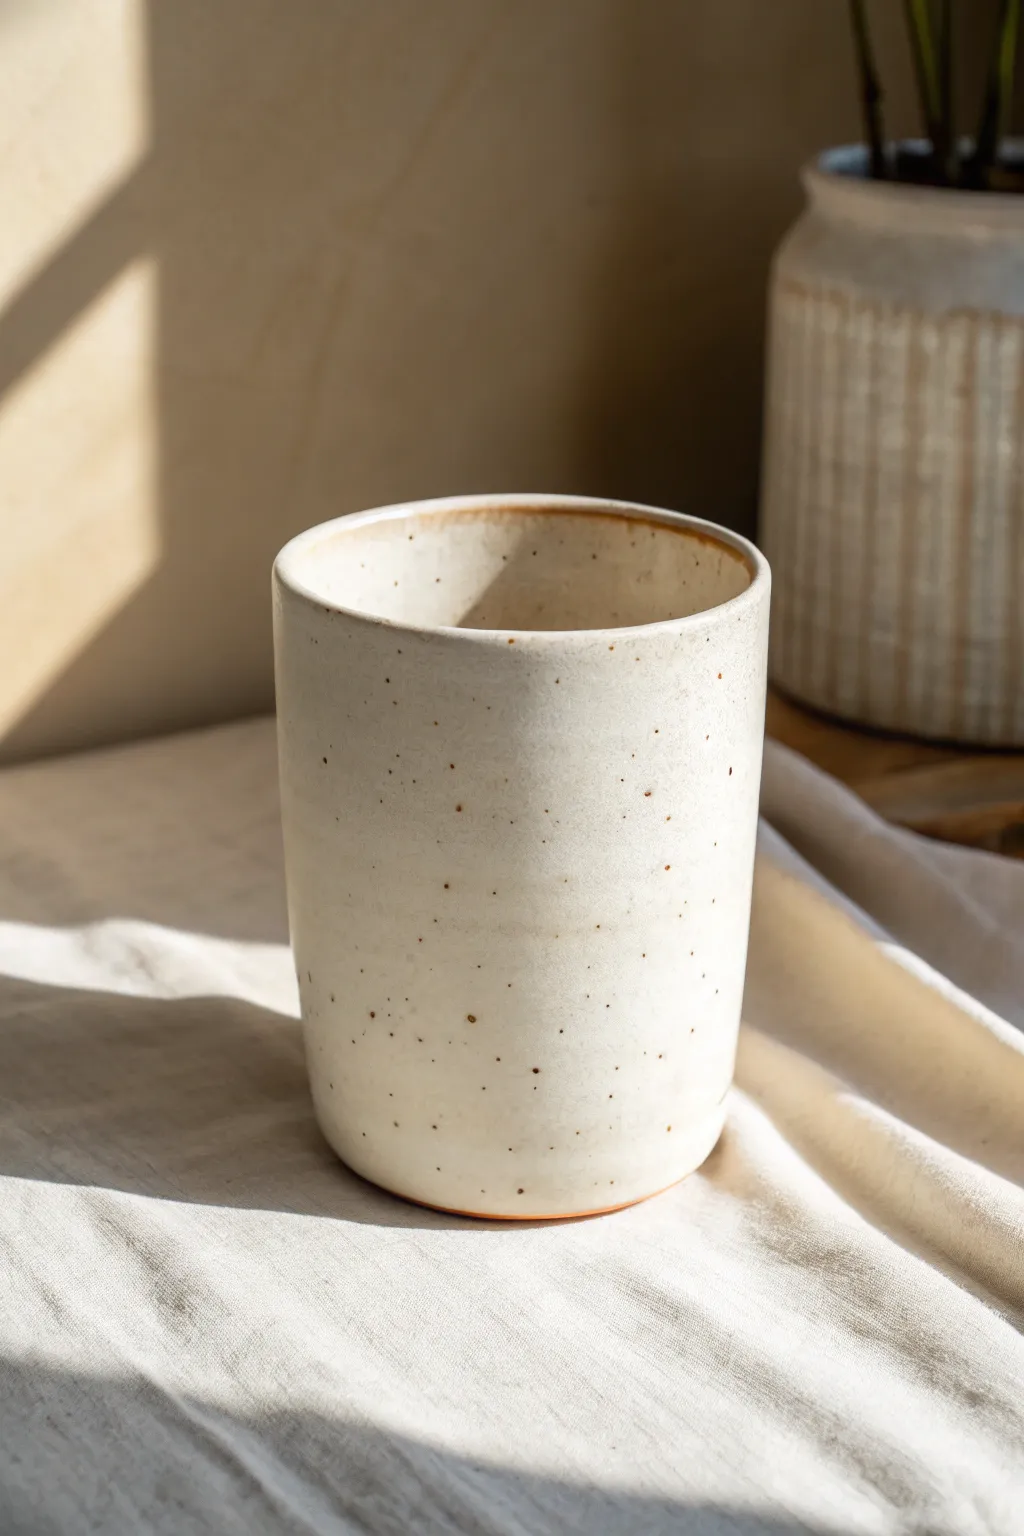
This project embraces the minimal beauty of a simple cylinder with a subtle taper, perfect for showcasing your favorite speckled clay body. The result is a smooth, hand-built vessel that feels comfortable in the hand and looks effortlessly modern on any table.
Detailed Instructions
Materials
- Speckled Stoneware Clay (mid-fire recommended)
- Slab Roller or Rolling Pin
- Canvas or Ware Board
- Needle Tool or Potter’s Knife
- Paper Template (Trapezoid shape)
- Serrated Rib or Scoring Tool
- Slip (clay mixed with water)
- Soft Rubber Rib
- Sponge
- Wooden Modeling Tool
- Satin White Glaze
Step 1: Preparing the Slab
-
Roll the clay:
Begin by rolling out your speckled stoneware clay to a consistent thickness, roughly 1/4 inch. If you are using a rolling pin, use guide sticks on either side to ensure the slab is completely even. -
Smooth the surface:
Take a soft rubber rib and compress the clay on both sides. This aligns the clay particles to prevent warping later and removes any canvas texture left by your workspace. -
Cut the template:
Place your paper template onto the slab. For that slight taper shown in the image, your template should be a trapezoid: a long rectangle that is slightly wider at the top edge than the bottom edge. -
Trace and slice:
Using your needle tool or potter’s knife, cut cleanly around the template. Keep the knife perpendicular to the table for straight edges, except for the two short sides which need beveling. -
Bevel the edges:
On the two shorter ends of your slab (the sides that will join to form the cylinder), cut a 45-degree angle. Bevel one side facing up and the opposite side facing down so they will overlap seamlessly.
Seam Success
When joining your beveled edges, wiggle the two sides slightly as you press them together. This friction helps lock the clay particles and slip together for a bond that won’t crack.
Step 2: Constructing the Form
-
Score the seams:
Take your serrated rib or scoring tool and rough up the beveled edges significantly. You want a nice texture for the slip to grab onto. -
Apply slip:
Dab a generous amount of slip onto the scored areas. I find applying it to both sides ensures the strongest possible bond. -
Form the cylinder:
Genlty lift the slab and curve it into a cylinder shape, bringing the beveled edges together. Press them firmly against each other to create the wall of your tumbler. -
Reinforce the seam:
Slide your hand inside the cylinder to support the wall while you use a wooden tool or rib on the outside to smooth over the join line. Repeat this on the inside to make the seam disappear completely. -
Measure the base:
Place your cylinder onto a leftover piece of slab. Trace a circle around the bottom edge of the cylinder with your needle tool to define the floor of the cup. -
Attach the base:
Score and slip both the bottom edge of your cylinder and the outer rim of the clay circle you just cut. Press the cylinder firmly onto the base. -
Seal the bottom:
Use a wooden modeling tool to blend the clay from the base up into the wall on the outside. On the inside, use a long-handled tool or a brush to smooth a tiny coil of clay into the interior corner for extra strength.
Level Up: Texture Play
Before rolling the slab into a cylinder, gently press a piece of rough linen or canvas into the exterior side. The glaze will break beautifully over the subtle fabric texture.
Step 3: Refining and Glazing
-
Refine the rim:
Once the cup is leather hard, use a slightly damp sponge to round off the rim. A sharp rim is uncomfortable to drink from, so aim for a soft, curved edge. -
Clean the surface:
Give the entire piece a final smoothing with a rib to ensure there are no fingerprints or sharp bits of clay. Let the mug dry slowly under plastic to prevent uneven shrinkage. -
Bisque fire:
Fire the bone-dry tumbler in your kiln to a bisque temperature (usually cone 04) to make it porous and ready for glazing. -
Wax the bottom:
Apply wax resist to the bottom of the tumbler and roughly 1/4 inch up the side wall to create a neat foot line. -
Apply glaze:
Dip the tumbler into a satin white glaze. Hold it upside down for a few seconds to let excess glaze drip off before turning it upright. -
Clean the rim (optional):
To achieve the look in the photo, wipe the glaze very gently off the very top edge of the rim with a damp sponge, revealing that thin line of toasted coloring. -
Final smooth:
Check the glaze surface for any pinholes or drips and rub them out gently with your finger before final firing.
Enjoy your morning coffee in a vessel that celebrates the simple beauty of handmade ceramics
Simple Spoon Rest With a Notched Edge
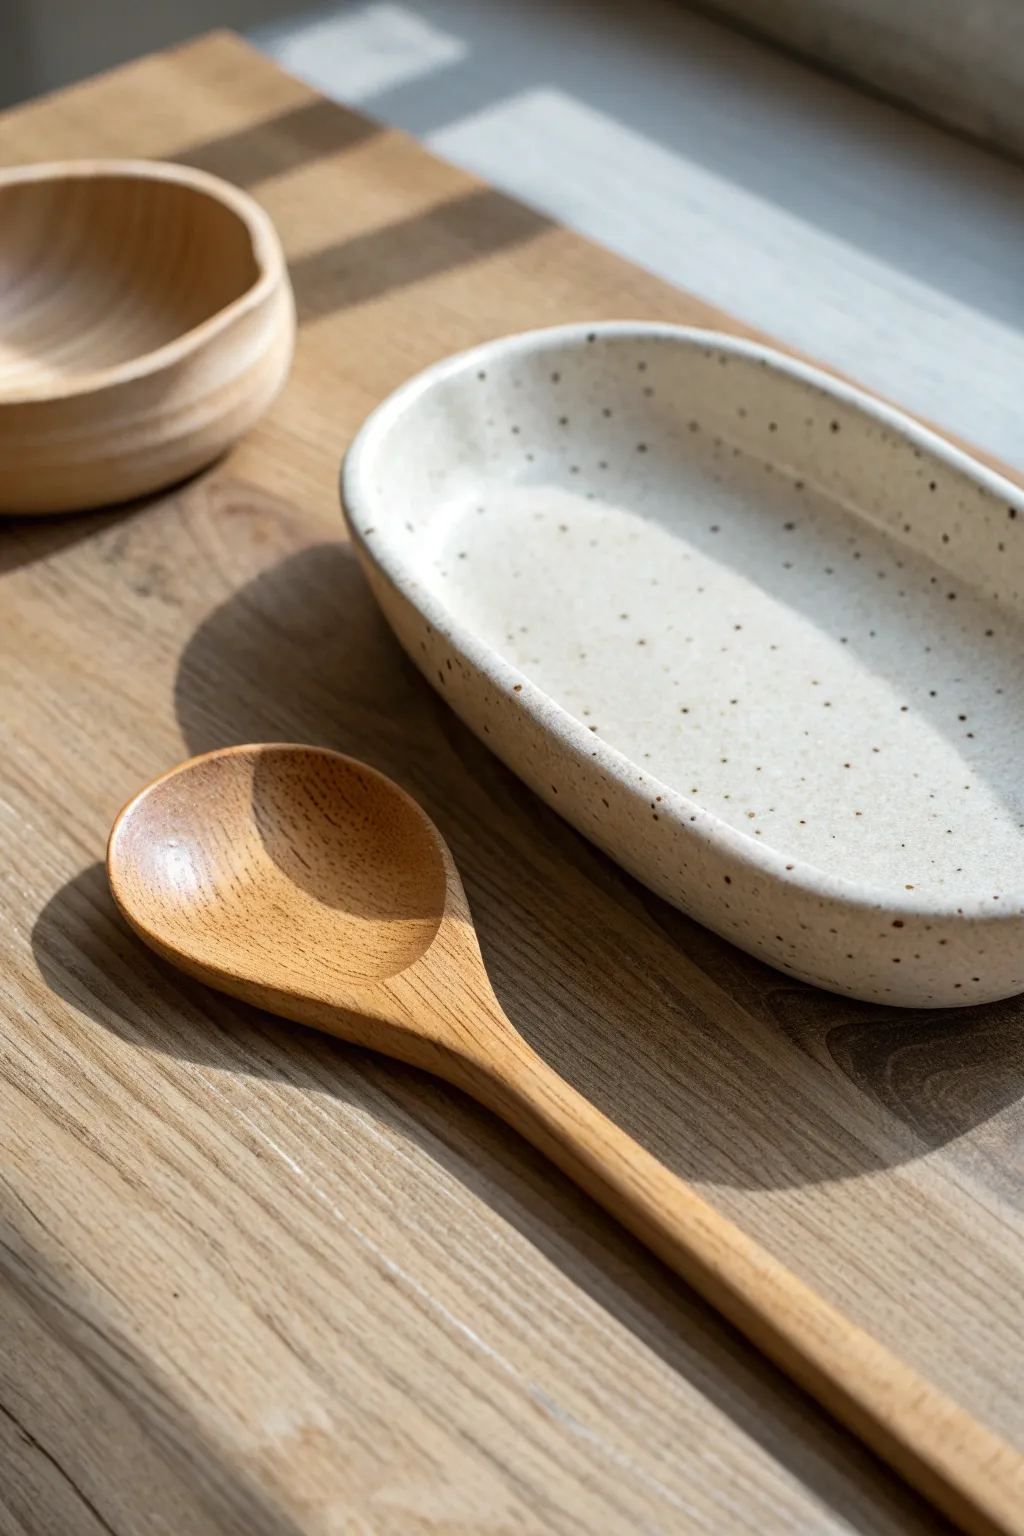
This charming spoon rest combines an organic oval shape with a minimalist speckled glaze for a functional piece that looks great on any countertop. Its gently curved sides keep messy spoons contained, while the sturdy stoneware clay ensures durability for everyday kitchen use.
Step-by-Step Tutorial
Materials
- White stoneware clay (speckled or plain)
- Rolling pin
- Canvas mat or cloth
- Oval paper template (approx. 6” x 4”)
- Fettling knife or needle tool
- Small sponge
- Rib tool (wooden or silicone)
- Small foam block or cushion (optional)
- Speckled matte glaze (if using plain clay) OR clear matte glaze (if using speckled clay)
- Kiln
Step 1: Forming the Slab
-
Prepare your clay:
Cut a manageable wedge of white stoneware clay. If you want the distinctive spotted look seen in the photo, you have two choices: use a pre-speckled clay body (often labeled ‘speckled buff’ or similar) or plan to apply a speckled glaze later. -
Roll the slab:
Place your clay on a canvas mat to prevent sticking. Using your rolling pin, roll the clay out into an even slab. Aim for a thickness of about 1/4 inch—not too thin, or it might warp, but not too chunky. -
Compress the clay:
Take your rib tool and gently drag it across the surface of the slab in multiple directions. This compression step is crucial; it aligns the clay particles, smooths out canvas textures, and helps prevent cracking during drying. -
Cut the shape:
Lay your oval paper template onto the smooth slab. Using a fettling knife or needle tool, trace around the template, keeping your tool perpendicular to the table for a clean, straight edge. -
Smooth the rim:
Once the oval is cut, pick it up gently. Run your finger or a slightly damp sponge along the cut edge to round it off. Sharp edges become razor-sharp after firing, so take time to soften them now.
Keep it Warble-Free
To prevent the flat bottom from warping during drying, place a small weighted bag (filled with sand or rice) in the center while it dries to leather-hard.
Step 2: Shaping and Drying
-
Lift the edges:
Place the oval back on a clean board or piece of foam. Gently use your fingers to lift the outer rim upwards. You aren’t pinching a wall; you are just creating a shallow, continuous curve so sauce won’t spill out. -
Refine the curve:
I like to use a small damp sponge to smooth the transition where the floor meets the lifted wall. Ensure the curve is gradual rather than a sharp 90-degree angle. -
Check for flatness:
Look at the piece from the side. Ensure the bottom remains flat so it doesn’t rock on the table. If the bottom has rounded out, gently tap the piece against the table to flatten the base again. -
Slow drying:
Cover the piece loosely with plastic for the first day to let humidity equalize. Uncover it slowly over the next few days until it is bone dry. This slow process helps maintain that perfect oval shape without warping. -
Bisque fire:
Load your bone dry piece into the kiln for a bisque firing (usually Cone 04). This creates a porous stage ready for glazing.
Add a Notch
While plastic, gently press the handle of a wooden spoon into the rim on one side. This creates a functional groove for your utensil to rest securely.
Step 3: Glazing and Finishing
-
Clean the bisque:
Wipe the bisque-fired spoon rest with a damp sponge to remove any kiln dust. This ensures the glaze adheres properly without crawling. -
Apply the glaze:
If you used plain white clay, choose a glaze like ‘Speckled White’ or ‘Marshmallow’ that has iron flecks suspended in it. Dip the piece or brush on 2-3 even coats. -
Alternate option:
If you used a speckled clay body, simply apply a clear matte or white semi-opaque glaze. The natural iron specks in the clay will burn through the glaze during firing to create the texture. -
Wipe the foot:
Using a wet sponge, carefully wipe all glaze off the very bottom of the piece where it will touch the kiln shelf. Leaving glaze here will fuse your spoon rest to the shelf forever. -
Glaze fire:
Fire the piece to the temperature recommended for your specific clay and glaze combination (often Cone 5 or 6 for stoneware). Allow the kiln to cool completely before opening. -
Final inspection:
Check the bottom for any sharp burrs. If necessary, sand the unglazed foot lightly with wet sandpaper to ensure it won’t scratch your wooden tabletop.
Place your finished spoon rest next to your stove for a stylish and practical kitchen upgrade


What Really Happens Inside the Kiln
Learn how time and temperature work together inside the kiln to transform clay into durable ceramic.
Pinch-and-Slab Cup for Extra Forgiveness
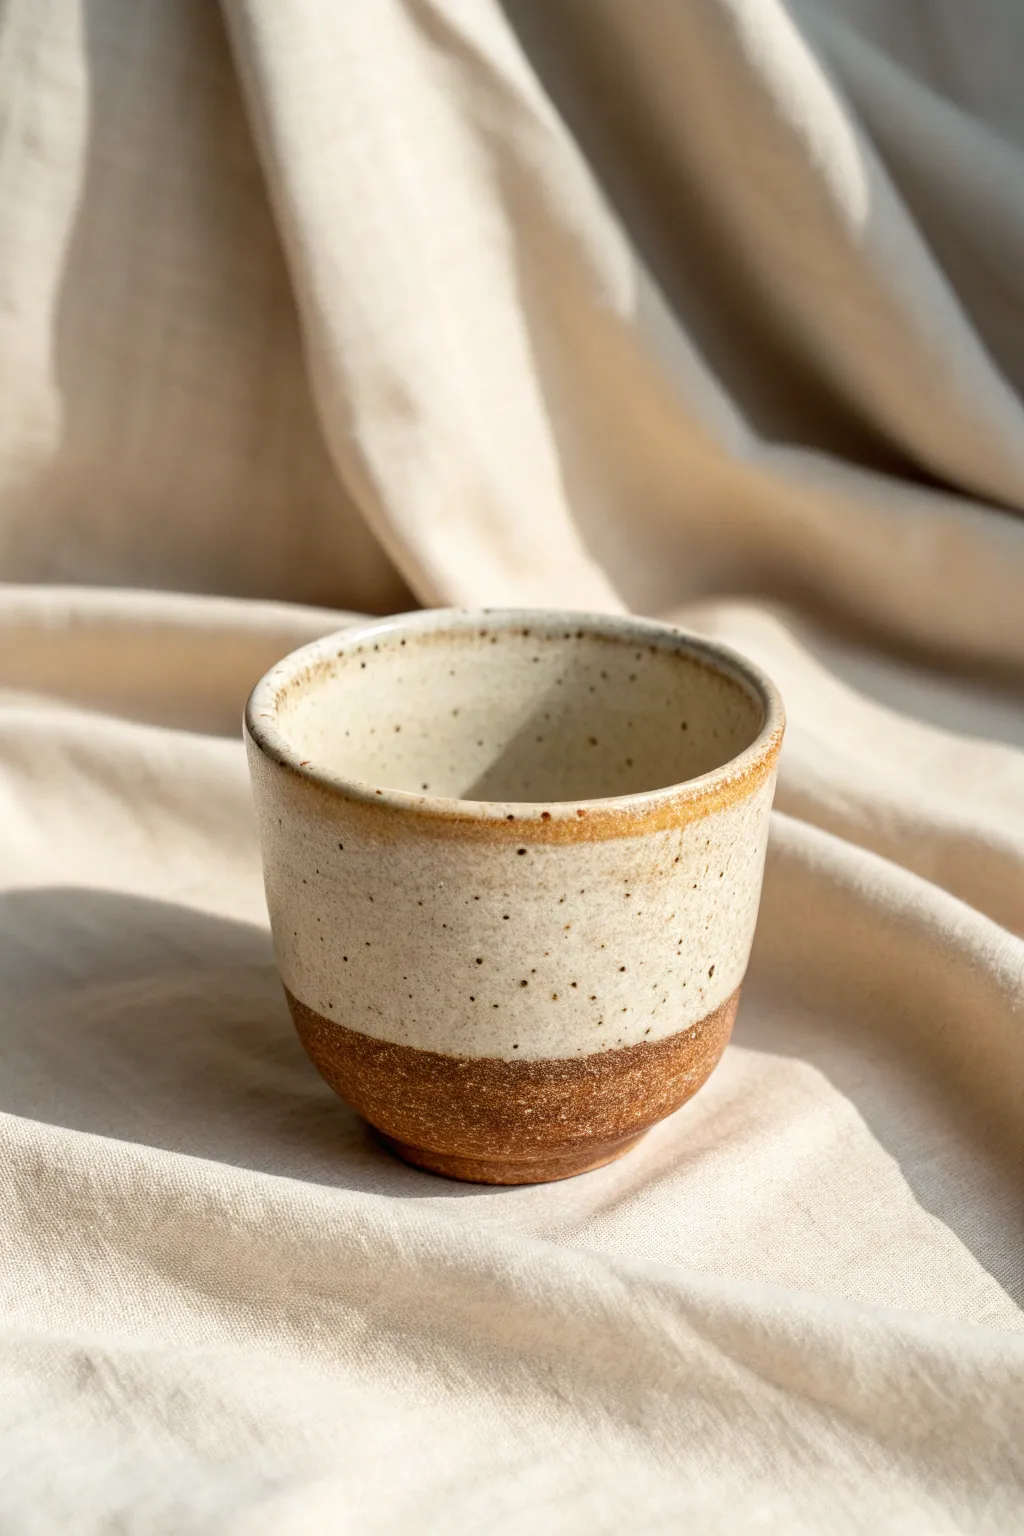
This charming, rustic cup combines the stability of a pinch pot with the clean lines of slab construction, resulting in a gentle, two-tone vessel. The finished piece features a beautiful contrast between the raw, warm clay body at the base and a creamy, speckled white glaze dripping down the sides.
Step-by-Step
Materials
- Stoneware clay (preferably speckled)
- Rolling pin
- Canvas mat or cloth
- Needle tool or fettling knife
- Scoring tool (or fork)
- Slip (clay and water slurry)
- Wooden rib or smoothing tool
- Sponge
- Creamy white dipping glaze
- Ruler
Step 1: Creating the Pinch Pot Base
-
Form the starting ball:
Start with a ball of wedged clay roughly the size of a tangerine. Pat it into a smooth sphere in your hands to ensure there are no air bubbles trapped inside. -
Open the hole:
Push your thumb gently into the center of the ball, stopping about a half-inch from the bottom. This thick base adds stability and gives the cup a nice weight. -
Pinch the walls:
Using a rhythmic pinching motion between your thumb and fingers, rotate the clay and thin out the walls. Aim for a curve rather than a flat bottom, creating a small bowl shape about 2 inches high. -
Level the rim:
Once your pinch pot base is formed, use a needle tool to trim the top rim horizontally so it is perfectly flat. This flat surface is crucial for attaching the slab wall later.
Step 2: Adding the Slab Extension
-
Roll the slab:
Roll out a separate piece of clay into a slab that matches the thickness of your pinch pot walls—roughly 1/4 inch thick. I find rolling on a canvas mat prevents sticking. -
Measure and cut:
Measure the circumference of your pinch pot rim. Cut a rectangular strip from your slab that matches this length plus a slight overlap, and decide on your desired height (2-3 inches usually works well). -
Score and slip:
Score the top rim of your pinch pot and the bottom edge of your rectangular slab thoroughly. Apply a generous amount of slip to both scored areas. -
Attach the slab cylinder:
Curve the slab into a cylinder and place it atop the pinch pot rim. Be careful to line up the seams. Gently press the slab down onto the base to ensure a strong bond. -
Seal the vertical seam:
Where the slab ends meet, score and slip the vertical joint. Smear the clay across the seam with your thumb to lock it together, blending it until it’s invisible.
Cracking at the Seam?
If the join cracks during drying, the clay was likely too dry when attached. Score deeper next time and use vinegar in your slip.
Step 3: Refining and Glazing
-
Blend the horizontal connection:
Use a wooden rib or your fingers to smooth the connection line between the pinch pot base and the slab wall. You want a seamless transition on the inside, though you can leave a subtle texture on the outside if you prefer. -
Shape the rim:
Use a damp chamois or a wet sponge to compress and round off the top lip of the cup. This makes it comfortable to drink from and prevents chipping. -
Dry slowly:
Loosely cover the cup with plastic and let it dry slowly to the leather-hard stage, then uncover to bone dry. This prevents the two different construction methods from pulling apart. -
Bisque fire:
Fire the bone-dry piece in the kiln to cone 04 (or your clay’s specific bisque temperature). -
Apply wax resist:
Paint liquid wax resist on the bottom third of the exterior, covering the pinch-pot portion. This preserves the raw clay look shown in the image. -
Dip the glaze:
Holding the cup by the foot, dip it upside down into a creamy, speckled semi-matte white glaze. Submerge it until the glaze meets the wax line. -
Final firing:
Clean any stray glaze spots off the waxed bottom and fire the piece to the final temperature (typically cone 5 or 6 for stoneware).
Textured Grip
Before glazing, gently tap the lower pinch-pot section with a rough stone or paddle to enhance the tactile contrast against the smooth glazed top.
Enjoy the tactile pleasure of holding a cup that tells the story of its own making in two distinct chapters
Slab Coasters With Stamped Texture
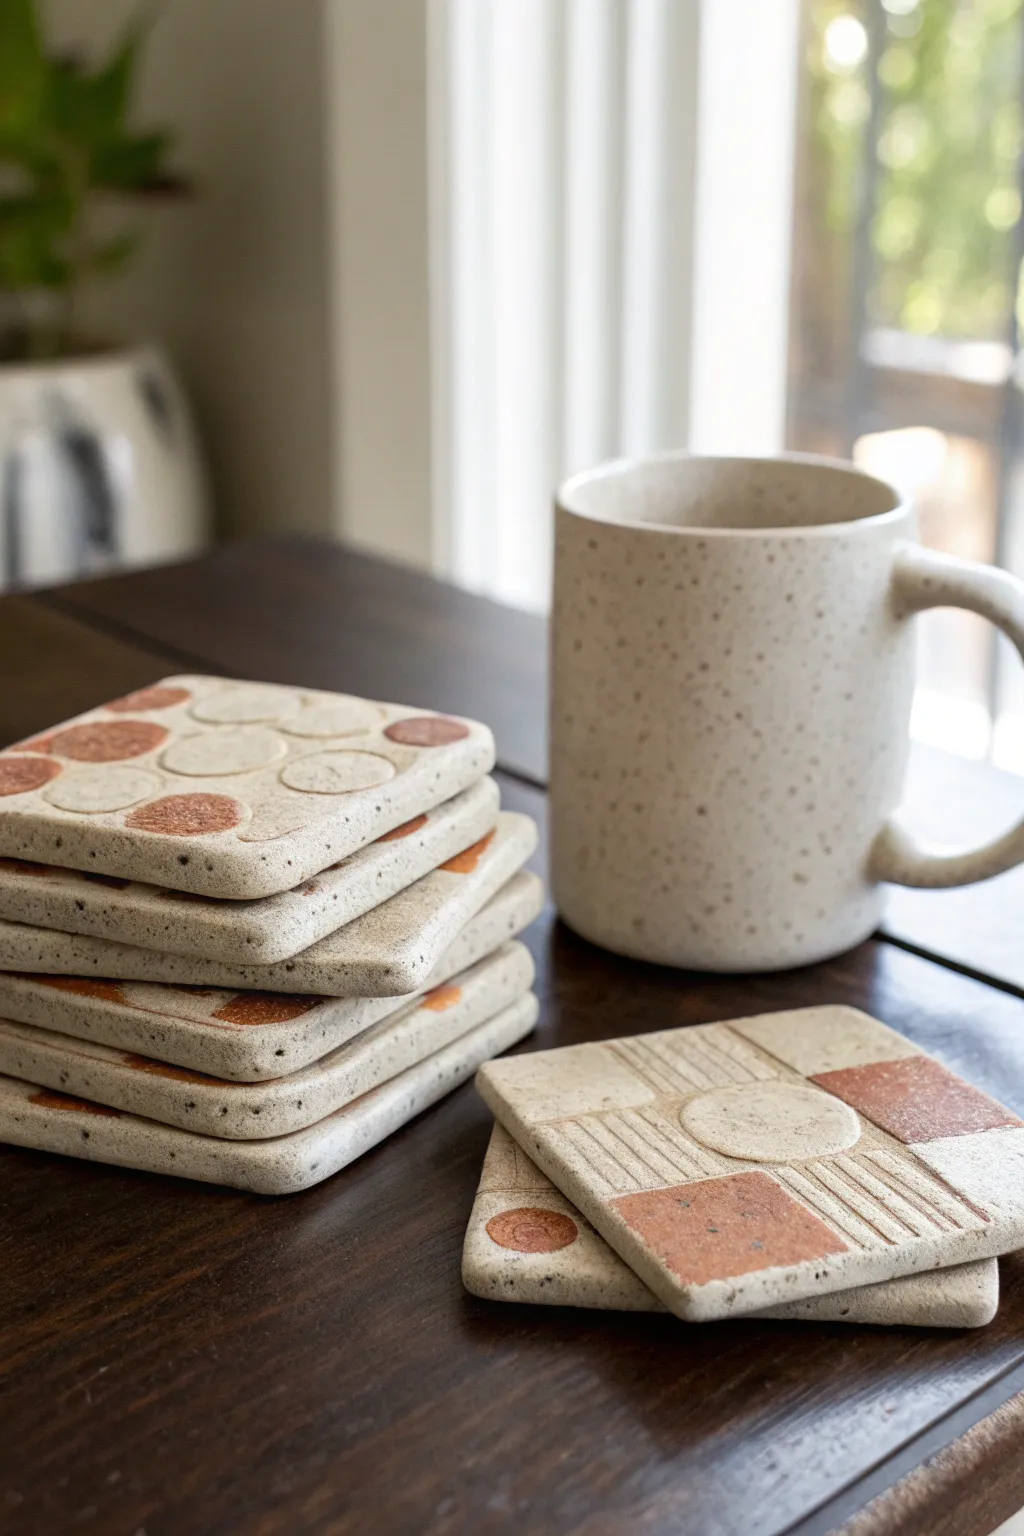
These speckled stoneware coasters combine functional simplicity with an earthy, geometric aesthetic. Mixing stamped textures and warm terracotta tones creates a modern yet rustic set perfect for protecting your surfaces.
Step-by-Step Guide
Materials
- Speckled buff stoneware clay
- Rolling pin
- Two wooden guide strips (approx. 1/4 inch thick)
- Square cookie cutter (approx. 4 inches) or a template and needle tool
- Canvas mat or slab roller
- Various stamps (circular objects, wooden blocks)
- Fettling knife or needle tool
- Terracotta colored underglaze or slip
- Small paintbrush
- Sponge
- Clear matte or satin glaze
- Kiln
Step 1: Preparing the Slabs
-
Wedge the clay:
Start by thoroughly wedging your speckled buff clay to remove air bubbles and ensure an even consistency, which is crucial for flat slabs. -
Set up your workspace:
Lay down a canvas mat to prevent sticking. Place two wooden guide strips on either side of your clay ball to ensure a uniform thickness. -
Roll the slab:
Using a rolling pin, roll the clay out until the pin rests on the guide strips. Aim for a thickness of about 1/4 inch so the coasters feel substantial but not heavy. -
Smooth the surface:
Before cutting, take a damp sponge or a soft rib tool and gently compress the clay surface. This removes the canvas texture and aligns the clay particles.
Warping Woes
If corners curl up during drying, flip the coasters over daily and weigh them down gently with a piece of drywall or a wooden board to keep them flat.
Step 2: Cutting and Designing
-
Cut the shapes:
Use a square cookie cutter to press out your coaster shapes. If you don’t have a cutter, place a paper square template on the clay and trace around it with a needle tool. -
Smooth the edges:
Once cut, handle the squares gently. Run a damp finger or sponge along the sharp edges to soften them, paying attention to the corners. -
Plan the circle pattern:
For the circular design, select a round object like a small bottle cap or dowel. Press gently to create a grid of circles, varying the pressure slightly for visual interest. -
Create the geometric pattern:
For the second design, use a straight edge to impress lines. Create quadrants or sections, filling some with parallel lines to create texture. -
Add a central focal point:
I like to stamp a circle right in the center or at the intersection of lines on the geometric coasters to tie the design together.
Clean Impressions
Dust your stamps or texture tools with a tiny bit of cornstarch before pressing them into the clay to prevent them from sticking and tearing the surface.
Step 3: Decoration and Finishing
-
Apply accent color:
Using the terracotta underglaze, carefully paint specific shapes. On the circle coasters, paint a few random dots; on the geometric ones, fill in alternating squares. -
Clean up lines:
If any underglaze spills over the stamped lines, wait for it to dry slightly and scrape it back with a clean tool for a crisp edge. -
Dry slowly:
Place the coasters on a flat board. Cover them loosely with plastic to ensure they dry slowly and evenly, which helps prevent warping. -
Bisque fire:
Once bone dry, load the coasters into the kiln for a bisque firing to prepare them for glazing. -
Wax resist (optional):
If you want the raw clay texture on the bottom, apply wax resist to the base of each coaster. -
Glaze application:
Dip or brush a clear matte or satin glaze over the entire top surface. This seals the clay and makes the coaster water-resistant while letting the speckles show through. -
Final wipe:
Wipe the bottoms clean with a sponge to ensure no glaze sticks to the kiln shelf. -
Glaze fire:
Fire the coasters to the temperature recommended for your specific clay body and glaze combination.
Stack your finished coasters on the coffee table and enjoy the tactile modern art you have created

TRACK YOUR CERAMIC JOURNEY
Capture glaze tests, firing details, and creative progress—all in one simple printable. Make your projects easier to repeat and improve.
Slab Tile Wall Hanging as a Texture Sampler
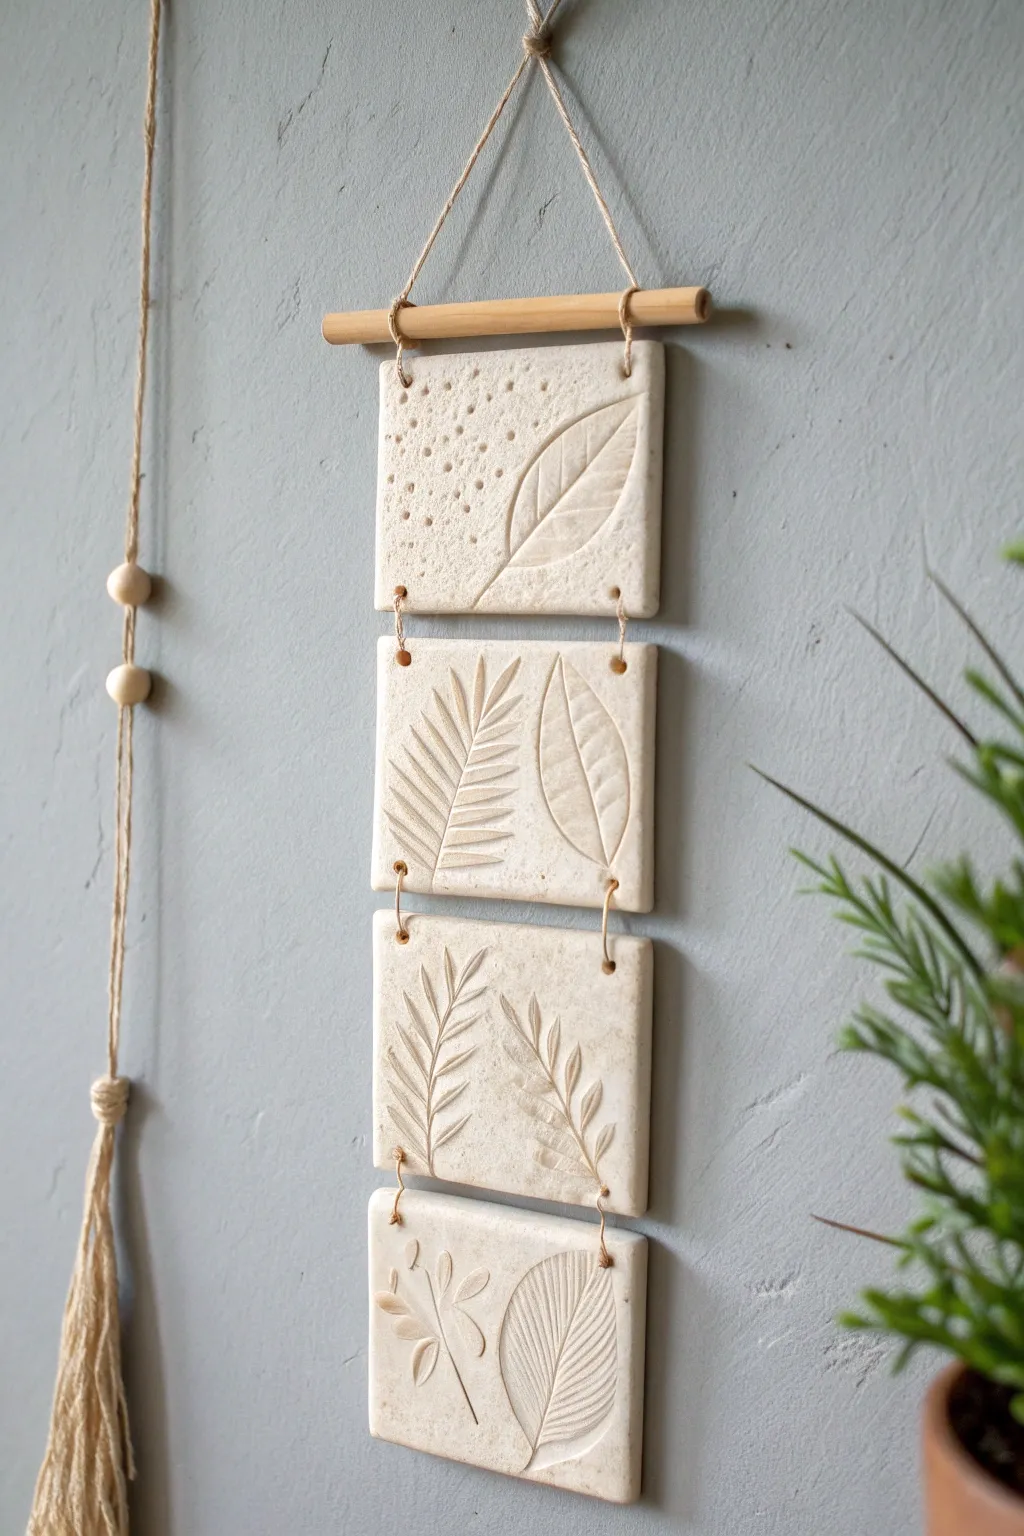
This elegant wall hanging combines the simplicity of slab construction with the organic beauty of botanical impressions. It’s a perfect project for testing textures, resulting in a tiered cascading mobile that brings a touch of nature indoors.
Step-by-Step Guide
Materials
- White stoneware or porcelain clay body
- Rolling pin
- Two wooden thickness strips (approx. 1/4 inch thick)
- Assorted fresh leaves and foliage (ferns, heavy-veined leaves)
- Needle tool or fettling knife
- Ruler
- Small circular clay cutter or hole punch tool (straw can work)
- Wooden dowel or driftwood piece
- Jute twine or cord
- Wooden beads (optional)
- Sponge and water
- Clear matte glaze or transparent gloss
- Metal rib
Step 1: Preparing the Slabs
-
Wedging the clay:
Begin by thoroughly wedging your white clay to remove air bubbles and ensure a consistent texture, which is crucial for preventing cracks in thin slabs. -
Rolling out:
Place your clay between two wooden thickness strips on a canvas work surface. Use your rolling pin to flatten the clay until the roller rests on the strips, ensuring a perfectly even 1/4 inch thickness. -
Smoothing the surface:
Take a metal rib and gently compress the surface of the clay slab. Drag it across the top to remove canvas texture and align the clay particles, making it a smooth canvas for your prints. -
Cutting the rectangles:
Using a ruler and needle tool, measure and cut out four identical rectangles. A size of about 4×3 inches works well, but you can adjust based on your preference. -
Refining edges:
Once cut, run a damp finger or a slightly moist sponge along the sharp cut edges of each rectangle to round them off slightly and prevent sharpness after firing.
Step 2: Adding Textures
-
Selecting foliage:
Arrange your chosen leaves on a separate surface first to plan your composition. Look for leaves with prominent veins on the back side, as these create the deepest impressions. -
Placement:
Gently place the leaves vein-side down onto your clay rectangles. You can let some leaves run off the edge for a more dynamic look. -
Rolling the impression:
With the leaves in place, gently roll over them with your rolling pin once. Apply firm, even pressure to press the plant matter into the clay without deforming the rectangle’s shape. -
Adding detail texture:
For the top tile shown in the example, use a tool or a stiff brush to stipple small dots around the leaf shape, creating a contrasting pebbled background. -
Removing the organic material:
Carefully peel the leaves away from the clay using a needle tool to lift the stem. Reveal the crisp impression left behind.
Highlight the Veins
After bisque firing, wipe a dark oxide wash (like iron oxide) into the leaf impressions and sponge off the surface. This makes the leaf veins pop creates an antique look.
Step 3: Assembly Prep
-
Punching holes:
While the clay is still leather hard, use a small circular cutter or a plastic straw to punch holes. You’ll need two holes at the top of the first tile, and four holes (two top, two bottom) on the middle two tiles. -
Final tile holes:
For the bottom-most tile, you only need two holes at the top. Ensure all holes are aligned vertically so the tiles hang straight. -
Drying:
Sandwich your tiles between two pieces of drywall or heavy wood boards to dry slowly. This is my favorite trick to keep flat slabs from warping as they lose moisture. -
Bisque firing:
Once bone dry, fire the pieces to bisque temperature (usually Cone 04) to prepare them for glazing.
Make it a Melody
Fire your tiles to a high temperature (vitrification) so the clay becomes dense. Hang the tiles closer together so they gently clink in the breeze to act as wind chimes.
Step 4: Finishing and Hanging
-
Glazing:
Apply a clear matte or very light transparent glaze. This highlights the shadows in the leaf depressions without obscuring the details. Fire to the final temperature for your clay body. -
Preparing the dowel:
Cut a length of jute twine and tie it to both ends of your wooden dowel to create the main hanger. -
Connecting the tiles:
Cut short lengths of twine or wire jump rings to connect the tiles. Thread the material through the bottom holes of one tile and the top holes of the next, knotting securely in the back. -
Attaching to the dowel:
Thread twine through the top two holes of the first tile and tie this securely to the wooden dowel above. -
Adding the tassel:
Create a separate long hanging accent with the wooden beads and a tassel, attaching it to the main hook or beside the dowel solely for decorative balance.
Now step back and admire how the light catches the subtle textures of your new botanical wall piece
Beginner Slab Box With a Lift-Off Lid
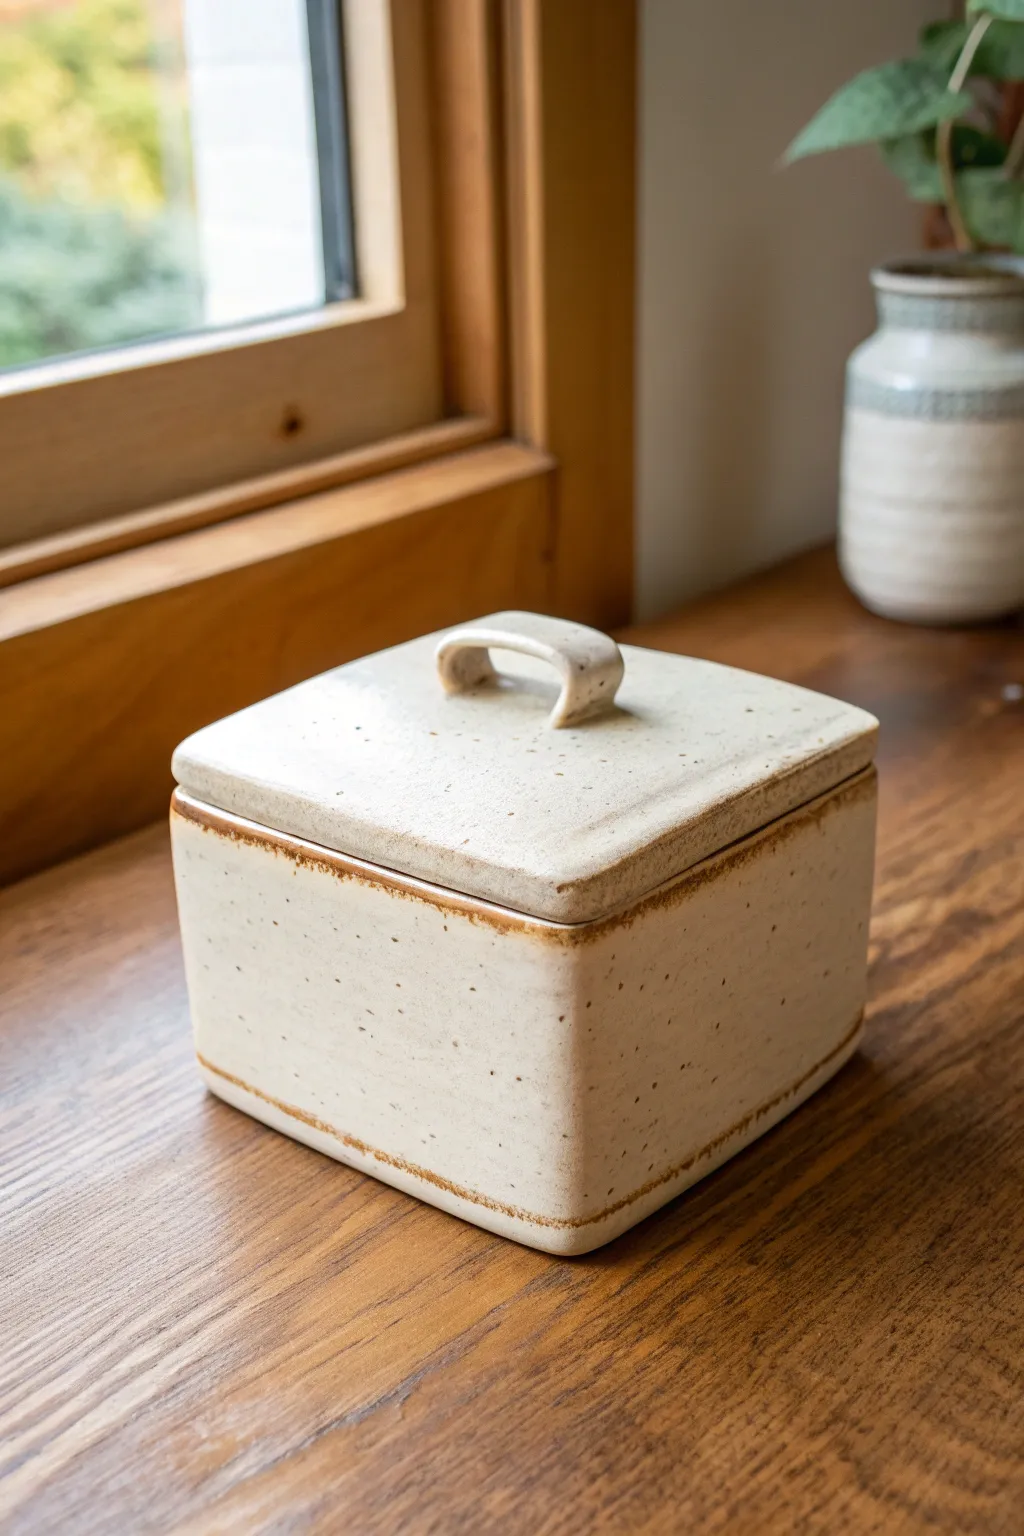
This charming, square lidded box features a creamy speckle glaze with warm, toasted edges that highlight its handmade nature. It’s a perfect introductory project for slab building, resulting in a sturdy and functional container for jewelry or trinkets.
Step-by-Step Guide
Materials
- Speckled stoneware clay
- Rolling pin
- Two 1/4 inch wooden guide strips (slab sticks)
- Sharp knife or needle tool
- Ruler or square templates
- Serrated rib or fork (for scoring)
- Slip (clay mixed with water)
- Wooden modeling tool
- Sponge
- Iron oxide wash
- Creamy white dipping glaze
Step 1: Planning and Rolling
-
Prepare your clay:
Begin by wedging your speckled stoneware clay thoroughly to remove air bubbles. This ensures a uniform consistency and prevents cracking later on. -
Roll out the slab:
Set up your 1/4 inch wooden guide strips on a canvas-covered work surface. Place the clay between them and use your rolling pin to create a smooth, even slab. I like to flip the clay over once during rolling to keep it from sticking. -
Let it firm up:
Allow the clay slab to dry slightly until it reaches a ‘leather-hard’ stage. It should be stiff enough to hold its shape when lifted but still flexible enough to be joined without cracking.
Pro Tip: Clean Seams
When blending seams, work the clay across the join in both directions (left-right, right-left) before smoothing it down. This stitches the clay particles together.
Step 2: Cutting and Assembling the Box
-
Cut the components:
Using a ruler or paper templates, cut out your pieces: one square for the base (e.g., 4×4 inches), four rectangular side walls (e.g., 4×3 inches), and one slightly larger square for the lid (e.g., 4.25×4.25 inches). -
Bevel the edges:
For stronger, cleaner corners, use your knife to cut a 45-degree angle (bevel) on the vertical edges of the wall pieces where they will meet each other. You can leave the bottom edges flat to sit on top of the base slab. -
Score and slip:
Rough up all joining surfaces (the beveled edges and the perimeter of the base) using a serrated rib or needle tool. Apply a generous amount of slip to these scored areas. -
Construct the walls:
Press the walls firmly onto the base and against each other. Ensure the corners are square. Use a wooden modeling tool to blend the clay seams together on both the inside and outside for maximum strength. -
Reinforce the seams:
Roll very thin coils of soft clay and press them into the interior seams. Smooth these out carefully with your finger or a tool to ensure a watertight bond.
Level Up: Surface Texture
Before assembling, gently press a piece of canvas or burlap onto your damp slabs. This subtle texture will catch the glaze and highlight the iron oxide edges even more.
Step 3: Creating the Lid
-
Add a flange:
Flip your lid slab over. Create a containment flange by attaching a small square of clay coils or slab strips about 1/4 inch in from the edge. This flange should fit loosely inside the box walls to keep the lid from sliding off. -
Make the handle:
Cut a small strip of clay, about 3 inches long and 1/2 inch wide. Gently curve it into an arch shape to form the handle seen in the photo. -
Attach the handle:
Score and slip the center of the lid top and the ends of your handle. Press the handle firmly into place, blending the clay at the connection points with a small tool to make it seamless. -
Smooth and refine:
Use a damp sponge to smooth out any sharp edges, fingerprints, or rough spots on both the box and lid. Pay special attention to the rim of the box so the lid sits flush.
Step 4: Finishing and Glazing
-
Bisque fire:
Once bone dry, fire the piece in a kiln to bisque temperature (usually cone 04) to prepare it for glazing. -
Apply oxide wash:
Mix iron oxide with water and brush it carefully along the corners, the rim, and the base edge of the box. Wipe it back with a damp sponge so it stains the clay grooves without being too heavy. -
Wax the bottom:
Apply wax resist to the bottom of the box and the contact flange of the lid to prevent glaze from adhering where it touches the kiln shelf or the box rim. -
Glaze dip:
Dip the entire box and lid into a creamy white stoneware glaze. The iron oxide underneath will interact with the glaze during firing, creating that beautiful toasted brown edge. -
Final firing:
Fire the piece to maturity (cone 6 or 10 depending on your clay/glaze). The speckles in the clay will bleed through the white glaze, completing the rustic look.
Now you have a beautiful, custom storage vessel that celebrates the natural qualities of the clay
Geometric Mini Planter Built From Stiff Slabs
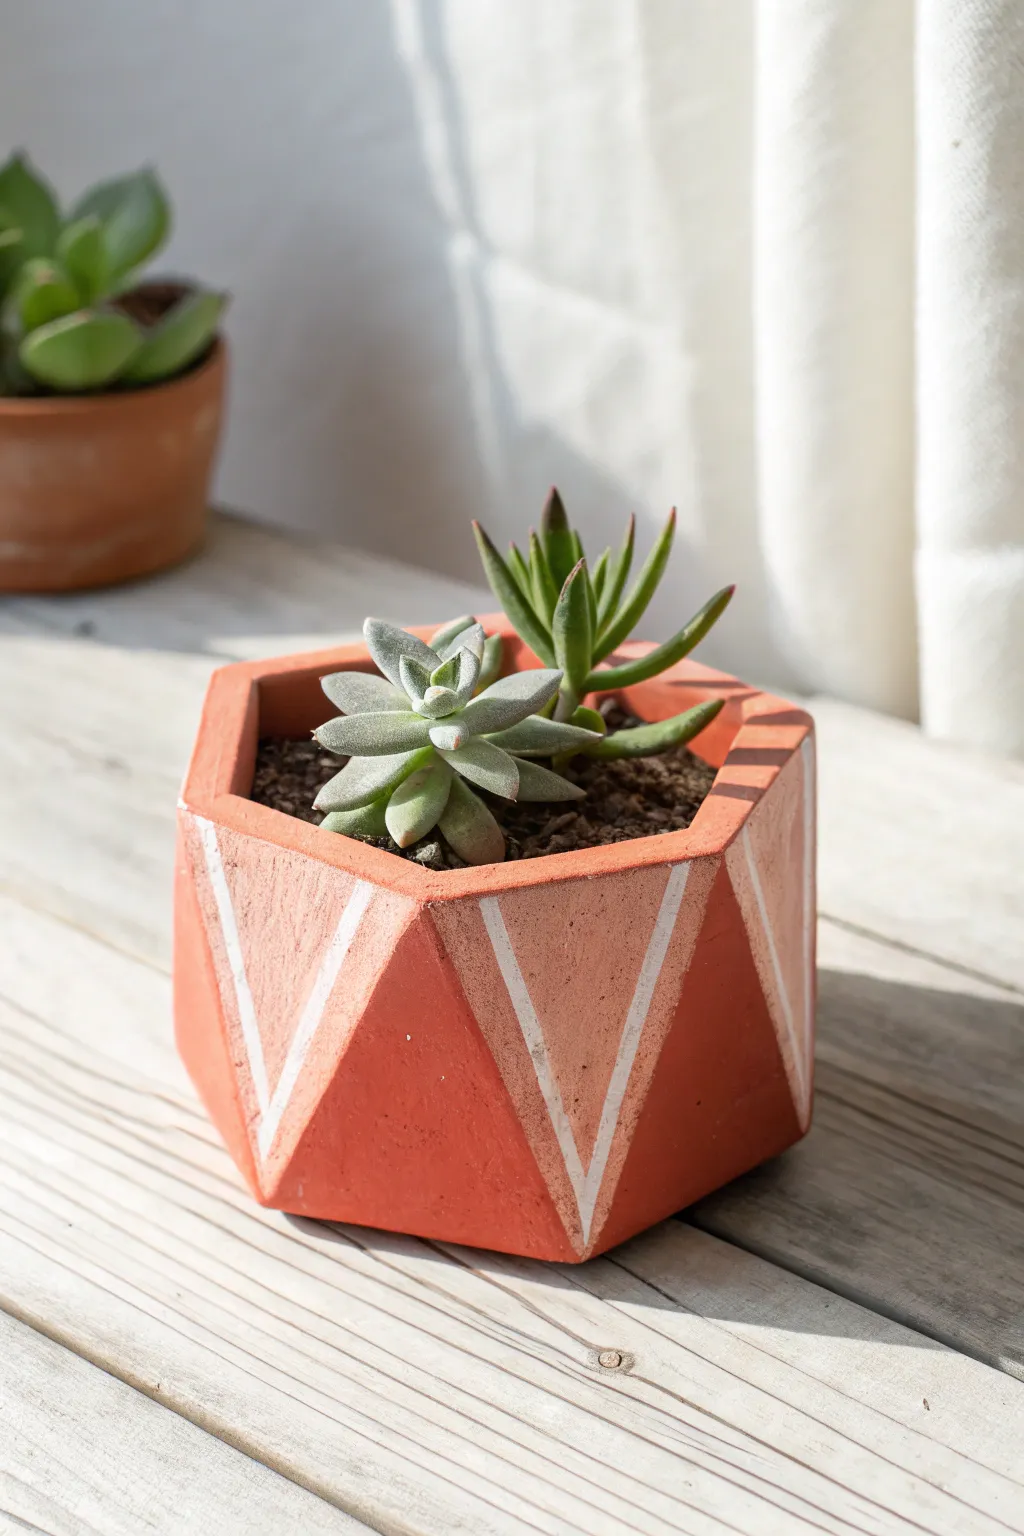
This striking geometric planter combines crisp angles with a warm, organic terracotta finish. Its clean lines and subtle white detailing make it a perfect modern home for your favorite succulents, adding a pop of desert chic to any windowsill.
Detailed Instructions
Materials
- Red earthenware or terracotta clay body
- Rolling pin
- Two wooden slats (1/4 inch thick) for thickness guides
- Fettling knife or X-Acto blade
- Paper or cardstock for template
- Ruler
- Scoring tool (or fork)
- Slip (clay and water slurry)
- White underglaze
- Fine detail paintbrush
- Sponge
- Clear matte glaze (optional)
Step 1: Preparing the Slabs
-
Design the template:
Sketch a rectangle on cardstock roughly 2 inches tall and 1.5 inches wide for your walls. You will need six of these. Also create a hexagon shape for the base that matches the width of your wall panels. -
Roll out the clay:
Wedge your red clay to remove air bubbles, then place it between your two wooden guide slats. Roll the clay out until the rolling pin rests on the slats, ensuring an even quarter-inch thickness across the entire slab. -
Initial firming:
Before cutting, let the slab sit uncovered for about 30-45 minutes. You want the clay to be ‘leather hard’—stiff enough to hold its shape when lifted, but not dry enough to crack. -
Cut the shapes:
Place your templates on the leather-hard clay. Using a sharp fettling knife and a ruler for guidance, carefully cut out six rectangular wall pieces and one hexagonal base piece.
Miter Magic
If cutting 30-degree angles is difficult, simply butt-joint the slabs (flat edge to flat edge). It creates a slightly different look but is much easier for beginners to manage.
Step 2: Assembling the Form
-
Bevel the edges:
To make the hexagon fit together seamlessly, you’ll need to bevel the vertical edges of your wall pieces. Cut the long sides of each rectangle at a 30-degree angle so they will lock together tightly. -
Score the connection points:
Take your scoring tool or a fork and scratch up the beveled edges of the walls, as well as the edges of the hexagonal base. The texture should look rough and messy. -
Apply slip:
Dab a generous amount of slip onto all the scored areas. This acts as the glue for your pottery. -
Attach the first wall:
Press one wall piece firmly onto one side of the hexagonal base. Smooth the clay on the inside seam to secure it. -
Build the perimeter:
Attach the remaining five walls, joining them to the base and to each other side-by-side. As you complete the circle, press the final seams together firmly. -
Reinforce seams:
Roll a very tiny coil of soft clay and press it into the interior corners where the walls meet the floor. Smooth this out with your finger to ensure a watertight seal.
Level Up: Texture Play
Before the clay hardens, press a piece of lace or burlap into just one or two of the side panels. This adds tactile contrast to the smooth geometric painted sides.
Step 3: Refining and Decorating
-
Clean the exterior:
Once assembled, use a damp sponge to wipe away excess slip or rough marks on the outside. Be careful not to round over your nice crisp corners. -
Dry thoroughly:
Let the pot dry slowly under loose plastic for a day, then uncover it to dry completely to the ‘bone dry’ stage. -
Bisque fire:
Fire the piece in a kiln to cone 04 (or according to your clay’s instructions) to harden it into permanent ceramic. -
Paint the geometric design:
Using white underglaze and a fine brush, paint V-shapes on the alternate panels. I like to rest my pinky finger on the pot for stability to get those lines perfectly straight. -
Final firing:
If you want a raw finish like the image, the piece is done. If you prefer a sealed surface, apply a thin coat of clear matte glaze over the exterior and fire it one last time.
Fill your new planter with gritty cactus soil and your favorite succulents to bring the whole piece to life
Abstract Folded Slab Sculptural Bowl With Bold Texture
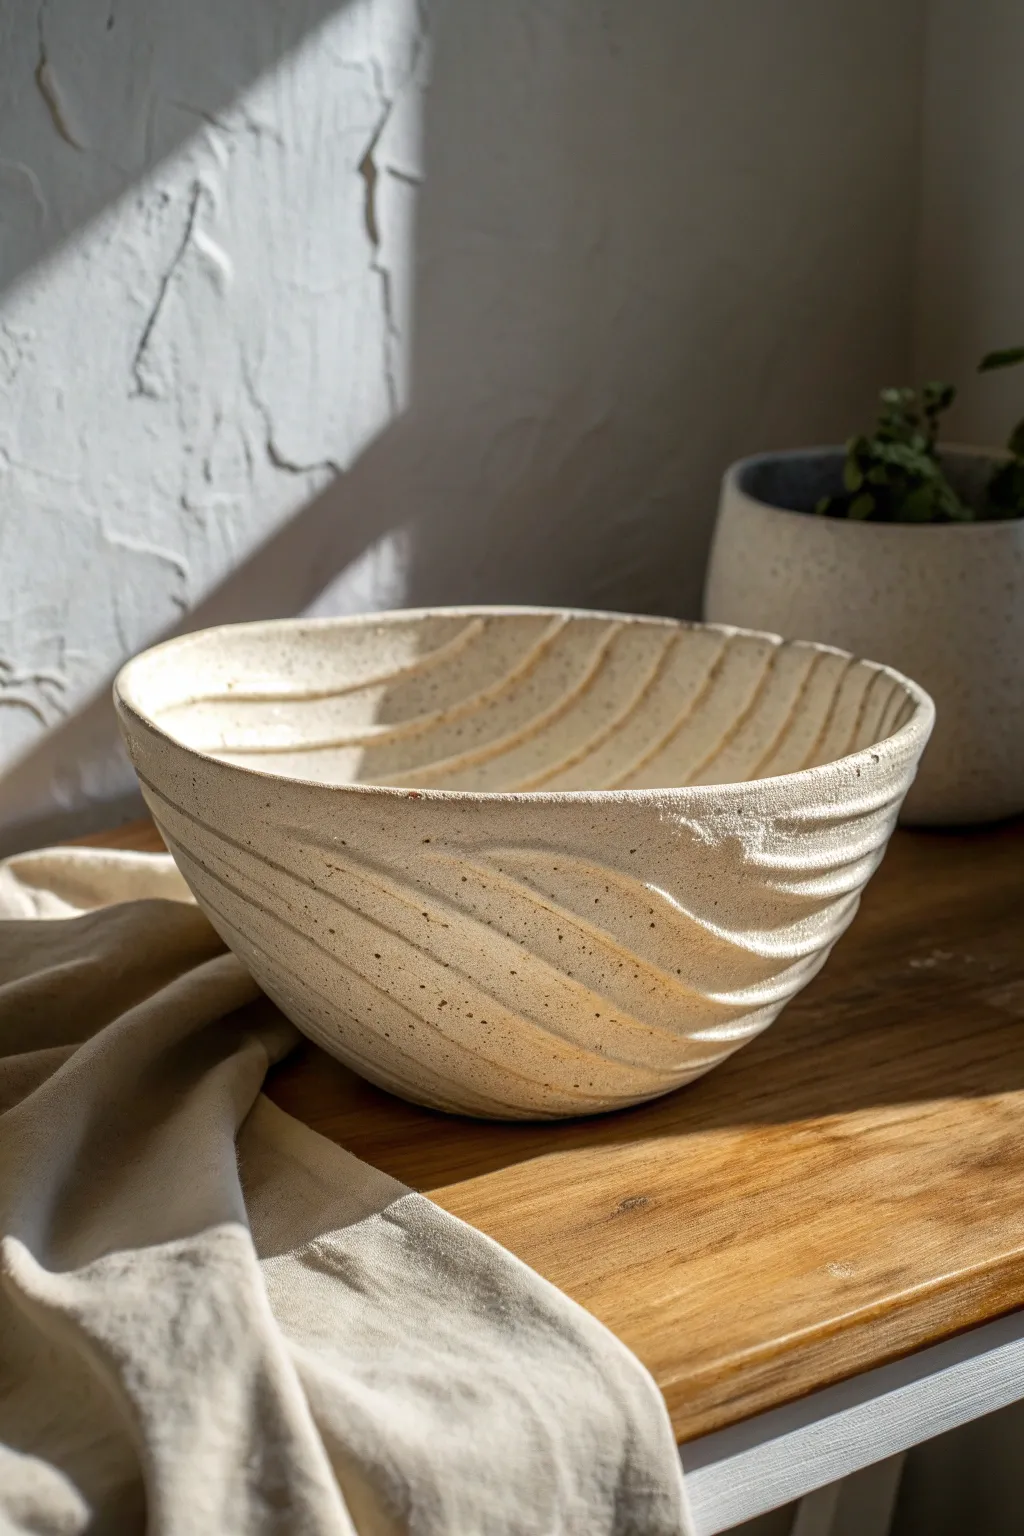
This project transforms a simple clay slab into a stunning sculptural bowl featuring deep, rhythmic grooves that mimic ripples in sand or water. The creamy, speckled clay body catches the light beautifully, highlighting the textural contrast between smooth valleys and carved ridges.
Step-by-Step
Materials
- Stoneware clay with grog or speckles (cream or white)
- Rolling pin and canvas or slab roller
- Large plaster or bisque slump mold (bowl shaped)
- Wooden modeling tool or fettling knife
- Carving loop tool (medium size)
- Sureform rasp (optional)
- Sponge
- Plastic sheet
Step 1: Slab Preparation
-
Roll the slab:
Begin by rolling out your clay slab to a uniform thickness of about 3/8 of an inch. A slightly thicker slab works best here to accommodate the deep carving you’ll do later without breaking through the wall. -
Smooth the surface:
Compress the clay on both sides using a rib tool. This aligns the clay particles to prevent warping and creates a smooth canvas for your texture work. -
Cut the rough shape:
Cut a large circle from your slab that is slightly larger than your intended mold. It doesn’t need to be perfect, as the organic edge is part of the charm.
Step 2: Forming the Bowl
-
Drape into the mold:
Carefully lift your slab and slump it into your bowl mold. I prefer using a plaster slump mold because it absorbs moisture evenly. -
Secure the form:
Gently press the slab into the curve of the mold, working from the center outward to ensure no air remains trapped between the clay and the mold. -
Trim the rim:
Clean up the rim of the bowl. You can cut it straight or leave a slight undulation to match the organic feel of the future texture. -
Stiffen the clay:
Let the bowl sit in the mold until it reaches a soft leather-hard stage. It needs to be firm enough to hold its shape when removed, but soft enough to carve easily.
Pro Tip: Depth Control
Use a specialized loop tool with a depth guard if you are worried about carving too deep. This ensures your walls stay a consistent thickness.
Step 3: Carving the Texture
-
Plan your flow:
Vizualize the wave pattern. The lines should wrap diagonally across the outside of the bowl, flowing continuously from the rim down toward the base. -
Initial carving:
Support the bowl wall from the inside with one hand. With your other hand, use a medium loop tool to carve the first groove. Start at the rim and pull the tool diagonally downward. -
Establish the rhythm:
Continue carving parallel grooves next to the first one. vary the pressure slightly to create ridges that feel natural and not too mechanical. -
Refining the ridges:
Look closely at the high points between your carved troughs. Use a damp sponge or your finger to soften any sharp burrs, but leave the texture rugged. -
Carve the interior (optional):
If desired, replicate the texture on the inside of the bowl. Generally, the image shows the texture wrapping noticeably on the exterior, but faint interior echoes can be lovely. -
Check the rim:
Ensure the carving lines meet the rim intentionally. You might need to round off the lip again where the carving tool exited the clay.
Troubleshooting: Warping
If your bowl warps into an oval, you likely removed it from the mold while too soft. Leave it supported until it is a firm leather-hard next time.
Step 4: Finishing and Firing
-
Slow drying:
Cover the bowl loosely with plastic to let it dry slowly. This is crucial for heavily carved pieces to prevent cracking. -
Bisque fire:
Once bone dry, fire the piece to bisque temperature (usually cone 04). -
Glazing strategy:
Select a glaze that breaks over textures. A matte white or cream glaze is ideal, as it will pool slightly in the grooves and thin out on the ridges, accentuating the form. -
Final smooth:
Before the final firing, wipe the foot of the bowl clean so it doesn’t stick to the kiln shelf. -
Glaze fire:
Fire to the maturity temperature of your clay body (likely cone 5 or 6 for stoneware).
The mesmerizing rhythm of your finished bowl will make it a centerpiece on any table