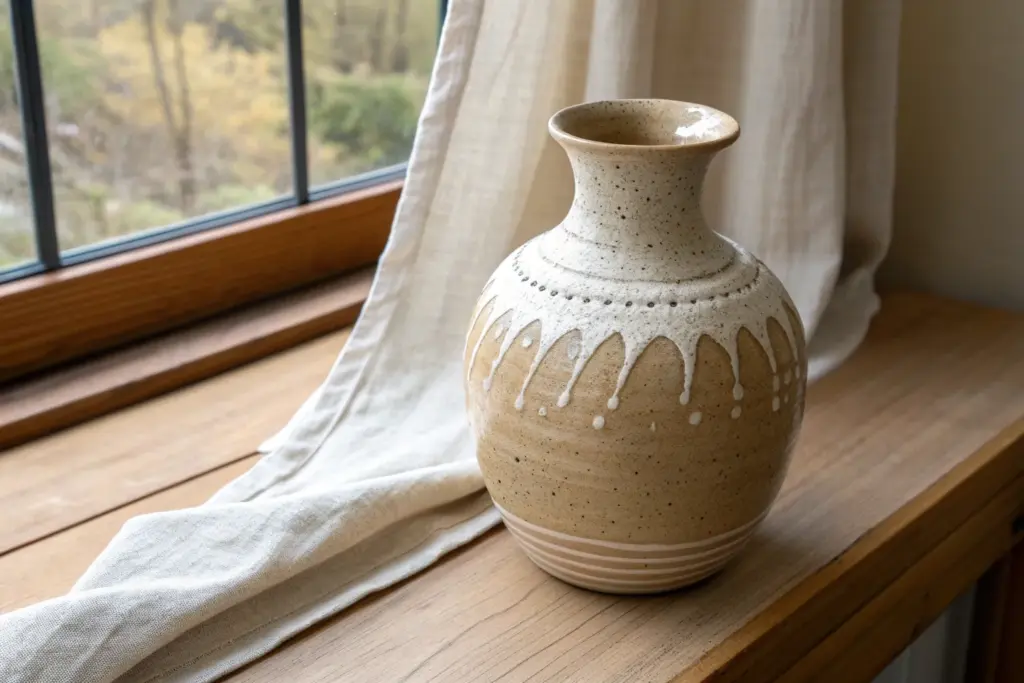
If you’re craving pottery projects that feel a little less “basic mug” and a little more “wait, you made that?”, you’re in the right headspace. These unique pottery ideas are the kinds of pieces I love seeing on studio shelves—functional, playful, and full of personality.
Mugs With Sculptural Handles
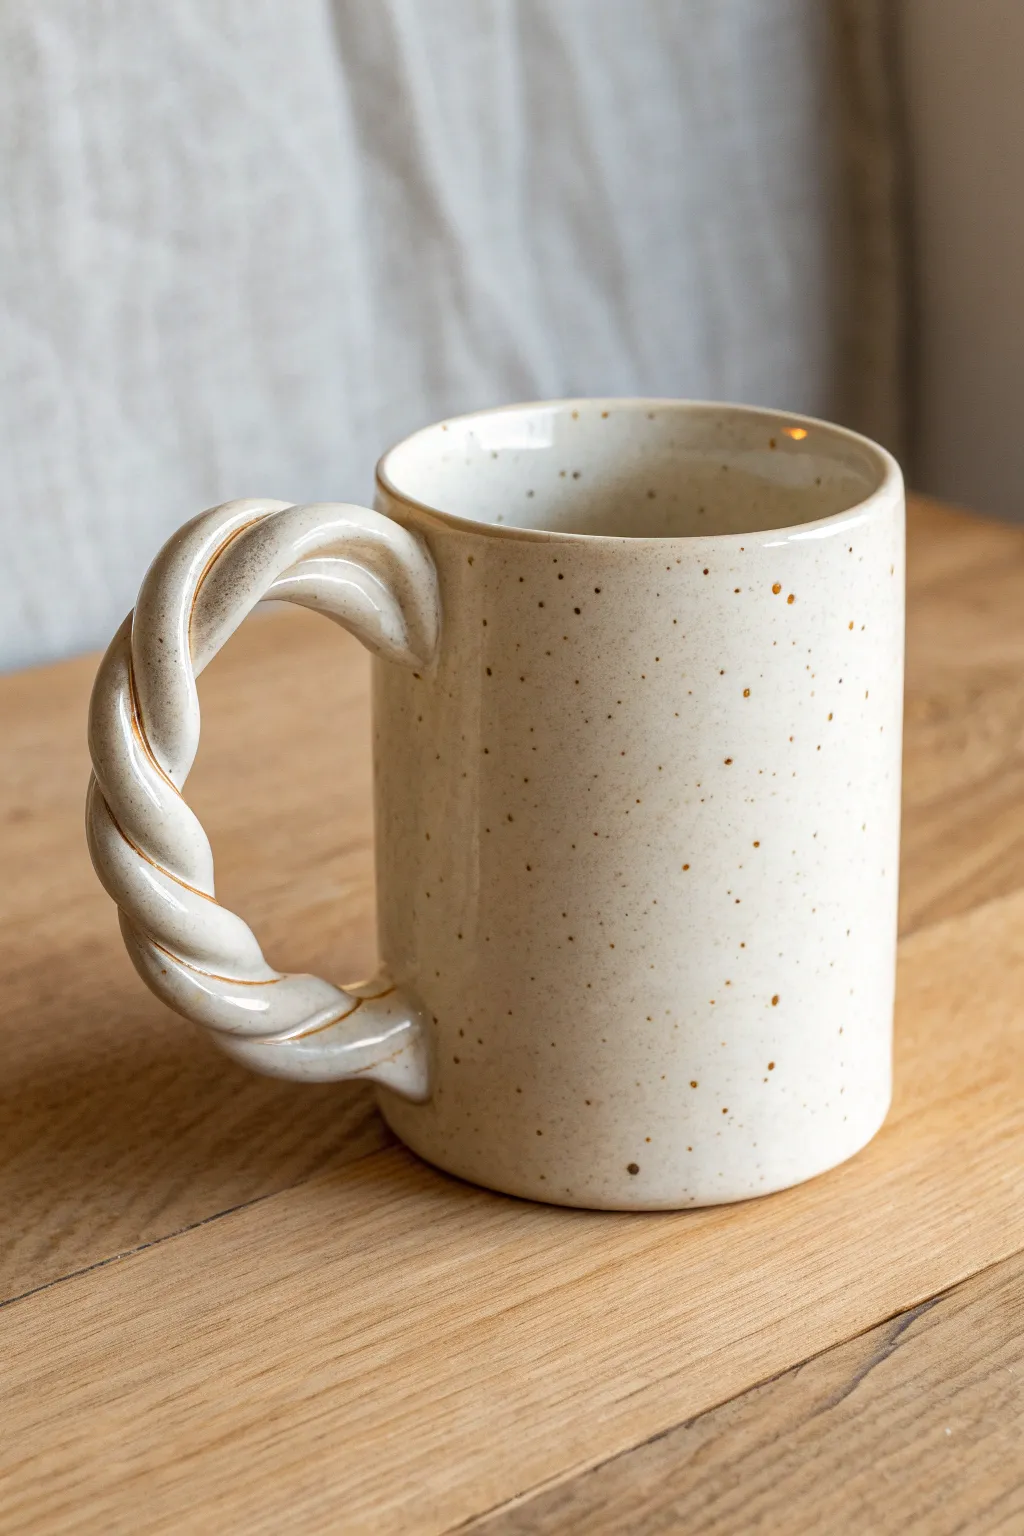
Elevate your daily coffee ritual with this charming handmade mug featuring a warm, speckled cream glaze. The standout feature is its sculptural handle, formed by twisting two coils of clay together for a rustic yet sophisticated grip.
Detailed Instructions
Materials
- Stoneware clay (preferably a speckled body or one with iron spotting)
- Pottery wheel
- Throwing tools (sponge, rib, wire cutter)
- Needle tool
- Serrated rib or scoring tool
- Slip (clay mixed with water)
- Clear or transparent cream glaze
- Kiln
- Loop tool for trimming
- Wooden modeling tool
Step 1: Throwing the Body
-
Center and Weigh:
Begin with about 1 pound (450g) of speckled stoneware clay. Wedge it thoroughly to remove air bubbles, then center it firmly on the wheel head. -
Open the Form:
Open the clay to create the floor of your mug. Compress the bottom with a sponge or wooden rib to prevent S-cracks later. Leave the floor about a quarter-inch thick. -
Pull the Walls:
Pull the walls up into a simple cylinder. Aim for straight, vertical sides similar to the reference photo. I find that keeping the rim slightly thicker helps prevent warping during firing. -
Refine the Shape:
Use a smooth kidney rib on the outside while supporting the inside with your hand to remove throwing lines and create that clean, minimalist surface. -
Cut and Dry:
Wire the mug off the wheel head but leave it on the bat if possible. Set it aside until it reaches leather-hard consistency.
Cracking at the twist seams?
Deep twists can crack during drying. Compress the twist seams gently with a damp brush, and dry the mug very slowly under plastic for several days.
Step 2: Sculpting the Twisted Handle
-
Roll the Coils:
While the body stiffens, roll out two long, even coils of clay. They should be roughly the thickness of a pencil—remember, they will double in width once twisted. -
Twist Together:
Lay the two coils side-by-side. gently twist them around each other, creating a rope-like braid. Keep the twist tight and consistent. -
Shape the Arc:
Cut the twisted rope to your desired handle length plus an inch. Gently curve it into a ‘C’ or ear shape and let it stiffen slightly on a board so it holds its curve. -
Flatten Ends:
Once the handle is firm enough to handle without deforming, gently flatten the attachment points at the top and bottom of the twist to create a surface for scoring.
Accentuate the texture
After the main glaze dip, brush a thin oxide wash (like rutile or iron) just into the grooves of the twisted handle to make the sculptural details pop.
Step 3: Assembly and Finishing
-
Trim the Body:
Place your leather-hard mug back on the wheel (or use a banding wheel). Trim away excess clay from the bottom to create a neat foot ring. -
Score and Slip:
Hold the handle up to the mug to check placement. Score the attachment points on both the mug and the handle vigorously, then apply a generous amount of slip. -
Attach Firmly:
Press the handle onto the mug body. Wiggle it slightly to knit the clay particles together. -
Blend Seams:
Use a wooden modeling tool to blend the clay from the handle ends onto the mug body. Pay special attention to the deep crevices of the twist so no air gets trapped. -
Clean Up:
Wipe away any excess slip with a damp sponge. Run a finger over the twisted texture to smooth any sharp edges. -
Bisque Fire:
Allow the mug to dry slowly under plastic to ensure even shrinkage. Once bone dry, bisque fire it to Cone 04 (or your clay’s specific temperature). -
Glazing:
Dip the mug into a transparent cream or clear glaze. The speckles in the clay body will burn through the glaze during the final firing, creating the texture seen in the image. -
Final Fire:
Glaze fire to maturity (usually Cone 5 or 6 for stoneware). Ensure the foot is wiped clean so it doesn’t stick to the kiln shelf.
Enjoy the tactile comfort of your new favorite mug


Wavy Rim Snack Bowls
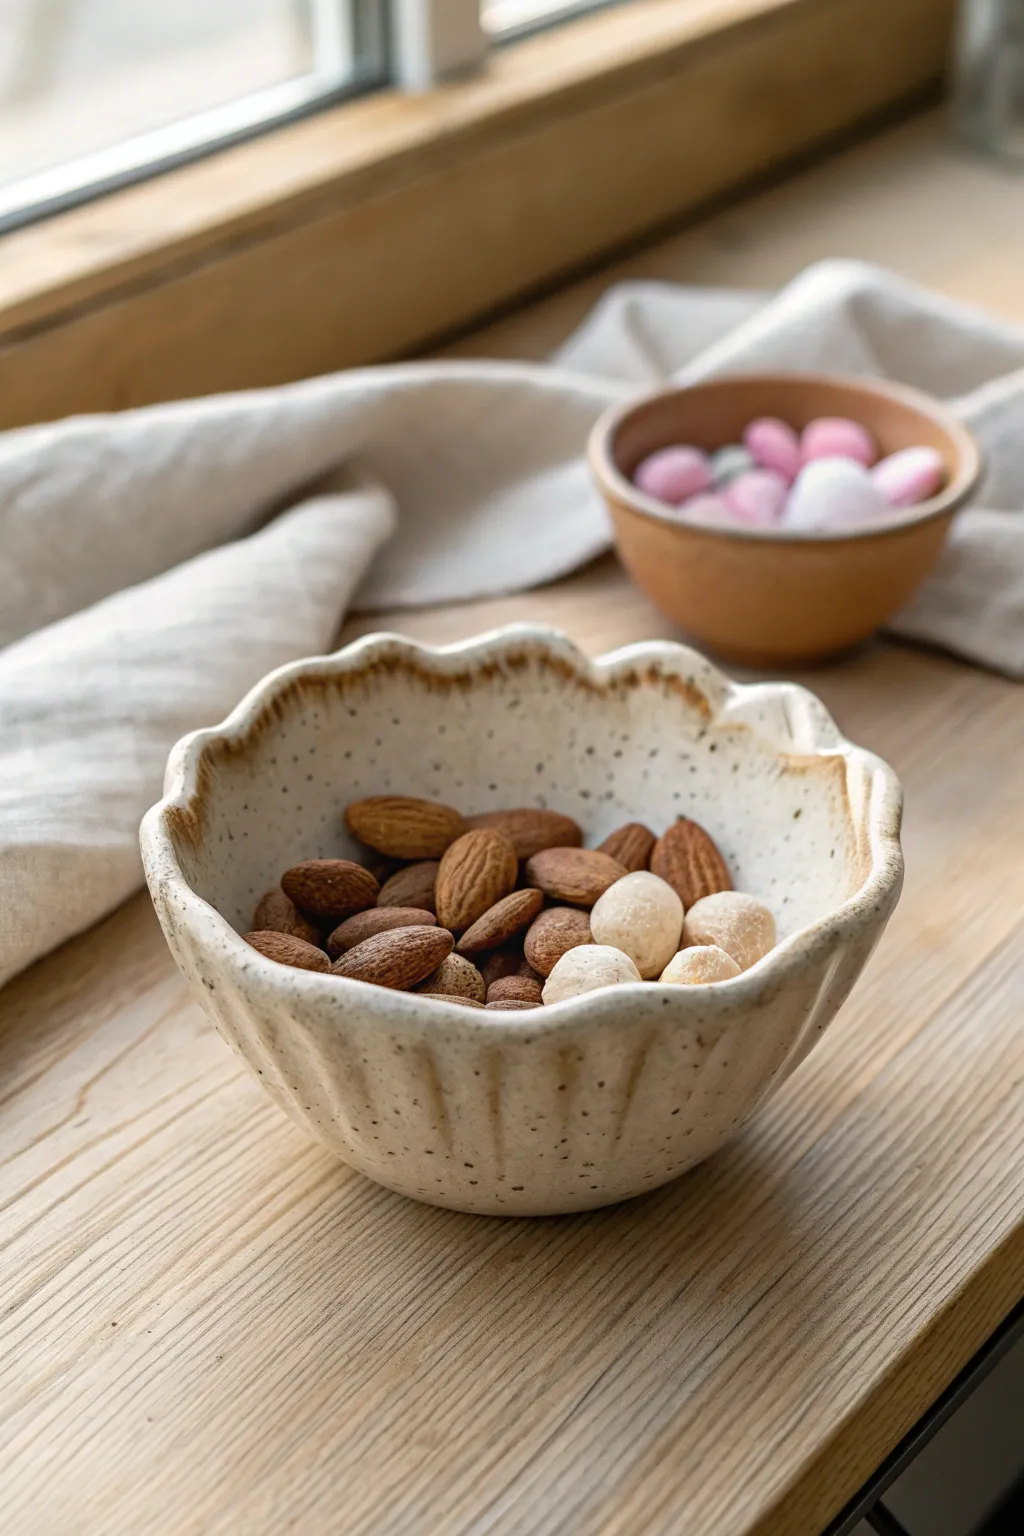
Embrace the beauty of imperfection with this naturally inspired snack bowl, featuring a gently fluted body and a playful wavy rim. The creamy white glaze over speckled clay creates a rustic, timeless vessel perfect for holding almonds or small treats.
Step-by-Step
Materials
- Speckled clay body (stoneware)
- Pottery wheel (or can be hand-built)
- Sponge
- Wire cutter
- Wooden modeling tool or chamois
- Rib tool (wooden or silicone)
- Fettling knife
- Loop trimming tool
- Satin white or cream glaze
- Kiln
Step 1: Throwing and Shaping
-
Prepare the clay:
Start by wedging about 1 to 1.5 pounds of speckled clay to remove air bubbles. Center the clay on the wheel head, ensuring it feels stable and even before opening. -
Open and pull:
Open the centered clay and pull up the walls to form a simple cylinder. Aim for a height of about 3-4 inches, keeping the walls relatively thick at the rim to support the shaping later. -
Belly out the form:
Using a rib on the inside and gentle pressure from the outside, push the clay outward to create a rounded belly. The bowl should have a generous curve while maintaining a slightly narrower foot. -
Refine the rim:
Before adding texture, smooth the rim with a chamois or your wet finger. Ensure it is level for now, though we will alter it shortly.
Use A Ruler
To get perfectly spaced scallops, lightly mark the rim with a needle tool at 12, 3, 6, and 9 o’clock first, then subdivide sections.
Step 2: Creating the Texture
-
Establish vertical flutes:
While the clay is still plastic but firm enough to hold shape, use the side of your finger or a rounded wooden tool. Drag it vertically from the base to the rim on the exterior to create soft indentations. -
Enhance the grooves:
Work around the circumference of the pot, spacing your finger drags evenly. I like to support the wall from the inside with my other hand to prevent collapsing. -
Define the interior:
As you press in from the outside, allow the interior to bulge slightly inward at the valleys of your flutes. This connects the inside form to the outside texture. -
Sculpt the scalloped rim:
Where your vertical flute hits the rim, gently press the clay downward. Where the clay bulges out between flutes, leave the rim high. This creates the signature wavy edge. -
Smooth the edges:
Go over the now-wavy rim with a damp sponge or soft chamois. Soften any sharp angles created by the sculpting process to ensure it’s pleasant to touch. -
Dry partially:
Cut the bowl from the wheel using a wire tool and set it aside to dry to a leather-hard state.
Fixing Warp
If the rim warps too much while drying, place a small, light board on top of the rim (with plastic) to gently weigh it down evenly.
Step 3: Trimming and Finishing
-
Trim the foot ring:
Once leather hard, center the bowl upside down on the wheel. Secure it with clay lugs. Use a loop tool to trim away excess weight from the base and carve a neat foot ring. -
Match the foot to the body:
Ensure the curve of the foot flows naturally into the fluted body. You can gently continue the vertical indentations down slightly into the foot area if desired. -
Bisque fire:
After the bowl is bone dry, load it into the kiln for a bisque firing (usually Cone 04 or 06, depending on your clay).
Step 4: Glazing
-
Clean the bisque:
Wipe the fired bowl with a damp sponge to remove any dust, which can cause glaze defects like crawling. -
Apply the glaze:
Pour a satin white or cream glaze into the bowl to coat the interior, pouring the excess back out. Use tongs to dip the exterior. -
Highlight the texture:
Because the glaze is semi-opaque, it will break beautifully over the iron speckles in the clay and pool slightly in the flutes, accentuating the wavy form. -
Wipe the foot:
Thoroughly clean the glaze off the foot ring with a sponge to prevent it from sticking to the kiln shelf. -
Glaze fire:
Fire the bowl to the maturity temperature of your clay and glaze combination (typically Cone 5 or 6 for stoneware).
Fill your finished bowl with colorful snacks and enjoy the tactile pleasure of the fluted surface


Ring Dishes With a Built-In Ring Cone
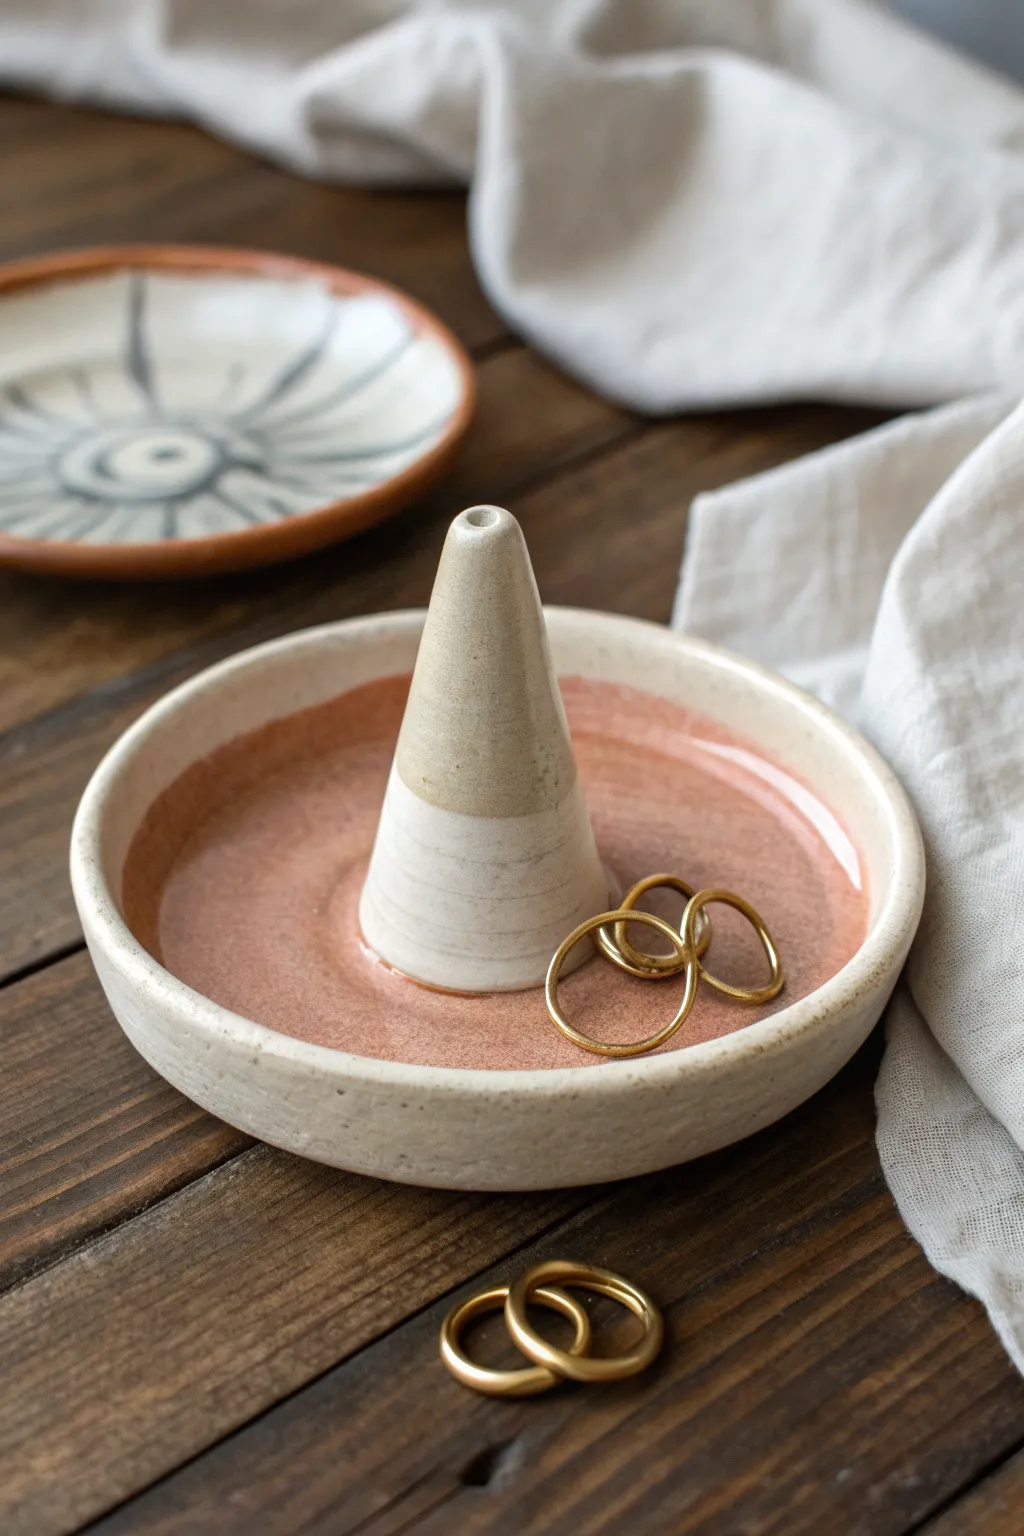
This elegant ring dish combines a functional jewelry holder with a sculptural ceramic cone, offering a perfect home for your everyday treasures. The piece features a striking two-tone glaze effect, pairing a warm, earthy terracotta pink interior with a creamy, speckled stoneware exterior.
Detailed Instructions
Materials
- Stoneware clay (speckled or buff)
- Pottery wheel (or slab roller/rolling pin for hand building)
- Needle tool
- Rib tool (kidney)
- Sponge
- Wire cutter
- Loop styling tool / trimming tool
- Scoring tool (or fork)
- Slip (clay and water mixture)
- Terracotta pink glaze (glossy)
- Cream or white glaze (matte or satin)
- Small paintbrush
- Kiln
Step 1: Forming the Base Dish
-
Prepare your clay:
Begin by wedging about 1 pound of stoneware clay to remove air bubbles. This ensures a uniform consistency and prevents explosions in the kiln later. -
Center and open:
Throw the clay onto the wheel head and center it. Open the clay up into a low, wide cylinder, keeping the floor roughly 1/4 inch thick to support the cone later. -
Pull the walls:
Gently pull the walls outward to create a shallow bowl shape. Aim for a diameter similar to a saucer (about 4-5 inches wide) with a distinct vertical rim about 1 inch high. -
Define the rim:
Use a chamois or your sponge to smooth and round the rim. A rounded lip is more durable and looks more finished than a sharp edge. -
Refine the floor:
Compress the floor of the dish using a rib tool. This prevents S-cracks and creates a smooth, flat surface for the glaze to pool beautifully. -
Cut from wheel:
Wire the dish off the wheel bat but leave it on a ware board to firm up to a leather-hard state.
Uneven Cone?
If your cone looks lopsided after attaching, use a damp sponge to gently reshape it while it’s still plastic. Step back frequently to view it from all angles before it dries.
Step 2: Creating and Attaching the Cone
-
Form the cone shape:
While the dish dries, take a smaller ball of clay (about the size of a golf ball) and roll it into a smooth cone shape by hand or throw it off the hump on the wheel. -
Refine the cone:
Smooth the sides so the taper is even. I like to make the base of the cone slightly wider for stability. Use a small tool to create a tiny depression or hole at the very tip for a stylistic touch. -
Wait for leather hard:
Allow both the dish and the cone to dry until they are leather hard—stiff enough to handle without deforming, but still dark with moisture. -
Trim the dish:
Flip the dish over and trim the bottom on the wheel to create a clean foot ring. This elevates the piece and gives it a professional profile. -
Score the surfaces:
Mark the exact center of the dish’s interior floor. Score this area and the bottom of the cone aggressively with a needle tool or serrated rib. -
Apply slip and attach:
Dab a generous amount of slip onto the scored areas. Press the cone firmly into the center of the dish with a slight twisting motion to lock it in place. -
Clean up the seam:
Use a small brush or a modeling tool to smooth the seam where the cone meets the dish floor. It should look seamless, as if the cone grew out of the dish. -
Bisque fire:
Let the piece dry completely (bone dry) before loading it into the kiln for a bisque firing to cone 04/06.
Marbled Clay Effect
For a unique look, wedge two different colored clays together (like white and red) before throwing. Use a clear glaze so the swirls remain visible!
Step 3: Glazing and Finishing
-
Wax the foot:
Once bisque fired, wipe the piece with a damp sponge to remove dust. Apply wax resist to the bottom foot ring to prevent glaze from sticking to the kiln shelf. -
Glaze the interior:
Pour the terracotta pink glaze into the interior of the dish, swirling it around to coat the floor evenly, but avoiding the rim. Pour out the excess. -
Dip the cone:
Carefully dip the top half of the cone into a cream or tan glaze, or brush it on if you prefer more control. Leave the bottom half of the cone bare or apply a clear matte glaze to show the raw clay body. -
Glaze the exterior:
Brush or dip the exterior and the rim of the dish in a creamy, speckled white glaze. Be careful not to drip onto the pink interior. -
Final wipe:
Check the foot ring one last time to ensure no glaze droplets are present. -
Glaze fire:
Fire the piece again, this time to the maturation temperature of your stoneware clay and glazes (typically cone 5 or 6).
Once cooled, your custom ring dish is ready to organize your jewelry with handmade style


Planters With an Attached Drip Tray
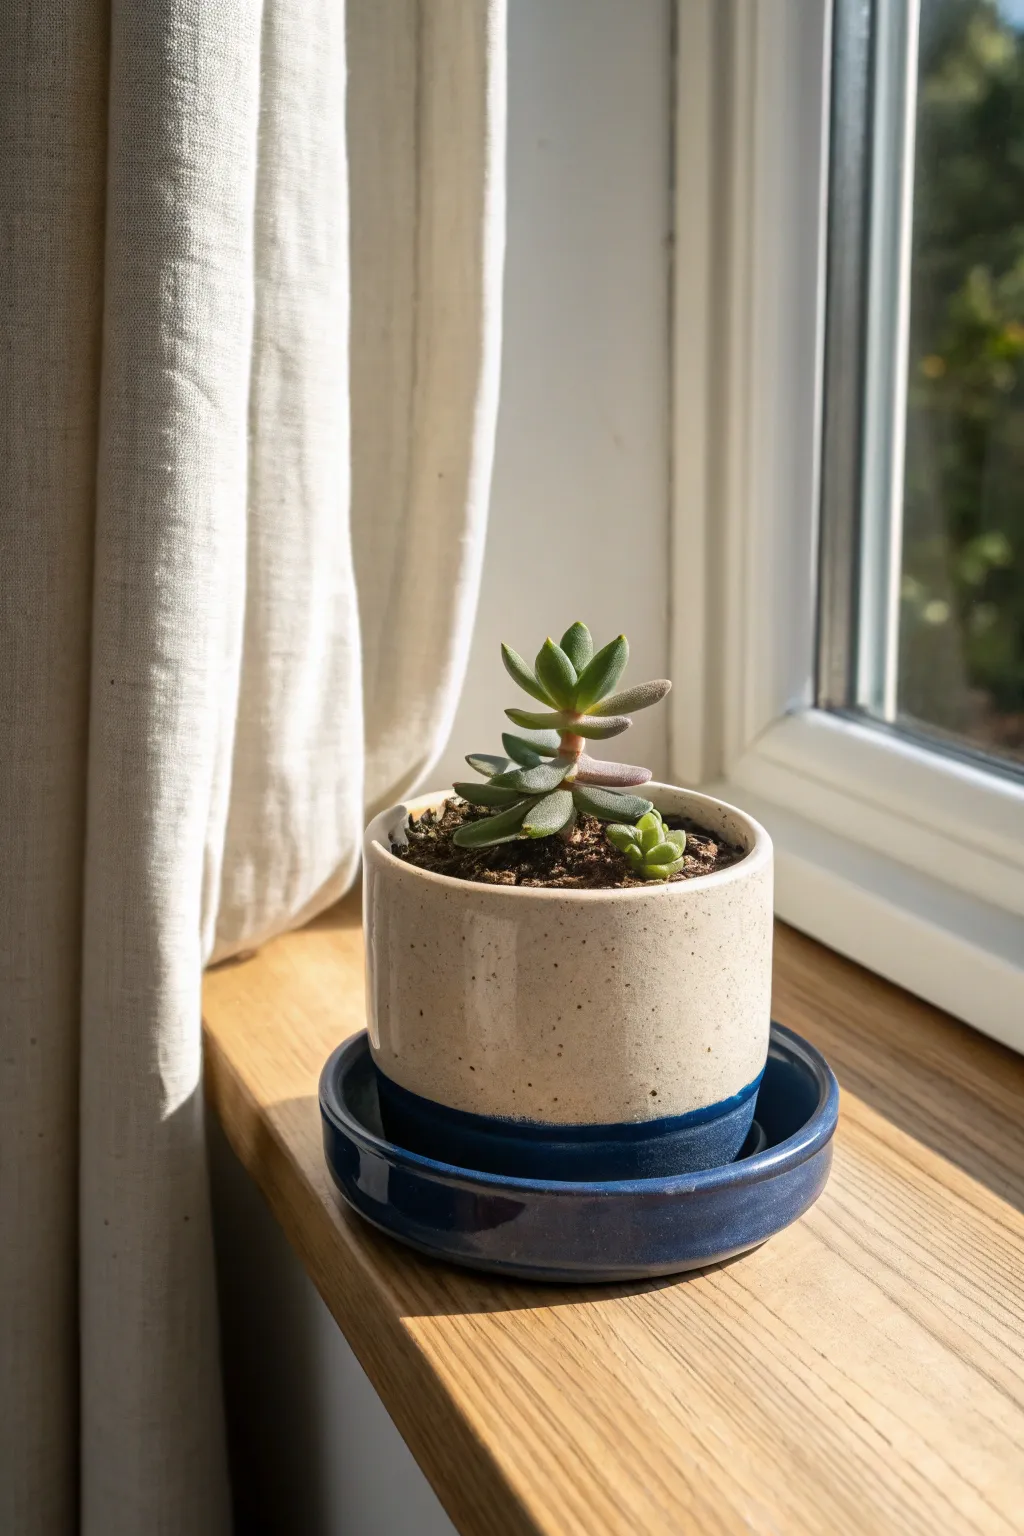
This elegant wheel-thrown planter features a clever integrated design where the catch basin is permanently attached to the pot, creating a seamless silhouette. The aesthetic combines a natural, speckled stoneware clay body on top with a rich, glossy cobalt blue glaze on the base and tray for a striking two-tone look.
How-To Guide
Materials
- Speckled stoneware clay (approx. 2.5 lbs)
- Pottery wheel
- Throwing tools (sponge, rib, wooden knife)
- Wire cutter
- Stylus or needle tool
- Trimming tools
- Metal rib suitable for scoring
- Slip
- Cobalt blue glossy glaze
- Clear or white speckled glaze (optional if using plain clay)
- Wax resist
- Small paintbrush
Step 1: Throwing the Components
-
Wedge the clay:
Begin by thoroughly wedging your clay to remove air bubbles. Divide it into two balls: a larger one (approx. 1.5 lbs) for the main pot and a smaller one (approx. 1 lb) for the saucer. -
Throw the main cylinder:
Center the larger ball on the wheel. Open and pull the walls to form a straight-sided cylinder, aiming for a width of about 4-5 inches. Keep the walls even, but leave the bottom slightly thicker than usual to accommodate drainage holes later. -
Refine the rim:
Smooth the rim with a chamois or sponge. I like to keep the rim slightly squared off to match the modern aesthetic of the final piece. -
Throw the saucer:
Center the smaller clay ball. Throw a shallow, low bowl or plate shape. Measure the base of your cylinder; the interior floor of this saucer must be slightly wider than the cylinder’s base to allow the pot to sit inside comfortably. -
Refine the saucer:
Create a distinct, slightly raised rim on the saucer, curling it upwards to hold water. Cut both pieces from the batt using your wire tool and set them aside until they are leather hard.
Pro Tip: Drainage Notches
Don’t forget the ‘mouse holes’ on the pot’s bottom rim! Without these side notches, the pot will seal to the saucer, trapping water and drowning your roots.
Step 2: Trimming and Assembly
-
Trim the cylinder base:
Once leather hard, center the cylinder upside down on the wheel. Trim away excess weight from the bottom, creating a clean, flat foot. Do not make a foot ring; the bottom should be flat to maximize contact with the saucer. -
Create drainage mechanism:
This is crucial: drill 3-4 drainage holes into the bottom of the cylinder. Then, carve 3-4 small notches or “mouse holes” into the outer edge of the cylinder’s bottom rim. These notches allow water to flow out of the pot and into the saucer area once the pieces are joined. -
Trim the saucer:
Trim the underside of the saucer to create a tidy foot ring. Ensure the interior floor is flat and smooth where the pot will sit. -
Score and slip:
Score the bottom of the cylinder (avoiding your drainage holes and notches) and the center of the saucer floor heavily. Apply a generous amount of slip to both scored areas. -
Join the pieces:
Press the cylinder firmly onto the center of the saucer. Apply slight pressure to seal the join. Clean up any excess slip that oozes out with a damp brush, ensuring the notches you carved earlier remain unobstructed so water can escape. -
Final smoothing:
Use a modeling tool or your finger to smooth the seam between the pot and saucer if visible, or leave it defined if you prefer a stepped look. Allow the assembled piece to dry slowly under plastic to prevent cracking at the join.
Troubleshooting: Cracking
If the join cracks during drying, the pieces likely had different moisture levels. Ensure both are at the exact same leather-hard stage before attaching.
Step 3: Glazing and Firing
-
Bisque fire:
Fire the bone-dry piece in the kiln to cone 04 (or your clay’s specific bisque temperature). -
Wax the join:
Apply wax resist carefully to the connection point between the saucer and the pot if you want a clean break, although for this dip-dye look, we will largely rely on the dipping line. -
Glaze the interior:
Pour your clear or white glaze inside the main planter pot, swirl it around to coat, and pour it out. Wipe any drips off the rim. -
Dip the base:
Holding the pot by the upper rim, dip the bottom portion—including the entire attached saucer and the bottom inch of the cylinder—into the cobalt blue glaze. Hold it there for 3 seconds to get an opaque coat. -
Check the line:
Ensure the glaze line is straight. If you dripped, gently scrape the excess off with a knife or clean with a damp sponge. -
Apply clear glaze (optional):
If your clay is naturally speckled and beautiful, leave the top raw. If not, dip the top half in a transparent matte or clear glaze, slightly overlapping the blue if desired. -
Glaze fire:
Fire the piece to cone 6 (or your clay body’s maturity temperature). Ensure the bottom of the saucer is wiped completely clean of glaze before firing to save your kiln shelf.
Once cooled, fill your new architectural planter with gritty soil and a beautiful succulent.

What Really Happens Inside the Kiln
Learn how time and temperature work together inside the kiln to transform clay into durable ceramic.
Candleholders That Double as Mini Vase Bud Holders
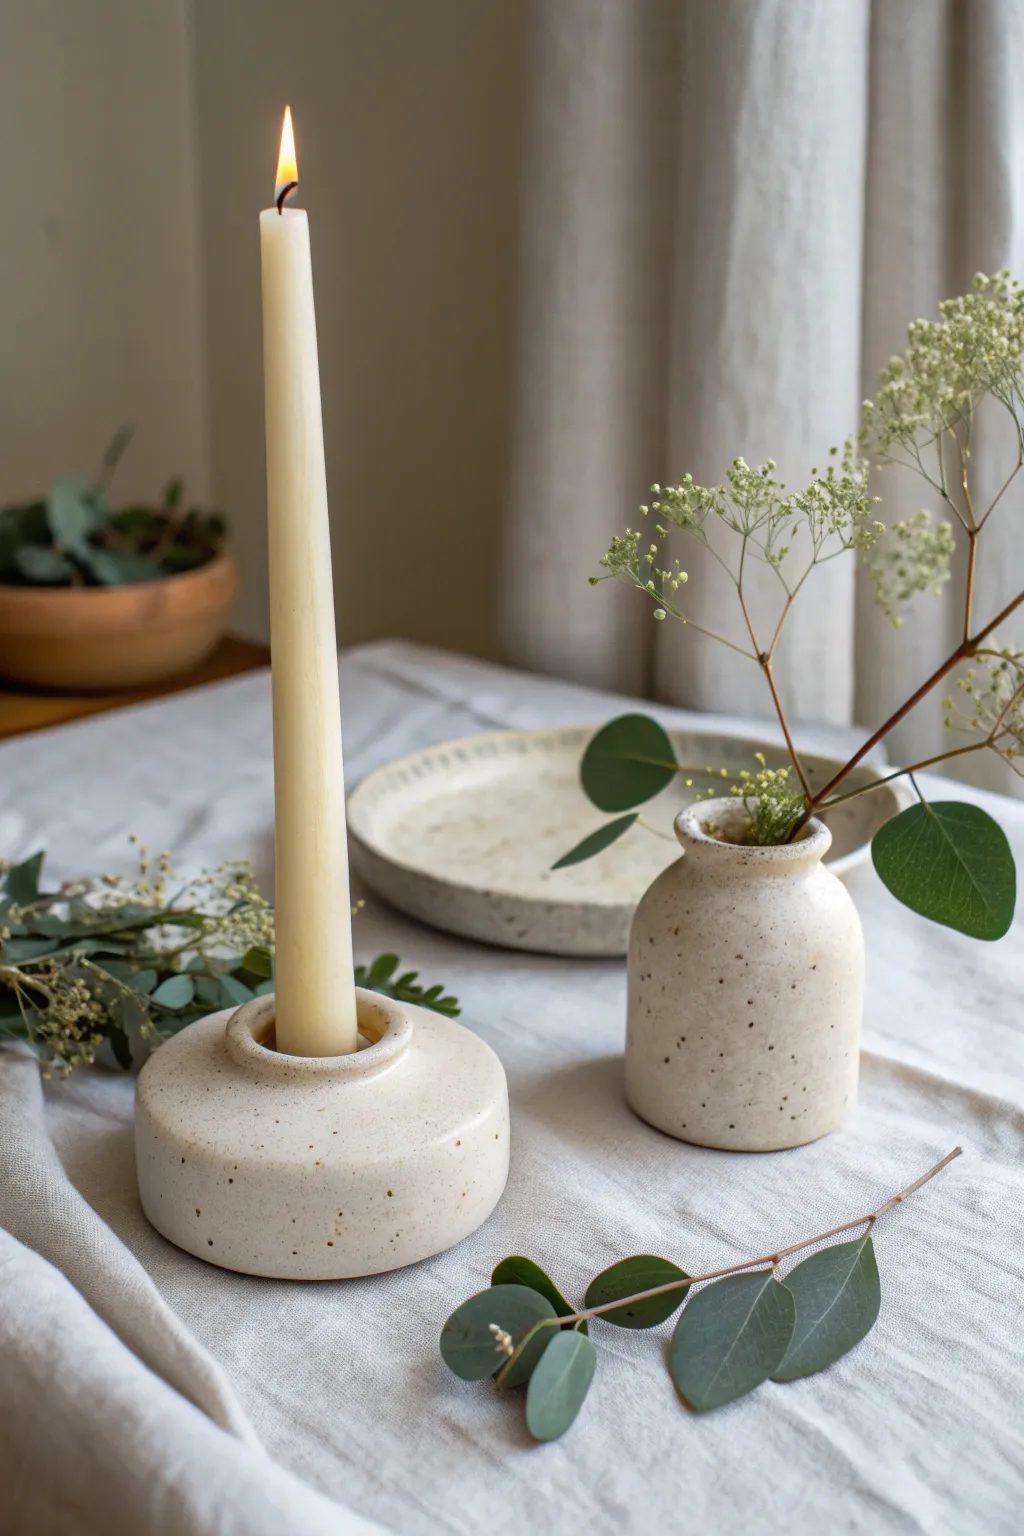
Embrace the beauty of handmade ceramics with this dual-purpose project featuring a candleholder and a matching mini bud vase. The speckled cream glaze and minimalist forms create a serene, grounded aesthetic perfect for modern tabletops.
Detailed Instructions
Materials
- White stoneware clay (preferably with speckles or grog)
- Pottery wheel
- Wire cutter
- Sponge
- Pin tool
- Ribs (metal and wood)
- Trimming tools
- Taper candle (for size testing)
- Speckled cream matte glaze
- Kiln
- Calipers
Step 1: Throwing the Candleholder
-
Prepare the Clay:
Begin by wedging about 1-1.5 pounds of speckled stoneware clay to remove air bubbles. Center the clay on your wheel into a low, wide puck shape rather than a tall cone. -
Open the Center:
Open the centered clay, but do not go all the way to the bat. Leave a thick floor, approximately 1 inch, as this will provide weight and stability for the candle. -
Form the Base:
Pull the clay outward to form a wide, squat cylinder. The walls should be thick and sturdy, curving gently inward at the top to create a enclosed, pebble-like shoulder. -
Create the Collar:
Collar the neck in significantly. You want a very narrow opening that rises slightly like a small chimney from the rounded base. -
Measure the Candle Fit:
Using your calipers, measure the diameter of a standard taper candle (usually 7/8 inch). Adjust the opening of your clay collar to match this, adding just a hair of extra width to account for clay shrinkage during drying. -
Refine the Rim:
Compress the rim of the candle opening with a sponge or chamois to ensure it’s smooth and rounded, preventing sharp edges that could chip later.
Shrinkage Woes
Candle fit too tight after firing? Don’t toss it! Safely shave the wax base of your taper candle with a knife to make it fit, or drip a little melted wax into the hole to secure a loose candle.
Step 2: Throwing the Mini Vase
-
Center a Smaller Amount:
Wedge a smaller ball of clay, roughly 0.75 pounds. Center this on the wheel for the companion mini vase. -
Pull the Cylinder:
Open the clay and pull a small cylinder. The walls can be thinner here than on the heavy candleholder base. -
Shape the Belly:
Apply pressure from the inside to bulge the walls outward gently, creating a soft, rounded belly that mimics the curve of the candleholder base. -
Narrow the Neck:
Collar the neck in to create a distinct transition between the vase body and the rim. This stricture helps hold small flower stems upright. -
Finish the Rim:
Flair the lip out just slightly to create a welcoming opening for stems, matching the rounded aesthetic of the first piece. -
Cut and Dry:
Wire both pieces off the wheel. I usually let them dry to a leather-hard state under loose plastic for a day or two to even out the moisture content.
Dual Purpose Tip
Since the candleholder is essentially a narrow-necked bottle, you can actually use it as a second bud vase when you aren’t burning candles. Just make sure the interior is fully glazed to hold water.
Step 3: Trimming and Glazing
-
Trim the Base:
Once leather hard, flip the pieces over and trim the bottoms. Create a defined foot ring on both to elevate them slightly and give them a finished professional look. -
Check the Fit Again:
Before the clay is bone dry, gently test your candle size again. If the hole is too tight, you can carefully carve away a bit of clay with a trimming tool. -
Bisque Fire:
Allow the pottery to become bone dry, then load them into the kiln for a bisque firing (usually to Cone 04 or 06). -
Prepare the Glaze:
Stir your speckled cream matte glaze thoroughly. If using a brush-on glaze, ensure you have a soft fan brush ready. -
Apply Glaze:
Pour glaze inside the vase to coat the interior. For the exteriors of both pieces, either dip them or apply 2-3 even coats with a brush. Make sure not to glaze the inside of the candle holder where the candle sits, or the fit might become too tight. -
Clean the Foot:
Wipe any glaze off the foot rings and the very bottom of the pieces with a damp sponge to prevent them from sticking to the kiln shelf. -
Glaze Fire:
Fire the pieces again to the glaze’s recommended temperature (typically Cone 5 or 6 for stoneware).
Once cooled, arrange your new set with simple eucalyptus stems and a warm candle for an instantly cozy atmosphere
Berry Bowls With Colander Holes and Little Feet
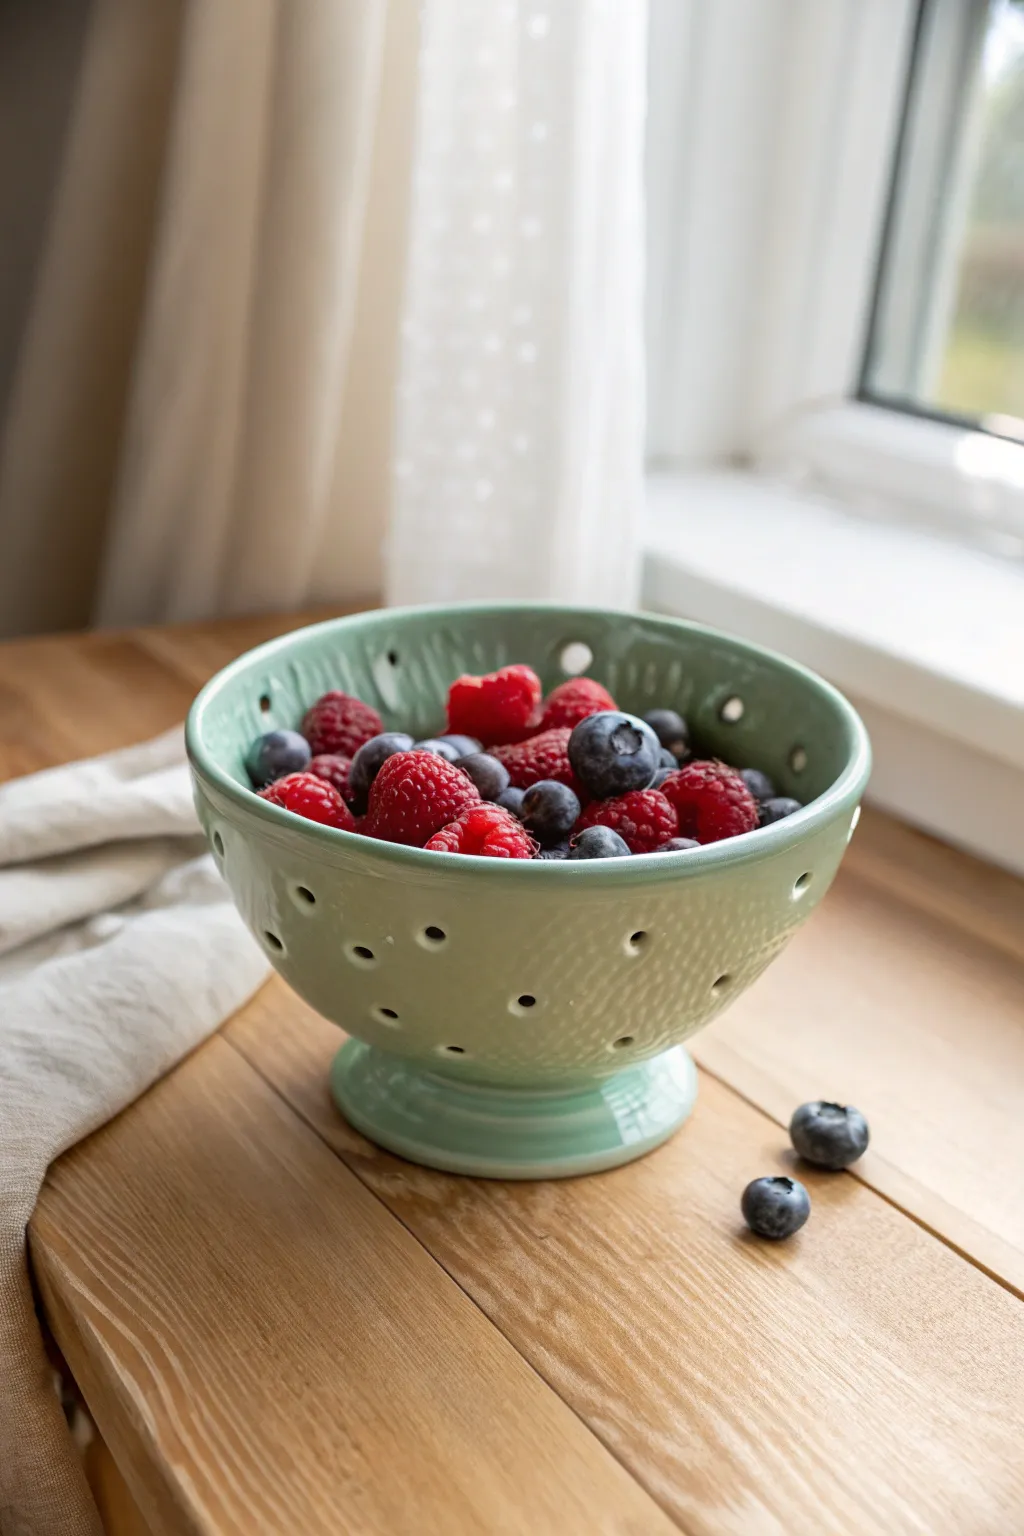
This charming, pastel green berry bowl functions beautifully as both a serving piece and a colander, featuring delicate drainage holes and a sturdy pedestal foot. Its soft glaze and thoughtful design make washing and displaying summer fruits an elegant affair.
Step-by-Step
Materials
- Light-colored stoneware clay (approx 2 lbs)
- Pottery wheel
- Throwing tools (sponge, wire cutter, rib)
- Pin tool or small hole cutter (straw-sized)
- Trimming tools
- Celadon or translucent mint green glaze
- Scoring tool and slip
- Wooden bat
- Sanding sponge
Step 1: Throwing the Bowl
-
Center the clay:
Begin by wedging your clay thoroughly to remove air bubbles. Secure about 1.5 lbs of clay onto the center of your wheel head and bring it into a centered mound using firm, consistent pressure. -
Open and pull:
Open the mound and pull the walls outward and upward to create a classic bowl shape. Aim for a distinct U-shape rather than a V-shape to allow room for the berries to settle. -
Refine the curve:
Use a kidney rib on the inside of the bowl while supporting the outside with your hand to smooth the interior curve and compress the clay particles. -
Shape the rim:
Finish the rim by gently compressing it with a chamois or sponge. Create a slightly rounded, substantial rim that will be durable against chipping. -
Wire off:
Run your wire cutter under the base of the bowl to separate it from the bat, but leave it in place to dry to leather-hard.
Clean Hole Punching
When punching holes, twist your tool as you push it through the leather-hard clay, then twist as you pull it out. This reduces drag and keeps the hole rim cleaner.
Step 2: Trimming and Adding the Foot
-
Throw the foot ring:
While the bowl stiffens, take the remaining small amount of clay and throw a separate, small ring directly on the wheel head. This will be the tall pedestal foot. Measure the bowl’s base to ensure the ring’s diameter matches. -
Trim the bowl:
Once leather-hard, center the bowl upside down on the wheel. Trim the exterior to mirror the interior curve, removing excess weight from the bottom. -
Prepare the connection:
Score the bottom of the trimmed bowl and the top edge of your thrown foot ring. Apply slip generously to both scored areas. -
Attach the foot:
Press the foot ring firmly onto the bowl’s base. Center it carefully. Use a modeling tool to smooth the seam where the two pieces meet, blending the clay until the join is invisible. -
Shape the foot profile:
I like to flare the bottom of the foot slightly outward for visual stability, giving it that classic chalice silhouette.
Warped Rim?
If the rim warps while you are punching holes, invert the bowl onto a flat board and apply gentle pressure to the base to realign the rim before it dries completely.
Step 3: Piercing and Glazing
-
Plan the holes:
While the clay is still leather-hard but sturdy, lightly mark your desired hole pattern on the exterior. Use a grid or freehand a random scatter depending on your style. -
Pierce the clay:
Using a hole punch tool or a specialized pottery drill, carefully punch holes through the bowl walls. Support the clay from the inside with your hand to prevent warping. -
Add drainage:
Don’t forget to punch a pattern of holes in the very bottom of the bowl to ensure water drains out completely when washing fruit. -
Clean the edges:
Once the pot is bone dry, gently smooth any sharp burrs around the holes with a dry sponge or fine sandpaper. Sharp edges here can snag berries later. -
Bisque fire:
Load the piece into the kiln for the bisque firing (usually cone 04 or 06). Ensure the piece is totally dry to avoid explosions. -
Glaze application:
Dip or pour your mint green Celadon glaze. Celadons are great here because they break beautifully over texture and pool slightly in the holes. -
Clean the holes… again:
Inspect every single hole. If glaze has filled them, gently blow it out or clear it with a pin tool so the holes remain open after firing. -
Final Fire:
Wipe the bottom of the foot with a wax resist or sponge to remove glaze, then fire to the maturation temperature of your clay (likely Cone 6).
Now you have a functional centerpiece perfect for rinsing and serving your market finds


The Complete Guide to Pottery Troubleshooting
Uncover the most common ceramic mistakes—from cracking clay to failed glazes—and learn how to fix them fast.
Soap Saver Dishes With Drainage Ridges
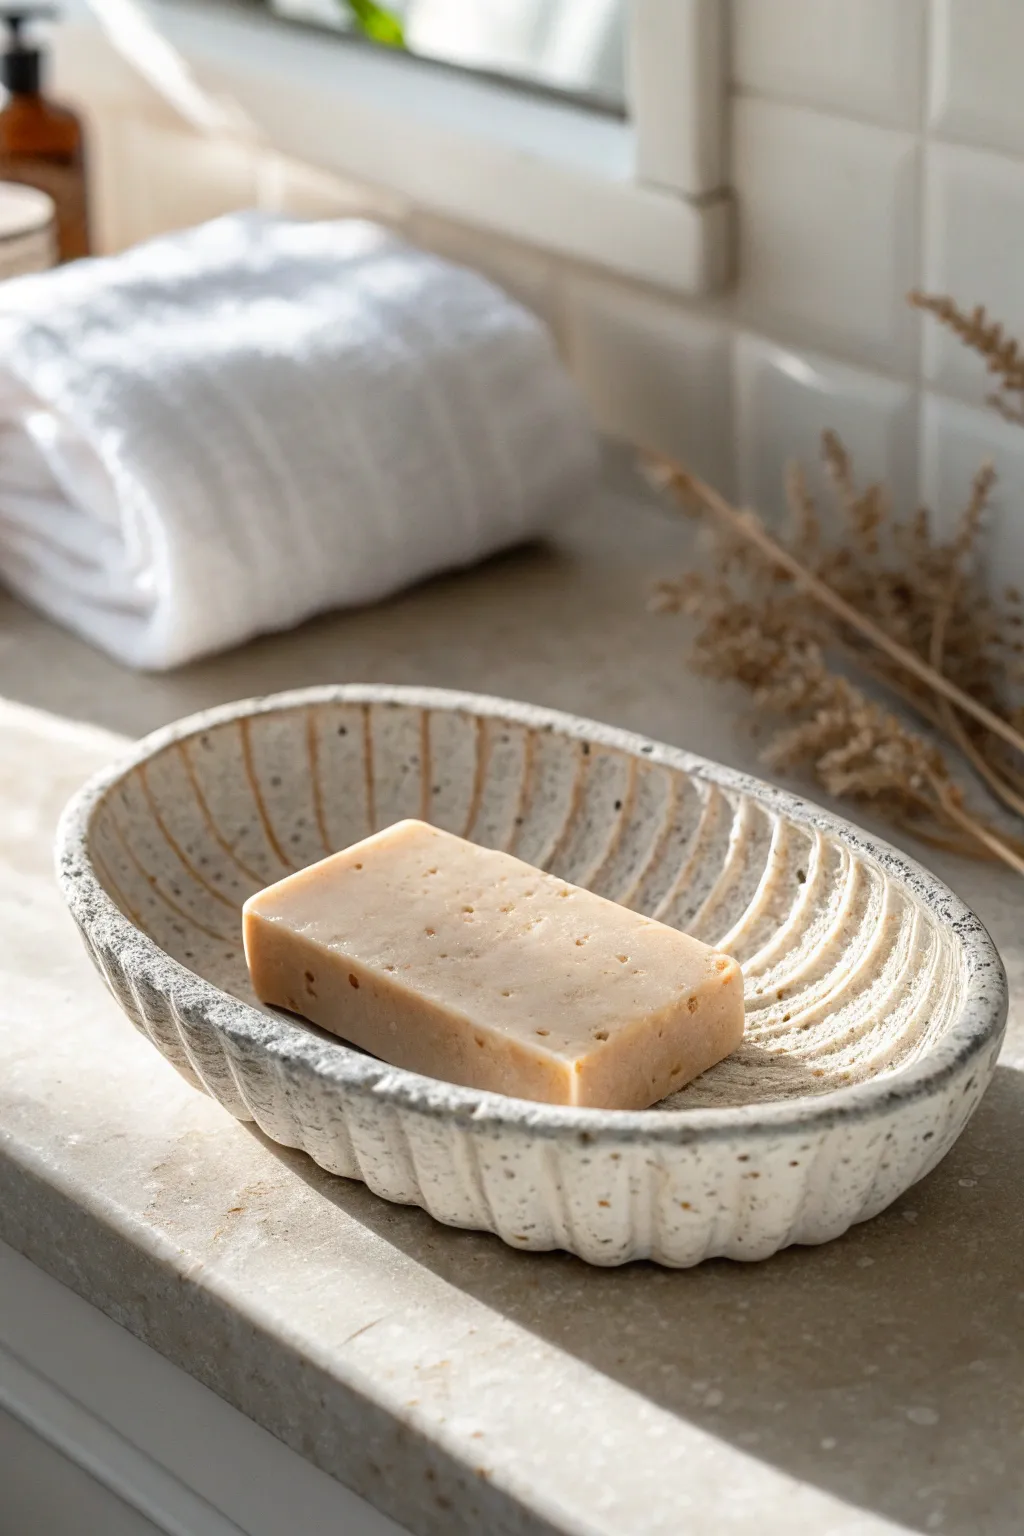
This rustic soap dish combines functionality with organic beauty, featuring deep, hand-carved channels that allow your soap to drain and dry perfectly. The speckled clay body and soft, neutral glaze give it a timeless, spa-like quality that elevates any bathroom counter.
Step-by-Step Guide
Materials
- Speckled stoneware clay (mid-fire)
- Rib tool (kidney shaped, wood or rubber)
- Carving tool (U-gouge or loop tool)
- Sponge
- Rolling pin and guide strips (slaat sticks)
- Oval template (paper or craft foam)
- Fettling knife
- Pottery wheel (optional, for trimming)
- White or clear matte glaze
Step 1: Forming the Base
-
Roll the slab:
Start by rolling out a medium-sized slab of your speckled stoneware clay. Use guide strips to ensure an even thickness of about 3/8 inch (1 cm). -
Cut the shape:
Place your oval template onto the clay. Trace around it lightly, then cut cleanly through the clay using a fettling knife or needle tool. -
Smooth the slab:
Before shaping, take a damp sponge or a soft rib and compress both sides of the slab. This removes canvas texture and prevents warping later. -
Curve the edges:
Place the oval slab onto a piece of foam or a shallow plaster slump mold. Gently press the center down and curl the edges upward to create a shallow bowl shape. -
Refine the rim:
Use your fingers and a wet chamois or sponge to round over the rim so it is smooth to the touch. -
Dry to leather hard:
Set the piece aside to dry slowly. Cover loosely with plastic if necessary. You want it to reach a firm leather-hard state where it can hold its shape but is still soft enough to carve cleanly.
Step 2: Carving the Texture
-
Plan your lines:
Lightly sketch your ridge lines with a needle tool. Aim for a pattern that radiates slightly from the center or runs parallel across the width, mimicking the look of ridges. -
Carve the interior:
Using a U-gouge or a loop tool, carve deep channels into the interior floor of the dish. These are functional drainage channels, so ensure they are deep enough to elevate the soap. -
Match the exterior:
Flip the dish over. I find it helpful to mirror the interior carving on the outside to give the piece a consistent, ribbed structural look. Carve vertical grooves up the sides. -
Soften the edges:
After carving, small burrs of clay will remain. Wait until the clay is bone dry, then use a stiff brush or a damp sponge to smooth these rough edges down.
Clean Channels
Use a damp paintbrush to smooth the inside of your carved channels while the clay is leather hard. This makes cleaning dried glaze out of those crevices much easier later.
Step 3: Glazing and Firing
-
Bisque fire:
Load the bone-dry dish into the kiln for a bisque firing (typically Cone 04-06) to prepare it for glazing. -
Wax the foot:
Apply wax resist to the very bottom of the dish to prevent glaze from running onto your kiln shelf. -
Apply the glaze:
Pour or dip the piece in a matte white or semi-transparent glaze. The key here is using a glaze that breaks over edges. -
Wipe back highlights:
For added dimension, lightly sponge the glaze off the high points of the ridges. This exposes the raw speckled clay underneath, highlighting the texture. -
Glaze fire:
Fire the piece to maturity (Cone 5 or 6 depending on your clay body). Let the kiln cool completely before unloading.
Drainage Holes
For a true draining dish rather than a catcher, use a small hole punch tool to add 2-3 holes in the deepest parts of the carved grooves before firing.
Place your favorite bar of handmade soap on top and enjoy the organic elegance this dish brings to your daily routine
Tiny Match Striker Pots for the Coffee Table
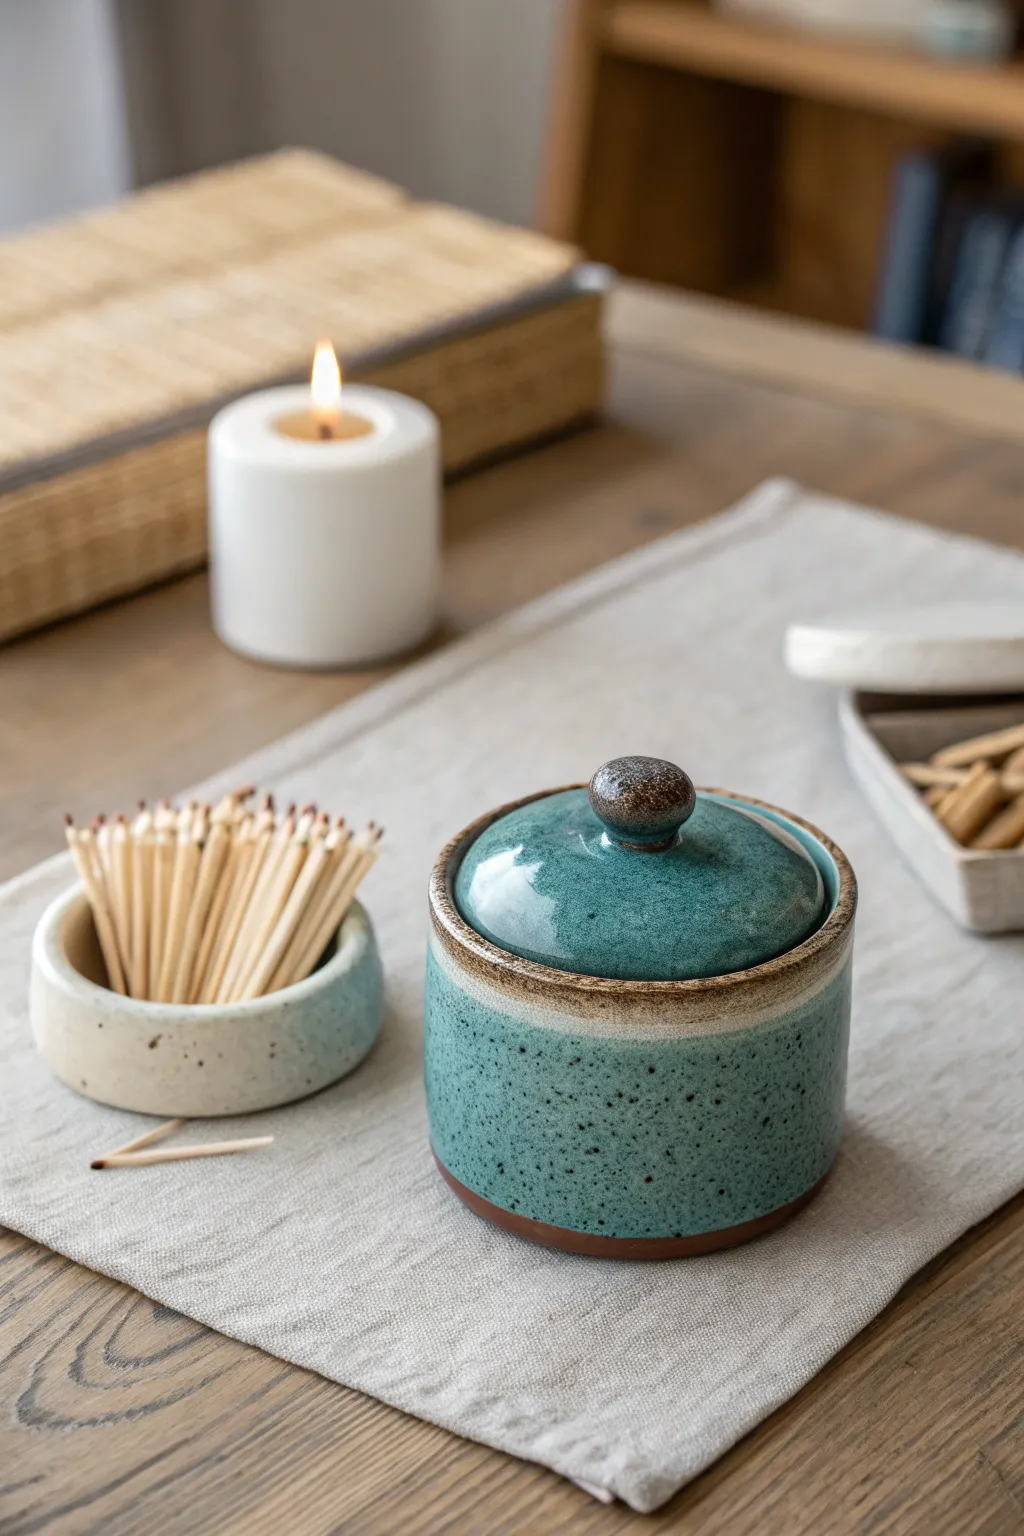
Elevate your coffee table decor with this charming ceramic duo, featuring a speckled teal lidded jar for match storage and a matching open striker bowl. The rustic brown rims and earthy speckles give these pieces a cozy, handcrafted feel perfect for cozy evenings.
How-To Guide
Materials
- Speckled Stoneware Clay (e.g., Laguna B-Mix with speckles)
- Pottery wheel
- Throwing tools (sponge, needle tool, ribs)
- Calipers
- Trimming tools
- Teal/Turquoise gloss glaze
- Iron oxide wash or brown underglaze
- Natural kiln sponge
- Strike-anywhere matches (for testing fit)
Step 1: Throwing the Lidded Jar
-
Center and open:
Begin with about 1 lb of speckled clay. Center it on the wheel and open it up, creating a flat floor about 3 inches wide. -
Pull the walls:
Pull the cylinder straight up to a height of about 3.5 inches. Keep the walls even, aiming for a thickness of about 1/4 inch. -
Shape the gallery:
Using a wooden modeling tool or your finger, split the rim to create a gallery shelf. This inset ledge is where the lid will sit securely. -
Refine the shape:
Bulg the belly slightly with a rib for a soft curve, then caliper the inner diameter of the gallery shelf before wire cutting the pot off the bat. -
Throw the lid:
Using a small ball of clay (approx. 0.5 lb), throw a small bowl shape -
Check the fit:
Invert the lid shape. Measure with your calipers to match the gallery you created on the jar base. It should fit snugly. -
Add the knob:
While the lid is still attached to the hump or bat, shape a small, round knob from the excess clay at the center.
Step 2: Throwing the Striker Bowl
-
Center a small lump:
Start with a smaller amount of clay, roughly 0.75 lb. Center it and open it wider than the jar, creating a shallow bowl form. -
Create thick walls:
Pull short, thick walls. You want a sturdy, donut-like rim that feels substantial. The height should be roughly 1.5 inches. -
Texture the exterior (Optional):
The rough clay body itself acts as a striker, but you can leave the exterior un-ribbed for extra friction.
Un-glazed Striker Area
For the match striker to work, you MUST leave a section of the clay unglazed. The rough, raw clay provides friction to ignite strike-anywhere matches.
Step 3: Trimming and Glazing
-
Trim the foot rings:
Once leather hard, trim a clean foot ring on both the jar and the small bowl. I like to make sure the bottom is smooth so it doesn’t scratch the table. -
Bisque fire:
Fire both pieces to cone 04 (or your clay’s specific bisque temperature). -
Wax the bottoms:
Apply wax resist to the foot rings and any area you want to remain raw clay, specifically specifically a strip on the bowl if you want a dedicated strike zone. -
Dip in base glaze:
Dip both pieces into your teal speckled glaze. For the lid, hold it by the knob and dip; for the jar, use tongs. -
Clean the gallery:
Wipe the glaze off the gallery shelf of the jar and the contact point of the lid so they don’t fuse together in the kiln. -
Apply the oxide rim:
Dip a sponge into iron oxide wash or brown underglaze. Gently dab it onto the knob of the lid and the very rim of the jar for that rustic contrast. -
Glaze fire:
Fire to cone 5/6 (or your glaze’s maturity temperature).
Textured Bottom Level-Up
Add deeply grooved chatter marks with a trimming tool on the bottom half of the open bowl before bisque firing. This creates an even better striking surface.
Fill your jar with matches and enjoy the warm glow these handmade pieces bring to your living space

TRACK YOUR CERAMIC JOURNEY
Capture glaze tests, firing details, and creative progress—all in one simple printable. Make your projects easier to repeat and improve.
Paint Water Cups With a Built-In Brush Rest
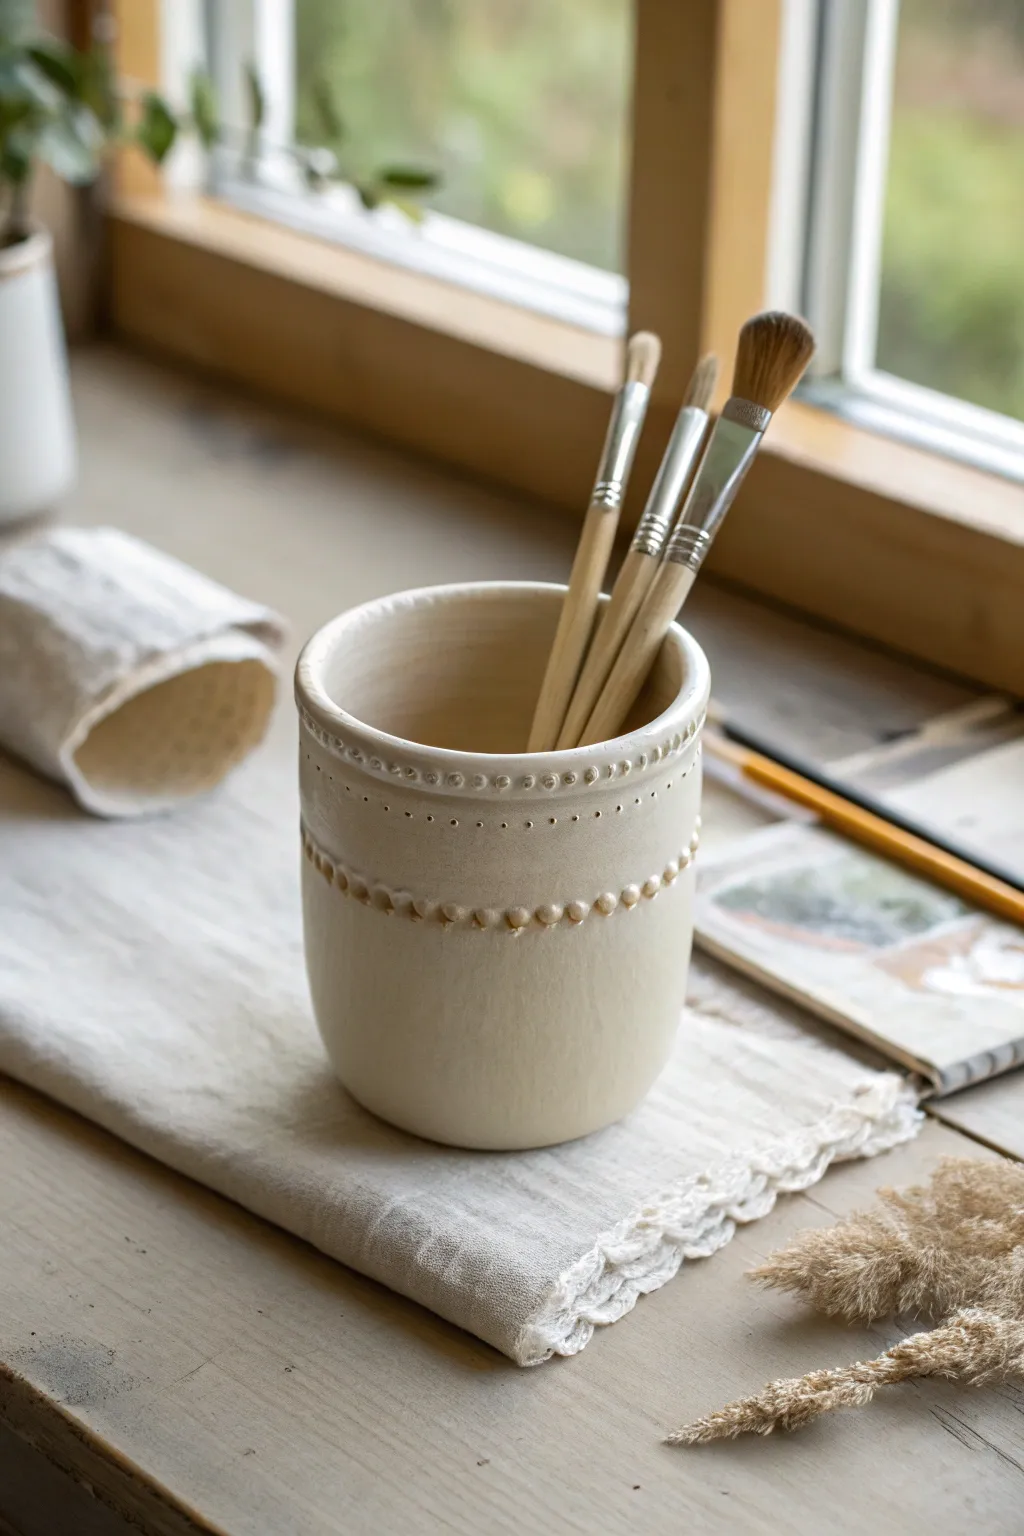
Elevate your studio space with this elegantly simple ceramic paint water cup, featuring delicate rows of tactile beading. The soft, creamy glaze and hand-built slab construction give it a warm, organic feel that looks beautiful even when just holding clean water.
Detailed Instructions
Materials
- White stoneware clay (cone 5/6)
- Canvas mat or slab roller
- Rolling pin
- Clay knife or fettling knife
- Flexible metal rib
- Scoring tool or serrated rib
- Slip (clay slurry)
- Small slip trailer or piping bag with fine tip
- Sponge
- Satin matte cream or white glaze
- Kiln
Step 1: Forming the Cylinder
-
Roll the slab:
Begin by wedging your white stoneware clay to remove air bubbles, then roll out a slab to a consistent thickness of about 1/4 inch. If you have guide sticks, use them to ensure the slab is perfectly even. -
Cut the rectangle:
Measure and cut a rectangular strip from your slab. For a standard cup size like this, aim for a rectangle approximately 4 inches high and 10 inches long. -
Cut the base:
Use a circle cutter or a jar lid as a template to cut a circular base from the remaining slab that corresponds to the desired diameter of your cup. -
Bevel the edges:
On the short ends of your rectangular strip, cut 45-degree angles (bevels) in opposite directions. This scarf joint creates a seamless connection when rolled into a cylinder. -
Score and slip:
Score the beveled edges of the wall and the outer edge of the circular base roughly. Apply a generous amount of slip to all scored areas. -
Construct the form:
Stand the rectangle up and curve it into a cylinder, pressing the beveled edges together firmly. Place the cylinder onto the scored base. -
Seal the seams:
Use a wooden tool or your finger to smooth the interior and exterior seams where the walls join, and where the wall meets the floor. I like to run a tiny coil of soft clay along the inside bottom seam for extra reinforcement. -
Refine the shape:
Using a flexible metal rib, smooth the outside of the cylinder while supporting it from the inside. Gently curve the rim inward slightly to give it a soft, rounded lip.
Step 2: Adding the Texture
-
Prepare slip trailer:
Fill a small slip trailer with a slip made from your same clay body. The consistency should be like thick yogurt—stiff enough to hold a peak but fluid enough to squeeze out. -
Mark the lines:
Lightly etch two horizontal guide lines around the cup while it spins on a banding wheel: one just below the rim and one around the middle belly. -
Pipe the top beads:
Carefully squeeze small, uniform dots of slip along the top guide line. Try to keep your spacing consistent, leaving just a hair of space between each bead. -
Pipe double decoration:
For the top band, add a second row of much smaller, finer dots just beneath the main beaded row for delicate detail. -
Pipe the middle band:
Repeat the process for the middle section, creating a single robust row of beads. Allow the slip dots to set up until leather hard. -
Softening touches:
Once the dots are firm, gently tap them with a clean finger to remove any sharp peaks, ensuring they are comfortable to hold.
Slip Consistency Tip
If your slip dots slump and lose their shape, your slip contains too much water. Let it sit uncovered for an hour to thicken, or mix in dry clay dust.
Step 3: Glazing and Firing
-
Bisque fire:
Allow the cup to dry slowly and completely under loose plastic to prevent warping. Fire to cone 04 (bisque). -
Wax the bottom:
Wipe the bisque ware with a damp sponge to remove dust. Apply wax resist to the bottom of the cup and up the visual foot to keep the kiln shelf clean. -
Dip glaze:
Dip the entire cup into a satin matte cream glaze. Hold it upside down for a few seconds to let excess glaze drip off the rim. -
Reveal texture:
Check the beaded areas; if the glaze is too thick there, it might obscure the texture. You can gently sponge a tiny bit of glaze off the high points of the beads if needed, though a breaking glaze will do this naturally. -
Glaze fire:
Fire the piece to cone 6 (or whatever temperature your clay and glaze require).
Add a Function
Before the clay dries, gently press the handle of a paintbrush into the rim at two opposite points to create gentle divots for resting wet brushes horizontally.
Now you have a serene, custom-made vessel ready to hold your brushes for your next painting session
Animal-Inspired Planters With Tiny Legs
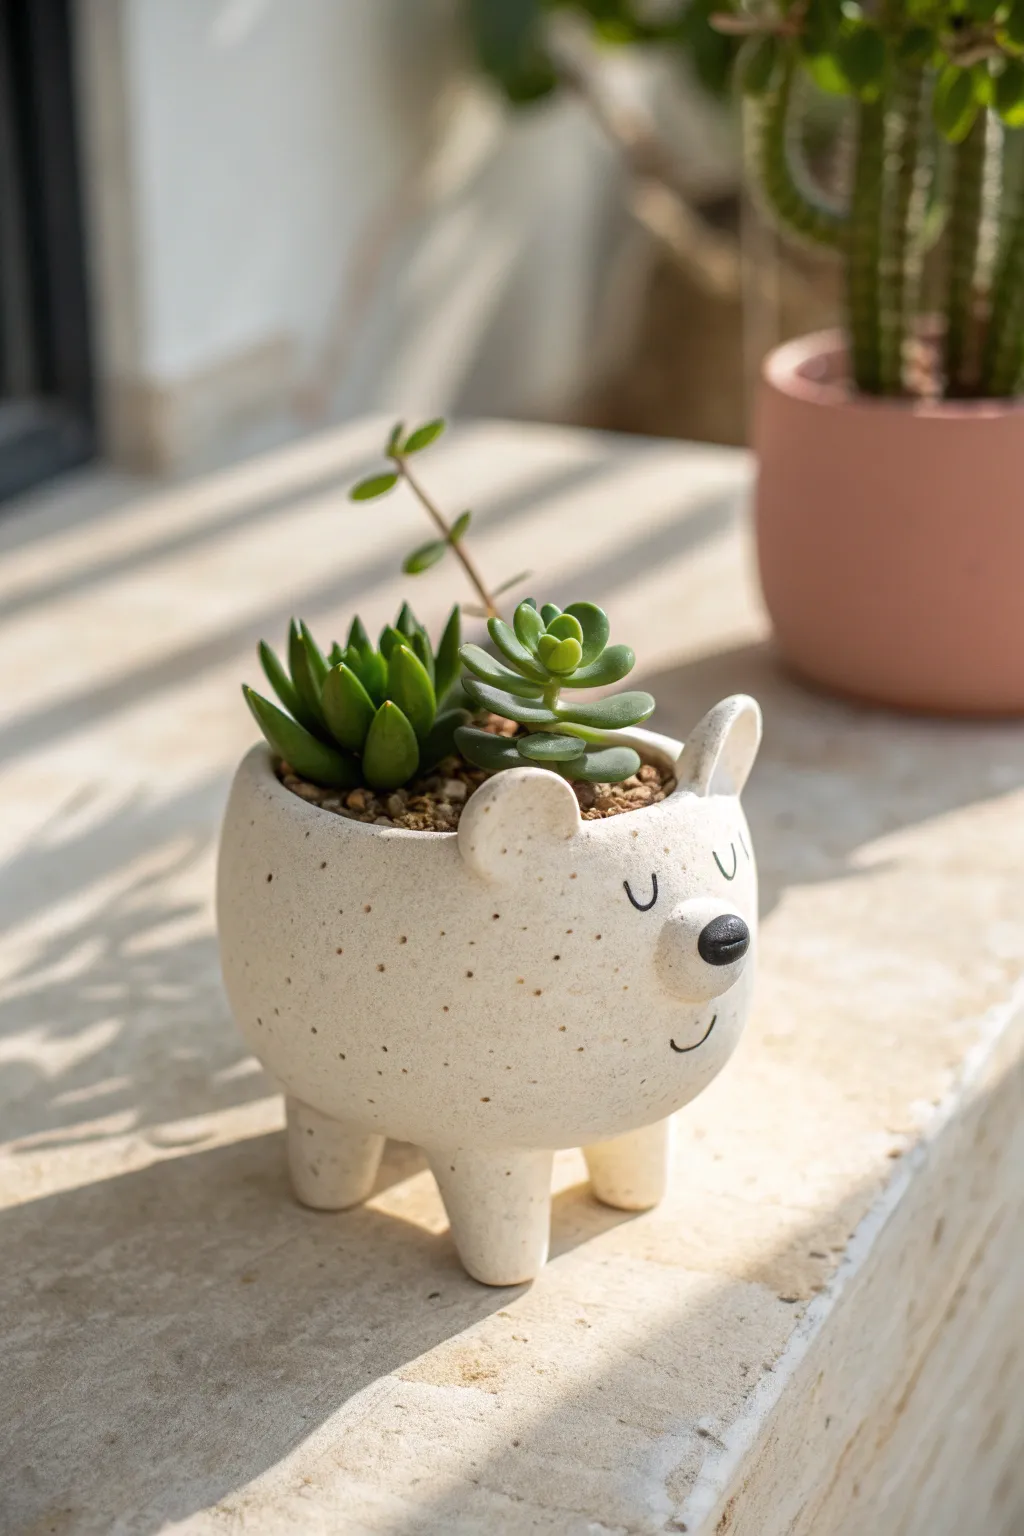
Bring a touch of whimsical charm to your succulent collection with this adorable, four-legged bear planter. The speckled clay body and simple painted features give it a modern, minimalist aesthetic that looks great on any sunny windowsill.
How-To Guide
Materials
- Speckled stoneware clay (white or cream)
- Pottery tools (needle tool, rib tool, sponge)
- Scoring tool or old fork
- Slip (clay mixed with water)
- Underglaze pencil or fine brush (black)
- Clear matte glaze
- Rolling pin
- Circular template or cookie cutter (approx. 4-5 inches)
- Kiln access
Step 1: Forming the Body
-
Prepare the Clay:
Begin by wedging your speckled clay thoroughly to remove air pockets. Roll out a slab to an even thickness of about 1/4 inch. -
Cut the Base:
Using a needle tool, cut out a circular base for the bottom of the pot. A 3-inch diameter circle is a good size for a small succulent planter. -
Create the Pinch Pot:
Instead of slab building the whole thing, I find starting with a pinch pot creates a nicer organic shape. Take a ball of clay roughly the size of a large orange and press your thumb into the center. -
Shape the Walls:
Gently pinch and rotate the clay ball to thin out the walls and expand the opening. Aim for a rounded, bowl-like shape that curves slightly inward at the top rim. -
Refine the Surface:
Use a flexible rib tool to smooth the exterior of your pinch pot, erasing your fingerprints while maintaining that lovely speckled texture.
Step 2: Adding the Tiny Legs
-
Roll Coils:
Roll out a thick coil of clay, roughly the thickness of your thumb. Cut this coil into four equal segments, about 1 inch long each. -
Shape the Legs:
Tap one flat end of each leg segment against the table to steady it, and gently round off the other end that will attach to the body. -
Attach the Legs:
Flip your bowl shape upside down. Score the four attachment points on the bottom and the tops of your legs. Apply slip generously. -
Secure and Smooth:
Press the legs firmly onto the body. Use a modeling tool to smooth the clay seams together so the legs look like they are growing out of the body, not just stuck on. -
Check for Balance:
Flip the planter right-side up and gently tap it on the table to ensure all four legs touch the ground evenly and the pot sits level.
Wobbly Bear?
If the legs are uneven after attaching, gently tap the pot exclusively on the longer legs or use a rasp tool on the dry greenware to level them.
Step 3: Sculpting the Features
-
Make the Ears:
Roll two small, marble-sized balls of clay. Flatten them slightly into discs and score the bottom edge. -
Attach Ears:
Score the rim of the pot where you want the face to be. Slip and attach the ears, blending the back seams smooth but leaving the front slightly defined. -
Sculpt the Nose:
Create a tiny, slightly protruding snout area by adding a small pat of clay to the front face, blending the edges seamlessly into the main body. -
Add the Nose Button:
Roll a very tiny pea-sized ball of clay for the actual nose tip. Attach this to the snout area with slip. -
Drainage Hole:
Don’t forget to use a hole cutter to punch a drainage hole in the very bottom center of the pot. Your succulents will thank you later.
Pro Tip: Eye Placement
Draw the face lightly with a regular pencil first. The graphite burns off in the kiln, leaving only your perfect underglaze lines behind.
Step 4: Finishing Touches
-
Bisque Fire:
Allow the piece to dry slowly under plastic for a few days before uncovering it to dry completely. Fire it to bisque temperature (usually cone 04). -
Paint the Details:
Using a fine brush and black underglaze, carefully paint the nose tip solid black. Then, draw two dainty ‘U’ shapes for sleeping eyes and a tiny smile curve. -
Glaze Application:
Dip the entire piece into a clear matte glaze. This will seal the clay and make the specks pop without making the animal look too glassy or artificial. -
Final Fire:
Fire the piece again to your clay body’s maturity temperature (e.g., cone 5 or 6). Once cool, pot it up with gritty soil and your favorite succulents.
Once fired and planted, you have a charming little companion ready to brighten up your desk
Vases With Face Details and Simple Features
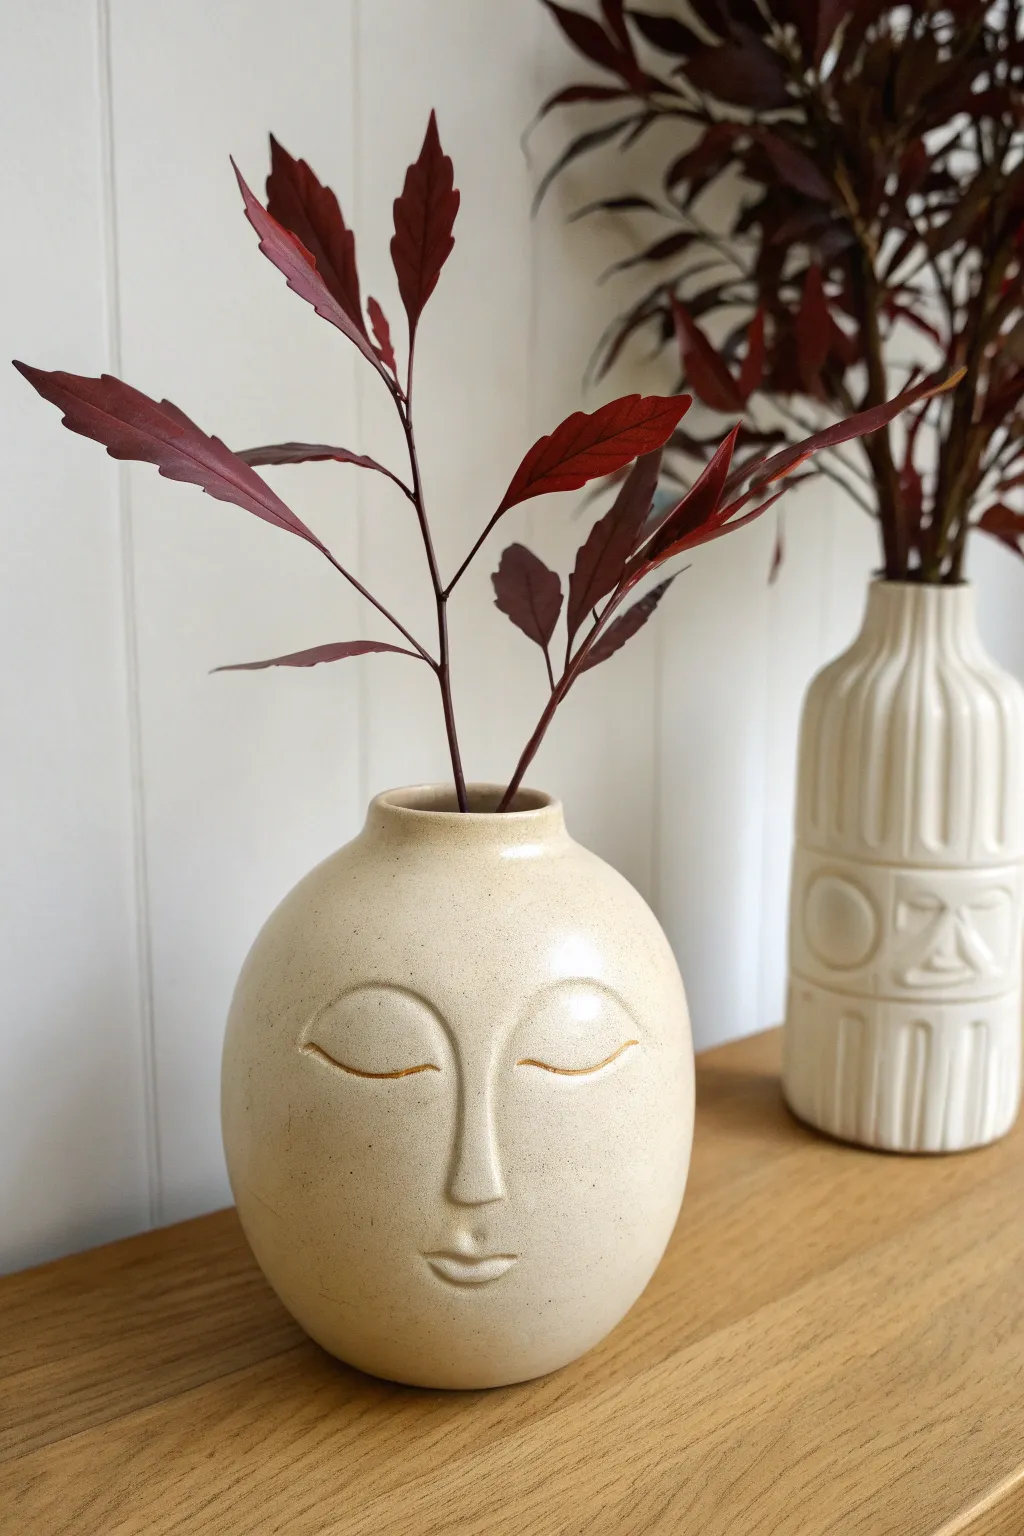
Capture a moment of tranquility with this elegant ceramic vase featuring stylized, peaceful facial features. Its smooth, rounded form and subtle expression make it a perfect minimalist centerpiece for holding dried botanicals or single stems.
Detailed Instructions
Materials
- White or cream stoneware clay body
- Pottery wheel (or coil building supplies)
- Rib tool (metal and rubber)
- Sponge
- Needle tool
- Small loop tool
- Modeling tool (rounded tip)
- Clear matte or satin glaze
- Kiln
- Gold luster (optional highlight)
- Fine liner brush
Step 1: Throwing the Form
-
Center and open:
Begin with about 2-3 pounds of well-wedged clay. Center it firmly on the wheel head and open the clay to create a flat internal floor, leaving slightly more thickness at the base for stability. -
Pull the cylinder:
Pull the walls up into a cylinder first. Ensure the walls are even in thickness, aiming for about a quarter-inch thick throughout to support the eventual curve. -
Shape the belly:
Using a rib tool on the outside and your hand on the inside, gently push the clay outward to create a bulbous, round belly. I like to work gradually here to keep the curve symmetrical. -
Collar the neck:
Slow the wheel down and gently collar the top inward to form a narrow neck. Compress the rim with a chamois or sponge to smooth it, keeping the opening small—ideal for just a few stems. -
Refine the curve:
Use a flexible metal rib to scrape away slip and refine the exterior curve until it is perfectly smooth and egg-like. Cut the vase from the bat and let it dry to leather-hard.
Step 2: Sculpting the Features
-
Plan the face:
Once leather-hard, lightly sketch the facial placement using a needle tool. Position the features slightly lower than the vertical center of the belly to give the face a grounded, peaceful look. -
Build the nose:
Form a small, elongated triangle of fresh clay. Score and slip the center of your sketched face, then press the clay on to form the bridge and tip of the nose, blending the edges seamlessly into the vase surface. -
Refine the nose bridge:
Use a modeling tool to smooth the transition from the forehead into the nose bridge. The nose should be stylized and sleek, not overly realistic. -
Carve the eyes:
Instead of adding clay for eyes, carve into the surface. Use a loop tool to gently create uniform, crescent-shaped indentations for the closed eyelids. They should curve downward peacefully. -
Define the eyelid line:
Take a needle tool or sharp modeling tool and incite a crisp, shallow line along the bottom edge of the carved crescent to clearly define the closed lash line. -
Sculpt the mouth:
Add a tiny amount of clay for the lips or simply press into the clay to form a small, pouty mouth. Use a rounded tool to create the indents for the corners of the lips and the cupid’s bow. -
Smooth everything:
Take a slightly damp sponge or a soft brush and smooth all the harsh edges of your carving and sculpting. The goal is a soft, eroded stone appearance.
Don’t Rush Smoothing
Use a soft paintbrush dipped in water to smooth the nose seams. A sponge can sometimes erase delicate details, while a brush respects the curves.
Step 3: Finishing and Glazing
-
Bisque fire:
Let the piece bone dry completely, slowing the drying process if necessary to prevent cracking around the added nose. Fire to bisque temperature (usually cone 04). -
Apply glaze:
Dip or spray the vase with a clear matte or satin white glaze. Choose a glaze that breaks slightly over texture to highlight the facial features without obscuring them. -
Glaze fire:
Fire the piece to the maturation temperature of your clay and glaze (typically cone 5 or 6 for stoneware). -
Gold accent (optional):
If you want the metallic detail seen in similar styles, apply a thin line of gold luster overglaze to the eyelid crease using a very fine liner brush. -
Final firing:
If luster was applied, fire the piece one last time at a much lower temperature (cone 018) to set the gold.
Add Eyebrows
For a different expression, carve faint, high arches above the eyes. High eyebrows create a look of surprise, while lower, straight ones look meditative.
Place your finished vase near natural light to let the shadows play across the serene features you’ve created
Landscape Bowls With a Mini Scene Inside

Bring a touch of the forest floor to your dining table with this speckled stoneware bowl that features a surprise landscape at the bottom. This project uses underglazing techniques to create a delicate fern scene that reveals itself as you finish your meal.
Step-by-Step
Materials
- Speckled stoneware clay (mid-fire recommended)
- Pottery wheel and tools (rib, sponge, wire cutter)
- Trimming tools
- Green underglaze (forest green and sage)
- Small fine-liner paintbrush
- Clear glossy glaze (food safe)
- Wax resist
- Kiln
Step 1: Throwing the Form
-
Prep the clay:
Wedge about 1.5 to 2 pounds of speckled stoneware clay thoroughly to remove air pockets and ensure even consistency. -
Center and open:
Throw the ball of clay onto the wheel head and center it. Open the clay wide, keeping the base flat and somewhat thick (about a half-inch) to allow room for the foot later. -
Pull the walls:
Gently pull the walls upward and outward to create a classic bowl shape. Aim for a distinct, vertical rim, leaving the upper edge uncurved for a modern look. -
Refine the interior:
Use a smooth kidney rib to compress the inside curve. This is crucial for your landscape ‘canvas’—you want the bottom to be exceedingly smooth so the painting applies easily. -
Create the texture:
While the wheel spins slowly, hold a tool or a slightly rough sponge against the exterior to enhance the natural speckle of the clay, or leave it smooth if you prefer the glaze to do the work. Cut the bowl from the bat and let it dry to leather hard.
Clear Glaze Tip
Test your clear glaze on a test tile first. Some ‘clear’ glazes can turn milky if applied too thick, obscuring your delicate underglaze painting.
Step 2: Trimming and Painting
-
Trim the foot:
Once leather hard, center the bowl upside down on the wheel. Trim a clean foot ring, defining the bottom curve to mirror the interior. -
Smooth the canvas:
Flip the bowl over. Ensure the inside bottom is clean and free of clay burrs. I like to wipe it gently with a barely damp sponge to prep the surface for underglaze. -
Draft the design:
Lightly sketch your fern fronds with a pencil directly onto the clay. Don’t worry about mistakes; the pencil graphite will burn away in the kiln. -
Mix your greens:
Squeeze out a small amount of dark forest green and a lighter sage green underglaze onto a palette. You can mix a tiny bit of water to get a watercolor consistency. -
Paint the stems:
Using your finest brush, paint delicate central stems starting from the center and reaching outward. Keep the lines thin. -
Add the leaves:
With short, swift brushstrokes, add the small fern leaves coming off the stems. Vary the pressure to create organic, tapered shapes. -
Layer the color:
Once the dark green is dry to the touch, add highlights with the sage green to give the fern depth and dimension. -
Bisque fire:
Allow the bowl to dry completely (bone dry) before loading it into the kiln for a bisque firing (usually cone 04).
Add Hidden Details
Paint a tiny bug or fallen leaf among the ferns that is only visible when the bowl is completely empty, rewarding the diner.
Step 3: Glazing and Finishing
-
Clean the bisque:
Wipe the bisque-fired bowl with a damp sponge to remove any dust, which can cause glaze crawling. -
Apply wax resist:
Apply wax resist to the foot of the bowl to prevent glaze from sticking to the kiln shelf. -
Pour the clear:
Pour a food-safe clear glaze into the bowl. Swirl it around quickly to coat the entire interior, then pour the excess back out. This traps the landscape under a glass-like layer. -
Dip the exterior:
Hold the bowl by the foot and dip the exterior into the clear glaze, or the glaze of your choice. The example image uses a clear glaze that allows the speckles to shine through. -
Clean up:
Sponge off any rogue glaze drips from the waxed foot. -
Glaze fire:
Load the kiln for your final glaze firing (often cone 5 or 6 depending on your clay and glaze).
Now you have a serene, nature-inspired vessel ready for your morning cereal or soup
Marbled Clay Vases for Natural Swirl Patterns
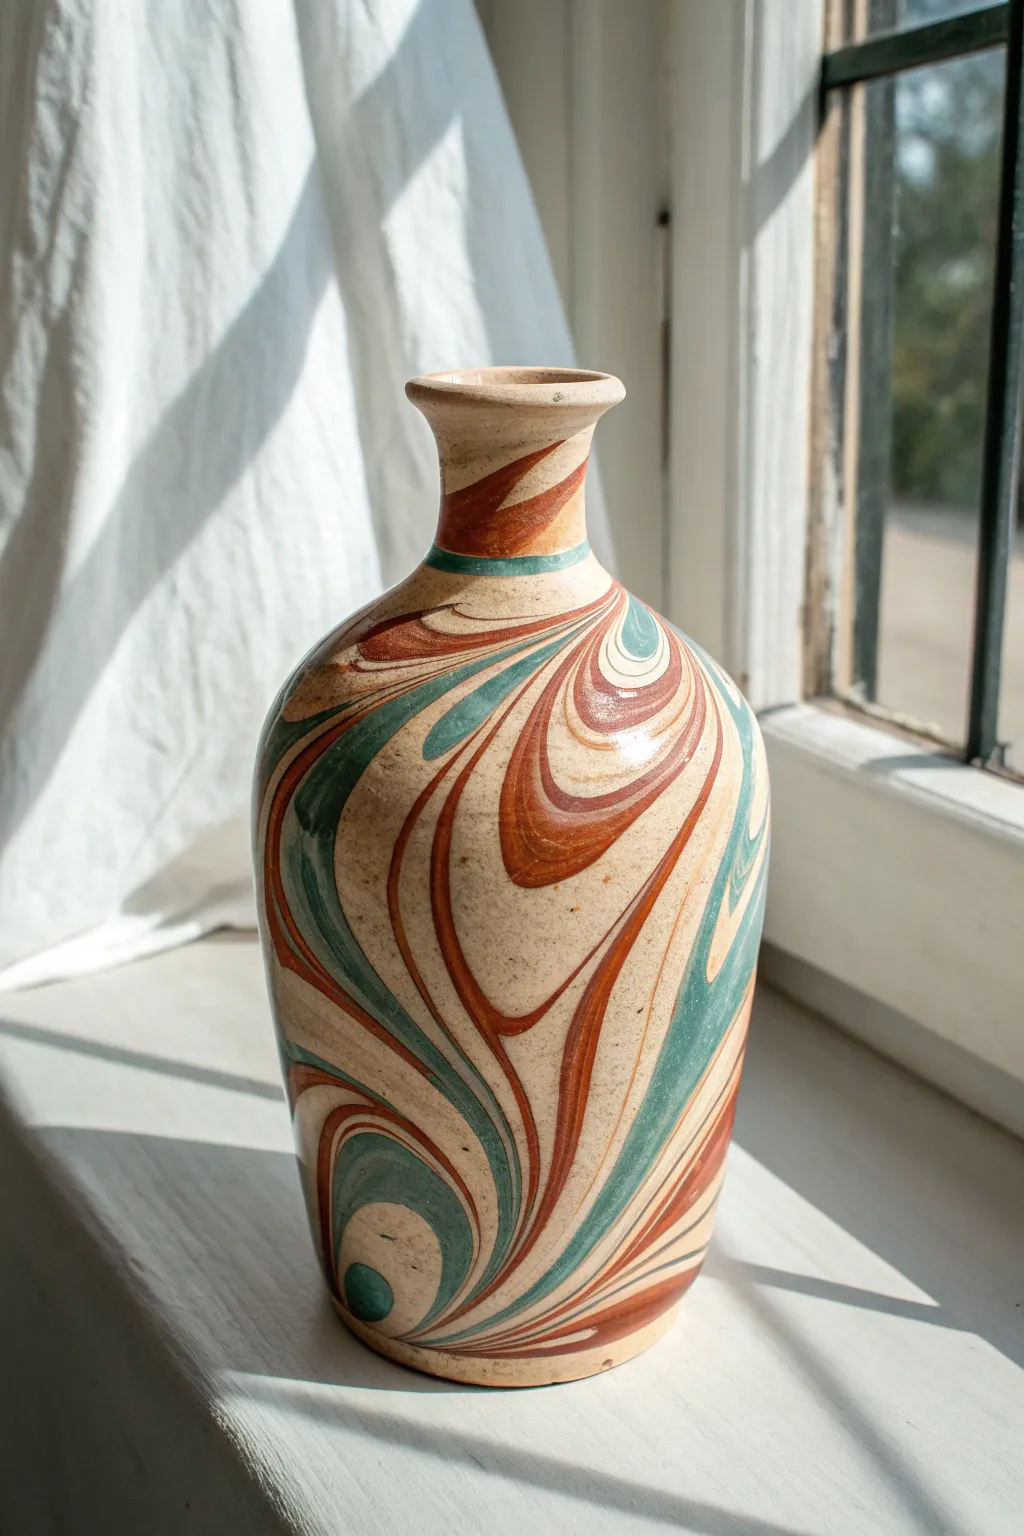
This stunning vase captures the fluid beauty of geology with its ribbons of terracotta, teal, and cream clay dancing together. By blending colored clay bodies before throwing or hand-building, you create an integral pattern that changes from every angle, making each piece entirely one-of-a-kind.
Step-by-Step Tutorial
Materials
- White or cream stoneware clay (primary body)
- Red earthenware or terracotta clay
- Mason stain (Teal or Sea Green)
- Pottery wheel (or slab roller/rolling pin for hand-building)
- Wire cutter
- Ribs (metal and wooden)
- Sponge
- Trimming tools
- Clear glossy glaze
- Kiln
Step 1: Preparing the Clay Colors
-
Tinting the teal clay:
Start by taking a portion of your white stoneware clay—about 20% of your total weight—and wedging in the teal mason stain. Wear a mask while mixing the dry powder, and wedge thoroughly until the color is uniform and streak-free. -
Preparing the contrast bodies:
Prepare a similar amount of the red terracotta clay. Ensure all three clay bodies (white, teal, red) have roughly the same moisture content; if one is significantly softer or harder, they will dry unevenly and potentially crack apart. -
Creating the stack:
Form the white clay into a thick log. Roll the teal and red clays into thinner snakes or flattened slabs. Layer these colored pieces onto the white log, twisting and folding them together gently. -
Wedging for pattern:
Wedge the combined lump of clay distinctively. I like to do just a few turns of ‘stack and slam’ wedging—enough to adhere the layers, but not so much that the colors muddy into a single greyish-brown hue. You need distinct separation.
Shrinkage Issues
If cracks appear where colors meet during drying, your clay bodies have different shrinkage rates. Test clays beforehand or add grog to equate them.
Step 2: Throwing the Form
-
Centering carefully:
Place your marbled ball on the wheel head. When centering, try to move the clay up and down (coning) minimally to preserve the crispness of the swirls. Excessive friction will smear the surface colors. -
Opening and pulling:
Open the center and begin pulling your walls. As you pull up, you will see the pattern stretch and elongate, creating those beautiful, sweeping curves seen in the reference image. -
Shaping the belly:
Using a rib on the inside, push the wall outward to create a bulbous, rounded belly. This expansion stretches the marbled layers, making the ‘agate’ pattern more dramatic. -
Collaring the neck:
Gently collar the top third of the vase inward to form a narrow neck. Use plenty of water or slip to prevent torque from twisting the clay too much, which can stress the seams between different clay bodies. -
Refining the lip:
Flare the very top rim outward slightly to create a finished lip. Use a chamois or a damp sponge to compress the rim, ensuring it is smooth and round. -
Surface reveal:
At this stage, the surface often looks muddy because the slip from throwing has coated everything. Don’t worry; the pattern is hiding just underneath.
Step 3: Trimming and Finishing
-
Drying to leather hard:
Allow the vase to dry slowly to a leather-hard state. Because you are mixing different clay bodies (stoneware and earthenware), slow drying is crucial to prevent tension cracks. -
Trimming the exterior:
Place the vase back on the wheel to trim the foot. As you trim away the outer ‘skin’ of the pot, the crisp, vibrant marble pattern will suddenly reveal itself. It’s the most satisfying part of the process. -
Scraping the body:
Use a sharp metal rib to scrape the entire exterior of the vase, removing the surface slurry from throwing. This cleanup is essential to make the teal and red lines pop against the cream background. -
Smoothing the surface:
Once trimmed and scraped, burnish the surface lightly with a soft rib or the back of a spoon if you want an extra smooth texture, or simply sponge it smooth. -
Bisque firing:
Fire the piece in a bisque kiln. Ensure the firing schedule is slow to accommodate the different expansion rates of the mixed clays. -
Glazing:
Dip or pour a clear, transparent gloss glaze over the entire piece. A colored glaze would hide your hard work, while a clear coat acts like varnish, deepening the contrast of the clay colors. -
Final firing:
Glaze fire to the temperature required by your primary white stoneware body. The red clay may darken slightly but will provide a rich contrast.
Level Up: Neriage Slices
Instead of throwing a mixed ball, press distinct slices of patterned clay into a slab mold for a more controlled, geometric kaleidoscope effect.
Once fired, the clear glaze will make those earthy ribbons shine, giving you a timeless vessel that celebrates the raw material itself
Leather-Laced Pots With Stitched Rim Details
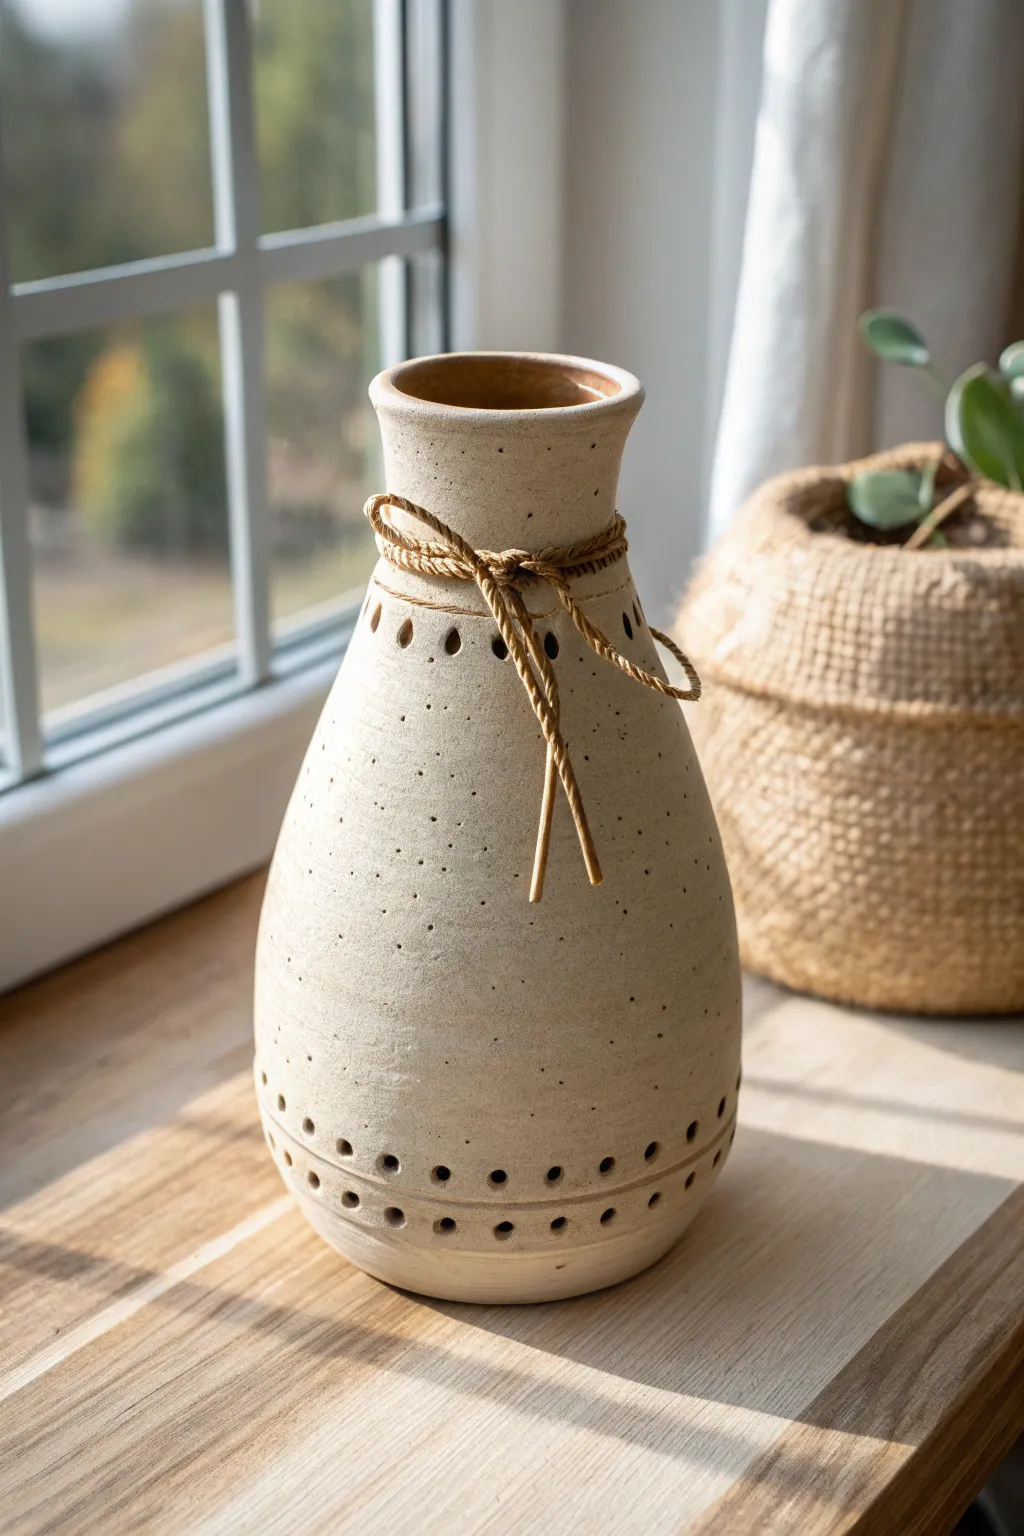
This elegant bottle-shaped vase combines earthy textures with delicate, thoughtful detailing, bringing a warm, handcrafted aesthetic to any shelf. The natural speckling of the clay is perfectly complemented by woven cord accents and precision-punched geometric patterns.
Step-by-Step Tutorial
Materials
- Speckled buff stoneware clay (approx. 3-4 lbs)
- Pottery wheel
- Throwing tools (sponge, rib, wire cutter)
- Needle tool
- Small circular hole punch tool (approx. 5mm diameter)
- Trimming tools
- Natural braided jute or hemp cord
- Matte clear glaze or satin finish glaze
- Kiln
Step 1: Throwing the Form
-
Center and open:
Start by wedging your speckled stoneware clay thoroughly to remove air bubbles. Center the clay on the wheel head, aiming for a tall, narrow cone shape to support the height we’ll be building. Open the center, keeping a base thickness of about half an inch. -
Pull the cylinder:
Begin pulling up the walls. For this bottle shape, you want to maintain a relatively narrow cylinder at the start. Use steady, even pulls to distribute the clay upward, leaving slightly more thickness at the bottom for stability. -
Shape the belly:
Once you have your height, use a kidney rib on the inside to gently push the belly of the vase outward. Create a smooth curve that starts widening from the base and reaches its widest point about one-third of the way up. -
Collar the neck:
As you move past the belly, begin collaring the clay inward to form the tapered shoulder. Use both hands to compress the clay, moving slowly to prevent the walls from buckling. -
Refine the rim:
Pull the neck straight up for about two inches, then flare the rim outward slightly. This flaring creates a classic vase silhouette and makes pouring easier if used as a vessel. Smooth the lip with a chamois.
Clean Hole Punching
Twist the hole punch tool slightly as you push it into the clay, rather than pushing straight in. This cutting motion creates much cleaner edges and reduces the cleanup needed later.
Step 2: Detailing and Trimming
-
Dry to leather hard:
Allow the piece to dry slowly until it reaches a sturdy leather-hard stage. It should be firm enough to handle without warping but soft enough to cut easily. -
Trim the foot:
Invert the vase on the wheel (using a chuck or clay lugs to secure it) and trim the base. I like to carve a clean, defined foot ring that mirrors the curve of the body. -
Mark the hole placement:
Turn the pot upright. Using a needle tool, lightly score a guideline around the neck where the decorative cord will sit. Create two more parallel guidelines near the base for the bottom decorative holes. -
Punch the neck holes:
Using your small circular hole punch, carefully press through the clay wall along your neck guideline. Space these holes about 3/4 of an inch apart. Make sure to support the wall from the inside with your hand to prevent deformation. -
Punch the base details:
For the bottom decoration, punch two rows of holes. The holes in the top row should sit directly above the spaces between the holes in the bottom row creating an offset or zigzag pattern. -
Smooth the edges:
Once the holes are punched, wait for the clay to stiffen slightly more, then use a damp sponge or a soft brush to smooth away any sharp burrs created by the punch tool.
Try Leather Lacing
Instead of jute, thread a thin strip of tan leather or suede through the neck holes. The leather creates a beautiful material contrast against the speckled ceramic surface.
Step 3: Finishing Touches
-
Bisque fire:
Let the vase dry completely to the bone-dry stage. Load it into the kiln and bisque fire it according to your clay body’s specifications (usually cone 04 or 06). -
Glaze application:
Since we want to highlight the natural speckles of the clay, dip or spray the vase with a matte clear or very light satin glaze. Wipe the foot ring clean with a damp sponge. -
Glaze fire:
Fire the piece again to its final maturity temperature (likely cone 5 or 6 depending on your stoneware). -
Thread the cord:
Once the vase is cool, take your braided jute cord. Start threading it through the holes in the neck, weaving in and out. -
Tie the knot:
Pull the ends of the cord tight enough to sit flush against the neck but not so tight that it strains the connection. Tie a simple shoelace bow and trim the ends to your desired length to complete the rustic look.
Place your finished vase near a window where the light can catch the subtle texture of the clay and the shadow of your decorative tie