Clay trays are my favorite little project because they’re fast, functional, and somehow always make a space feel more put-together. Here are clay tray ideas you can keep simple and classic—or push into artsy, statement territory when you’re in the mood to play.
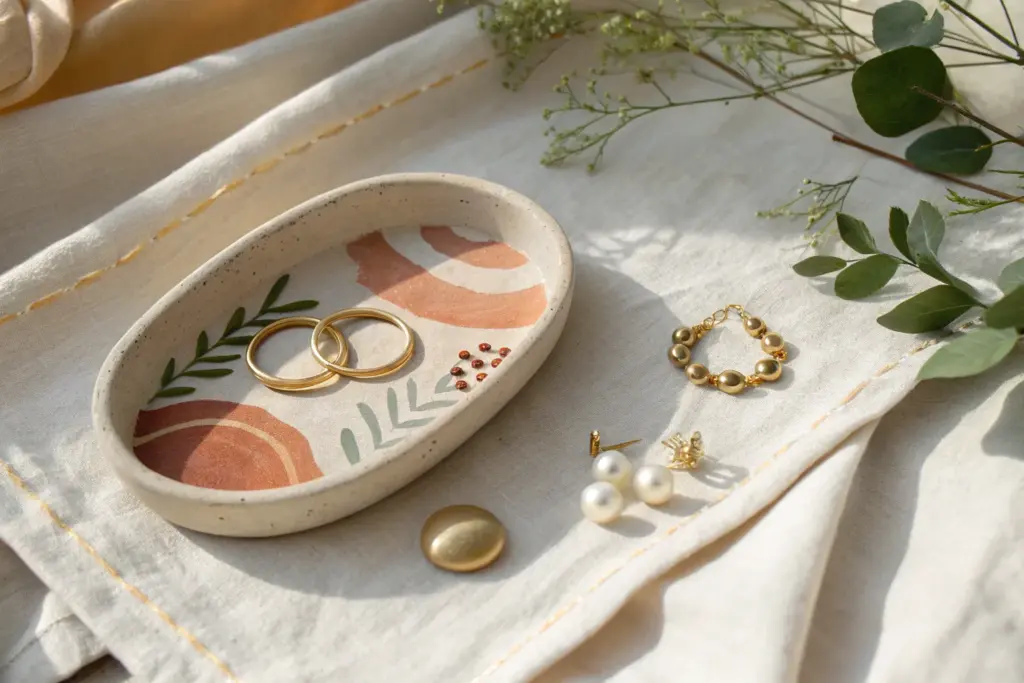
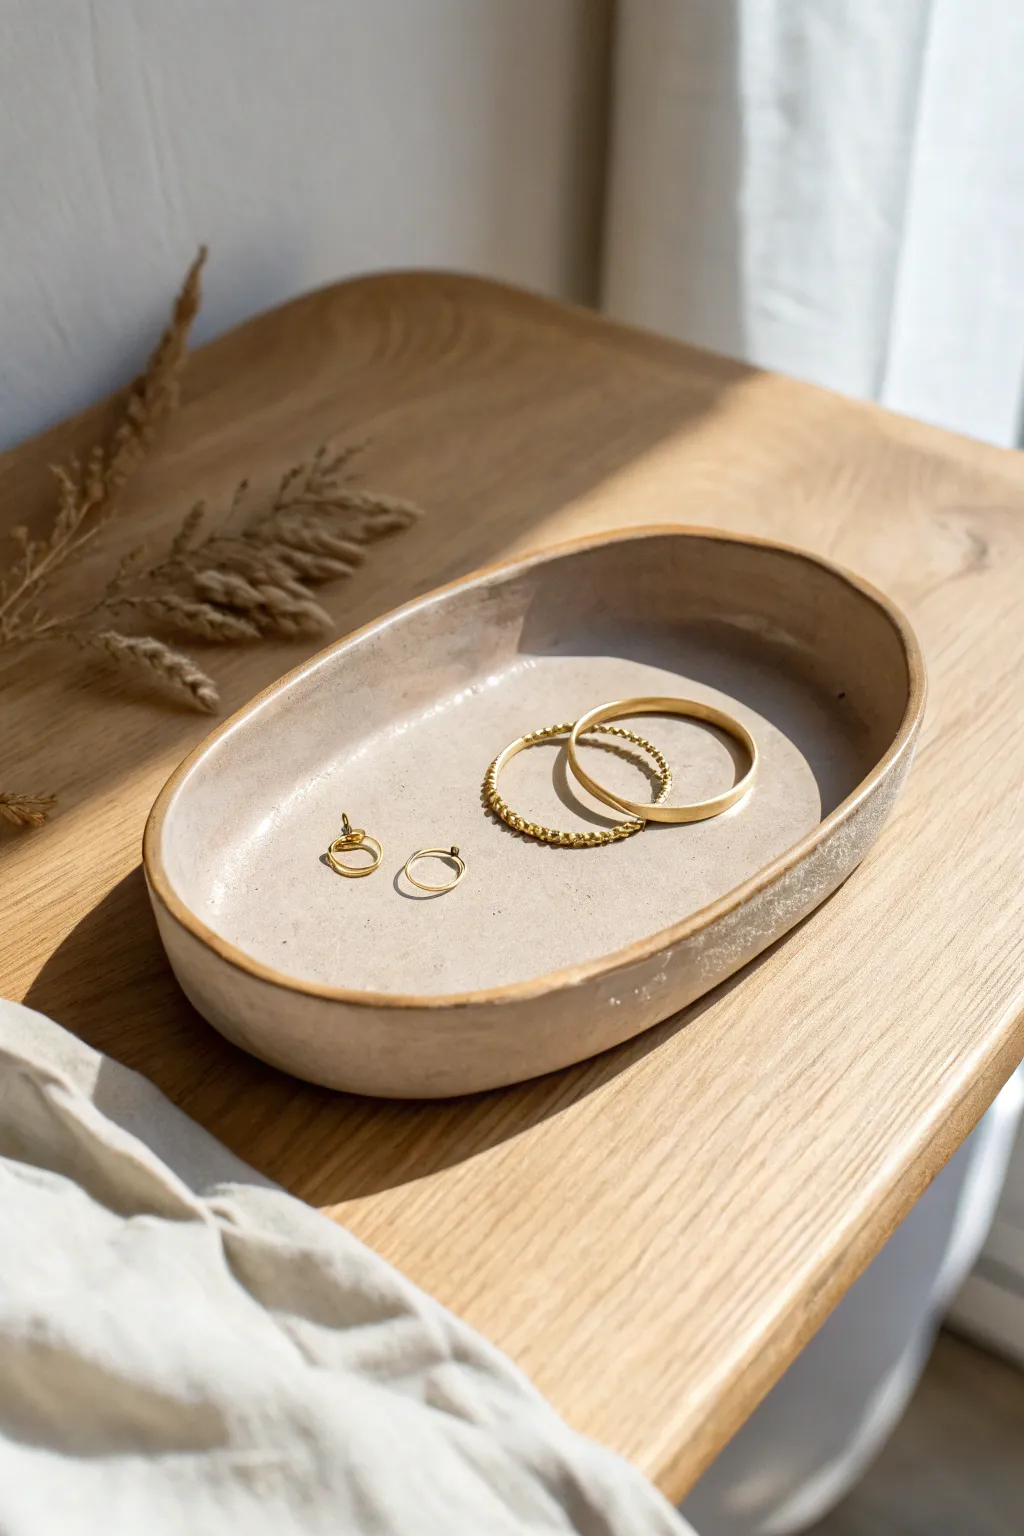
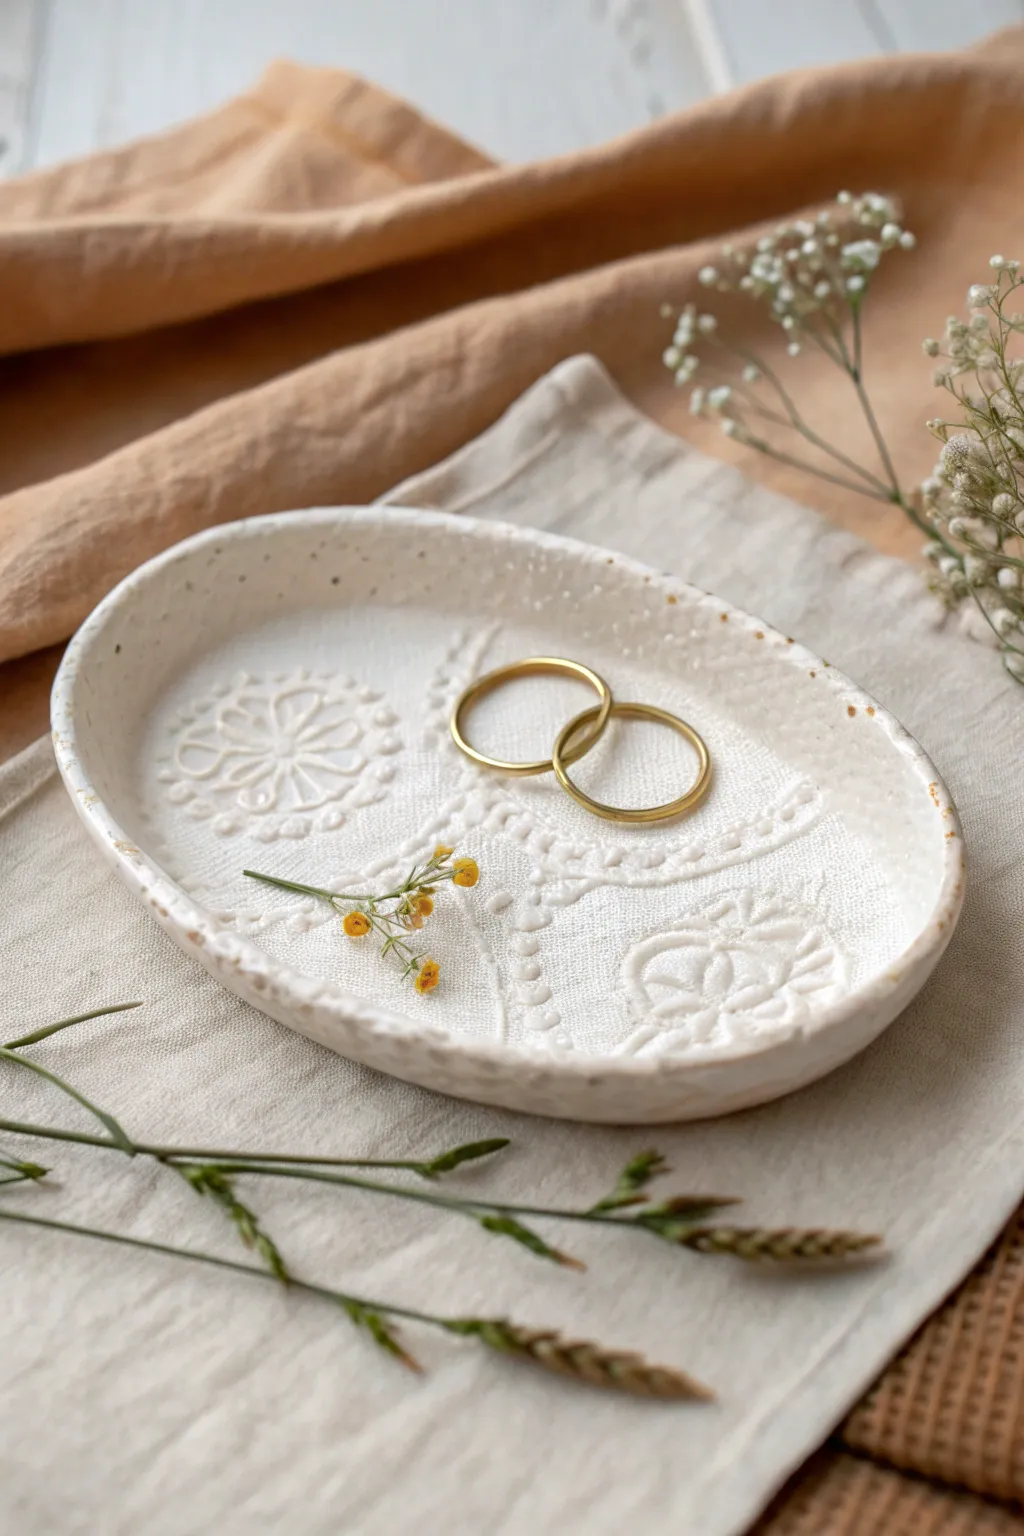
Classic Organic Round Trinket Tray
Embrace the beauty of imperfection with this lovely trinket dish, featuring a creamy, speckled finish and an organically wavy rim. It is the perfect minimalist vessel for keeping your favorite rings and earrings safe on your bedside table.
Step-by-Step Tutorial
Materials
- Air-dry clay (stone or granite effect, or plain white)
- Acrylic rolling pin
- Circle cutter or a round bowl (approx. 4-5 inches diameter)
- Craft knife
- Small sponge
- Water bowl
- Fine-grit sandpaper (220-400 grit)
- Acrylic paint (thinned brown or black) or speckle medium (if using white clay)
- Old toothbrush (if adding speckles manually)
- Matte varnish or sealant
Step 1: Shaping the Base
-
Condition the clay:
Begin by taking a handful of your air-dry clay. Knead it in your hands for a minute or two to warm it up and make it pliable, which helps prevent cracks later on. -
Roll it out:
Place the clay on a smooth surface or a silicone mat. Use your acrylic rolling pin to roll it out to an even thickness of about 1/4 inch. Try to keep the pressure consistent so one side isn’t thicker than the other. -
Cut the circle:
Place your circle cutter or an upside-down bowl onto the clay slab. Press down firmly or trace around the bowl with a craft knife to cut out a clean, perfect circle. -
Smooth the edges:
Dip your finger slightly in water and run it along the cut edge of the clay circle. This softens the sharp angle left by the knife, giving it that smooth, handmade pottery feel.
Step 2: Creating the Scalloped Rim
-
Lift the edges:
Gently lift the edges of the circle upwards to create a shallow bowl shape. You can cup the clay in your palm to help it curve naturally without folding. -
Form the waves:
Using your thumb and forefinger, gently pinch sections of the rim to create a wavy, scalloped pattern. I find spacing them about an inch apart creates a nice relaxed rhythm. -
Refine the shape:
Go around the rim a second time, smoothing out your pinch marks with a damp sponge. The goal is an organic, flowing wave rather than sharp, distinct crimps. -
Check symmetry:
Set the dish down and look at it from eye level. Adjust any sides that might be drooping too low or standing too high.
Cracking Up?
If small cracks appear while the clay dries, mix a tiny amount of fresh clay with water to make a paste (slip) and fill the cracks, then sand smooth once dry.
Step 3: Finishing Touches
-
The drying phase:
Place your tray in a safe spot away from direct sunlight. Let it dry for at least 24-48 hours. Carefully flip it over halfway through the drying process to ensure the bottom dries evenly. -
Sand for smoothness:
Once fully dry and hard, take your fine-grit sandpaper and gently sand away any rough spots, focusing on the rim and the outer curve. -
Clean the dust:
Wipe the entire tray with a slightly damp cloth or sponge to remove all the clay dust created by sanding. -
Add the speckles:
If you didn’t use pre-speckled clay, mix a tiny bit of brown or black acrylic paint with water. Dip an old toothbrush into all the mixture, aim it at the tray, and run your thumb across the bristles to flick tiny dots onto the surface. -
Let paint dry:
Allow the paint speckles to dry completely, which should only take about 15-20 minutes. -
Seal the piece:
Apply a coat of matte varnish to the entire dish. This protects the clay from moisture and gives it a finished, professional look without making it too shiny. -
Final cure:
Let the varnish cure according to the bottle instructions ensuring it is non-tacky before placing any jewelry inside.
Gilded Edge
For a luxe upgrade, paint just the very top edge of the scalloped rim with liquid gold leaf or metallic gold paint after the speckling step is dry.
Now you have a stunning, boutique-style display piece ready to hold your daily treasures


Pinched Corner Square Clay Tray
This elegant square tray features soft, rounded corners and a natural, stone-like texture that feels effortlessly chic. Its neutral tone and subtle speckling make it the perfect minimalist catch-all for your favorite gold chains and rings.
How-To Guide
Materials
- White or cream-colored polymer clay (2 oz)
- Black pepper or dried coffee grounds (for speckling)
- Acrylic roller or glass jar
- Square cookie cutter (approx. 4-5 inches) or a craft knife and ruler
- Fine-grit sandpaper (400 and 800 grit)
- Matte spray varnish or clay glaze
- Parchment paper
- Ceramic tile or glass work surface
- Small sponge or soft brush
Step 1: Preparing the Clay
-
Condition the base:
Begin by warming the white polymer clay in your hands. Knead it thoroughly until it is soft, pliable, and free of any air bubbles. -
Create the texture:
Flatten the conditioned clay slightly. Sprinkle a generous pinch of coarse black pepper or dried coffee grounds onto the surface. -
Fold and mix:
Fold the clay over the speckles and knead it again. Repeat this process until the black specks are evenly distributed throughout the white clay, mimicking real stone. -
Roll it out:
Place the clay on a piece of parchment paper to prevent sticking. Use your acrylic roller to flatten the clay into an even sheet, approximately 1/4 inch thick.
Uneven Rims?
If the edges warp while baking, sand the completely cooled rim upside down on a flat sheet of sandpaper. This levels the top perfectly.
Step 2: Shaping the Tray
-
Cut the square:
Place your square cookie cutter onto the clay sheet and press down firmly to cut the shape. If using a knife, measure a perfect square and slice cleanly. -
Soften the edges:
Gently run your finger along the cut edges of the square to smooth out the sharpness. Simple finger pressure works best here to remove that ‘cut’ look. -
Lift the sides:
Carefully lift one side of the square and gently curl it upward. Do this for all four sides creating a shallow rim. -
Pinch the corners:
At each corner where the sides meet, gently pinch the clay together from the outside. You want to round off the sharp angle into a soft curve. -
Refine the shape:
Use your thumb to smooth the inside of the corners, ensuring the transition from the base to the wall is seamless and organic. -
Check symmetry:
Look at the tray from eye level. Tap down any high spots on the rim so the height is consistent all the way around. -
Smooth the surface:
I like to take a tiny bit of baby oil on my fingertip and lightly brush over the clay to remove any fingerprints before baking.
Stone Effect
Mix a tiny dot of translucent clay into your white base. This adds depth and creates a faux-stone translucency that looks incredibly realistic.
Step 3: Finishing Touches
-
Bake the piece:
Transfer the parchment paper with the tray onto a baking sheet. Bake according to your clay package instructions (usually 275°F/135°C for 15-30 minutes). -
Cool down:
Remove the tray from the oven and let it cool completely. Do not handle it while hot, as the clay is still fragile. -
Initial sanding:
Once cool, use the 400-grit sandpaper under running water (wet sanding) to smooth rim edges and the bottom. -
Polish sanding:
Switch to the 800-grit sandpaper to give the surface a buttery smooth finish. Rinse off any residue and dry thoroughly. -
Seal (optional):
For a protected finish that keeps the matte stone look, apply a light coat of matte spray varnish. Let it dry completely before use.
Place your finished tray on a nightstand to hold your treasures in style


Simple Oval Key Catchall Tray
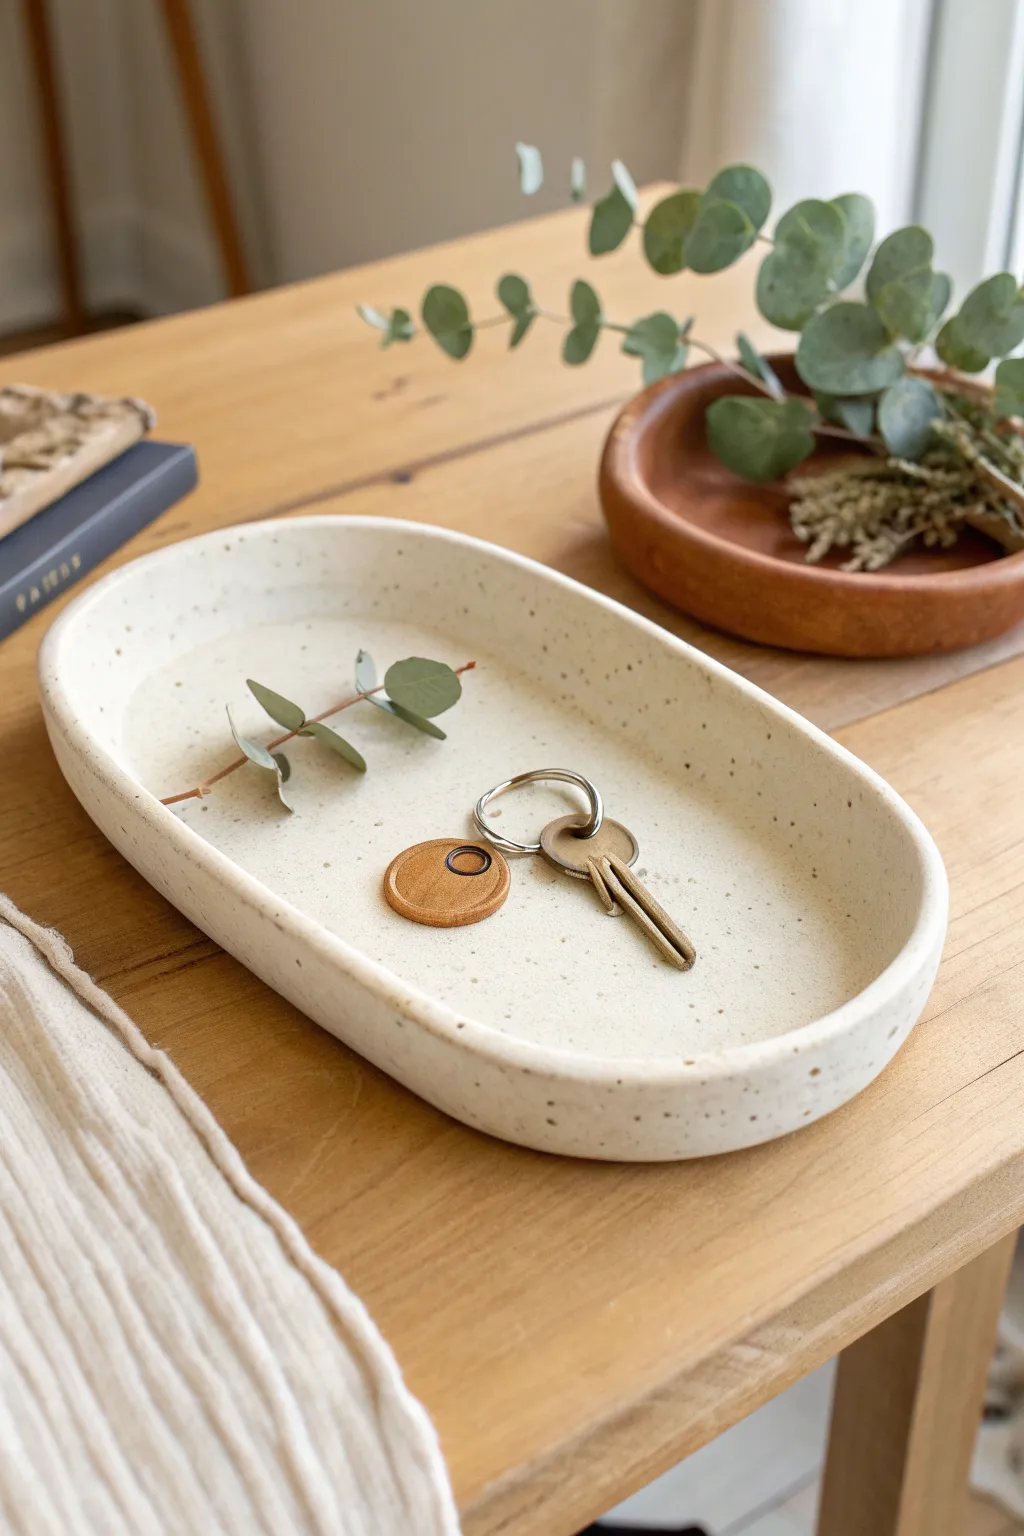
This minimalist tray combines a soft, organic oval shape with a trendy speckled finish that mimics high-end stoneware. It’s the perfect size for an entryway console to corral keys, loose change, or small jewelry pieces.
Step-by-Step Guide
Materials
- White air-dry clay or polymer clay
- Rolling pin
- Sharp craft knife
- Fine-grit sandpaper
- Acrylic paint (cream/white and dark brown)
- Old toothbrush
- Clear matte varnish or sealant
- Small bowl of water
- Oval paper template (optional)
Step 1: Shaping the Base
-
Prepare the clay:
Begin by taking a large handful of white air-dry clay and kneading it in your hands until it becomes warm, soft, and pliable. This conditioning step prevents cracks later on. -
Roll the slab:
Place the clay on a smooth work surface or a piece of parchment paper. Use a rolling pin to flatten it into an even slab, aiming for a consistent thickness of about 1/4 inch. -
Cut the oval:
Freehand an elongated oval shape with a craft knife or lightly trace around a paper template if you prefer perfect symmetry. Cut out the shape and remove the excess clay. -
Smooth the edges:
Dip your finger into a small bowl of water and run it along the cut edge of your oval slab. This softens the sharp cut lines and prepares the edge for attachment.
Cracking Up?
If small cracks appear while drying, don’t panic. Mix a tiny bit of fresh clay with water to make a paste (slip) and fill the cracks, then sand smooth once dry.
Step 2: Building the Rim
-
Create a coil:
Take the excess clay you set aside and roll it into a long, even snake or coil. It should be long enough to wrap around the entire circumference of your oval base. -
Attach the coil:
Place the coil directly on top of the outer edge of your oval base. Press it down gently to secure it initially. -
Blend the inside seam:
Using a modeling tool or your thumb, smear the clay from the coil down onto the base on the *inside* of the tray. I find that using firm, downward strokes creates the strongest bond. -
Blend the outside seam:
Repeat this blending process on the outside of the tray, smoothing the coil down into the base edge until the seam creates a continuous, invisible line. -
Refine the shape:
Once the walls are attached, use your fingers to pinch and shape the rim to be uniform in height. Smooth out any fingerprints with a slightly damp sponge or finger. -
Dry completely:
Allow the tray to dry fully according to the clay package instructions. This usually takes 24-48 hours. Flip it occasionally to ensure even drying.
Step 3: Finishing Touches
-
Sand the surface:
Once bone dry, take fine-grit sandpaper and gently buff the entire tray. Focus on limit, the rim, and any stubborn bumps to get that smooth, stonewear look. -
Base coat:
Paint the entire tray with a coat of cream or off-white acrylic paint. This gives you a clean canvas and hides any grayish tones from the raw clay. -
Prepare the speckle:
Dilute a small amount of dark brown paint with water until it is quite runny and ink-like. -
Apply the speckles:
Dip an old toothbrush into the runny brown paint. Hold it over the tray and run your thumb across the bristles to flick tiny droplets onto the surface. Practice on paper first to control the spray. -
Seal the piece:
Allow the paint to dry completely, then apply two coats of clear matte varnish. This protects the clay from moisture and gives it a finished, professional appearance.
Pro Tip: Weighted Center
While the clay dries, place a light weight (like a bag of beans) in the center of the tray on a paper towel. This prevents the base from bowing upward.
Place your finished tray on a console table or desk to instantly declutter your space with effortless style


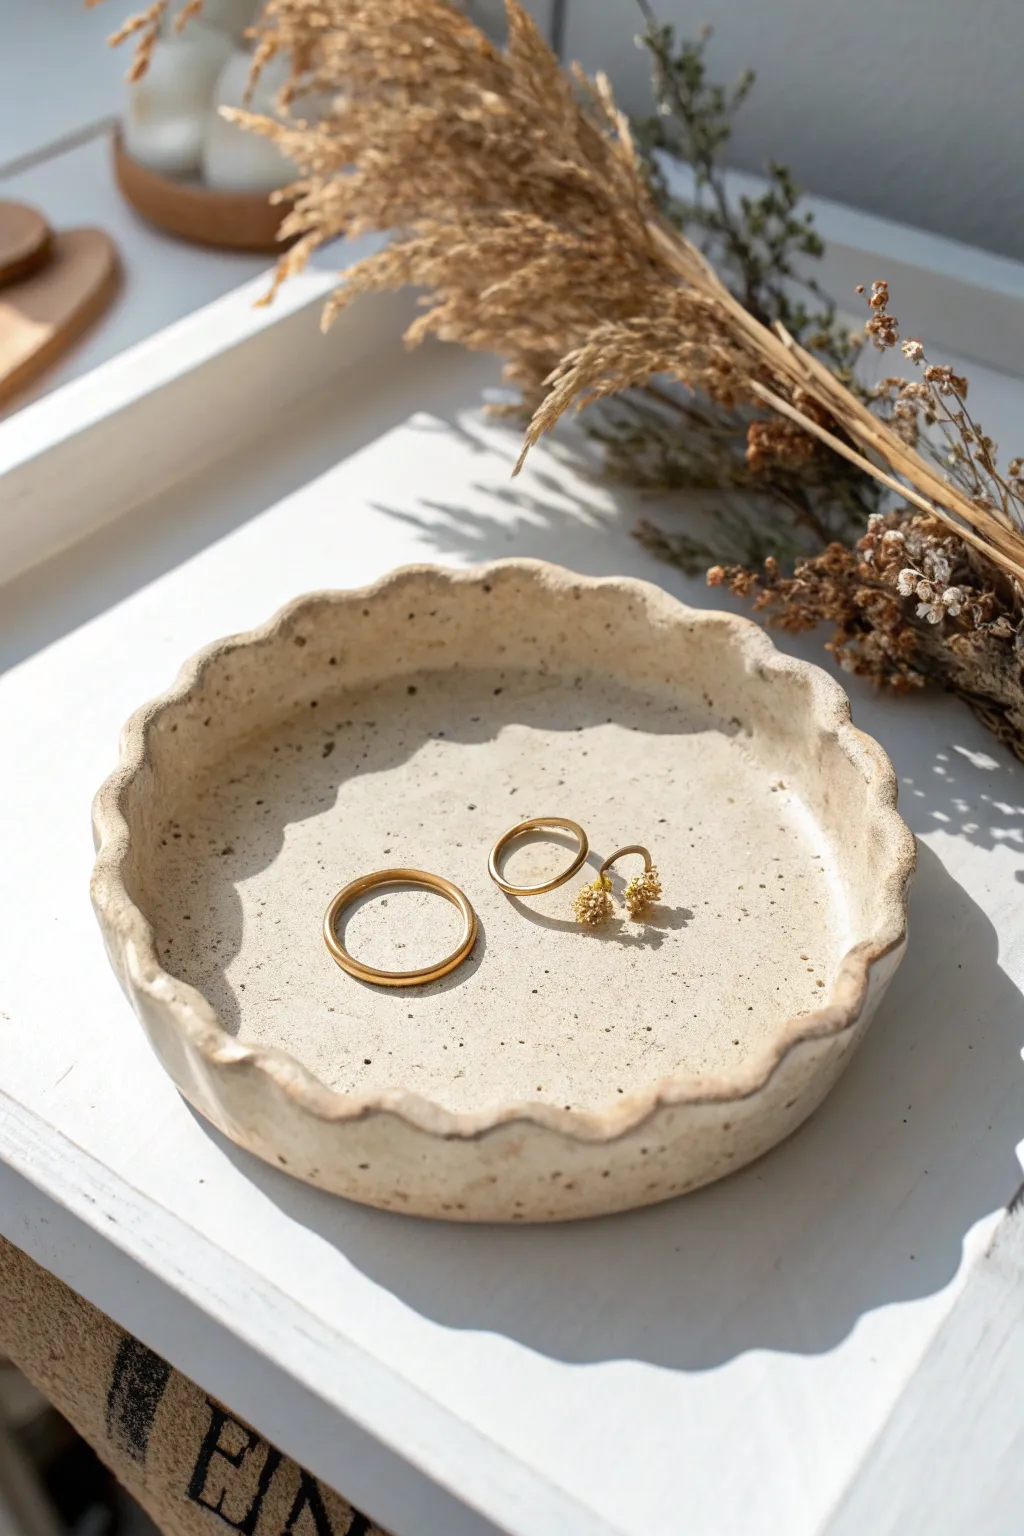
Scalloped Edge Jewelry Dish Tray
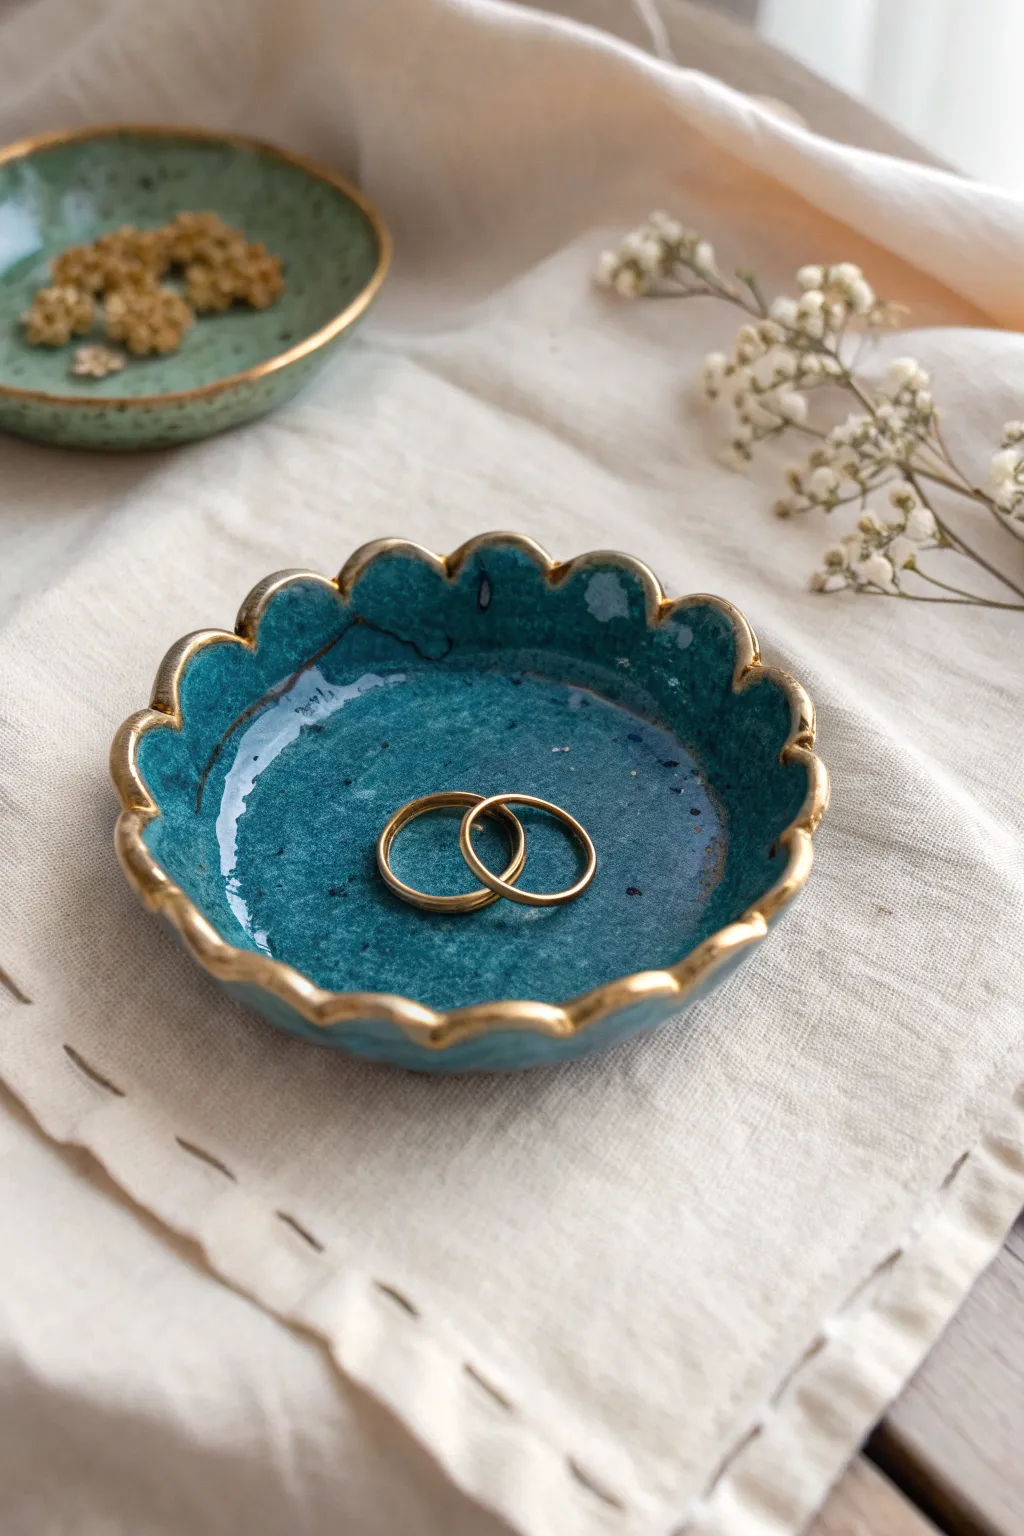
Create a stunning jewelry holder that looks effortlessly high-end with its deep teal glaze and elegant scalloped rim. This project combines classic pottery techniques with a touch of luxury, resulting in a perfect catch-all for your favorite rings.
Detailed Instructions
Materials
- Air-dry clay (white) or polymer clay
- Rolling pin
- Round cookie cutter (approx 4-5 inches)
- Small round piping tip or marker cap (for scalloping)
- Small bowl (for shaping)
- Sandpaper (fine grit)
- Acrylic paint (teal/turquoise)
- Gloss varnish or resin
- Gold leaf paint or liquid gold leaf
- Fine paintbrush
- Sponge brush
Step 1: Shaping the Clay
-
Condition the clay:
Start by kneading a handful of your air-dry clay until it is soft, pliable, and free of cracks. If it feels too dry, you can wet your hands slightly to introduce a tiny bit of moisture. -
Roll the slab:
Place the clay on a smooth surface or canvas mat. Roll it out evenly to a thickness of about 1/4 inch. Try to keep the thickness consistent so the drying process is uniform. -
Cut the base:
Using your large round cookie cutter or a bowl as a template, cut a perfect circle from the rolled slab. Remove the excess clay and set it aside for future use. -
Create the scallops:
This is the signature detail. Take a small round tool—like the back of a large piping tip or a marker cap—and gently press it into the edge of the circle, removing small semi-circles of clay. Move around the circumference, slightly overlapping or spacing them so they meet perfectly. -
Smooth the edges:
Dip your finger in a little water and run it gently along the scalloped cuts. This softens any sharp drag marks from the cutter and gives it that refined, professional ceramic look. -
Form the dish:
Lift your clay circle and gently drape it into a small bowl. Press lightly so it takes the curved shape of the bowl bottom. Let it dry in this position for about 24-48 hours until hardened completely.
Cracked Clay?
If small cracks appear while drying, mix a tiny amount of fresh clay with water to make a paste (slip) and fill the cracks. Smooth over and let dry again.
Step 2: Painting and Finishing
-
Sand for smoothness:
Once fully dry, remove the dish from the mold. Use fine-grit sandpaper to gently buff away any rough spots on the rim or the underside. -
Apply base color:
Mix a deep teal acrylic paint. I like to add a tiny drop of black to standard turquoise to get that rich, moody hue shown in the photo. Apply a coat to the entire inside of the dish. -
Build color depth:
Allow the first coat to dry, then apply a second coat. For a reactive glaze look, you can sponge on a slightly lighter turquoise in random spots while the paint is still wet. -
Seal the piece:
Apply two coats of high-gloss varnish or a thin layer of resin. This is crucial—it mimics the glass-like shine of fired ceramic glaze and protects the paint from scratching. -
Gild the rim:
Dip a fine-point brush into liquid gold leaf or metallic gold paint. Carefully trace the very edge of the scallops. The glossy surface helps the brush glide smoothly. -
Add detail to the rim:
Don’t be afraid to let the gold line vary slightly in thickness, or drip just a millimeter down the side in spots; this enhances the organic, handmade feel. -
Final cure:
Let the gold paint dry completely according to the manufacturer’s instructions before placing any jewelry inside.
Glaze Effect Trick
To get that speckled pottery look, dip a toothbrush in dark blue paint and flick tiny droplets onto the teal base layer before varnishing.
Place this beautiful dish on your nightstand or vanity to keep your treasures safe

The Complete Guide to Pottery Troubleshooting
Uncover the most common ceramic mistakes—from cracking clay to failed glazes—and learn how to fix them fast.
Coil-Rimmed Clay Tray With Raised Border
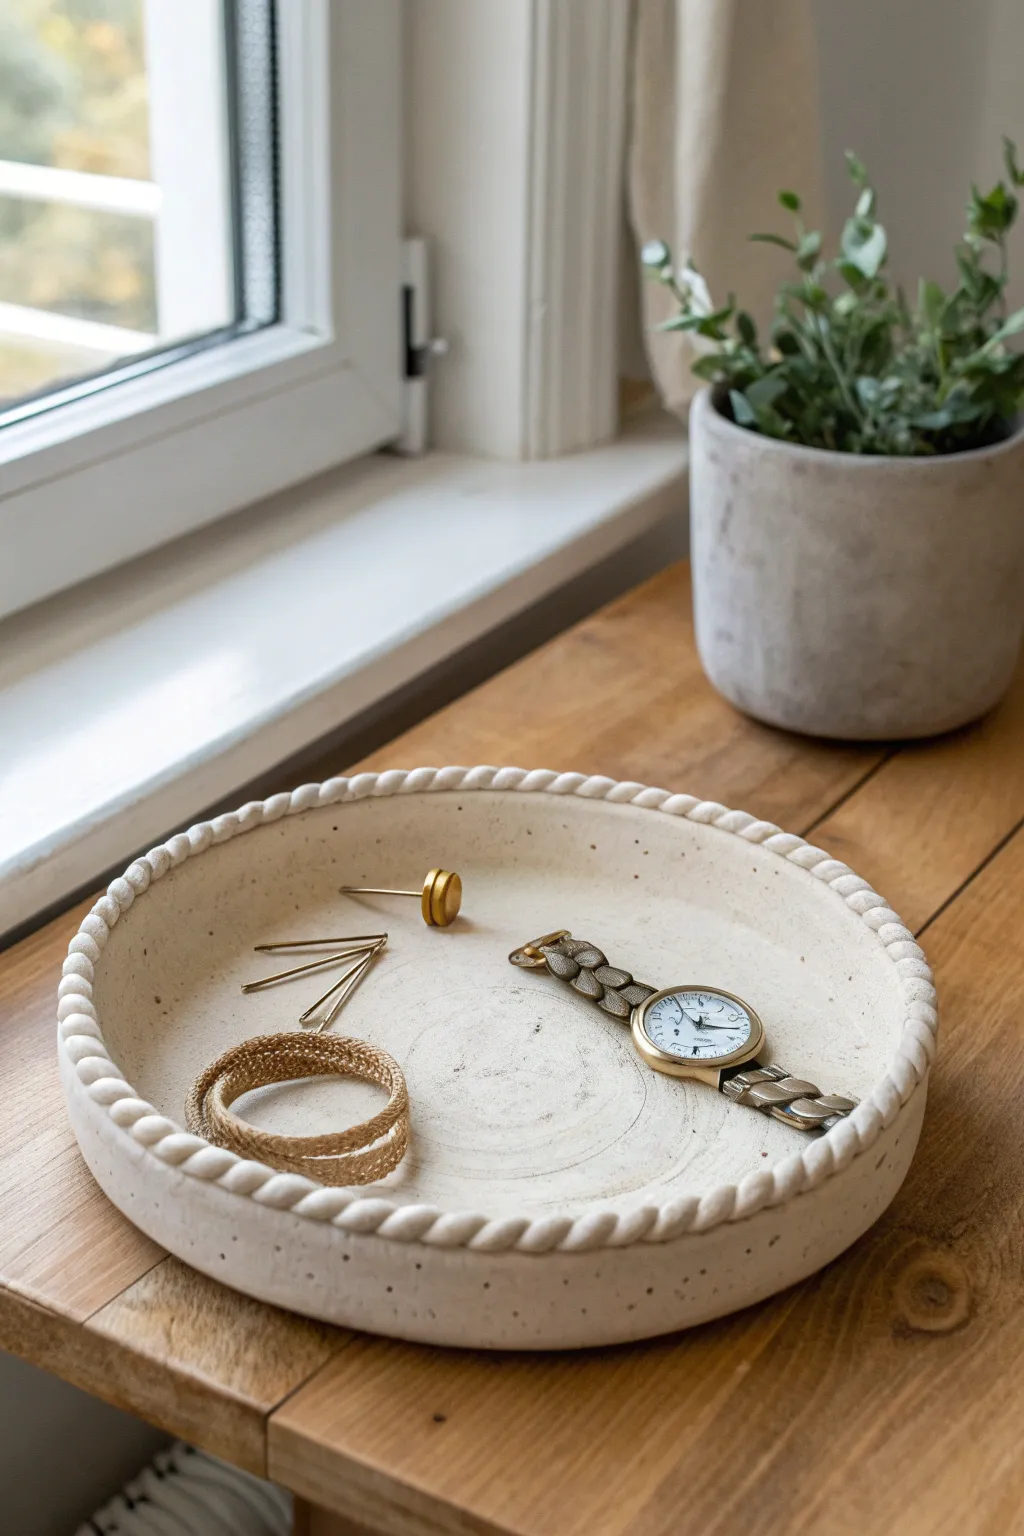
This minimalist catch-all tray combines organic texture with a touch of elegance, featuring a sandy speckled finish and a distinctive rope-twisted rim. It’s the perfect bedside companion for keeping your daily jewelry organized in style.
How-To Guide
Materials
- White polymer clay or air-dry clay (approx. 500g)
- Speckled clay additive (or black pepper/dried coffee grounds)
- Acrylic rolling pin
- Circle cutter or bowl (approx. 6-7 inches diameter)
- Clay knife or scalpel
- Small bowl of water (for smoothing)
- Slip (clay and water mixture) or liquid clay adhesive
- Fine grit sandpaper
- Matte sealant or varnish
Step 1: Preparing the Base
-
Condition the clay:
Start by warming up your clay in your hands. Knead it thoroughly until it is soft, pliable, and free of cracks. If you are using plain white clay, now is the time to knead in your speckles—black pepper works wonderfully for that organic look. -
Roll out the slab:
Place the clay on a smooth work surface. Use your rolling pin to flatten it into an even slab, aiming for a consistent thickness of about 1/4 inch (6mm) to ensure durability. -
Cut the circle:
Place your circle template or an upside-down bowl onto the clay slab. Using your clay knife, carefully trace around the edge to cut out a perfect circle. Remove the excess clay but keep it nearby for the rim. -
Smooth the edges:
Dip your finger in a little water and run it along the cut edge of the circle to smooth out any sharpness or drag marks left by the knife.
Cracking Up?
If you see tiny cracks forming in the twisted rope while bending it, your clay is too dry. Dip your fingers in water and smooth the cracks immediately, or knead a drop of baby oil into the raw clay.
Step 2: Creating the Twisted Rim
-
Roll two coils:
Take the remaining clay and divide a portion into two equal balls. Roll each ball into a long, thin snake (coil) on your table. They should be slightly longer than the circumference of your base and roughly the thickness of a pencil. -
Twist the pair:
Lay the two coils side by side. Pinch them together at one end, then gently twist them over one another all the way down to create a tight rope pattern. Try to keep the twist even throughout. -
Score the base:
Take a needle tool or toothpick and scratch rough hash marks (scoring) all along the very outer top edge of your circular base. This rough texture helps the rim adhere securely. -
Apply adhesive:
Brush a small amount of slip or liquid clay adhesive over the scored area. I find applying just enough to make it tacky prevents the clay from sliding around too much. -
Attach the rope:
Gently lift your twisted rope and place it onto the scored edge of the base. Press it down firmly but carefully, ensuring you don’t flatten the beautiful twisted details. -
Join the ends:
When the rope meets its start, cut through both ends at a 45-degree angle. Push the cut ends together and smooth the seam with a little water or a modeling tool so the joint becomes invisible.
Step 3: Finishing Touches
-
Create the interior well:
Because the rim sits on top, you want to ensure the junction is sealed on the inside. Run a smoothing tool or your finger along the inside corner where the rope meets the base to blend slightly, ensuring no gaps remain. -
Refine the shape:
Look at the tray from eye level. If the base has warped, gently press it flat against the table. Adjust the rim to ensure it sits vertically and evenly all around. -
Dry or Bake:
If using polymer clay, bake according to the package instructions (usually around 275°F/135°C for 15-30 minutes). If using air-dry clay, leave it in a cool, dry place for 24-48 hours, turning it occasionally to prevent warping. -
Sand for perfection:
Once fully cured or dry, take your fine-grit sandpaper and lightly buff the base and any sharp spots on the rim. The goal is a matte, stone-like finish, so don’t polish it too much. -
Seal the piece:
Finish by applying a thin coat of matte varnish or sealant. This protects the clay from moisture and dirt without making it look plasticky or shiny.
Make It Marble
Before rolling your initial slab, twist a small snake of beige or grey clay into your white clay but don’t fully blend it. This creates faint marble veins alongside the speckles for extra depth.
Now you have a chic, handmade vessel ready to display your favorite trinkets
Leaf-Imprint Botanical Tray
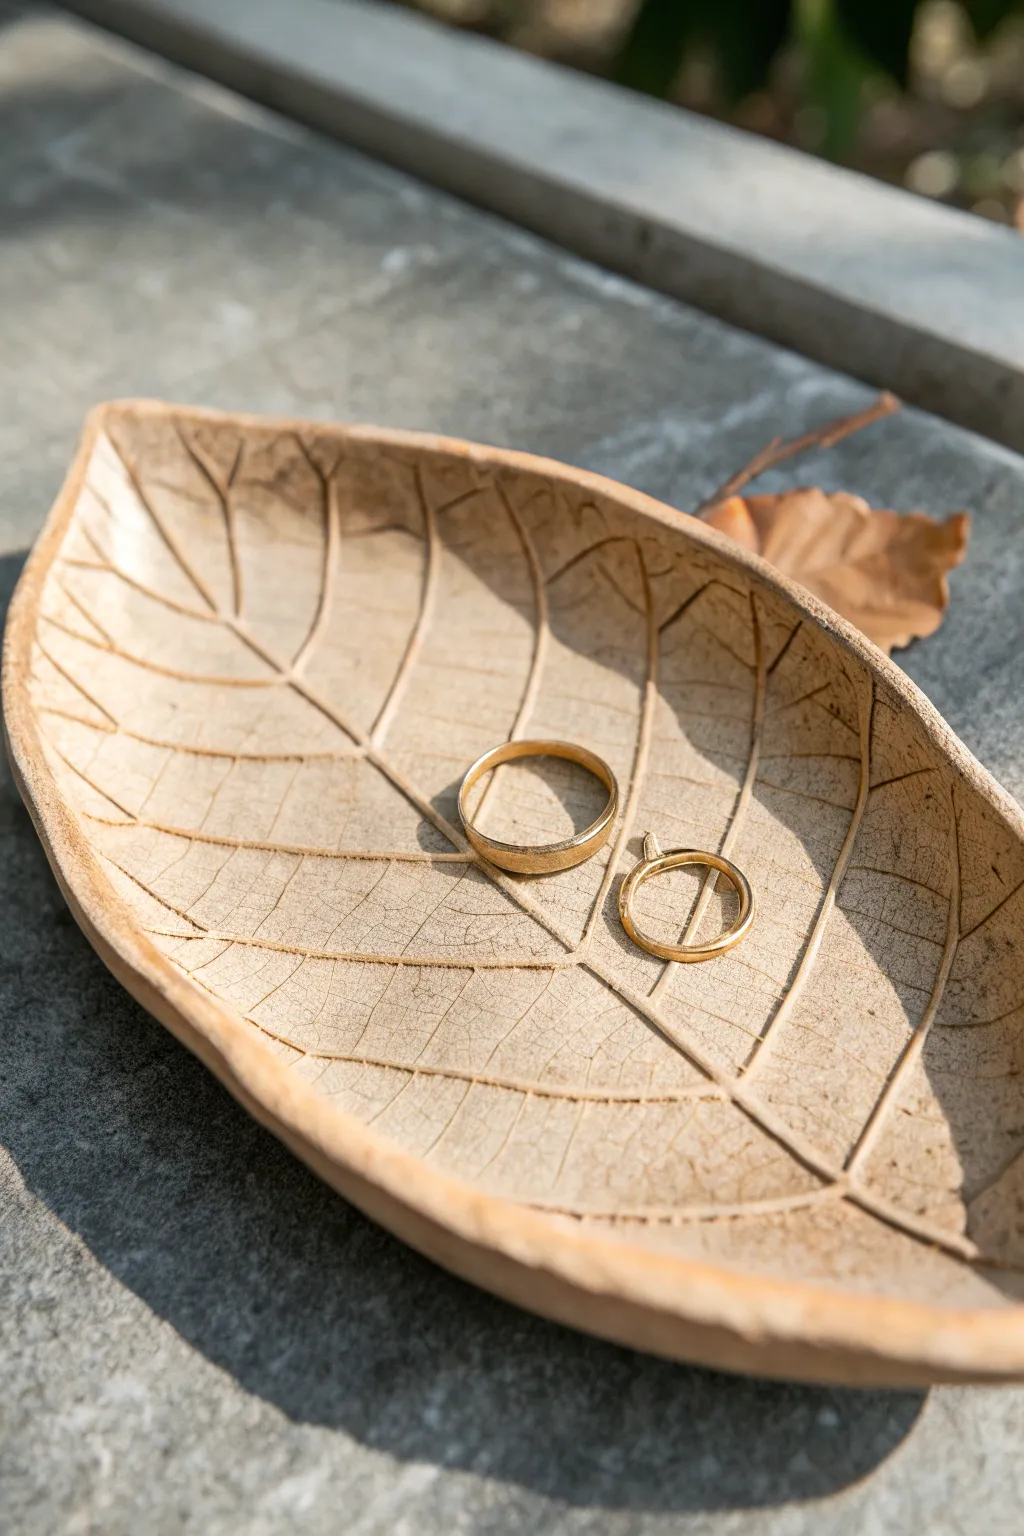
Capture nature’s intricate details forever with this organic clay dish, perfect for holding precious rings or trinkets. By pressing a real leaf into pliable clay, you’ll create a stunning, textured botanical imprint that looks like fossilized stone.
Detailed Instructions
Materials
- Air-dry clay (stone or white color recommended)
- Large, fresh leaf with prominent veins (like a hydrangea or beech leaf)
- Rolling pin
- Sharp craft knife or scalpel
- Small bowl or sponge for smoothing
- Fine-grit sandpaper
- Acrylic paints (beige, sand, burnt umber)
- Matte varnish or sealant
- Plastic wrap or parchment paper
Step 1: Preparing the Impression
-
Condition the Clay:
Begin by taking a handful of air-dry clay and kneading it thoroughly in your hands until it becomes warm and pliable. This prevents cracking later on. -
Roll out the Slab:
Place the clay on a sheet of parchment paper or a clean work surface. Use a rolling pin to flatten it into an even slab, aiming for a thickness of about 1/4 inch. -
Select and Place the Leaf:
Choose a fresh leaf with thick, raised veins on the underside. Place the leaf vein-side down onto your clay slab. -
Imprint the Texture:
Gently roll your rolling pin over the leaf, applying firm and even pressure. Do this just once or twice to press the veins deep into the clay without making the slab too thin. -
Reveal the Design:
Carefully lift the leaf stem first and peel it away from the clay to reveal the intricate botanical skeleton left behind.
Step 2: Shaping and Refining
-
Cut the Shape:
Using a sharp craft knife or scalpel, carefully trace around the outline of the leaf impression. Keep your blade vertical for a clean edge. -
Remove Excess Clay:
Peel away the excess clay from the outside of your cut shape. Return this scrap clay to an airtight container for future use. -
Smooth the Edges:
Dip your finger in a little bit of water and gently run it along the cut edges of the leaf to soften any sharpness or potential burrs. -
Form the Curve:
To give the tray its dish shape, gently lift the clay leaf and place it inside a shallow bowl or on a curved surface. Let the edges curve upward naturally. -
Adding Texture:
While the clay is still soft, you can use a dry sponge or toothbrush to lightly tap the surface between the veins, creating a stone-like, porous texture similar to the reference image.
Vein Definition
If your leaf veins seem faint after rolling, gently deepen the main center lines with a needle tool or toothpick while the clay is still wet.
Step 3: Finishing Touches
-
Dry Completely:
Allow the clay to dry fully in its curved shape. This usually takes 24-48 hours depending on humidity; don’t rush this step or the clay feels cold to the touch. -
Sand Imperfections:
Once bone dry, use fine-grit sandpaper to smooth out the rim and underside. Wipe away the dust with a barely damp cloth. -
Apply Base Color:
Paint the entire dish with a mixture of beige and white acrylic paint to mimic natural stoneware. I prefer adding a tiny drop of brown to warm it up. -
Highlight the Veins:
Create a ‘wash’ by diluting burnt umber paint heavily with water. Brush it over the textured veins and quickly wipe the surface with a paper towel, leaving the darker color settled only in the deep crevices. -
Seal the Tray:
Finish with a coat of matte varnish to protect the surface from moisture and scratches while maintaining that natural, earthy look.
Preventing Warping
If the edges curl too much while drying, place a light piece of plastic wrap loosely over the drying bowl to slow down evaporation.
Place your finished tray on a bedside table or vanity for a touch of organic elegance


What Really Happens Inside the Kiln
Learn how time and temperature work together inside the kiln to transform clay into durable ceramic.
Shell-Shaped Clay Tray for Beachy Vibes
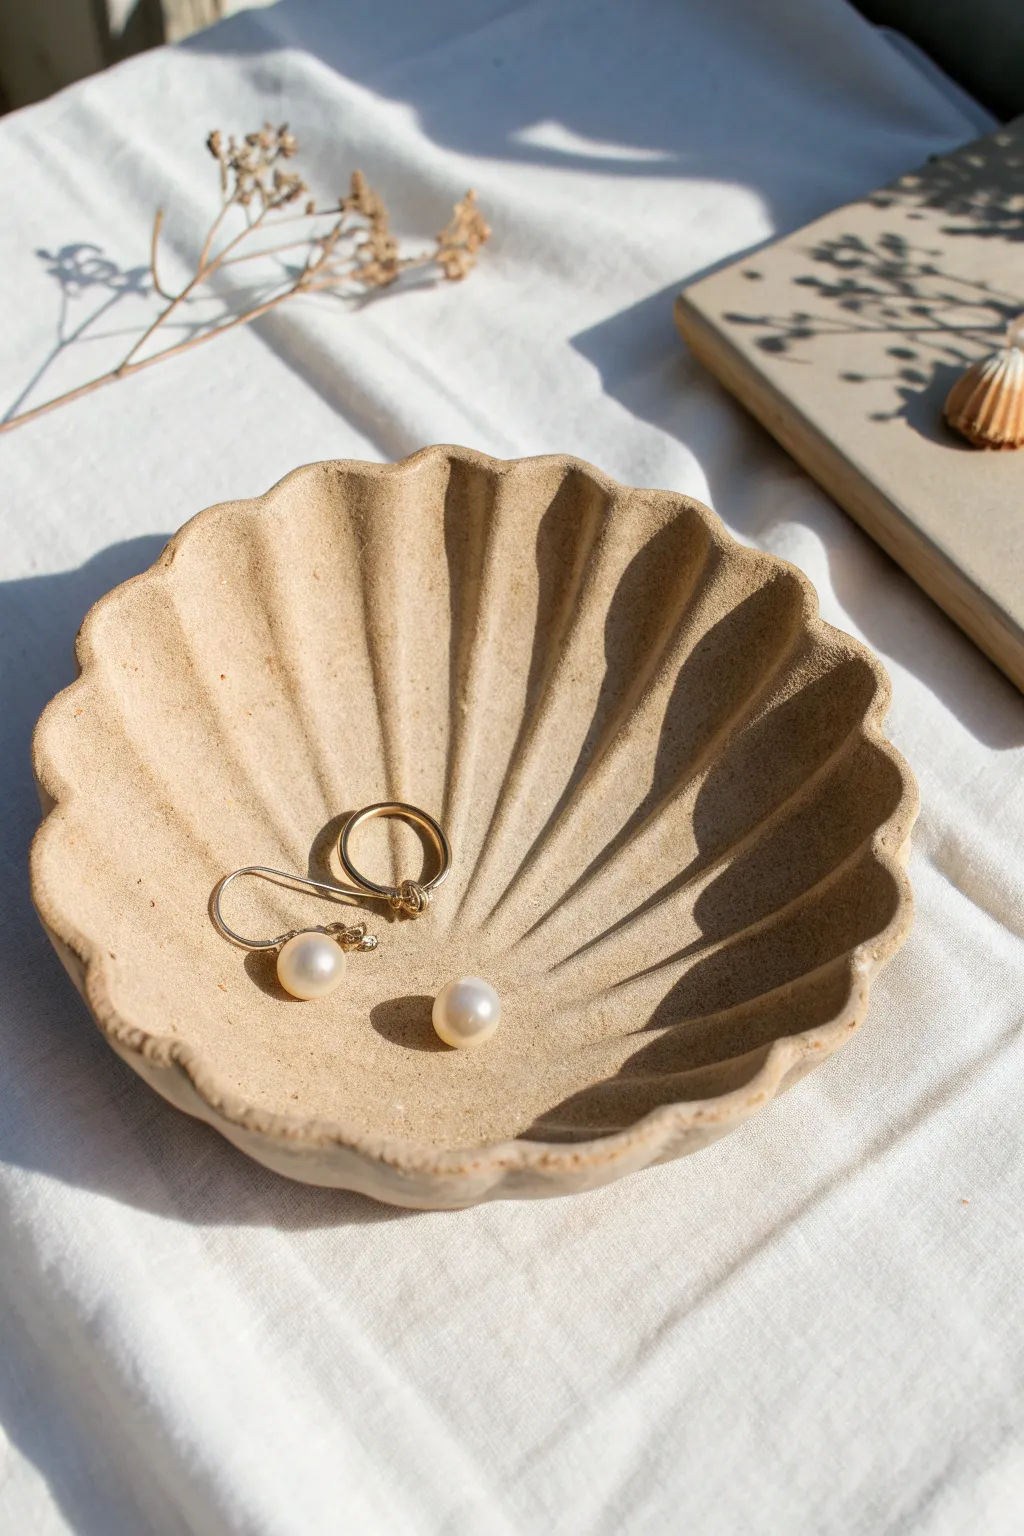
Bring a touch of the seaside to your vanity with this elegant shell-shaped trinket dish. Its sandy texture and organic fluted edges make it the perfect resting place for your favorite pearl earrings or delicate rings.
Step-by-Step Guide
Materials
- Air-dry clay (stone or sand effect preferred)
- Rolling pin
- Real scallop shell (large) OR a printed shell template
- Clay knife or craft scalpel
- Modeling tool or dull butter knife
- Small sponge
- Water bowl
- Fine-grit sandpaper
- Matte spray varnish or acrylic sealer
Step 1: Shaping the Base
-
Prepare the workspace:
Clear a flat surface and lay down a piece of parchment paper or a silicone mat to prevent the clay from sticking. This also makes moving the wet piece easier. -
Condition the clay:
Take a handful of your air-dry clay and knead it warmly in your hands until it becomes pliable and smooth. This helps prevent cracks later on. -
Roll it out:
Using your rolling pin, flatten the clay into an even slab about 1/4 inch thick. Try to keep the thickness consistent so it dries evenly. -
Create the outline:
Place your large scallop shell or paper template gently onto the clay slab. If using a real shell, press it down lightly to leave a faint impression. -
Cut the shape:
With your clay knife held vertically, carefully trace around the perimeter of the shell shape. Remove the excess clay and set it aside for future projects. -
Smooth the edges:
Dip your finger in a little bit of water and run it along the cut edges to soften any sharp angles or rough bits left by the knife.
Natural Texture
To get that speckled, sandy look without buying special clay, mix dry used coffee grounds or cracked black pepper into plain white clay before rolling.
Step 2: Adding Texture and Form
-
Sculpt the ridges:
Using a modeling tool or the back of a butter knife, gently press indentations radiating from the bottom center of the shell out towards the scalloped edges. These lines mimic the natural fluting of a seashell. -
Deepen the scallops:
At the outer edge of each ridge line, use your finger or a rounded tool to slightly push the clay edge upward and inward, emphasizing the classic scalloped silhouette. -
Form the bowl:
Carefully lift the clay slab and place it into a shallow, curved bowl or onto a large real shell to dry. This ensures it hardens into a concave dish shape rather than drying flat. -
Refine the surface:
I like to take a barely damp sponge and lightly pat the inside surface. This smooths out accidental fingerprints without erasing your beautiful ridge lines. -
Let it dry:
Allow the tray to dry completely in a cool, dry place. Depending on your humidity and clay brand, this usually takes 24 to 48 hours. Don’t rush this part or it might warp.
Step 3: Finishing Touches
-
Sand imperfections:
Once the clay is bone dry and turns a lighter color, use fine-grit sandpaper to gently smooth the rim. Focus on any jagged spots on the underside or edges. -
Clean dust:
Wipe the tray down with a dry, soft brush or cloth to remove all the sanding dust before sealing. -
Seal the piece:
Apply a thin coat of matte spray varnish or acrylic sealer. This protects the clay from moisture and gives it a finished, durable quality. -
Second coat:
Wait for the first coat to dry, then apply a second light coat for extra protection.
Gilded Edge
Once the sealer is dry, paint just the very rim of the scallops with liquid gold leaf or metallic paint for a luxurious, high-end jewelry store finish.
Your new shell tray is ready to organize your treasures with effortless coastal style
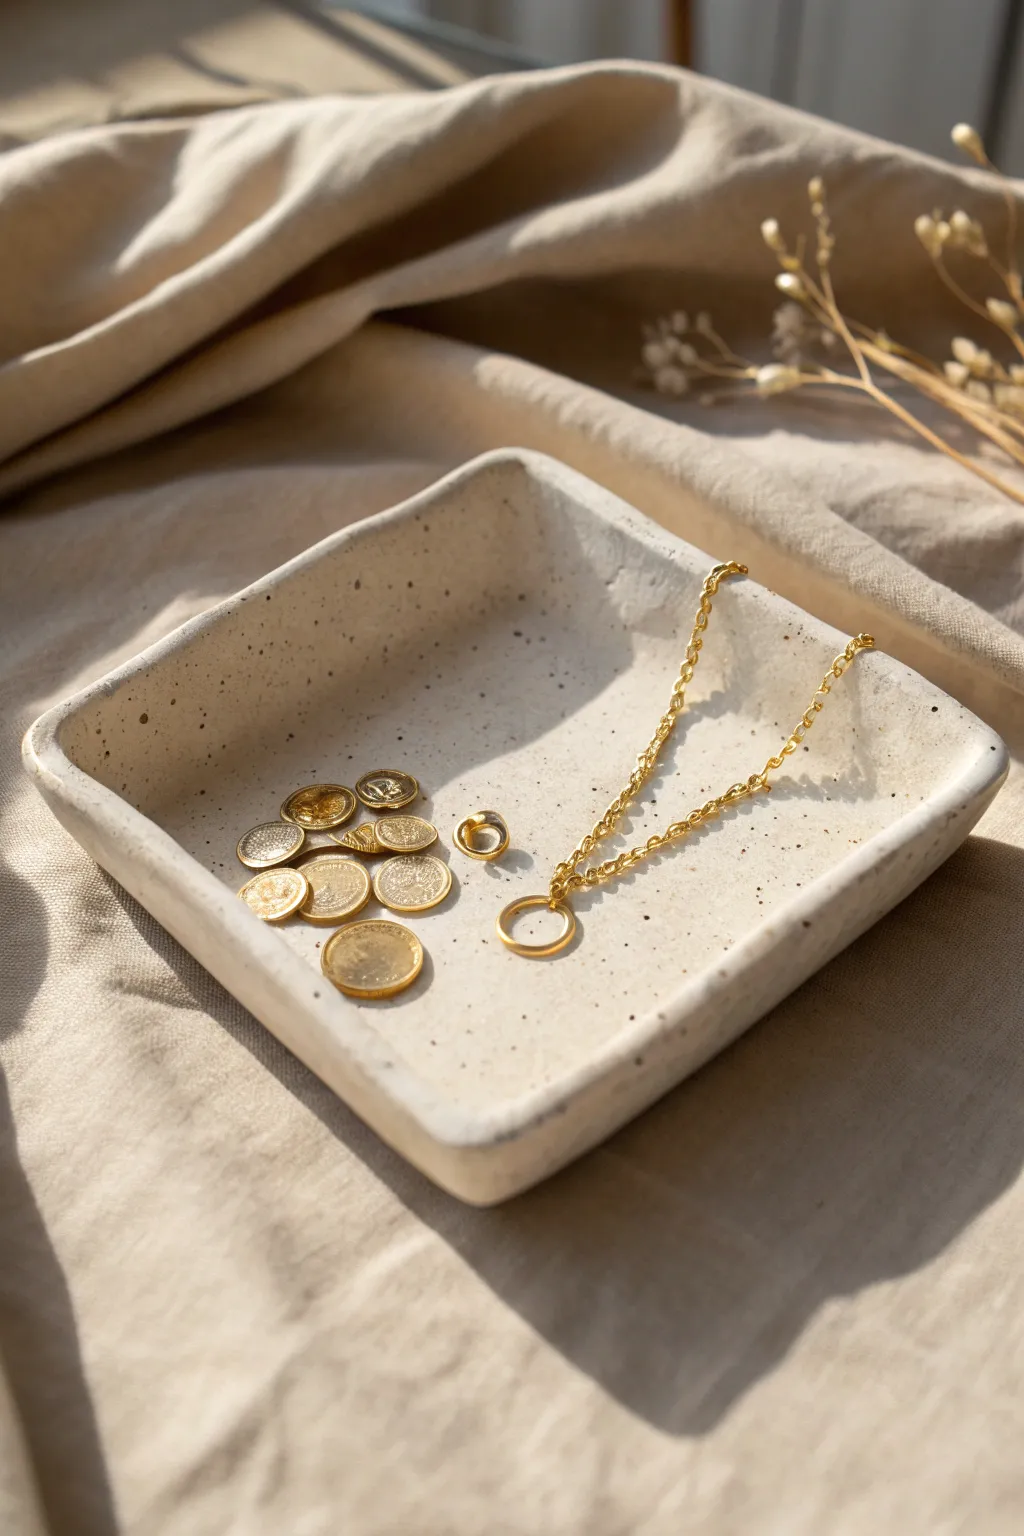
Terrazzo-Style Speckled Clay Tray
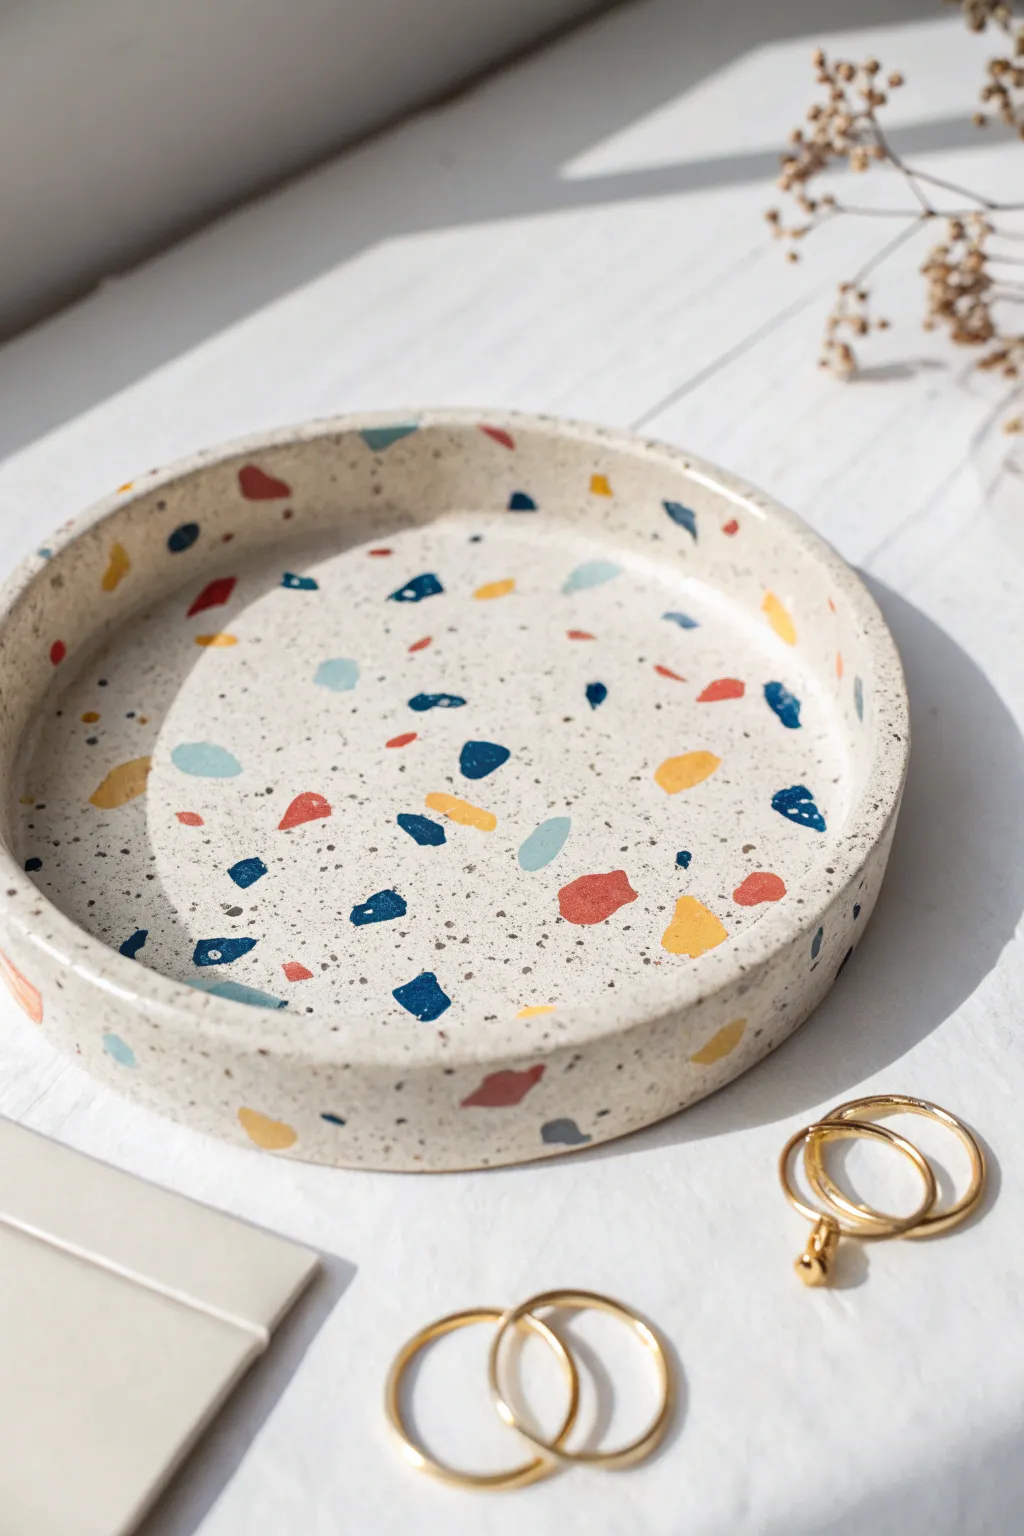
Bring a pop of modern playfulness to your vanity with this chic faux-terrazzo tray. Using simple polymer clay techniques, you’ll create a durable, colourful catch-all that perfectly mimics the look of authentic stone.
How-To Guide
Materials
- White or Beige Polymer Clay (Base)
- Small amounts of Red, Blue, Yellow, and Teal Polymer Clay
- Acrylic rolling pin
- Round clay cutter (approx. 4-5 inches) or a bowl template
- Craft knife
- Parchment paper
- Clay slicer or blade
- Fine-grit sandpaper (400 to 1000 grit)
- Matte or glossy clay varnish
- Soft brush
- Baking sheet
Step 1: Preparing the ‘Chips’
-
Condition the coloured clay:
Start by warming up small amounts of your red, blue, yellow, and teal clay in your hands until they are soft and pliable. This conditioning prevents cracking later. -
Flatten the colours:
Roll each coloured piece into a very thin sheet, roughly 1-2mm thick. You don’t need these to be perfect circles; irregular shapes are fine. -
Create the terrazzo chips:
Use your craft knife or clay blade to chop these thin sheets into small, irregular geometric shards. Aim for a mix of tiny specks and slightly larger chunks to create visual interest. -
Separate the pieces:
Gently separate the chopped pieces on a piece of parchment paper so they don’t stick back together while you prepare the base.
Sticky Situation?
If the clay gets too soft and sticky while working, pop it in the fridge for 10 minutes. The chips will slice cleaner when cold.
Step 2: Creating the Base Slab
-
Condition the base clay:
Take a large block of your white or beige clay (about 2-3 oz) and condition it thoroughly until it is completely smooth. -
Roll the foundation:
Roll the base clay out on parchment paper into a thick slab, approximately 5mm thick. Ensure it is wide enough to accommodate your chosen cutter size. -
Apply the chips:
Randomly scatter the coloured clay chips onto the surface of your white slab. You want an even distribution, but keep it organic—avoid explicit patterns. -
Add the ‘pepper’ specks:
To mimic the sandy texture seen in the photo, grate a tiny bit of dried black or dark grey clay (or use coarse black pepper) and sprinkle it very sparingly over the slab. -
Embed the pattern:
Cover the slab with a fresh sheet of parchment paper and gently roll over it with your acrylic roller. Apply pressure until the coloured chips are flush with the white surface.
Go Upscale
Add tiny flecks of gold leaf along with your coloured chips before rolling flat for a luxurious, high-end finish.
Step 3: Forming the Tray
-
Cut the circle:
Place your round cutter or bowl template onto the patterned slab and cut out a perfect circle. Remove the excess clay. -
Prepare the rim strip:
Gather the excess clay (or use fresh white clay mixed with leftover chips) and roll it into a long snake. Flatten this into a long, rectangular strip about 1cm tall. -
Attach the rim:
Wrap the long strip around the circumference of your circle base. I usually stand the strip on top of the base’s edge rather than wrapping around the side for a cleaner seam. -
Blend the seams:
Use a modeling tool or your finger to gently smudge the clay on the inside seam where the wall meets the base, ensuring they bond tightly. -
Smooth the outside:
Repeat the smoothing process on the exterior seam. Roll the side of the tray gently against your work surface to ensure the wall is perfectly vertical and smooth.
Step 4: Finishing Touches
-
Inspect and refine:
Check the rim for any unevenness. Slice off any high points with your blade to make the top edge perfectly flat. -
Bake the tray:
Place the tray on a baking sheet lined with parchment paper. Bake according to your clay package instructions (usually 275°F/135°C for 15-30 minutes per 1/4 inch thickness). -
Cool down:
Let the tray cool completely in the oven with the door slightly ajar. This gradual cooling helps prevent cracks. -
Sand for stone effect:
Once cool, wet-sand the tray under running water using 400-grit sandpaper, moving to finer grits. This reveals slightly more of the coloured chips and mimics real stone. -
Seal the piece:
Apply a thin layer of matte varnish to protect the surface from oils and dust, giving it a finished, professional look.
Place your new speckled tray on a dresser or desk to organize your favourite jewelry pieces in style

TRACK YOUR CERAMIC JOURNEY
Capture glaze tests, firing details, and creative progress—all in one simple printable. Make your projects easier to repeat and improve.
Marbled Swirl Clay Tray
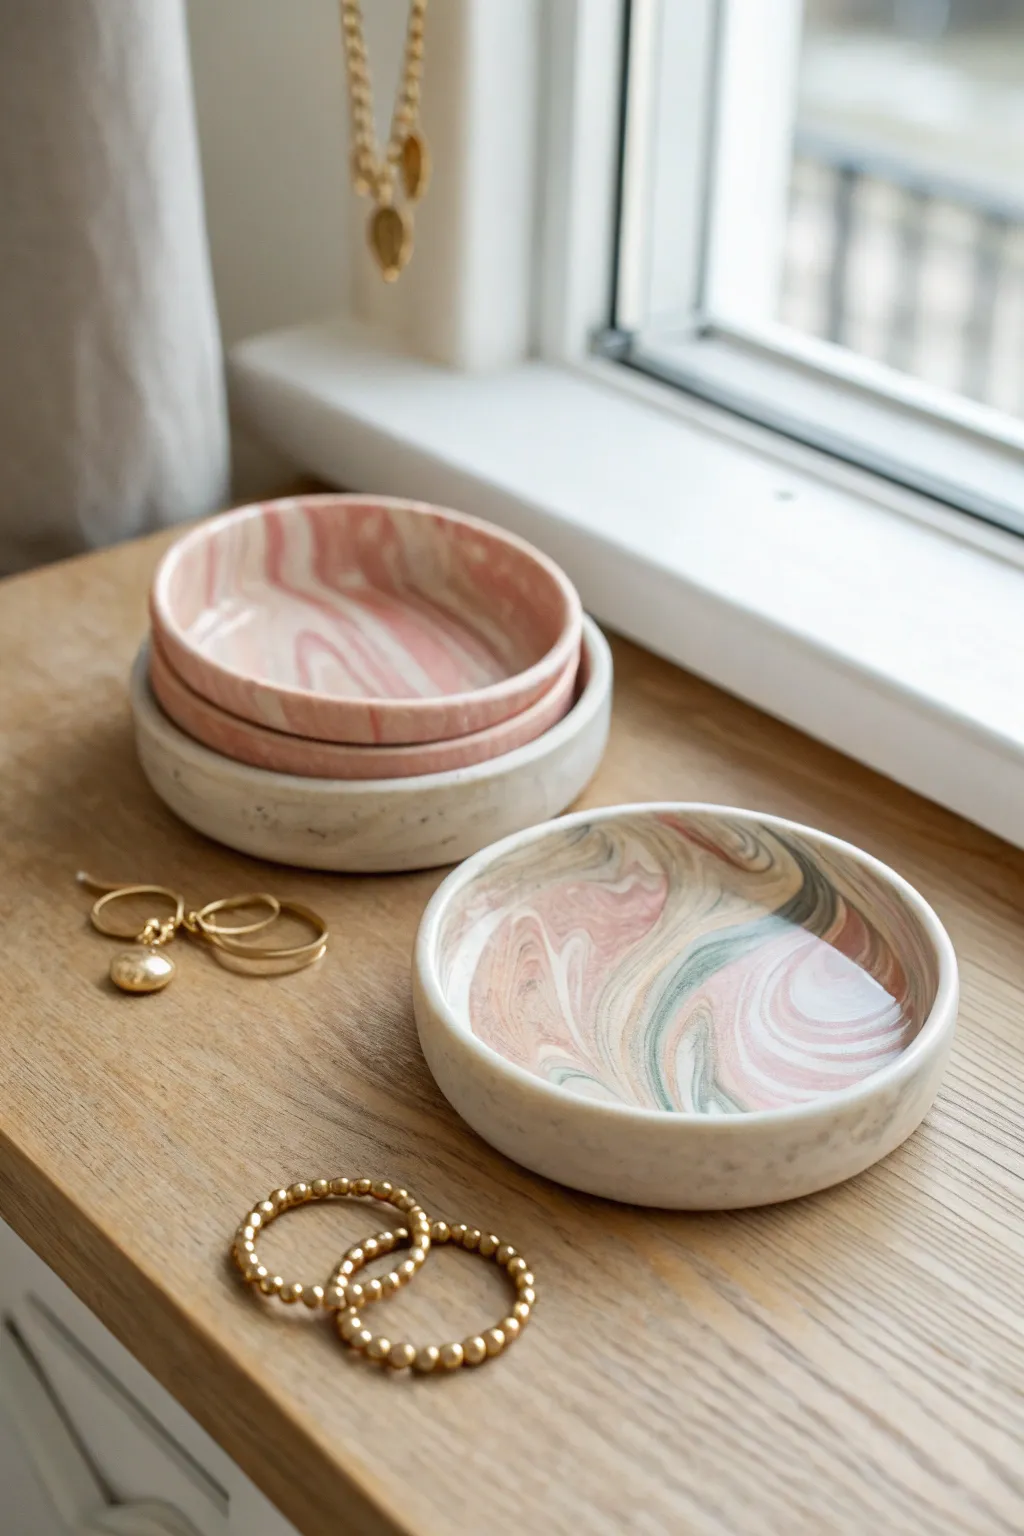
Capture the elegance of natural stone with these delicate, swirling trinket dishes. By twisting together different colors of polymer or air-dry clay, you can achieve a sophisticated marbled effect that looks high-end but is surprisingly simple to craft at home.
Step-by-Step
Materials
- White polymer clay (approx. 2 oz per tray)
- Pink or dusty rose polymer clay
- Grey or sage green polymer clay (optional, for accent)
- Acrylic rolling pin
- Circle layout tool or round cookie cutter (approx. 4-5 inches)
- Oven-safe bowls (for shaping)
- Craft knife or clay blade
- Fine-grit sandpaper (400 and 800 grit)
- Gloss or matte varnish (optional)
- Parchment paper or baking mat
Step 1: Preparing the Clay
-
Condition the base:
Start by kneading a large block of white clay until it is soft, pliable, and free of any cracks. This will be your primary canvas. -
Prepare accent colors:
Take smaller amounts of the pink and grey/green clay—about 1/4 the amount of the white—and roll them into thin, snake-like ropes. -
Create the marble log:
Roll your white clay into a thick log. Lay the thin colored ropes lengthwise along the white log to create vertical stripes. -
twist and pull:
Twist the entire log like a candy wrapper. Once twisted, fold it in half and twist again. Repeat this twist-and-fold process 2-3 times, but be careful not to over-mix, or the colors will turn muddy.
Keep it Clean
White clay picks up dust instantly. Wipe your work surface, tools, and hands with a baby wipe before starting to ensure your white base stays pristine.
Step 2: Shaping the Tray
-
Form a ball:
Roll the twisted clay log into a smooth ball. You should already see swirling patterns on the surface. -
Roll out the slab:
Place the ball on your parchment paper. Using the acrylic rolling pin, roll the clay out into a flat circle about 1/4 inch thick. Roll in different directions to stretch the marble pattern organically. -
Check the pattern:
Inspect both sides of your clay slab. Often, the bottom side reveals a more interesting or dramatic swirl pattern that you might prefer to feature. -
Cut the circle:
Place your circle cutter or a round template over the best part of the pattern. Press down firmly or trace around the template with a craft knife to cut a clean, perfect circle. -
Smooth the edges:
Dip your finger in a tiny bit of water (or baby oil if using polymer clay) and gently run it along the cut edge to soften the sharp rim.
Add Metallic Veins
Mix small flakes of gold or silver leaf into your clay log before the twisting phase to create shimmering metallic veins within the marble.
Step 3: Forming and Baking
-
Support the shape:
Gently lift your clay circle and drape it into your oven-safe bowl. Ensure it sits centered in the bottom to create a slight curve and raised rim. -
Refine the curve:
Press lightly into the center of the bowl so the clay takes the shape of the vessel, smoothing out any air pockets trapped underneath. -
Bake:
Place the bowl with the clay inside into a preheated oven according to your clay manufacturer’s specific temperature instructions (usually around 275°F or 135°C for 15-30 minutes). -
Cool down:
Once baked, remove from the oven and let the clay cool completely inside the bowl. Removing it while hot can cause warping.
Step 4: Finishing Touches
-
Initial sanding:
Once cool, pop the tray out of the mold. Use 400-grit sandpaper under running water to smooth any remaining rough spots on the rim. -
Buffing:
I prefer to switch to a finer 800-grit sandpaper next to buff the surface to a satin-smooth finish. -
Clean surface:
Wash the tray with mild soap and water to remove all sanding dust, then dry thoroughly with a lint-free cloth. -
Sealing (Optional):
For a glossy ceramic look, apply a thin coat of glaze or varnish. If you prefer the matte stone look shown in the image, you can skip this step entirely. -
Paint the rim (Optional):
For an extra touch of luxury, use a gold leaf pen to carefully trace the very top edge of the rim.
Now you have a chic resting spot for your jewelry that looks like expensive stone
Color-Blocked Dip-Dye Tray
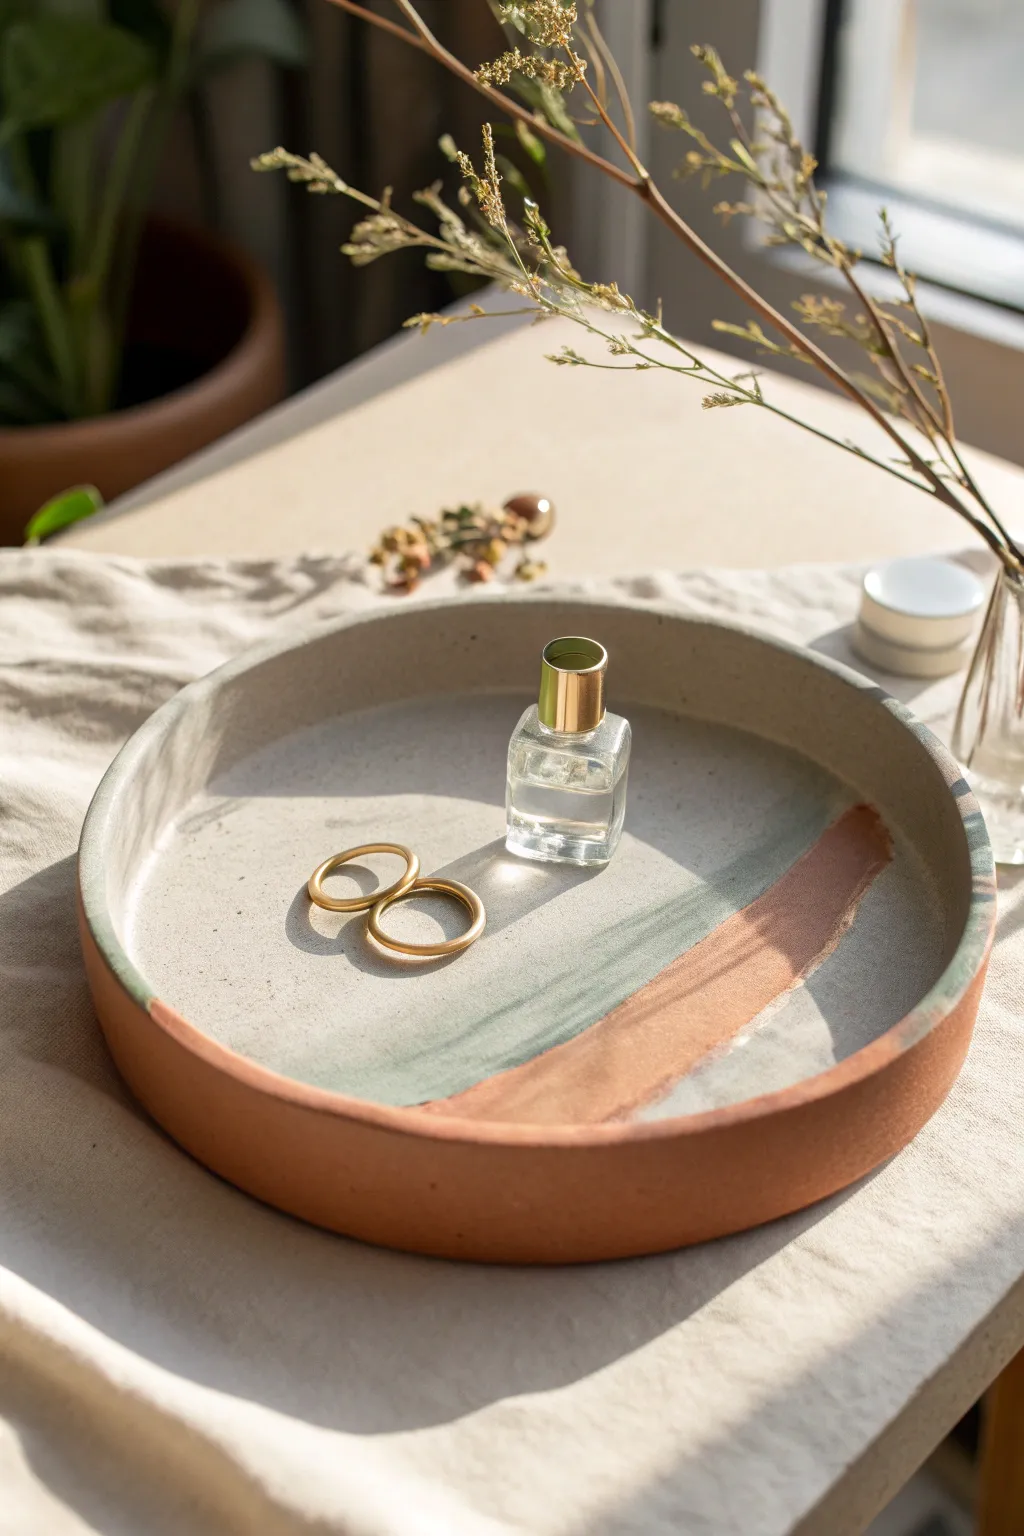
Transform a simple terra cotta saucer into a chic vanity organizer with this modern color-blocking technique. The interplay between the raw clay rim and the soft, painted interior creates a sophisticated, nature-inspired palette perfect for holding jewelry or perfumes.
Detailed Instructions
Materials
- Large terra cotta plant saucer (10-12 inch diameter)
- White gesso or primer
- Acrylic paint (Cream or Off-White)
- Acrylic paint (Sage Green)
- Acrylic paint (Terracotta or Burnt Sienna)
- Matte or Satin varnish/sealant
- Wide flat paintbrush (1-2 inch)
- Medium soft-bristle brush
- Painter’s tape or loose paper for masking
- Fine-grit sandpaper (optional)
- Palette or paper plate
Step 1: Preparation & Base Coat
-
Clean surface:
Begin by wiping down your terra cotta saucer with a slightly damp cloth to remove any dust or pottery residue. Let it dry completely. -
Apply gesso:
Using your wide flat brush, apply a coat of white gesso to the entire *interior* face of the tray. This seals the porous clay and provides a bright foundation for your colors. -
Dry and repeat:
Allow the primer to dry fully. If you can still see the dark clay coming through significantly, apply a second thin coat for better coverage. -
Paint the background:
Mix a Cream or Off-White shade of acrylic paint. Cover the entire primed interior area with this base color. -
Refine the edge:
Pay close attention to the rim during this step. You want the paint to stop cleanly just before it rounds the top edge, leaving the rim and exterior raw for that beautiful contrast.
Step 2: Creating the Abstract Design
-
Mix the sage tone:
Prepare your Sage Green. If your green is too vibrant, mix in a tiny dot of black or brown to desaturate it until it matches the muted tone in the photo. -
Paint the green swoop:
Load a medium brush with the green paint. Starting from the left side, paint a broad, confident stroke that curves gently downward and fades out toward the center right. -
Soften edges:
While the green is still slightly wet, you can feather the ending edge slightly so it doesn’t look like a hard stop, though a painterly look is desired here. -
Mix the rust tone:
Create your rust color. If you don’t have a pre-mixed Terracotta hue, mix Burnt Sienna with a little orange and a touch of white to get that warm, clay-like shade. -
Paint the rust swoop:
Once the green is dry to the touch, paint the second swoop. This one should start lower on the right side and curve upwards, overlapping the tail end of the green section. -
Layering check:
Ensure the overlap between the green and rust feels natural. The rust stroke should sit slightly ‘on top’ visually, creating a dynamic composition.
Clean Lines Pro Tip
For a perfect separation between the painted interior and raw rim, run a line of flexible painter’s tape or wash tape around the top edge before you start priming.
Step 3: Sealing & Finishing
-
Final drying:
Let the painted design cure for at least 1-2 hours. Acrylics dry fast, but you want them fully set before sealing. -
Check texture:
I prefer to run my fingers lightly over the surface; if there are any rough paint ridges, you can very gently sand them down with fine-grit sandpaper, wiping away the dust afterwards. -
Apply varnish:
Using a clean soft brush, apply a layer of matte or satin varnish over the entire painted interior. This protects the paint from scratches and moisture. -
Seal the rim:
For longevity, brush a thin layer of matte varnish over the raw terra cotta rim and exterior as well. This keeps the look ‘raw’ but prevents oil from your hands or products from staining the clay.
Make It Yours
Add texture by mixing baking soda into your acrylic paint. This creates a grainy, ceramic-like finish that makes the tray look like high-end stoneware.
Place your favorite perfume bottle and daily jewelry on your new tray to admire the calming harmony of the colors
Gold-Edged Rim Clay Tray
Embrace the beauty of imperfection with this lovely, hand-formed clay tray featuring soft, neutral tones and a touch of luxury. The organic shape and subtle gold rim create a sophisticated catch-all that looks stunning on any vanity or bedside table.
Step-by-Step Tutorial
Materials
- Air-dry clay (white or light grey)
- Rolling pin
- Canvas mat or parchment paper
- Modeling tool or butter knife
- Small bowl of water
- Sponge
- Fine-grit sandpaper (220 grit)
- Gloss varnish or sealant
- Acrylic paint (warm beige/taupe)
- Gold leaf paint or gold liquid classic gilding
- Small fine-point paintbrush
Step 1: Shaping the base
-
Prepare your clay:
Cut off a generous chunk of air-dry clay, about the size of a large orange. Knead it in your hands for a few minutes to warm it up and ensure there are no air bubbles trapped inside. -
Roll it out:
Place the clay on your canvas mat or parchment paper. Use the rolling pin to flatten the clay into an oval shape, aiming for a consistent thickness of about 1/4 inch. -
Cut the oval form:
Using a modeling tool or a dull knife, free-hand cut a distinct oval shape. Don’t worry about making it perfectly symmetrical; the charm of this piece lies in its organic, handmade feel. -
Smooth the edges:
Dip your finger in a little water and run it along the cut edge to soften any sharp corners or clay crumbs left by the cutting tool.
Cracking Up?
If small cracks appear while drying, mix a tiny bit of fresh clay with water to make a paste and fill them in. Let dry and sand smooth.
Step 2: Forming the walls
-
Create a coil:
Take the excess clay scraps and roll them into a long, snake-like coil. The coil should be roughly the thickness of a pencil and long enough to go around the perimeter of your oval base. -
Score and slip:
Use your tool to make small scratch marks (scoring) around the top edge of your base and on one side of the coil. Add a drop of water (slip) to the scratched areas to act as glue. -
Attach the wall:
Place the coil onto the edge of the base, pressing gently to secure it. If your coil breaks, just join the ends together and smooth the seam. -
Blend the seams:
This is crucial for strength. Use your thumb or a modeling tool to drag the clay from the coil down onto the base, both on the inside and outside. Do this until the seam disappears completely. -
Refine the shape:
Once the wall is attached, pinch it gently upwards to give it height. I like to purposefully leave the rim slightly uneven to mimic the wabi-sabi aesthetic seen in the photo. -
Final smooth:
Use a damp sponge to wipe down the entire piece, smoothing out fingerprints and tool marks. Let the tray dry completely for 24-48 hours until it turns white and feels hard.
Speckled Effect
Flick a toothbrush dipped in diluted brown paint over the dried base coat before sealing to add faux ceramic specks.
Step 3: Finishing touches
-
Sand for perfection:
Once fully dry, take your fine-grit sandpaper and gently sand the surface. Focus on the rim to make it feel pleasant to the touch, but keep the subtle waves in the shape. -
Dust off:
Wipe away all sanding dust with a slightly damp cloth or a dry decorative paintbrush to ensure a clean surface for painting. -
Apply the base color:
Mix a warm beige or taupe acrylic paint. Apply two thin coats to the entire tray, letting the first coat dry before adding the second. This gives it that glazed ceramic look. -
Seal the tray:
Protect your paint job with a layer of gloss varnish. This step mimics the glossy finish of kiln-fired pottery and makes the tray durable. -
Paint the gold rim:
Shake your gold liquid gilding or metallic paint well. Using a fine-point brush, carefully paint the very top edge of the rim. -
Allow specifically organic lines:
Don’t try to make the gold line perfectly straight. Allow the paint to follow the natural dips and bumps of your handmade rim for an authentic look. -
The final cure:
Let the gold detail dry completely according to the manufacturer’s instructions before placing any jewelry inside.
Your elegant, custom jewelry tray is now ready to hold your favorite rings and trinkets
Stamped Pattern Clay Tray
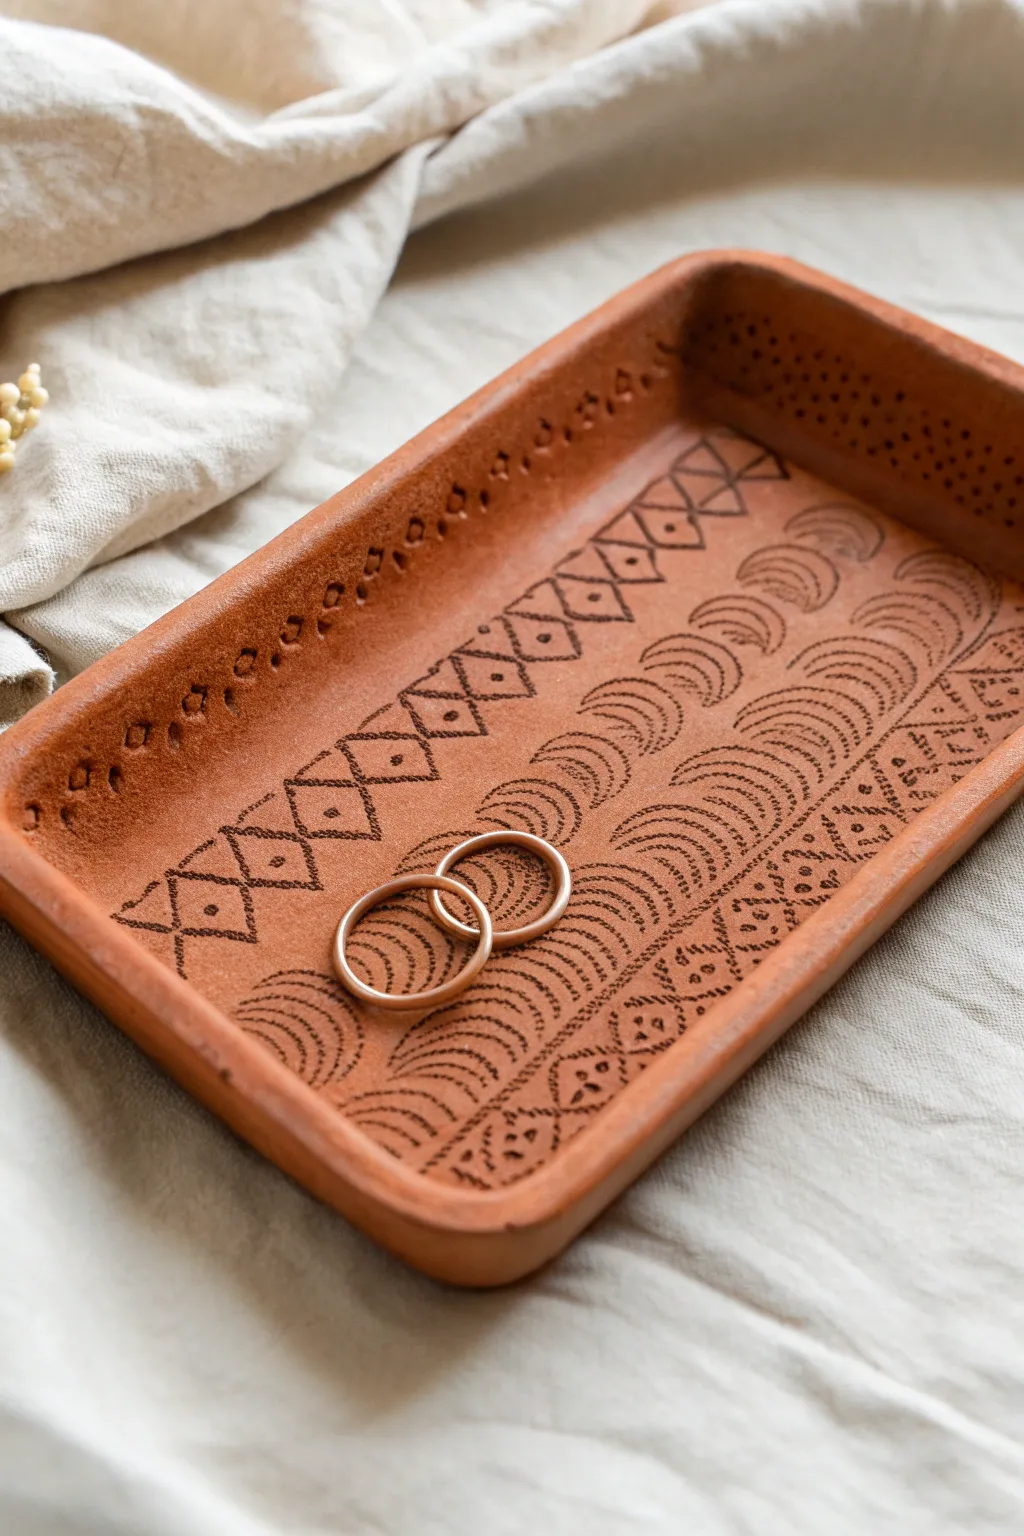
Embrace the warmth of natural textures with this beautifully patterned rectangular tray, perfect for holding rings or trinkets. Using simple stamping tools and terracotta-colored clay, you’ll create a piece that feels both rustic and refined with its intricate geometric motifs.
Detailed Instructions
Materials
- Terracotta air-dry clay (or reddish-brown polymer clay)
- Rolling pin
- Sharp crafting knife or clay cutter
- Rectangular template (cardstock or paper)
- Small bowl of water
- Sponge or smoothing tool
- Various stamping tools (e.g., small metal washers, hollow tubes, geometric clay stamps, or even pen caps)
- Fine-grit sandpaper
Step 1: Shaping the Base
-
Prepare the Clay:
Begin by kneading a generous amount of terracotta clay until it is soft, pliable, and free of air bubbles. This conditioning step is crucial to prevent cracks later on. -
Roll it Out:
Use your rolling pin to flatten the clay on a non-stick surface or canvas mat. Aim for an even thickness of about 1/4 inch (6mm). If you want a perfectly level surface, place two magazines or wood slats of equal thickness on either side of the clay as guides while rolling. -
Cut the Rectangle:
Place your rectangular cardstock template onto the rolled slab. Using your sharp crafting knife, trace around the template to cut out a clean rectangle. Peel away the excess clay. -
Form the Rims:
Instead of attaching separate coils, gently lift the edges of your rectangle upwards. Use your fingers to pinch and fold the outer 1/2 inch of the clay inward to create a raised wall. Work your way around the entire perimeter. -
Refine the Edges:
Dip your finger or a small sponge into the water and smooth out any fingerprints or rough seams on the rim. Pay special attention to the corners, gently rounding them so they aren’t sharp points.
Step 2: Adding the Texture
-
Plan Your Pattern:
Before pressing into the actual tray, practice your design on a scrap piece of flattened clay. The design in the image uses alternating bands of geometric shapes and curved lines. -
Stamp the Central Curves:
Start with the central pattern. Take a small curved tool (like a half-circle cutter or the edge of a spoon handle) and impress rows of overlapping arches. Create three distinct vertical columns of these arches running down the center of the tray. -
Add the Diamond Borders:
Flank the central arches with a geometric border. Use a diamond-shaped stamp (or carve freehand with a needle tool) to create a repeating diamond pattern on both the left and right sides of the arches. -
Fill the Diamonds:
To match the reference, press a small dot into the center of each diamond using a blunt point or a small ball stylus. -
Detail the Rim:
Move to the raised interior walls of the tray. Using a small hollow tube or a tiny circular cutter, stamp a repeating pattern of small circles or teardrops along the inner vertical walls. -
Texture the Top Edge:
For the finishing touch on the stamping, add a row of very fine dots along the very top edge of the rim using a needle tool or toothpick to give it a finished look.
Stamp Hunting
Look around your house for tools! Pen caps, marker lids, hardware washers, and even screw heads make incredible industrial-style geometric impressions.
Step 3: Finishing Touches
-
Correcting Imperfections:
Look over the tray one last time. If stamping warped the shape, gently push the walls back into a straight rectangular alignment. -
Drying Phase:
Set the tray aside in a cool, dry place away from direct sunlight. To ensure the bottom dries flat, I like to place a small piece of parchment paper underneath it on a wire rack. -
Check Dryness:
Allow the clay to dry for at least 24 to 48 hours. The color will lighten significantly as the moisture evaporates. -
Sanding:
Once fully cured and hard, take your fine-grit sandpaper and very gently buff any sharp edges on the rim or the corners. Do not sand over your stamped patterns. -
Sealing (Optional):
If you plan to use this near moisture or want a slight sheen, apply a thin coat of matte water-based varnish. However, leaving it raw preserves that beautiful, dusty terracotta aesthetic shown in the photo.
Darken the Details
After baking or drying, run a dark brown acrylic wash over the texture and wipe it off immediately. The dark paint stays in the grooves, making the pattern pop.
Now you have a stunning, custom-patterned tray ready to display your favorite rings or hold your desk essentials
Celestial Sun and Moon Clay Tray
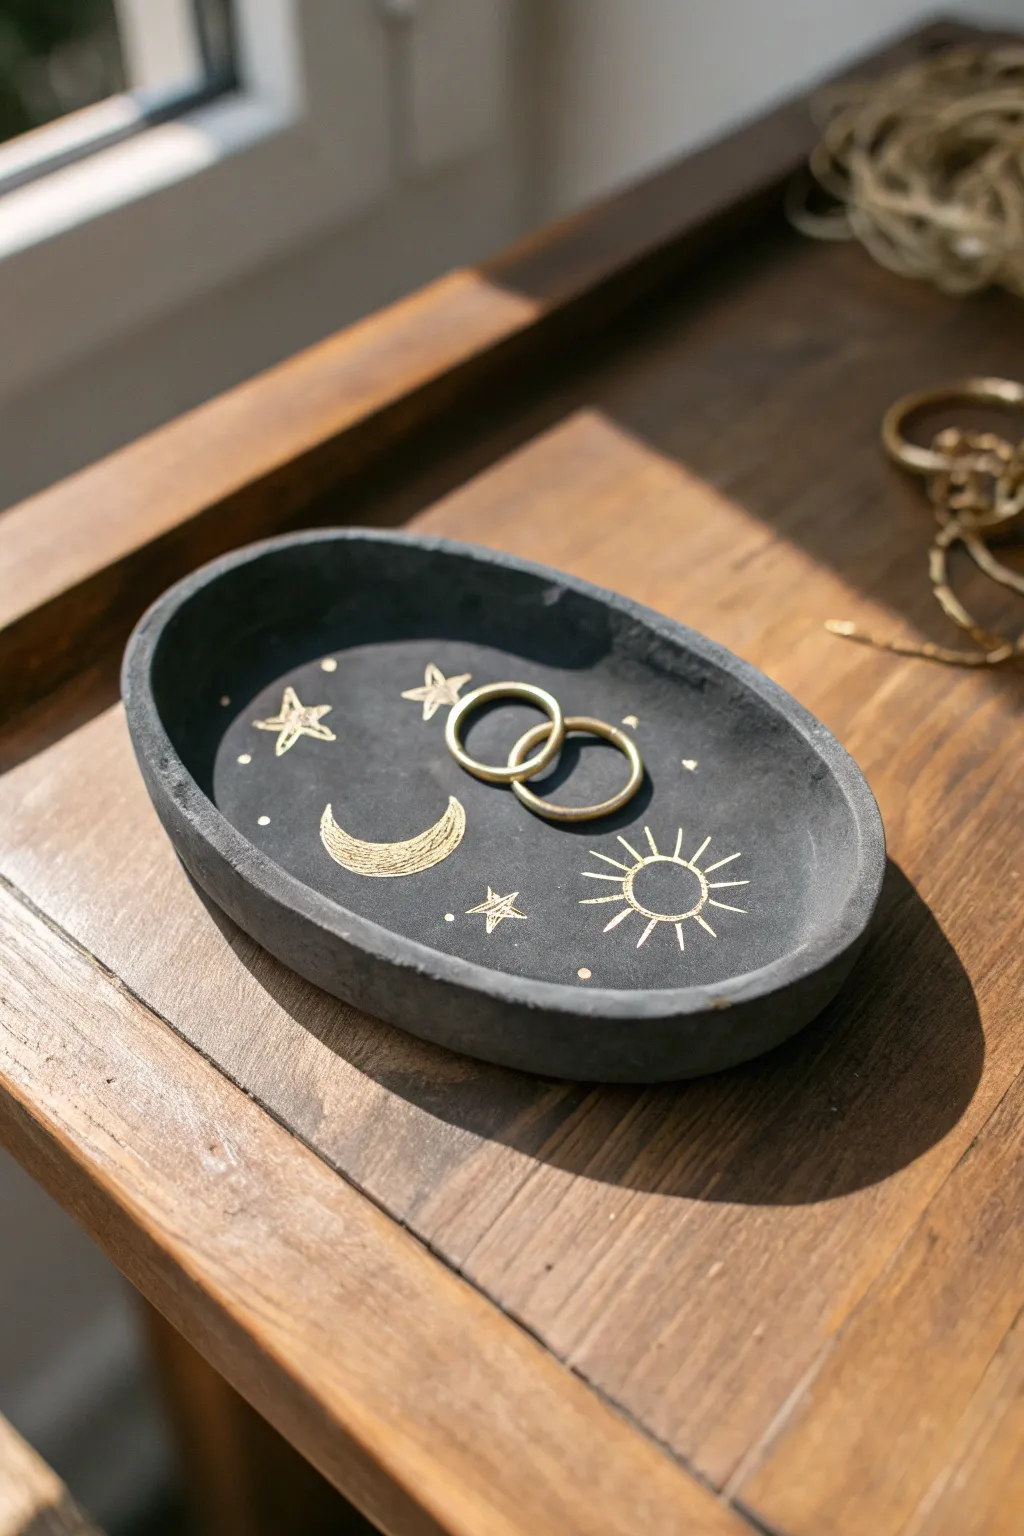
Capture the magic of the night sky with this elegant, celestial-themed jewelry dish. Featuring a deep charcoal finish and shimmering gold details of the sun, moon, and stars, it’s the perfect spot to keep your rings safe.
Step-by-Step Guide
Materials
- Air-dry clay (black or dark grey preferred, otherwise white)
- Acrylic paint (black/charcoal)
- Gold paint pen (fine tip) or gold acrylic paint with a liner brush
- Rolling pin
- Oval template (paper or flexible plastic)
- Craft knife
- Small bowl of water
- Fine grit sandpaper
- Matte or satin varnish
- Paintbrush
Step 1: Shaping the Base
-
Condition the Clay:
Begin by taking a handful of air-dry clay and kneading it in your hands until it becomes soft, pliable, and warm. -
Roll it Out:
On a clean, flat surface, roll the clay out to an even thickness of about 1/4 inch. If you want a smoother surface, placing parchment paper underneath can help prevent sticking. -
Cut the Oval:
Place your oval template on top of the rolled clay. Using a sharp craft knife, carefully trace around the template to cut out your base shape. -
Prepare the Wall:
Roll a long snake or coil of clay, keeping it roughly the same thickness as your base. It needs to be long enough to wrap around the entire circumference of your oval. -
Score and Slip:
Score (scratch) the outer edge of your oval base and one side of your clay coil. Apply a little water to the scratched areas to create a ‘slip’ that acts as glue. -
Attach the Rim:
Gently press the coil onto the edge of the base. Once attached, use your thumb or a modeling tool to smooth the seam between the wall and the base, both on the inside and outside, blending the clay until the join is invisible. -
Smooth the Edges:
Here, I like to dip my finger in a tiny bit of water and run it along the top rim to round off any sharp edges and smooth out fingerprints. -
Dry Completely:
Set your tray aside in a cool, dry place. Allow it to air dry for at least 24-48 hours until it turns a lighter shade and is hard to the touch.
Smooth Seams Tip
Use the back of a spoon to burnish and smooth the inside seams while the clay is wet. It covers more surface area than a finger and leaves no prints.
Step 2: Finishing and Decorating
-
Sand for Perfection:
Once fully dry, take a piece of fine-grit sandpaper and gently sand the entire tray to remove any bumps or uneven textures. -
Base Coat:
Paint the entire tray, inside and out, with black or deep charcoal acrylic paint. You may need two coats for full, opaque coverage. -
Dry the Base:
Let the black paint dry completely before moving on to the metallic details. -
Draft the Design:
Lightly sketch your design placements—the crescent moon, the sun, and scattered stars—using a pencil. The graphite will shine slightly against the matte black, making it easy to see. -
Paint the Moon:
Using your gold paint pen or a fine liner brush, draw the outline of the crescent moon. Fill it with thin, scratched lines textures rather than a solid block of gold to give it an engraved look. -
Add the Sun:
Draw the sun on the opposite side. Start with a circle, then add radiating lines for rays. Varying the length of the rays adds a nice whimsical touch. -
Scatter the Stars:
Fill the empty spaces with stars. Draw classic five-point stars and use simple dots for smaller, distant stars to create a sense of depth. -
Seal the Dish:
Protect your artwork by applying a coat of matte or satin varnish over the entire piece. This will keep the gold bright and prevent the black paint from chipping.
Level Up: Galaxy Effect
Before adding gold, sponge on very faint patches of dark blue and purple paint over the black base to create a subtle galaxy nebula background.
Now you have a stunning, handmade piece of decor ready to hold your favorite treasures
Sgraffito Scratch-Art Clay Tray
This earthy jewelry dish combines the warmth of red clay with the crisp elegance of sgraffito carving. By scratching away a layer of white slip to reveal the terra cotta underneath, you create a stunning, high-contrast botanical design that feels both rustic and refined.
Step-by-Step Tutorial
Materials
- Red earthenware clay (low fire)
- White underglaze or white slip
- Rolling pin
- Circle template or bowl (approx. 5-6 inches diameter)
- Fettling knife or needle tool
- Sponge
- Soft fan brush
- Sgraffito tool (wire loop or carving stylus)
- Clear glaze (zinc-free recommended for red clay)
- Kiln access
Step 1: Forming the Tray
-
Roll the slab:
Begin by wedging your red earthenware clay to remove air bubbles. Roll it out into an even slab using a rolling pin, aiming for a thickness of about 1/4 inch. If you want a smooth texture like the reference, smooth the surface with a rib tool now. -
Cut the circle:
Place your circle template or an upside-down bowl onto the slab. Using a needle tool or fettling knife, cut a clean circle around the perimeter. -
Shape the rim:
Gently lift the edges of the circle to create a shallow wall. You can pinch the clay slightly upward or press the slab into a shallow mold to get that perfect vertical rim shown in the image. -
Refine the edges:
Red clay can be gritty, so run a damp sponge along the top rim to round it off and remove any sharp bits. Ensure the walls are roughly uniform in height.
Step 2: Applying Slip & Designing
-
Dry to leather hard:
Let the tray sit until it reaches a leather-hard state. It should be firm enough to hold its shape without slumping, but still cool to the touch. -
Apply the white layer:
Using a soft fan brush, apply 2-3 even coats of white underglaze or slip to the *interior* floor of the tray only. Leave the side walls and exterior as bare red clay to create the framed effect. -
Wait for the sheen to disappear:
Allow the white layer to dry just until it loses its wet sheen and is dry to the touch, but not bone dry. If it’s too wet, your lines will be messy; too dry, and it will chip. -
Sketch the layout:
With a very light touch, use a dull pencil to faintly scratch your leafy stem design onto the white surface. This acts as a guide before you commit to carving.
Clean Lines Only
Is your underglaze chipping while carving? The clay is likely too dry. Mist it lightly with water and cover with plastic for an hour to rehydrate slightly before trying again.
Step 3: The Sgraffito Process
-
Carve the negative space:
This design is unique because it’s a ‘reverse’ sgraffito. Instead of carving the leaves, you are carving away the *background* around the leaves to reveal the red clay, leaving the leaves themselves white? No, looking closer, the leaves are red and the background is white. Wait, let me re-examine. Actually, the reference shows red leaves on a white background. This means you scratch away the white slip *inside* the leaf shapes. -
Outline the leaves:
Using a fine-point sgraffito tool, scratch the outline of the central stems and the leaf shapes. Establish the flowing curve of the vines first. -
Reveal the clay:
Now, use a wider loop tool to scrape away all the white slip *inside* your leaf outlines. This exposes the rich red clay body, creating the dark leaf silhouettes against the cream background. -
Add rim details:
Notice the delicate white scratch marks on the inner red wall? Use a fine needle tool to scratch simple, loose organic lines or tiny sprigs directly into the bare red clay of the rim. Use white underglaze to fill those tiny scratches if you want them to pop, or simply carve through a thin band of slip. -
Clean up crumbs:
Sgraffito creates little clay burrs and crumbs. Don’t brush them off while wet, or they will smear. Wait for the piece to be bone dry, then gently sweep them away with a soft, dry brush.
Level Up: Color Wash
Instead of stark white, try a light teal or sage green slip for the background. The red clay leaves will create a beautiful complementary color contrast against the cool tones.
Step 4: Firing and Finishing
-
Bisque fire:
Allow the tray to dry completely (bone dry) before loading it into the kiln for a bisque fire (usually cone 04). -
Glaze application:
Once bisqued, wipe the tray with a damp sponge to remove dust. Apply a thin layer of clear glaze over the entire interior to seal the design and make it food or jewelry safe. -
Final wipe:
For a matte, natural exterior, you can leave the outside unglazed, or glaze it as well. Just ensure the very bottom is wiped clean of glaze to prevent sticking to the kiln shelf. -
Final firing:
Fire the piece again to the temperature required by your clear glaze and clay body.
Place your finished dish on a dresser to hold your favorite rings and enjoy the handmade warmth it brings to the room
Fabric-Textured Clay Tray (Lace Press Look)
Capture the delicate beauty of vintage textiles in permanent form with this simple yet elegant project. By pressing lace into clay, you’ll create a sophisticated jewelry dish that features intricate patterns and a soft, speckled cream finish.
How-To Guide
Materials
- White air-dry clay or polymer clay (oven-bake)
- Vintage lace doily or textured lace fabric scrap
- Rolling pin or acrylic roller
- Oval template (paper or cardstock)
- Craft knife or clay needle tool
- Small sponge
- Sandpaper (fine grit)
- Speckled cream acrylic paint (or white paint mixed with tiny brown specks)
- Gloss varnish or clear sealant
- Small paintbrush
- Bowl of water
Step 1: Preparation and Rolling
-
Prepare your workspace:
Begin by cleaning a flat, smooth surface to work on. A silicon mat or a piece of parchment paper taped down works well to prevent sticking. -
Condition the clay:
Take a generous handful of your white clay and knead it in your hands until it becomes soft, pliable, and free of cracks. Warm clay is much easier to impress. -
Roll out the base:
Use your rolling pin to flatten the clay into an even slab. Aim for a thickness of about 1/4 inch (6mm) to ensure the tray is sturdy but elegant. -
Smooth the surface:
Before adding texture, verify the surface is perfectly smooth. Gently run a slightly damp finger or sponge over the clay to remove any fingerprints or imperfections.
Clean Impressions
Lightly dust your lace with cornstarch or baby powder before pressing it into sticky clay. This acts as a release agent and prevents the fabric from getting stuck.
Step 2: Creating the Texture
-
Position the lace:
Lay your lace doily or fabric flat onto the rolled clay slab. Take a moment to position the most intricate part of the pattern where you want the center of your tray to be. -
Press the pattern:
Roll your rolling pin firmly over the lace. Apply even, steady pressure; you want to push the fabric deep enough to leave a crisp impression, but not so deep that you distort the slab’s thickness significantly. -
Reveal the design:
Carefully lift one corner of the lace and peel it back slowly to reveal the textured clay underneath. If any areas look faint, you can carefully lay the lace back down and re-roll, provided you haven’t shifted its position.
Step 3: Shaping and Refining
-
Cut the shape:
Place your oval paper template lightly onto the textured clay. Using your craft knife or needle tool, cut vertically around the template to create a clean oval shape. -
Smooth the edges:
Dip your finger in a little water and gently run it along the cut edge of the oval. This softens the sharp cut lines and gives the piece a more finished, handmade ceramic look. -
Form the rim:
Gently lift the edges of the oval upwards with your fingertips to create a shallow rim. I like to pinch and curve it slightly to give it an organic, bowl-like feel. -
Refine the curve:
Check the symmetry of your curve. If you want a more uniform lift, you can temporarily place the clay oval inside a shallow bowl lined with plastic wrap to help it hold its shape while drying.
Gilded Edge
For a luxe touch, paint just the very rim of the tray with liquid gold leaf or metallic gold paint after the sealing step is complete.
Step 4: Drying and Finishing
-
Allow to dry:
Let the tray dry completely according to your clay package instructions. For air-dry clay, this usually takes 24-48 hours; for polymer clay, bake it in the oven as directed. -
Sand imperfections:
Once fully cured and dry, use fine-grit sandpaper to lightly smooth the rim or underside if there are any rough spots. Wipe away dust with a slightly damp cloth. -
Apply the base coat:
Paint the entire tray with a cream or off-white acrylic paint. If you want the lace texture to stand out more, you can dilute the paint slightly so it pools naturally in the deep recesses. -
Add speckled detail:
To mimic the stonewear clay look in the photo, create a speckled effect. Dip an old toothbrush into diluted brown paint and flick the bristles with your thumb to mist tiny specks over the tray. Practice on paper first to control the spray. -
Seal the tray:
Once the paint is totally dry, apply a coat of gloss varnish or sealant. This gives it that ceramic shine and protects the surface from scratches from jewelry. -
Final cure:
Let the varnish cure completely before use. Your tray is now ready to hold rings and small treasures.
Now you have a charming, vintage-inspired catchall perfect for your bedside table
Faceted Gem-Inspired Clay Tray
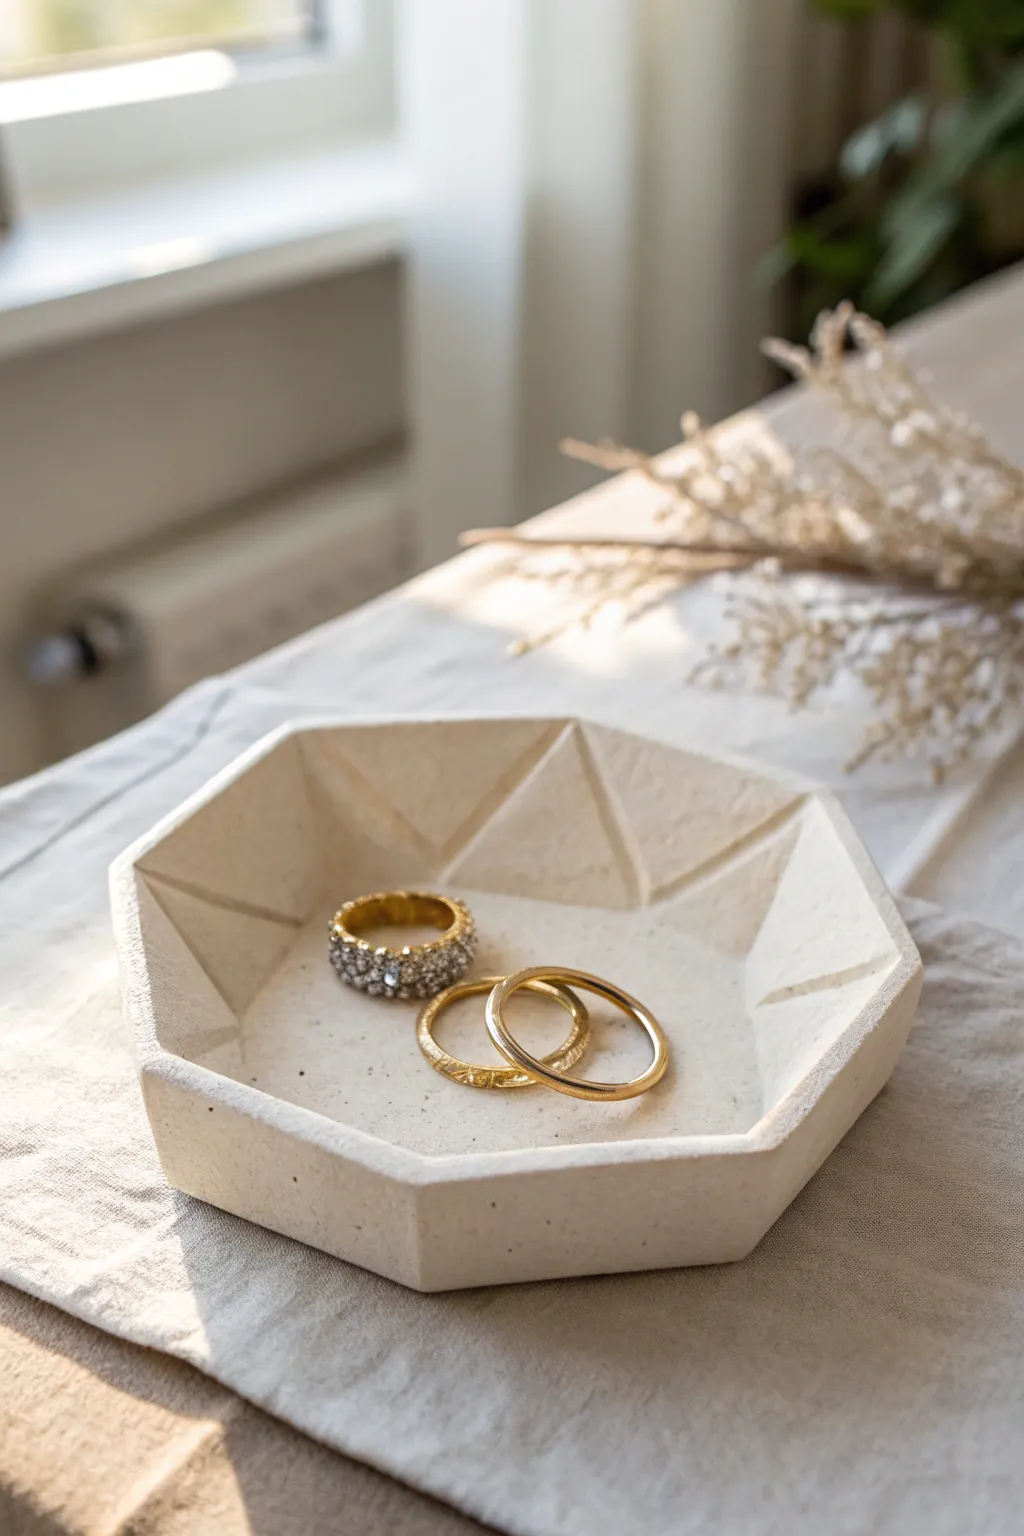
Bring modern sophistication to your vanity with this minimalist, gem-inspired tray featuring a unique geometric interior. Its faceted edges and clean lines create a high-end architectural look perfect for showcasing your favorite rings and jewelry.
Step-by-Step Tutorial
Materials
- Air-dry clay (stone effect, white, or concrete-style)
- Rolling pin with depth guides (about 5-6mm)
- Ruler
- Craft knife or clay blade
- Hexagon paper template (about 4-5 inches wide)
- Modeling tool (flat edge)
- Sanding sponge (fine grit)
- Small bowl of water
- Acrylic sealer or matte varnish
- Parchment paper or canvas work surface
Step 1: Shaping the Base
-
Prepare the Clay:
Begin by conditioning a generous handful of air-dry clay. Knead it in your hands until it feels pliable and warm, which prevents cracking later on. -
Roll the Slab:
Place your clay on a piece of parchment paper. Using your rolling pin, roll the clay out into an even slab roughly 1/4 inch (6mm) thick. Rotate the clay occasionally to ensure uniform thickness. -
Cut the Exterior Shape:
Lay your paper hexagon template gently onto the clay slab. Using a sharp craft knife or clay blade, cut vertically around the template to create a clean-edged geometric base. Peel away the excess clay.
Clean Cuts Matter
For the sharpest geometric lines, clean your blade with a wet paper towel after every single cut. Clay residue drags and creates ragged edges that are harder to sand later.
Step 2: Creating the Faceted Walls
-
Mark the Rim:
Without cutting all the way through, lightly score a smaller hexagon about 1.5 cm inside the outer edge. This guide line will help define where the walls rise. -
Score the Facet Lines:
This is the crucial step for the ‘gem’ look. Connect each corner of your inner hexagon score line to the corresponding corner of the outer edge using the craft knife, scoring lightly. -
Cut Corner Triangles:
To allow the flat clay to fold into a bowl shape, you need to remove material. Cut out small, narrow ‘V’ shapes or darts at each outer corner, pointing inward toward the inner hexagon line. -
Lift the Sides:
Gently lift the rim sections upwards. Pinch the cut edges together at each corner. The removed ‘V’ sections allow the sides to angle up without bunching. -
Fuse the Seams:
Using a finger dipped in a tiny bit of water, smooth over the seams where you joined the corners. Blend the clay on both the inside and outside until the separation creates a solid wall, but try to maintain the angular integrity.
Step 3: Carving the Interior Design
-
Define the Interior Angles:
The inside of this tray features raised geometric ridges. Use a ruler to gently impress lines connecting opposite corners or creating triangles within the basin to mimic facets. -
Enhance the Facets:
Using a flat-edged modeling tool, gently scrape away thin layers of clay *between* your impressed lines. By sloping the clay downwards from the ridges toward the center, you create physical depth and shadow. -
Refine the Edges:
Go around the top rim with your damp finger or a sponge to ensure it is flat and smooth, but keep the corners sharp rather than rounded. -
Slow Drying:
Place the tray in a cool, dry area away from direct sunlight. To prevent warping, I like to weigh down the center lightly with a small bag of rice for the first few hours. -
Let it Cure:
Allow the piece to dry completely for 24-48 hours. The clay will lighten in color when it is fully dry.
Faux Stone Finish
Mix used coffee grounds or cracked black pepper into white clay before rolling it out. When sanded, these specks reappear, creating a convincing faux-granite or speckled stone effect.
Step 4: Finishing and Protecting
-
Sand for Crispness:
Once bone dry, take a fine-grit sanding sponge and gently sand the exterior walls and top rim. Focus on making the geometric planes flat and the angles sharp. -
Dust Off:
Wipe the entire piece with a dry, soft brush or cloth to remove all clay dust. -
Seal the Tray:
Apply a thin coat of matte varnish or acrylic sealer to the entire surface. This protects the clay from moisture and gives it a finished, professional feel.
Place your new angular tray on a sunny windowsill and enjoy how the light catches the sculpted facets.