If you’re in a pink clay bead mood, you can get a totally different vibe just by swapping shades, spacing, and a few simple accents. Here are my favorite pink clay bead bracelet ideas—starting with the classics and drifting into the fun, “how did you think of that?” designs.
Classic Pink Ombre Heishi Stack

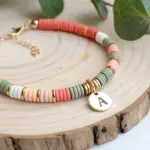
Capture the golden hour glow with this trio of polymer clay heishi bracelets featuring a stunning gradient of pinks and crisp whites. Punctuated by metallic gold accents, these stacked bands offer a sophisticated yet playful accessory perfect for everyday wear.
Step-by-Step
Materials
- Polymer clay heishi beads (6mm or 4mm) in: White, Light Pink, Medium Pink, Hot Pink/Fuchsia
- Gold tone metallic spacer beads (small nuggets or faceted cubes)
- Elastic stretch magic cord (0.7mm or 0.8mm)
- Super glue or jewelry cement (e.g., G-S Hypo Cement)
- Scissors
- Bead stopper or masking tape
- Ruler or tape measure
Step 1: Planning the Stack
-
Measure your wrist:
Before cutting any string, wrap a measuring tape around your wrist to find your size. Add about 0.5 inches to this measurement for a comfortable fit that isn’t too tight. -
Prepare the cord:
Cut three strands of elastic cord, each about 10-12 inches long. This extra length makes tying the final knots much easier than struggling with short ends. -
Secure the ends:
Attach a bead stopper or simply place a piece of folded masking tape on one end of each cord to prevent your beads from sliding off while you work.
Knot Slipping?
If your elastic knot refuses to stay tight while gluing, use a small binder clip to hold the tension on the cord while the adhesive sets completely.
Step 2: Creating the White & Pink Ombre Bracelet
-
Start with pure white:
Begin threading white heishi beads onto the first cord. String about 1.5 inches of solid white to create the base section. -
Add first gold accent:
Slide on three gold spacer beads. These metallic breaks add a luxurious touch and define the sections of color. -
Transition to blush:
Switch to your lightest pink beads. String a small section, perhaps half an inch, then alternate with a few white beads before switching fully to light pink to create a subtle fade. -
Deepen the color:
After your light pink section, add another trio of gold spacers. Then, begin threading the medium pink beads for the next segment. -
Finish the gradient:
Complete the strand by moving into the darkest pink/fuchsia shade, ensuring you have enough beads to wrap fully around your wrist. Check the length against your wrist occasionally.
Step 3: Crafting the Solid Fuchsia Band
-
Load the solid color:
For the middle bracelet, we want a bold pop of color. Thread solid hot pink (fuchsia) beads for the majority of the strand. -
Insert gold highlights:
Instead of grouping the gold beads, scatter single gold spacers every 1-1.5 inches throughout the pink strand for a subtle sparkle that ties the stack together.
Personalize It
Add a single white letter bead with your initial in the center of the solid fuchsia bracelet for a custom monogrammed look.
Step 4: Designing the Soft Pink Gradient
-
Begin the final strand:
For the third bracelet, aim for a softer look. Start with your medium pink beads for about 2 inches. -
Gold segment:
Add a cluster of 4-5 gold spacers here to create a more prominent metallic focal point. -
Fade to light:
Continue with the lightest pink beads for the remainder of the bracelet, creating a two-tone effect rather than a complex multi-step gradient.
Step 5: Finishing Touches
-
Check the fit:
Hold the ends of each cord together and wrap them around your wrist one last time to ensure they sit comfortably without pinching. -
Pre-stretch the cord:
Gently pull on the ends of the elastic a few times. This pre-stretching prevents the bracelet from drooping or loosening shortly after you start wearing it. -
Tie the surgeon’s knot:
Remove the tape or stopper. Cross the left end over the right, then loop it through twice (instead of once like a regular shoelace knot). Pull tight. -
Secure the knot:
Repeat the knotting process once more for security. I strictly use a dab of jewelry cement on the knot here; it really helps extend the life of the jewelry. -
Hide and trim:
Let the glue dry for a few minutes. Trim the excess cord close to the knot, then carefully slide the knot inside the hole of a nearby bead to hide it.
Enjoy mixing and matching these bands to brighten up any outfit with a touch of handmade warmth


Bubblegum Pink and White Candy-Stripe Pattern
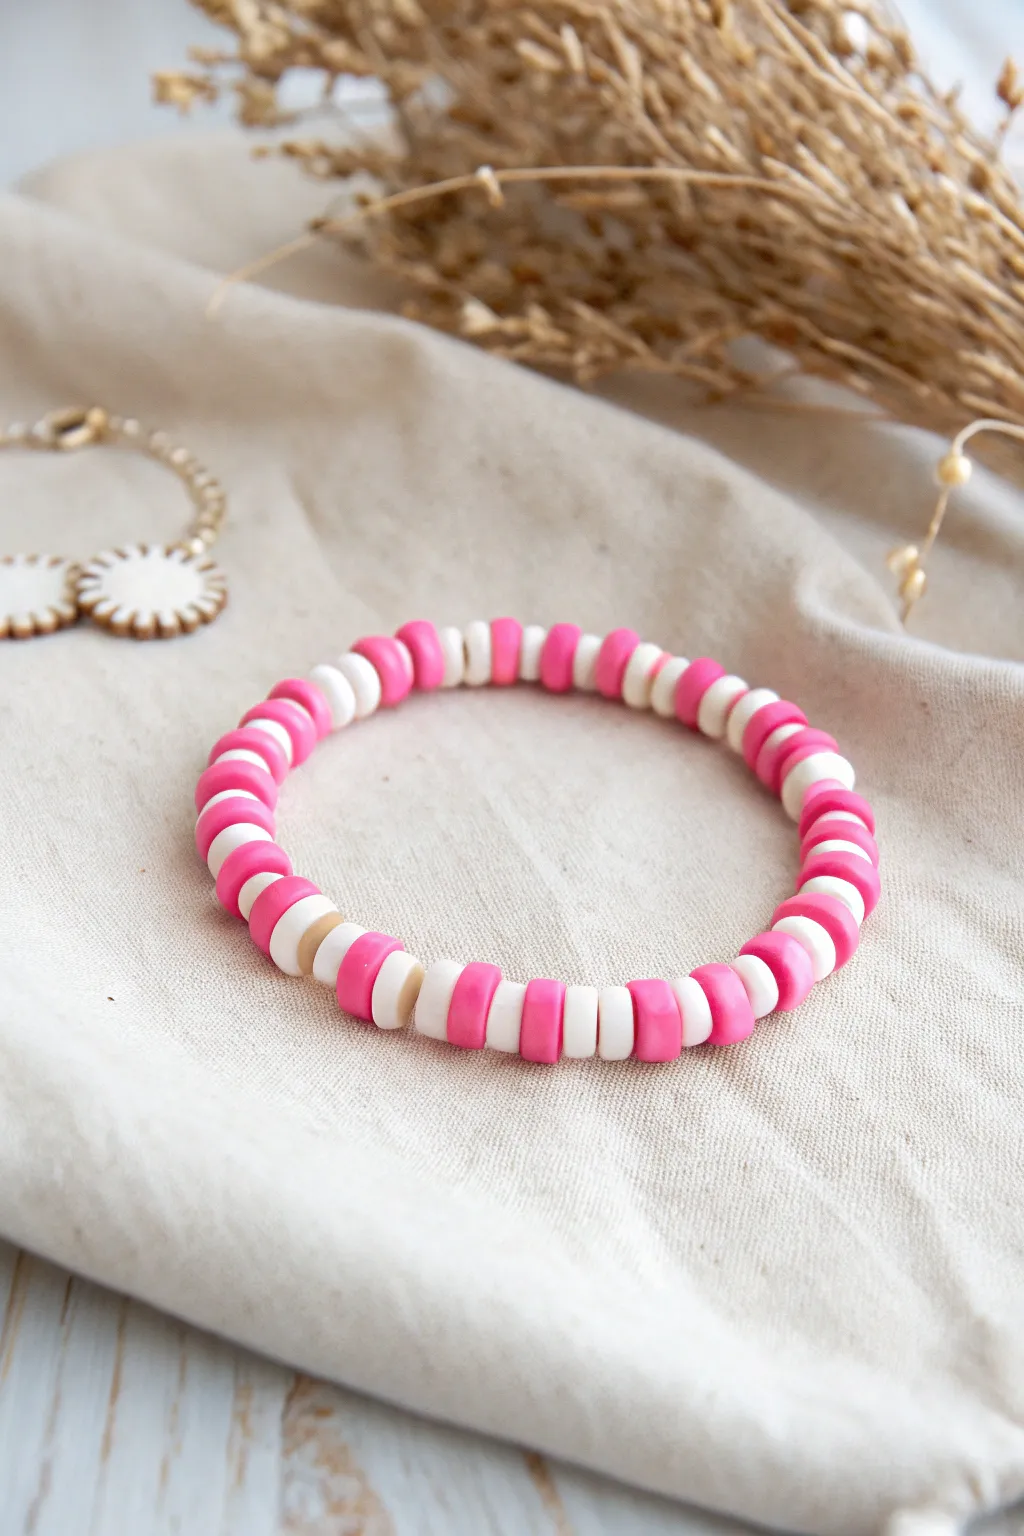
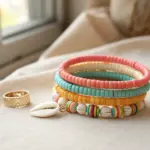
This cheerful bracelet combines vibrant bubblegum pink with soft creamy white in a rhythmic, candy-stripe pattern. The flat heishi beads create a smooth, comfortable fit that looks sweet enough to eat, perfect for stacking or wearing as a solo statement piece.
How-To Guide
Materials
- 6mm flat polymer clay heishi beads (Bubblegum Pink)
- 6mm flat polymer clay heishi beads (Cream or Off-White)
- 0.8mm clear elastic stretch cord
- Jewelry glue or clear nail polish
- Scissors
- Tape or a bead stopper clip
- Ruler or measuring tape
Step 1: Setting Up
-
Measure the wrist:
Wrap your measuring tape snugly around your wrist to find the circumference. Add about 0.5 to 1 inch to this measurement to ensure a comfortable fit that isn’t too tight. -
Cut the cord:
Cut a piece of elastic cord about 10-12 inches long. Having this extra length makes tying the final knot significantly easier than struggling with short ends. -
Pre-stretch the elastic:
Hold the cord firmly at both ends and give it a few gentle tugs. This pre-stretching step helps prevent the bracelet from sagging or loosening immediately after you wear it. -
Secure the end:
Affix a piece of tape to one end of your cord, or attach a bead stopper clip. This safety measure ensures your beads won’t slide right off the other side while you are stringing them.
Knot Security
Don’t trim the elastic flush against the knot! Leaving a tiny 2mm tail prevents the knot from untying under tension.
Step 2: Stringing the Pattern
-
Start with pink:
Begin your pattern by threading on two bubblegum pink clay beads. These flat discs nest together perfectly, so make sure they are sitting flush against each other. -
Add the cream:
Follow the pink section with two cream or off-white clay beads. This establishes the base of your 2-pink, 2-white repeating pattern. -
Establish the rhythm:
Continue stringing beads in this exact sequence: two pink, two cream, two pink, two cream. I find it helpful to lay out a small pile of each color beforehand to speed up the picking process. -
Check the length:
Periodically hold the string up to your ruler. Continue the pattern until you reach your desired length calculated earlier (wrist size plus ease). -
Test the fit:
Carefully wrap the unknotted strand around your wrist to check the size. Ideally, the pattern should end on a pair of cream beads if you started with pink, creating a seamless loop, but ending on the same color is fine too.
Step 3: Finishing Touches
-
Prepare to knot:
Remove the tape or bead stopper. Hold both ends of the elastic securely, bringing the beads together to close the circle. -
Tie the first knot:
Cross the ends and tie a simple overhand knot. Pull it tight, ensuring there are no gaps between the beads, but not so tight that the bracelet puckers. -
Secure with a surgeon’s knot:
For the second knot, create a loop as if making another overhand knot, but pass the tail end through the loop twice instead of once. Pull this very tight to lock it in place. -
Apply adhesive:
Place a tiny drop of jewelry glue or clear nail polish directly onto the knot. This seals the elastic and prevents it from slipping over time. -
Let it dry:
Allow the glue to dry completely according to the manufacturer’s instructions before manipulating the bracelet further. -
Trim the excess:
Once the glue is dry, use your scissors to trim the excess cord ends short, leaving about 2-3mm of tail. -
Hide the knot:
Gently stretch the bracelet and slide the nearest bead over the knot to hide it inside. Because heishi beads have larger holes, the knot usually tucks inside easily.
Gold Accent Variation
Replace every third cream section with flat gold spacer beads to add a touch of glamour to the sweet candy pattern.
Enjoy wearing your sweet, candy-striped creation or gift it to a friend who loves pop colors


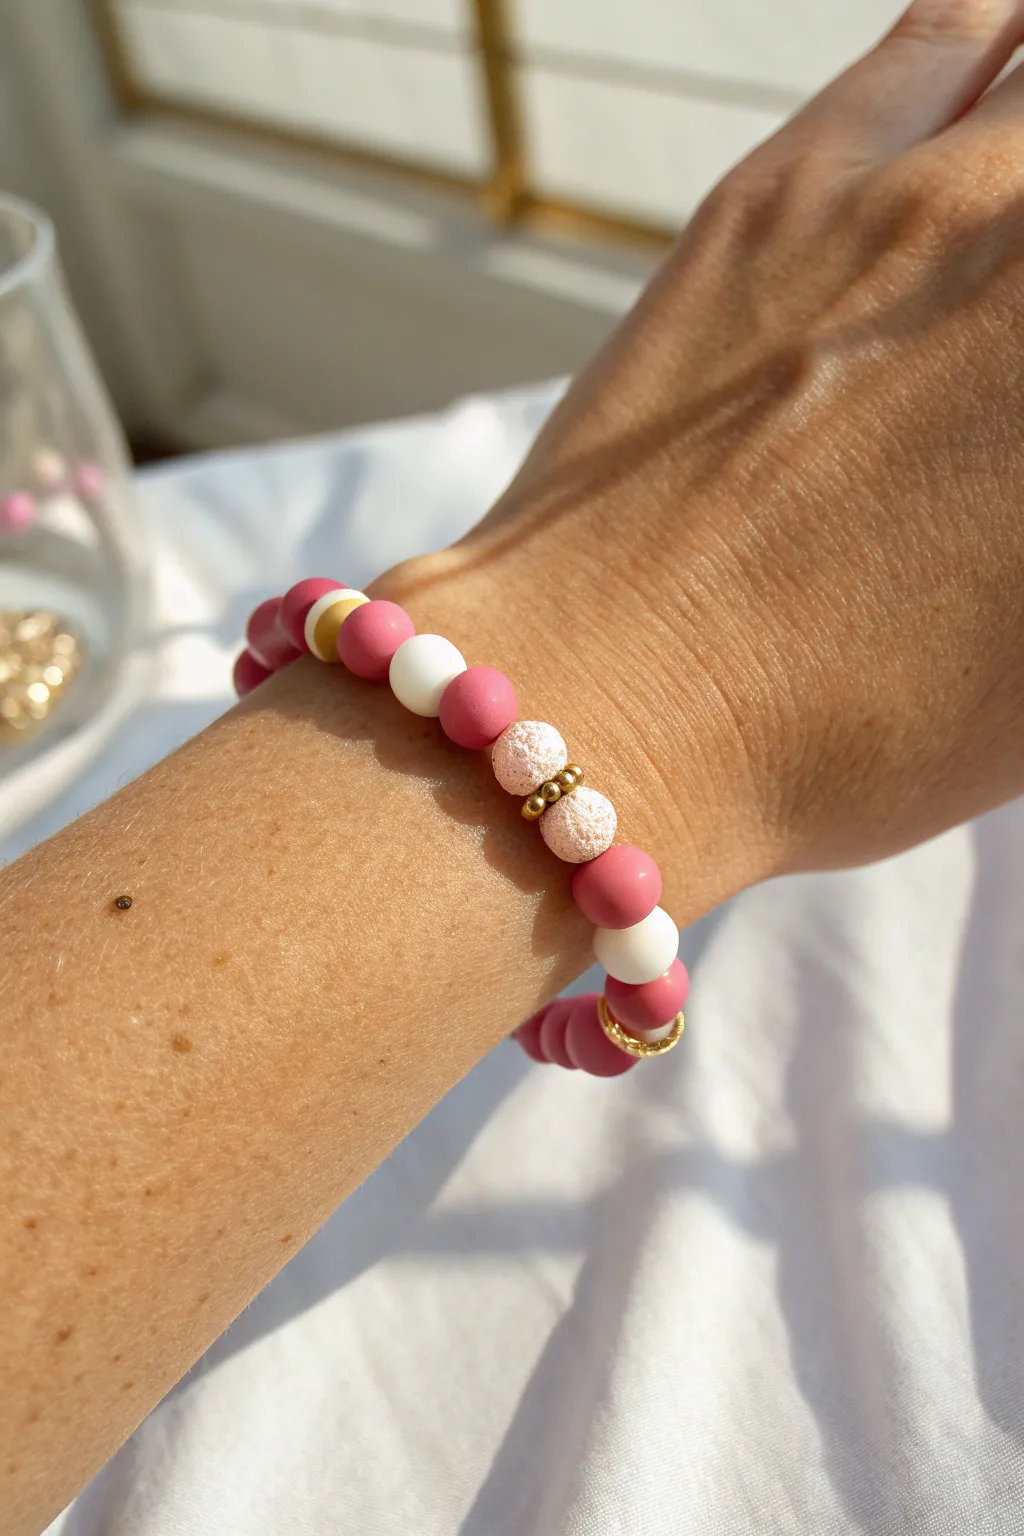
Blush Pink With Gold Spacer Rhythm
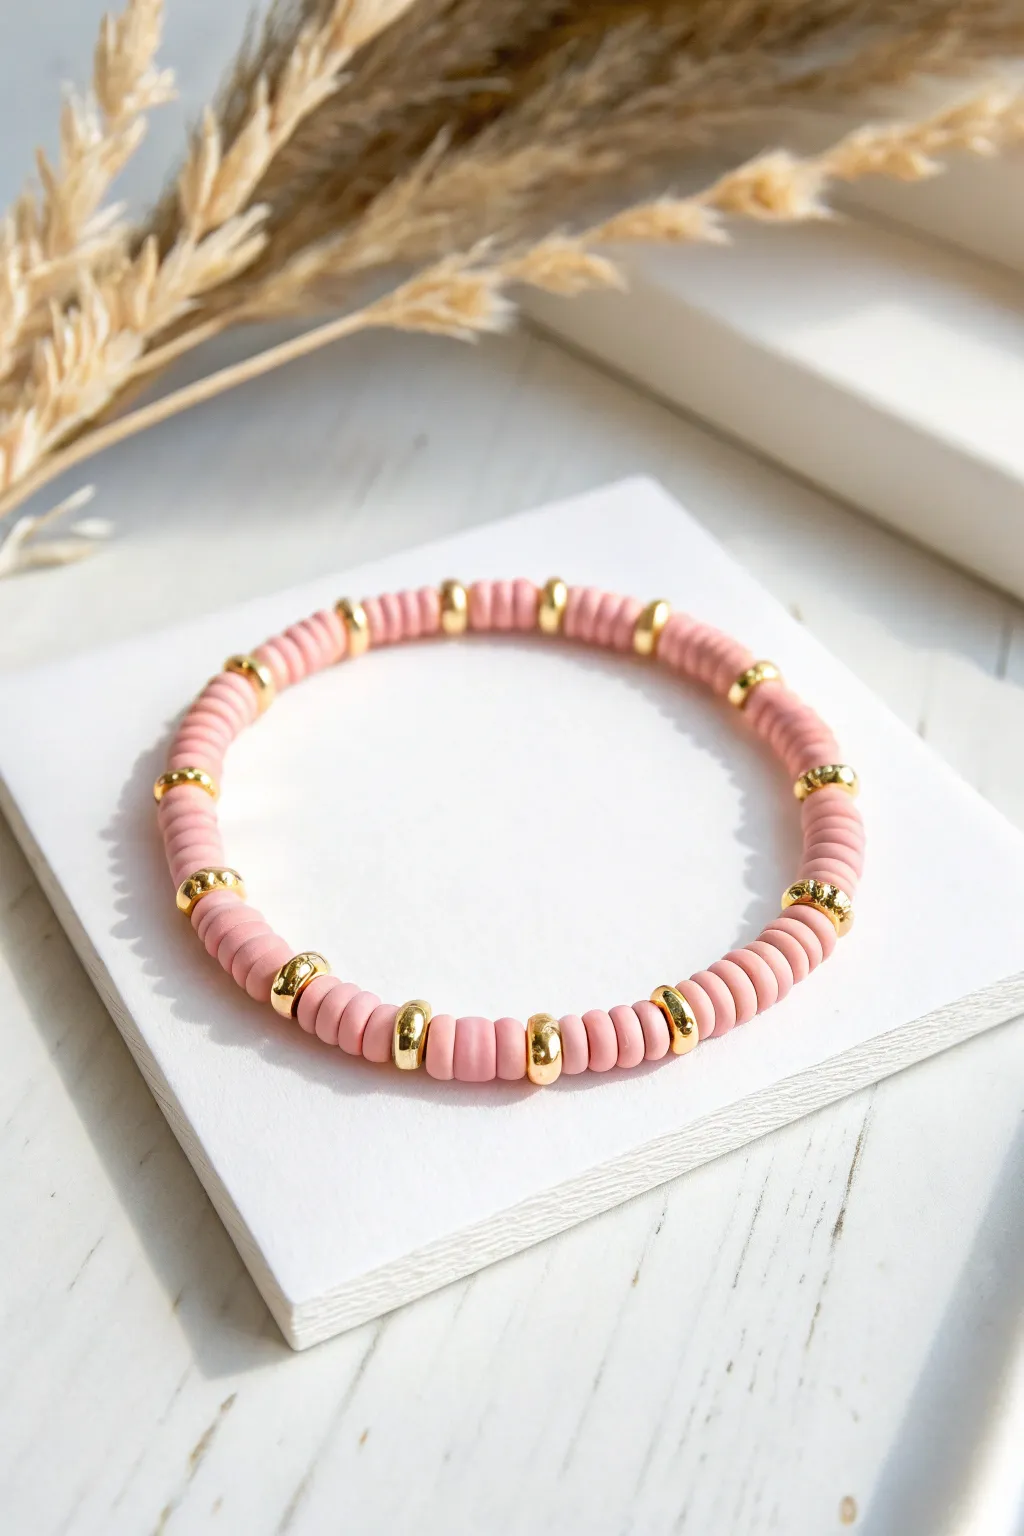
Achieve a sophisticated, understated look with this blush pink polymer clay bead bracelet, accented by gleaming gold spacers. The repeating pattern creates a gentle rhythm that feels both modern and timeless, perfect for everyday wear.
Step-by-Step
Materials
- Blush pink flat polymer clay heishi beads (6mm)
- Gold round spacer beads (4-5mm), metallic finish
- Elastic jewlery cord (0.8mm clear, stretchy)
- Jewelry glue or clear nail polish
- sharp scissors
- Bead stopper or tape
- Ruler
Step 1: Preparation & Measure
-
Cut the cord:
Cut a piece of elastic cord approximately 10-12 inches long. This generous length gives you plenty of room to knot securely without struggling. -
Pre-stretch the elastic:
Hold both ends of the cord and tug gently several times. Pre-stretching prevents the finished bracelet from sagging after the first few wears. -
Secure the end:
Attach a bead stopper to one end of the cord, or tape it down to your work surface, so your beads don’t slide off while styling.
Knot Hiding Trick
Use a gold bead with a slightly larger hole next to your knot. This makes it effortless to tuck the knot inside for a professional, seamless finish.
Step 2: Creating the Rhythm
-
Begin with pink:
Thread three blush pink clay beads onto the elastic cord. These flat heishi beads should stack neatly against each other. -
Add first sparkle:
Follow the three pink beads with a single round gold spacer bead. This establishes the 3-to-1 pattern we will use for the entire design. -
Continue the pattern:
Add three more pink beads, followed by one gold spacer. Repeat this specific sequence: 3 pink, 1 gold, 3 pink, 1 gold. -
Check the fit:
Periodically wrap the strand around your wrist to check the length. Continue beading until the bracelet fits comfortably without being too tight. -
Design check:
Ensure your pattern ends correctly. For a seamless look when tied, if you started with pink beads, end with a gold spacer (or vice versa) so the pattern flows uninterrupted across the knot.
Gap Prevention
If gaps appear between beads when the bracelet is worn, you tied it too loosely. Ensure beads are pressed firmly together while tightening the first knot.
Step 3: Finishing Touches
-
Prepare to tie:
Remove the bead stopper or tape carefully, holding both ends of the elastic firmly. -
First overhand knot:
Tie a standard overhand knot (right over left and through), bringing the beads together closely so there are no gaps. -
Surgeon’s knot:
For the second knot, create loop but pass the cord end through loop twice instead of once before pulling tight. This extra pass creates significant friction. -
Tighten firmly:
Pull all four strands (the two tail ends and the two bracelet loops) simultaneously to cinch the knot down as small as possible. -
Secure with adhesive:
I like to apply a tiny drop of jewelry glue or clear nail polish directly onto the knot. Let it dry completely before moving on. -
Trim the tails:
Once dry, use sharp scissors to trim the excess cord ends close to the knot, leaving about 1-2mm just to be safe. -
Hide the knot:
Gently stretch the bracelet and slide the nearest gold bead over the knot to conceal it inside the bead’s hole.
Slip on your new bracelet and enjoy the subtle warmth the gold spacers bring to the soft pink tone

Hot Pink Pop With Minimal Gold Accents
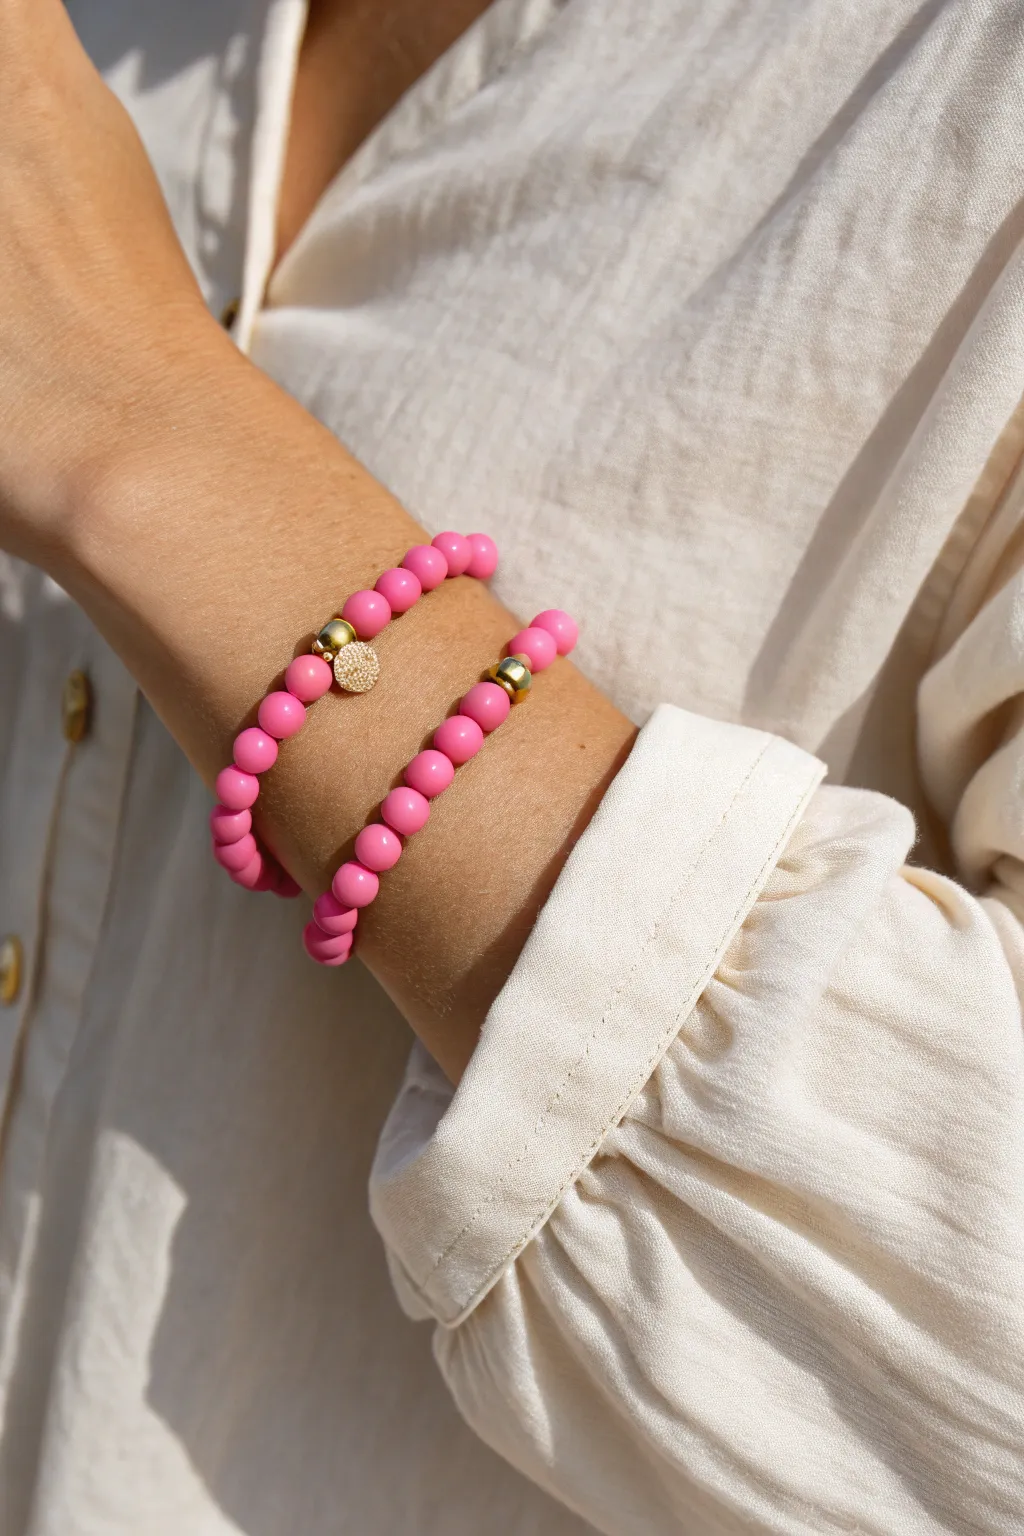
Brighten up any neutral outfit with this vibrant duo of hot pink bracelets featuring sleek matte beads and minimal gold touches. This beginner-friendly project creates a high-contrast, professional-looking stack that is perfect for everyday wear.
How-To Guide
Materials
- Hot pink round matte acrylic or clay beads (6mm or 8mm)
- Strong elastic cord (0.8mm or 1mm)
- Gold tone spacer beads (cylindrical or round)
- Small gold disc charm (pave or textured)
- Two jump rings (4mm or 5mm, gold tone)
- Jewelry adhesive or clear nail polish
- Scissors
- Tape or binder clip (optional stopper)
Step 1: Preparation
-
Measure your wrist:
Wrap a piece of string or a measuring tape loosely around your wrist to find your comfortable size. Add about half an inch to this measurement to ensure the bracelets won’t fit too tightly. -
Cut the cord:
Cut two lengths of elastic cord, making each piece roughly 10-12 inches long. This extra length gives you plenty of room to tie secure knots without struggling. -
Pre-stretch the elastic:
Hold the ends of your cut cord and give it a few firm tugs. This is a crucial step I always do to prevent the bracelet from stretching out and becoming loose after the first few wears. -
Secure the end:
Place a piece of tape or a binder clip on one end of your first cord to stop beads from sliding off while you work.
Knot Slipping?
If your elastic is slippery, sanding the very ends where you tie the knot creates friction. A textured surface holds the knot much tighter than smooth plastic.
Step 2: Creating the Charm Bracelet
-
String first half of pink beads:
Begin threading your hot pink beads onto the elastic. You will need to string enough beads to cover roughly half of your final bracelet circumference. -
Add the gold accent:
Slide on a single gold spacer bead or round gold bead. This will act as the anchor point for your charm. -
Attach the charm:
Open a jump ring using pliers or your fingers if it’s soft enough. Loop the gold disc charm onto the jump ring, then hook the jump ring around the gold spacer bead you just threaded, or simply slide the charm directly onto the cord next to the gold bead if the jump ring is large enough. -
Complete the pink beads:
Continue threading the remaining pink beads until the strand reaches your desired length minus the knot allowance.
Step 3: Creating the Accent Bead Bracelet
-
Prepare the second strand:
Grab your second piece of pre-stretched elastic and secure the end just like before. -
String the beads:
Thread on your hot pink beads until you are approximately halfway through the strand. -
Insert the gold bead:
Add a single gold metal bead. This bracelet is simpler and only needs one metallic focal point to balance the set. -
Finish the strand:
Add the rest of the pink beads to match the length of your first bracelet.
Mix It Up
Add a third bracelet using only gold beads or replace the single gold spacers with groups of three for a bolder metallic look.
Step 4: Finishing Touches
-
Check the fit:
Wrap each un-knotted strand around your wrist to double-check the sizing. Add or remove a bead if necessary for the perfect fit. -
Tie the surgeon’s knot:
Remove the tape or clip. Cross the right end over the left, slip it under, and pull tight. Then, cross the left end over the right, slip it under twice, and pull firmly to secure the knot. -
Apply adhesive:
Dab a tiny drop of jewelry glue or clear nail polish directly onto the knot. Let it dry for a moment to ensure it won’t slip. -
Hide the knot:
Once the glue is tacky but not fully set, gently pull the elastic so the knot slides inside the hole of the nearest bead. -
Trim excess cord:
carefully snip off the excess elastic tails, getting as close to the bead hole as possible without cutting the knot itself.
Slip on your new stack and enjoy the pop of color against your neutral wardrobe pieces

The Complete Guide to Pottery Troubleshooting
Uncover the most common ceramic mistakes—from cracking clay to failed glazes—and learn how to fix them fast.
Soft Pink and Pearl-Inspired Mix
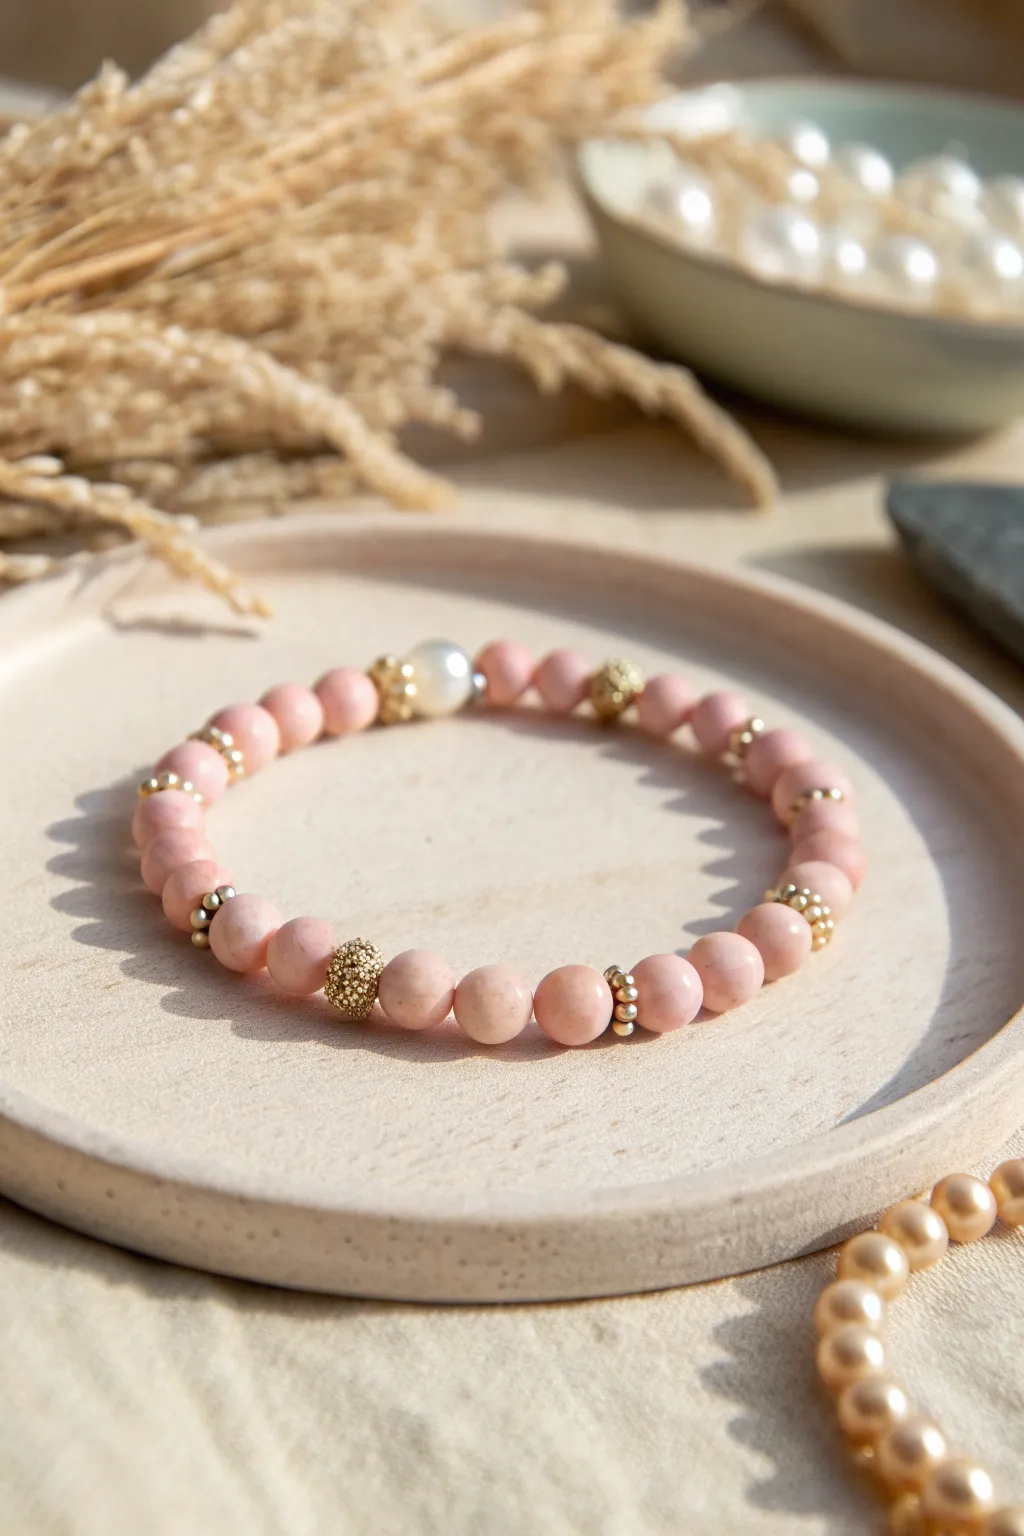
Embrace a touch of romance with this delicate bracelet design, which pairs the matte warmth of soft pink stoneware beads with the classic luster of pearls and gold accents. The result is a sophisticated yet understated accessory perfect for stacking or wearing solo.
Detailed Instructions
Materials
- 8mm matte pink gemstone beads (like rhodonite or pink opal)
- 8mm white freshwater pearl (large hole)
- Small gold textured spacer beads (approx 3-4mm)
- Gold rondelle spacer beads (approx 3mm)
- Detailed gold accent beads (textured melon or stardust style, 6-8mm)
- Strong elastic cord (0.7mm or 0.8mm)
- Jewelry glue or clear nail polish
- Scissors
Step 1: Preparation
-
Review your beads:
Lay out all your materials on a bead board or a soft piece of fabric to utilize the natural texture, preventing beads from rolling away. -
Sort the accents:
Separate your gold findings into three piles: the tiny textured spacers, the flat rondelles, and the larger ‘stardust’ style accent beads. -
Cut the cord:
Cut a piece of elastic cord about 10-12 inches long. Having extra length makes tying the final knot much easier than struggling with short ends. -
Pre-stretch the elastic:
To prevent the bracelet from sagging later, give the elastic cord several firm tugs along its length to pre-stretch it.
Step 2: Creating the Pattern
-
Start the main sequence:
Begin stringing by adding four of the 8mm matte pink beads onto the cord. -
Add the first accent:
Slide on a textured gold bead. This particular design uses a textured ‘stardust’ style bead here to break up the solid pink. -
Continue the pink run:
Add another set of four 8mm pink beads following the gold accent. -
Insert spacer trio:
Create a detailed separation point by threading on one tiny gold rondelle, then one pink bead, and another tiny gold rondelle. -
Resume standard beading:
String on three more pink beads. I find that varying the count slightly between accents keeps the eye moving around the piece. -
Add the next focal bead:
Place another textured gold stardust bead onto the cord. -
String the next section:
Thread on four more pink beads. -
Create the pearl focal point:
Now for the centerpiece: add one gold rondelle, followed by the large freshwater pearl, and finish with another gold rondelle. -
Finish the loop:
Add the remaining pink beads needed to complete your desired length (usually about 7 inches total for an average wrist). -
Check the fit:
Wrap the unfinished strand around your wrist to ensure it fits comfortably without pinching. Add or remove pink beads if necessary.
Knot Slipping?
If your knot won’t stay tight while gluing, use a bead stopper or a piece of tape on one end while you work to keep tension consistent.
Step 3: Securing the Bracelet
-
Prepare the knot:
Bring the two ends of the elastic together, ensuring there is no slack between the beads. -
Tie a surgeon’s knot:
Cross the ends over each other, loops them twice, and pull tight. Repeat this process to create a secure surgeon’s knot. -
Apply adhesive:
Place a tiny drop of jewelry glue or clear nail polish directly onto the knot. This prevents it from slipping over time. -
Hide the knot:
Ideally, pull the knot inside the hole of the large pearl or one of the larger pink beads to conceal it. -
Trim the excess:
Wait for the glue to dry completely, then use your scissors to trim the excess cord as close to the bead as possible without cutting the knot.
Level Up: Texture Play
Swap the focal pearl for a raw quartz chunk or a baroque pearl to add an organic, asymmetrical vibe to the polished look.
Slip this dusty pink beauty onto your wrist for an instant touch of softness and shine
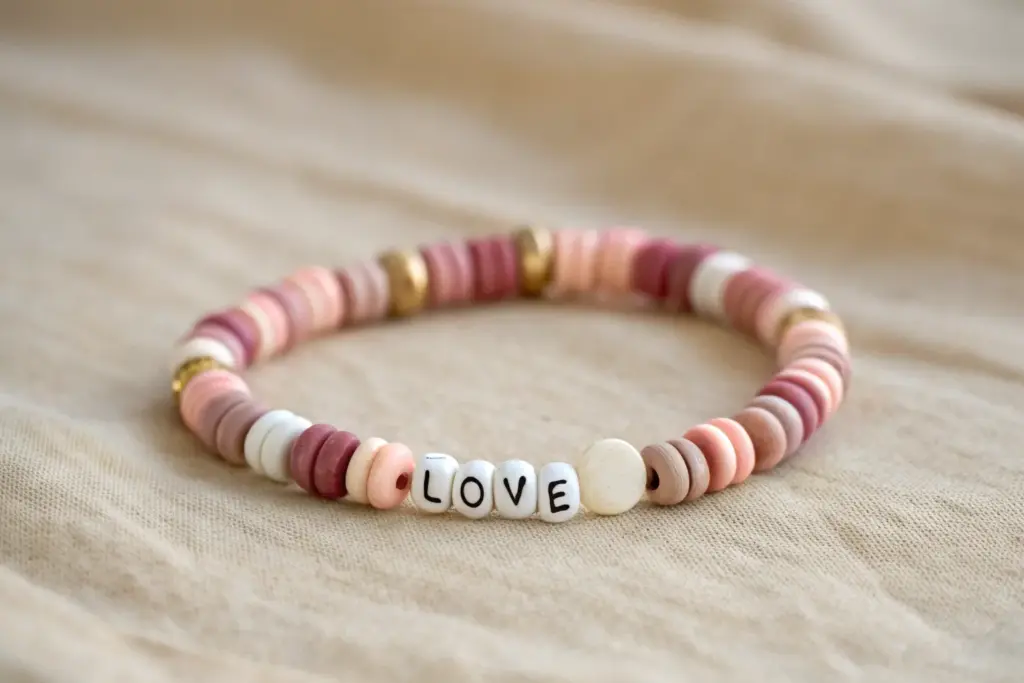
Pink Heart Centerpiece Bracelet
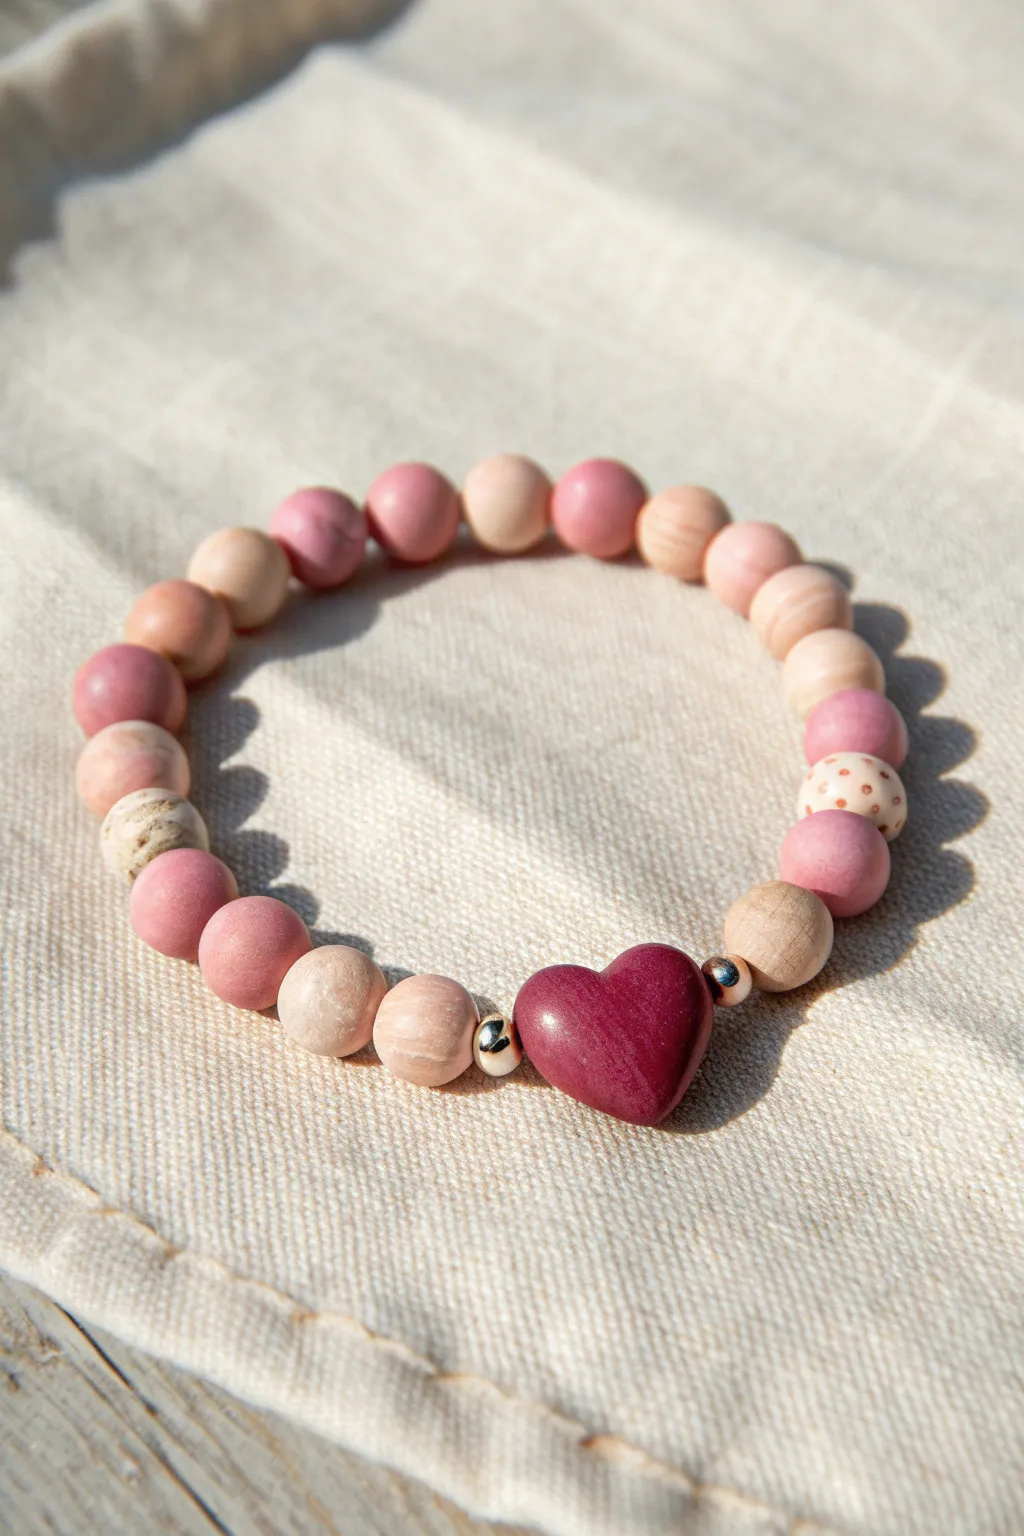
This rustic yet elegant bracelet features a deep berry-colored heart surrounded by a mix of natural wood and soft clay beads in varying shades of pink and beige. The addition of small silver spacer beads gives it a polished, professional finish perfect for stacking or wearing solo.
Step-by-Step Tutorial
Materials
- Polymer clay heart bead (dark berry/maroon)
- Small round wood or clay beads (approx. 8mm) in light tan/beige
- Small round beads (approx. 8mm) in matte dusty pink
- One patterned bead (tan with pink dots, approx. 8mm)
- Two small silver spacer beads (metal or metal-look)
- Elastic stretch cord (0.7mm or 0.8mm)
- Super glue or jewelry adhesive
- Scissors
Step 1: Preparation
-
Measure your wrist:
Wrap a piece of string around your wrist to find a comfortable fit, then add about an inch to account for the bulk of the beads. -
Cut the cord:
Cut a length of elastic cord about 10-12 inches long. Having extra length makes the final tying process much less frustrating. -
Pre-stretch the elastic:
Hold both ends of the cord and give it a few firm tugs. This prevents the bracelet from drooping or loosening immediately after you finish making it. -
Secure the end:
Clip a binder clip or a piece of tape to one end of the cord so beads don’t slide off while you are stringing them.
Step 2: Stringing the Design
-
Start with the centerpiece:
Thread the dark purple/berry heart bead onto the cord first. This will help you center the design visually as you work. -
Add silver accents:
Place one silver spacer bead on the cord immediately to the right of the heart, and another one immediately to the left. -
Begin the bead pattern (Right Side):
On the right side of the heart, add a light tan wood bead followed by a dusty pink bead. -
Add the patterned bead:
Next on the right side, add the beige bead with small pink polka dots. This adds a nice bit of texture to the sequence. -
Continue the right side:
Thread on two dusty pink beads, followed by a light tan bead, then another pink bead to finish this section. -
Begin the bead pattern (Left Side):
Switch to the left side of the heart. Add a light tan bead, followed by a dusty pink bead. -
Continue the left texturing:
Add a distinctive textured beige bead here if you have one (like the marble-look bead shown), or simply use another plain tan bead. -
Fill in the rest:
Continue alternating pink and tan beads on both sides until you reach your desired length. The image uses a fairly random organic mix, so don’t stress about perfect symmetry.
Knot Strength
For extra security, try using two strands of thinner elastic rather than one thick one. It creates a stronger, more durable hold.
Step 3: Finishing Touches
-
Check the fit:
Wrap the unfinished strand around your wrist to ensure it sits comfortably. Add or remove one or two beads if necessary. -
Tie the knot:
Remove the clip and bring the two ends together. Tie a standard surgeon’s knot (right over left, left over right) and pull it very tight. -
Secure with glue:
Place a tiny drop of super glue or jewelry cement directly onto the knot. I usually let this dry for a minute or so before trimming. -
Hide the knot:
Trim the excess cord close to the knot, then gently tug the cord so the knot slides inside the hole of the nearest bead to hide it.
Scent Infusion
Since this design uses unfinished wood beads, add a drop of rose or lavender essential oil to them for a diffusing bracelet.
Enjoy your beautiful, custom-made beaded heart bracelet


What Really Happens Inside the Kiln
Learn how time and temperature work together inside the kiln to transform clay into durable ceramic.
Pink Smiley Accent Bracelet
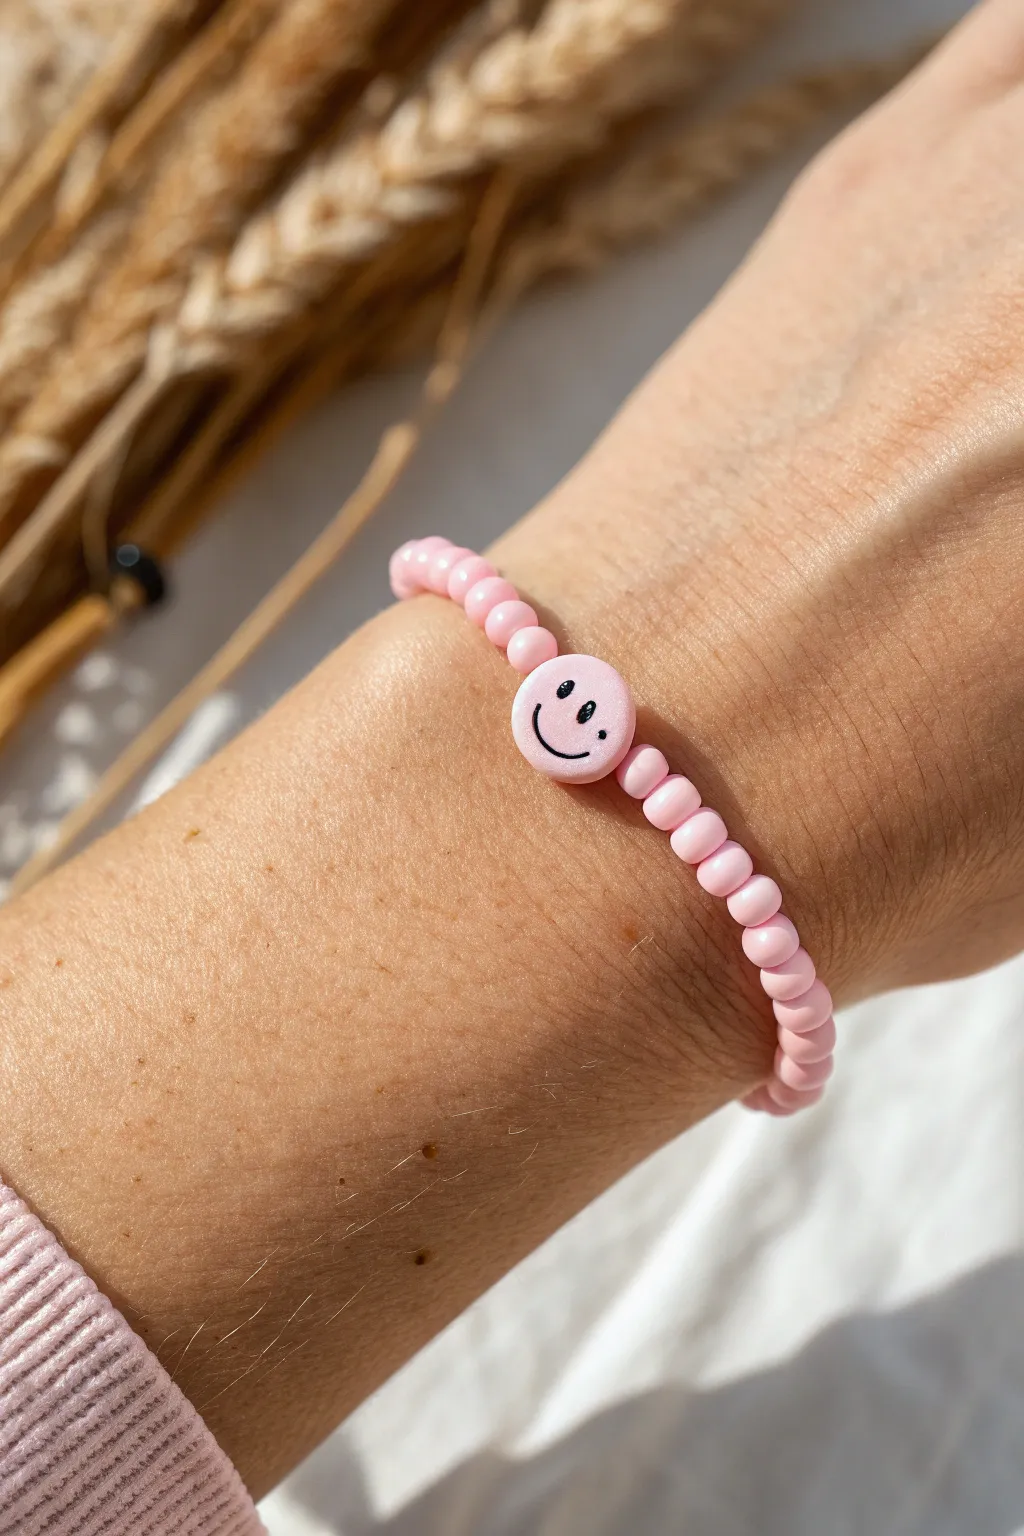
Embrace a minimalist-chic aesthetic with this darling pale pink bracelet featuring a single, cheerful smiley face accent. The soft matte pink beads create a delicate monochromatic look that really lets the centerpiece shine.
Step-by-Step Guide
Materials
- Light pink round seed beads (size 6/0 or 4mm)
- One flat round clay or acrylic smiley face bead (pink with black face)
- Stretch cord (0.8mm or 0.5mm depending on bead hole size)
- Beading needle (optional)
- Scissors
- Jewelry glue or clear nail polish
- Tape or bead stopper
Step 1: Preparation
-
Measure your wrist:
Wrap a piece of string or measuring tape around your wrist to find your size. Add about 1/2 inch to this measurement to ensure the bracelet fits comfortably without pinching. -
Cut the cord:
Cut a length of stretch cord about 10-12 inches long. Having extra length makes tying the final knot much easier than struggling with short ends. -
Pre-stretch the elastic:
Hold the ends of your cut cord and give it a few gentle firm pulls. This “pre-stretching” step is crucial because it prevents the bracelet from sagging or loosening after you’ve worn it a few times. -
Secure the end:
Place a piece of tape or a bead stopper on one end of the cord so your beads don’t slide right off while you work.
Step 2: Stringing the Design
-
Start the first half:
Begin threading your light pink round beads onto the cord. You’ll want to string enough beads to cover roughly half of your total wrist circumference. -
Check the fit:
Wrap the beaded section around your wrist to gauge the length. It should reach roughly from the underside of your wrist to the top center. -
Add the focal bead:
Slide on the pink smiley face bead. Make sure the face is oriented correctly relative to how you want to wear it, though usually, these beads spin freely. -
Finish the strand:
Continue adding the rest of your pink round beads until you reach your desired total length. I usually check the size one last time by wrapping it around my wrist before tying. -
Remove bubbles:
Check for any large gaps between beads. Gently push all beads together so they are snug, but not so tight that the bracelet becomes stiff or creates a weird kink in the line.
Knot Slipping?
If your elastic knot feels loose, try tying a separate square knot on top of your surgeon’s knot before adding glue. Pull tight on all four strands.
Step 3: Finishing Touches
-
Prepare to knot:
Remove the tape or bead stopper from the end carefully, holding both ends of the elastic firmly. -
The first crossover:
Cross the left end over the right end and pull tight, just like the first step of tying a shoelace. -
Tie a surgeon’s knot:
Cross the ends again, but this time loop one end through the circle twice before pulling tight. This extra loop adds friction and security. -
Secure the knot:
Pull the cord ends firmly to tighten the knot. You might see the elastic stretch and become thinner; this allows the knot to get very small. -
Apply glue:
Dab a tiny drop of jewelry glue or clear nail polish directly onto the knot. Let it dry for a minute or two to ensure it won’t slip. -
Hide the mechanism:
Once the glue is tacky or dry, trim the excess cord ends close to the knot (leave about 2mm). Gently tug the beads so the knot slides inside the hole of the nearest bead, vanishing from sight.
Make It Glossy
Swap the matte round beads for pink miracle beads or glass pearls. The reflective surface adds a surprising amount of elegance to the casual smiley bead.
Slip on your cheerful new accessory and enjoy the subtle pop of pink positivity
Pink Beachy Bracelet With a Turtle Charm
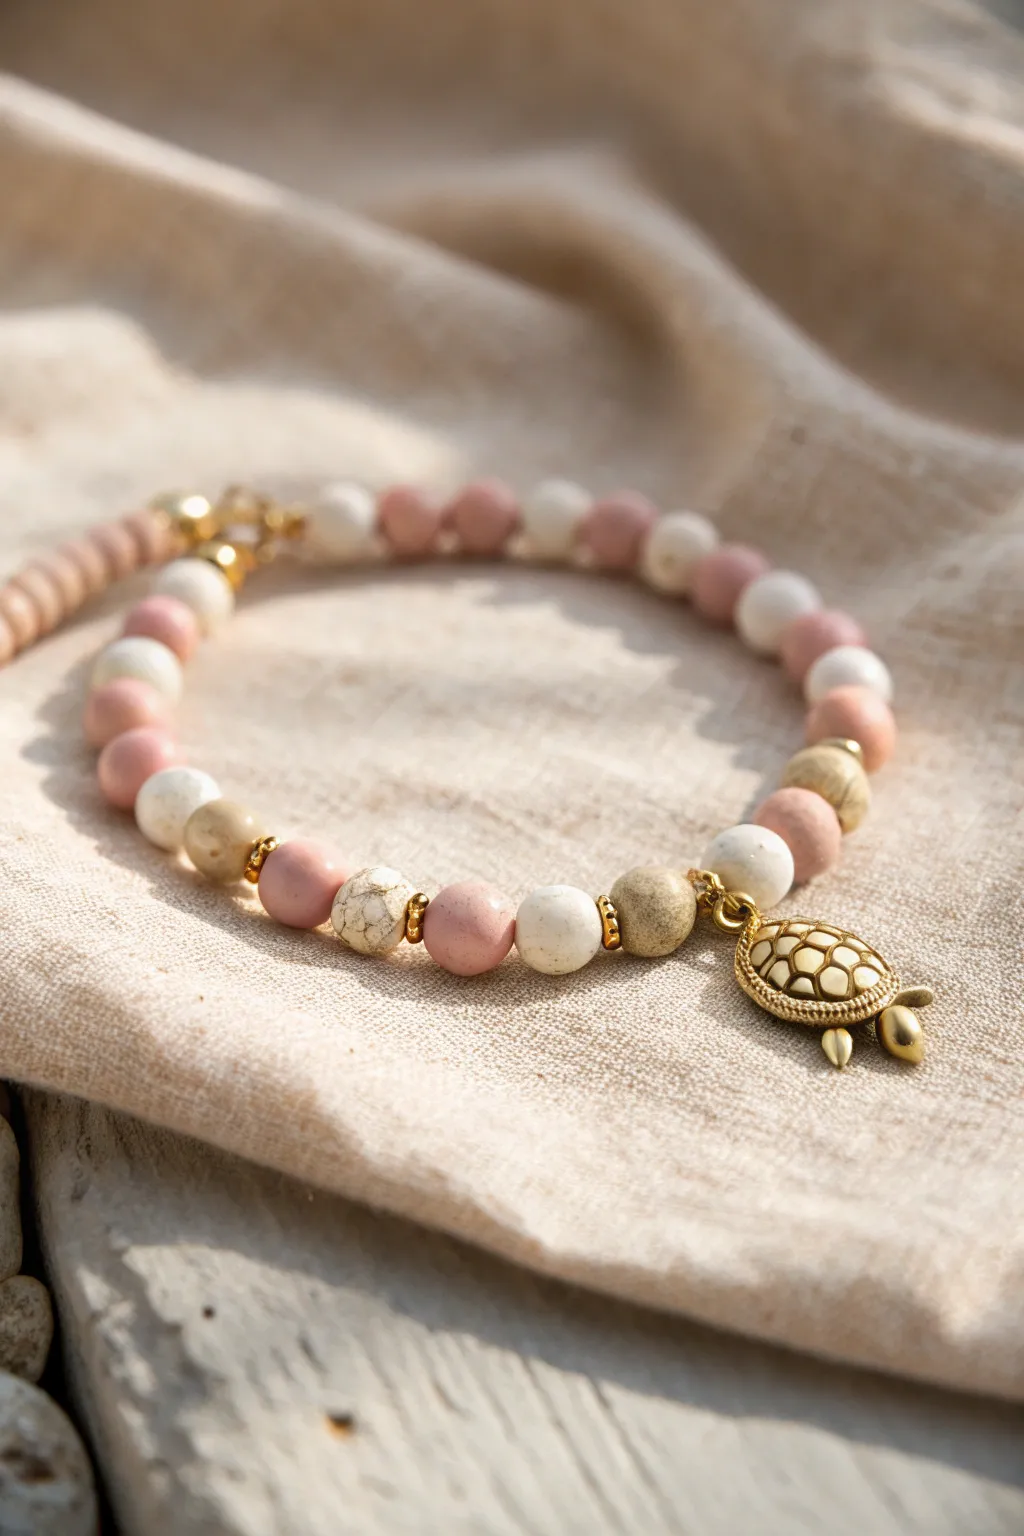
Bring the calming vibes of a sandy beach to your wrist with this dusty pink and cream bracelet. Featuring textural stone-like beads and an adorable gold turtle charm, this piece perfectly balances elegance with aquatic whimsy.
Step-by-Step
Materials
- Dusty pink matte round beads (6mm or 8mm)
- White/cream polymer clay or stone beads (6mm or 8mm)
- Beige speckled ‘sand’ style beads (6mm or 8mm)
- Small gold spacer beads (heishi or daisy style)
- Gold sea turtle charm with white shell inlay
- Gold jump ring
- Elastic beading cord (0.8mm recommended)
- Bead stopper or tape
- Jewelry glue (GS Hypo Cement)
- Scissors or jewelry snips
- Flat nose pliers
Step 1: Planning and Prep
-
Measure your wrist:
Wrap a flexible measuring tape around your wrist to find your size. Add about 0.5 to 1 inch to this measurement depending on how loose you want the bracelet to fit. -
Prepare the cord:
Cut a piece of elastic cord about 10-12 inches long. This extra length makes tying the final knot much easier than struggling with short ends. -
Secure the end:
Place a bead stopper or a piece of masking tape on one end of the cord to prevent your beads from sliding off while you work. -
Lay out the pattern:
Before stringing, lay your beads out on a bead board or a towel. The pattern shown uses an alternating sequence, but establishes a distinct rhythm with the speckled beige beads acting as anchors.
Knot Strength
For maximum security, refrain from stretching the bracelet excessively for at least 24 hours to allow the glue to fully cure inside the knot.
Step 2: Stringing the Beads
-
Start the main sequence:
Begin by stringing a beige speckled bead followed by a gold spacer bead. This gold accent adds a touch of necessary shine between the matte finishes. -
Add the pink and white section:
Slide on a dusty pink bead, followed by a white bead, and then another dusty pink bead. This trio creates a soft, blushing gradient effect. -
Repeat the pattern:
Add another gold spacer, then a beige speckled bead, and another gold spacer. Continue repeating this entire sequence (Spacer -> Beige -> Spacer -> Pink -> White -> Pink) until you reach your desired length. -
Cheek for fit:
Wrap the strung beads around your wrist to check the size. Remember that the charm will add a tiny bit of length, but mostly hangs downwards. -
Prepare the focal point:
Ensure your pattern ends so that two beige speckled beads will sit on either side of the charm. This frames the turtle perfectly.
Step 3: Adding the Charm and Finishing
-
Attach the jump ring:
Using your flat nose pliers, carefully open the gold jump ring by twisting the ends away from each other (not pulling apart). -
Secure the turtle:
Slide the loop of the turtle charm onto the open jump ring. Close the ring securely by twisting it back into place until the ends meet flush. -
String the charm:
Thread the elastic cord through the jump ring attached to the turtle. The charm should interrupt the bead pattern, sitting between two gold spacers or beige beads depending on your layout. -
Pre-stretch the cord:
Before tying, give the ends of the elastic a gentle tug. I always do this to remove any slack so the bracelet doesn’t stretch out permanently after the first wear. -
Tie the surgeon’s knot:
Cross the ends of the cord like a normal knot, then loop one end through the circle a second time strictly before pulling tight. This extra loop creates a surgeon’s knot for extra security. -
Secure with glue:
Apply a tiny dot of jewelry glue (like GS Hypo Cement) directly onto the knot. Let it tack up for a minute. -
Hide the knot:
If hole size allows, gently pull the cord so the knot slides inside the hole of the nearest beige bead. -
Trim the excess:
Once dry, use your scissors to snip the excess cord as close to the bead as possible without cutting the knot itself.
Ocean Variation
Swap the pink beads for sea-glass blue or soft teal to create a ‘deep ocean’ version of this bracelet while keeping the same layout.
Your beach-ready accessory is now complete and ready for sunny days

TRACK YOUR CERAMIC JOURNEY
Capture glaze tests, firing details, and creative progress—all in one simple printable. Make your projects easier to repeat and improve.
Pink Color-Block Sections in Three Shades
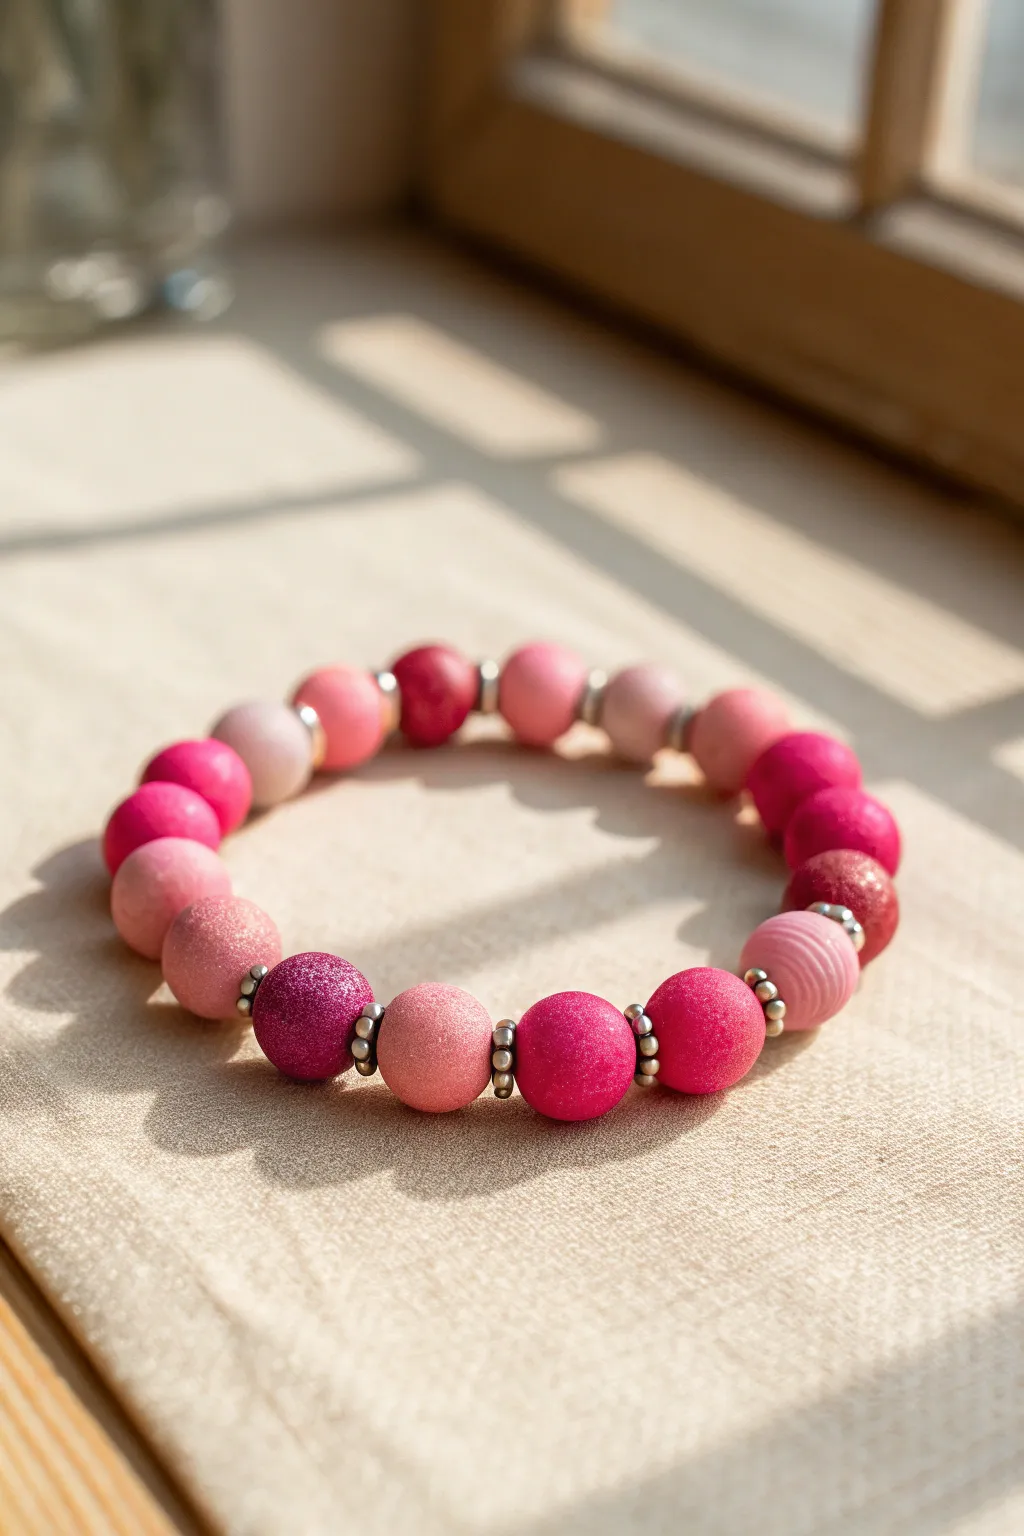
Capture the soft glow of a sunny afternoon with this textured clay bead bracelet featuring graduated pink tones. By mixing matte, glittered, and striped finishes with sleek silver accents, you’ll create a piece that feels both playful and sophisticated.
Step-by-Step Tutorial
Materials
- Polymer clay in three shades (pale pink, bubblegum pink, deep magenta)
- Silver metallic spacer beads (daisy or rondelle style)
- Clear elastic bead cord (0.7mm or 0.8mm)
- Fine glitter (pink or iridescent)
- Texture tools (sandpaper or stiff bristle brush)
- Needle tool or toothpick
- Super glue or jewelry cement
- Scissors
Step 1: Prepping the Clay Styles
-
Condition the clay:
Start by warming up your three shades of pink polymer clay in your hands until they are soft and pliable. This prevents cracking later on. -
Create the matte base:
Roll small balls of each color, roughly 10-12mm in diameter. Keep them relatively uniform, but slight handmade variations add charm. -
Make the glitter mix:
Take a portion of your deep magenta clay and knead in a generous pinch of fine glitter. Roll these into balls to create the sparkle accent beads. -
Texture the matte beads:
For the non-glitter beads, gently roll the unbaked clay balls over different grades of sandpaper or tap them with a stiff brush. This mimics the stone-like texture seen in the photo. -
Form the striped bead:
Create a focal bead by wrapping thin snakes of lighter pink clay around a medium pink core, then rolling it gently until smooth but still visibly striped.
Glitter Control
To keep the glitter from shedding later, you can seal the sparkle beads with a thin coat of glossy glaze before stringing them.
Step 2: Baking and Assembly
-
Piercing the beads:
Carefully pierce a hole through the center of each bead using your needle tool. Use a twisting motion to avoid squashing the sphere shape. -
Bake the clay:
Arrange your beads on a baking sheet and bake according to your polymer clay package instructions (usually around 275°F for 15-30 minutes). Let them cool completely. -
Measure the cord:
Cut a length of elastic cord about 10 inches long. I always cut extra to make tying the final knot easier without fumbling. -
Pre-stretch the elastic:
Give the elastic cord a few firm tugs. This pre-stretching step helps prevent the bracelet from loosening up after you start wearing it. -
Plan the pattern:
Lay out your cooled beads on a board. Alternate the shades: place a dark glitter bead, then a medium matte, then a light matte to create a gradient effect. -
Insert spacers:
Place one silver spacer bead between every single clay bead. These metallic accents define the sections and add a professional finish. -
String the beads:
Thread the beads onto the elastic following your pattern. Using a bead stopper or just a piece of tape on the end prevents everything from sliding off. -
Check the fit:
Wrap the strung beads around your wrist to check the sizing. Add or remove beads as needed for a comfortable fit. -
Tie the knot:
Tie a secure surgeon’s knot (right over left, left over right) and pull tight. -
Secure and trim:
Dab a tiny drop of super glue on the knot. Once dry, trim the excess cord close to the knot and tuck it inside a neighboring bead if possible.
Add a Charm
Enhance the design by attaching a small silver heart or star charm on a jump ring next to one of the spacer beads for extra personality.
Enjoy wearing your custom pink bracelet stack on your next sunny outing
Pink Confetti Mix for a Random-Cute Look
This charming bracelet combines matte pink tones with textured accents and flashes of gold for a relaxed, playful accessory. The “confetti” style comes from the seemingly random yet balanced placement of special accent beads among the smooth pink base.
Detailed Instructions
Materials
- Elastic stretch cord (0.7mm or 0.8mm)
- Matte round polymer clay or acrylic beads (8mm-10mm) in dark rose pink
- Matte round polymer clay or acrylic beads (8mm-10mm) in white
- Two round lava stone or textured ceramic beads (light pink or cream)
- Small gold ball spacer beads (3mm-4mm)
- Gold rondelle spacer beads or crimp covers (optional)
- Super glue or jewelry cement
- Scissors
- Tape or bead stopper
Step 1: Preparation
-
Measure your cord:
Cut a piece of elastic cord about 10-12 inches long. This generous length gives you plenty of room to tie your knot later without struggling. -
Secure the end:
Place a piece of tape or a bead stopper clip on one end of the cord to prevent your beads from sliding off while you design your pattern. -
Stretch the elastic:
Before adding any beads, give your elastic cord a few firm stretches. I always do this because it “pre-stretches” the material, preventing the bracelet from sagging or expanding permanently after the first wear.
Sticky Situation
If your knot won’t hide inside a bead hole, enlarge the hole slightly with a bead reamer tool, or simply ensure the knot is very tight and nestled between two beads.
Step 2: Creating the Pattern
-
Start the sequence:
Begin by threading on four or five of the dark rose pink matte beads to establish the main color base of the bracelet. -
Add a white accent:
Slide on one white matte bead. This stark contrast breaks up the pink and adds freshness to the design. -
Continue the pink base:
Add two more rose pink beads following the white one. -
Create the focal point:
Thread on one textured lava stone bead (or cream ceramic bead). This adds a wonderful visual and tactile variety to the smoothness of the other beads. -
Insert gold spacers:
Add two small gold ball spacer beads immediately after the textured bead. These act as a metallic bridge in the center of the focal section. -
Finish the focal point:
Place the second textured lava stone bead next to the gold spacers to sandwich them, creating a symmetrical center element. -
Resume the pattern:
Follow the focal section with another single dark rose pink bead. -
Second white accent:
Add another white matte bead here to balance the one placed earlier in the design. -
Add gold randomness:
Slide on a gold rondelle or flat spacer bead, followed by a dark rose bead, and then a gold ball spacer. This irregular spacing gives it that “confetti” feel.
Step 3: Finishing Up
-
Check the length:
Continue adding dark rose pink beads until the bracelet wraps comfortably around your wrist. It should sit flush against the skin but not squeeze. -
Prepare to tie:
Remove the tape or clip from the end. Bring both ends of the cord together, ensuring there is no slack between the beads. -
Tie the surgeon’s knot:
Cross the ends like a normal knot, but loop the top tail through twice instead of once before pulling tight. This extra loop adds friction and security. -
Add adhesive:
Place a tiny drop of super glue or jewelry cement directly onto the knot. Be careful not to get glue on the beads themselves, as it can cloud the finish. -
Hide the knot:
Ideally, slide the knot inside the hole of one of the larger beads (like the textured one or a white one) while the glue is still slightly tacky. -
Trim excess:
Once the glue is fully dry, trim the excess cord ends close to the bead/knot with sharp scissors.
Aromatic Addition
Since this design uses porous lava stone beads, add a drop of essential oil to them. They will diffuse the scent slowly throughout the day as you wear it.
Slip on your new bracelet and enjoy the customized pop of pink on your wrist
Strawberry Milk Speckle Palette
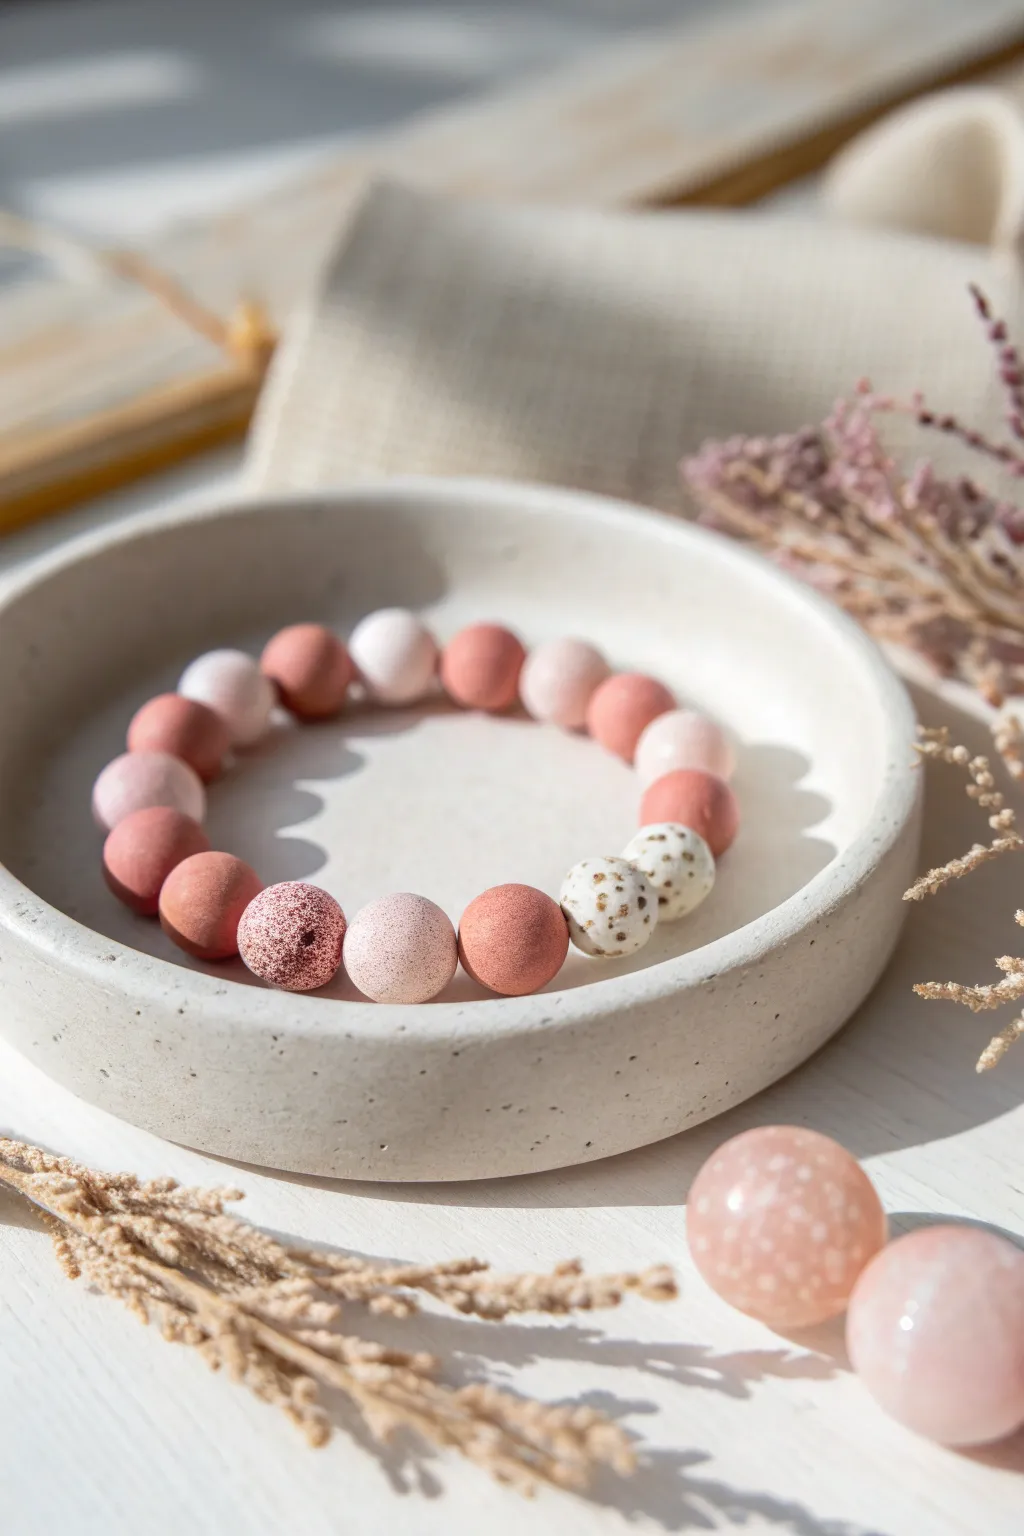
Reflect the soft, dreamy hues of a strawberry milkshake with this polymer clay bead bracelet. Combining matte solids with handcrafted speckled accents creates a sophisticated yet playful accessory perfect for everyday wear.
How-To Guide
Materials
- Polymer clay in varying shades: dusky rose, blush pink, salmon, and white
- Fine grit sandpaper or nail buffer
- Acrylic paint (dark brown or burnt sienna)
- Old toothbrush or stiff bristle brush
- Dried spices (like nutmeg or ground pepper) – optional for gritty texture
- Bead piercing pins or toothpicks
- Elastic cord (0.8mm or 1mm)
- Super glue or jewelry cement
- Oven requiring baking tray and parchment paper
Step 1: Creating the Bead Bases
-
Condition the Clay:
Begin by thoroughly conditioning each color of polymer clay until it is soft and pliable. Use your hands to warm and knead the dusky rose, blush pink, salmon, and white blocks separately to prevent color contamination. -
Portion Control:
Roll each color into a long, even log (snake). Use a blade to slice uniform segments from each log to ensure your finished beads are roughly the same size, aiming for about 12-14mm in diameter. -
Roll Spheres:
Take each sliced segment and roll it between your palms using a circular motion. Apply even pressure to create smooth, perfect spheres. Don’t worry about texture yet; focus on shape.
Step 2: Adding the Speckled Effects
-
Prepare the Spiced White Beads:
For the vanilla-bean look on the white beads, I like to flatten the white spheres slightly and sprinkle a tiny pinch of ground nutmeg or coarse black pepper onto the clay. -
Incorporate the Spice:
Fold the clay over the spice and re-roll the sphere. Repeat this process until the speckles are evenly distributed throughout the white bead. -
Create the Paint Speckle:
For the pink speckled beads, keep the clay balls smooth initially. Place the blush pink beads you want to speckle on a piece of scrap paper. -
Flick the Paint:
Dip an old toothbrush into slightly watered-down dark brown or deep red acrylic paint. Run your thumb across the bristles to flick tiny droplets onto the pink beads. Let them dry completely before touching. -
Textured Rose Beads:
For the darker rose beads that look porous, gently roll the unbaked clay sphere over a piece of coarse sandpaper or a textured sponge to imprint a subtle, stone-like surface.
Fixing Wonky Holes
If holes close up during baking, use a small hand drill or a bead reamer while the clay is still slightly warm to gently widen the channel without cracking the bead.
Step 3: Baking and Assembly
-
Pierce the Holes:
Use a bead piercing pin or a toothpick to carefully poke a hole through the center of each bead. Twist the tool gently as you push through to avoid distorting the spherical shape. -
Arrangement check:
Verify that the holes are large enough for your elastic cord. If the clay squished a bit, gently re-roll the bead between your fingers while the pin is still inside to smooth it out. -
Bake:
Place all beads on a baking tray lined with parchment paper. Bake according to your polymer clay manufacturer’s instructions (usually 275°F/135°C for 15-30 minutes). -
Cool Down:
Allow the beads to cool completely in the oven with the door slightly ajar. This gradual cooling tempers the clay and makes it stronger. -
Buff (Optional):
If you want a smoother finish on the non-textured beads, lightly sand them with a fine-grit buffer to remove any fingerprints. -
Pattern Layout:
Lay out your beads on a bead board or towel to finalize the design. Try alternating solid matte colors with your speckled feature beads for balance. -
Stringing:
Cut a piece of elastic cord about 10 inches long. Pre-stretch the cord by pulling it gently a few times to prevent it from stretching out later. -
Add Beads:
Thread the beads onto the elastic cord in your chosen order. -
Tie the Knot:
Tie a secure surgeon’s knot (right over left, left over right, looping through twice). Pull tight to close the gap between beads. -
Secure and Trim:
Add a tiny drop of super glue or jewelry cement to the knot for extra security. Once dry, trim the excess cord and tuck the knot inside a neighboring bead.
Level Up: Granite Effect
Mix translucent clay with your solid colors in a 1:1 ratio before rolling. This adds a realistic, semi-stone depth that mimics polished granite or quartz.
Slip on your new bracelet and enjoy the subtle, earthy charm of your handmade speckled beads
Pink Floral Beads as Tiny Statement Moments
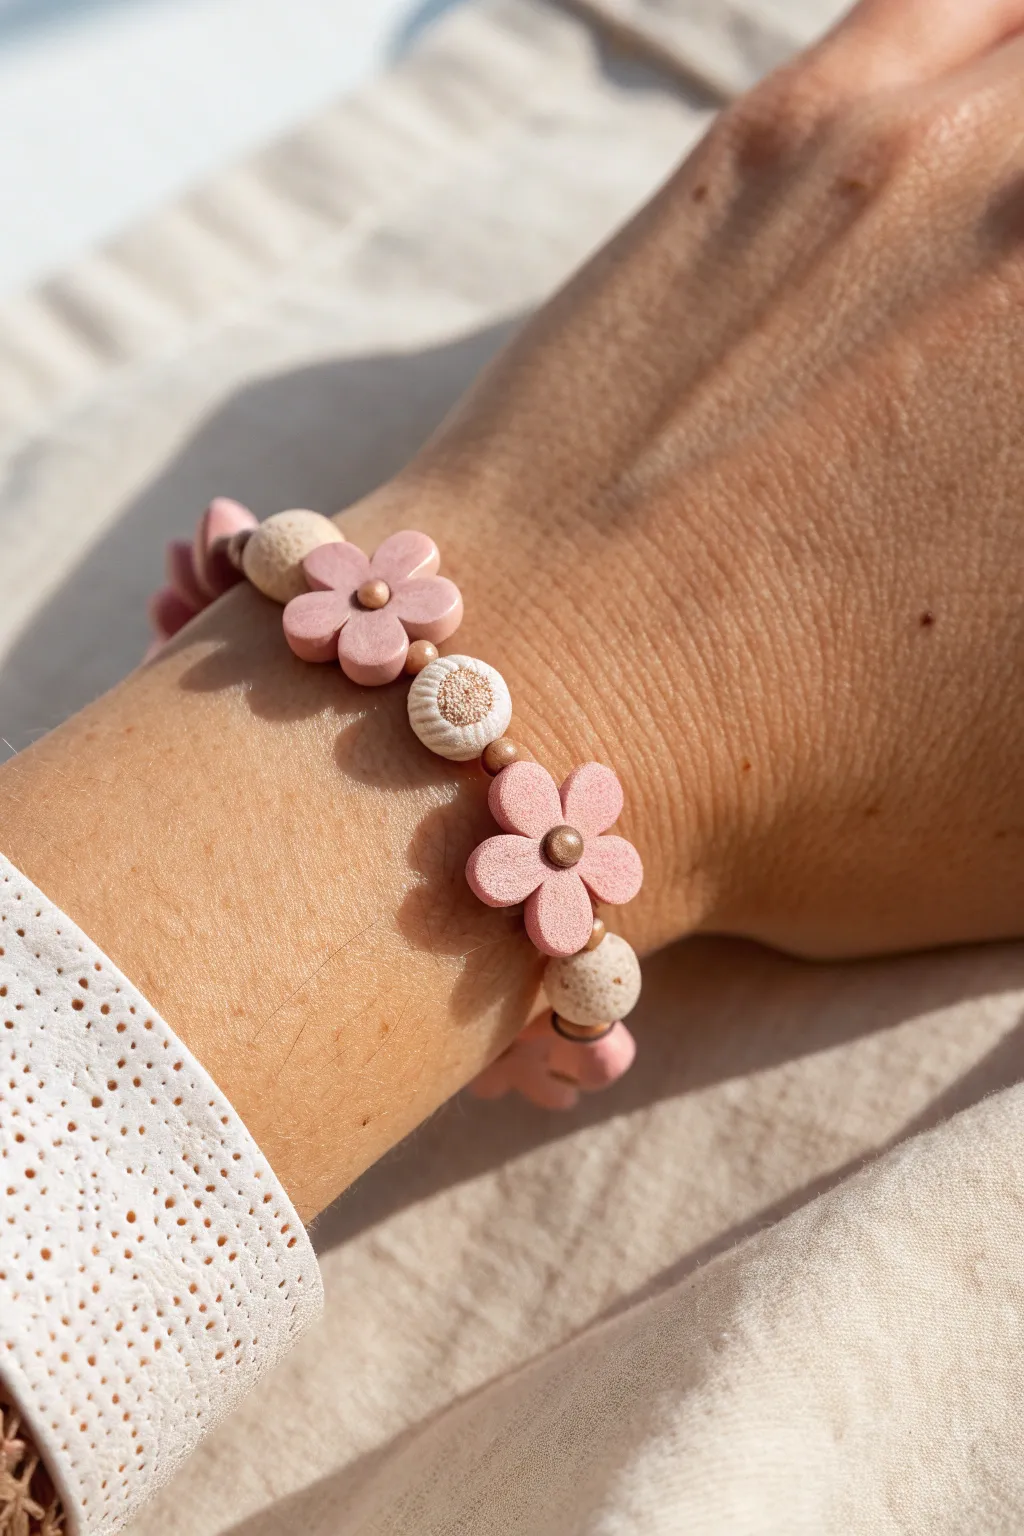
Capture the soft elegance of spring with this handmade polymer clay bracelet featuring delicate pink flowers and textured accent beads. The combination of matte florals and subtle metallic spacers creates a sophisticated yet playful accessory perfect for everyday wear.
Step-by-Step Guide
Materials
- Polymer clay (Soft Pink, White/Cream, Metallic Copper/Gold)
- Stretch cord (0.8mm clear elastic)
- Small flower clay cutter (approx. 15mm)
- Dotting tool or small ball stylus
- Bead piercing pin or needle tool
- Texture sponge or sandpaper (coarse grit)
- Small round cutter or straw (for bead centers)
- Instant glue or jewelry cement
- Toothpick
- Ceramic tile or baking sheet
- Oven (for curing clay)
Step 1: Creating the Flower Beads
-
Condition the Pink Clay:
Start by warming the soft pink polymer clay in your hands, kneading it until it is smooth and pliable. This prevents cracks during baking. -
Roll Out the Slab:
Roll the conditioned pink clay onto your work surface or ceramic tile to a uniform thickness of about 3-4mm. Ensure it’s not too thin, as the flowers need to be sturdy. -
Cut the Flowers:
Using your small flower cutter, press firmly into the clay slab to cut out your flower shapes. You will need about 5-6 flowers for an adult bracelet, depending on spacing. -
Soften the Edges:
Gently tap the cut flowers with your finger to round off the sharp cutting edges, giving them a softer, more organic petal look. -
Create the Bead Channel:
This is crucial: Instead of piercing a hole front-to-back, carefully pierce through the side of the flower. Insert your bead pin horizontally through the center of the flower so the string will run hidden inside. -
Add the Center Detail:
Take a tiny pinch of the metallic copper clay and roll it into a small ball. Press this gently into the center of the pink flower. -
Indent the Center:
Use a small dotting tool to press into the metallic center, securing the bond between the clays and adding a finished look.
Clean Beading Holes
To prevent bead holes from closing during baking, bake the beads directly on the piercing pins. If you don’t have enough pins, slightly over-drill the holes before baking.
Step 2: Crafting the Textured Accent Beads
-
Form the Base Beads:
Roll small balls of the white/cream clay. These should be roughly 8-10mm in diameter, slightly smaller than your flowers. -
Texture the Surface:
Roll these white balls gently over a coarse texture sponge, sandpaper, or even a clean concrete surface to create a pitted, stone-like texture. -
Add Metallic Caps:
Flatten tiny discs of metallic copper clay and press them onto opposite sides of the textured bead where the hole will go. -
Pierce the Accents:
Using your pin tool, pierce a hole straight through the center of the bead, going through the metallic caps you just added. -
Bake the Clay:
Arrange all your beads on a ceramic tile or baking sheet. Bake according to your brand of polymer clay instructions (usually 275°F/130°C for 15-30 minutes). Let them cool completely before handling.
Step 3: Assembly and Finishing
-
Prepare the Cord:
Cut a length of stretch cord about 10 inches long. Pre-stretch it by pulling on it gently a few times; this prevents the bracelet from stretching out later. -
Plan the Pattern:
Lay out your design on a bead board or cloth. The pattern shown uses one flower, one small copper spacer bead (store-bought or handmade), one textured bead, one spacer, and repeats. -
String the Beads:
Thread your beads onto the elastic cord following your pattern. Check the length against your wrist periodically to ensure a good fit. -
Tie the Knot:
Once the size is right, tie a surgeon’s knot (right over left, left over right, loop through twice). Pull the elastic tight to secure. -
Secure and Hide:
Apply a tiny dot of instant glue to the knot. Once dry, trim the excess cord and gently pull the knot inside the hole of one of the flower beads to hide it.
Add Scented Charm
Use unfinished wood beads for the textured spacer beads instead of clay. You can then add a drop of essential oil to the wood, turning this into a functional aromatherapy diffuser bracelet.
slip your new floral creation onto your wrist alongside other favorites for a lovely stacked look
Pink and Clear Bead Contrast for a Light, Airy Look
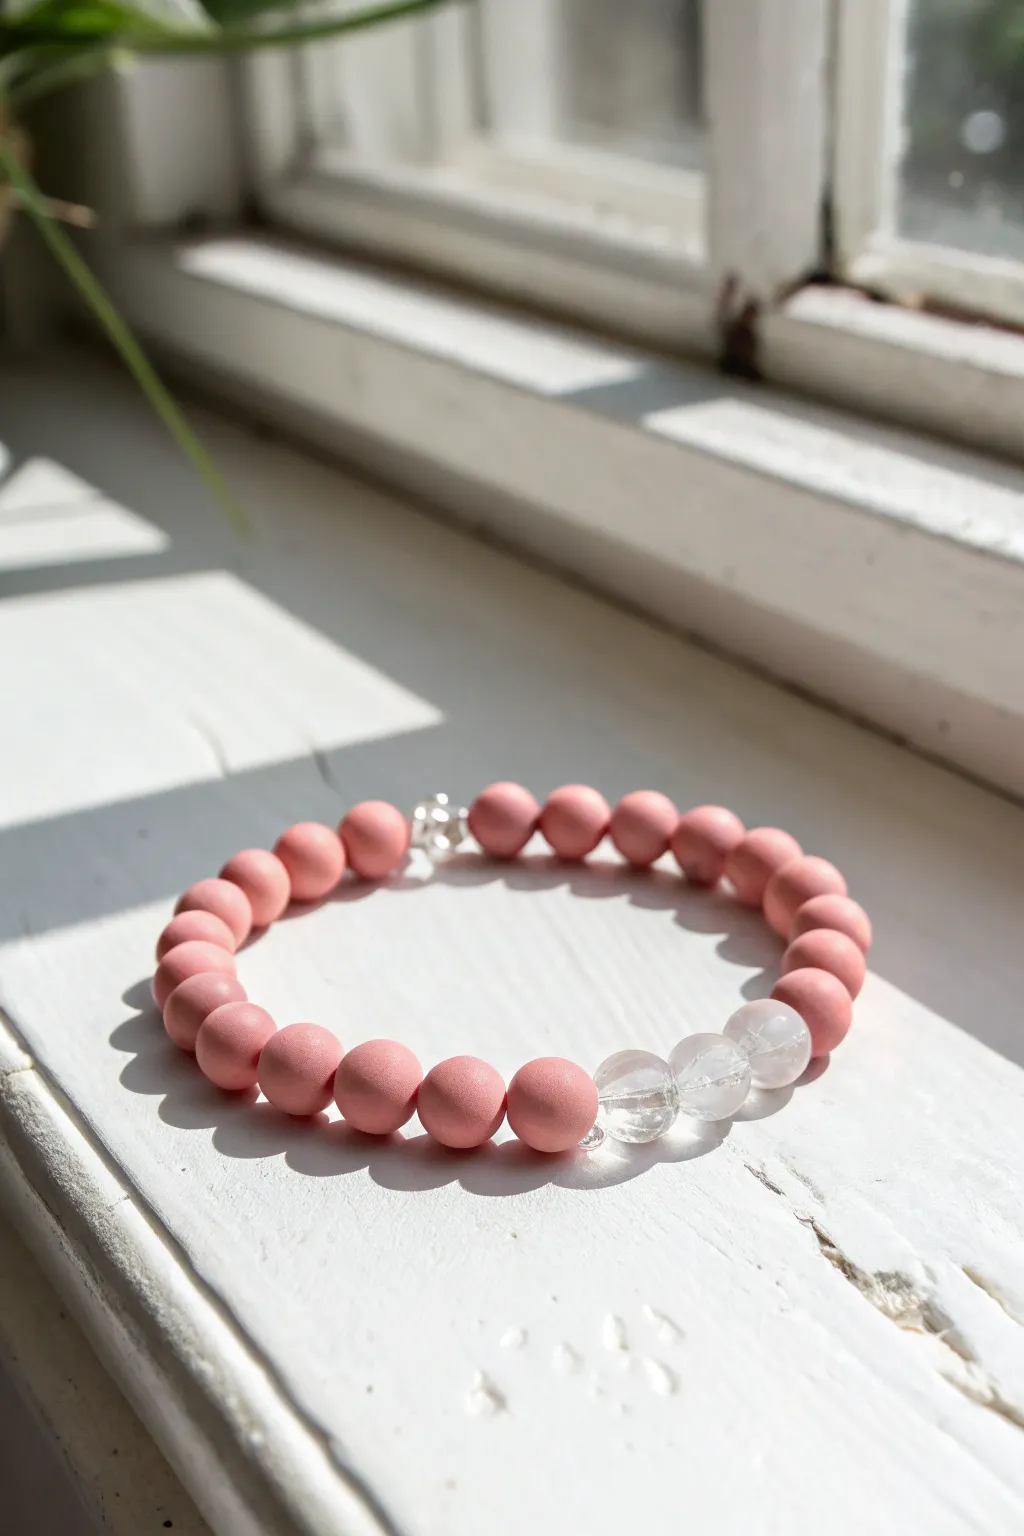
Using matte finish beads alongside sparkling clear quartz or glass creates a sophisticated interplay of textures that feels both modern and delicate. This simple stringing project relies on the soft, powdery look of the pink beads to make the transparent accents truly pop.
Detailed Instructions
Materials
- 8mm matte pink round beads (polymer clay or coated acrylic)
- 8mm clear round beads (quartz, glass, or resin)
- Strong clear elastic cord (0.8mm or 1mm recommended)
- Super glue or jewelry cement (e.g., E6000)
- Beading needle (optional but helpful)
- Scissors
- Measuring tape
Step 1: Measurement and Prep
-
Measure your wrist:
Wrap a measuring tape comfortably around your wrist where you want the bracelet to sit. Note the measurement. -
Calculate bead length:
Add about 0.5 to 1 inch to your wrist measurement depending on how loose you want the fit. This is your target length. -
Cut the elastic:
Cut a piece of elastic cord about 10-12 inches long. I always prefer to have plenty of excess cord to make tying the knot easier later. -
Pre-stretch the cord:
Giving your elastic a few gentle tugs before you start prevents the bracelet from stretching out and becoming loose after the first few wears.
Step 2: Stringing the Design
-
Secure the end:
Place a piece of tape or a bead stopper on one end of your elastic so beads don’t slide off as you work. -
Start with the focus:
Begin by stringing the three clear beads first. These will act as the focal point of the bracelet. -
Add the matte pink beads:
String the matte pink beads onto the cord one by one following the clear section. Continue adding them until you reach your target length. -
Check the fit:
Wrap the unfinished strand around your wrist to verify the size. The ends should meet comfortably without gaps, but not be tight. -
Verify the pattern:
Ensure all your pink beads are consistent in color and that the three clear beads are grouped together solidly.
Knot Security
Use a flexible jewelry glue like GS Hypo Cement. It has a pinpoint applicator perfect for tiny knots and won’t make the cord brittle.
Step 3: Finishing the Bracelet
-
Prepare to knot:
Remove the tape or bead stopper carefully while holding both ends of the elastic securely. -
Tie the first knot:
Cross the ends and tie a simple overhand knot. Pull it tight, but be careful not to snap the elastic. -
Tie a surgeon’s knot:
For the second knot, loop the end through twice before pulling tight. This extra loop creates friction that holds the elastic significantly better. -
Secure with glue:
Dab a tiny drop of super glue or jewelry cement directly onto the knot. Let it tack up for a moment. -
Hide the knot:
While the glue is still slightly wet, gently pull the elastic so the knot slides inside the hole of one of the adjacent beads. -
Final trim:
Once the knot is hidden and the glue is dry, trim the excess elastic tails as close to the bead hole as possible with sharp scissors.
Add a Little Sparkle
Place thin silver or gold spacer discs between the clear beads and the pink ones to frame the focal section elegantly.
Wear your new bracelet solo for a minimalist statement or stack it with others for a textured look
Pink Checkerboard Tile Bracelet
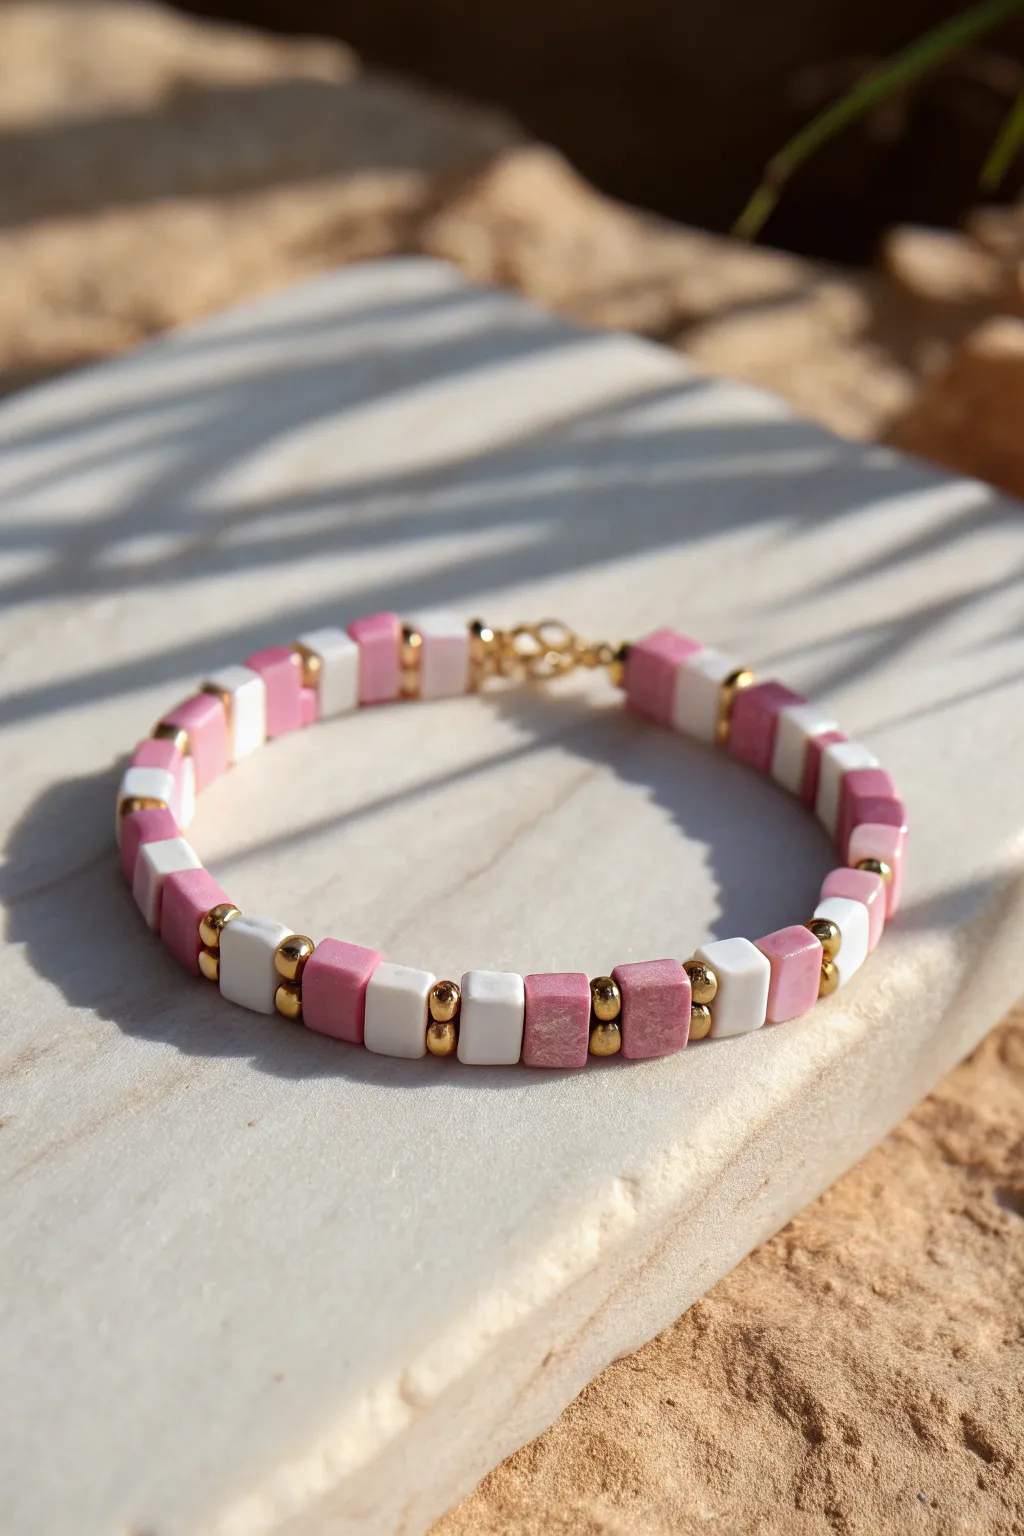
Embrace a chic, modern aesthetic with this pink checkerboard tile bracelet, featuring alternating square beads and elegant gold accents. The mix of soft pink, mauve, and white tiles creates a sophisticated palette that elevates the classic clay bead trend.
Step-by-Step
Materials
- Square tile beads (6mm or similar) in white
- Square tile beads in light pink
- Square tile beads in mauve or dusty rose
- Small round gold spacer beads (approx. 2-3mm)
- Small gold crimp beads
- Gold finish lobster clasp and jump ring
- Elastic beading cord or beading wire
Step 1: Planning and Preparation
-
Measure your wrist:
Start by wrapping a measuring tape comfortably around your wrist to determine the desired length, adding about half an inch for a comfortable fit. -
Cut the cord:
Cut a length of elastic cord or wire about 10-12 inches long. This extra length makes it much easier to tie knots or attach clasps later without fumbling. -
Pre-stretch elastic:
If you are using elastic cord, give it a few gentle tugs to pre-stretch it. I find this helps prevent the bracelet from loosening up after the first few wears. -
Anchor the end:
Place a piece of tape or a bead stopper on one end of your cord so your beads don’t slide off while you are working.
Gaps Appearing?
If gaps appear between tiles, your cord might be too thin for the bead holes. Use a thicker elastic (0.8mm+) or double up your string for a tighter, cleaner fit.
Step 2: Creating the Pattern
-
String the first gold spacers:
Begin your pattern by threading two small round gold spacer beads onto the cord. -
Thread the first tile block:
Add one mauve (darker pink) square tile bead, followed by one white square tile bead. -
Repeat gold spacers:
Slide on another set of two gold spacer beads. These dual spacers act as decorative dividers between your tile blocks. -
Thread the second tile block:
Now, thread on a mauve square bead followed by a white square bead again, continuing this color pairing. -
Create the alternating sequence:
For variety, you can alternate between mauve/white blocks and light pink/white blocks, or simply mix the pink shades randomly for a more organic look shown in the inspiration. -
Check density:
Ensure the beads sit flush against each other but aren’t too tight, which can cause the bracelet to kink. -
Continue the pattern:
Repeat the sequence: two gold spacers, then two square tiles. Continue until the beaded section reaches your desired wrist length. -
Verify sizing:
Wrap the unfinished strand around your wrist to double-check the fit before you proceed to closing it off.
Make It Luxe
Swap the dual gold spacers for tiny freshwater pearls or faceted crystal rondelles between the tile blocks to give the bracelet a softer, more romantic texture.
Step 3: Finishing Touches
-
Prepare for closure:
If using elastic, remove the tape/stopper. If using wire, thread a crimp bead onto one end. -
Add the hardware:
Thread the wire through the loop of the lobster clasp, then loop it back through the crimp bead. -
Secure the crimp:
Use flat-nose pliers to flattened the crimp bead firmly, securing the wire. Trim the excess wire tail close to the bead. -
Finish the other end:
Repeat the crimping process on the other end of the bracelet, attaching a jump ring instead of the clasp. -
Alternative knot method:
If you used elastic cord, tie a strong surgeon’s knot (right over left, left over right), pull it tight, and secure it with a tiny dab of jewelry glue before trimming the ends.
Now you have a stylish, geometrically pleasing accessory perfect for stacking or wearing solo
Pink Bow-Inspired Bracelet With a Center Charm
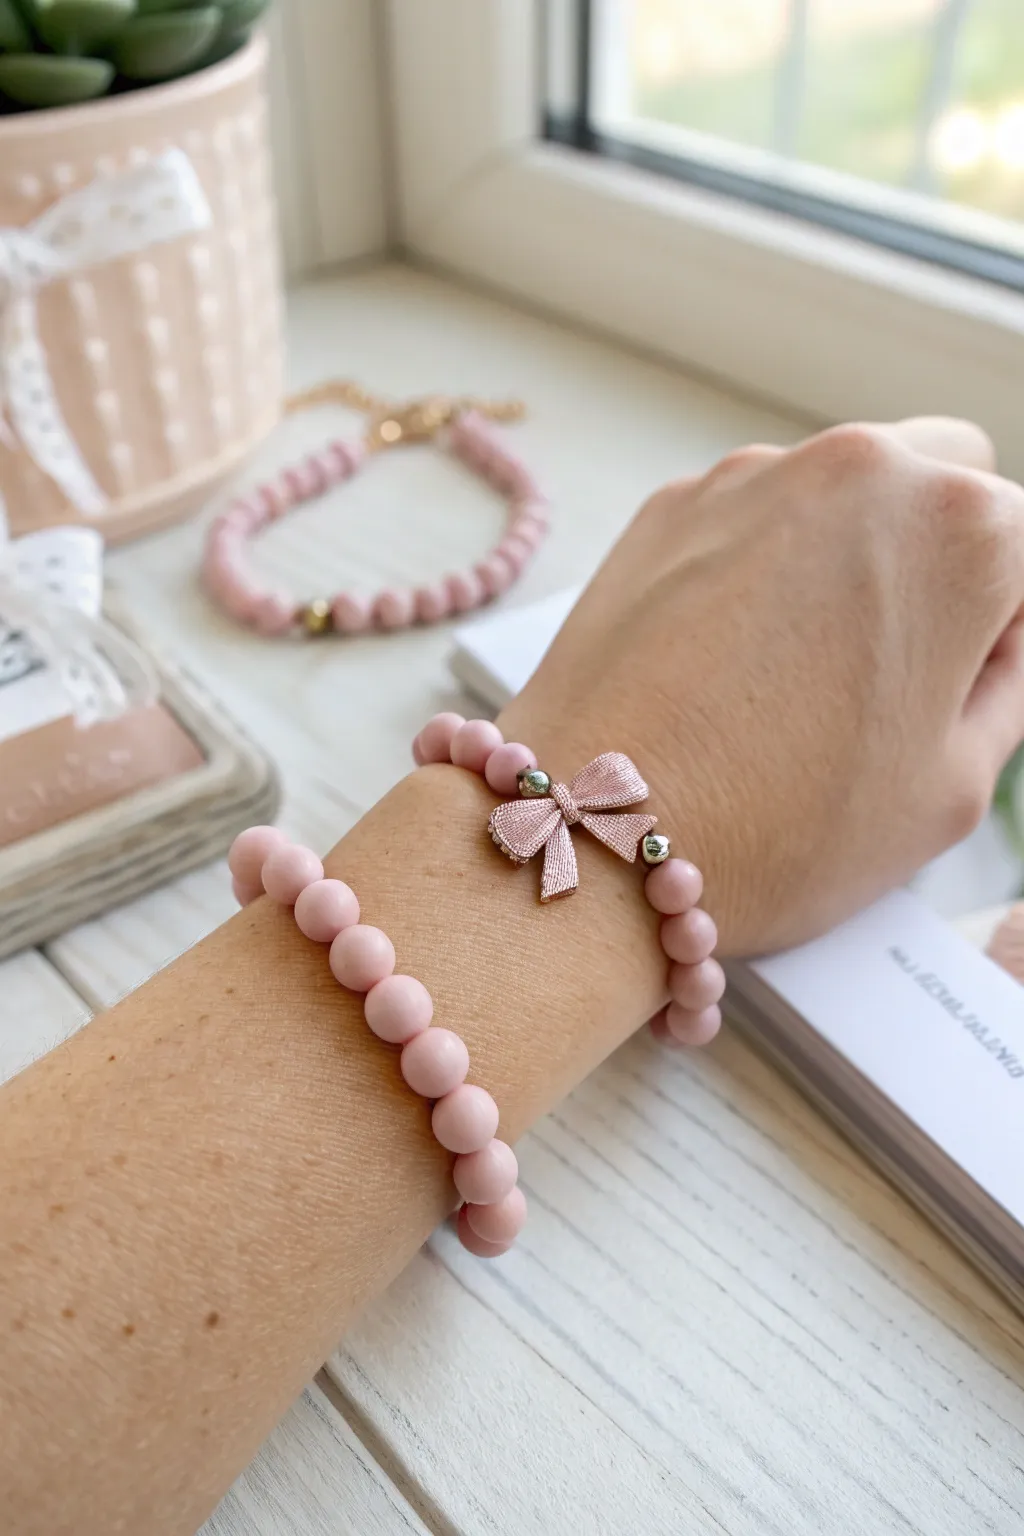
This sweet and simple bracelet design combines the soft texture of matte clay beads with a charming metallic bow accent. It creates a darling accessory that feels both playful and elegant, perfect for stacking or wearing as a dainty statement piece.
How-To Guide
Materials
- Matte pink round beads (approx. 8mm, clay or polymer)
- Small pink textured bow charm with horizontal hole
- Two silver metallic sphere spacer beads (approx. 4mm)
- Strong elastic stretch cord (0.8mm recommended)
- Jewelry glue or clear nail polish
- Scissors
- Bead stopper or tape
- Measuring tape
Step 1: Preparation & Sizing
-
Measure your wrist:
Begin by wrapping a measuring tape comfortably around your wrist where you want the bracelet to sit. Note the measurement and add about half an inch to ensure a comfortable fit that isn’t too tight. -
Cut the cord:
Cut a piece of your elastic stretch cord to a length of about 10-12 inches. I always prefer to have a generous amount of excess cord; it makes the final knotting process significantly less frustrating. -
Pre-stretch the elastic:
Gently pull on the ends of the elastic cord several times to pre-stretch it. This crucial step helps prevent the finished bracelet from sagging or loosening up immediately after you wear it. -
Secure the end:
Attach a bead stopper or simply place a piece of tape folded over one end of the cord. This creates a safety barrier so your beads don’t slide right off while you are working.
Hiding the Hardware
If the hole of your pink bead is too small to hide the knot, try hiding it inside the larger hollow space inside the metallic bow charm.
Step 2: Creating the Centerpiece
-
String the first spacer:
Take the free end of your cord and thread on one of the small silver metallic spacer beads. Let it slide all the way down to your stopper. -
Add the bow charm:
Thread your cord through the horizontal channel of the pink textured bow charm. Ensure the bow is facing the correct direction relative to how you want it to lay against the wrist. -
Add the second spacer:
Immediately follow the bow charm with your second silver metallic spacer bead. This brackets the bow, giving it a polished, professional look and separating it slightly from the matte pink beads. -
Center the design:
Move this three-piece assembly (spacer, bow, spacer) to the approximate middle of your cord to help you visualize the symmetry as you add the rest of the beads.
Stacking Style
Make a second bracelet using just the matte pink beads without the charm to create the trendy stacked look seen in the photo.
Step 3: Beading the Band
-
Count your beads:
Estimate how many pink matte beads you will need to fill the rest of the length based on your initial measurement. Divide this number by two. -
Bead the first side:
Thread that first half of the pink matte beads onto the right side of the bow assembly. Slide them down until they sit flush against the silver spacer. -
Bead the second side:
Thread the remaining half of the pink beads onto the left side of the bow assembly. This ensures your charm stays centered on the bracelet. -
Check the fit:
Carefully pick up the bracelet by holding both loose ends of the cord. Wrap it around your wrist to check the size. Add or remove pink beads symmetrically if adjustments are needed.
Step 4: Finishing Touches
-
Prepare to knot:
Once the size is perfect, remove the bead stopper or tape. Bring the two ends of the elastic together, ensuring there are no gaps between the beads. -
Tie the first knot:
Cross the right cord over the left and pull it through to make a simple overhand knot. Pull it tight to bring the beads snugly together. -
Tie a surgeon’s knot:
For extra security, tie a surgeon’s knot next. Loop the cord through the knot twice before pulling it tight. This creates friction that holds the elastic much better than a standard knot. -
Secure with glue:
Apply a tiny dab of jewelry glue or clear nail polish directly onto the knot. Let this dry for a moment while holding the tension; this prevents the knot from slipping undone over time. -
Hide the knot:
Trim the excess elastic cord close to the knot (but not too close!). Gently pull the bracelet so the knot slides inside the hole of the nearest pink bead to conceal it.
Now you have a charming accessory ready to add a touch of pink sweetness to your outfit
Pink Galaxy Mix With Dark Accents

Capture the magic of a nebula with this stunning bracelet that blends vibrant hot pinks, soft roses, and mysterious dark galaxy tones. The mix of textures—from smooth matte finishes to sparkling accents—creates a tactile piece that feels as good as it looks.
Step-by-Step
Materials
- Various 8mm-10mm beads in shades of pink: hot pink matte, light pink marble, textured glittery purple
- 8mm-10mm black or dark grey beads (matte onyx or dark galaxy style)
- Silver daisy spacers or rondelle spacers
- Textured lava beads in dyed pink or purple
- Elastic clear stretch cord (0.7mm or 0.8mm)
- Bead design board or soft cloth
- Jewelry glue or clear nail polish
- Scissors
Step 1: Planning and Sorting
-
Assess your cosmos:
Begin by laying out all your bead varieties on a bead board or a soft towel. You want a mix of textures: smooth matte rounds, textured ‘sugar’ or lava-style beads, and swirled galaxy beads. -
Establish a pattern:
This bracelet relies on a semi-random but balanced look. I like to group similar colors together but alternate the textures to keep the eye moving. -
Color blocking:
Notice the design uses small clusters. Plan to place a dark bead next to a light pink one, followed by a bright fuchsia one.
Step 2: Stringing the Core
-
Prepare the cord:
Cut a piece of elastic cord about 10-12 inches long. This generous length makes tying the final knot much easier without fumbling. -
Pre-stretch the elastic:
Give your cord a few gentle tugs before stringing. This prevents the bracelet from loosening up significantly after the first few wears. -
Start with a focal section:
Begin stringing with your ‘feature’ focal point. In the image, this is the section with distinct silver spacers. -
Add first silver spacer:
Thread a silver daisy spacer onto the cord. -
Add the central bead:
Slide on a smooth, hot pink round bead. This smooth texture contrasts beautifully with the metal. -
Cap the focal bead:
Add a second silver daisy spacer immediately after the pink bead to frame it. -
Transition texture:
Next, add a dark, galaxy-style bead (black with purple specks) or a deep purple textured bead next to the spacer combination.
Knot Security
If the bead hole is too small to hide the knot, simply trim the ends very short and dab clear polish on the knot to keep it from fraying or slipping.
Step 3: Building the Circle
-
Continue the pattern:
Move on to the next section. String a textured pink bead (like a sugar bead or dyed lava stone) followed by a smooth lighter pink bead. -
Create the second focal point:
About one-third of the way around, recreate the spacer detail. Thread: Spacer -> Smooth Rose Bead -> Spacer. -
Fill in the back:
String the remaining beads, mixing dark violets and blacks amongst the pinks. Keep checking the length against your wrist. -
Create the third focal point:
Add the final spacer set: Spacer -> Deep Pink/Magenta Bead -> Spacer. This creates a balanced look with three metallic highlights around the circle. -
Check the fit:
Wrap the strand around your wrist. The beads should touch comfortably without gaps, but not feel tight.
Texture Twist
Add a drop of essential oil to any porous lava beads used in the mix to turn your galaxy bracelet into a wearable aromatherapy diffuser.
Step 4: Finishing
-
Prepare the knot:
Bring both ends of the elastic together carefully. -
Tie the knot:
Tie a surgeon’s knot (right over left, left over right loops) and pull it tight. You should feel the elastic stretch as you secure it. -
Cement the knot:
Here I prefer to add a tiny drop of jewelry glue or clear nail polish directly onto the knot for extra security. -
Hide the work:
Before the glue fully hardens, gently tug the elastic so the knot slides inside the hole of the nearest large bead. -
Trim excess:
Once the glue is dry, use your scissors to trim the remaining tails of the elastic cord close to the bead.
Now you have a cosmic accessory that balances bold energy with mysterious dark tones, ready to wear.
Shimmery Pink Party Bracelet With Mixed Metallic Spacers
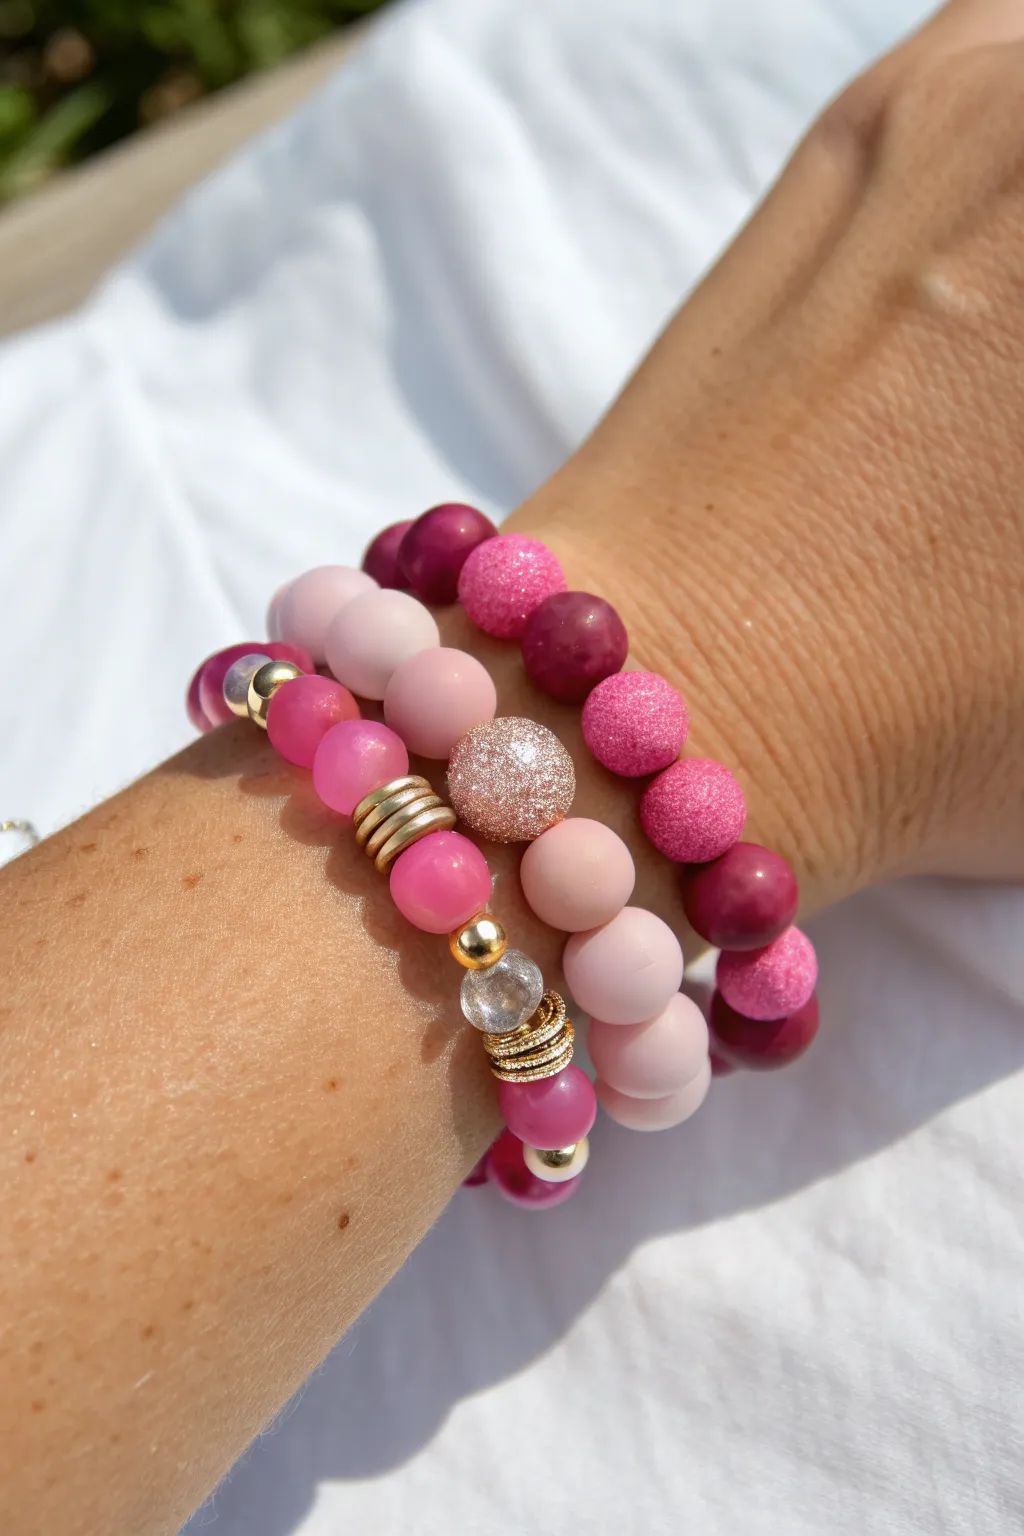
This stunning arm candy combines various shades of pink with contrasting textures like matte, glossy, and disco-ball sparkle to create a playful yet sophisticated look. The addition of gold spacers adds a touch of luxury, making this stack perfect for a party or adding a pop of color to a neutral outfit.
Step-by-Step Guide
Materials
- Elastic cord (0.7mm or 0.8mm transparent stretch jewelers cord)
- Matte pale pink round beads (8mm or 10mm)
- Glossy translucent hot pink beads (8mm)
- Fuchsia ‘sugar’ or ‘stardust’ textured beads (10mm)
- Champagne gold glitter pave round bead (12mm)
- Gold tone disc spacer beads (heishi style)
- Gold tone small round spacer beads (3mm or 4mm)
- Clear quartz or faceted glass accent bead (8mm)
- Jewelry glue or clear nail polish
- Scissors
Step 1: Planning and Measuring
-
Measure your wrist:
Wrap a piece of string or a soft measuring tape around your wrist where you want the bracelets to sit. Add about half an inch to this measurement to ensure the bracelets are comfortable and not too tight. -
Pre-cut your elastic:
Cut three pieces of elastic cord, each about 10-12 inches long. Having extra length makes tying the final knots much easier than struggling with short ends. -
Pre-stretch the cord:
Hold each piece of elastic firmly between your hands and give it a few gentle tugs. This pre-stretching step helps prevent the bracelet from loosening up after the first few times you wear it.
Step 2: Bracelet 1: The Matte Gradient
-
Start the matte strand:
Thread your matte pale pink beads onto the first cord. This bracelet acts as the soft base for the brighter colors. -
Create a focal point:
In the center of your strand, add the large champagne gold glitter pave bead. Flank this bead on either side with a slightly larger matte pink bead if available, or simply continue the pattern. -
Add metallic texture:
On one side of the glitter bead, string on about four or five gold disc spacers in a row. This ‘stack within a stack’ creates a modern, industrial texture contrast against the soft matte beads. -
Finish the strand:
Continue adding matte pink beads until the strand reaches your desired length.
Knot Slipping?
If your elastic knots feel slippery, try roughening the cord ends slightly with sandpaper before tying, or use a square knot followed by a surgeon’s knot for extra grip.
Step 3: Bracelet 2: The Sugar & Spice
-
Pattern the textured beads:
For the second bracelet, focus on the textured ‘sugar’ or ‘stardust’ beads. I like to alternate these with deep fuchsia smooth beads to keep the texture from being overwhelming. -
Mix shades for depth:
Use a mix of dark maroon-pink smooth beads and the lighter bright pink sparkly beads. This color variation adds depth and makes the bracelet look more expensive. -
Check length:
Hold this strand up against the first one to ensure they are roughly the same circumference.
Add a Charm
Personalize the stack by attaching a small gold initial charm or a tiny tassel to the metallic spacer section of the matte pink bracelet for extra movement.
Step 4: Bracelet 3: The Glossy Gold Accent
-
Thread the translucent beads:
String your glossy hot pink translucent beads onto the third cord. These beads capture the light beautifully. -
Insert the crystal element:
Place a single clear faceted glass or quartz bead into the pattern as a focal point. -
Add gold highlighting:
Surround that clear bead with gold disc spacers—use about three or four on one side to mimic the style of the first bracelet. This ties the whole set together visually. -
Include mixed metals:
Add a few small round gold spacer beads randomly or near the crystal section to break up the pink.
Step 5: Finishing Touches
-
Tie the first knot:
Take the ends of your first bracelet and tie a simple overhand knot, pulling it tight against the beads. -
Secure with a surgeon’s knot:
Tie a second knot, but loop the elastic through twice before pulling tight. This is a surgeon’s knot and is very secure. -
Apply adhesive:
Dab a tiny drop of jewelry glue or clear nail polish onto the knot. Let it dry for a few minutes before trimming the excess cord close to the knot. -
Repeat and hide:
Repeat the tying and gluing process for the other two bracelets. If possible, gently tug the knot inside the hole of a neighboring bead to hide it.
Enjoy mixing and matching these pink textures to brighten up your daily look