
I love how a small lump of air-dry clay or polymer clay can turn into something ridiculously cute in one afternoon. Here are my favorite clay creations ideas—mostly small, beginner-friendly projects that feel playful, look great in photos, and actually get used.
Smiley Face Trinket Dishes
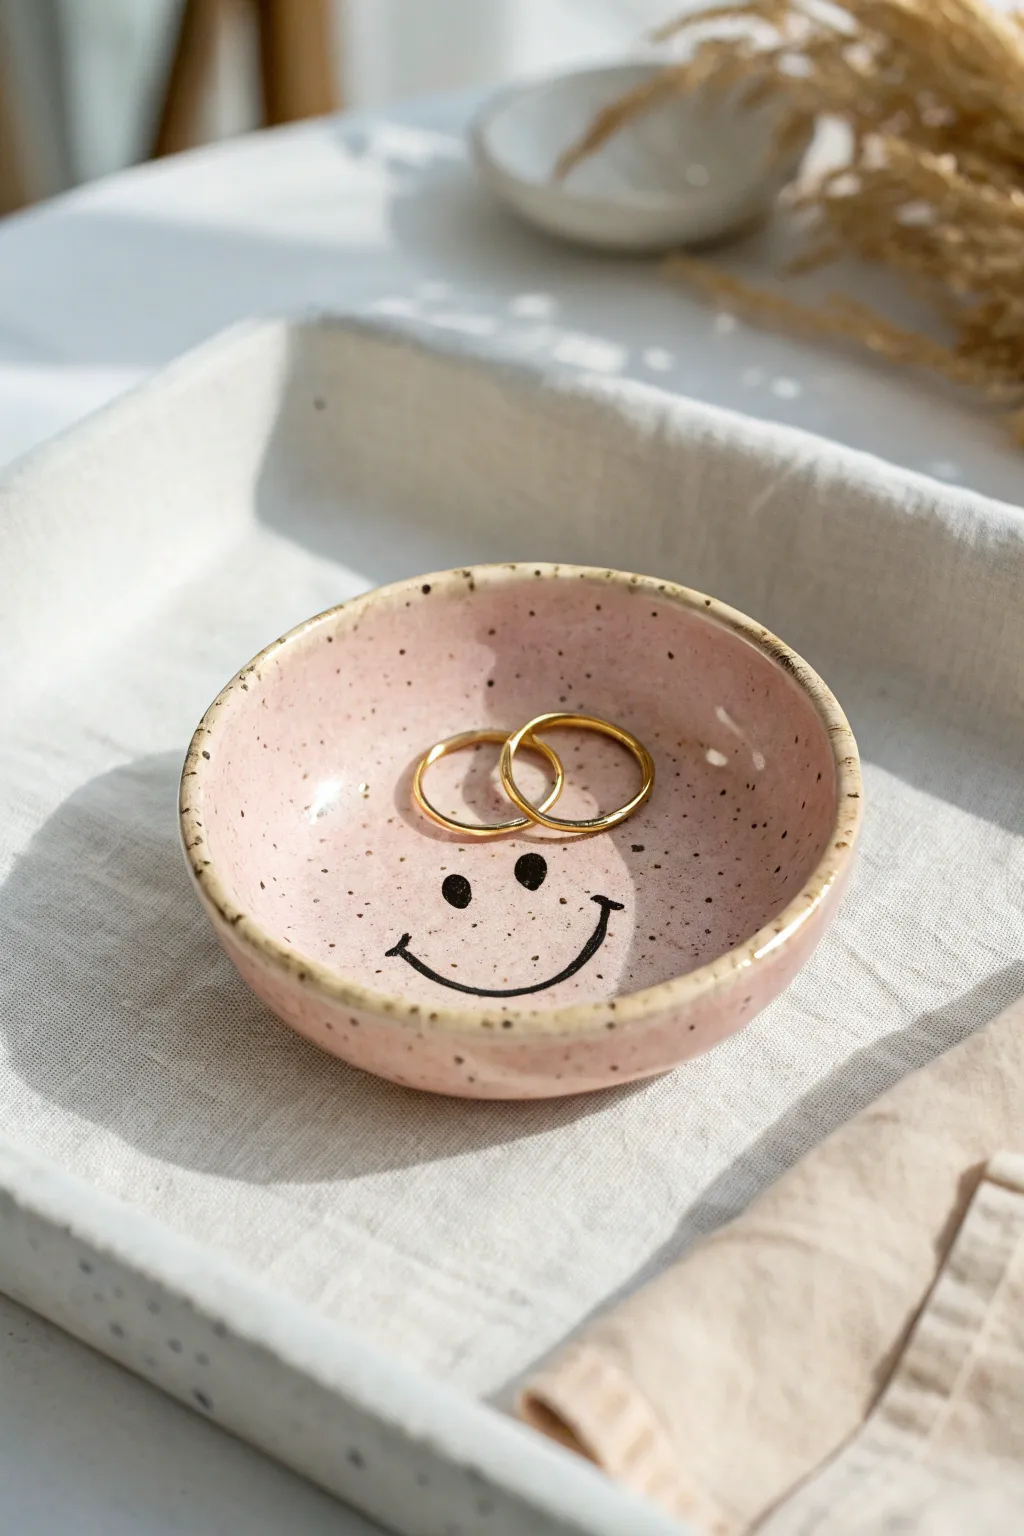
Bring a little joy to your bedside table with this charming pink trinket dish featuring a simple, hand-painted smiley face. Its speckled finish and organic rim give it a trendy, handmade feel perfect for holding your favorite daily jewelry.
Step-by-Step
Materials
- Air-dry clay (white or light grey)
- Rolling pin
- Circular cookie cutter or small bowl (approx. 3-4 inches)
- Small sponge or smoothing tool
- Acrylic paint (Light Pink, Black, Beige/Cream)
- Old toothbrush (for splattering)
- Fine detail paintbrush
- Glossy varnish or sealant (Mod Podge or resin)
- Sandpaper (fine grit)
- Small bowl of water
Step 1: Shaping the Clay
-
Roll the slab:
Start by kneading a ball of air-dry clay to warm it up, then roll it out on a flat surface until it is roughly ¼ inch thick. Try to keep the thickness consistent. -
Cut the circle:
Use your circular cookie cutter or trace around a small bowl to cut a perfect circle from the slab. Remove the excess clay. -
Form the curve:
Gently lift the clay circle and cup it in the palm of your hand. Use your thumbs to press the center down slightly while curving the edges upward to create a shallow bowl shape. -
Rough up the rim:
To mimic the organic look in the photo, don’t make the rim perfectly smooth. Use your fingertips to gently pinch and unevenly flatten the very edge of the rim. -
Smooth the surface:
Dip your finger or a small sponge into water and run it over the inside and outside of the dish to remove any fingerprints or cracks. Be careful not to use too much water, as this can weaken the clay. -
Dry completely:
Set the dish aside to dry for 24-48 hours. I find that flipping it over halfway through the drying process helps the bottom dry evenly.
Step 2: Painting & Speckling
-
Sand imperfections:
Once fully dry, lightly sand any rough patches on the edges with fine-grit sandpaper. Wipe away the dust with a dry cloth. -
Base coat:
Paint the entire inside and outside of the dish with a soft, light pink acrylic paint. You may need two coats to get a solid, opaque color. Let this dry completely. -
Rim detail:
Mix a beige or cream color paint. Using a small brush, gently dab this color along the uneven rim of the dish to highlight the edge, giving it that exposed ceramic look. -
Create the speckles:
Dilute a small amount of black or dark brown paint with water. Dip an old toothbrush into the mixture, aim it at the dish, and run your thumb across the bristles to flick tiny speckles over the pink surface. -
Control the splatter:
Practice the splatter technique on a piece of paper first to gauge the density. You want a fine mist of dots, not large globs. -
Draft the face:
Once the speckles are dry, use a pencil to very lightly sketch the placement of the eyes and the wide smile. Keep the features centered and low in the bowl. -
Paint the smile:
Using your finest detail brush and black paint, carefully trace over your pencil lines. Create two small solid ovals for eyes and a thin, curved line for the mouth with tiny perpendicular lines at the ends.
Clean Lines
If your hand is shaky when painting the smile, try using a black ultra-fine tip paint marker instead of a brush and acrylic paint for better control.
Step 3: Finishing Touches
-
Seal the piece:
protect your paint job, apply a coat of glossy varnish or sealant. This gives the dish a ceramic-like shine and makes it durable enough for holding metal jewelry. -
Wait for cure:
Let the varnish cure according to the bottle’s instructions before placing any rings or trinkets inside.
Level Up
Add real gold leaf to the rim instead of beige paint for a luxurious, gilded finish that sparkles alongside your jewelry.
Enjoy seeing your cheerful creation every time you take off your rings


Mushroom Ring Holders
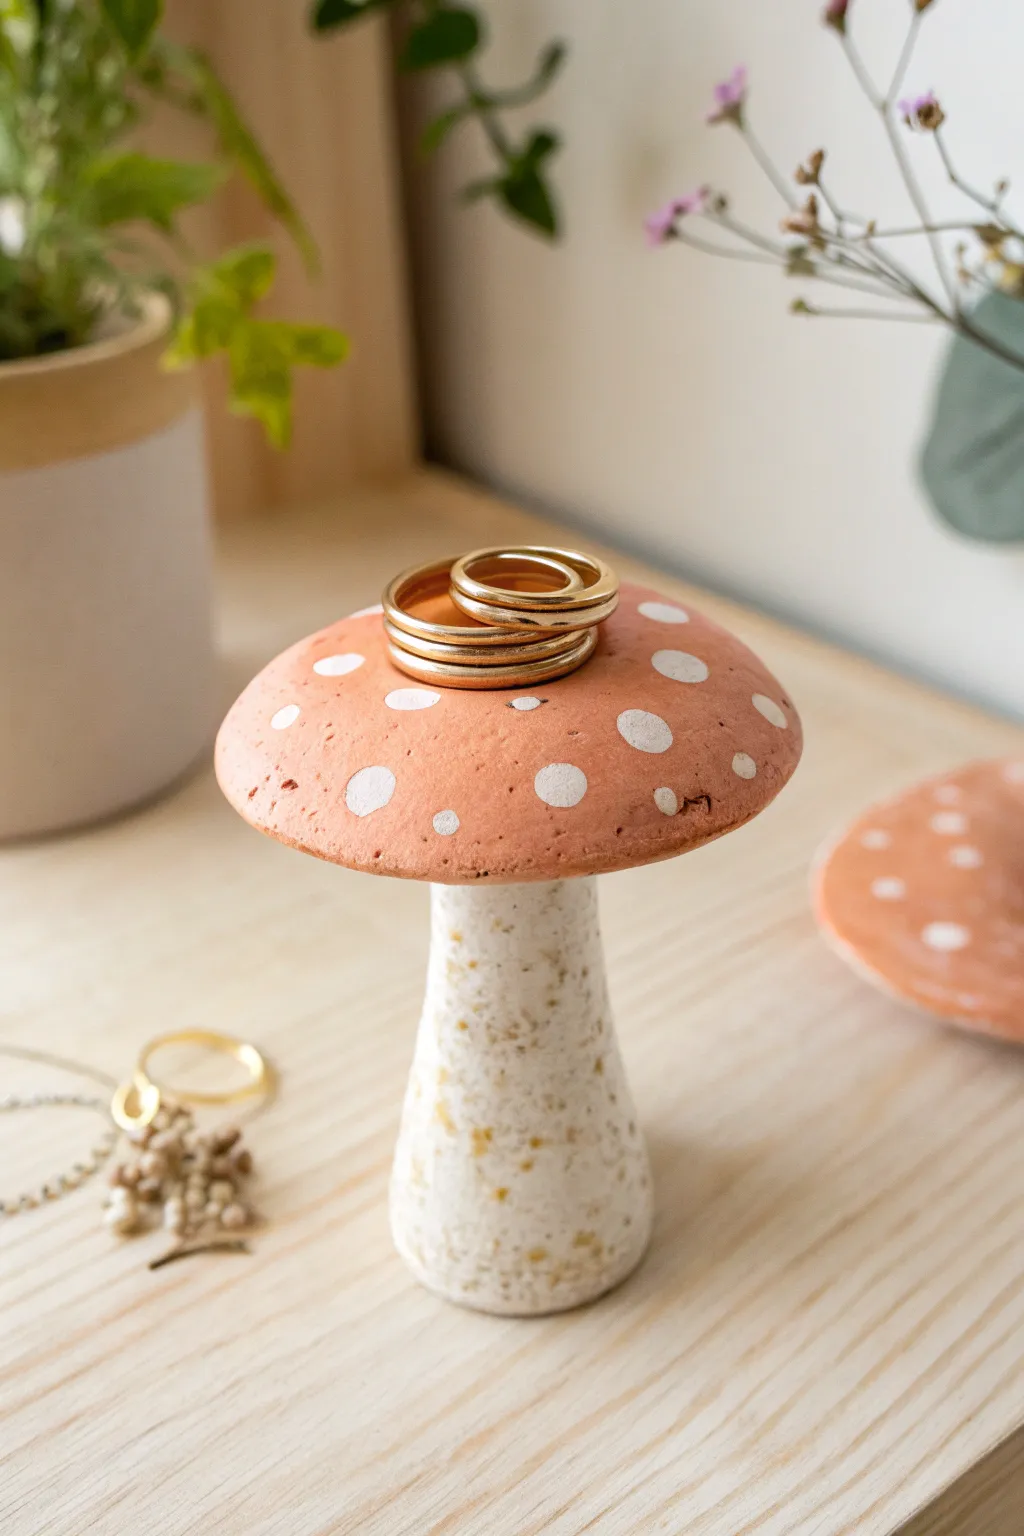
Create a whimsical forest vibe on your vanity with this charming mushroom ring holder. Featuring a soft terra cotta cap with white polka dots and a naturally speckled stem, this functional sculpture keeps your jewelry organized in style.
Step-by-Step Tutorial
Materials
- White polymer clay (approx. 2oz)
- Terra cotta or pink-brown polymer clay (approx. 1.5oz)
- Speckle inclusions: Dried tea leaves, crushed black pepper, or faux granite clay mix
- Rolling pin or acrylic roller
- Small round cutter or circle template (2-3 inches)
- Detailing tool or toothpick
- White acrylic paint
- Small round paintbrush
- Liquid polymer clay (optional, for bonding)
- Oven and baking sheet
- Parchment paper
Step 1: Shaping the Stem
-
Prepare the Speckled Clay:
Begin by conditioning the white polymer clay until soft. To achieve that natural, earthy look seen in the photo, knead in a small pinch of dried tea leaves or crushed black pepper. Alternatively, mix white clay with a small amount of ‘granite’ effect clay. -
Form the Base Shape:
Roll the speckled white clay into a thick log. Taper it slightly so it is wider at the bottom and narrower at the top, resembling a classic mushroom stalk. -
Flatten for Stability:
Gently press the bottom of the stalk against your work surface to create a flat base so the mushroom stands upright without wobbling. -
Smooth the Surface:
Roll the stalk gently between your palms to smooth out any fingerprints, maintaining that gentle conical shape. -
Create a Connection Point:
Slightly flatten the very top tip of the stem where the cap will eventually sit. I like to scratch this area a little with a toothpick to create texture for a better bond.
Natural Speckles
Mix dried spices like coarsely ground pepper or dried oregano into your white clay. It mimics ceramic glaze speckles perfectly without needing special paint.
Step 2: Creating the Cap
-
Condition the Cap Color:
Take your terra cotta or pink-brown clay and condition it until pliable. Roll it into a smooth ball. -
Shape the Dome:
Press the ball gently into your palm to flatten the bottom while keeping the top rounded, forming a thick dome shape. -
Curve the Edges:
Using your thumbs, gently pull and curve the edges of the dome downward to create a slight umbrella shape. The clay should be thick enough to hold its form. -
Check the Size:
Hold the cap over your stem to ensure the proportions look right. The cap should be significantly wider than the stem to hold rings securely. -
Texture the Underside:
Use a needle tool or toothpick to gently scratch the center underside of the cap where it will join the stem.
Drooping Cap?
If the mushroom cap sags while baking, support the edges with cornstarch or small balls of scrap clay covered in foil to hold the umbrella shape.
Step 3: Assembly and Baking
-
Join the Pieces:
Press the cap firmly onto the stem. For extra security, add a drop of liquid polymer clay ‘glue’ between the parts before pressing them together. -
Blend the Seam:
If you want a seamless look underneath, use a silicone tool to drag a tiny bit of the stem clay up onto the underside of the cap, smoothing it out. -
Pre-Bake Inspection:
Give the entire piece a once-over, smoothing out any accidental nail marks. Verify it stands straight. -
Bake:
Place the mushroom on a baking sheet lined with parchment paper. Bake according to your clay package instructions (usually 275°F/135°C for 15-30 minutes depending on thickness). -
Cool Down:
Allow the mushroom to cool completely in the oven or on a wire rack before handling. The clay is fragile while hot.
Step 4: Painting Details
-
Prepare the Paint:
Squeeze a small amount of white acrylic paint onto a palette. -
Add Polka Dots:
Using a small round brush, dab white dots onto the terra cotta cap. Vary the pressure to create slightly different sizes for an organic look. -
Layer the Paint:
Let the first coat dry. Since terra cotta is a darker base, I find adding a second coat of white paint makes the dots look crisp and bright. -
Final Seal (Optional):
If you want extra durability, brush a thin layer of matte varnish over the painted cap once the dots are fully dry.
Once dry, stack your favorite rings on top and enjoy this adorable piece of handmade decor


Mini Pinch-Pot Planters With Cute Faces
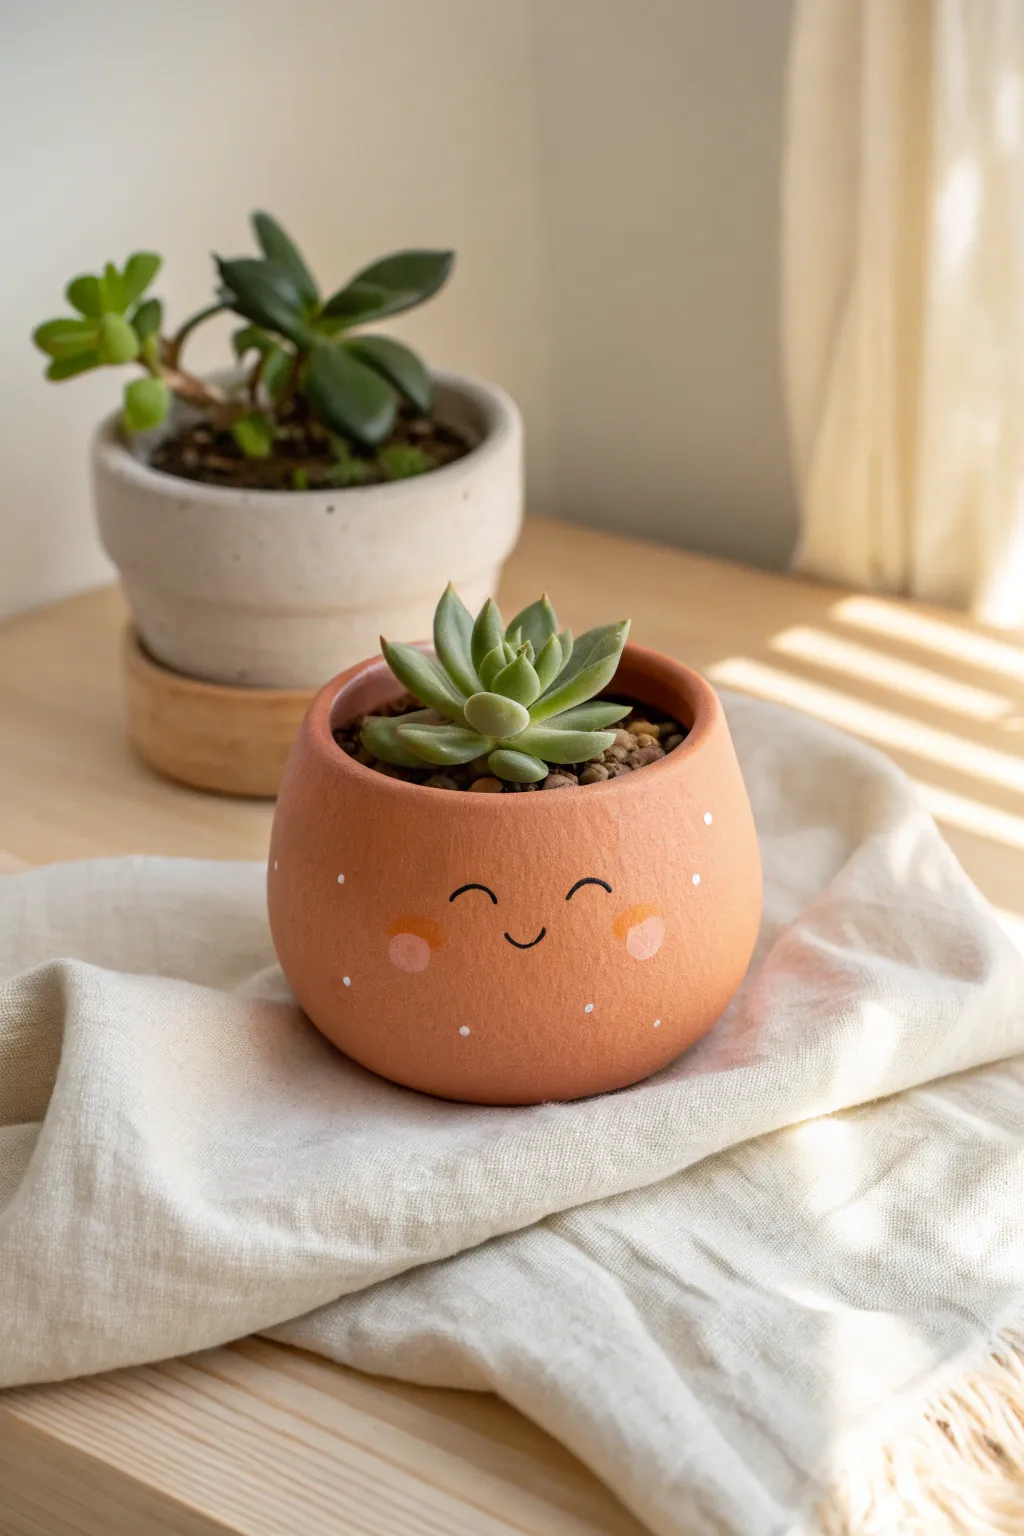
Bring a little joy to your windowsill with these adorable terracotta-style pinch pots featuring sweet, smiling faces. Their rounded, organic shape and blushing cheeks make them the perfect home for your favorite mini succulents.
Detailed Instructions
Materials
- Terracotta-colored air-dry clay or polymer clay
- Rolling pin (optional)
- Small cup of water (for smoothing)
- Black acrylic paint or fine-tip permanent marker
- Pink or coral acrylic paint
- White acrylic paint
- Small round paintbrush (size 0 or 1)
- Detail brush or dotting tool
- Matte varnish or sealant (optional but recommended)
Step 1: Shaping the Pot
-
Prepare the clay:
Start with a ball of terracotta-colored clay about the size of a tangerine. Knead it in your hands until it’s warm, pliable, and free of cracks. -
Form the base:
Hold the ball in one hand and firmly press your thumb into the center, stopping before you push all the way through the bottom. -
Pinch the walls:
Using your thumb on the inside and fingers on the outside, gently pinch and rotate the clay. Work your way from the bottom up to thin out the walls evenly. -
Shape the curve:
Aim for a rounded, slightly bulbous shape rather than straight sides. Gently cup the pot in your palms to encourage a spherical bottom with a stable flat base. -
Smooth the surface:
If you notice cracks forming, dip your finger in a tiny bit of water and smooth them over immediately. A seamless surface is key for the painted face later. -
Refine the rim:
Tap the rim gently to even it out, or slice off the very top with a clay wire if you want a cleaner edge, though a soft, hand-shaped rim adds character. -
Dry or bake:
Follow the instructions for your specific clay. If using air-dry clay, let it sit for 24-48 hours. If using polymer clay, bake according to the package directions and let it cool completely.
Cracked Clay?
If air-dry clay cracks while drying, mix a tiny bit of fresh clay with water to make a paste (slip) and fill in the handsome scars.
Step 2: Painting the Face
-
Plan placement:
Look at your dried pot and choose the smoothest side for the face. Visualizing where the eyes and mouth will sit helps ensure symmetry. -
Paint the eyes:
Using a fine-tip brush and black acrylic paint, create two small, upward-curving arches for the closed eyes. Keep them widely spaced for a kawaii look. -
Add the smile:
Paint a tiny, simple ‘u’ shape directly between and slightly below the eyes for the mouth. -
Blush the cheeks:
Mix a soft coral or pink paint. Dip your finger or a round brush into the paint, dab off the excess, and gently stamp a circle on each cheek, just outside the eyes. -
Add freckles:
Dip a detail brush or a toothpick into white paint. Add tiny, delicate dots scattered around the cheeks and forehead area. -
Finishing touches:
Once the paint is fully dry, apply a coat of matte varnish to protect your design, especially if you plan to water a real plant inside. -
Planting:
Fill your new friend with cactus soil and tuck in a small Echeveria or similar rosette succulent to complete the look.
Accessorize It
Before drying, mold tiny clay ears or little feet to the bottom of the pot to turn your planter into a bear, cat, or made-up creature.
Enjoy the cheerful company of your new little green friend


Tiny Bud Vases That Double as Magnets
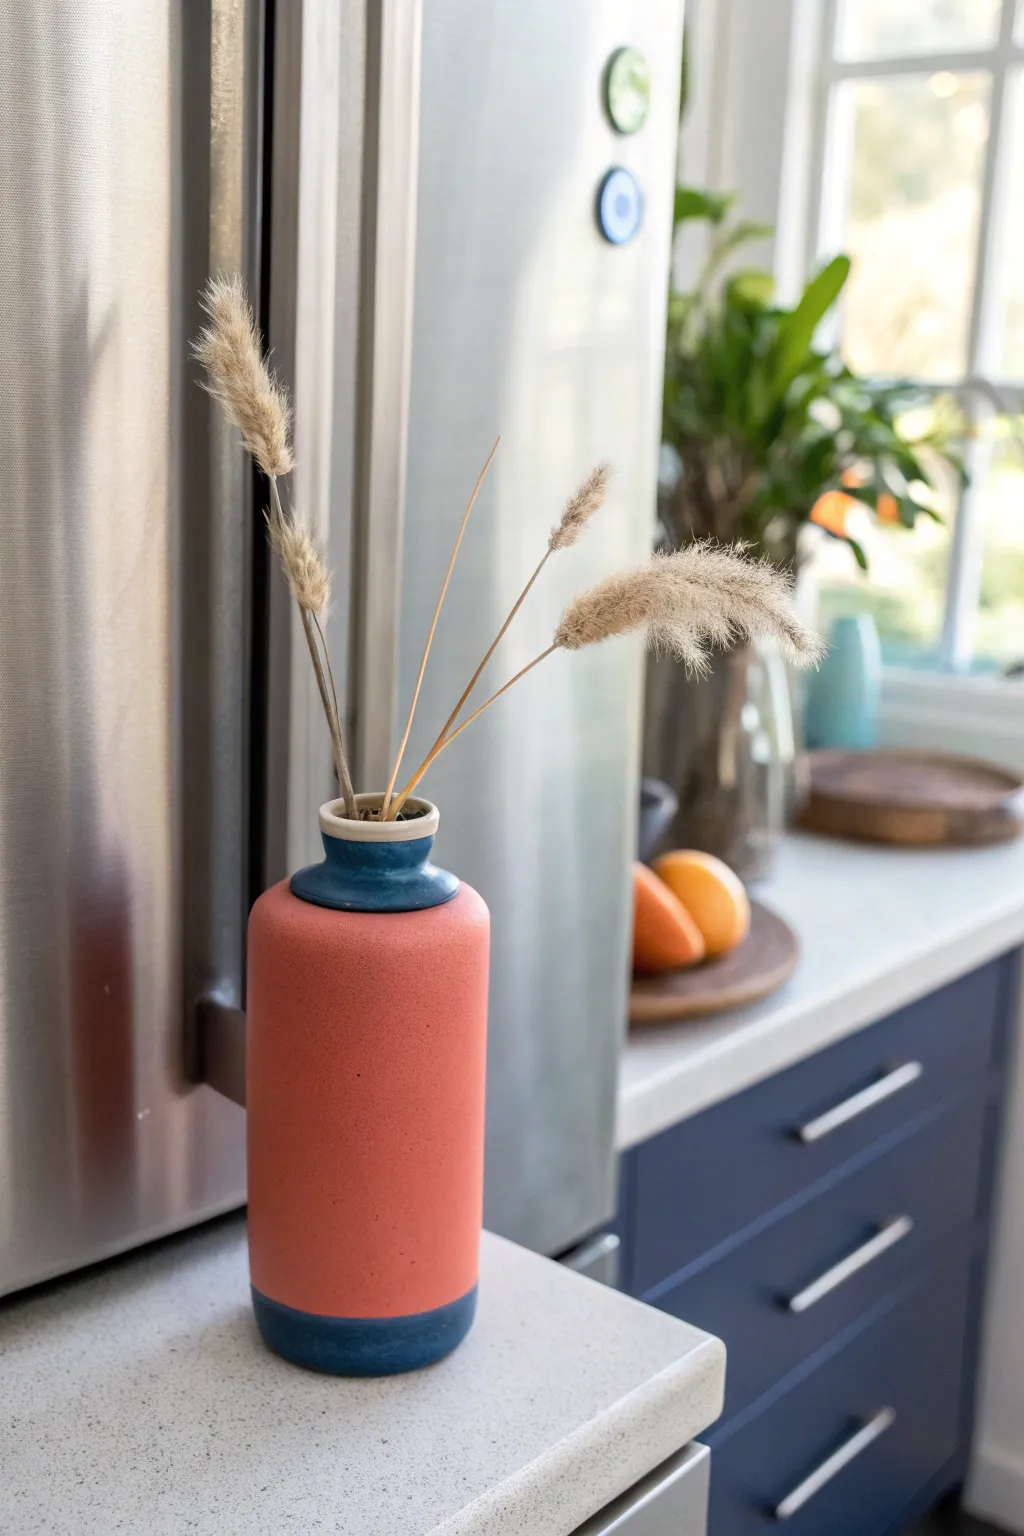
Bring a pop of color to your kitchen with this clever dual-purpose creation that holds dried blooms right on your fridge door. The design features a textured coral-pink body sandwiched between a deep navy blue rim and base for a striking modern look.
Step-by-Step Tutorial
Materials
- Polymer clay (Coral Pink/Terracotta)
- Polymer clay (Navy Blue)
- Neodymium magnets (strong rare-earth magnets)
- Clay roller or pasta machine
- Small round clay cutter or craft knife
- Liquid polymer clay (optional but helpful)
- Fine-grit sandpaper
- Dried grass or small faux flower stems
- Super glue (cyanoacrylate)
- Texture sponge or toothbrush (optional)
Step 1: Forming the Base Components
-
Condition the coral clay:
Begin by thoroughly conditioning your coral pink polymer clay until it is soft and pliable. Roll it into a smooth cylinder, approximately 3 inches tall and 1.5 inches wide. -
Add texture (optional):
The vase in the photo has a lovely, slightly gritty texture. You can achieve this by gently pressing a clean texture sponge or even an old toothbrush against the surface of the cylinder, or mix in a tiny amount of dried coffee grounds or black pepper for speckles before rolling. -
Hollow the center:
Use a small, round tool to create a deep hole down the center of the cylinder for the stems. Don’t go all the way through; leave about a quarter-inch at the bottom. -
Prepare the blue clay:
Condition the navy blue clay. Roll out a thick sheet, about 1/4 inch thick, to create the top and bottom accents. -
Cut the base disc:
Cut a circle from the blue clay that matches the diameter of your coral cylinder. Smooth the edges with your finger to round them slightly. -
Create the top rim:
Form a second, smaller blue piece for the neck. Roll a small ball of blue clay, flatten it slightly into a thick disc, and poke a hole through the center that matches the opening in your coral cylinder.
Step 2: Assembly and Magnet Integration
-
Attach the base:
Press the blue base disc firmly onto the bottom of the coral cylinder. You can use a dab of liquid polymer clay between the layers to ensure a permanent bond during baking. -
Attach the rim:
Place the blue rim piece on top of the cylinder, aligning the holes perfectly. Press down gently to adhere, smoothing the seam slightly with your finger or a clay tool so it looks like a distinct, attached piece rather than blended. -
Create the magnet recess:
Turn the vase to its back side. Press your neodymium magnet into the clay created a recessed spot where it will live. I prefer to make this indentation now but remove the magnet before baking to avoid weakening its magnetic pull with heat. -
Flatten the back:
Ensure the back surface around the magnet hole is perfectly flat. If the vase is round, shave off a thin slice from the back to create a flat plane that will sit flush against the fridge. -
Refine the shape:
Look over the piece and smooth out any accidental fingerprints. If you want the speckled look to be more prominent, lightly buff the surface with a piece of denim.
Sliding down the fridge?
If your vase slides down, the clay is too heavy for a single magnet. Add a second magnet recess below the first one for extra grip.
Step 3: Baking and Finishing
-
Bake the clay:
Place your vase on a ceramic tile or baking sheet. Bake according to the manufacturer’s instructions for your specific brand of polymer clay, usually around 275°F (135°C) for 30 minutes per 1/4 inch of thickness. -
Cool down:
Allow the piece to cool completely in the oven with the door slightly ajar. This gradual cooling helps prevent cracking. -
Attach the magnet:
Once cool, place a drop of strong super glue into the recessed spot on the back created earlier. Press the magnet in firmly and let it cure fully. -
Sand the rim (optional):
The image shows a slight white/unpainted edge on the very top lip. To mimic this, lightly sand the very top of the blue rim to reveal a possibly lighter core or just to give it a weathered, ceramic feel. -
Style and mount:
Insert your dried bunny tail grasses or wheat stems. The vase is not watertight, so stick to dried botanicals only.
Stone effect hack
Mix black pepper or embossing powder into the coral clay before shaping. After baking, sand lightly to reveal the particles for a realistic stoneware look.
Pop this charming little vessel onto your refrigerator and enjoy a touch of nature every time you reach for a snack

The Complete Guide to Pottery Troubleshooting
Uncover the most common ceramic mistakes—from cracking clay to failed glazes—and learn how to fix them fast.
Wavy Catchall Bowls With Color-Blocked Paint
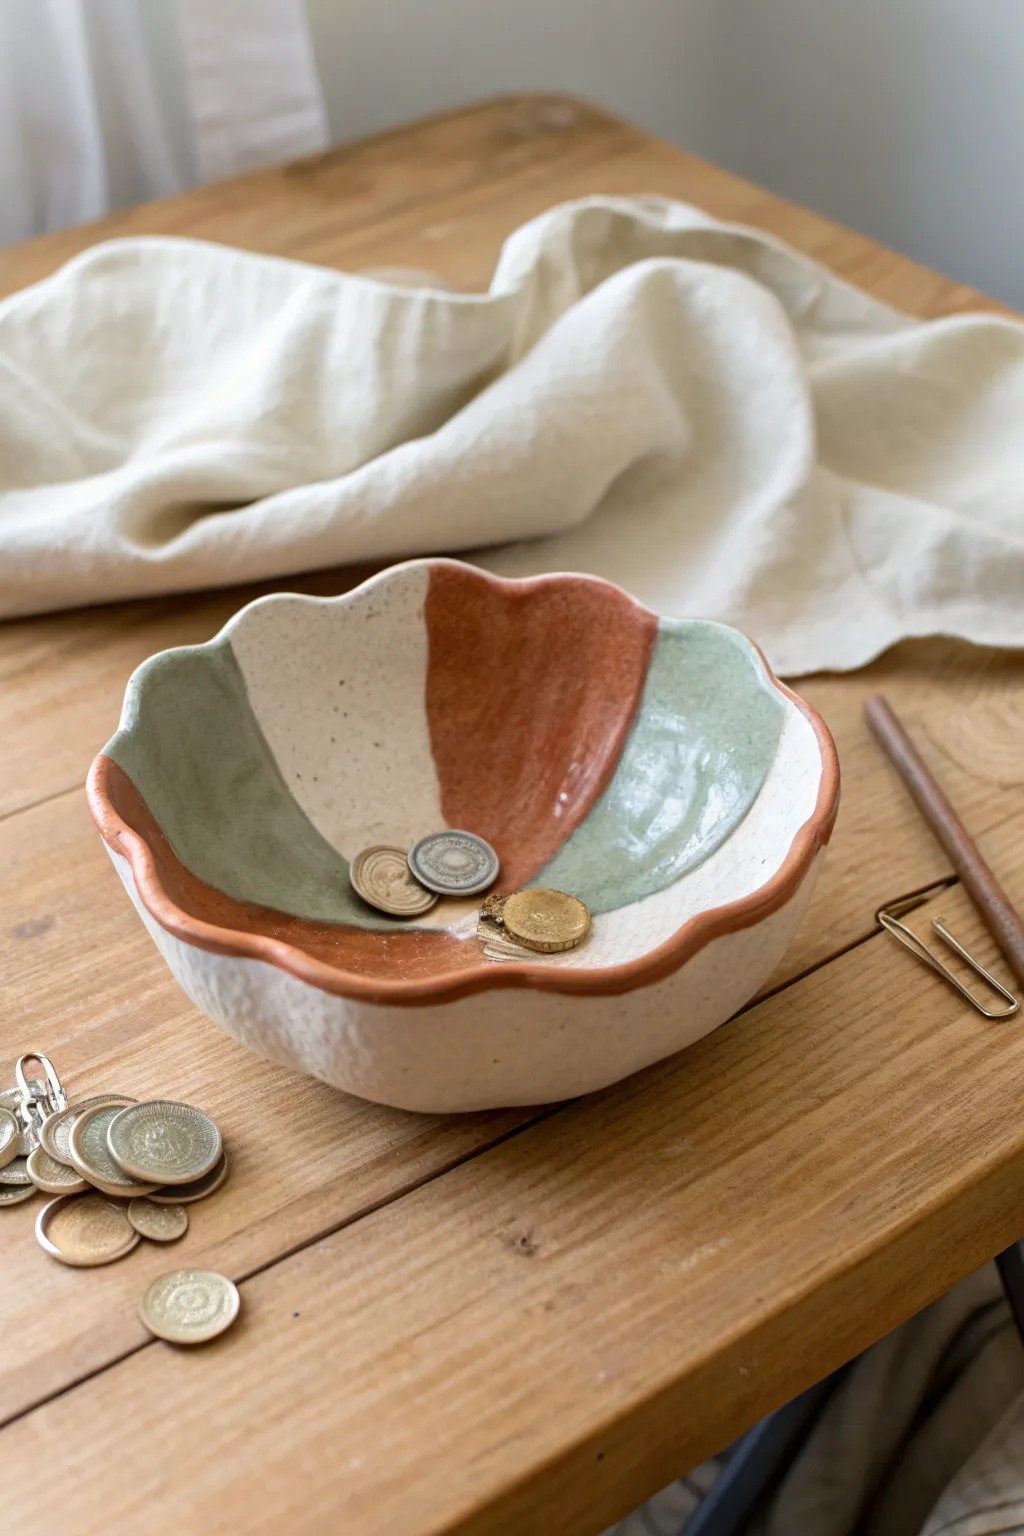
This charming, organically shaped bowl brings a touch of modern earthiness to any side table or dresser. Featuring a soft, scalloped rim and distinct wedges of terracotta and sage green glaze against a speckled cream background, it’s the perfect vessel for holding loose change, keys, or jewelry.
Step-by-Step
Materials
- Air-dry clay (white or cream)
- Rolling pin
- Canvas mat or parchment paper
- Small bowl (for use as a mold/slump mold)
- Fettling knife or craft knife
- Sponge
- Water cup
- Sandpaper (fine grit)
- Acrylic paints (terracotta, sage green, cream/off-white)
- Small flat paintbrush
- Fine detail brush
- Old toothbrush (optional for speckling)
- Matte or satin sealant/varnish
Step 1: Shaping the Clay Base
-
Prepare the slab:
Begin by removing a generous handful of air-dry clay from the package. Knead it briefly to warm it up, then place it on your canvas mat or parchment paper. Using the rolling pin, roll the clay out evenly until it is approximately 1/4 inch thick. Aim for a consistent thickness to prevent cracking later. -
Cut the circle:
Find a bowl or round object slightly larger than your desired finished size to use as a template. Place it upside down on the clay slab and trace around it with a needle tool or craft knife to cut out a perfect circle. -
Create the waves:
With the clay circle flat on the table, use your fingers to gently pinch and lift the edges at regular intervals. I find that using my thumb inside and two fingers outside creates the most natural scalloped wave. Don’t overthink it; irregularity adds charm. -
Form the bowl shape:
Carefully lift your scalloped clay circle and drape it inside a small bowl lined with plastic wrap or parchment paper. This ‘slump mold’ method helps it hold its concave shape while drying. Gently press the center down to ensure it has a flat bottom. -
Refine the rim:
Dip your finger in a little water and run it along the wavy rim to smooth out any sharp edges or cracks that formed during shaping. The rim should feel soft and rounded, not cut. -
Dry thoroughly:
Set the bowl aside to dry. Depending on humidity and clay thickness, this can take 24 to 48 hours. Let it dry slowly away from direct heat to prevent warping. Once the top is dry, remove it from the mold and turn it upside down so the bottom can dry completely.
Fixing Cracks
If hairline cracks appear during drying, mix a small amount of fresh clay with water to make a paste (slip). Fill the crack, smooth it over, and let it dry again.
Step 2: Refining and Painting
-
Sand the surface:
Once the clay is bone dry and hard, use fine-grit sandpaper to gently smooth over any bumps or fingerprints. Wipe away the clay dust with a slightly damp sponge or cloth. -
Apply the base coat:
Paint the entire bowl—inside and out—with a cream or off-white acrylic paint. This provides a neutral canvas and seals the porous clay slightly. Let this coat dry completely. -
Sketch the design:
Using a very light pencil touch, mark out your sections inside the bowl. Imagine a pie chart; draw lines from the center out to the valleys of your wavy rim to create distinct wedges. -
Paint the terracotta sections:
Select two opposing wedges for the terracotta color. Using a flat brush, fill these sections in with smooth strokes, being careful to follow the curve of the bowl. Extend the color over the rim just slightly to create a border effect. -
Add the sage green:
Choose two other opposing wedges for the sage green tone. Paint these sections carefully, keeping a steady hand where the colors meet the cream background. Leave some wedges plain cream for contrast. -
Paint the rim:
Take a smaller brush loaded with the terracotta paint and carefully trace along the very top edge of the wavy rim. This defines the shape and ties the color scheme together. -
Add speckles (optional):
To mimic the look of stoneware clay, dip an old toothbrush into slightly watered-down brown or grey paint. Run your thumb over the bristles to flick tiny specks onto the cream sections of the bowl. -
Seal the piece:
Once all paint layers are fully dry, apply a coat of matte or satin varnish. This protects the paint from chipping and gives the bowl a finished, professional ceramic look. -
Final cure:
Allow the varnish to cure according to the bottle instructions before placing any coins or keys inside to ensure the finish doesn’t get tacky or marked.
Clean Lines Pro-Tip
For ultra-crisp lines between color sections, use thin washi tape or painter’s tape to mask off the areas. Press the edges down firmly to stop paint from bleeding.
Enjoy styling your new handmade catchall and watching it organize your daily trinkets.
Pressed-Texture Coasters With Simple Flower Shapes
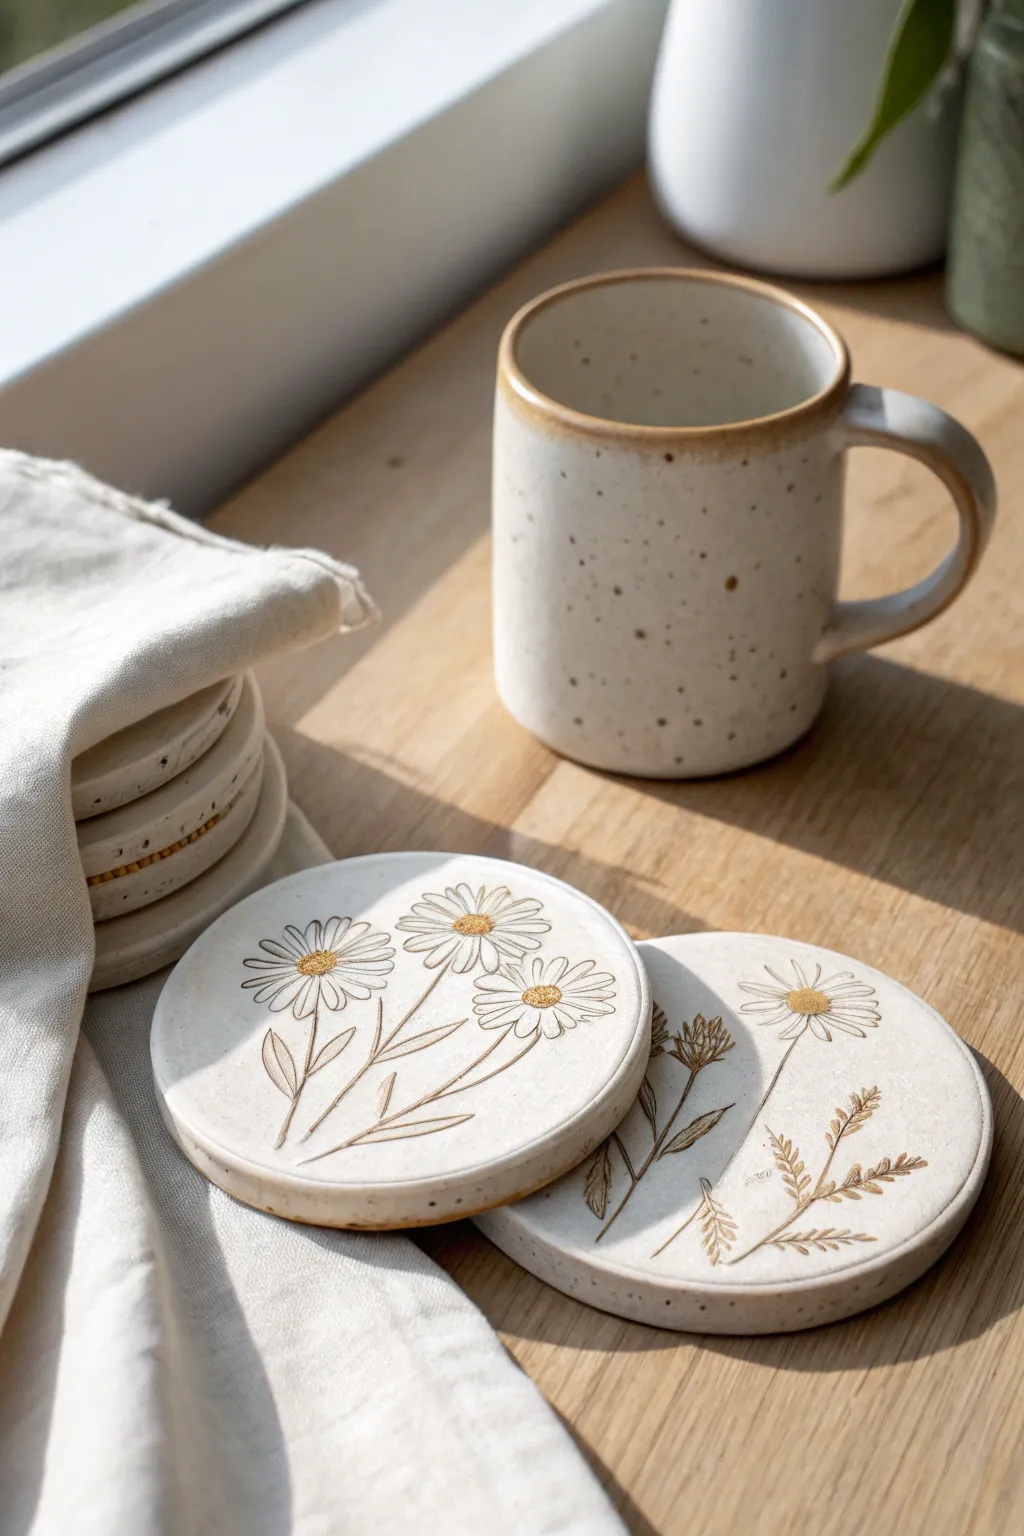
These charming coasters combine the warmth of speckled clay with delicate, hand-drawn floral motifs inspired by pressed wildflowers. The result is a set of functional art pieces that feel both earthy and refined, perfect for protecting your surfaces in style.
Step-by-Step Tutorial
Materials
- Speckled cream or beige stoneware clay
- Rolling pin
- Two 1/4-inch wooden depth guides/slats
- Round cookie cutter (approx. 4 inches) or a jar lid
- Needle tool or sharp pencil
- Small carving loop tool (optional)
- Underglaze (dark brown and yellow/gold)
- Fine detail paintbrush
- Sponge
- Clear matte or satin glaze
- Canvas or cloth board for rolling
Step 1: Shaping the Base
-
Prepare the Clay:
Begin by wedging your speckled stoneware clay thoroughly to remove air bubbles and ensure an even consistency. This is crucial for preventing cracks during firing. -
Roll the Slab:
Place your clay on a canvas board between two 1/4-inch wooden depth guides. Roll the clay out until it is perfectly flat and the rolling pin rests on the guides. -
Cut the Circles:
Using a 4-inch round cutter, press firmly into the slab to cut out your coaster shapes. If you don’t have a cutter, trace around a wide jar lid with a needle tool. -
Smooth the Edges:
Dip your finger in a little water or use a damp sponge to gently round over the sharp cut edges of each circle. This makes the finished coaster feel much nicer in the hand. -
Firming Up:
Let the clay circles sit for about an hour until they are ‘leather hard’—firm enough to handle without warping, but soft enough to carve into.
Warping Woes?
Flat objects like coasters love to warp. Dry them slowly by loosely covering them with plastic, followed by a weighted board on top to keep them perfectly flat.
Step 2: Designing the Flowers
-
Sketch the Outline:
Using a sharp needle tool or a very fine pencil, lightly scratch your floral design onto the leather-hard clay. Aim for simple daisies with stems and leaves. -
Carve the Lines:
Use the needle tool to deepen these lines. Don’t just scratch the surface; press with consistent pressure to create a defined groove that will catch the glaze later. -
Detail the Petals:
For the daisy petals, carefully etch multiple small lines radiating from the center. Keep your hand steady and wipe away any clay crumbs created during incising. -
Refine the Centers:
Create texture in the flower centers by stippling (making small dots) with the tip of your needle tool. -
Clean Up:
Gently brush away any loose burrs of clay with a soft, dry brush. Using a sponge here might blur your crisp lines, so I prefer a dry brush for cleanup.
Step 3: Adding Color
-
Apply Dark Underglaze:
Take a fine detail brush and paint dark brown underglaze directly into the grooves of the stems and petal outlines. It’s okay if you go outside the lines slightly. -
Wipe Back:
Once the brown underglaze is touch-dry, take a barely damp sponge and wipe across the surface. This removes the surface color but leaves the dark pigment settled deep in your carved lines. -
Highlight the Centers:
Identify the textured centers of your daisies. Carefully dab a small amount of yellow or gold underglaze onto these spots to make them pop. -
Drying:
Allow the coasters to dry completely (bone dry). This usually takes 24-48 hours depending on humidity.
Add Burnt Umber
For a vintage look, wash a thinned iron oxide or burnt umber stain over the whole piece and wipe it back before glazing to highlight the clay’s natural speckles.
Step 4: Firing & Glazing
-
Bisque Fire:
Load your kiln and bisque fire the coasters to Cone 04 (or according to your clay body’s instructions). -
Apply Clear Glaze:
Once cool, dip the coasters into a clear matte or satin glaze. Shake gently to remove excess drips. -
Check the Foot:
Wipe the bottom of the coaster completely clean of glaze with a sponge to prevent it from sticking to the kiln shelf. -
Glaze Fire:
Fire the final time to the maturity temperature of your clay (usually Cone 5 or 6 for stoneware). -
Finishing Touch (Optional):
Glue small cork or felt pads to the bottom of the fired coasters to protect your furniture.
Enjoy your beautifully handcrafted coasters as a cozy addition to your coffee table setup


What Really Happens Inside the Kiln
Learn how time and temperature work together inside the kiln to transform clay into durable ceramic.
Cute Creature Toothbrush Holders
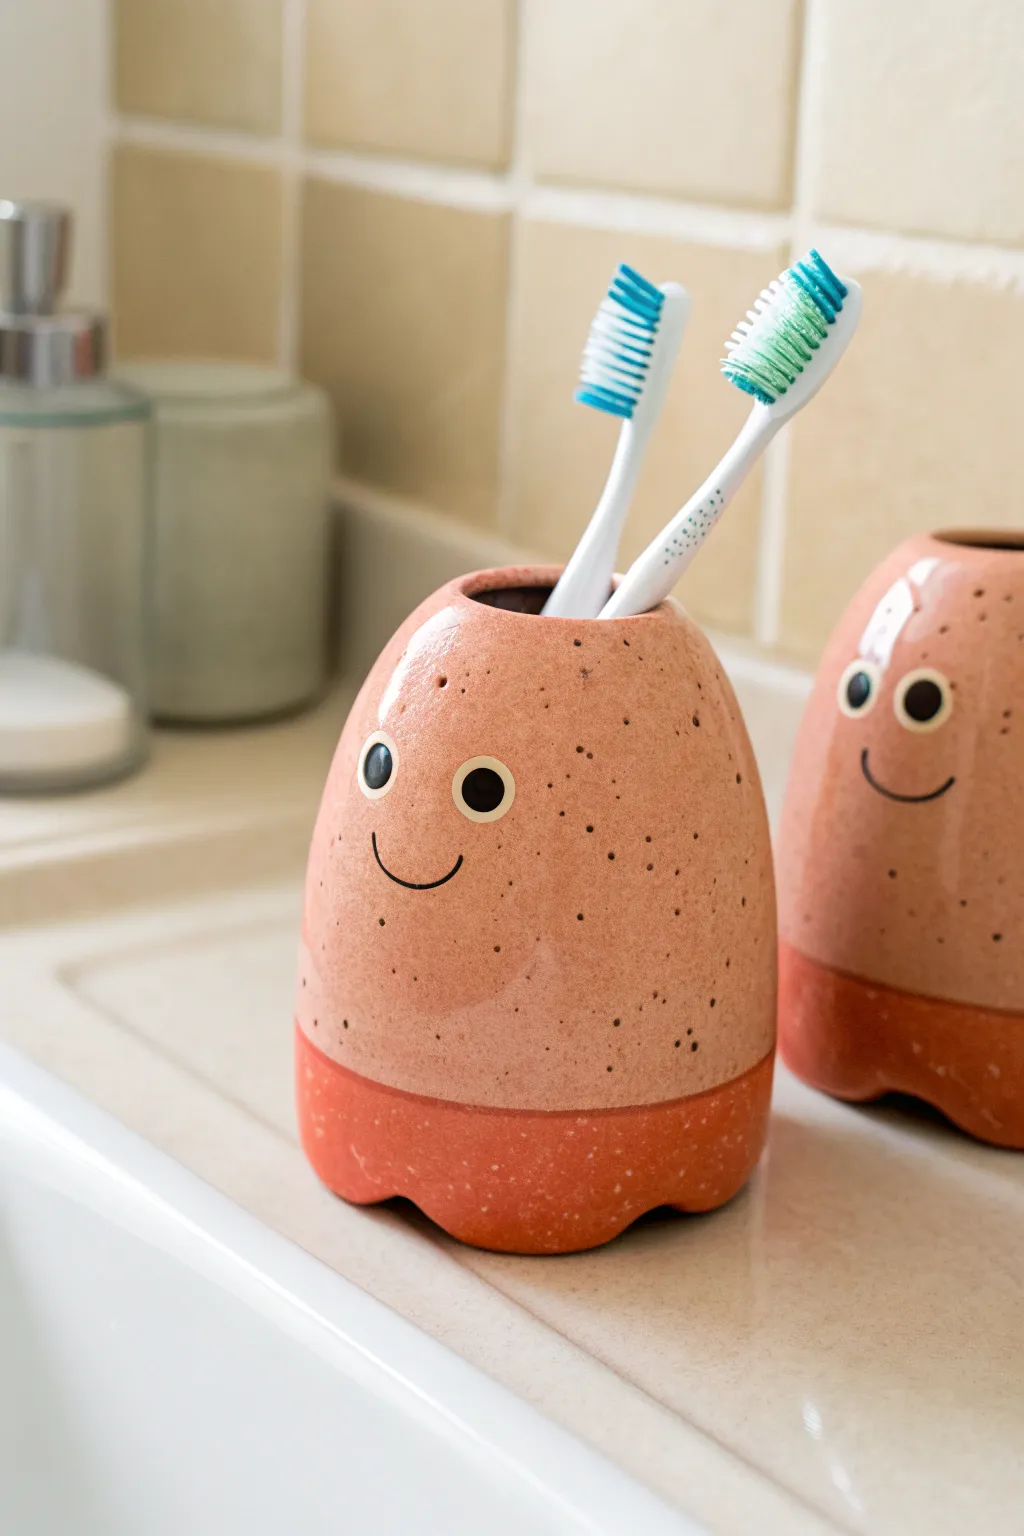
Add a friendly face to your bathroom counter with these whimsical toothbrush holders. These charming ceramic creatures feature a speckled, sandy-pink body with a contrasting terracotta base, offering a delightful mix of modern pottery style and playful character for your morning routine.
Step-by-Step
Materials
- White or speckled stoneware clay
- Terracotta underglaze (or red clay slip)
- Pinkish-tan glaze (or speckled white glaze with pink oxide added)
- Black underglaze
- Clear transparent glaze
- Pottery wheel (optional, can be hand-built)
- Needle tool
- Small trimming loop tool
- Sponge
- Small fine-point liner brush
- Toothbrush (for texture splatter, optional)
- Wire cutter
- Rolling pin (if hand-building)
Step 1: Forming the Body
-
Prepare the Clay:
Begin by wedging about 1 lb of white stoneware clay to remove air bubbles. If you are throwing on the wheel, center the clay into a compact mound. -
Throwing the Cylinder:
Pull the clay up into a thick cylinder, approximately 4-5 inches tall. Unlike a standard cup, you want to gently collar the top inward as you pull, creating a tapered, dome-like shape rather than a straight rim. -
Shaping the Dome:
Continue collaring the neck until the opening is just wide enough for two toothbrushes (about 1.5 inches diameter). Use a rib tool on the exterior to smooth the curve into a continuous, egg-like silhouette. -
Alternative Hand-building Method:
If you aren’t using a wheel, roll out a slab of clay about 1/4 inch thick. Form it into a cylinder and smooth the seam. Dart and pinch the top to create the tapered dome shape, smoothing everything with a sponge. -
Create the Scalloped Foot:
Once the form is leather hard, use a wire tool or loop tool to carve gentle arches into the very bottom edge. This creates the little ‘legs’ or scalloped base shown in the image. -
Refine the Surface:
Wipe the entire piece down with a slightly damp sponge to remove any throwing lines or fingerprints, ensuring the surface is smooth and ready for decoration.
Glaze Consistency
For the crispest face details, use underglaze that has the consistency of heavy cream. Too watery and it will run; too thick and it may flake off during firing.
Step 2: Adding Character & Glazing
-
Establish the Base:
Using masking tape, tape off a line around the bottom third of the holder. Brush 2-3 coats of terracotta underglaze (or red slip) below this line to create the dipped base effect. -
Bisque Firing:
Allow the creature to dry completely (bone dry) and fire it to bisque temperature (usually Component 04) to prepare it for glazing. -
Apply the Base Glaze:
Dip the top portion (or brush heavily) with a speckled pinkish-tan glaze. If you don’t have a pre-speckled glaze, I sometimes flick iron oxide specks onto a wet cream glaze using an old toothbrush for that organic look. -
Paint the Face:
Once the base glaze is dry to the touch, use a very fine liner brush and black underglaze to paint the features. Draw two simple circles for eyes and a small U-shape for the smile. -
Add Eye Details:
Carefully add a tiny dot of white glaze inside the black pupils to give the eyes life and a sense of direction. -
Clear Coat (Optional):
If your colored glazes are not glossy on their own, dip the entire piece in a clear transparent glaze to seal the underglaze and provide a hygienic, shiny finish. -
Final Firing:
Fire the piece to the maturity temperature of your clay and glaze (typically Cone 5 or 6 for stoneware). Make sure the bottom is wiped clean of glaze so it doesn’t stick to the kiln shelf.
Wobbly Creatures?
If the scalloped feet make the holder unstable, gently sand the bottom on a flat surface or piece of drywall after the bisque firing to level the contact points.
Place your finished creature by the sink and enjoy a cheerful greeting every time you reach for your toothbrush
Tea Light Holders With Star and Heart Cutouts
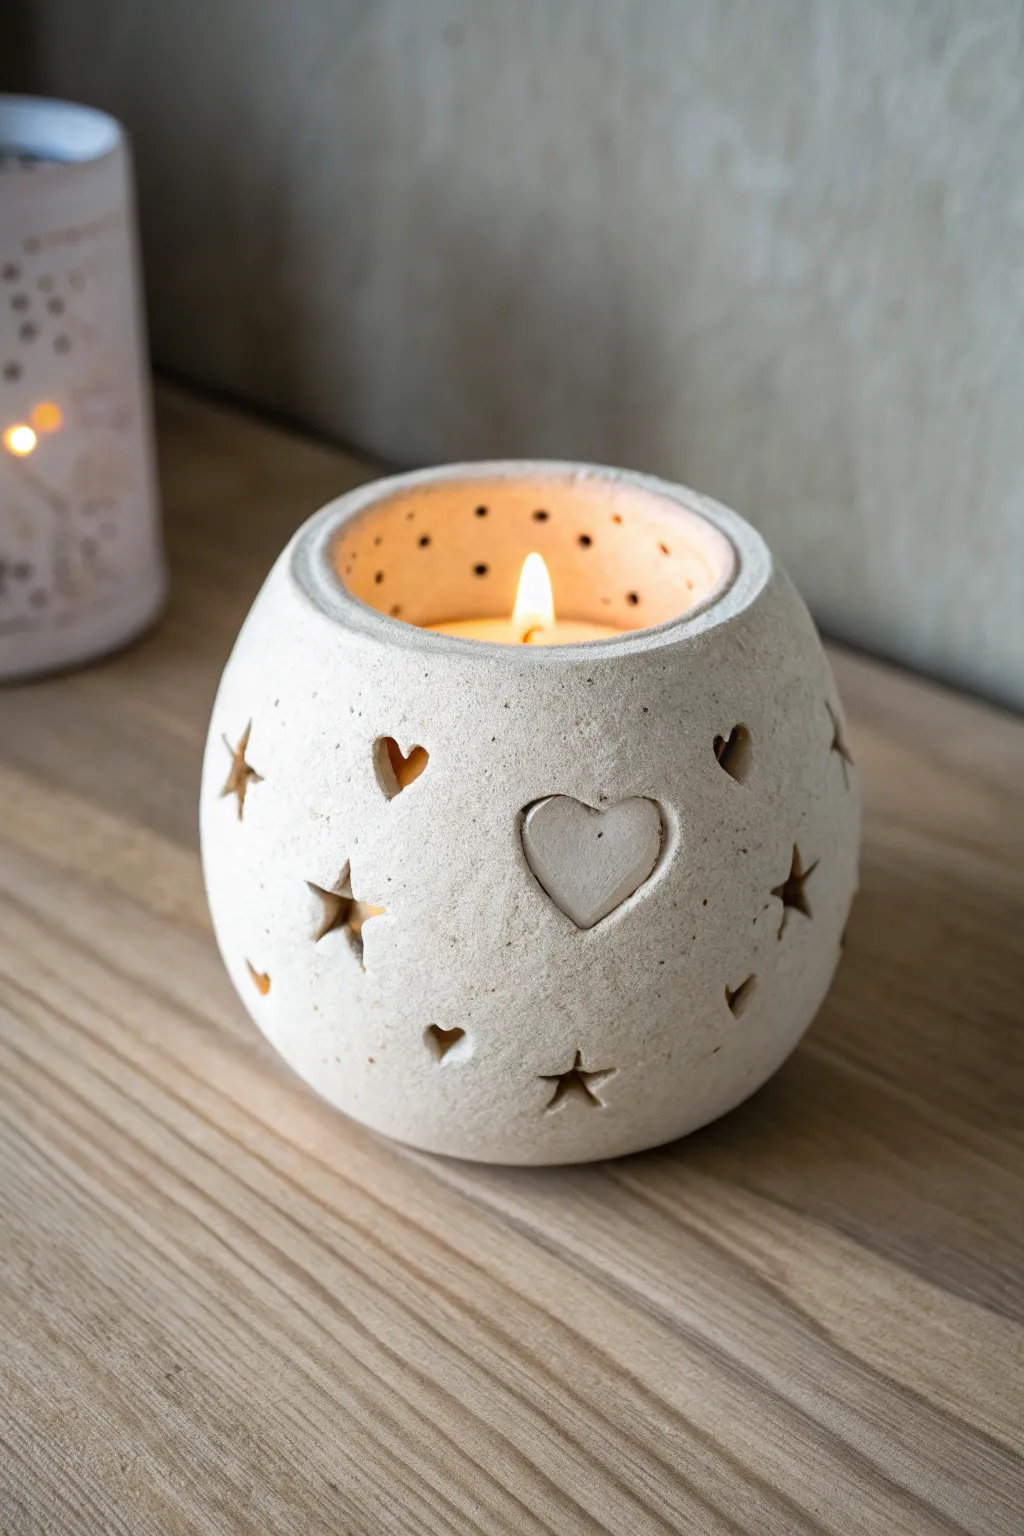
Capture the warmth of candlelight with this charming spherical tea light holder, featuring whimsical star and heart cutouts that cast playful shadows. Its textured, stone-like finish and raised heart motif give it a rustic yet refined look perfect for cozy evenings.
Step-by-Step Tutorial
Materials
- White or cream speckled stoneware clay (groggy texture recommended)
- Two half-sphere molds (styrofoam balls or plaster) or a pinch pot technique
- Rolling pin
- Star and heart shaped mini clay cutters
- Needle tool or sharp craft knife
- Small sponge
- Slip (clay and water mixture)
- Scoring tool or old toothbrush
- Circular cookie cutter (approx. 3-inch diameter for opening)
- Fine-grit sanding sponge (optional)
- Clear matte glaze (optional)
Step 1: Forming the Sphere Base
-
Prepare the clay:
Begin by wedging your stoneware clay thoroughly to remove air bubbles. You want a clay body with some grog or sand in it to achieve that beautiful, natural stone texture seen in the photo. -
Create two pinch pots:
Divide your clay into two equal balls. I like to hold the clay in my palm and press my thumb into the center, gently pinching and turning to create two evenly walled hemispheres. -
Check fit and size:
Ensure your two halves are roughly the same diameter. Place them rim-to-rim to check that they will form a nice round sphere when joined. -
Score and slip:
Score the rim of both hemispheres aggressively with a scoring tool or toothbrush. Apply a generous amount of slip to the roughed-up edges. -
Join the halves:
Press the two halves together firmly. Use your thumb or a wooden rib to smoothe the seam on the outside until the join is completely invisible and the ball is seamless. -
Shape the sphere:
Gently roll the clay ball on your work surface or paddle it lightly with a wooden spoon to perfect the round shape.
Collapsing Sphere?
If the sphere starts to sag while working, inflate a small balloon inside the joined halves. It provides support while you shape and smooth the exterior.
Step 2: Refining and Cutting
-
Create the opening:
Use a circular cutter to remove a section from the top of your sphere. This hole needs to be wide enough to easily drop a tea light inside. -
Refine the rim:
Smooth the cut edge of the opening with a damp sponge. You want the rim to look slightly recessed and soft, not sharp. -
Let it firm up:
Allow the clay to dry to a ‘leather hard’ stage. This is crucial; if the clay is too soft, the sphere will collapse when you try to cut shapes into it. -
Add surface texture:
If your clay is smooth, gently dab the surface with a coarse sponge or a crumpled ball of aluminum foil to give it that pitted, stone-like appearance. -
Cut the shapes:
Using your mini cutters or a sharp knife, carefully cut out star and heart shapes around the belly of the pot. Support the clay from the inside with your finger while cutting to prevent deforming the wall. -
Add the raised heart:
Roll out a small scrap of clay and cut a heart shape. Score and slip the back of it, then attach it firmly to the front of the sphere as a focal point. Smooth the edges slightly so it looks integrated. -
Pierce the rim details:
Using a small drill bit or a needle tool, poke a row of tiny holes around the interior upper curve of the sphere, just below the opening rim.
Clean Cuts Pro Tip
Wait until the clay is stiff leather-hard before cutting the stars. If edges look ragged, don’t fix them immediately; wait until bone dry and sand them smooth.
Step 3: Firing and Finishing
-
Final smooth:
Wipe down any sharp burrs from your cutouts with a barely damp sponge. Don’t use too much water, or you’ll wash away your nice texture. -
Dry slowly:
Cover the pot loosely with plastic and let it dry very slowly to prevent cracking, especially around the cutouts. -
Bisque fire:
Once bone dry, fire the piece to bisque temperature (usually cone 04) in a kiln. -
Glazing:
To maintain the raw, sandy look, leave the outside unglazed or use a very thin matte wash. You might glaze just the inside to catch wax drips. -
Final fire:
Refire according to your clay and glaze specifications (likely cone 5 or 6 for stoneware).
Place a tea light inside and watch the stars twinkle on your walls

TRACK YOUR CERAMIC JOURNEY
Capture glaze tests, firing details, and creative progress—all in one simple printable. Make your projects easier to repeat and improve.
Chunky Earrings With Tiny Clay Charms
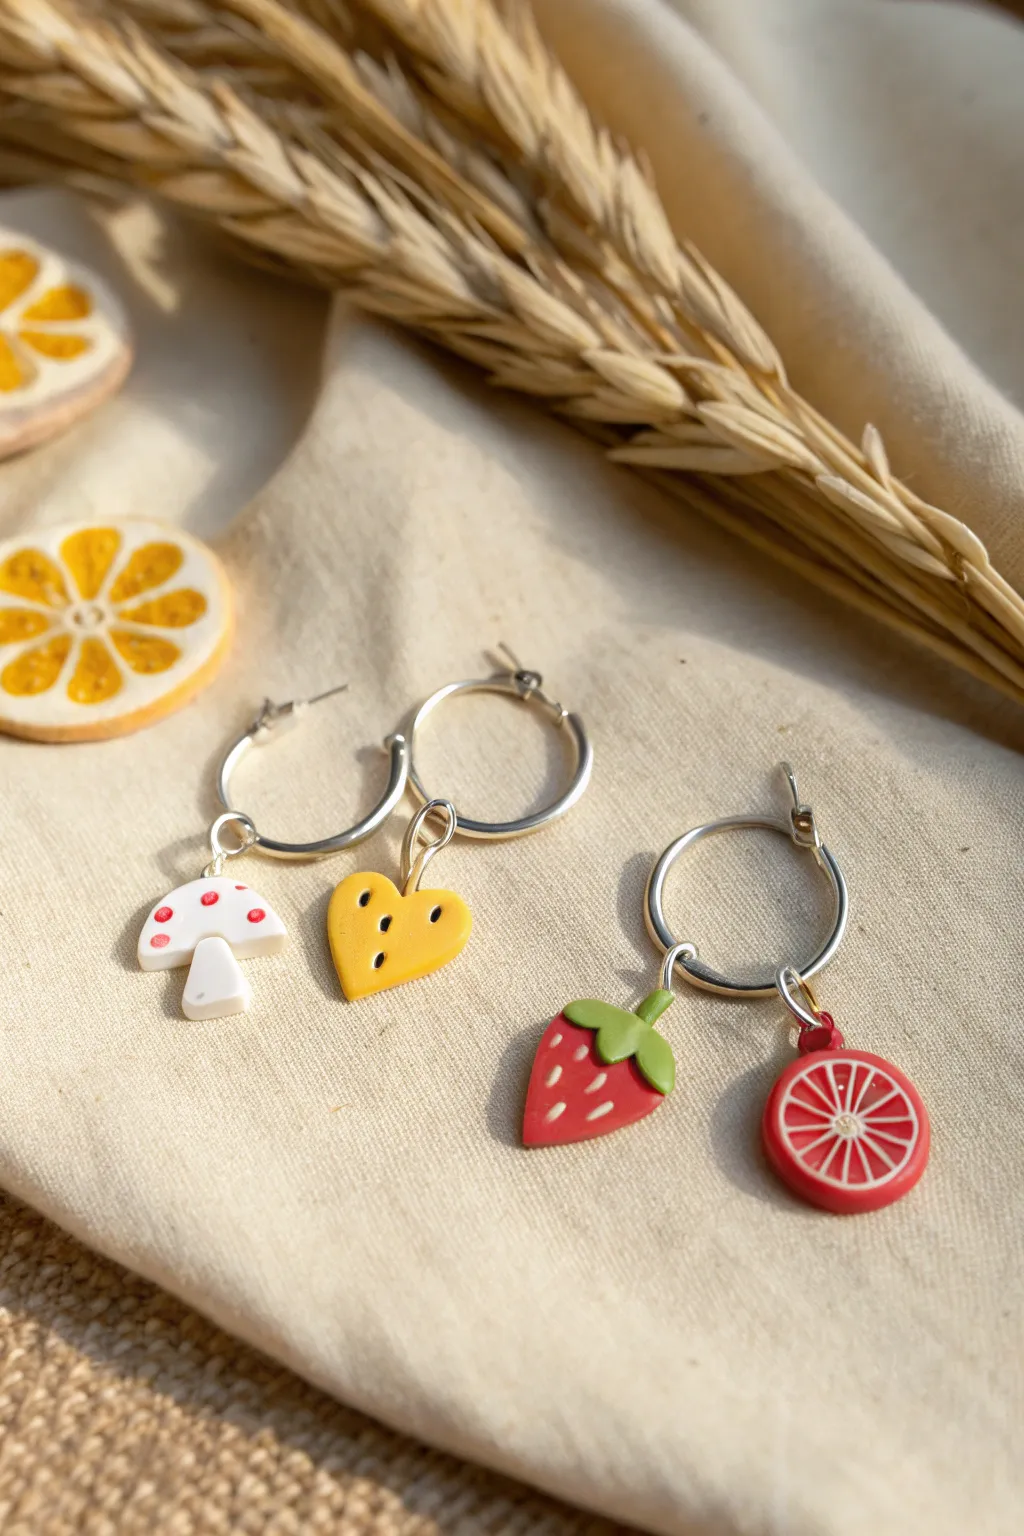
These delightful earrings showcase mismatched miniature charms, bringing a playful and whimsical touch to your jewelry collection. Featuring a tiny mushroom, a golden heart, a juicy strawberry, and a vibrant blood orange slice, this project is perfect for practicing small-scale sculpting techniques.
Step-by-Step
Materials
- Polymer clay (white, red, yellow, green, translucent)
- Small silver hoop earrings (approx. 20-25mm)
- Silver jump rings (4-6mm)
- Eye pins (silver)
- Needle tool or toothpick
- Rolling pin or pasta machine
- X-Acto knife or clay blade
- Round nose pliers
- Chain nose pliers
- Wire cutters
- Gloss glaze (optional)
Step 1: Sculpting the Mushroom
-
Create the stalk:
Roll a small ball of white clay and shape it into a cylinder that widens slightly at the bottom to form the mushroom stalk. Insert a trimmed eye pin into the top center. -
Form the cap:
Take a smaller ball of white clay, flatten the bottom, and dome the top. Carefully press this onto the stalk, smoothing the seam gently underneath. -
Add the dots:
Roll extremely tiny balls of red clay. Press them gently onto the white cap to create the classic toadstool pattern.
Clean Cuts Pro Tip
Pop your citrus cane in the fridge for 15 minutes before slicing. Cold clay is firmer and distorts much less when cut, keeping your white segment lines crisp.
Step 2: Crafting the Golden Heart
-
Shape the heart:
Mix yellow clay with a speck of orange to get a golden cheese-like color. Flatten a small ball and use your needle tool or a tiny cutter to form a heart shape. -
Add texture:
Using the tip of a needle tool, poke small, scattered indentations across the surface to mimic the texture seen in the photo. Insert an eye pin into the top cleft of the heart.
Troubleshooting Fingerprints
Since these charms are tiny, fingerprints show easily. Lightly brush the raw clay with a bit of baby oil or cornstarch to smooth them out before baking.
Step 3: Making the Strawberry
-
Shape the berry:
Roll red clay into a teardrop shape, slightly flattened. This forms the body of the strawberry. -
Add seeds:
Use a needle tool to press tiny, shallow teardrop-shaped indentations all over the red surface to represent seeds. -
Create the leaves:
Flatten a tiny piece of green clay and cut a star or flower shape. Press this onto the top (wide end) of the strawberry. -
Insert hardware:
Trim an eye pin and insert it through the center of the green leaves into the berry body.
Step 4: Building the Blood Orange Slice
-
Make the segments cane:
Roll a log of red clay. Wrap it in a thin sheet of white clay. Reduce this cane by rolling it thinner, then cut it into 8 equal short lengths. -
Assemble the slice:
Pinch the lengths into triangular wedges and arrange them in a circle to form the citrus wheel. Wrap the entire circle in a thin layer of white clay, then a final layer of red for the rind. -
Slice and finish:
Cut a slice from your cane. Insert an eye pin through the rind at the top. You can gently texture the red segments with a needle tool for juice realism.
Step 5: Baking and Assembly
-
Bake the charms:
Arrange all four charms on a baking tile or parchment paper. Bake according to your polymer clay package instructions (usually 275°F/135°C for 15-30 minutes). -
Cool down:
Let the charms cool completely before handling so they harden fully. -
Secure the pins:
I prefer to gently pull the eye pins out, add a dab of super glue, and reinsert them for maximum durability. -
Glaze (Optional):
For a shiny finish like the photo, brush a coat of gloss glaze over the strawberry and orange slice. -
Attach rings:
Use two pairs of pliers to twist open a jump ring. Slide it through the loop of an eye pin. -
Connect to hoops:
Slide the hoop earring onto the jump ring before closing it. Repeat for all charms, placing two distinct charms on each hoop.
Now you have a sweet set of mismatched earrings ready to wear or gift
Soft-Shape Bookends in Bright Colors

Add a touch of warmth and whimsy to your bookshelf with this sturdy, earth-toned rainbow arch. Its minimalist design and organic texture make it functional art that keeps your favorite reads perfectly in place.
Detailed Instructions
Materials
- Air-dry clay (approximately 1kg block, white or grey)
- Rolling pin
- Sharp craft knife
- Sandpaper (medium and fine grit)
- Acrylic paints (terracotta/rust, beige/taupe, deep slate blue)
- Paintbrushes (flat and detail brushes)
- Cardboard (for templates)
- Ruler
- Small bowl or water container
- Clear matte varnish (optional)
Step 1: Planning and Shaping
-
Draft your templates:
Before touching the clay, draw out three concentric arches on a piece of cardboard. The largest should be roughly 6-7 inches tall and wide to support standard books. Cut these shapes out to use as guides. -
Prep the workspace:
Lay down a non-stick sleek surface or parchment paper. This prevents the large clay slab from sticking while you work. -
Roll the main slab:
Roll out a substantial portion of your clay. Aim for a thickness of at least 1.5 to 2 inches to ensure the bookend has enough weight and stability. -
Cut the outer arch:
Place your largest cardboard template on the clay slab. Using a sharp craft knife, cut vertically straight down to create a clean, thick outer arch shape. -
Create the inner arches:
Repeat the rolling and cutting process for the two smaller inner arches using your remaining templates. Ensure they are the same thickness as the outer arch so they sit flush. -
Check the fit:
While the clay is still pliable, nest the three arches inside each other to ensure they fit snugly. If there are gaps, gently reshape them with your fingers.
Step 2: Refining and Drying
-
Smooth the edges:
Dip your finger in a little water and run it along any sharp cut edges to soften them slightly. The goal is a smooth, stone-like finish, not a razor-sharp geometric one. -
Initial texture check:
If you want that slightly pitted, concrete look seen in the photo, stick a toothbrush or stiff bristle brush gently onto the surface in random spots before drying. -
Separate for drying:
Carefully separate the three pieces. They need to dry individually to ensure air circulation reaches every side. -
Let it cure:
Allow the clay to dry completely. For pieces this thick, I usually wait at least 48 to 72 hours, flipping them occasionally to prevent warping. -
Sand for perfection:
Once fully dry, use medium-grit sandpaper to level out any bumps on the flat faces. Finish with fine-grit sandpaper for a professional touch.
Weight Hack
Is your clay too light for heavy books? Hide some heavy fishing weights or washers inside the wet clay of the largest arch while shaping it.
Step 3: Painting and Assembly
-
Mix your palette:
Prepare your acrylics. You want earthy, muted tones. Mix a rusty orange for the large arch, a sandy beige for the middle, and a deep, muted blue for the smallest arch. -
Paint the first coat:
Apply the base coat to each arch individually. Don’t worry about it being perfectly opaque yet; thin layers dry better. -
Add depth:
Apply a second coat. For a matte, ceramic feel, try stippling the paint on with a dry brush rather than long strokes. -
Assemble the structure:
Once the paint is bone dry, arrange the arches back together. Apply a strong craft glue or heavy-duty adhesive between the touching curved surfaces to bond them into a single solid unit. -
Weight it down:
If you need extra stability for heavy books, you can glue a piece of jagged felt or a non-slip rubber pad to the bottom base. -
Seal the deal:
Currently, the finish is quite raw. To protect the paint from chipping, apply a thin layer of matte varnish, which will keep the natural look while adding durability.
Terrazzo Twist
Mix dried chips of colored clay into your wet white clay before rolling. Sanding after drying reveals a trendy terrazzo pattern.
Place your new sculptural creation on the shelf and enjoy the modern, colorful vibe it brings to your reading nook
Pocket-Sized Desk Organizer Pods
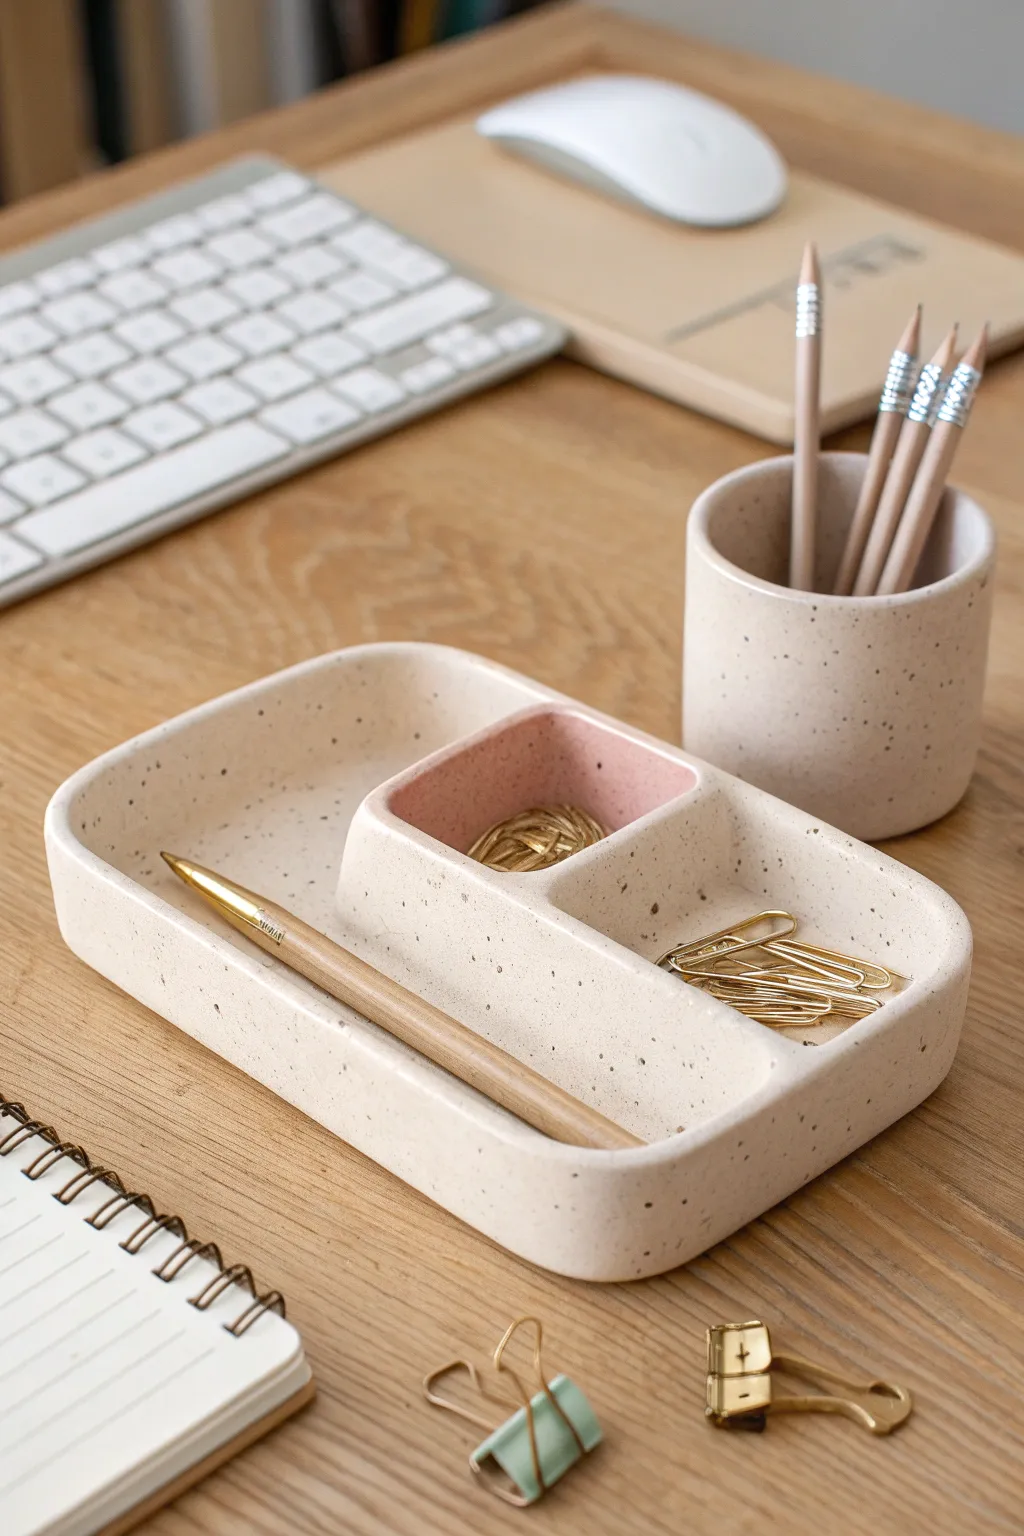
Keep your workspace serene with this sleek, segmented organizer tray featuring a subtle speckled finish and a soft blush accent. It’s the perfect size for wrangling paperclips, holding a favorite pen, and adding a touch of modern elegance to your desk.
How-To Guide
Materials
- Air-dry clay (white) or polymer clay
- Rolling pin
- Clay knife or craft blade
- Ruler
- Fine-grit sandpaper
- Acrylic paints (Cream/Off-white, blush pink, dark brown/black)
- Small flat paintbrush
- Old toothbrush or stiff bristle brush
- Matte spray varnish or sealant
- Water bonding slip (for air-dry clay) or liquid clay (for polymer)
Step 1: Shaping the Base and Walls
-
Roll the base:
Begin by rolling out a slab of white clay to an even thickness of about 1/4 inch. Use a ruler and knife to cut a rectangle approximately 4 inches by 6 inches, then use your finger to gently round off the four sharp corners for a softer look. -
Prepare the outer walls:
Roll a long snake of clay and flatten it into a strip roughly 3/4 inch tall and 1/4 inch thick. This strip needs to be long enough to wrap around the entire perimeter of your base rectangle. -
Attach the perimeter:
Score (scratch) the edges of your base and the bottom of your wall strip. Apply a little water or liquid clay to the scored areas, then stand the wall up along the edge of the base, pressing firmly to adhere. -
Blend the seams:
Using a modeling tool or your finger, smooth the clay where the wall meets the base on both the inside and outside so the seam disappears completely. This takes patience but ensures structural integrity.
Cracks Appearing?
If air-dry clay cracks while drying, mix a tiny bit of fresh clay with water to make a paste (slip). Fill the cracks, let dry, and sand smooth.
Step 2: Creating the Compartments
-
Form the divider block:
Create a raised ‘island’ in the center-right of the tray. You can do this by forming a smaller rectangular box shape with clay strips, roughly 2 inches wide and slightly taller than the outer walls. -
Divide the island:
Place a small dividing wall inside this island structure to create two distinct pods—one square and one rectangular. Ensure these inner walls are smoothed into the base and sides just like the exterior. -
Refine the shape:
Check that the long open section on the left is wide enough to hold a standard pen. Gently reshape the walls if they have warped during handling, keeping them straight and vertical. -
Smooth the edges:
Dip your finger in a tiny bit of water and run it along the top rims of all the walls to round them off gently. You want a smooth, organic feel rather than sharp, machined edges. -
Dry completely:
Allow the piece to dry fully. For air-dry clay, this usually takes 24-48 hours depending on thickness and humidity; if using polymer clay, bake according to package instructions.
Step 3: Finishing and Painting
-
Sand for smoothness:
Once fully cured or dry, use fine-grit sandpaper to gently buff away any fingerprints or uneven bumps. Wipe away the dust with a slightly damp cloth. -
Base coat:
Paint the entire organizer (inside and out) with a creamy off-white acrylic paint. You may need two thin coats to get a solid, opaque finish. -
Paint the accent pod:
Select one of the small compartments within the island (like the rear square one) and carefully paint the interior walls and floor with a soft blush pink. -
Create the speckles:
Dilute a small amount of dark brown or black paint with water until it’s inky. Dip an old toothbrush into this mixture. -
Splatter effect:
Hold the toothbrush over the tray and run your thumb across the bristles to flick tiny specks of paint onto the surface. I suggest testing this on a piece of paper first to control the density of the spray. -
Seal the piece:
After the paint is completely dry, spray the entire organizer with a matte varnish. This protects the finish and gives it that professional ceramic look.
Make it Luxe
Paint the top rim of the organizer with liquid gold leaf or metallic gold paint for a chic, high-end finish that catches the light.
Now you have a stylish home for your loose clips and favorite writing tools
Letter and Initial Ornaments With Simple Stamped Texture
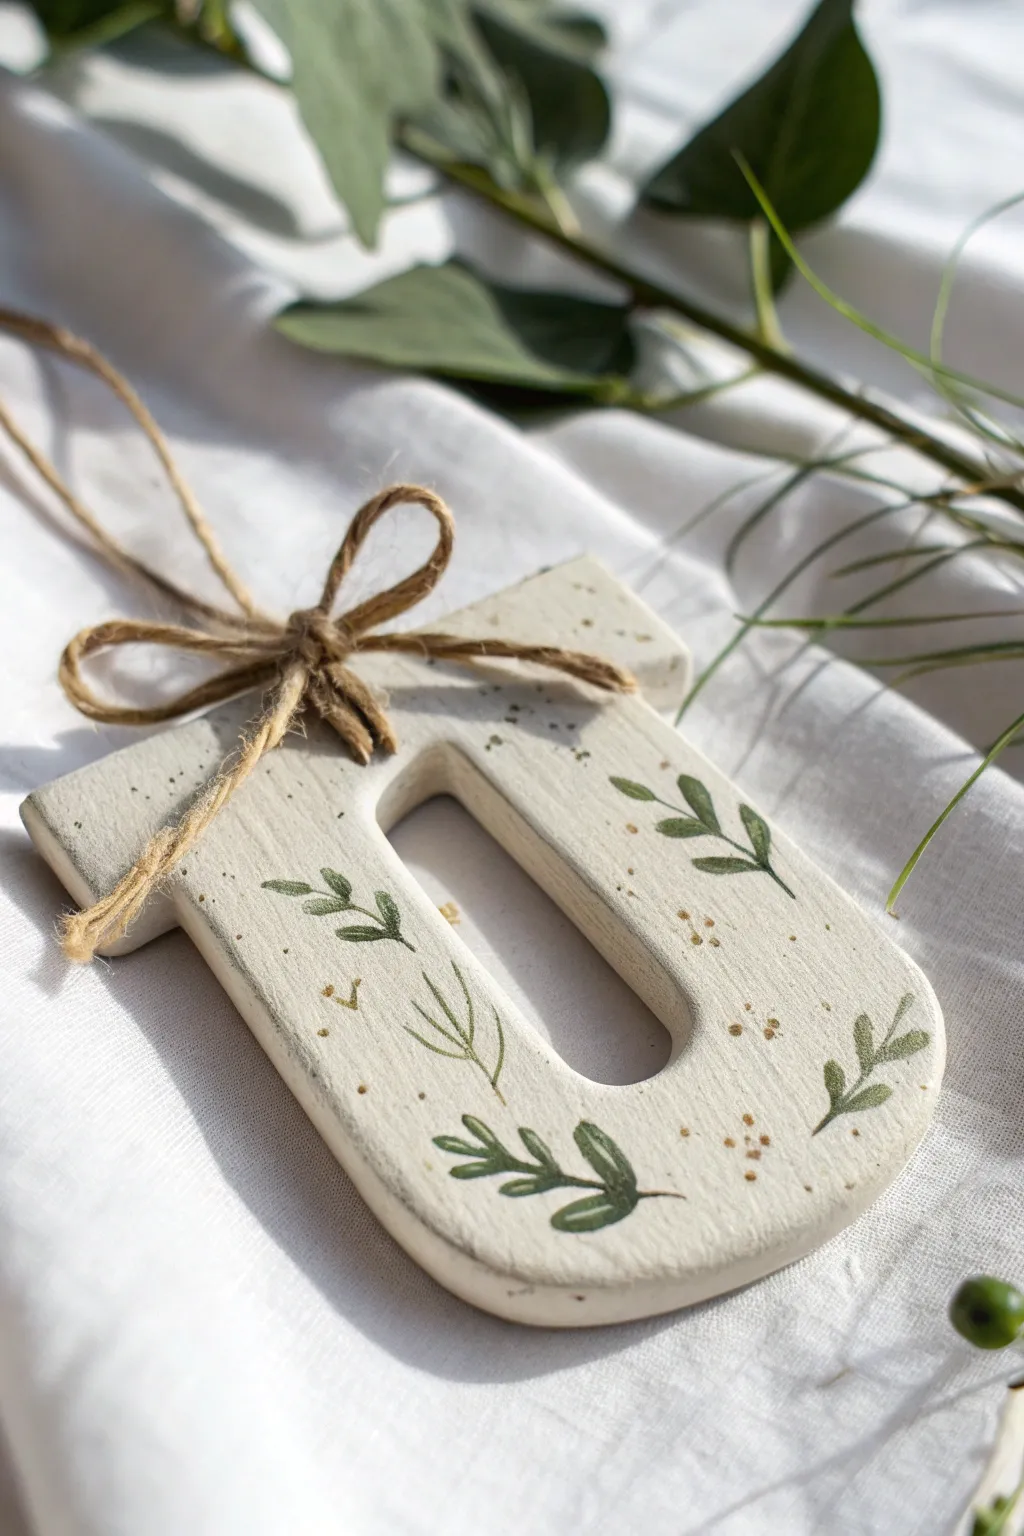
Create a personalized touch for your holiday decor or a heartfelt gift with this elegant clay letter ornament. Featuring delicate hand-painted greenery and subtle gold accents on a smooth white base, this project blends rustic charm with modern simplicity.
Detailed Instructions
Materials
- Air-dry clay (white) or polymer clay
- Rolling pin
- Letter template (printed on paper)
- Craft knife or scalpel
- Fine grit sandpaper
- Acrylic paints (olive green, forest green, metallic gold)
- Fine detail paintbrush (size 0 or 00)
- Old toothbrush or stiff bristle brush
- Jute twine
- Straw or skewer (for hole punching)
- Matte varnish or sealant (optional)
Step 1: Shaping the Clay Base
-
Prepare the workspace:
Lay down a smooth surface like a silicone mat or parchment paper to prevent the clay from sticking. This ensures the back of your ornament remains as smooth as the front. -
Roll the clay:
Take a handful of white air-dry clay and condition it slightly by kneading. Roll it out to an even thickness of about 1/4 inch (6mm). Using thickness guides or slats on either side of your roller can help keep it perfectly level. -
Cut the letter:
Place your printed paper letter template gently onto the clay. Using a sharp craft knife, trace around the edges carefully. Don’t drag the blade; instead, use a gentle sawing motion or press down cleanly to avoid distorting the clay. -
Create the hanging hole:
Before the clay starts to dry, use a straw or a skewer to punch a clean hole at the top of the letter. Make sure it’s not too close to the edge to prevent breaking later. -
Smooth the edges:
Dip your finger in a tiny bit of water and run it along the cut edges of the fresh clay to smooth out any roughness or sharp corners left by the knife. -
Let it dry completely:
Allow the clay to dry according to the package instructions. For air-dry clay, flip the piece over halfway through the drying process to prevent curling. This usually takes 24-48 hours. -
Sand for perfection:
Once bone dry, use fine-grit sandpaper to buff away any remaining irregularities on the surface or edges. Wipe away the dust with a slightly damp cloth or dry brush.
Step 2: Painting and Finishing
-
Prepare paint palette:
Squeeze out small amounts of olive green and forest green acrylic paint. You want a natural look, so having two shades adds nice depth to the leaves. -
Paint the sprigs:
Using your finest detail brush, paint thin, curving stems randomly across the surface of the letter. Keep the pressure light to ensure the lines remain delicate. -
Add the leaves:
Add small, almond-shaped leaves along the stems. I find it easiest to press the belly of the brush down and lift up quickly to create the tapered leaf shape naturally. -
Vary the greenery:
Mix up your leaf styles—make some fern-like with thin strokes and others fuller and rounder. Alternate between your olive and forest green shades for visual interest. -
Create the splatter effect:
Dilute a small drop of metallic gold paint with water until it’s inky. Dip an old toothbrush into this mixture. -
Apply the speckles:
Hold the toothbrush over the ornament and run your thumb across the bristles to flick tiny specks of gold paint onto the clay. Test on a scrap piece of paper first to gauge the spray pattern. -
Dry and seal:
Let the paint dry completely. If you want extra durability, apply a coat of matte varnish over the top, which will protect the paint without making it too shiny. -
Finish with twine:
Cut a length of jute twine. Thread it through the hole you created earlier. -
Tie the bow:
Tie the twine securely, then form a neat bow at the base of the loop. Trim the ends of the bow so they don’t obscure the letter design.
Water Smoothing Trick
Keep a small bowl of water nearby while cutting. Dipping your craft knife in water before slicing helps it glide through clay without dragging or tearing edges.
Elevated Textures
Before the clay dries, gently press a real leaf or piece of lace into the surface to create an imprinted texture, then lightly paint over the raised areas later.
Hang your finished monogram on the tree or use it as a sophisticated gift tag for a special present
Tiny Lidded Jewelry Boxes Shaped Like Animals
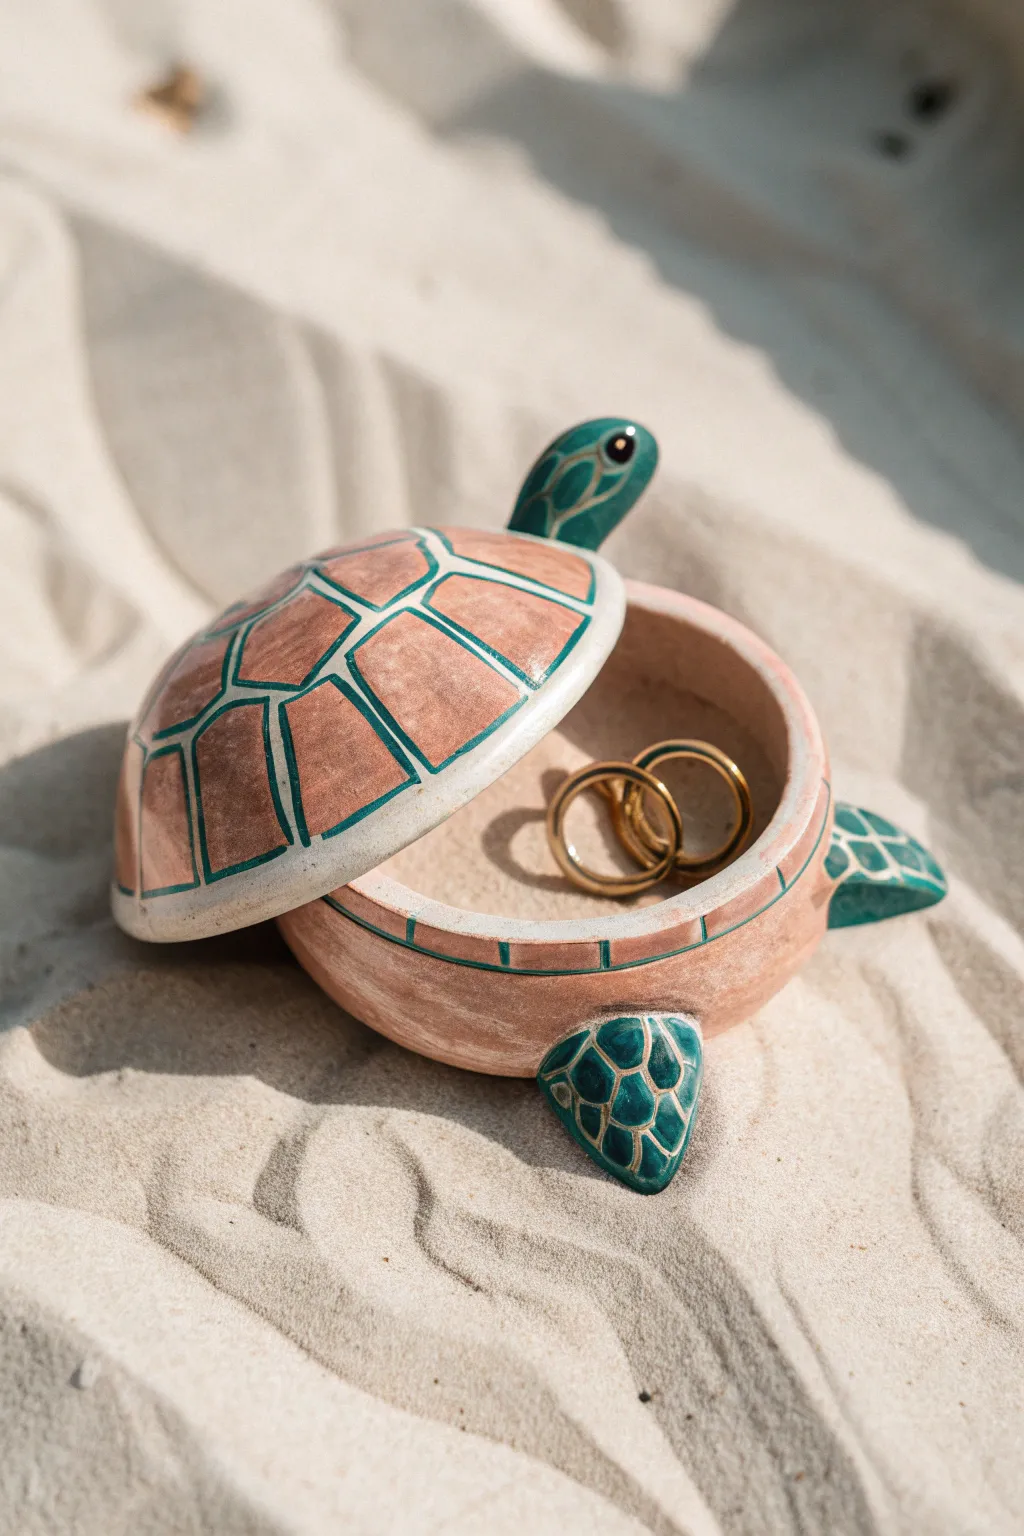
This adorable sea turtle box captures the charm of ocean life with its removable shell lid and detailed flippers. Finished with soft terra cotta tones and striking teal accents, it’s the perfect hiding spot for your favorite rings or earrings.
How-To Guide
Materials
- Air-dry clay or polymer clay (white or terra cotta)
- Clay sculpting tools (needle tool, modeling tool)
- Rolling pin
- Small bowl or sphere mold (for shape)
- Circle cutters (two sizes)
- Sponges (for smoothing)
- Slip (clay/water mixture for joining)
- Acrylic paints (Terra Cotta, Teal/Dark Turquoise, White)
- Fine detail paintbrushes
- Gold paint or pen (for eyes/outlines)
- Clear varnish or sealant (matte or gloss)
Step 1: Sculpting the Base and Lid
-
Form the base sphere:
Start by rolling a ball of clay roughly the size of a tangerine. Press your thumb into the center to create a pinch pot, rotating it to ensure even wall thickness. -
Refine the bowl shape:
Using water and a sponge (or baby oil for polymer clay), smooth the inside and outside of your pinch pot. Gently flatten the bottom just enough so it sits stably on a flat surface. -
Creates the lid:
Roll out a slab of clay to about 1/4 inch thickness. Cut a circle slightly larger than the opening of your bowl base. Gently drape this circle over a sphere mold or rounded object to give it a domed ‘shell’ shape that matches the curve of your base. -
Add the rim:
To ensure the lid stays put, roll a small coil of clay. Attach this coil to the underside of your domed lid, slightly inset from the edge, creating a lip that will fit inside the bowl base. -
Dry fit:
Once both pieces are firm enough to handles but not dry, test the fit. The lid should rest comfortably on top of the base without sliding off.
Step 2: Adding Turtle Features
-
Shape the head:
Roll a small oval of clay for the head. Pinch one end slightly to create a neck. Attach this to the rim of the base bowl using slipping and scoring. -
Sculpt the flippers:
Create four teardrop shapes—two larger for the front flippers and two smaller for the back. Flatten them gently. -
Attach the limbs:
Score the clay on the sides of the bowl base and firmly attach your flippers. Smooth the seams with a modeling tool so they look like they grow seamlessly from the body. -
Add a tail:
Add a tiny triangular point at the back of the base for the tail, opposite the head. -
Refine the surface:
Go over the entire piece with a slightly damp sponge to remove fingerprints. -
Initial drying:
Allow the clay to dry completely according to package instructions. For air-dry clay, I prefer to let it sit for at least 24-48 hours to prevent cracking.
Warping Woes?
If the lid warps while drying and won’t fit, sand the underside of the lid and the rim of the bowl gently with fine-grit sandpaper until they sit flush again.
Step 3: Painting and Detailing
-
Base coat:
Paint the entire outside of the ‘shell’ lid and the main body bowl with a soft terra cotta or pinkish-beige acrylic paint. You may need two coats for opacity. -
Sketch the shell segments:
Using a pencil very lightly, draw the scute pattern on the shell lid. Start with a central polygon and radiate lines outward. -
Paint the segment outlines:
Using a fine liner brush and teal paint, trace over your pencil lines on the shell. Make these lines thick and deliberate. -
Detail the flippers and head:
Paint the flippers and head solid teal. Once dry, use a very fine brush to paint light geometric ‘scale’ outlines in white or pale cream over the teal to mimic the photo. -
Rim details:
Paint the rim of the lid white, and add small tick marks in teal around the edge of the bowl base to continue the pattern when the box is closed. -
The eyes:
Paint a small black circle for the eye with a tiny white dot for reflection. Outline it with a thin ring of gold for a touch of elegance. -
Seal the piece:
Finish with a varnish to protect your paint job and give the turtle a smooth, finished ceramic look.
Make it Shine
Line the inside of the bottom bowl with a circle of velvet or felt fabric. This adds a luxurious feel and protects delicate jewelry from scratching against the clay.
Place your finished turtle on your vanity and enjoy your custom coastal treasure storage.
Suncatcher Shapes With Translucent Inlays
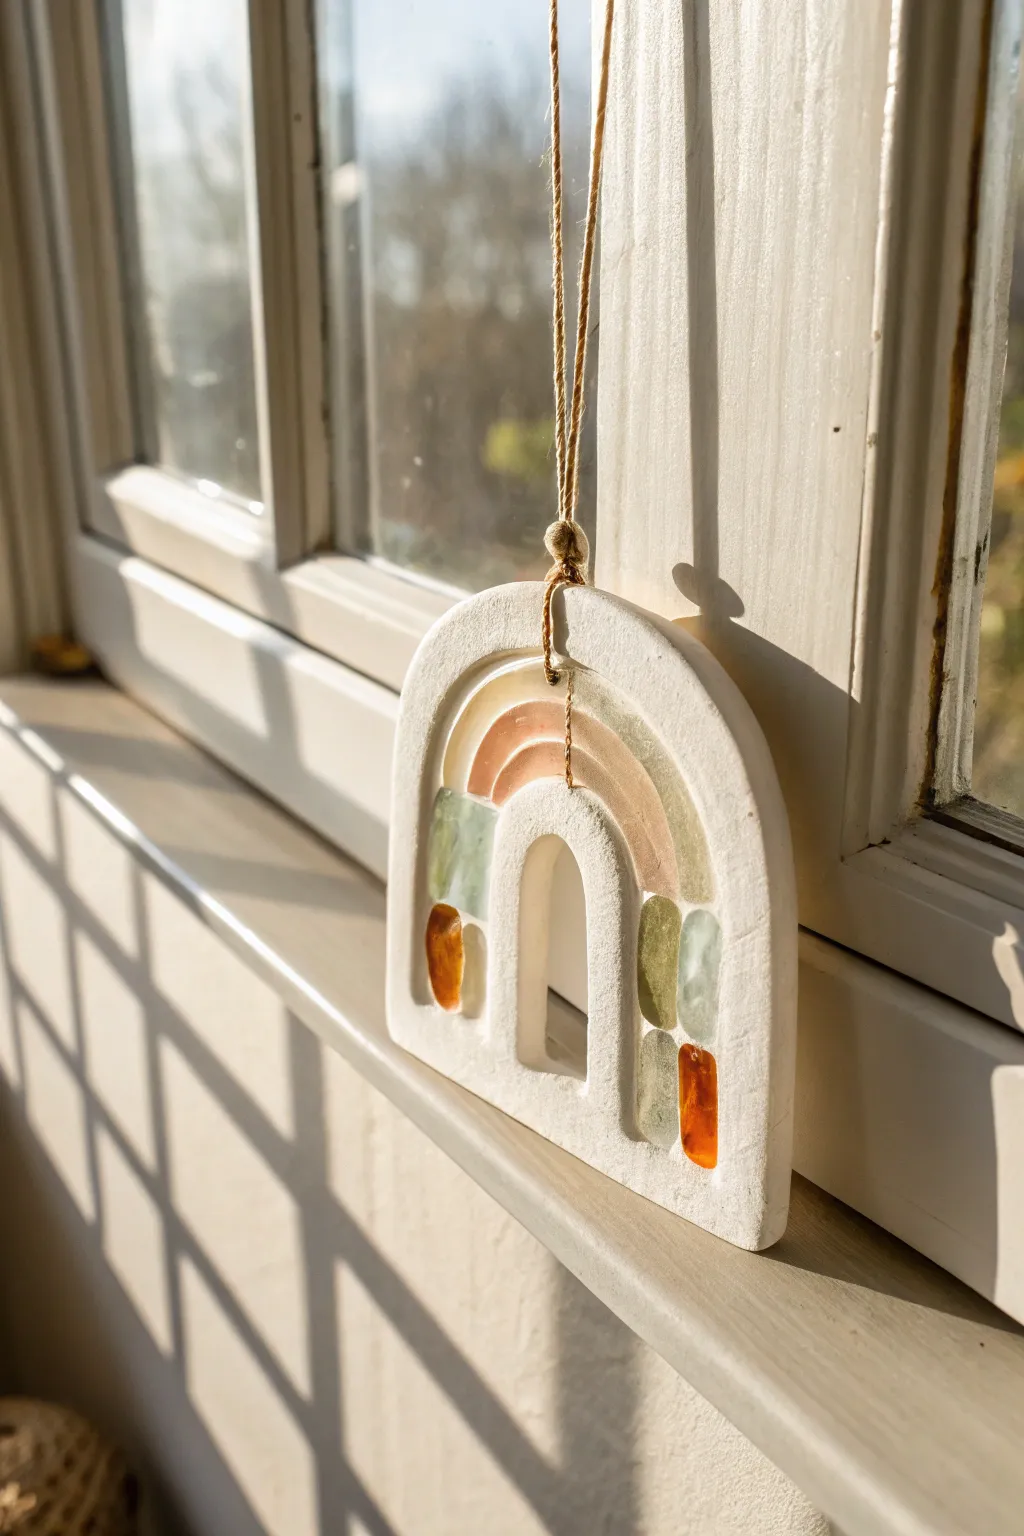
Capture the magic of golden hour with this modern, minimalist suncatcher that combines the matte texture of white clay with the glowing translucence of sea glass. The geometric arch shape creates a beautiful frame for light to filter through, casting colorful shadows across your room.
Step-by-Step Guide
Materials
- Air-dry clay (white) or polymer clay
- Rolling pin
- Clay knife or craft scalpel
- Paper template (arch shape)
- Small pieces of sea glass or amber (warm tones: orange, yellow, pale green)
- Small bowl of water
- Fine grit sandpaper
- Twine or jute cord
- Skewers or knitting needle (for hole punch)
- Clear varnish or sealant (optional)
Step 1: Preparation & Shaping
-
Prepare your template:
Sketch a simple U-shaped arch on a piece of paper or cardstock. Draw a smaller, inner arch to create the hollow center, ensuring the clay ‘frame’ is wide enough (about 1 inch) to hold your glass pieces. Cut this template out. -
Condition the clay:
Take a handful of white air-dry clay and knead it until it’s soft and pliable. If the clay feels too dry or cracks easily, wet your hands slightly to introduce moisture. -
Roll the slab:
Roll the clay out into an even slab, aiming for a thickness of roughly 1/4 to 1/2 inch. You want it thick enough to hold the glass securely, but not so heavy that it’s difficult to hang. -
Cut the arch:
Place your paper template onto the rolled clay slab. Using your clay knife or scalpel, carefully trace around the outside and inside edges to cut out your arch shape. -
Smooth the edges:
Dip your finger in a little water and run it along the cut edges of the clay to smooth out any roughness or sharp corners creates by the knife.
Clean Edges Pro Tip
To get perfectly smooth glass inlays, clean any clay smudge off the glass with a vinegar-dipped cotton swab before the clay fully dries.
Step 2: Inlaying the Glass
-
Plan your placement:
Before pressing anything in, arrange your sea glass pieces loosely on top of the clay arch to finalize your design. The example uses a symmetrical pattern with darker amber at the bottom and lighter greens and clears towards the top curve. -
Create the channels:
Remove the glass. Use a sculpting tool or knife to carve out shallow channels or depressions where the glass will sit. Don’t cut all the way through; just create indentations that match the basic shape of your glass pieces. -
Embed the glass:
Press the sea glass pieces firmly into the indentations you created. I find it helps to wiggle them slightly to ensure the clay grips the edges of the glass. -
Secure the back:
Flip the piece over carefully. If needed, gently push the clay from the back towards the glass to entrap the pieces more securely, creating a ‘bezel’ effect. -
Add a hanging hole:
Use a skewer or a knitting needle to poke a hole through the very top center of the arch. Make sure the hole is large enough for your twine to pass through easily.
Level Up: Texture
Before cutting your arch shape, press a piece of lace or linen into the clay slab to give the white surface a subtle, woven fabric texture.
Step 3: Finishing Touches
-
Let it dry:
Place the suncatcher on a flat, clean surface to dry. If using air-dry clay, this usually takes 24-48 hours. Turn it over halfway through the drying process to ensure the back dries evenly. -
Sand for perfection:
Once fully cured and hard, take fine-grit sandpaper and gently sand the clay surfaces. Focus on the edges to give them a professional, rounded finish. -
Clean up dust:
Wipe the entire piece down with a slightly damp cloth or a dry brush to remove any clay dust from the sanding process, especially from the surface of the glass. -
Seal (Optional):
If you want extra durability or a slight sheen, coat the clay parts with a matte varnish. Avoid painting over the glass to keep it translucent. -
Add the hanger:
Cut a length of natural jute twine. Thread it through the top hole and tie a secure knot at the base of the loop, right against the clay. -
Hang and enjoy:
Find a sunny window and hang your new creation where the sunlight can pass through the glass inlays.
Now watch as the morning sun transforms your window into a gallery of light and texture