Whenever I need a quick win in the studio, I make clay mushrooms—they’re forgiving, fun, and they instantly feel a little magical. Here are my favorite clay mushroom ideas to spark your next batch, whether you’re working with air-dry clay, polymer clay, or ceramic clay.
Mini Mushroom Figurines in Mixed Sizes
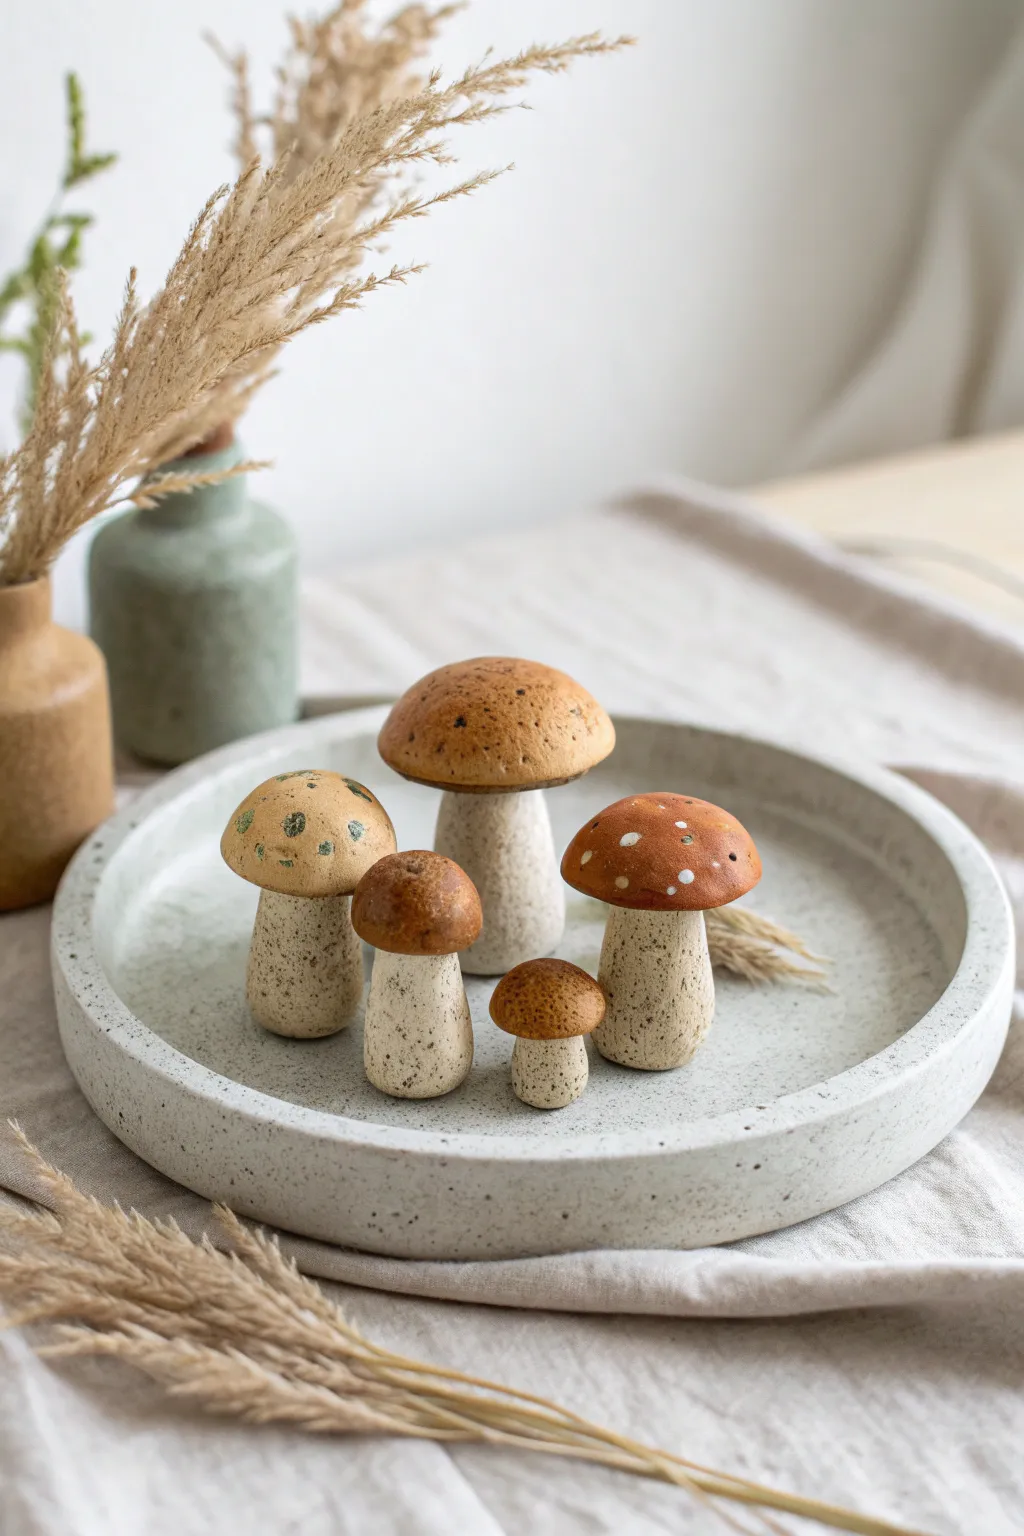
Capture the charm of the forest floor with these delightful clay mushroom figurines. Featuring a mix of earthy glazes and organic speckles, this set brings a modern, natural aesthetic to any ceramic tray or shelf display.
Step-by-Step Guide
Materials
- White or speckled stoneware clay
- Pottery wire cutter
- Modeling tools (wooden knife, rib)
- Small sponge
- Needle tool
- Scoring tool or serrated rib
- Slip (liquid clay)
- Underglazes: dark brown, burnt orange, mustard yellow, and sage green
- Clear matte glaze or low-sheen satin glaze
- Small paintbrush
- Toothedbrush or stiff-bristle brush (for spattering)
- Kiln for firing
Step 1: Sculpting the Forms
-
Portion the clay:
Begin by cutting five different sizes of clay amounts from your block. You want a range of sizes to create a dynamic family of mushrooms, from a tiny baby mushroom to a large, dominant one. -
Form the stalks:
Roll each portion of clay into a thick cylinder. Gently taper them so they are slightly wider at the base than at the top, mimicking the natural growth of a mushroom stem known as the stipe. -
Shape the caps:
Pinch off about a third of the clay from the top of each cylinder or use fresh clay balls to form the caps. Flatten the bottom of the ball and round the top into a classic dome shape. Vary the curve—make some flatter and wider, others more bulbous. -
Refine the surfaces:
Smooth out any fingerprints on both the stalks and caps using a slightly damp sponge. This is crucial for achieving that modern, distinct finish seen in the reference. -
Score and slip:
To attach the caps, deeply score the top of the stalk and the underside of the cap. Apply a generous dab of slip to both scored areas. -
Assemble the mushrooms:
Press the cap firmly onto the stalk with a gentle twisting motion to secure the bond. Use a modeling tool to clean up the seam where they meet, ensuring it looks like one cohesive piece or keeping a distinct line depending on your preference. -
Pierce the bottoms:
Use a needle tool to poke a small hole in the bottom of each stalk. Since these are solid clay, this vent hole helps release any trapped air and moisture during firing to prevent cracking. -
Dry to bone dry:
Allow the mushrooms to dry slowly under a loose plastic sheet for a day, then uncover them to dry completely until they are bone dry and ready for the bisque firing. -
Bisque fire:
Fire the pieces to cone 04 (or your clay body’s bisque temperature) to harden them for glazing.
Glaze Consistency
If your glaze seems too thick, thin it slightly with water. You want a milk-like consistency to ensure the speckles on the clay body show through the transparent glaze.
Step 2: Glazing and Decoration
-
Base coat the stalks:
Leave the stalks raw if you used beautiful speckled clay. If you used plain white clay, apply a thin wash of diluted beige underglaze to give them a natural, sandy tone. -
Speckle the stalks:
Load a toothbrush with dark brown underglaze or iron oxide wash. Use your thumb to flick the bristles, spraying a fine mist of speckles onto the stalks. I like to let this dry briefly before handling to avoid smudging the dots. -
Paint the caps:
Select your glaze colors for the caps. Paint the largest one a soft brown, the medium ones in burnt orange and tan, and perhaps a small one in a darker chestnut. Apply 2-3 coats for solid coverage. -
Add cap details:
On one or two mushrooms, like the medium-light one, stick with a solid color but add large, distinct spots. Use a contrasting color (like green on tan) and dab it on with a small round brush. -
Create the fly agaric look:
For the reddish-orange mushroom, use a fine tip brush to add small white dots. Group them slightly denser near the center of the cap for a realistic look. -
Clean the feet:
Using a damp sponge, carefully wipe away any glaze from the absolute bottom of the stalks so they don’t stick to your kiln shelves. -
Apply clear glaze:
Once the underglaze designs are dry, dip the caps (and stalks, if you want them sealed) into a clear matte or satin glaze. A matte finish gives that soft, modern ceramic look shown in the image. -
Final firing:
Fire the mushrooms to your clay’s maturity temperature (e.g., cone 5/6 for stoneware). Allow the kiln to cool completely before removing your new forest friends.
Make Them Functional
Before firing, carve a slit in the top of the caps to turn these figurines into adorable photo holders or place card stands for a dinner party.
Arrange your finished ceramic fungi on a tray or nestle them into plant pots for a touch of woodland magic


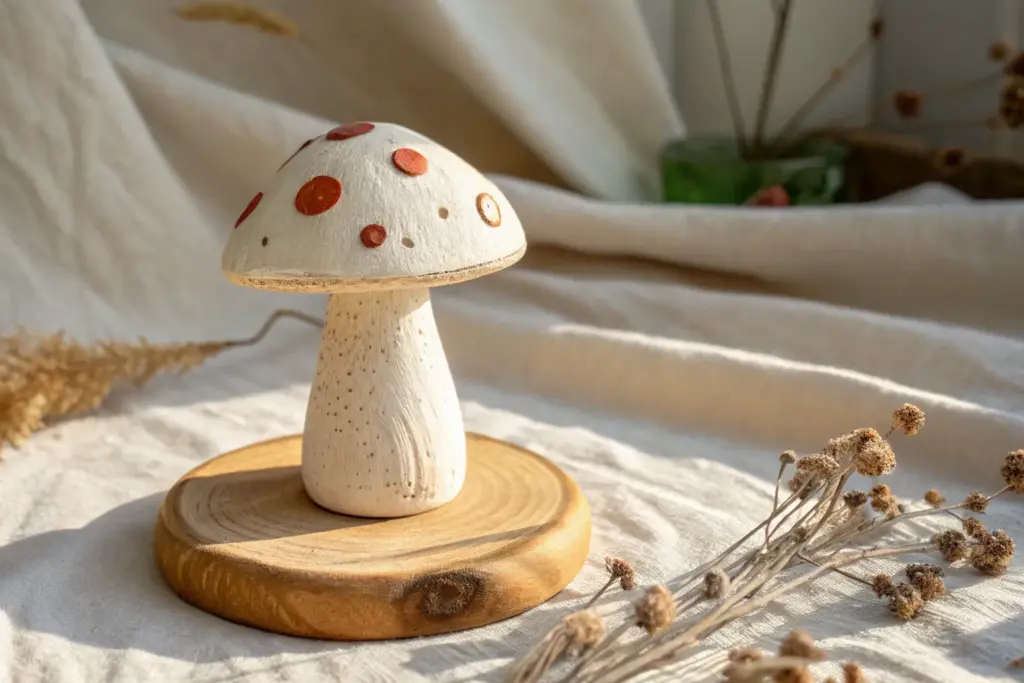
Hanging Mushroom Ornaments With Simple Loops
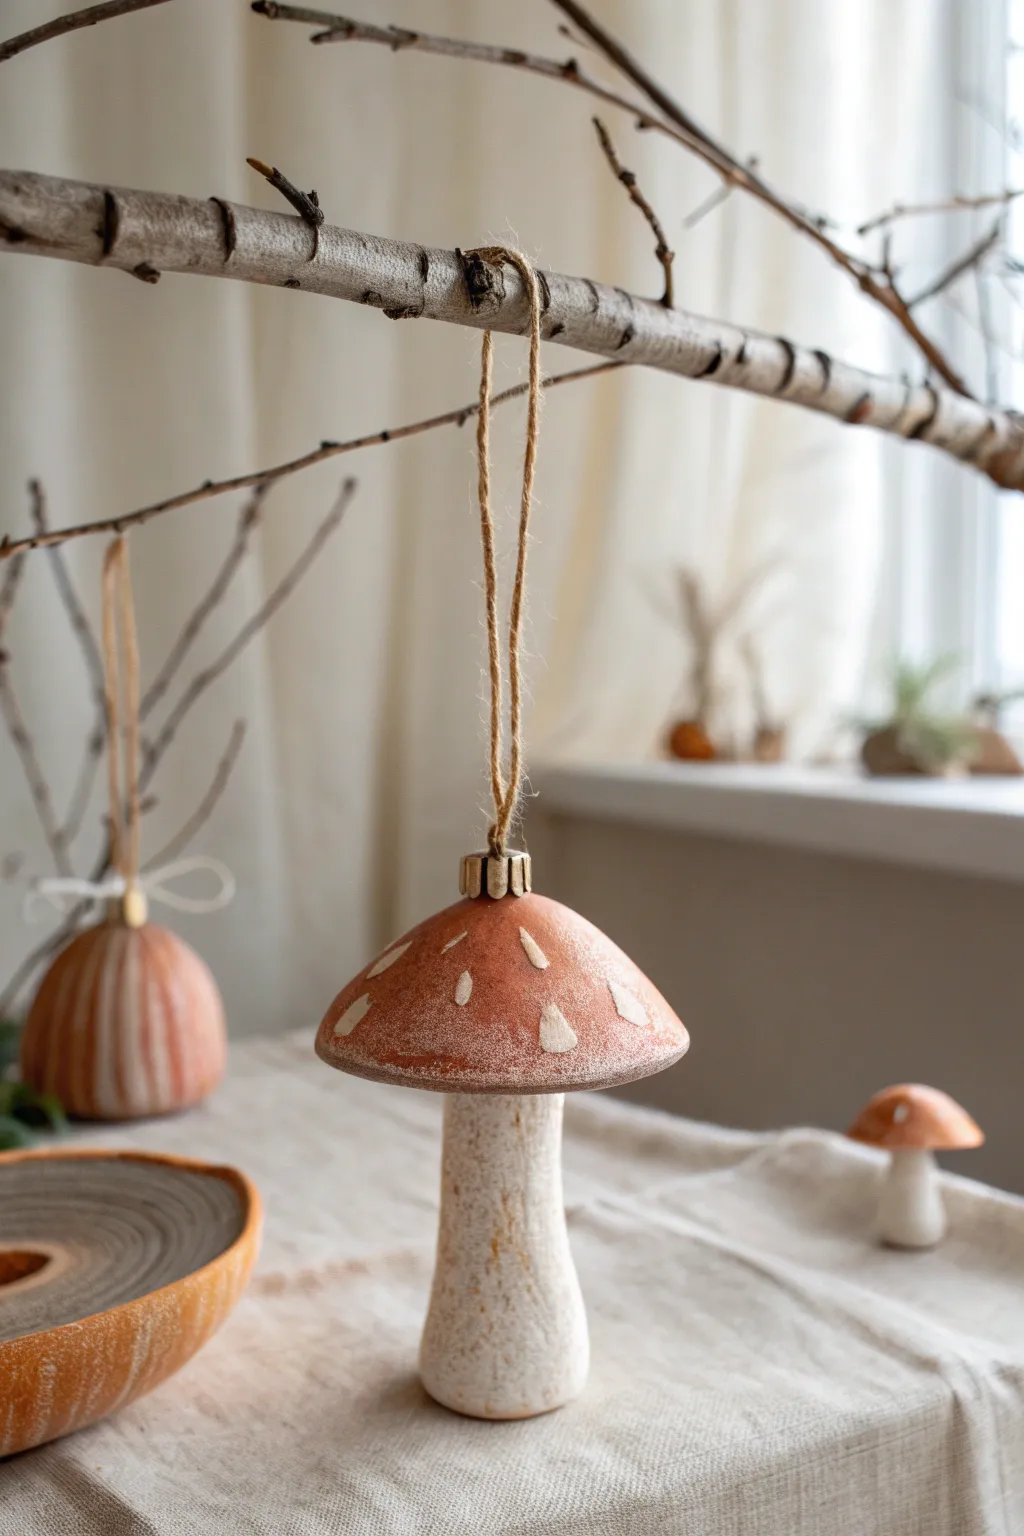
Bring the charm of the forest floor into your home with these textured, hanging mushroom ornaments. Their earthy clay tones and distressed finish give them a timeless, handcrafted appeal perfect for seasonal decor.
Step-by-Step Tutorial
Materials
- Air-dry clay or polymer clay (white or terracotta)
- Acrylic paints (terracotta/rust orange, antique white, dark brown)
- Small foam sponge or textured sponge
- Jute twine
- Metal ornament caps (looped)
- Super glue or strong craft adhesive
- Sculpting tools or toothpick
- Fine-grit sandpaper
- Matte varnish spray (optional)
Step 1: Sculpting the Form
-
Shape the Stem:
Start by taking a chunk of clay roughly half the size of your palm. Roll it into a thick cylinder. Gently taper the top slightly so it fits inside the cap later, and flatten the bottom so it looks like a traditional mushroom stalk. -
Texture the Stalk:
Before the clay hardens, take a stiff bristle brush or a crumpled ball of aluminum foil and roll it over the stem surface. This creates that organic, pitted texture rather than a smooth, manufactured look. -
Form the Cap:
Roll a separate ball of clay and flatten it into a thick disk. Gently curve the edges downward to create a dome shape. Make sure the dome is wide enough to overhang the stem comfortably. -
Test the Fit:
Place the cap onto the tapered top of the stem to ensure they fit together well. Don’t join them permanently yet—keeping them separate makes painting easier. -
Create the Cap Channel:
At the very top center of the dome, press the metal ornament cap slightly into the wet clay to create an impression. This ensures it will sit flush later. Remove the metal cap before drying. -
Dry the Pieces:
Let both clay pieces dry completely according to your clay package instructions. I find that flipping them over halfway through the drying process helps prevent warping.
Step 2: Painting and Finishing
-
Base Coat the Stem:
Paint the entire stem with an antique white or cream acrylic paint. Don’t worry about perfect coverage; a little translucency adds to the natural feel. -
Weather the Stem:
Mix a very watery wash of dark brown paint. Brush it over the textured stem and immediately wipe most of it off with a paper towel. The dark paint will stay in the crevices, highlighting the texture you created earlier. -
Paint the Cap:
Apply two coats of terracotta or rust-orange acrylic paint to the mushroom cap. Let it dry fully between coats for a solid, opaque color. -
Add the Spots:
Using a small brush or a toothpick, paint irregular oval or teardrop shapes onto the cap using the antique white paint. Keep them random in size and spacing. -
Distress the Cap:
Once the paint is bone dry, lightly sand the surface of the cap with fine-grit sandpaper. Focus on the white spots and the bottom rim to scuff them up, revealing a bit of the clay underneath for a worn, vintage look. -
Assemble the Mushroom:
Apply a strong adhesive to the top of the stem and press the cap firmly onto it. Hold it in place for a minute to ensure a secure bond. -
Attach the Hardware:
Put a drop of super glue into the depression at the top of the cap and press the metal ornament cap into place. -
Add the Hanger:
Cut a length of jute twine, thread it through the metal loop, and knot the ends together to create a rustic hanging loop. -
Seal the piece:
Protect your work with a light mist of matte varnish if you plan to reuse these year after year.
Cracked Clay?
If small cracks appear as the clay dries, mix a tiny bit of fresh clay with water to make a paste (slip) and smooth it into the cracks with your finger.
Add Mossy Details
Glue small bits of dried moss or lichen to the base of the stem or under the cap rim to make the mushroom look like it was just plucked from the forest.
Hang your new creation on a branch or tree and enjoy the cozy woodland atmosphere it creates


Mushroom Ring Dish With a Gilled Underside
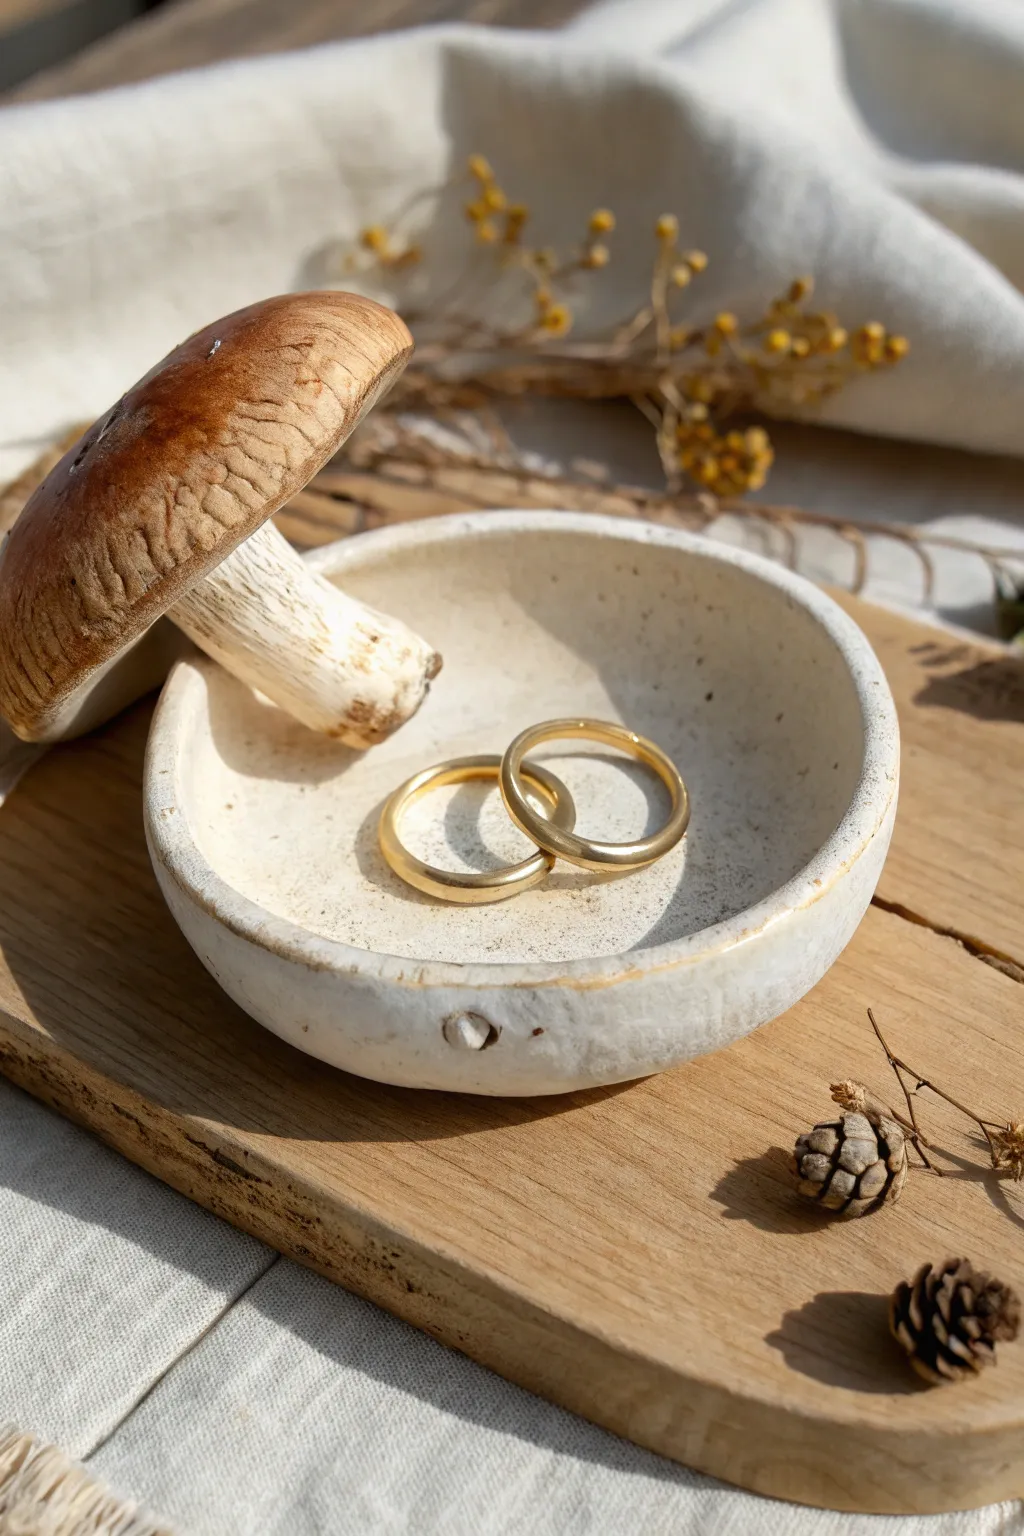
Bring a touch of the forest floor to your vanity with this charming clay ring dish that mimics an overturned mushroom cap. The natural textures and warm, earthy tones make it perfect for holding delicate gold bands or small treasures.
Step-by-Step
Materials
- White air-dry clay or polymer clay
- Pottery sponge
- Needle tool or toothpick
- Small rolling pin
- Bowl for shaping (hollow form)
- Acrylic paints: Burnt Umber, Ochre, Cream, White
- Paintbrushes: fineliner and soft round
- Gloss varnish or resin (optional)
Step 1: Shaping the Cap
-
Condition the clay:
Begin by taking a ball of white clay about the size of a tangerine. Knead it in your hands until it is warm, pliable, and free of cracks. -
Create the base form:
Roll the clay into a smooth sphere, then gently flatten it into a thick disc using the palm of your hand. -
Form the hollow:
Use your thumbs to gently press into the center of the disc, pinching the sides up to create a shallow bowl shape. Keep the walls somewhat thick and organic-looking rather than perfectly uniform. -
Smooth the edges:
Dip your finger or a pottery sponge in a tiny bit of water and run it along the rim to soften any sharp edges or cracks. The rim should feel rounded and earthy.
Step 2: Adding Texture & Detail
-
Texture the underside:
Turn the bowl over so the bottom is facing up (this will be the ‘top’ of the mushroom cap). Use a needle tool to scratch subtle, radiating lines from the center outward to mimic the texture of a mushroom skin, or leave it relatively smooth for a younger cap look. -
Create the gills (optional interior detail):
If you want the inside to look like gills, gently score fine lines radiating from the center of the bowl up to the rim. For the look in the photo, keep the interior largely smooth with just a hint of rough texture. -
Sculpt the accent mushroom:
To create the small mushroom resting on the edge, roll a small cylinder for a stem and a separate smaller cap. Attach them together by scoring the clay and using a dab of water or slip. -
Detail the accent stem:
Use your needle tool to drag vertical lines down the small stem, giving it a fibrous, realistic texture. -
Attach or display:
You can adhere this small mushroom to the rim of your bowl using slip, or bake/dry it separately to simply rest inside as decor. The photo shows a separate larger mushroom prop, but you can sculpt one to be part of the set. -
Dry the piece:
Let your clay dry completely according to the package instructions. For air-dry clay, turn it occasionally so the bottom dries evenly.
Fixing Cracks
If small hairline cracks appear as your clay dries, mix a tiny bit of fresh clay with water to make a paste and fill them in before painting.
Step 3: Painting & Finishing
-
Base coat the interior:
Mix a creamy off-white color using White and a tiny dot of Ochre. Paint the entire interior of the bowl, dabbling the paint for a textured finish. -
Paint the exterior cap:
For the outside of the bowl (the mushroom cap), paint a gradient. Start with Burnt Umber at the very center bottom and blend out to a lighter Ochre towards the rim. -
Add rim details:
Take a dry brush with a little Burnt Umber and gently dab the rim of the bowl. This creates a toasted, organic transition between the dark exterior and light interior. -
Paint the accent mushroom:
Paint the cap of your small accent mushroom a rich, reddish-brown. For the stem, use dirty cream paint and wash over it with watery brown paint so the dark color settles into the texture grooves. -
Speckle effect:
Dilute some dark brown paint with water. Dip a stiff brush (like a toothbrush) in it and flick very fine speckles onto the interior of the bowl for a natural, gritty look. -
Seal the piece:
Once the paint is fully dry, coat the interior with a gloss varnish or a thin layer of resin if you want a ceramic-like shine. A matte varnish works best for the rustic mushroom cap exterior.
Gilded Edge
For a magical touch, paint the very rim of the dish with liquid gold leaf. It adds a sophisticated contrast to the rustic earthenware vibe.
Place your favorite rings inside and enjoy your little piece of woodland art


Mushroom Magnets for Your Fridge or Tool Cart
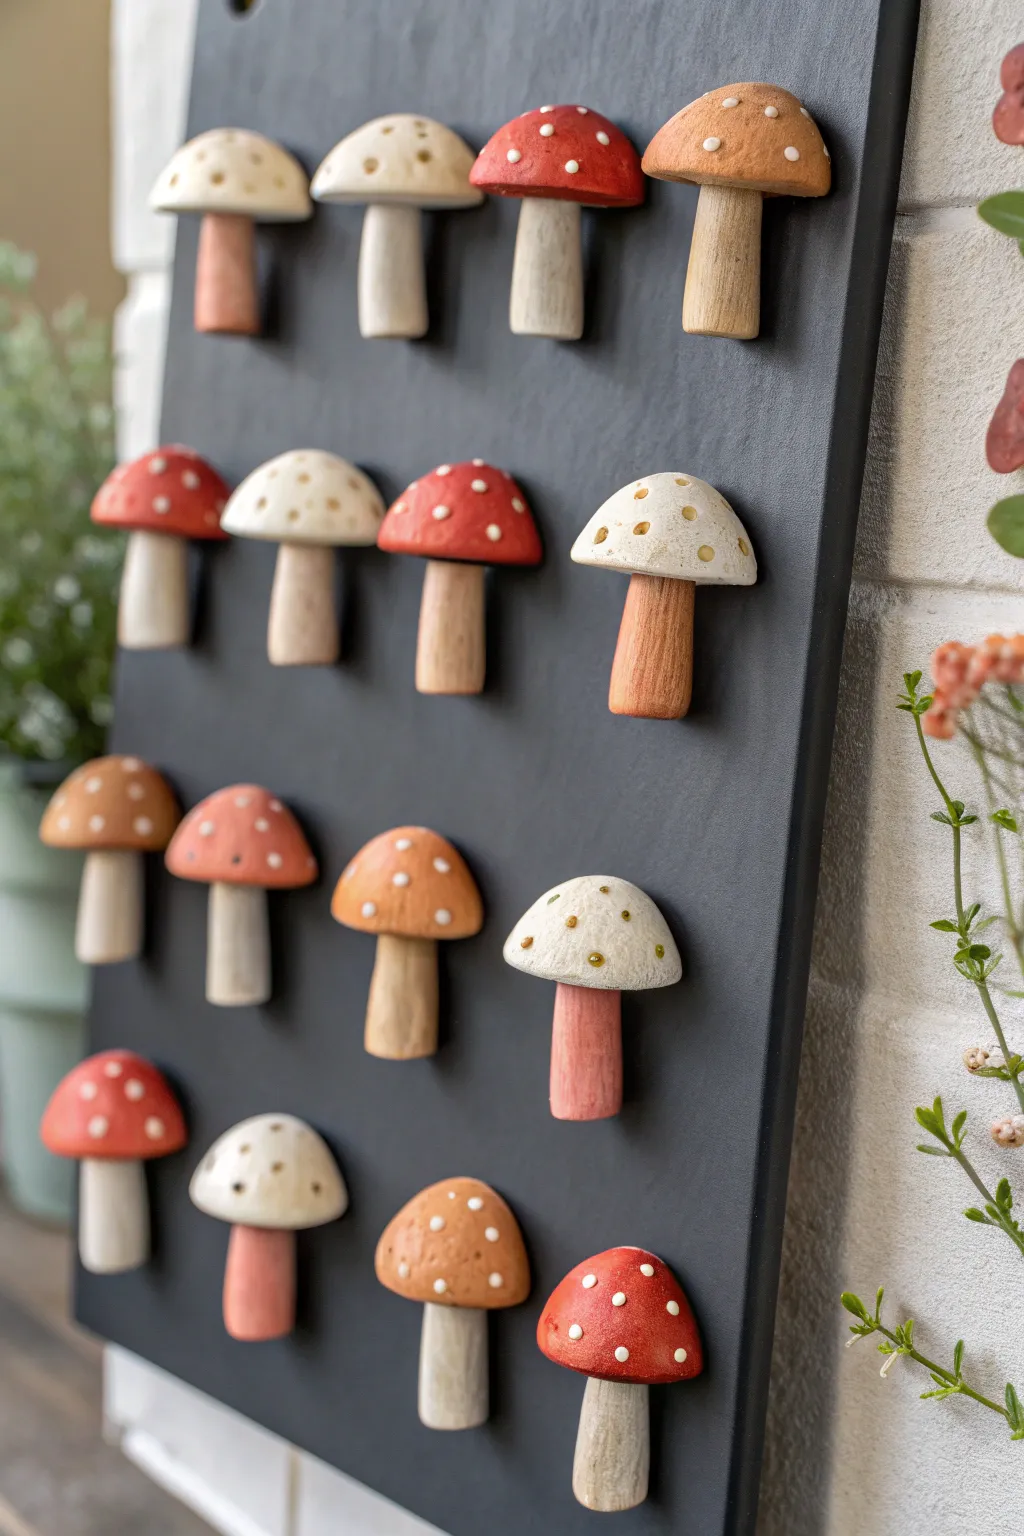
Bring a touch of cottagecore charm to your kitchen with these delightful clay mushroom magnets. Featuring a mix of earthy terracotta tones, creamy whites, and classic speckled red caps, this project transforms simple clay into a miniature forest for your fridge.
Detailed Instructions
Materials
- Polymer clay (white, terracotta/brown, red)
- Small round neodymium magnets (approx. 5-8mm)
- Sculpting tools (needle tool, small ball stylus)
- Strong super glue or E6000
- Acrylic paint (white, cream, burnt sienna, deep red)
- Fine detail paintbrush
- Baking sheet and parchment paper
- Matte finishing varnish (optional)
- Small crumpled foil ball (for texturing)
Step 1: Sculpting the Caps
-
Portion the clay:
Start by pinching off small pieces of clay, roughly the size of a marble for each mushroom cap. Vary the sizes slightly to create a natural, organic collection. You’ll need about 16-20 pieces for a full board like the one shown. -
Shape the domes:
Roll each piece into a smooth ball between your palms, then gently press your thumb into the center to flatten the bottom while keeping the top rounded. Aim for a mix of tall, bell-like domes and flatter, umbrella-style caps. -
Add cap details:
For the spotted caps, use a small ball stylus to press indentations into the clay before baking, or gently press tiny flattened balls of contrasting clay (like white on red) onto the surface. For the textured caps, lightly roll a crumpled ball of foil over the surface to give it an earthy, porous look. -
Create the connection point:
Use the end of a paintbrush handle to make a small indentation on the flat underside of each cap. This divot will help secure the stem later and increase the contact area for the glue.
Loose Magnets?
If a magnet pops out after glueing, scratch up the magnet’s surface and the clay recess with sandpaper. This rough texture gives the glue significantly more grip.
Step 2: Forming the Stems
-
Roll the stems:
Roll out thick snakes or cylinders of clay. I find that making them slightly thicker at the base gives the mushrooms more character and stability. Cut them to varying lengths—some short and stout, others long and elegant. -
Add wood texture:
Take a needle tool and gently drag vertical lines down the length of the stems. Don’t worry about being perfectly straight; irregular grooves mimic natural bark and wood grain much better. -
Check the fit:
Before baking, press the top of each stem gently into the indentation you made under the caps to ensure they fit together well. Separate them again for baking so they are easier to handle. -
Embed the magnets:
Press a neodymium magnet into the flat back of each cap to create a recess. Remove the magnet before baking (heat can demagnetize them), but now you have a perfect flush pocket for gluing later.
Glow in the Dark
Mix a pinch of glow-in-the-dark powder into your white clay or paint for the cap spots. Your mushroom forest will emit a magical, faint glow at night.
Step 3: Assembly and Finishing
-
Bake carefully:
Arrange all your pieces on a parchment-lined baking sheet. Bake according to your clay package instructions (usually around 275°F/135°C for 15-30 minutes). Let them cool completely before handling. -
Paint the stems:
Mix a wash of burnt sienna and water. Brush it over the textured stems and immediately wipe off the excess with a paper towel. This technique, which I love for natural effects, leaves dark paint in the crevices and highlights the wood grain texture. -
Paint the cap details:
If you didn’t use colored clay, paint the caps now. Use deep red for the classic toadstools and add crisp white dots. For the natural caps, a dry-brush of cream or light brown adds lovely depth. -
Glue the parts:
Apply a dab of strong glue to the top of a stem and press it firmly into the underside of a matching cap. Hold for a few moments to ensure a bond sets. -
Attach magnets:
Place a small drop of glue into the recess on the back of each mushroom cap or stem (depending on where you made the hole) and press the magnet in. Let this cure fully, usually overnight. -
Seal the work:
For durability, brush a coat of matte varnish over the entire mushroom. This protects the paint and gives the clay a consistent, professional finish without looking too glossy or plastic.
Arrange your charming fungal collection on any magnetic surface to enjoy a little piece of nature indoors

The Complete Guide to Pottery Troubleshooting
Uncover the most common ceramic mistakes—from cracking clay to failed glazes—and learn how to fix them fast.
Tiny Mushroom Stud Earrings and Charm Pairs
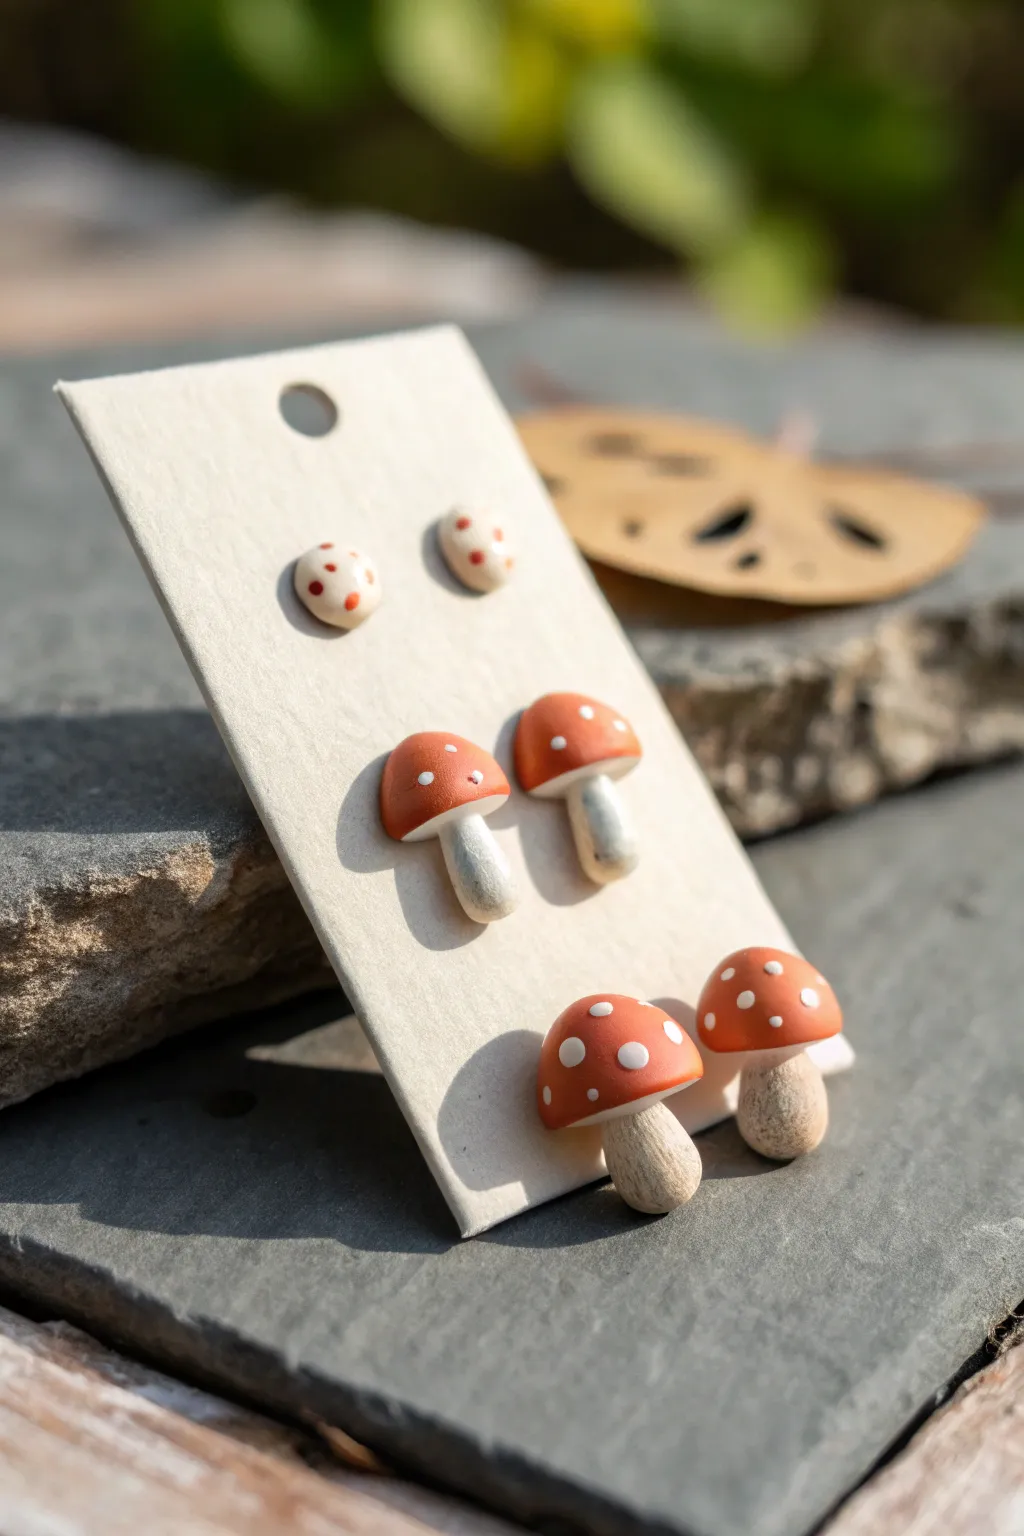
These charming earrings come in three unique styles, ranging from tiny spotted studs to iconic red toadstools with textured stems. Creating a mixed set like this allows you to practice different techniques, from simple shaping to detailed texturing, all resulting in a cohesive woodland collection.
Step-by-Step Tutorial
Materials
- Polymer clay (white, translucent white, granite/tan, brick red, orange-red)
- Liquid polymer clay (optional, for adhesion)
- Acrylic paint (white, burnt sienna)
- Dotting tool or toothpick
- Ball stylus tool
- Needle tool or stiff toothbrush (for texture)
- Earring posts (studs)
- Super glue or E6000
- Gloss varnish or UV resin
- Baking sheet and parchment paper
- Oven
Step 1: Creating the Mini Spotted Studs
-
Form the base:
Start with white polymer clay. Roll two tiny spheres, roughly 4-5mm in diameter. Gently press them onto your work surface so they flatten slightly into domed buttons. -
Add the spots:
Using a very small dotting tool or the tip of a toothpick, pick up a tiny amount of brick-red acrylic paint—or use minuscule bits of red clay—and create random, sparse dots across the surface of the white domes.
Step 2: Sculpting the Classic Red Mushrooms
-
Shape the caps:
Mix a bit of orange-red clay to get a warm, autumnal tone. Roll two balls, slightly larger than the studs, and press them gently to flatten the bottom while keeping the top rounded. -
Create the simple stems:
For the middle pair, use white clay mixed with a tiny speck of translucent to give it a waxy look. Roll two small cylinders, slightly thicker at the base. Attach these to the center of the red caps. -
Add detail dots:
Using a dotting tool, press two sizes of indentations into the red caps: a few larger shallow ones and smaller pin-pricks. Fill these carefully with white liquid clay or paint them white after baking.
Sticky Situation?
If clay sticks to your fingers, lightly dust them with cornstarch. Use baby wipes to clean hands when switching colors to keep white clay pristine.
Step 3: crafting the Textured Toadstools
-
Mix a textured stem color:
For the bottom pair, I prefer using a ‘granite’ or speckled tan clay. It mimics the earthy look of a real mushroom stalk beautifully. Roll two cylinders that mirror the size of the previous stems. -
Apply texture:
Use a needle tool to scratch vertical lines up and down the stems, or roll a stiff toothbrush over the surface to create a rough, grippy texture. -
Form the caps:
Create two large caps using a deeper reddish-brown clay. These should feel a bit heavier and rounder than the previous set. -
Connect cap and stem:
Press a small indentation into the underside of the caps with a ball tool to accept the stem. Apply a dot of liquid clay for a secure bond, then insert the textured stems. -
Paint the classic spots:
Before baking, you can press tiny flat discs of white clay onto the caps. Alternatively, leave them smooth and paint crisp white dots after baking for a sharper contrast.
Stem Stability
Insert a small piece of wire or a cut headpin inside the stem and into the cap before baking. This acts like internal rebar for stronger earrings.
Step 4: Baking and Assembly
-
Bake the batch:
Arrange all your mushroom pieces on a parchment-lined baking sheet or ceramic tile. Bake according to your brand of polymer clay instructions (usually 275°F/135°C for 15-30 minutes). -
Cool down:
Let the pieces cool completely inside the oven if possible to prevent cracking from thermal shock. -
Attach earring posts:
Once cool, use a strong adhesive (like E6000 or super glue gel) to attach flat-pad earring posts to the back of the studs and the back of the stems near the cap. -
Secure the backs:
For extra durability, you can cover the metal pad of the earring post with a thin layer of liquid clay or UV resin and cure it again. This embeds the post into the earring. -
Varnish touches:
Apply a coat of gloss varnish only to the colored caps to replicate that damp, forest-floor shine, keeping the stems matte for textural contrast.
Display your woodland treasures on a simple card to highlight their rustic charm
Kawaii Mushroom Pals With Sweet Faces
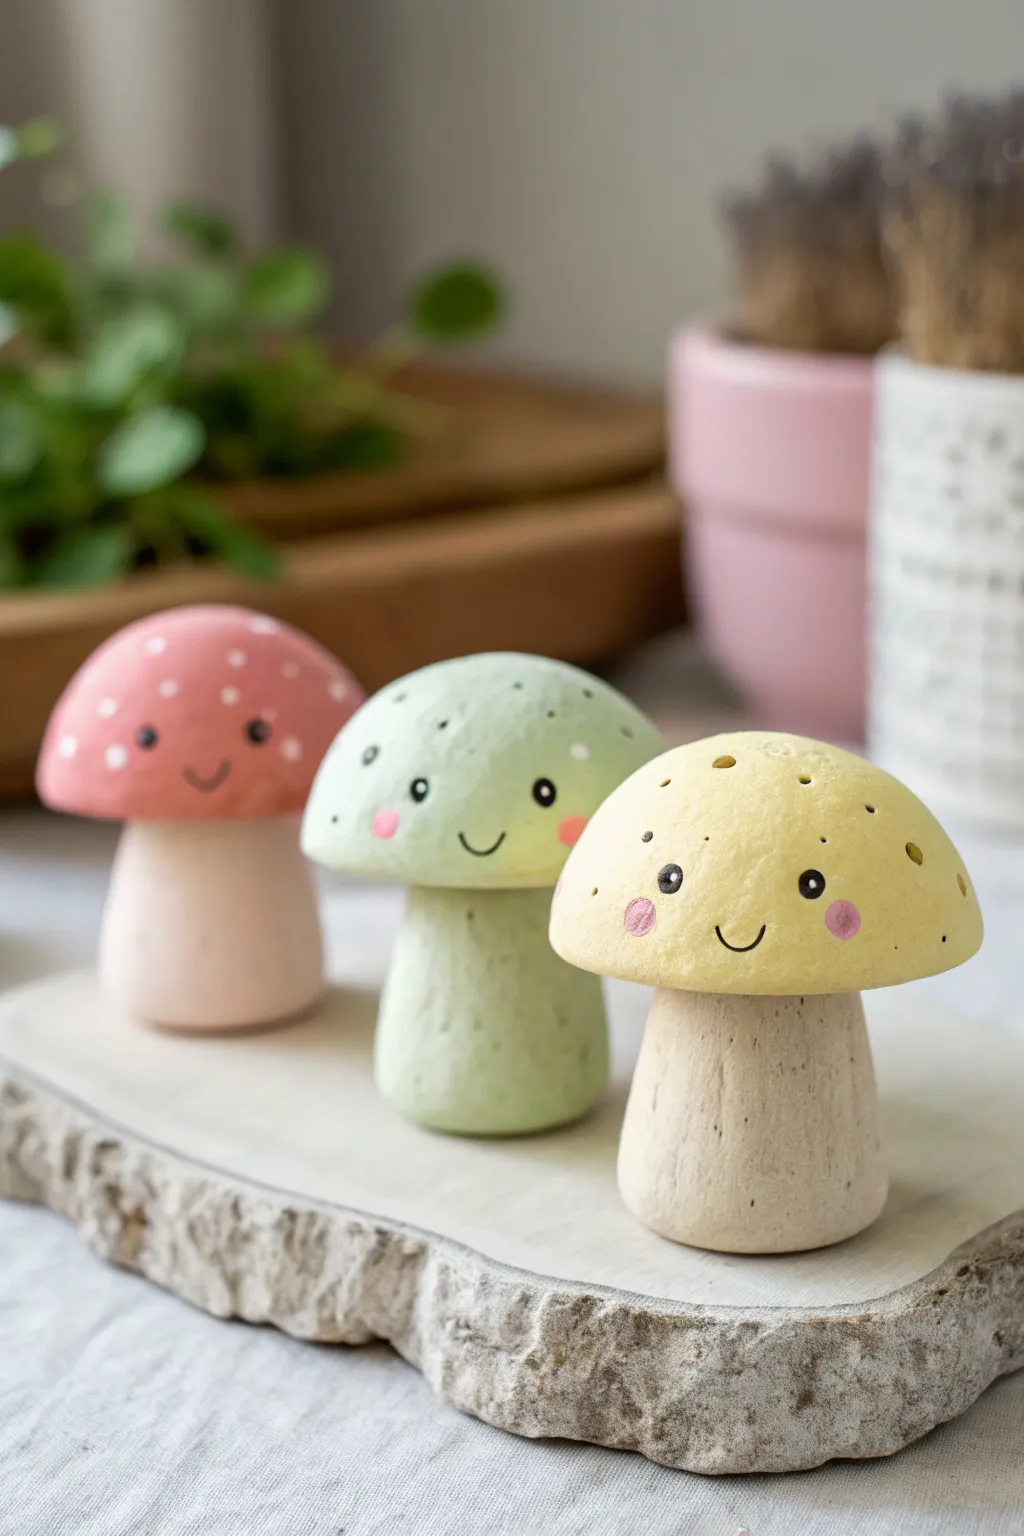
Bring a touch of forest charm to your desk or shelf with this adorable set of three clay mushrooms. Featuring soft pastel caps, textured woody stems, and the sweetest little faces, these pals are sure to brighten any rainy day.
Step-by-Step
Materials
- Air-dry clay or polymer clay (white)
- Acrylic paints (pastel pink, mint green, pale yellow, black, white, bright pink)
- Sculpting tools (needle tool, ball stylus)
- Small paintbrushes (flat and fine liner)
- Aluminum foil (for armature)
- Water and sponge (for smoothing)
- Matte varnish or sealant
Step 1: Sculpting the Shapes
-
Create the core:
Start by scrunching small pieces of aluminum foil into three distinct shapes: a cone for the stem and a rounded dome for the cap. This saves clay and keeps the mushrooms lightweight. -
Form the stems:
Roll out a thick slab of white clay and wrap it around your foil stem armature. Shape it into a sturdy cylinder that widens slightly at the base for stability. -
Texture the bark:
Using a needle tool or a stiff bristled brush, drag vertical lines up and down the stems to mimic the texture of rough wood or bark. Keep the strokes loose and organic. -
Shape the caps:
Cover your foil domes with a smooth layer of clay. Gently curve the edges downward so they will sit cupped over the stems. Smooth out any fingerprints with a slightly damp sponge. -
Connect the parts:
Score the top of the stem and the underside of the cap with a needle tool. Apply a dab of water (or slip) and press the pieces firmly together to join them. -
Add cap details:
For the yellow mushroom, use a small tool to poke random, gentle indentations over the surface for a porous look. Leave the pink and green caps smooth for now.
Fixing Wobbly Stems
If your mushrooms tip over, flatten the base again by sanding the bottom gently against a piece of medium-grit sandpaper until it sits perfectly flush.
Step 2: Painting and Personality
-
Base coat the stems:
Once fully dry, paint the stems with a wash of beige or diluted light brown paint. Wipe away excess paint with a paper towel so the darker color stays in the textured crevices. -
Paint the caps:
Apply your pastel colors—soft pink, mint green, and pale yellow—to the caps. You may need two coats for an opaque, consistent finish. -
Add the spots:
Dip the end of a paintbrush handle or a large ball stylus into white paint. Dot a random pattern of spots onto the pink and green mushroom caps. -
Paint the eyes:
Using your finest liner brush and black acrylic, carefully paint two small, solid black circles for eyes on each stem, positioning them about midway down. -
Add the highlight:
To bring them to life, add a tiny white dot in the upper corner of each black eye. This ‘catchlight’ is crucial for that kawaii look. -
Draw the smiles:
With the same liner brush and black paint, draw a tiny, shallow ‘U’ shape between the eyes for a sweet, subtle smile. -
Apply rosy cheeks:
Mix a little bright pink paint with water to make a glaze. Dab small, sheer pink circles just under the eyes for blushing cheeks. -
Seal the deal:
Finish by applying a coat of matte varnish over the entire piece to protect your paint job and eliminate any unwanted shine.
Make It a Keychain!
Before the clay dries, insert a small screw eye pin into the top center of the cap. Secure it with a dab of superglue after baking or drying.
Arrange your little fungal family together on a windowsill where they can greet you every morning


What Really Happens Inside the Kiln
Learn how time and temperature work together inside the kiln to transform clay into durable ceramic.
Realistic Woodland Mushrooms With Textured Caps
Capture the magic of the forest floor with this incredibly realistic mushroom sculpture mounted on a smooth pebbled base. By combining polymer clay techniques with careful texturing and painting, you’ll create a trio of boletes that look like they were just plucked from an autumn wood.
Step-by-Step Guide
Materials
- Polymer clay (white and translucent)
- Air-dry clay (stone color) or a large smooth river rock
- Aluminum foil
- Armature wire (16 or 18 gauge)
- Sculpting tools (needle tool, ball stylus)
- Toothbrush or stiff bristle brush
- Soft pastels (various browns, ochre, rusty red)
- Acrylic paints (burnt umber, darker brown, white)
- Gloss varnish or liquid polymer clay
- Strong craft glue or 2-part epoxy
- Paintbrushes (soft shader and fine detail)
Step 1: Creating the Base
-
Form the core:
Begin by crumpling aluminum foil into a large, flattened oval shape to serve as the core of your stone base. Compacting the foil tightly now saves clay later. -
Cover with clay:
Roll out a thick sheet of stone-colored air-dry clay (or polymer clay if you prefer baking the whole piece). Wrap it entirely around the foil core, smoothing the seams with a bit of water until the surface is uniform and resembles a river stone. -
Create mounting holes:
While the clay is still soft, poke three distinct holes where you want your mushroom stems to sit. Make them deep enough to hold the wire armature securely later. Let this base dry or cure completely according to package instructions.
Sticky Finger Prints?
If you are leaving fingerprints on the smooth caps while sculpting, dip your finger in a little cornstarch or baby oil and gently buff the raw clay before adding the pastel powders.
Step 2: Sculpting the Mushrooms
-
Prepare the stems:
Cut three lengths of armature wire. Twist a small ball of foil onto the top of each wire to support the cap, leaving enough wire exposed at the bottom to insert into your base. -
Mix the stem color:
Condition white polymer clay with a small amount of translucent clay. This mix gives the stems a natural, slightly fleshy look rather than a plastic white appearance. -
Shape the stalks:
Wrap the clay around the wire stems. Taper them so they are thicker at the bottom and slightly thinner toward the cap. These particular mushrooms (boletes) have sturdy, bulbous bases, so don’t make them too slender. -
Texture the stems:
This is a crucial step for realism. Use a toothbrush or a stiff bristle brush to tap texture onto the entire surface of the stalks. Then, use a needle tool to scratch vertical, irregular lines, focusing heavily on the bottom third of the stem to mimic dirt and growth patterns. -
Form the caps:
Roll three balls of clay for the caps—one large, one medium, and one small button. Flatten the bottoms and gently dome the tops. Press them onto the foil balls at the top of your armature wires, blending the clay of the cap underside to the top of the stem so no seam is visible. -
Refine the cap shape:
Smooth the tops of the caps with your finger. For the smallest mushroom, keep the cap quite round and closed; for the larger ones, flatten the dome slightly to show age.
Step 3: Coloring and Detailing
-
Shade the stems:
Before baking, scrape some brown and ochre soft pastels into a powder. Use a soft brush to dust the texturing on the stems, concentrating the darker brown near the base where the ‘dirt’ would be. -
Color the caps:
Apply pastel powder to the caps. Start with a rusty red-brown near the center and blend out to a lighter ochre-brown at the edges. I find layering the colors gradually builds a much deeper, more organic tone than a single coat. -
Add imperfections:
Real mushrooms aren’t perfect. Use a sculpting tool to add a tiny nick or dent to one of the caps, then dab a little dark brown pastel into the dent to simulate a bruised spot. -
Bake the mushrooms:
Preheat your oven according to the clay manufacturer’s directions. safely prop the mushrooms up (you can stick the wires into a ball of scrap foil) and bake. Let them cool completely.
Add Some Life
Sculpt a tiny snail or ladybug to attach to one of the stems or the stone base. This small narrative detail instantly turns the sculpture into a story piece.
Step 4: Assembly and Finishing
-
Enhance the texture:
Once cool, mix a very dilute wash of burnt umber acrylic paint and water. Brush it over the stems and immediately wipe it off with a paper towel. The dark paint will stay in the deep needle scratches, highlighting the texture. -
Mount the mushrooms:
Test fit the wires into the holes in your stone base. If the fit is good, apply strong craft glue or two-part epoxy into the holes and insert the mushroom wires. Hold them in place for a minute until the glue grabs. -
Blend the connection:
If there is a gap between the stem and the stone, take a tiny bit of brown-tinted clay (or air dry clay mixed with paint) and push it around the base of the stems to make them look like they are growing directly out of the surface. -
Varnish the caps:
For that fresh-from-the-rain look, apply a coat of gloss varnish or a thin layer of liquid polymer clay to just the tops of the caps. Leave the stems matte. -
Final touches:
If you want extra realism, dab a tiny bit of faux moss or dried tea leaves around the very base of the stems using clear glue.
Now you have a permanent piece of autumn nature to display on your shelf or windowsill
Morel-Inspired Mushrooms With Honeycomb Texture
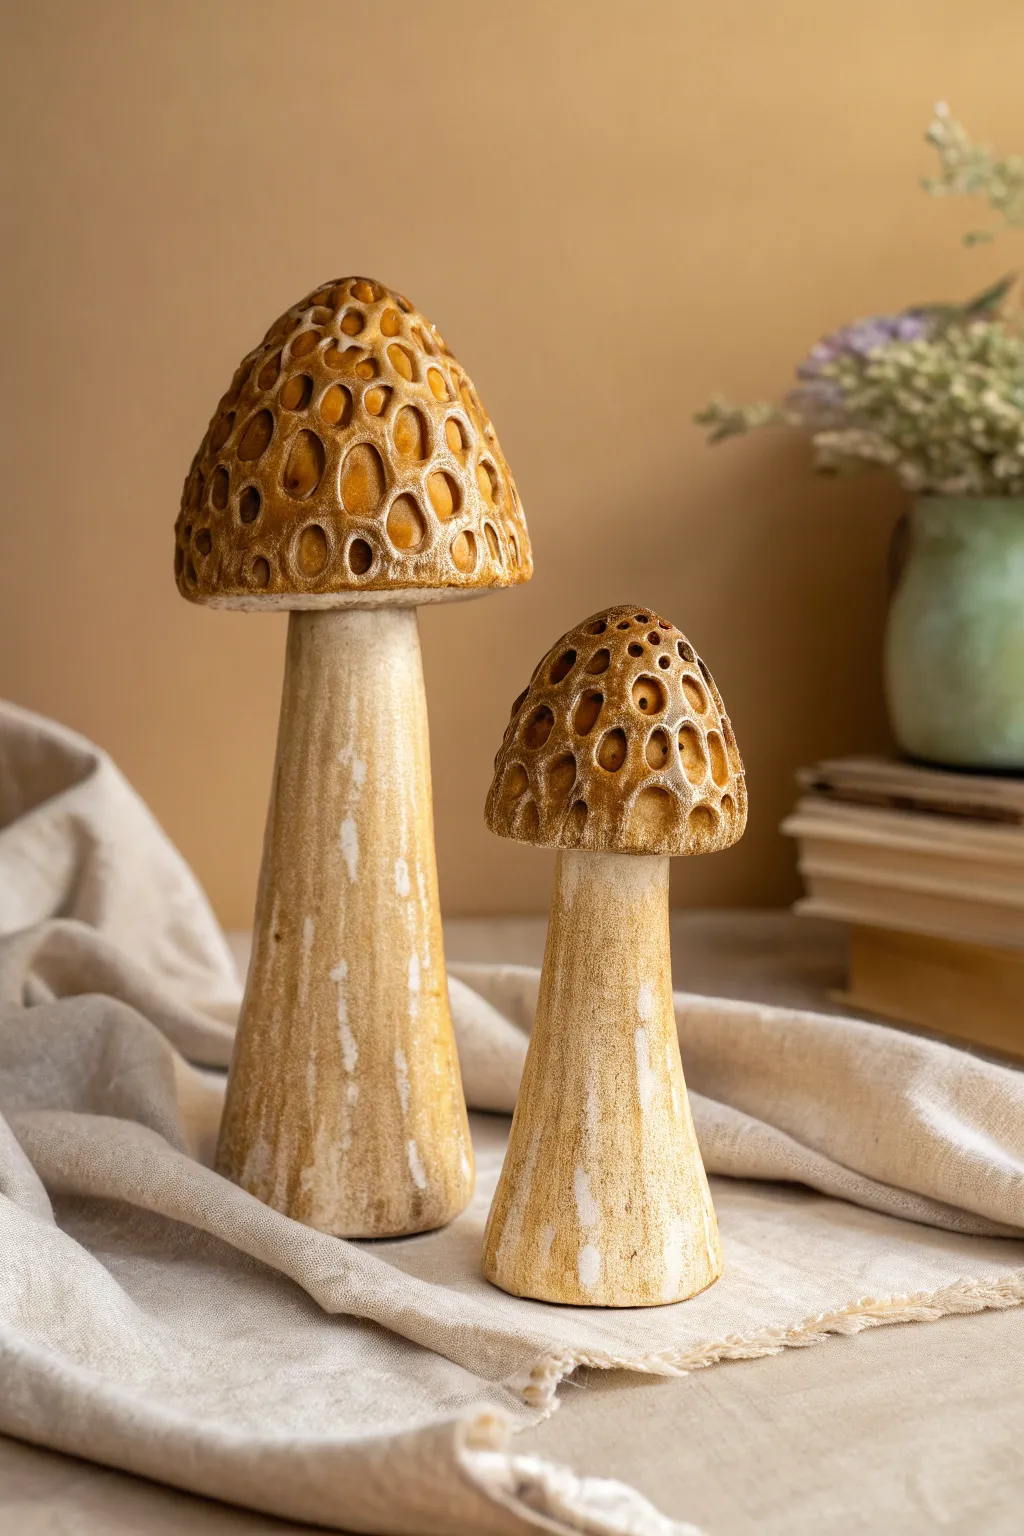
These striking faux morels capture the whimsy of the forest floor, featuring deeply pitted caps with a rich golden glaze contrasting against striated, sturdy stems. This project is perfect for adding an organic, earthy touch to your bookshelf or mantel using simple clay techniques.
Step-by-Step Tutorial
Materials
- Air-dry clay or polymer clay (white or light beige)
- Small ball stylus tool or rounded sculpting tool
- Aluminum foil
- Needle tool or toothpick
- Rolling pin
- Acrylic paints (Golden ochre, raw sienna, dark umber, titanium white)
- Matte or satin varnish
- Paintbrushes (small detail brush and medium flat brush)
- Water and sponge (for smoothing)
Step 1: Forming the Core Structure
-
Create the armatures:
Begin by crumpling aluminum foil into two distinct shapes: a cone shape for the cap and a thick, tapered cylinder for the stem. Compressing the foil tightly now will save you a lot of clay later. -
Prepare the stem clay:
Roll out a slab of clay to about 1/4 inch thickness. Wrap this sheet around your foil stem armature, pressing the seams together firmly so they disappear. -
Shape the base:
Stand the stem upright on your work surface and press down gently to flatten the bottom. This ensures your mushroom will stand stable without wobbling. -
Cover the cap armature:
Roll out a second slab of clay and drape it over the cone-shaped foil armature. Smooth the clay down the sides, trimming off any excess at the bottom rim. -
Join cap and stem:
Score (scratch) the top of the stem and the underside of the cap. Apply a little water or slip (liquid clay) to the scored areas and press the cap firmly onto the stem. Smooth the clay at the join line or add a small coil to reinforce the connection.
Step 2: Sculpting the Textures
-
Draft the honeycomb pattern:
Using a needle tool, lightly sketch irregular oval and circular shapes all over the cap. Keep them randomized and organic rather than perfectly grid-like for a natural look. -
Carve the pits:
Using a small ball stylus or rounded tool, press deep into the centers of your sketched shapes. Wiggle the tool slightly to widen the pits, creating the distinct morel honeycomb effect. -
Refine the ridges:
Gently pinch or smooth ridges between the holes so they look raised and interconnected. I find that softening the sharp edges with a damp finger makes the mushroom look less manufactured. -
Texture the stem:
Take a stiff brush or a needle tool and drag vertical lines up the length of the stem. These striations imitate the fibrous texture of a real mushroom stalk. -
Dry thoroughly:
Let the sculpture dry completely. For air-dry clay, this might take 24-48 hours depending on thickness. Flip it occasionally if needed to dry the bottom.
Natural Variation Tip
Make the pits different sizes—larger near the bottom of the cap and smaller near the tip—to mimic actual growth patterns of morel mushrooms.
Step 3: Painting and Finishing
-
Base coat the stem:
Mix a diluted wash of raw sienna and white paint. Apply this all over the stem, letting it seep into the vertical grooves. -
Highlight the stem:
Once the wash is dry, dry-brush a layer of pure titanium white over the raised parts of the stem. This emphasizes the vertical texture. -
Base coat the cap:
Paint the entire cap with a solid coat of golden ochre. Do not worry about the pits yet; just ensure the surface color is consistent. -
Darken the pits:
Mix a dark umber paint with a little water. carefully paint this dark color inside each honeycomb pit. Using a precise detail brush here helps avoid getting dark paint on the golden ridges. -
Enhance the ridges:
If you accidentally darkened the ridges, re-apply a touch of golden ochre or a lighter yellow to the very tops of the honeycomb structure to make them pop. -
Seal the piece:
Finish with a coat of matte or satin varnish to protect the paint and give the mushroom a finished, ceramic-like sheen.
Cracking Clay?
If small cracks appear as the clay dries, mix a tiny bit of fresh clay with water to make a paste and fill them in before painting.
Place your finished duo near a window or alongside potted plants to bring a quiet woodland atmosphere to your home

TRACK YOUR CERAMIC JOURNEY
Capture glaze tests, firing details, and creative progress—all in one simple printable. Make your projects easier to repeat and improve.
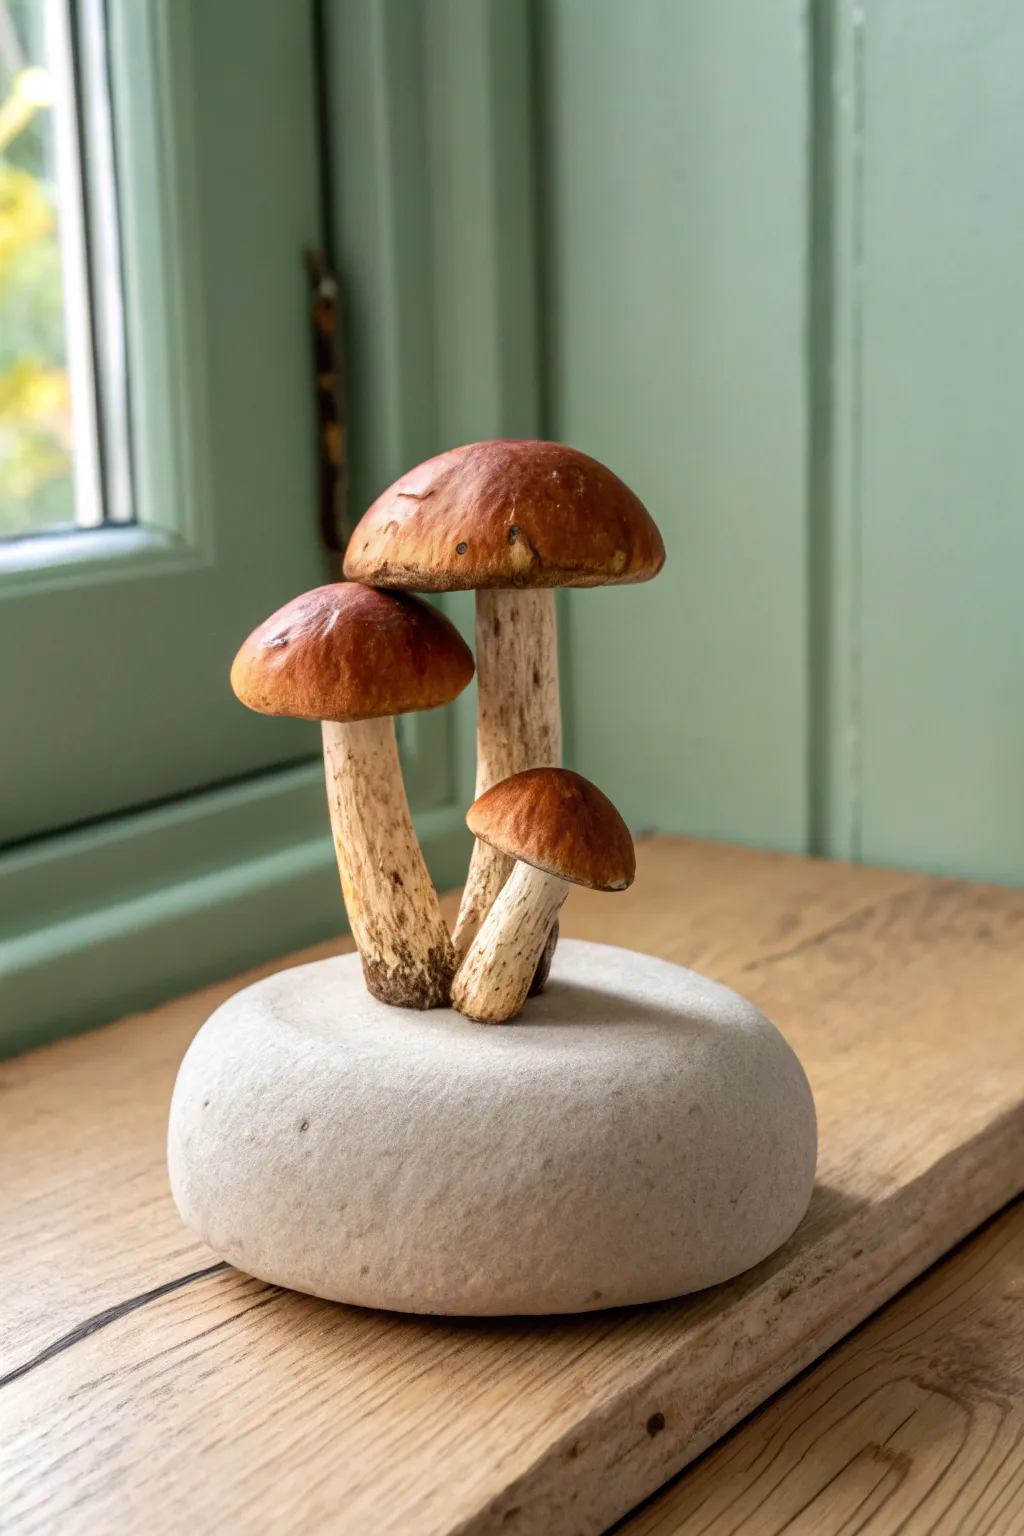
Mushroom Cluster Sculpture on a Mossy Base
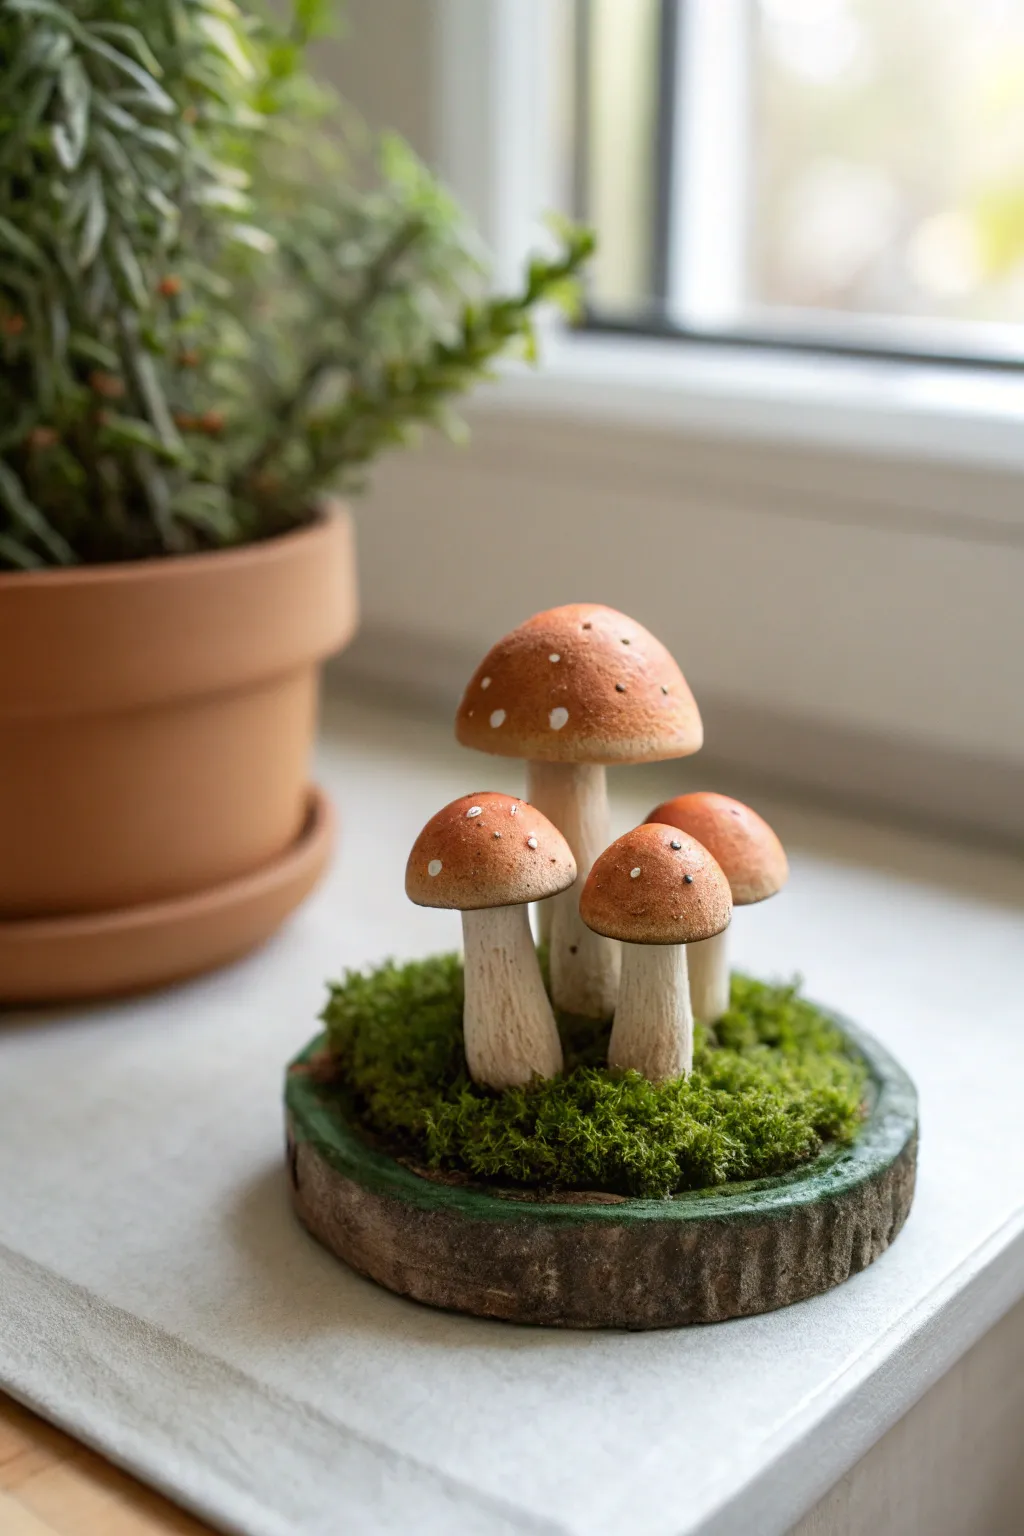
Bring a touch of the woodland indoors with this charming clay mushroom sculpture, featuring earthy tones and realistic textures. This project captures the rustic beauty of a porcini cluster sprouting from a verdant mossy bed on a natural wood slice.
Step-by-Step Guide
Materials
- Polymer clay (white, beige, and translucent)
- Acrylic paints (burnt umber, ochre, white, cream)
- Small wood slice (about 3-4 inches diameter)
- Preserved moss or artificial craft moss
- Sculpting tools (needle tool, ball stylus)
- Wire armature or toothpicks
- Tacky glue or strong craft adhesive
- Textured sponge or toothbrush
- Fine grit sandpaper
- Matte varnish
Step 1: Shaping the Stems
-
Prepare the Clay Base:
Start by conditioning your beige polymer clay until it is soft and pliable. Mix in a tiny amount of translucent clay to give the stems a slightly waxy, realistic mushroom look rather than a flat plastic appearance. -
Form Individual Stalks:
Roll four cylinders of clay in varying sizes—one large, one medium, and two smaller ones. Taper the tops slightly so they are narrower where the cap will sit, and widen the bases so they look rooted and sturdy. -
Add Texture:
Using a needle tool or an old toothbrush, gently scratch vertical striations up and down the stems. This mimics the fibrous texture of a real mushroom stalk. Don’t worry about being too neat; organic irregularities look better. -
Insert Support:
Cut small lengths of wire or toothpicks and insert them halfway into the top of each stem. This adds internal strength and provides a secure anchor for the mushroom caps later on.
Step 2: Creating the Caps
-
Form the Cap Shapes:
Roll balls of white clay corresponding to your stem sizes. Flatten the bottoms and gently curve the tops into domes. The largest cap should be broad and slightly flatter, while the smaller ones can be rounder buttons. -
Detail the Underside:
Underneath the caps, use a sponge or a ball tool to stipple the surface, creating the look of pores rather than gills, which is characteristic of bolete-style mushrooms like these. -
Attach Caps to Stems:
Gently press the caps onto the wire supports protruding from your stems. Smooth the seam where the cap meets the stem just slightly, but keep a distinct separation. -
Pre-Baking Adjustments:
Before baking, give the caps a final check. I like to gently press a few tiny dimples or imperfections into the tops to make them look weathered and natural. -
Bake the Clay:
Bake the mushrooms according to your specific polymer clay package instructions. usually around 275°F (135°C) for 15-30 minutes depending on thickness. Let them cool completely.
Texturing Trick
Roll a crumpled ball of aluminum foil over the wet clay caps before baking. It creates a subtle, organic leather-like texture that paint clings to beautifully.
Step 3: Painting and Assembly
-
Base Coat the Caps:
Mix burnt umber with a touch of ochre acrylic paint. Paint the tops of the caps, fading the color out as you reach the rim so the lighter clay color peeks through at the very edges. -
Add Realistic Specks:
Using a very fine brush or toothpick, dot tiny white or cream speckles onto the mushroom caps. Concentrate a few near the center but keep the pattern random. -
Weather the Stems:
Create a watery wash of brown paint. Brush it over the textured stems and immediately wipe most of it off with a paper towel. The dark paint will stay in the crevices of your texture, highlighting the details. -
Seal the Finish:
Once the paint is fully dry, apply a coat of matte varnish to the entire mushroom to protect the paint and remove any unnatural shine. -
Prepare the Wood Base:
Take your wood slice and plan the arrangement of your mushrooms. They usually look best clustered slightly off-center rather than perfectly in the middle. -
Attach the Mushrooms:
Apply a strong craft adhesive or tacky glue to the bottom of the mushroom stems and press them firmly onto the wood slice. Hold them in place for a moment until the glue grabs. -
Adding the Moss Bed:
Apply a generous layer of glue around the base of the stems, covering the rest of the top surface of the wood slice. -
Final Touches:
Press clumps of preserved moss into the glue, tucking it tightly around the mushroom stems to make them look like they are sprouting directly through the greenery.
Fixing Wobbly Stems
If your mushrooms won’t stand straight on the wood, standard dry clay bottoms might be uneven. Sand the bottoms flat on a piece of sandpaper before gluing.
Now you have a permanent piece of the forest to display on your desk or shelf
Fairy-Style Mushroom House With Door and Windows
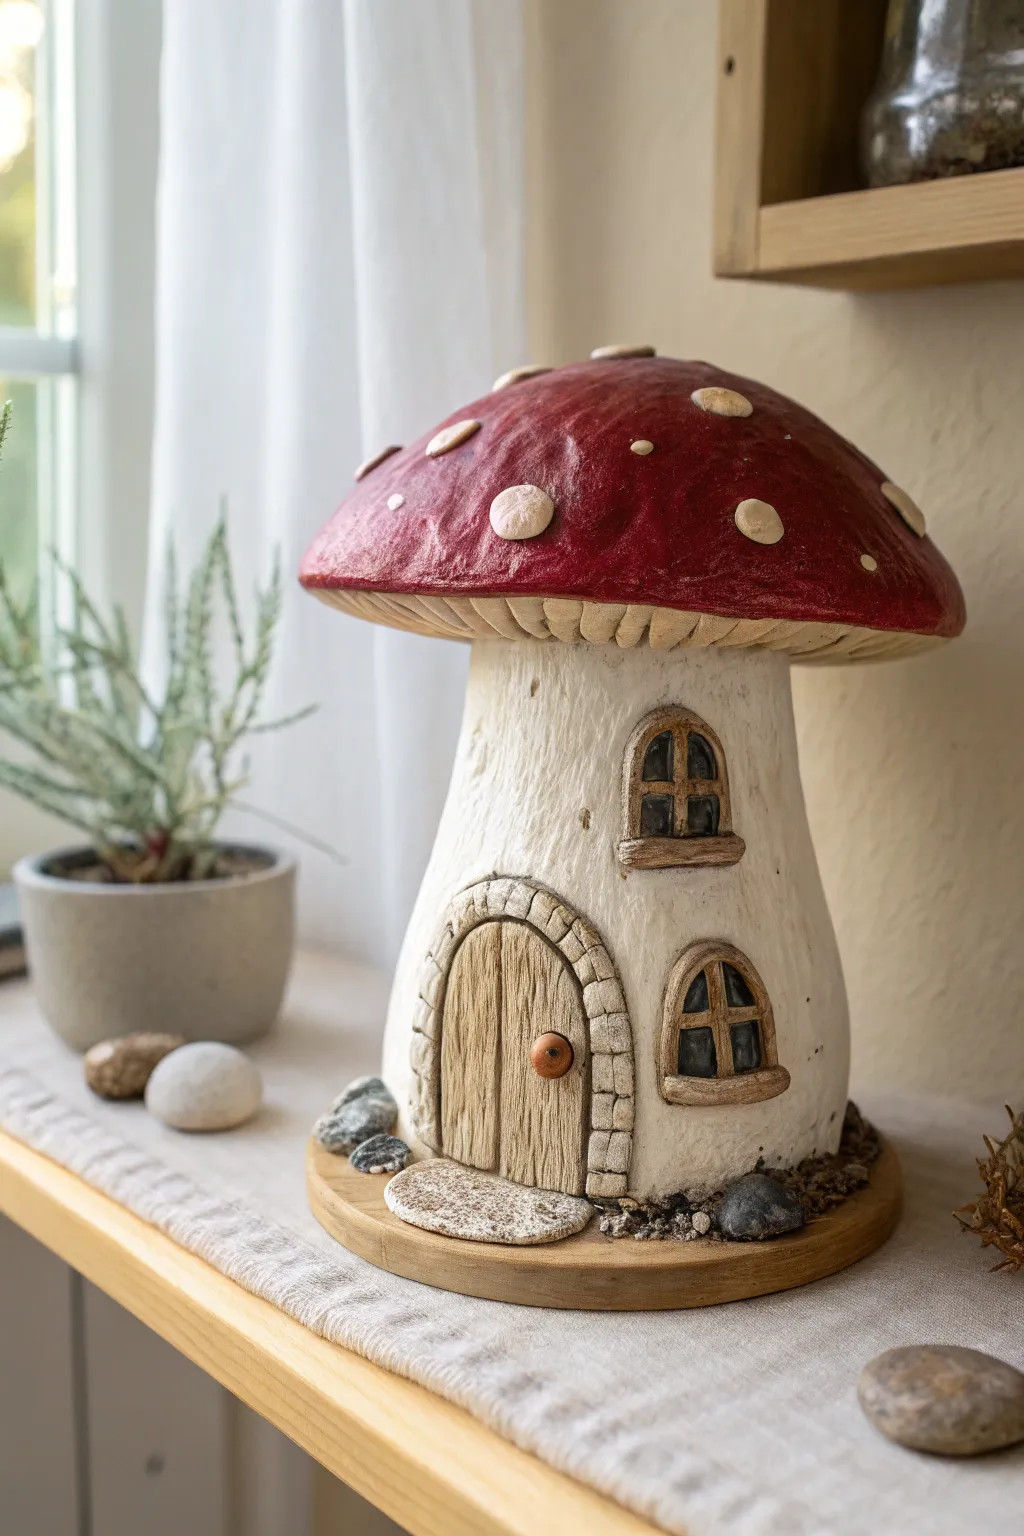
Transform imaginative play into reality with this enchanting fairy house sculpture featuring a classic red toadstool cap and rustic architectural details. This project combines simple clay shaping techniques with detailed texture work to create a cozy miniature dwelling perfect for a windowsill or shelf.
Detailed Instructions
Materials
- Air-dry clay or polymer clay (white or natural color)
- Aluminum foil
- Cardboard or cardstock (for armature base)
- Wooden circular base or coaster
- Modeling tools (or toothpicks, knitting needles)
- Acrylic paints (Red, Antique White, Brown, Black, Grey)
- Paintbrushes (various sizes)
- Clear matte or satin varnish
- Texture sponge or stiff bristle brush
- Water and small sponge (for smoothing)
Step 1: Building the Armature
-
Create the stem core:
Start by scrunching aluminum foil into a sturdy cylinder shape that tapers slightly towards the top. This saves clay and keeps the sculpture lightweight while providing a solid structure. -
Form the cap support:
Shape a separate, flattened dome from aluminum foil for the mushroom cap. It should be wider than your stem. Ensure the bottom is somewhat flat to sit securely on the stem later. -
Cover with clay:
Roll out a sheet of clay to about 1/4 inch thickness. Wrap the stem foil completely, smoothing the seams with a little water on your finger. Do the same for the top dome, ensuring a smooth, rounded surface.
Step 2: Modeling the House Details
-
Attach cap to stem:
Score the top of the stem and the underside of the cap with a needle tool. Add a little clay slip or water (if using air-dry clay) and press them firmly together. Blend the clay at the join underneath so it’s seamless and sturdy. -
Sculpt the gills:
For the underside of the mushroom cap, add a thin layer of clay. Use a modeling knife or thin tool to press repeated lines radiating from the stem to the edge of the cap, mimicking organic mushroom gills. -
Add the door frame:
Roll a thin snake of clay and form an arch on the base of the stem. Flatten it slightly to create a stone archway. Use a tool to press horizontal lines into this arch to simulate individual stones. -
Create the wooden door:
Fill the archway with a flat piece of clay. Use a needle tool to scratch vertical wood grain lines into it. Roll a tiny ball of clay for the doorknob and attach it to the right side. -
Construct windows:
Make two small oval shapes from clay and attach them to the stem—one above the door and one to the side. Frame them with thin clay snakes for sills and rims. Use a tool to press a cross shape into the center of each for windowpanes. -
Texturize the walls:
I prefer to use a stiff brush or a crumpled ball of aluminum foil to gently tap texture onto the white walls of the stem. This gives it a stucco or rough-hewn plaster look rather than being perfectly smooth. -
Add nature details:
Sculpt tiny rocks and pebbles around the very bottom edge of the house where it meets the wooden base. You can also add a flat, stepping-stone slab in front of the door.
Cracks in the Clay?
If small cracks appear while drying, don’t panic. Mix a tiny bit of fresh clay with water to make a paste and fill the cracks, then smooth over.
Step 3: Painting and Finishing
-
Base coat the cap:
Once the clay is fully dry, paint the entire mushroom cap a deep, rich red. You might need two coats for opaque coverage. Let it dry completely. -
Paint the stem:
Paint the stem walls an antique white or cream color. For the door and window frames, use a light brown wash to bring out the details. -
Detail the stonework:
Paint the stone archway and foundation rocks with varying shades of grey. Once dry, lightly dry-brush them with a lighter grey or white to highlight the texture. -
Darken the windows:
Carefully paint the inside panes of the windows black or dark grey to give the illusion of depth or a dark interior. -
Add the spots:
Using a creamy beige or off-white paint, dab organic, slightly raised spots onto the red cap. Vary their sizes—some large, some tiny specks—for a natural look. -
Antique the gills:
Mix a watery brown paint (a wash) and brush it over the gills under the cap. Gently wipe the surface with a paper towel, leaving the darker paint in the crevices to accentuate the ribbing. -
Final assembly:
Glue the finished house onto your wooden coaster or base. Glue small real pebbles or dried moss around the perimeter for extra realism.
Illuminated Windows
Make the windows from translucent vellum paper and leave the stem hollow. Place an LED tea light inside for a glowing nightlight effect.
Place your charming new cottage among your houseplants to give them a magical guardian.
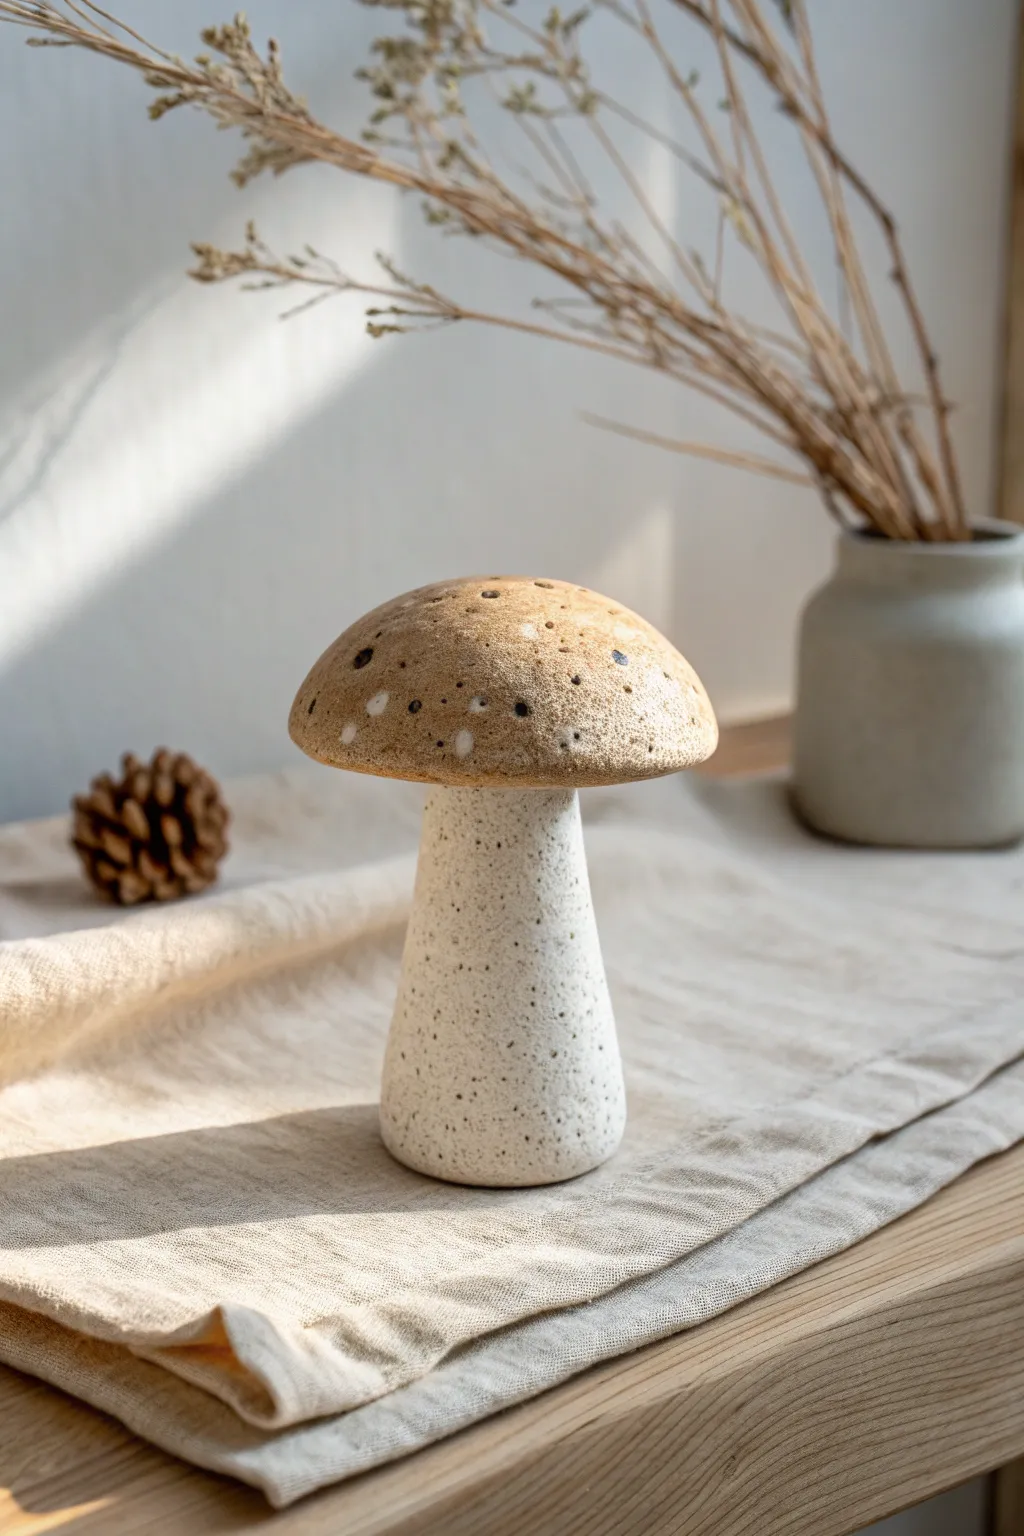
Mushroom Candleholder for a Battery Tea Light
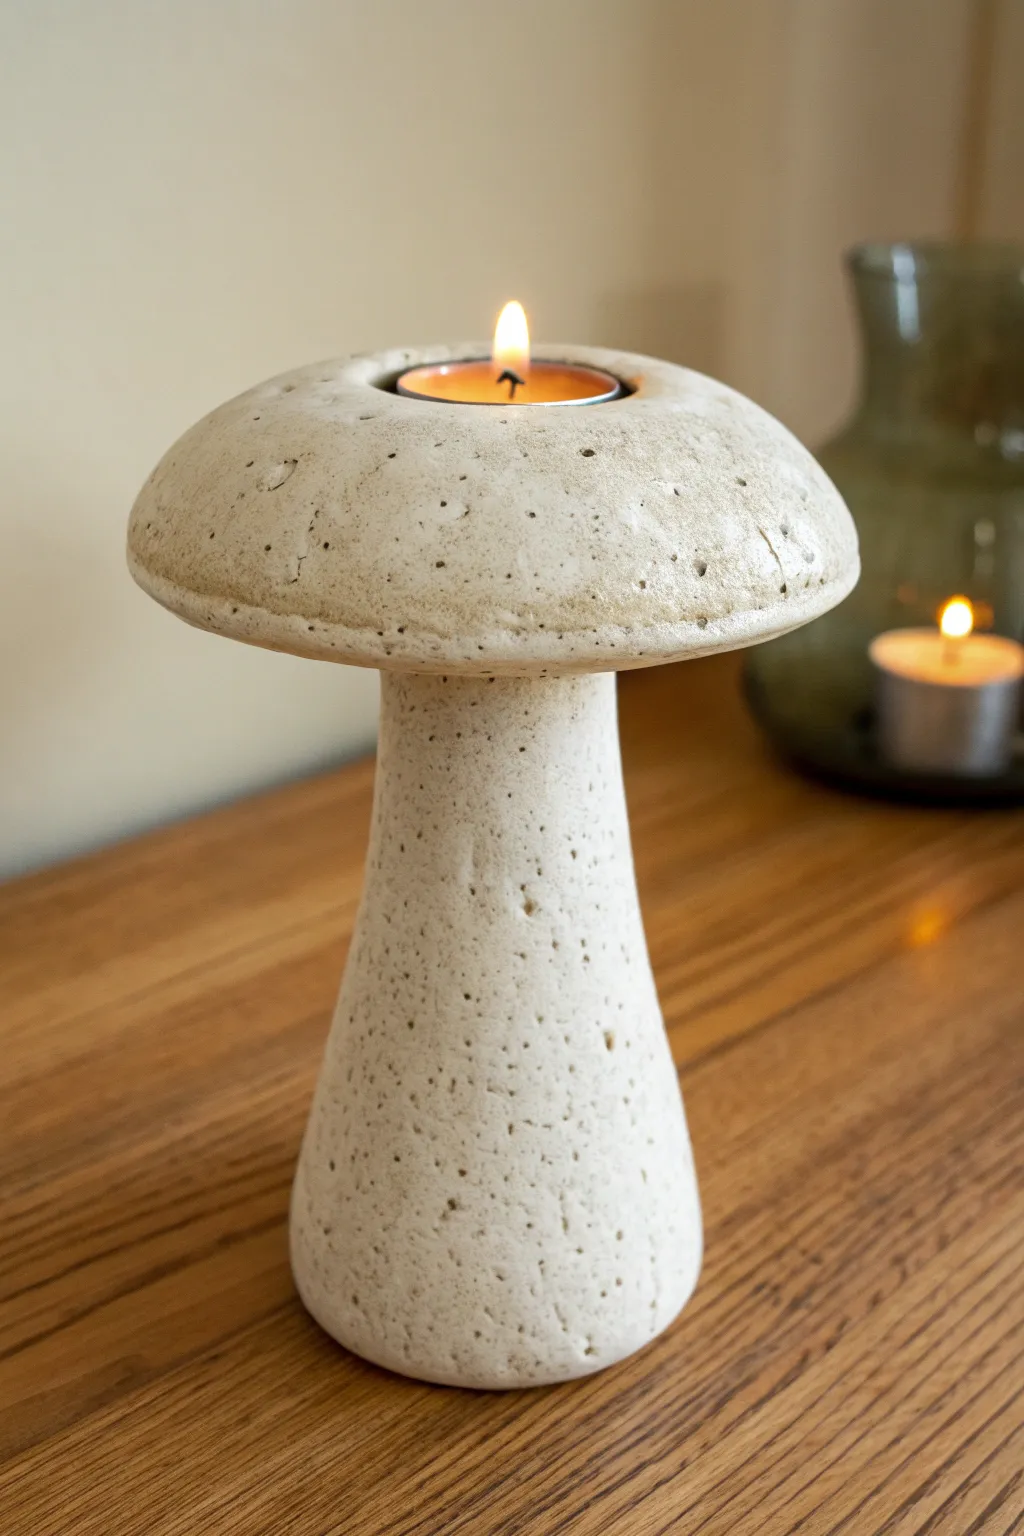
Bring a touch of woodland magic indoors with this robust mushroom candleholder that mimics the look of natural stone. Its wide cap is perfectly sized to cradle a tea light, casting a warm, gentle glow over the textured surface.
Step-by-Step Tutorial
Materials
- Air-dry clay (stone or grey color preferred)
- Rolling pin
- Water in a small bowl
- Pottery sponge
- Tea light (for sizing)
- Craft knife or clay tool
- Old toothbrush or stiff bristle brush
- Sandpaper (medium grit)
- Acrylic paint (warm white/cream)
- Matte varnish or sealant
Step 1: Sculpting the Base
-
Prepare the Clay:
Start by kneading a large handful of air-dry clay until it is pliable and warm. You want to remove any air bubbles. -
Form the Stalk:
Roll the clay into a thick cylinder. Taper it slightly so it is wider at the bottom for stability and narrower near the top where the cap will sit. -
Flatten the Base:
Pres firmly on the bottom of your cylinder against your work surface to ensure it stands perfectly straight. If it wobbles, tap it gently on the table to level it out. -
Create Texture:
Take a stiff toothbrush or a crumpled ball of aluminum foil and press it repeatedly into the stalk. This creates the porous, stone-like texture evident in the photo.
Step 2: Forming the Cap
-
The Mushroom Cap:
Take a second, slightly smaller ball of clay and flatten it into a thick disc. Shape it into a gentle dome with your fingers, smoothing the edges downward. -
Size the Candle Holder:
Press a metal casing from a tea light into the explicit center of your dome. Push down deep enough so the candle will sit flush with the surface, but not so deep that you puncture the bottom. -
Refine the Opening:
Remove the tea light casing and use a little water on your finger to smooth the inside of the hole you just made. -
Match the Texture:
Just as you did with the stalk, texture the entire surface of the cap using your toothbrush or foil tool. Don’t worry about being too neat; random pitting looks more natural.
Cracks Appearing?
If small cracks form while drying, mix a tiny bit of clay with water to make a paste (slip) and fill them in with a small brush, then smooth over.
Step 3: Assembly and Finishing
-
Score and Slip:
Use a craft knife to scratch cross-hatch marks (scoring) on the top of the stalk and the underside of the cap where they will join. -
Join the Parts:
Apply a dab of water or clay slip to the scored areas. Press the cap firmly onto the stalk, giving it a slight twist to lock it in place. -
Blend the Seam:
Reach underneath the cap and use a modeling tool to smooth the clay from the stalk up into the cap, ensuring a strong bond. I like to re-texture this seam afterward to hide the join lines. -
Final Shaping:
Double-check that the mushroom stands vertically and the cap is level. Adjust if it’s leaning. -
Drying Phase:
Let the sculpture dry completely. This usually takes 24-48 hours depending on humidity. Rotate it occasionally so the bottom dries evenly. -
Sand and Paint:
Once bone dry, lightly sand any sharp snags. Paint the entire piece with a diluted warm white or cream acrylic paint. The wash will settle into the pitted texture, highlighting the stone effect. -
Seal:
Finish with a coat of matte varnish to protect the surface and finalize that organic look.
Add Mossy Details
Dab bits of watered-down green paint into the deeper crevices near the base to mimic natural moss growth on old stone.
Place your finished mushroom on a shelf and enjoy the cozy atmosphere it creates
Mushroom Incense Holder With a Curved Stem
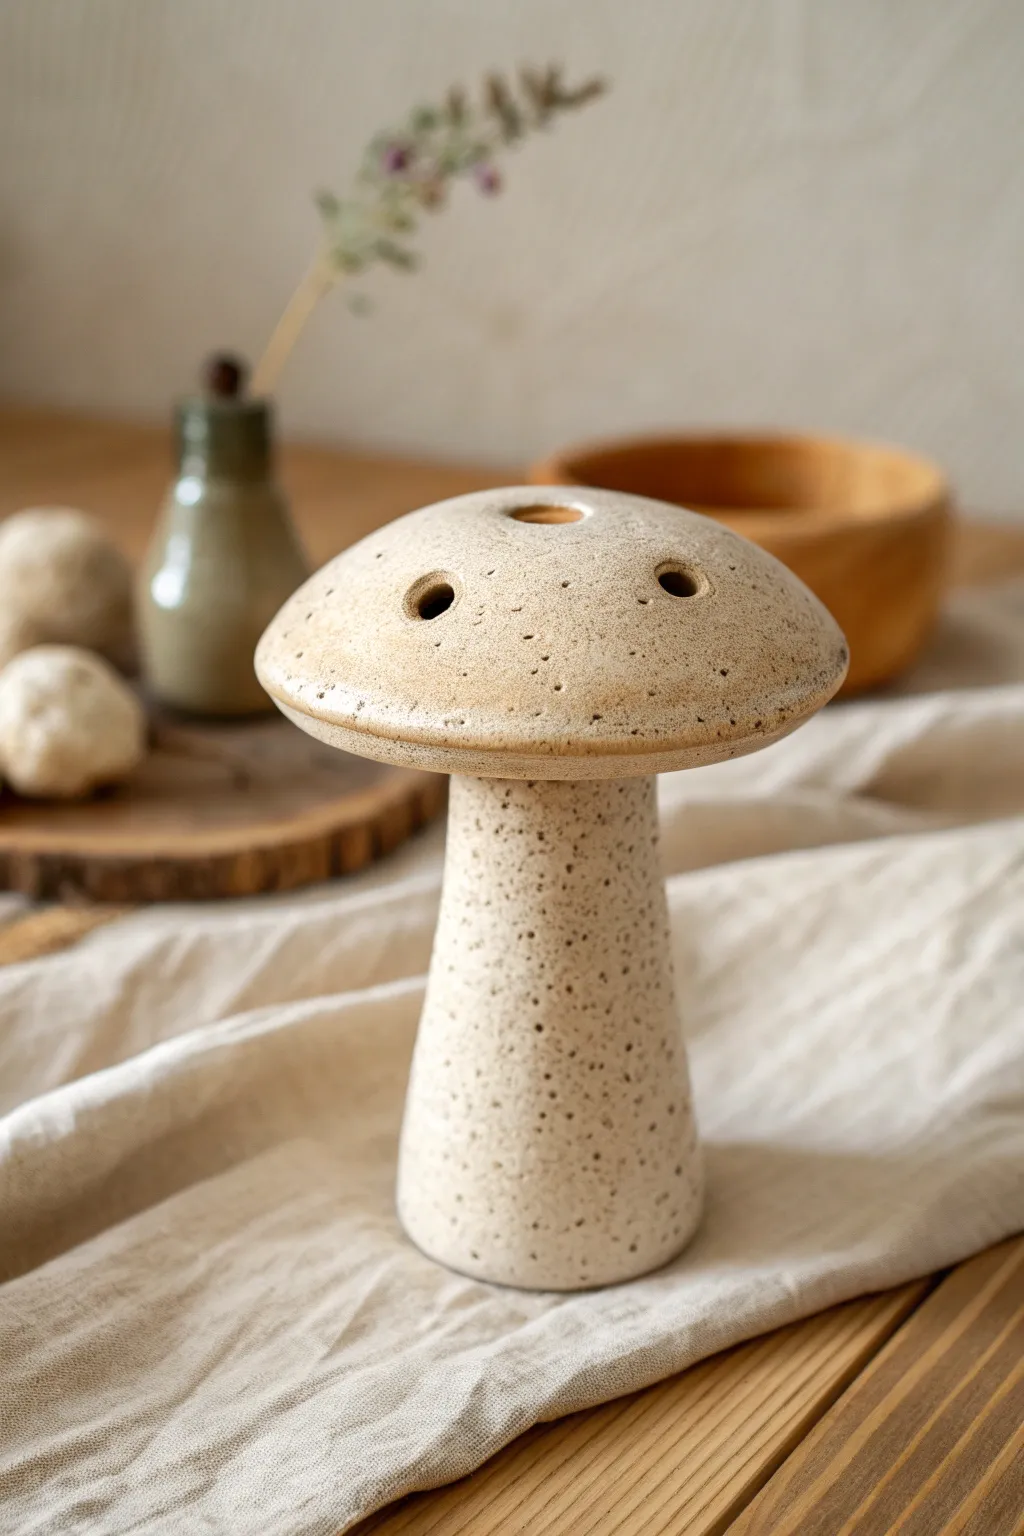
This charming incense holder combines earthy aesthetics with practicality, featuring a broad mushroom cap perforated to hold your favorite scents. The project utilizes speckled clay to achieve that distinctively organic, raw texture without needing complex glazing.
Step-by-Step Guide
Materials
- Speckled stoneware clay (mid-fire)
- Needle tool
- Rolling pin
- Canvas or slab mat
- Scoring tool (or serrated rib)
- Slip (clay and water mixture)
- Sponge
- Wooden modeling tool
- Loop tool or clean-up tool
- Drinking straw or small hole punch tool
- Calipers (optional)
Step 1: Forming the Stem
-
Roll the stem coil:
Begin by taking a handful of speckled clay and rolling it into a thick, sturdy coil. You want this to be the foundation, so aim for a thickness of about 1.5 inches. -
Shape the taper:
Stand the coil up vertically. Gently tap the bottom against your work surface to flatten the base, then roll the upper portion between your palms to create a subtle taper, making the top slightly narrower than the base. -
Refine the silhouette:
The image shows a stem that widens gracefully at the bottom. Use your fingers to flare the base out slightly, ensuring it stands perfectly stable. -
Smooth the surface:
Take a slightly damp sponge and run it over the stem to remove any fingerprints or rolling marks, smoothing the clay while maintaining that lovely speckled texture.
Slumping Cap?
If the cap droops while you are attaching it, wad up some newspaper or plastic wrap and tuck it under the rim for support until the clay stiffens up.
Step 2: Creating the Cap
-
Prepare the slab:
Roll out a slab of clay to approximately 1/4 inch thickness. I like to flip the slab once or twice during rolling to ensure the clay particles stay aligned and prevent warping. -
Cut the cap circle:
Using a needle tool, cut a nice, wide circle from your slab. For this proportion, the diameter should be roughly 2.5 times the width of your stem’s top. -
Form the dome:
Gently cup the clay circle in your hand or drape it over a rounded mold (like a small bowl or Styrofoam ball covered in plastic). Press gently to curve the edges downward, creating a classic mushroom cap shape. -
Finish the rim:
Smooth the cut edge of the cap with a damp finger or chamois strip so it is rounded and pleasant to the touch, rather than sharp.
Step 3: Assembly and Detailing
-
Score the connection points:
Use your scoring tool to scratch rough cross-hatch marks on top of the stem and the underside center of the cap. -
Apply slip and attach:
Dab a generous amount of slip onto the scored areas. Press the cap firmly onto the stem. Give it a tiny twisting motion to lock the clay particles together. -
Reinforce the seam:
Roll a very thin ‘snake’ of clay. Place it at the seam where the stem meets the underside of the cap. Use a wooden modeling tool to blend this coil seamlessly into both parts for structural integrity. -
Add incense holes:
Using a drinking straw or a small hole cutter, punch three distinct holes into the top curve of the cap. Twist the tool as you pull it out to get a clean hole. -
Angle the holes:
Check that your holes are angled slightly inward or deep enough to securely hold an incense stick without it falling out. -
Clean up the edges:
Once the clay is leather hard (stiff but still cool to the touch), go back and gently sponge away any sharp burrs created around your punched holes. -
Final drying:
Cover the mushroom loosely with plastic to let it dry slowly for a day or two. This slow drying prevents the heavy cap from cracking away from the stem. -
Firing:
Bisque fire the piece. Since the beauty of this piece relies on the speckled clay body, you can choose to leave it unglazed or apply a clear matte glaze to seal it before the final glaze firing.
Hole Sizing
Remember that clay shrinks up to 15% when fired. Make your incense holes slightly larger than you think you need so the sticks still fit after the kiln.
Place this on a surface that catches the ash and enjoy the peaceful vibe it brings to your space
Terrazzo or Speckled Mushroom Caps for Modern Style
Embrace the understated beauty of modern ceramics with this faux-terrazzo clay mushroom project. By combining simple speckling techniques with a natural color palette, you will create a sophisticated piece of decor that mimics the look of high-end stoneware without needing a kiln.
Step-by-Step Tutorial
Materials
- Air-dry clay (white and terracotta/beige, or polymer clay)
- Acrylic paints (white, beige, black, dark brown)
- Old toothbrush
- Small fine-point paintbrush
- Rolling pin
- Aluminum foil
- Sculpting tools or a butter knife
- Cup of water
- Sandpaper (fine grit)
- Matte varnish or sealant
- toothpicks or a wooden skewer
Step 1: Sculpting the Base Form
-
Build the armature:
Begin by scrunching a piece of aluminum foil into a thick, tapered cylinder for the stem base. Create a separate, slightly flattened dome shape from foil for the mushroom cap. This saves clay and keeps the sculpture lightweight. -
Prepare the stem clay:
Roll out a slab of white air-dry clay to about 1/4 inch thickness. Wrap this slab around your foil stem armature, smoothing the seam with a bit of water on your finger until it disappears. -
Prepare the cap clay:
For the cap, use a beige or terracotta-colored clay. If you only have white, you can knead in a small amount of beige acrylic paint before sculpting. Roll a slab and drape it over your foil dome armature. -
Shape the cap:
Gently press the clay onto the foil dome to ensure adhesion. Trim away excess clay at roughness at the bottom rim, curling the edge slightly inward for a polished look. Smooth the entire surface with a damp finger to remove fingerprints. -
Join the pieces:
Insert a toothpick or wooden skewer halfway into the top of the stem. Push the cap onto the exposed end of the skewer. Add a small coil of clay where the stem meets the underside of the cap and smooth it out with a sculpting tool to secure the bond. -
Dry thoroughly:
Set your mushroom aside to dry completely. Depending on the humidity and clay brand, this can take 24-48 hours. Turn it occasionally so the bottom of the stem dries evenly.
Natural Texture Hack
Before drying, gently press a clean kitchen sponge against the wet clay of the cap. This creates a subtle pitted texture that promotes an authentic stonelike feel.
Step 2: Creating the Terrazzo Finish
-
Sand for smoothness:
Once fully dry, lightly sand any bumps or rough textures with fine-grit sandpaper. Wipe away all dust with a slightly damp cloth or paper towel. -
Base coat touch-ups:
Even if you used colored clay, apply a thin coat of matte beige paint to the cap and creamy white to the stem to ensure an even, opaque canvas for your speckles. -
Prepare the splatter paint:
Mix a small amount of black or dark brown acrylic paint with a few drops of water. You want a fluid, inky consistency that flicks easily off a brush. -
Technique: The toothbrush flick:
Dip an old toothbrush into the watered-down dark paint. Hold it near the mushroom stem and run your thumb across the bristles to spray fine mist-like speckles. I usually practice on a scrap paper first to control the spray density. -
Speckle the cap:
Repeat the toothbrush flicking technique on the beige cap. Use a light hand here; you want a fine dusting of texture, not large blobs. -
Hand-painted terrazzo details:
Now for the larger terrazzo chips on the cap. Using a fine-point brush, paint scattered, irregular dots in white and dark brown. Vary their sizes—some should be tiny dots, others small organic blobs. -
Layering the look:
To create depth, you can dilute the white paint slightly and add faint, translucent spots on the cap. This makes the surface look like natural stone with mineral inclusions. -
Addressing the stem:
Keep the stem primarily fine speckles. If you want more contrast, add just three or four tiny hand-painted black dots near the base, but keep it much subtler than the cap to maintain visual balance. -
Seal and finish:
Allow all paint to dry completely. Finish the piece with a coat of matte varnish. Avoid glossy sealants, as the matte finish is crucial for mimicking the dry, earthy texture of unglazed pottery.
Level Up: Gilded Edge
After the matte sealer dries, paint a very thin, jagged line of gold leaf or metallic paint around the very bottom rim of the mushroom cap for a hint of luxury.
Now you have a serene, stoneware-inspired sculpture ready to add organic warmth to your shelf or table display
Glow-Look Night Mushrooms With Painted Highlights
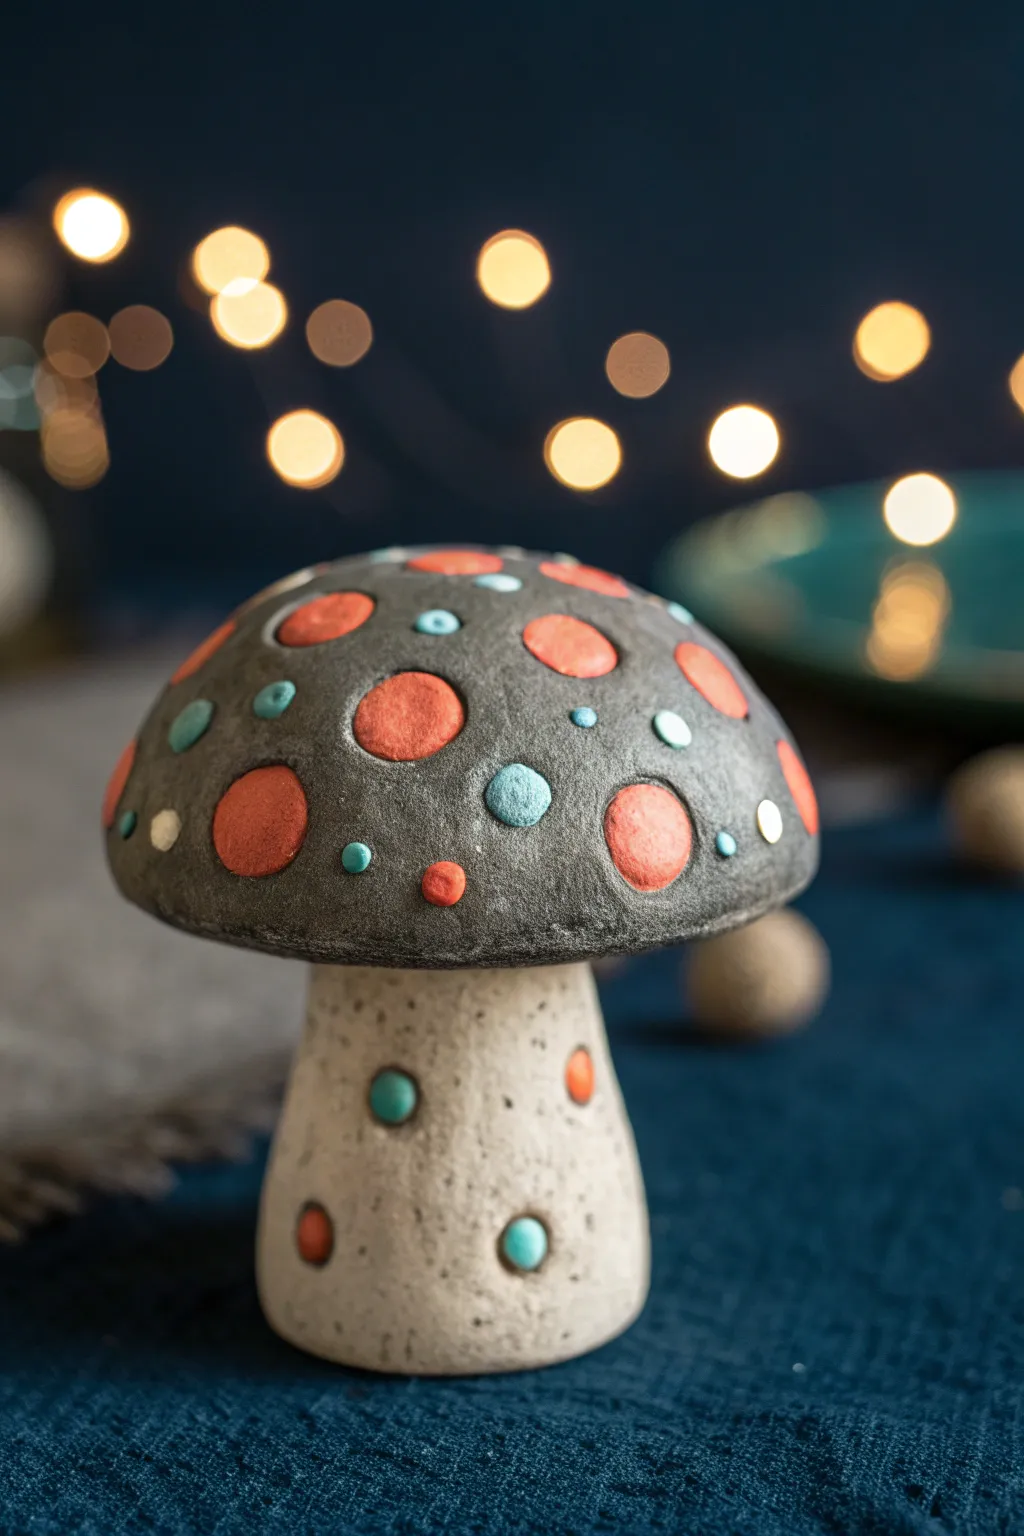
Capture the magic of a twilight forest with this sturdy clay mushroom sculpture, featuring textured spots and a distinct two-tone design. The dark, charcoal cap contrasts beautifully with vibrant coral and teal accents, making it a perfect decorative piece for a cozy shelf or garden display.
Step-by-Step Guide
Materials
- Air-dry polymer clay or stone clay (white or grey)
- Acrylic paints (charcoal grey, cream/off-white, coral orange, teal/aqua, metallic silver/white)
- Sculpting tools (ball styluses, needle tool)
- Aluminum foil (for armature)
- Fine-grit sandpaper
- Matte or satin varnish
- Small paintbrushes (detail and flat shader)
- Toothbrush (optional, for speckling)
Step 1: Sculpting the Form
-
Core construction:
Begin by crumpling aluminum foil into two shapes: a thick cylinder for the stem and a wide, domed disc for the cap. This saves clay and keeps the sculpture lightweight while drying. -
Covering the stem:
Roll out a thick sheet of white or grey clay. Wrap it around your foil stem cylinder, smoothing the seam with your thumb until it disappears. Shape the base to be slightly wider for stability. -
Shaping the cap:
Roll out a larger sheet of clay and drape it over the foil dome. Curl the edges underneath to create a finished rim. I find it helpful to gently pat the surface to remove any fingerprints at this stage. -
Joining the pieces:
Score the top of the stem and the underside of the cap with a needle tool. Apply a little water or slip (liquid clay) to the scored areas and press them firmly together, smoothing the clay at the join underneath. -
Adding texture:
Before the clay hardens, use your fingers or a sponge to gently dab the surface of the cap, giving it a slightly pitted, organic stone-like texture rather than leaving it perfectly smooth.
Clean Circles Tip
If you struggle to paint inside the indented circles neatly, try painting the colored spots *first*, let them dry, and then carefully paint the dark grey surface around them.
Step 2: Creating the Spots
-
Indenting the cap:
Use various sizes of ball styluses or the rounded end of a paintbrush to press circular indents into the dark clay cap. Vary the pressure—some can be deep, others shallow. -
Adding raised details:
For a varied look, roll tiny balls of fresh clay and flatten them slightly onto the cap surface in between your indented spots. Press them down firmly so they adhere well. -
Detailing the stem:
Repeat the indentation process on the stem, adding just a few scattered circular recesses near the base and middle. Keep these sparse compared to the busy cap. -
Drying time:
Allow the entire sculpture to dry completely according to your clay’s package instructions. This usually takes 24-48 hours for air-dry clay. -
Sanding:
Once fully dry, lightly sand any rough edges or harsh fingerprints, particularly around the rim of the cap and the base of the stem. Wipe away the dust with a damp cloth.
Step 3: Painting & Finishing
-
Base coat – Stem:
Paint the entire stem with a cream or off-white acrylic paint. You may need two coats to fully cover the clay color. -
Base coat – Cap:
Paint the cap with a dark charcoal grey. Be careful to get the paint into the recessed spots for now; we will paint over them later, but a dark base helps the colors pop. -
Filling the colors:
Using a fine detail brush, carefully fill the recessed circles on the cap. Alternate between the coral orange and the teal. Don’t worry about being perfect; a slightly rough edge adds character. -
Painting the raised spots:
Paint the small raised clay dots you added earlier. Use a metallic silver or very pale grey for these to catch the light and simulate a faint glow. -
Stem details:
Paint the recessed dots on the stem with the same coral and teal colors. To integrate the stem, mix a watery wash of brown or grey paint and lightly brush it over the cream base, wiping it back immediately to age it slightly. -
Speckling effect:
Load a toothbrush with slightly watered-down brown or grey paint. Run your thumb over the bristles to flick tiny speckles onto the cream stem for a realistic, earthy stone look. -
Sealing:
Finish the piece with a coat of matte or satin varnish to protect the paint and give the ‘stone’ texture a unified sheen.
Make It Glow
Swap the standard acrylics in the spots for glow-in-the-dark or UV-reactive paint. This will make your mushroom truly magical when the lights go down.
Place your finished mushroom among some fairy lights to complete the enchanting nocturnal vibe
Abstract Geometric Mushrooms With Bold Shapes
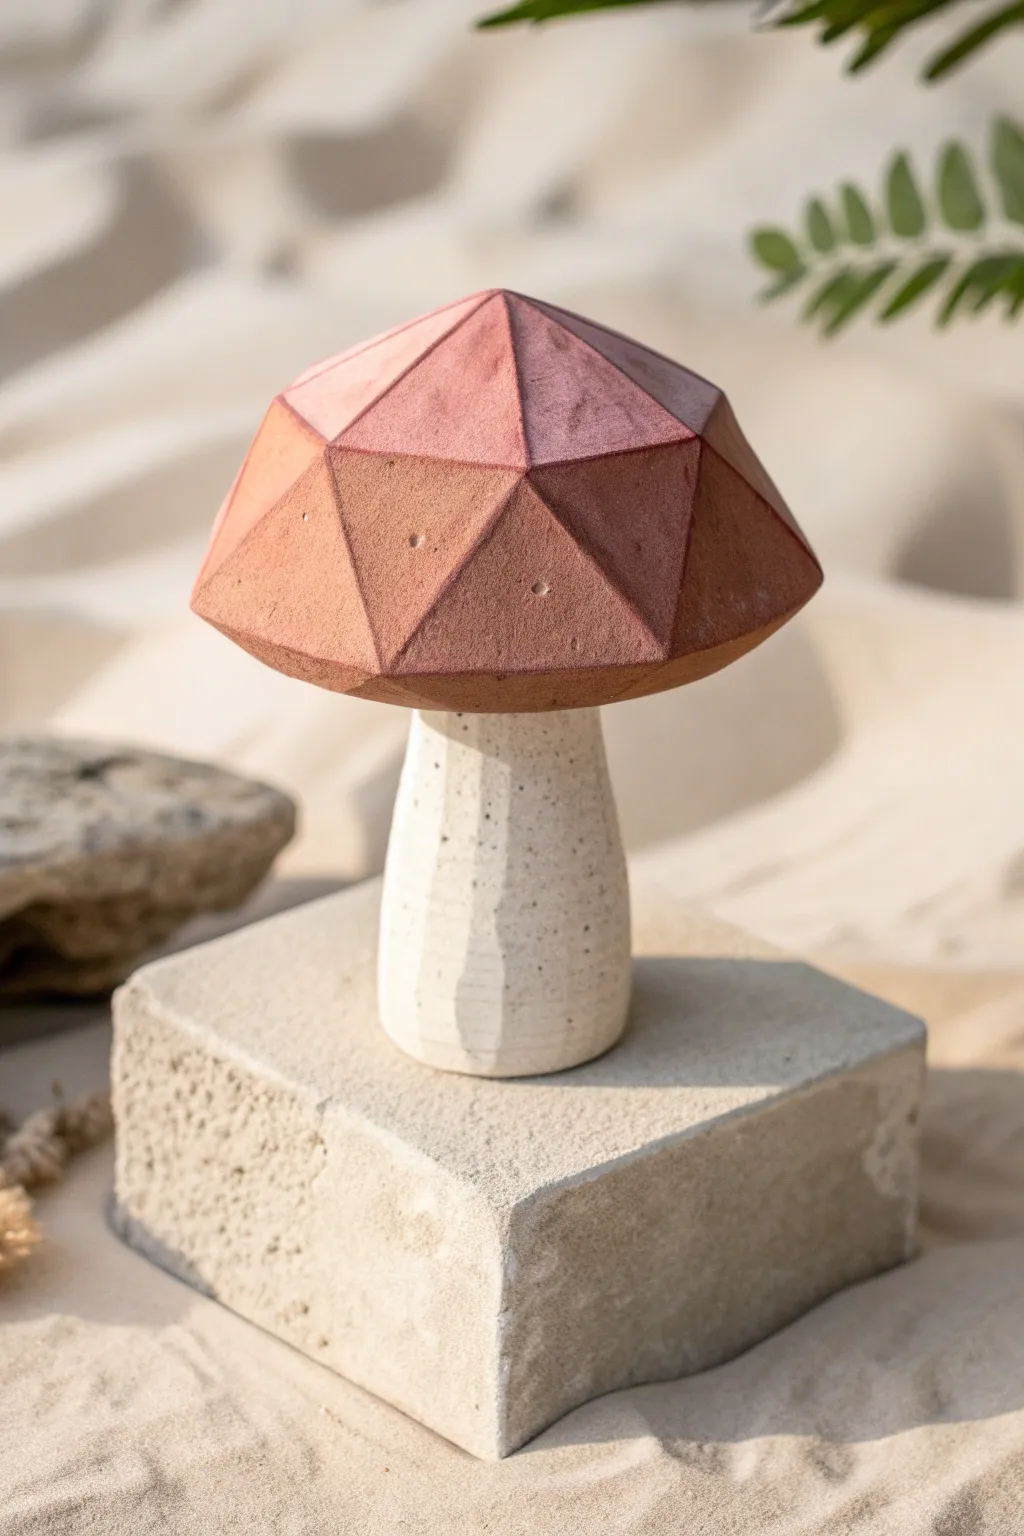
This modern take on the classic toadstool features a striking faceted cap made of triangular planes, resting on a textured, tapered stalk. The contrasting finish between the smooth, angular top and the grainy stem creates a sophisticated architectural look perfect for minimalist decor.
Step-by-Step Tutorial
Materials
- Polymer clay (terracotta or reddish-brown color)
- Polymer clay (white or specked granite color)
- Rigid tissue blade or craft knife
- Rolling pin or pasta machine
- Aluminum foil
- Masking tape
- Sandpaper (various grits)
- Wire armature (optional for internal support)
- Oven
- Baking sheet
- Paper towel or sponge (for texturing)
Step 1: Forming the Core Structure
-
Create the cap core:
Crumple aluminum foil into a tight, flattened dome shape. This will serve as the lightweight core for your mushroom cap, saving clay and reducing baking time. -
Shape the stem core:
Form a second piece of aluminum foil into a thick, slightly tapered cylinder for the stem. It should be wider at the base and slightly narrower where it connects to the cap. -
Connect the pieces:
If you want extra stability, insert a short piece of wire into the top of the stem foil and push the cap foil onto it. Secure the joint with a little masking tape.
Step 2: Sculpting the Geometric Cap
-
Condition the clay:
Thoroughly knead your terracotta-colored polymer clay until it is soft and pliable. -
Cover the cap:
Roll out a sheet of the clay to about 1/4 inch thickness. Drape it over the foil cap dome, pressing it down firmly to remove air bubbles, and trim the excess underneath. -
Initial shaping:
Smooth the clay with your fingers so it forms a seamless, even dome over the foil. -
Slice the facets:
Using a very sharp tissue blade, slice a flat plane off the clay near the peak of the dome. -
Continue faceting:
Cut adjacent flat planes around the first one, angling the blade to create sharp ridges where the cuts meet. Aim for triangular or trapezoidal shapes. -
Define the rim:
Work your way down to the edge of the cap, slicing angled planes that taper inwards slightly at the bottom rim to sharpen the silhouette. I try to keep my cuts decisive to avoid drag marks. -
Refine the edges:
Gently smooth any clay burrs with your finger, but be careful not to round over the sharp geometric ridges you just created.
Clean Cuts
Chill the clay in the fridge for 15 minutes before carving the facets. Firmer clay resists deformation and allows the blade to slice cleanly, creating sharper geometric edges.
Step 3: Creating the Textured Stem
-
Prepare the stem clay:
Condition the white or speckled granite clay. If using plain white, you can mix in some black pepper or dark sand for a faux-stone look. -
Wrap the stem:
Roll a thick slab of the white clay and wrap it fully around the foil stem armature, blending the seam until it disappears. -
Shape the form:
Roll the stem on your work surface to ensure it is round, tapering it slightly towards the top. -
Add faceting (optional):
For the look in the photo, use your blade to slice long, subtle vertical planes down the sides of the stem, giving it a rough-hewn, chiseled appearance. -
Texture the surface:
Gently press a coarse sponge or crumpled paper towel against the stem clay to create a pitted, stone-like limestone texture.
Stone Effect
Mix varying shades of terracotta or add real cinnamon to the brown clay. This creates subtle marbling that looks incredibly like real sandstone once baked.
Step 4: Assembly and Baking
-
Join the parts:
Press the finished cap firmly onto the stem. Use a small amount of liquid polymer clay or ‘Bake and Bond’ if you have it to ensure a strong connection. -
Final check:
Inspect the mushroom from all angles. Ensure the cap sits level and the geometric lines are distinct. -
Bake:
Place the mushroom upright on a baking sheet. Bake according to your specific clay manufacturer’s instructions (usually around 275°F/135°C for 15-30 minutes). -
Cool down:
Let the piece cool completely inside the oven with the door slightly ajar to prevent thermal shock cracks. -
Sanding (optional):
If you want an extra matte stone finish, lightly wet-sand the cured piece with fine-grit sandpaper.
Place your geometric sculpture on a shelf or desk where the light can catch its facets and emphasize the modern design