If you can roll a couple balls and “little clay sausages,” you can make an entire tiny zoo that actually looks like animals. These easy clay animals ideas are my go-to projects in air-dry clay or polymer clay, built from basic shapes so you can relax and have fun.
Classic Chubby Clay Cat
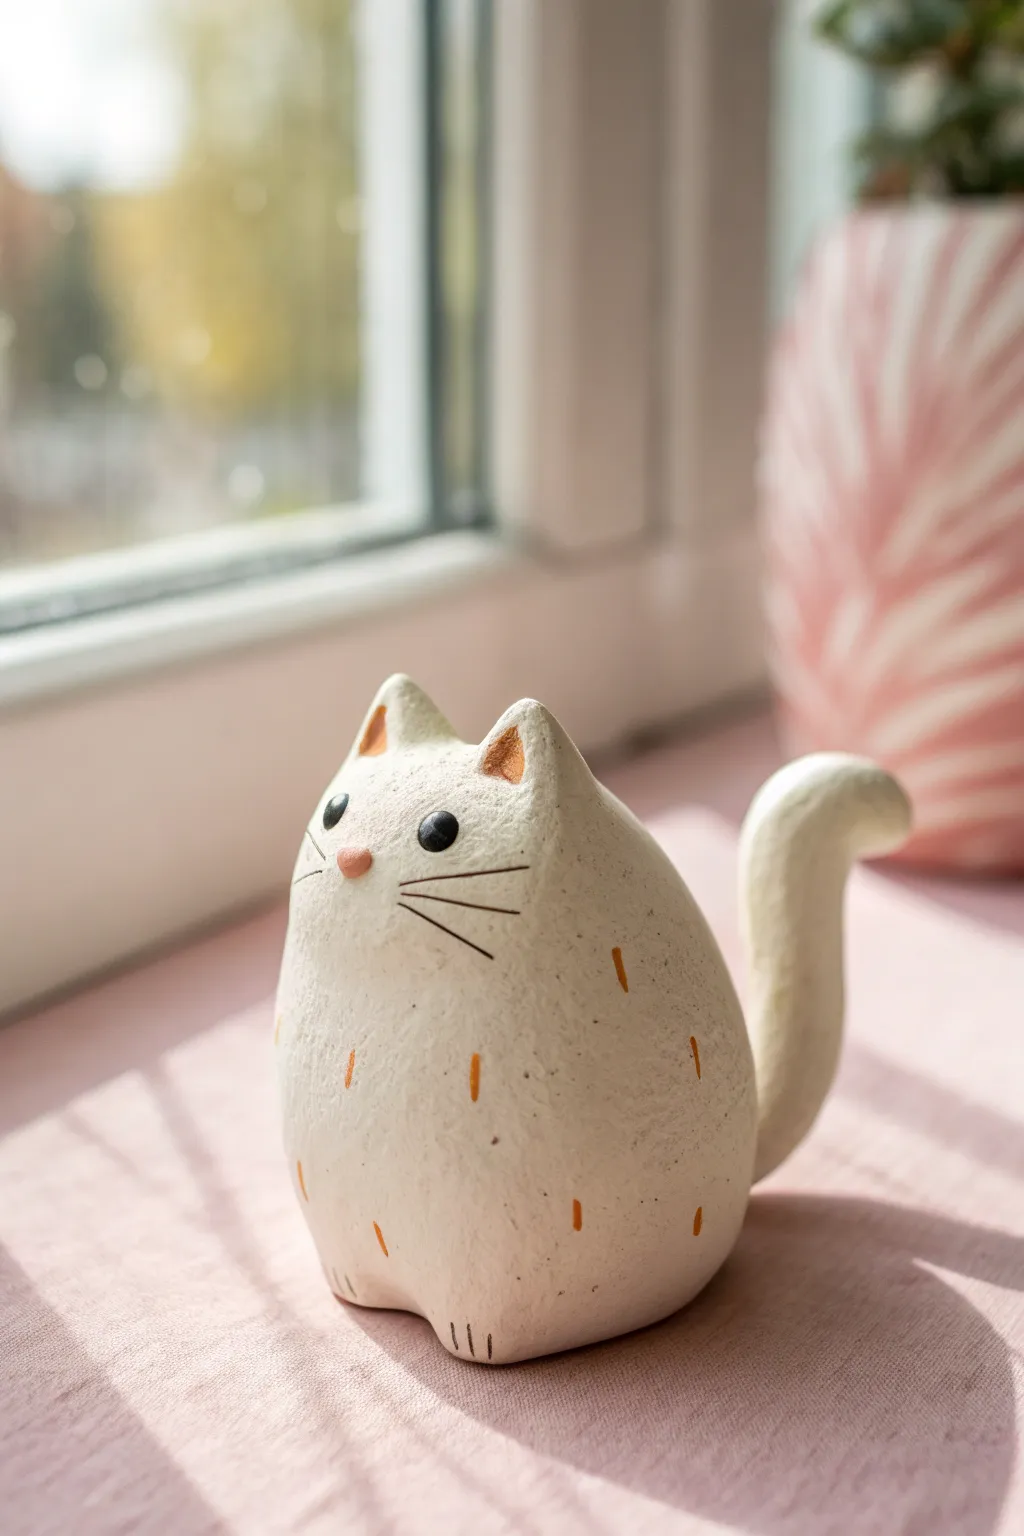
This charming, minimalistic cat figurine captures the essence of a feline loafing in the sun. With its sturdy, chubby body and minimal limbs, it’s a perfect beginner sculpting project that prioritizes character over anatomical precision.
Step-by-Step Tutorial
Materials
- Air-dry clay (white) or polymer clay
- Small rolling pin
- Sculpting tools (needle tool and a small rounded tool)
- Water (for smoothing)
- Acrylic paints (Black, Orange/Terracotta, Pink)
- Fine-point paintbrush
- Fine-point black permanent marker (optional alternatives for whiskers)
- Matte finish varnish
Step 1: Shaping the Base Body
-
Form the main lump:
Start with a ball of clay roughly the size of a tangerine. Roll it smooth in your palms to eliminate any major cracks. -
Create the taper:
Gently gently roll the ball on your work surface, applying slightly more pressure to the top half to create a teardrop or pear shape. The bottom should remain wide and heavy to keep the figure stable. -
Flatten the base:
Tap the bottom of your pear shape firmly against the table. You want a flat, wide surface so your cat sits without wobbling. -
Define the head:
Instead of adding a separate head, simply smooth the top of the pear shape to be slightly rounded but integrated with the body—this is a ‘hunchback’ style cat where the neck is non-existent.
Cracking Clay?
If cracks appear while drying, mix a tiny bit of fresh clay with water to make a paste (slip) and fill the cracks, then smooth over with a finger.
Step 2: Ears and Tail
-
Pinch the ears:
At the very top of the head area, use your thumb and forefinger to pinch up two small triangles of clay. They should be relatively close together. -
Shape the ears:
Refine the pinched triangles by smoothing the clay downwards into the head. Use the back of a needle tool to create a shallow indentation inside each ear. -
Roll the tail coil:
Take a separate, smaller piece of clay and roll it into a thick cylinder, about the thickness of your pinky finger. Round off one end. -
Attach the tail:
Score (scratch) the back of the cat body and the flat end of the tail. Add a drop of water (or slip) and press the tail firmly onto the lower back. -
Pose the tail:
Curl the tail upwards in an ‘S’ shape so visible from the front, pressing it slightly against the side of the body for extra support if needed. Blend the seam where it attaches so it looks seamless.
Step 3: Details and Drying
-
Form the tiny feet:
At the very bottom front of the body, use a sculpting tool to press two small vertical indentations. These suggest the front paws tucked under the body. -
Add toe details:
Use a needle tool or knife to make three tiny scratch marks on each ‘paw’ area to represent toes. -
Smooth the surface:
Dip your finger in a little water and run it over the entire sculpture to remove fingerprints. I find this step crucial for that polished, ceramic look. -
Let it dry:
Allow the clay to dry completely according to package instructions. For air-dry clay of this thickness, 24-48 hours is usually best.
Weight Issues
To prevent the cat from tipping backward due to the heavy tail, you can press a small, flat stone or metal washer into the base before the clay dries.
Step 4: Painting the Character
-
Paint the inside ears:
Using a tiny brush and orange or terracotta paint, fill in the triangular indentations of the ears. -
Add the nose:
Paint a small, inverted pink triangle or oval securely in the center of the face area. -
Create the eyes:
Use the back end of a paintbrush dipped in black paint to stamp two small, solid black circles for eyes. Place them fairly wide apart for a cute look. -
Draw the whiskers:
Using a very fine liner brush with thinned black paint (or a permanent marker), draw three straight lines radiating out from each cheek area. -
Add texture marks:
To mimic individual fur tufts, paint small, random vertical dashes of orange paint all over the chest and lower body. -
Seal the work:
Once the paint is fully dry, coat the entire figure in a matte varnish to protect the paint and give it a finished feel.
Now you have a quiet, contemplative little friend to keep you company on your desk or shelf


Simple Puppy With Floppy Ears
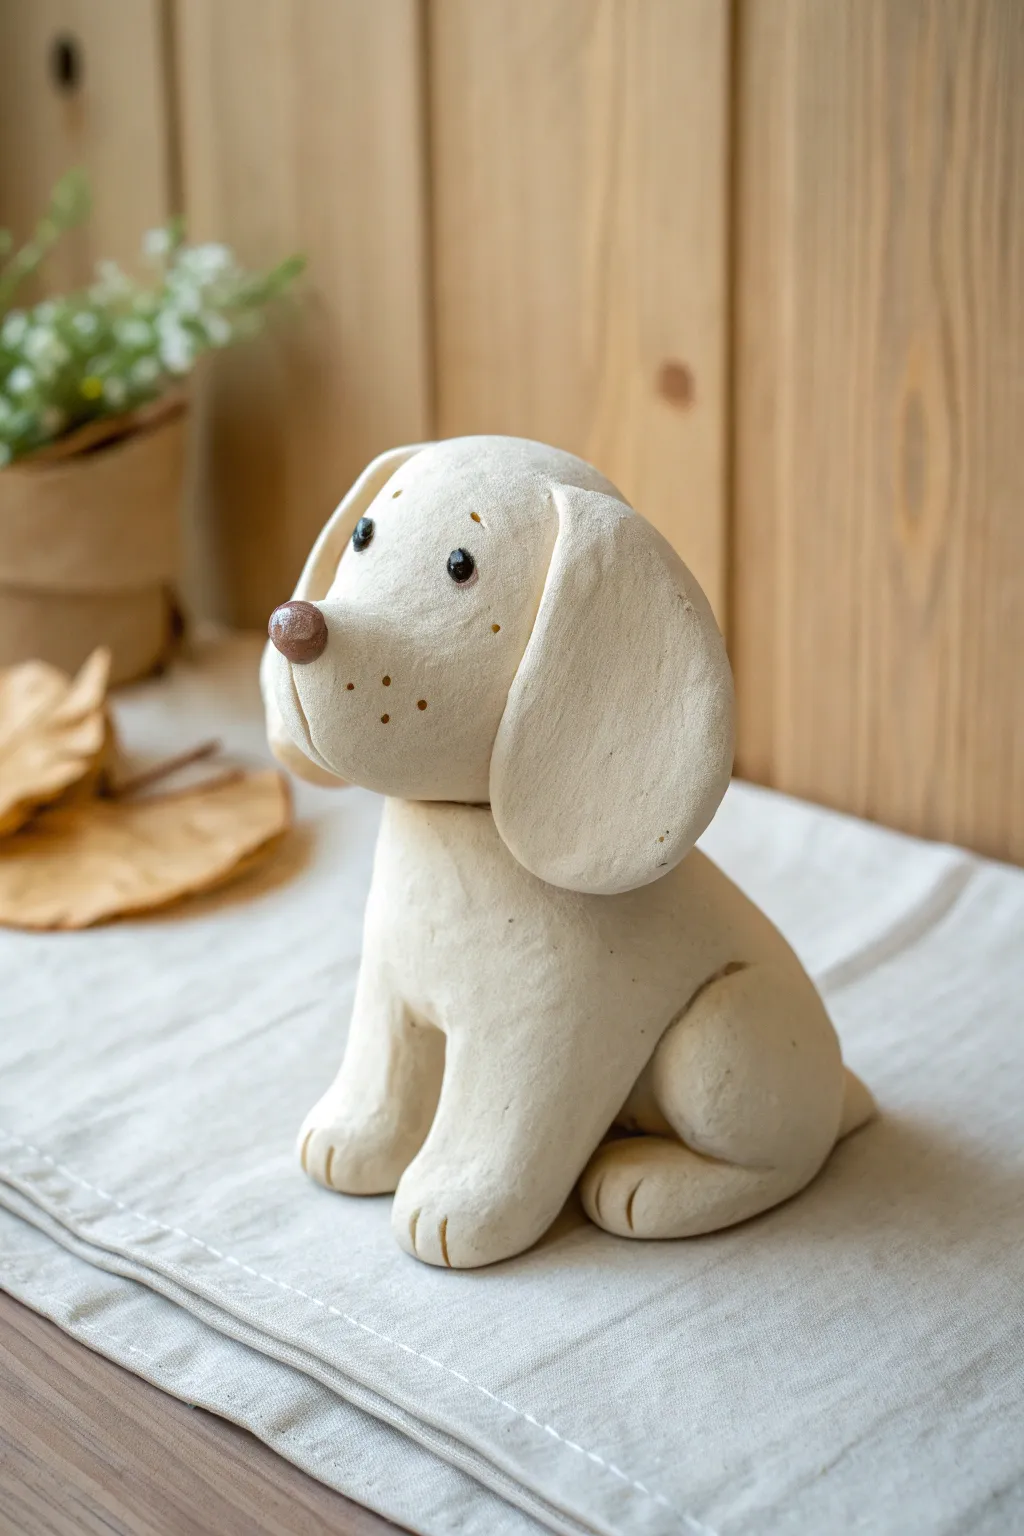
This charming little figurine captures the sweet innocence of a puppy waiting for a treat. With its oversized ears and smooth, rounded forms, it’s a delightful project perfect for getting comfortable with shaping basic clay bodies.
Detailed Instructions
Materials
- White air-dry clay or polymer clay (approx. 200g)
- Small amount of brown clay (or brown acrylic paint)
- Black acrylic paint or tiny black beads for eyes
- Sculpting tools (needle tool/toothpick, smoothing tool)
- Water (for air-dry clay) or clay softener (for polymer)
- Fine-grit sandpaper (optional)
- Matte varnish (optional)
- Rolling pin
Step 1: Shaping the Core Body
-
Create the torso:
Start with a generous handful of white clay. Roll it into a smooth ball to remove cracks, then gently elongate it into a rounded pear shape. This will be the puppy’s seated body. -
Flatten the base:
Tap the wider end of your pear shape onto your work surface. You want a flat, stable bottom so the puppy sits upright without wobbling. -
Form the head:
Roll a second, slightly smaller ball of clay for the head. Shape it into a soft oval, making sure it is proportionate to the body you just made. -
Define the muzzle:
Instead of attaching a separate nose piece, gently pinch and pull the front of the head oval to create a protruding snout. Smooth the transition so it looks like one organic shape. -
Attach head to body:
Score (scratch) the top of the body and the bottom of the head. Add a dab of water or liquid clay, then press them firmly together. Use a modeling tool to blend the clay at the neck slightly for a strong bond.
Head Slumping?
If the head feels too heavy for the wet clay body, insert a toothpick or a bit of crumpled foil into the neck area. This acts as an internal armature.
Step 2: Adding Very Floppy Ears
-
Prepare the ears:
Roll two equal-sized balls of clay. Flatten them into thick pancake shapes using your fingers or a small rolling pin. They should be roughly tear-drop shaped. -
Refine the shape:
Smooth the edges of your flattened teardrops so they are rounded and soft, resembling oversized petals. -
Attach the ears:
Place one ear on each side of the head, positioning them relatively high up. Press the top of the ear firmly against the side of the head, blending the clay seamlessly. -
Create the flop:
Limit the blending to just the top attachment point. Let the rest of the ear hang down freely. You can gently curve the bottom of the ear outward slightly to give it movement.
Keep it Clean
White clay shows every speck of dust. Keep a pack of wet wipes nearby and clean your hands frequently, especially before switching back to white after handling colored clay.
Step 3: Limbs and Tail
-
Form the front legs:
Roll two sausages of clay. These should be thick and sturdy. Flatten one end of each slightly to create the paw area. -
Attach front legs:
Press these sausages onto the front of the chest, blending the clay at the shoulders so they look like they grow from the body, not just stuck on. -
Detail the paws:
Use a needle tool or knife to gently press three vertical lines into the bottom of each front leg to indicate toes. -
Form the hind legs:
Roll two balls of clay and flatten them into semi-circles. These will be the haunches. Attach them to the lower sides of the body. -
Add back paws:
Add small oval shapes sticking out from under the haunches for the back paws. Detail them with toe lines just like the front. -
Add a tail:
Roll a small, short cone of clay for the tail. Attach it to the lower back, blending well. You can curl it slightly to one side for personality.
Step 4: Facial Features & Finish
-
Add the nose:
Take a tiny pinch of brown clay (or white clay you plan to paint later) and roll it into a small triangle or oval. Press this onto the very tip of the muzzle. -
Create eyes:
Use a ball tool or the end of a paintbrush to make two small indentations for eyes above the muzzle. Insert small black beads or tiny balls of black clay. -
Add freckles:
Using a needle tool, gently poke a few tiny holes on the muzzle area to suggest whisker spots or freckles. -
Smooth everything:
Dip your finger in a little water (or baby oil for polymer) and give the whole sculpture a gentle rub down to remove fingerprints. -
Painting (If needed):
If you used solely white clay, wait for it to fully dry or cure. Then, paint the nose brown and the eyes black if you haven’t already done so with colored clay.
Once dry, place your new loyal friend on a shelf where it can brighten your day.


Tiny Bunny With a Button Tail
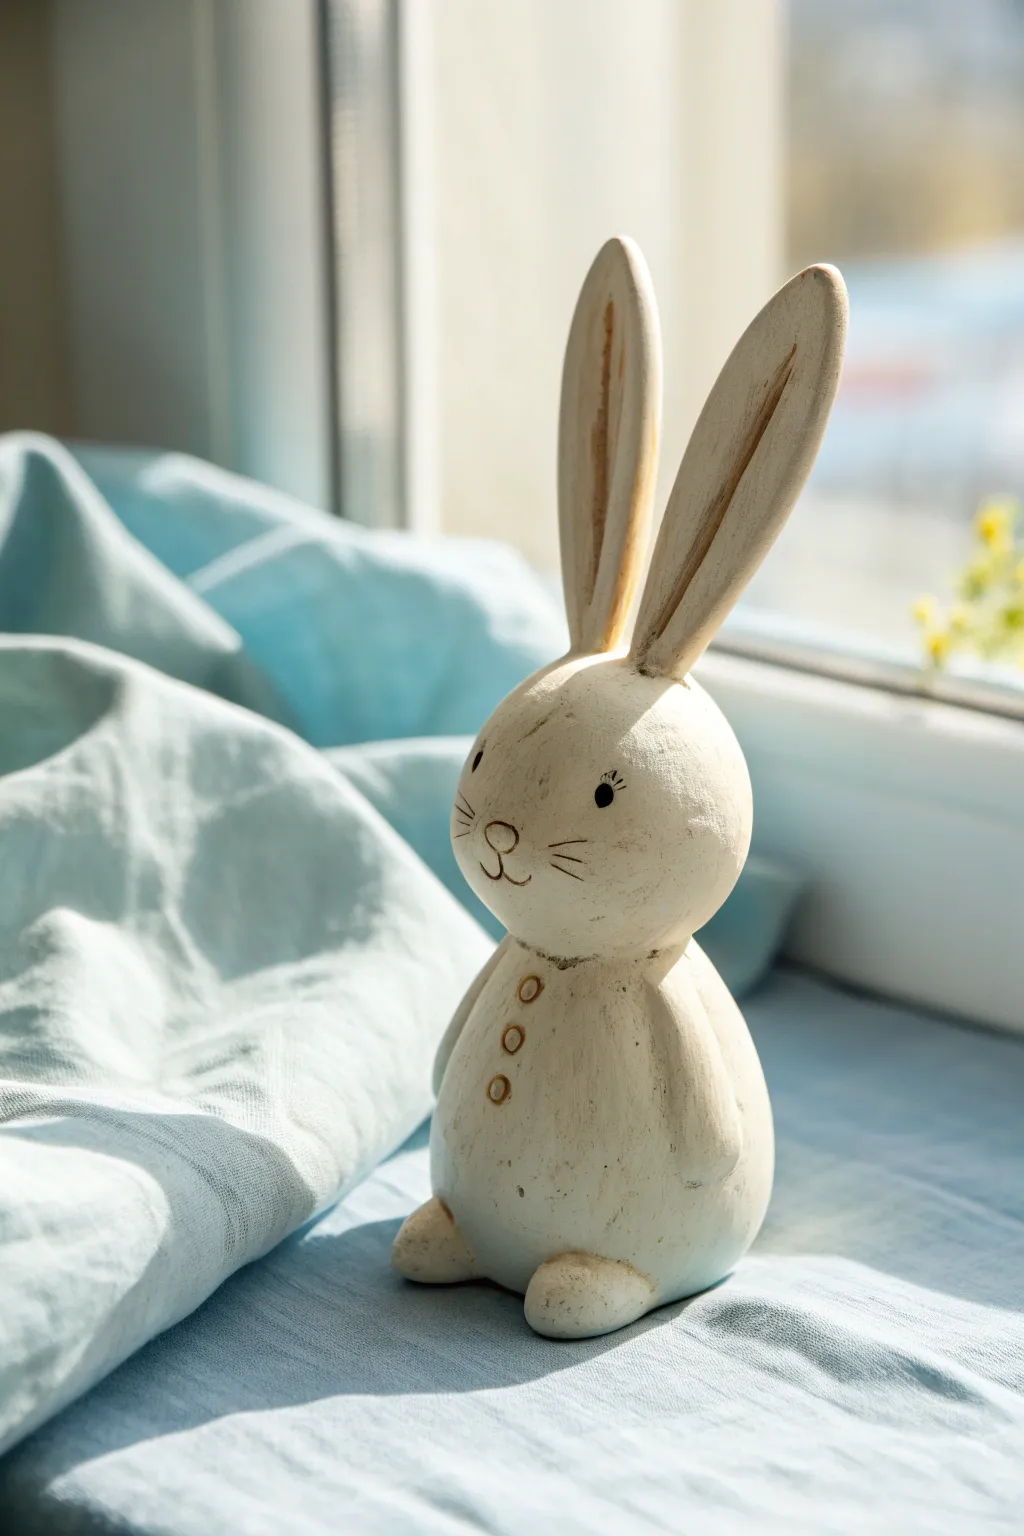
Create a charming, vintage-style figurine that looks like hand-carved wood but is actually molded from air-dry clay. With its distressed off-white finish and minimalist painted features, this standing bunny brings a touch of farmhouse elegance to any windowsill.
Step-by-Step Tutorial
Materials
- White Stone Air-Dry Clay (or Das Modeling Clay)
- Acrylic Paints: Creamy Off-White/Ivory, Light Brown, Black
- Sculpting Tools (needle tool, smooth wooden modeling tool)
- Small Rolling Pin
- Aluminum Foil (for armature)
- Fine Grit Sandpaper
- Flat Paintbrush (small and medium)
- Detail Paintbrush (very fine)
- Water Cup
- Paper Towels
- Matte Varnish/Sealant
Step 1: Sculpting the Form
-
Form the Core:
Begin by crinkling aluminum foil into two distinct shapes: a larger egg shape for the body (about the size of a lemon) and a smaller sphere for the head. Packing the foil tightly helps save clay and reduces drying time. -
Cover the Body:
Roll out a slab of clay to about 1/4 inch thickness. Wrap it completely around your foil body armature, smoothing the seams together with a bit of water until the surface is uniform. -
Attach the Head:
Cover the head armature in the same manner. Score the top of the body and the bottom of the head, add a dab of water or slip, and press them firmly together. Blend the clay across the neck seam to secure it. -
Flatten the Base:
Gently tap the figurine on your work surface to flatten the bottom. This ensures your bunny will stand upright securely without wobbling. -
Shape the Feet:
Roll two small balls of clay and slightly flatten them into ovals. Attach these to the bottom front of the body to create the little feet paws, blending the seams at the back. -
Create the Ears:
Roll two long, tapered sausage shapes for the ears. Flatten them gently so they look like tall leaves. I find it helpful to insert a small piece of wire or toothpick into the base of each ear for internal support before attaching them to the head. -
Attach the Ears:
Score and slip the attachment points on top of the head. Press the ears on vertical and straight, blending the clay downward into the head for a seamless transition. -
Add Arm Details:
Roll two thin coils of clay for the arms. Press them onto the sides of the body, curving them slightly forward so they rest naturally against the tummy. Blend the shoulder area smooth. -
Carve the Buttons:
Using a small tube or the back of a pen cap, lightly impress three small circles down the center of the chest to mimic buttons. -
Dry Completely:
Set the sculpture aside in a cool, dry place. Allow it to dry for at least 24-48 hours. The clay will turn from grey to white (depending on brand) and feel hard to the touch.
Step 2: Painting and Finishing
-
Sand and Smooth:
Once fully dry, use fine-grit sandpaper to gently smooth out any fingerprints or rough bumps. Wipe away the dust with a slightly damp paper towel. -
Base Coat:
Paint the entire bunny with the creamy off-white acrylic paint. You may need two thin coats for opaque coverage, letting the first dry completely before adding the second. -
Distress the Surface:
To get that weathered wood look, mix a tiny amount of water with light brown paint to make a wash. Brush it over the recessed areas (inside the ears, around the neck, near the feet) and immediately wipe most of it off with a paper towel. This leaves shadowing in the crevices. -
Highlight the Ears:
Paint the inner elongated oval of the ears with a slightly darker shade of beige or light brown to create depth, mimicking the natural shadow of an ear. -
Paint the Buttons:
Using your fine detail brush, paint the three impressed buttons on the chest with a golden-brown or copper color. -
Add Facial Features:
With the finest brush or a black paint pen, draw two small dots for eyes with tiny eyelashes. Add a small rounded triangle nose and a simple ‘W’ shape for the mouth. -
Draw Whiskers:
Flick three very fine lines outward from the cheek area on each side to create delicate whiskers. -
Final Varnish:
Protect your work with a coat of matte varnish. This seals the paint and gives the bunny a finished, professional ceramic look without making it too shiny.
Smoother Texture
Dip your finger in a little water while smoothing the raw clay. This creates a slip-like surface that erases fingerprints instantly.
Fabric Scarf
Cut a thin strip of scrap fabric or burlap and tie it around the bunny’s neck for an extra mixed-media farmhouse touch.
Place your finished bunny near a window where the light can catch its friendly face


Round Bear Cub Figurine
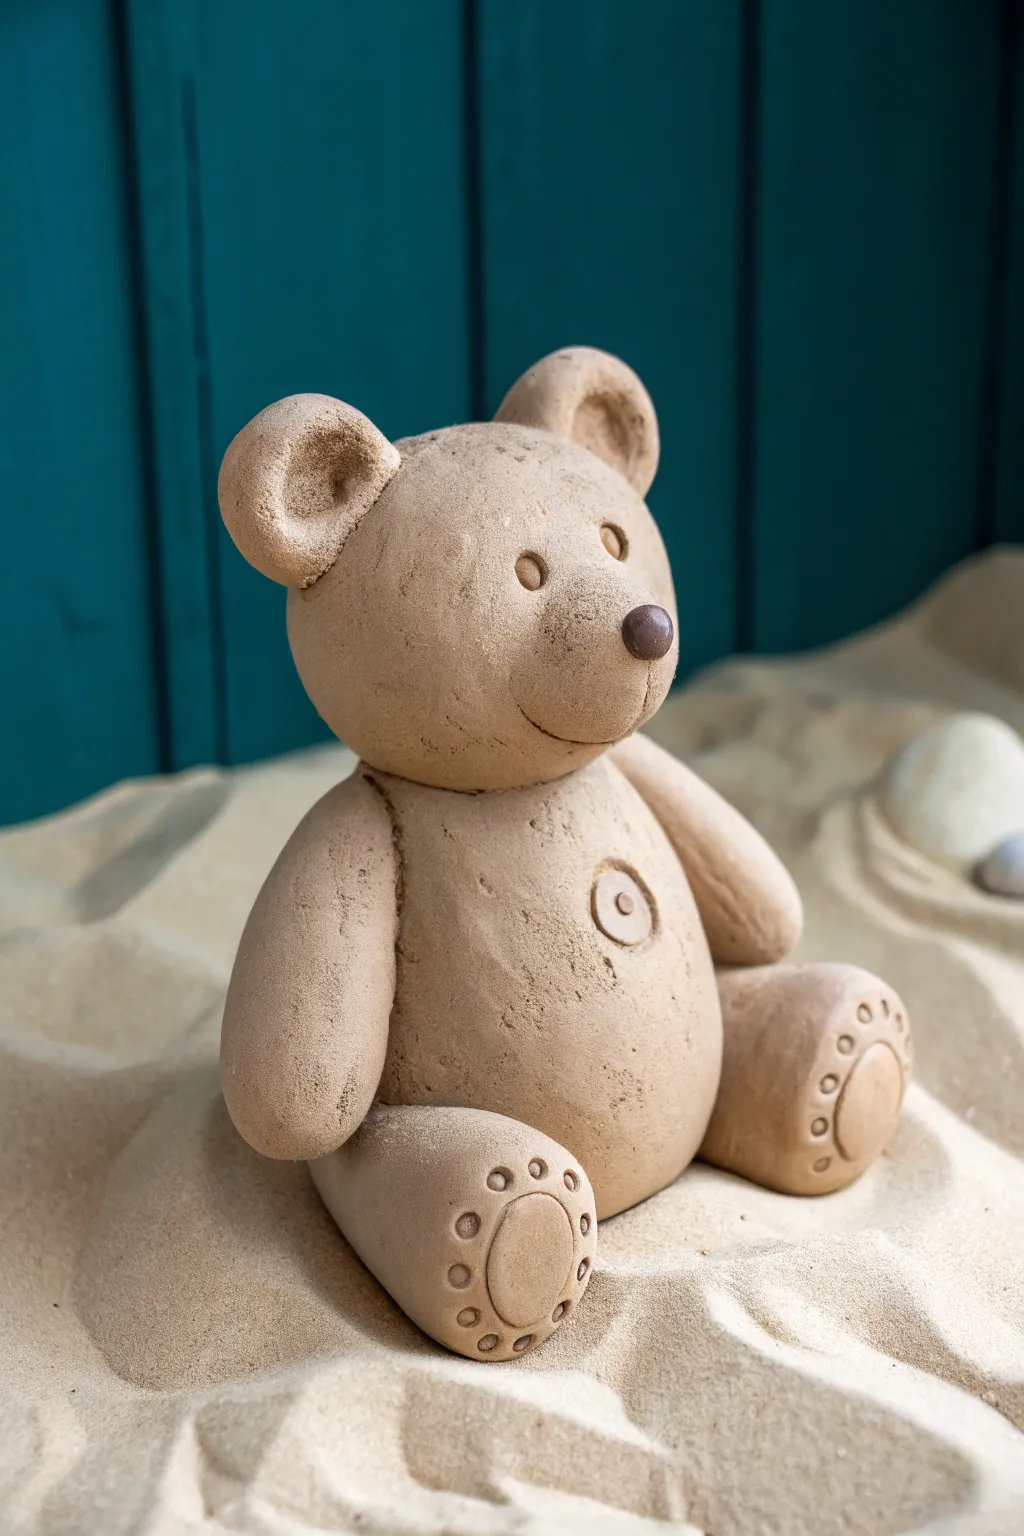
This adorable bear figurine captures the cozy charm of a classic teddy with a unique, sandy texture that mimics natural stone. Its rounded forms and sweet button belly make it a delightful project for sculptors of any skill level.
Step-by-Step Guide
Materials
- Stone-effect polymer clay (granite or sandstone color)
- Small amount of dark brown clay (for the nose)
- Aluminum foil (for armature)
- Needle tool or toothpick
- Ball stylus tool (medium and large)
- Straw or small circle cutter
- Soft brush (for texture)
- Oven for baking
Step 1: Forming the Core
-
Create the foil base:
Crumple a piece of aluminum foil into a tight ball about the size of a golf ball for the head, and a slightly larger, pear-shaped piece for the body. This reduces clay usage and makes the figure lighter. -
Condition the clay:
Warm your stone-effect clay in your hands, kneading it until soft and pliable. Roll out a sheet thick enough to cover your foil shapes. -
Cover the body:
Wrap the pear-shaped foil armature in the clay sheet, smoothing out all seams until you have a seamless, stone-like pear shape for the torso. -
Cover the head:
Repeat the process for the head, covering the foil ball completely. Roll it gently between your palms to ensure it is perfectly round. -
Connect head to body:
Insert a short piece of wire or a toothpick halfway into the top of the body, then press the head firmly onto it. Blend the clay slightly at the neck seam if you want a solid connection, though a distinct separation looks cute here.
Step 2: Adding Limbs and Features
-
Shape the legs:
Roll two equal logs of clay for the legs. They should be thick and slightly tapered at one end to attach to the hips. -
Attach the legs:
Press the tapered ends of the legs onto the sides of the body near the bottom. Orient them so they stick straight out, giving the bear a sitting posture. -
Form the feet:
Flatten the ends of the legs slightly to create the footpads. They should be wide and oval-shaped. -
Detail the paws:
Use a needle tool or small circle cutter to imprint a large oval in the center of the foot. Then, create small circular indentations around the top curve of the foot for toes. -
Add the arms:
Roll two smaller sausage shapes for the arms. Attach them high on the shoulders, pressing them down so they rest naturally against the sides of the belly. -
Make the ears:
Roll two small balls of clay. Flatten them slightly and press them onto the top of the head. Use a large ball tool to create a deep, concave indentation in the center of each ear.
Stone Effect Hack
If you don’t have stone-effect clay, mix regular beige clay with black pepper or dried used coffee grounds to create realistic speckles.
Step 3: Refining the Face and Texturing
-
Create the muzzle:
Form a small, flattened oval of clay and press it onto the lower center of the face. Smooth the edges so it merges seamlessly with the head. -
Add the nose:
Take a tiny pinch of dark brown clay, roll it into a small oval, and press it onto the very top tip of the muzzle. -
Sculpt the mouth:
Use your needle tool to carefully draw a vertical line down from the nose, curving into a gentle smile on either side. -
Indent the eyes:
Use a medium ball tool to press two small sockets above the muzzle for eyes. You can leave them as shadows or add tiny balls of black clay inside. -
Add the belly button:
Roll a small flat disc of clay and place it centrally on the tummy. Use a straw to impress a circle in the middle, creating a button look. -
Enhance the texture:
I like to take a stiff bristle brush and gently tap it all over the surface of the bear. This removes fingerprints and enhances the sandy, stone-like texture. -
Bake the figure:
Bake according to your clay package instructions. Let the bear cool completely before handling.
Make it a Keepsake
Before baking, use letter stamps to imprint a name or date into the bear’s footpad to turn this figurine into a personalized gift.
Place your finished bear on a shelf or in a planter for a touch of rustic whimsy

The Complete Guide to Pottery Troubleshooting
Uncover the most common ceramic mistakes—from cracking clay to failed glazes—and learn how to fix them fast.
Easy Panda With Two-Tone Patches
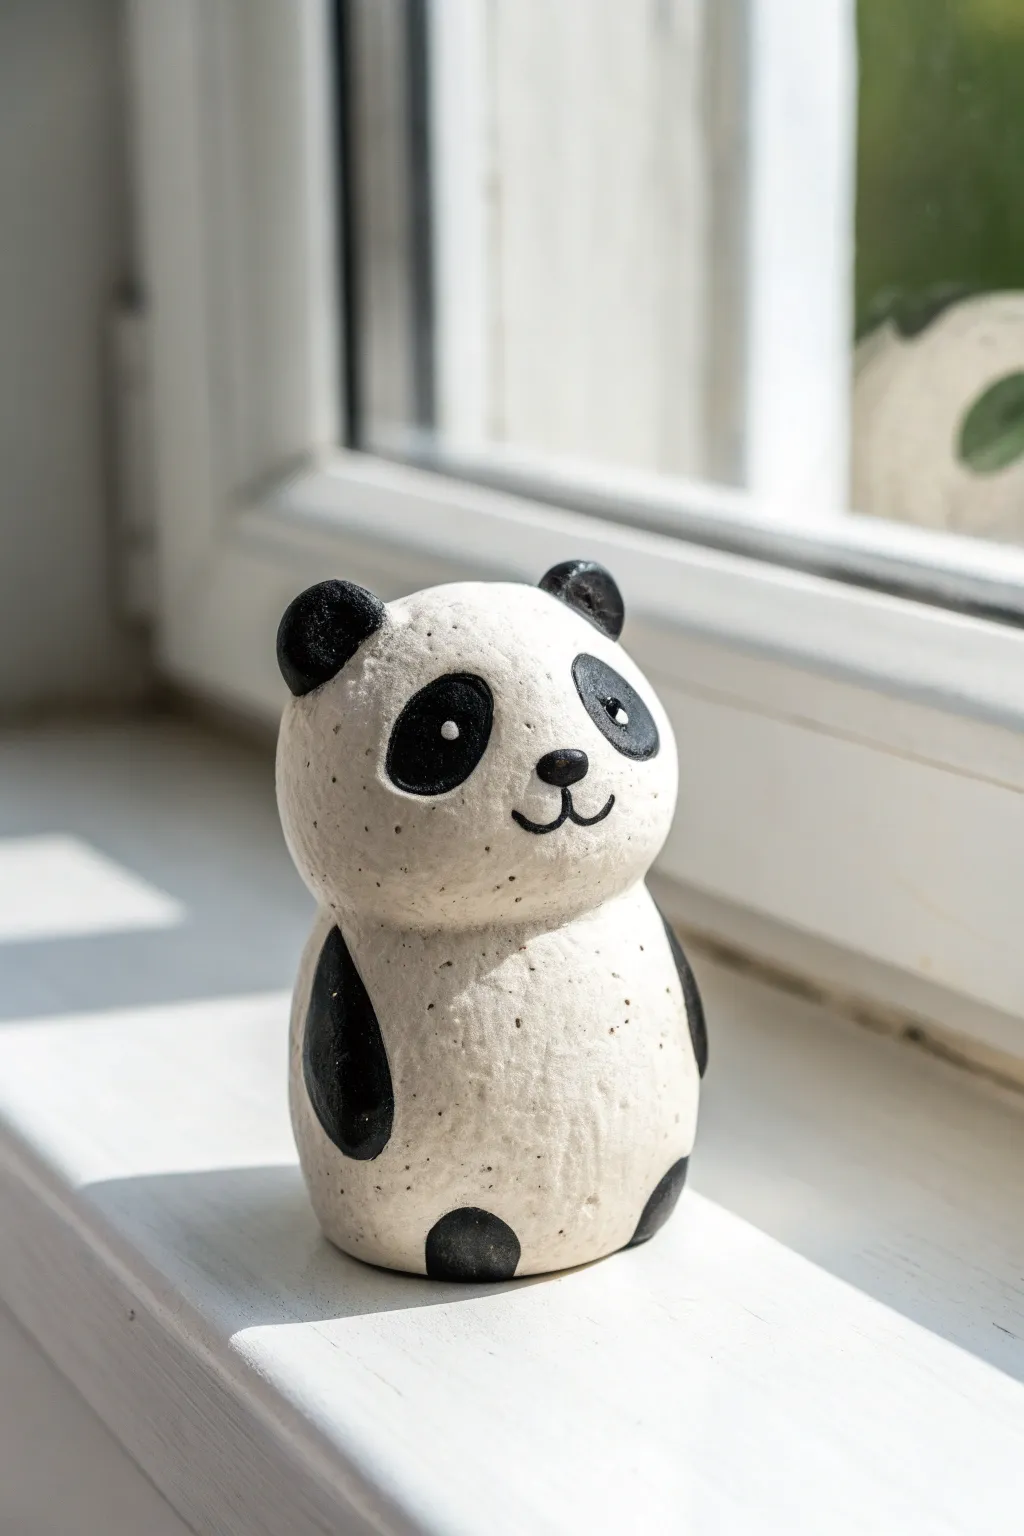
Create a charming, minimalist panda figurine that captures the essence of this beloved bear with simple shapes and a textured finish. The speckled clay body gives it a natural, organic look, while the painted black details bring its friendly personality to life.
Step-by-Step
Materials
- White or light grey speckled stoneware clay (or air-dry clay with added speckles)
- Black acrylic paint or black underglaze (if firing)
- Small round paintbrush (size 0 or 1)
- Needle tool or toothpick
- Sponge and water bowl
- Clear matte varnish or glaze
Step 1: Shaping the Body
-
Form the base:
Start with a ball of speckled clay roughly the size of a tangerine. Roll it between your palms until it is smooth and round. -
Create the pear shape:
Gently apply more pressure to the top third of the ball while rolling, tapering it slightly to distinguish the head from the body. You want a single, solid pear-like shape rather than two separate joined balls. -
Flatten the base:
Tap the bottom of your pear shape firmly against your work surface so the panda sits flat and stable without wobbling. -
Refine the head:
Use your thumb to gently smooth the transition area between the head and body. The neck should be subtle, not a deep groove.
Natural Speckles
Can’t find speckled clay? Mix dry used coffee grounds or black pepper into plain white air-dry clay before sculpting to get that texture.
Step 2: Adding Clay Details
-
Make the ears:
Roll two tiny, pea-sized balls of clay. Flatten them slightly into thick discs. -
Attach the ears:
Score the top of the head and the bottom of the ear discs with your needle tool. Add a dab of water or slip, then press the ears firmly in place. -
Blend the seams:
Use a modeling tool or your finger to smooth the clay from the back of the ears down onto the head, ensuring they are securely attached. -
Form the arms:
Roll two small sausage shapes for the arms. They should be slightly tapered at one end. -
Attach the arms:
Score and slip the sides of the body. Press the arms flat against the sides, curving them slightly forward to follow the body’s roundness. -
Create the legs:
Roll two slightly larger ovals for the feet/legs. Flatten them gently. -
Attach the legs:
Attach these to the bottom front of the body using the score and slip method. I like to position them slighty apart for a cute, seated posture. -
Smooth the surface:
Take a slightly damp sponge and gently wipe over the entire figure. This removes fingerprints and softens any harsh tool marks. -
Dry or Fire:
If using air-dry clay, let it dry completely (24-48 hours). If using ceramic clay, fire it to bisque according to manufacturer instructions.
Wobbly Head?
If the head starts drooping during sculpting, insert a toothpick vertically through the neck into the body for hidden structural support.
Step 3: Painting and Finishing
-
Paint the ears:
Using a small brush and black paint, carefully color the ears. Cover both the front and back, maintaining a crisp line where they meet the head. -
Outline the eyes:
Paint two large, slanted oval patches for the eyes. They should tilt slightly outward/downward for that classic sad-panda look. -
Add the pupils:
Once the black patches are dry, add a tiny white dot for a glint (optional), or leave the white clay showing through for the pupil if you outline carefully. -
Paint the nose and mouth:
Paint a small, inverted soft triangle for the nose. Draw a thin ‘w’ shape connected to the nose for the mouth. -
Color the limbs:
Paint the arm patches on the sides and the little ovals on the feet black. Keep the edges neat and rounded. -
Seal the piece:
Once all paint is fully dry, apply a coat of clear matte varnish or glaze to protect the finish without making it too shiny.
Now you have a sweet little desk companion ready to bring a smile to your face
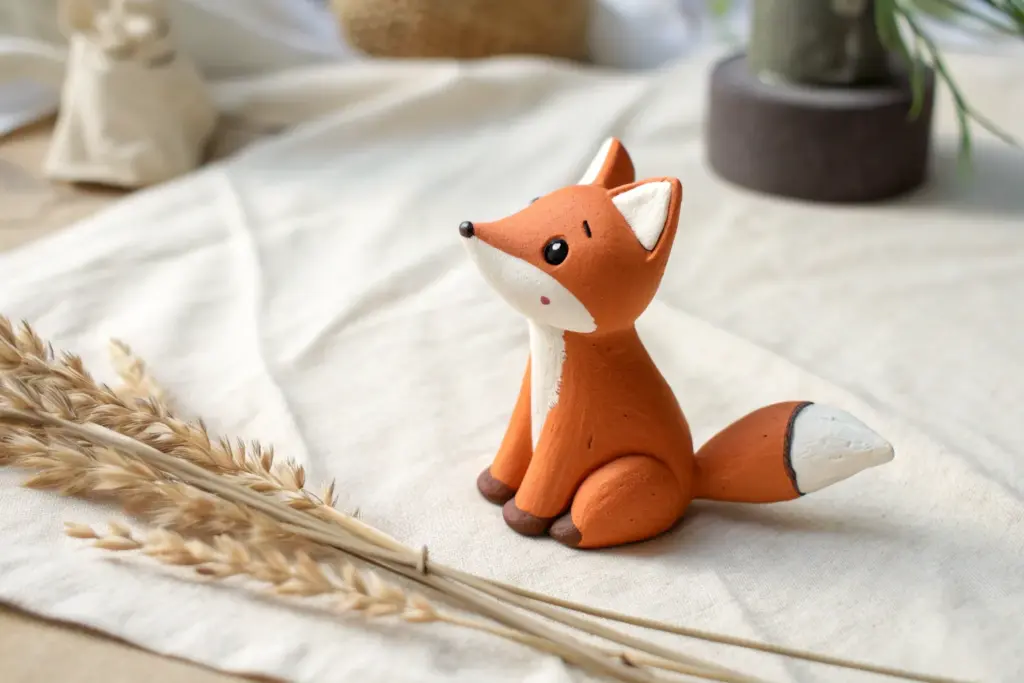
Little Fox With Triangle Ears
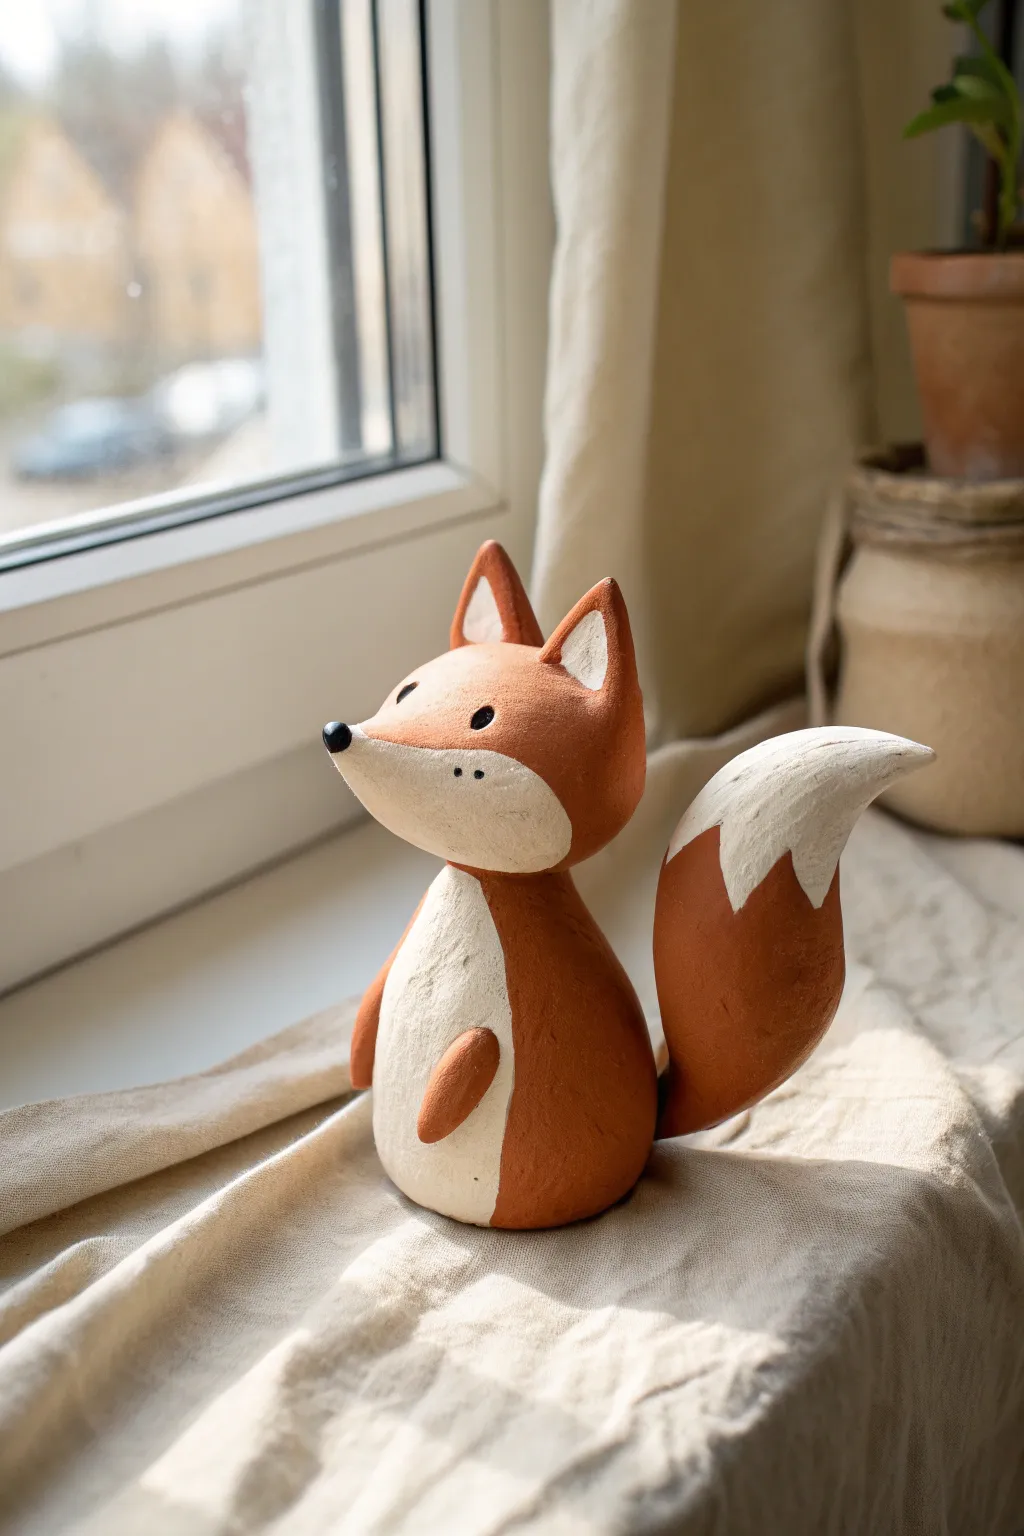
This friendly clay fox brings a touch of forest charm right to your windowsill with its warm amber tones and simple, stylized shapes. The design focuses on clean curves and distinctive pointed ears, making it an excellent project for practicing smooth seam blending and character sculpting.
Step-by-Step Guide
Materials
- Air-dry clay or polymer clay (white or terracotta)
- Acrylic paints (burnt sienna/fox orange, off-white/cream, black)
- Small detailed paintbrushes
- Medium flat paintbrush
- Needle tool or toothpick
- Water cup (for smoothing)
- Fine-grit sandpaper (optional)
- Matte varnish or sealant
Step 1: Sculpting the Body and Head
-
Form the base:
Start with a ball of clay roughly the size of a tangerine for the body. Roll it into a smooth egg shape, slightly flattening the bottom so it stands up securely on its own. -
Shape the head:
Take a slightly smaller amount of clay to form the head. Roll a ball and then gently pull one side out to create a tapered snout, ensuring the back of the head remains rounded. -
Attach head to body:
Score the top of the body and the intended neck area of the head with a needle tool. Apply a tiny bit of water (or slip) and press the pieces together firmly. -
Blend the neck seam:
Use your thumb or a modeling tool to smooth the clay across the seam where the head meets the body until the transition is completely invisible and strong. -
Create the triangle ears:
Pinch two small triangles of clay. Gently curve them slightly so they aren’t perfectly flat, giving them a natural, alert look. -
Attach the ears:
Score and slip the bottom of the ears and attach them to the top of the head. Use a small tool to blend the clay at the base of the ears into the skull for a seamless look.
Cracks Appearing?
If small cracks appear while drying, mix a tiny bit of fresh clay with water to make a paste and fill them in gently.
Step 2: Adding the Tail and Limbs
-
Form the tail:
Roll a thick coil of clay that tapers at both ends, resembling a large comma shape. This needs to be quite voluminous to match the fox’s fluffy look. -
Position the tail:
Attach the tail to the lower back of the body, sweeping it upwards so the tip curves away from the body. I sometimes prop this up with a crumpled piece of paper while it dries so it doesn’t sag. -
Make the arms:
Create two small, elongated teardrop shapes for the front paws. These should be simple and stylised, without detailed fingers. -
Attach the arms:
Press the arms onto the sides of the belly area, blending the upper shoulder area into the body while leaving the lower paw section slightly raised for dimension. -
Smooth the surface:
Dip your finger in a little water and run it over the entire sculpture to remove fingerprints and minor imperfections. Allow the clay to dry completely according to package instructions (usually 24-48 hours).
Step 3: Painting and Details
-
Sand imperfections:
Once fully dry, check for any rough spots. If needed, gently buff them away with fine-grit sandpaper for a professional finish. -
Paint the belly patch:
Using the off-white paint, outline a large oval shape on the belly and paint it in. You might need two coats for solid coverage. -
Paint the face highlights:
Use the same off-white color to paint the lower half of the face (the snout and jawline) and the inner triangles of the ears. -
Apply the main coat:
Paint the rest of the body—head, back, outer ears, and arms—with the burnt sienna or fox orange color. Use a small brush to carefully paint around the white patches you just created. -
Add the tail tip:
Paint the main part of the tail orange, but leave a generous zig-zag section at the very end to be painted white. -
Draw the face:
Dip the back end of a paintbrush into black paint to dot on the nose at the very tip of the snout. Use a fine liner brush to add two small black eyes and three tiny freckle dots on the white cheek area. -
Seal the fox:
protect your work with a coat of matte varnish to keep the colors vibrant and the clay safe from moisture.
Level Up: Texture
Before the clay dries, use an old toothbrush to gently tap the orange areas for a subtle fur-like texture.
Place your new woodland friend near a plant or window to enjoy its watchful, calm expression every day


What Really Happens Inside the Kiln
Learn how time and temperature work together inside the kiln to transform clay into durable ceramic.
Sweet Pig With a Coin Snout
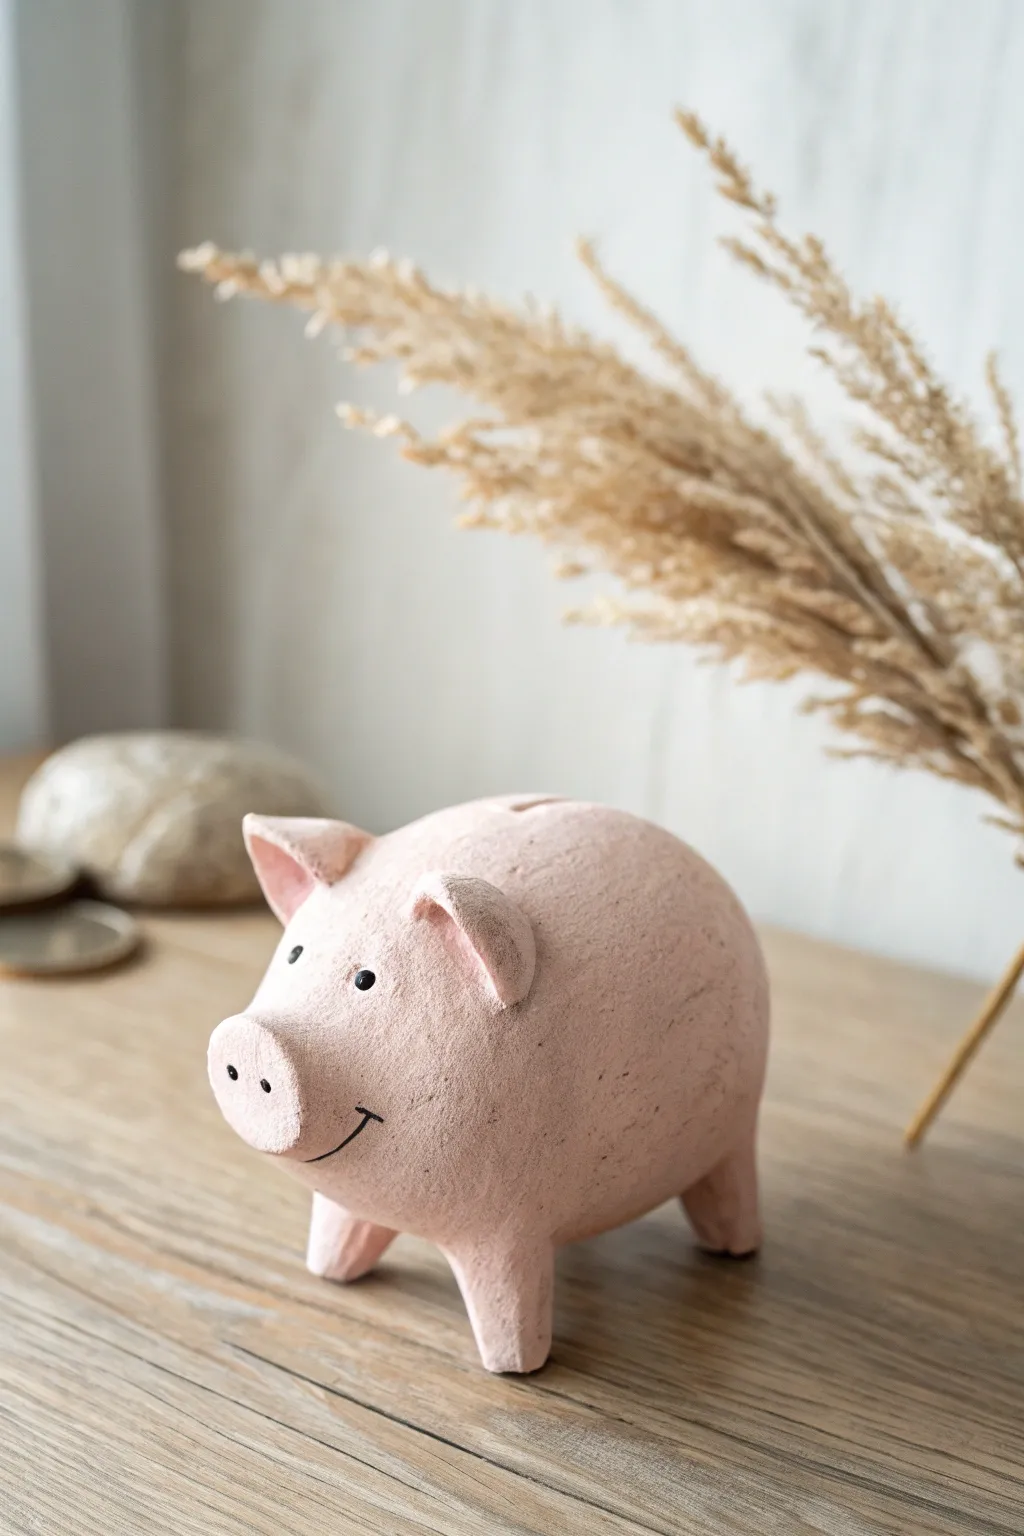
Create a charming, rustic friend for your shelf with this textured clay piggy bank project. Its soft pink hue and delightfully prominent snout make it a sweet addition to any room, perfect for holding small treasures or just looking adorable.
Detailed Instructions
Materials
- Air-dry clay (white or terracotta)
- Acrylic paint (soft pink, black)
- Small foam ball or crumpled foil (for the core structure)
- Clay sculpting tools (or a toothpick and spoon)
- Texture sponge or stiff bristle brush
- Paintbrushes (flat shader and fine detail)
- Water cup
Step 1: Forming the Body
-
Create the core:
Start by rolling a ball of foil or using a small foam ball as the base armature. This keeps the pig lightweight and saves clay. -
Cover with clay:
Flatten a large piece of air-dry clay and wrap it fully around your armature. Smooth out the seams with a little water on your finger until you have a smooth, egg-like shape. -
Shape legs:
Roll four equal-sized cylinders of clay for the legs. They should be stout enough to support the body’s weight. -
Attach legs:
Score the bottom of the body and the tops of the legs with a toothpick or clay tool. Add a dab of water (slip) and press the legs firmly onto the body, blending the clay edges upwards so they are seamless. -
Balance check:
Stand the pig on a flat surface and gently press down to ensure all four feet touch the ground evenly. Adjust the leg angles if he wobbles.
Cracks while drying?
If small cracks appear as the clay shrinks, mix a tiny amount of fresh clay with water to make a paste and fill them in before painting.
Step 2: Adding Features
-
Form the snout:
Roll a small ball of clay and flatten it slightly into a disc. Attach this to the front of the face, blending the back edges into the head while keeping the front face flat and distinct. -
Add nostrils:
Use the back of a small paintbrush or a dotting tool to press two indentations into the snout for nostrils. -
Craft the ears:
Shape two small triangles of clay. Gently curve them forward and attach them to the top of the head using the score-and-slip method. -
Create the coin slot:
carefully cut a rectangular slot into the top of the pig’s back using a clay knife or fettling tool. Wiggle it slightly to ensure the opening is wide enough for a coin. -
Add texture:
This is crucial for the rustic look shown in the image. Take a damp sponge or a stiff-bristled brush and firmly tap it all over the surface of the clay to create a pitted, stone-like texture. Avoid smoothing it out.
Step 3: Painting and Finishing
-
Dry completely:
Let the sculpture dry for at least 24-48 hours. It must be bone dry before painting. -
Base coat:
Mix a soft, uneven pink color. I prefer not to mix the paint too thoroughly, so you get subtle variations of light and dark pink on the surface. -
Apply paint:
Dab the paint onto the pig using a sponge or a stippling motion with a brush. This preserves the clay texture rather than filling it in with thick strokes. -
Paint the eyes:
Once the pink is dry, use a very fine brush or a toothpick dipped in black paint to make two small, solid black dots for eyes just above the snout. -
Add the smile:
Paint a very thin, curved black line extending from under the snout to create a gentle smile.
Pro Tip: Rustic Wash
After the pink base dries, dilute a tiny drop of brown paint in water and wash it over the pig, wiping it back immediately for an aged look.
Now you have a sweet little piggy bank ready to guard your coins
Mini Owl With Big Eyes
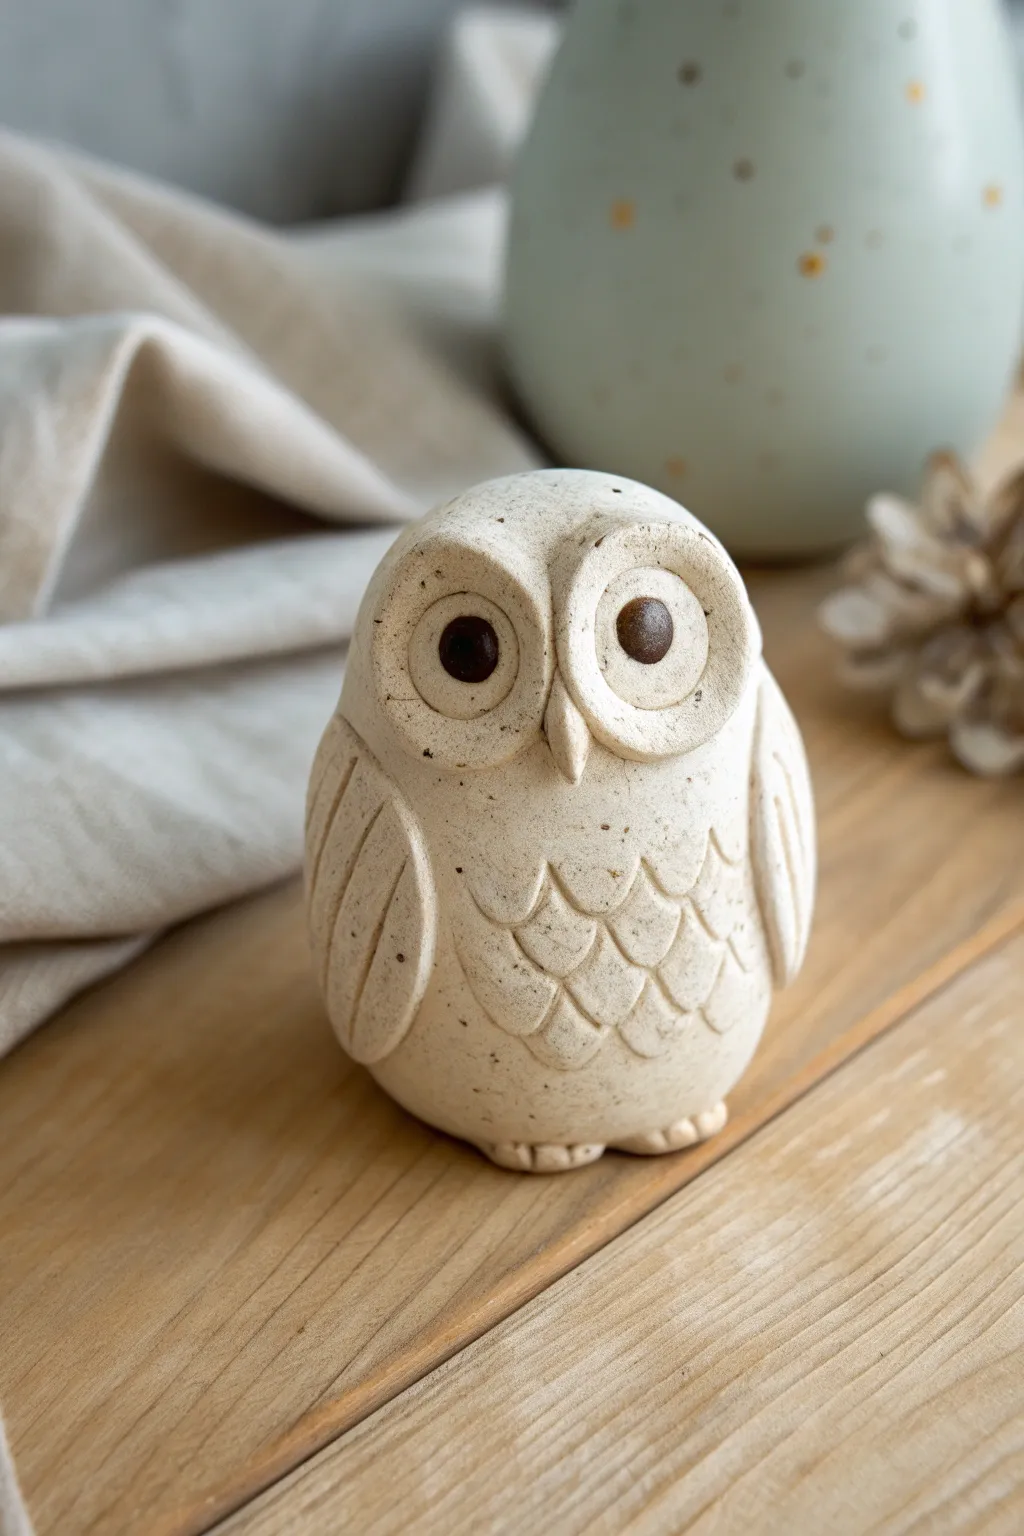
This charming little owl combines rustic texture with adorable, oversized features for a figurine that feels both earthy and sweet. With its speckled finish and simple repeating patterns, it makes for a perfect windowsill guardian or a thoughtful handmade gift.
Step-by-Step
Materials
- White polymer clay (curing type) or air-dry clay
- Brown speckled clay or fine black pepper (to mix in for texture)
- Small ball tool or rounded end of a paintbrush
- Needle tool or toothpick
- Small knife or clay blade
- Brown acrylic paint (for eyes)
- Clear matte varnish (optional)
Step 1: Forming the Body
-
Prepare the clay:
Start by conditioning your white clay until it is soft and pliable. If you want to achieve the speckled look shown in the photo but only have plain white clay, knead in a tiny pinch of fine black pepper or glitter-free embossing powder until it’s evenly distributed. -
Shape the base:
Roll the clay into a smooth ball about the size of a golf ball. -
Create the oval form:
Gently press the ball onto your work surface to flatten the bottom so it stands up. Squeeze the sides slightly to give it an upright, egg-like oval shape. -
Round the head:
Use your thumb to gently round over the top of the oval, ensuring there are no sharp peaks. The top should be a smooth dome.
Uneven Eye Rims?
If your eye rims distort while pressing, let the clay sit for 15 minutes to firm up slightly. Then, assume the shape again using a lighter touch with the ball tool.
Step 2: Sculpting the Face and Eyes
-
Make the eye discs:
Roll two smaller balls of clay, flattened into discs about the size of a dime. Placing them side-by-side on the upper half of the body will help you gauge the right size. -
Attach the discs:
Press the discs firmly onto the face area. They should touch in the middle to form that classic owl mask shape. -
Indenting the rims:
Use a medium-sized ball tool or the rounded handle of a paintbrush to press a circular indentation into the center of each disc, leaving a raised rim around the edge. -
Add the eyeballs:
Roll two small, pea-sized balls of clay. Place them into the indentations you just made and press them slightly flat so they look like buttons. -
Form the beak:
Create a tiny tear-drop shape of clay. Place it point-down right where the two eye rims meet in the center, blending the top edge slightly so it stays attached.
Step 3: Adding Wings and Texture
-
Shape the wings:
Flatten two elongated ovals of clay for the wings. They should reach from the owl’s shoulder area down to the base. -
Attach wings:
Press the wings onto the sides of the body, smoothing the clay at the shoulder connection point so they look integrated rather than just stuck on. -
Wing details:
Using your needle tool or knife, gently carve two or three long, curved vertical lines into each wing to simulate large feathers. -
Create chest feathers:
Use a small U-shaped cutter or the tip of a drinking straw cut in half to impress a pattern of scallops on the owl’s tummy. I find working from the bottom row upward creates the most realistic layering effect. -
Add feet:
Roll two tiny sausages of clay and tuck them under the front bottom edge of the owl. Use a toothpick to make two indentations in each for toes.
Pro Tip: Rustic Texture
Before baking, gently tap the entire surface with an old toothbrush or a stiff bristle brush. This removes fingerprints and adds a lovely stone-like finish.
Step 4: Finishing Touches
-
Paint the pupils:
If you are using colored clay, add a tiny dot of dark brown clay to the center of each eye. If you are baking plain clay, bake the owl first according to package directions, then paint the pupils dark brown once cooled. -
Bake or dry:
Follow the instructions for your specific clay type. Remember that thicker figurines may need a slightly longer curing time at a lower temperature to prevent cracking. -
Seal:
Once completely finished, brush a thin layer of matte varnish over the piece to protect the texturing and give it a finished ceramic look.
Place your little owl on a shelf where its big eyes can watch over the room

TRACK YOUR CERAMIC JOURNEY
Capture glaze tests, firing details, and creative progress—all in one simple printable. Make your projects easier to repeat and improve.
Turtle With a Dome Shell
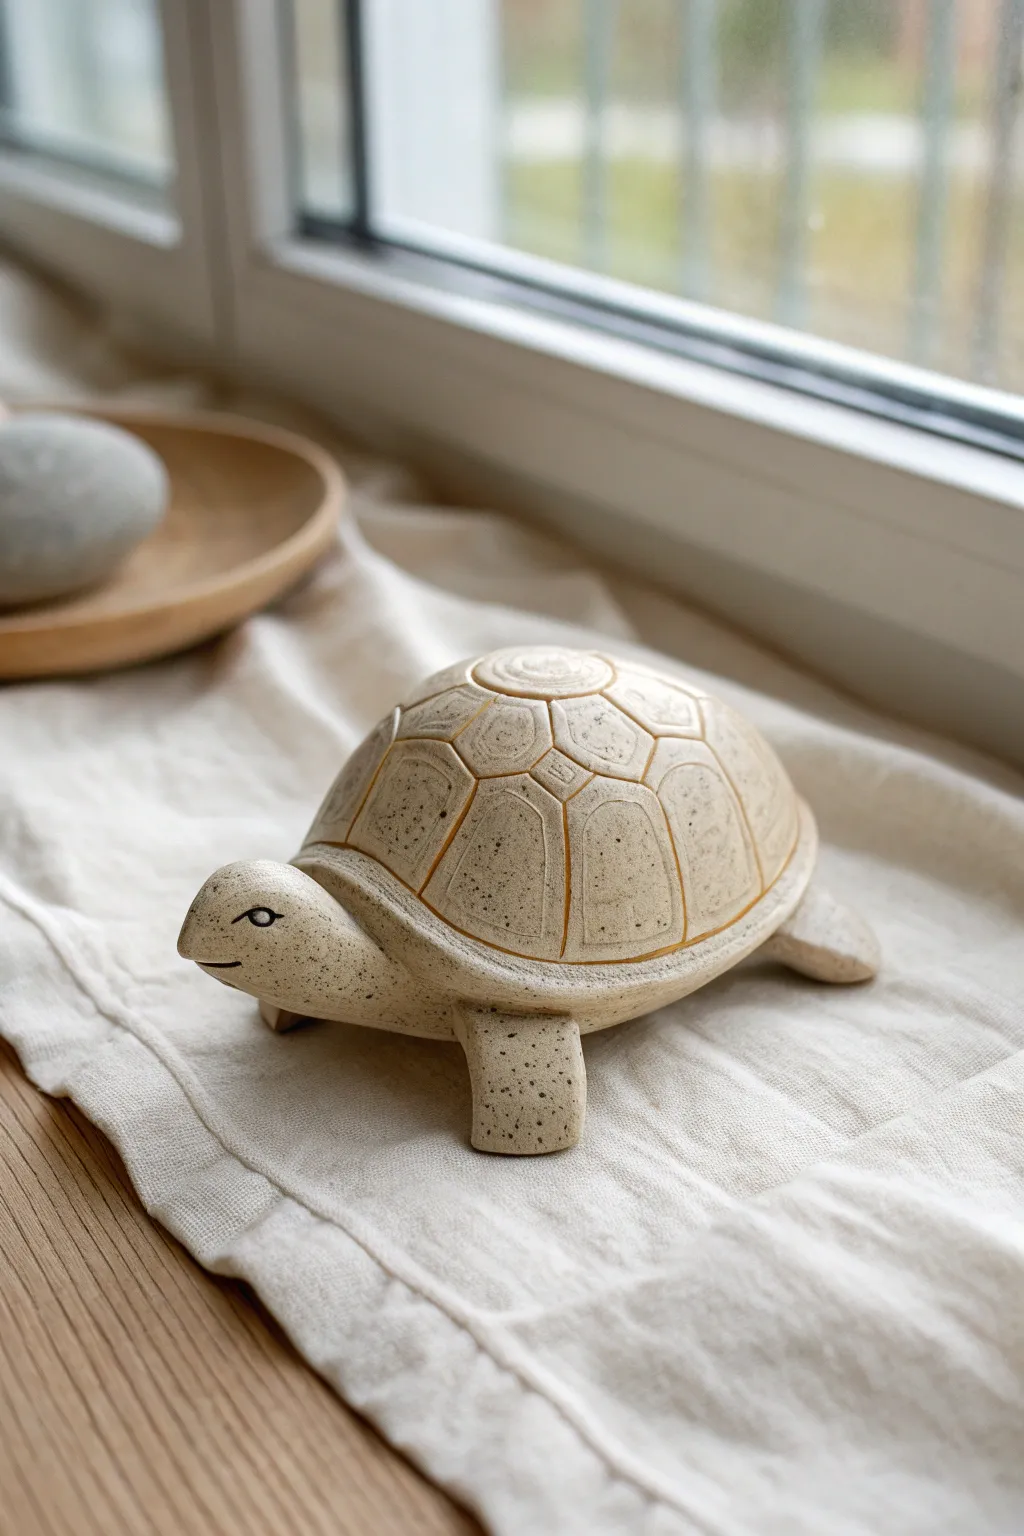
This charming turtle features a high, perfectly rounded shell decorated with crisp geometric carvings. The speckled beige finish gives it a natural, stony look that feels right at home on a sunny windowsill.
Detailed Instructions
Materials
- White or beige air-dry clay (or polymer clay)
- Small rolling pin
- Carving tools (needle tool and small U-gouge)
- Hollow half-sphere mold (or a small round bowl/ball)
- Slip (clay and water mix) or scoring tool
- Speckled tan acrylic paint or glaze
- Black fine-tip detail brush or pen
- Matte varnish
Step 1: Forming the Base
-
Create the shell dome:
Roll out a slab of clay to about 1/4 inch thickness. Place it over your half-sphere mold (like a small overturned bowl or a smooth foam ball) to create a perfect dome shape, trimming away the excess at the bottom. -
Make the base plate:
Roll out a second, slightly smaller circle of flat clay. This will enclose the bottom of the turtle so it isn’t hollow. -
Join the shell:
Score the edges of both the dome and the base plate, apply a little slip or water, and press them together firmly. Smooth the seam completely with your finger until it looks like one solid stone. -
Shape the head:
Roll a medium-sized ball of clay into a smooth tear-drop shape. Slightly flatten the wider end to serve as the turtle’s face. -
Attach the head:
Score the connection point on the front of the shell and the back of the head. Press the head firmly onto the shell base, blending the clay at the neck so the join is invisible.
Step 2: Limbs and Details
-
Form the legs:
Create four thick cylinders for the legs. Flatten the bottoms slightly so the turtle stands distinctively, rather than just resting on its belly. -
Attach the legs:
Attach the legs to the underside of the body using the score-and-slip method. Position them so they peek out just enough to support the shell’s weight. -
Add the tail:
Roll a very tiny cone for the tail and attach it to the rear center of the shell, blending well. -
Refine the rim:
Roll a thin snake of clay and wrap it around the base of the shell (where the dome meets the body) to create a distinct rim. Flatten it slightly against the shell and smooth it out.
Slumping Shell?
If the dome collapses while working, keep the mold inside the clay until it’s leather-hard. Just ensure the mold is non-porous or covered in plastic wrap so it releases easily.
Step 3: Carving and Finishing
-
Map the pattern:
Using a needle tool, lightly sketch a simplified geometric pattern on the shell. Start with a circle at the very top, then draw a ring of trapezoids around it, followed by larger shapes near the rim. -
Carve the grooves:
Once you’re happy with the sketch, use a small U-gouge or the needle tool to deepen the lines, creating distinct separation between the shell ‘scutes’ (plates). -
Detail the face:
Use a needle tool to carve a simple, smiling mouth curved upwards. I find less is more here to keep the expression sweet. -
Smooth and dry:
Use a slightly damp sponge to wipe away any sharp clay crumbs from your carving. Let the piece dry completely according to your clay’s instructions (usually 24-48 hours). -
Apply base color:
Paint the entire turtle with a creamy beige or off-white acrylic paint. You may need two coats for full coverage. -
Create the speckled effect:
Dilute a darker brown paint with water. Dip an old toothbrush into it and run your thumb over the bristles to flick tiny specks of paint onto the turtle. -
Add the eyes:
Using a very fine detail brush and black paint, paint almond-shaped outlines for the eyes with a distinct pupil. -
Seal the work:
Finish with a coat of matte varnish to protect the paint and give it that soft ceramic sheen.
Color Wash
Instead of speckling, try an ‘antique’ wash. Paint diluted brown paint into the carved cracks and wipe the surface clean with a damp cloth, leaving dark definition in the grooves.
Set your finished turtle near some natural light to really show off the texture of the shell
Easy Fish With a Fan Tail
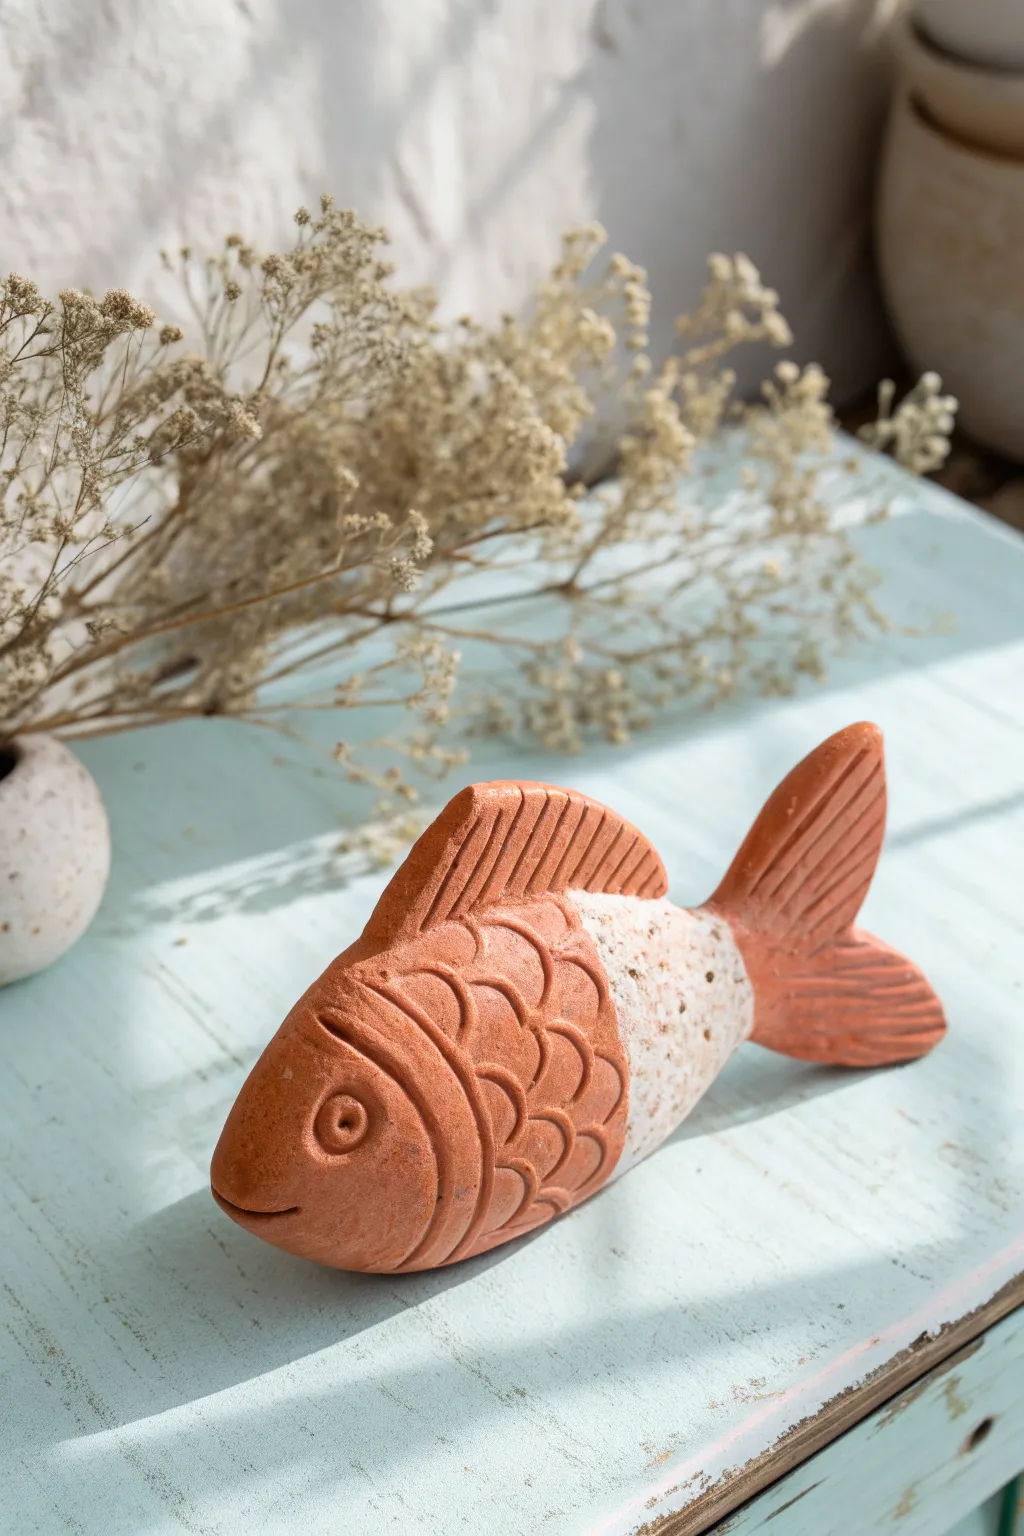
Capture the rustic charm of pottery with this delightful fish sculpture, featuring a lovely contrast between smooth terracotta and textured white clay. Its gentle curves and prominent fan tail make it a perfect beginner sculpting project that looks professional upon completion.
Step-by-Step Guide
Materials
- Terracotta air-dry clay (or polymer clay)
- White stone-effect clay (or white clay mixed with sand)
- Clay sculpting tools (needle tool, modeling tool)
- Small rolling pin
- Water slip (clay mixed with water)
- Sponge
- Clear matte sealant spray
Step 1: Shaping the Body
-
Torso Base:
Begin with a fist-sized ball of terracotta clay and embrace the tactile nature of the medium rolling it into a smooth, thick oval. -
Tapering:
Gently taper both ends of the oval, making the front slightly more rounded for the head and the back narrower where the tail will attach. -
Flattening:
Press the oval slightly against your work surface so it isn’t perfectly round; you want a flattened, swimming profile. -
Adding the Midsection:
Take a walnut-sized piece of your white stone-effect or speckled clay. Flatten it into a thick pancake. -
Joining Clays:
Score the back third of your terracotta body and one side of the white clay. Apply a little water or slip. -
Smoothing the Seam:
Press the white clay onto the back section of the body and smooth the edges where the two colors meet. I like to use my thumb here to drag the clay across the seam for a solid bond.
Step 2: Fins and Tail
-
Creating the Tail:
Roll a new piece of terracotta clay into a triangle shape about 1/4 inch thick for the fan tail. -
Attaching the Tail:
Score and slip the narrow end of the white body section and the point of your tail triangle. Press them firmly together. -
Dorsal Fin:
Create a smaller, elongated triangle of terracotta clay for the top fin. Attach it to the upper ridge of the body using the score-and-slip method. -
Refining Edges:
Use a damp sponge to smooth out any fingerprints or rough edges around the join lines before you start adding details.
Cracks at the Seams?
If the clay pulls apart where colors meet, dampen the crack with a wet brush and fill it with a tiny ‘snake’ of fresh clay. Smooth it down until invisible.
Step 3: Detailing and Texture
-
Carving the Gill:
Use a needle tool or a carving tool to incise a deep, curved line separating the head area from the scaled body. -
Adding the Eye:
Press a small ring tool or the end of a straw into the head area to make a circle. Poke a small hole in the center for the pupil. -
Mouth Detail:
Carve a small, upward-curving slit at the very front of the nose to give the fish a gentle smile. -
Sculpting Scales:
Using a U-shaped loop tool or the rounded cap of a pen, press semi-circle indentations into the terracotta mid-section to resemble large scales. -
Fin Texture:
Draw parallel lines across the dorsal fin using a needle tool, following the angle of the fin. -
Fan Tail Lines:
Carve deep grooves into the tail fin, radiating outward from the body to create that distinctive fan look. -
Texture Clean-up:
Check the white clay section; if you lost texture during handling, gently tap it with a toothbrush or stiff brush to bring back the stone effect. -
Drying:
Allow the piece to dry slowly away from direct heat to prevent cracking, preferably for 24-48 hours. -
Sealing:
Once fully cured, apply a light coat of matte sealant to protect the finish without making it too shiny.
DIY Stone Effect
Don’t have speckled clay? Mix coarse sand, black pepper, or dried coffee grounds into plain white clay to achieve that organic, rocky texture instantly.
Display your charming fish on a sunny shelf or use it as a whimsical paperweight
Teardrop Whale With a Tiny Spout
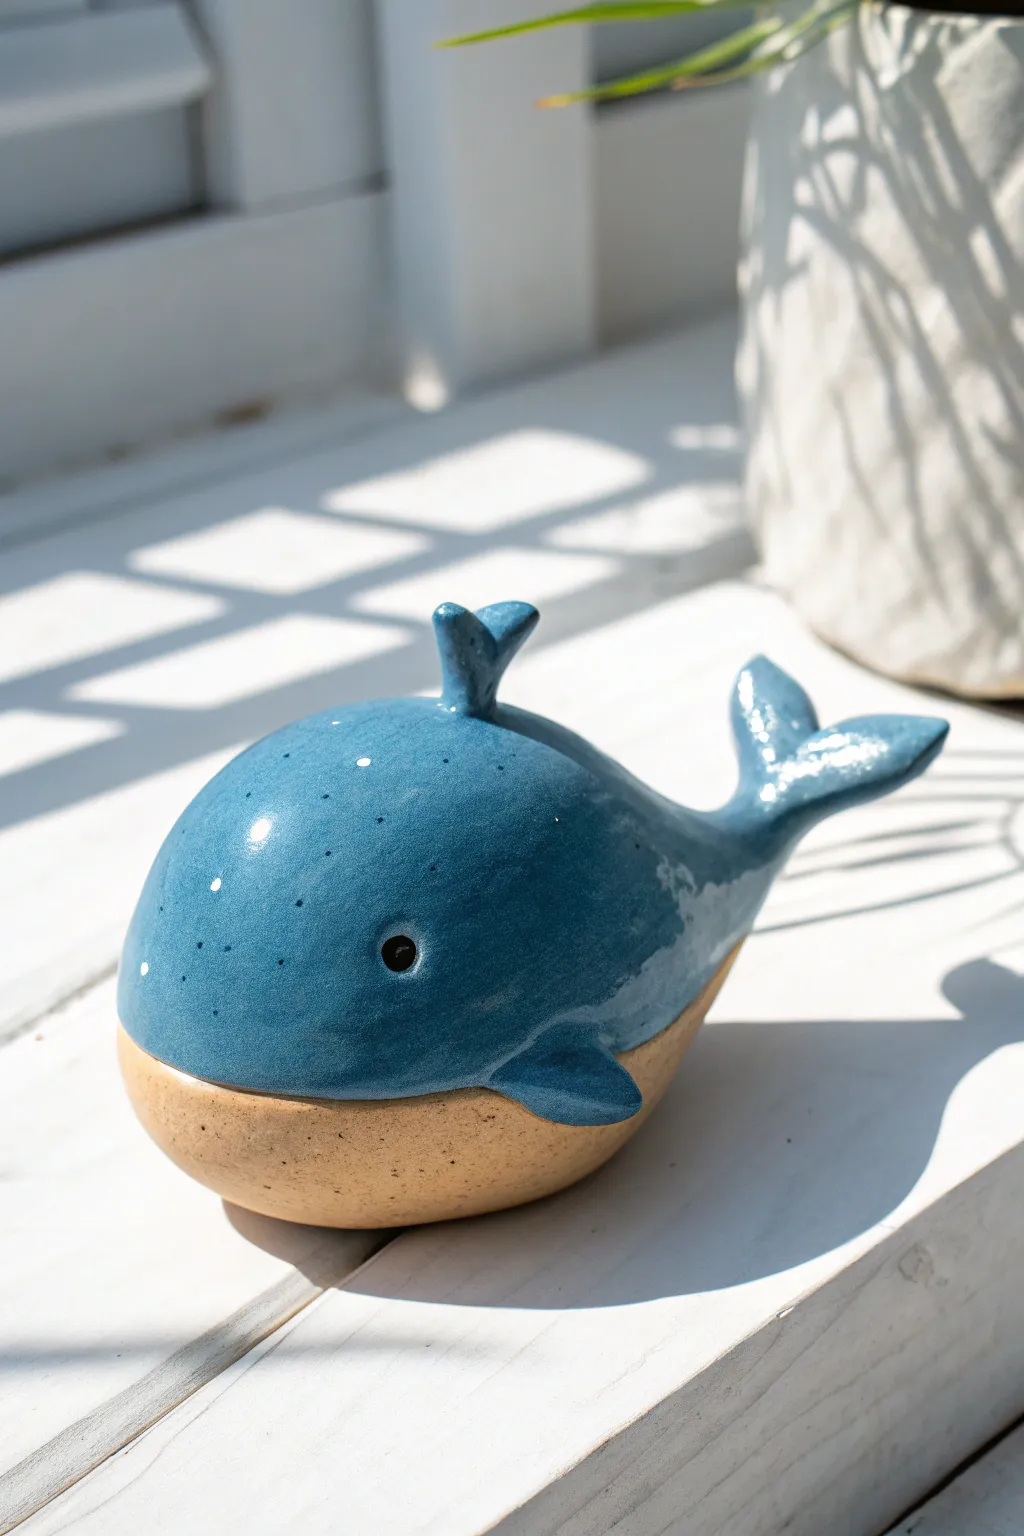
This charming little whale brings a splash of the ocean to your windowsill with its glossy blue back and natural clay belly. Its playful, rounded shape and tiny water spout make it an adorable project for beginners learning to shape simple forms.
Step-by-Step Tutorial
Materials
- Stoneware clay (buff or speckled)
- Clay carving tools (needle tool, rib tool)
- Slip and scoring tool (or fork)
- Blue ceramic glaze (glossy)
- White underglaze or white glaze for dots
- Small paintbrush
- Medium paintbrush
- Sponge
- Kiln access
Step 1: Shaping the Whale Body
-
Form the base shape:
Start with a ball of clay about the size of a large orange. Roll it between your palms until it is smooth and round. -
Create the teardrop:
Gently apply pressure to one side of the ball, rolling it back and forth to elongate it into a thick teardrop shape. The rounded end will be the head, and the tapered end will become the tail. -
Flatten the bottom:
Tap the teardrop gently onto your work surface to create a flat stable base so the whale sits upright without rolling over. -
Smooth the surface:
Use a damp sponge or a rubber rib tool to smooth out any fingerprints or bumps on the clay surface.
Clean Lines
If you don’t have wax resist, use automotive detail tape to mask off the belly line. Peel it off immediately after glazing for a super sharp edge.
Step 2: Adding Fins and Tail
-
Shape the tail flukes:
Pinch a small amount of clay from the pointed end of the teardrop and split it down the middle, flattening each side slightly to create the horizontal tail flukes. Gently curve them upward for a swimming motion. -
Make the side fins:
Roll two small marble-sized balls of clay and flatten them into triangle shapes. These will be the pectoral fins. -
Attach the fins:
Score the side of the whale body and the base of the fins with a needle tool. Apply a little slip (clay glue), press the fins firmly onto the lower sides of the body, and smooth the seams until invisible. -
Create the water spout:
Form a tiny ‘V’ shape or a small splash shape from a scrap of clay. I find it easiest to roll a tiny coil and split the top. -
Attach the spout:
Score and slip the top center of the whale’s head and attach the spout securely.
Step 3: Checking Details and Glazing
-
Add the eye:
Using the back of a small paintbrush or a rounded tool, press a distinct, small indentation into the side of the head to create the eye. -
Bisc firing:
Allow your whale to dry completely (bone dry) before firing it in the kiln for the first time (bisque fire). -
Wax resist method:
Brush a line of wax resist around the lower third of the whale’s body. This ensures the glaze line stays crisp and the bottom remains raw clay. -
Glaze the body:
Dip the top portion of the whale into a glossy blue glaze, or paint it on carefully, ensuring you stop right at your wax line. -
Add the speckles:
Dip a toothbrush or stiff brush into white glaze and flick the bristles to spray tiny droplets onto the blue glaze while it’s still damp. -
Highlight the eye:
Ensure no thick blue glaze has pooled inside the eye indentation; wipe it out gently with a cotton swab if needed so the dark shadow remains visible. -
Final firing:
Place the whale back in the kiln for the final glaze firing according to your clay and glaze specifications.
Air Dry Alternative
No kiln? Use air-dry clay! Paint the top with blue acrylics, splatter with white, and seal with a high-gloss varnish to mimic the ceramic look.
Place your shiny new friend on a shelf where it can catch the light and show off its glossy finish
Squat Frog With Toe Balls
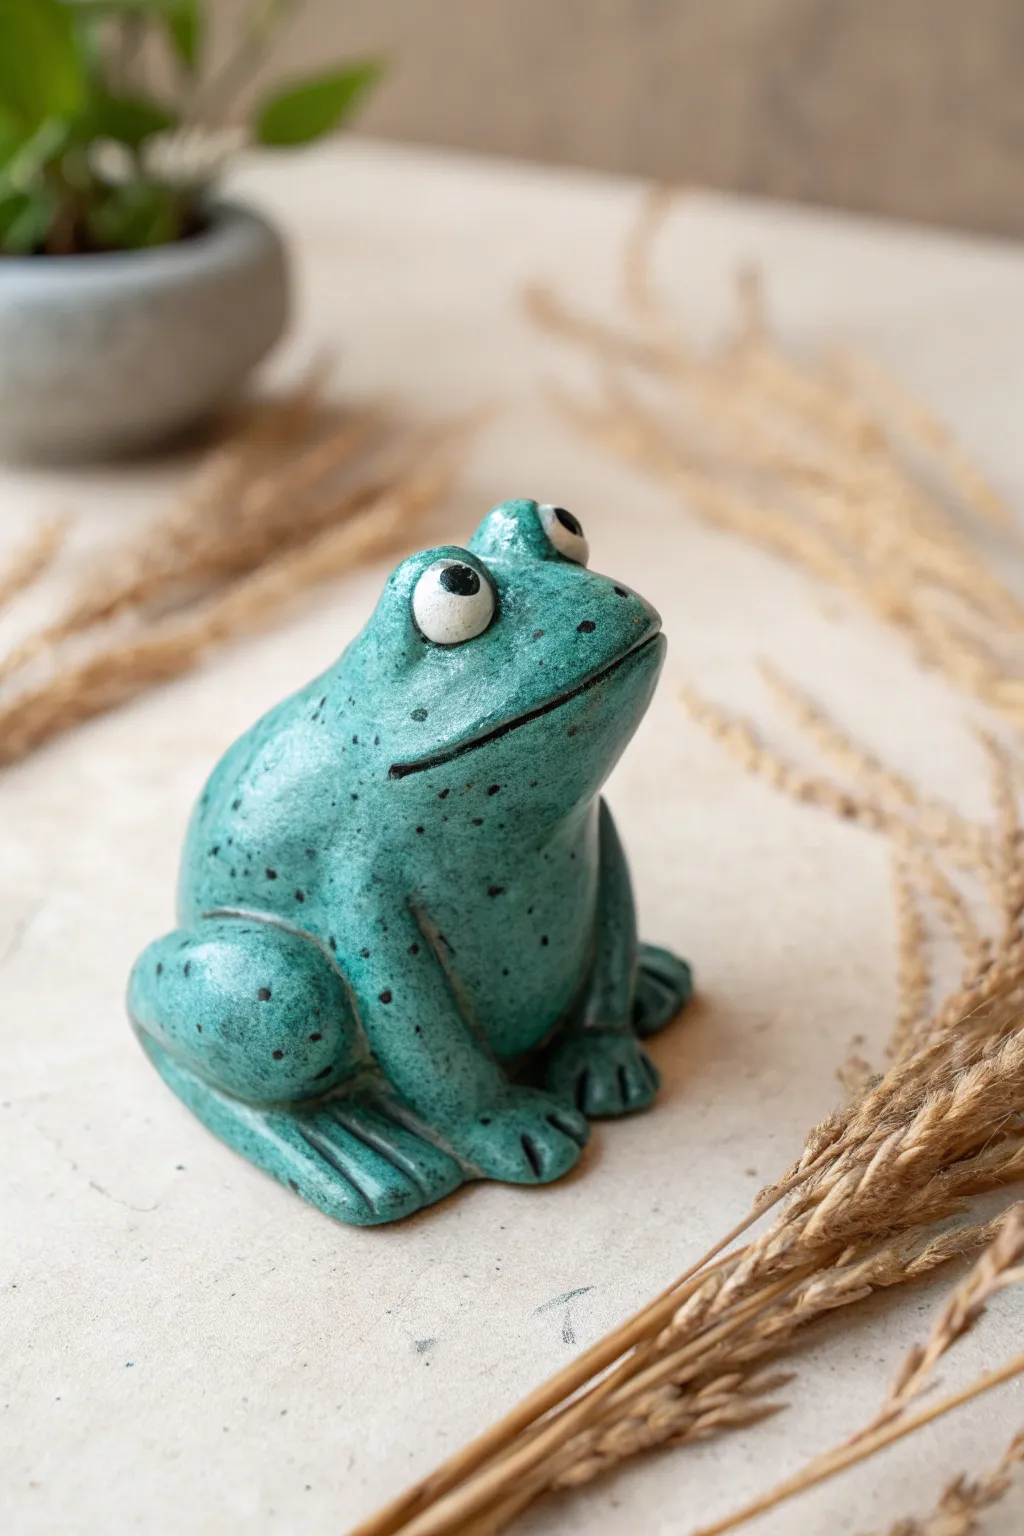
Capture the charm of glazed pottery without a kiln using this delightful clay project. This squat little frog features wide, expressive eyes and a beautiful faux-ceramic speckled finish that looks great on any shelf.
Step-by-Step
Materials
- Air-dry clay or polymer clay (white or grey)
- Sculpting tools (needle tool, ball stylus)
- Water (for smoothing)
- Sandpaper (fine grit)
- Acrylic paints: Teal/Turquoise, Black, White
- Stiff bristle brush (for splattering)
- High-gloss varnish or polyurethane sealer
- Soft synthetic paintbrushes
Step 1: Sculpting the Body
-
Form the base:
Start with a ball of clay roughly the size of a tangerine. Roll it smooth and then gently tap the bottom against your work surface to create a flat base so the frog sits stably. -
Shape the head:
Pinch the top half of the ball slightly to narrow it for the head area, but keep the overall shape quite round and squat. Smooth out any fingerprints with a bit of water. -
Add the back legs:
Roll two smaller balls of clay into thick teardrop shapes. Flatten them slightly and press them onto the sides of the body, near the back. The wider part should be the thigh, blending seamlessly into the body. -
Create the front legs:
Roll two generous snake shapes for the front arms. Attach them vertically to the front of the chest, blending the clay at the shoulders so they look muscular and integrated. -
Sculpt the toes:
Use a modeling tool or knife to press indentations into the ends of the feet to separate three distinct toes on each foot. Round off the tips gently.
Wet Finger Trick
Keep a small bowl of water nearby while sculpting. Dipping your finger and rubbing the clay surface will erase fingerprints and seams instantly.
Step 2: Adding Details
-
Make the eyes:
Roll two small balls of clay for the eyes. Attach them to the very top of the head, pressing them down securely so they bulge upwards. -
Refine the eyelids:
Roll tiny snakes of clay and wrap them around the base of the eyeballs to create eyelids. Blend these downward into the head for a natural transition. -
Carve the mouth:
Using a needle tool or a thin blade, carve a long, wide smile that curves slightly upward at the cheeks. Deepen the cut slightly to separate the top and bottom jaw visually. -
Dry and Sand:
Allow the clay to dry completely according to package instructions (24-48 hours for air-dry). Once hard, lightly sand any rough bumps, especially around the toes and joints.
Step 3: Painting the Faux-Ceramic Finish
-
Base coat:
Paint the entire frog with a coat of teal or turquoise acrylic paint. You may need two coats for full opacity. -
Add depth:
Mix a tiny drop of black into your teal to darken it. Paint this darker shade into the crevices: specifically the line of the mouth, the crease between the legs and body, and between the toes. -
Paint the eyes:
Carefully paint the eyeballs white. Once dry, add a large black dot in the center for the pupil. -
Create the speckles:
I like to water down black acrylic paint slightly for this step. Dip a stiff bristle brush (or toothbrush) into the paint and flick the bristles with your thumb to splatter tiny dots all over the frog’s skin. -
Seal for shine:
Once the paint is fully bone-dry, apply two to three generous coats of high-gloss varnish. This is the secret step that makes the clay look like fired ceramic.
Metallic Glaze
Mix a tiny amount of iridescent or pearl medium into your top varnish coat. This subtle shimmer mimics expensive ceramic glazes beautifully.
Place your finished frog near a houseplant to create a whimsical garden scene
Caterpillar Made From a Chain of Balls
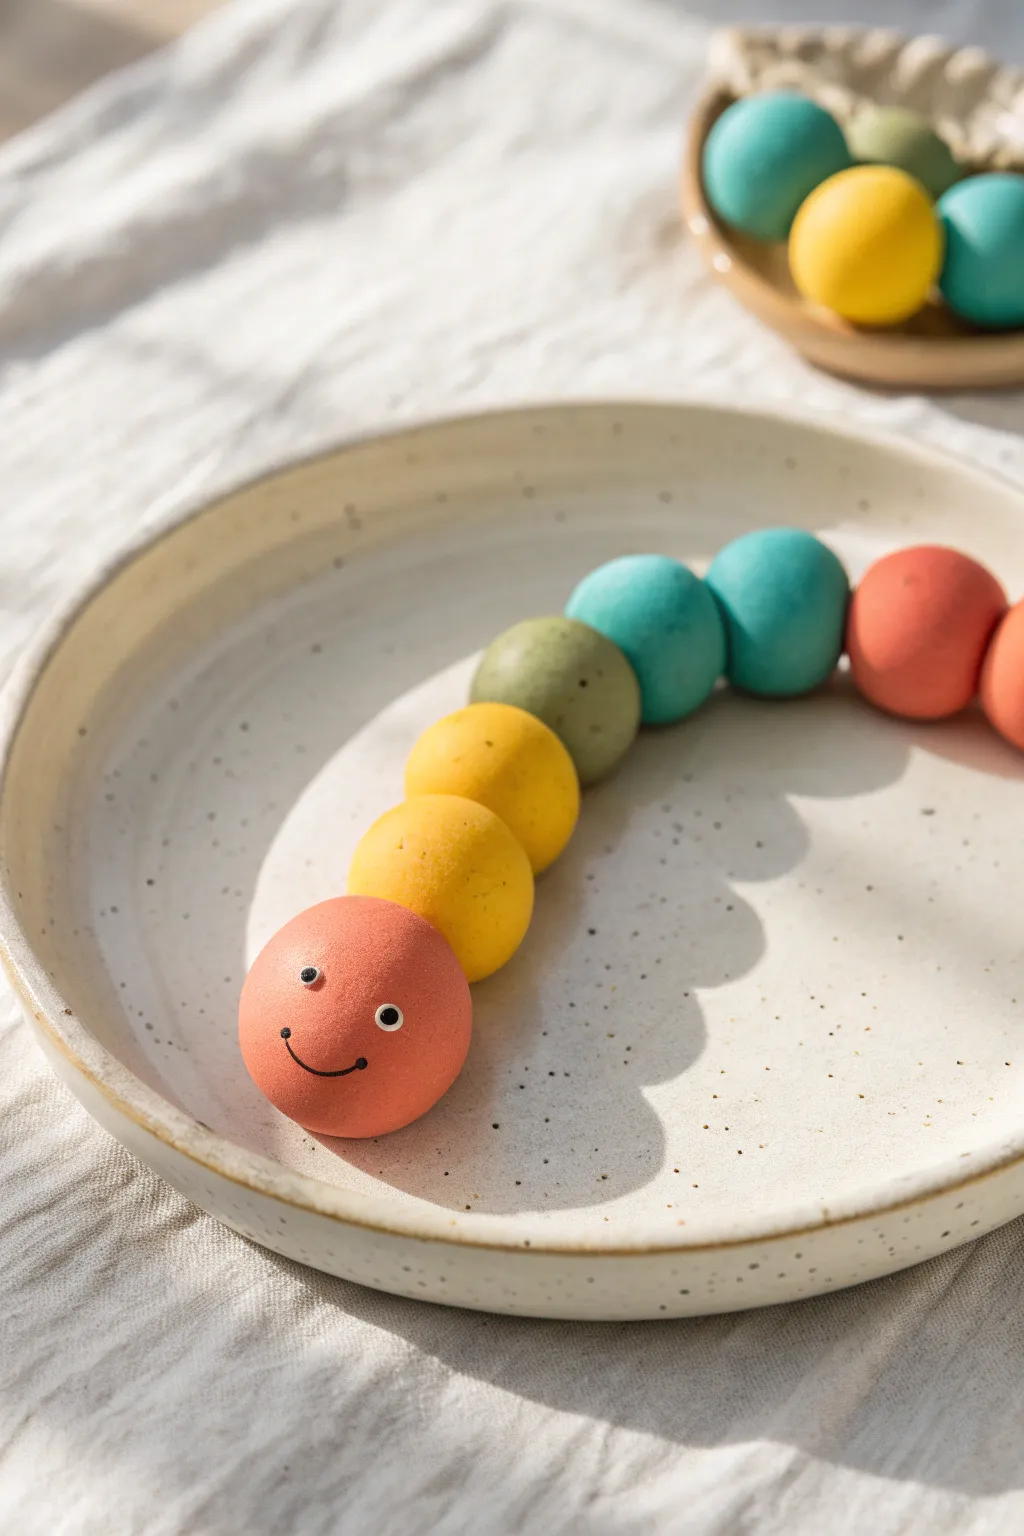
This cheerful figurine is built from a simple chain of perfectly round clay spheres, making it an ideal starter project. The soft, matte finish and graduated color scheme give it a modern, playful look that sits beautifully on a shelf or desk.
Step-by-Step Tutorial
Materials
- Air-dry clay or polymer clay (White)
- Acrylic paints (Coral/Salmon, Golden Yellow, Mustard, Olive Green, Teal, Blue)
- Fine-point black permanent marker or black acrylic paint with a detail brush
- White acrylic paint (for eye highlights)
- Two toothpicks or a needle tool
- Small paintbrush
- Clear matte varnish (optional)
- Water cup (for smoothing)
Step 1: Shaping the Spheres
-
Portion the clay:
Start by pinching off seven distinct pieces of clay. You want the piece for the head to be slightly larger than the body segments. -
Roll the head:
Take the largest piece and roll it firmly between the palms of your hands. Aim for a perfectly smooth sphere with no cracks. -
Form the body segments:
Roll the remaining six pieces into balls. These can be uniformly sized or slightly graduated, getting smaller toward the tail. -
Check surface texture:
Inspect each ball closely. If you see tiny cracks, dip your finger in a little water and gently smooth them out before they dry. -
Initial arrangement:
Lay the balls out on your work surface in a gentle ‘S’ curve to visualize the final shape, but do not join them yet.
Cracking Clay?
If your spheres develop cracks while drying, perform ‘surgery’ by filling the crack with a wet slurry of clay and water. Sand it smooth once dry before you start painting.
Step 2: Coloring the Sections
-
Head color:
Paint the largest ball entire surface with a soft coral or salmon pink shade. I like to spear the clay ball on a toothpick to paint all sides without getting fingerprints on it. -
Body gradient – Yellows:
Paint the ball directly behind the head a rich golden yellow. Paint the next ball a slightly more muted mustard yellow. -
Body gradient – Greens:
Paint the middle section ball a soft olive green. This acts as a transition color between the warm and cool tones. -
Body gradient – Blues:
Paint the next ball a bright teal. Follow this with a deeper blue or turquoise for the second-to-last segment. -
Tail color:
Paint the final, smallest ball a warm reddish-orange or a deep coral to bookend the colors nicely. -
Apply second coats:
Let the first layer dry completely, then apply a second coat if the clay color is showing through. An opaque finish looks best here.
Step 3: Assembly and Detailing
-
Join the segments:
Once fully dry, glue the spheres together. Apply a tiny dot of strong craft glue or superglue at the contact points and press them gently together in that waving ‘S’ shape. -
Draw the smile:
Using a fine-point black marker or a liner brush, draw a wide, simple ‘U’ shape for the smile low on the head. -
Add dimples:
Place two tiny dots at the very ends of the smile line to create cute little cheeks or dimples. -
Paint the eyes:
Dip the back end of a paintbrush into black paint and stamp two small circles above the mouth for the eyes. -
Add the sparkle:
Wait for the black eye paint to dry. Then, using a toothpick dipped in white paint, add a tiny white dot inside the black of each eye for a reflection. -
Protect the finish:
For durability, coat the entire caterpillar in a matte varnish. Avoid glossy finishes to maintain the soft, modern aesthetic shown in the photo.
Textured Touch
Before the paint dries, gently dab the surface with a dry sponge. This creates the slightly speckled, stone-like texture seen in the reference image instead of a slick plastic look.
Place your colorful little friend on a sunny windowsill to brighten up the room
Bumblebee With Simple Stripes and Wings
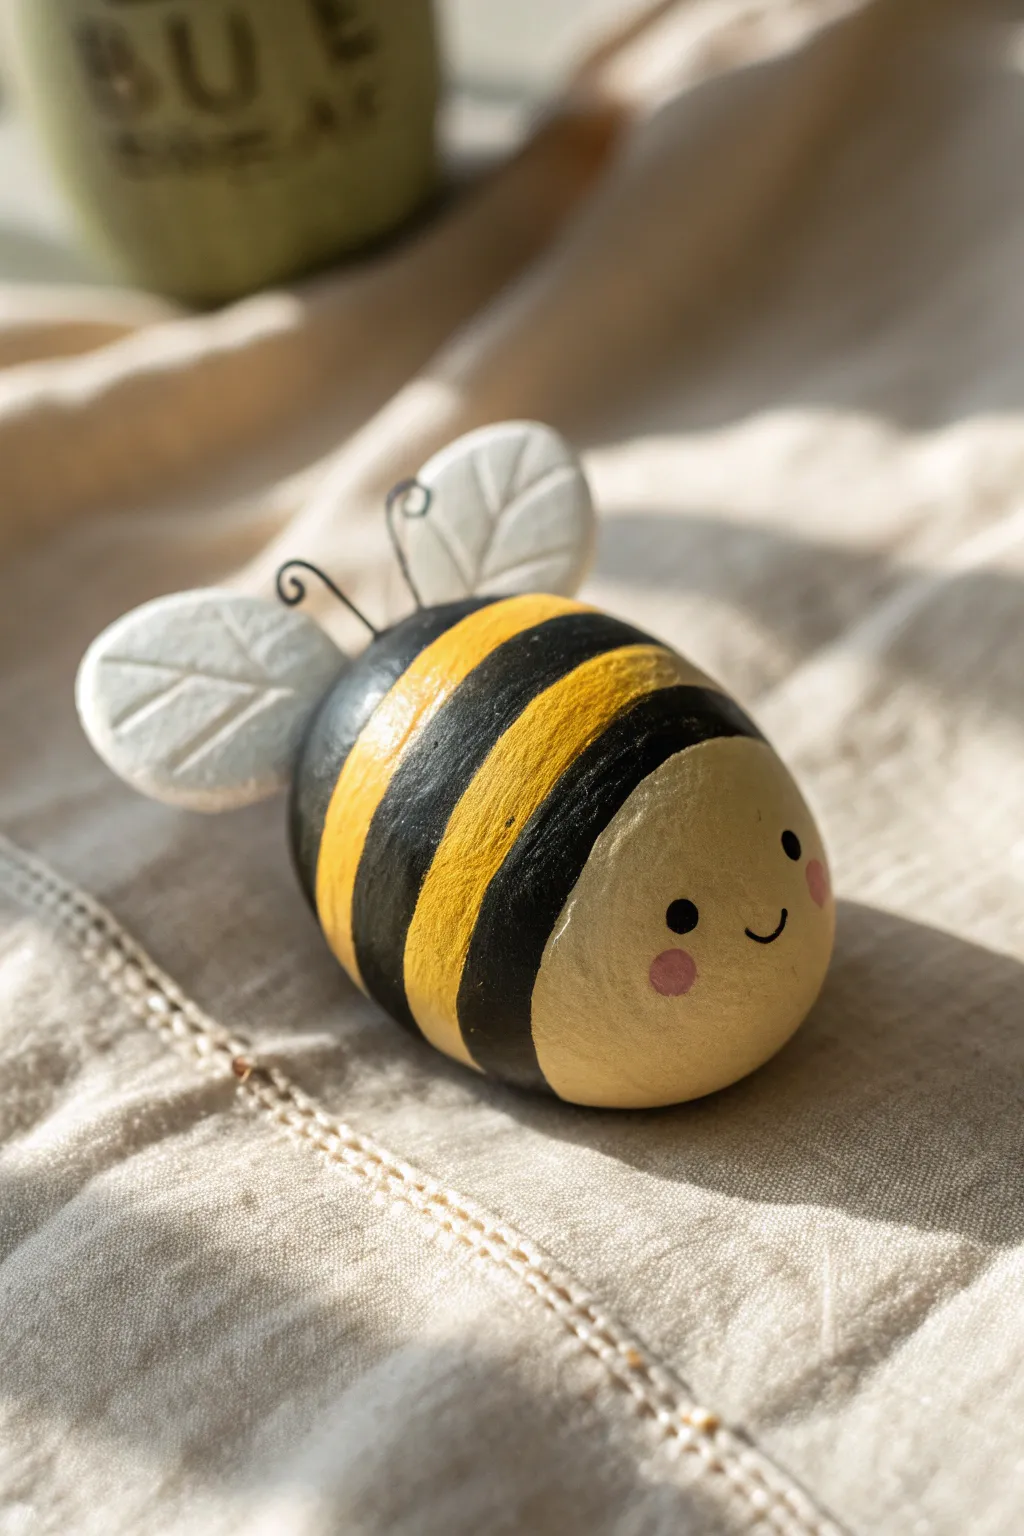
This charming bumblebee brings a touch of summer whimsy to any desk or shelf with its smooth, rounded body and delicately etched wings. It’s a wonderfully beginner-friendly project that focuses on simple shapes and bold, high-contrast painting to create a friendly little character.
Detailed Instructions
Materials
- Air-dry clay or polymer clay (white or neutral color)
- Acrylic paints: Bright yellow, warm black, white, and soft pink
- Paintbrushes: Medium flat brush and a fine detail liner brush
- Thin crafting wire (black or silver)
- Clay sculpting tools (specifically a small knife tool for etching)
- Water cup and paper towels
- Clear matte varnish (optional)
- Wire cutters
- Super glue or strong craft glue
Step 1: Shaping the Base
-
Roll the main body:
Start with a lump of clay about the size of a golf ball or a large egg. Roll it firmly between your palms until you have a smooth, crack-free oval shape. This will be the main body of your bee. -
Flatten the bottom:
Gently tap the oval onto your work surface to create a slightly flat bottom. This ensures your bee sits stably without rolling away. -
Create the wings:
Take two smaller balls of clay, roughly grape-sized, and flatten them into teardrop or leaf shapes. I find pressing them down with the pad of my thumb creates a nice, organic taper. -
Etch wing details:
Using a clay knife or a toothpick, gently press ‘vein’ lines into the wings. Draw one straight line down the center, then angle smaller lines outward from it to resemble leaf veins. -
Insert feeler holes:
Before the clay hardens, use a scrap piece of wire to poke two small holes near the front top of the body where the antennae will eventually go. -
Initial Drying:
Let your clay pieces dry completely according to the package instructions. Air-dry clay may take 24-48 hours, while polymer needs baking.
Smooth Operator
To get that perfectly smooth finish on air-dry clay, dip your finger in water and gently rub away any cracks or seams before setting it aside to dry.
Step 2: Painting the Details
-
Base coat the face:
Paint the front third of the oval body with a pale, creamy yellow. This lighter shade distinguishes the face from the brighter body stripes. -
Paint the body yellow:
Paint the rest of the body with your brighter primary yellow. Don’t worry about being messy near the middle; we will cover the transitions with black stripes. -
Add the stripes:
Once the yellow is dry to the touch, use a flat brush to paint two wide, curved black stripes around the body. Leave a generous gap of yellow between them. -
Paint the rear:
Paint the very back end of the bee with solid black to match the stripes. -
Color the wings:
Paint the hardened clay wings entirely white. You may need two coats to get a crisp, opaque finish. -
Add facial features:
Using a very fine detail brush or a dotting tool, dab two small black dots for eyes. Add a tiny, curved smile between them. -
Rosy cheeks:
Mix a tiny amount of pink with white paint. Apply two soft, circular blushes on the cheeks, just below and outside the eyes.
Step 3: Assembly and Finish
-
Prepare the antennae:
Cut two pieces of wire, roughly 1.5 inches long. Use needle-nose pliers (or your fingers) to curl one end of each wire into a small spiral. -
Attach the antennae:
Dip the straight ends of the wire into a dab of super glue and insert them firmly into the pre-made holes on the head. -
Attach the wings:
Apply strong glue to the pointed end of each wing. Press them onto the back of the bee, positioning them on the first yellow stripe section behind the head. -
Seal the work:
To protect the paint from chipping, brush a thin layer of matte varnish over the entire clay surface once everything is fully cured.
Wobbly Wings?
If the wings slide off while the glue sets, use a small lump of poster putty or folded masking tape to prop them up at the correct angle until dry.
Your cheerful little bumblebee is now ready to buzz around your workspace