If you love handbuilding, a slab-built mug is basically the perfect little canvas: quick to shape, endlessly customizable, and full of personality. I’m sharing my favorite slab mug ideas—from classic forms and clean seams to bold textures and playful add-ons.
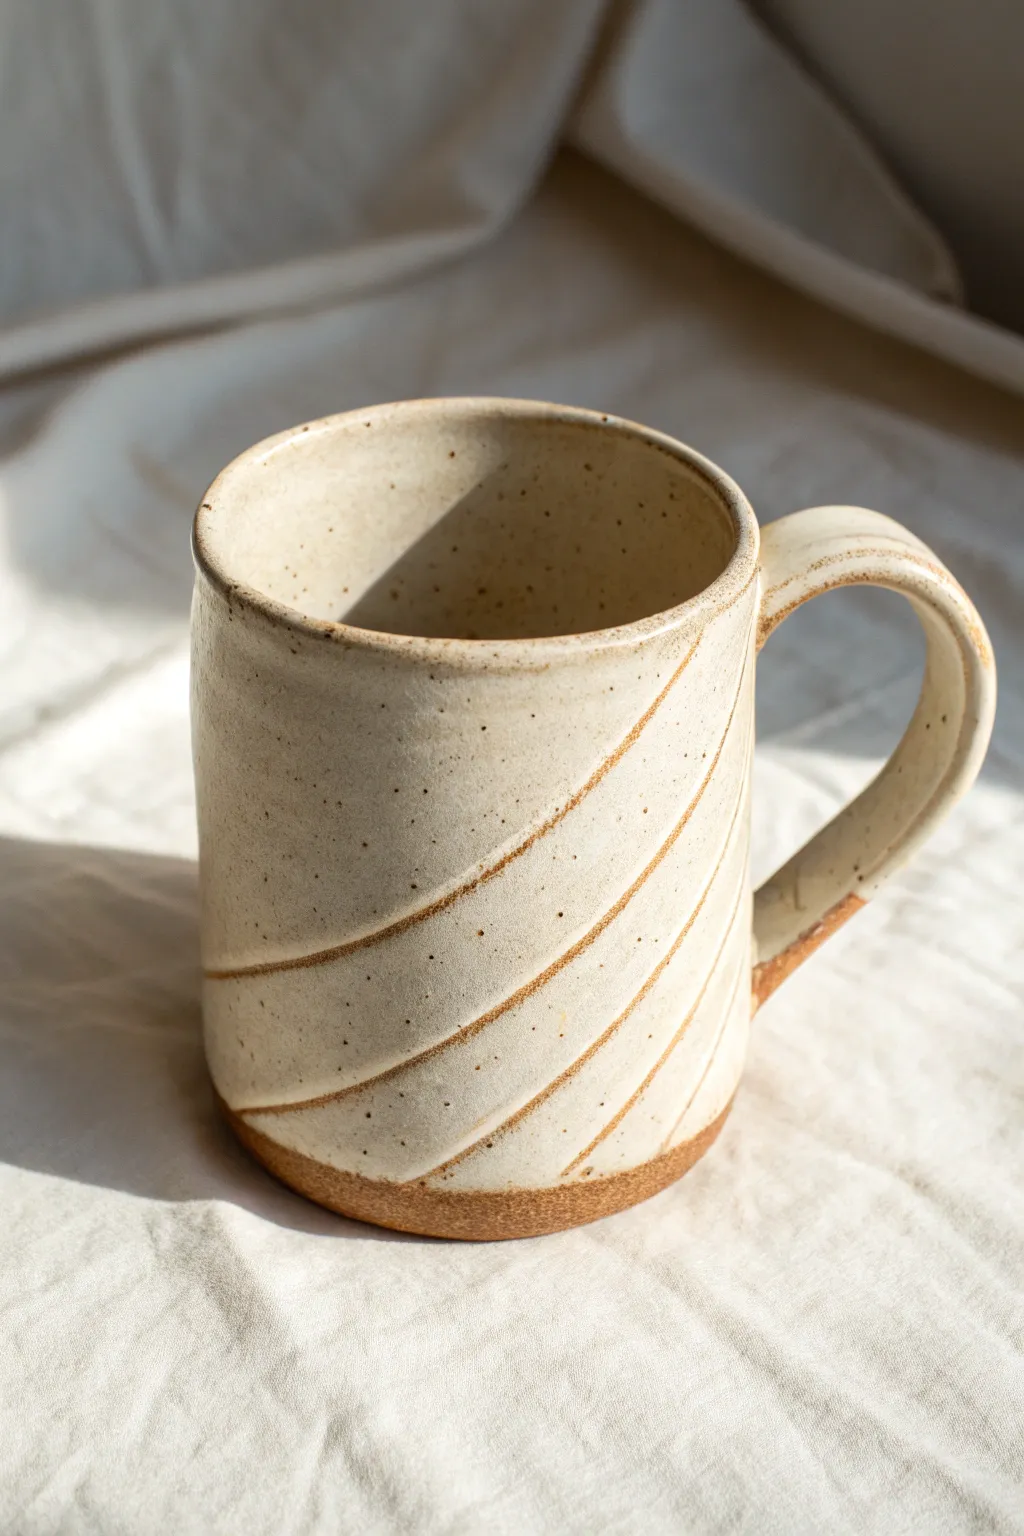
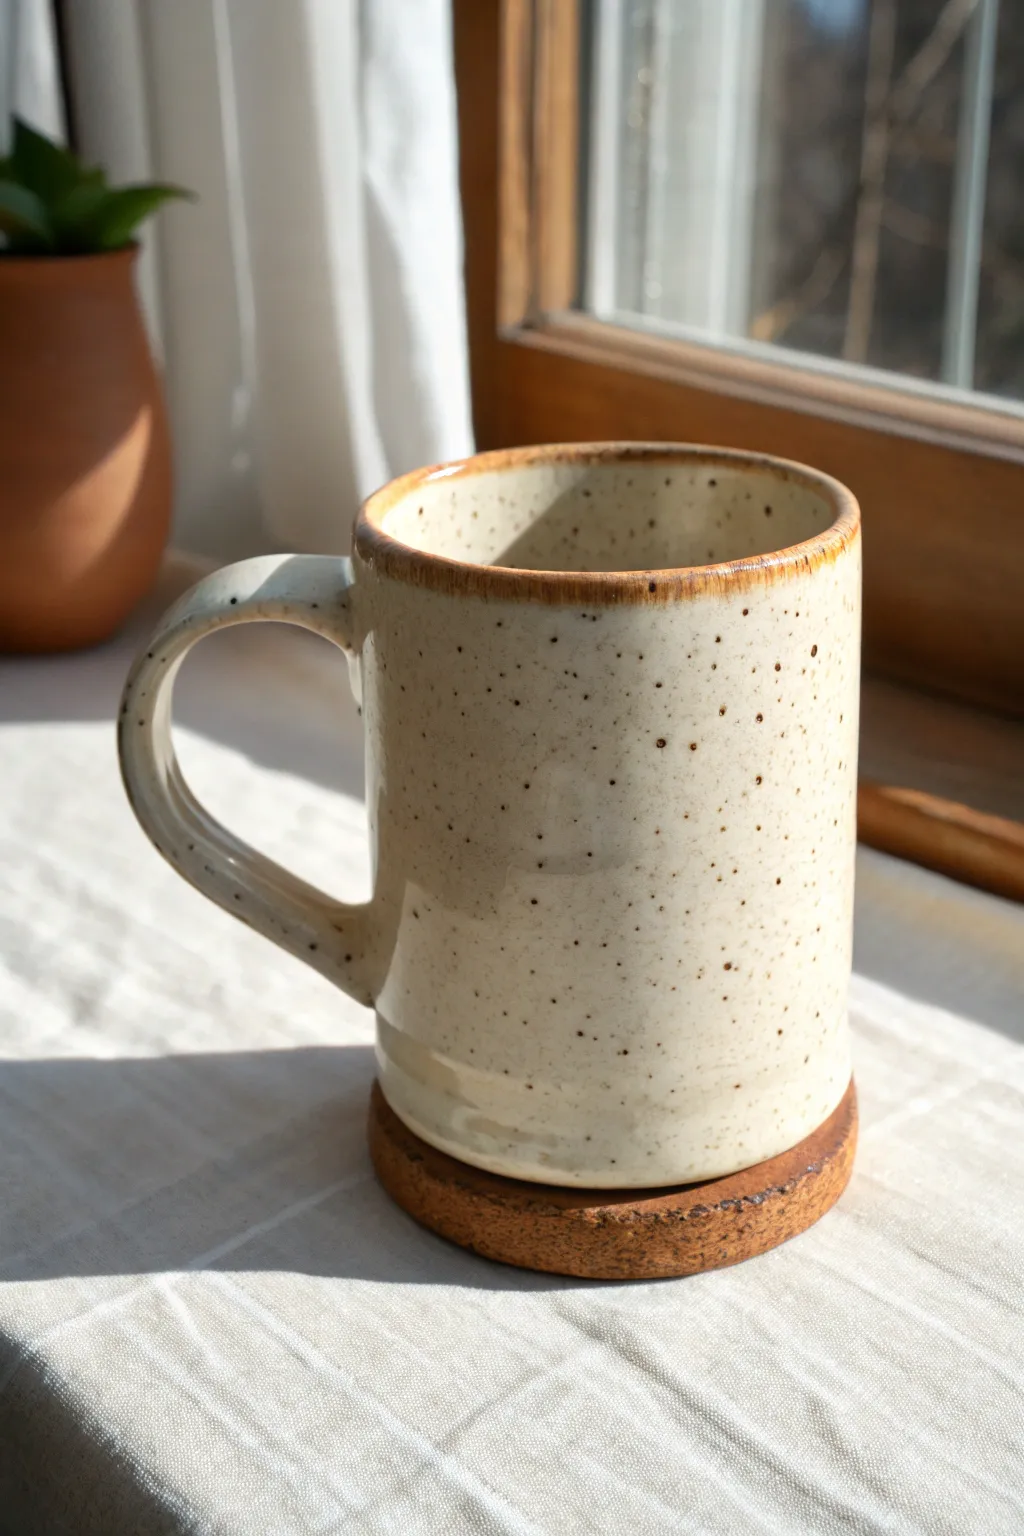
Classic Wrapped Cylinder With a Clean Hidden Seam

This project features a perfectly cylindrical slab-built mug that balances a modern silhouette with an organic, earthy finish. The soft mint glaze breaks beautifully over the rim to reveal the warm clay body beneath, while subtle speckling adds depth to the surface.
Detailed Instructions
Materials
- Stoneware clay (speckled or buff works best)
- Rolling pin
- Canvas or slab mat
- Guide sticks (approx 1/4 inch thickness)
- Fettling knife
- Scoring tool (serrated rib or needle tool)
- Slip (clay mixed with water)
- Wooden modeling tool
- Rubber kidney rib (soft)
- Rectangle paper template (approx 10″ x 4.5″)
- Sponge
- Mint green stoneware glaze
- Clear or transparent glaze (optional)
Step 1: Forming the Cylinder
-
Roll the Slab:
Begin by wedging your clay to remove air bubbles. Lay it on your canvas between two guide sticks. Roll the clay out until the rolling pin rests flatly on the sticks, ensuring an even thickness across the entire slab. -
Compress Surface:
Take a rubber kidney rib and firmly engage the clay surface. Drag the rib across the slab in multiple directions. This compression aligns the clay particles, preventing cracking later and creating that smooth canvas for the glaze. -
Cut the Shape:
Place your rectangular paper template onto the slab. Using a fettling knife held vertically, cut around the template. Save the excess clay for the handle and base. -
Bevel the Edges:
For a seamless join, you need to bevel the short ends of your rectangle. Cut one short end at a 45-degree angle facing up, and the opposite short end at a 45-degree angle facing down. -
Score and Slip:
Rough up the beveled surfaces with your scoring tool until they look like shredded wheat. Apply a generous amount of slip to both scored areas. -
Create the Cylinder:
Carefully lift the slab and curl it into a cylinder, overlapping the beveled edges. The two 45-degree cuts should mate perfectly, creating a wall of uniform thickness without a bulky bump. -
Seal the Seam:
Support the wall from the inside with one hand. With the other, use a wooden tool to blend the clay across the seam line on the outside. Repeat this process on the interior seam.
Step 2: Attaching the Base and Handle
-
Cut the Floor:
Roll a small piece of scrap clay to the same thickness as your walls. Place your cylinder on top and trace a circle slightly larger than the cylinder’s diameter. -
Attach Base:
Score and slip the bottom edge of the cylinder and the outer rim of the circular base. Press the cylinder firmly onto the base. Blend the excess clay from the base up into the wall using a wooden tool or your thumb. -
Pull a Handle:
While many slab mugs use slab handles, a pulled handle offers a more comfortable grip. Pull a strap of clay using wet hands until it tapers nicely, then curve it into a ‘C’ shape and let it stiffen for 30 minutes. -
Attach Handle:
Hold the handle up to the mug to check proportions. Score and slip the attachment points on both the mug and handle. Press firmly to attach, blending the clay where the handle meets the body for a seamless transition. -
Smooth Everything:
Once the mug is leather hard, use a damp sponge to smooth the rim and any sharp edges. I like to run my finger over the rim to ensure it feels soft against the lips.
Use a Rolling Guide
If you don’t have guide sticks, stack two paint stirrers on either side of your clay. This hack guarantees perfectly even walls every time.
Step 3: Glazing and Finishing
-
Bisque Fire:
Allow the mug to dry slowly and completely before bisque firing it to cone 04 (or your clay body’s specifications). -
Wax the Foot:
Apply wax resist to the bottom of the mug and slightly up the side (about 1/4 inch) to create a clean line and prevent the glaze from sticking to the kiln shelf. -
Dip Glaze:
Stir your mint green glaze thoroughly. Holding the mug by the foot (or using tongs), dip the entire piece into the bucket for 3 seconds. Lift it out and shake gently to remove drips. -
Rim Detail:
For the effect shown in the image, wipe the very edge of the rim with a damp sponge. This thins the glaze slightly, allowing the toasty brown clay color to burn through during firing. -
Final Fire:
Glaze fire the piece to cone 6 (oxidation). The heat will cause the speckles in the clay (or glaze) to bloom and the mint color to develop that glossy, fluid finish.
Mix Up The Finish
Try layering a runny white glaze over just the top inch of the rim. It will flux with the mint base and create beautiful drips.
Enjoy your morning coffee in a custom piece that feels both modern and handmade


Soft-Square Slab Mug for a Modern Look

This mug balances modern geometry with organic warmth, featuring a gently rounded square form that feels comfortable in the hands. The speckled creamy glaze highlights the simple silhouette, making it a perfect everyday vessel for your morning coffee.
Step-by-Step Guide
Materials
- Speckled buff stoneware clay
- Rolling pin
- Canvas or slab mat
- Rectangle paper template (approx. 12 x 5 inches)
- Square paper template (approx. 3.5 x 3.5 inches with rounded corners)
- Fettling knife
- Serrated rib or scoring tool
- Slip or vinegar
- Wooden modeling tool
- Soft sponge
- Surform tool (optional)
- Clear or semi-transparent cream matte glaze
Step 1: Preparing the Slabs
-
Roll the clay:
Begin by rolling out your speckled buff clay on a piece of canvas until it is a uniform slab, approximately 1/4 inch thick. Compress the clay on both sides with a rubber rib to align the particles and prevent warping later. -
Cut the body:
Lay your long rectangular template onto the slab. Using a fettling knife held perpendicular to the table, cut around the template to create the main body wall of the mug. -
bevel the edges:
On the two short ends of your rectangle, cut a 45-degree angle bevel on opposite sides (one bevel facing up, one facing down). This creates a stronger, seamless overlap joint. -
Cut the base:
Use your rounded-square template to cut the base of the mug from the remaining slab. Set both pieces aside on a ware board until they reach a soft leather-hard state—firm enough to stand up, but flexible enough to bend without cracking.
Step 2: Assembling the Form
-
Form the cylinder:
Take the rectangular slab and gently curve it into a cylinder, bringing the beveled edges together. I like to score these edges aggressively and add a generous amount of slip before pressing them firmly together. -
Reinforce the seam:
Use a wooden tool or your thumb to smooth the clay across the seam on both the inside and outside, erasing the joy line completely. Support the wall from the opposite side while you work. -
Shape the square:
Gently manipulate the cylinder into a soft square shape by pressing outwards from the inside with your hand, matching the curve of your base template. The corners should be rounded, not sharp. -
Attach the base:
Score the bottom edge of your wall and the perimeter of your base slab. Apply slip, then place the wall onto the base. Press down firmly to adhere. -
Blend the bottom:
Use a wooden modeling tool to drag clay from the base up onto the wall to seal the connection. Smooth this area with a damp sponge so the transition is seamless.
Seam Success
When joining the wall seam, offset it slightly from a corner. Placing the seam in the middle of a flat side makes it easier to compress and hide completely.
Step 3: Handle and Refining
-
Pull a handle:
From a small lug of clay, pull a strip for the handle using plenty of water. Aim for a slightly flattened oval cross-section that complements the mug’s modern lines. -
Shape the handle:
Curve the pulled strip into a ‘C’ shape and let it stiffen slightly on your work table until it holds its form but is still tacky. -
Attach handle:
Score and slip the attachment points on the mug body and the handle ends. Press the handle firmly onto the mug, ensuring it is vertically straight and centered on one of the flat sides of the square. -
Clean up connections:
Use a small intricate damp sponge or a soft brush to wipe away excess slip around the handle joints. Smooth the rim of the mug with a chamois or piece of plastic bag to ensure it is comfortable for drinking. -
Refine the rim:
Double-check that the rim maintains that soft-square shape. If it has distorted during handling, gently push it back into square alignment.
Rim Variation
For a more organic look, gently undulating the rim with your finger creates a ‘wavy’ top edge that contrasts beautifully with the square geometric base structure.
Step 4: Glazing and Finishing
-
Bisque fire:
Allow the mug to dry slowly and evenly, loosely covered with plastic for the first day, before bisque firing to cone 04 (or your clay’s specific temperature). -
Wax the foot:
Apply wax resist to the bottom of the mug and up the side about 1/16th of an inch. This ensures a clean line where the glaze ends. -
Apply glaze:
Pour a creamy semi-matte glaze into the interior, coat evenly, and pour out. Dip the exterior into the same glaze for a uniform look. -
Glaze fire:
Fire the mug to maturity (likely Cone 5 or 6 for stoneware). The heat will interact with the iron speckles in the clay body, causing them to bleed through the cream glaze for that signature speckled finish.
Once cooled, your soft-square mug is ready to bring a touch of modern elegance to your beverage routine


Faceted Slab Mug With Clean Planes
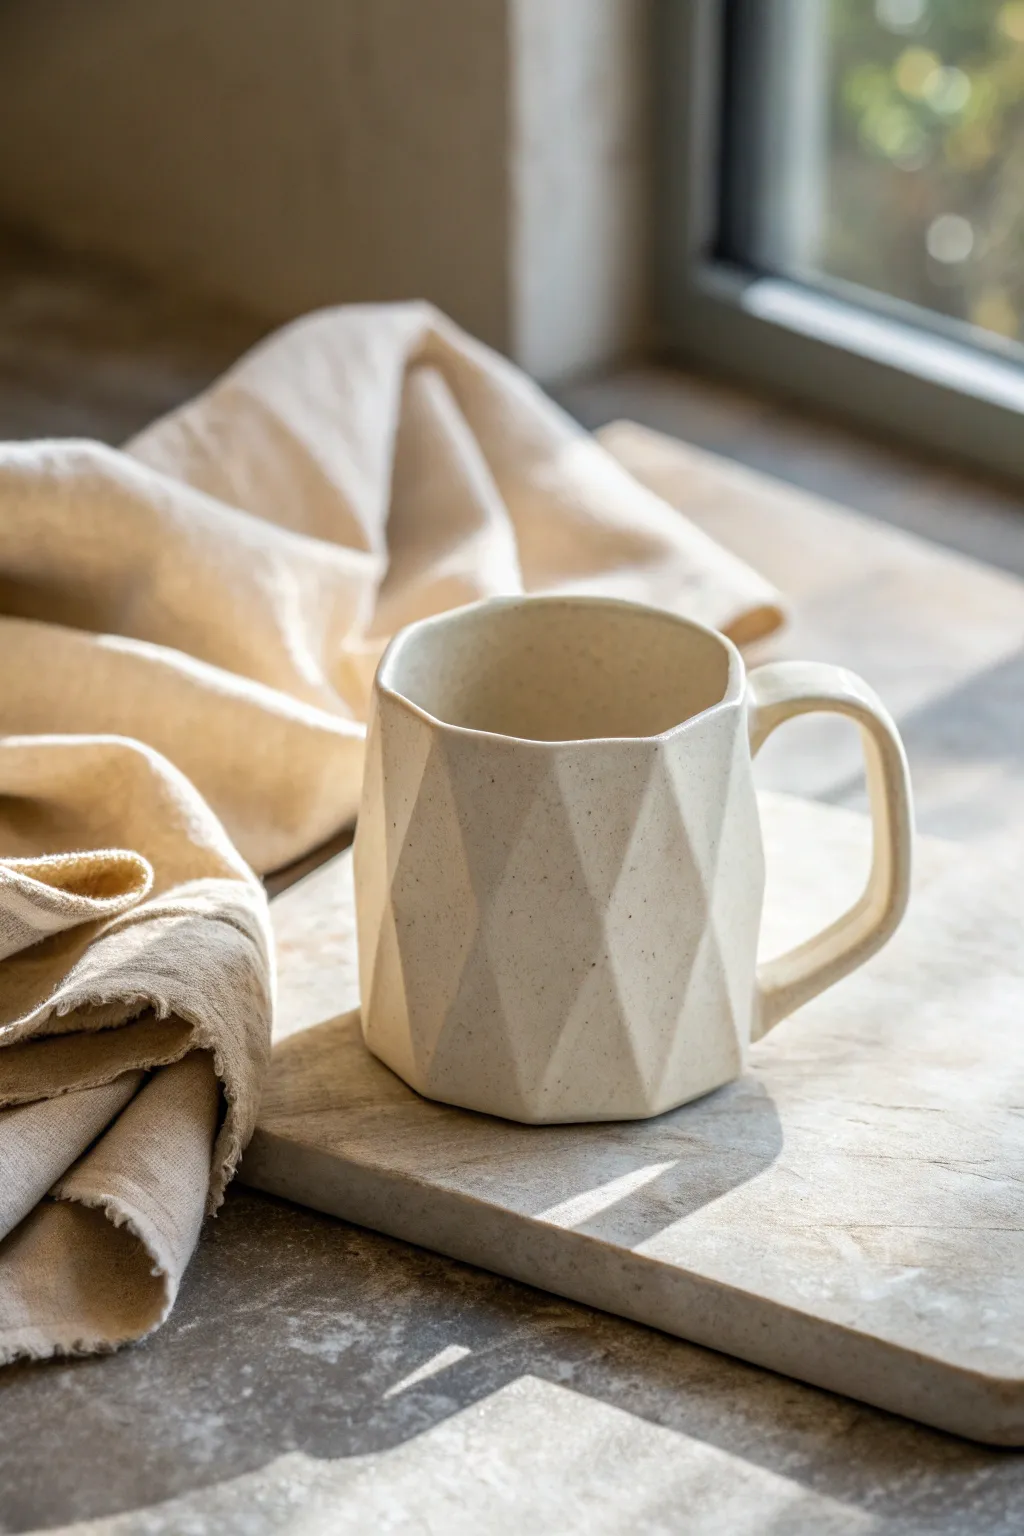
This striking mug combines the organic warmth of speckled clay with sharp, contemporary geometry. By faceting a thick slab cylinder, you’ll create a tactile drinking vessel where light plays beautifully across the angular planes.
Step-by-Step Tutorial
Materials
- Speckled cream stoneware clay
- Rolling pin with 1/4 inch and 3/8 inch guide strips
- Fettling knife or X-Acto blade
- Wire clay cutter
- Scoring tool (serrated rib or needle tool)
- Slip (clay mixed with water)
- Sure-form tool or rasp
- Straight edge or ruler
- Sponge
- Clear or satin matte white glaze (translucent)
Step 1: Forming the Cylinder
-
Roll the primary slab:
Begin by rolling out a substantial slab of speckled stoneware clay. Unlike standard mugs, you want this slab thicker—around 3/8 to 1/2 inch thick—to allow depth for carving the facets later without cutting through the wall. -
Cut the template:
Using a ruler and fettling knife, cut a rectangle approximately 5 inches tall by 10-11 inches long. Be sure to cut the short edges at a 45-degree angle to create beveled seams that will join invisibly. -
Texture the slab (optional):
If you want the subtle speckle to be the main texture, leave the surface smooth. Smooth it over with a soft rib to compress the clay grid. -
Form the tube:
Stand the slab up and curve it gently into a cylinder. Score the beveled edges aggressively and apply a generous amount of slip. Press the edges together firmly to create a bond. -
Reinforce the seam:
Use a thin wooden tool or your finger to smooth the seam on the inside. Roll a tiny coil of clay and press it into the interior corner of the seam for extra security, blending it until it vanishes.
Fixing Drag Marks
If your knife drags and tears the clay while faceting, the clay is too wet or your blade is dull. Change blades or wait 30 mins for the clay to firm up.
Step 2: Adding the Base
-
Prepare the base slab:
Roll a second piece of clay slightly thinner, about 1/4 inch thick. Place your cylinder on top of it and trace lightly around the perimeter. -
Attach the bottom:
Score and slip both the bottom edge of the cylinder and the marked area on the slab. Press the cylinder down onto the base firmly. I like to give it a little wiggle to ensure the slip grabs. -
Trim the excess:
Cut away the excess clay from the base slab, flush with the cylinder wall. Blend the clay upward from the base into the wall so the connection is seamless.
Step 3: Faceting the Surface
-
Stiffen the clay:
This is crucial: Let the cylinder dry to a flexible leather-hard state. If it’s too soft, the walls will collapse when you cut; too dry, and it will chip. -
Map your cuts:
Using the wire cutter or a very sharp fettling knife, plan your geometric cuts. You want triangular and diamond shapes that interlock. -
Execute the facets:
Slice downwards in confident, straight strokes to shave off planes of clay. Vary the angles slightly—cut deeper in the middle of a facet and shallower at the edges to create the diamond topography. -
Refine the rim:
Leave the top 1/2 inch of the rim mostly round for comfortable sipping. You can lightly facet the exterior rim, but ensure the lip remains uniform. -
Smooth the edges:
Once carved, run a barely damp sponge over the sharp ridges. You want to soften the “knife edge” just enough so it feels pleasant in the hand, but keep the visual crispness.
Accentuate the Planes
Try a glaze that “breaks” over edges. These glazes thin out on sharp corners, revealing the darker speckled clay body underneath and highlighting exactly where you carved.
Step 4: The Geometric Handle
-
Pull or cut the handle strip:
Cut a thick strip of clay, roughly 5/8 inch square. Tap it on the table to square off the edges, keeping that angular aesthetic matching the body. -
Shape the ear:
Bend the strip into a rectangular ‘ear’ shape, rather than a round loop. The corners of the handle should mirror the sharp angles of the mug body. -
Attach firmly:
Score and slip the contact points. Attach the top of the handle near the rim and the bottom near the base. Use a small tool to blend the clay around the connection points securely. -
Dry slowly:
Cover the mug loosely with plastic. Because the walls vary in thickness due to the faceting, slow drying prevents cracking.
Step 5: Finishing
-
Bisque fire:
Fire the bone-dry mug to cone 04 (or your clay body’s bisque temperature) to prepare it for glazing. -
Glaze application:
Dip or brush on a semi-opaque cream or white glaze. A satin finish works best here; high gloss can obscure the facets, but a satin matte catches the light on each plane beautifully. -
Final wipe:
Wipe the foot / bottom of the mug clean with a sponge to prevent it sticking to the kiln shelf. -
Glaze fire:
Fire to the maturation temperature of your clay and glaze (typically cone 5 or 6 for stoneware).
Enjoy your morning coffee in a vessel that feels as good to hold as it looks.


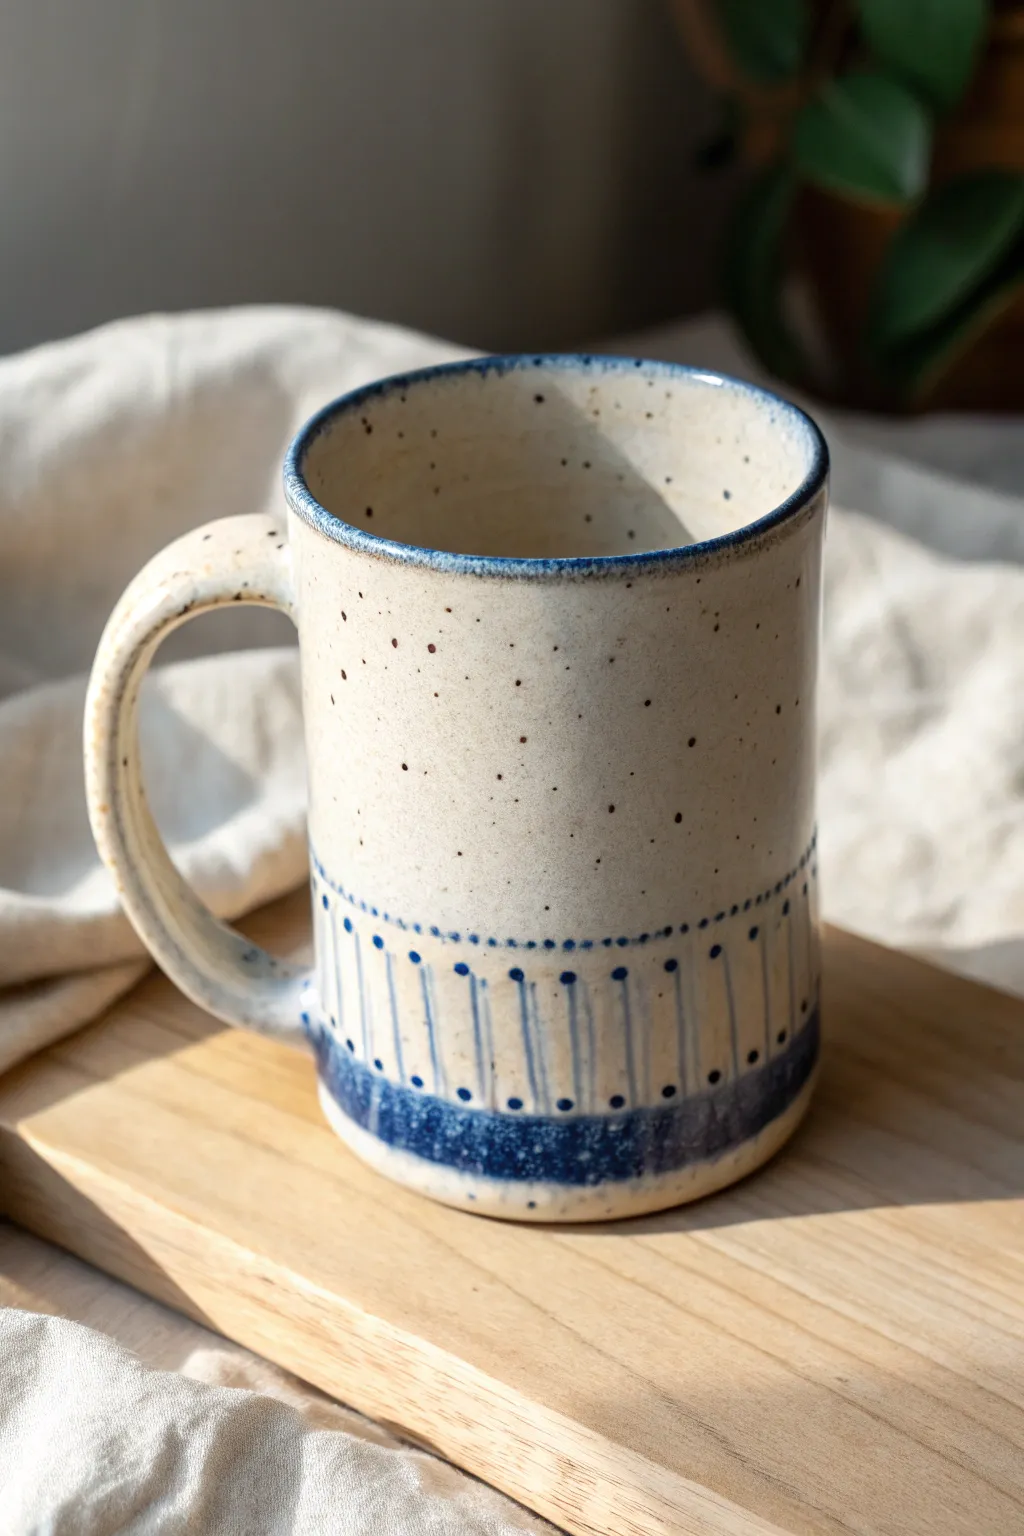
Tall Slab Mug With a Comfortable Taper
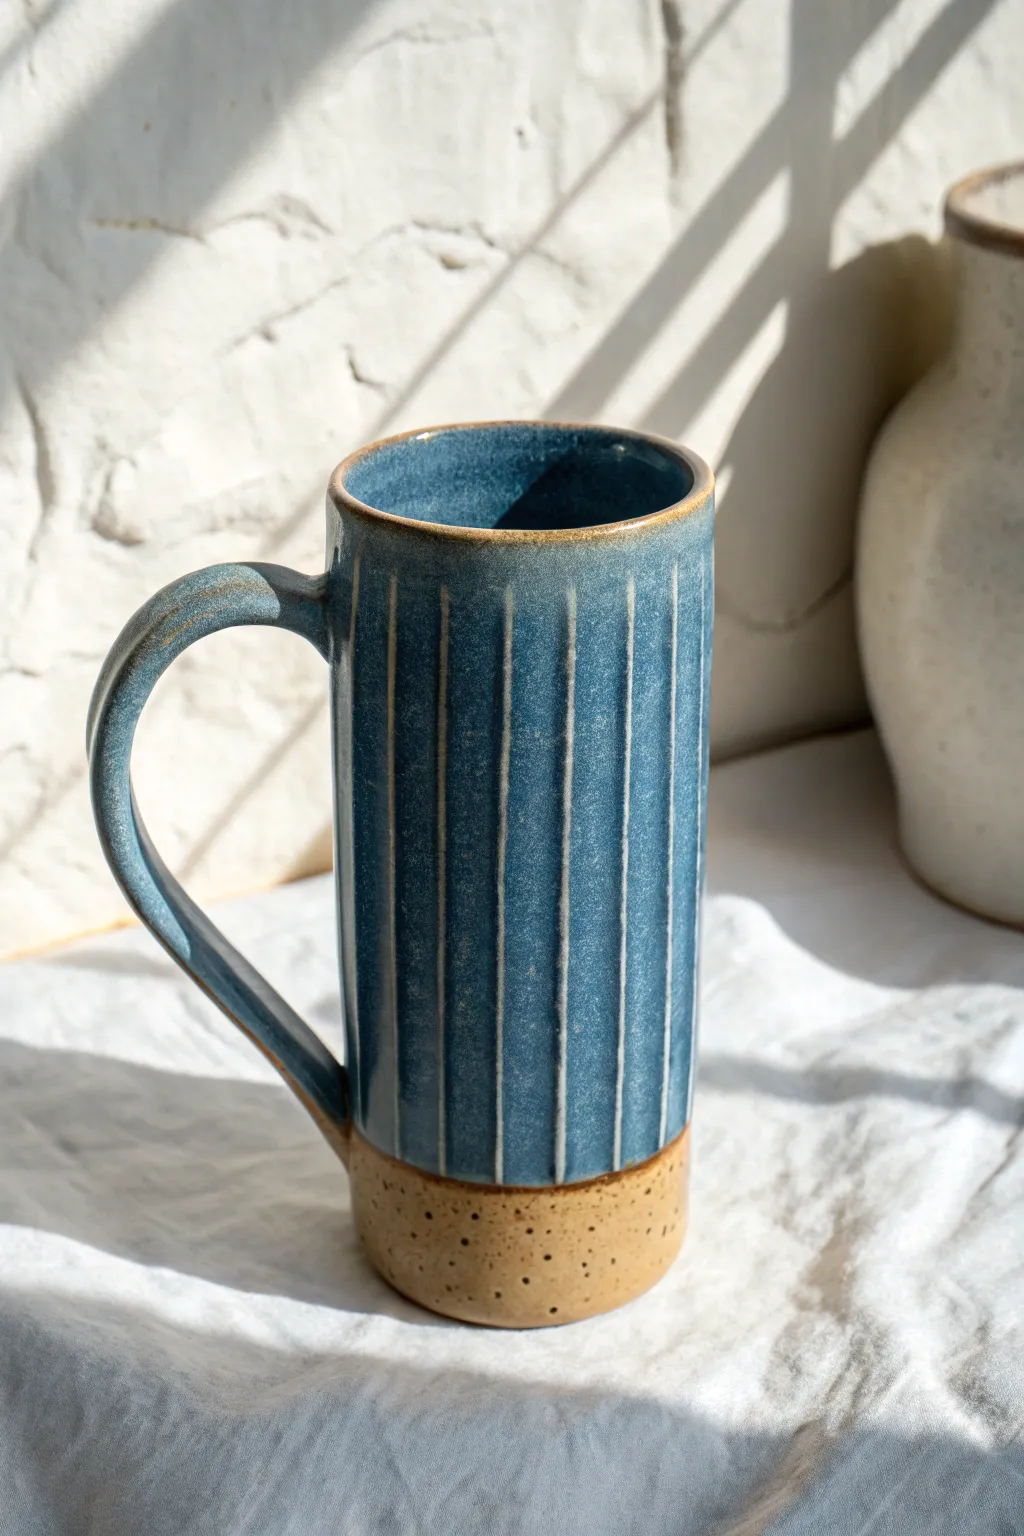
This elegant, tall mug combines a rustic, speckled clay base with a sophisticated blue glaze featuring crisp vertical pinstripes. Its elongated form is perfect for a large morning coffee, while the bare clay bottom adds a lovely textural contrast.
Detailed Instructions
Materials
- Speckled stoneware clay
- Rolling pin
- Canvas or slab mat
- Fettling knife or needle tool
- Ruler or straight edge
- Slip and scoring tool (or serrated rib)
- Wooden spoon or dowel (for handle)
- Sponge
- Carving tool (small loop or sgraffito tool)
- Wax resist (optional)
- Blue stoneware glaze (glossy/semi-opaque)
- White or light slip (optional, for inlay)
Step 1: Creating the Slab Base
-
Roll the slab:
Start by wedging your speckled stoneware clay to remove air bubbles. Roll it out into a consistent slab about 1/4 inch thick. Compress the slab on both sides with a rib to align the clay particles, which helps prevent warping later. -
Cut the body template:
Using a ruler and fettling knife, cut a large rectangle for the body of the mug. For a tall mug like this, aim for a rectangle approximately 6 inches high by 10-11 inches long (depending on your desired diameter). -
Cut the base:
Use a circular cutter or a template to cut a round base from the same slab. Make sure the circumference of this circle matches the length of your rectangle. -
Texture preparation:
Before assembling, create the vertical groove texture. Use a ruler as a guide and a carving tool to gently press or carve vertical straight lines into the flat slab. Space them evenly. Alternatively, you can carve these after assembly for a more organic feel, which I often prefer to ensure the lines stay straight on the curve.
Pro Tip: Better Seams
When joining the vertical seam, use a wooden paddle to gently tap the outside of the join while supporting the inside. This helps fully integrate the clay particles for a crack-free seam.
Step 2: Assembly
-
Bevel the edges:
Cut 45-degree angles on the short vertical ends of your rectangular slab. This will create a cleaner, stronger seam when you roll it into a cylinder. -
Form the cylinder:
Stand the rectangle up and curve it into a cylinder. Score and slip the beveled edges thoroughly. Press them together firmly to create a seal, supporting the wall from the inside with one hand. -
Attach the base:
Score and slip the bottom edge of your cylinder and the outer edge of your circular base. Place the cylinder onto the base. Use a modeling tool to blend the clay from the base up onto the wall to seal the join seamlessly. -
Refine the seam:
Smooth out the vertical seam on the cylinder using a rib or sponge. If you carved your lines earlier, touch them up where the seam joins. If not, carve your vertical pinstripes now, stopping about 1.5 inches from the bottom to leave space for the unglazed foot. -
Clean the rim:
Use a damp sponge or a piece of chamois leather to smooth and round the rim of the mug. A pleasant drinking experience depends heavily on a comfortable rim.
Step 3: Handle and Finishing
-
Pull a strap:
Roll a coil or cut a strip from your remaining slab for the handle. If using a strip, soften the edges with a wet sponge. The handle should be long and elegant to match the mug’s height. -
Shape the handle:
Bend the strip into a large ‘C’ shape or ear shape. Allow it to firm up slightly until it holds its curve but is still flexible enough to attach. -
Attach the handle:
Score and slip the attachment points on the mug and the handle ends. Attach the top of the handle near the rim and the bottom about 2 inches up from the base. Reinforce the joins with small coils of clay if needed and smooth everything out. -
Reveal the grain:
Once the mug is leather hard, you can wipe the bottom un-carved section with a slightly damp sponge to expose more of the grog or speckles in the clay body. -
Bisque fire:
Let the mug dry slowly under loose plastic to prevent the handle from cracking. Once bone dry, bisque fire it to cone 04 (or your clay’s specific bisque temperature).
Troubleshooting: Warped Rim
If your cylinder goes oval during handling, wait until the clay is leather hard. Gently squeeze it back into a perfect circle. You can also dry it upside down to help keep the rim round.
Step 4: Glazing
-
Wax the foot:
Apply wax resist to the bottom 1.5 inches of the mug, covering the un-carved area and the bottom of the base. This ensures a clean line where the glaze stops. -
Glaze application:
Pour a blue stoneware glaze into the mug, swirl to coat the inside, and pour it out. Then, dip the outside of the mug into the glaze, holding it by the foot (or using tongs). The wax will resist the glaze at the bottom. -
Highlight the stripes:
The glaze naturally breaks over sharp edges. Because we carved grooves, the glaze will pool slightly in the recesses and thin out on the ridges, creating that beautiful stripe effect. If you want white stripes, you could have inlaid white slip into the grooves before bisque firing. -
Clean up:
Use a damp sponge to wipe away any droplets of glaze that may have beaded up on the waxed area. The line between glaze and bare clay should be crisp. -
Final firing:
Fire the mug to maturity (typically Cone 5 or 6 for stoneware). Let the kiln cool completely before unloading to avoid thermal shock.
Enjoy your morning brew in this sleek, handmade vessel that feels as good in the hand as it looks on the table

The Complete Guide to Pottery Troubleshooting
Uncover the most common ceramic mistakes—from cracking clay to failed glazes—and learn how to fix them fast.
Rustic Wood-Grain Slab Mug With Warm Glaze Breaks

Embrace the natural warmth of clay with this slab-built mug featuring carved vertical textures that mimic raw wood grain. The deep glaze breaks beautifully over the incisions, highlighting the rich, earthy tones of the speckled clay body.
Detailed Instructions
Materials
- Speckled stoneware clay (mid-fire)
- Rolling pin
- Canvas mat or slab roller
- Needle tool
- Flexible metal rib
- Serrated rib (scoring tool)
- Slip
- Carving tool (small loop or v-tip)
- Sponge
- Warm amber/honey glaze (translucent)
- Clear glaze (optional for liner)
Step 1: Creating the Slab Body
-
Roll the slab:
Begin by rolling out a consistent slab of speckled stoneware clay to approximately 1/4 inch thickness. Use a canvas mat to prevent sticking and wooden guide strips if rolling by hand to ensure an even surface. -
Compress the clay:
Smooth both sides of your slab firmly with a flexible metal rib. This step is crucial not just for texture, but to align the clay particles and prevent warping later in the kiln. -
Cut the template:
Using a rectangular paper template (roughly 12×4 inches depending on your desired shrinkage), cut out the main body of the mug with your needle tool. -
Bevel the edges:
To create a seamless join, cut the short ends of your rectangle at a 45-degree angle. They should slope in opposite directions so they overlap perfectly when the clay is curled into a cylinder. -
Form the cylinder:
Stand the slab up and curl it into a cylinder. Score the beveled edges aggressively with your serrated rib and apply a generous amount of slip. Press the ends together firmly. -
Seal the seam:
Use a wooden modeling tool or your finger to smooth the seam inside and out, blending the clay until the join is invisible. I find it helpful to support the inside wall with one hand while smoothing the outside with the other.
Step 2: Adding the Base and Handle
-
Attach the floor:
Roll a small piece of clay for the base. Place your cylinder on top, trace around it, and then cut slightly outside the line. Score and slip the bottom of the cylinder and the base, then press them together. -
Sculpt the handle:
Pull a strap handle or roll a coil, slightly flattening it to match the rim’s thickness. Aim for a comfortable ‘C’ shape that mimics the organic feel of the mug body. -
Attach the handle:
Score and slip the attachment points on the mug and handle. Press the handle on firmly, blending the clay at the distinct ‘thumb placement’ area at the top join for extra strength. -
Clean up the form:
Once the mug is assembled, smooth out any fingerprints or rough spots on the rim with a damp sponge.
Fixing Sharp Edges
If your carved lines feel sharp after the bisque fire, lightly sand the surface with 400-grit sandpaper before glazing. Always wear a mask while sanding.
Step 3: Carving and Glazing
-
Wait for leather hard:
Allow the mug to dry slowly to a leather-hard state. This is when the clay is firm enough to carve without deforming but soft enough to cut cleanly. -
Carve the texture:
Using a carving tool, cut vertical lines down the body of the mug. Vary the pressure: start deeply near the bottom third and pull upward, letting the line taper off and disappear near the rim. -
Refine the lines:
Don’t make the lines perfectly parallel; allow them to angle slightly to mimic natural wood bark or grain. Leave the bottom inch of the mug uncarved to create a solid ‘foot’ visual. -
Bisque fire:
Once bone dry, fire the mug to cone 04 (or your clay’s specific bisque temperature). -
Wax the foot:
Apply wax resist to the bottom of the mug and slightly up the side wall, leaving the textured raw clay exposed near the base. -
Apply the glaze:
Pour a warm amber or honey-colored glaze into the interior and coat the exterior. This type of semi-transparent glaze will pool darkly in the carved recesses and break thinner and lighter over the high points. -
High fire:
Fire the mug to maturity (likely cone 5 or 6 depending on your clay). The heat will melt the glaze into the texture, creating that rich, toasted effect.
Play with Ash
For an even deeper rustic look, sprinkle a tiny pinch of wood ash on the rim before the final firing to create drippy, unpredictable flux patterns.
Enjoy your morning coffee in a mug that feels as grounded and natural as the earth it came from
Botanical Leaf-Imprint Slab Mug
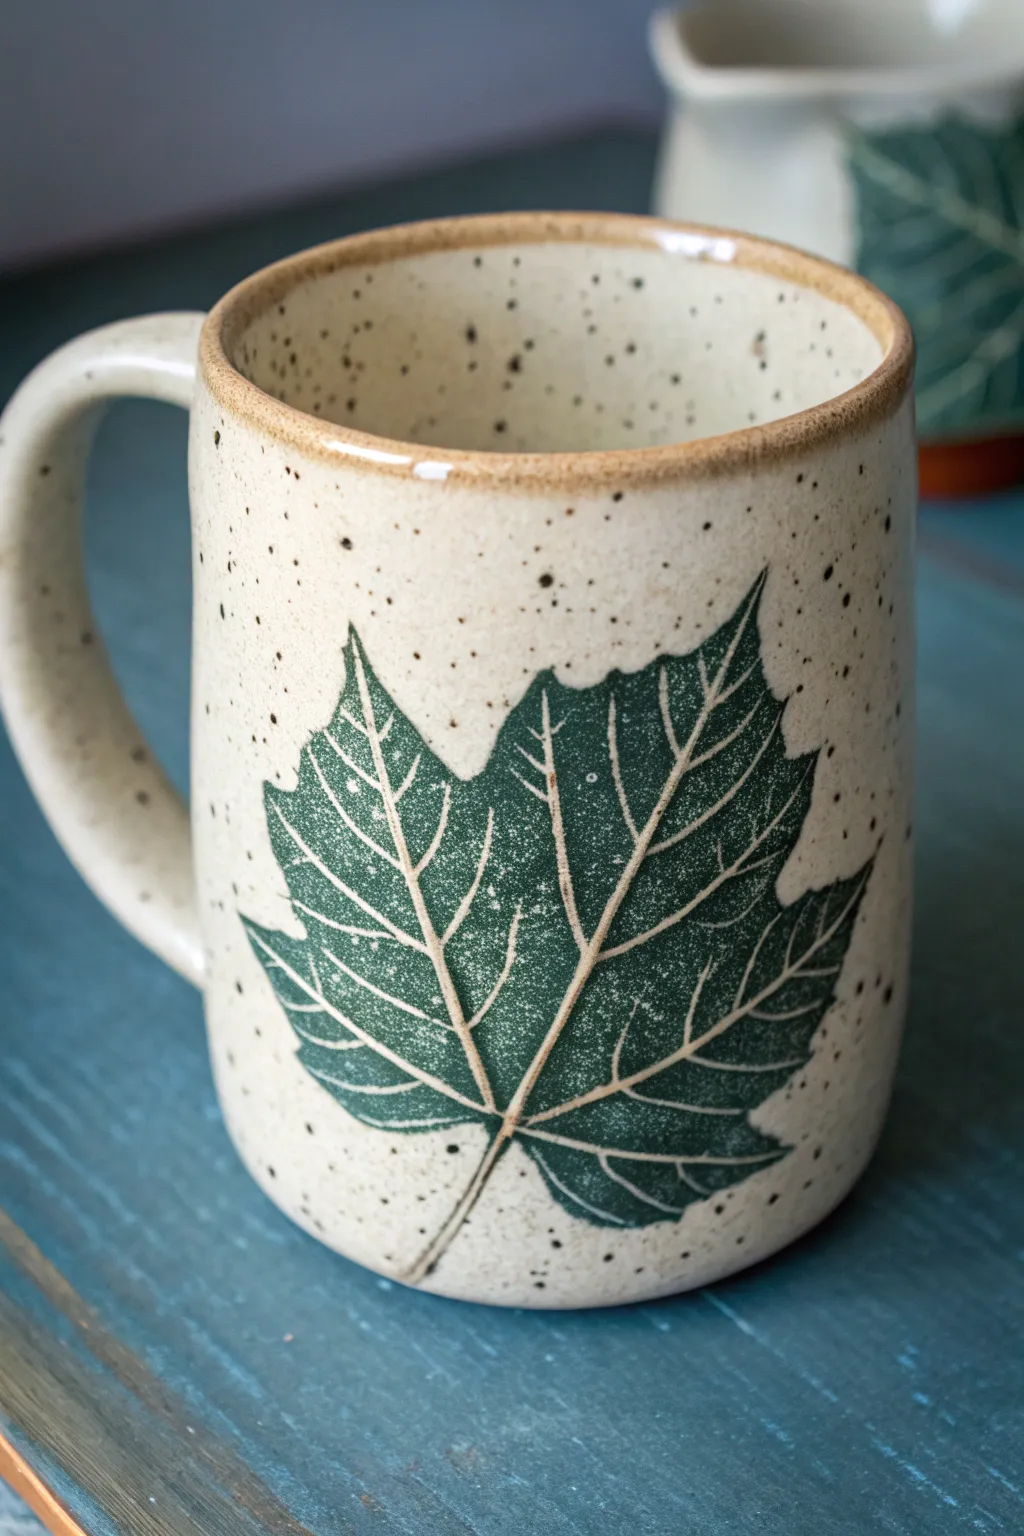
This rustic, nature-inspired mug captures the delicate veins of a real maple leaf against a backdrop of warm, speckled stoneware. The technique relies on pressing fresh foliage directly into soft clay to create a subtle relief that acts as a resist for the striking green underglaze.
Step-by-Step Guide
Materials
- Speckled stoneware clay (mid-fire)
- Fresh maple leaf (or similar distinct leaf)
- Rolling pin and guide sticks (approx. 1/4 inch)
- Needle tool or fettling knife
- Bisque mold or cylindrical form (standard size)
- Serrated rib and scoring tool
- Slip or vinegar
- Green underglaze (dark forest green)
- Wax resist emulsion
- Sponge
- Clear or transparent gloss glaze
- Small stiff paintbrush
Step 1: Slab Preparation & Imprinting
-
Roll out the slab:
Begin by rolling out your speckled stoneware clay into an even slab using ¼ inch guide sticks. Ensure the slab is large enough to wrap around your chosen cylinder mold with a little overlap for the seam. -
Compress the clay:
Use a soft rib to smooth both sides of the slab. This compression aligns the clay particles, preventing future warping and creating a nice canvas for your leaf. -
Position the leaf:
Place your fresh maple leaf vein-side down onto the clay surface. The veins on the back are more prominent and will leave a crisper impression. -
Roll the impression:
Gently roll your rolling pin over the leaf once or twice to press it flush into the clay. Be firm enough to capture the texture but careful not to thin the slab too much. -
Cut the rectangle:
Measure the height and circumference of your mold form. Using a needle tool and a ruler, cut a precise rectangle from the slab, keeping the leaf centered or positioned where you want the design to appear. -
Remove the leaf:
Carefully peel the leaf away using the tip of your needle tool to lift the stem. You should see a ghostly, impressed image of the botanical structure.
Step 2: Construction
-
Form the cylinder:
Wrap the slab around your cylindrical mold or tube. Where the ends meet, cut them at a 45-degree angle (beveled) to increase the surface area for the join. -
Score and slip:
Thoroughly score the beveled edges with your serrated tool and apply a generous amount of slip or vinegar. Press the edges together firmly to create the mug body. -
Reinforce the seam:
Use a wooden tool to blend the clay across the seam on the inside and outside, then smooth it over with a sponge. I find using a small coil on the interior seam adds necessary structural integrity. -
Attach the base:
Roll a small slab for the bottom. Place your cylinder on top, trace around it, cut out the circle, and attach it using the score-and-slip method. Smooth the connection so it looks seamless. -
Pull and attach the handle:
Pull a strap handle from a carrot-shaped lug of clay. Allow it to stiffen slightly into a curve, then attach it to the side of the mug opposite the leaf print. Make sure the placement feels balanced in the hand. -
Smooth the rim:
Use a damp sponge or a chamois cloth to round over the rim of the mug. A sharp rim is unpleasant to drink from, so take extra time here.
Veins disappearing?
If your glaze covers the waxed lines too thickly, the wax might not resist fully. Wipe the leaf area gently with a sponge after dipping to reveal the wax lines again.
Step 3: Decorating & Glazing
-
Bisque fire:
Allow the mug to dry slowly to the bone-dry stage, then bisque fire it to cone 04 (or your clay’s specific bisque temperature). -
Wax the leaf veins:
This is the crucial detailing step. Using a tiny brush and wax resist, carefully paint over the depressed veins and stem of the leaf imprint. The wax will prevent glaze from sticking to these lines. -
Apply underglaze:
Once the wax is dry, paint a rich forest green underglaze over the entire leaf shape. The underglaze will bead up or wipe away easily from the waxed veins, leaving them the color of the raw clay. -
Clean up edges:
If you painted outside the lines of the leaf, use a damp, clean brush or sponge to wipe away excess green underglaze, ensuring the shape stays sharp against the speckled background. -
Clear glaze:
Dip the entire mug into a clear or transparent gloss glaze. This will seal the clay, make it food-safe, and magnify the speckles in the stoneware. -
Final wipe:
Wipe the bottom of the mug clean of any glaze with a sponge to prevent it from sticking to the kiln shelf. -
Glaze fire:
Fire the mug to maturity (typically cone 5 or 6 for mid-fire stoneware). The heat will melt the glaze and bring out the deep green contrast.
Go deeper
Try inlaying slip into the veins instead of wax resist. Fill the lines with white slip, scrape back, then apply a translucent green glaze over the top.
Pour your morning coffee into this handmade vessel and enjoy the permanent touch of autumn it brings to your table


What Really Happens Inside the Kiln
Learn how time and temperature work together inside the kiln to transform clay into durable ceramic.
Pressed Wildflower “Fossil” Slab Mug
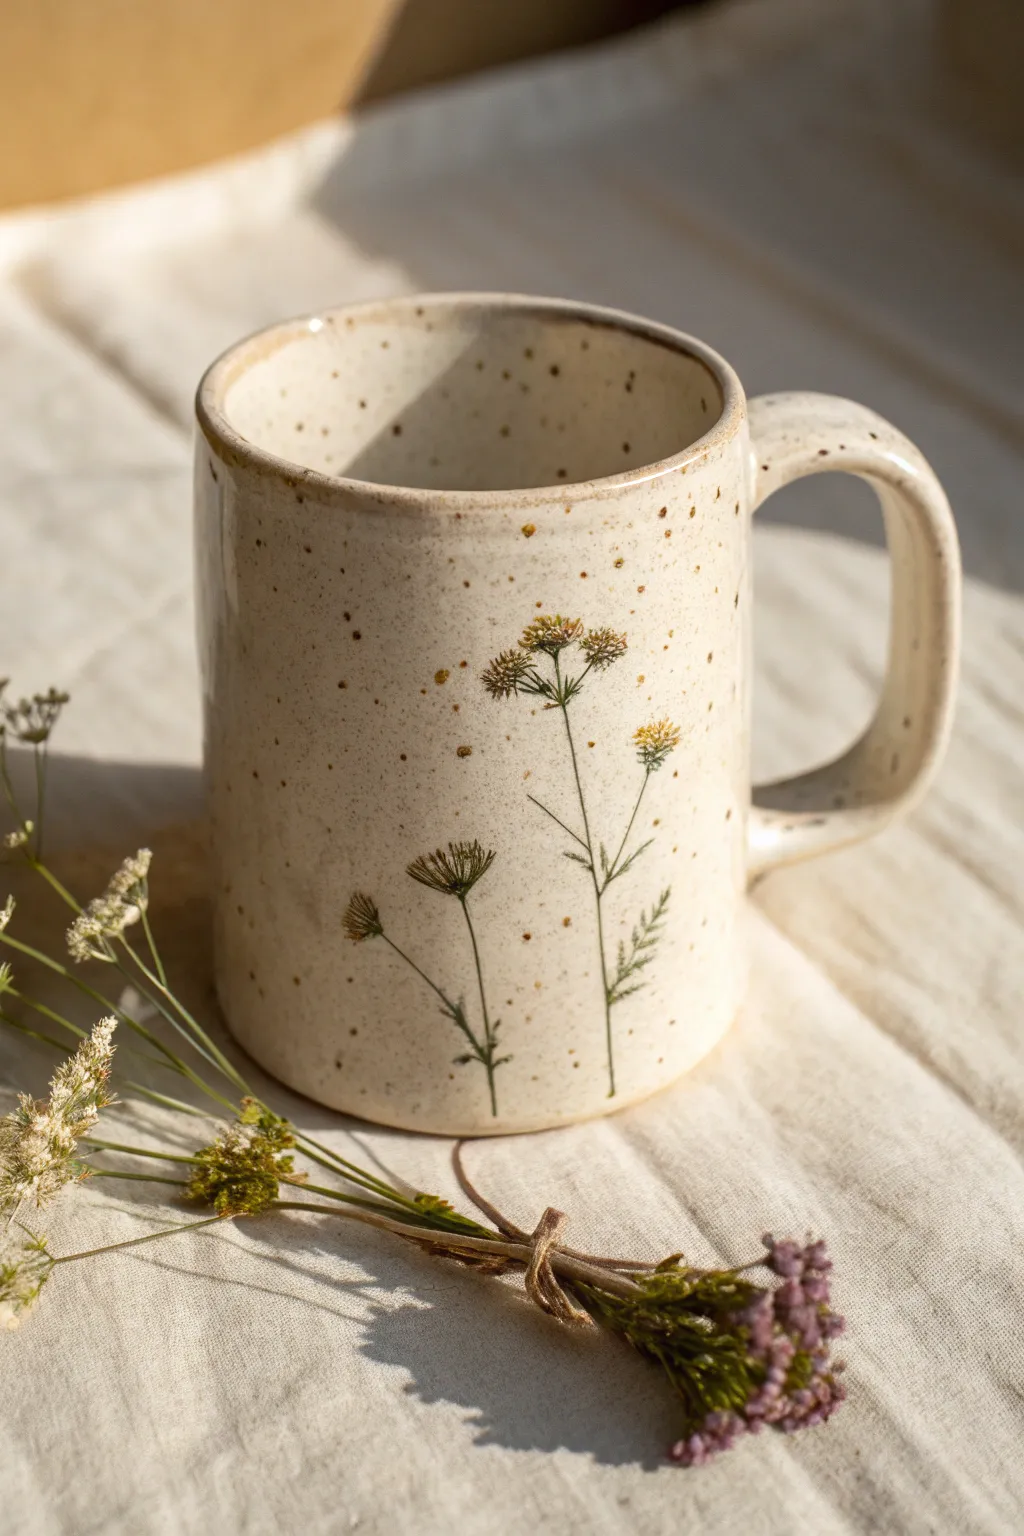
Capture the delicate beauty of a summer meadow with this slab-built mug featuring real pressed botanical impressions. The creamy, speckled clay body highlights the intricate details of wildflower stems, creating a timeless, earthy piece perfect for morning coffee.
Detailed Instructions
Materials
- Speckled stoneware clay (e.g., Laguna Speckled Buff)
- Fresh or dried wildflowers (sturdy stems work best)
- Rolling pin
- Canvas working surface
- Fettling knife or needle tool
- Mug template or ruler
- Scoring tool (serrated rib)
- Slip (clay mixed with water)
- Smooth wooden rib
- Sponge
- Underglaze (black or deep brown for the stems/flowers)
- Clear or transparent cream glaze
- Small detail brush
Step 1: Preparation & Slab Rolling
-
Wedge the Clay:
Begin by thoroughly wedging your speckled stoneware clay to remove air bubbles and ensure uniform consistency, which is crucial for preventing cracks during firing. -
Roll the Slab:
Roll out a slab of clay on your canvas to an even thickness of about 1/4 inch. Smooth both sides with a damp sponge or rib to compress the particles. -
Cut to Size:
Using your template or ruler, cut a long rectangle for the mug body (approximately 12×4.5 inches is a standard size) and a circle for the base.
Step 2: Creating the Impressions
-
Arrange Botanicals:
Lay your wildflowers onto the flat clay slab. Think about composition—place taller stems slightly off-center and vary the height of the flowers for a natural look. -
Press the Flowers:
Gently but firmly roll over the flowers with your rolling pin once. You want to press them flush into the clay without thinning the slab significantly. -
Remove Plant Material:
Carefully peel the stems and flowers out of the clay. If small bits remain, use a needle tool or tweezers to lift them out, leaving a clean fossil-like impression.
Clean Impressions
Place a thin sheet of plastic wrap or newsprint over your flowers before rolling. This prevents the plants from sticking to your rolling pin.
Step 3: Construction
-
Form the Cylinder:
Lift the slab and curve it into a cylinder shape. Be careful not to smudge your floral impressions while handling the clay. -
Score and Slip:
Score the short edges of the rectangle aggressively and apply slip. Overlap the edges slightly or butt them together, pressing firmly to seal the seam. -
Attach the Base:
Score and slip the bottom edge of your cylinder and the edge of your circular base. Join them together, smoothing the clay connection with a wooden tool. -
Smooth the Rim:
Use a damp sponge or a chamois cloth to round off the rim of the mug, ensuring it will be comfortable to drink from.
Warped Rim?
If the rim goes oval during drying, gently push it back into a circle while the clay is leather hard. You can rest a light board on top to keep it level.
Step 4: Handle & Finishing
-
Pull a Handle:
Create a strap handle from a coil of clay or cut a strip from remaining slab scraps. Shape it into a comfortable ‘ear’ shape. -
Attach Handle:
Score and slip the contact points on both the mug body and handle. Press the handle firmly onto the side opposite your main floral design. -
Clean Up:
Wipe away any excess slip around the handle joints and base with a damp brush for a professional finish. -
Bisque Firing:
Allow the mug to dry slowly under plastic to prevent warping, then bisque fire it to cone 04.
Step 5: Glazing
-
Inlay the Design:
Mix a small amount of black or dark brown underglaze with water. Paint it into the floral depressions, then wipe the surface back with a damp sponge so the color stays only in the deep lines. -
Glaze Application:
Dip the entire mug into a transparent cream or clear glaze. This allows the speckles of the clay and the dark floral inlay to show through. -
Final Fire:
Fire the mug to maturity (usually cone 6 for stoneware) to melt the glaze and vitrify the clay.
Enjoy your handmade mug with a warm drink, admiring how the speckles interact with your botanical design
Graphic Sgraffito Illustration on a Slab Mug
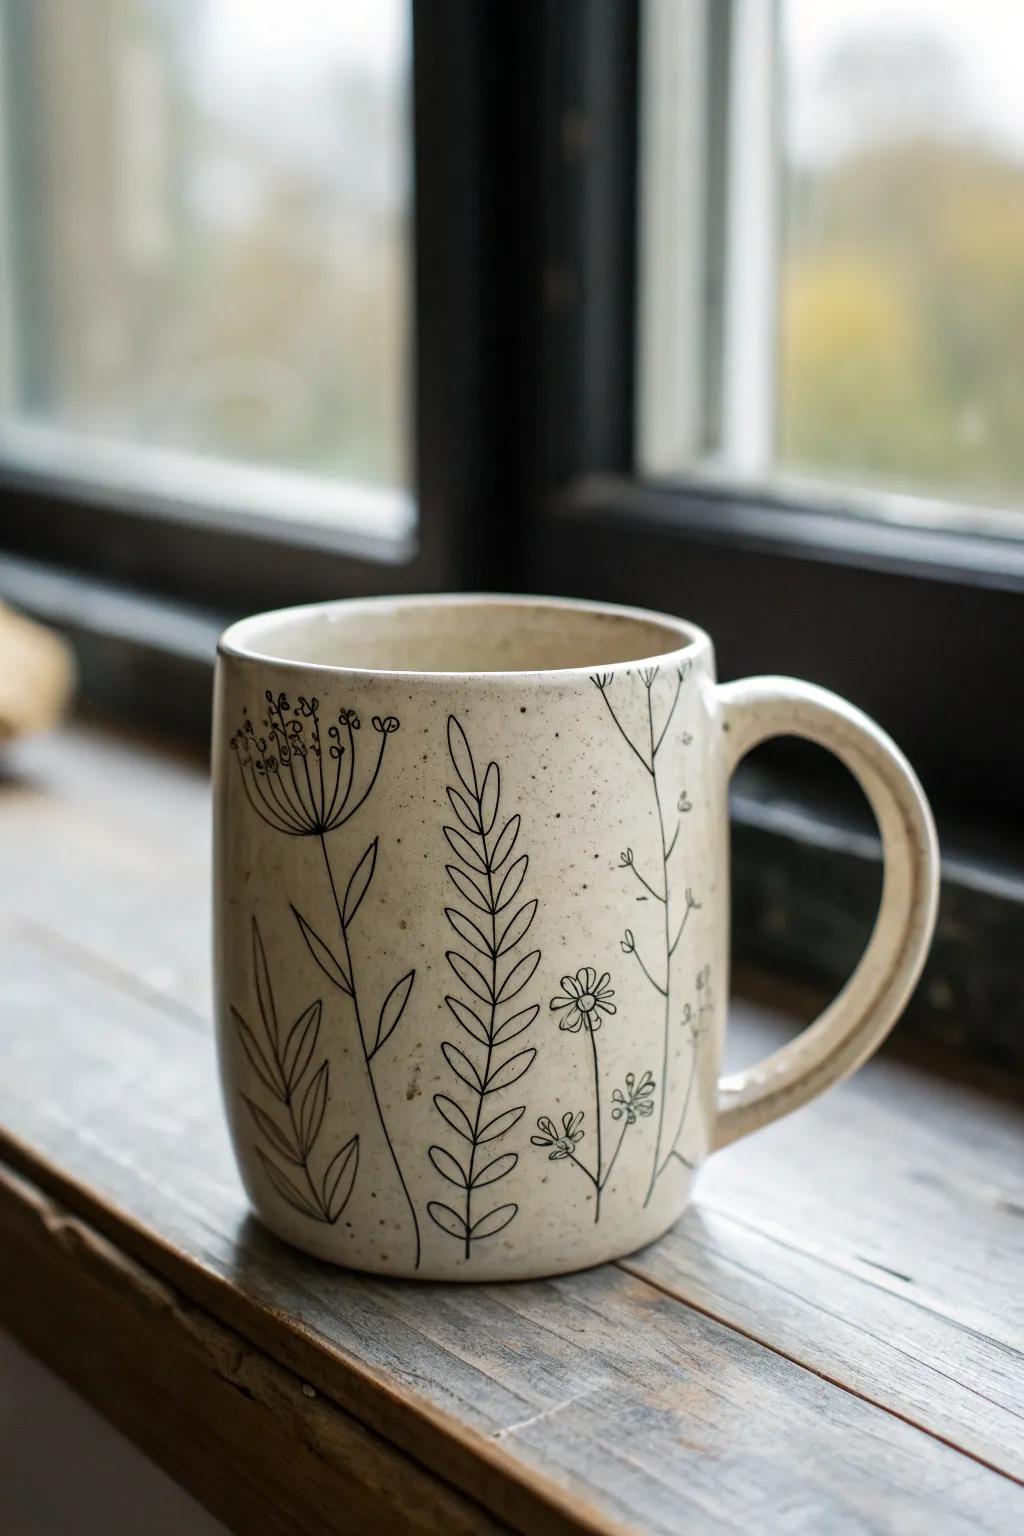
Create a charming, nature-inspired mug featuring delicate black floral illustrations carved through a creamy speckled slip. This project combines simple slab building with the satisfying precision of sgraffito to produce an heirloom-quality piece perfect for your morning coffee.
Step-by-Step
Materials
- Stoneware clay body (smooth)
- Black underglaze or black slip
- Cream or white matte glaze (translucent)
- Rolling pin and guide strips
- Needle tool
- Sgraffito loop tool (small)
- Fine-point carving tool
- Fettling knife
- Scoring rib or serrated tool
- Slip for joining
- Sponge
- Template for mug body (paper or craft foam)
- Paintbrush (soft bristle)
Step 1: Building the Canvas
-
Roll the Slab:
Begin by rolling out your stoneware clay into a smooth, even slab about 1/4 inch thick. Compress the slab on both sides with a rib to align the clay particles, which helps prevent warping later. -
Cut the Body:
Place your rectangular template onto the slab and cut around it using a fettling knife to create the cylinder wall. Save the excess clay for the base and handle. -
Form the Cylinder:
Bevel the short edges of your rectangle at a 45-degree angle. Score these edges heavily and apply slip, then roll the slab into a cylinder, pressing the beveled edges together firmly to create a seamless join. -
Attach the Base:
Place the cylinder on a piece of leftover slab and trace around the bottom. Cut out this circle, score and slip the meeting points, and attach the base. Use a modeling tool to smooth the seam on the outside and inside. -
Add the Handle:
Pull or cut a strap for the handle. Shape it into a generous ‘C’ curve and attach it to the mug body using the score and slip method. Ensure the attachment points are blended smoothly for a clean look.
Clean Lines Only
If your carving tool is dragging or tearing the clay rather than cutting smoothly, the clay poses a troubleshooting issue: it is likely too wet. Let it dry for another hour.
Step 2: Applying the Sgraffito Design
-
Leather Hard Stage:
Allow the mug to dry slowly until it reaches a sturdy leather-hard stage. The surface should be firm enough to carve without deforming, but retain enough moisture to not chip. -
Apply Black Underglaze:
Coat the entire exterior or just the specific design area with 2-3 even layers of black underglaze. Let the underglaze dry until it is no longer tacky to the touch. -
Sketch the Design:
Lightly sketch your floral layout directly onto the black surface using a dull pencil or a light-colored watercolor pencil. Focus on tall, vertical stems like dandelions, ferns, and wildflowers to mimic the reference image. -
Carve Main Stems:
Using a fine-point carving tool or small loop tool, carefully carve away the black underglaze along your sketched lines to reveal the raw clay body underneath. Keep your hand steady and pull the tool towards you. -
Add Details:
Switch to a finer needle tool or extra-fine sgraffito point for delicate elements like leaf veins, tiny flower petals, and subtle texture dots around the plants. -
Clean Up:
Once carved, use a soft, dry brush to gently sweep away the clay crumbs (burrs). Avoid rubbing them with your finger, as this can smear the black underglaze into your fresh white lines.
Step 3: Firing and Glazing
-
Bisque Fire:
Dry the mug slowly under loose plastic to prevent handle cracking. Once bone dry, bisque fire the piece to Cone 04 (or your clay’s specific bisque temperature). -
Glaze Application:
Dip or brush the mug with a translucent cream or white matte glaze. If you want the speckled look shown in the image, choose a glaze with iron speckles or apply a speckled overglaze wash. -
Wipe Back:
I usually gently sponge the glaze off the sgraffito lines if the glaze is too opaque, ensuring the black illustration remains crisp and visible. -
Final Fire:
Glaze fire the mug to the temperature recommended for your clay and glaze combination (typically Cone 5 or 6 for stoneware). Allow the kiln to cool completely before unloading.
Reverse Technique
Try ‘Mishima’ for a variation: carve the lines into raw clay first, fill the grooves with black slip, let dry, and scrape the surface flush to reveal black lines.
Enjoy your morning brew in a vessel that captures the quiet beauty of a meadow sketch

TRACK YOUR CERAMIC JOURNEY
Capture glaze tests, firing details, and creative progress—all in one simple printable. Make your projects easier to repeat and improve.
Mishima Inlay Slab Mug for Crisp Lines
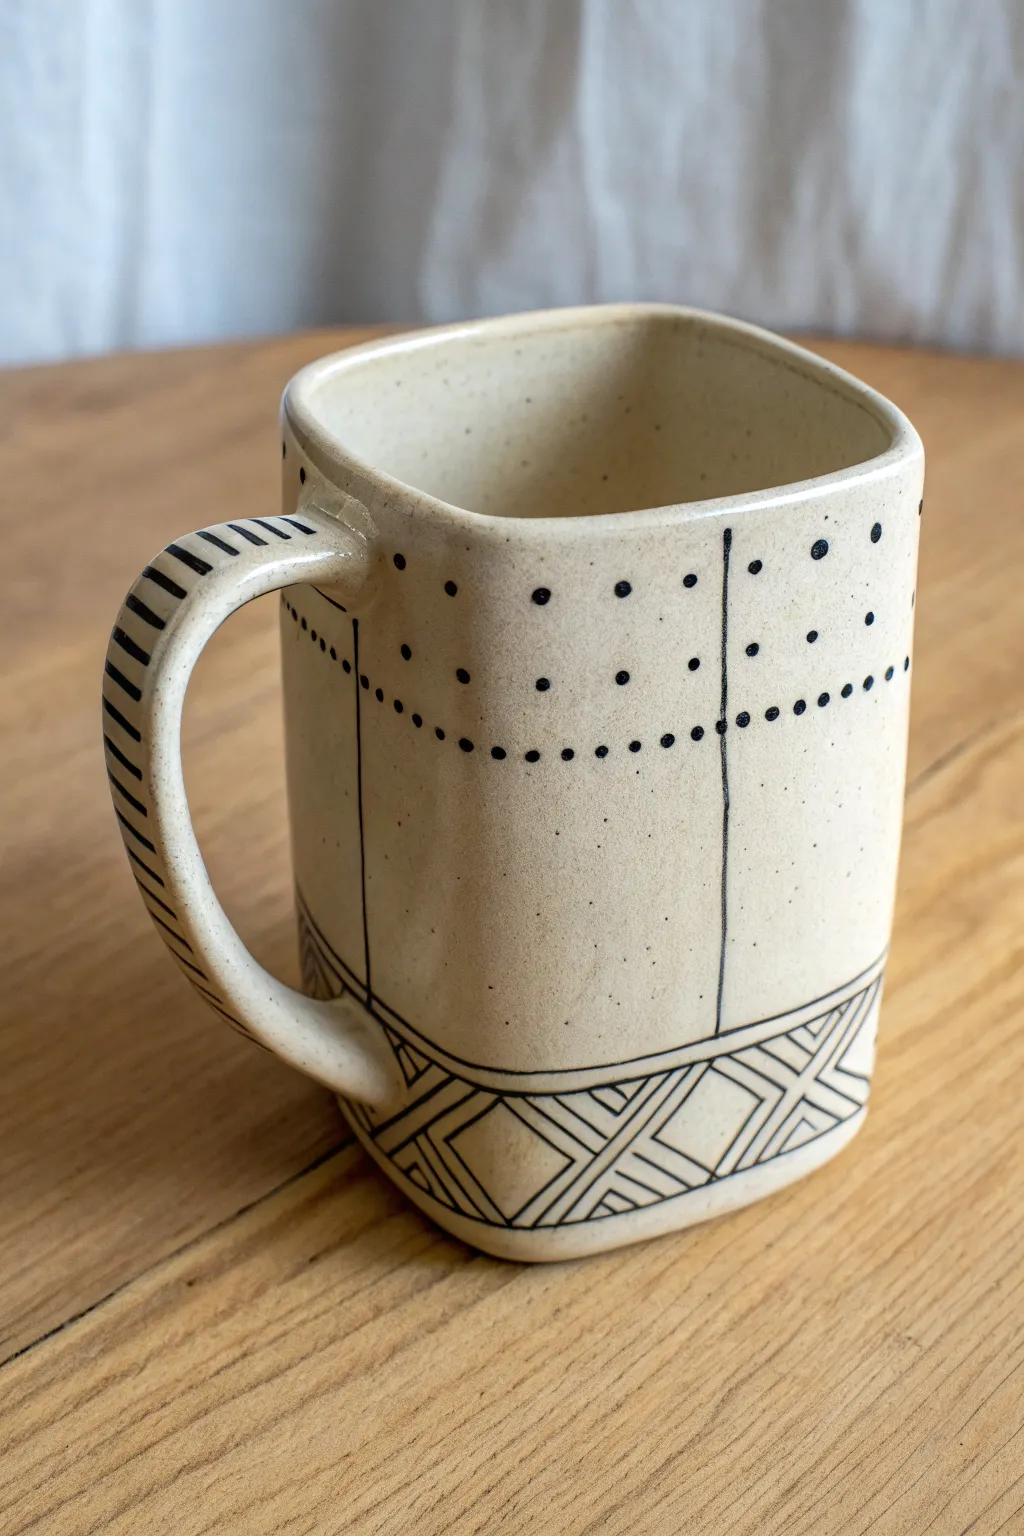
This project combines precise slab construction with the striking contrast of Mishima inlay. By carving thin lines and filling them with underglaze, you’ll achieve a crisp, graphic look that feels both modern and handmade.
Step-by-Step Guide
Materials
- Stoneware clay (speckled or buff)
- Black underglaze or black slip
- Rolling pin and thicker dowels (approx 1/4 inch)
- Fettling knife or X-Acto blade
- Ruler or straight edge
- Needle tool or specific Mishima carving tool
- Scoring tool (serrated rib)
- Slip (made from your clay body)
- Wax resist (optional)
- Metal rib
- Sponge
- Clear glaze
Step 1: Forming the Mug Body
-
Roll the Slab:
Begin by rolling out a consistent slab of stoneware clay. Use guide sticks or dowels on either side of your clay to ensure an even thickness, aiming for about 1/4 inch. -
Cut the Rectangle:
Using a ruler and your fettling knife, cut a clean rectangle. For a standard mug, try dimensions around 11 inches long by 4.5 inches high, but feel free to adjust based on your desired volume. -
Smooth the Canvas:
Compress the slab on both sides with a soft rib. This aligns the clay particles to prevent warping and creates a smooth canvas for your upcoming inlay work. -
Join the Seams:
Bevel the short ends of your rectangle at opposite 45-degree angles. Score these edges heavily, apply slip, and wrap the slab into a cylinder. Press the joints together firmly. -
Shape the Square:
Since this mug has a softly squared profile, gently press the circular cylinder against a table or use a paddle to flatten four sides slightly, keeping the corners rounded and distinct. -
Attach the Base:
Roll a smaller slab for the bottom. Score and slip the bottom edge of your mug walls, place it onto the slab, and cut away the excess clay flush with the walls. Smooth the connection with a tool or your finger.
Step 2: Carving the Design
-
Leather Hard Stage:
Allow the mug to dry to a true leather-hard stage. This is crucial; if the clay is too wet, the lines will be messy, and if it’s too dry, it might crack. -
Wax the Surface:
I like to brush a thin coat of wax resist over the entire exterior surface. This protects the light clay body from staining when you apply the black underglaze later. -
Carve Vertical Lines:
Using a sharp needle tool or a carving tool, incise vertical lines down the face of the mug. Use a ruler to keep them perfectly straight. -
Carve the Geometric Base:
Near the bottom, carve two parallel horizontal lines. Inside this band, carve a repeating diamond or ‘X’ pattern to create the geometric border seen in the example. -
Add Decorative Dots:
Above the midpoint, poke rows of small holes or dots. Vary the spacing—group some closer to the rim and others more sparse—to create visual rhythm.
Use Wax for Clean Lines
Applying wax resist before carving acts as a stencil. The black underglaze won’t stick to the waxed surface, making the wipe-back step infinitely cleaner and faster.
Step 3: The Mishima Inlay
-
Apply Underglaze:
Generously paint black underglaze or slip over all your carved lines and dots. Don’t worry about staying in the lines; you want the incisions completely filled. -
Wipe Back:
Once the underglaze has stiffened slightly (is no longer shiny), use a clean, slightly damp sponge or a metal rib to scrape away the excess surface color. The wax resist helps the black wipe off the high points easily, leaving crisp black lines behind. -
Create the Handle:
Pull or roll a coil for the handle. Flatten it slightly into a strap shape. While it rests on the table, carve horizontal stripes across the outer face. -
Inlay the Handle:
Repeat the inlay process on the handle: paint with black, let sit, and wipe back to reveal the stripes. -
Attach Handle:
Score and slip the attachment points on the mug and handle. Press firmly to join, ensuring the handle is straight. Clean up any oozing slip immediately. -
Final Fire:
Bisque fire the piece, then dip or brush on a clear glaze to seal the clay and make the black inlay pop. Fire to your clay body’s final temperature.
Try Colored Slip
Instead of black underglaze, try inlaying with a bright blue or teal slip. The pop of color against the raw clay creates a completely different, cheerful vibe.
Enjoy your morning coffee in a mug that perfectly balances bold graphics with rustic charm
Decorative “Stitched” Seam Slab Mug
This cozy slab-built mug mimics the look of vintage enamelware with its speckled clay body and charming indigo details. The design features a faux-stitched pattern created with underglaze, giving it a textile-inspired aesthetic perfect for your morning coffee.
How-To Guide
Materials
- Speckled stoneware clay slab (approx. 1/4 inch thick)
- Template (rectangle for body, circle for base)
- Potter’s needle tool
- Scoring tool (serrated rib)
- Slip
- Rolling pin and guides
- Sponge
- Cobalt blue underglaze
- Fine detail brush
- Clear or satin white transparent glaze
- Modeling tool or wooden stick
Step 1: Forming the Cylinder
-
Cut the clay:
Begin by rolling out your speckled clay slab to an even thickness. Use your templates to cut out a rectangular strip for the mug body and a circle for the base. -
Bevel the edges:
On the short sides of your rectangular slab, cut 45-degree angles in opposite directions. This allows the seam to overlap smoothly without creating a thick lump. -
Score and slip:
Score the beveled edges aggressively and the outer edge of your circular base. Apply a generous amount of slip to all scored areas. -
Assemble the body:
Wrap the slab into a cylinder, pressing the beveled edges together firmly. Place the cylinder onto the base and compress the connection point from both the inside and outside to ensure a water-tight seal. -
Smooth the surfaces:
Use a damp sponge or a soft rib to smooth out the seam line so it becomes invisible. I like to do a final pass over the rim with a chamois to make it soft for drinking.
Step 2: Handle and Details
-
Pull a handle:
Roll a coil or pull a strap of clay for the handle. Shape it into a curve that fits comfortably in the hand and let it stiffen slightly until it holds its shape. -
Attach the handle:
Score and slip the attachment points on both the mug body and the handle. Press firmly to attach, blending the clay at the joints for strength, then wipe away excess slip with a damp brush. -
Bisque fire:
Allow the mug to dry slowly under plastic to prevent warping. Once bone dry, bisque fire the piece to the appropriate cone (usually Cone 06 or 04) to prepare it for decoration.
Clean Lines
To get straighter vertical lines, use a ruler and a dull pencil to lightly sketch guidelines directly onto the bisque ware before painting with underglaze.
Step 3: Glazing the Design
-
Clean the bisque:
Wipe down the fired mug with a damp sponge to remove any kiln dust. This ensures the underglaze will adhere properly without crawling. -
Paint the bottom band:
Using cobalt blue underglaze, paint a band approximately an inch thick around the very bottom edge of the mug. Don’t worry if the top edge of this band is slightly uneven; it adds character. -
Define the grid:
Paint a thin horizontal scaffolding line about 1.5 inches up from the bottom. Then, paint vertical lines connecting this horizontal line to the bottom blue band, spacing them evenly. -
Add the dots:
Dip the back end of a paintbrush into the underglaze to stamp uniform dots. Place one row of dots along the top horizontal line, and another row inside the bottom blue band, between the vertical lines. -
Rim detail:
Carefully paint the rim of the mug with the blue underglaze. I prefer to let the brush wobble slightly here to give it that organic, hand-dipped enamel look. -
Apply clear glaze:
Once the underglaze is completely dry, dip the entire mug into a clear or semi-transparent satin white glaze. This will seal the clay and allow the speckles and blue design to show through brightly. -
Glaze fire:
Fire the mug again to the glaze temperature required by your specific clay and glaze body (typically Cone 5 or 6).
Variation Idea
Instead of painting the vertical lines, you can carve them into the clay at the leather-hard stage (sgraffito) and fill them with dark slip for a textured, tactile finish.
Now you have a charming, hand-built mug ready for your favorite hot drink
Overlapped “Folded” Seam Slab Mug
This handmade ceramic mug features distinctive diagonal ridges that spiral gently around the form, created through a clever overlapping technique during slab construction. The look is completed with a speckled cream glaze that breaks beautifully over the textures, leaving raw clay exposed at the base for contrast.
Detailed Instructions
Materials
- Stoneware clay body (speckled buff recommended)
- Rolling pin
- Canvas work surface or slab mat
- Guide sticks (1/4 inch thickness)
- Fettling knife or needle tool
- Scoring tool or serrated rib
- Slip
- Cylindrical form or bisque mold (optional)
- Wooden modeling tool
- Sponge
- Speckled cream or white glaze
Step 1: Creating the Textured Slab
-
Roll out the slab:
Begin by rolling out your clay on a canvas surface. Use 1/4 inch guide sticks on either side to ensure an even thickness throughout the slab. -
Smooth the surface:
Once rolled, use a rib tool (rubber or metal) to compress the clay on both sides. This aligns the clay particles which prevents warping and creates a smooth canvas for your texture. -
Cut the clay strips:
Instead of one large rectangle for the body, you will cut several long strips of clay. These should be about 1.5 to 2 inches wide and long enough to wrap around your desired mug circumference. -
Bevel the edges:
On the long edges of each strip, create a slight bevel. This helps the strips transition smoothly when they overlap, rather than creating a bulky step. -
Assemble the sheet:
Lay the strips out side-by-side on your board. Overlap the edge of one strip onto the next by about 1/4 inch creating a shingled effect. -
Join the strips:
Score the overlapping areas thoroughly and add a little slip. Press the seams firmly together without flattening the ridge line completely—you want that defined ‘step’ to remain visible.
Step 2: Forming the Mug Body
-
Cut the main template:
Now that you have a large, textured sheet of clay with diagonal ridges, place your rectangular mug template over it. Orient the template so the ridges run diagonally across the shape. -
Bevel the vertical sides:
Cut your rectangle out. Bevel the two short vertical ends at 45-degree angles in opposite directions to create a seamless join when rolled. -
Roll the cylinder:
Lift the slab carefully and wrap it into a cylinder. If you are new to this, wrapping it around a paper-covered bisque mold or PVC pipe can help maintain a perfect circle. -
Seal the vertical seam:
Score and slip the beveled ends. Join them firmly, using a wooden modeling tool to blend the seam on the inside. On the outside, carefully blend the clay while trying to maintain the diagonal flow of the ridges across the join line. -
Attach the base:
Roll a small separate slab for the base and cut a circle slightly larger than your cylinder. Score and slip the bottom of the cylinder and the edge of the base circle. -
Clean up the bottom connection:
Press the cylinder onto the base. Trim the excess clay flush with the wall or leave a tiny overhang to smooth upward. I like to use a wooden tool to compress this connection really well to prevent leaks.
Seam Splitting?
If the diagonal seams start to crack during drying, immediately score deeply, add vinegar slip, and compress. Dry the mug very slowly under loose plastic.
Step 3: Handle and Finishing
-
Pull or roll a handle:
Create a handle strap that matches the thickness of your mug walls. Curve it into a question mark or ear shape suitable for your grip. -
Attach the handle:
Wait until the body is leather hard. Score and slip the attachment points and join the handle. Reinforce the connection with tiny coils of clay blended smooth. -
Refine the rim:
Use a damp chamois or sponge to round over the rim of the mug. It should be comfortable for the lips and free of any sharp edges. -
Bisque fire:
Allow the mug to dry slowly to prevent cracking, especially at the thick seam lines. Once bone dry, bisque fire the piece to cone 04. -
Glaze application:
Wax the bottom inch of the mug to keep the raw clay exposed, as seen in the photo. Dip the rest of the mug into a speckled cream or matte white glaze, allowing the glaze to pool slightly against the ridges for emphasis. -
Final firing:
Glaze fire the mug to cone 6 (or whatever temperature your clay and glaze require).
Level Up: Texture Contrast
Use a serrated rib to gently scrape just the raised edges of the ridges before glazing. This creates a rougher texture that pops against the smooth glaze nearby.
Enjoy your morning coffee while tracing the unique ridges of your handmade creation
Bold Strap Handle Slab Mug With a Thumb Rest
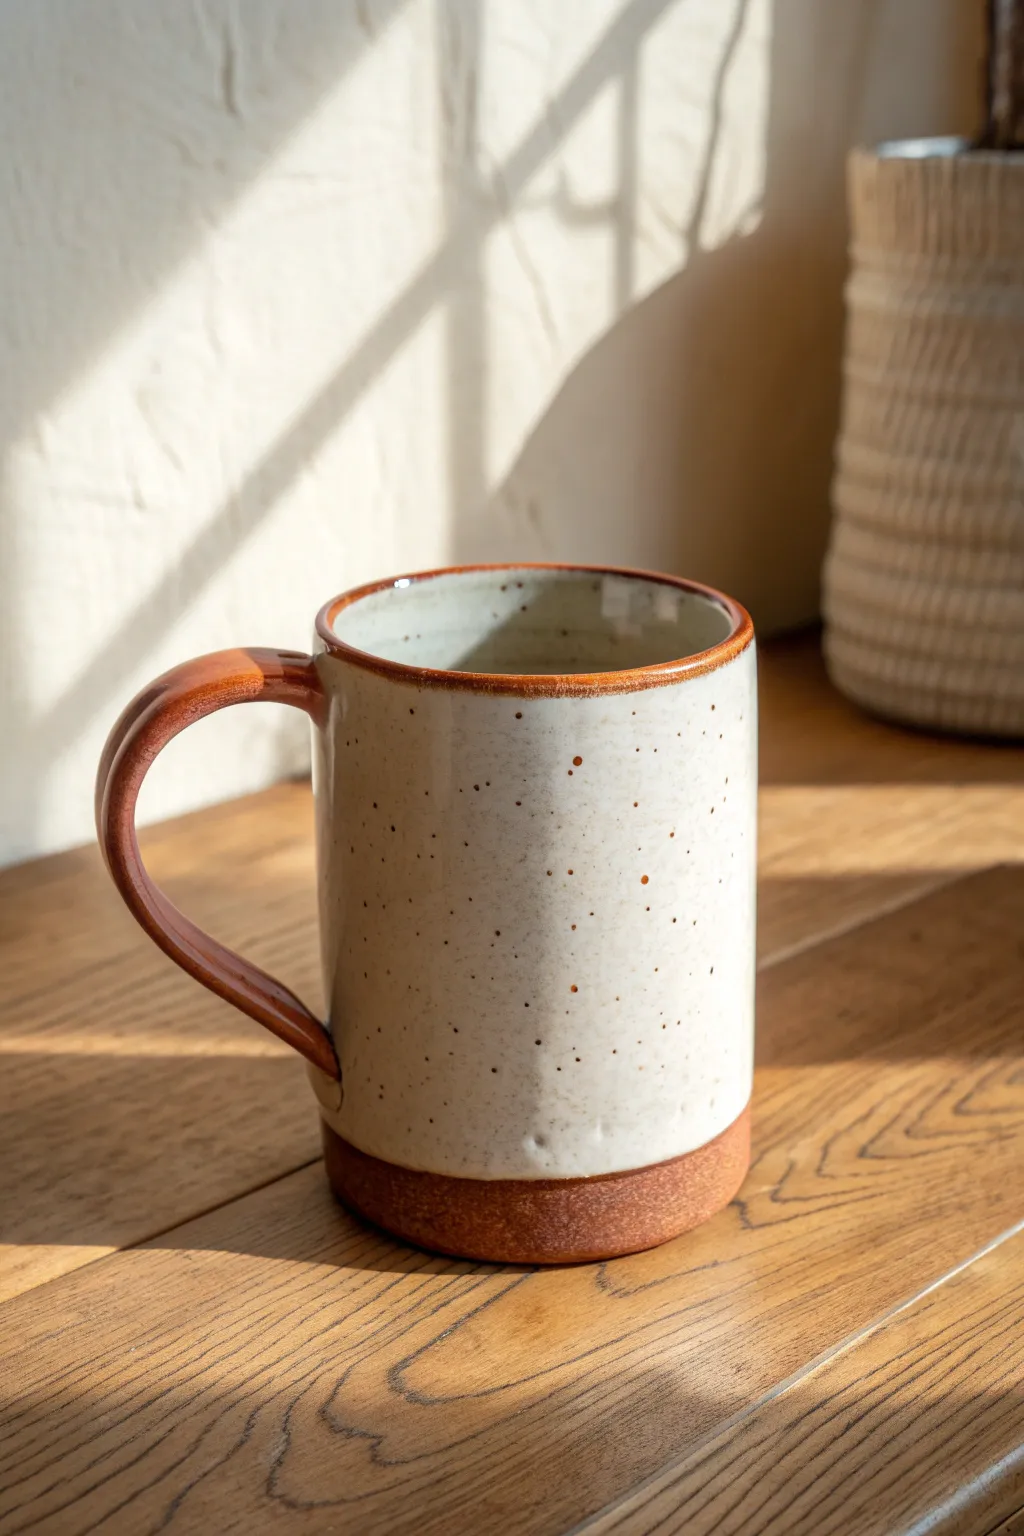
Embrace the warmth of handmade pottery with this earthy, slab-built mug featuring a distinct unglazed base and a comfortable strap handle. The creamy, speckled glaze contrasts beautifully with the raw terra cotta or stoneware clay, creating a piece that feels both modern and timeless.
Step-by-Step Tutorial
Materials
- Stoneware clay (speckled or red clay body)
- Slab roller or rolling pin with guide sticks
- Cylindrical form or template (approx. 3.5″ diameter)
- Fettling knife or needle tool
- Serrated rib or scoring tool
- Slip (clay mixed with water)
- Wooden modeling tool
- Sponge
- Creamy white speckled glaze
- Clear glaze (optional for handle)
- Wax resist
Step 1: Forming the Body
-
Prepare the slab:
Begin by rolling out a consistent slab of clay, aiming for about 1/4 inch thickness. If you are using a rolling pin, guide sticks are essential here to ensure the wall thickness is even throughout. -
Cut the rectangle:
Using a ruler and your fettling knife, cut a rectangle from the slab. The height should be the desired height of your mug plus a little extra for shrinkage, and the length should wrap around your cylindrical form with a slight overlap. -
Bevel the edges:
Carefully bevel the short ends of your rectangle at opposite 45-degree angles. This allows for a seamless join where the clay doesn’t double up in thickness at the seam. -
Score and slip:
Vigorously score the beveled edges with your serrated rib and apply a generous amount of slip. Wrap the slab around your cylindrical form or simply curl it into a cylinder, pressing the beveled edges together firmly. -
Reinforce the seam:
Use a wooden modeling tool to compress the seam both inside and out. I like to run a smooth rib over the exterior seam until it completely disappears, ensuring the cylinder looks like a continuous piece. -
Add the base:
Roll a small piece of slab for the bottom. Place your cylinder on top, trace around it, and then score and slip both the bottom edge of the cylinder and the base piece before pressing them together. Trim away excess clay.
Use a Template
Make a paper template for your slab body first. Wrap it around a PVC pipe to test the fit before cutting into your clay.
Step 2: Handle and Refining
-
Make the strap handle:
Cut a strip of clay from your remaining slab, approximately 1 inch wide and 5 inches long. Smooth the edges with a damp sponge to remove any sharpness. -
Shape the curve:
Bend the strip into a ‘C’ shape or ear shape. Allow it to firm up slightly (leather had stage) so it holds its curve without collapsing when attached. -
Attach the handle:
Score and slip the attachment points on both the mug body and the handle ends. Press the handle firmly onto the mug, positioning the top attachment near the rim and the bottom curve swooping inward. -
Smooth connections:
Use a tiny coil of clay around the attachment points if needed to fill gaps, then smooth everything down with a modeling tool or your finger to create a seamless transition. -
Clean the rim:
Smooth the drinking rim with a damp sponge or chamois cloth. A slightly rounded rim is much more pleasant to drink from than a sharp, squared-off edge.
Step 3: Glazing and Finishing
-
Bisque fire:
Once the mug is bone dry, fire it in the kiln to bisque temperature (usually Cone 04 or 06) to prepare it for glazing. -
Wax the base:
Apply wax resist to the bottom inch of the mug’s exterior and the entire underside. This creates the distinct dual-tone look and keeps the raw clay exposed. -
Wax the rim (optional):
If you want the exposed clay rim shown in the photo, careful apply a thin line of wax resist to the very top edge of the lip. -
Dip in glaze:
Dip the mug into your creamy white speckled glaze. Hold it for a few seconds to get an even coat, then lift it out and shake off excess drips. -
Clean the handle:
If you want the handle to remain raw or have a different finish, wipe the glaze off the handle with a sponge, or wax it before dipping. Alternatively, brush a clear glaze over the handle if you want it sealed but showing the clay color. -
Glaze fire:
Fire the mug to the maturity temperature of your clay and glaze (often Cone 5 or 6 for stoneware). Allow the kiln to cool completely before removing your finished piece.
Dual-Tone Handle
For extra depth, apply an oxide wash (like iron oxide) to the handle and base before glazing to darken the exposed clay.
Enjoy your morning coffee in a mug that’s uniquely yours and full of handmade character.
Twisted or Braided Handle on a Slab Mug
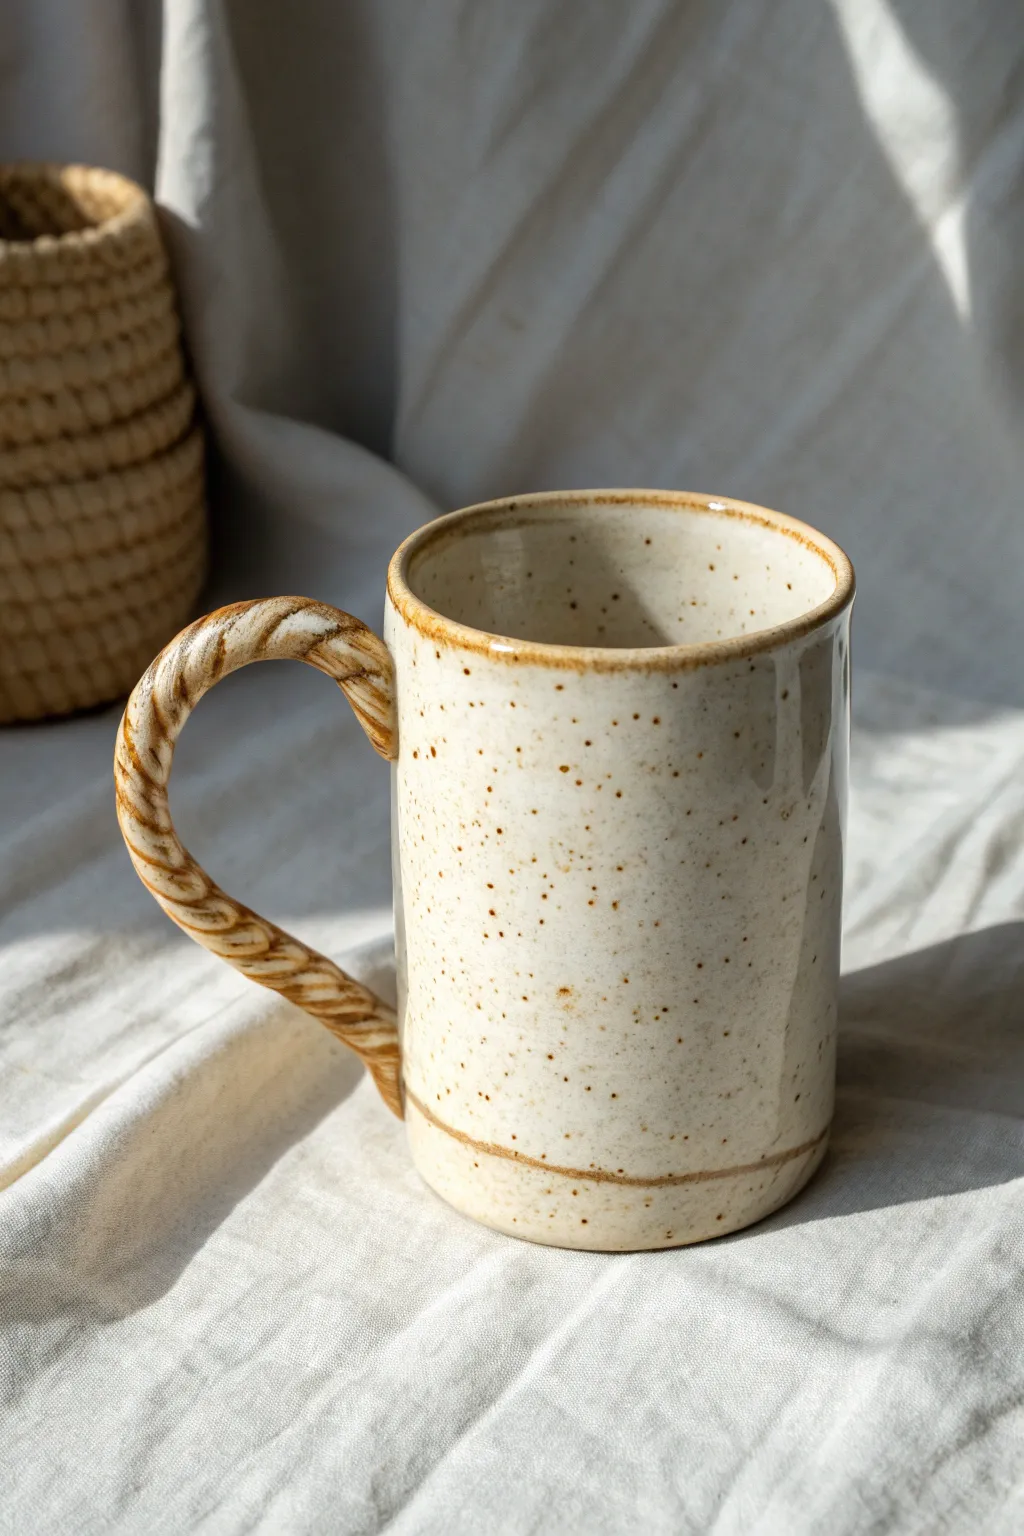
This project combines sleek, cylindrical slab construction with a charming, tactile twisted handle that mimics the look of woven rope. The speckled finish and warm brown accents give it a cozy, farmhouse aesthetic perfect for your morning coffee.
Step-by-Step Guide
Materials
- Speckled buff stoneware clay
- Rolling pin with thickness strips or slab roller
- Fettling knife
- Serrated rib or scoring tool
- Slip (clay mixed with water)
- Ruler or straight edge
- Cylindrical form for shaping (like a PVC pipe or rolling pin)
- Sponge
- Wooden modeling tool
- Glossy clear or white semi-opaque glaze
- Iron oxide wash (optional for accents)
Step 1: Forming the Mug Body
-
Roll the slab:
Begin by wedging your speckled clay well. Roll out a consistent slab about 1/4 inch thick. Compress both sides of the slab with a rubber rib to align the clay particles, which helps prevent warping later. -
Cut the rectangle:
Using your ruler and fettling knife, cut a rectangle measuring roughly 4 inches high by 10-11 inches long (depending on your desired mug diameter). Save your excess clay for the base and handle. -
Bevel the edges:
On the two short ends of your rectangle, cut 45-degree bevels in opposite directions. This allows the ends to overlap seamlessly without creating a thick lump at the seam. -
Attach the seam:
Score the beveled edges thoroughly and apply slip. Wrap the clay loosely around your cylindrical form or simply curl it by hand, pressing the beveled ends together firmly. Smooth the seam inside and out until it’s invisible. -
Make the base:
Roll a small piece of clay for the bottom. Place your cylinder on top of it and trace around the edge with a needle tool. Cut out this circle. -
Join base to body:
Score and slip the bottom of the cylinder heavy and the edge of the base circle. Press them together firmly. I like to run a wooden tool around the exterior seam to ensure a tight bond, then smooth it over with a sponge. -
Define the rim:
Smooth the drinking rim with a damp sponge or chamois cloth. You want a rounded, comfortable edge for the lips.
Cracking at the Twist?
If the coils separate during drying, your clay was likely too dry when twisting. Use softer clay next time, or spritz the coils lightly with water before twisting them together.
Step 2: Creating the Twisted Handle
-
Roll coils:
Roll out two even coils of clay about the thickness of a pencil. Try to keep them consistent in diameter so the twist looks uniform. -
Twist the rope:
Place the two coils side-by-side. gently twist them around each other to create a rope effect. Don’t pull too hard or the clay will thin out; just guide them over one another. -
Compress the twist:
Once twisted, gently roll the entire rope on your table just once or twice. This flattens the back slightly (making it easier to attach) and ensures the two coils are bonded together. -
Shape the arch:
Cut your twisted rope to the desired handle length (about 4-5 inches). Gently bend it into an ear shape or ‘C’ curve, allowing it to stiffen slightly for 10-15 minutes.
Level Up: Ombre Twist
Use two different clay bodies (like white and dark stoneware) for your coils. When twisted, you’ll get a beautiful marbled ‘candy cane’ effect on the handle.
Step 3: Assembly and Finishing
-
Score attachment points:
Hold the handle up to the mug to find the best placement. Mark the spots, then score the mug surface and the ends of the handle deeply. -
Attach the handle:
Apply generous slip and press the handle ends onto the mug body. Use a small wooden tool to meld the clay from the handle onto the mug body for a secure connection. -
Refine the connection:
Clean up any excess slip squeezing out from the handle joints with a damp brush. Ensure the twisted texture remains distinct right up to the connection point. -
Add texture lines:
Using a modeling tool, you can gently incise a line around the bottom of the mug, about 1/2 inch from the base, to mimic the detail seen in the image. -
Bisque fire:
Let the mug dry slowly under loose plastic to equalize moisture, then bisque fire to cone 04. -
Glaze application:
Dip the mug into a glossy clear or semi-opaque white glaze. The speckled clay body will show through nicely. -
Accent the details:
Before firing, wipe a very small amount of iron oxide wash onto the rim and the bottom texture line with a sponge, then wipe most of it back so it just highlights the edges. -
Final Fire:
Glaze fire to the maturation temperature of your clay (usually cone 6 for stoneware).
Now you have a beautifully textured mug ready for your favorite warm beverage
Sculpted Leaf or Vine Handle Slab Mug
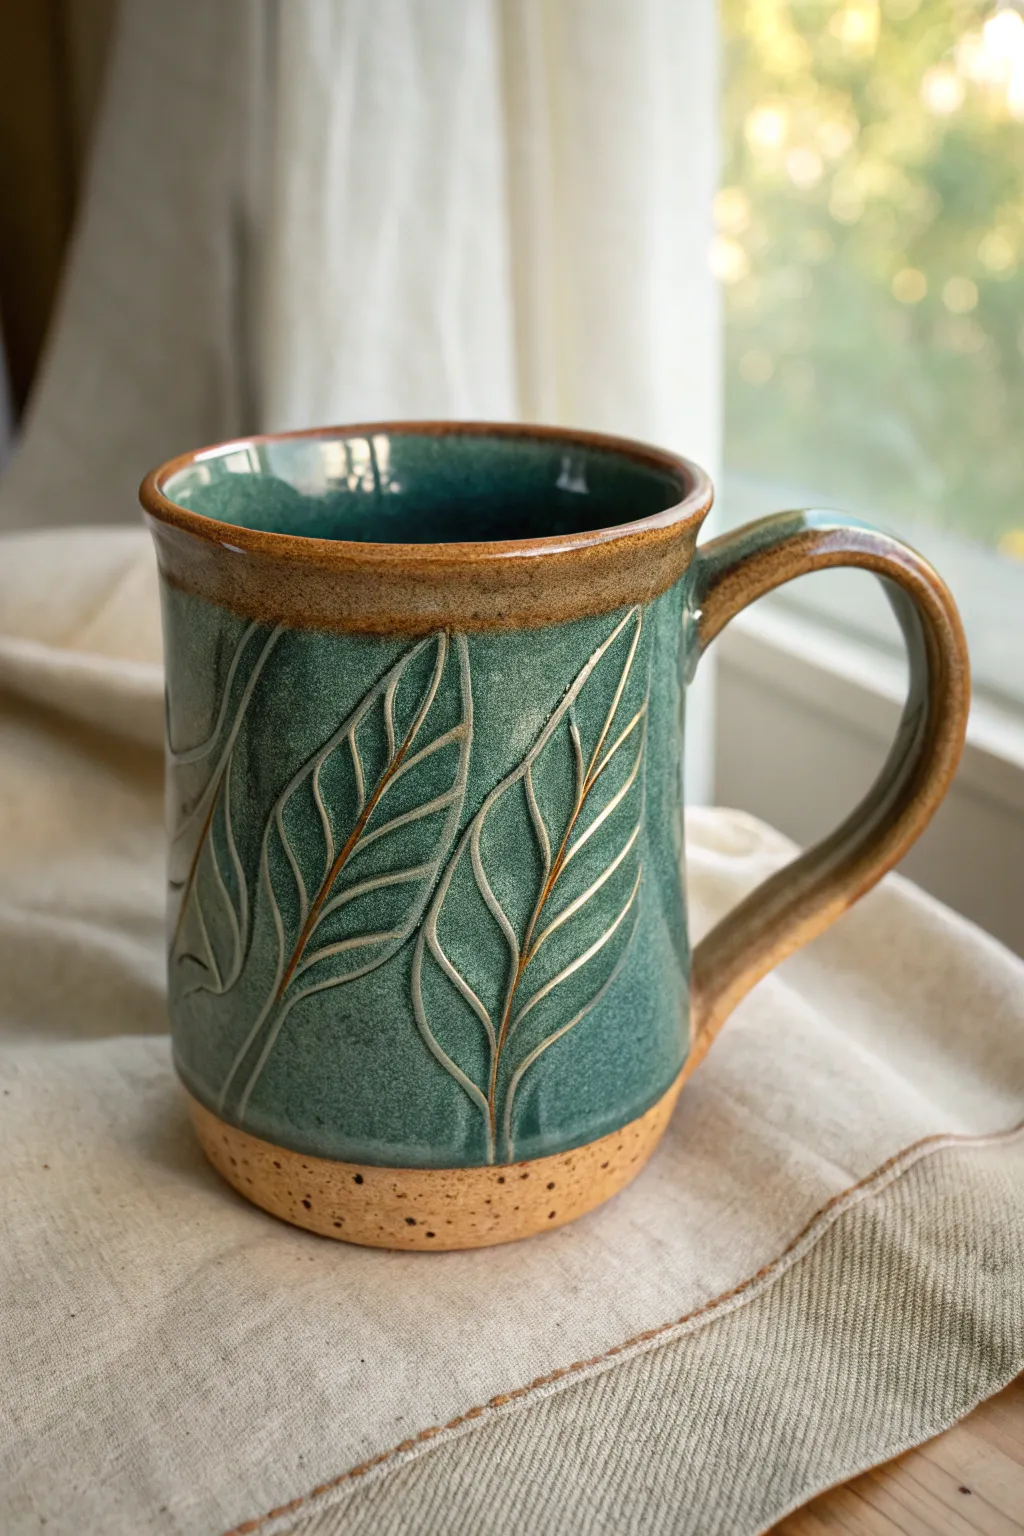
This rustic, nature-inspired mug features a rich green glaze that breaks beautifully over hand-carved leaf veins. The contrast between the glossy emerald surface and the raw, speckled clay base gives it an earthy, grounded feel perfect for your morning coffee.
How-To Guide
Materials
- Speckled Stoneware Clay (cone 5/6 recommended)
- Rolling pin
- Slab guides or canvas (approx. 1/4 inch thick)
- Fettling knife
- Bevelling tool (optional but helpful)
- Scoring tool or serrated rib
- Slip (made from your clay body)
- Sgraffito tool or small loop tool for carving
- Large sponge
- Wax resist
- Deep Green Glaze (e.g., Mayco Dark Green or similar cone 5/6 glaze)
- Kiln
Step 1: Forming the Cylinder
-
Roll the Slab:
Begin by rolling out your speckled stoneware clay into a smooth, even slab. Aim for a thickness of about 1/4 inch using slab guides to ensure consistency. -
Cut the Template:
Using a paper template or a ruler, cut a long rectangle for the mug body (approx. 4×10 inches, depending on desired size) and a circle for the base. -
Bevel the Edges:
Cut 45-degree angles on the short ends of your rectangle. This creates a stronger, cleaner seam when you join the ends together. -
Join the Seam:
Score the beveled edges aggressively and apply slip. Bring the ends together to form a cylinder, pressing firmly from the inside and outside to seal the joint. -
Attach the Base:
Score and slip the bottom edge of your cylinder and the outer edge of your circular base. Press the cylinder onto the base. -
Smooth the Connection:
Use a wooden tool or your finger to smooth the clay where the wall meets the base, both inside and out. I like to run a damp sponge over the rim now to round it off while the clay is still workable.
Clean Lines Pro-Tip
After carving your leaves, gently run a firm, slightly damp sponge over the design. This smooths sharp edges without erasing the deep texture essential for the glaze to break.
Step 2: Carving and Handling
-
Leather Hard Stage:
Let the mug dry slowly under loose plastic until it reaches a leather-hard state. The clay should be firm enough to handle without deforming but soft enough to carve. -
Sketch the Leaves:
Lightly trace your leaf outlines onto the surface using a needle tool or pencil. Aim for a vertical flowing pattern that wraps around the form. -
Carve the Veins:
Using a U-shaped carving tool or sgraffito loop, carve out the outlines and the central veins of the leaves. Vary your pressure to create lines that tamper off at the ends. -
Clean the Burrs:
Wait for the shavings to dry a bit more, then gently brush them away. Smoothing them too keenly while wet can mud up your crisp lines. -
Pull the Handle:
Pull a traditional strap handle from a lump of clay, tapering it slightly. Alternatively, you can cut a strip from your remaining slab. -
Attach Handle:
Score and slip the attachment points on the mug and handle. Press firmly to attach, then wipe away excess slip with a wet brush or finger. -
Bisque Fire:
Allow the mug to bone dry completely before loading it into the kiln for a bisque fire (usually cone 04).
Level Up: Oxide Wash
Apply a black or iron oxide wash into the leaf carvings and wipe it back before glazing. This deepens the shadows and makes the vein details pop dramatically.
Step 3: Glazing and Finishing
-
Wax the Base:
Apply wax resist to the bottom of the mug and up the side about half an inch. This creates the exposed raw clay band seen in the reference image. -
Wax the Rim (Optional):
If you want a toasted rim effect, carefully sponge a thin line of wax resist along the very top edge, or you can simply wipe the glaze back later. -
Glaze Application:
Pour your deep green glaze into the mug, swirl to coat the interior, and pour out. Then, dip the exterior into the glaze bucket. -
Revealing the Rim:
Immediately after dipping, use a damp sponge to wipe the glaze off the rim and the handle if you want that two-tone look. This exposes the underlying clay which will brown in the kiln. -
Glaze Fire:
Clean any stray drips from the waxed bottom and fire the piece to the maturity temperature of your clay and glaze (typically cone 5 or 6).
Enjoy the warmth of your new handmade mug every morning as a reminder of your craftsmanship
Footed Base Slab Mug for a Little Lift
Give your handmade pottery a literal lift with this charming slab-built mug featuring a distinct footed base. The design combines the organic feel of speckled clay with a clean, cylindrical silhouette and a warm, toasted rim that highlights the form.
Step-by-Step Guide
Materials
- Speckled cone 6 stoneware clay
- Rolling pin with thickness guides (approx. 1/4 inch)
- Fettling knife or needle tool
- Flexible metal rib
- Scoring tool or serrated rib
- Slip (clay mixed with water)
- Ruler
- Sponge
- Creamy white matte glaze
- Iron oxide wash (optional for rim)
Step 1: Forming the Body Cylinder
-
Roll the slab:
Start by wedging your speckled clay well to remove air bubbles. Roll out a consistent slab about 1/4 inch thick. Compress the slab on both sides with a flexible rib to align the clay particles, which helps prevent warping later. -
Cut the rectangle:
Using a ruler and fettling knife, measure and cut a rectangle. For a standard mug size, try approximately 4.5 inches high by 11 inches long, but feel free to adjust based on your desired volume. -
Bevel the edges:
On the two shorter ends of your rectangle, cut 45-degree bevels in opposite directions. This allows the seam to overlap cleanly without adding bulk to the wall thickness. -
Form the cylinder:
Score the beveled edges thoroughly and apply slip. Gently curve the slab into a cylinder, pressing the beveled ends together. Support the wall from the inside with one hand while smoothing the seam on the outside with a rib.
Clean Seams
When smoothing the vertical seam of your cylinder, use a wooden paddle to gently tap the outside while supporting the inside. This helps erase the join completely.
Step 2: Creating the Footed Base
-
Cut the base disc:
Roll a slightly thicker slab (about 3/8 inch) for the base. Place your cylinder on top of it and trace a circle about 1/4 inch wider than the cylinder itself. Cut this circle out. -
Attach the cylinder:
Score and slip the bottom edge of your cylinder extremely well. Do the same to the corresponding area on the base disc. Press the cylinder firmly onto the base. -
Refine the foot:
Instead of smoothing the excess base clay upward into the wall, leave it visible to create the ‘foot.’ Use a modeling tool or your thumb to smooth the connection point on the *inside* of the mug to ensure it’s watertight. -
Bevel the foot edge:
Take a sponge or a trimming tool and soften the outer edge of the base disc. You can impart a slight inward bevel or round it off to differentiate it visually from the vertical walls.
Make it Match
Create a matching stoneware coaster by cutting a simple circle from the same clay. Glaze only the top surface to create a custom set that mimics the cork look.
Step 3: Handle & Finishing Touches
-
Pull or roll a handle:
Roll a coil or cut a strip from your remaining slab for the handle. For this project, a slightly flattened strap-style handle works beautifully. Shape it into an ear-like curve and let it stiffen slightly until it holds its shape. -
Attach the handle:
Score and slip the attachment points on both the mug body and the handle. Press firmly to attach, ensuring the top of the handle is level with or just below the rim. -
Clean up:
Wipe down the entire piece with a damp sponge to smooth any rough edges, especially around the rim and the handle joints. Let the mug dry slowly under loose plastic to reach the bone-dry stage. -
Bisque fire:
Fire the mug to cone 04 (or your clay body’s bisque temperature). -
Glaze application:
Dip or brush your mug with a creamy white matte glaze. If using a brush, apply 3 even coats, letting each dry in between. I like to wax the bottom foot ring carefully before glazing to keep the kiln shelf clean. -
Accentuate the rim:
To get that toasted edge effect, wipe a very thin layer of iron oxide wash onto the rim with a sponge, or simply allow the clay body to break through the glaze naturally if your glaze is translucent enough. -
Final firing:
Glaze fire to cone 6. The heat will bring out the speckles in the clay, which will gently bleed through the cream glaze for that classic speckled pottery look.
Enjoy your morning coffee knowing exactly how much care went into every step of the process
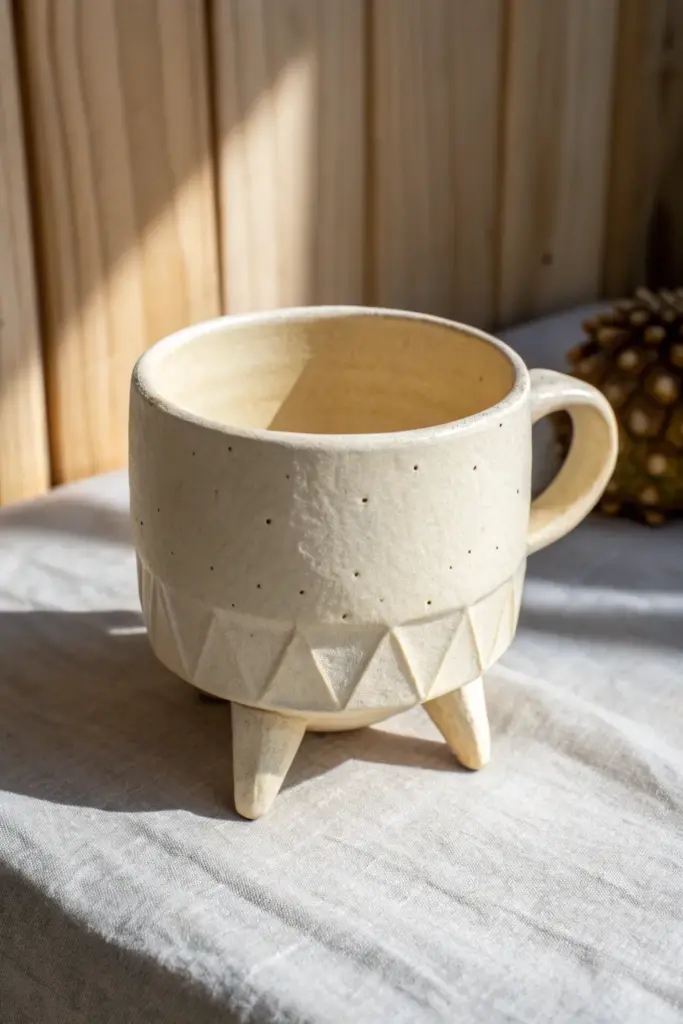
Tripod-Foot Slab Mug for a Playful, Sculptural Twist
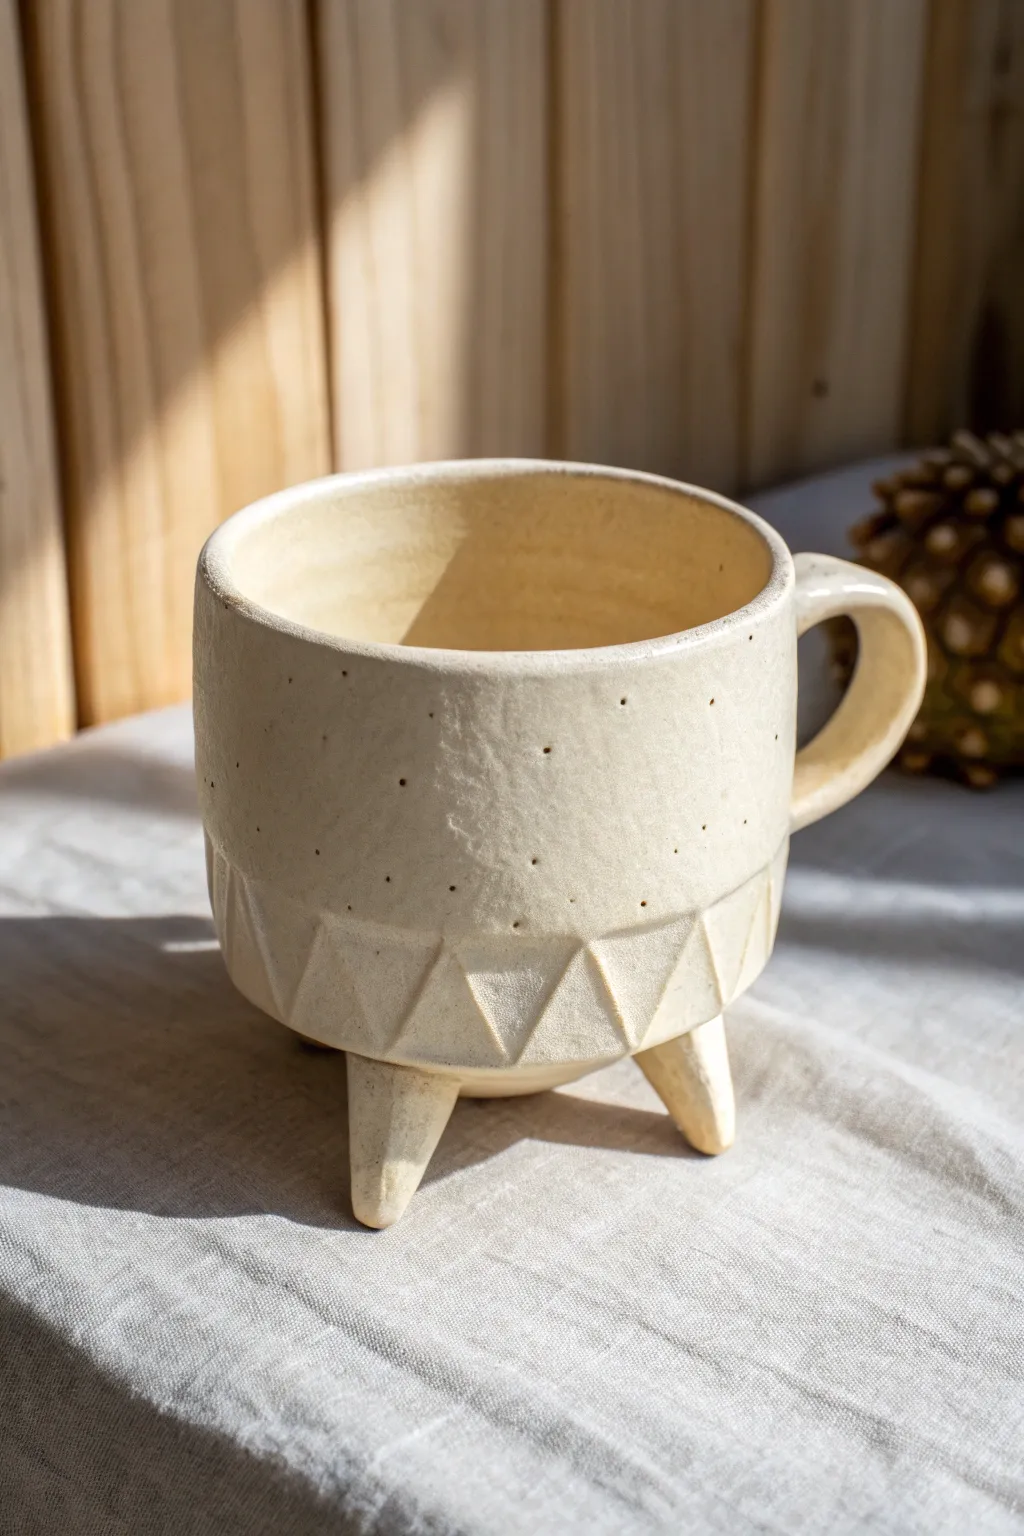
This charming mug brings a touch of whimsy to your morning coffee with its playful tripod stance and subtle geometric carving. The natural cream glaze highlights the speckled clay body, while the carved triangles around the base offer a delightful tactile finish.
Step-by-Step Tutorial
Materials
- Speckled cone 6 stoneware clay
- Rolling pin and thick guide strips (canvas or wood rails)
- Mug template or ruler
- Fettling knife
- Scoring tool (serrated rib)
- Slip
- Needle tool
- Carving tool (loop or square end)
- Small sponge
- Matte cream glaze
Step 1: Forming the Main Body
-
Roll the Slab:
Begin by rolling out a consistent slab of speckled stoneware clay to about 1/4 inch thickness. Use guide strips to ensure the thickness is perfectly even, which is crucial for a stable mug wall. -
Cut the Rectangle:
Measure and cut a long rectangle for the mug body. A standard size is roughly 11 inches long by 4 inches tall, but adjust based on your desired volume. -
Texture Option:
Before assembling, you can lightly roll a distinct texture over the slab if desired, though the example project relies on the natural clay texture and later carving. If keeping it smooth, compress both sides with a rib now. -
Form the Cylinder:
Bevel the short ends of your rectangle at opposite 45-degree angles. This creates a stronger, cleaner seam than a simple butt joint. -
Attach the Seam:
Score the beveled edges aggressively and apply slip. Bring the ends together to form a cylinder, pressing the seam firmly from both inside and outside. Smooth the join until it is invisible.
Solid Stance Pro Tip
When attaching the feet, gently tap the mug on a flat board immediately after joining. This naturally levels the tripod so your mug won’t wobble later.
Step 2: Adding the Base and Feet
-
Create the Floor:
Roll a smaller piece of slab for the floor. Place your cylinder on top, trace around it lightly with a needle tool, and cut out the circle. -
Attach the Bottom:
Score and slip the bottom edge of the cylinder and the edge of the circular base. Join them securely. I usually run a small coil of clay along the inside seam for extra leak-proof security. -
Shape the Feet:
Roll three small, thick cones of clay. These should be sturdy—about 1 inch tall and tapering slightly downward. Flatten the top surface of each cone where it will attach to the mug. -
Position the Tripod:
Mark three equidistant points on the bottom of the mug. Score and slip these spots and the tops of your feet. Press the feet firmly onto the base. -
Blend and Level:
Smear the clay from the feet onto the mug base to secure them. Flip the mug right-side up and gently press down to ensure it sits level on the table.
Step 3: Handle and Carving
-
Add Decorative Carving:
Once the mug is leather hard—firm to the touch but not dry—use a sharp loop tool to carve a row of triangles around the bottom inch of the wall. Remove the clay inside the triangles to create a recessed geometric border. -
Poke Texture:
Using your needle tool, add small, random pinpricks on the upper half of the mug for that subtle dotted texture shown in the image. -
Pull a Strap Handle:
Pull a short, comfortable strap handle or cut one from a leftover slab strip. Curve it into an ear shape and let it stiffen slightly. -
Attach the Handle:
Score and slip the attachment points on both the mug and handle. Press firmly to join. The top of the handle should sit just below the rim. -
Dry Slowly:
Cover the mug loosely with plastic. Because the feet are solid and the walls are thin, slow drying is essential to prevent cracking at the connection points.
Level Up: Color Inlay
Brush a dark underglaze into the carved triangles and needle holes, then wipe it back with a damp sponge before glazing to make the texture pop.
Step 4: Finishing
-
Bisque Fire:
Fire the mug to cone 04 (or your clay’s specific bisque temperature) once completely bone dry. -
Glaze Application:
Dip or brush your matte cream glaze. Make sure the glaze isn’t too thick in the carved triangles, or you’ll lose the geometric definition. -
Final Fire:
Fire to cone 6. Ensure the bottom of the feet are wiped completely clean of glaze to prevent sticking to the kiln shelf.
Enjoy the satisfying weight and stability of your sculptural mug during your next tea break