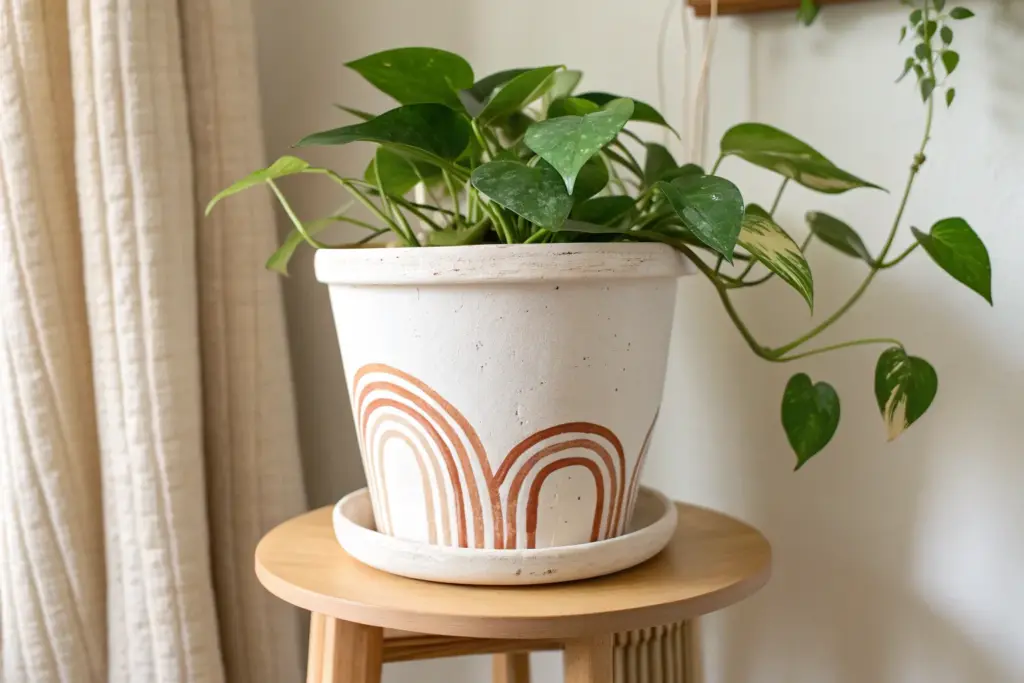
A plain terra cotta pot is basically a blank canvas, and a little paint turns it into instant decor you’ll actually want to show off. Here are my favorite painting flower pots ideas—starting with the classics and working toward the fun, unexpected ones.
Simple Polka Dots for an Easy, Cheerful Look
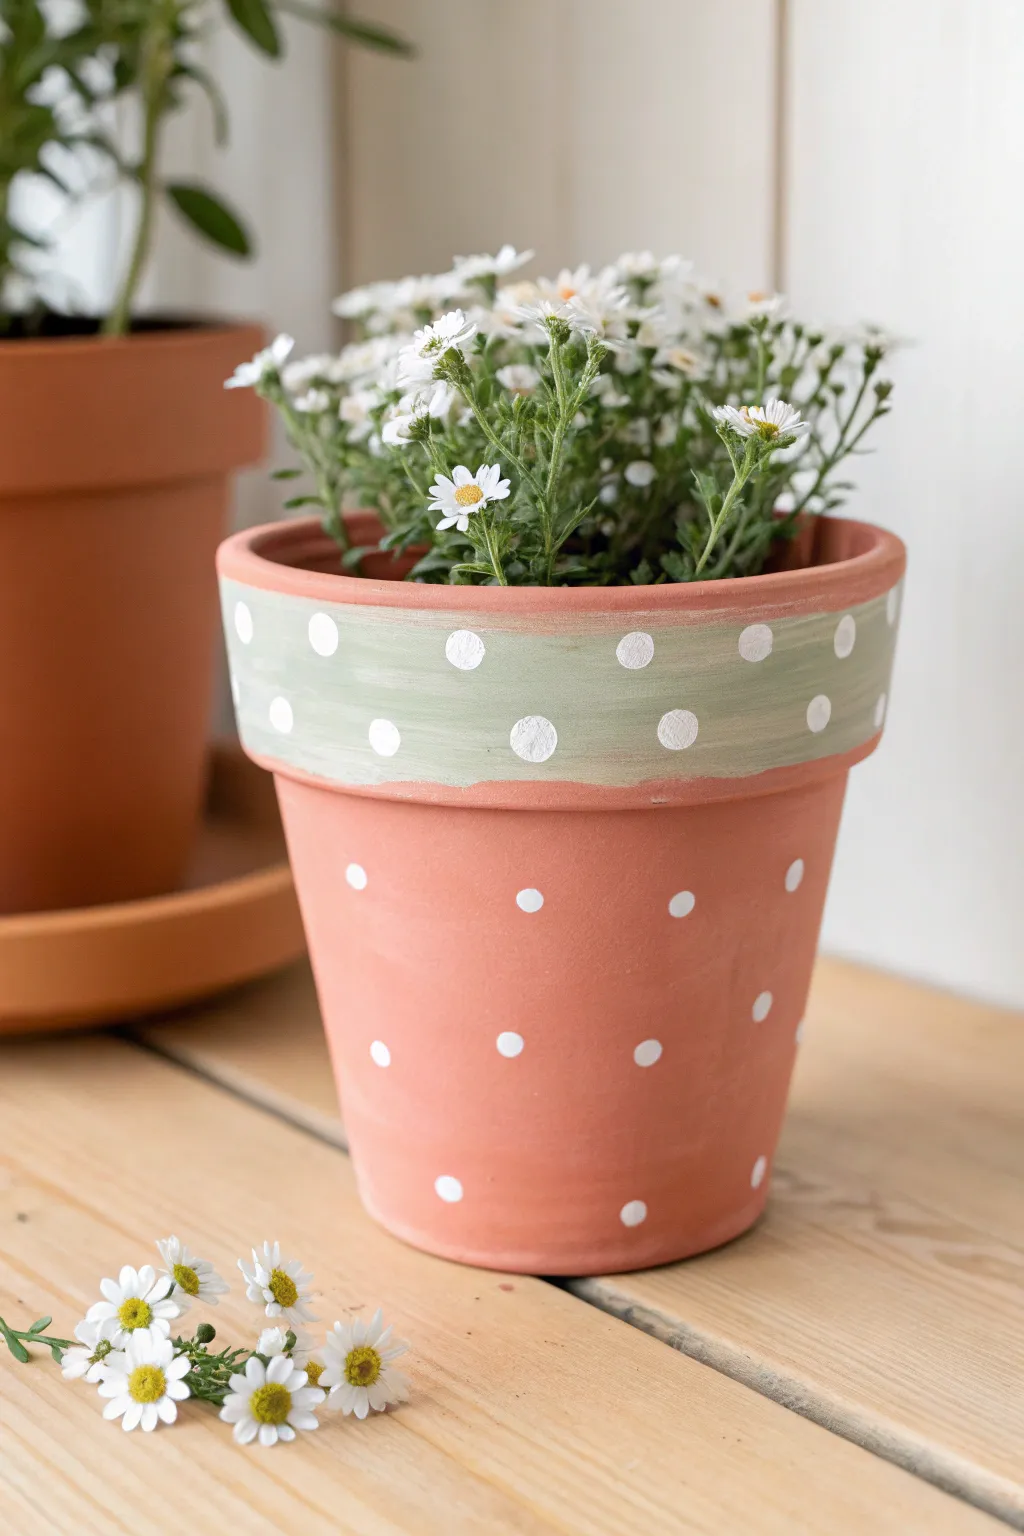
Transform a plain terracotta pot into a charming home for your daisies with this soft, cheerful design. The combination of earthy clay, mint green, and crisp white dots creates a fresh look perfect for brightening up any windowsill.
Step-by-Step Guide
Materials
- Clean terracotta pot (standard size)
- Soft mint green acrylic craft paint
- White acrylic craft paint
- Medium flat paintbrush (approx. 1 inch)
- Small round sponge pouncer or cotton swabs
- Paper plate or painting palette
- Damp cloth
- Water cup
Step 1: Preparing the Canvas
-
Clean surface:
Before you begin, wipe down your terracotta pot with a damp cloth to remove any dust or debris. Let it dry completely so the paint adheres properly. -
Protect your workspace:
Lay down some newspaper or a drop cloth. Terracotta is porous and paint can dry quickly on it, so having your space ready is helpful. -
Pour the green paint:
Squeeze a generous amount of mint green acrylic paint onto your palette or paper plate.
Uneven Dots?
If your paint dots look messy or have peaks, lightly tap the wet paint with a damp finger to flatten them out for a smooth, professional finish.
Step 2: Painting the Rim
-
Load the brush:
Dip your flat paintbrush into the mint green paint. You want full coverage, but not so much that it drips. -
Paint the first coat:
Apply the green paint specifically to the rim of the pot. Brush horizontally around the circumference, following the natural line of the clay. -
Check the edges:
Be mindful of the bottom edge of the rim where it meets the main body of the pot; a slightly uneven, hand-painted line adds rustic charm, so don’t stress about perfection here. -
Dry and repeat:
Let the first coat dry for about 15 minutes. The clay absorbs paint, so you will likely need a second coat to get that opaque, creamy green color visible in the photo. -
Second coat application:
Apply the second layer of mint green to the rim and let it dry completely to the touch.
Step 3: Adding the Polka Dots
-
Prepare white paint:
Clean your brush or grab your dotting tool. Pour a small puddle of white acrylic paint onto your palette. -
Choose your tool:
For the larger dots on the green rim, a small round sponge pouncer works best. For the smaller dots on the body, the handle end of a paintbrush is perfect. -
Dot the green rim:
Dip your pouncer into the white paint and press gently onto the green rim. Space these larger dots evenly around the center of the band. -
Create the body pattern:
Switch to your smaller tool (paintbrush handle or cotton swab). I like to start a few inches below the rim. -
Applying main dots:
Press your tool onto the raw terracotta surface to create white dots. Create a staggered pattern—place a dot, move down and to the right, and place another. -
Maintain spacing:
Try to keep the distance between dots relatively consistent to maintain that organized but playful look. -
Finish the pattern:
Continue dotting all the way down to the base of the pot. Reload your tool with paint frequently to keep the dots round and opaque. -
Clean up edges:
If any dots look too thin, waiting for them to dry and dabbing a tiny bit more white paint on top will make them pop. -
Final drying:
Allow the entire pot to dry for at least an hour before handling or planting.
Sealing the Deal
To prevent water from bubbling your paint later, seal the inside of the pot with a clear acrylic spray before planting your flowers.
Once dry, pot your favorite white blooms to complete this lovely spring display


Modern Geometric Triangles and Color Blocks
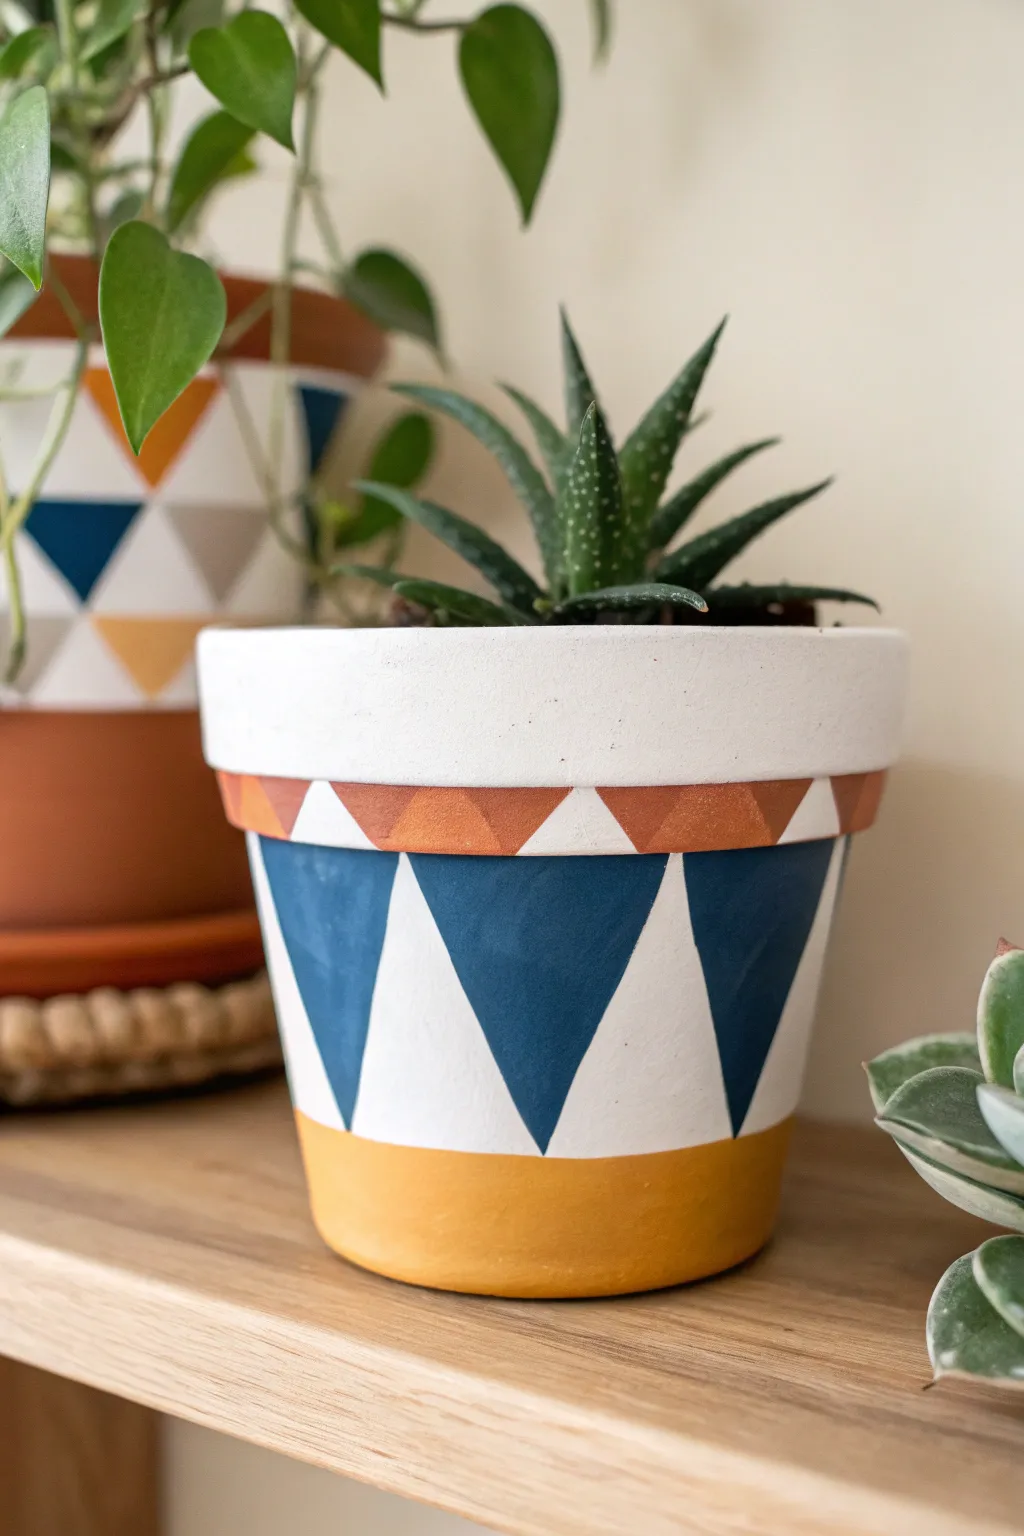
Transform a plain terracotta vessel into a modern statement piece with crisp lines and bold color blocking. This project achieves a sophisticated look by layering distinct bands of pattern—simple white banding, warm terracotta diamonds, striking navy triangles, and a grounding mustard base.
Step-by-Step
Materials
- Terracotta pot (clean and dry)
- White acrylic craft paint
- Navy blue acrylic craft paint
- Mustard yellow acrylic craft paint
- Terracotta/burnt orange acrylic paint (optional, for touch-ups)
- Painter’s tape (various widths if available, or standard)
- Flat paintbrushes (medium and small)
- Detail brush
- Pencil
- Ruler or measuring tape
- Water cup and paper towels
- Matte or satin clear sealant spray
Step 1: Base Coat and Preparation
-
Clean the surface:
Ensure your terracotta pot is completely clean and dry. Wipe away any dust with a damp cloth and let it air dry for at least an hour before painting to ensure good adhesion. -
Paint the rim:
Start by painting the upper rim of the pot with white acrylic paint. This is the wide band at the very top. You’ll likely need 2-3 coats for opaque coverage, allowing 15-20 minutes of drying time between layers. -
Create the white middle band:
Extend the white paint down below the rim onto the main body of the pot. Paint a band that is roughly 2-3 inches wide. Don’t worry about a perfectly straight bottom edge yet, as the yellow paint will cover it later. -
Let it cure:
Allow the white base coats to dry completely for at least an hour. This is crucial because we will be applying tape over this paint, and if it’s tacky, the tape will peel it off.
Step 2: Drafting the Design
-
Mark the horizontal lines:
Use a ruler to lightly mark a horizontal line around the circumference of the pot where the white section ends and the mustard yellow bottom will begin. -
Paint the bottom yellow:
Using a flat brush, paint the bottom section of the pot with mustard yellow paint, following your pencil line. This creates the solid colored base. Apply 2 coats for richness. -
Draft the large triangles:
Once the base colors are dry, use a pencil and ruler to markpoints for the large navy triangles. Measure the circumference and divide equally so your triangles are uniform. -
Draw the zig-zag:
Connect your marked points to draw a large zig-zag line around the center of the pot. These lines will form the boundaries between the blue triangles and the white background.
Clean Lines Hack
Before painting your colored layer, brush a tiny amount of your base color (white) over the tape edge first to seal it completely against bleeds.
Step 3: Applying Geometric Details
-
Tape the large triangles:
Apply painter’s tape along the outside edges of the triangles you want to paint blue. Press the edges of the tape down firmly with your fingernail to prevent paint bleed. -
Paint the navy triangles:
Fill in the large downward-pointing triangles with navy blue paint. Brush away from the tape edge rather than underneath it to keep the lines crisp. Apply two coats. -
Remove tape carefully:
Peel off the tape while the second coat of blue is still slightly wet. This helps prevent the paint from drying to the tape and pulling up in chunks. -
Draft the upper rim detail:
For the smaller triangle band on the rim, use your pencil to draw a smaller zig-zag pattern inside the white rim area, leaving a thin white border above and below. -
Detail the terracotta triangles:
Using a small detail brush, carefully paint the downward-pointing triangles in the rim band with a terracotta-colored paint (or leave them unpainted if you masked this area initially, though painting is easier for precision here). -
Touch up lines:
I usually find a few spotty edges after removing tape. Use a fine liner brush and the appropriate paint color to sharpen any fuzzy lines or fix small bleeds. -
Seal the pot:
Once the entire design is fully dry (wait overnight if possible), take the pot to a well-ventilated area and apply a clear matte or satin spray sealant to protect your work from water measurement.
Uneven Triangles?
If the math for the circumference is tricky, make a paper template of one triangle beforehand and trace it repeatedly around the pot for uniformity.
Now style your fresh geometric pot with a spiky aloe or succulent to mirror those sharp angles


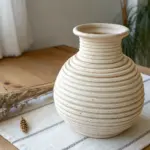
Thin Stripes That Wrap All the Way Around
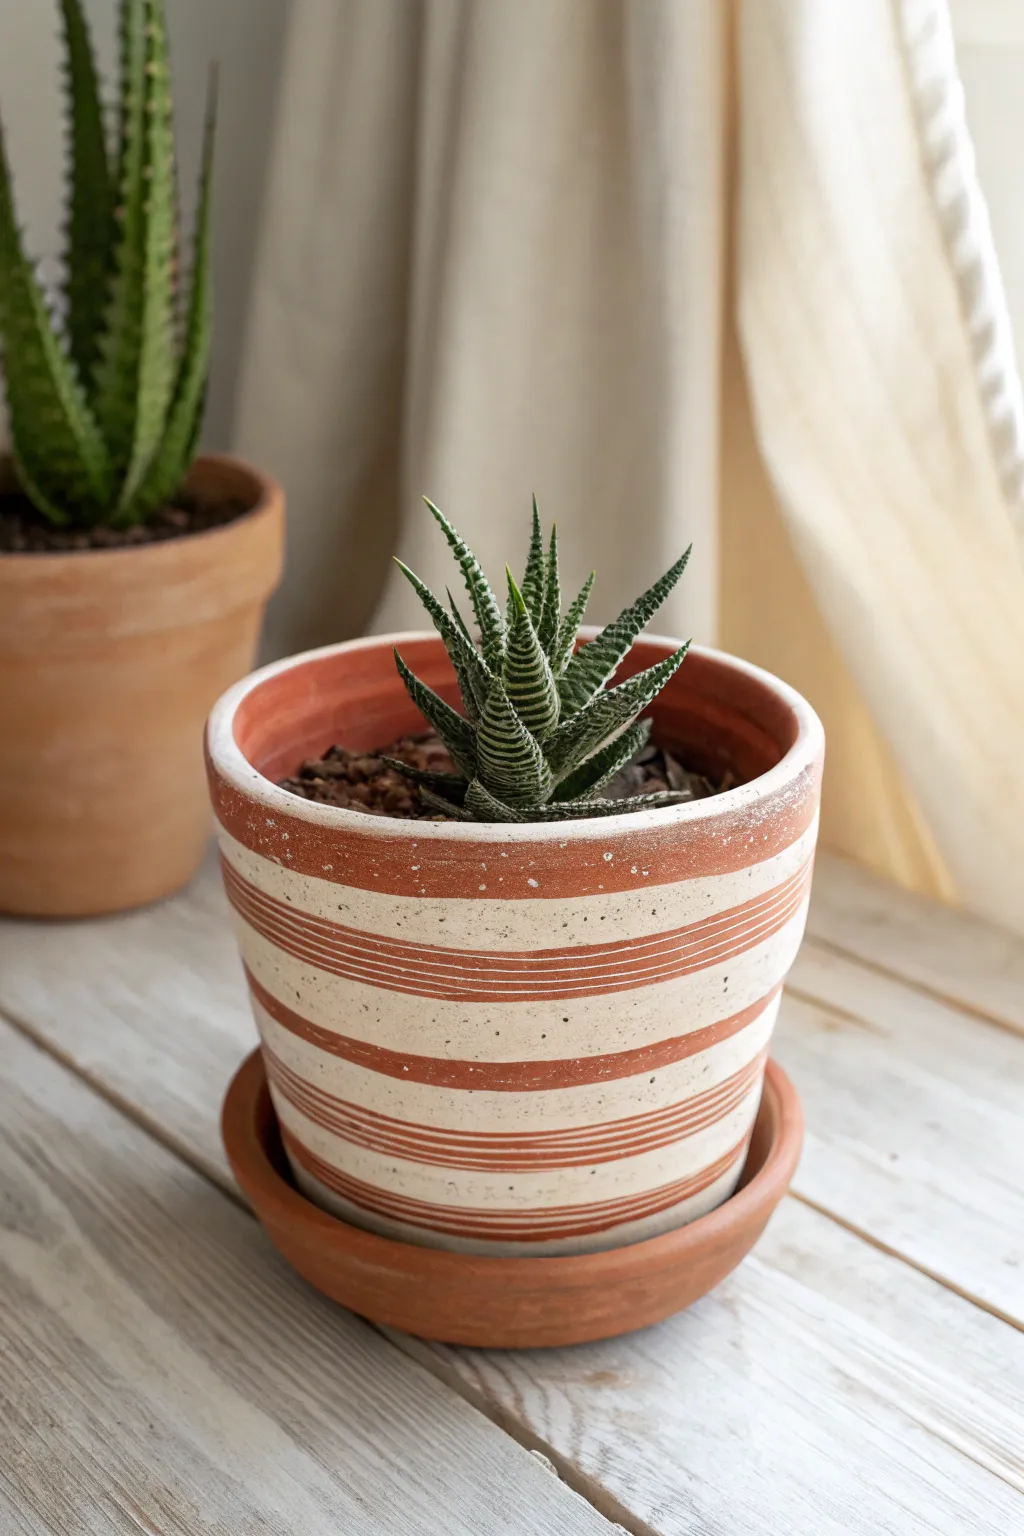
Transform a plain terracotta planter into a chic, modern home accent with this simple striping technique. By leaving the natural clay exposed between painted cream bands, you create a beautiful textural contrast that mimics high-end ceramic designs.
Detailed Instructions
Materials
- Terracotta pot and matching saucer
- Cream or off-white acrylic craft paint (outdoor formula recommended)
- Rubber bands (various widths preferred)
- Small flat paintbrush
- Matte spray sealer
- Damp cloth or sponge
- Masking tape (optional)
Step 1: Preparation
-
Clean surface:
Begin by wiping down your terracotta pot with a damp cloth to remove any dust or loose clay particles. The surface needs to be completely clean and dry for the paint to adhere properly. -
Soak bands:
If you are using new rubber bands, stretch them out a few times with your hands to loosen them up. This prevents them from snapping or gripping the pot too tightly and making marks.
Step 2: Creating the Pattern
-
Apply first band:
Place your first rubber band around the top rim of the pot. Adjust it so it sits straight and parallel to the lip of the container. -
Middle spacing:
Add a few rubber bands around the decorative center curve of the pot. I like to group two or three thin bands close together to create those intricate, narrow clay stripes you see in the photo. -
Lower section:
Place your final rubber bands near the bottom third of the pot. Varying the spacing between these groups creates a more dynamic visual rhythm than perfectly even spacing. -
Check alignment:
Rotate the pot slowly at eye level. Nudge any bands that look crooked or wavy; getting them straight now is crucial for crisp resulting lines. -
Seal edges:
Press down firmly on all the rubber bands with your fingernail. This ensures a tight seal against the clay and helps prevent paint from seeping underneath.
Bleeding Lines?
If paint bleeds under the bands, wait for it to dry fully. Then, use an exacto knife to gently scrape the excess dry paint off the terracotta to sharpen the edge.
Step 3: Painting
-
Load the brush:
Dip your flat brush into the cream acrylic paint. Off-load a little paint onto a paper towel; you want coverage, but a dripping brush will cause bleeds. -
Paint the background:
Paint the exposed areas of the pot, painting right over the rubber bands. Don’t worry about keeping the bands clean—they act as your stencil. -
Watch the direction:
Brush horizontally, moving with the curve of the pot rather than up and down. This helps minimize visible brushstrokes. -
Second coat:
Let the first layer dry to the touch (usually about 15-20 minutes). Apply a second coat to ensure the cream color is opaque and solid. -
Rim painting:
Carefully paint the very top rim of the pot and just inside the lip (about an inch down) so the soil line looks neat. -
Dry time:
Allow the paint to dry completely. This is critical; if the paint is tacky, pulling the bands off might peel up the paint.
Add Color Depth
Mix a tiny drop of tan paint into your white acrylic. This warms up the cream tone so it blends more harmoniously with the orange terracotta base.
Step 4: Finishing Touches
-
Remove bands:
Gently lift and snip the rubber bands with scissors to remove them without dragging them across the painted surface. -
Clean up lines:
If any paint seeped under the bands, use a damp toothpick or a craft knife to gently scrape the excess paint away to reveal the clean terracotta line. -
Distress (optional):
For the slightly rustic look in the photo, lightly sand a few spots with fine-grit sandpaper to reveal specks of clay through the white paint. -
Seal the pot:
Take the pot outside and apply a coat of matte clear spray sealer. This protects the paint from water damage when you water your plant.
Now you have a stylish, custom planter ready for your favorite succulent


Sweet Daisy Band Around the Rim
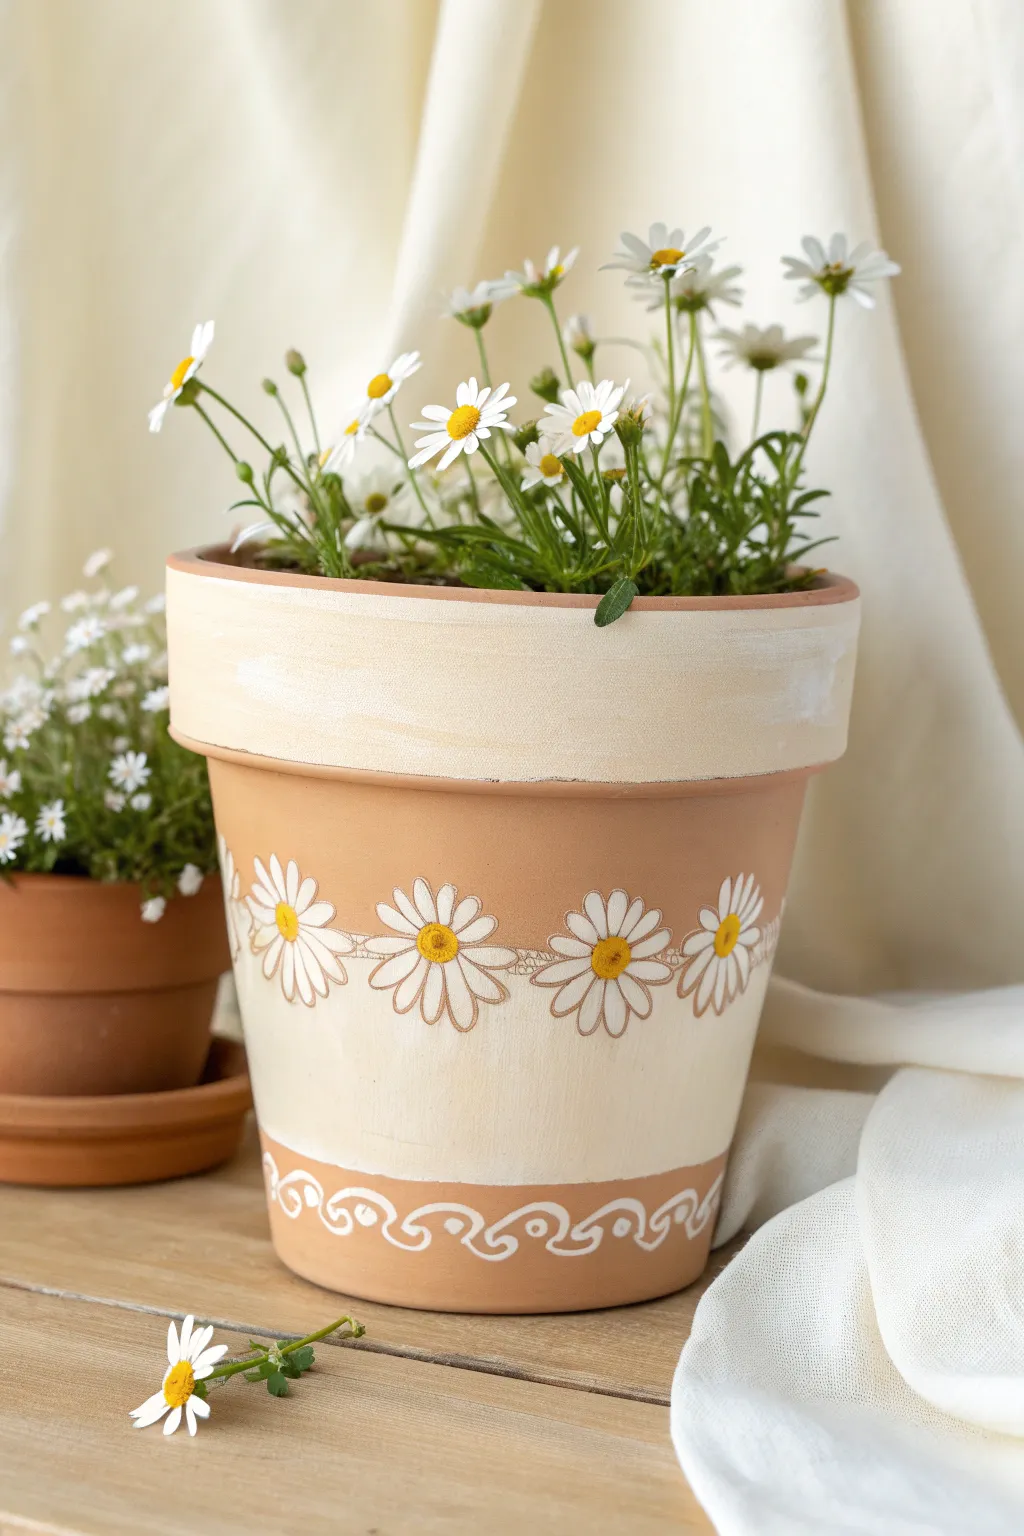
Bring the charm of a summer garden indoors with this delightfully layered terracotta pot design. A creamy central band hosts a delicate chain of hand-painted daisies, creating a vintage-inspired look that perfectly complements fresh blooms.
Step-by-Step Tutorial
Materials
- Terracotta pot (cleaned and dried)
- White acrylic paint (warm or antique white)
- Yellow acrylic paint (golden yellow)
- Small flat brush (size 6-8)
- Fine detail brush (liner or size 0 round)
- Small round sponge applicator (optional)
- Pencil
- Painter’s tape or masking tape
- Matte sealer or outdoor varnish
Step 1: Base Prep
-
Clean the surface:
Ensure your terracotta pot is thoroughly cleaned and free of dust or price tag residue. If you washed it, let it dry completely for at least 24 hours to prevent moisture from trapping under the paint. -
Paint the rim:
Using your flat brush, apply a coat of warm white paint to the entire upper rim of the pot. Leave the very top edge brushy and slightly uneven for a rustic feel, or make it crisp if you prefer. -
Apply the second coat:
Once the first layer on the rim is dry to the touch, add a second coat to ensure the terracotta orange doesn’t show through too strongly.
Clean Lines Hack
If you struggle painting perfect circles for the flower centers, use the eraser end of a fresh pencil as a stamp. Dip it in yellow paint and press firmly.
Step 2: Creating the Central Band
-
Mark the band:
Measure about two inches down from the bottom of the rim. Use a pencil to verify the spacing, or apply a strip of painter’s tape around the pot to create a clean lower line for your central cream band. -
Paint the band section:
Fill in the area between the rim and your tape line with the warm white paint. I like to use horizontal strokes here to mimic the texture of the clay. -
Dry and peel:
Allow the paint to dry completely before carefully peeling off the tape. Touch up the bottom edge with a small brush if any paint bled under the tape.
Step 3: Painting the Daisies
-
Plan the flower placement:
Using a pencil, lightly mark small ‘X’s around the upper part of the cream band where the center of each daisy will sit. Space them evenly so they wrap all the way around. -
Paint the centers:
Dip your fine round brush or a sponge applicator into the golden yellow paint. Dab a round center onto each of your pencil marks. -
Create the petals:
Switch to your detail liner brush and white paint. Paint long, slender oval petals radiating from the yellow centers. Don’t worry about making them identical; natural variation adds charm. -
Outline the petals:
For that illustrative look shown in the image, mix a tiny drop of brown paint with water to make a translucent wash. Very delicately outline the white petals to make them pop against the cream background. -
Add connecting details:
Between the flowers, paint delicate scalloped lines or tiny lace-like loops using the thinned brown wash or a very pale grey to visually connect the daisies.
Add Dimension
Mix a tiny drop of orange into your yellow paint and add a small ‘C’ shape to the bottom of each flower center to give them a 3D rounded appearance.
Step 4: The Bottom Details
-
Sketch the wave pattern:
Near the bottom of the pot, on the bare terracotta section, lightly pencil in a continuous scrolling wave or swirl pattern. -
Paint the swirls:
Go over your pencil lines with white paint and a liner brush. Keep the pressure steady to create smooth, flowing curves. -
Add accent dots:
Place small white dots inside the curls of the wave pattern or underneath the peaks for extra decoration.
Step 5: Finishing Touches
-
Clean up stray marks:
Once all paint is bone dry, gently erase any visible pencil marks with a soft eraser. -
Seal the artwork:
Apply a coat of matte sealer or outdoor varnish over the entire painted area. This protects your design from water damage when you water the plant.
Fill your new pot with cheerful daisies or white alyssum to complete the look

The Complete Guide to Pottery Troubleshooting
Uncover the most common ceramic mistakes—from cracking clay to failed glazes—and learn how to fix them fast.
Wildflower Meadow Wrap for Cottage Energy
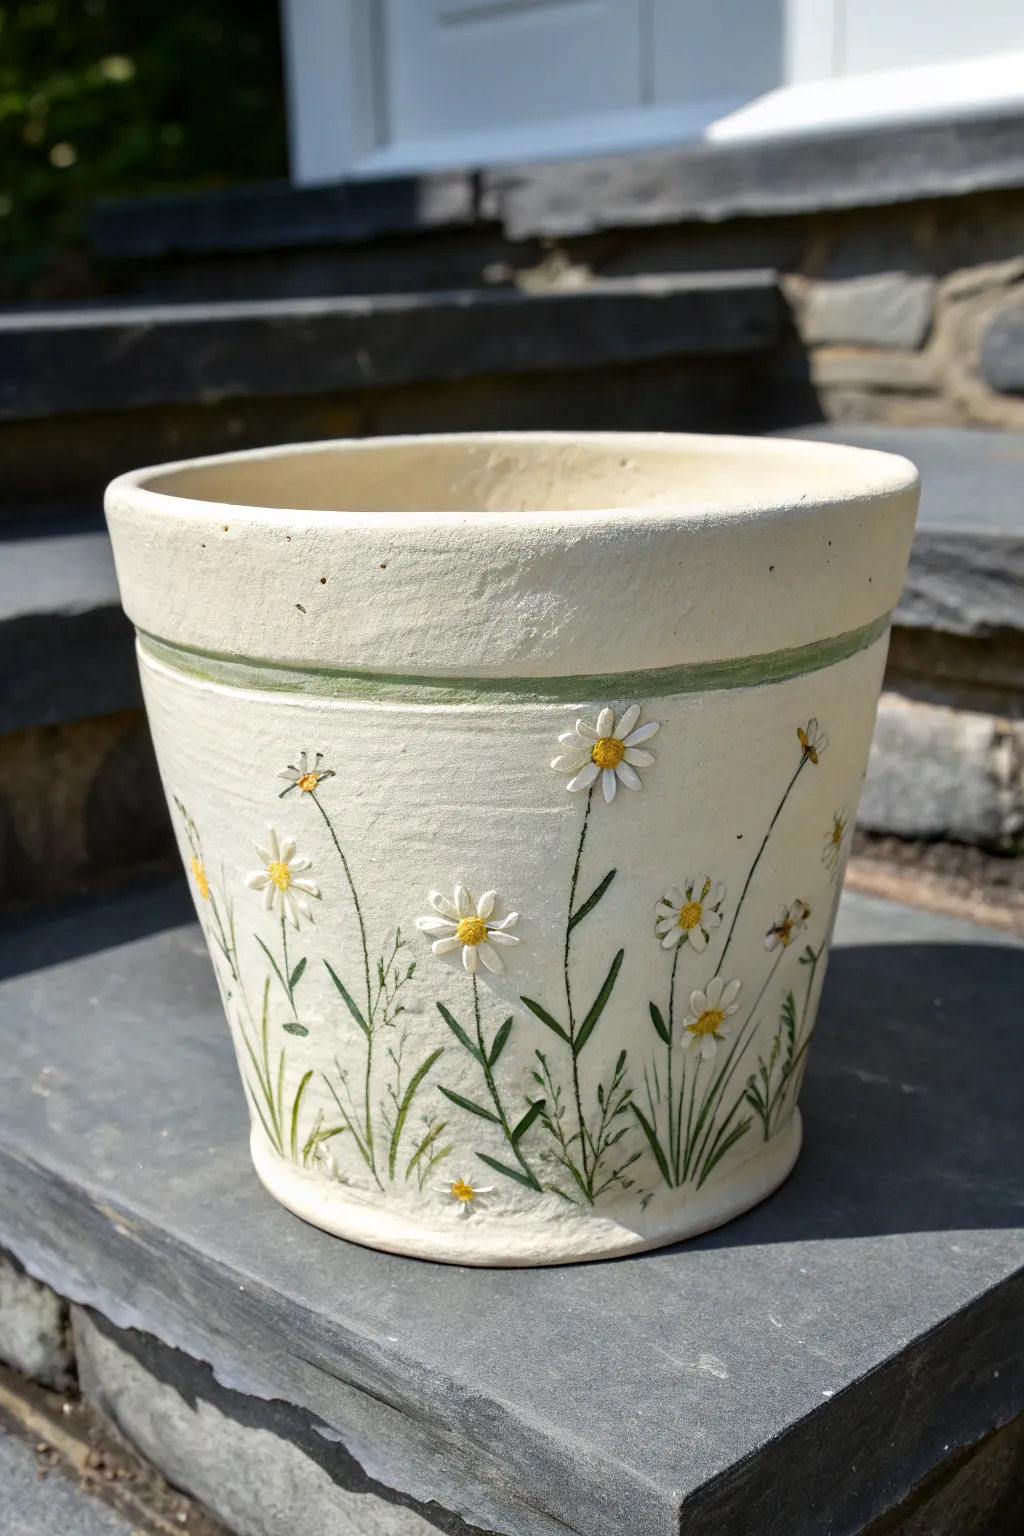
Transform a plain pot into a blooming meadow with this delicate design that captures the gentle essence of cottage living. The raised texture of the flowers adds a stunning tactile element, making the daisies seem to pop right off the ceramic surface.
Step-by-Step Guide
Materials
- Terracotta pot (matte finish preferred)
- Cream or off-white acrylic craft paint (matte)
- White texture paste or heavy body acrylic paint
- Sage green acrylic paint
- Forest green acrylic paint
- Mustard yellow acrylic paint
- Small round brushes (sizes 0 and 2)
- Thin liner brush
- Palette or small dish
- Water cup and paper towels
- Clear matte sealant spray
Step 1: Preparing the Canvas
-
Clean surface:
Begin by wiping down your terracotta pot with a damp cloth to remove any dust or oils, ensuring a clean slate for your artwork. -
Base coat application:
Paint the entire exterior and the inner rim of the pot with your cream or off-white acrylic paint. This creates that lovely, soft ceramic look. -
Apply second coat:
Once the first layer is dry to the touch, apply a second coat to ensure solid, opaque coverage without any terracotta showing through. -
Paint the accent band:
Mix a small amount of sage green with a drop of your cream base to lighten it. Using a size 2 brush, paint a slightly imperfect, organic-looking stripe just below the rim of the pot.
Use a sponge for soft bases
For the cream base coat, apply the paint with a kitchen sponge instead of a brush. This eliminates brushstrokes and gives the pot a stone-like texture.
Step 2: Growing the Stems
-
Sketch placement:
Visualize where your tallest flowers will go. I find it helpful to imagine them swaying slightly in the wind rather than standing perfectly straight. -
Paint main stems:
Load your liner brush with forest green paint thinned slightly with water. Paint long, slender stems reaching up from the base of the pot to varying heights. -
Add variety:
Intersperse shorter stems and fine, grass-like blades amongst the main flower stems to create density near the bottom. -
Leaf details:
Using the same forest green, add small, slender leaves to the stems. Press the brush down and lift quickly to get tapered points. -
Layering greens:
For depth, mix a little sage green with the forest green and add a few lighter grass blades in the background.
Texture paste won’t stick?
If your thick petals slide off, sand the specific spot lightly where the flower will go. The rougher surface gives the heavy medium something to grip.
Step 3: Blooming the Daisies
-
Mixing texture:
On your palette, mix white acrylic paint with a little texture paste. If you don’t have paste, simply use heavy body white paint straight from the tube. -
Petal formation:
Dip a small round brush into the thick white mixture. Press and pull to form teardrop-shaped petals around the top of your stems. -
Building dimension:
Don’t smooth the paint out too much; let the brushstrokes remain visible and slightly raised to mimic the texture of real petals. -
Varying perspectives:
Paint some flowers fully open (circular) and others from a side view (fan-shaped) to make the meadow look natural. -
Tiny buds:
Add small white dots or tight clusters on the shorter stems to represent unopened buds or smaller wildflowers.
Step 4: Final Flourishes
-
Adding centers:
Dip the handle end of a paintbrush into mustard yellow paint to create perfect, round dots for the flower centers. -
Texturing centers:
While the yellow paint is wet, gently tap it with a dry brush to give the centers a slightly fuzzy, pollen-like appearance. -
Highlighting:
Add tiny flecks of lighter yellow or white to the top of the yellow centers to simulate sunlight hitting the flowers. -
Grounding the design:
Use your thinned green paint to add a few very faint wild grass strokes right at the base rim to “root” the plants. -
Sealing:
Allow the pot to cure for 24 hours. Because of the texture, use a spray matte sealant rather than a brush-on varnish to protect the raised petals.
Place your favorite fern or blooming plant inside to bring your personalized meadow into full bloom
Sunflower Face Front-and-Center

Bring a burst of late-summer sunshine indoors with this vibrant teal planter featuring a bold, illustrative sunflower design. The contrast between the rich matte teal background and the golden-yellow petals makes for a stunning, cheerful home for your succulents.
Step-by-Step Tutorial
Materials
- Terracotta pot (4-inch to 6-inch size recommended)
- Acrylic paints: Teal/Turquoise, Golden Yellow, Light Yellow, Dark Brown, White
- Paintbrushes: Medium flat brush, small round brush, fine liner brush
- Pencil
- Palette or paper plate
- Water cup and paper towels
- Clear acrylic sealer spray (matte or satin finish)
Step 1: Preparation & Base Coat
-
Clean the surface:
Before painting, ensure your terracotta pot is clean, dry, and free of dust. You can wipe it down with a damp cloth and let it air dry completely. -
Apply the first teal coat:
Using a medium flat brush, apply a smooth coat of your teal acrylic paint to the entire exterior of the pot, including the rim. Don’t forget to paint about an inch down the inside of the rim for a finished look. -
Allow to dry:
Let the first coat dry fully. Terracotta is porous and soaks up paint, so this first layer might look a bit streaky. -
Apply the second coat:
Add a second coat of teal to achieve that solid, opaque matte finish seen in the photo. If needed, do a third coat for complete coverage, ensuring no clay color peeks through.
Smooth Lines Tip
Add a single drop of water to your outlining paint. It should be the consistency of ink, allowing the brush to glide smoothly over the textured clay surface.
Step 2: Drafting the Design
-
Sketch the center:
Once the base coat is bone dry, use a pencil to lightly sketch a medium-sized circle in the middle of the pot’s side. This will be the center of your main sunflower. -
Draw primary petals:
Lightly sketch long, pointy petal shapes radiating outward from your circle. Don’t worry about them being identical; natural variation adds charm. -
Fill the gaps:
Draw a second layer of petal tips behind the first set to make the flower look full. -
Add side flowers:
I like to draw partial semicircles and petals on the sides of the pot to suggest other sunflowers wrapping around the design.
Step 3: Painting the Sunflowers
-
Base coat the petals:
Using a small round brush, fill in all the petal shapes with your golden yellow paint. You may need two coats here to cover the dark teal background completely. -
Paint the center:
Fill the center circle with dark brown paint. Keep the edges relatively neat where they meet the yellow petals. -
Add petal depth:
Mix a tiny bit of brown with yellow to create a darker mustard shade. Paint thin, subtle streaks near the base (center) of each primary petal to create shadow and dimension. -
Highlight the tips:
Mix a little white with your yellow paint. Apply this lighter shade towards the tips of the petals to catch the ‘light’. -
Texture the center:
Dip an old or stiff brush into light brown or tan paint. Dab off most of the paint, then stipple (tap repeatedly) over the dark brown center to create a seed-like texture.
Go 3D
For a tactile finish on the flower center, mix your brown paint with a little baking soda or sand before stippling it on. It creates real grainy texture.
Step 4: Inking & Finishing
-
Outline the center:
Using a very fine liner brush and black or very dark brown paint thinned slightly with water, carefully outline the central brown circle. -
Outline the petals:
Outline each individual yellow petal. These lines define the illustrative, almost cartoon-like style of the piece. -
Add petal details:
Paint a thin line down the center of some petals to suggest a fold or vein. This makes the flower look less flat. -
Clean up errors:
If any lines went astray, use your original teal paint to touch up the background around the flower edges. -
Seal the pot:
Once the paint is cured (wait at least 24 hours), spray the entire pot with a clear acrylic sealer. This protects your artwork from water damage when you water your plants.
Pop in a spikey succulent or fresh basil plant to complete the look and enjoy your new art piece


What Really Happens Inside the Kiln
Learn how time and temperature work together inside the kiln to transform clay into durable ceramic.
Rosebuds and Vines for a Romantic Pot
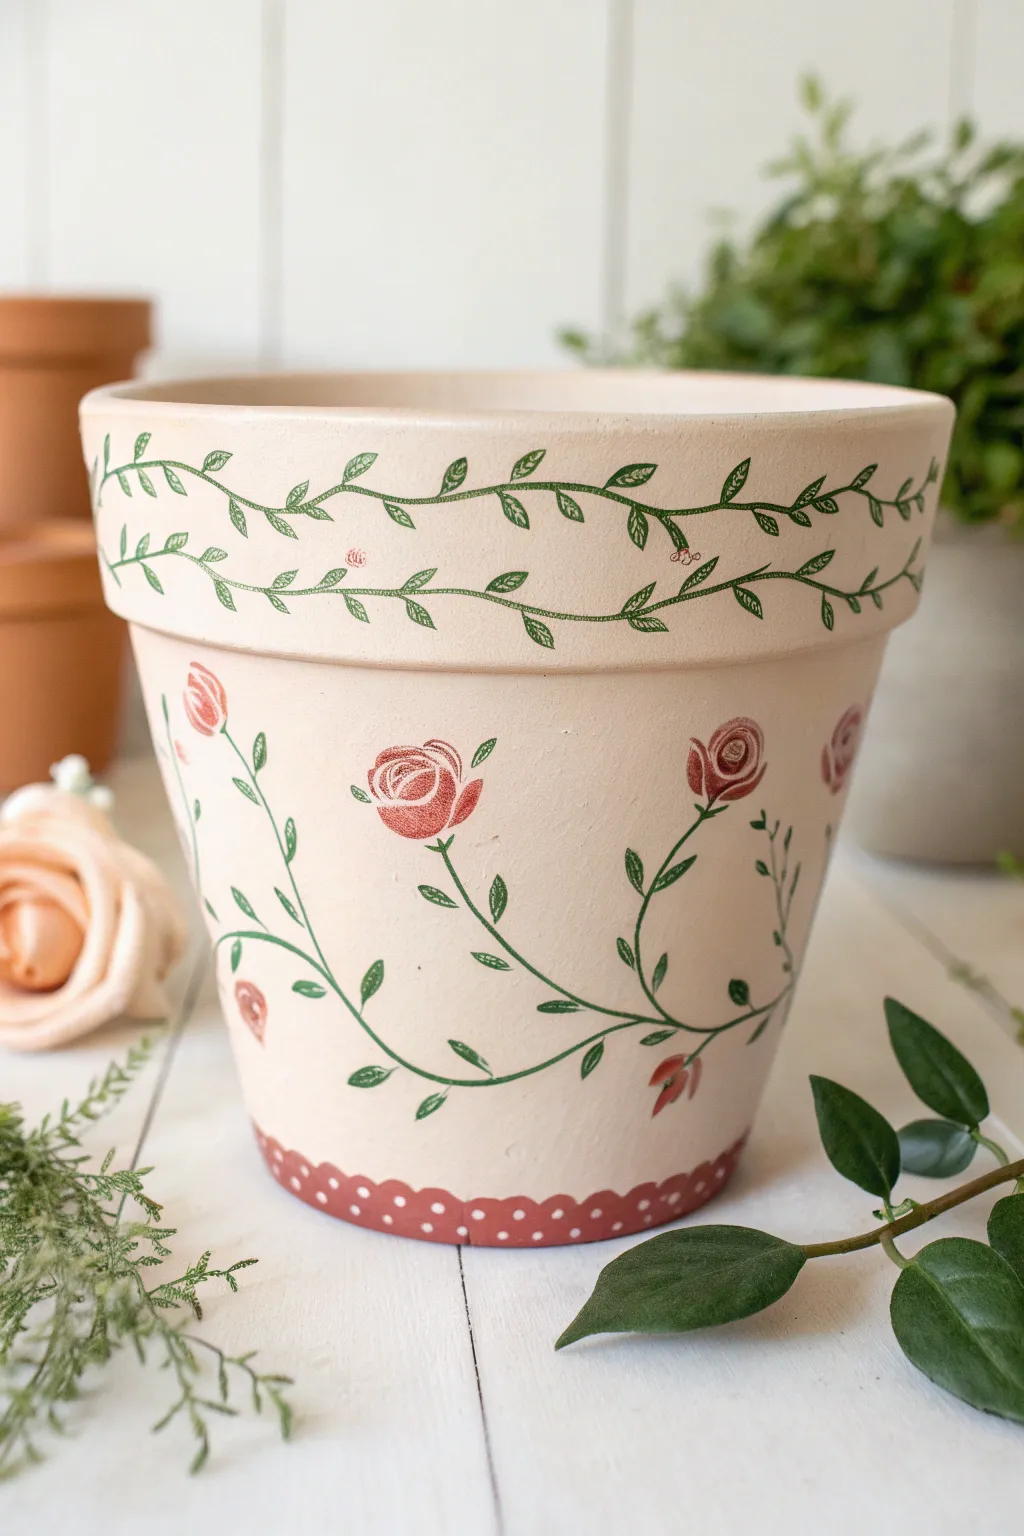
Transform a plain terracotta vessel into a romantic garden centerpiece with delicate rosebuds and trailing greenery. This design uses soft hues and graceful lines to mimic the look of hand-painted porcelain or vintage china pattern.
How-To Guide
Materials
- Clean terracotta pot (standard size)
- Creamy blush or off-white matte acrylic paint
- Sage or olive green acrylic paint
- Dusty rose or coral pink acrylic paint
- Brick red or dark pink acrylic paint
- Small round detail brush (size 0 or 1)
- Medium flat brush (size 8 or 10)
- Pencil for sketching
- Matte spray sealer
- Paper plate or palette
- Doughnut-shaped foam pouncer or small circle stencil (optional)
Step 1: Preparing the Canvas
-
Clean surface:
Ensure your terracotta pot is completely clean and dry. Wipe away any dust with a slightly damp cloth and let it air dry for a few minutes. -
Apply base coat:
Using the medium flat brush, apply a coat of the creamy blush or off-white paint to the entire exterior of the pot, including the rim. -
Build opacity:
Allow the first coat to dry for about 20 minutes. Apply a second or third coat until you have a smooth, opaque finish where the terracotta color doesn’t show through.
Flow Mechanic
Add a drop of water to your green acrylic paint for the vines. Inky, thinner paint flows much smoother from a liner brush, creating crisp, long stems without breaks.
Step 2: Painting the Rim Vines
-
Sketch the wave:
Lightly pencil a wavy line going around the center of the pot’s rim. Think of a gentle sine wave pattern. -
Add the second wave:
Draw an opposing wavy line that crisscrosses the first one, creating a chain-link effect around the rim. -
Trace with green:
Load your small detail brush with somewhat thinned sage green paint. Use the very tip to trace over your pencil lines carefully. -
Add tiny leaves:
Along these green vines, paint tiny, single-stroke leaves. Press the brush down gently and lift up quickly to create a teardrop leaf shape.
Make It Antique
For a truly vintage aged look, lightly sand the finished painting with fine-grit sandpaper, then rub a little brown antiquing wax over the surface before sealing.
Step 3: Creating the Rose Garden
-
Plot the stems:
On the main body of the pot, pencil in long, sweeping S-curves rising from the bottom. These will be the main stalks for your roses. -
Paint main stems:
Go over your pencil sketches with the sage green paint and the detail brush. Keep the lines fluid and organic rather than perfectly straight. -
Add foliage:
Paint larger leaves branching off the main stems. Vary the angles, placing some lower and some higher near where the blooms will sit. -
Paint rose base shapes:
For the flowers, paint small, tilted oval or circle shapes using your dusty rose pink at the top of the stems. These don’t need to be perfect; they are just the background color. -
Add definition:
I like to let the pink layer dry to the touch before adding details. Once dry, mix a little brick red with your pink to get a darker shade. -
Detail the petals:
Paint a small spiral or ‘C’ curves inside the pink ovals using the darker shade. This creates the illusion of tightly wrapped rose petals. -
Highlighting (optional):
Add a tiny touch of white or very light pink to the upper edges of the petals to make the buds look round and dimensional.
Step 4: finishing Touches
-
The bottom border:
Paint a thick band of the brick red or dark pink color around the very bottom edge of the pot using a flat brush. -
Polka dot detail:
Dip the handle end of a paintbrush into your base cream color. Dot it along the red bottom border to create a cute scalloped lace effect. -
Erase guidelines:
Once the paint is thoroughly dry (give it at least an hour), use a clean eraser to gently remove any visible pencil marks. -
Seal the work:
Take the pot to a well-ventilated area and apply a clear matte spray sealer. This protects the design from water damage and fading.
Place a fern or ivy inside to complement the painted foliage and enjoy your romantic garden accent
Bold Black-and-White Floral Line Art
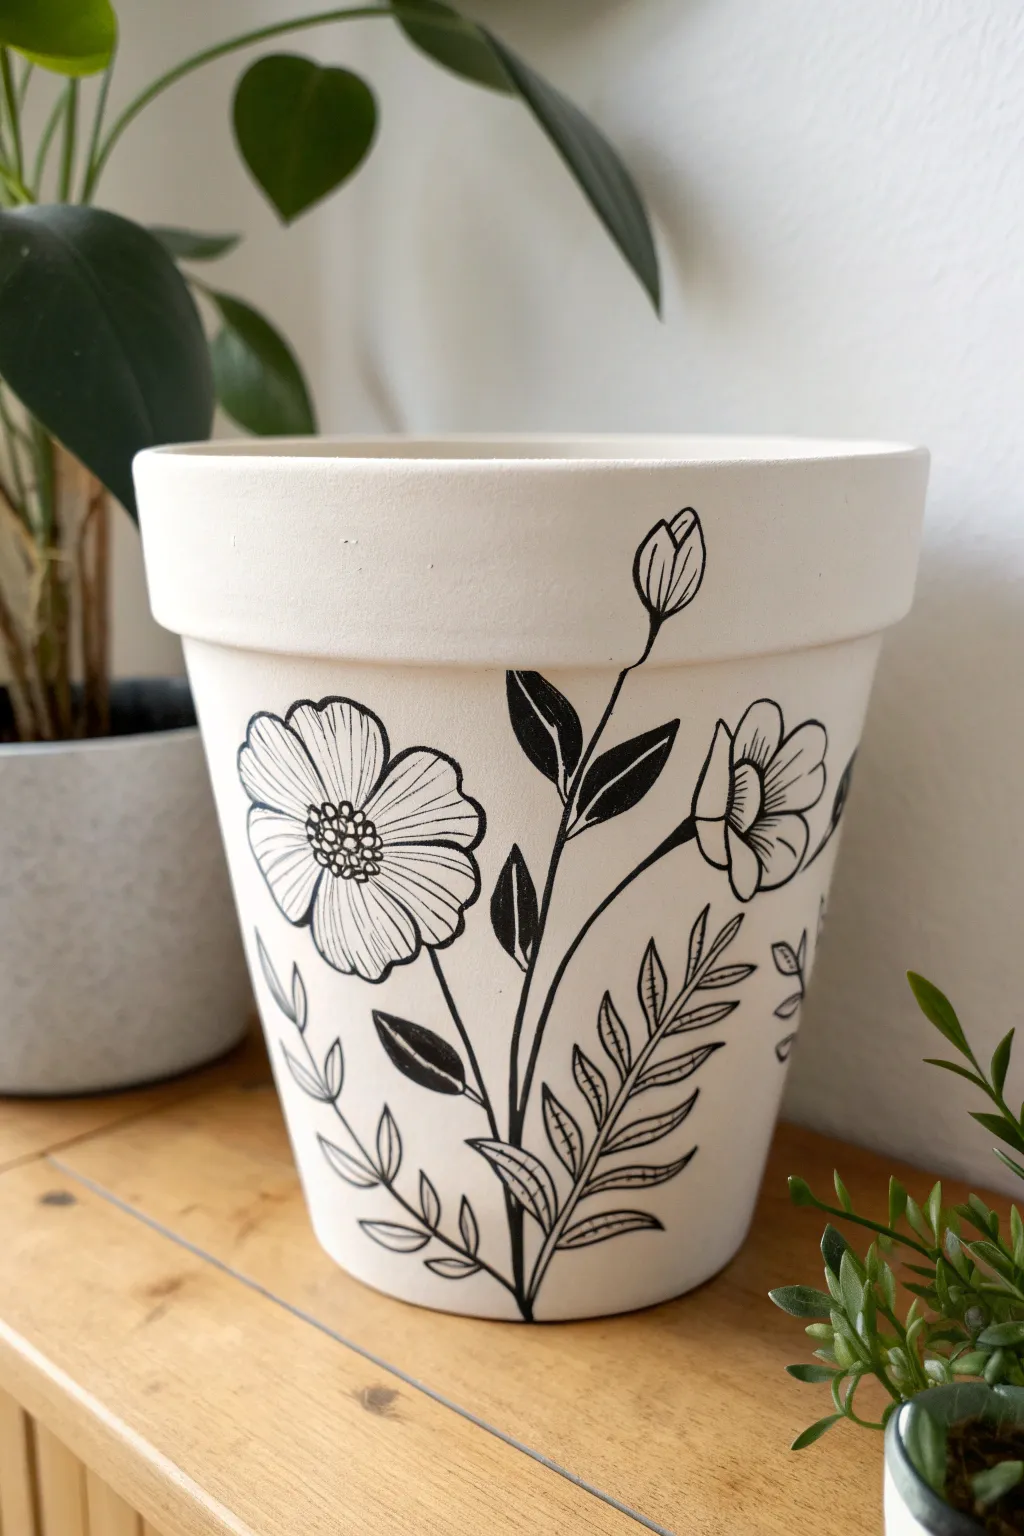
Transform a plain terracotta pot into a chic statement piece using nothing but white paint and sharp bold lines. This project embraces the beauty of contrast with elegant floral illustrations that climb up the side of the planter, creating a sophisticated look that fits any modern decor.
Step-by-Step Guide
Materials
- Terracotta pot (clean and dry)
- White acrylic paint (priming quality or matte finish)
- Wide flat paintbrush
- Pencil (HB or lighter)
- Black paint pen (fine and medium tips) or fine liner brush with black acrylic paint
- Matte spray sealer or varnish
- Paper plate or palette
- Cup of water
- Paper towels
Step 1: Base Preparation
-
Clean the surface:
Ensure your terracotta pot is completely free of dust and dirt. If you’ve just washed it, let it dry for at least 24 hours so moisture doesn’t get trapped under the paint. -
Apply the first coat:
Squeeze a generous amount of white acrylic paint onto your palette. Using a wide flat brush, apply a smooth, even base coat over the entire exterior of the pot, including the rim. -
Paint inside the rim:
Don’t forget to paint the inner top inch of the pot. Since the soil won’t fill it to the brim, this ensures the finished look is cohesive. -
Building opacity:
Allow the first coat to dry completely. Terracotta is porous and will soak up paint, so apply a second and third coat until you have a solid, opaque white finish with no orange showing through.
Step 2: Sketching the Design
-
Plan your composition:
Visualize a central stem rising from the bottom edge. The main stem should branch out slightly, hosting a mix of large open blooms, buds, and various leaf shapes. -
Light pencil sketch:
With a very light touch, use your pencil to sketch the main structural lines on the dry white surface. Focus on the placement of the largest flower first to anchor the design. -
Adding foliage details:
Sketch in the leaf variety. Include some solid, almond-shaped leaves and some delicate, fern-like fronds to create visual interest and texture contrast.
Steady Hand Trick
Rest your pinky finger on the dry surface of the pot as you draw. It stabilizes your hand and acts as a pivot point for smoother curves.
Step 3: Inking the Artwork
-
Outline the main bloom:
Using a medium-tip black paint pen, carefully trace the outline of your main flower petals. Keep your hand steady and maintain consistent pressure for a crisp line. -
Draw the center details:
Switch to a finer tip pen if available. Draw the central stamen of the flower using small circles contributing to a textured, clustered look. -
Define the stem:
Draw the main stem line, making it slightly thicker at the base and tapering off as it reaches the top buds. This adds a sense of organic growth. -
Create solid leaves:
For the almond-shaped leaves attached to the main stem, outline the shape first. Then, fill them in completely with black ink to create bold, dark focal points. -
Detail the center line:
If you prefer a lighter look, you can leave a tiny sliver of white down the center of the dark leaves to suggest a vein, as seen in the upper leaves of the design. -
Draw the fern fronds:
Move to the bottom right section. Draw a central spine, then add small, repetitive leaf shapes branching off each side. Leave these leaves outlined (hollow) rather than filled in. -
Add floating buds:
Near the rim, draw a closed flower bud. Use simple teardrop shapes with a few internal lines to suggest tightly wrapped petals. -
Review and refine:
Step back and look at the pot from a distance. If any lines look shaky or too thin, carefully go over them again to thicken and smooth them out.
Oops, Smudged It?
Don’t panic! Let the black smudge dry completely, then paint over it with your white base color. Rework the black line once the patch dries.
Step 4: Finishing Touches
-
Erase guidelines:
Once you are absolutely certain the black ink is 100% dry (give it extra time to prevent smearing), gently erase any visible pencil marks. -
Seal the artwork:
Take your project outside or to a well-ventilated area. Spray a light, even coat of matte sealer over the entire pot to protect the paint from water damage and UV fading. -
Second seal coat:
Apply a second coat of sealer for durability, especially if the pot will live outdoors.
Now your stunning minimalist planter is ready to be the perfect home for your favorite greenery

TRACK YOUR CERAMIC JOURNEY
Capture glaze tests, firing details, and creative progress—all in one simple printable. Make your projects easier to repeat and improve.
Boho Mandala Flower Motif
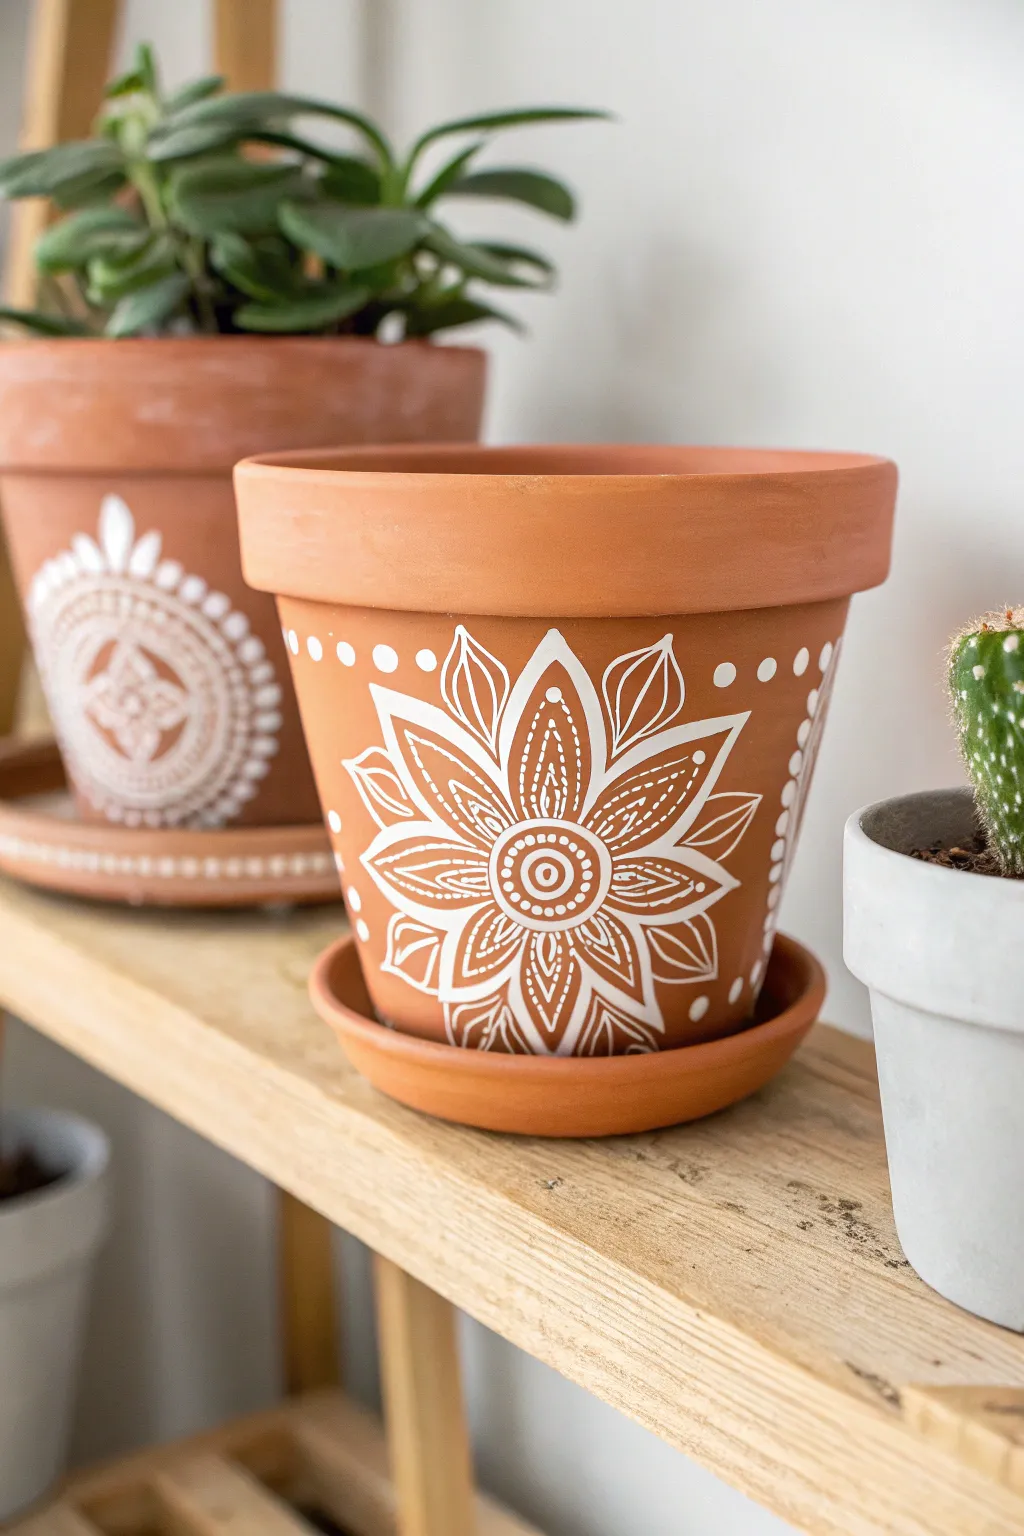
Transform a plain terracotta vessel into a piece of bohemian decor with this crisp white mandala design. The striking contrast between the natural clay and the delicate white line work makes for a perfect home for your favorite succulents.
Step-by-Step Tutorial
Materials
- Terracotta pot and matching saucer
- White acrylic paint pen (medium or fine tip)
- White acrylic paint pen (extra-fine tip)
- Pencil
- Eraser
- Damp cloth
- Clear matte sealant spray (optional)
Step 1: Preparation
-
Clean the surface:
Wipe down your terracotta pot with a damp cloth to remove any dust or debris. Let it dry completely before you begin, as moisture can prevent the paint markers from adhering properly. -
Sketch the center:
Using a pencil, lightly mark the center point on the front of the pot. Draw a small circle around this point, roughly the size of a dime. This will lead the eye right to the middle of your design.
Step 2: Drawing the Mandala
-
Draft the petals:
Lightly sketch a layer of eight large, pointed petals radiating from your center circle. Aim for symmetry, but don’t worry about perfection; the handmade look is part of the charm. -
Add secondary petals:
Sketch smaller petals peeking out from between the main eight petals. These should be slightly shorter and fit snugly in the gaps. -
Ink the center:
Take your medium-tip white paint pen and trace over your central circle. Draw a smaller dot directly in the middle, then add a ring of tiny dots around that central point. -
Outline the main petals:
Go over your pencil sketches for the large main petals with the medium tip pen. Use confident, smooth strokes to keep the lines clean. -
Outline the filler petals:
Trace the smaller secondary petals between the main ones. I find that rotating the pot as I work helps keep my hand steady for these curves. -
Add inner details:
Switch to your extra-fine tip pen. Inside each large petal, draw a smaller petal shape that mirrors the outline but doesn’t touch it. -
Create dotted spines:
With the extra-fine pen, draw a line of tiny dots running down the center spine of each large petal leaf. -
Detail the drawing:
Add fine lines or vein details inside the smaller secondary petals to give them texture.
Oops! Smudged ink?
If you smudge wet paint, wait for it to dry completely. Then, use a piece of fine-grit sandpaper to gently buff the mistake off the clay surface.
Step 3: Finishing Touches
-
Add the rim border:
Using the medium tip marker, create a horizontal line of dots just below the rim of the pot. Try to space them evenly around the circumference. -
Accent the sides:
Add a few stray decorative dots or small circles floating near the tips of the petals to expand the design outward without making it too busy. -
Erase guidelines:
Once you are absolutely sure the white paint is bone dry, gently erase any visible pencil marks. -
Seal the pot:
To protect your design from water damage when watering plants, spray the pot with a clear matte sealant in a well-ventilated area.
Make it Pop
For a bolder look, paint the entire inside of the petal shapes with a solid white fill before adding the detail lines on top after it dries.
Now your custom boho pot is ready to showcase your favorite green cactus or succulent
Folk-Inspired Petal Scallops Around the Base
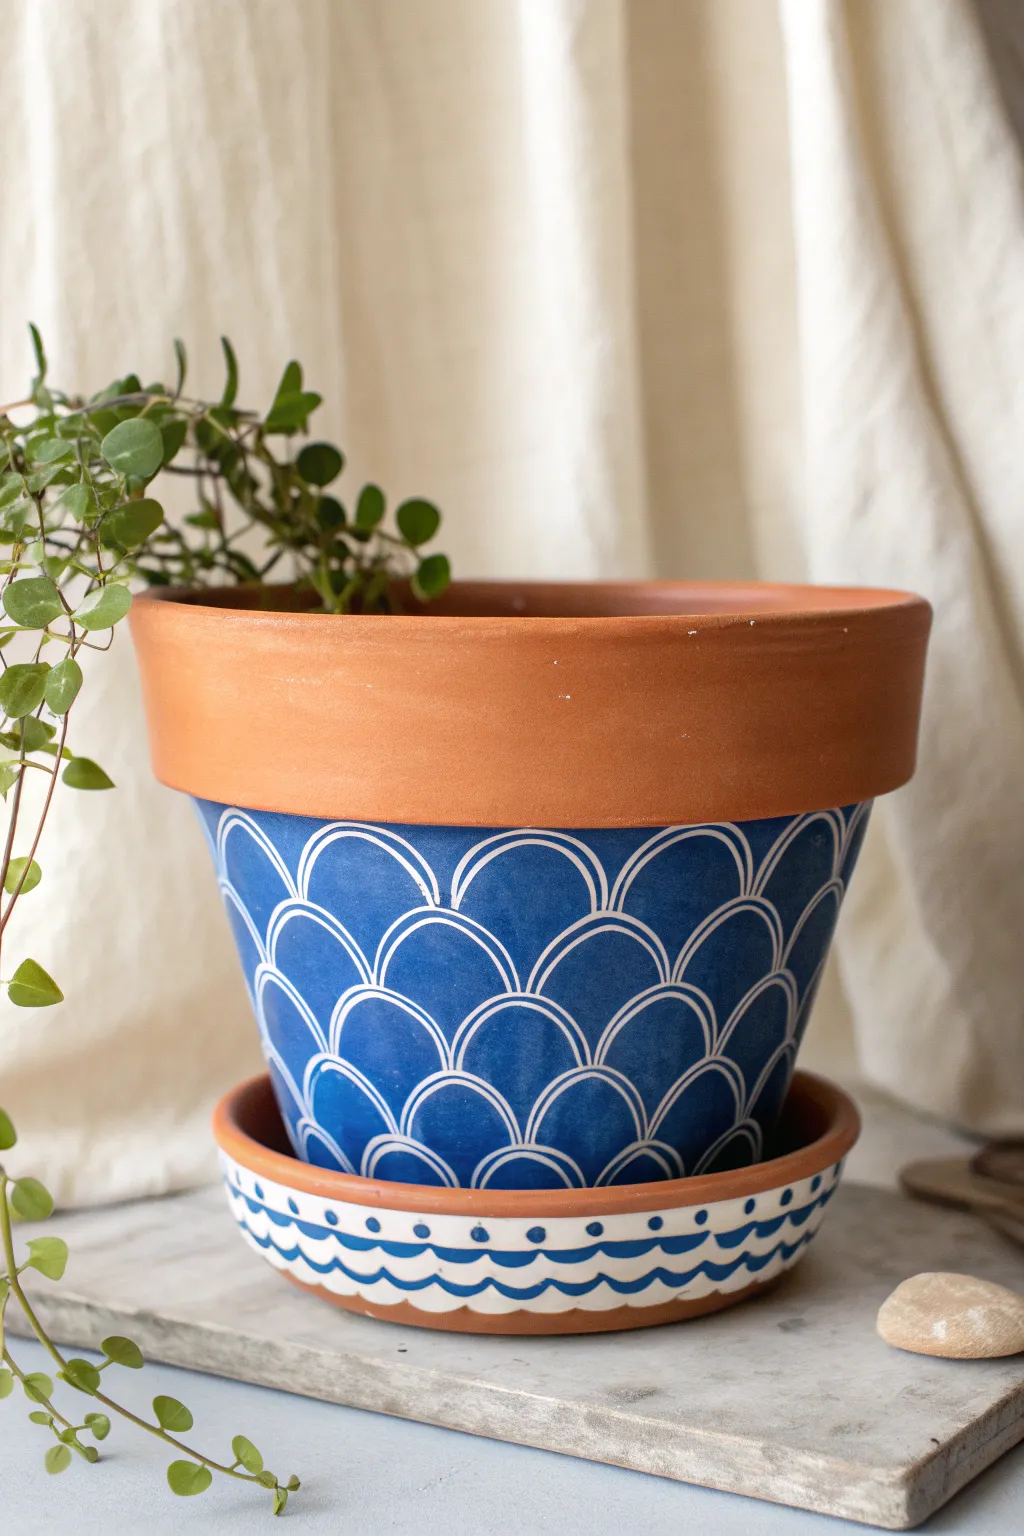
Transform a standard terracotta pot into a folk-art masterpiece with this striking blue and white scallop design. The repeating arches create a soothing rhythm that mimics ocean waves or traditional tile work, giving your plants a beautiful, handmade home.
Step-by-Step
Materials
- Standard terracotta pot and saucer (clean and dry)
- Deep cobalt blue acrylic craft paint
- White acrylic paint (or a white paint pen)
- Small flat paintbrush (size 6 or 8)
- Thin liner brush (size 0 or 1)
- Pencil
- Ruler or tape measure
- Round object for tracing (like a bottle cap or small lid)
- Matte or satin spray sealer (optional)
Step 1: Preparing the Canvas
-
Clean the surface:
Ensure your terracotta pot is completely free of dust and debris before starting. Wipe it down with a damp cloth and let it dry fully so the paint adheres properly. -
Define the painting area:
Decide where your design will start. For this look, we are leaving the thick rim of the pot as exposed terracotta. You can use painter’s tape to mask off the bottom edge of the rim if you want a crisp line, or simply paint carefully up to the crease.
Step 2: Creating the Scallop Pattern
-
Base coat the blue:
Using your flat brush and the deep cobalt blue paint, cover the main body of the pot below the rim. Apply the paint in smooth, horizontal strokes. -
Let it dry and repeat:
Terracotta is porous and will soak up the first layer. Allow it to dry for about 20 minutes, then apply a second coat of blue to get that rich, opaque finish seen in the photo. -
Mark your grid:
Once the blue paint is bone dry, lightly use a pencil to mark horizontal guidelines around the pot. Space them evenly based on how tall you want your scallops to be—about 1.5 inches is a good standard size. -
Trace the arches:
Using a small round object or freehanding with a pencil, draw your bottom row of arches first. They should look like rainbows, jumping from one point to the next along your bottom guideline. -
Offset the second row:
For the row above, start the arch in the middle (the peak) of the arch below it. This ‘brick-lay’ or offset pattern is crucial for the scallop scale effect. -
Continue upward:
Keep drawing these offset rows until you reach the rim of the pot. Don’t worry if the top row gets cut off by the rim; that looks natural.
Uneven Lines?
If painting thin curves with a brush is frustrating, swap the brush for a white oil-based paint pen. It gives you more control and consistent line width.
Step 3: Painting the Details
-
Outline the scallops:
Load your thin liner brush with white paint. I find slightly thinning the paint with a drop of water helps it flow smoother for long lines. Carefully trace over your pencil arches. -
Double the lines:
To mimic the look in the photo, add a second, smaller arch inside each main arch. This creates a double-lined effect that adds depth to the pattern. -
Refine the intersections:
Where the arches meet at the corners, ensure the white lines touch cleanly. You can use a damp Q-tip to quickly wipe away any mistakes while the paint is wet.
Pro Tip: Flow Aid
Terracotta sucks moisture rapidly. Mix a tiny bit of acrylic flow medium into your paint to keep it workable longer and prevent choppy brushstrokes.
Step 4: Designing the Saucer
-
Base coat the saucer:
Paint the exterior side of the saucer rim with white paint. You may need two coats here to cover the orange clay completely. -
Paint the waves:
Using your blue paint and a small brush, paint a continuous wavy line around the center of the white rim. Think of a gentle sine wave. -
Fill the bottom curves:
In the valley of each wave (the bottom curve), paint a solid blue semi-circle or fill it in to create a heavy visual weight at the bottom. -
Add dots:
Dip the handle end of a paintbrush into the blue paint. Press a dot into the center of each upper white curve, just above the blue wave line. -
Seal the work:
Once everything is completely dry (give it a few hours), take the pot outside and spray it with a clear matte or satin sealer to protect your design from water damage.
Now your custom planter is ready to add a splash of Mediterranean charm to your windowsill
Pressed-Flower Look Using Painted Florals
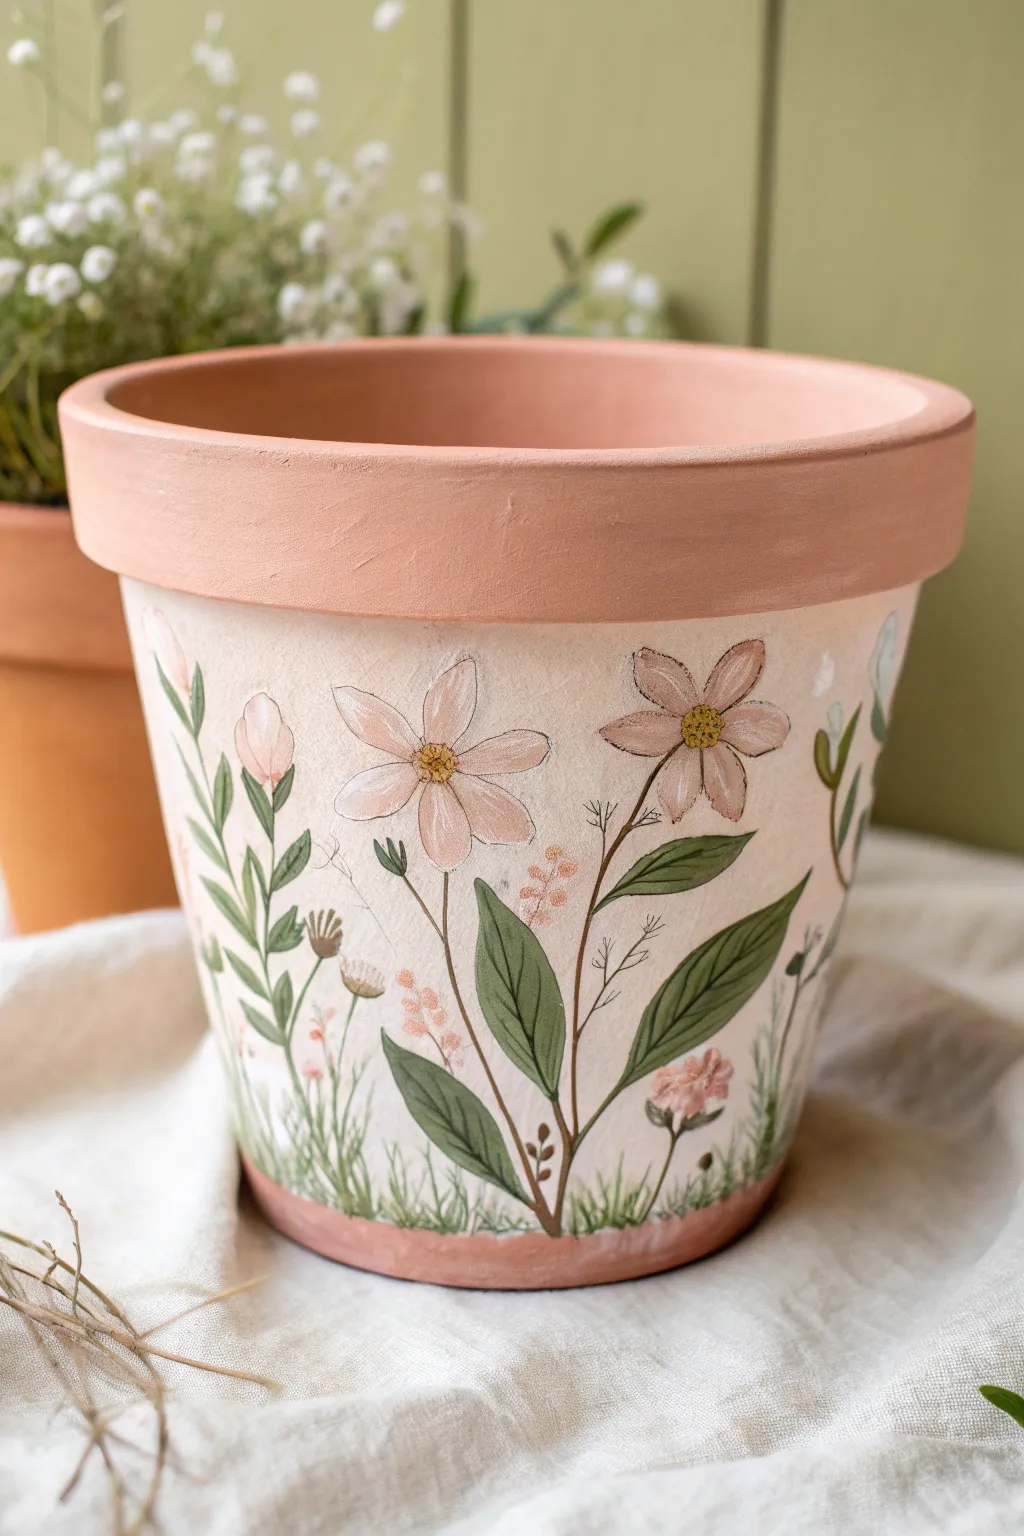
Capture the delicate beauty of a botanical herbarium without needing any real pressed petals. This project uses soft washes and fine lines to transform a standard terracotta pot into a gentle, garden-inspired masterpiece that looks lovely indoors or out.
Detailed Instructions
Materials
- Standard terracotta pot (clean and dry)
- White or cream chalk paint (or acrylic)
- Acrylic paints: sage green, forest green, pale pink, blush, yellow ochre, warm brown
- Small flat brush (approx. 1/2 inch)
- Liner brush (size 0 or 00) for fine details
- Round brush (size 2 or 4) for petals
- Water cup and paper towels
- Matte sealer or varnish (spray or brush-on)
- Pencil (optional)
Step 1: Preparing the Canvas
-
Clean surface:
Ensure your terracotta pot is completely free of dust or sticker residue. Wipe it down with a damp cloth and let it dry fully before starting. -
Base coat application:
Using the flat brush, apply a coat of white or cream chalk paint to the main body of the pot, stopping just under the rim. You want an uneven, slightly translucent look—almost like a whitewash—so don’t worry about perfect opacity. -
Rim preservation:
Leave the top rim of the pot unpainted to maintain that classic terracotta warmth, which frames the white design beautifully. -
Second coat (optional):
If the first coat is too sheer, add a second light layer after ten minutes, but keep the texture visible to mimic old paper.
Uneven Paint?
If your base coat looks too streaky, use a damp sponge to dab the wet paint. This creates a soft, clouded texture similar to parchment paper.
Step 2: Planning the Garden
-
Sketch placement:
Lightly sketch the main stems with a pencil. Aim for an organic flow, with some stems taller than others, originating from the bottom edge of the pot. -
Varied composition:
Plan for three distinct flower heads as focal points, spaced somewhat evenly around the visible face, interspersed with smaller buds and filler stems.
Level Up: Vintage Ageing
Mix 1 part brown paint with 10 parts water. Brush this wash quickly over the dried white area and wipe off immediately for an antique look.
Step 3: Adding Greenery
-
Main stems:
Mix sage green with a touch of brown for an earthy tone. Using your liner brush, paint thin, flowing lines over your pencil marks to establish the stems. -
Leaf formation:
Switch to the round brush. Load it with forest green and press down near the stem, then lift as you pull away to create tapered, almond-shaped leaves. -
Leaf details:
While the green is still slightly wet, I like to pull a very fine line of darker green or brown down the center of larger leaves for a vein effect. -
Grass accents:
At the very bottom edge of the pot, use the liner brush and quick, upward flicking motions with light green paint to create a bed of grass blades that grounds the design.
Step 4: Painting the Blooms
-
Base petals:
Mix a very pale pink shade. Using the round brush, paint the five to six petals of the large focal flowers. Keep the paint slightly watery to achieve that translucent, pressed-flower watercolor effect. -
Bud details:
For the smaller buds, paint simple ovals in a slightly deeper blush tone at the tips of the smaller stems. -
Flower centers:
Dip the tip of a small brush or a toothpick into yellow ochre. Dot the centers of the open flowers gently to create pollen clusters. -
Adding definition:
Once the petals are dry, use the liner brush with a watered-down brown or dark grey paint to outline the petals very faintly. This mimics the delicate edges of dried botanical specimens. -
Filler sprigs:
Add tiny sprigs of ‘baby’s breath’ or filler flowers using minuscule dots of pale pink or cream on thin, branching stems.
Step 5: Finishing Touches
-
Bottom border:
If the bottom edge where the grass meets the terracotta looks unfinished, smudge a tiny bit of brown paint along the very bottom rim to blend the transition. -
Full drying time:
Let the entire pot sit for at least an hour to ensure all layers, especially thicker dots, are completely cured. -
Sealing:
Apply a coat of clear matte sealer over the painted section. This is crucial if the pot will hold a real plant, as moisture seeping through the clay can bubble the paint.
Now you have a timeless piece of pottery that brings a delicate, artistic touch to your plant collection
Cute Face Pot With Flower Cheeks
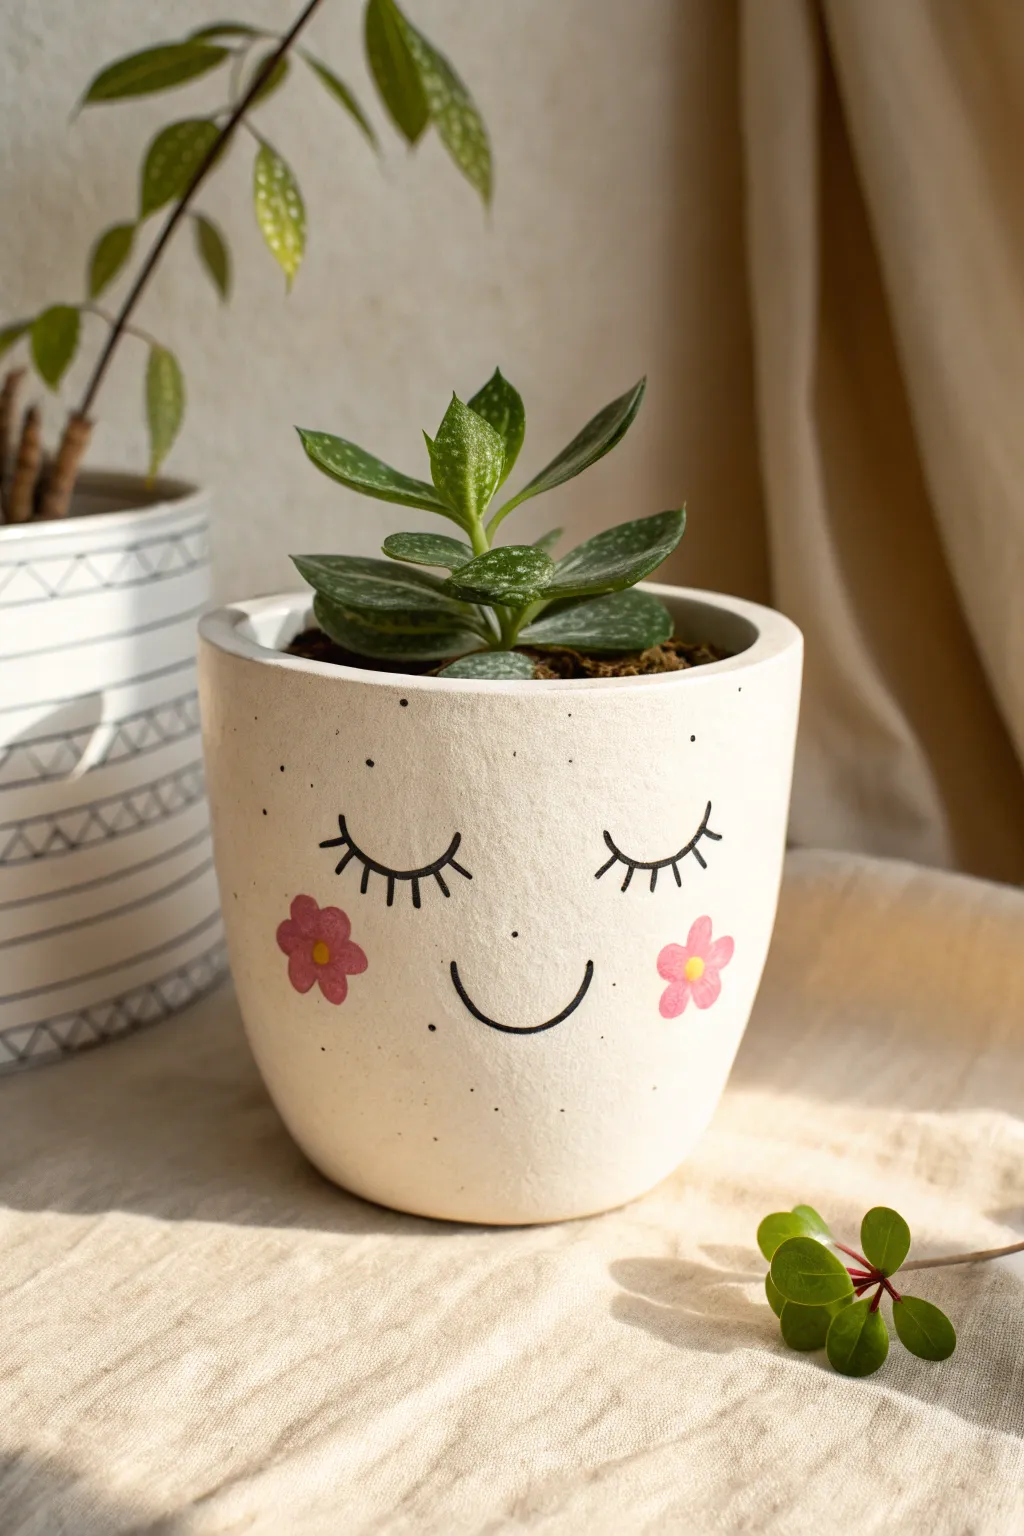
Transform a plain planter into a charming character with this minimalist face design featuring rosy floral cheeks. It’s an adorably quick project that brings a touch of whimsy to any succulent collection.
Step-by-Step Tutorial
Materials
- Small ceramic pot (white or off-white)
- Black acrylic paint pen (fine tip)
- Pink acrylic paint pen or brush paint
- Yellow acrylic paint pen or brush paint
- Clear matte sealant spray
- Rubbing alcohol and cotton pad
- Pencil
- Paper towel
Step 1: Prep & Planning
-
Clean the surface:
Before removing any caps, thoroughly wipe down the exterior of your ceramic pot with rubbing alcohol and a cotton pad. This removes invisible oils or dust that might stop the paint from sticking properly. -
Dry completely:
Give the pot a few minutes to air dry completely. The surface must be bone dry for the paint pens to work effectively. -
Sketch the face:
Lightly sketch the placement of the eyes and mouth using a pencil. Aim for the center of the pot’s vertical space. The eyes should be widely spaced, and the mouth a simple, gentle curve right between them.
Step 2: Painting the Features
-
Draw the eyelids:
Using your fine-tip black paint pen, carefully trace over the pencil lines for the closed eyelids. Draw two downward-curving arcs. Keep your hand steady and move slowly. -
Add the lashes:
Starting from the center of the eyelid arc, add short, slightly curved lines radiating outward for eyelashes. I usually do about five to seven lashes per eye to keep it looking sweet without being cluttered. -
Draw the smile:
Trace the smile line with the black pen. A simple U-shape works best. Make sure the ends of the smile don’t go higher than the bottom of the eyelids. -
Add freckles:
Place random tiny dots around the nose area (even though there is no nose) and cheeks using the very tip of the black pen. Use a light touch so the dots stay small. -
Let the black ink dry:
Wait about 5-10 minutes for the black lines to set fully. You don’t want to accidentally smudge the liner while working on the cheeks next.
Paint Pen Flow
Before touching the pot, press the paint pen tip onto a scrap paper a few times to get the ink flowing smoothly. This prevents sudden blobs of paint ruining your design.
Step 3: Adding the Floral Cheeks
-
Paint the first petal:
Switch to your pink paint (pen or small brush). Position the flower cheek slightly below and to the outside of the eye. Start by dabbing one small oval petal. -
Complete the flower shape:
Continue adding four more petals in a circle touching the center point to create a simple 5-petal flower. Repeat this process on the other cheek. -
Fill opacity:
If the pink looks a bit translucent against the pot, let it dry briefly and add a second coat of pink right on top to make the color pop. -
Add the flower centers:
Once the pink petals are dry to the touch, take your yellow paint and place a small, solid dot right in the center of each flower. -
Clean up sketch lines:
Check for any visible pencil marks that weren’t covered by paint. You can gently erase these now, but be extremely careful not to rub over the painted areas.
Wobbly Lines?
If you make a mistake with the paint pen, don’t panic. quickly wipe it away with a damp Q-tip or a bit of rubbing alcohol before it dries, then try again.
Step 4: Finishing Up
-
Final dry time:
Let the entire design cure for at least an hour. This ensures the paint bonds well to the ceramic surface. -
Seal the deal:
Take the pot to a well-ventilated area. Hold your clear matte sealant spray about 10-12 inches away and apply a light, even coat over the painted face. -
Cure and plant:
Allow the sealant to dry required time listed on the can (usually 24 hours) before adding soil and your favorite succulent.
Now you have a cheerful new home for your little green friend
Bee and Tiny Flowers Garden Story Pot
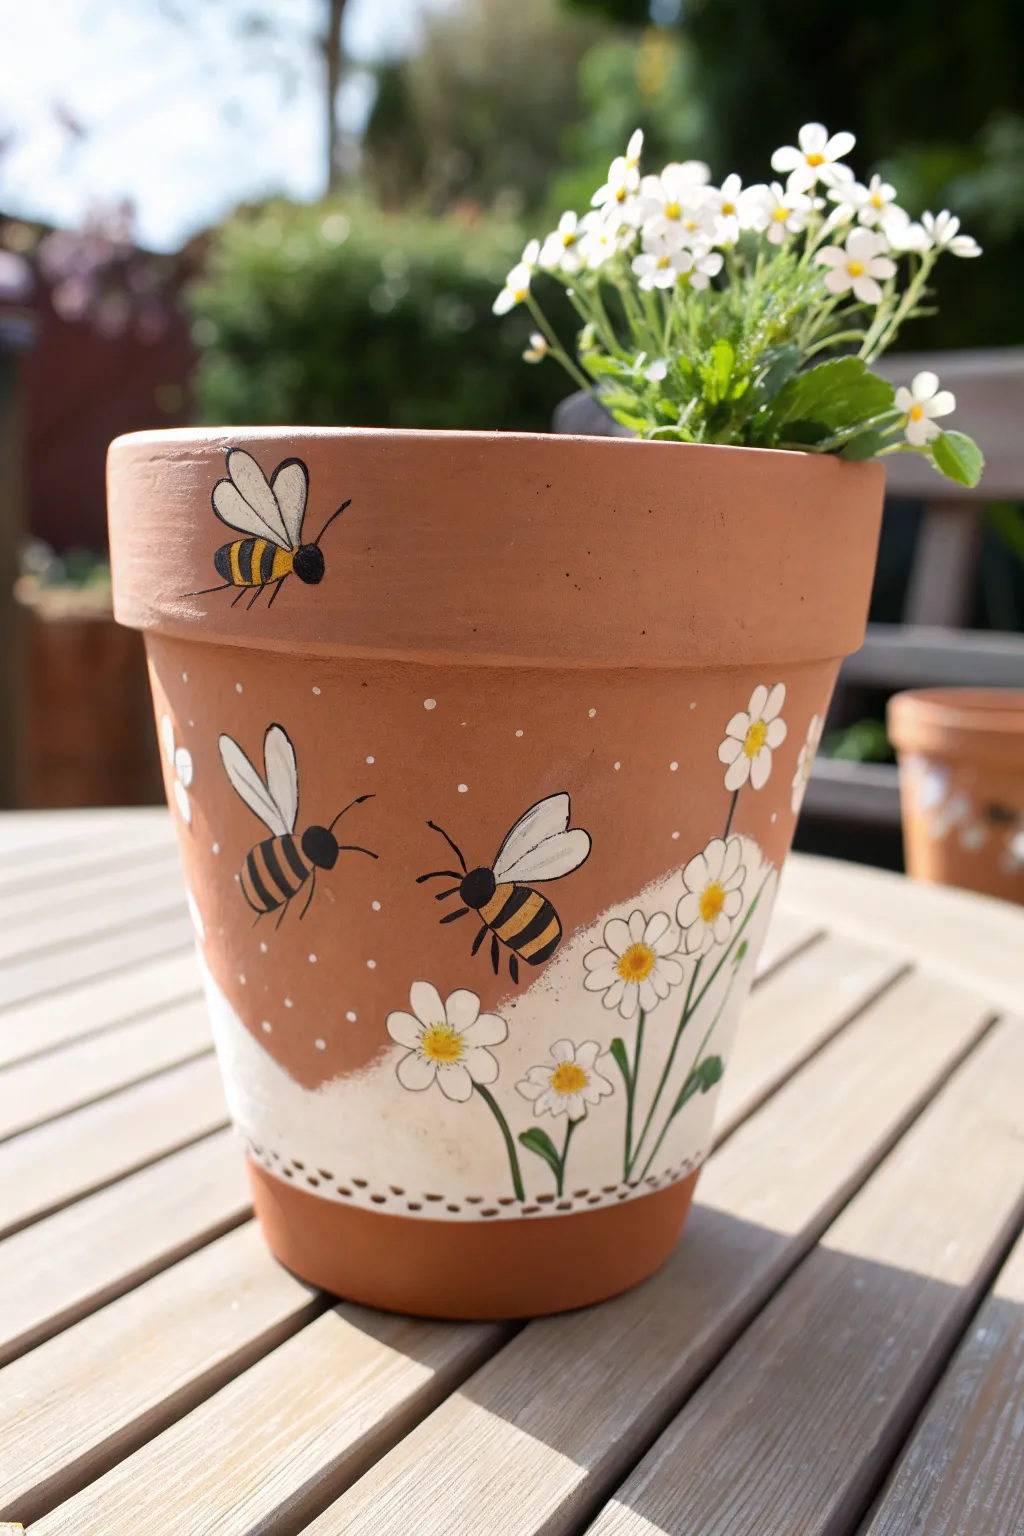
Transform a plain terracotta planter into a buzzing garden scene featuring whimsical bees and delicate daisies. This project uses a clever diagonal color block design to add modern flair to a classic hand-painted motif.
Step-by-Step Guide
Materials
- Terracotta pot (clean and dry)
- White acrylic craft paint
- Yellow acrylic craft paint (bright sunny shade)
- Black acrylic craft paint
- Green acrylic craft paint (leaf green)
- Flat paintbrush (medium size)
- Round detail brushes (small and extra-fine)
- Pencil
- Water cup and paper towels
- Clear acrylic sealer spray (matte or satin)
Step 1: Base Coat and Background
-
Prepare the surface:
Ensure your terracotta pot is completely clean and dry. Wipe it down with a damp cloth to remove any dust that might interfere with paint adhesion. -
Sketch the dividing line:
Using a pencil, draw a wavy, diagonal line across the lower half of the pot. This will separate the natural clay color from the painted white garden section. -
Paint the white section:
Fill in the area below your pencil line with white acrylic paint. Use your flat brush for this step. -
Apply a second coat:
The terracotta acts like a sponge, so the first coat might look streaky. Let it dry completely, then add a second or even third coat of white until the coverage is solid and opaque.
Step 2: Painting the Bees
-
Outline the bee bodies:
With a pencil, lightly sketch oval shapes for the bees. Place one on the top rim and scatter two or three on the main body of the pot in the unpainted terracotta section. -
Fill in yellow bodies:
Use a small round brush to paint the bee bodies with bright yellow paint. Let this distinct layer dry. -
Add the stripes:
Once the yellow is dry, use an extra-fine brush dipped in black paint to carefully curve three stripes across each bee’s back. -
Paint the heads:
Paint a small, solid black semi-circle at the front of each yellow oval to create the bee’s head. -
Add bee details:
Using your finest brush, draw tiny antennas coming from the head and thin, delicate legs extending from the bottom of the body. I find that quick, light strokes work best here to keep the lines thin. -
Create the wings:
Paint two teardrop-shaped wings on the back of each bee using white paint. When the white is dry, outline them very faintly with thinned black paint or a fine-tip marker to make them pop.
Wing Transparency
Mix a tiny drop of water into your white paint for the wings. This makes them slightly translucent, looking more realistic.
Step 3: Painting the Flowers
-
Create daisy centers:
Dip the handle end of a paintbrush into yellow paint and dot it onto the white painted section to create the centers of your flowers. -
Paint the petals:
Using a small round brush and white paint, create five or six small petal strokes radiating outward from each yellow center. It’s okay if the white petals overlap the white background; the texture adds nice depth. -
Add stems and leaves:
With your fine detail brush and green paint, draw thin lines extending downward from the flower heads. Add small, simple leaf shapes along the stems. -
Extend the garden:
Allow some of the taller flowers to cross over the boundary line, so the white petals and green stems sit against the terracotta background for contrast.
Shaky Lines?
If painting thin bee legs is difficult, wait for the paint to dry fully and use an ultra-fine tip permanent marker instead.
Step 4: Final Details
-
Add background dots:
Dip the very tip of a toothpick or a fine stylus into white paint. Gently dot the terracotta background around the bees to create a whimsical, pollen-like effect. -
Decorate the border:
along the very bottom edge of the white section (near the pot’s base), paint a row of tiny brown or black dots to create a finished border look. -
Seal the pot:
Once all paint is thoroughly dry (give it at least 24 hours), spray the entire pot with a clear acrylic sealer. This protects your artwork from water damage and fading.
Fill your new creation with bright white blooms to mirror the painted design and enjoy your cheerful garden addition
Night Sky With Glowing Painted Flowers
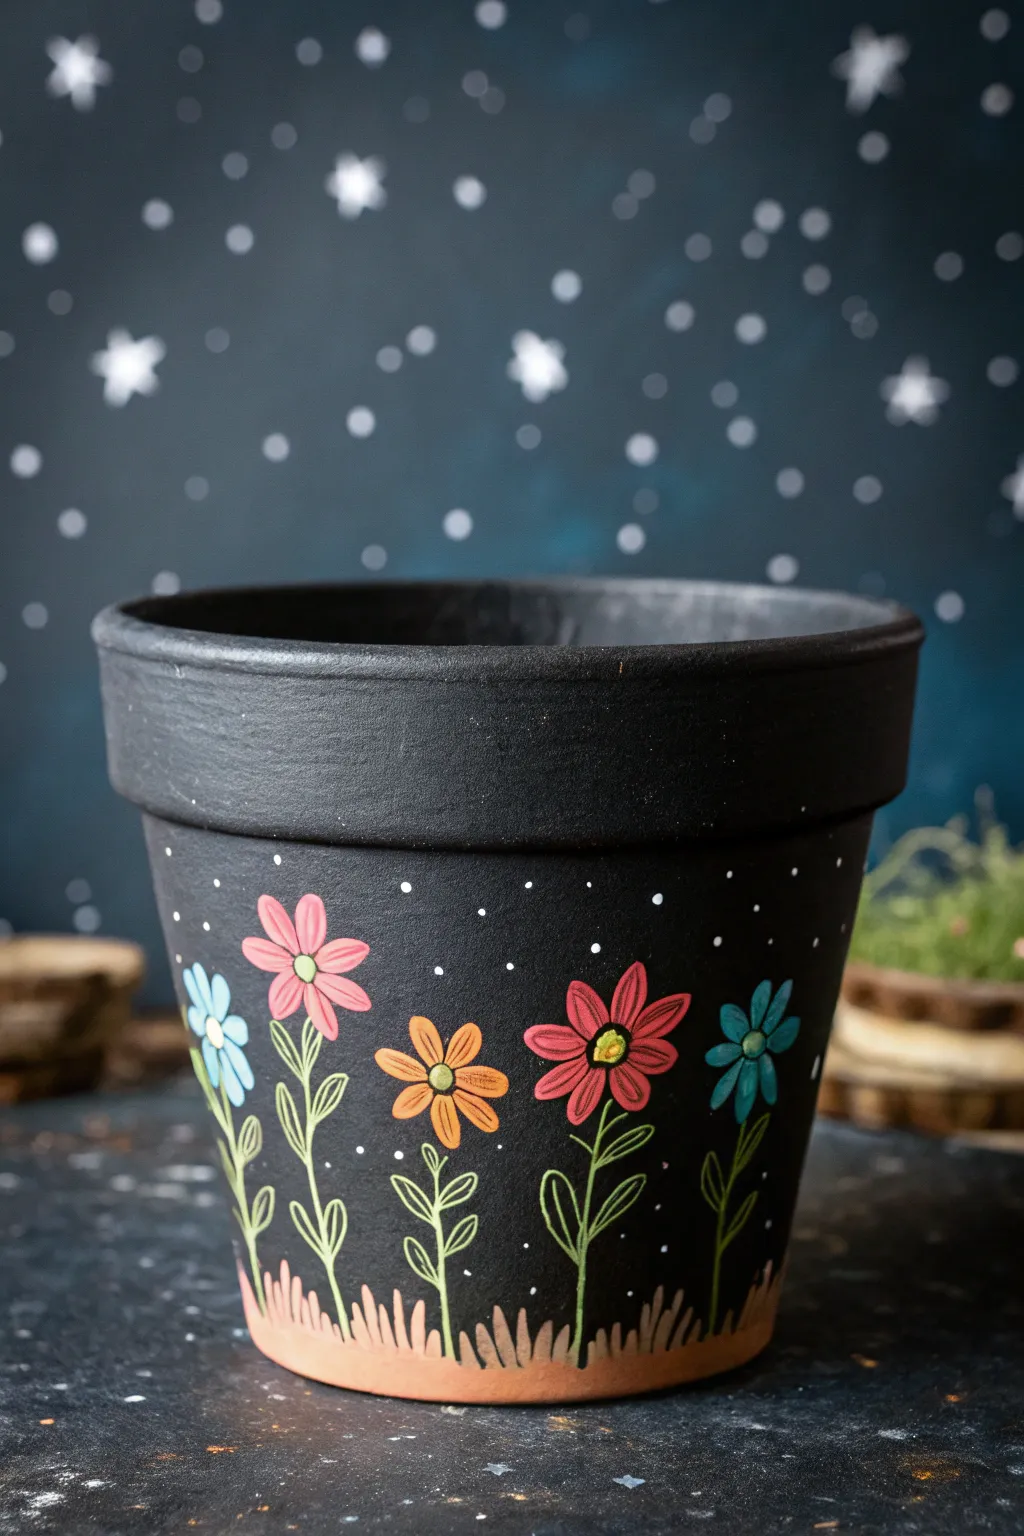
Transform a plain terracotta pot into a midnight garden scene where vibrant petals seemingly glow against a dark blackboard-style backdrop. This project combines simple floral doodles with a starry night theme for a whimsical, hand-painted look that pops.
How-To Guide
Materials
- Terracotta pot (clean and dry)
- Matte black acrylic paint or black chalkboard paint
- Acrylic paints (pink, orange, red, light blue, teal, yellow, green, light brown, white)
- Wide flat paintbrush (approx 1 inch)
- Detail round paintbrush (size 1 or 2)
- Small liner brush (size 0 or 00)
- Small sponge or toothbrush (optional for stars)
- Clear matte sealer spray
Step 1: Setting the Night Scene
-
Base coating:
Begin by painting the entire exterior of the terracotta pot with matte black paint. Use a wide flat brush for smooth coverage. -
Rim coverage:
Don’t forget to paint the top rim and just inside the upper lip of the pot, as this area will be visible once planted. -
Second coat:
Allow the first layer to dry completely (about 20 minutes) paint a second coat to ensure the terracotta color doesn’t peek through. A truly opaque black background is crucial for the bright colors to stand out later.
Step 2: Adding the Grass
-
Mixing the soil color:
Mix a light brown or tan shade. If you only have dark brown, lighten it with a touch of white and yellow to mimic dry grass or clay. -
Painting the blades:
Using your detail round brush, paint short, upward flicks along the very bottom edge of the pot. Vary the lengths slightly to create an organic, grassy texture. -
Bottom blending:
I find it helpful to drag this brown color slightly underneath the curve of the pot to create a grounded base for your garden scene.
Make Colors Pop
If your cheap acrylics look dull on the black base, paint the flower shapes in white first as a primer. Let dry, then apply the color.
Step 3: Blooming Flowers
-
Planning placement:
Visualize five or six flowers spaced evenly around the pot. You want them to sit at a ‘mid-height’ level, leaving room for stems below and stars above. -
First petals:
Start with the main flowers. Use a pink acrylic to paint a simple daisy shape with five elongated petals. You may need two coats for the pink to look bright against the black. -
Color variation:
Move to the next flower spot and paint a red flower with slightly pointed petals, then an orange flower with rounded petals. -
Cool tones:
Next, add a teal or light blue flower. Alternating warm and cool colors creates a nice visual rhythm around the pot. -
Flower centers:
Once the petals are dry, use a small dab of yellow or green in the center of each flower to pull the look together.
Oops, Smudged It?
Keep a damp Q-tip handy. Since the base is black, most mistakes can be wiped away quickly or painted over with black once dry.
Step 4: Stems and Leaves
-
Drawing stems:
Switch to your liner brush and green paint. Draw a thin, slightly wavy line from the bottom of each flower head down into the brown grass area. -
Adding leaves:
Paint simple outline-style leaves coming off the stems. Keep the lines thin and delicate; they don’t need to be filled in, just outlined. -
Leaf details:
For variety, paint some leaves as solid filled shapes and keep others as open outlines, mimicking the doodled style of the reference artwork.
Step 5: Creating the Galaxy
-
Star placement:
Dip the very tip of your smallest brush (or a toothpick) into white paint. -
Dotting the sky:
Place tiny dots randomly in the black space above and between the flowers. Vary the pressure to create different sized ‘stars’. -
Avoiding clusters:
Try not to cluster the dots too evenly; spread them out to look like a natural night sky. -
Final sealing:
Let the pot cure for at least 24 hours. Finish by spraying a clear matte sealer over the entire pot to protect your work from water and sunlight.
Now you have a stunning piece of celestial décor ready to house your favorite plant
Drippy Paint Rim Over a Floral Base Color
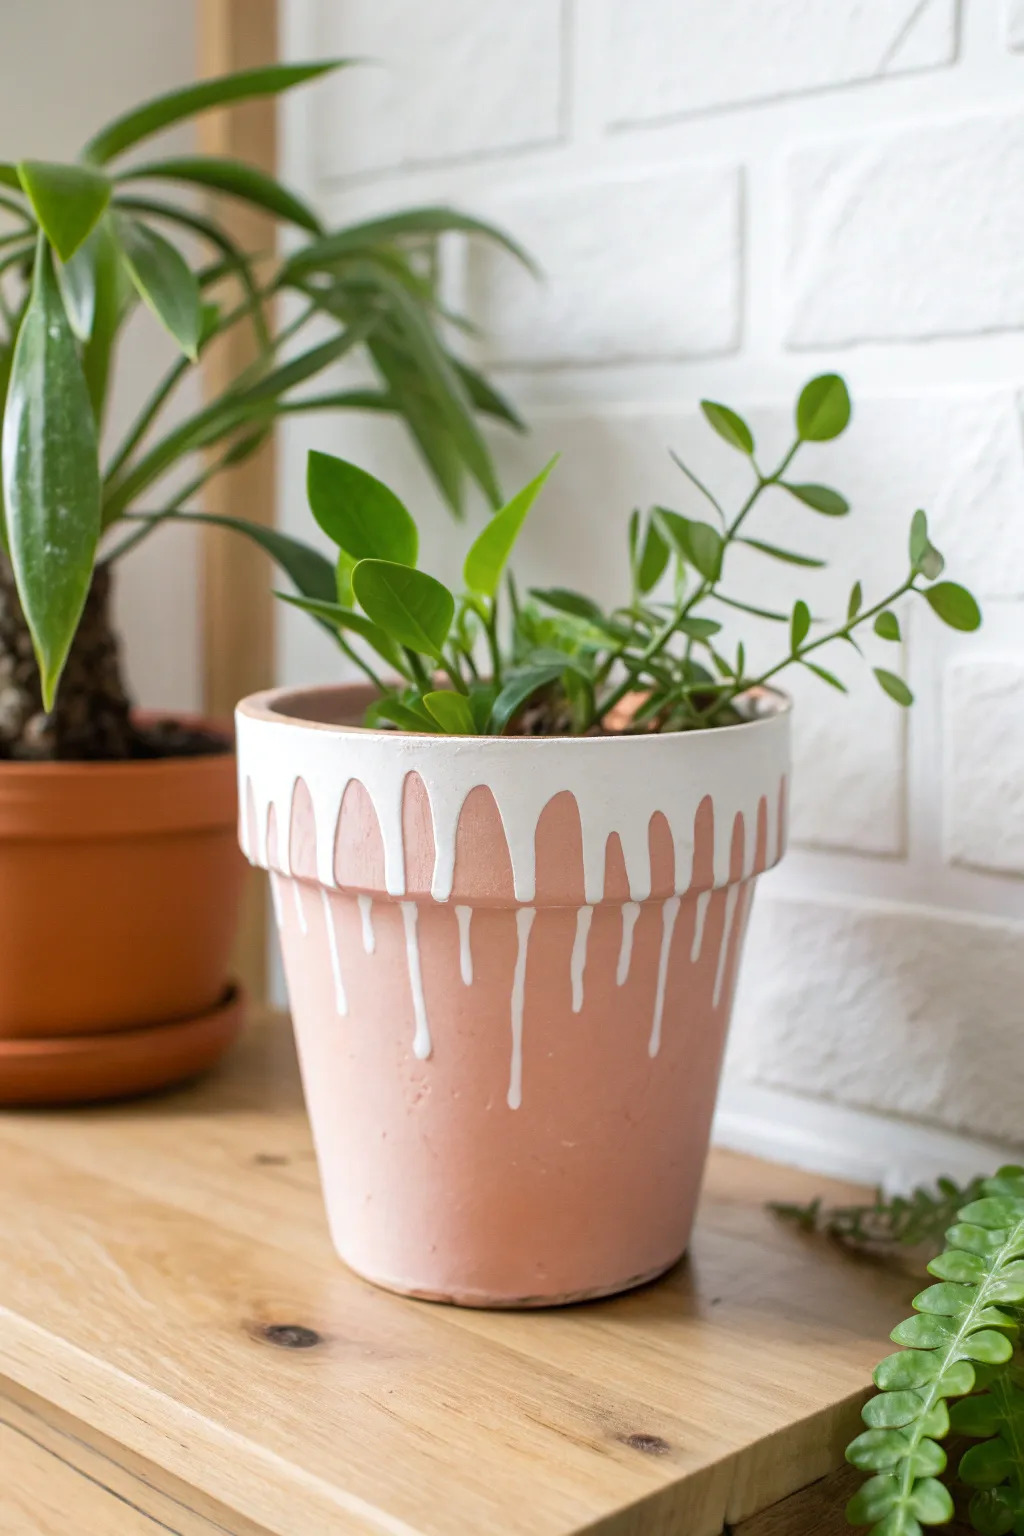
Transform a standard terracotta pot into a modern statement piece with this delightful drip-painting technique. By combining a soft, matte floral base color with a stark white rim, you create a playful contrast that looks effortlessly chic.
Step-by-Step
Materials
- Terra cotta pot (standard 6-inch is ideal)
- Acrylic paint (soft coral or salmon pink)
- Acrylic paint (titanium white)
- Paintbrush (medium flat brush)
- Squeeze bottle or plastic syringe
- Water
- Paper plate or palette
- Clear acrylic sealer spray (matte finish)
Step 1: Base Preparation
-
Clean the surface:
Before painting, ensure your terracotta pot is completely clean and dry. Wipe it down with a damp cloth to remove any dust or sticker residue that might interfere with paint adhesion. -
Mix the floral base:
Prepare your base color on a paper plate. If your coral or salmon paint is too bright, mix in a tiny drop of white to soften it into a pastel floral shade similar to the reference photo. -
Apply the first coat:
Using a medium flat brush, paint the entire exterior of the pot, stopping just inside the top rim. Don’t worry about perfect opacity yet; the terracotta absorbs the first layer quickly. -
Let it dry completely:
Wait about 20-30 minutes for the first coat to dry to the touch. Painting on damp terracotta can cause the paint to lift. -
Apply the second coat:
Add a second layer of your coral paint to achieve a smooth, opaque finish. I find that brushing horizontally around the pot gives the cleanest look. -
Dry partially:
Allow this base coat to dry completely before moving on to the drip effect. This prevents the white paint from blending with the pink and turning pink.
Drip Disaster?
If a drip runs too far or too fast, don’t wipe it! Simply tilt the pot upside down immediately. Gravity will pull the paint back toward the rim, shortening the drip naturally.
Step 2: Creating the Drip Rim
-
Prepare the white paint:
Thin your white acrylic paint slightly with a few drops of water. You want a consistency like heavy cream—thick enough to hold its shape, but fluid enough to run down the side. -
Fill your applicator:
Pour the thinned white paint into a small squeeze bottle or draw it up into a plastic syringe. This gives you much more control than simply pouring from a cup. -
Paint the top band:
Start by painting the flat top edge and the upper 1 inch of the rim with your white paint mixture using a brush to establishing a solid white band. -
Start the drips:
Position your squeeze bottle at the bottom edge of that white band. Gently squeeze a generous bead of paint and let gravity pull it down. -
Vary the lengths:
Move around the rim, creating drips at uneven intervals. Squeeze harder for long drips that reach the middle of the pot, and use less paint for shorter, subtle drips. -
Connect the drips:
Use your brush or the nozzle to smooth the paint between the drips along the rim, ensuring the transition from the solid band to the drip is seamless. -
Check for gaps:
Rotate the pot carefully. If any drips look too thin or translucent, carefully trace over them with a second line of paint while they are still wet. -
Dry flat:
Leave the pot sitting upright on a flat, protected surface. Do not touch the drips until they are fully dry, which may take longer than standard brushing due to the thickness of the paint.
Make it Pop
For a bolder look, swap the white drip for metallic gold or silver paint. The metallic sheen creates a stunning, muddy contrast against the matte pastel base.
Step 3: Finishing Touches
-
Inspect the rim:
Once dry, check the top rim. If the terracotta color is peeking through the white band, add a quick touch-up layer with a small brush. -
Seal the exterior:
Take the pot to a well-ventilated area and spray the exterior with a matte clear acrylic sealer. This protects the paint from water damage when you water your plants. -
Plant and enjoy:
Once the sealer is cured (check the can instructions), fill your pot with potting soil and your favorite green leafy plant to complete the look.
This charming pot adds a touch of artistic flair to any windowsill or shelf without overpowering your greenery