Whenever I’m stuck on what to make next, I come back to the classics: simple forms that feel good in your hands and look even better on a shelf. Here are my favorite clay pottery ideas—starting with the tried-and-true projects and drifting into the playful, slightly weird stuff that always sparks new inspiration.
Pinch Pot Bowls With Soft, Organic Curves
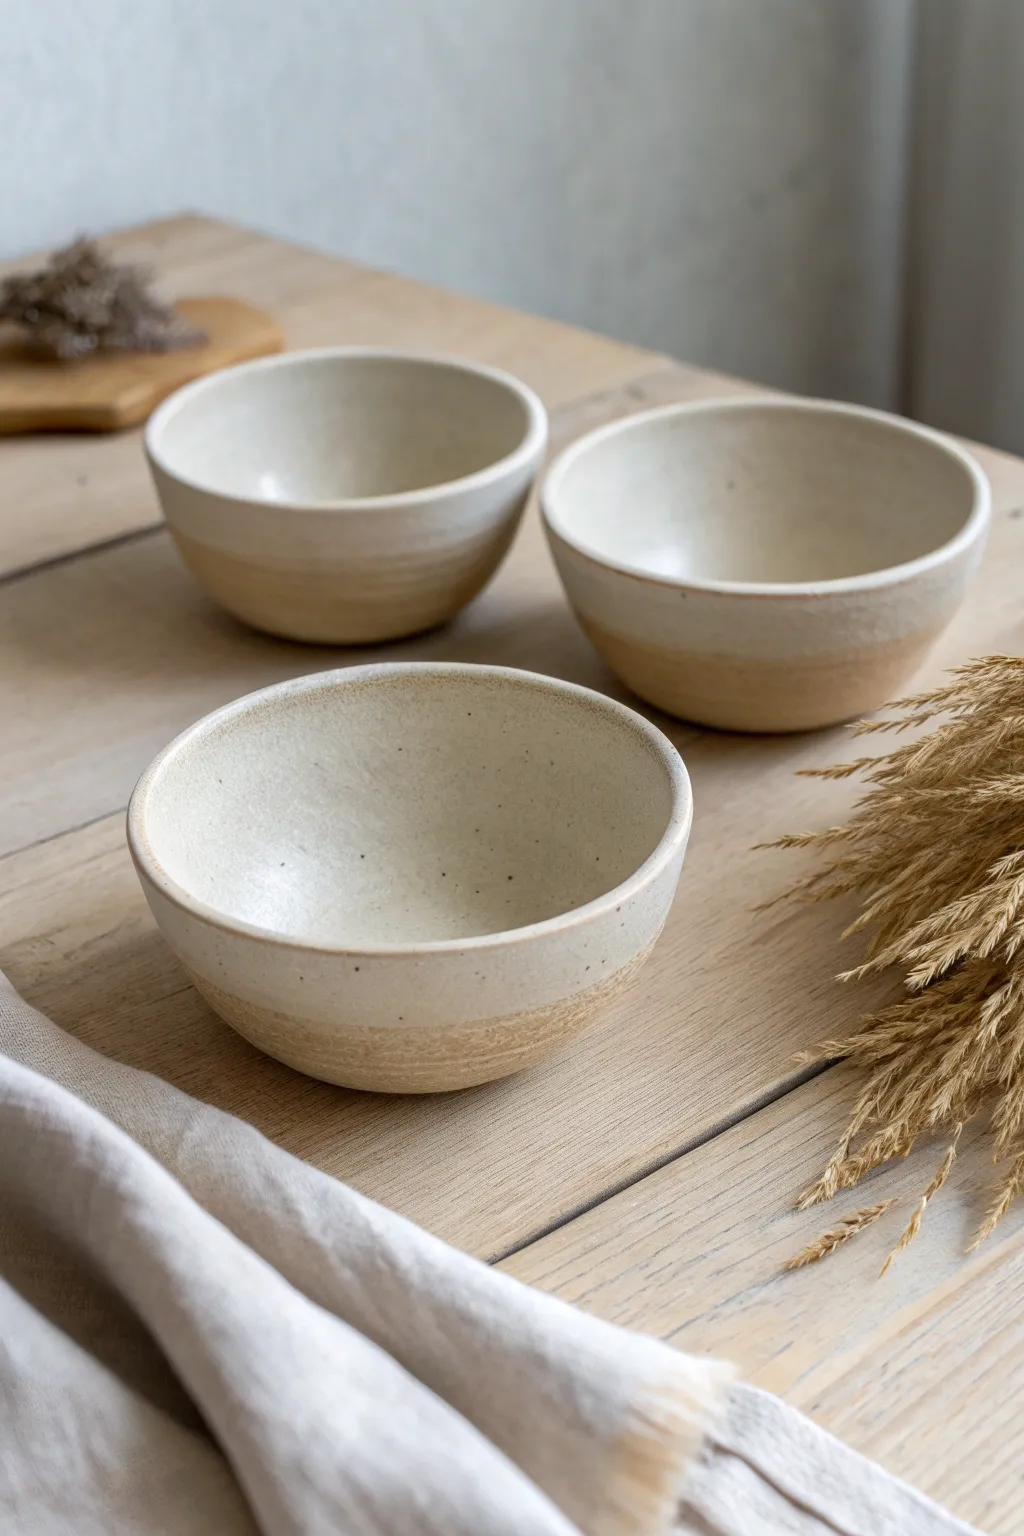
Embrace the natural beauty of exposed clay with these simple yet elegant pinch pot bowls. Featuring soft, organic curves and a creamy white glaze that stops midway, they highlight the beautiful contrast between smooth ceramic and raw, earthy texture.
Step-by-Step Guide
Materials
- Stoneware clay (speckled or buff)
- Pottery wire cutter
- Wooden modeling tool
- Metal kidney rib
- Soft sponge
- Bowl of water
- Rolling pin (optional)
- Canvas or wooden work board
- Creamy matte white glaze
- Wax resist (brush-on)
- Paintbrush for wax
- Kiln access
Step 1: Forming the Base
-
Prepare the clay:
Begin by wedging your stoneware clay thoroughly to remove any air bubbles. Divide the clay into three equal portions, each roughly the size of a large orange or a tennis ball, depending on your desired bowl size. -
Form the ball:
Roll one portion of clay between your palms until it creates a smooth, round sphere. Repeat this for the other two pieces so you have a matching set ready to go. -
Open the pot:
Hold the clay ball in your non-dominant hand. Gently press your thumb into the center of the ball, pushing down until you are about a quarter-inch from the bottom. Be careful not to push all the way through. -
Pinch the walls:
Starting from the bottom, use your thumb on the inside and fingers on the outside to gently pinch and lift the clay walls. Rotate the ball slightly with each pinch to ensure even thickness. -
Shape the curve:
Continue pinching upward, focusing on creating a gentle, open curve rather than straight vertical walls. Aim for a consistent wall thickness of about a quarter-inch throughout the vessel.
Keep it Organic
Don’t stress about perfect circles. A slight wobble in the rim adds character and emphasizes the handmade nature of the pinch pot technique.
Step 2: Refining and Smoothing
-
Level the rim:
Place the bowl on your work surface. If the rim is very uneven, you can use a needle tool to slice off the high points or simply tap the rim gently with a flat wooden paddle to level it out while keeping it organic. -
Smooth the interior:
Take a slightly damp sponge or a flexible kidney rib and run it along the inside of the bowl. This compresses the clay particles and removes fingerprints, leaving a smooth surface for food safety later. -
Refine the exterior:
Use the metal kidney rib to scrape and smooth the outside walls. I like to hold the rib at a slight angle to drag the grog slightly, which enhances that earthy texture on the bottom half. -
Define the foot:
Gently tap the bottom of the bowl on your table to create a small flat spot so it sits stable. You can use a wooden modeling tool to press a subtle indentation or ‘foot ring’ if you prefer a lifted look. -
Dry properly:
Cover the bowls loosely with plastic for a day to let them dry slowly to leather-hard, then uncover them to dry completely to bone dry state. -
Bisque fire:
Once bone dry, fire the bowls in a kiln to bisque temperature (usually roughly cone 04/06 depending on your clay body).
Step 3: Glazing the Two-Tone Look
-
Clean the bisque:
Wipe the fired bowls with a damp sponge to remove any kiln dust. This ensures the glaze adheres perfectly to the surface. -
Apply wax resist:
Dip a brush into liquid wax resist and paint the bottom third of the bowl’s exterior, including the underside. Create a clean, straight line or a soft, wavy organic line where the glaze will stop. -
Mixing the glaze:
Stir your creamy white glaze thoroughly. It should have the consistency of heavy cream to ensure an opaque, even coating. -
Dipping:
Holding the bowl by the foot (the waxed area), dip it straight down into the glaze bucket. Submerge it past the wax line for a split second, then lift it out in one smooth motion. -
Pouring (alternative):
If you don’t have enough glaze to dip, pour glaze inside the bowl, swirl it to coat, and pour it out. Then carefully brush glaze on the top two-thirds of the exterior. -
Clean up:
The wax resist should repel the glaze, but use a damp sponge to wipe away any stubborn droplets specifically from the waxed bottom section. Any glaze left on the bottom will stick to the kiln shelf. -
Glaze fire:
Load the bowls into the kiln for their final glaze firing (often cone 5 or 6 for stoneware). Once cool, sand the unglazed bottoms lightly if they feel rough.
Dual Texture
Try using a carving tool to add vertical fluting or small divots to the unglazed bottom section for added tactile contrast against the smooth top.
Enjoy using your new set of bowls for morning yogurt or simply as beautiful display pieces on your table


Coil-Built Planters for Succulents and Herbs
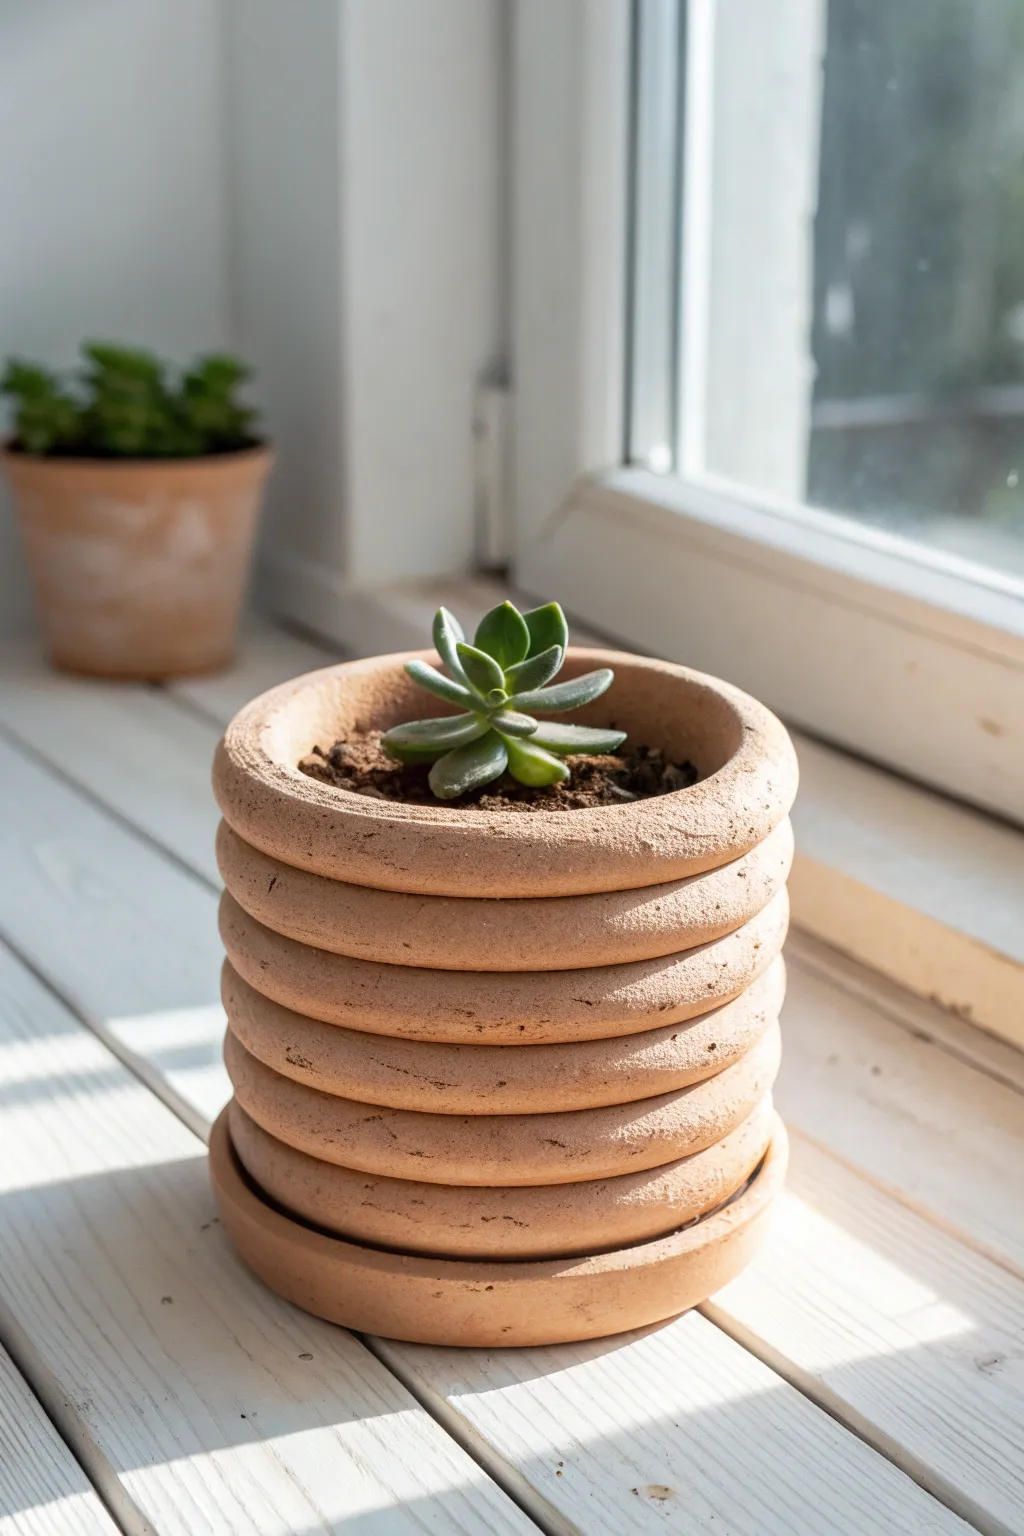
This charming planter features a distinctive ribbed texture created by stacking thick, uniform rings of clay, giving it a modern yet earthy architectural feel. The rough, unglazed finish highlights the natural beauty of terracotta clay and provides the perfect breathable home for small succulents.
How-To Guide
Materials
- Terracotta or earthenware clay (air-dry or kiln-fire depending on preference)
- Clay roller or rolling pin
- Two guide sticks (approx. 1/2 inch thick)
- Circle cutters (two sizes) or a compass tool
- Clay scoring tool or wire brush
- Slip (clay and water slurry)
- Potter’s knife or fettling knife
- Smoothing sponge
- Wooden modeling tool
Step 1: Creating the Base and Saucer
-
Prepare your workspace:
Begin by setting up a clean, flat surface covered with canvas or a clay mat to prevent sticking. Wedge your clay thoroughly to remove any air bubbles, which is crucial for structural integrity. -
Roll the slab:
Place your guide sticks on either side of a ball of clay. Roll the clay out into a uniform slab approximately 1/2 inch thick, ensuring the thickness is consistent throughout. -
Cut the base circles:
Use your larger circle cutter or a compass to cut out two identical circles. One will be the base of the pot, and the other will become the saucer. -
Create the saucer rim:
To make the saucer, gently pinch the edge of one clay circle upwards slightly to create a very shallow rim, just enough to catch minor water drips.
Smooth Seams
When joining rings, offset the vertical seams (where the ring ends meet) on different sides of the pot. This distributes stress and prevents a vertical crack from forming.
Step 2: Forming the Rings
-
Roll coils:
Take a large chunk of clay and roll it into a very thick, long coil. The coil should be slightly thicker than you want the final rings to be, as you will flatten it slightly. -
Flatten into strips:
Gently press down on your thick coil to create a long strip that is rounded on the edges but flat on the top and bottom. Aim for about 1/2 inch in height. -
Measure and cut:
Wrap the strip around your pot base to measure the length needed for one full ring. Cut the strip at an angle (beveled cut) where the ends meet to ensure a seamless join. -
Join the ring ends:
Score the angled ends, apply a dab of slip, and press them firmly together. Smooth the seam with your finger or a modeling tool so the ring is continuous. Repeat this process until you have 5 or 6 identical rings.
Step 3: Assembly
-
Score the base:
Take the flat circle reserved for the pot base. Heavily score the outer perimeter where the first ring will sit and apply a generous amount process. -
Attach the first ring:
Place your first ring onto the scored base. Press down firmly to adhere. I always like to run a wooden tool along the *inside* seam to blend the clay of the ring down into the base for strength, leaving the outside seam visible for the design. -
Stack subsequent rings:
Score the top of the first ring and the bottom of the second ring. add slip, and stack the second ring directly on top. Ensure they are perfectly aligned vertically. -
Continue stacking:
Repeat the scoring and slipping process for all remaining rings. As you stack, check frequently from the side to ensure your tower isn’t leaning. -
Reinforce the interior:
While the outside maintains the stacked look, the inside needs to be essentially one smooth wall. Use your fingers or a tool to smudge the coils together on the interior walls to prevent leaks and cracks. -
Refine the exterior:
Once stacked, use a damp sponge to gently smooth the rounded outer edges of the rings. You want them to look distinct but not jagged or rough.
Gradient Glaze
For a unique look, dip just the bottom saucer and the first ring into a white glaze after bisque firing to create a dipped, two-tone effect.
Step 4: Finishing
-
Add drainage:
Use a small circular tool or a straw to punch a drainage hole in the center of the pot’s bottom. This is vital for succulent health. -
Slow drying:
Loosely cover the pot and saucer with plastic to let them dry slowly. Rapid drying can cause layers to separate or the pot to warp. -
Final Surface Check:
Once the clay is leather-hard, do a final pass with a slightly damp sponge to remove any sharp burrs or fingerprints. -
Firing or sealing:
If using kiln clay, fire according to the clay manufacturer’s cone recommendation. If using air-dry clay, allow to fully cure and then seal the interior with a waterproof varnish.
Once fully cured, place your favorite echeveria in its new architectural home and enjoy the natural textures.


Slab-Built Mugs With Comfortable Handles
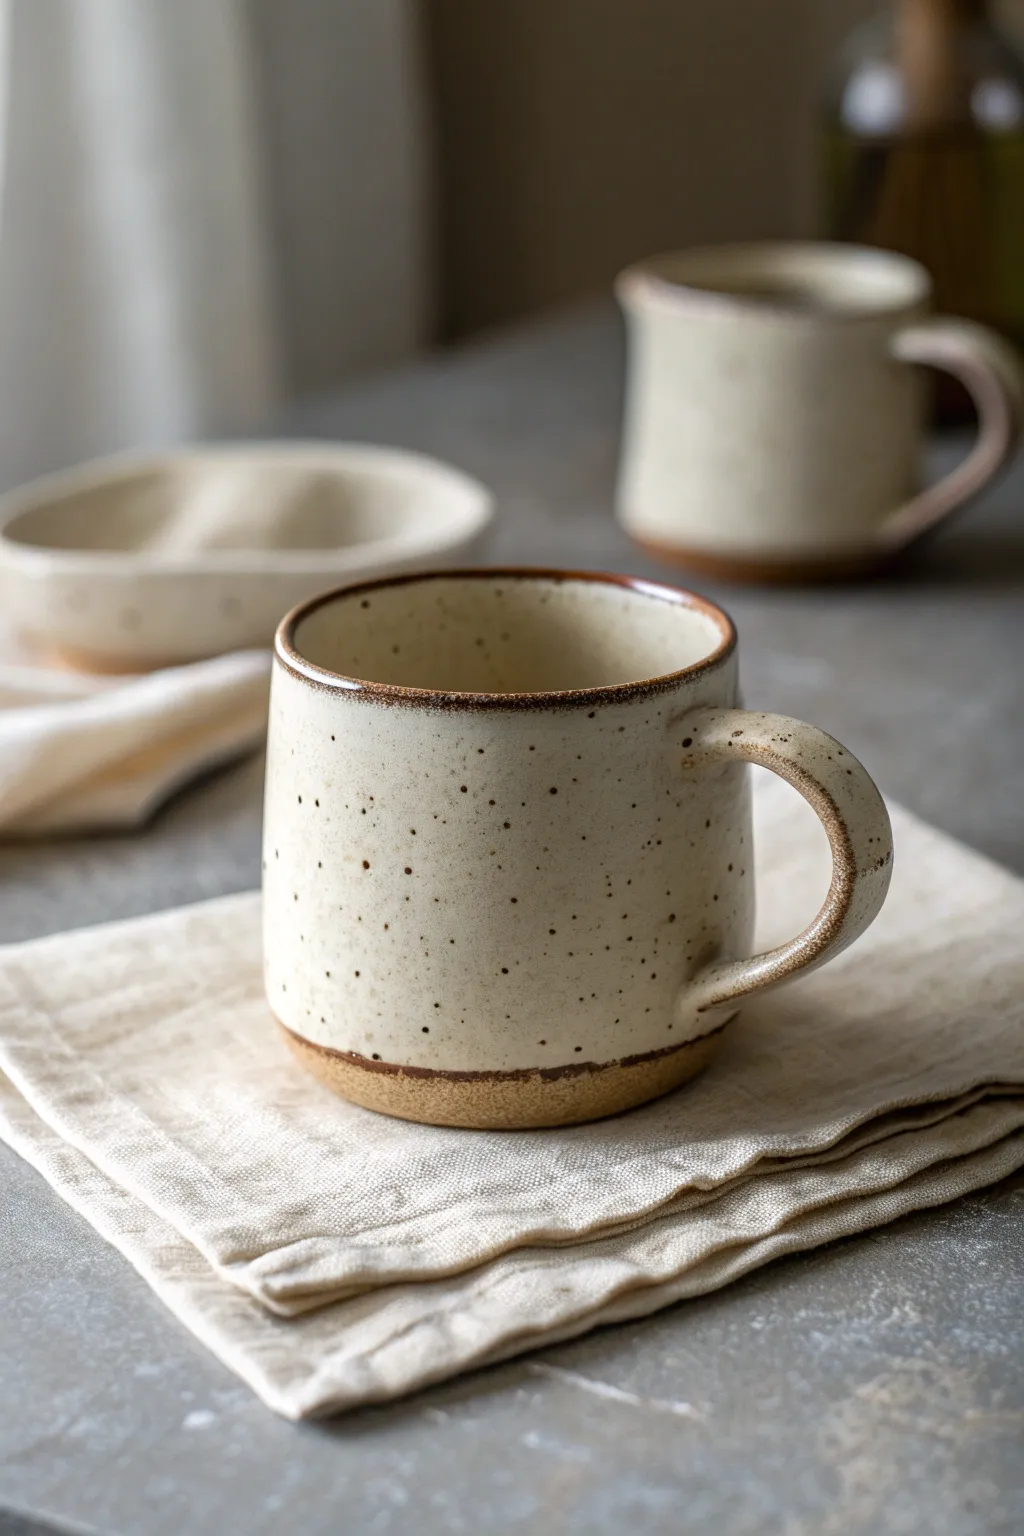
Create a cozy, earthy mug that feels as good in your hand as it looks on your shelf. This slab-built project features a beautiful speckled clay body, a defined unglazed foot ring, and a perfectly comfortable handle for your morning coffee.
Step-by-Step
Materials
- Speckled stoneware clay (e.g., Laguna Speckled Buff)
- Rolling pin
- Canvas or slab mat
- Guide strips (1/4 inch thick)
- Rectangular template (approx. 10.5″ x 4″)
- Circular template (approx. 3.5″ diameter)
- Fettling knife
- Serrated rib or scoring tool
- Slip (clay mixed with water)
- Wooden modeling tool
- Sponge
- Soft kidney rib
- White or cream matte glaze
- Wax resist
Step 1: Forming the Body
-
Prepare the slab:
Begin by wedging your speckled clay to remove air bubbles. Flatten it slightly with your palm, then roll it out on your canvas using 1/4 inch guide strips to ensure an even thickness throughout the slab. Smooth the surface with a soft rib to compress the clay particles. -
Cut the components:
Place your rectangular template on the slab and cut around it using a fettling knife; this will be the mug body. Next, cut out a circle for the base. Let these pieces stiffen to a soft leather-hard state so they can hold their shape without slumping. -
Bevel the edges:
On the short sides of your rectangle, cut 45-degree angles in opposite directions. This allows the seam to overlap cleanly without adding extra bulk to the wall of the mug. -
Construct the cylinder:
Score the beveled edges aggressively and apply a generous amount of slip. Bring the two ends together to form a cylinder, pressing the seam firmly. I like to use a wooden tool on the inside and outside to knit the clay together until the seam completely disappears. -
Attach the base:
Score and slip the bottom edge of your cylinder and the outer rim of your circular base. Press the cylinder onto the base. Use a modeling tool to blend the clay from the base up onto the wall, sealing the connection thoroughly.
Step 2: Refining and Handle
-
Shape the form:
With the cylinder constructed, gently push out the walls from the inside using a rib to create a slight curve or belly if desired, though the example image shows fairly straight walls. Smooth the rim with a damp sponge or a piece of chamois leather. -
Create the foot ring:
Since this is slab-built, we can faux trim a foot. Roll a thin coil of clay and attach it to the bottom outer edge of the mug. Blend the top of the coil into the mug wall, but leave the bottom edge defined to create that distinct unglazed foot shown in the photo. -
Pull a handle strap:
Using a leftover piece of clay, pull a strip of clay for the handle. You want it somewhat wide and flat for comfort. Alternatively, cut a strip from your remaining slab and smooth the sharp edges with a damp sponge. -
Form the handle curve:
Shape the strip into a ‘C’ or ear shape and let it stiffen slightly on your work table. It needs to be firm enough to not flop over when attached. -
Attach the handle:
Score and slip the attachment points on both the mug and the handle. Press the handle firmly onto the mug body. Use a small coil of clay around the connection points to reinforce the join, blending it smoothly so it looks seamless.
Rim Perfection
For a truly comfortable sip, lightly compress the rim with a strip of plastic wrap folded over the edge while the clay is leather hard. It creates a seamless rounded lip.
Step 3: Finishing and Glazing
-
Smooth and dry:
Go over the entire mug with a slightly damp sponge to remove any harsh fingerprints or rough textures. Allow the mug to dry slowly under plastic for the first day, then uncover it to dry completely to bone dry state. -
Bisque fire:
Fire the mug in the kiln to bisque temperature (usually cone 04 or 06). This prepares the clay to accept the glaze without dissolving. -
Wax the foot:
Apply wax resist to the bottom of the mug and up the side regarding the foot ring you created. For the look in the image, keep the wax line fairly low, exposing the raw clay texture at the bottom. -
Glaze application:
Dip the mug into a cream or white semi-opaque glaze. A glaze that breaks over edges (is thinner on rims) is ideal, as it will reveal the warm brown rim and speckles seen in the photo. -
Wipe the rim (optional):
If your glaze doesn’t naturally break to brown, carefully wipe a tiny bit of glaze off the very top rim with a damp sponge to expose the clay body for that rustic outline. -
Glaze fire:
Fire the mug to maturity (likely cone 5 or 6 for stoneware). Ensure the foot is wiped perfectly clean before loading it into the kiln.
Warping Walls?
If your cylinder goes oval during handling, don’t squeeze it back into a circle immediately. Let it stiffen slightly, then gently coax it back to round using a circular lid as a guide.
Enjoy the warmth of your homemade mug, knowing that those unique speckles are a signature of your own handiwork


Everyday Bowls Thrown or Hand-Built
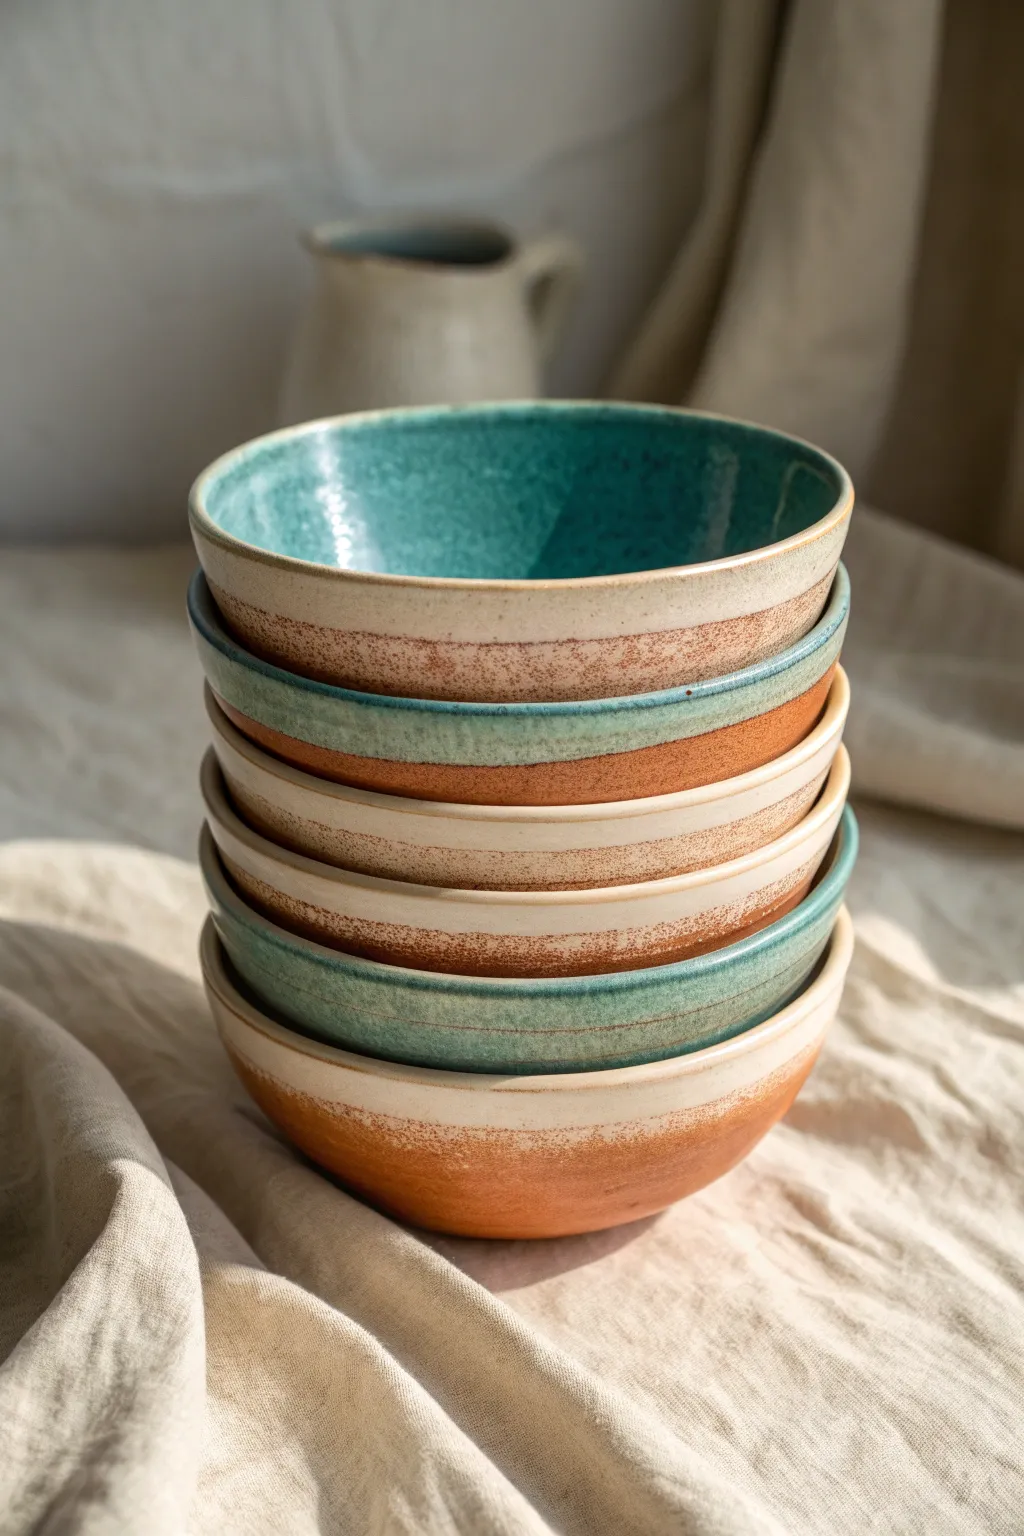
These inviting, reliable bowls strike a beautiful balance between raw, earthy texture and sleek, colorful utility. Their design highlights the natural warmth of red stoneware clay contrasted against a vibrant, glassy turquoise interior, making them perfect for your morning cereal or evening soup.
Detailed Instructions
Materials
- Red stoneware clay (e.g., terracotta or a groggy red clay)
- Pottery wheel
- Throwing tools (sponge, wire cutter, rib, needle tool)
- Trimming tools (loop tools)
- Turquoise or Teal reactive glaze (cone 5-6)
- White or clear liner glaze (optional, for food safety if needed)
- Wax resist
- Soft fan brush
- Kiln
Step 1: Throwing the Form
-
Wedge the clay:
Begin by wedging your red stoneware clay thoroughly. You want to remove all air bubbles and ensure the moisture is consistent throughout the ball. For these everyday bowls, aim for balls of clay weighing approximately 1.5 to 2 pounds each. -
Center on the wheel:
Slap the clay ball onto the center of the wheel head. Using moistened hands and steady pressure, cone the clay up and down until it is perfectly centered and spinning without wobble. -
Open the form:
Drill your thumbs into the center of the clay, stopping about a half-inch from the wheel head to leave enough thickness for a foot ring later. Pull the clay outward to establish the floor width of your bowl. -
Pull the walls:
Using a sponge in your outside hand and fingers on the inside, gently squeeze and lift the clay current. I like to keep the walls slightly thicker at the bottom for stability, tapering as I reach the rim. Aim for a gentle, upward curve rather than a flat, wide saucer shape. -
Refine the curve:
Use a kidney bean-shaped rib (metal or rubber) on the inside of the bowl to smooth the throwing lines and establish a continuous, flowing curve from the floor to the rim. -
Address the rim:
Compress the rim gently with a piece of chamois leather or your sponge. A slightly rounded, thickened rim resists chipping better. -
Cut and dry:
Run your wire cutter under the pot to release it from the wheel. Carefully lift it off and set it aside to dry until it reaches a leather-hard state.
Glaze Crazing?
If the glaze shows tiny cracks (crazing) after firing, the clay and glaze are expanding differently. Try a glaze specifically formulated for your clay body’s expansion rate.
Step 2: Trimming and Finishing
-
Center for trimming:
Once leather-hard, place the bowl upside down on the wheel. Tap it into center and secure it with wads of soft clay. -
Define the profile:
Using a sharp loop tool, shave away the excess clay from the lower exterior. Follow the interior curve you created earlier so the wall thickness is even. -
Carve the foot:
Carve a distinct foot ring. This lifts the bowl off the table and gives it an elegant shadow line. Smooth the trimmed area with a damp sponge or a rubber rib to burnish the raw clay slightly. -
Bisque fire:
Allow the bowls to dry completely—bone dry—before loading them into the kiln for a bisque firing (usually to Cone 04 or 06, depending on your clay body).
Step 3: Glazing
-
Clean the bisque:
Wipe the fired bowls with a damp sponge to remove any kiln dust. This ensures the glaze adheres properly without crawling. -
Wax the exterior base:
Apply wax resist to the bottom third of the bowl’s exterior and the foot ring. The design relies on this exposed raw clay, so apply the wax carefully in a reasonably straight line, though a little waviness adds character. -
Pour the interior:
Pour your turquoise glaze inside the bowl, roll it around to coat the entire interior surface, and pour the excess back into your bucket. Shake the bowl gently to level the glaze coat. -
Dip the rim:
Holding the bowl by its waxed foot, dip the top rim into the glaze bucket. Submerge it just deep enough to overlap the interior glaze and coat the top 2/3 of the exterior, stopping right where your wax resist line begins. -
Clean up drips:
Once the glaze is dry on the pot, check the wax line. If any glaze beads up on the wax, wipe it away cleanly with a damp sponge. -
Glaze fire:
Load the bowls into the kiln for the final glaze firing (likely Cone 5 or 6). Make sure the bowls do not touch each other.
Pro Tip: Texture
Don’t over-smooth the raw clay exterior. Leaving slight grog or trimming marks adds tactile friction, making the bowls easier to hold when they contain hot food.
Now you have a stunning set of handmade pottery ready to grace your dinner table

What Really Happens Inside the Kiln
Learn how time and temperature work together inside the kiln to transform clay into durable ceramic.
Mini Bud Vases That Make One Stem Look Fancy

These charming, minimalist bud vases prove that sometimes less is definitely more. With their creamy white glaze, subtle speckling, and varied silhouettes, they create a stunning trio perfect for highlighting single stems found on a morning walk.
Step-by-Step
Materials
- White stoneware clay (speckled or plain)
- Pottery wheel
- Throwing tools (sponge, wooden rib, wire cutter)
- Needle tool
- Trimming tools
- White matte or satin glaze
- Iron oxide wash (if using plain clay)
- Small paintbrush
- Kiln
Step 1: Throwing the Bulbous Vase (Left)
-
Center the clay:
Start with a small ball of clay, about 1 lb. Center it firmly on the wheel head, keeping your base relatively narrow since bud vases have small footprints. -
Open and pull:
Open the clay and pull up a short cylinder. Don’t worry about the shape yet; focus on getting an even wall thickness of about 1/4 inch. -
Belly out the form:
Using a rib inside the pot and gentle pressure from the outside, push the clay outward to create a round, bulbous ‘belly’. Keep the very top section thick enough to collar in later. -
Collar the neck:
Gently squeeze the top rim inward with wet hands (collaring) to narrow the opening significantly. You want a distinct transition from the round body to a very narrow neck. -
Refine the rim:
Use a chamois or sponge to smooth the lip. For this specific look, flare the rim outward slightly, almost like a tiny trumpet shape.
Collaring Woes
If the clay ripples or twists when narrowing the neck, the clay is too dry or your wheel speed is too slow. Keep it wet and speed up slightly.
Step 2: Throwing the Bottle & Cone Shapes
-
The Bottle Shape (Center):
For the middle vase, center a similar amount of clay but pull a taller, narrower cylinder initially. Create a gentle curve near the bottom but leave the majority of the height for a long, graceful neck. -
The Conical Shape (Right):
For the third vase, keep your pulling motion consistently angled inward. Instead of curving it out, you want a straight, tapered line from the base to the rim, forming a tall triangle or cone profile. -
Cut off and dry:
Wire the vases off the wheel and set them aside until they reach leather-hard consistency.
Step 3: Trimming and Texture
-
Trimming the feet:
Once leather hard, center each vase upside down on the wheel. Trim excess weight from the bottom and carve a small foot ring to give them a lifted, professional appearance. -
Adding texture:
To recreate the textured look on the round vase, I like to use a slightly rough sponge or a stiff brush to dab the upper shoulder area while the clay is still damp, creating surface variation. -
Bisque fire:
Allow the vases to dry completely (bone dry) before loading them into the kiln for a bisque firing to cone 04.
Make It a Set
Create a unified tray or wooden plank with recessed spots to hold all three vases together as a permanent centerpiece arrangement.
Step 4: Glazing and Finishing
-
Prepare the surface:
Wipe the bisque-fired vases with a damp sponge to remove any dust. If you used plain white clay and want speckles, now is the time to lightly flick iron oxide wash onto the surface using a toothbrush. -
Apply glaze:
Dip each vase into a matte or satin white glaze. Hold them upside down for a few seconds to let excess glaze drip off, ensuring an even coat. -
Create the drip effect:
For the bulbous vase on the left, you can apply a slightly thicker second coat just near the neck to encourage that subtle textural drip during firing. -
Clean the bottoms:
Meticulously wipe all glaze off the foot rings with a wet sponge. Any glaze left on the bottom will fuse your beautiful vase to the kiln shelf. -
Final firing:
Fire the vases to the maturation temperature of your clay and glaze (likely cone 5 or 6). Let even cooling happen naturally to avoid thermal shock.
Arrange your trio on a windowsill and enjoy the elegant simplicity of your handmade collection
Slab Plates and Trays With Leaf Impressions

Capture the delicate veins and organic shapes of nature with this rectangular slab-built tray. Featuring clean lines and crisp leaf reliefs layered under a soft creamy glaze, this piece makes a stunning centerpiece or vanity dish.
Step-by-Step Guide
Materials
- Light-colored stoneware clay or porcelain
- Rolling pin or slab roller
- Two wooden thickness strips (approx. 1/4 inch)
- Rectangular slump mold or wooden board for shaping
- Assorted fresh leaves (maple, beech, etc.) with prominent veins
- Needle tool or fettling knife
- Smooth ribs (rubber or metal)
- Sponge and water
- Fearsome rolling tool (brayer) – optional but helpful
- Kiln
- Cream or off-white glaze (matte or satin finish)
Step 1: Preparing the Slab
-
Wedge the clay:
Begin by thoroughly wedging your clay to remove any air bubbles, ensuring a smooth, consistent texture that will take impressions well. -
Roll the foundation:
Place your clay between two wooden thickness strips or guide rails. Roll out a consistent slab that is slightly larger than your intended final dimensions. -
Compress the surface:
Run a smooth rubber rib over the entire surface of the slab on both sides. This aligns the clay particles, preventing warping later, and creates a flawless canvas for your leaves.
Sticky Leaf Issues?
If leaves won’t peel off easily, let the clay dry for 15-20 minutes with the leaves still embedded. As the clay shrinks slightly, the leaves usually pop right off.
Step 2: Creating the Impressions
-
Plan your composition:
Arrange your collected leaves on top of the clay slab before pressing them in. Play with orientation—some pointing up, some angled—to create a balanced, natural flow like leaves falling on a path. -
Embed the leaves:
Once satisfied with the placement, gently use your rolling pin or a small brayer to press the leaves into the clay. I prefer to roll from the center outward to avoid trapping air pockets under the foliage. -
Ensure good contact:
Make sure the thickest parts of the stems and veins are pressed flush with the surface. Run your finger over the leaf edges to ensure a crisp outline. -
Remove the foliage:
Carefully peel the leaves away by lifting the stem first. If a leaf is stubborn, use a needle tool to gently lift the edge without gouging the clay.
Pro Tip: Vein Definition
Always place leaves vein-side down! The back of the leaf has the most prominent texture, which ensures a deep, highly detailed impression in the clay.
Step 3: Construction and Refining
-
Cut the shape:
Using a ruler and a needle tool or fettling knife, cut a clean rectangle around your leaf composition. Round the corners slightly for a softer, more finished look. -
Form the rim:
If using a slump mold, drape the slab inside carefully. If working on a flat board, gently lift the edges of the slab (about 1 inch) to create a vertical rim. -
Reinforce the corners:
If you hand-built the rim, pinch the corners gently to secure the lift. Smooth any seams or cracks immediately with a slightly damp sponge so the transition looks seamless. -
Refine the edges:
Run a damp sponge or a piece of chamois along the top rim of the tray to soften the sharp cut edge. A comfortable, rounded lip feels much better to hold. -
Dry slowly:
Cover the tray loosely with plastic to allow it to dry slowly and evenly. This is crucial for slab pieces to prevent the corners from curling up.
Step 4: Firing and Glazing
-
Bisque fire:
Once the piece is bone dry, fire it in the kiln to a bisque temperature (usually cone 04 or 06, depending on your clay body). -
Apply the glaze:
Pour or dip your tray in a cream or off-white glaze. A satin or matte finish works best here, as high gloss can sometimes obscure the delicate texture of the veins. -
Wipe back (optional):
If your glaze is thick, you can gently wipe the raised areas of the leaves with a sponge, leaving more glaze in the recesses to highlight the texture. -
Clean the foot:
Ensure the bottom of the tray is completely free of glaze before the final firing to prevent it from sticking to the kiln shelf. -
Glaze fire:
Fire the piece again to the maturation temperature of your specific clay and glaze combination.
Now you have a permanent record of nature’s design ready to display your treasures


The Complete Guide to Pottery Troubleshooting
Uncover the most common ceramic mistakes—from cracking clay to failed glazes—and learn how to fix them fast.
Trinket Dishes for Rings, Keys, and Tiny Treasures
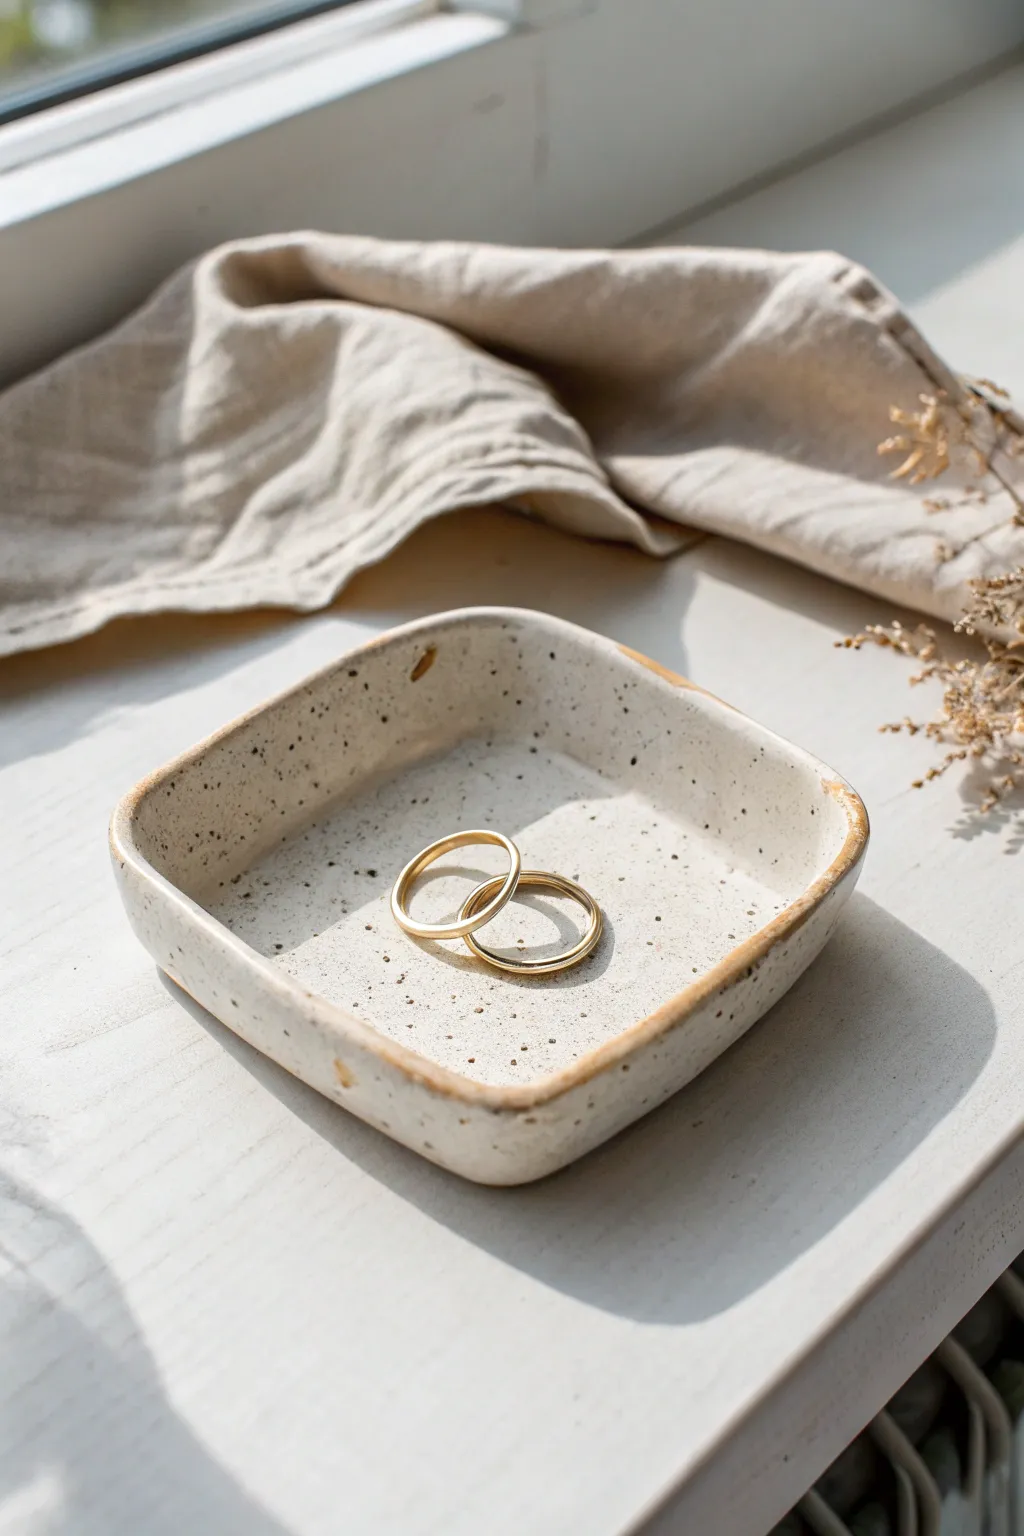
This minimalist trinket dish features a gentle square shape with softened corners and a lovely speckled finish that mimics stoneware. It’s the perfect size for holding your most precious rings or tiny keepsakes by the windowsill.
Step-by-Step
Materials
- White polymer clay or air-dry clay
- Rolling pin or acrylic roller
- sharp craft knife or clay blade
- Square template (cardstock or cookie cutter approx. 3-4 inches)
- Fine-grit sandpaper
- Tan or light brown acrylic paint
- Black acrylic paint
- Gloss or satin varnish/glaze
- Small paintbrush
- Old toothbrush
- Small bowl or curved form for drying
Step 1: Shaping the Base
-
Condition the Clay:
Begin by warming up a ball of white clay in your hands until it becomes soft and pliable. If you are using air-dry clay, knead it briefly to remove any air pockets. -
Roll it Out:
Use your rolling pin or acrylic roller to flatten the clay into a slab. You want an even thickness of about 1/4 inch (6mm) so the dish feels substantial but delicate. -
Cut the Shape:
Place your square paper template or cookie cutter onto the slab. Using your craft knife, carefully cut around the perimeter to create your square base. -
Smooth the Edges:
Dip your finger in a little bit of water (for air-dry clay) or baby oil (for polymer clay) and run it along the cut edges to smooth out any sharpness or roughness. -
Soften the Corners:
Gently press down on each of the four sharp corners with your thumb to round them off slightly. This gives the piece that organic, handmade pottery look seen in the photo. -
Create the Lip:
With the square flat on your work surface, gently pinch and lift the edges upward. Pinch evenly around the perimeter to create a raised rim that is about 1/2 inch high.
Step 2: Refining and Drying
-
Form the Curve:
To ensure the dish holds its shape while drying, place it into a shallow bowl or a curved form. Gently press the center down so it conforms to the curve. -
Smooth the Interior:
Check the inside of the dish for any fingerprints or uneven spots. I like to use a slightly damp sponge here to make final smoothing passes. -
Let it Dry (or Bake):
If using air-dry clay, let it sit for 24-48 hours until bone dry. If using polymer clay, bake it according to the manufacturer’s temperature instructions (usually around 275°F for 15-30 minutes). -
Sand the Imperfections:
Once fully cured or dry, take your fine-grit sandpaper and lightly buff the rim and the sides. This ensures a professional, finished texture. -
Wipe Clean:
Use a barely damp cloth or paper towel to remove all the sanding dust before you start adding color.
Splatter Control
Practice your toothbrush flicking technique on a scrap piece of paper first. This helps you gauge how much paint to load and how hard to flick for the perfect splatter size.
Step 3: Painting the Faux-Ceramic Look
-
Mix the Rim Color:
Mix a small amount of tan or light brown acrylic paint with a tiny drop of water to create a wash. -
Paint the Rim:
Using a small brush, apply this tan wash specifically to the very top edge of the rim. Don’t worry about being perfect; a slightly uneven line mimics natural pottery glazing. -
Prepare the Speckles:
Dilute a small drop of black acrylic paint with water until it is quite runny and inky. -
Apply the Splatter:
Dip an old toothbrush into the watered-down black paint. Hold it over the dish and run your thumb across the bristles to flick tiny specks onto the clay surface. -
Control the Density:
Add more speckles towards the edges and keep the center slightly clearer if you want to highlight the jewelry placed there later. Let the paint dry completely. -
Seal the Dish:
Apply a coat of gloss or satin varnish over the entire piece. This protects the paint and gives the clay that fired ceramic shine. -
Apply a Second Coat:
For extra durability, add a second thin layer of varnish once the first is dry to the touch. -
Final Cure:
Allow the varnish to cure fully (usually 24 hours) before placing any metal jewelry inside to prevent sticking.
Rim Effect
Instead of tan paint for the rim, try using a metallic gold leaf pen. Run it along the edge for a chic, modern upgrade that catches the light beautifully.
Place your new dish in a sunny spot and enjoy the simple elegance it brings to your space
Soap Dishes With Drainage Grooves
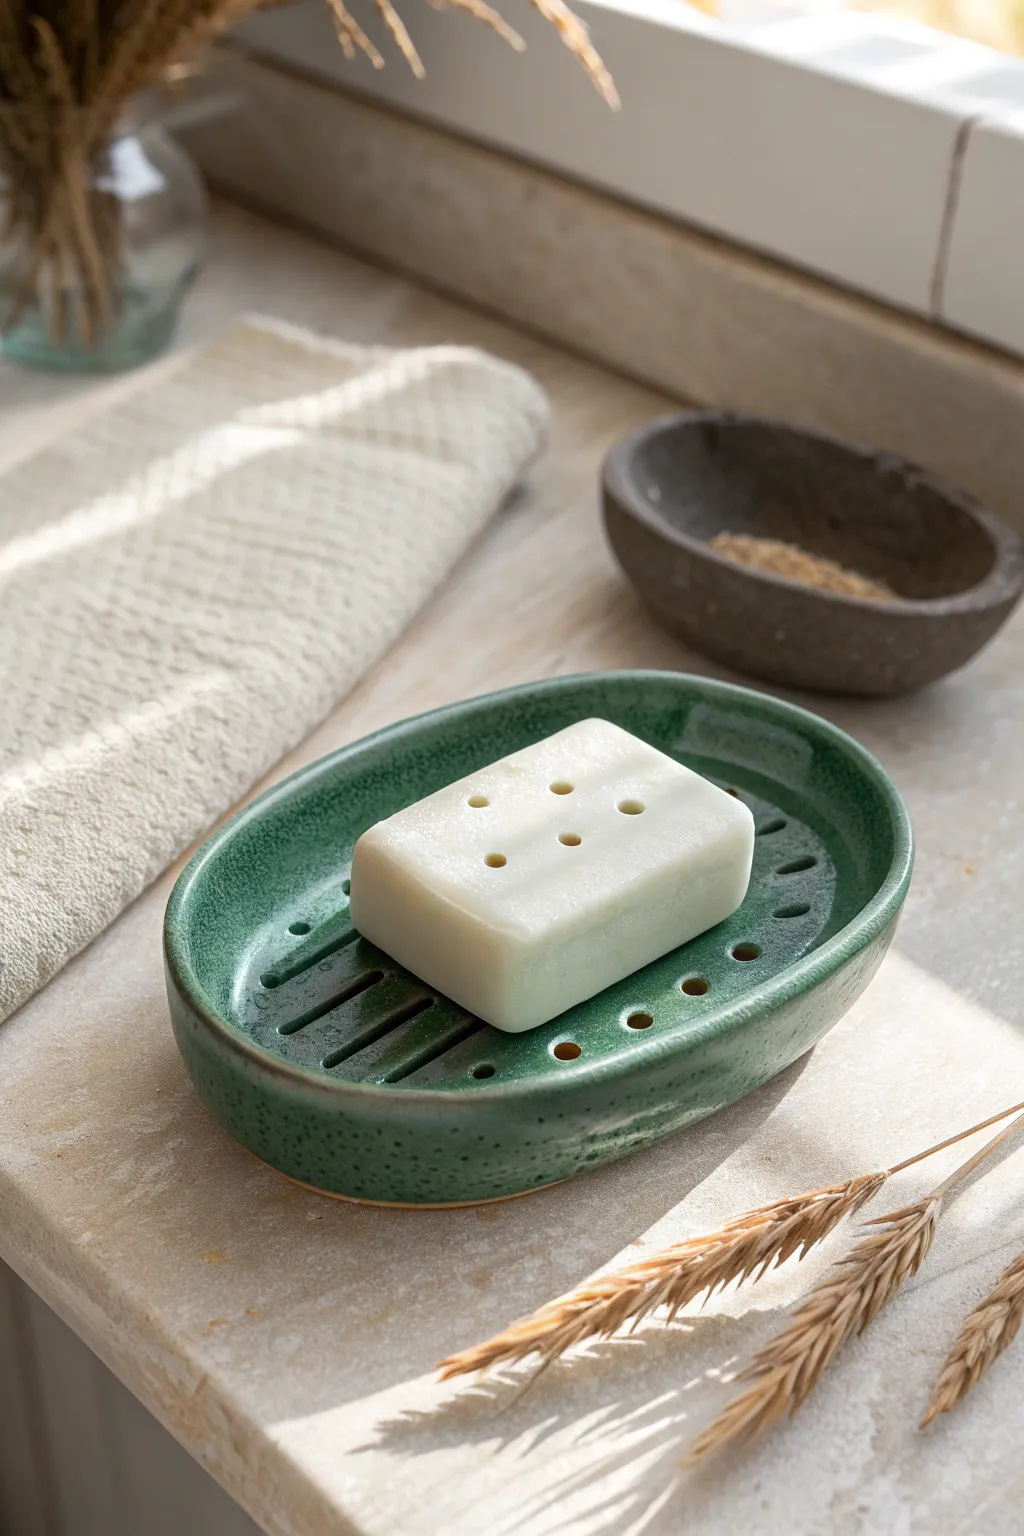
This charming oval soap dish features thoughtful drainage design and a rich, speckled green glaze that brings an earthy elegance to any bathroom sink. By creating a raised platform with perforated holes and carved grooves, you ensure your soap stays dry while learning essential slab-building techniques.
Step-by-Step Guide
Materials
- Stoneware clay body (smooth or speckled)
- Rolling pin
- Slab strips (approx. 1/4 inch thickness)
- Oval paper template or cookie cutter
- Fettling knife or needle tool
- Rib tool (flexible metal or rubber)
- Sponge
- Small hole punch or drinking straw
- Loop tool for carving
- Slip and scoring scoring tool
- Speckled green glaze
- Kiln
Step 1: Forming the Base
-
Roll the slab:
Begin by wedging your clay to remove air bubbles, then roll it out into a smooth slab. Use 1/4 inch guide strips on either side of your rolling pin to ensure an even thickness throughout the entire piece. -
Smooth the surface:
Before cutting, take a rubber rib and compress the clay slab on both sides. This aligns the clay particles, preventing future warping, and gives you a nice canvas to work on. -
Cut the shapes:
Place your oval template onto the slab. You will need to cut two identical ovals: one for the bottom basin and one that will become the inserted drainage shelf. -
Create the walls:
Cut a long strip of clay from the remaining slab, approximately 1 inch tall. This will form the vertical wall of the dish. -
Assemble the perimeter:
Score and slip the edge of the first oval base and the bottom edge of your clay strip. Attach the strip around the perimeter of the oval to create a shallow bowl form. -
Reinforce the seam:
Use a small coil of clay or your modeling tool to blend the seam where the wall meets the base on the inside. Smooth the outside seam with a rib tool so it looks seamless.
Warping Worries
If the oval shelf sags during drying, place a supportive piece of foam or crumpled newspaper underneath it until it reaches the leather-hard stage.
Step 2: Creating the Drainage Shelf
-
Trim the insert:
Take the second oval you cut earlier and trim about 1/8th of an inch off the entire perimeter. This needs to fit inside the walls of your first piece, resting slightly above the bottom. -
Punch drainage holes:
Using a small circular cutter or a drinking straw, punch a series of holes around the outer edge of this smaller oval. I like to space them evenly to create a decorative pattern that doubles as functional drainage. -
Carve the grooves:
With a loop tool, gently carve shallow linear grooves connecting the solid center of the shelf toward the holes. These channels will help water run off the soap and into the basin below. -
Create supports:
Roll small balls or short coils of clay to act as feet for the shelf. Score and slip these onto the bottom of the shelf piece so it will stand elevated inside the main dish. -
Attach the shelf:
Score and slip the bottom of the support feet and place the shelf inside the main dish. Press down gently to secure it, ensuring the shelf is level.
Step 3: Finishing and Glazing
-
Refine the edges:
Once the clay is leather-hard, use a damp sponge to smooth the rim of the dish and the edges of the drainage holes. Sharp edges can become very sharp after firing, so round them off now. -
Bisque fire:
Let the piece dry slowly and completely before loading it into the kiln for the bisque firing, typically to Cone 04 depending on your clay body. -
Apply the glaze:
Dip or brush on your speckled green glaze. Make sure the glaze gets into the drainage holes but doesn’t clog them; you can blow gently on the holes while the glaze is wet to clear them. -
Wipe the bottom:
Clean the bottom of the dish thoroughly with a wax resist or a wet sponge to prevent it from sticking to the kiln shelf. -
Glaze fire:
Fire the piece again to the maturation temperature of your clay and glaze (often Cone 5 or 6 for stoneware) to achieve that glossy, durable finish.
Texture Twist
Press a piece of lace or a textured fabric into the wet clay of the exterior walls before assembling for a tactile, patterned surface.
Once fired, you will have a durable, custom soap dish that keep your vanity tidy and your soap dry

TRACK YOUR CERAMIC JOURNEY
Capture glaze tests, firing details, and creative progress—all in one simple printable. Make your projects easier to repeat and improve.
Spoon Rests That Actually Catch the Mess
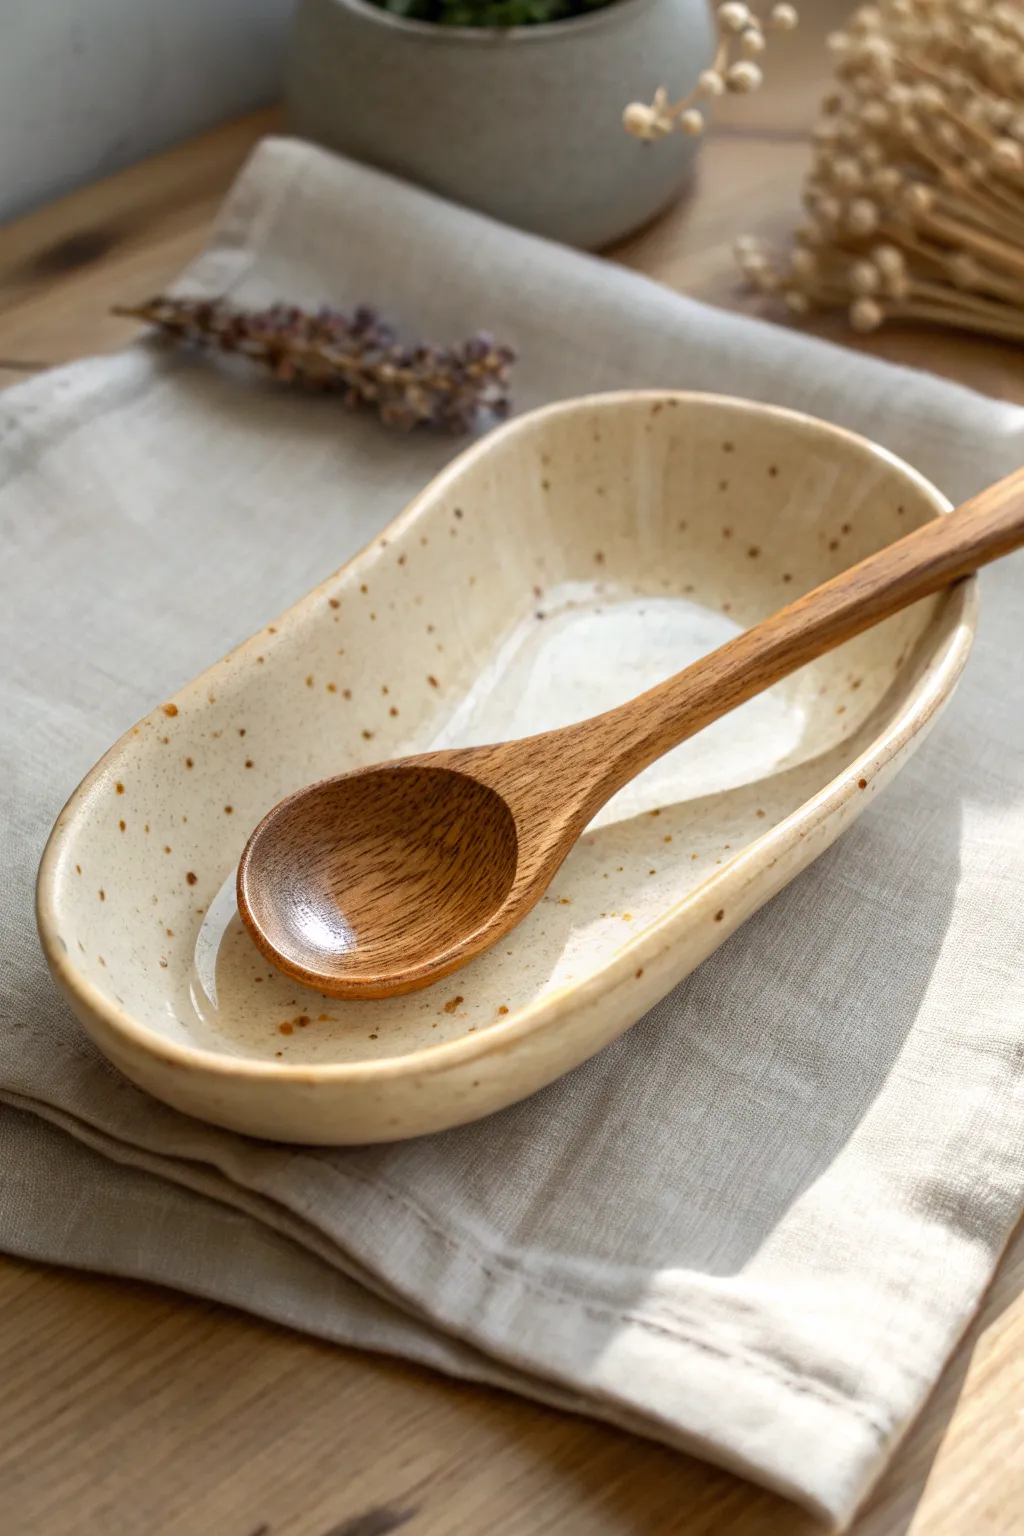
This elongated, oval spoon rest combines organic warmth with practical design, featuring a soft creamy glaze interrupted by earthy brown speckles. Its deep, curved sides ensure that sauce drips and messy utensils stay contained, making it a functional beauty for any kitchen counter.
Detailed Instructions
Materials
- Light-colored stoneware clay (smooth body)
- Pottery wheel or rolling pin/slab roller (for hand-building)
- Oval template (paper or cardstock)
- Pottery knife or needle tool
- Rib tool (kidney)
- Sponge
- Cream/Off-white glossy glaze
- Iron oxide wash or speckled clay body (if not using speckled glaze)
- Kiln
Step 1: Forming the Base
-
Prepare the slab:
Begin by rolling out a slab of light stoneware clay to an even thickness of about 1/4 inch. If you are hand-building, ensure you compress the clay on both sides with a rib to prevent warping later. -
Cut the shape:
Place your elongated oval template on the slab. Using a needle tool, trace and cut around the template to create the base of your spoon rest. -
Soften the edges:
Run a damp sponge or your finger along the cut edge to smooth out any sharpness or burrs left by the cutting tool. -
Lift the walls:
Gently pinch up the edges of the oval to create a vertical wall. Work slowly around the perimeter, lifting the clay about 1 inch high to form a shallow bowl shape. -
Refine the curve:
Use a damp sponge or chamois to smooth the transition where the floor meets the wall, ensuring a seamless, gentle curve inside rather than a sharp angle.
Step 2: Shaping and Drying
-
Create the irregular rim:
For that handmade, organic look seen in the photo, allow the rim to undulate slightly rather than making it perfectly level. I like to gently press down on opposite sides to create a subtle dip. -
Smooth the exterior:
Turn your attention to the outside walls. Use a flexible rib to smooth the exterior surface, refining the oval shape and removing any fingerprints from the pinching process. -
Slow drying:
Cover the piece loosely with plastic to allow it to dry slowly to the leather-hard stage. This prevents the elongated shape from warping or cracking. -
Trim the foot (optional):
Once leather-hard, you can gently carve a small recession or foot ring on the bottom if desired, or simply sponge the bottom smooth for a flat base. -
Bisque fire:
Allow the piece to become bone dry, then load it into the kiln for a bisque firing according to your clay body’s specifications (usually Cone 04 or 06).
Natural Speckle Hack
Use a clay body labeled ‘Speckled Buff’ or similar. It contains manganese nodules that bleed through light glazes automatically, saving you the splattering step.
Step 3: Glazing and Finishing
-
Clean the bisque:
Wipe the bisque-fired piece with a damp sponge to remove any kiln dust, which can prevent the glaze from adhering properly. -
Apply base glaze:
Pour a glossy cream or off-white glaze into the interior of the spoon rest, swirl it to coat, and pour out the excess. Dip or brush the exterior to match. -
Add the speckles:
To achieve the speckled effect if your clay or glaze doesn’t already have it, dip a stiff bristle brush into an iron oxide wash. Flick the bristles with your thumb to splatter fine droplets over the wet glaze. -
Clean the foot:
Carefully wipe away any glaze from the bottom of the piece where it will touch the kiln shelf to prevent it from sticking during the firing. -
Glaze fire:
Load the piece into the kiln for the final glaze firing (often Cone 5 or 6 depending on your materials). Ensure good spacing so the speckled flux doesn’t jump to other pots.
Warping Woes?
Elongated shapes like ovals warp easily. Dry this piece very slowly under plastic for the first 2-3 days, and dry it on a drywall board to absorb moisture evenly.
Once cooled, your durable new spoon rest is ready to catch drips and add a touch of artisan charm to your stovetop
Tile Coasters With Stamped or Carved Patterns
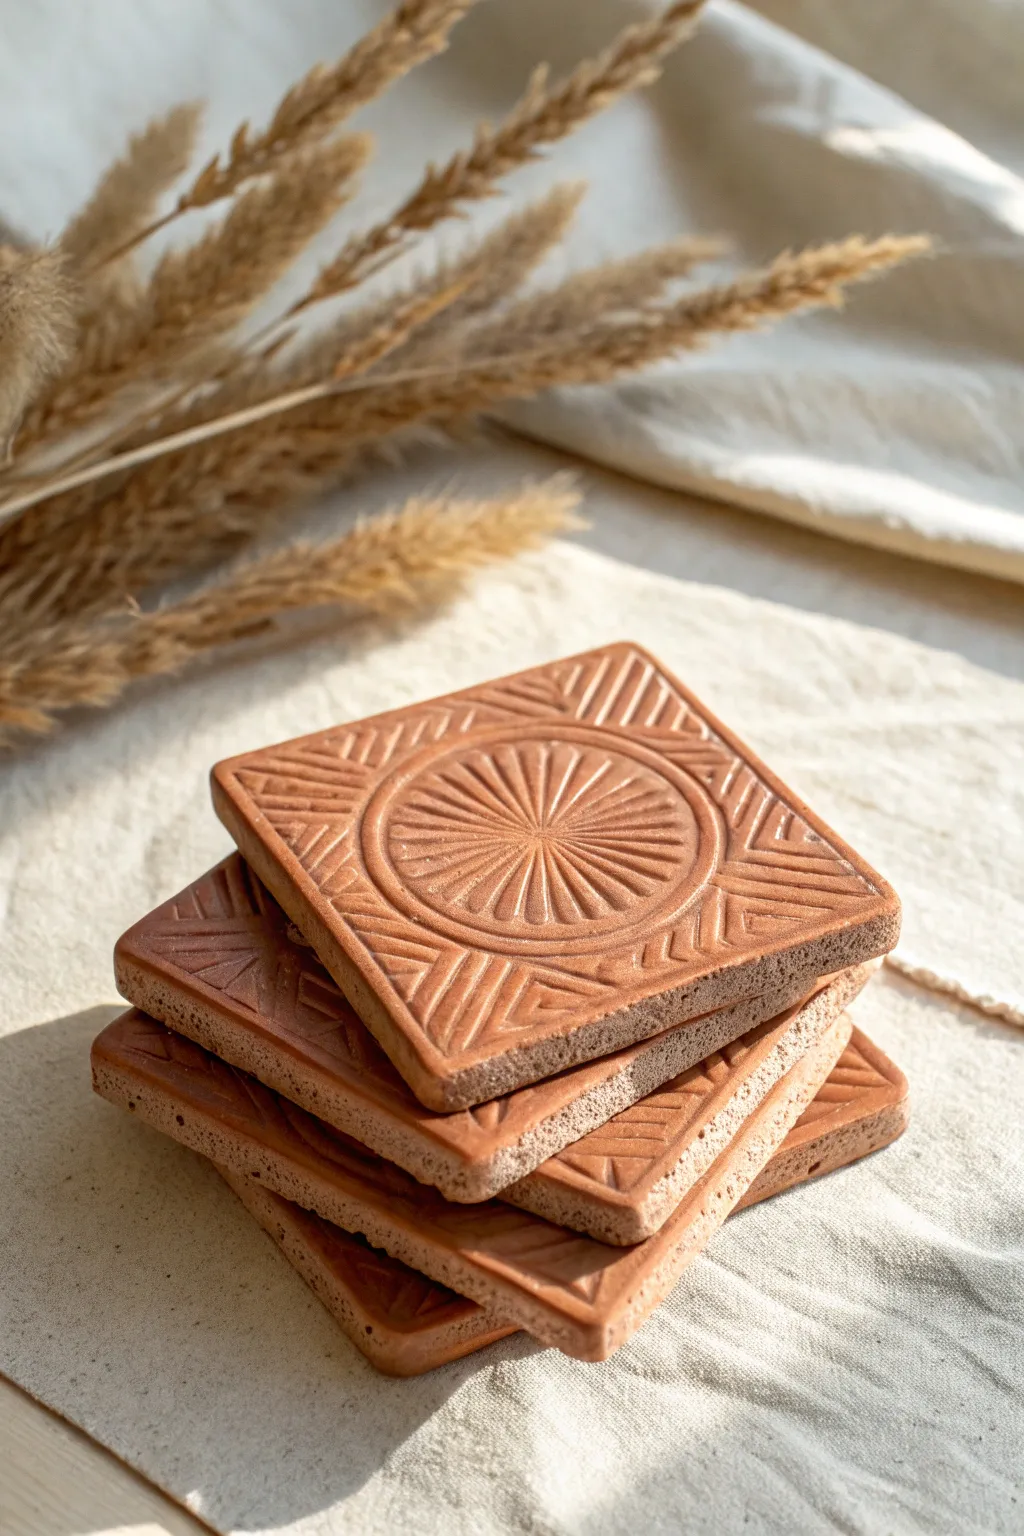
These warm, terracotta-toned coasters combine rustic charm with precise geometric detailing. Featuring a central sunburst motif framed by angled lines, they make for a functional yet beautiful addition to any coffee table.
Step-by-Step Tutorial
Materials
- Terracotta or red earthenware clay
- Rolling pin
- Two 1/4-inch wooden guide strips (for even thickness)
- Square cookie cutter (approx. 4×4 inches) or ruler and needle tool
- Carving tools (ribbon tool or linoleum cutter)
- Small round object (like a jar lid or cookie cutter) for the center circle
- Needle tool or toothpick
- Sponge
- Canvas or cloth work surface
Step 1: Preparation and Shaping
-
Prepare your workspace:
Lay down a piece of canvas or heavy cloth on your table to prevent sticking. Wedge your clay thoroughly to remove air bubbles and ensure a uniform consistency. -
Set up thickness guides:
Place your wooden guide strips on either side of your clay ball. These will ensure your slab is a perfect, even thickness, which is crucial for coasters to sit flat. -
Roll out the slab:
Using your rolling pin, roll the clay out until the pin rests on the guide strips. Roll in multiple directions to compress the clay platelets, which helps prevent warping later. -
Cut the square shape:
Press your square cutter firmly into the clay. If you don’t have a cutter, measure a 4×4 inch square with a ruler and slice cleanly with a needle tool or fettling knife. -
Smooth the edges:
Run a damp finger or a slightly moist sponge along the cut edges to soften the harsh corners. This prevents sharp edges on the finished piece that could scratch table surfaces.
Step 2: Creating the Design
-
Mark the center circle:
Find the center of your square. Lightly press a small round lid or circular cutter into the center to create an impression. Don’t cut all the way through; you just want a clear guideline. -
Add a border ring:
Create a second, slightly smaller concentric circle inside the first one using a smaller tool or by freehand marking, creating a narrow band that will define the sunburst area. -
Carve the sunburst rays:
Using a V-tipped carving tool or a needle tool, draw lines radiating from the very center point out to the inner circle’s edge. Space them evenly to create the sunburst effect. -
Deepen the relief:
Go back over your sunburst lines with a carving tool to remove thin strips of clay. This creates the tactile, raised texture seen in the reference image. -
Mark the corners:
Draw diagonal lines extending from the corners of the square toward the central circle. This divides the outer border area into triangular sections. -
Fill the corner patterns:
In the triangular spaces at each corner, carve parallel lines that follow the angle of the square’s edge. This creates the chevron-like geometric frame around the sunburst. -
Clean up debris:
You’ll likely have small crumbs of clay from carving. Wait until they are slightly leather-hard and brush them away with a soft paintbrush rather than smearing them while wet.
Clean Lines
For crisper lines, let the clay dry to a ‘leather hard’ state before carving. Soft clay drags and creates crumbs; firmer clay slices cleanly.
Step 3: Drying and Finishing
-
Slow drying process:
Place the coasters on a flat board. To prevent warping—the enemy of flat coasters—place a sheet of newspaper loosely over them. Let them dry slowly away from direct drafts. -
Weight them down:
Once the clay is leather hard (stiff but cold to the touch), I usually sandwich the coasters between two drywall boards or pieces of wood to force them to dry perfectly flat. -
Final sanding:
When bone dry, gently sand any rough spots or sharp burrs on the bottom and edges using fine-grit sandpaper. Wear a dust mask for this step. -
Firing:
Bisque fire the coasters in a kiln to cone 04. If you wish to keep the raw terracotta look as shown, you can fire them to maturity without glaze, or apply a clear matte sealer afterward. -
Add protective feet:
After firing (or sealing if using air-dry clay), attach small cork or felt pads to the four bottom corners. This adds stability and protects your furniture from the rough ceramic.
Liquid Resistance
Apply a penetrating masonry sealer to the unglazed surface. It keeps the raw look but prevents coffee stains from soaking into the porous clay.
Stack your finished set and enjoy the handcrafted warmth they bring to your living space
Tea Light Holders With Cutout Shapes

This rustic, elegant tea light holder combines a natural speckled finish with geometric negative space for a warm, flickering glow. The minimalist cylindrical shape highlights the delicate cutouts, making it a perfect centerpiece or cozy accent for any shelf.
Step-by-Step
Materials
- Speckled stoneware clay (white or light beige)
- Slab roller or rolling pin
- Canvas working mat or wooden board
- Cylindrical mold or PVC pipe (approx. 3-inch diameter)
- Needle tool
- Fettling knife
- Small oval cookie cutter or template
- Small round punch or straw (for circular holes)
- Scoring tool or serrated rib
- Slip (clay and water mixture)
- Smoothing sponge
- Sanding pad (optional)
- Clear matte glaze
Step 1: Preparing the Slab
-
Wedge the clay:
Begin by thoroughly wedging a ball of speckled stoneware clay to remove any air bubbles. This ensures a consistent texture and prevents cracks during firing. -
Roll out the slab:
Roll the clay onto your canvas mat until it is an even 1/4 inch thick. I find using guide sticks on either side of the clay helps keep the thickness perfectly uniform across the whole slab. -
Cut the rectangle:
Measure the circumference of your cylindrical mold and add about half an inch for the overlap. Use a ruler and fettling knife to cut a clean, long rectangle from your slab based on these measurements. -
Add texture (optional):
If your clay isn’t naturally speckled enough, you can gently press sand or coarse grog into the surface now, rolling over it lightly to embed the texture.
Fixing Warp
If your cylinder warps into an oval shape during drying, gently coax it back to round every few hours, or dry it with the top rim resting on a flat board to maintain the circular structure.
Step 2: Forming the Cylinder
-
Wrap the mold:
Wrap a piece of paper around your PVC pipe or mold to prevent sticking. Carefully lift your clay slab and wrap it snugly around the form. -
Score and slip:
Where the two ends of the clay meet, use your scoring tool to scratch up the surface and apply a generous amount of slip. -
Create the seam:
Press the scored ends together firmly. Use your thumb or a wooden tool to blend the clay across the seam on both the inside and outside until the join is invisible. -
Trim the excess:
If the cylinder is taller than you’d like, use your needle tool to trim the top rim while the clay is still on the mold to ensure a level edge. -
Smooth the surface:
Run a barely damp sponge over the entire surface to refine the shape and smooth out any fingerprints from the joining process.
Glow Up
Apply a gold luster to the interior after the final glaze firing. This will reflect the candlelight dramatically and add a hidden touch of luxury that glows brightly when lit.
Step 3: Adding Cutouts and Details
-
Leather hard stage:
Allow the cylinder to dry to a ‘leather hard’ state. It should be firm enough to handle without warping but still soft enough to cut easily. -
Punch the ovals:
Using a small oval cutter or a paper template and knife, cut out the oval shapes near the bottom of the cylinder. Space them evenly around the circumference. -
Add accent holes:
Above the ovals, use a small punch or a straw to create a decorative line of smaller round holes. Twist the tool as you remove it for a clean cut. -
Clean the edges:
Once the clay is slightly drier, use a small sponge or a soft brush to gently smooth the sharp edges of your cutouts.
Step 4: Drying and Firing
-
Slow drying:
Cover the piece loosely with plastic to let it dry slowly over a few days. Uneven drying can cause the delicate areas between cutouts to crack. -
Bisque fire:
Once bone dry, fire the piece to bisque temperature (usually cone 04) to prepare it for glazing. -
Glazing:
Dip the entire piece into a clear matte glaze to seal the clay while allowing the natural speckles to show through. Wipe the bottom clean of any glaze. -
Final fire:
Fire the piece to the maturity temperature of your clay body (likely cone 5 or 6 for stoneware).
Place a tea light inside and enjoy the soft patterns of light dancing on your table
Ring Holders and Ring Cones for Easy Storage
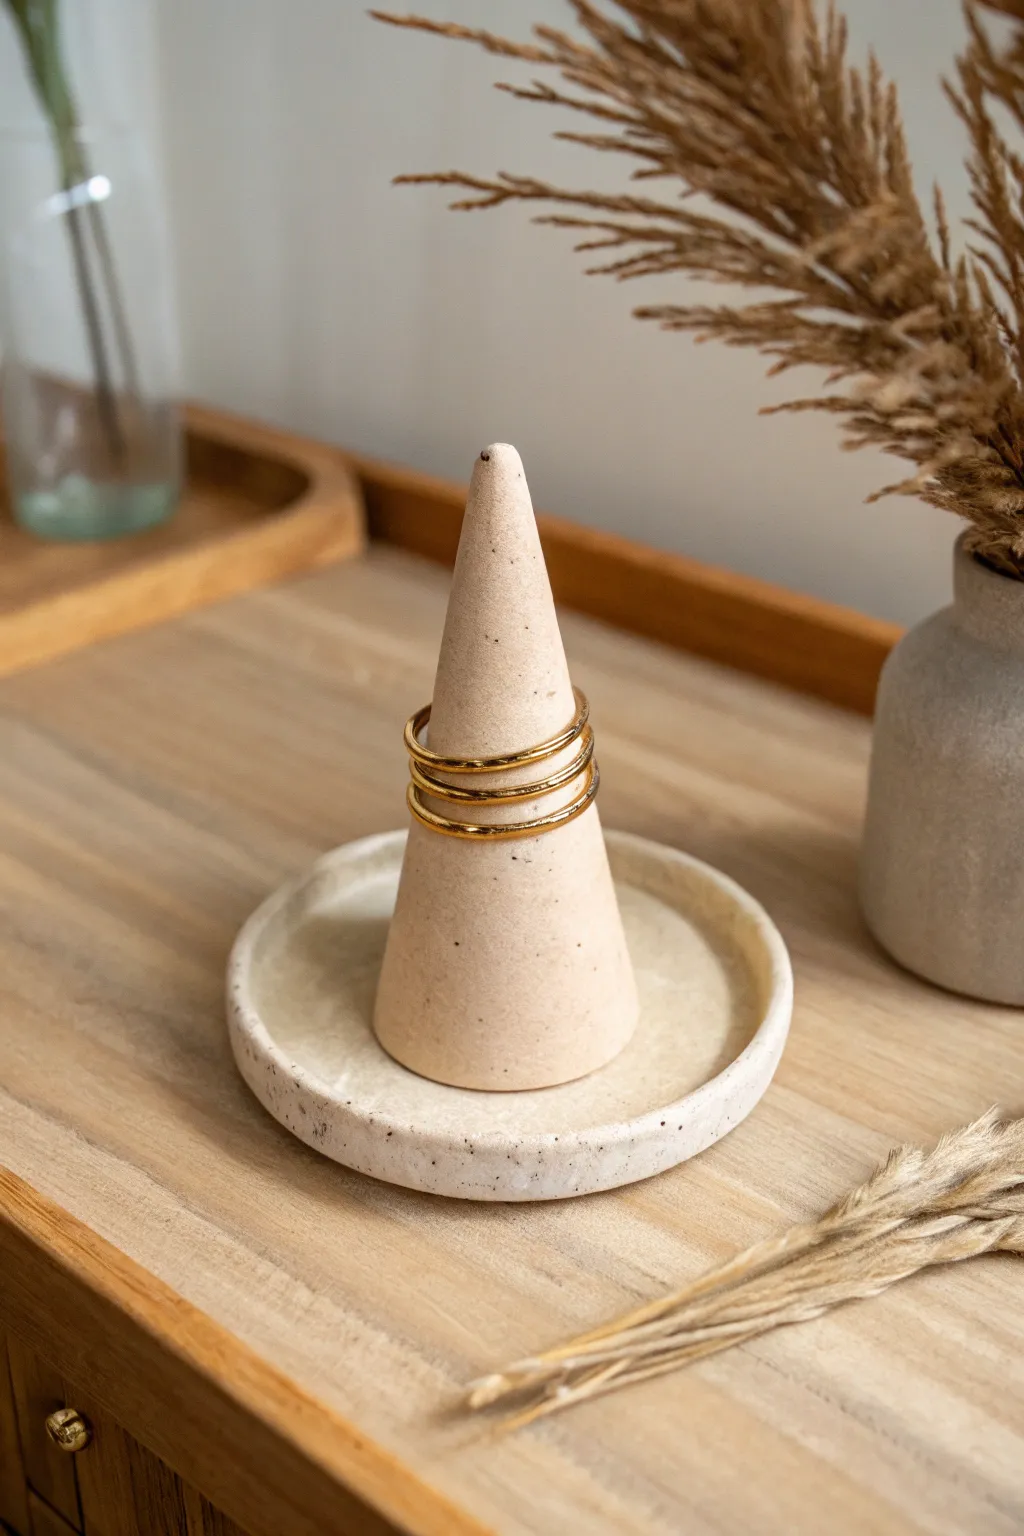
This elegant storage piece combines a classic ring cone with a shallow catch-all dish for smaller studs or earrings. The look is defined by its clean, geometric lines and that lovely natural speckled clay finish that mimics stone.
How-To Guide
Materials
- Speckled stoneware clay (or white polymer clay mixed with black pepper/sand)
- Rolling pin
- Circle cutter (approx. 3-4 inch diameter)
- Fettling knife or X-Acto blade
- Sponge
- Water slip
- Scoring tool or needle tool
- Sandpaper (fine grit)
- Clear matte glaze (or varnish for polymer clay)
- Kiln or oven (depending on clay type)
Step 1: Forming the Base Dish
-
Prepare your clay slab:
Begin by wedging your speckled clay to remove any air bubbles. Roll it out into a smooth, even slab that is roughly 1/4 inch thick. I like to use wooden guide sticks on either side of the rolling pin to ensure the thickness is perfectly uniform across the whole piece. -
Cut the base circle:
Use your circle cutter or trace around a circular object like a wide mug to cut out the base shape. This will form the tray part of your ring holder. -
Create the rim:
Roll a very thin snake or coil of clay, roughly the same thickness as a pencil lead or slightly thicker depending on your preference. -
Attach the rim:
Score the outer edge of your circular base and apply a small amount of slip or water. Lay the coil directly on top of this roughened edge. -
Blend the coil:
Using your thumb or a modeling tool, gently blend the inside of the coil down into the base so there is no seam visible on the interior. Repeat this process on the outside edge. -
Refine the shape:
Use a damp sponge to smooth over the rim you just created, ensuring it is rounded and level. This creates that soft, finished lip found on professional pottery.
Step 2: Sculpting the Cone
-
Form the initial cone shape:
Take a lump of clay roughly the size of a golf ball. Roll it in your hands to form a thick cylinder, then begin rolling one end with more pressure against your work surface to taper it. -
Refine the taper:
Continue rolling back and forth, focusing on smooth movements to avoid flat spots. You want a tall, slender pyramid shape that mimics the geometry in the photo. -
Check the proportions:
Place your cone in the center of your dish to check the visual balance. It should be tall enough to hold several rings but not so wide that it overwhelms the small tray. -
Flatten the bottom:
Tap the wide bottom of the cone firmly against the table to create a perfectly flat surface for attachment. Use your knife to trim it if it’s uneven. -
Score and slip:
Use your needle tool to cross-hatch (score) the bottom of the cone and the exact center of your dish. Apply slip generously to both scored areas. -
Join the pieces:
Press the cone firmly into the center of the dish with a slight twisting motion to lock the clay particles together. -
Clean up the seam:
Sometimes a little slip will squish out; use a small brush or a sculpting tool to wipe this away and smooth the transition point where the cone meets the dish.
Uneven Cone?
If your cone looks lopsided, roll it against a flat ruler on the table while the clay is soft to force the sides into straight, geometric lines.
Step 3: Finishing Touches
-
Smooth the surface:
Take a barely damp sponge and go over the entire piece one final time to remove any fingerprints or harsh tooling marks. -
Dry slowly:
Cover the piece loosely with plastic wrap to let it dry slowly over a day or two. Rapid drying can cause the cone to crack away from the base. -
Bisque fire:
Once bone dry, fire the piece in a kiln to bisque temperature (usually cone 04). If using polymer clay, bake according to the package instructions. -
Apply glaze:
For the look in the photo, apply a clear matte glaze. This seals the clay while letting the natural speckles shine through without adding high gloss. -
Final wipe:
Before the final firing, wipe the very bottom of the dish clean so it doesn’t fuse to your kiln shelf. -
Final firing:
Fire the piece a second time to the maturation temperature of your specific clay body (e.g., cone 6 for stoneware). Let it cool completely before stacking your rings.
Add a Gold Rim
After the final glaze firing, apply a ring of gold luster overglaze to the very top tip of the cone and re-fire for a luxe, dipped detail.
This simple yet functional sculpture will keep your favorite jewelry safe and look beautiful on any dresser
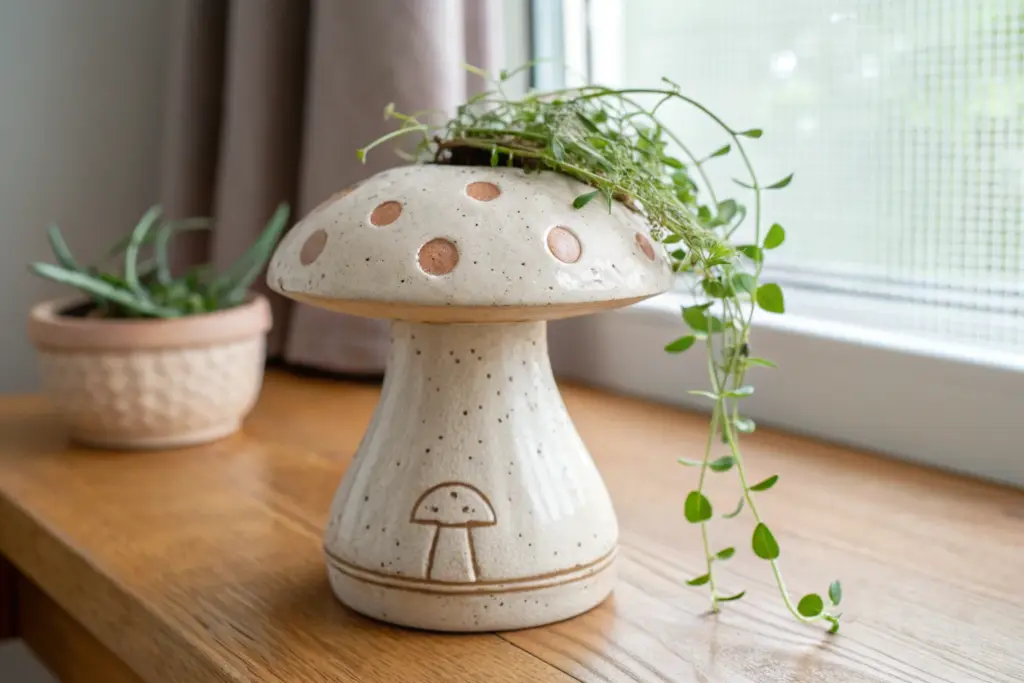
Animal Planters That Turn Pots Into Little Creatures
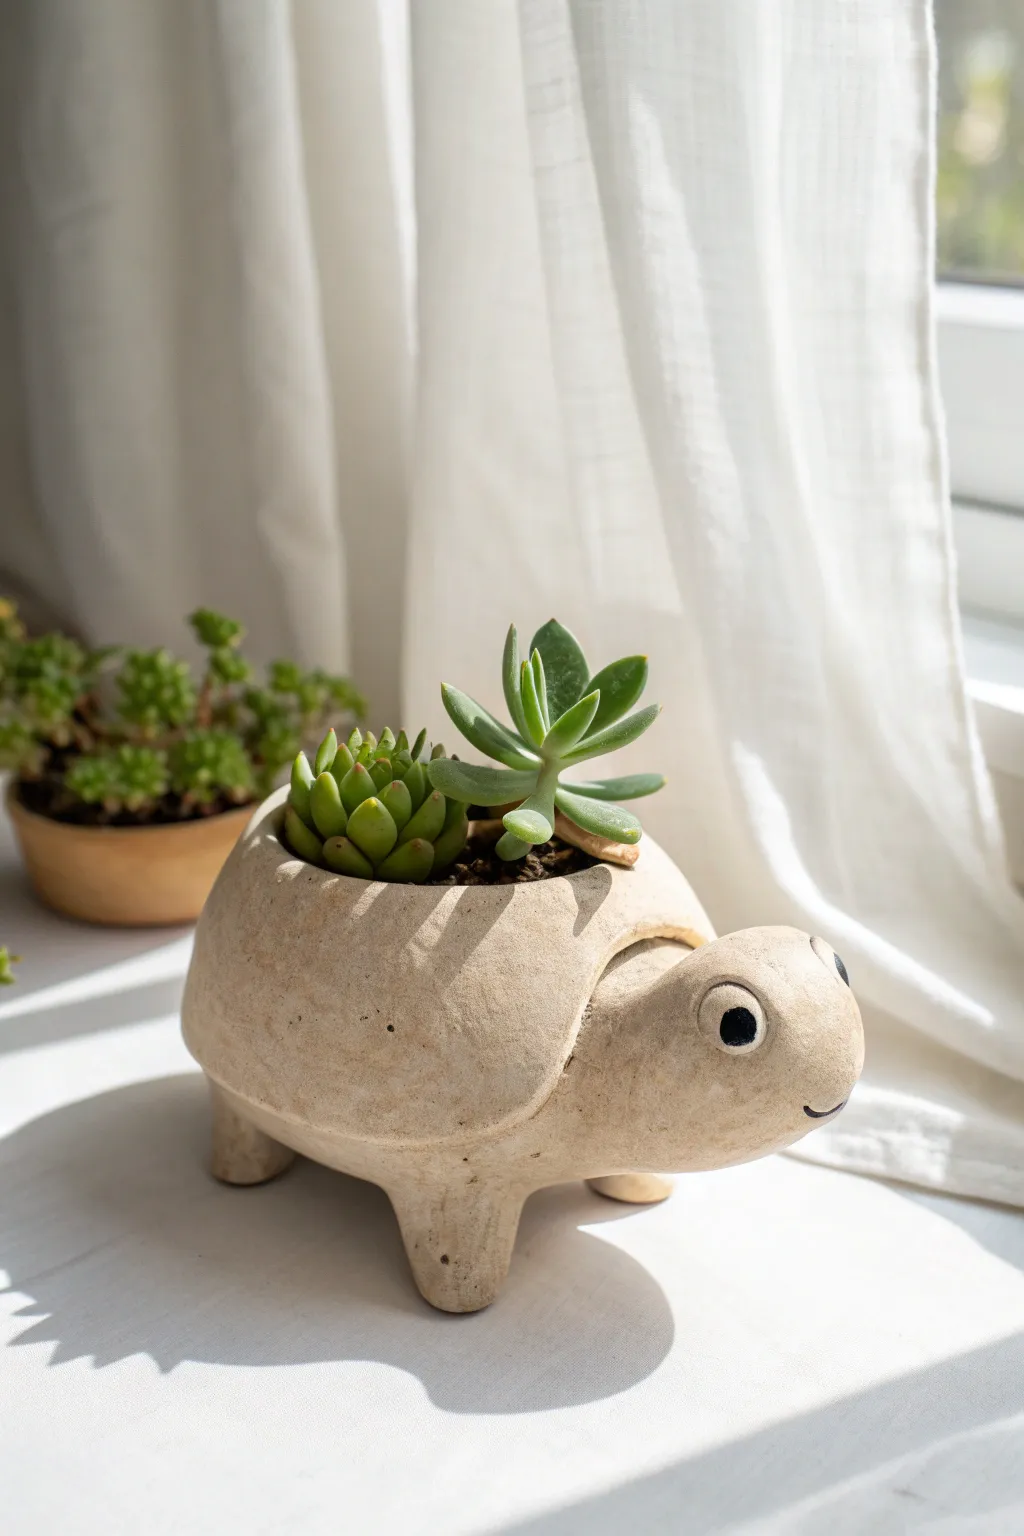
Bring a slow and steady charm to your windowsill with this adorable turtle-shaped planter, featuring a textured, stone-like finish and a friendly smile. Perfect for housing small succulents, this handmade clay pot adds a touch of organic warmth to any room.
How-To Guide
Materials
- Air-dry clay or pottery clay (white or cream)
- Clay rolling pin
- Pottery needle tool or toothpick
- Small bowl (for shaping the shell)
- Plastic wrap (cling film)
- Clay slip (or water)
- Scoring tool or old toothbrush
- Sponge
- Black acrylic paint
- Small detail paintbrush
- Fine-grit sandpaper
Step 1: Forming the Shell Body
-
Prepare the Mold:
Begin by selecting a small bowl that matches the desired size of your turtle’s shell. Cover the outside of the bowl tightly with plastic wrap to prevent the clay from sticking. -
Roll the Slab:
Roll out a slab of clay to an even thickness of about 1/4 inch. Ensure the clay is smooth and free of air bubbles. -
Shape the Dome:
Drape the clay slab over the plastic-covered bowl. Gently press it down to conform to the bowl’s shape, trimming away excess clay at the bottom rim with your needle tool. -
Define the Opening:
While the clay is still on the mold, cut a circular or oval opening on the top (which is currently the bottom of the bowl) to create the planting hole. Smooth the cut edges with a damp sponge. -
Initial Drying:
Allow the clay to stiffen slightly on the mold until it can hold its shape, usually about 1-2 hours for air-dry clay. Carefully remove the bowl and plastic wrap.
Step 2: Sculpting the Head and Legs
-
Create Legs:
Roll four identical small cylinders or thick cones of clay for the legs. Tap the wider ends on your work surface to flatten them for stability. -
Form the Head:
Roll a slightly larger ball of clay for the head. Gently elongate one side to form a neck that will attach to the body. -
Attach the Legs:
Turn the shell upside down. Score the attachment points on both the legs and the underside of the shell with a needle tool. Apply slip or water and press the legs firmly into place. -
Attach the Head:
Score the neck area and the corresponding spot on the front of the shell. Join them securely, smoothing the clay seam with your thumb or a modeling tool so it looks like one continuous piece. -
Add Details:
Using a small loop tool or your fingers, gently define the connection between the head and the shell to suggest the turtle’s neck extending from under the shell.
Smooth Seams Expertly
When joining the head, roll a tiny coil of clay and wrap it around the seam. Smear the coil into both the head and shell for an invisible, super-strong bond.
Step 3: Finishing Touches
-
Check Stability:
Flip the turtle onto its feet. I always gently press down on the shell to ensure all four legs touch the surface evenly and the planter doesn’t wobble. -
Texture the Surface:
Dab the entire surface with a textured sponge or crumpled aluminum foil to give it that organic, stone-like appearance shown in the photo. -
Sculpt the Eyes:
Roll two tiny balls of clay and flatten them onto the sides of the head for eyes. Use a tool to make a small indentation in the center of each for the pupil. -
Carve the Smile:
Use a needle tool to gently carve a simple, curved line for the mouth, giving your turtle a happy expression. -
Final Dry:
Let the entire piece dry completely according to your clay’s instructions. If using kiln clay, now is the time to fire it bisque. -
Paint Details:
Once dry (and fired, if applicable), use a fine brush and black acrylic paint to fill in the pupils and trace the smile line for emphasis. -
Seal (Optional):
If using air-dry clay for real plants, apply a waterproof sealant to the inside and outside to protect it from moisture.
Add Shell Patterns
Before the clay dries, lightly crave hexagon patterns or spiral designs onto the back of the shell for extra texture and realistic detail.
Your charming new turtle friend is now ready to carry a tiny garden on its back
Tiny Animal Figurines for Shelves and Gifts
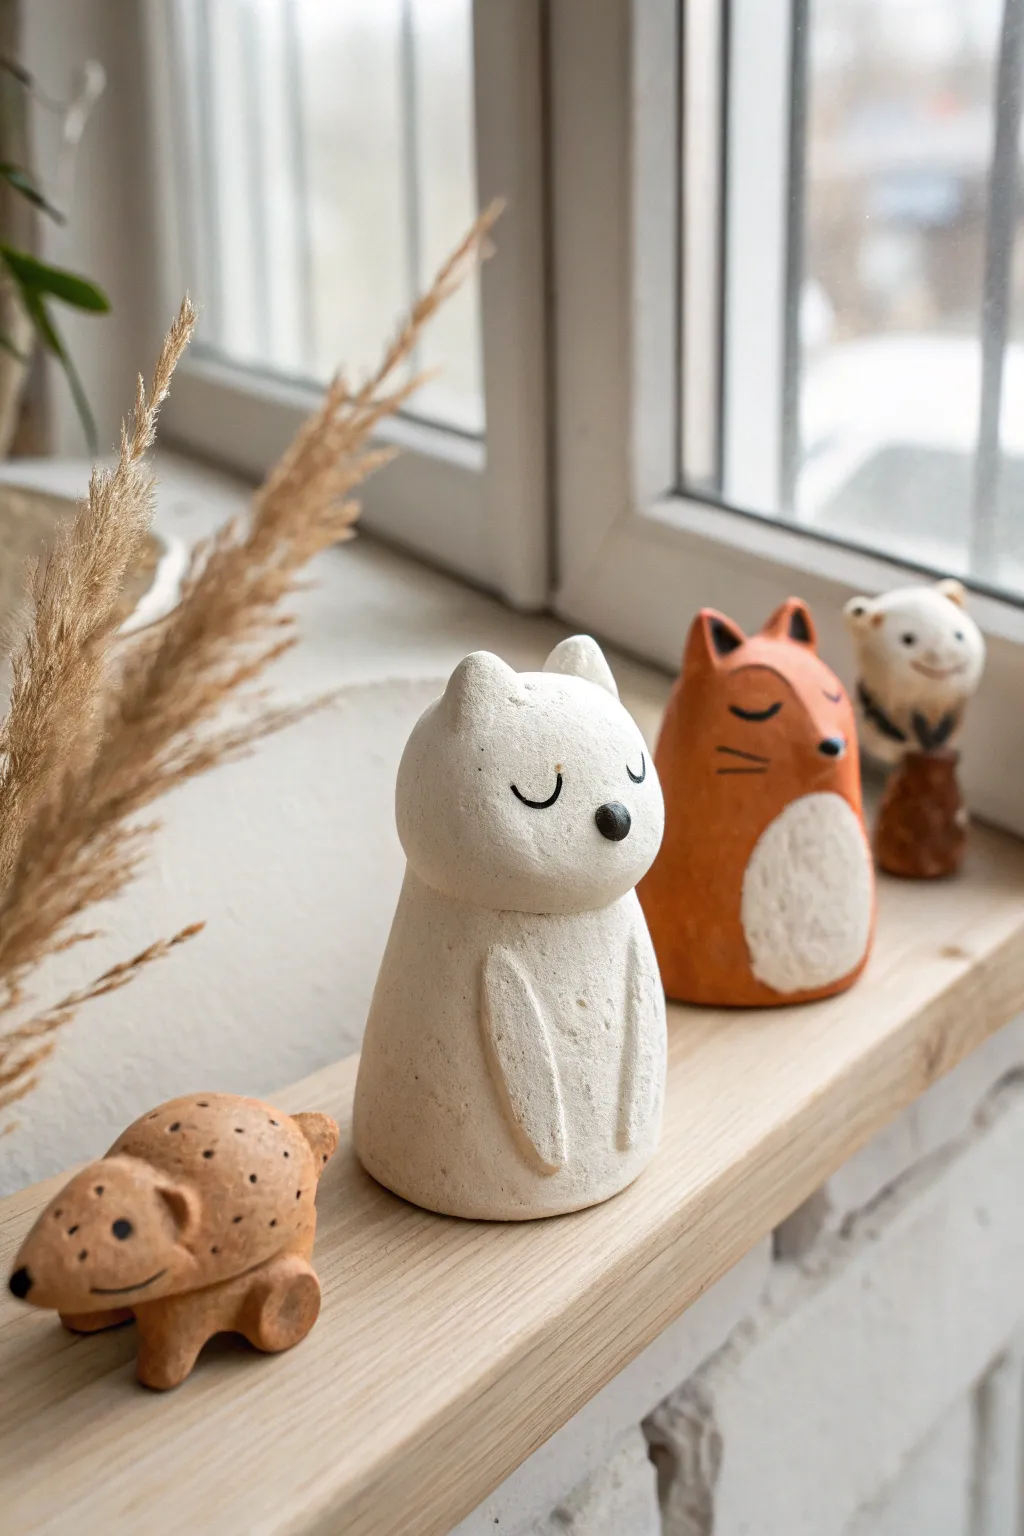
These charming, minimalist animal figurines bring a touch of woodland magic to any windowsill or shelf. With their smooth, matte finishes and simple painted details, the serene white cat and sleepy orange fox make perfect handmade gifts.
Step-by-Step
Materials
- Air-dry clay or polymer clay (white is best)
- Small rolling pin
- Sculpting tools (needle tool, smoothing tool)
- Acrylic paints (White, Warm Orange, Black)
- Fine detail paintbrushes (size 0 or 00)
- Water cup and sponge
- Fine-grit sandpaper (400-600 grit)
- Matte varnish or sealant
Step 1: Shaping the Base Forms
-
Condition the Cray:
Begin by working a palm-sized amount of clay in your hands until it becomes warm, pliable, and free of cracks. If you’re using air-dry clay, keep your hands slightly damp. -
Form the Body:
Roll the clay into a smooth ball, then gently roll it back and forth on your work surface to elongate it into a cone or teardrop shape with a flattened bottom so it stands upright securely. -
Create the Head:
Roll a second, slightly smaller ball for the head. Flatten the bottom of this ball slightly where it will join the body. Score both the top of the body and the bottom of the head with a needle tool, add a dab of water or slip, and press them firmly together. -
Smooth the Seam:
Using a modeling tool or your finger, blend the clay across the neck seam until the connection is invisible and the transition is smooth. I find wetting my finger slightly helps create that seamless stone-like finish.
Smooth Operator
Use a barely-damp makeup sponge to smooth the raw clay before drying. It removes fingerprints better than water alone.
Step 2: Sculpting Details
-
Add Ears: Cat:
For the white cat, pinch two small triangles of clay. Attach them to the top of the head using the score-and-slip method, blending the edges so they look like they grow naturally from the skull. -
Add Ears: Fox:
For the fox figurine, make the ears slightly taller and more pointed than the cat’s. Position them high on the head for that classic alert fox silhouette. -
Sculpt the Arms:
Roll two small, thin logs of clay. Flatten them gently and attach them vertically against the body, curving inwards towards the belly. Blend the top shoulder area into the main body, leaving the lower paws distinct to create mild relief. -
Refine the Faces:
For the fox, gently pinch the front of the face to create a subtle snout area. For the cat, keep the face round and gentle. Add a tiny ball of clay for the nose on both animals. -
Dry and Sand:
Allow the figurines to dry completely (24-48 hours for air-dry clay). Once fully cured, use fine-grit sandpaper to buff away any fingerprints or bumps until the surface feels like smooth porcelain.
Make it a Set
Create a whole forest family by varying sizes. Add a tiny hedgehog by texturing a clay mound with a needle tool for spines.
Step 3: Painting and Finishing
-
Base Coat:
Paint the cat completely white (even if the clay is white, paint adds a uniform texture). For the fox, paint the body a warm, matte orange, leaving a large oval on the belly and the tip of the tail unpainted. -
Fox Belly Detail:
Fill in the fox’s belly oval with white paint. If you want texture, use a dry brush to stipple the white paint slightly, mimicking fur. -
Painting Faces:
Using your finest brush and black paint, carefully draw two downward-curving arcs for sleepy, closed eyes. Add fine whiskers if desired. -
Nose Details:
Paint the small clay nose bumps solid black. Ensure the edges are crisp against the lighter snout area. -
Fox Ear Tips:
For the fox specifically, paint the very tips of the ears and the paws with black accents to distinguish the species. -
Seal the Work:
Once the paint is totally dry, apply a coat of matte varnish. This protects the paint without making the animals look like shiny plastic, preserving that earthy, ceramic aesthetic.
Arrange your quiet little menagerie near a window and enjoy the calm presence they bring to your space
Textured Pottery Using Lace, Fabric, or Pressed Patterns
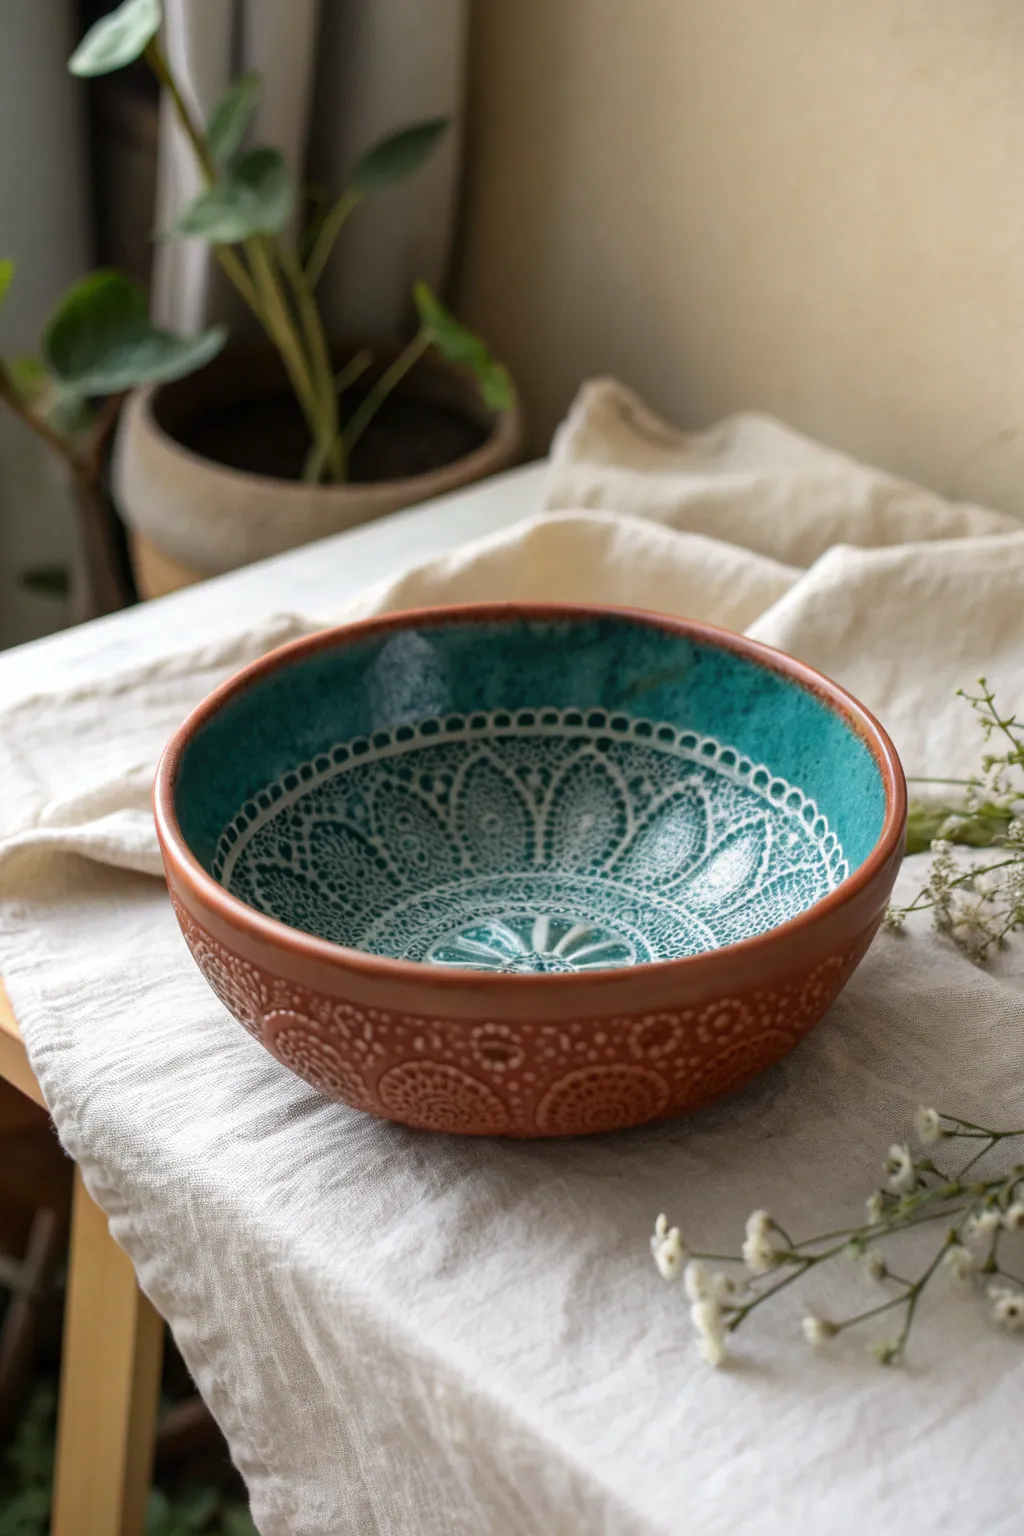
This stunning bowl combines the earthy warmth of terracotta clay with the intricate elegance of lace textures. By pressing fabric into soft clay and highlighting the relief with a vibrant turquoise glaze, you create a piece that feels both vintage and modern.
Step-by-Step Tutorial
Materials
- Red earthenware or terracotta clay body
- Rolling pin and guide sticks (approx. 1/4 inch)
- Doily or textured lace fabric (thick crochet works best)
- Bowl mold (plaster or a simple kitchen bowl covered in plastic)
- Pottery sponge
- Fettling knife or needle tool
- Rib tool (smooth wood or rubber)
- Turquoise gloss glaze (for earthenware)
- Clear glaze (optional)
- Soft fan brush
- Kiln
Step 1: Preparing the Slab
-
Wedge the clay:
Start by thoroughly wedging a ball of terracotta clay to remove air bubbles and ensure an even consistency. This is crucial to prevent cracking later. -
Roll out the slab:
Place your clay on a canvas board. Using guide sticks on either side appropriately spaced, roll the clay out into a smooth slab about 1/4 inch thick. Compress the slab on both sides with a rib to align the clay particles. -
Place the texture:
Lay your crochet doily or lace fabric directly onto the clay slab. Ensure it is flat and positioned where you want the pattern to appear—usually centered for a symmetrical look. -
Impress the pattern:
Gently roll over the lace with your rolling pin. Apply firm, even pressure to embed the fabric deep enough to leave a crisp impression, but not so deep that it thins or tears the clay. -
Reveal the design:
Carefully peel back the lace to reveal the intricate relief pattern. I always love this moment—the detail captured in the clay is instantly rewarding.
Glaze too thick?
If the pattern disappears under the glaze, your application was too heavy. Lightly sponge off more glaze from the high points before firing to bring the lace details back into focus.
Step 2: Shaping the Bowl
-
Prepare the mold:
If you are using a plaster hump mold, ensure it is clean. If using a kitchen bowl as a slump or hump mold, cover it with plastic wrap or a piece of stocking to prevent sticking. -
Drape the clay:
Lift your textured slab carefully and drape it over the mold (design side down if using a slump mold; design side up if using a hump mold). For the look in the image, a slump mold works well to keep the interior pattern crisp. -
Secure the shape:
Gently press the slab into the mold’s curve using a damp sponge. Work from the center outward to avoid trapping air pockets, being careful not to smudge your beautiful texture. -
Trim the rim:
Use a needle tool or fettling knife to trim the excess clay around the rim of the mold. Hold the tool perpendicular to the mold edge for a clean cut. -
Refine the edge:
Smooth the cut rim with a damp chamois or sponge. You want the lip to be rounded and comfortable to the touch, not sharp. -
Initial drying:
Let the clay sit in the mold until it is leather-hard. This allows it to hold its shape when removed.
Step 3: Finishing and Glazing
-
Bisque fire:
Once the bowl is bone dry, load it into the kiln for a bisque firing according to your clay body’s specifications (usually Cone 04). -
Apply interior glaze:
Pour a generous amount of turquoise glaze into the center of the bisque bowl. Rotate the bowl to coat the entire interior surface evenly, then pour out the excess. -
Wipe back the relief:
This is the magic step: once the glaze is dry or slightly set, take a damp sponge and very gently wipe the high points of the lace pattern. This removes glaze from the raised clay while leaving it in the recesses, highlighting the white/turquoise contrast. -
Glaze the exterior:
For the exterior, you can leave the terracotta raw for that earthy contrast, or apply a very thin wash of the same glaze to accent the outer texture. -
Clean the foot:
Ensure the bottom of the bowl is completely free of glaze. Wipe it with a clean sponge to prevent it from fusing to the kiln shelf. -
Glaze fire:
Fire the piece again to the maturation temperature of your glaze and clay (typically Cone 05/06 for earthenware).
Level Up: Double Texture
Texture the outside too! Before draping the clay into the bowl, add a simpler texture to the reverse side of the slab so the exterior has tactile interest as well.
Once cooled, your bowl is ready to display, showcasing a beautiful balance between raw earth and delicate design
Ruffled Edge Plates for a Fancy-But-Relaxed Table
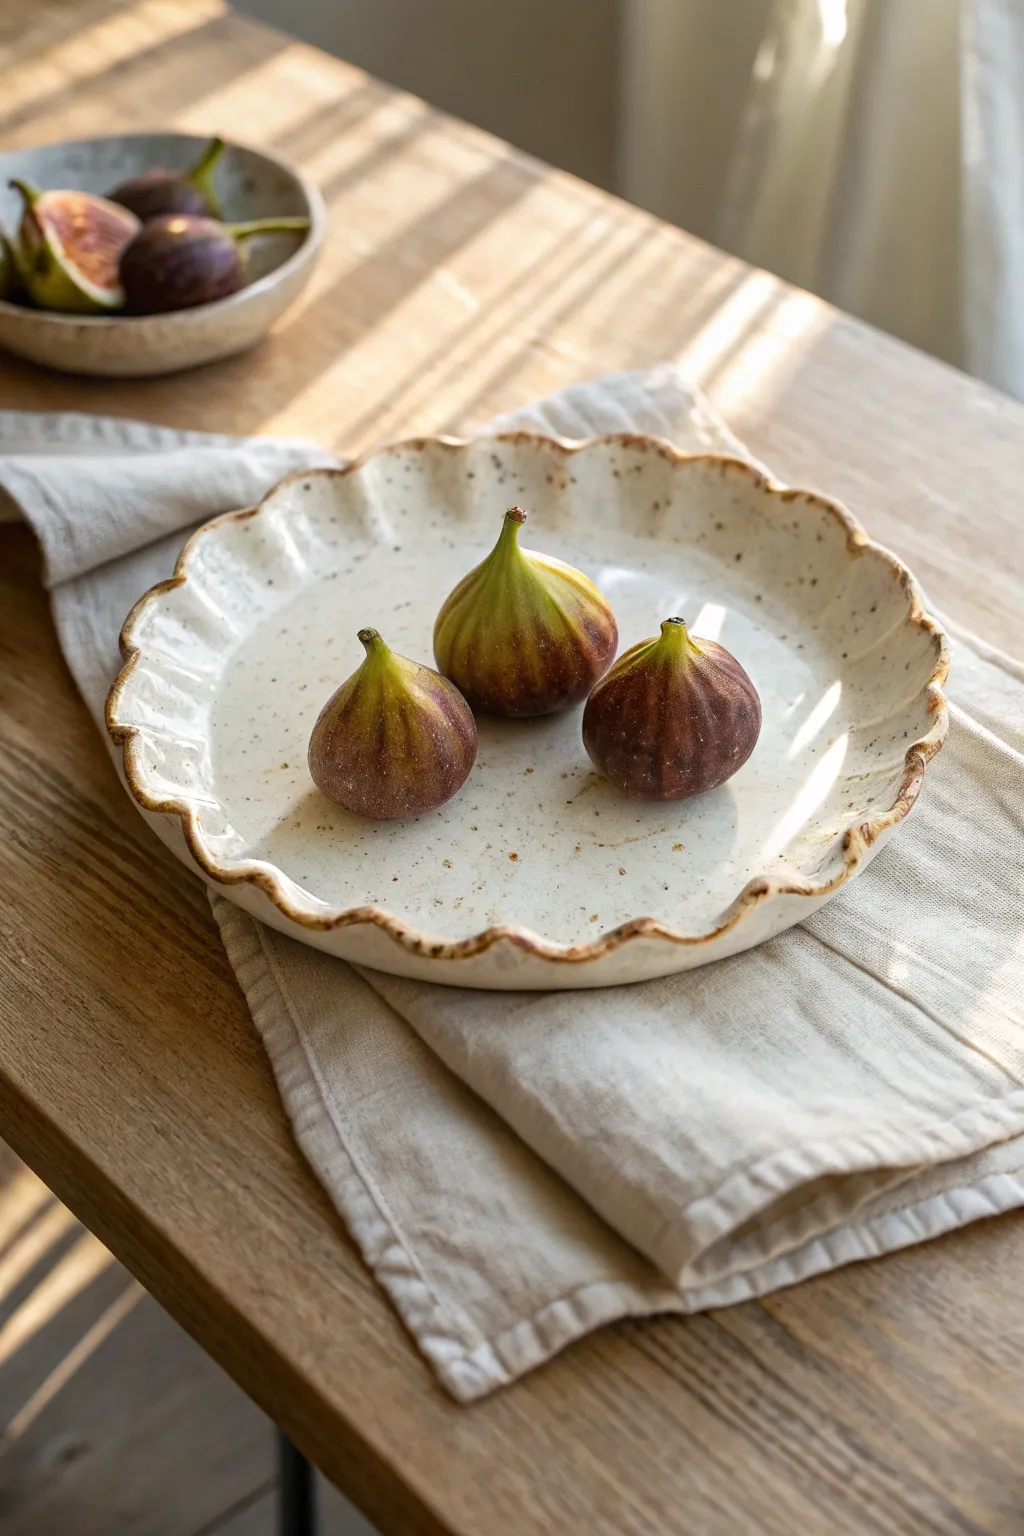
Embrace the imperfect beauty of hand-built pottery with this charming ruffled edge plate. The gentle undulations of the rim catch the light beautifully, while speckled clay and a soft white glaze give it an organic, farm-to-table aesthetic perfect for everyday use.
How-To Guide
Materials
- Speckled stoneware clay (mid-fire recommended)
- Rolling pin and guide sticks (approx. 1/4 inch or 6mm)
- Circular template or large dinner plate
- Needle tool or fettling knife
- Yellow pottery sponge
- Soft ribbed kidney tool
- Foam cushion or shallow slump mold
- Loop tool (optional for foot ring)
- Glossy white glaze
- Kiln
Step 1: Slab Preparation
-
Wedging the Clay:
Begin by thoroughly wedging a ball of speckled stoneware clay to remove air bubbles and ensure particle alignment. A well-wedged ball will prevent cracking during drying and firing. -
Rolling the Slab:
Place your clay on a canvas board or heavy cloth. Using guide sticks on either side to ensure even thickness, roll the clay out into a smooth slab about 1/4 inch thick. Roll in multiple directions to compress the clay platelets. -
Smoothing the Surface:
Take a soft rib tool and gently compress the surface of the slab on both sides. This step is crucial for removing canvas texture and further preventing warping in the kiln. -
Cutting the Shape:
Lay your circular template or an existing dinner plate gently onto the slab. Using a needle tool, trace around the edge of the template. Hold the needle tool perpendicular to the table for a straight, clean cut.
Rim Stability Pro-Tip
Place small balls of clay or foam under the raised parts of the ruffles while drying. This supports the clay against gravity so the waves don’t flatten out before they harden.
Step 2: Forming the Rim
-
Smoothing the Edges:
Before shaping, take a damp sponge and run it along the sharp cut edge of your circle. Smooth and round it over slightly; a soft edge feels much better in the hand and holds glaze better. -
Setting the Form:
Transfer your clay circle onto a piece of foam or drape it into a shallow slump mold. If using foam, gently press the center down to define the eating surface, leaving the rim slightly elevated. -
Creating the Ruffles:
To create the signature ruffled edge, use your thumb and forefinger. Place your index finger under the rim and two fingers on top. -
Pinching the Undulations:
Gently lift the clay with the bottom finger while pressing down lightly on either side with the top fingers. Repeat this motion at regular intervals around the entire circumference. -
Refining the Waves:
Go back around the rim and adjust the ruffles. I like to make sure they are organic and not too mechanically perfect. Ensure the rim isn’t too thin at the highest points of the wave. -
Drying:
Allow the plate to dry slowly to leather-hard consistency. Cover it loosely with plastic sheeting to ensure the rim and center dry at the same rate, preventing warping.
Step 3: Finishing and firing
-
Trimming (Optional):
If desired, flip the leather-hard plate over and trim a shallow foot ring using a loop tool. This adds elegance and lifts the plate off the table, but a flat bottom worked with a rib is also perfectly functional for this rustic style. -
Bisque Firing:
Once bone dry, fire the piece to bisque temperature (usually cone 04 or 06) according to your clay body’s specifications. -
Glazing:
Dip, brush, or pour a glossy white glaze over the bisque ware. Avoid a glaze that is too opaque; a semi-translucent white allows the beautiful speckles of the clay body to show through. -
Wiping the Rim:
For that rustic definition seen in the photo, gently wipe the very edge of the ruffled rim with a damp sponge to thin the glaze layer slightly. This encourages the glaze to ‘break’ over the texture during firing, highlighting the brown clay underneath. -
Glaze Firing:
Fire the plate a second time to the maturation temperature of your clay and glaze (typically cone 5 or 6 for stoneware).
Warping Woes?
If your plates warp, try drying them slower. Weight the center down with a small sandbag during the leather-hard stage to keep the eating surface perfectly flat.
Now you have a stunning, food-safe piece of art ready to elevate your next dinner party
Air Dry Clay Practice Pieces You Can Paint and Seal
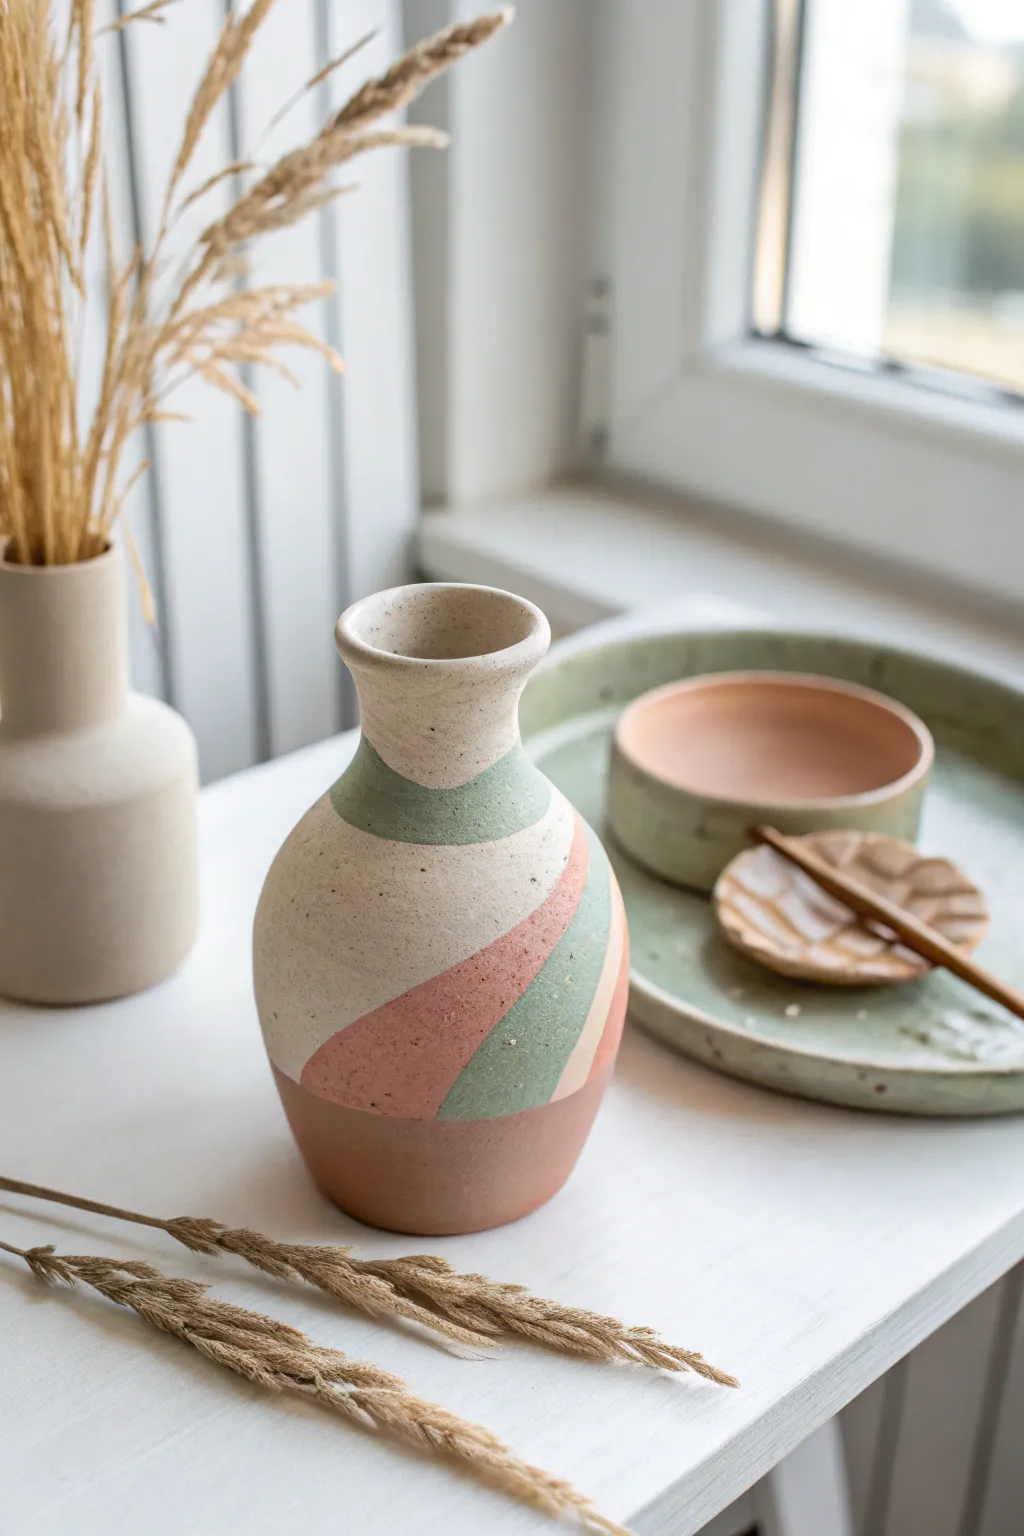
Capture the essence of contemporary ceramics with this earthy, geometrically patterned vase project. This air dry clay piece mimics the look of high-fire stoneware with its speckled finish and soothing swaths of terracotta, sage green, and cream.
Step-by-Step Tutorial
Materials
- White or grey air dry clay (approx. 1-1.5 lbs)
- Small rolling pin
- Pottery sponge
- Clay sculpting tools (rib tool, modeling stick)
- Water in a small cup
- Acrylic paints (terracotta/burnt sienna, sage green, cream/off-white)
- Old toothbrush (for speckling effect)
- Brown acrylic paint (watered down for speckles)
- Painter’s tape or masking tape
- Fine grit sandpaper (320 or 400 grit)
- Matte spray varnish or sealant
- Glass jar or bottle (to use as an armature – optional)
Step 1: Forming the Vessel
-
Prepare your clay:
Begin by kneading your air dry clay until it feels pliable and warm in your hands. This removes air bubbles and ensures a smooth working texture. -
Build the base ball:
Roll the clay into a large, smooth ball. If you are building this as a pinch pot, stick your thumb into the center and gently pinch outwards while rotating the ball to open up the internal space. -
Shape the bulbous belly:
Continue thinning the walls of your pot, guiding the shape into a rounded, bulbous bottom section. Keep the walls about 1/4 inch thick for stability. -
Construct the neck:
Using the coil method, roll out a snake of clay and stack it onto the opening of your pinch pot. Blend the clay downwards with your thumb or a modeling tool to merge the seams completely. -
Flare the rim:
Gently gently squeeze the clay upwards to form the narrow neck, then flare the very top edge outwards slightly to create a soft, inviting rim. -
Smooth the surface:
Dip a pottery sponge in a tiny bit of water and wipe down the exterior. This is crucial for getting that professional, ‘thrown-on-a-wheel’ look. Let the vase dry completely for 24-48 hours.
Uneven Drying?
If you notice cracks forming while drying, your clay is shrinking unevenly. Patch small cracks with a “slip” made of wet clay paste, then smooth over.
Step 2: Painting & Finishing
-
Sand imperfections:
Once fully dry and bone-white, take your fine-grit sandpaper and gently buff away any fingerprints or lumps. Wipe away the dust with a dry cloth. -
Apply base coat:
Paint the entire vase with a cream or off-white acrylic paint. You may need two coats to get a solid, opaque finish. Let this base layer dry thoroughly. -
The speckle technique:
Dilute a small amount of dark brown paint with water. Dip an old toothbrush into it, hold it near the vase, and run your thumb across the bristles to flick tiny speckles over the cream base. This creates a faux-stone texture. -
Tape the first curve:
Once the speckles are dry, apply painter’s tape in a curved, swooping line around the belly of the vase. Press the edges down firmly to prevent bleed-through. -
Paint the terracotta section:
Paint the bottom section or the widest band in your terracotta/burnt sienna shade. I usually peel the tape off while the paint is still slightly wet to get the cleanest line. -
Tape the second curve:
Once the terracotta section is dry to the touch, apply a new line of tape to mark off the sage green bands. Follow the natural curve of the vase for an organic feel. -
Apply sage green:
Fill in the designated striped areas with your sage green paint. Use a flat brush to get nice coverage near the tape lines. -
Refine the lines:
If any paint bled under the tape, use a very small detail brush and your cream paint to carefully tidy up the edges. -
Seal the piece:
Finish by spraying the entire vase with a matte varnish. This seals the porous clay and protects the paint job without making it look plasticky.
Pro Tip: Weighted Base
Air dry clay is lightweight. To prevent tipping, add a few small clean stones into the bottom of the vase before closing up the neck shape.
Place your finished vase near a window to let the natural light highlight those beautiful textures