Ceramic lanterns are one of my favorite projects because they’re equal parts sculpture and cozy lighting. The best part is how a few simple cut-outs can turn into magical shadow play the moment you add a light inside.
Classic Pierced Cylinder Lantern
This elegant ceramic lantern merges a modern cylindrical form with the rustic charm of speckled stoneware. Through a simple repeating pattern of pierced holes, it transforms candlelight into a warm, dotted glow perfect for cozy evenings.
Step-by-Step Tutorial
Materials
- Speckled buff stoneware clay (approx. 3-4 lbs)
- Rolling pin
- Canvas mat or guide strips (1/4 inch thickness)
- Cylindrical form or large PVC pipe (approx. 4-5 inch diameter)
- Newspaper
- Fettling knife
- Scoring tool or serrated rib
- Slip (clay + water slurry)
- Hole cutter tool or drill bit (approx. 1/2 inch)
- Sponge
- Clear matte glaze or satin white glaze
- Kiln access
Step 1: Forming the Cylinder
-
Prepare the slab:
Begin by wedging your speckled clay to remove air bubbles. Roll it out on a canvas mat into a large, rectangular slab. Use guide strips to ensure an even thickness of about 1/4 inch across the entire surface. -
Measure and cut:
Determine the height you want the finished lantern to be (around 10-12 inches works well). Measure the circumference of your PVC pipe form and add an inch for overlap. Cut a clean rectangle from your clay slab based on these dimensions. -
Prep the form:
Wrap your PVC pipe or cylindrical mold in a sheet of newspaper. This crucial step prevents the clay from sticking to the rigid form and allows you to slide it off later. -
Build the wall:
Lift the clay slab and wrap it around the paper-covered form. Bring the two long vertical edges together. You can either overlap them slightly or butt them against each other for a seamless look. -
Score and slip:
Where the edges meet, score the clay deeply with your tool and apply a generic amount of slip. Press the edges firmly together to create a bond. -
Smooth the seam:
Use a wooden rib or your thumb to blend the clay across the seam line, working both the outside and inside until the join is invisible. I find running a damp sponge vertically over the area helps unify the texture. -
Taper the top:
Gently gently press inward around the top rim of the cylinder while rotating the form. You want to create a subtle taper, narrowing the opening slightly compared to the body. -
Add a base:
Roll a small separate slab for the base. Place your cylinder on top, trace around it, and cut out the circle. Score and slip this disc to the bottom edge of your cylinder to close it off.
Step 2: Piercing and Finishing
-
Let it stiffen:
Allow the cylinder to dry to a ‘leather hard’ state. It should be firm to the touch and hold its shape perfectly, but not yet bone dry. Slide it off the PVC form carefully. -
Plan the grid:
Lightly sketch a grid pattern on the surface using a soft pencil or a needle tool. For this look, aim for staggered rows, keeping about 1 to 1.5 inches of space between where the holes will go. -
Punch the holes:
Using a sharp circular hole cutter, punch through the leather-hard clay at your marked intersections. Support the wall from the inside with your hand to prevent the cylinder from collapsing under pressure. -
Clean the edges:
Once all holes are punched, wait for the clay to dry a little more. Then, use a damp sponge or a small smoothing tool to soften the sharp edges of each circle. -
Bisque fire:
Let the piece dry completely (bone dry) for several days. Fire it in the kiln to cone 04 (or your clay’s specific bisque temperature). -
Glaze application:
Wipe the bisque-fired piece with a damp sponge to remove dust. dip or brush on a clear matte or semi-transparent satin white glaze. This ensures the natural speckles of the clay body show through. -
Clear holes:
Check every single hole to ensure no glaze has bridged across the opening. Wipe away any excess glaze drips near the bottom. -
Final firing:
Fire the piece again to the maturity temperature of your clay and glaze (often cone 5 or 6 for stoneware). Once cooled, place a candle inside to test the cast light.
Warped Walls?
If your cylinder starts sagging or warping while working, the clay is too soft. Let it firm up for 30 minutes, or use a heat gun briefly to stiffen the walls before piercing.
Clean Cuts
Twist your hole cutter as you insert it and pull it out. This twisting motion creates a much cleaner hole and reduces the amount of burrs you need to clean up later.
Now you have a stunning, handmade vessel ready to illuminate your space with geometric patterns of light


Slab-Built Box Lantern With Geometric Windows
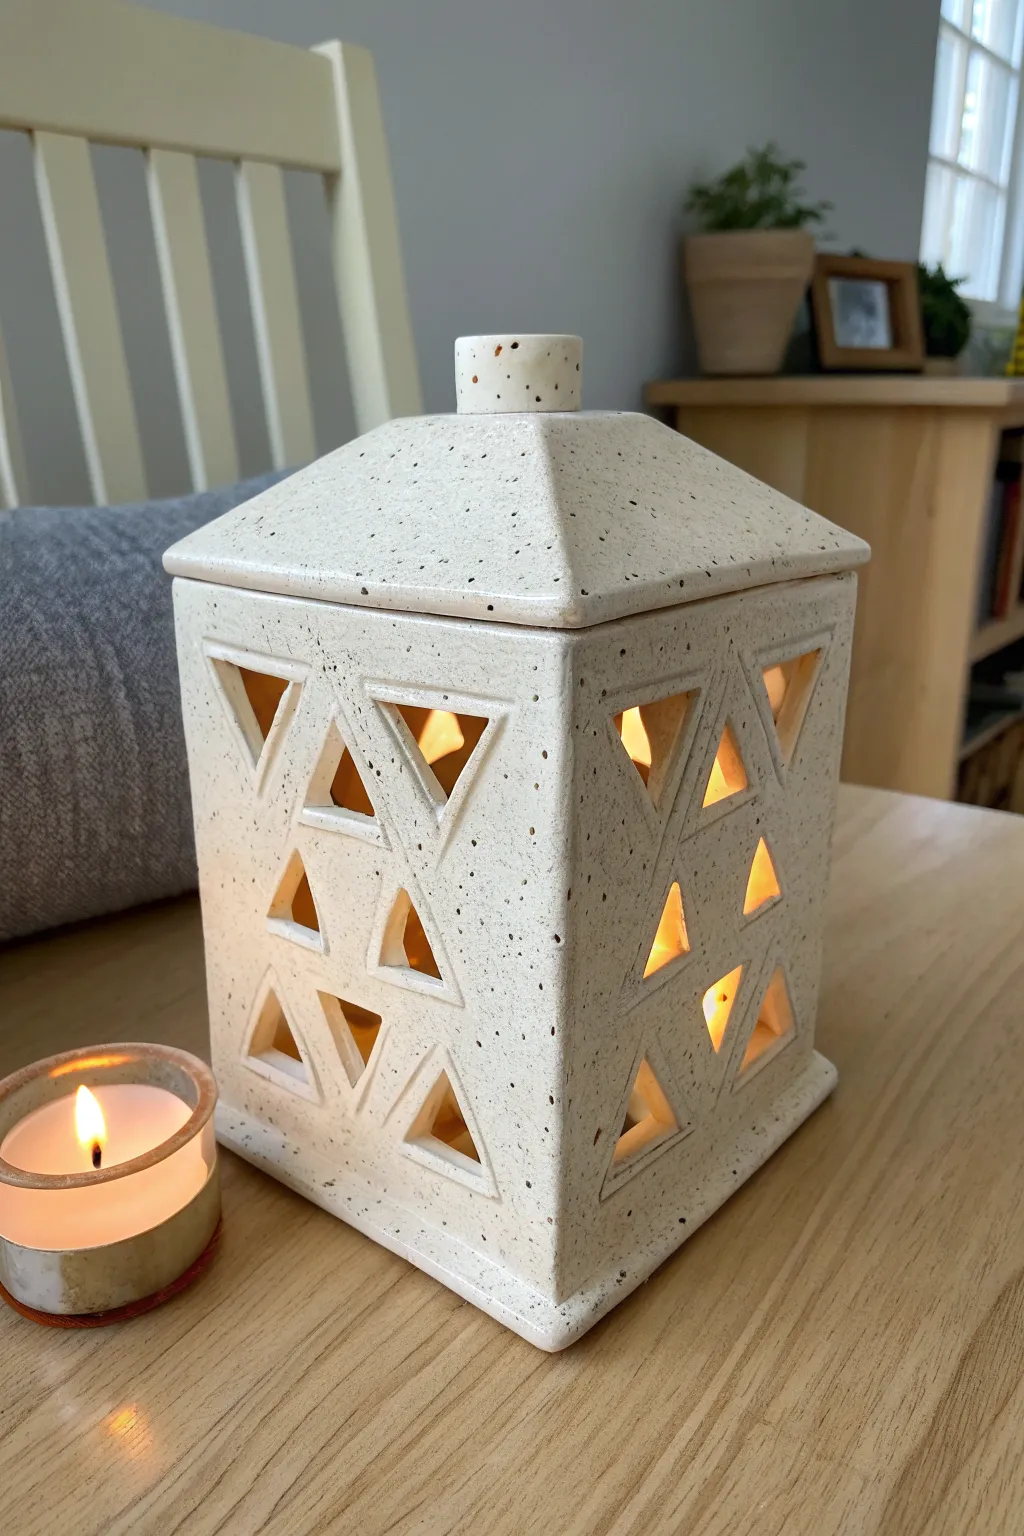
Illuminate your space with the warm, dappled light of this modern ceramic lantern. Featuring crisp triangular cutouts and a speckled stoneware finish, this lidded box project balances architectural lines with the cozy charm of handmade pottery.
Detailed Instructions
Materials
- Speckled stoneware clay (approx. 3-4 lbs)
- Rolling pin and guide sticks (for uniform thickness)
- Fettling knife or X-Acto blade
- Ruler or square tool
- Paper templates (square for walls, square for lid)
- Triangle cutter or stencil
- Scoring tool and slip
- Wooden modeling tool
- Sponge
- Clear glaze
Step 1: Preparing the Slabs
-
Roll Out the Clay:
Begin by wedging your speckled stoneware clay to remove air bubbles. Using guide sticks or a slab roller, roll the clay out to an even thickness of about 1/4 inch. You want the walls substantial enough to stand but thin enough to cut easily. -
Smooth the Surface:
Before cutting any shapes, compress the clay slab on both sides using a rubber rib. This aligns the clay particles, preventing warping later, and creates that smooth, professional canvas for your speckles to shine. -
Cut the Wall Components:
Using a ruler and fettling knife, cut four identical rectangles for the walls (e.g., 5 inches wide by 6 inches tall). Be precise here—square corners are crucial for a tidy box construction. -
Cut the Base and Lid:
Cut two squares slightly larger than the footprint of your assembled walls. One will serve as the base, and the other will be formed into the lid. Save your scraps for the lid handle. -
Leather Hard Stage:
Set all your cut pieces on a ware board covered with canvas or newsprint. Let them dry to a ‘leather hard’ state. They should be stiff enough to hold their shape upright without slumping, but soft enough to carve.
Step 2: Carving the Geometry
-
Plan the Pattern:
While your slabs are stiffening, sketch your triangular pattern. I find it helpful to make a small paper stencil of the triangle size I want to ensure every window is identical. -
Cut the Windows:
Gently place your triangle stencil onto the leather-hard wall panels. Use a sharp, thin blade (like an X-Acto knife) to cut out the triangles. Remove the clay plugs carefully to keep the edges sharp. -
Clean the Edges:
Once the windows are cut, run a slightly damp finger or a small sponge along the interior edges of the cutouts to smooth away any sharp burrs or crumbs. -
Bevel the Joins:
For the strongest corner joints, cut a 45-degree angle (bevel) on the long vertical edges of your four wall panels. This miter joint creates a seamless look and provides more surface area for sticking.
Warped Walls?
If walls bow inward while drying, place a crumpled ball of newspaper inside the box during the drying phase to support the structure until it is bone dry.
Step 3: Assembly & Finishing
-
Score and Slip:
Aggressively score (scratch) the beveled edges and apply clay slip. Connect the four walls to create the box shape. Use a wooden tool to blend the internal seams so they disappear. -
Attach the Base:
Score and slip the bottom edge of your box and attach it to the base square. Trim any excess clay from the base so it sits flush with the walls, or leave a tiny overhang as a decorative footer. -
Form the Lid:
Take your remaining square slab for the lid. To create the pyramid slope shown in the image, gently pinch and lift the center, or cut a small wedge from the corners and rejoin them to dome the slab slightly. -
Add a Gallery:
Add a small coil or strip of clay to the underside of the lid, inset slightly from the edge. This ‘gallery’ or flange will sit inside the lantern walls and prevent the lid from sliding off. -
Create the Knob:
Form a small cylinder or cube from leftover clay. Attach it securely to the center peak of the lid using the score and slip method. This acts as your handle. -
Final Cleanup:
Wipe the entire piece with a damp sponge to remove dust and smooth any fingerprints. Pay special attention to the corners and the rim where the lid sits. -
Fire and Glaze:
Bisque fire the piece once bone dry. Apply a clear or translucent white glaze to highlight the clay’s natural speckles, then glaze fire according to your clay body’s temperature.
Level Up: Light Play
Carve the triangles at an angle rather than straight through. This beveled window edge directs the candlelight differently and adds depth to the clay wall.
Place a tea light inside your finished lantern and watch the geometric shadows dance across your room


Little House Lantern With Cut-Out Doors and Windows
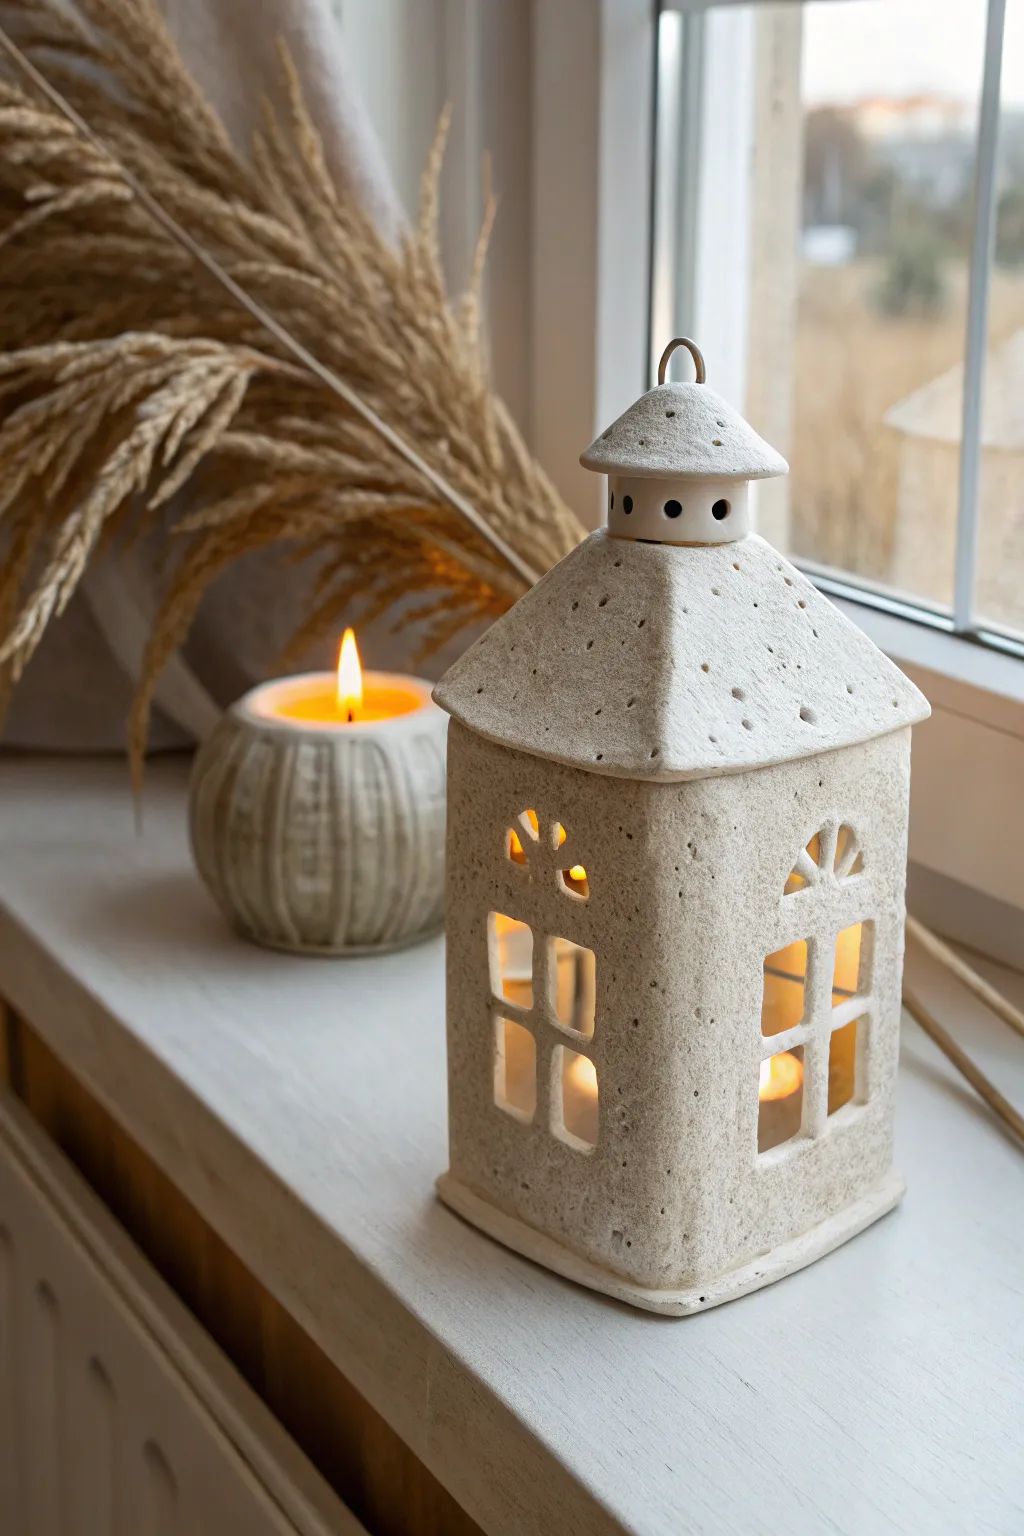
This charming ceramic lantern mimics a quaint little house with warm light spilling through arched windows and a steeply pitched roof. The speckled, slightly rough texture of the clay gives it a cozy, rustic feel perfect for a windowsill or mantle display.
Step-by-Step Tutorial
Materials
- Speckled cone 6 stoneware clay (white or light buff)
- Rolling pin and guide sticks (about 6mm thickness)
- Fettling knife or X-Acto blade
- Ruler or set square
- Paper templates (4 walls, 2 roof pieces, 1 cupola)
- Slip and scoring tool
- Small square and arch-shaped cookie cutters (or freehand tools)
- Small hole punch tool (for roof detail)
- Sponge and water
- Metal loop tool (optional for texture)
- Kiln
Step 1: Preparing the Slabs
-
Roll out the clay:
Begin by wedging your speckled clay to remove air bubbles. Roll it out into a large, even slab about 6mm (1/4 inch) thick. Using guide sticks here is crucial to ensure the walls stand up evenly later. -
Texture the surface:
If you want that pitted, weathered stone look seen in the photo, gently tap the surface of the slab with a coarse sponge or a crumpled ball of aluminum foil before cutting your shapes. -
Cut the components:
Using your paper templates, cut out four identical rectangular walls, two triangular roof pieces that fit the width of your walls, and the small circular base for the cupola. -
Hardening phase:
Let the cut slabs sit until they reach a soft ‘leather-hard’ state. They need to be firm enough to stand upright without slumping but soft enough to join.
Clean Cuts
When cutting out the window panes, let the clay dry to leather-hard first. If the clay is too wet, the thin window bars will warp and drag as you pull the knife through.
Step 2: Building the House Body
-
Cut the windows:
On what will be the front and side walls, carefully cut out your window shapes. The design features a large, arched window divided into four panes. You can use cutters or carefully slice the clay away with a scalpel, leaving the cross-bars intact. -
Add upper details:
Above the main window, cut out smaller decorative shapes like the semi-circle fanlight seen in the image. Smooth the raw edges of all cutouts with a damp brush or finger. -
Prepare the edges:
Score the vertical edges of all four wall pieces using a serrated tool. Apply a generous amount of slip to the scored areas. -
Assemble the walls:
Stand the walls up and press the scored edges together to form a box. Use a small coil of clay on the inside corners to reinforce the seams, smoothing it down so it’s invisible. -
Refine the shape:
check that the structure is square and the walls are vertical. I find it helpful to gently tap the structure on the table to level the bottom.
Warping Walls?
If your walls start bowing inward during assembly, place a crumpled ball of newspaper inside the house to support the structure while the seams firm up.
Step 3: Creating the Roof
-
Cut the roof texture:
Take your roof slab pieces. To mimic the texture in the photo, poke random, shallow holes across the surface using a needle tool or stiff brush, creating a porous stone effect. -
Attach the roof:
Score and slip the top edges of your house box. Place the roof slabs on top, creating a pyramid or pitched shape depending on your template. Join the seams securely. -
Create the cupola base:
Form a small cylinder or ring of clay to sit on the peak of the roof. Cut small ventilation holes into this ring to allow heat to escape when a candle is lit inside. -
Make the cupola cap:
Shape a small cone or dome for the very top. Add the metal loop detail now if desired, inserting a high-temp wire loop into the wet clay. -
Assemble the top:
Attach the vented ring to the roof peak, and then the conical cap on top of the ring. Ensure all joins are slipped and scored thoroughly.
Step 4: Finishing Touches
-
Final texture check:
Look over the entire piece. If the handling smoothed out your texture too much, re-apply the stippled effect with your tool of choice. -
Drying:
Place the lantern under a loose plastic sheet to dry very slowly. This is vital to prevent the seams from cracking as the clay shrinks. -
Bisque fire:
Once bone dry, fire the piece to cone 04 (or your clay’s specific bisque temperature). -
Glazing (Optional):
To keep the raw look shown in the image, you might skip a full glaze. Instead, wipe a thin wash of dark oxide (like iron oxide or manganese) over the surface and sponge it off, leaving color only in the pits and textures. -
Final Firing:
Fire the piece to maturity (likely cone 6 for stoneware). The bare clay will vitrify and become durable while maintaining that sandy, matte finish.
Once fired, place a tea light inside and enjoy the soft, flickering glow through the cottage windows


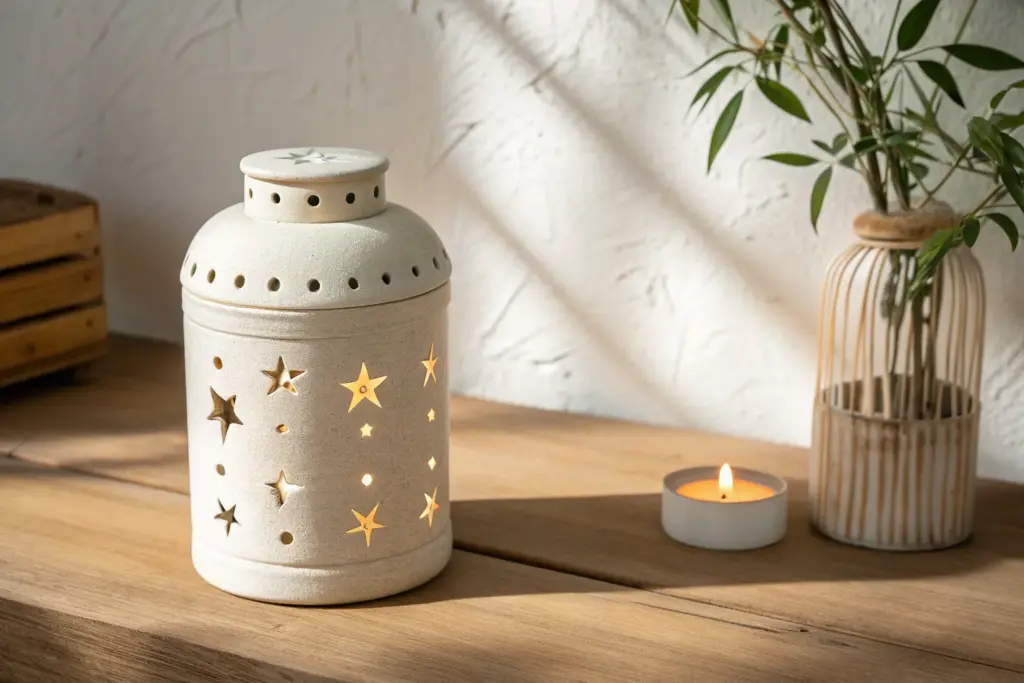
Star and Moon Cut-Out Lantern
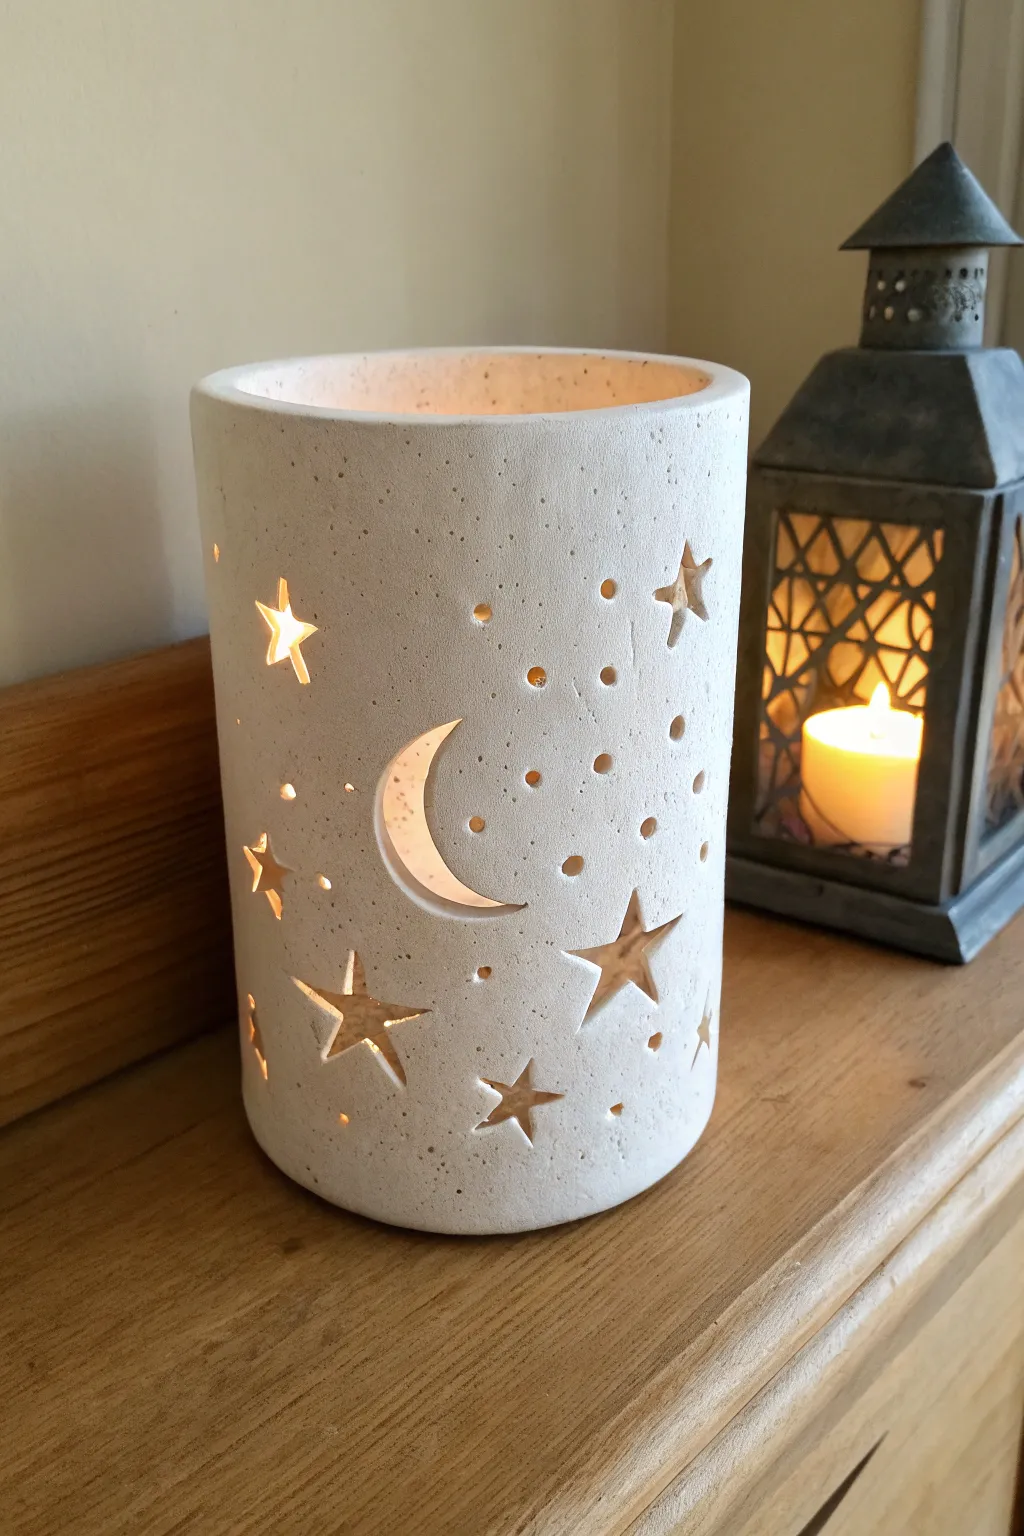
Illuminate your evenings with this serene ceramic candle holder featuring delicate star and moon cut-outs. The speckled clay body and warm candlelight create a magical, starry-night effect perfect for cozy corners.
Step-by-Step Guide
Materials
- White speckled stoneware clay (approx. 2 lbs)
- Slab roller or rolling pin with guide strips
- Cardstock or paper for templates
- Craft knife or scalpel (X-Acto)
- Small circular clay hole cutters (various sizes)
- Star-shaped clay cutters (optional but helpful)
- Slip and scoring tool
- Straight edge/ruler
- Cylindrical form (like a PVC pipe or large rolling pin)
- Sponge and water
- Clear matte glaze (optional)
- Kiln access
Step 1: Preparing the Clay Body
-
Template Creation:
Begin by measuring the circumference of your desired finished size. Cut a rectangular template from cardstock; a good starting size is roughly 12 inches long by 6 inches high to account for shrinkage. -
Rolling the Slab:
Roll out your speckled clay on a canvas board. Aim for an even thickness of about 1/4 inch (6mm). Using guide strips on either side of your rolling pin ensures the walls are perfectly uniform. -
Texture Check:
Compress the slab on both sides with a rubber rib. This aligns the clay particles, preventing cracking later, and smooths the surface for a clean finish. -
Cutting the Shape:
Place your paper template onto the clay slab. Using a needle tool or knife, trace and cut out the rectangular body and a circular base that matches the cylinder’s diameter.
Step 2: Designing the Night Sky
-
Surface Prep:
Let the slab stiffen slightly to a ‘soft leather-hard’ stage. It should hold its shape but still be flexible. This prevents the walls from collapsing while you cut. -
Moon Placement:
Sketch a crescent moon gently onto the clay surface with a needle tool. Carefully cut along the lines with a scalpel, removing the clay piece cleanly. -
Starry Constellation:
Use small star-shaped cutters or freehand cut 5-pointed stars scattered around the moon. vary the sizes for visual interest, keeping them spaced out to maintain structural integrity. -
Adding Stardust:
Take your smallest circular hole cutters or a drill bit and punch tiny random holes between the stars and moon. These represent distant stars and help ventilate the candle heat. -
Smoothing Edges:
Once all cuts are made, take a refined sponge or a soft brush with a tiny bit of water and smooth the sharp internal edges of every cut-out. Sharp edges can be prone to chipping after firing.
Clean Cuts Pro Tip
Wait until the clay is leather hard before cleaning up the “burrs” on the inside of the cut-outs. They flick off easily when dry versus smearing when wet.
Step 3: Assembly and Finishing
-
Beveling the Seam:
Cut the short vertical edges of your rectangular slab at a 45-degree angle. This slanted join creates a stronger seam than a butt joint. -
Forming the Cylinder:
Wrap the slab around your cylindrical form or simply curl it carefully by hand. Score the beveled edges aggressively and apply slip. -
Sealing the Wall:
Press the scored edges together firmly. Use a wooden modeling tool to blend the clay across the seam on both the inside and outside until the join is invisible. -
Attaching the Base:
Score and slip the bottom edge of the cylinder and the outer edge of your circular base. Press them together, flipping the cylinder upside down if needed to seal the connection securely. -
Drying:
Cover the lantern loosely with plastic to let it dry very slowly. Rapid drying can warp the cylindrical shape or cause cracks around the intricate cut-outs. -
First Firing:
Bisque fire the piece in the kiln to cone 04 (or your clay’s specific temperature). This hardens the clay and prepares it for glazing. -
Glazing Strategy:
For the look in the photo, you might choose to leave the outside unglazed to show the raw speckled clay texture. Clear glaze or a white matte glaze can be applied to the interior for easier cleaning. -
Final Firing:
Fire the piece a second time to its maturity temperature (likely Cone 5 or 6 for stoneware). Once cool, add a tealight or votive candle to see your design come to life.
Warping Woes?
If your cylinder turns into an oval while drying, place a gentle weight (like a small board) on top, or dry it upside down on its rim to help maintain the circle.
Enjoy the gentle, flickering shadows your new lantern casts against the wall

The Complete Guide to Pottery Troubleshooting
Uncover the most common ceramic mistakes—from cracking clay to failed glazes—and learn how to fix them fast.
Leaf Pattern Ceramic Lantern for Garden Glow
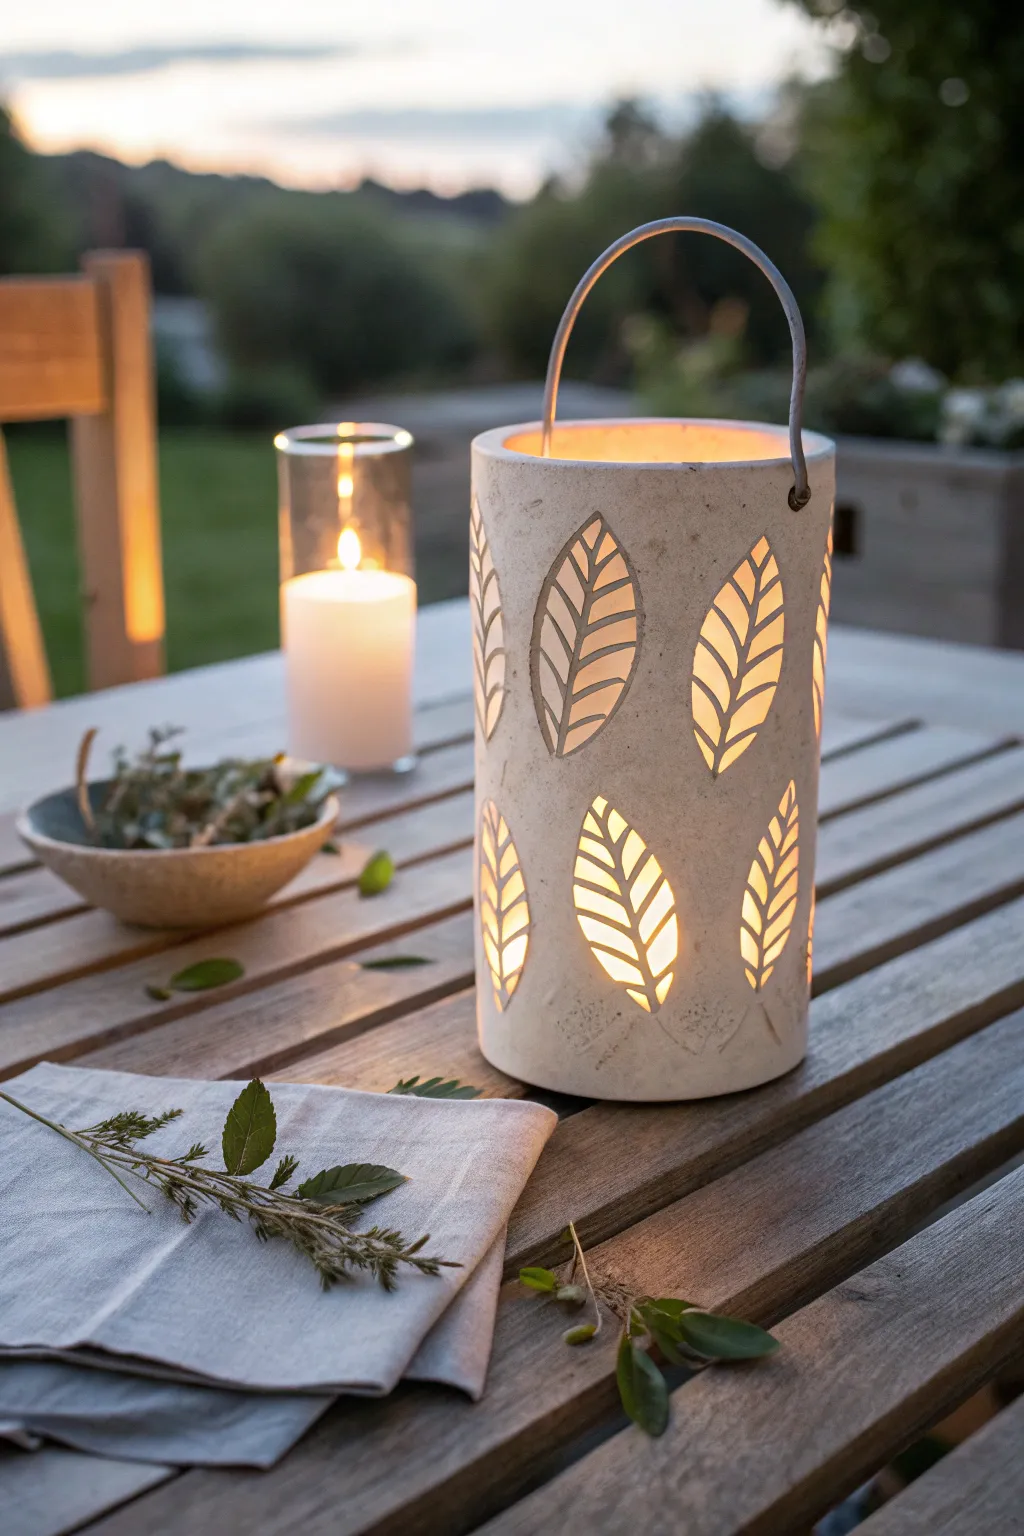
Bring the tranquility of a forest evening to your patio table with this rustic cylindrical lantern. Crafted from textured stoneware clay and featuring delicate leaf cutouts that dance with candlelight, this vessel combines natural motifs with a cozy, functional design.
Step-by-Step
Materials
- Stoneware clay (groggy/speckled finish recommended)
- Rolling pin with guide strips (approx. 0.5 cm)
- Leaf template (cardstock) or real sturdy leaves
- Potter’s knife or X-Acto blade
- Fettling knife
- Needle tool
- Scoring tool or serrated rib
- Slip (clay and water slurry)
- Cylindrical mold (PVC pipe or large can) covered in newspaper
- Sponge
- Metal wire (heavy gauge for handle)
- Drill bit tool or hole punch tool
- Matte white or transparent glaze (optional)
Step 1: Forming the Cylinder
-
Prepare the slab:
Begin by wedging your stoneware clay thoroughly to remove air bubbles. Roll it out into a long rectangular slab using guide strips to ensure an even thickness of about 0.5 cm. Smooth the surface with a flexible rib to compress the clay particles. -
Cut to size:
Measure the circumference of your cylindrical mold. Cut the clay slab into a rectangle that matches this length plus a slight overlap for the seam, and decide on your desired height—about 8-10 inches works well for this design. -
Create the cylinder:
Wrap the slab around your newspaper-covered mold. I find it easiest to stand the mold upright and curl the clay around it gently to avoid stretching. -
Join the seam:
Score the overlapping edges agressively with your serrated tool and apply a generous amount of slip. Press the edges together firmly. -
Blend the join:
Use a wooden tool or your thumb to smear the clay across the seam line, both inside and outside, until the join is invisible. Smooth the area with a damp sponge. -
Create the base:
Roll out a smaller slab for the floor of the lantern. Place your cylinder on top of it and trace around the bottom edge with a needle tool. Cut out this circle. -
Attach the base:
Score and slip the bottom rim of the cylinder and the edge of the circular base. Press them together firmly and blend the clay upwards from the base to the wall to secure the seal.
Slumping Walls?
If the clay walls start to sag while cutting, the clay is too wet. Stop immediately and let it dry for an hour, or use a hair dryer briefly to stiffen the walls before continuing.
Step 2: Carving the Leaves
-
Plan the layout:
Allow the cylinder to stiffen slightly to a ‘leather hard’ state. Lightly trace your leaf shapes onto the surface using a needle tool. Alternate their orientation—some pointing up, some down—to create a dynamic pattern. -
Cut the outlines:
Using a sharp potter’s knife or X-Acto blade, carefully cut along the perimeter of your first leaf shape. -
Carve the veins:
Instead of removing the whole leaf, you want to leave the veins intact for structure. Carefully cut out the negative space pieces *between* the veins and the leaf outline. Work slowly to avoid breaking the delicate clay bridges of the veins. -
Clean the edges:
Once a section is cut, push the small clay pieces out from the inside. Use a small, slightly damp sponge or a soft brush to smooth the sharp cut edges. -
Repeat the pattern:
Continue cutting out the leaf negatives around the entire cylinder. Adjust the spacing as you go to ensure the pattern flows naturally without overcrowding one side.
Clean Carving Tip
Wait until the clay is leather-hard before carving. If it’s too soft, the knife will drag and distort the leaf shapes; too dry, and it will chip or crack.
Step 3: Finishing Touches
-
Refine the rim:
Check the top rim of the lantern. Use a damp sponge to round it off slightly, ensuring there are no sharp edges. -
Drill handle holes:
Using a hole punch tool or a drill bit, create two holes directly opposite each other about 1 inch down from the top rim. Make sure these are large enough to accommodate your metal wire after the clay shrinks during firing. -
Smooth the surface:
Give the entire piece a final wipe with a sponge to remove any burrs or crumbs. If you want that stone-like texture shown in the image, you can gently dab the surface with a coarse sponge. -
Dry slowly:
Cover the lantern loosely with plastic to let it dry very slowly. This prevents the delicate lattice work of the leaves from warping or cracking. Once bone dry, bisque fire the piece. -
Glaze and fire:
Apply a matte white or clear glaze if you want to highlight the clay’s natural color. Wipe the foot clean and fire to the temperature appropriate for your clay body. -
Attach the handle:
Once the piece is fired and cool, bend a length of heavy gauge wire into an arch. Thread the ends through the holes and curl them upwards with pliers to secure the handle.
Place a pillar candle inside your finished lantern and watch the leaf shadows create a magical atmosphere in your garden
Floral Cut-Out Lantern With Soft Petal Shadows
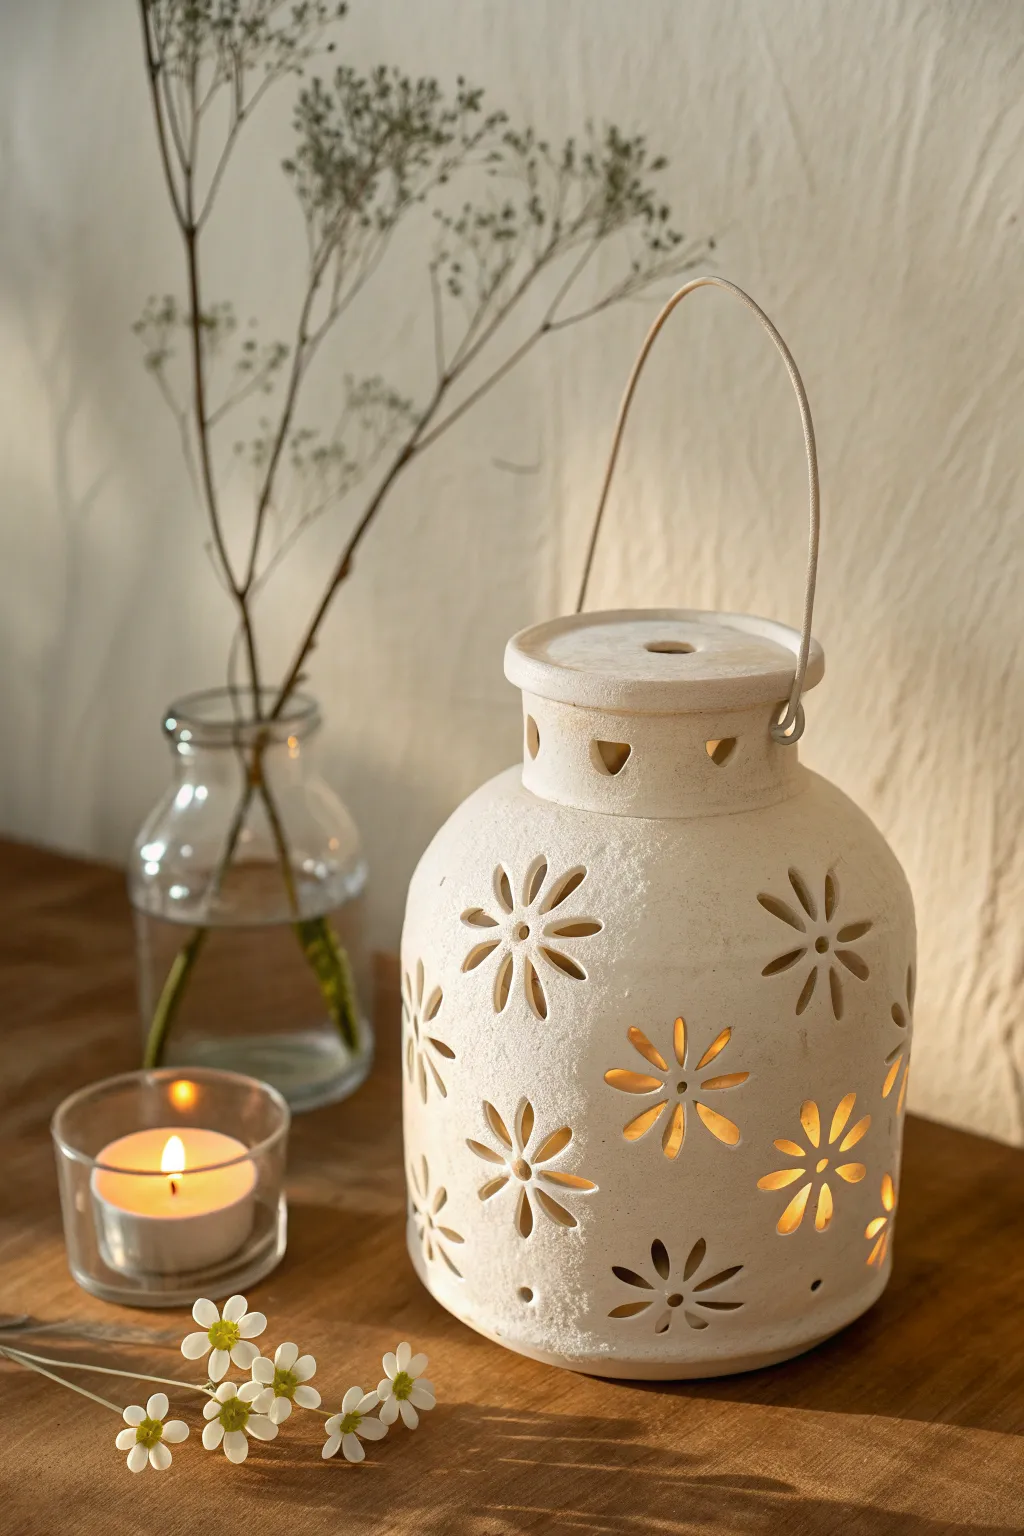
Bring the warmth of a garden indoors with this charming clay lantern featuring intricate floral cut-outs. The natural, matte white finish amplifies soft candlelight, casting dancing petal shadows that instantly cozy up any corner.
Detailed Instructions
Materials
- White stoneware or porcelain clay body
- Rolling pin and guide sticks (approx. 1/4 inch)
- Circular template or bowl (for base)
- Fettling knife or needle tool
- Slip and scoring tool
- Various small flower-shaped cookie cutters (daisy style)
- Small hole punch or straw
- Canvas work surface
- Thin crafting wire (flexible)
- Sponge and water
- Kiln (or access to firing service)
Step 1: Forming the Body
-
Prepare the slab:
Begin by wedging your white clay thoroughly to remove air bubbles. Roll it out into a smooth, even slab about 1/4 inch thick using guide sticks to ensure consistency. -
Cut the base:
Use your circular template or a small bowl to trace and cut out a round base for the lantern. Set this aside on a small ware board. -
Create the walls:
Cut a large rectangular strip from your remaining slab. Determining the length requires measuring the circumference of your base circle, plus a little extra for overlap. -
Attach the cylinder:
Score the outer edge of the base and the bottom edge of your rectangular strip. Apply slip generously. -
Seal the seam:
Wrap the wall around the base, pressing firmly. Where the rectangle ends meet, bevel the edges at 45-degree angles for a seamless join. Score, slip, and smooth the vertical seam inside and out. -
Shape the bell:
Gently paddle the sides of the cylinder or use your hands to bulb out the middle slightly, then taper the top inward to create that classic lantern shoulder.
Clean Cuts Every Time
When cutting holes, let the clay firm up slightly more than usual. Use a tiny piece of plastic wrap over the clay before pressing a cutter down for softer, rounded edges.
Step 2: Carving the Light
-
Wait for leather hard:
This is crucial: Let the pot dry to a ‘leather hard’ state. If it’s too wet, the walls will collapse when you cut; too dry, and it will crack. -
Plan the pattern:
Lightly sketch your flower placement on the surface with a needle tool. I find a staggered pattern works best to keep the structural integrity strong. -
Cut the petals:
Using a small, sharp fettling knife or specialized clay hole cutters, carefully remove the clay to form the flower petals. Support the wall from the inside with your other hand as you cut. -
Refine the edges:
Once the cut-outs are done, use a damp sponge or a soft brush to smooth the sharp edges of each petal. This creates a cleaner shadow when lit.
Structural Sagging?
If the lantern starts slouching while you work, stuff the interior gently with crumpled newspaper or plastic bags. This supports the walls while you cut the floral patterns.
Step 3: The Lid and Handle
-
Measure the opening:
Measure the top opening of your lantern body. Roll a smaller slab and cut a circle slightly larger than this opening. -
Add the flange:
On the underside of the lid, score and slip a small ring of clay that fits *inside* the lantern rim. This flange keeps the lid secure so it doesn’t slide off. -
Ventilation:
Cut a small hole in the center of the lid. This acts as a chimney for the candle’s heat to escape. -
Detailing the rim:
If you like, add a decorative collar or small cut-outs to the rim of the lid to match the body design. -
Wire holes:
pierce two small holes on opposite sides of the lantern’s upper neck using a needle tool or small drill bit. These will hold the wire handle later. -
Dry and Fire:
Allow the piece to dry completely slowly under loose plastic. Bisque fire the piece. For the matte look in the photo, leave the exterior unglazed or apply a thin matte white glaze, then fire to temperature. -
Final Assembly:
Once the ceramic is fired and cool, thread a length of thin, sturdy wire through the holes to create the arched handle, twisting the ends securely inside.
Place a tealight inside and watch your handcrafted garden glow come to life this evening


What Really Happens Inside the Kiln
Learn how time and temperature work together inside the kiln to transform clay into durable ceramic.
Lidded Jar Lantern With Handle Loop
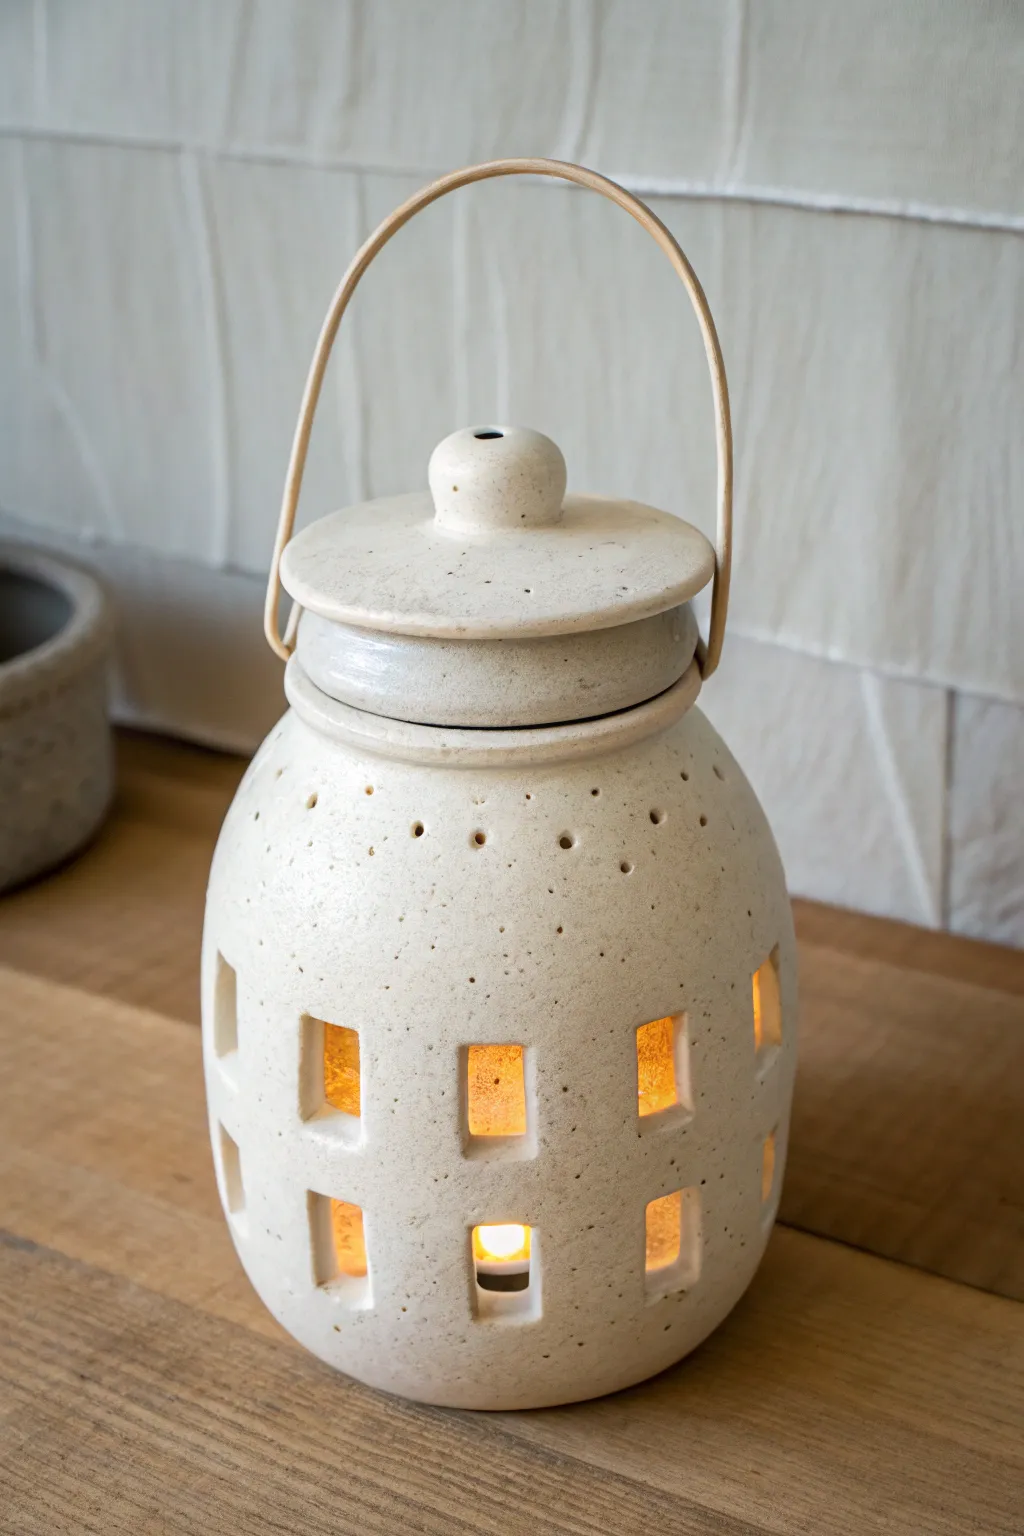
This charming lidded lantern combines the rustic warmth of speckled clay with a cozy, inviting glow. Its classic jar silhouette features geometric window cutouts and a delicate overhead handle, perfect for holding a tealight or votive candle.
Step-by-Step Tutorial
Materials
- Speckled buff stoneware clay (approx. 2-3 lbs)
- Pottery wheel (or slab roller/rolling pin for hand-building)
- Needle tool
- Fettling knife
- Square clay cutter (small) or X-Acto knife
- Loop trimming tool
- Wooden rib tool
- Sponge
- Wire cutter
- Cane or bamboo handle material (pre-made or raw)
- Drill bit or hole punch tool (small)
- Clear matte glaze
Step 1: Throwing the Body & Lid
-
Center the clay:
Begin by wedging your speckled clay thoroughly to remove air bubbles. Secure a ball of clay (about 1.5 lbs) onto the wheel head and center it using steady pressure and water for lubrication. -
Open and pull the cylinder:
Open the centered mound and pull up the walls to create a cylinder. Aim for a height of roughly 6-7 inches. As you pull, gently bell the belly of the pot outward using a rib tool inside to create that rounded jar shape. -
Form the gallery:
At the rim, carefully split the clay slightly or compress it inward to create a small gallery (a ledge) where the lid will eventually sit. Ensure the rim is smooth and sturdy. -
Throw the lid:
Using a smaller amount of clay (about 0.5 lbs), throw a lid ‘off the hump’ or centered on a bat. Measure the gallery of your jar with calipers to ensure the lid fits perfectly. Create a small, rounded knob in the center. -
Dry to leather hard:
Cut both pieces from the wheel and let them dry slowly until they reach a leather-hard state. I find this stage critical because if the clay is too soft, the cutouts will deform the pot.
Step 2: Trimming & Carving
-
Trim the base:
Place the jar upside down on the wheel (centering it carefully) and use a loop tool to trim the excess weight from the bottom, creating a clean foot ring. -
Trim the lid:
Refine the shape of the lid and knob. While trimming the lid, drill a small vent hole through the side of the knob if you plan to use real flame candles, though the window cuts usually provide enough airflow. -
Mark the windows:
Determine the placement of your window cutouts. Lightly score a grid or guide lines onto the surface of the jar to ensure your spacing is even. -
Cut the windows:
Using a small square cutter or a sharp X-Acto knife, carefully slice out the square windows. Support the wall from the inside with your hand to prevent collapsing. -
Add decorative perforations:
Above the windows and near the neck, use a small drill bit or hole punch tool to create the pattern of tiny dots. These add texture and let extra speckles of light through. -
Create handle lugs:
Fashion two small loops or lugs from excess clay. Attach these securely to opposite sides of the jar’s shoulder using the score-and-slip method. These will hold the handle later. -
Smooth the edges:
Once all cutting is done, take a slightly damp sponge and gently wipe down all the cut edges to remove sharpness and burrs. Don’t use too much water, or you’ll weaken the walls.
Slumping Walls?
If the jar shape warps while cutting windows, your clay is too wet. Stop immediately and let it dry for another hour or two. The walls must be stiff leather hard.
Step 3: Firing & Assembly
-
Bisque fire:
Allow the piece to dry completely to the bone-dry stage. Load it into the kiln and bisque fire to approximately Cone 04 to prepare it for glazing. -
Glaze application:
Dip or brush the piece with a clear matte glaze. A clear glaze is essential here to let the natural speckles of the clay body shine through. Wipe the foot ring clean with a sponge. -
Glaze fire:
Fire the kiln again to the maturity temperature of your clay (likely Cone 5 or 6 for stoneware). Let the kiln cool naturally before opening. -
Attach the handle:
Once the ceramic is cool, thread your cane or bamboo handle ends through the ceramic lugs you created. Secure them by bending the ends up and wrapping them tightly to the main handle loop.
Colored Glow
For a magical effect, apply a thin coat of amber or yellow celadon glaze inside the jar only. When lit, this intensifies the warm candlelight color.
Place a tea light inside, pop on the lid, and enjoy the beautiful patterns of light dancing on your table.
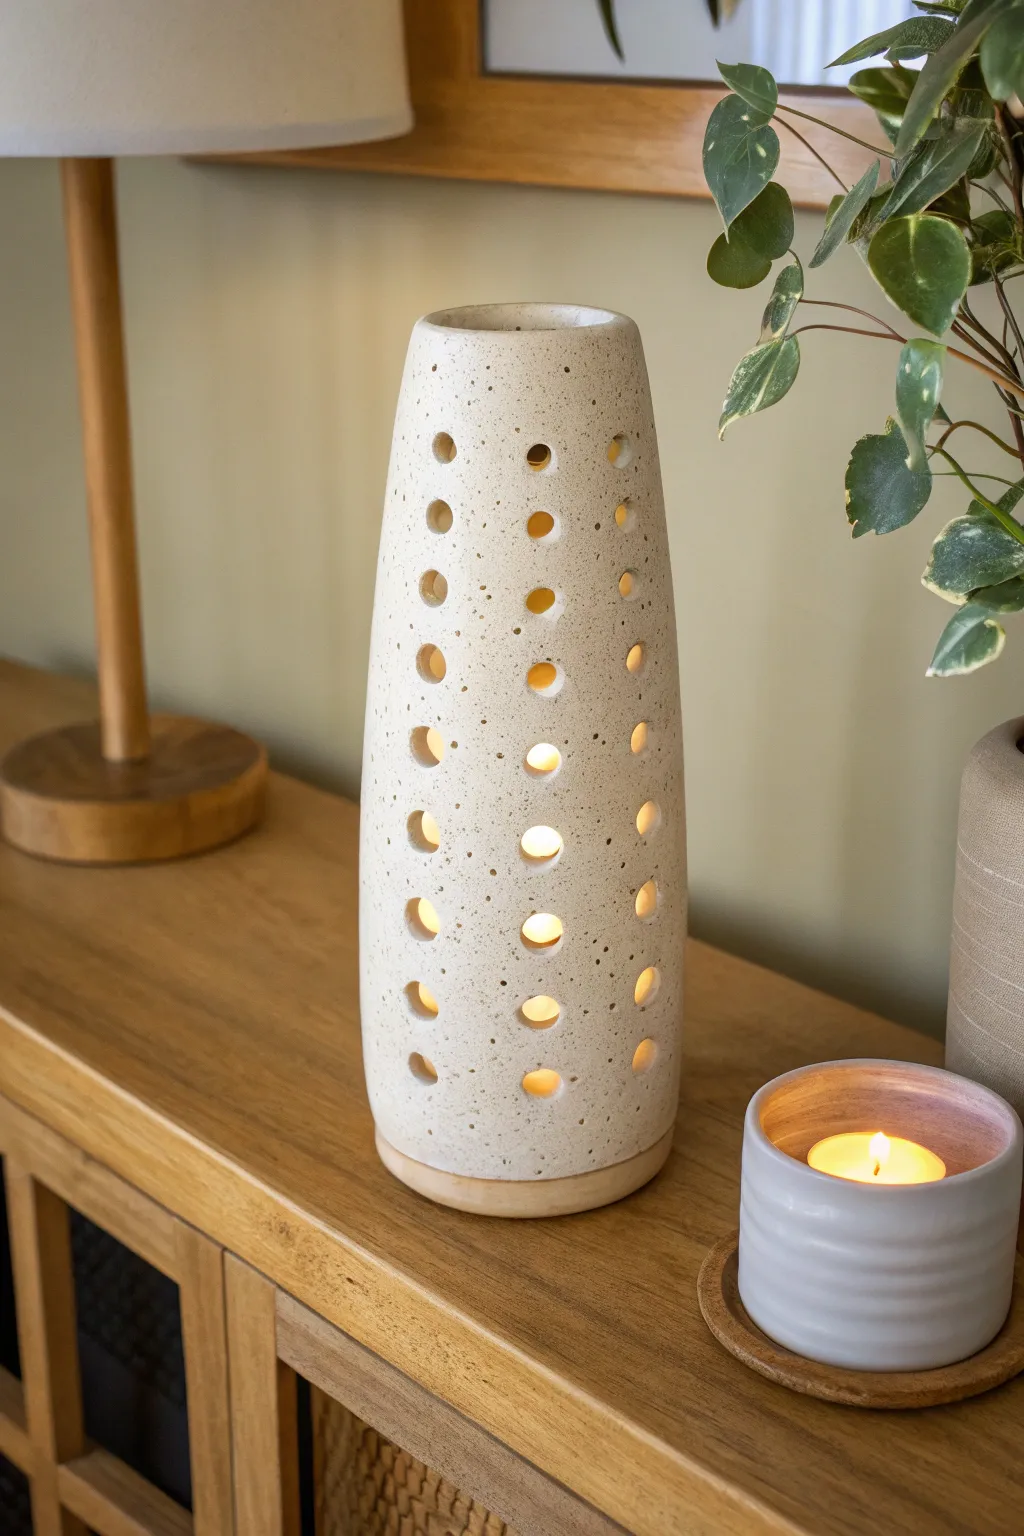
Mixed Hole Sizes Lantern for Depth and Sparkle
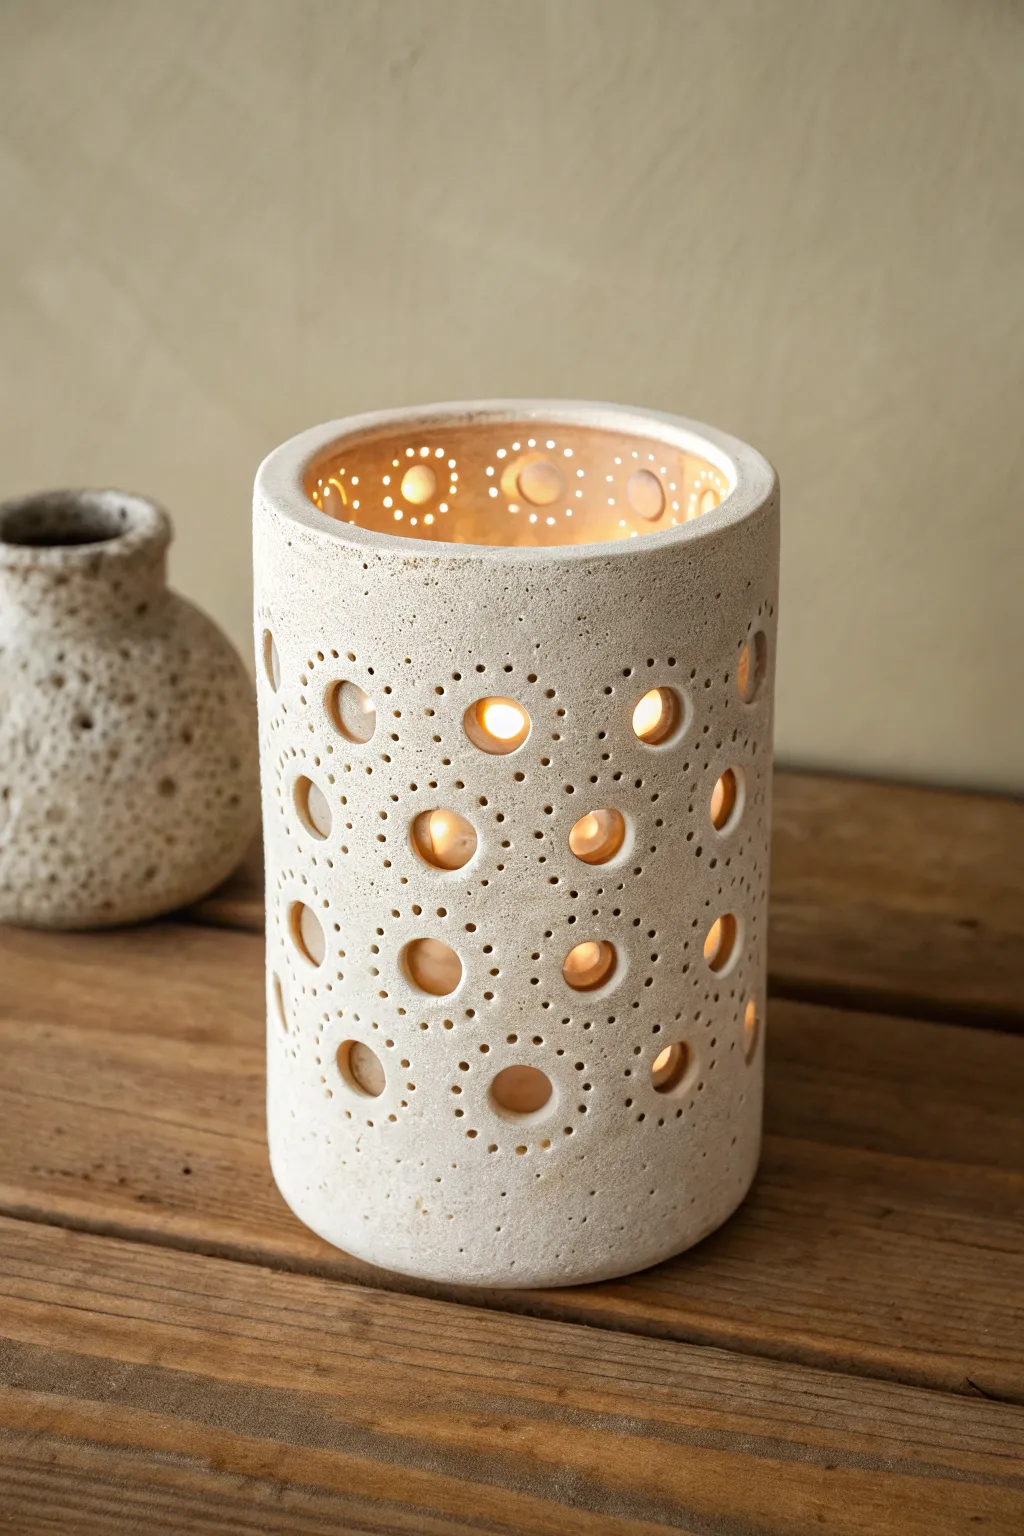
This project captures the warm, flickering glow of candlelight through a carefully pierced cylindrical lantern. With its textured, stone-like finish and pattern of varied hole sizes, creates a captivating play of depth and sparkle ideal for cozy evenings.
Step-by-Step
Materials
- Stoneware clay with grog (for texture)
- Rolling pin
- Canvas mat or slab roller
- Cylindrical mold or PVC pipe (approx. 4-6 inch diameter)
- Pottery knife or needle tool
- Scoring tool (serrated rib)
- Slip (clay and water slurry)
- Small circle cutter (approx. 0.5 – 0.75 inch)
- Very small drill bit tool or pin tool (1-2mm)
- Sponge
- Plastic sheet
- Kiln (or access to a firing service)
Step 1: Forming the Cylinder
-
Roll the slab:
Begin by rolling out your stoneware clay on a canvas mat to a thickness of about 1/4 inch. Try to keep the thickness consistent so the light filters through evenly later. -
Cut the rectangle:
Measure the circumference of your cylindrical mold and add an inch for overlap. Cut a clean rectangle from your slab based on this width and your desired height. -
Texture the surface:
Before assembling, lightly press a coarse sponge or rough fabric over the surface of the slab. This mimics the stone-like, sandy texture seen in the finished piece. -
Wrap the mold:
Wrap a sheet of newspaper or paper towel around your PVC pipe or mold to prevent sticking. Carefully lift your clay slab and wrap it around the form. -
Join the seam:
Score the overlapping edges thoroughly with your serrated tool and apply slip. I like to press the edges together firmly, then smooth the seam inside and out so it becomes invisible. -
Refine the rim:
While the clay is supported by the mold, trim the top rim to be perfectly level. Use a damp sponge to soften the square edge into a rounded, smooth lip.
Step 2: Creating the Pattern
-
Initial drying:
Let the cylinder firm up to a ‘leather-hard’ state. It should be stiff enough to hold its shape without the mold but soft enough to cut easily. -
Plan the grid:
Lightly scratch a grid pattern or use a paper template to mark where the centers of your large circles will go. A staggered or diamond pattern works best for this look. -
Punch large holes:
Using your small circle cutter, punch out the main holes at your marked intervals. Twist the cutter gently as you pull it out to keep the edges clean. -
Mark satellite guides:
Lightly trace a larger imaginary circle around each cutout hole. This will serve as the path for your tiny accent holes. -
Pierce the decorative ring:
Take your pin tool or small drill bit and pierce a ring of tiny holes around every large cutout. Space them evenly to create a sunburst effect. -
Fill the gaps:
Add additional tiny holes in the negative spaces between the main clusters to ensure light sparkles from every angle. -
Clean the cuts:
Wait for the clay to dry a bit more, then use a dry stiff brush or a small sponge to gently whisk away any burrs or crumbs from the drilling process.
Clean Cuts Hack
When punching holes, support the clay wall from the inside with a small block of wood or your hand to prevent the cylinder from warping under pressure.
Step 3: Firing and Finishing
-
Slow drying:
Cover the lantern loosely with plastic to let it dry very slowly. This prevents the delicate lattice-work of holes from cracking as the clay shrinks. -
Bisque fire:
Once bone dry, fire the piece in the kiln to bisque temperature (usually Cone 04 or 06). -
Add a wash (optional):
If you want to enhance the texture, wipe a thinned iron oxide wash over the surface and sponge it off, leaving color only in the pits and holes. -
Clear glaze (optional):
Or, leave the exterior unglazed for a raw stone look, and apply a clear matte glaze only to the inside for durability. -
Final firing:
Fire the lantern to the maturity temperature of your clay body (likely Cone 5 or 6 for stoneware). The heat will solidify the clay into a durable stone-like material.
Cracking Up?
If you see tiny hairline cracks appearing around holes while drying, burnish them gently with the back of a spoon to compress the clay particles.
Place a tea light inside and enjoy the mesmerizing shadows your handmade lantern casts on the wall

TRACK YOUR CERAMIC JOURNEY
Capture glaze tests, firing details, and creative progress—all in one simple printable. Make your projects easier to repeat and improve.
Carved Groove and Pierced Combo Lantern
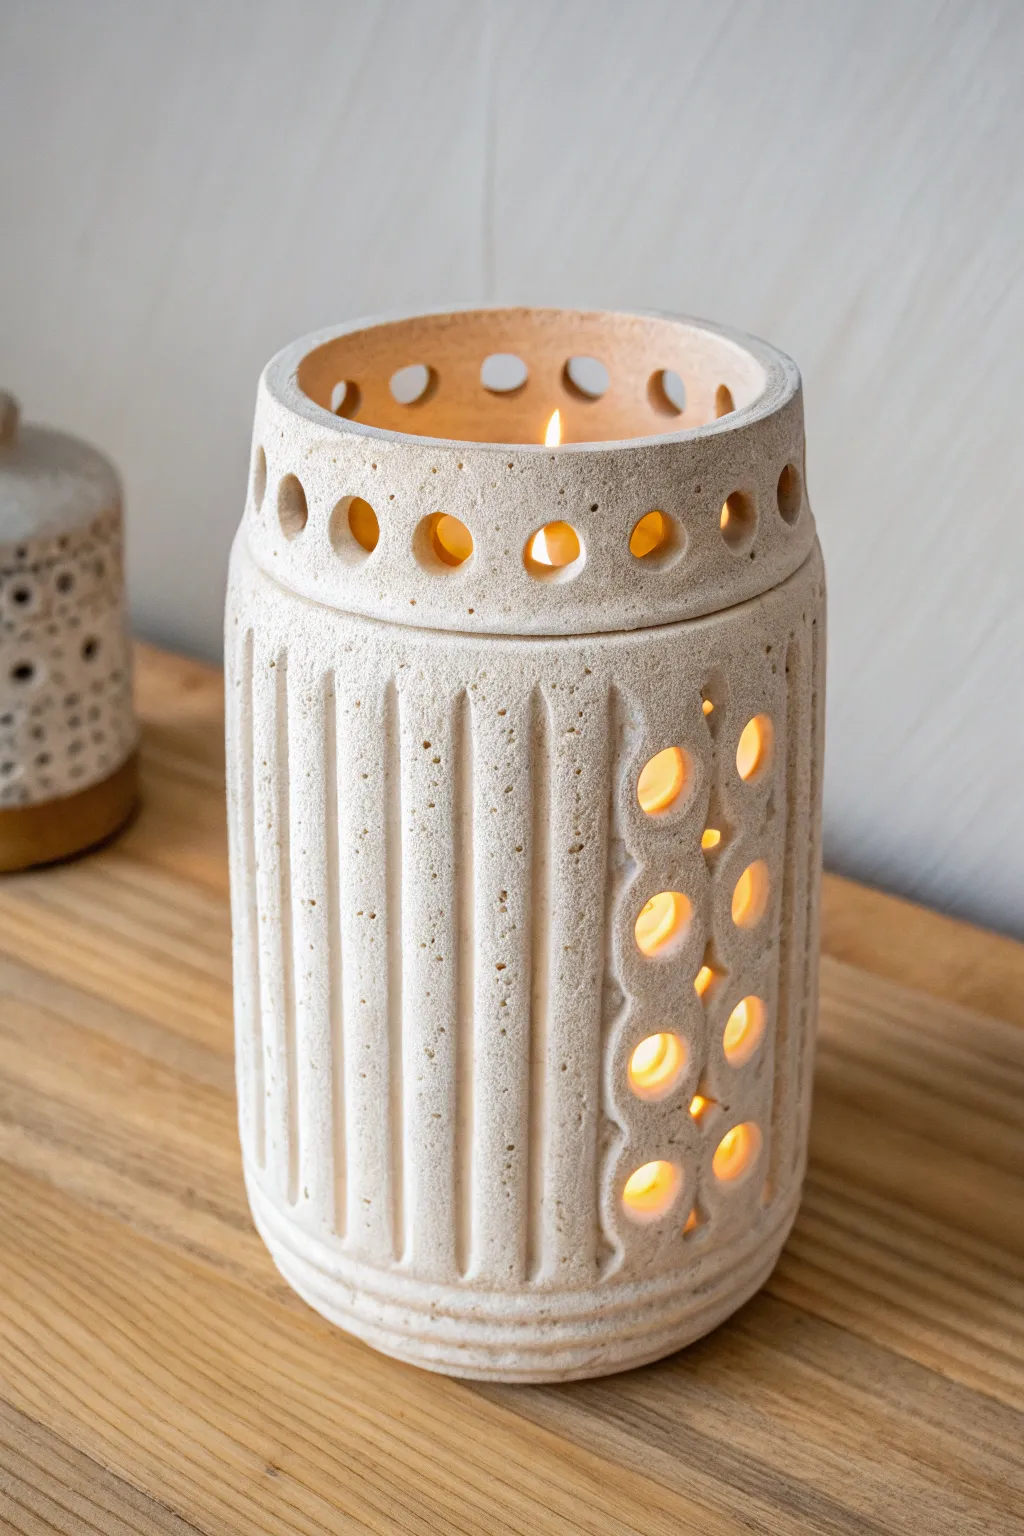
This rustic, speckled ceramic lantern combines deep vertical fluting with whimsical pierced circles to create a warm, dappled glow. The textured clay body gives it an intricate, ancient feel, perfect for housing a flickering tealight or votive candle.
Detailed Instructions
Materials
- Speckled stoneware clay (mid-fire)
- Rolling pin and guide strips (or slab roller)
- Clay carving tools (specifically a U-shaped loop tool)
- Circular hole cutters (various sizes)
- Needle tool
- Scoring tool (ribbed kidney or serrated rib)
- Slip (clay and water slurry)
- Sponge
- Round slump mold or mailing tube (approx 4-5 inches diameter)
- Wooden modeling tool
Step 1: Forming the Cylinder
-
Roll the Slab:
Begin by rolling out your speckled clay to an even slab, approximately 1/4 inch thick. Compress the slab on both sides with a rubber rib to align the clay particles and prevent warping. -
Cut to Size:
Measure and cut a rectangle that will form the body of your lantern. A good size is about 14 inches long by 6 inches high, but adjust based on your desired final diameter. -
Score and Slip:
Score the short vertical edges of your rectangle using a serrated rib. Apply generous slip to the scored areas. -
Join the Cylinder:
Wrap the slab around your form (like a mailing tube covered in newspaper). Press the scored ends together firmly to create a seam. Smooth the seam inside and out so it disappears completely.
Cracking Up?
If small cracks appear near the punched holes while drying, compress the area with a rounded tool immediately. Dry the piece slowly under plastic to prevent tension.
Step 2: Adding the Rim and Details
-
Create the Upper Rim:
Roll a small coil and attach it to the top edge of your cylinder to create a slightly thickened, inward-curving rim. Smooth this into the main body so it looks seamless, gently tapering the top inch of the cylinder inward. -
Define the Bottom Base:
Use a wooden tool to press a horizontal groove about half an inch from the bottom edge. This creates a visual ‘foot’ for the lantern without needing to trim a separate ring. -
Adding the Base Slab:
Cut a circle of clay slightly larger than your cylinder’s diameter. Score and slip the bottom edge of the cylinder and attach it to this circle. Trim away the excess flush with the wall. -
Let it firm up:
Allow the piece to dry to a ‘leather hard’ state. This is crucial; if it’s too soft, the carving tools will drag; too hard, and they will chatter.
Glaze It Up
Instead of leaving it bare, try inlaying a dark glaze into the carved grooves and wiping back the surface. This enhances the depth of the texture.
Step 3: Carving and Piercing
-
Marking the Pattern:
Lightly sketch your design on the surface with a needle tool. Dedicate one vertical section (about 2 inches wide) for the pierced circles, and mark the rest for vertical grooves. -
Carving the Flutes:
Using a U-shaped loop tool, carve vertical channels from the bottom groove up to where the cylinder begins to taper (about an inch from the top). I find pulling the tool towards me gives a straighter line. -
Refining the Grooves:
Go back over the grooves with a damp brush or sponge to soften the sharp edges left by the carving tool, exposing the gritty texture of the speckled clay. -
Piercing the Side Panel:
In the uncarved vertical panel, use various sized hole cutters to punch out a pattern of circles. Make sure not to get too close to the edge of the panel to maintain structural integrity. -
Cutting the Top Vent Holes:
Around the top tapered rim—above where your vertical flutes end—punch a single row of evenly spaced circular holes. These serve as heat vents and decorative elements. -
Cleaning Up:
Once the clay is bone dry, gently sand any sharp burrs from the hole punches. Bisque fire the piece, then fire it to maturity. For this natural look, leave the exterior unglazed or apply a very thin matte wash to highlight the specks.
Place a candle inside and enjoy the beautiful patterns of light casting across your room
Sgraffito-Style Lantern With Revealed Clay Contrast
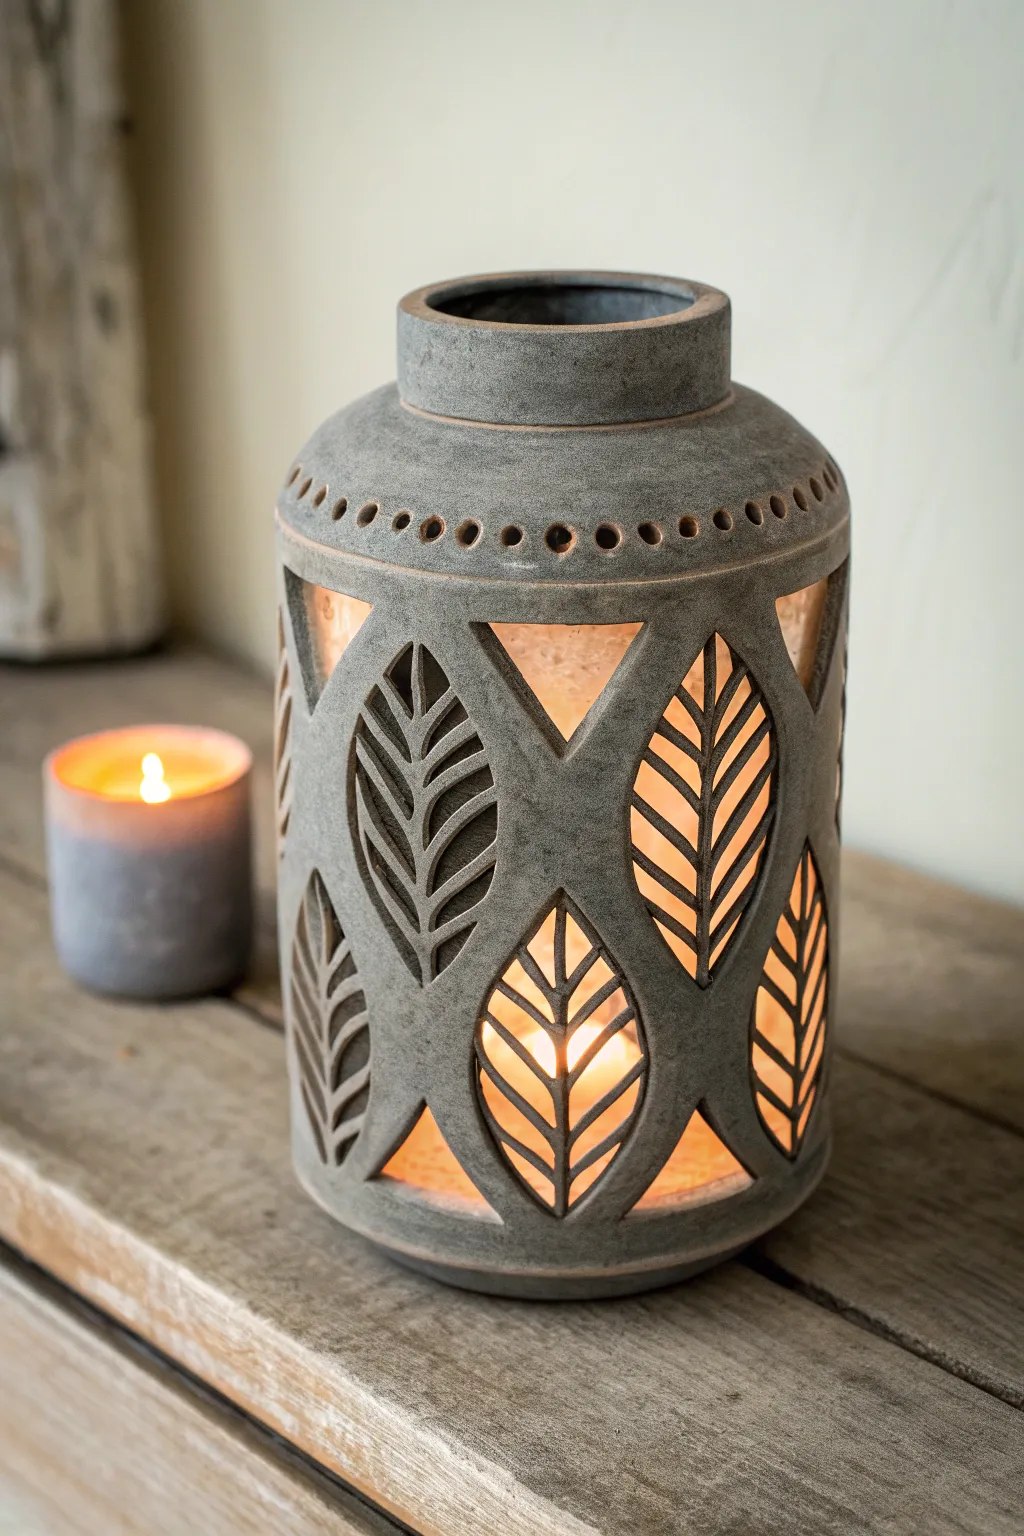
This rustic, elegant lantern relies on negative space to create a warm atmosphere, featuring intricate leaf motifs carved directly into a clay cylinder. The distinct contrast between the matte grey surface and the exposed, warmer clay body along the cut edges adds depth and an earthy charm to the finished piece.
Step-by-Step Tutorial
Materials
- Stoneware clay (groggy, reddish-brown firing)
- Grey slip or matte grey underglaze
- Rolling pin or slab roller
- Pottery knife or fettling knife
- X-acto knife or scalpel
- Sponge
- Leaf template (paper or cardstock)
- Scoring tool (serrated rib)
- Slip (made from the same clay)
- Hole punch tool (small diameter)
- Clear glaze (optional, for inside only)
Step 1: Planning and Forming the Cylinder
-
Roll the slab:
Begin by rolling out a consistent slab of your stoneware clay to approximately 1/4 inch thickness. Ensure the clay is free of air bubbles by compressing it on both sides with a rib tool. -
Cut the rectangle:
Measure and cut a clean rectangle. The length of the rectangle will determine the lantern’s circumference, and the height will define how tall your lantern stands. A good starting size is roughly 14 inches long by 8 inches high. -
Form the cylinder:
Carefully lift the slab and curve it into a cylinder shape. Bevel the short edges at opposite 45-degree angles to create a stronger seamless join. -
Join the seam:
Score the beveled edges aggressively and apply slip. Press the edges together firmly. I like to support the inside wall with one hand while smoothing the outside seam with a rib to make the joint invisible. -
Add the collar:
Roll a smaller, narrower strip of clay. Attach this to the top of your cylinder to create a distinct collar or neck, slightly stepped in from the main body, ensuring a strong connection by scoring and slipping.
Step 2: Applying Surface and Carving
-
Apply the grey finish:
Before carving, brush a layer of grey slip or matte underglaze over the entire exterior surface. Doing this now ensures crisp edges later, as you’ll be cutting through this colored layer. -
Leather hard stage:
Calculated patience is key here; cover the piece loosely with plastic and let it dry to a leather-hard state. It needs to be firm enough to hold its shape while being cut, but not so dry that it cracks. -
Map out the design:
Using a soft pencil or a needle tool, lightly trace the outline of large leaf shapes onto the surface. Alternate them, with some pointing up and others pointing down, to fill the space dynamically. -
Initial cut-outs:
Using a sharp fettling knife or scalpel, carefully cut out the main leaf silhouettes. Support the wall from the inside with your hand to prevent the cylinder from warping under the pressure. -
Carve the veins:
This is the ‘sgraffito-style’ revelation. Instead of cutting all the way through for the veins, you can either carve the clay away to leave floating leaf segments, or cut entirely through to create the floating ‘islands’ of clay. In this design, thin strips of clay are removed to create open veins. -
Detailing the veins:
For the specific look in the image, you need to leave a central stem and ribs attached to the main pot body. Carefully slice out the negative space *between* the leaf veins, leaving the skeletal structure of the leaf intact. -
Clean the edges:
Once the shapes are removed, use a slightly damp sponge to smooth the sharp edges of the cutouts. This reveals the reddish clay body underneath the grey slip, creating that defining contrast outline. -
Add rim details:
Using a small circular hole punch or a drill bit, remove a row of small dots just below the collar. Space them evenly around the circumference for ventilation and decorative flair.
Clean Cuts Pro Tip
Wait until the clay is stiff leather-hard before carving. If the knife drags or the clay deforms, it’s too wet. If it crumbles, mist it slightly.
Step 3: Finishing and Firing
-
Bevel the rim:
Run a damp sponge or chamois around the very top rim of the collar to soften it. A sharp rim is unpleasant to touch and more prone to chipping. -
Slow drying:
Because you have removed a significant amount of structure, cover the lantern loosely with plastic to equalize moisture. Let it dry very slowly over several days to prevent warping. -
Bisque fire:
Once bone dry, bisque fire the piece to the appropriate cone (usually Cone 06 or 04) to prepare it for the final glazing. -
Glaze interior:
If you want the inside to be reflective and easy to clean, pour a liner glaze inside, swirl to coat, and pour out the excess. Wipe any drips off the matte exterior immediately. -
Final wipe down:
Use a specialized sponge or lightly sanding pad to clean up any rough spots on the exterior slip, ensuring the contrast lines remain sharp. -
Final firing:
Fire to the maturation temperature of your clay body (likely Cone 5/6 or Cone 10 for stoneware). The heat will solidify the clay and set the contrasting grey finish permanently.
Level Up: Texture
Before applying the grey slip, lightly paddle the exterior with a textured board or hessian fabric. The slip will pool in the texture for added depth.
Place a tea light or small pillar candle inside to see your leaf shadows dance on the walls
Glaze-Drip Lantern That Glows Around the Openings
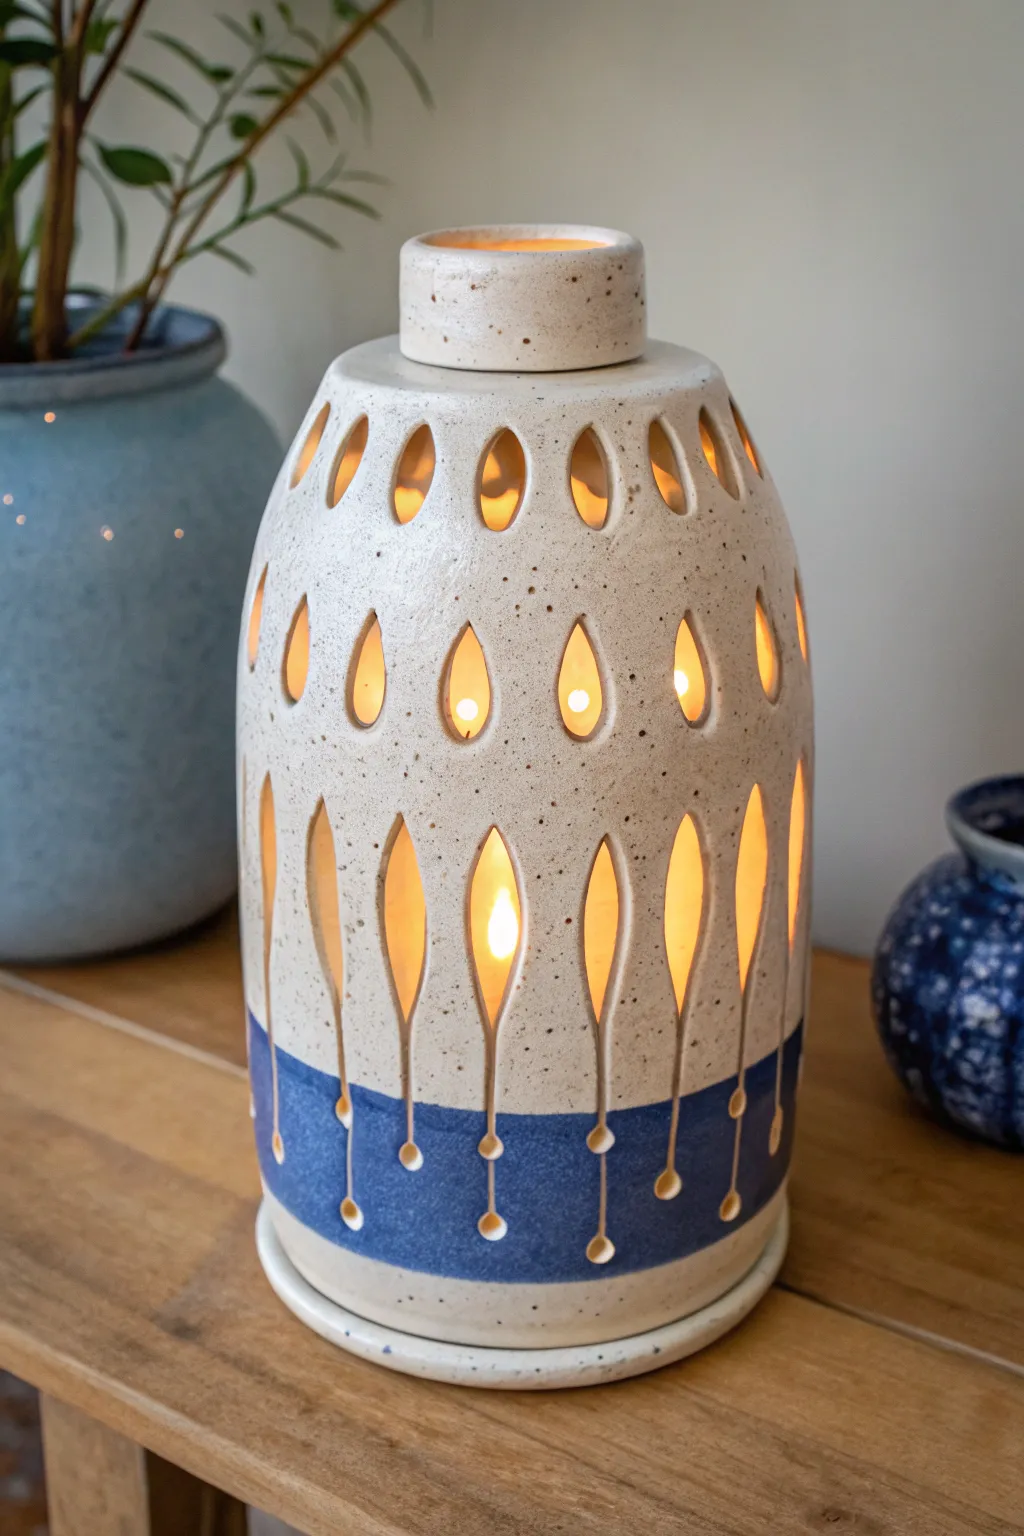
This elegant ceramic lantern features a warm, speckled cream body contrasted by a deep denim-blue band, illuminated through intricate teardrop cutouts. The design mimics stylized rain or glaze drips, creating a soothing, modern luminary for your home.
Detailed Instructions
Materials
- Stoneware clay (speckled or sand-coloured)
- Pottery wheel
- Throwing tools (sponge, wire cutter, rib)
- Trimming tools
- Needle tool
- Teardrop-shaped cutter (small and medium)
- Carving tool (small loop or sgraffito tool)
- Hole punch or small drill bit for clay
- Cream/white speckled glaze (matte or satin)
- Deep blue underglaze or glaze
- Wax resist
- Paintbrushes
- Kiln
Step 1: Throwing the Forms
-
Throw the main cylinder:
Begin by centering about 2-3 pounds of stoneware clay on your wheel. Open the center and pull up a tall, consistent cylinder, aiming for a height of about 8-10 inches. -
Shape the vessel:
Collar the top third of the cylinder inward gently to create a sloped shoulder, leaving an opening at the top about 2-3 inches wide. Smooth the surface with a rib to remove throwing lines. -
Throw the lid:
Using a smaller amount of clay, throw a simple cap-style lid. Measure the gallery or flange so it fits securely into or over the top opening of your lantern. Make sure to leave the top flat. -
Throw the saucer:
Throw a low, flat plate or saucer slightly wider than the base of your lantern to catch any wax drips and complete the set.
Clean Cuts Pro-Tip
Wait until the clay is stiff leather-hard before carving. If edges look jagged, don’t sponge them immediately; let them dry fully, then lightly sand the dry clay for the crispest cutout lines.
Step 2: Carving & Shaping
-
Leather hard stage:
Allow all three pieces (body, lid, saucer) to dry to a leather-hard state. This is crucial for clean cuts without warping the walls. -
Trim the bases:
Invert the main body and the saucer on the wheel to trim away excess clay from the bottom, creating defined foot rings. -
Mark the design grid:
Lightly sketch or visualize horizontal bands. You’ll need three rows. The bottom row occupies the lower third, and the top two rows occupy the upper shoulder area. -
Punch the top teardrops:
Use a medium teardrop cutter to punch the highest row of holes around the shoulder. Orient them with the point facing upward. -
Create the second row:
Below the first row, punch the second row of teardrops. Position these slightly smaller teardrops in the spaces between the top ones, creating a staggered pattern. -
Carve the long ‘drips’:
For the main lower section, don’t punch holes yet. Instead, carve long, elongated teardrop shapes. Cut all the way through the clay for the wide part of the drop, but as you taper down, switch to a surface carving line that extends downward. -
Add the stem details:
Continue that carved line straight down towards the bottom of the pot. At the very end of each line, use a small hole punch or drill tool to create a tiny circular decorative divot. -
Vent the lid:
Cut a designated opening or hole in the top or side of the lid to allow heat to escape when a candle is lit inside.
Electric Upgrade
Instead of a candle, create a notch in the bottom of the base for a cord. Wire it with a bulb kit to turn this into a permanent electric table lamp that won’t heat up the ceramic.
Step 3: Glazing & Firing
-
Bisque fire:
Once bone dry, load the pieces into the kiln and bisque fire them to your clay body’s specifications (usually Cone 04 or 06). -
Apply wax resist:
Paint wax resist over the foot rings to prevent glaze from sticking to the kiln shelf. -
Paint the blue band:
Using a deep blue underglaze or glaze, paint a thick horizontal band around the bottom third of the lantern. This band should cover the bottom section of the carved ‘stems’ and the small circular divots. -
Dip in cream glaze:
Holding the lantern by the foot (or using tongs), dip the entire piece into a creamy, speckled matte glaze. If you used glaze for the blue part, wax it first; if you used underglaze, the cream glaze can go right over it (if it’s semi-opaque). -
Clean the holes:
Before the glaze dries completely, check all the cutouts. Use a fettling knife or sponge to ensure no glaze has clogged the teardrop openings. -
Glaze lid and saucer:
Dip the lid and saucer in the matching cream glaze. You can add a blue accent to the rim of the saucer if desired to tie the look together. -
Final firing:
Load the kiln carefully, ensuring pieces don’t touch. Fire to maturity (typically Cone 5 or 6 for stoneware). I always double-check that the lid isn’t fired *on* the pot unless I’ve used alumina wax to prevent fusing.
Place a tea light or pillar candle inside and watch how the flickering light casts beautiful teardrop shadows around your room.
Pagoda-Inspired Tiered Roof Lantern
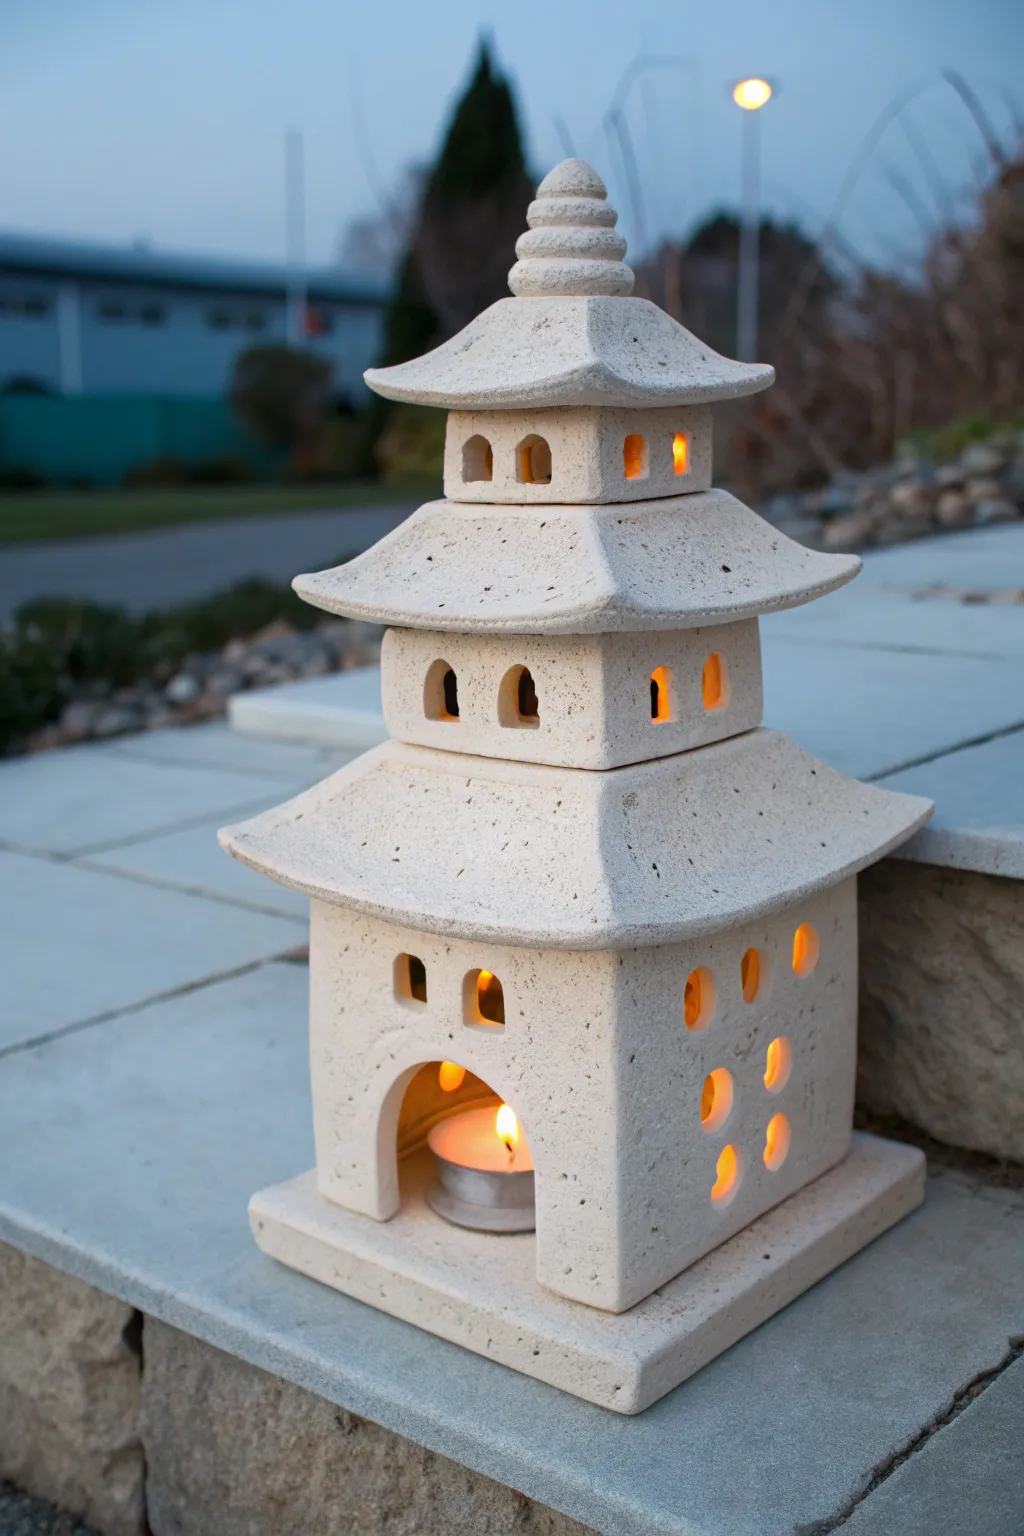
Bring a touch of Zen to your garden or patio with this three-tiered ceramic lantern that mimics the texture of natural sandstone. The warm glow of a tea light filters through arched windows, creating a peaceful ambiance as twilight falls.
Step-by-Step
Materials
- Stoneware clay (groggy/sandy texture preferred)
- Templates for walls (cardstock or paper)
- Rolling pin and guide strips (approx. 1/4 inch)
- Fettling knife
- Scoring tool or serrated kidney
- Slip (clay and water mixture)
- Cutters: Arch shapes and small circles/oblongs
- Wooden modeling tools
- Sponge
- Kiln (or access to a firing service)
- Matte cream or sandstone glaze
Step 1: Creating the Base Structure
-
Roll the slabs:
Begin by rolling out your clay into even slabs using 1/4 inch guide strips. You will need enough clay for three roof sections, three wall modules, and a sturdy base plate. -
Cut the base plate:
Cut a square slab for the very bottom foundation, making it slightly wider than your intended bottom wall section to create a decorative lip. Smooth the edges with a damp sponge. -
Construct the bottom walls:
Cut four rectangular panels for the lowest and largest tier. Use your arch cutter to remove a large doorway on one panel—this is where the candle will be inserted. -
Add window details:
On the remaining three panels of the base tier, use small circular or oblong cutters to create the decorative light holes shown in the image, arranging them in a grid pattern. -
Assemble the bottom box:
Score the edges of your four walls and the base plate. Apply slip generously and join the walls together to form a square box, smoothing the internal seams to ensure stability.
Stone Texture Secret
Mix a small amount of grog or sand directly into your slip. When you sponge the seams, it leaves a gritty texture that matches the rest of the clay body perfectly.
Step 2: Building the Tiers
-
Form the roofs:
For the pagoda roofs, you will need three squares of clay, graduating in size from large to small. Gently flare the corners upward with your fingers to mimic the curved Japanese architectural style. -
Create the middle story:
Construct a smaller box for the second tier using four smaller rectangular slabs. Cut arched windows into each side before assembling this smaller box. -
Create the top story:
Repeat the process for the third and smallest tier, creating a tiny box with small arched windows. This section will sit just below the final roof. -
Stacking the main body:
Score and slip the top of your bottom box, then attach the largest roof piece. Center the middle box on top of that roof, attach the medium roof, and finally add the top box. -
Ensuring airflow:
Important: Cut a large hole in the center of the base of the middle and top tiers (hidden inside) so heat from the candle can rise through the entire structure without trapping air.
Sagging Roofs?
If the roof corners droop while the clay is wet, prop them up with small crumpled balls of newspaper or foam wedges until the clay stiffens to a leather-hard state.
Step 3: Finishing Touches
-
Cap it off:
Attach the smallest roof to the top tier. Roll a small coil and a cone shape to create the decorative finial spire. -
Texture the surface:
I prefer to take a stiff brush or a serrated tool and gently tap or drag it across the surface of the leather-hard clay to enhance that stone-like texture. -
Dry slowly:
Because this structure has many vertical joints, cover it loosely with plastic to let it dry very slowly over several days to prevent warping. -
Bisque fire:
Once bone dry, fire the piece to bisque temperature (usually cone 04) to prepare it for glazing. -
Glaze application:
Apply a matte cream or speckled sandstone glaze. Avoid thick glossy glazes, as they will obscure the texture. Wipe the bottom clean and fire to the clay’s maturity temperature.
Place a tea light inside your finished pagoda and watch the soft shadows dance across your patio
Hanging Ceramic Lantern With Cut-Out Bands
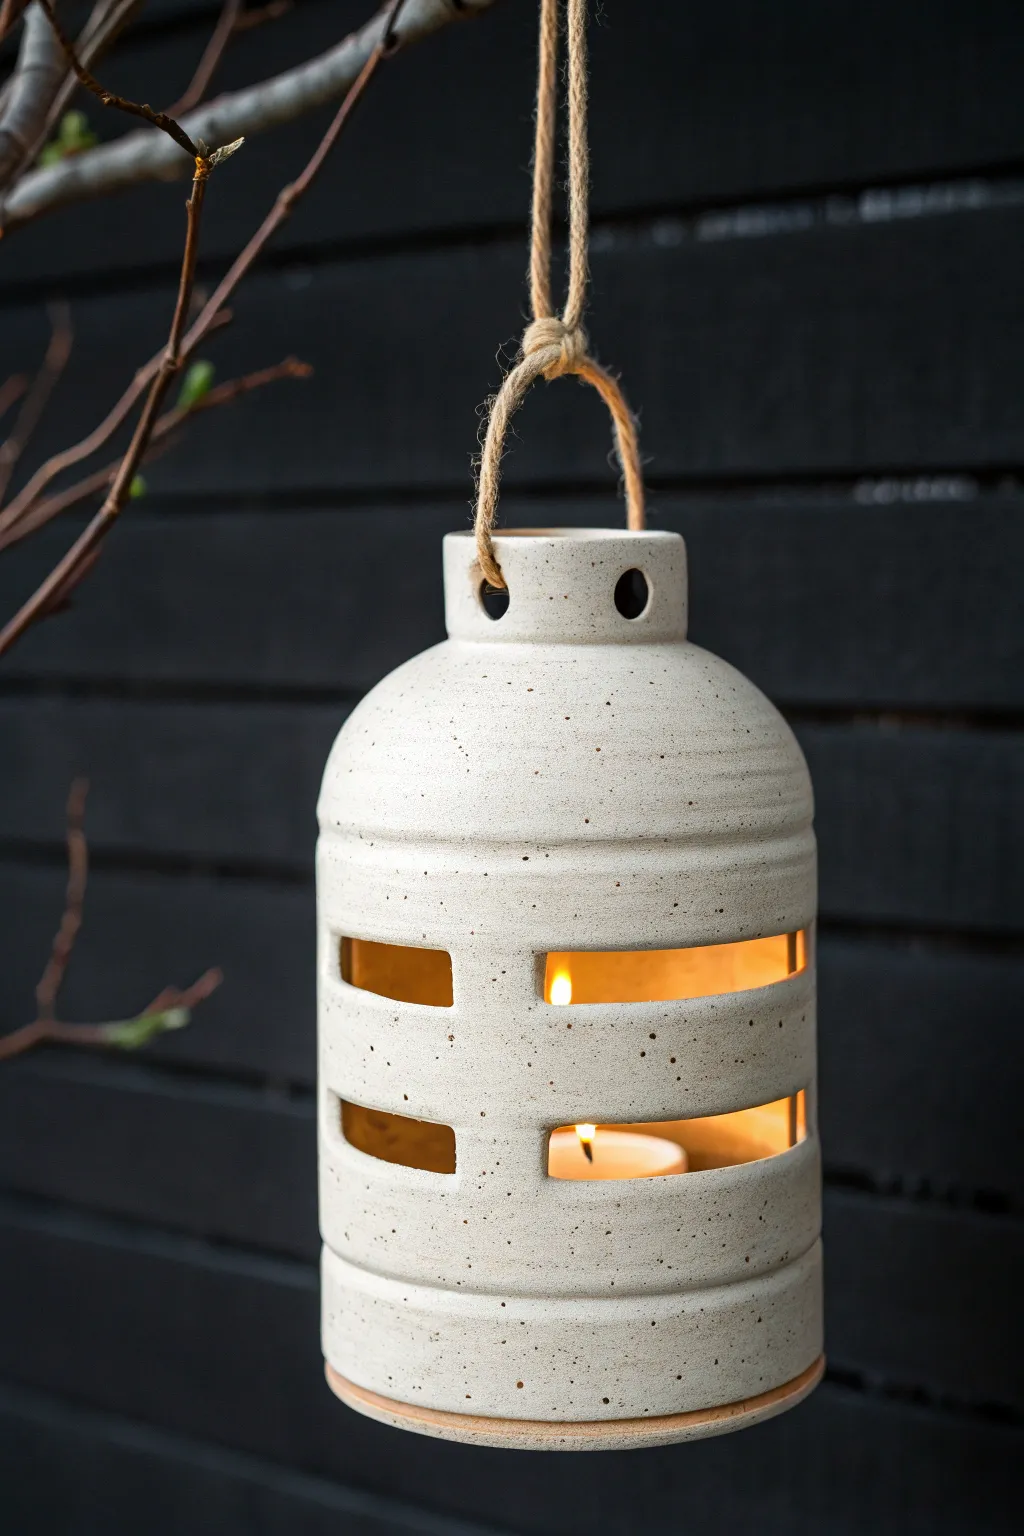
Embrace a modern rustic aesthetic with this hanging ceramic lantern featuring clean lines and warm, glowing cut-outs. The speckled clay body and natural twine hanger create an earthy charm perfect for cozy outdoor evenings or indoor ambiance.
How-To Guide
Materials
- Speckled stoneware clay (mid-fire recommended)
- Pottery wheel
- Throwing tools (sponge, rib, wire cutter)
- Pin tool or needle tool
- Fettling knife
- Loop tool for trimming
- Drill bit tool or circular hole cutter (approx 1/2 inch)
- Flexible metal kidney rib
- Serrated rib
- Glaze (transparent or clear matte recommended)
- Natural jute twine or hemp rope
- Tea light candle
Step 1: Throwing the Form
-
Center and open:
Begin by centering about 2-3 pounds of speckled stoneware clay on the wheel. Open the clay down to the bat, leaving a base thickness of about 1/4 inch. -
Pull the cylinder:
Pull the walls up into a tall, even cylinder. Unlike a bowl, you want the sides relatively straight, though a gentle curve inward at the top is the goal. -
Shape the shoulder:
Collaring the clay inward near the top to form a distinctive shoulder. This lantern has a classic bottle shape, so bring the neck in significantly narrower than the body. -
create the gallery:
Instead of a simple rim, create a strong, flat collar at the very top. Use your chamois or sponge to compress this rim well so it can support the hanging weight. -
Add texture lines:
While the wheel is spinning slowly, use a wooden tool or the corner of a rib to press subtle horizontal grooves into the clay body. Add one near the shoulder and one near the base to frame the design. -
Refine and cut:
Use a metal rib to smooth the surface, ensuring the speckles in the clay get pushed down slightly so they don’t drag. Cut the pot from the wheel but leave it on the bat to firm up to leather-hard.
Step 2: Trimming and Carving
-
Trim the foot:
Once leather-hard, flip the piece and trim a clean foot ring. This helps the lantern sit stable if you choose not to hang it, and reduces bottom weight. -
Mark the cut-out zones:
Lightly sketch two horizontal bands around the middle of the lantern where your light will shine through. I find it helpful to use a banding wheel to keep these lines perfectly straight. -
Cut the horizontal slots:
Using a sharp fettling knife, carefully cut out rectangular windows within your marked bands. Leave vertical ‘pillars’ of clay intact between the cuts to maintain structural integrity. -
Clean the edges:
Once the clay is slightly stiffer, go back with a damp sponge or finger to smooth the sharp edges of your cut-outs. Sharp edges can chip easily after firing. -
Drill hanging holes:
Using a hole cutter or drill tool, create two holes on opposite sides of the neck collar. Ensure these are large enough to accommodate your twine later. -
Smooth the interior:
Reach inside through the bottom or the neck (if your hand fits) to smooth any burrs created by the cutting process. Clean openings ensure a better candle glow.
Keep it Clean
When cutting the windows, cut the top and bottom lines first, then the sides. Wait until the clay is firm leather-hard; if it’s too wet, the walls will slump.
Step 3: Finishing Touches
-
Bisque fire:
Allow the lantern to dry very slowly to prevent warping around the cut-outs. Once bone dry, bisque fire it to cone 04 (or your clay’s specific schedule). -
Glaze application:
Dip or spray the piece with a clear matte or transparent semi-gloss glaze. This highlights the natural speckling of the clay without obscuring the form. -
Wipe the foot:
Clean off any glaze from the bottom foot ring to prevent it sticking to the kiln shelf. -
Glaze fire:
Fire the piece to maturity (likely cone 5 or 6 for stoneware). Let the kiln cool completely before opening. -
Add the handle:
Cut a length of natural jute twine. Thread one end through a neck hole from the outside in, tie a secure knot inside, and repeat on the other side. -
Secure the top loop:
Gather the two rising strands of twine and knot them together at your desired hanging height to create the loop seen in the photo. -
Light it up:
Place a tea light or small LED candle inside to test the warm glow through the horizontal bands.
Make it Modular
Make a separate small clay saucer that fits exactly inside the lantern’s foot. This makes removing melted wax and changing candles much easier later on!
Hang your new lantern in a sheltered spot and enjoy the cozy atmosphere it creates
Clustered Mini Lantern Set for a Table Centerpiece
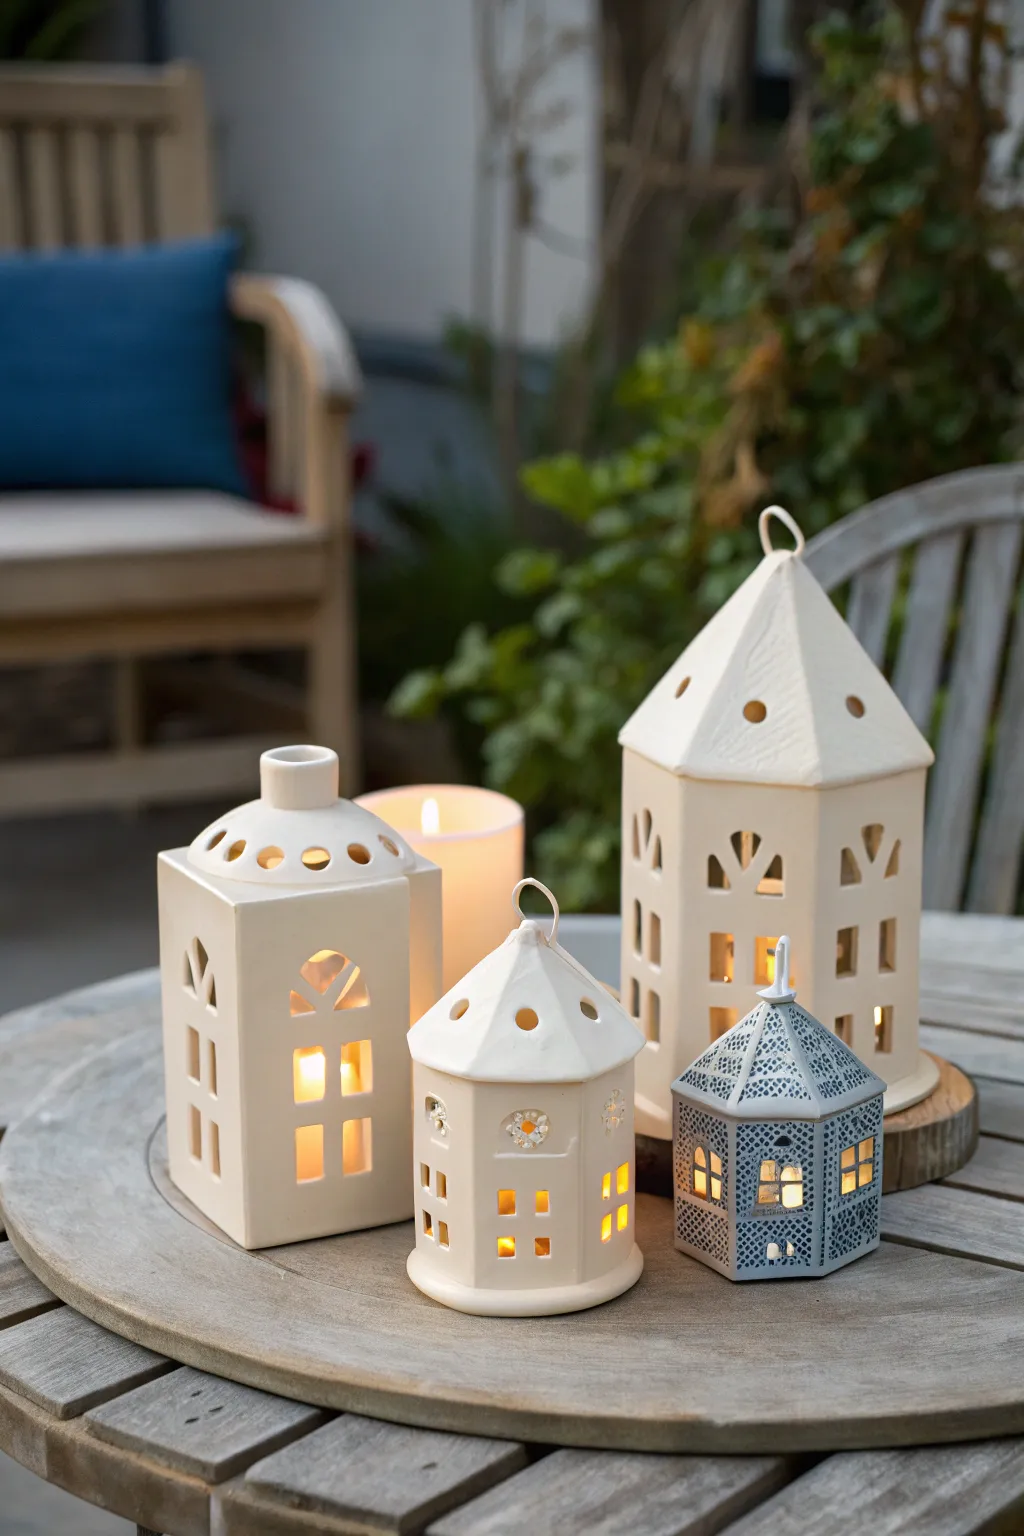
Create a cozy, architectural centerpiece by hand-building your own set of ceramic house lanterns. This project combines simple slab-building techniques with creative cutout work to form a charming, illuminated mini-village perfect for warm summer evenings.
Step-by-Step Tutorial
Materials
- White or cream-colored mid-fire clay (e.g., stoneware or porcelain body)
- Blue-grey underglaze or clay body (for the accent lantern)
- Rolling pin and guide strips (approx. 1/4 inch thick)
- Fettling knife or craft knife (X-Acto)
- Clay scoring tool or serrated rib
- Slip (clay and water slurry)
- Paper templates (rectangles for walls, triangles for roofs)
- Small geometric clay cutters (squares, circles, arches)
- Needle tool
- Sponge and water
- Clear matte or glossy glaze (optional)
- Flameless LED votives or candles
Step 1: Planning and Slab Preparation
-
Design your village:
Sketch out 3-4 distinct building shapes on paper first. Aim for variety in height and roof styles—one tall tower, a stout cottage, and perhaps a classic colonial shape. This visual plan ensures a balanced cluster. -
Create templates:
Cut cardstock templates for the walls and roof pieces of each house. For a standard house, you’ll generally need four wall rectangles and four triangles for a pyramid roof, or two triangles and two rectangles for a pitched roof. -
Roll the slabs:
Roll your clay out into an even slab using 1/4 inch guide strips to ensure uniform thickness. Smooth the surface with a rib tool to compress the clay particles, which helps prevent warping later. -
Cut the components:
Lay your templates onto the leather-hard clay slab. Using a fettling knife or needle tool, carefully trace and cut out all the walls and roof sections for one lantern at a time.
Clean Cuts Matter
Let the clay dry to ‘leather hard’ before cutting detailed windows. If the clay is too soft, the walls will slump and deform when you drag the knife through.
Step 2: Carving Details
-
Mark window placement:
While the cut slabs are flat on your work surface, lightly impress where you want the windows and doors to go. Don’t cut all the way through yet; just plan the spacing. -
Cut out windows:
Use your X-Acto knife or small geometric clay cutters to punch out the window panes. Clean up the corners with a needle tool to make them sharp and crisp. -
Add architectural features:
For the taller white lantern, try cutting arched windows or small decorative circles near the roofline. I find that leaving small bars of clay within larger window openings adds great structural realism. -
Create the grey accent lantern:
For the smaller, grey lantern, use a needle tool to pierce intricate patterns rather than large open windows. This creates that delicate, filigree look seen in the reference image. -
Texture the roofs:
Before assembly, you can lightly press a texture mat or use a tool to draw subtle lines on the roof pieces to mimic shingles or slate.
Create a Soft Glow
Line the inside of the windows with varied shades of tracing paper or vellum after firing. This diffuses the candlelight and hides the bulb.
Step 3: Assembly & Finishing
-
Score and slip edges:
Once the clay is leather-hard (firm enough to stand up but not dry), deeply score the edges of the walls that will connect. Apply a generous amount of slip. -
Construct the walls:
Press the wall edges together firmly to form the box of the house. Use a small coil of soft clay on the inside corners to reinforce the seam, smoothing it down with a modeling tool. -
Attach the roof:
Score and slip the top edges of the walls and the contact points of the roof pieces. gently set the roof in place, smoothing the seams where the roof panels meet. Leave a hole or chimney at the top for heat to escape if you plan to use real flame candles. -
Add loops and chimneys:
Roll a tiny coil of clay to create the loop handle on top of the large white lanterns, or a small spike for the grey one. Attach these securely with slip. -
Smooth and sponge:
Wipe down the entire piece with a barely damp sponge to soften any sharp cut edges and remove fingerprints. This gives the ceramic that professional, finished look. -
Bisque fire:
Allow the houses to dry slowly under plastic for a few days to prevent cracking, then bisque fire them in a kiln according to your clay body’s specifications. -
Glaze application:
For the white houses, apply a creamy white glaze. You can choose a matte finish for a modern look or glossy for a traditional feel. For the grey house, use a darker slate-blue glaze or underglaze. -
Final firing:
Fire the pieces a second time to the glaze temperature. Once cool, arrange them on your table with pillar candles or LED lights inside to bring the village to life.
Light your candles and enjoy the soft patterns these houses cast on your evening table