Whenever I’ve got a plain clay pot on my table, I see a blank canvas just begging for color. These terracotta pot painting ideas are my go-to favorites for turning inexpensive pots into decor you’ll actually want to leave out year-round.
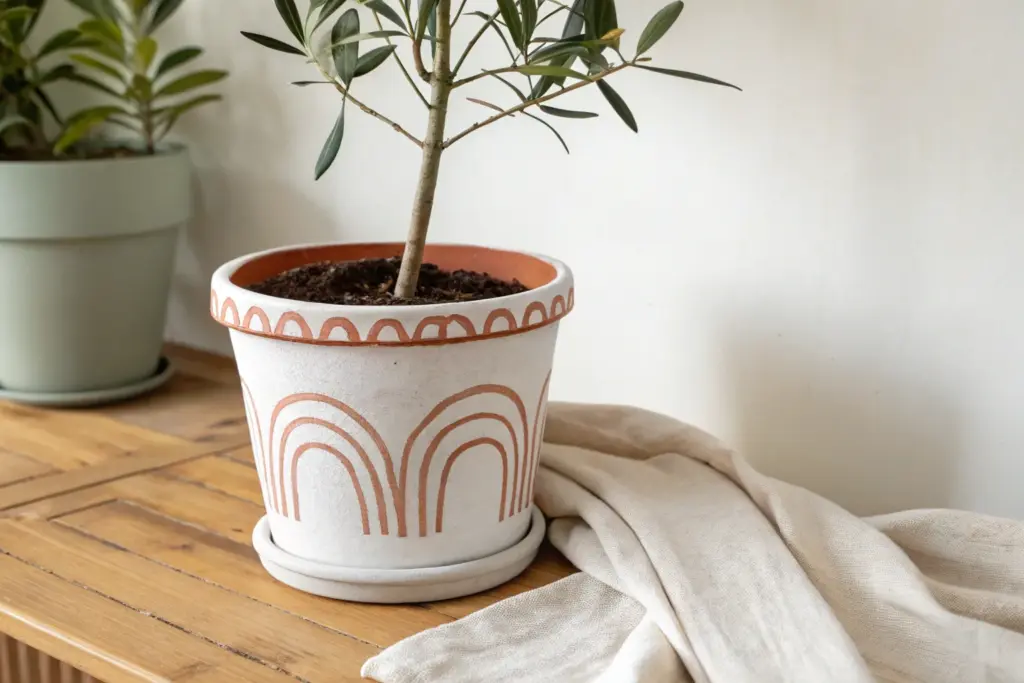
Classic Tape-Resist Stripes
Transform a plain terracotta pot into a chic, modern planter with this simple stripe technique. The muted seafoam green and creamy white bands contrast beautifully with the natural clay for a relaxed, bohemian vibe.
Detailed Instructions
Materials
- Standard terracotta pot (approx. 6 inch)
- Acrylic craft paint: Creamy White
- Acrylic craft paint: Muted Seafoam Green
- Painter’s tape or washi tape
- Flat paintbrush (medium width)
- Small detail brush (optional)
- Clear matte sealer (spray or brush-on)
- Paper plate or palette
- Water cup and paper towels
Step 1: Cleaning & Prep
-
Clean Pot:
Start with a clean, dry terracotta pot. If you are reusing an old pot, scrub it thoroughly to remove dirt and salt deposits. Let it dry completely for 24 hours so moisture doesn’t trap under the paint. -
Seal Inside (Optional):
For longevity, I recommend painting the inside of the pot with a clear sealer. This prevents water from blooming through the clay and bubbling your exterior paint job later.
Step 2: Painting the Rim
-
Base Coat Rim:
Dip your flat brush into the creamy white paint. Apply a smooth, even coat all around the classic folded rim of the pot. -
Extend Slightly:
Bring the white paint just slightly over the top lip and about a quarter-inch down inside the top inner edge for a clean, professional finish. -
Second Coat:
Let the first coat dry to the touch (about 15-20 minutes). Apply a second layer of white to ensure the terracotta orange doesn’t peek through, giving you a solid, opaque band.
Bleeding Lines?
If paint seeps under your tape, use a stiff brush dipped in water to gently scrub away the excess paint while it’s still wet, or scratch it off gently with an craft knife once dry.
Step 3: Creating the Stripes
-
Visual Planning:
Look at your pot’s body. You will be creating alternating bands. The beauty of this design is utilizing the natural terracotta as one of your ‘colors’, so you don’t need to paint everything. -
First Tape Line:
Apply a strip of painter’s tape horizontally around the pot, about one inch below the rim. Press the edges down firmly with your fingernail to prevent paint bleed. -
Green Stripe:
Using the seafoam green paint, paint the area directly below your tape line. Make this band about 1 to 1.5 inches wide. You can freehand the bottom edge for a more organic look, or use another piece of tape for a sharp line. -
Drying Time:
Allow this green stripe to dry completely. Acrylics dry fast on clay, but give it at least 20 minutes. -
Leaving Negative Space:
Leave a band of unpainted raw terracotta below your green stripe. This band should be roughly the same width as your painted stripes to keep the proportions balanced. -
White Stripe:
Below the exposed terracotta band, paint your next stripe using the creamy white paint. Be careful to keep your brush strokes horizontal for a smooth texture. -
Final Green Stripe:
Leave another section of raw terracotta below the white stripe, then paint a final band of seafoam green near the bottom edge. -
Bottom Edge:
Leave the very bottom sliver of the pot unpainted terracotta to frame the design nicely.
Pro Tip: Better Adhesion
Wipe the exterior of the pot with rubbing alcohol just before painting. This removes oils and dust, ensuring your acrylic paint sticks perfectly to the clay surface.
Step 4: Finishing Touches
-
Remove Tape:
If you used tape for the top line, gently peel it off now. Pull it slowly at a 45-degree angle to keep the paint edge crisp. -
Touch Up:
Inspect your lines. If any paint bled or looks uneven, use a small detail brush or a damp Q-tip to tidy up the edges while the paint is still fresh. -
Final Dry:
Let the entire pot cure for at least an hour. The clay is porous and absorbs moisture, so ensure it feels bone dry. -
Seal the Exterior:
Apply a coat of clear matte sealer over the painted areas. This protects your hard work from scratches and water damage when watering your plant.
Pop in your favorite succulent or leafy plant and enjoy your custom creation


Easy Ombre Gradient Fade

Bring the warmth of a desert horizon into your home with this subtle, earthy ombre design. By blending soft creams into warm terracotta tones, you’ll create a sophisticated gradient that looks professional yet feels wonderfully organic.
Step-by-Step Tutorial
Materials
- Terracotta pot and saucer
- White acrylic paint (matte finish)
- Terracotta or warm coral acrylic paint
- Burnt sienna acrylic paint (optional, for deepening the base)
- Medium flat paintbrush
- Small stiff-bristled brush or old toothbrush (for speckling)
- Water cup and paper towels
- Palette or paper plate
- Clear matte sealer spray
Step 1: Preparation and Base
-
Clean surface:
Start by wiping down your terracotta pot with a damp cloth to remove any dust or debris. Let it dry completely so the paint adheres properly. -
Mix the top color:
On your palette, squeeze out a generous amount of white paint. Add the tiniest drop of your terracotta or coral color to tint it slightly off-white. We want a creamy, warm tone rather than a stark bright white. -
Apply the top section:
Paint the top third of the pot with your creamy mixture. Don’t worry about a perfect straight line at the bottom; a slightly uneven edge helps with blending later. -
Paint inside rim:
Extend this creamy color over the rim and paint the top inch of the inside of the pot for a finished look.
Step 2: Creating the Gradient
-
Mix the transition shade:
In a new spot on your palette, take some of your cream mixture and add more terracotta/coral paint until you achieve a soft peach tone. It should be distinct from the top color but lighter than the raw pot. -
Paint the middle section:
Apply this peach shade to the middle section of the pot, slightly overlapping the bottom wet edge of the cream section you just painted. -
Initial blending:
While the paints are still wet, use your brush to gently feather the peach color up into the cream. Use horizontal side-to-side strokes to blur the line where they meet. -
Deepen the base:
For the bottom third, you can either leave the raw terracotta exposed if it’s clean, or paint it with a mix of terracotta and a touch of burnt sienna for a rich, consistent base color. -
Final blend:
Paint the bottom section, bringing the dark color up to meet the peach. Clean your brush slightly, then feather the two colors together using horizontal strokes. The goal is a soft, hazy transition rather than a hard stripe. -
Smoothing the fade:
If the transition looks too harsh, dampen your brush very slightly with water and run it lightly over the gradient lines to melt the colors together further. -
Let it dry:
Allow the gradient layers to dry completely. Acrylics dry darker, so don’t panic if the colors look slightly different while wet.
Uneven Blending?
If the paint dries too fast while blending, keep a misting bottle handy to lightly wet the surface, or mix a retarder medium into your acrylics to extend drying time.
Step 3: Finishing Touches
-
Prepare speckle paint:
Dilute a small amount of dark brown or burnt sienna paint with water until it has an inky consistency. -
Apply speckles:
Dip a stiff brush or old toothbrush into the thin paint. Use your thumb to flick the bristles, spraying tiny droplets onto the upper cream section of the pot. This adds that lovely ceramic texture. -
Seal the pot:
Once the speckles are totally dry, take the pot to a well-ventilated area and apply a clear matte sealer spray. This protects your paint from water damage when watering your plants. -
Pot your plant:
Fill with succulent soil and add your favorite plant, like the Echeveria shown here, to complete the look.
Stylize It
For a modern twist, use masking tape to create a crisp geometric shape over the gradient, then paint that area solid gold before peeling the tape away.
This simple technique transforms a standard garden center find into a custom piece of decor that radiates calm warmth


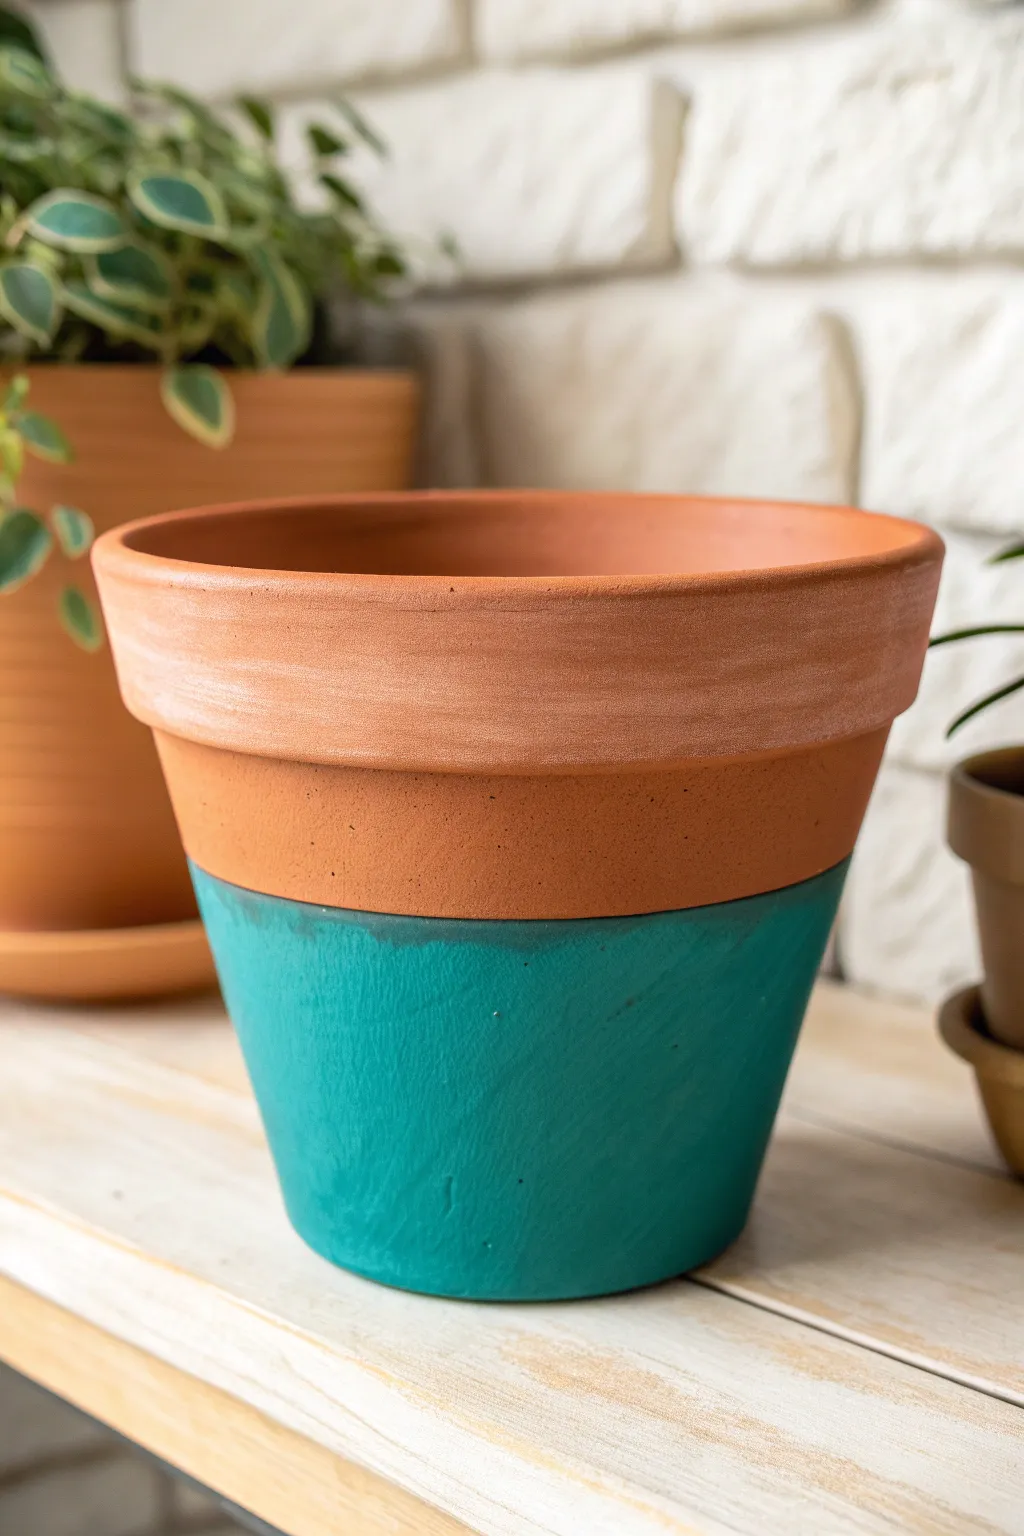
Modern Color-Blocked Bands
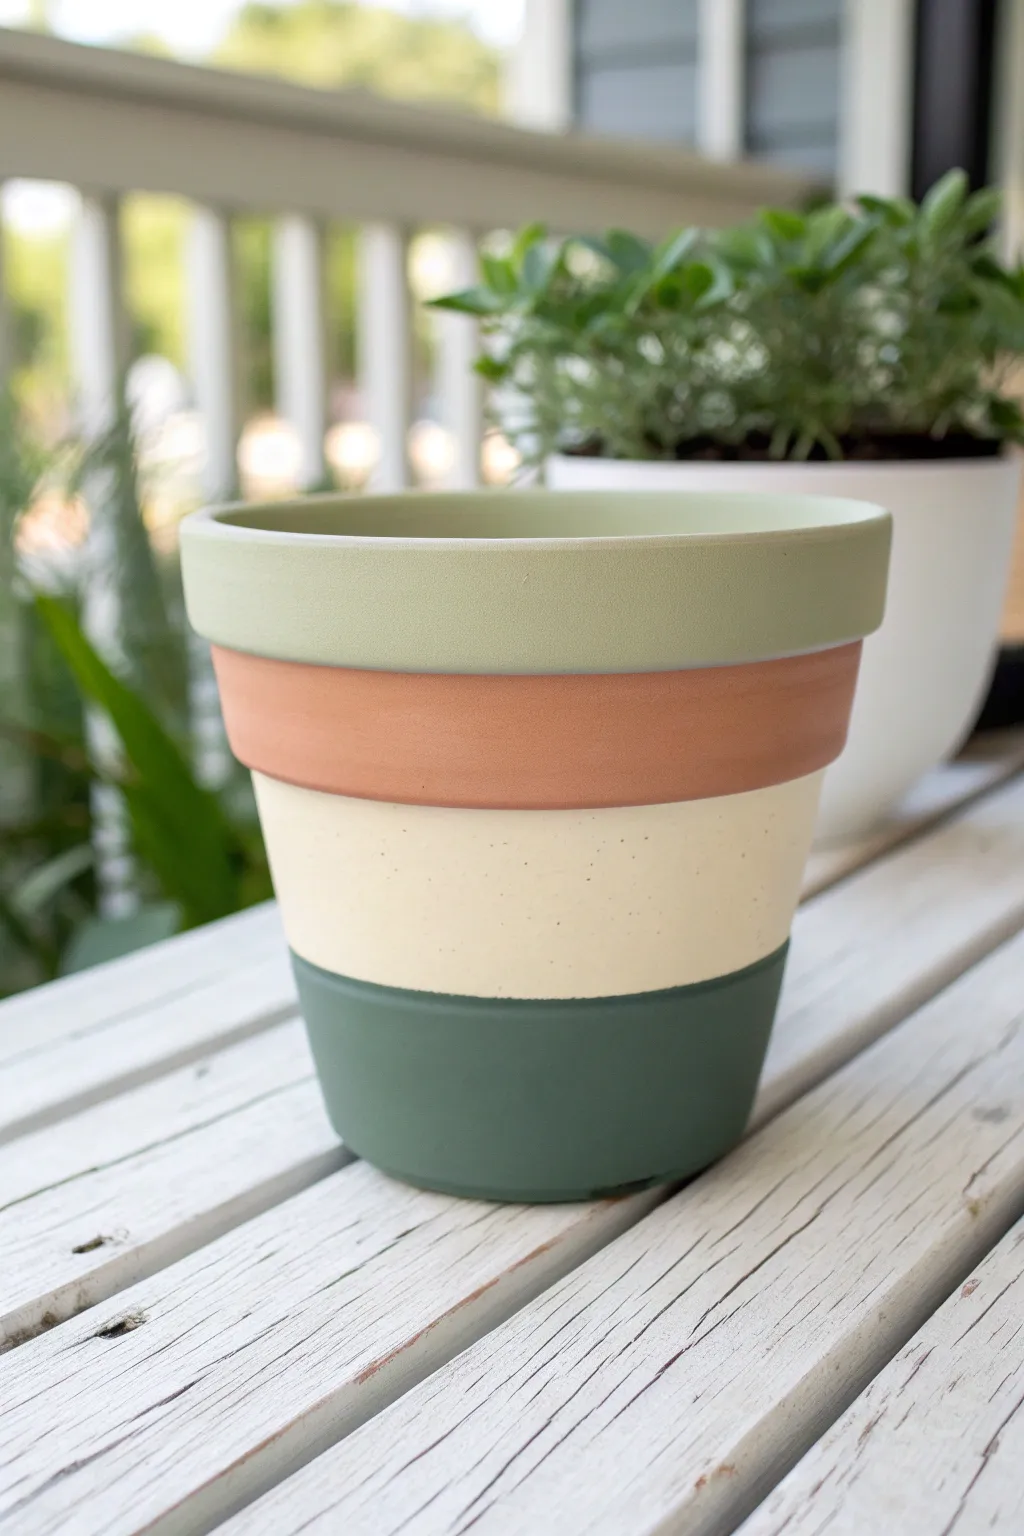
Transform a plain garden staple into a piece of modern decor with this simple color-blocking technique. The soothing palette of sage, terracotta, cream, and hunter green brings a sophisticated, grounded feel to any houseplant display.
Step-by-Step Guide
Materials
- Standard terracotta pot (clean and dry)
- Pencil
- Painter’s tape or Washi tape
- Measuring tape or ruler
- Acrylic craft paints (Light Sage, Terracotta/Burnt Orange, Warm Cream, Dark Hunter Green)
- Flat paintbrush (medium width)
- Small detail brush (for touch-ups)
- Clear matte sealer spray
Step 1: Preparation
-
Clean the Surface:
Begin by thoroughly cleaning your terracotta pot. Use a stiff brush and water to remove any dust or debris, then let it dry completely overnight to ensure the paint adheres. -
Map Out the Bands:
Decide on the width of your color bands. For this specific look, the top rim is its own natural section, followed by a narrower terracotta band, a wide cream section, and a darker base. Use a pencil to lightly mark where each section will start and end. -
Mark with Light Lines:
Using a measuring tape, make small tick marks around the circumference of the pot at your desired heights to ensure the lines stay level. Connect these marks lightly with your pencil.
Use A Lazy Susan
Place your heavy pot on a lazy Susan or banding wheel. Paint by holding your brush steady in one spot while slowly rotating the wheel for perfectly straight lines.
Step 2: Painting the Sections
-
Base Color: Cream:
Start with the large middle section using your Warm Cream paint. This is often the easiest place to begin. Apply a smooth, even coat around the middle, slightly overlapping your pencil lines. Don’t worry about perfect edges yet. -
Applying the Second Coat:
Let the cream layer dry for about 20 minutes. Apply a second coat to ensure opaque coverage, hiding the darker clay underneath. Allow this to dry fully before taping over it. -
The Bottom Band:
Paint the bottom section with Dark Hunter Green. Use your flat brush and carefully follow the pencil guideline or the edge where the cream paint ends. I find resting my pinky on the table helps steady my hand for this bottom curve. -
Refining the Bottom Edge:
If painting freehand is tricky, wait for the cream paint to cure completely (at least an hour), then apply painter’s tape gently over the cream section to create a crisp line for the green paint. -
The Terracotta Band:
Move to the band just below the rim. Mix a burnt orange or terracotta shade if you don’t have one pre-mixed. Carefully paint this strip, butting up against the cream section below and the rim above. -
Painting the Rim:
Finally, paint the thick rim of the pot with Light Sage Green. Ensure you paint the top edge and about an inch inside the pot for a finished look when filled with soil.
Paint Peeling Off?
Terracotta is porous and absorbs moisture. If paint peels, ensure the pot was bone dry before starting and always seal the inside with a waterproofing spray first.
Step 3: Finishing Touches
-
Touch-Up Work:
Once all bands are dry to the touch, inspect your lines. Use a small detail brush to fix any uneven edges where colors meet. A steady hand here makes all the difference. -
Add Texture (Optional):
Notice the subtle speckling on the cream section in the photo? You can recreate this by flicking a toothbrush loaded with slightly watered-down brown paint over the cream area before sealing. -
Full Dry Time:
Let the entire pot dry undisturbed for 24 hours. Acrylic paint needs time to bond properly with the porous clay. -
Sealing the Project:
Take the pot to a well-ventilated area. Apply a coat of clear matte sealer spray. This protects the paint from water damage and UV fading without adding an unwanted glossy shine. -
Second Seal Coat:
Apply a second light coat of sealer for extra durability, especially if the pot will be used outdoors or watered frequently.
Now you have a stylish, custom planter ready to showcase your favorite greenery


Geometric Triangles and Angles
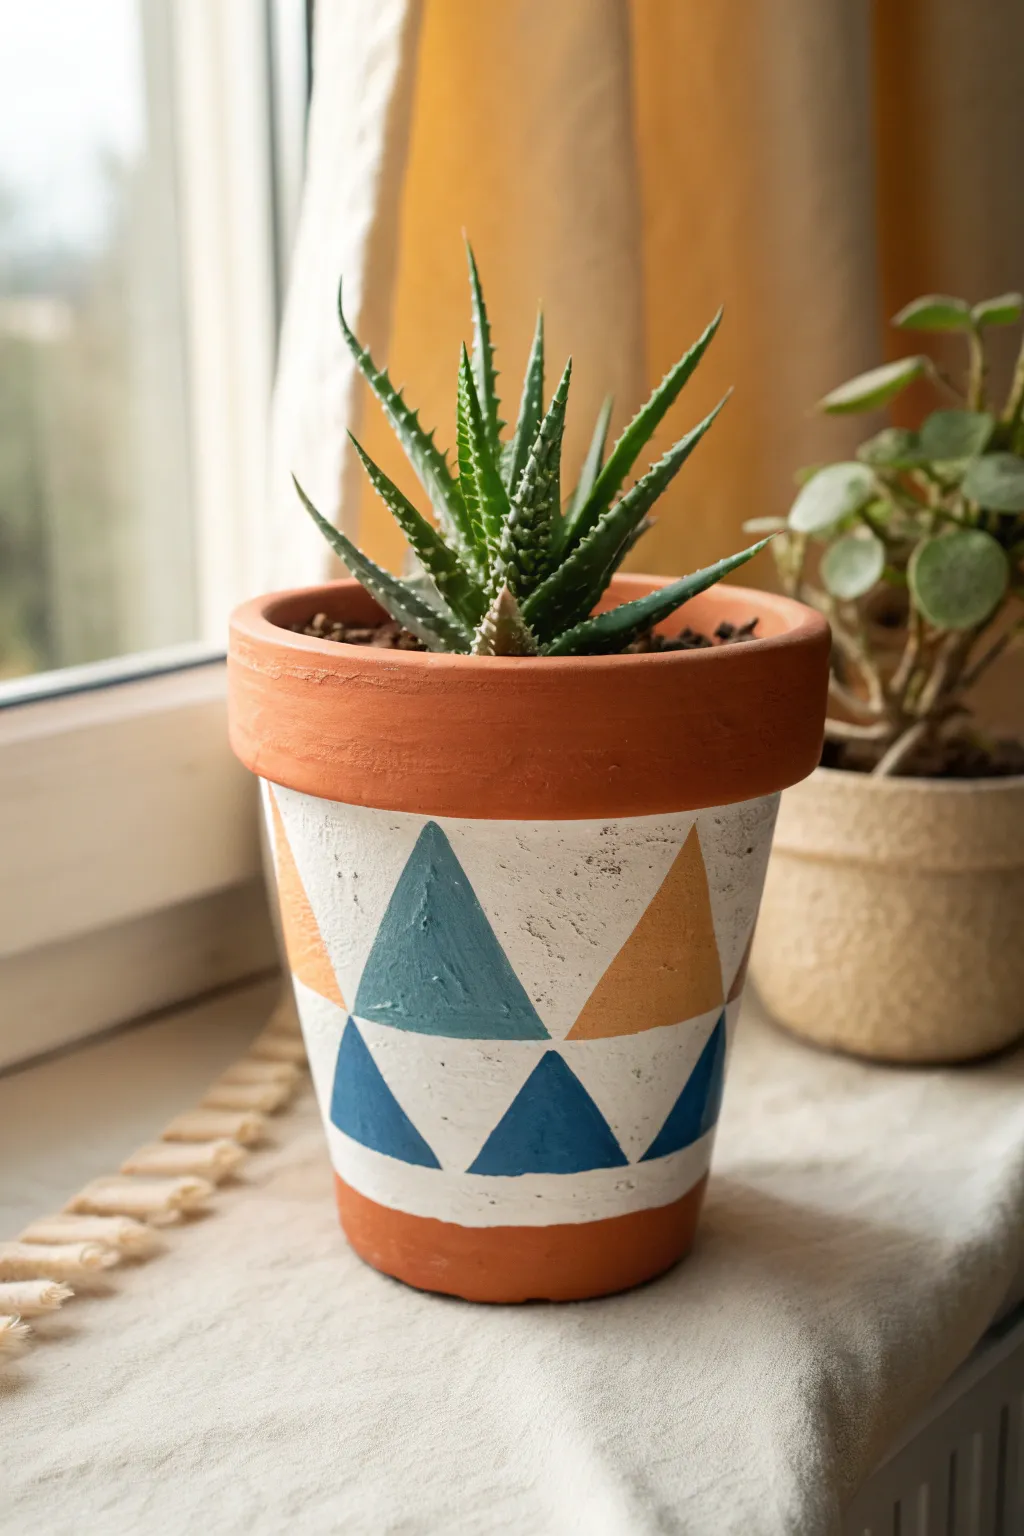
Transform a plain terracotta vessel into a modern decor piece with this crisp, geometric design featuring alternating triangles. The cool palette of teal and navy, warmed up by mustard yellow, creates a balanced look that suits succulents perfectly.
Step-by-Step Tutorial
Materials
- Standard terracotta pot (cleaned and dried)
- Acrylic craft paints (White, Teal, Navy Blue, Mustard Yellow)
- Painter’s tape or Washi tape (low tack)
- Flat shader brush (medium size)
- Fine detail brush
- Pencil
- Ruler or measuring tape
- Palette or paper plate
- Matte sealer or varnish spray
Step 1: Preparation and Base
-
Clean surface:
Begin by ensuring your terracotta pot is completely clean and free of dust. Wipe it down with a damp cloth and let it dry fully before applying any paint. -
Tape the rim:
Apply a strip of painter’s tape just below the rim of the pot. Ensure the tape is level all the way around, pressing down firmly on the edge to prevent paint bleeding. -
Tape the base:
Repeat the taping process near the bottom of the pot, leaving about an inch of raw terracotta exposed at the base. This frames your future design nicely. -
Paint the background:
Using your flat shader brush, apply a coat of white acrylic paint to the entire area between the top and bottom tape strips. -
Apply second coat:
Allow the first layer of white to dry for about 15-20 minutes. If the terracotta color is still showing through, apply a second coat for opaque coverage. -
Dry completely:
Let the white background dry thoroughly. This is crucial because you will be placing tape over this layer later, and wet paint will peel.
Bleeding Lines?
If paint bleeds under the tape, don’t panic. Once dry, use a small stiff brush dampened with rubbing alcohol to gently scrub away the excess, or paint over the error with your white background color.
Step 2: Drafting the Pattern
-
Measure intervals:
Using a measuring tape, lightly mark dots around the circumference of the pot with a pencil to determine the width of your triangles. -
Draw the grid:
Lightly sketch a central horizontal line around the middle of the white section. This will serve as the meeting point for the tips of your triangles. -
Sketch the triangles:
Using a ruler, lightly draw the triangle outlines. Create a row of upward-pointing triangles on the bottom half, and a row of downward-pointing triangles on the top half. The tips of the bottom row should sit between the tips of the top row.
Step 3: Painting the Design
-
Tape for crisp lines:
Apply fresh painter’s tape along the pencil lines of your first few triangles. I find it easiest to work on non-adjacent triangles first to avoid tape overlap issues. -
Paint the teal:
Fill in selected triangles on the top row with teal paint. Brush away from the tape edge inward to minimize seepage. -
Paint the mustard:
Select alternating triangles on the top row and fill them with mustard yellow paint using the flat brush. -
Paint the navy:
Move to the bottom row of triangles. Paint these using the navy blue acrylic, ensuring solid coverage. -
Remove tape carefully:
While the paint is still slightly tacky (not fully dry), gently peel back the painter’s tape. Pulling at a 45-degree angle usually gives the cleanest line. -
Touch up edges:
Once the tape is removed, use your fine detail brush and a little white paint to tidy up any spots where the color might have bled. -
Seal the work:
After the entire design has cured for 24 hours, spray the pot with a clear matte varnish. This protects the acrylic from moisture when you water your plant.
Seal Tape Edges
For ultra-crisp lines, brush a tiny amount of the BACKGROUND color (white) over the tape edge first. This seals the gap, so the colored paint sits perfectly on top without bleeding.
Pop in an aloe vera or succulent and enjoy your custom modern planter

The Complete Guide to Pottery Troubleshooting
Uncover the most common ceramic mistakes—from cracking clay to failed glazes—and learn how to fix them fast.
Polka Dots That Still Look Grown-Up
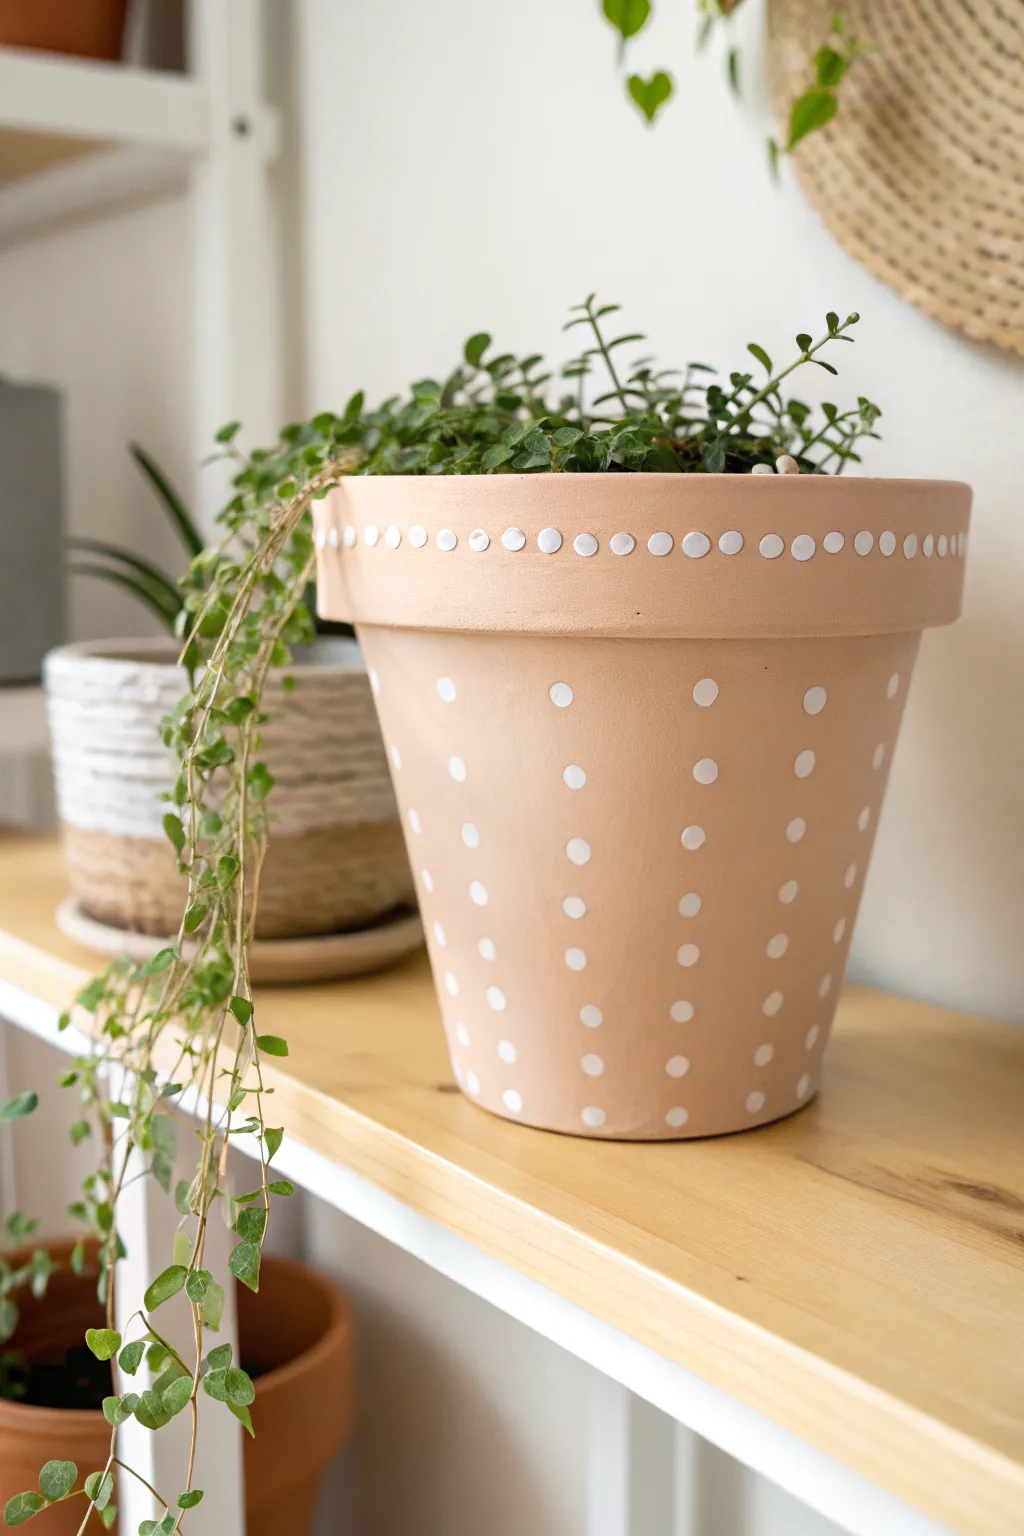
Transform a basic garden center find into this chic, sophisticated statement piece with a soft palette and precise detailing. The warm, peachy-pink base coat gives the classic polka dot pattern a modern, grown-up update that fits beautifully into contemporary decor.
Detailed Instructions
Materials
- Clean terracotta pot (standard size)
- Warm peach or salmon acrylic craft paint
- White acrylic craft paint
- Medium flat paintbrush (1-inch width)
- Small round paintbrush or dotting tool (alternatively, a pencil eraser)
- Small palette or disposable plate
- Paper towels
- Spray sealer (matte or satin finish)
- Painter’s tape (optional, for the rim)
Step 1: Base Coat Prep
-
Clean surface:
Begin by thoroughly wiping down your terracotta pot with a damp cloth to remove any dust or sticker residue. Terracotta is very porous, so let it dry completely before letting any paint touch the surface. -
Mix your color:
Pour a generous amount of your peach or salmon acrylic paint onto your palette. If the shade feels too bright, you can tone it down by mixing in a tiny drop of white or tan paint for that earthy look shown in the photo. -
Paint the exterior:
Using the flat paintbrush, apply the first coat of peach paint to the entire exterior of the pot, including the rim. -
Don’t forget the inside:
While painting the exterior, paint just inside the top lip of the pot (about an inch down). This ensures that once filled with soil, the raw terracotta won’t show. -
Dry and repeat:
Allow the first coat to dry for roughly 20-30 minutes. Apply a second coat to ensure solid, opaque coverage where no orange clay peeks through. -
Final smooth out:
Inspect the pot for brush strokes. If needed, do a third thin coat with a slightly damp brush to smooth everything out perfectly.
Perfect Circles Hack
Use the flat end of a drill bit or a foam pouncer dipped in paint to stamp perfect circles. It’s much faster and more uniform than hand-painting circles with a brush.
Step 2: Dotting the Details
-
Prepare the white paint:
Squeeze a dollop of white acrylic paint onto your palette. Make sure the consistency is creamy but not too runny so the dots hold their shape. -
Test your tool:
Choose your dotting tool. A the eraser end of a new pencil works surprisingly well for this scale, or use a medium-sized dotting stylus. Test a few dots on a piece of scrap paper first to get the pressure right. -
Start with the rim:
Begin the pattern on the protruding rim of the pot. Place your first dot directly in the center to anchor your spacing. -
Complete the rim row:
Work your way around the rim, spacing the white dots evenly—about a half-inch apart. Try to keep them horizontally aligned in the middle of the rim band. -
Plan vertical alignment:
Moving to the body of the pot, visualize vertical lines dropping down from the spaces *between* the rim dots. This offset pattern creates a more pleasing rhythm than stacking them directly underneath. -
Paint the top body row:
Paint your first row of dots on the main body, just under the rim lip. I find it helpful to rotate the pot on a lazy susan or a towel so I don’t smudge wet paint. -
Continue the pattern:
Continue painting rows down the pot. Notice how the dots in the photo are arranged in a grid; try to keep your vertical spacing consistent with your horizontal spacing. -
Touch ups:
Once all dots are applied, check for any that might look thin or translucent. Carefully dab a little extra white paint on top if needed to make them pop.
Step 3: Finishing Touches
-
Full cure:
Let the pot sit undisturbed for several hours, or preferably overnight, to ensure the acrylic paint cures completely. -
Seal the deal:
Take the pot to a well-ventilated area. Hold the spray sealer can about 10-12 inches away and apply a light, even mist over the entire painted surface. -
Second seal:
Once the first layer of sealer is dry to the touch, apply a second coat. This protects your paint from water damage when you water your plant.
Mix Up the Pattern
For a funkier look, try graduating the dot sizes—start with large dots near the rim and use smaller tools to make them tiny near the base.
Pop in a trailing plant like the one shown here and enjoy your stylish new planter
Simple Stenciled Motifs
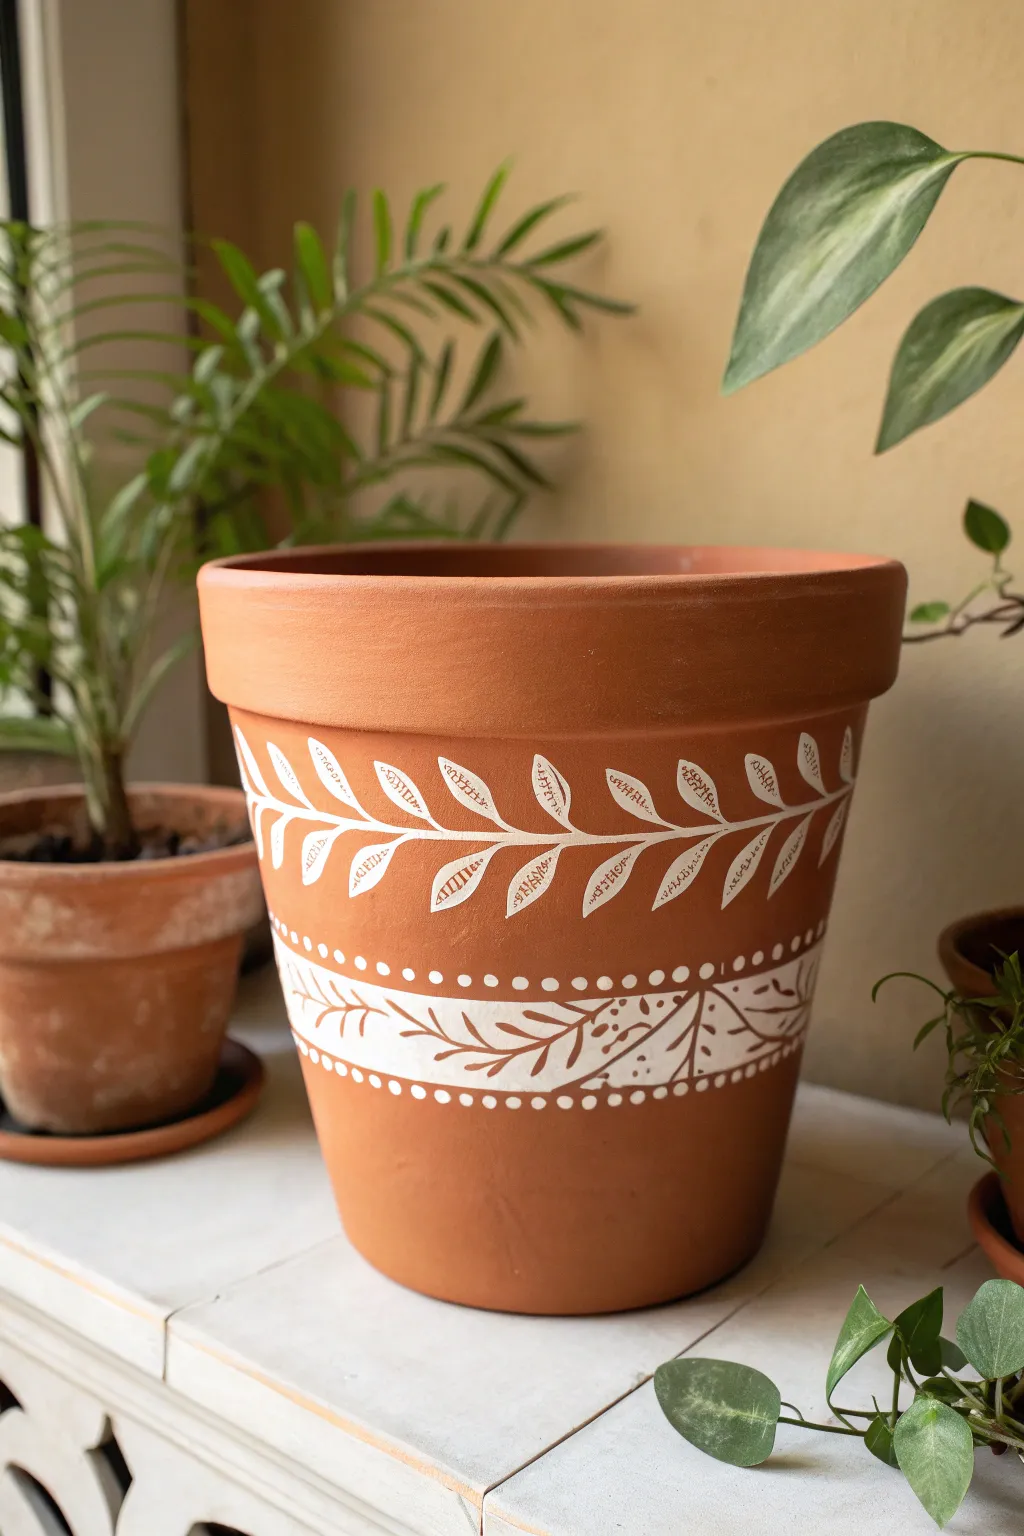
Give your plant collection a fresh, artisanal look with this simple yet striking painted design. By combining delicate vine motifs with bold geometric bands in a crisp white, you can transform a basic garden center staple into a custom piece of decor.
Step-by-Step
Materials
- Terracotta pot (standard size shown is approx. 6-8 inch)
- White acrylic craft paint or chalk paint
- Small round paintbrush (size 2 or 3)
- Medium flat paintbrush
- Pencil
- Tracing paper (optional)
- Fine-grit sandpaper
- Paper plate or palette
- Water cup and paper towels
- Matte clear sealer spray
Step 1: Preparation and Planning
-
Clean surface:
Begin by thoroughly cleaning your terracotta pot. Use a damp cloth to wipe away any dust, dirt, or price tag residue. If the pot has been used before, scrub it with warm soapy water and let it dry completely overnight. -
Smooth the texture:
Lightly sand the exterior surface of the pot with fine-grit sandpaper. This creates a smoother canvas for your brushwork and helps the paint adhere better. -
Mark guidelnes:
Using a pencil, lightly sketch two horizontal lines around the circumference of the pot to define the middle decorative band. Try to keep them parallel to the rim. -
Draft the top vine:
Sketch the main wavy stem line for the top vine motif. Start about an inch below the rim and draw a gentle, undulating wave that goes all the way around the pot.
Step 2: Painting the Vine Motif
-
Load the brush:
Squeeze a small amount of white paint onto your palette. Dip your small round brush into the paint, ensuring it’s coated but not dripping. -
Paint the stem:
Carefully trace over your pencil line for the main stem. Use a steady hand and consistent pressure to keep the line width relatively uniform. -
Add leave outlines:
Starting from the stem, paint small, teardrop-shaped outlines for the leaves. Space them evenly along the vine, alternating sides as you move along the wave. -
Detail the leaves:
Instead of filling the leaves in solidly, use tiny, hatched strokes to create texture inside each leaf outline. This gives it that hand-carved, illustrative look seen in the photo. -
Connect to stem:
I like to go back and add tiny connector lines from the base of each leaf to the main stem to ensure everything looks organic and attached.
Pro Tip: Steady Hands
Rest your pinky finger against the dry surface of the pot as you paint. This creates a pivot point and stabilizes your hand for smoother lines.
Step 3: Creating the Geometric Band
-
Paint the borders:
Using your small round brush again, paint over the two horizontal pencil lines you marked earlier. These will form the top and bottom rails of your central band. -
Add the dots:
Dip the handle end of your paintbrush into the white paint. Firmly press a dot just above the top line and just below the bottom line. Repeat this spacing evenly around the entire circumference. -
Fill the band background:
Switch to a slightly larger brush if needed. Paint the background space between the two rail lines white. You may need two coats for opaque coverage. Let this dry completely. -
Scratch in details:
Once the white band is fully dry, use a contrasting technique. You can use a sharpened pencil or a needle tool to scratch away the white paint to reveal the terracotta underneath, creating the vine pattern inside the white band. Alternatively, paint the vine pattern using a terracotta-colored paint. -
Refine the edges:
Check the edges of your white band. If they look a bit messy, use a damp Q-tip to clean up any stray smudges while the paint is still workable.
Level Up: Color Pop
Instead of white, try a metallic gold or soft sage green for the paint. It maintains the earthy vibe but adds a unique twist.
Step 4: Final Touches
-
Distress (Optional):
To mimic the rustic look in the photo, take your fine-grit sandpaper and very lightly scuff over the painted designs once they are bone dry. This softens the stark white paint. -
Clear coat:
Take the pot to a well-ventilated area and apply a light coat of matte clear sealer. This protects your artwork from water damage when you water your plant. -
Cure time:
Allow the sealer to cure for at least 24 hours before filling the pot with soil and adding your favorite greenery.
Now your custom-designed pot is ready to be the new home for your favorite houseplant


What Really Happens Inside the Kiln
Learn how time and temperature work together inside the kiln to transform clay into durable ceramic.
Botanical Vines Wrapped Around the Pot
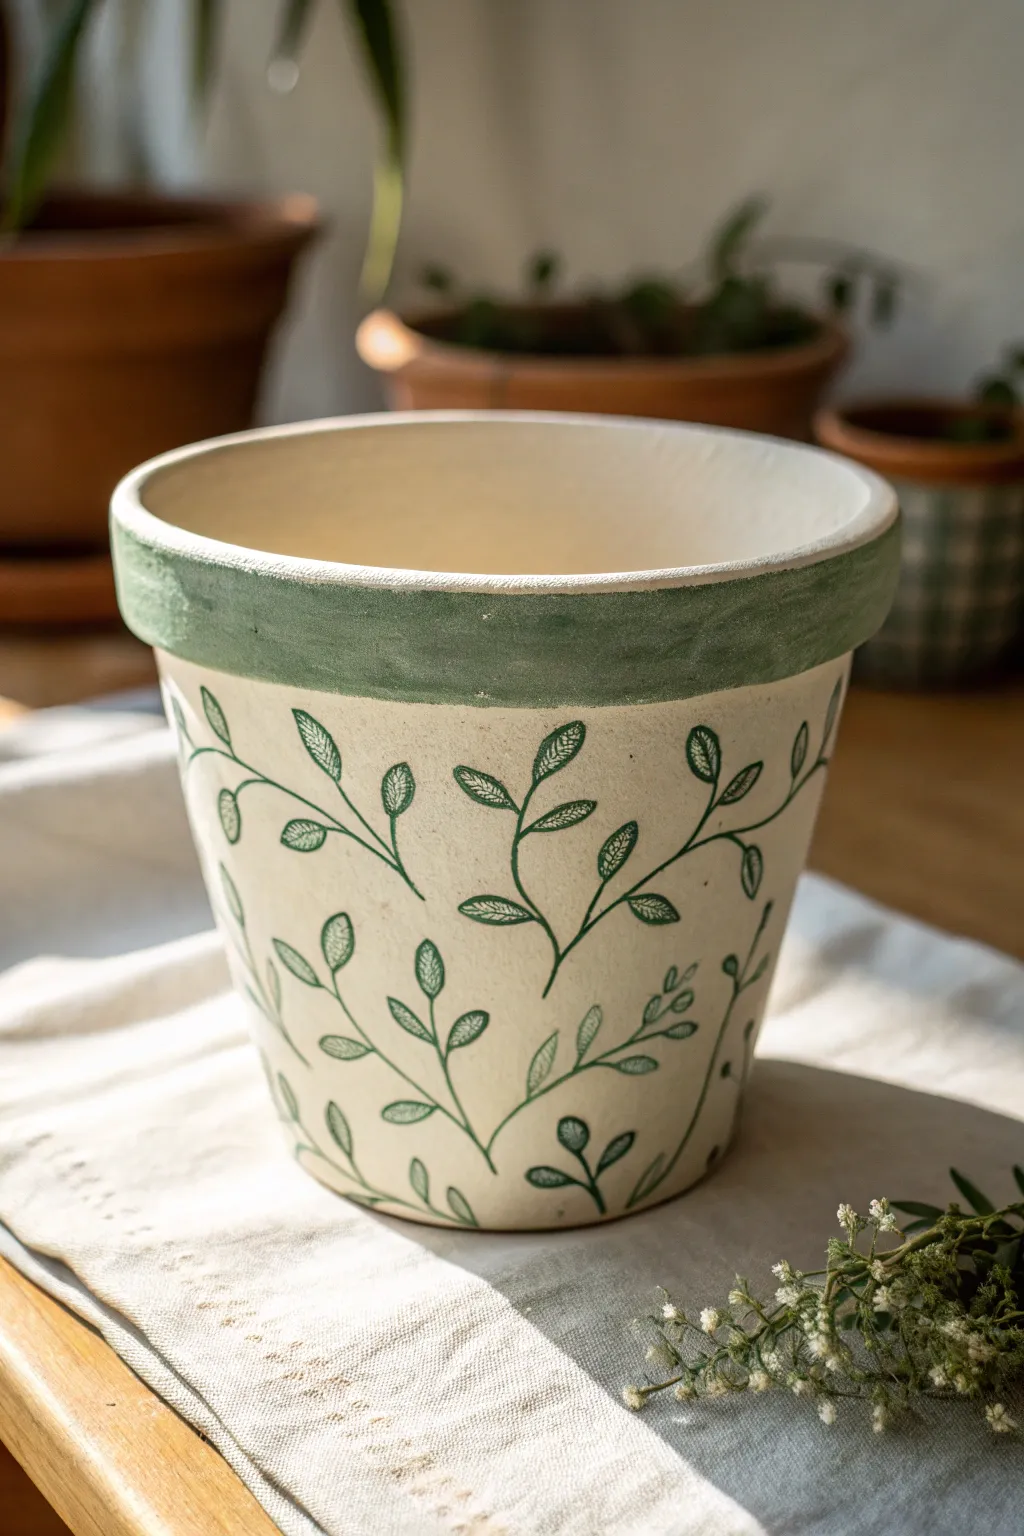
Transform a standard terracotta planter into a piece of cottagecore art with this delicate vine design. The soft cream base creates a lovely contrast against the dusty green rim and hand-painted foliage, giving it an airy, organic feel.
How-To Guide
Materials
- Terracotta pot (clean and dry)
- White or cream acrylic paint (matte finish)
- Sage or dusty green acrylic paint
- Darker forest green acrylic paint (for details)
- Wide flat paintbrush (1-inch)
- Fine liner paintbrush (size 0 or 00)
- Small round paintbrush (size 2 or 4)
- Palette or paper plate
- Water cup and paper towels
- Clear matte sealer spray
Step 1: Base Coat Application
-
Clean surface:
Begin with a terracotta pot that is thoroughly clean and dry. Use a brush or cloth to wipe away any loose dust or debris, which ensures the paint adheres smoothly. -
First layer:
Load your wide flat brush with the cream or off-white acrylic paint. Apply a generous first coat over the entire exterior of the pot, including the rim. -
Inner rim:
Don’t forget to paint about two inches down the inside of the rim, just in case the soil level sits low. -
Drying time:
Let this first coat dry completely to the touch, which usually takes about 20-30 minutes. -
Second coat:
Apply a second layer of the cream paint to ensure solid opacity, covering any classic terracotta orange that might be showing through.
Paint Flow Pro-Tip
Add a drop of water to your green vine paint. Thinner paint flows off the liner brush much smoother, creating long, unbroken stems without dragging.
Step 2: Painting the Rim
-
Mix the green:
Prepare your sage green color. If it looks too bright, I like to mix in a tiny drop of the cream base to soften it and make it cohesive. -
Apply rim color:
Using a clean flat brush or the medium round brush, paint the thick protruding rim of the pot with your sage green. -
Clean edges:
Carefully trace the bottom edge of the rim where it meets the pot body to keep a relatively straight line, though a slightly organic, hand-painted look adds charm. -
Second rim layer:
Once the first green layer is dry, add a second coat to make the color rich and velvety.
Uneven Coverage?
If the terracotta color still bleeds through the white base after two coats, try dabbing the paint on with a sponge for the third layer instead of brushing.
Step 3: Creating the Vines
-
Practice lines:
Before touching the pot, practice creating thin, curved vine shapes on a piece of paper using your fine liner brush. -
Main stems:
Load your fine liner brush with a slightly thinned dark green paint. Paint sweeping, curving lines starting from the bottom and reaching upward, letting them intersect and flow naturally. -
Vary direction:
Ensure the vines don’t all go straight up; let some curve sideways to fill the negative space comfortably. -
Adding leaves:
Switch to your small round brush or keep using the liner. Along the stems, press down gently and lift up to create teardrop-shaped leaves in pairs or alternating patterns. -
Leaf details:
For texture, you can use a lighter green to add tiny veins inside the larger leaves, or use the ‘dry brush’ technique to give them a slightly sketched look as seen in the photo. -
Fill gaps:
Step back and look at the pot. Add smaller sprigs or tiny leaves in any large empty cream spaces to balance the composition.
Step 4: Finishing Up
-
Full cure:
Allow the painted vines to dry completely, ideally overnight, to ensure the paint is fully set. -
Sealing:
Take the pot to a well-ventilated area and spray it with a clear matte sealer. This protects your artwork from water damage when you water your plants.
Now your pot is ready to house your favorite greenery and brighten up a sunny windowsill
Tiny Wildflower Scatter Pattern
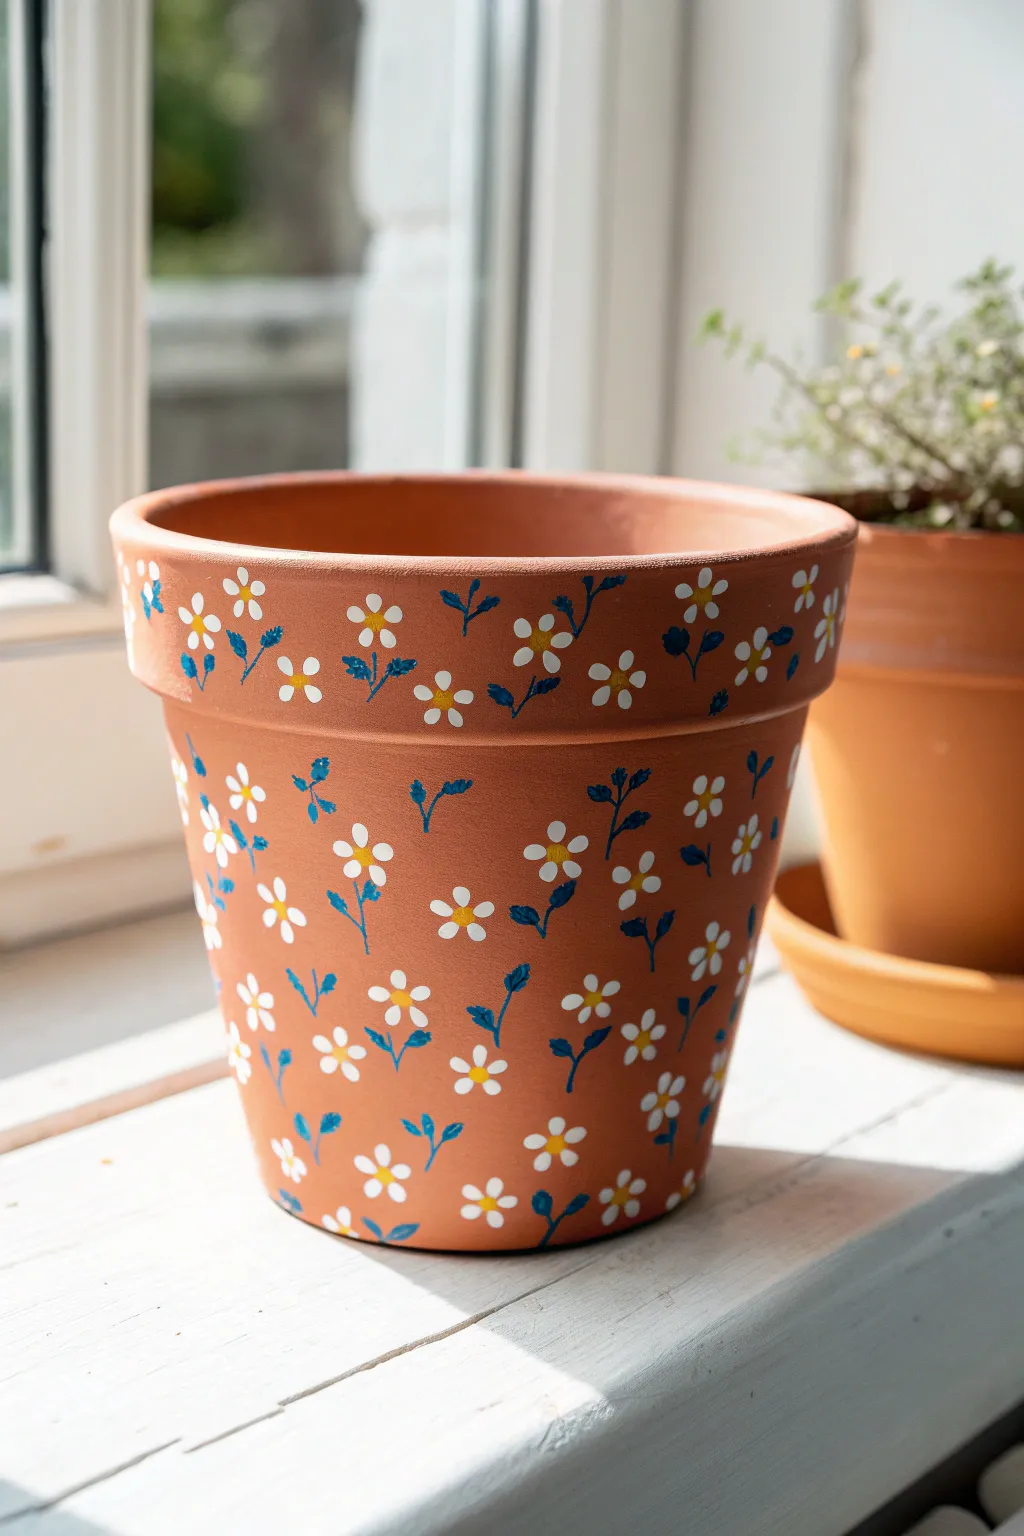
Transform a plain terracotta vessel into a whimsical garden accent with this dainty wildflower scatter pattern. The simple repeating motif of tiny white daisies and blue stems creates a fresh, airy look perfect for brightening up any windowsill.
Detailed Instructions
Materials
- Terracotta pot (standard size shown)
- Clean cloth or sponge
- White acrylic paint (matte or satin finish)
- Sunshine yellow acrylic paint
- Deep teal or denim blue acrylic paint
- Small round paintbrush (size 1 or 2)
- Fine liner brush (size 0 or 00)
- Clear acrylic sealer spray (matte finish)
Step 1: Preparation & Base Planning
-
Clean surface:
Begin by wiping down your terracotta pot with a damp cloth to remove any dust or manufacturing residue. Let it dry completely so the paint adheres properly. -
Visualize the spacing:
Look at the pot’s surface and mentally divide it into casual rows. Avoid drawing a grid; the goal is a random ‘scattered’ look, but you want to ensure even coverage from the rim down to the base.
Pro Tip: Petal Perfection
Instead of brushing strokes, use the handle end of a paintbrush dipped in paint to ‘stamp’ five distinct dots for petals. It guarantees uniform size and perfect roundness.
Step 2: Painting the Blooms
-
Load the white paint:
Dip your small round brush into the white acrylic paint. You want enough paint on the tip to create a solid opaque dot but not so much that it drips. -
Create the first petal group:
Start near the rim. Press the tip of the brush gently against the clay to make five small petal shapes arranged in a circle. They shouldn’t touch in the center; leave a tiny gap for the yellow dot later. -
Vary the positions:
Move a few inches over and paint another five-petal flower. Rotate the flower slightly so the petals point in a different direction than the first one to keep things looking natural. -
Scatter the pattern:
Continue painting white flower shapes across the entire pot. Place some higher, some lower, and allow plenty of empty terracotta space between them—this negative space is key to the design. -
Check for density:
Step back and look at your pot. Fill in any large empty gaps with an extra flower, but remember that the stems and leaves will take up space too. -
Add the centers:
Once the white petals are touch-dry (usually about 10 minutes), take a clean small round brush or the handle end of your brush and dip it into the sunshine yellow paint. -
Dot the details:
Place a single, distinct yellow dot in the center of every white flower grouping. This instantly makes them pop against the clay background.
Level Up: Color Shift
Paint half of the flower centers in a lighter pale yellow or cream. This subtle variation adds depth to the pattern so it doesn’t look like a flat digital print.
Step 3: Adding Stems & Leaves
-
Mix the foliage color:
Prepare your deep teal or denim blue paint. If standard green feels too bright, this bluish tone adds a lovely modern, folk-art feel to the design. -
Switch brushes:
Move to your fine liner brush (size 0 or 00) for delicate line work. Thin the paint slightly with a drop of water if needed to improve the flow. -
Paint short stems:
Draw tiny, fine lines extending downward from random flowers. You don’t need a stem for every single bloom; I like to leave some as floating heads to keep the pattern light. -
Add leaf accents:
Along the stems or floating in empty spaces, paint small V-shapes or single dashes to represent leaves. Keep them loose and gestural rather than botanically perfect. -
Fill the gaps:
Look for empty terracotta patches between flowers and add standalone sprigs of leaves or tiny blue budding branches to balance the composition. -
Detail the rim:
Don’t forget the thick rim of the pot. Continue the pattern up and over the edge, ensuring the flowers wrap around seamlessly.
Step 4: Protection
-
Final dry:
Allow the entire painted design to dry completely, ideally for at least an hour to ensure no moisture is trapped. -
Seal the deal:
Spray the pot with a clear matte acrylic sealer. This protects your handiwork from water damage and fading, especially if you plan to plant directly inside the pot.
Now you have a charming, custom planter ready to house your favorite herbs or succulents

TRACK YOUR CERAMIC JOURNEY
Capture glaze tests, firing details, and creative progress—all in one simple printable. Make your projects easier to repeat and improve.
Monogram Lettering for Gift-Ready Pots
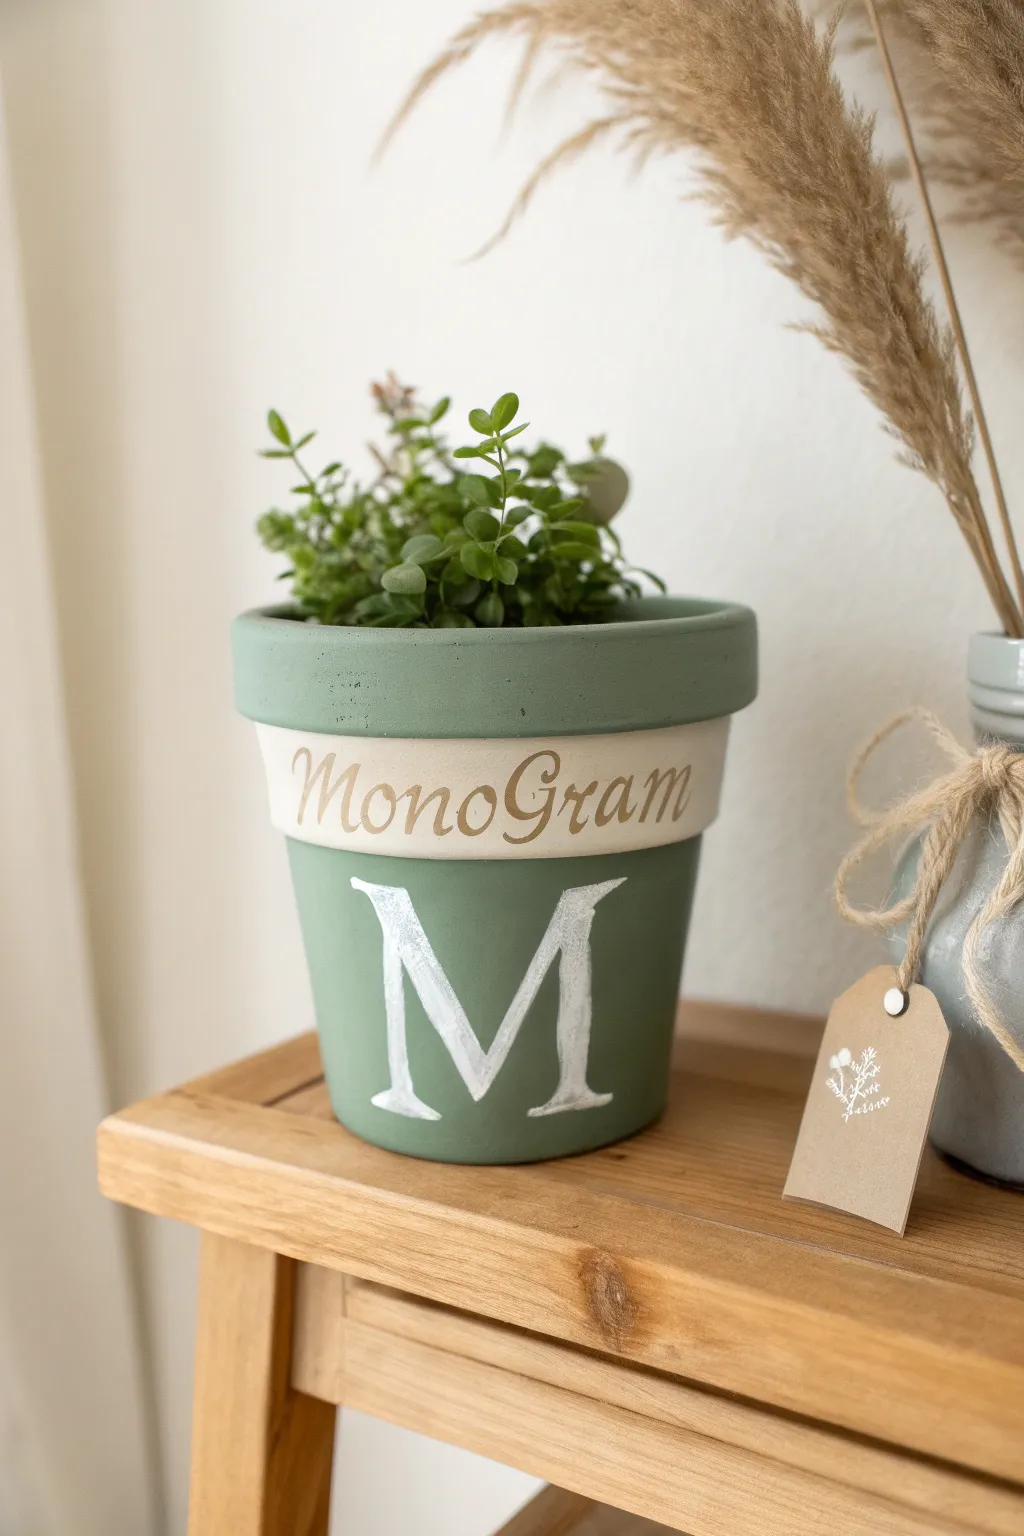
This elegant painted pot combines a soft matte sage green with crisp white lettering for a personalized touch perfect for gifting. The distinct cream band around the rim adds a sophisticated break in color, making the gold script detail pop beautifully.
Step-by-Step
Materials
- Standard terracotta pot (clean and dry)
- Matte sage green acrylic paint
- Cream or off-white acrylic paint
- White acrylic paint
- Gold or metallic brown paint pen (fine tip)
- Flat paintbrush (1 inch)
- Small detail brush (round size 1 or 2)
- Painter’s tape or masking tape
- Pencil
- Clear matte sealer spray
Step 1: Preparation and Base Coats
-
Clean the surface:
Before starting, ensure your terracotta pot is completely free of dust and dirt. Wipe it down with a damp cloth and let it dry fully so the paint adheres properly. -
Apply the first green coat:
Using your flat paintbrush, apply the sage green paint to the entire exterior of the pot, including the rim. Don’t worry about the cream band area yet; it’s easier to paint over the green than to tape it off perfectly right away. -
Paint the inner rim:
Paint the top inch of the inside of the pot with the same green. This ensures the terracotta color doesn’t peek through once the soil is added. -
Let it dry:
Allow the first coat to dry completely, which usually takes about 20-30 minutes. Terracotta is porous, so the first layer dries fast. -
Apply a second coat:
Apply a second layer of sage green to get that solid, opaque matte finish shown in the photo. Let this dry thoroughly, preferably for an hour or more to prevent peeling during the next steps.
Step 2: Creating the Cream Band
-
Tape off the band:
Apply a strip of painter’s tape just under the protruding rim of the pot. This will create a sharp, straight line for the bottom edge of your cream band. -
Tape the upper edge (optional):
If you have a steady hand, you can skip this, but painting the rim edge involves cutting in carefully. You can tape the top lip if you want a perfect rectangle of color. -
Paint the band cream:
Using a clean flat brush, fill in the area between the rim and your tape with the cream or off-white paint. I find that cream paint often needs two to three thin coats to cover the green underneath completely. -
Remove tape carefully:
Peel off the tape while the final coat of cream paint is still slightly tacky. This helps prevent the dried film of paint from lifting off with the tape.
Bleeding Edges?
If paint bleeds under your tape, wait for it to dry perfectly, then use a tiny detail brush and the original base color (green) to “erase” the mistakes for a crisp line.
Step 3: Detailing and Lettering
-
Sketch the large letter with pencil:
Lightly draw a large serif ‘M’ (or your chosen initial) on the main body of the pot using a pencil. Center it below the cream band. -
Paint the large initial:
Use your small detail brush and white acrylic paint to fill in the pencil sketch. Start with the thin strokes and thicken the vertical lines to create that classic serif font look. -
Refine the edges:
Go back over the white letter with a second coat to make it bright and opaque against the dark green background. -
Sketch the rim script:
Lightly write out ‘Monogram’ (or a name) in cursive script along the center of the cream band using your pencil. -
Trace with paint pen:
Take your gold or metallic brown paint pen and carefully trace over your cursive pencil lines. Shake the pen well beforehand to ensure the metallic pigment flows smoothly. -
Clean up sketch lines:
Once all paint is 100% dry, gently erase any visible pencil marks with a soft eraser. -
Seal the project:
Take the pot to a well-ventilated area and spray it with a clear matte sealer. This protects the paint from water damage when you water your plant.
Level Up: Distress It
After the paint dries, lightly sand the raised edges of the rim and the letter ‘M’ with fine-grit sandpaper for a trendy, rustic farmhouse look.
Pop in a small leafy plant and you have a personalized centerpiece ready for display
Chalkboard Label Band for Herb Pots
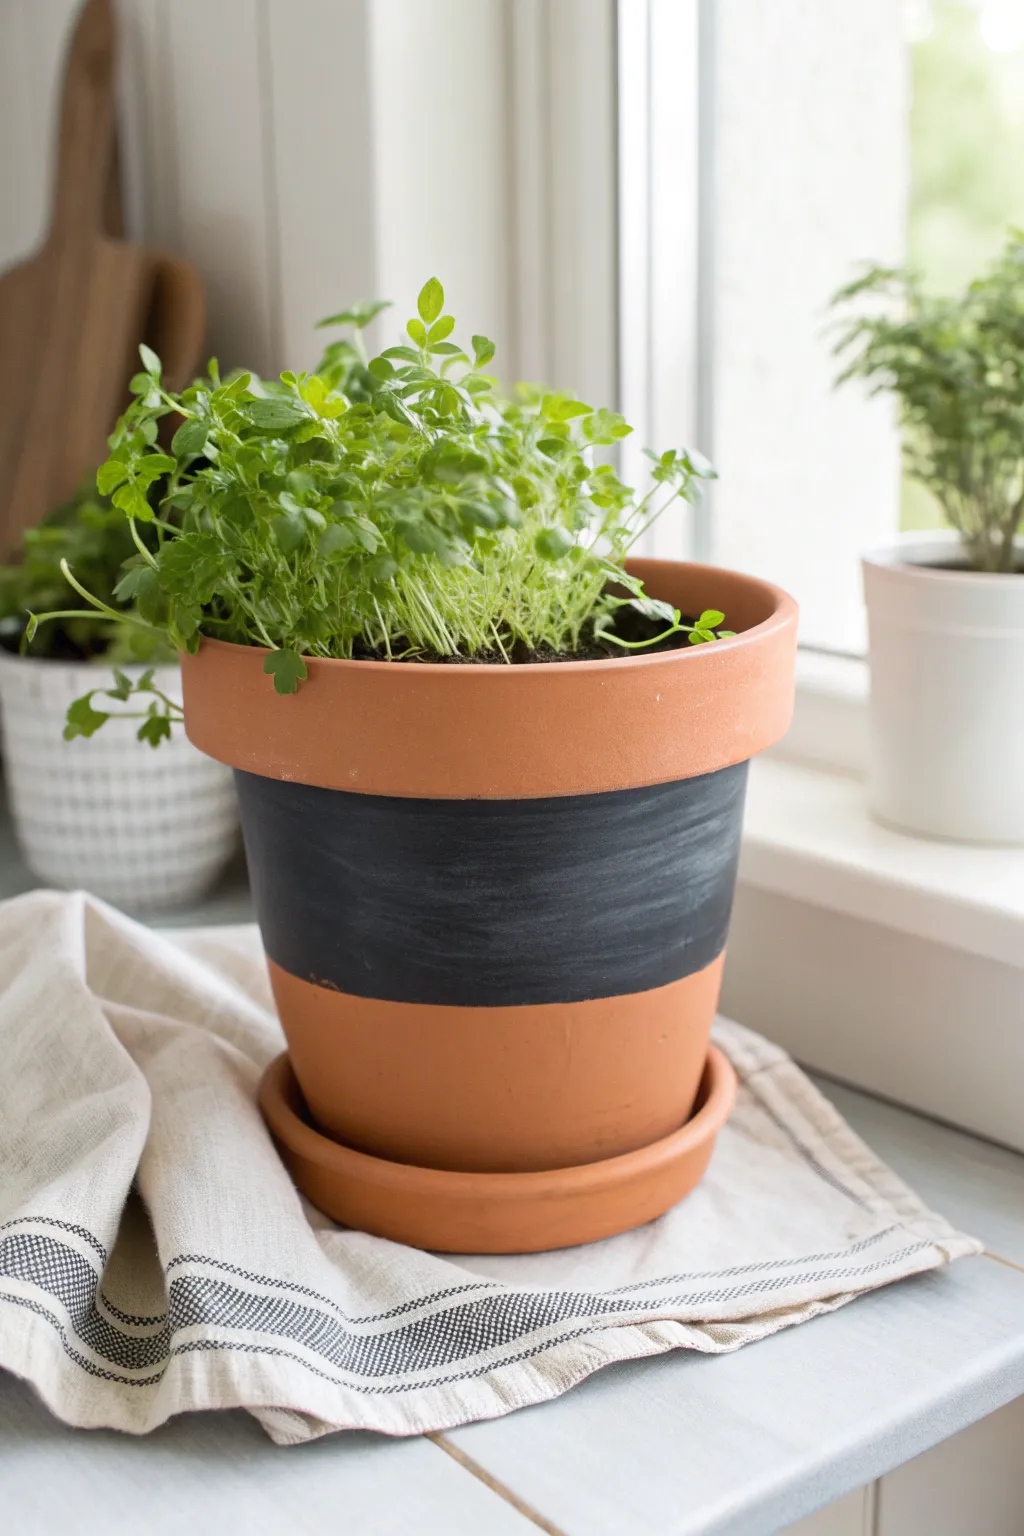
Transform a plain terracotta pot into a functional and stylish herb container with a simple bold chalkboard band. This sleek black stripe not only adds a modern touch but gives you the perfect spot to label your growing greens.
How-To Guide
Materials
- Standard terracotta pot with saucer
- Black chalkboard paint
- Painter’s tape (1-inch width works well)
- Flat paintbrush (medium width)
- Small paintbrush (for touch-ups)
- Drop cloth or recycled newspaper
- Damp cloth
- Chalk or chalk marker (optional, for labeling later)
Step 1: Preparation
-
Clean the pot:
Before doing anything else, ensure your terracotta pot is completely clean. Wipe it down thoroughly with a damp cloth to remove any dust or pottery residue that could prevent the paint from sticking. -
Dry completely:
Let the pot sit until all moisture has evaporated from the clay. If the pot feels cool to the touch, it might still be holding water, so give it extra time. -
Define the top line:
Apply a strip of painter’s tape horizontally around the pot, positioning it just below the thick rim at the top. Use your thumbnail or a credit card to press the tape edge down firmly to prevent bleed-through. -
Define the bottom line:
Apply a second strip of painter’s tape around the lower third of the pot. Measure the distance from the bottom rim if you want to be precise, ensuring the band is uniform all the way around.
Bleeding Lines?
If paint seeps under the tape, let it dry partially, then gently scrape it off with an X-Acto knife or the edge of a coin. Terracotta is forgiving and scrapes clean easily.
Step 2: Painting
-
Stir the paint:
Open your chalkboard paint and stir it gently but thoroughly. The chalkboard grit tends to settle at the bottom, so you need to mix it well for an even matte finish. -
Apply the first coat:
Using your flat paintbrush, apply the black chalkboard paint between the two lines of tape. Paint in horizontal strokes, following the curve of the pot. -
Feather the edges:
Be careful near the tape lines. I like to paint away from the tape edge slightly rather than pushing paint under it, which helps keep the line crisp. -
Let it dry:
Allow this first coat to dry for at least one hour. Terracotta is porous, so the first layer might look a bit streaky or absorbed—this is normal. -
Apply the second coat:
Paint a second layer using the same horizontal strokes to ensure full, opaque coverage. If you see any brush marks, smooth them out quickly before the paint begins to tack up. -
Optional third coat:
Inspect the coverage. If you can still see the orange clay peeking through, add a thin third coat after the second one is dry.
Step 3: Finishing Up
-
Remove the tape:
The key to sharp lines is removing the tape while the final coat is still slightly wet. Carefully peel the tape back at a 45-degree angle. -
Clean up errors:
If any paint bled under the tape, don’t worry. Use a slightly damp cloth or a scraping tool to gently remove the excess while it’s fresh, or touch up with a tiny bit of orange acrylic paint later. -
Cure the paint:
Let the pot sit for at least 24 hours before handling or planting. This curing time ensures the chalkboard finish hardens completely. -
Prime the surface:
Before writing, condition the surface by rubbing the side of a piece of chalk over the painted band, then wiping it off. This prevents your first written word from being permanently ‘ghosted’ into the paint. -
Plant your herbs:
Fill the pot with potting soil and your chosen herb, such as the leafy cilantro or parsley shown in the example.
Style It Up
Instead of a solid band, apply thin strips of tape within the painted area before painting to create pinstripes or a geometric pattern reveals in the final black band.
Now you have a customized planter that makes organizing your kitchen herb garden effortless
Distressed Wash for a Vintage Look
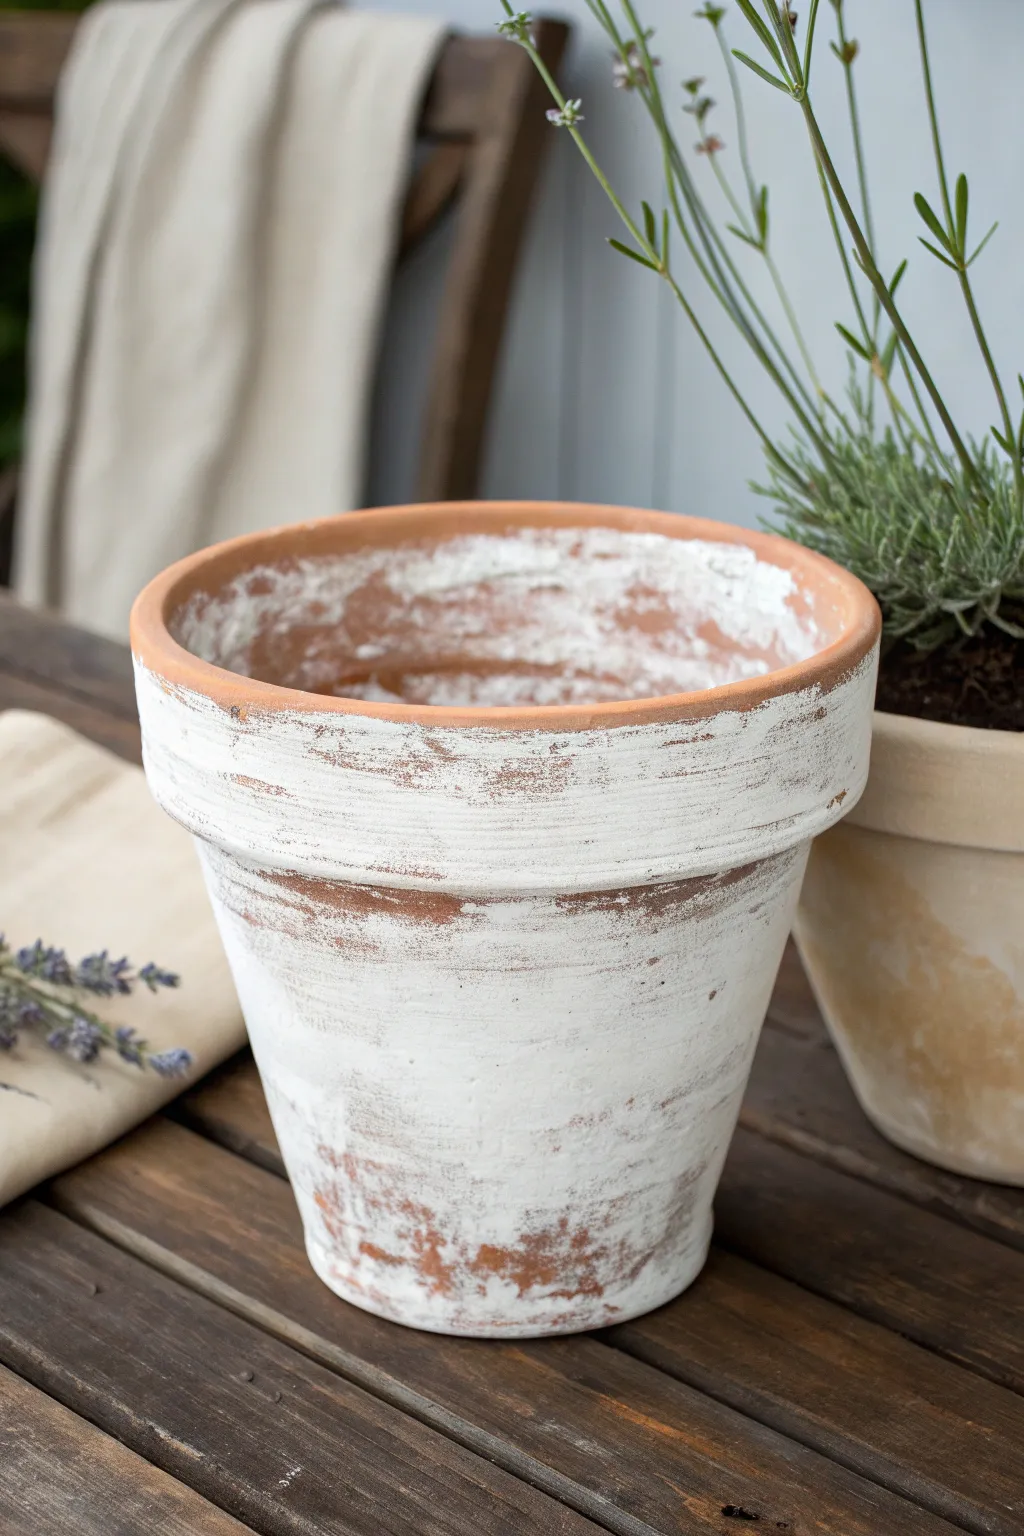
Turn a brand-new orange clay pot into a charmingly weathered antique with this simple distressing technique. The result is a beautifully chalky, time-worn finish that lets hints of the original terracotta peek through for instant farmhouse appeal.
Detailed Instructions
Materials
- Standard terracotta pot
- White acrylic paint or chalk paint
- Water (for diluting)
- Wide, flat paintbrush (chip brush works best)
- Paper towels or lint-free rags
- Small bowl for mixing
- Fine-grit sandpaper (optional)
- Matte sealer (optional)
Step 1: Preparation & Mixing
-
Clean surface:
Begin by ensuring your terracotta pot is completely clean and dry. Remove any price stickers and wipe away loose dust with a damp cloth so the paint adheres properly to the porous clay. -
Prepare paint:
Squeeze a dollop of white acrylic or chalk paint into your small mixing bowl. You won’t need much, as this look relies on thin coverage. -
Create the wash:
Add water to the paint gradually. You are aiming for a consistency similar to heavy cream or whole milk—thin enough to spread easily but opaque enough to leave a mark. -
Test consistency:
Dip your brush and test the wash on the very bottom of the pot. If it’s too opaque, add more water; if it’s too translucent, add a tiny bit more paint.
Use a Dry Brush
For the most authentic aged look, use a cheap, stiff-bristled brush. Avoid soft watercolor brushes, as they will lay the paint down too smoothly.
Step 2: Applying the Wash
-
Initial application:
Load your wide brush with the paint wash. Start applying it to the exterior of the pot using horizontal strokes that follow the curvature of the rim. -
Cover the body:
Work your way down the body of the pot. Don’t worry about perfect , even coverage; in fact, leaving some gaps or thinner areas is exactly what creates the character we want. -
Paint the interior rim:
Paint the inside top rim of the pot—about two inches down—so that the soil line will be hidden and the finished look remains consistent even when planted. -
Quick dry:
Allow the paint to sit for just a moment (about 30-60 seconds). You want it to start setting into the clay pores but not dry completely.
Add Faux Moss
Dab tiny amounts of diluted antique green paint into the crevices or under the rim to mimic moss growth for an even older garden feel.
Step 3: Distressing & Texture
-
Wipe back:
Take a crumpled paper towel or dry rag and firmly wipe over the wet paint. This removes the excess and pushes the pigment into the texture of the clay. -
Check the reveals:
Assess how much terracotta is showing through. Create variation by wiping harder in some spots to reveal the orange clay, and softer in others to leave the white opaque. -
Add heavy layers:
Dip your brush into undiluted white paint (straight from the tube/bottle) and dry-brush it randomly over the existing wash. Focus on the raised rim and the middle belt of the pot. -
Create texture:
Use a dabbing motion with a nearly dry brush to create the splotchy, uneven texture seen in the reference photo. I find that focusing this texture on the thickest part of the rim looks most authentic. -
Layer the interior:
Repeat the dry-brushing technique on the inside rim. The photo shows significant white buildup here, which mimics mineral deposits from watering over time.
Step 4: Finishing Touches
-
Sanding (Optional):
Once the paint is fully dry, you can use fine-grit sandpaper to roughen up specific areas if the wipe-back method didn’t reveal enough clay for your taste. -
Final wipe:
Use a clean, dry cloth to brush away any paint dust or loose particles created during the distressing process. -
Sealing:
If this pot will live outdoors, apply a clear matte sealer spray. Keep the coat very light to maintain that chalky, ultra-matte vintage aesthetic.
Place your favorite herbs inside and enjoy the timeless charm of your new antique creation
Two-Tone Dipped-Paint Illusion
Bring a pop of color to your indoor garden with this effortlessly chic two-tone planter. By leaving the top portion raw and painting the base in a vibrant teal, you create a modern dipped effect without the mess of actual dipping.
Step-by-Step
Materials
- Standard terracotta pot (clean and dry)
- White acrylic craft paint (for primer)
- Teal or turquoise acrylic craft paint
- Painter’s tape (optional, for a sharper line)
- Medium-sized flat paintbrush
- Small round paintbrush (for touch-ups)
- Matte or satin spray sealer
- Small bowl or palette
- Paper towels
Step 1: Preparation & Planning
-
Clean surface:
Ensure your terracotta pot is thoroughly clean. If it’s brand new, wipe it down with a damp cloth to remove any clay dust. If reusing an old pot, scrub it well and let it dry completely overnight to prevent trapped moisture. -
Visualize the line:
Decide where you want your color block to start. For this specific look, aim for a line about one-third of the way up from the bottom, leaving the thicker rim and the upper body natural. -
Mark the boundary:
If you trust your steady hand for an organic look, you can freehand this. However, to match the image’s fairly straight horizon, I recommend using painter’s tape. Apply a strip of tape around the circumference of the pot at your chosen height. -
Secure the tape:
Run your fingernail firmly along the bottom edge of the tape to seal it tightly against the clay. This prevents the paint from bleeding underneath.
Pro Tip: Moisture Barrier
Terracotta wicks moisture. Before painting the outside, seal the *inside* of the pot with a clear waterproof sealer. This prevents water from seeping through and bubbling your exterior paint job.
Step 2: Painting the Base
-
Prime the surface:
Terracotta is extremely porous and will drink up your colored paint. To get that solid, opaque teal coverage, apply a thin layer of white acrylic paint to the area below your tape line first. -
Let primer dry:
Allow the white base coat to dry to the touch, which usually takes about 15-20 minutes depending on humidity. -
Mix your color:
Squeeze your teal acrylic paint onto a palette. If the shade feels too dark, mix in a tiny drop of white to brighten it up. -
Apply first coat:
Using your flat paintbrush, apply the teal paint over the primed area. Use horizontal strokes that mimic the curve of the pot for the smoothest finish. -
Paint the bottom:
Don’t forget to flip the pot over and paint the underside of the base so no raw clay shows when the pot is sitting on a shelf. -
Dry and reassess:
Let this first color coat dry completely. Terracotta absorbs liquid quickly, so the first coat might look streaky or uneven. -
Apply second coat:
Add a second layer of teal paint. This layer will provide that rich, solid saturation seen in the finished photo. -
Check for consistency:
Hold the pot up to the light to ensure you haven’t missed any spots in the texture of the clay. Dab extra paint into any deep pores if necessary.
Troubleshooting: Streaky Paint
If the teal looks streaky after two coats, the clay is drinking the medium. Don’t layer it on thick; instead, apply multiple thin layers, letting each dry fully, to build up opacity.
Step 3: Finishing Touches
-
Remove tape:
While the second coat is still slightly tacky (not fully bone dry), carefully peel off the painter’s tape at a 45-degree angle. This helps prevent the paint from chipping at the line. -
Soften the edge:
The project image shows a slightly organic transition rather than a razor-sharp geometric line. If your tape line is too harsh, dip a small brush in water and very lightly run it along the top edge of the paint to blur it slightly. -
Clean up errors:
Did any paint slip onto the raw section? Use a damp paper towel immediately to wipe it away, or gently sand it off with fine-grit sandpaper once dry. -
Seal the paint:
To protect the paint from water damage when you water your plants, spray the painted section (or the whole pot if you prefer a uniform sheen) with a matte or satin sealer. -
Final dry:
Let the pot cure for at least 24 hours before filling it with soil and plants.
Place your favorite succulent or leafy green inside and enjoy your custom modern planter
Speckled Terrazzo-Inspired Finish
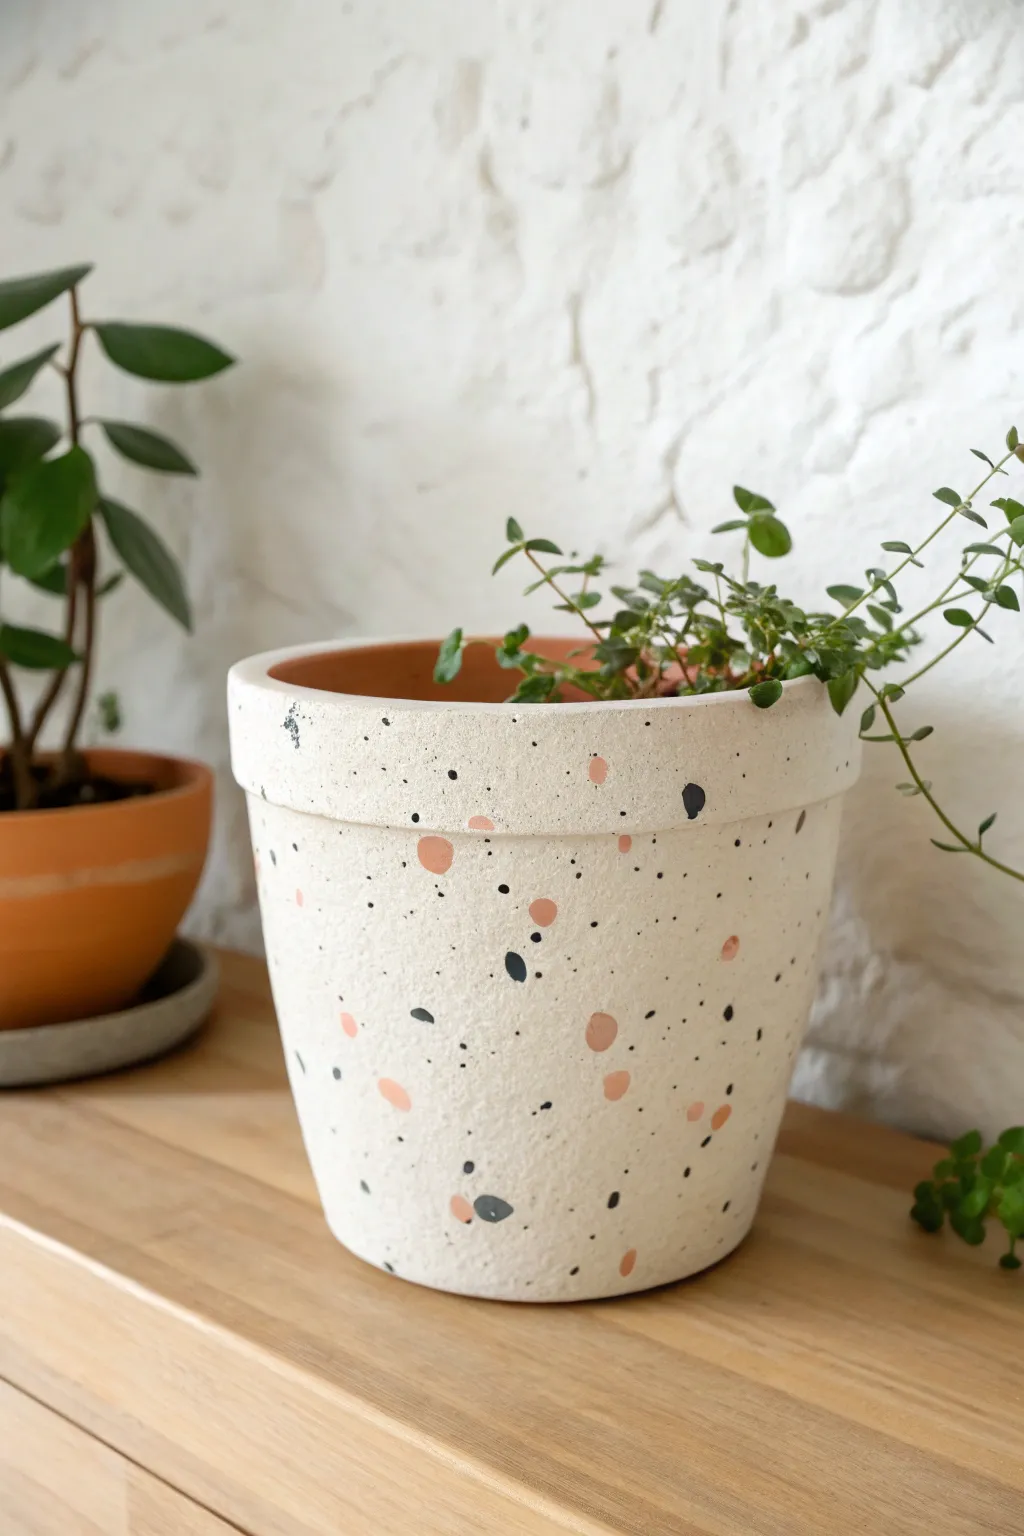
Transform a plain terracotta pot into a modern, high-end decor piece with this surprisingly simple speckled paint technique. This method mimics the look of trendy terrazzo stone without the weight or cost, using just a few colors of acrylic paint.
Detailed Instructions
Materials
- Clean terracotta pot (any size)
- White acrylic paint (base coat)
- Cream or off-white acrylic paint
- Peach or coral acrylic paint
- Black or charcoal acrylic paint
- Flat paintbrush (1-inch width)
- Fine detail paintbrush or toothpick
- Small round paintbrush
- Baking soda (optional, for texture)
- Matte clear sealant spray
- Palette or paper plate
- Water cup and paper towels
Step 1: Base Preparation
-
Clean and Dry:
Begin by scrubbing your terracotta pot with warm water and a stiff brush to remove any dust or manufacturing residue. Allow it to bone dry completely, preferably overnight, as moisture trapped inside can cause the paint to bubble later. -
Mix the Texture Paint:
To achieve that stony, matte look seen in the photo, mix your white acrylic paint with a teaspoon of baking soda. This thickens the paint and gives it a slightly gritty, realistic stone texture. -
Apply the First Coat:
Using your flat paintbrush, apply a generous layer of the white texture mixture all over the exterior of the pot. Don’t forget to paint the top inch or two of the inside rim, as this will be visible when the plant is potted. -
Let it Dry:
Allow the first coat to dry for about 20-30 minutes. The baking soda mixture tends to dry faster than regular paint, creating a chalky finish. -
Apply the Second Coat:
Paint a second layer of the textured white mix to ensure full opacity. You shouldn’t see any of the orange terracotta color peeking through. Let this dry completely before moving on to the details. -
Smooth the Rim:
Run your finger lightly along the rim of the pot. If the baking soda created any sharp peaks, gently sand them down with a high-grit sandpaper or just rub them away with your thumb.
Natural Stone Texture
Mix baking soda into your base white paint (1 part soda to 2 parts paint). This creates a gritty, realistic stone texture that mimics real terrazzo much better than flat paint.
Step 2: Creating the Terrazzo Effect
-
Prepare Your Palette:
Squeeze out small amounts of your accent colors: peach/coral, black, and a touch of the cream color onto your palette. You want these accessible for quick dipping. -
Mix the Coral Shape Color:
If your peach paint is too bright, tone it down slightly with a tiny drop of white or brown to match the earthy tone in the image. I find mixing customized shades makes the final piece look much more expensive. -
Paint Large Coral Shapes:
Dip a small round brush into the coral paint. Dab random, organic shapes onto the pot. Avoid perfect circles; aim for irregular blobs, soft triangles, or ovals to mimic crushed stone aggregate. -
Space Them Out:
Be mindful of negative space. Place the coral shapes sporadically around the pot, leaving plenty of white space between them. Rotate the pot as you go to ensure even coverage. -
Add Black Accents:
Using a slightly smaller brush or the tip of your round brush, add the black shapes. These should vary in size—some slightly larger blobs and some tiny specks. -
Overlap Occasionally:
It creates a nice depth if a few of the black shapes are placed very close to, or even slightly touching, the coral shapes, though try to keep most of them separate. -
Create the ‘Sand’ Effect:
This is the secret to the look: use an old toothbrush or a stiff bristle brush for the finest speckles. Dip the tips in watered-down black paint. -
Flick the Bristles:
Hold the brush near the pot and run your thumb across the bristles to flick a fine mist of black dots onto the surface. This fills in the empty white spaces and ties the larger shapes together. -
Manual Touch-ups:
Inspect the pot for bald spots. Use a toothpick dipped in black paint to manually add tiny dots where the splatter technique might have missed. -
Add Highlights:
For extra dimension, dab a few irregular shapes using the cream or off-white paint. These will be subtle against the white background but add to the realistic stone effect.
Step 3: Final Steps
-
Review and Edit:
Step back and look at the pot from a distance. If an area looks too empty, add a small coral or black shape. If a shape looks too ‘perfect,’ distort its edges slightly with your brush. -
Final Dry Time:
Let all the decorative paint dry for at least one hour. Acrylics dry fast, but thicker blobs need extra time to cure. -
Seal the Finish:
Because terracotta is porous and absorbs water from the soil, sealing is crucial. Take the pot outdoors and spray it with a matte clear sealant. -
Apply Second Sealant Coat:
Once the first layer of sealant is dry to the touch, apply a second light coat to ensure durability against water discoloration.
Blob Control
If your ‘splatter’ step creates paint blobs that are too large or runny, quickly dab them gently with the corner of a paper towel to lift the excess paint before it dries.
Once sealed and dry, your trendy new planter is ready to be the stylish home your favorite houseplant deserves
Abstract One-Line Face Art

Transform a plain planter into a piece of modern art with this striking face design. The combination of clean black lines and soft pink dots creates a playful yet sophisticated look that fits perfectly in any contemporary space.
Step-by-Step Guide
Materials
- Standard terracotta pot (cleaned and dried)
- Cream or off-white acrylic paint (matte finish)
- Black acrylic paint or a black oil-based paint marker
- Soft pink or coral acrylic paint
- Flat paintbrush (medium size)
- Fine liner paintbrush or detail brush
- Round foam pouncer or small stencil brush
- Pencil
- Sketch paper (optional)
- Clear matte sealant spray
Step 1: Base Preparation
-
Clean the surface:
Begin by thoroughly wiping down your terracotta pot with a damp cloth to remove any dust or debris. Let it dry completely before you start painting. -
Mix your base color:
If you don’t have a pre-mixed cream shade, mix a large amount of white acrylic paint with a tiny drop of yellow ochre or beige to get that warm, expansive off-white tone shown in the image. -
Apply the first coat:
Using a flat medium brush, apply an even coat of your cream paint all over the exterior of the pot, including the rim. Don’t worry if it looks streaky; terracotta usually drinks up the first layer. -
Layer up for opacity:
Once the first coat is dry to the touch, apply a second coat. I like to paint in the opposite direction of the first coat (creating a cross-hatch pattern) to minimize visible brushstrokes. -
Check coverage:
Inspect the pot for any thin spots where the orange clay shows through. Apply a third thin coat if necessary to achieve a solid, opaque matte finish.
Step 2: Drafting the Design
-
Sketch the face:
Before touching the pot, practice drawing the continuous line face on a piece of paper. Focus on the elongated nose, the simple curved lips, and the abstract eye shape. -
Mark the layout:
Lightly sketch the design onto the dry cream paint using a pencil. Start with the vertical line of the nose to center your design, then build the eyes and mouth around it. -
Add hair details:
Draw the sweeping lines for the hair on the side of the face, ensuring they flow naturally from the forehead area towards the back of the pot. -
Plan the dots:
Mark light ‘X’s or small circles where you want your pink polka dots to go. In the reference, they cascade down the side of the pot, framing the face.
Steady Hand Trick
Rest your pinky finger against the dry surface of the pot while you paint lines. It acts as an anchor, stabilizing your hand for smoother, less shaky brushstrokes.
Step 3: Painting the Details
-
Outline the face:
Using a fine liner brush loaded with black acrylic paint (or a black paint marker for easier control), carefully trace over your pencil lines. Keep your pressure consistent to maintain a uniform line thickness. -
Refine the features:
Pay special attention to the eyes and lips. The lines should be crisp and deliberate. If using a brush, slightly thin your black paint with a drop of water to help it glide smoother. -
Paint the hair:
Fill in the hair section with bold, confident strokes. The illustration uses simple, parallel curved lines to suggest volume without needing complex shading. -
Create the polka dots:
For the pink dots, dip a round foam pouncer or a small round brush into your coral-pink paint. Press gently onto your marked spots to create perfect circles. -
Clean up edges:
If any dots aren’t perfectly round, use a small detail brush to carefully smooth out the edges while the paint is still wet. -
Erase guidelines:
Once the black and pink paints are completely dry (give it at least an hour), gently erase any visible pencil marks that weren’t covered by paint.
Mix It Up
Swap the pink dots for abstract geometric shapes like triangles or arches in mustard yellow or sage green to match different room aesthetics.
Step 4: Finishing Touches
-
Seal the artwork:
Take the pot to a well-ventilated area and apply a clear matte sealant spray. This protects your design from water damage and soil stains. -
Wait for cure time:
Allow the sealant to cure according to the can’s instructions—usually 24 hours—before planting anything inside. -
Plant:
Add your potting soil and choose a spiky plant, like the succulent shown, to act as ‘hair’ for your new art piece.
Now you have a charming, gallery-worthy planter ready to house your favorite greenery
Fruit Slice Themes (Citrus, Watermelon, Strawberry)
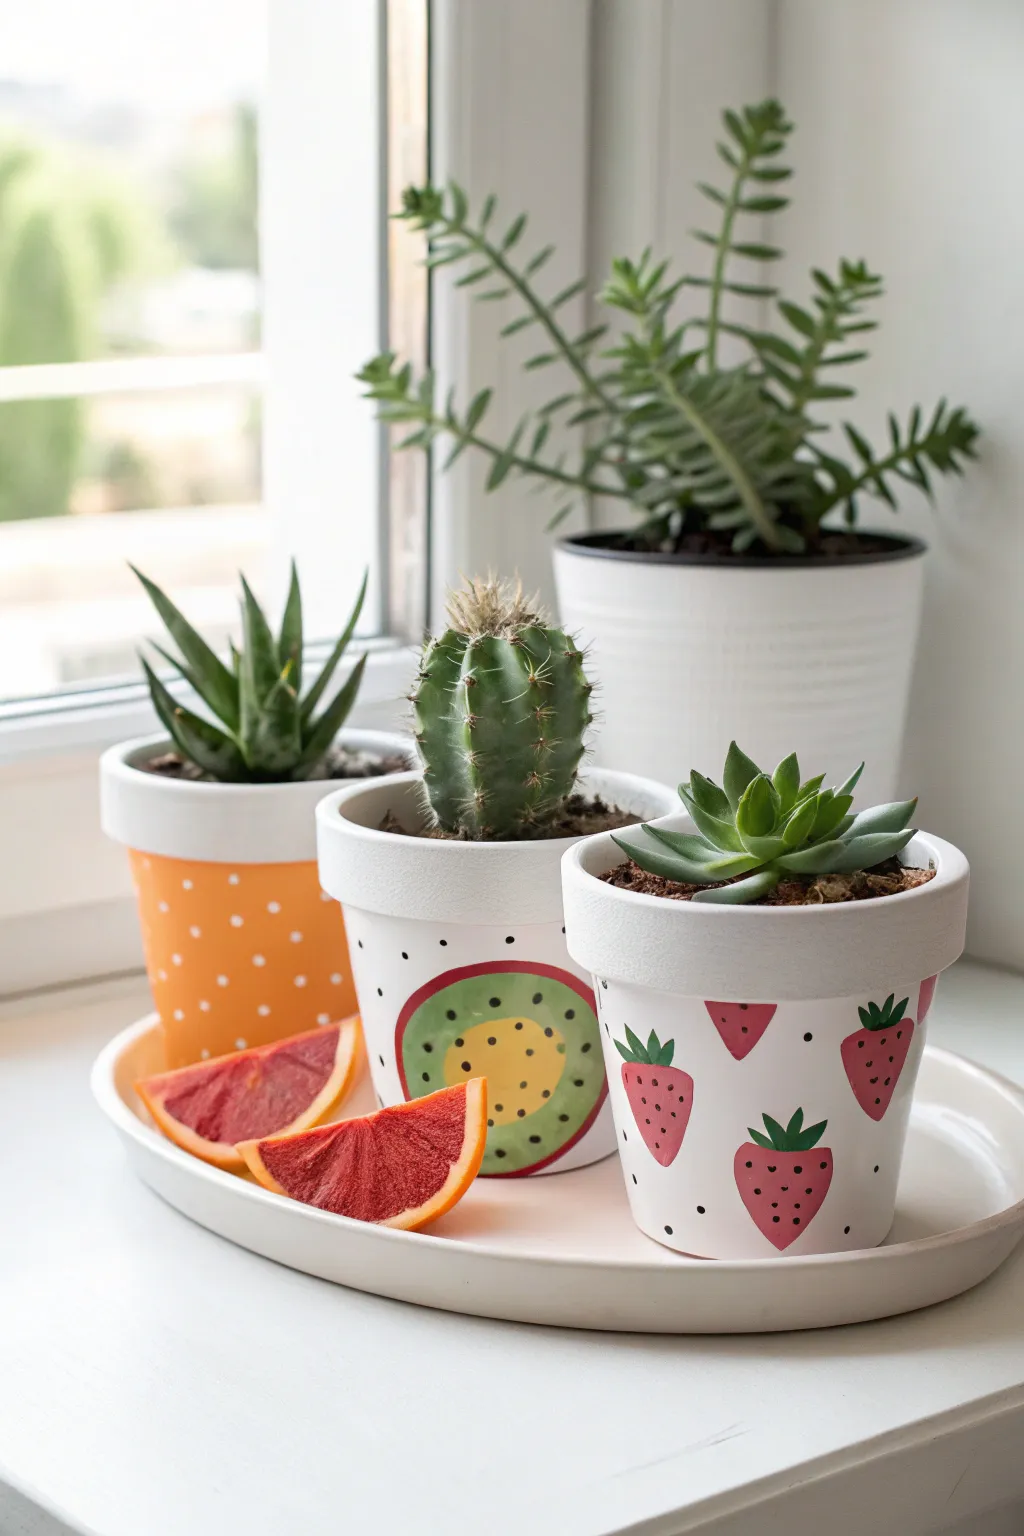
Brighten up your windowsill with these delightful fruit-inspired pots that capture the freshness of summer. This tutorial will guide you through creating a matching set featuring a zesty orange, a bold kiwi slice, and a charming strawberry pattern.
Step-by-Step
Materials
- 3 small terracotta pots (approx. 4-inch diameter)
- White acrylic paint (as primer and detail)
- Orange acrylic paint
- Pinkish-red acrylic paint
- Lime green acrylic paint
- Dark green acrylic paint
- Yellow ochre or mustard yellow acrylic paint
- Black acrylic paint or fine tip permanent marker
- Flat paintbrushes (medium and large)
- Fine detail paintbrush or dotting tool
- Painter’s tape
- Palette or paper plate
- Clear acrylic sealer (spray or brush-on)
- Water cup and paper towels
Step 1: Base Preparation
-
Clean the Pots:
Before starting, wipe down your terracotta pots with a damp cloth to remove any dust or debris. Let them dry completely to ensure the paint adheres properly. -
Prime the Surface:
Using a large flat brush, paint the entire exterior surface of all three pots with white acrylic paint. This primer coat makes the top colors pop. You might need two coats for full opacity. -
Create the Rim:
Once the base is dry, apply painter’s tape just below the rim of each pot to create a crisp line. Paint the rims white (if they aren’t already fully covered) and leave them white for a clean, unified look across the set.
Uneven Paint?
If your acrylic paint looks streaky, sand it very lightly with fine-grit sandpaper between coats once dry, then apply the next layer in the opposite direction.
Step 2: Painting the Orange Pot
-
Apply Orange Base:
Below the taped rim, paint the body of the first pot with a bright orange acrylic paint. Apply 2-3 thin coats for an even, saturated finish, allowing drying time between layers. -
Add Polka Dots:
Once the orange paint is bone dry, dip the back end of a paintbrush or a dotting tool into white paint. gently press dots onto the orange surface in a random, scattered pattern to mimic citrus texture.
Perfect Circles
For the kiwi slice, trace the bottom of a smaller glass or a round spice jar instead of freehanding the circle to get a perfectly round shape quickly.
Step 3: Painting the Kiwi Pot
-
Paint the Background:
For the second pot, paint the body underneath the rim with white paint if your primer coat wasn’t solid enough. The background needs to be a clean white. -
Sketch the Kiwi circle:
Lightly trace a large circle on the side of the pot using a pencil. This will be your main fruit slice feature. -
Fill the Outer Ring:
Paint the outer ring of your circle with lime green paint. Make this ring fairly thick, leaving a smaller circular space in the center unpainted. -
Paint the Core:
Fill the center circle with a yellow ochre or mustard yellow paint to represent the core of the kiwi. -
Add Seeds:
Using a fine detail brush or a black marker, add small black teardrop shapes or dots around the yellow core, sitting on top of the green section. -
Outline:
Use a steady hand and a liner brush with red paint to crate a thin outline around the entire green circle to enable it to stand out against the white background. -
Add Extra Dots:
Scatter a few tiny black dots on the white background around the kiwi slice for extra visual interest.
Step 4: Painting the Strawberry Pot
-
White Background:
Ensure the third pot has a solid white base on the body, just like the kiwi pot design. -
Paint Berry shapes:
Using pinkish-red paint, create small, upside-down triangle shapes with rounded corners scattered across the pot. I usually paint about 5-6 berries to keep it from looking cluttered. -
Add Leaves:
With a small brush and dark green paint, add three small strokes on top of each red berry to create the leafy green tops. -
Seed Details:
once the red paint is dry, use your finest brush or a marker to add tiny black specs on the berries for seeds. -
Final Touches:
Add tiny black dots randomly in the white space between the strawberries to tie the design together with the other pots.
Step 5: Finishing
-
Remove Tape:
Carefully peel off the painter’s tape from under the rims. If any paint bled led through, touch it up with white paint. -
Seal:
Apply a clear acrylic sealer (matte or gloss) over the painted areas to protect your artwork from water damage and wear.
Give your new succulent friends a perfect home with this juicy and refreshing set of pots
Drippy Dessert Paint Effect
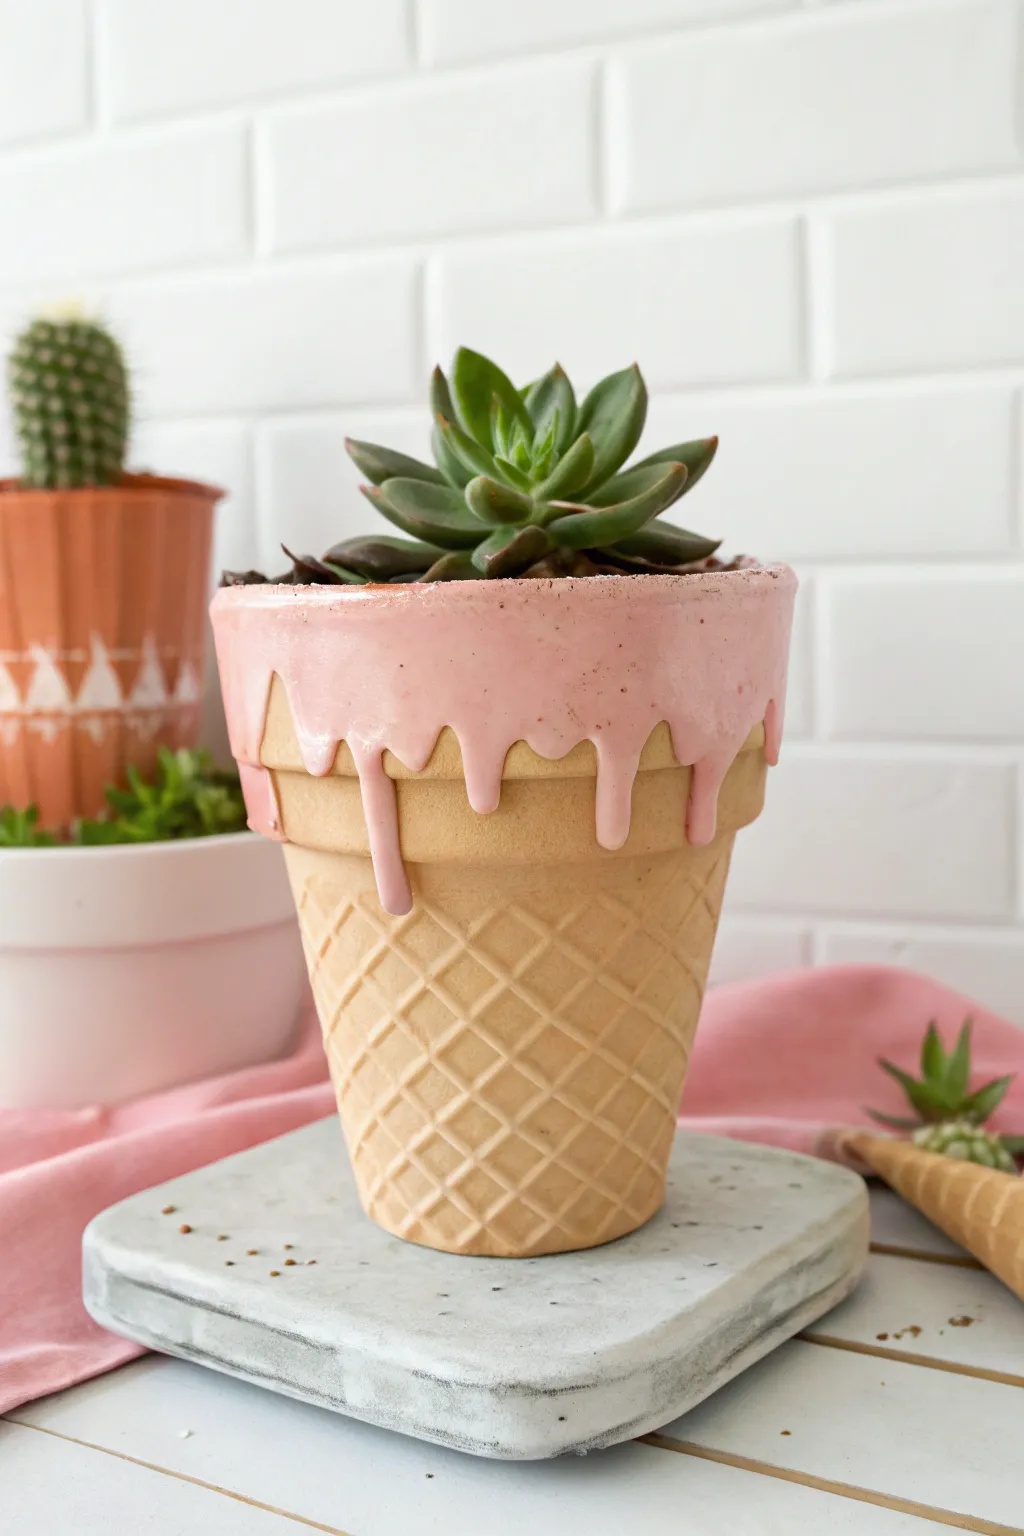
Turn a standard terracotta pot into a sweet treat that never melts with this playful ice cream cone design. The textured waffle cone pattern combined with glossy, dripping paint creates a delightful trompe-l’œil effect perfect for small succulents.
Detailed Instructions
Materials
- Standard terracotta pot (4-6 inch diameter)
- Beige or tan acrylic craft paint (matte finish)
- Pastel pink acrylic craft paint (glossy finish or mix with pouring medium)
- White puff paint (dimensional fabric paint)
- Medium flat paintbrush
- Small round paintbrush
- Ruler
- Pencil
- Squeeze bottle (optional, for the pink paint)
- Glazing medium or pouring medium (optional)
- Clear sealant spray (matte)
Step 1: Creating the Waffle Cone Base
-
Clean the pot:
Start with a clean, dry terracotta pot. Wipe away any dust or debris with a damp cloth and let it dry completely to ensure the paint adheres properly. -
Base coat application:
Paint the entire exterior of the pot, including the rim, with the beige or tan acrylic paint. Use your flat brush for even coverage. -
Second coat:
Once the first layer is dry to the touch, apply a second coat of beige paint to make the color opaque and solid. Let this dry fully before moving on. -
Pencil guidelines:
Using a flexible ruler and a pencil, lightly mark diagonal lines spaced about 1/2 inch apart going around the body of the pot below the rim. -
Create the grid:
Draw a second set of diagonal lines in the opposite direction to create a diamond grid pattern that mimics a waffle cone texture. -
Adding texture:
Trace over your pencil lines carefully with beige or white puff paint. The dimensional paint is key here—it physically raises the surface to look like a baked waffle grid. -
Color matching:
If your puff paint isn’t the exact shade of your base coat, let it dry completely (usually 4 hours), then paint over the raised lines with your beige acrylic paint to unify the cone color.
Gravity does the work
For the most realistic drips, hold the pot upside down for a few seconds after applying heavy paint blobs, then flip upright to let them settle naturally.
Step 2: Adding the Melting Ice Cream
-
Prepare the pink paint:
To get a thick, drippy consistency, mix your pastel pink acrylic paint with a little pouring medium or glazing medium. If you don’t have these, mixing in a bit of white glue can work in a pinch. -
Paint the rim:
Paint the top horizontal surface of the rim with a thick layer of your pink mixture. -
Start the drips:
Load a round brush heavily with pink paint. Press it against the side of the rim and let gravity pull the excess paint down, creating natural-looking drips. -
Varying lengths:
Create drips of different lengths all around the rim. Some should stop just below the lip, while others can extend further down onto the waffle grid area. -
Thickening the layer:
Go back over the main band of pink around the rim to ensure it looks thick and glossy, like melting soft serve. I find adding a second layer to the drip tips makes them look more rounded and realistic. -
Optional sprinkles:
If you want extra detail, you could drop tiny glass beads or paint multi-colored dots onto the wet pink paint, though the plain look is very clean and modern. -
Final drying time:
This thick paint layer will take significantly longer to dry than standard coats. leave the pot undisturbed in a dust-free area for at least 24 hours. -
Potting up:
Once fully cured, plant your favorite rosette-shaped succulent inside. The shape of an Echeveria mimics the swirl of ice cream perfectly.
Flavor variety
Make a whole sundae set! Try mint green paint for mint chocolate chip, pale yellow for lemon sorbet, or a rich brown for chocolate ice cream.
Display your sweet new planter on a sunny windowsill for a zero-calorie treat
Cute Animal Face Planters
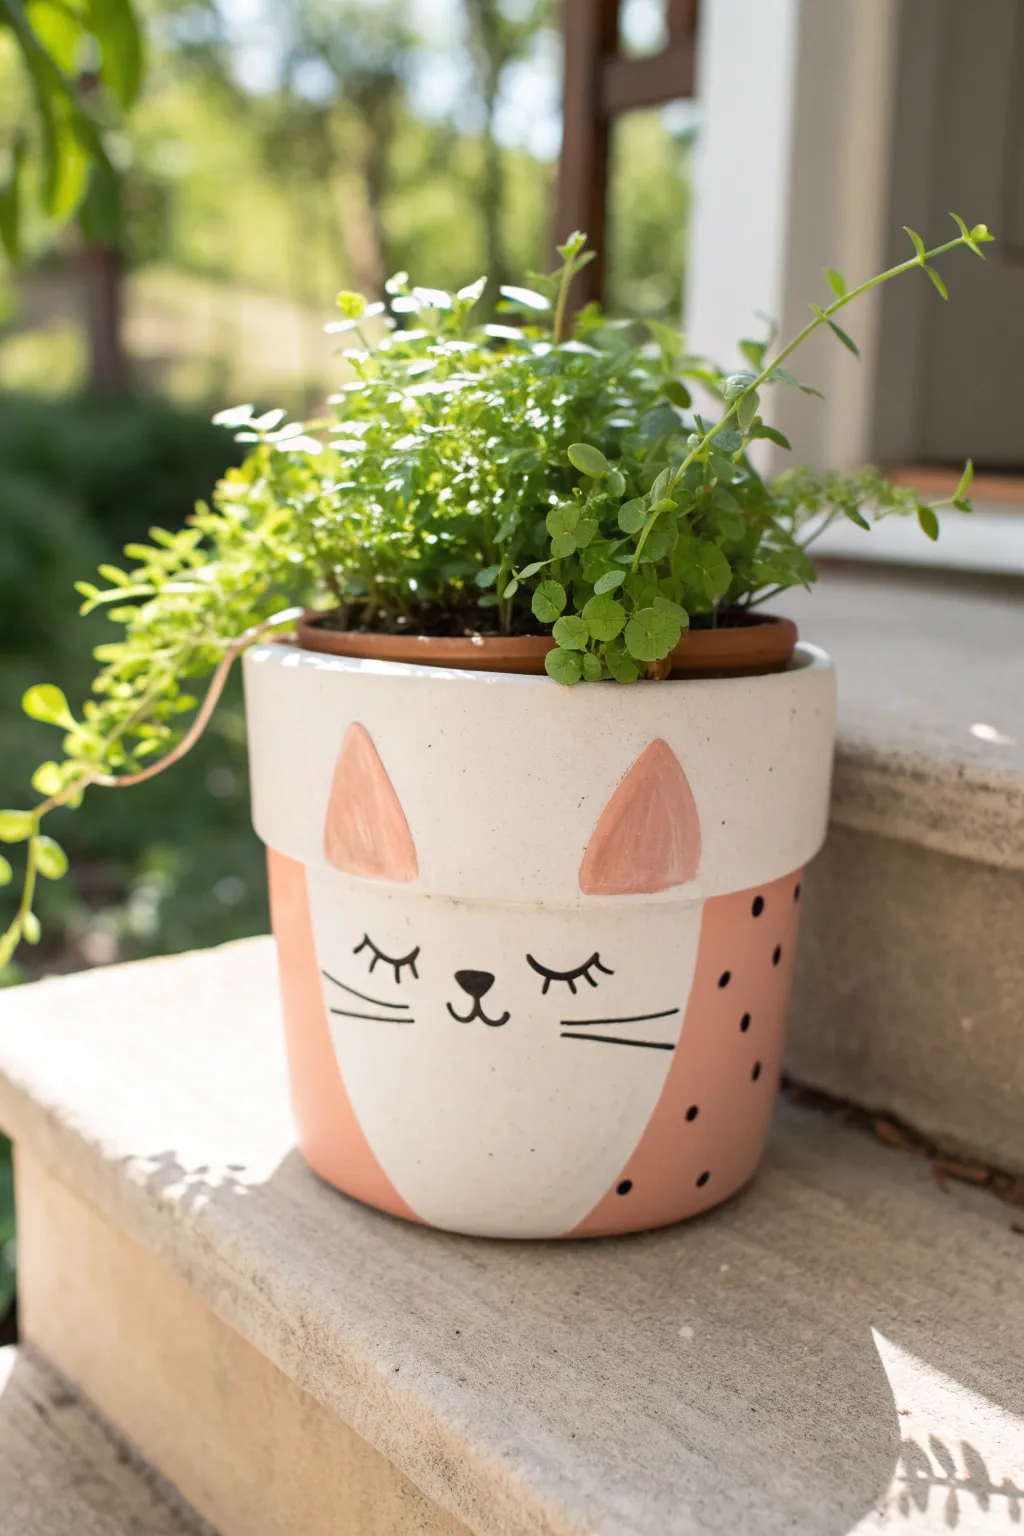
Transform a plain terracotta pot into an adorable feline friend with this sweet and simple painting project. Featuring a soft pastel color palette, whimsical dotted details, and a sleepy cat face, this planter adds a touch of character to any windowsill garden.
Step-by-Step Guide
Materials
- Standard terracotta pot (4-6 inch diameter works best)
- Acrylic craft paints: White, Peach/Salmon Pink, Black
- Medium flat paintbrush (approx. 1/2 inch) for base coats
- Small round paintbrush (size 2 or 4) for details
- Fine detail brush (size 0 or 00) or extra-fine black paint pen
- Surface sealer or clear acrylic spray (matte or satin finish)
- Pencil
- Eraser
- Paper plate or palette
- Water cup and paper towels
Step 1: Base Painting
-
Clean surface:
Begin by wiping down your terracotta pot with a damp cloth to remove any dust or debris. Let it dry completely before starting, as moisture can prevent paint adhesion. -
Paint the rim:
Using your medium flat brush, paint the entire rim of the pot with white acrylic paint. You may need 2-3 coats to get full, opaque coverage over the terracotta color. -
Paint the body:
Mix a small amount of white into your peach/salmon pink paint to soften it slightly if needed. Paint the body of the pot below the rim with this color, leaving a large, U-shaped area unpainted on the front. -
Refine the body shape:
Ensure the painted pink area curves up towards the rim on both sides, creating the negative space for the cat’s white face. -
Fill the face:
Paint the remaining U-shaped area on the front of the pot white, blending smoothly where it meets the white rim. This creates a solid white field for the face details. -
Dry completely:
Allow all base layers to dry fully. I usually give this a good 30 minutes to ensure the next steps don’t smear the base colors.
Step 2: Face Features
-
Sketch the face:
Lightly sketch the ear triangles on the rim and the facial features (eyes, nose, mouth, whiskers) onto the white area using a pencil. -
Paint the ears:
Using a small round brush and the same pink color used for the body, paint two soft triangles on the white rim. These should align with the edges of the white face section below. -
Shape the ears:
Make sure the bottom of the triangles touches the groove between the rim and the pot body, giving them a rooted look. -
Detail the eyes:
Switch to your fine detail brush or a black paint pen. Carefully trace over your sketched sleepy eyes, creating a small downward curve with three distinct lashes on each eye. -
Add the nose:
Paint a small, inverted triangle for the nose just below the center point between the eyes. -
Create the mouth:
Draw two small hooks curving outward from the bottom point of the nose to create the classic cat smile. -
Add whiskers:
With a steady hand, paint two long, thin horizontal lines on each cheek, extending outward from near the mouth area.
Paint Pen Rescue
If your hand feels shaky with a brush for thin lines like whiskers, swap to an extra-fine Posca paint pen. It offers much more control for detailed line work.
Step 3: Finishing Touches
-
Add polka dots:
Dip the back end of a small paintbrush handle into black paint. Gently dot the pink sections on the sides and back of the pot to create a uniform polka dot pattern. -
Clean up lines:
Once dry, use a clean brush with a tiny bit of white paint to tidy up any edges where the pink ears might have bled or where the face shape needs refining. -
Seal the pot:
If you plan to put a real plant inside, apply a clear acrylic sealer (spray or brush-on) over the entire painted exterior to protect your work from water damage.
Waterproofing Tip
Terracotta is porous and absorbs water, which can bubble paint. Seal the INSIDE of the pot with a clear sealant first to prevent moisture from seeping through.
Fill your new planter with some trailing foliage like the creeping jenny shown, giving your cat a wild, green hairdo
Galaxy Night Sky With Constellation Dots
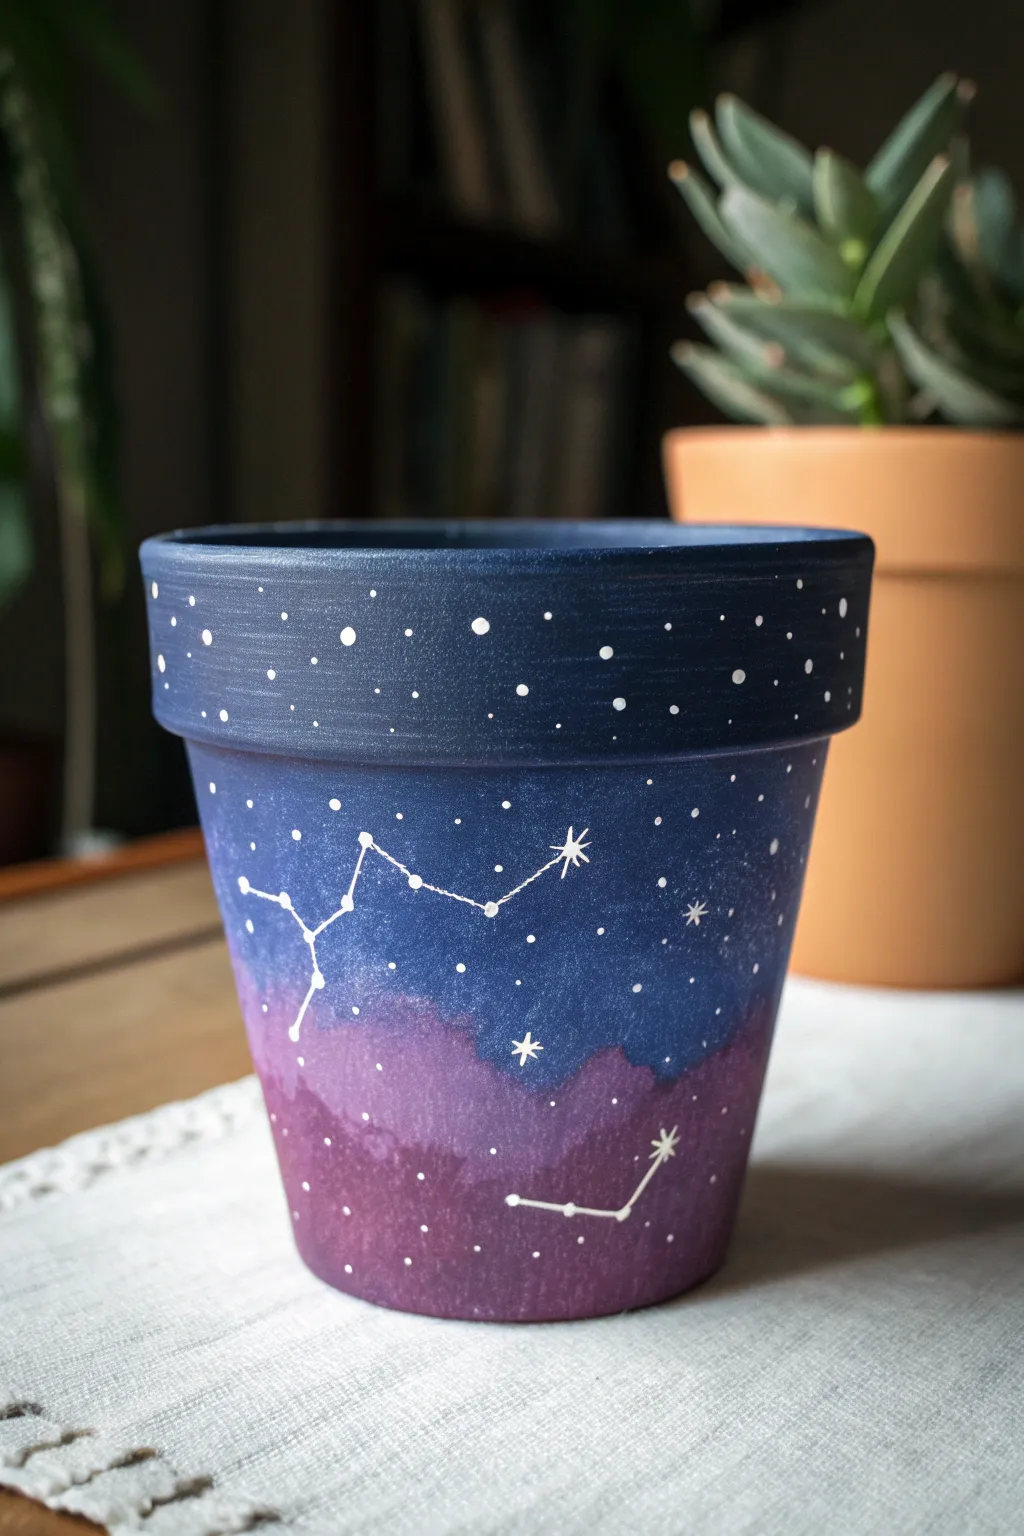
Bring the wonder of the cosmos into your home with this stunning deep blue and purple galaxy pot. Featuring hand-painted constellations and a splatter of starlight, this design transforms a plain planter into a dreamy piece of decor.
Detailed Instructions
Materials
- Clean terracotta pot
- Deep navy blue acrylic paint
- Rich purple acrylic paint
- White acrylic paint
- Small flat paintbrush
- Detail round paintbrush (size 0 or similar)
- Sponge dabber or small makeup sponge
- Palette or paper plate
- Cup of water
- Paper towels
- Matte spray sealant
Step 1: Setting the Background
-
Clean surface:
Before you begin, ensure your terracotta pot is clean, dry, and free of any dust or sticker residue. A quick wipe with a damp cloth usually does the trick. -
Base coat rim:
Load your flat brush with deep navy blue paint. Paint the entire outer rim of the pot with a solid, opaque coat. Cover the top lip and just inside the rim as well for a polished look. -
Paint upper body:
Continue using the navy blue to paint the upper half of the pot’s body, just below the rim. Don’t worry about a crisp bottom edge yet; keep it jagged and uneven. -
Apply purple base:
Clean your brush thoroughly. Pick up the rich purple paint and fill in the bottom half of the pot, letting the paint meet the blue section. -
Create the gradient:
While both paints are still slightly wet, use a sponge dabber or a clean, damp brush to gently blend where the blue and purple meet. Using a dabbing motion creates a cloud-like transition rather than a hard line. -
Second coat:
Allow the first layer to dry completely (about 15-20 minutes). Apply a second coat to both colors, repeating the blending process to ensure the terracotta color doesn’t peek through. -
Rim texture:
For the rim specifically, brush horizontally to create subtle streaks, mimicking the vastness of space. Let everything dry completely before moving on.
Uneven Blending?
If the gradient looks muddy, let it dry completely. Re-apply fresh blue and purple, then use a slightly damp sponge to dab just the boundary line for a softer fade.
Step 2: Adding the Stars
-
Prepare white paint:
Put a small dollop of white acrylic paint on your palette. You want a creamy consistency, so add a tiny drop of water if it feels too thick. -
Rim stars:
Using your smallest detail brush or the handle end of a paintbrush, dot white specks all around the dark blue rim. vary the pressure to make some dots larger and others tiny. -
Body stars:
Continue adding random stars to the main body of the pot. Place them over both the blue and purple sections, scattering them naturally like a real night sky. -
Cluster check:
Step back and look at your pot. Add a few denser clusters of tiny dots in the transitional area between colors to suggest distant galaxies.
Step 3: Painting Constellations
-
Map your design:
Decide which constellation you want to feature. The image shows a larger constellation like Cassiopeia or Cygnus near the top and a smaller one near the bottom. -
Mark major stars:
Using the detail brush, paint the main stars of your chosen constellation first. These should be distinctly larger than your background stars. -
Connect the lines:
Carefully draw thin white lines connecting these major stars. I find it helps to steady my pinky finger against the dry part of the pot for stability while drawing these delicate lines. -
Add starbursts:
Select one or two key stars in your constellation and turn them into ‘twinkling’ stars. Do this by drawing a small cross or plus sign through the dot, extending the arms slightly. -
Final highlights:
Add tiny second coats of white to the centers of your biggest stars to make them pop against the dark background. -
Seal the work:
Once the white paint is completely dry (give it at least an hour), take the pot to a well-ventilated area and apply a clear matte spray sealant to protect your artwork from water damage.
Glow Up
Mix a tiny amount of glow-in-the-dark medium into your white paint for the constellations. Your pot will look normal by day but light up beautifully at night.
Now your plant has a magical cosmic home that looks beautiful on any windowsill