A good ceramic vase is basically a little sculpture that just happens to hold flowers. Here are my favorite ceramic vase ideas—from classic shapes you’ll make again and again to playful statement pieces that steal the whole shelf.
Classic Wheel-Thrown Cylinder Vase
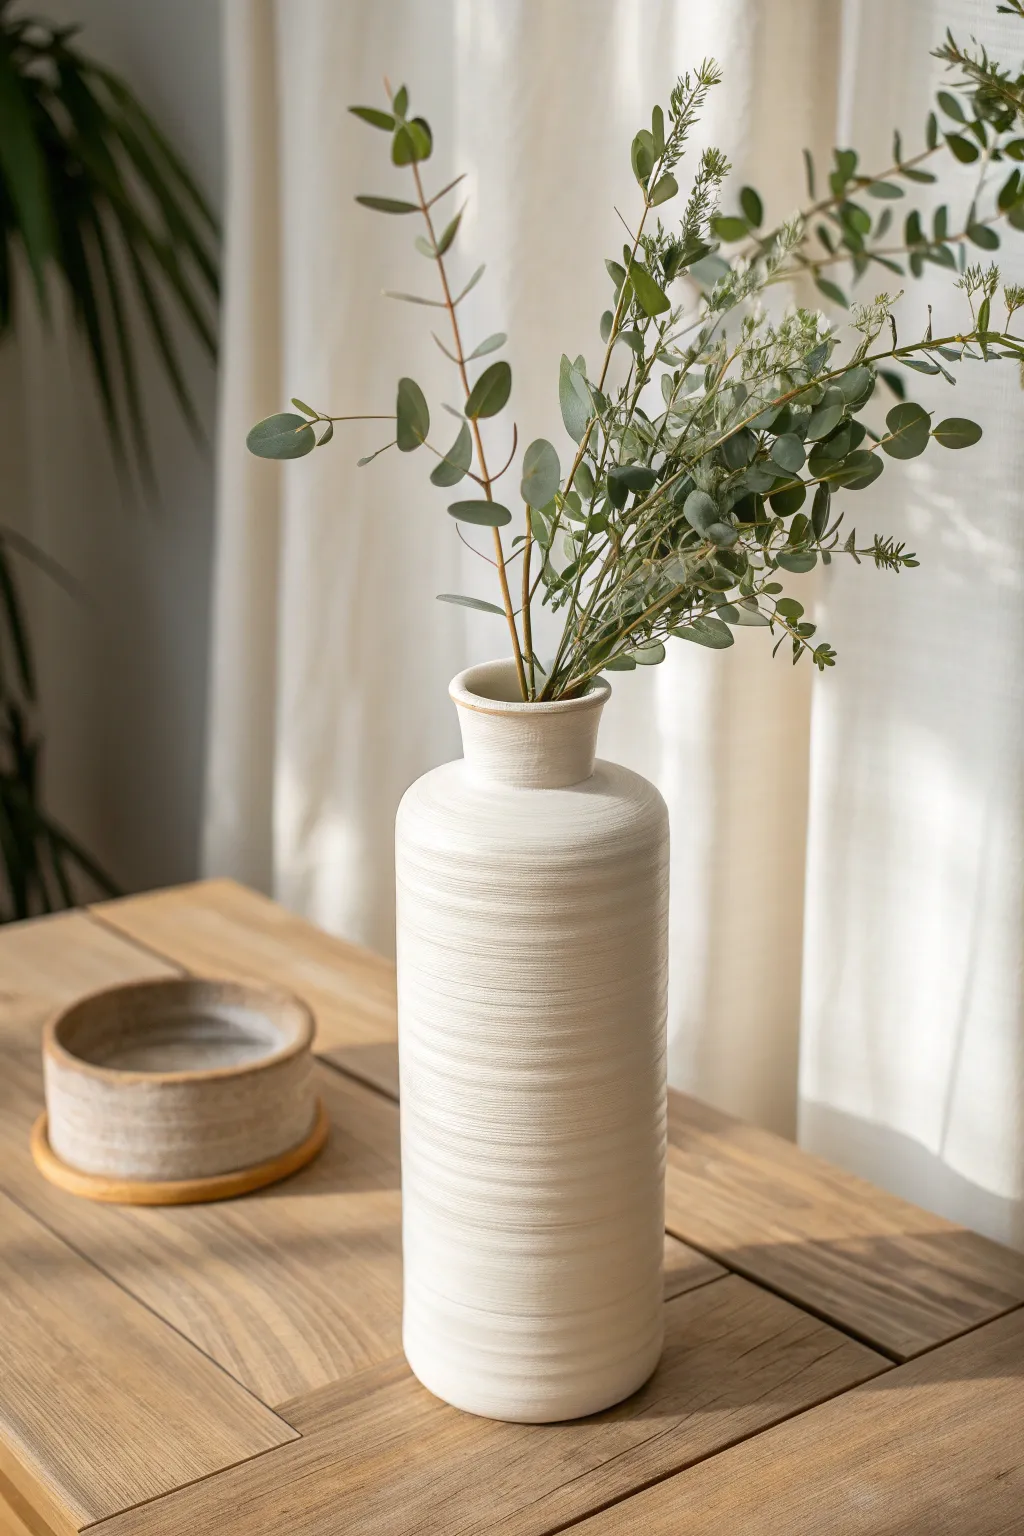
This elegant vessel combines height with a tactile surface, featuring subtle, continuous ridges that catch the light beautifully. The clean white matte finish gives it a modern, minimalist aesthetic perfect for displaying dried eucalyptus or tall branches.
Step-by-Step Guide
Materials
- Wheel-throwing clay body (white stoneware or porcelain)
- Potter’s wheel
- Sponge
- Wire cutter
- Needle tool
- Wooden rib tool
- Serrated metal rib or textured styling tool
- Calipers (optional)
- Matte white glaze
- Kiln
Step 1: Throwing the Cylinder
-
Center the clay:
Start with a generous ball of white stoneware clay, roughly 3-4 pounds, on your wheel head. Center it firmly, ensuring there is absolutely no wobble, as height requires a perfect foundation. -
Open the form:
Drill your thumbs down into the center to open the clay, leaving about a half-inch floor thickness. Pull the floor out until it reaches your desired base width, approximately 4 inches for this proportions. -
Establish the initial pull:
Begin your first pull, bringing the clay up into a thick, low cylinder. Keep the walls even and compress the rim after each pull to maintain structural integrity. -
Build height:
Focus on lifting the clay upward rather than outward. Use even pressure between your inside and outside hands to draw the walls up tall and straight. I find it helpful to slow the wheel speed down as the piece gets taller. -
Shape the shoulders:
Once you have significant height (around 10-12 inches), gently collar the top section inward to form the sloping shoulder leading to the neck. -
Form the neck and rim:
Pull the neck vertically for about an inch or so, then gently flare the very top outward to create the distinct, rounded rim seen in the reference.
Collapsing Walls?
If the tall walls start to wobble or twist, your walls may be too thin or uneven. Leave slightly more clay at the bottom for support and pull up gradually.
Step 2: Texturing and Trimming
-
Apply the texture:
While the wheel is spinning at a slow, steady pace, take a serrated metal rib or a specialized texturing tool. Press it gently against the exterior wall at the base and slowly move up to the shoulder to create continuous horizontal striations. -
Dry to leather hard:
Remove the vase from the wheel using a wire cutter and let it dry slowly until it reaches a leather-hard state. This is crucial for the tall walls to support themselves during trimming. -
Trim the base:
Place the leather-hard vase back on the wheel, centered and secured with lugs of clay. Trim any excess weight from the bottom and define a clean foot ring. -
Smooth the lip:
Use a slightly damp sponge to soften the rim and ensure there are no sharp edges or burrs from the throwing process.
Texturing Tip
Don’t press the texturing tool too hard. You just want to scratch the surface. Pressing deep can weaken the wall or warp the cylinder’s shape.
Step 3: Glazing and Firing
-
Bisque fire:
Load the thoroughly dried vase into the kiln for a bisque firing (usually to Cone 04 or 06, depending on your clay body). -
Prepare the glaze:
Mix your matte white glaze thoroughly. It should have the consistency of heavy cream to ensure it coats the texture without filling in the grooves completely. -
Pour the interior:
Pour glaze inside the vase, swirl it to coat the entire inner surface, and pour out the excess quickly to avoid saturating the walls. -
Dip or spray the exterior:
For the exterior, dipping is ideal if you have a large enough bucket. If not, spray the glaze evenly as you rotate the piece to ensure a uniform coating over the ridges. -
Clean the foot:
Wipe the bottom of the foot completely clean with a wax resist or a damp sponge to prevent the pot from sticking to the kiln shelf. -
Glaze fire:
Fire the piece to the maturity temperature of your clay and glaze (typically Cone 5, 6, or 10).
Once cooled, fill your new textured vase with wild branches to enjoy the interplay of light on the grooved surface


Small Bud Vase Trio for Easy Styling
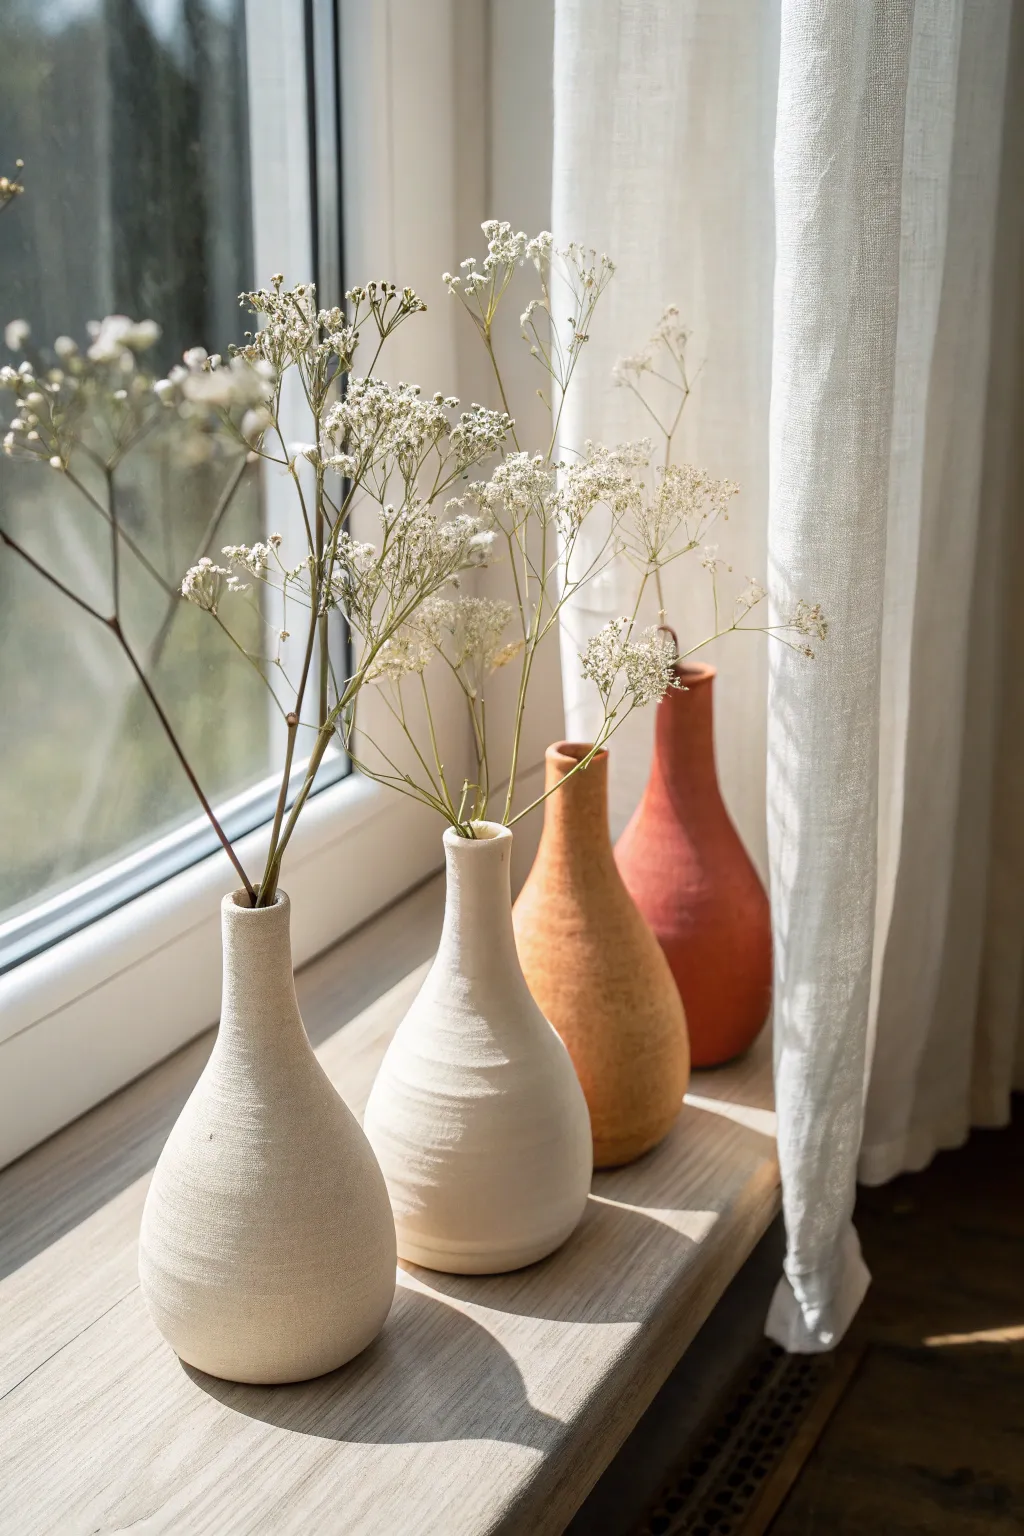
Transform plain glass or smooth ceramic bottles into an artisanal, pottery-inspired display with this simple upcycling technique. By adding texture to paint, you can mimic the earthy, matte look of hand-thrown clay without needing a kiln.
Step-by-Step
Materials
- Three glass bottles or smooth bud vases (differing slightly in height/shape)
- Acrylic paint (cream, terracotta orange, deep reddish-brown)
- Baking soda or baking powder
- Paintbrushes (flat bristle brush and a sponge brush)
- Small mixing bowls or cups
- Stir sticks
- Matte finish clear sealant spray
- Dried Gypsophila (Baby’s Breath) stems
- Sandpaper (fine grit)
- Cardboard or drop cloth
Step 1: Preparation & Mixing
-
Clean surface:
Begin by removing any labels or sticky residue from your glass bottles. Wash them thoroughly with warm soapy water and let them dry completely to ensure the paint adheres well. -
Mix base color:
Pour about 1/2 cup of cream acrylic paint into a mixing container. This will be the base for your two front vases. -
Add texture:
Gradually stir in baking soda to the cream paint. Aim for a ratio of about 1 part baking soda to 2 parts paint. You want a consistency similar to fluffy frosting or mousse. -
Mix accent colors:
Repeat the mixing process in separate cups for your terracotta and deep reddish-brown paints. I like to make the texture slightly thicker for the darker vases to give them a rougher, more rustic appearance.
Paint Peeling Off?
If the paint slides off the glass, the surface might be too slick. Lightly sanding the glass before painting or using a spray primer first creates better grip.
Step 2: Painting & Layering
-
Apply first cream coat:
Using a flat bristle brush, apply the cream textured mixture to the first bottle. Paint in horizontal strokes around the neck and body to mimic the turning lines of a potter’s wheel. -
Create variation:
For the second cream bottle, switch your stroke direction or use a sponge brush to dab the paint on, creating a more pitted, stone-like surface. -
Paint the background vases:
Apply the terracotta mixture to your third bottle and the reddish-brown mixture to the fourth (if using). Ensure you coat the rim and just inside the neck so the original material doesn’t show. -
Initial drying:
Let the first coat dry for about 30-45 minutes. The baking soda mixture dries faster than plain paint, but it can be fragile while wet. -
Apply second coat:
Apply a second layer to all vases. This is where you can build up ‘imperfections’ by globbing a little extra paint in spots or creating gentle ridges. -
Detailed ridges:
While the second coat is wet on the cream vases, lightly drag your brush horizontally around the widest part of the base to enhance that hand-thrown pottery look. -
Full cure:
Allow the vases to dry completely, preferably overnight. The thick paint needs time to harden fully.
Step 3: Finishing Touches
-
Distress (Optional):
Once fully dry, you can very lightly sand high points with fine-grit sandpaper if you want a weathered look, though leaving it rough is also beautiful. -
Seal the surface:
Take the vases to a well-ventilated area and spray them with a matte clear sealant. This prevents the baking soda from flaking off over time. -
Prepare florals:
Take your dried baby’s breath stems and gently tease the branches apart so they aren’t clumped together. -
Trim stems:
Cut the stems to varying lengths. You want the flowers to hover just a few inches above the neck of each vase. -
Arrange:
Place 2-3 stems in each vase. The sparse arrangement highlights the delicate nature of the flowers against the heavy texture of the vases. -
Final display:
Group the vases on a sunny windowsill, placing the lighter vases in front and the darker ones in the back to create depth.
Dual-Tone Effect
For more depth, mix a slightly darker shade of cream and sponge it lightly over the textured dried base coat to highlight all the nooks and crannies.
Enjoy the calm, organic atmosphere these textured beauties bring to your window space


Tall Bottle-Neck Vase for Branches
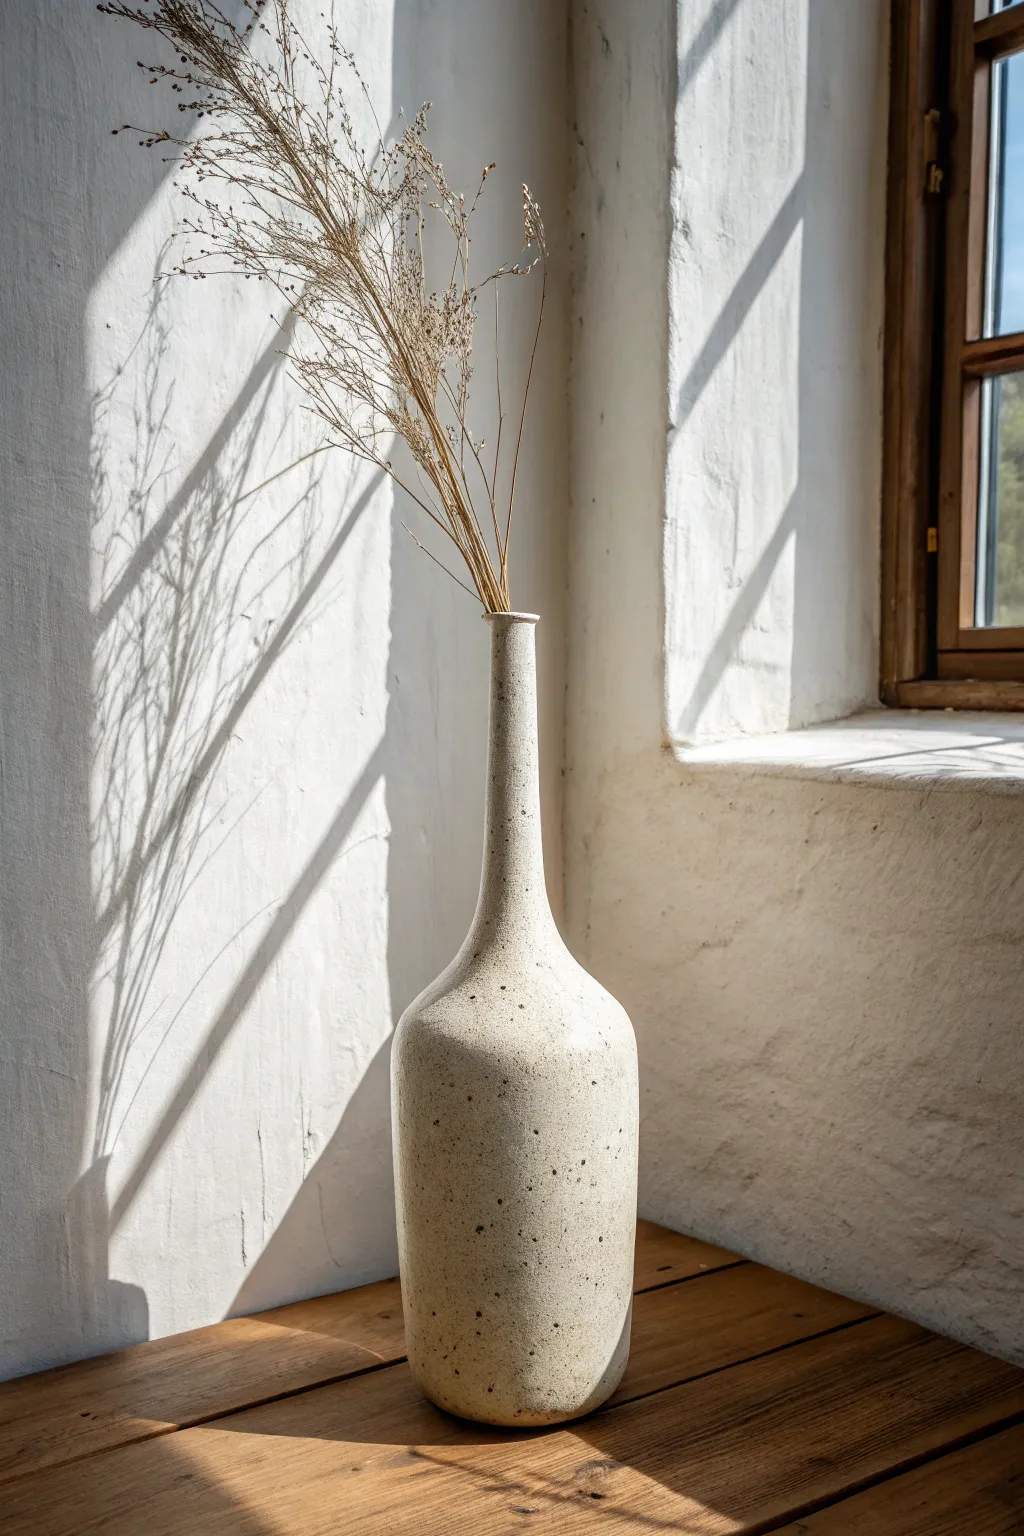
Embrace organic textures and graceful silhouettes with this handmade bottle-neck vase project. The tall, slender neck creates a dramatic contrast with the earthy, speckled stoneware, making it the perfect vessel for displaying delicate dried branches.
Detailed Instructions
Materials
- Speckled stoneware clay (about 3-4 lbs)
- Pottery wheel
- Throwing sponge
- Wire cutter
- Ribs (wooden and metal)
- Needle tool
- Trimming tools
- Calipers (optional but helpful)
- Chamois cloth
- Clear matte glaze
- kiln
Step 1: Throwing the Base Form
-
Center the clay:
Start by wedging your speckled clay thoroughly to remove air bubbles. Slam the ball onto the wheel head and center it using firm pressure and water, ensuring the cone is perfectly symmetrical before proceeding. -
Open the clay:
Press your thumbs into the center to open the clay, leaving about a half-inch of thickness for the floor. Since this is a tall vase, keep the interior floor relatively narrow to support the height. -
Pull the first cylinder:
Slow the wheel down slightly and begin pulling the walls up into a cylinder. Focus on keeping the walls thick at this stage; you need plenty of clay reserved at the top to later collar in the long neck. -
Shape the belly:
Using a rib on the outside and your fingers on the inside, gently push the clay outward from the inside to create the bulbous bottom section. Maintain a smooth curve, tapering back in slightly as you reach the middle of the form.
Collaring Success
To prevent the long neck from torquing or twisting, speed up the wheel slightly while collaring and minimize friction by keeping your hands well-lubricated with slip.
Step 2: Forming the Narrow Neck
-
Begin collaring:
With the wheel spinning at a medium speed, lubricate the upper rim well. Place both hands around the outside of the clay cylinder and gently squeeze while lifting upwards. This is called “collaring” and will narrow the opening. -
Compress and lift:
After each collaring pass, the clay wall will thicken. Use a thin throwing stick or your finger to pull that excess clay upward, extending the height of the neck. This phase requires patience to avoid twisting the clay. -
Refine the transition:
Smooth the area where the bulbous body meets the neck. I find it helpful to use a metal rib here to scrape away slip and define that shoulder curve cleanly. -
Finalize neck height:
Continue alternating between collaring in and pulling up until you achieve a long, slender neck about one-third the width of the body. Aim for straight vertical lines on the neck for that modern bottle look. -
Finish the rim:
Use a chamois cloth held over the rim to compress and round it off smoothly. A slight outward flare at the very top adds a delicate finishing touch.
Dual-Tone Texture
Enhance the earthy look by leaving the bottom inch of the vase unglazed. The contrast between the smooth glazed body and the raw, toasted clay foot creates beautiful visual tension.
Step 3: Trimming and Finishing
-
Dry to leather hard:
Cut the vase from the wheel and let it dry slowly under plastic until it reaches a leather-hard state. The neck is fragile, so ensure even drying to prevent warping. -
Trim the foot:
Invert the vase into a tall chuck or use clay lugs to secure it gently to the wheel. Trim away excess weight from the bottom and carve a neat foot ring that complements the vase’s curves. -
Smooth the surface:
Use a damp sponge or a soft rib to burnish the surface slightly, pushing any grog back into the clay body if you want a smoother tactile finish. -
Bisque fire:
Load the bone-dry vase into the kiln and fire to your clay body’s bisque temperature (usually cone 04 or 06). -
Apply glaze:
Pour a clear matte glaze inside the vase and swirl to coat the interior. For the exterior, dip or spray a thin layer of the same clear glaze. This highlights the natural speckles of the clay body without obscuring them. -
Final firing:
Fire the glazed piece to cone 5 or 6 (depending on your clay). Once cool, arrange a few stems of dried grass for immediate display.
Place your finished vase near a window where the light can play across the speckled surface and cast dramatic shadows through the dried branches.


Rounded Belly Vase With a Narrow Mouth
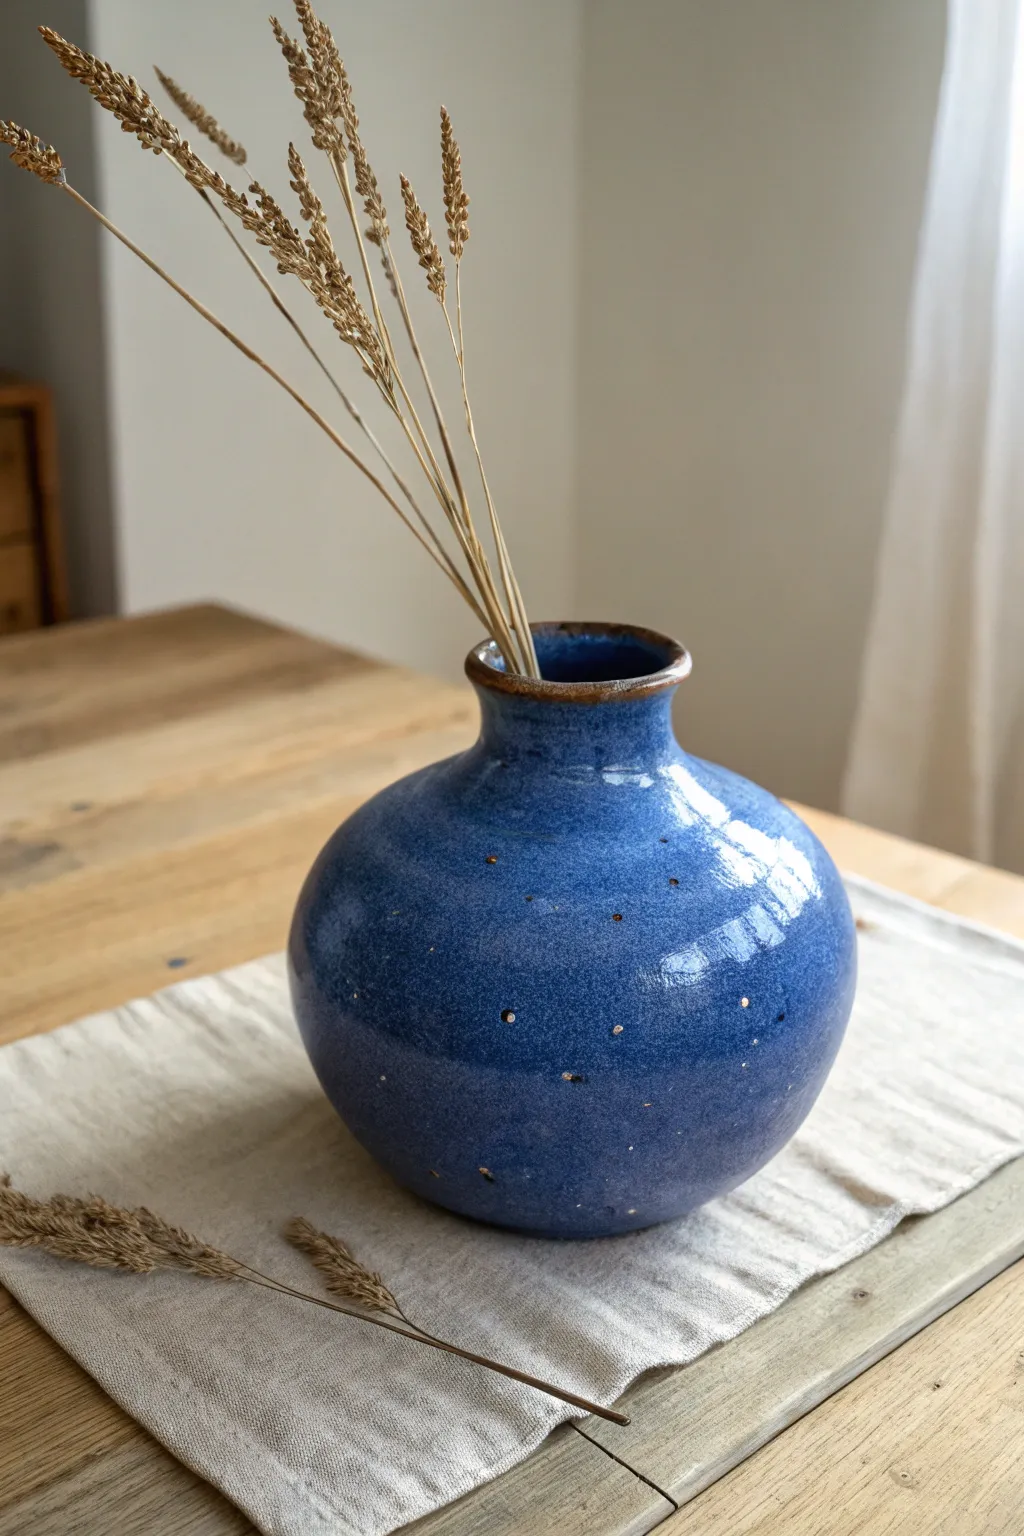
Capture the magic of a twilight sky with this wheel-thrown vase featuring a voluminous rounded body and a delicate narrow neck. The rich, glossy blue glaze is punctuated by subtle speckling and a warm, exposed clay rim, giving it an earthy yet celestial feel.
Step-by-Step Guide
Materials
- Stoneware clay (smooth body recommended)
- Pottery wheel
- Throwing sponge
- Pin tool
- Wooden rib tool
- Metal kidney rib
- Wire cutter
- Trimming tools
- Cobalt blue glossy glaze
- Wax resist (liquid)
- Small paintbrush
- Sponge for cleaning
- Kiln
Step 1: Throwing the Form
-
Center the clay:
Start with a well-wedged ball of clay, about 2-3 pounds. Firmly slam it onto the center of the wheel head and use water and pressure to center it perfectly into a low, wide mound rather than a tall cone. -
Open the form:
Press your thumbs into the center to open the clay, leaving a base thickness of about half an inch. Pull the floor outwards towards yourself to established the width of the belly early on. -
Raise the cylinder:
Slowly pull the walls upward into a cylinder. Don’t worry about the curve yet; just ensure the walls are even from bottom to top. Aim for a cylinder slightly wider than your intended neck size. -
Belly out the form:
Using a rib on the outside for support and your fingers on the inside, gently push the belly outward. Start from the bottom and stretch the clay into a spherical shape. I like to do this in several gentle passes to avoid collapsing the wall. -
Bevel the curve:
Use a wooden rib on the exterior to refine the curve of the belly, scraping away slip to reveal the structural shape and smoothing out any finger ridges. -
Collar the neck:
Identify where the shoulder meets the neck. Using both hands with wet fingers, gently squeeze or ‘collar’ the clay inwards to narrow the top opening significantly. -
Refine the rim:
Once the neck is narrowed, use your fingertips or a chamois cloth to compress and smooth the rim lip. Flare it ever so slightly outward to create a defined termination point. -
Undercut the foot:
Use a wooden modeling tool to undercut the base of the pot, creating a small shadow line that will make trimming easier later. Wire off the pot and let it dry to leather hard.
Collaring Success
When collaring the neck, speed up the wheel slightly. Use plenty of water and compress the clay after every inward push to prevent the walls from buckling or twisting.
Step 2: Trimming and Glazing
-
Trim the foot:
Center the leather-hard pot upside down on the wheel (use a chuck if the neck is too narrow to support the weight). Trim away excess clay from the bottom to create a rounded curve that continues all the way to a small, defined foot ring. -
Bisque fire:
Once the piece is bone dry, load it into the kiln for a bisque firing (around Cone 04-06) to prepare it for glazing. -
Wax the foot:
Apply liquid wax resist to the bottom foot ring and about 2mm up the side to prevent glaze from running onto the kiln shelf. -
Wax the rim:
Using a small brush, carefully apply wax resist to the very top edge of the rim. This creates the exposed brown clay accent seen in the reference image. -
Pre-wet the pot:
Quickly dunk the bisque ware in clean water or wipe with a damp sponge. This prevents the glaze from absorbing too instantly and allows for a smoother coat. -
Pour the interior:
Pour your cobalt blue glaze into the vase, swirl it around to coat the entire interior, and pour out the excess. Wipe any drips off the exterior. -
Dip the exterior:
Holding the pot by the foot (or using dipping tongs), submerge the entire vase into the glaze bucket. Hold for 3 seconds and lift out. -
Add the starry effect:
For the speckles, you can either use a glaze that has iron flecks built-in, or lightly flick a stiff toothbrush loaded with a contrasting iron oxide wash or white glaze onto the wet blue surface. -
Clean up:
Use a damp sponge to wipe any stray glaze off the waxed foot rim and the waxed mouth rim. The wax resists the glaze, but droplets often sit on top and need removal. -
Glaze fire:
Fire the vase to maturity (likely Cone 5 or 6 depending on your clay and glaze). Let the kiln cool completely before opening.
Uneven Drying?
Narrow-mouth vases dry unevenly because air can’t reach the inside. Wrap the rim loosely in plastic while the base dries to let the moisture content equalize.
Fill your finished vase with dried grasses to complement the organic tones of the rim

The Complete Guide to Pottery Troubleshooting
Uncover the most common ceramic mistakes—from cracking clay to failed glazes—and learn how to fix them fast.
Soft Ribbed Texture Vase (Simple but So Good)

This project centers on creating a timeless, creamy white vase featuring gentle, vertical ribbed fluting that catches the light beautifully. The form is classic—a bulbous body tapering into a narrow neck—enhanced by a textured surface that feels both modern and organic.
How-To Guide
Materials
- White stoneware clay (mid-fire)
- Pottery wheel
- Throwing sponge
- Wire cutter
- Rib tool (wooden or metal)
- Fluting tool (or a small loop tool)
- Flexible metal rib
- Needle tool
- Chamois cloth or soft plastic strip
- Matte white or satin white glaze
- Small sponge for smoothing
- Kiln
Step 1: Throwing the Form
-
Center and open:
Begin by wedging about 3-4 pounds of white stoneware clay to remove air bubbles. Center the clay on the wheel head, ensuring it feels stable and symmetrical before opening the center hole down to about a half-inch from the bat. -
Establish the floor:
Compress the floor of your vessel by running your fingers back and forth from the center to the edge. This prevents cracking later during the drying and firing processes. -
Pull the cylinder:
Perform your initial pulls to create a tall, even cylinder. Focus on keeping the walls consistent in thickness from bottom to top, as this is crucial for the carving stage later. -
Belly out the form:
Using a rib tool on the inside and your hand on the outside, gently push the clay outward from the inside to create a rounded, bulbous belly. The widest point should be just below the center of the vase. -
Collar the neck:
Slowly collar the top third of the clay inward to form the tapered neck. Use both hands to gently squeeze the spinning clay, moving upward to narrow the opening significantly. -
Refine the rim:
Once the neck is shaped, use a chamois cloth or a strip of soft plastic to compress and smooth the rim. A slight flare at the very top adds elegance and makes it easier to arrange flowers. -
Smooth the surface:
Before removing the pot from the wheel, run a flexible metal rib up the exterior to remove throwing lines and slurry. You need a very smooth canvas for the ribbing texture. -
Wire off and dry:
Cut the vase from the bat with a wire cutter and set it aside to dry until it reaches a sturdy leather-hard stage. It should be firm enough to handle without deforming, but soft enough to carve.
Uneven Lines?
If your vertical lines are wobbling, try placing the vase on a banding wheel. Rotate it slightly for positioning, but hold your arm steady against your body while dragging the tool downwards.
Step 2: Carving the Texture
-
Mark vertical guides:
I like to lightly mark the rim or the foot with four equidistant points using a needle tool. This helps keep your vertical lines straight if you tend to drift while carving. -
Select your tool:
Choose a fluting tool or a wire loop tool with a U-shaped profile. The width of the loop will determine the width of your ribs. -
Carve the first channel:
Starting just under the rim flare, drag your tool vertically down the body of the vase, following the curve of the belly, all the way to the foot. Apply consistent pressure to maintain an even depth. -
Continue around the vessel:
Carve the next channel immediately adjacent to the first, leaving a narrow ridge between them. Repeat this process around the entire circumference. The goal is tight, repetitive vertical lines. -
Refine the ridges:
Once carved, the clay edges might be sharp. Use a damp sponge or a soft brush to gently smooth the high points of the ribs without washing away the definition. -
Dry slowly:
Cover the vase loosely with plastic to let it dry slowly. Because the walls vary in thickness due to the carving, slow drying prevents warping or cracking.
Step 3: Glazing and Firing
-
Bisque fire:
Load the bone-dry vase into the kiln for a bisque firing (usually to Cone 04 or 06). This prepares the clay to accept glaze. -
Wax the foot:
Apply wax resist to the bottom foot ring of the vase to prevent glaze from sticking to the kiln shelf. -
Apply the glaze:
Pour a matte or satin white glaze into the vase, swirl it to coat the interior, and pour it out. Then, dip or spray the exterior. A matte finish is key here to soften the shadows in the grooves. -
Clean the grooves:
Check that the glaze hasn’t pooled too thickly in the carved channels, which could obscure the texture. If needed, gently wipe excess glaze from the deep grooves. -
Glaze fire:
Fire the vase to the maturity temperature of your clay and glaze (typically Cone 5 or 6 for mid-fire stoneware).
Pro Tip: Soften the Look
For that ultra-soft, organic look shown in the image, use a slightly damp sponge to wipe down the sharp ridges *after* the clay is bone dry but before bisque firing, rounding them off further.
Once cooled, fill it with fresh eucalyptus or dried stems to highlight the beautiful vertical shadows of your new handmade piece
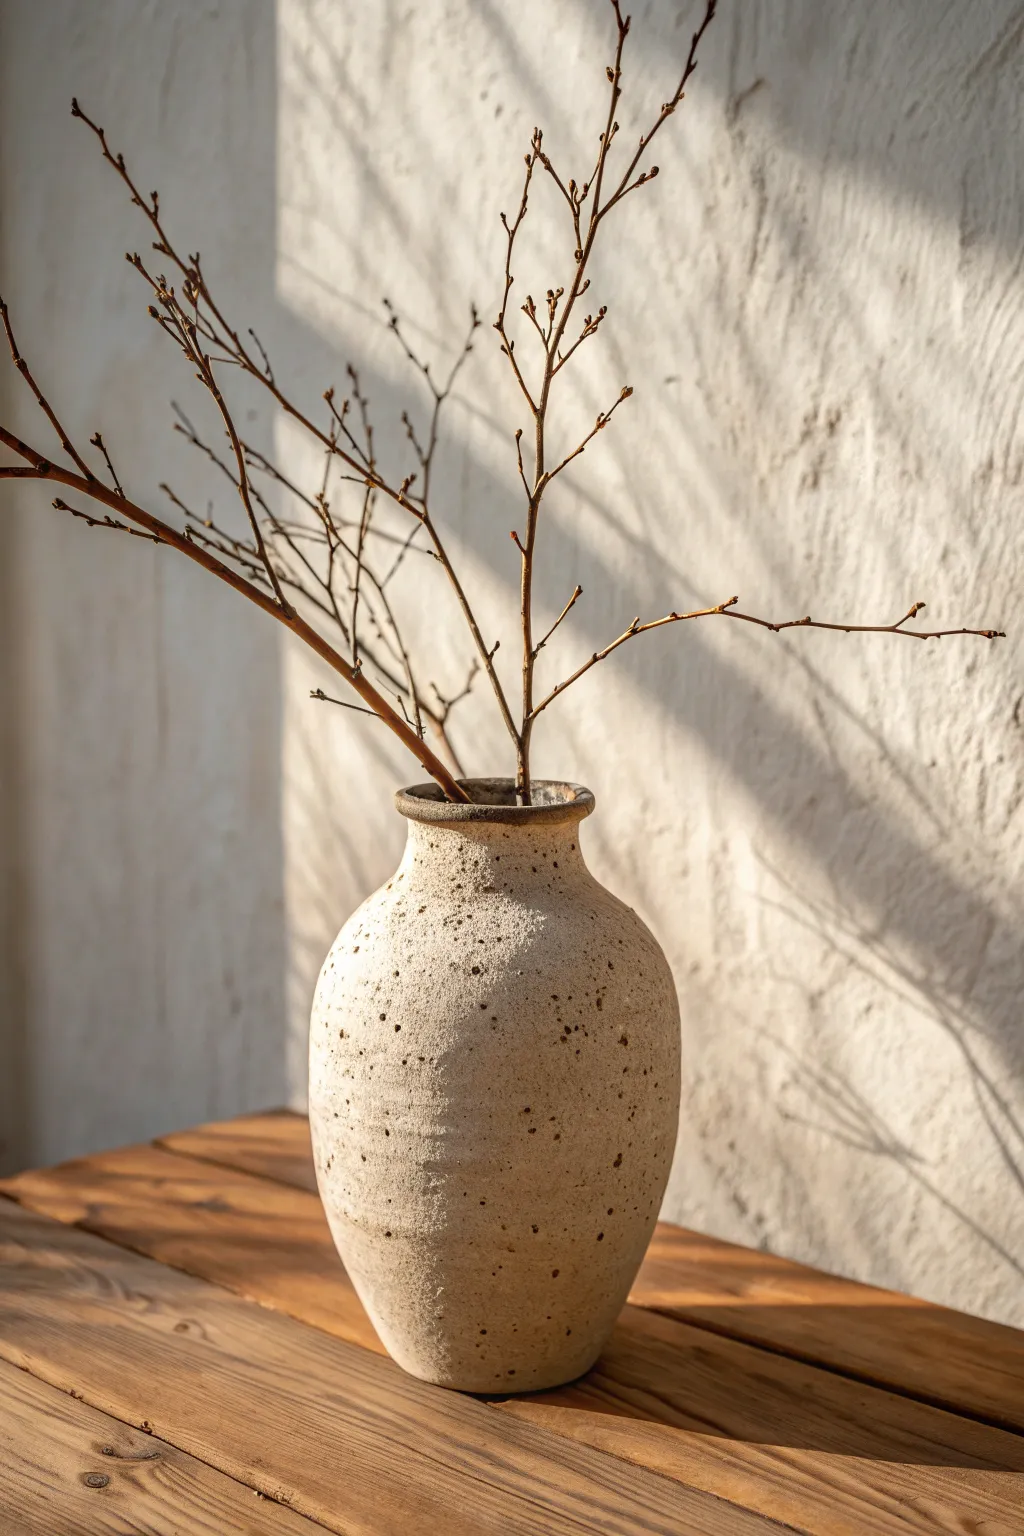
Speckled Stoneware Vase for a Handmade Look
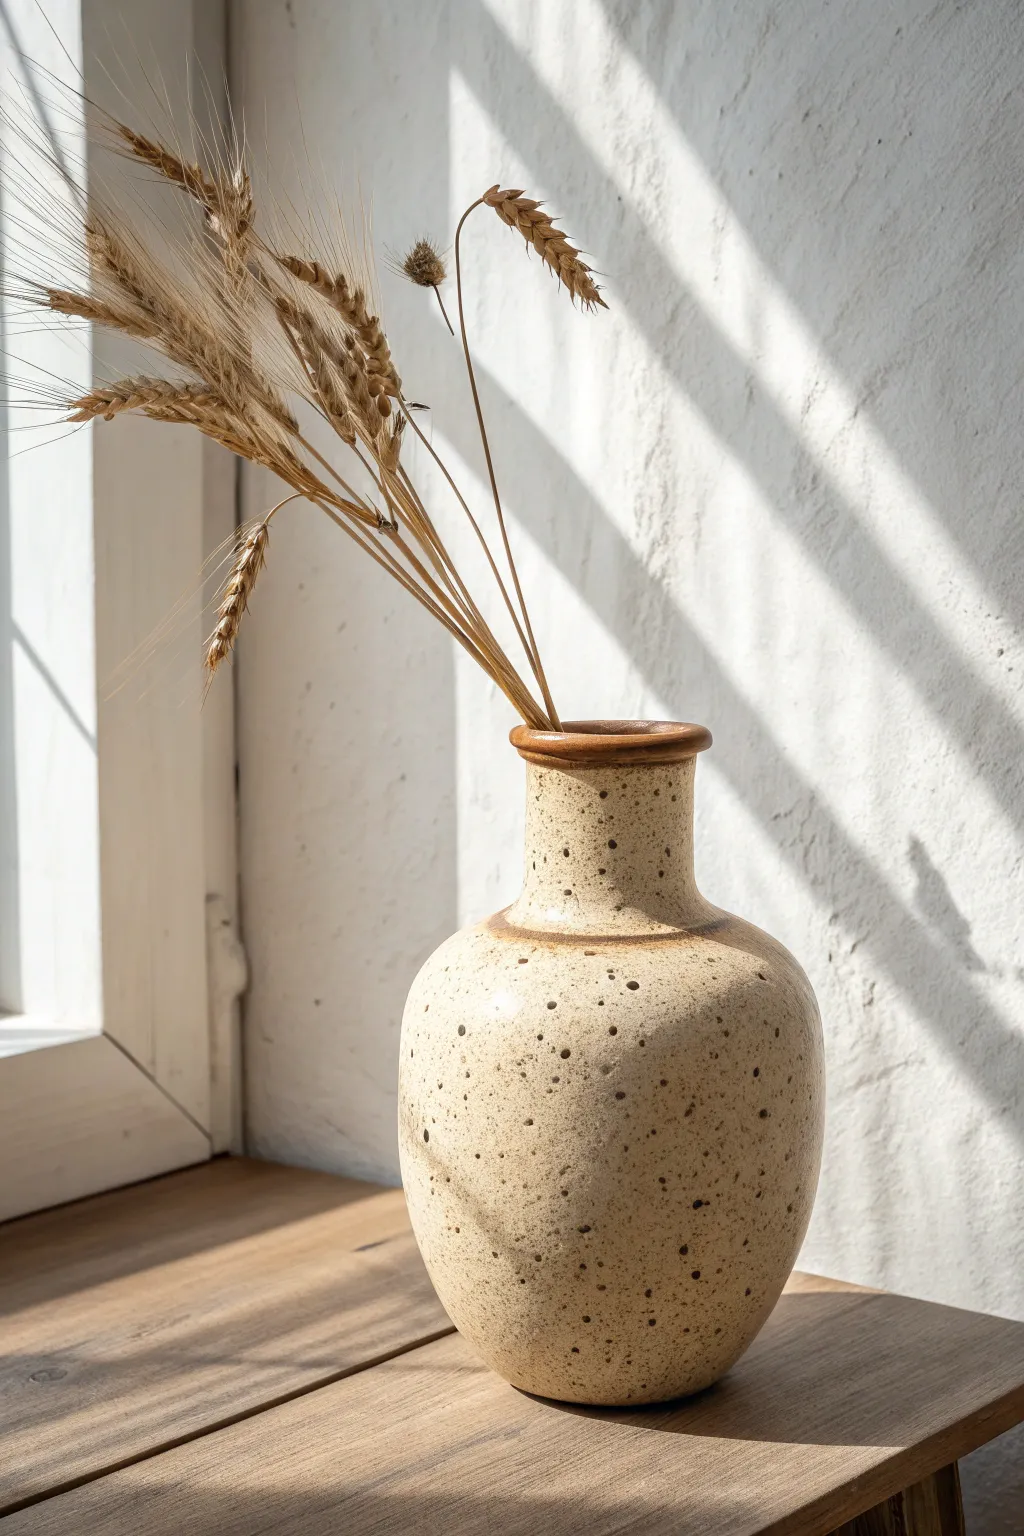
Embrace the organic beauty of handmade ceramics with this simple wheel-thrown vase featuring a timeless speckled finish. The earthy clay body and unglazed texture combine to create a warm, inviting piece perfect for holding dried wheat or wildflowers.
Detailed Instructions
Materials
- Speckled stoneware clay (approx. 2-3 lbs)
- Pottery wheel
- Throwing sponge
- Pin tool
- Wooden throwing rib
- Wire cutter
- Trimming tools
- Clear matte glaze (optional, for interior)
- Small brush (for rim detail)
- Loop tool
Step 1: Throwing the Form
-
Wedge the clay:
Begin by thoroughly wedging your speckled stoneware clay to remove any air bubbles and ensure an even consistency, forming it into a round ball. -
Center on the wheel:
Slam the clay onto the center of the wheel head. Use water and your palms to cone the clay up and down until it is perfectly centered and spinning smoothly. -
Open the clay:
Press your thumbs into the center of the mound to open a hole, leaving about a half-inch of thickness at the base for trimming later. -
Pull the wclls:
Slowly pull the clay upward into a tall cylinder using even pressure between your inside and outside fingers. Aim for a consistent wall thickness of about a quarter-inch. -
Belly out the form:
Using a wooden rib on the outside and your hand on the inside, gently push the clay outward from the inside to create the rounded ‘belly’ of the vase. -
Collar the neck:
Choke in the upper portion of the cylinder by creating a ring with your hands and gently squeezing inward as the wheel turns. This defines the transition from the body to the neck. -
Refine the neck:
Pull the remaining clay at the top upward to create a straight, narrow neck. I like to keep the wheel speed medium-slow here to maintain control. -
Shape the rim:
Compress the top edge of the clay with a chamois or your sponge to create a smooth, rounded lip that flares out slightly.
Step 2: Trimming and Finishing
-
Dry to leather hard:
Cut the vase from the wheel with a wire tool and let it dry until it reaches a leather-hard state where it is firm but still cold to the touch. -
Trim the foot:
Center the vase upside down on the wheel. Use a sharp loop tool to trim away excess weight from the bottom and carve a neat foot ring. -
Smooth the surface:
Use a slightly damp sponge to wipe down the exterior, smoothing any harsh trimming marks while leaving the natural texture of the speckled clay visible. -
Bisque fire:
Once fully bone dry, load the vase into the kiln for a bisque firing (usually Cone 04) to harden the clay slightly.
Iron Wash Tip
If you don’t have brown glaze for the rim, a simple mix of red iron oxide and water creates that darker, toasted edge seen in the photo.
Step 3: Glazing and Final Fire
-
Glaze the interior (optional):
If you plan to use water in the vase, pour a clear glaze inside, swirl it to coat, and pour out the excess. Wipe any drips off the rim immediately. -
Accent the rim:
For the look in the photo, mix a small amount of iron oxide wash or brown stain. Carefully paint a thin band around the very top rim and the transition line at the neck base. -
Highlight the speckles:
Leave the main exterior unglazed. The high firing temperature will naturally bring out the dark iron speckles inherent in the clay body. -
Final wipe:
Ensure the bottom foot is completely free of glaze or oxide to prevent sticking to the kiln shelf. -
High fire:
Fire the piece to the maturity temperature of your specific stoneware clay (typically Cone 5 or 6). This vitrifies the clay and solidifies the rustic aesthetic.
Make It Glossy
For a different vibe, dip the entire vase in a transparent clear glaze. This will amplify the speckles and make the surface shiny and smooth.
Now you have a stunning, organic vessel ready to display your favorite dry botanical arrangements


What Really Happens Inside the Kiln
Learn how time and temperature work together inside the kiln to transform clay into durable ceramic.
Simple Two-Tone Dipped Glaze Vase
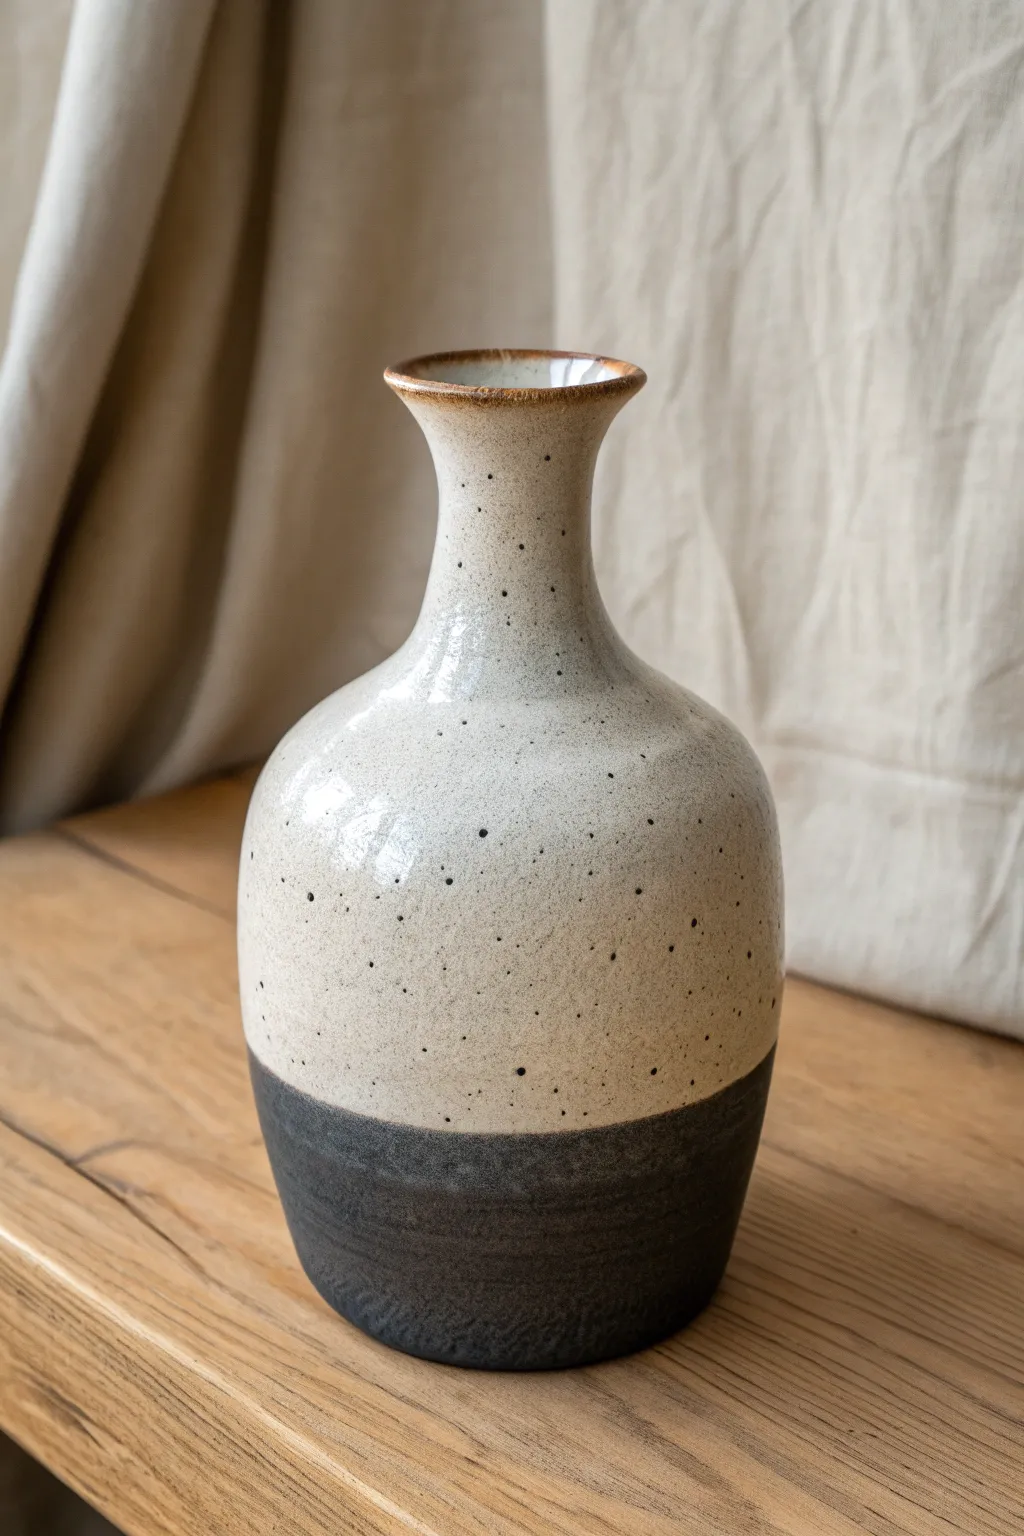
This elegant project combines the raw, tactile beauty of dark clay with a creamy, speckled milky glaze for a stunning contrast. The simple bottle shape highlights the horizon line where the two textures meet, creating a modern piece that feels both rustic and refined.
Step-by-Step Guide
Materials
- Dark speckled stoneware clay (such as charcoal or chocolate stoneware)
- Pottery wheel
- Throwing tools (sponge, needle tool, rib, wire cutter)
- Trimming tools
- White or cream speckled glaze (glossy finish)
- Wax resist (liquid wax)
- Small sponge or brush for waxing
- Kiln (bisque and glaze firing capabilities)
- Bucket for glaze dipping
Step 1: Throwing the Form
-
Prepare the clay:
Begin by wedging about 2-3 pounds of your dark stoneware clay. Ensure it is completely free of air bubbles, as this dark clay body will be visible and unglazed at the bottom. -
Center on the wheel:
Secure the clay to the wheel head and center it. Keep your base relatively narrow, about 3-4 inches wide, as we are aiming for a tall, elegant bottle shape rather than a wide bowl. -
Open and pull:
Open the clay and pull up the walls into a cylinder. Focus on keeping the walls even. For this bottle shape, create a wider belly in the middle section that gently tapers inward toward the top. -
Define the shoulder:
Using a rib tool on the outside and your fingers inside, gently push the clay inward near the top third to define the shoulder of the vase. Compress the clay carefully here to prevent buckling. -
Create the neck:
Collar the top section inward to form a narrow neck. Use both hands to encircle the clay and apply even pressure, moving upward. Keep the rim slightly flared outward for a classic bottle silhouette. -
Refine the surface:
Use a smooth metal or rubber rib to compress the outside of the form. This is crucial for the unglazed bottom section, as you want the raw clay texture to look intentional and smooth, not messy. -
Cut and dry:
Undercut the base with your wooden tool, run the wire through, and carefully lift the vase off the wheel. Let it dry to a leather-hard state.
Step 2: Trimming and Bisque
-
Trim the foot:
Once leather-hard, center the vase upside down on the wheel. Trim the bottom section to remove excess weight and define a clean foot ring. I like to smooth the trimmed area with a damp sponge to bring out the grog in the clay. -
Smooth the transition:
Pay special attention to the bottom third of the exterior wall. Since this will remain unglazed, use a soft rib to burnish it slightly if you want a smoother tactile experience. -
Bisque fire:
Load the bone-dry vase into the kiln and fire to cone 04 (or your clay’s specific bisque temperature). This prepares the pot for glazing.
Clean Line Secret
Use a pencil to lightly mark your glaze line while the pot spins on the wheel before applying wax. It guides your hand for perfect symmetry.
Step 3: Glazing the Two-Tone Design
-
Clean the bisque:
Wipe the entire bisqued vase with a damp sponge to remove any dust. This ensures the glaze adheres properly. -
Apply wax resist:
This is the most critical step for the straight line. Place the vase on a banding wheel. Hold a brush loaded with wax resist steady against the vase at the 1/3 height mark while spinning the banding wheel to create a perfect, level ring. -
Wax the bottom:
Fill in the area below your line with wax resist, covering the entire bottom third and the foot ring. This prevents glaze from sticking to the dark clay section we want to showcase. -
Prepare the glaze bucket:
Mix your creamy white speckled glaze thoroughly. It should have the consistency of heavy cream. If it’s too thin, the dark clay will show through too much; too thick, and it might run. -
Dip the vase:
Holding the vase by the foot (the waxed area), dip the entire pot upside down into the white glaze. Submerge it all the way up to just past your wax line. The wax will repel the glaze. -
Shake off excess:
Lift the vase out and give it a quick, firm shake to remove excess glaze. Turn it right side up immediately to prevent drips from running down onto the clean clay line. -
Clean the line:
Once the glaze is dry to the touch, use a damp sponge to wipe away any tiny droplets that might be sitting on top of the waxed section, ensuring a razor-sharp transition line. -
Rim detail:
Check the very top rim. If the glaze is too thick, gently wipe it back slightly so the brown clay peeps through at the edge, matching the image’s aesthetic.
Texture Contrast
Before bisque firing, gently press a rough sponge against the bottom third of the clay while spinning. This enhances the contrast between the rough base and smooth glass top.
Step 4: Final Firing
-
Load the kiln:
Place the vase in the kiln. Since the bottom is unglazed, you don’t need to worry about stilting, but make sure the foot is wiped clean. -
Glaze fire:
Fire to the maturation temperature of your clay and glaze (typically Cone 5 or 6 for stoneware). Allow the kiln to cool completely before opening.
Place your finished vase near natural light to let the glossy speckles shine against the matte dark base
Glossy Drip Glaze Accent Vase
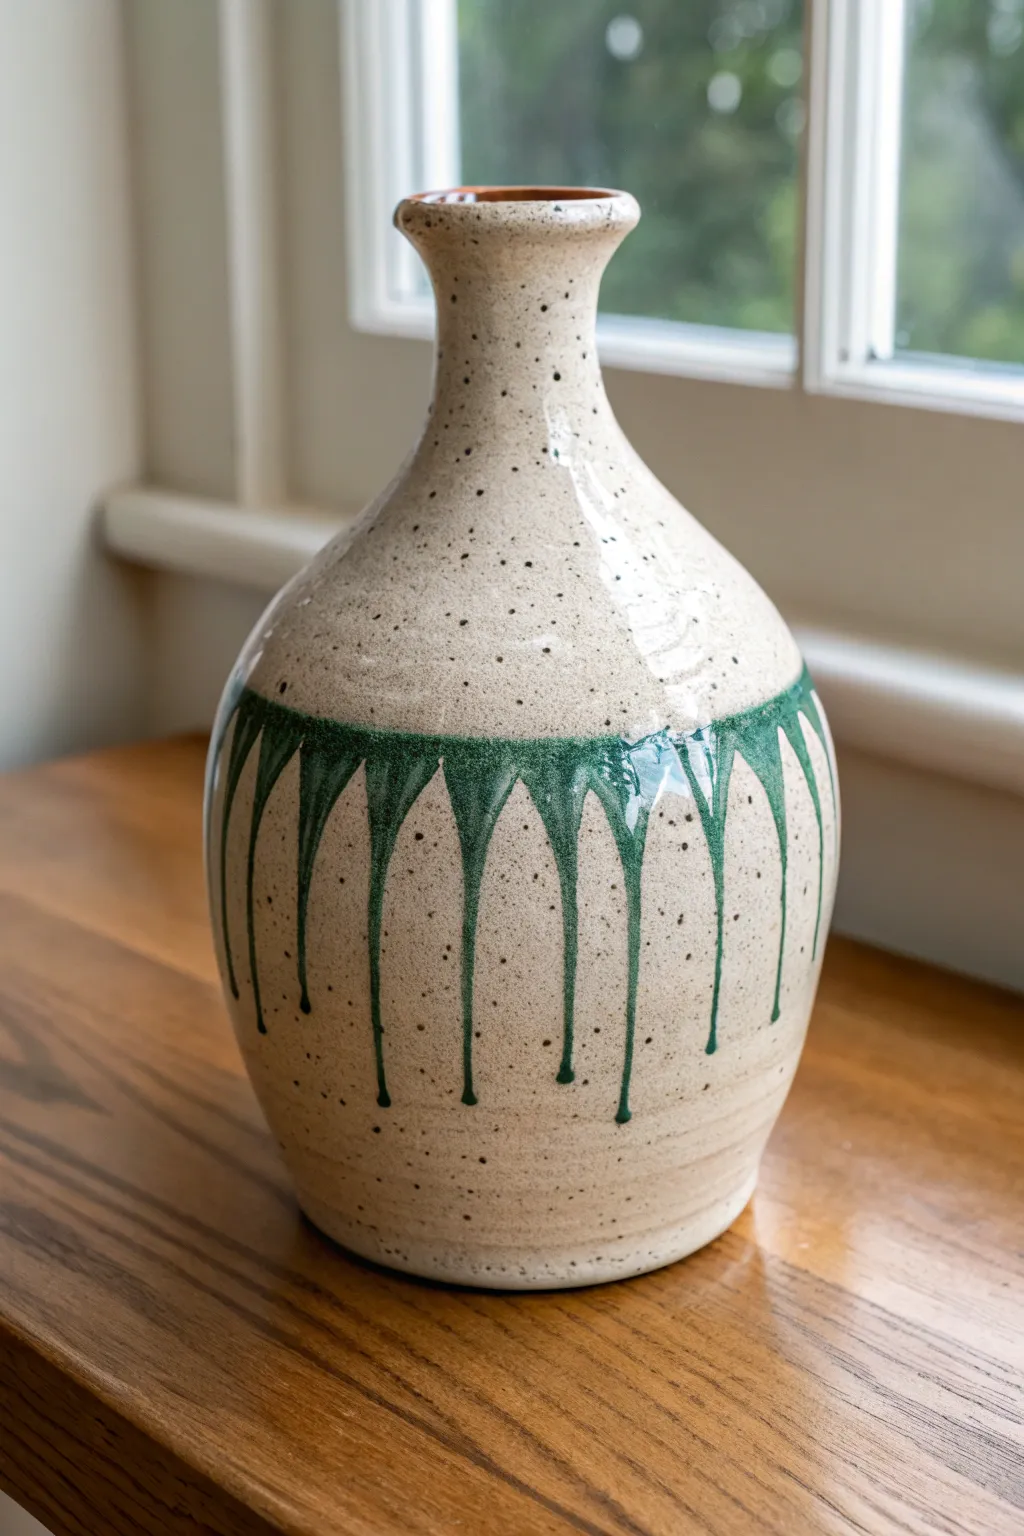
This rustic yet elegant vessel showcases the beauty of combining a speckled stone-like base with a controlled, glossy drip effect. The striking contrast between the matte sandy body and the rich emerald runnels makes it a perfect centerpiece for a cottage-style home.
Step-by-Step Tutorial
Materials
- Stoneware clay body (speckled buff specific)
- Pottery wheel
- Throwing tools (rib, sponge, wire cutter)
- Trimming tools
- Bisque kiln firing access
- Clear matte or satin glaze
- Glossy emerald green glaze
- Wax resist
- Fan brush
- Detail brush or glaze trailer
- Glaze kiln firing access
Step 1: Throwing the Form
-
Center and open:
Start with about 3-4 pounds of speckled stoneware clay. Center it firmly on the wheel head, then open the clay, pulling the floor out to about 4-5 inches wide. -
Establish the height:
Pull the walls up into a tall cylinder first. Aim for even thickness from bottom to top, leaving a slightly thicker rim for finishing later. -
Shape the belly:
From the inside, gently press outward to create the bulbous ‘belly’ of the vase. Use a rib on the outside to refine the curve and compress the clay particles. -
Collar the neck:
Using both hands, gently squeeze the upper third of the cylinder inward to form the bottleneck. Do this in several passes to avoid buckling the clay. -
Refine the rim:
Flare the very top edge slightly outward to create that classic lip. Use a chamois or sponge to smooth the rim perfectly. -
Dry to leather hard:
Wire the pot off the wheel and set it aside. Let it dry slowly until it reaches a leather-hard state, firm enough to handle without deforming. -
Trim the foot:
Invert the vase on the wheel and trim a clean foot ring. This lifts the form and gives the weighty bottom a lighter visual feel.
Step 2: Creating the Surface
-
Bisque fire:
Once bone dry, fire the piece in a bisque kiln (usually cone 04) to prepare it for glazing. -
Wax the foot:
Apply a coat of wax resist to the bottom foot ring to prevent glaze from sticking and ruining your kiln shelf. -
Base glaze application:
Dip the entire vase into a clear matte or satin glaze. This allows the natural speckles of the clay body to shine through as the primary texture. -
Mapping the drip line:
Using a very light pencil mark (which will burn off), trace a gentle horizontal line around the shoulder of the vase where you want the color to begin. -
Apply the green band:
Use a fan brush to paint a thick, generous band of glossy emerald glaze right along your pencil line. I like to do two heavy coats here to ensure there is enough material to move. -
Initiate the drips:
While the green band is still wet, dip a detail brush into the glaze and deliver extra dollops at regular intervals along the bottom edge of the band. -
Encourage the flow:
Gravity will do the work in the kiln, but adding these slightly heavier beads of glaze helps guide exactly where the long drip lines will form. -
Check the spacing:
Step back and look at your drip placement. Aim for organic irregularity rather than perfect soldier-like spacing for a more natural look. -
Glaze fire:
Fire the vase to the maturity temperature of your clay and glaze (typically cone 5 or 6 for stoneware). The heat will melt the green band, sending those beautiful streaks down the side.
Drips Too Short?
If your drips didn’t run far enough, your glaze application was likely too thin. Next time, apply a thicker bead of glaze at the ‘start’ of each drip or choose a glaze with a lower melting point.
Level Up: Texture
Use a chatter tool during the trimming phase to add subtle texture to the belly of the vase. The clear glaze will pool in the recesses, highlighting the craftsmanship.
Place your finished vase near a window to let the natural light catch those glassy green trails

TRACK YOUR CERAMIC JOURNEY
Capture glaze tests, firing details, and creative progress—all in one simple printable. Make your projects easier to repeat and improve.
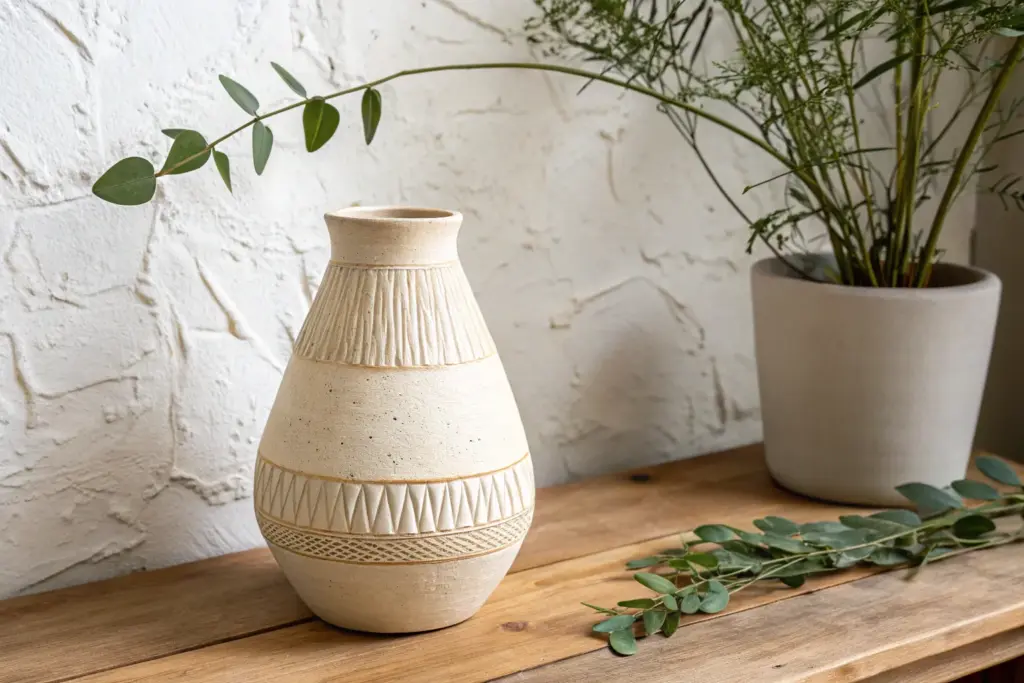
Carved Sgraffito Pattern Vase
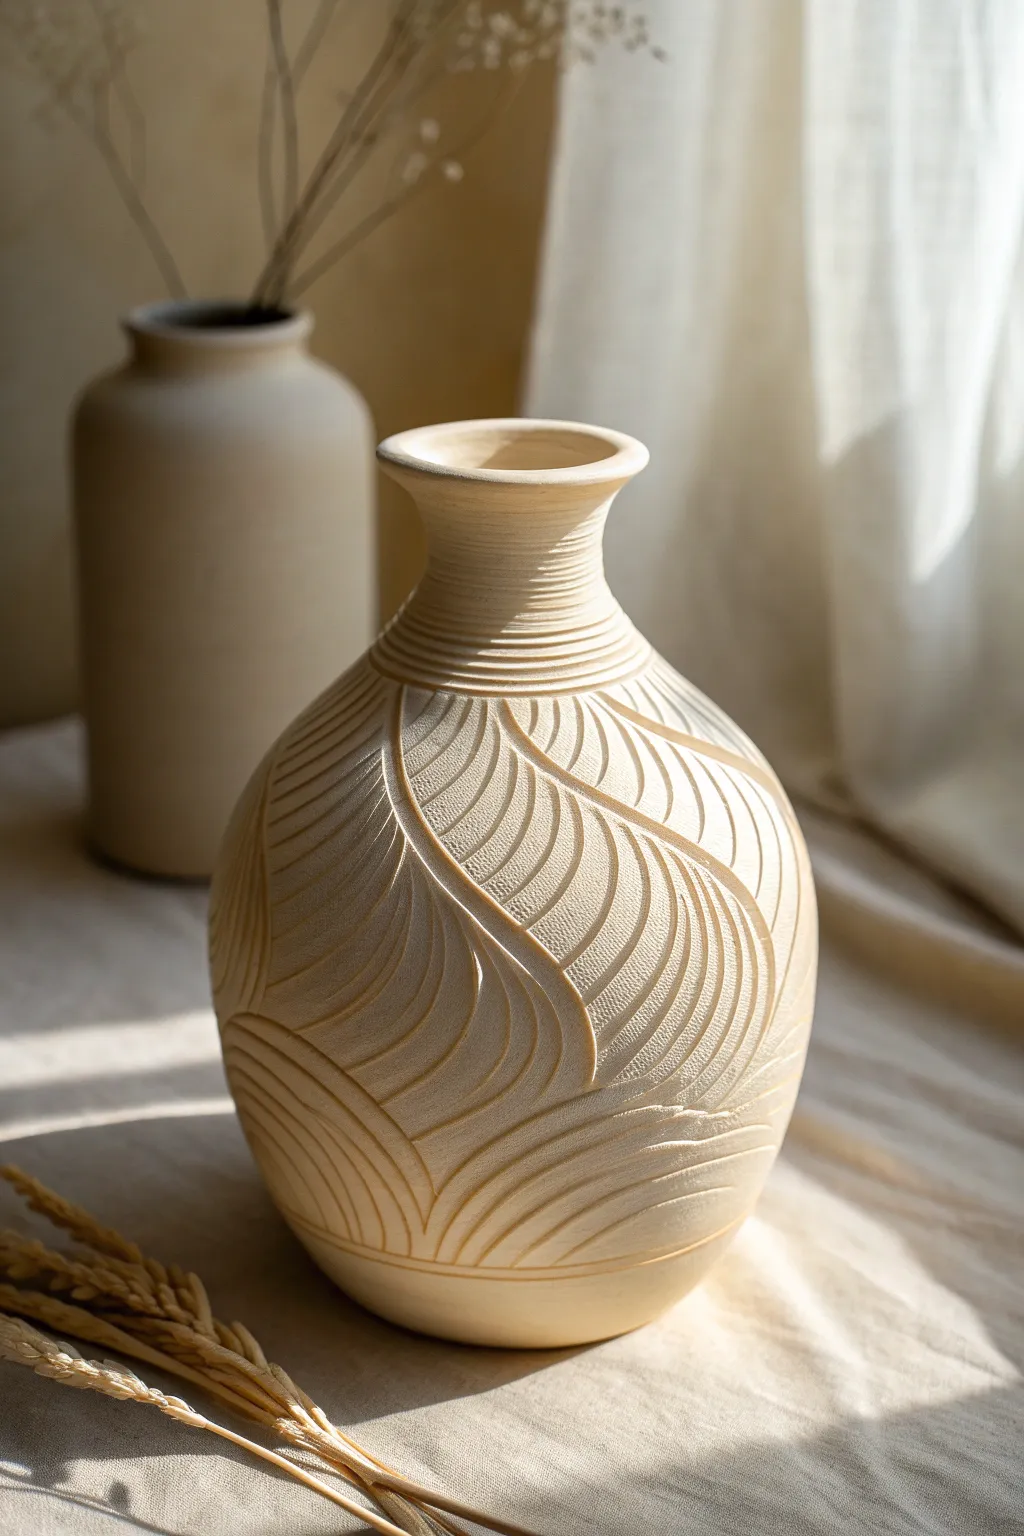
This elegant ceramic project transforms a simple wheel-thrown form into a masterpiece of texture and light. This monochromatic design relies on deep, rhythmic carving to create dynamic shadows using a technique similar to sgraffito but on bare clay.
How-To Guide
Materials
- Stoneware clay (smooth, light-colored body)
- Pottery wheel
- Throwing tools (sponge, ribs, wire tool)
- Small loop tool (sharp, U-shaped)
- Sgraffito tool or fine needle tool
- Soft brush
- Damp sponge
- Matte transparent glaze (optional) or raw finish tools
Step 1: Forming the Base
-
Preparing the clay:
Wedge about 3-4 pounds of light stoneware clay thoroughly to remove air bubbles. This ensures a consistent canvas for your intricate carving later. -
Centering and opening:
Center the clay on the wheel and open it up, keeping the base relatively narrow to support the bulbous shape we are aiming for. -
Throwing the belly:
Pull the walls up, gently collaring in at the top while pushing out from the inside to create a wide, rounded belly. Aim for a smooth, even curve. -
Defining the neck:
Significantly collar the clay at the shoulder to form a distinct, narrow neck. Flare the rim outward slightly for a classic silhouette. -
Refining the surface:
Use a smooth metal rib on the exterior while the wheel is spinning slowly to remove throwing lines and create a perfectly smooth, untouched surface. -
Trimming:
Let the pot dry to a solid leather-hard state. Turn it over on the wheel and trim the foot ring, ensuring the bottom curve matches the elegance of the body.
Moisture Management
Keep the vase wrapped in plastic between carving sessions. If the clay gets too dry (bone dry), it will chip rather than carve smoothly.
Step 2: Carving the Design
-
Mapping the grid:
Lightly sketch vertical guidelines using a needle tool to divide the vase into four or six equal sections. This helps keep your swirling pattern symmetrical. -
Creating the neck ribs:
Starting at the base of the neck, use a small loop tool to carve horizontal rings. Vary the depth slightly to create a ribbed texture that transitions from the neck to the shoulder. -
outlining the main swirls:
Use a needle tool or sgraffito styling tool to lightly draw the large, leaf-like swoops that define the main pattern. They should flow upward from the base and downward from the shoulder, interlocking in the middle. -
Carving the flow:
Select a sharp U-shaped loop tool. Begin carving parallel lines inside your outlined shapes. Maintain a consistent depth, pressing firm enough to create ridges that will catch the light. -
Maintaining direction:
Ensure all lines within a specific ‘leaf’ shape follow the same curve. This repetition creates the mesmerizing optical effect seen in the photo. -
Connecting the sections:
Pay distinct attention to where the direction of the lines changes. Create a sharp, clean ridge or ‘spine’ where two swirling sections meet. -
Refining the bottom:
As you reach the bottom third, curve the lines upward to cup the form, giving the visual impression that the vase is ‘holding’ the pattern. -
Adding base detail:
Carve two parallel horizontal lines near the foot of the vase to ground the design and provide a clean stopping point for the vertical textures.
Step 3: Finishing and Firing
-
Cleanup:
Once the carving is complete, use a soft, dry brush to gently sweep away all the clay burrs and crumbs. Avoid using water here, as it can soften your crisp edges. -
Testing smoothness:
Run your finger lightly over the ridges. If any sharp bits remain, gently burnish them with a smooth stone or the back of a spoon. -
Bisque firing:
Let the vase dry completely (bone dry) before bisque firing it to cone 04/06. -
Glazing choice:
For the look in the photo, apply a very thin matte clear glaze, or leave the exterior unglazed if using a vitrified stoneware clay to keep that raw, tactile feel. -
Final firing:
Fire the piece to maturity (likely Cone 5/6 or 10 depending on your clay). I prefer to use a custom firing schedule with a slow cool to enhance the matte surface quality.
Playing with Contrast
Before carving, paint the leather-hard pot with a dark underglaze or slip. When you carve through it, you’ll reveal the light clay body for a bold two-tone effect.
Enjoy the interplay of light and shadow on your new textured vessel
Crisp Faceted Geometric Slab Vase
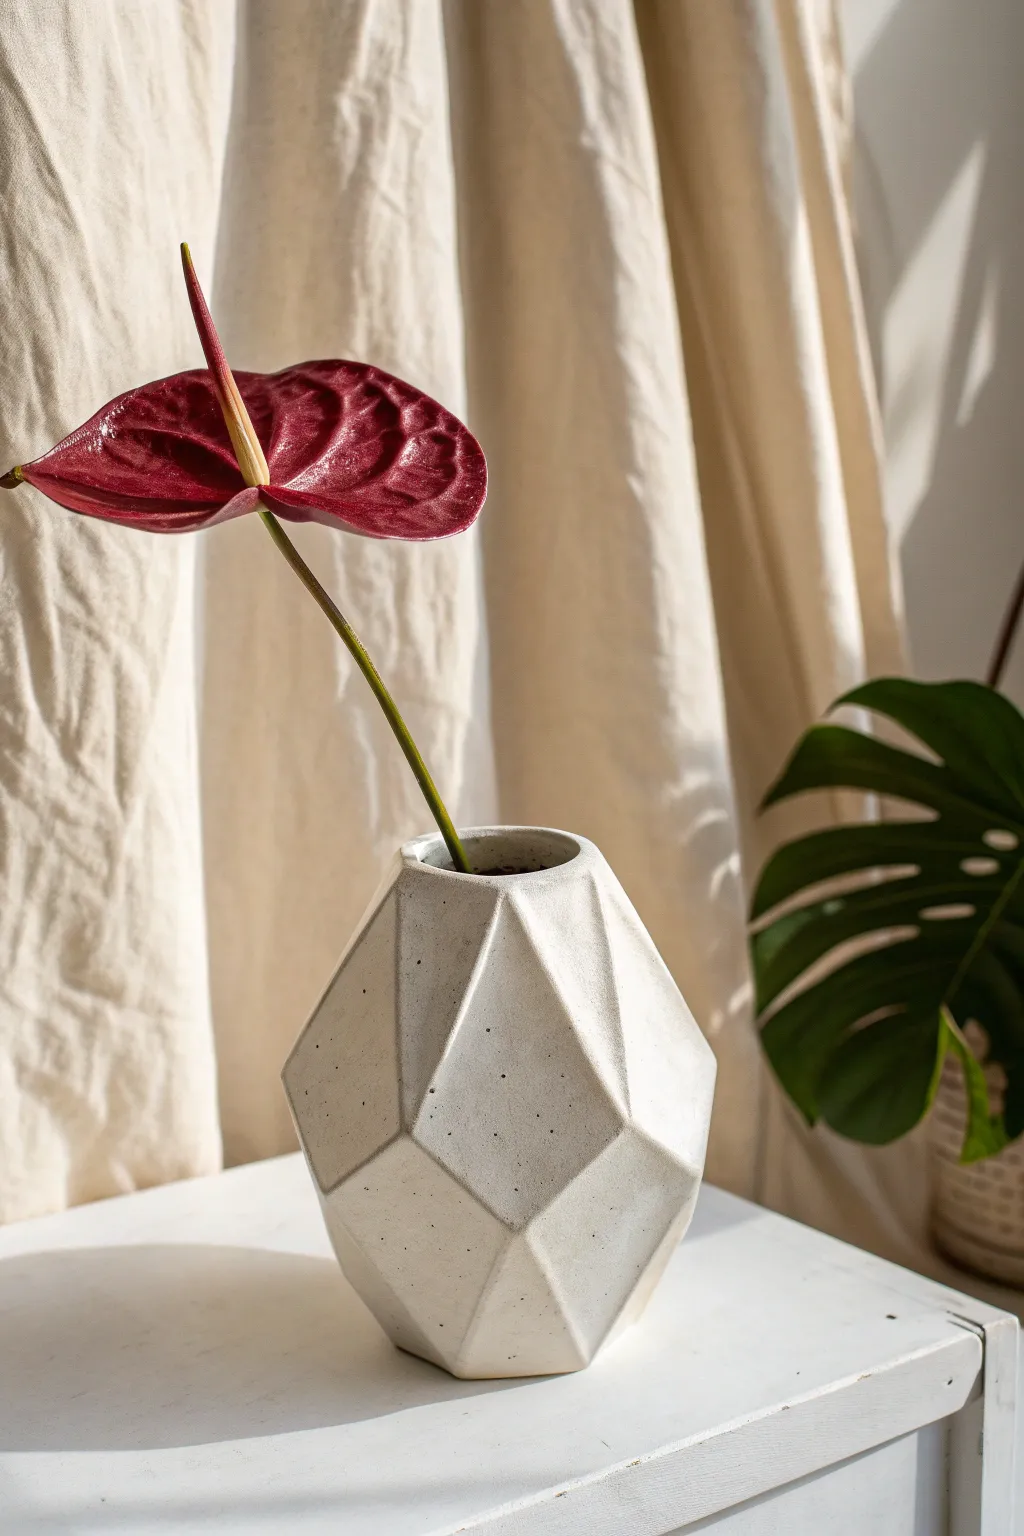
This striking geometric vase brings a modern, architectural feel to any space with its crisp edges and polygonal faces. Using the slab-building technique, you will construct a faceted form that catches light and shadow beautifully, creating a perfect home for solitary stems.
Step-by-Step
Materials
- White stoneware clay (medium texture)
- Rolling pin with texture/thickness guides
- Fettling knife or X-Acto blade
- Paper templates (cardstock works best)
- Ruler or straight edge
- Scoring tool or serrated rib
- Slip (clay and water slurry)
- Wooden modeling tool
- Potter’s sponge
- Matte white glaze
Step 1: Planning and Prepping
-
Draft your template:
Before touching clay, sketch out your geometric shape on paper. This vase uses a combination of triangles and irregular quadrilaterals. Cut these shapes out of cardstock to serve as your cutting guides. -
Roll the slab:
Roll out a consistent slab of white stoneware clay. For this project, a thickness of about 1/4 inch is ideal—sturdy enough to stand but thin enough to look elegant. -
Let it stiffen:
Allow your clay slab to dry slightly to a ‘soft leather-hard’ state. I find this crucial because if the clay is too wet, the geometric walls will sag; too dry, and they won’t join properly. -
Cut the shapes:
Place your cardstock templates onto the slab. Using a ruler and your fettling knife, cut out the multiple polygonal faces required to build the form. Be sure to cut bevels at a 45-degree angle on the edges where the pieces will join.
Sagging Walls?
If your facets act floppy during assembly, use a hair dryer briefly on the pieces to stiffen them up, or prop the walls with crumpled newspaper from the inside.
Step 2: Assembling the Geometry
-
Score the edges:
Take your serrated rib or needle tool and aggressively score the beveled edges of your first two connecting pieces. This creates the ‘tooth’ needed for a strong bond. -
Apply slip:
Dab a generous amount of slip onto the scored areas. It should be the consistency of heavy cream to act as a proper glue. -
Join the first section:
Press the first two panels together firmly. You want to see a tiny bead of slip squeeze out from the seam, indicating a tight seal. -
Reinforce the interior:
Reach inside (or use a tool if the opening is small) and smooth a very thin coil of clay along the interior seam to reinforce the joint. -
Build upwards:
Continue adding panels one by one, working in a spiral or tier system around the base. Always score and slip every new connection point. -
Close the form:
As you reach the top, the angles might becoming tricky. Gently paddle the outside of the form with a wooden spatula to align the faces if they have shifted slighty during construction.
Pro Tip: Sharp Lines
To get ultra-crisp corners after assembly, let the clay reach leather-hard stage, then gently sand the exterior faces with a rasp or Surform tool.
Step 3: Refining and Finish
-
Sharpen the edges:
Once the basic form is built, use a flat metal rib to compress and sharpen the exterior faces. This enhances that crisp, faceted look. -
Clean the rim:
Ensure the opening at the top is smooth. You can bevel the rim slightly inward to match the angular aesthetic of the body. -
Create the texture:
If you want the subtle speckling seen in the photo, you can flick a toothbrush dipped in iron oxide wash gently over the raw clay, or rely on a speckled clay body. -
Bisque fire:
Let the vase dry slowly under loose plastic to prevent uneven shrinkage, then bisque fire it according to your clay manufacturer’s cone rating. -
Glaze application:
Dip the vase into a matte white glaze. A matte finish is essential here because a high-gloss glaze often obscures the sharp geometric lines with reflections. -
Final firing:
Fire the piece a final time to the glaze temperature. Ensure the bottom is wiped clean or stilted so it doesn’t fuse to the kiln shelf.
Now you have a stunning, architectural vessel ready to showcase your favorite botanical finds
Modern Donut Vase (Ring Shape)
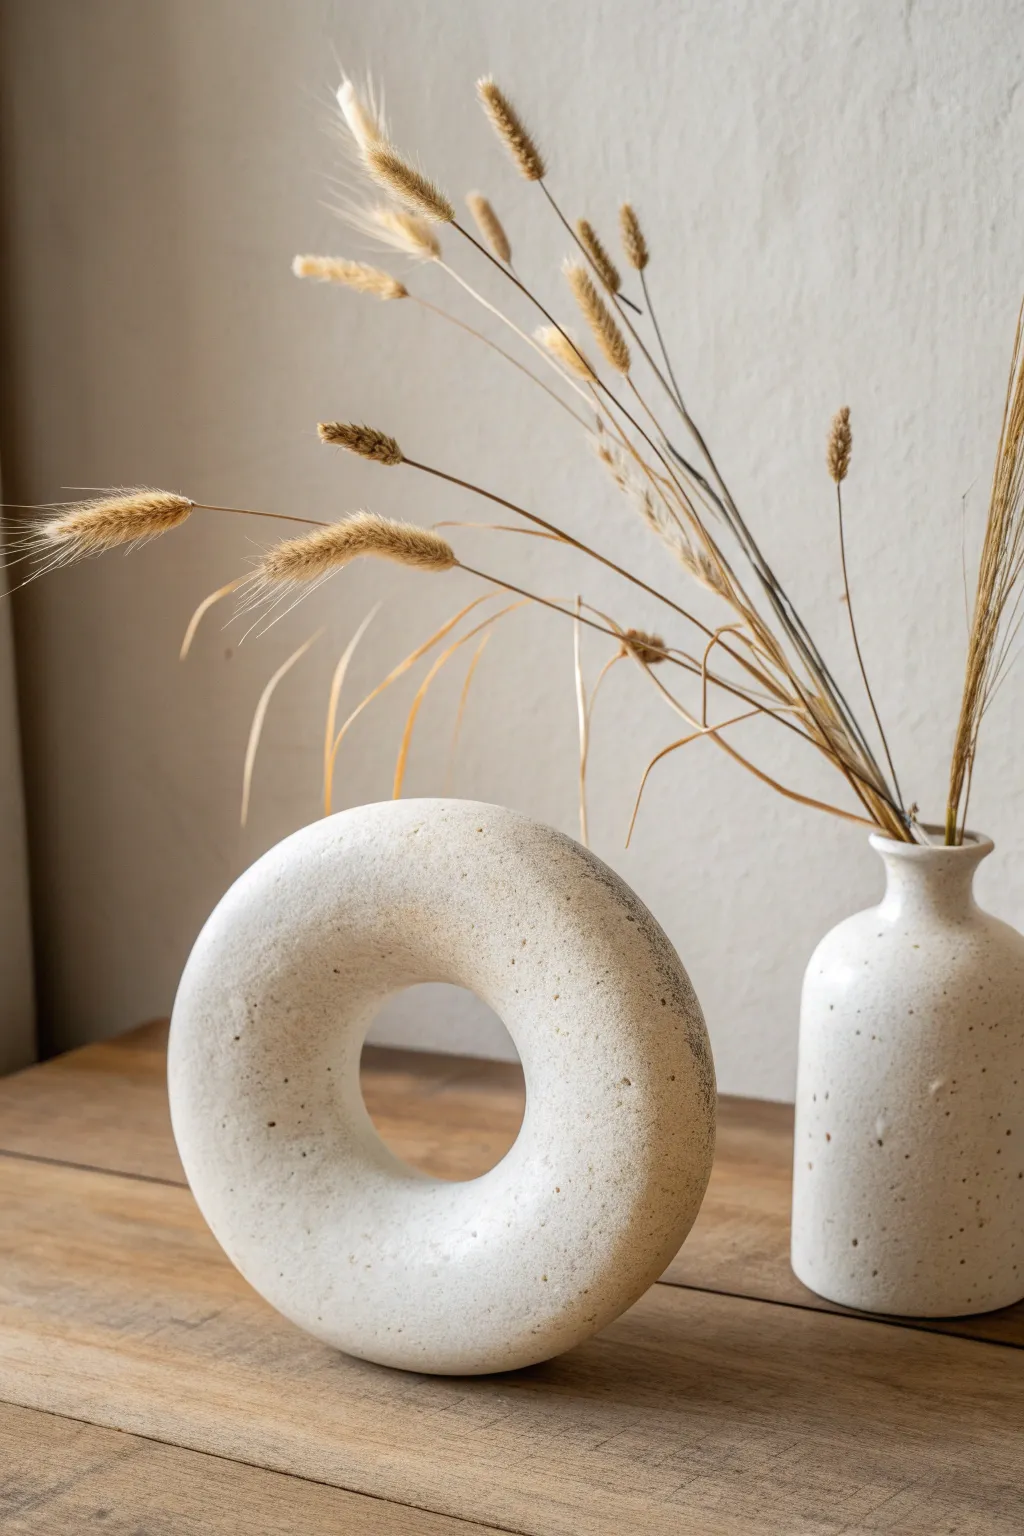
This trendy, modern donut vase brings a touch of organic minimalism to any space with its unique ring shape and speckled, stone-like finish. Creating this high-end look is surprisingly accessible using air-dry clay and a clever armature technique.
Step-by-Step Tutorial
Materials
- White air-dry clay (approx. 1kg)
- Cardboard (for the template)
- Aluminum foil
- Tape (masking or painter’s tape)
- Rolling pin
- Potter’s sponge
- Clay sculpting tools (or a butter knife)
- Sandpaper (medium and fine grit)
- Acrylic paint (white, beige, and dark brown/black)
- Baking soda (for texture)
- Old toothbrush
- Paintbrush (flat, medium size)
- Matte spray sealer
Step 1: Building the Armature
-
Create the Template:
Begin by deciding on the size of your vase. Draw a circle on a piece of cardboard (a dinner plate works great as a guide) and cut it out. Then, cut a smaller circle out of the center to form a flat ring shape. This will be the skeleton of your vase. -
Bulk Up the Form:
Take your aluminum foil and scrunch it into long, thick snakes. Wrap these snakes around your cardboard ring to give it volume. You want the ring to be roughly the same thickness all the way around, resembling a large bagel. -
Secure with Tape:
Once you are happy with the puffy ring shape, wrap the entire foil structure firmly with masking tape. This compresses the foil, smooths out sharp spikes, and gives the clay a better surface to adhere to than slick metal.
Step 2: Sculpting the Clay Body
-
Prepare the Clay:
Knead your air-dry clay until it’s pliable and warm. I find rolling it out into a large, flat sheet about 1/4 inch thick is the easiest way to start covering the form. -
Cover the Ring:
Drape strips or sheets of the rolled clay over your taped armature. Work in sections, pressing the clay firmly against the form to avoid trapping air pockets. -
Merge the Seams:
Wherever pieces of clay meet, use your fingers or a sculpting tool to cross-hatch (score) the edges, add a tiny bit of water, and smooth them together until the seam disappears. This prevents cracking later. -
Refine the Shape:
Wet your fingers slightly and run them over the vase to smooth out bumps. Pay special attention to the inner circle; use a damp sponge to round out the interior curve so it looks seamless and organic. -
Create the Opening:
Decide where the top of your vase will be. Use a tool to carefully carve a small, deep hole into the top of the ring, penetrating through the clay and slightly into the foil armature, large enough to hold a few dried stems. -
Initial Drying:
Let the vase sit in a cool, dry place. Rotate it every few hours so the bottom doesn’t stay soggy. Air-dry clay shrinks as it dries, so slow drying is best to avoid cracks.
Smooth Seams Tip
Use a tiny amount of vinegar on your finger instead of water when smoothing clay seams. It breaks down the clay surface slightly, creating a slip that bonds joints much stronger.
Step 3: Finishing and Texturing
-
Sand for Smoothness:
Once the clay is bone dry (usually 24-48 hours), use medium-grit sandpaper to remove major unevenness. Follow up with fine-grit sandpaper for a smooth finish, wiping away the dust with a barely damp cloth. -
Mix the Base Coat:
To achieve that faux-stone look, mix white acrylic paint with a small drop of beige and—this is the secret ingredient—a teaspoon of baking soda. The baking soda creates a gritty, plaster-like texture. -
Apply Texture Paint:
Paint the entire vase with your baking soda mixture. Use dabbing motions rather than long strokes to build up a varied, stony surface texture. -
Create the Speckles:
Mix a very watery dark brown or black paint. Dip an old toothbrush into it, hold it near the vase, and run your thumb across the bristles to flick tiny speckles onto the surface. Practice on paper first to control the spray. -
Seal the Project:
Allow the paint to dry completely. Finish with a coat of matte spray sealer to protect the surface and lock in the texture without adding an artificial shine.
Waterproof it
Air-dry clay isn’t waterproof! To hold fresh flowers, insert a hidden plastic test tube into your carved opening, or stick strictly to dried pampas grass and botanicals.
Place your new sculptural piece on a sideboard or shelf where its unique silhouette can truly stand out
U-Shaped Arch Vase for Minimal Ikebana Vibes
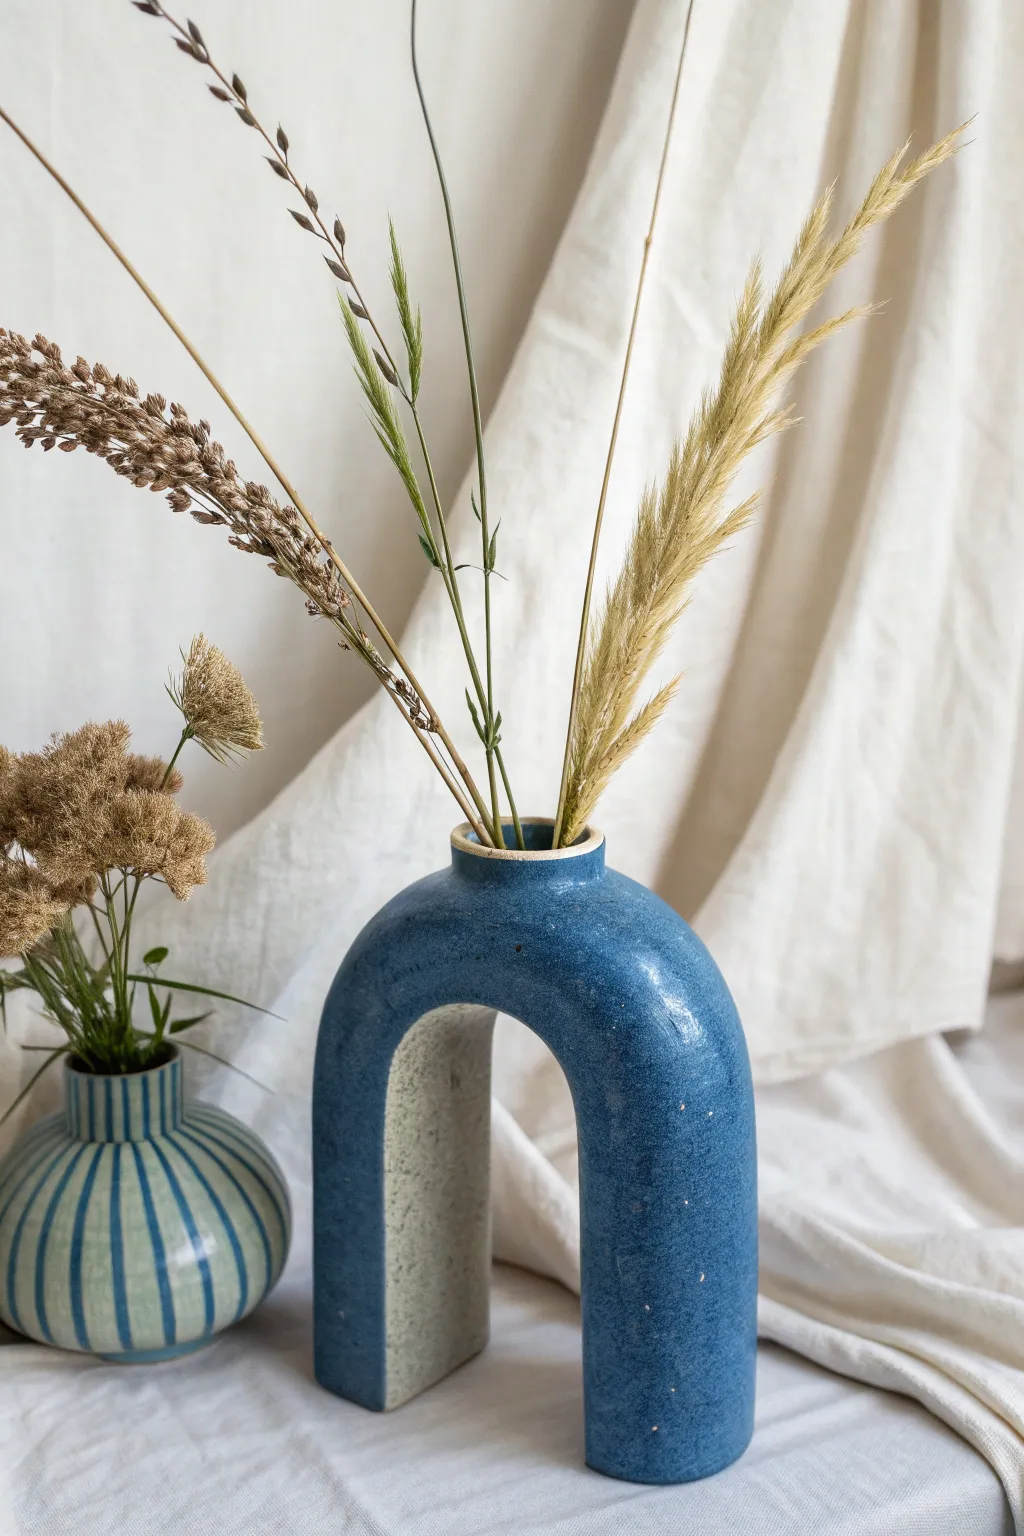
Embrace the beauty of negative space with this striking U-shaped arch vase, featuring a rich cobalt blue glaze and subtle speckling. Its minimal, architectural form is perfect for holding tall, dried grasses or a single statement stem.
How-To Guide
Materials
- Speckled stoneware clay (mid-fire)
- Clay slab roller or rolling pin
- Canvas mat or wooden board
- Guide sticks (1/4 inch thickness)
- Sharp knife or fettling knife
- Scoring tool (serrated rib or needle tool)
- Slip (clay mixed with water)
- Smoothing rib (rubber or wood)
- Sponge
- Cardboard packing tube (approx. 3-4 inch diameter)
- Newsprint or paper
- Cobalt blue fluid glaze
- Clear glaze (optional for interior)
- Kiln access
Step 1: Forming the Slab
-
Wedge the clay:
Begin by wedging your speckled stoneware clay thoroughly to remove air bubbles and ensure particle alignment, which is crucial for structural integrity. -
Set up guides:
Place your canvas mat on a flat surface and position your 1/4 inch guide sticks on either side of the clay ball to ensure an even thickness. -
Roll the slab:
Roll out a long, rectangular slab. You will need a strip approximately 16-18 inches long and 4 inches wide for the U-shape, plus extra for the side walls. -
Compress the slab:
Use a damp sponge or a soft rib to compress the clay slab on both sides. This smooths the texture and prevents warping during the drying process.
Step 2: Building the Arch
-
Prepare the mold:
Cut a section of your cardboard tube to the desired height of your arch. Wrap the tube in newsprint so the clay doesn’t stick to the cardboard. -
Cut the main strip:
Using a ruler and knife, cut a clean, long rectangle from your slab. The width determines the depth of the vase (about 3-4 inches). -
Drape the clay:
Carefully lift the clay strip and drape it over the paper-covered cardboard tube. Gently press it down around the curve to form the inverted ‘U’ shape. -
Firm up:
Let the clay sit on the form until it reaches a leather-hard state. It needs to be stiff enough to hold its shape without the tube support.
Clean Curves
Use a flexible metal kidney tool to scrape the flat sides after assembly. This ensures the walls are perfectly flat and removes any lumpy fingerprints.
Step 3: Assembling the Body
-
Trace side walls:
Once the U-shape is firm, place it on its side onto the remaining slab clay. Trace the U-shape twice to create the front and back flat faces of the vase. -
Cut the faces:
Cut out these two U-shaped face pieces. Be precise, cutting slightly outside your trace line to account for the thickness of the curved wall. -
Score and slip:
Score the edges of the curved strip (the arch) and the corresponding perimeter of the flat face pieces. Apply a generous amount of slip to all scored areas. -
Attach the faces:
Press the front face onto the arch. I find using a paddle or flat board to gently tap it ensures a tight bond. Repeat with the back face. -
Adding the neck:
For the vase opening, cut a small hole at the apex of the arch. Roll a small coil or a tiny cylinder of clay and attach it to create a short neck.
Textural Contrast
Leave the underside of the arch unglazed raw clay. The gritty, matte texture creates a stunning contrast against the glossy blue exterior.
Step 4: Refining and Glazing
-
Smooth seams:
Using a wooden tool or your thumb, blend all the seams together so they disappear. Clean up edges with a damp sponge for a soft, rounded look. -
Bisque fire:
Allow the vase to dry slowly and completely (at least a week) before loading it for a bisque fire (usually Cone 04). -
Wax resist:
Once bisqued, apply wax resist to the bottom feet of the arch to prevent the piece from sticking to the kiln shelf. -
Glaze application:
Dip or brush the exterior with a cobalt blue glaze. The glaze should be fluid enough to pool slightly but stiff enough not to run. Leave the inner arch (the underside) unglazed or apply a clear matte for contrast. -
Final firing:
Fire the piece to the maturity temperature of your clay and glaze (likely Cone 5 or 6). Let the kiln cool naturally before retrieving your finished vase.
Now you have a sculptural vessel ready to display your favorite dried botanical arrangement
Organic Wabi-Sabi Pinch-Form Vase
Embrace the beauty of imperfection with this wabi-sabi inspired vessel, characterized by its organic silhouette and rustic, speckled finish. This project focuses on hand-building techniques to achieve a natural, earthy texture that looks like it was weathered by time.
Step-by-Step
Materials
- Speckled buff stoneware clay (or white clay with grog added)
- Pottery wheel (optional, can be coil built)
- Wooden modeling tool
- Metal rib scraper
- Sponge
- Cutting wire
- Needle tool
- Scoring tool or fork
- Matte white or transparent matte glaze
- Kiln
Step 1: Farming the Base
-
Prepare the clay:
Begin by wedging about 3-4 pounds of speckled stoneware clay. Wedging is crucial to remove air bubbles and align the clay particles, ensuring a smooth building process. -
Establish the center:
If using a wheel, center your clay ball firmly. If hand-building, flatten a ball of clay into a thick disk about 4 inches in diameter to serve as your base. -
Open the clay:
Press your thumbs into the center of the mound (or disk) and open it up, leaving about a half-inch thickness for the floor. Compress the floor with a sponge to prevent cracking later.
Step 2: Shaping the Vessel
-
Pull up the walls:
Whether pulling on the wheel or building up with coils, aim for height first. Create a cylinder that is slightly taller than your intended finished piece, keeping the walls approximately 1/4 inch thick. -
Belly out the form:
From the inside, gently press outward with a sponge or rib tool while supporting the outside. Create a soft, rounded curve starting from just above the base and reaching the widest point about halfway up the vase. -
Narrow the neck:
As you move past the belly, gently collar the clay inward. Use both hands to embrace the clay and compress it slowly to form a narrower shoulder and neck. -
Define the rim:
Leave the rim slightly thicker and rounded. You can flare it out very subtly, but keep it sturdy to balance the visual weight of the belly.
Speckle Hack
If you don’t have speckled clay, wedge granular manganese or iron oxide sand into plain white clay to artificially create those lovely dark spots.
Step 3: Adding Texture and Detail
-
Create the rough surface:
Once the basic form is established but the clay is still soft, I like to take a metal rib with a serrated edge or a rough sponge and drag it vertically up the sides. This breaks the smooth surface. -
Refine the surface:
Smooth over the rough scratches lightly with a soft rubber rib or your fingers. You want to leave the texture visible but knock down any sharp clay burrs. -
Dry to leather hard:
Allow the vase to dry slowly until it reaches a leather-hard state. This usually takes a day or two depending on humidity. -
Trim the foot:
Flip the vase over and trim away excess weight from the bottom. Carve a small foot ring to give the heavy form a sense of lift.
Natural Finish
For a truly organic look, skip the glaze on the outside entirely. Rub a dark oxide wash over the texture and sponge it off, leaving color only in the crevices.
Step 4: Firing and Glazing
-
Bisque fire:
Once bone dry, fire the piece in a kiln to cone 04 (or your clay body’s bisque temperature). -
Apply the glaze:
Choose a matte white or very thin transparent matte glaze. The goal is to let the clay’s natural speckles show through, so avoid opaque, glossy glazes. -
Wipe back technique:
Dip the vase or pour the glaze over it. Once the glaze dries to the touch, take a damp sponge and gently wipe away some glaze from the high points of the texture, revealing the raw clay color beneath. -
Rim detail:
Ensure the rim has a slightly darker or thinner application of glaze to mimic the rustic lip seen in the reference, or wipe it back completely to expose the dark stoneware. -
Final firing:
Fire the glazed piece to maturity (usually cone 5 or 6 for stoneware). Let the kiln cool completely before removing your finished work.
Fill your new creation with dried branches to complete the minimalist aesthetic
Statement Handle Vase (Decorative Loops)
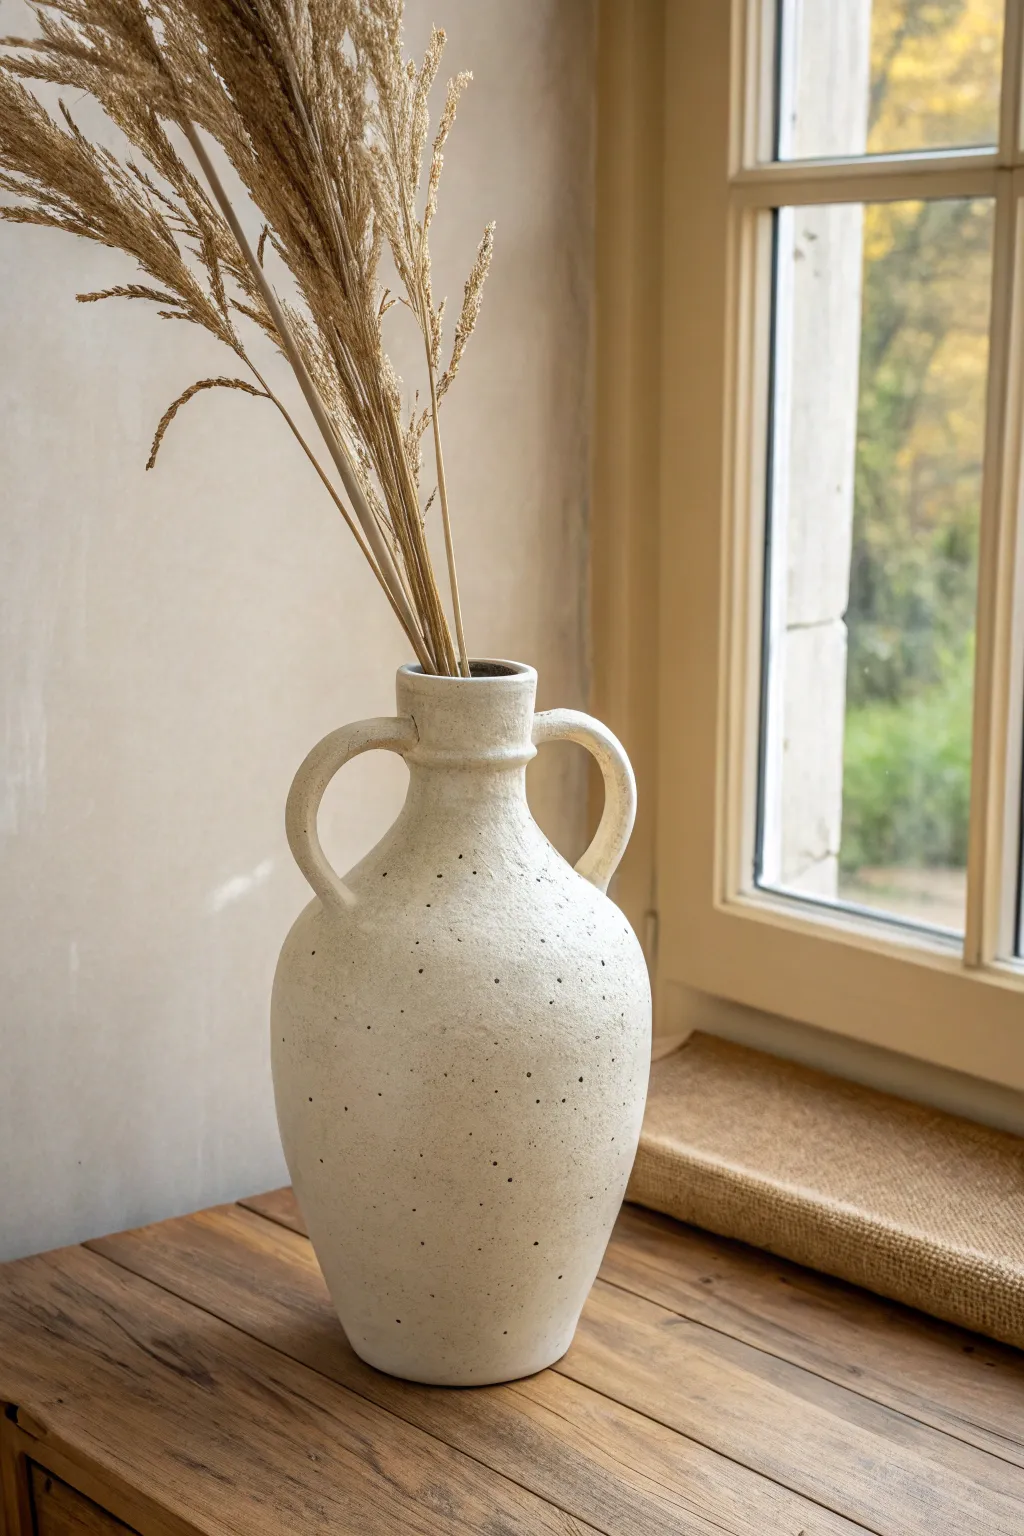
This project emphasizes raw, organic beauty with a textured ceramic vessel featuring distinctive high-loop handles. The finish mimics speckled stoneware, creating a rustic yet elegant statement piece perfect for holding dried botanicals near a sunlit window.
How-To Guide
Materials
- Air-dry clay (stone or white color) or stoneware clay if firing
- Rolling pin
- Canvas mat or non-stick surface
- Clay cutting tool or knife
- Serrated rib tool or fork for scoring
- Slip (clay mixed with water)
- Sponge
- Wooden modeling tools
- Spray bottle with water
- Acrylic paint (cream/off-white)
- Black or brown acrylic paint (for speckles)
- Stiff bristle brush (e.g., old toothbrush)
- Matte sealant spray
Step 1: Forming the Base Structure
-
Prepare the Clay Base:
Start by wedging your clay to remove air bubbles. Roll out a slab about 1/4 inch thick. Cut a circle roughly 4-5 inches in diameter for the base of your vase. -
Build the Vessel Walls:
Use the coil method for an organic shape. Roll long, even snakes of clay approximately 1/2 inch thick over your canvas mat. -
Stack and Smooth:
Score the outer edge of your base and apply a little slip. Place your first coil on top, blending the clay downward onto the base on both the inside and outside to secure the wall. -
Shape the Belly:
Continue stacking coils. To create the wider ‘belly’ of the vase seen in the photo, place each new coil slightly further outward than the last. -
Taper the Neck:
Once you reach the widest point, start placing coils slightly inward to taper the form back in. Smooth the walls vertically with your fingers or a rib tool as you go to erase the coil lines and create a unified surface. -
Form the Spout:
Build the neck straight up for the last 2-3 inches, creating a narrow cylinder. Finish the rim by smoothing it with a damp sponge for a soft, rounded lip.
Stone-Cold Pro Tip
Mix a small amount of fine sand or dried coffee grounds directly into your paint or the wet clay itself. This adds genuine grit and texture that painting alone can’t replicate.
Step 2: Adding the Statement Handles
-
Shape the Handles:
Roll two thick coils of clay, about 6-7 inches long. Gently curve them into tight ‘C’ shapes or loops. Ensure both are roughly symmetrical before attaching. -
Positioning:
Identify the attachment points on the vase—one end of the handle should attach near the top rim of the neck, and the other should land on the upper curve of the vase’s shoulder. -
Secure Attachments:
Score the main vase body and the ends of your handles deeply. Apply generous slip. Press the handles firmly into place. -
Reinforce:
Use a small tool to smudge the clay from the handle onto the vase body, ensuring a seamless, strong bond. I like to add a tiny coil around the seam and smooth it out for extra stability.
Step 3: Texturing and Finishing
-
Create Surface Texture:
While the clay is still leather-hard, dab the surface gently with a coarse sponge or a crumpled ball of aluminum foil. This mimics the rough, stone-like texture shown in the image. -
Refine the Detail:
Add the slight ridge detail just below the rim by pressing a flat tool gently around the circumference of the neck. -
Drying:
Allow the vase to dry slowly under loose plastic for 24-48 hours, then uncover it to dry completely. If using air-dry clay, wait until it is bone dry and light in color. -
Base Coat:
Paint the entire vase with a matte cream or off-white acrylic paint. You may need two coats for full opacity. -
Speckling Technique:
Dilute a very small amount of black or dark brown paint with water. Dip a stiff brush (or toothbrush) into the mixture. -
Applying Speckles:
Holding the brush a few inches from the vase, run your thumb across the bristles to flick tiny splatters of paint onto the surface. Rotate the vase to get even coverage. -
Seal:
Once the paint is completely dry, spray the vase with a matte sealant to protect the finish and deepen the stone effect.
Level Up: Aged Patina
After the base coat dries, apply a watered-down brown wash over the vase and immediately wipe most of it off with a rag. The dark color will stick in the textures for an antique look.
Fill your new vessel with tall dried grasses to complete the organic aesthetic
Raised Floral Appliqué Relief Vase
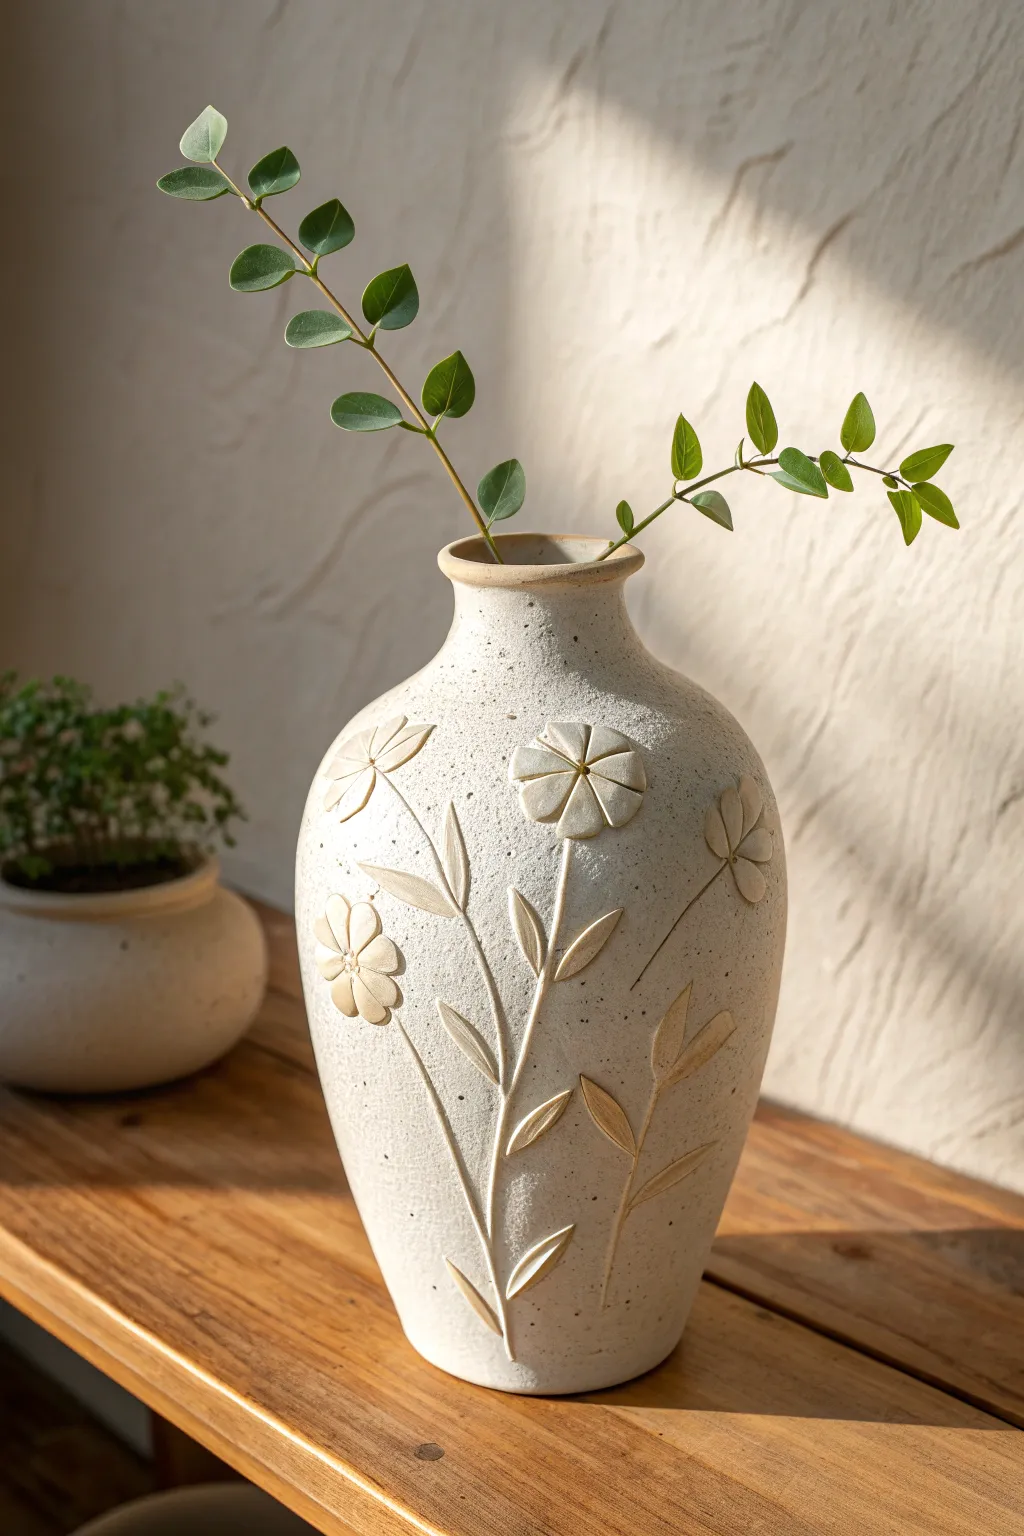
This elegant ceramic project features a soothing cream-colored clay body speckled with subtle iron flecks and adorned with raised floral motifs. The dimensional flowers create a beautiful interplay of light and shadow, giving the vase a tactile charm that feels both rustic and refined.
Step-by-Step
Materials
- Speckled stoneware clay (buff or cream)
- Pottery wheel (or coil building tools)
- Basic pottery tool kit (needle tool, rib, sponge)
- Rolling pin
- Leaf and petal cookie cutters (optional)
- Modeling tool or small wooden knife
- Scoring tool (serrated rib)
- Slip (made from the same clay body)
- Clear matte glaze
- Kiln
Step 1: Forming the Vase Body
-
Prepare the Clay:
Begin by thoroughly wedging about 3-5 pounds of speckled stoneware clay to remove air bubbles and ensure consistency. -
Center and Open:
Secure the clay on the pottery wheel bat and center it perfectly. Open up the center, creating a floor about half an inch thick. -
Pull the Walls:
Slowly pull the walls upward to create a cylinder. Aim for a height of roughly 10-12 inches, keeping the walls even but leaving slightly more thickness at the bottom for stability. -
Shape the Belly:
From the inside, gently push the clay outward while supporting the outside to form a bulbous, rounded belly in the lower two-thirds of the form. -
Collar the Neck:
Using both hands, gently collar (squeeze) the upper third of the cylinder inward to create a tapered shoulder leading to a narrower neck. -
Refine the Rim:
Finish the lip by compressing it with a chamois or sponge. Create a slightly flared, rounded rim that will look soft once fired. -
Trim and Smooth:
Use a rib tool to smooth the exterior surface, removing throwing lines to create a clean canvas for your floral work. Allow the vase to dry to a leather-hard state.
Step 2: Creating the Floral Appliqué
-
Roll a Slab:
Roll out a small separate piece of the same clay into a thin slab, approximately 1/8 inch thick. Smooth it with a rib. -
Cut Floral Shapes:
Using a needle tool or small cutters, cut out simple petal shapes (teardrops), circles for flower centers, and elongated leaf shapes. You don’t need perfect realism; stylized shapes work best here. -
Refine Edges:
Smooth the cut edges of your clay pieces with a damp finger so they stick to the vase cleanly without sharp burrs. -
Create Stems:
Roll very thin coils of clay to serve as the stems. I find rolling them on a slightly damp canvas helps prevent them from drying out too quickly. -
Plan the Layout:
Lightly trace your intended design onto the leather-hard vase with a needle tool to map out where the stems and blooms will sit.
Cracking Issues?
If the appliqué flowers are cracking off during drying, the moisture content between the vase and decoration was too different. Ensure both are leather-hard when joining.
Step 3: Assembly and Finishing
-
Score and Slip:
Wherever you plan to attach a piece, score the vase surface and the back of the Appliqué piece, then apply a dab of slip. -
Attach Stems First:
Press the thin coils onto the scored lines to form the main stems. Gently flatten them slightly so they adhere completely. -
Build the Flowers:
Attach the petals in a radial pattern around specific points on the stems. Press firmly in the center of the petals to secure them, but leave the edges slightly raised for dimension. -
Add Details:
Use a modeling tool to press a line down the center of each leaf and petal. This not only adds detail but helps bond the clay further. -
Clean Up:
Use a small, damp brush to wipe away any excess slip that may have oozed out from under the attached pieces. -
Drying:
Cover the vase loosely with plastic to let it dry very slowly. Because the appliqué pieces are thinner than the body, slow drying prevents them from popping off. -
Bisque Fire:
Once bone dry, fire the piece to Cone 04 (or your clay’s specific bisque temperature). -
Glaze and Final Fire:
Dip the vase in a clear matte glaze. This will seal the clay while allowing the natural speckles to show through. Fire to maturity (usually Cone 5 or 6 for stoneware).
Tint the Clay
Knead a small amount of mason stain into the clay used for the flowers before attaching. This creates a subtle, pastel contrast against the natural uncolored vase body.
Fill your new vessel with simple greenery and enjoy the organic warmth it brings to your space
Playful Bubble or Squiggle Texture Vase
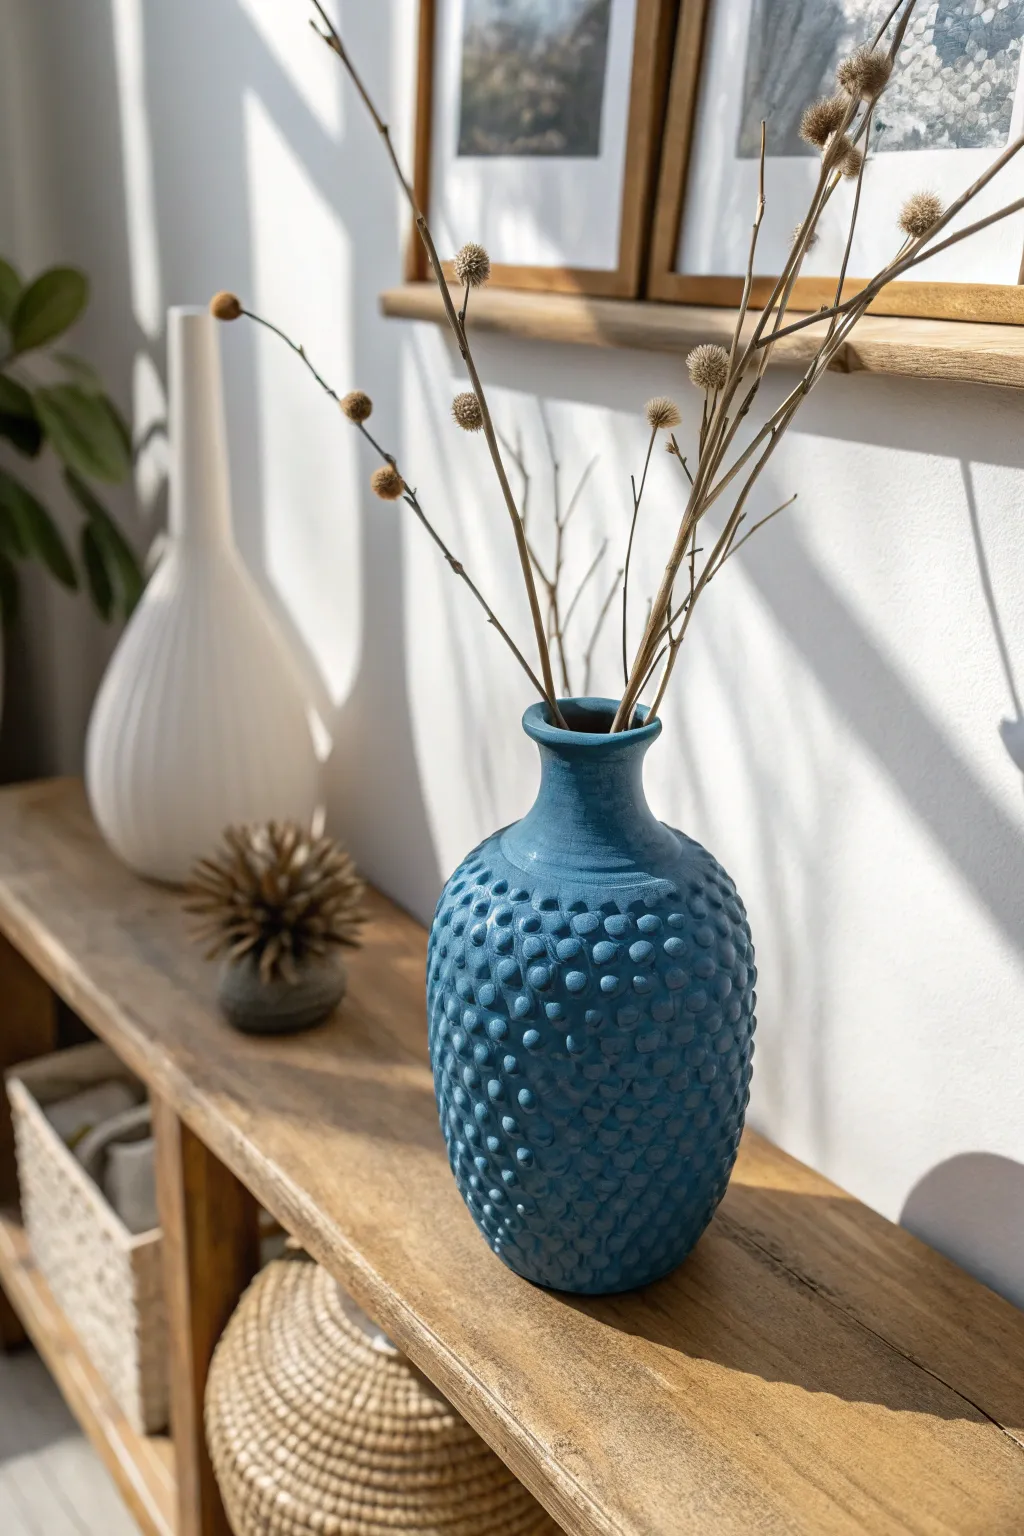
Transform a plain ceramic form into a tactile masterpiece with this playful bubble texture technique. The rich, matte blue finish highlights every bump and curve, creating a striking focal point for your dried stems.
How-To Guide
Materials
- Plain bisque or ceramic vase (bottle shape)
- Air-dry clay or ceramic texturing paste
- Modeling tools (small ball stylus or round-ended stick)
- Matte acrylic paint (Royal Blue or similar deep blue)
- Small sponge applicator
- Soft synthetic brush
- Sandpaper (fine grit)
- Matte spray sealer
Step 1: Creating the Bubble Texture
-
Prep the Surface:
Begin by cleaning your base vase thoroughly. If the surface is very slick or glazed, give it a light sanding with fine-grit sandpaper to help your texture adhere better, then wipe away any dust. -
Mix Texturing Medium:
Prepare your clay or texturing paste. For this look, I like to use a mixture of air-dry clay blended with a tiny bit of water to make it pliable but sticky, similar to thick frosting. -
Apply Base Layer:
Apply a very thin, uneven layer of the clay mixture to the main body of the vase, stopping just below the neck. This doesn’t need to be perfect; it just acts as a gripping surface for the bumps. -
Form Small Spheres:
Roll dozens of small balls of clay between your fingers. Aim for slight variety in size, ranging from tiny peas to small blueberries, to keep the texture looking organic rather than manufactured. -
Attach the Bubbles:
Press the clay spheres onto the vase body. Start from the bottom and work your way up toward the shoulder of the vase. -
Blend the Edges:
Use your thumb or a modeling tool to gently smear the edges of each sphere into the base layer, ensuring they are securely attached while leaving the center of the ‘bubble’ raised and round. -
Refine the Neck:
Leave the neck of the vase relatively smooth to create a visual break. You can create a subtle ridge where the texture ends at the shoulder by pressing a clay coil around the circumference and smoothing it down. -
Texturizing the Bubbles:
Once all bumps are placed, gently tap over them with a slightly damp sponge. This softens any fingerprints and unifies the surface texture. -
Drying Time:
Allow the vase to dry completely. Depending on the thickness of your clay, this may take 24 to 48 hours. Ensure it is bone dry before painting.
Step 2: Painting and Finishing
-
Base Coat Application:
Mix your royal blue acrylic paint. Using a soft synthetic brush, apply the first coat, working the brush into all the crevices between the bumps. -
Check for Gaps:
Inspect the vase from different angles. Because of the heavy texture, it’s easy to miss spots underneath the bumps. Dab extra paint into any white recesses. -
Second Coat:
Once the first layer is dry to the touch, apply a second coat for full opacity. This ensures rich, solid color coverage. -
Stippling Effect:
For a powdery, matte ceramic look, use a sponge applicator to stipple the final layer of paint. This removes brush strokes and enhances the stone-like appearance. -
Dry Brushing (Optional):
If you want to highlight the texture further, mix a tiny drop of white into your blue paint and very lightly dry brush just the tops of the highest bumps. -
Sealing the Work:
Take the vase to a well-ventilated area. Apply two light coats of matte spray sealer to protect the finish without adding unwanted shine. -
Final Cure:
Let the sealer cure for at least 12 hours before handling or filling. -
Styling:
Insert your favorite dried botanicals, like the billy balls or branches shown here, to complete the organic, sculptural aesthetic.
Sticky Situation
If using air-dry clay on glass, brush a layer of PVA glue on the vase first. This acts as a bonding primer so your clay bubbles won’t pop off later.
Color Shift
Mix baking soda into your acrylic paint before applying. This creates a chalky, terracotta-style texture that looks incredibly high-end and handmade.
Place your new textured vessel in a spot where the sunlight can dance across its unique surface