When I’m craving clean lines and big, satisfying surfaces to decorate, I reach for slab-building every time. Here are my favorite slab project ideas—starting with the classics you’ll make on repeat and drifting into the fun, weird stuff that always sparks the best studio chatter.
Classic Slab-Built Dinner Plates
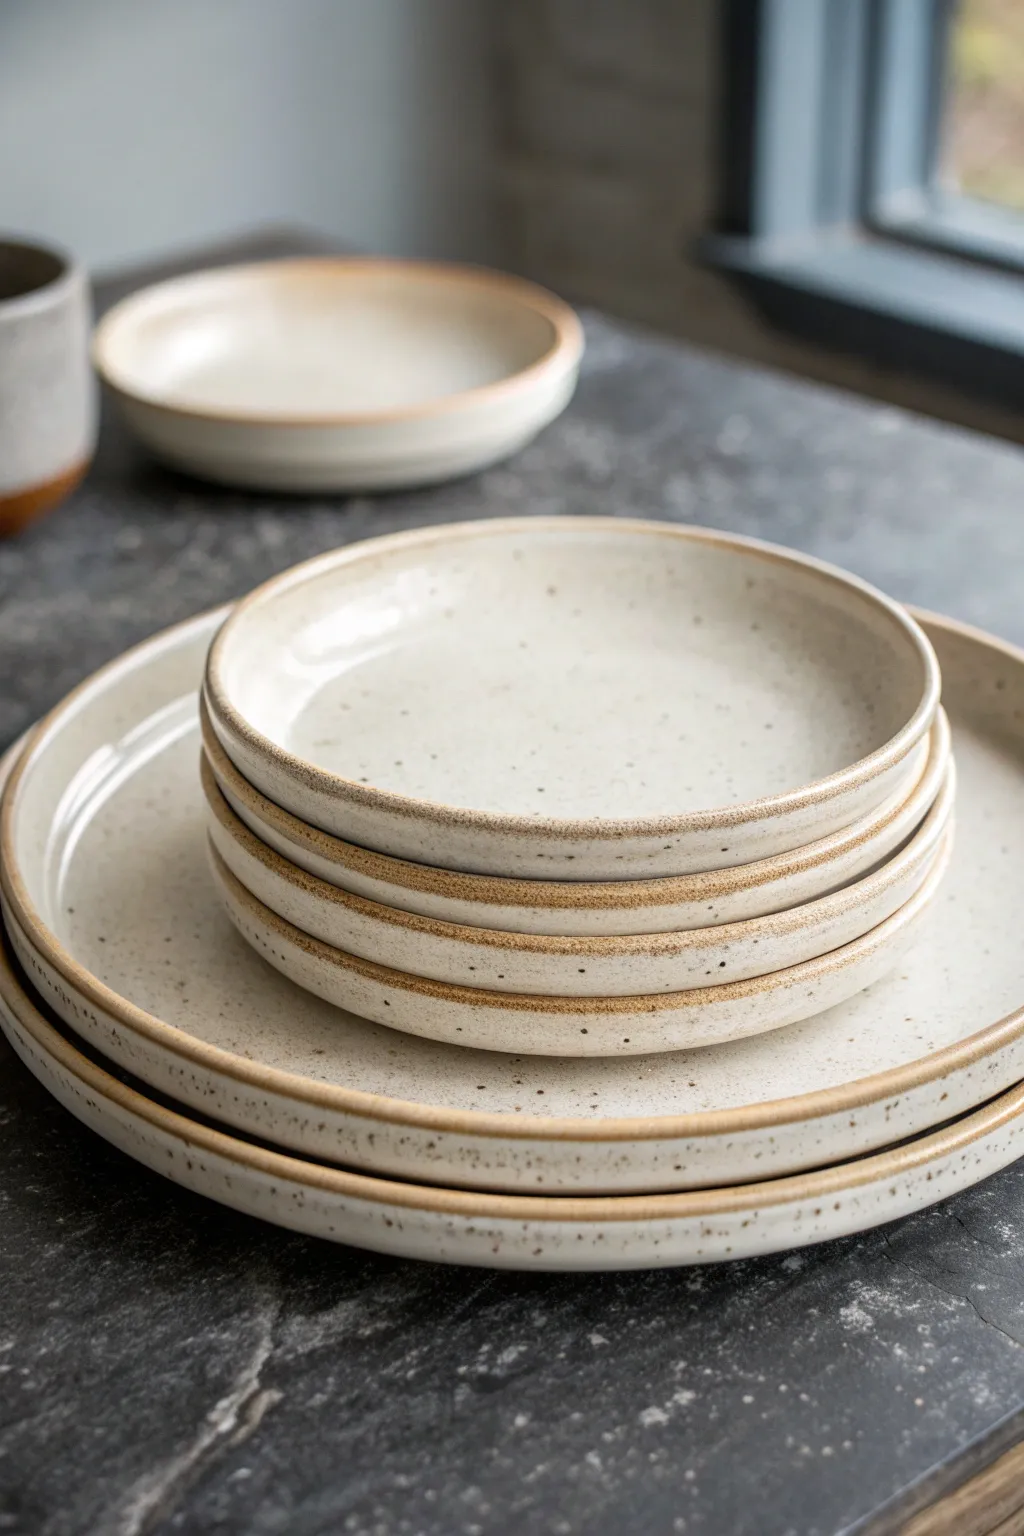
Create your own artisanal dinnerware set featuring rustic, exposed clay rims and a creamy, speckled glaze finish. These slab-built plates offer a timeless, organic look that brings warmth to any table setting.
Step-by-Step Guide
Materials
- Speckled stoneware clay (mid-fire)
- Rolling pin
- Canvas work surface or slab mat
- Wooden guide strips (1/4 inch thick)
- GR Pottery Forms or similar drape molds (dinner and salad sizes)
- Rubber kidney rib
- Needle tool
- Fettling knife
- Sponge
- Chamois cloth
- Weighted bag or sandbag
- Creamy matte white glaze
- Wax resist (optional)
Step 1: Preparing the Slabs
-
Wedge the clay:
Begin by thoroughly wedging your speckled stoneware clay. This removes air pockets and ensures the particles are aligned for a stronger finished plate. -
Set up guides:
Place your 1/4 inch wooden guide strips on either side of your canvas workspace. This thickness ensures sturdy plates that aren’t too heavy. -
Roll the slab:
Roll the clay out between the guides. Start from the center and push outward, rotating the clay occasionally to prevent it from sticking to the canvas. -
Compress the clay:
This is a crucial step I never skip: take your rubber kidney rib and firmly slide it across the entire surface of the slab in multiple directions. This aligns the clay particles and prevents future warping.
Warped Plates?
Warping usually happens during drying, not firing. Ensure your plates dry extremely slowly. Cover them loosely with plastic and keep a small sandbag in the center for the first few days.
Step 2: Shaping the Plates
-
Cut the rough shape:
Place your drape mold onto the slab to estimate size, then remove it and cut a circle about 1 inch wider than the mold using a needle tool. -
Transfer to mold:
Lift the slab carefully and center it over your drape mold. Let gravity start to pull the edges down gently. -
Define the form:
Use a damp sponge or your rubber rib to smooth the clay down over the mold. Start at the top (which will be the plate bottom) and work your way down the sides to create the rim angle. -
Trim excess clay:
Holding your fettling knife steady against the bottom edge of the mold, spin the mold (if on a banding wheel) or carefully cut around the perimeter to create a perfect, even rim. -
Refine the rim:
Use a damp chamois or sponge to round over the sharp cut edge of the rim. This compression helps prevent chipping later. -
Dry partially:
Allow the plates to stiffen up to a soft leather-hard stage while still on the mold. If they dry too much, they might crack as they shrink against the mold.
Level Up: Nesting Set
Make a full nesting set by using 3 different sized molds. Use the same clay and glaze to unify them, but vary the rim height slightly for visual interest when stacked.
Step 3: Finishing and Glazing
-
Remove and dry:
Pop the plates off the molds once they hold their shape. Place a weighted bag in the center of the plate while it dries slowly to keep the bottom perfectly flat. -
Clean up edges:
Once fully bone dry, do a final pass with a slightly damp green scrubbing pad to remove any burrs or rough spots, especially on the rim. -
Bisque fire:
Load the kiln carefully and bisque fire the plates to Cone 04 (or your clay body’s recommendation). -
Wax the rim:
To achieve that specific exposed-clay look from the photo, apply a steady line of wax resist along the very edge of the rim, or simply be very careful when dipping. -
Glaze application:
Dip the plate into a creamy matte white glaze. If you didn’t obscure the rim with wax, wipe the glaze off the edge with a damp sponge immediately after dipping. -
Check the foot:
Ensure the bottom foot of the plate is completely wiped clean of glaze to prevent it from fusing to your kiln shelf. -
Glaze fire:
Fire the plates to the maturation temperature of your clay and glaze (typically Cone 5 or 6 for stoneware). -
Sand the bottom:
After firing, use wet sanding paper or a diamond pad to smooth the unglazed foot ring so it won’t scratch your table.
Now you have a stunning set of durable, handmade plates ready to elevate your next dinner party.


Soft-Edged Slab Snack Bowls (No Mold Needed)
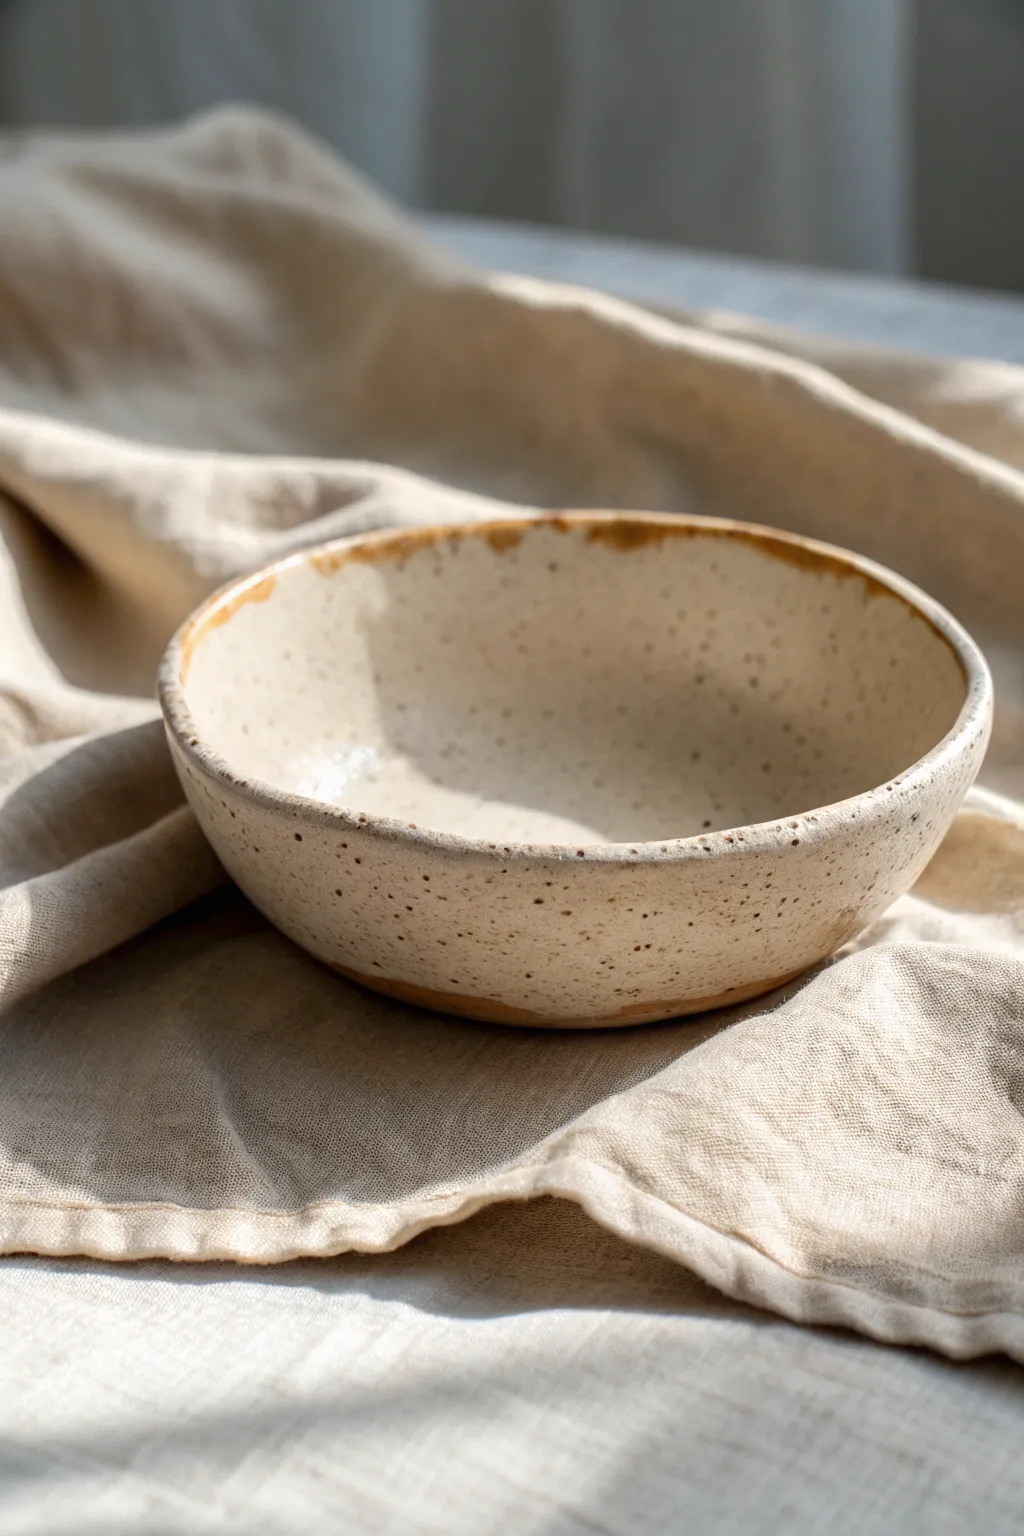
Embrace the beauty of imperfection with these charming hand-built snack bowls. Using a simple slab technique without molds allows for organic, gently waved rims and a unique silhouette for every piece.
Step-by-Step
Materials
- Speckled stoneware clay body (e.g., Laguna Speckled Buff)
- Rolling pin
- Canvas working mat or slab mat
- Two wooden guide strips (approx. 1/4 inch thick)
- Needle tool or fettling knife
- Paper template (circle, approx. 6-7 inches)
- Serrated rib tool
- Smooth rubber or metal kidney rib
- Sponge
- Small banding wheel (optional but helpful)
- Clear or transparent glossy glaze
- Oxide wash (Iron Oxide) or dark underglaze for the rim
- Small detail brush
Step 1: Preparing the Slab
-
Wedge the clay:
Begin by thoroughly wedging a grapefruit-sized ball of clay to remove air bubbles and ensure particle alignment. -
Flatten the mass:
Press the ball onto your canvas mat with the palm of your hand to create a thick, rounded pancake shape. -
Set up guides:
Place your wooden guide strips on either side of the clay. These will ensure your slab is an even thickness throughout. -
Roll the slab:
Roll the clay out using the rolling pin. Roll once, lift the clay carefully to unstick it from the canvas, rotate it 90 degrees, and roll again until the pin touches the guide strips. -
Compress the surface:
Take your smooth rib and run it firmly over the entire surface of the slab on both sides. This aligns the clay particles, preventing future warping, and removes canvas texture.
Step 2: Forming the Bowl
-
Cut the shape:
Place your circular paper template onto the slab. Trace around it with a needle tool to cut out your base circle. -
Soften the edge:
Before lifting the circle, run a damp finger or a small piece of plastic wrap over the sharp cut edge to round it off slightly. -
Create darts:
To make the flat circle into a bowl without a mold, we need to remove material. Cut a small triangular wedge (a dart) out of the circle visually similar to a slice of pie, roughly 1 inch wide at the rim tapering to a point near the center. -
Score the edges:
Using a serrated rib or needle tool, rough up the two cut edges of your dart where they will join. -
Join the seam:
Apply a tiny amount of slip or water to the scored areas. Bring the two cut edges together, curving the slab into a cone-like bowl shape. -
Reinforce the join:
Firmly press the seam together. Support the outside with one hand while smoothing the clay across the seam on the inside with your thumb or a wooden tool. -
Shape the curve:
With the basic shape formed, cradle the bowl in your palms. Gently press outward from the inside to round out the bottom and soften the angle created by the dart, making it look seamless.
Seam Splitting?
If the dart seam cracks during drying, score it deeper next time and use a tiny coil of clay to reinforce the join before smoothing it out.
Step 3: Refining and Drying
-
Wavy rim adjustment:
I like to gently press down on the rim at random intervals with my thumb to create that organic, slightly undulating edge seen in the photo. -
Wait for leather hard:
Let the bowl dry slowly under loose plastic until it reaches a leather-hard state. -
Trim the foot (optional):
If parts of the base are uneven, you can lightly trim the bottom now, but for this rustic style, simple smoothing with a sponge is often enough. -
Bisque fire:
Once bone dry, fire the piece to bisque temperature (usually cone 04) creates a porous state ready for glazing.
Level Up: Texture
Before cutting your circle, roll the slab onto a textured fabric or lace doily to imprint a subtle pattern on the exterior of the bowl.
Step 4: Glazing and Finishing
-
Wipe down:
Wipe the bisque ware with a clean, damp sponge to remove any dust that might resist the glaze. -
Apply rim detail:
Using a small detail brush, paint a thin, slightly irregular line of iron oxide wash or dark brown underglaze along the very edge of the rim. -
Dip or brush glaze:
Apply a clear or transparent glossy glaze over the entire interior and exterior. This allows the natural speckles of the clay body to show through. -
Clean the foot:
Wipe the bottom of the bowl clean of any glaze to prevent it sticking to the kiln shelf. -
Glaze fire:
Fire to the maturity temperature of your clay and glaze (typically cone 5 or 6 for stoneware).
Enjoy using your new custom bowl for morning granola or evening snacks


Slump-Molded Slab Bowls With Crisp Rims
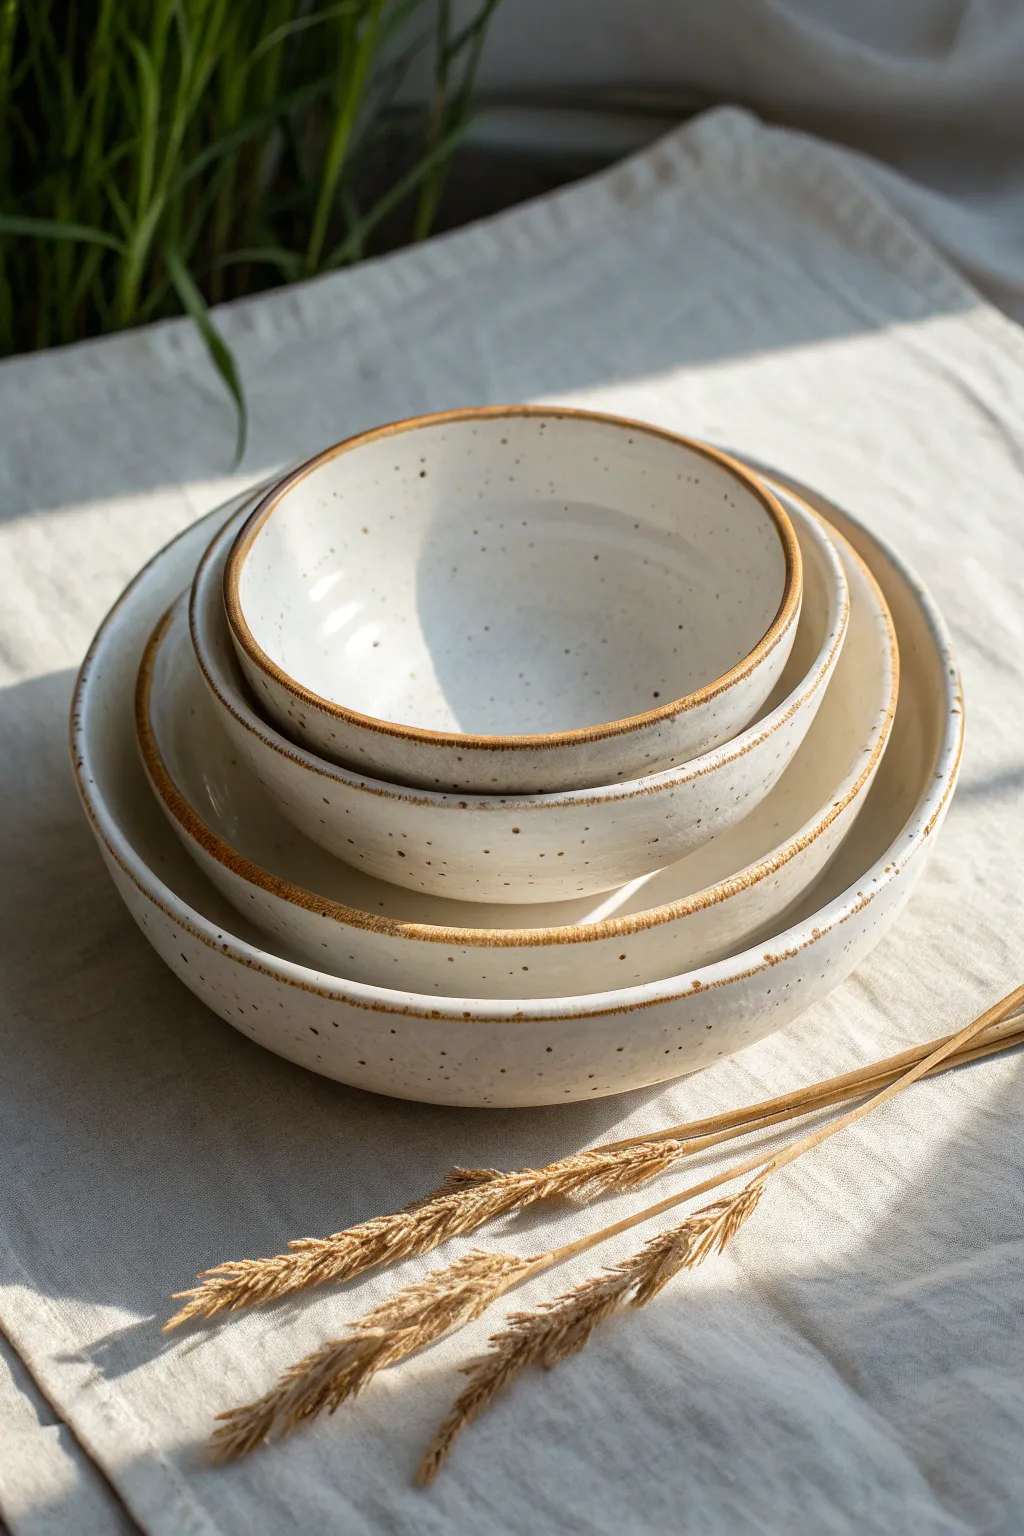
These simple yet elegant nesting bowls showcase the beauty of raw clay against a smooth, speckled white glaze. The imperfect, organic rims and exposed clay edges give them a warm, rustic charm perfect for any table setting.
How-To Guide
Materials
- Stoneware clay (speckled or buff)
- Rolling pin
- Canvas or slab mat
- Thickness strips or guides (1/4 inch)
- Slump molds (various sizes of plaster or bisqued bowls)
- Clay knife or fettling knife
- Rib tool (soft kidney)
- Sponge
- Speckled white glaze
- Wax resist
- Soft brush
Step 1: Preparing the Slabs
-
Wedge the clay:
Start by wedging your stoneware clay thoroughly to remove any air bubbles and ensure an even consistency, which is crucial for preventing warping later. -
Setup the workspace:
Lay out your canvas or slab mat on a flat surface. Place your thickness strips on either side of where you will roll to ensure a uniform slab. -
Roll the clay:
Roll the clay out into a large, even slab. Check periodically to make sure the clay isn’t sticking to the canvas, flipping the slab if necessary. -
Smooth the surface:
Once rolled to the desired thickness, take your soft rib tool and compress the clay surface on both sides. This aligns the clay particles and removes the canvas texture.
Smooth Moves
Compressing the slab with a rib is vital. It prevents warping during firing and removes canvas texture for a sleeker finish.
Step 2: Forming the Bowls
-
Cut circular blanks:
Select slump molds in graduating sizes. Use a needle tool or knife to cut circles from your slab that are slightly larger than each mold to account for depth. -
Shape the first bowl:
Gently lift a clay circle and drape it inside your largest slump mold. Press the clay firmly but gently against the mold’s interior, starting from the center and working outward to avoid trapping air. -
Refine the rim:
Use your knife to trim the excess clay at the rim of the mold. For the look in the photo, hold the knife at a slight angle to create a beveled edge. -
Smooth the edge:
Run a damp sponge or your finger along the cut rim to soften the sharp edge while keeping that crisp, defined line. This is where I like to spend a little extra time to ensure it feels good to the touch. -
Repeat for nesting set:
Repeat the molding process with your smaller clay circles and smaller molds. Ensure you are pressing them consistently so the final bowls will nest well together. -
dry slowly:
Let the bowls stiffen inside the molds until leather hard. If you remove them too soon, they may slump and lose their shape.
Rim Variations
Try gently undulating the rim with your finger while the clay is soft to create an organic, wabi-sabi aesthetic instead of a perfect circle.
Step 3: Finishing and Glazing
-
Bisque fire:
Once completely bone dry, fire the bowls in a kiln to bisque temperature (usually cone 04 or 06). -
Clean the bisque:
After firing, wipe the bowls down with a damp sponge to remove any kiln dust that could prevent the glaze from adhering properly. -
Apply wax resist:
Paint a careful line of wax resist along the very top edge of the rim and a few millimeters down the outside. This will keep the glaze off the rim, creating that exposed clay detail. -
Glaze the interior:
Pour speckled white glaze into the bowl, roll it around to coat the entire interior, and pour out the excess. Wipe any drips immediately. -
Glaze the exterior:
Dip the exterior of the bowl into the glaze, or brush it on if you prefer. The wax resist on the rim will naturally repel the glaze, leaving that crisp brown line. -
Clean the foot:
Sponge off any glaze from the bottom foot of the bowl to prevent it from sticking to the kiln shelf. -
Final firing:
Fire the bowls to the maturity temperature of your clay and glaze (likely cone 5 or 6). Allow the kiln to cool completely before unloading.
Now you have a stunning set of handmade stacking bowls ready for your morning cereal or to display on your shelf


Easy Wrap-Around Slab Mugs
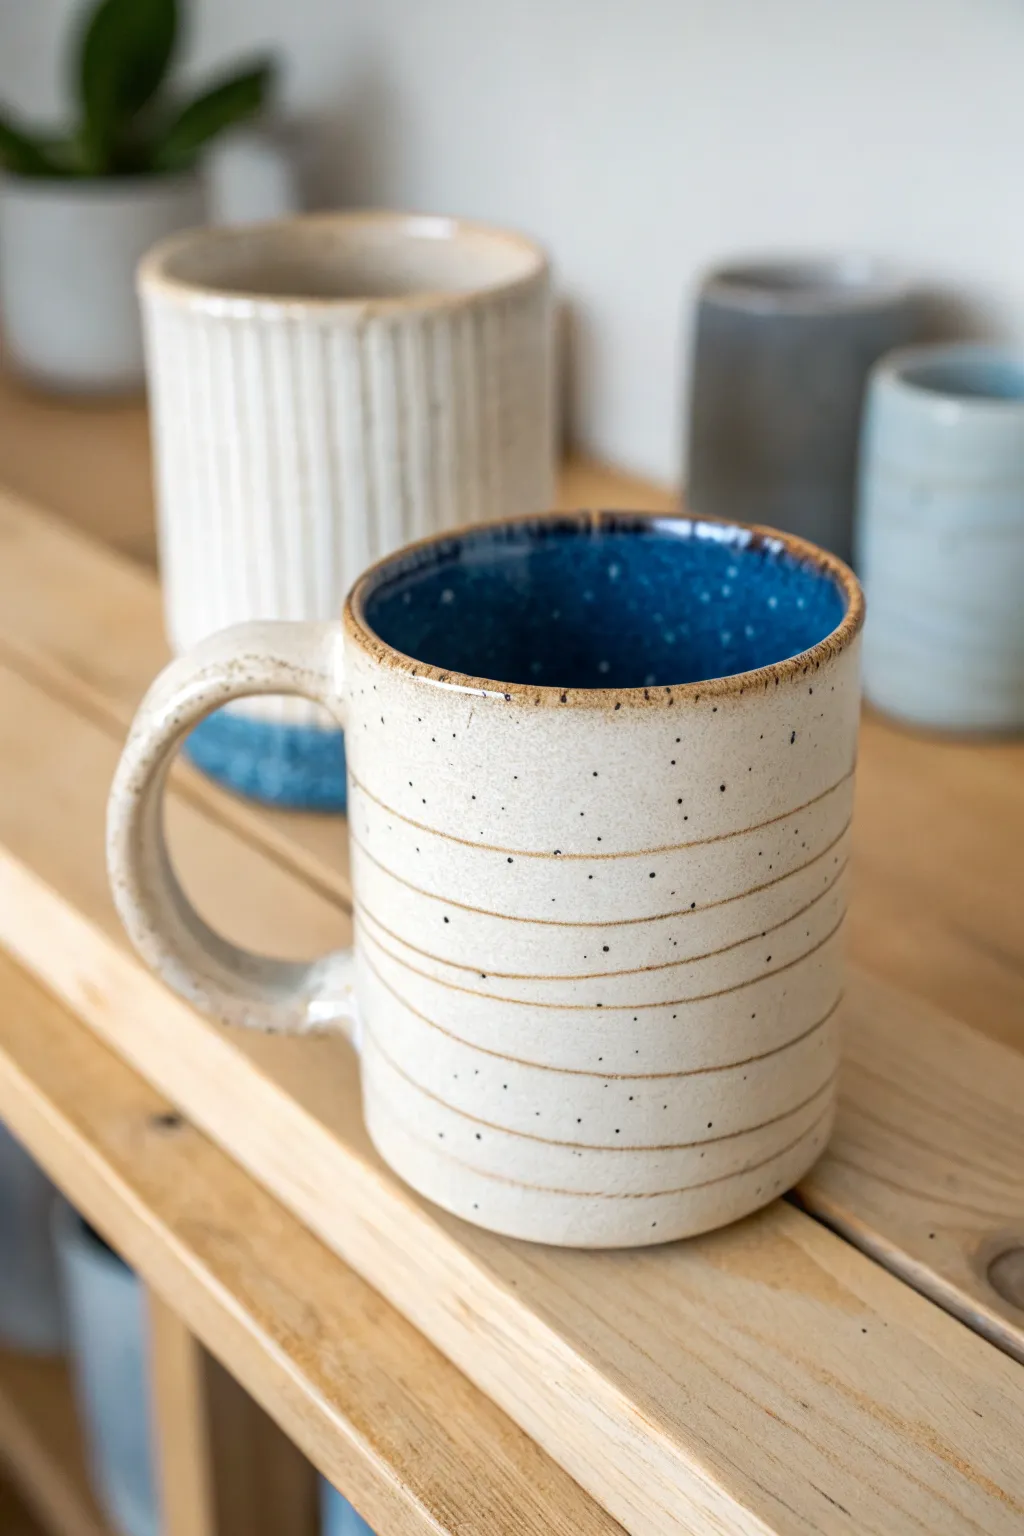
This charming mug features a warm, speckled cream exterior with rustic horizontal sgraffito lines that reveal the clay body beneath. The interior surprises with a deep, glossy cosmic blue glaze, creating a beautiful contrast perfect for your morning brew.
Step-by-Step Guide
Materials
- Stoneware clay (speckled or buff)
- Rolling pin and guide strips (canvas cloth optional)
- Fettling knife or needle tool
- Serrated rib tool
- Bisque mold or cardboard tube (for forming)
- Scoring tool (or fork)
- Slip
- Modeling tool or wooden spoon
- Sponge
- Creamy satin matte white glaze (exterior)
- Deep cobalt blue glossy glaze (interior)
- Wax resist
Step 1: Forming the Cylinder
-
Roll the slab:
Begin by rolling out a consistent slab of speckled stoneware clay to about 1/4 inch thickness. Use guide strips on either side of your rolling pin to ensure the thickness is perfectly even from edge to edge. -
Cut the rectangle:
Measure and cut a rectangular strip from your slab. The height determines your mug’s depth (aim for 4-5 inches), and the length should wrap fully around your form with a slight overlap. -
Texture the surface (optional):
Before assembling, smooth the surface with a soft rib. If you want the exterior lines to be physical indentations rather than just glaze effects, you can lightly drag a tool across the slab now, but for this specific look, we will rely on glazing later. -
Bevel the edges:
On the short ends of your rectangle, cut 45-degree bevels in opposite directions. This allows the seam to overlap smoothly without creating a thick lump. -
Form the wall:
Wrap the slab around your cylindrical form or bisque mold. Score the beveled edges aggressively and apply a generous amount of slip. -
Seal the seam:
Press the beveled edges together firmly. Use a wooden modeling tool to blend the seam on both the inside and outside until it is invisible, then smooth over with a damp sponge.
Step 2: Adding the Base and Handle
-
Cut the floor:
Roll a small piece of slab for the base. Place your cylinder on top of it and trace around the bottom edge with a needle tool. -
Attach the bottom:
Score and slip both the bottom edge of your cylinder and the outer rim of the base circle. Press them together firmly. -
Reinforce the join:
Roll a very thin coil of clay and press it into the interior seam where the wall meets the floor. Smooth this coil down completely to ensure a watertight seal. -
Pull or roll a handle:
For this mug’s aesthetic, roll a thick coil or pull a strap of clay. Curve it into a ‘C’ shape and let it stiffen slightly so it holds its arch. -
Attach handle:
Score and slip the attachment points on the mug body and handle. Press the handle on firmly, blending the clay at the joints for strength. -
Dry and bisque:
Allow the mug to dry slowly under loose plastic to prevent warping. Once bone dry, fire it to bisque temperature (usually Cone 04).
Warped Rim?
If your cylinder goes oval during drying, gently reshape it while it’s leather hard. You can rest a lightweight board on the rim to help keep it level.
Step 3: Glazing and Finishing
-
Wax the bottom:
Apply wax resist to the very bottom of the mug and slightly up the foot to prevent glaze from running onto the kiln shelf. -
Glaze the interior:
Pour a deep cosmic blue gloss glaze into the mug, swirl it to coat the entire interior surface, and pour out the excess immediately. Wipe any drips off the rim. -
Glaze the exterior:
Dip the exterior of the mug into a satin matte cream or white glaze. I find dipping gives a more even coat than brushing for this smooth look. -
Create the lines:
While the exterior glaze is dry to the touch but not powdery, use a dull carving tool or the back of a needle tool to gently scratch horizontal spiral lines around the mug, revealing the raw clay body beneath. -
Reveal the rim:
Use a damp sponge to carefully wipe the cream glaze off the very top rim, exposing the raw clay color similar to the scratched lines. This frames the blue interior beautifully. -
Final wipe:
Check the exterior for any accidental blue smudges and gently sponge them away. Ensure the wax on the bottom is clean. -
Glaze fire:
Fire the mug to maturity (likely Cone 5 or 6 depending on your clay body). The heat will melt the glazes and toast the exposed clay lines to a warm brown.
Clean Lines Pro-Tip
When carving the spiral lines through the glaze, brush away the dust instantly with a soft fan brush. Don’t blow on it, or you might spot the glaze.
Now you have a cozy, custom mug ready for your favorite hot drink

What Really Happens Inside the Kiln
Learn how time and temperature work together inside the kiln to transform clay into durable ceramic.
Minimal Slab Espresso Cups
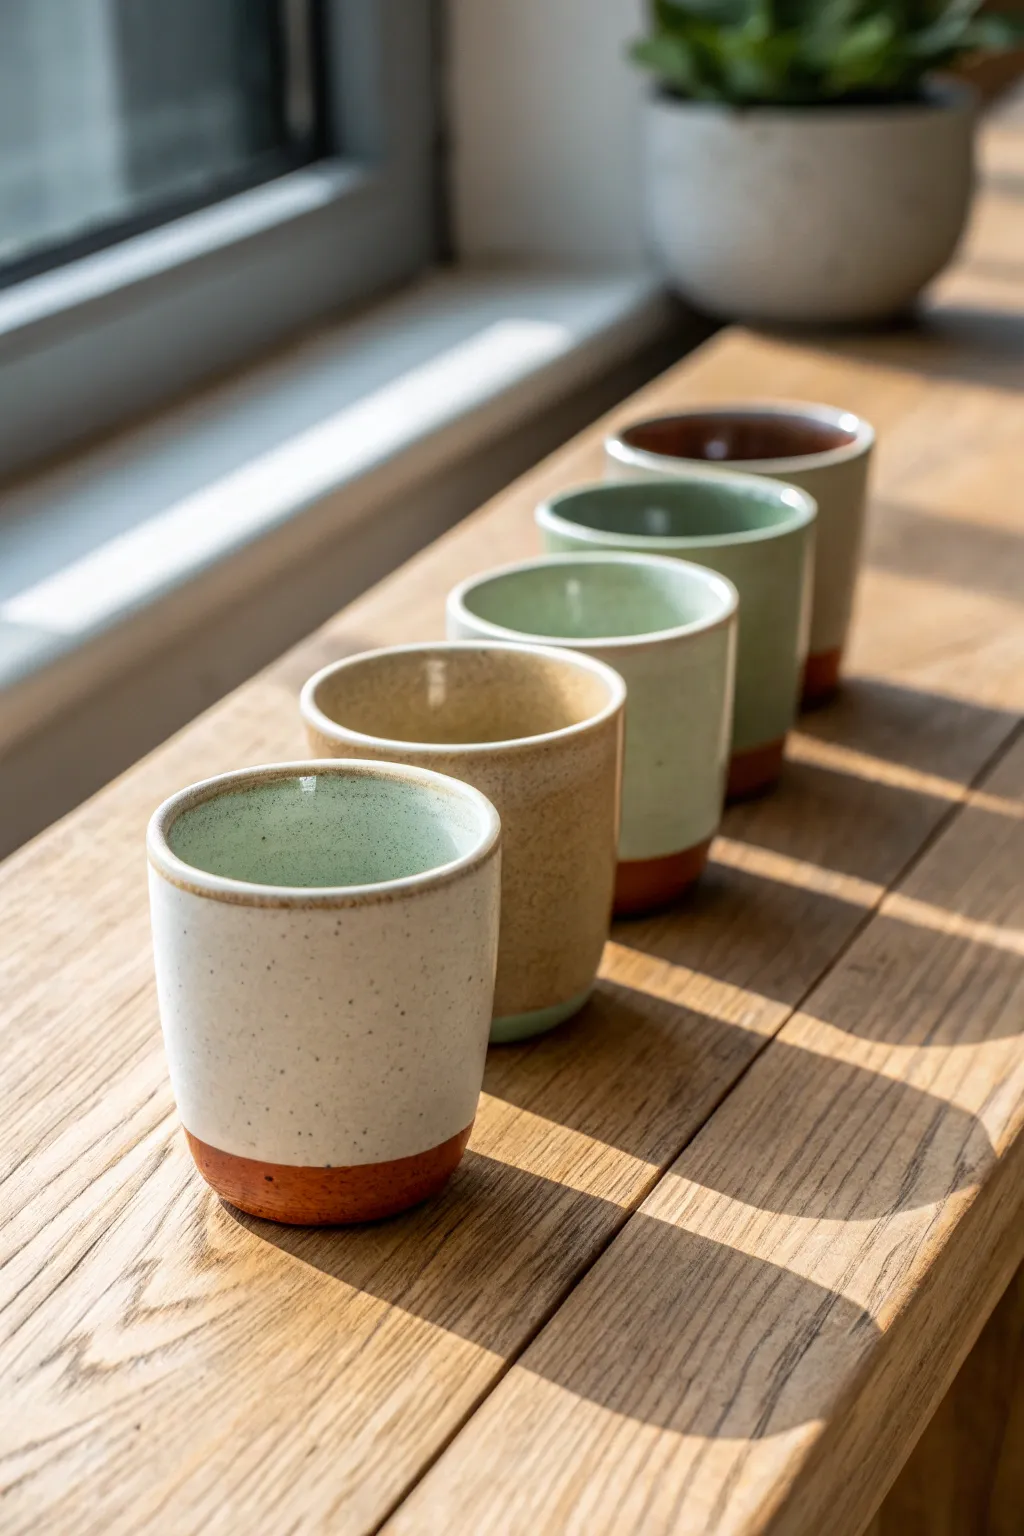
These sleek, handleless espresso cups feature a modern, minimalist design with a raw clay base and soft, earthy glazes. Perfect for a cozy morning coffee, their straight-sided form is an excellent introduction to working with consistent clay slabs.
Step-by-Step Tutorial
Materials
- Red stoneware or terracotta clay (mid-fire)
- Slab roller or rolling pin with thickness strips (1/4 inch)
- 3-inch circular cookie cutter
- Flexible ruler or measuring tape
- Fettling knife or X-Acto blade
- Serrated rib (scoring tool)
- Slip (clay mixed with water)
- Wooden modeling tool or blending stick
- Soft cosmetic sponge
- Variety of dipping glazes (white speckled, ochre, sage green, dark brown)
- Wax resist
Step 1: Preparing the Slabs
-
Roll the clay:
Begin by rolling out your red stoneware clay into a consistent slab. Aim for a thickness of about 1/4 inch (approx. 6mm). If you aren’t using a slab roller, wooden guide strips on either side of your rolling pin are essential for keeping the wall thickness even. -
Smooth the surface:
Before cutting, take a soft rubber rib and compress the clay slab on both sides. This aligns the clay particles to prevent warping later and gives you a pristine surface for glazing. -
Cut the bases:
Use your 3-inch circular cutter to punch out five discs from the slab. These will serve as the floors of your cups. Set them aside on a ware board covered with canvas or newsprint. -
Measure the circumference:
To determine the length of your wall rectangle, wrap a flexible measuring tape around your circular base or calculate it (Diameter x 3.14). Add about 1/2 inch to this measurement to account for the bevel overlap. -
Cut the walls:
Cut five rectangular strips from the remaining slab. The height is up to you, but 3.5 to 4 inches creates a nice espresso size. Use a straight edge to ensure your cuts are perfectly perpendicular.
Warped Walls?
If your cylinders are turning into ovals, your clay is likely too soft. Let the slabs stiffen to a ‘soft leather hard’ stage before assembling for better structural integrity.
Step 2: Assembling the Cylinders
-
Bevel the edges:
On the short sides of your rectangular strips, cut 45-degree angles. Cut one angle on the front face and the other on the back face so they will overlap seamlessly when curled into a cylinder. -
Score and slip the walls:
deeply score the beveled edges with your serrated rib and apply a generous amount of slip. Curve the clay rectangle carefully into a tube, overlapping the beveled ends. -
Join the seam:
Press the beveled seam firmly together. Support the wall from the inside with one hand while using a wooden tool to blend the seam on the outside. Repeat on the interior seam. -
Attach the base:
Score and slip the bottom edge of your cylinder and the top perimeter of your circular base. Press the cylinder onto the base firmly. -
Reinforce the bottom connection:
Use a thin coil of clay on the interior bottom seam if needed, blending it smooth with a rounded tool to ensure it’s watertight. I find using a damp sponge on a stick helps smooth that hard-to-reach inside corner. -
Refine the rim:
Once the cup is assembled, check the rim. If it’s uneven, use a needle tool to trim it level while the cup sits on a banding wheel. Smooth the lip with a chamois or wet fingertip for a comfortable drinking edge.
Texture Play
Before rolling the cylinder, press canvas, lace, or leaves into the slab surface. The glaze will break beautifully over the textures while keeping the clean cylindrical form.
Step 3: Finishing and Glazing
-
Bisque fire:
Allow the cups to dry slowly under plastic to prevent cracking. Once bone dry, bisque fire them to Cone 04 (or according to your clay body’s specs). -
Wax the exterior:
To achieve the dipped look shown in the photo, apply wax resist to the bottom 1/2 inch or 3/4 inch of the exterior wall, as well as the entire bottom of the cup. This keeps the red clay exposed. -
Glaze the interior:
Pour your chosen glaze inside the cup, swirl it to coat the entire inner surface, and pour out the excess. Wipe any drips off the rim immediately. -
Dip the exterior:
Hold the cup by the foot (or use tongs) and dip it straight down into the glaze bucket. Submerge it until the glaze meets your wax line. Hold for 3 seconds and lift straight out. -
Clean up:
Once the glaze is dry on the surface, take a damp sponge and firmly wipe the waxed bottom area to remove any beads of glaze that are sitting on top of the wax. -
Final firing:
Load the cups into the kiln and glaze fire to the maturity temperature of your clay and glaze (typically Cone 5 or 6 for stoneware). Ensure the cups don’t touch each other during firing.
Line up your finished cups on a sunny sill and enjoy the beautiful rhythm of repeating forms
Everyday Slab Platters With Lifted Corners
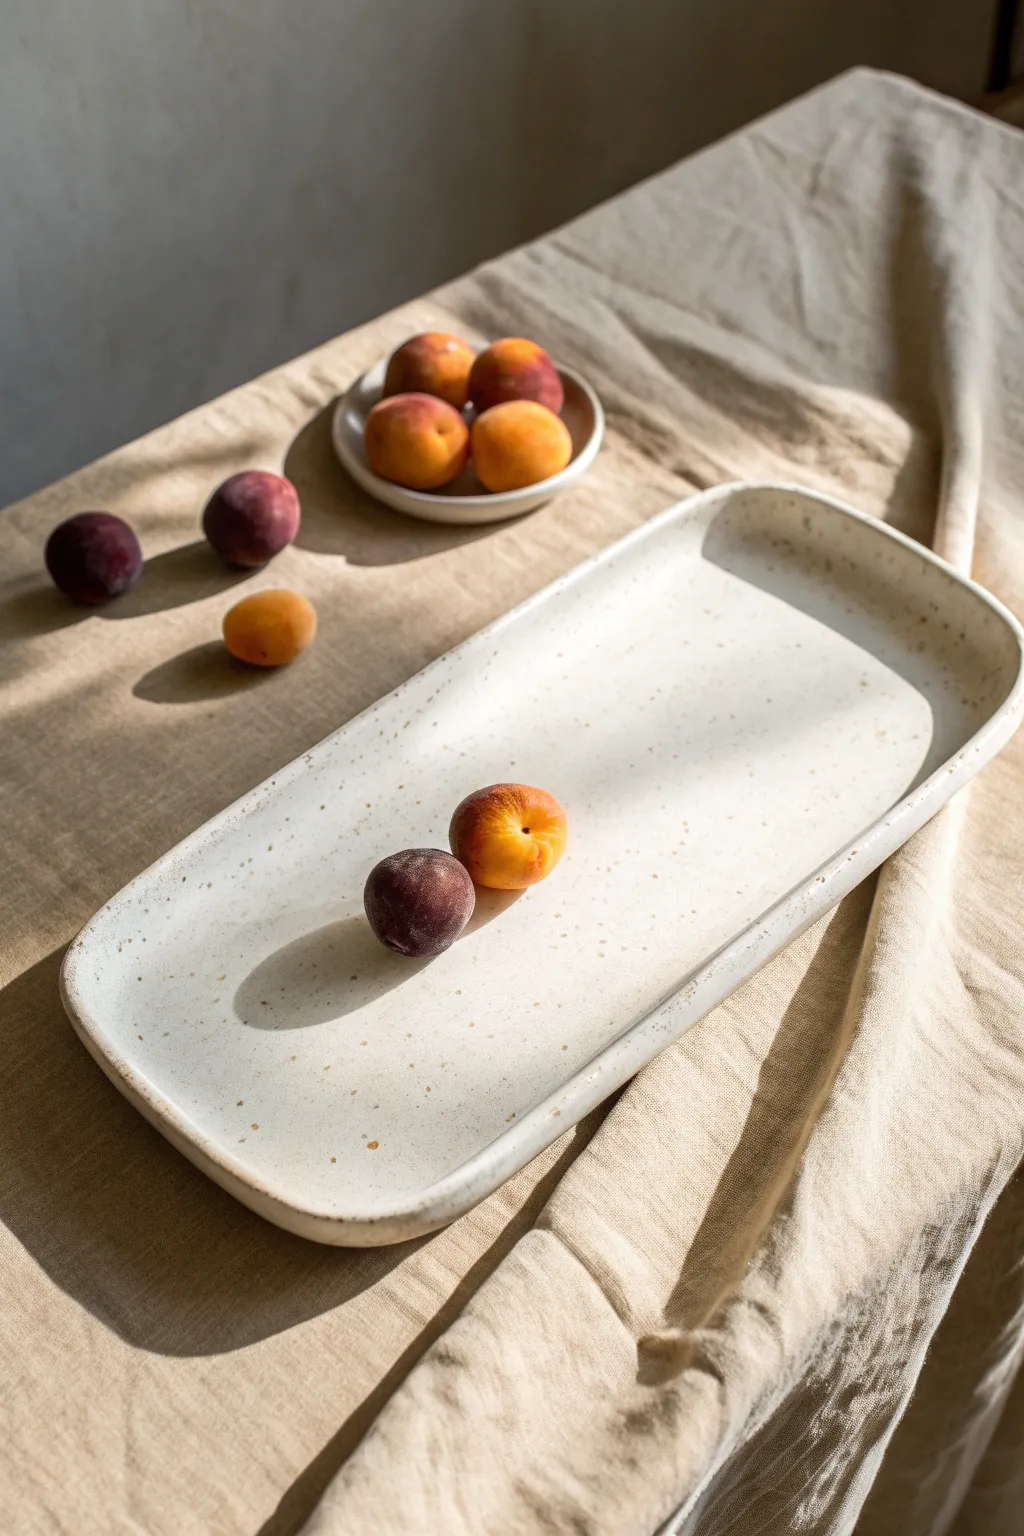
This minimalist serving tray balances modern lines with an organic, handmade feel thanks to its softly lifted corners and speckled clay body. It uses a straightforward slab-building technique that creates a functional canvas perfect for serving summer fruits or appetizers.
How-To Guide
Materials
- Speckled stoneware clay (approx. 2-3 lbs)
- Available slab roller or rolling pin with guide sticks (1/4 inch)
- Rectangular paper template (approx. 6” x 14”)
- Needle tool or fettling knife
- Soft flexible rib (rubber or silicone)
- Sponge
- Canvas or slab mat
- Ware board
- Optional: Foam shaper or rolled towels for support
- Clear matte glaze
Step 1: Rolling and Cutting
-
Prepare the Clay:
Begin by wedging your speckled stoneware clay thoroughly to remove air bubbles and align the particles. Shape the wedged clay into a thick rectangular block to make rolling easier. -
Roll the Slab:
Roll out a slab of clay to a uniform thickness of about 1/4 inch. If you are using a rolling pin, place wooden guide sticks on either side of the clay to ensure the thickness is perfectly even from end to end. -
Compress the Slab:
Take your flexible rib and firmly compress the surface of the clay in multiple directions. This step aligns the clay platelets, prevents warping during firing, and erases any texture from the canvas. -
Cut the Shape:
Place your rectangular paper template onto the slab. Using a needle tool or fettling knife, trace around the template, holding the tool perpendicular to the table for a clean, straight edge. -
Smooth the Rim:
Once the rectangle is cut, run a damp sponge or your finger gently along the cut edge to soften the sharp corners. You don’t want a razor-sharp edge on a functional platter.
Warp Watch
Flat platters love to warp. To prevent this, flip your drying slab every few hours during the first day so both sides dry evenly.
Step 2: Forming the Platter
-
Transfer to Board:
Carefully lift your slab and place it onto a ware board. It is much easier to shape the platter on the board it will dry on, so you don’t have to move it later when it’s fragile. -
Lift the Edges:
Gently slide your fingers under the long sides of the rectangle and lift them upwards slightly to create a shallow curve. You aren’t building a wall, just creating a concave surface. -
Create the Corners:
Focus on the four corners. Press your thumb gently into the interior corner while pulling the exterior corner upward. This creates the signature ‘lifted’ look seen in the photo. I find that smoothing the clay upward with a rib helps lock this curve in place. -
Refine the Profile:
Look at the platter from eye level. Adjust the rim so it has a continuous, gentle flow. The ends should remain mostly flat or slightly lifted, while the sides curb up to hold contents. -
Support the Lift:
If the clay is very soft and slumping back down, tuck small pieces of foam or rolled-up paper towels under the lifted corners to support them while they stiffen.
Texture Twist
Before cutting the rectangle, roll a piece of linen or lace into the slab. The clear glaze will pool in the texture, adding depth.
Step 3: Finishing and Firing
-
Slow Dry:
Cover the platter loosely with plastic to let it dry slowly to the leather-hard stage. Slow drying is crucial for flat pieces to prevent the corners from curling up or the center from cracking. -
Refine the Foot:
Once leather hard, flip the piece over gently. Smooth the bottom with a rib to ensure it sits flat on a table. If desired, you can sponge away any harsh marks. -
Bisque Fire:
Let the piece dry completely (bone dry) before loading it into the kiln for a bisque firing to Cone 04 (or your clay’s specific bisque temperature). -
Glaze Application:
Wipe the bisque-fired platter with a damp sponge to remove dust. Pour a clear matte glaze over the interior, or dip the entire piece if you have a large enough container. The clear glaze allows the beautiful natural speckles of the clay to shine through. -
Wipe the Foot:
Ensure the bottom of the platter where it touches the kiln shelf is completely free of glaze. Wipe it clean with a sponge. -
Final Fire:
Fire the piece to maturity (likely Cone 5 or 6 for stoneware). Once cool, sand the bottom lightly if there are any rough spots.
With its simple form and stunning speckled finish, this platter is ready to become a staple on your dining table


The Complete Guide to Pottery Troubleshooting
Uncover the most common ceramic mistakes—from cracking clay to failed glazes—and learn how to fix them fast.
Big Flat Slab Trays for Coffee Tables and Vanities
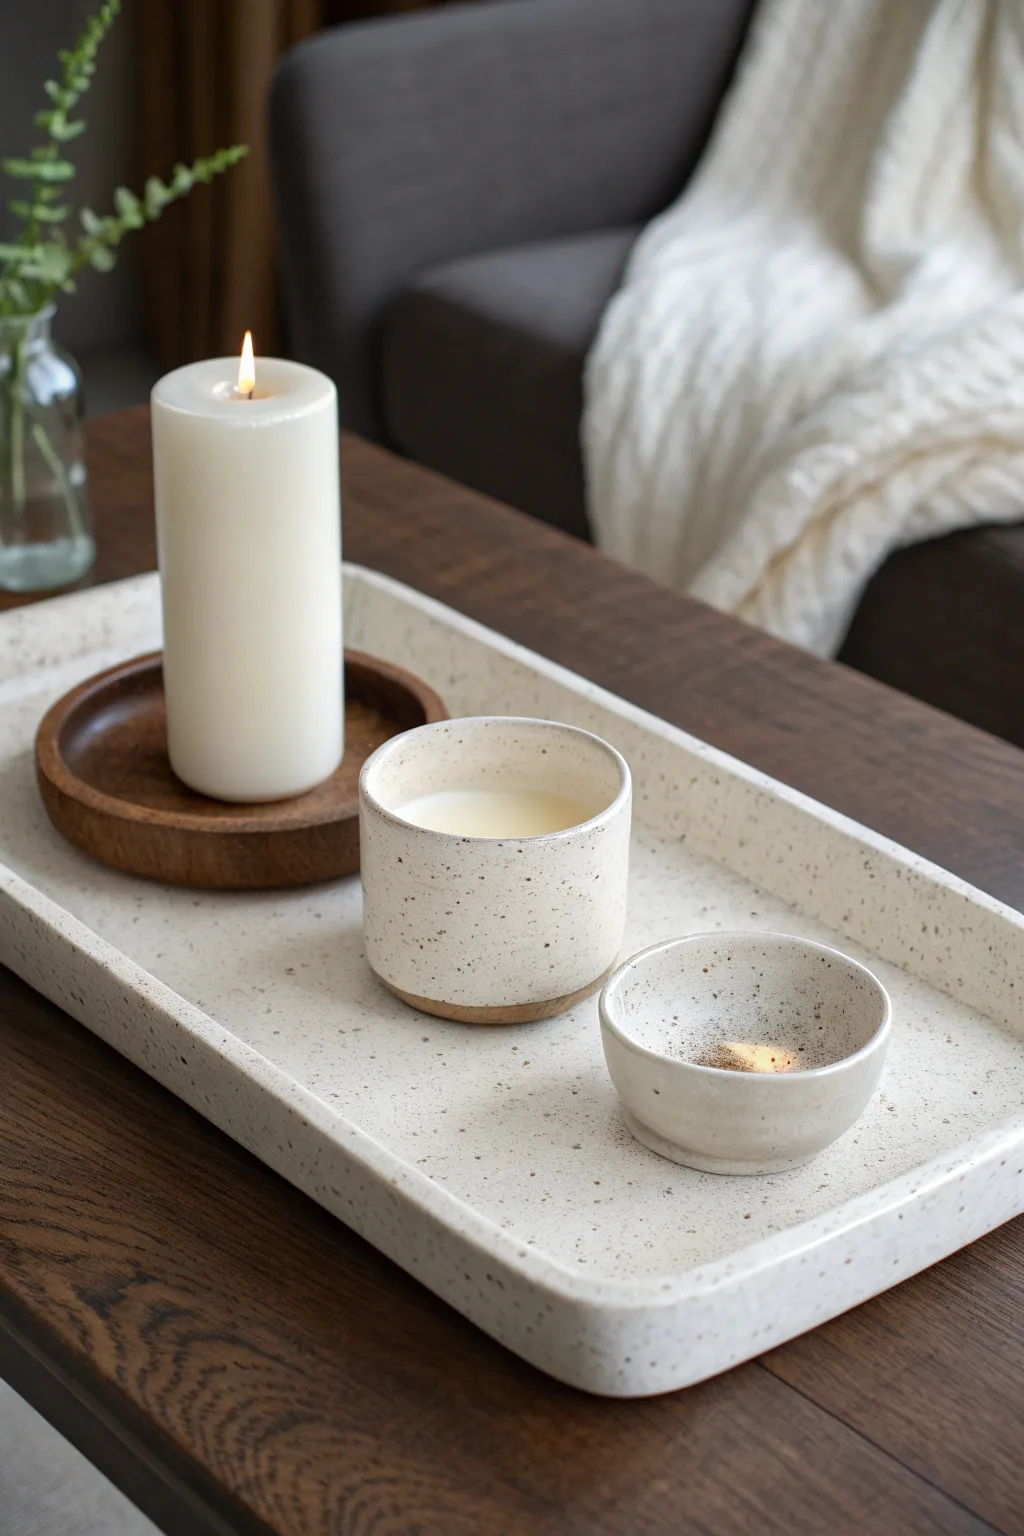
This minimalist stoneware tray serves as the perfect organizing base, unifying candles and small bowls with its clean lines and earthy texture. The design features a gentle, rounded square shape and a substantial raised rim, finished with a creamy, speckled glaze that lets the warmth of the clay peek through.
Step-by-Step Guide
Materials
- Stoneware clay (speckled or buff)
- Rolling pin
- Two wooden guide strips (approx. 1/4 inch thick)
- Rectangle template (paper or craft foam)
- Needle tool
- Fettling knife
- Rib tool (metal or rubber)
- Serrated rib or scoring tool
- Slip
- Sponge
- Plastic wrap
- Creamy matte white glaze (speckled)
Step 1: Preparing the Slab Base
-
Roll the main slab:
Begin by wedging your clay to remove air bubbles, then place it on a canvas board. Lay your wooden guide strips on either side of the clay to ensure even thickness, and roll the clay out until it is perfectly flat and about 1/4 inch thick. -
Compress the clay:
Take a rubber rib and drag it across the surface of the slab in multiple directions. This compression is crucial for preventing warping during the firing process and ensures a smooth workspace. -
Cut the shape:
Place your rectangular template onto the slab. Using a needle tool held vertically, trace around the template to cut out the base shape. -
Soften the corners:
Instead of leaving sharp 90-degree angles, use your finger or a smoothing tool to gently round off the four corners of the rectangle, mimicking the soft geometry seen in the photo.
Weighted Drying
To prevent the large flat base from bowing upward while drying, place a small bag of sand or rice in the center of the tray once it’s leather hard.
Step 2: Constructing the Rim
-
Measure the perimeter:
Roughly measure the total perimeter of your base so you know how long your rim coil needs to be. It’s always better to overestimate slightly. -
Roll a thick coil:
Roll out a long, even coil of clay. For this specific look, you want a coil that is slightly taller than it is wide, perhaps flattening it slightly into a rectangular strip rather than a perfect cylinder. -
Score the connection points:
Using a serrated rib or needle tool, vigorously score the top outer edge of your base slab. Do the same to the bottom edge of your coil or strip. -
Apply slip:
Dab a generous amount of slip onto the scored area of the base. This acts as the glue that bonds the wall to the floor. -
Attach the rim:
Place the coil onto the base, aligning it flush with the outer edge. Work your way around the rectangle, pressing down firmly to ensure a solid connection. -
Join the ends:
Where the two ends of the coil meet, cut them at a 45-degree angle to increase surface area, score, slip, and press them together seamlessly.
Matching Set
Use your leftover clay scraps to pinch-pot the small bowl and matching candle cup shown in the photo for a cohesive vanity set.
Step 3: Refining and Shaping
-
Blend the interior seam:
Use a wooden modeling tool or your thumb to drag clay from the coil down onto the floor of the tray on the inside. Smooth this transition until the seam is invisible and the interior angle is a soft curve. -
Blend the exterior seam:
Repeat the blending process on the outside, dragging clay from the slab up into the coil. I prefer using a metal rib here to scrape away excess clay and create a continuous vertical profile. -
Level the rim:
Turn the tray upside down (carefully!) onto a flat board and gently tap it. This helps ensure the top rim is perfectly level. -
Round the edges:
Use a damp sponge to wipe down the top edge of the rim, rounding it over to create that soft, pillowy look rather than a sharp, machined edge. -
Clean the surface:
Do a final pass with a damp sponge over the entire piece to remove fingerprints and smooth out any rough texture.
Step 4: Drying and Glazing
-
Slow drying:
Cover the tray loosely with plastic wrap for the first 24 hours to let the moisture even out. Then, uncover and let it dry completely to the bone-dry stage. -
Bisque fire:
Fire the piece in a kiln to cone 04 (or your clay’s specific bisque temperature). -
Apply glaze:
Dip or brush on your creamy, speckled matte white glaze. Ensure an even coat, but avoid the very bottom if you aren’t using stilts. -
Final firing:
Fire the tray to maturity (likely cone 5 or 6 for stoneware). The heat will bring out the iron speckles from the clay body through the glaze.
Once cooled, this durable tray is ready to elevate your coffee table display with simple elegance
Drainage-Friendly Slab Soap Dishes
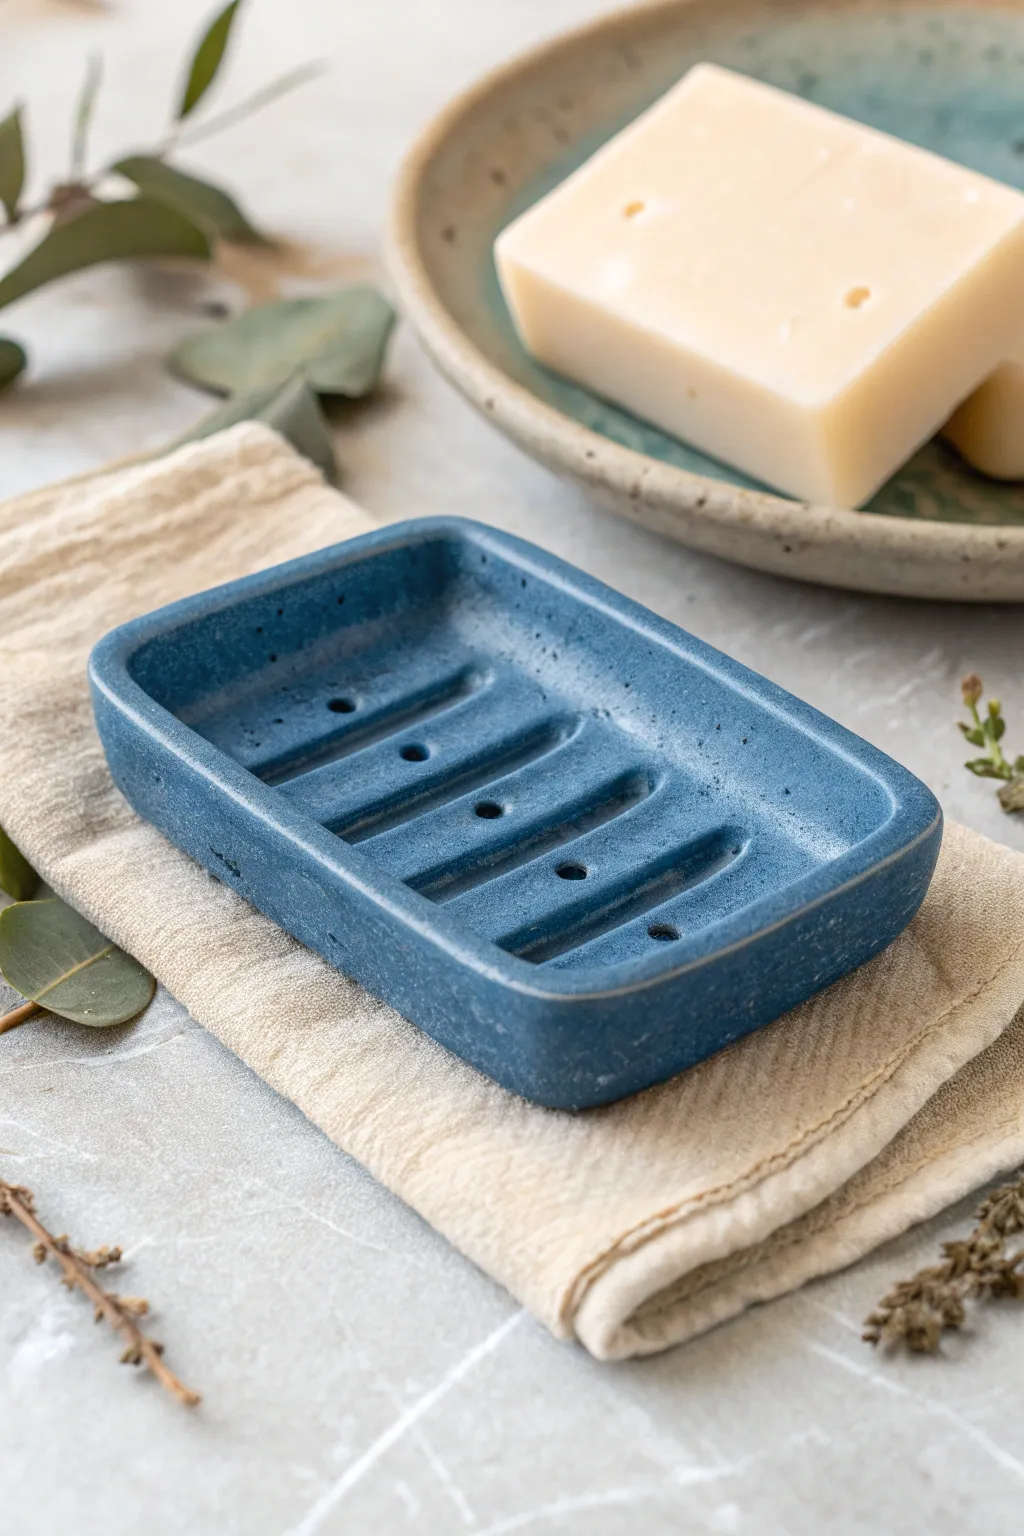
Embrace the beauty of functional ceramics with this sturdy slab-built soap dish, featuring deep drainage channels and holes to keep your soap dry. The matte denim-blue finish gives it a modern, grounded feel that looks perfect on any bathroom vanity.
How-To Guide
Materials
- Mid-fire stoneware clay
- Rolling pin
- Two wooden guide slats (approx. 1/4 inch thick)
- Rectangular template (paper or card)
- Fettling knife
- Smooth kidney rib (rubber)
- Modeling tool with a rounded edge (for channels)
- Hole cutter or drinking straw
- Sponge
- Matte blue glaze
- Kiln access
Step 1: Slab Preparation and Shaping
-
Roll the Slab:
Begin by wedging your clay to remove air bubbles, then place it between your wooden guide slats. Roll the clay out into a smooth, even slab about 1/4 inch thick. -
Compress the Clay:
Take your rubber kidney rib and run it firmly over the surface of the slab in multiple directions. This compression aligns the clay particles, preventing future warping and creating a silky surface. -
Cut the Base:
Place your rectangular template onto the slab. Using your fettling knife, cut vertically around the template to create your base shape. -
Soften the Edges:
Before manipulating the clay further, gently wipe the cut edges with a damp sponge or your finger to remove sharp burrs and slightly round the corners. -
Form the Rim:
To create the raised sides, you won’t be attaching a separate coil. Instead, gently pinch and lift the outer 1/2 inch of the slab upward. I find using my thumb on the inside and fingers on the outside gives the best control. -
Refine the Walls:
Smooth the transition between the floor and the new wall using your rib or a modeling tool so it looks like one continuous piece rather than a bent slab.
Groove Smoothness
After pressing your drainage channels, run a damp brush through them. This smooths out micro-cracks that soap scum loves to stick to later.
Step 2: Adding Texture and Function
-
Mark the Channels:
Lightly sketch four parallel lines lengthwise across the interior floor of the dish to guide your texture placement. -
Create Drainage Grooves:
Using a rounded modeling tool or the back of a small spoon, press firmly along your marked lines to create deep indentations. These grooves allow air to circulate under the soap. -
Punch Drainage Holes:
Select a small hole cutter or a drinking straw. Punch three evenly spaced holes directly into the center of the middle two grooves, and two holes in the outer grooves. -
Clean the Underside:
Flip the dish over gently. You will likely see clay burrs where the holes punched through; slice these off cleanly or sponge them smooth. -
Dry Slowly:
Cover the dish loosely with plastic to let it dry slowly to a leather-hard state. This prevents the corners from curling up as the clay shrinks.
Step 3: Finishing and Glazing
-
Bisque Fire:
Once bone dry, fire the piece to bisque temperature (usually Cone 04) to prepare it for glazing. -
Wax the Foot:
Apply a wax resist to the bottom surface of the dish to prevent glaze from sticking to the kiln shelf. -
Check Hole Clearance:
Check your drainage holes before glazing. If the glaze is thick, it might clog them, so have a needle tool ready to clear them instantly after dipping. -
Apply Glaze:
Dip the piece into a matte blue stoneware glaze. A matte finish highlights the form without being distracting. -
Glaze Firing:
Fire the piece to the maturity temperature of your clay and glaze (typically Cone 5 or 6 for stoneware).
Raised Feet
Add four tiny balls of clay to the corners of the underside. This lifts the dish slightly off the counter for better airflow underneath.
Place your favorite bar of soap on your new creation and enjoy the clean, functional design

TRACK YOUR CERAMIC JOURNEY
Capture glaze tests, firing details, and creative progress—all in one simple printable. Make your projects easier to repeat and improve.
Slab Spoon Rests With a Built-In Notch
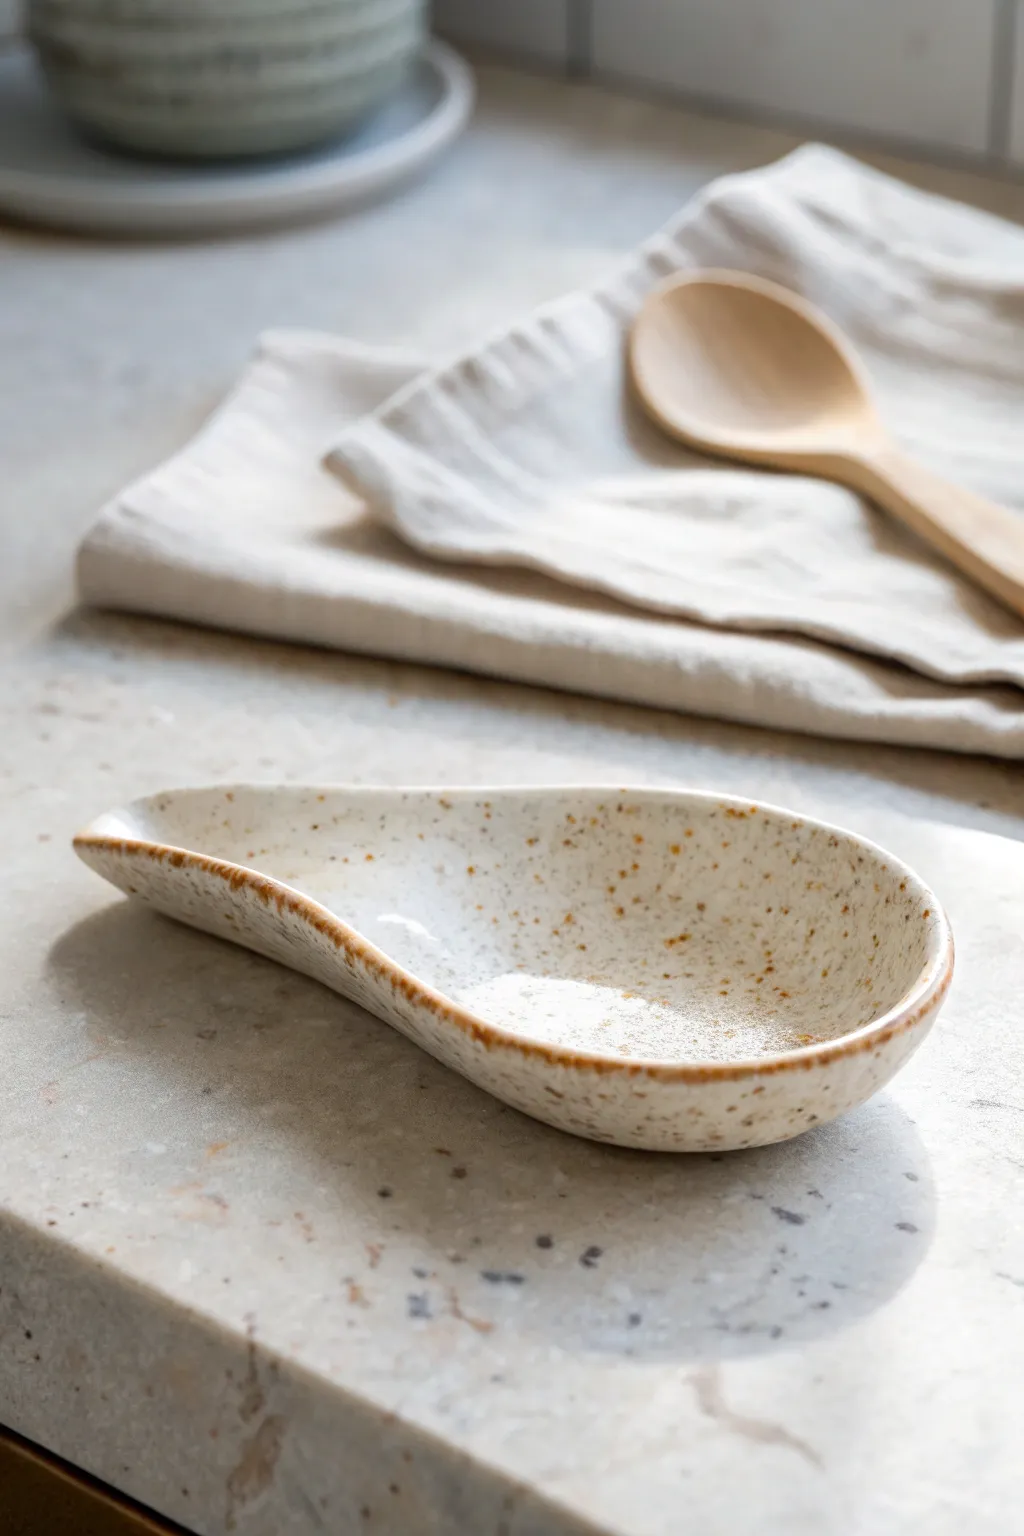
This project transforms a simple slab of clay into a functional, minimalist spoon rest with a lovely speckled finish. The organic curve and convenient notch make it a perfect countertop companion for your wooden spoons.
Detailed Instructions
Materials
- Speckled Stoneware clay (or standard stoneware with added grog)
- Rolling pin
- Canvas mat or cloth
- Needle tool or fettling knife
- Rib tool (flexible rubber or metal)
- Small sponge
- Small bowl for water
- Surform tool (optional)
- Paper template (teardrop shape)
- Clear or transparent white glaze
Step 1: Preparing the Slab
-
Wedge the clay:
Start by wedging a baseball-sized amount of speckled stoneware clay to remove air bubbles and ensure a consistent texture. -
Roll the slab:
Place the clay on your canvas mat. Using a rolling pin, roll the clay out evenly. Aim for a thickness of about 1/4 inch (6mm) to ensure durability without being too heavy. -
Compress the clay:
Run a rib tool firmly across the surface of the slab on both sides. This compresses the clay particles, which helps prevent warping during drying and firing.
Pro Tip: Anti-Warp Tricks
Dry your spoon rest on a piece of foam or a small bag filled with rice. This supports the curved shape while allowing air to circulate underneath.
Step 2: Shaping the Rest
-
Cut the shape:
Lay your teardrop-shaped paper template onto the slab. Using a needle tool or fettling knife, trace around the template to cut out your spoon rest shape. -
Soften the edges:
Once the shape is cut, gently run a damp sponge or your finger along the cut edges to round them off. Sharp edges can become brittle after firing, so smoothing them now is crucial. -
Create the curve:
Pick up the clay shape and gently cradle it in your hand. Use your thumb to press the center downwards while lifting the sides slightly to create a shallow bowl form. -
From the notch:
At the narrower end of the teardrop, gently pinch and pull the clay slightly to emphasize the spout-like notch. This is where the handle of your spoon will eventually rest. -
Refine the rim:
Go around the rim again with a damp sponge. Make sure the transition from the base to the rim is smooth and organic, not angular.
Level Up: Texture Play
Before cutting the shape, press a piece of lace or linen into the wet slab. The glaze will break beautifully over the subtle texture.
Step 3: Drying and Bisque
-
Slow drying:
Place the spoon rest on a board to dry. I prefer to cover mine loosely with plastic for the first day to ensure it dries evenly and doesn’t warp. -
Check for flatness:
As it dries to leather-hard, check that the bottom remains relatively flat so it won’t rock on the counter. If needed, gently press it down on a flat surface. -
Bone dry:
Let the piece dry completely until it is bone dry. It should feel room temperature to the touch, not cool. -
Bisque fire:
Load the bone-dry spoon rest into the kiln for a bisque firing (typically Cone 04 or 06). This prepares the clay for glazing.
Step 4: Glazing and Finishing
-
Clean the bisque:
Wipe the bisque-fired piece with a damp sponge to remove any dust that might prevent the glaze from adhering properly. -
Wax the foot:
Apply wax resist to the bottom of the spoon rest to prevent glaze from sticking to the kiln shelf. Alternatively, you can wipe the bottom clean after dipping. -
Apply glaze:
Dip the spoon rest into a clear or transparent white glaze. This ensures the beautiful natural speckles of the clay body show through. -
Clean the rim:
If you want the rim to have that exposed clay look seen in the image, gently wipe the glaze off the very edge of the rim with a damp sponge. -
Glaze fire:
Fire the piece again to the appropriate temperature for your clay and glaze (often Cone 5 or 6 for stoneware). Let the kiln cool completely before unloading.
Once cooled, your custom spoon rest is ready to catch drips and keep your counters tidy
Textured Slab Coasters (Make a Matching Set)
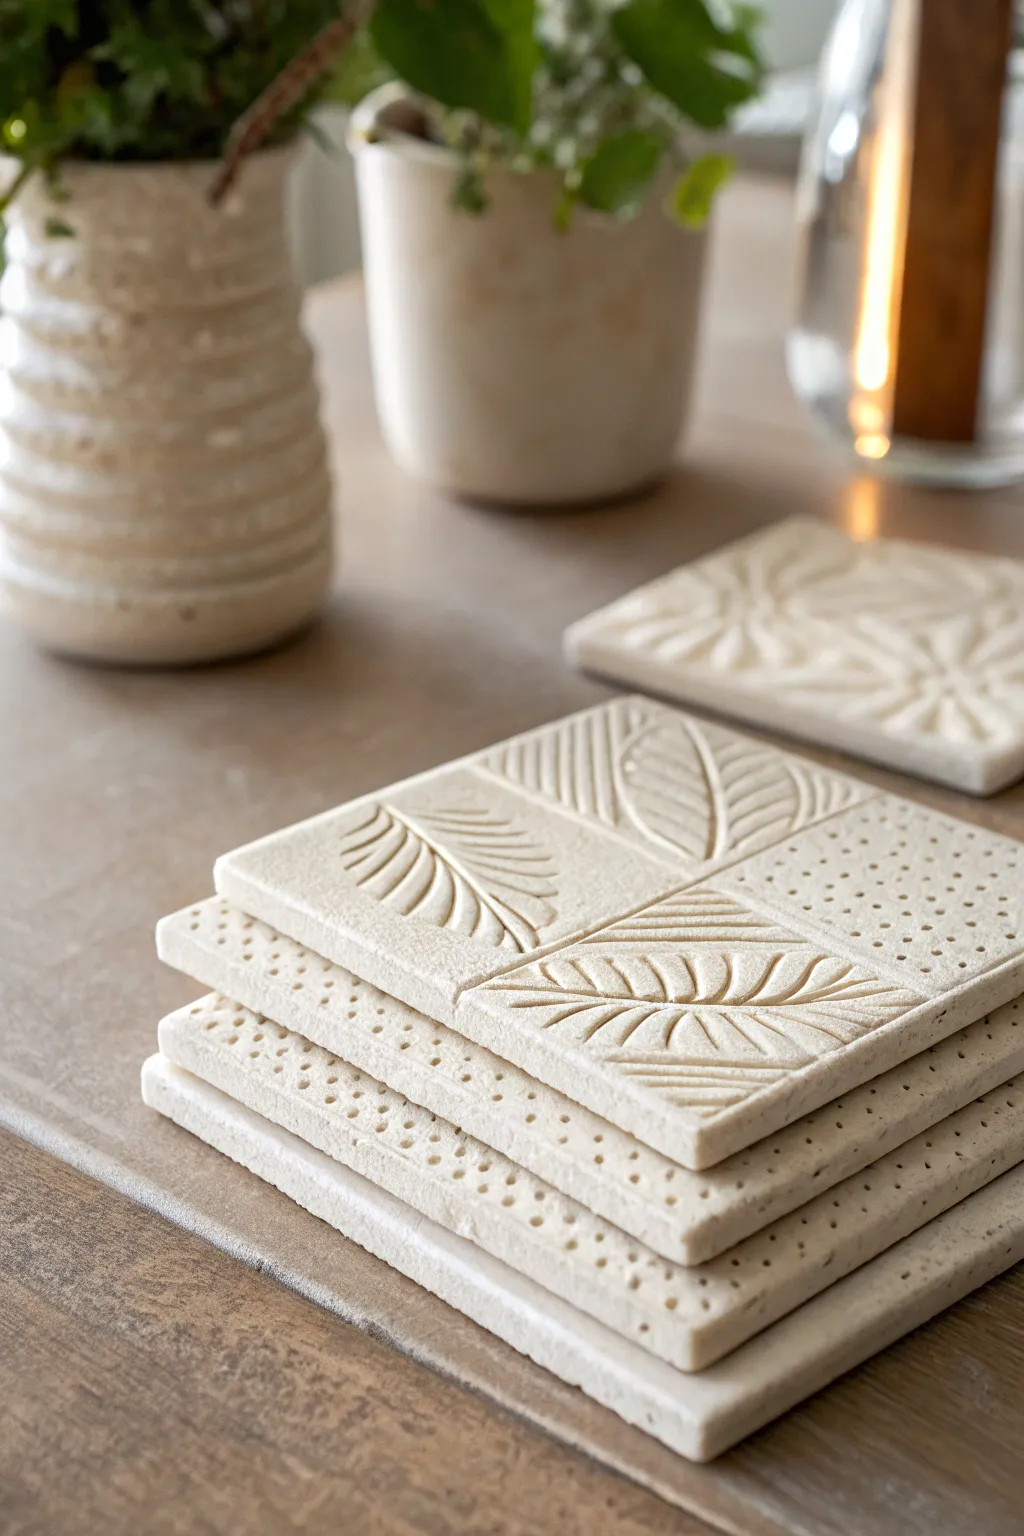
These elegant, creamy-white coasters combine organic leaf motifs with delicate stippling for a modern, tactile finish. Created from simple clay slabs, this project is perfect for practicing texture techniques and results in a stunning, functional set for your coffee table.
How-To Guide
Materials
- White stoneware or porcelain clay body (grogged clay adds nice texture)
- Rolling pin
- Two wooden guide slats (approx. 1/4 inch thick)
- Canvas or heavy fabric mat for rolling
- Needle tool or fettling knife
- Square template (cardstock or 3D printed cutter, 4×4 inches)
- Carving tools (small ribbon tools or loop tools)
- Pin tool or small drill bit (for stippling)
- Smoothing rib (rubber or flexible metal)
- Sponge and water bucket
- Ruler
- Ware board for drying
- Clear matte or satin glaze (optional)
Step 1: Preparing the Slabs
-
Wedge the clay:
Start by thoroughly wedging your white stoneware clay to remove any air pockets and ensure a consistent texture, which is crucial for preventing warping later. -
Set up the rolling station:
Place your canvas mat on a sturdy table. Position your two wooden guide slats on either side of the workspace to ensure your slab rolls out to a perfect, even thickness. -
Roll the slab:
Flatten the clay slightly with your palm, then roll it out using the rolling pin. Roll from the center outward, turning the clay periodically to keep it from sticking to the canvas. -
Smooth the surface:
Once rolled, take your flexible rubber rib and gently compress the surface of the clay in all directions. This aligns the clay particles and removes the canvas texture. -
Cut the shapes:
Place your 4×4 inch square template onto the slab. Using a needle tool or fettling knife, cut straight down around the edges to create clean squares. Make at least four for a full set.
Preventing warping
Slabs love to warp! Flip your drying coasters upside down every few hours during the first day, and always dry them slowly away from drafts.
Step 2: Texturing and Carving
-
Mark the quadrants:
Using a ruler and a needle tool, very lightly score a cross into the center of each coaster to divide the space into four equal quadrants. Do not cut deep; this is just a guide. -
Outline the leaves:
In two diagonal quadrants (top right and bottom left, for example), lightly sketch a simple almond leaf shape spanning from corner to corner. -
Carve the leaf veins:
Using a small ribbon or loop tool, gently carve out the central vein of the leaf first. Keep the depth consistent, removing ribbons of clay. -
Add leaf details:
Carve the smaller veins branching off the center. I find that curving these lines slightly toward the leaf tip creates a more natural, organic look than straight lines. -
Create the stippled texture:
In the remaining two empty quadrants, use a pin tool or a blunt drill bit to press small dots into the clay. Create a dense, random, or grid-like pattern to contrast with the smooth leaves. -
Texture the edges:
Don’t forget the sides of the coaster. Use the pin tool to continue the stippled dot pattern along the vertical edges of the slab for a cohesive, finished appearance.
Add Cork Backing
For extra furniture protection, glue a square of thin cork sheet or adhere small felt feet to the bottom of each coaster after the final firing.
Step 3: Finishing and Firing
-
Clean up burrs:
Allow the coasters to dry to a leather-hard state. Once stiff, gently brush away any clay crumbs or ‘burrs’ created during carving using a soft brush or your finger. -
Smooth the edges:
Take a slightly damp sponge and run it along the sharp corners and bottom edges to soften them slightly, ensuring they won’t scratch furniture later. -
Slow drying:
Place the coasters between two pieces of drywall or wooden ware boards to dry. Weigh them down lightly if possible. This slow, weighted drying is the secret to keeping flat objects like coasters from curling up at the corners. -
Bisque fire:
Once bone dry, fire the pieces to bisque temperature (usually cone 04) in the kiln. -
Glazing:
For the look in the photo, stick to unglazed raw clay if fully vitrified, or apply a very thin, matte white or clear glaze. Wipe back the glaze with a sponge so it stays mostly in the recessed textures, highlighting the carving. -
Final firing:
Fire the coasters to the final temperature required by your specific clay body (e.g., cone 6 for stoneware).
Stack your finished set on the table and enjoy the play of light over your hand-carved textures
Tiny Slab Trinket Dishes and Ring Holders
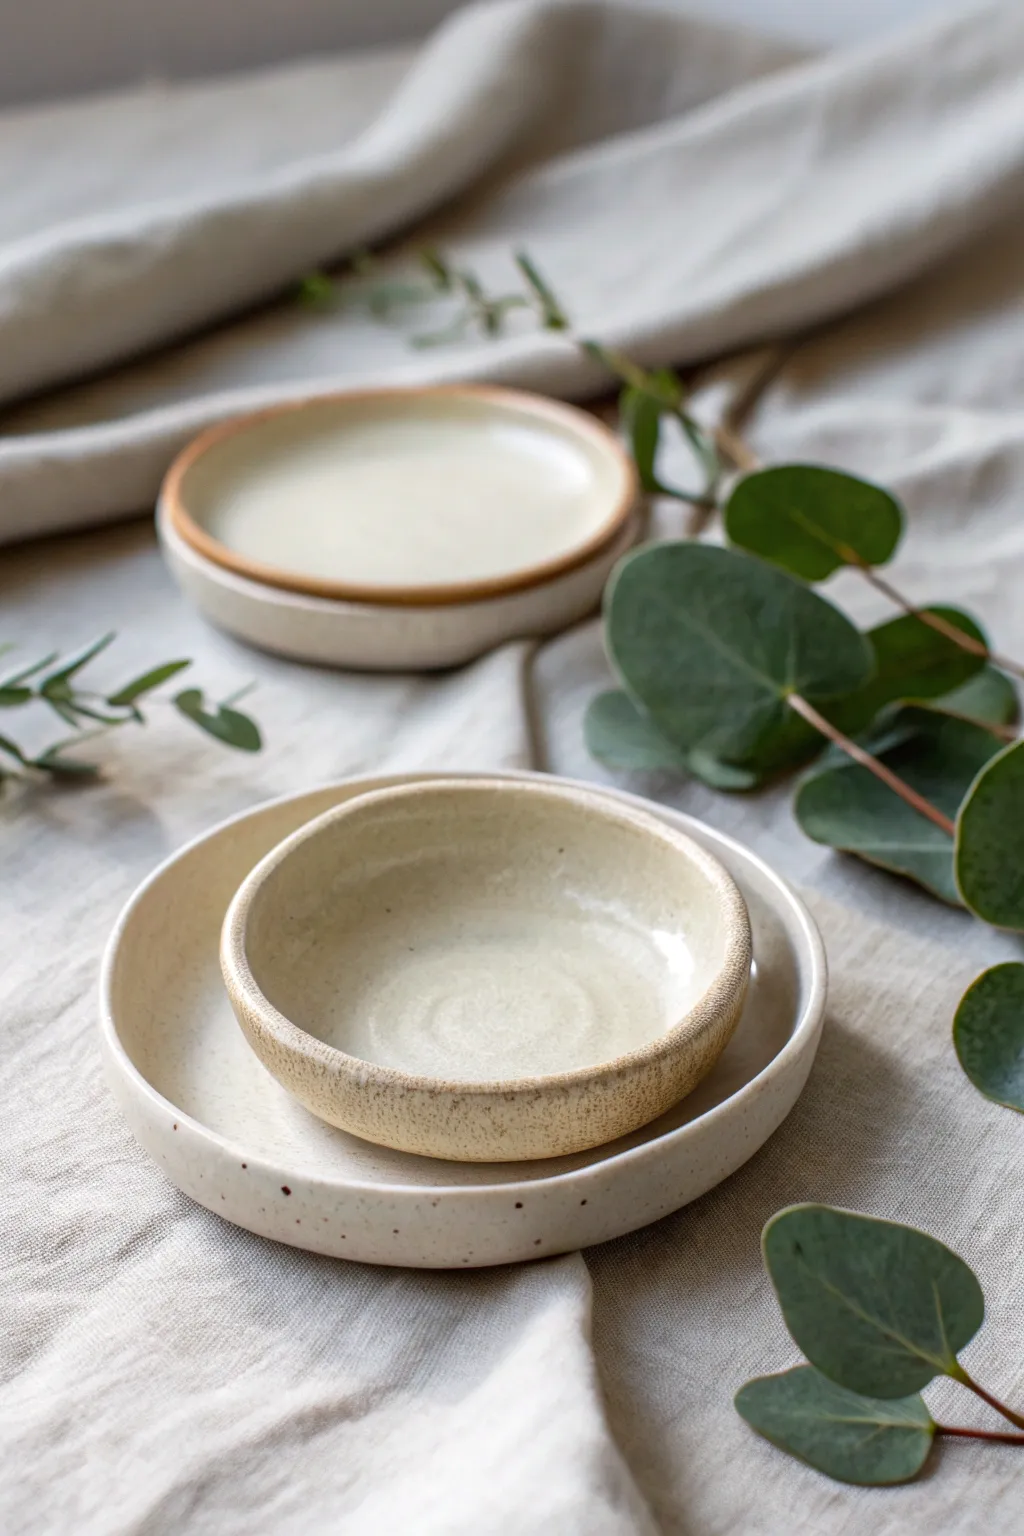
These elegant, understated trinket dishes showcase the natural beauty of clay with smooth curves and a soft, creamy speckled glaze. Perfect for holding rings or jewelry, this set features a shallow nesting design created from simple clay slabs, emphasizing clean lines and earthy textures.
Detailed Instructions
Materials
- Speckled buff stoneware clay
- Rolling pin
- Two dowels or canvas boards (approx. 1/4 inch thickness guides)
- Canvas work surface
- Circular templates (paper or cookie cutters) in graduated sizes
- Needle tool or fettling knife
- Soft rib tool (yellow or red)
- Small sponges
- Shallow bowl or slump mold forms (plaster or bisque preferred)
- Pottery wire
- Scoring tool or serrated rib
- Creamy matte white glaze
Step 1: Preparing the Slab
-
Wedge the clay:
Start with a ball of speckled stoneware clay about the size of a grapefruit. Wedge it thoroughly to remove air bubbles and ensure the particles are aligned for strength. -
Set up guides:
Place your wooden dowels or thickness strips on either side of your canvas work mat. This ensures your slab is perfectly even, which is crucial for these delicate forms. -
Roll the slab:
Roll the clay out between the guides. Rotate the clay periodically so you aren’t over-stretching it in just one direction, aiming for a consistent 1/4-inch thickness. -
Compress the surface:
Take your soft rib tool and firmly drag it across the surface of the slab in multiple directions. This key step aligns the clay platelets to prevent warping and creates that incredibly smooth finish you see in the photo.
Step 2: Forming the Dishes
-
Cut the shapes:
Using your circular templates, cut out two circles—one larger for the base dish and a smaller one for the nesting bowl. A needle tool works well here for a clean cut. -
Smooth the edges:
Before moving the clay, run a damp finger or a small piece of sponge around the cut rim to soften the sharp angle left by the blade. -
Lift carefully:
Gently lift the clay circles. If they stick, slide a wire tool underneath to release them without distorting the round shape. -
Slump into molds:
Ideally, place the clay circles *inside* a shallow bowl form (a slump mold) rather than over a hump mold. This allows gravity to create a gentle, natural curve. -
Shape the nesting bowl:
For the smaller, deeper bowl shown in the center of the photo, gently press the clay deeper into its form. Use a damp sponge to smooth the interior curve. -
Define the rim:
While the clay is in the mold, gently compress the rim downward with your thumb to create a slightly flat, substantial edge rather than a tapered one. -
Dry slowly:
Cover the pieces loosely with plastic. Let them dry to a leather-hard state inside the molds so they retain that specific curvature.
Warped Dishes?
If your circles warp into ovals while drying, check your rolling technique. Rotate the clay often while rolling, and ensure you compress both sides with a rib before cutting.
Step 3: Finishing and Glazing
-
Refine the foot:
Once leather hard, remove the dishes from the molds. Turn them over and use a rib to smooth the bottom. You can gently sponge the bottom edge to ensure it won’t scratch a table later. -
Bisque fire:
Fire the pieces in a kiln to cone 04 (or your clay body’s specified bisque temperature) to prepare them for glazing. -
Wax the bottoms:
Apply wax resist to the bottom contact points of both dishes to prevent them from fusing to the kiln shelf. -
Apply the glaze:
Dip or brush a creamy matte white glaze over the pieces. I usually prefer dipping for these to get that perfectly even, manufactured look seen in the reference. -
Wipe the rim (Optional):
If you want to highlight the raw clay speckles like the top dish in the image, use a damp sponge to wipe the glaze off the very top rim, leaving a ring of exposed clay. -
Glaze fire:
Fire the final pieces to cone 5/6 (mid-range). The heat will interact with the iron speckles in the clay, causing them to bleed slightly through the white glaze for that lovely peppered effect.
Gilded Edge
For an extra touch of luxury, apply a ring of gold overglaze luster to the rim after the glaze firing. Refire at a very low temperature (around cone 018) to set the gold.
Place your finished set on a linen cloth to admire how the organic speckles shine through that creamy glaze.
Keepsake Slab Boxes With Fitted Lids
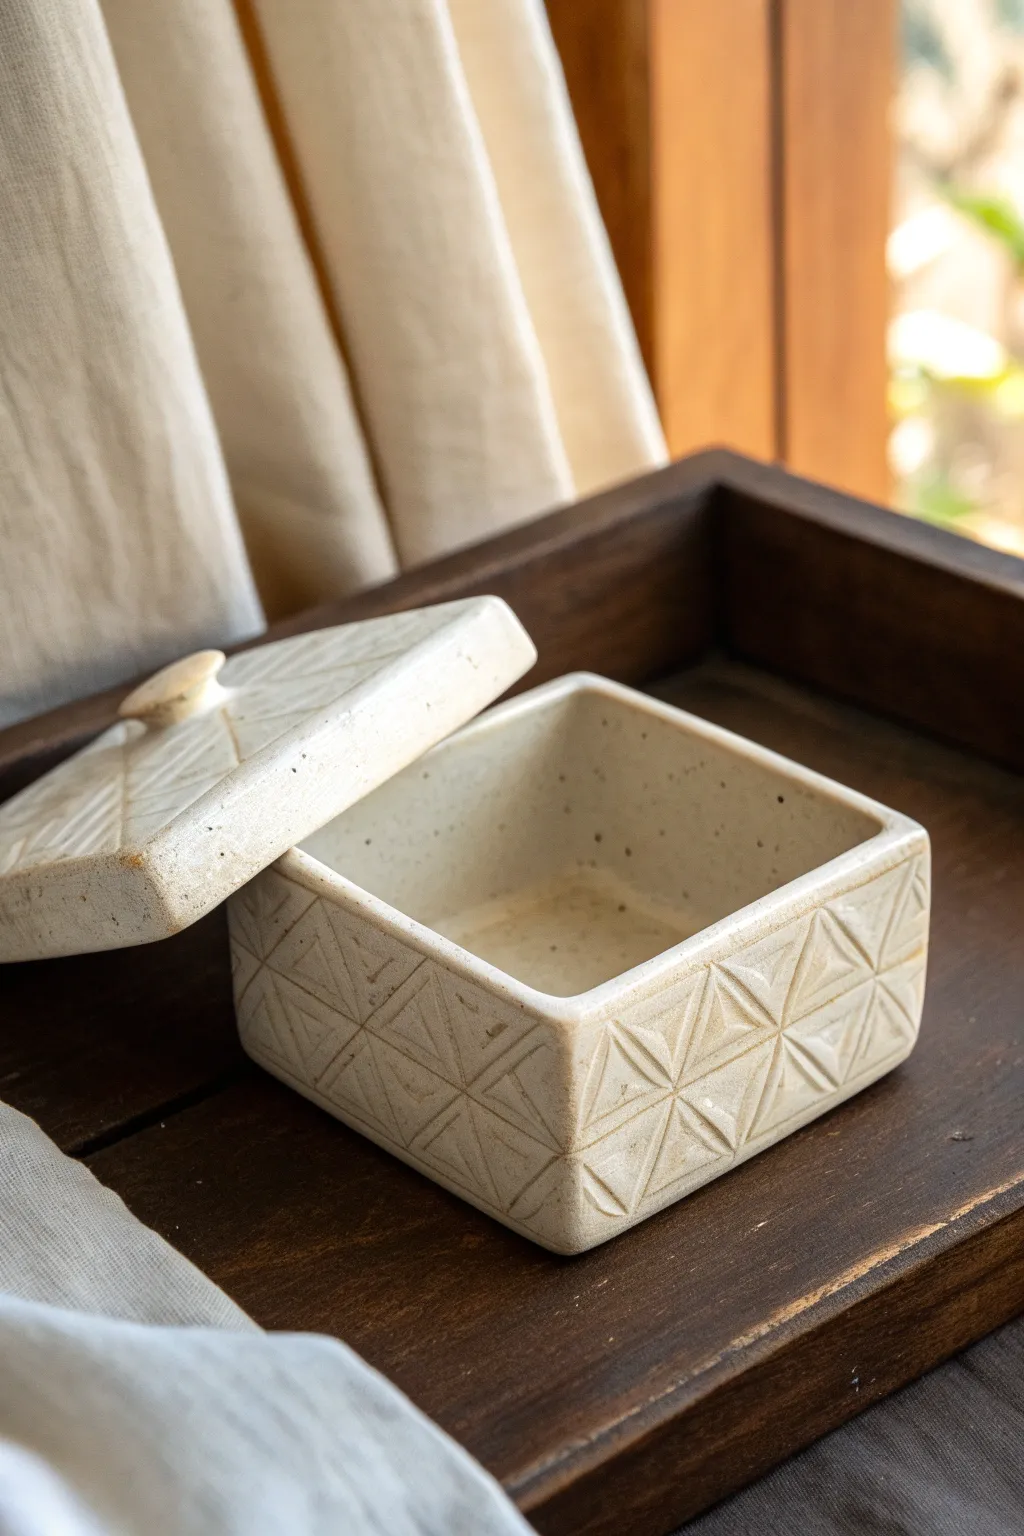
This elegant keepsake box relies on clean slab construction and precise surface carving to create a timeless, textured finish. The creamy glaze highlights the geometric relief, making it a perfect functional container for small treasures or jewelry.
Step-by-Step Tutorial
Materials
- Stoneware clay body (smooth, light-firing)
- Rolling pin with 1/4 inch thickness strips
- Fettling knife
- Serrated rib and scoring tool
- Slip or vinegar
- Carving tools (loop tool and V-gouge)
- Ruler or straight edge
- Small sponge
- Soft bristle brush
- Satin white or cream translucent glaze
Step 1: Forming the Box
-
Prepare the slabs:
Begin by rolling out a smooth slab of clay to an even 1/4 inch thickness. Compress the slab on both sides with a rib to align the clay particles, which helps prevent warping later. -
Cut the components:
Using a ruler and fettling knife, cut a square for the base (approx. 4×4 inches) and four rectangular walls. Cut a second square slightly larger than the base for the lid. -
Leather hard stage:
Let your cut slabs sit until they reach a soft leather-hard state. They should be firm enough to hold their shape upright but still flexible enough to join without cracking. -
Bevel the edges:
For clean corners, cut a 45-degree bevel on the vertical edges of your wall pieces and along the perimeter of the base slab. This creates a stronger miter joint. -
Score and slip:
Rough up the beveled edges thoroughly with a serrated tool and apply a specialized joining slip or magic water. -
Assemble the walls:
Press the walls onto the base and against each other, ensuring the corners meet squarely. I find using a wooden block inside the corner helps keep things 90-degrees while joining. -
Reinforce the seams:
Roll a very thin coil of clay and press it into the interior seams to reinforce them, then smooth it out completely with a modeling tool so the inside is seamless.
Step 2: Creating the Fitted Lid
-
Add the flange:
Flip the lid slab over. Roll a coil or cut strips to create a flange (a recessed rim) slightly smaller than the opening of your box. Score and slip this onto the underside of the lid so it will sit snugly inside the box walls. -
Add a handle:
Form a small, organic oval or button shape from a scrap of clay. Attach this to the center of the top of the lid to act as a knob. -
Refine the fit:
Place the lid onto the box to check the fit. If it’s too tight, shave down the inner flange slightly; if it’s too loose, you may need to gently widen the flange.
Keep it Straight
Use a drywall sanding screen on the rim of the box and the underside of the lid when bone dry. This ensures perfectly flat mating surfaces and prevents the lid from wobbling after firing.
Step 3: Carving & Glazing
-
Grid the surface:
Once the constructed box is a firm leather hard, lightly sketch a grid pattern onto the exterior walls and the top of the lid using a pencil. Divide each square section diagonally to create triangles. -
Carve the relief:
Using a sharp V-gouge or small loop tool, carve out alternating triangles. Leave the raised triangles relatively flat but remove material around them to create the pyramid-like geometric effect. -
Clean the edges:
After carving, go over the high points with a slightly damp sponge to remove any sharp burrs or crumbs of clay. -
Slow drying:
place the lid on the box and loosely wrap the entire piece in plastic to dry very slowly. This helps ensure the lid and box shrink at the same rate and stay fitted. -
Bisque fire:
Once bone dry, fire the piece to cone 04 (or your clay’s bisque temperature). -
Apply glaze:
Choose a satin or semi-transparent cream glaze. Dip or brush the glaze onto the piece, ensuring it gets into the carved recesses. -
Wipe back (optional):
If you want to accentuate the texture further, lightly wipe the raised surfaces with a damp sponge after glazing. This leaves more glaze in the deep cuts for contrast. -
Final firing:
Glaze fire the piece to the maturity temperature of your clay body (likely cone 5 or 6 for stoneware).
Mishima Detail
Instead of carving away clay, try inlaying colored slip into your incised lines (Mishima technique) before the first firing for a flush, graphic surface design.
Once cooled, your geometric box is ready to organize your desk or serve as a thoughtful handmade gift.
Desktop Slab Pencil Cups and Divided Organizers
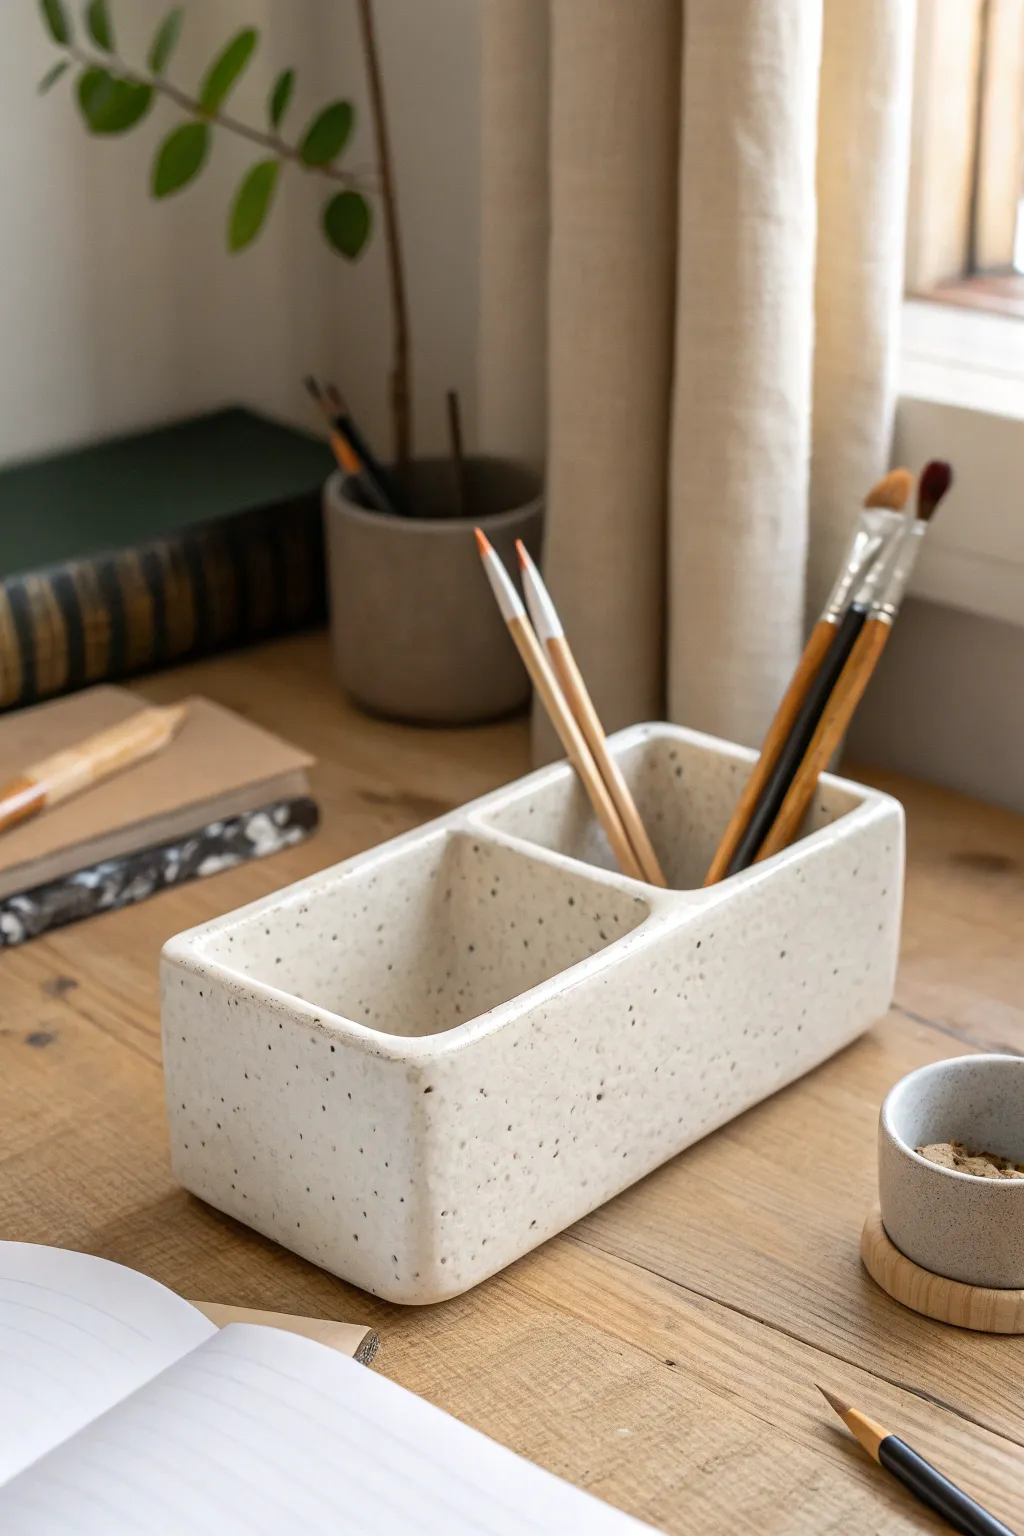
Bring order to your workspace with this charming, minimalist ceramic organizer featuring two distinct compartments for sorting your tools. The soft edges and creamy, speckled glaze give it a modern yet handcrafted aesthetic perfect for holding brushes, pens, and pencils.
Step-by-Step
Materials
- Stoneware clay body (preferably speckled)
- Rolling pin
- Canvas work surface or slab mat
- Measuring ruler
- Fettling knife or needle tool
- Guide strips or dowels (approx. 1/4 inch thick)
- Scoring tool or serrated rib
- Slip (clay slurry)
- Wooden modeling tool
- Smooth rubber rib
- Sponge
- Creamy matte white glaze (translucent enough to show speckles)
Step 1: Slab Preparation
-
Roll the main slab:
Begin by wedging your clay thoroughly to remove air bubbles. Place it on your canvas and use the rolling pin over guide strips to roll out an even slab, approximately 1/4 inch thick. -
Compress the clay:
Take a rubber rib and firmly smooth over both sides of the slab. This aligns the clay particles to prevent warping later and provides that nice smooth canvas for your glaze. -
Cut the components:
Using your ruler and fettling knife, measure and cut five pieces: one long rectangle for the base (measure your desired footprint), two long side walls, two short end walls, and one divider piece. The divider should match the width of the base. -
Leather hard stage:
Let the pieces sit until they reach a soft leather-hard state. They need to be stiff enough to stand up without slumping but soft enough to join easily. I usually wait about an hour depending on humidity.
Step 2: Assembly
-
Score the base:
Take your scoring tool and rough up the perimeter of the base slab where the walls will attach. Do the same for the center line where the divider will go. -
Prepare the walls:
Score the bottom edges and the vertical sides of all your wall pieces. Apply a generous amount of slip to the scored areas on the base. -
Attach the first long wall:
Press one long wall onto the base. Use a wooden modeling tool to blend the clay from the wall down onto the base on the inside to create a strong seam. -
Install the divider:
Before adding the other walls, place the center divider. This provides immediate structural support. Score, slip, and blend it firmly to the base and the first wall. -
Complete the perimeter:
Attach the remaining long wall and the two short end walls. Ensure all vertical corners are scored, slipped, and pressed firmly together. -
Reinforce the seams:
Roll very thin coils of soft clay. Press these into the interior corners and seams, then smooth them out completely with your modeling tool or finger to ensure leak-proof joints.
Use a Template
Cut paper templates for your walls and base first. Test tape them together to visualize the size. Clay shrinks about 12%, so make your templates slightly larger than you want the final cup to be.
Step 3: Refining and Finish
-
Soften the corners:
Ideally, this piece has soft, rounded edges rather than sharp boxy ones. Gently press and smooth the exterior vertical corners with your thumb or a rib to round them over. -
Level the rim:
Turn the piece upside down gently onto a flat board to level the top rim. If it’s too uneven, use a cheese cutter or rasp to level it before smoothing. -
Final smoothing:
Wipe the entire piece with a slightly damp sponge to remove any crumbs or rough texture. Pay special attention to the rim, ensuring it’s comfortable to the touch. -
Slow drying:
Loosely cover the organizer with plastic to let it dry slowly for the first day, then uncover to bone dry. This prevents the corners from cracking. -
Bisque fire:
Fire the piece to bisque temperature (usually Cone 04) once it is completely bone dry. -
Glazing:
Dip or brush on your creamy white matte glaze. If you used a specific speckled clay body, choose a glaze that breaks clearly so those iron spots pop through. -
Final wipe:
Use a damp sponge to wipe the glaze completely off the bottom of the piece to prevent it from sticking to the kiln shelf. -
Glaze fire:
Fire to the maturation temperature of your clay and glaze (often Cone 5 or 6 for stoneware) to finish the piece.
Uneven Divider Height
Cut the internal divider wall slightly shorter than the exterior walls. This makes it easier to clean the bottom of the organizer later and adds a subtle professional design detail.
Once fired, fill your new organizer with your favorite art supplies and enjoy the upgrade to your desktop
Geometric Slab Planters With Feet
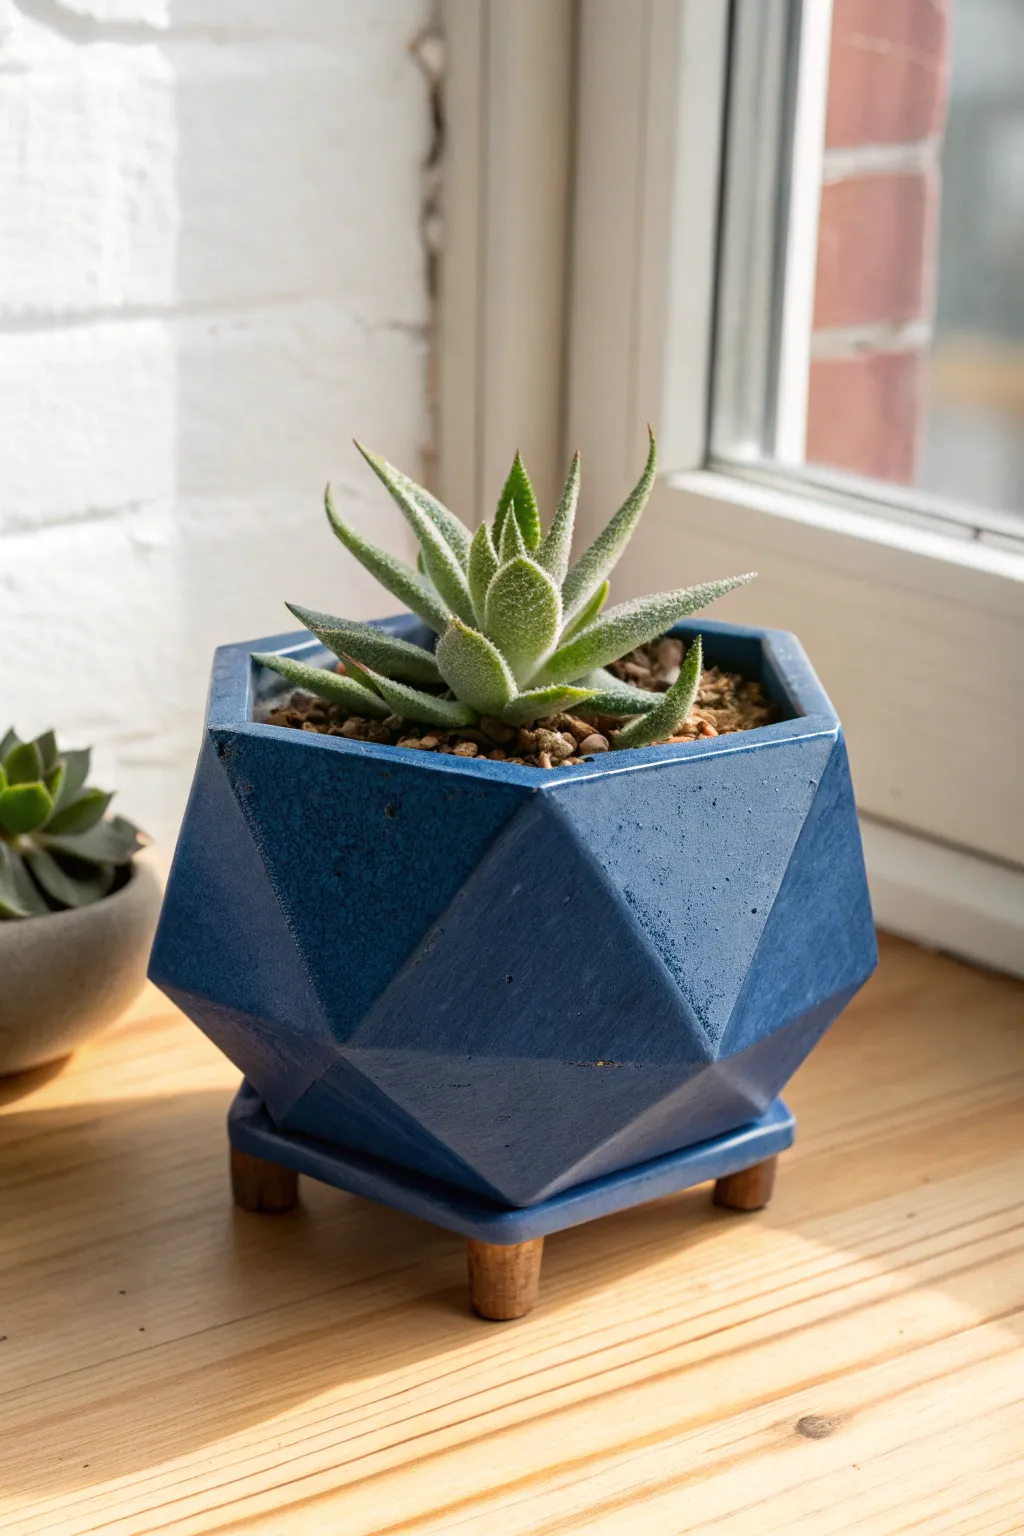
This striking geometric planter combines sharp, modern angles with a rich, oceanic blue glaze for a polished finish. Built using the slab technique, its faceted sides catch the light beautifully, while the hidden tray and wooden feet add a functional yet stylish elevation.
Step-by-Step Guide
Materials
- Stoneware clay (smooth body recommended)
- Rolling pin
- ¼ inch wooden guide slats or canvas boards
- Template material (cardstock or stiff paper)
- Fettling knife or X-Acto knife
- Scoring tool or serrated rib
- Slip (clay and water slurry)
- Rubber kidney rib
- Sponge
- Wooden dowel (approx. ½ inch diameter) for feet
- Cobalt blue glossy glaze
- Kiln and firing equipment
- Ruler
Step 1: Creating the Hexagonal Structure
-
Prepare your templates:
Before touching clay, cut out your paper templates. You will need a hexagon for the base and likely two alternating trapezoidal shapes for the side facets to create that angular ‘gem’ look when joined. -
Roll out the slab:
Wedge your clay thoroughly to remove air bubbles, then roll it out to a consistent ¼ inch thickness using your guide slats. Smooth the surface with a rubber rib to compress the clay particles. -
Cut the components:
Lay your templates on the slab. You will need one hexagon base and enough side panels to encircle it (usually six sets of panels if following a hexagonal theme). Cut cleanly with your fettling knife held vertically. -
Let the slabs stiffen:
This step is crucial for geometric work. Allow your cut pieces to dry to a ‘leather hard’ state. They should be stiff enough to hold their shape without slumping but soft enough to score. -
Bevel the edges:
For sharp, professional corners, cut a 45-degree angle (bevel) on the edges that will join together. This increases the surface area for the joint and makes the corner neater. -
Assemble the base:
Score the edges of your hexagonal base and the bottom of your first wall panel. Apply slip generously. -
Build the walls:
Attach the wall panels to the base and to each other, pressing firmly. I find using a small coil of clay on the interior seam helps reinforce these sharp angles. -
Refine the exterior:
once the pot is assembled, use a metal rib to scrape the faceted sides smooth. You want the planes to be completely flat to emphasize the geometric style.
Wobbly Walls?
If your walls slump during assembly, your clay is too wet. Use a heat gun briefly to stiffen the panels, or prop them up with crumpled newspaper until the seams set.
Step 2: Adding the Tray and Feet
-
Create the drip tray:
Roll a smaller slab and cut a second hexagon slightly larger than the base of your pot. Add a very low rim (about ¼ inch) to catch water. -
Cut the feet:
Slice your wooden dowel into three or four equal lengths (about 1 inch long). These will be attached after firing, so keep them safe. -
Check the fit:
Ensure your main pot sits comfortably inside or on top of the drip tray hexagon before firing. The tray is separate here, acting as a coaster. -
Dry slowly:
Cover the pot and tray loosely with plastic. Geometric shapes are prone to warping if they dry unevenly, so let it dry very slowly over several days.
Step 3: Finishing and Firing
-
Bisque fire:
Load the bone-dry greenware into the kiln for the bisque firing (usually Cone 04). -
Glazing:
Wipe the bisque ware with a damp sponge to remove dust. Pour or dip the pot into a Cobalt Blue glaze. I prefer pouring for the inside to ensure it’s watertight. -
Clean the bottom:
Wax the bottom of the tray and the pot to prevent them from sticking to the kiln shelf. Wipe away any stray glaze droplets. -
Glaze fire:
Fire to the maturity temperature of your clay and glaze (often Cone 5 or 6 for stoneware). -
Attach the wooden feet:
Once the ceramics are cooled and finished, use a strong two-part epoxy to glue the wooden dowel pieces to the underside of the blue ceramic coaster tray. -
Final assembly:
Place the blue pot onto its footed tray, throw in some gritty soil, and pot up your favorite succulent.
Make It Marble
Instead of a solid blue glaze, mix white and blue clays (nerikomi style) before rolling your slabs to create a natural, stone-like marble pattern.
Your modern geometric planter is now ready to bring a pop of color and architectural style to your windowsill
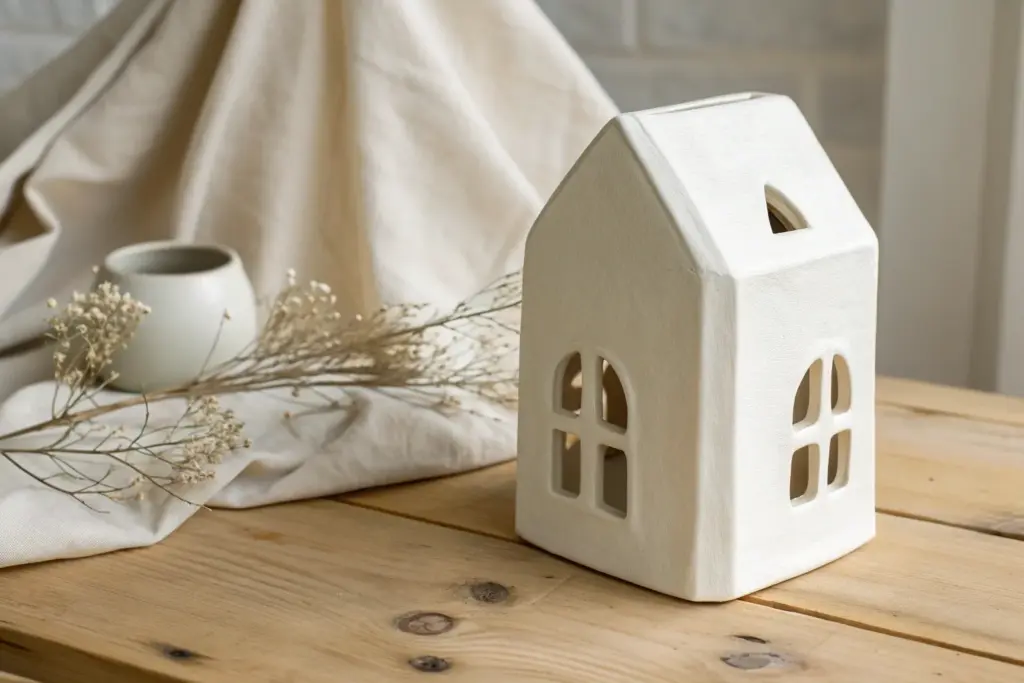
Cutout Slab Lanterns for Cozy Light Patterns
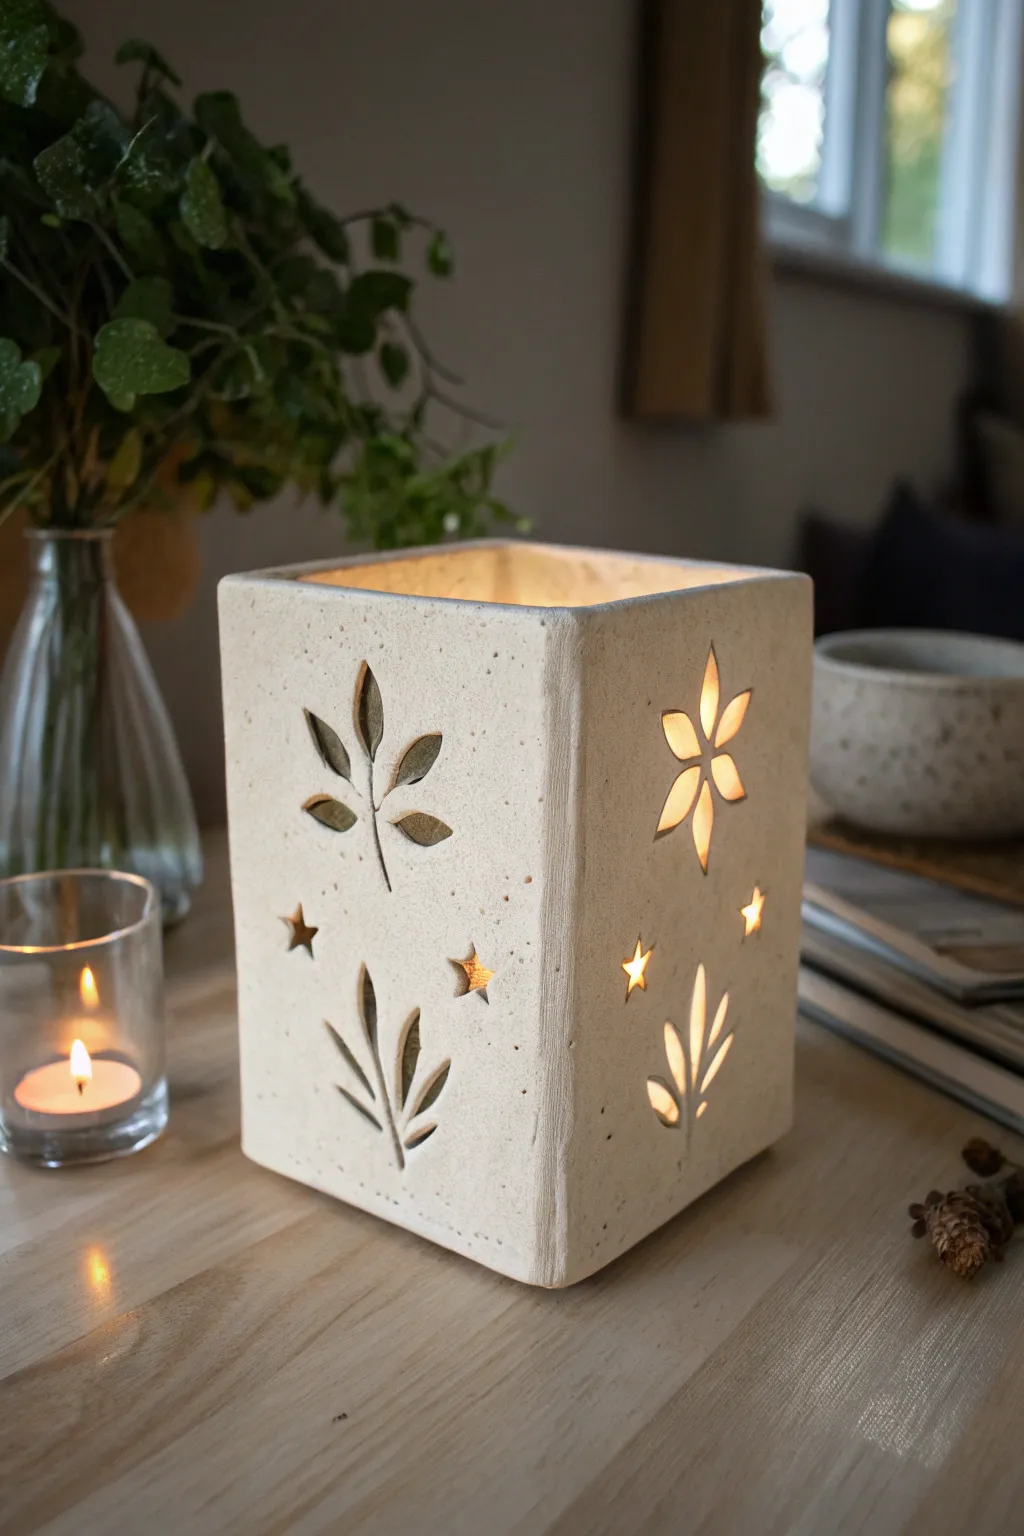
Create a warm ambiance in any room with this handmade ceramic lantern featuring delicate botanical cutouts. The natural texture of the clay combined with the rhythmic pattern of leaves and stars casts beautiful, cozy shadows when illuminated from within.
Detailed Instructions
Materials
- Stoneware clay (speckled or light-colored)
- Rolling pin
- Two wooden guide slats (approx. 1/4 inch thick)
- Fettling knife or creative cutter
- Needle tool
- Small cookie cutters (star and teardrop/petal shapes)
- X-Acto knife or sharp detail hygiene tool
- Serrated rib or scoring tool
- Slip (clay mixed with water)
- Sponge
- Ruler
- Paddle (optional)
Step 1: Preparing the Slabs
-
Roll Out the Clay:
Begin by wedging your clay to remove air bubbles, then roll it out into a large, even slab. Use your wooden guide slats on either side of the clay to ensure a consistent 1/4-inch thickness throughout. -
Smooth the Surface:
Take a damp sponge or a soft rib and gently compress the surface of the slab. This aligns the clay particles which helps prevent warping later and gives you a nice canvas for your cutouts. -
Measure and Cut Walls:
Using a ruler, measure and cut a long rectangle that will form the four walls of your lantern. A common size is roughly 16-20 inches long and 6 inches tall, but you can adjust depending on your desired lantern size. -
Leather Hard Stage:
This is crucial: Let the slab dry until it is ‘leather hard’—firm enough to hold its shape but soft enough to be cut and joined. If you rush this step, the walls will slump.
Step 2: Designing and Cutting
-
Mark the Wall Sections:
Lightly score vertical lines to divide your long strip into four equal panels. Don’t cut through; these lines just mark where the corners will be folded. -
Plan Your Pattern:
Sketch your design lightly onto the clay surface with a needle tool. For this look, arrange stylized leaf sprigs and scattered stars naturally across the different panels. -
Cut the Leaf Shapes:
Use a small teardrop cutter or your sharp X-Acto knife to remove clay for the leaves. Create a stem by gently carving a thin line or removing a very thin strip of clay. -
Add Star Details:
Punch out small star shapes using a mini cutter. I like to place these randomly around the leaves to mimic a starry night sky. -
Create the Flower Motif:
On one of the panels, arrange six teardrop cutouts in a circle to form a flower shape. Keep the spacing consistent so the center of the flower remains strong. -
Clean Up Edges:
Once all shapes are cut, use a slightly damp sponge or your finger to smooth the sharp edges of the cutouts. This looks much more professional than leaving rough, sharp burrs.
Clean Cuts Pro Tip
When cutting shapes, wait until the clay is firm leather-hard. If the clay is too soft, the cutter will drag and distort the shape. Clean up crumbs with a dry soft brush.
Step 3: Assembly and Finishing
-
Bevel the Ends:
Cut the two short ends of your long slab at a 45-degree angle. This bevel joint creates a cleaner seam and a stronger corner connection. -
Score and Slip:
Rough up the beveled edges with your scoring tool and apply a generous amount of slip. This acts as the glue for your clay. -
Form the Box:
Stand the slab up and fold it along the lines you marked earlier to create a square tube. Press the scored ends together firmly. -
Reinforce the Seam:
Roll a very thin coil of clay and press it into the inside corner where you joined the seam. Smooth it out completely so it’s invisible. -
Add a Base (Optional):
While open-bottom lanterns are great for candles, you can add a floor. Score the bottom edges of your box, place it on a spare slab, trace around it, cut the square, and attach it using the same score-and-slip method. -
Refine the Shape:
Use a wooden paddle to gently tap the outside walls. This sharpens the corners and ensures the walls are perfectly straight and square. -
Final Smoothing:
Give the entire piece a final wipe with a sponge to remove fingerprints. Let it dry very slowly under plastic to prevent corner cracks before firing.
Level Up: Texture
Before cutting holes, press a piece of lace or burlap into the soft slab. The light will catch the textured surface beautifully while glowing through the cutouts.
Place a tea light or LED candle inside your finished lantern and enjoy the calming patterns it casts on your walls