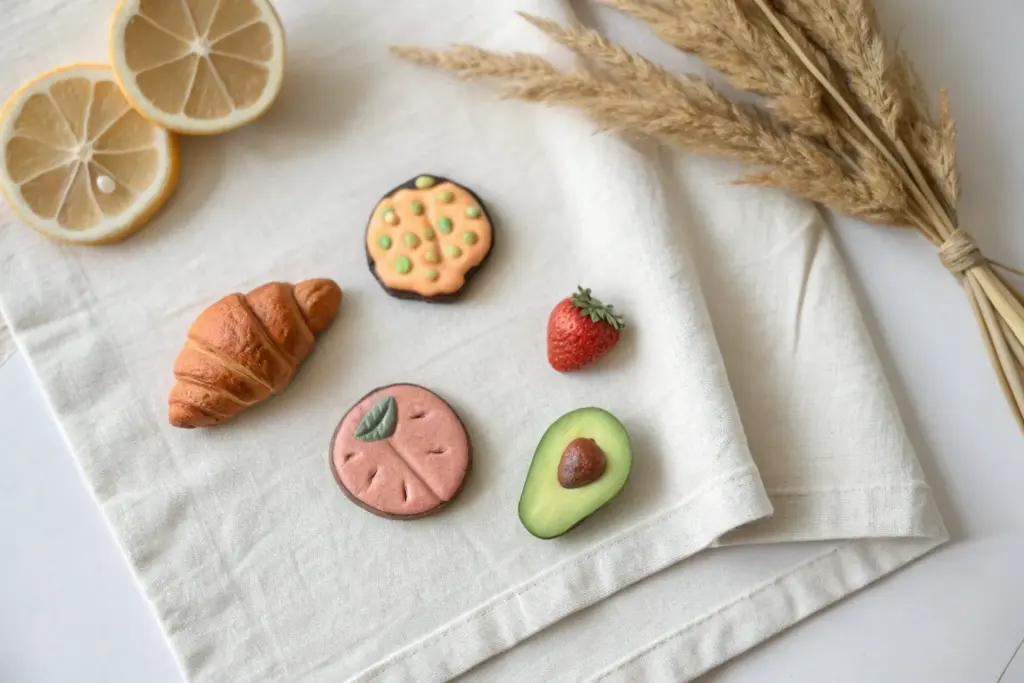
If you’ve got a little clay and a spare magnet, you can turn your fridge into a tiny gallery of handmade fridge magnets. These clay fridge magnet ideas are the projects I reach for when I want something cute, quick, and actually achievable with polymer clay or air-dry clay.
Classic Pizza Slice Magnet
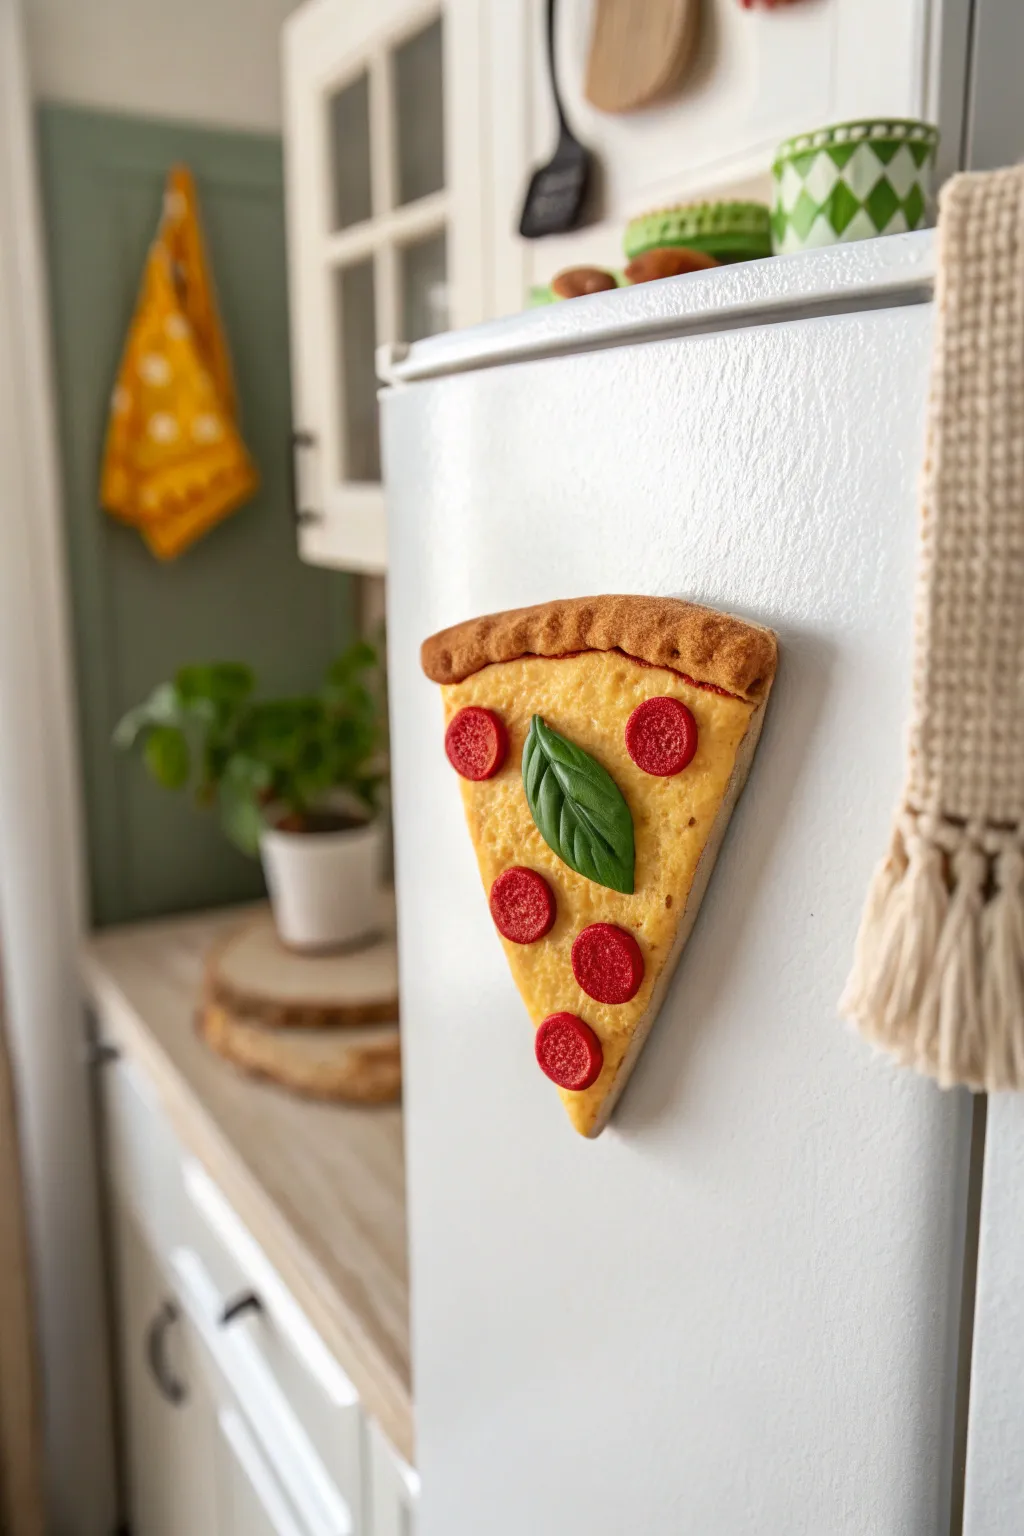
Add a delicious touch to your kitchen decor with this hyper-realistic pizza slice magnet. This project focuses on textured crusts, melty-looking cheese, and vibrant toppings that look good enough to eat but will live happily on your fridge door.
Step-by-Step Guide
Materials
- Polymer clay (white, translucent, yellow, red, orange, brown, green)
- Fimo liquid gel or bake-and-bond
- Aluminum foil (for armature)
- Texture tools (toothbrush, needle tool, sandpaper)
- Pastel chalks (yellow ochre, burnt sienna, dark brown)
- Soft paintbrush for shading
- Rolling pin or pasta machine
- Strong neodymium magnet
- Super glue (E6000 or similar)
- Clay blade
- Gloss glaze (optional)
Step 1: Prepping the Base and Crust
-
Mix your dough color:
Start by mixing a ‘baguette’ dough color using white clay with a very small amount of yellow and ochre. You want a pale, unbaked dough look initially. -
Form the base triangle:
Roll out a slab of your dough-colored clay to about 1/4 inch thickness. Cut a classic isosceles triangle shape with your blade to serve as the foundation of the slice. -
Create the crust rim:
Roll a snake of the same dough clay. Flatten it slightly and attach it to the top (short edge) of your triangle. Blend the seam on the back so it holds firmly. -
Texture the crust:
To make the bread look realistic, take a clean toothbrush or a ball of crumpled aluminum foil and press it repeatedly all over the rim and the sides of the slice. This mimics the air pockets in baked bread. -
Shade the crust:
Before baking or adding cheese, use a soft brush to dust yellow ochre and burnt sienna pastel chalks onto the crust rim. Focus the darker browns on the very top ridges to look ‘oven-baked’.
Fixing Flat textures
If your cheese looks too smooth, take a stiff brush and stipple the surface vigorously before creating the bubble indents. This micro-texture catches the light better.
Step 2: Adding the Sauce and Cheese layers
-
Apply the sauce layer:
Mix a small amount of deep red clay with liquid clay gel to make a thick paste. Spread a very thin layer of this ‘sauce’ in the center of the triangle, leaving the crust rim clean. -
Mix the perfect cheese color:
Combine translucent clay with a tiny bit of yellow and a speck of orange. The translucency is key—it makes the cheese look melted and greasy rather than like plastic. -
Apply the cheese:
Flatten your cheese mixture into a thin sheet. Tear it into irregular pieces and lay them over the sauce layer. I like to overlap them slightly and leave tiny gaps near the crust for realism. -
Texture the melting cheese:
Use a dotting tool or the back of a needle tool to gently indent the surface of the yellow clay, creating an uneven, bubbling texture typical of hot mozzarella. -
Add baked cheese details:
Dust the center of the cheese layer lightly with orange pastel chalk to simulate those golden-brown spots you get from the oven heat.
Step 3: Crafting the Toppings
-
Create pepperoni slices:
Mix red clay with a tiny bit of translucent and brown. Roll a thin log, slice off five thin discs. Texture the surface of each disc by tapping it with fine grit sandpaper. -
Place the pepperoni:
Press the five slices onto the cheese. Arrange them somewhat randomly—two near the crust, two in the middle, one near the point—and press them down firmly so they look embedded. -
Sculpt the basil leaf:
Take a small amount of green clay and form a teardrop shape. Flatten it and use a needle tool or knife to gently score a central vein and smaller side veins. -
Pose the basil:
Place the leaf right in the center of the slice. Give the tip of the leaf a slight curl or lift so it doesn’t look pasted down flat.
Make it Spicy
For a ‘meat lover’s’ version, chop tiny bits of brown clay to make sausage crumbles, or cut tiny squares of green pepper to nestle into the cheese layer.
Step 4: Finishing Up
-
Bake the project:
Bake the pizza slice according to your polymer clay package instructions (usually 230°F – 275°F for 15-30 minutes). Let it cool completely. -
Seal the piece:
If you want a greasy look, apply a satin or gloss glaze selectively just to the pepperoni and parts of the cheese. -
Attach the magnet:
Turn the cooled slice over. Use strong super glue (like E6000) to attach a neodymium magnet to the back. Press firmly and let it cure for several hours.
Now your fridge has a permanent snack that looks delicious enough to fool your guests


Sunny-Side Egg And Bacon Magnet
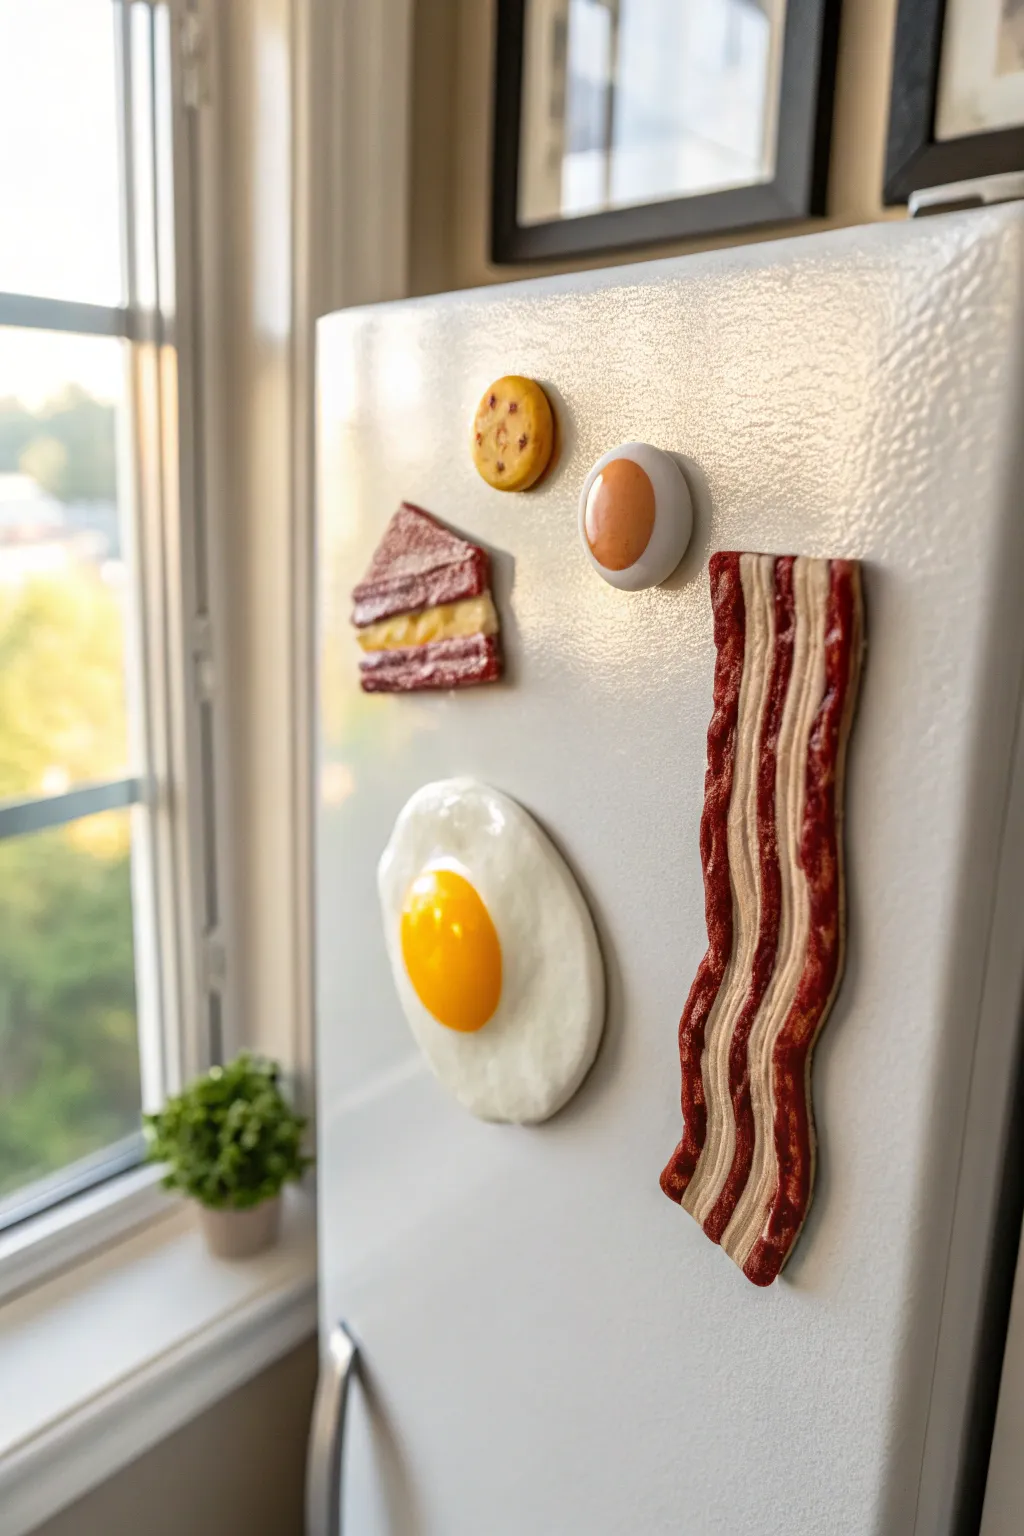
Brighten up your kitchen decor with these irresistibly realistic breakfast staples. Using polymer clay, you will sculpt a perfectly fried egg and a strip of crispy streaky bacon that look good enough to eat right off the fridge door.
Step-by-Step Tutorial
Materials
- White polymer clay
- Translucent polymer clay
- Yellow polymer clay (sunny yellow)
- Red polymer clay (dark red/burgundy)
- Beige or tan polymer clay
- Glossy glaze or polyurethane varnish
- Sculpting tools (needle tool, ball stylus)
- Rolling pin or pasta machine
- Old toothbrush or sandpaper (for texturing)
- Pastel chalks (browns, oranges, rust red)
- Soft paintbrush
- Strong round magnets
- Strong craft glue (e.g., E6000)
Step 1: Cooking the Egg
-
Mix the perfect white:
Start by conditioning your white polymer clay until it is soft and malleable. To make the egg white look more realistic and less like plastic, I like to mix in a very small amount of translucent clay—about a 4:1 ratio of white to translucent. -
Form the base:
Flatten a ball of your white mixture into an irregular oval shape. It should be roughly 2-3 inches wide. Don’t make it a perfect circle; real eggs have wobbly, organic edges when cracked into a pan. -
Thin the edges:
Using your fingers, gently press and smooth the outer edges of the white shape so they are thinner than the center. This mimics how egg whites spread in a hot skillet. -
Create the yolk:
Take a piece of sunny yellow clay and roll it into a smooth ball. Flatten the bottom slightly so it sits well, but keep the top distinctively domed and round. -
Attach the yolk:
Place the yellow yolk onto the center of your white base. Press it down gently to bond the clays, smoothing the seam just slightly so it looks naturally nestled in the white. -
Add fried texture:
To simulate that crispy, bubbly texture of a fried egg edge, lightly dab the very edges of the white clay with a toothbrush or a piece of coarse sandpaper. This subtle detail catches the light beautifully.
Step 2: Sizzling the Bacon
-
Prepare the meat colors:
Condition your dark red burgundy clay and your beige/tan clay separately. The red will be the meat, and the beige will be the fat. -
Roll stripes:
Roll both colors into thin snakes or flat strips of varying thicknesses. You want them long enough to create a substantial bacon slice, roughly 4-5 inches. -
Assemble the slab:
Lay the strips side-by-side, alternating between red and beige. Usually, a pattern like red-beige-red-beige-red works well. Press them together side-by-side to form a single striped slab. -
Flatten and wavy:
Gently use a rolling pin to flatten the combined strips into a single cohesive ribbon of bacon. Don’t roll it too thin; you want some durability. -
Texture the surface:
Take a stiff brush or a needle tool and drag it lengthwise across the bacon strip. This creates the fibrous texture of cooked meat. -
Shape the ripple:
Bacon never cooks flat. Gently bend your clay strip into a wavy, undulating shape. Curve the edges slightly upwards in spots to look like it has curled in the pan. -
Apply cooked colors:
Using a soft brush, dust the edges and the ‘fatty’ beige parts with rust red and brown pastel chalks. This shading imitates the delicious caramelization of fried bacon.
Sticky Situation
If your clay gets too soft and sticky while you work, pop it in the fridge for 10 minutes. Cooling perfectly firms it up for detailed texturing.
Step 3: Baking and Assembly
-
Bake the batch:
Place your egg and bacon pieces on a baking sheet lined with parchment paper. Bake according to your specific polymer clay manufacturer’s instructions (usually around 275°F or 130°C for 15-30 minutes). -
Cool down:
Allow the pieces to cool completely before handling. They are fragile while warm. -
Glaze the yolk:
Apply a coat of high-gloss glaze specifically to the yellow yolk of the egg. This ‘wet’ look is crucial for making the egg appear freshly cracked and sunny-side up. -
Glaze the bacon:
Dab a little gloss glaze on the high points of the bacon waves to simulate grease, but leave the recessed areas matte for contrast. -
Glue the magnets:
Turn the pieces over. Apply a dab of strong craft glue like E6000 to the back of the clay and press a round magnet firmly into it. Let the glue cure for at least 24 hours.
Crispy Edges
For ultra-realism, dab brown pastel dust specifically on the very outer ruffled edges of the egg white to make it look ‘burnt’ and crispy.
Now your fridge has a delicious new look that celebrates the best meal of the day


Citrus Slice Magnet Set
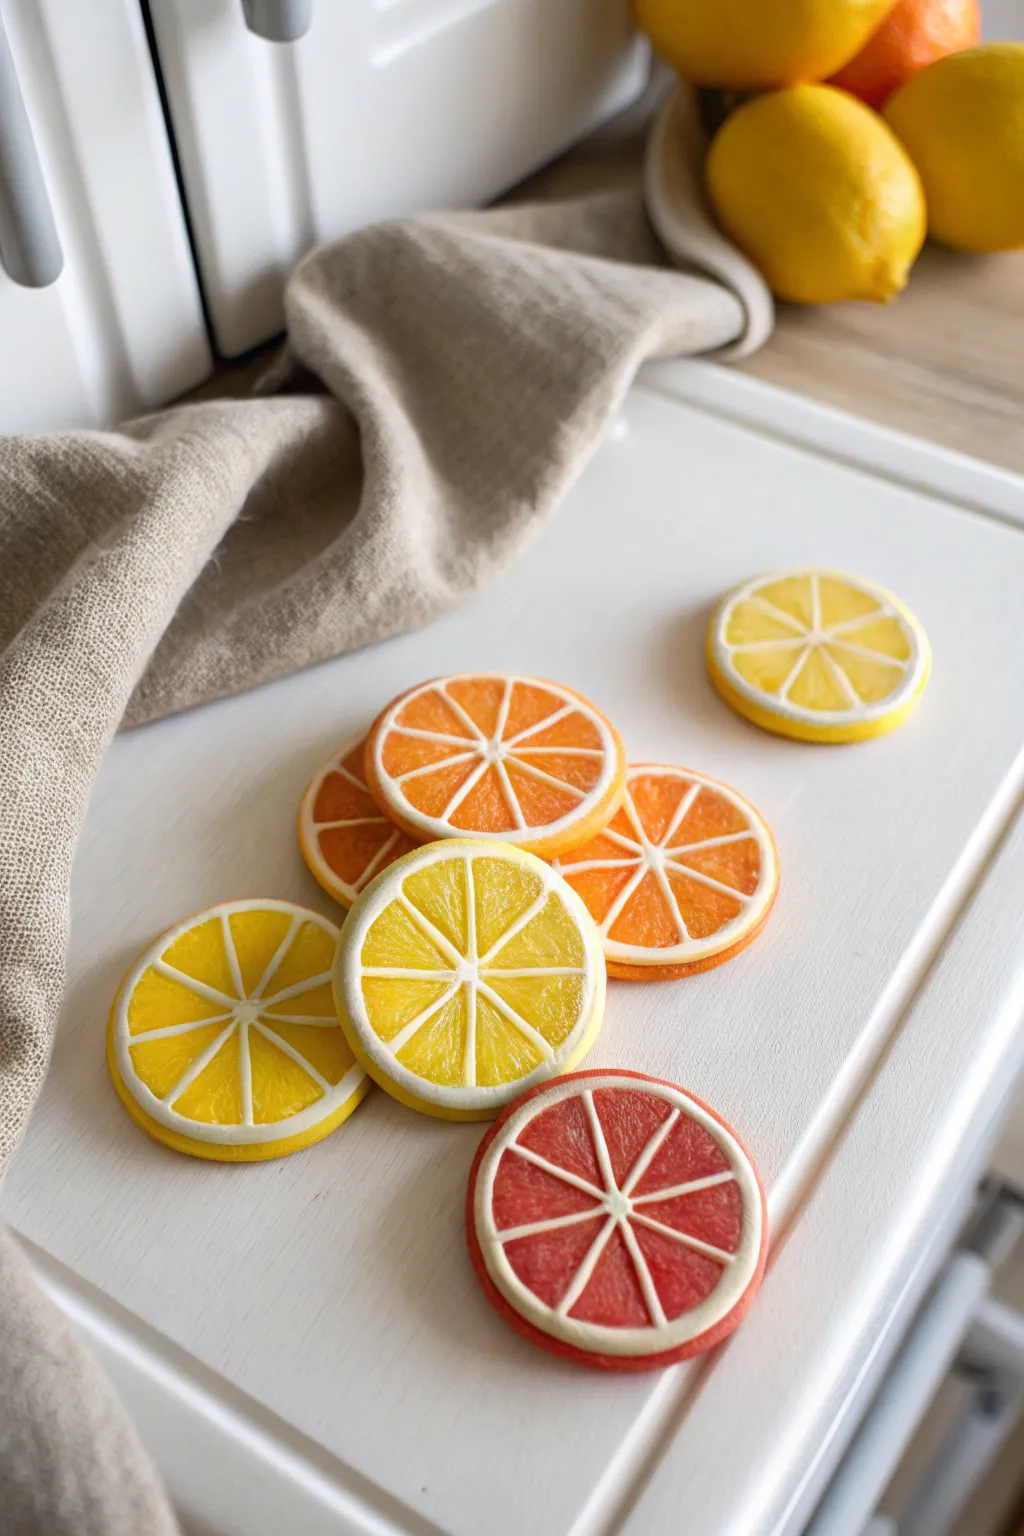
Brighten up your refrigerator with these incredibly realistic citrus slice magnets made from polymer clay. The translucent juicy effect mixed with opaque rinds creates a stunning faux-gummy texture that looks almost good enough to eat.
Step-by-Step Tutorial
Materials
- Translucent polymer clay (white or colorless)
- Opaque polymer clay (white)
- Alcohol inks or clay dyes (yellow, orange, red)
- Liquid polymer clay (translucent)
- Round cookie cutters (various small sizes)
- Craft blade or scalpel
- Rolling pin or pasta machine
- Needle tool
- Sandpaper (fine grit)
- Small round magnets
- Strong craft glue (E6000 or similar)
- Key ring or clay extruder (optional)
Step 1: Creating the Segments
-
Color the translucent clay:
Divide your translucent clay into batches. Use alcohol inks to tint them: one bright yellow (lemon), one orange, and one pinkish-red (grapefruit). Keep the color saturation high as baking can sometimes fade it slightly. -
Form the cane center:
Take a portion of your tinted translucent clay and roll it into a thick log, about 1 inch in diameter. This will form the juicy interior segments. -
Wrap in pith:
Roll out a very thin sheet of opaque white clay. Wrap this sheet completely around your translucent colored log, trimming the excess so the seam meets perfectly without overlapping. -
Shape the wedge:
Gently pinch one side of the wrapped log to create a teardrop or wedge shape. The white wrapping should now look like the thin skin separating the fruit segments. -
Reduce the cane:
Gently stretch and roll the teardrop cane to elongate it, reducing its diameter until it is the size you want for a single fruit segment. -
Cut segments:
Slice the long cane into equal lengths. You will need 8 segments for each citrus slice.
Clean Cuts Matter
Rotate the cane slightly after every slice you cut. This prevents the bottom of the cane from flattening out and keeps your citrus rounds perfectly circular.
Step 2: Assembling the Slices
-
Arrange the interior:
Take your 8 wedge segments and arrange them in a circle, with the pointy ‘pith’ ends meeting in the center. Press them gently together so they stick. -
Fill the center gap:
Roll a tiny snake of opaque white clay and insert a small piece into the very center hole where all the wedges meet to create the central core. -
Wrap the outer rind:
Roll out a thicker sheet of opaque white clay for the inner rind. Wrap this around your assembled circle of wedges. -
Add the zest layer:
Mix a small amount of your original tinted clay with a bit of opaque white to create a colored rind. Roll this into a sheet and wrap it as the final outer layer of your cane. -
Final reduction:
Compress the entire large cylinder gently to ensure all layers are fused. I usually like to let the cane rest in the fridge for 15 minutes here to firm up up before slicing, which prevents distortion. -
Slice the cookies:
Using a very sharp blade, slice the cane into even disks, approximately 1/4 inch thick. Try to cut straight down to keep the thickness uniform.
Sparkle & Shine
After baking, coat just the translucent fruit segments with a high-gloss UV resin or glaze. Leave the white pith matte for a realistic wet-fruit look.
Step 3: Texturing and Finishing
-
Texture the fruit:
Use a needle tool or a stiff brush to gently poke and scratch the translucent segments of each slice. This creates that realistic, fibrous juicy texture. -
Add ‘juice’:
For extra realism, lightly brush a thin layer of liquid translucent clay over the textured segments before baking. -
Bake:
Bake the slices according to your polymer clay manufacturer’s instructions. Usually, this is around 265°F (130°C) for 15-30 minutes. -
Sand the edges:
Once cooled, lightly sand the outer edges if there are any fingerprints or irregularities. -
Attach magnets:
Flip the slices over. Apply a dab of strong adhesive to the back and press a magnet firmly into place. Let the glue cure fully before stick them to your fridge.
Enjoy arranging your fresh, everlasting fruit slices on any magnetic surface for a pop of summer color


Strawberry With Seed Texture Magnet
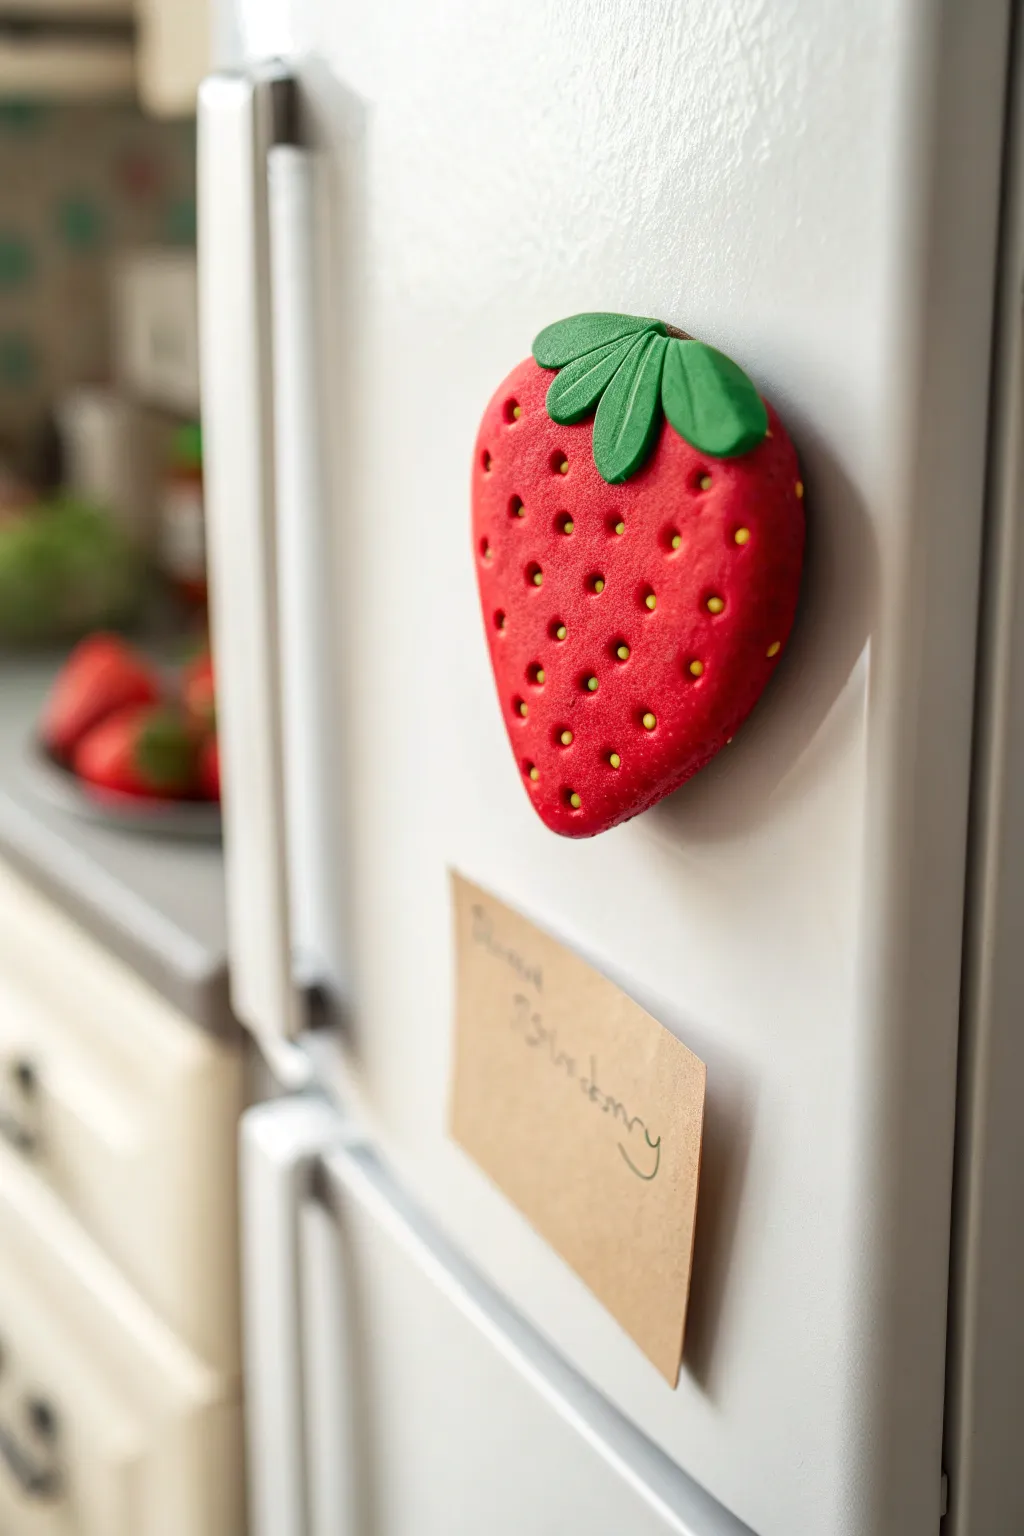
Brighten up your kitchen with this delightful strawberry magnet, featuring a realistic pitted texture and vibrant green leaves. It is the perfect beginner-friendly project to add a pop of summer color to your fridge door.
Detailed Instructions
Materials
- Red polymer clay
- Green polymer clay
- Yellow polymer clay (tiny amount)
- Circle clay cutter (approx. 2 inches)
- Dotting tool or toothpick
- Needle tool or craft knife
- Neodymium magnet (round)
- Super glue or strong craft adhesive
- Clean work surface (tile or mat)
Step 1: Fruity Foundation
-
Condition the Clay:
Start by taking a chunk of red polymer clay and kneading it in your hands until it becomes soft, pliable, and free of cracks. Warm clay is much easier to shape smoothly. -
Roll a Sphere:
Roll the conditioned red clay into a smooth ball, aiming for a size slightly larger than a golf ball depending on how big you want your magnet. -
Flatten the Back:
Press the ball onto your work surface to flatten the back completely. The front should remain domed and rounded, not flat like a cookie. -
Shape the Berry:
Gently squeeze the bottom half of the circle to taper it into a rounded point, creating that classic strawberry heart shape. Soften any sharp angles with your fingertip.
Fingerprint Detective
Is your smooth berry covered in fingerprints? Before baking, lightly brush the surface with a drop of baby oil or cornstarch to smooth imperfections out instantly.
Step 2: Texturing the Seeds
-
Create Seed Pits:
Using a medium-sized dotting tool, press gently into the red clay to create rows of small indentations. Start near the top and work your way down. -
Stagger the Rows:
For a natural look, stagger your rows of dots so they don’t look too grid-like. The indentations should be deep enough to hold a tiny bit of yellow clay later. -
Prepare Yellow Seeds:
Take a tiny amount of yellow clay and roll it into an extremely thin snake—almost thread-like. -
Cut Tiny Segments:
Use your craft knife to slice the thin yellow snake into microscopic bits, just big enough to fill the center of your indentations. -
Insert the Seeds:
Carefully place a tiny yellow bit into each indentation. You can use the tip of your needle tool to help transfer them. Press them in gently so they sit flush or slightly recessed.
Realistic Seed Hack
Instead of rolling tiny yellow balls, pre-bake a thin snake of yellow clay, slice it into tiny discs, and press those hard bits into the soft red clay.
Step 3: Leafy Top
-
Condition Green Clay:
Clean your hands to remove red residue, then condition the green clay until soft. -
Form Teardrops:
Shape three small equal-sized balls of green clay, then roll them into teardrop shapes to form the individual leaves. -
Flatten the Leaves:
Flatten each teardrop slightly with your thumb. They should be thick enough to hold their shape but thin enough to look like foliage. -
Add Vein Texture:
Use a needle tool or the back of a craft knife to press a central vein down the middle of each leaf. -
Assemble the Calyx:
Arrange the three leaves at the top broad end of the strawberry, overlapping them slightly at the center. Press them gently onto the red clay to adhere.
Step 4: Baking and Assembly
-
Embed the Magnet (Optional):
If you want the magnet hidden, press your neodymium magnet into the flat back of the strawberry now, smoothing the clay over the edges to hold it. Otherwise, bake the clay first. -
Bake the Clay:
Place your strawberry on a baking sheet lined with parchment paper. Bake according to your clay manufacturer’s instructions (usually around 275°F/135°C for 15-30 minutes). -
Cool Down:
Allow the piece to cool completely before handling. I usually leave it in the oven with the door open to prevent thermal shock. -
Glue the Magnet:
If you didn’t embed the magnet earlier, apply a dab of strong super glue or E6000 to the center of the flat back and press the magnet firmly in place. -
Final Polish:
Once the glue is dry, you can lightly buff the surface with a soft cloth to give it a nice sheen, or add a coat of satin glaze for extra protection.
Now your fridge has a fresh, juicy update that looks good enough to eat

The Complete Guide to Pottery Troubleshooting
Uncover the most common ceramic mistakes—from cracking clay to failed glazes—and learn how to fix them fast.
Sunflower Bloom Magnet
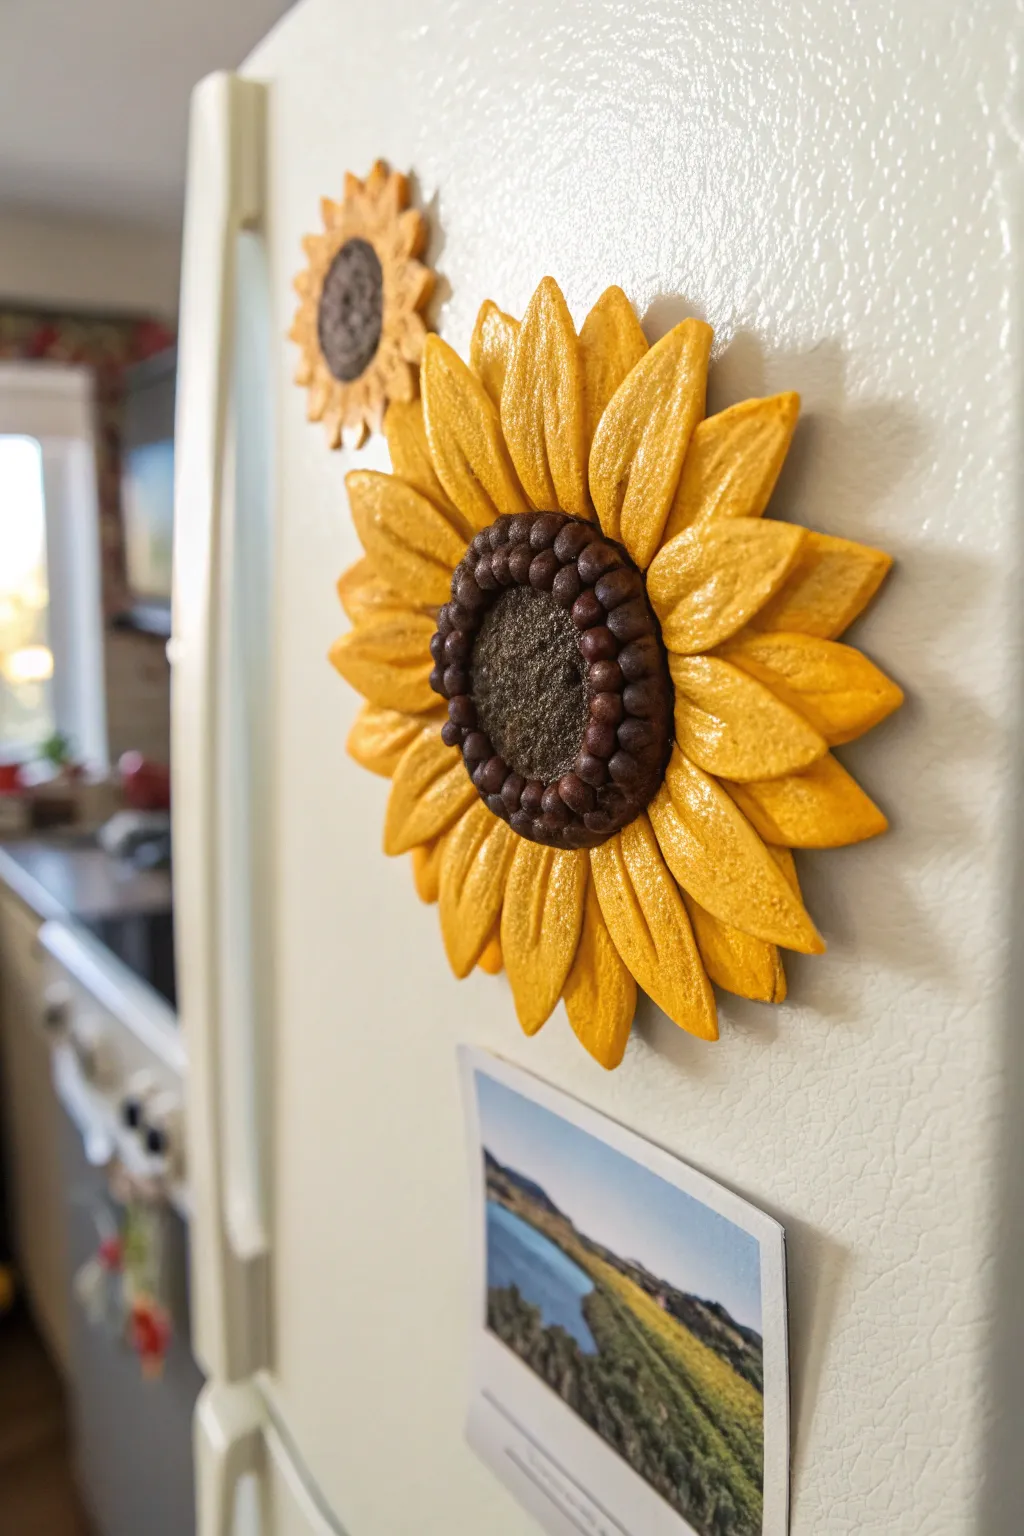
Bring a burst of eternal sunshine into your kitchen with this highly textured, realistic sunflower magnet. Its layered petals and intricate seed center create a charming dimensional effect that looks like it was freshly plucked from a summer field.
Step-by-Step Guide
Materials
- Polymer clay (golden yellow, dark brown, black)
- Small round magnet or magnetic sheet
- Sculpting tool (needle tool or toothpick)
- Small ball stylus tool
- Texture sponge or toothbrush
- Acrylic paint (optional: orange, burnt umber)
- Gloss varnish or sealant
- Craft glue or strong adhesive
- Rolling pin or pasta machine
Step 1: Sculpting the Center
-
Create the base:
Start by conditioning a small ball of dark brown clay about the size of a quarter. Flatten it slightly into a thick disk to serve as the flower’s center. -
Texture the core:
Take a smaller ball of black or very dark brown clay and press it into the very middle of your brown disk. Use a texture sponge or an old toothbrush to tap vigorously against this central area, creating a rough, mossy look. -
Form the seeds:
I like to roll tiny, individual spheres of dark brown clay for the outer seed ring. You’ll need about 20-30 of these peppercorn-sized balls. -
Attach the seeds:
Press these tiny spheres in two concentric circles around the textured black center. Use a small ball stylus to indentation the center of each ‘seed’ slightly, giving them a cupped, organic appearance.
Step 2: Forming the Petals
-
Prepare petal clay:
Condition your golden yellow clay until pliable. Roll it into a log and cut it into roughly 16-20 equal segments. -
Shape individual petals:
Roll each segment into a ball, then flatten and pinch one end to create a teardrop shape. Unlike a daisy, these petals should be somewhat wide and substantial. -
Add vein details:
Using a needle tool or toothpick, gently score a central vein down the length of each petal. Add smaller, subtle lines radiating from the center to mimic natural leaf texture. -
Create the first layer:
Attach the first ring of petals to the back of your flower center. Ensure the pointed tips face outward and the rounded bases tuck underneath the brown seed disk. -
Overlap the second layer:
Create a second set of petals and place them behind the first layer, positioning them in the gaps between the front petals. This layering creates the sunflower’s signature lush volume. -
Refine the shape:
Gently curl the tips of a few petals slightly upward or downward to avoid a uniform, manufactured look. Nature is perfectly imperfect.
Droopy Petals?
If your large petals sag before baking, support them with small bits of paper or foil underneath to hold the curl shape during the oven process.
Step 3: Finishing Touches
-
Bake the clay:
Place your sunflower on a ceramic tile or baking sheet. Bake according to your polymer clay package instructions (usually 275°F/135°C for 15-30 minutes). -
Cool down:
Allow the piece to cool completely before handling. Polymer clay is fragile while hot and hardens as it returns to room temperature. -
Enhance with paint:
For extra depth, use a dry brush with a tiny amount of orange acrylic paint near the base of the petals. Highlighting the ridges with a lighter yellow can also make the texture pop. -
Seal the work:
Apply a coat of semi-gloss or matte varnish to protect the clay and give the center seeds a subtle, realistic sheen. -
Attach the magnet:
Flip the flower over. Use a dab of strong craft glue or superglue to attach a round ceramic magnet to the flat back of your flower.
Add Pollen Dust
Before baking, lightly brush crushed yellow pastel chalk or mica powder onto the dark brown seeds to mimic the look of scattered golden pollen.
Now your fridge has a permanent bloom that captures the warmth of late summer all year round
Terrazzo Pattern Clay Tile Magnet
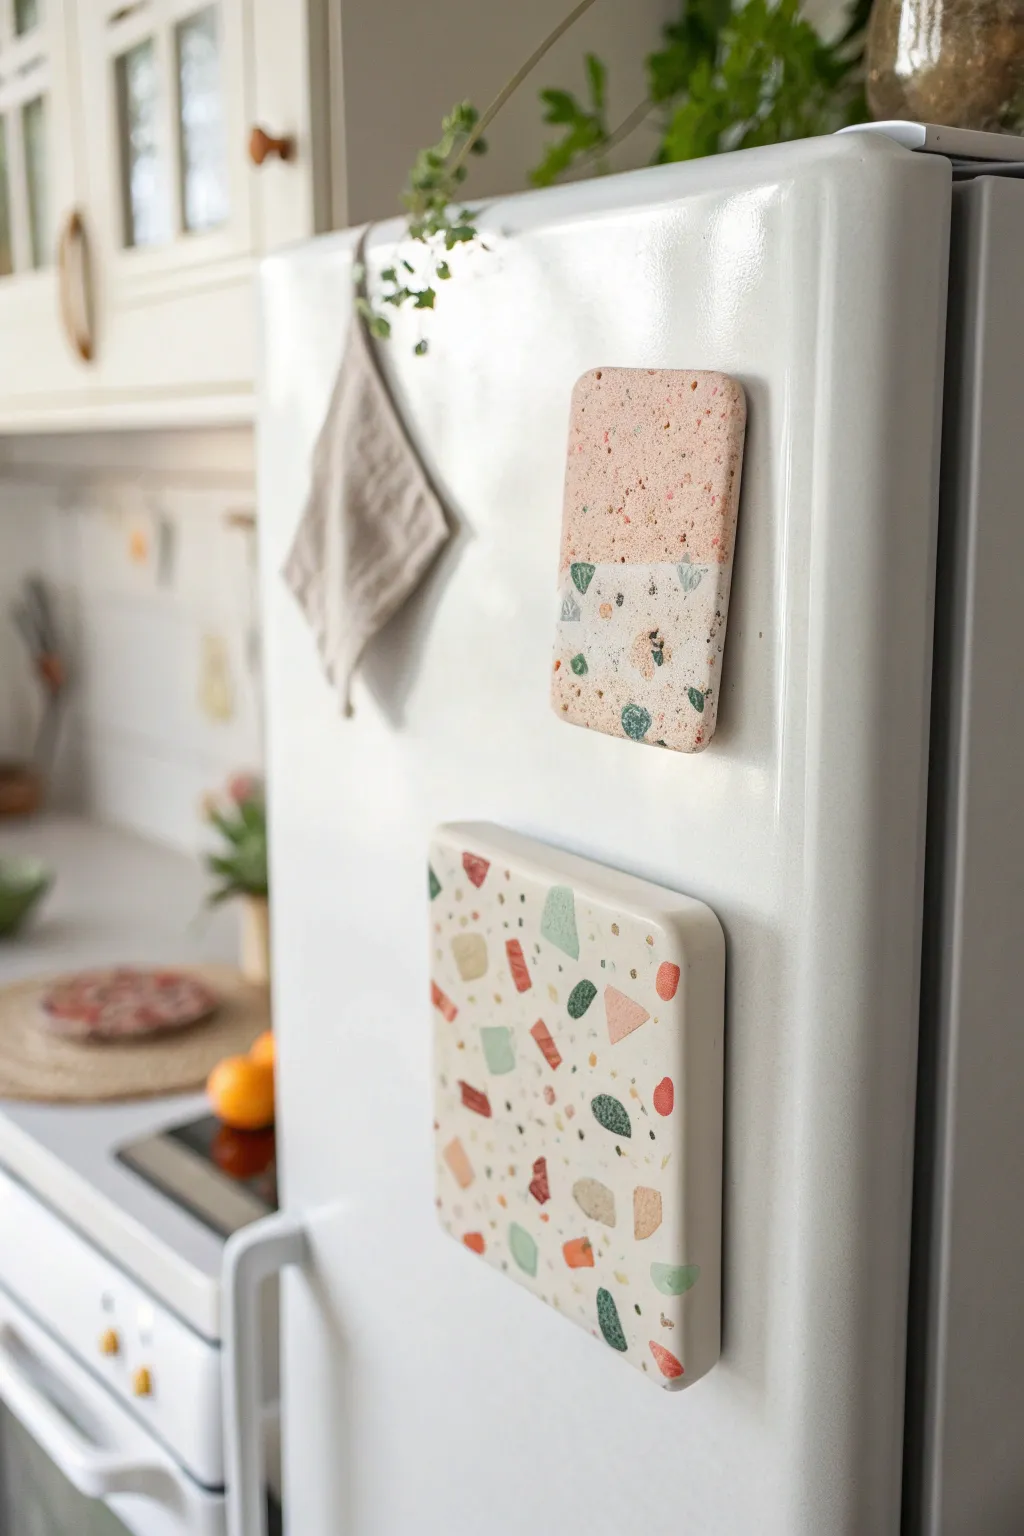
Bring a touch of modern design to your kitchen with these faux terrazzo clay magnets. The speckled, geometric look is surprisingly easy to achieve using polymer clay, creating durable and stylish functional art for your fridge.
Step-by-Step
Materials
- White polymer clay (approx. 2 oz)
- Colored polymer clay (terracotta, sage green, and black or dark grey)
- Rolling pin (acrylic or glass works best)
- Clay slicer or craft knife
- Square and rectangular cookie cutters (or a ruler)
- Parchment paper or baking tile
- Strong craft glue (E6000 or similar)
- Heavy-duty neodymium magnets
- Fine grit sandpaper (400 and 600 grit)
- Matte varnish (optional)
Step 1: Making the ‘Chips’
-
Condition the colors:
Start by conditioning your colored clay blocks (terracotta, sage green, and dark grey) in your hands until they are soft and pliable. This ensures your chips won’t crumble later. -
Roll thin sheets:
Roll each color out into a very thin sheet, roughly 1-2mm thick. The thinner the sheet, the more delicate your final terrazzo pieces will be. -
Bake the sheets partially:
Place these thin colored sheets on a baking tray lined with parchment paper. Bake them for about 10-15 minutes at the temperature recommended on your clay package. They should be hard but not fully cured. -
Chop into fragments:
Once cool, use your clay slicer to chop these sheets into tiny, jagged fragments. Vary the sizes: keep some pieces distinct and chunky while chopping others into fine dust for a realistic stone effect.
Smudged Colors?
If your colored chips are smearing during the rolling phase, the clay was likely too warm or soft. Chill the chopped bits in the fridge for 10 minutes before sprinkling them.
Step 2: Creating the Terrazzo Slab
-
Prepare the base:
Condition a large block of white clay. Roll it into a thick slab, roughly 5-6mm thick. This needs to be sturdy enough to hold the magnet. -
Apply the chips:
Take your chopped colored fragments and sprinkle them generously over the white slab. For the split-design look seen in the photo, cover one half densely with pink/terracotta dust and the other half with larger mixed chips. -
Embed the pattern:
Cover the slab with a piece of parchment paper. Use your rolling pin to firmly press the colored chips down into the white base until the surface is completely flat and flush. -
Check for gaps:
Peel back the paper. If you see large white gaps that look empty, sprinkle a few more chips in those spots and roll again until you have an even distribution.
Make it Shine
For a glossy ceramic look instead of matte stone, coat the finished baked pieces with a layer of UV resin and cure under a UV lamp for a durable, high-shine finish.
Step 3: Cutting and Refining
-
Cut the shapes:
Use your cutters or a ruler and knife to cut out your final magnet shapes. A clean square and a tall rectangle work beautifully together. I find using a blade specifically for clay gives the sharpest edges. -
Smooth the edges:
Gently tap the sides of your cut shapes with your finger to soften the sharp corners slightly. This prevents chipping later on. -
Final bake:
Bake your square and rectangle pieces according to the package instructions (usually 275°F/135°C for 30 minutes per 6mm of thickness). Let them cool completely.
Step 4: Finishing Touches
-
Sand the surface:
Wet your 400 grit sandpaper and sand the top surface of the cured clay. This removes the thin film of white clay that might be obscuring your colored chips, making the colors pop. -
Polishing:
Follow up with 600 grit wet sandpaper to get a super smooth, stone-like finish. Wipe away any residue with a damp cloth. -
Attach the magnet:
Turn the tiles over. Apply a dab of strong craft glue to the back and press your magnet firmly into the center. -
Dry and display:
Allow the glue to cure for at least 24 hours before sticking them to your fridge to ensure a permanent bond.
Now your kitchen has a custom, architectural detail that is useful as well as beautiful