Whenever I’ve got a plain plate in front of me, my brain immediately starts brainstorming color, texture, and little details that make it feel like yours. These plate decoration ideas mix classic paint-and-pattern favorites with more hands-on ceramic surface techniques and even a few ceremonial tray styling looks for special occasions.
Hand-Painted Floral Rim Wreath
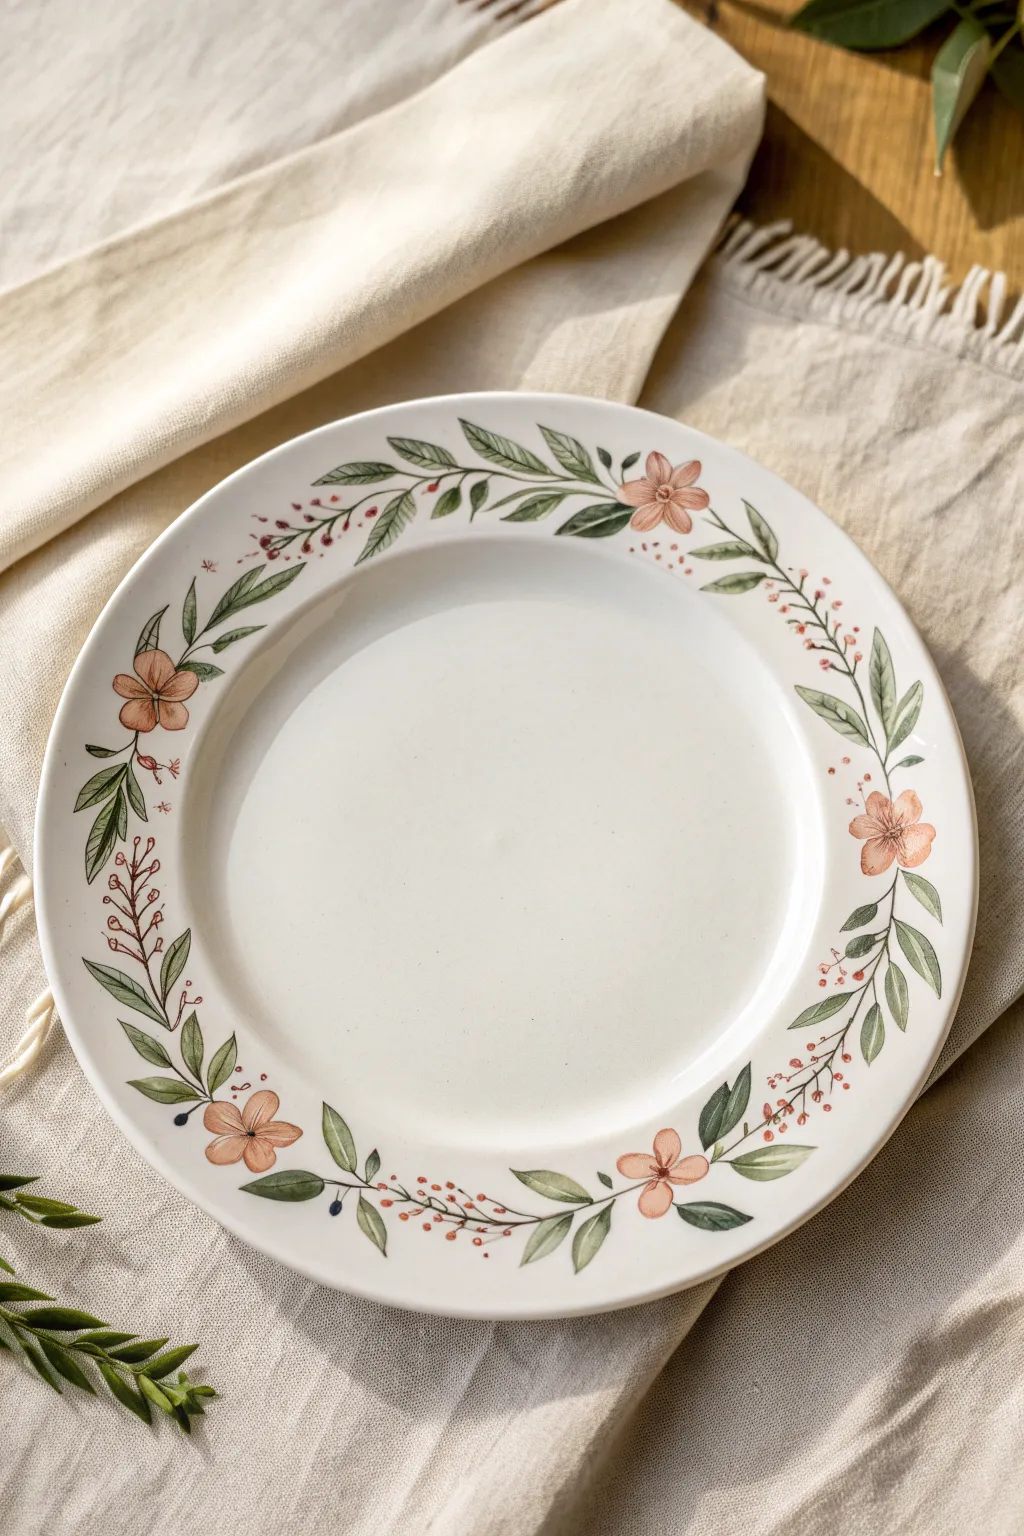
Transform a plain white dinner plate into a botanical masterpiece with this airy, hand-painted floral rim design. The soft peach blooms and trailing greenery create an elegant frame for your meals, evoking the feeling of a peaceful garden party.
Step-by-Step Guide
Materials
- Plain white ceramic dinner plate (glazed)
- Pebeo Porcelaine 150 paints (Peach, Sage Green, Deep Green, Sepia/Brown)
- Fine liner brush (size 00 or 0)
- Small round brush (size 2 or 3)
- Rubbing alcohol and cotton pads
- Paper palette or mixing tile
- Pencil (optional for sketching)
- Kitchen oven (for curing)
Step 1: Preparation & Planning
-
Clean surface:
Before you begin painting, it is crucial to remove any grease or fingerprints from the plate’s rim. Wipe the entire outer edge thoroughly with rubbing alcohol and a cotton pad, then avoid touching this area with your bare hands. -
Plan spacing:
Visualize the wreath as five distinct floral clusters evenly spaced around the rim. You can lightly mark these center points with a pencil if you wish; the pencil marks will burn off during the baking process.
Step 2: Painting the Blooms
-
Mix peach tone:
On your palette, prepare your peach color. If the bottled paint is too opaque, I like to mix in a tiny drop of painting medium or thinner to achieve that translucent, watercolor effect seen in the reference. -
Paint first cluster:
Using the small round brush, paint a simple five-petal flower at your first mark. Keep the petals loose and slightly uneven for a natural look. Leave a tiny bit of white space in the center. -
Repeat blooms:
Rotate the plate and paint the remaining four primary flowers at your pre-marked spots. Ensure they are roughly the same size but vary the orientation slightly so they don’t look like stamps. -
Add centers:
Once the peach petals are tacky or dry, dip the very tip of your fine liner brush into the sepia paint. Add a small dot in the center of each flower and pull 3-4 tiny, hair-thin lines outward onto the petals to create depth.
Transparency Trick
To get that watercolor look with opaque ceramic paints, mix a drop of gloss medium into your color. It thins the pigment without breaking the binder.
Step 3: Adding Foliage
-
Create main vines:
Switching to your green palette, use the fine liner brush to paint a thin, sweeping vine connecting the flowers. These lines don’t need to perfectly touch; let them curve elegantly along the curvature of the rim. -
Paint broad leaves:
Load the round brush with Sage Green. Press the belly of the brush down near the vine and lift as you pull away to create tapered, almond-shaped leaves. Add 2-3 of these larger leaves near each flower cluster. -
Add dark accents:
While the sage leaves are drying, mix a Deep Green. Use the fine liner to paint smaller, sharper leaves tucked behind the larger ones, adding contrast and visual weight to the foliage. -
Detail vein lines:
With the finest tip of your liner brush and a very diluted dark green or sepia, paint a single central vein down the middle of the largest leaves for realistic detail.
Oops! A Smudge?
If you make a mistake while the paint is wet, dampen a Q-tip with rubbing alcohol and gently wipe the error away. Let that spot dry fully before repainting.
Step 4: Delicate Fillers
-
Paint berry branches:
Using the Sepia/Brown paint and the liner brush, draw delicate, wispy branches extending outward from the main floral clusters into the empty white spaces. -
Dot the berries:
Dip the back end of your brush (the handle) or a dotting tool into a reddish-brown or dark peach mix. Gently dot tiny berries along the wispy branches you just painted. -
Final leaf sprigs:
Inspect the wreath for any large gaps. Fill them with tiny, single brush-stroke leaves or small floating dots to balance the composition without overcrowding it.
Step 5: Curing Process
-
Dry time:
Allow the paint to air dry for at least 24 hours. Does it look dry sooner? Yes, but don’t rush this; the deep drying ensures the paint won’t bubble in the oven. -
Bake to set:
Place the plate in a cool oven. Set the temperature to 300°F (150°C). Once the oven reaches temperature, bake for 35 minutes. -
Cool down:
Turn the oven off and leave the plate inside until it is completely cool. Removing it while hot can cause the ceramic to crack due to thermal shock.
Once baked and cooled, your custom dinnerware is ready to be admired at your next gathering


Color-Blocked Edges With Tape
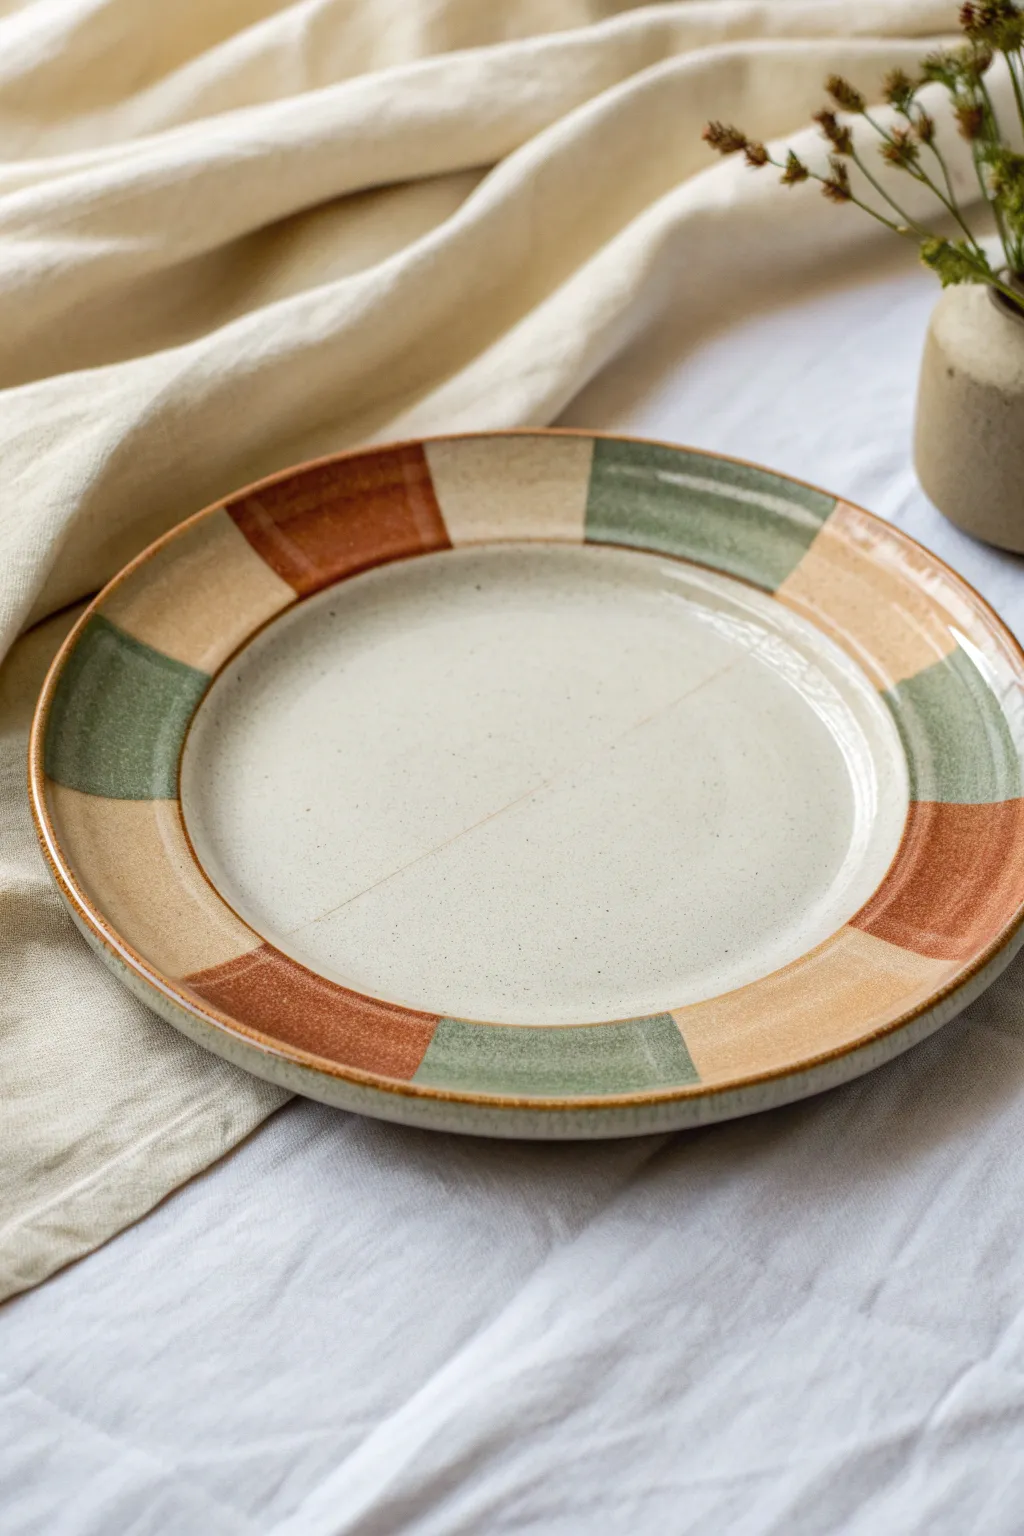
Transform a plain ceramic plate into a rustic statement piece with this segmented rim design. Using warm terracotta, sage green, and light tan tones, you’ll create a structured yet organic pattern that feels perfectly cozy.
How-To Guide
Materials
- Plain cream or white ceramic plate (smooth rim preferred)
- Peel-off masking tape or painter’s tape (1/4 inch width)
- Porcelain or ceramic paint (Terracotta, Sage Green, Beige)
- Soft flat paintbrush (size 6 or 8)
- Rubbing alcohol
- Cotton rounds
- Ruler or measuring tape
- Pencil (optional)
- Oven (for curing, if paint requires)
Step 1: Preparation and Mapping
-
Clean surface:
Begin by wiping the entire rim of the plate with rubbing alcohol on a cotton round to remove any oils or dust. This ensures the paint adheres properly. -
Measure segments:
Visualize the rim as a clock face. You want to divide the rim into roughly equal rectangular segments. I find it helpful to lightly mark 8 or 10 equidistant points around the outer edge with a pencil. -
Apply vertical tape lines:
Place strips of masking tape radially across the rim at your marked points. These strips will serve as the dividers between your color blocks. -
Define the inner circle:
Apply a continuous curved line of tape along the inner edge where the rim meets the plate’s center depression. This creates a clean stopping point for your paint. -
Seal the edges:
Run your fingernail or a credit card firmly over all tape edges. This prevents paint from bleeding underneath and keeps your lines crisp.
Bleeding Lines?
If paint seeps under the tape, wait until it’s semi-dry. Use a rubber clay shaper or a wooden toothpick to gently scrape the excess bleed back toward the straight line.
Step 2: Painting the Blocks
-
Plan your pattern:
Decide on your repeating color sequence. For this look, alternate between terracotta, beige, and sage green. -
Paint the first color:
Load your flat brush with the terracotta paint. Fill in every third segment on the rim, applying the paint in smooth, horizontal strokes following the curve of the plate. -
Apply second color:
Clean your brush thoroughly. Move to the beige tone and fill in the segments to the right of your terracotta blocks. -
Finish the sequence:
Fill the remaining empty segments with the sage green paint. Ensure the paint coverage is opaque but not so thick that it creates ridges. -
Check for gaps:
Look closely at the corners where the tape meets the rim edge. Dab a tiny bit of extra paint there if needed to ensure full coverage. -
Let it tack:
Allow the paint to sit for about 10-15 minutes. It should be slightly tacky to the touch but not fully dry.
Step 3: Finishing Touches
-
Remove tape carefully:
Slowly peel back the tape strips at a 45-degree angle. Pulling while the paint is still slightly tacky helps prevent the dry paint from chipping off with the tape. -
Clean up edges:
If any paint bled through, use a toothpick or a damp cotton swab to gently scrape or wipe away the excess while it’s fresh. -
Add texture (optional):
For a rustic look, you can use a dry brush to lightly stipple a tiny bit of brown speckling over the dried color blocks, mimicking stoneware clay. -
Dry completely:
Let the plate sit undisturbed for 24 hours to allow the paint to fully cure and harden. -
Bake to set:
If your specific paint brand requires heat setting, place the plate in a cool oven, heat to the recommended temperature (usually 300°F/150°C), bake for 30 minutes, and let it cool inside the oven.
Layer the Look
Before removing the tape, sponge a slightly darker shade of each color onto the outer edges of the blocks. This creates a fired-glaze gradient effect.
Now you have a custom set of geometric dinnerware ready for your next gathering


Dot Mandala Centerpiece

Bring warmth to your table with this earth-toned ceramic project featuring a stylized floral mandala. The design combines simple geometric repetition with rustic glazes for a cozy, handcrafted aesthetic.
Detailed Instructions
Materials
- Bisque-fired ceramic plate (approx 8-10 inches)
- Underglazes: Rust Orange, Sage Green, Dark Brown, Cream/Off-White
- Clear dipping glaze (food safe)
- Small round paintbrush (sz 2 or 4)
- Fine liner brush (sz 0 or 00)
- Pencil for sketching
- Banding wheel (turntable)
- Sponge
Step 1: Preparation & Base
-
Clean the bisque:
Wipe your bisque plate with a damp sponge to remove any dust. This ensures the underglaze adheres properly and prevents pinholing later. -
Apply base color:
Using a wide soft brush, coat the entire top surface of the plate with the Cream/Off-White underglaze. Apply 2-3 even coats, letting each dry until it’s no longer shiny before adding the next. -
Mark the center:
Once the base is dry to the touch, place your plate on a banding wheel. Use a pencil to lightly mark the absolute center and trace extremely faint concentric circles to guide your pattern placement.
Step 2: Painting the Central Mandala
-
Paint the center seeds:
Start with the innermost circle. Using the liner brush and Rust Orange, paint tiny clusters of dots or ‘seeds’ in the very center. I like to keep these naturally irregular for a handmade feel. -
Define the first petals:
Around the center seeds, paint a small flower shape with 8-10 rounded petals using Dark Brown. Keep the lines thin. -
Add inner details:
Fill the small brown petals with Rust Orange, leaving a small gap near the outline so the colors don’t bleed. -
Create the green spiral ring:
Paint a larger ring of circular outlines around the central flower using Rust Orange. Inside each circle, switch to Sage Green and paint a loose, inward-curling spiral. -
Frame with scallops:
Enclose the spiral circles with large, scalloped petal shapes in Rust Orange. The bottom of each scallop should hug the spiral circle, creating a continuous flower shape.
Clean Lines Pro-Tip
For perfectly round dots, use the back end of your paintbrush handle instead of the bristles. Dip the handle in paint and stamp it lightly.
Step 3: Adding Patterns & Borders
-
Detail the mid-section:
In the negative space between your flower and the plate rim, add scattered small dots. Use Dark Brown and Rust Orange to create a speckled, starry effect without overcrowding the white space. -
Create the dotted ring:
Moving outward, paint a delicate ring of tiny, closely spaced circles (hollow dots) using Dark Brown. A steady hand or a slow-moving banding wheel helps keep this concentric. -
Paint the heavy rim border:
Near the edge of the plate, paint a bold series of solid Rust Orange dots. Make them fairly large—about the size of a pea—and space them evenly. -
Add the faint outer details:
Just outside the heavy orange dots, closer to the very edge, add a final ring of tiny pin-prick dots in Dark Brown to frame the design. -
Rim finish:
Run a thin line of Rust Orange along the very lip of the plate to give it a finished, professional look.
Level Up: Texture
Use a needle tool to gently scratch sgraffito lines through the green spirals before firing. This reveals the white clay body underneath for extra contrast.
Step 4: Glazing & Firing
-
Clear glaze application:
Once all underglaze design work is completely dry (it should feel chalky), dip the entire plate into a clear, food-safe dipping glaze. Hold it for just a second or two to avoid a coat that’s too thick. -
Clean the foot:
Use a wet sponge to wipe all glaze off the foot ring (the bottom ridge that touches the shelf). Any glaze left here will fuse the plate to the kiln shelf. -
Final fire:
Fire the plate in a kiln according to your clay and glaze specifications (typically Cone 5 or 6 for stoneware). Let the kiln cool completely before opening.
Once fired, you’ll have a durable piece of functional art perfect for serving warm rustic meals


Minimal Line Art Motifs

Embrace the beauty of simplicity with this continuous-line style portrait on a speckled ceramic plate. The deep indigo brushstrokes create a striking modern contrast against natural stoneware, perfect for a decorative accent piece.
Step-by-Step Guide
Materials
- Bisque-fired ceramic plate (cream or speckled clay body/glaze)
- Underglaze pencil or soft graphite pencil (for sketching)
- Dark blue ceramic underglaze (e.g., cobalt or navy)
- Fine liner brush (size 0 or 1)
- Clear transparent food-safe glaze
- Damp sponge
- Palette or small dish for glaze
- Paper towels
Step 1: Preparation & Sketching
-
Clean the surface:
Begin by wiping down your bisque-fired plate with a barely damp sponge. This removes any kiln dust or oils from your hands that might repel the underglaze. -
Plan composition:
Visualize the placement. The face profile should sit slightly to the left of the center, leaving room on the right for the botanical element. The design uses nearly the full height of the plate’s interior. -
Sketch the profile lightly:
Using a soft graphite pencil or underglaze pencil, lightly sketch the profile. Start with the forehead, curving down into the nose and lips. Don’t worry about perfection; pencil lines will burn off in the kiln. -
Add facial details:
Draw the eye as a simple almond shape with a curved line above for the lid. Add the ear outline and a simple circle for a dangling earring. -
Outline the hair:
Instead of drawing individual strands, sketch bold, curved sections sweeping backward from the forehead and down the neck to suggest a headscarf or flowing hair. -
Sketch the botanical motif:
On the right side of the plate, draw a simple curved stem rising upward. Add elongated leaf shapes extending from both sides of the stem.
Step 2: Painting the Line Work
-
Prepare the underglaze:
Shake your dark blue underglaze well and pour a small amount onto your palette. If it feels too thick, I like to add a single drop of water to improve the flow for long lines. -
Load the brush:
Dip your fine liner brush into the underglaze. Roll the tip on the palette to create a sharp point and ensure the bristles are fully saturated but not dripping. -
Paint the profile outline:
Start at the forehead and paint the main profile line in a confident, fluid motion. Try to keep the line thickness consistent. Reload your brush frequently to avoid dry, scratchy lines. -
Fill in the eye and brow:
Carefully paint the eye shape. For the eyebrow, use a slightly heavier, curved stroke to give the face expression. -
Detail the ear and earring:
Trace over your sketch for the ear and the circle earring. Ensure the connection points are clean and not blobbing. -
Paint the hair sections:
Paint the long, sweeping curves for the hair. Apply slightly more pressure at the start of the stroke and lift gently at the end to taper the lines naturally. -
Execute the botanical element:
Paint the central stem first. Then, add the leaves, starting from the stem and pulling outward. A quick flick of the wrist helps create sharp tips on the leaves. -
Clean up mistakes:
If you make a smudge or a line goes astray, wait for it to dry (it will look chalky), then gently scratch it off with a craft knife or a stiff, dry brush.
Smudged Lines?
Don’t wipe wet underglaze mistakes with water; it just spreads the pigment. Let the mistake dry completely, then scrape it off cleanly with a needle tool.
Step 3: Glazing & Firing
-
Dry completely:
Allow the underglaze design to dry fully. It should look matte and chalky. -
Apply clear glaze:
Dip or brush on your clear transparent glaze over the entire plate. Don’t worry if the design disappears temporarily; it will re-emerge after firing. -
Wipe the foot:
Flip the plate and wipe any glaze off the bottom foot ring with a damp sponge to prevent it from sticking to the kiln shelf. -
Final Fire:
Fire the piece in the kiln according to the clay and glaze manufacturer’s instructions (typically cone 5 or 6 for stoneware) to achieve that glossy, durable finish.
Try Wax Resist
For sharper lines, paint your design with liquid wax resist over raw clay, then sponge a dark wash over the whole plate. The lines will resist the color.
Once fired, you will have a stunning, food-safe piece of art ready for your table or wall display

The Complete Guide to Pottery Troubleshooting
Uncover the most common ceramic mistakes—from cracking clay to failed glazes—and learn how to fix them fast.
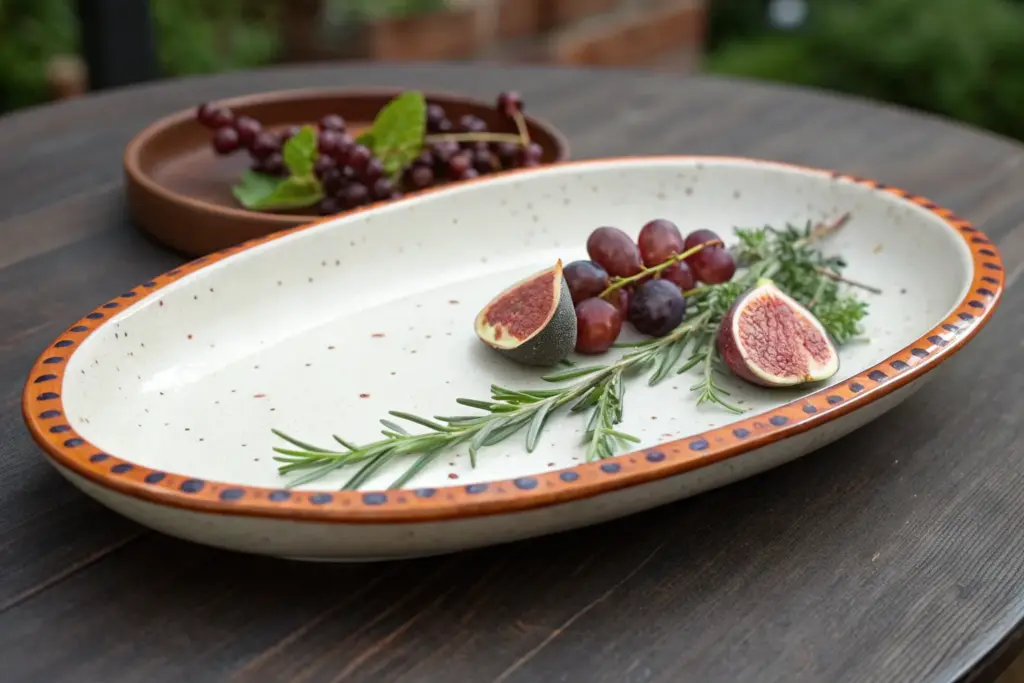
Watercolor-Style Blends

Transform a plain ceramic blank into a piece of rustic stoneware art using specialty ceramic paints and simple watercolor techniques. This project captures the delicate beauty of a wildflower meadow with soft, blended petals and an organic, speckled finish.
Step-by-Step Tutorial
Materials
- Plain white ceramic plate (bisque or glazed, depending on paint choice)
- Ceramic paints (soft pink, peach, sage green, moss green, brown)
- Glazing medium or water (to thin paints)
- Round watercolor brushes (sizes 2 and 4)
- Fine liner brush (size 00)
- Old toothbrush
- Palette or small dishes for mixing
- Paper towels
- Oven (for setting, if using oven-bake paints)
Step 1: Base Preparation & Speckling
-
Clean surface:
Begin by thoroughly cleaning your plate with rubbing alcohol or warm soapy water. Dry it completely to ensure no oils or dust interfere with the paint adhesion. -
Prepare the speckle mix:
Mix a small amount of dark brown ceramic paint with a few drops of water. You want a consistency that is fluid but still opaque, similar to heavy cream. -
Apply speckles:
Dip an old toothbrush into your thinned brown paint. Hold it over the plate and gently run your thumb across the bristles to flick tiny droplets onto the rim. Concentrate the speckles near the edge for that authentic stoneware look. -
Dry completely:
Let the speckles dry fully before moving on. This prevents them from smearing when you paint the flowers later.
Step 2: Painting the Flora
-
Mix floral colors:
Create your palette by thinning out your pink and peach paints with a glazing medium or a touch of water. The goal is a translucent, watercolor-like consistency. -
Paint main blooms:
Using a size 4 round brush, paint loose, circular flower shapes on the plate’s rim. Don’t worry about perfect petals; organic, blob-like shapes work best here. -
Add color variation:
While the paint is still wet, drop a tiny bit of darker pink or peach into the center of the blooms. Let the colors bleed naturally into each other. -
Paint buds:
With the smaller size 2 brush, add smaller, tighter buds near the main flowers. Use a slightly more saturated pigment here to create depth. -
Establish stems:
Switch to your fine liner brush and sage green paint. Draw thin, curving stems connecting your flowers. Keep your hand loose to avoid stiff, straight lines. -
Add leaves:
Using the moss green and sage green, add leaves along the stems. Press down on the belly of the brush and lift up to create a tapered leaf shape. -
Layer foliage:
Paint some leaves overlapping others, varying the green tones. I like to let the first layer dry briefly so the second layer stands out without muddying the colors. -
Detail the centers:
Once the flower petals are dry to the touch, use the liner brush and a brownish-orange hue to add tiny dots or star shapes in the center of the open blooms.
Paint beading up?
If paint separates on the glazed surface, clean the area again with alcohol. If it persists, mix a drop of dish soap into your paint to break the surface tension.
Step 3: Finishing Touches
-
Rim definition:
Mix a very thin wash of light brown/beige. Carefully paint a thin line around the inner indentation of the plate (where the rim meets the center) to define the shape. -
Outer edge shading:
Using a slightly damp sponge or brush, dab a faint amount of brown along the very outer edge of the plate to give it a weathered, vintage feel. -
Final dry:
Allow the entire plate to dry for at least 24 hours to ensure all moisture has evaporated from the paint layers. -
Bake to set:
Place the plate in a cool oven and set the temperature according to your paint manufacturer’s instructions (usually around 300°F or 150°C). Let it heat up and cool down with the oven to prevent cracking.
Layered dimension
Add a second layer of speckles *after* painting the flowers. This makes the design look like it’s truly embedded in the ceramic glaze rather than just sitting on top.
Enjoy using your lovely new custom plate for your next light lunch or display it as a piece of art
Marbled Swirl Finish
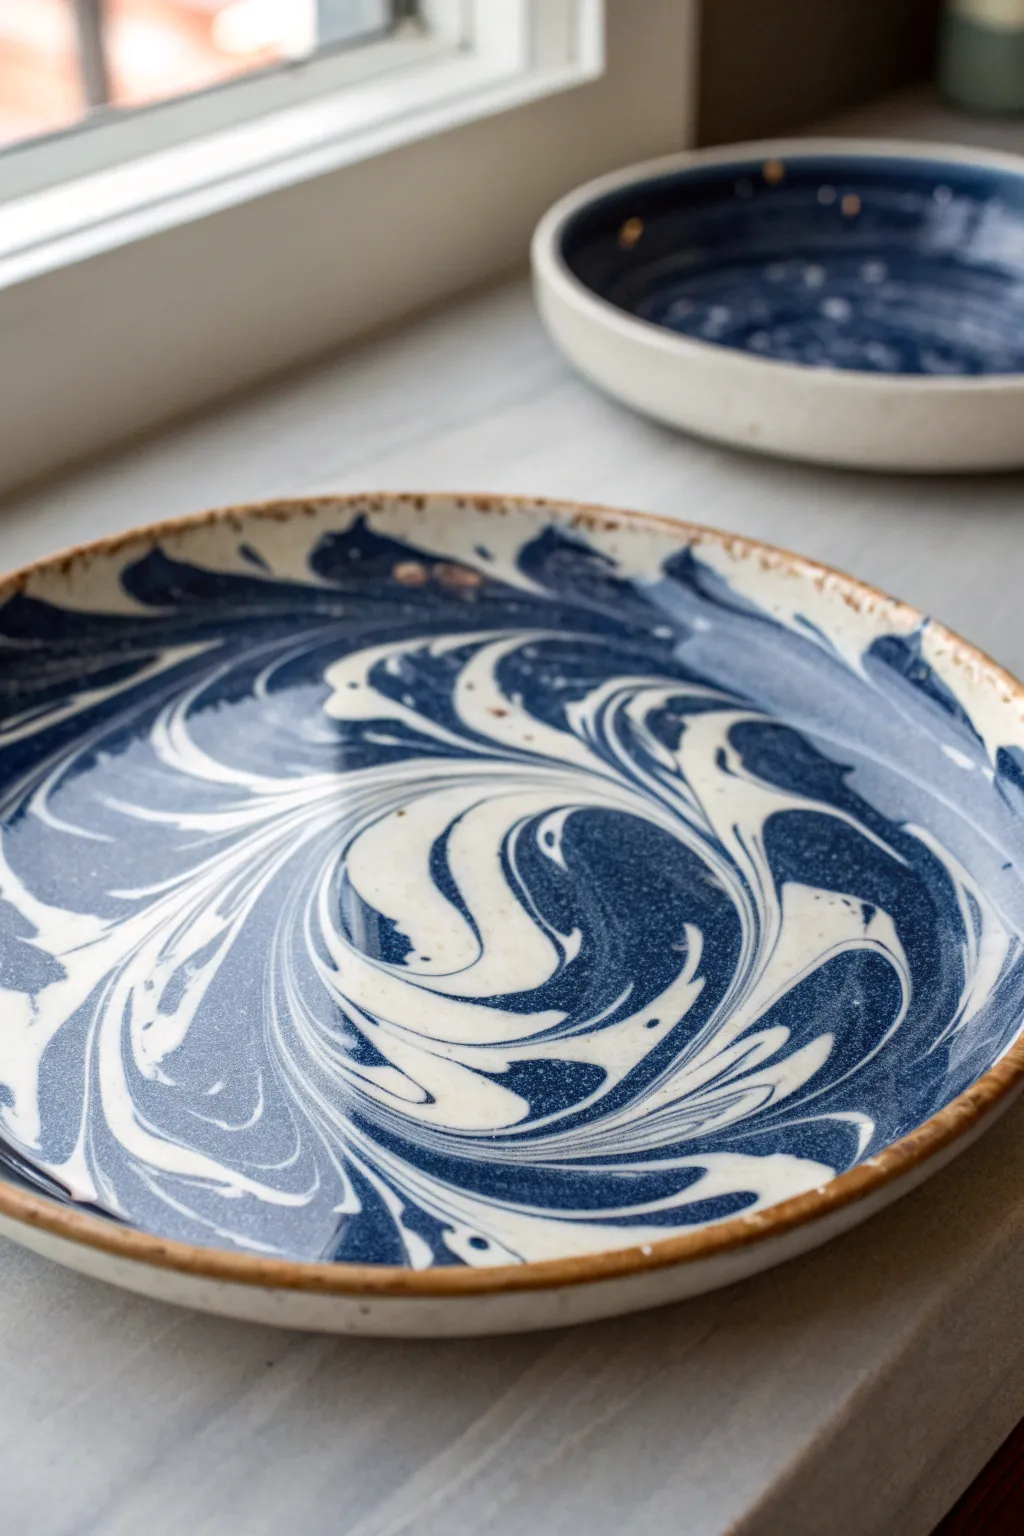
Capture the fluid beauty of splashing water or swirling galaxies directly onto your dinnerware with this striking marbling technique. Using a simple slip-trailing method, you’ll create dynamic, organic patterns where deep indigo meets creamy white stoneware.
Step-by-Step Guide
Materials
- Bisque-fired ceramic plate (stoneware or porcelain)
- Dark blue ceramic slip or underglaze
- White or cream ceramic slip
- Slip trailer bottles with fine nozzle tips
- Clear dipping glaze (transparent)
- Small bamboo skewer or toothpick
- Sponge
- Bucket of water
- Kiln (or access to a firing service)
Step 1: Preparation and Base Layer
-
Clean the Bisque:
Begin by wiping down your bisque-fired plate with a slightly damp sponge. This removes any dust that could prevent the slip from adhering properly. -
Prepare the Slips:
Ensure both your dark blue and white slips are the consistency of heavy cream. If they are too thick, add a tiny amount of water and mix thoroughly; if too thin, let them settle and pour off the excess water. -
Load the Trailers:
Fill one slip trailer with the dark blue slip and a second trailer with the white slip. Tap the bottles on the table to force any air bubbles to the surface. -
Pour the Base Color:
Pour a generous amount of the dark blue slip onto the center of the plate. You want enough to coat the bottom surface but not so much that it overflows the rim immediately. -
Tilt to Cover:
Gently tilt the plate in a circular motion to spread the blue slip evenly across the interior surface. Stop just before it climbs too high up the rim, as we want to control the flow.
Step 2: Creating the Marbling
-
Add White Accents:
While the blue base is still completely wet and fluid, take your white slip trailer and drizzle curved lines or spiral shapes directly into the blue puddle. -
Vary the Lines:
Make some lines thick and others thin. I generally try to add more white near the center and less near the edges to create a focal point. -
Swirl the Plate:
Pick up the plate again and initiate a gentle rocking and tilting motion. Watch as the white slip begins to stretch and distort within the blue slip. -
Manipulate the Pattern:
Change the angle of your tilt to guide the swirls. Aim for organic, wave-like shapes rather than perfect circles. -
Refine Details:
If you want tighter details, lightly drag a bamboo skewer through the wet slips, cutting across the bands of color to feather them. -
Settle the Design:
Once you are happy with the swirl, give the plate a definitive tap on the table to flatten the slip surface and remove any hidden air pockets. -
Clean the Rim:
The tilting process likely left slip on the rim. Use a clean, damp sponge to wipe the very edge of the rim, exposing the raw clay for a nice brown contrast border.
Muddy Colors?
If your blue and white are blending into a light blue mush rather than distinct swirls, your slip creates too much friction. Try thinning the slip slightly so they slide over each other.
Step 3: Firing and Finishing
-
Slow Drying:
Because the slip layer is thick, let the plate dry slowly away from drafts for at least 24 hours to prevent cracking. -
Bisque Fire:
Fire the plate in the kiln to a bisque temperature (usually cone 04) to set the slip design permanently onto the clay body. -
Clear Glaze Application:
Once cool, dip the entire plate into a clear, transparent glaze. This seals the design and makes the plate food-safe and glossy. -
Wipe the Foot:
Thoroughly wipe the glaze off the bottom ‘foot’ ring of the plate with a sponge so it doesn’t stick to the kiln shelf. -
Final Glaze Fire:
Load the kiln for the final glaze firing (often cone 5 or 6 for stoneware). Ensure the plate isn’t touching any other pots.
Pro Tip: The Rim
For that rustic brown edge seen in the photo, wipe the rim clean to expose the clay body, then lightly sponge a very diluted iron oxide wash over just the exposed rim before glazing.
Now you have a stunning, functional piece of art ready for your next dinner party


What Really Happens Inside the Kiln
Learn how time and temperature work together inside the kiln to transform clay into durable ceramic.
Metallic Rim Lines and Highlights
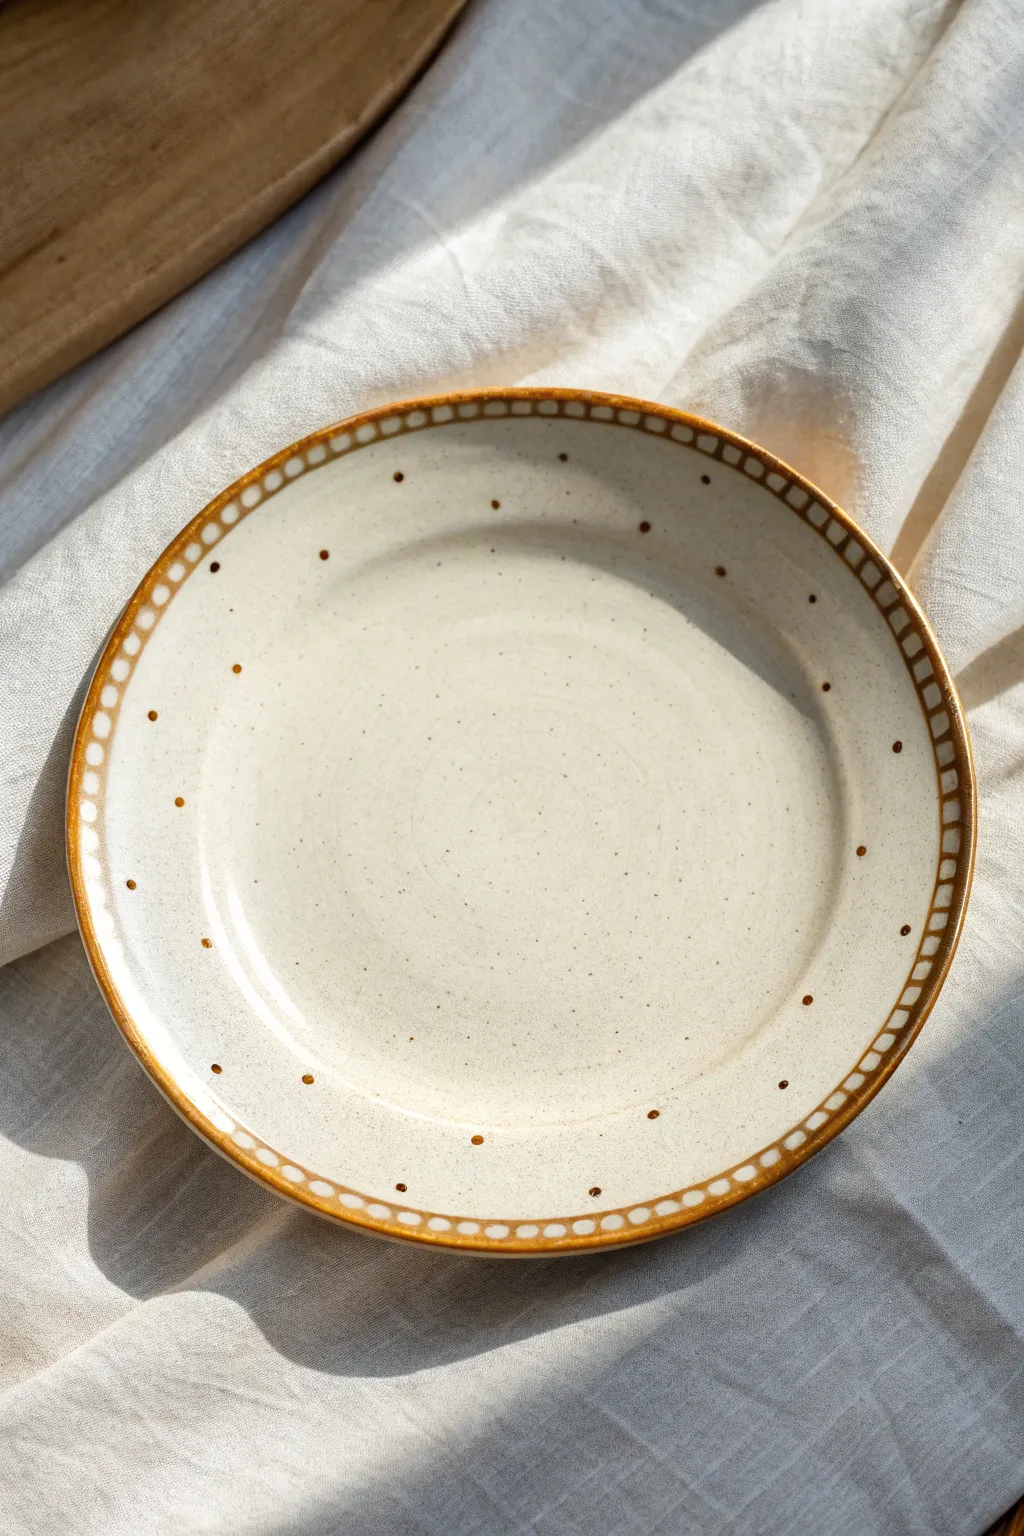
Transform a simple cream plate into a piece of golden-hued elegance with this patterned rim design. Using specialty ceramic paints or luster, this project mimics the warmth of vintage stoneware with a modern, geometric twist.
Step-by-Step
Materials
- Simpel cream or off-white ceramic/bisque plate
- Pebeo Porcelaine 150 paint (Gold or Amber)
- Pebeo Porcelaine 150 outliner (Gold or Copper)
- Fine detail paintbrush (size 0 or 00)
- Q-tips for cleanup
- Rubbing alcohol
- Oven (kitchen oven is fine for Porcelaine 150)
- Ruler or soft measuring tape
- Water-soluble marking pencil
Step 1: Preparation and Mapping
-
Clean surface:
Begin by thoroughly wiping down your ceramic plate with rubbing alcohol and a paper towel. This removes any oils or fingerprints that might prevent the paint from adhering properly. -
Define the rim:
Using your water-soluble marking pencil, lightly sketch a circle about 0.5 inches inside the outer edge of the plate. This creates the inner boundary for your rim pattern. -
Mark spacing:
Next, make small tick marks along the very edge of the plate to plan out your repeating rectangle pattern. Aim for spaces about 0.25 inches wide to keep the design consistent. -
Create the segments:
Connect your edge tick marks to your inner circle line, creating a series of small, evenly spaced boxes all the way around the rim.
Step 2: Painting the Gold Rim
-
Load the brush:
Shake your metallic ceramic paint well. Dip your fine detail brush in, ensuring you have enough paint to flow smoothly but not so much that it drips. -
Outline the boxes:
Carefully trace over your penciled grid lines with the metallic paint. I prefer to paint all the vertical divider lines first, then go back and connect them with the horizontal arched lines. -
Fill the color:
You can leave the boxes as outlines for a lighter look, but to match the image, fill the space *between* the boxes with the metallic paint. This creates negative space ‘windows’ inside the golden rim. -
Refine edges:
If any lines look shaky or uneven, use a damp Q-tip to gently wipe away the mistake before the paint sets. Clean up the edges to make the metallic band look solid. -
Add the dots:
Dip the non-brush end of your paintbrush (the handle) into the paint. Gently press a dot onto the plate about an inch inward from the rim design. Repeat this sporadically around the inner curve of the plate.
Paint sliding off?
If paint beads up, the surface is too glossy or oily. Wipe again with alcohol. If it persists, lightly sand the area with fine-grit sandpaper for grip.
Step 3: Curing
-
Initial dry time:
Let the plate sit undisturbed for at least 24 hours. Because the metallic paint is thicker, it needs ample time to air dry before baking. -
Load the oven:
Place the plate in a cool, room-temperature oven. Do not preheat the oven, as sudden temperature changes can crack the ceramic. -
Bake process:
Set your oven to 300°F (150°C). Allow the oven to reach temperature, then bake for 35 minutes. -
Cool down:
Turn the oven off and leave the door closed. Let the plate cool down completely inside the oven along with the appliance. This gradual cooling is crucial for durability. -
Final wipe:
Once fully cooled and removed, wipe the plate with a damp cloth to remove any remaining marking pencil lines.
Steady Hands
Rest your pinky finger on the dry center of the plate while painting the rim. This anchors your hand, giving you pivotal control for smoother lines.
Your new custom-rimmed plate is now ready to add a touch of golden warmth to your table setting
Stenciled Repeating Patterns
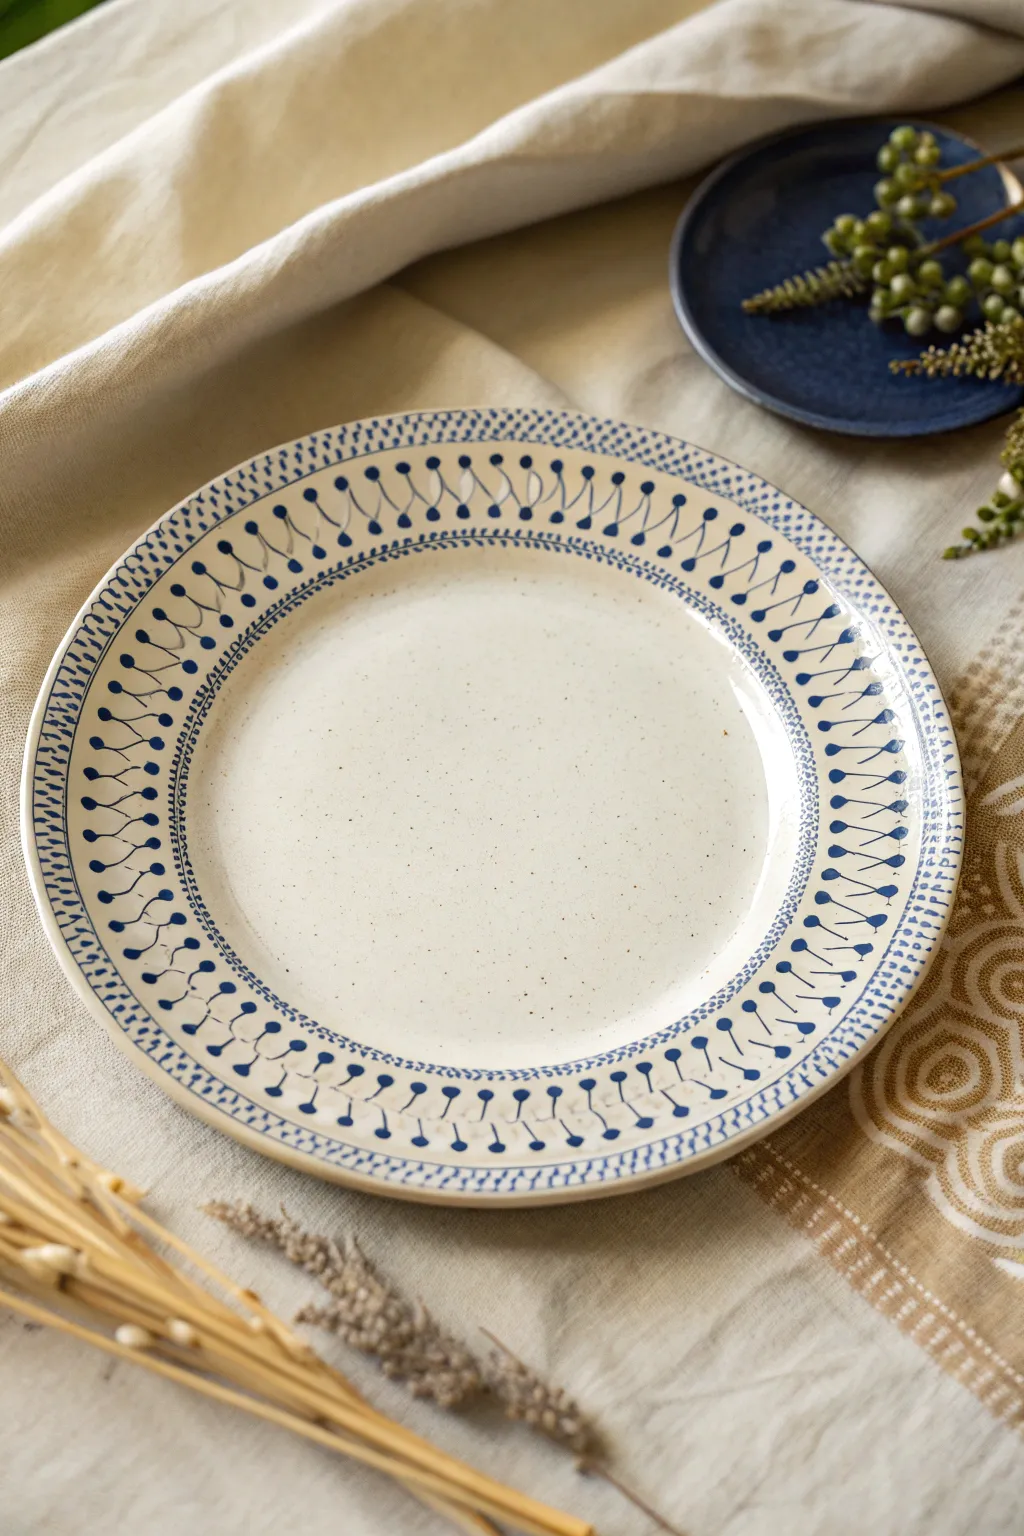
Transform a simple bisque plate into a stunning piece of artisanal dinnerware with this intricate yet approachable design. By combining fine liner work with repetitive stenciled motifs, you’ll create a soothing blue-on-white pattern that mimics the charm of vintage botanical illustrations.
Detailed Instructions
Materials
- Round bisque ceramic plate (8-10 inches)
- Cobalt blue underglaze
- Speckled white glaze (or transparent glaze if using speckled clay)
- Fine liner brush (size 0 or 00)
- Small round detail brush (size 1)
- Flexible stencil sheet (blank)
- X-Acto knife or cutting plotter
- Pencil
- Damp sponge
- Lazy Susan or banding wheel (optional but recommended)
Step 1: Preparation & Base
-
Clean surface:
Begin by wiping down your bisque plate with a damp sponge to remove any dust or oils that might resist the underglaze. -
Create the stencil:
On your blank stencil sheet, draw a simple ‘lollipop’ shape—a small circle on a slanted stem. You can also create a small sawtooth edge for the inner and outer borders if you prefer stenciling over freehanding. Carefully cut these shapes out. -
Mark guidelines:
Lightly sketch three concentric circles on the plate rim with a pencil to guide your pattern placement. These pencil marks will burn off in the kiln.
Use a Banding Wheel
Place the plate on a rotating banding wheel. Keep your hand steady in one spot and rotate the wheel to paint the continuous wave lines smoothly.
Step 2: Painting the Borders
-
Load the liner brush:
Thin your cobalt blue underglaze slightly with a drop of water until it has an inky consistency suitable for fine lines. -
Inner ring detail:
Start with the innermost circle guideline. Using your finest brush, paint a delicate ‘chain’ pattern essentially small, connected loops or tiny hatch marks that create a textured line. -
Outer rim dashes:
Moving to the very edge of the plate, paint short, angled dash marks all along the rim. Try to keep the spacing consistent, but embrace slight irregularities for a handmade feel. -
Refining the edges:
Go back over your inner and outer borders to ensure the blue is opaque enough; if it looks streaky, add a second thin coat.
Vary Key Colors
Try painting the ‘berry’ dots in a contrasting color like iron oxide red or sage green for a brighter, multi-colored folk art aesthetic.
Step 3: The Berry Wave Pattern
-
Positioning:
Working in the broad open space between your inner and outer borders is where the main action happens. Visualize a zig-zag or wave connecting the two. -
Painting the stems:
Using the liner brush, paint a continuous, angled wave line that bounces between the inner chain and the outer dashes. The peaks should point outward and the valleys inward. -
Adding the ‘berries’:
Switch to your size 1 round brush. Dip it generously in the blue underglaze. -
Stamping the motif:
At the tip of every upward-pointing angle on your wave, press the brush down to create a solid round dot. This forms the ‘berry’ head. -
Connecting the dots:
Ensure every dot is firmly connected to the stem line you painted earlier. I find it helpful to drag the brush slightly back down the stem as I lift it to create a smooth transition. -
Checking consistency:
Spin the plate on your banding wheel to check the visual rhythm. Fill in any gaps or thicken lines that appear too delicate.
Step 4: Glazing & Firing
-
Drying:
Allow the underglaze pattern to dry completely, preferably overnight, so it won’t smudge during glazing. -
Applying the overglaze:
Dip or brush on your speckled white glaze. If you are using pre-speckled clay, a clear transparent glaze works best to let the clay body shine through. -
Wiping the foot:
Clean the bottom ring (foot) of the plate with a wet sponge to prevent it from sticking to the kiln shelf. -
Final fire:
Fire the plate in the kiln according to your clay and glaze instructions (usually Cone 5 or 6 for stoneware).
Once fired, you will have a durable, food-safe plate that showcases a timeless pattern perfect for any table setting

TRACK YOUR CERAMIC JOURNEY
Capture glaze tests, firing details, and creative progress—all in one simple printable. Make your projects easier to repeat and improve.
Decoupage Paper or Fabric Under a Clear Seal
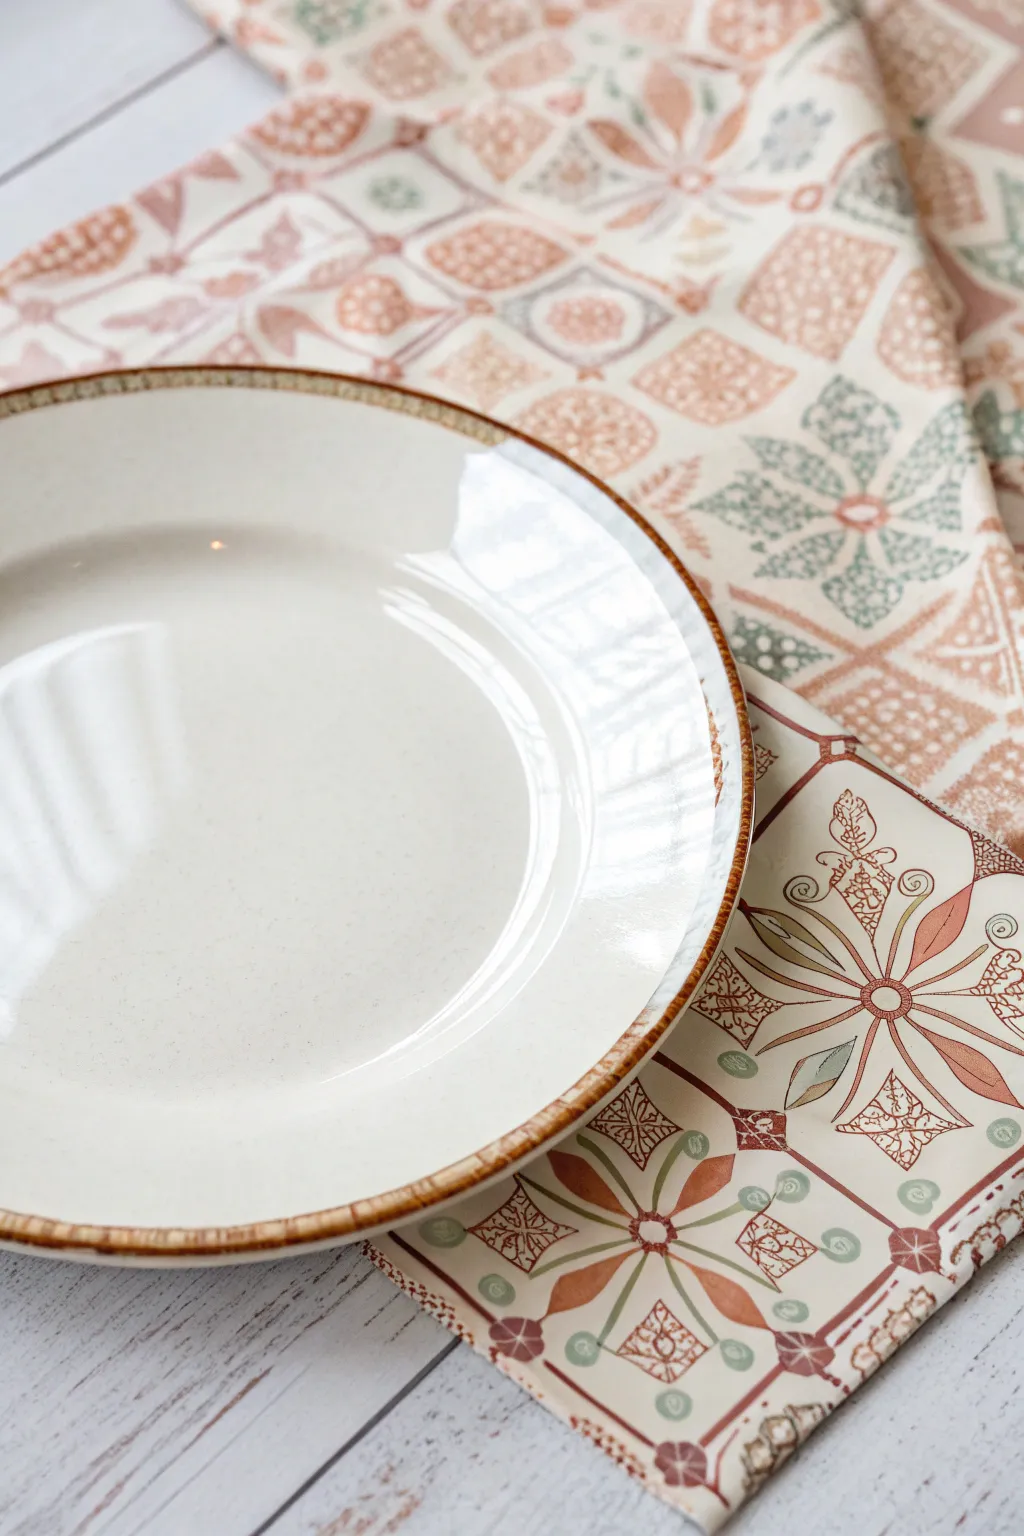
Transform a plain clear glass plate into a stunning piece of tableware by applying fabric to the reverse side. This “reverse decoupage” technique creates a durable, washable finish where the intricate pattern shines through the glass while keeping the eating surface perfectly food-safe.
Step-by-Step
Materials
- Clear glass plate (smooth, non-textured)
- Patterned cotton fabric (tight weave)
- Decoupage medium (Dishwasher Safe Mod Podge recommended)
- Flat paintbrush or foam brush
- Fabric scissors
- Rubbing alcohol
- Lint-free cloth
- Small craft knife (X-Acto)
- Parchment paper or wax paper
- Optional: Acrylic paint for backing (white or cream)
Step 1: Preparing the Surface
-
Clean the Glass:
Before starting, ensure your glass plate is completely free of oils and fingerprints. Wash it with warm, soapy water and dry thoroughly. -
Degrease with Alcohol:
Wipe down the *back* side of the plate with rubbing alcohol on a lint-free cloth. This step is crucial for adhesion; I ensure I don’t touch the glass surface again with bare fingers after this point. -
Prepare the Fabric:
Wash and dry your chosen fabric to remove any sizing chemicals that might prevent the glue from sticking. Do not use fabric softener. -
Iron Smooth:
Iron the fabric until it is perfectly flat. Any wrinkles or creases will show through the glass and create bubbles later.
Wrinkle Rescue
Work with bias cuts! Fabric cut on the bias (diagonal to the weave) stretches slightly better over curved plate rims, reducing those stubborn wrinkles.
Step 2: Applying the Fabric
-
Rough Cut:
Place your plate face-down onto the fabric. Cut a circle around the plate, leaving about an inch of excess fabric on all sides to make handling easier. -
Apply Medium to Glass:
Flip the plate over so the back is facing up. Apply a generous, even layer of decoupage medium to the back of the plate using your brush. -
Position the Fabric:
Carefully lay the fabric piece onto the wet glue, with the pattern facing *down* towards the glass. Center your design if the pattern has a specific focal point. -
Smooth Center Outward:
Starting from the very center of the plate, use your fingers to press the fabric down. Work your way outward in a spiral motion. -
Eliminate Bubbles:
Firmly smooth the fabric over the curves of the plate rim. Press firmly to push out any trapped air bubbles or excess glue. -
Check Adhesion:
Lift the plate and look through the front to ensure the pattern is clear and bubble-free. If you see dry spots, lift the fabric edge slightly and add more medium.
Metallic Edge
After trimming, paint the very rim of the plate with liquid gold leaf or metallic enamel. It creates a professional border that mimics fine china.
Step 3: Sealing and Finishing
-
First Drying Phase:
Allow the plate to dry upside down for at least 1-2 hours. The fabric should feel stiff to the touch. -
Top Coat Application:
Apply a coat of decoupage medium over the back of the fabric to seal it. Pay special attention to the edges of the plate rim where wear is most likely. -
Trim Excess:
Once the top coat is fully dry and hard, use a sharp craft knife or small sharp scissors to trim the excess fabric right up against the edge of the glass rim. -
Seal the Edge:
Apply a final thin line of decoupage medium along the cut edge of the fabric to prevent fraying and seal it to the glass rim. -
Add Opacity (Optional):
If your fabric is sheer, the pattern might look faint. Paint the back of the dried fabric with white or cream acrylic paint to make the colors pop when viewed from the front. -
Cure Time:
Follow the specific curing instructions on your decoupage medium bottle. This often requires waiting 21-28 days before washing to ensure it is dishwasher safe.
Enjoy your custom-designed plate at your next dinner party, knowing the artwork is safe behind the glass
Decal Transfers for Vintage-Inspired Images
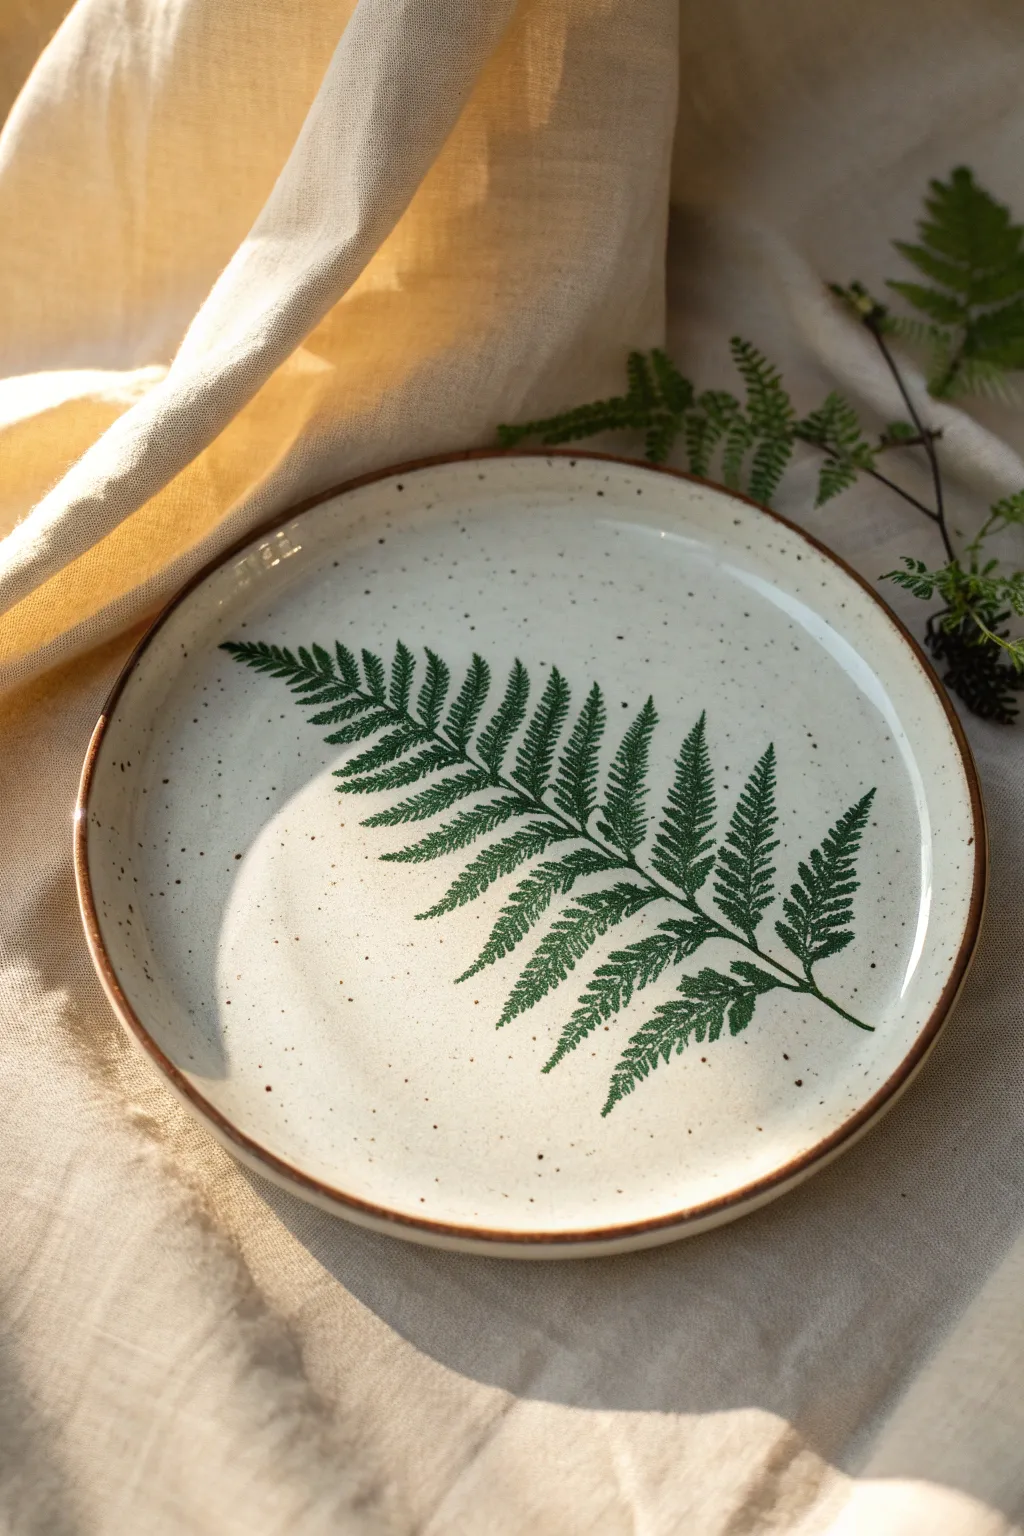
Bring the serene beauty of the forest into your dining room with this elegant fern-patterned plate. Using waterslide decal paper, you can transfer a vintage botanical illustration onto ceramic ware for a polished, professional finish that looks hand-painted.
Detailed Instructions
Materials
- White or cream ceramic plate (stoneware style works best)
- Waterslide decal paper (clear)
- Inkjet or laser printer (depending on your paper type)
- Clear acrylic spray sealant (for inkjet paper)
- Scissors
- Bowl of lukewarm water
- Soft sponge or cloth
- Rubbing alcohol
- Oven (optional, for curing)
Step 1: Preparation
-
Select your image:
Find a high-resolution image of a fern frond or botanical specimen. Search for vintage botanical illustrations with transparent backgrounds or isolate the fern yourself using photo editing software. -
Clean the ceramic:
Thoroughly wash your plate with soap and water. Dry it completely. -
Degrease surface:
Wipe down the center of the plate with rubbing alcohol on a soft cloth to remove any residual oils or fingerprints. This is crucial for adhesion. -
Print the decal:
Load your waterslide decal paper into the printer. Print the fern image on the glossy side of the paper. Ensure you print at a high quality setting. -
Seal the ink:
If using an inkjet printer, take the printed paper to a well-ventilated area. Apply a thin, even coat of clear acrylic spray sealant over the image. -
Let it dry:
Allow the first coat of sealant to dry for about 15-20 minutes. Apply a second and third coat, letting each dry in between, to ensure the ink won’t run in water.
Seamless edges tip
When trimming your decal, cut in smooth, flowing lines rather than jagged angles. The clear film edge becomes almost invisible when it lacks sharp corners to catch the light.
Step 2: Application
-
Trim the design:
Use scissors to cut out your fern image. Cut as close to the green leaves as possible, leaving just a tiny 1-2mm border of clear film. -
Soak the decal:
Fill a shallow bowl with lukewarm water. Submerge your cut-out decal for about 30-60 seconds until the paper backing starts to curl or slide. -
Position the fern:
Remove the decal from the water and place it gently onto the center of the plate, still attached to the backing paper. -
Slide the backing:
Hold the decal film in place with your thumb while slowly sliding the white paper backing out from underneath. I find it easiest to pull the paper away horizontally. -
Adjust placement:
While the decal is still wet, gently nudge the fern into the perfect diagonal position across the plate. -
Remove water:
Starting from the center of the fern and working outward, use a soft sponge or squeegee to gently push out any water and air bubbles trapped beneath the film. -
Blot dry:
Use a lint-free towel to very carefully dab away excess moisture around the edges of the decal.
Decal tearing?
If your decal rips while sliding off the backing, you likely didn’t use enough acrylic spray coats. Add one more sealing layer next time to strengthen the film before soaking.
Step 3: Finishing
-
Air dry:
Let the plate sit undisturbed for at least 24 hours to allow the decal to completely dry and adhere. -
Bake to cure:
For added durability, place the plate in a cool oven. Set the temperature to 350°F (175°C) and bake for 20-30 minutes. -
Cool down:
Turn the oven off and let the plate cool down completely inside the oven. Removing it while hot can cause cracking. -
Hand wash only:
Remember that while cured decals are durable, these plates will last longest if washed gently by hand rather than in a dishwasher.
Now you have a stunning, nature-inspired piece ready for display or light use
Plate Wall Gallery With Coordinated Designs
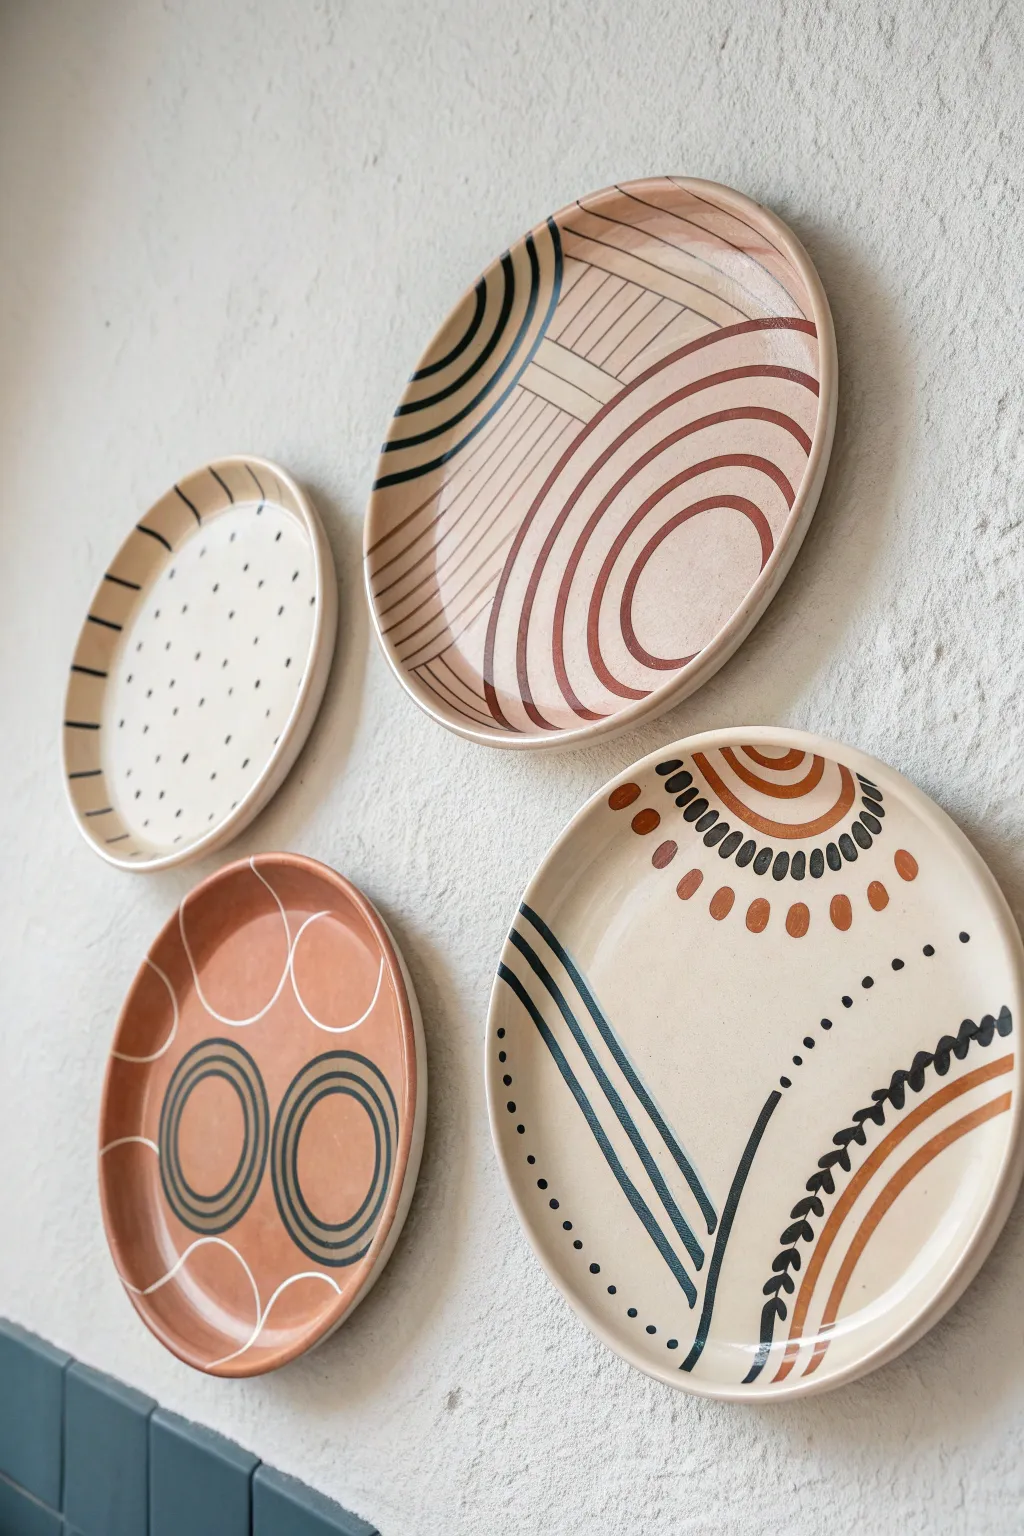
Transform plain ceramic plates into a stunning, cohesive wall display using simple geometric patterns and a warm, earthy color palette. This project combines abstract lines, arches, and dots to create a modern, artisanal look that feels custom-made for your space.
How-To Guide
Materials
- 4 plain ceramic bisque plates (various sizes)
- Acrylic paints (terracotta/rust, black, cream/beige, white)
- Ceramic sealant or clear acrylic sealer (matte finish)
- Round paintbrushes (size 2 and 4)
- Fine liner brush (size 0 or 00)
- Pencil
- Eraser
- Paper plate or palette
- Cup of water
- Plate hangers or adhesive discs
Step 1: Preparation & Base Layers
-
Clean the surfaces:
Wipe down all your ceramic plates with a damp cloth to remove any dust or oils. Let them dry completely before applying any paint. -
Create the terracotta base:
Select the smallest plate for a full-color base. Paint the entire surface with your terracotta or rust-colored acrylic paint. You may need two coats for opaque coverage; allow the first coat to dry for about 15 minutes before applying the second. -
Sketch the designs:
While the terracotta plate dries, lightly sketch your patterns onto the other three beige/cream plates using a pencil. For the large top plate, draw a large off-center circle series. For the bottom right plate, sketch a rising sun motif and a leafy vine.
Step 2: Painting the Large Radial Plate
-
Paint the rust arches:
On the largest plate, use a size 4 brush to paint the thick, concentric semi-circles in the terracotta color. These should radiate from the bottom right edge toward the center. -
Add black accents:
On the opposite side (top left) of the same plate, paint bold black curved stripes using a size 2 brush. I like to vary the thickness slightly to give it a hand-drawn feel. -
Connect with fine lines:
Switch to your fine liner brush. Mix a little water into your rust paint to improve flow, and draw thin, straight lines connecting the black curves to the rust arches, creating a geometric grid effect.
Steady Hand Trick
Rest your pinky finger on the dry part of the plate while painting lines. This anchors your hand and gives you much cleaner, smoother curves.
Step 3: Detailing the Accent Plates
-
Create the dotted plate:
Move to the medium-sized plate. Using the size 2 brush and black paint, create short, thick dash marks along the left rim. Then, use the back of a paintbrush handle dipped in black paint to stamp small, irregular dots across the center. -
Paint the abstract sun plate:
On the bottom right plate, use the rust color to paint a small rainbow-like arch at the top. Below it, paint a series of radiating dashes and dots using alternating rust and black paints. -
Add the vine and stripes:
On the same bottom right plate, use the liner brush and black paint to draw two long, sweeping lines acting as stems. Add small leaf shapes to one stem and keep the other as a simple double-stripe.
Oops! Blobs?
If you make a mistake on the raw ceramic, let the acrylic paint dry slightly, then gently scrape it away with a toothpick or crafting knife.
Step 4: Finishing the Terracotta Plate
-
Add white geometrics:
Return to your fully dried terracotta plate. Using white paint and a size 2 brush, paint two large circles near the bottom. Paint a smaller concentric circle inside each one. -
Layer the black rings:
Once the white circles are dry, carefully paint thin black rings directly on top of the white circles. This layering adds depth and makes the design pop against the dark background. -
Detail with fine lines:
Use your liner brush with white paint to add delicate, thin curved lines connecting the main circular elements, creating a subtle webbing effect.
Step 5: Sealing & Hanging
-
Apply sealant:
Once all paint is completely dry (wait at least 2 hours), apply a thin coat of matte ceramic sealer over the entire front surface of each plate to protect your artwork. -
Mount hanging hardware:
Attach adhesive plate discs or wire plate hangers to the back of each plate according to the package instructions. -
Arrange on the wall:
Lay your plates out on the floor first to find the perfect arrangement, then hang them on your wall to complete your gallery.
Step back and admire how these simple shapes come together to create a sophisticated focal point for your room
Sgraffito Scratch-Back on Colored Slip
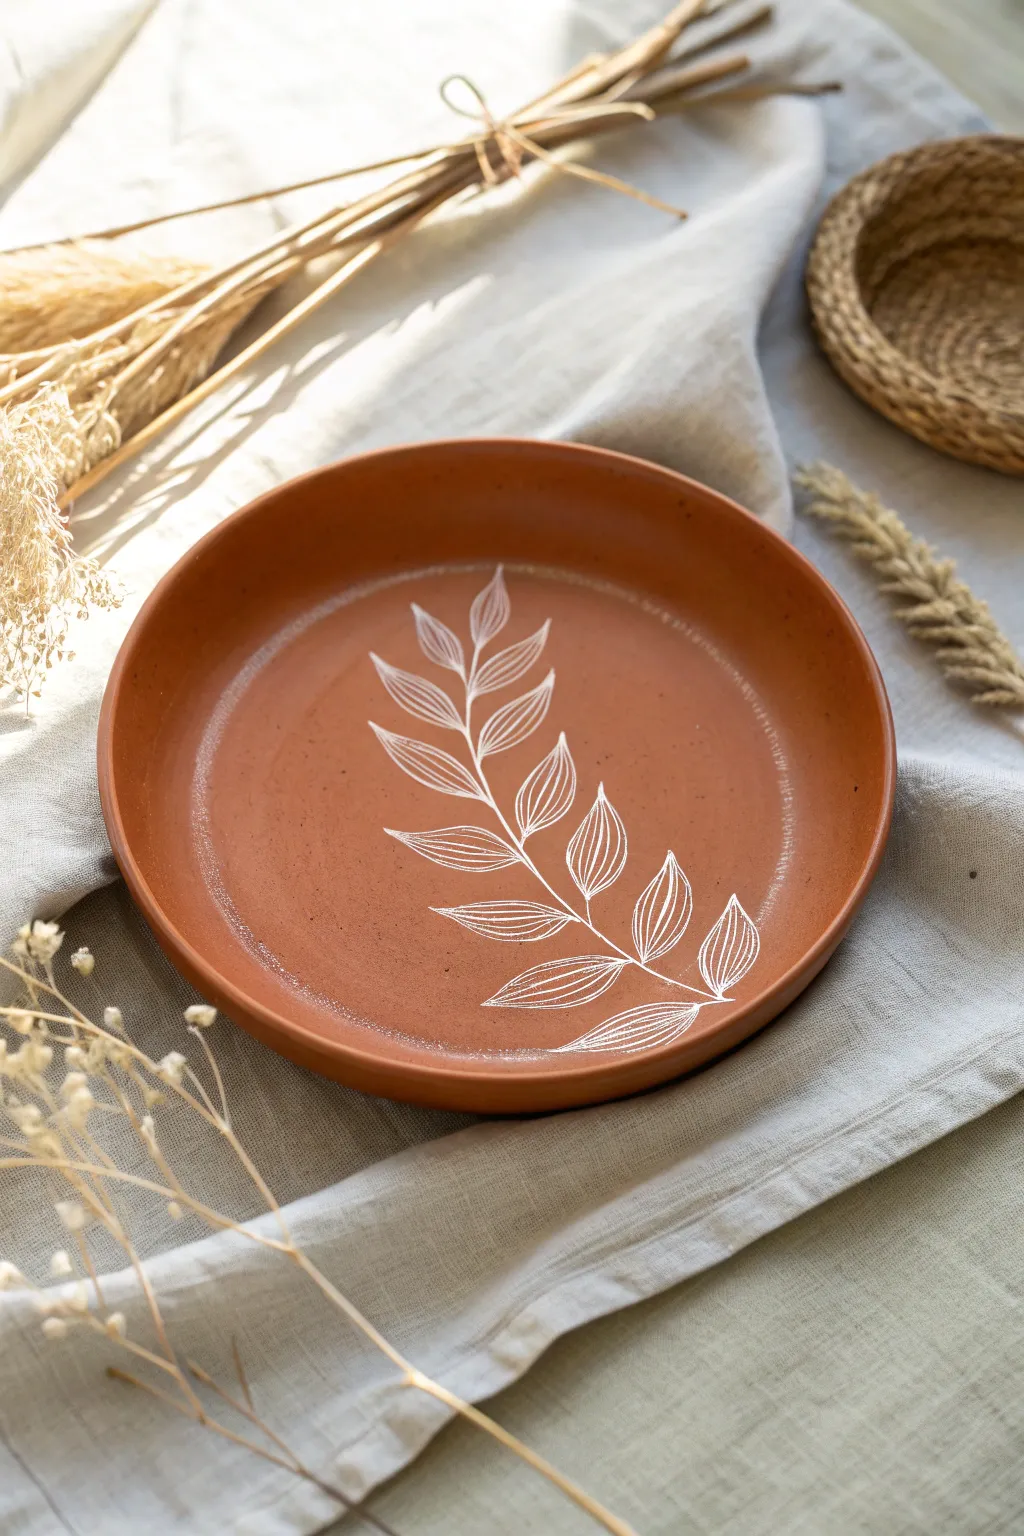
Embrace the natural warmth of terracotta with this minimalist sgraffito plate project. By applying a layer of light slip over dark clay and scratching through it, you’ll reveal a striking, high-contrast botanical design that feels both modern and rustic.
Step-by-Step
Materials
- Leather-hard terracotta or red clay plate
- White ceramic slip or underglaze
- Wide hake brush or soft fan brush
- Sgraffito tool (sharp needle tool or fine loop tool)
- Pencil (optional)
- Damp sponge
- Clear matte glaze (for finishing)
Step 1: Preparation & Application
-
Check the clay state:
Ensure your terracotta plate is in a ‘leather-hard’ state. It should be firm enough to handle without warping but still hold moisture; you must be able to carve into it without the clay crumbling. -
Clean surface:
Lightly wipe the surface with a damp sponge to remove any dust or stray clay crumbs, ensuring a smooth canvas for your slip. -
Prepare the slip:
Stir your white slip or underglaze thoroughly. It should have the consistency of heavy cream to provide opaque coverage without being gunky. -
Apply the contrasting layer:
Using a soft fan brush or hake brush, apply an even coat of white slip across the interior of the plate. I like to do this while the plate is spinning on a banding wheel for smoother coverage. -
Monitor the drying:
Let the slip dry until it loses its wet sheen and becomes matte to the touch. This is the ‘sweet spot’ for carving.
Chipped Edges?
If slip chips off while carving, it’s too dry. Mist it lightly with water, wait 5 minutes for absorption, and try again. It should cut like butter.
Step 2: Designing the Motif
-
Plan the placement:
Visualize a curving branch that starts from one edge and sweeps toward the center. The curve should mimic the roundness of the plate itself. -
Sketch lightly (optional):
If you are nervous about freehanding, use a dull pencil to very lightly sketch the main spine of the branch directly onto the slip. Don’t press hard; you just want a faint guide.
Color inversion
Flip the script by using white clay and applying a black or dark blue underglaze. Carving will reveal bright white lines against a dark, moody background.
Step 3: Carving the Sgraffito
-
Carve the stem:
Using your sgraffito tool or a sharp needle tool, scratch through the white slip to reveal the red clay underneath. Start with the main central stem, using a confident, single stroke. -
Add leave outlines:
Begin carving the leaf shapes. Start at the base of the stem and work your way up, alternating sides. Carve the outline of each leaf first, keeping the shapes elongated and pointed. -
Structure the leaves:
Inside each leaf outline, draw a central vein that connects back to the main stem. -
Add detailed veins:
Carefully scratch small diagonal lines branching from the leaf’s central vein. These interior lines create the delicate, fern-like texture seen in the photo. -
Vary line weight:
For a more organic look, vary your pressure slightly. Press a bit harder on the main outlines and lighter on the interior veins. -
Clean up debris:
As you carve, ‘burrs’ of clay will pile up. Do not brush these away with your hand, as sketching them will ruin the white surface. Instead, gently blow the crumbs away or tap the plate upside down.
Step 4: Refinement & Finishing
-
Check the contrast:
Lean back and look at the overall composition. If any white slip remains inside your scratched lines, carefully go over them again to ensure the red clay is fully visible. -
Bone dry:
Allow the plate to dry completely to the bone-dry stage. This usually takes a day or two depending on humidity. -
Bisque fire:
Fire the plate in a kiln to bisque temperature (usually cone 04) to set the design permanently. -
Glaze application:
Once cool, apply a clear matte glaze over the entire plate. A matte finish preserves the earthy, natural look better than a high gloss. -
Final firing:
Fire the plate a second time to the glaze maturity temperature appropriate for your clay body.
Now you have a stunning botanical plate that highlights the beautiful contrast of raw materials
Slip-Trailed Raised Dots and Lace
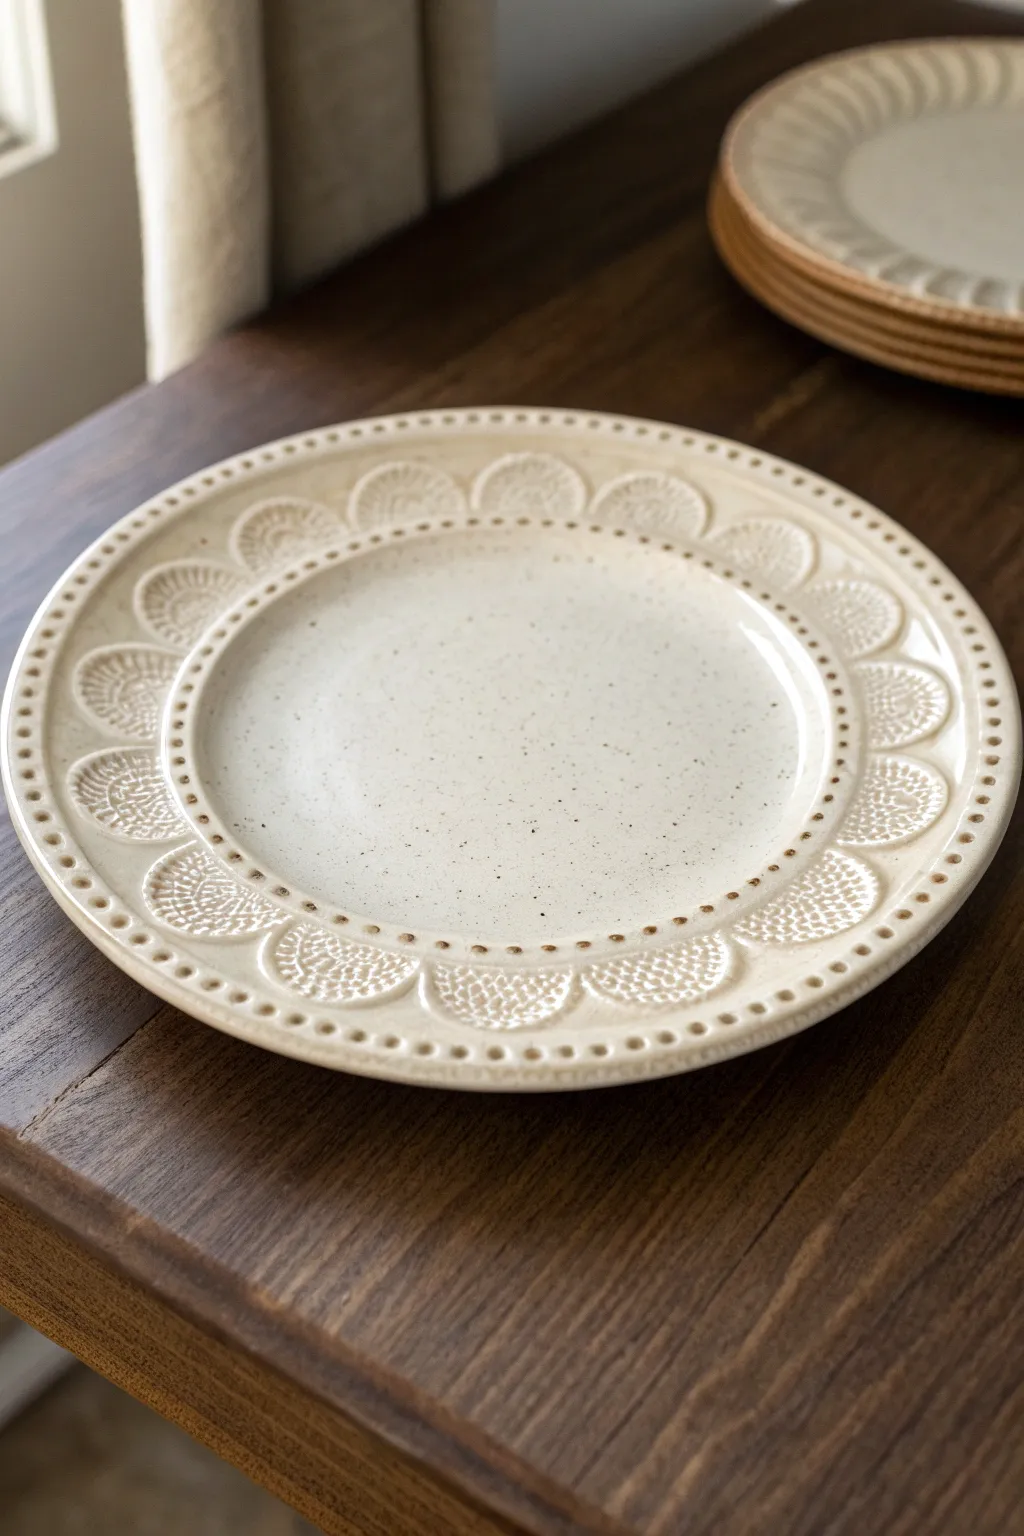
This elegant ceramic project transforms a simple plate form into a vintage-inspired heirloom using the technique of slip trailing. With creamy speckled clay and delicate raised textures, you’ll create a semi-matte finish that highlights a beautiful repeating lace motif.
Step-by-Step Tutorial
Materials
- Speckled cream stoneware clay body
- Pottery wheel (or slab roller/biscuit mold for hand-building)
- Rib tool (kidney)
- Needle tool
- Slip trailer bottle with fine metal tip
- Thick slip (made from the same clay body)
- Small round loop tool (optional for trimming)
- Drafting divider or compass
- Small carving loop or sgraffito tool
- Clear or semi-matte creamy white glaze
- Sponge
Step 1: Forming the Plate
-
Prepare the Clay:
Begin by thoroughly wedging your speckled stoneware clay. You want to ensure there are absolutely no air bubbles, as these can disrupt the smooth surface needed for the lace details later. -
Throw or Roll the Slab:
If using a wheel, throw a flat plate with a gentle, wide rim. If hand-building, roll a consistent slab about 1/4 inch thick and drape it over a plate mold to achieve the curve. -
Define the Rim:
Use a rib tool to compress the floor of the plate and clearly define where the flat eating surface ends and the rim begins. This transition line will be crucial for your pattern placement. -
Trim the Foot:
Once the plate is leather-hard, trim the underside to create a clean foot ring. This adds lift and professional quality to the final piece. -
Smooth the Surface:
Before adding decoration, wipe the rim with a very slightly damp sponge. You need a pristine, smooth canvas for the slip trailing to adhere properly.
Clogged Trailer?
If your slip trailer keeps clogging, sieve your slip through a fine mesh screen before filling the bottle. Even tiny clumps of unmixed clay can block the fine metal tips needed for this detail.
Step 2: Creating the Lace Pattern
-
Mark Guidelines:
Using a compass or a drafting divider, lightly scratch two concentric circles on the rim: one near the outer edge and one near the inner well. These will constrain your lace pattern. -
Divide the Rim:
Lightly mark vertical division lines around the rim to space your scallops mainly evenly. I usually eyeball this, but you can measure for precision. -
Carve the Arches:
Using a small loop tool, gently crave shallow, semi-circular arches connecting your division marks. This creates the ‘scalloped’ depression that forms the base of the lace petals. -
Prepare the Slip:
Fill your slip trailer with a thick slip made from your clay body. It should have the consistency of soft yogurt—stiff enough to hold a peak but fluid enough to squeeze. -
Test the Flow:
Squeeze a few practice lines on a scrap piece of clay. You want a consistent bead that doesn’t flatten out immediately. -
Dot the Perimeter:
Start by piping a row of evenly spaced, raised dots along the very outer edge of the plate rim. Keep your hand steady and apply equal pressure for uniform dot size. -
Define the Inner Circle:
Repeat the dotting process along the inner circle where the rim meets the plate floor. These two dotted rings frame your central lace design. -
Fill the Scallops:
Inside the shallow carved arches you made earlier, pipe rows of tiny, dense dots. Follow the curve of the arch, stacking rows of dots until the scallop is filled with texture. -
Clean Up:
If a dot forms a sharp peak, lightly tap it down with a damp finger once the slip has stiffened slightly, but be careful not to smudge the design.
Step 3: Glazing and Firing
-
Bisque Fire:
Allow the plate to dry slowly to prevent warping. Once bone dry, bisque fire the piece to the appropriate temperature for your clay (typically Cone 04). -
Clean and Wash:
Wipe the bisque-fired plate with a damp sponge to remove any kiln dust. This ensures the glaze won’t crawl away from your intricate dots. -
Apply Glaze:
Dip or brush a coat of semi-matte creamy white glaze over the entire piece. Use a glaze that breaks over texture; if it’s too opaque, you’ll lose the definition of your dots. -
Check the Thickness:
Ensure the glaze isn’t pooling too thickly around the raised dots. If it looks heavy, gently dab the excess away with a dry brush. -
Final Fire:
Glaze fire the plate to maturity (likely Cone 5/6 or Cone 10 depending on your clay). The heat will fuse the slip dots and glaze into a durable, varying surface.
Add Color Depth
To emphasize the texture further, wipe an iron oxide wash over the bisque ware before glazing. Sponge it off the high points so the oxide remains only in the crevices around the dots.
Once cooled, your plate will be ready to serve as a stunning centerpiece that invites touch and admiration
Stamped Texture Bands Around the Rim
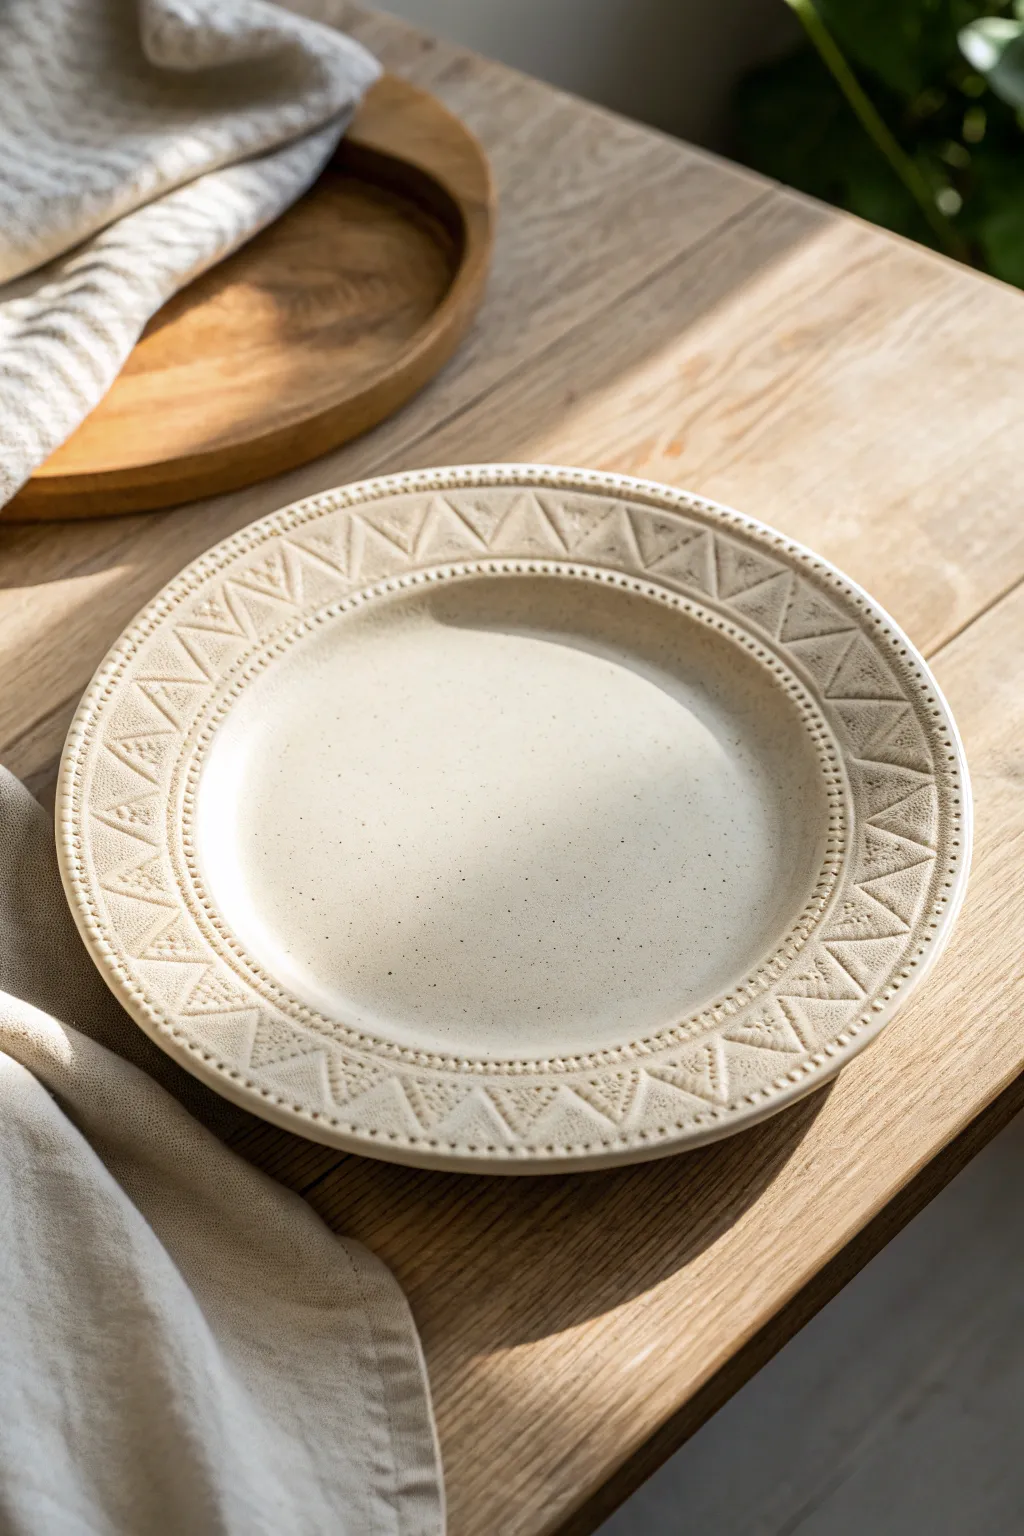
Create a stunning, earthy ceramic piece with this textured rim design featuring repeating geometric triangles. The speckled cream glaze and precise stamped details give it a modern bohemian feel that looks beautiful on any table.
Step-by-Step
Materials
- Raw stoneware clay (light or speckled body)
- Pottery wheel or rolling pin and slab roller
- Ribs (wooden and metal)
- Sponge
- Triangle stamp tool (custom or found object)
- Small circular embossing tool or stylus
- Needle tool
- Satin matte cream glaze with speckles
- Kiln
Step 1: Forming the Plate Base
-
Prepare the clay:
Begin by wedging your clay thoroughly to remove air bubbles. Since this design relies on a clean, consistent rim, ensure your clay is smooth and pliable. -
Create the plate form:
Whether throwing on a wheel or hand-building with slabs, form a dinner-sized plate with a wide, flat rim. The rim needs to be at least 1.5 to 2 inches wide to accommodate the full pattern. -
Smooth the surface:
Use a smooth kidney rib to compress the clay surface. This is crucial for preventing warping and creating a pristine canvas for your stamping later. -
Define the rim:
Clearly define the separation between the eating surface and the rim. I like to use a soft wooden tool to create a slight dip or transition point where the rim begins. -
Let it firm up:
Allow the plate to dry to a soft leather-hard stage. If the clay is too wet, the stamps will stick; too dry, and they won’t leave a deep impression.
Step 2: Stamping the Design
-
Plan your spacing:
Lightly mark the rim into quadrants to ensure your pattern stays even as you go around. This subtle guide helps prevent bunching up the design at the end. -
Create the inner border:
Using a small circular stylus or a dull point tool, press a row of evenly spaced dots right at the junction where the rim meets the center well. -
Stamp the main triangles:
Take your triangle stamp tool and press the first shape firmly into the clay, aligning the base of the triangle with the outer edge of the rim. The point should face inward. -
Continue the pattern:
Repeat the triangle stamp around the entire circumference. Leave a very narrow gap between each triangle base to keep them distinct but cohesive. -
Add internal texture:
If your stamp doesn’t already have internal texture, use a needle tool or small stylus to stipple dots inside each triangle impression while the clay is still receptive. -
Create the outer border:
Finish the textural work by adding a second row of dotted impressions along the very outer edge of the rim, mirroring the inner border you created first. -
Clean up edges:
smooth the very outer lip of the plate with a damp sponge to soften any sharp edges created by the stamping process.
Stamp Sticking?
If your stamp pulls up clay, dust the clay surface lightly with cornstarch or dip your tool in vegetable oil before pressing. This acts as a resist.
Step 3: Glazing and Firing
-
Bisque fire:
Once the plate is bone dry, load it into the kiln for a bisque firing to cone 04 (or your clay body’s specific recommendation). -
Clean the bisque:
Wipe the fired plate down with a damp sponge to remove any kiln dust, which helps prevent glaze crawling. -
Select the glaze:
Choose a satin or matte cream glaze. A glossy glaze tends to pool too heavily in the texture, obscuring the crisp stamped details. -
Apply the glaze:
Dip or brush the glaze onto the plate. Ensure the coat is not too thick; you want the glaze to break slightly over the high points of the texture to highlight the pattern. -
Clean the foot:
Wipe the bottom foot ring of the plate completely clean of glaze to prevent it from fusing to the kiln shelf. -
Final firing:
Fire the plate to maturity (usually cone 5 or 6 for stoneware). Allow the kiln to cool completely before opening to avoid thermal shock.
Dual-Tone Effect
After glazing, gently wipe the raised surfaces of the rim with a damp sponge. This reveals the raw clay body on the high points for higher contrast.
Enjoy using your new handcrafted plate for your next meal or display it as a piece of functional art
Mishima Inlay for Crisp Graphic Lines
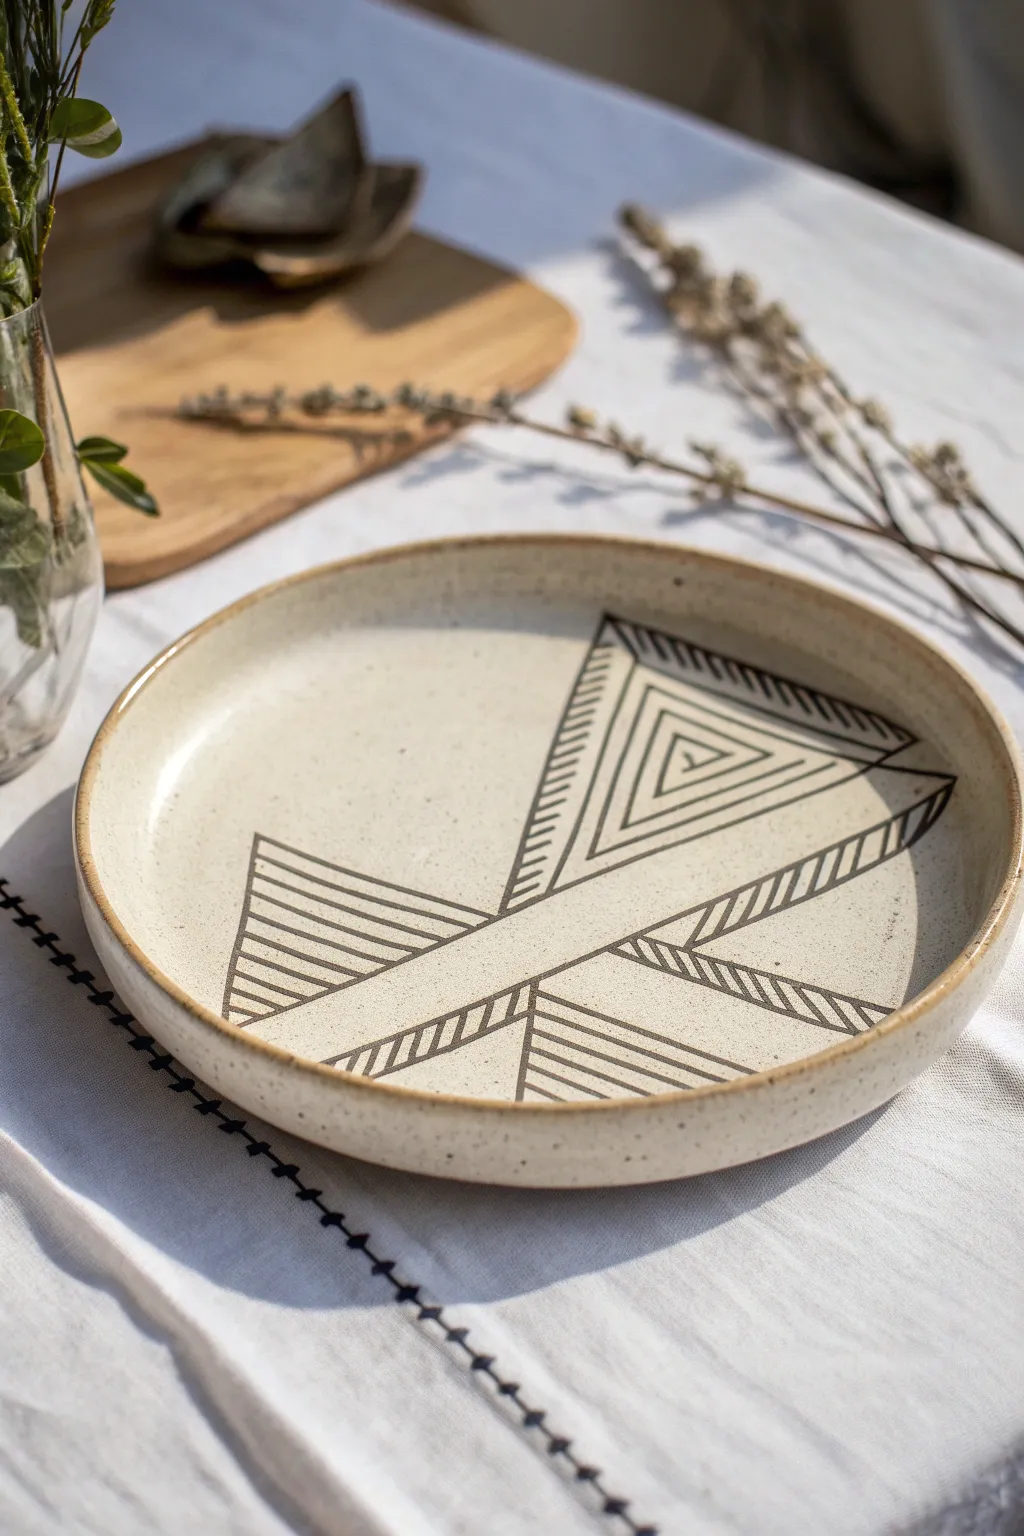
This tutorial guides you through creating a stunning ceramic plate featuring crisp, graphic lines using the traditional Mishima inlay technique. The result is a smooth surface where the dark geometric pattern is physically embedded into the cream-colored clay body, creating a striking contrast that feels wonderful to the touch.
Step-by-Step Tutorial
Materials
- Stoneware clay (speckled or light cream)
- Black underglaze or slip
- Pottery wheel (or slab roller/rolling pin and mood for hand-building)
- Sharp carving tool (needle tool or fine loop tool)
- Metal kidney rib
- Soft sponge
- Wax resist
- Clear matte glaze
- Paintbrush
- Ruler or straight edge
Step 1: Forming the Plate
-
Prepare the Clay:
Begin by wedging your stoneware clay thoroughly to remove air bubbles. For a plate of this size, you will need approximately 2-3 pounds of clay. -
Form the Base:
Throw a flat plate on the wheel, ensuring you compress the bottom well to prevent cracking. Alternatively, roll out a slab and use a slump mold to form a shallow dish shape. -
Define the Rim:
create a distinct, slightly raised rim about 1 inch high. Keep the transition from the flat eating surface to the rim smooth but defined. -
Dry to Leather Hard:
Allow the plate to dry slowly until it reaches a sturdy ‘leather hard’ stage. This is crucial—it needs to be firm enough to carve without dragging, but soft enough to cut cleanly.
Step 2: Carving the Design
-
Plan the Geometry:
Using a soft pencil, lightly sketch your geometric design directly onto the leather-hard clay. Focus on the large triangle shapes and intersecting bands seen in the reference. -
Carve Main Lines:
Using a sharp needle tool or fine carving tool, incision the main structural lines of your design. Use a flexible ruler or straight edge to keep your lines perfectly straight. -
Add Inner Details:
Carve the parallel hatch lines inside the triangular sections. Vary the spacing slightly to create visual rhythm, but try to keep your depth consistent. -
Clean the Incisions:
Gently brush away any clay crumbs or ‘burrs’ created by carving. Do not use a wet sponge yet, as this might blur your crisp edges; a soft dry brush works best. -
Wax Application:
Apply a thin coat of wax resist over the entire surface of the plate *except* inside the carved lines. This step is optional but makes the cleanup process significantly faster and cleaner.
Smudged Lines?
If your lines look blurry after scraping, your clay was likely too wet or soft. Let the piece dry longer to a firm leather-hard stage before carving next time.
Step 3: Inlaying and Finishing
-
Apply Underglaze:
Generously paint black underglaze or slip over the carved areas. Ensure the liquid fills the grooves completely. Don’t worry about being neat; you want the incisions flooded. -
Stiffening:
Let the underglaze dry until it loses its sheen. If you wipe it away too wet, you might pull the pigment out of the grooves. -
Scrape Back:
Using a metal kidney rib or a sharp scraping tool, carefully scrape away the excess underglaze from the surface. The goal is to reveal the clay body while leaving the black pigment trapped inside the carved lines. -
Final Clean:
Wipe the surface gently with a barely damp sponge to remove any remaining haze of black pigment. The design should now look sharp and crisp against the clay. -
Bisque Fire:
Once the plate is bone dry, load it into the kiln for a bisque firing. -
Glazing:
After the bisque fire, apply a clear matte glaze over the entire plate. This will seal the clay and the inlay work without obscuring the graphic quality of the lines. -
Final Firing:
Fire the plate to the final temperature required by your specific clay and glaze combination.
Add Color Depth
Instead of black, try using a deep cobalt blue or forest green slip for the inlay. You can even alternate colors in different geometric sections.
Now you have a beautifully crisp, modern plate ready for serving or display
Underglaze Pencil Sketches With a Clear Gloss
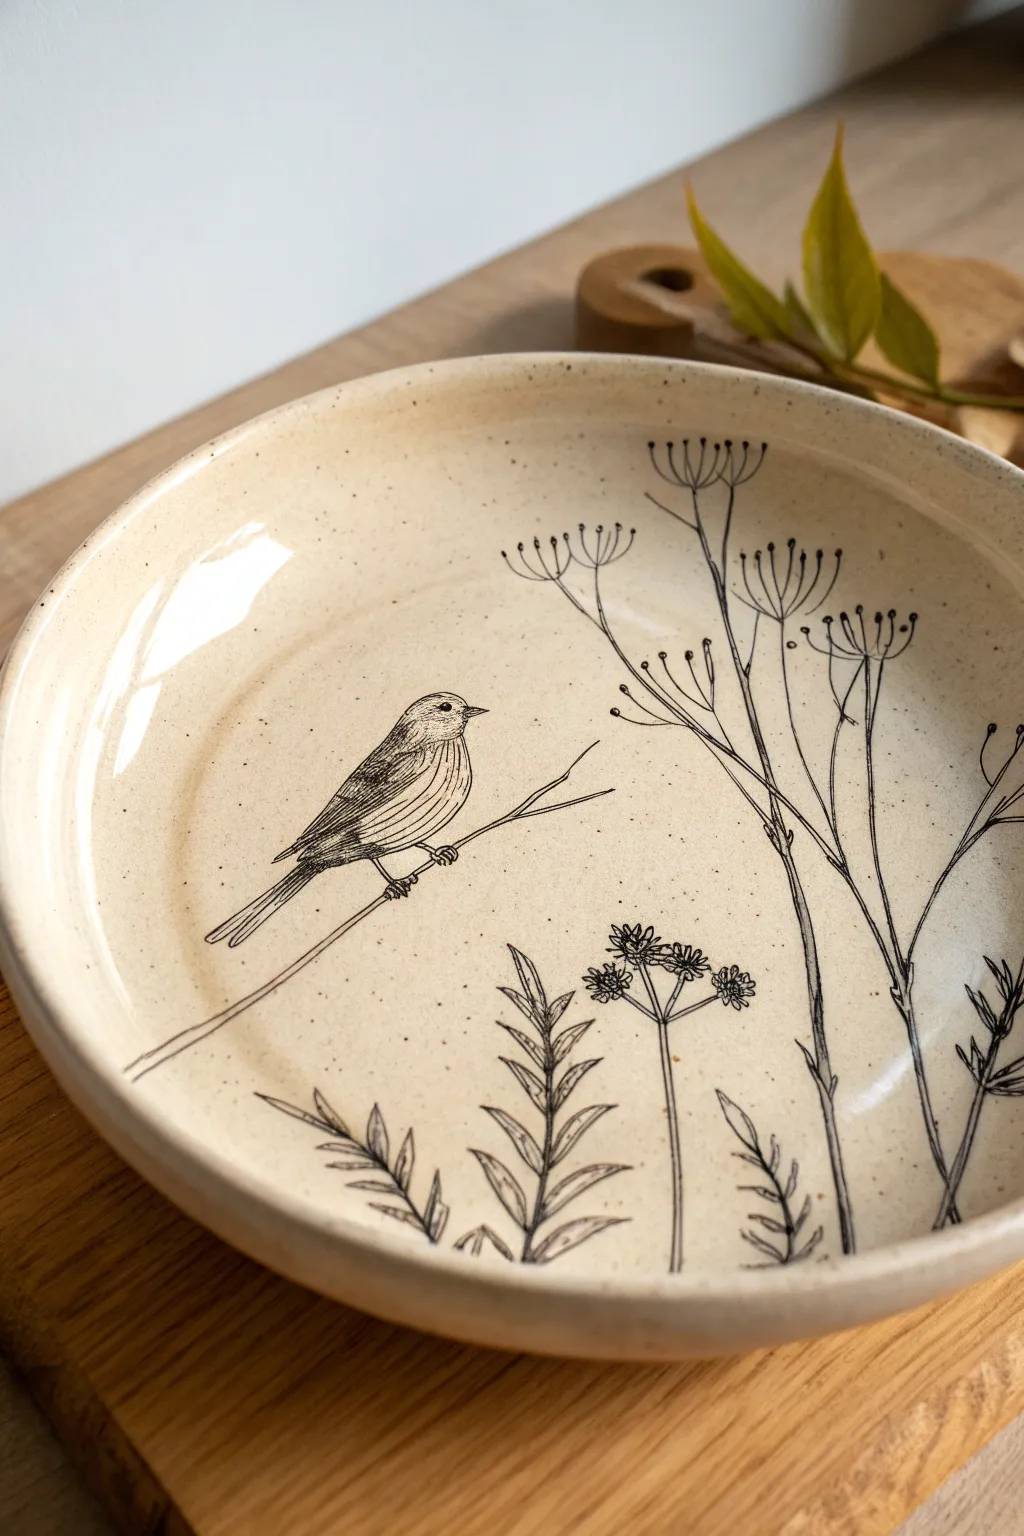
Transform a simple bisque plate into a delicate piece of art by utilizing the precision of underglaze pencils. This project features a sketchbook-style bird perched amongst wildflowers, sealed under a glossy glaze for a timeless, rustic finish.
Detailed Instructions
Materials
- Bisque-fired ceramic plate (preferably a stoneware clay body)
- Black underglaze pencil/crayon
- Clear transparent gloss glaze
- Soft fan brush
- Damp sponge
- Sketchbook paper and regular pencil
- Kiln (or access to a firing service)
- Optional: Black underglaze liquid and fine liner brush
Step 1: Preparation & Planning
-
Clean the surface:
Begin by wiping down your bisque-fired plate with a damp sponge. This removes any kiln dust or oils from your hands that might interfere with the glaze application later. -
Sketch your design:
Before touching the plate, work out your composition on paper. Draw a simple warbler or sparrow profile, a long diagonal branch, and vertical stems of Queen Anne’s Lace or fennel. -
Practice pressure:
I like to test the underglaze pencil on the back of the plate first. Get a feel for how hard you need to press to get a dark line versus a faint shading line.
Smudge Control
Underglaze pencil smears easily! Place a piece of paper under your hand while drawing to rest your palm on, just like sketching with charcoal.
Step 2: Drawing the Design
-
Outline the bird:
Lightly sketch the bird’s outline on the left side of the plate’s interior. Keep the touch feathery; unlike graphite, underglaze won’t erase easily with an eraser, though it can be sponged off. -
Draw the perch:
Extend a long, slightly curved line beneath the bird to serve as the branch. Let it run diagonally across the lower left quadrant, tapering off towards the center. -
Add wing details:
Fill in the wing feathers using short, directional strokes. Use slightly heavier pressure for the primary flight feathers and lighter hatching for the chest to suggest volume. -
Define the eye and beak:
Sharpen your underglaze pencil to a fine point. Carefully define the beak and place a small, solid dot for the eye, leaving a tiny speck of white for a highlight if possible. -
Sketch the flora:
On the right side of the plate, draw vertical stems rising from the bottom rim. Add the umbrella-like structures of the flower heads, using small dots or tiny circles at the end of radiating lines. -
Ground the composition:
Add fern-like or leafy graphical elements at the very bottom of the bowl to create a visual base. These should be looser and more gestural than the bird. -
Check line weight:
Go back over the main structural lines (the bird’s belly, the main branch, the thickest plant stems) to darken them. Underglaze pencil tends to fire slightly lighter than it looks raw, so don’t be afraid of contrast. -
Clean up stray marks:
If you smudged any area, use a slightly damp Q-tip or a clean corner of a sponge to gently lift the unwanted pigment. Allow the moisture to dry completely before glazing.
Add Watercolor Effects
Before the clear gloss, use watered-down underglaze paints to add faint washes of blue or green behind the drawing for a misty background.
Step 3: Glazing & Firing
-
Prepare the clear glaze:
Mix your clear transparent gloss glaze thoroughly. It should be the consistency of heavy cream to ensure a smooth coating without cloudiness. -
Set the drawing:
Dab a very small amount of glaze water (or gum solution) over the drawing gently with a sponge. This helps fix the powdery pencil lines so they don’t smear during the main glaze application. -
Apply the first coat:
Using a soft fan brush, apply a flowing coat of clear glaze over the entire interior of the plate. Glide the brush over the drawing rather than dragging it to prevent smudging. -
Layer up:
Once the first coat effectively loses its sheen (is dry to the touch), apply a second coat. Cross the direction of your brushstrokes to ensure even coverage. -
Clean the foot ring:
Flip the plate and ensure the bottom foot ring is completely free of glaze. Wipe it with a sponge to prevent the plate from sticking to the kiln shelf. -
Final inspection:
Check for pinholes in the glaze surface and smooth them over with your finger if necessary. -
Fire the piece:
Load the plate into the kiln for a glaze firing suitable for your clay body (typically Cone 5 or 6 for stoneware). Allow the kiln to cool completely before opening to prevent thermal shock.
Enjoy using your beautifully illustrated plate for serving treats or displaying as a standalone artwork
Polymer Clay Appliqué Details on the Rim
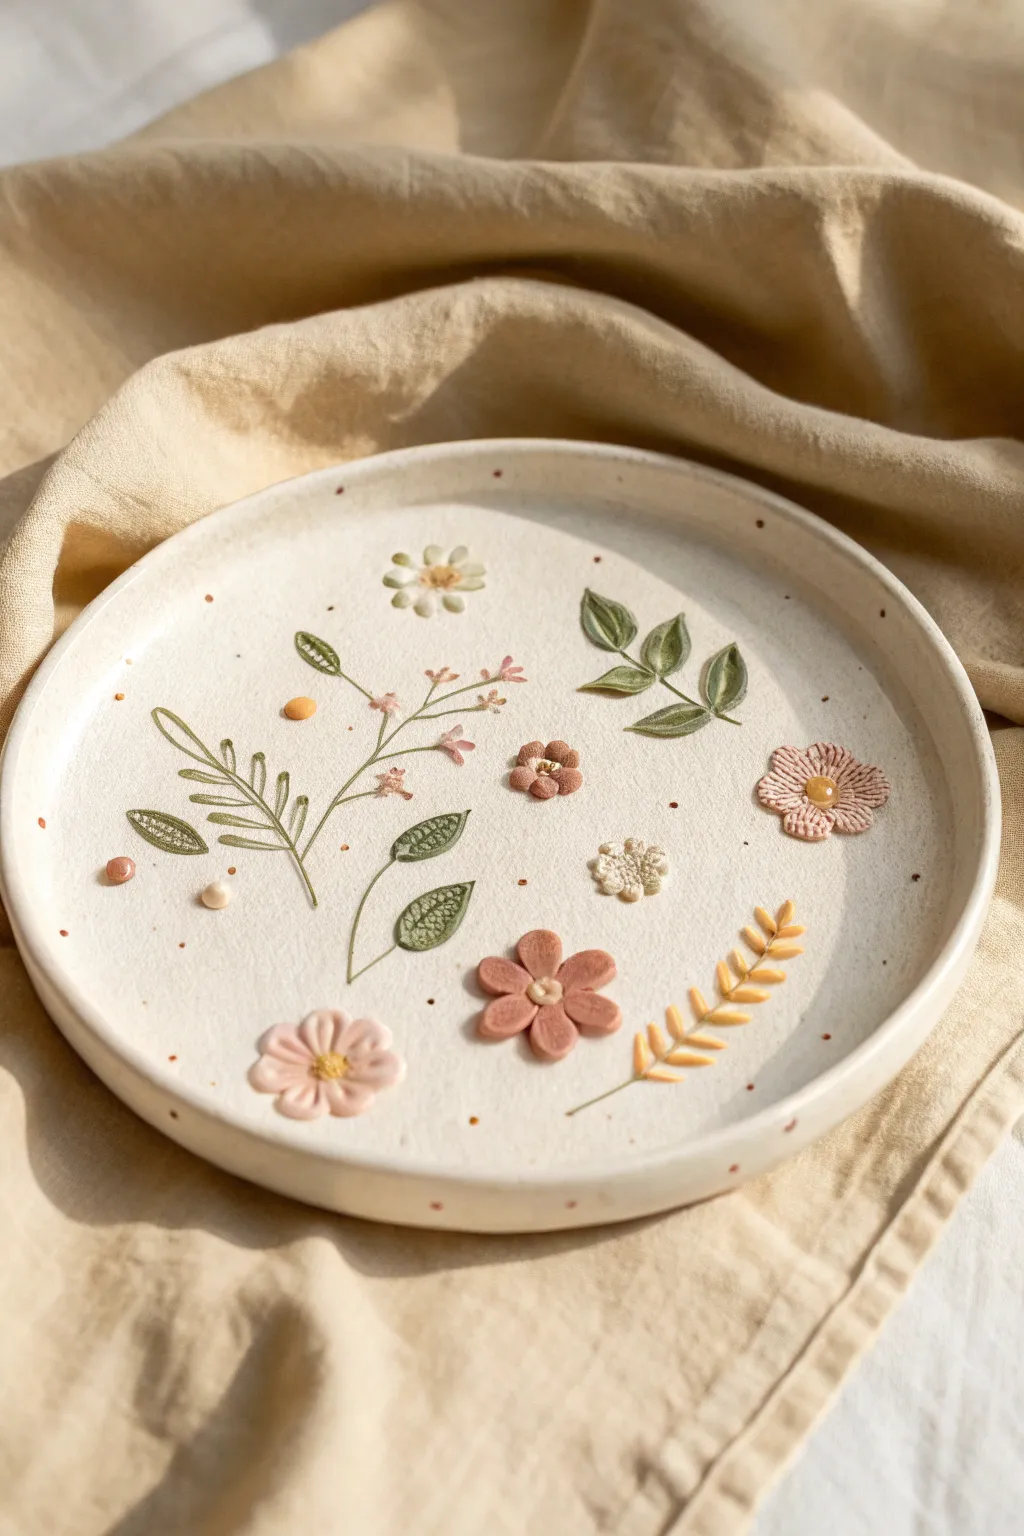
Transform a plain ceramic dish into a blooming garden with delicate, dimensional polymer clay elements. This project captures the softness of a meadow with scattered wildflowers and leaves in varied textures and muted, earthy pastels.
Step-by-Step Tutorial
Materials
- Oven-bake polymer clay (white, beige, sage green, olive green, dusty rose, terracotta, ochre)
- Plain ceramic plate (oven-safe)
- Liquid polymer clay (translucent or white)
- Detailing tools: needle tool, small ball stylus
- Rolling pin or pasta machine
- Craft knife or scalpel
- Small soft brush
- Ceramic sealant or varnish (satin finish)
- Clean work surface (tile or glass mat)
- Baby wipes (for cleaning tools between colors)
Step 1: Preparing the Canvas
-
Clean the surface:
Begin by thoroughly cleaning your ceramic plate with soap and water, then wipe it down with rubbing alcohol to remove any oils or residue. This ensures the clay adheres properly during the baking process. -
Condition the clay:
Warm up your various colors of polymer clay by kneading them in your hands until they are soft and pliable. If you want custom shades, mix your colors now—for example, blend sage green with a little white for a softer leaf tone.
Clay Won’t Stick?
If clay slips on the glazed ceramic, wipe the area with a little acetone. A thin smear of liquid polymer clay (Bake & Bond) acts as a powerful glue.
Step 2: Creating Foliage
-
Roll out stems:
Roll tiny snakes of olive green clay very thinly to create the delicate stems. Gently press these onto the plate surface in curved, organic lines to map out your composition. -
Form teardrop leaves:
For the simple leaves, pinch off tiny bits of sage green clay and roll them into teardrop shapes. Flatten them gently onto the plate near your stems. -
Add leaf texture:
Use your needle tool to carefully impress a central vein and small angled lines onto the flattened leaves. I find that varied pressure creates a more realistic, organic look. -
Craft detailed fern greenery:
For the fern-like sprig, create a central stem first. Then, attach tiny, flattened ovals on either side, using the needle tool to press a line down the center of each leaflet. -
Sculpt the yellow sprig:
Mix ochre clay to get a warm yellow. Roll a thin stem and attach small, grain-like ovals along it in pairs to create the wheat-like stalk shown on the right side.
Add Antique Charm
After baking, dilute brown acrylic paint with water and brush it over the flowers, then wipe it off immediately. The paint stays in the crevices for a vintage look.
Step 3: Blooming Flowers
-
Create the pink daisy:
Roll five or six small balls of dusty rose clay. Flatten them into petals and arrange them in a circle. Use a needle tool to press a deep indentation into the center of each petal, giving it a cupped shape. -
Add flower centers:
Place a tiny ball of yellow or contrasting clay in the center of your daisy. Texture it by poking it repeatedly with the tip of your needle tool or a stiff brush. -
Form the rust-colored bloom:
Take terracotta clay and create five heart-shaped petals. Arrange them tightly together. Use a small ball stylus to press into the center, bonding the petals to the plate. -
Detail the white wildflower:
Flatten a small blob of white clay into a rough circle. Use your knife to cut small notches around the edge to define petals, then use the needle tool to prick tiny holes in a ring pattern for texture. -
Assemble the tiny pink spray:
At the ends of your thinnest green branches, press minute balls of pale pink clay. Use the needle tool to poke a single hole in the center of each to make them look like budding flowers.
Step 4: Finishing Touches
-
Add scattered dots:
To fill empty negative space, roll extremely tiny spheres of different clay colors—rust, ochre, and sage. Press these randomly around the main floral elements like confetti. -
Secure with liquid clay:
If any pieces feel loose or don’t want to stick to the smooth ceramic, lift them gently and apply a tiny dab of liquid polymer clay underneath as an adhesive. -
Check for fingerprints:
Inspect your work closely. If you see any fingerprints on the clay, lightly brush them with a little baby oil or use a soft brush to smooth them away before baking. -
Bake the project:
Place the entire plate into a cool oven. Set the temperature according to your clay manufacturer’s instructions (usually around 275°F/130°C) and bake for 15-30 minutes. Let it cool completely in the oven to prevent the ceramic from cracking due to thermal shock. -
Seal the artwork:
Once fully cool, apply a thin coat of satin varnish or glaze over the clay parts only to protect them and give a finished sheen. Note that this plate is for decorative use only and should be cleaned by hand gently.
Display your beautiful botanical creation on a shelf or use it as a jewelry tray to enjoy your handiwork daily