When I’m in the studio making holiday jewelry, Christmas clay bead bracelets are my go-to because they’re festive, fast, and seriously addictive to design. Here are a bunch of Christmas-ready ideas you can mix, match, and stack until they feel perfectly you.
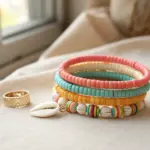
Classic Red, Green, White, and Gold Heishi Stack
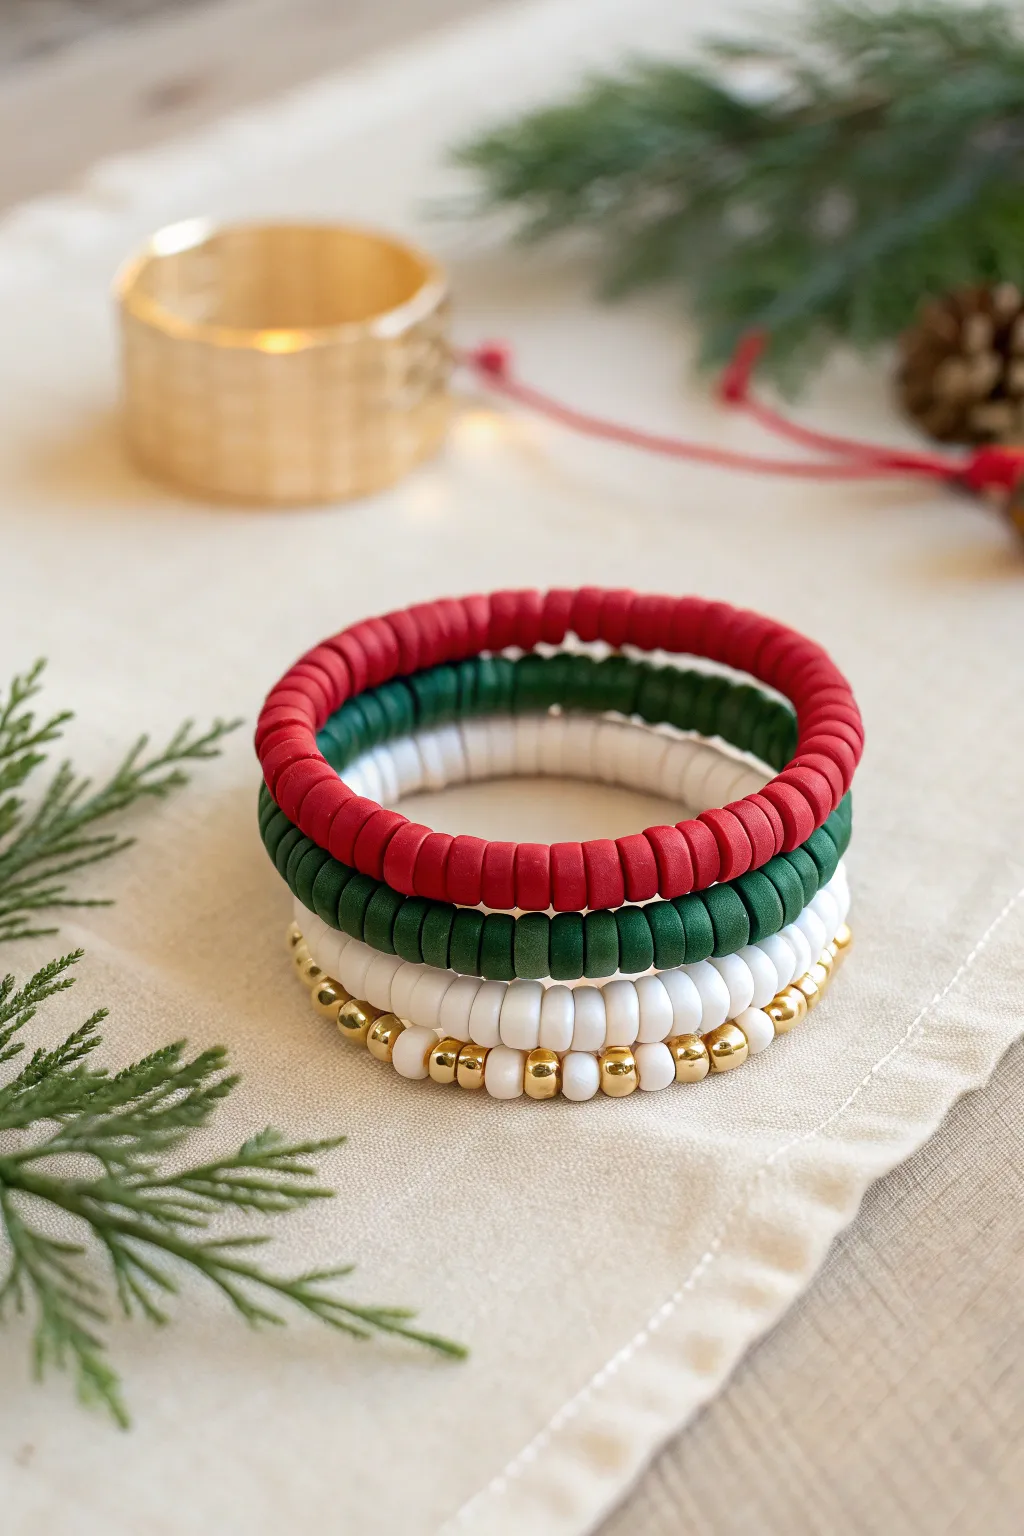
Embrace traditional Christmas colors with this sophisticated stack of four bracelets that balances matte clay textures with festive metallic shine. The combination of deep red, forest green, crisp white, and gold accents creates a versatile accessory set perfect for holiday parties or cozy nights in.
Step-by-Step
Materials
- Polymer clay heishi beads (6mm disc beads) in matte Red
- Polymer clay heishi beads (6mm disc beads) in matte Forest Green
- Polymer clay heishi beads (6mm disc beads) in matte White
- Gold tone metallic spacer beads (round, approx. 4mm-5mm)
- Stretch cord (0.8mm or 1mm thickness)
- Jewelry glue or clear nail polish
- Scissors or jewelry snips
- Bead stopper or tape
- Ruler or measuring tape
Step 1: Planning and Preparation
-
Measure Your Wrist:
Begin by measuring your wrist with a flexible measuring tape. For a comfortable fit with heishi beads, add about half an inch to your actual wrist measurement. -
Cut the Cord:
Cut four pieces of stretch cord, each about 10-12 inches long. Having extra length makes the final knotting process much easier and prevents accidental bead spills. -
Pre-stretch the Elastic:
Gently tug on each piece of cut cord several times. Pre-stretching prevents the bracelets from sagging or loosening up immediately after you wear them. -
Secure the Ends:
Place a bead stopper or a piece of masking tape on one end of each cord strand to act as an anchor while you string your beads.
Step 2: Creating the Solid Color Bracelets
-
String the Red Bracelet:
Start with the first cord. String only the matte red heishi beads continuously until you reach your desired length. Check the fit by wrapping it around your wrist. -
String the Green Bracelet:
Repeat the process on the second cord using the forest green clay beads. Aim to make this strand exactly the same length as the red one for a uniform stack look. -
Simple White Strand:
Take the third cord and string it entirely with the white clay disc beads. This acts as a bright, neutral separator between the darker holiday colors. -
Adjustment Check:
Hold all three solid-colored strands together to ensure they are equal in length before moving on to the patterned strand.
Pro Tip: Seamless Knots
For the cleanest finish, use a surgeon’s knot (loop the cord through twice on the first tie) instead of a square knot. It holds elastic cord much tighter and slips less often.
Step 3: Creating the Accent Bracelet
-
Start the Pattern:
For the fourth bracelet, begin by stringing three white clay heishi beads. -
Add Gold Accents:
After the three white beads, add one gold metallic round bead. These gold beads are slightly thicker than the discs, adding nice dimension. -
Repeat the Sequence:
Continue this pattern—three white clay discs followed by one gold bead—for the entire length of the bracelet. -
Finish the Pattern:
End the strand with three white beads if possible, so that when tied, the pattern flows seamlessly without two gold beads touching.
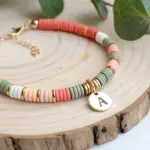
Level Up: Personalized Charm
Add a single gold letter bead to the center of the solid red or green bracelet to create a custom initial stack for a thoughtful gift.
Step 4: Finishing the Stack
-
Prepare to Knot:
Remove the bead stopper from the first bracelet. Bring the two ends of the cord together carefully. -
Tie the Knots:
Tie a standard square knot (right over left, left over right). Pull the elastic tight to secure the knot close to the beads. -
Secure with Glue:
Apply a tiny dab of jewelry glue directly onto the knot. I usually let this sit for a minute to become tacky before trimming. -
Hide the Knot:
Once the glue is dry, trim the excess cord ends short. If the hole of a nearby bead is large enough, gently tug the knot inside to hide it. -
Repeat for All Strands:
Repeat the knotting and gluing process for the remaining three bracelets. -
Final Assemble:
Stack them on your wrist or a display holder, mixing the order to see which arrangement highlights the gold accents best.
Enjoy mixing and matching your new festive stack throughout the holiday season


Candy Cane Stripe Bracelet With Clean Red-White Repeats
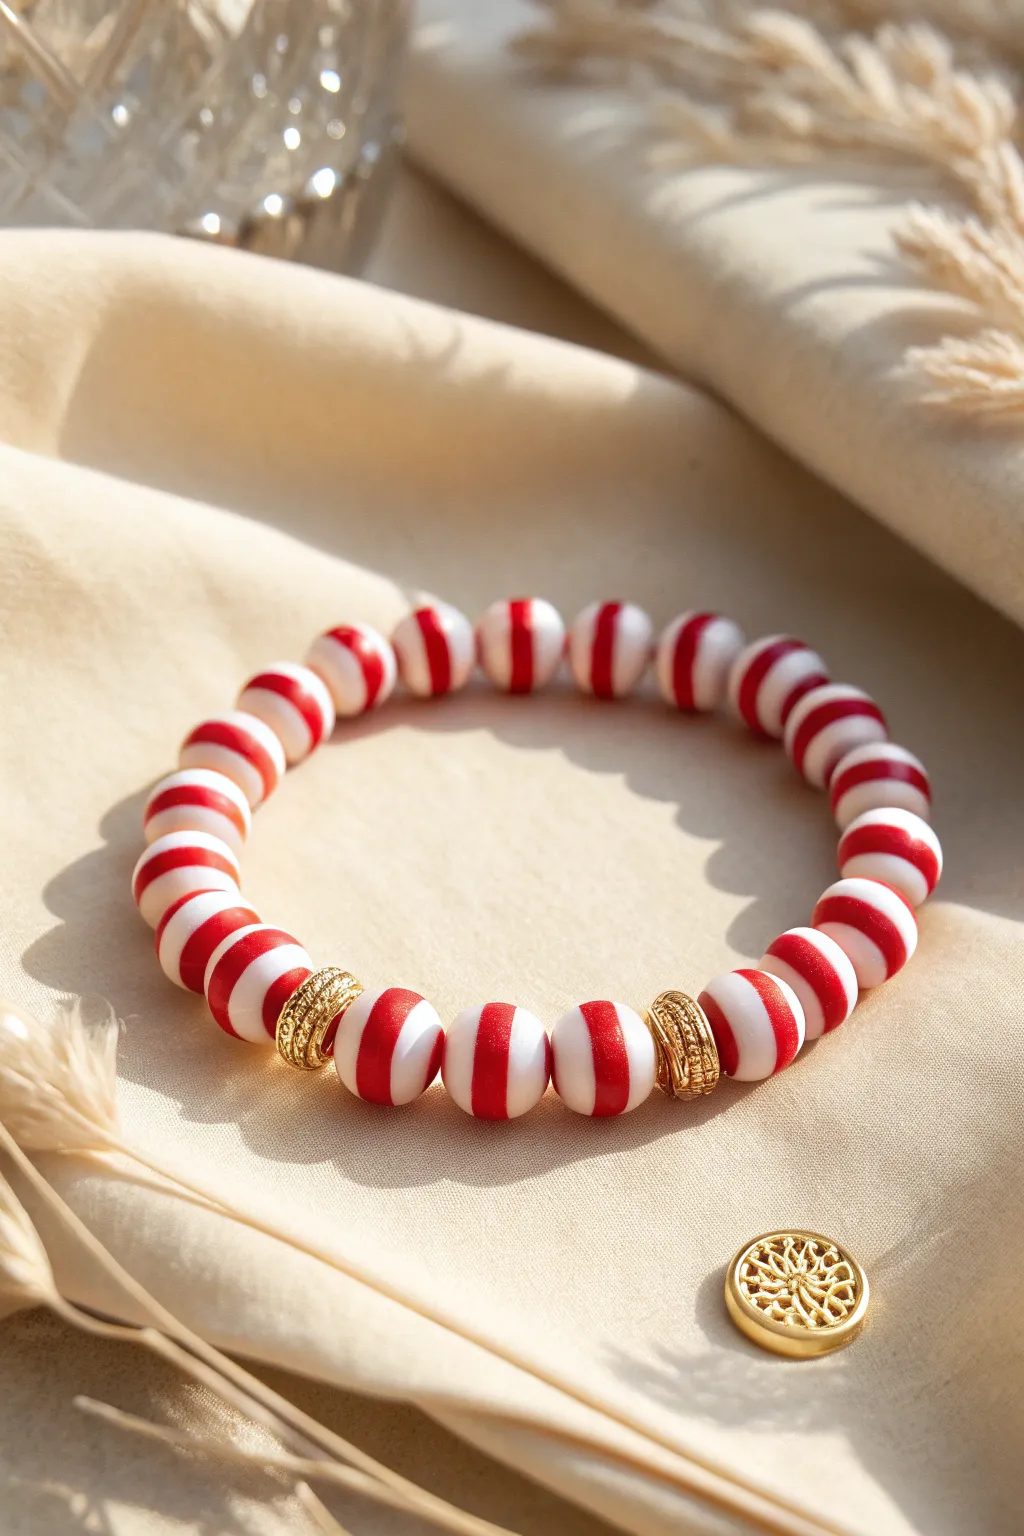
Capture the classic charm of Christmas sweets with this sophisticated take on a candy cane bracelet. Featuring crisp red and white striped polymer clay beads accented with stunning gold spacers, this accessory balances festive cheer with chic, wearable design.
Step-by-Step Tutorial
Materials
- Red and white striped polymer clay beads (10mm, spherical)
- Gold-plated decorative spacer beads (ribbed or twisted texture, ring shape to fit 10mm beads)
- Strong elastic jewelry cord (0.8mm or 1.0mm thickness)
- Jewelry glue or clear nail polish
- Scissors
- Bead stopper or masking tape
- Tape measure
Step 1: Preparation and Design
-
Measure your wrist:
Before cutting any cord, wrap a measuring tape comfortably around your wrist. Add about one inch to this measurement to account for the bulk of the 10mm beads; this ensures the bracelet won’t be too tight. -
Cut the elastic cord:
Cut a piece of elastic cord roughly 10 inches long. I find it much easier to tie the final knot when I have plenty of excess string to work with. -
Secure the end:
Attach a bead stopper to one end of the cord. If you don’t have one, a piece of masking tape folded over the end works perfectly to keep your beads from sliding off. -
Pre-stretch the cord:
Gently pull on the elastic cord a few times. Pre-stretching helps prevent the bracelet from sagging or loosening immediately after you’ve made it.
Seamless Stripes
When stringing stripes, try to rotate beads slightly so the lines flow visually from one bead to the next, rather than clashing at random angles.
Step 2: Stringing the Pattern
-
Plan your gold accents:
Looking at the design, notice there are exactly two gold spacers placed opposite each other. Decide where you want these focal points to sit among your striped beads. -
Begin with the first segment:
Start threading your red and white striped beads onto the cord. String about half the number of beads needed for your full wrist size. For an average wrist, this is usually 8 to 10 beads. -
Add the first gold spacer:
Slide on one of the gold decorative spacer beads. Ensure the pattern of the spacer complements the vertical stripes of the clay beads. -
Create the center segment:
Thread on a small group of striped beads—usually just three or four. This creates a distinct section between the two gold accents. -
Place the second gold spacer:
Add your second gold spacer bead. This symmetry is key to the bracelet’s balanced, high-end look. -
Finish the bead strand:
Continue adding the remaining striped clay beads until the strand reaches your desired length. Check the fit by wrapping it around your wrist; the ends should touch comfortably without gaps.
Step 3: Finishing Touches
-
Remove the stopper:
Carefully remove the bead stopper or tape from the end, holding both ends of the elastic firmly so no beads escape. -
The initial cross:
Cross the left end over the right end as if you are starting to tie a shoelace. Pull it snug to bring the beads together. -
Tie a surgeon’s knot:
Loop the end through the circle twice instead of just once. This extra loop creates friction that prevents the elastic from slipping while you tighten it. -
Tighten securely:
Pull all four strands—the two tail ends and the two bracelet sides—slowly and firmly. You want the knot to be tight, but be careful not to snap the elastic. -
Secure with adhesive:
Apply a tiny drop of jewelry glue or clear nail polish directly onto the knot. I like to let this dry briefly, just for a minute or so, to ensure the bond is secure. -
Hide the knot:
Trim the excess cord about 2mm from the knot. Gently pull the elastic so the knot slides inside the hole of the nearest large bead, disappearing from view.
Knot Slipping?
If your elastic knot keeps coming undone before you can glue it, try asking a friend to hold a finger on the first loop while you tie the second.
Enjoy wearing your festive creation throughout the holiday season


Holly Berry Bracelet With Green Base and Red Pops
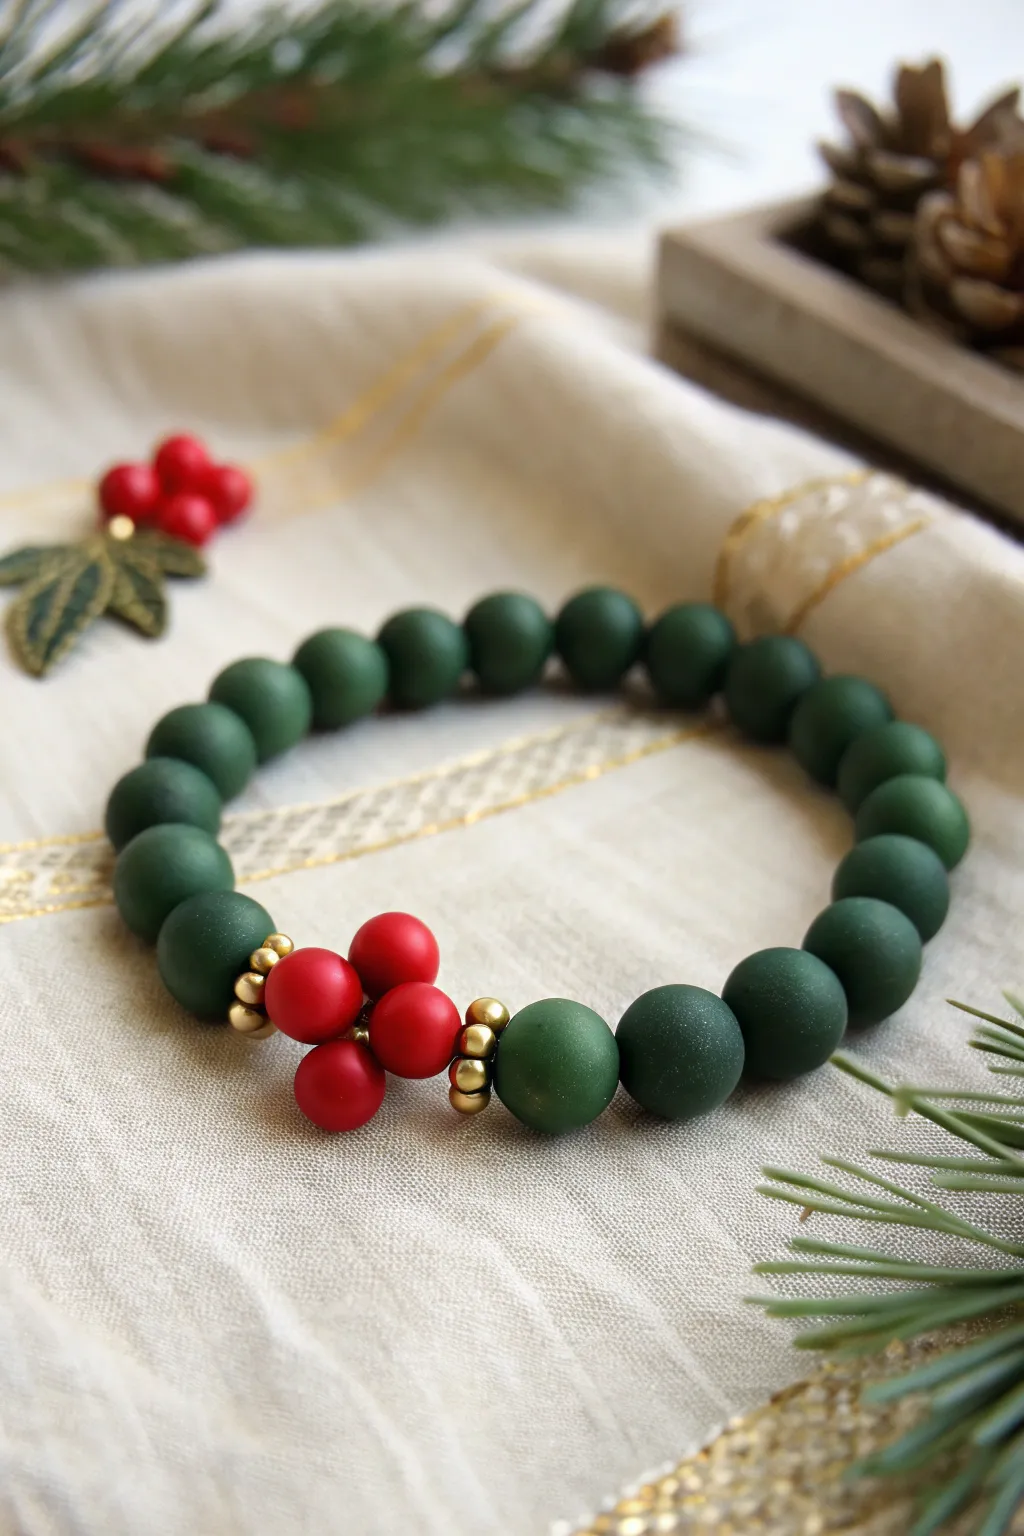
This elegant holiday accessory captures the classic look of holly berries against evergreen boughs using smooth, matte-finish beads. The contrast between the muted forest green base and the bright red focal cluster, accented with touches of gold, creates a sophisticated piece perfect for winter gatherings.
Detailed Instructions
Materials
- Matte forest green round beads (approx. 10mm)
- Matte red round beads (approx. 6mm or 8mm)
- Small gold spacer beads (approx. 3-4mm)
- Strong elastic stretch cord (0.8mm or 1mm)
- Super glue or jewelry adhesive
- Scissors
Step 1: Preparation
-
Measure your wrist:
Wrap a measuring tape loosely around your wrist to determine the circumference. Add about half an inch to this measurement to ensure the bracelet fits comfortably without being too tight. -
Cut the cord:
Cut a length of elastic cord about 10-12 inches long. Having this extra length makes it much easier to tie the final knot securely without fumbling. -
Pre-stretch the elastic:
Hold both ends of the cord and give it several firm tugs. This pre-stretching step helps prevent the bracelet from sagging or loosening shortly after you start wearing it. -
Secure one end:
Place a piece of tape or a bead stopper on one end of the cord so your beads don’t slide off while you are working.
Knot Ninja
Can’t hide the knot inside a bead? Try starting your pattern with a bead that has a slightly larger hole, so you can easily pull the knot inside at the end.
Step 2: Creating the Holly Cluster
-
Start the gold accent:
Begin by threading two small gold spacer beads onto your cord. These will frame the berry cluster on one side. -
Add red berries:
Thread on four of the smaller matte red beads. These will form the ‘berries’ of your holly center. -
Form the cluster shape:
This is the trickiest part: take the end of the cord you just threaded into the beads and loop it back through the very first red bead you added. Pull tight so the four red beads bunch together into a little diamond or flower shape. -
Finish the accent:
Add two more small gold spacer beads immediately after the red cluster. This completes the focal point and helps hold the red beads in their bunched formation.
Frosty Effect
For a snowy look, lightly dab white acrylic paint on the tops of the red ‘berries’ with a sponge before stringing, or use frosted glass beads instead of matte clay.
Step 3: Beading the Base
-
Add the green beads:
Start threading the larger matte green beads onto the cord. These represent the holly leaves or evergreen branches. -
Check the length:
Continue adding green beads until the beaded portion matches your target wrist size. Wrap it around your wrist occasionally to check the fit, keeping in mind the knot takes up a tiny bit of space. -
Symmetry check:
Ensure the holly berry cluster sits centrally if you want a specific orientation, though for a continuous elastic bracelet, this is less critical until you tie it.
Step 4: Finishing Touches
-
Prepare to knot:
Remove the tape or bead stopper from the end. Bring both ends of the elastic cord together, ensuring there are no gaps between the beads. -
Tie the knot:
Tie a surgeon’s knot. To do this, cross the ends like a normal knot, but loop one end through twice before pulling tight. Repeat this a second time for extra security. -
Secure with glue:
Apply a tiny dab of jewelry glue or super glue specifically to the knot. Be careful not to get glue on the beads themselves, just the cord. -
Hide the knot:
While the glue is still tacky but not wet, pull the knot gently inside the hole of one of the adjacent green beads to hide it. -
Trim the excess:
Once the glue is fully dry, use your scissors to trim the excess cord tails as close to the bead hole as possible.
Enjoy wearing your festive, handmade holly bracelet all season long

Santa Suit Color-Block Bracelet With a Black Belt Stripe

Capture the jolly spirit of the season with this sophisticated take on a Santa suit design. By combining textured matte red beads with gold and black accents, you create a subtle nod to St. Nick’s iconic outfit without being overly cartoonish.
Step-by-Step Tutorial
Materials
- 8mm or 10mm matte red round beads (polymer clay, dyed lava stone, or sponge coral)
- One 8mm matte black round bead (onyx or agate)
- Four gold-tone spacer rings with black enamel stripes or black inlay
- Strong elastic cord (0.8mm or 1mm thickness)
- Jewelry adhesive or clear nail polish
- Scissors
Step 1: Preparation
-
Measure your wrist:
Wrap a piece of string around your wrist to find your size, then add about half an inch for a comfortable fit. Keep this length in mind as you plan your bead count. -
Pre-stretch the cord:
Cut a length of elastic cord about 10-12 inches long. Give it a few firm tugs to pre-stretch it; this prevents the bracelet from loosening up after you wear it a few times. -
Secure the end:
Place a piece of tape or a binder clip on one end of the cord so beads don’t slide off while you are stringing them.
Pro Tip: Bead Texture
Using ‘sponge coral’ or matte lava stone beads gives that plush, velvety look similar to Santa’s coat, far better than shiny smooth plastic beads.
Step 2: Creating the Belt Buckle
-
Start the pattern:
This design centers around the ‘belt buckle’ feature, so we will build that first. Slide on two regular red matte beads to start. -
Add first gold spacers:
Thread on two of your striped gold spacer rings. These act as the shiny metal of the belt buckle. -
The center stone:
Add the single matte black bead next. This represents the dark leather belt running through the buckle. -
Complete the buckle:
Thread on the remaining two gold spacer rings. You should now have a symmetrical centerpiece: two spacers, one black bead, two spacers.
Step 3: Finishing the Strap
-
Continue with red:
Now, fill the rest of the bracelet with your textured red beads. Simply string them on one by one until you reach your desired length. -
Check the symmetry:
I like to ensure there are an equal number of red beads on either side of the ‘buckle’ section if I’m planning a specific clasp, but for a continuous elastic loop, just filling the rest of the strand works perfectly. -
Test the size:
Wrap the unfinished strand around your wrist to check the fit. It should sit comfortably without pinching your skin or dropping too low on the hand.
Level Up: White Trim
Replace the two red beads immediately flanking the gold spacers with white textured beads to mimic the fur trim on Santa’s jacket sleeves.
Step 4: Securing the Knot
-
Remove the anchor:
Carefully remove the tape or clip from the end of your cord, holding both ends firmly. -
Tie the knot:
Tie a surgeon’s knot (right over left, left over right, and loop through an extra time) to secure the bracelet. Pull the elastic tight to close any gaps between beads. -
Apply adhesive:
Dab a tiny drop of jewelry glue or clear nail polish onto the knot. This is crucial for longevity. -
Hide the knot:
While the glue is still slightly tacky, gently tug the cord so the knot slides inside the hole of the nearest red bead. -
Trim excess:
Once the glue is fully dry, trim the excess cord tail close to the bead hole using sharp scissors.
Enjoy wearing this festive accessory that adds a subtle touch of holiday magic to any outfit

The Complete Guide to Pottery Troubleshooting
Uncover the most common ceramic mistakes—from cracking clay to failed glazes—and learn how to fix them fast.
Christmas Tree Green Gradient Bracelet With a Star Accent
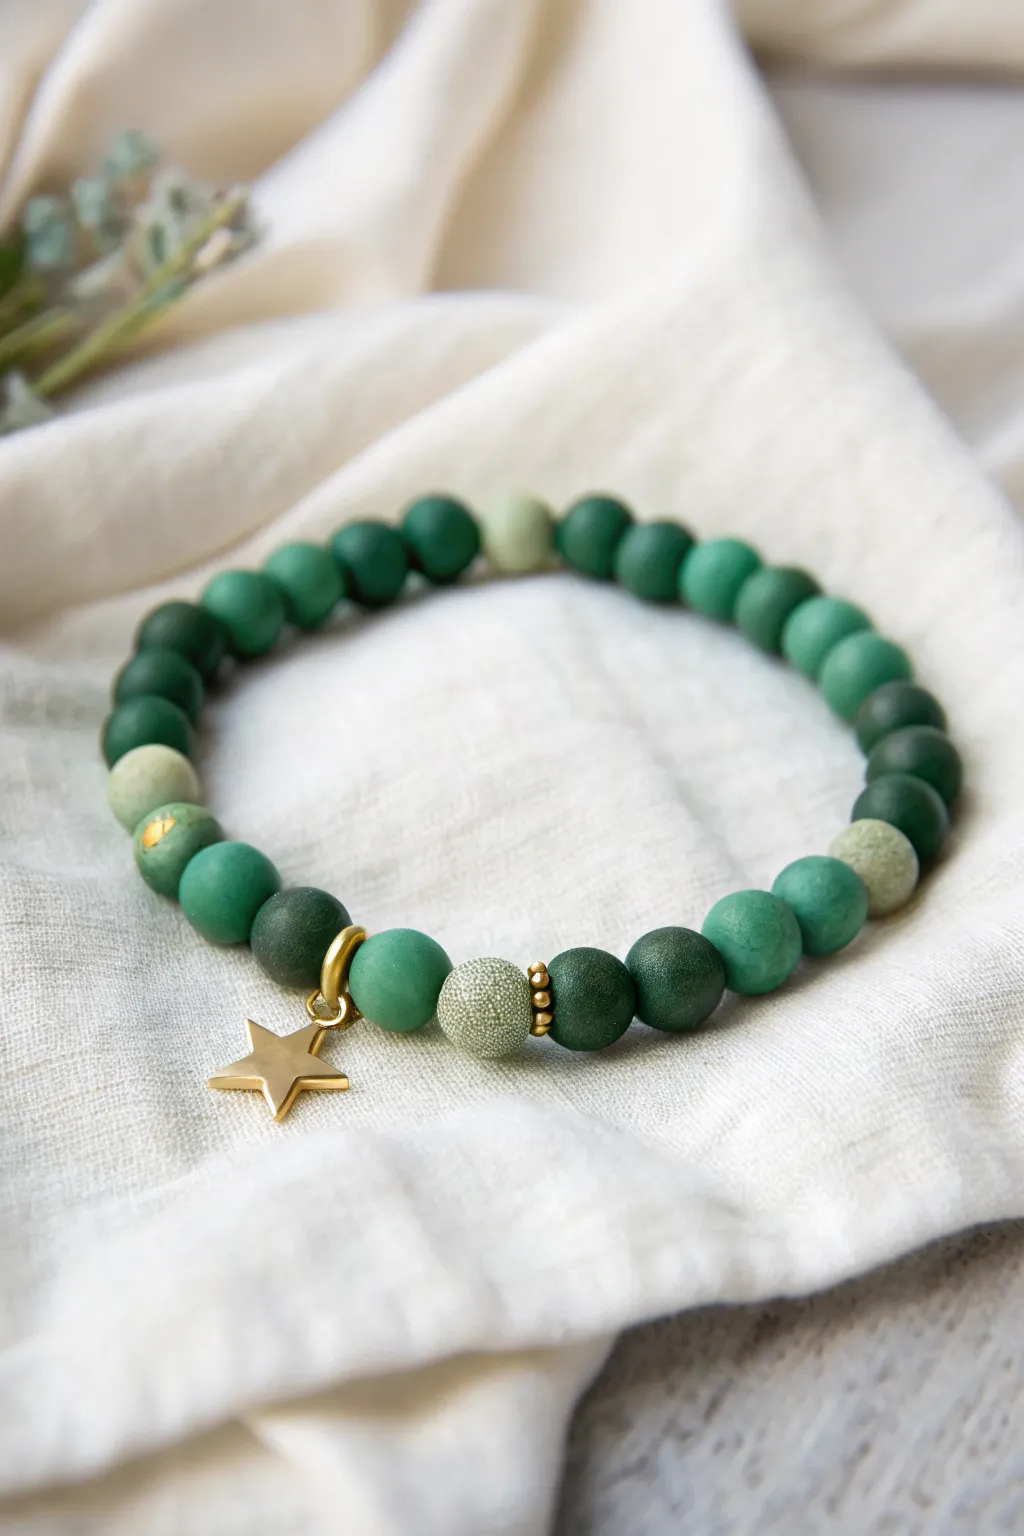
Capture the essence of an evergreen forest with this sophisticated polymer clay bead bracelet, featuring a rich spectrum of greens and a striking golden star. Its matte finish and subtle gradient create a modern, earthy look perfect for the holiday season without being overly flashy.
How-To Guide
Materials
- Polymer clay in various shades: deep forest green, true green, light sage, and white (for mixing)
- Elastic beading cord (0.8mm clear)
- Gold star charm with jump ring
- Gold jump ring (4-6mm)
- Small gold spacer beads or crimp covers
- Gold bail bead or large-hole bead (to hold the charm)
- Bead rolling tool or clear acrylic block
- Toothpick or bead piercing pin
- Super glue or jewelry adhesive
- Scissors
- Oven for baking clay
Step 1: Crafting the Clay Beads
-
Mix your colors:
Start by conditioning your green clays. You want a gradient effect, so create at least three distinct shades: a dark forest green, a medium evergreen, and a light sage green. I like to mix a little black into the dark green for depth and white into the sage for softness. -
Create a textured accent:
For the light speckled bead seen in the center, mix a tiny amount of white clay into your sage green but don’t blend fully, or roll the bead in salt before baking (and wash it off after) for a pitted texture. -
Portion the clay:
Roll your clay colors into equal-sized snakes. Cut them into uniform segments to ensure your finished beads are roughly the same size, aiming for about 8-10mm in diameter. -
Roll the spheres:
Take each segment and roll it between your palms to form a smooth ball. For a perfectly round shape, use a bead roller or gently rotate the ball under a clear acrylic block on your work surface. -
Piercing the holes:
Using a toothpick or a piercing pin, carefully poke the hole through the center of each bead. Twist the pin gently as you push to avoid squishing the bead’s shape. -
Create the matte finish:
To mimic the matte, organic look in the photo, you can lightly gently roll the raw beads on a piece of denim or coarse paper to remove any glossy fingerprints before baking. -
Bake the beads:
Arrange your beads on a baking sheet lined with parchment paper. Bake according to your polymer clay package instructions (usually 275°F/135°C for 15-30 minutes). Let them cool completely.
Sticky Situation?
If your knot won’t disappear inside a bead, gently use a bead reamer or a small drill bit to widen the hole of the bead closest to the knot just enough to tuck it away neatly.
Step 2: Assembly & Finishing
-
Plan the layout:
Lay out your beads on a bead board or towel. Start with the lightest, textured accent bead in the center, flanked by dark forest green beads, then transition outwards to medium greens, creating a subtle ombré or mixed effect. -
Add gold accents:
In the center, place small gold spacer beads on either side of your textured light bead. Slide the gold bail bead (for the star) beside the central focal section. -
String the beads:
Cut a piece of elastic cord about 10-12 inches long. Simply string your beads in the order you laid them out. Stretching the cord slightly before stringing helps prevent it from loosening later. -
Check the fit:
Wrap the strung beads around your wrist to check the size. Add or remove beads from the back section (opposite the star) to adjust the fit without disturbing your front design. -
Tie the knot:
Tie a secure surgeon’s knot (right over left, left over right). Pull the elastic tight to ensure there are no gaps between beads. -
Secure the knot:
Apply a tiny drop of super glue or jewelry adhesive directly onto the knot. Let it dry for a few moments before trimming the excess cord close to the knot. -
Hide the knot:
Gently pull the knot inside one of the adjacent clay beads to hide it, giving your bracelet a professional, seamless finish. -
Attach the star:
Open your gold jump ring using two pliers (twist, don’t pull apart). Thread the star charm onto the jump ring, then attach it to the bail bead or directly onto the cord if you skipped the bail.
Glaze it Up
For a different vibe, apply a water-based glossy glaze to just a few of the dark green beads. The mix of matte and shiny textures adds an upscale, boutique quality to the piece.
Now you have a stunning, handmade accessory that brings a touch of evergreen elegance to your holiday wardrobe
Gingerbread Neutrals With White “Icing” Details
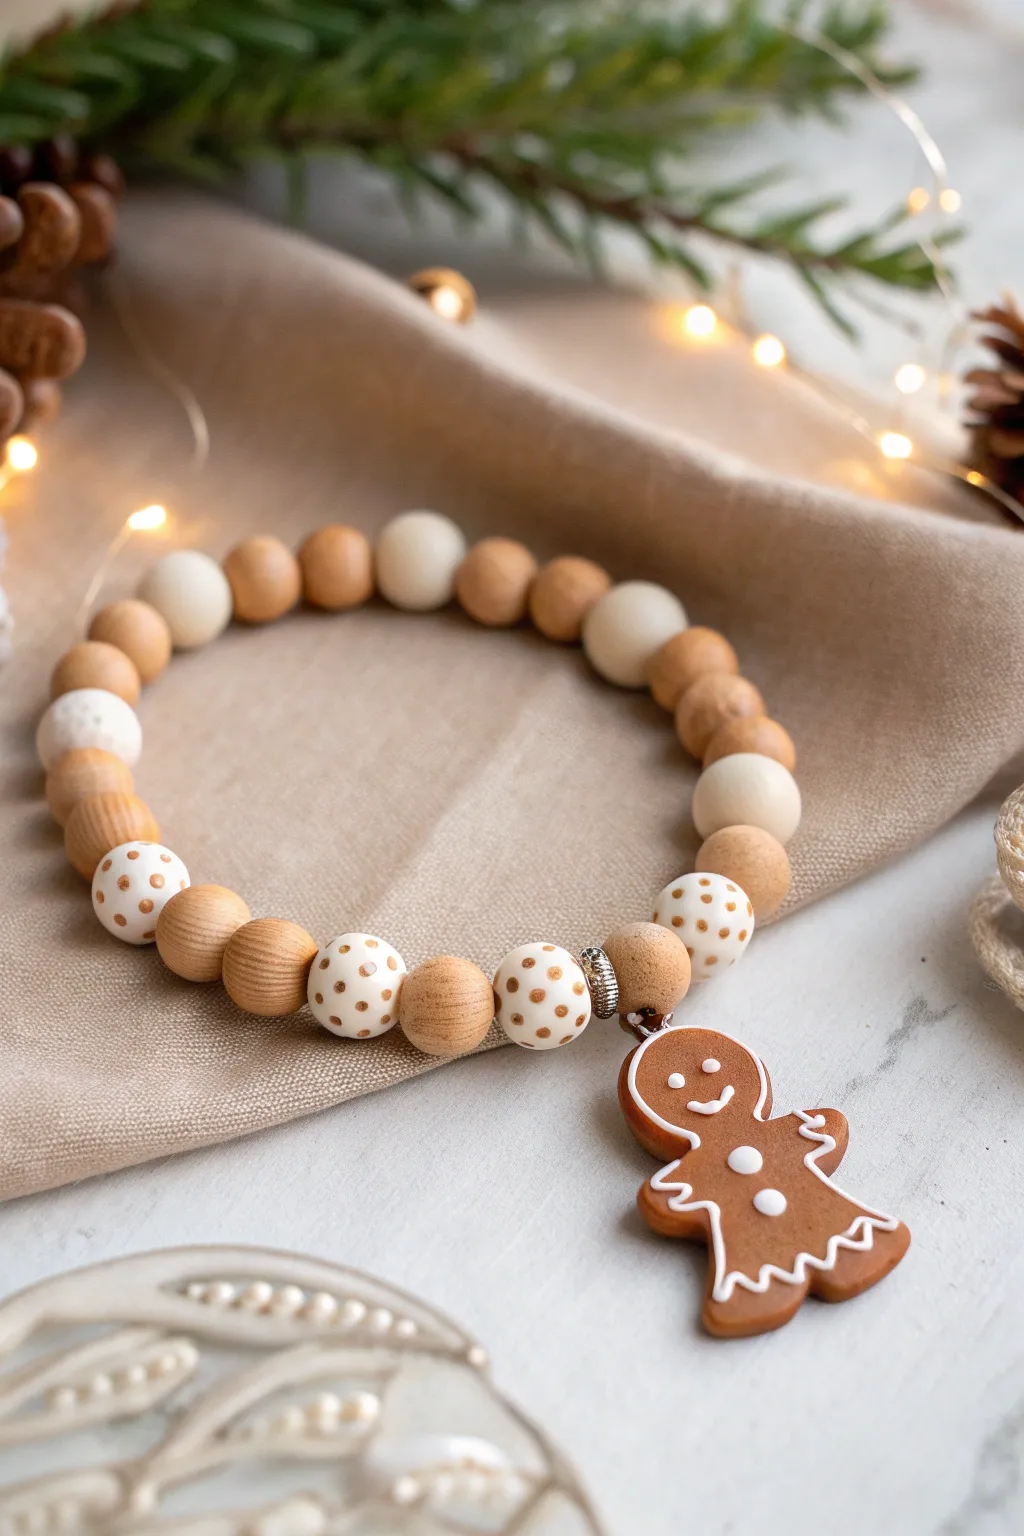
Embrace the warmth of the holidays with this charming bracelet that combines natural wood textures with a playful clay gingerbread girl. The soft, neutral palette of creams and browns creates a cohesive look that pairs perfectly with cozy winter sweaters.
How-To Guide
Materials
- Polymer clay (warm gingerbread brown, white)
- Small eye pin
- Jump ring (silver or rhodium)
- Elastic cord (0.7mm or 0.8mm)
- Needle tool or toothpick
- Liquid polymer clay (Translucent or white – optional for bonding)
- Round nose pliers
- Super glue or jewelry cement
- Round natural wood beads (approx. 10mm)
- Cream/off-white round beads (approx. 10mm)
- White or cream beads with brown polka dots (10mm)
- Rondelle crystal spacer beads (silver)
- Acrylic paint (brown) and small dotting tool (if making your own polka dot beads)
Step 1: Crafting the Gingerbread Charm
-
Condition the Clay:
Start by warming the gingerbread-colored polymer clay in your hands until it is soft and pliable. Roll it into a smooth ball free of cracks. -
Shape the Base:
Flatten the ball into a thick disc, about 4-5mm thick. Use a cookie cutter if you have one small enough, or gently use a craft knife to cut out a simple ginger-person silhouette by hand. -
Smooth the Edges:
If you cut the shape by hand, use your finger to gently tap and round off the cut edges so the cookie looks baked and soft, not sharp. -
Add the Icing Details:
Take extremely thin snakes of white clay. Carefully lay them along the sleeve cuffs and skirt hem in a zigzag or wavy pattern to mimic piped icing. -
Create the Face:
Roll tiny balls of white clay for the buttons and press them gently onto the chest. For the face, use a needle tool to etch a smile and create small indentations for eyes. -
Fill the Features:
Roll even tinier bits of white clay and place them into the eye indentations and the smile line you just etched. -
Insert the Eye Pin:
Trim a metal eye pin to about half an inch. Insert the straight end into the top of the charm’s head. I find adding a dab of liquid clay to the pin helps it stick permanently during baking. -
Bake the Charm:
Bake the charm according to your specific clay package directions (usually around 275°F/135°C for 15-30 minutes). Let it cool completely before handling.
Step 2: Assembling the Bracelet
-
Prepare the Cord:
Cut a piece of elastic cord about 10-12 inches long. This extra length makes tying the knot much easier later. -
String the Charm:
Attach a jump ring to the eye pin on your cooled gingerbread charm. Thread the elastic cord through this jump ring. -
Add Decorative Spacers:
Immediately on either side of the charm, thread a silver rondelle spacer bead. This frames the focal point beautifully. -
Begin the Pattern:
On both sides of the spacers, add a larger natural wood bead. Using two ends to string works well to keep the design symmetrical. -
Create the Bead Sequence:
String the rest of the bracelet in a repeating pattern. For this look, try alternating between the polka dot beads, the plain natural wood, and solid cream beads. -
Check the Fit:
Wrap the strand around your wrist to check the size. Add or remove beads until it sits comfortably without being too tight. -
Tie the Knot:
Bring the two ends of the elastic together. Tie a surgeon’s knot (a square knot where you loop the cord through twice on the first pass) and pull it very tight. -
Secure and Trim:
Apply a tiny drop of super glue or jewelry cement directly onto the knot. Allow it to dry for a moment, then trim the excess cord ends close to the knot. -
Hide the Knot:
Gently tug the nearest large bead over the knot to hide it inside the bead hole for a professional finish.
Clean Clay Tip
Use rubbing alcohol and a cotton swab to wipe away any fingerprints or lint from your clay charm before baking for a flawless finish.
Knot Slipping?
If your elastic knot slides undone, pre-stretch the cord firmly before stringing. This reduces elasticity loss and helps the knot bite.
Enjoy wearing your handcrafted festive accessory all season long


What Really Happens Inside the Kiln
Learn how time and temperature work together inside the kiln to transform clay into durable ceramic.
Peppermint Swirl Bracelet Using Marbled Red-and-White Beads

Capture the sweetness of holiday candy with this delightful red and white beaded bracelet. Featuring a mix of swirled peppermint beads, glittering red accents, and classic white spacers, this accessory is festive enough for a party yet subtle enough for everyday winter wear.
Step-by-Step Guide
Materials
- Polymer clay (Bright Red, White, Translucent)
- Glittery red polymer clay (or red clay + red glitter)
- Red and white twisted baker’s twine
- Silver crimp beads or knot covers
- Silver clasp (lobster claw or toggle)
- Beading needle
- Clay roller or pasta machine
- Needle tool or toothpick
- Sandpaper (fine grit)
- Gloss glaze (optional)
Step 1: Creating the Peppermint Swirl Beads
-
Condition the Clay:
Start by thoroughly conditioning your white and red polymer clay separately until they are soft and pliable. This ensures your beads won’t crack later. -
Form the Logs:
Roll a snake of white clay and a snake of red clay. They should be roughly the same thickness, about the diameter of a pencil. -
Make the Cane:
Twist the two snakes together tightly to create a candy-cane stripe effect. Continue rolling this twisted log on your work surface to smooth it out and blend the seams. -
Cut and Swirl:
Slice the log into equal-sized segments. Roll each segment into a round ball between your palms. -
Refine the Swirls:
For the distinct ‘pinwheel’ look seen in the photo, you can gently pinch the sides of the ball while rolling to directionalize the stripes. -
Pierce the Beads:
Using your needle tool, carefully poke a hole through the center of each swirled bead. Twist the tool as you push to avoid deforming the shape.
Fixing Wonky Holes
If a bead hole closes up during baking, use a small hand drill or a heated needle to gently re-open it. Do this slowly to prevent the bead from cracking.
Step 2: Creating Accent Beads
-
Glitter Beads:
Take your glittery red clay (or mix fine red glitter into plain red clay) and roll small, uniform balls. These add a lovely sparkle that contrasts with the matte swirls. -
Solid Color Beads:
Create simple solid white and solid red balls. Make some slightly smaller than your main peppermint beads to act as spacers or tapered ends. -
Disc Spacers:
Roll a small amount of red clay into a thin sheet and use a small circular cutter (or a straw) to punch out tiny flat disc beads. -
Pierce Remaining Beads:
Just as before, create holes in all your accent beads, ensuring the holes are large enough to accommodate your baker’s twine. -
Bake:
Arrange all your beads on a baking sheet or tile. Bake according to your clay manufacturer’s instructions (usually 275°F for 15-30 minutes). -
Cool and Sand:
Let the beads cool completely. I like to lightly sand any fingerprints off the white beads for a professional finish.
Step 3: Assembly
-
Prepare the Cord:
Cut a length of red and white baker’s twine, ensuring it’s about 4 inches longer than your desired bracelet size. -
Plan the Pattern:
Lay out your beads on a bead board or towel. Recreate the pattern from the photo: center the peppermint swirls, flanked by glitter beads, then alternate solid white and red beads towards the ends. -
Stringing:
Thread your twine onto a large-eye beading needle. String the beads following your laid-out design. -
Adding Spacers:
Don’t forget to insert those tiny red disc spacers between larger white beads to add visual rhythm. -
Finishing Ends:
Once all beads are strung, thread a silver crimp bead or knot cover onto one end. -
Attach Clasp:
Loop the twine through the clasp ring, feed it back through the crimp bead, and flatten the crimp tightly with pliers. -
Tie and Trim:
For extra security, tie a small knot with the excess twine before trimming it close to the bead. Repeat on the other side. -
Final Adjustments:
Gently massage the beads so they sit comfortably against one another, ensuring the bracelet is flexible and not too stiff.
Scented Jewelry
Mix a tiny drop of peppermint essential oil into the clay while conditioning to make your bracelet actually smell like candy canes.
Enjoy wearing your festive, handmade accessory throughout the holiday season
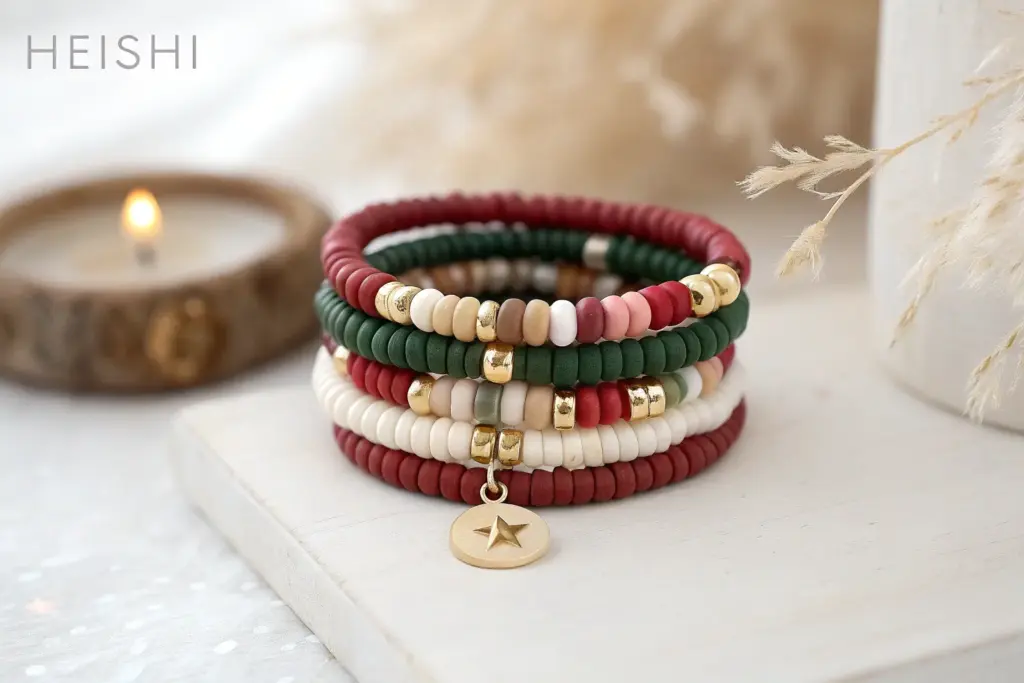
Ornament Charm Bracelet With Shiny Metallic Spacers
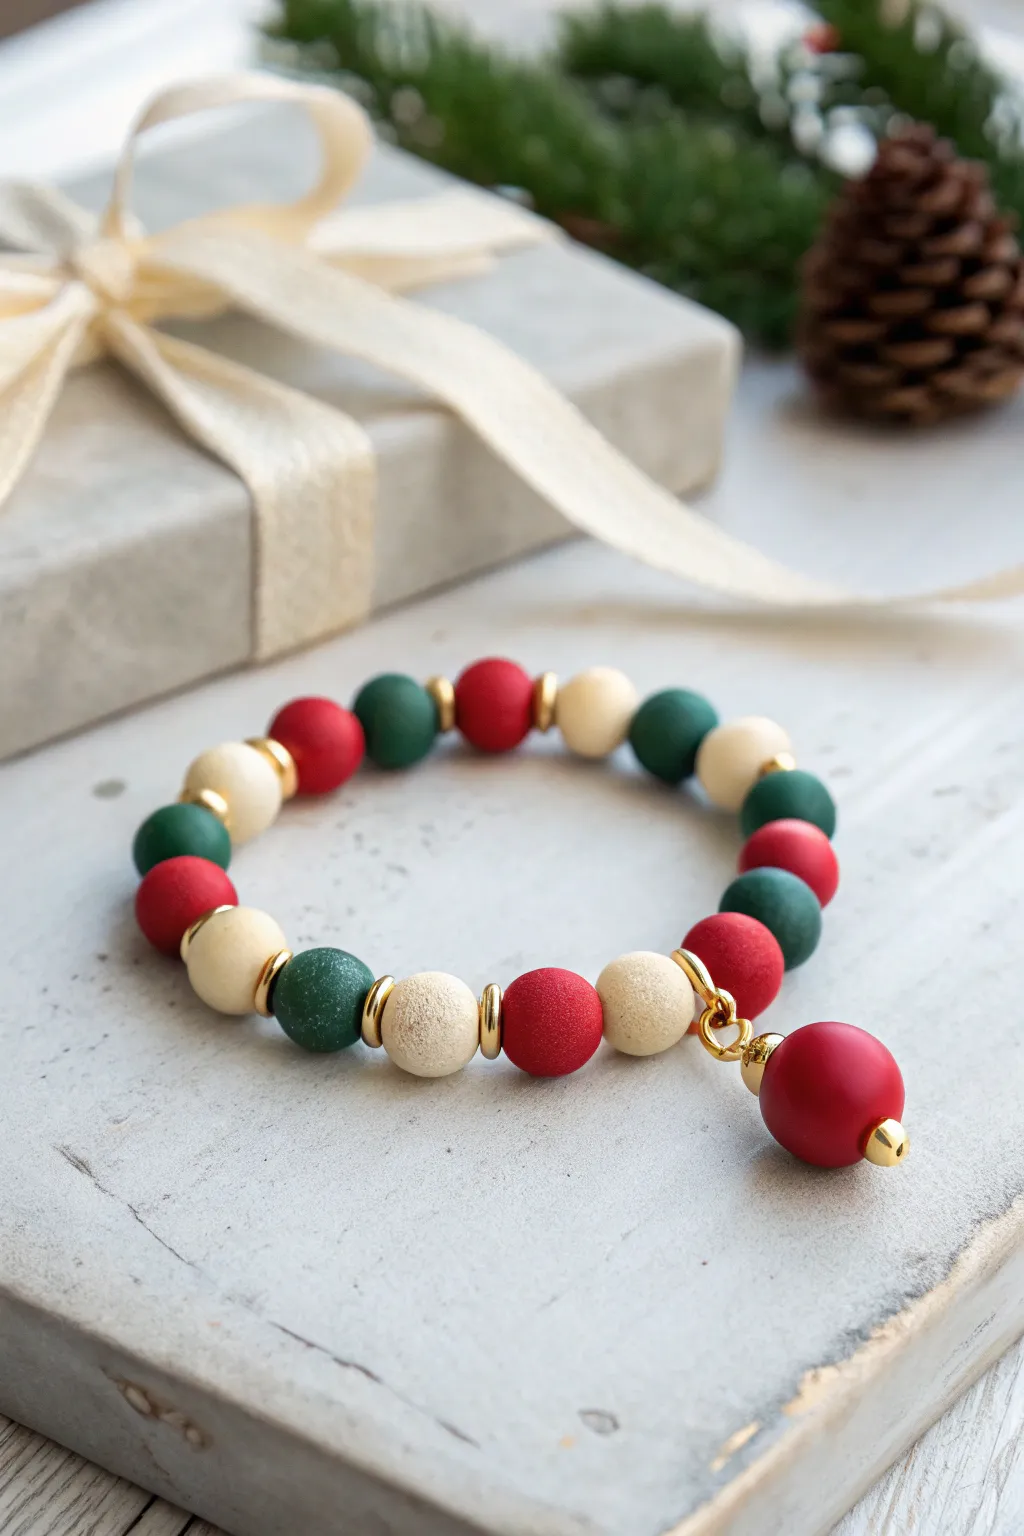
This elegant holiday bracelet combines the classic Christmas trio of deep red, forest green, and creamy white polymer clay beads with luxurious gold accents. The design features a charming dangle bead that acts like a tiny ornament, perfect for adding a touch of sophisticated cheer to any winter outfit.
Step-by-Step Tutorial
Materials
- 10-12mm round polymer clay beads in matte red
- 10-12mm round polymer clay beads in matte dark green
- 10-12mm round polymer clay beads in matte cream/beige
- Elastic stretch cord (0.7mm or 0.8mm)
- Gold saucer spacer beads or small gold heishi beads
- One gold headpin (2 inches long)
- One gold jump ring (6mm or 8mm)
- Small gold seed bead or crimp bead (for the charm end)
- Jewelry adhesive (e.g., E6000 or specialized knot glue)
- Round nose pliers
- Wire cutters
- Scissors
Step 1: Planning and Preparation
-
Measure your wrist:
Before cutting any cord, wrap a measuring tape loosely around your wrist to determine the desired length. Add about an inch to this measurement to account for the size of the chunky beads. -
Cut the elastic cord:
Cut a piece of elastic cord about 10-12 inches long. Having extra length makes tying the final knot much easier without fumbling. -
Pre-stretch the cord:
Hold both ends of the elastic and give it a few firm tugs. This pre-stretching step prevents the bracelet from sagging or expanding permanently after you wear it a few times. -
Plan the pattern:
Lay your beads out on a bead board or a towel to visualize the sequence. A repeating pattern of Red -> Gold Spacer -> Cream -> Green -> Gold Spacer works beautifully, or mix it up as seen in the photo for a more organic feel.
Hiding the Knot
If the bead hole is too small to hide the knot, finish your strand next to a large-hole metal spacer bead instead, which can easily swallow the knot.
Step 2: Creating the Ornament Charm
-
Prepare the headpin:
Take your gold headpin and slide on a small gold bead or spacer first. This adds a nice metallic finish to the bottom of the charm. -
Add the main bead:
Slide one red clay bead onto the headpin. It should sit snugly against the bottom gold accent. -
Top the charm:
Add a small gold spacer bead on top of the red clay bead to cap it off neatly. -
Form the loop:
Using your round nose pliers, grasp the wire just above the top bead. Bend the wire 90 degrees, then rotate the pliers to form a simple loop. Wrap the excess wire around the stem if you prefer a wrapped loop, or simply trim the excess for a basic loop. -
Attach the jump ring:
Open a gold jump ring by twisting it sideways with pliers. Hook it through the loop you just made on the bead charm, but don’t close it yet.
Pro Tip: Matte Finish
To get the soft matte look shown here, lightly buff plain polymer clay beads with a fine-grit sanding sponge or denim cloth before stringing.
Step 3: Stringing the Bracelet
-
Start stringing:
Begin sliding your beads onto the elastic cord. I find it easiest to secure one end of the cord with a piece of tape or a bead stopper so nothing slides off while working. -
Insert spacers:
Place a gold spacer bead between every clay bead, or alternate them sporadically. In the example, notice how gold spacers frame the cream beads specifically to highlight them. -
Add the charm connector:
Identify where you want your charm to hang. At that point in the pattern, thread the open jump ring (with the charm attached) onto the elastic cord just like a bead. -
Complete the strand:
Continue adding beads until you reach the desired length. Wrap it around your wrist to double-check the fit; it should be snug but not tight. Add or remove a bead if necessary. -
Close the jump ring:
Once the charm is positioned correctly on the cord, use your pliers to twist the jump ring closed securely so it doesn’t slip off.
Step 4: Finishing Touches
-
Tie the knot:
Remove the tape or stopper. Bring the two ends of the elastic together and tie a surgeon’s knot (a standard overhand knot, but loop the end through twice before pulling tight). -
Secure with glue:
Apply a tiny dab of jewelry adhesive directly onto the knot. This ensures it won’t unravel over time. -
Hide the knot:
While the glue is still tacky, pull the elastic firmly so the knot slides inside the hole of the nearest large clay bead. This hides the mechanics for a professional finish. -
Trim excess cord:
Once the glue has fully dried (check the manufacturer’s instructions), trim the excess elastic cord close to the bead hole using sharp scissors.
Now you have a sophisticated holiday accessory ready to wear or gift.

TRACK YOUR CERAMIC JOURNEY
Capture glaze tests, firing details, and creative progress—all in one simple printable. Make your projects easier to repeat and improve.
Mistletoe and Kisses Bracelet With Green-White Base
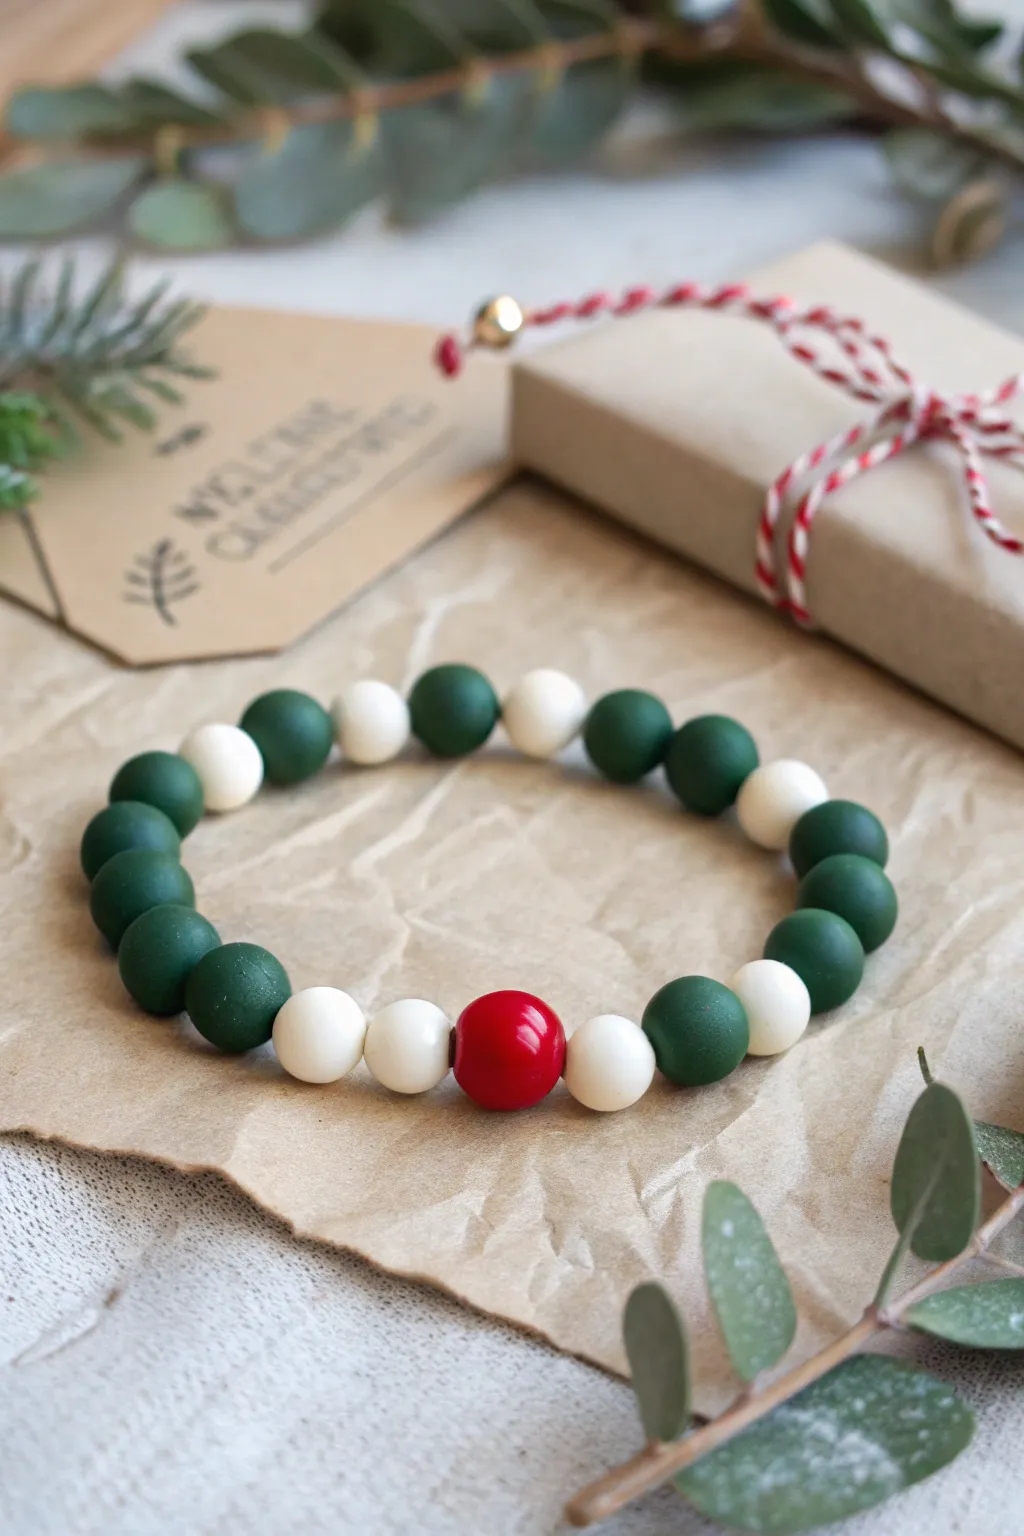
Capture the romantic charm of a winter holiday with this elegant beaded bracelet featuring deep matte greens, creamy whites, and a striking pop of ruby red. The alternating pattern is subtly disrupted by a central focal section, creating a sophisticated accessory perfect for Christmas gatherings.
Step-by-Step
Materials
- Polymer clay (Dark Forest Green, Cream/Off-White, Deep Ruby Red)
- Bead rolling tool or acrylic sheet
- Circle cutter (small, approx. 12mm)
- Toothpick or bead piercing tool
- Clear elastic jewelry cord (0.7mm or 0.8mm)
- Super glue or jewelry adhesive
- Gloss glaze (optional, for the red bead)
- Wet/dry sandpaper (400-800 grit)
- Oven for baking
Step 1: Creating the Clay Beads
-
Condition the Green Clay:
Start by thoroughly conditioning your dark forest green polymer clay until it is soft and pliable. Roll it out into a thick sheet, approximately 10mm thick, to prepare for cutting uniform pieces. -
Cut Green Segments:
Using your small circle cutter, punch out circles from the green slab. You will need about 12-14 green pieces depending on your wrist size, but make a few extras just in case. -
Roll Green Spheres:
Take each green cutout and roll it between your palms to form a smooth sphere. I prefer to use a circular motion rather than back-and-forth to get them perfectly round without flat spots. -
Create White and Red Beads:
Repeat the conditioning and cutting process with the cream clay (about 6-8 beads) and the red clay (exactly 1 bead). Roll them into spheres matching the size of your green beads. -
Pierce the Holes:
Hold a bead gently between your thumb and forefinger. Using a toothpick or piercing tool, slowly twist a hole through the center. Twist the bead, not the tool, to prevent distortion. -
Refine the Holes:
Once the tool pokes through the other side, carefully remove it and re-insert it from the exit hole. This cleans up the edges and ensures the hole is uniform on both sides. -
Bake the Beads:
Arrange your beads on a baking sheet lined with parchment paper. Bake according to your clay package instructions (usually 275°F/135°C for 15-30 minutes). Let them cool completely before handling.
Step 2: Assembly & Finishing
-
Sand for Texture:
Once cool, lightly sand the green beads with fine-grit sandpaper under running water. This removes any fingerprints and enhances that trendy matte, velvety finish seen in the photo. -
Glaze the Red Bead:
For that juicy ‘holly berry’ look, apply a coat of gloss glaze specifically to the single red bead. Leave the green and white beads matte for contrast. Let the glaze dry fully. -
Cut the Elastic:
Cut a piece of elastic cord about 10 inches long. Pre-stretch it by pulling on the ends firmly a few times; this prevents the bracelet from drooping later. -
String the Centerpiece:
Start threading by placing the glossy red bead in the middle. On either side, add two cream beads. This creates the ‘mistletoe’ focal point. -
Build the Pattern:
On the left side of your focal section, thread a green bead. On the right side, thread another green bead. Continue adding green beads to fill out the sides. -
Add Accent Breaks:
After placing about 4-5 green beads on each side, insert one cream bead, followed by one green, and another cream bead to break up the solid color block. Finish the rest of the length with green beads until it fits your wrist. -
Check the Fit:
Wrap the unfinished strand around your wrist to check the size. It should sit comfortably without pinching or sliding too freely. -
Tie the Knot:
Tie the ends together using a surgeon’s knot (right over left, left over right, and loop through twice). Pull the knot tight. -
Secure and Hide:
Add a tiny drop of super glue specifically to the knot. Let it dry for a few seconds, trim the excess cord, and slide the knot inside the hole of a neighboring green bead to hide it.
Smooth Rolling Tip
To eliminate fingerprints entirely, wear latex gloves while rolling your clay spheres or smooth them gently with a drop of baby oil before baking.
Distorted Holes?
If your beads squish into ovals while piercing, let the rolled spheres sit in the fridge for 10 minutes to firm up before poking the holes.
Enjoy wearing your festive, custom-fitted holiday accessory all season long
Plaid-Inspired Christmas Bracelet With Micro-Stripe Blocks

Evoke the warmth of a Christmas flannel with this sophisticated plaid-inspired design. By grouping deep burgundy, forest green, and creamy white flat clay beads with elegant gold spacers, you’ll create a rhythmic pattern that feels traditional yet modern.
How-To Guide
Materials
- Flat disc polymer clay beads (Heishi) in Forest Green
- Flat disc polymer clay beads (Heishi) in Deep Burgundy/Wine
- Flat disc polymer clay beads (Heishi) in Cream or Off-White
- Square or flat hex golden spacer beads (approx. 4-6mm)
- Strong elastic stretch cord (0.8mm or 1mm recommended)
- Beading needle (optional but helpful)
- Scissors
- Super glue or jewelry cement
Step 1: Planning the Pattern
-
Study the swatch:
Before stringing, examine the visual rhythm of the bracelet. This isn’t a random mix; it relies on ‘blocks’ of color separated by metallic spacers to mimic the intersecting lines of plaid fabric. -
Establish the color units:
This design uses small stacks of 3-5 clay beads to form solid color blocks. I find that using exactly 4 beads per color block creates the perfect ‘stripe’ thickness. -
Mapping the sequence:
The core recurring pattern is: Gold Spacer → Red Block → White Block → Green Block → Gold Spacer. You can vary this order, such as Red → White → Red → Gold, to create a more complex tartan look. -
Measure your wrist:
Wrap the elastic cord loosely around your wrist and add about 3-4 inches of extra length for safe knotting. Don’t cut it off the spool yet if you want to prevent beads from sliding off the other end.
Step 2: Stringing the Design
-
Start the string:
Begin by threading a gold spacer bead onto your elastic. This gives you a solid anchor point and hides the knot later. -
Create the first green block:
Thread 4 forest green flat disc beads onto the cord. Ensure they sit flush against each other to form a solid cylinder of color. -
Add a gold accent:
Slide on one gold square spacer. Notice how the metallic shine immediately breaks up the matte texture of the clay, essential for that ‘plaid’ structure. -
Form a red block:
Add 4 deep burgundy beads next. The contrast between the gold and the dark red is very classic. -
Insert the white stripe:
Thread 2 to 3 cream beads. Making the white sections slightly thinner than the colored sections (like pinstripes) can make the plaid effect more realistic. -
Build a mixed sequence:
Now create a longer section without gold: try Green Block (3 beads) → White Block (2 beads) → Red Block (3 beads). This mimics the thick-and-thin lines of woven fabric. -
Cap with gold:
End that mixed sequence with another gold spacer bead to close the ‘pattern unit’. -
Repeat until length is reached:
Continue repeating these units—alternating between single color blocks separated by gold, and multi-color runs—until the bracelet wraps comfortably around your wrist without stretching. -
Check the fit:
Wrap the unfinished strand around your wrist. The beads should touch skin all the way around without gaps slightly showing the cord.
Fixing Gaps
If gaps appear between bead ‘blocks’ revealing the cord, add one extra clay bead to every third color section. This compresses the tension slightly for a seamless tube look.
Step 3: Finishing Touches
-
Pre-stretch the cord:
Gently pull tightly on both ends of the elastic. This ‘pre-stretching’ prevents the bracelet from sagging later after you’ve worn it a few times. -
Tie the surgeon’s knot:
Cross right over left, then left over right, looping the top strand through twice on the second pass. This extra loop adds security. -
Secure the knot:
Pull the knot tight. Apply a tiny dot of super glue or jewelry cement directly onto the knot. Let it dry for a minute. -
Hide the mechanics:
Once the glue is tacky or dry, trim the excess elastic ends close to the knot. Gently tug the knot so it slides inside one of the gold spacer beads or a clay bead stack to hide it.
Golden Hour
Swap the plain gold spacers for gold crystal rondelles. The added sparkle transforms this from a casual day bracelet to a piece suitable for a holiday evening party.
Wear your new bracelet stacked with a watch or gold bangle for instant holiday cheer
Ugly Sweater Christmas Stack With Mixed Patterns
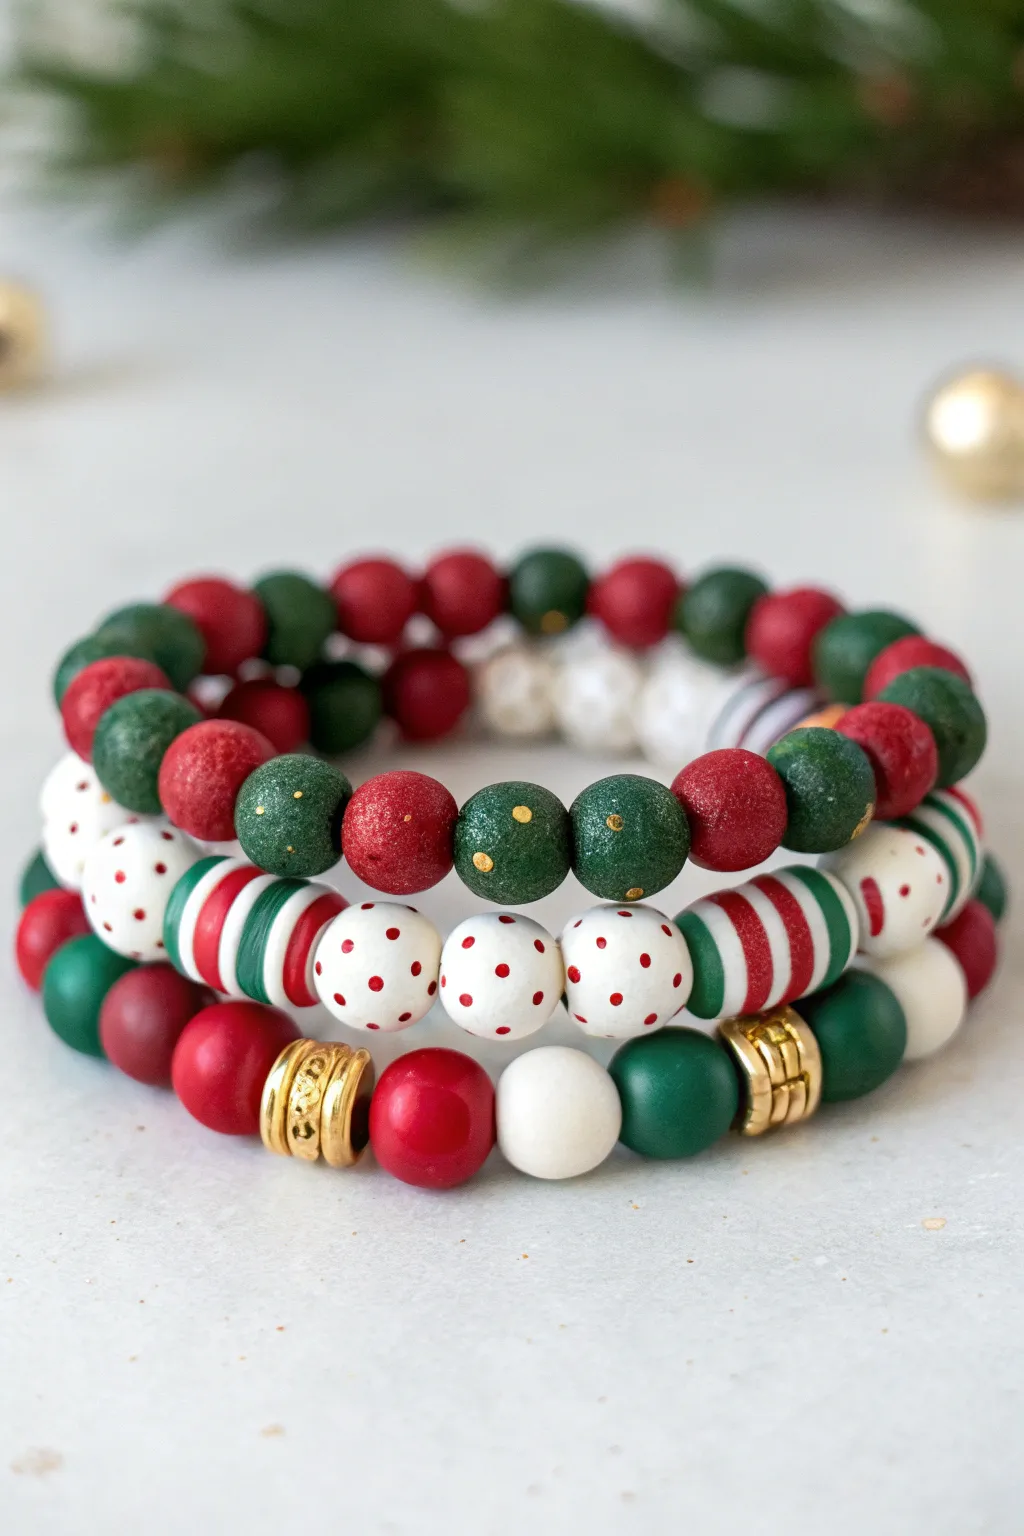
Embrace the festive chaos with this quirky and charming bracelet stack that mimics the beloved patterns of a classic Christmas sweater. Featuring a mix of polka dots, stripes, and subtle glitter accents, this trio balances fun textures with elegant gold touches for a look that is both playful and polished.
Step-by-Step Guide
Materials
- Stretch cord (0.8mm or 1mm thickness)
- Red polymer clay beads (10mm, smooth round)
- Green polymer clay beads (10mm, smooth round)
- White or cream polymer clay beads (10mm, smooth round)
- Red polymer clay beads with subtle glitter/matte finish (8mm)
- Green polymer clay beads with subtle gold speckles (8mm)
- Patterned polymer clay beads: white with red polka dots
- Patterned polymer clay beads: red, green, and white stripes
- Gold tube spacer beads (textured or ribbed)
- Gold flat disc spacer beads
- Hypo-cement or strong jewelry glue
- Scissors
Step 1: The ‘Solid & Gold’ Base Layer
-
Measure your cord:
Cut a piece of stretch cord about 10-12 inches long. This generous length makes it much easier to tie the final knot without fumbling. -
Pre-stretch the string:
Give the elastic a few firm tugs before you start beading. This prevents the bracelet from stretching out and becoming loose immediately after you wear it. -
Start the pattern:
Begin by threading a large, smooth green bead, followed by a smooth white bead. -
Add the focal point:
Slide on a large red bead, then thread on one of the wide gold tube spacers. Follow this immediately with another large red bead. -
Secure the gold accent:
Add a second gold tube spacer after that red bead. This creates a bold metallic section that anchors the bottom of the stack. -
Complete the loop:
Continue the pattern around the rest of the cord using alternating green and white beads until it fits comfortably around your wrist (usually about 6.5 to 7 inches). -
Tie it off:
Tie a secure surgeon’s knot (right over left, left over right, and loop the top strand through twice). Add a tiny dab of glue to the knot before trimming the excess cord.
Knot Slipping?
If your elastic knot keeps coming undone before the glue dries, try clamping it with a small binder clip or a piece of tape for 5 minutes while the adhesive sets properly.
Step 2: The ‘Pattern Play’ Middle Layer
-
Prepare the second strand:
Cut and pre-stretch another length of cord just like the first one. -
Introduce the stripes:
Thread on a striped clay bead (alternating red, green, and white bands). I prefer to place these near the center so they really pop. -
Mix in the polka dots:
Next to the stripe, add a white bead with red polka dots. The clash of patterns is exactly what gives this that ‘ugly sweater’ charm. -
Create a repeating sequence:
Alternate between the striped beads and the polka dot beads for the front section of the bracelet. -
Balance with solids:
Finish the back half of the bracelet with smaller solid white beads or plain red spacers if you run out of patterned beads, keeping the busy patterns focused on the top of your wrist. -
Finish the strand:
knot and glue this strand secure, ensuring it sits slightly looser than the first one so they stack nicely.
Step 3: The ‘Texture & Sparkle’ Top Layer
-
Select your texture beads:
For the final strand, sort out your 8mm matte/glitter beads. Look for the red ones with a sugary texture and green ones with gold flecks. -
Begin alternating:
Thread a green speckled bead, followed by a red textured bead. -
Add subtle separation:
Place a tiny gold flat disc spacer between every 3 or 4 colored beads. This adds just a hint of shine without overpowering the matte finish of the clay. -
Check the fit:
Wrap this strand around your wrist alongside the other two. Adjust the bead count so it sits comfortably on top of the stack without sliding down. -
Final knotting:
Perform your final surgeon’s knot, apply glue, and let it dry completely before trimming the ends close to the beads. -
Hide the knots:
Gently tug on the beaded strands to pull the knots inside the hole of a neighboring bead for a seamless, professional finish.
Level Up: Charm It
Add a tiny gold enamel charm to the middle patterned bracelet—a miniature snowflake, a tiny tree, or a candy cane adds an adorable focal point to the stack.
Stack them all together on your wrist and enjoy the festive cheer you’ve just created
Christmas Lights Bracelet With Bright Bulb-Like Color Pops
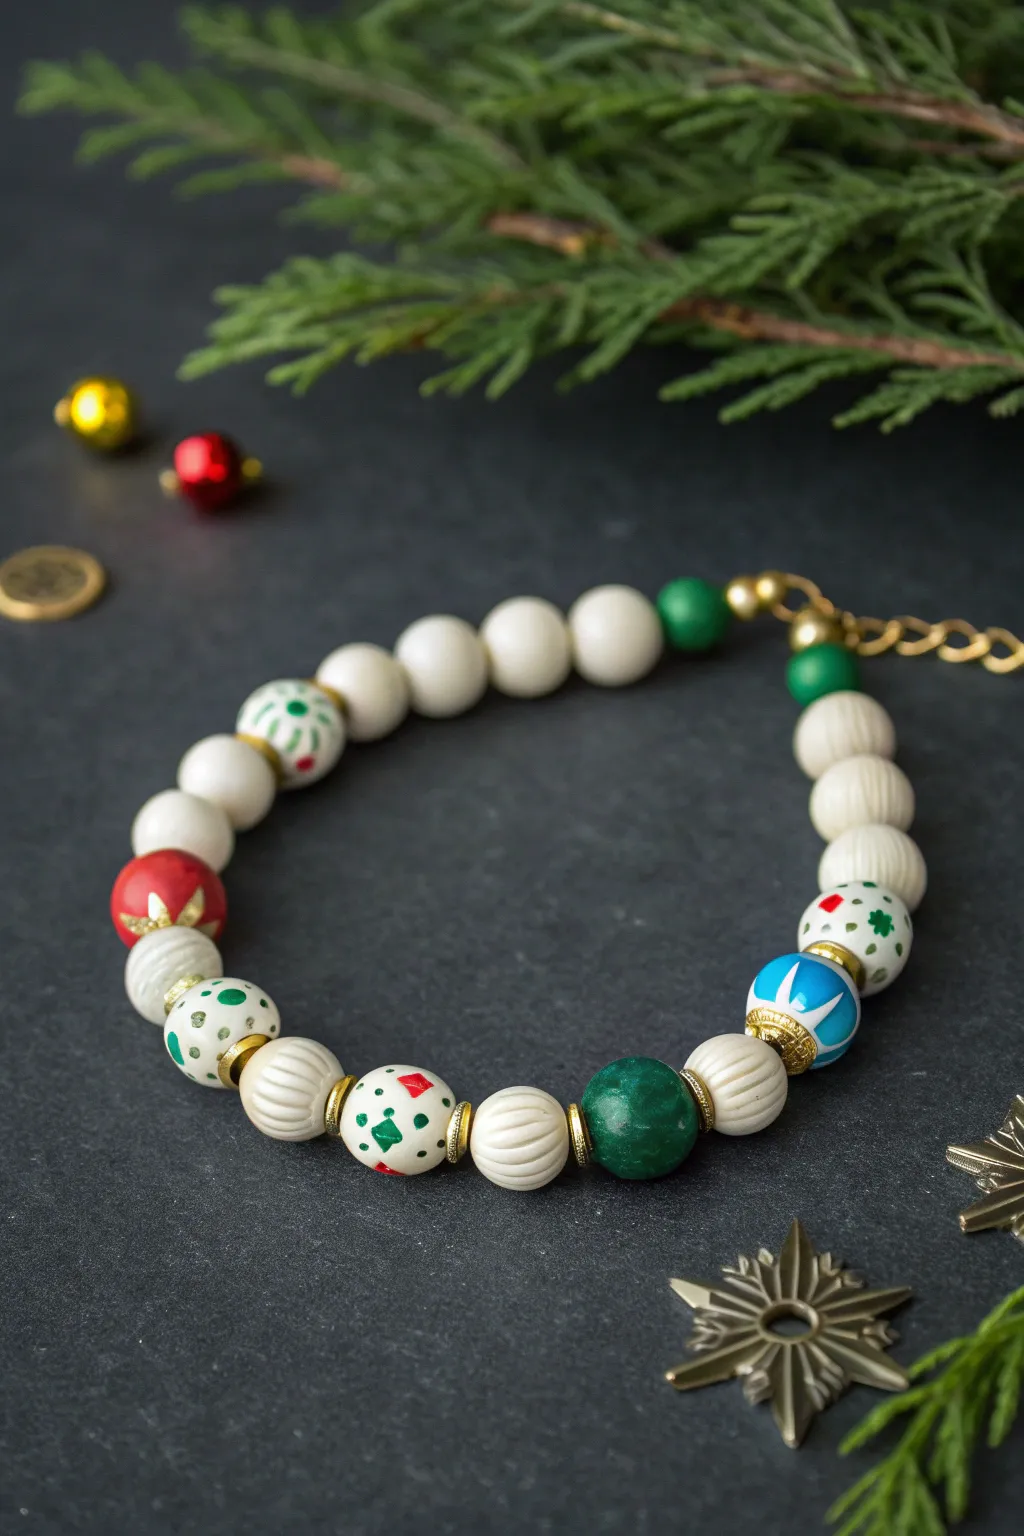
Illuminate your holiday style with this charming beaded bracelet featuring playful pops of color that resemble classic Christmas lights. The mix of textured cream beads and vibrant, painted accents creates an elegant yet festive accessory perfect for seasonal parties.
Step-by-Step
Materials
- White or cream polymer clay round beads (approx. 10-12mm)
- Small round plain cream beads (approx. 8mm)
- Polymer clay or ceramic accent beads (red, blue, green, and patterned)
- Gold tone bead spacers (daisy or disc style)
- Gold tone crimp beads and covers
- Gold lobster clasp and extender chain
- Strong beading wire (gold or clear)
- Wire cutters
- Chain nose pliers
- Crimping tool (optional but recommended)
Step 1: Preparation & Layout
-
Measure your wrist:
Before cutting any wire, measure your wrist and add about an inch to account for the bead bulk. This ensures a comfortable fit. -
Cut the beading wire:
Cut a length of beading wire that is 3-4 inches longer than your final measurement to give yourself plenty of room to work with the clasp. -
Visualize the pattern:
Lay out your beads on a bead board or soft cloth. The design in the photo uses a symmetrical but varied pattern. Start with your centerpiece—notice the large green focal bead—and build outwards. -
Organize the ‘Light Bulbs’:
Identify your colorful ‘light bulb’ beads. You’ll need a large solid green bead, a blue patterned bead, a red patterned bead, and several white beads with holiday speckles.
Loose Beads?
If the design feels too stiff, you crimped too tightly. Leave a tiny 1-2mm gap of wire at the end before crimping to ensure the bracelet drapes naturally around the wrist.
Step 2: Designing the Sequence
-
Create the center cluster:
For the focal point, place the large dark green round bead in the center. Flank it on either side with a gold spacer, followed by a ribbed cream bead. -
Add the first patterned beads:
Moving outward from the ribbed cream beads, add a gold spacer, then a festive white bead with red and green diamonds/dots. -
Symmetry check:
Ensure whatever you place on the right side of the green center bead, you mirror on the left side to maintain balance. -
Incorporate the bold colors:
Next, add a ribbed cream bead on each side. Then, introduce your bold ‘bulb’ colors: place a blue patterned bead on one side and a red patterned bead on the other. Use gold spacers to cap these colorful beads for an elegant finish. -
Continue the pattern:
Add another section of white beads. Use a plain white bead, followed by a green-dotted white bead, and then another plain white bead. -
Finish the strand:
Complete the length of the bracelet using smaller, plain cream beads until you reach your desired length. End with a small green bead near the clasp area for a hidden pop of color.
Pro Tip: Custom Textures
Can’t find ribbed cream beads? Make your own by gently rolling plain polymer clay balls over a fine-toothed comb before baking them.
Step 3: Stringing & Finishing
-
Secure the first end:
Thread a crimp bead onto one end of the wire, followed by the jump ring of your extender chain. Loop the wire back through the crimp bead. -
Crimp securely:
Use your crimping pliers to flatten the crimp bead securely, locking the wire in place. I like to double-check this connection with a gentle tug. -
String the design:
Thread your laid-out pattern onto the wire, sliding the beads down to cover the short tail of wire left from crimping. -
Prepare the second crimp:
Once all beads are strung, slide on a crimp bead and then the lobster clasp. -
Loop and tighten:
Pass the wire back through the crimp bead and through the last couple of beads on the strand. Pull the wire until the loop is snug against the clasp but still allows movement. -
Final crimp:
Flatten the final crimp bead securely. Trim the excess wire close to the beads using your wire cutters. -
Add crimp covers (Optional):
If you want a polished professional look, gently close a gold crimp cover over each flattened crimp bead to make them look like gold spacer beads.
Now you have a festive, handcrafted accessory ready to wear to your next holiday gathering