Whenever I’m building a clay bead bracelet stack, I treat it like glazing a set of mugs: everything should coordinate, but each piece still gets to have its own moment. Here are my favorite heart bundle ideas that feel giftable, wearable, and super fun to mix on your wrist.
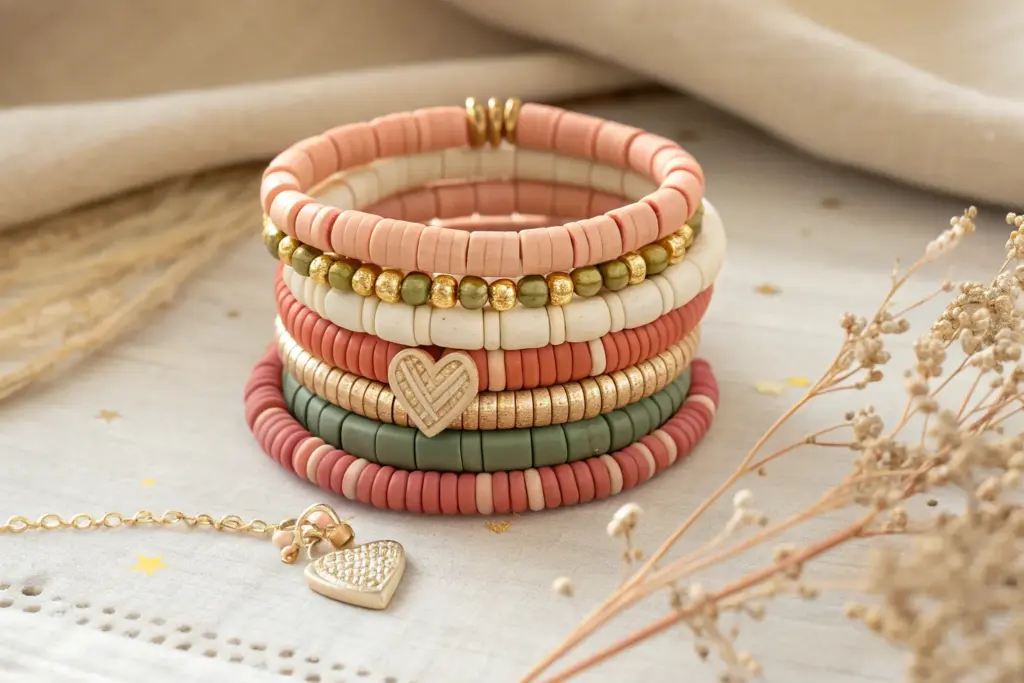
Valentine Ombre Heart Bracelet Stack
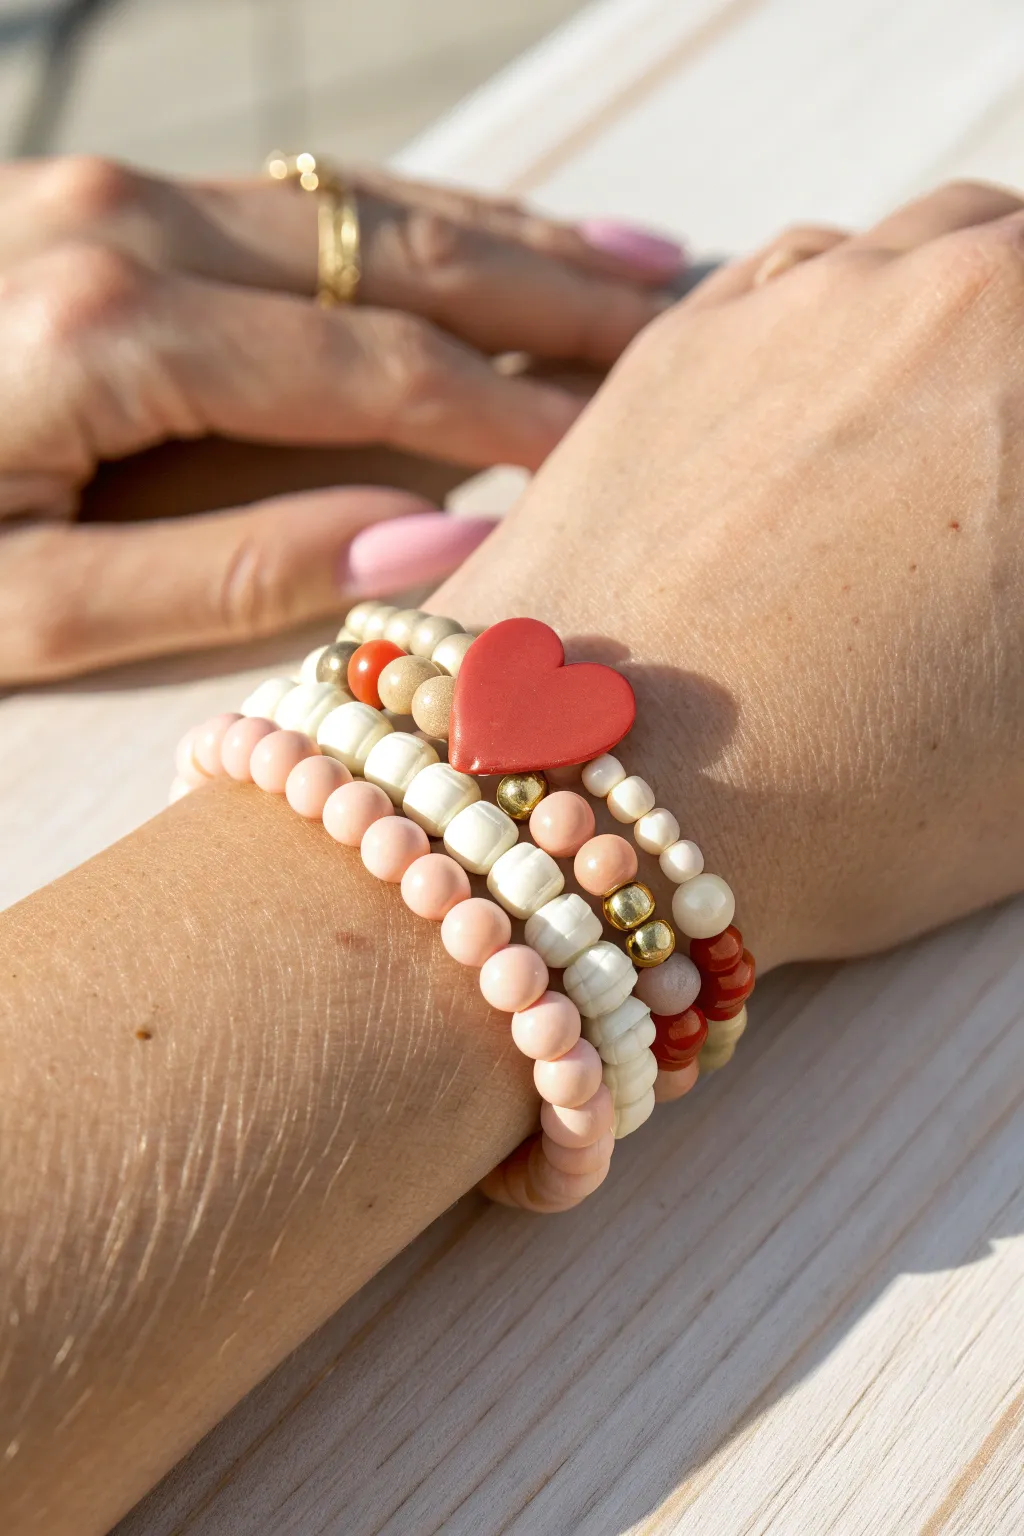
Embrace the season of love with this stunning five-piece bracelet stack featuring a romantic gradient of cherry reds, soft pinks, and creamy whites. The centerpiece is a delicate cord bracelet anchored by a sparkling heart charm, perfecting a look that balances elegance with playful charm.
How-To Guide
Materials
- Dark red garnet or glass round beads (4mm)
- Small white pearl beads (2-3mm)
- Rose quartz or pink opal round beads (6mm)
- Translucent pink glass or quartz beads (4mm)
- Faceted deep red/garnet crystal beads (3mm)
- Gold curved tube bead or straight spacer bar (approx. 20-25mm)
- Silver or white glitter heart charm (side-drilled or top-drilled)
- Gold saucer spacer beads
- Gold ribbed drum spacer beads
- Strong elastic stretch cord (0.5mm or 0.7mm)
- Jewelry glue (optional)
- Scissors
Step 1: The Centerpiece Heart Bracelet
-
Prepare the Charm:
Begin with the focal bracelet. If your heart charm is a pendant style, you may need to attach it to the center of your gold tube bar using a jump ring. If it’s a slider bead, simply thread it onto the tube. -
String the Base:
Cut a piece of elastic cord about 10 inches long. Thread your gold tube (with the heart charm attached) onto the center. -
Add Faceted Beads:
On both sides of the gold tube, string your 3mm faceted deep red crystal beads. Continue creating a symmetrical pattern until the strand fits your wrist comfortably. -
Tie it Off:
Bring the ends together and tie a secure surgeon’s knot. Pull tight, dab with a tiny dot of glue, let it dry, and trim the excess cord.
Knot Security
Pre-stretch your elastic cord firmly before stringing beads. This prevents the bracelet from loosening up and creating gaps after you wear it a few times.
Step 2: The Classic Pearl & Red stack
-
Start the Red Strand:
For the darkest layer, cut another length of elastic. String the 4mm dark red round beads until you reach your desired length, generally about 6.5 to 7 inches for an average wrist. -
Create the Pearl Accent:
For the delicate white strand, string the small 2-3mm white pearls. I find these smaller beads create a lovely texture contrast against the larger stone beads. -
Finish Both Strands:
Tie off both the dark red and pearl bracelets using the same knotting technique as the first bracelet. Hide the knots inside a bead if the hole size allows.
Make it Personal
Swap the heart charm for a gold initial letter or a small locket. You can also mix metals by using silver spacers instead of gold for a cooler tone.
Step 3: The Statement Pink Layer
-
Select Larger Beads:
This layer adds volume. Use the larger 6mm rose quartz or pink opal beads. Their milky, opaque finish is crucial for the ombre effect. -
Add Variety:
Intersperse a few gold saucer spacers or a ribbed gold drum bead roughly halfway through the strand to break up the pink pattern. -
Secure the Strand:
Double-check the fit against your wrist—larger beads take up more inner circumference, so you might need slight adjustments. Tie, glue, and trim.
Step 4: The Translucent Blush Strand
-
String the Final Layer:
Use the 4mm translucent pink beads for this final piece. These beads should catch the light and bridge the gap between the dark red and opaque pink tones. -
Final Assembly:
Knot and finish this last bracelet. Secure all knots with a final check to ensure they are tight. -
Stacking:
Arrange the bracelets on your wrist starting with the dark red, then the pearls, the large pink stones, the heart charm bracelet, and finally the translucent pink layer to recreate the full ombre effect.
Wear your beautiful new stack with pride or gift it to someone special to celebrate affection


White and Gold Heart Bundle for a Clean, Chic Look
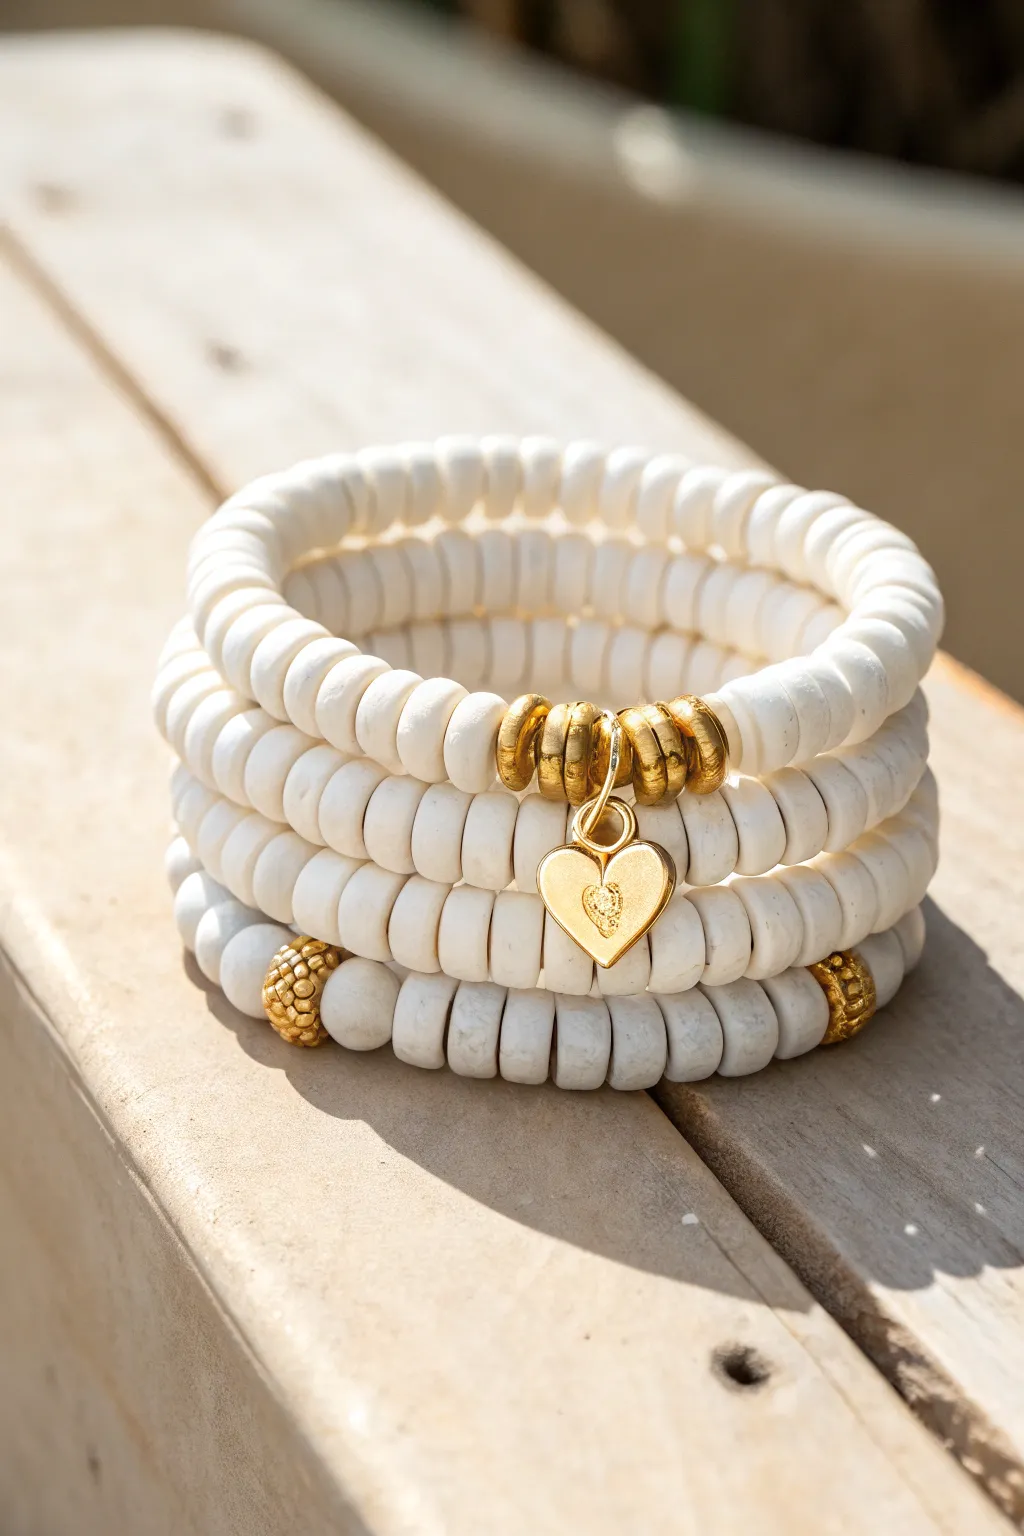
Achieve a clean, sophisticated look with this timeless stack of white clay bracelets accented by striking gold details. This bundle combines matte texture with metallic shine, featuring a sweet heart charm as the centerpiece for an effortlessly chic accessory.
Step-by-Step Tutorial
Materials
- 6mm White heishi clay beads (matte or vinyl finish)
- Small gold spacer beads (round or disc-shaped)
- Textured gold accent beads (stardust or hammered finish)
- Gold tone jump rings (6mm or 8mm)
- Gold tone open heart charm
- 0.8mm clear elastic cord (Crystal Tec or similar)
- Jewelry glue (E6000 or G-S Hypo Cement)
- Sharp scissors
- Bead stopper or tape
- Measuring tape
Step 1: Preparation & Sizing
-
Measure your wrist:
Wrap a flexible measuring tape around your wrist where you want the bracelets to sit. Add about 0.5 to 0.75 inches to this measurement to ensure a comfortable fit that isn’t too tight. -
Cut the elastic:
Cut three strands of elastic cord, making each one about 10-12 inches long. This extra length is crucial for tying secure knots later without struggling. -
Pre-stretch the cord:
Gently pull on each strand of elastic a few times. Pre-stretching prevents the bracelets from sagging or stretching out permanently after the first wear. -
Secure the ends:
Place a bead stopper or a piece of masking tape on one end of each cord to prevent your monochromatic masterpiece from sliding off while you work.
Sticky Situation?
If the knot won’t slide into a bead, gently ream the hole of a white clay bead with a large needle or bead reamer to widen the opening just enough to tuck the knot inside.
Step 2: Creating the Charm Bracelet
-
Thread the base beads:
Begin threading the white heishi beads onto your first cord. Fill about half the length needed for your wrist size to center the focal point. -
Add gold spacers:
Slide on three flat gold spacer beads. These act as a frame for the charm and break up the white pattern beautifully. -
Attach the charm:
Using your fingers or pliers, gently twist open a gold jump ring, slide on the heart charm, and twist it closed back and forth until the gap disappears. Thread the jump ring onto the elastic next to the spacers. -
Complete the pattern:
Add three more flat gold spacer beads on the other side of the charm, creating a symmetrical metallic focal section. -
Finish the strand:
Continue threading white clay beads until the strand reaches your target total length.
Level Up Your Stack
Add a fourth bracelet using only gold beads or mix in a strand of freshwater pearls. The iridescent pearl texture pairs beautifully with the matte white clay for a luxe finish.
Step 3: Creating the Accent Bracelets
-
Start the second bracelet:
For the second bracelet, thread enough white heishi beads to cover about one-third of the total length. -
Insert textured gold beads:
Add a large, textured gold accent bead. I prefer using a ‘stardust’ finish bead here for that extra sparkle shown in the photo, but a hammered finish works too. -
Space the accents:
Continue adding white beads for another third of the length, add a second textured gold bead, and then finish the strand with white beads. This creates varying points of interest in the stack. -
Create the third bracelet:
Thread the third strand almost entirely with white heishi beads. This simple strand acts as a neutral foundation to balance the charm and accent bracelets. -
Optional variation:
If you want more shine on the third bracelet, sneak in a single small gold spacer bead right near the knot to hide it later.
Step 4: Finishing Touches
-
Double check the fit:
Before tying, wrap each strand around your wrist to ensure they sit comfortably together. Remove or add a couple of white beads if necessary. -
Tie a surgeon’s knot:
Take the ends of the first bracelet. Cross right over left, then left over right twice. Pull tight to secure the knot. -
Knot the remaining strands:
Repeat the surgeon’s knot process for the other two bracelets, ensuring the tension is firm but not so tight that the elastic buckles. -
Apply adhesive:
Dab a tiny drop of jewelry glue directly onto each knot. Let it dry completely according to the glue’s instructions before proceeding. -
Hide the knots:
Trim the excess elastic cord close to the knot. Gently tug the elastic to pull the knot inside one of the adjacent clay beads or gold spacers to conceal it.
Slip on your new stack and enjoy the fresh, elegant vibe it adds to your outfit


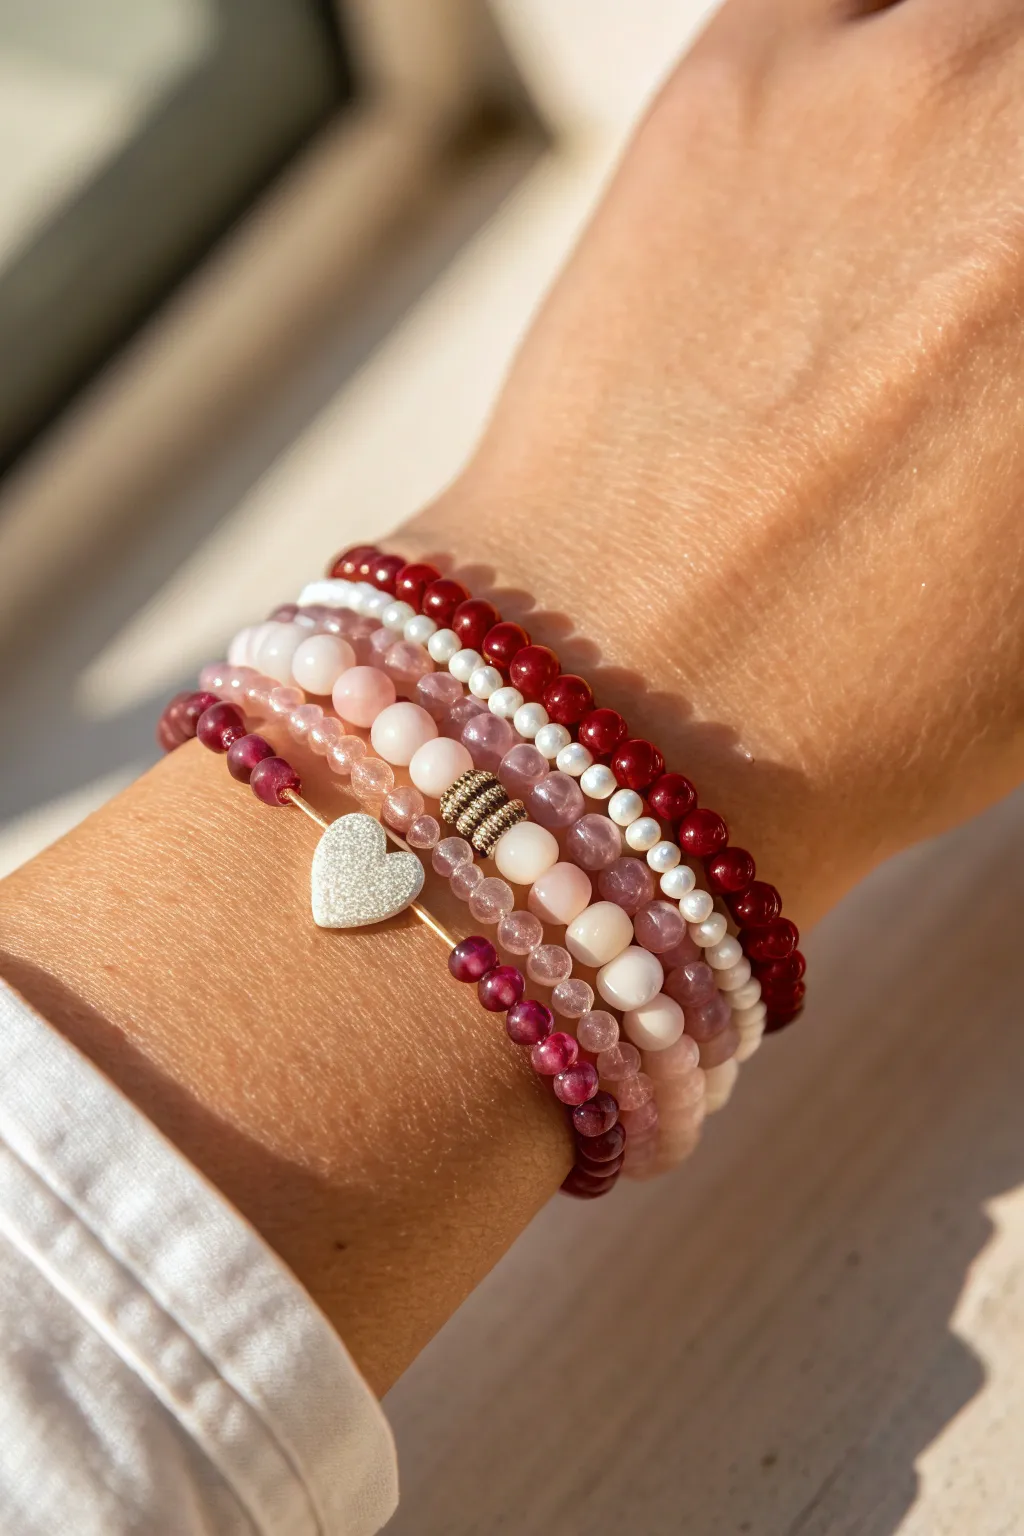
Hot Pink, Red, and Bubblegum Heart Mix Bundle

This charming five-piece bracelet set blends romantic hues of hot pink, deep red, and soft blush for a look that is pure love. Featuring a mix of matte, translucent, and metallic textures, the stack culminates in a sweet gold heart charm centerpiece.
Step-by-Step Guide
Materials
- Hot pink matte round beads (6mm)
- Deep red wooden or matte round beads (8mm)
- Light blush pink matte round beads (6mm)
- Translucent rose quartz-style beads (8mm)
- Bright bubblegum pink acrylic beads (6mm)
- Small gold round spacer beads (3mm)
- Gold heart charm
- Gold jump ring
- Strong elastic beading cord (0.8mm)
- Beading needle (optional)
- Jewelry glue or clear nail polish
- Scissors
Step 1: Planning Your Palette
-
Sort your beads:
Begin by separating your beads by color and size. You will be creating five distinct bracelets that coordinate together, so having piles for hot pink, deep red, blush, translucent pink, and bubblegum pink will keep you organized. -
Measure your wrist:
Wrap a piece of string around your wrist to find your size, then add about half an inch for a comfortable fit. Cut five lengths of elastic cord, making sure each is about 3-4 inches longer than your measurement to allow for easy tying. -
Prepare the elastic:
Pre-stretch your elastic cords by pulling on them gently several times. This crucial step prevents the bracelets from stretching out and becoming loose after you wear them for the first time.
Knot Security Tip
When hiding the knot inside a bead, choose a bead with a larger hole (like the wooden or 8mm beads) next to your tie-off point to make sliding it in much easier.
Step 2: Creating the Solid Strands
-
String the deep red bracelet:
Start with the largest beads for the top bracelet. Thread the 8mm deep red wooden beads onto your first piece of elastic until you reach your desired length. -
Create the ombre effect:
For the second bracelet, use the 6mm blush pink matte beads. String them continuously just like the first strand. The size contrast between these and the red beads adds visual interest to the stack. -
String the hot pink strand:
Create the third bracelet using the 6mm hot pink matte beads. This vibrant layer acts as the bold center of your stack, bridging the gap between the darker red and lighter pinks. -
Add the translucent layer:
For the fourth bracelet, use the 8mm translucent rose quartz-style beads. These beads catch the light differently than the matte ones, adding a lovely depth and glass-like quality to the set.
Step 3: The Charm Bracelet
-
Begin the charm strand:
The final bracelet is the most detailed. Start by threading about five or six 6mm bubblegum pink beads onto your last cord. -
Start the gold pattern:
Introduce the gold spacers. Slide on one small gold spacer bead, followed by a bubblegum pink bead. Repeat this pattern—one gold, one pink—until this patterned section covers about half of the bracelet’s length. -
Attach the charm:
Open a gold jump ring using pliers (or your fingers if it’s soft enough) and slide on the gold heart charm. Close the jump ring securely. Thread the jump ring onto the elastic right in the middle of your gold-and-pink pattern section. -
Finish the detailed strand:
Continue the alternating gold and pink pattern for another inch or so, mirroring the other side of the charm. Finish the rest of the strand with just the solid bubblegum pink beads until it matches the length of the others.
Level Up: Texture Mix
Swap the blush matte beads for faceted crystal beads in a champagne color. The sparkle will contrast beautifully against the matte pinks and wooden reds.
Step 4: Finishing Touches
-
Tie the knots:
For each bracelet, bring the ends of the elastic together. Tie a standard surgeon’s knot: cross the ends, loop one under twice, pull tight, then tie a standard overhand knot on top. -
Secure with glue:
Place a tiny drop of jewelry glue or clear nail polish directly onto the knot. I prefer to hold the knot taut for about 30 seconds while the glue gets tacky to ensure it doesn’t slip. -
Hide the knots:
Once dry, trim the excess elastic ends close to the knot. Gently tug the bracelet so that the knot slides inside the hole of the adjacent bead, hiding it from view. -
Arrange the stack:
Slide all five bracelets onto your wrist or a display stand. Arrange them to mix the textures, perhaps placing the charm bracelet at the bottom or middle to let the heart dangle freely.
Now you have a stunning, romantic wrist stack ready for everyday wear or a special date night

Pastel Rainbow Heart Bundle With a Single Red Pop
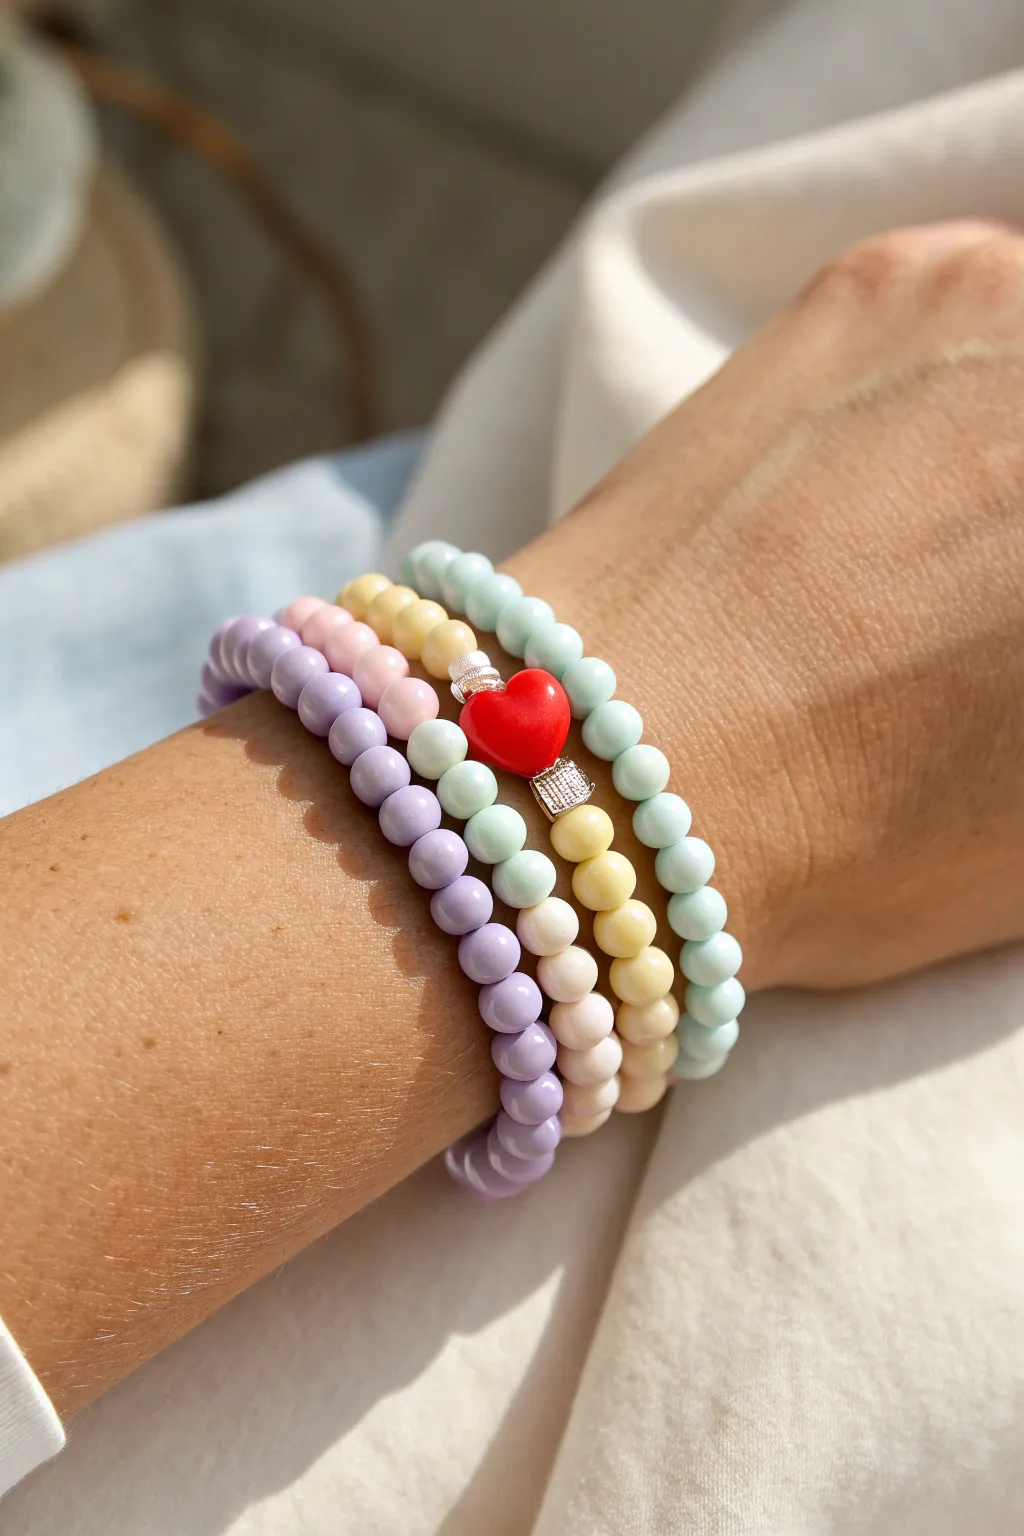
This charming bracelet stack combines soft, sorbet-colored matte beads with a striking red heart focal point for a balanced, playful accessory set. The project involves creating four distinct strands that layer together to form a cohesive pastel rainbow on your wrist.
Step-by-Step
Materials
- Matte round beads (6mm or 8mm) in Lavender/Purple
- Matte round beads (6mm or 8mm) in Pale Pink
- Matte round beads (6mm or 8mm) in Butter Yellow
- Matte round beads (6mm or 8mm) in Mint Green/Aqua
- Bright red ceramic or acrylic heart bead (center drilled)
- Two silver spacer beads (rhinestone or textured metal/rondelle)
- Strong elastic bead cord (0.8mm recommended)
- Jewelry glue or clear nail polish
- Scissors
Step 1: Planning and Patterning
-
Measure your wrist:
Before cutting any string, wrap a piece of string or a soft measuring tape around your wrist comfortably. Add about half an inch to this measurement for the beads to sit nicely without pinching, as simple round beads take up some inner circumference. -
Prepare your workspace:
Lay out a bead design board or a soft towel to prevent your round beads from rolling away. Having a surface with friction is essential for these smooth matte beads. -
Cut the elastic:
Cut four pieces of elastic cord, making each one about 10-12 inches long. You want plenty of excess cord to make tying the knots easier later. -
Pre-stretch the cords:
Gently pull on each strand of elastic a few times. This pre-stretching step helps prevent the bracelets from sagging or stretching out permanently after the first wear.
Heart Hole Check
Before starting, ensure your heart bead has a hole large enough for TWO strands of elastic. If not, use thinner cord just for the middle strands.
Step 2: Creating the Solid Strands
-
String the lavender strand:
Start with the purple beads. Thread them onto your first piece of elastic until you reach your measured length. This strand needs to be simple and solid, acting as an anchor for the stack. -
Check the fit:
Wrap the strung beads around your wrist to verify the size. Add or remove one bead if necessary for the perfect fit. -
Tie the lavender bracelet:
Secure the bracelet with a surgeon’s knot (loop left over right twice, then right over left). Pull tight. -
String the mint green strand:
Repeat the process for the mint green beads on a separate cord. This will likely be the outermost bracelet in the stack, mirroring the purple one. -
Close the mint bracelet:
Tie off the mint green strand securely just like the first one, ensuring the tension is consistent with the purple strand.
Weird Bunching?
If the linked heart strands bunch up, the tension is uneven. Retie the knots, ensuring both strands have the exact same slack before tightening.
Step 3: Assembling the Heart Center
-
Start the yellow/pink mix:
This central section is a bit tricky because the heart spans two strands. I prefer to string half of the yellow strand first to gauge the center point. -
Position the first spacer:
Thread beads onto the yellow strand until you are halfway done. Add one silver spacer bead here. -
Prepare the pink strand:
String your pale pink beads onto their cord until you reach the halfway mark, matching the length of the yellow strand. -
Add the second spacer:
Thread the second silver spacer onto the pink strand. These spacers will sit on either side of the heart to frame it. -
Thread the heart bead:
Take both the yellow and pink working cords and thread them *together* through the hole of the single red heart bead. The heart will now link the two strands. -
Finish the yellow strand:
Separate the cords again. Continue adding yellow beads to the yellow cord on the other side of the heart until it matches the length of the first half. -
Finish the pink strand:
Continue adding pink beads to the pink cord until it matches the length of the yellow strand. -
Check alignment:
Lay the two connected strands flat. Ensure the heart sits squarely in the middle and the spacers are adding a nice metallic touch next to it.
Step 4: Final Security
-
Knot the linked strands:
Tie off the yellow strand, and then the pink strand. Be careful here; since they are connected by the heart, you need to make sure you don’t pull them awkwardly against each other. -
Apply adhesive:
Place a tiny dot of jewelry glue or clear nail polish on the knots of all four bracelets. Let this dry completely before touching them again. -
Hide the knots:
Once dry, trim the excess elastic tails close to the knot. Gently tug the standard bracelets so the knot slips inside a neighboring bead hole to hide it. -
Final arrangement:
Stack them on your wrist! Order them: Purple, Pink, Yellow, Mint Green, so the linked heart sits perfectly in the center of the pastel gradient.
Enjoy wearing this sweet and vibrant stack that adds a perfect pop of color to any outfit

The Complete Guide to Pottery Troubleshooting
Uncover the most common ceramic mistakes—from cracking clay to failed glazes—and learn how to fix them fast.
Blush, Beige, and Cream Heart Bundle for Everyday Wear
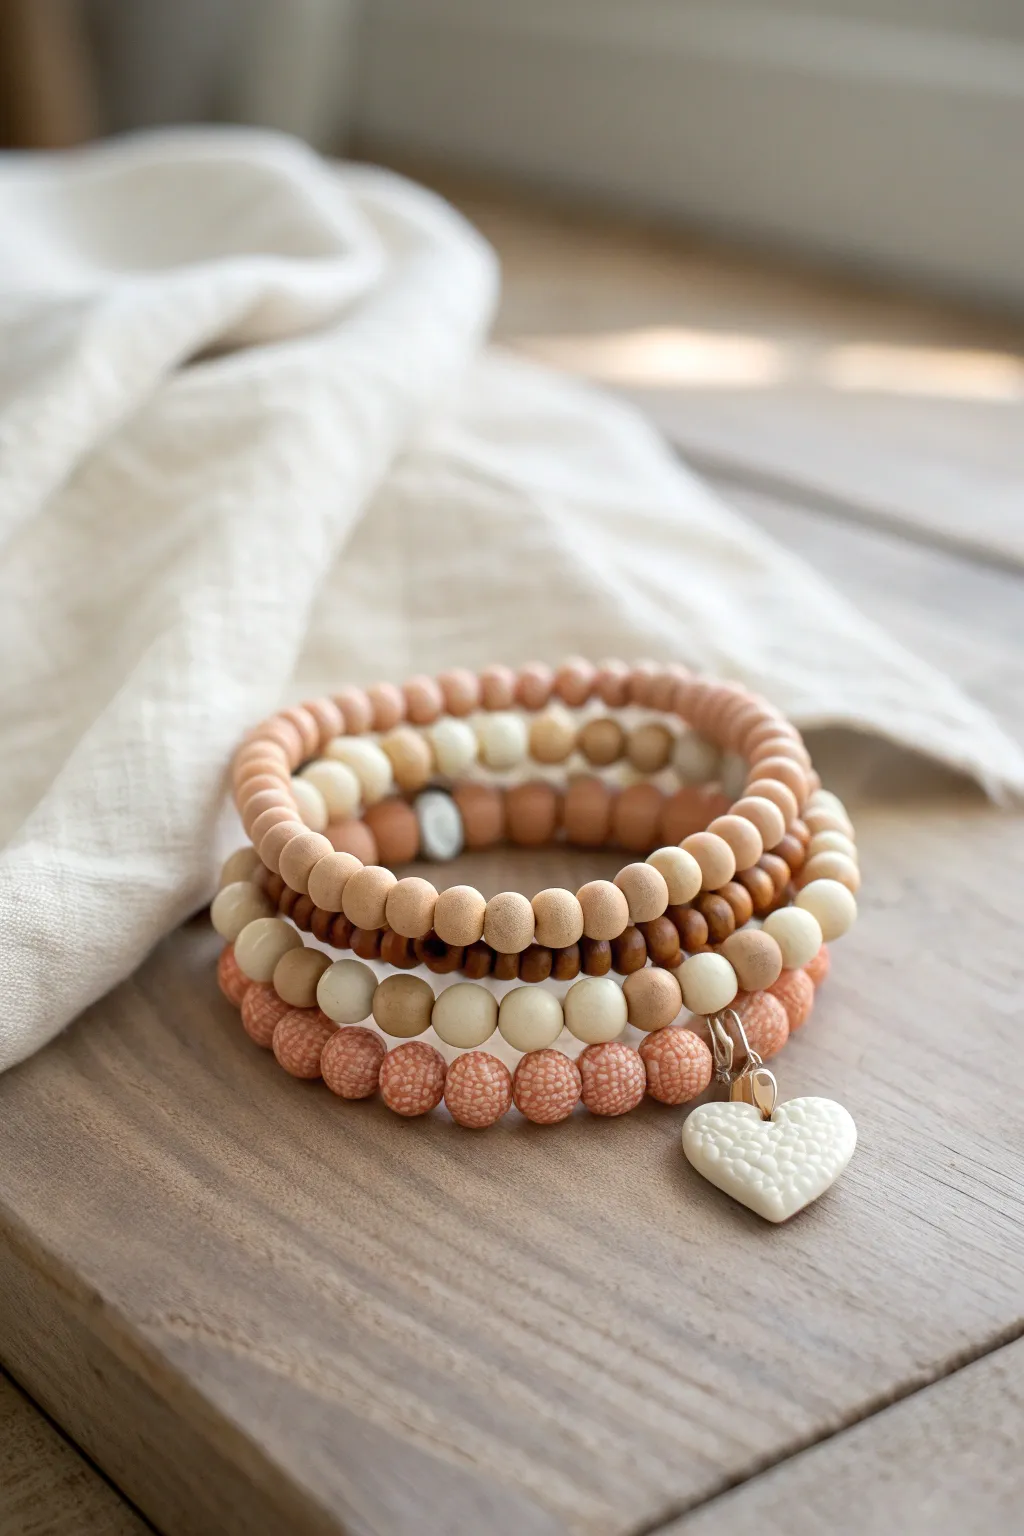
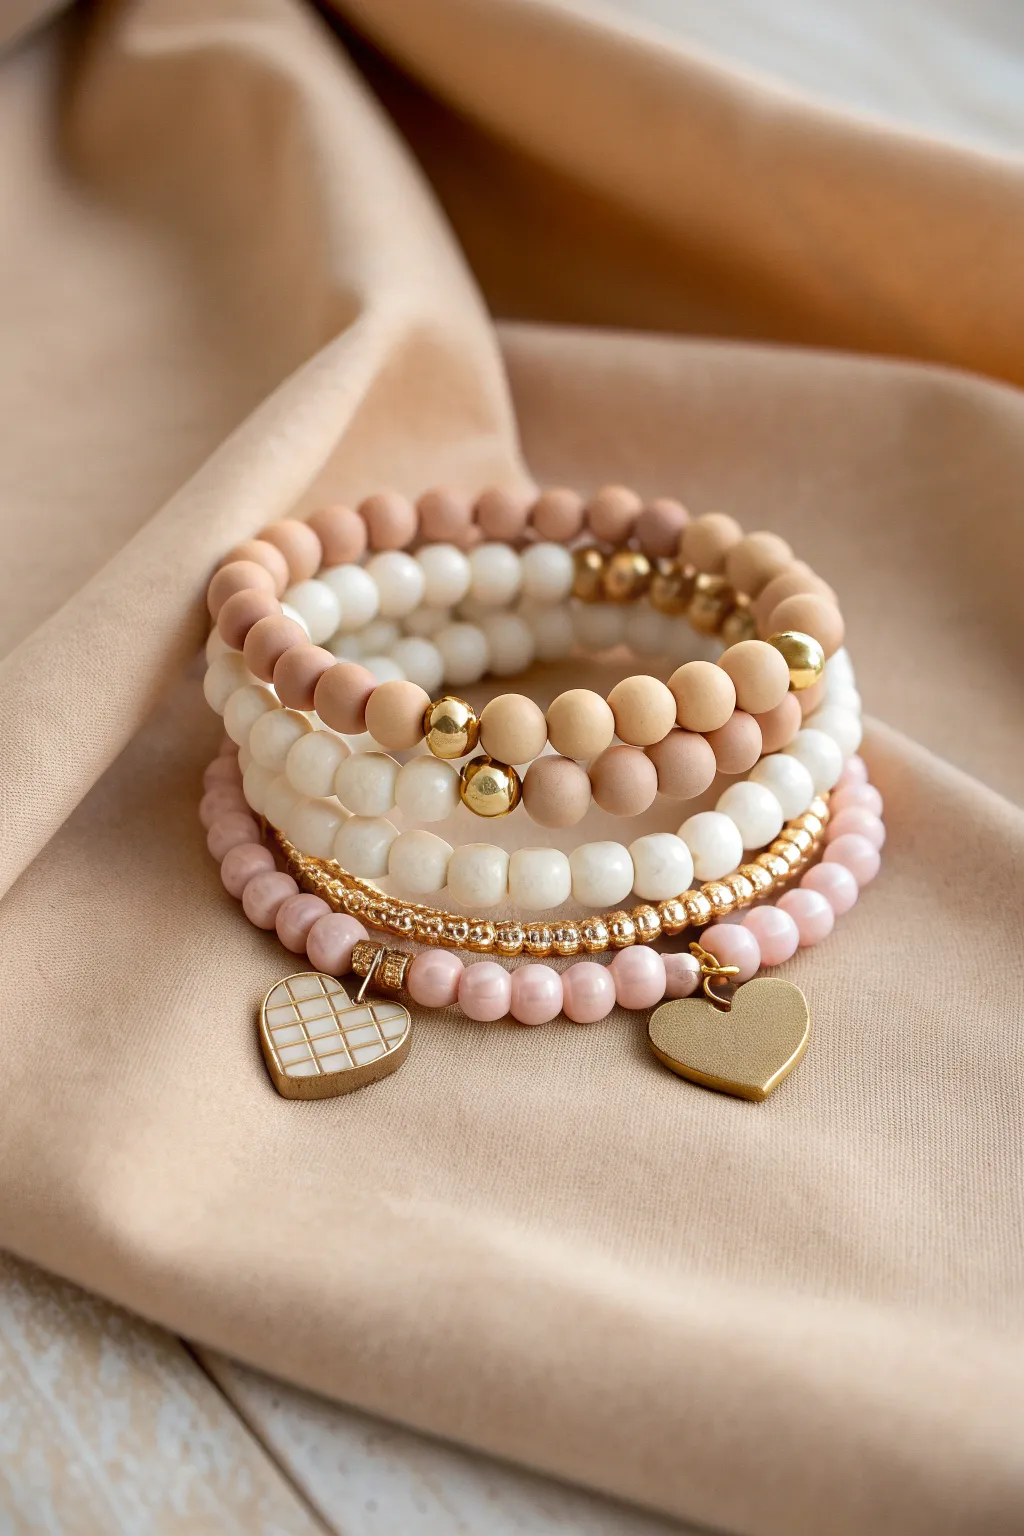
This charming bracelet stack combines the earthy warmth of natural wood tones with soft, romantic blush hues for a versatile everyday accessory. Featuring varied textures from smooth matte beads to speckled finishes and a delicate heart charm, this bundle creates a perfectly curated layered look.
Step-by-Step Tutorial
Materials
- 6mm matte peach/blush round beads (polymer clay or acrylic)
- 8mm cream wooden beads
- 8mm natural tan wooden beads
- 6mm dark walnut brown wooden beads
- 8mm textured/speckled coral beads (polymer clay or stone)
- Small white/cream heart charm (ceramic or acrylic)
- Gold jump ring (6mm or 8mm)
- Elastic beading cord (0.7mm or 0.8mm clear)
- Beading needle (optional but helpful)
- Super glue or jewelry cement
- Scissors
Step 1: Preparation & Sizing
-
Measure your wrist:
Wrap a flexible measuring tape around your wrist where you want the bracelets to sit. Add about 0.5 to 1 inch to this measurement depending on how loose you prefer the fit. -
Cut the elastic:
Cut four pieces of elastic beading cord, making each one about 10-12 inches long. This generous length gives you plenty of room to tie secure knots later without struggling. -
Pre-stretch the cord:
Gently pull on each strand of elastic several times to pre-stretch it. This crucial step prevents the bracelets from stretching out and becoming loose after the first few wears.
Knot Slipping?
If your elastic knots keep coming undone before you can glue them, tighten the first knot while holding tension, then use a bead stopper or clip to hold the ends while you prepare the second knot.
Step 2: Creating the Bracelets
-
String the Blush Solid:
For the first bracelet, thread the 6mm matte peach/blush beads onto one cord. Fill it until you reach your desired length. I like to tape the end of the cord to the table so beads don’t slide off while I work. -
Design the Cream & Tan Mix:
For the second strand, create a soft pattern using the larger 8mm cream and tan wooden beads. You can alternate them one-by-one or create small random sections for a more organic, natural feel. -
Assemble the Dark Wood:
Thread the 6mm dark walnut brown wooden beads onto the third cord. This darker layer adds depth and grounding to the otherwise light and airy stack. -
Create the Textured Strand:
For the final charm-bearing bracelet, use the 8mm textured coral beads. String them until the strand is complete, leaving a tiny bit of extra slack compared to the others. -
Prepare the Charm:
Using pliers, carefully open your gold jump ring. Slide the white heart charm onto the ring. -
Attach the Charm:
Hook the open jump ring carrying the heart charm around the elastic cord of the textured coral bracelet—right in the center of the strand or near where you will knot it. Close the jump ring securely.
Add Gold Accents
Elevate the stack by adding gold spacer discs or small brass geometric accents between the wooden beads. This adds a subtle shimmer that complements the gold jump ring perfectly.
Step 3: Finishing Touches
-
Tie the first knot:
Starting with the first bracelet, bring the two ends of the elastic together and tie a basic overhand knot, pulling it snug against the beads without causing them to buckle. -
Secure with a surgeon’s knot:
Tie a second knot, but this time loop the elastic through the knot twice before pulling tight. This is a surgeon’s knot and is much more secure for elastic jewelry. -
Apply adhesive:
Place a tiny dab of super glue or jewelry cement directly onto the knot. Be careful not to stick the knot to the beads themselves, just the cord. -
Hide the knot:
Once the glue is tacky but not fully set, gently pull the elastic so the knot slides inside the hole of the nearest bead. This creates a seamless, professional finish. -
Trim the ends:
After the glue has fully dried (typically 10-15 minutes), use sharp scissors to trim the excess elastic cord close to the bead hole. Repeat the tying and finishing process for all four bracelets.
You now have a beautiful set of bracelets ready to complement any casual outfit with a touch of warmth and love
Alternating Letter Beads and Heart Beads Recipe Bundle
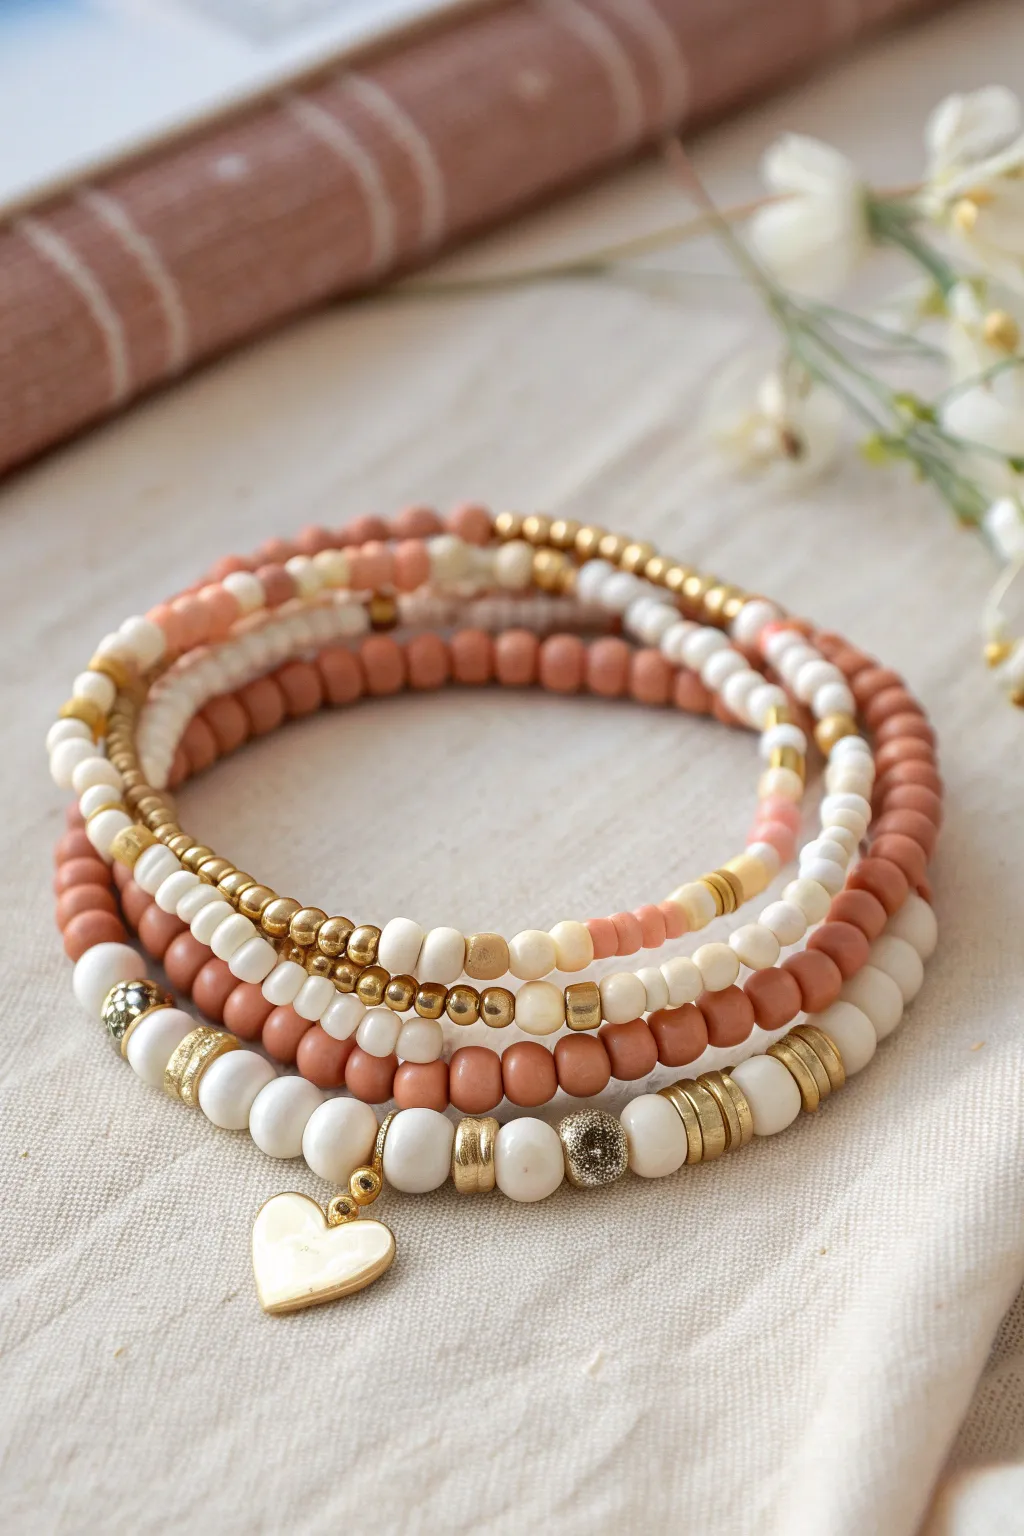
This gorgeous four-piece bracelet stack combines warm terracotta tones with creamy whites and luxurious gold accents for a sophisticated boho look. Featuring a mix of textures—from smooth clay heishi beads to faceted metals and a delicate heart charm—this set is perfect for mixing, matching, and stacking.
Step-by-Step Tutorial
Materials
- Elastic jewelry cord (0.8mm clear stretchy string)
- Small clay heishi beads (terracotta/peach color, approx. 4mm)
- Small clay heishi beads (cream/white color, approx. 4mm)
- Small gold spacer beads (round, 3-4mm)
- Small gold spacer beads (thick flat disc style)
- Larger white round beads (approx. 8mm, ceramic or acrylic)
- Gold textured/stardust beads (approx. 6mm)
- Gold flat disc spacer beads (larger, approx. 6mm)
- Gold heart charm with jump ring
- Jewelry glue or clear nail polish
- Scissors
Step 1: Planning Your Stack
-
Measure and Cut:
Begin by measuring your wrist and adding about 3-4 inches to determine your string length. Cut four separate pieces of elastic cord to this length to ensure you have plenty of room for tying knots later. -
Pre-stretch the Cord:
Before adding any beads, give each piece of elastic a firm tug. Pre-stretching prevents the bracelets from sagging or loosening up after you wear them for the first time.
Knot Security Tip
Use a surgeon’s knot (right over left, left over right, loop through twice) for maximum hold. Hide the knot inside a larger bead’s hole for a cleaner finish.
Step 2: Bracelet 1: Terracotta Heishi & Gold
-
Establish the Base:
For the first bracelet (the second from the top layer in the stack), thread on a long section of your terracotta clay heishi beads. This will form the majority of the band. -
Create the Focal Section:
Create an alternating pattern for the front center: string one white heishi bead, followed by a gold disc spacer, then another white heishi bead. Repeat this small sequence or mix in a few gold round spacers to break up the solid color. -
Close the Loop:
Check the fit against your wrist. Tie off the bracelet using a surgeon’s knot (looping the string through twice before pulling tight). Dab a tiny drop of glue on the knot, let it dry, and trim the excess ends.
Step 3: Bracelet 2: Cream & Gold Mix
-
Bead the Pattern:
For the top bracelet in the image, you’ll be mixing textures. String cream heishi beads for about an inch. -
Insert Gold Accents:
Add a small gold round bead, then switch to a short section of peach beads. I like to alternate these sections randomly—1 inch of white, a gold bead, 1 inch of peach/terracotta, another gold bead—to keep it visually interesting. -
Finish the Strand:
Continue until the strand fits your wrist comfortably, then tie, glue, and trim just like the first one.
Make It Personal
Swap the heart charm for an initial charm or a birthstone pendant to turn this stack into a meaningful personalized gift.
Step 4: Bracelet 3: The Golden Stripe
-
Start with White:
For the third bracelet (second from the bottom), start with a section of simple white heishi beads. -
Add the Gold Feature:
Create a distinct metallic section by threading 10-15 small gold round spacer beads in a row. This creates a shiny ‘bar’ effect that catches the light beautifully. -
Complete with Terracotta:
Finish the rest of the bracelet with alternating sections of terracotta and white beads to unify the color palette with the previous bracelets. Secure the knot firmly.
Step 5: Bracelet 4: The Charm Statement
-
Prepare Large Beads:
This final bracelet (the bottom one) uses the largest beads. String your large white round beads, placing a flat gold disc spacer in between every two or three white beads. -
Add Texture:
Instead of smooth gold spacers, occasionally swap in one of the textured ‘stardust’ gold beads to add sparkle and dimension. -
Attach the Charm:
Find the center point of your design. Thread the jump ring of your gold heart charm onto the cord so it sits between two gold spacer beads or a gold spacer and a white bead. -
Final Secure:
Finish stringing until the size matches the others. Tie your final knot extra tightly, as heavier beads put more strain on the cord. Apply a generous drop of glue to the knot. -
Hide the Knot:
If one of your white beads has a large enough hole, gently tug the elastic so the knotted section slides inside the bead, hiding it from view.
Slip on your beautiful new stack and enjoy the lovely shine of gold against the soft clay tones


What Really Happens Inside the Kiln
Learn how time and temperature work together inside the kiln to transform clay into durable ceramic.
One Hero Heart Charm Bracelet Plus Simple Supporting Strands
This trendy bracelet stack balances a bold hero piece with understated supporting strands for a cohesive, lovely look. Featuring a prominent red heart charm on a bed of cream heishi beads, flanked by soft pink accents, it’s a perfect everyday accessory or handmade gift.
Step-by-Step Guide
Materials
- Elastic cord (0.8mm transparent)
- White or cream clay heishi/disc beads (6mm)
- Red heart charm (polymer clay or acrylic)
- Gold round spacer beads (4mm and 6mm)
- Pale pink round beads (6mm, gemstone or glass)
- Red round accent beads (4mm)
- Superglue or jewelry cement
- Scissors
Step 1: The Hero Heart Bracelet
-
Measure the cord:
Cut a length of elastic cord about 10-12 inches long. This gives you plenty of slack for tying knots later without losing your beads. -
Secure the end:
Attach a piece of tape or a bead stopper to one end of the cord to prevent beads from sliding off while you work. -
Start the pattern:
Begin threading your cream clay heishi beads. Thread about 2 inches of beads, or enough to cover roughly a third of your wrist depending on size preference. -
Add first gold accents:
Slide on one gold spacer bead, followed by three cream heishi beads, and another gold spacer. This creates a nice transition zone. -
Place the centerpiece:
Thread your large red heart charm onto the cord. Ensure the hole runs horizontally through the heart so it sits flat against the wrist. -
Mirror the accents:
Immediately after the heart, add a gold spacer bead, three cream heishi beads, and another gold spacer to mirror the other side. -
Finish the strand:
Fill the rest of the cord with cream heishi beads until the bracelet fits comfortably around your wrist. I usually aim for about 6.5 to 7 inches total length. -
Knot and secure:
Tie a surgeon’s knot (right over left, left over right twice). Pull tight to secure the elastic, add a tiny dot of superglue to the knot, let it dry, and trim the excess cord.
Knot Slipping?
If your elastic knots slip, try pre-stretching the cord before beading. This prevents the bracelet from loosening later. Always hide the knot inside a larger bead hole if possible.
Step 2: Supporting Strand 1: Soft Pinks
-
Prepare the second cord:
Cut another 12-inch piece of elastic cord and secure one end as before. -
Create the pink base:
String the pale pink round beads continuously. These beads are slightly larger and rounder than the heishi beads, adding nice texture. -
Interject pattern (optional):
For the look in the photo, stick to a solid pink strand, but you can add a single gold bead in the center if you want to tie the look together further. -
Check fit:
Wrap it around your wrist to check the size against the first bracelet. They should be the same length. -
Tie off:
Secure this strand with a tight surgeon’s knot, glue, and trim.
Level It Up
Add personalized letter beads to the pink strand to spell a name or ‘LOVE,’ keeping the gold spacers on either side of the word to match the main heart bracelet.
Step 3: Supporting Strand 2: Mixed Textures
-
Prep the final cord:
Cut your final length of elastic cord and secure the end. -
Mix your beads:
Create a pattern alternating between sections of cream heishi beads and small groups of accent beads. Try five heishi beads followed by one red round bead. -
Introduce gold:
Every third repetition, swap the red bead for a gold spacer to add sparkle. -
Complete the loop:
Continue this alternating pattern until the bracelet reaches the desired length. -
Final securement:
Tie your final sturdy knot, apply a drop of adhesive, and trim the tails closely. -
Stack and style:
Roll the bracelets gently onto your wrist one by one—never stretch them aggressively—and arrange them so the heart sits prominently in the center.
Now you have a charming stack that looks professionally curated and ready to wear
Mixed Bead Shapes Heart Bundle (Discs, Rounds, and Facets)
This charming bracelet stack combines soft matte textures with the gleam of gold and dainty heart charms. The mix of peach tones, creamy whites, and metallic accents creates a romantic, versatile accessory set perfect for everyday wear.
Step-by-Step
Materials
- Matte peach/tan round beads (6mm or 8mm)
- Cream/off-white round semi-precious stone or glass beads (8mm)
- Small gold faceted spacer beads or heishi beads (3-4mm)
- Pink polished round beads (6mm)
- Gold tone heart charm (solid)
- Gold tone heart charm with white grid/plaid pattern
- Gold spherical accent beads (6-8mm)
- Elastic jewelers cord (0.8mm clear)
- Jewelry glue or clear nail polish
- Scissors
- Small gold jump rings
- 2 pairs of flat-nose pliers
Step 1: The Matte Peach Strand
-
Measure the cord:
Cut a piece of elastic cord about 10-12 inches long. Is pre-stretching the cord a step you usually skip? I find giving it a few gentle tugs before stringing prevents the bracelet from loosening up later. -
Begin stringing:
Thread on your matte peach or tan round beads. These have a lovely soft finish that contrasts well with the metals coming later. -
Add gold accents:
Interrupt the pattern of peach beads by adding 2-3 gold spherical beads. You can group them together as a focal point or space them out among the peach beads. -
Check the fit:
Wrap the strand around your wrist to check the size. Add or remove peach beads until it sits comfortably without digging in. -
Tie it off:
Tie a secure surgeon’s knot (right over left, left over right). Add a tiny dab of jewelry glue to the knot, let it tack up for a moment, and trim the excess cord.
Knot Security
Hide the knot inside a bead! After gluing, pull the elastic firmly so the knot pops inside the nearest bead hole for a seamless, professional finish.
Step 2: The Cream Comfort Strand
-
Start the second strand:
Cut another length of elastic cord. This layer uses the slightly larger cream or off-white stone beads for volume. -
String the beads:
Thread the cream beads onto the cord. Since these beads are often natural stone, take a moment to look at their variations and arrange them so the most interesting patterns are visible. -
Insert the gold heavy bead:
Place one large gold spherical bead into the design. This creates a visual connection to the first bracelet. -
Secure the knot:
Tie off this bracelet using the same surgeon’s knot method. Ensure the tension is similar to the first bracelet so they stack neatly together.
Curling Cord?
If your elastic keeps curling up while stringing, tape one end to your table. If beads won’t thread, dip the cord end in super glue to create a stiff, clear needle.
Step 3: The Golden Faceted Strand
-
Prepare the metallic layer:
For this thinner strand, you will use the small gold faceted spacer beads. These smaller beads require a bit more patience to string. -
String solid gold:
Fill the entire length of your cord with these shimmering gold beads. The texture here is key—the facets catch the light beautifully. -
Finish the gold strand:
Tie your knot tightly. Because the holes in spacer beads can be larger relative to the bead size, make sure your knot is large enough not to slip through, or hide it carefully inside a bead if possible.
Step 4: The Pink Heart Charm Strand
-
String the base:
On your final piece of cord, string the polished pink round beads. These should be smaller than the cream beads, similar in size to the matte peach ones. -
Attach jump rings:
Using your two pairs of pliers, gently twist open two jump rings. Slide one onto the solid gold heart charm and the other onto the grid-patterned heart charm. -
Place the charms:
Slide the jump rings (with charms attached) onto the elastic cord, positioning them between two pink beads. Spacing them slightly apart allows them to jingle and move freely. -
Final knotting:
Tie your final knot securely. Apply glue, let it dry, and trim the ends. Hiding the knot inside a bead adjacent to the charms keeps the focal point clean.
Slide your new stack onto your wrist and enjoy the lovely mix of textures and hearts

TRACK YOUR CERAMIC JOURNEY
Capture glaze tests, firing details, and creative progress—all in one simple printable. Make your projects easier to repeat and improve.
Double-Dangle Heart Accent Bracelet in a Balanced Set
This elegant bracelet trio combines soft peach tones, speckled earth beads, and a double-dangle heart charm feature for a balanced, romantic look. The set features three distinct bracelets that can be worn together for a stacked effect or separately for subtle charm.
Step-by-Step
Materials
- 6mm coral or matte salmon-pink round beads
- 8mm beige/white speckled stone beads (jasper or similar)
- 8mm matte peach aventurine or sunstone beads
- 8mm white jade or moonstone beads
- 6mm silver or speckled spacer beads
- Gold tone jump rings (4mm and 6mm)
- White enamel heart charm
- Gold textured/pavé heart charm
- Curved silver tube bead or bail connector
- Strong elastic cord (0.8mm or 1.0mm)
- Jewelry glue (e.g., E6000 or G-S Hypo Cement)
- Scissors
- Bead stopper or tape
Step 1: Planning the Stack
-
Measure your wrist:
Wrap a piece of string around your wrist to find your comfortable size, then add about half an inch to determine the length of elastic needed. Cut three pieces of elastic cord, leaving about 3-4 inches of excess on each side for tying knots. -
Secure the ends:
Place a bead stopper or a piece of tape on one end of each elastic strand to prevent beads from sliding off while you work. I find this simple step saves so much frustration later on.
Knot Slipping?
If your elastic knots feel slippery, try roughening the cord ends slightly with sandpaper before tying, or use a quadruple knot for extra grip.
Step 2: Creating the Solid Coral Strand
-
String the coral beads:
Take your first elastic strand and thread on the 6mm coral/salmon-pink beads until you reach your desired bracelet length. -
Check the fit:
Wrap the strand around your wrist to ensure it sits comfortably without gaps, adding or removing a bead if necessary. -
Tie the knot:
Tie a strong surgeon’s knot (right over left, left over right) and pull tight to secure. Dab a tiny amount of jewelry glue on the knot. -
Hide the knot:
Once the glue is tacky but not fully set, trim the excess cord and gently pull the knot inside one of the coral beads to hide it.
Pro Tip
Pre-stretch your elastic cord by pulling it firmly a few times before stringing. This prevents the bracelet from sagging after the first wear.
Step 3: Assembling the Heart Charm Centerpiece
-
Prepare the jump rings:
Open two small jump rings using jewelry pliers. Twist them sideways rather than pulling them apart to maintain their circle shape. -
Attach the hearts:
Slide the white enamel heart onto one jump ring and the gold textured heart onto the other. Attach both jump rings to the central loop of your curved tube bead or bail connector. -
String the charm strand:
On your second elastic cord, thread a pattern. Start with your mixed 8mm beads—alternating between the speckled stone, matte peach, and white beads in a random but balanced sequence. -
Add the centerpiece:
Once you have strung half the length of the bracelet, slide on the curved tube bead with the dangling heart charms. -
Finish the strand:
Continue the bead pattern on the other side of the charm until the length matches your first bracelet. Tie off, glue, and hide the knot as before.
Step 4: Building the Mixed Accent Strand
-
Create a pattern:
For the third bracelet, create a more varied texture. Alternate the larger 8mm white and peach beads with the smaller 6mm silver or speckled spacer beads. -
Incorporate texture:
Every third or fourth bead, insert one of the darker speckled stone beads to tie the design back to the charm bracelet. -
Verify length alignment:
Hold this strand up against the finished coral bracelet to ensure they are exactly the same size before tying. -
Finalize the set:
Tie the final surgeon’s knot, apply glue, trim the ends, and hide the knot inside a larger 8mm bead for a clean finish. -
Let it cure:
Allow the glue on all three bracelets to dry for at least 24 hours before stretching or wearing them to ensure maximum durability.
Now you have a beautifully coordinated set ready to add a warm, romantic touch to your outfit
Split-Color Heart Beads for a Bold Two-Tone Bundle
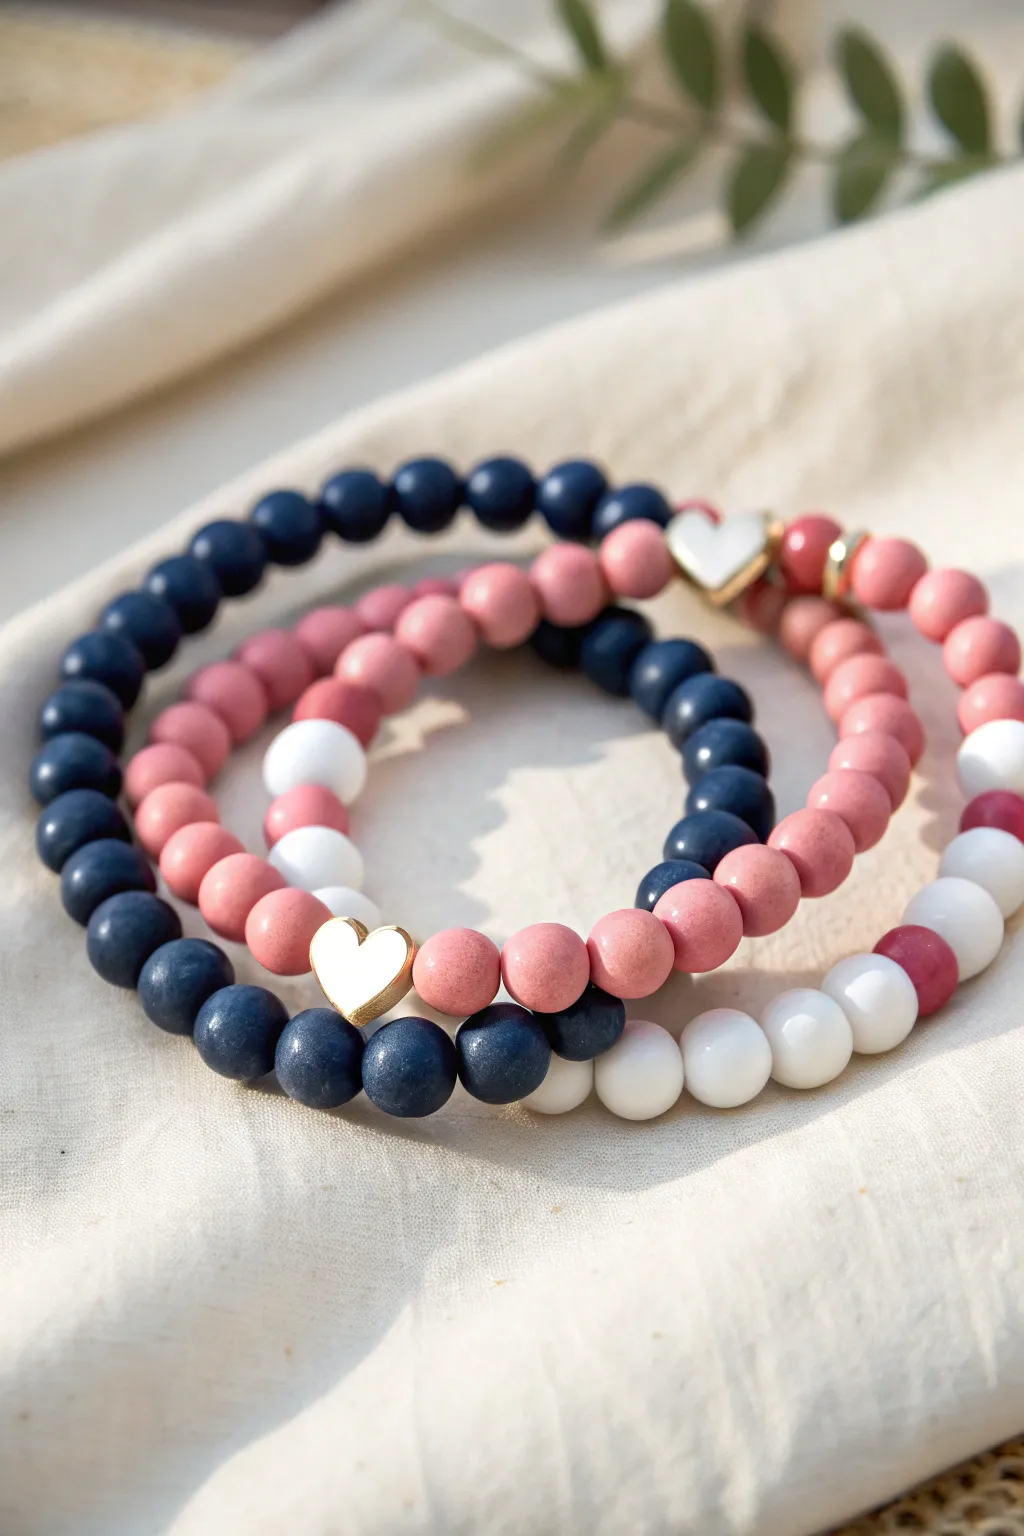
This elegant bracelet stack combines deep navy hues with soft dusty rose and crisp white beads to create a striking split-color effect. Centered with delicate gold-rimmed white hearts, this trio offers a sophisticated take on classic friendship bracelets.
Step-by-Step Guide
Materials
- Matte round beads (6mm or 8mm) in navy blue
- Matte round beads (6mm or 8mm) in dusty rose/pink
- Matte round beads (6mm or 8mm) in white
- 3 Gold-rimmed white heart charm beads
- Elastic beading cord (0.8mm clear)
- Scissors
- Jewelry glue or clear nail polish
- Tape or bead stopper
Step 1: Preparation
-
Measure the cord:
Cut three distinct pieces of elastic cord, each about 10-12 inches long to ensure you have plenty of room to tie knots later. -
Secure the ends:
Place a piece of tape or a bead stopper on one end of each cord so your beads don’t slide off while you are designing the patterns. -
Plan your patterns:
Lay out your beads on a flat surface or bead board. You will be making three distinct designs: one primarily navy, one split pink/navy, and one mixing pink, white, and heart accents.
Knot Security
Work quickly with the glue! Apply a tiny dot directly on the knot while holding tension, then let it cure completely before trimming the tails.
Step 2: The Navy & Pink Split Bracelet
-
String the first half:
Start with the navy blue beads. Thread approximately 15-20 beads onto your first cord, filling about half of the bracelet length. -
Add the centerpiece:
Slide on one gold-rimmed heart bead. Ensure the heart is facing outward correctly so it sits flat against the wrist. -
Complete the circle:
Finish the strand by threading an equal number of dusty pink beads on the other side of the heart until the bracelet fits your wrist size.
Step 3: The Pink & White Accent Bracelet
-
Start with color blocks:
For the second bracelet, begin by threading a long section of dusty rose beads, covering about two-thirds of the length. -
Create the white section:
Transition to the white beads. Add about 6-8 white beads to create a bright contrast segment. -
Insert the heart:
Place your second gold-rimmed heart bead right in the middle of this white section or at the transition point between pink and white for asymmetrical flair. -
Fill the gap:
If needed, add a few more pink or white beads to close the loop effectively.
Texture Play
Swap the smoothness. Use faceted glass beads for the colored sections and keep the matte finish only for the white accent beads for a luxury feel.
Step 4: The Navy & White Detail Bracelet
-
Dominant navy base:
Thread a long sequence of navy blue beads, similar to the first bracelet, creating a solid dark base. -
Lighten it up:
Interrupt the blue pattern with a short segment of 4-5 white beads. -
Add the final heart:
Slide on the last gold-rimmed heart bead immediately following the white segment. -
Pink accent:
Finish this specific strand with just 3-4 dusty pink beads next to the heart before returning to navy if length allows, tying the whole color palette together.
Step 5: Finishing Touches
-
Pre-stretch the cords:
Hold both ends of a bracelet and give the elastic a gentle tug. This pre-stretching prevents the bracelet from loosening up after you wear it. -
Tie the surgeon’s knot:
Remove the tape and tie the ends using a surgeon’s knot (right over left, then left over right and loop through twice). Pull tight. -
Secure the knots:
I like to dab a tiny drop of jewelry glue on the knot for extra security. Let it dry for a few minutes. -
Trim excess cord:
Cut the extra string close to the knot, but leave about 2mm to ensure it doesn’t slip undone. -
Hide the knot:
If possible, gently tug the elastic so the knot slides inside the hole of a neighboring bead to hide it.
Stack them all together for a beautifully coordinated look that feels custom-made just for you