Whenever I need a creative reset, I grab air-dry clay or polymer clay and make something small enough to finish in a day. Here are my favorite diy clay ideas—the kind that look polished, feel doable, and make your space (or your gift pile) instantly cuter.
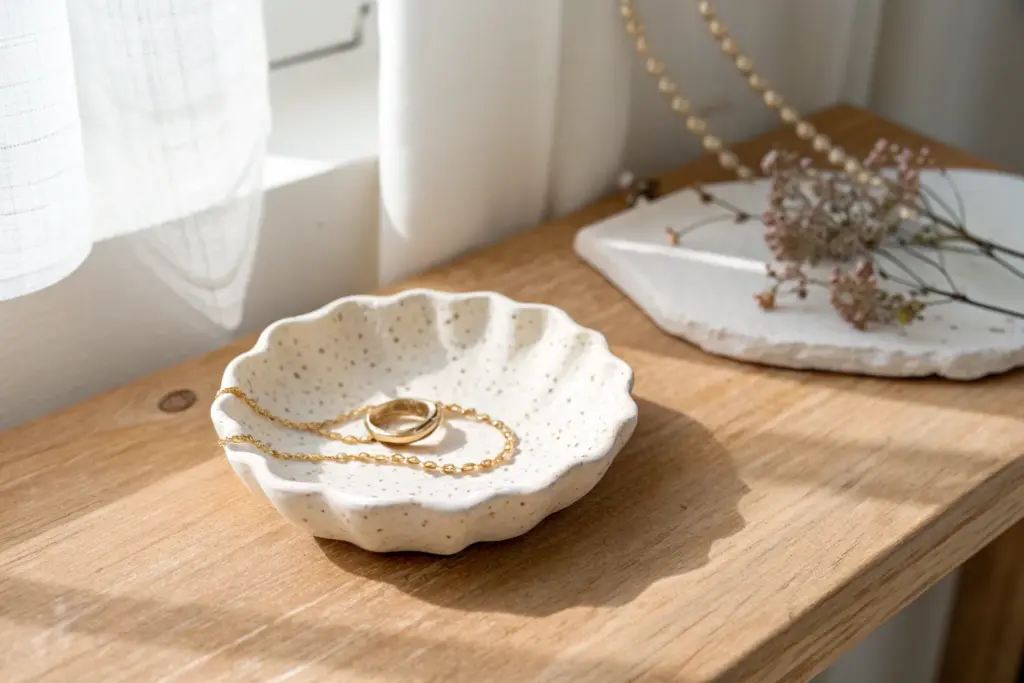
Easy Air-Dry Clay Trinket Dishes
This charming trinket dish mimics the organic warmth of wheel-thrown pottery with its natural speckles and hand-painted scalloped details. It’s perfect for holding jewelry or keys, bringing a touch of rustic elegance to any tabletop.
Step-by-Step Guide
Materials
- White or cream air-dry clay
- Rolling pin
- Small bowl (to use as a mold)
- Plastic wrap
- Clay sculpting tool or butter knife
- Sponge
- Small bowl of water
- Fine-grit sandpaper
- Amber or terracotta acrylic paint
- Fine liner paintbrush
- Gloss varnish or clear sealant
- Old toothbrush (optional for speckling)
Step 1: Shaping the Clay
-
Prepare your workspace:
Clear a flat surface and lay down a piece of canvas or parchment paper to prevent the clay from sticking. Knead a ball of white air-dry clay in your hands for a minute to warm it up and make it pliable. -
Roll out the slab:
Using your rolling pin, flatten the clay ball into an even slab. Aim for a thickness of about 1/4 inch; you want it substantial enough to be sturdy but not clunky. -
Cut the circle:
Place a bowl or a circular template onto the clay slab. Use your clay tool or knife to cut around the edge to create a perfect circle. Peel away the excess clay. -
Prepare the mold:
Take a small bowl that has the shape you want for your dish. Cover the inside of the bowl with plastic wrap; this ensures your clay won’t get stuck as it dries. -
Form the dish:
Gently lift your clay circle and press it into the lined bowl. Smooth it down firmly against the bottom and sides so it takes the shape of the mold. I like to work from the center outward to push out air bubbles.
Cracks appeared?
Don’t panic! Create a ‘slip’ paste by mixing a tiny bit of fresh clay with water. Fill the crack, smooth it over with a finger, and let it dry again before sanding.
Step 2: Refining and Drying
-
Smooth the edges:
Dip your finger or a small sponge into a little water. Run it along the top rim of the clay to round off any sharp edges left from cutting. Smooth the inside surface as well. -
Create the foot (optional):
If you want a small foot ring like the photo, roll variable thin snake of clay, form a ring, and score-and-slip it onto the bottom center of the bowl. Smooth the seam so it looks like one piece. -
Initial drying:
Let the clay sit inside the bowl mold for about 24 hours until it’s firm enough to hold its shape. -
Remove and flip:
Carefully lift the clay dish out of the mold using the plastic wrap. Peel off the plastic and place the dish upside on a drying rack to let the bottom dry completely. This usually takes another 24-48 hours. -
Sand for perfection:
Once bone dry, take your fine-grit sandpaper and gently buff away any bumps or rough spots on the rim and surface. Wipe away the dust with a slightly damp cloth.
Pro Tip: Seamless finish
Use a barely damp sponge instead of sandpaper for final smoothing before the clay is 100% dry. This ‘burnishing’ creates an incredibly smooth surface without the dust.
Step 3: Decoration and Finish
-
Add the speckled effect:
To mimic the look of stoneware clay, dip an old toothbrush into watered-down brown or tan paint. Flick the bristles with your thumb to spray fine speckles over the inside and outside of the dish. -
Draft the pattern:
Once the speckles are dry, lightly sketch a scalloped pattern (half-circles) using a pencil. Draw one ring of scallops on the inner floor of the bowl and a matching ring on the exterior rim. -
Paint the scallops:
Using your fine liner brush and the amber/terracotta paint, carefully trace over your pencil lines. Keep the paint relatively thin to look like a ceramic glaze stain. -
Paint the rim:
Run a thin line of the same paint color along the very top edge of the rim to define the shape and tie the design together. -
Seal the piece:
Apply two coats of gloss varnish to the entire dish. This not only protects the paint but gives it that shiny, fired-ceramic look shown in the image. Let it cure fully according to the bottle instructions.
Now you have a beautiful, organic-looking vessel ready to organize your smallest treasures


Minimal Clay Coasters With Soft Texture
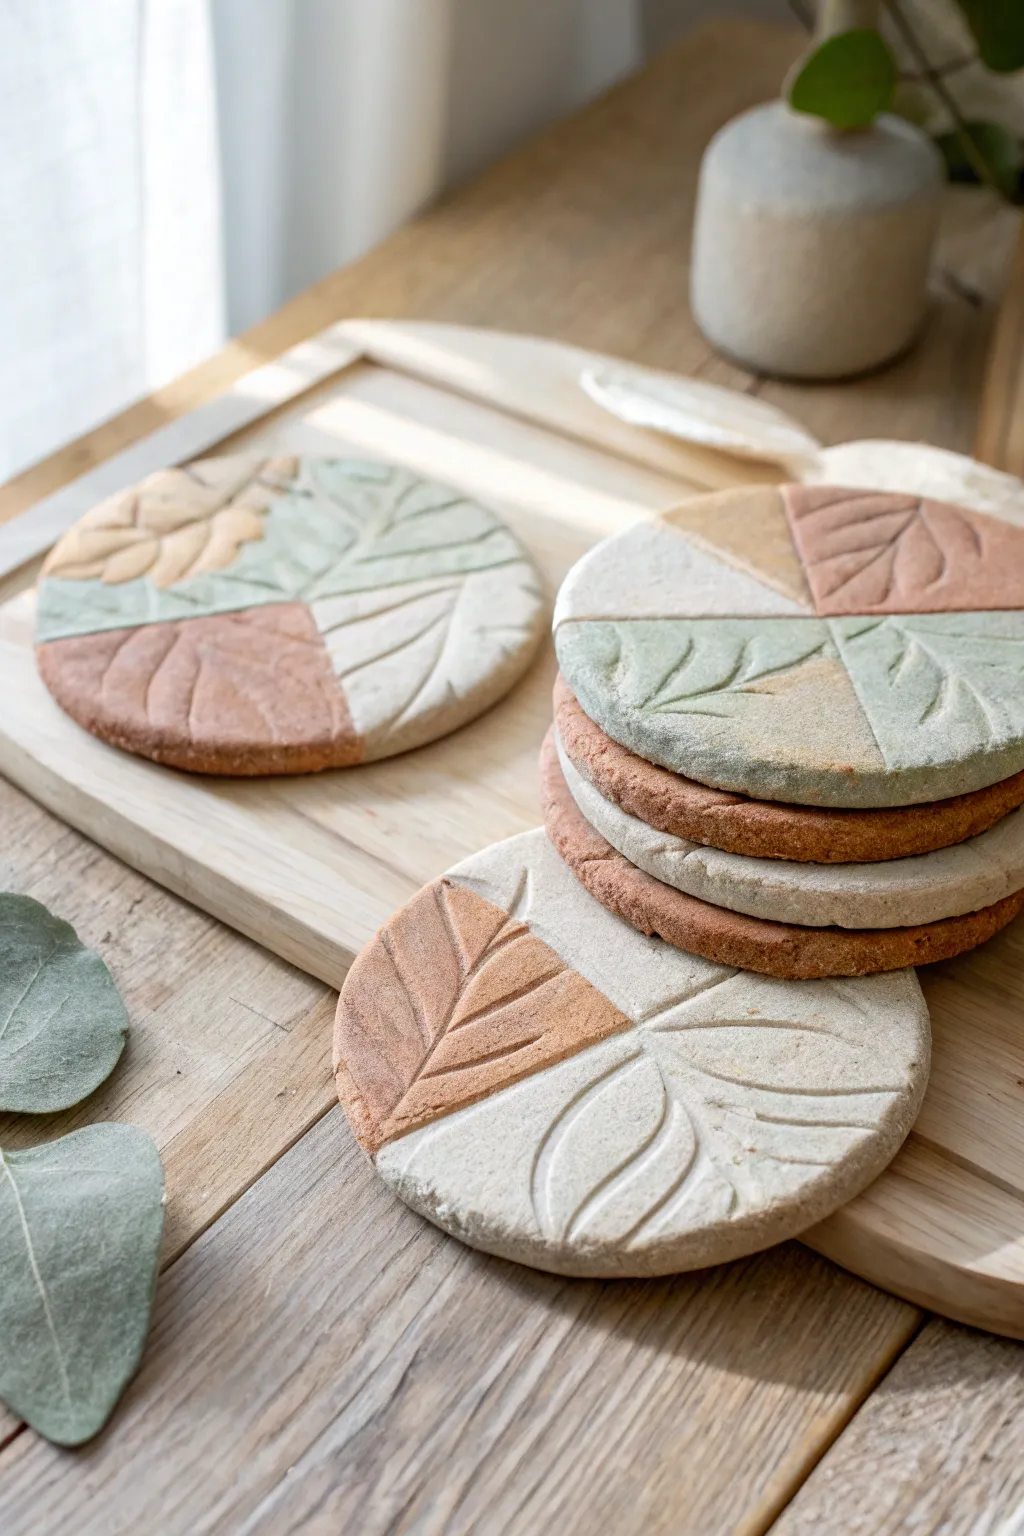
These minimal coasters combine the warmth of terracotta and neutral clay tones with soft, embossed textures to create a stunning botanical effect. The segmented leaf design gives them a modern, organic look that feels both handmade and sophisticated.
Detailed Instructions
Materials
- Air-dry clay in multiple colors (white, terracotta/brick red, soft sage green, pale ochre yellow)
- Non-stick rolling pin
- Circle cookie cutter (approx. 4 inches) or a bowl to trace
- Clean craft knife or scalpel
- Rolling mat or parchment paper
- Leaf veining tool, needle tool, or dull knife
- Small bowl of water
- Fine-grit sandpaper (optional)
- Matte sealant or water-resistant varnish
Step 1: Prepping the Palette
-
Conditioning:
Begin by kneading each color of clay separately until it is soft, pliable, and free of cracks. Warm clay is much easier to work with and adheres better. -
Dividing:
Pull off small balls of each color, roughly the size of a walnut. For the design shown, you will need a mix of white, terracotta, sage green, and ochre. -
Creating segments:
To achieve the color-block effect, take different colored balls and press them next to each other on your rolling mat. I like to arrange them so they form a rough square or circle shape before rolling, ensuring the colors touch firmly.
Cracking Seams?
If color joins separate while drying, mix a tiny bit of the matching clay with water to make a paste (slip) and fill the crack, then smooth it over.
Step 2: Forming the Base
-
Rolling out:
Use your rolling pin to flatten the combined clay mass. Roll gently at first to mesh the seams together, aiming for an even thickness of about 1/4 inch. -
Checking the seams:
Inspect the joins between colors. If they are pulling apart, push the clay together with your fingers and roll again lightly to smooth the surface. -
Cutting the shape:
Take your circle cutter or a bowl and press it firmly into the rolled slab to cut your coaster shape. Try to position the cut so it captures the intersection of multiple colors for the best visual interest. -
Smoothing edges:
Before the clay dries, dip your finger in a little water and gently run it along the cut edge of the circle to remove any sharpness or burrs.
Step 3: Texturing the Design
-
Planning the veins:
Visualize a leaf pattern radiating from the center or crossing the color boundaries. The beauty of these coasters is how the texture overlays the color blocks. -
Carving the midrib:
Using your sculpting tool or dull knife, gently press a straight central line (the midrib) across the circle. Don’t cut all the way through; just create a clear indentation. -
Adding main veins:
Press angled lines branching off the center midrib. Make these lines curve slightly to mimic the natural flow of a leaf. -
Detailing:
For added texture, you can add smaller, shorter lines between the main veins. Varying the pressure gives a more organic, ‘soft’ texture as seen in the photo.
Go For Granite
Mix dried tea leaves or cracked black pepper into the white clay before rolling. This creates a speckled, faux-stone effect that adds immense depth.
Step 4: Finishing Up
-
Drying setup:
Transfer the coaster carefully to a flat, clean surface lined with parchment paper or a wire cooling rack. -
Preventing warping:
Air-dry clay likes to curl as moisture leaves it. Place a light book or a flat board on top of the coasters once they are strictly ‘touch dry’ to keep them perfectly flat. -
Sanding:
Once fully cured (usually 24-48 hours), use fine-grit sandpaper to gently smooth the outer rim and face if you want a cleaner, more porcelain-like finish. -
Sealing:
To protect your coasters from condensation, apply a thin coat of matte water-resistant varnish. This preserves the natural, earthy look while adding functionality.
Enjoy styling your coffee table with these uniquely textured botanical pieces


Polymer Clay Statement Earrings in Modern Shapes
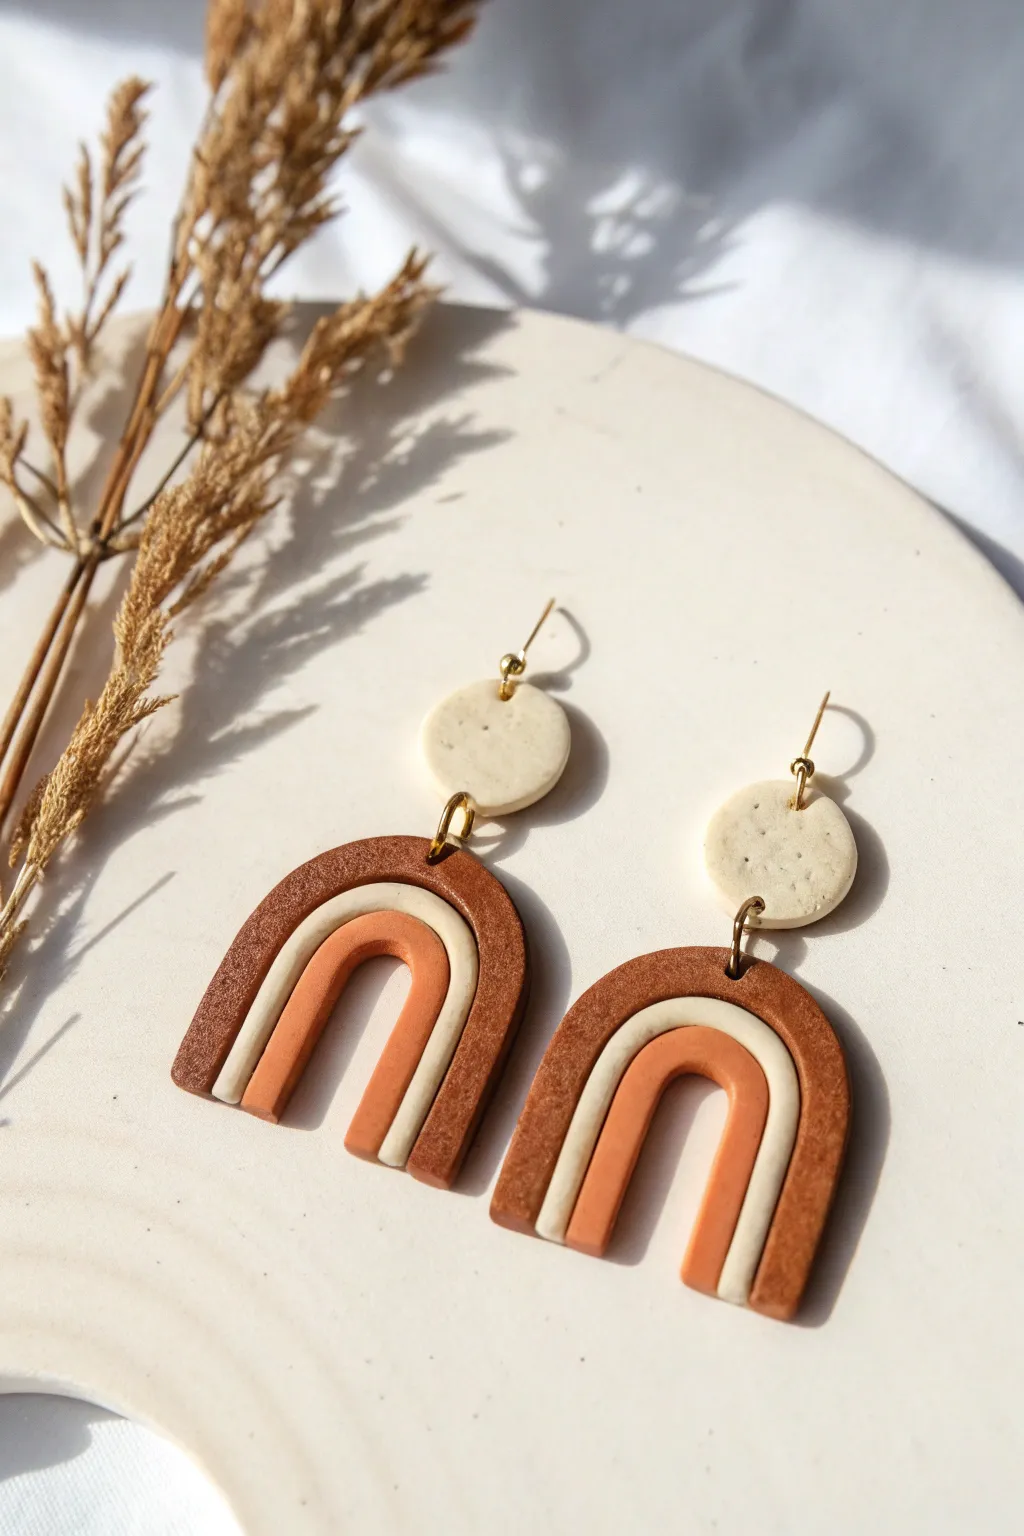
These warm, earthy rainbow earrings combine modern geometric shapes with a delightfully organic speckled texture. The result is a statement accessory that feels both handcrafted and polished, perfect for adding a touch of bohemian flair to any outfit.
Step-by-Step Tutorial
Materials
- Polymer clay in terracotta brown
- Polymer clay in muted orange/rust
- Polymer clay in cream or beige
- Black pepper or dried coffee grounds (for speckling)
- Acrylic rolling pin
- Clay extruder (optional but helpful)
- Circle clay cutter (approx. 1 cm)
- Sharp tissue blade
- Small hand drill or piercing tool
- 4 jump rings (gold finish)
- 2 earring posts and backs
- Jewelry pliers
- Super glue or UV resin
- Baking sheet and parchment paper
- Sandpaper (fine grit)
Step 1: Preparing the Speckled Clay
-
Condition the clay:
Start by warming up your clay blocks in your hands. Knead the terracotta brown and the cream clay separately until they are soft and pliable. -
Add texture:
To achieve that organic speckled look seen in the photo, flatten your cream and terracotta clays slightly. Sprinkle a tiny pinch of ground black pepper or very fine dried coffee grounds onto the surface. -
Mix it in:
Fold the clay over the speckles and knead thoroughly until the particles are evenly distributed throughout the material. Don’t overdo it; you want subtle texture, not dirty clay.
Step 2: Creating the Stud Tops
-
Roll the sheet:
Take your speckled cream clay and roll it out into a sheet approximately 3mm thick. Use depth guides if you have them to ensure it’s perfectly even. -
Cut the circles:
Use your small circle cutter to punch out two discs. These will serve as the stud tops of your earrings. -
Smooth the edges:
Gently gently rub your finger along the rim of the circles to soften any sharp cutting edges. This small detail makes the final piece look much more professional. -
Pierce holes:
Using a needle tool or toothpick, make a small hole near the bottom edge of each circle. wiggle it slightly to ensure the hole is wide enough for a jump ring later.
Uneven Arches?
If your clay snakes keep separating after baking, use a tiny dab of liquid polymer clay or ‘Bake & Bond’ between the colored strands before curing to fuse them permanently.
Step 3: Forming the Rainbow Arches
-
Prepare the snakes:
For the cleanest arches, I prefer using a clay extruder to create long, even snakes of clay. You need a medium thickness for all three colors: speckled terracotta, speckled cream, and the solid rust orange. -
Roll by hand (alternative):
If you don’t have an extruder, roll the snakes by hand on a glass surface, using a flat acrylic block to apply even pressure back and forth until they are uniform in thickness. -
Form the inner arch:
Take the solid rust orange snake and bend it into a tight U-shape. This will be the smallest, innermost curve of your rainbow. -
Add the middle layer:
Take the speckled cream snake and gently press it around the outside of the orange arch. Ensure the clays touch along the entire seam without squishing the round profile too much. -
Add the outer layer:
Wrap the speckled terracotta snake around the cream layer to complete the rainbow shape. -
Trim the bottoms:
Once your three layers are secure, use your sharp tissue blade to make a clean, straight cut across the bottom of the rainbow legs so they are perfectly flush. -
Repeat for the second earring:
Build the second rainbow right next to the first one to compare sizes as you go, ensuring they are symmetrical twins. -
Add connection holes:
Pierce a hole through the top center of the outer (terracotta) band. Make sure it goes all the way through cleanly.
Level Up: Glossy Contrast
After baking, apply a thin layer of UV resin or generous glossy glaze ONLY to the center rust-colored arch. This mixed-texture look adds a high-end designer finish.
Step 4: Baking and Assembly
-
Bake the pieces:
Place all clay components on a parchment-lined baking sheet. Bake according to your brand of polymer clay instructions (usually around 275°F/135°C for 30 minutes). -
Cool and finish:
Let the pieces cool completely. If there are any fingerprints, lightly sand them away with fine-grit sandpaper, or wipe with a little acetone on a q-tip. -
Attach the posts:
Glue the flat earring posts to the back of the small speckled cream circles using strong super glue or a dab of UV resin cured under a lamp. -
Connect with jump rings:
Open a jump ring with your pliers. Loop it through the hole in the circle stud and the hole in the rainbow arch, then close it securely.
You have just created a stunning pair of statement earrings ready to wear or gift


DIY Clay Ring Holder Cones and Sculptural Stands
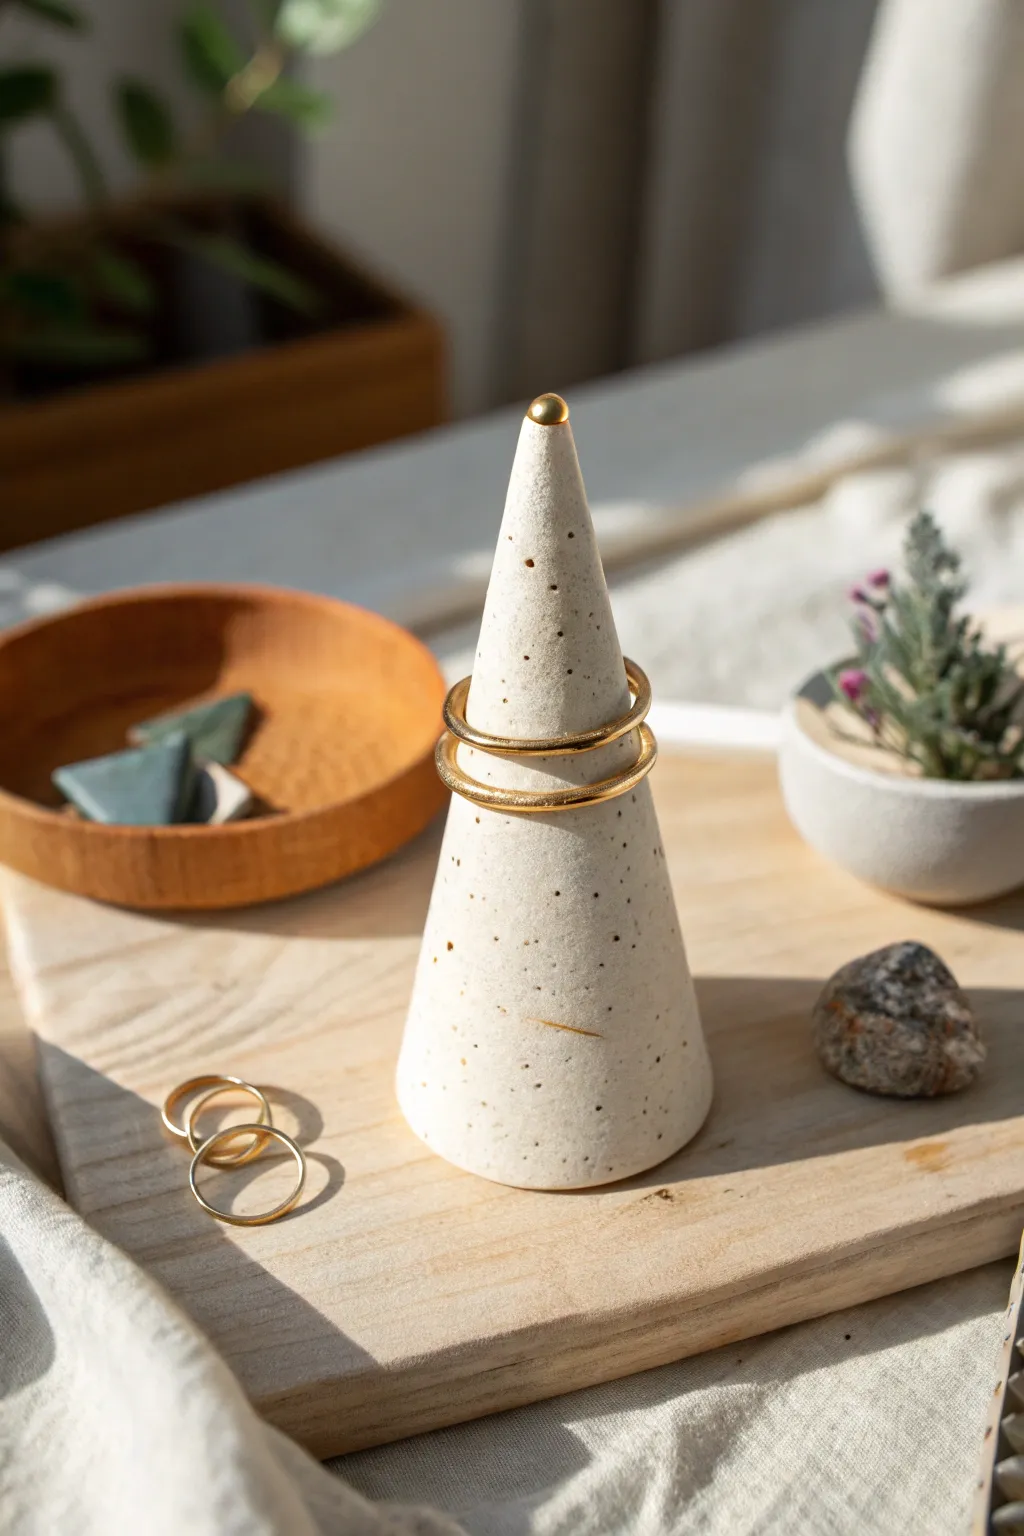
This elegant ring holder combines minimalism with functionality, featuring a creamy white cone shape dotted with natural-looking speckles and topped with a metallic gold accent. It’s designed to keep your favorite bands organized while acting as a tiny sculptural piece for your nightstand or vanity.
Detailed Instructions
Materials
- White polymer clay (approx. 2oz)
- Speckled clay additives (like dried coffee grounds, black pepper, or faux-granite clay mix)
- Rolling pin or acrylic roller
- Craft knife or clay blade
- Smooth work surface (glass or ceramic tile)
- Fine-grit sandpaper (400 and 800 grit)
- Liquid gold leaf or metallic gold enamel paint
- Small round paintbrush
- Oven (for baking) and baking sheet
- Parchment paper
Step 1: Preparing the Speckled Clay
-
Condition the clay:
Start by warming the white polymer clay in your hands. Knead and fold it repeatedly until it becomes soft, pliable, and easy to shape without cracking. -
Add texture:
To achieve the speckled look shown in the photo, flatten your conditioned clay into a pancake. Sprinkle a very small pinch of your chosen speckle material—crushed black pepper or dried coffee grounds work beautifully—onto the surface. -
Integrate the speckles:
Fold the clay over the speckles and knead thoroughly. Continue folding and kneading until the tiny dark spots are evenly distributed throughout the entire white mass. -
Form the initial ball:
Roll the now-speckled clay between your palms to create a smooth, tight sphere. Ensure there are no major seams or air pockets trapped inside.
Uneven Base?
If your cone wobbles, rub the base in a figure-8 motion on a sheet of coarse sandpaper taped to a flat table. This levels the bottom perfectly flat.
Step 2: Shaping the Cone
-
Start the tapered shape:
Place the ball on your work surface. Using the flat palm of your hand, begin rolling the clay back and forth, but apply more pressure to one side of the ball than the other. -
Refine the cone:
As you continue rolling, the side with more pressure will elongate into a point, while the other side remains wider. Aim for a height of about 3 to 4 inches. -
Flatten the base:
Once you have a rough carrot shape, stand it upright on your work surface. Gently pres down on the top point to ensure the base is flush with the table. -
Final shaping:
With the cone standing, assist the shape by gently patting the sides with flat fingers or a flat tool to straighten them out. The goal implies a geometric cone rather than an organic, lumpy carrot. -
Round the tip:
The tip shouldn’t be needle-sharp. Use your finger to gently blunt the very top point into a tiny, rounded dome, as seen in the reference image. -
Smooth the surface:
Look closely for fingerprints. Lightly stroke the clay with a tiny amount of baby oil or cornstarch on your finger to buff away any prints before baking.
Step 3: Baking and Finishing
-
Prepare for baking:
Preheat your oven according to the manufacturer’s instructions on your clay package (usually around 275°F or 130°C). Place the cone standing up on a baking sheet lined with parchment paper. -
Bake the clay:
Bake for approximately 30 minutes for every quarter-inch of thickness. Since this is a solid cone, I tend to bake it a bit longer—around 45 to 60 minutes—to ensure the core cures completely. -
Cool down:
Remove from the oven and let the cone cool completely. Do not try to sand or paint while it is still warm. -
Initial sand:
Once cool, use the 400-grit sandpaper to gently smooth out any bumps on the surface. Use a circular motion and light pressure. -
Polish sand:
Follow up with the 800-grit sandpaper for an ultra-smooth, matte stone finish. Wipe away all dust with a damp cloth or rinse quickly under water and dry. -
Add the gold accent:
Dip your small round brush into liquid gold leaf or metallic enamel. Carefully paint just the rounded tip of the cone. -
Create the clean line:
To get that neat separation between the gold and the clay, steady your hand or turn the cone while holding the brush still against it. -
Let it cure:
Allow the gold paint to dry fully according to the bottle’s instructions before placing any jewelry on the cone to avoid tarnishing your rings.
Marbled Effect
Mix a tiny amount of beige or grey clay into your white speckled mix but don’t fully blend it. Leave swirls visible for a faux-stone marble look.
Now you have a chic, modern display piece ready to hold your daily essentials with style

The Complete Guide to Pottery Troubleshooting
Uncover the most common ceramic mistakes—from cracking clay to failed glazes—and learn how to fix them fast.
Cute Clay Magnets for Fridge or Locker

These adorable magnets look just like freshly iced sugar cookies, featuring a mix of happy faces, lattice hearts, and tiny strawberries. The soft pastel palette and simple geometric shapes make them a perfect beginner project for brightening up your fridge or locker.
Step-by-Step Guide
Materials
- White or cream polymer clay (for the base)
- Yellow, pink, red, and orange polymer clay
- Liquid polymer clay (Translucent and White)
- Rolling pin or clay machine
- Square cookie cutter (approx. 1 inch)
- Small round cutters
- Soft pastel chalks (for shading)
- Black acrylic paint or fine detail marker
- Needle tool or toothpick
- Gloss glaze (optional)
- Small round magnets
- Strong craft glue (E6000 or similar)
Step 1: Creating the Bases
-
Condition the white clay:
Start by kneading your white or cream clay until it is soft and pliable. This prevents cracks during baking. -
Roll out the sheet:
Roll the clay out to a consistent thickness of about 1/4 inch. You want them thick enough to look like cookies and hold the magnet firmly. -
Cut the shapes:
Use your square cutter to punch out roughly 9-12 squares. Gently smooth the edges with your finger to mimic the soft edge of a baked cookie. -
Add texture (optional):
If you want a realistic cookie texture, gently tap the surface with a clean toothbrush or a ball of aluminum foil.
Clean Cuts Pro Tip
Place a piece of cling film over your rolled clay before using cutters. This creates a pillowed, rounded edge that looks much more like a soft cookie than a sharp, straight cut.
Step 2: Sculpting the Toppers
-
Make the simple smileys:
Roll out white or pale yellow clay very thinly. Cut small circles that fit inside your squares, leaving a border. Press these gently onto the square bases. -
Create the teardrops:
Form small balls of yellow or orange clay, flatten them slightly, and pinch one end to create a teardrop or balloon shape. Place these on their own square bases or leave them as standalone magnets. -
Form the hearts:
Using pink clay, cut or hand-sculpt small heart shapes. Place some on squares and save others as loose accents. -
Sculpt the strawberries:
Shape red clay into small, flattened triangles with rounded corners. Add tiny green clay leaves to the top and use a needle tool to poke small seeds into the surface.
Step 3: Detailing and Piping
-
Mix the ‘icing’:
Mix a small amount of white liquid clay with a tiny bit of white solid clay to create a thick paste. It should hold its shape when piped. -
Pipe the grid lines:
On the pink heart toppers, use a needle tool or a very fine piping bag to drag lines of your white paste across the surface to create a lattice or plaid effect. -
Add pastel shading:
Scrape some pink or orange pastel chalk into a powder. Use a soft brush to gently apply ‘blush’ to the cheeks of the smiley faces or shading to the edges of the teardrops for dimension. -
Bake the clay:
Place all pieces on a tile or parchment-lined baking sheet. Bake according to your clay package instructions (usually 275°F/135°C for 15-30 minutes).
Dust Particles?
White clay picks up everything! Wipe your hands and work surface with a baby wipe before starting. If dust gets on the raw clay, use a q-tip dipped in rubbing alcohol to wipe it away.
Step 4: Finishing Touches
-
Cool completely:
Let the clay pieces cool down entirely before proceeding. They are fragile while warm. -
Paint the faces:
Using a fine paintbrush and black acrylic paint, or a detail marker, carefully draw the eyes and smiles. Keep the features small and centered for maximum cuteness. -
Glaze the fruit:
I like to apply a coat of gloss glaze specifically to the strawberry and lemon slices to give them a juicy, fresh look, while keeping the ‘cookie’ parts matte. -
Attach magnets:
Flip the pieces over. Apply a dab of strong glue to the back and press a magnet firmly into the center. Let the glue cure fully before sticking them to your fridge.
Now you have a charming set of faux-cookie magnets ready to organize your notes
Air-Dry Clay Mini Planters and Plant Pots
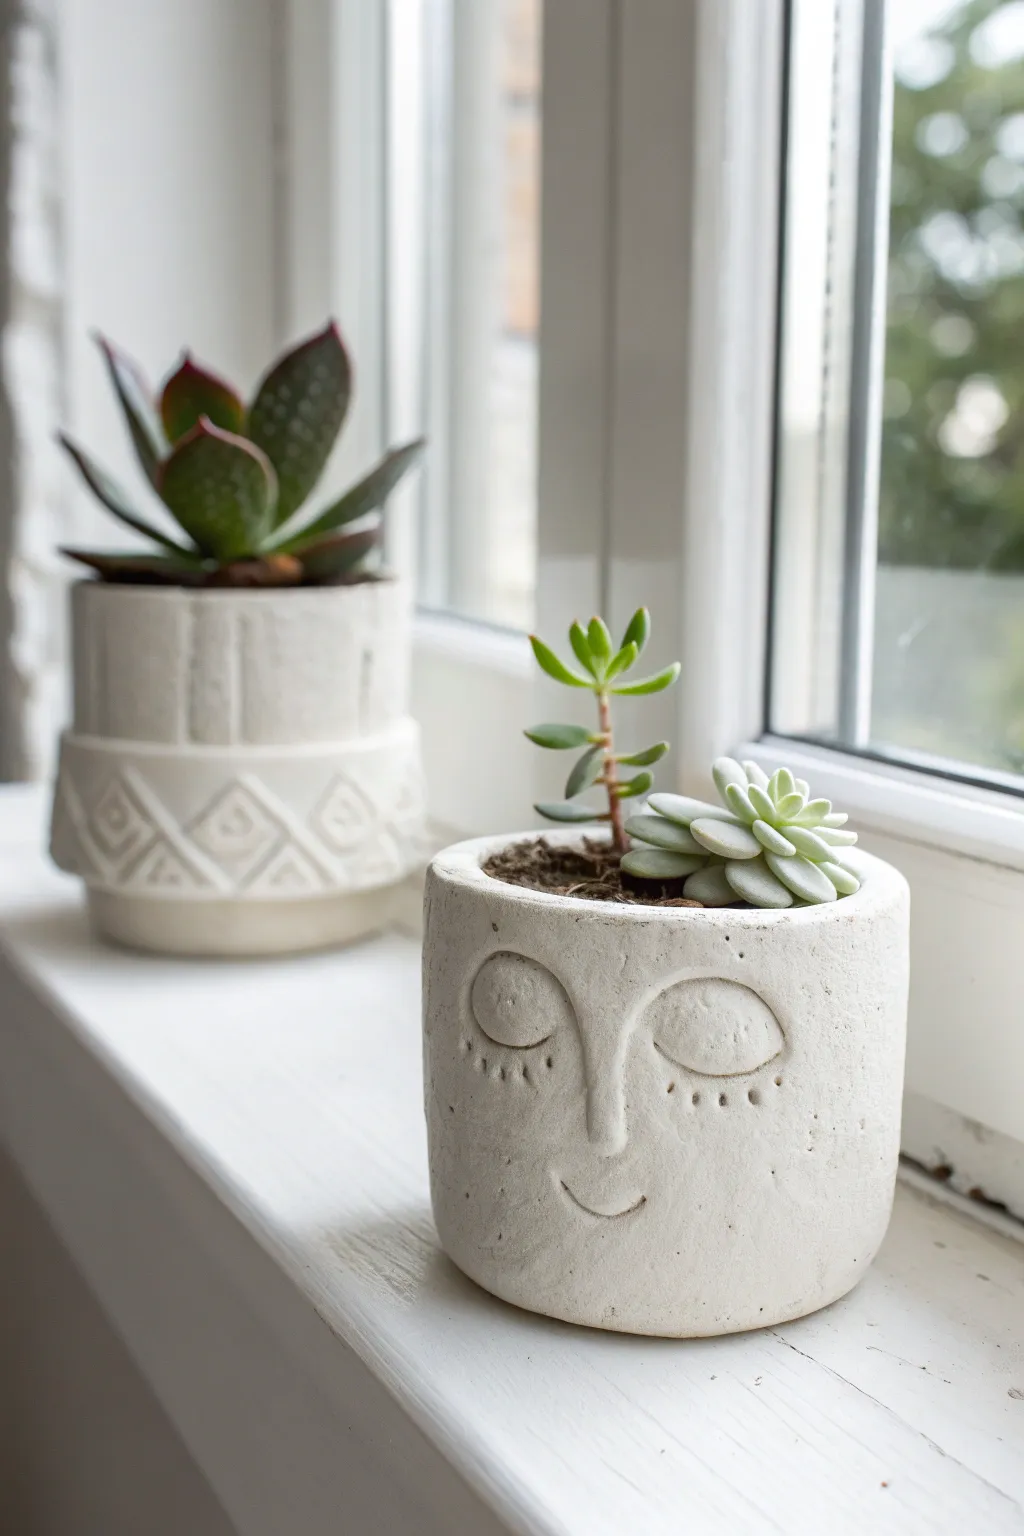
Transform your windowsill with these charming handcrafted planters, including a delightful character with a sleepy face and a more structured geometric pot. Using air-dry clay, you’ll sculpt personality and texture into simple vessels that perfectly house your favorite mini succulents.
Step-by-Step
Materials
- White air-dry clay (approx. 500g)
- Small rolling pin
- Clay knife or craft knife
- Small cup or jar (to use as a mold)
- Small bowl of water
- Sponge
- Needle tool or toothpick
- Fine-grit sandpaper
- Acrylic sealant or varnish (matte finish)
Step 1: Preparing the Clay Base
-
Condition the clay:
Begin by taking a handful of air-dry clay and kneading it in your hands until it feels soft, warm, and pliable. This prevents cracks later on. -
Roll out the slab:
On a clean, flat surface, use your rolling pin to flatten the clay into a long rectangular slab, aiming for an even thickness of about 1/4 inch. -
Cut the base:
Place your chosen cup or jar onto the clay slab and trace around the bottom with your knife to create a circular base. Set this circle aside. -
Measure the walls:
Wrap a piece of string or paper around your mold to find the circumference, then cut a long rectangle from your clay slab that matches this length plus a little overlap.
Step 2: Constructing the Pot Structure
-
Wrap the mold:
Loosely wrap the paper or plastic wrap around your mold to prevent sticking. Then, wrap the rectangular clay slab around the mold. -
Join the seam:
Where the two ends of the rectangle meet, score both edges with your needle tool (make little scratches) and add a drop of water. Press them firmly together. -
Smooth the exterior:
Use your finger or a damp sponge to smooth over the vertical seam until it disappears completely into the wall of the pot. -
Attach the base:
Score the bottom edge of your cylinder wall and the outer edge of your circular base. Press the cylinder onto the base and smooth the clay down to seal the join. -
Refine the shape:
Gently slide the mold out. If the walls sag slightly, you can stuff the inside with crumpled paper towel to hold the shape while you work.
Smooth Operator
Keep a damp sponge nearby while working. Wiping the clay periodically prevents cracks and keeps the surface looking polished before it even dries.
Step 3: Sculpting the Sleepy Face Pot
-
Create the nose:
Roll a small, thin snake of clay about an inch long. Attach it vertically to the center of the pot face using the score-and-slip method, smoothing the edges so it merges seamlessly. -
Form the eyelids:
Roll two small semi-circles or ovals of clay. Press them gently onto the pot on either side of the nose to create the sleeping eyelids. -
Add details:
Using your needle tool, gently press into the bottom edge of the eyelids to create lashes. Carve a small curved line below the nose for a simple smile. -
Smooth everything out:
Dip your finger in water and very lightly run it over the added features to remove any sharp edges or tool marks.
Make it Waterproof
Air-dry clay isn’t naturally waterproof. For real plants, insert a small plastic nursery pot inside your clay creation rather than planting directly.
Step 4: Creating the Geometric Pot
-
Add a raised band:
For the second design, roll a thicker strip of clay and attach it around the lower third of the pot to create a raised tier. -
Carve the pattern:
Use a modeling tool or knife to carve diamond shapes and vertical lines into the clay surface. I find deeper lines read better once the clay dries. -
Texture the top:
Use the back of a knife or a texture tool to press vertical indentations into the upper section of the pot for contrast.
Step 5: Finishing Touches
-
Let it dry:
Place your creations in a cool, dry spot away from direct sunlight. Let them dry for 24-48 hours until they are completely white and hard. -
Sand imperfections:
Once fully dry, take your fine-grit sandpaper and gently buff away any rough spots, seams, or fingerprints for a professional matte look. -
Seal the pot:
Apply two coats of matte acrylic varnish or sealant to the inside and outside. This is crucial to protect the clay from moisture when watering your plants.
Pop in your favorite succulents and enjoy the serene vibe these handmade pots bring to your space


What Really Happens Inside the Kiln
Learn how time and temperature work together inside the kiln to transform clay into durable ceramic.
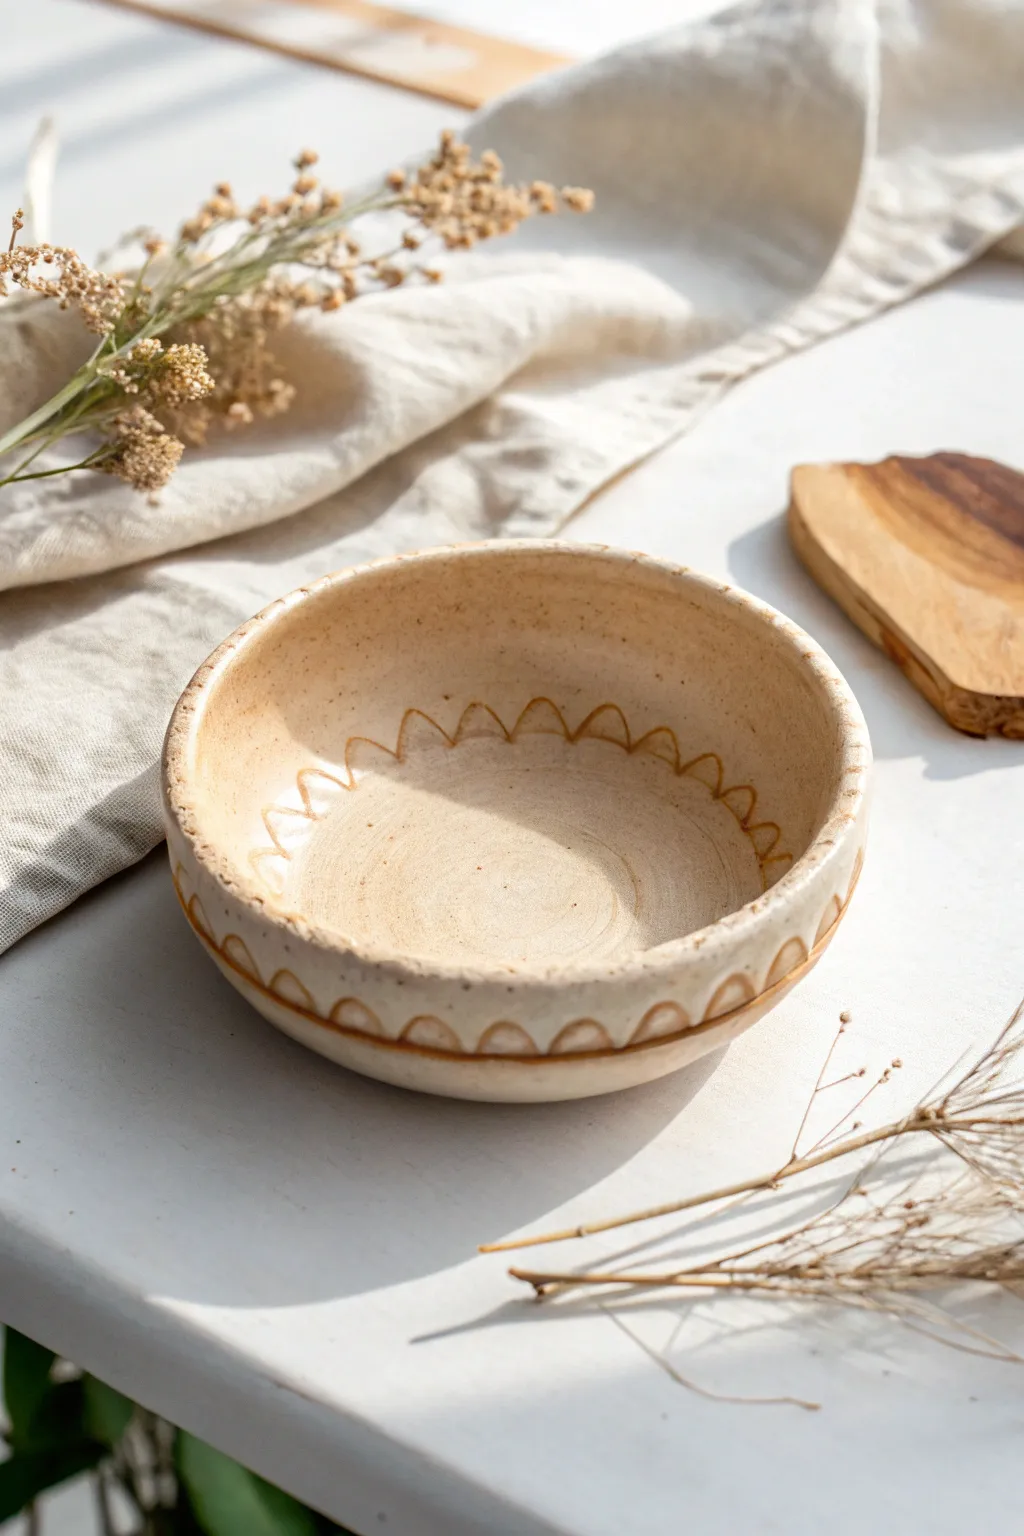
Simple Clay Incense Holders With a Glazed Look
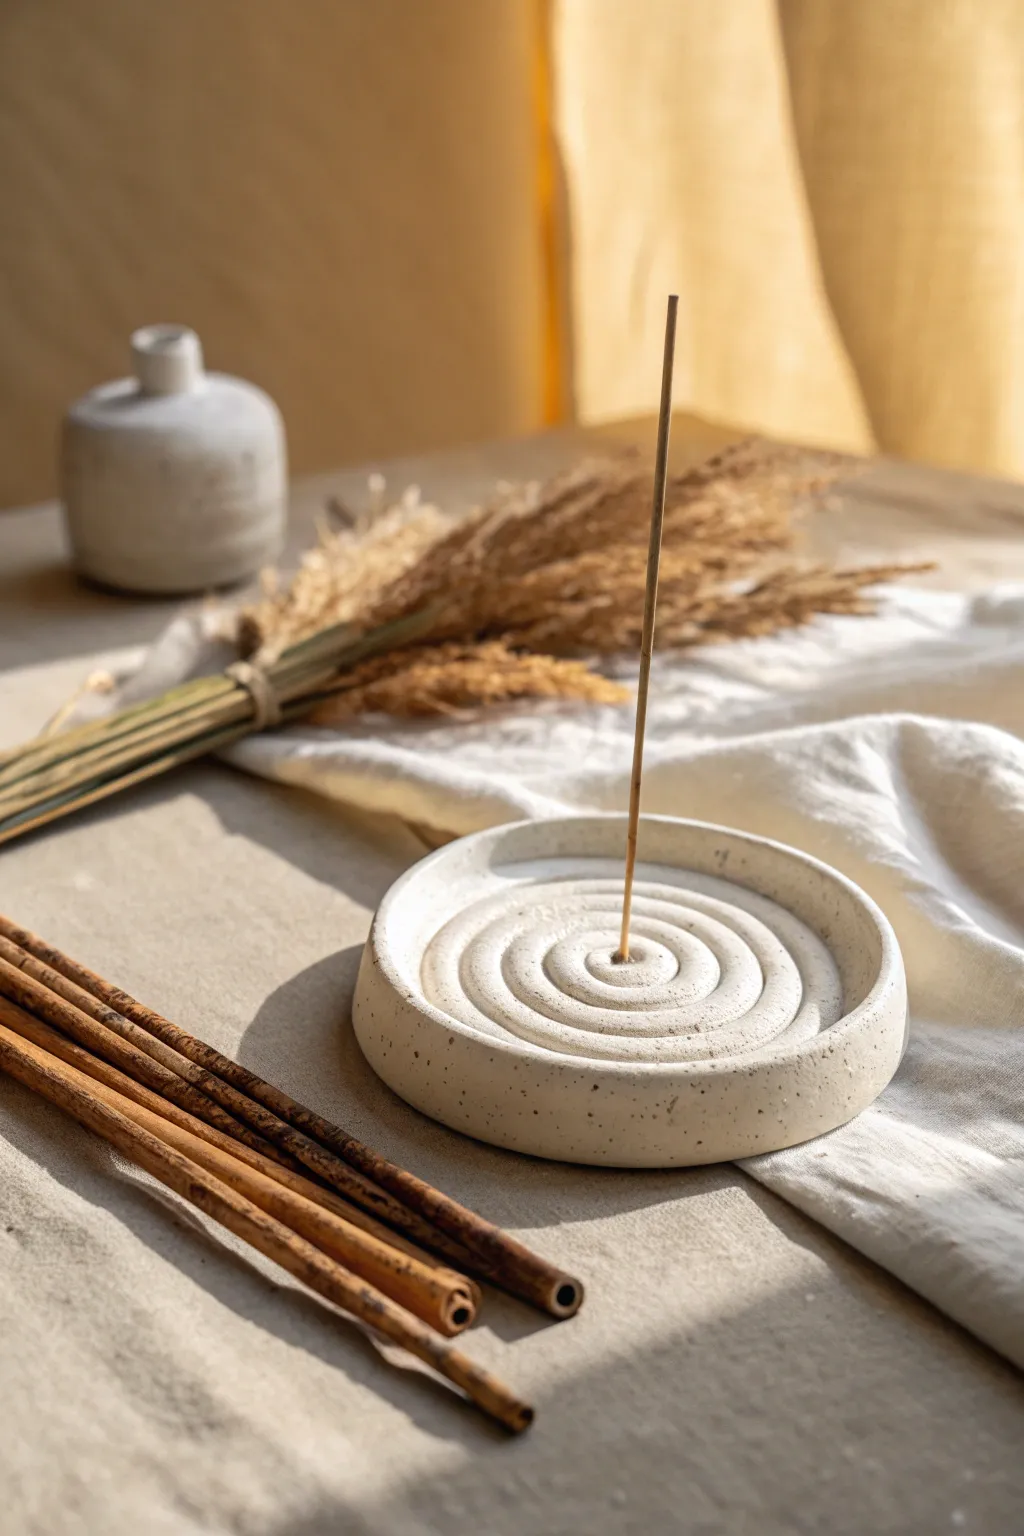
Bring a touch of Zen to your space with this minimalist, stone-effect incense holder featuring a calming spiral design. The speckled finish mimics natural granite without the need for a kiln, making it a perfect afternoon project for beginners.
Step-by-Step Tutorial
Materials
- White or cream air-dry clay (approx. 200g)
- Black acrylic paint
- Rolling pin
- Clay knife or craft knife
- Small bowl or round cutter (approx. 4-5 inches diameter)
- Bamboo skewer or wooden incense stick
- Cup of water
- Old toothbrush
- Fine-grit sandpaper
- Gloss or satin varnish (optional for ‘glazed’ look)
- Small sponge
Step 1: Creating the Base
-
Condition the Clay:
Begin by kneading your air-dry clay until it is soft, warm, and pliable. This prevents cracks from forming later. -
Roll the Slab:
Roll the clay out on a smooth surface to a thickness of about 1/4 inch. Try to keep the thickness consistent across the entire slab. -
Cut the Circle:
Place your small bowl or round cutter onto the clay and cut around it with your knife to create a perfect circle. -
Smooth the Edges:
Dip your finger in a little water and run it along the cut edge of the circle to smooth out any roughness or sharp crumbs.
Cracking Up?
If you see tiny hairline cracks appearing as the clay dries, mix a tiny bit of fresh clay with water to make a paste and smooth it into the cracks immediately.
Step 2: Forming the Coil Spiral
-
Roll a Snake:
Take the remaining clay and roll it into a very long, even snake. Aim for a thickness of about 1/4 inch, similar to a thick pencil. -
Start the Spiral:
Place the end of the clay snake in the exact center of your clay circle. Gently press it down to adhere. -
Wind the Coil:
Slowly wind the snake around the center point, creating a tight spiral. Ensure each loop touches the previous one without gaps. -
Continue Winding:
Keep winding until you reach about 1/2 inch from the outer edge of the base circle. -
Trim the End:
Cut the clay snake at an angle and smooth the end into the previous coil so it tapers off neatly. -
Secure the Rim:
Roll a slightly thicker snake for the outer rim. Wrap this around the very edge of the base circle to create a raised wall that contains the spiral. -
Blend the Seams:
Using a tiny bit of water and a modeling tool or your finger, gently blend the bottom of the outer rim onto the base so it’s securely attached. -
Create the Holder Hole:
Take your incense stick or skewer and press it vertically into the very center of the spiral. Wiggle it slightly to ensure the hole is wide enough for an incense stick stem.
Step 3: Finishing and Speckling
-
Drying:
Let the piece dry completely according to your clay package instructions. I usually leave mine for 24-48 hours just to be safe. -
Sand Smooth:
Once bone dry, use fine-grit sandpaper to gently smooth out any fingerprints or rough edges on the rim. -
Prepare Speckle Paint:
Dilute a small drop of black acrylic paint with water until it has an inky consistency. -
Splatter Effect:
Dip an old toothbrush into the watery paint. Hold it over the clay dish and run your thumb across the bristles to flick tiny speckles onto the surface. -
Let Paint Dry:
Allow the speckles to dry completely, which should only take about 10-15 minutes. -
Apply Glaze:
For that ceramic look, apply a coat of gloss or satin varnish using a soft brush or sponge, covering the entire piece.
Make it Marble
Instead of painting speckles, knead tiny bits of dried black clay crumbs or black pepper directly into the wet white clay before rolling it out.
Now you have a serene little spot to burn your favorite scents and relax
Modern Clay Candle Holders in Chunky Shapes
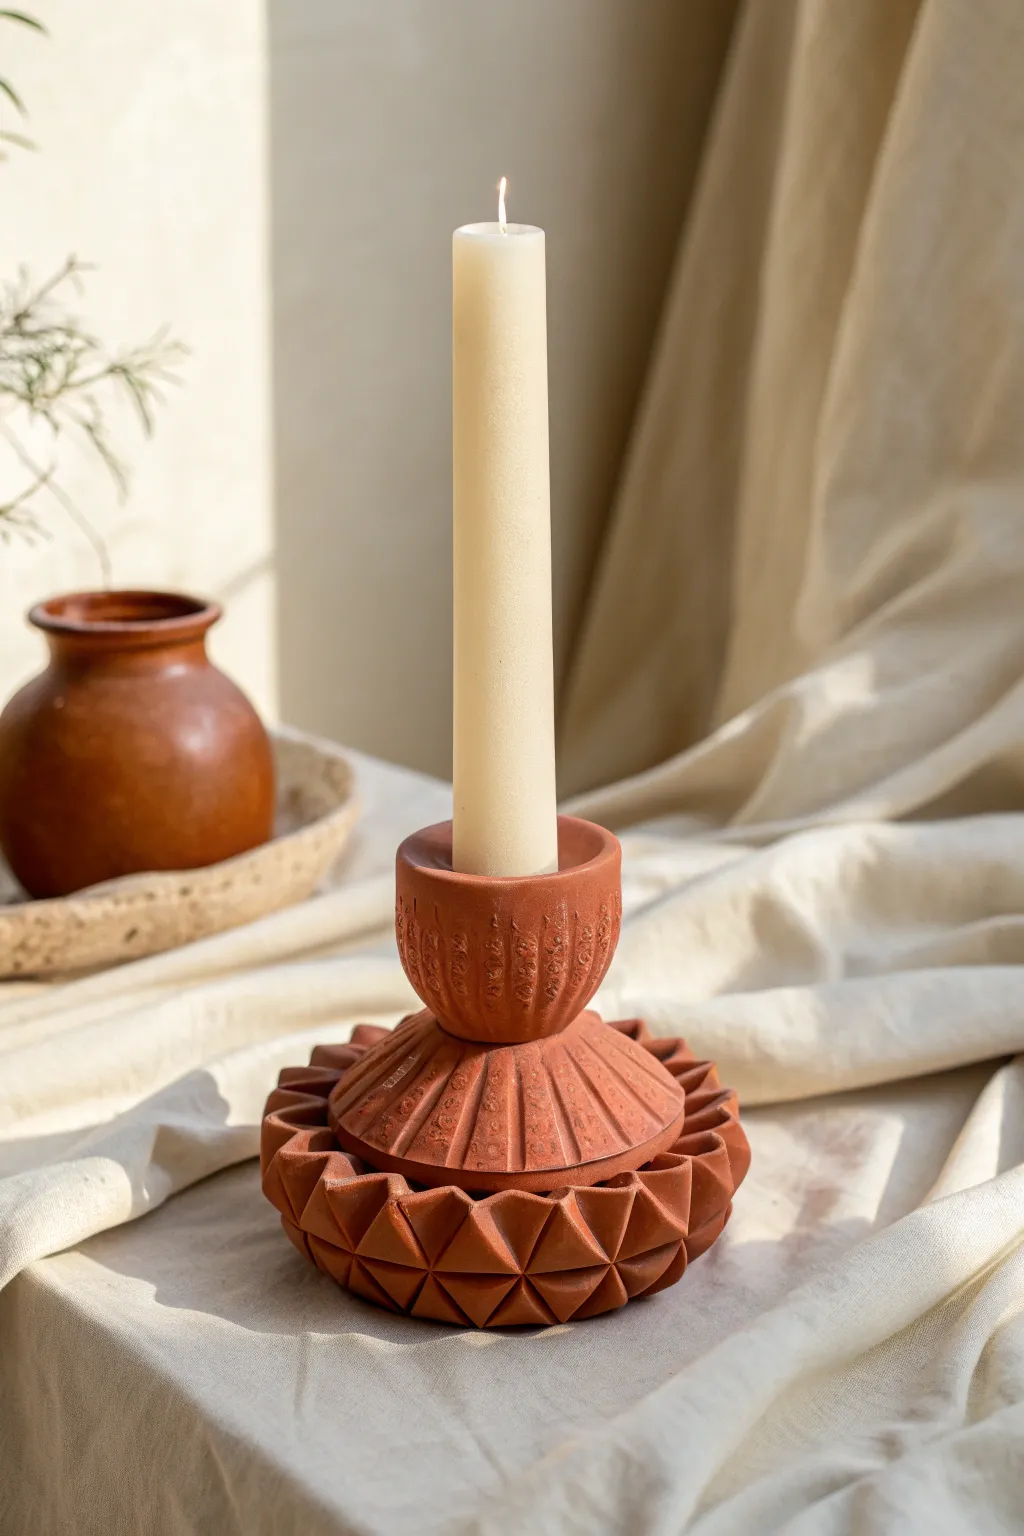
Bring warmth and modern texture to your space with this striking three-tiered clay candle holder. The design combines geometric precision with the raw, earthy appeal of terracotta-colored clay for a piece that looks like high-end pottery.
Detailed Instructions
Materials
- Air-dry clay (terracotta color)
- Rolling pin
- Clay knife or craft knife
- Ruler
- Slip (clay mixed with water)
- Small cup of water
- Smoothing sponge
- Modeling tools (or a plastic fork/toothpick)
- Taper candle (for sizing)
- Sandpaper (fine grit)
Step 1: Creating the Geometric Base
-
Roll the base slab:
Start by rolling out a substantial chunk of clay until it is about 1/2 inch thick. Cut out a perfect circle, roughly 4-5 inches in diameter, to serve as the foundation of your holder. -
Form the outer ring:
Roll a long, thick snake of clay and flatten it slightly into a rectangular strip. This strip needs to be long enough to wrap around the circumference of your base circle. -
Carve the triangles:
Before attaching the strip, use your knife to carve v-shaped notches along one long edge to create a zig-zag pattern. Alternatively, you can cut individual triangles and attach them side-by-side, but a carved strip is sturdier. -
Sculpt the facets:
Using your fingers, pinch and sharpen the points of your zig-zag pattern to create distinct 3D triangular pyramids. The goal is to make them look like faceted gems. -
Attach the ring:
Score the edge of your base circle and the bottom of your faceted strip. Apply slip and wrap the strip around the base, blending the seams on the inside so they are invisible.
Keep it Sharp
As you work, the clay can soften and lose its sharp geometric edges. Let the piece firm up for 20 minutes in the fridge before the final carving to keep lines crisp.
Step 2: Building the Fluted Middle
-
Form the central mound:
Create a solid dome or semi-sphere of clay that fits comfortably inside your faceted ring. It should be slightly smaller in diameter than the outer ring. -
Add texture:
Using the back of a knife or a specialized modeling tool, press distinct vertical lines or flutes into the dome. These lines should radiate from the top center down to the base. -
Refine the fluting:
soften the edges of your indented lines with a slightly damp finger or sponge to remove loose clay bits while keeping the definition sharp. -
Mount the middle:
Score and slip the bottom of this fluted dome and press it firmly onto the center of your base. Ensure it is centered perfectly.
Faux Glaze Finish
For a glossy ceramic look without a kiln, coat your dried and sanded piece with two thin layers of water-based polyurethane varnish or Mod Podge.
Step 3: Crafting the Candle Cup
-
Roll the cup cylinder:
Roll a smaller ball of clay and shape it into a cylinder. Press a taper candle into the center to create the perfect-sized opening, twisting gently to widen it slightly for clearance. -
Detail the cup exterior:
I prefer to use a small loop tool or a toothpick to scratch vertical texture onto the cup’s exterior. This should coordinate with, but not exactly match, the fluting below. -
Attach the cup:
Score the top of your fluted dome and the bottom of the cup. Apply plenty of slip and press the cup onto the dome. Use a tool to blend the clay where they meet for a secure bond. -
Check for plumb:
Place your taper candle gently back into the holder to ensure the cup is perfectly vertical. Adjust the soft clay if the candle leans. -
Final smoothing:
Dip a sponge in water and wring it out almost completely. Gently wipe down the entire piece to remove fingerprints and refine the geometric edges. -
Drying:
Let the piece dry slowly away from direct heat or sunlight for 24-48 hours. Turn it occasionally if possible to ensure even drying. -
Sanding and Finishing:
Once fully dry, use fine-grit sandpaper to smooth any rough spots, particularly around the rim of the candle cup and the sharp points of the geometric base.
Now you have a stunning, architectural centerpiece ready to light up your dinner table

TRACK YOUR CERAMIC JOURNEY
Capture glaze tests, firing details, and creative progress—all in one simple printable. Make your projects easier to repeat and improve.
Boho Clay Wall Hanging With Geometric Pieces
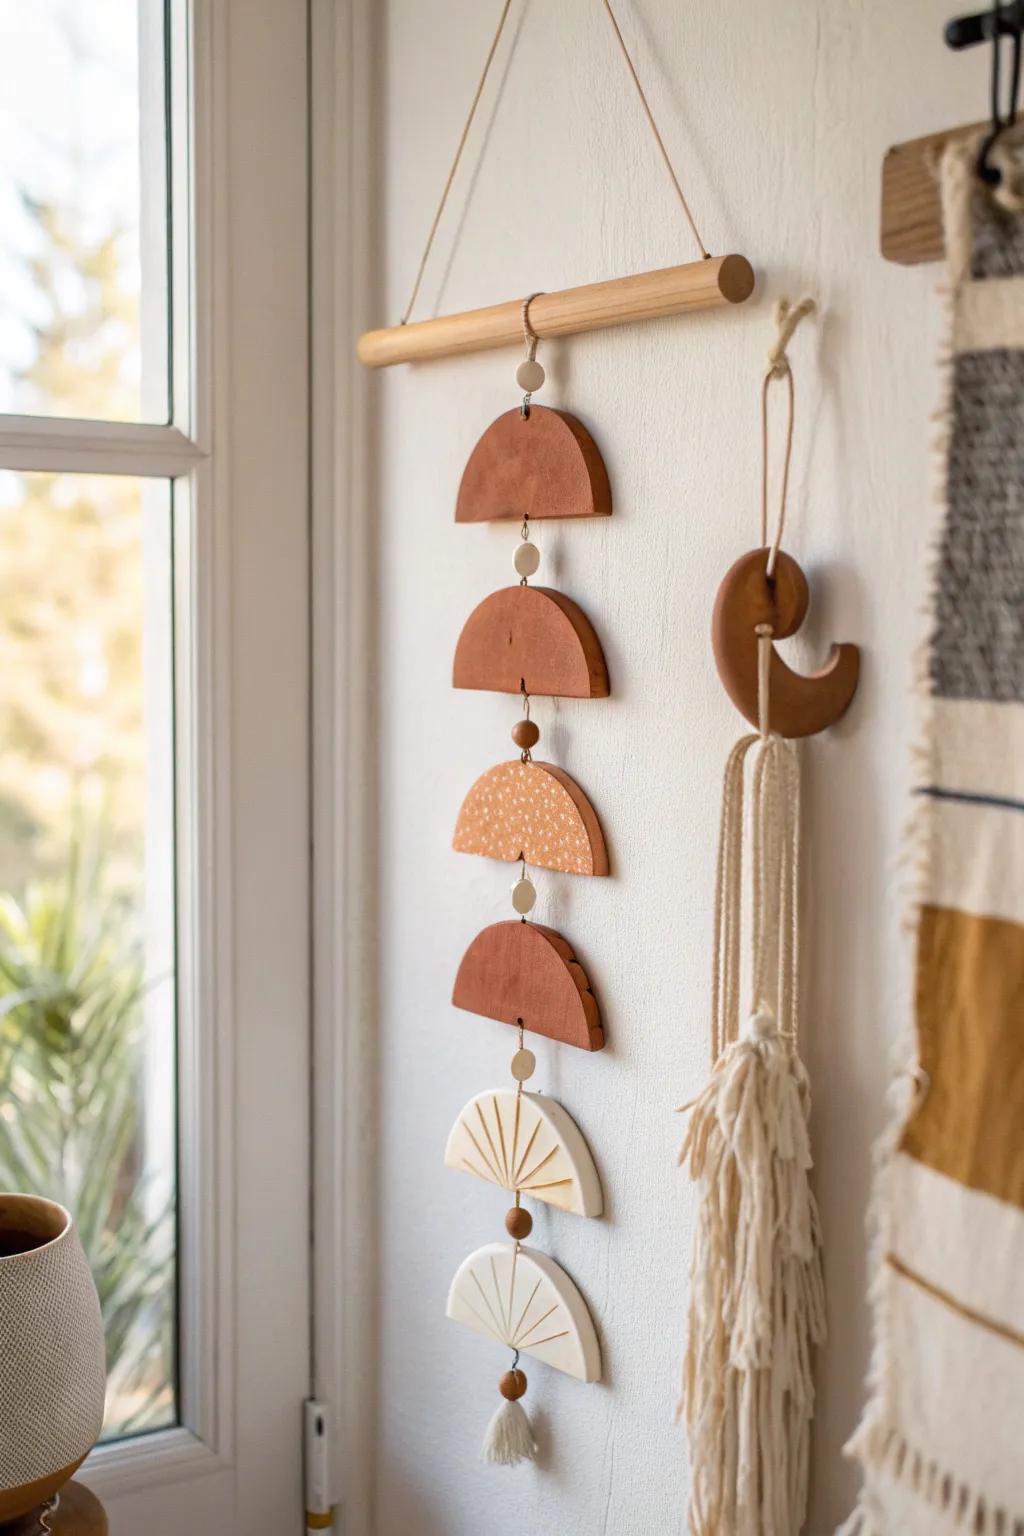
Bring earthy warmth to your walls with this vertical mobile featuring cascading clay semicircles in terra cotta and cream tones. The mix of smooth textures, subtle speckling, and carved sunburst lines creates a visually striking yet serene piece of decor.
Detailed Instructions
Materials
- Air-dry clay or polymer clay (Terra cotta color and white/cream color)
- Acrylic paint (white and burnt orange)
- Rolling pin
- Updates circle cutters (approx. 3-4 inches diameter) or a drinking glass
- Knife or clay cutting tool
- Wooden dowel (approx. 12 inches long)
- Twine or thin macramé cord
- Wooden beads (assorted sizes)
- Toothpick or straw (for making holes)
- Fine-grit sandpaper
- Clear matte sealant (optional)
Step 1: Shaping the Clay Components
-
Condition and roll:
Begin by conditioning your terra cotta colored clay until it is soft and pliable. Roll it out on a flat surface to an even thickness of about 1/4 inch. -
Cut the circles:
Use your large round cutter or a drinking glass to cut out four perfect circles from the terra cotta clay. If you are using white clay for the bottom pieces, clean your workspace and repeat this process to cut two white circles. -
Create semicircles:
Use your knife or clay blade to slice each circle exactly in half. You will need roughly 6-8 semicircles for the main strand depending on your desired length, so you’ll have some spares. -
Pierce the hanging holes:
Carefully poke a hole through the top center and bottom center of each semicircle using a toothpick or straw. Ensure the hole is large enough for your twine to pass through later. -
Note on the bottom piece:
For the very bottom semicircle, you only need one hole at the top center. The bottom edge can remain solid unless you plan to attach a tassel.
Step 2: Adding Texture and Detail
-
Carve the sunbursts:
Take your two white or cream semicircles. Using a needle tool or the back of a knife, gently press radiating lines into the clay to create a sunburst pattern. Start from the bottom center point and fan out toward the curved edge. -
Create the speckled effect:
Select one or two terra cotta semicircles to be accent pieces. Take an old toothbrush or stiff brush, dip it in white acrylic paint, and flick a fine mist of specks onto the wet clay surface. -
Smooth the edges:
Dip your finger in a little water and run it along the cut edges of all your clay pieces to smooth out any roughness or sharp corners. -
Dry the pieces:
Lay all your components flat on parchment paper. Let them dry completely according to your clay package instructions (usually 24-48 hours for air-dry clay) or bake them if using polymer clay.
Curling Issues?
If your flat clay pieces start curling up as they air dry, gently flip them over every few hours to ensure both sides dry evenly.
Step 3: Assembly and Hanging
-
Sand imperfections:
Once fully cured, use fine-grit sandpaper to gently buff away any remaining rough edges, being careful not to scratch your carved designs. -
Prepare the dowel:
Cut a length of twine about 20 inches long. Tie each end securely to the ends of your wooden dowel to create the main hanging loop. -
Start the vertical strand:
Cut a long piece of twine (about 3 feet). Tie one end to the center of your wooden dowel using a secure knot, perhaps adding a dab of glue for extra hold. -
Thread the first bead:
Thread a wooden bead onto the hanging twine and slide it up so it sits just below the dowel. -
Attach the top semicircle:
Thread the twine through the top hole of your first terra cotta semicircle and out through the bottom hole. I like to tie a small knot underneath the piece or add a small bead to keep it in place before adding the next one. -
Continue the pattern:
Repeat the process: add a spacer bead, then thread the next semicircle. Alternate your plain terra cotta, speckled, and carved cream pieces to create visual rhythm. -
Finish with a tassel:
After threading the final bottom semicircle, tie a knot or attach a small handmade tassel to the end of the twine to weigh the mobile down and finish the look. -
Optional Sealant:
If desired, brush a coat of matte sealant over the clay pieces to protect the finish and colors from fading over time.
Make It a Set
Use your leftover half-circles to make a matching wall hook decor piece (like the moon shape in the photo) by gluing a hook to the back.
Now hang your masterpiece near a window where the light can catch the textures of the clay.
Moon Phase Clay Garland for Bedroom Decor

Bring the calming cycle of the moon into your home with this simple, nature-inspired garland. Using speckled clay and natural jute twine, these hanging moons catch the light beautifully and add a bohemian touch to any window or wall.
Step-by-Step Tutorial
Materials
- White polymer clay with speckles (or plain white clay plus coarse sand/pepper)
- Rolling pin or smooth glass jar
- Three circle cookie cutters (small, medium, large) or a drinking glass
- Jute twine or hemp cord
- Straw or coffee stirrer (for hole punching)
- Parchment paper
- Baking sheet
- Fine grit sandpaper
- Scissors
Step 1: Shaping the Moons
-
Prepare the Clay:
Begin by conditioning your clay. Knead it in your hands until it’s soft, pliable, and warm. If you are adding texture yourself, mix in a pinch of coarse sand or ground pepper now to achieve that speckled stone look. -
Roll It Out:
Place the clay on a sheet of parchment paper to prevent sticking. Use your rolling pin to flatten the clay to a uniform thickness, aiming for about 1/4 inch thick so the moons feel substantial but not too heavy. -
Cut the Circles:
Using your circle cutter or the rim of a glass, press firmly into the clay to cut out several full circles. Lift the excess clay away, roll it into a ball, and flatten it again to cut more circles until you have enough for your desired garland length. -
Create Crescent Shapes:
To make the crescent moons, take your circle cutter and overlap it slightly over one of your clay circles. Press down to slice off a crescent shape. Experiment with different overlaps to create thin slivers or wider crescents. -
Refine the Edges:
Dip your finger in a little water (if using air-dry clay) or baby oil (if using polymer) and gently smooth the cut edges of each moon to remove any sharpness or burrs.
Cracking Clay?
If your holes are cracking while punching, wait 10-15 minutes for the clay to rest after rolling. The slight firming makes it cut cleaner than when it’s freshly warm.
Step 2: Adding Hardware & Baking
-
Punching Holes:
Using a straw or a coffee stirrer, poke a hole near the top of each moon shape. Ensure the hole is centered and at least 1/4 inch away from the edge to prevent the clay from cracking later. -
Add a Texture Tip:
I like to gently pat the surface of the moons with a scrap of denim or a textural sponge before baking to remove fingerprints and add a natural matte finish. -
Bake the Clay:
Arrange the moons on a parchment-lined baking sheet. Bake according to the specific manufacturer’s instructions on your chosen clay package. Usually, this is around 275°F (135°C) for 15-30 minutes. -
Cooling Down:
Once the baking time is up, turn off the oven but leave the door slightly ajar. Let the moons cool down completely on the tray before handling them to ensure they harden properly. -
Sanding:
After cooling, inspect your moons. If there are any rough spots, use a fine-grit sandpaper to gently buff them smooth, paying extra attention to the hole area.
Add Some Shine
Mix gold leaf flakes into the clay before rolling, or paint the edges with gold metallic acrylic paint after baking for a luxurious, celestial shimmer.
Step 3: Assembly
-
Measure the Twine:
Unspool a length of jute twine or hemp cord. Measure the width of the window or wall space you want to decorate and add an extra 2 feet to allow for hanging loops and knot tying. -
Create the End Loops:
Tie a secure overhand loop knot at one end of the twine. This will be the anchor point where you hang the garland. -
String the First Moon:
Thread the loose end of the twine through the hole of your first moon clay piece. Slide it down toward your starting knot, leaving a few inches of spacing. -
Tie in Place:
Once positioned, tie a simple overhand knot right above the moon on the twine itself. This knot acts as a stopper to keep the moon from sliding down the line. -
Creating the Knotted Spacer:
The image shows a distinct knot feature between moons. To do this, tie a larger, bulky knot about 4-5 inches away from the previous moon to create visual separation. -
Continue the Pattern:
Thread the next moon, position it, tie it off, and then create your spacer knot. Repeat this rhythm until all your moons are attached. -
Finishing Up:
Finish the garland by tying a loop knot at the remaining end. Trim any excess twine with scissors for a neat look.
Hang your new moon phases in a sunny window and enjoy the play of light and shadow throughout the day
Stamped Clay Keychains and Gift Tags
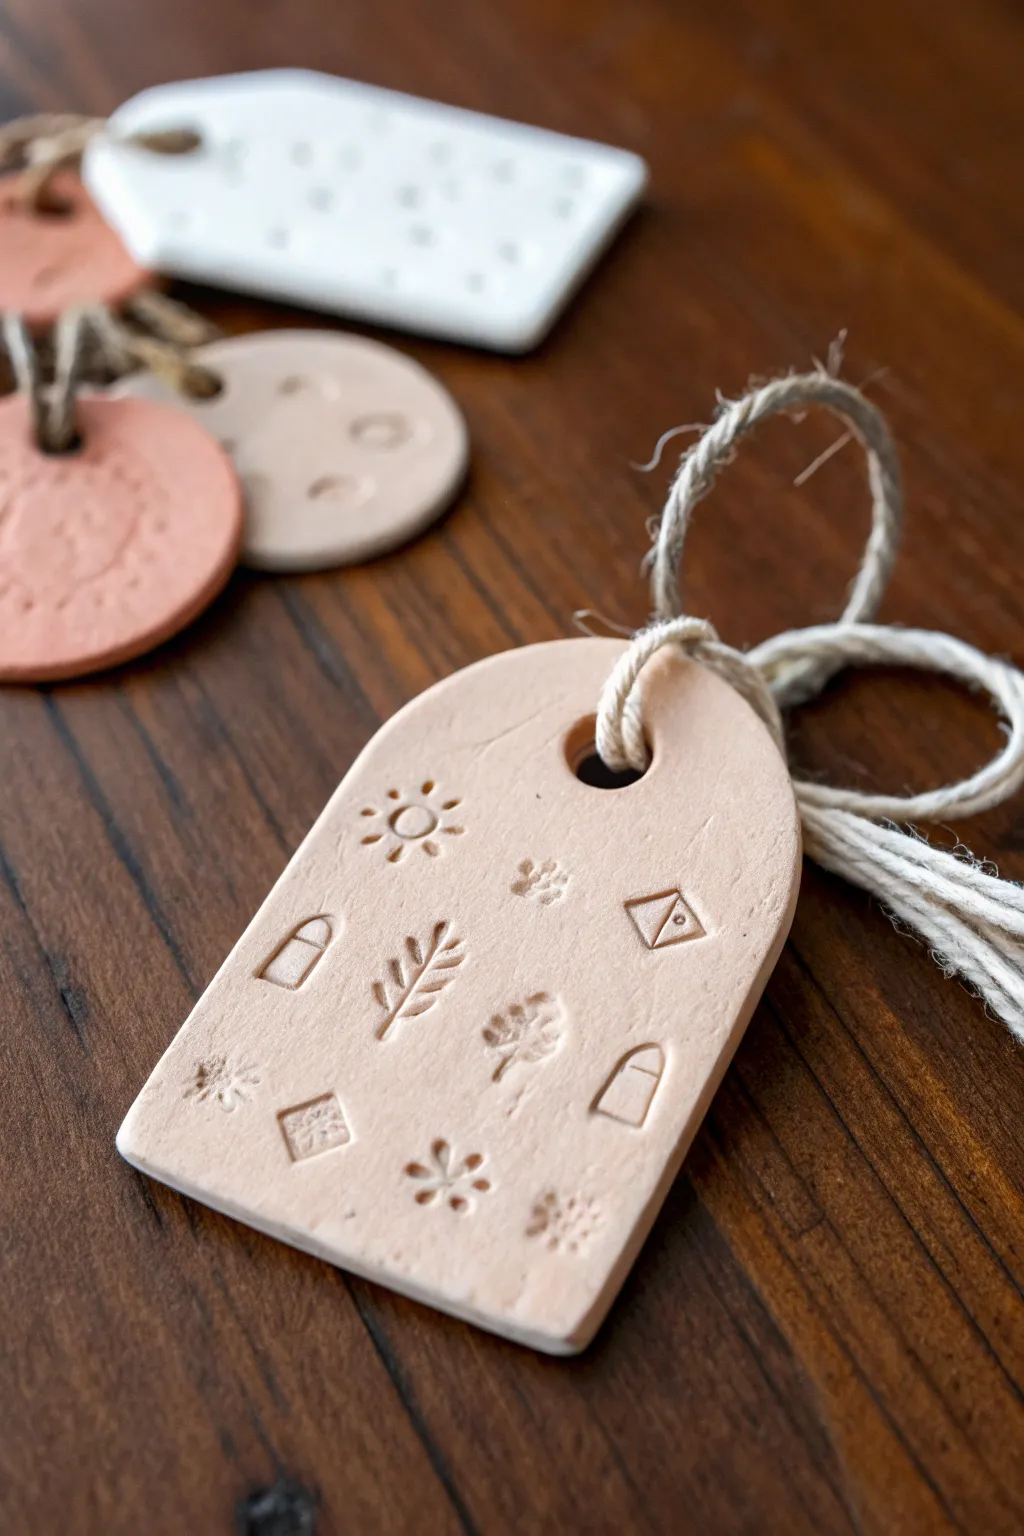
These charming, earthy clay tags add a personalized touch to gifts or make delightful minimalist keychains. With their soft matte finish and delicate imprinted motifs, they capture a timeless, handcrafted aesthetic that is surprisingly simple to achieve.
Step-by-Step
Materials
- Air-dry clay (terra cotta, white, and beige varieties)
- Rolling pin or smooth glass jar
- Parchment paper or silicone mat
- Arch-shaped cookie cutter (or a knife and paper template)
- Small decorative stamps (leaves, sun, geometric shapes)
- Drinking straw or small round cutter (for the hole)
- Fine-grit sandpaper (400-600 grit)
- Jute twine or hemp cord
- Clear matte varnish (optional)
Step 1: Preparing the Clay
-
Prepare your workspace:
Lay down a sheet of parchment paper or a silicone mat on a flat surface to prevent the clay from sticking and to ensure easy removal later. -
Condition the clay:
Take a handful of your chosen air-dry clay color. Knead it in your hands for a minute or two until it feels warm, pliable, and free of cracks. -
Roll it out:
Place the clay on your mat and use a rolling pin to flatten it. Aim for an even thickness of about 1/4 inch (6mm). If it’s too thin, it may crack; too thick, and it will be heavy. -
Smooth the surface:
Run your finger or a slightly damp sponge lightly over the surface of the clay to smooth out any rolling pin textures or fingerprints.
Stamp Snagging?
If your stamps are sticking to the wet clay, lightly dust the stamp surface with cornstarch or baby powder before pressing it down. This acts as a release agent for a crisp impression.
Step 2: Cutting and Stamping
-
Cut the shape:
Press your arch-shaped cutter firmly into the rolled clay. If you don’t have a cutter, place a paper template on top and carefully trace around it with a craft knife. -
Create the hanging hole:
While the clay is still wet, use a drinking straw to punch a hole near the top of the arch. Twist the straw slightly as you pull it out to get a clean removal. -
Plan your design:
Before stamping, visualize where you want your motifs. A random scatter pattern, like the one shown in the photo, looks organic and pleasing. -
Imprint the motifs:
Press your small stamps gently but firmly into the clay surface. Be careful not to push all the way through; you just want a clear impression. -
Clean up edges:
Dip your finger in a tiny bit of water and run it along the cut edges of the tag to soften any sharpness left by the cutter.
Step 3: Drying and Assembly
-
Begin drying:
Leave the tags on the parchment paper to dry. Place them in a cool, dry spot away from direct heat sources to prevent warping. -
Flip for even drying:
After about 12 hours, or when the top feels dry to the touch, gently flip the tags over. This helps air reach the bottom and ensures they dry flat. -
Wait for full cure:
Allow the clay to dry completely, which usually takes 24 to 48 hours depending on humidity. The clay will lighten in color and feel hard when ready. -
Sand for smoothness:
Once fully dry, take a piece of fine-grit sandpaper and very gently buff the edges and surface. This removes any tiny burrs and gives that professional, velvety finish. -
Seal (Optional):
If these will be used as keychains, brush on a thin coat of matte varnish to protect them from moisture and dirt. For gift tags, you can skip this step to keep the raw clay look. -
Cut the twine:
Cut a piece of jute twine or hemp cord, approximately 8-10 inches long. -
Attach the loop:
Ref the image: Fold the twine in half, push the looped end through the tag’s hole, and pull the loose ends through the loop to secure it with a lark’s head knot.
Add Subtle Color
To make the stamped patterns pop, dilute acrylic paint with water and brush it into the grooves. Wipe the surface immediately with a damp cloth, leaving pigment only in the recessed design.
Now you have a set of beautiful, earthy tags ready to adorn your packages or carry your keys in style
DIY Clay Desk Organizer Trays for Tiny Stuff
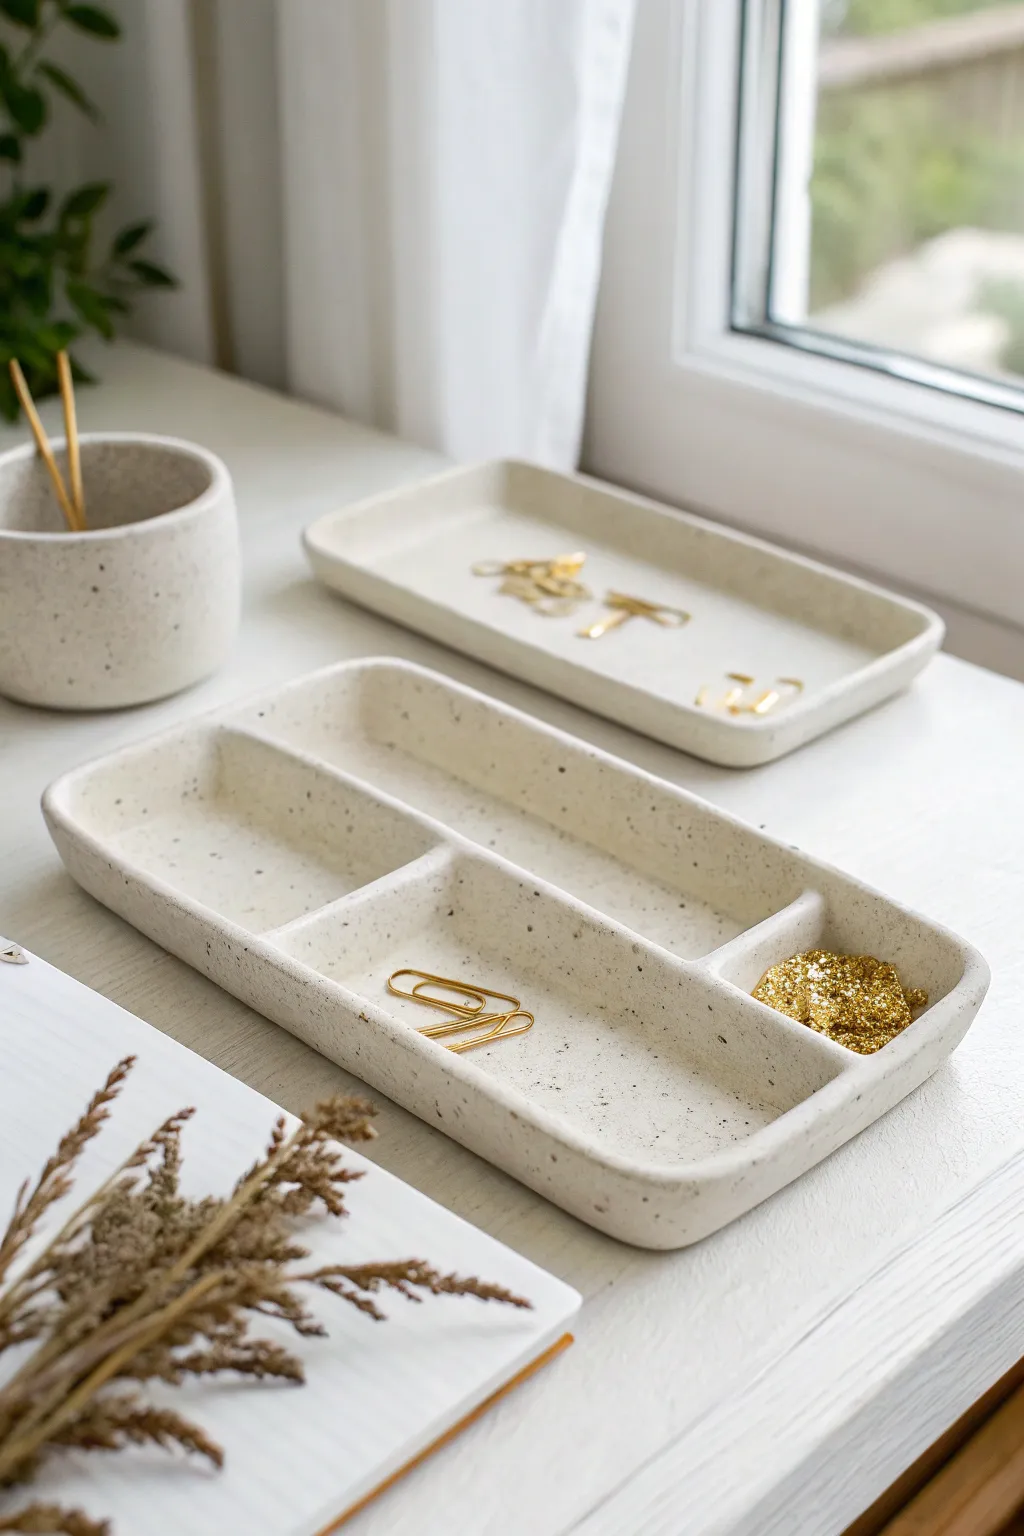
Bring a sense of calm and order to your workspace with these chic, minimalist desk organizers that mimic the look of speckled stoneware. This project uses air-dry clay to create a cohesive set featuring a segmented tray, a catch-all dish, and a matching cup for all your tiny treasures.
Detailed Instructions
Materials
- White air-dry clay (approx. 1kg)
- Faux stone spray paint (cream/granite effect) or acrylic paints (black, brown, white)
- Rolling pin
- Sharp craft knife
- Ruler
- Small sponge
- Sandpaper (fine grit)
- Small bowl of water
- Gloss or matte varnish (optional)
Step 1: Planning and Rolling
-
Condition the Clay:
Begin by taking a large chunk of air-dry clay and kneading it in your hands to warm it up. This conditioning process makes the clay more pliable and less prone to cracking as you work. -
Roll the Base Slab:
On a clean, flat surface, roll out the clay to a uniform thickness of about 1/4 inch (6mm). If you want to ensure perfect evenness, place two dowels or magazines of the same height on either side of the clay as guides for your rolling pin. -
Cut the Base Shape:
Decide on the dimensions for your main segmented tray. Using a ruler and a craft knife, cut a clean rectangle from the slab. A size like 4 inches by 10 inches works well for holding pens and clips.
Smoother Seams
For invisible seams, roll a tiny ‘snake’ of clay and press it into the corner where two pieces meet, then blend it outwards.
Step 2: Building the Walls
-
Create Long Strips:
Gather the excess clay and roll it out again to the same thickness. Cut long strips that are approximately 3/4 inch wide. These will become the outer walls and inner dividers of your tray. -
Score and Slip:
To attach the walls securely, you need to roughen the connecting surfaces. Use your knife to make small hatch marks (scoring) along the outer edge of your rectangular base and along the bottom edge of your clay strips. Dab a little water (slip) onto these scored areas. -
Attach the Outer Frame:
Place the strips onto the perimeter of the base, pressing them down firmly. Gently smoothe the clay where the wall meets the base, both on the inside and outside, using your finger or a modelling tool to blend the seam until it disappears. -
Add Dividers:
Cut smaller lengths of your clay strip to fit inside the tray as dividers. Arrange them to create compartments—for example, one long section and two smaller squarish ones. Score, slip, and blend these into place just like the outer walls.
Step 3: Creating the Simple Tray and Cup
-
Form the Catch-All Tray:
Roll out a smaller rectangle of clay. Instead of adding separate walls, you can simply curve the edges of the slab upward gently to create a shallow, open dish. Use a damp sponge to smooth the upturned edges. -
Build the Cup Base:
For the pen holder, cut a circular base using a cookie cutter or by tracing around a glass. Roll a long, wide rectangular strip that is tall enough for your pens (about 3-4 inches). -
Assemble the Cylinder:
Wrap the rectangular strip around the circular base to form a cylinder. Score and slip the vertical seam where the strip ends meet, and blend the clay smooth so the join is invisible. Attach the cylinder to the base using the same blending technique.
Cracking Issues?
If cracks appear while drying, mix a tiny bit of clay with water to make a paste and fill the cracks, then sand smooth once dry.
Step 4: Refining and Drying
-
Smooth the Edges:
Dip your finger or a small sponge into water and run it over all the varying edges of your pieces. You want to soften any sharp corners to achieve that organic, rounded pottery look shown in the photo. -
Let it Dry:
Place all your pieces on a wire rack or a piece of parchment paper to dry. This usually takes 24-48 hours depending on humidity. Rotate them occasionally to ensure even airflow. -
Sand Imperfections:
Once fully dry and hard, take fine-grit sandpaper and gently buff away any bumps or fingerprints. Wipe away the dust with a slightly damp cloth.
Step 5: The Speckled Finish
-
Base Coat:
If your clay dried to a stark white, you might want to paint a base coat of off-white or cream acrylic paint to get that warm, ceramic tone. -
Splatter Technique:
To create the speckles without using a specialized spray, mix a small amount of watered-down black or dark brown acrylic paint. Dip a toothbrush into the paint and flick the bristles with your thumb to spray tiny droplets over the trays. -
Seal:
Finish by applying a coat of matte varnish. This seals the porous clay and protects your beautiful faux-stone finish from ink stains or scratches.
Now you have a custom set of organizers ready to tidy up your desk with style
Mini Clay Bud Vases for Single Stems
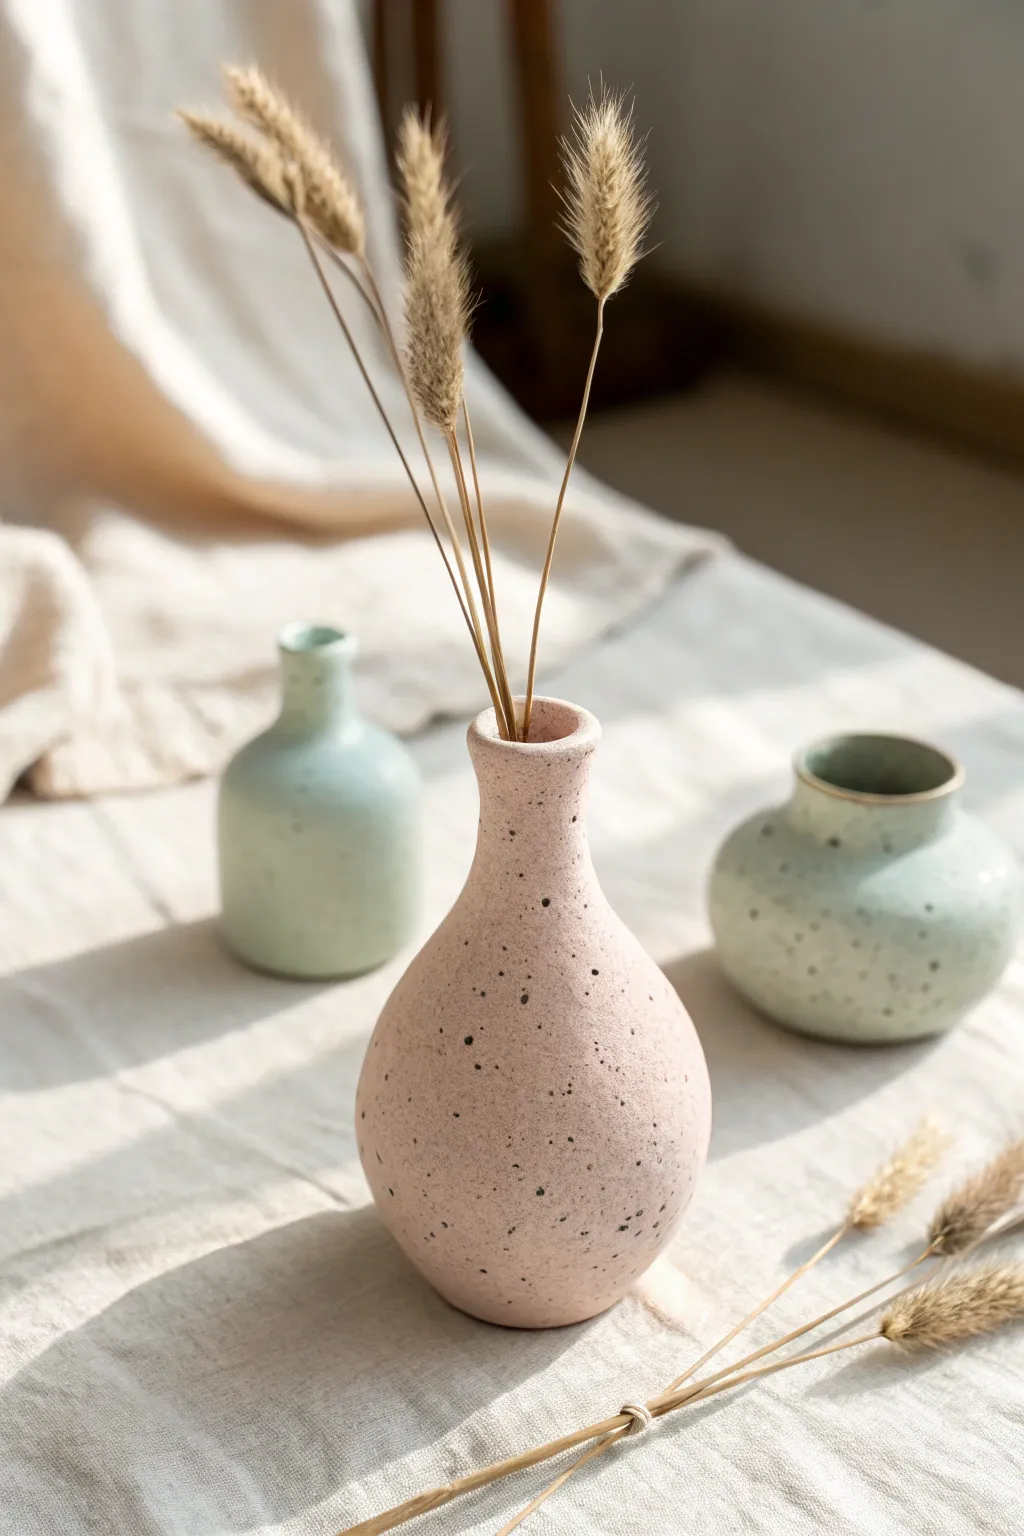
Embrace the imperfect charm of hand-built pottery with these sweet, pear-shaped bud vases. Featuring a soft matte finish and playful speckles, they are perfectly sized to showcase delicate dried grasses or single fresh stems.
Step-by-Step Tutorial
Materials
- Air-dry clay or polymer clay (white or light beige)
- Acrylic paints (pastel pink, sage green, black, white)
- Fine grit sandpaper (220-400 grit)
- Small rolling pin
- Modeling tools or a butter knife
- Cup of water (for smoothing)
- Old toothbrush or stiff bristle brush
- Matte varnish or sealant
- Cardboard or palette for mixing paint
Step 1: Forming the Base Shape
-
Condition the Clay:
Begin by taking a handful of clay, roughly the size of a tennis ball. Knead it in your hands until it is warm, pliable, and free of any air bubbles. -
Create a Ball:
Roll the clay between your palms on a work surface to create a smooth, solid sphere. This will be the main body of your vase. -
Elongate the Neck:
Gently pinch and pull the top third of the sphere upward to start forming a neck. Rotate the piece as you pull so the neck stays centered. -
Refine the Pear Shape:
Use your fingers to smooth the transition between the round belly and the narrower neck. You want a gradual, organic curve rather than a sharp angle. -
Flatten the Bottom:
Tap the vase gently on your table to create a flat base so it stands securely. Check from eye level to ensure it isn’t leaning.
Step 2: Creating the Opening
-
Initial Hole:
Using a rounded modeling tool or the handle of a paintbrush, press directly down into the center of the neck. Go slowly to avoid distorting the neck shape. -
Deepen the Well:
Push the tool deeper into the body of the vase, stopping about half an inch before the bottom. Rotate the tool gently to widen the opening slightly. -
Flare the Lip:
With your thumb and forefinger, carefully pinch the very top rim of the clay to flare it out slightly. This creates that classic trumpet-like mouth. -
Smooth with Water:
Dip your finger in a little water and run it over the exterior to erase fingerprints and tiny cracks. Pay special attention to the rim. -
Dry Completely:
Set your vase aside in a clean, dry area. Depending on your clay type and humidity, this could take 24 to 48 hours. Turn it occasionally for even drying.
Perfect Splatters
Practice your toothbrush flicking technique on a piece of scrap paper first. The distance of the brush affects speckle size—closer creates denser clusters.
Step 3: Finishing and Painting
-
Sand for Texture:
Once fully dry, take your fine-grit sand paper and lightly buff the surface. I prefer to leave a little texture to maintain that stone-like look, but remove any sharp ridges. -
Wipe Clean:
Use a slightly damp cloth or tack cloth to remove all sanding dust before you start painting. -
Mix Base Color:
Mix white acrylic paint with a tiny drop of red to create a pale, dusty pink. Aim for a matte, earthy tone rather than a bright bubblegum pink. -
Apply Base Coat:
Paint the entire exterior of the vase. You may need two coats to get full, opaque coverage. Let the paint dry fully between layers. -
Prepare the Speckles:
Dilute a small amount of black acrylic paint with water until it has an inky consistency. It should be runny enough to flick easily. -
Splatter Effect:
Dip an old toothbrush into the runny black paint. Hold it near the vase and run your thumb across the bristles to flick tiny speckles onto the surface. Rotate the vase to cover all sides. -
Adjust Speckle Density:
Add a few larger dots manually using a toothpick if you want more variation in the speckle sizes. -
Seal the Work:
Once the paint is bone dry, apply a coat of matte varnish. This protects the finish and deepens the colors without adding unwanted shine.
Waterproofing Hack
Air-dry clay isn’t waterproof! To hold fresh flowers, hide a small plastic test tube or a cut straw inside the neck to hold the water safely.
Fill your new miniature creation with dried stems and enjoy the serene aesthetic it adds to your shelf
Chunky DIY Clay Bookends With Color Blocking
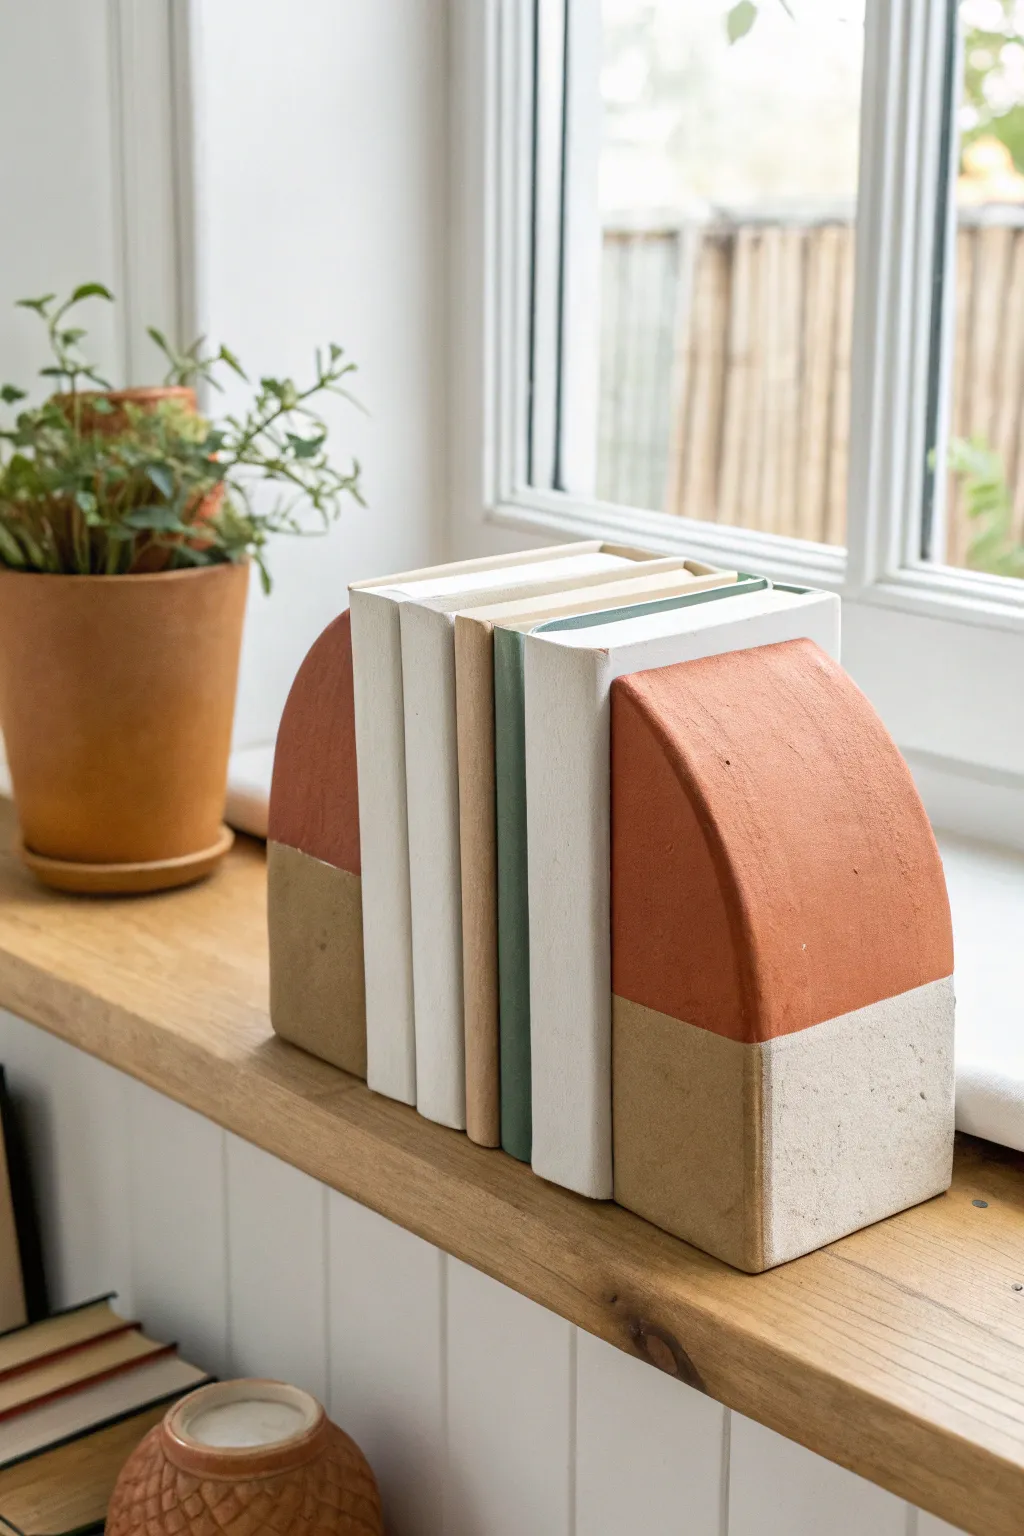
Add functional style to your bookshelf with these heavy, minimalist bookends featuring an earthy color palette and a modern arch design. The split-tone look combines raw clay texture with warm terracotta tones for a piece that feels both organic and architectural.
Step-by-Step
Materials
- Air-dry clay (approx. 2-3kg depending on desired size)
- Thick cardboard or sturdy cardstock (for the template)
- Rolling pin
- Sharp craft knife or clay slicing tool
- Water and a small sponge
- Sandpaper (fine and medium grit)
- Painter’s tape or masking tape
- Acrylic paint (terracotta orange and beige/sand color)
- Matte sealant or varnish
- Ruler
- Two heavy rectangular objects (like bricks or wood blocks) to act as a core (optional, for weight)
Step 1: Shaping the Base
-
Create a template:
Sketch a quarter-circle arch shape on your cardboard to serve as your profile guide. A 5-inch by 5-inch square with one rounded corner works perfectly for standard books. -
Prepare the clay:
Knead your air-dry clay thoroughly to remove air bubbles and make it pliable. You will need two equal distinct large lumps for the pair. -
Form the rough shape:
Mold the clay into two large rectangular blocks first. If you want them extra heavy, you can wrap a brick or wood block in a thin layer of clay, but solid clay is easier to sculpt. -
Cut the arch:
Place your cardboard template against the side of your clay block. Use your craft knife to slice away the excess clay, following the curve of the template to create that distinctive quarter-circle shape. -
Flatten the sides:
Use a flat board or ruler to gently tap the flat sides (the bottom and the side that will touch the books) to ensure they are perfectly 90-degree angles. This is crucial for stability. -
Smooth the curve:
Dip your fingers or a small sponge in water and run them over the curved surface to remove cutting marks and fingerprints. Repeat this for all surface areas until smooth. -
Dry thoroughly:
Let the bookends dry completely. Because these are thick, this can take 3-5 days. Flip them occasionally to ensure air reaches the bottom.
Weighted Core Tip
To save clay and add necessary weight for heavy books, press a clean paving stone or brick inside your clay block while forming it.
Step 2: Refining and Painting
-
Sand the surface:
Once fully dry and hard, use medium grit sandpaper to level out any bumps. Switch to fine grit to get a velvety smooth finish. -
Wipe down:
Use a barely damp cloth or dry brush to remove all sanding dust before painting. -
Mask the design:
Decide where you want your color split. For the look in the photo, place a strip of painter’s tape horizontally across the bookend, about one-third of the way up from the bottom. -
Seal the tape edge:
Press the tape down firmly, especially at the curved edge, to prevent paint bleed. -
Paint the bottom section:
Apply your beige or sand-colored acrylic paint to the bottom section. I find dabbing with a sponge brush creates a nice stone-like texture compared to stroking with a bristle brush. -
Paint the top section:
Apply the terracotta orange paint to the top arched section. Depending on the opacity of your paint, you may need two coats for rich coverage. -
Remove tape:
Peel off the tape while the paint is still slightly tacky to get the crispest possible line. -
Touch up:
If any paint bled under the tape, use a tiny detailed brush and the opposing color to correct the line. -
Seal the project:
Apply a coat of matte sealant or varnish over the entire piece to protect the paint and clay from chipping over time.
Textured Finish
Mix a teaspoon of baking soda into your acrylic paint. This creates a fluffy, faux-ceramic texture that looks high-end when dry.
Place your new bookends on a sunny sill and enjoy the organized aesthetic they bring to your reading collection
Handmade Clay Domino Tiles for Game Night
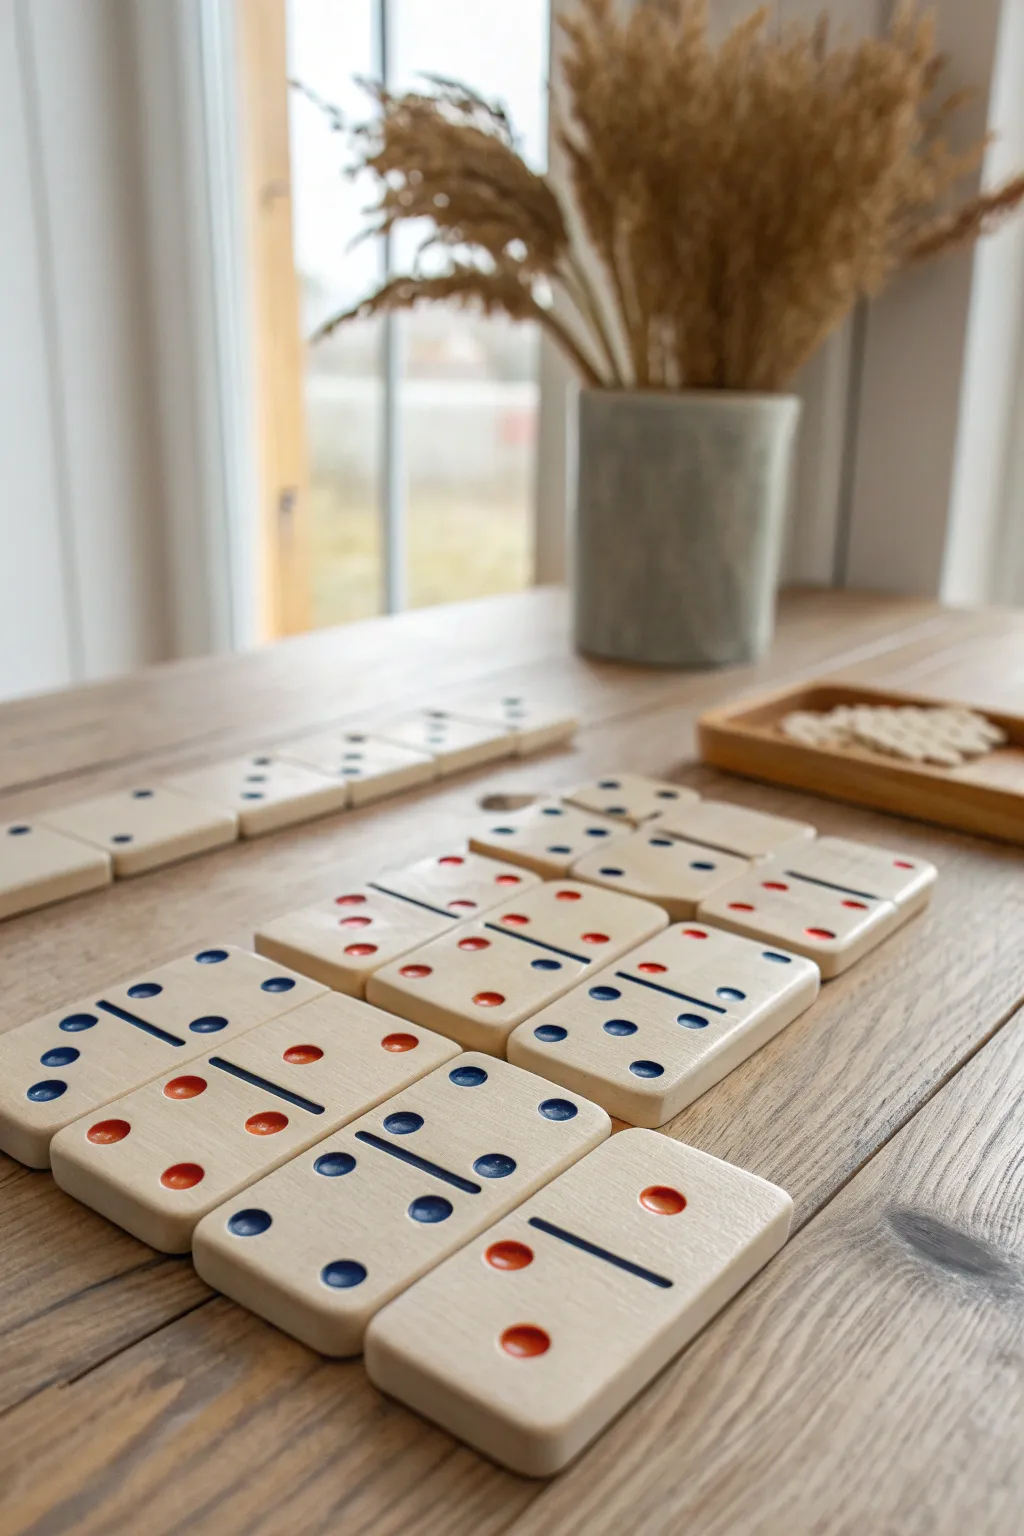
Upgrade your next game night with a set of tactile, handmade domino tiles that feel satisfyingly smooth in the hand. These creamy-white clay pieces feature simple, striking indigo and rust-orange pips for a modern, minimalist look.
Detailed Instructions
Materials
- White air-dry clay or polymer clay (approx. 1 lb)
- Parchment paper or non-stick silicone mat
- Rolling pin with depth guides (about 1/4 inch or 6mm)
- Small rectangular cookie cutter (1 x 2 inch) or a sharp craft knife and ruler
- Small round piping tip or a smooth pen cap (for impressing indentations)
- Fine-grit sandpaper (400 and 800 grit)
- Acrylic paints: Navy Blue/Indigo and Rust Orange/Vermilion
- Very fine detail paintbrush (size 0 or 00)
- Matte or satin clear sealant spray
Step 1: Shaping the Tiles
-
Condition the Clay:
Begin by kneading your white clay until it is warm, pliable, and free of air bubbles. If using air-dry clay, keeping your hands slightly damp can prevent surface cracking. -
Roll to Thickness:
Place the clay between two depth guides or use a guided rolling pin to roll it out into an even slab. Aim for a thickness of about 1/4 inch (6mm) to give the tiles a nice weight. -
Cut the Rectangles:
Using a rectangular cutter or a ruler and craft knife, cut out 28 uniform rectangles. Ensure your cuts are straight up and down to avoid slanted edges. -
Clean the Edges:
Before the clay hardens, dip your finger in a little water (or cornflour if using polymer) and gently run it along the cut edges to soften the harsh corners. -
Add the Center Line:
Using a ruler and a dull blade or clay tool, gently press a shallow line across the exact center of each tile to separate the two playing zones. Don’t cut all the way through. -
Create the Pips:
Using a small round tool—like the back of a small drill bit or a dotting tool—gently press indentations for the numbers. Press straight down and lift straight up to keep the circles crisp. -
Slightly Round the Corners:
I find that gently tapping the four corners of each soft tile against the table helps achieve that professional, slightly rounded look seen in the photo.
Weight Hack
Want heavier tiles? Carefully embed a small clean washer or coin into the center of the clay slab before cutting out your shapes to give them a satisfying ‘clack’.
Step 2: Refining and Finishing
-
Initial Drying (or Baking):
If using polymer clay, bake according to package instructions. If using air-dry clay, let the tiles sit on a wire rack for 24-48 hours, flipping them occasionally to ensure even drying. -
Sand for Smoothness:
Once fully cured, use 400-grit sandpaper to remove any fingerprints or sharp burrs. Follow up with 800-grit for a silky, stone-like feel. -
Wipe Clean:
Remove all sanding dust with a slightly damp cloth or a tack cloth. The surface must be perfectly dust-free for the paint to adhere neatly. -
Mix Your Palette:
Prepare your acrylic paints. You want a deep indigo blue and a warm rust orange. If the paint is too thick, thin it slightly with a drop of water or flow medium. -
Paint the Center Lines:
Using your finest brush, carefully paint the indented center line with the indigo blue. Keep a damp Q-tip nearby to quickly wipe away any slips. -
Fill the Blue Pips:
Identify which numbers will be blue (like the 6s and 2s in the photo) and carefully fill those indentations. Let capillary action help pull the paint into the divots. -
Fill the Orange Pips:
Rinse your brush thoroughly and proceed to fill the remaining number indentations with the rust orange paint. -
Let Paint Dry:
Allow the paint to dry completely. Because the paint is pooled in the divots, this may take longer than usual. -
Seal the Set:
Arrange the tiles on a clean surface outdoors or in a well-ventilated area. Apply two light costs of clear matte spray to protect the clay from dirt and oils during gameplay.
Level Up: Wooden Box
Build a simple matching tray or box using balsa wood strips glued together, sized perfectly to hold your stacked dominoes for stylish storage.
Now you have a beautiful, heirloom-quality game set ready for years of family fun