When I’m teaching kids’ polymer clay in my studio, I always start with projects that feel like play: bright colors, simple shapes, and quick wins. These polymer clay ideas for kids are all about cute little creations that look totally doable, even if it’s your first time squishing clay.
Easy Blob Animals With Big Personalities
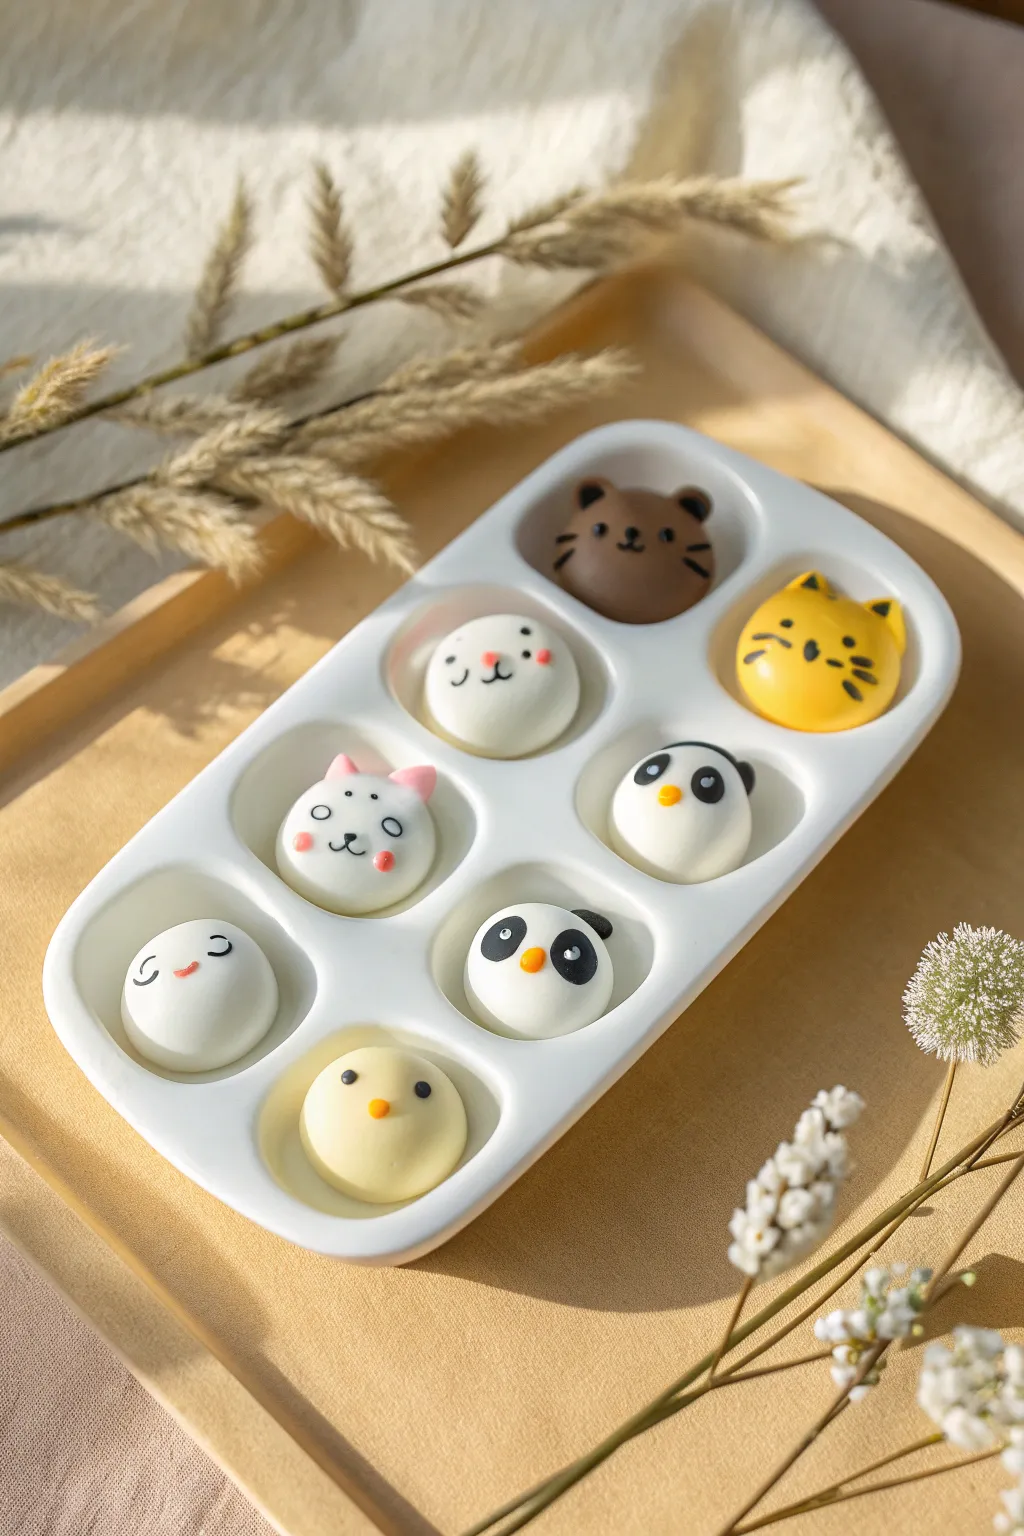
Transform simple spheres of clay into an adorable menagerie of expressive animal faces. These smooth, blob-style creatures are perfect for beginners because they rely on basic shapes to build big personality without needing complex sculpting skills.
Step-by-Step Guide
Materials
- White polymer clay
- Colored polymer clay (brown, yellow, pale yellow, pink, black)
- Dotting tools or ball stylus (small and medium)
- Needle tool or toothpick
- Clean ceramic tray or baking tile
- Oven for baking
- Detailing brush or fine-tip marker (optional for whiskers)
Step 1: Base Preparation
-
Conditioning the White Clay:
Start by taking a generous amount of white polymer clay. Knead it thoroughly in your hands until it is warm, soft, and pliable. This conditioning step is crucial to prevent cracks later on. -
Forming the Spheres:
Divide your white clay into six equal portions. Roll each portion between your palms to create perfectly smooth balls. Aim for a size that fits comfortably in the palm of your hand, about the size of a ping pong ball. -
Creating Colored Bases:
Take a portion of brown clay and a portion of bright yellow clay. Roll these into smooth spheres similar in size to the white ones. These will become your bear and cat faces. -
Soft Flattening:
Gently press each sphere down onto your work surface or baking tray. You want the top to remain rounded and domed, but the bottom needs to be flat so they don’t roll away.
Sticky Situation?
If clay gets too soft or sticky to handle, pop it in the fridge for 10 minutes. This firms it up, making tiny details like ears easier to attach without squishing the main shape.
Step 2: Adding Animal Features
-
The Brown Bear Ears:
Pinch off two tiny pieces of brown clay and roll them into small balls. Gently press them onto the top left and right of your brown sphere to create rounded ears. -
Bear Face Details:
Using black clay, roll three minuscule specks. Place two for eyes and one for a nose on the bear. Use a needle tool to gently impress a vertical line below the nose for the mouth. -
The Yellow Cat:
Moving to the yellow sphere, shape two small triangles from yellow clay for pointed ears. Attach them to the top of the head. -
Cat Whiskers:
Add black eyes and a tiny nose. For the whiskers, I find it easiest to roll extremely thin distinct threads of black clay and press them gently onto the cheeks, three on each side. -
The Panda Duo:
For the panda faces, start with two white spheres. Roll small black balls for ears and attach them. Take slightly larger pieces of black clay, flatten them into ovals, and press them where the eyes will go. -
Panda Eye Definition:
Press a tiny white dot onto the black eye patches to simulate a shine or pupil. Add a small orange triangle or dot for a nose to give a pop of color. -
The Happy Chick:
Take a ball of pale yellow clay. Add two tiny black dots for wide-set eyes. In the center, place a small orange beak shaped like a tiny diamond or triangle.
Turn Them into Magnets
Make these functional by gluing strong neodymium magnets to the flat backs after baking. They make an incredibly cute set for organizing notes on the fridge.
Step 3: Bringing the White Blobs to Life
-
Blushing Bunny:
On a white sphere, attach two small pink triangles for ears. Use a needle tool to draw a simple ‘w’ mouth shape, add open circular eyes with a fine black clay snake, and press pink dots onto the cheeks for blush. -
Silly Seal Pup:
For the next white sphere, use a needle tool to create squinting eye lines resembling overturned ‘U’ shapes. Add a pink oval mouth and small pink cheeks. -
Minimalist Critter:
For the final white sphere, keep it simple with tiny black dot eyes, a pink nose, and little red rosy cheeks. Sometimes less is more for cute expressions. -
Smoothing Seams:
Before baking, give every piece a once-over. Gently smooth out any fingerprints using a light touch or a drop of baby oil on your finger. -
Baking:
Place your tray of animals into the oven. Follow the baking temperature and time directed on your specific package of polymer clay. Let them cool completely before handling.
Once cooled, arrange them in a grid or display tray to show off their happy expressions


Smiley Fruit and Veggie Minis
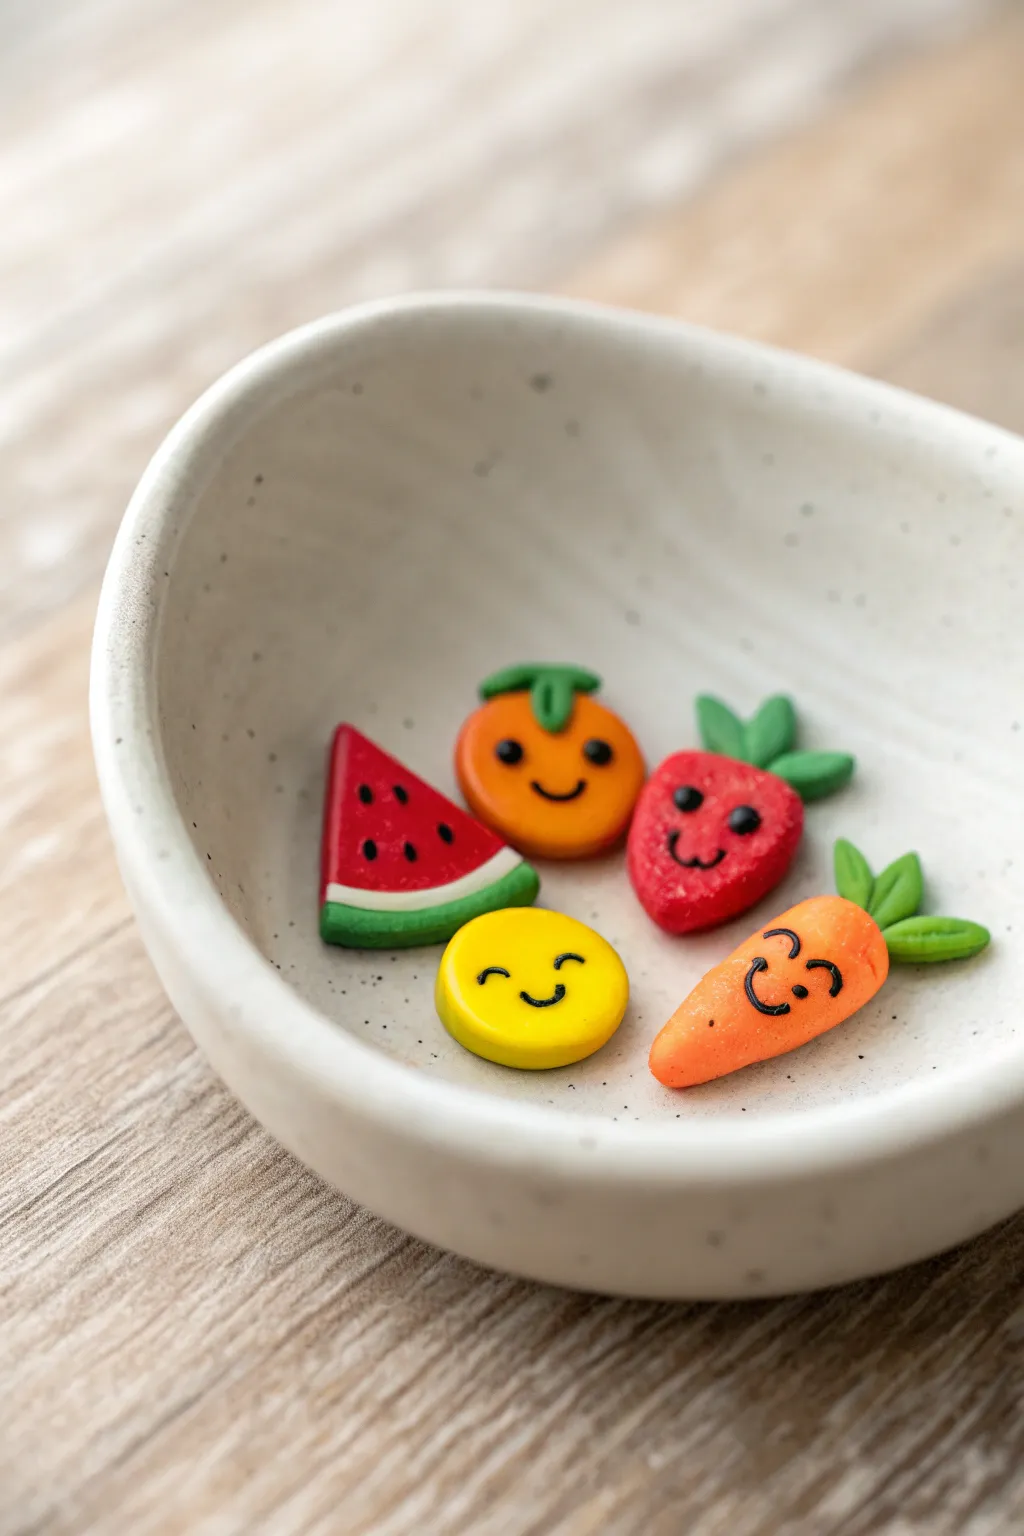
Bring a burst of charm to your craft collection with these adorable fruit and vegetable miniatures sitting snugly in a bowl. Each tiny figure features a cheerful face painted on bright, glossy clay, making them perfect pocket companions or cute desk decorations.
Step-by-Step Tutorial
Materials
- Polymer clay (bright red, orange, yellow, dark green, light green)
- Black acrylic paint or fine-point black clay marker
- Ball stylus tool or toothpick
- Small rolling pin
- Craft knife or clay blade
- Gloss glaze or polyurethane varnish
- Small paintbrush
- Baking sheet and parchment paper
Step 1: Prepping and Base Shapes
-
Condition the clay:
Start by warming up your clay in your hands. Knead each color separately until it is soft and pliable, which prevents cracking later. -
Form the orange:
Roll a small ball of orange clay, about the size of a marble. Gently press it down onto your work surface to flatten the back slightly so it sits still. -
Shape the yellow disc:
Take a piece of yellow clay and roll it into a ball, then flatten it into a thick disc shape. Smooth the edges with your finger to ensure a nice round finish. -
Create the watermelon wedge:
Roll a ball of red clay and flatten it into a thick triangle. Round off the corners gently so they aren’t too sharp. -
Mold the strawberry:
Roll red clay into a ball and then taper one end to form a soft teardrop or heart shape. Flatten it slightly like the others. -
Sculpt the carrot:
Roll a piece of orange clay into a tapered cone shape. Slightly blunt the wider end where the leaves will go.
Step 2: Adding Details and Leaves
-
Watermelon rind:
Roll a thin snake of white or very light green clay and wrap it along the curved bottom edge of your red triangle. Follow this with a slightly thicker snake of dark green clay for the outer rind, blending the seams gently. -
Strawberry texture:
Using a needle tool or toothpick, gently poke small indentations all over the red strawberry shape to mimic seeds. -
Carrot texture:
Using the back of your craft knife or a toothpick, press faint horizontal lines across the carrot body to give it a realistic rooted texture. -
Make the leaves:
Roll several tiny tear-drop shapes from green clay. Flatten them slightly to look like leaves. -
Attach the greenery:
Press two small leaves onto the top of the orange, three onto the top of the strawberry, and two upright leaves onto the wide end of the carrot. You can use a tiny dot of liquid clay if they aren’t sticking well.
Smudgy Smiles?
If your painted faces smudge, wipe them away quickly with a wet q-tip or baby wipe before the paint dries. Wait for the clay to be bone-dry before retrying.
Step 3: Baking and Bringing them to Life
-
Bake the batch:
Arrange your fruits and veggies on a parchment-lined baking sheet. Bake according to your specific clay brand’s package instructions (usually around 275°F or 135°C for 15-30 minutes). -
Cool completely:
Let the pieces cool fully before handling. They are fragile while warm but harden as they return to room temperature. -
Paint the faces:
Using a very fine paintbrush dipped in black acrylic paint, carefully draw the smiley faces. I find it easiest to dot the eyes first, then swoop the smile underneath. -
Add seeds:
For the watermelon, use the black paint to add three small seed teardrops on the red section. -
Seal for shine:
Once the paint is totally dry, apply a coat of gloss glaze to protect the paint and give the minis a polished, ceramic-like look.
Tiny Texture Tip
For realistic strawberry seeds, lightly dust the indented holes with a tiny bit of darker red chalk pastel dust before baking to add depth.
Arrange your cheerful little garden harvest in a small dish to brighten up your room


Pocket-Sized Fantasy Creatures

These adorable pocket-sized companions combine the magic of mythical creatures with the cuteness of round, simple shapes. Perfect for beginners, this project creates three distinct characters—a kitty-unicorn, a sleepy dragon, and a teal star-beast—using smooth blends and charming gold accents.
Detailed Instructions
Materials
- Polymer clay (White, Pastel Pink, Teal/Mint, Gold)
- Black clay or acrylic paint for eyes
- Dotting tools or ball stylus
- Needle tool or toothpick
- Small craft knife (use with supervision)
- Gloss glaze (optional)
- Small brush (if painting features)
Step 1: Sculpting the Caticorn (Left)
-
Body Base:
Start by conditioning a chunk of white clay and rolling it into a smooth, slightly elongated cylinder with a rounded bottom. Gently flatten the base so it stands upright on your work surface. -
Ears and Arms:
Pinch two small triangles of white clay for ears and attach them to the top of the head. Add tiny pink triangles inside the ears. Roll two tiny white tear-drop shapes for arms and press them onto the sides of the body. -
Golden Horn:
Roll a small piece of gold clay into a cone. Gently twist it or use a needle tool to press spiral indentations around it, then attach it securely between the ears. -
Face and Feet:
Add two tiny pink flattened balls for feet. For the face, use a needle tool to gently impress a smile, and add two small black clay balls for eyes (or mark their growing spots to paint later). -
Textured Back:
Roll a thin strip of pink clay and attach it down the center of the caticorn’s back. Use a texturing tool or toothpick to prick the surface repeatedly, giving it a bumpy, scale-like appearance.
Keeping White Clay Clean
Dust sticks to white clay instantly! Wipe your hands and work surface with a baby wipe before handling the white parts, or roll the clay in a scrap piece first to pick up debris.
Step 2: Creating the Sleepy Dragon (Center)
-
Building the Form:
Create two white shapes: a larger rounded teardrop for the body and a slightly flattened sphere for the head. Stack the head onto the body, blending the clay at the neck slightly for stability. -
Wings and Spikes:
Cut small triangles of pink clay. Attach a row of them down the back of the head and body for spines. Fashion huge, simplified wings from pink triangles and press them onto the creature’s back. -
Facial Details:
Roll a pink clay cone for the horn and place it on the forehead. I find using a small ball tool to make cheek indentations before adding tiny pink blushes adds extra character. Scribe sleepy, closed eyelids with a needle tool. -
Finishing Limbs:
Add small pink feet at the base and white teardrop arms similar to the first figure.
Make Them Ornaments
Before baking, insert a small metal eye pin into the top of each head. Once baked, you can thread a ribbon through to turn these cute creatures into hanging charms or keychains.
Step 3: Forming the Starry Beastie (Right)
-
Teal Base Body:
Roll a ball of teal or mint clay, shaping it into a chubby, rounded character. Pinch the top corners gently to form subtle ear shapes. -
Belly Patch:
Flatten a small piece of light pink clay into a shield or bib shape. Press this onto the creature’s chest. Use a toothpick to add texture to the pink clay if desired. -
Star Accents:
Mold two five-pointed stars from gold clay. Place a larger one on the forehead like a crown and a tiny one in the center of the pink belly patch. -
Tail and Limbs:
Roll a teal snake for a tail, tapering one end. Attach it to the back, curling it upward around the side. Add two teal arms hugging the sides. -
Expressive Face:
Press two large eye sockets with a ball tool and insert black clay balls. Add tiny white clay specks for eye highlights to bring them to life.
Step 4: Baking and Finishing
-
Baking:
Place all figures on a baking sheet or ceramic tile. Bake according to your polymer clay package instructions (usually 275°F/135°C for 15-30 minutes per 1/4 inch thickness). -
Cooling and Glazing:
Let the figures cool completely. Once cool, you can apply a coat of gloss glaze to the eyes and gold elements to make them shine.
Arrange your trio on a shelf or gift them to a friend as magical pocket charms


Pencil Toppers That Turn Homework Into Play
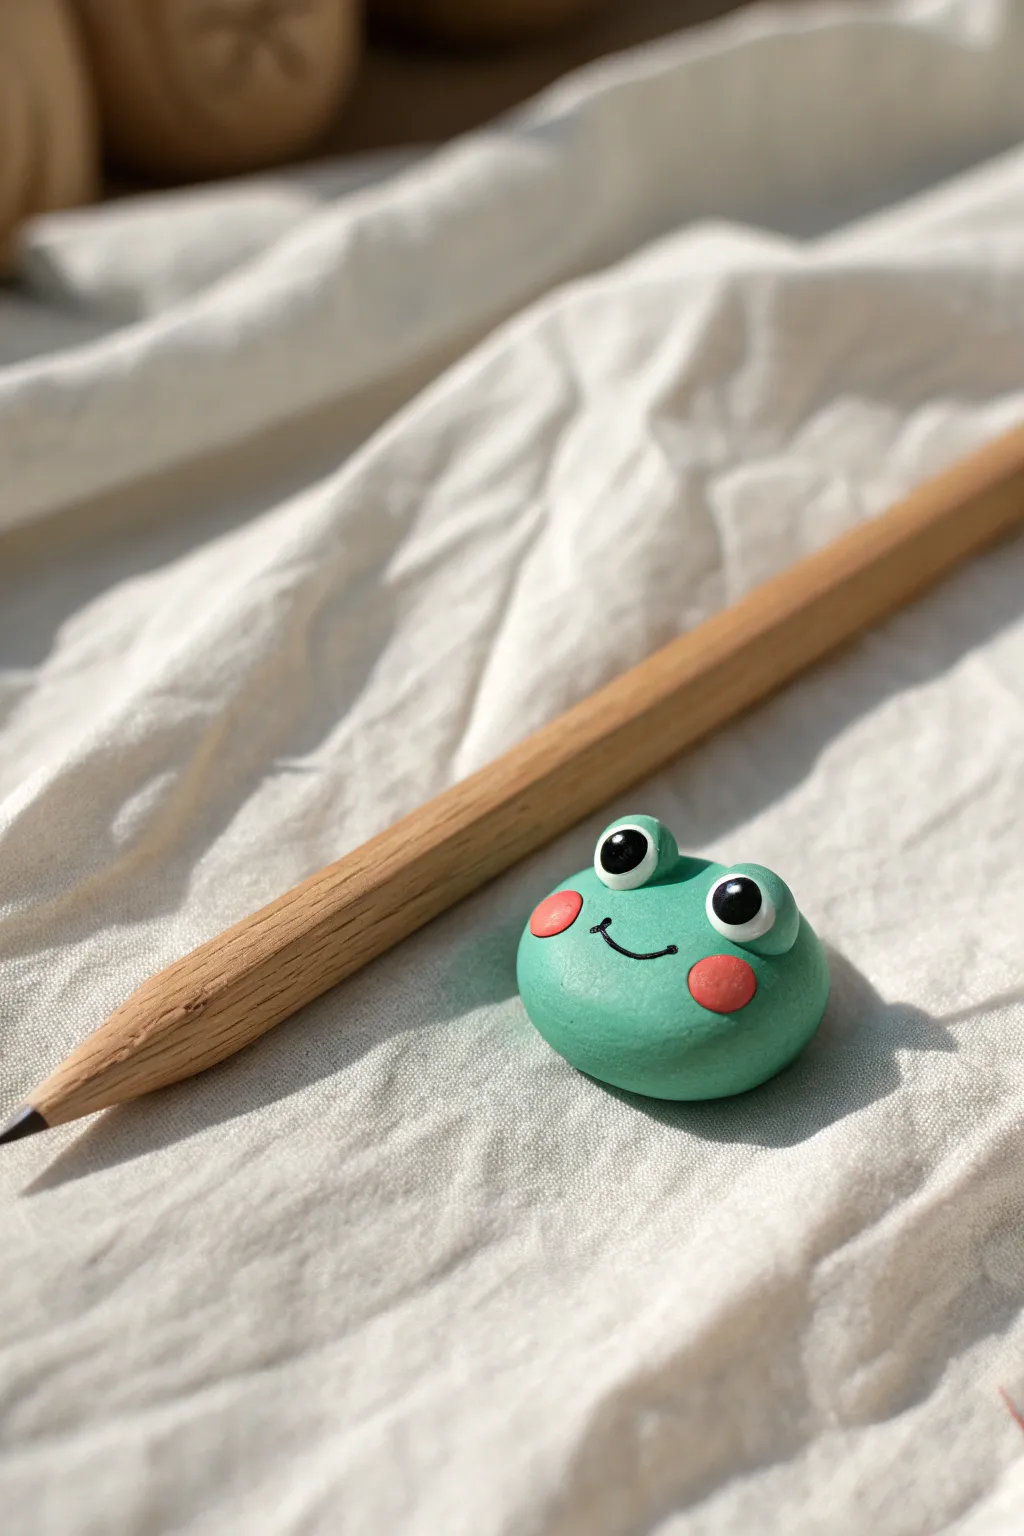
Turn study time into a pond-side adventure with this delightfully simple polymer clay frog. This charming little buddy features a smooth, matte green finish, bold eyes, and rosy cheeks that will make you smile every time you pick up your pencil.
Detailed Instructions
Materials
- Polymer clay (Mint Green, White, Black, Coral/Red)
- Wooden pencil (unvarnished works best for grip)
- Clay sculpting tool or toothpick
- Ball stylus tool (optional)
- Black acrylic paint or fine-tip permanent marker (optional alternative for mouth)
- Oven for baking
- Aluminum foil baking sheet
Step 1: Shaping the Base
-
Condition the Green Clay:
Start with a chunk of mint green polymer clay about the size of a large gum ball. Knead it thoroughly in your hands until it becomes warm, soft, and pliable, which prevents cracks during baking. -
Form the Body:
Roll the green clay into a smooth, perfect sphere. Once smooth, press it gently onto your work surface to flatten the bottom slightly, creating a stable dome shape. -
Check the Size:
Hold your clay dome next to your pencil. It should look proportional—not so heavy that it will make writing difficult, but large enough to fit the pencil shaft. -
Create the Pencil Hole:
Carefully push the eraser end (or the blunt end) of your pencil into the center of the flat bottom of the frog. Push about halfway into the clay body. Wiggle it ever so slightly to ensure the pencil can slide in and out after baking, or leave the pencil inserted to bake it permanently attached.
Sticky Situation?
If your clay gets too soft and sticky to hold detail, pop it in the fridge for 10 minutes. This firms it up instantly.
Step 2: Bringing the Face to Life
-
Make Eye Sockets:
Using a ball stylus or your thumb, make two shallow indentations on the top of the head where you want the eyes to sit. This helps the eyeballs stay attached securely. -
Form the Eyeballs:
Roll two smaller balls of mint green clay for the eye stalks. Press these into the indentations you made. Then, flatten the front of each green ball slightly to create a surface for the white part. -
Add the Whites:
Take a tiny amount of white clay and roll two small spheres. Flatten them into discs and press them gently onto the front of the green eye stalks. Smooth the edges carefully so they bond well. -
Add the Pupils:
Roll two miniscule balls of black clay. Position them on the white discs. You can place them centered for a staring look or off-center for a goofy expression. Press gently to flatten. -
Create Rosy Cheeks:
Take two small pinches of coral or red clay. Roll them into tiny balls and flatten them into thin pancake shapes. Press these onto the face, just below the eyes and slightly to the outside.
Step 3: Drawing the Smile
-
Roll a Clay Snake:
For the mouth, roll an extremely thin, thread-like snake of black clay. This requires patience; try rolling it on a glass surface for the best result. -
Shape the Smile:
Use a needle tool or toothpick to lift the tiny black snake and gently curve it into a smile shape on the frog’s face, connecting the area between the cheeks. -
Secure the Mouth:
Lightly tap the black mouth line with your finger or a tool to ensure it adheres to the green clay without smashing the shape. -
Smooth Fingerprints:
Before baking, give your frog a final inspection. I find that lightly brushing the surface with a tiny bit of baby oil or cornstarch can help buff away stray fingerprints.
Pro Tip: Eye Shine
Add a tiny dot of white acrylic paint to the black pupils after baking. This ‘catchlight’ makes the frog look alive.
Step 4: Baking and Finishing
-
Prepare for Baking:
If you are baking the frog directly on the pencil, prop the pencil up so the clay doesn’t touch the rack, or lay it on a bed of folded foil to keep the shape. -
Bake:
Bake firmly according to your clay package’s instructions (usually around 275°F or 135°C for 15-30 minutes). Do not overbake. -
Cool Down:
Let the frog cool completely before handling. Polymer clay is fragile while hot and hardens as it cools. -
Secure the Pencil:
If you baked the topper separately, add a drop of super glue into the hole and insert the pencil. Let it dry vertically for a solid bond.
Now you have a cheerful little study buddy to keep you company during homework time

The Complete Guide to Pottery Troubleshooting
Uncover the most common ceramic mistakes—from cracking clay to failed glazes—and learn how to fix them fast.
Glow-in-the-Dark Stars and Space Charms
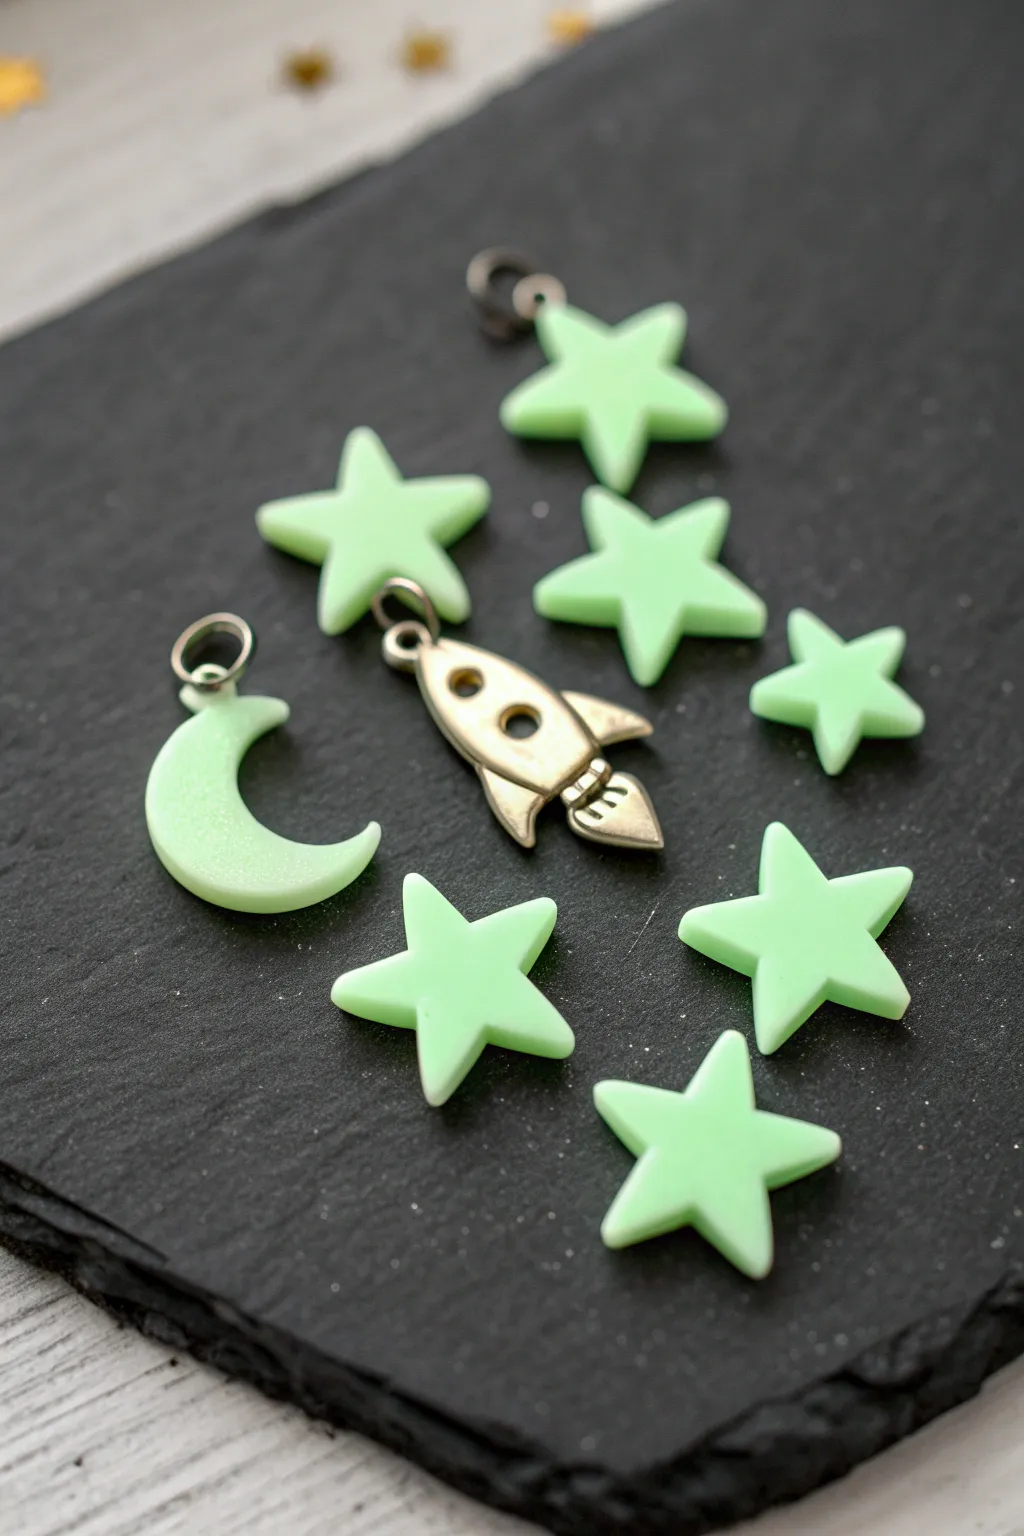
Transform your room into a starry night sky with these simple yet captivating polymer clay charms. Glowing soft green in the dark, these stars, crescent moons, and silver rockets are perfect for jewelry or space-themed decorations.
Step-by-Step Tutorial
Materials
- Glow-in-the-dark polymer clay (green)
- Silver polymer clay or metallic silver acrylic paint
- Small star-shaped clay cutter (approx. 1 inch)
- Small circle cutter (smaller than the star)
- Blade or craft knife
- Silver screw eye pins
- Acrylic roller or pasta machine
- Needle tool or toothpick
- Baking sheet and parchment paper
- Oven (for baking)
- Sandpaper (optional, fine grit)
- Glaze or varnish (optional)
Step 1: Shaping the Stars
-
Condition the Clay:
Start by taking a chunk of glow-in-the-dark polymer clay and kneading it in your hands until it becomes soft, warm, and pliable. This conditioning step is crucial to prevent cracks later. -
Roll it Out:
Use your acrylic roller to flatten the clay into a smooth sheet. Aim for a thickness of about 3mm to 4mm—thick enough to be sturdy but thin enough for a charm. -
Cut the Shapes:
Press your star-shaped cutter firmly into the clay sheet. Wiggle it slightly before lifting to ensure a clean cut. -
Smooth the Edges:
Gently pop the star out of the cutter. Use your fingertip to lightly smooth down any sharp edges or burrs left by the cutting tool. -
Add Hardware:
Take a small silver screw eye pin. Carefully twist and push the screw end into the top point of one of the stars if you want it to be a dangling charm. For others, you can leave them plain as table scatter.
Sticky Cutters?
If the clay sticks inside your cutter, dip the cutter into a little cornstarch or water before pressing it into the clay. This acts as a release agent.
Step 2: Making the Moon
-
Cut the First Circle:
Using the same rolled-out sheet of glow-in-the-dark clay, use a circle cutter to punch out a round shape. -
Form the Crescent:
Take the circle cutter again and overlap it with the circle you just cut, positioning it to slice off a portion. This second cut creates a crescent moon shape. -
Refine the Shape:
Use your fingers to gently pinch the tapered ends of the moon so they aren’t too sharp or fragile. Smooth out the inner curve. -
Insert the Pin:
Just like with the star, carefully screw an eye pin into the top tip of the crescent moon.
Step 3: Crafting the Rocket
-
Shape the Body:
Using metallic silver clay, roll a small teardrop shape, flattening it slightly to create the fuselage of the rocket. -
Add Fins:
Cut two small triangles for the side fins and attach them firmly to the lower sides of the body. I also like to add a small central fin near the bottom for extra detail. -
Create Windows:
Use a small straw or a tool to impress two small circles into the body of the rocket to represent portholes. Alternatively, punch tiny holes right through. -
Attach the Burner:
Form a small trapezoid shape and attach it to the very bottom to act as the engine exhaust. Use a needle tool to press horizontal lines onto it for texture. -
Secure the Eye Pin:
Insert a screw eye pin into the top nose cone of the rocket. Ensure the clay grips the metal tightly.
Super Charge
To confirm your clay is evenly mixed and ready, hold it under a bright lamp for 30 seconds, then check it in a dark closet. Uneven glow means more mixing!
Step 4: Baking and Finishing
-
Prepare for Baking:
Arrange all your stars, moons, and the rocket on a baking sheet lined with parchment paper. -
Bake:
Bake the pieces in a preheated oven according to the manufacturer’s instructions on your specific package of clay (usually around 275°F or 135°C for 15-30 minutes). -
Cool Down:
Let the pieces cool completely on the baking tray before handling them to ensure they harden properly. -
Optional Painting:
If you didn’t use silver clay for the rocket, this is the time to paint your baked clay rocket with metallic acrylic paint. Let it dry fully.
Turn off the lights and watch your handmade galaxy illuminate the room
Solar System Planets Kids Can Actually Build
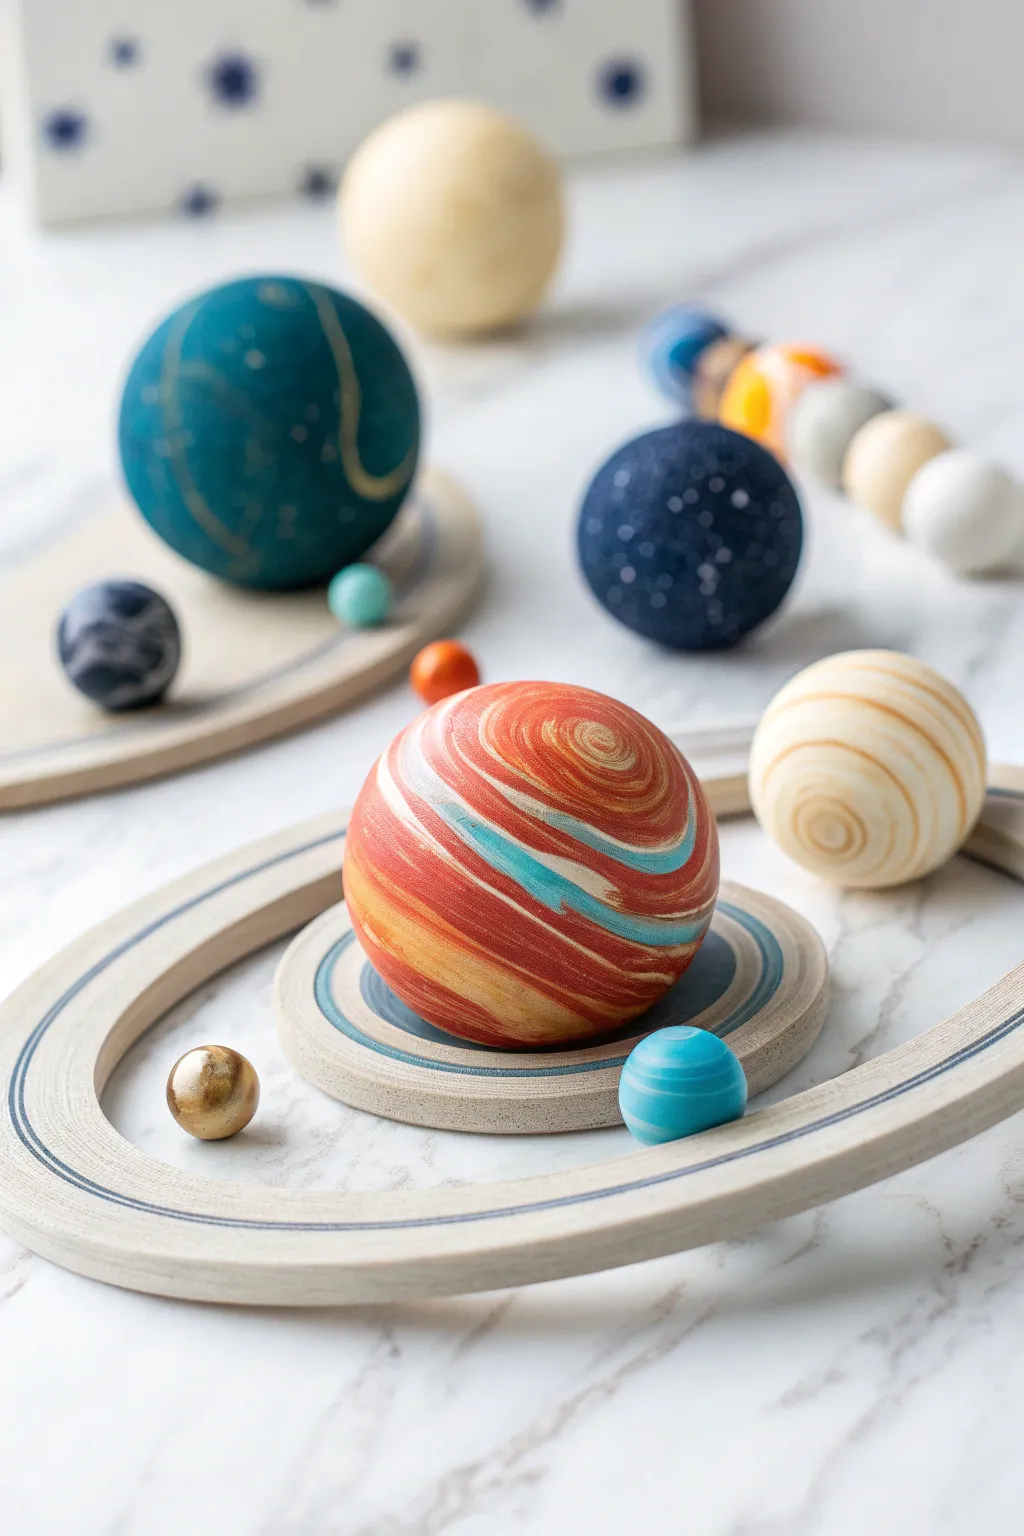
Bring the cosmos down to earth with this stunning polymer clay solar system set, featuring mesmerizing marbled textures and custom wooden orbital rings. The swirling reds, teals, and starry blues make each planet a unique piece of tactile art perfect for hands-on learning.
Step-by-Step
Materials
- Polymer clay in assorted colors (red, orange, teal, white, dark blue, gold, cream)
- Wooden craft rings (various sizes for orbits)
- Wooden circular discs or bases
- Acrylic rolling pin
- Clay carving tools or a toothpick
- Sandpaper (fine grit)
- Acrylic paint (gold, white, silver)
- Small paintbrush or toothbrush for speckling
- Gloss or matte polymer clay varnish
- Baking sheet and parchment paper
- Strong craft glue (E6000 or wood glue)
Step 1: Shaping the Giant Planets
-
Prepare the marbled clay:
For the large distinct planet (Jupiter-inspired), condition blocks of red, rust-orange, cream, and teal clay. Roll them into long snakes of varying thickness. -
Twist and fold:
Gather your clay snakes into a bundle, twist them tightly together, fold the bundle in half, and twist again. Repeat this process until you see intricate, thin striations of color. -
Form the sphere:
Roll the twisted clay into a smooth ball between your palms. Use gentle, circular motions to smooth out any seams without muddying the colors too much. -
Create the teal planet:
Repeat the marbling process for the second large planet using teal, dark green, and a touch of gold clay. Leave the swirls slightly chunkier for a different atmospheric look. -
Add texture:
If desired, use a carving tool to gently etch latitude lines or storm circles into the clay while it is still soft.
Clay Too Soft?
If your complex cane or marble pattern is turning to mush while you roll it, pop the clay in the fridge for 10 minutes to firm up before the final shaping.
Step 2: Crafting the smaller celestial bodies
-
Make the starry planet:
Roll a ball of solid deep blue or black clay. To create the starry texture, you can mix in a small amount of white glitter or wait to paint it after baking. -
Form the moons and smaller planets:
Create various smaller spheres using leftover marbled clay or solid colors like metallic gold, cream, and slate grey. Aim for a variety of sizes to represent different planetary masses. -
Create the striped gas giant:
For the creamy beige planet, layer flat pancakes of white and tan clay, cut a cross-section, and roll it into a ball to create distinct, clean bands rather than swirls.
Step 3: The Orbital Rings
-
Prepare the wooden base:
Select a wooden craft ring that fits comfortably around your main red planet. It needs a solid base to sit on, so glue a smaller wooden disc underneath the ring system or prepare a flat clay base. -
Embellish the rings:
Roll very thin snakes of blue and grey clay. Press these into the surface of your wooden ring to create orbital paths. -
Flatten the ring details:
Gently roll over the wooden ring with your acrylic roller to flatten the clay stripes so they become flush with the wood surface.
Make It Magnetic
Embed a strong neodymium magnet into the bottom of each planet before baking. Then they can attach to a magnetic whiteboard for a vertical solar system display.
Step 4: Baking and Finishing
-
Bake the planets:
Place all clay spheres and clay-embellished wood pieces on a parchment-lined baking sheet. Bake according to your clay package instructions (usually 275°F/135°C for 15-30 minutes depending on thickness). -
Cool and sand:
Let the pieces cool completely. If there are any fingerprints, lightly sand the surface with fine-grit sandpaper under running water. -
Add painted details:
Dilute a little white paint and flick it off a toothbrush onto the dark blue planet to create a distant galaxy effect. Paint gold accents on the teal planet if you want raised continents. -
Seal the work:
Apply a thin coat of polymer clay varnish. I prefer a matte finish for the wooden parts and a satin or gloss finish for the gas giants to make them look gaseous and shimmering. -
Assemble the scene:
Once dry, arrange your planets. You can glue the main red planet into the center of its ring system, or leave it loose so kids can pick it up and explore.
Display your new galaxy on a sunny shelf or use it as the centerpiece for your next science lesson


What Really Happens Inside the Kiln
Learn how time and temperature work together inside the kiln to transform clay into durable ceramic.
Surprise Creature Eggs With Hidden Minis Inside
Create a magical moment with these adorable turquoise dragons emerging from specked eggshells. This project combines simple sculpting techniques to make tiny, friendly creatures hiding inside cracked ceramic-look eggs.
Detailed Instructions
Materials
- Light teal or turquoise polymer clay (sparkle or glitter effect optional)
- White or pale cream polymer clay for the egg
- Light pink polymer clay for bellies and mini eggs
- Small amount of red or orange clay for horns
- Black acrylic paint or clay for eyes
- Small round cutter or egg-shaped mold (optional)
- Needle tool and ball stylus tool
- Old toothbrush or stiff bristle brush
- Brown acrylic paint for speckling
- Clear matte varnish
- Aluminum foil
Step 1: Sculpting the Eggshells
-
Form the Base:
Before sculpting, create a core of crumpled aluminum foil in the shape of a large egg to save clay and keep the egg lightweight. -
Cover with Clay:
Roll out a sheet of white or pale cream clay to about 3mm thickness. Carefully wrap this around your foil egg core, smoothing the seams until invisible. -
Create the Texture:
To mimic a real eggshell, gently tap the entire surface with an old toothbrush or a stiff bristle brush to create a porous, stone-like texture. -
Create the Crack:
Using a craft knife (adult supervision required), carefully cut a jagged, zig-zag line around the top third of the egg to separate the ‘lid’ from the base. -
Hollow it Out:
Carefully remove the foil core from inside both halves. If the clay is too soft, you can chill it in the fridge for 15 minutes before this step to help it hold its shape.
Collapsing Eggshells?
If your eggshells slump while removing the foil, bake the clay *with* the foil inside first. Once baked and cool, you can carefully pick out the foil.
Step 2: Creating the Dragons
-
Shape the Body:
Take a small ball of turquoise clay and roll it into a pear shape for the sitting body. Flatten the bottom slightly so it sits securely inside the egg base. -
Add the Belly:
Flatten a small oval of light pink clay and press it gently onto the front of the pear shape for the dragon’s soft tummy. -
Form the Head:
Roll a slightly larger ball for the head. Shape a short, wide snout by pinching one side gently. -
Sculpt the Face:
Use a ball tool to make indentations for the eyes. Use a needle tool to create small nostrils and a friendly smiling mouth line. -
Attach the Head:
Press the head firmly onto the body. I like to insert a small piece of toothpick or wire between the head and body for extra stability before baking. -
Make the Limbs:
Roll two small sausages for arms and two thicker ones for legs. Attach the legs to the bottom sides and the arms resting on the belly. -
Add Details:
Create tiny triangular spikes from red or orange clay and run them down the back of the head. Add a small tail curving around the side if desired. -
Add the Eyes:
Place tiny balls of black clay into the eye sockets, adding a minuscule white dot for a highlight, or wait to paint these after baking.
Magical Scales
Before baking, brush a tiny amount of pearl mica powder or iridescent eyeshadow over the turquoise clay to give your dragon a shimmering, magical finish.
Step 3: Finishing Touches
-
Mini Eggs:
Roll leftover pink and cream clay into tiny egg shapes to nestle inside the larger shell next to your dragon. -
Baking:
Bake all pieces (dragon, eggshell halves, and mini eggs) according to your clay manufacturer’s instructions, usually at 275°F (130°C) for 15-30 minutes. -
Speckling:
Once cool, dilute a drop of brown acrylic paint with water. Dip a toothbrush in it and flick the bristles with your thumb to spray tiny speckles over the eggshells and mini eggs. -
Assembly:
Place the dragon inside the bottom half of the cracked eggshell. You can glue it in place or leave it loose for play. -
Varnishing:
Apply a coat of matte varnish to the dragon to protect it, avoiding the eggshell if you want to keep the rough, realistic texture.
Now you have a mythical friend ready to hatch and bring a little magic to your shelf