I love how a little lump of clay can turn into something you actually reach for every day. These useful clay ideas are the kind of projects that make your space feel more organized, more personal, and way more “you.”
Ring Dish for Everyday Jewelry
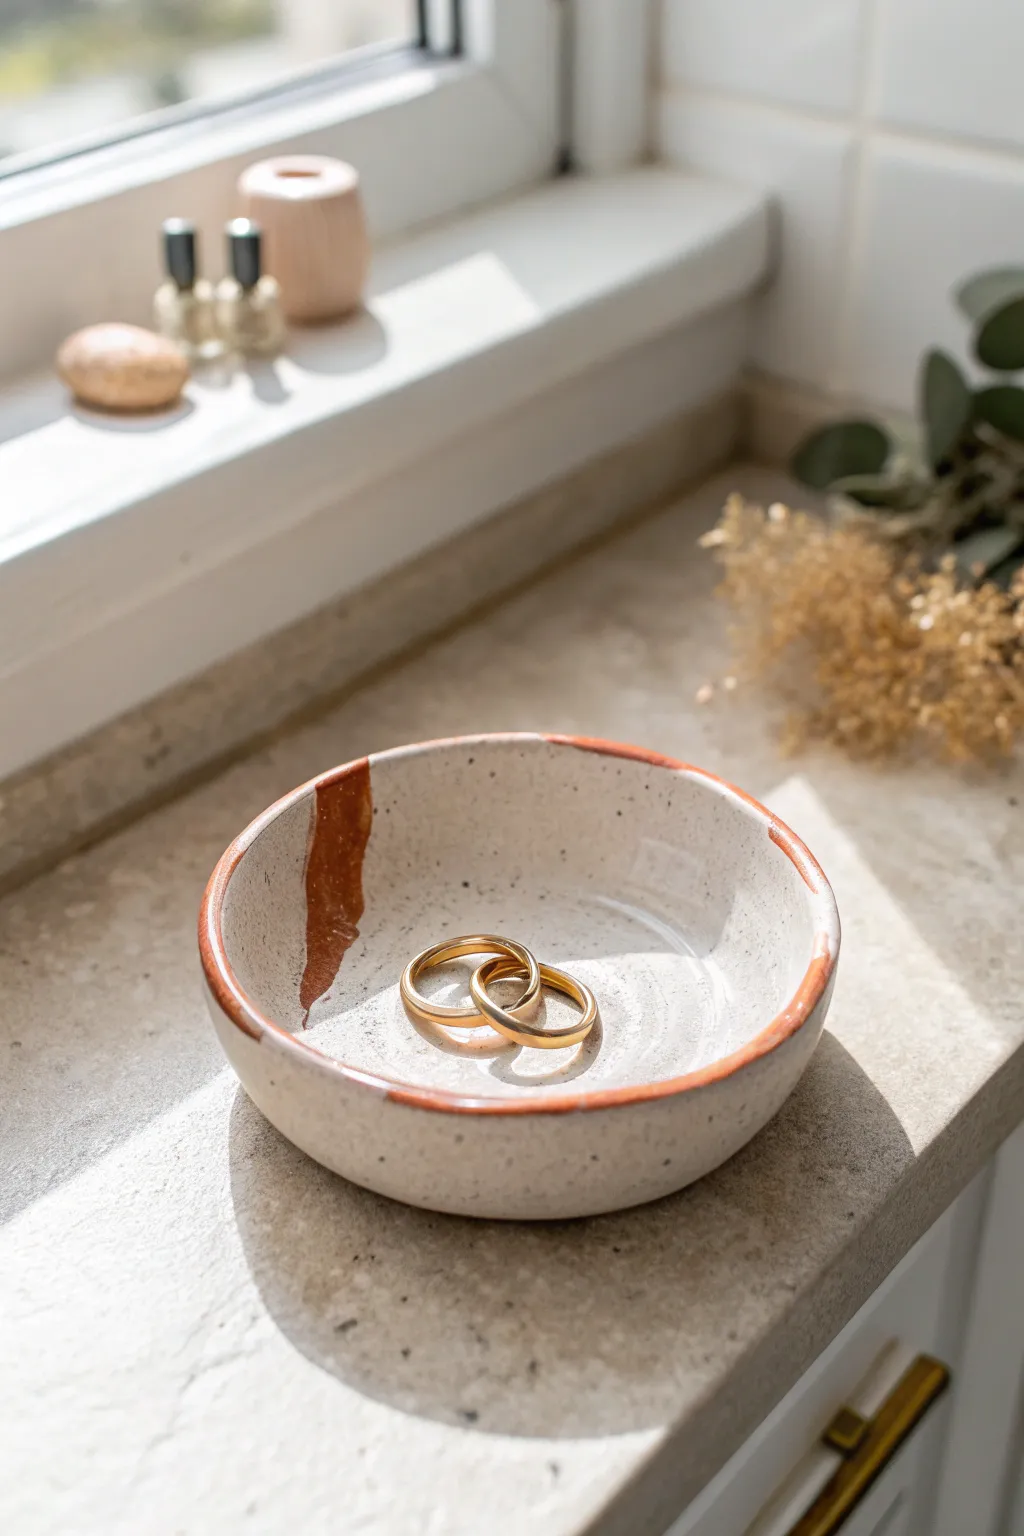
This charming, understated ring dish combines the organic warmth of speckled clay with a simple, glazed finish. Its gently curved sides and subtle terracotta-colored rim accent make it the perfect resting spot for your everyday jewelry.
Step-by-Step
Materials
- Speckled stoneware clay (white or light cream body)
- Red iron oxide wash or terracotta underglaze
- Clear or glossy white transparent glaze
- Rolling pin
- Canvas mat or slab roller
- Round cookie cutter or bowl (approx. 4-5 inches diameter)
- Small foam sponge
- Soft rib tool (flexible kidney)
- Small fine-point paintbrush
- Kiln (or access to a firing service)
Step 1: Forming the Dish
-
Prep the clay:
Begin by wedging a fist-sized ball of speckled stoneware clay to remove air bubbles and ensure an even consistency. This prevents cracking during firing. -
Roll out a slab:
Place the clay on your canvas mat. Using a rolling pin, flatten the ball into an even slab about 1/4 inch thick. Turn the clay periodically to ensure it doesn’t stick to the mat. -
Cut the circle:
Press your round cookie cutter or invert a bowl onto the slab to trace and cut out a perfect circle. Remove the excess clay scraps. -
Smooth the texture:
Take a slightly damp sponge and gently wipe the surface of the clay circle to smooth out the canvas texture marks, but leave the natural speckles visible. -
Lift the edges:
Place the clay circle on a piece of foam or cup it in the palm of your hand. Gently pinch and lift the edges upward to create a shallow wall. You want a gradual curve rather than a sharp 90-degree angle. -
Refine the rim:
Run your finger along the rim to round it off. Since the original image shows a slightly organic, uneven edge, avoid making it too mechanically perfect. -
Optional pinch method:
Alternatively, if you prefer a more handmade look, you can gently pinch the walls between your thumb and forefinger while rotating the base to raise the sides. -
Slow drying:
Place the formed dish on a clean board. Cover it loosely with plastic sheeting to let it dry slowly to the leather-hard stage. This usually takes about 24 hours.
Uneven Rim Fix
If the rim cracks while lifting the edges, compress the clay with a damp sponge or a chamois cloth. Keep the clay slightly moist while working to maintain flexibility.
Step 2: Decorating & Glazing
-
Bisque fire:
Once the dish is bone dry, fire it in the kiln to a bisque temperature (usually cone 04). This hardens the clay and prepares it for glazing. -
Clean the bisque:
Wipe the bisque-fired dish with a damp sponge to remove any kiln dust, which can prevent glaze from adhering properly. -
Apply the accent stripe:
Mix a small amount of red iron oxide with water (or use a terracotta underglaze). I like to use a small brush to paint a vertical stripe down one side of the interior wall, starting from the rim. -
Paint the rim:
Using the same oxide or underglaze, carefully paint a thin line along the very top edge of the rim. Allow the line to be slightly uneven to match the rustic aesthetic. -
Let accents dry:
Allow the painted accents to dry completely before moving to the main glaze application so they don’t smear. -
Dip or brush clear glaze:
Dip the entire dish into a clear or transparent white glaze. If brushing, apply 2-3 even coats. This will seal the clay and allow the speckles and the painted accents to show through clearly. -
Wipe the foot:
Use a wet sponge to thoroughly clean any glaze off the bottom of the dish so it doesn’t fuse to the kiln shelf. -
Final firing:
Fire the piece again to the maturity temperature of your clay and glaze (typically cone 5 or 6 for stoneware). Allow the kiln to cool completely before opening.
Enhancing Speckles
To make the natural speckles pop even more through a white glaze, try lightly wiping the glaze back with a sponge just before firing to thin the layer slightly.
Place your newly finished dish on a vanity or windowsill to catch the light and your favorite rings


Trinket Bowl for Keys and Loose Change
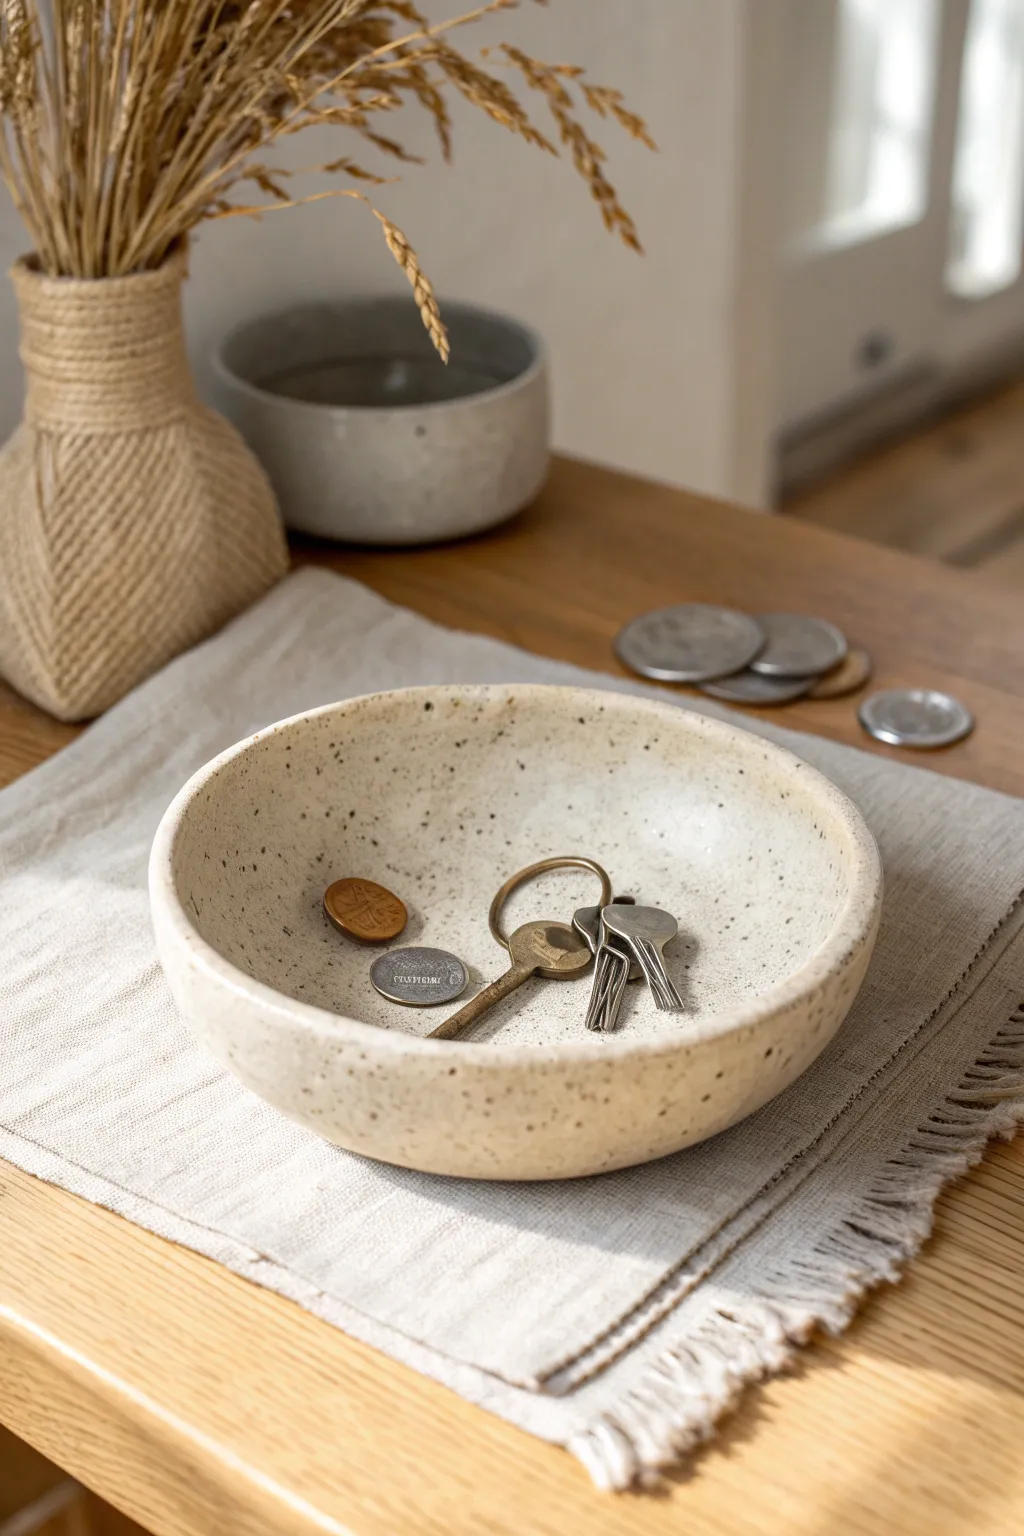
Every entryway needs a dedicated spot for life’s little necessities, and this beautiful speckled clay bowl is the perfect solution. With its organic shape and creamy, stone-like finish, it brings a serene and grounded touch to holding your keys and loose coins.
Detailed Instructions
Materials
- Speckled stoneware clay (or white clay with added granular manganese)
- Canvas mat or rolling surface
- Rolling pin
- Pottery rib (smooth, kidney-shaped tool)
- Sponge
- Needle tool or fettling knife
- Bowl mold (plaster slump mold or a kitchen bowl covered in plastic wrap)
- Clear matte or satin glaze
- Kiln access (or use air-dry clay with speckles and a sealant for a non-fired version)
- Plastic wrap
Step 1: Preparing the Clay Slab
-
Wedge the clay:
Begin by taking a grapefruit-sized ball of speckled stoneware clay. Wedge it thoroughly on your canvas surface to remove any air bubbles, ensuring the clay consistency is uniform and pliable. -
Flatten the base:
Place the clay ball in the center of your work surface. Give it a firm pat with your hand to start flattening it into a thick disc shape, which makes rolling easier. -
Roll the slab:
Using your rolling pin, roll the clay out into an even slab. Aim for a thickness of about 1/4 inch (approx. 6mm). Rotate the clay periodically so it doesn’t stick to the canvas and maintains a relatively circular shape. -
Compress the surface:
Take your pottery rib and gently drag it across the surface of the slab. This compression aligns the clay particles which helps prevent cracking later, and gives you that smooth, professional finish.
Smooth Rim Secret
For a perfect rim, wrap a small piece of plastic grocery bag around your finger and rub the edge of the clay. It smooths better than a sponge!
Step 2: Shaping the Bowl
-
Cut the circle:
Find a circular template (like a paper plate or bowl rim) slightly larger than your desired finished size. Place it lightly on the slab, trace around it with a needle tool, and remove the excess clay trimmings. -
Prepare the mold:
If you are using a kitchen bowl as a slump mold, cover the inside with a layer of plastic wrap to prevent the clay from sticking. Smooth out as many wrinkles as possible. -
Slump the clay:
Carefully lift your clay circle and gently lower it into the mold. Let it slump naturally into the curve. I find gravity does most of the work here, but you can delicately press it down to ensure it touches the bottom. -
Refine the rim:
While the clay is in the mold, look at the rim. Use a damp sponge to smooth the sharp cut edge into a soft, rounded curve. Run your finger along it to ensure there are no jagged bits. -
Initial drying:
Let the bowl sit in the mold until it is leather hard. This means it’s stiff enough to hold its shape but still cool to the touch. This usually takes a few hours to overnight, depending on humidity.
Step 3: Finishing and Firing
-
Remove from mold:
Once leather hard, carefully lift the bowl out of the mold (or peel away the plastic). Turn it over and place it on a flat board. -
Clean the foot:
Check the bottom of the bowl. If it’s slightly rounded, gently press or tap it on the table to create a small flat spot so it sits stable without wobble. Smooth out any marks with a rib. -
Final smoothing:
Use a barely damp sponge to wipe the entire surface one last time. This brings the fine grog or speckles to the surface and ensures a clean texture. -
Slow drying:
Cover the bowl loosely with plastic and let it dry slowly over several days until it is bone dry. This prevents warping. -
Bisque fire:
Load the bone dry bowl into the kiln for a bisque firing (usually Cone 04). This hardens the clay and prepares it for glazing. -
Glazing:
Once cool, wipe off any dust with a damp sponge. Pour a clear matte or satin glaze into the bowl, swirl it to coat the inside, and pour out the excess. Dip the outside if desired, or leave the raw clay exposed. -
Wipe the base:
Use a sponge to wipe the bottom of the bowl completely clean of glaze. This is crucial so it doesn’t fuse to the kiln shelf. -
Glaze fire:
Fire the bowl again to the temperature recommended for your specific clay and glaze (often Cone 5 or 6 for stoneware). This melts the glaze into that durable, glassy finish.
Make It Matchy
Use the same clay to roll out a tall cylinder vase. Attach a coil texture to it to mimic the woven vase in the photo for a cohesive set.
Place your warm, speckled bowl near the door and enjoy having a designated, stylish home for your keys.


Cone Ring Holder That Keeps Stacks Tidy
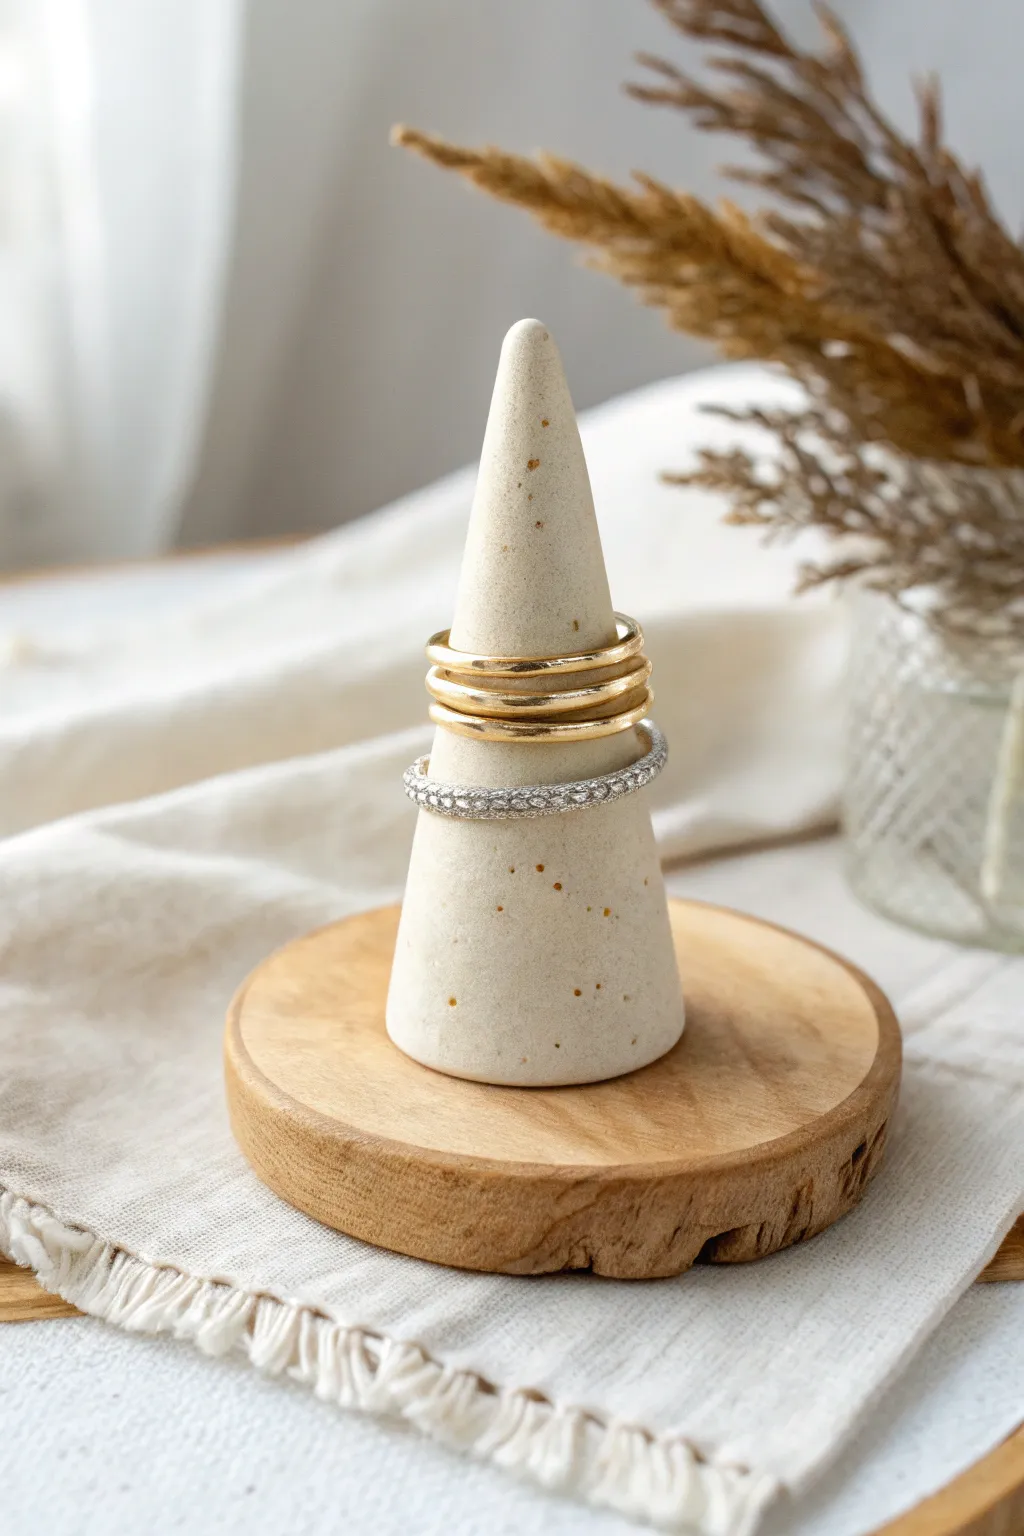
This minimalist ring holder combines natural textures with modern geometry, featuring a speckled beige clay cone aimed at keeping your favorite bands organized. The smooth, upward-tapering shape sits atop a rustic wooden base, creating a charming display piece for any vanity.
How-To Guide
Materials
- Speckled beige polymer clay (e.g., Fimo Effect ‘Granite’ or Sculpey Premo ‘Gray Granite’)
- Rolling pin or acrylic roller
- Flexible tissue blade or craft knife
- Small round wooden slice (approx. 3-4 inches diameter)
- Strong craft adhesive (e.g., E6000 or 2-part epoxy)
- Fine-grit sandpaper (400 and 600 grit)
- Oven for baking
- Baking tile or parchment paper
- Ruler
- Cardstock or paper (for template)
- Tape
Step 1: Shaping the Cone
-
Prepare the Clay:
Start by conditioning your speckled polymer clay until it is soft and malleable. Warm it in your hands and knead it thoroughly to prevent cracking later on. -
Create a Cone Core:
Roll a significant portion of the clay into a ball, then begin rolling it against your work surface with the palm of your hand, applying more pressure to one side to form a thick, tapered carrot shape. -
Refine the Taper:
Stand the clay up on its wider end. Using your palms or a flat acrylic block, gently roll and press the sides to make the cone shape symmetrical and smooth. The base should be roughly 1.5 inches wide, tapering up to a rounded point. -
Check the Height:
Ensure the cone is tall enough to hold multiple rings, aiming for a height of about 3 to 4 inches. If it’s too short, gently pull and roll the tip upwards to elongate it. -
Flatten the Base:
To ensure the cone stands perfectly straight, press the bottom firmly onto your work surface. You can use your tissue blade to slice off a thin layer from the bottom to create a perfectly flat, level surface. -
Smooth the Surface:
Inspect the cone for fingerprints or uneven bumps. Dip your finger in a tiny bit of baby oil or cornstarch and buff the surface gently until it is flawless.
Leaning Tower?
If your cone leans during baking, stick a raw spaghetti noodle through the center vertically before baking to act as an internal armature, or prop it gently with balls of foil.
Step 2: Baking and Mounting
-
Bake the Cone:
Place your clay cone upright on a ceramic tile or baking sheet lined with parchment paper. Bake according to the manufacturer’s instructions on your specific package of clay (usually 275°F/130°C for 15-30 minutes per 1/4 inch of thickness). -
Cool Down:
Once the baking time is up, turn off the oven and let the cone cool down inside slowly to prevent thermal shock cracks. Wait until it is completely cool to the touch before handling. -
Sand for Texture:
Use 400-grit sandpaper to wet-sand the surface of the cone under running water. This removes any shiny spots and enhances the natural, stone-like appearance of the speckles. -
Polish the Finish:
Follow up with 600-grit sandpaper for a smoother, satin finish. Dry the cone thoroughly with a clean towel. -
Prepare the Wooden Base:
Take your wooden slice and ensure the top surface is clean and dry. If the wood is rough, give it a quick sanding to ensure a good bond with the adhesive. -
Apply Adhesive:
Apply a generous dab of strong craft adhesive, like E6000, to the center of the wooden slice. I prefer to add a small dot to the bottom of the clay cone as well for extra security. -
Attach the Cone:
Press the clay cone firmly onto the center of the wooden slice. Hold it in place for a few pressure to ensure good contact between the wood and clay. -
Cure the Glue:
Allow the adhesive to cure fully according to the package directions (usually 24 hours) before placing any jewelry on the holder.
Stone Effect Hack
If you don’t have speckled clay, mix translucent clay with white clay and add coarse ground black pepper or dried used coffee grounds to mimic the granite look.
Your new jewelry stand is now ready to showcase your favorite rings with earthy elegance


Coaster Set With Texture or Pressed Patterns
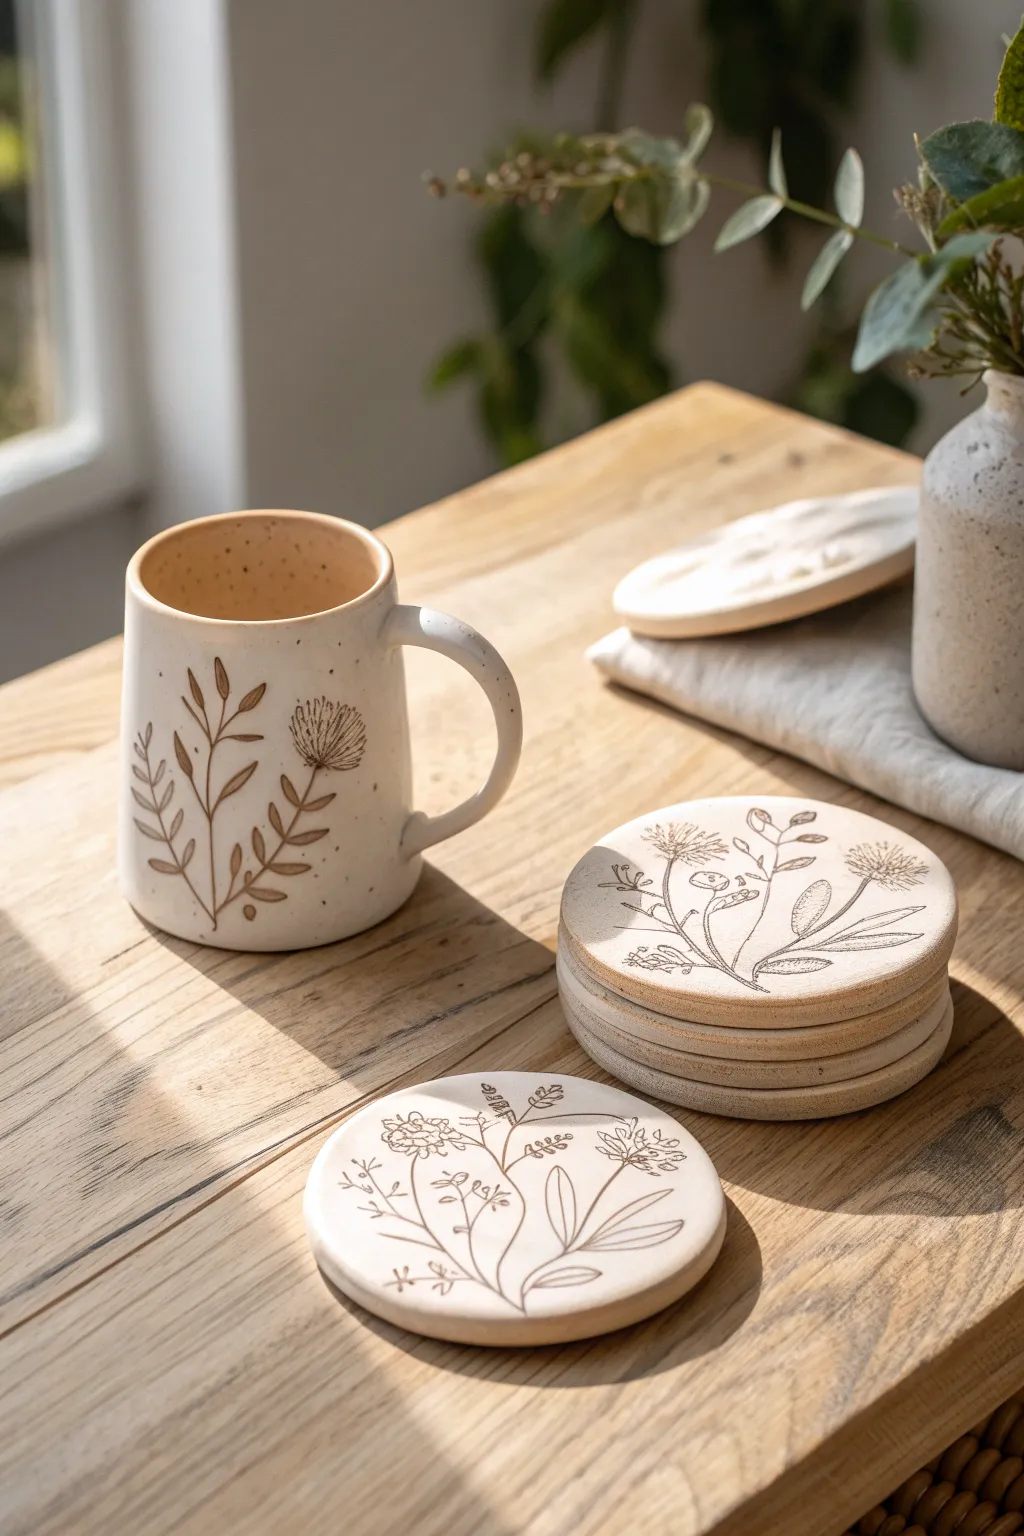
Bring the calming beauty of nature to your coffee table with this set of handcrafted clay coasters. These sturdy, round discs feature delicate wildflower illustrations etched in sepia tones against a creamy, speckled ceramic finish.
Step-by-Step
Materials
- White or cream speckled stoneware clay
- Rolling pin
- Two 1/4 inch wooden guide strips
- Round cookie cutter (approx. 4 inches)
- Botanical rubber stamps or fresh wildflowers
- Sponge
- Ceramic stain (Sepia or Dark Brown)
- Clear matte glaze
- Small paintbrush
- Soft cloth or paper towel
- Kiln (or oven if using polymer clay alternative)
Step 1: Shaping the Clay Base
-
Prepare your workspace:
Begin by cleaning a canvas or non-stick silicone mat. Place your two wooden guide strips parallel to each other, slightly wider than your ball of clay. -
Roll the slab:
Wedge your speckled stoneware clay well to remove air bubbles. Place it between the guide strips and use your rolling pin to flatten it into a consistent slab. The guides ensure an even thickness, which is crucial for flat drying. -
Smooth the surface:
Take a slightly damp sponge and gently wipe the surface of the clay slab. This removes the canvas texture and any small imperfections, creating a pristine canvas for your design. -
Cut the shapes:
Using your 4-inch round cutter, press firmly into the clay slab to cut out your circles. If the clay sticks, you can dip the cutter into a little cornstarch first. -
Refine the edges:
Lift the excess clay away. Pick up each circle carefully and use your damp sponge or finger to smooth the sharp edges cut by the tool, rounding them off slightly for a more finished look.
Warping Woes?
If coasters curl while drying, flip them over daily and dry them slowly under plastic loosen over several days. Weighted boards also help keep them perfectly flat.
Step 2: Creating the Botanical Design
-
Check moisture:
Allow the clay rounds to firm up just slightly—leather hard is too dry, but wet mud is too sticky. They should hold their shape when handled but still take an impression easily. -
Press the pattern:
Position your botanical rubber stamp or actual pressed flowers onto the center of a coaster. Press down firmly and evenly. If using stamps, ensure you rock it slightly to catch all the fine lines. -
Clean up the impression:
I like to carefully inspect the impression immediately. If there are any jagged bits of clay interfering with the lines, smooth them down gently with a soft brush. -
The drying phase:
Sandwich your coasters between two pieces of drywall or heavy board to prevent warping. Let them dry completely to the greenware stage, which usually takes a few days depending on humidity. -
Bisque fire:
Load your kiln and fire the pieces to bisque temperature (usually Cone 04). This hardens the clay and prepares it for the stain application.
Pro Tip: Depth Check
When stamping, dust your stamp with a tiny bit of cornstarch. This prevents the clay from sticking to rubber or wood and ensures a crisp, clean release every time.
Step 3: Glazing and Finishing
-
Prepare the stain:
Mix your sepia ceramic stain with a little water until it reaches a watercolor consistency. You want it fluid enough to sink into the deepest parts of your stamped design. -
Apply the wash:
Brush the stain generously over the entire pressed design. Don’t worry about being neat; the goal is to get the dark pigment into every groove of the botanical illustration. -
Wipe back:
Using a clean, damp sponge, wipe the surface of the coaster. This removes the stain from the raised, flat surfaces but leaves it trapped in the depressed lines of the drawing. -
Check the contrast:
Assess the look. If the lines are too faint, you can re-apply and wipe again. The clay body should return to its natural cream color, with the design standing out in dark brown. -
Apply clear glaze:
Dip or brush a thin layer of clear matte glaze over the entire top surface. This seals the clay and protects the design without making it overly shiny. -
Wipe the foot:
Ensure the bottom of the coaster is strictly free of glaze so it doesn’t stick to your kiln shelf. Sponge it clean if necessary. -
Final firing:
Fire the coasters again to the maturation temperature of your specific clay body (e.g., Cone 6). Once cool, sand the bottom lightly if there are any rough spots.
Stack your new coasters on the side table and enjoy the organic warmth they add to your morning routine

The Complete Guide to Pottery Troubleshooting
Uncover the most common ceramic mistakes—from cracking clay to failed glazes—and learn how to fix them fast.
Spoon Rest to Save Your Countertops
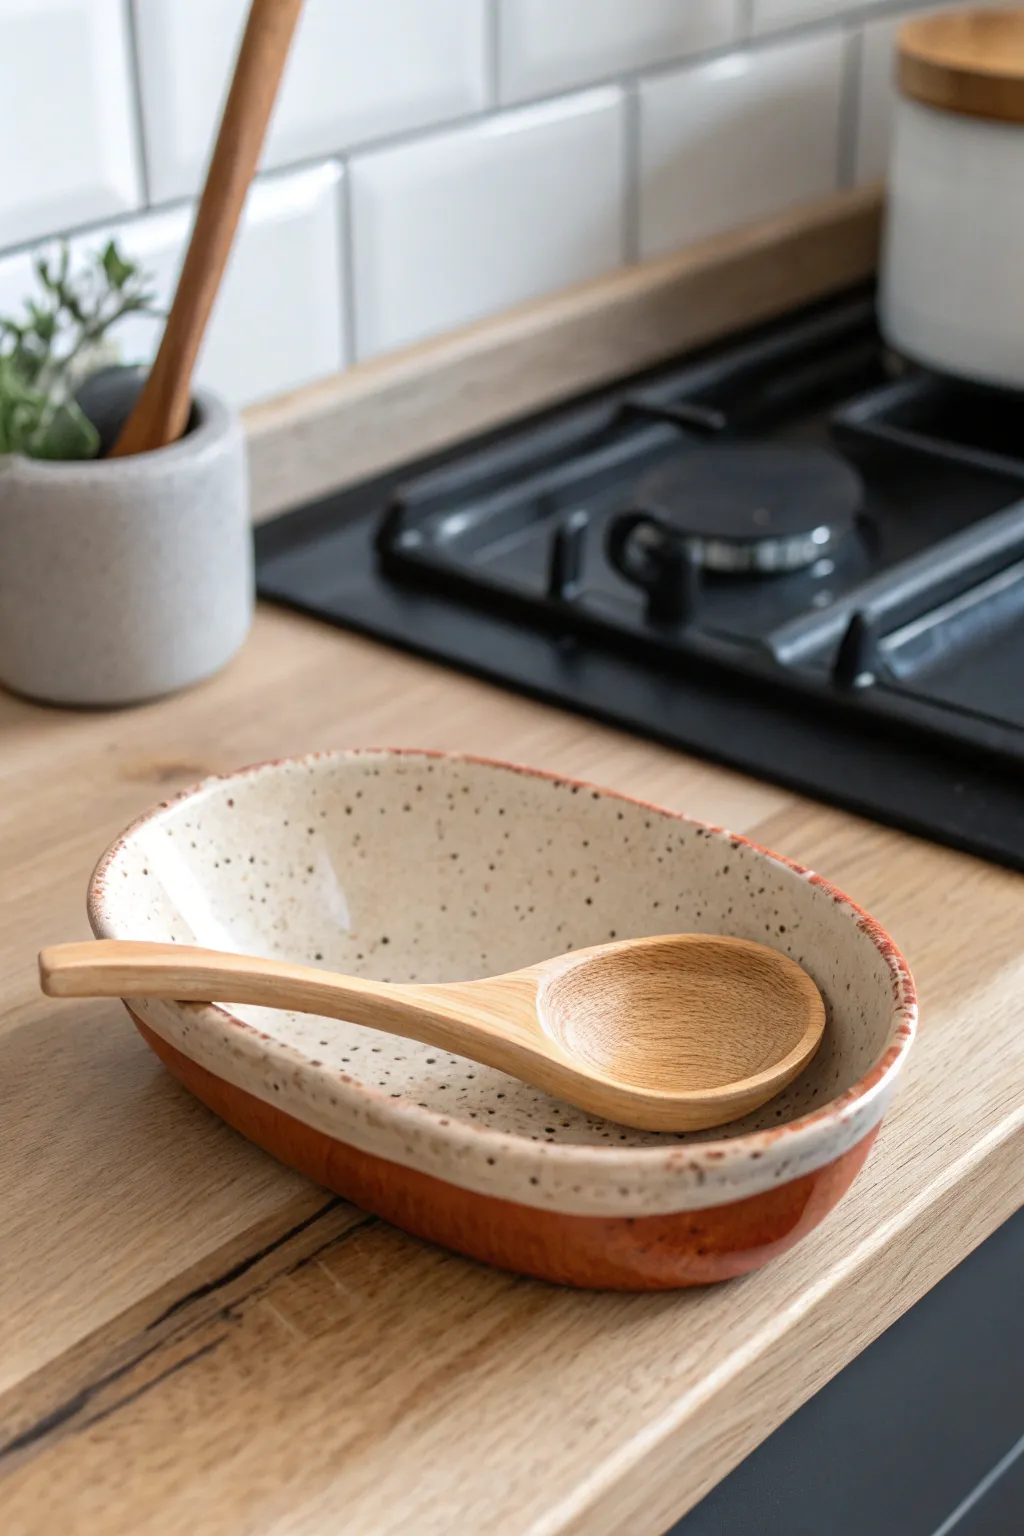
This charming, rustic spoon rest combines utilitarian function with handmade beauty, featuring a warm terracotta exterior and a creamy, speckled interior glaze. Its organic oval shape and gentle curves are perfect for catching drips while keeping your utensils within easy reach.
How-To Guide
Materials
- Stoneware clay (preferably a smooth white or buff body)
- Rolling pin
- Canvas work surface
- Oval paper template (approx. 6×4 inches)
- Fettling knife or needle tool
- Soft rib tool (rubber or silicone)
- Sponge
- Loop tool for trimming (optional)
- Terracotta colored underglaze or slip
- Creamy white speckled glaze (food safe)
- Clear glaze (if speckled glaze is not glossy enough)
- Kiln
Step 1: Forming the Dish
-
Prepare the slab:
Begin by wedging your clay thoroughly to remove air bubbles. Roll out a slab of clay on your canvas to an even thickness of about 1/4 inch. I like to flip the slab once during rolling to ensure the canvas texture is minimal. -
Cut the shape:
Place your oval paper template onto the slab. Using a needle tool or fettling knife, trace around the template and cut out your oval base. Smooth the cut edges with your finger to remove sharp angles. -
Lift the walls:
Gently lift the edges of the oval slab upwards with your fingers. Use a pinching motion to thin and raise the rim, creating a shallow bowl shape. Aim for a wall height of about 1 to 1.5 inches. -
Refine the curve:
Use a soft rib tool on the inside of the dish to smooth out finger marks and create a continuous, gentle curve from the bottom to the rim. Support the outside with your hand as you press the rib against the interior. -
Shape the rim:
Run a damp sponge along the top rim to round it off. Don’t worry if it’s slightly uneven; that wave adds to the organic, handmade aesthetic shown in the photo. -
Dry slowly:
Cover the piece loosely with plastic and allow it to dry to a leather-hard state. This usually takes about a day, depending on your studio’s humidity.
Warping Woes?
If your oval turns into a circle or twists, dry it slower. Place a small weight bag in the center during the initial drying phase to keep the bottom flat.
Step 2: Decorating and Glazing
-
Refine the foot:
Once leather hard, flip the piece over. If the bottom is heavy, you can trim away excess clay with a loop tool to create a slight foot ring, or simply smooth the bottom flat with a rib. -
Apply exterior color:
Brush two to three coats of terracotta-colored underglaze or slip onto the exterior of the dish, stopping exactly at the rim’s edge. Let each coat dry slightly before applying the next. -
Bisque fire:
Allow the piece to become bone dry, then load it into the kiln for a bisque firing (typically cone 04 or 06). This prepares the clay to accept glaze. -
Clean the bisque:
Wipe the bisque-fired piece with a damp sponge to remove any kiln dust. This ensures the glaze adheres properly to the surface. -
Glaze the interior:
Pour your creamy white speckled glaze into the interior of the bowl. Swirl it around to coat the inside completely and pour out the excess. Alternatively, you can carefully brush the glaze on, ensuring even coverage. -
Detail the rim:
If you want that distinct reddish rim seen in the image, carefully wipe away any white glaze that dripped onto the very top edge, exposing the terracotta underglaze or clay body beneath. -
Clean the foot:
Use a damp sponge to wipe any glaze off the bottom of the piece where it will sit on the kiln shelf. I always double-check this to prevent the pot from sticking to the shelf. -
Glaze fire:
Fire the piece again to the maturity temperature of your clay and glaze (typically cone 5 or 6 for stoneware). Follow the specific firing schedule recommended for your glaze. -
Sand the bottom:
Once cooling is complete and you’ve unloaded the kiln, check the bottom for any rough spots. Briefly sand the base with wet sandpaper to ensure it won’t scratch your countertops.
Make it a Set
Create a smaller, round version to serve as a matching teabag rest or a pinch bowl for salt, using the same clay and glaze combination.
Now you have a durable, custom piece of pottery ready to keep your kitchen surfaces clean
Soap Dish With Drainage Ridges
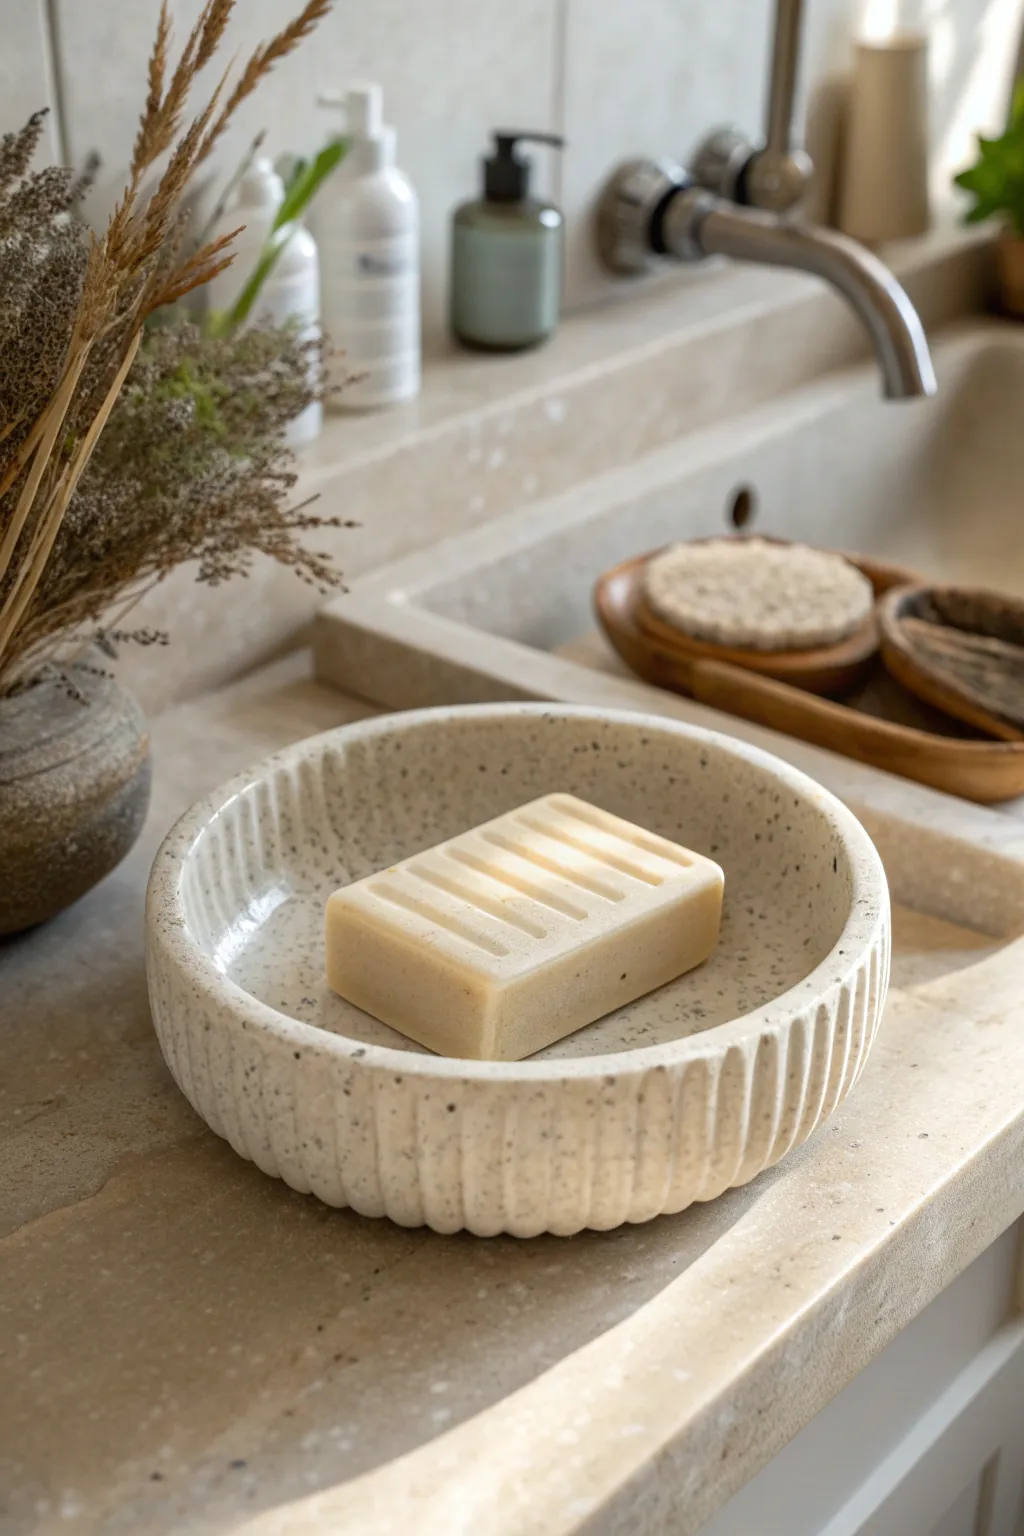
Elevate your bathroom sink with this minimalist, spa-inspired soap dish featuring elegant exterior fluting and a speckled finish. The gentle interior curve cradles soap perfectly while the tactile ridges add a sophisticated, modern touch to your daily routine.
Step-by-Step
Materials
- Speckled cream stoneware clay (e.g., Laguna Speckled Buff)
- Pottery wheel (or banding wheel for hand-building)
- Wooden rib tool
- Metal rib tool
- Carving tool (u-shaped loop tool)
- Sponge
- Wire cutter
- Needle tool
- Chamois cloth
- Clear matte or satin glaze
Step 1: Forming the Dish
-
Prepare the Clay:
Begin by wedging about 1 to 1.5 pounds of speckled stoneware clay. Ensure it is fully de-aired to prevent bubbles later. -
Center and Open:
Throw the clay onto the wheel head and center it firmly. Open the clay up relatively wide, as we are making a shallow dish rather than a tall bowl. -
Establish the Floor:
Compress the floor well with a wooden rib or your fingers. Keep the floor slightly thick (about 1/2 inch) to allow for later trimming or foot definition. -
Pull the Walls:
Pull up the walls, keeping them short and thick. You want a wall thickness of at least 3/8 inch to accommodate the carving we’ll do later. -
Shape the Profile:
Using a rib on the inside, gently press outward to create a continuous, smooth curve from the floor to the rim. Avoid creating a sharp corner at the bottom. -
Refine the Rim:
Compress the rim with a chamois cloth to make it rounded and smooth. This step prevents the clay from becoming sharp after firing. -
Dry to Leather Hard:
Wire the piece off the wheel and let it dry slowly until it reaches a solid leather-hard state. The clay needs to be firm enough to carve without warping.
Clean Lines
When carving the flutes, pull the tool downwards from the rim to the foot. Gravity helps keep the line straight and prevents drag marks near the delicate rim.
Step 2: Carving & Finishing
-
Mark Carving Guides:
I like to lightly mark vertical guidelines around the exterior using a needle tool to ensure my fluting stays evenly spaced, though you can eyeball it for a more organic look. -
Carve the Flutes:
Using a U-shaped loop tool, carve vertical channels from the bottom of the dish straight up to the rim. Apply even pressure to keep the depth consistent. -
Clean the Edges:
Step back and check your spacing. Once the carving is done, use a damp sponge or a soft brush to gently smooth the sharp edges of the carved ridges. -
Shape the Soap Platform (Optional):
If hand-building, you can press a small, slightly raised platform or ridges into the interior center to help soap drain. -
Slow Drying:
Cover the dish loosely with plastic to let it dry very slowly. This equalization of moisture is crucial to prevent cracking where the clay is now thinner. -
Bisque Fire:
Once bone dry, fire the piece in a bisque kiln to Cone 04 (or your clay body’s recommendation). -
Glaze Application:
Dip or brush, dip the piece in a clear matte or satin glaze. This allows the beautiful natural speckles of the clay body to shine through. -
Final Fire:
Fire the glazed piece to maturity (usually Cone 5 or 6 for stoneware). Ensure the foot is wiped clean of glaze before firing.
Function First
Make the interior bottom slightly convex (higher in the middle) or add drainage holes if you have a catch-plate, so the soap doesn’t sit in a puddle of water.
Place your favorite artisanal soap in the dish and enjoy the serene aesthetic it brings to your countertop


What Really Happens Inside the Kiln
Learn how time and temperature work together inside the kiln to transform clay into durable ceramic.
Toothbrush Holder for a Neater Sink Area

Bring a touch of organic minimalism to your bathroom with this cylindrical toothbrush holder that mimics the look of porous stone. With its clever four-hole lid and textured body, it keeps bristles separate while adding a spa-like aesthetic to any countertop.
Detailed Instructions
Materials
- White or beige air-dry clay (or polymer clay)
- Speckled pottery clay slip or brown micro-beads/sand for texture
- Rolling pin with guide rings (1/4 inch thickness)
- Cylindrical mold (like a soda can or PVC pipe)
- Circle cutters (various sizes)
- Craft knife or scalpel
- Sponge and water
- Wooden sculpting tools
- Fine-grit sandpaper
- Clear matte acrylic sealant (waterproof)
Step 1: Forming the Body
-
Prepare the Clay:
Begin by conditioning your clay until it is soft and pliable, ensuring there are no air bubbles trapped inside. -
Add Texture:
To achieve that speckled, porous look, knead in a small amount of brown micro-beads or coarse sand; alternatively, you can flick thinned brown paint onto the surface later, but mixing texture in now looks more authentic. -
Roll the Slab:
Roll out the clay into a long rectangular slab, maintaining a consistent thickness of about 1/4 inch to ensure stability. -
Cut to Size:
Measure the circumference and desired height of your cylindrical mold, then use a craft knife to cut a rectangle that will wrap perfectly around it with just a tiny overlap for the seam. -
Wrap the Cylinder:
Carefully wrap the clay rectangle around your chosen mold, pressing the ends together firmly. -
Seal the Seam:
Score the overlapping edges (scratch cross-hatch marks) and add a little water or slip, then smooth the clay together until the seam disappears completely. -
Surface Detailing:
For the porous stone effect shown in the photo, take a stiff-bristled brush or a needle tool and gently poke random, shallow holes all over the exterior surface, varying the depth and spacing. -
Create the Base:
Cut a circle of clay slightly larger than the cylinder’s diameter, place the cylinder on top, and blend the bottom clay up onto the walls to create a watertight seal.
Step 2: Crafting the Divider Lid
-
Measure the Lid:
Roll out a fresh slab of clay (slightly thicker than the walls) and cut a circle that fits precisely inside the top rim of your cylinder. -
Mark Hole Positions:
Lightly mark four evenly spaced circles on the lid piece where the toothbrushes will sit. -
Cut the Openings:
Use a small circle cutter or a unsteady hand with a craft knife to cut out the four holes; smooth the inner edges of these holes with a wet finger so they are soft and rounded. -
Refine the Rim:
Create a slight lip or ridge around the edge of this disc so it can rest securely on top of the main body without sliding off. -
Test the Fit:
Gently place the lid onto the cylinder to ensure it sits flush; adjust the size if necessary while the clay is still workable.
Sticky Situation?
If the clay sticks to your mold, wrap the mold in a layer of parchment paper or cling film before wrapping the clay slab around it.
Step 3: Finishing Touches
-
Initial Drying:
Allow the clay to dry until leather-hard; I like to rotate the piece every few hours during this stage to prevent warping as moisture evaporates. -
Smooth the Edges:
Once fully dry, use fine-grit sandpaper to smooth out the top rim and the base, ensuring the piece stands perfectly flat. -
Enhance the Speckles:
If your texture isn’t prominent enough, dilute a tiny bit of darker beige paint and wash it over the surface, wiping it back immediately so pigment remains only in the pockmarks. -
Waterproofing:
Apply a coat of waterproof sealant to the inside of the cylinder first, allowing it to dry completely. -
Final Seal:
Coat the exterior and the lid with a matte sealant to protect the finish from bathroom humidity without making it look glossy or plastic.
Make it Modular
Make the lid removable rather than sealing it shut. This allows you to easily clean out any toothpaste residue from the bottom.
Place your finished piece on a wooden tray or beside the sink to enjoy a clutter-free morning routine
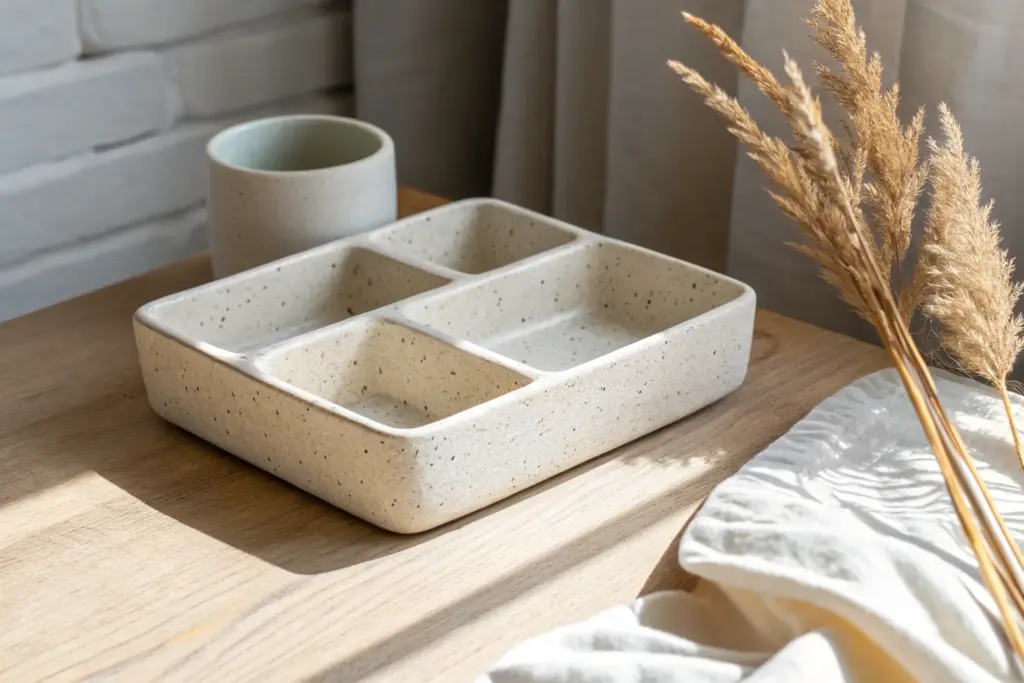
Mini Catchall Tray for Bedside Essentials
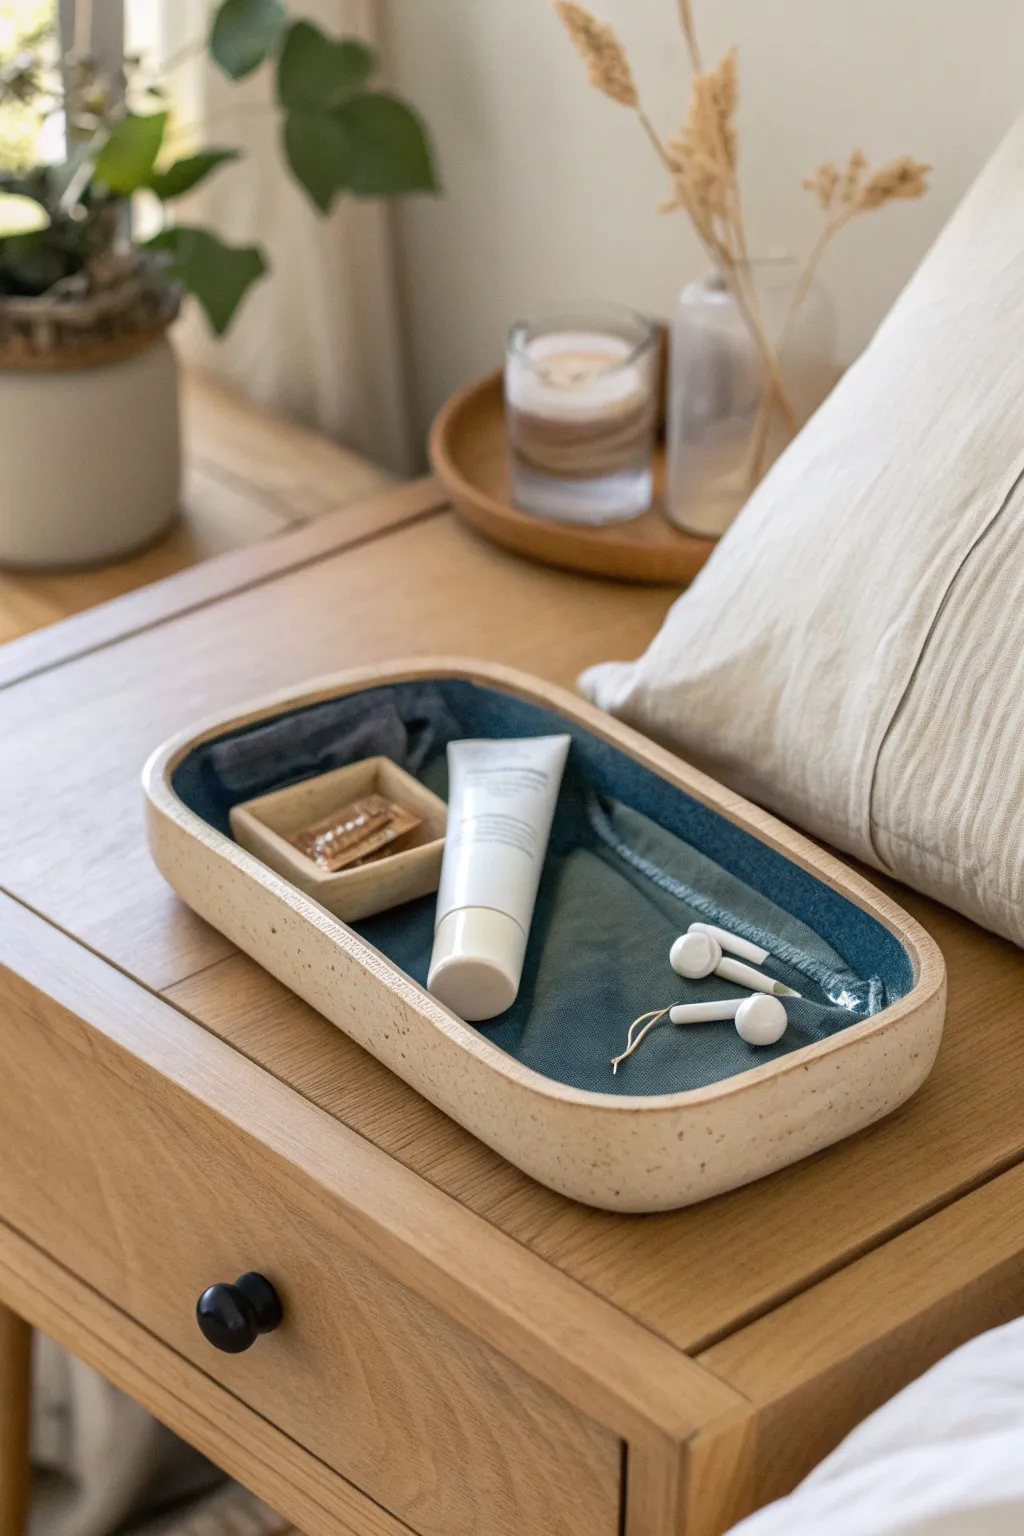
This elegant rectangular tray combines the organic look of speckled stoneware with a soft fabric lining to protect your bedside essentials. Its clean lines and gently rounded corners make it a minimalist organizer perfect for holding jewelry, earbuds, or hand cream.
Step-by-Step
Materials
- Speckled polymer clay (e.g., Fimo Effect Granite or Premo Granite)
- Deep teal or forest green linen fabric fabric
- Rolling pin or pasta machine
- Spray adhesive or fabric glue
- Rectangular cookie cutter or craft knife
- Rounded corner cutter (optional)
- Cardboard or cardstock (for templates)
- Fine-grit sandpaper (400 and 600 grit)
- Ceramic baking tile or parchment paper
- Ruler
- Baking sheet
Step 1: Shaping the Clay Base
-
Condition the Clay:
Begin by thoroughly conditioning your speckled polymer clay until it is soft and pliable. This particular clay type can sometimes be crumbly, so take your time warming it up in your hands. -
Roll the Slab:
Roll out the clay into a flat slab that is approximately 1/4 inch (6mm) thick. Ensure the thickness is even across the entire surface to prevent warping during baking. -
Cut the Base Shape:
Using a ruler and craft knife (or a template made from cardstock), cut a rectangle approximately 8 inches by 4 inches. If you want rounded corners like the example, use a round cutter or coin to trim the sharp corners into gentle curves. -
Create the Sidewalls:
Roll out a second snake of clay and flatten it into a long strip about 3/4 inch high and 1/4 inch thick. This will become the retaining wall around the tray. -
Attach the Walls:
Place the long strip on top of the base’s outer edge. I prefer to score the contact points lightly before pressing them together to ensure a strong bond. -
Blend the Seams:
Use a modeling tool or your fingertip to smudge the clay from the wall down onto the base, both on the inside and outside. Smooth the seam until it is completely invisible and the connection is seamless.
Bubbled Lining?
If air bubbles appear under your fabric lining, prick the center of the bubble with a very fine needle and press down hard to force the trapped air out for a smooth finish.
Step 2: Refining and Baking
-
Smooth the Rim:
Gently run a damp finger along the top rim of the tray to soften any sharp cutting marks. The goal is a uniform, rounded lip. -
Check Symmetry:
Look at the tray from eye level to ensure the walls stand straight and aren’t leaning outward. Nudge them gently into position if needed. -
Bake:
Place your tray on a ceramic tile or a baking sheet lined with parchment paper. Bake according to your clay manufacturer’s specific instructions, usually around 275°F (130°C) for 30 minutes per 1/4 inch of thickness. -
Cool Down:
Turn off the oven and let the tray cool down completely inside the oven with the door cracked slightly. This slow cooling helps prevent thermal shock or cracking. -
Sand the Surface:
Once fully cool, use 400-grit wet/dry sandpaper under running water to smooth out any fingerprints or bumps. Finish with 600-grit for a velvety matte stone finish.
Texture Tip
To enhance the ‘stone’ effect, mix a pinch of coarsely ground black pepper or dried used coffee grounds into white clay if you can’t find pre-speckled polymer clay.
Step 3: Adding the Lining
-
Make the Interior Template:
Place a piece of copy paper inside your finished tray and trace the bottom curve by pressing your fingernail into the corner edges. Cut this shape out carefully—this is your fabric pattern. -
Cut the Fabric:
Iron your linen fabric flat. Pin your paper template to the fabric and cut it out precisely. Test the fit inside the tray and trim tiny slivers off the edges if it’s too snug. -
Apply Adhesive:
In a well-ventilated area, lightly apply spray adhesive to the back of the fabric cutout. Alternatively, brush a thin, even layer of fabric glue onto the interior clay floor of the tray. -
Install the Lining:
Carefully lower the fabric into the tray. Start pressing from the center outwards to eliminate air bubbles and ensure the fabric sits flush against the bottom corners. -
Final Press:
Use a dry cloth or a bone folder to firmly press the edges of the fabric into the corners where the floor meets the wall for a crisp, tailored look.
Place your new catchall on your nightstand to keep your evening essentials organized and stylish

TRACK YOUR CERAMIC JOURNEY
Capture glaze tests, firing details, and creative progress—all in one simple printable. Make your projects easier to repeat and improve.
Earring Organizer Board With Peg Holes
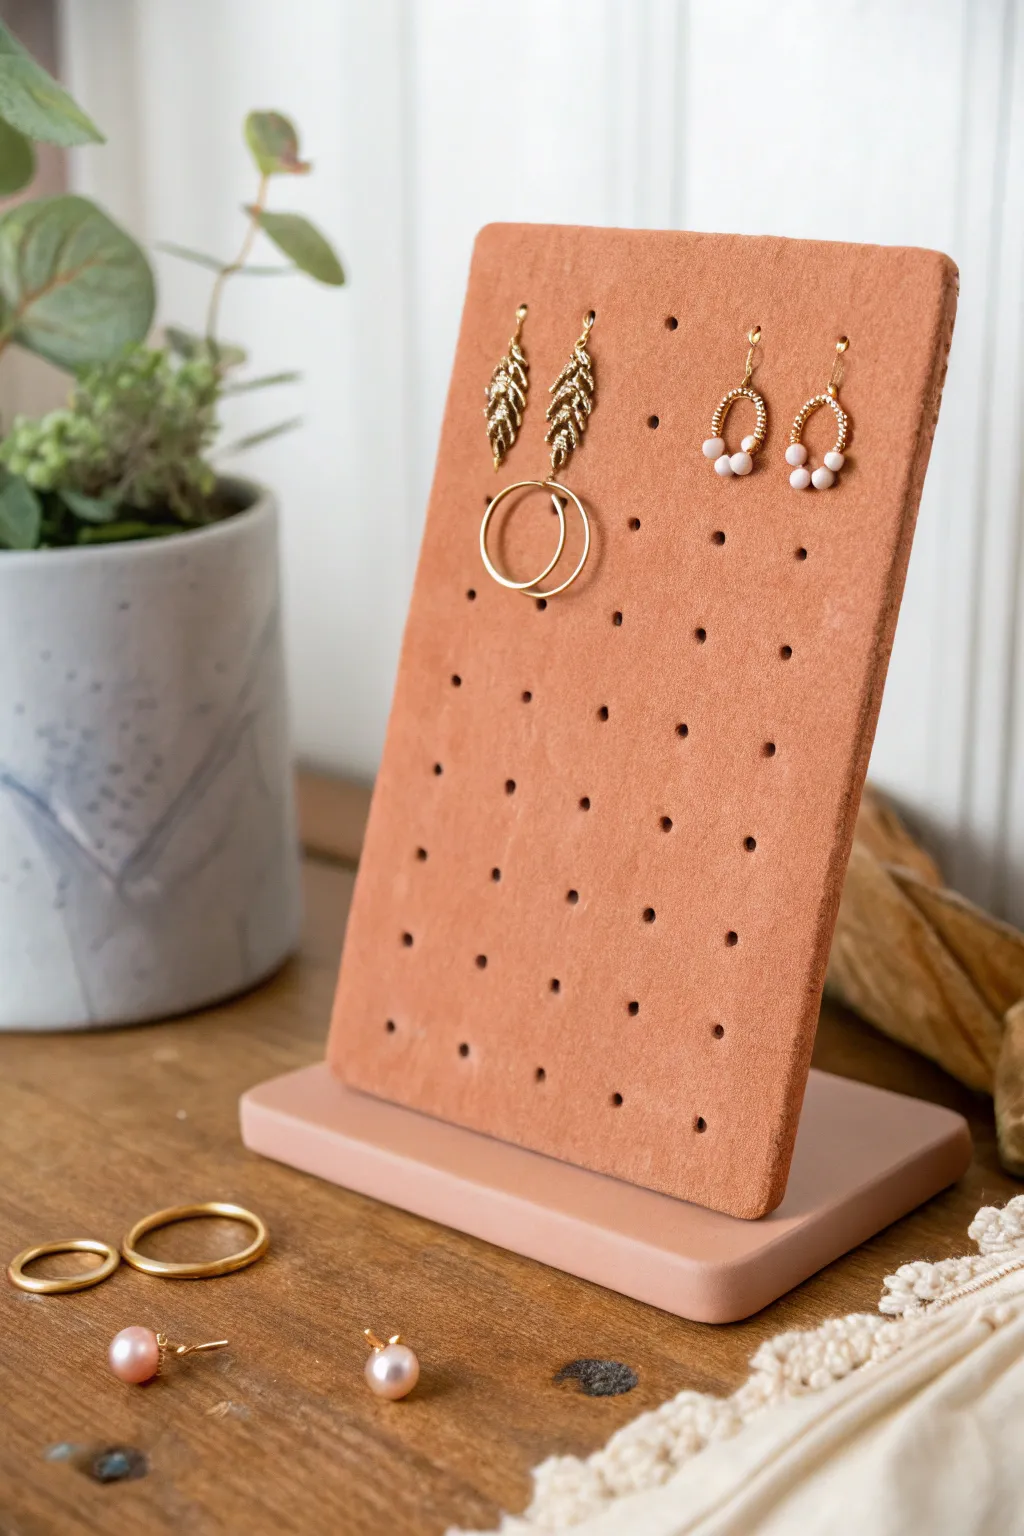
Showcase your favorite jewelry on this minimalist, terracotta-colored organizer that combines earthy warmth with modern functionality. The simple pegboard design allows for versatile display options while looking like a chic sculptural piece on your dresser.
Step-by-Step Tutorial
Materials
- Terracotta-colored polymer clay (approx. 4-6 blocks)
- Acrylic rolling pin
- Rolling guides or playing cards
- Ruler or grid mat
- Straw or small circular clay cutter (approx. 3mm diameter)
- Rigid tissue blade or long craft knife
- Parchment paper
- Smooth ceramic tile or baking sheet
- Sandpaper (various grits from 400 to 1000)
- Strong craft glue (like E6000) or liquid bakeable clay
- Wooden skewer or toothpick
Step 1: Creating the Main Board
-
Condition the Clay:
Begin by thoroughly conditioning your terracotta polymer clay. Knead it in your hands until it is soft, pliable, and free of any air bubbles or cracks. -
Roll Out the Slab:
Place the clay on a sheet of parchment paper. Using an acrylic roller and rolling guides (or stacks of playing cards) on either side for even thickness, roll the clay out into a large slab. Aim for a thickness of about 1/4 inch (6mm) to ensure the stand is sturdy. -
Cut the Rectangle:
Using a rigid tissue blade or a sharp knife and a ruler, cut a clean rectangle from your slab. A good size is approximately 4 inches wide by 6 inches tall, but you can adjust based on your jewelry collection. -
Round the Corners:
Gently tap the corners of your rectangle with your finger or a smoothing tool to slightly round them off, giving the piece a softer, more finished look similar to the inspiration image. -
Mark the Grid:
Lay a ruler lightly across the clay surface. Using a needle tool or toothpick, make tiny, faint guide marks where your holes will go. I like to space mine about 0.75 inches apart in a staggered or straight grid pattern. -
Punch the Holes:
Using a small drinking straw or a tiny circular cutter, press straight down into the clay at your guide marks to create the holes. Twist slightly as you pull the tool out to remove the clay core cleanly. -
Refine the Edges:
Inspect the edges of your rectangle and the interior of the holes. Smooth away any rough bits or fingerprints with a drop of baby oil on your finger.
Step 2: Faming the Base
-
Roll the Base Slab:
Take the remaining clay and roll out a second slab. This one should be slightly thicker than the main board, perhaps closer to 3/8 inch (9mm), to provide a heavy, stable foundation. -
Cut the Base Shape:
Cut a smaller rectangle for the base. It should be wider than the main board to prevent tipping. A size of roughly 5 inches width by 2.5 inches depth works well. -
Soften Base Edges:
Like the main board, gently round the corners and smooth the edges of the base slab so it matches the aesthetic of the vertical piece. -
Bake the Pieces:
Place both the perforated board and the base slab on a ceramic tile or baking sheet lined with parchment paper. Bake according to your clay package instructions (usually 275°F/135°C for 30 minutes per 1/4 inch of thickness). -
Cool Down:
Allow the pieces to cool completely inside the oven or on a cooling rack. Do not try to assemble them while they are still warm, as the clay is fragile.
Textured Finish
Before cutting holes, gently press a piece of coarse sandpaper or a stiff bristle brush onto the raw clay surface. This creates a realistic stone-like texture.
Step 3: Assembly and Finishing
-
Sanding:
Once cool, use wet/dry sandpaper to smooth the edges further. Start with a 400 grit to remove distinct imperfections and move up to 1000 grit for a velvety smooth finish. -
Wash and Dry:
Rinse the pieces under water to remove any sanding dust and dry them thoroughly with a lint-free cloth. -
Apply Adhesive:
Apply a strong line of heavy-duty craft glue (like E6000) or a thick line of liquid bakeable clay along the bottom edge of the vertical perforated board. -
Connect the Parts:
Press the vertical board firmly onto the center of the base slab. Use a ruler to ensure it is perfectly centered and standing at a 90-degree angle. -
Secure While Bonding:
Prop the vertical board up with books or heavy objects on either side to keep it upright while the glue cures. If using liquid clay, you will need to bake the assembled piece again for 20 minutes to set the bond.
Upgrade the Look
Mix some translucent clay or black pepper into your terracotta block before rolling. This creates a faux-granite speckle effect for a more organic, high-end look.
Now you have a stylish and custom organizer ready to hold your delicate hoops and studs
Pen and Pencil Cup for a Prettier Desk
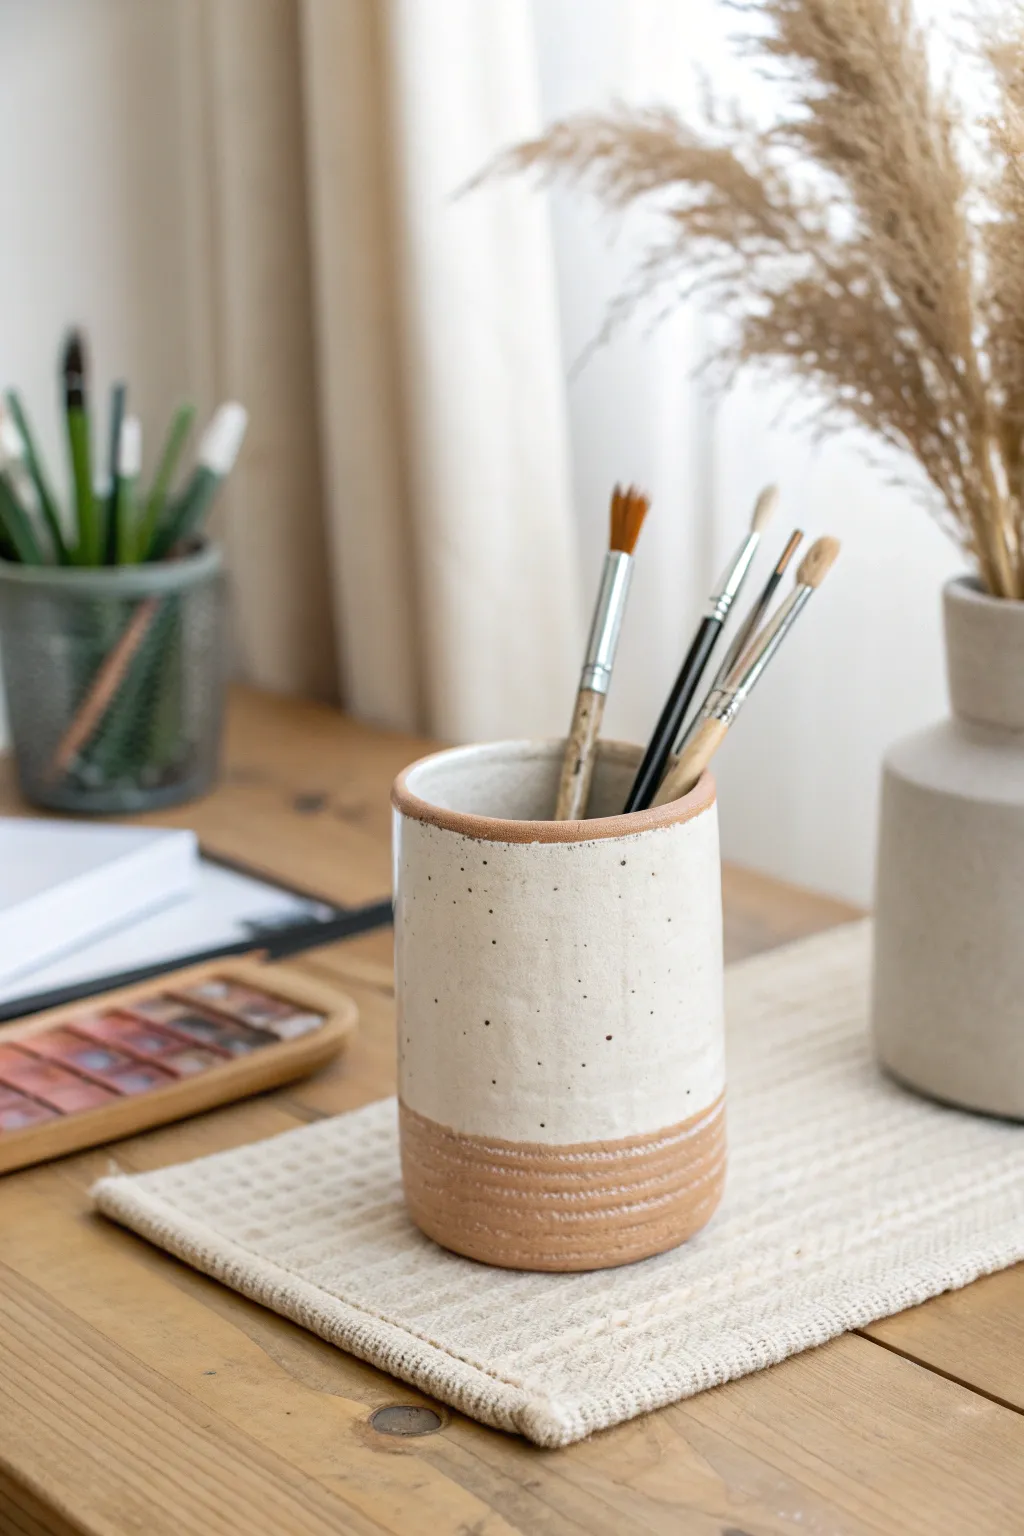
Bring a touch of minimalist elegance to your workspace with this hand-built ceramic cup, featuring a texturally rich raw clay base and a smooth, speckled white glaze. Its earthy tones and sturdy cylindrical shape make it the perfect home for your favorite paintbrushes or pens.
Step-by-Step Guide
Materials
- Stoneware clay (terracotta or buff colored)
- Speckled white glaze (cone 5/6 or suitable for your clay)
- Rolling pin
- Canvas mat or cloth
- Fettling knife or clay tool
- Scoring tool (or fork)
- Slip (clay mixed with water)
- Small sponge
- Ruler
- Straight-edged rib tool (serrated and smooth)
- Kiln access
Step 1: Forming the Base Cylinder
-
Roll the Slab:
Begin by wedging your clay to remove air bubbles, then roll it out on your canvas mat to an even thickness of about 1/4 inch. -
Cut the Rectangle:
Using a ruler and fettling knife, measure and cut a rectangle approximately 4.5 inches tall and 10 inches long. This will form the walls of your cup. -
Cut the Base:
Use a round cookie cutter or trace a circle onto the remaining slab that matches the diameter you want for your cup (around 3 inches), and cut it out. -
Bevel the Edges:
carefully cut the short ends of your rectangular slab at a 45-degree angle. This ensures a stronger, cleaner seam when you join the ends together. -
Score and Slip:
Score the beveled edges and the outer edge of your circular base using your scoring tool. Apply a generous amount of slip to these rough areas. -
Construct the Cylinder:
Stand the rectangle up and curve it into a cylinder, pressing the beveled ends together firmly. I like to support the inside wall with one hand while smoothing the seam on the outside. -
Attach the Base:
Place the cylinder onto the scored circular base. Use a modeling tool to blend the clay from the walls down onto the base, sealing the join completely so no light shines through.
Clean Lines
Use masking tape to mark the line between the smooth top and textured bottom before glazing. Peel it off while the glaze is still slightly wet for an imperfectly perfect, crisp edge.
Step 2: Texturing and Refining
-
Smooth the Upper Walls:
Use a damp sponge or a smooth rib tool to compress and smooth the top two-thirds of the cup. This prepares the surface for a clean glaze application later. -
Refine the Rim:
Gently wipe the rim with a damp sponge or piece of chamois leather to round it off. A smooth rim is crucial since this area often gets touched. -
Create the Lower Texture:
For the distinct ridges at the bottom, use a serrated rib tool or a clay comb. Hold the tool steady against the bottom third of the spinning pot (or rotate the pot by hand) to carve shallow, horizontal grooves. -
Clean Up:
Check the interior for any rough spots or burrs of clay and smooth them out. Let the piece dry slowly under plastic to the leather-hard stage, then uncover until bone dry. -
Bisque Fire:
Load your bone-dry cup into the kiln for a bisque firing (usually Cone 04). This hardens the clay and prepares it for glazing.
Fixing Warp
If your cylinder turns oval during drying, gently squeeze it back into round every few hours as it dries. Placing a light weight on the rim can also help keep it flat.
Step 3: Glazing and Finishing
-
Wax the Bottom:
Apply a wax resist to the bottom of the cup and up the sides—covering the entire textured area you created earlier. This prevents glaze from adhering to the raw clay section. -
Apply the Glaze:
Dip the top portion of the cup into your speckled white glaze. If brushing, apply 2-3 even coats, stopping cleanly right where the texture begins to create a sharp line. -
Expose the Rim:
To match the reference look, wipe the very top edge of the rim with a damp sponge immediately after glazing to expose a thin line of the raw clay body. -
Clean the Line:
If any glaze drips onto the textured bottom section, use a small knife or stiff brush to gently scrape it away for a crisp transition line. -
Glaze Fire:
Place the cup back into the kiln for the final glaze firing (typically Cone 5 or 6, depending on your clay and glaze choice). -
Final Polish:
Once cool, check the bottom for any sharp bits of clay or kiln wash and sand them lightly with wet sandpaper if necessary.
Fill your new vessel with your favorite tools and enjoy the organized aesthetic it brings to your desk
Paperclip and Pin Dish for Tiny Desk Bits

Keep your desk organized with this charming, minimalist clay dish that mimics the look of high-end speckled stoneware. It features a simple, slightly organic rim and a creamy white glaze peppered with tiny dark flecks for a modern, textured finish.
Detailed Instructions
Materials
- Air-dry clay (white or cream)
- Acrylic paint (warm white/cream)
- Acrylic paint (black or dark brown)
- Soft synthetic paintbrush
- Old toothbrush
- Gloss varnish or sealant
- Rolling pin
- Small bowl or round cutter (approx. 4-5 inches)
- Fine-grit sandpaper
- Sponge and water
Step 1: Shaping the Clay Base
-
Condition the Clay:
Begin by taking a handful of white air-dry clay and kneading it in your hands until it becomes warm, soft, and pliable. This helps prevent cracking later on. -
Roll the Slab:
Roll the clay out on a smooth surface to an even thickness of about 1/4 inch. If you want a more organic feel, don’t worry if the edges aren’t perfectly uniform. -
Cut the Circle:
Place your small bowl upside down on the clay as a template, or distinctively use a round cutter, and slice around it with a craft knife to create your base circle. -
Establish the Wall:
Gently lift the edges of the circle upward to create a shallow wall. Pinch the clay between your thumb and forefinger, moving around the circumference to thin the rim slightly. -
Smooth the Form:
Dip your finger in a tiny bit of water and run it along the rim and the interior to smooth out any cracks or fingerprints. This is where I find a damp sponge works wonders for getting a flawless surface.
Cracked Rim Rescue
If you see hairline cracks forming while drying, mix a tiny bit of fresh clay with water to make a paste (slip) and fill the cracks immediately. Smooth over with a damp finger.
Step 2: Refining and Drying
-
Create the Curve:
To ensure the bowl holds its shape while drying, you can gently place it inside a slightly larger cereal bowl lined with plastic wrap. This supports the walls as they set. -
Initial Drying Time:
Let the clay sit undisturbed for at least 24 to 48 hours. It needs to be bone dry and turn a chalky white color before you proceed. -
Sanding the Surface:
Once fully dry, take your fine-grit sandpaper and gently buff the rim and the outside of the bowl. Aim to soften any sharp ridges on the lip but keep a little irregularity for that handmade charm. -
Dust Off:
Wipe the entire piece down with a dry cloth or a slightly damp paper towel to remove all the sanding dust.
Rim Detail Trick
For added contrast, carefully paint just the very edge of the rim with a burnt orange or brown paint before varnishing to mimic raw, unglazed terracotta showing through.
Step 3: Painting and Finishing
-
Apply the Base Coat:
Paint the entire bowl, inside and out, with a warm white or cream acrylic paint. Apply two to three thin coats for opaque coverage, letting each layer dry in between. -
Prepare the Speckle:
Dilute a small dollop of black or dark brown paint with water until it has an inky consistency. -
Flick the Specs:
Dip your old toothbrush into the watered-down dark paint. Holding the brush about 6 inches from the bowl, run your thumb across the bristles to flick tiny specks onto the surface. -
Control the Density:
Rotate the bowl as you flick to ensure even coverage. Go lightly at first; you can always add more speckles, but you can’t easily take them away. -
Dry the Paint:
Allow the speckled paint layer to dry completely for about an hour. -
Seal the Dish:
Brush on a coat of gloss varnish to give the piece a ‘fired ceramic’ look. This seal also protects the paint from chipping. -
Final Cure:
Let the varnish cure according to the bottle instructions (usually overnight) before filling it with your desk treasures.
Now you have a stylish spot for those loose paperclips and pins that feels uniquely handmade
Photo or Place Card Holder for Shelves and Tables
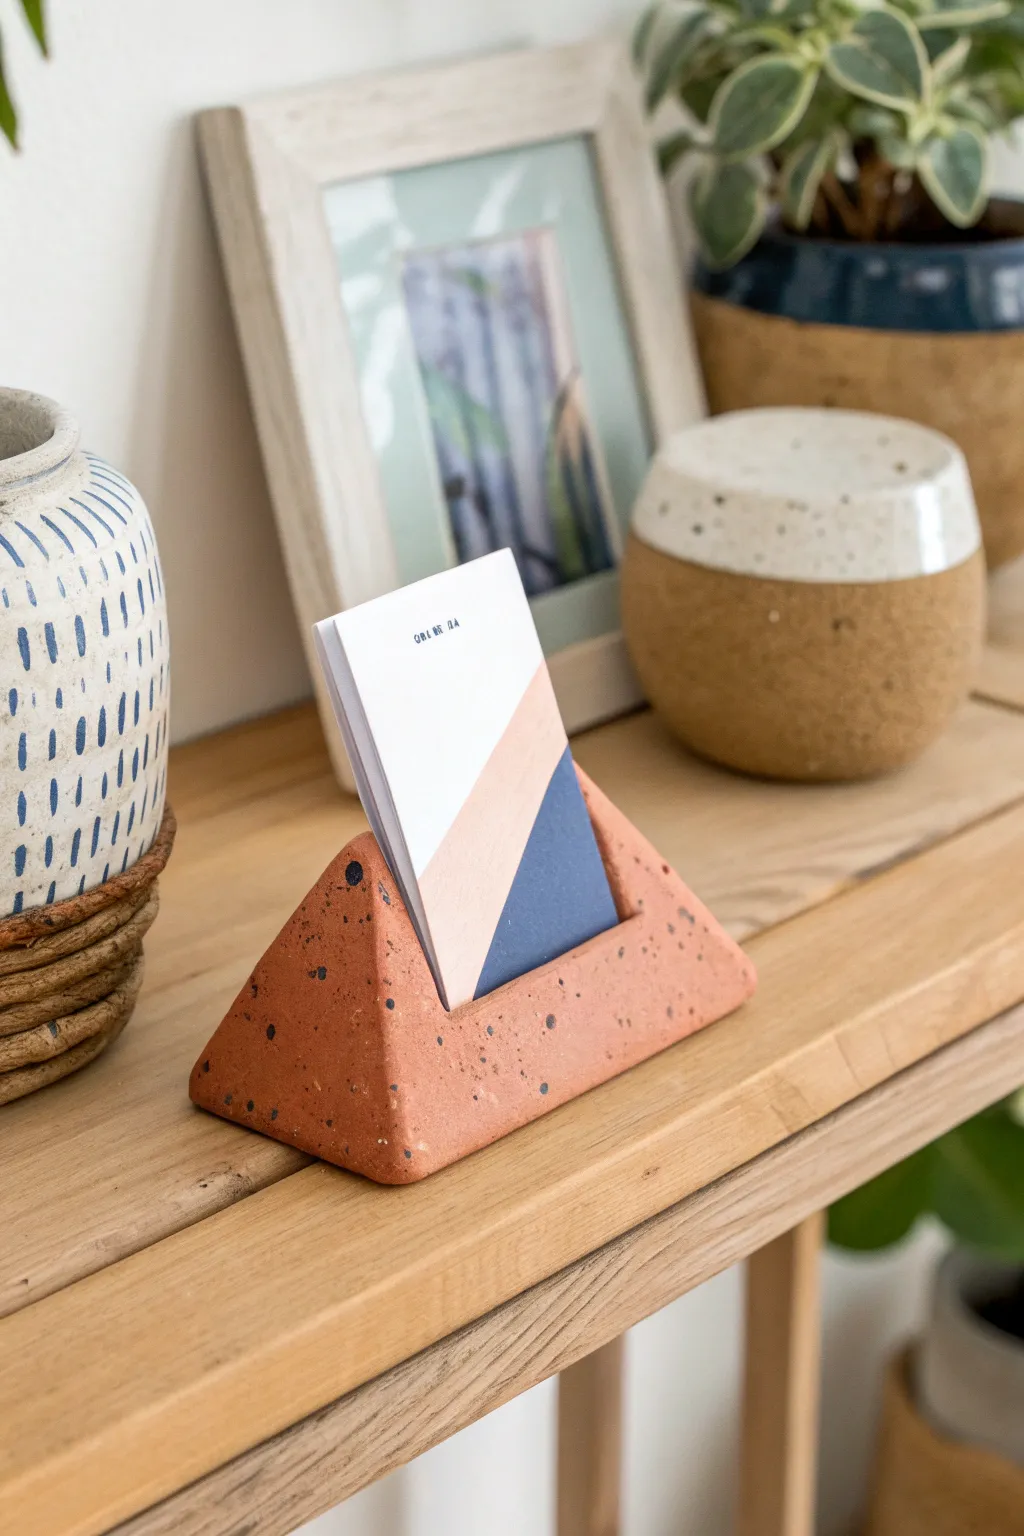
Bring a touch of modern earthiness to your shelves with this geometric clay card holder. The warm terracotta tone speckled with black creates a trendy faux-stone look that perfectly supports your favorite photos or place cards.
How-To Guide
Materials
- Terracotta-colored polymer clay (approx. 4oz)
- Black polymer clay (very small amount)
- Acrylic roller or rolling pin
- Tissue blade or sharp craft knife
- Ruler
- Baking sheet and parchment paper
- Fine-grit sandpaper (400-600 grit)
- Matte varathane or clay varnish (optional)
Step 1: Preparing the Faux Stone Clay
-
Condition the base:
Begin by thoroughly conditioning your terracotta-colored clay. Knead it in your hands until it is soft, pliable, and free of any air bubbles. -
Create the speckles:
Take a tiny amount of black polymer clay and chop it into extremely fine, almost dust-like pieces using your tissue blade. Avoid large chunks, as you want a subtle peppered look. -
Mix the colors:
Sprinkle the black choppings over your flattened terracotta clay. Fold the clay over and pass it through a pasta machine or roll it out, fold, and roll again. -
Distribute evenly:
Continue folding and rolling until the black specks are distributed randomly throughout the block. I like to stop before they smear into streaks, keeping them as distinct little dots.
Step 2: Shaping the Prism
-
Form a log:
Roll your speckled clay into a thick, smooth cylinder or log shape, approximately 4 to 5 inches long. -
Shape the triangle:
Place the log on your work surface. Gently pinch the top ridge while pressing the bottom flat against the table to begin forming a triangular profile. -
refine the sides:
Use your acrylic roller or a flat object to press against the two sloped sides, sharpening the angles. You want an equilateral triangle shape when viewed from the end. -
Trim the ends:
Use your tissue blade to slice off both irregular ends of the prism. This will leave you with a clean, sharp geometric shape that stands stably. -
Smooth the surface:
Check for fingerprints. Lightly rub your finger over the surface or roll it gently with the acrylic roller to ensure the planes are flat and smooth.
Uneven Slot?
If the slot closes up during baking, fold a piece of thick paper and leave it inserted in the slot while it bakes to keep the gap open perfectly.
Step 3: Creating the Slot & Baking
-
Mark the center:
Identify the center of the top ridge. You want the slot to run lengthwise along the peak of the triangle. -
Cut the slot:
Press a thick piece of cardstock or a credit card firmly into the top ridge to create an indentation. Alternatively, carefully carve a V-groove or slice a straight line with a blade, widening it slightly so a card fits easily. -
Test the fit:
Verify the slot is deep enough to hold a card securely, about 0.5 inches deep usually works well, but be careful not to distort the triangle shape while testing. -
Final smooth:
Run your finger along the edges of the slot to soften any sharp clay burs created during cutting. -
Bake:
Place the holder on parchment paper on a baking sheet. Bake according to your clay manufacturer’s instructions (typically 275°F for 15-30 minutes per 1/4 inch of thickness).
Pro Tip: Granite Look
Add translucent clay to your mix before adding the black specks. It creates depth that makes the faux stone look incredibly realistic after baking.
Step 4: Finishing Touches
-
Cool securely:
Allow the piece to cool completely in the oven or on a wire rack. Don’t handle it while hot as polymer clay is fragile until fully cool. -
Sand for stone effect:
Once cool, wet-sand the piece under running water with fine-grit sandpaper. This removes fingerprints and exposes the black specs more clearly, enhancing the stone effect. -
Buff and seal:
Buff the piece with a soft denim cloth for a natural matte sheen. If you prefer a wet look, apply a thin coat of matte varnish, though the raw sanded finish looks most like real terracotta.
Place your favorite memory in the slot and enjoy your handmade decor piece
Candle Holder for Cozy Evenings at Home

Bring warmth to your space with this inviting, earth-toned candle holder made from speckled clay. Its rounded orb shape features delicate incised patterns and pierced details that add a rustic, artisanal charm to any tabletop.
Detailed Instructions
Materials
- Light stoneware or polymer clay (speckled or granite effect preferred)
- Small rolling pin
- Sphere mold or small styrofoam ball (approx. 3-4 inches diameter)
- Craft knife or scalpel
- Loop tool for carving
- Needle tool or toothpick
- Small drill bit or skewer (for piercing)
- Water and slip (if using ceramic clay) or liquid polymer clay
- Taper candle for sizing
- Sponge and fine sandpaper
Step 1: Forming the Base
-
Prepare the Clay:
Start by conditioning your clay until it is soft and pliable. If you are using stoneware, wedge it thoroughly to remove any air bubbles. Roll out a slab about 1/4 inch thick. -
Create the Orb Structure:
You can either use a pinch pot method to create two hemispheres and join them, or drape your slab over a sphere mold. Aim for a smooth, round ball shape approximately the size of a large orange. -
Flatten the Bottom:
Gently tap the sphere on your work surface to create a flat stable base. This ensures your candle holder won’t wobble once finished. -
Open the Top:
Use your needle tool to mark a circle at the very top. Cut this clay away to create the opening. Insert your actual taper candle to test the fit; the hole should be slightly wider than the candle to account for shrinkage during drying or firing. -
Build the Collar:
Roll a small coil of clay and attach it around the rim of the opening. Use your thumbs to blend the clay downward into the main body, smoothing out the transition so it looks like one solid piece. -
Refine the Rim:
Flatten the top of the added coil to create a smooth, wide lip. I find using a slightly damp sponge here helps create that perfectly soft, rounded edge visible in the photo.
Clean Lines
When carving the geometric band, wait until the clay is ‘leather hard’ (firm but cool). If the clay is too soft, the tools will drag and distort the shape rather than cutting cleanly.
Step 2: Carving and Detailing
-
Plan the Design:
Lightly trace two horizontal lines around the upper hemisphere using a needle tool. These will act as the boundaries for your geometric pattern. -
Carve the Triangles:
Using a small loop tool or a carving V-tool, carve out a series of simplified triangular shapes between your horizontal lines. Keep the strokes confident but not too deep. -
Add Vertical Accents:
Inside the triangles or the negative space between them, carve simple vertical lines or fan shapes. Don’t worry about perfect symmetry; the hand-carved look adds character. -
Smooth the Carvings:
Run a finger or a soft brush over the carved areas to remove any sharp clay crumbs or burrs created by the tools. -
Add Pierced Dots to the Top:
Using a blunt tool or the back of a small paintbrush, press indents into the center of your carved shapes or along the border lines. These add texture without going all the way through.
Glow Up
Make the pierced holes in the bottom half deep enough to go all the way through the wall. When the candle burns low, light will spill through these holes for a magical lantern effect.
Step 3: Adding Texture and Finishing
-
Create the Lower Texture:
The bottom half of the holder features a distinct ‘pock-marked’ texture. Use a stiff-bristled brush, a piece of coral, or a specialized texture tool to gently tap against the lower clay surface. -
Pierce the Dot Pattern:
Just below your carved band, use a small drill bit or skewer to poke a series of decorative holes. Start with a row of larger holes, then add smaller, random holes beneath them to fade the pattern downwards. -
Final Smoothing:
Inspect the piece for any unwanted fingerprints. Use a lightly dampened sponge to soften any harsh edges, particularly around the candle opening and the base. -
Drying or Baking:
If using ceramic clay, wrap loosely in plastic to dry slowly for a few days before bisque firing. If using polymer clay, bake according to the manufacturer’s instructions on the package. -
Post-Fire Sanding:
Once hardened (and cooled), sand the bottom lightly to ensure it sits perfectly flat. If you used speckled clay, a light sanding over the texture can help reveal those lovely flecks.
Place your favorite beeswax taper inside and enjoy the gentle, handmade ambiance this piece brings to your home
Pinch Pot Salt Cellar for Cooking Nights
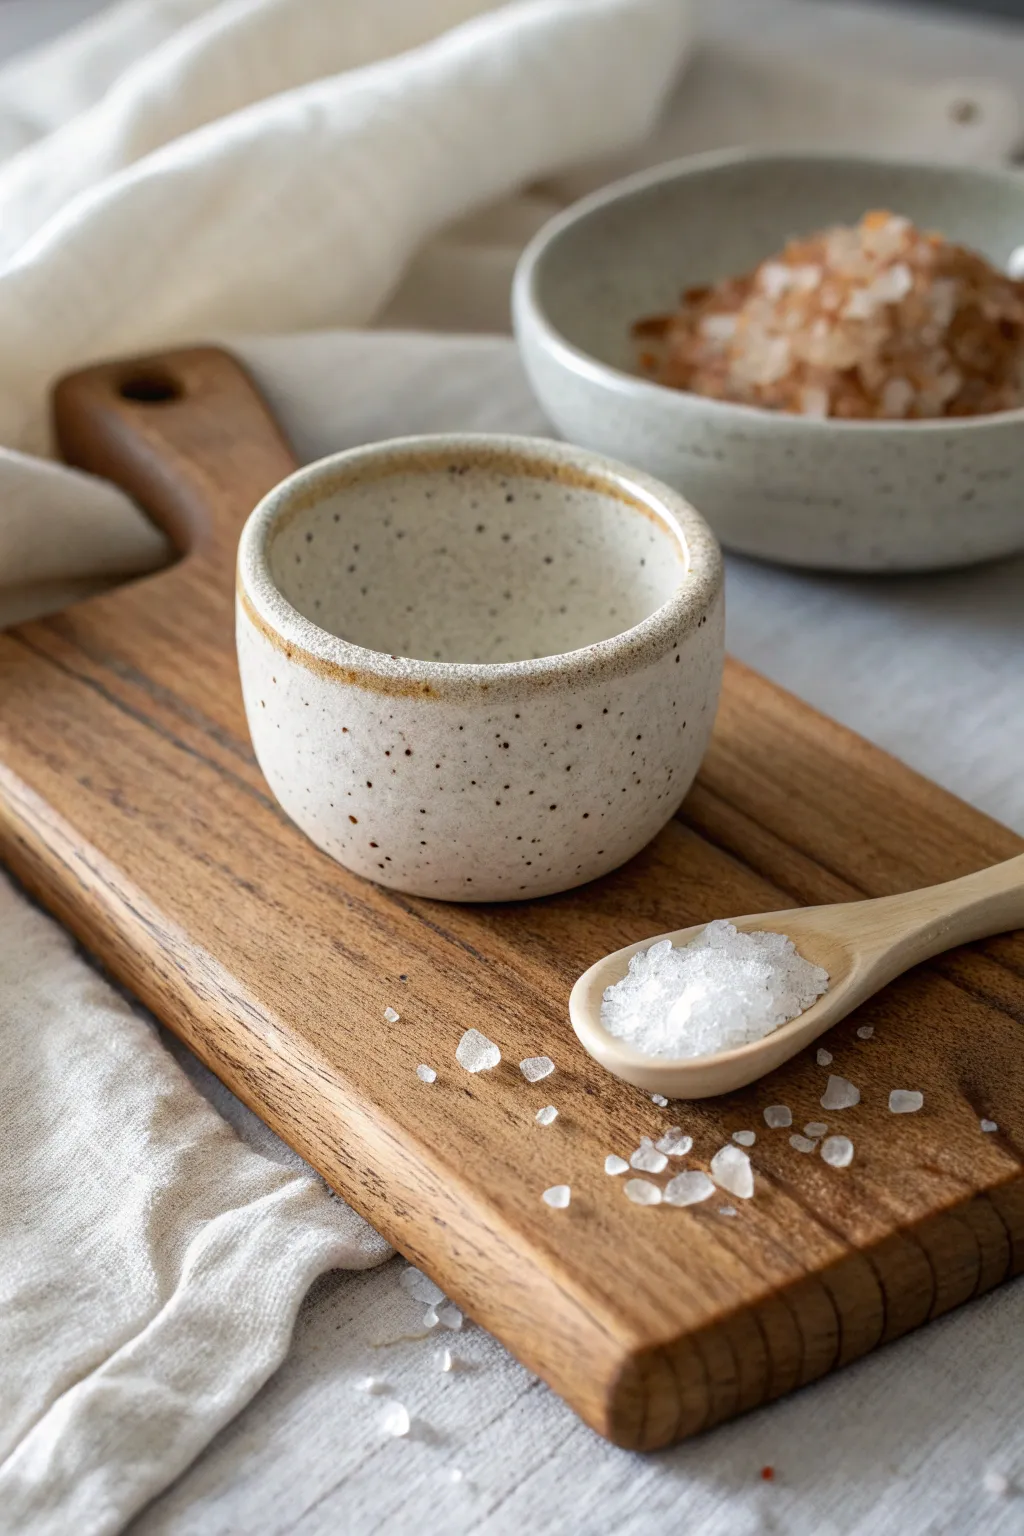
Embrace the rustic charm of hand-built pottery with this minimalist salt cellar project. Featuring a creamy white glaze with delicate speckles and a raw clay rim, this small vessel is perfect for keeping your favorite finishing salts right by the stove.
Step-by-Step Guide
Materials
- White stoneware clay (preferably with speckles or grog)
- Small bowl of water
- Sponge
- Wooden modeling tool or old credit card
- Pottery needle tool
- Creamy white matte glaze
- Paintbrush for glazing
- Kiln access
- Rubber kidney rib (optional)
Step 1: Forming the Shape
-
Prepare the Clay:
Start with a ball of wedged white stoneware clay roughly the size of a tennis ball. Ensure it is free of air bubbles by throwing it firmly from hand to hand a few times. -
Open the Form:
Hold the clay ball in your non-dominant hand. Press your thumb into the center, stopping about a half-inch from the bottom to create a thick base. -
Pinch the Walls:
Slowly rotate the ball while gently pinching the clay between your thumb (inside) and fingers (outside). Work from the bottom up, thinning the walls gradually. -
Establish the Cylinder:
Instead of flaring the walls out like a bowl, try to pinch them straight upward to create a cylindrical shape. Check that the wall thickness is even, aiming for about a quarter-inch. -
Flatten the Bottom:
To give the cellar stability, gently tap the bottom of the pot against your work surface. This creates the flat base seen in the reference image.
Raw Clay Accent Tip
For a sharper line at the rim where the glaze stops, apply a thin line of wax resist along the top edge before dipping. This ensures the raw earth-toned band stays crisp and glaze-free.
Step 2: Refining and Drying
-
Smooth the Surface:
Use a slightly damp sponge or a rubber kidney rib to smooth out finger marks on the exterior and interior walls. The goal is a clean, modern look, but a few organic imperfections add character. -
Define the Rim:
Pay special attention to the rim. Compress it gently with a damp sponge or a strip of plastic/chamois to round it slightly. This makes the finished piece pleasant to touch. -
Create the Texture:
If your clay body doesn’t have natural speckles, you can splatter a very small amount of iron oxide wash or a dark underglaze flicked from a toothbrush onto the leather-hard surface before firing. -
Slow Drying:
Cover the pot loosely with plastic and let it dry slowly for a day or two until it reaches the leather-hard stage. Then, uncover it and let it dry completely to bone dry. -
Bisque Fire:
Load your bone-dry piece into the kiln for a bisque firing (usually around Cone 04 or 06). This prepares the clay to accept glaze without disintegrating.
Step 3: Glazing and Finishing
-
Wax the Bottom:
Apply wax resist to the bottom of the pot and about 2mm up the sidewall. This prevents glaze from sticking to the kiln shelf during firing. -
Prepare the Glaze:
Mix your creamy white matte glaze thoroughly. If aiming for the speckled look and your clay was plain, ensure you used a speckled glaze or added the speckles in the previous phase. -
Pour the Interior:
Pour a small amount of glaze inside the pot, swirl it around to coat the entire interior, and pour out the excess. Wipe any drips off the rim immediately. -
Dip or Paint the Exterior:
Dip the exterior into the glaze, or brush it on carefully. Stop glazing just below the rim to leave that beautiful band of exposed raw clay visible at the top, just like in the photo. -
Clean the Rim:
I like to take a damp sponge and carefully wipe the very top edge of the rim again, ensuring clear definition between the glaze and the bare clay accent. -
Final Firing:
Place the pot in the kiln for the final glaze firing according to your clay and glaze specifications (usually Cone 5 or 6 for stoneware). -
Sand the Bottom:
Once cooled and removed from the kiln, use wet sandpaper to smooth the unglazed bottom so it won’t scratch your countertops.
Make it a Set
Create a companion lid by flattening a slab of clay and cutting a circle slightly larger than the rim. Add a small knob or loop handle for a complete farmhouse-style cellar set.
Fill your new handmade cellar with pink Himalayan salt or flaky sea salt and enjoy it during your next cooking night
Small Planter for Succulents or Herbs
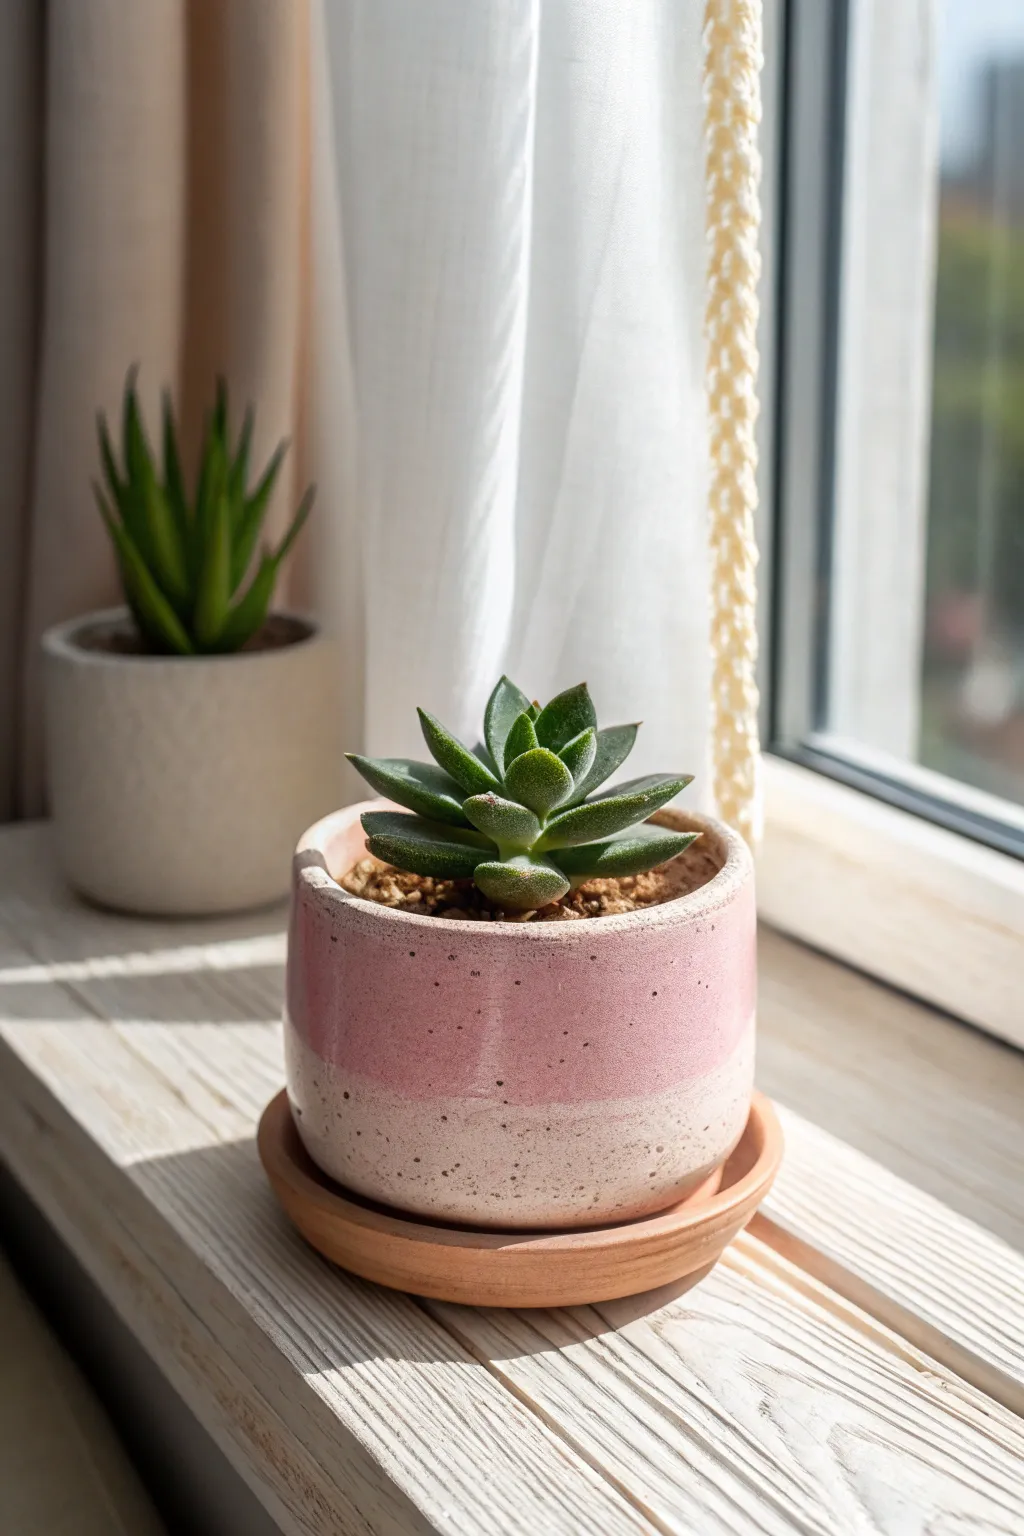
This charming, compact planter features a delightful two-tone design, blending a soft dusty pink upper half with a creamy, speckled white base. Its simple cylindrical form and organic textures make it a perfect modern home for your favorite succulent.
How-To Guide
Materials
- White stoneware or polymer clay (oven-bake)
- Rolling pin
- Ruler
- Craft knife or clay slicer
- Slip and scoring tool (if using ceramic clay)
- Circular cookie cutter or template (approx. 3-4 inch diameter)
- Sponge and water
- Pink colored glaze or acrylic paint (dusty rose)
- White speckled glaze or cream acrylic paint with faux speckles
- Small terracotta saucer (to match base size)
- Clear matte sealant (if using paint)
Step 1: Forming the Base Structure
-
Roll the Slab:
Begin by wedging your clay to remove air bubbles, then roll it out into a smooth, even slab that is approximately 1/4 inch thick throughout. -
Cut the Base:
Using your circular cutter or a paper template, cut a perfect circle from the clay slab. This will serve as the bottom of your pot. -
Measure the Wall:
Calculate the circumference of your base circle (Diameter x 3.14). Measure and cut a long rectangular strip from the remaining slab that matches this length plus a tiny bit of overlap, with a height of about 3 inches. -
Texture the Clay:
Before assembling, you can lightly roll a textured surface over the clay if you want a subtle organic feel, though the glaze will provide most of the texture later. -
Score and Slip:
Score (scratch) the outer edge of the circular base and the bottom long edge of your rectangular strip. Apply a little slip (clay water) or liquid clay adhesive to these roughed-up areas. -
Attach the Wall:
Carefully wrap the rectangular strip around the circular base, standing it upright. Press the scored edges together firmly to create a seal. -
Seal the Seam:
Where the two ends of the wall meet, score and slip the vertical seam. Blend the clay together on both the inside and outside using a modeling tool or your finger until the join is invisible. -
Smooth the Rim:
Use a damp sponge or your finger to gently round off the top rim of the pot. It should look soft and finished, not sharp or jagged.
Step 2: Firing and Decoration
-
Dry and Fire/Bake:
If using ceramic clay, let the pot bone dry slowly before bisque firing. If using polymer clay, bake according to the manufacturer’s instructions on the package. -
Prepare the Colors:
For the two-tone look, you’ll need a dusty rose pink and a creamy white. I prefer utilizing a glaze with built-in speckles for the bottom half to get that authentic pottery look. -
Apply the Base Coat:
Apply the creamy, speckled color to the bottom half of the pot first. You can use masking tape to get a sharp line, or freehand it for a more organic, handmade feel. -
Add the Pink Top:
Paint or glaze the upper half of the cylinder with the dusty rose color. Allow the colors to meet naturally; slight overlapping at the horizon line adds character. -
Creates Speckles Manually:
If your paint or glaze isn’t pre-speckled, load an old toothbrush with thinned-down brown or grey paint and flick the bristles to spray fine dots over the cream section. -
Glaze Fire or Seal:
For ceramics, perform the final glaze firing. For polymer or painted pots, apply a matte clear sealant to protect the finish and mimic a fired glaze surface. -
Prepare the Saucer:
Take your separate terracotta saucer. You can leave it raw for an earthy contrast or apply a clear matte sealer to prevent water staining over time. -
Final Assembly:
Once fully cured and dry, place your cylindrical pot onto the saucer. Fill with cactus soil and nestle your succulent into its new home.
Wobbly Walls?
If your cylinder walls are slumping while working, place a cardboard tube or soda can wrapped in paper inside as a support structure until the clay stiffens slightly.
Make It Drain
Don’t forget to punch a hole in the center of the base circle before baking or firing! This is crucial for succulent health so water can flow into the saucer.
You now have a chic, modern planter that adds a soft pop of color to any windowsill
Bud Vase for One-Stem Flowers and Clippings
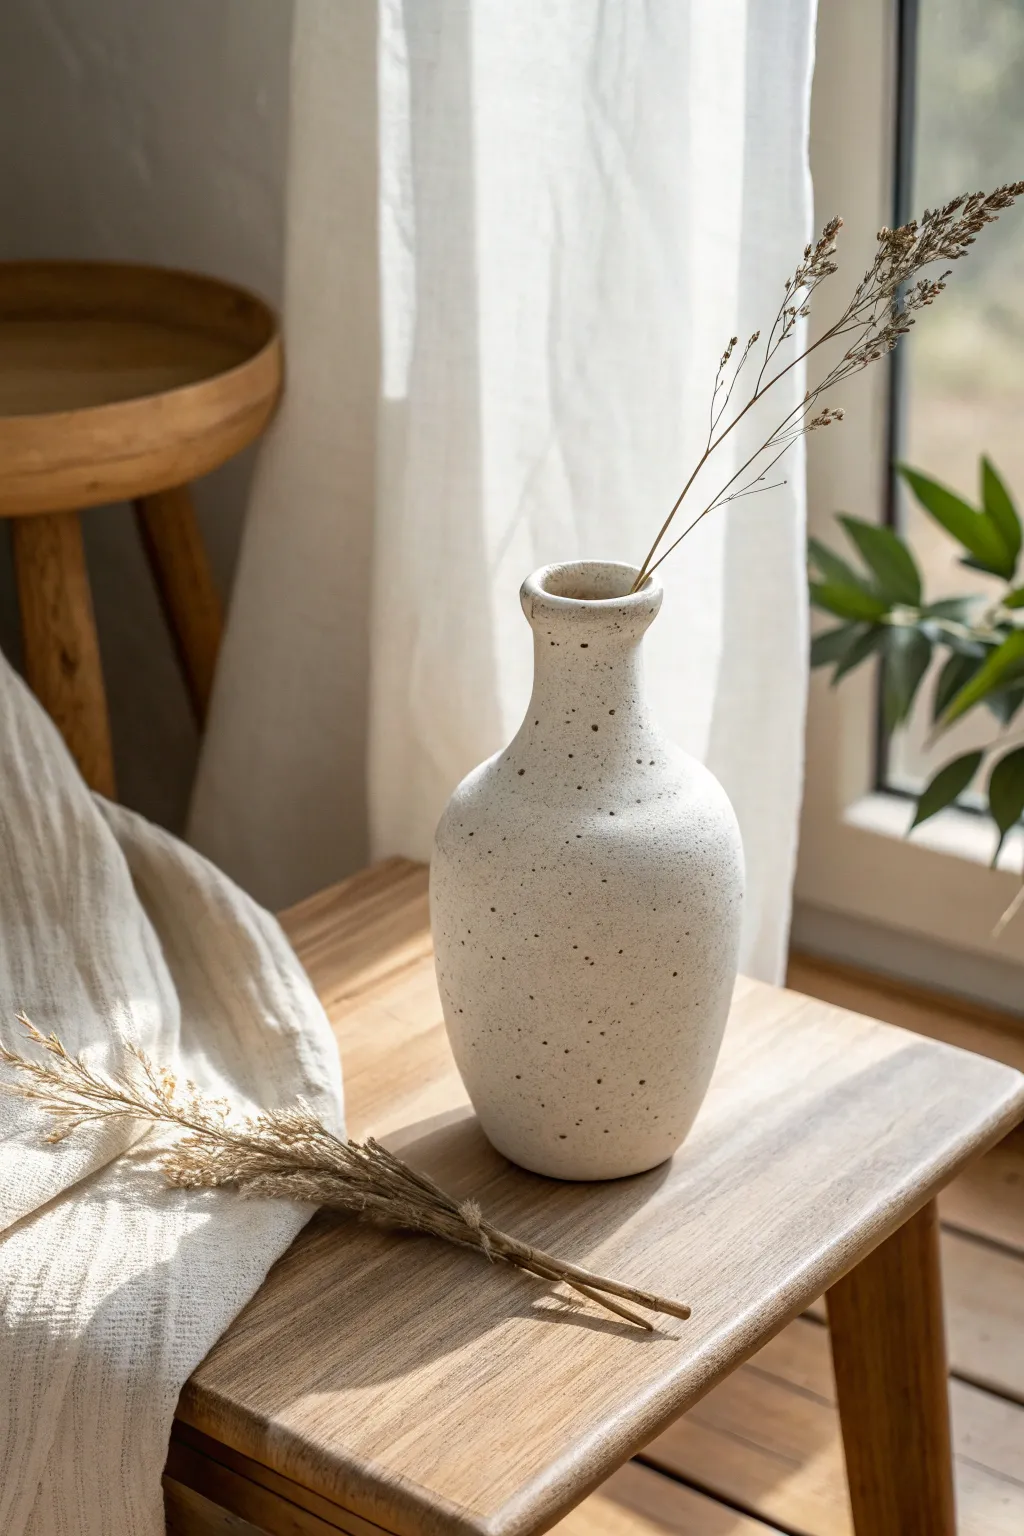
Create a serene, minimalist focal point for your home with this speckled stoneware bud vase. Its organic shape and textured, creamy finish make it the perfect vessel for showcasing a lone, delicate stem found on a morning walk.
Step-by-Step Tutorial
Materials
- Speckled stoneware clay (white or buff with iron flecks)
- Pottery wheel (or can be adapted for coil/pinch methods)
- Wire clay cutter
- Wooden modeling tools
- Metal rib
- Sponge
- Pin tool
- Cutting wire
- Matte white or transparent glaze (depending on clay body)
- Kiln
Step 1: Throwing the Form
-
Preparation:
Begin by wedging about 1-1.5 lbs of speckled stoneware clay to remove any air pockets. Form it into a ball and slam it securely onto the center of your wheel head. -
Centering:
With the wheel spinning at a medium-fast speed, use wet hands to cone the clay up and down until it feels perfectly centered and stable. -
Opening:
Drill your thumbs into the center of the mound, leaving about a half-inch of clay for the floor. Gently pull the clay outward to establish the interior width of the base. -
Pulling the walls:
Slow the wheel down slightly. Perform your first pull to raise the walls into a cylinder. Keep the walls relatively thick at the bottom to support the belly shape later. -
Shaping the belly:
Using a rib on the outside and your fingers on the inside, gently push the clay outward from the inside to create a rounded, bulbous bottom. I like to work gradually here to avoid collapsing the form. -
Collaring the neck:
Bring your hands to the upper section of the vase. Using even pressure from the outside with wet hands, slowly choke or ‘collar’ the clay inward to narrow the neck significantly. -
Elongating the neck:
Once narrowed, perform a small fingertip pull on just the neck section to give it height and definition, creating a seamless transition from the belly. -
Refining the rim:
Use a chamois or a wet sponge to compress and smooth the rim, rounding it slightly for a finished, professional look. -
Smoothing:
Run a metal or wooden rib along the exterior to remove throwing lines and refine the silhouette, emphasizing that classic droplet shape. -
Removal:
Use your wire cutter to slice the vase from the wheel head. Carefully lift it off using pot lifters or dry hands and set it on a ware board to dry to leather-hard.
Collaring Cracks?
If the neck ripples or cracks while collaring, you are squeezing too hard or the clay is too dry. Add slip, speed up the wheel slightly, and use gentler, gradual pressure.
Step 2: Trimming and Finishing
-
Trimming setup:
Once the piece is leather-hard (firm but carveable), center it upside down on the wheel. Secure it with small coils of clay. -
Trimming the base:
Use a trimming tool to remove excess weight from the bottom and refine the curve of the belly so it tucks in neatly toward the foot. -
Creating the foot ring:
Carve a small foot ring into the bottom. This lifts the form slightly and gives the piece a visual lightness. -
Smoothing the texture:
After trimming, run a slightly damp sponge over the entire surface to smooth out any tool marks and bring the grog or speckles slightly to the surface. -
Bisque firing:
Allow the vase to dry completely (bone dry). Fire it in the kiln to cone 04 (or your clay’s specific bisque temperature). -
Glazing:
Dip the bisqued vase into a matte white glaze. If your clay is already quite white, a transparent glaze can work, but a satin matte white enhances the modern look shown here. -
Glaze cleanup:
Wipe the foot ring completely clean of glaze with a damp sponge to prevent it from sticking to the kiln shelf. -
Final firing:
Fire the piece for a second time to the maturation temperature of your specific clay and glaze combination (often Cone 5 or 6 for stoneware).
Enhance the Speckle
To get more dramatic spots like the photo, choose a clay body labeled ‘heavy speckle’ or ‘peppered.’ A slightly thinner glaze application allows the iron spots to burn through more clearly.
Place your finished vase near a window where the natural light can highlight the subtle texture and organic curves
Wall-Mounted Key Rack With Built-In Hooks
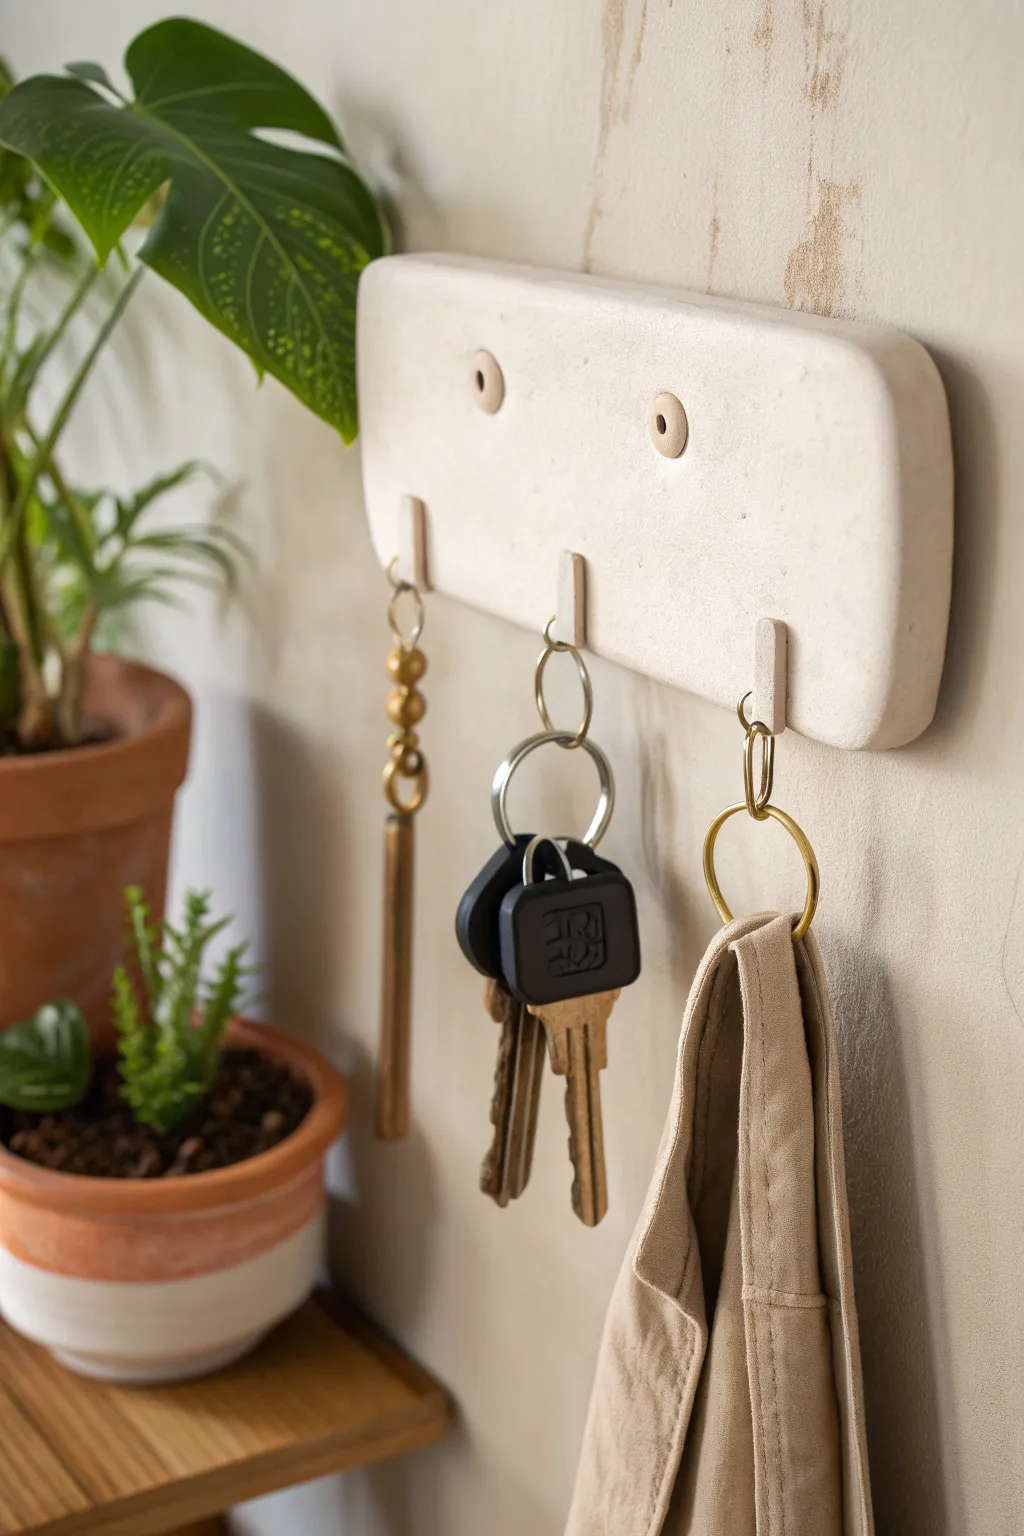
This sleek and modern wall-mounted rack keeps your essentials organized with a natural, stone-like aesthetic. Its smooth, rounded oblong shape and integrated hooks make it a sturdy and stylish addition to any entryway wall.
Step-by-Step Guide
Materials
- White polymer clay or strong air-dry clay (e.g., DAS stone effect)
- Rolling pin
- Parchment paper or silicone mat
- Sharp crafting knife or blade
- Rectangle template (cardstock)
- Thick gauge flexible wire or brass loops (for internal structure)
- Small circular cutter (approx 1/2 inch) or a marker cap
- Sandpaper (various grits: 220, 400, 800)
- Matte varnish or sealant
- Strong adhesive (like two-part epoxy, optional for reinforcement)
- Acrylic roller
- Two wall screws for mounting
Step 1: Preparation & Base Shaping
-
Condition the Clay:
Begin by thoroughly kneading your clay until it is warm, pliable, and free of air bubbles. If you are using polymer clay, this step is crucial to prevent cracking later. -
Roll the Slab:
Place the clay on parchment paper and roll it out into a thick, even slab. Aim for a thickness of about 3/4 inch to ensure the rack is sturdy enough to hold heavy keys. -
Cut the Main Shape:
Using a cardstock template or freehanding with a ruler, cut a long rectangle (approx 6 inches by 2.5 inches). Use your knife to gently curve the four corners for a pill-shaped, organic look. -
Smooth the Edges:
Dip your finger in a little water (for air-dry clay) or baby oil (for polymer) and run it along the cut edges. You want to eliminate sharp angles and achieve that soft, rounded stone appearance.
Fixing Cracks
If hairline cracks appear while air-drying, mix a small amount of fresh clay with water to make a paste. Fill the crack, smooth it over, and let it dry again before sanding.
Step 2: Creating the Mounting Points
-
Mark Screw Placement:
Measure two points near the top of the slab, centered horizontally and equally spaced from the edges. These will be your wall mounting holes. -
Create Countersunk Holes:
Press a small circular cutter or marker cap into the clay at your marked points to create a recessed circle. Don’t go all the way through—just deep enough for a screw head to sit flush. -
Punch the Through-Hole:
Inside the center of the recessed circle you just made, use a smaller tool (like a straw or chopstick) to poke a hole completely through the slab. This allows the screw shaft to pass through into the wall.
Step 3: Forming the Hooks
-
Prepare Hook Strips:
Roll out a smaller slab of clay to the same thickness as your base. Cut three small, narrow rectangular strips, roughly 1/2 inch wide and 1 inch long. -
Shape the Hooks:
Gently curve the bottom of each small strip upwards to form a ‘J’ shape. I recommend wrapping the clay around a dowel or thick pen to get a consistent curve. -
Attach the Hooks:
Score the back of the hooks and the corresponding spots on the main slab. Apply a dab of liquid clay or slip (a clay/water mix) and press the hooks firmly onto the bottom front face of the slab. -
Blend the Seams:
Use a modeling tool to smooth the clay where the hook meets the base slab. Ensure the seam is invisible and the connection is reinforced so it won’t snap under weight.
Level Up: Hidden Strength
Embed a bent piece of sturdy wire inside each clay hook before attaching it to the base. This acts as internal rebar, allowing the hook to hold heavier coats or bags.
Step 4: Finishing Touches
-
Final Surface Check:
Look over the piece for fingerprints or lint. Lightly dampen your finger and smooth the entire surface one last time before curing. -
Cure the Clay:
Bake (for polymer) or dry (for air-dry) according to the manufacturer’s package instructions. Air-dry clay may take 24-48 hours to fully harden due to the thickness. -
Sand for Texture:
Once fully cured/dried, sand the piece. Start with 220 grit to remove big bumps, then move to 400 and 800 for a buttery smooth, matte finish. -
Add Speckling (Optional):
To mimic the stone look in the photo, dip a toothbrush in diluted brown or grey acrylic paint and flick the bristles to spatter tiny dots across the surface. -
Seal the Piece:
Apply a coat of ultra-matte varnish to protect the clay from scratches and moisture without making it look plastic or shiny. -
Mount on Wall:
Use appropriate wall anchors and screws. Insert screws through the recessed holes so the heads sit flush, securing your new rack firmly to the wall.
Now you have a custom, minimalist organizer ready to greet you every time you walk through the door
Page Opener Tool for Easy Reading and Journaling
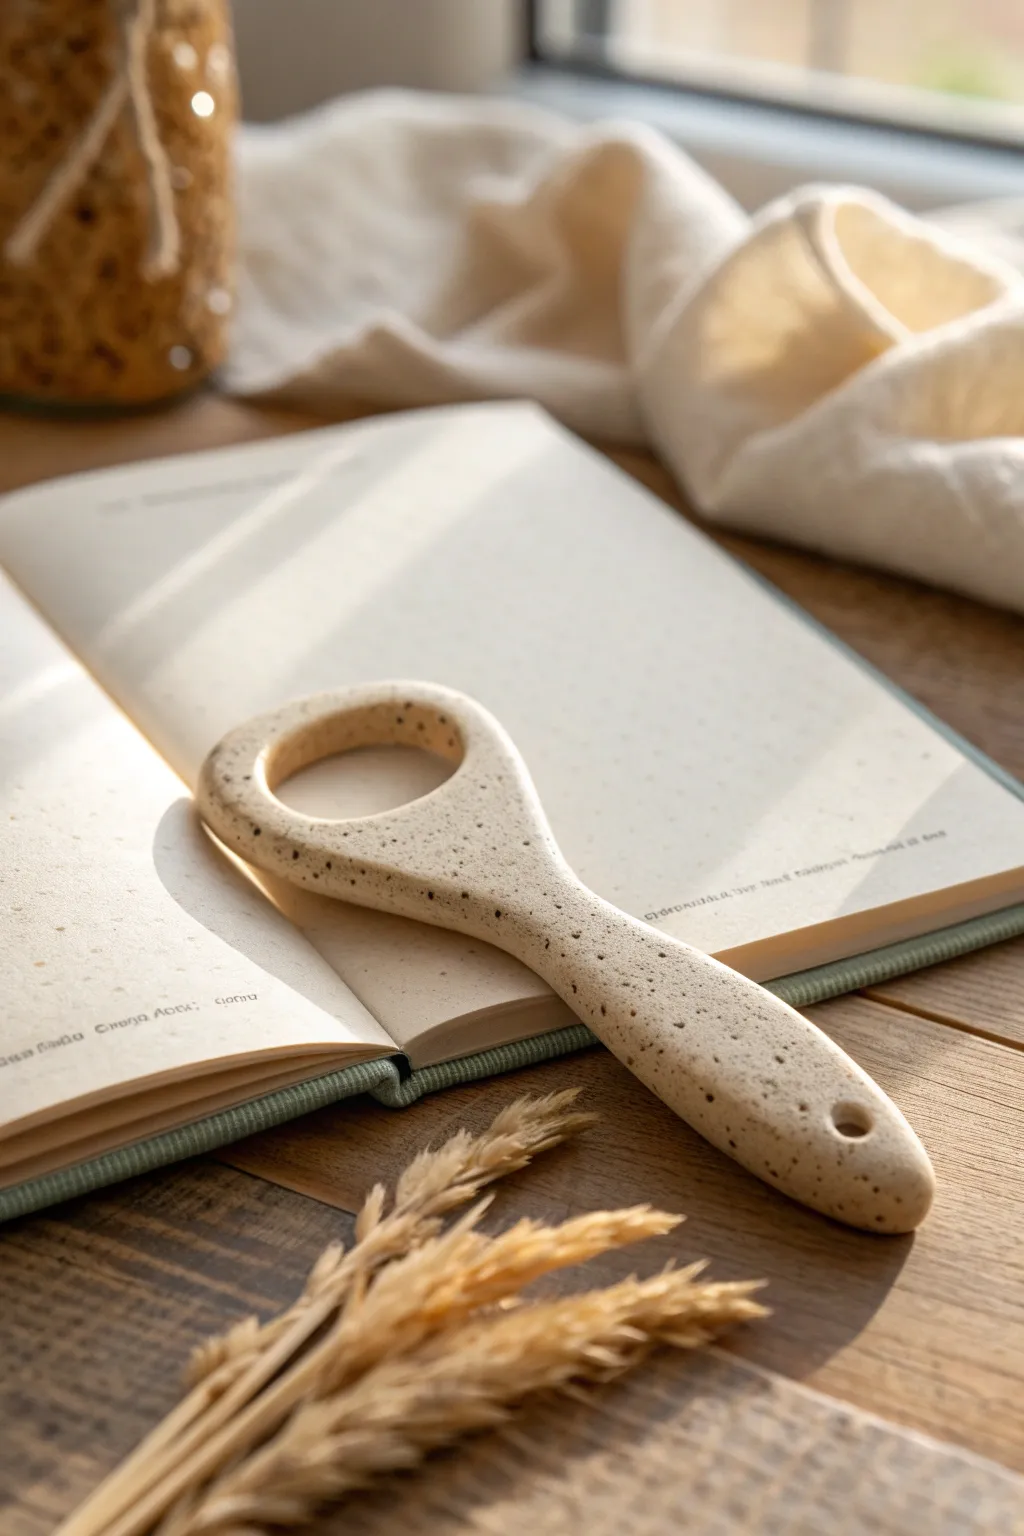
Keep your book flat and your hands free with this elegant and functional page anchor. The natural speckled finish and ergonomic shape make it a delightful companion for your cozy reading sessions or journaling time.
How-To Guide
Materials
- Polymer clay (beige or light tan)
- Faux granite or black pepper polymer clay (for speckles)
- Small magnifying glass lens (optional, purely for shaping)
- Circle cutter (approx. 1.5 – 2 inches diameter)
- Smaller circle cutter (approx. 1 inch diameter)
- Acrylic roller
- Modeling tools (smoothing loop tool)
- Fine grit sandpaper (400-800 grit)
- Oven for baking
- Straw or small drill bit (for the handle hole)
Step 1: Preparing the Clay
-
Condition the Base:
Begin by thoroughly conditioning your beige polymer clay until it is soft and pliable. Warm hands make this process much faster. -
Create the Speckle Mix:
To achieve that organic, stony look, take a very small amount of black pepper or granite effect clay and mix it into your beige base. Knead until the specks are evenly distributed but not fully blended into a grey color. -
Roll Out a Slab:
Using your acrylic roller, roll the mixed clay into a thick slab, approximately 1/4 inch thick. You want it substantial enough to hold weight but not clunky.
Uneven Thickness?
If your slab is lumpy, place wooden craft sticks on either side of the clay as guide rails for your roller to ensure a perfectly even thickness.
Step 2: Shaping the Anchor
-
Cut the Basic Shape:
Use a modeling knife to cut a long paddle shape purely freehand, or sketch a template on paper first. The total length should be about 6-7 inches. -
Refine the Head:
Shape the top end into a wide, rounded circle. This ‘spoon’ shape will sit on the page. -
Cut the Window:
Use your smaller circle cutter to punch a clean hole directly in the center of the rounded head. This window allows you to see text if needed, or simply reduces weight. -
Form the Handle:
Taper the clay down from the head into a comfortable handle. Round off the bottom of the handle so there are no sharp edges. -
Add the Lanyard Hole:
At the very bottom of the handle, use a straw or a small circular tool to punch a tiny hole. This is perfect for adding a tassel or hanging loop later.
Step 3: Refining and Baking
-
Smooth the Edges:
Dip your finger in a little bit of baby oil or water and run it along every cut edge. Smoothing the clay now saves a lot of sanding time later. -
Add Texture (Optional):
If you want a more rustic stone feel, gently tap the surface with a toothbrush or coarse sponge to remove fingerprints. -
Check the Profile:
Look at the tool from the side. Ensure the transition from the handle to the open ring is seamless and sturdy. -
Bake:
Place your piece on a ceramic tile or baking sheet. Bake according to your specific clay manufacturer’s instructions—usually around 275°F (130°C) for 30 minutes. -
Cool Down:
Allow the piece to cool completely in the oven with the door slightly ajar to prevent thermal shock cracking.
Level Up: Leather Wrap
Wrap the handle section with thin leather cord or suede lace for a luxurious, tactile grip that contrasts beautifully with the stone look.
Step 4: Finishing Touches
-
Initial Sanding:
Once cool, use 400 grit sandpaper under running water to smooth any remaining rough edges or bumps. -
Polishing:
Follow up with a higher grit sandpaper (800+) to create a velvety matte finish that feels nice against the paper. -
Rinse and Dry:
Wash off any clay dust with mild soap and water, then dry thoroughly with a soft cloth. -
Sealing (Optional):
The raw sanded finish is lovely, but if you prefer a gloss, apply a thin layer of matte or satin polymer clay varnish.
Now you have a beautiful custom tool to enhance your reading ritual