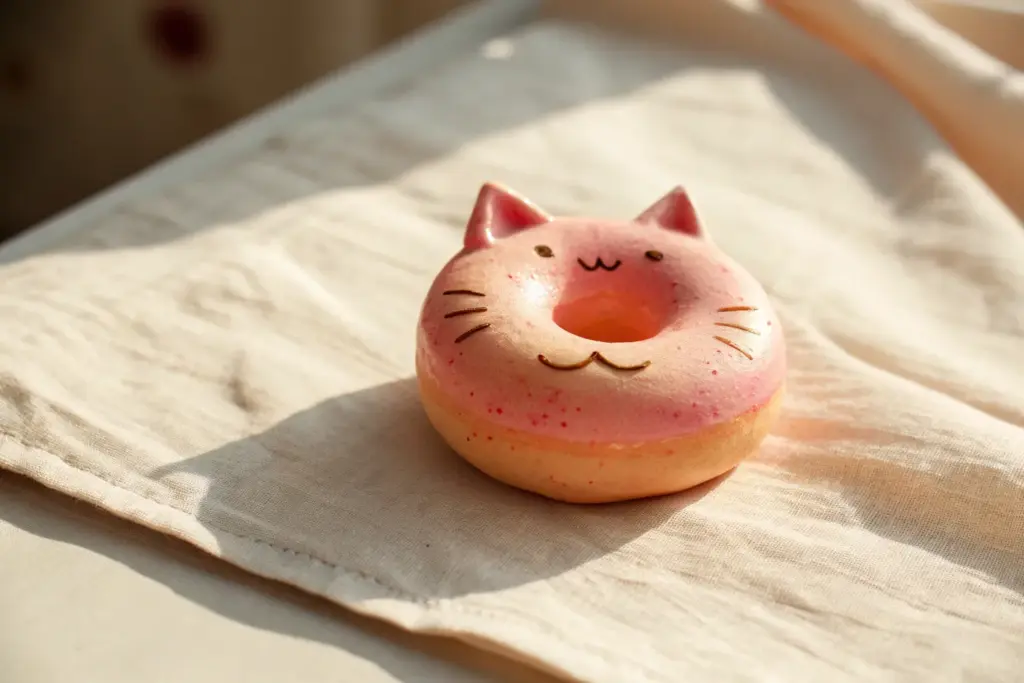
If you’re craving clay art ideas easy enough to finish in one sitting, you’re in the right mindset—simple shapes can look seriously adorable. I’m sharing beginner-friendly projects that lean on basic coils, balls, and slabs so you can relax and enjoy the squish.
Flat Clay Rainbow Wall Charm Using Rolled Coils
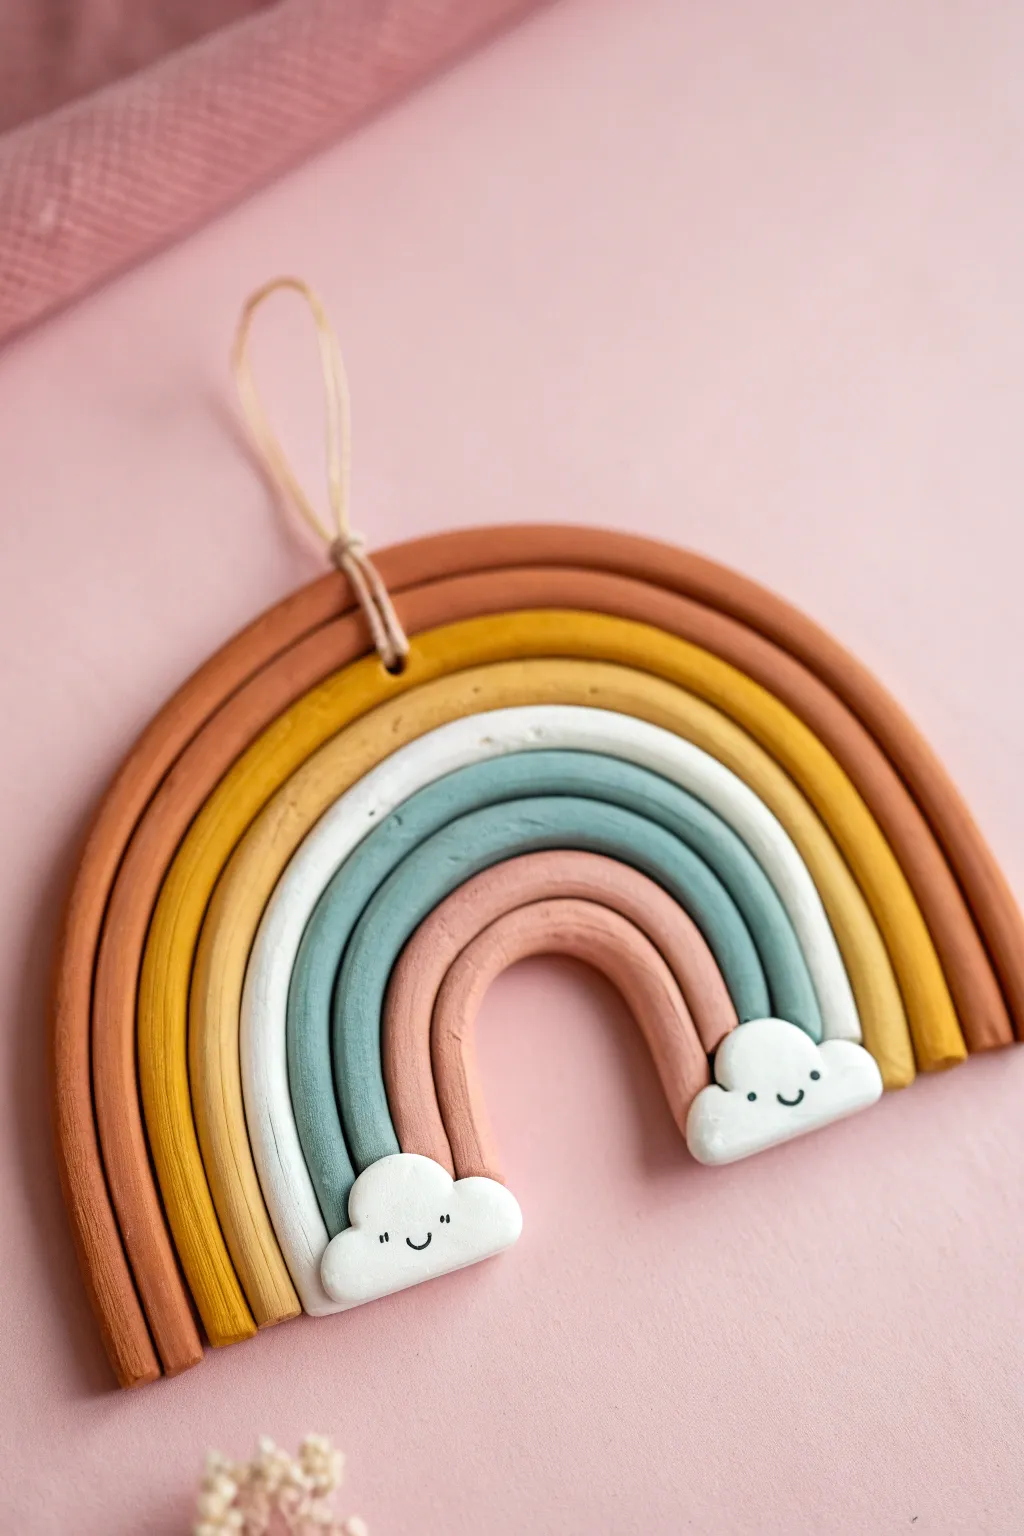
Create a charming, muted-tone rainbow wall hanging that adds a playful bohemian touch to any room. This project uses simple rolled coils of air-dry or polymer clay to form a sturdy, adorable arc perfect for nurseries or gallery walls.
How-To Guide
Materials
- Polymer clay or air-dry clay (terracotta, mustard yellow, white, sage green, dusty pink)
- Acrylic rolling pin
- Clay knife or craft blade
- Liquid clay or strong craft glue
- Needle tool or toothpick
- Fine grit sandpaper
- Black acrylic paint and fine detail brush
- Twine or leather cord for hanging
Step 1: Preparing the Coils
-
Condition the clay:
Begin by taking portions of each clay color—terracotta, mustard, white, sage green, and dusty pink—and kneading them individually in your hands until they are soft, pliable, and free of cracks. -
Roll the first coil:
Take the terracotta clay (for the outermost arch) and roll it on a clean, flat surface into a long, even snake. Aim for a thickness of about 1/2 inch to ensure the rainbow feels substantial. -
Roll remaining coils:
Repeat the rolling process for the mustard, white, sage green, and dusty pink clays. Try to keep the thickness consistent across all five strands so the surface of your finished rainbow is level. -
Check lengths:
Lay the coils out in a rainbow shape to ensure they are long enough. The outer coils need to be significantly longer than the inner coils to wrap around the curve without stretching.
Smooth Moves
To prevent fingerprints, lightly dust your fingers with cornstarch before handling polymer clay, or smooth with baby oil before baking.
Step 2: Assembling the Arches
-
Form the inner arch:
Start with the smallest dusty pink coil. Bend it into a tight U-shape on your work surface. This will be the foundational piece that determines the size of the gap in the middle. -
Add the next layer:
Apply a thin line of liquid clay or score and slip (if using air-dry clay) along the outer edge of the pink arch. Gently press the sage green coil against it, molding it to follow the curve perfectly. -
Continue layering:
Repeat this bonding process with the white coil, then the mustard coil, and finally the terracotta coil. Gentle pressure helps them adhere without flattening the round profile of the coils too much. -
Trim the bottom edge:
Once all five arches are joined, take your long craft blade or knife. Make a clean, straight cut across the bottom of the rainbow legs so they are perfectly flush and even. -
Create the hanging hole:
Use a tool to poke a hole through the top center of the rainbow, right between the outer terracotta coil and the yellow one. Ensure the hole is wide enough for your cord.
Step 3: Adding Details and Finishing
-
Sculpt the clouds:
Take two small balls of white clay and flatten them slightly into oval shapes. Use a modeling tool or your fingers to indent the edges, creating a fluffy, scalloped cloud effect. -
Attach the clouds:
Position the clouds at the bottom ends of the inner pink arch. Adhere them securely using liquid clay or glue, pressing them firmly so they bridge the gap between the coils slightly for stability. -
Dry or bake:
Follow the manufacturer’s instructions for your specific clay. Bake in the oven for polymer clay or let air-dry clay sit undisturbed for 24-48 hours until completely hard. -
Sand imperfections:
Once fully cured and cooled, use fine-grit sandpaper to smooth out any fingerprints or rough edges on the back or sides of the rainbow. -
Paint the faces:
Dip a fine detail brush (or use a specialized paint pen) into black acrylic paint. Carefully draw two small dots for eyes and a tiny U-shape smile on each white cloud. -
Seal (optional):
If you want extra protection, apply a matte varnish over the painted faces and the clay, though leaving the clay raw often looks more organic and textured. -
Attach the hanger:
Thread a piece of twine or leather cord through the hole you made earlier at the top. Tie a secure knot to create a loop for hanging.
Cracking Up?
If air-dry clay cracks while drying, mix a tiny bit of fresh clay with water to make a paste and fill in the fissures, then sand smooth once dry.
Hang your cheerful new creation on a wall hook or doorknob to bring a little handmade joy to your space


Cute Fruit Minis Made From Balls and Ovals
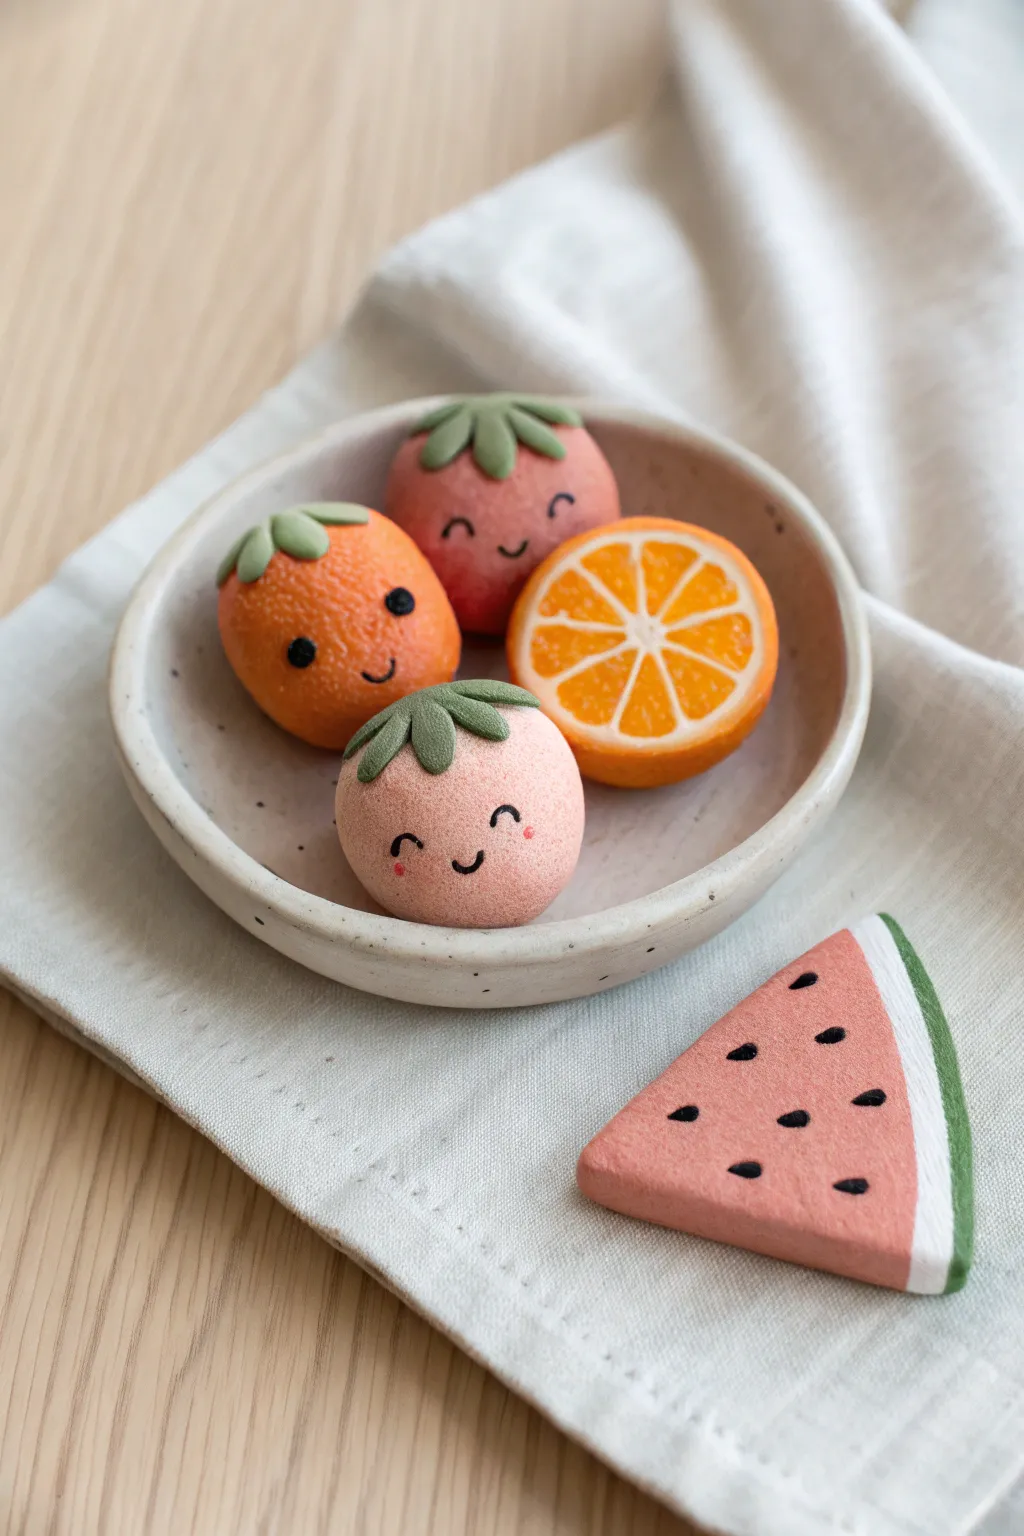
These adorable miniature fruits bring a smile to anyone’s face with their softly textured surfaces and tiny, cheerful expressions. By combining simple spheres and geometric shapes, you can create a whole platter of personality-filled produce perfect for desk decor or magnets.
Step-by-Step Tutorial
Materials
- Polymer clay (coral pink, light orange, dark pink, white, dark green, black)
- Texture tools (toothbrush or sandpaper)
- Needle tool or toothpick
- Small ball stylus
- Clay blade or craft knife
- clean work surface or ceramic tile
- Baking sheet and oven (as per clay manufacturer instructions)
Step 1: Shaping the Base Fruits
-
Roll the spheres:
Start by conditioning your pink, light orange, and red clay until pliable. Roll a walnut-sized ball of each color to serve as the base for your berries and citrus fruits. -
Gentle texturing:
Before adding details, gently roll the surface of your fruit balls over a clean toothbrush or piece of sandpaper. This gives them that realistic, matte ‘skin’ texture visible in the photo. -
Form the strawberry shape:
Take the coral pink ball and gently pinch the top slightly while flattening the bottom, creating a soft, rounded strawberry silhouette. -
Create the leafy caps:
Roll tiny logs of dark green clay. Flatten each log into a small teardrop shape to act as leaves. You will need about 4-5 leaves for each fruit. -
Attach the greenery:
Press the green teardrops onto the top center of your fruit balls, arranging them in a starburst pattern. Use your finger to smooth the seams down slightly so they look attached, not just floating.
Make It Matte
Shiny clay can look plasticky. Dust your unbaked clay lightly with cornstarch before texturing to prevent sticking and ensure a soft, realistic matte finish after baking.
Step 2: Sculpting the Slices
-
Make the orange half:
Roll a ball of bright orange clay and slice it perfectly in half with your blade. This clean cut is crucial for the realistic interior look. -
Detail the segments:
Roll a very thin snake of white clay. Lay pieces of this snake across the flat face of the orange in a wheel-spoke pattern to create the pith lines. -
Add the rind:
Wrap a thin sheet of white clay around the curved outside of the orange half, followed by a thin sheet of orange clay to create the skin layer. -
Surface texture for the slice:
Use a needle tool to scratch tiny dots and irregularities into the orange pulp sections between the white lines to mimic juice sacs. -
Shape the watermelon:
Cut a triangular wedge from a thick sheet of pink clay. Attach a thin strip of white clay to the wide edge, followed by a strip of green clay for the rind.
Step 3: Bringing Them to Life
-
Mark eye sockets:
Using a small ball stylus, gently press two indentations into the front of your whole fruits where you want the eyes to sit. -
Insert the eyes:
Roll impossibly tiny balls of black clay and press them into the sockets. For the watermelon, press small black teardrop shapes flat onto the pink surface for seeds. -
Carve the smiles:
Use the edge of a small straw or a curved needle tool to imprint a tiny, upward-curving mouth between the eyes. -
Add blush details:
For the pink berry, use a needle tool to add two tiny red clay dots or use a dot of pink paint on the cheeks for that extra cute factor. -
Final smooth:
Give everything a once-over to remove fingerprints. I sometimes use a brush with a tiny bit of baby oil to smooth out imperfections before baking. -
Bake:
Place all pieces on a ceramic tile or baking sheet. Bake according to your brand of clay’s instructions (usually around 275°F/135°C for 15-30 minutes). -
Cooling down:
Let the pieces cool completely in the oven before handling them to prevent cracking.
Turn Them into Charms
Before baking, insert a tiny metal eye pin into the top of the fruit (through the leaves). Once baked, you can attach these to keychains, earrings, or necklace chains.
Arranging your finished fruit family in a small dish creates an instant spot of joy on any table


Simple Animal Heads Made From Two Clay Balls
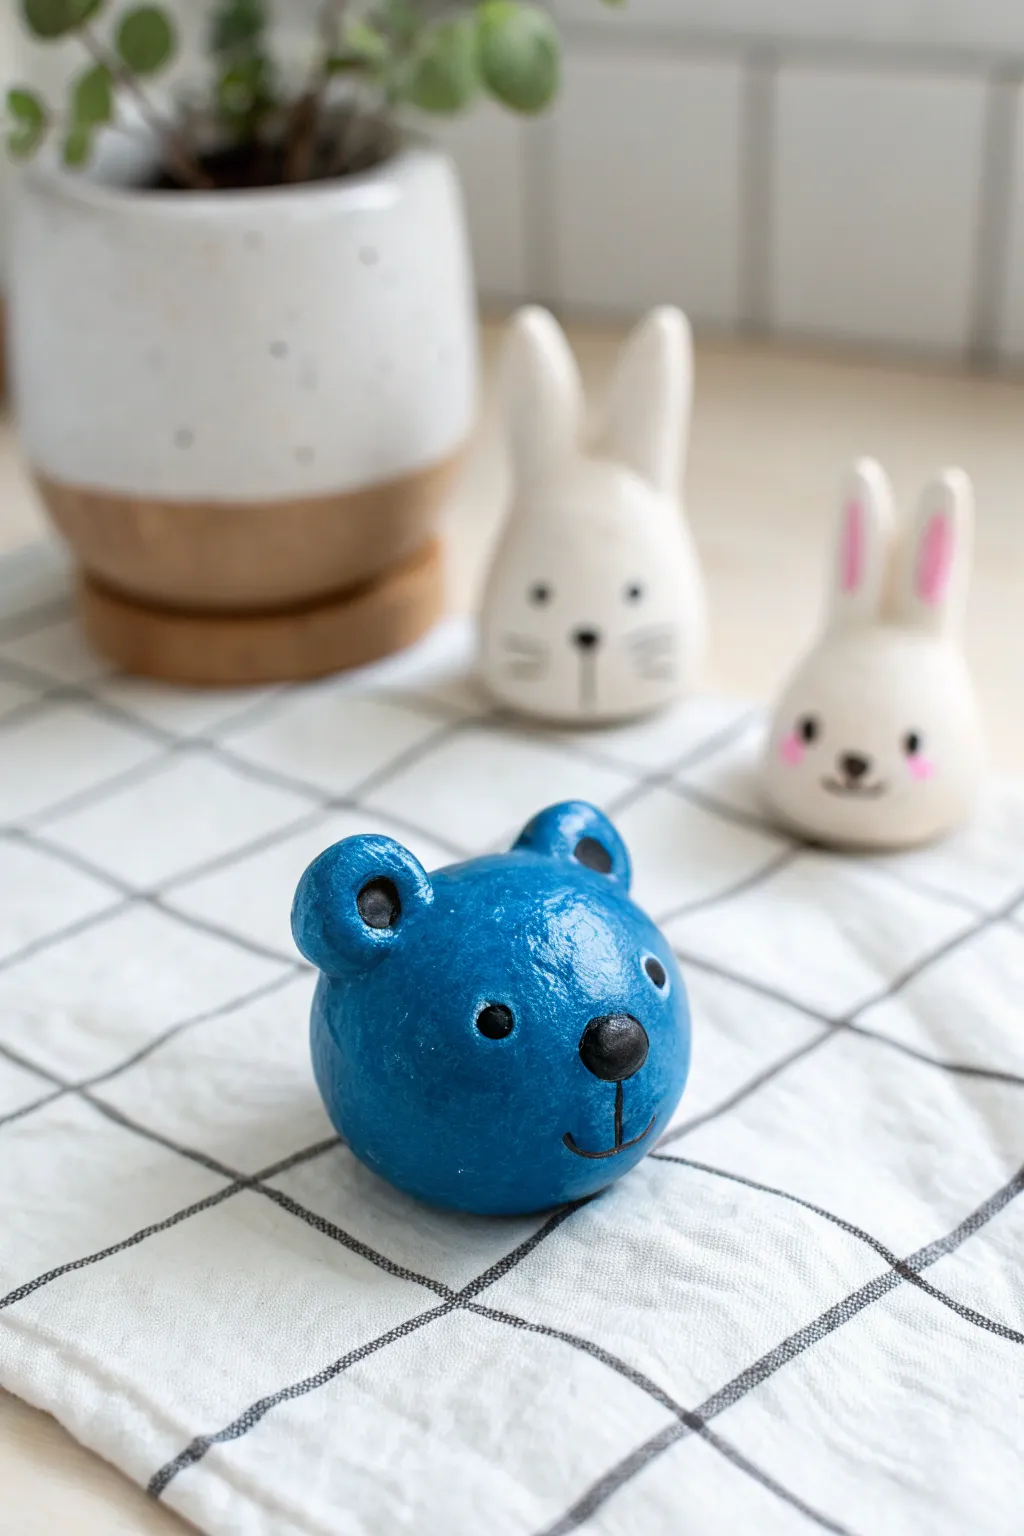
This charming blue bear head is a perfect beginner project that transforms simple clay shapes into a friendly desk companion. With its glossy finish and minimalist features, it captures a sweet expression using just basic sculpting techniques.
Step-by-Step Tutorial
Materials
- Air-dry clay or polymer clay (white or pre-colored blue)
- Acrylic paints (blue, black, white)
- High-gloss varnish or sealant
- Small paintbrush (round tip)
- Dotting tool or toothpick
- Cup of water
- Aluminum foil (optional core)
Step 1: Sculpting the Base Form
-
Create the main sphere:
Start by conditioning your clay until it is soft and pliable. Roll a medium-sized chunk into a smooth, even ball about the size of a tangerine. I like to roll it between my palms repeatedly to remove any cracks. -
Establish the ears:
Pinch off two much smaller pieces of clay, rolling them into pea-sized balls. These will become the ears. -
Attach the ears:
Place the small balls on top of the main head sphere, spacings them wider apart rather than close together. Press them down firmly to adhere. -
Blend the seams:
Using your thumb or a modeling tool, gently drag clay from the base of the ears down onto the head to seamless blend the connection points so they don’t fall off later. -
Shape the ear indentation:
Use the rounded end of a paintbrush, a dotting tool, or just your pinky finger to press a small indentation into the center of each ear. This gives them a cupped, realistic look.
Step 2: Adding Features & Drying
-
Form the snout:
You have a choice here: either gently pinch and pull the front of the face to create a slight protrusion, or attach a small, flattened disk of clay to the front to define the muzzle area. -
Refine the surface:
Dip your finger in a tiny bit of water and smooth over the entire sculpture to remove fingerprints and bumps. -
Create the nose:
Roll a tiny, tiny ball of clay for the nose and press it firmly onto the center of the snout area. Make sure it sticks well. -
Dry the sculpture:
If using air-dry clay, set the bear aside in a warm, dry place for 24-48 hours. If using polymer clay, bake according to the package instructions and let it cool completely.
Cracks Appearing?
If you see tiny hairline cracks as your clay dries, mix a small amount of fresh clay with water to make a paste (slip) and brush it over the cracks to fill them.
Step 3: Painting and Finishing
-
Base coat application:
Paint the entire head (except the nose if you want it black) with a deep, rich blue acrylic paint. You may need two thin coats for full coverage, letting the first dry before adding the second. -
Paint the nose:
Using a fine-tip brush, paint the small protruding nose ball a solid black. -
Detail the ears:
Inside the ear indentations, paint a small black circle or oval to add depth. -
Add the eyes:
Dip the handle end of a paintbrush or a dotting tool into black paint. Firmly stamp two eyes onto the face, spacing them wide apart inline with the nose. -
Add eye highlights:
Once the black eye dots are dry, use a toothpick to place a microscopic dot of white paint near the top of the black circles to bring the character to life. -
Draw the mouth:
With your finest brush or a black paint pen, draw a straight vertical line down from the nose, connecting to a simple curved smile line. -
Seal the piece:
Finish by applying a coat of high-gloss varnish over the entire piece. This protects the paint and gives it that polished, ceramic-like shine seen in the photo.
Turn it into a Buddy
Before the clay dries, push a strong magnet into the back to make a fridge magnet, or insert a stiff wire loop into the top to turn your bear into a hanging ornament or charm.
Enjoy your new little blue friend sitting cheerfully on your desk or shelf


Easy Octopus Using One Ball and Eight Coils
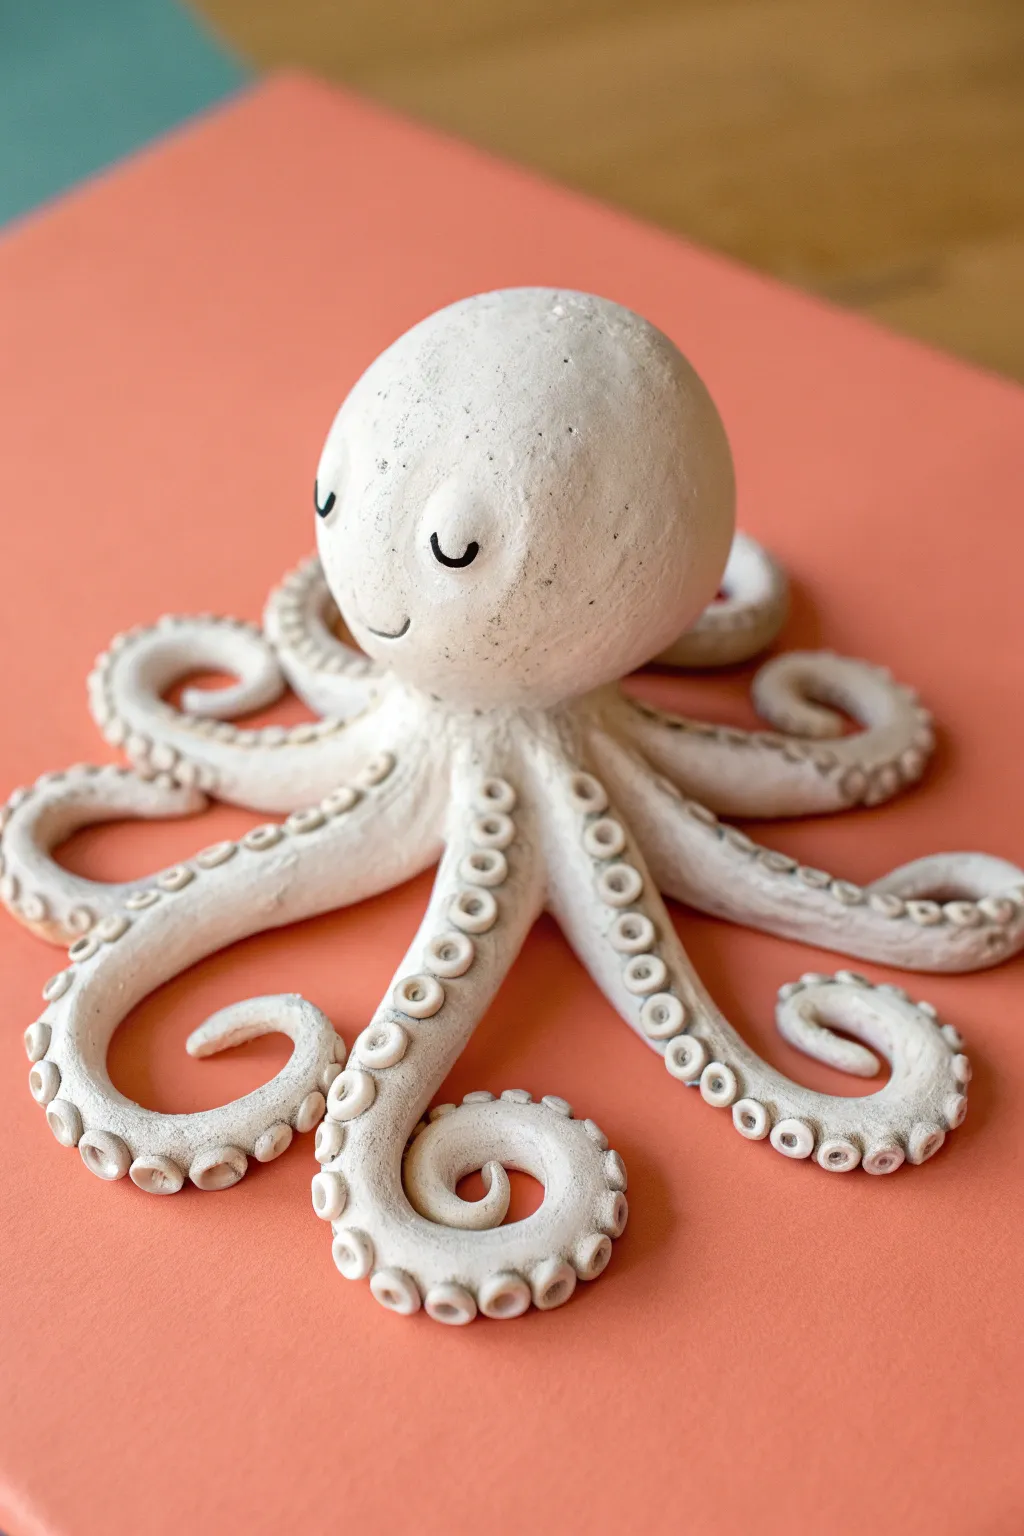
This adorable aquatic friend is crafted from simple geometric shapes, making it a perfect project for beginners. With its charming curled tentacles and sweet painted expression, this minimalist white octopus brings a touch of seaside whimsy to any desk or shelf.
Detailed Instructions
Materials
- White polymer clay or air-dry clay
- Small ball tool (or rounded end of a paintbrush)
- Needle tool or toothpick
- Rolling pin (optional)
- Fine-point black marker or acrylic paint
- Clear varnish or matte sealant (optional)
- Smooth work surface
Step 1: Shaping the Base
-
Prepare the head:
Start by conditioning a large chunk of white clay until it is soft and pliable. Roll into a smooth, perfect sphere about the size of a golf ball or slightly larger, ensuring there are no cracks. -
Form the tentacle coils:
Divide a separate portion of clay into eight equal pieces. Roll each piece into a long, tapered coil or ‘snake’ shape, making one end slightly thicker than the other. -
Create the suction cups:
Roll many tiny balls of clay—you will need roughly 10-12 per tentacle. Flatten them slightly into small discs. -
Attach the cups:
Press the small discs onto the underside of each tentacle coil in a single row. Depending on your clay type, you might need a tiny dab of water or liquid clay to help them stick. -
Indent the cups:
Using a small ball tool or the smooth end of a paintbrush handle, gently press into the center of each disc to create the signature cup shape.
Cracking Clay?
If using air-dry clay, cracks form when it dries too fast. Keep your hands moist while working, and cover the piece with a loose plastic bag to slow down the drying process.
Step 2: Assembly & Detailing
-
Arrange the base:
Lay out the eight tentacles in a starburst pattern on your work surface. Bring the thicker ends together in the center so they touch, creating a platform for the head. -
Curl the tips:
Gently curl the tapered ends of the tentacles. I like to spiral some tightly and leave others looser to give the octopus a sense of movement. -
Mount the head:
Place the large spherical head onto the center where the tentacles meet. Press down firmly but gently to bond the pieces without squashing the round shape. Use a smooth tool to blend the clay at the neck seam if needed. -
Refine the pose:
Adjust the tentacles so they lift slightly off the surface in places, giving the creature a more dynamic, floating appearance. -
Smooth the surface:
Check the head for fingerprints. Lightly brush over any imperfections with a damp finger (for air-dry clay) or a touch of baby oil (for polymer clay). -
Dry or bake:
If using air-dry clay, let the figure sit undisturbed for 24-48 hours. If using polymer clay, bake according to the manufacturer’s package instructions.
Seamless Joints
To make the head stay on securely without glue, score (scratch) the bottom of the head and the top of the tentacle junction before pressing them together.
Step 3: Finishing Touches
-
Draw the eyes:
Once fully cured and cooled, use a fine-point black marker or a thin brush with black acrylic paint to draw two small, U-shaped eyes that look like they are closed in happiness. -
Add the smile:
Paint a very small, simple curved line just below and between the eyes for a subtle smile. -
Seal the work:
To protect the surface and give it a finished look, apply a coat of matte or satin varnish over the entire piece.
Now you have a charming clay companion ready to bring a smile to anyone’s face

The Complete Guide to Pottery Troubleshooting
Uncover the most common ceramic mistakes—from cracking clay to failed glazes—and learn how to fix them fast.
Caterpillar Cuties Built From a Row of Spheres
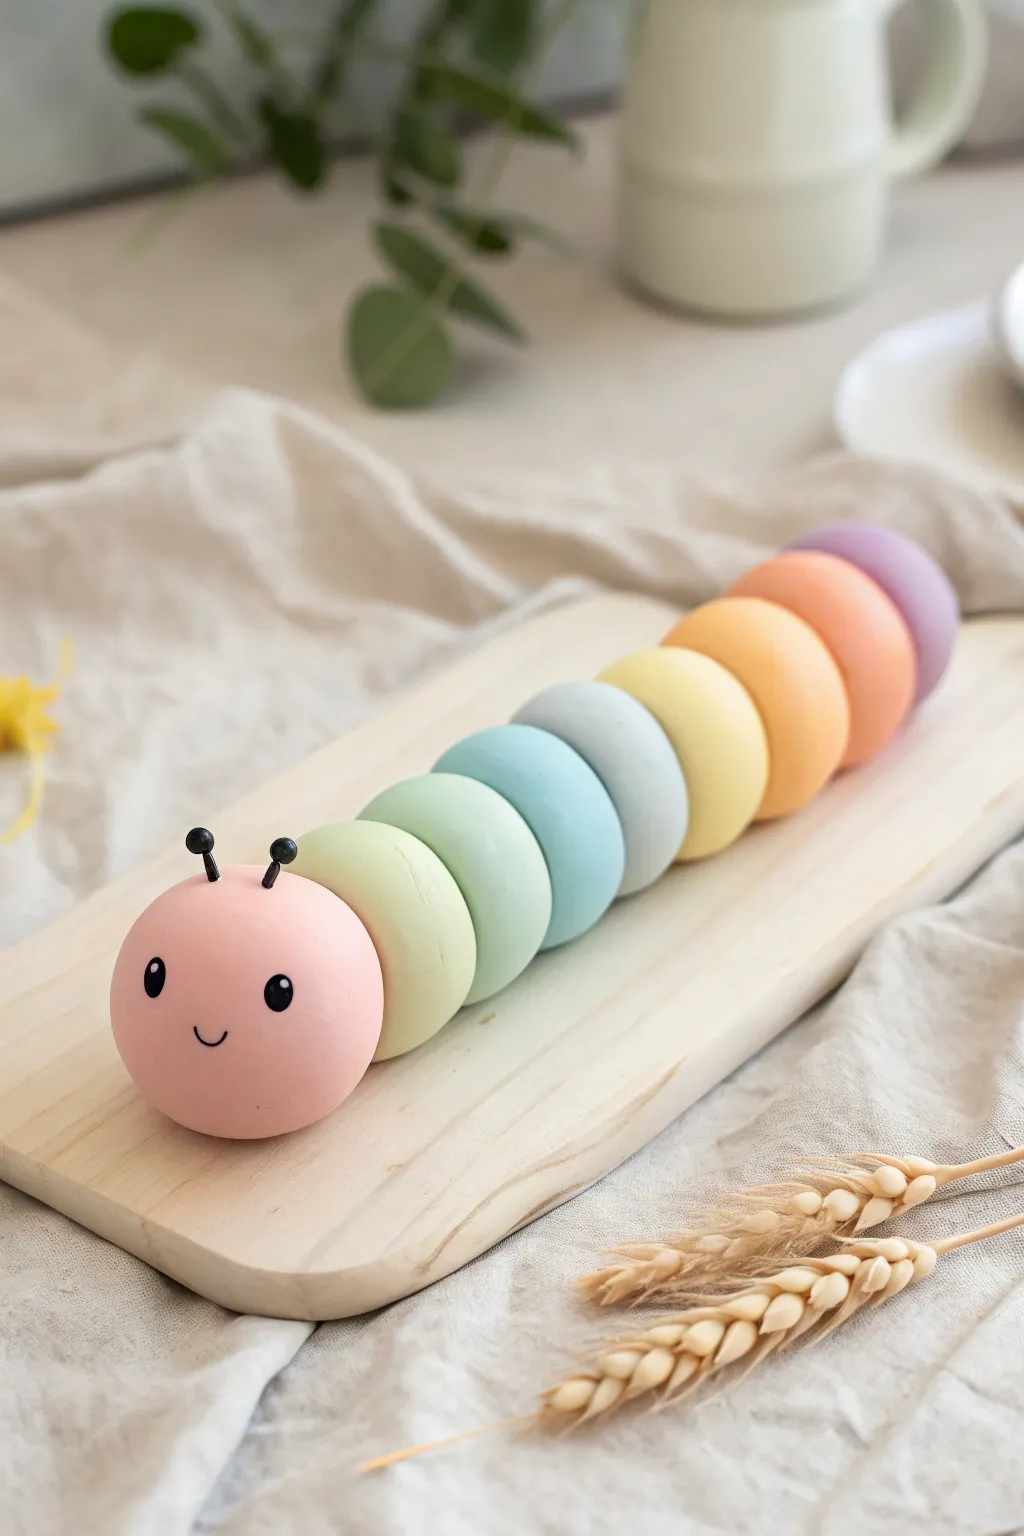
Brighten up your desk or shelf with this adorable pastel caterpillar, assembled from a simple row of perfectly smooth clay spheres. Its soft, matte finish and gradient rainbow body make it a charming project for beginners to practice colour mixing and shaping fundamentals.
Step-by-Step Tutorial
Materials
- Polymer clay (pastel pink, yellow, mint green, seafoam blue, grey-blue, lemon yellow, orange, violet)
- Black polymer clay or small black round beads (for eyes/antennae)
- Black wire or jewelry headpins (for antennae)
- Acrylic roller or clay machine (optional for conditioning)
- Needle tool or toothpick
- Ball stylus tool
- Liquid polymer clay (Bake and Bond) or craft glue
- Oven and baking sheet
- Parchment paper
Step 1: Preparing the Colors
-
Condition the clay:
Begin by thoroughly kneading each color of clay until specific soft and pliable to prevent cracking later. -
Mix pastel shades:
If you don’t have pre-mixed pastels, mix a large amount of white clay with tiny pinches of saturated colors to achieve the soft, milky hues seen in the photo. -
Portion the body segments:
Pinch off equal-sized amounts of clay for the body segments. You will need seven colors for the body and a slightly larger portion of pink for the head.
Smooth Surface Secret
Before baking, gently wipe each sphere with a brush dipped in baby oil or rubbing alcohol. This removes fingerprints and smoothes out tiny lint particles.
Step 2: Shaping the Spheres
-
Roll the head:
Take the pink clay portion and roll it between your palms. Use a gentle circular motion to create a perfect, smooth sphere about 1.5 inches in diameter. -
Roll the body segments:
Repeat the rolling process for the remaining seven colors (yellow, mint, blue, grey, yellow, orange, purple). These should be slightly smaller than the head—aim for about 1.25 inches wide. -
Check consistency:
Line the balls up on your work surface to ensure they look uniform in size. If one looks too small, add a sliver more clay and re-roll. -
Flatten the bases:
Gently tap the bottom of each sphere against your table. This creates a tiny flat spot so the caterpillar won’t roll away once assembled.
Level Up: Texture
Before assembling, gently press a textured sponge or sandpaper against the clay surface to give the caterpillar a soft, matte skin texture instead of shiny plastic.
Step 3: Creating the Face
-
Mark eye placement:
use a needle tool to faintly mark where the eyes will go on the large pink sphere to ensure symmetry. -
Make the eyes:
Roll two tiny balls of adhesive black clay. Flatten them slightly and press them onto your marked spots. -
Add eye shine:
Dip the tip of a needle tool into white paint or use a tiny speck of white clay and place it on the upper right of each black eye for a ‘sparkle’ effect. -
Carve the mouth:
Use a small ball stylus or a curved sculpting tool to gently impress a simple ‘U’ shape smile between the eyes. -
Prepare antennae:
Cut two short pieces of black wire (about 0.5 inches). Roll tiny black clay balls and bake them onto the ends of the wire first, or use pre-made headpins. -
Insert antennae:
Push the raw ends of your wire antennae into the top of the pink head.
Step 4: Assembly and Baking
-
Arrange the gradient:
Line up your spheres in the correct color order: Head (pink), yellow-green tone, mint, blue, grey-blue, yellow, orange, purple. -
Bonding surfaces:
Apply a small drop of liquid polymer clay (Bake and Bond) to the side of each sphere where it will touch its neighbor. -
Press together:
Gently press the spheres together in a straight line on your parchment-lined baking sheet. Don’t squish them too hard; just enough for contact. -
Final check:
I usually hold the tray at eye level to ensure the caterpillar isn’t curving excessively and all bases are touching the ground. -
Bake carefully:
Bake according to your clay manufacturer’s instructions (usually 275°F/135°C for 30 minutes). Tent with foil to prevent the pastel colors from darkening or scorching. -
Cool down:
Allow the piece to cool completely on the baking sheet before handling it, as the clay is fragile while hot.
Place your colorfully assembled friend on a display board or let it march across your desk for a daily dose of cheer
Beginner Snail With a Spiral Coil Shell
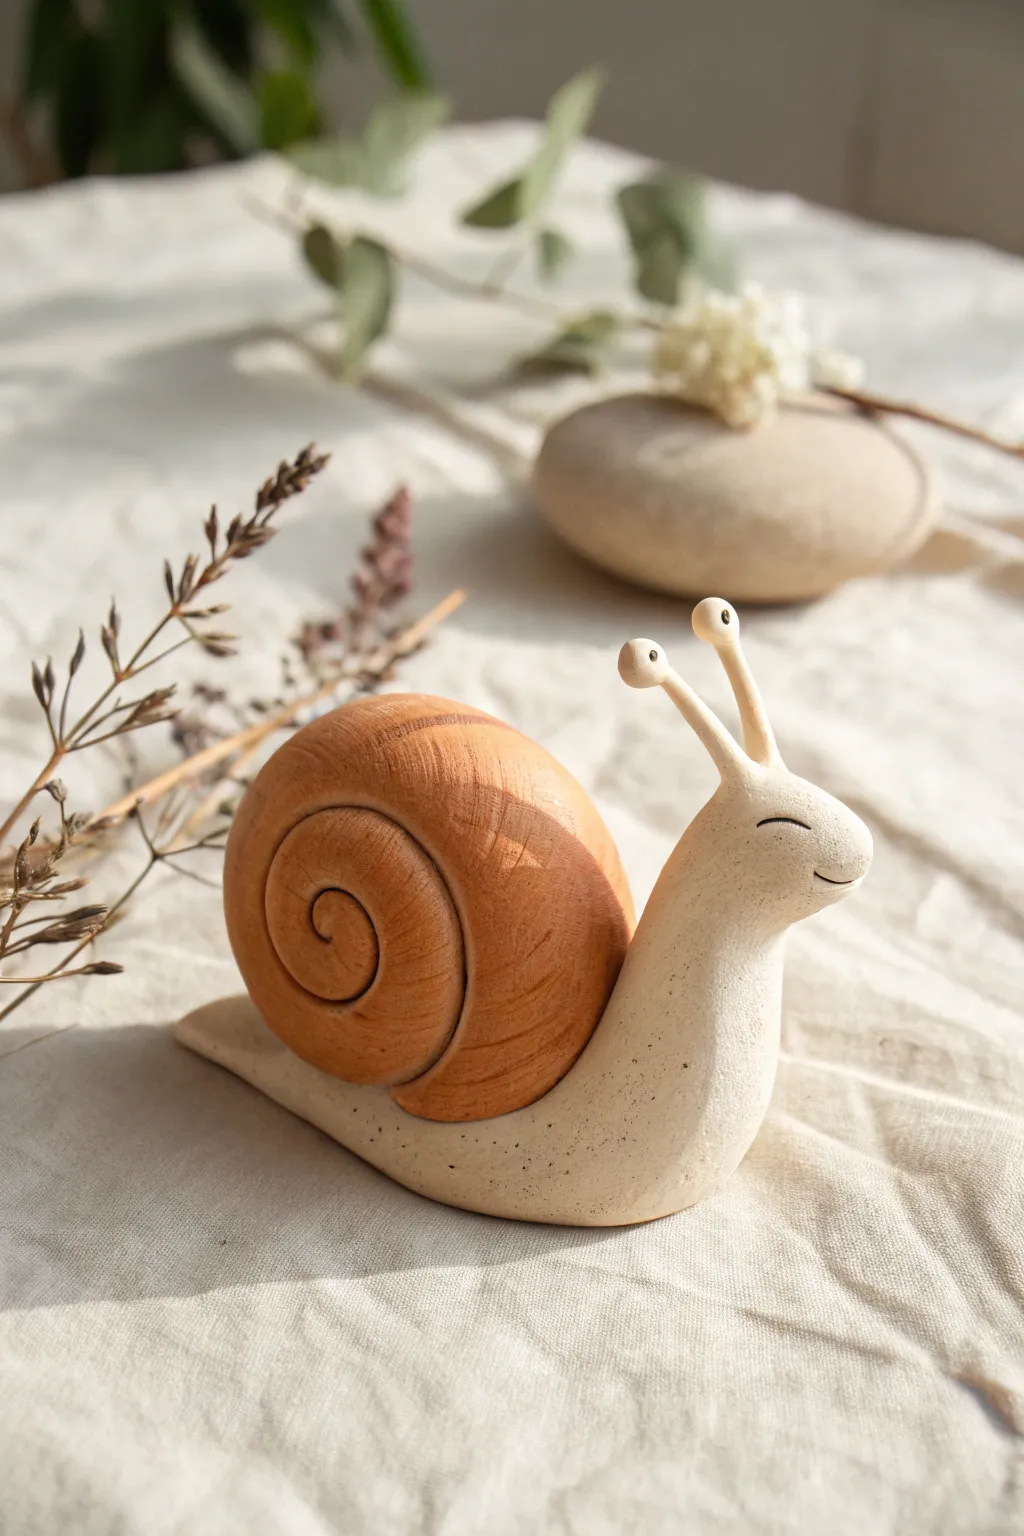
This charming little sculpture combines the minimalist beauty of speckled clay with a faux-wood finish. It’s an approachable project that teaches basic coil and slab techniques while resulting in a sophisticated, nature-inspired decorative piece.
Step-by-Step
Materials
- Speckled cream polymer clay (or air-dry clay)
- Terracotta or warm brown polymer clay
- Sculpting tools (needle tool, smoothing tool)
- Acrylic rolling pin
- Small ball tool
- Black acrylic paint or fine-tip marker
- Small paintbrush
- Soft toothbrush or texture sponge
- Aluminum foil (for armature)
- Matte varnish (optional)
Step 1: Sculpting the Shell
-
Prepare the foil core:
Since the shell is quite large, start by crumpling a small ball of aluminum foil into a flattened sphere shape. This saves clay and keeps the figurine lightweight. -
Roll the brown clay:
Take your terracotta or warm brown clay and condition it until soft. Roll it into a long, thick snake or rope, tapering it slightly towards one end. -
Form the spiral:
Take the tapered end of your clay rope and begin coiling it tightly around itself to create a flat spiral disk. -
Shape the dome:
Gently press the center of your spiral outward to give it a domed, 3D shape that resembles a real snail shell. If using a foil core, wrap the coil around the foil, smoothing the seams on the inside where they won’t be seen. -
Add wood grain texture:
Using a needle tool or a stiff brush, lightly drag lines along the length of the coil to mimic wood grain. I like to add a few subtle darker streaks with a tiny amount of brown paint or pastel powder before baking for extra depth.
Secret Texture Trick
Mix uniform black pepper or used dried coffee grounds into your white clay before sculpting to create instant, natural-looking speckles without painting.
Step 2: Forming the Body
-
Shape the base:
Roll a log of the speckled cream clay. It should be thickest at one end (for the head) and taper gently to a point at the tail. -
Flatten the bottom:
Press the log gently onto your work surface to flatten the bottom so the snail sits stable and won’t roll over. -
Create the head lift:
Bend the thicker end of the log upwards to create the snail’s neck and head. Smooth the clay with your fingers to ensure a seamless curve. -
Indent the shell seat:
Use your thumb or a modeling tool to create a slight depression on the back of the body where the shell will rest. This ensures a snug fit. -
Attach the shell:
Place the brown shell into the depression. Press firmly to adhere the clays together. If using air-dry clay, score both surfaces and add a dab of water or slip first.
Step 3: Details and Finishing
-
Make the eye stalks:
Roll two small, thin logs of cream clay. Attach small balls to the top of each log to form the eyes. -
Attach the stalks:
Press the stalks onto the top of the head. Blend the clay at the base of the stalks into the head using a small smoothing tool so they look like they grew there, rather than just being stuck on. -
Sculpt the face:
Use a needle tool or knife to carve a simple, curved line for the smiling mouth. Use a small ball tool or needle to create tiny dots for the pupils in the eye balls. -
Paint the eyes:
Once the sculpture is hardened (baked or dried according to package instructions), use a fine-tip paintbrush or marker to fill in the pupil indentations with black. -
Seal the piece:
Protect your work with a coat of matte varnish. This preserves the natural, earthy look of the clay without adding an artificial shine.
Garden Snail Upgrade
Before the clay hardens, press a real leaf into the bottom of the snail’s body to leave a hidden fossil-like imprint on the underside.
Place your finished snail near a potted plant or on a windowsill to bring a slow, peaceful vibe to your decor


What Really Happens Inside the Kiln
Learn how time and temperature work together inside the kiln to transform clay into durable ceramic.
Easy Relief Art: Koala Hugging a Tree Oval

Capture the serenity of the Australian bush with this charming oval relief sculpture. Featuring a sleepy koala clinging to a textured tree trunk, this project uses simple layering techniques to create a delightful 3D effect.
Step-by-Step Guide
Materials
- Air-dry clay or polymer clay (white, grey, light brown)
- Oval clay cutter or template
- Modeling tools (needle tool, ball tool, silicone shaper)
- Texture sponge or toothbrush
- Rolling pin
- Acrylic paints (pastel sage green, cream, soft pink)
- Fine detail paintbrush
- Wooden backing board or sturdy cardboard (optional)
Step 1: Setting the Scene
-
Prepare the base:
Start by conditioning your white or light grey clay until it’s pliable. Roll it out to a consistent thickness of about 1/4 inch (6mm). Use your oval cutter or a paper template and knife to cut out a smooth oval shape. -
Smooth the canvas:
Dip your finger in a little water (or baby oil for polymer clay) and gently smooth the edges of the oval to remove any sharp cut marks. This creates the perfect backing for your relief. -
Texture the background:
For a subtle stone-like finish, gently dab the entire surface of the oval with a piece of texture sponge or an old toothbrush. Use light pressure so you don’t warp the shape.
Cracks Appearing?
If air-dry clay cracks while drying, mix a tiny bit of fresh clay with water to make a ‘slip’ paste. Fill the cracks and smooth over with a damp finger
Step 2: Building the Tree
-
Form the trunk:
Roll a log of light brown clay. Flatten it slightly into a strip that tapers at the top. Position this diagonally across the right side of your oval base, pressing it down gently to adhere. -
Add tree texture:
Using a needle tool or a clay knife, score vertical, rugged lines up and down the brown strip to mimic bark. Vary the depth of the lines for a natural wood look. -
Create the branch:
Roll a very thin snake of light brown clay. Attach this to the main trunk, extending it out to the left side in a gentle curve. Press the ends down to blend seamlessly into the main trunk and the background.
Shadow Play
After drying, promote depth by dusting dry pastel powder or watered-down dark paint into the crevices of the tree bark and koala fur
Step 3: Sculpting the Koala
-
Shape the body:
Take a ball of grey clay and form a teardrop shape. Press this onto the tree trunk so the wider bottom part sits lower. Flatten it slightly, ensuring it looks like it’s resting against the wood. -
Add the head:
Roll a slightly flattened sphere of grey clay for the head. Place it at the top of the body, overlapping slightly. You want a distinct separation but a cohesive figure. -
Attach the limbs:
Form two small sausage shapes for arms and two for legs. Attach the front arm hugging the tree and the back leg tucked under the body. Use a sculpting tool to press in three small indentations for toes/claws. -
Detail the ears:
Make two small balls of grey clay and flatten them. Press the center with a ball tool to create a cup shape. Attach these to the sides of the head. Add a tiny dot of pink or orange clay inside for the inner ear fluff. -
Create the fur texture:
I like to use a stiff bristle brush or a needle tool here to gently stipple the surface of the grey clay. This gives the koala a soft, fuzzy appearance without disturbing the main shapes. -
Face features:
Roll a tiny oval of black or dark grey clay for the nose and place it centrally. Use a needle tool to etch two small curved lines for sleepy, closed eyes and a small curve for the smile.
Step 4: Leafy Details
-
Form the leaves:
Roll tiny rice-grain shapes from very light greenish-brown clay. Flatten them gently to create elongated eucalyptus leaves. -
Arrange the foliage:
Press the leaves along the thin branch you created earlier. Arrange them in alternating patterns. Use a needle tool to press a central vein into each leaf. -
Final drying:
Once you are happy with the arrangement, let the piece dry according to your clay’s instructions (air dry for 24-48 hours or bake as directed for polymer clay).
Now you have a tranquil piece of relief art to display on a shelf or wall
Millefiori-Style Clay Slices Using Super Simple Canes
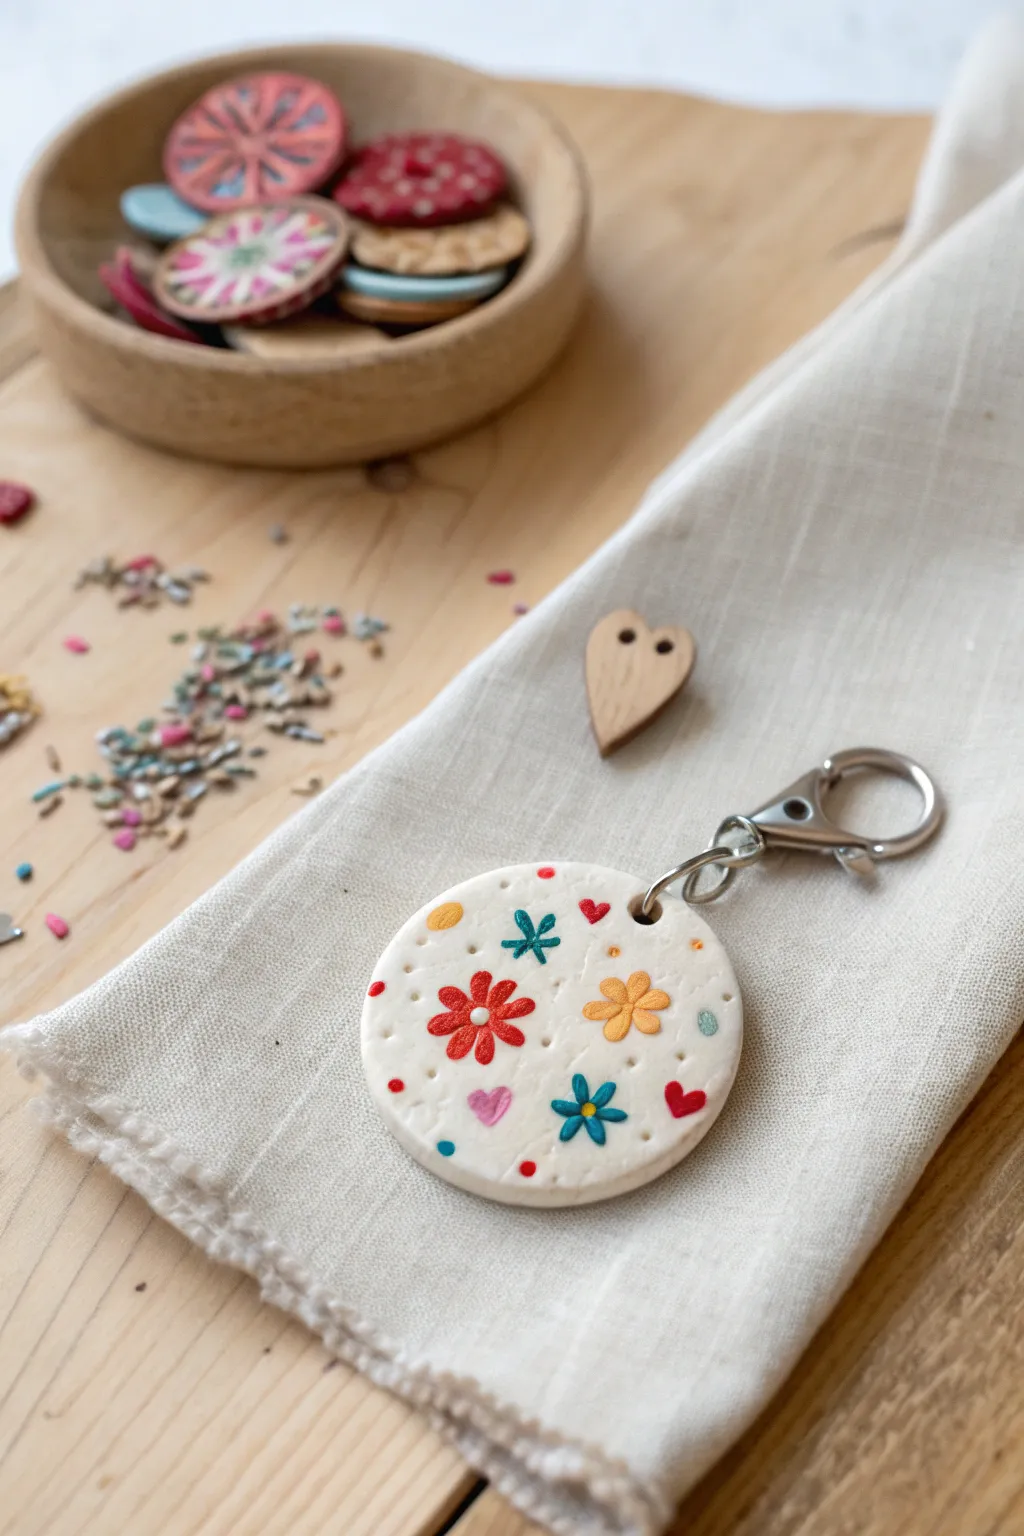
Bring the intricate beauty of millefiori to life without complex caning techniques using this clever clay hacking method. This charming keychain features a white clay base adorned with delicate, colorful floral slices for a sweet, textured finish.
Detailed Instructions
Materials
- White polymer clay
- Assorted polymer clay scrap colors (red, blue, yellow, green, pink)
- Circle clay cutter (approx. 2 inches)
- Clay roller or pasta machine
- Needle tool or toothpick
- Small jump ring
- Large lobster clasp or keychain hardware
- Parchment paper
- Oven for baking
Step 1: Preparing the Base
-
Condition the white clay:
Start by warming the white polymer clay in your hands, kneading it until it is soft and pliable. This prevents cracks later on. -
Roll the slab:
Roll out the white clay to a medium thickness, roughly 1/4 inch thick. You want it substantial enough to hold the hardware but not too heavy. -
Cut the shape:
Use your circle cutter to punch out a clean, round disc. Smooth any rough edges with your finger. -
Create the hole:
Using a needle tool or a straw, punch a hole near the top edge for the hardware. Make sure the hole is big enough for your jump ring to move freely.
Step 2: Creating the ‘Millefiori’ Slices
-
Mix flower colors:
Condition small amounts of the colored clays. You’ll need bright red, sunny yellow, teal blue, and pink. -
Form simple flower logs:
To make a simple flower cane, roll a tiny snake of yellow for the center. Roll five or six small snakes of red (or your chosen petal color) and surround the yellow center. -
Consolidate the cane:
Gently squeeze and roll the bundle of snakes together until they fuse into a single log. Repeat this process with different color combinations for variety. -
Make simple shapes:
For hearts or leaves, shape a small log of clay into a teardrop profile or heart profile using your fingers or a flat surface before slicing. -
Slice thinly:
Using a very sharp tissue flex blade or craft knife, slice extremely thin cross-sections of your mini canes. These are your ‘millefiori’ slices.
Cold Canes Cut Best
Put your flower canes in the fridge for 10 minutes before slicing. Cold clay is firmer and won’t squish, giving you perfectly crisp flower shapes.
Step 3: Assembling and Finishing
-
Arrange the pattern:
Gently place your clay slices onto the white disc. Arrange the flowers, leaves, and hearts in a scattered, pleasing pattern. -
Embed the designs:
Once you are happy with the placement, use your acrylic roller to gently roll over the surface. This presses the colored slices flush into the white base. -
Add texture:
Using your needle tool, add small decorative dots or stippling to the white background space between the flowers for extra detail. -
Final smooth:
Give the edges one last check to ensure the rolling didn’t distort the circle shape too much; gently pat it back into a perfect round if needed. -
Bake carefully:
Place the pendant on parchment paper and bake according to your clay package directions (usually around 275°F for 15-30 minutes). -
Cool down:
I always let the piece cool completely on the baking sheet before moving it, as hot clay is fragile. -
Attach hardware:
Open your jump ring with pliers, loop it through the clay hole, and attach the lobster clasp keychain.
Fixing Smudges
If a darker color smears onto the white base while rolling, use a cotton swab dipped in rubbing alcohol on the raw clay to gently wipe the smudge away.
Clip this cheerful handmade accessory to your keys or bag for a daily dose of floral brightness