When I’m craving a project that’s more expressive than a bowl or mug, I reach for ceramic sculpture because it lets you tell a whole story in shape and texture. Here are my favorite ceramic sculpture ideas—from classic forms you’ll recognize right away to the weirder, studio-daydream kind of pieces.
Pocket-Size Animal Figurines With Big Personality
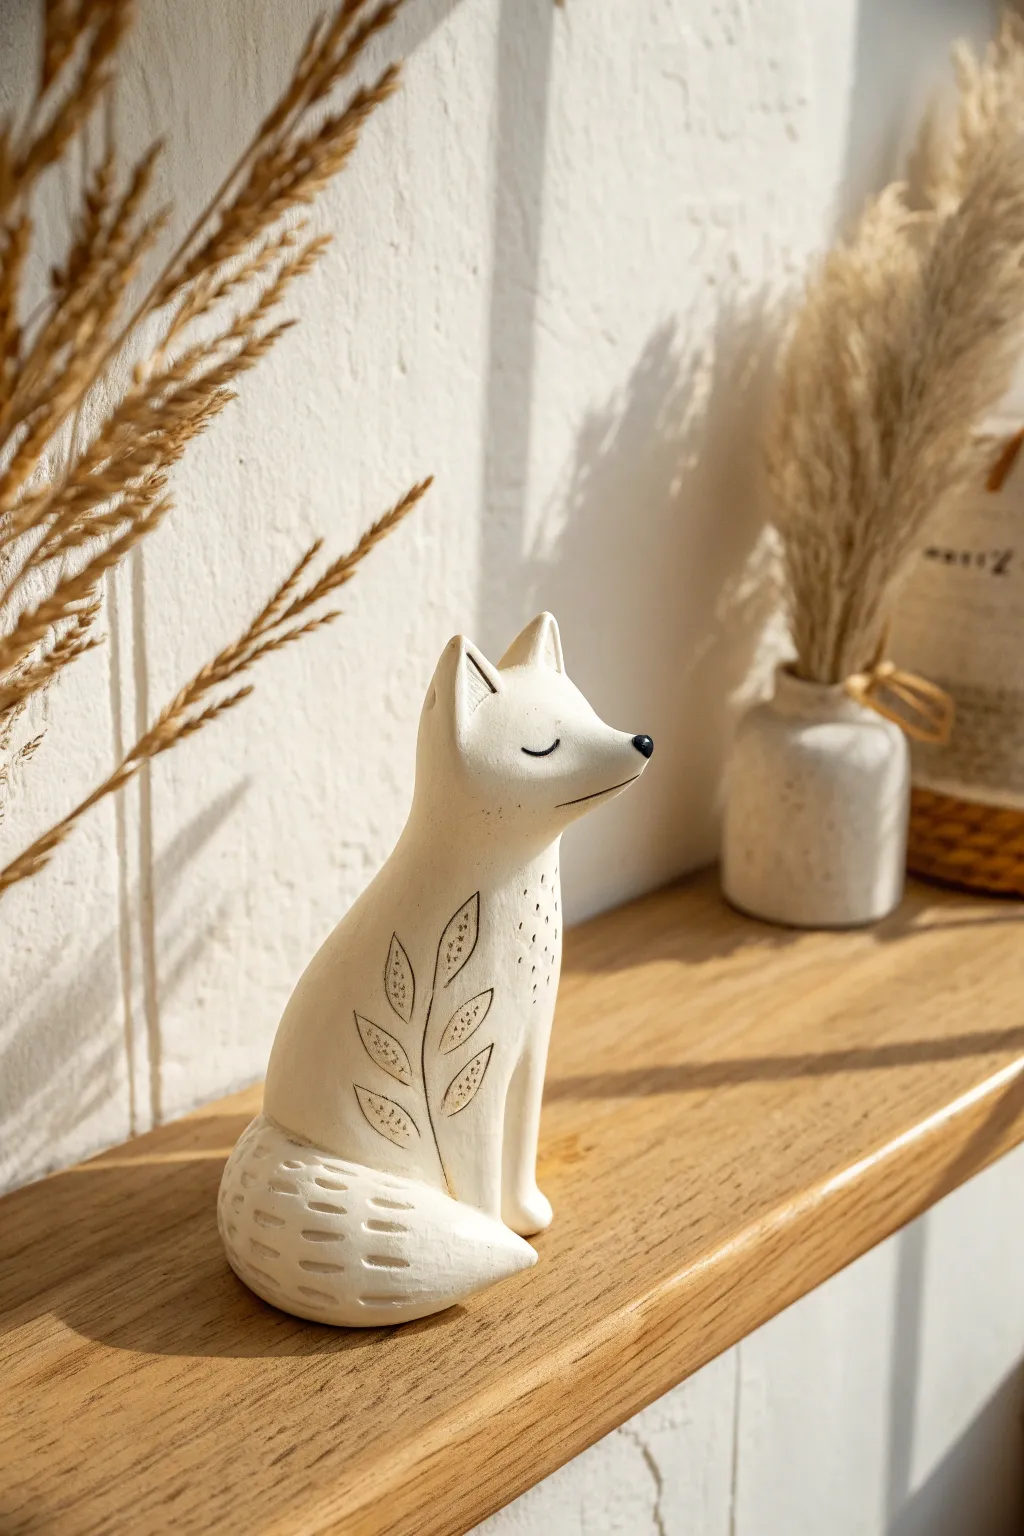
This elegant little figurine captures the serene charm of a sitting fox, featuring simple lines and delicate botanical engravings. Its minimal cream finish and black accents give it a modern, Scandinavian-inspired look that fits perfectly on any sunny shelf.
Step-by-Step Tutorial
Materials
- White earthenware clay or white polymer clay
- Basic sculpting tools (rib, needle tool)
- Small rolling pin
- Slip and scoring tool (if using ceramic clay)
- Black underglaze (for ceramics) or black acrylic paint
- Pin tool or very fine liner brush
- Clear matte glaze or matte varnish
- Sponge and water
- Fine-grit sandpaper (optional)
Step 1: Shaping the Base Form
-
Form the body:
Start with a palm-sized ball of white clay. Roll it into a smooth, elongated cone shape to create the sitting posture, keeping the bottom wide and stable while tapering gently toward the top for the neck. -
Define the head:
At the top of your cone, pinch and pull the clay slightly forward to differentiate the head from the neck. You want a seamless transition, not a separate ball attached on top. -
Sculpt the snout:
Gently pull the front of the face outward to form a pointed snout. The nose should point slightly upward to give the fox a proud, alert posture. Smooth the underside of the jaw so it flows back into the chest. -
Add the ears:
Fashion two small triangles from leftover clay. Score and slip the top of the head (if using ceramic clay) or blend tightly (if using polymer) to attach them upright. Pinch the tips so they look perked and attentive. -
Create the front legs:
Instead of attaching separate legs, carve or impress a vertical line halfway up the front of the chest to suggest the front legs are sitting together. You can add a slight indentation at the bottom to define the paws. -
Attach the tail:
Roll a thick coil of clay for the tail, tapering one end. Curve it around the base of the fox’s body, wrapping it snugly against the side. Score and slip effectively here to ensure it doesn’t crack off during drying. -
Smooth the surface:
Use a slightly damp sponge or your fingers to smooth out any fingerprints or join marks. The goal is a sleek, matte texture that looks effortless.
Fixing Wobbly Bases
If your fox tips over, tap the figurine firmly on the table while the clay is still soft to flatten the bottom. You can also hollow out the base slightly to prevent warping during kiln firing.
Step 2: Adding Details & Decorating
-
Initial drawing:
Let the clay leather-harden slightly so it’s firm but carveable. Using a needle tool, lightly sketch a tall, leafy branch design on the side of the fox’s body, slightly curving with the animal’s form. -
Engrave the botanicals:
Re-trace your branch lines deeper into the clay. For the leaves, scratch tiny texture marks inside each leaf outline to give them a natural, veined appearance. -
Texture the chest:
Using the tip of your needle tool, poke a series of small, scattered dots on the chest area just below the snout, simulating fluffy fur texture. -
Detail the tail:
Carve short, horizontal dashes along the wrapped tail to mimic the texture of the tail fur without being overly realistic. -
Refine the face:
Carve two simple curved slits for the sleepy, closed eyes. Add a gentle line for the mouth if desired, though the snout shape does most of the work. -
First firing (Ceramics only):
If using ceramic clay, dry the piece slowly and fire it to bisque temperature according to your clay’s specifications.
Step 3: Painting & Finishing
-
Highlighting the carving:
Dilute a small amount of black underglaze or paint with water. Brush this wash over the engraved botanical leaves and the chest dots, then immediately wipe the surface with a clean, damp sponge. The black will stay in the recesses while the surface remains white. -
Defining features:
Use a fine liner brush or a pin dipped in black pigment to carefully paint the nose tip, the closed eyelids, and the inner lines of the ears. I find a steady hand and very little paint work best here. -
Final coat:
If using ceramics, apply a clear matte glaze and fire again. If using polymer clay, bake according to package instructions and finish with a matte varnish to protect the surface.
Seasonal Variations
Instead of leaves, try carving varying symbols like snowflakes for winter or small flowers for spring. Changing the engraved motif gives the fox a completely different seasonal character.
Place your little woodland guardian near a window to let the light catch those subtle engraved textures.


A Stylized Ceramic Bust That Focuses on Mood
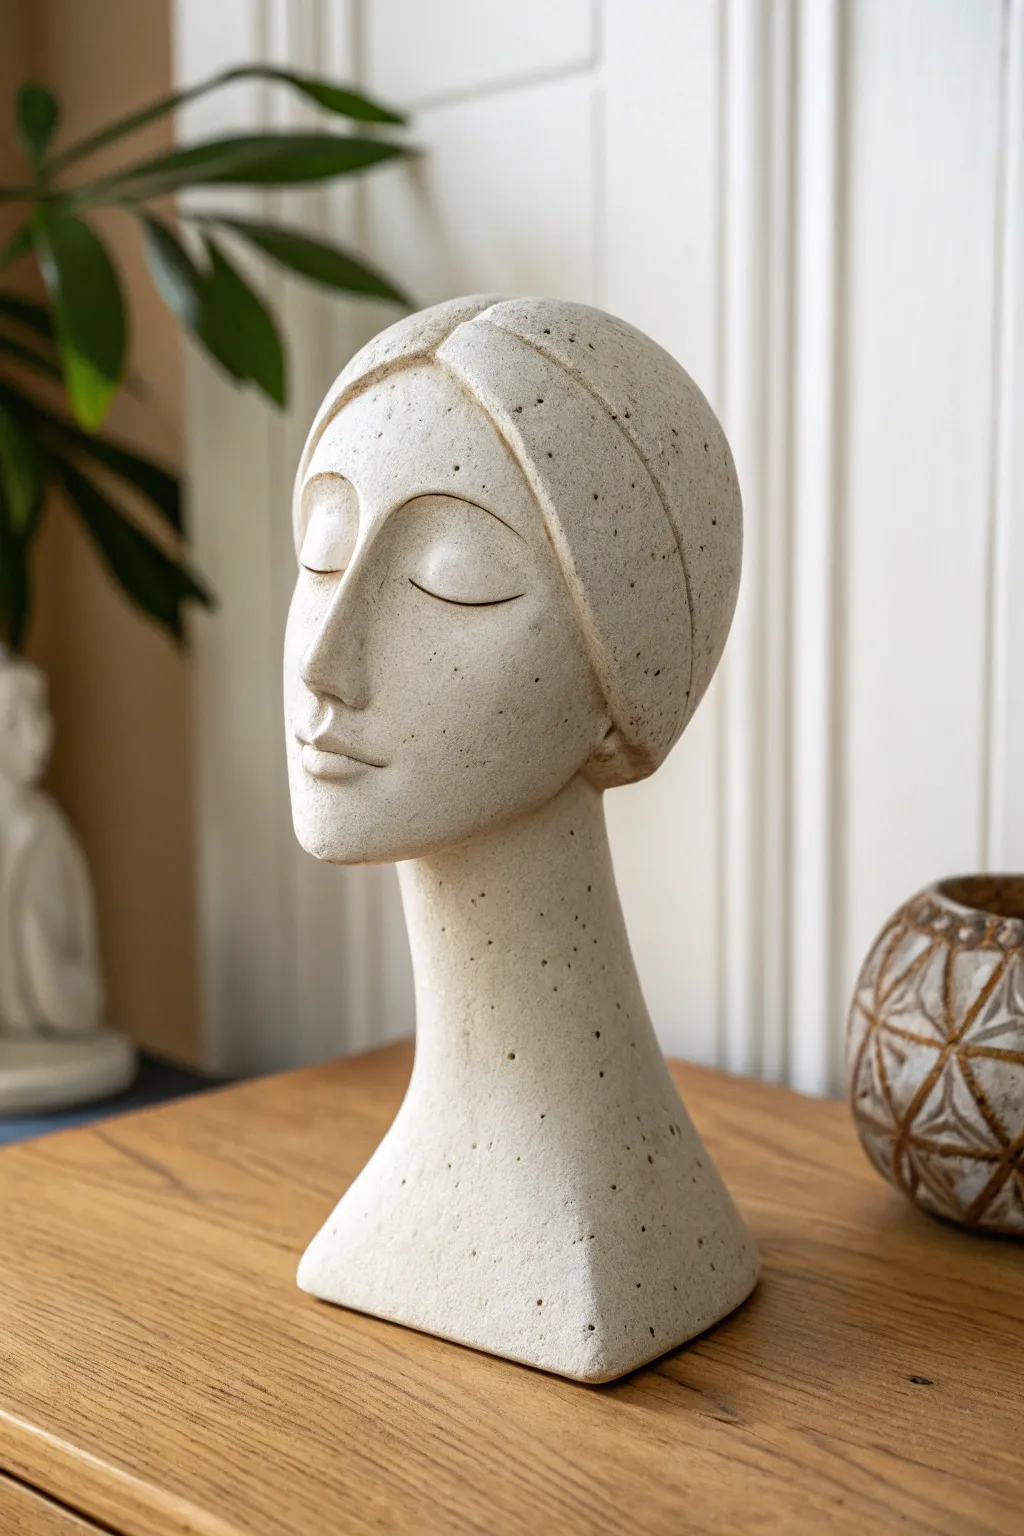
Capture a profound sense of calm with this stylized bust, characterized by its elongated neck, contemplative closed eyes, and a raw, speckled stone texture. The minimalist form draws inspiration from modern sculpture, focusing on smooth planes and gentle curves rather than hyper-realistic details.
Step-by-Step Guide
Materials
- Stoneware clay (buff or white grogged)
- Wooden sculpting tools
- Loop tools
- Fettling knife
- Slip and scoring tool
- Sponge
- Plastic wrap (for slow drying)
- Speckled matte glaze or oxide wash
- Optional: Black iron oxide or manganese dioxide (for speckling)
Step 1: Forming the Base Structure
-
Establish the Foundation:
Start by wedging your clay thoroughly to remove air pockets. Create a solid base slab about 3/4 inch thick in a rounded square shape, which will support the sculpture’s weight. -
Build the Shoulder Slope:
Using the coil building method, build up the shoulders. Create a gentle, downward slope rather than broad, realistic shoulders; this stylization emphasizes the neck. -
Construct the Elongated Neck:
Continue coiling upwards to form the neck. Deviate from realistic proportions by extending the cylinder taller than usual. Ensure the walls are even (about 1/2 inch thick) to prevent cracking. -
Adding Interior Support:
Since the neck is long, add a temporary support inside if the clay feels too soft, such as a paper towel tube wrapped in newspaper, to keep it upright while you work.
Neck Slumping?
If the long neck starts to bow, your clay is too wet. Pause and use a heat gun gently to stiffen the lower section, or insert a wooden dowel for internal support until leather hard.
Step 2: Sculpting the Head and Features
-
Form the Basic Head Shape:
Attach a hollow oval form for the head using the score and slip method. Shape it into a smooth, egg-like dome, keeping the back of the head relatively flat and the face area convex. -
Defining the Center Line:
Lightly draw a vertical guideline down the center of the face. This symmetry is crucial for the serene, meditative look we are aiming for. -
Carving the Brow Ridge:
Instead of adding clay for eyebrows, gently carve away clay from the eye sockets to create a continuous, elegant arch that flows directly into the nose bridge. -
Shaping the Nose:
Add a small wedge of clay for the nose. Blend it seamlessly into the brow ridge you just carved, creating a long, straight Grecian profile. -
Sculpting the Eyes:
For the closed eyes, shape two crescent mounds of clay. Score and attach them into the sockets. Keep them smooth and convex to simulate eyelids shut in meditation. -
Refining the Eyelid Crease:
Use a fine wooden tool to Incise a single, clean arching line across the eyelid mound. This simple line defines the crease without needing eyelashes. -
Forming the Mouth:
Keep the mouth small and subtle. Create a slight protrusion for the lips and use a wire tool to press a gentle horizontal line, turning the corners up almost imperceptibly. -
Adding the Head Wrap:
Roll a flat slab of clay and drape it over the top/back of the head to simulate a scarf or hair wrap. Trim it to follow the curve of the forehead and blend the edges at the nape of the neck.
Step 3: Surface Treatment and Finishing
-
Smoothing:
Once leather hard, use a slightly damp sponge to smooth out all tool marks. The goal is a matte, stone-like skin, not a glossy polish. -
Texturizing:
Take a stiff bristle brush or a needle tool and gently stipple the surface. I find this creates that wonderful porous, natural stone look seen in the reference. -
Drying:
Cover the piece loosely with plastic to dry very slowly over several days. The elongated neck is prone to cracking if it dries faster than the thicker head. -
Bisque Firing:
Fire the piece to bisque temperature (usually Cone 04 or 06) once it is bone dry. -
Applying the Speckle:
Apply a matte, creamy white glaze. Can lightly splatter iron oxide wash over the raw glaze to create the random brown speckles if your clay body doesn’t have them naturally. -
Final Glaze Fire:
Fire to the maturation temperature of your chosen clay and glaze (likely Cone 5 or 6 for stoneware).
Pro Tip: The Stone Look
To get that gritty texture without glaze tricks, mix ‘grog’ (fired, ground clay) or sand directly into your smooth clay body before sculpting. It adds structural strength too.
Place your finished sculpture in a spot with soft lighting to let the shadows accentuate the serene facial curves


Hand Gesture Sculptures (A Tiny Moment Frozen in Clay)
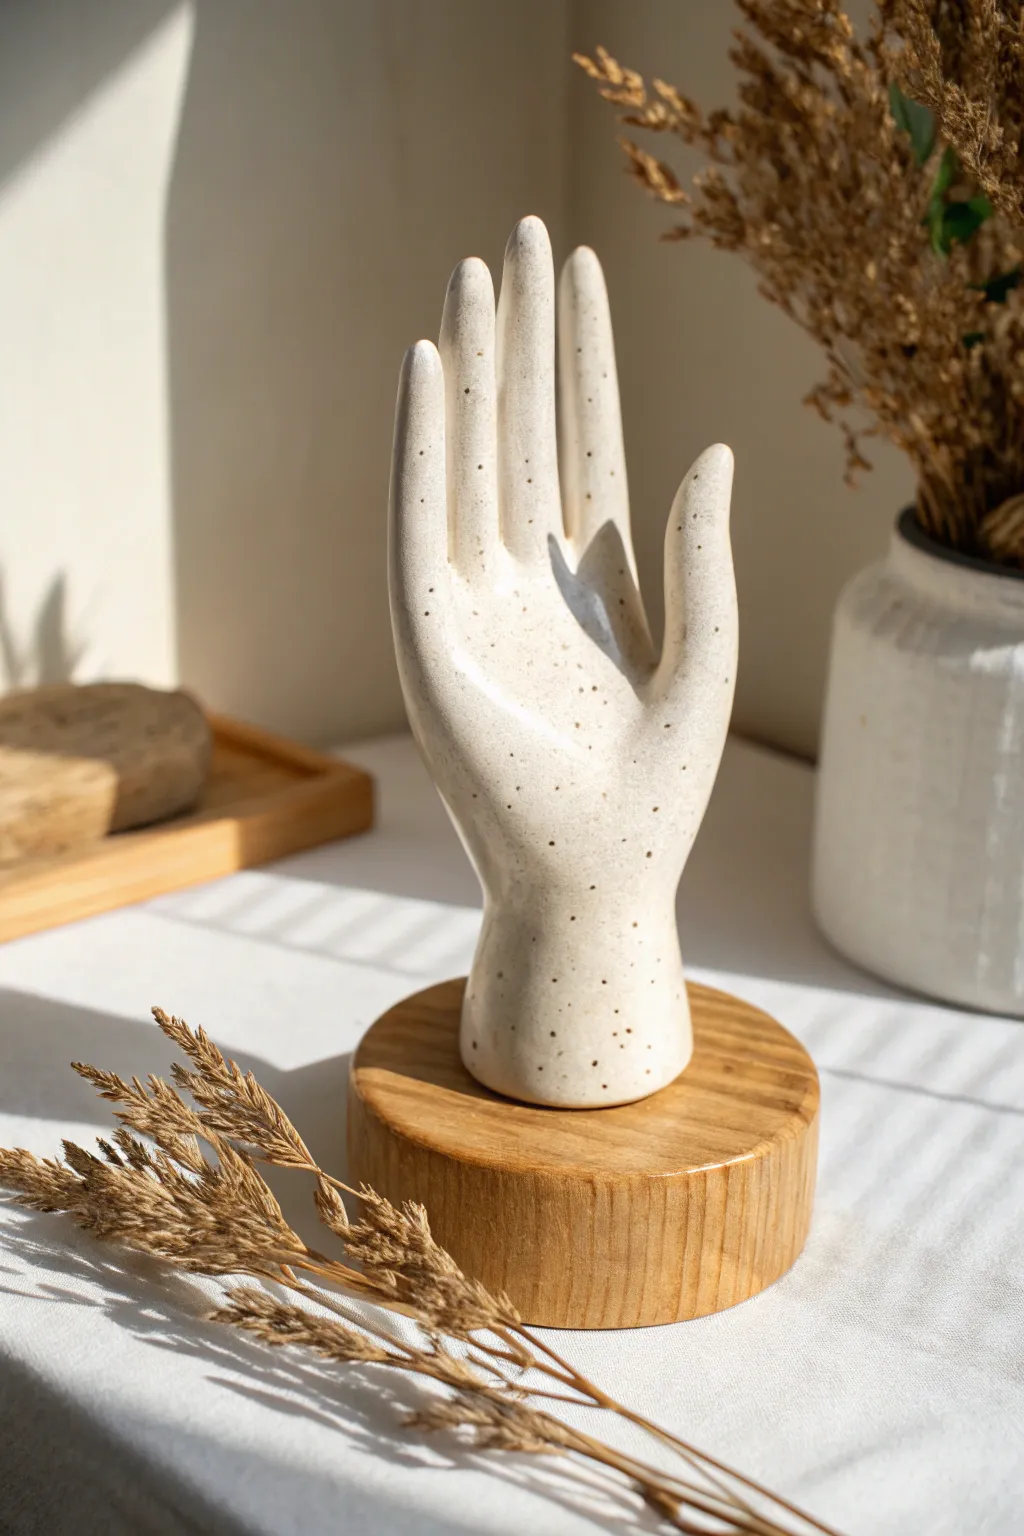
Sculpt a quiet moment of elegance with this stylized ceramic hand sculpture, perfect for holding rings or simply standing alone as art. The finish features a creamy, speckled glaze that pairs beautifully with a warm, minimalist wooden base.
How-To Guide
Materials
- Speckled buff stoneware clay (or white clay with speckles)
- Wooden circular base (approx. 4″ diameter)
- Strong two-part epoxy glue
- Clear wood varnish or beeswax
- Needle tool
- Rib tool (kidney shaped)
- Fettling knife
- Sponge
- Clear gloss glaze
- Kiln access
- Sandpaper (various grits)
Step 1: Sculpting the Form
-
Prepare the clay:
Begin by wedging a pound of speckled stoneware clay to remove any air bubbles. Roll it into a thick, smooth cylinder about the width of your own wrist. -
Establish the wrist:
Flatten the bottom of the cylinder firmly against your work surface to create a flat base for the sculpture itself. This needs to be completely level so it stands upright during firing. -
Flatten the palm:
Gently flatten the upper portion of the cylinder to create a paddle shape. This will become the palm and fingers. Keep the thickness consistent, roughly 1/2 to 3/4 inch thick. -
Outline the fingers:
Using a needle tool, lightly sketch the outline of the fingers and thumb onto the flattened clay. Aim for a slightly elongated, elegant style rather than perfect anatomical realism. -
Cut the shape:
Use your fettling knife to cut away the negative space between the fingers. Do this carefully, removing small wedges of clay. -
Round the edges:
Dip your fingers in a little water and smooth all the sharp cut edges. Gently round each finger so they look organic and soft rather than blocky. -
Shape the gesture:
Gently manipulate the clay while it is still plastic. Push the thumb slightly forward and curve the fingers back just a hair to create a natural, relaxed gesture. -
Refine the surface:
Take a damp sponge and wipe down the entire piece to remove any fingerprints or tooling marks. The surface should be impeccably smooth. -
Dry and fire:
Let the piece dry slowly under loose plastic for a few days to prevent cracking. Once bone dry, bisque fire it according to your clay body’s specifications.
Thumb Troubles?
If the thumb or fingers feel fragile or won’t stay upright while wet, prop them up with small pieces of foam or crumpled newspaper until the clay stiffens to leather-hard.
Step 2: Glazing and Assembly
-
Apply glaze:
Dip the bisque-fired hand into a clear gloss glaze. If your clay body is plain white, use a ‘speckled’ specialty glaze instead. Wipe the very bottom of the wrist clean with a sponge. -
Glaze fire:
Load the kiln again and fire to the maturity temperature of your clay and glaze (likely Cone 5 or 6 for stoneware). -
Prep the base:
While the kiln cools, prepare your wooden base. Sand the cylindrical wood block until it is silky smooth, paying attention to the edges. -
Seal the wood:
Apply a coat of clear varnish or beeswax to the wood to bring out the grain and protect it. Let it cure completely. -
Test fit:
Once the ceramic piece is cool, place it centrally on the wooden base to find the best orientation. -
Mix epoxy:
Mix a small amount of strong two-part epoxy in a disposable tray. You want a 5-minute set or similar strength adhesive. -
Apply adhesive:
Apply a thin, even layer of epoxy to the ceramic wrist’s bottom surface. Avoid getting too close to the edge to prevent squeeze-out. -
Final mount:
Press the ceramic hand firmly onto the center of the wooden base. Hold it steady for a few minutes until the bond sets.
Pro Tip: Hidden Weight
Hollow out the wrist slightly from the bottom before attaching it to the base. This reduces weight and helps the clay dry more evenly, minimizing the risk of firing cracks.
Place your finished sculpture in a spot where the sunlight can catch the gloss and highlight those lovely speckles


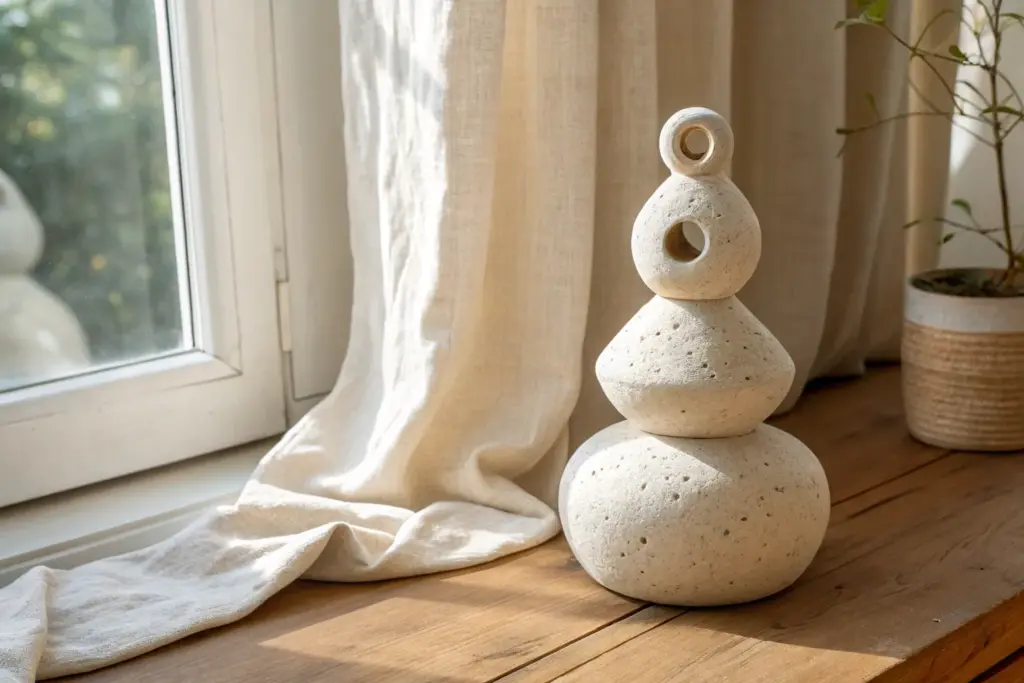
Coil-Built Totem Sculptures You Can Stack Your Way
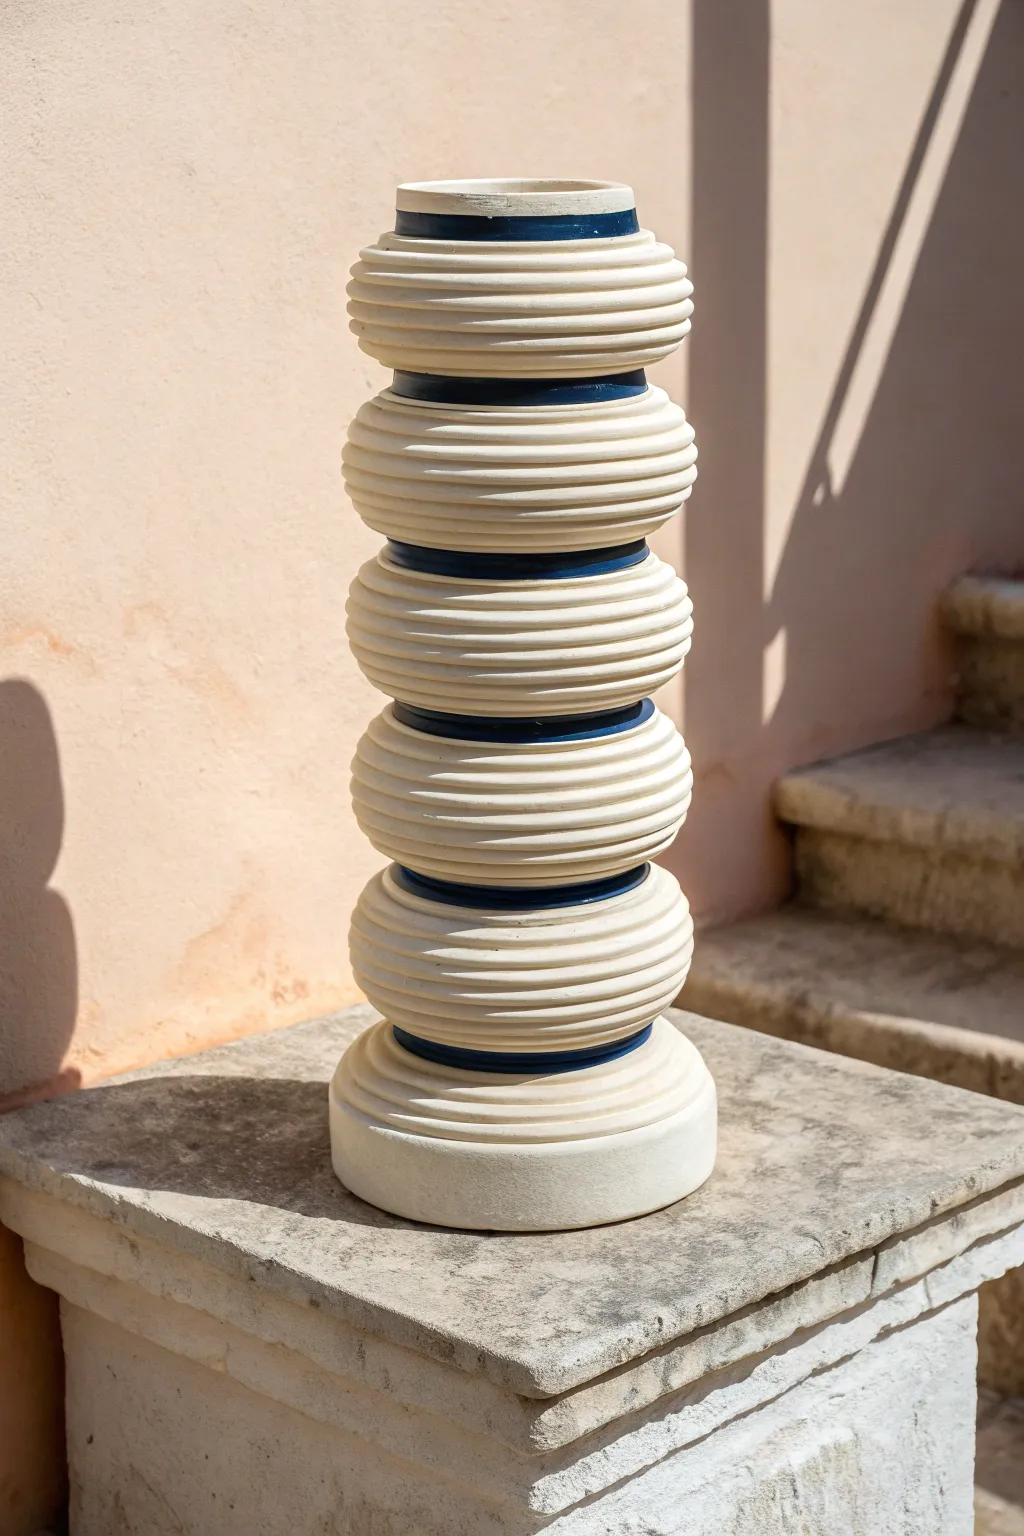
Bring a sense of architectural structure and coastal calm to your space with this segmented ceramic totem. Featuring a rhythm of cream-colored ribbed spheres stacked with deep blue accents, this sculpture balances organic texture with geometric precision.
Step-by-Step Guide
Materials
- Stoneware clay (groggy, buff or white)
- Pottery wheel (optional, can be fully hand-built)
- Extruder (optional for coils)
- Ribbing tool or serrated kidney scraper
- Slip and score tool
- Needle tool
- Deep blue underglaze or glaze
- Matte clear glaze (optional)
- Canvas work surface
- Sponge
Step 1: Forming the Base Segments
-
Prepare your clay:
Wedge your stoneware clay thoroughly to remove air pockets. For a totem of this height (roughly 18-24 inches), you’ll need a substantial amount of clay, likely around 15-20 lbs depending on wall thickness. -
Create the base cylinder:
Start with the bottom-most segment. This piece is unique because it needs a flat, stable foot. Construct a wide, low cylinder about 8 inches in diameter and 3 inches high using thick coils or by throwing a bottomless ring on the wheel. -
Shape the footer:
Angle the walls of your base cylinder slightly inward as you go up, creating a gentle slope. This isn’t a full sphere like the upper sections; it acts as the plinth for the sculpture. -
Refine the rim:
Ensure the top rim of this base piece is perfectly level and flat, with a sufficient thickness (roughly 1/2 inch) to support the weight of the pieces above.
Wobbly Towers?
If segments rock or don’t sit flat, use a rasp or heavy-grit sandpaper on the bisque-fired connection points to level them before applying glaze and doing the final firing.
Step 2: Constructing the Ribbed Spheres
-
Build the first sphere:
For the main body segments, you will be creating flattened spherical shapes. I find it easiest to build these as closed forms initially. Coil build or throw a shape that resembles a beehive or a flattened pumpkin. -
Apply the ribbed texture:
While the clay is leather hard but still malleable, use a rounded sculpting tool or a profiled rib to carve deep, consistent horizontal grooves around the entire circumference. Aim for 5-7 ridges per segment. -
Create the connection points:
The ‘neck’ connecting the spheres is crucial. At the top and bottom of your sphere, model a distinct, smooth recessed ring. This inset area will later be painted blue and serves as the visual separator. -
Ensure fit:
Before they dry, stack your fresh segments gently to check that the top of one fits snugly into the bottom of the next. The smooth inset rings should align perfectly. -
Repeat the process:
Create 4 to 5 identical ribbed sphere segments. Consistency is key here, so use calipers to measure the width and height of each one to keep them uniform. -
Cap the top:
For the final top piece, create a flat, smooth disc that sits inside the upper blue ring of the highest sphere. This gives the totem a finished, architectural look rather than leaving an open hole.
Internal Strength
For outdoor safety, leave a hole in the center of every segment (top/bottom). Once installed, run a piece of rebar or PVC pipe through the entire stack into the ground for stability.
Step 3: Surface Treatment and Assembly
-
Smooth the ridges:
Once leather hard, use a damp fine-pore sponge to gently round over the sharp edges of your carved ribs. You want them defined, but soft enough to touch. -
Dry slowly:
Because these pieces carry weight, uneven drying can cause warping. Cover the pieces loosely with plastic and let them dry very slowly over several days until bone dry. -
Bisque fire:
Load your kiln and bisque fire the segments. You can stack them if they are sturdy enough, but firing them separately is safer to prevent sticking or warping. -
Apply the accent color:
Using a small brush, carefully apply three coats of deep blue underglaze or glaze specifically to the recessed connection rings and the very top rim. Keep the ribbed areas bare to show off the raw clay body. -
Glaze or wash (optional):
If you want a sealed finish, apply a very thin matte clear glaze over the ribbed sections. Alternatively, leave the raw clay for a textural, unglazed stone look. -
Final firing:
Fire the pieces to the maturity temperature of your clay body (likely Cone 5 or 6 for stoneware). Ensure no glaze is on the contact points where the segments touch the kiln shelf. -
Permanent assembly:
Once fired and cooled, you can stack the totem in your garden or home. For a permanent installation, use a strong outdoor adhesive like E6000 or silicone between the segments to secure them together.
Step back and admire how the simple repetition of form creates a striking vertical statement piece.

The Complete Guide to Pottery Troubleshooting
Uncover the most common ceramic mistakes—from cracking clay to failed glazes—and learn how to fix them fast.
Ceramic Wall Relief Tiles With Botanical Texture
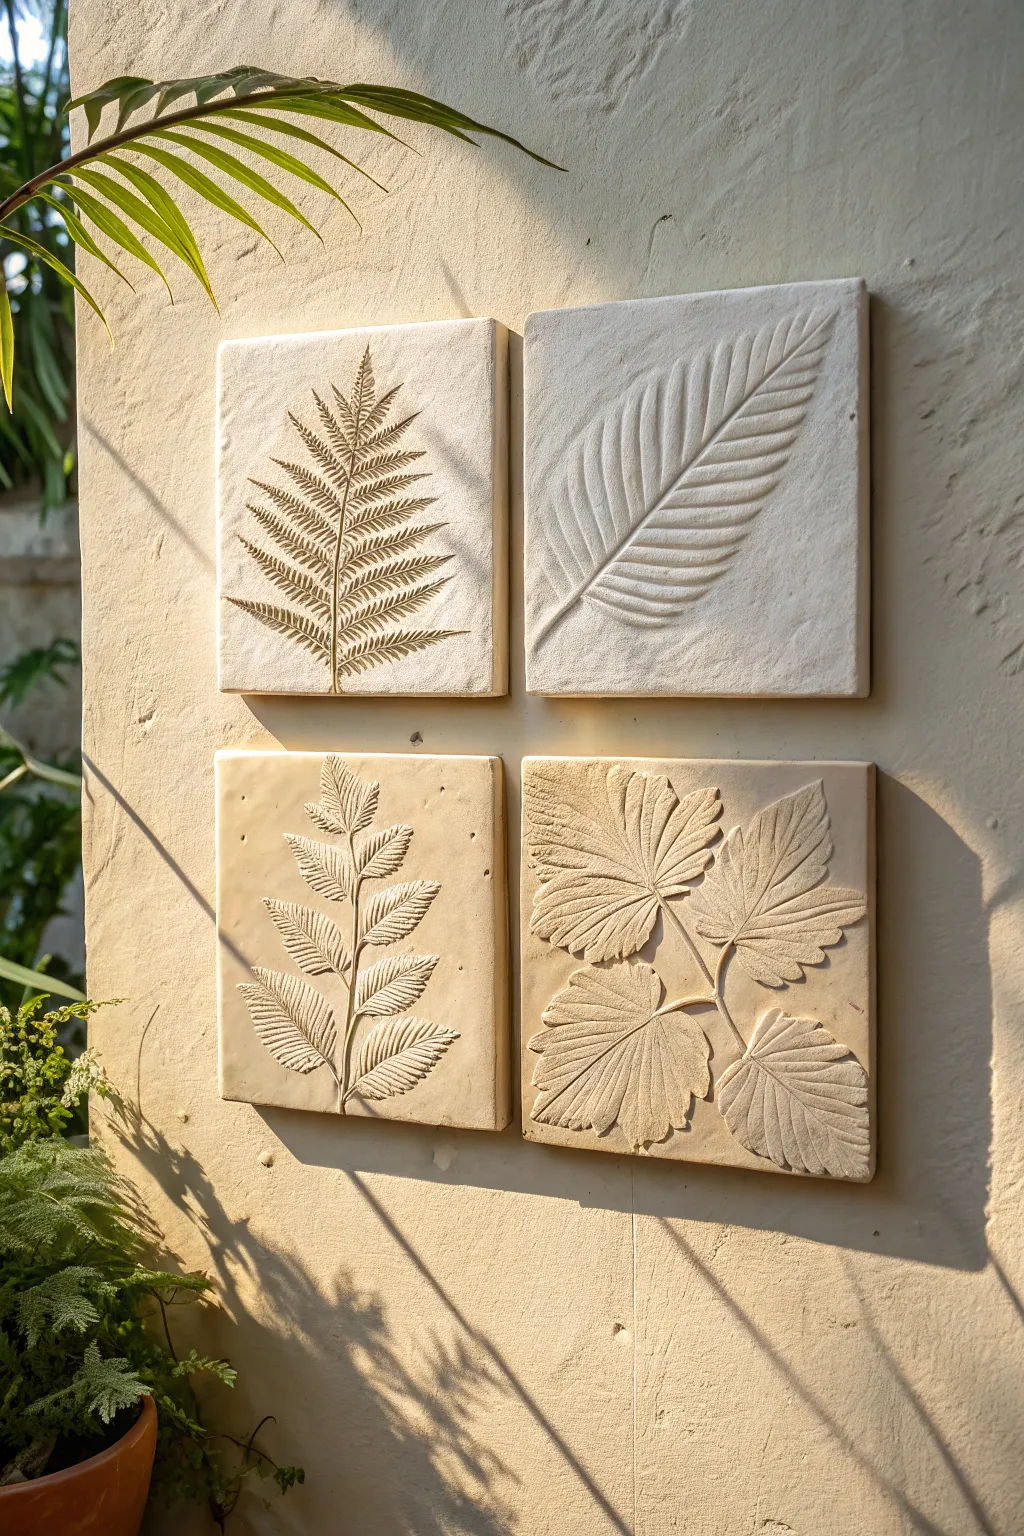
Capture the delicate details of nature forever with these elegant ceramic wall relief tiles. This project uses real foliage to create deeply embossed textures, resulting in a sophisticated, fossil-like finish that brings organic beauty into your home decor.
Step-by-Step Tutorial
Materials
- Light stoneware or earthenware clay (with grog for strength)
- Fresh botanical specimens (ferns, leaves with prominent veins)
- rolling pin
- Wooden guide strips (approx. 1/2 inch thick)
- Canvas mat or slab roller
- Fettling knife or needle tool
- A square template (cardboard or wood)
- Rib tool (rubber or metal)
- Ware board
- Kiln
- Matte white or light beige glaze (optional)
Step 1: Preparation and Slab Rolling
-
Select your foliage:
Begin by foraging for your botanical subjects. Look for leaves with strong, raised veins on the back or interesting serrated edges. Ferns, as seen in the top left tile of the example, and deeply veined tree leaves work best for distinct impressions. -
Prepare the clay:
Wedge your clay thoroughly to remove air pockets. I find that using a clay body with a little fine grog helps the tiles dry flat without warping. -
Set up guides:
Place your wooden guide strips on either side of your clay on a canvas surface. These ensure your slab is a consistent thickness, which is crucial for even drying. -
Roll out the slab:
Using your rolling pin, roll the clay out until the pin rests firmly on the guide strips. You want a slab that is roughly 1/2 inch thick. -
Smooth the surface:
Take a rubber or metal rib tool and compress the surface of the clay slab. Smooth out the canvas texture completely; you want a pristine, blank canvas for your leaf print.
Step 2: Creating the Relief
-
Position the botanicals:
Layout your chosen leaves on top of the smoothed clay slab. Place them vein-side down, as the veins are what create the detailed relief pattern. -
Embed the leaves:
Gently roll over the leaves with your rolling pin. Apply firm, steady pressure to press them into the clay, ensuring they sit flush with the surface but aren’t buried too deep. -
Cut the tiles:
Place your square template over the pressed leaves. Use a fettling knife or needle tool to cut vertically around the template. Don’t drag the knife; cut straight down to keep the edges sharp. -
Remove the excess:
Lift away the excess clay from around your square tiles. -
Reveal the texture:
Carefully find the stem or edge of a leaf and peel it back slowly to reveal the impression. This is the most satisfying part, seeing the perfect negative space left behind.
Warping Woes?
If corners lift while drying, gently weight them down with small sandbags. Drying evenly and slowly is key—never rush tiles with a heat gun or direct sun.
Step 3: Finishing and Firing
-
Clean the edges:
Once the tiles are leather-hard (stiff but still cool to the touch), use a damp sponge or your finger to soften the sharp cut edges slightly. -
Add hanging method:
Flip the tiles over and score the back to add a clay loop, or create two angled holes for wire. Do this while leather-hard. -
Make the holes (alternative):
If you plan to mount these flush with adhesive as shown in the photo, ensure the backs are perfectly flat and scored for grip. -
Slow drying:
To prevent warping—the enemy of flat tiles—sandwich your tiles between two pieces of drywall or wooden ware boards, turning them daily. Let them dry very slowly. -
Bisque fire:
Load the bone-dry tiles into the kiln for a bisque firing (usually to Cone 04). Ensure they are supported evenly. -
Glaze application (optional):
For the raw stone look shown, you might leave the clay bare or apply a very thin, matte clear glaze. Alternatively, a wash of iron oxide wiped back can highlight the veins. -
Final firing:
Fire the tiles to the maturity temperature of your specific clay body.
Pro Tip: Depth Control
If you want deeper definition without thinning the slab, place a piece of newspaper over the leaf before rolling. This prevents the leaf from tearing or sticking to the roller.
Once mounted, the play of light across the textured surfaces will bring dynamic, natural elegance to your room
Hollow Seed Pod Sculptures Inspired by Nature
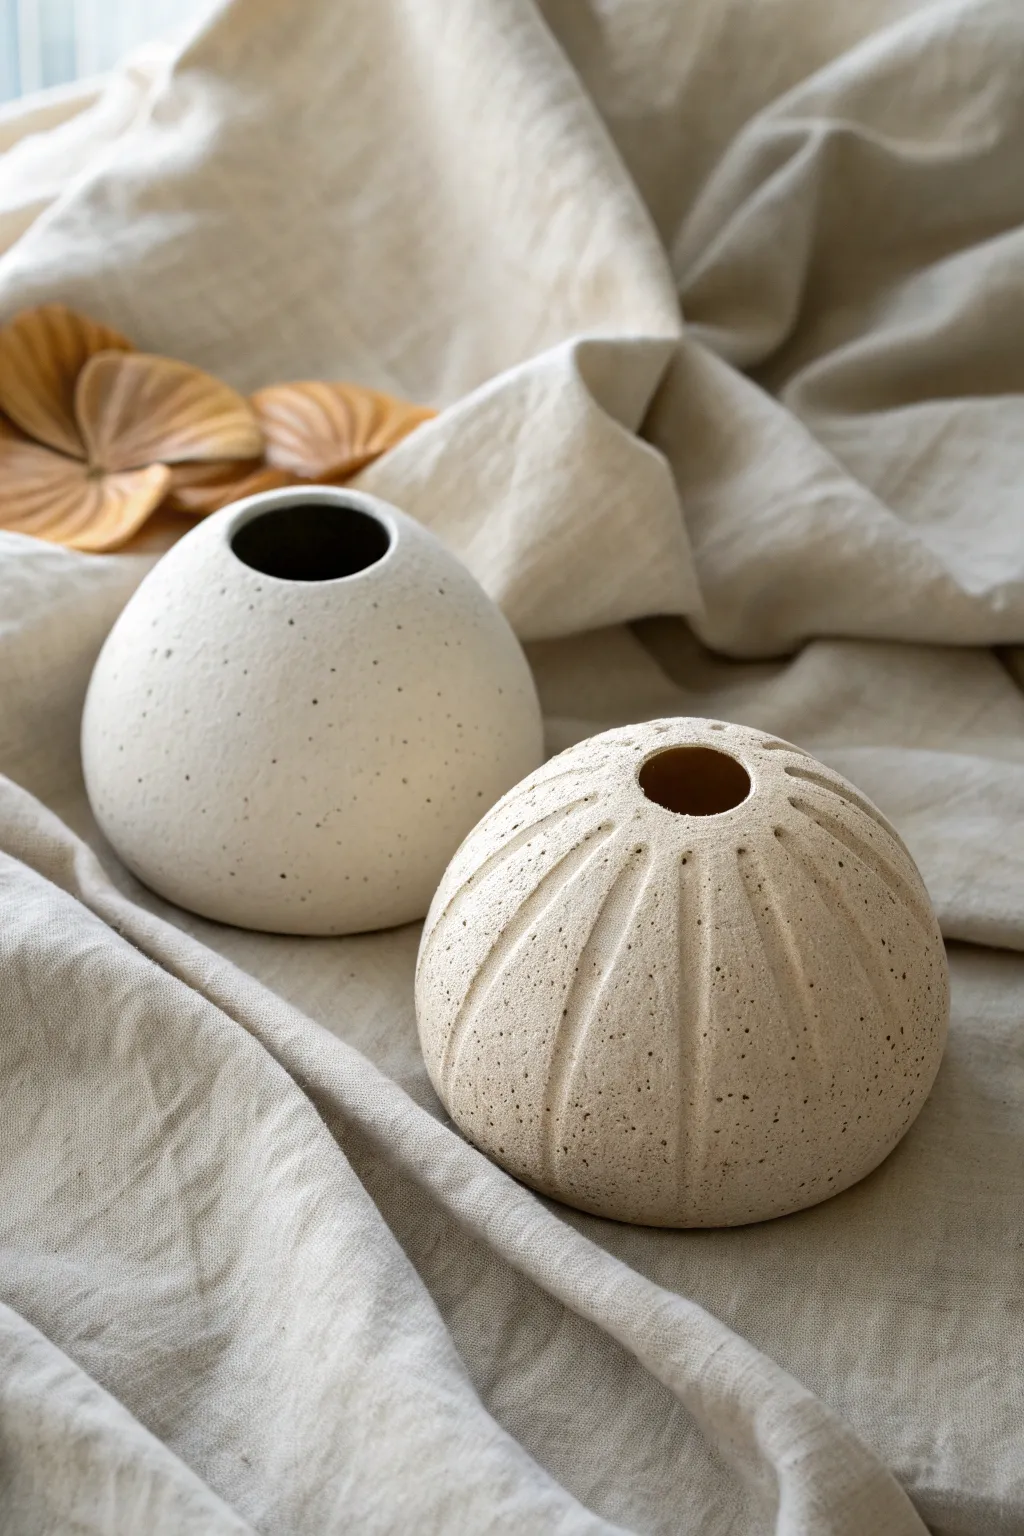
These charming, rounded forms capture the organic simplicity of nature, featuring speckled clay bodies and delicate textures reminiscent of sea urchins or poppy heads. Perfect for displaying dried stems or standing alone as sculptural elements, they bring a calm, earthy aesthetic to any shelf.
Step-by-Step
Materials
- Speckled stoneware clay (white or buff)
- Pottery wheel (optional) or rolling pin and canvas
- Rib tools (wooden and flexible metal/rubber)
- Needle tool
- Carving tool (loop tool or specific fluting tool)
- Sponge
- Plastic bat or banding wheel
- Spray bottle with water
- Clear matte glaze
Step 1: Forming the Base Structure
-
Prepare the clay:
Begin by wedging your speckled stoneware clay thoroughly to remove air pockets and align the particles. For two small pods like these, you’ll need about 1 to 1.5 pounds of clay per piece. -
Create a pinch pot (Handbuilding method):
If handbuilding, start with a ball of clay. Insert your thumb into the center and gently pinch the walls while rotating the ball in your palm. Aim for an even thickness of about ¼ inch throughout the sphere. -
Close the form (Handbuilding method):
Continue pinching the walls upward and inward until they curve completely to form a hollow sphere. Leave a small opening at the top, or close it completely and cut a hole later. Use a paddle to gently tap the outside to refine the round shape. -
Throwing a closed form (Wheel method – Alternative):
If using a wheel, center your clay and open it deep but narrow. Pull the walls upward and cylinder-like, then slowly collar the neck inward with each pass until you have a narrow aperture at the top. -
Refine the surface:
Whether thrown or pinched, use a flexible metal or rubber rib to smooth the exterior. This compresses the clay and brings the grog or speckles subtly to the surface. It helps to support the wall from the inside with a finger if the opening allows.
Step 2: Sculpting the Details
-
Establish the opening:
If you closed the form completely, wait until the clay is leather hard, then use a needle tool to cut a clean, circular opening at the very top. Smooth the rim with a damp sponge or chamois so the edge is soft and inviting. -
Create the smooth pod:
For the plain pod on the left, your work is nearly done. Ensure the curve is continuous and the surface is blemish-free. I often run a barely damp sponge over it one last time to ensure the texture is uniform. -
Marking the ribbed pod:
For the textured pod on the right, use a needle tool to lightly score guidelines. Draw a circle around the top opening, then mark vertical meridians spacing out where your carved lines will go to ensure they are evenly distributed. -
Carving the ribs:
Using a loop tool or a U-shaped carving tool, gently drag from the bottom of the pod upward toward the rim. Vary the pressure slightly; start light at the bottom, deepen the cut in the middle belly of the pot, and lighten up again as you near the rim. -
Refining the grooves:
Once all lines are carved, use a stiff brush or your finger to smooth down any sharp clay crumbs or burrs created by the carving tool. The edges of the cuts should feel soft to the touch, not sharp. -
Add texture to the rim:
For the ribbed pod, add small impressed dots or tiny dashes around the immediate rim of the opening using a small dowel or the end of a paintbrush handle to create that seed-head look.
Air Pressure Tip
When closing a hollow form, trapped air supports the walls like a balloon. Don’t poke the air release hole until stiff, or it might collapse.
Step 3: Finishing and Firing
-
Slow drying:
These closed forms can trap moisture. Cover them loosely with plastic for a day or two to let them dry slowly and evenly, preventing cracks, especially where the thickness varies due to carving. -
Bisque fire:
Once bone dry, load the pieces into the kiln for a bisque firing (usually Cone 06 or 04). This prepares perfectly for glazing. -
Glazing:
Since the beauty here is the speckled clay body, use a clear matte glaze. Dip the pod or brush on thin layers. Alternatively, you can leave the exterior unglazed if your clay vitrifies nicely, only glazing the interior to make it watertight. -
Wipe the foot:
Ensure the bottom of the pod (the foot) is completely free of glaze before firing to prevent it from sticking to the kiln shelf. -
Final firing:
Fire to the maturity temperature of your specific clay body (likely Cone 5 or 6 for stoneware). Allow the kiln to cool completely before removing your new sculptures.
Nature’s Wash
Apply an iron oxide wash into the carved grooves and wipe it back with a sponge. This darkens the recesses and highlights the carving depth.
Set your finished pods on a windowsill where the natural light can play across those lovely carved textures.


What Really Happens Inside the Kiln
Learn how time and temperature work together inside the kiln to transform clay into durable ceramic.
A Cluster of Ceramic Mushrooms for Whimsical Shelf Decor
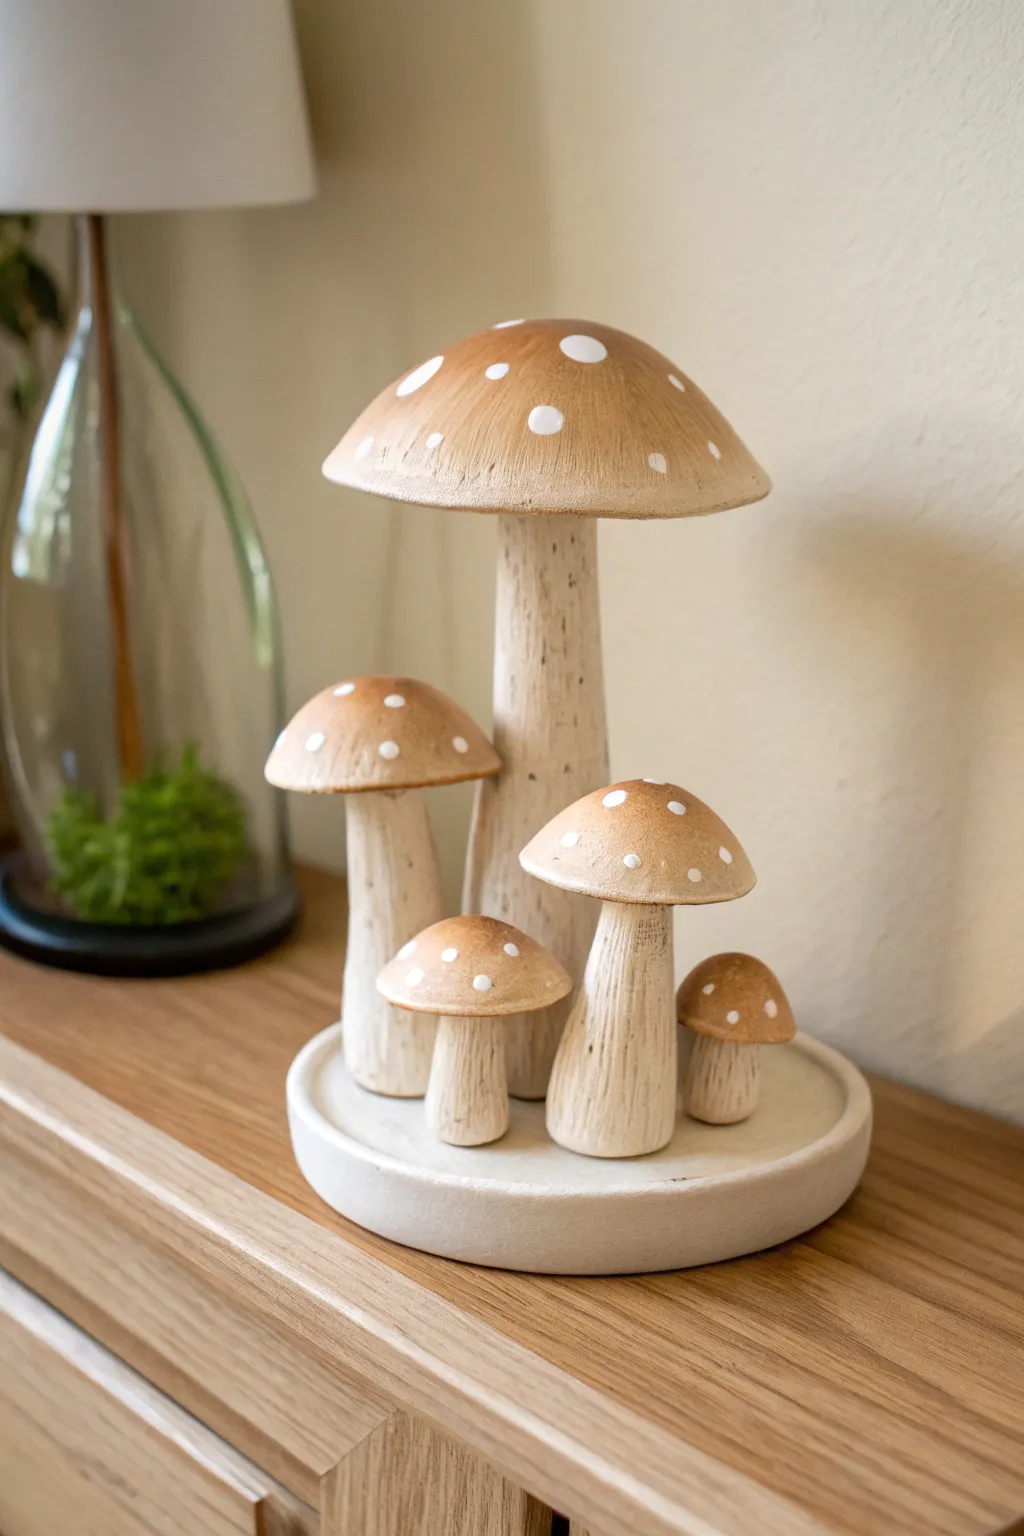
This charming ceramic sculpture features a family of five delightful mushrooms in varying sizes, all sprouting from a unified round base. The piece combines a textured, earthy beige finish on the stems with soft caramel-coloured caps dotted with cheerful white spots for a magical woodland feel.
Step-by-Step Tutorial
Materials
- Light-colored speckled stoneware clay (or white earthenware)
- Pottery wheel (optional for base, but hand-building works too)
- Modelling tools (needle tool, wooden rib, sponge)
- Slip and scoring tool
- Rolling pin
- Underglazes: Caramel brown, White, and a warm Beige wash
- Clear matte glaze
- Kiln
- Small round paintbrushes
- Wire cutter
Step 1: Forming the Components
-
Create the base:
Start by forming a flat, round disk of clay approximately 15-18cm in diameter and 1.5cm thick. You can throw this on the wheel for a perfect circle or roll out a slab and cut it. If throwing, trim a neat foot ring underneath once leather hard. -
Roll the stems:
Roll out five coils of clay for the stems. You’ll need one tall and thick master stem, two medium-sized stems, and two smaller, stouter stems. Taper them slightly so they are wider at the bottom and narrower at the neck. -
Shape the texture:
Before attaching anything, take a serrated rib or a stiff brush and drag it vertically up the sides of each stem. This creates that lovely organic, fibrous bark texture seen in the reference photo. -
Form the caps:
Roll five balls of clay corresponding to your stem sizes. Pinch each ball into a distinct mushroom cap shape—rounded on top and slightly undercut underneath. Keep the edges smooth and rounded, not sharp. -
Secure the stems:
Score the connection points on your base heavily. Apply slip, then firmly press your stems onto the base in a pleasing, clustered arrangement. I like to keep the tallest one slightly off-center for better balance. -
Attach the caps:
Score and slip the tops of the stems and the undersides of the caps. Press them together gently, wiggling slightly to create a vacuum seal. Ensure the clay is blended at the connection point if you want a seamless look, or leave the join visible for a ‘gill’ effect. -
Refine the surface:
Use a damp sponge to smooth out any fingerprints on the caps, but be careful not to erase the vertical texture you created on the stems. -
Drying:
Cover the piece loosely with plastic to let it dry very slowly. Because the stems vary in thickness, fast drying can cause cracks at the base. Once bone dry, bisque fire the piece.
Hollow Those Stems!
For stems thicker than your thumb, gently hollow them out from the bottom before attaching them to the base. This prevents explosions during firing.
Step 2: Glazing and Finishing
-
Apply the stem wash:
Mix a very watered-down beige or light sepia underglaze. Brush this loosely over the textured stems. Use a damp sponge to wipe most of it back, leaving the color settled deep into the vertical crevices to highlight the texture. -
Paint the caps:
Apply 2-3 coats of a caramel or light brown underglaze to the mushroom caps. Use smooth, concentric strokes from the center outward to keep the finish neat. -
Add the dots:
Using a small detail brush or the back end of a drill bit, dot opaque white underglaze onto the caps. Vary the sizes slightly—some large, some tiny pinpricks—to make the pattern look natural rather than manufactured. -
Clear glaze:
Once the underglaze is completely dry, apply a coat of clear matte glaze over the entire piece. A matte finish is crucial here to maintain the rustic, woodland aesthetic; a glossy finish would look too artificial. -
Final firing:
Fire the piece to your clay body’s recommended glaze temperature (likely Cone 5 or 6 for stoneware). Ensure the kiln is well-vented.
Cracking at the Base?
If stems separate from the base during drying, coil a tiny ‘snake’ of wet clay around the join and blend it smoothly with a modelling tool to reinforce the seam.
Place your finished mushroom cluster on a bookshelf or mantelpiece to bring a touch of forest magic indoors
Bird-on-a-Branch Ceramic Sculptures With Clean Lines
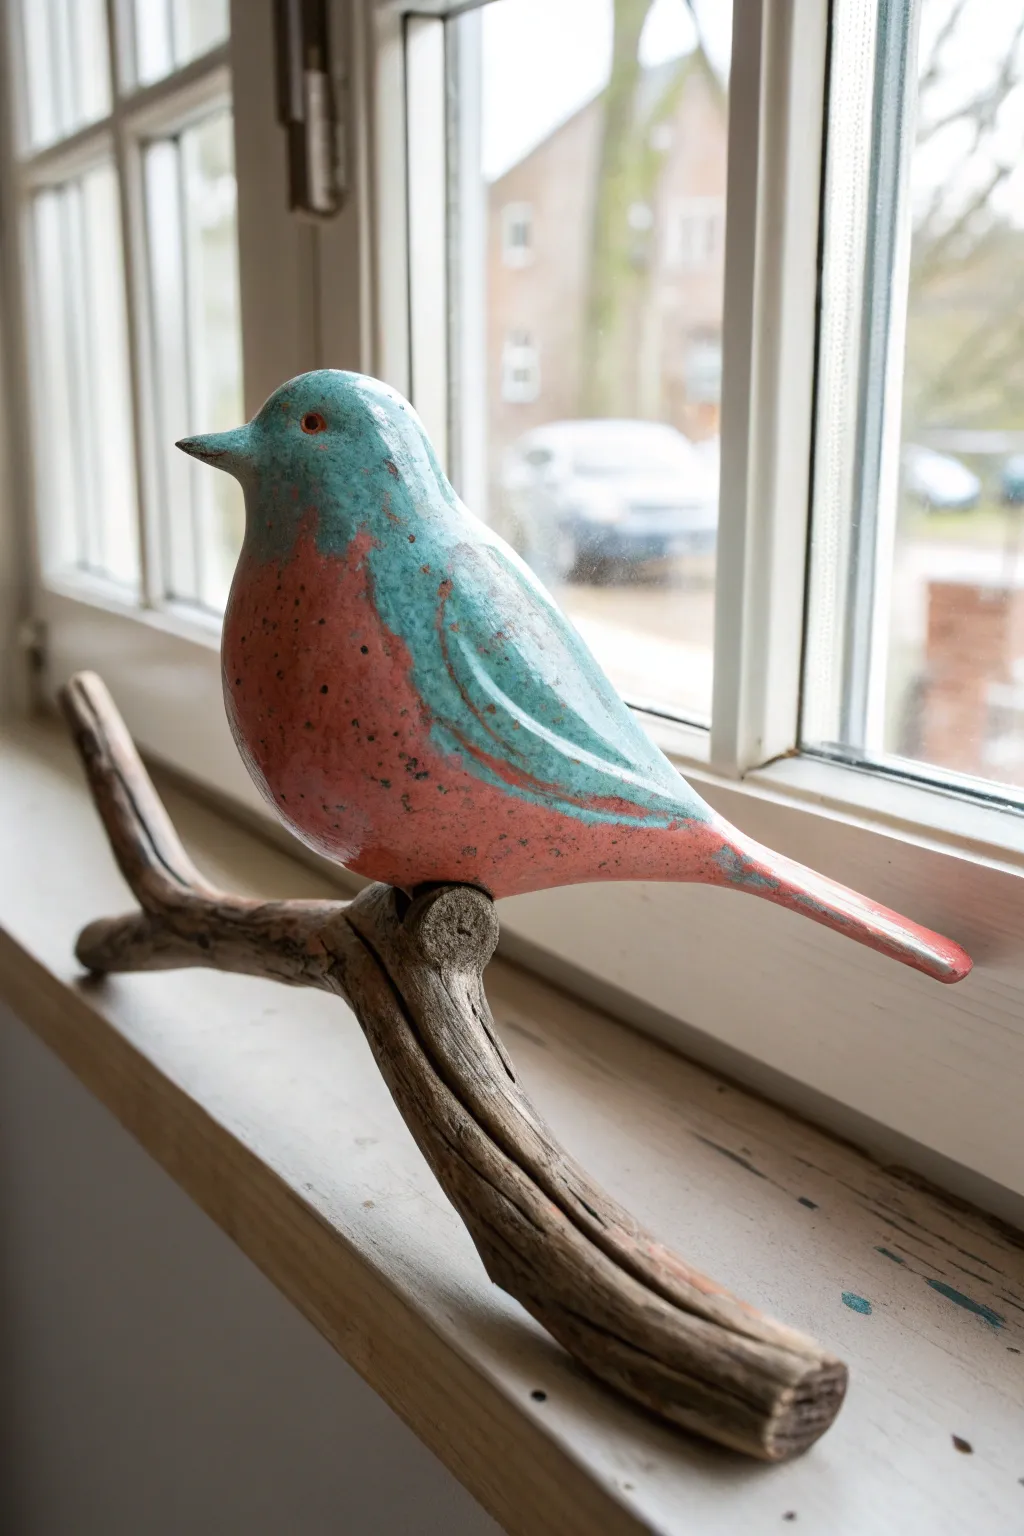
This charming ceramic sculpture combines the smooth, cool finish of glazed pottery with the rugged texture of natural wood. The simple, stylized form of the bird, finished with a delightful distressed glaze effect, creates a timeless piece perfect for a windowsill display.
Step-by-Step
Materials
- White earthenware or stoneware clay (low-fire or mid-fire)
- Small piece of driftwood or weathered branch
- Pottery tools (needle tool, rib tool, sponge)
- Slip (liquid clay)
- Scoring tool or old fork
- Underglazes: Bright turquoise/teal and salmon pink/coral
- Clear glaze (optional for extra shine)
- Kiln access
- Strong two-part epoxy adhesive
- Sandpaper
Step 1: Sculpting the Bird
-
Prepare the Clay Body:
Begin with a fist-sized ball of well-wedged clay to remove air bubbles. Gently elongate it into a smooth, thick teardrop shape, keeping the wider end for the chest and the tapered end for the tail. -
Define the Head:
At the rounded top of your teardrop, pinch and smooth the clay to define a distinct head area, separating it slightly from the chest curve. -
Pull the Beak:
Pinch a very small amount of clay at the front of the face and gently pull it outward to form a short, pointed beak. Smooth the connection point so it flows seamlessly into the head. -
Shape the Wings:
Instead of adding separate pieces, use a modeling tool or your thumb to press subtle indentations into the sides of the body. This relief technique suggests folded wings without breaking the sculpture’s clean silhouette. -
Refine the Tail:
Elongate the tail section, making it flat and slightly rounded at the tip. Ensure it extends straight back to balance the visual weight of the heavy chest. -
Check the Balance:
Since this bird will sit on a branch, you need a concave curve on the belly. Press the bird gently onto a dowel or a similar round object to create a saddle-shaped indentation underneath. -
Add Eye Details:
Use the back of a small paintbrush or a detail tool to press a small, deep circular indentation for the eye on each side of the head. -
Smooth the Surface:
Use a slightly damp sponge to wipe down the entire piece, removing fingerprints and smoothing rough areas. The charm lies in the simplicity, so try to keep the curves fluid. -
Drying and Bisque Fire:
Allow the bird to dry slowly under plastic for at least a week to prevent cracking. Once bone dry, bisque fire the piece in the kiln according to your clay’s specifications.
Step 2: Glazing and Finishing
-
Apply the Base Pink:
Paint the salmon pink underglaze primarily on the belly and chest area. Brush it on generously, allowing for an organic, uneven edge where it will meet the blue. -
Apply the Turquoise Layer:
Apply the turquoise underglaze to the head, back, wings, and tail. Carefully bring the blue down to meet and slightly overlap the pink edges to create harmony between the zones. -
Distress the Finish:
For that antiqued look, take a slightly damp sponge or fine sandpaper (if the underglaze is dry) and gently rub areas where the ‘paint’ might naturally wear—like the beak tip, wing ridges, and tail edges. I like to reveal just a hint of the raw clay underneath. -
Glaze Firing:
If you want a glossy finish, apply a coat of clear glaze over the entire bird. Fire the piece again to the appropriate temperature for your glazes. -
Prepare the Wood Base:
While the bird is firing, clean your driftwood branch. If it’s rough, lightly sand any sharp protruding splinters, but keep the natural bark texture intact. -
Test the Fit:
Once the bird is fired and cooled, place it onto the branch to find the most stable position where the belly curve sits naturally. -
Final Assembly:
Mix a small amount of clear two-part epoxy. Apply it to the contact points on the branch and press the bird firmly in place. -
Curing:
Prop the branch up if necessary so the bird stays level while the glue sets. Allow it to cure fully undisturbed for 24 hours before displaying.
Wobbly Bird?
If the bird won’t sit flush on the wood, put a small dab of epoxy putty (instead of liquid glue) in the gap. It fills the void and hardens like rock for a perfect custom fit.
Level Up: Metal Legs
Before drying, poke two holes in the belly. After firing, glue in two thick rusty nails or copper wire lengths, then drill matching holes in the wood for a ‘standing’ bird look.
Place your finished sculpture near a window where natural light can highlight the beautiful contrast between the glossy glaze and matte wood

TRACK YOUR CERAMIC JOURNEY
Capture glaze tests, firing details, and creative progress—all in one simple printable. Make your projects easier to repeat and improve.
A Playful Creature Mask Sculpture for the Wall
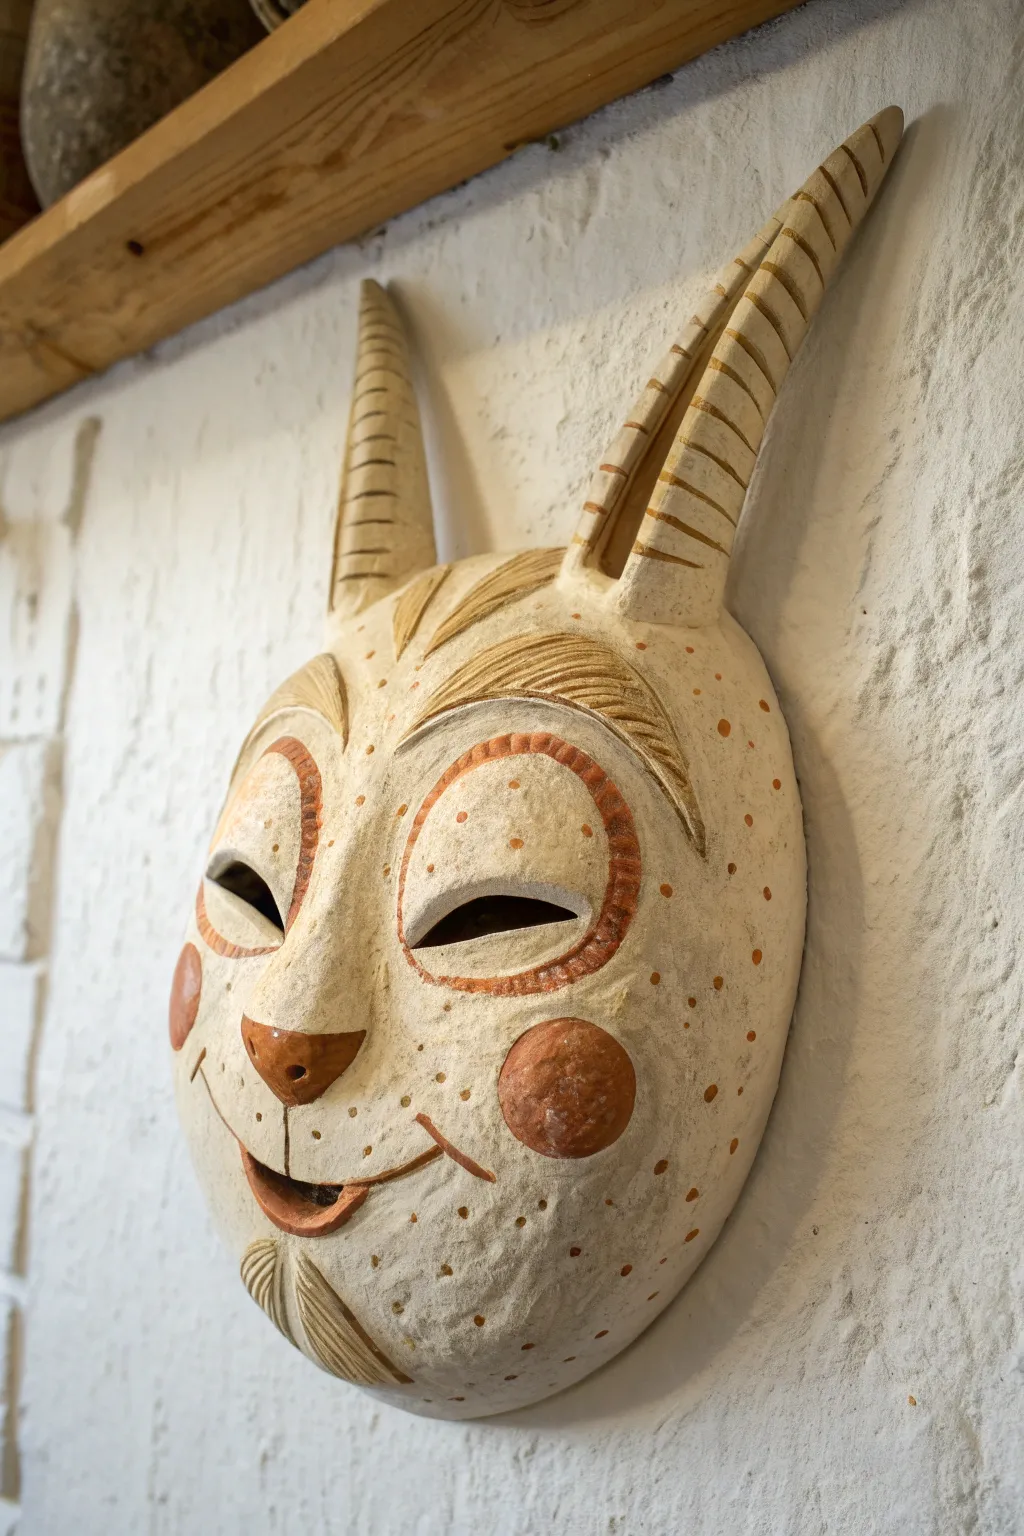
Bring a touch of folklore to your wall with this charming, slightly mischievous creature mask. Sculpted from stoneware clay and decorated with warm earth tones, its ribbed ears and textured details give it a wonderful handmade character.
Step-by-Step Tutorial
Materials
- Light-colored stoneware clay (with fine grog)
- Newsprint or paper towels
- Rolling pin and canvas mat
- Potter’s needle tool
- Scoring tool (serrated rib)
- Slip (clay mixed with water)
- Modeling tools (wooden and rubber ribs)
- Loop tool for carving
- Underglazes: Rust orange, warm brown
- Sponge
- Small stiff brushes
- Clear matte glaze (optional)
Step 1: Forming the Base
-
Roll the slab:
Begin by rolling out a medium-thick slab of clay, roughly 1/4 to 3/8 inch thick. Compress the clay on both sides with a rib to prevent warping later. -
Create the support mound:
Crumple a generous pile of newsprint into an oval dome shape on a ware board. This forms the mold that will give your mask its convex curve. -
Drape the face:
Gently lay your clay slab over the paper mound. Use a rubber kidney or your palms to smooth it down, creating a rounded, egg-like face shape. -
Trim the outline:
Using your needle tool, cut the excess clay away to define the chin and cranium. Aim for a shape that is slightly wider at the cheeks and tapers toward the chin.
Step 2: Sculpting Features
-
Build the nose:
Roll a small ball of clay and shape it into a triangular nose. Score and slip the attachment area securely, then blend the edges seamlessly into the face using a wooden tool. -
Define the brow:
Add two curved coils above where the eyes will go. Blend the bottom edge of these coils into the face, but keep the top edge sharper to create a distinct brow ridge. -
Sculpt the cheeks:
Add rounded pads of clay for the cheeks. Blend them well so they appear to swell naturally from the face rather than looking stuck on. -
Add the mouth and beard:
Carve a smiling mouth line. Add a small, tapered slab at the chin for a beard, scoring texture lines into it to mimic hair. -
Cut the eyes:
Once the clay is leather-hard, use a fettling knife or scalpel to cut out the almond-shaped eye holes. Smooth the cut edges with a damp sponge or finger.
Crack Prevention
If the horns are heavy, dry the mask slowly under loose plastic for several days. Uneven drying causes stress cracks at the attachment points.
Step 3: The Horns & Detailing
-
Form the horns:
Roll two tapered coils of clay about 5-6 inches long. Flatten them slightly so they aren’t perfect cylinders. -
Hollow the horns:
To keep the sculpture light, carefully hollow out the thicker base of each horn using a small loop tool, extending up as far as possible without piercing the wall. -
Attach the horns:
Score and slip the top of the head heavily. Attach the horns securely, blending the clay downwards into the skull. I like to add a tiny coil around the seam for extra strength before smoothing. -
Texture the horns:
Use a modeling tool to press horizontal ridges up the length of both horns, giving them a segmented, organic look. -
Add surface texture:
Using a stiff bristle brush or a texture tool, gently tap the entire surface of the mask to create a pitted, skin-like texture.
Wild Expression
Try altering the angle of the horns or the shape of the eye cutouts. A slight tilt can change the expression from happy to inquisitive instantly.
Step 4: Decoration & Finishing
-
Create hanging holes:
Don’t forget to punch two small holes near the temples or mask edge while the clay is still wet so you can hang it later with wire. -
Apply underglaze accents:
Once bone dry or bisque fired, paint rust orange circles on the cheeks and outline the eyes with a thick band of the same color. -
Paint the nose and mouth:
Use a warm brown underglaze for the nose tip and the interior of the smiling mouth. -
Add the speckles:
Dilute your rust underglaze slightly and use a small brush to dot freckles across the cheeks, forehead, and sporadically around the rest of the face. -
Final Fire:
Fire the piece according to your clay body’s instructions. You can leave it unglazed for a matte stone look or apply a thin clear matte glaze to seal it.
Hang your finished creature on a well-lit wall to let the shadows play across the textured surface
Mini Ceramic House Sculptures That Feel Like Little Worlds
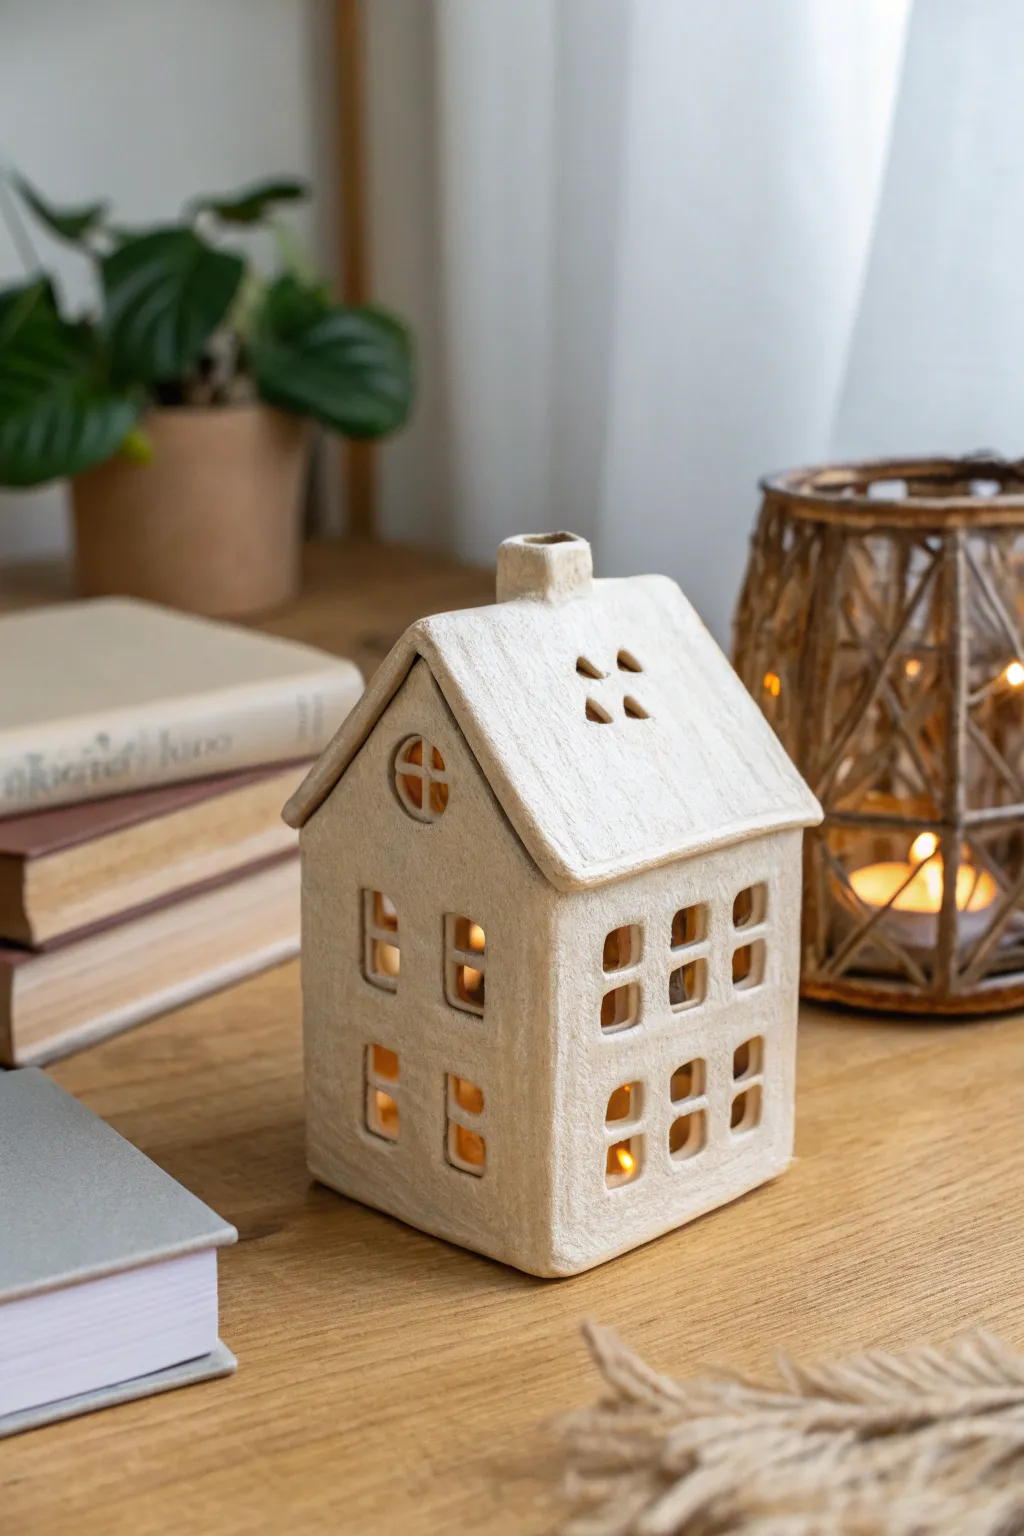
This charming ceramic house creates a warm, inviting glow with its multitude of tiny windows and slightly textured finish. Built using slabs of clay, its simple gabled roof and chimney evoke a cozy, rustic feel perfect for housing a tealight or LED candle.
Step-by-Step
Materials
- Stoneware or earthenware clay (light colored)
- Rolling pin
- Two 1/4 inch wooden guide strips
- Fettling knife or X-Acto blade
- Ruler
- Slip (clay and water mixture)
- Scoring tool or serrated rib
- Small square cookie cutters (optional, for windows)
- Sponge
- Wooden modeling tool
- Clear glaze or matte white glaze
- Kiln
Step 1: Planning and Preparation
-
Draft your templates:
Before touching clay, sketch your house dimensions on paper or cardstock. You will need two rectangles for the long sides, two pentagons (rectangle bottom with triangle top) for the front and back walls, and two rectangles for the roof panels. -
Cut out templates:
Cut your paper templates out carefully with scissors. Ensure the roof panels are slightly wider than the house body to create the overhang shown in the photo. -
Prepare the workspace:
Set up a canvas board or cloth-covered table to prevent sticking. Place your wooden guide strips on either side of your working area.
Fixing Sagging Roofs
If the roof starts to bow inward while building, ball up some newspaper and gently stuff it inside the house to support the clay while the joints dry and harden.
Step 2: Creating the Slabs
-
Roll out the clay:
Wedge your clay to remove air bubbles, then roll it out between the wooden guides. This ensures an even thickness of about 1/4 inch for all your walls. -
Smooth the surface:
Run a rubber rib or a slightly damp sponge over the slab to compress the clay particles and create a nice, smooth texture before cutting. -
Cut the shapes:
Lay your paper templates onto the clay slab. Using a fettling knife or X-Acto blade, trace around the templates and cut out your four walls and two roof pieces. -
Stiffen the slabs:
Let the cut pieces sit uncovered for about 30-60 minutes until they reach a ‘leather-hard’ state. They should be firm enough to stand up without flopping over but still flexible enough to join.
Clean Window Corners
Use the back of a small drill bit or a needle tool to clean up the inside corners of your windows. Crisp corners make the light shine through much more cleanly.
Step 3: Constructing the Structure
-
Cut the windows:
While the walls are flat, carefully cut out the grid of square windows. You can use a small square cutter or freehand it with a knife for a more rustic look. Don’t forget the circular window on the gables. -
Bevel the edges:
Cut 45-degree angles (miter joints) on the vertical edges of the walls where they will meet. This creates a stronger corner joint than simply overlapping them. -
Score the joints:
Take your scoring tool and rough up the beveled edges on all four wall pieces. Apply a generous amount of slip to the scored areas. -
Assemble the walls:
Stand the walls up and press the corners together firmly. I like to reinforce the inside corners by smoothing a tiny coil of soft clay into the seam. -
Attach the roof:
Score and slip the top edges of the house walls and the underside of the roof panels where they will touch. Place the roof panels on, ensuring they meet at the peak, and press gently to seal.
Step 4: Adding Details and Finishing
-
Create the chimney:
Form a small rectangular tube from leftover clay slab. Cut the bottom at an angle that matches the slope of the roof. -
Attach the chimney:
Score the spot on the roof ridge and the bottom of the chimney, apply slip, and press the chimney into place. -
Vent holes:
Cut a few small decorative holes in the roof (like the triangular pattern shown) or ensure the chimney is open to allow heat to escape during firing and when a candle is lit. -
Texture the surface:
Use a rough sponge or a bristle brush to tap lightly over the entire surface of the house. This mimics the stucco-like texture seen in the reference image. -
Dry slowly:
Cover the house loosely with plastic for a day or two to let the moisture equalize, then uncover it to dry completely before the bisque firing. -
Glaze and fire:
After the first firing, apply a thin coat of matte white, irregular glaze or leave the raw clay if using a white stoneware. Fire it a second time according to your clay’s specifications.
Place an LED tealight inside your new cottage and enjoy the warm shadows it casts across the room
Abstract Arch and Loop Sculptures for Modern Shelves
Bring a touch of organic modernism to your shelf with this textured arch sculpture. The serene curves and speckled stone finish mimic the look of natural travertine or sandstone, creating a peaceful, high-end decor piece.
Step-by-Step Guide
Materials
- White or light beige air-dry clay (or polymer clay)
- Aluminum foil
- Rolling pin
- Craft knife
- Sandpaper (medium and fine grit)
- Rectangular wooden base or heavy cardstock box (for the plinth)
- Gesso or white primer
- Acrylic paints (cream, beige, warm grey)
- Faux stone spray paint (optional)
- Old toothbrush
- Strong craft glue or epoxy
- Matte sealant spray
Step 1: Forming the Arches
-
Create the armatures:
Crumple aluminum foil into two snake-like cylinder shapes. This saves clay and keeps the sculpture lighter. Make one long cylinder for the tall outer arch and a shorter one for the inner nested arch. -
Refine the foil shapes:
Bend your foil cylinders into U-shapes. Ensure the taller arch is wide enough to comfortably fit over the smaller one. Compress the foil tightly so it is dense and holds its shape. -
Prepare the clay:
Condition your clay by kneading it until it is pliable. Roll out a slab of clay approximately 1/4 inch thick to ensure uniform walls for your arches. -
Cover the armatures:
Wrap the clay sheet around your foil tubes. Smooth the seams where the clay edges meet using a bit of water (for air-dry clay) or smoothing oil (for polymer clay). -
Secure the ends:
Trim the bottom ends of each arch with a craft knife to ensure they are perfectly flat. This is crucial for stability when you eventually glue them to the base. -
Smooth the surface:
Wet your fingers slightly and run them over the clay to remove fingerprints. Aim for a mostly smooth surface, though slight organic irregularities add to the stone look.
Uneven Arches?
If your arch wobbles, tape a piece of gritty sandpaper to a flat table. Rub the bottom of the arch back and forth over it to grind it perfectly flat.
Step 2: Building the Base
-
Size the plinth:
If using a wooden block, sand it smooth. If building from scratch, construct a low rectangular box from heavy cardstock or use a block of floral foam covered in a layer of clay. -
Cover the base:
Roll out another slab of clay and carefully wrap your base structure, creating sharp, crisp corners to contrast with the rounded arches. -
Dry the components:
Let all clay pieces dry completely. If using air-dry clay, this takes 24-48 hours. Rotate the pieces occasionally so air reaches all sides and prevents warping.
Level Up: Texture
Mix baking soda or clean sand into your acrylic paint before applying. This adds physical grit, making the ‘stone’ surface feel real to the touch.
Step 3: Texturing and Finishing
-
Sanding:
Once fully cured, use medium-grit sandpaper to refine the curves. Follow up with fine-grit sandpaper for a smoother feel, focusing on the tops of the arches. -
Prime the surface:
Apply a coat of gesso or white primer to the arches and the base. This seals the clay and provides a uniform starting point for the paint. -
Base coat painting:
Mix a warm cream color using acrylics and paint the entire sculpture. This mimics the base tone of limestone. -
Adding stone texture:
Dip an old toothbrush into watered-down beige or warm grey paint. Run your thumb over the bristles to flicker tiny specks onto the sculpture. -
Layering the speckles:
Repeat the speckling process with a slightly darker grey or brown paint, but go sparingly. I prefer to do this from a distance of about 12 inches to keep the mist fine. -
Assembly:
Once the paint finishes drying, use strong craft glue or epoxy to attach the arches to the base. Position the smaller arch slightly forward or backward for depth. -
Seal the work:
Finish with a matte spray sealant to protect the paint and eliminate any unnatural glossy shine, locking in that raw stone aesthetic.
Place your sculpture near a window where shadows can play off the curved forms throughout the day
Negative Space Sculptures With Cutouts and Windows

This striking ceramic vessel plays with negative space through elegant arched windows, creating a structural cage that reveals a vibrant, contrasting interior. The textured white exterior gives it an ancient, organic feel, while the deep blue inside adds a modern pop of depth.
Step-by-Step Tutorial
Materials
- High-fire stoneware clay (white or light body)
- Wooden rolling pin and guide sticks
- Large plaster hump mold (oval/egg shape)
- Fettling knife
- Loop tools and ribs
- Paper template for arches
- Slip and scoring tool
- Underglaze (Cobalt Blue)
- Matte white glaze (exterior)
- Sponge and bucket of water
- Round wooden base (pre-cut or DIY)
- Epoxy adhesive
Step 1: Planning and Slab Rolling
-
Create templates:
Before touching clay, sketch out your arched window shape on cardstock. Cut it out to use as a stencil. You will need to calculate the circumference of your intended vessel to ensure your windows are spaced evenly. -
Prepare the clay:
Wedge your stoneware clay thoroughly to remove air pockets. This is crucial for structural integrity, especially with a piece that has so many cutouts. -
Roll the slabs:
Roll out a large slab of clay to a consistent thickness, around 3/8 of an inch. Use guide sticks to ensure it’s even. For a tall vessel like this, you might need two large slabs to build it in sections.
Slumping Prevention
If the clay walls start sagging while cutting windows, reshape immediately and use a hair dryer to stiffen the remaining ‘frames’ or stuff the inside with newspaper for temporary support.
Step 2: Forming the Vessel
-
Use a hump mold:
Drape your large slab over a rigid foam or plaster hump mold to get the initial curved ovoid shape. If you don’t have a large enough mold, you can coil-build the basic egg shape, smoothing the walls perfectly as you go. -
Join the seams:
If building from slabs, score and slip the edges aggressively where they meet. Compress the seams both inside and out with a rib tool so the join becomes invisible. -
Refine the shape:
Once the basic hollow egg form is closed (or open at the top if preferred), use a paddle to gently tap the exterior. This helps shapen the curves and compacts the clay particles. -
Add surface texture:
While the clay is still relatively soft, take a textured sponge or a piece of rough canvas and press it gently across the entire exterior surface. This creates that tactile, stone-like finish seen in the image.
Level Up: Illumination
Turn this sculpture into a functioning lamp by drilling a hole through the wooden base before gluing. Insert a wired light socket so the blue interior glows from within.
Step 3: Carving the Negative Space
-
Wait for leather hard:
Patience is key here. Verify the clay has reached a stiff leather-hard stage. It needs to be strong enough to hold its shape when large chunks are removed. -
Map the grid:
Using a needle tool, lightly incise a grid system on the vessel’s surface. Mark vertical and horizontal lines that will serve as the frames between your windows. -
Trace the windows:
Place your cardstock template into each grid section and trace the arched shape lightly onto the clay. -
Cut the openings:
Using a sharp fettling knife, carefully cut out the windows. I like to cut a smaller hole first, then work my way out to the line to avoid stressing the clay. -
Bevel and smooth:
Once the pieces are removed, use a damp sponge or a chamois cloth to smooth the raw edges of the cutouts. Round them slightly so they aren’t razor-sharp.
Step 4: Glazing and Finishing
-
Bisque fire:
Allow the piece to dry slowly under plastic to prevent warping. Once bone dry, bisque fire it to cone 04. -
Apply interior color:
Pour a rich cobalt blue viscous underglaze or glaze into the interior. Roll it around to coat the inside completely, then pour out the excess. Wipe any drips off the exterior rim immediately. -
Glaze the exterior:
Apply a matte white or stone-textured glaze to the exterior. You can brush this on carefully to avoid getting it into the cutouts, or spray it if you have access to a spray booth. -
Glaze fire:
Fire the piece again to the maturation temperature of your chosen clay and glaze (typically cone 6 or cone 10). -
Attach the base:
Once fired and cooled, center the ceramic vessel on your round wooden base. Use a strong two-part epoxy to bond the ceramic permanently to the wood for stability.
Place your sculpture near a window where shadows can play through the cutouts, enhancing the architectural beauty of your work
Frozen Wave Sculptures That Capture Movement
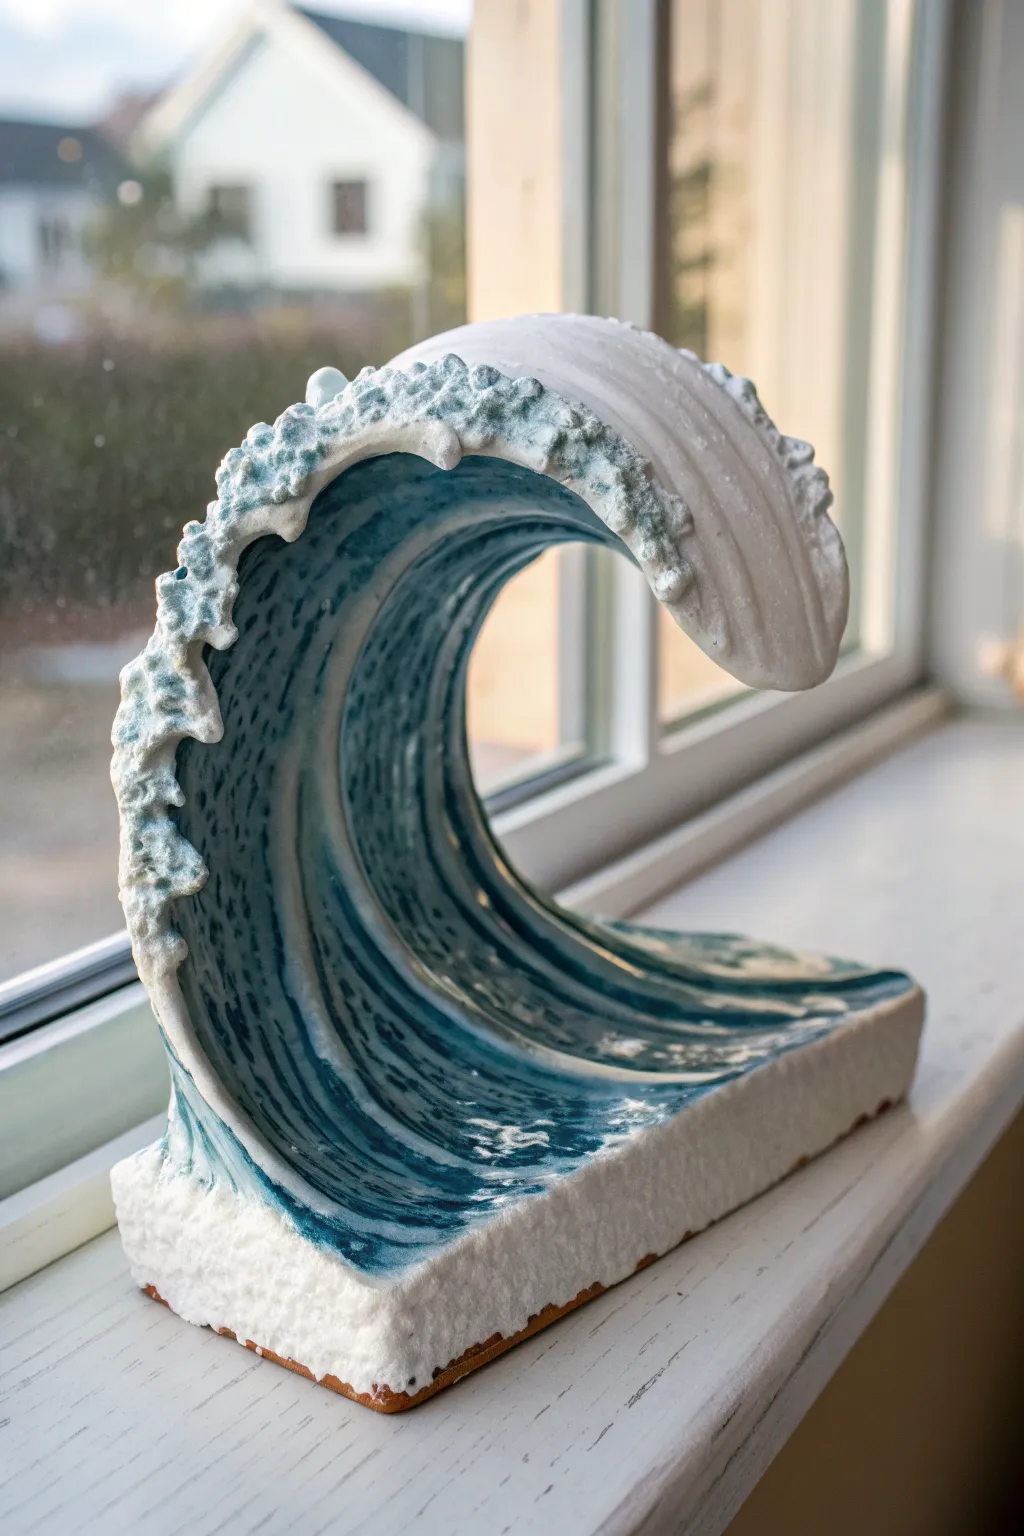
Capture the raw power of the ocean in clay with this dynamic wave sculpture, featuring a sweeping barrel shape and frothy, textured crests. The finished piece combines smooth, glassy turquoise glazes with rough, unglazed white textures to evoke the contrast between deep water and sea foam.
Step-by-Step
Materials
- White stoneware clay (mid-fire or high-fire)
- Slab roller or rolling pin with guide strips
- Pottery knife or fettling knife
- Rib tool (kidney shaped, smooth)
- Scoring tool or serrated rib
- Slip (clay mixed with water)
- Sponge
- Ocean Blue / Turquoise celadon-style glaze
- Clear glaze (optional)
- White slip or white texture paste (optional for extra foam)
- Carving tools (loop tool)
- Newspaper or foam support
Step 1: Forming the Base and Slab
-
Roll the foundation:
Begin by rolling out a medium-sized slab of white stoneware clay to approximately 3/8-inch thickness. You want it sturdy enough to hold the curve but not so heavy it collapses. -
Cut the primary shape:
Cut a long rectangular strip, roughly 12 inches long by 5 inches wide. This will become the body of your wave. -
Prepare the base:
Cut a separate, smaller rectangular slab to serve as the sturdy base. This anchors the sculpture and provides a flat bottom for shelf display. -
Score and slip:
Thoroughly score the bottom edge of your wave strip and the corresponding attachment area on the base slab. Apply generous slip to create a strong bond.
Slumping Curve?
If the wave curls too much while wet, use a hairdryer on the ‘spine’ (back) of the wave for 2-3 minutes. Stiffening just the back wall helps hold the weight of the curl.
Step 2: Shaping the Movement
-
Attach the wave:
Press the wave strip onto the base, curving it slightly as you attach it to ensure it stands upright. Smooth the seam inside and out with a clay tool so the join becomes invisible. -
Curl the crest:
Gently bend the top of the vertical slab over to form the barrel of the wave. You want a dramatic ‘C’ curve. -
Support the curve:
Place a ball of crumpled newspaper or a piece of shaping foam inside the barrel of the wave. This temporary support is crucial to prevent the clay from sagging while it’s still plastic. -
Refine the walls:
Use a damp sponge or a smooth rib tool to compress the clay on the smooth, inner face of the wave. This prepares the surface for that glassy water look later.
Sparkling Spray
After the final glaze firing, glue tiny clear glass beads or crushed glass bits into the crevices of the foam texture. It mimics light catching water droplets beautifully.
Step 3: Texturing the Foam
-
Build the crest:
Tear small, ragged chunks of fresh clay and begin adding them to the very lip of the wave. Don’t smooth them down; simply press them firmly enough to stick. -
Create chaotic texture:
Use a needle tool or a rough brush to pick at the added clay chunks, creating a spongy, aerated look that mimics sea foam. I find that being a bit aggressive here creates the most realistic splashes. -
Add trailing foam:
Extend this rough texture down the back spine of the wave and slightly onto the base, suggesting the turbulence of the water crashing down. -
Dry slowly:
Cover the piece loosely with plastic to let it dry very slowly. Uneven drying between the thin lip and thick base can cause cracks. -
Bisque fire:
Once bone dry, fire the piece to bisque temperature (usually cone 04 or 06) to prepare it for glazing.
Step 4: Glazing the Ocean
-
Wax the bottom:
Apply wax resist to the very bottom of the piece to prevent glaze from fusing it to your kiln shelf. -
Glaze the interior:
Pour or brush a fluid, turquoise or ocean blue glaze onto the smooth interior curve of the wave. Let the glaze pool slightly in the textures for depth. -
Glaze the exterior:
Apply the same blue glaze to the back of the wave, tapering it off as you reach the rough, foamy texture. -
Highlight the foam:
Leave the rough, textured crests largely unglazed if your clay body is white, or lightly dry-brush them with a white glaze or underglaze to enhance the brightness of the ‘foam’. -
Final wipe:
Use a damp sponge to wipe back any blue glaze that dripped onto the white foam areas. The contrast between the shiny blue and the matte white texture is key. -
Glaze fire:
Fire the piece to the maturity temperature of your chosen clay and glaze (typically cone 5/6 for stoneware).
Now you have a dynamic moment of the sea frozen in time to display on your shelf
Coral-Inspired Biomorphic Sculptures With Porous Texture
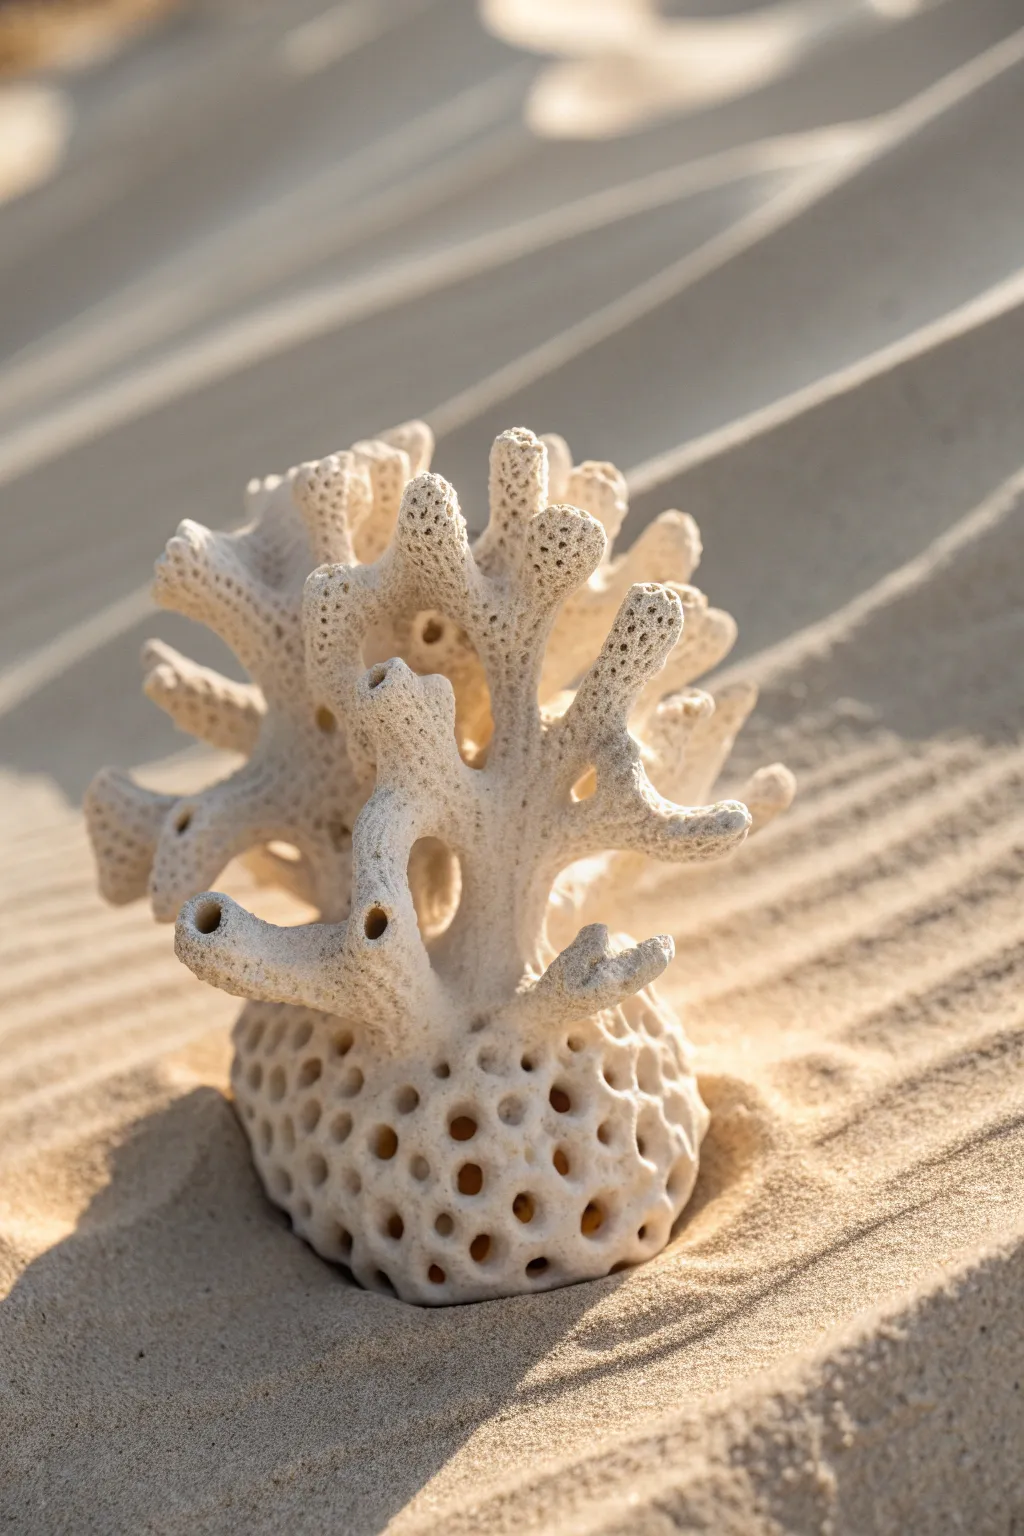
Capture the delicate, skeletal beauty of the ocean with this white clay sculpture blending organic branching structures with a perforated, urchin-like base. The interplay of smooth curves and rough, pitted textures creates a stunning study in natural forms.
Step-by-Step Guide
Materials
- White earthenware or stoneware clay (a groggy clay works best for structure)
- Pottery tools (needle tool, rib, sponge)
- Loop tools (various sizes for carving holes)
- Pointed sculpting tool or stiff brush (for texturing)
- Slip and scoring tool
- Plastic bags (for slow drying)
- Kiln
- Matte white glaze or underglaze (optional)
Step 1: Forming the Base
-
Pinch the foundation:
Start with a softball-sized lump of clay. Use the pinch pot method to open it up, creating a hollow, rounded dome shape. This will serve as the anchor for your branching structures. -
Refine the shape:
Gently paddle the exterior with a wooden paddle or flat hand to smooth out the lumpiness, aiming for a semi-organic, urchin-like spheroid. -
Close the form:
If you want a fully enclosed look like the reference, pinch the opening closed gradually, trapping air inside to help hold the shape, or leave a small hole at the bottom for air to escape during firing. -
Create the perforations:
Once the base is leather-hard, use a variety of small loop tools or a hole cutter to carve out a series of circular divots and through-holes. Keep them random in size and spacing to mimic natural porosity.
Step 2: Sculpting the Branches
-
Roll coils:
Roll out several tapered coils of clay in varying thicknesses. These will become the vertical coral branches. -
Build the primary stalks:
Attach the thickest coils to the top of your perforated base. Score the connection points thoroughly, apply slip, and blend the clay downward into the base so the seam disappears completely. -
Modify the branches:
Bend and twist the coils slightly as you attach them. Coral isn’t perfectly straight, so adding subtle curves gives the piece life. -
Add secondary shoots:
Attach smaller, shorter tapered coils to the sides of the main branches to create the forked, antler-like appearance. -
Blend connections:
Use a small modeling tool to smooth the joins between the branches. The transition from one branch to another should look grown, not pasted on.
Natural Imperfection
Don’t smooth your coils perfectly. Letting the clay fissure or crack slightly as you bend it adds to the naturally weathered aesthetic of dried coral.
Step 3: Detailing and Texture
-
Poking technique:
Take a needle tool or a stiff-bristled brush and stipple the surface of the branches. Press into the clay repeatedly to create the rough, calcified texture typical of dead coral. -
Deepen the pores:
Use a larger, blunt tool to press random, deeper indentations into the branches, mimicking the larger pores where polyps hide. -
Hollow inputs:
At the tips of certain branches or at major forks, press a round tool in deeply to create ‘mouths’ or hollow tubes, suggesting the internal structure is hollow. -
Refine the base texture:
Return to the base and soften the edges of your carved holes with a damp sponge so they don’t look too mechanical or sharp. -
Structural check:
I like to step back and view the piece from all angles here; ensure the branches are balanced and not top-heavy before the clay dries further.
Oceanic Ombré
Instead of pure white, stain the tips of the branches with a diluted pink or watery blue oxide wash before firing to mimic living coral reefs.
Step 4: Finishing and Firing
-
Slow drying:
Tent the sculpture loosely with plastic. Because the branches are thin and the base is thick, you must dry it very slowly to prevent cracking at the joins. -
Bisque fire:
Once bone dry, fire the piece to bisque temperature (usually roughly cone 04, depending on your clay body). -
Glazing decision:
To match the reference image’s matte, bleached bone look, you can leave the high-fire bare clay if it is naturally white. Otherwise, apply a very thin coat of matte white glaze. -
Glaze wiping:
If glazing, wipe much of it back with a sponge. You want the glaze to settle into the textures and pores you created, enhancing the depth without creating a thick, glossy shell. -
Final fire:
Fire to the maturity temperature of your clay body.
Place your finished sculpture in a spot with raking light to emphasize the intricate shadows of the porous texture
Stacked Pebble Cairn Sculptures With Calming Balance
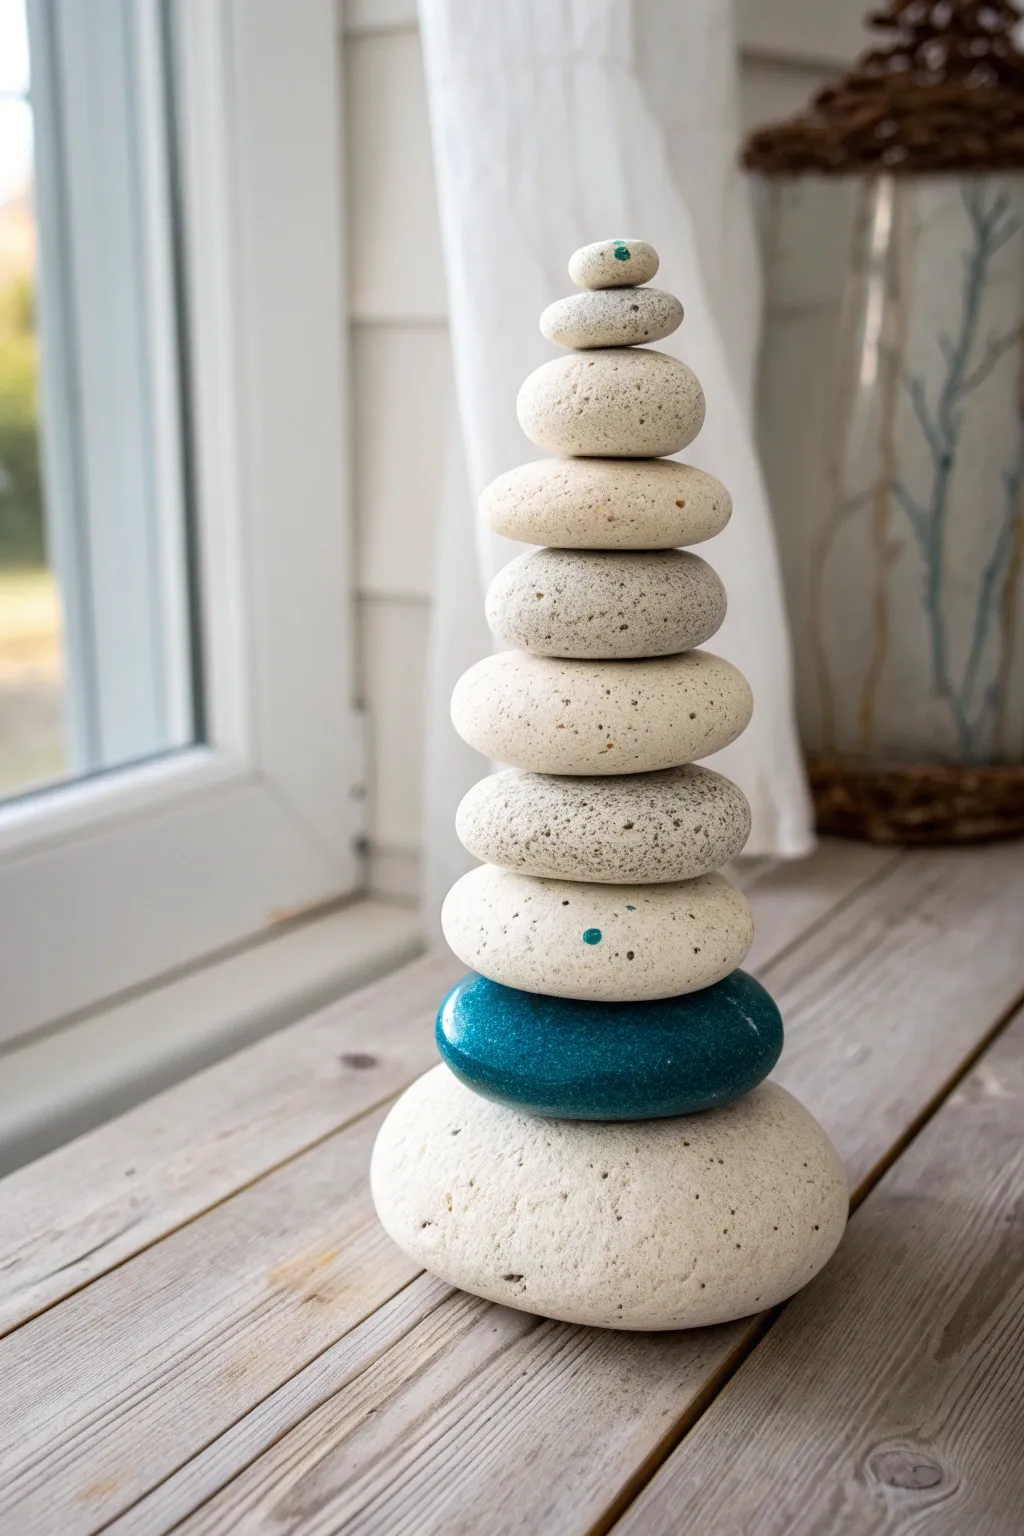
Bring the calming influence of a beachside cairn indoors with this beautifully balanced ceramic sculpture. By combining speckled clay with a striking pop of teal glaze, you create a modern, minimalist piece that adds a touch of Zen to any space.
Detailed Instructions
Materials
- Speckled stoneware clay (white or buff)
- Pottery wheel (optional, can be hand-built)
- Needle tool
- Rib tool (smooth)
- Paddle tool
- Sponge
- Scoring tool
- Slip (liquid clay)
- High-gloss teal glaze
- Translucent or matte clear glaze
- Kiln
Step 1: Forming the Pebble Shapes
-
Prepare the clay:
Start by wedging your speckled stoneware clay thoroughly to remove air bubbles. Since we need a pyramid structure, portion out the clay into about 10 balls of graduating sizes, ranging from grapefruit-sized for the base to a small marble for the top. -
Shape the base:
Take the largest ball of clay. If you are hand-building, pinch and gently flatten it into a rounded, organic disc shape. It should be flatter on the bottom for stability but curved on the sides. -
Refine the form:
Use a wooden paddle to gently tap the clay, smoothing out finger marks and creating that distinct, water-worn river rock silhouette. The shape shouldn’t be perfectly round; slight irregularities add realism. -
Create the stack:
Repeat this shaping process for all remaining clay balls. As you work, occasionally stack them loosely to test the proportions and ensure a pleasing taper as the pile rises. -
Hollow larger stones:
For the largest two or three stones (including the base), you may want to hollow them out to prevent exploding in the kiln. Cut them in half, scoop out the center, score and slip the edges, and rejoin them. Pierce a tiny hidden hole for air to escape. -
Smooth the surfaces:
Go over each ‘stone’ with a damp sponge or a soft rib tool. You want to compress the clay particles and create a smooth canvas for the speckles to shine through later.
Wobbly Stack?
If the stack leans while building, use a temporary prop like a wooden dowel or rolled newspaper under the leaning side until the slip firms up.
Step 2: Structure and Assembly
-
Score the connection points:
Decide on the final orientation of your stack. Mark where each stone touches the one below it. Use your scoring tool to scratch rough cross-hatch marks into these contact points. -
Apply slip:
Dab a generous amount of clay slip onto the scored areas. This acts as the glue that will fuse your sculpture into a single, permanent unit. -
Join the base and accent:
firmly press the second largest stone (which will become our teal accent) onto the large base stone. Wiggle it slightly to lock the scored clays together. -
Build the tower:
Continue stacking and joining the stones one by one. I find it helpful to step back every few stones to check the vertical alignment; a slight lean looks natural, but too much will cause structural issues in the kiln. -
Clean the seams:
As you press stones together, excess slip might ooze out. Use a small, damp brush to wipe away this excess, keeping the ‘cracks’ between stones visible but tidy. -
Finishing the top:
Place the tiniest pebble at the very peak. Ensure this top piece is securely attached, as it is the most fragile part of the sculpture. -
Slow drying:
Cover the finished stack loosely with plastic. Let it dry very slowly over several days to prevent warping or cracking between the joined sections.
Level Up: Texture
Before drying, gently roll a real rock or piece of coral over the clay surface. This imprints subtle, organic textures that glaze will pool into gorgeously.
Step 3: Glazing and Firing
-
Bisque fire:
Once bone dry, fire the sculpture to cone 04 (or your clay’s specific bisque temperature). -
Wax resist:
Apply wax resist to the very bottom of the base stone to prevent it from sticking to the kiln shelf. You might also carefully wax the contact points between stones if you want the ‘seams’ to remain raw and clearly defined. -
Glaze the accent stone:
Using a small brush, carefully apply three coats of the deep teal glaze to the second stone from the bottom. Take your time to paint distinct edges so the color doesn’t bleed onto the white stones. -
Glaze the natural stones:
For the remaining stones, you can either leave them raw (if the clay is vitrified and beautiful) or apply a thin matte or satin clear glaze. This highlights the natural speckles without making them look like plastic. -
Detail work:
If you want the tiny teal dot seen on the image’s upper stones, use the tip of a toothpick to drop a speck of the teal glaze onto the white surfaces. -
Final firing:
Fire the piece to the maturity temperature of your clay and glaze (likely Cone 5 or 6 for stoneware).
Now you have a permanent symbol of balance and tranquility to anchor your favorite room
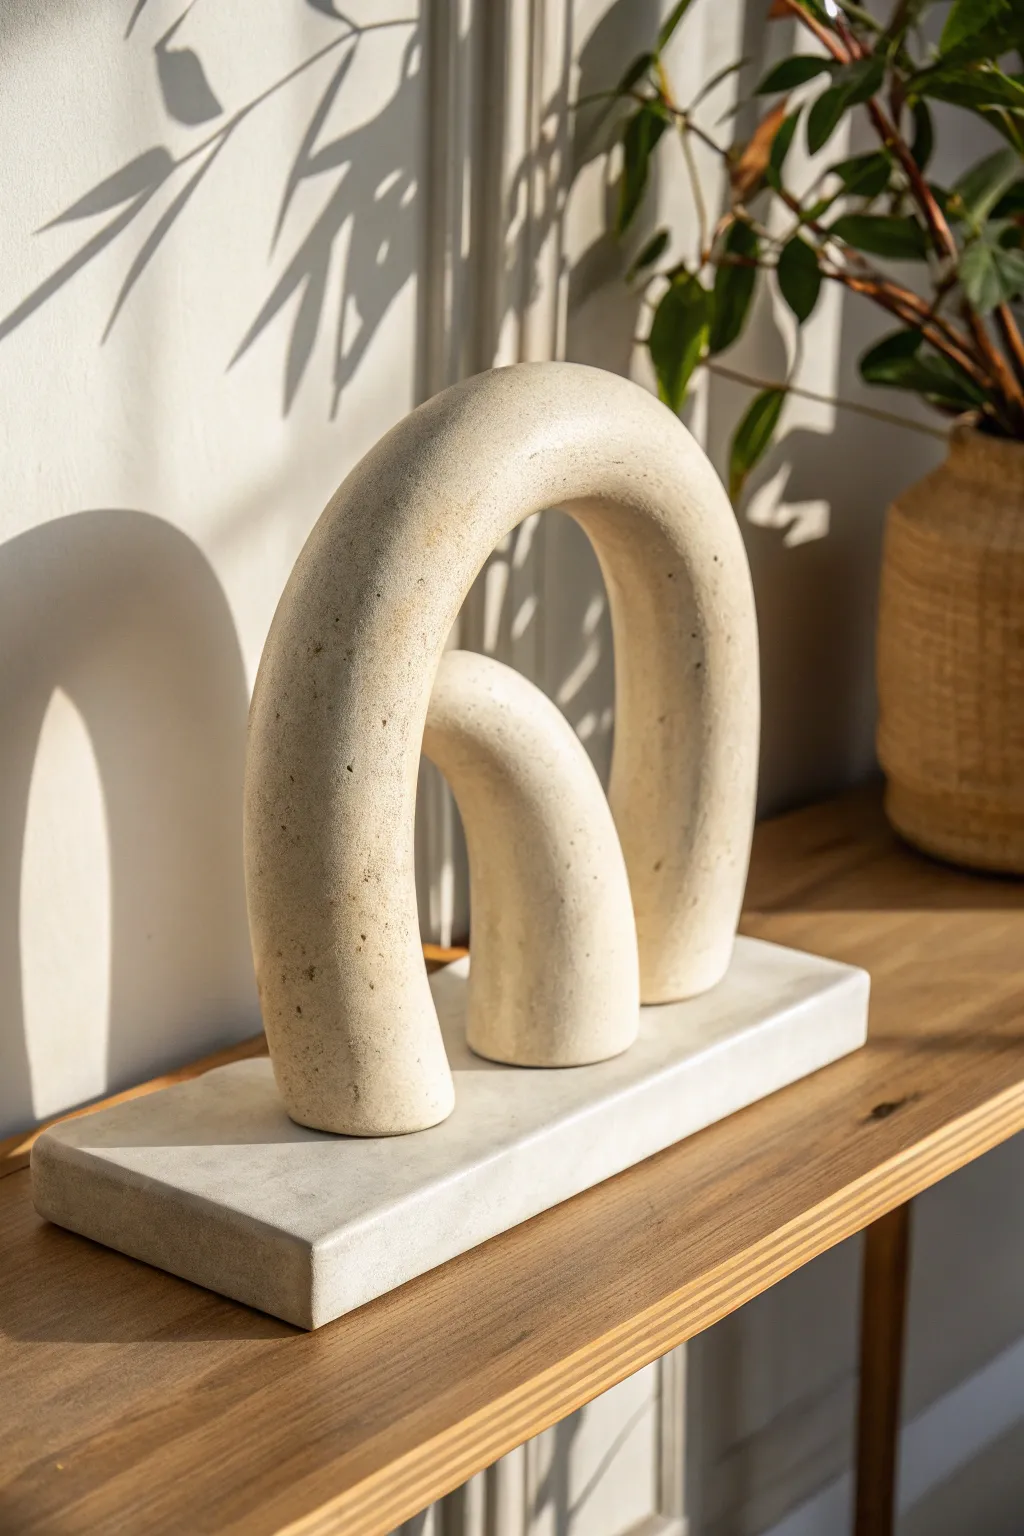
Modular Ceramic Sculptures Made of Repeat Shapes

This elegant modular sculpture plays with balance and repetition, featuring three sturdy arches crowned by spherical forms. The matte, speckled finish gives it a grounded, architectural feel that blends beautifully with modern decor.
Step-by-Step
Materials
- Stoneware clay (speckled or sand-coloured)
- Rolling pin and guide sticks (approx. 1cm thick)
- Fettling knife
- Metal kidney rib
- Sponge
- Cardboard or stiff paper (for templates)
- PVC pipe or mailing tube (approx. 8-10cm diameter)
- Scoring tool or serrated rib
- Slip (clay and water mixture)
- Matte white or transparent glaze
Step 1: Forming the Arches
-
Prepare your clay slab:
Begin by rolling out a substantial slab of clay. Use guide sticks to ensure an even thickness of about 1cm to 1.5cm, as these arches need to be sturdy enough to support weight. -
Cut the strips:
Measure and cut three long rectangular strips. The width should be consistent for all three—around 5cm is a good starting point—but the lengths should vary slightly if you want a graduated look, or keep them identical for symmetry. -
Shape the curves:
Drape your clay strips over a round form like a PVC pipe or a sturdy mailing tube covered in newsprint. Gently press the clay to conform to the curve. -
Refine the legs:
Once draped, use your fettling knife to trim the ends of the arches so they sit perfectly flat on the table. A square or ruler helps ensure the cut is perpendicular to the table surface. -
Let them stiffen:
Allow the clay to dry to a ‘leather-hard’ state on the form. If you remove them too early, the arches will slump and lose their perfect semi-circle shape. -
Smooth the surfaces:
Once firm, remove the arches from the mold. Use a metal kidney rib to compress the surface and smooth out any canvas textures or fingerprints. Pay special attention to the edges, rounding them slightly with a damp sponge for a softer look.
Use A Slump Mold
Instead of draping clay *over* a tube, try laying the clay *inside* a cut PVC pipe lined with plastic. This prevents the clay from stretching and thinning as it dries.
Step 2: Creating the Toppers
-
Pinch the spheres:
Form two balls of clay for the middle spheres. Using a pinch pot technique or rolling them in your hands, create hollow spheres if they are large, or keep them solid if they are small (under 3cm). I generally prefer hollow forms to reduce weight. -
Make the cup:
For the very top piece, create a small pinch pot. Instead of closing it into a sphere, flatten the bottom slightly and keep the top open like a small cup or candle holder. -
Refine the shapes:
Roll the spheres gently on your work surface to ensure they are round but have small flat spots on the top and bottom where they will stack. This adds stability. -
Texture matching:
Use your sponge or rib to match the surface texture of the spheres to your arches. They should feel like a cohesive family of shapes.
Step 3: Assembly and Firing
-
Test the stack:
While the clay is leather hard, carefully stack the pieces to check balance. If any surfaces are uneven, use a rasp or sanding screen to level the contact points. -
Bisque fire:
Once bone dry, fire all components in a bisque kiln. Stack them loosely on the shelf, not in their final tower formation. -
Glaze application:
Apply a matte white or jagged stone glaze. Depending on your clay body, a simple transparent glaze might be enough to show off the natural speckles seen in the photo. -
Wipe the contacts:
Crucial step: Wipe all glaze off the contact points (the tops of the arches and bottoms of the sitting pieces). If you don’t, the pieces will fuse together permanently in the kiln. -
Final firing:
Fire the pieces separately to the maturity temperature of your clay body. -
Final assembly:
Arrange your finished ceramic pieces. You can leave them loose for interactive play or use a strong epoxy if you want a permanent sculpture.
Wobbling Tower?
If the fired pieces don’t sit flat, use a wet sanding block or diamond pad under running water to grind the contact points perfectly flat before final display.
Explore different stacking orders to refresh the look of your space whenever you like
A Small Ceramic Installation of Tall Stalks and Pods
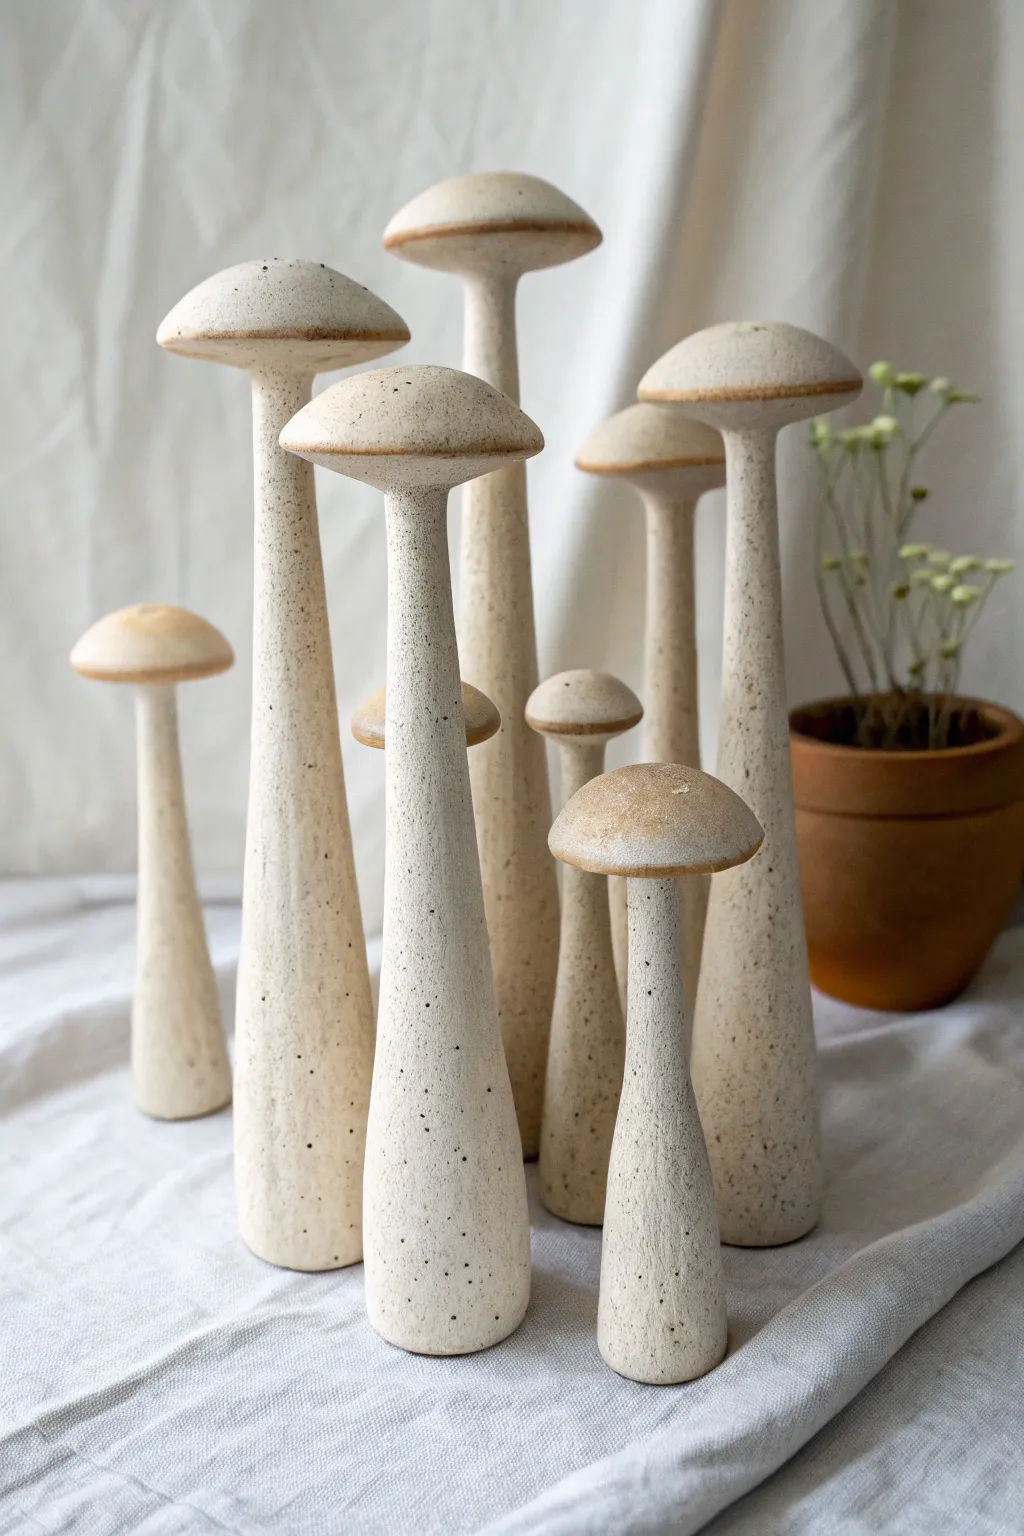
This minimalist ceramic installation features a grouping of slender, elongated mushroom-like forms that evoke a sense of quiet forest magic. Using speckled clay and subtle glazing techniques, you can create these organic sculptures that look beautiful clustered together on a mantle or shelf.
Step-by-Step Tutorial
Materials
- Speckled stoneware clay (mid-fire)
- Potter’s wheel (or hand-building surface)
- Throwing tools (sponge, needle tool, rib, wire)
- Trimming tools
- Calipers (optional but helpful)
- Scoring tool or serrated rib
- Slip
- Wax resist
- Clear matte glaze
- Iron oxide wash or toasted clay stain
Step 1: Throwing the Stalks
-
Prepare the Clay:
Begin by wedging your speckled clay thoroughly to remove air bubbles. You will need varying amounts of clay for each stalk to achieve graduated heights; start with balls ranging from 1 to 2 pounds. -
Center and Open:
Center your clay on the wheel head. Open the clay deeper than you would for a bowl, aiming to keep a narrow base of about 2-3 inches wide. -
Pull the Cylinder:
Pull the clay upwards into a tall, narrow cylinder. Focus on tapering the form as you go higher, keeping the base slightly wider for stability. The walls should be even but sturdy enough to support a cap. -
Shape the Neck:
Use a rib tool to smooth the exterior and refine the taper. The top of the stalk needs to be essentially a closed cylinder or have a very small, flat platform to accept the cap later. -
Close the Top:
Gently collar the very top rim inward until it nearly closes, creating a flat surface about 1 inch in diameter. This provides the attachment point. -
Dry to Leather Hard:
Cut the stalk from the wheel but leave it on the bat if possible to prevent warping. Allow the stalks to dry slowly until they reach a firm leather-hard stage.
Air Escape Pro-Tip
Since the stalk is a closed hollow form, use a needle tool to poke a tiny, hidden hole in the base. This allows expanding air to escape during firing and prevents explosions.
Step 2: Creating the Caps
-
Throw off the Hump:
To make multiples easily, center a large mound of clay and throw the caps ‘off the hump.’ Isolate a small amount of clay at the top. -
Shape the Dome:
Flatten the isolated clay into a small, thick disc, then curve the edges downward to create a gentle mushroom cap shape. Keep the rim slightly thick and rounded. -
Refine the Underside:
Use a tool to undercut the cap, creating a defined connection point that will match the width of your stalks. Cut it off with a wire or needle tool. -
Trim the Caps:
Once leather hard, flip the caps over and trim the underside to remove excess weight and create a clean, flat spot for attachment.
Level Up: Texture
Before the clay dries, gently sponge away a layer of surface clay to expose more of the ‘speckles’ (grog or manganese) for a rougher, stone-like texture.
Step 3: Assembly and Finishing
-
Score and Slip:
Score the top of a stalk and the underside of a matching cap aggressively. Apply slip to both surfaces. -
Attach the Components:
Press the cap firmly onto the stalk with a gentle twisting motion to secure the bond. Clean up any excess slip that oozes out with a damp sponge or brush. -
Smooth the Join:
I like to use a soft rubber rib to smooth the area under the cap where it meets the stalk, ensuring the transition looks seamless and organic. -
Bisque Fire:
Allow the assembled mushrooms to dry very slowly under plastic to prevent cracking at the join. Once bone dry, bisque fire them to cone 04. -
Apply Oxide Accent:
Mix a small amount of iron oxide wash. Dip a sponge into the wash and lightly dab it just around the rim of the cap to create that toasted, browned edge seen in the image. -
Wax the Base:
Apply wax resist to the bottom of the stalk to keep the kiln shelf clean. -
Glaze Application:
Note that these sculptures appear to be unglazed on the outside to show off the raw clay texture, or have a very thin matte clear coat. If glazing, pour a clear matte glaze inside (if hollow) and possibly mist the exterior lightly. -
Final Firing:
Fire the pieces to maturity (likely cone 5 or 6 depending on your clay body). The heat will interact with the iron oxide to create warm, burnt orange accents.
Arrange your finished ceramic stems in a varied cluster to bring a touch of earthy calm to your space.