If you can make a basic pinch pot, you can make an animal—seriously. I love how a simple little clay bowl turns into something with a face, ears, and personality in just a few easy add-ons.
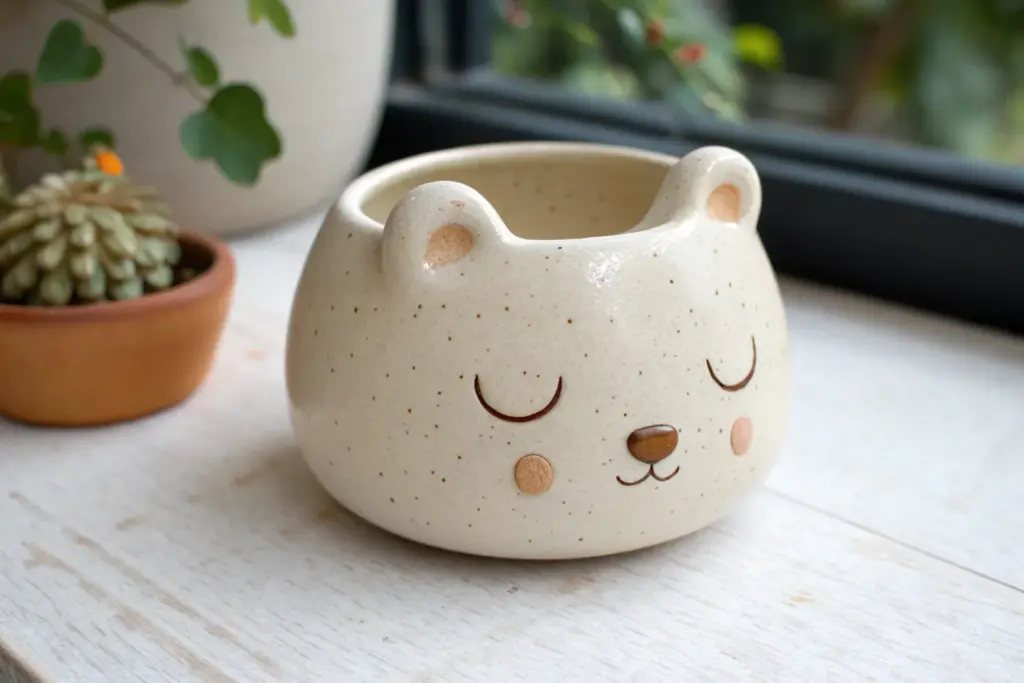
Classic Kitty Pinch Pot
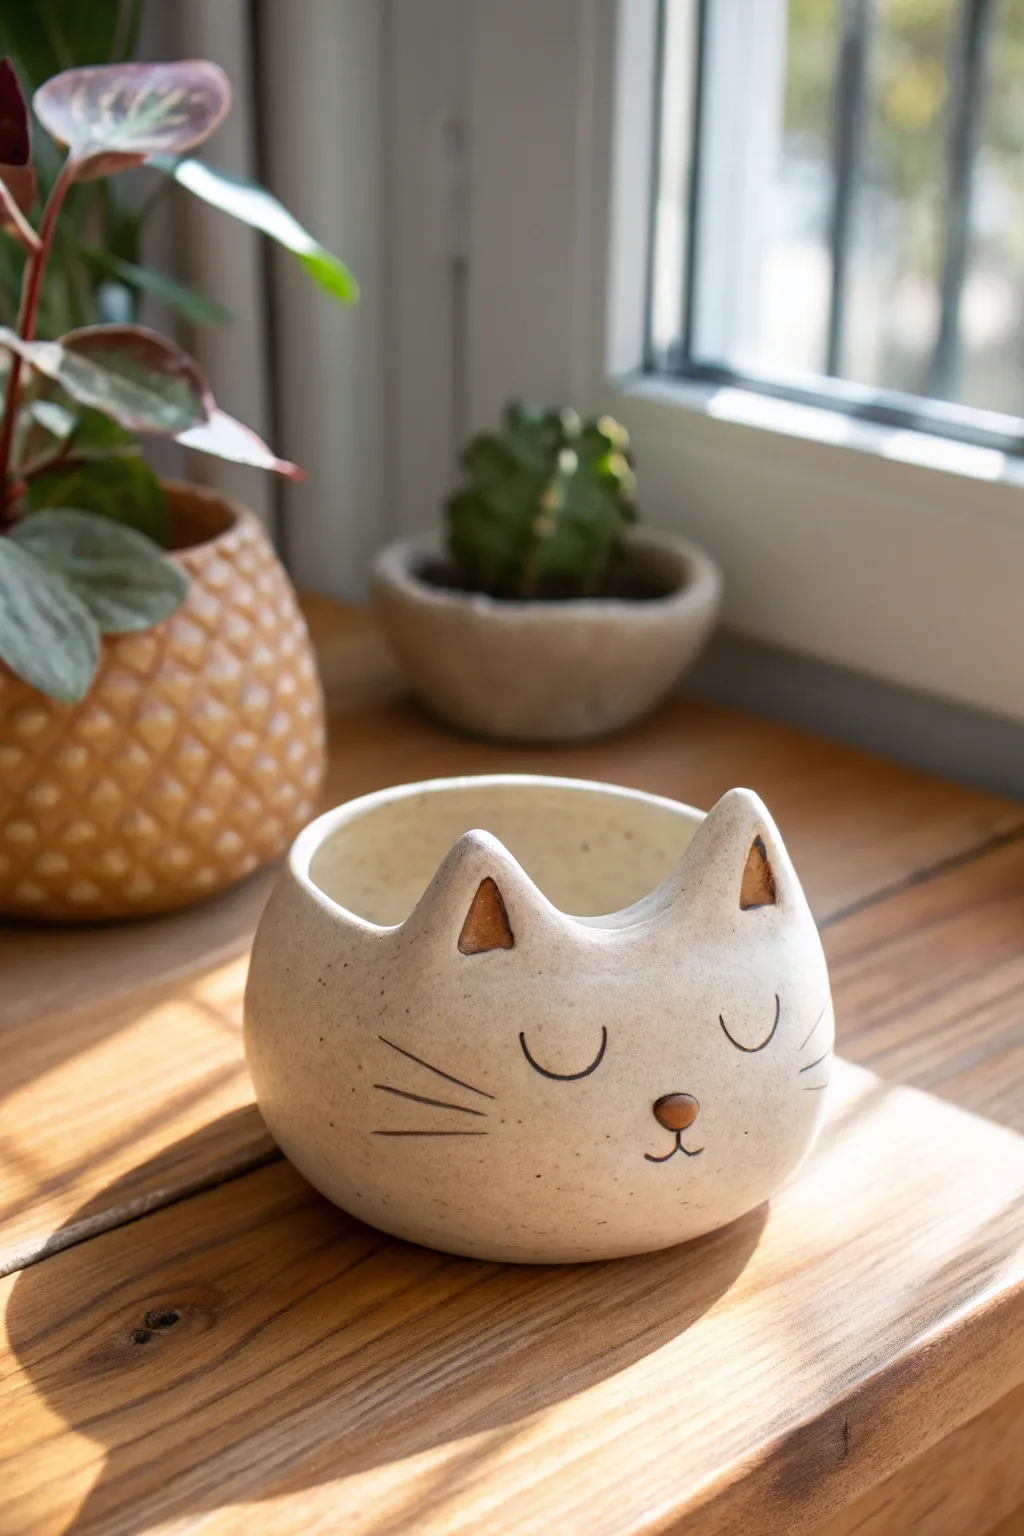
This charming little planter takes the basic pinch pot technique and transforms it into a sleepy, speckled kitty cat. With its gentle curves, warm stoneware finish, and minimalist facial features, it makes a perfect cozy home for a small succulent or cactus.
Step-by-Step
Materials
- White or buff stoneware clay (speckled clay recommended for the exact look)
- Small bowl of water
- Pottery sponge
- Needle tool or toothpick
- Scoring tool (or serrated rib)
- Small paintbrush
- Brown underglaze or oxide wash
- Black underglaze
- Clear matte or satin glaze
- Kiln (or air-dry clay and acrylics alternative)
Step 1: Forming the Base
-
Prepare the clay:
Start with a ball of clay roughly the size of a large orange. Wedge it well to remove air bubbles, then pat it into a smooth, round sphere. -
Open the pot:
Hold the sphere in one hand and press your thumb into the center, stopping about a half-inch from the bottom. This thickness is crucial for stability. -
Pinch the walls:
Rotate the ball slowly while gently pinching the clay between your thumb and fingers. Work from the bottom up, aiming for an even wall thickness of about 1/4 inch. -
Shape the curve:
As you pinch, gently curve the walls inward slightly near the top rim to create a rounded, enclosed feeling rather than a flaring bowl shape. Smooth the rim with a damp sponge. -
Flatten the base:
Tap the pot gently on your work surface to create a flat, stable bottom so it won’t rock.
Uneven Walls?
If one side is thicker, don’t just pinch that spot. Press from the thicker area toward the thinner areas to redistribute the clay evenly around the pot.
Step 2: Sculpting the Features
-
Make the ears:
Roll two small, equal-sized triangles of clay. Gently pinch them to make them distinctively pointed, curving the front face slightly concave. -
Score and slip:
Score the bottom of the ears and the spots on the rim where they will attach. Apply a little water or slip (liquid clay) to the scored areas. -
Attach the ears:
Press the ears firmly onto the rim. Use a small wooden tool or your finger to blend the clay at the seam, smoothing it downward so the ears look like they grow naturally out of the pot. -
Refine the shape:
Once attached, reshape the ears if they got squashed. I like to pinch the tips just slightly to keep them perky. -
Add the nose:
Roll a tiny, flattened triangle or oval of clay. Score and slip the center of the ‘face’ area and attach this nose piece securely.
Use a Template
Cut a paper triangle first to test the ear size against your pot before shaping the clay versions. It saves trial and error re-shaping.
Step 3: Decorating and Glazing
-
Bisque fire:
Allow the pot to dry slowly and completely (bone dry) before firing it in a bisque cycle at the appropriate cone for your clay. -
Paint the accents:
Using a small brush, apply brown underglaze inside the triangular hollows of the ears and gently tap it onto the raised nose button. -
Draw the face:
With a fine liner brush and black underglaze, paint two downward curves for closed sleepy eyes. Add a small ‘w’ shape for the mouth under the nose, and three whiskers on each cheek. -
Apply clear glaze:
Dip the entire piece into a clear matte or satin glaze. If you used speckled clay, this will allow those lovely natural spots to show through. -
Final firing:
Fire the piece again for the glaze cycle. Make sure the bottom is wiped clean of glaze so it doesn’t stick to the kiln shelf.
Pop a small plant inside your new friend and find a sunny windowsill for it to enjoy


Sweet Bunny With Long Ears
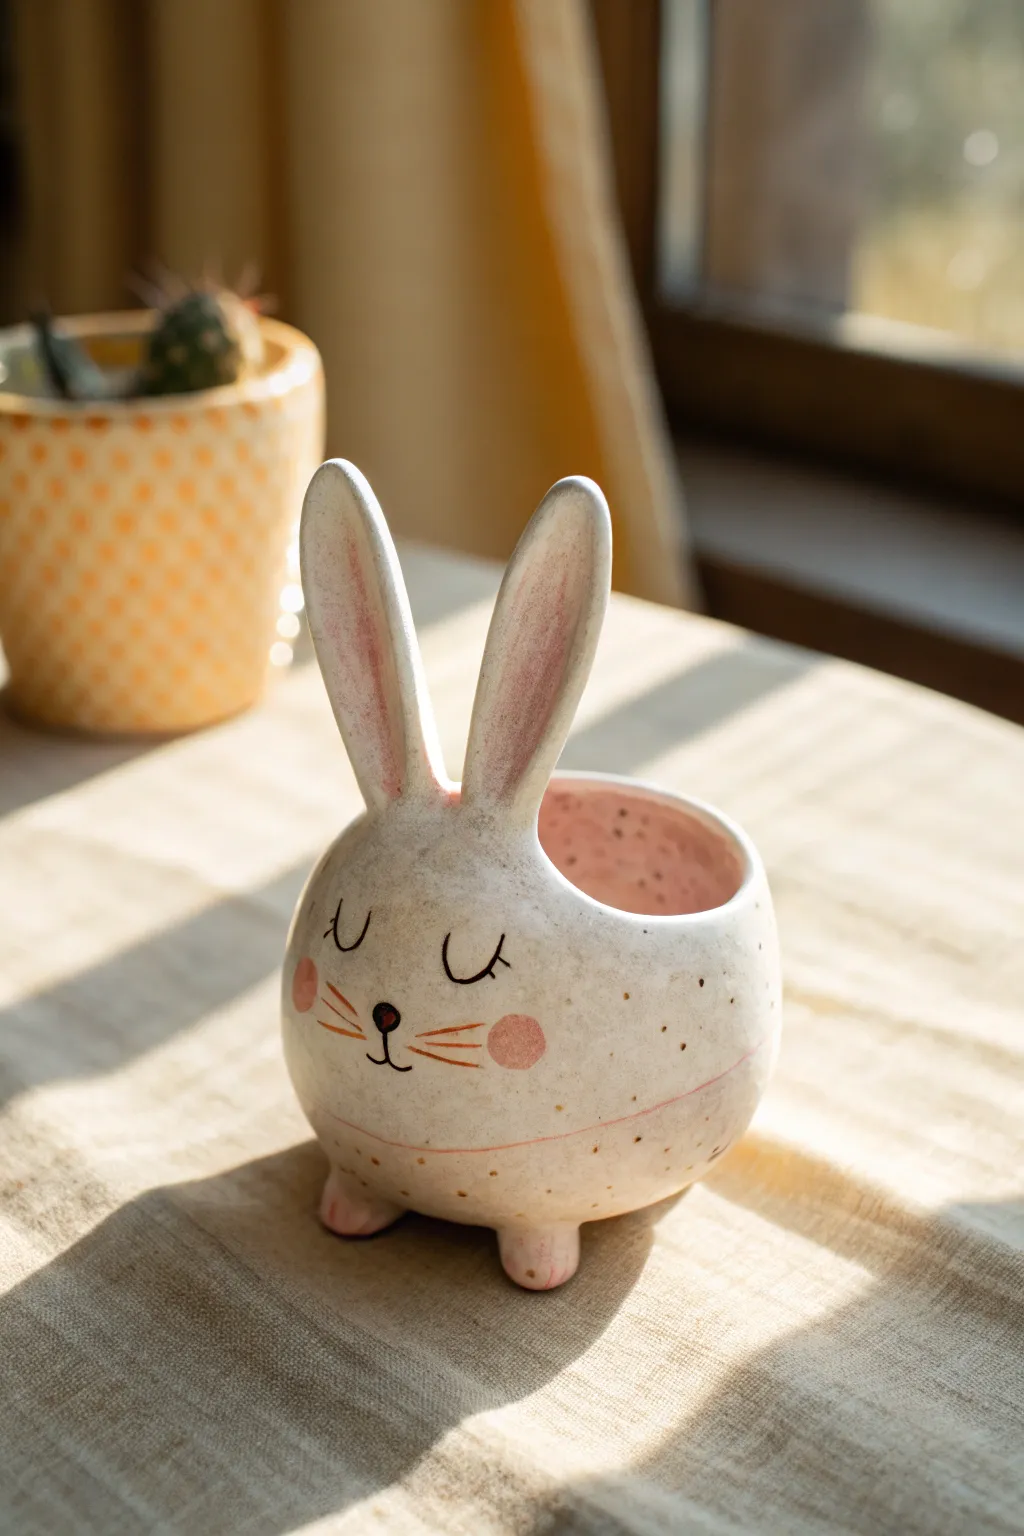
This charming bunny pinch pot features long, expressive ears and a sweet, sleeping face, making it a perfect home for a small succulent or cactus. With its speckled finish and soft pink accents, it captures a gentle, handcrafted aesthetic that warms up any windowsill.
How-To Guide
Materials
- White clay (low-fire earthenware or stoneware)
- Pottery tools (needle tool, rib tool, sponge)
- Rolling pin
- Slip (liquid clay)
- Scoring tool (or serrated rib)
- Underglazes (Soft Pink, Black/Dark Brown)
- Speckled glaze or clear glaze (if using speckled clay)
- Small paintbrush
- Water cup
Step 1: Forming the Body
-
Prepare the Clay:
Begin with a ball of white clay about the size of a large orange. Wedge it well to remove air bubbles, ensuring the consistency is smooth and pliable. -
Start the Pinch Pot:
Push your thumb into the center of the ball, stopping about half an inch from the bottom. This base thickness is crucial for stability. -
Pinch the Walls:
Gently pinch the clay between your thumb and fingers, rotating the ball as you go. Aim for an even thickness of about 1/4 inch all around, pulling the clay upward to create a rounded, bowl-like shape. -
Shape the Opening:
Unlike a standard bowl, you want this form to curve slightly inward near the top to mimic a bunny’s round head. Gently collar the rim inward with moist hands to narrow the opening slightly. -
Smooth the Surface:
Use a rib tool or a slightly damp sponge to smooth out any finger marks on the exterior. I like to spend a little extra time here to get that perfectly round, organic finish.
Step 2: Adding Features
-
Create the Feet:
Roll four small balls of clay, roughly marble-sized. Slightly flatten them and attach them to the bottom of the pot using the score and slip method. Press firmly to secure them, ensuring the pot sits level. -
Form the Ears:
Roll out two coils of clay, about 3-4 inches long. Flatten them gently to create a long oval shape. Taper one end of each ear to a point and leave the base slightly wider for attachment. -
Attach the Ears:
Score the top of the pot where the ears will go, and score the base of the ears. Apply slip and press the ears firmly onto the rim. Smooth the clay from the ear onto the pot’s body to create a seamless transition. -
Refine the Ear Shape:
Gently curve the ears slightly to give them character. You can hollow out the inner part of the ear slightly with a modeling tool to create depth, which we will paint pink later. -
Dry to Leather Hard:
Allow the piece to dry until it reaches a leather-hard state. This makes it sturdy enough for painting without deforming the shape.
Floppy Ears?
If the long ears droop while wet, support them with crumpled newspaper or small sponges until the clay stiffens to leather-hard.
Step 3: Painting and Glazing
-
Paint the Inner Ears:
Using a soft pink underglaze, paint the inside depression of the long ears. A single coat often works for a watercolor look, but add a second for opacity. -
Paint the Interior:
Apply the same soft pink underglaze to the entire inside of the pinch pot. This adds a lovely surprise pop of color when viewing the pot from above. -
Add Cheeks:
Dip a round sponge or brush into the pink underglaze and gently dab two rosy circles onto the front of the pot for the cheeks. -
Paint Facial Features:
Using a very fine detail brush and black or dark brown underglaze, carefully paint two ‘U’ shapes for closed sleepy eyes. Add a small oval nose and three whispers of whiskers on each side. -
Bisque Fire:
Fire the piece in a kiln to cone 04 (or according to your clay’s instructions) to set the shape and underglaze. -
Apply Speckled Glaze:
If you didn’t use speckled clay, apply a speckled clear glaze over the entire piece. If your clay already has specks (like a buff stoneware), a simple clear glaze works perfectly. -
Final Fire:
Perform the final glaze firing according to your glaze’s temperature requirements to achieve that glossy, durable finish.
Texture Twist
Before drying, gently press a clean piece of linen or burlap against the clay exterior to give your bunny a soft, fabric-like texture.
Once fired and cooled, your bunny is ready to hold sweet treasures or a spiky cactus friend


Little Owl With Big Eyes
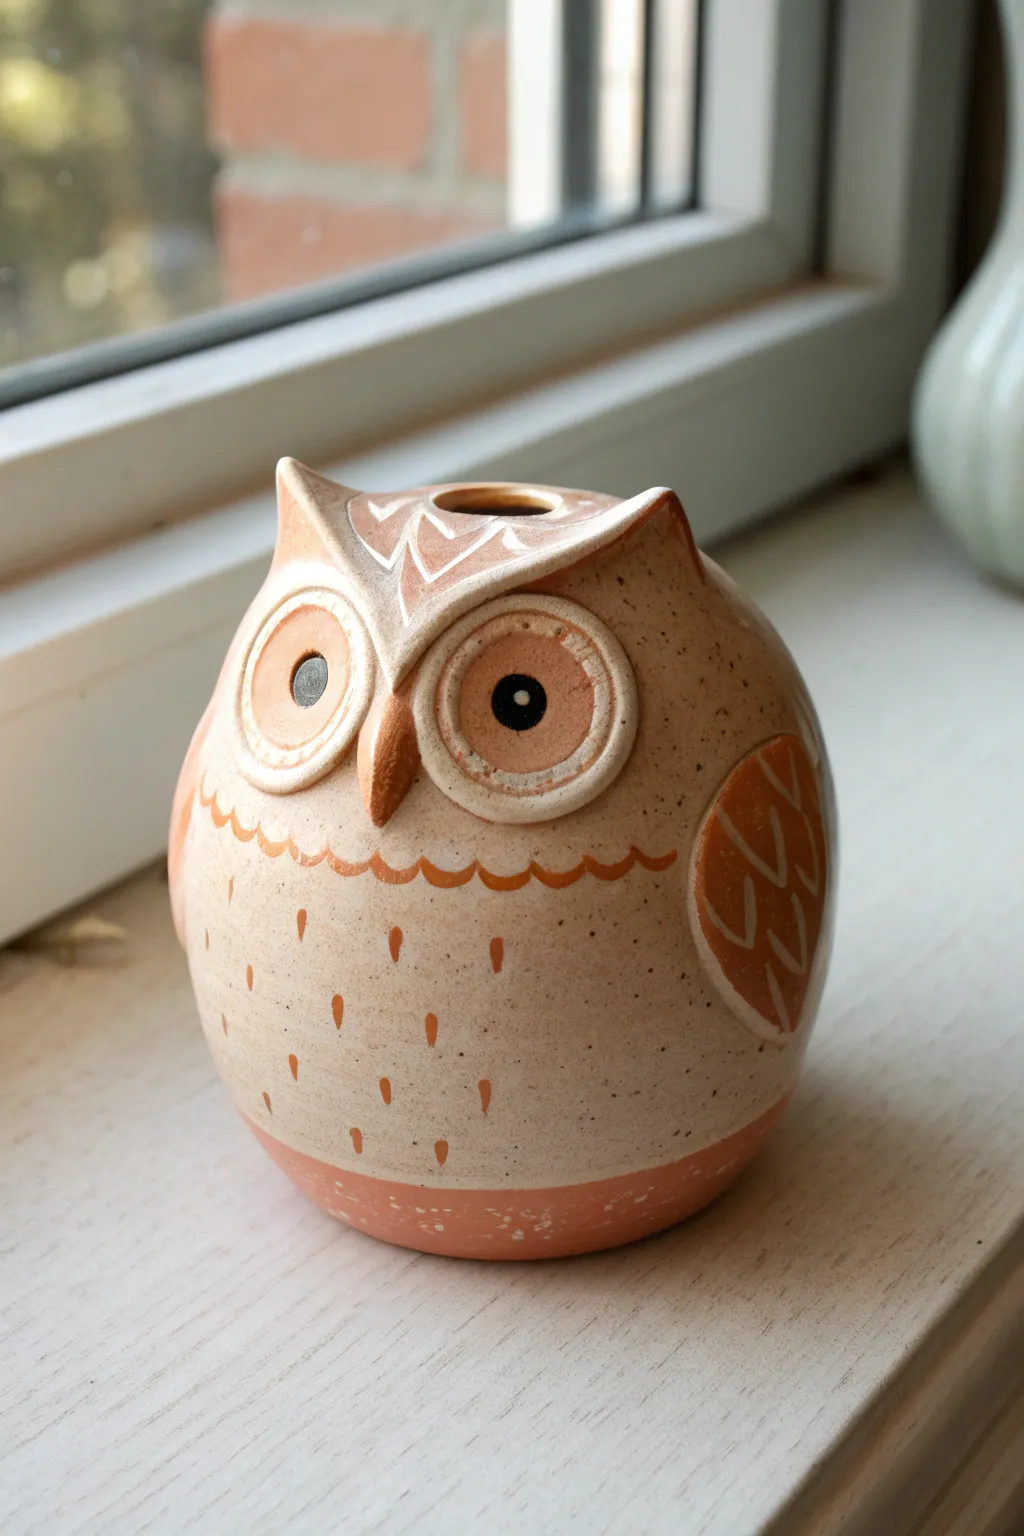
This charming ceramic owl starts as a simple pinch pot but transforms into a woodland friend with the addition of expressive eyes and a textured belly. With its earthy glaze tones and speckled clay body, it makes a perfect little bud vase or desk companion.
Step-by-Step
Materials
- Speckled stoneware clay (approx. 1 lb)
- Pottery tools (needle tool, rib, sponge)
- Scoring tool or old toothbrush
- Slip (clay mixed with water)
- Underglazes (terracotta/orange, white, black)
- Clear matte glaze or transparent glaze
- Small Rolling pin
- Round cutters (two sizes)
Step 1: Forming the Body
-
Roll the ball:
Start by wedging your clay to remove air bubbles, then roll it into a smooth, even ball about the size of a large orange. -
Start the pinch pot:
Hold the ball in one hand and press your thumb deep into the center, leaving about half an inch at the bottom for the base. -
Pinch the walls:
Gently pinch and rotate the clay between your thumb and fingers, working your way up from the bottom. Aim for consistent wall thickness, creating a rounded, bulbous shape rather than a straight bowl. -
Close the form:
As you reach the top, angle your pinching inward to slightly close the opening. This creates the owl’s head shape. Leave a small opening at the very top if you plan to use this as a vase. -
Shape the ears:
At the rim of your opening, pinch the clay on the left and right sides to pull up two pointed ‘ear’ tufts. Smooth the clay between them so it dips down slightly.
Keep it Clean
For crisp details, apply wax resist over your painted underglaze designs before dipping the whole owl in the clear overglaze.
Step 2: Adding Features
-
Make the eyes:
Roll out a small slab of clay. Use your larger round cutter to cut two circles for the outer eyes. Use a smaller cutter to make two inner circles. -
Attach outer eyes:
Score the back of the large circles and the attachment points on the face. Apply slip and press the large circles firmly onto the upper half of the pot. -
Layer the details:
Score and slip the smaller circles onto the larger ones. For the pupils, roll tiny balls of black underglaze-tinted clay (or paint later) and press them into the center. -
Sculpt the beak:
Shape a small cone or triangle of clay. Score and slip it between the eyes, pointing downward. Smooth the edges so it looks integrated into the face. -
Add wings:
Roll two teardrop shapes for wings. Attach them to the sides of the body using the score and slip method. I like to curve them slightly around the belly.
Step 3: Sgraffito & Texture
-
Define the belly:
Using a needle tool, lightly sketch a scalloped line across the chest to separate the head from the belly feathers. -
Create feather texture:
Below the scalloped line, press a small loop tool or the end of a paintbrush into the clay to make small, repetitive teardrop indentations for belly feathers. -
Wing details:
Carve ‘V’ shapes or scalloped lines into the wings to mimic layers of feathers. -
Refine the forehead:
Carve simple geometric lines or zig-zags on the forehead between the ears for extra decoration.
Cracking Issues?
If attachments crack while drying, the added clay was likely too dry compared to the body. Wrap the piece in plastic for 24 hours to equalize moisture.
Step 4: Glazing & Finishing
-
Bisque fire:
Let the piece dry slowly and completely before bisque firing it to cone 04 (or your clay’s specification). -
Apply accents:
Paint the wings, beak, and base with a terracotta or orange underglaze. Use a detail brush to carefully paint the scalloped chest line and the feather indentations. -
Final glaze:
Dip or brush the entire piece in a clear matte glaze to seal it while letting the speckled clay body show through. Wipe the bottom clean with a sponge.
Once fired, your wide-eyed owl is ready to hold a tiny wildflower or just look cute on a shelf


Easy Bird With A Beak Opening

This charming ceramic bird pot features a rounded body, a lifted head with a sweet expression, and colorful underglaze details. The speckled white finish and hand-painted feathers give it a cozy, folk-art aesthetic perfect for holding small trinkets or succulents.
Step-by-Step Tutorial
Materials
- White stoneware clay (speckled clay works best)
- Pottery tools: needle tool, metal rib, sponge
- Underglazes: Orange/Rust, Teal/Turquoise, Black
- Clear transparent glaze (food safe if using for snacks)
- Small paintbrushes (fine tip for details)
- Kiln access (or air-dry clay and acrylics for a non-functional version)
Step 1: Forming the Bird Base
-
Prepare the clay:
Start with a ball of clay roughly the size of a large orange. Wedge it well to remove air bubbles, then pat it into a smooth, round sphere. -
Open the pot:
Push your thumb into the center of the sphere, stopping about a half-inch from the bottom. Gently pinch and rotate the clay to widen the opening and thin the walls evenly. -
Shape the body:
Continue pinching until you have a deep bowl shape. Use a smooth rib tool on the outside to refine the curve and compress the clay, removing fingerprints. -
Create the head:
Choose one side of the rim to be the front. Gently pinch and pull the clay upward and slightly inward at this spot to form a raised mound for the bird’s head. -
Form the beak:
At the very front of your raised head section, pinch a small amount of clay and pull it outward to create a pointed, triangular beak shape. -
Form the tail:
On the opposite side of the bowl, pinch the rim slightly to create a subtle outward curve suggesting a tail feather, keeping the overall shape rounded. -
Refine surface:
Smooth the transition between the head and the body with a damp sponge. Ensure the rim is rounded and comfortable to the touch.
Head Slumping?
If the head droops while pulling, the clay is too wet. Use a heat gun or hair dryer for 30-second bursts to stiffen the clay just enough to hold its shape.
Step 2: Decoration & Glazing
-
Bisque fire:
Allow your piece to dry slowly until bone dry, then bisque fire it in the kiln according to your clay body’s specifications. -
Sketch the design:
Lightly sketch the wing shape and face features onto the bisque or dry clay using a standard pencil; the graphite will burn off in the kiln. -
Paint the beak:
Using a small brush, apply 2-3 coats of rust-orange underglaze to the beak, letting each coat dry briefly in between. -
Add face details:
Paint a small black circle for the eye, leaving a tiny white spot unpainted for a highlight. Add a small orange dot for the cheek just below the eye. -
Outline the wing:
Draw a curved teardrop shape on the side for the wing using a very fine brush or an underglaze pencil. I prefer using a fine liner brush for crisper lines. -
Fill the wing:
Paint the front curve of the wing in teal. Paint the back feathers in orange, leaving thin lines of unpainted clay between the colors to define the feathers. -
Add chest patterns:
Paint small, vertical triangular dashes in orange along the chest area to simulate feathers. Add tiny teal dots between the rows for extra decoration. -
Interior details:
Paint a few sporadic teal dots on the inside rim of the pot to tie the design together. -
Final glaze:
Once the underglaze is dry, dip the entire piece in a clear transparent glaze or brush on a clear gloss. Wipe the foot of the pot clean. -
Final firing:
Glaze fire the piece to the temperature required for your clay and glaze combination.
Make it a Vase
Pinch the walls taller and narrower instead of wide. This transforms the bird into a cute bud vase perfect for a single stem flower.
Now you have a sweet little ceramic friend ready to brighten up your desk or windowsill

The Complete Guide to Pottery Troubleshooting
Uncover the most common ceramic mistakes—from cracking clay to failed glazes—and learn how to fix them fast.
Playful Puppy With Floppy Ears
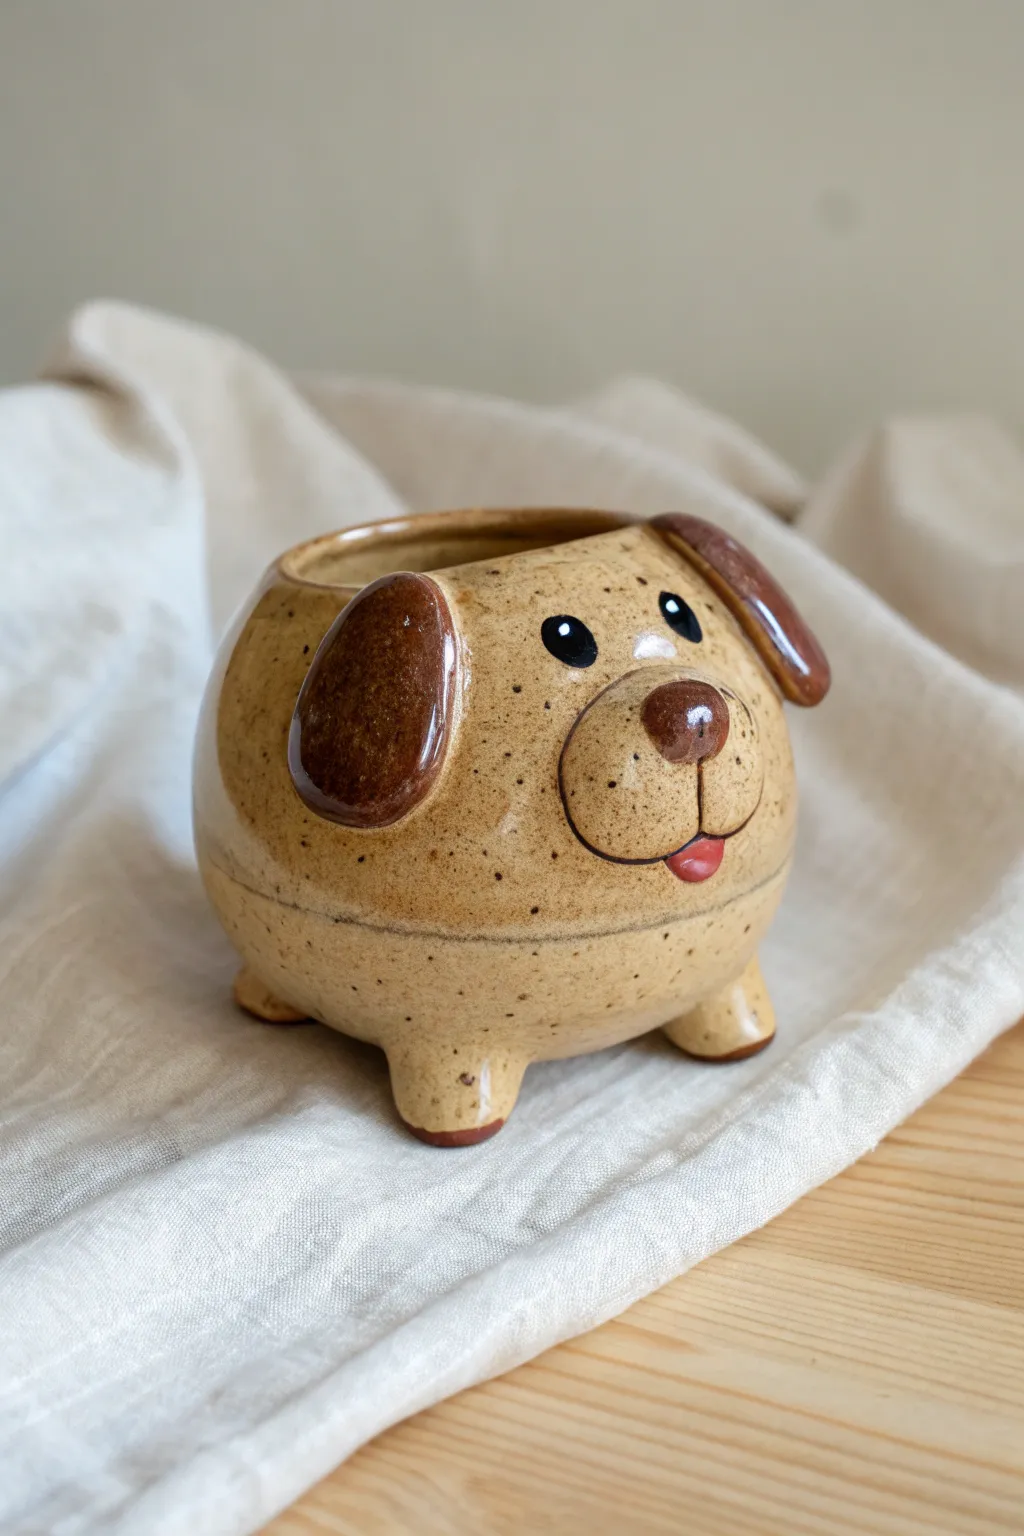
This adorable ceramic puppy is built from a simple pinch pot base, transforming a round ball of clay into a smiling, four-legged friend. Its warm, speckled tan glaze and glossy brown details give it a classic, endearing pottery look.
Step-by-Step Tutorial
Materials
- Stoneware clay (speckled or buff)
- Pottery tools (needle tool, scoring rib, sponge)
- Slip (clay mixed with water)
- Small paintbrush
- Underglazes (Brown, Black, White, Red)
- Clear glaze (glossy)
- Rolling pin (optional)
Step 1: Forming the Body
-
Make a ball:
Start with a baseball-sized lump of clay and roll it between your palms until it is perfectly round and smooth. -
Open the pot:
Hold the ball in one hand and press your thumb into the center, leaving about half an inch of clay at the bottom. -
Pinch the walls:
Gently pinch and rotate the clay between your thumb and fingers to thin the walls evenly. Aim for a rounded, spherical shape rather than a wide bowl, keeping the opening slightly narrower than the belly of the pot. -
Smooth the surface:
Use a slightly damp sponge or a flexible rib to smooth out any finger marks on the exterior. The smoother the surface now, the better the glaze will look later.
Step 2: Adding Feet & Features
-
Create feet:
Roll four small, equal-sized balls of clay (about the size of marbles) and flatten them slightly into peg shapes. -
Attach the feet:
Score the bottom of the pot and the top of each foot. Apply slip, press them firmly in place, and blend the seams upward until they are seamless. I like to tap the pot on the table gently to ensure it stands flat. -
Form the muzzle:
Roll a flattened oval of clay for the muzzle. Score and slip it onto the front center of the pot, blending the edges so it looks integrated but still prominent. -
Sculpt the ears:
Flatten two teardrop shapes of clay for the ears. They should be thick enough to hold their shape but thin enough to look like floppy ears. -
Attach the ears:
Score and slip the pointed end of the teardrops to the sides of the head. Bend the rounded ends downward so they flop against the cheeks, pressing them gently to secure the contact point. -
Add the nose:
Roll a tiny triangular or oval bit of clay and attach it to the top center of the muzzle for the nose.
Air Pocket Patrol
When attaching the muzzle and ears, score aggressively! Trapped air between added pieces can cause them to pop off in the kiln. Firm pressure is key.
Step 3: Refining & Glazing
-
Define the smile:
Use a needle tool or modeling tool to incise a vertical line down the muzzle and a curved smile line underneath. -
Refine the eyes:
Mark the placement of the eyes lightly. You can press a small tool in slightly to create a socket, or leave the surface smooth for painting. -
Bisque fire:
Once the piece is bone dry, fire it to cone 04 (or your clay’s bisque temperature). -
Base coat:
Apply a speckled tan or oatmeal-colored glaze to the entire body, avoiding the bottom of the feet. If your clay is naturally speckled, a semi-transparent clear or honey glaze works beautifully. -
Color the ears and nose:
Carefully paint the ears and the nose button with a dark brown underglaze or glaze. Ensure the edges are crisp where the colors meet. -
Paint the face:
Using a very fine brush, paint two black circles for eyes and fill the mouth area. Add a tiny dab of white to each eye for a highlight, and a small pink or red tongue within the smile. -
Final glaze fire:
Apply clear glaze over the underglazed areas if necessary (unless you used colored glazes), and fire the piece to the final temperature required for your clay body.
Wobbly Dog?
If the pot rocks after adding feet, place a small wooden board on top of the rim and press down gently while the clay is soft to relevel the legs. Check from all angles.
Place a small succulent inside your new puppy planter to give him a fun, green hairstyle
Sleepy Sloth Hanging Over The Rim
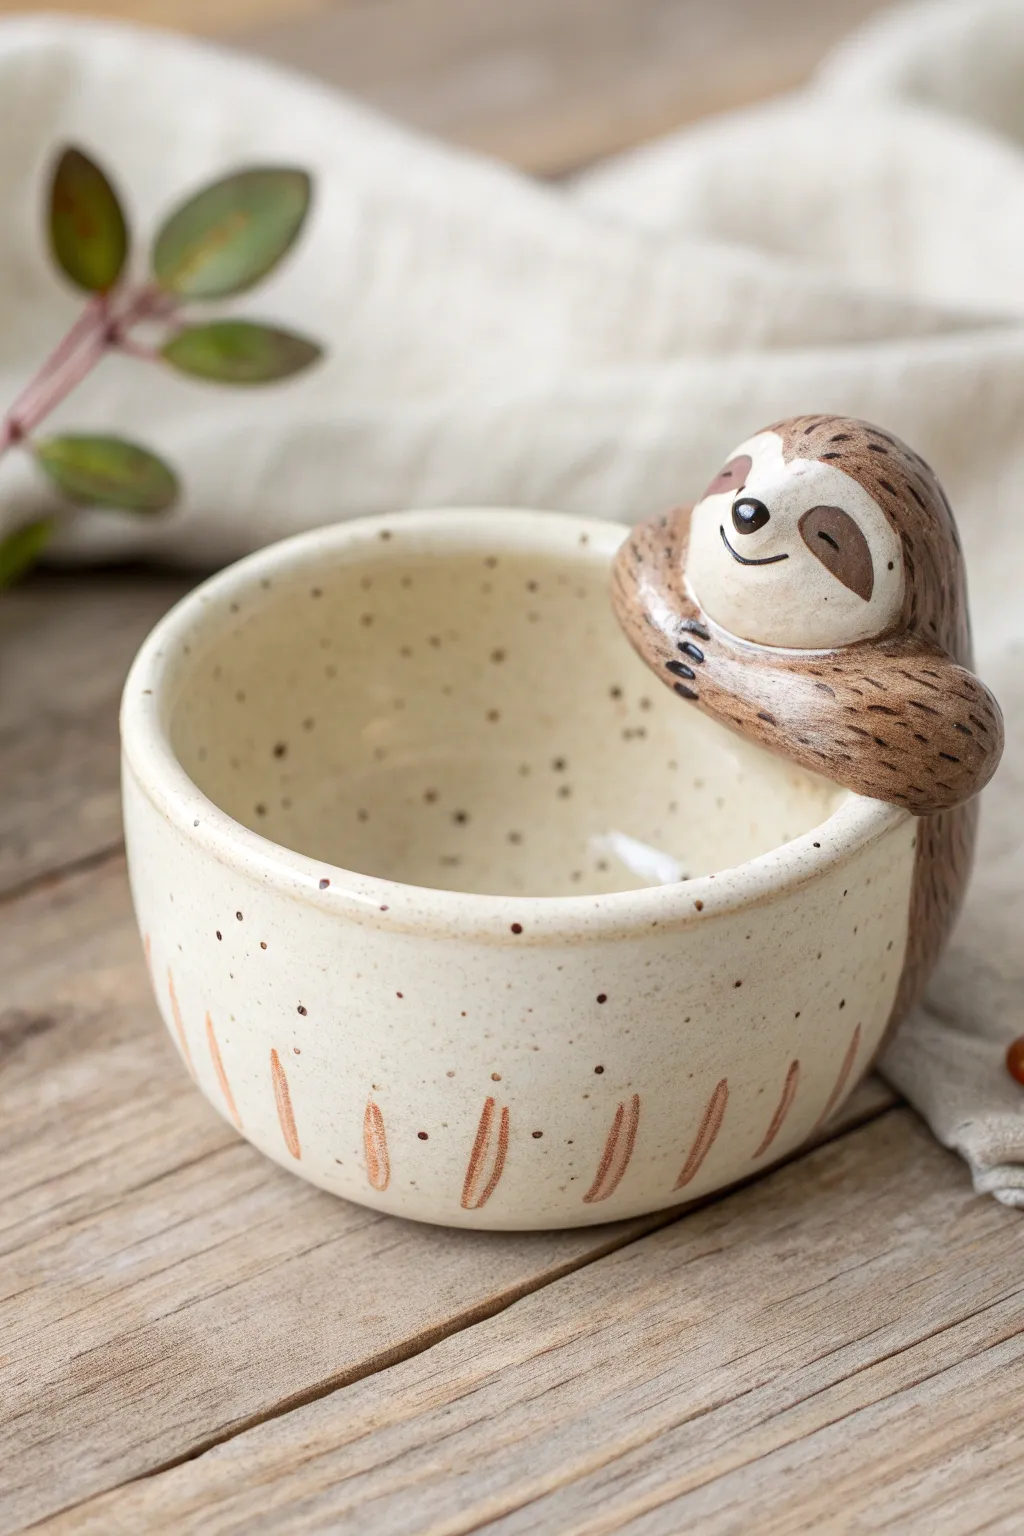
This charming ceramic bowl features a relaxed sloth lazily hugging the rim, perfect for holding small trinkets or acting as a sweet planter. The speckled glaze and hand-painted details give it a warm, organic feel that captures the peaceful nature of this sleepy creature.
Detailed Instructions
Materials
- White or speckled stoneware clay
- Pottery tools (needle tool, rib tool, scoring tool)
- Slip (clay mixed with water)
- Underglazes (brown, black, cream/white)
- Clear glossy glaze (or a food-safe speckled matte glaze)
- Small paintbrushes
- Sponge
- Kiln access
Step 1: Forming the Bowl Base
-
wedge the clay:
Start with a ball of clay roughly the size of a large orange. Wedge it thoroughly to remove any air bubbles, ensuring the clay is consistent and workable. -
Create the pinch pot:
Push your thumb into the center of the ball, stopping about a half-inch from the bottom. Gently pinch the clay between your thumb and fingers, rotating the ball as you work to thin the walls evenly. -
Shape the walls:
Continue pinching upwards to create a cylindrical cup shape with straight sides. Aim for walls that are about 1/4 inch thick. I like to keep the rim slightly rounded rather than sharp. -
Smooth the surface:
Use a damp sponge or a soft rib tool to smooth the inside and outside of the pot, removing any fingerprints or intense ridges. If you want a perfectly flat bottom, tap the pot gently against your work surface.
Crack Prevention
A heavy sloth head can pull on the rim while drying. Dry your pot upside down for the first few hours so gravity helps keep the sloth attached rather than pulling it off.
Step 2: Sculpting the Sloth
-
Form the body:
Roll a small oval of clay for the sloth’s body. It should be sized to look proportionate when attached to the side of your pot. -
Attach the body:
Position the oval vertically against the outside of the pot. Score both the pot surface and the back of the sloth body, add a dab of slip, and press firmly to attach. Smooth the edges of the clay into the pot so they become one unit. -
Create the head:
Roll a slightly smaller, rounder ball for the head. Press it gently to flatten the ‘face’ area. -
Attach the head:
Score and slip the top of the body and the bottom of the head. Attach the head so it rests right at the rim of the pot, peeking over the edge. -
Sculpt the arms:
Roll two small sausage shapes for the arms. Flatten one end of each arm slightly where it will attach to the shoulder area. -
Pose the hug:
Attach the arms to the sloth’s shoulders using the score and slip method. Curve them forward so they drape comfortably over the rim of the pot, as if the sloth is hugging the bowl. Press the ‘paws’ gently onto the inner rim. -
Refine the shape:
Use a modeling tool to smooth the seams where the limbs attach. Gently press three tiny divots into the end of each paw to suggest claws.
Pro Tip: Fur Texture
Instead of painting fur lines, use a needle tool on the leather-hard clay to physically carve shallow fur textures before the first firing. The glaze will break beautifully over the texture.
Step 3: Decoration and Glazing
-
Initial Bisque Fire:
Allow the pot to dry slowly and completely (bone dry) before firing it in the kiln to bisque temperature (usually cone 04). -
Base color for the sloth:
Once bisqued, paint the sloth’s body and the back of its head with a medium-brown underglaze. Leave the face area unpainted or paint it a soft cream color. -
Face details:
Using a very fine brush and black underglaze, paint the sleeping eyes (two small curved lines), a little triangle nose, and a gentle smile. Add the distinctive dark eye patches around the eyes with a wash of brown. -
Fur texture:
With a fine brush and a darker brown underglaze, add small, short dashes all over the brown parts of the body and arms to mimic fur texture. -
Pot decoration:
Paint vertical, slightly curved reddish-brown dashes around the bottom edge of the pot to create a simple grass-like pattern. You can also flick a toothbrush dipped in brown underglaze to add speckles if your clay body isn’t naturally speckled. -
Apply clear glaze:
Dip the entire pot into a clear glossy glaze. If you used a speckled clay body, the natural specks will show through. If using white clay, ensure you added the speckles in the previous step. -
Final wipe:
Wipe the bottom of the pot clean with a sponge to prevent it from sticking to the kiln shelf. -
Glaze Fire:
Fire the pot again to the maturity temperature of your clay and glaze (often cone 5 or 6). Let the kiln cool completely before retrieving your new friend.
Fill your new bowl with succulents or tea bags and enjoy the calming vibe of your sloth companion


What Really Happens Inside the Kiln
Learn how time and temperature work together inside the kiln to transform clay into durable ceramic.
Frog With Wide Eyes And A Grin
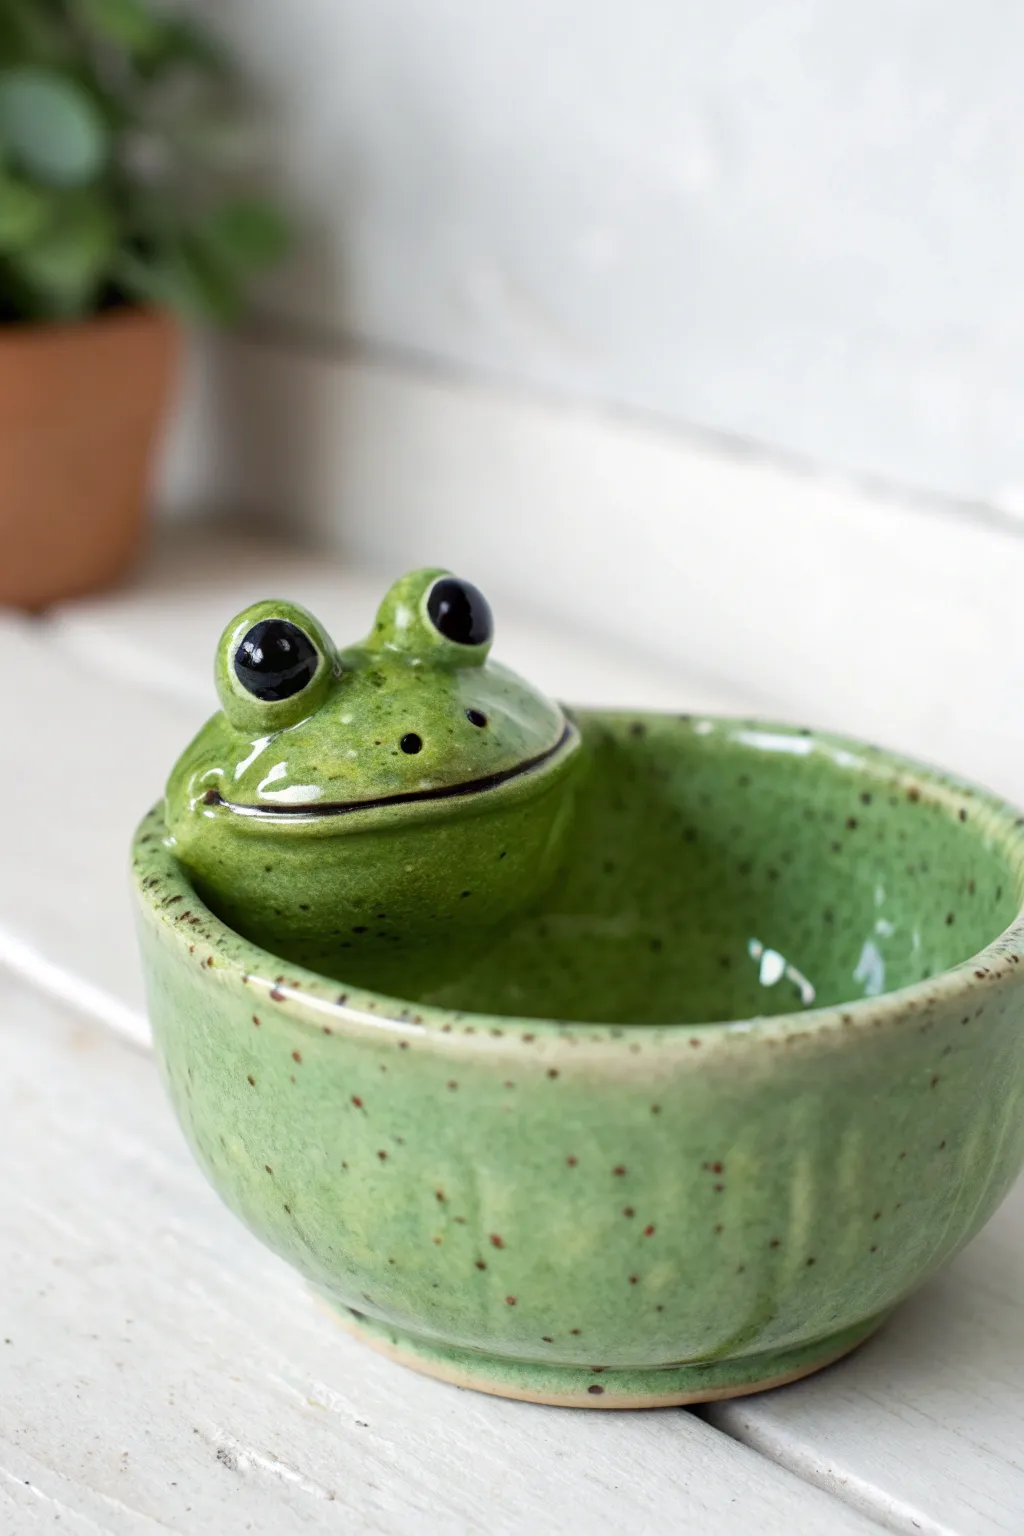
Bring a swampy smile to your shelf with this charming ceramic frog bowl. Featuring glossy green glaze, playful speckles, and oversized eyes, this functional pinch pot is perfect for holding trinkets or small plants.
Detailed Instructions
Materials
- Earthenware or stoneware clay (white or buff firing)
- Small sponge
- Modeling tools or a wooden skewer
- Slip (clay mixed with water)
- Scoring tool (or fork)
- Underglaze (Black)
- Mid-fire glossy green glaze (speckled variety preferred)
- Clear glaze (optional, depending on green glaze used)
- Kiln access
Step 1: Forming the Base
-
Prepare the Clay:
Start with a ball of clay roughly the size of a large orange. Wedge it thoroughly to remove air bubbles and ensure the consistency is even. -
Open the Pot:
Hold the clay ball in your non-dominant hand. Press your thumb into the center, stopping about a half-inch from the bottom. -
Pinch the Walls:
Slowly rotate the ball while gently pinching the clay between your thumb and fingers. Work your way from the bottom up to thin the walls evenly. -
Shape the Curve:
Aim for a rounded, organic bowl shape. Don’t worry if the rim isn’t perfectly straight; a little waviness adds character. -
Smooth the Surfaces:
Use a damp sponge or your finger to smooth out any cracks on the rim or the exterior texture. I like to leave slight finger marks on the outside for a handmade feel.
Step 2: Sculpting the Frog Head
-
Form the Head Shape:
Take a separate piece of clay, about the size of a walnut, and shape it into a flattened oval. This will become the frog’s upper head and mouth. -
Attach the Head:
Choose a spot on the pot’s rim. Score both the rim and the underside of the head piece, apply slip, and press the head firmly onto the rim so it overhangs slightly inside. -
Blend the Seams:
Use a wooden tool or your thumb to drag clay from the back of the head down onto the pot, creating a seamless transition. The frog should look like it’s growing out of the bowl. -
Define the Mouth:
Use a needle tool or knife to carve a deep, wide horizontal line across the front of the head to create that signature grin. Curve the ends slightly upward. -
Make the Eye Sockets:
Roll two small balls of clay for the eyes. Before attaching, press your thumbs into the top of the head to create slight indentations where they will sit. -
Attach the Eyes:
Score and slip the indentations and the clay balls. Press them firmly into place on top of the head. -
Refine the Details:
Poke two tiny holes for nostrils just above the mouth line. Smooth any rough edges around the eyes with a slightly damp brush.
Keep it Light
Hollow out the frog’s head slightly from underneath if the clay piece is thicker than 1 inch. This prevents it from exploding in the kiln.
Step 3: Glazing and Firing
-
Bisque Fire:
Allow the piece to dry slowly until bone dry (usually 5-7 days). Fire it to cone 04 (or your clay’s specific bisque temperature). -
Apply Underglaze:
Once out of the kiln, carefully paint the pupils and the inside of the mouth line with black underglaze. Let this dry completely. -
Glaze the Body:
Dip or brush the entire piece with a speckled green glossy glaze. Be careful not to smudge the black underglaze details; dabbing glaze over them gently works best. -
Wipe the Base:
Clean the bottom of the pot with a sponge to ensure no glaze touches the kiln shelf. -
Glaze Fire:
Fire the bowl again to the maturity temperature of your glaze (typically cone 5 or 6). This will melt the specks and give the frog its wet, shiny look.
Make it a Planter
Before drying, use a hole cutter tool to punch a drainage hole in the bottom center. Now your froggy friend is ready for a succulent.
Once cooled, your cheerful amphibian is ready to hop onto your desk or hold your keys
Hedgehog With Stamped Spines
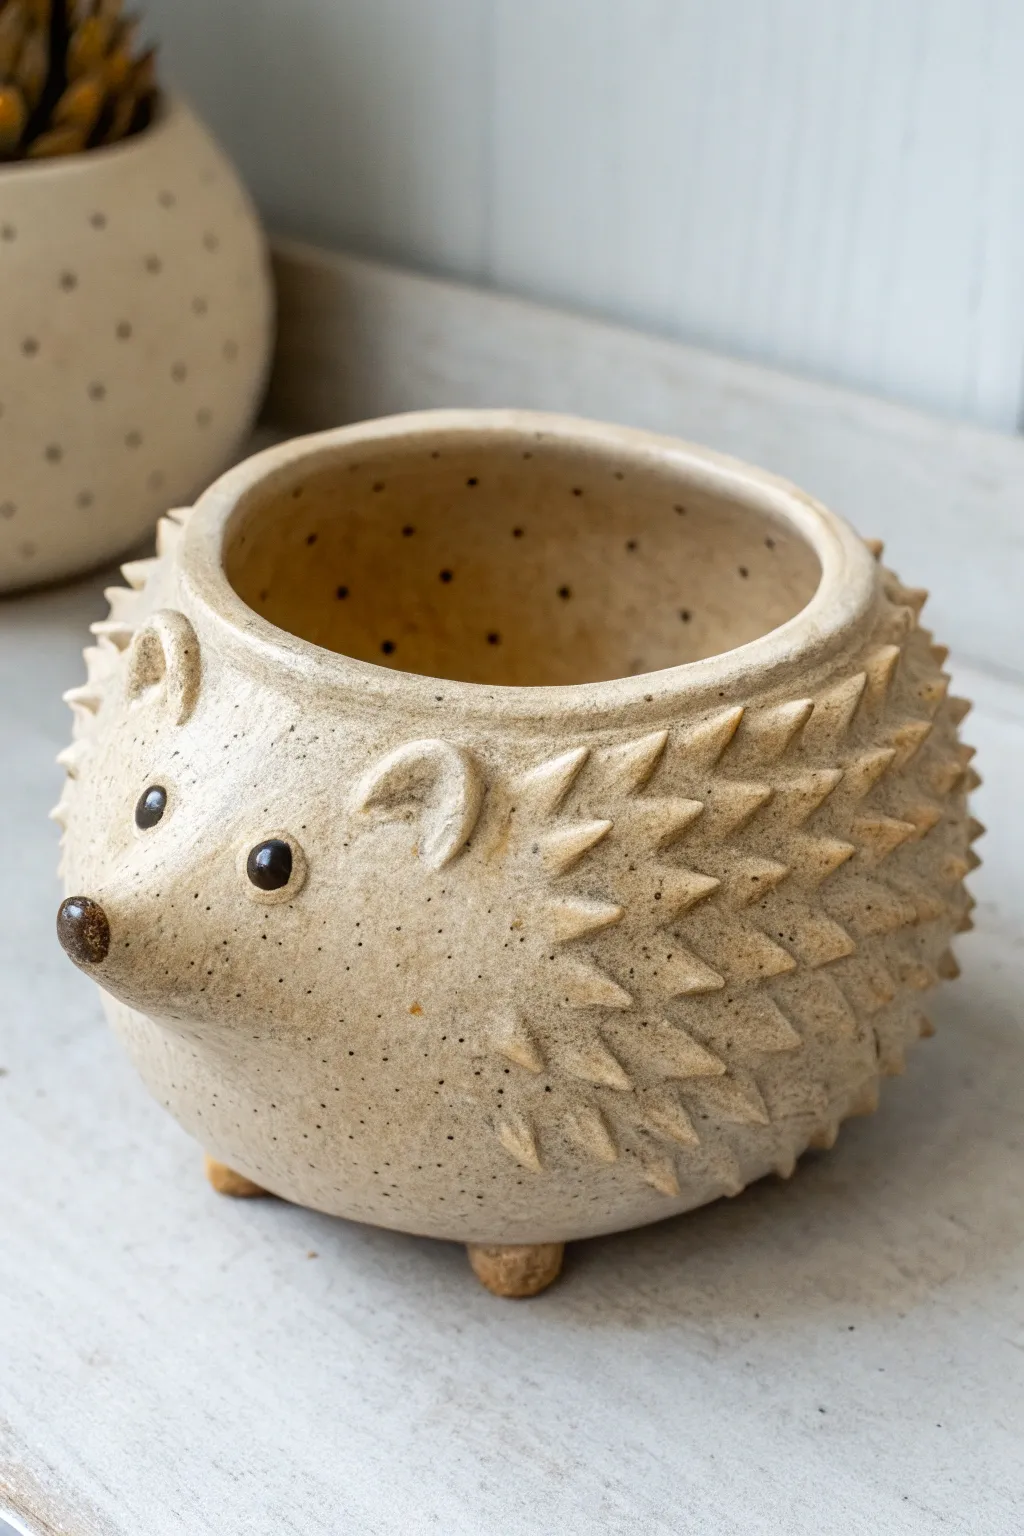
This adorable hedgehog planter combines the rustic charm of speckled clay with playful, tactile textures. Its inviting round shape and carefully sculpted spines make it the perfect home for a small succulent or cactus.
How-To Guide
Materials
- Speckled buff stoneware clay
- Pinch pot tools (rib, needle tool)
- Small loop tool or carving tool
- Scoring tool (or serrated kidney)
- Slip (clay and water mixture)
- Black underglaze (for eyes)
- Brown stain or underglaze (for nose)
- Small brush
- Sponge
Step 1: Forming the Base
-
Prepare the Clay:
Begin with a ball of speckled buff stoneware clay about the size of a large orange. Wedge it well to remove air bubbles and ensure particle alignment. -
Open the Pot:
Press your thumb into the center of the ball, leaving about a half-inch of thickness at the bottom. Begin pinching the walls, rotating the clay in your hand to maintain a spherical shape. -
Shape the Walls:
Continue pinching upward, aiming for a slight inward curve at the rim to create that enclosed, rounded hedgehog body. Keep the walls even, roughly 1/4 inch thick throughout. -
Create the Snout:
While the clay is still plastic, gently push out a section of the wall from the inside to create a bulge. On the outside, pinching gently, pull this bulge into a slightly pointed, upturned snout shape. -
Refine the Surface:
Use a flexible rib tool to smooth the interior and exterior surfaces. This compresses the clay and removes rough fingerprints, giving you a clean canvas for the texture. -
Add Stability:
Roll three tiny balls of clay for the feet. Score and slip the bottom of the pot, then attach the feet in a tripod formation so the hedgehog sits stable and slightly elevated.
Clean Tip Trick
If your carved spines create sharp ‘burrs’ or crumbs of clay, wait until the pot is bone dry. You can brush them away easily with a stiff dry paintbrush without smudging the design.
Step 2: Sculpting Details
-
Attach the Ears:
Make two small semi-circles of clay. Score the spots behind the eyes, add a dab of slip, and press the ears on. Use a modeling tool to blend the back of the ears into the body, leaving the front concave. -
Mark the Spine Area:
Using a needle tool, lightly sketch a line around the face where the spines will begin. This ensures you leave the face smooth and cute. -
Create the Spines:
Now for the texture. Instead of stamping, use a small carving tool or the tip of a detailing knife. Press into the clay and flick the clay upward to raise small, triangular points. I find starting from the back and moving forward helps keep the pattern consistent. -
Refine the Spines:
Continue flickering up these triangular wedges across the entire back and sides of the pot. Stagger the rows so they look like natural quills. -
Smooth the Edges:
Once the spines are carved, use a slightly damp sponge or your finger to gently soften the very sharpest tips so they don’t chip off later. -
Detail the Face:
Roll two tiny balls for eyes and one for the nose tip. Score and slip them onto the face. Press the eyes in slightly to seat them securely.
Step 3: Finishing and firing
-
Dry Slowly:
Because of the variable thickness near the added nose and feet, let the piece dry slowly under loose plastic for a day before uncovering it completely. -
Bisque Fire:
Fire the piece to bisque temperature (usually Cone 04) to prepare it for glazing. -
Apply Color:
Paint the tiny nose tip with a brown underglaze or stain. Carefully dot the eyes with shiny black underglaze or glaze to give them life. -
Clear Glaze Inside:
Pour a clear or white liner glaze inside the pot to make it waterproof. Leave the outside unglazed (or use a matte transparent glaze) to show off the raw speckled clay texture. -
Final Fire:
Fire the piece to the final temperature compatible with your stoneware clay (typically Cone 5 or 6). This will bring out the lovely speckles in the clay body.
Drainage Hole
Planning on planting real succulents? Don’t forget to punch a drainage hole in the bottom center before the clay dries out. Your plants will thank you later.
Once fired, fill your little hedgie with soil and a spiky plant to complete the look

TRACK YOUR CERAMIC JOURNEY
Capture glaze tests, firing details, and creative progress—all in one simple printable. Make your projects easier to repeat and improve.
Panda With Bold Face Patches
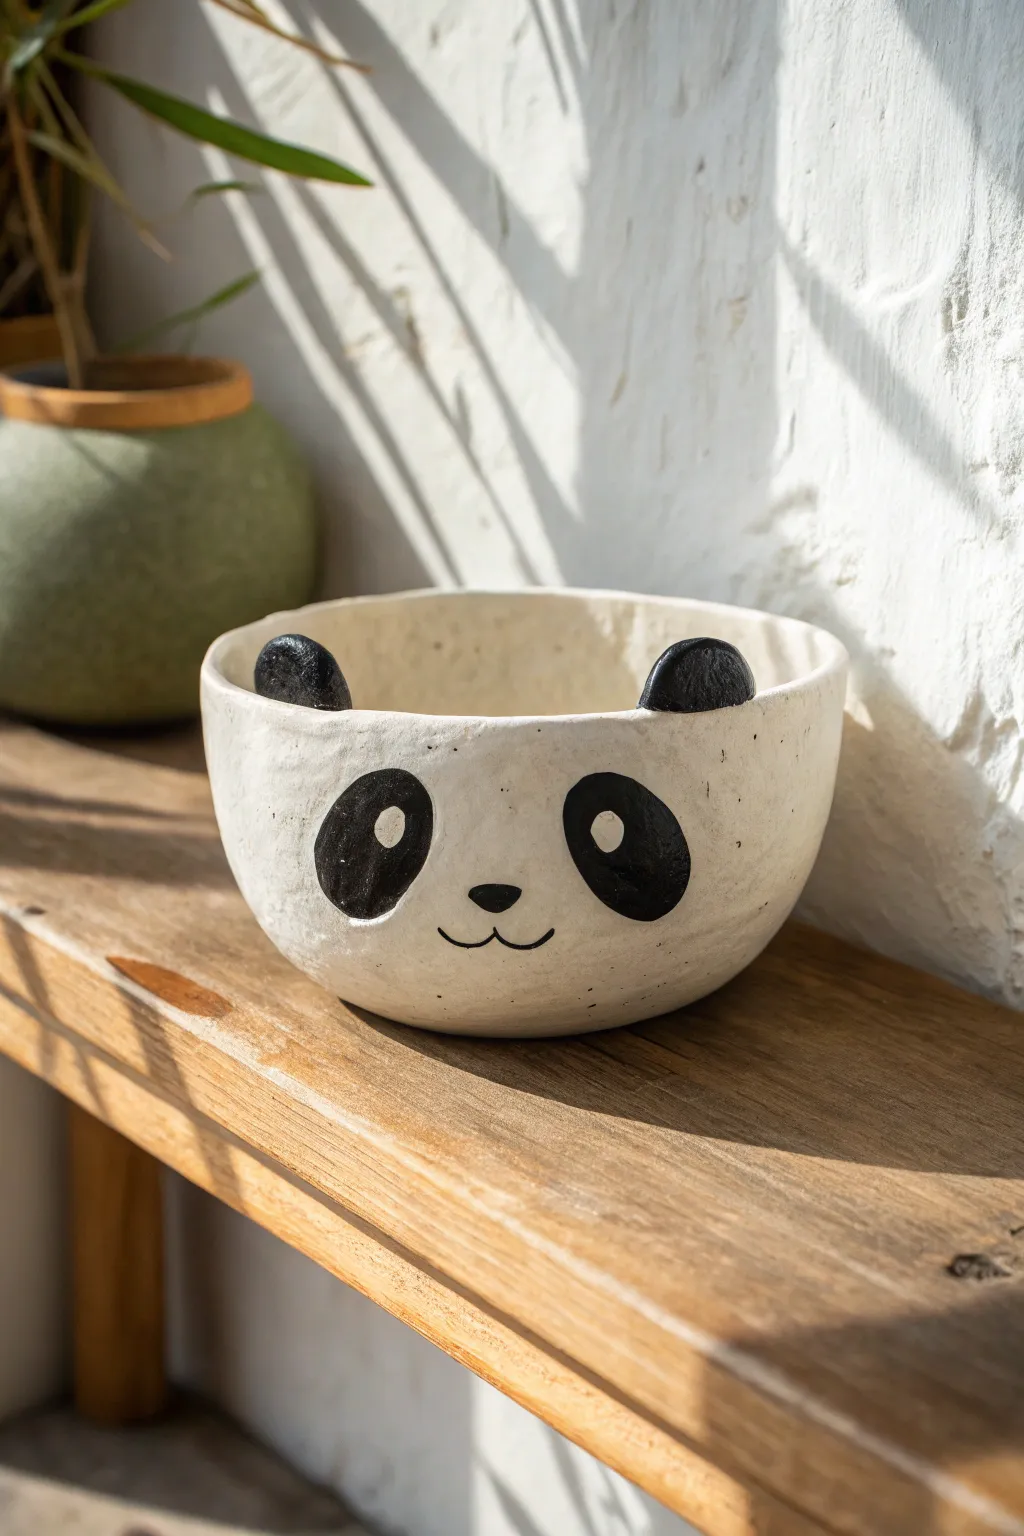
This adorable panda pinch pot features a charming irregular shape that highlights its handmade nature, complete with bold black eye patches and cute rounded ears perched on the rim. With its smooth matte finish and minimalist face, it is the perfect little vessel for holding trinkets or a small succulent.
Step-by-Step Guide
Materials
- White creative paper clay or air-dry clay
- Acrylic paints (black and white)
- Small rolling pin (optional)
- Small cup of water
- Sponge
- Clay sculpting tools (or a butter knife)
- Fine grit sandpaper
- Medium round paintbrush
- Fine detail paintbrush
- Matte varnish or sealant
Step 1: Shaping the Base
-
Prepare the clay:
Start with a ball of white clay about the size of a large orange. Knead it in your hands for a minute to ensure it is warm, pliable, and free of air bubbles. -
Form the pinch pot:
Press your thumb into the center of the ball, leaving about half an inch of clay at the bottom. Start pinching the clay walls between your thumb and fingers, rotating the ball as you go to thin out the sides evenly. -
Widen the shape:
Continue pinching and pulling gently upwards and outwards until you have a bowl shape. Aim for a slightly wider, open form rather than a tall cup shape to give the panda a chubby face. -
Flatten the bottom:
Gently tap the bottom of the pot against your work surface to create a flat base so the bowl sits stably without wobbling. -
Smooth the surfaces:
Dip your finger or a slightly damp sponge into water and run it over the clay to smooth out any deep fingerprints or cracks. The surface doesn’t need to be perfect, as the texture adds character.
Step 2: Adding the Features
-
Create the ears:
Take two small pieces of excess clay and roll them into balls about the size of large marbles. Flatten them slightly to create thick, rounded ear shapes. -
Attach the ears:
Score the bottom of the ears and the rim of the pot where you want them to sit. Apply a dab of water or clay slip, press the ears firmly onto the rim, and smooth the seam with your finger or a tool so they are completely integrated. -
Refine the rim:
Run a damp sponge around the entire rim of the bowl, ensuring the transition between the pot and the ears is seamless and smooth. -
Dry the piece:
Set the pot aside to dry completely. Depending on your clay type and humidity, this could take 24 to 48 hours. I like to rotate it occasionally so it dries evenly from all sides. -
Sand for smoothness:
Once fully dry, use fine-grit sandpaper to gently buff the surface. Focus on the rim and the outside curve to get a nice, stone-like matte texture.
Oops, cracking?
If small cracks appear while drying, don’t panic. Mix a tiny bit of fresh clay with water to make a paste and fill the cracks, then sand smooth once dry.
Step 3: Painting the Panda
-
Paint the background:
If your clay isn’t naturally bright white, give the entire pot a coat of white acrylic paint. If using white clay, you can skip this to keep the natural texture. -
Outline the patches:
Using a pencil, very lightly sketch where the large eye patches, nose, and mouth will go. The eye patches should slant slightly downward toward the cheeks. -
Fill the eye patches:
With a medium round brush and black acrylic paint, fill in the large oval shapes for the eyes. Apply a second coat if necessary to get a solid, opaque black. -
Paint the ears:
Carefully paint the attached ears black, covering front and back. Use the edge of your brush to get a crisp line where the black ear meets the white bowl. -
Add the face details:
Switch to a fine detail brush. Paint a small, rounded triangle nose in the center, and a thin, wavy ‘w’ shape for the mouth just below it. -
Add the eye shine:
Once the black eye patches are completely dry, dip the handle end of a paintbrush into white paint and dot a small highlight into the upper corner of each black patch to bring the panda to life. -
Seal:
Finish the project by applying a coat of matte varnish. This protects the paint and gives the pot a finished, professional look.
Pro Tip: Eye Position
Place the eye patches slightly wider apart and lower on the bowl than you think. A ‘low forehead’ makes the panda look much cuter and younger.
Fill your new panda friend with your favorite items and enjoy the handmade charm on your shelf