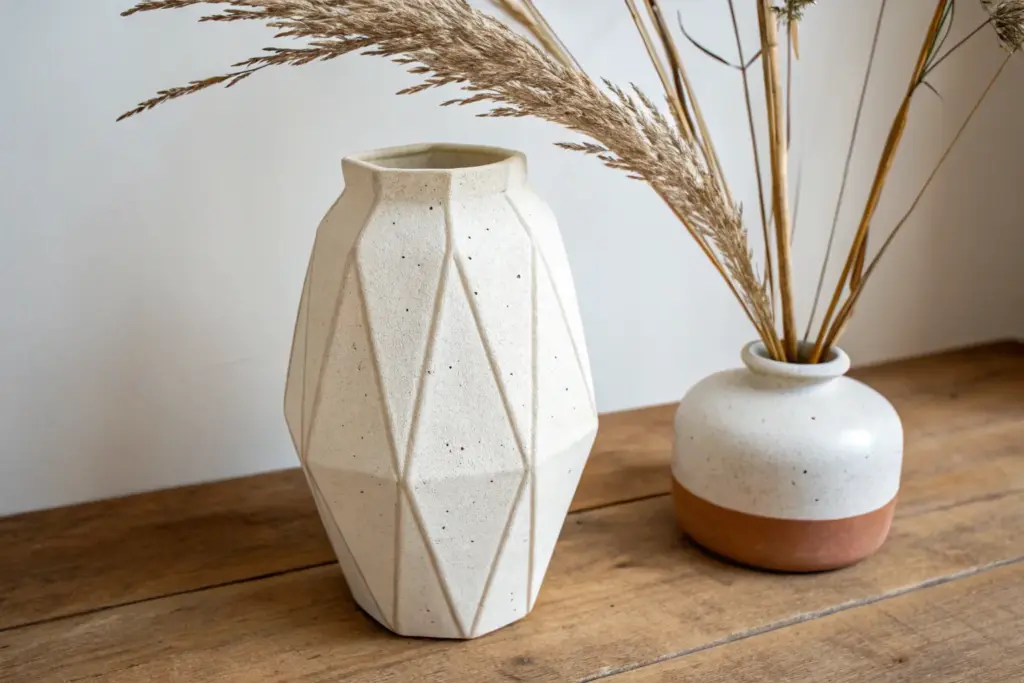
If you love crisp edges, bold silhouettes, and lots of room for texture, slab-built vases are going to feel like your happy place. Here are my favorite slab vase ideas—starting with the classics and drifting into the fun, weird, wow-worthy stuff.
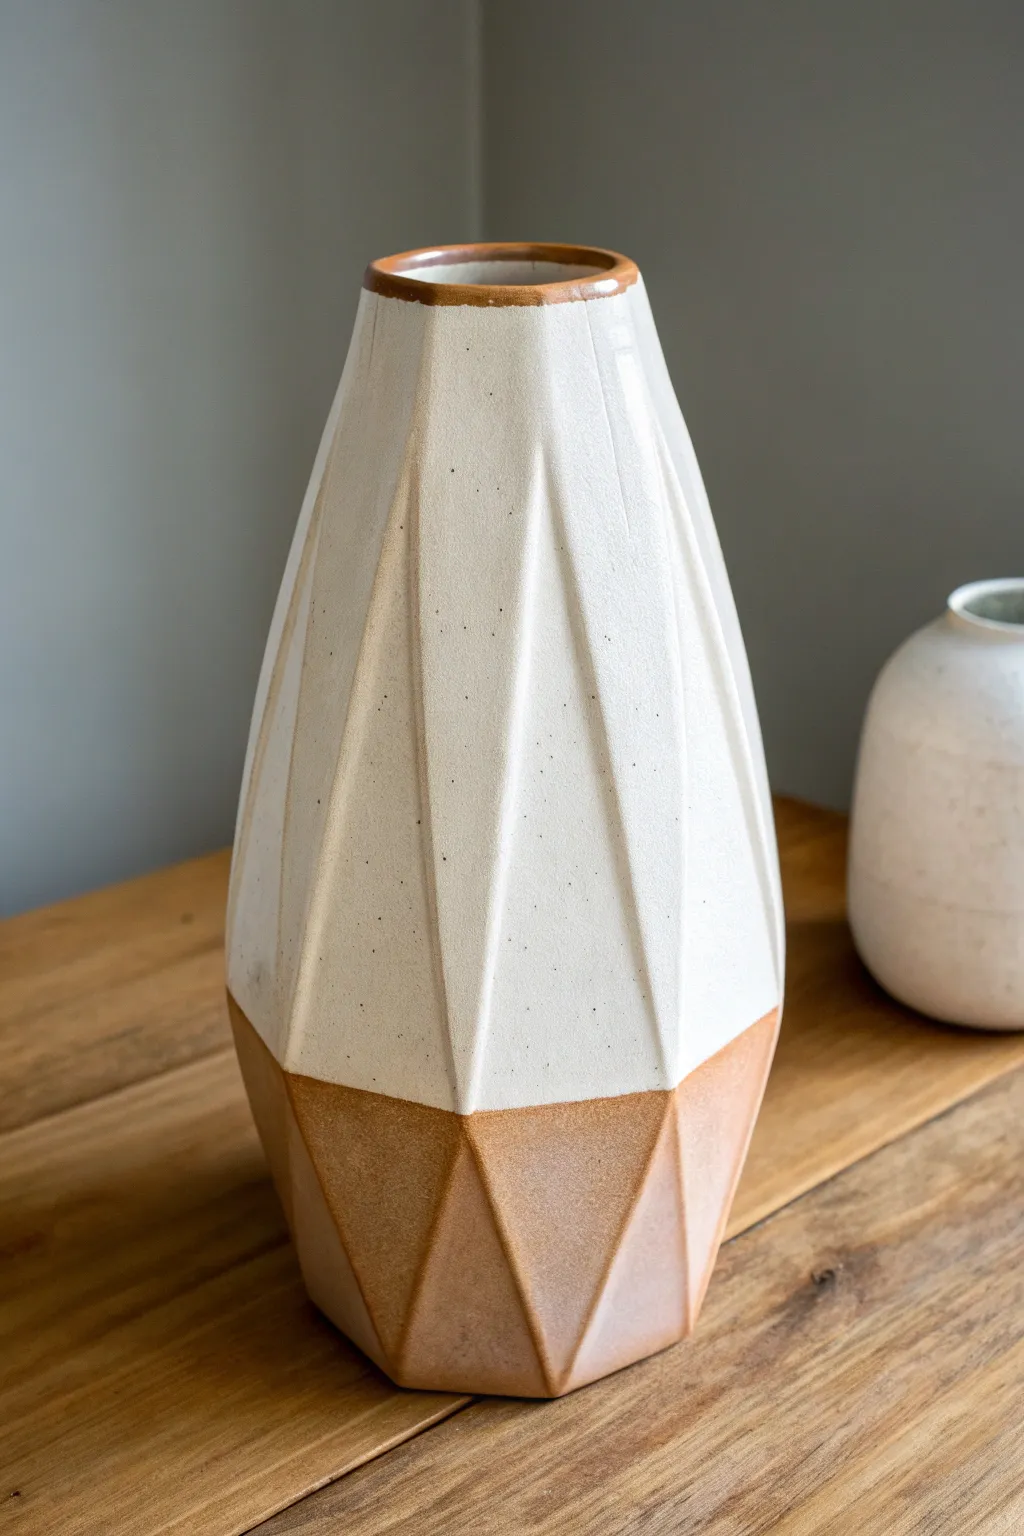
Classic Slab Cylinder Vase With a Clean Seam
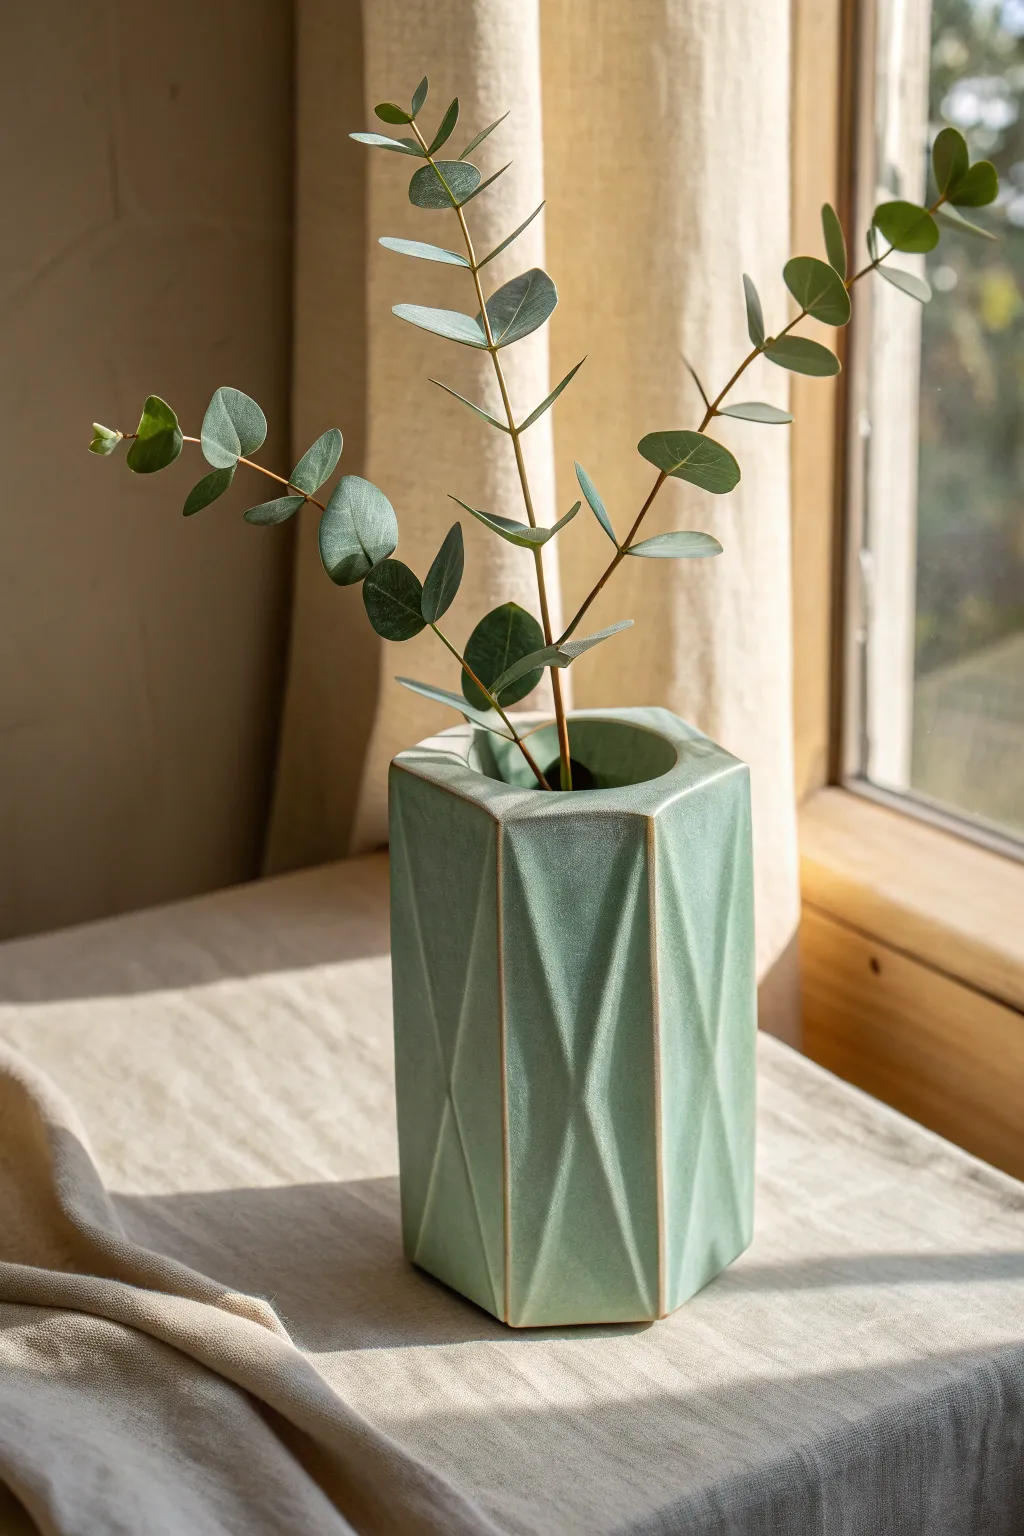
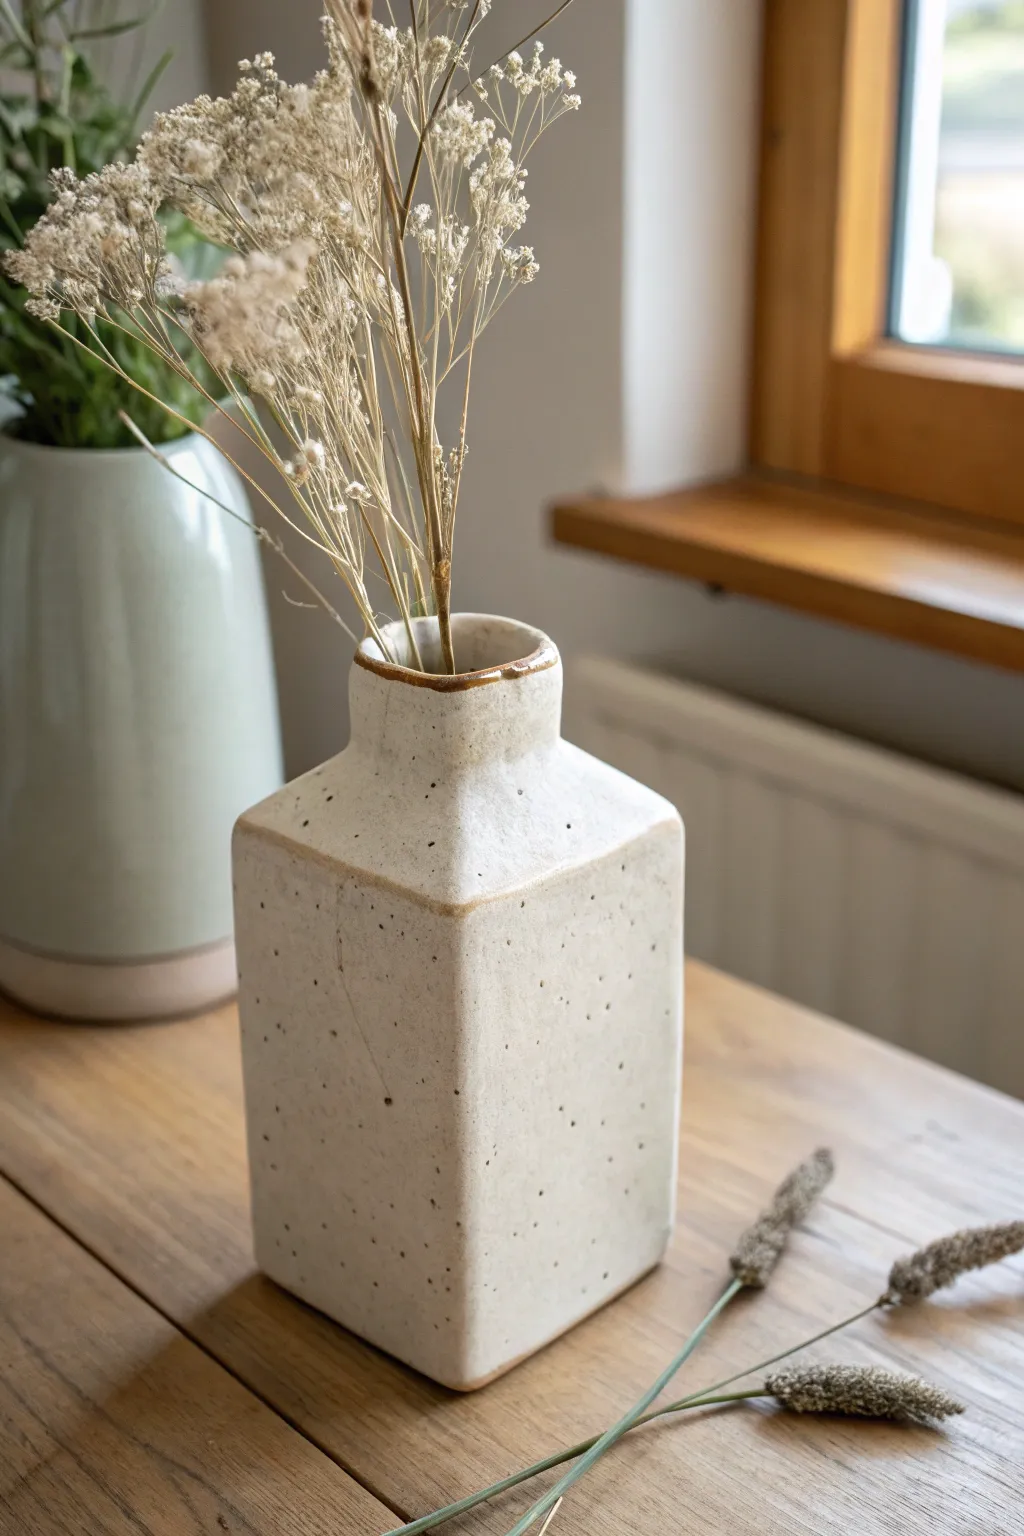
This elegant slab-built cylinder combines modern simplicity with organic texture, featuring a creamy, speckled glaze that contrasts beautifully with a raw clay foot. The tall, straight silhouette is perfect for displaying dried grasses or long-stemmed blooms.
Step-by-Step Guide
Materials
- Speckled stoneware clay (mid-fire)
- Canvas mat or slab roller
- Rolling pin and guide strips (approx. 1/4 inch thickness)
- Needle tool
- Fettling knife
- Serrated rib and smooth rib
- Slip (made from your clay body)
- Ruler or straight edge
- Circle cutter or compass tool
- Soft sponge
- Matte white or cream glaze (translucent enough to show speckles)
- Kiln
Step 1: Preparing the Slab
-
Roll the clay:
Begin by wedging your speckled stoneware clay to remove air bubbles. Roll it out into a large rectangular slab using a rolling pin and guide strips to ensure an even thickness of about 1/4 inch. -
Smooth the surface:
Before cutting, compress the clay slab on both sides using a soft rib. This aligns the clay particles, reducing the chance of warping later, and creates a nice canvas for the glaze. -
Measure and cut the wall:
Decide on the height and circumference of your vase. Using a ruler and a fettling knife, cut a clean rectangle. For a vase like the one pictured, a height of 10-12 inches works well. -
Bevel the edges:
On the two shorter sides of your rectangle (which will become the vertical seam), act cut a 45-degree bevel. Cut one bevel facing up and the opposite edge facing down so they will overlap seamlessly.
Clean Seams
Use a wooden paddle to gently tap the seam after joining. This compresses the clay wall and helps completely hide the join line better than smoothing alone.
Step 2: Forming the Cylinder
-
Score the bevels:
Take a serrated rib or needle tool and aggressively score the beveled edges you just cut. The texture helps the clay lock together. -
Stand and curve:
Carefully lift the slab and curve it into a cylinder. It helps to let the slab firm up slightly to leather-hard before doing this so it doesn’t slump, but it must still be flexible. -
Join the seam:
Apply slip to the scored edges and press the beveled ends together. Overlap them gently and compress the seam from both the inside and outside to ensure a tight bond. -
Create the base:
Roll out a small separate piece of slab for the floor. Place your cylinder on top of it and trace around the bottom edge with a needle tool, then cut out the circle. -
Score and slip base:
Thoroughly score the bottom edge of your cylinder and the outer rim of your circular base. Apply slip and press the cylinder firmly onto the base.
Textural Depth
If your clay isn’t naturally speckled, add 0.5% granular ilmenite or manganese to your white slip and spatter it on the vase before glazing.
Step 3: Refining and Sealing
-
Reinforce the interior:
I like to roll a very thin coil of soft clay and press it into the interior seam where the wall meets the floor. Smooth it down with your finger or a modeling tool to ensure the vase is watertight. -
Clean the exterior seam:
Use a metal rib to scrape away excess slip on the outside vertical join. Smooth it until the seam is virtually invisible. -
Refine the rim:
Use a damp sponge or a piece of chamois leather to smooth the top rim of the vase. Round it off slightly for a finished, professional look. -
Expose the foot:
If you want the distinct shadowed foot seen in the photo, create a slight undercut at the very bottom of the vase exterior using a trimming tool, lifting the visual weight slightly off the table.
Step 4: Glazing and Finishing
-
Bisque fire:
Allow the vase to dry slowly and completely. Once bone dry, load it into the kiln for a bisque fire (usually Cone 04). -
Wax the foot:
Apply wax resist to the bottom inch of the vase exterior and the entire underside. This ensures the raw clay remains exposed, creating that beautiful contrast. -
Apply glaze:
Pour your matte cream glaze inside the vase, swirl to coat, and pour out. Then, dip the exterior into the glaze bucket up to the wax line. Hold it upside down for a moment to let drips fall off. -
Clean up:
Use a sponge to wipe away any stray droplets of glaze that may be resting on the waxed area to ensure a crisp, clean line. -
Glaze fire:
Fire the vase to the maturity temperature of your clay and glaze (typically Cone 5 or 6 for stoneware). The heat will bring out the iron speckles through the creamy glaze.
Once cooled, fill with dried bunny tails or pampas grass to complete the serene aesthetic


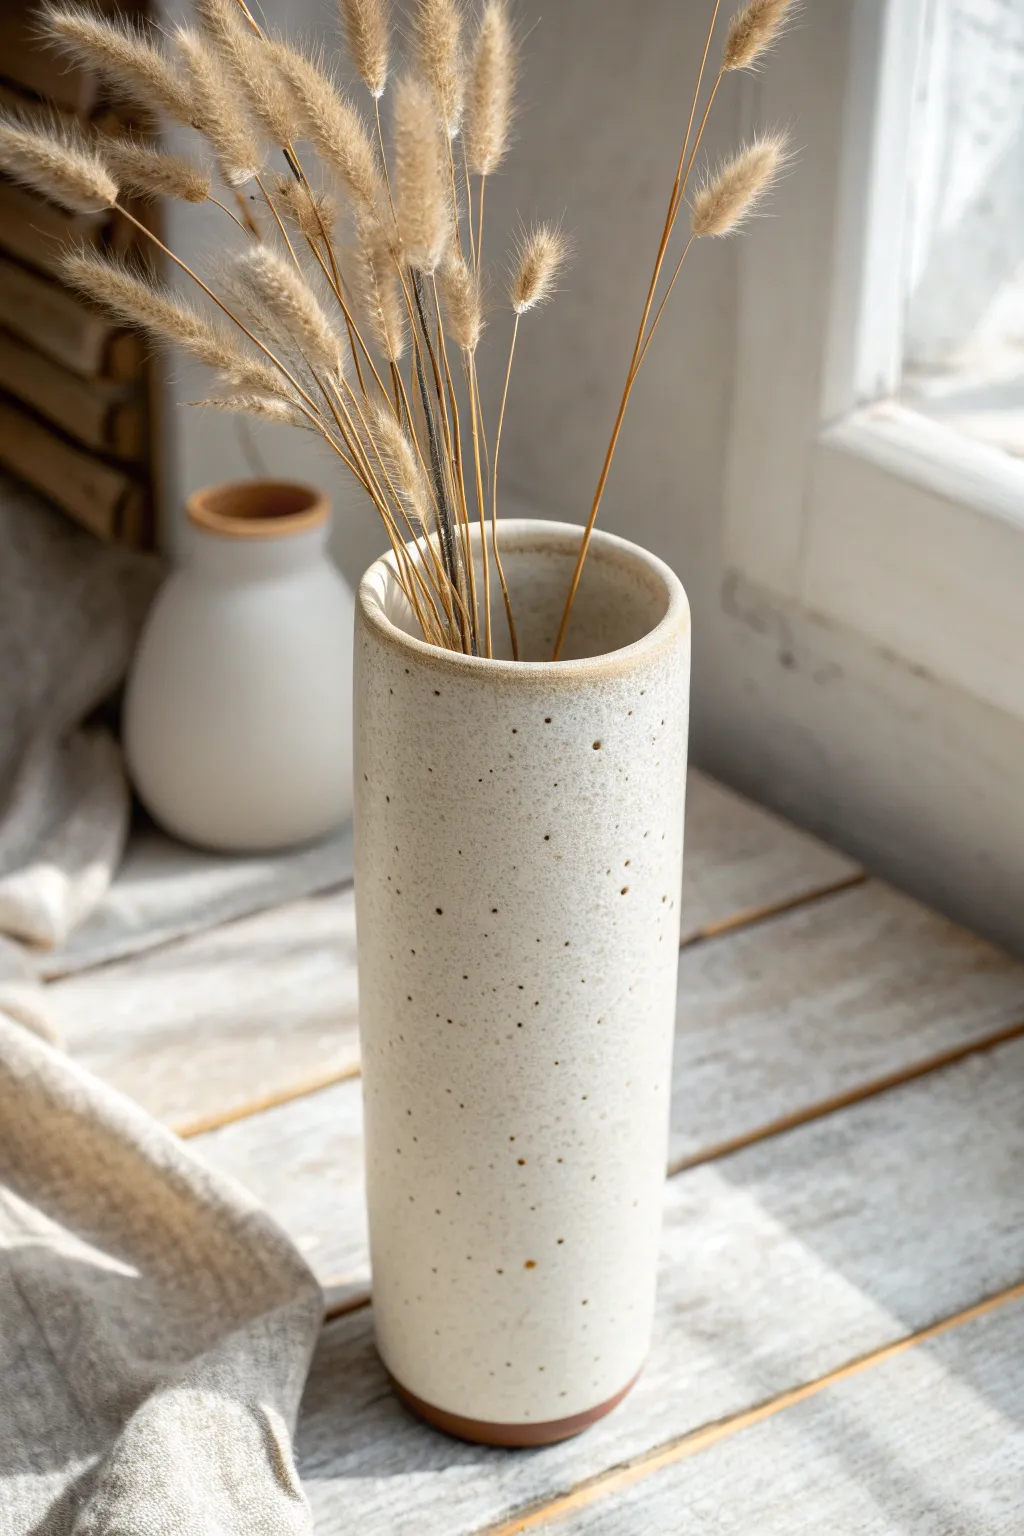
Easy Tapered Cone Slab Vase
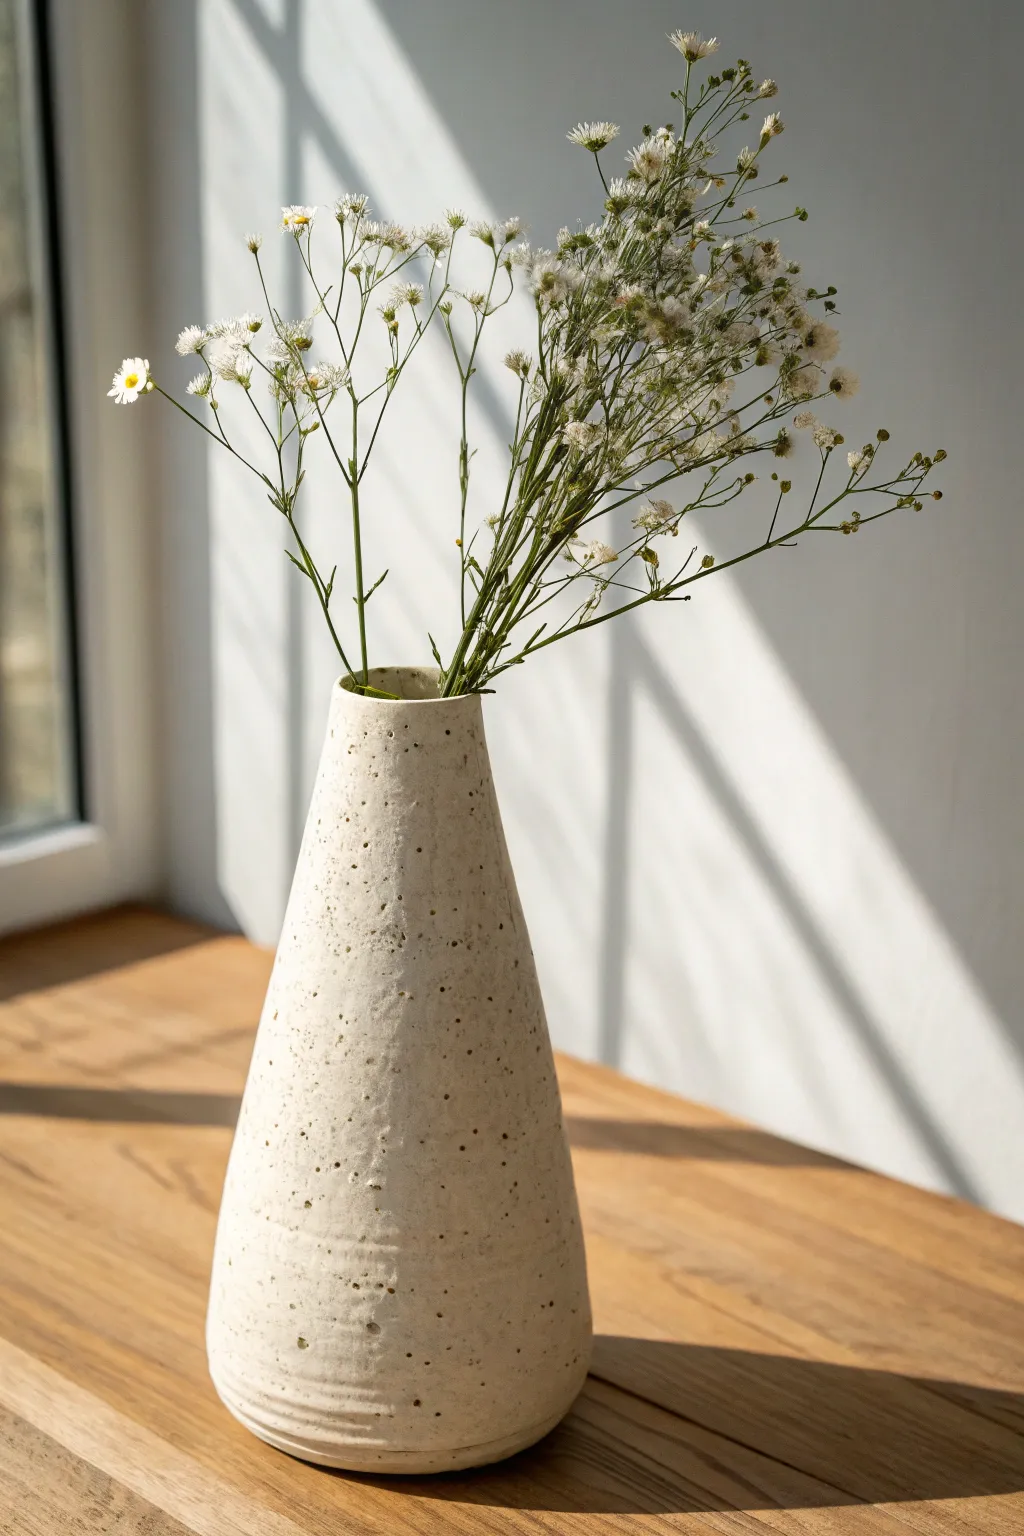
This project transforms a simple slab of clay into an elegant, minimalist vessel perfect for wildflowers. The creamy, speckled clay body and soft tapered shape give it a timeless, organic feel that looks great on any windowsill.
Step-by-Step
Materials
- Speckled stoneware clay (e.g., Laguna Speckled Buff)
- Rolling pin
- Canvas or slab mat
- Paper cone template
- Fettling knife or needle tool
- Scoring tool (serrated rib or needle tool)
- Slip (clay and water slurry)
- Wooden paddle
- Sponge
- Clear matte glaze
Step 1: Preparing the Slab
-
Wedge the clay:
Start by wedging your speckled stoneware clay thoroughly to remove air bubbles and ensure a consistent texture, which is crucial for a smooth slab. -
Roll the slab:
Roll out a slab of clay on your canvas or mat to an even thickness of about 1/4 inch. Flip the clay occasionally as you roll to prevent it from sticking to the surface. -
Smooth the surface:
Before cutting, run a soft rubber rib over the surface of the slab to compress the clay particles and erase the canvas texture. -
Cut the cone shape:
Place your paper cone template onto the slab. The template should look like a large fan shape. Trace around it with your needle tool and cut cleanly with the fettling knife. -
Cut the base:
From the remaining clay scraps, cut a simple circle that matches the diameter of the bottom opening of your cone template. This will be the floor of your vase.
Seam Splitting?
If the vertical seam starts opening during drying, press fresh soft clay into the gap and compress. Wrap the vase tightly in plastic for two days to rehydrate.
Step 2: Assembling the Form
-
Bevel the edges:
For a seamless vertical join, bevel the two side edges of your fan shape at opposite 45-degree angles so they overlap perfectly when rolled up. -
Score the contact points:
Rough up the beveled edges and the outer perimeter of your base circle using your scoring tool. -
Apply slip:
Apply a generous amount of slip to all scored areas. I like to make sure the slip is thick like yogurt for the strongest bond. -
Form the cylinder:
Stand the slab up and curl it around until the beveled edges meet. Press them firmly together, supporting the wall from the inside with one hand. -
Attach the base:
Place the clay cylinder over the scored circular base. Reach inside (use a stick tool if your hand doesn’t fit) to press the walls down onto the floor.
Step 3: Refining and Finishing
-
Reinforce the seams:
Roll a very thin coil of clay and press it into the interior bottom seam to prevent leaks. Smooth it out completely with your finger or a modeling tool. -
Paddle the shape:
Gently gently pat the outside of the vase with a wooden paddle. This helps shape the cone, compress the seams, and remove any lumpy areas. -
Clean the rim:
Use a damp sponge to round off the top rim. You don’t want a sharp edge here, just a soft, slightly organic curve. -
Texture the surface:
If you lost the natural speckle or texture during smoothing, lightly wipe the exterior with a damp sponge to expose the grog or speckles in the clay body. -
Dry slowly:
Cover the vase loosely with plastic for the first day to let the moisture equalize, then uncover to let it dry completely to bone dry stage. -
Bisque fire:
Fire the piece to cone 04 (or your clay’s specific bisque temperature) in the kiln. -
Glaze application:
Pour a clear matte glaze inside the vase, swirl to coat, and pour out. Dip the exterior quickly or brush on a thin coat to highlight the specks without obscuring them. -
Final firing:
Glaze fire the piece to the maturity temperature of your clay body, usually Cone 5 or 6 for stoneware.
Add Subtle Texture
Before rolling the slab into a cone, gently roll a textured fabric or lace doily over the clay surface. The glaze will break beautifully over the pattern.
Enjoy styling your new handmade vase with freshly picked stems from the garden


Square Slab Vase With Crisp Corners
This elegant ceramic vase combines structural simplicity with striking dimensional details. By strategically folding and seaming clay slabs, you’ll create a modern, X-shaped faceted design that catches the light beautifully, highlighted by a serene celadon glaze.
Detailed Instructions
Materials
- Stoneware clay body (smooth, fine grog)
- Templates (cardstock or thin plastic)
- Fettling knife or X-Acto blade
- Slab roller or rolling pin with guide sticks
- Rib tool (metal and rubber)
- Scoring tool (serrated rib or needle tool)
- Slip or magic water
- 45-degree bevel cutter (optional but helpful)
- Ruler/straight edge
- Paddle tool
- Celadon glaze (cone 5-6)
Step 1: Preparation & Slab Rolling
-
Create the templates:
Begin by designing your template on cardstock. You will need a distinct hexagonal shape for the top and bottom (approximately 3-4 inches wide) and a rectangular wall panel template. The wall panels need a diagonal ‘X’ drawn lightly on them to mark where the folds will go. -
Determine panel dimensions:
Measure one side of your hexagonal base. This measurement will be the width of each of your wall panels. Decide on your desired height—around 8-10 inches works well for this proportions. -
Roll the clay:
Roll out a consistent slab of clay, aiming for just under 1/4 inch thickness. I find that slightly thinner slabs work better for crisp faceted folds, but don’t go too thin or the structure will collapse. -
Smooth the surface:
Before cutting, compress the slab on both sides using a soft rubber rib. This removes canvas texture, aligns clay particles to prevent warping, and creates that smooth surface necessary for the glaze to break cleanly.
Collapsing Walls?
If your facets are sagging during assembly, the clay is too wet. Use a heat gun briefly on the panels or let them sit under plastic for an hour to stiffen before trying to join them.
Step 2: Cutting & Faceting
-
Cut the components:
Using your templates and a sharp fettling knife, cut out the base hexagon, the top rim hexagon (which you will later cut a hole into), and the six rectangular wall panels. -
Bevel the long edges:
On the long vertical sides of each wall panel, cut a 30-degree bevel. Since you are joining six panels to form a hexagon, standard 45-degree cuts won’t fit perfectly; a slightly steeper angle helps them join snugly. -
Score the facet lines:
Lay the panels flat. Using a ruler and a dull tool or the back of a knife, gently score an ‘X’ shape from corner to corner on the *front* face of each panel. Do not cut all the way through. -
Create the fold:
Flip the slab over. Now, gently press or score a shallow vertical line down the exact center of the back. This acts as a hinge. -
Form the geometric planes:
Carefully pick up a panel. While supporting the back, gently push the center intersection of the ‘X’ inward (concave) while keeping the top and bottom horizontal edges straight. This pushes the triangular sections of the ‘X’ into different planes, creating the diamond facet effect. -
Stiffen the panels:
Repeat this for all six panels. Let them set up to a firm leather-hard state. They must be stiff enough to hold their angular shape without sagging when stood upright.
Step 3: Assembly
-
Attach the first wall:
Score and slip one edge of your hexagonal base and the bottom edge of your first wall panel. Press the panel firmly onto the base, ensuring the corners create a crisp seal. -
Construct the hexagon:
Continue adding wall panels one by one. Score and slip the vertical beveled edges thoroughly. As you join the sides, press the seams together from the inside to ensure a strong bond without distorting the outer facets. -
Clean the outer seams:
Once all six walls are attached, use a thin coil of clay to reinforce the interior seams if needed. On the outside, refrain from smoothing the vertical seams completely; leaving a crisp line emphasizes the geometric construction. -
Prepare the top slab:
Take your top hexagonal slab and cut a circular opening in the center. Use a template or a cookie cutter to ensure a perfect circle. -
Cap the form:
Score and slip the top edges of the wall panels and the corresponding underside of the top slab. Place the top slab on strictly, making sure the corners align with the vertical wall seams. -
Refine the edges:
Use a damp sponge or a chamois to soften the sharp edge of the circular rim. Run a metal rib lightly over the exterior corners to sharpen them, ensuring the ‘crisp corner’ aesthetic is maintained.
Add Gold Luster
For an extra touch of luxury, apply an overglaze gold luster to the vertical seams and the top rim after the glaze firing, then fire again at a lower temperature (usually cone 018).
Step 4: Finishing
-
Slow drying:
Cover the finished vase loosely with plastic. Because the faceted walls have stress points at the folds, drying slowly is critical to prevent cracking. -
Bisque fire:
Once bone dry, fire the piece to cone 04 (or your clay’s appropriate bisque temperature). -
Glazing:
Dip or spray coating with a translucent celadon glaze. Celadon is ideal here because it pools in the crevices and thins over the sharp corners, naturally highlighting the geometric relief. -
Final firing:
Fire to the maturity temperature of your glaze and clay (typically cone 5 or 6). Allow to cool completely in the kiln.
Enjoy styling your modern vase with a few sprigs of greenery to contrast the sharp lines.


Faceted Hexagon (or Octagon) Slab Vase
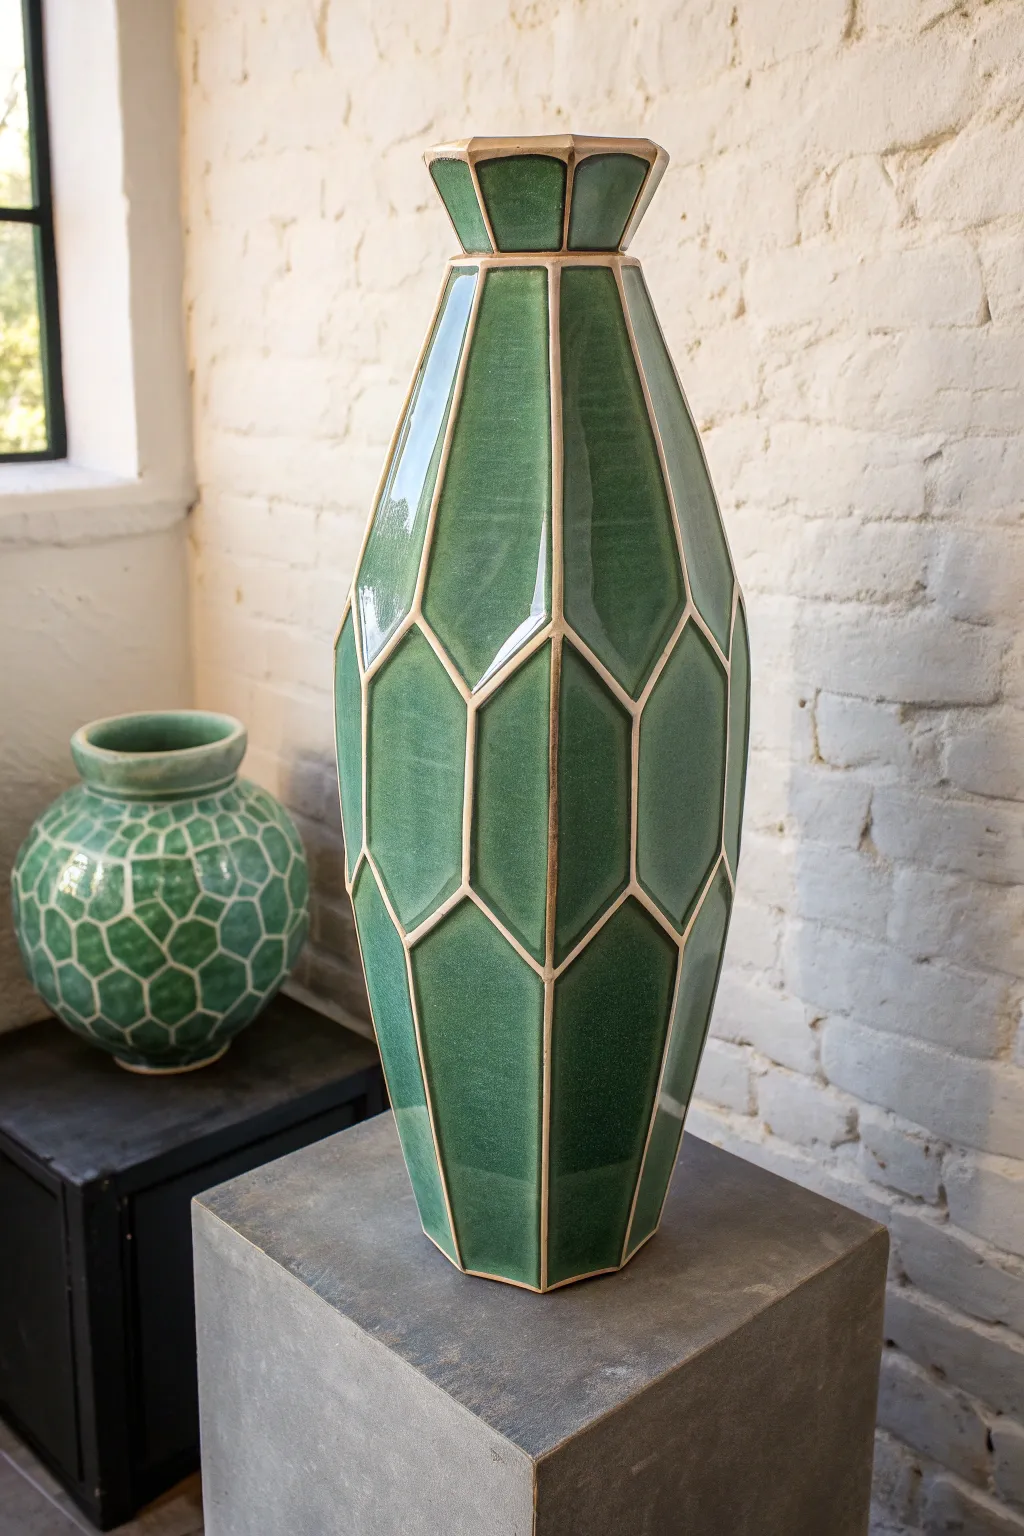
This stately vase combines the precision of geometry with the organic warmth of ceramics, featuring elongated hexagonal facets that taper elegantly toward the neck. The distinct seams and glossy emerald glaze highlight the slab-building technique, creating a piece that feels both modern and timeless.
How-To Guide
Materials
- High-grog stoneware clay (buff or brown firing)
- Cardboard or tar paper for templates
- Rolling pin and slab roller (optional)
- Slab strips or thickness guides (approx. 1/4 inch)
- Fettling knife or X-Acto knife
- Beveled cutting tool (45-degree angle)
- Scoring tool (serrated rib)
- Slip (clay slurry)
- Paddle
- Emerald green breaking glaze
- Kiln
- Ruler/straight edge
Step 1: Planning and Template Creation
-
Design the tiers:
This vase is built in tiers. Sketch a tall, tapered form divided into three main sections: a base section that tapers out, a long central barrel section, and a top section that tapers in. You will need templates for the distinct elongated diamond/coffin shapes for the middle, and hexagonal or trapezoidal shapes for the top and bottom. -
Draft paper templates:
Cut your templates from sturdy cardstock or tar paper. You will need one template for the widely tapered bottom panels, one for the tall, elongated hexagonal middle panels, and one for the inward-tapering neck panels. Ensure the edges where these tiers meet are the same width so they align perfectly.
Pro Tip: The Magic Bevel
If you don’t have a bevel tool, holding your fettling knife at a steady 45-degree angle against the table edge works perfectly. Practice on scrap clay first.
Step 2: Slab Preparation
-
Roll the clay:
Roll out a large slab of stoneware clay to a uniform 1/4-inch thickness. Compress the slab on both sides with a rubber rib to align the clay particles, which helps prevent warping during drying. -
Cut the shapes:
Using your templates, cut out 6 panels for each tier (bottom, middle, top) to create a hexagonal cross-section. You will also need a hexagonal base slab for the floor of the vase. -
Bevel the edges:
This step is crucial for sharp corners. Bevel the long vertical edges of every panel at a 45-degree angle. This allows the pieces to join at a sharp corner rather than a butt joint. Leave the horizontal top and bottom edges straight/flat for stacking. -
Leather hard stage:
Let the slabs stiffen to a firm leather-hard state. They need to be strong enough to stand up without slumping but soft enough to score and slip. I like to sandwich them between drywall boards for even drying.
Step 3: Assembly
-
Construct the bottom tier:
Score and slip the vertical beveled edges of your bottom tier panels. Attach them to the hexagonal base slab and to each other, pressing the seams firmly together to create a bowl-like shape. -
Reinforce inner seams:
run a thin coil of clay along the interior seams of the bottom tier. Smooth it down with a modeling tool to ensure a watertight bond. -
Build the central tower:
Assemble the tall middle panels into a cylinder-like hexagonal tube on a separate board. Score and slip the verticals, press them together, and reinforce the inside seams with coils just as you did before. -
Join the tiers:
Score and slip the top rim of the bottom tier and the bottom rim of the tall middle section. Carefully lift the tall section and place it onto the bottom tier, aligning the corners. Paddle the join gently from the outside to compress the connection. -
Add the neck:
Assemble the top tier (the inward tapering neck) separately, then score, slip, and attach it to the top of the central tower. Finish the very top with a final hexagonal ring or slab to create the lip.
Trouble: Seams Cracking?
If seams crack during drying, your clay was likely too dry when joining. Score deeper, use more slip, and wrap tightly in plastic for 2 days to re-homogenize moisture.
Step 4: Refining and Glazing
-
Define the edges:
Once assembled, use a damp sponge or a soft rib to clean up the exterior seams. Unlike some pots where you hide the seams, here you want to gently define that sharp angle. Don’t over-smooth; let the geometry speak. -
Slow drying:
Cover the vase loosely with plastic to let it dry very slowly. Because the seams create tension, fast drying can cause cracks. -
Bisque fire:
Fire the piece to cone 04 (or your clay body’s bisque temperature). -
Glaze application:
Wax the bottom and pour a breaking emerald green glaze into the interior, swirling to coat. Pour out excess. For the exterior, dipping is best for an even coat, but pouring or brushing (3 thick coats) works if you lack a large bucket. -
Clean the edges:
This is the secret to the look: after the glaze dries, take a slightly damp sponge and very gently wipe the sharpest exterior angles. This thins the glaze on the corners, encouraging it to ‘break’ and show the toasted clay color underneath during firing. -
Glaze fire:
Fire to the maturity temperature of your clay and glaze (likely Cone 5 or 6). This will melt the glaze into that deep glassy pool while highlighting the architectural lines.
Place your finished vase near a window where natural light can catch the glossy facets and illuminate the beautiful geometry you’ve created

The Complete Guide to Pottery Troubleshooting
Uncover the most common ceramic mistakes—from cracking clay to failed glazes—and learn how to fix them fast.
Stiff-Slab Panel Vase Built Like a Jigsaw
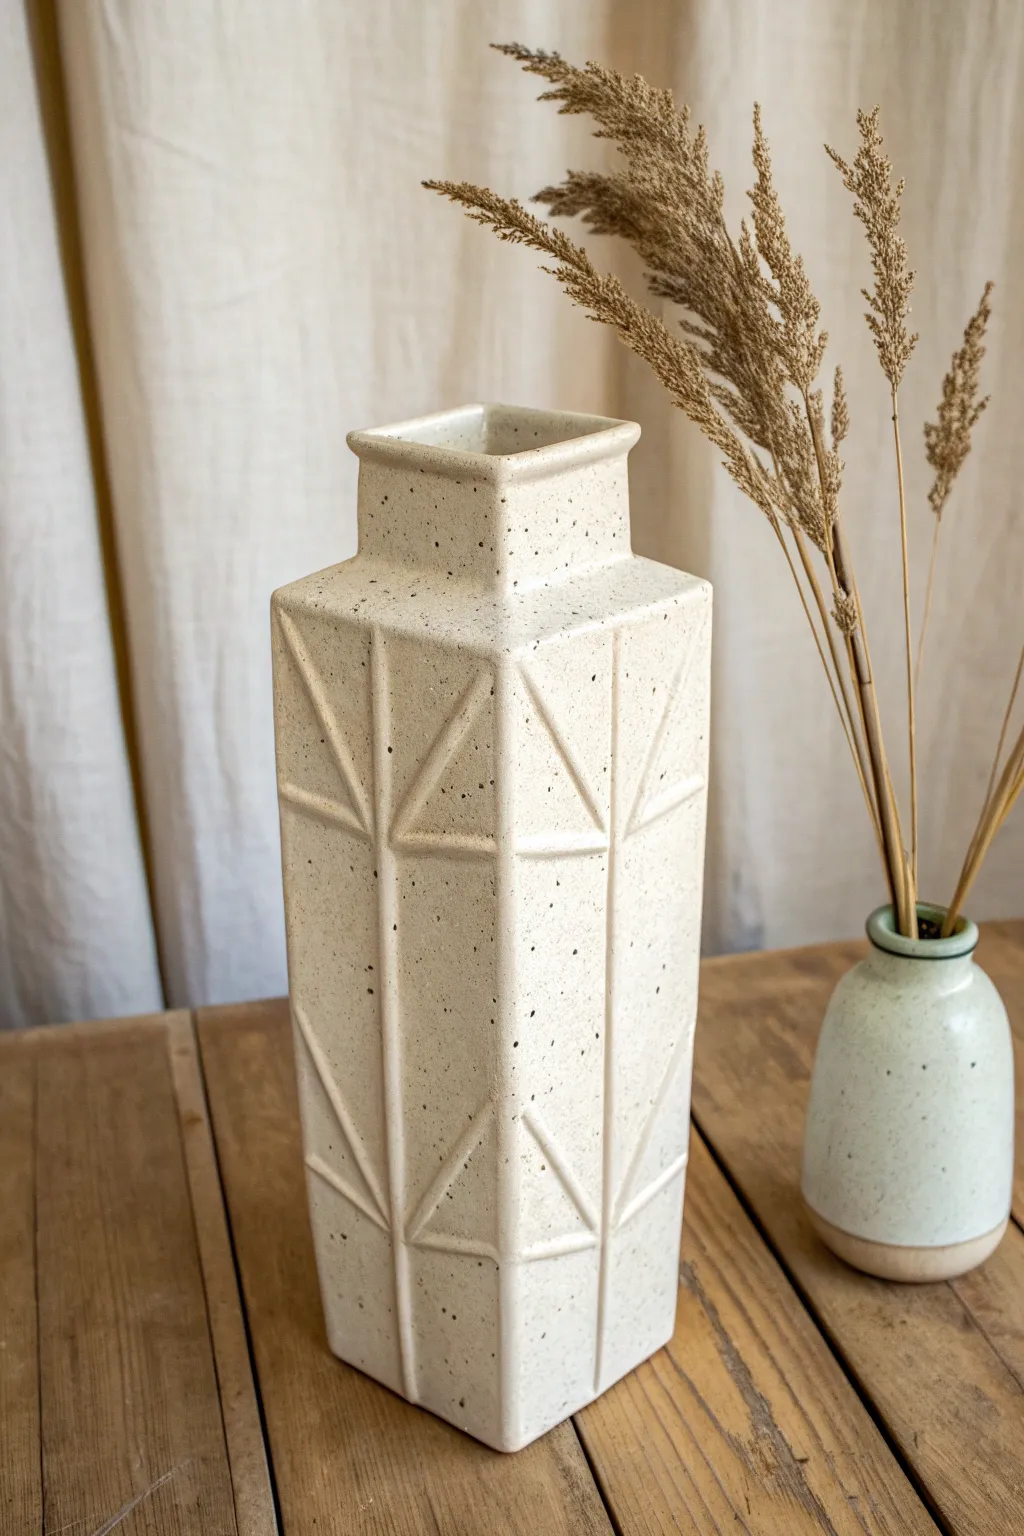
This elegant, tall vase combines crisp architectural lines with a warm, speckled finish perfect for dried grasses. By constructing it from stiff slabs, you can achieve sharp corners and precise geometric relief patterns that catch the light beautifully.
Step-by-Step Guide
Materials
- Stoneware clay (speckled or buff)
- Rolling pin and minimal guide strips (1/4 inch)
- Needle tool
- Fettling knife
- Serrated rib or flexible metal rib
- Scoring tool or fork
- Slip (clay mixed with water)
- Ruler or straight edge
- Protractor or set square
- Canvas or slab mat
- Paddle (wooden)
- Sanding sponge
- Speckled matte white glaze
Step 1: Designing and Analyzing Templates
-
Draft your templates:
Before touching clay, draw your panel shapes on paper or cardstock. You will need four long rectangular panels for the body (e.g., 3 inches wide by 10 inches tall) and four smaller rectangles for the neck (e.g., 2 inches wide by 2 inches tall). Don’t forget a square base piece. -
Plan the geometric relief:
Sketch the ‘X’ and diamond patterns within your drawn rectangles. This vase features a repeating motif of triangles that meet in the center. Planning this now ensures your lines will match up at the corners later.
Miter Master
Use a dedicated bevel cutting tool instead of a knife for consistent 45-degree angles. This ensures your box corners fit together perfectly without gaps.
Step 2: Slab Preparation
-
Roll out the clay:
Roll your clay into a consistent slab about 1/4 inch thick. Use guide strips to ensure even thickness, which is crucial for a tall form like this to stand straight. -
Texture the slab surface:
Compress the slab on both sides with a rib to align the clay particles. This prevents warping later. If you want the subtle stippled texture seen in the photo, you can lightly dab the surface with a coarse sponge now. -
Cut the primary shapes:
Using your paper templates, cut out the four main body panels, the four neck panels, the base, and a ‘shoulder’ piece (a square with a hole in the middle) that connects the body to the neck. -
Let the slabs stiffen:
This is the ‘stiff-slab’ technique, so allow your cut pieces to dry to a ‘leather hard’ state. They should hold their shape without bending when lifted but not be brittle. I usually leave them on a ware board covered lightly with plastic for a few hours.
Design Shift
Instead of adding clay strips for relief, try carving the negative space away to leave raised triangles. This creates a subtler, more organic texture.
Step 3: Creating the Geometric Relief
-
Mark the guide lines:
Once stiff, lightly score your geometric pattern onto the flat panels using a ruler and needle tool. Create a central vertical line and diagonal lines radiating from the center to form the triangle motifs. -
Apply the raised details:
Roll very thin coils or cut thin strips from leftover slab scraps. Score and slip along your marked guide lines, then attach these strips to create the raised ridges. It’s much easier to do this while the panels are flat rather than after assembly. -
Refine the ridges:
Use a modeling tool or your finger to smooth the attached strips onto the slab, sharpening the edges into crisp triangular peaks. Ensure they are securely bonded.
Step 4: Assembly
-
Miter the edges:
For a seamless box shape, use a fettling knife held at a 45-degree angle to bevel the long edges of your body panels. This creates a stronger miter joint. -
Construct the main body:
Score and slip the mitered edges liberally. Stand two panels up and press them together. Add the third and fourth panels to complete the column. Reinforce the inside seams with a thin coil of clay. -
Attach the base:
Score and slip the bottom of your rectangular tube and attach it to the square base piece. Trim any excess clay flush with the walls. -
Paddle for sharpness:
Gently tap the outside corners with a wooden paddle. This compresses the joints and sharpens the 90-degree angle of the vase corners. -
Assemble the neck:
Repeat the box-building process for the smaller neck section using the four smaller panels. -
Connect body and neck:
Attach the ‘shoulder’ piece (the square with the hole) to the top of the main body. Then, score and slip the bottom of the neck box and attach it over the hole in the shoulder piece.
Step 5: Finishing and Glazing
-
Final smoothing:
Once fully assembled, check all seams. Use a damp sponge to smooth any rough edges on the rim and corners. Let the piece dry slowly under plastic to prevent cracking. -
Bisque fire:
Fire the bone-dry vase in a kiln to cone 04 (or your clay’s bisque temperature). -
Apply glaze:
Use a white, speckled matte glaze. Pour the glaze inside the vase first and pour it out to coat the interior. Then, dip or brush the exterior. Ensure the glaze isn’t too thick in the relief corners, or you’ll lose the geometric detail. -
Glaze fire:
Fire the piece again to the maturation temperature of your clay and glaze (likely cone 5 or 6 for stoneware).
Fill your architectural masterpiece with dried wheat or tall grasses for a timeless display
Pinched-Corner “Milk Carton” Slab Vase
This charming vase borrows the familiar silhouette of a milk carton, softening its industrial lines with hand-pinched shoulders and a rustic, speckled finish. The clean, square geometry contrasts beautifully with organic dried grasses, making it a perfect centerpiece for minimalist or farmhouse decor.
Step-by-Step Tutorial
Materials
- Stoneware clay (speckled or buff)
- Clay slab roller or rolling pin
- Two 1/4-inch wooden guide strips
- Fettling knife or X-Acto tool
- Ruler or straight edge
- Small square template (paper or creative foam)
- Scoring tool or serrated rib
- Clay slip
- Wooden paddle
- Damp sponge
- Matte white glaze (semi-translucent for speckles)
- Iron oxide wash (optional)
Step 1: Creating the Body
-
Roll the slabs:
Begin by wedging your clay to remove air bubbles. Roll it out into a large, even slab about 1/4 inch thick, using your guide strips or a slab roller to ensure distinct uniformity. -
Cut the walls:
Using a ruler and fettling knife, cut a long rectangle that will serve as the four walls. The height should determine your vase’s tallness (around 6 inches), and the length should be four times the width of your desired base (e.g., 4 x 3 inches = 12 inches total), plus a little extra for the seam. -
Texture and stiffen:
If you want the subtle surface texture shown in original image, lightly drag a serrated rib across the surface while the slab is flat. Let the clay firm up to a ‘soft leather hard’ stage so it can stand without buckling. -
Form the tube:
Score and slip the short ends of your long rectangle. Stand the slab up and curve it around to meet the ends, pressing them firmly together to create a tall, square tube. Reinforce the seam on the inside with a small coil of soft clay. -
Attach the base:
Cut a square slab slightly larger than your tube’s opening. Score and slip the bottom edges of the tube and the contact area of the base. Press the tube firmly onto the base. -
Refine the corners:
Once the base is attached, use a wooden paddle to gently tap the oscillating walls flat again. I like to sharpen the corner angles by pinching them slightly or paddling against a straight edge held inside.
Step 2: Shaping the Shoulder
-
Prepare the shoulder:
Cut a separate square slab that matches the dimensions of your vase’s top opening. Cut a circular hole in the exact center of this square—this will be where the neck attaches. -
Attach the shoulder slab:
Score and slip the top edge of your standing vase body. Place the square ‘shoulder’ slab on top and compress the seams well. It will look like a closed box with a hole in the top. -
Pinch the corners:
This is the ‘milk carton’ effect. With the clay still pliable, gently press the corners of the shoulder slab downwards. You want the shoulder to slope from the neck hole down to the corner of the walls, creating a soft, pyramidal fullness. -
Smooth the transition:
Use a damp sponge or your thumb to blend the exterior seam between the shoulder slab and the vertical walls. It should look like one continuous piece of clay rather than two separate joined slabs.
Clean Seams
For invisible corner seams, miter cut your slab edges at a 45-degree angle before joining. This creates a stronger bond and sharper 90-degree corners.
Step 3: Finishing and Glazing
-
Add the neck:
Roll a small strip of clay to create the vertical neck. Form it into a ring that fits the hole in your shoulder slab. Score, slip, and attach it. -
Refine the rim:
Smooth the lip of the vase with a damp chamois or plastic bag for a soft, rounded edge. The goal is an organic feel, so it doesn’t need to be perfectly mechanically round. -
Bisque fire:
Allow the vase to dry slowly under loose plastic to prevent corner cracking. Once bone dry, bisque fire it according to your clay body’s specifications. -
Apply the glaze:
Dip or pour a matte white or creamy satin glaze over the entire piece. If you used speckled clay, the dark spots will naturally break through the glaze during firing. -
Accent the rim:
Carefully wipe the glaze off just the very top rim of the neck to reveal the raw clay body. Alternatively, paint a thin line of iron oxide wash on the rim for that toasted brown edge effect. -
Final firing:
Glaze fire the piece to the maturity temperature of your clay and glaze. Make sure to wipe the bottom clean before loading it into the kiln.
Speckle Hack
Using plain white clay but want the look? Mix granular manganese or coarse ilmenite into your white glaze. It will melt into tiny black specks during firing.
Now you have a beautifully understated vessel ready to hold your favorite dried botanicals


What Really Happens Inside the Kiln
Learn how time and temperature work together inside the kiln to transform clay into durable ceramic.
Impressed-Texture Slab Vase With All-Over Pattern
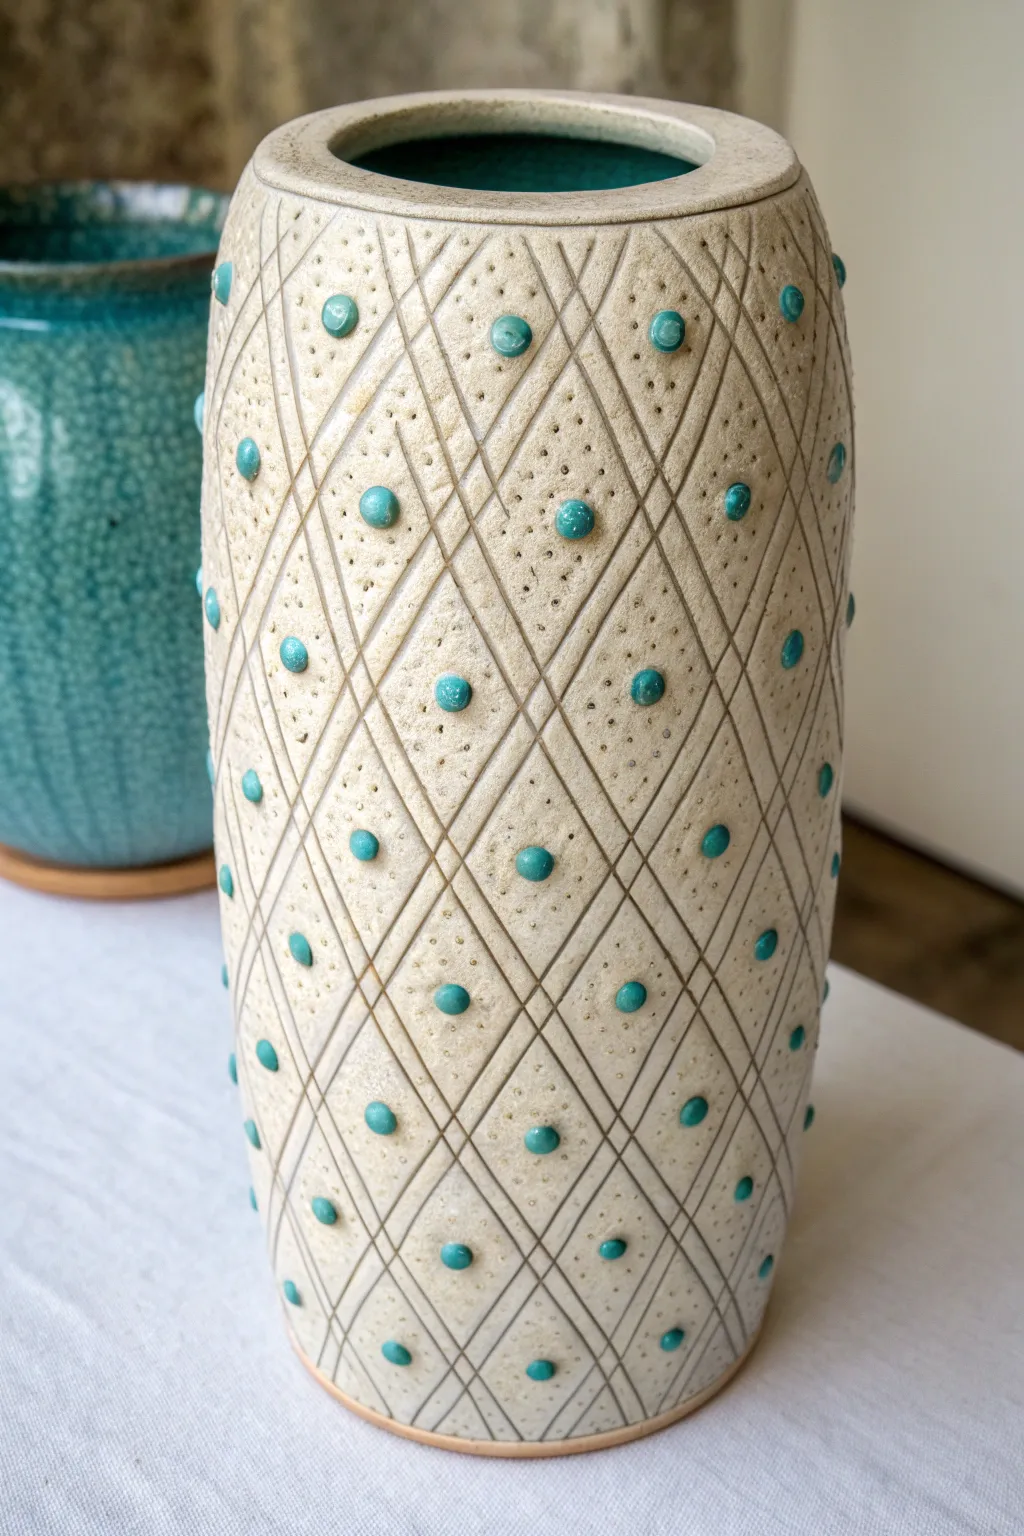
This elegant slab-built vase combines geometric precision with organic texture, featuring a deeply incised diamond lattice pattern. The creamy stoneware is accented by raised turquoise buttons and a matching interior glaze that creates a stunning pop of color.
Step-by-Step Tutorial
Materials
- Light colored stoneware clay slab (approx. 1/4 inch thick)
- Turquoise glaze
- Clear matte glaze (optional)
- Needle tool or fettling knife
- Straight edge/ruler
- Slip and scoring tool
- Cylindrical form for shaping (PVC pipe or bisque mold)
- Small circle cutter or piping tip (approx. 1/4 inch diameter)
- Pointed tool for stippling (awl or dull pencil)
- Banding wheel
Step 1: Slab Construction
-
Prepare the slab:
Roll out a consistent slab of stoneware clay to about 1/4 inch thickness. Smooth both sides with a rib to compress the clay particles and remove canvas texture. -
Cut the rectangle:
Using a ruler and needle tool, cut a precise rectangle. The length should equal the circumference of your desired cylinder plus a slight overlap for the seam, and the height determines how tall your vase will be. -
Bevel the edges:
Cut 45-degree bevels on the two short ends of the slab. One bevel should face up and the other down, creating an overlapping joint that hides the seam perfectly when rolled. -
Form the cylinder:
Carefully lift the slab and wrap it around your cylindrical mold or form it freehand into a tube. Score and slip the beveled edges thoroughly, then press them together firmly to bond. -
Reinforce the seam:
Use a wooden modeling tool to smooth the seam inside and out. I like to run a rib over the exterior seam until it’s completely invisible. -
Add the base:
Place the cylinder on a fresh piece of slab. Trace around the bottom, cut out the circle, and attach it using the score and slip method. Smooth the connection so the transition is seamless.
Uneven Seams?
If your vertical seam tries to split during drying, score it deeper and add a tiny coil of soft clay into the gap. Blend smooth and compress well.
Step 2: Creating the Texture
-
Mark the grid:
Lightly mark a grid on the leather-hard cylinder to guide your lines. You want diagonal lines running both directions to create tall diamonds. -
Carve the lattice:
Using a carving tool or a slightly dull needle tool, deeply score the diagonal lines. Use a flexible ruler to help wrap the straight edge around the curve of the vase. -
Make the buttons:
Roll a small coil of extra clay and slice it into tiny, equal discs, or punch small circles from a thin slab. You need one button for every diamond on the vase. -
Attach the buttons:
Score the center of each diamond and the back of each button. Slip and press a button firmly into the center of every diamond shape. -
Stipple the background:
Take a pointed tool and gently press small dots into the clay surface surrounding each button. Fill the entire diamond space with this texture, but leave the raised buttons and the carved lattice lines smooth. -
Refine the rim:
Smooth the top rim with a damp sponge or chamois leather. You can bevel the inside edge slightly for a more refined look.
Step 3: Glozing & Finishing
-
Bisque fire:
Allow the vase to dry slowly under plastic to prevent warping, then bisque fire it according to your clay body’s specifications. -
Wax the exterior:
Apply wax resist to the entire exterior of the vase *except* for the raised buttons. This is the crucial step that keeps the main body raw. -
Glaze the interior:
Pour a bright turquoise glaze inside the vase, swirl it to coat completely, and pour out the excess. Wipe any drips off the rim. -
Glaze the buttons:
Carefully dab a drop of the same turquoise glaze onto each exposed concave button on the exterior. The wax resist should help keep the glaze confined to the dots. -
Clean and fire:
Use a damp sponge to wipe away any stray glaze specks on the waxed areas. Fire the piece to the glaze’s maturity temperature.
Colored Clay Body
Mix mason stains into your clay body before building. A dark charcoal or terracotta clay would make the turquoise buttons pop even more dramatically.
Once fired, the contrast between the raw, textured stoneware and the glossy jewels of glaze creates a tactile masterpiece.
Carved Linework on Flat Planes for a Graphic Slab Vase
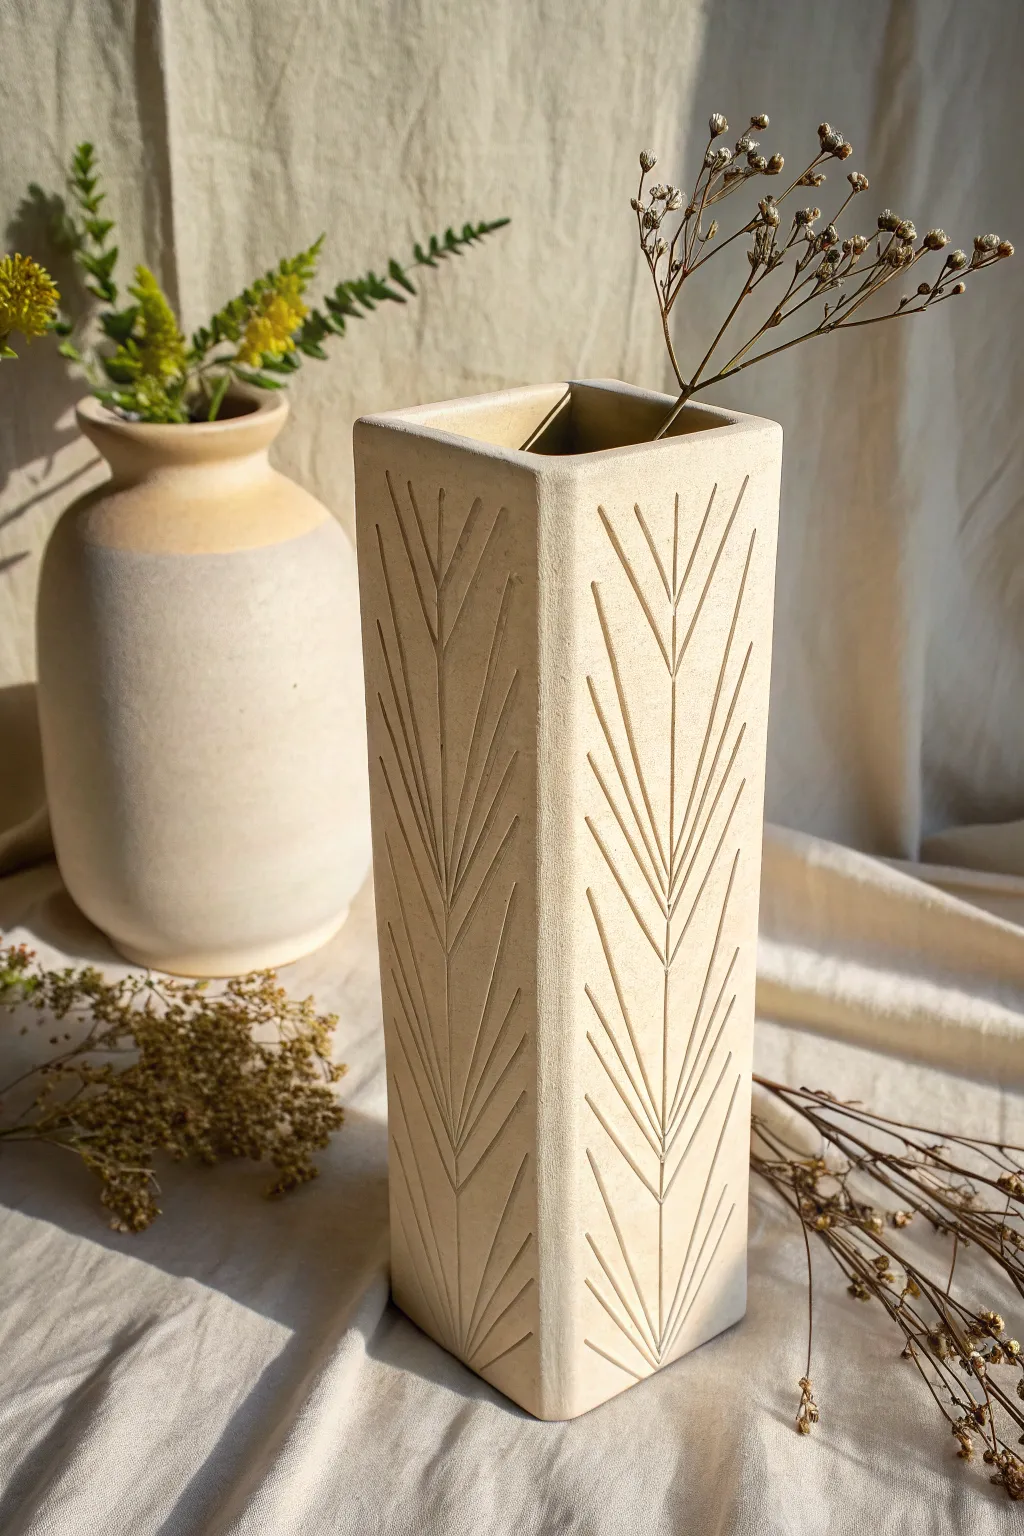
Achieve a stunning blend of architectural form and organic detail with this carved slab vase project. The clean, rectangular structure provides the perfect canvas for rhythmic, wheat-inspired linework that adds movement to the rigid shape.
How-To Guide
Materials
- Stoneware clay (buff or cream color)
- Rolling pin
- Two long wooden guide strips (approx. 1/4 inch thick)
- Fettling knife
- Ruler
- Ware board or canvas
- Carving tool (V-gouge or fine ribbon tool)
- Needle tool
- Serrated rib or flexible metal rib
- Vinegar or slip
- Soft sponge
- Chamois strip
Step 1: Forming the Structure
-
Roll the Slabs:
Begin by wedging your clay to remove air bubbles. Place your wooden guide strips on either side of the clay and roll out a consistent slab with your rolling pin, ensuring the entire surface is smooth and even. -
Compress the Clay:
Use a flexible metal rib to compress the slab on both sides. This aligns the clay particles, preventing warping later, and creates a pristine surface for carving. -
Cut the Walls:
Using a ruler and fettling knife, measure and cut four identical tall rectangles. For the vase in the image, aim for panels roughly 3 inches wide by 8-10 inches tall. -
Cut the Base:
Cut a square base piece. It should be slightly smaller than the assembled footprint of your walls if you are beveling, or cut to fit the interior dimensions if doing butt joints. -
Leather Hard Stage:
Let the slabs stiffen to a firm leather-hard state. I find this usually takes a few hours depending on humidity; the slabs need to hold their shape perfectly upright without slumping. -
Miter the Edges:
For a seamless corner like the example, cut the long edges of your four wall panels at a 45-degree angle. This allows them to join cleanly without a visible thick seam. -
Score and Slip:
Score the mitered edges thoroughly with a serrated rib or needle tool. Apply magic water, vinegar, or slip to the scored areas. -
Assemble the Column:
Stand the walls up, pressing the mitered joints together firmly. It’s helpful to join two L-shapes first, then combine them into the rectangle. -
Attach the Base:
Score and slip the bottom edge of your column and the perimeter of your base slab. Press the base securely into place. -
Smooth the Joints:
Use a wooden modeling tool to compress the outer corners. Gently run a slightly damp sponge over the corners to soften the sharp edge just a tiny bit, creating a unified form.
Step 2: Carving the Design
-
Mark the Vertical Guide:
Lightly sketch a very faint vertical line down the center of each face using a needle tool and ruler. This will serve as the spine for your chevron pattern. -
Plan the Spacing:
Make small tick marks along that center line to establish where your varying chevron angles will meet. Notice how the design in the photo has widely spaced ‘branches’ at the top intersecting with denser ones at the bottom. -
Carve the Spine:
Using your V-gouge tool, carve the straight vertical line first, following your guide mark from top to bottom. -
Carve the Diagonals:
Starting from the center line, carve diagonal lines outward and upward. Apply confident, even pressure to ensure the groove depth stays consistent. -
Create the Overlap:
For the layered effect seen in the photo, allow the tips of lower chevron sets to nest between the lines of the set above it. This creates that continuous, flowing wheat-stalk appearance. -
Clean Up Burrs:
Wait until the clay is bone dry or very hard leather hard before cleaning up the little clay crumbs (burrs) from the carving. They will flake off easily with a stiff brush or a light sanding sponge. -
Refine the Rim:
Use a damp chamois strip to compress the top rim of the vase one last time, ensuring it is smooth and pleasant to touch. -
Final Surface Check:
Wipe away any remaining dust with a barely damp sponge, being careful not to soften your crisp carved lines.
Clean Corner Trick
Use a fresh razor blade when cutting your 45-degree miters. A dull knife drags the clay, creating ragged edges that make seamless joining much more difficult.
Add Color Depth
After bisque firing, brush a dark oxide wash (like iron or manganese) into the carved lines and wipe back the surface with a sponge to make the pattern pop.
Once fired, the deep shadows in your carved lines will give this architectural vase a sophisticated, timeless appeal

TRACK YOUR CERAMIC JOURNEY
Capture glaze tests, firing details, and creative progress—all in one simple printable. Make your projects easier to repeat and improve.
Two-Tone Glaze Blocking for a Modern Slab Vase
Embrace the beauty of sharp lines and contrasting textures with this modern geometric vase project. By combining precise slab building with a clever glazing technique, you’ll create a striking vessel that highlights the raw warmth of the clay against a sleek, speckled finish.
Step-by-Step Guide
Materials
- Speckled stoneware clay (mid-fire)
- White gloss glaze
- Rolling pin and guide strips (3/8 inch thickness)
- Fettling knife or X-Acto blade
- Paper templates (triangle shapes)
- Scoring tool and slip
- Kemper rib (soft silicone or rubber)
- Clean sponge
- Wax resist
- Wide glazing brush or dipping tongs
- Ruler or straight edge
Step 1: Preparing the Slabs and Templates
-
Create your templates:
Draft elongated isosceles triangles on cardstock to serve as your templates. You will need a wider set for the base connections and thinner, elongated ones for the upper body. The geometry relies on alternating inverted triangles to form the tapered cylindrical shape. -
Roll out the clay:
Wedge your stoneware clay thoroughly to remove air pockets. Roll out a large slab using 3/8-inch guide strips to ensure even thickness throughout, which is crucial for structural integrity during the folding process. -
Cut the shapes:
Lay your templates onto the slab. Using a straight edge and a fettling knife, cut out the required number of triangular facets. Be sure to cut bevels at a 45-degree angle along the long edges where the pieces will join; this creates stronger, cleaner seams. -
Stiffen the slabs:
Allow the cut pieces to dry to a firm leather-hard state. They need to be stiff enough to stand up without slumping but still moist enough to score and slip effectively.
Keep it Sharp
To maintain crisp geometric ridges, avoid over-sponging the seams. Instead, use a barely damp sponge just once, or refine edges with a rasp when bone dry.
Step 2: Assembling the Form
-
Score and slip edges:
Take two adjacent triangular panels (one pointing up, one pointing down) and deeply score the beveled edges. Apply a generous amount of slip to the scored areas. -
Begin the connection:
Press the edges together firmly. I like to use a small wooden tool to compress the seam from the inside, ensuring the bond is tight and no air gaps remain. -
Build the ring:
Continue attaching alternating triangles until you have completed the full circumference of the vase. The form should naturally start to taper inward towards the top orifice. -
Close the final seam:
Carefully join the last panel to the first one to close the cylinder. Use a soft rib to smooth the exterior seams gently, reinforcing the sharp geometric creases rather than rounding them over. -
Attach the base:
Roll a small slab for the floor of the vase. Place your faceted cylinder onto this slab, trace the outline, and cut it out. Score, slip, and attach the base securely, compressing the bottom edge from the outside. -
Refine the rim:
Use a sponge or chamois to smooth the top rim of the vase. It should be level and comfortable to the touch, contrasting with the sharp angular body.
Add Color Depth
Before glazing, rub a red iron oxide wash onto the raw clay bottom and wipe it back. This enhances the toasted color and highlights the texture of the stonware.
Step 3: Firing and Glazing
-
Bisque fire:
After the vase has dried slowly and completely (bone dry), fire it in the kiln to a bisque temperature (usually cone 04) to prepare it for glazing. -
Mark the glaze line:
Decide where your two-tone transition will happen—typically the bottom third looks best. Place the vase on a banding wheel and hold a pencil steady against it while spinning the wheel to create a perfectly level guide line around the faceted form. -
Apply wax resist:
Using a steady hand, paint liquid wax resist onto the bottom section of the vase, right up to your pencil line and covering the entire base. Allow this to dry thoroughly. -
Glaze the interior:
Pour your white gloss glaze inside the vase, swirl it to coat the entire interior surface, and pour out the excess. Wipe any drips off the rim immediately. -
Glaze the exterior:
Dip the vase upside down into the glaze bucket, submerging it past your wax line. Alternatively, brush on 3 even coats if dipping isn’t possible. The wax will repel the glaze from the bottom section. -
Clean up:
Once the glaze is dry to the touch, use a damp sponge to wipe any stray beads of glaze off the waxed bottom section. This ensures a crisp, clean line between the raw clay and the glossy top. -
Final firing:
Fire the vase to the maturity temperature of your clay and glaze (typically cone 5 or 6). This will melt the glaze and vitrify the exposed clay at the bottom into a rich, toasted color.
Place your finished vase near a window to let natural light play across the angular facets and highlight the contrast between matte warmth and cool gloss
Pierced-Window Slab Vase With an Inner Liner
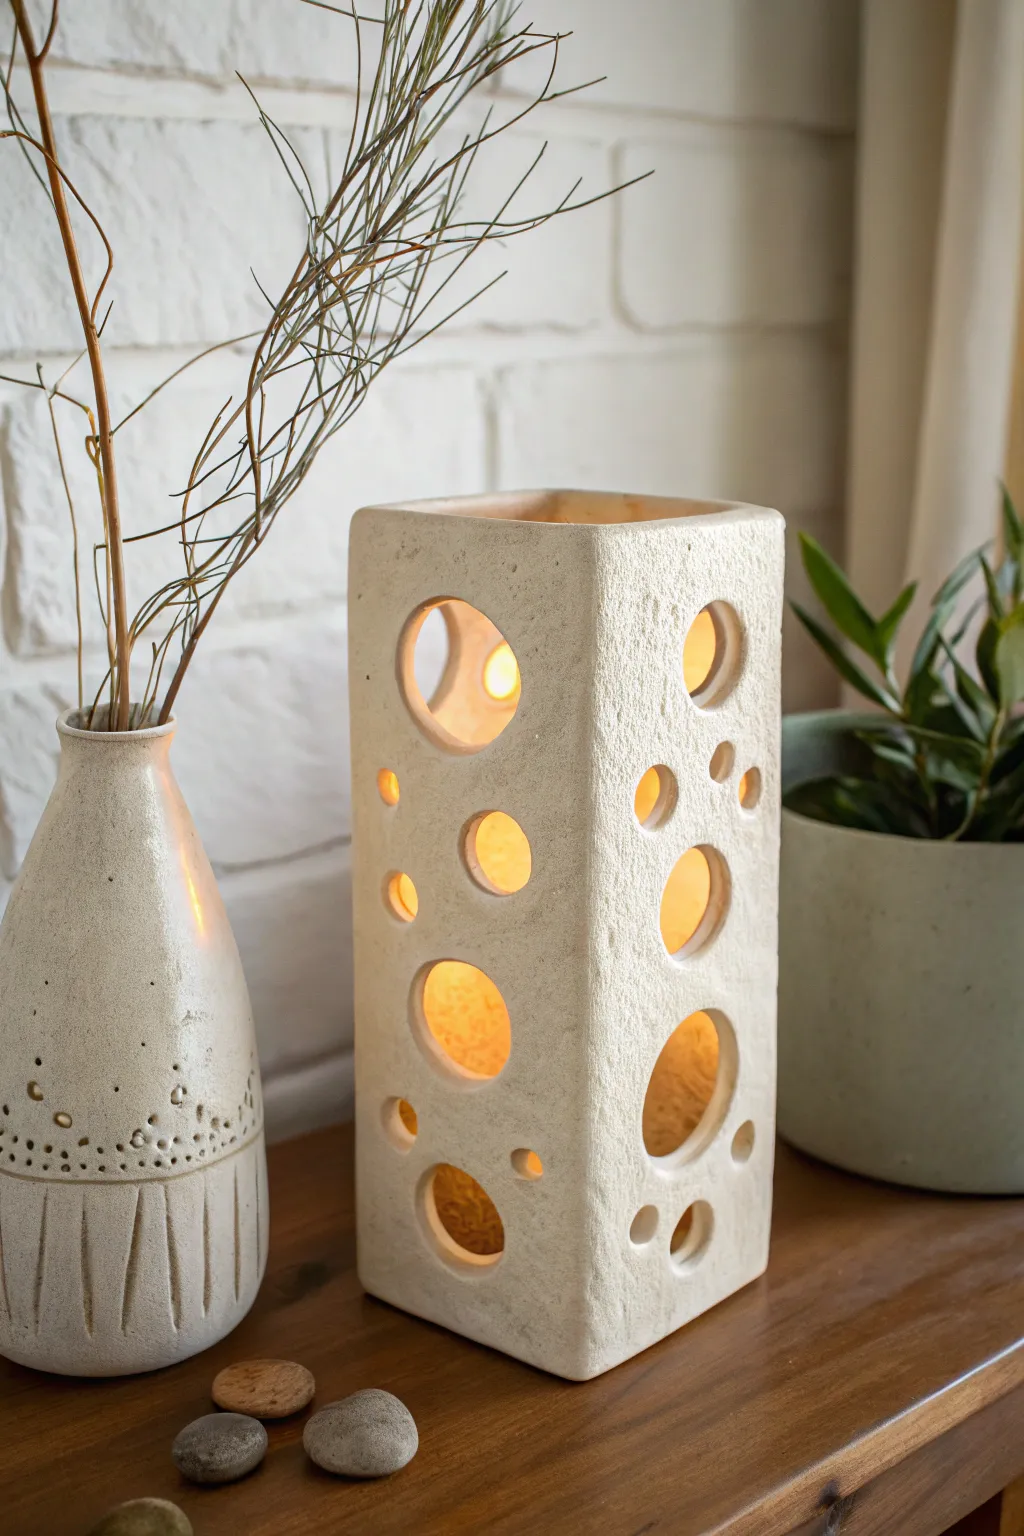
This rectangular slab-built vase combines structural geometry with organic whimsy through its varied circular cutouts. The double-walled effect creates a fascinating interplay of light and shadow, making it a perfect vessel for LED candles or dried arrangements.
Detailed Instructions
Materials
- Stoneware clay (preferably with grog for texture)
- Rolling pin
- Two long wooden slats (approx. 1/4 inch thick)
- Fettling knife or creative cutting tool
- Various circle cutters (cookie cutters, bottle caps, or hole punch tools)
- Ruler
- Scoring tool (serrated rib or needle tool)
- Slip (clay and water slurry)
- Sponge
- Wooden paddle
- Inner liner material (translucent paper, vellum, or a separate thinner clay cylinder)
Step 1: Preparing the Slabs
-
Roll out the clay:
Begin by wedging your stoneware clay thoroughly to remove air bubbles. Place the wooden slats on either side of your clay lump to act as depth guides. Roll the clay out into a large, consistent slab about 1/4 inch thick. -
Texture the surface:
Before cutting your shapes, you want that lovely stone-like finish. Gently press a coarse sponge or a rough piece of fabric across the entire slab surface to imprint a subtle, natural texture. -
Measure and cut panels:
Using a ruler and fettling knife, cut four identical rectangular panels for the walls (e.g., 4 inches wide by 10 inches tall) and one square for the base (e.g., 4 inches by 4 inches). Let these slabs stiffen to a ‘leather-hard’ state so they can stand up without slumping.
Clean Cuts Tip
Wait until the clay is leather-hard before punching holes. If the clay is too wet, the walls will deform and the circles will warp into ovals.
Step 2: Creating the Windows
-
Plan your composition:
Lay your four wall panels flat on your work surface. Arrange your various circle cutters over the clay to visualize the design. I like to scatter them randomly, mixing large and small circles for a bubbly, organic look. -
Punch the holes:
Press the cutters firmly through the clay. Remove the clay circles carefully. If the edges of the holes look sharp or ragged, smooth them gently with a damp fingertip or a soft, moist brush. -
Refine the edges:
Check the long edges of your rectangular panels. For a cleaner corner joint, you can bevel cut the edges at a 45-degree angle, though a simple butt joint works fine for rustic pottery if scored well.
Level Up: Double Clay
Instead of paper, build a slightly smaller, thinner solid clay cylinder to go inside. The double-walled ceramic effect is heavy but stunning.
Step 3: Assembly
-
Score and slip:
Score (scratch) the edges of the base and the bottom edges of your wall panels. Apply a generous amount of slip to these rough areas. -
Attach the first wall:
Press the first wall onto the base. Use a small coil of clay on the inside seam to reinforce the connection, blending it smooth with a modeling tool. -
Build the box:
Repeat the scoring and slipping process for the side seams. Attach the remaining three walls, pressing them firmly against each other to form a tall rectangular prism. -
Secure the shape:
Once all four walls are up, use a wooden paddle to gently tap the outside corners. This compresses the clay joints and sharpens the rectangular shape. -
Clean up:
Wipe away any excess slip that squeezed out during assembly using a damp sponge. Pay special attention to the inside corners, as these are hard to reach once the piece is fired.
Step 4: Finishing and Lining
-
Final drying:
Loosely cover the vase with plastic to let it dry slowly. Uneven drying can cause warping, especially with those cutout windows weakening the structure. Once bone dry, bisque fire the piece. -
Glazing strategy:
Apply a matte white or jagged stone glaze. To maintain the crispness of the holes, sponge off any glaze that drips into the cutouts before firing. -
Firing:
Fire the vase according to your clay and glaze specifications (likely Cone 5 or 6 for stoneware). -
Create the liner:
To achieve the glow shown in the photo, roll a cylinder of stiff, translucent vellum paper that fits inside the finished ceramic vase. Secure it with tape. -
Illumination:
Place a battery-operated LED pillar candle inside the vellum liner. The paper will diffuse the light through the ceramic holes, creating a soft, warm amber glow.
Now you have a stunning architectural piece that transforms light into artwork in your home
Stacked Two-Part Slab Vase (Base Plus Sleeve)

This project combines geometric precision with earthy warmth, resulting in a vase that feels both modern and hand-touched. The distinct segments created by stacking slab cylinders allow for a beautiful interplay of raw clay texture and glossy, rich glazes.
Step-by-Step Guide
Materials
- Stoneware clay body (speckled buff recommended)
- Rolling pin
- Thickness strips or guides (1/4 inch)
- Canvas work surface
- Fettling knife or needle tool
- Flexible metal rib
- Serrated rib or scoring tool
- Slip
- Cylindrical forms for templates (or paper templates)
- Banding wheel (optional but helpful)
- Sponge
- Wax resist
- Glossy rust/red-brown glaze
- Matte cream/beige speckled glaze
Step 1: Forming the Base Cylinder
-
Roll the Slabs:
Begin by rolling out a substantial amount of stoneware clay on your canvas. Use your 1/4 inch thickness guides to ensure an even slab throughout, which is crucial for structural integrity during the stacking process. -
Cut the Base Rectangle:
Measure and cut a large rectangle for the main body. A good starting size is roughly 12 inches long by 6 inches high, but adjust based on your desired volume. -
Bevel the Edges:
Cut a 45-degree angle on the short ends of your rectangle. Beveling opposite sides allows for a seamless invisible join when you roll the cylinder. -
Construct the Cylinder:
Score the beveled edges aggressively and apply slip. Carefully stand the slab up and curl it into a cylinder, pressing the beveled ends together firmly. -
Reinforce the Seam:
Support the wall from the inside with one hand while using a flexible rib on the outside to compress the seam. Smoothing it thoroughly now prevents cracking later. -
Add the Floor:
Place your cylinder on a fresh piece of slab. Trace around the bottom, remove the cylinder, score and slip the contact areas, and attach the floor. Trim away any excess clay flush with the wall.
Slumping Shoulder?
If the shoulder dips when you add the neck, the clay is too wet. Let the base and shoulder stiffen to a firm leather-hard state before attaching the top weight.
Step 2: Creating the Shoulder and Neck
-
Form the Shoulder Slab:
Cut a circular donut shape from a slab. The outer diameter should match your base cylinder’s rim, and the inner hole should match the desired width of your neck piece. -
Attach the Shoulder:
Score and slip the top rim of your base cylinder. Place the donut slab on top. Use a wooden modeling tool or your fingers to meld the clay downward, blending the seam completely so it looks like one continuous piece. -
Make the Neck Cylinder:
Create a smaller cylinder using the same method as the base. It should be slightly taller than you think you need to allow for trimming and visual balance. -
Deform the Neck (Optional):
For the look in the photo, gently press outward from the inside of the neck cylinder to create subtle ridges or ‘rings’ rather than a perfectly straight pipe. -
Stack the Neck:
Score the area around the hole on the shoulder piece and the bottom of your neck cylinder. Press the neck firmly onto the shoulder. I find using a coil on the interior seam adds necessary strength here.
Step 3: Finishing and Glazing
-
Refine the Surface:
Once the pot is leather hard, use a metal rib to smooth the main body walls. Leave the bottom inch slightly rougher if you want that raw textural contrast shown in the example. -
Bisque Fire:
Allow the piece to dry slowly to prevent warping at the connection points, then bisque fire to cone 04. -
Wax Layout:
Apply wax resist to the bottom inch of the vase (the raw clay band) and the foot. This keeps the clay body exposed and creates a crisp line. -
Apply the Cream Glaze:
Dip or brush the bottom two-thirds of the main cylinder and the entire neck in the matte cream speckled glaze. Wipe back any drips immediately. -
Wax the Middle Band:
Once the cream glaze is dry, apply a band of wax over the cream section on the main body to protect it from the next glaze layer. -
Apply the Rust Glaze:
Carefully brush or pour the glossy rust-colored glaze onto the shoulder section. If you are gentle, you can let it slightly overlap the cream section for a soft transition, or keep it distinct. -
Final Fire:
Glaze fire the piece to the maturation temperature of your clay (typically Cone 5 or 6). Ensure no glaze is on the bottom before loading the kiln.
Texture Twist
Before rolling the neck cylinder, press a hearty fabric or rope into the slab. The glaze will break beautifully over the imprinted texture.
Place your finished vase near a window where natural light can highlight the contrast between the glossy shoulder and the matte stone body