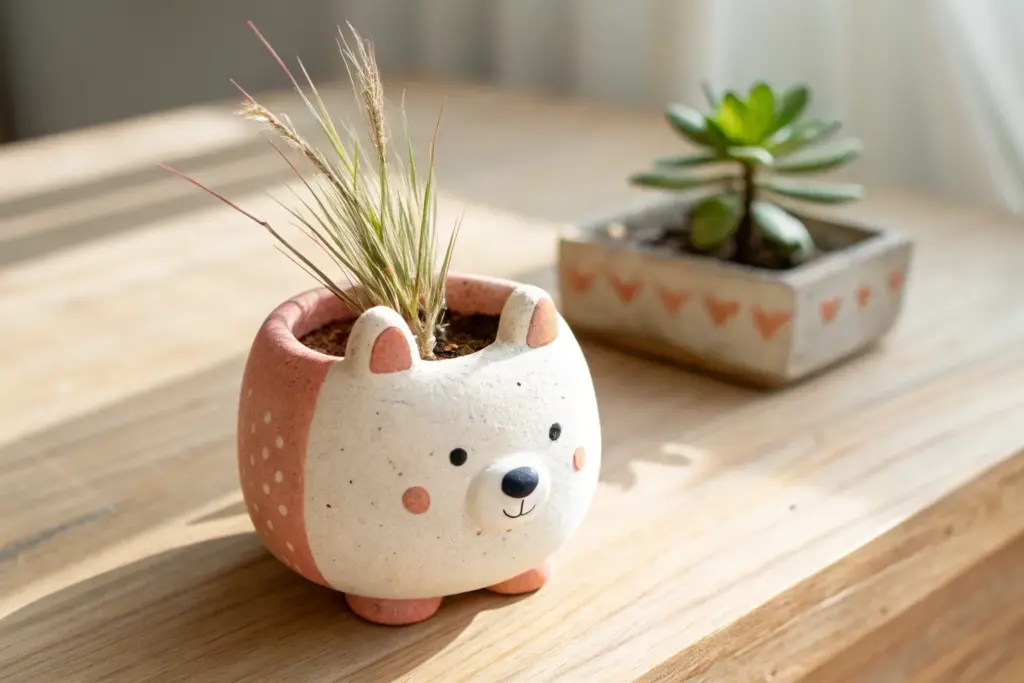
When I need fresh clay inspo ideas, I reach for projects that are small, satisfying, and totally doable in one or two sessions. Here are my favorite directions to play in—mixing air-dry clay, polymer clay, and simple handbuilding for pieces that feel both cute and genuinely useful.
Easy Trinket Dishes With Cute Rim Shapes
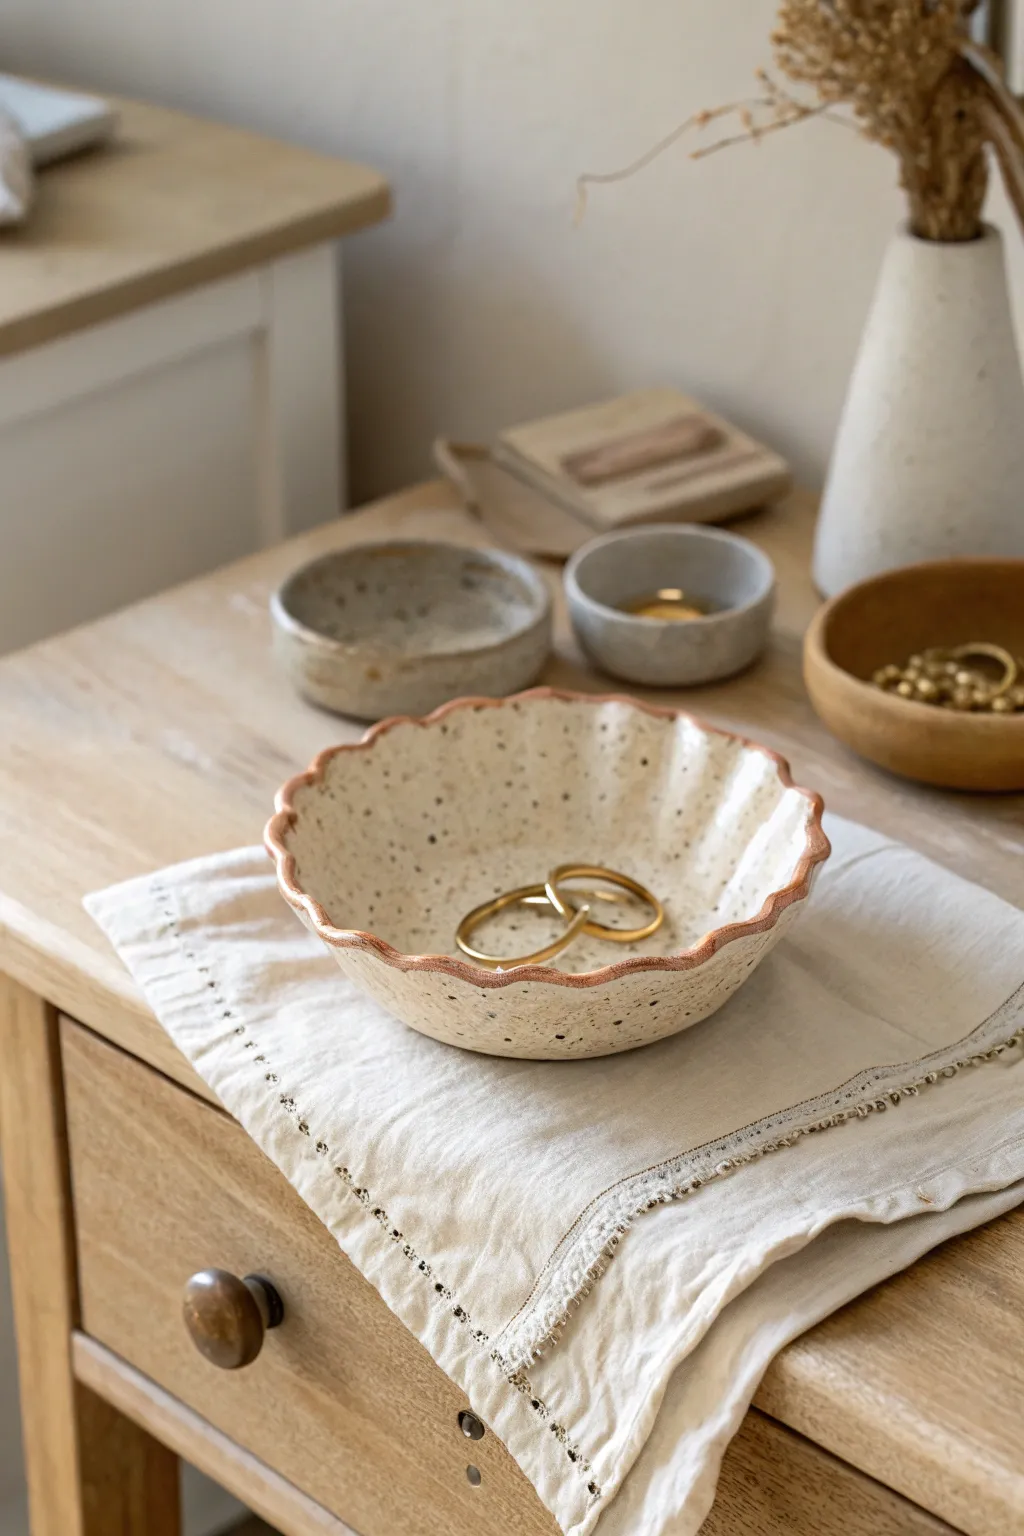
Embrace the imperfect charm of handmade pottery with this delicate speckled trinket dish. The gentle, wavy rim adds a sweet floral touch, while the rusty-brown edge creates a beautiful, rustic contrast against the creamy ceramic surface.
Step-by-Step Guide
Materials
- White stoneware clay with speckles (or plain white clay)
- Rolling pin
- Two 1/4 inch wooden guide slats
- Circle cutter or bowl template (approx. 5-6 inches)
- Small sponge
- Needle tool
- Small bowl or slump mold (for shaping)
- Clear dipping glaze
- Iron oxide wash or dark brown underglaze
- Small detail brush
- Canvas mat or cloth for rolling
Step 1: Forming the Base
-
Prepare the Clay:
Begin with a ball of speckled clay about the size of a large orange. Wedge it thoroughly on your canvas mat to remove any air bubbles, as these can cause cracks during firing. -
Roll the Slab:
Place your wooden guide slats on either side of the clay ball. Using your rolling pin, roll the clay out until the pin rests flat on the guides, ensuring an even thickness across the entire slab. -
Smooth the Surface:
Take a damp rib or a slightly moist sponge and gently compress the clay slab. This not only aligns the clay particles for strength but also creates that buttery smooth surface we want for the finished bowl. -
Cut the Circle:
Place your template or circle cutter onto the slab. Using a needle tool, cut straight down around the perimeter to create a perfect disc. Remove the excess clay.
Rim Sinking?
If your scalloped edges are flopping down while in the mold, the clay was likely too wet. Let the slab stiffen slightly on the canvas before shaping next time.
Step 2: Shaping the Scallops
-
Lift and Soften:
Gently lift the clay disc from the canvas. Run a damp finger or sponge along the cut edge to round it off, removing the sharp angle left by the needle tool. -
Create the Waves:
With the disc in your hand or on a banding wheel, use your thumb and forefinger to gently pinch the rim into a wave pattern. I like to push out with one finger while supporting between two fingers on the outside to create consistent scallops. -
Slump Shaping:
Carefully place your clay disc into your slump mold or bowl. Gently press the center down so it takes the curve of the mold, being careful not to flatten the beautiful waves you just created. -
Refine the Rim:
Once nestled in the mold, go back over the scalloped rim. Enhancing the curves now ensures they stay distinct after drying. -
Slow Drying:
Cover the bowl loosely with plastic. Allow it to dry slowly to the leather-hard stage; if it dries too fast, the rim might warp.
Pro Tip: Consistent Waves
Mark your clay disc like a clock face before pinching. Pinch at 12, 6, 3, and 9 o’clock first, then fill in the gaps for perfectly spaced scallops.
Step 3: Glazing and Finishing
-
Bisque Fire:
Once the piece is bone dry, fire it in the kiln to bisque temperature (usually Cone 04) to prepare it for glazing. -
Clean the Bisqueware:
Wipe the fired piece with a damp sponge to remove any kiln dust. This helps the glaze adhere properly preventing pinholes. -
Apply the Clear Glaze:
Dip the entire bowl into a clear gloss glaze. Shake off the excess gently and let it dry. The clear glaze will allow the natural speckles of the clay body to shine through. -
Paint the Rim:
Using a small detail brush, carefully apply the iron oxide wash or dark brown underglaze just along the very edge of the scalloped rim. A steady hand creates that lovely vintage enamelware look. -
Wipe the Foot:
Before the final firing, meticulously wipe any glaze off the bottom foot of the bowl so it doesn’t fuse to your kiln shelf. -
Glaze Fire:
Load the kiln again and fire to the maturation temperature of your specific clay and glaze (typically Cone 5 or 6 for stoneware).
Place your finished dish on a bedside table to hold your favorite rings and enjoy the handmade warmth it adds to your room


Classic Pinch Pots With Modern Patterns
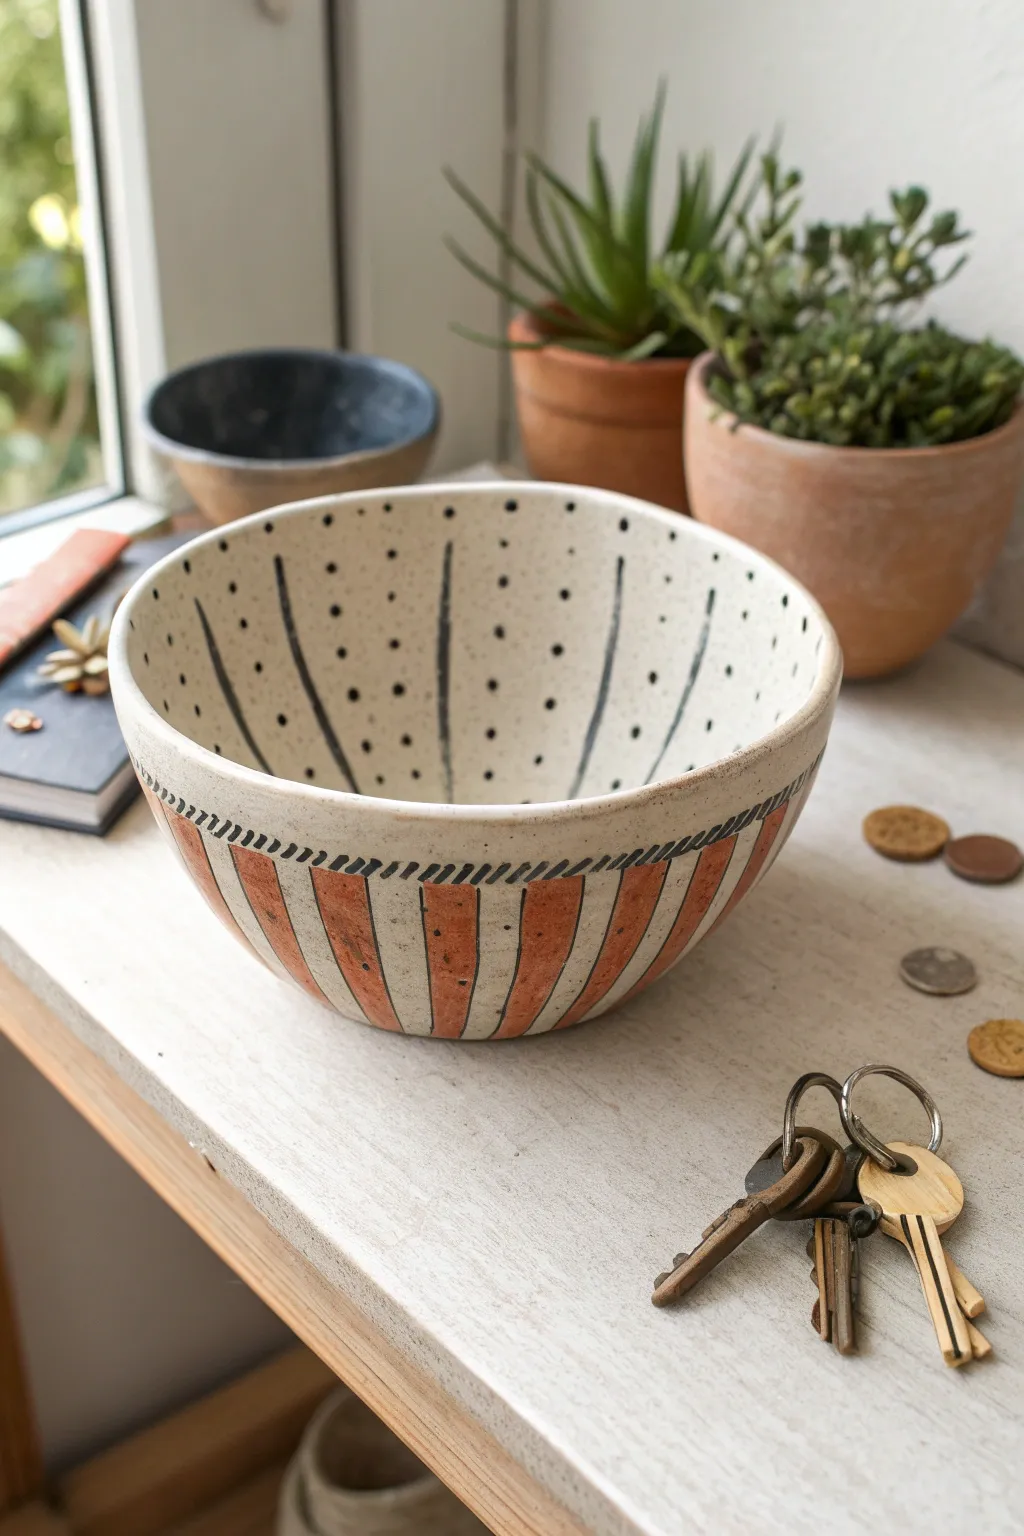
This charming, handmade bowl combines classic pottery techniques with a modern graphic aesthetic. Featuring a speckled cream interior dotted with black markings and a bold, terracotta-striped exterior, it makes a perfect catch-all for keys or a unique planter.
How-To Guide
Materials
- Speckled cream stoneware clay (e.g., stoneware with manganese specks)
- Pottery tools (rib, needle tool, sponge)
- Black underglaze
- Terracotta or rust-colored underglaze
- Fine liner brush
- Medium flat brush
- Clear matte glaze
- Kiln access (or air-dry clay alternatives with acrylics)
Step 1: Forming the Bowl
-
Prepare the clay:
Start with a ball of speckled stoneware clay about the size of a large grapefruit. Wedge it thoroughly to remove air bubbles and ensure an even consistency. -
Open the form:
Press your thumb into the center of the ball, leaving about half an inch of clay at the bottom for the base. This establishes the initial pinch pot structure. -
Pinch the walls:
Rotate the ball in your hand while gently pinching the clay between your thumb and fingers. Work your way from the bottom up to thin the walls evenly. -
Refine the shape:
Once the walls are about 1/4 inch thick, place the pot on a banding wheel or table. Use a rubber rib to smooth the interior and exterior curves, removing finger marks and creating a gentle, open bowl shape. -
Define the rim:
Level the rim with a needle tool if it’s uneven, or simply smooth it with a damp chamois or sponge for a softer, handmade look. Let the clay dry to a leather-hard state.
Step 2: Adding the Pattern
-
Sketch the zones:
With the clay leather-hard, lightly drag a pencil just below the outer rim to create a guide line for your border. This will separate the striped body from the rim detail. -
Paint exterior stripes:
Using a medium flat brush and terracotta underglaze, paint vertical stripes around the exterior. Leave gaps of raw clay between them that are roughly equal in width to the painted stripes. -
Apply a second coat:
Once the first layer of terracotta is dry to the touch, apply a second coat to ensure the color is opaque and rich. -
Outline the stripes:
Load a fine liner brush with black underglaze. Carefully outline each terracotta stripe with thin black lines. Don’t worry if the lines waiver slightly; it adds character. -
Create the rim detail:
Using the same black underglaze, paint short, diagonal dashes all along the exterior rim, following the guide line you carved earlier.
Steady Hand Trick
Rest your pinky finger against the dry surface of the bowl while painting fine lines. This anchors your hand and gives you much better control over the liner brush.
Step 3: Interior & Finishing
-
Paint interior lines:
Moving to the inside, use the fine liner brush and black underglaze to paint long, vertical lines that curve with the bowl’s shape, radiating from the bottom center up to the rim. -
Add dots:
In the spaces between the interior vertical lines, dab small black dots in vertical rows. I prefer to vary the spacing slightly so it doesn’t look machine-printed. -
Bisque fire:
Allow the bowl to dry completely (bone dry). Fire it in the kiln to bisque temperature (usually cone 04). -
Glaze application:
Dip the entire bisqued bowl into a clear matter glaze. Shake off excess drips and wipe the foot (bottom) clean with a wax resist or damp sponge. -
Final firing:
Fire the piece again to the maturation temperature of your specific clay and glaze (often cone 5 or 6 for stoneware).
Go Geometric
Instead of vertical stripes, try painting horizontal bands or checkered patterns on the outside using masking tape for crisp, clean edges on the clay.
Place your finished bowl on a sunny sill or entryway table to enjoy that organic, handcrafted warmth


Flower And Bubble Coasters You Can Batch Make
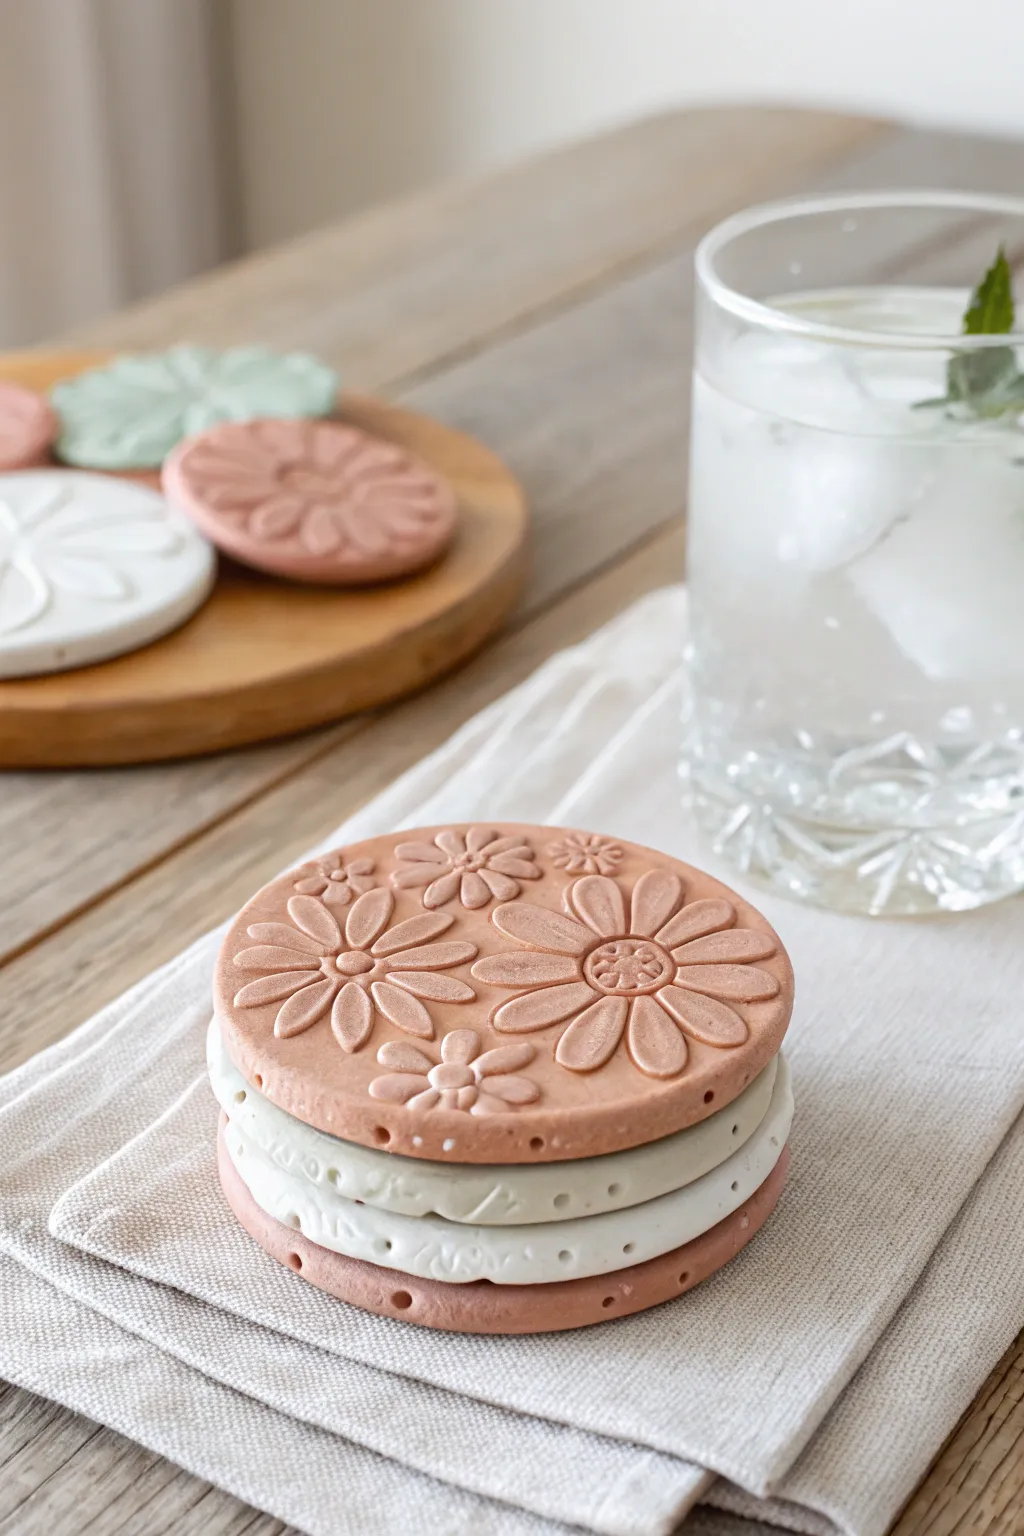
These charming coasters combine a modern matte finish with delicate, embossed botanical patterns for a look that is both functional and decorative. The muted palette of terracotta, sage, and cream creates a sophisticated stack that adds a touch of nature to your coffee table.
Detailed Instructions
Materials
- Air-dry clay (white, terracotta, and colored or paintable)
- Acrylic rolling pin
- Circle cookie cutters (approx. 3.5 – 4 inches)
- Floral pattern stamps or fondant impression mats
- Fine-grit sandpaper (400-600 grit)
- Matte sealant or varnish (waterproof)
- Parchment paper or silicone work mat
- Small sponge for smoothing
- Bowl of water
- Optional: Clay pigments or acrylic paints
Step 1: Preparing the Clay Body
-
Condition the clay:
Begin by taking a handful of clay and kneading it thoroughly in your hands. This warms up the material and ensures there are no air bubbles, which helps prevent cracking later on. -
Color mixing (optional):
If you are using plain white clay and want the muted terracotta or sage tones shown in the photo, knead a small amount of acrylic paint or clay pigment directly into the white clay until the color is uniform and streak-free. -
Roll out the slab:
Place your clay on a piece of parchment paper. Using your acrylic rolling pin, roll the clay out to an even thickness of about 1/4 inch (6mm). Using depth guides or two stacks of playing cards on either side of the clay can help ensure it’s perfectly level.
Step 2: Creating the Design
-
Position the stamps:
Select your floral stamps or an impression mat. Plan your layout by hovering the stamps over the clay before pressing down. -
Emboss the pattern:
Firmly press the floral stamps into the clay slab. Ensure you apply even pressure so the petals and centers are deeply defined but don’t push all the way through the slab. -
Check the impression:
Gently lift the stamp. If the clay sticks, you can dust the stamp lightly with cornstarch before the next press. Repeat until your slab has the desired amount of floral coverage. -
Cut the shape:
Take your large circle cutter and position it over your embossed design. Press straight down firmly to cut the coaster shape. -
Remove excess clay:
Peel away the excess clay from around the circle cutter before lifting the cutter itself. This prevents the circle from warping as you remove it. -
Refine the edges:
Dip your finger or a small sponge into a little water and gently run it around the circumference of the cut clay to smooth out any sharp ridges left by the cutter. -
Create the stack:
Repeat the rolling, embossing, and cutting process with different colored clays to create a complete set of 4-6 coasters.
Clean Impressions
If your stamp is sticking to the clay, place a piece of plastic wrap over the clay slab before stamping. This keeps the stamp clean and creates soft, rounded edges on the flower petals.
Step 3: Finishing and Sealing
-
Initial drying:
Transfer the coasters carefully to a clean sheet of parchment paper on a flat surface. Let them dry for 24-48 hours. I find flipping them over gently halfway through the drying time helps them stay perfectly flat. -
Sanding the surface:
Once bone dry, take your fine-grit sandpaper and very lightly sand the edges and the flat surfaces for a professional, smooth finish. Be careful not to sand down your embossed flower details. -
Dusting off:
Wipe the coasters with a slightly damp cloth or a dry soft brush to remove all clay dust from the crevices of the flowers. -
Waterproofing coat:
Apply a thin layer of matte waterproof varnish or sealant. This is crucial as coasters will encounter moisture. Uses a soft brush to get the varnish into the recessed flower petals. -
Final cure:
Allow the first coat to dry completely according to the manufacturer’s instructions, then apply a second coat for extra durability. Let them cure fully before testing them with a cold glass.
Warping Woes
If the coasters curl up at the edges while drying, place a lightweight book on top of them (sandwich them between parchment paper first) once they are semi-dry but still slightly flexible.
Now you have a stunning set of custom coasters ready to protect your surfaces in style


Ring Holders That Look Like Tiny Sculptures
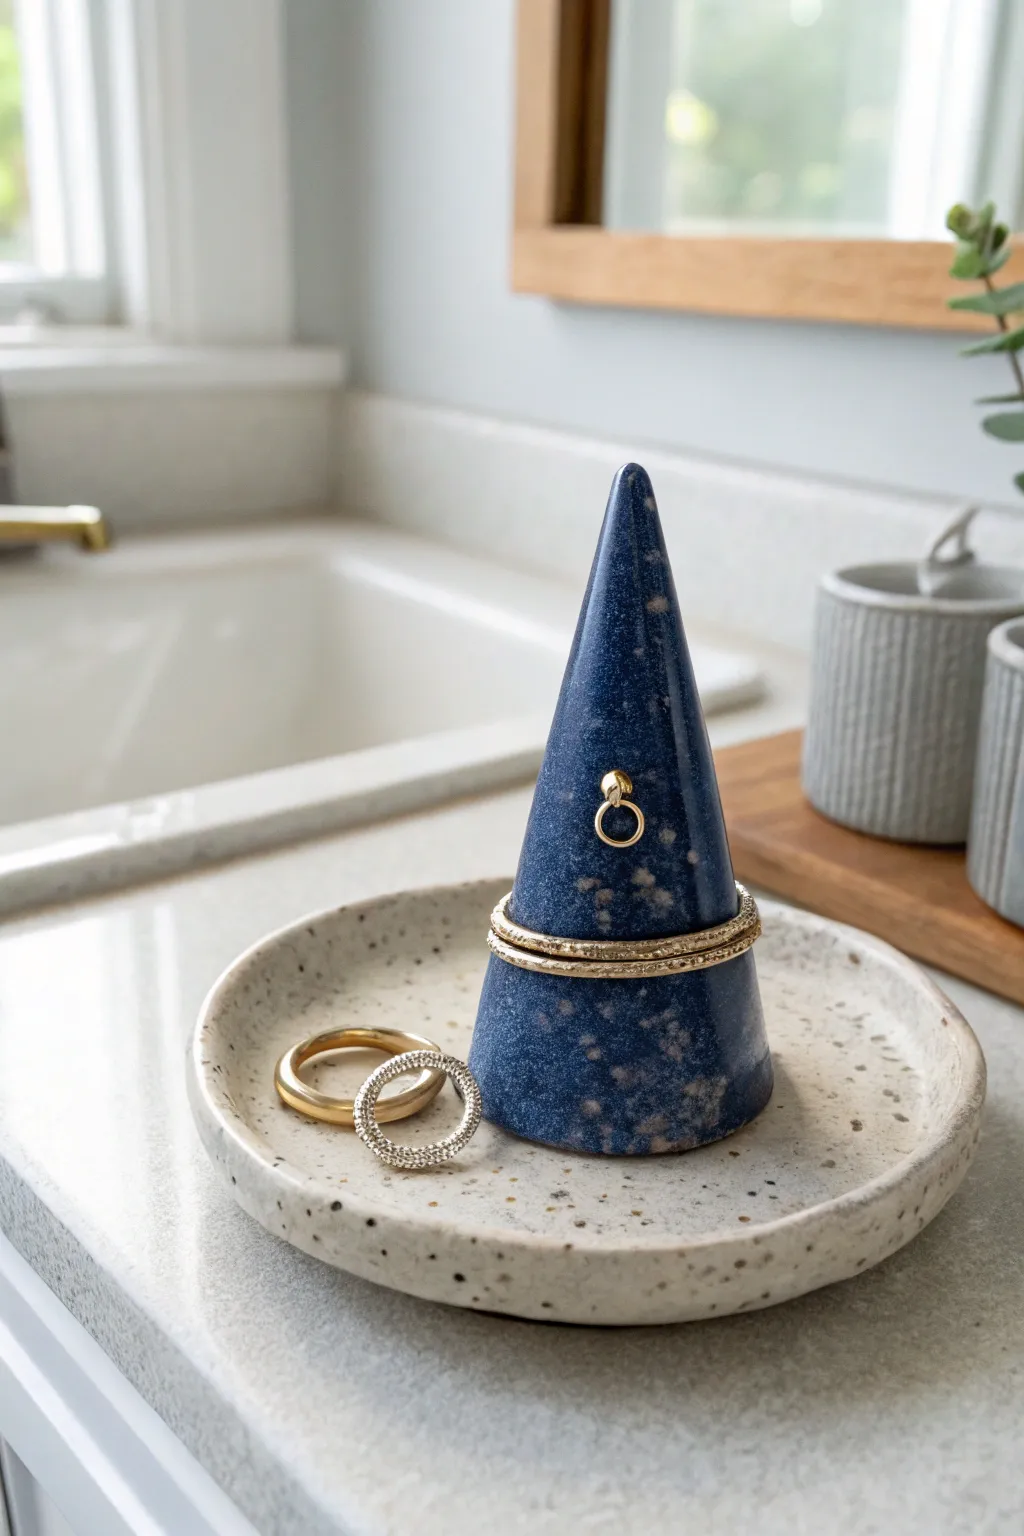
This striking two-piece jewelry organizer features a deep midnight-blue cone speckled with galaxy-like flecks, resting perfectly on a flat, creamy speckled stoneware dish. It combines functional ring storage with a sculptural aesthetic that elevates any vanity top.
Step-by-Step Tutorial
Materials
- Polymer clay (midnight blue, translucent, white, and gold/bronze)
- Speckled cream polymer clay (or white clay mixed with cracked black pepper/sand)
- Acrylic rolling pin
- Circle cutter (approx. 4-5 inches diameter)
- Flexible clay blade
- Sandpaper (various grits from 400 to 1200)
- Gloss glaze or resin (optional for shine)
- Small paintbrush
- Oven thermometer
- Baking tile or parchment paper
Step 1: Forming the Galaxy Cone
-
Mix the faux stone:
Start by conditioning your midnight blue clay. To achieve the natural stone look seen in the photo, mix in small chopped bits of translucent clay and tiny shavings of gold or bronze clay. Don’t overmix; you want distinct flecks. -
Shape the initial cone:
Roll your conditioned blue mixture into a ball, then gently roll it back and forth on one side to begin tapering it into a cone shape. -
Refine the height:
Stand the cone up on your work surface. Gently elongate the tip by rolling it between your palms while maintaining the flat base. Aim for a height of about 3 to 4 inches. -
Flatten the base:
Press the cone firmly onto your work surface to ensure the bottom is perfectly flat. This stability is crucial so it doesn’t wobble on the dish later. -
Smooth the surface:
Use your fingers or the flat side of your blade to smooth out any fingerprints. The sleek, geometric quality of the cone depends on smooth lines.
Stone Effect Tip
For a realistic faux-lapis look, freeze the clay block first, then grate it with a cheese grater before compressing it back together. This creates organic patterns.
Step 2: Creating the Speckled Dish
-
Prepare the speckled clay:
Take your speckled cream clay (or mix coarse black pepper into white clay for a DIY speckled effect) and condition it until pliable. -
Roll out the slab:
Using your acrylic roller, roll the clay out to an even thickness, roughly 1/4 inch thick. Use depth guides if you have them to keep it uniform. -
Cut the circle:
Use your large circle cutter or trace around a bowl to cut a perfect circle from the slab. -
Form the rim:
Gently curve the outer edge of the circle upwards to create a slight lip. You can do this by pinching gently or pressing the center into a slightly curved bowl mold. -
Texture the rim (optional):
The dish in the image has a slightly rustic edge; tap the rim lightly with your finger or a sponge to soften any sharp cut lines.
Step 3: Baking and Finishing
-
Test the fit:
Place your raw blue cone onto the raw dish to ensure they look proportional. Make adjustments to the cone’s width if necessary. -
Bake carefully:
Place both pieces on a baking tile lined with parchment paper. Bake according to your specific clay brand’s instructions (usually 275°F/135°C for 30 minutes per 1/4 inch thickness). -
Cool down:
Allow the pieces to cool completely in the oven with the door slightly ajar to prevent thermal shock cracks. -
Wet sanding:
Once cool, use wet sandpaper to smooth any imperfections. Start with 400 grit and work up to 1200 grit for a silky finish. Pay special attention to the cone’s tip. -
Buffing:
Rub the pieces vigorously with a denim scrap or soft cloth to bring out a natural sheen. -
Sealing (Optional):
If you want the high-gloss look of the blue stone in the photo, apply a thin layer of gloss glaze or UV resin to the cone only, leaving the dish matte for contrast.
Leaning Tower?
If your cone starts drooping while baking, insert a toothpick or a crumpled cone of aluminum foil into the center of the raw clay for internal support.
Place your everyday rings on the cone and heavier pieces in the tray for a stylish functional display

The Complete Guide to Pottery Troubleshooting
Uncover the most common ceramic mistakes—from cracking clay to failed glazes—and learn how to fix them fast.
Polymer Clay Earrings With Simple Cutout Shapes
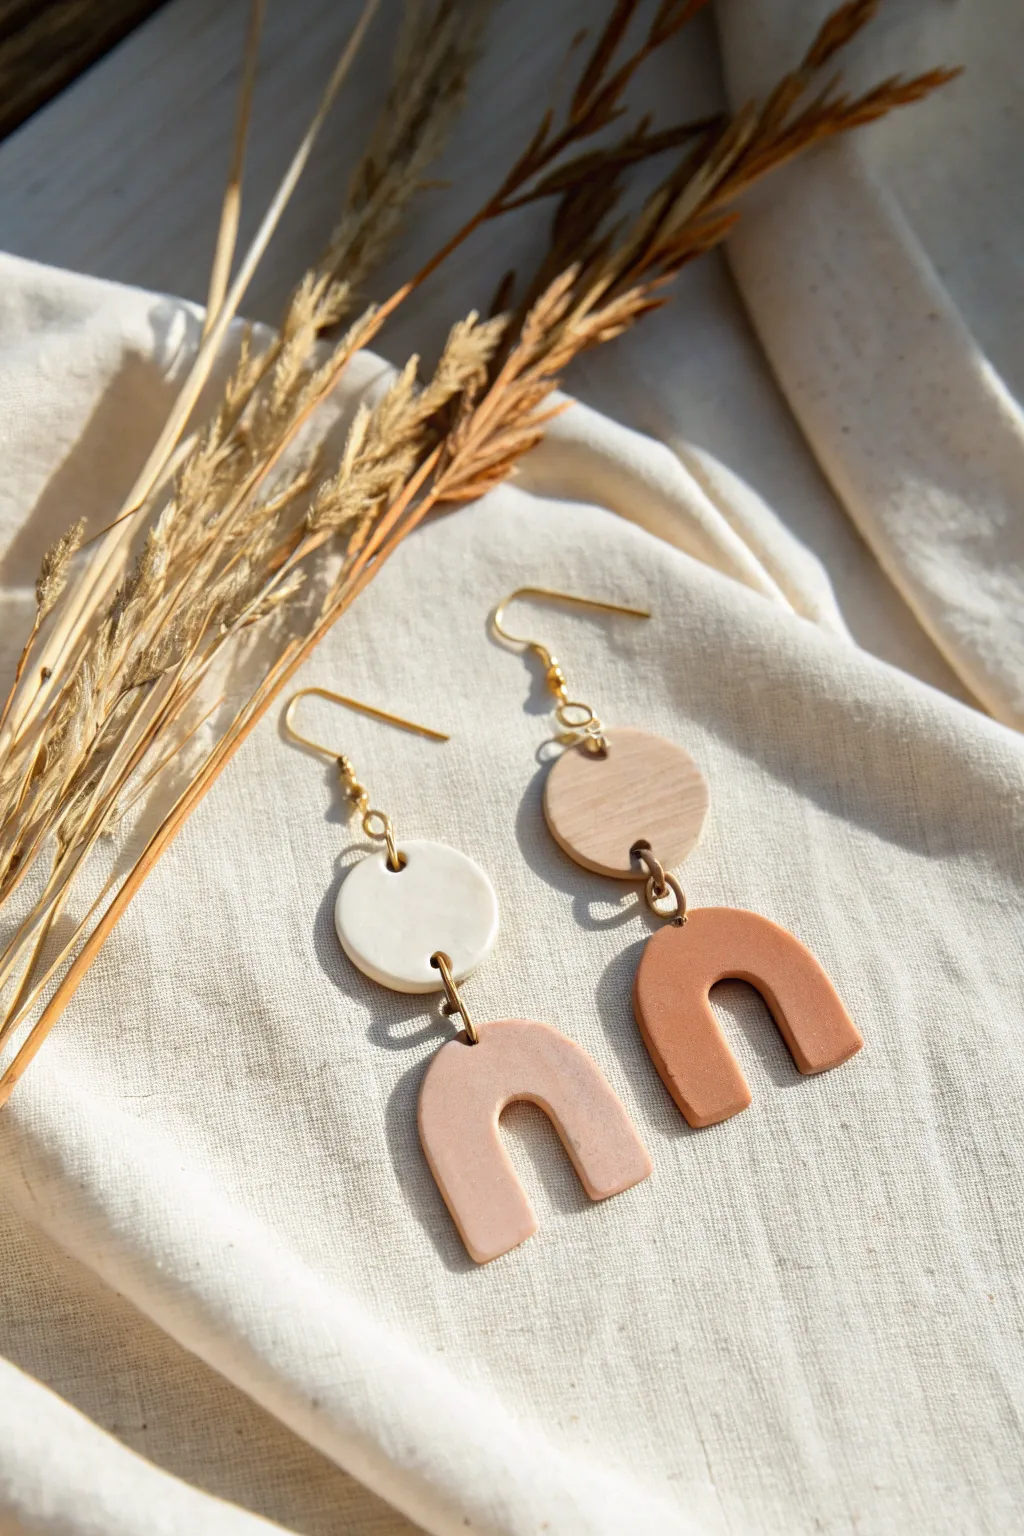
These trendy, mismatched-yet-cohesive earrings combine soft neutrals with abstract shapes for a stylish boho look. Using basic cutters and three shades of polymer clay, you can craft lightweight jewelry that looks high-end but is surprisingly simple to make.
How-To Guide
Materials
- Polymer clay in White, Pale Pink/Beige, and Terracotta/Camel
- Small round clay cutter (approx. 10mm or 12mm)
- Arch shaped clay cutter (approx. 20-25mm)
- Acrylic rolling pin or pasta machine
- Depth guides or playing cards (optional)
- Small hand drill or toothpick
- 4 jump rings (gold or brass, 6mm or 7mm)
- 2 earring hooks (gold or brass)
- Jewelry pliers (flat nose and round nose)
- Ceramic tile or baking sheet with parchment paper
- Oven
Step 1: Clay Preparation
-
Conditioning the clay:
Start by taking a small chunk of each clay color—white, pale pink, and terracotta. Knead each piece separately in your hands until they are soft, pliable, and free of cracks. -
Rolling flat:
Using your acrylic roller or pasta machine, roll each color out onto a smooth surface. Aim for a thickness of about 2-3mm. To ensure even thickness across all colors, I like to use depth guides or stacks of playing cards on either side of my roller. -
Smoothing texture:
Gently wipe the surface of the clay sheets with your finger or a baby wipe to remove any fingerprints or dust specks before cutting.
Step 2: Cutting Shapes
-
Cutting the circles:
Press your small round cutter firmly into the white clay to make one circle. Repeat with the beige/tan clay to make a second circle. Lift the cutter straight up to get clean edges. -
Cutting the arches:
Use your arch cutter to cut one shape from the pale pink clay. Clean the cutter if necessary, then cut a second arch from the terracotta clay. -
Refining edges:
Gently smooth the cut edges with your finger. If the clay stuck to your work surface, slide a craft blade underneath to lift them without distorting the shapes.
Smooth Operator
Before baking, lightly dip your finger in cornstarch or water and gently rub out any fingerprints on the raw clay for a professional, matte finish.
Step 3: Piercing & Baking
-
Creating holes:
Before baking, you need to create holes for the jump rings. Use a toothpick or a small needle tool to poke a hole near the top and bottom of each circle piece. -
Arch holes:
Poke a single hole in the center top of each arch shape. Make sure the holes are large enough to fit your jump rings comfortably. -
Baking:
Transfer your pieces to a ceramic tile or baking sheet lined with parchment paper. Bake according to your polymer clay package instructions (usually 275°F/130°C for about 30 minutes). -
Cooling:
Let the pieces cool completely inside the oven or on a wire rack. They are most fragile when warm, so don’t handle them until they are room temperature.
Bubbles Be Gone
If you see tiny air bubbles on the surface after rolling, slice into them carefully with a blade and smooth the clay back down before cutting your shapes.
Step 4: Assembly
-
Testing the layout:
Lay out your cooled pieces on your work surface. Pair the white circle with the pale pink arch, and the tan circle with the terracotta arch to match the inspiration image. -
Opening jump rings:
Using two pairs of pliers, twist a jump ring open sideways (never pull it apart outwards). This preserves the shape of the ring. -
Connecting the pieces:
Thread the open jump ring through the bottom hole of the white circle and the top hole of the pale pink arch. Close the jump ring securely by twisting it back. -
Adding the hook:
Open the loop at the bottom of your earring hook (or use another jump ring if the hook loop is closed). Thread it through the top hole of the white circle and close it. -
Second earring:
Repeat the assembly process for the second earring: connect the tan circle to the terracotta arch, then attach the second earring hook to the top of the tan circle.
Enjoy styling these beauties with your favorite casual outfits for an effortless pop of color
Tiny Bud Vases For Single-Stem Arrangements
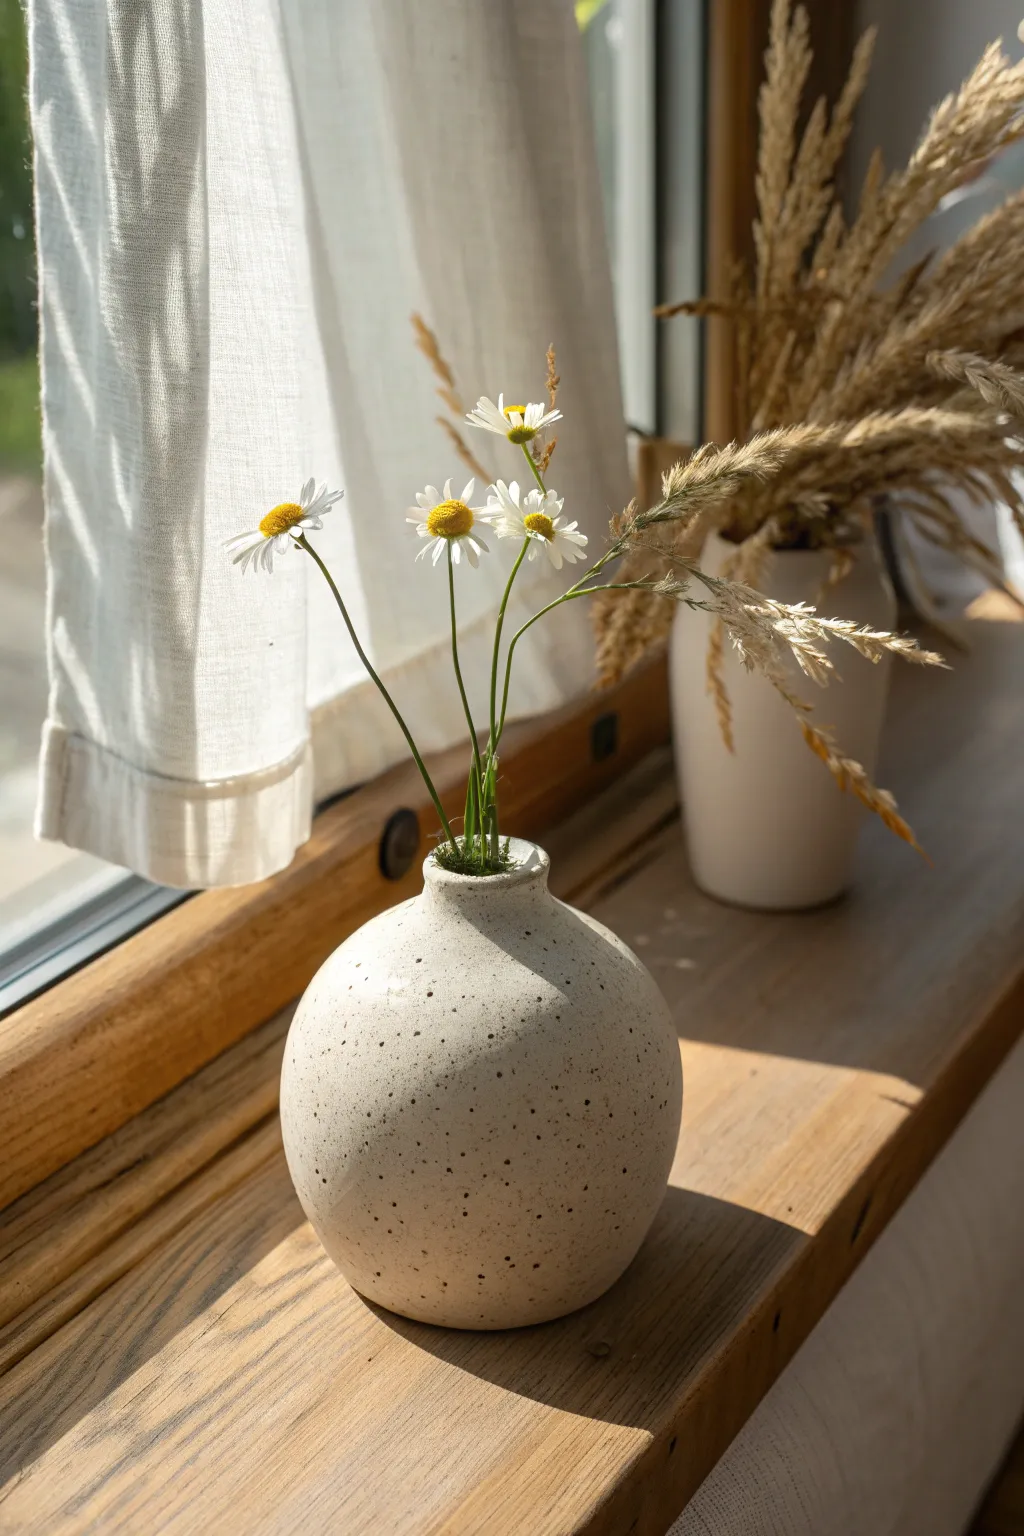
Embrace the beauty of simplicity with this minimalist spherical bud vase, distinct for its soothing round form and rustic speckling. It’s the perfect size for showcasing modest treasures like a sprig of dried grass or a single fresh daisy.
Step-by-Step Guide
Materials
- White stoneware clay (speckled or plain)
- Black iron oxide or mason stain (if using plain clay)
- Pottery wheel or banding wheel (for coil building)
- Rib tool (metal or rubber)
- Needle tool
- Sponge
- Clear matte glaze
- Modeling tool or smooth wooden spoon
Step 1: Preparing the Clay
-
Choose your clay body:
For that authentic spotted look shown in the photo, start with a pre-speckled stoneware clay body. If you only have standard white clay, you can wedge in a small amount of granular manganese or iron oxide to create the effect manually. -
Wedge thoroughly:
Wedge about 1 to 1.5 pounds of clay until it is completely homogenous and free of air bubbles. This small amount is deceptive; you need enough mass to keep the walls sturdy before thinning them out. -
Form a ball:
Shape your wedged clay into a tight, symmetrical ball before placing it on the wheel head or your work surface.
Step 2: Shaping the Base
-
Center the clay:
If throwing on the wheel, slap the ball onto the center of the bat. Use water and steady pressure to center the clay perfectly. A wobbly start will make achieving a perfect sphere very difficult later. -
Open the form:
Press your thumbs into the center, going down until you have about a half-inch of clay left for the floor. Open the floor narrowly; we want a tight form, not a wide bowl. -
Pull the initial cylinder:
Pull the walls up into a short, thick cylinder. Don’t go too thin yet. Keep the top rim slightly gathered in to prepare for the closing shape.
Clean Curves
Use a credit card or rigid rib tool during the shaping phase to compress the clay. This prevents hidden water pockets and creates that specific smooth, tension-filled surface seen in the photo.
Step 3: Creating the Sphere
-
Belly out the form:
Using a rib tool on the outside and your fingers on the inside, gently push the belly of the pot outward. Start from the bottom and curve upward to create that voluminous round shape. -
Collar the neck:
As you push the belly out, you must simultaneously keep the neck narrow. Use both hands to gently squeeze or ‘collar’ the upper rim inward after every outward stretch to maintain tension. -
Refine the curve:
I like to use a flexible metal rib here to smooth the exterior curve. Run it up the side while the wheel spins to remove finger ridges and ensure the silhouette is perfectly round like a river stone. -
Define the neck:
Once the body is spherical, focus on the neck. It needs to be very short and narrow—just enough to hold a few stems vertically. Use your needle tool to trim the rim so it is level. -
Smooth the rim:
Use a piece of chamois or a damp sponge to round off the lip of the vase. It should look soft and finished, not sharp.
Collapsing Walls?
If the sphere starts to slump while throwing, the clay is too wet or thin. Use a heat gun or hair dryer to stiffen the lower walls slightly, giving them the strength to support the upper curve.
Step 4: Finishing and Glazing
-
Trim the foot:
Let the vase become leather hard. Flip it over and trim a small, neat foot ring. This lifts the sphere slightly off the surface, giving it a lighter appearance. -
Bisque fire:
Once fully bone dry, fire the piece in a bisque kiln according to your clay body’s specifications (usually Cone 04 or 06). -
Glaze application:
Dip the entire vase into a clear matte glaze. A glossy glaze can reflect too much light and hide the speckles, whereas the matte finish shown here mimics the texture of an eggshell. -
Wipe the foot:
Carefully sponge off any glaze from the bottom foot ring to prevent it from fusing to the kiln shelf. -
Final firing:
Fire the glazed piece to the maturity temperature of your clay (likely Cone 5 or 6). Allow the kiln to cool completely before removing your new bud vase.
Place your finished vase near a window to let natural light highlight the subtle speckles and organic shape


What Really Happens Inside the Kiln
Learn how time and temperature work together inside the kiln to transform clay into durable ceramic.
Incense And Candle Holders With Pressed Texture
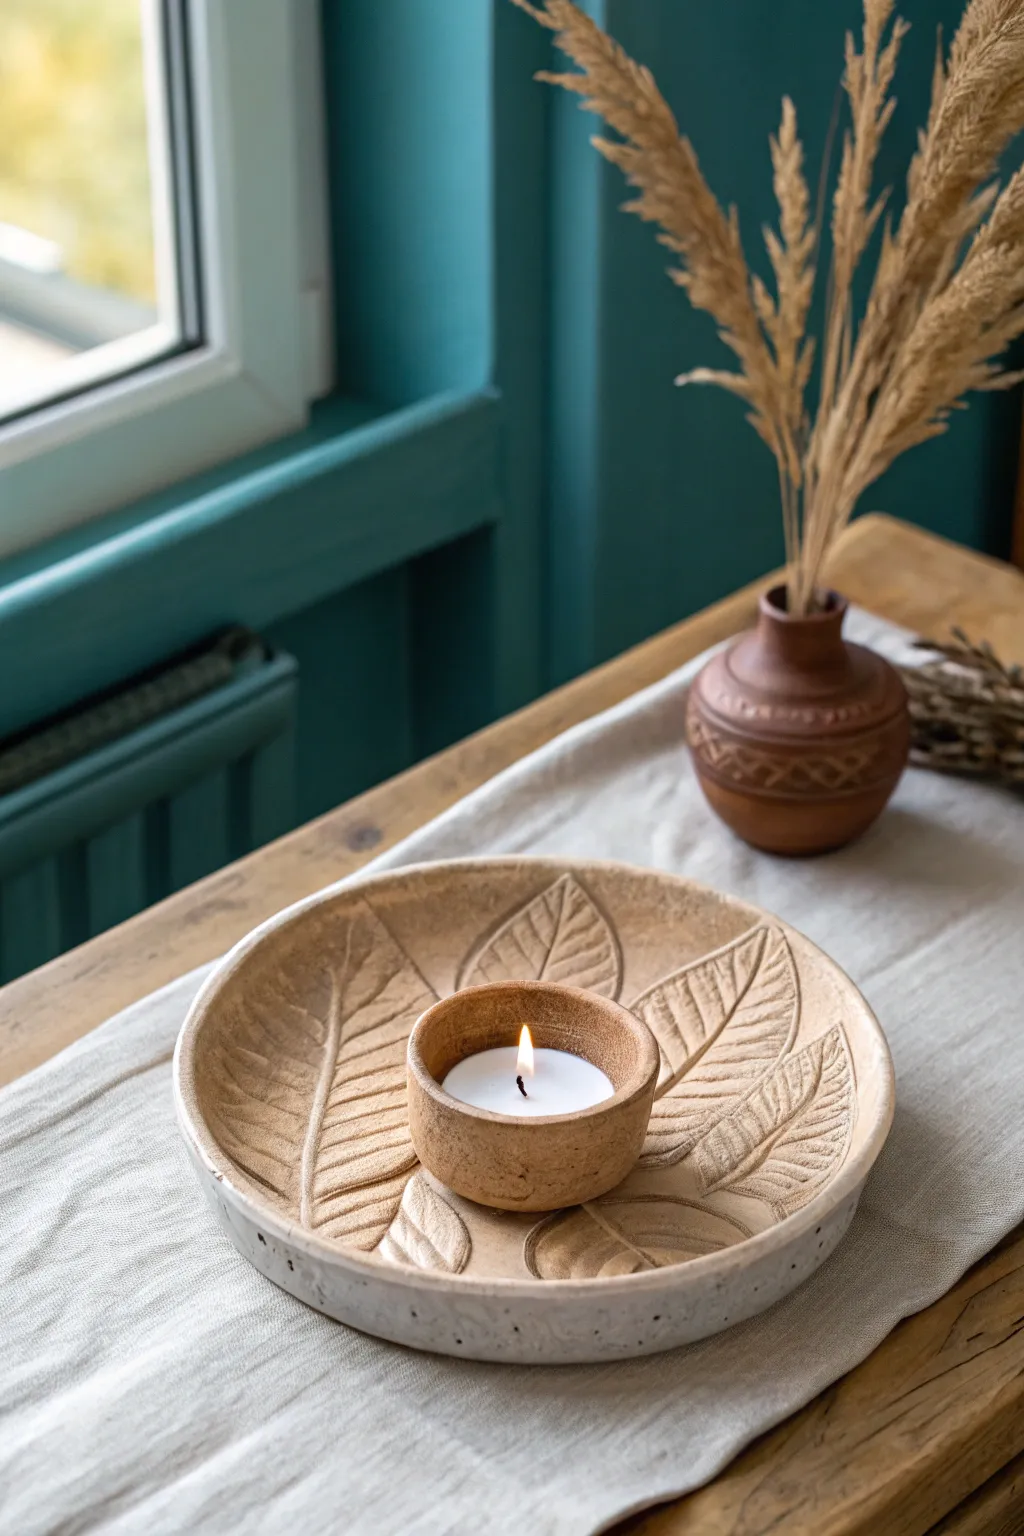
Bring a touch of autumn nature indoors with this rustic, earth-toned candle holder featuring deep relief leaf patterns. The dual-piece design combines a wide, textured catch-all dish with a perfectly fitted central cup for your tea light.
Detailed Instructions
Materials
- Air-dry clay or kiln-fire stoneware clay (earthy tan color)
- Fresh or sturdy faux leaves with prominent veins
- Rolling pin
- Canvas or cloth work surface
- Round bowl or plate (for use as a mold/template)
- Craft knife or needle tool
- Small round cookie cutter or cup (sized for a tea light)
- Sponge and water
- Sandpaper (fine grit)
- Satin or matte varnish (optional)
Step 1: Prepping the Clay Base
-
Roll the slab:
Start by wedging your clay to remove air bubbles, then roll it out on your canvas cloth into a consistent slab about 1/4 inch thick so it’s sturdy but not heavy. -
Arrange the leaves:
Select leaves with stiff spines and deep veins. Arrange them vein-side down onto your clay slab in a pleasing, overlapping circular pattern, leaving a small empty space in the exact center. -
Press the texture:
Using your rolling pin, roll firmly over the leaves to embed them into the clay surface. You want them flush with the clay to get that deep, crisp impression visible in the photo. -
Remove the leaves:
Carefully peel back the leaves one by one to reveal the botanical impressions. If a stem gets stuck, use a needle tool to gently lift it out. -
Cut the circle:
Place your bowl or circular template over the textured area and cut around it with your craft knife to create the main dish shape.
Veins Not Showing?
If the texture is too faint, the clay might be too dry. Spray a light mist of water on the slab and wait 5 minutes before pressing the leaves again.
Step 2: Forming the Bowl and Cup
-
Shape the dish:
Gently lift your circular slab and place it inside a shallow bowl to give it a curved form. Press gently so it takes the shape without smoothing out your leaf textures. -
Create the center cup base:
From your remaining clay scraps, roll a small ball and flatten it slightly to form the floor of the tea light holder. -
Build the cup walls:
Roll a small coil (snake) of clay or cut a strip from a slab. Wrap it around a standard tea light candle (wrapped in plastic wrap so it doesn’t stick) to gauge the perfect diameter. -
Attach the cup:
Score the bottom of the little cup and the center of your textured dish. Add a dab of water or slip, and press the cup firmly into the center of the dish. -
Refine the edges:
Smooth the rim of the central cup with a damp sponge or your finger to make it soft and rounded like the reference image. -
Clean the outer rim:
Go around the outer edge of the large dish and smooth any sharp cutting marks with a slightly damp sponge.
Step 3: Finishing and Drying
-
Slow drying:
Let the piece dry slowly away from direct heat or sunlight to prevent warping. This usually takes 24-48 hours depending on your humidity. -
Sanding:
Once bone dry, take fine-grit sandpaper and gently smooth the rim of the bowl and the top of the candle cup. I find this step crucial for that professional, finished feel. -
Applying the wash:
To enhance the texture, you can apply a watered-down brown acrylic paint or oxide wash. Brush it into the veins and immediately wipe the surface with a damp sponge, leaving color only in the deep crevices. -
Seal or fire:
If using air-dry clay, seal the piece with a matte varnish to protect it. If using ceramic clay, fire it in the kiln according to the clay manufacturer’s instructions.
Make It Speckled
To mimic the speckled stoneware look in the photo on plain clay, try flicking a toothbrush loaded with diluted brown paint over the piece before varnishing.
This botanical candle holder adds a serene, grounding warmth to any table setting
Desk Organizers That Feel Like Little Desk Friends
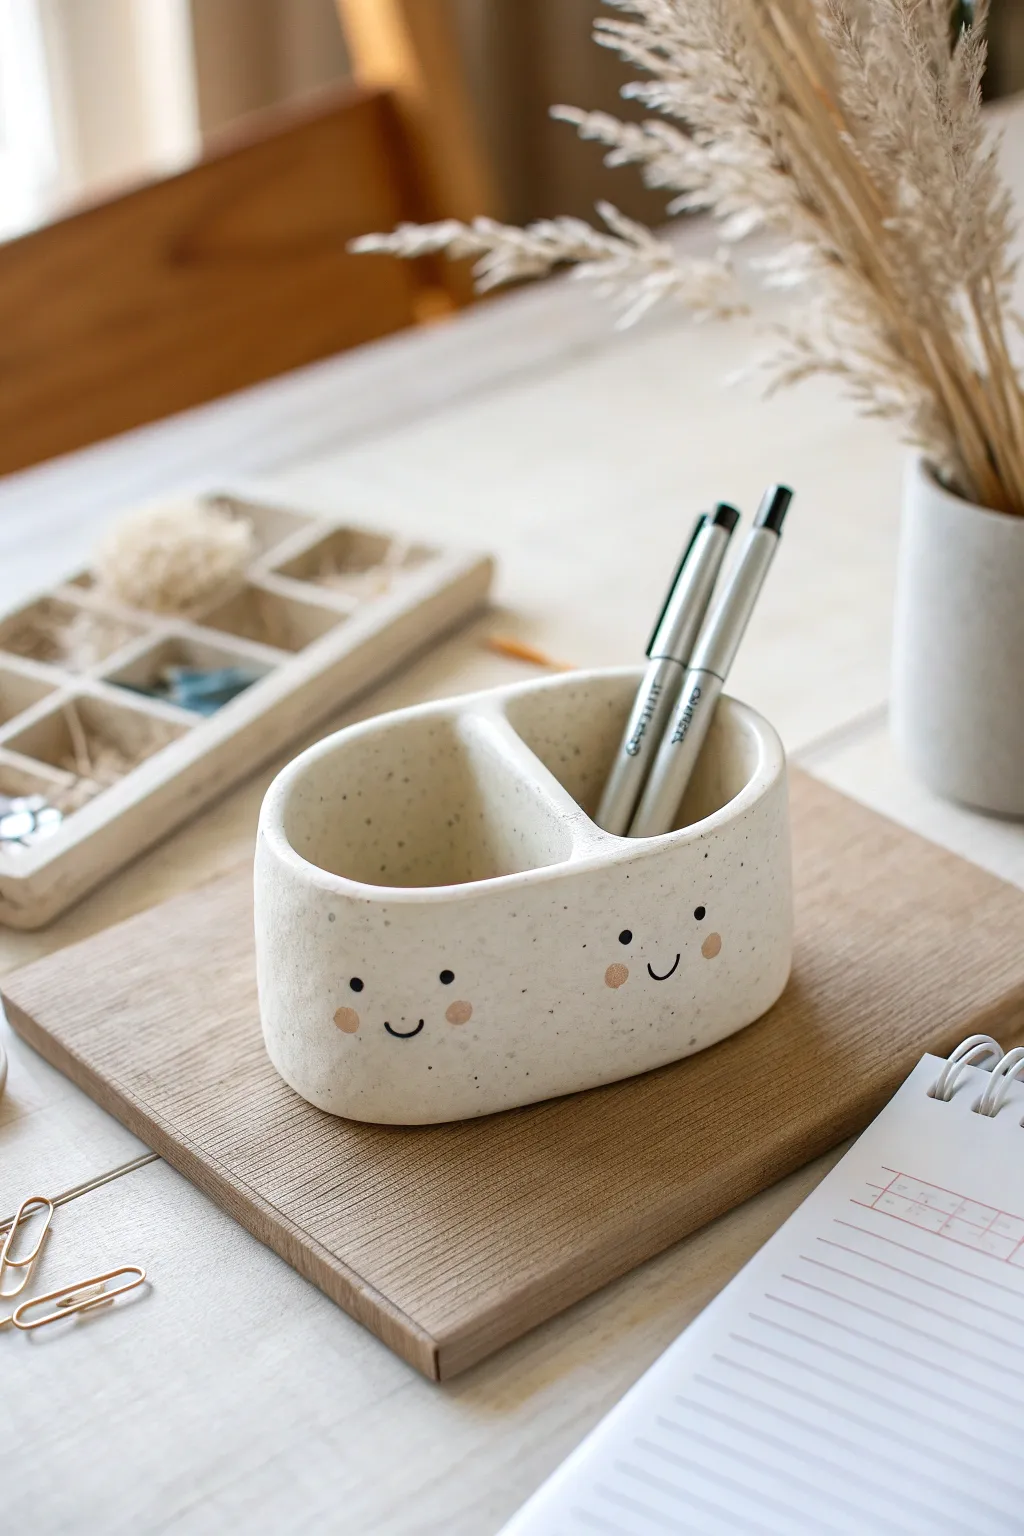
Brighten up your workspace with this adorable double-compartment organizer that literally smiles back at you. Made from speckled clay with a soft, matte finish, it’s the perfect home for your favorite pens and a sweet little companion for long work days.
How-To Guide
Materials
- Speckled stoneware clay (white or cream base)
- Clay slab roller or rolling pin
- Oval cookie cutter or paper template (approx. 6 inches wide)
- Fettling knife or needle tool
- Scoring tool (or serrated rib)
- Slip (liquid clay)
- Small sponge
- Black underglaze (for details)
- Pink or peach underglaze (for cheeks)
- Fine detail brush
- Clear matte glaze
- Rolling slats or guide sticks (1/4 inch thick)
Step 1: Forming the Base Structure
-
Roll the slab:
Begin by wedging your speckled clay to remove air bubbles. Roll it out into a smooth, even slab using guide sticks to maintain a consistent 1/4 inch thickness throughout. -
Cut the components:
Using an oval cutter or a paper template, cut out the base shape. Next, cut a long rectangular strip for the walls—measure the circumference of your oval base to determine the length, adding a slight overlap. -
Score and slip the base:
Run your scoring tool along the outer edge of the oval base where the wall will attach. Apply a generous amount of slip to the scored area. -
Attach the wall:
Carefully stand the rectangular strip up along the edge of the base. Curve it around the oval shape until the ends meet. -
Seal the seam:
Where the two ends of the wall meet, score and slip the connection thoroughly. Smooth the seam inside and out with your thumb or a rib tool so the join becomes invisible. -
Secure the bottom:
Use a modeling tool to blend the clay from the wall down onto the base on the exterior. I like to run a small coil of clay along the inside seam for extra stability, smoothing it down completely.
Step 2: Adding the Divider & Refining
-
Create the divider:
Measure the internal width of your oval at its center point. Cut a small rectangular piece of clay slab to fit this space comfortably, ensuring it matches the height of the exterior walls. -
Install the partition:
Score vertically down the inside walls where the divider will go. Apply slip, then slide the divider into place, creating two distinct compartments. -
Smooth edges:
Blend the edges of the divider into the inner walls. Take a damp sponge and gently run it over the top rim of the entire piece to soften any sharp angles and create that rounded, organic look.
Wobbly Walls?
If the walls slump during construction, stuff the inside with crumpled newspaper or plastic wrap to support the shape while it stiffens up.
Step 3: Personality & Finishing
-
Let it stiffen:
Allow the piece to dry to a leather-hard state. It should be firm to the touch but still cool, which makes painting the details much easier. -
Paint the cheeks:
Dip a small round brush into your pink or peach underglaze. Dab two small dots on the left side and two on the right side to create the rosy cheeks for both faces. -
Add the smiles:
Using a very fine liner brush and black underglaze, paint a small ‘U’ shape between the cheeks for the mouth. Add two tiny dots for eyes just above the cheek line. -
Bisque fire:
Let the piece dry completely (bone dry) before loading it into the kiln for a bisque firing. -
Glaze application:
Once bisque fired, dip the entire piece into a transparent matte glaze. The matte finish is crucial here to keep the natural, earthy texture of the speckled clay visible. -
Final firing:
Fire the piece again specifically to the maturation temperature of your chosen clay and glaze.
Level Up: Texture
Before assembly, gently press a piece of linen fabric into the wet clay slab to give the organizer a subtle, tactile woven texture.
Now you have a charming custom companion ready to keep your desk organized and your spirits high

TRACK YOUR CERAMIC JOURNEY
Capture glaze tests, firing details, and creative progress—all in one simple printable. Make your projects easier to repeat and improve.
Plant Markers And Garden Tags With Whimsy
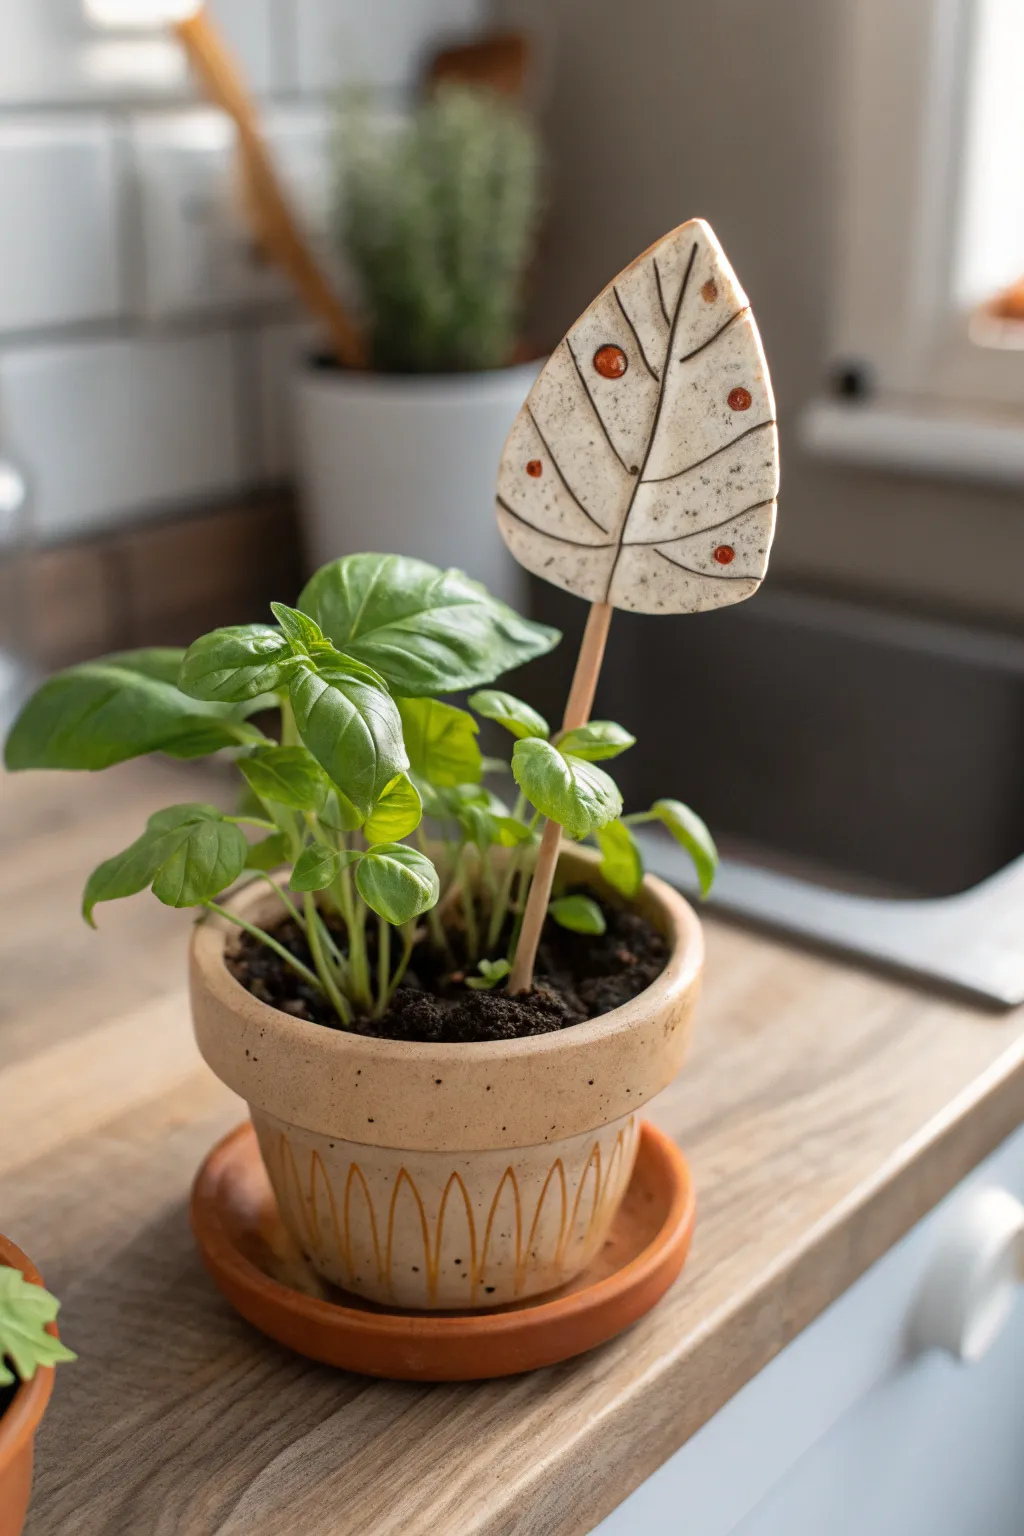
Add an organic touch to your indoor herb garden with these whimsical ceramic leaf markers. Featuring a natural speckled finish and warm amber accents, they are a sturdy and stylish way to remember which herb is which.
Step-by-Step Guide
Materials
- White polymer clay with granite/speckled effect (or stoneware clay if firing)
- Rolling pin
- Leaf-shaped cookie cutter (or X-Acto knife and paper template)
- Wooden dowel or skewer (approx. 4-5mm diameter)
- Needle tool or toothpick
- Ball stylus tool (small)
- Amber/terracotta acrylic paint (or glaze)
- Black acrylic paint (or underglaze)
- Matte spray varnish (if using polymer clay)
- Super glue or strong craft adhesive
- Fine grit sandpaper
Step 1: Shaping the Leaf
-
Condition the Clay:
Begin by warming up your speckled polymer clay in your hands until it becomes pliable and soft. Proper conditioning prevents cracking during the baking process. -
Roll it Out:
Use your rolling pin to flatten the clay into a slab that is approximately 1/4 inch thick. You want it substantial enough to hold the stick but not too heavy. -
Cut the Shape:
Press your leaf-shaped cutter firmly into the clay. If you don’t have a cutter, place a paper template on the slab and carefully trace around it with an X-Acto knife. -
Smooth the Edges:
Dip your finger in a little water (or clay softener) and gently run it along the cut edges to remove any sharpness or burrs.
Clean Lines Trick
If your carved lines look messy after baking, gently sand the surface with fine-grit sandpaper before painting. This sharpens the edges instantly.
Step 2: Adding Details
-
Create the Veins:
Using a needle tool or the tip of a toothpick, gently score a vertical line down the center of the leaf, stopping just short of the top tip. -
Add Angle Lines:
Draw angled lines branching off the center vein to create the leaf’s rib structure. Keep your hand light; you want to indent the clay, not cut all the way through. -
Emboss the Accents:
Take a small ball stylus tool and press it into the spaces between the veins to create shallow circular divots. I like to scatter 4 or 5 randomly for a loose, artistic look. -
Insert the Mounting Hole:
Carefully press the end of your wooden dowel into the bottom point of the leaf to create a socket. Insert it about 1/2 inch deep, then remove the dowel before baking.
Step 3: Finishing Touches
-
Bake the Clay:
Place your clay leaf on a parchment-lined baking sheet. Bake according to your specific brand’s package instructions (usually around 275°F for 15-30 minutes). -
Cool Down:
Allow the piece to cool completely before handling. It will harden fully as it returns to room temperature. -
Prepare the Wash:
Dilute a small amount of black acrylic paint with water until it is very runny. -
Highlight the Veins:
Brush the black wash over the incised lines, ensuring it gets into the grooves. Immediately wipe the surface with a damp paper towel, leaving the dark pigment only inside the lines. -
Paint the Dots:
Using a fine brush, carefully fill the circular divots with your amber or terracotta paint. You might need two coats for opaque coverage. -
Seal the piece:
Once all paint is dry, spray the leaf with a light coat of matte varnish to protect the surface from moisture. -
Attach the Stick:
Place a drop of super glue into the hole at the bottom of the leaf and re-insert the wooden dowel. Hold firmly for 30 seconds to set.
Weatherproofing
For outdoor use, swap the polymer clay for air-dry stone clay and seal heavily with UV resin, or use real kiln-fired stoneware for permanence.
Pop your new marker into your basil or mint plant and enjoy the rustic charm it adds.
Mini Character Charms In A Soft Plush-Inspired Style
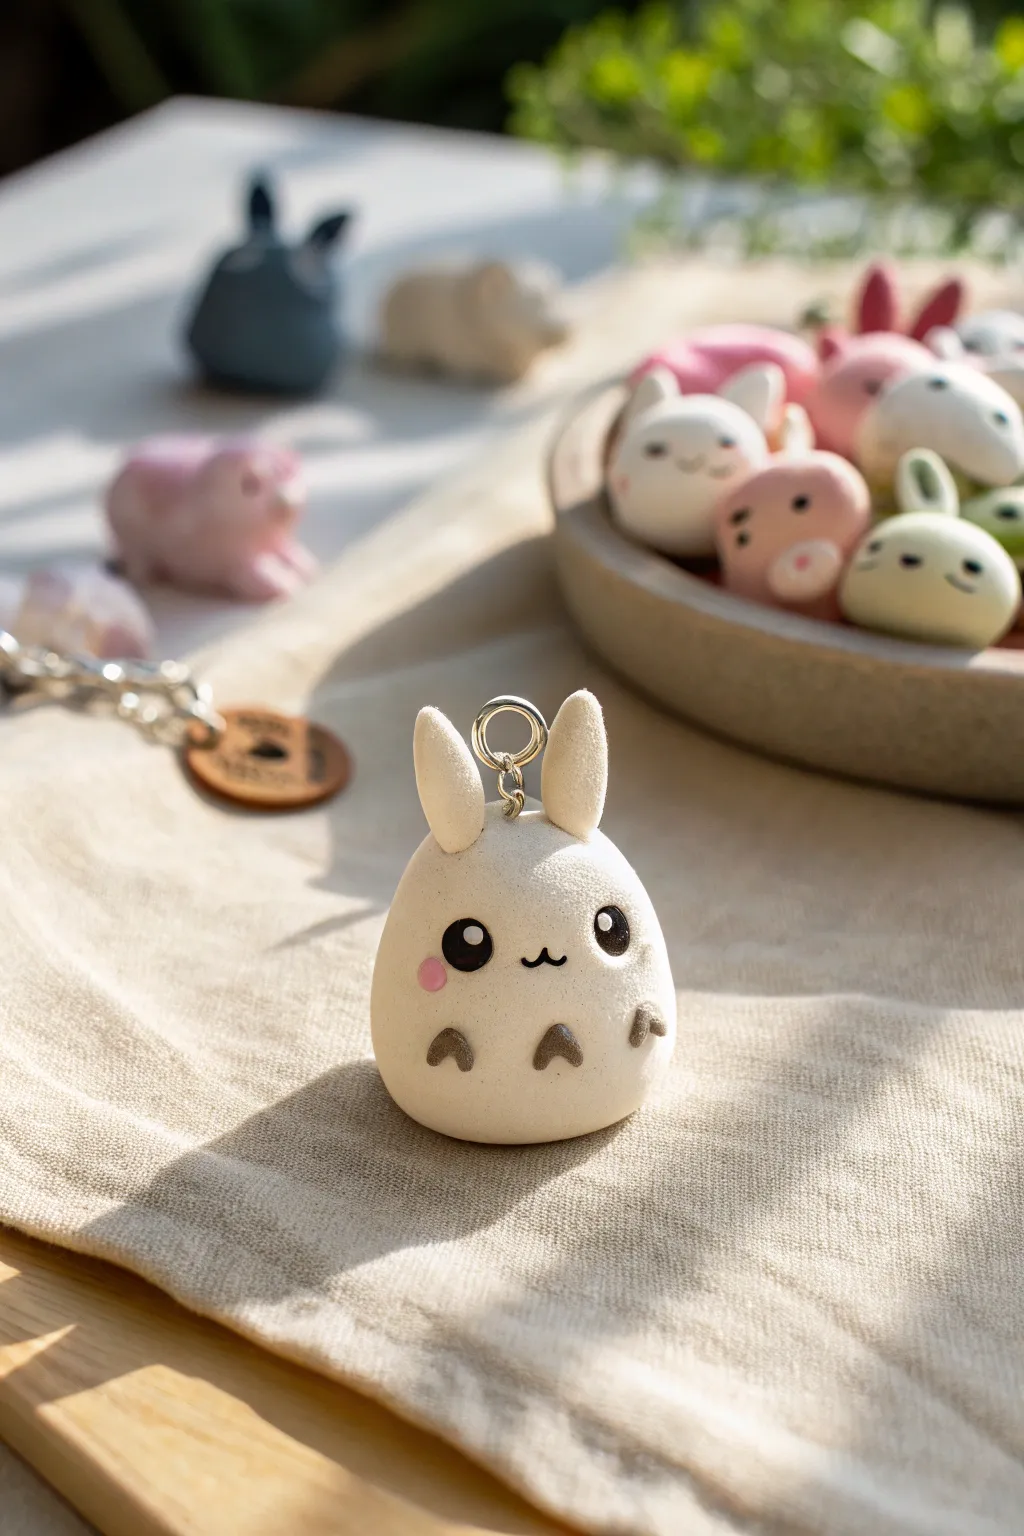
Capture the cozy texture of a soft toy in solid clay form with this adorable Totoro-inspired charm. The secret to its charm lies in the soft, matte finish and simple, kawaii facial features.
Step-by-Step Guide
Materials
- White polymer clay
- Translucent liquid polymer clay (optional)
- Black acrylic paint
- Pink acrylic paint or soft pastel chalk
- Grey acrylic paint
- Fine detail paintbrush (size 000)
- Dotting tool or toothpick
- Eye pin or screw eye
- Eyebrow brush or toothbrush (for texture)
- Matte varnish
- Cornstarch or baby powder (to prevent sticking)
Step 1: Sculpting the Base
-
Conditioning the Clay:
Begin by thoroughly kneading a small block of white polymer clay until it is soft and pliable. Warm clay prevents cracks from forming later. -
Forming the Body:
Roll the clay into a smooth ball about 1 inch in diameter. Gradually gently tamper the top so it becomes an egg shape with a slightly flattened bottom for stability. -
Creating the Ears:
Roll two small, equal-sized pieces of white clay into teardrop shapes. Flatten them slightly to mimic the look of fabric ears. -
Attaching the Ears:
Press the wider bottom of the teardrops onto the top of the egg shape. Use a rubber sculpting tool or your finger to blend the seams perfectly so the ears look like a continuous part of the body. -
Adding Texture:
To achieve that ‘plushie’ look, gently tap the entire surface of the clay with a clean toothbrush or eyebrow brush. This creates a stippled texture that mimics fabric nap. -
Inserting Hardware:
If you plan to use this as a keychain, insert a metal eye pin into the top center between the ears. I sometimes add a dot of liquid clay to the pin’s shaft for extra grip before baking.
Sticky Lint Blues?
White clay attracts dust like a magnet. Keep a piece of scotch tape nearby to dab away dust specks from the raw clay, or wipe your hands with a baby wipe before sculpting.
Step 2: Adding Details & Baking
-
Pre-Bake Check:
inspect your charm for any fingerprints that mar the texture. Lightly re-texture any smoothed areas with your brush. -
Baking:
Bake the piece according to your specific clay brand’s instructions (usually 275°F/130°C for 15-20 minutes). Place it on a tile or parchment paper. -
Cooling Down:
Allow the charm to cool completely before painting. Painting on warm clay can make the acrylics dry too fast and clump up.
Step 3: Painting & Finishing
-
Drafting the Face:
Lightly mark the position of the eyes and mouth with a pencil if you’re nervous about freehand painting. -
Painting the Eyes:
Using a dotting tool dipped in black acrylic paint, place two solid black circles for the eyes. Avoid making them perfectly round; a slight oval shape adds character. -
The Eye Highlights:
Once the black paint is semi-dry, use a very fine tip or a pin to add a tiny white dot in the upper corner of each eye. This ‘sparkle’ brings the character to life. -
Nose and Mouth:
With your finest brush (size 000), paint a tiny, thin ‘w’ shape between the eyes for the mouth and a minuscule nose just above it. -
Adding Cheeks:
Dip a Q-tip into pink pastel powder or very watered-down pink paint. Gently dab it onto the cheek area for a soft, diffused blush effect. -
Belly Markings:
Mix a light grey paint. Paint small, inverted ‘V’ shapes or arrowheads low on the belly area to mimic the character’s traditional markings. -
Sealing the Charm:
Once all paint is visibly dry, coat the entire piece with a matte varnish. Avoid glossy finishes, as we want to maintain the soft fabric illusion.
Flocking Powder Hack
For a truly fuzzy texture, brush liquid clay onto the baked charm and dip it into white flocking powder or embossing powder before doing a final quick bake.
Attach your new little friend to your keys or bag and enjoy the cuteness wherever you go
Hidden Storage Trinket Boxes Disguised As Critters
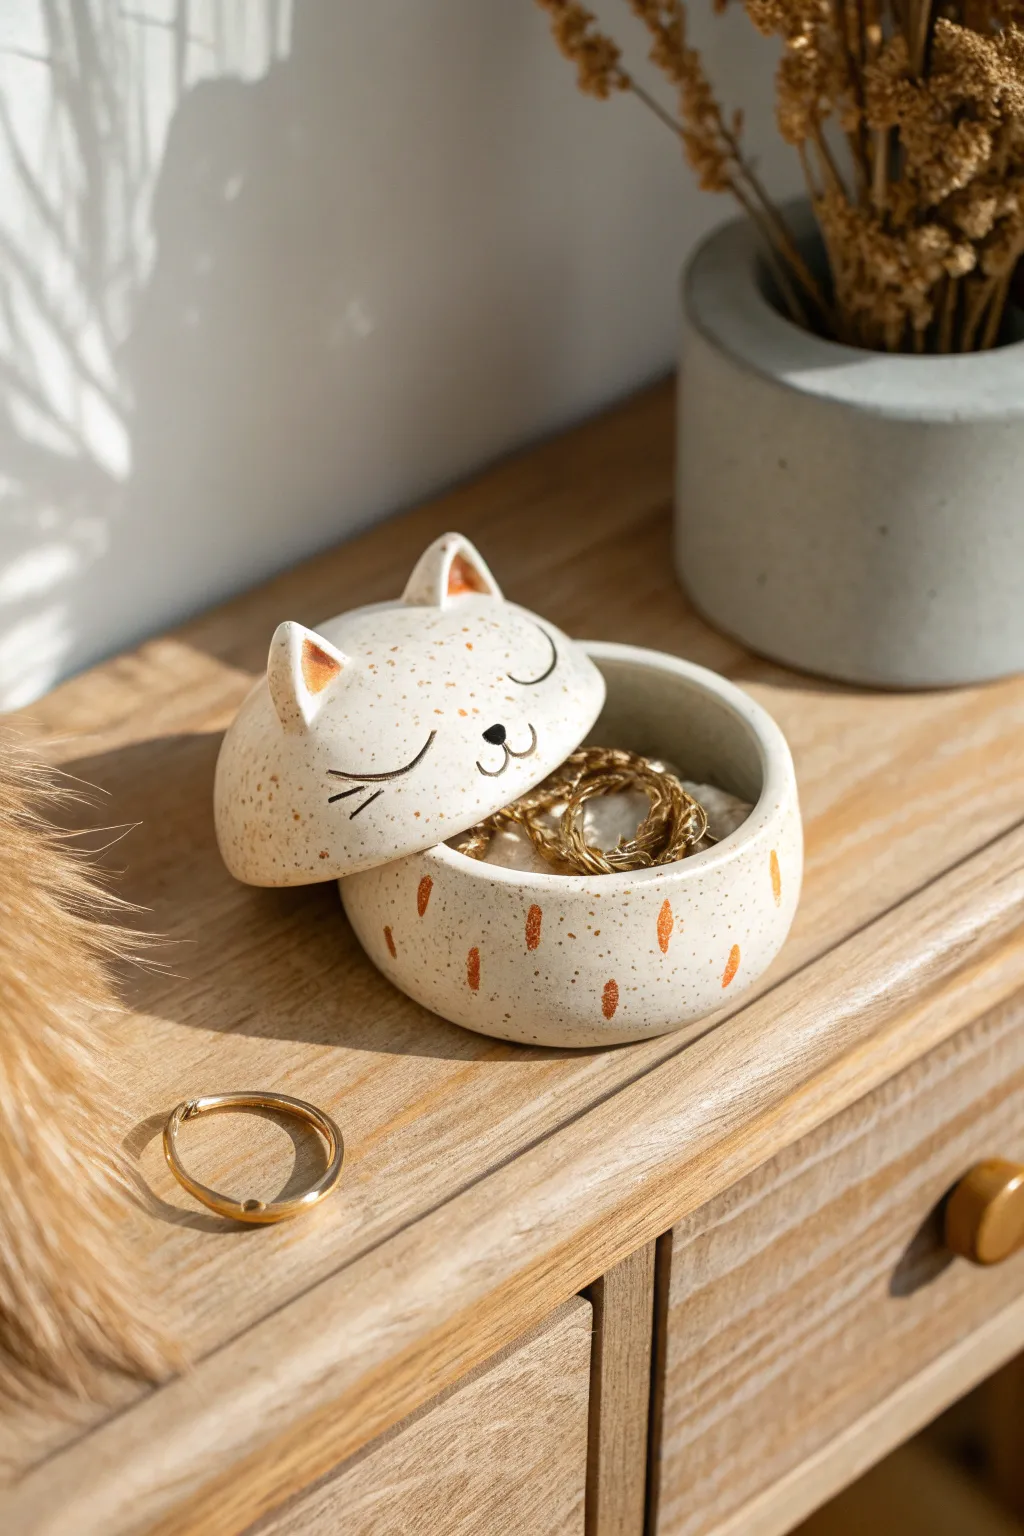
This adorable jewelry box hides your treasures beneath the serene face of a sleeping cat. Crafted from speckled clay and featuring hand-painted orange accents, this two-part pot is both a functional storage solution and a charming piece of handmade decor.
How-To Guide
Materials
- White or speckled stoneware clay (approx. 1 lb)
- Pottery wheel (optional, can be hand-built)
- Needle tool
- Loop trimming tool
- Scoring tool (or fork)
- Slip (clay mixed with water)
- Orange underglaze
- Black underglaze
- Fine detail brush
- Clear transparent glaze
- Sponge
- Rolling pin (if hand-building)
Step 1: Forming the Base
-
Shape the vessel:
Center a ball of clay on the wheel and open it up to create a shallow, wide bowl form. Aim for straight vertical walls about 1.5 inches high. If hand-building, create a pinch pot or use the coil method to achieve a similar cylinder shape. -
Refine the rim:
Using a chamois or sponge, gently compress the rim to ensure it is smooth and level. This is crucial for the lid to sit properly later. -
Create the gallery (optional):
For a more secure fit, you can trim a small interior ledge (gallery) on the rim, though a simple flat rim works perfectly for this loose-fitting style. -
Dry to leather hard:
Wire the pot off the wheel and set it aside until it reaches a leather-hard state, firm enough to handle without deforming. -
Trim the foot:
Flip the base over and center it on the wheel. Using a loop tool, trim away excess weight from the bottom and crave a shallow foot ring to give the pot a finished look.
Wobbly Lid?
If the lid rattles or slides too much after the bisque fire, add three tiny dots of silicone to the rim of the base after the final glaze firing to create grippy bumpers.
Step 2: Sculpting the Lid
-
Form the dome:
Throw a second, slightly smaller inverted bowl shape for the lid, or pinch a dome of clay by hand. Measure it against your base frequently to ensure the diameter matches the rim of the bottom pot. -
Add the ears:
Roll two small triangles of clay. Score and slip the attachment points on top of the dome, then press the ears firmly into place, blending the clay seams until invisible. -
Refine the curve:
Smooth the transition between the ears and the head using a modeling tool or your finger to create a natural, organic silhouette. -
Dry and fit:
Allow the lid to dry to leather hard. Test the fit on the base and gently sand or trim any uneven areas so they sit flush together.
Step 3: Decorating and Glazing
-
Paint the face details:
Using a very fine brush and black underglaze, carefully paint the sleeping eyes (two U-shapes with lashes) and the nose and mouth area. Keep your hand steady for crisp lines. -
Add orange accents:
Fill in the inner triangles of the ears with orange underglaze. I like to dab the color on slightly thick here for vibrancy. -
Create the fur pattern:
For the dash pattern on the base vessel, paint small, vertical oval strokes using the orange underglaze. Space them somewhat randomly but evenly around the circumference. -
Bisque fire:
Once the piece is bone dry, fire it in the kiln to cone 04 (or your clay’s specific bisque temperature). -
Apply clear glaze:
Dip both the lid and the base into a clear transparent glaze to seal the clay and make the underglaze colors pop. -
Wipe the connection points:
Crucial step: thoroughly wipe the glaze off the rim of the base and the bottom rim where the lid touches. If you skip this, the lid will fuse to the jar permanently. -
Glaze fire:
Fire the pieces again to the maturity temperature of your clay and glaze (typically cone 5 or 6 for stoneware).
Purr-fect Texture
Instead of specked clay, use white clay and flick iron oxide on with a toothbrush before glazing to create your own custom ‘flecks’ and speckles.
Now you have a sweet, sleepy companion to guard your favorite rings and small treasures
Bold Surface Experiments: Terrazzo, Marbling, And Faux Stone
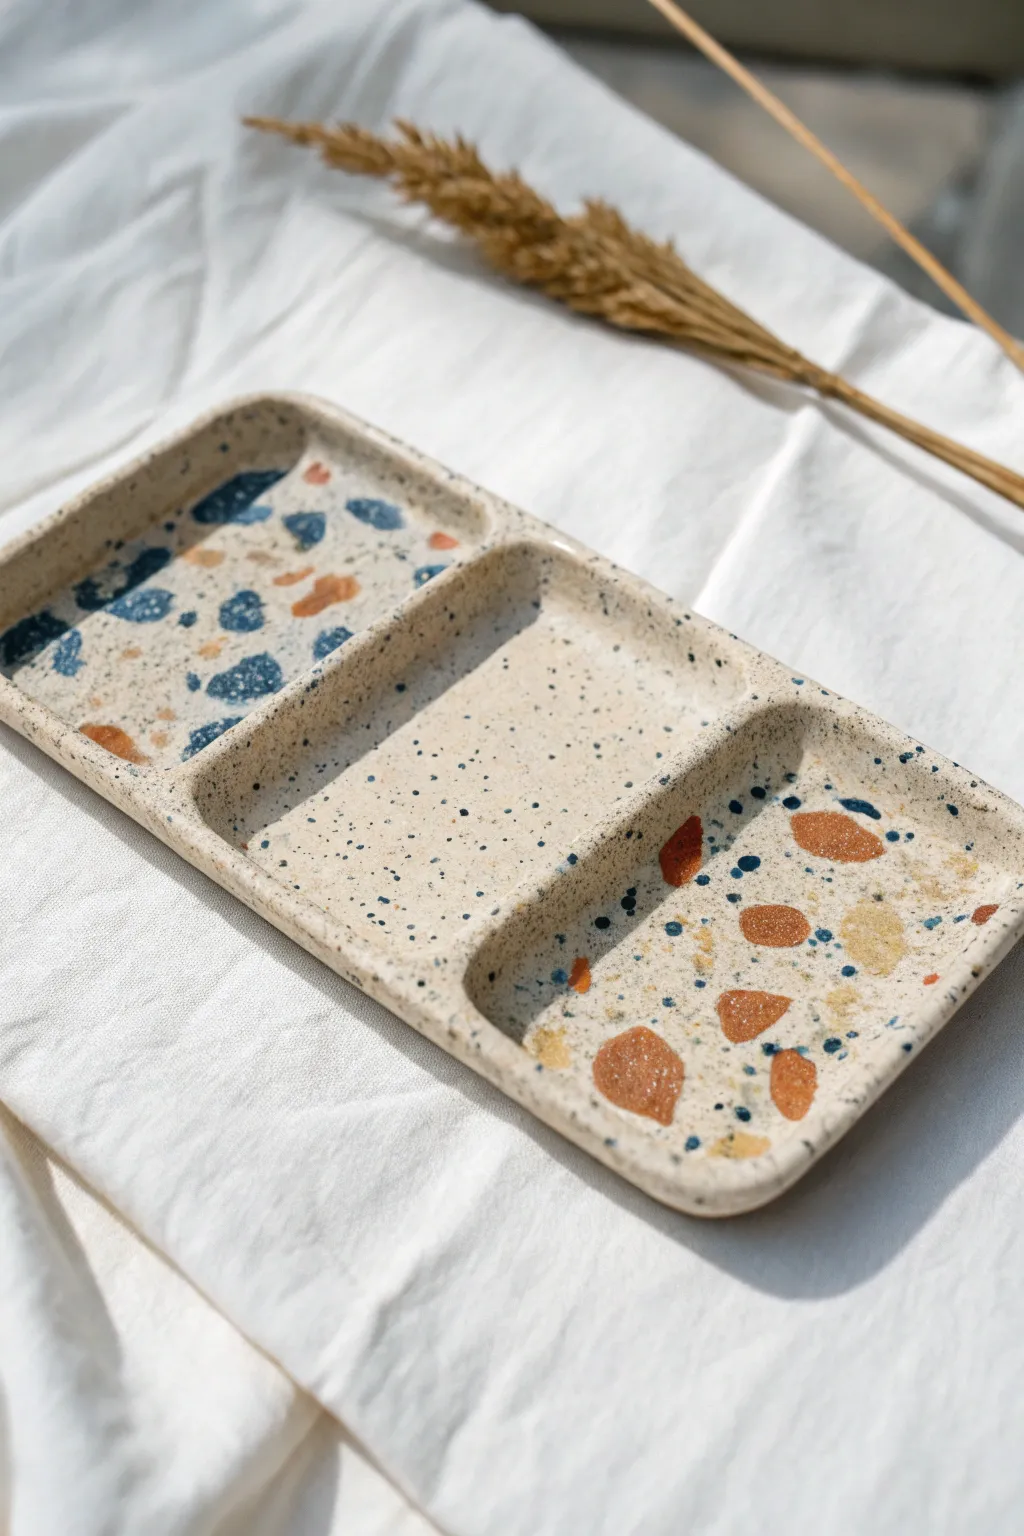
Embrace the playful chaos of terrazzo with this divided rectangular tray, featuring three distinct sections that blend speckled clay with bold splashes of blue, rust, and ocher. Perfect for organizing jewelry or desk supplies, this project mimics the look of authentic composite stone using accessible polymer clay techniques.
Step-by-Step Guide
Materials
- Polymer clay (white/beige granite effect, navy blue, terracotta, mustard yellow)
- Clay roller or pasta machine
- Rectangle clay cutter or craft knife
- Ruler
- Smooth work surface (ceramic tile or glass)
- Sandpaper (various grits from 400 to 1200)
- UV resin or glossy varnish (optional for finish)
- Hard bristle brush or toothbrush (for texture)
- Sculpting tools (smoothing tool, needle tool)
Step 1: Prepping the ‘Chips’
-
Roll thin sheets:
Begin by rolling out your colored clays (navy blue, terracotta, and mustard yellow) into very thin sheets, approximately 1mm thick. -
Bake the sheets:
Place these thin colored sheets on a tile and bake them for about 10-15 minutes at the temperature recommended on your clay package. Use a lower time since they are thin; you just want them hard enough to snap. -
Create the terrazzo chips:
Once cooled, break the baked clay sheets into jagged, irregular pieces. Vary the sizes from tiny crumbs to larger statement chunks specifically for the side compartments.
Step 2: Forming the Base
-
Condition base clay:
Thoroughly condition your granite-effect or speckled white clay until it is soft and malleable. -
Roll the main slab:
Roll out a large slab of the base clay to about 5mm thickness. This needs to be large enough to cut a long rectangle that will serve as the bottom of your tray. -
Embed the chips:
Scatter your prepared baked chips onto the raw base slab. Concentrate blue chips on one side, leave the middle relatively clear (or just use tiny speckles), and place the rust/yellow chips on the other end. -
Press and flatten:
Use your acrylic roller to firmly press the baked chips into the raw clay slab until the surface is flush and smooth. This embeds the terrazzo pattern properly.
Clean Cuts Pro Tip
Chill your clay slab in the fridge for 15 minutes before cutting the final rectangle shape. Cold clay moves less under the knife, giving you sharper, less distorted edges.
Step 3: Constructing the Tray
-
Cut the base shape:
Using a ruler and craft knife, cut a clean rectangle from your terrazzo slab. Round the corners gently with your finger or a shaped cutter for a softer look. -
Create the walls:
Roll out long snakes of the base clay and flatten them into strips for the walls. You’ll need enough to go around the perimeter plus two shorter strips for the dividers. -
Attach perimeter walls:
Place the main wall strip on top of the base edge. Blend the seams on the outside and inside using a sculpting tool so the connection is invisible. -
Add dividers:
I usually measure the total length and mark thirds before placing the divider walls. Insert the two divider strips to create the three compartments, blending the seams thoroughly where they meet the outer walls and the floor. -
Smooth everything:
Take time to smooth all edges and fingerprints. If you want a more stone-like texture, tap the surface gently with a toothbrush.
Level Up: Realism
Mix black pepper or dried tea leaves into your white base clay before rolling. These organic speckles create a convincing faux-ceramic pottery texture once baked.
Step 4: Refining and Finish
-
Final Bake:
Bake the full assembled tray according to package directions, usually 30 minutes at 275°F (130°C), but check your specific brand. Support the walls with cardstock if the clay is soft. -
Sand for stone effect:
Once fully cooled, wet sand the piece under running water. Start with 400 grit to reveal the crisp edges of the embedded angular chips, then move up to higher grits for smoothness. -
Seal (Optional):
For a glossy finish like the inspiration photo, apply a thin layer of UV resin or gloss varnish to make the colored chips pop against the speckled background.
Enjoy styling your modern, faux-stone organizer on your vanity or desk