
If you’ve got a little polymer clay and a key ring, you’re already halfway to a handmade accessory you’ll actually use every day. These polymer clay keychain ideas are the kinds of designs I make on repeat in my studio—cute, giftable, and totally doable.
Citrus Slice Polymer Clay Keychain (Lemon or Orange)
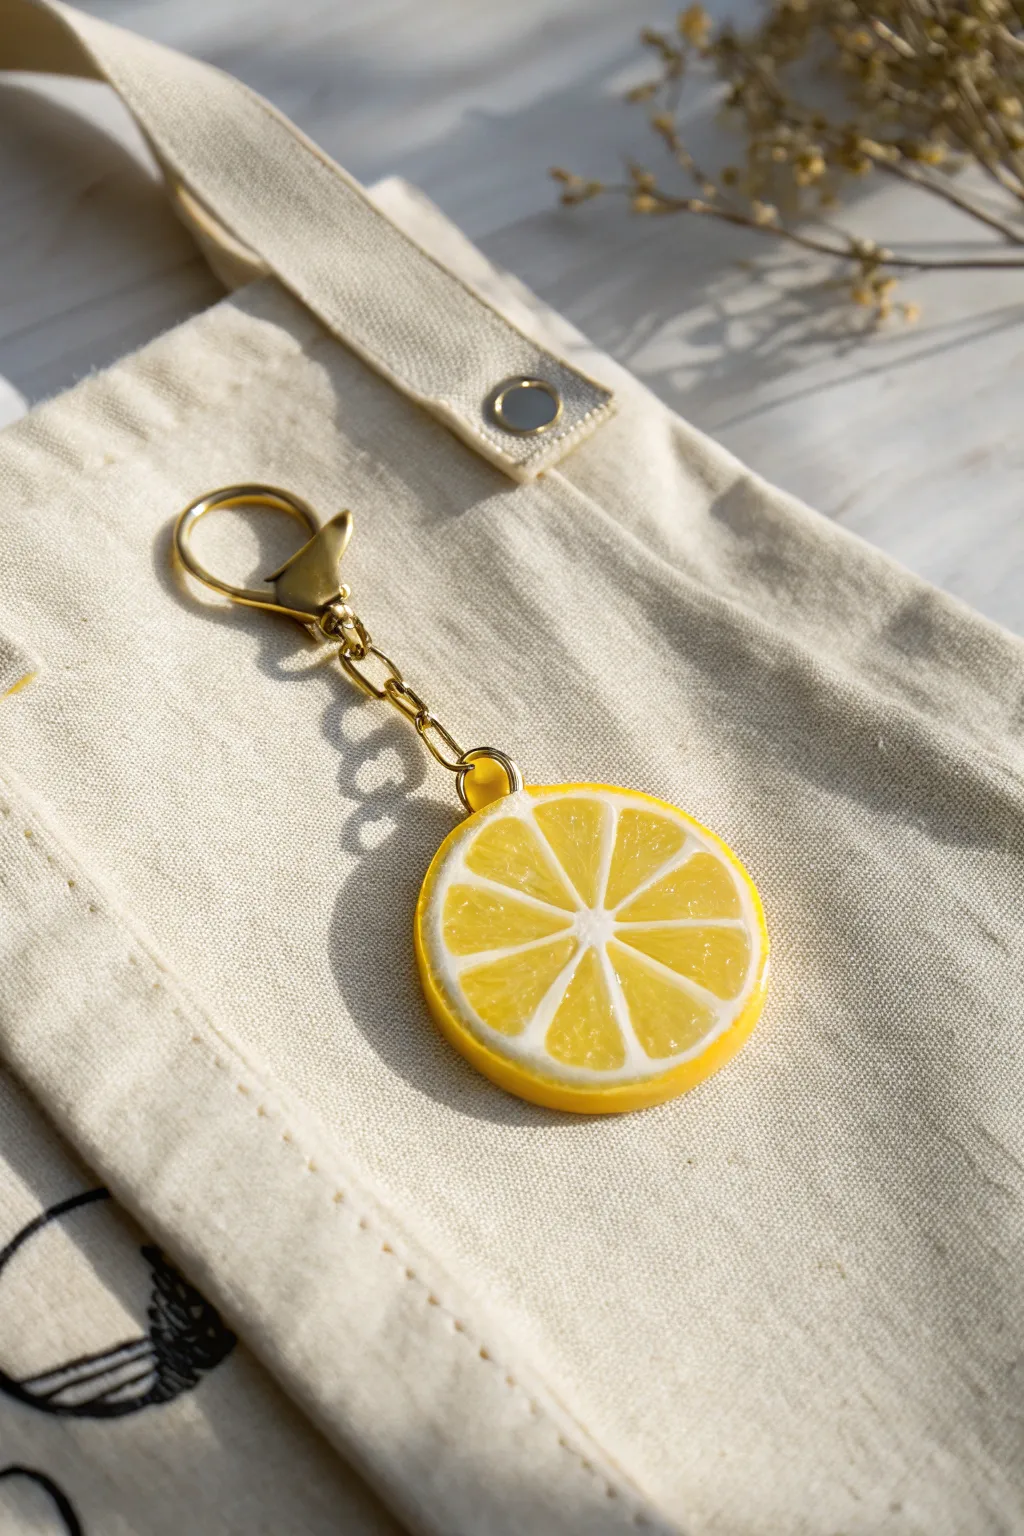
Brighten up your bag with this refreshingly realistic lemon slice keychain made from polymer clay. The secret to its juicy look is using translucent clay mixed with yellow to create that authentic citrus pulp texture.
Step-by-Step Guide
Materials
- Translucent polymer clay
- Yellow polymer clay (opaque)
- White polymer clay (opaque)
- Gold keychain hardware with jump ring
- Glossy UV resin or polyurethane varnish
- UV light (if using resin)
- X-acto knife or tissue blade
- Needle tool or toothpick
- Rolling pin or pasta machine
- Small eye pin screw (gold)
- Sandpaper (fine grit)
Step 1: Creating the Citrus Canes
-
Mix the Pulp Color:
Start by mixing a large amount of translucent clay with a very small pinch of opaque yellow. You want a semi-sheer, juicy yellow color, not a solid block of opaque pigment. -
Form the Wedge Log:
Roll your translucent yellow mixture into a thick, short log about 2 inches long. This will form the meat of the lemon. -
Wrap in White:
Roll out a very thin sheet of white opaque clay. Wrap this sheet around your yellow log completely, trimming any excess so the seam meets perfectly without overlapping. -
Reduce to Triangle:
Gently pinch one side of the cylinder to begin forming a teardrop or triangle wedge shape. Stretch and roll the cane until it is long and thin, keeping that triangular cross-section. -
Cut Segments:
Use your blade to cut the long triangular cane into 8 to 10 equal-length segments. These are your individual lemon wedges.
Step 2: Assembling the Slice
-
Arrange the Center:
Take a very thin snake of white clay to act as the center point. Arrange your triangular wedges in a circle around this center, with the pointy ends touching the middle. -
Fill the Gaps:
If your wedges don’t create a perfect circle, you can gently squeeze them together near the center. The white layers between the wedges create those classic pith lines. -
Wrap the Rind:
Roll out a sheet of white clay (imperceptibly thicker than the wedge outlines) and wrap it around the entire circle. Smooth the seam. -
Add the Yellow Skin:
Roll out a sheet of opaque yellow clay. This should be thicker than the white layer. Wrap this final layer around the white circle to create the lemon zest skin. -
Compress and Slice:
Gently gently roll the entire large cane on your work surface to compress the layers together. Use a very sharp blade to slice a clean, flat disk about 5-6mm thick.
Sticky Situation?
If your cane gets too soft and the colors smear while slicing, pop the clay in the freezer for 10 minutes. It will slice cleanly like hard butter.
Step 3: Texture and Finish
-
Texture the Pulp:
This is my favorite part for realism: use a needle tool to gently scratch tiny radiating lines and dots into the translucent yellow sections to mimic juicy vesicles. -
Texture the Rind:
Lightly tap the exterior yellow skin with a toothbrush or sandpaper to give it that porous citrus skin texture. -
Insert Hardware:
Carefully screw a small gold eye pin into the top of the rind (through the yellow and white layers) before baking to ensure it bonds with the clay. -
Bake:
Bake the slice according to your clay manufacturer’s instructions, usually around 275°F (135°C) for 30 minutes. -
Cool and Sand:
Once fully cooled, lightly sand the flat face if there are any fingerprints, but be careful not to remove your texture. -
Glaze:
Apply a coat of UV resin or high-gloss varnish to the face of the lemon slice. This makes the translucent clay clarify and look wet and shiny. -
Cure and Assemble:
Cure the resin under a UV light (or let varnish dry completely). Finally, use pliers to attach the gold keychain hardware to the eye pin.
Pro Tip: Translucency
To check if your ‘pulp’ mix is translucent enough before building the cane, roll a tiny piece flat and bake it. It should darken and clear up significantly.
Clip this sunny accessory onto your tote bag and enjoy the summer vibes all year round


Stamped Initial Monogram Disc Keychain
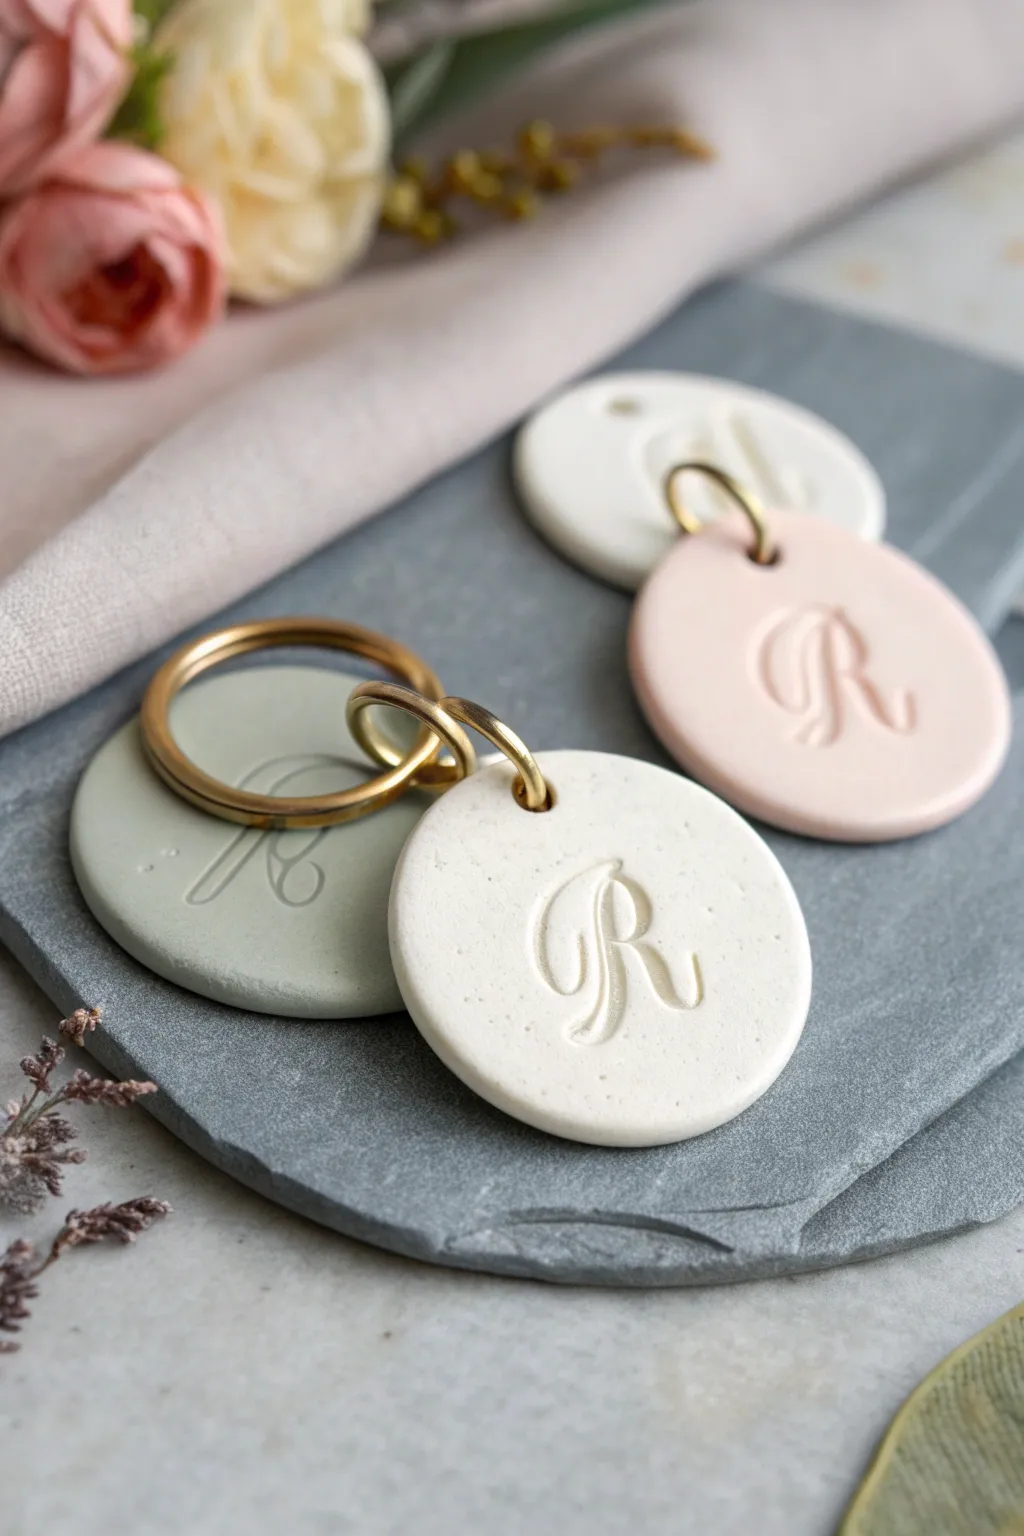
Create sophisticated, personalized accessories with this simple stamped clay project. These minimalist disc keychains feature a lovely matte finish and gold hardware, making them perfect for bespoke gifts or organizing your own keys.
Detailed Instructions
Materials
- Polymer clay (white, beige, blush pink, and sage green)
- Acrylic rolling pin or clay pasta machine
- flecking medium or black pepper (optional for speckled look)
- Round clay cutter (approx. 1.5 – 2 inches)
- Script letter stamps or monogram impress tools
- Small straw or heavy-gauge needle tool (for piercing)
- Gold jump rings (8mm or 10mm)
- Gold split key rings
- Jewelry pliers (flat nose and round nose)
- Fine-grit sandpaper (400 to 1000 grit)
- Baking sheet
- Parchment paper or cardstock
Step 1: Preparing the Clay
-
Condition the clay:
Start by warming the polymer clay in your hands, kneading it thoroughly until it is soft and pliable. This prevents cracking later. -
Mix colors:
To achieve the muted, pastel tones seen in the photo, mix a tiny amount of colored clay into a larger block of white. Knead until the color is uniform. -
Add texture (optional):
For the white speckled disc, I like to mix in a tiny pinch of black pepper or specialty granite-effect clay to create that natural stone look. -
Roll out the slab:
Using an acrylic roller or pasta machine, flatten the clay into a sheet. Aim for a thickness of about 4mm to 5mm; you want it sturdy enough to act as a keychain.
Stamp Release Trick
Dust your letter stamp lightly with cornstarch or baby powder before pressing it into the clay. This prevents the stamp from sticking and ruining the crisp edges.
Step 2: Cutting and Stamping
-
Cut the shapes:
Press your round cutter firmly into the clay slab to create clean discs. If the clay sticks to the surface, you can slide a blade underneath to release it. -
Smooth the edges:
Gently run your finger around the circumference of each cut disc to soften the sharp edge left by the cutter. -
Position the stamp:
Choose your script letter stamp. Align it carefully in the center of the clay disc. Hover over it first to check your spacing. -
Press the monogram:
Press the stamp down firmly and evenly. You want a deep, clear impression, but be careful not to push through to the other side. -
Create the hole:
Use a small straw or a needle tool to punch a hole near the top edge of the disc. Ensure the hole is large enough to fit your jump ring comfortably.
Add a Luxe Touch
After baking, paint the inside of the impressed letter with liquid gold leaf or acrylic paint using a fine brush to make the monogram pop.
Step 3: Baking and Finishing
-
Prepare for baking:
Place the clay discs on a baking sheet lined with parchment paper. You can also bake them on a piece of cardstock to prevent shiny spots on the back. -
Bake the clay:
Bake according to your clay manufacturer’s instructions (usually around 275°F or 130°C) for 30 to 45 minutes to ensure durability. -
Cool down:
Let the pieces cool completely inside the oven or on a cooling rack before handling them, as warm clay is fragile. -
Sand the edges:
Once cool, use fine-grit sandpaper to lightly buff the edges or surface if there are any fingerprints or uneven spots. -
Rinse and dry:
Briefly rinse the discs in water to remove sanding dust and pat them completely dry with a soft cloth.
Step 4: Assembly
-
Open the jump ring:
Using two pairs of pliers, twist the gold jump ring open sideways (don’t pull it apart outwards). -
Attach the hardware:
Thread the open jump ring through the hole in the clay disc. -
Add the keyring:
Before closing the jump ring, loop the large gold split key ring onto it as well. -
Secure the closure:
Twist the jump ring back using the pliers until the ends meet perfectly flush, ensuring the keychain won’t slip off.
Attach your keys and enjoy the chic, custom look of your new accessory


Boho Rainbow Keychain in Muted Pastels
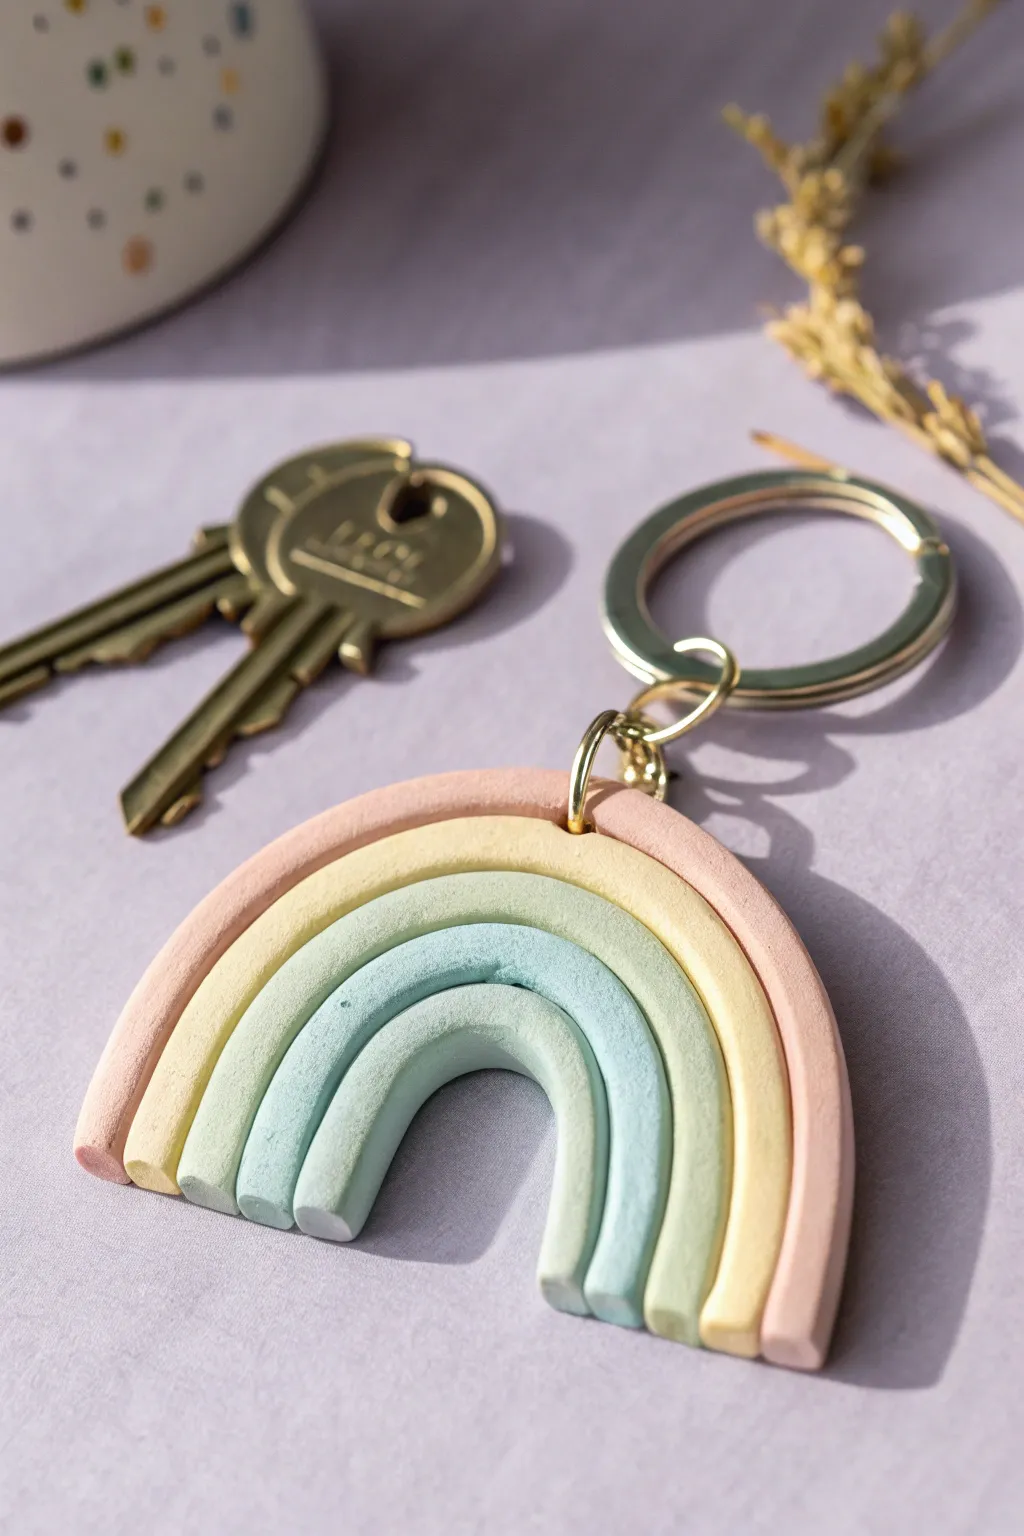
Capture the charm of soft, muted tones with this delightful polymer clay rainbow keychain. Its matte, stone-like texture and soothing pastel palette make it the perfect geometric accessory for your keys or bag.
Step-by-Step Tutorial
Materials
- Polymer clay in four colors: muted pink, pale yellow, light sage green, and muted teal
- Acrylic rolling pin or clay machine
- Clay slicer blade or X-Acto knife
- Liquid polymer clay (bakeable adhesive)
- Clean ceramic tile or glass work surface
- Jump rings (gold)
- Keychain hardware (split ring and chain)
- Pliers
- Optional: Cornstarch or baby powder (to prevent sticking)
- Oven for baking
Step 1: Prepping and Shaping the Arches
-
Condition the clay:
Begin by thoroughly kneading each color of polymer clay until it is soft and pliable. This conditioning step is crucial to prevent cracking later. -
Roll the snakes:
Take a portion of the muted teal clay (for the smallest arch) and roll it on your work surface into an even snake or log. Aim for a thickness of about 6-8mm. -
Create the first arch:
Curve the teal snake into a tight U-shape on your ceramic tile. Use your blade to trim the ends straight across so the bottom sits flat. -
Form the subsequent layers:
Repeat the rolling process with the sage green, pale yellow, and muted pink clays. Make each snake the same thickness as the first one for a uniform look. -
Assemble the rainbow:
Apply a very thin line of liquid polymer clay along the outer edge of the teal arch to act as glue. Gently press the green snake around it, ensuring they bond without squishing the shape. -
Continue layering:
Add the yellow snake next, followed by the pink outer arch, using a small amount of liquid clay between each layer to ensure durability. -
Trim the bottom edge:
Once all four arches are assembled, take your long slicer blade and make one clean, confident cut across the bottom of the entire rainbow to ensure all legs are perfectly level.
Fixing Uneven Arches
If gaps appear between arches, gently push them together from the outside in before baking. Only trim the bottom once all layers are snug.
Step 2: Finishing and Assembly
-
Add the hardware hole:
Using a needle tool or a small straw, carefully pierce a hole through the top center of the pink (outermost) arch. Make sure the hole is large enough for your jump ring but not so close to the edge that it tears. -
Texture check:
Before baking, gently smooth out any fingerprints. I like to lightly tap the surface with a piece of sandpaper or a toothbrush to give it that matte, stone-like texture seen in the photo. -
Bake the clay:
Place the tile with your rainbow into the oven. Bake according to your clay manufacturer’s specific instructions (usually around 275°F or 130°C for 15-30 minutes). -
Cool down:
Allow the piece to cool completely in the oven or on a cooling rack. The clay is fragile while hot and hardens as it cools. -
Attach the jump ring:
Use two pairs of pliers to twist open a gold jump ring. Thread it through the hole you created in the top arch. -
Connect the keychain:
Before closing the jump ring, slide on your keychain hardware. Twist the jump ring closed securely so there is no gap. -
Final inspection:
Check the connection to ensure it swings freely. Your boho rainbow is now ready to organize your keys in style.
Add Some Shine
For a different look, apply a gloss glaze only to the specific colored bands after baking to make the colors pop against a matte background.
Enjoy carrying a little handmade arch of color with you wherever you go


Abstract Arch-and-Circle Statement Keychain
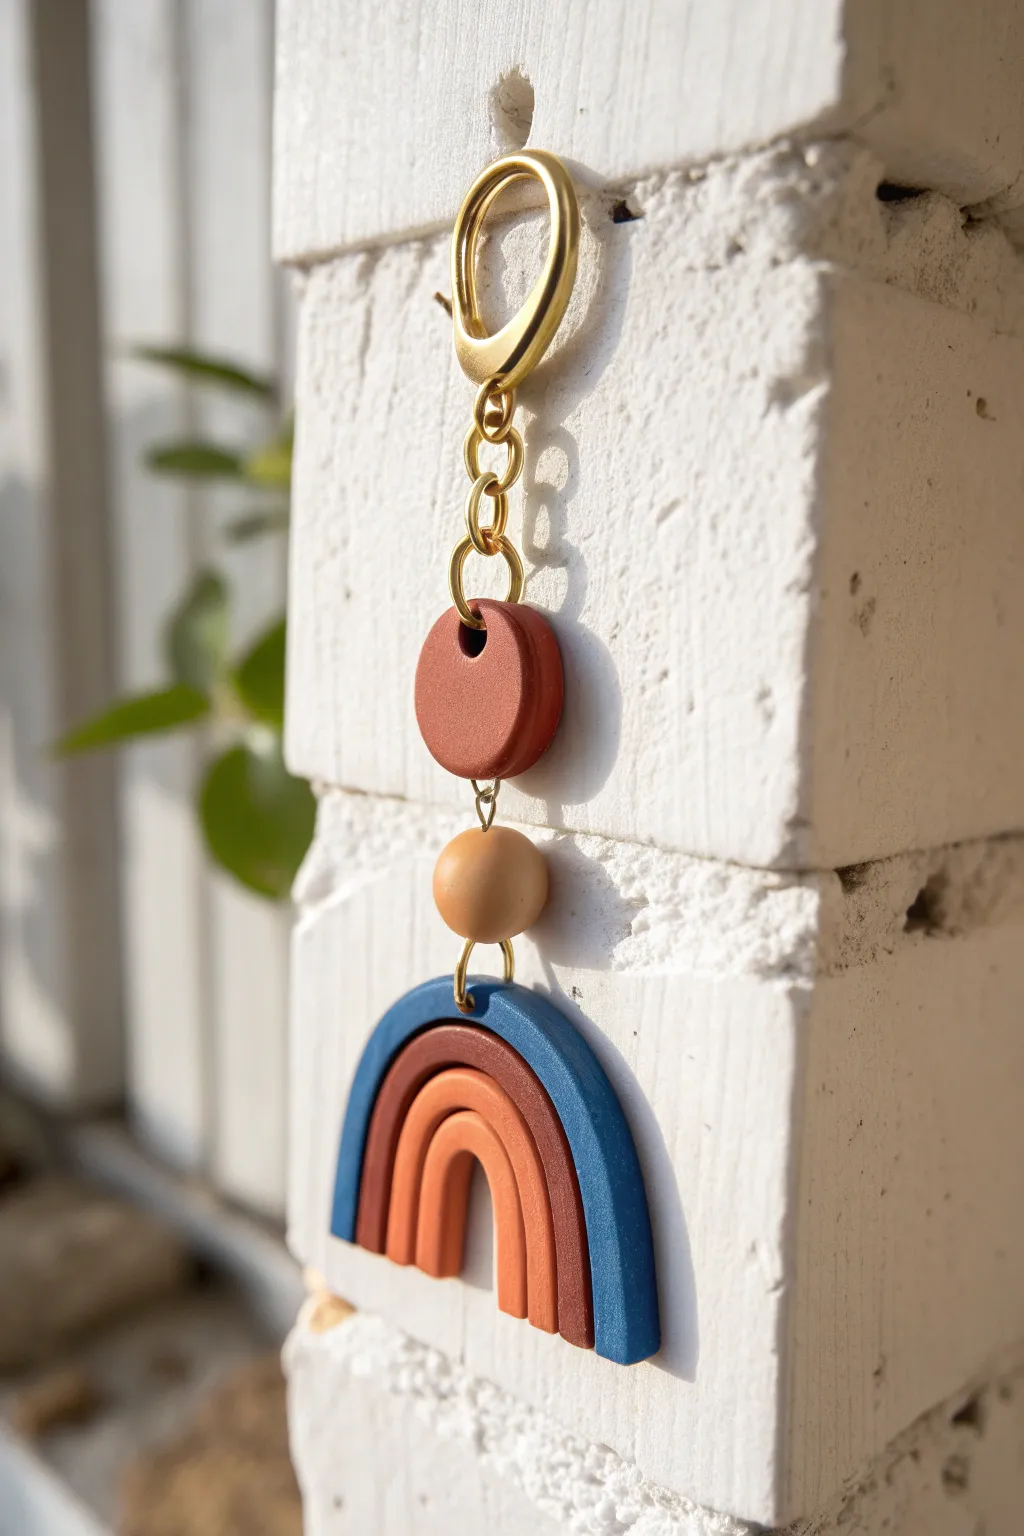
Elevate your accessory game with this stunning, modern keychain featuring a smooth terracotta disc, a natural bead accent, and a perfectly formed triple arch. The rich earth tones and gold hardware create a sophisticated boutique look that is surprisingly simple to achieve at home.
How-To Guide
Materials
- Polymer clay (Terracotta/Burnt Orange, Dark Blue, Muted Brown, Apricot/Peach)
- Acrylic rolling pin
- Circle cutter (approx. 1 inch)
- Wooden bead (approx. 12-14mm, natural or beige)
- Gold lobster clasp keychain finding
- Gold jump rings (mix of sizes, sturdy gauge)
- Needle tool or toothpick
- Ceramic tile or glass sheet for baking
- Flexible tissue blade
- Oven (for baking clay)
- Pliers (flat nose and chain nose)
- Sandpaper (optional, fine grit)
Step 1: Prepping and Cutting the Top Disc
-
Condition the Clay:
Begin by thoroughly conditioning your terracotta-colored polymer clay until it is soft and pliable. Warm hands make this process much faster. -
Roll the Slab:
Use your acrylic roller to flatten the terracotta clay into a slab. Aim for a thickness of about 4-5mm so it feels substantial and sturdy. -
Cut the Circle:
Press your circle cutter firmly into the clay slab. Give it a tiny wiggle before lifting to ensure a clean cut. -
Create the Hole:
Using a needle tool or a straw, pierce a hole through the top of the circle (for the keychain clasp) and another hole at the absolute bottom (for connecting the lower pieces). Ensure the holes are large enough for your heavy-gauge jump rings.
Step 2: Forming the Rainbow Arch
-
Mix and Match Colors:
Prepare your three arch colors: dark blue, muted brown, and apricot/peach. Condition each color separately. -
Roll the snakes:
Roll each color into a long, even snake or log. Try to keep them equal in thickness to create a uniform look. -
Form the Center Arch:
Take the apricot snake and form a tight ‘U’ shape. This will be the smallest, innermost arch. -
Add the Middle Layer:
Wrap the muted brown snake snugly around the apricot arch. Gently press them together so they bond without distorting the rounded shape. -
Complete the Outer Arch:
Wrap the dark blue snake around the outside. Smooth the seam where the three colors meet to ensure they are fully connected. -
Slice the Bottom:
Using your flexible tissue blade, make a clean, straight cut across the bottom of the rainbow so all three legs are perfectly flush and flat. -
Pierce the Top:
carefully poke a hole through the top of the blue (outermost) arch. This hole needs to be centered for the piece to hang straight.
Smooth Moves
Before baking, lightly dip your finger in baby oil or cornstarch and rub it over the clay to remove any fingerprints or dust specks for a professional finish.
Step 3: Baking and Assembly
-
Bake the Pieces:
Place your circle and rainbow arch on a ceramic tile. Bake according to your brand of clay’s specific instructions (usually 275°F/135°C for 15-30 minutes). -
Cool Down:
Allow the pieces to cool completely inside the oven or on a wire rack before handling. They are fragile while hot. -
Attach the Middle Bead:
Thread a long headpin or piece of wire through your wooden bead. Create loops on both the top and bottom of the bead using pliers. -
Connect the Clasp:
Open a jump ring with your pliers and attach the gold lobster clasp assembly to the top hole of your terracotta circle. -
Link the Components:
Use a jump ring to connect the bottom of the terracotta circle to the top loop of your bead component. -
Final Attachment:
Connect the bottom loop of the bead directly to the hole in your blue rainbow arch using a final jump ring. Ensure all rings are closed tightly.
Make it Sparkle
Mix a tiny amount of gold leaf or glitter into the blue outer arch clay before rolling it for a subtle shimmer that catches the sunlight.
Clip your new handmade masterpiece onto your bag or keys and enjoy the pop of earthy color

The Complete Guide to Pottery Troubleshooting
Uncover the most common ceramic mistakes—from cracking clay to failed glazes—and learn how to fix them fast.
Speckled Terrazzo Keychain Tag
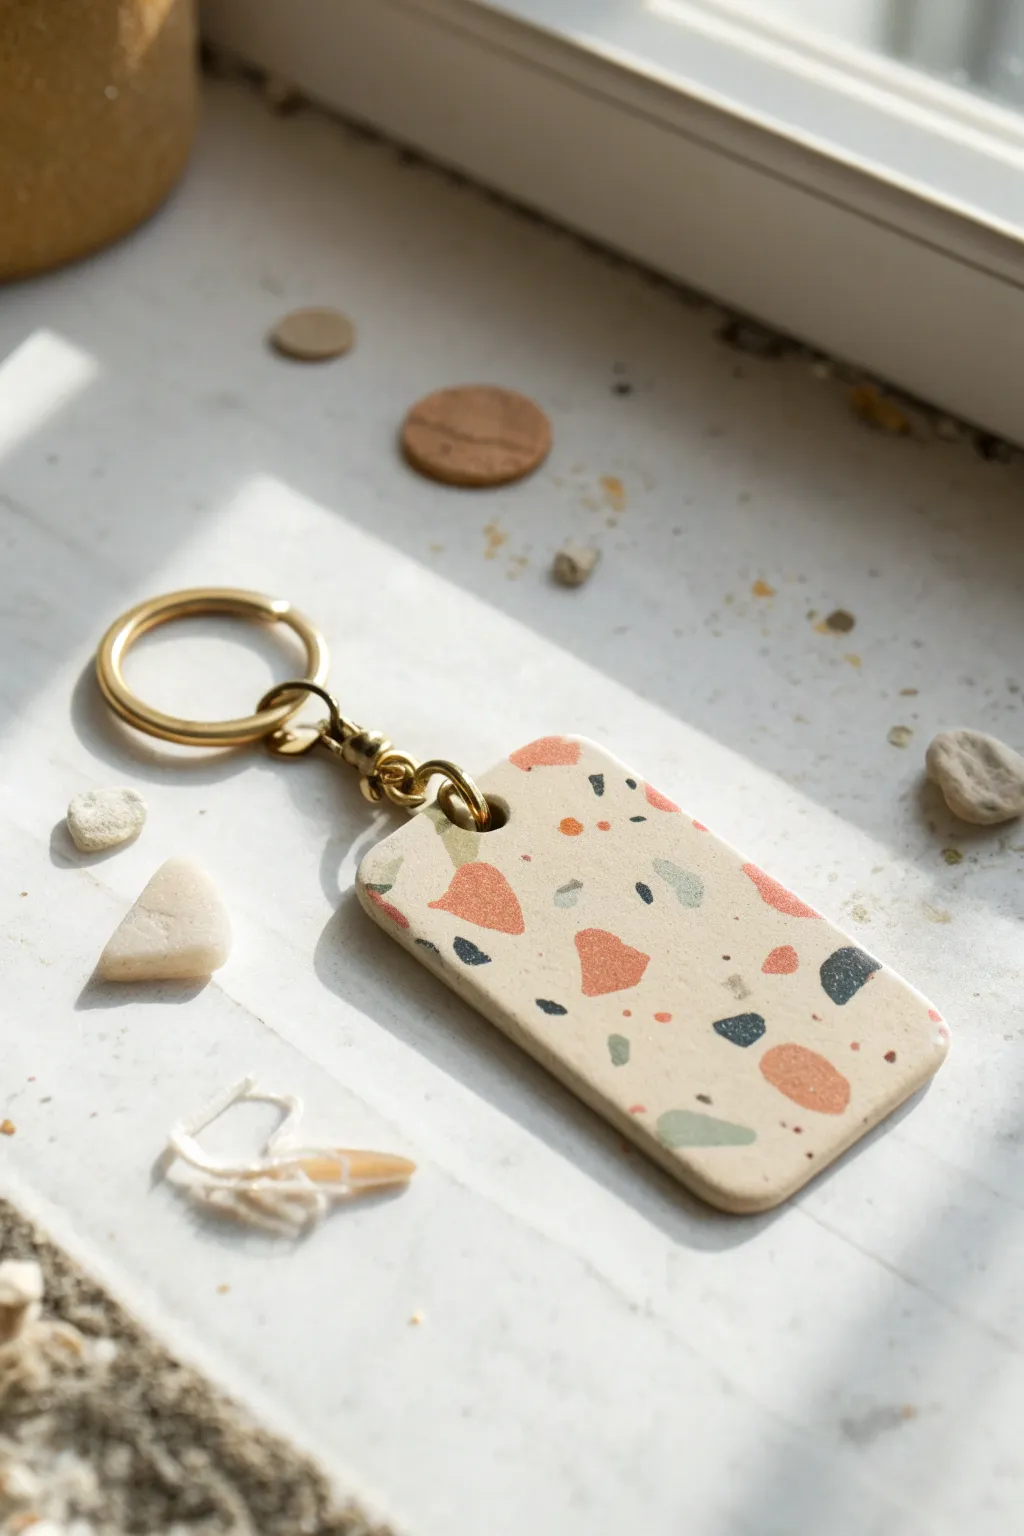
Embrace the trendy, organic look of terrazzo with this simple yet stylish polymer clay keychain project. Featuring a warm cream base speckled with chips of terracotta, sage green, and obsidian, this accessory brings a modern, artisanal touch to your everyday essentials.
Step-by-Step
Materials
- Polymer clay (colors: cream/beige, terracotta/burnt orange, sage green, black/dark grey)
- Acrylic roller or pasta machine
- Precision craft knife or tissue blade
- Rectangle cutter (approx. 1.5″ x 2.5″) or ruler
- Small circle cutter or drinking straw (for the hole)
- Parchment or wax paper
- Ceramic tile or baking sheet
- Sandpaper (varying grits: 400, 600, 800)
- UV resin (optional) or water-based gloss varnish
- UV lamp (if using resin)
- Gold keyring hardware with swivel clasp
- Needle nose pliers
- Jump ring (gold)
Step 1: Prepping Your Terrazzo Chips
-
Condition the accent colors:
Start by thoroughly conditioning your accent clay colors: terracotta, sage green, and black. Roll each color out into a very thin sheet, roughly 1mm thick. -
Create the chips:
Using your craft knife or tissue blade, chop these thin sheets into small, irregular fragments. Aim for a mix of sizes—some tiny specks and some slightly larger, jagged triangles or quadrilaterals. -
Separate the colors:
Keep your piles of colored chips separate on your work surface for now so you can control the distribution later.
Keep it Clean
Terrazzo looks best when ‘crisp.’ Before applying chips, wipe your hands and tools with a baby wipe to ensure no rogue dust or lint gets trapped in the light cream base clay.
Step 2: Forming the Base
-
Condition the base clay:
Take a larger portion of the cream or beige polymer clay and condition it until it’s soft and pliable. This ensures a smooth canvas for your design. -
Roll the base sheet:
Roll the cream clay into a slab that is slightly thicker than your desired final result, approximately 3-4mm distinct.
Gold Flake Glam
Mix tiny pieces of gold leaf foil in with your polymer clay chips before rolling. The metallic flecks catch the light beautifully and elevate the design to look more expensive.
Step 3: Creating the Pattern
-
Scatter the chips:
Gently sprinkle your chopped color chips onto the cream slab. I like to start with the largest chips first to ensure balanced placement, then fill in gaps with the smaller specks. -
Embed the chips:
Protect the surface with a piece of parchment paper. Gently roll over the slab with your acrylic roller to press the colorful chips down into the base clay so they sit flush with the surface. -
Smooth and level:
Continue rolling until the surface feels completely smooth and uniform. You may need to roll in multiple directions to prevent the slab from distorting too much.
Step 4: Cutting and Baking
-
Cut the shape:
Position your rectangular cutter over a section of the slab with a pleasing arrangement of spots. Press down firmly to cut out your tag shape. -
Soften the edges:
Before lifting the piece, gently run your finger along the cut edges to smooth them slightly, removing any sharp angles left by the cutter. -
Pierce the hole:
Use a small circle cutter or a straw to punch a hole centered near the top edge of the rectangle. Make sure it’s not too close to the edge to prevent tearing. -
Bake the clay:
Transfer the piece to a ceramic tile or baking sheet covered with parchment paper. Bake according to your brand of clay’s instructions (typically 275°F/135°C for 30 minutes). -
Cool down:
Allow the piece to cool completely before handling. It will be slightly soft when hot but hardens as it cools.
Step 5: Finishing Touches
-
Sand the surface:
Wet sand the tag under running water, starting with 400 grit sandpaper and moving up to 800 grit. This reveals the crisp edges of the terrazzo chips and creates a silky smooth finish. -
Seal (Optional):
If you want a glossy finish like the inspiration photo likely mimics, apply a thin layer of UV resin and cure under a lamp, or use a water-based glaze. For a natural stone look, you can leave it matte. -
Attach hardware:
Open a gold jump ring using two pairs of pliers (twist sideways, don’t pull apart). Thread it through the hole in the clay tag and the bottom loop of the swivel clasp. -
Secure the ring:
Close the jump ring securely by twisting it back into place until the ends meet perfectly flush.
Now you have a chic, handmade accessory ready to organize your keys or gift to a friend
Soft Swirl Marble Polymer Clay Keychain

Capture the elegance of natural stone with this soft, mesmerizing marble design. Using a simple twisting technique, you can blend creamy white, terracotta, and gold polymer clay into a sophisticated heart-shaped accessory.
Step-by-Step Tutorial
Materials
- Polymer clay (White, Terracotta/Salmon, Gold Metallic)
- Acrylic rolling pin or pasta machine
- Heart-shaped clay cutter (approx. 2 inches)
- Clay blade or tissue blade
- Hand drill or small round cutter (for hole)
- Sandpaper (wet/dry, various grits)
- UV resin or clear gloss glaze (optional)
- Small paintbrush (if glazing)
- Gold keychain hardware (split ring, jump rings)
- Jewelry pliers (flat nose and round nose)
- Oven for baking
Step 1: Preparing the Clay
-
Condition the clay:
Start by kneading each color of polymer clay separately until they are soft and pliable. This is crucial to prevent cracking later. -
Roll snakes:
Roll each color into a long, thin snake or log shape. You’ll want the white log to be slightly thicker than the colored ones since it’s the base color. -
Design your ratio:
For the look in the photo, use about 50% white clay, 30% terracotta, and 20% gold. Adjust the lengths of your snakes to match these ratios.
Muddy Colors?
Stop mixing sooner! The key to defined marbling is knowing when to quit. Over-rolling blends the colors into a single muddy brown. Aim for contrast, not uniformity.
Step 2: Creating the Marble Effect
-
Twist together:
Bundle the three snakes together and twist them into one large rope. Keep twisting until the lines start to spiral tightly. -
Fold and twist:
Fold the twisted rope in half and twist it again. Repeat this ‘fold and twist’ process 2-3 times. -
Create the swirl:
Roll the clay into a smooth ball. I like to gently massage the seams together so the surface is uniform. -
Flatten the slab:
Using your acrylic roller or pasta machine, flatten the ball into a slab about 1/4 inch thick. Roll in different directions to stretch the pattern organically. -
Check the pattern:
Examine your slab. If the marble swirl isn’t distinct enough, fold it once more and re-roll. Stop when you see defined streaks like in the image.
Step 3: Cutting and Baking
-
Cut the shape:
Select the most attractive part of your marble pattern. Press your heart-shaped cutter firmly into the clay and wiggle slightly to release. -
Smooth the edges:
Gently rub your finger along the cut edges to soften any sharp ridges left by the cutter. -
Create the hole:
Use a small circular cutter or a straw to punch a hole near the dip of the heart for the hardware. Make sure it’s not too close to the edge. -
Bake:
Place the heart on a ceramic tile or parchment-lined baking sheet. Bake according to your clay package instructions (usually 275°F for 15-30 minutes). -
Cool down:
Allow the clay to cool completely in the oven or on a wire rack before handling to ensure maximum strength.
Add Sparkle
Mix a pinch of gold leaf foil into the clay before twisting. As you roll it out, flakes of real gold will break through the surface for extra luxury.
Step 4: Finishing Touches
-
Sand the piece:
Once cool, use fine-grit wet/dry sandpaper under water to smooth the edges and surface until it feels polished. -
Apply finish (optional):
For that glassy shine seen in the photo, apply a thin layer of UV resin or gloss glaze. Cure or dry as directed. -
Attach jump ring:
Open a gold jump ring by twisting it sideways with your pliers. Loop it through the hole in the heart. -
Connect to split ring:
Before closing the jump ring, slip on a short chain or directly attach the large split ring. -
Secure hardware:
Close the jump ring tightly so the gap disappears completely, securing your new accessory.
Clip your keys onto this chic heart and enjoy your handmade art every day


What Really Happens Inside the Kiln
Learn how time and temperature work together inside the kiln to transform clay into durable ceramic.
Leopard Print Keychain With Warm Neutrals
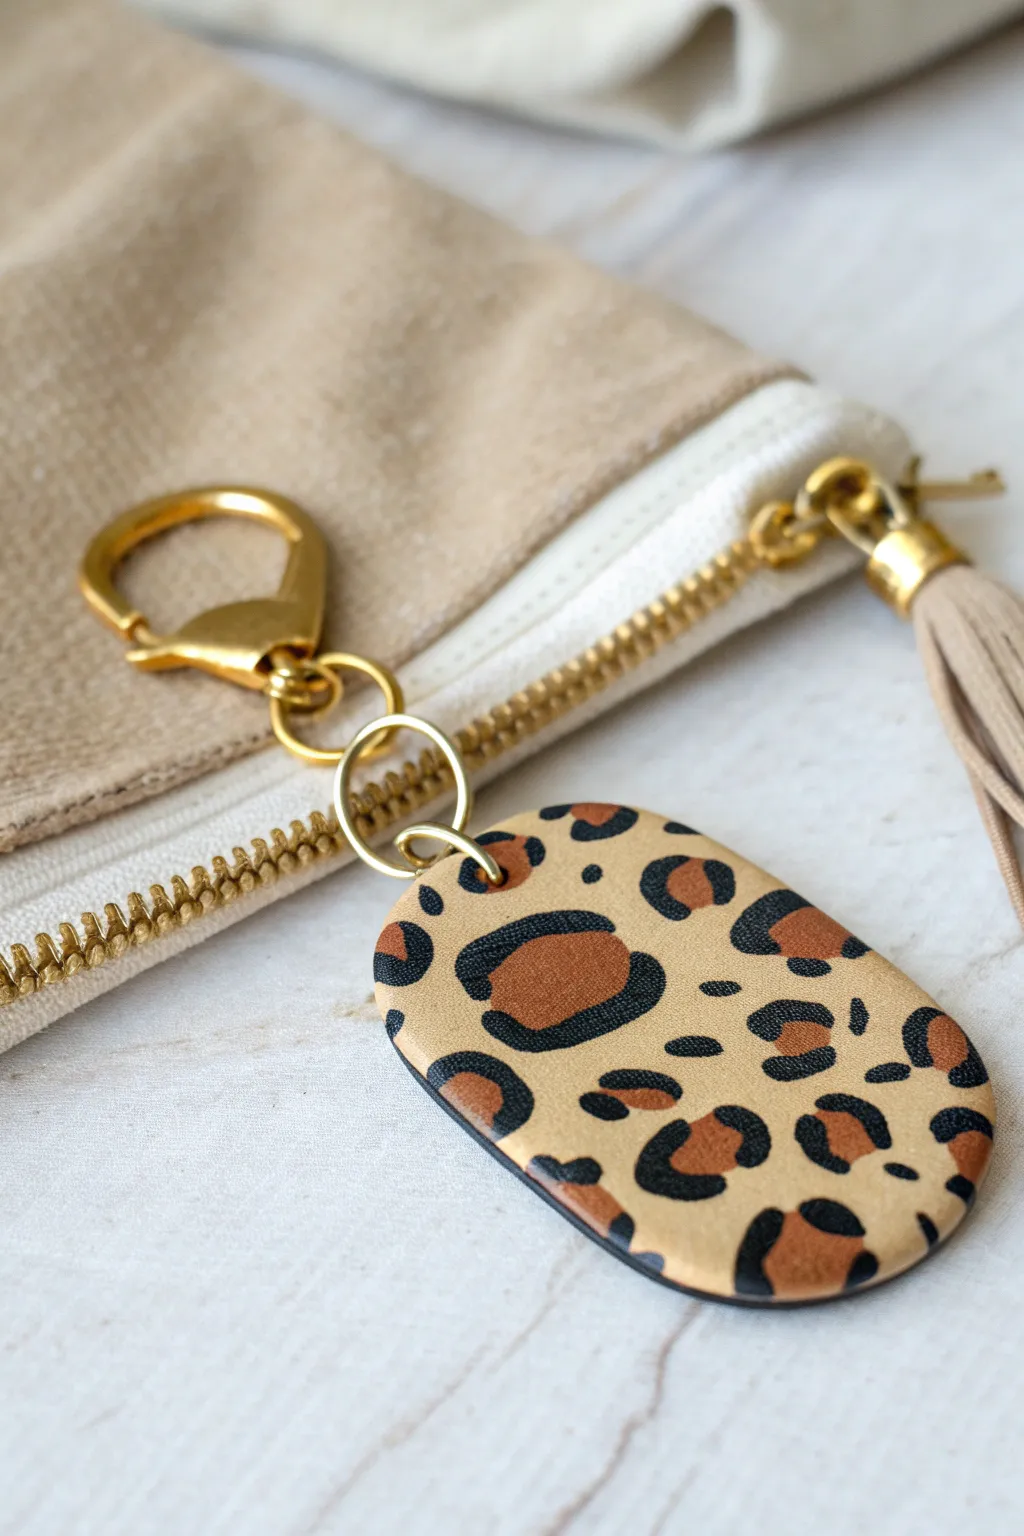
Embrace the timeless appeal of animal print with this stylish leopard print keychain. Featuring warm neutrals like tan, chocolate brown, and black, this oval-shaped charm adds a touch of sophistication to any bag or set of keys.
Step-by-Step
Materials
- Polymer clay (Tan/Beige, Terracotta/Brown, Black)
- Acrylic rolling pin
- Oval clay cutter
- X-Acto knife or clay blade
- Small circle cutter or straw (for hole)
- Small jump rings (Gold)
- Large lobster clasp (Gold)
- Pliers (Chain nose and round nose)
- Fine-grit sandpaper (optional)
- Gloss or matte glaze (optional)
- Oven for baking
Step 1: Preparing the Pattern
-
Condition the base:
Begin by thoroughly conditioning your tan or beige polymer clay until it is soft and pliable. Roll it out into a smooth, even sheet about 1/4 inch thick. This will be the canvas for your print. -
Create the spots:
Take your terracotta or medium brown clay and roll it into several small, thin snakes. Slice these snakes into tiny irregular pieces and roll them into small balls. -
Flatten the centers:
Gently press these small brown balls onto your tan clay sheet. Distribute them randomly, leaving plenty of space between them for the black outlines and background. -
Prepare the outlines:
Condition the black clay and roll it into extremely thin snakes. These need to be quite fine to create delicate borders around your spots. -
Outline the spots:
Cut small segments of the black snake and wrap them partially around the brown spots. I like to wrap two or three separate pieces around a single spot to create that organic, broken-circle look distinct to leopard print. -
Fill the gaps:
Take any remaining black clay snakes, cut them into tiny specks or smaller curves, and place them in the empty tan spaces between the larger spots to add depth and variety to the pattern.
Pattern looking weird?
If your leopard spots look too uniform, try varying the size of the brown centers. Squish some into irregular ovals or beans rather than perfect circles.
Step 2: Shaping and Baking
-
Smooth the surface:
Once your pattern is laid out, gently roll over the entire slab with your acrylic roller. Roll in multiple directions to embed the pattern flush with the background, ensuring the surface is completely smooth. -
Cut the shape:
Position your oval cutter over the section of the pattern you like best. Press down firmly to cut out your keychain shape. If the clay sticks, you can use a blade to gently lift it. -
Smooth the edges:
Before baking, use your finger to gently rub around the cut edges of the oval to soften any sharp ridges left by the cutter. -
Pierce the hole:
Using a small circle cutter or a straw, punch a hole near the top center of the oval. Ensure it isn’t too close to the edge to prevent breakage later. -
Bake carefully:
Place your piece on a ceramic tile or baking sheet lined with parchment paper. Bake according to the manufacturer’s instructions for your specific brand of clay, usually around 275°F (135°C) for 30 minutes. -
Cool down:
Allow the piece to cool completely inside the oven or on a cooling rack. The clay hardens fully as it cools.
Step 3: Finishing Touches
-
Sand (Optional):
If there are any rough spots on the edges or surface, lightly sand them with fine-grit wet/dry sandpaper under running water for a polished feel. -
Glaze (Optional):
For extra durability or a different finish, apply a thin coat of polymer clay glaze. Let it dry completely before handling. -
Attach the hardware:
Using two pairs of pliers, twist open a small jump ring (twist sideways, don’t pull apart). Thread it through the hole in your clay charm. -
Connect the clasp:
Add a second jump ring or a chain segment if needed for length, then attach the large gold lobster clasp. Close the jump rings securely by twisting them back into place until the ends meet perfectly.
Make it luxe
Mix a tiny amount of gold foil flakes into your tan background clay before adding spots, or use metallic gold clay for the spot centers.
Clip your new handmade accessory onto your favorite bag and enjoy the classic style.
Bold Checkerboard Keychain in Two Colors
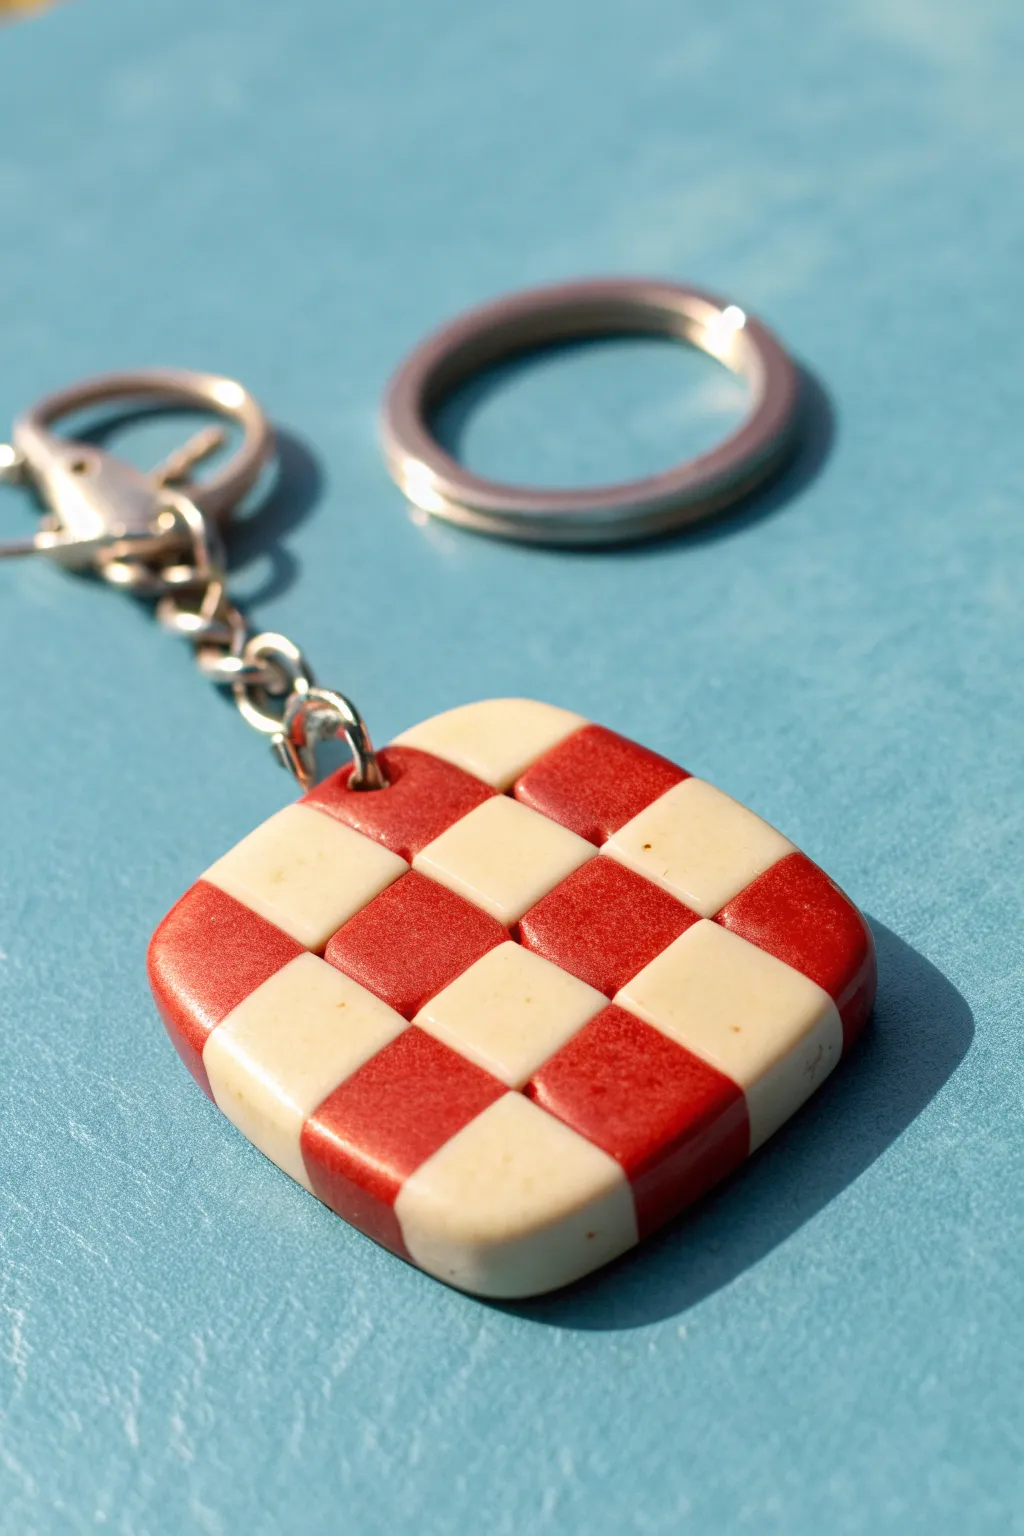
Master the satisfying geometry of a classic checkerboard with this bold two-tone keychain. The smooth, pillow-like finish and vibrant red-and-cream palette give this simple square a wonderfully retro feel.
How-To Guide
Materials
- Red polymer clay
- Cream or off-white polymer clay
- Rolling pin or pasta machine
- Tissue blade or flexible clay slicer
- Ruler
- Small circle cutter (optional for rounding)
- Sandpaper (various grits from 400 to 1000)
- Hand drill or pin vibe
- Jump ring and keychain hardware
- Jewelry pliers
- Oven
Step 1: Prepping the Clay ‘Logs’
-
Condition the clay:
Begin by thoroughly conditioning both the red and cream polymer clay until they are soft, pliable, and free of air bubbles or cracks. -
Form square logs:
Roll each color into a thick cylinder, then use a flat surface or an acrylic block to flatten the sides, forming long rectangular beams or ‘logs’ of clay. -
Measure and refine:
Using your ruler and tissue blade, trim these logs so they are exactly the same size in cross-section—about 1/4 inch or 6mm square looks perfect for this scale. -
Slice strips:
Cut four equal lengths from the red log and four equal lengths from the cream log. Aim for strips that are about 2 inches long.
Clean Cuts Only
Chill your clay cane in the refrigerator for 20 minutes before slicing. Cold clay is firmer and won’t distort or smear the crisp checkerboard pattern when cut.
Step 2: Constructing the Cane
-
Build the first row:
Lay a red strip next to a cream strip, followed by another red and another cream. Press them gently together on their sides to bond them into a single slat. -
Build the second row:
Create a second slat, but alternate the colors so the pattern is cream-red-cream-red. -
Assemble the block:
Stack the second slat on top of the first, ensuring the alternating colors create a checkerboard effect. Repeat this process until you have a 4×4 block. -
Compress the cane:
Gently squeeze the square cane from all sides to eliminate gaps between the strips. I prefer to roll over the sides lightly with an acrylic roller to keep the external walls flat.
Warped Reality
Instead of a perfect grid, gently twist the square cane before slicing to create a psychedelic, wavy optical illusion checkerboard pattern.
Step 3: Shaping and Finishing
-
Slice the main slab:
Use your sharpest tissue blade to cut a thick slice from your cane—about 1/4 inch thick. This single slice will be your keychain fob. -
Soften the edges:
Using your fingertips, gently press and round over the sharp corners and edges of the square to create a ‘puffier’ pillow look. -
Drill the hole:
Before baking, use a needle tool to create a pilot hole in one corner for the hardware. You can widen this later, but it helps to have a guide. -
Bake:
Bake the piece according to your clay manufacturer’s instructions, typically between 265°F and 275°F for about 30 minutes. Let it cool completely. -
Sand for smoothness:
Once cool, wet sand the piece starting with 400 grit and working up to 1000 grit to achieve a silky, matte finish. -
Buff (Optional):
Rub the cured clay vigorously with a piece of denim or a soft cloth to bring out a natural sheen. -
Attach hardware:
Drill a clean hole through your pilot mark using a hand drill. Open a jump ring with pliers, thread it through the hole, and attach the keychain clasp. -
Final check:
Ensure the jump ring is closed tightly so your new checkered accessory stays secure.
Step 4: Cleanup
-
Store leftovers:
Wrap the remaining unbaked cane in plastic wrap to keep it fresh for future projects.
Now you have a stylish geometric accessory ready to organize your keys.

TRACK YOUR CERAMIC JOURNEY
Capture glaze tests, firing details, and creative progress—all in one simple printable. Make your projects easier to repeat and improve.
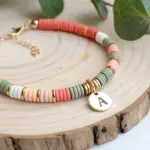
Ombre Clay Bead Keychain With Gradient Colors
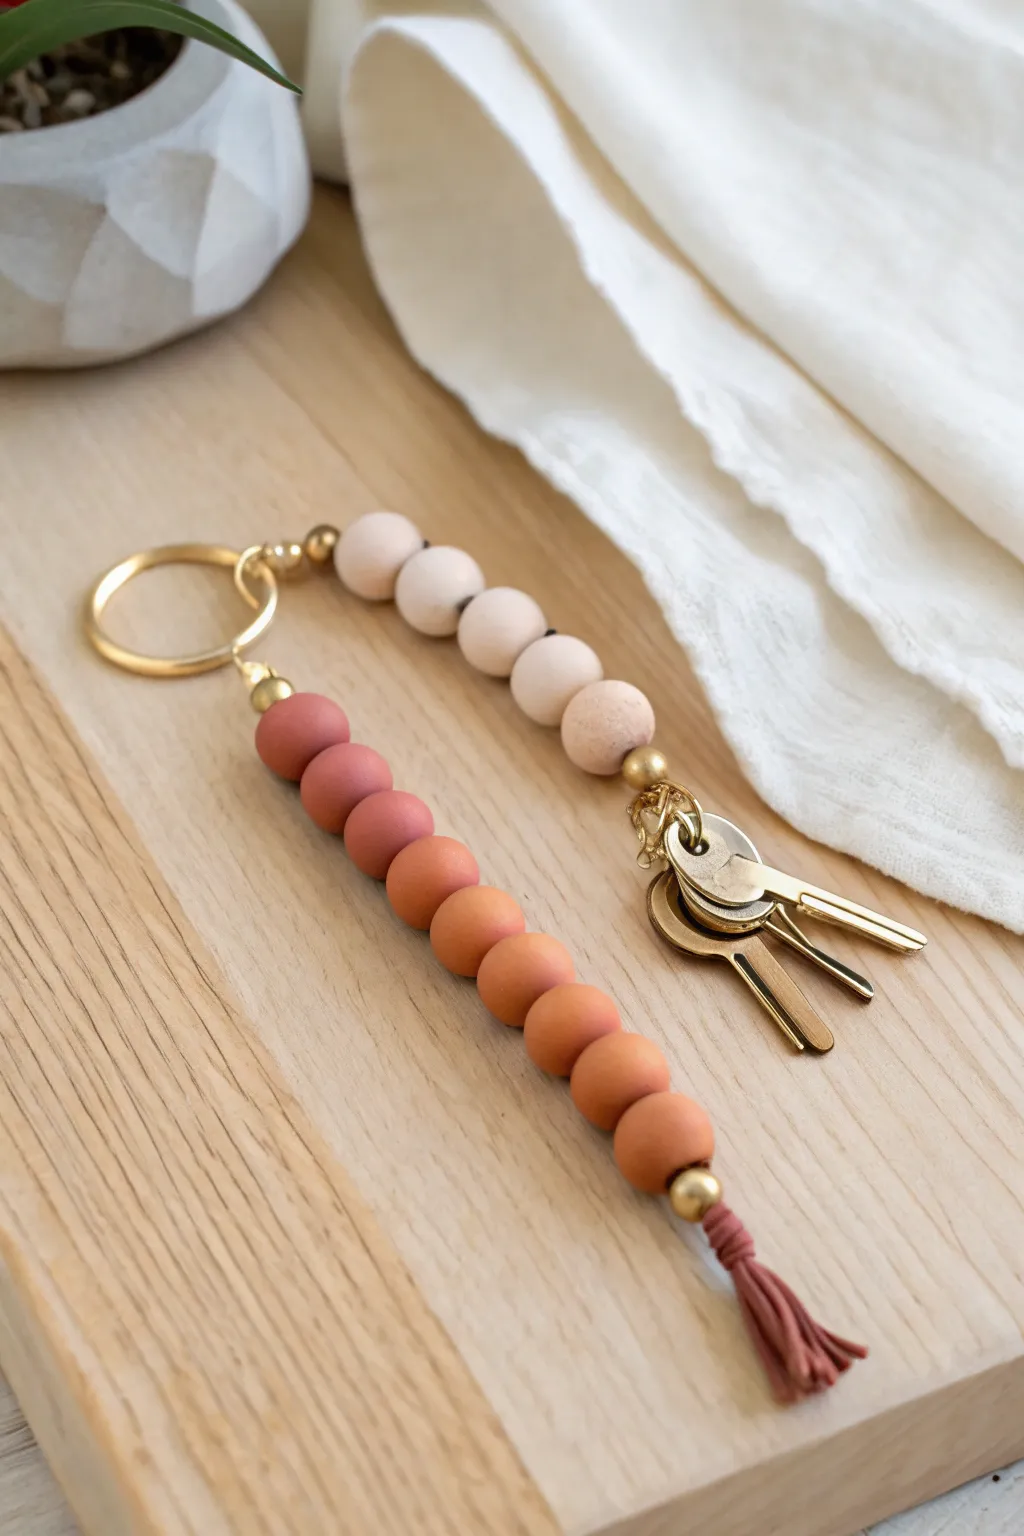
Capture the warmth of a desert sunset with this chic, U-shaped keychain featuring a stunning color gradient. The design combines chunky ombre beads on one side with smaller neutral accents on the other for a balanced, modern accessory.
Step-by-Step Tutorial
Materials
- Polymer clay in terracotta, white, and translucent (or a pre-mixed gradient set)
- Small round wooden beads (approx. 10mm)
- Large round wooden beads or bead roller for clay (approx. 12-14mm)
- Gold beading wire or strong nylon cord
- Gold keyring with chain extension
- Gold spacer beads
- Gold crimp beads
- Small rust-colored thread tassel
- Jewelry pliers (needle nose)
- Clay roller and cutters
- Oven for baking clay
Step 1: Prepping Your Clay Gradient
-
Mix your base shade:
Start with a rich terracotta or burnt orange polymer clay. Condition it well by kneading until it is soft and pliable. -
Create the ombre palette:
Divide your terracotta clay into five equal portions. Leave the first portion pure. For the second, mix in a tiny pinch of white clay. -
Lighten the subsequent shades:
For the third portion, add more white clay than the previous one. Continue this process for the fourth and fifth balls, adding progressively more white to create a smooth transition from dark rust to soft peach. -
Prepare the neutral side:
Take a beige or ‘sand’ colored clay for the other side of the keychain. You will need enough for four to five slightly smaller beads.
Fingerprint Fix
If you notice fingerprints on your raw clay beads, lightly brush them with a little cornstarch or baby oil before baking to smooth the surface perfectly.
Step 2: Forming & Baking the Beads
-
Roll the ombre beads:
Take your five ombre color mixes and roll them into smooth, even spheres. Aim for a diameter of about 12-14mm. I like to use a clear acrylic block to roll them for perfect roundness. -
Roll the neutral beads:
Roll your beige clay into 4 or 5 balls. Make these slightly smaller than your ombre beads, perhaps around 10-12mm, or simply use raw wooden beads if you prefer a texture contrast. -
Pierce the bead holes:
Using a toothpick or a thick needle tool, carefully pierce a hole through the center of each bead. Rotate the bead gently as you push through to avoid flattening the shape. -
Bake the clay:
Arrange your beads on a baking sheet lined with parchment paper. Bake according to the manufacturer’s instructions for your specific brand of clay (usually around 275°F for 15-30 minutes). -
Cool down:
Let the beads cool completely before handling. This ensures they harden fully and won’t fingerprint.
Make It Matte
For a stone-like texture, lightly sand your baked beads with fine-grit sandpaper, or mix black pepper into the clay before baking for a speckled granite look.
Step 3: Assembly & Finishing
-
Cut the cord:
Cut a piece of beading wire or sturdy cord approximately 12 inches long. This gives you plenty of slack to work with. -
Start the ombre strand:
Tie your small thread tassel to the very end of your cord securely. Thread a gold crimp bead or small knot cover over the knot to hide it. -
String the gradient:
Thread your ombre beads onto the cord, starting with the lightest peach shade and ending with the darkest terracotta. Add a small gold spacer bead between the last clay bead and the upcoming hardware. -
Attach to keyring:
Loop the cord through the small jump ring or chain link attached to your large gold keyring. -
String the neutral side:
Bring the cord back down from the keyring. Thread on your beige beads (or wooden beads). This creates the second leg of the ‘U’ shape. -
Secure the end:
After the last neutral bead, thread heavily through a crimp bead. Loop the wire back through the crimp bead to create a loop, pulled tight against the beads. -
Final crimp:
Use your pliers to flatten the crimp bead firmly, locking everything in place. Trim any excess wire close to the bead. -
Attach keys:
Slide your keys onto the main ring and give the clay beads a final check to ensure they sit nicely.
Now you have a stylish, handmade accessory that keeps your keys organized and brings a touch of warmth to your day
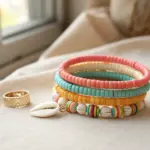
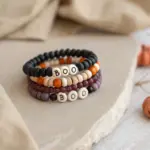
Chunky Beaded Keychain With a Simple Tassel
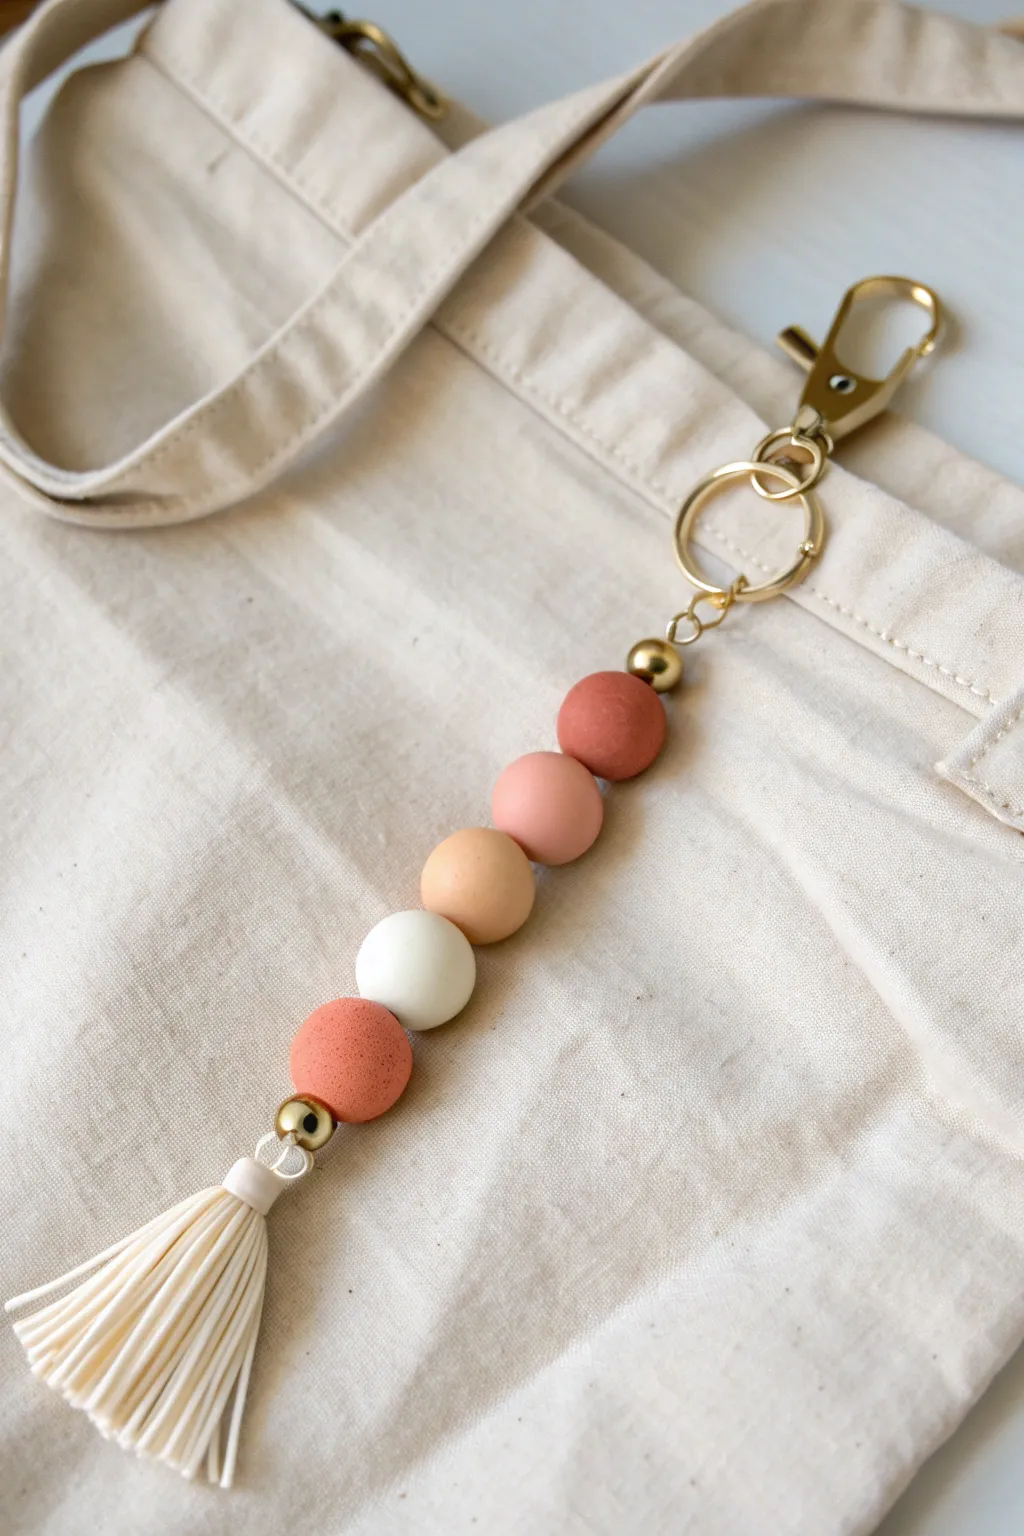
This elegant keychain captures the essence of bohemian minimalism with its warm, earthy color palette and mixed textures. By combining smooth polymer clay rounds with polished gold accents and a soft tassel, you’ll create a functional accessory that looks store-bought but is entirely handmade.
Step-by-Step Guide
Materials
- Polymer clay (terracotta, light pink, beige, white)
- Small round bead roller (optional but helpful)
- Bead piercing tool or toothpick
- Baking sheet and parchment paper
- Oven
- Gold lobster clasp keychain hardware
- Two large gold jump rings
- Gold spacer beads (approx. 4mm)
- Nylon beading cord or waxed cotton cord (cream)
- Pre-made cream tassel (or embroidery floss to make one)
- Jewelry pliers
- Scissors
Step 1: Crafting the Beads
-
Color mixing:
Begin by conditioning your polymer clay blocks. You want a gradient effect, so use straight terracotta for the darkest bead, and then mix white into small amounts of pink and orange clay to achieve the lighter blush and beige tones seen in the photo. -
Portioning:
Cut equal-sized chunks of clay for your main beads. For this design, you will need five beads total: two dark terracotta, one blush pink, one beige/peach, and one white or cream. -
Rolling:
Roll each chunk of clay in your palms until they are perfectly spherical. I find that moving your hands in a circular motion with light pressure helps eliminate any seams or cracks. -
Smooth finish:
Use a clear acrylic block or a bead roller if you have one to gently refine the shape. Fingerprints can show up later, so lightly smoothing the surface with a drop of baby oil or cornstarch can help give them that matte perfection. -
Piercing:
Carefully pierce the center of each bead with your tool. Gently twist the tool as you push through to avoid squishing the sphere, and ensure the hole is large enough for your specific cord. -
Baking:
Arrange the beads on a parchment-lined baking sheet. Bake them according to your specific brand’s package instructions—usually around 275°F (130°C) for 15–30 minutes. -
Cooling:
Let the beads cool completely before handling. They are slightly soft when hot and harden firmly as they return to room temperature.
Smooth Surface Secrets
Before baking, lightly brush your raw clay beads with cornstarch. This removes fingerprint oils and creates a velvety soft, matte texture after baking.
Step 2: Assembly
-
Preparing the cord:
Cut a length of your nylon or waxed cord, roughly 12 inches long. This gives you plenty of slack to work with for knots. -
Attaching the clasp:
Fold the cord in half. Attach this loop to the bottom of the gold jump ring (the one connected to the lobster clasp) using a lark’s head knot. -
First gold accent:
Thread both ends of the cord through a small gold spacer bead. Push it all the way up so it sits snugly against the jump ring. -
Stringing the gradient:
Thread your clay beads onto the cord in the following order: terracotta, blush pink, beige, white, and finally the second terracotta bead. -
Second gold accent:
Slide your second gold spacer bead onto the cord, pushing it up against the bottom terracotta bead to bookend the clay section. -
Securing the stack:
Tie a tight double overhand knot right beneath the final gold spacer bead to keep everything secure. Ensure there is no gap between the beads so the keychain structure remains rigid. -
Adding the tassel:
If using a pre-made tassel with a loop, simply tie your cord ends through the loop. If making your own, wrap embroidery floss around the cord ends securely. -
Concealing the knot:
Hide your final structural knot by pulling it down inside the neck of the tassel cap or wrapping the tassel neck with extra gold wire for a polished look. -
Trimming:
Trim any excess cord ends that are sticking out, blending them into the tassel fringe.
Knot Slippage?
Nylon cord can be slippery. If your knots won’t hold tight, add a tiny dot of superglue or clear nail polish to the final knot before hiding it in the tassel.
Clip your new handmade accessory onto your favorite bag and enjoy the personalized pop of color
Layered Cutout Window Keychain With a See-Through Center
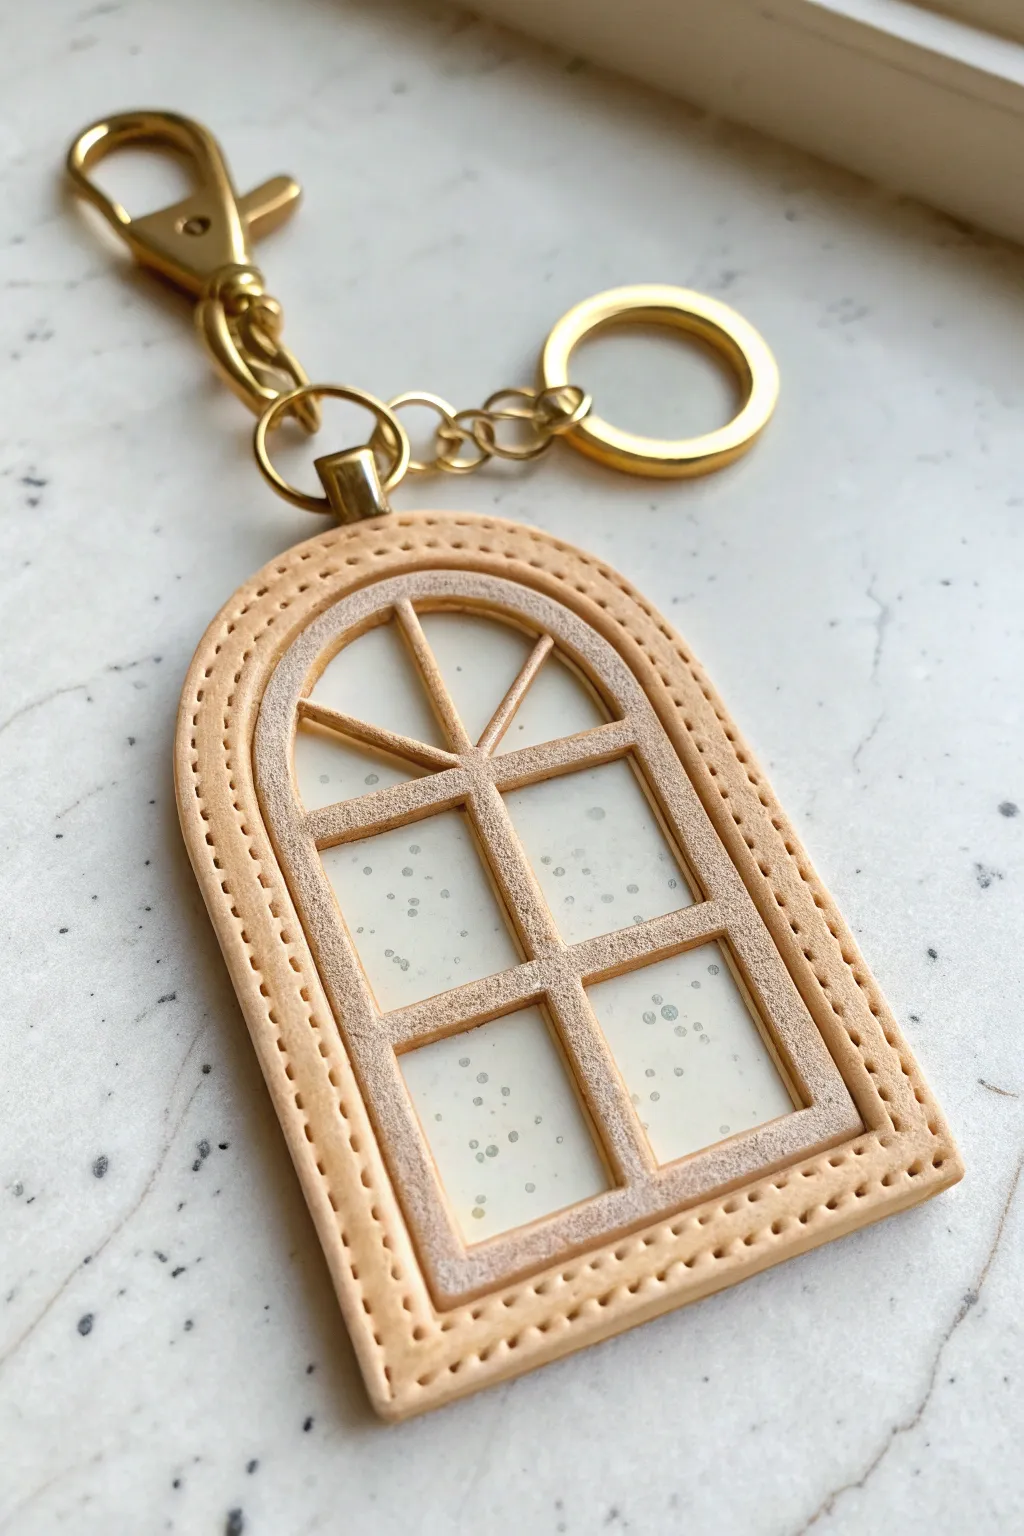
This charming keychain mimics the look of a classic arched window with a faux-glass center. Using layered polymer clay techniques and simple texturing, you can create a sturdy, elegant accessory perfect for housewarming gifts.
How-To Guide
Materials
- Light beige or tan polymer clay
- Translucent liquid polymer clay (or UV resin)
- Fine glitter (optional, for the glass effect)
- Clay roller or pasta machine
- U-shaped or arch clay cutters (two sizes)
- X-Acto knife or sharp blade
- Needle tool or toothpick
- Gold metal keychain hardware (clasp, chain, jump rings)
- Pliers
- Oven and baking sheet
Step 1: Creating the Frame Base
-
Condition the Clay:
Begin by conditioning your beige polymer clay until it is soft and pliable. Roll it out into a sheet approximately 3mm thick. -
Cut the Base Shape:
Use your larger arch cutter to punch out the main shape of the keychain. This will serve as the backing and outer rim. -
Create the Inner Cutout:
Take a smaller arch cutter that fits comfortably inside the first one. Center it on your clay shape and cut out the middle, leaving a sturdy frame border about 5mm wide. -
Cut the Window Mullions:
From the same rolled slab, use your knife to cut thin strips of clay, about 2-3mm wide. These will become the crossbars (mullions) of the window. -
Assemble the Grid:
Lay the strips across the back of your frame opening. I like to place a horizontal bar first, followed by a vertical one to create the main cross. Trim any excess clay that extends beyond the frame’s outer edge. -
Add Sunburst Details:
For the top arch detail, cut two smaller angled strips and fit them into the upper section of the window to create a sunburst effect.
Cloudy Glass?
If your liquid clay looks cloudy after baking, it likely didn’t get hot enough. Put it back in the oven for another 5-10 minutes, or use a heat gun to clarify it.
Step 2: Texturing and Filling
-
Secure the Seams:
Gently press the strips into the frame on the backside to ensure they bond. You can use a smooth tool to blend the seams slightly for strength. -
Add Faux Stitching:
Flip the piece over to the front. Using a needle tool, poke evenly spaced holes around the perimeter of the outer frame to simulate stitching marks. -
Attach the Bail:
Fashion a small loop or rectangle of clay to hold the hardware later. Attach this securely to the very top of the arch. -
Prepare the Backing:
Place your clay frame onto a piece of heat-resistant tape or a silicone mat that it will bake on. This prevents leakage in the next step. -
Mix the ‘Glass’:
Mix a small amount of translucent liquid clay with a tiny pinch of fine glitter if you want a sparkly effect, or leave it plain for a frosted look. -
Fill the Panes:
Carefully carefully pour or drip the liquid clay mixture into the open spaces of the window grid. Fill them until they are level with the clay strips. -
Pop Bubbles:
Check closely for air bubbles in the liquid clay. Pop them with a lighter or a needle tool before baking.
Step 3: Finishing Touches
-
Bake the Piece:
Bake the clay according to the manufacturer’s instructions (usually 275°F/135°C for 15-30 minutes). Ensure the liquid clay cures completely clear. -
Cool and Sand:
Let the piece cool completely before removing it from the tape. If there are sharp edges, gently sand them with fine-grit sandpaper. -
Attach Hardware:
Open a large jump ring using two pairs of pliers. Thread it through the clay loop you created at the top. -
Connect the Clasp:
Add the chain and lobster clasp to the jump ring before closing it securely.
Textured Interior
Instead of smooth strips for the inner window pane dividers, use a piece of sandpaper to gently roughen the clay for a stone-like texture before assembly.
Now you have a miniature architectural piece to carry with you wherever you go