When kids get their hands on air-dry clay, magic happens fast—no kiln, no fancy tools, just pure imagination. Here are my favorite air clay ideas for kids that stay simple for little hands but still turn out seriously adorable.
Pinch-Pot Animal Snack Bowls
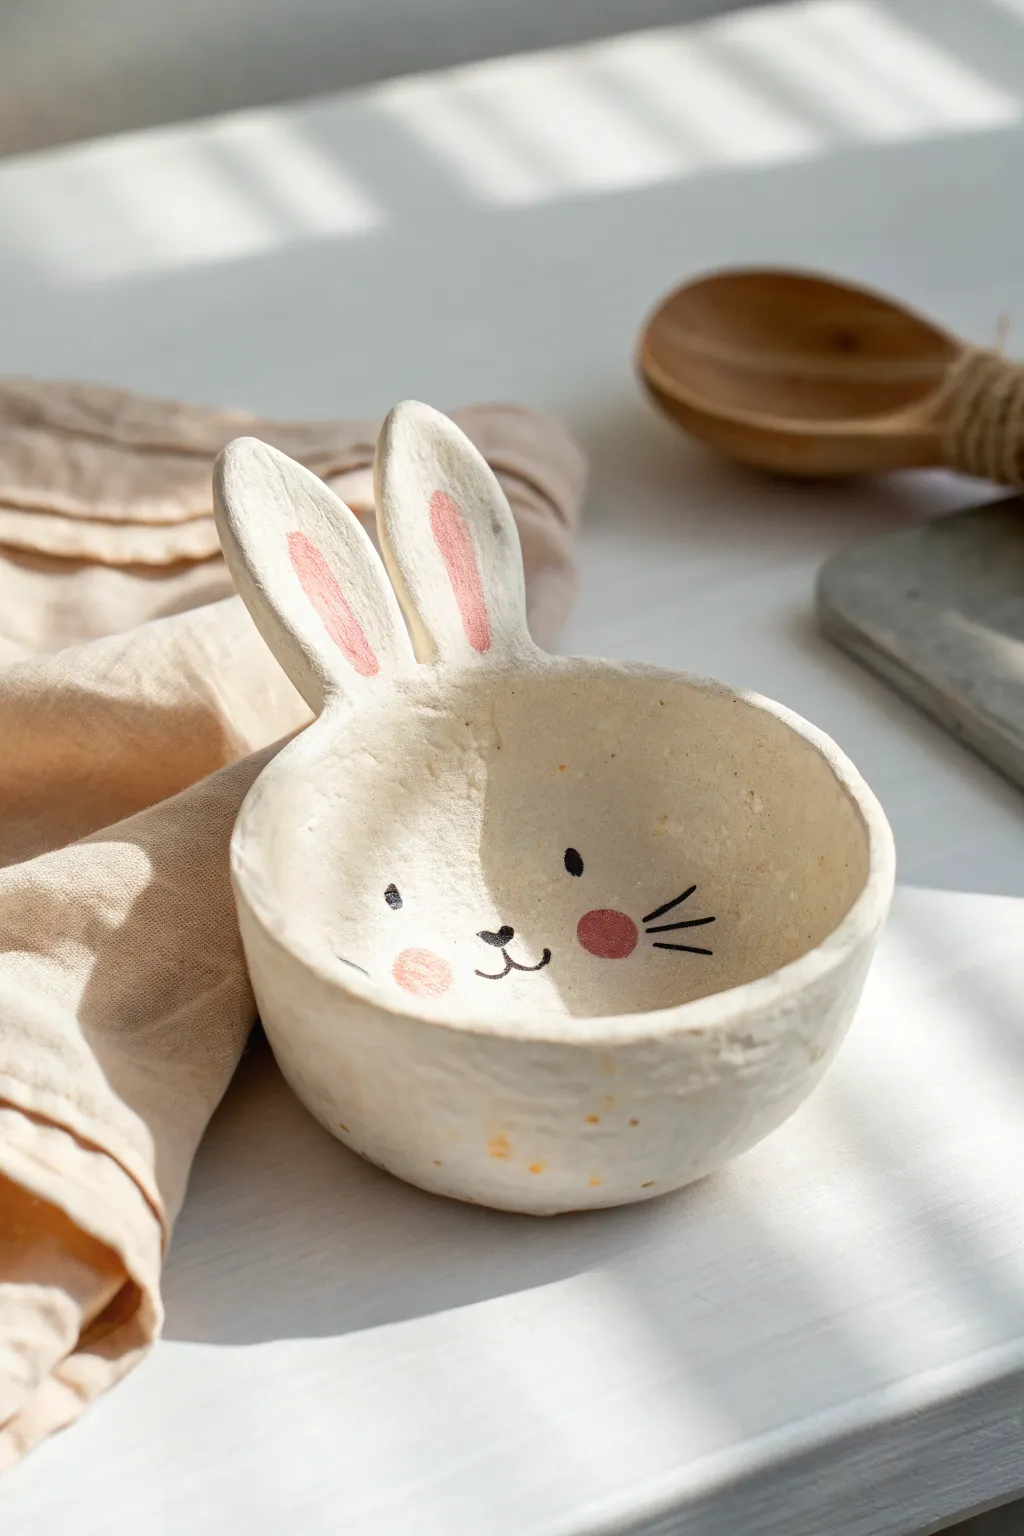
This adorable snack bowl combines the classic pinch pot technique with charming sculptural details to create a sweet rabbit face. The textured, matte finish gives it an organic, pottery-like feel without needing a kiln.
Step-by-Step Tutorial
Materials
- White classic air-dry clay (e.g., DAS or Crayola)
- Small bowl of water
- Acrylic paints (pink, black, watered-down brown/orange)
- Fine-grit sandpaper
- Small paintbrush
- Paint palette or scrap cardboard
- Clay sculpting tool or butter knife
Step 1: Sculpting the Base
-
Prepare the Clay:
Start by taking a handful of clay, about the size of a tennis ball or slightly smaller. Knead it in your hands for a minute until it feels warm and pliable, which helps prevent cracking later. -
Form a Ball:
Roll the clay between your palms to create a smooth, tight sphere. Try to smooth out any major lines or creases as you roll. -
Begin the Pinch:
Hold the ball in one hand and press your thumb deep into the center, but stop before you poke through the bottom. This is the start of your bowl. -
Shape the Walls:
Gently pinch the clay between your thumb (inside) and fingers (outside), rotating the ball as you go. Work your way from the bottom up to the rim. -
Even It Out:
Continue pinching and turning until the walls are an even thickness—aim for about a quarter-inch thick. If the clay starts to dry or crack, dip your finger in water and smooth it over. -
Flatten the Bottom:
Tap the bottom of your bowl gently against your table surface. This creates a flat base so your bunny won’t wobble when it’s holding snacks.
Smooth Operator
Keep a small sponge damp with water nearby. Lightly wiping the clay as you work removes fingerprints better than just wetting your hands directly.
Step 2: Adding Features
-
Shape the Ears:
Take two smaller lumps of clay and roll them into thick sausage shapes. Flatten them slightly and taper one end to a point to resemble bunny ears. -
Score the Clay:
Use a tool to scratch rough hatch marks (scoring) on the bottom of the ears and on the rim of the bowl where you want them to attach. This texture helps the pieces grip each other. -
Slip and Stick:
Dab a little water or liquid clay (slip) onto the scored areas. Press the ears firmly onto the rim of the bowl. -
Blend the Seams:
I find using the back of a spoon or a modeling tool works best here to smooth the clay from the ears down onto the bowl. Ensure the seam disappears completely so the ears are secure. -
Final Shaping:
Gently curve the ears slightly forward or askew for personality. Check the rim of the bowl one last time to smooth out any sharp edges with a wet finger. -
Let it Dry:
Set your bowl aside in a dry spot. Depending on humidity, this can take 24 to 48 hours. The clay should turn completely white and feel hard to the touch.
Step 3: Painting and Finishing
-
Smooth the Surface:
Once fully dry, take fine-grit sandpaper and lightly buff the surface. You want to keep some of that hand-formed texture, but remove any sharp burrs or rough fingerprints. -
Paint the Ears:
Mix a soft pink acrylic paint. Using a small brush, paint the elongated oval shapes inside the ears, leaving a border of white clay around the edges. -
Add Cheeks:
With the same pink (or a slightly deeper shade), paint two circles on the front of the bowl for rosy cheeks. -
Paint the Face Details:
Using a very fine detail brush and black paint, carefully add two small dots for eyes, a little heart or triangle for the nose, and a curved ‘W’ shape for the mouth. Don’t forget the whiskers! -
Create the Speckled Texture:
To mimic the ceramic look in the photo, dilute a tiny bit of orange-brown paint with lots of water. Load an old toothbrush or stiff brush and flick tiny speckles across the bowl. Practice on paper first to control the spray. -
Seal (Optional):
If you plan to put dry snacks in this, apply a coat of matte varnish or Mod Podge to protect the paint and give it a finished sheen.
Cracks Appearing?
If small cracks appear while drying, mix a tiny bit of clay with water to make a paste and fill them in. Let dry again, then sand smooth.
Now you have a sweet little companion to hold your trinkets or treats on your desk


Rainbow and Cloud Shelf Decor
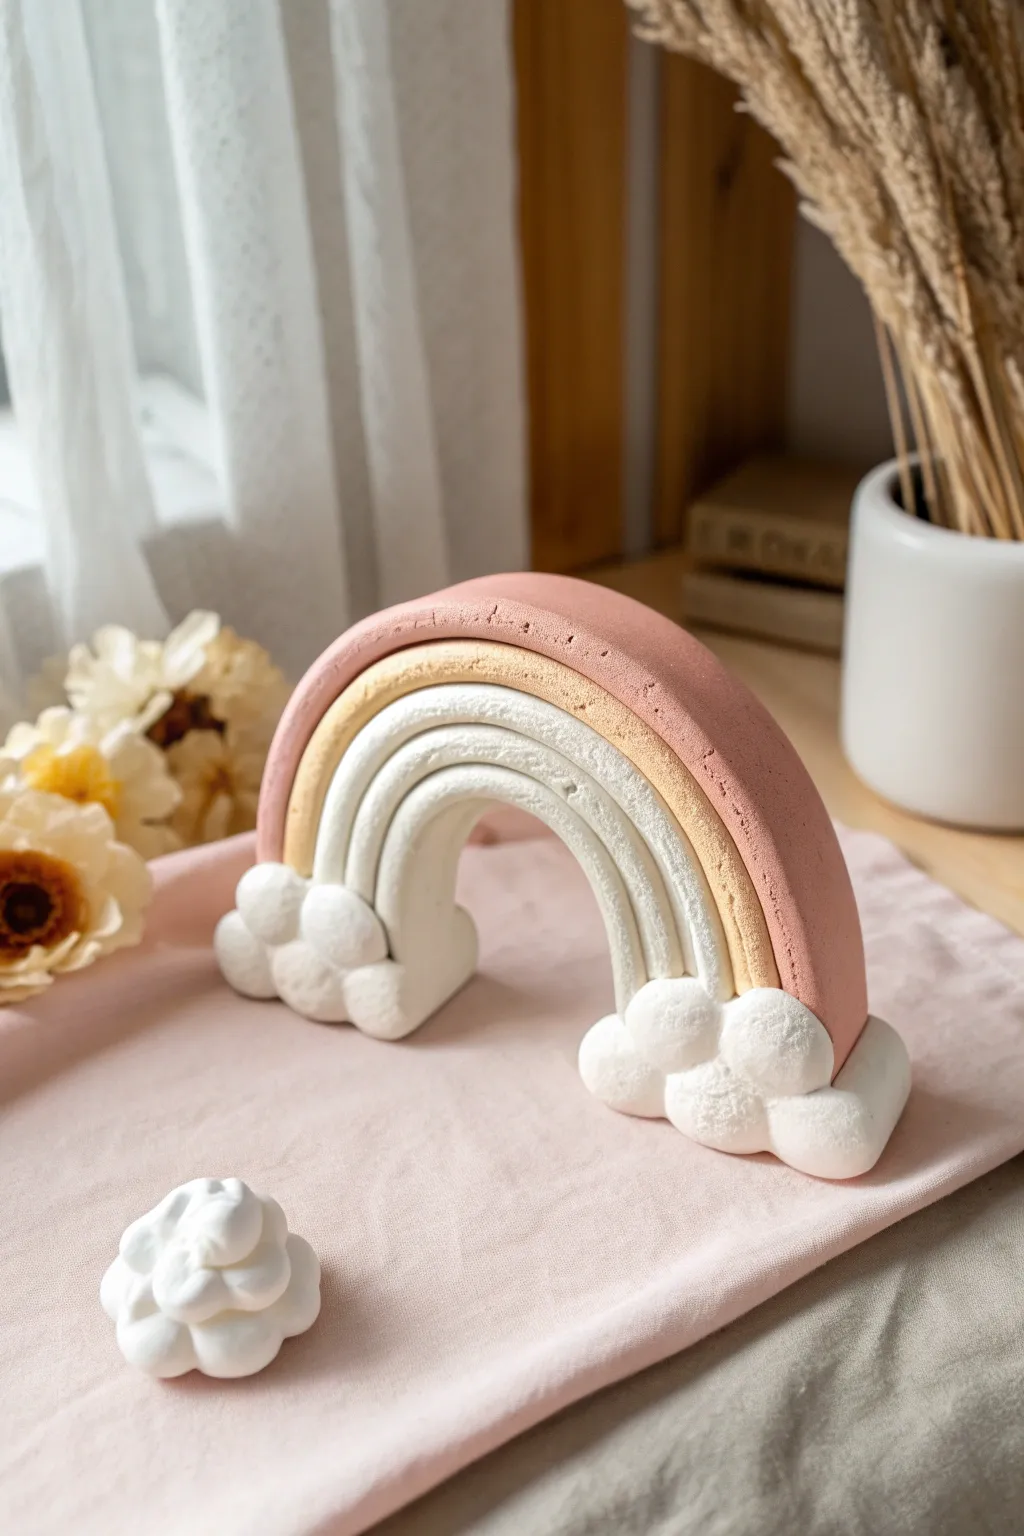
Brighten up any playroom shelf with this soft, touchable rainbow sculpture set upon fluffy clouds. Using muted pastel tones and simple shaping techniques, this air clay project creates a charming, minimalist piece of decor that’s surprisingly sturdy once dry.
Detailed Instructions
Materials
- White air-dry clay (foam clay or lightweight modeling clay works best)
- Acrylic paints (muted pink, mustard yellow, cream/beige)
- Rolling pin
- Sculpting tools or a plastic knife
- Water (for smoothing)
- Small paintbrush
- Parchment paper or silicone mat (work surface)
- Sandpaper (optional, fine grit)
Step 1: Creating the Arches
-
Prepare the base clay:
Start by taking three large chunks of white air clay. Knead them warm in your hands to ensure they are pliable and crack-free. -
Color the outer arch:
Take the largest chunk and mix in a drop of muted pink acrylic paint. Knead the color thoroughly into the clay until you have a solid, even matte pink tone. -
Color the middle arch:
Repeat the process with the second chunk, using a mix of cream and a tiny dot of mustard yellow to create a warm, sandy beige color. -
Keep the center white:
Leave the third specific chunk purely white for the innermost arch. -
Roll out the snakes:
Roll each colored ball into a long, thick sausage shape. Aim for them to be rectangular or slightly flattened rather than perfectly round cylinders, about 1 inch thick. -
Form the rainbow structure:
Bend the white snake into a tight ‘U’ shape first. Then, wrap the beige snake over it, followed by the pink snake on top. Press them gently together so they stick without losing their defined shape. -
Trim the bottom:
Use your plastic knife or a sculpting tool to slice across the bottom of the rainbow legs, ensuring the entire piece creates a flat, even surface to stand on.
Step 2: Adding the Cloud Base
-
Make cloud spheres:
Roll about 10-12 small balls of white clay in varying sizes, similar to large grapes or marbles. -
Assemble the cloud clusters:
Group the balls together into two clusters. Press them gently so they fuse into a puffy cloud shape, but keep the individual bubbly texture visible. -
Flatten the cloud bottoms:
Press the bottom of each cloud cluster onto your table to create a flat base, ensuring your rainbow will stand up straight later. -
Attach clouds to the arch:
Score the bottom of the rainbow legs and the tops of the cloud clusters slightly. Add a tiny dab of water and press the rainbow legs firmly into the cloud bases. -
Secure the joint:
I like to use a sculpting tool to smooth a little clay from the back of the clouds up onto the rainbow leg to make the connection extra strong. -
Create a standalone cloud:
Use leftover white clay to make a separate, smaller cloud decoration to sit alongside your rainbow, using the same ball-clustering technique.
Cracks Appearing?
If you see tiny cracks forming while the clay dries, mix a small paste of fresh clay and water. Apply it over the cracks like spackle and smooth it with your finger.
Step 3: Finishing Touches
-
Texture the surface:
For a stone-like look, gently tap the surface of the clay with a clean toothbrush or a crumpled ball of foil while it is still damp. -
Let it dry completely:
Allow the sculpture to dry in a safe, airy spot for at least 24-48 hours. Turn it over gently once halfway through if the bottom feels damp. -
Sand for perfection:
Once fully hardened, you can use fine-grit sandpaper to gently smooth out any fingerprints or rough edges on the sides of the arches.
Make It Sparkle
Before the clay dries, lightly dust the white cloud sections with fine iridescent glitter. Press it gently into the surface for a magical, shimmering finish.
Place your lovely handmade sculpture on a bookshelf or desk to enjoy the calm vibes


Handprint Keepsake Plaques
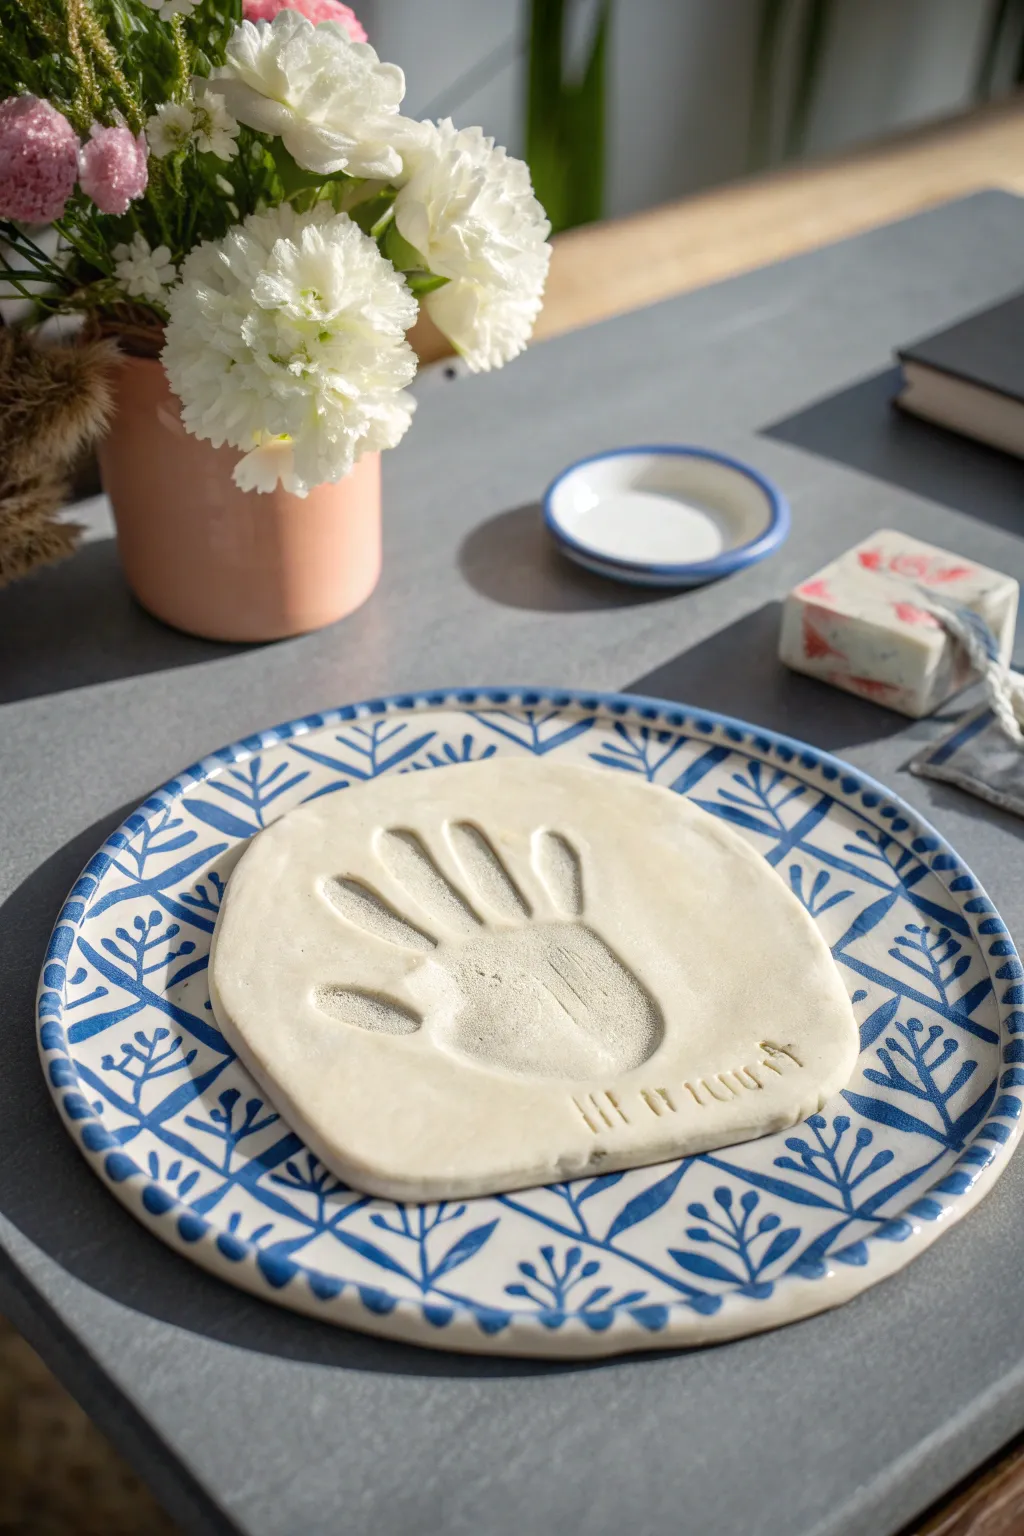
Capture a fleeting moment in time with this classic, organic-style handprint keepsake. The soft, natural finish of white air-dry clay creates a sophisticated look that pairs beautifully with any home decor, making it a perfect gift or mantlepiece treasure.
Step-by-Step
Materials
- White air-dry clay (approximately 1 lb)
- Rolling pin
- Parchment paper or wax paper
- Small bowl relative to hand size (optional, for cutting)
- Butter knife or clay tool
- Small sponge and water cup
- Toothpick or clay needle tool (for date/name)
- Sandpaper (fine grit)
- Matte acrylic varnish (optional)
Step 1: Preparation & Shaping
-
Prepare your surface:
Lay down a sheet of parchment paper on a flat, stable surface. This prevents sticking and makes it easier to move the project later without distorting the shape. -
Knead the clay:
Take a generous ball of white air-dry clay and knead it in your hands for a minute or two. The goal is to make it pliable and remove any internal air pockets which can cause cracking. -
Roll it out:
Place the clay ball on the parchment paper. Using your rolling pin, roll the clay out evenly. Aim for a thickness of about half an inch (1.2 cm)—too thin and it will crack; too thick and it takes forever to dry. -
Create the base shape:
For the organic, rounded square look seen in the photo, you don’t need a cutter. Gently press the clay with your palms to flatten it further into a rough circle or soft square shape. -
Refine the edges:
Use your fingers to gently push the edges inward to smooth out any major cracks or jagged bits, but keep the silhouette slightly irregular for that handmade charm. -
Smooth the surface:
Dip your finger or a small sponge lightly in water and run it over the top surface. You want it perfectly smooth before making the impression.
Clean Print Secret
Before pressing, lightly dust the child’s hand with cornstarch. This acts as a release agent, ensuring the hand lifts cleanly without pulling up sticky clay bits.
Step 2: Impression & Details
-
Position the hand:
Have the child spread their fingers comfortably. Guide their hand to the center of the clay slab. If you’re doing this with a squirmy toddler, I find it helps to do this when they are calm or distracted. -
Press firmly:
Press the hand down into the clay. Apply firm, even pressure to the palm first, then press down on each individual finger and the thumb to ensure a deep, clear print. -
Lift carefully:
Hold the edges of the clay down gently with one hand while lifting the child’s hand strictly straight up with the other to avoid smudging the print walls. -
Clean up the print:
If the edges of the finger impressions look a bit rough or sharp, use a very slightly damp fingertip to smooth them down gently without erasing the details. -
Add inscription:
Using a toothpick or a clay needle tool, scratch the date, the child’s name, or a short message near the bottom edge. Keep the lettering simple and rustic by using small, straight strokes. -
Smooth edges again:
Give the outer rim of the plaque one final pass with a damp sponge to soften the perimeter before drying.
Level Up: Color Wash
Mix a tiny drop of watercolor paint with lots of water. Brush it into the imprint, then immediately wipe the surface with a paper towel. The color will stay only in the crevices.
Step 3: Drying & Finishing
-
Initial drying:
Leave the plaque on the parchment paper in a safe corner away from direct sunlight or heat, which can cause cracking. Let it sit for 24 hours. -
Flip for airflow:
After the top is dry to the touch, gently flip the plaque over. This allows the bottom to dry evenly. Leave it for another 24 to 48 hours. -
Check hardness:
The clay should turn from cool grey to bright white and feel room temperature (not cold) when fully dry. -
Sand imperfections:
Once fully cured, take a piece of fine-grit sandpaper and gently buff the outer edges of the plaque to remove any sharp ridges. -
Seal (Optional):
To protect the pure white finish from dust over time, apply a thin coat of matte acrylic varnish. This keeps the natural look but seals the porous clay.
Place your finished plaque on a plate stand or shelf to enjoy this frozen moment in time.


Clay Bead Necklaces and Keychains
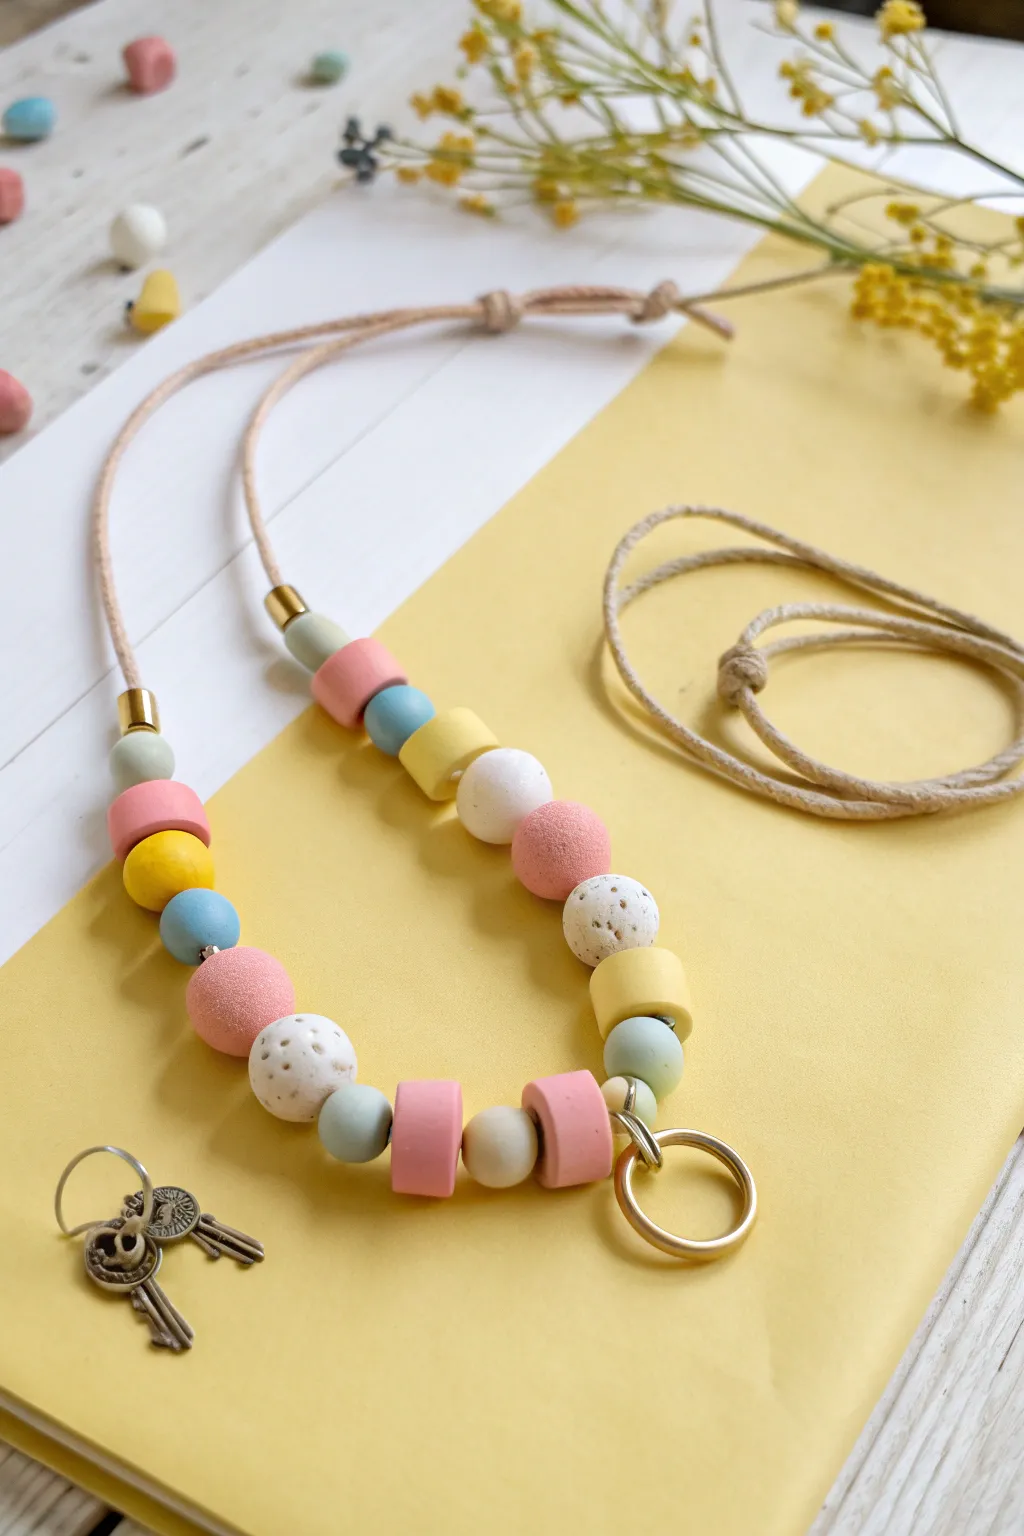
Create a functional piece of wearable art with this trendy beaded lanyard project. Using soft pastels and playful shapes, you’ll craft a custom accessory perfect for holding keys or an ID badge.
How-To Guide
Materials
- Air dry clay (white, pink, blue, yellow)
- Leather or waxed cotton cord (approx. 36 inches)
- Gold keyring hardware
- Rolling pin or smooth jar
- Toothpick or skewer
- Small craft knife or clay cutter
- Fine grit sandpaper
- Gold beading crimps (optional)
- Matte sealant or varnish
Step 1: Shaping the Beads
-
Mix colors:
Start by mixing your clay if you don’t have pre-mixed pastels. Combine a small amount of colored clay with white clay to achieve soft, muted pastel tones in pink, baby blue, and butter yellow. -
Roll spheres:
Pinch off small pieces of clay and roll them between your palms to create smooth, round beads. Aim for a mix of sizes, from small peas to large marbles. -
Create cylinders:
For the cylindrical beads, roll a thick snake of clay on your work surface. Use your craft knife to slice it into even segments, then gently tap the flat ends to smooth them out so they aren’t too sharp. -
Add texture:
Leave some white beads round but add texture. Lightly poke the surface with a toothpick or a clean toothbrush to create a speckled, stone-like effect without piercing all the way through. -
Pierce holes:
Carefully insert a skewer or toothpick through the center of each bead to create the stringing hole. Rotate the skewer as you push to prevent flattening your bead shapes. Make sure the hole is wide enough for your cord. -
Dry completely:
Arrange your finished beads on a flat surface lined with parchment paper. Let them air dry for at least 24-48 hours, turning them occasionally to ensure even drying.
Cracked Beads?
Cracks often happen if clay dries too fast. Dry them away from direct sunlight or heat vents. If a crack appears, fill it with a slip made of water and fresh clay.
Step 2: Refining and Assembly
-
Sand smooth:
Once fully dry, inspect your beads. Use fine grit sandpaper to gently buff away any fingerprints or rough edges, especially around the bead holes. -
Seal beads:
Apply a thin coat of matte varnish to protect the clay from moisture and dirt. This step is crucial for jewelry that gets handled often. -
Prepare the cord:
Cut a length of leather or cotton cord to your desired lanyard length (usually around 30-36 inches). Fold it in half to find the center loop. -
Attach the ring:
Thread the folded center loop of the cord through your gold keyring. Pull the two loose ends of the cord through this loop and tighten it to secure the ring with a lark’s head knot. -
Start stringing:
Begin threading your beads onto both strands of the cord simultaneously. Start from the keyring and work your way up. -
Create a pattern:
Experiment with your pattern before committing. The image uses a symmetrical design: cylinder, round, cylinder, textured round. I like to lay them out on the table first to visualize the final look. -
Secure the top:
Once you have roughly 5-6 inches of beaded length on the necklace, secure the top most bead. You can tie a simple overhand knot with both cords right above the last bead to keep them in place. -
Finish the ends:
Bring the two loose ends of the cord together at the top intended for the neck. You can simply tie a strong knot here, or use gold crimp ends for a more polished finish. -
Add gold accents:
If you have gold crimp beads, you can slide one on at the very start or end of your bead sequence to add a metallic touch that matches the keyring.
Make it Sparkle
Mix a tiny pinch of gold mica powder or glitter into your white clay before rolling. This gives a subtle shimmer that mimics natural stone.
Now you have a stylish, handcrafted lanyard ready to organize your keys

The Complete Guide to Pottery Troubleshooting
Uncover the most common ceramic mistakes—from cracking clay to failed glazes—and learn how to fix them fast.
Thumbprint Heart Trinket Trays
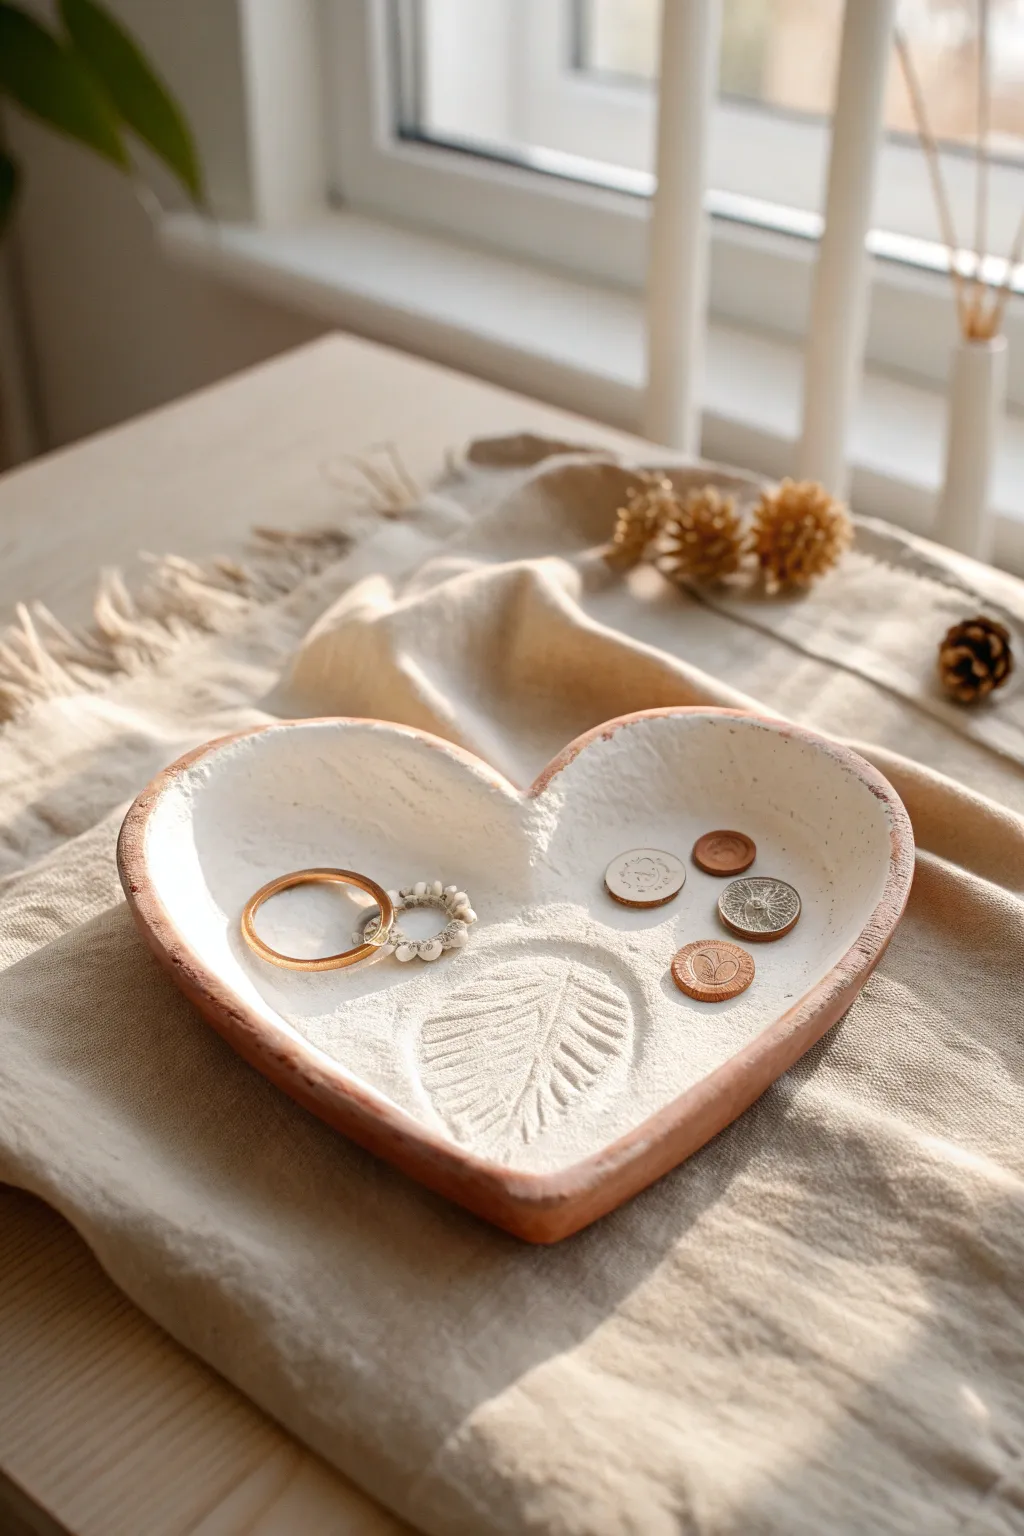
This charming heart-shaped trinket dish combines a rustic terracotta edge with a pure white, textured interior for a natural, bohemian look. The delicate leaf impression at the bottom adds a beautiful fossil-like detail that makes it perfect for holding rings or coins.
Step-by-Step
Materials
- White air-dry clay (approx. 1/2 lb)
- Heart-shaped cookie cutter (large) or paper template
- Rolling pin
- Parchment paper or canvas mat
- Small bowl of water
- Sponge or paper towel
- Terracotta or brown acrylic paint
- Small flat paintbrush
- Real or artificial leaf with prominent veins
- High-grit sandpaper (optional)
- Matte spray varnish
Step 1: Shaping the Clay
-
Condition the Clay:
Start by taking a handful of white air-dry clay and kneading it in your hands to warm it up. This conditioning process makes the clay more pliable and less prone to cracking as you work. -
Roll out the Slab:
Place your clay on a piece of parchment paper to prevent sticking. Use a rolling pin to flatten the clay into an even slab, aiming for a thickness of about 1/4 inch. -
Cut the Heart Shape:
Press a large heart-shaped cookie cutter firmly into the clay. If you don’t have a cutter large enough, simply place a paper heart template on the clay and trace around it with a craft knife or needle tool. -
Smooth the Edges:
Remove the excess clay from around your shape. Dip your finger in a little water and gently run it along the cut edges of the heart to smooth out any roughness or sharp corners.
Smooth Moves
To prevent the leaf from sticking to the clay while rolling, lightly dust the surface of the leaf with cornstarch or baby powder before pressing it down.
Step 2: Adding Texture & Detail
-
Position the Leaf:
Choose a leaf with strong vein details. Place it vein-side down onto the center of your clay heart, positioning it slightly toward the bottom point if you want room for trinkets above it. -
Create the Impression:
Gently roll over the leaf with your rolling pin. Apply firm, even pressure to ensure the veins imprint deeply, but be careful not to distort the overall heart shape. -
Reveal the Design:
Carefully lift the stem of the leaf and peel it away from the clay to reveal the botanical impression underneath. -
Form the Rim:
Now, gently lift the edges of the heart upward to create a slight lip. I usually pinch the clay gently between my thumb and forefinger, working my way around the perimeter to create a shallow bowl shape. -
Refine the Surface:
If you want that slightly textured, rustic look seen in the photo, you can dab the interior (avoiding the leaf) with a scrunched-up piece of foil or a stiff sponge.
Step 3: Finishing Touches
-
Let it Dry:
Set the tray aside in a dry, room-temperature spot. Allow it to air dry completely for 24-48 hours. Flipping it over halfway through can help the bottom dry evenly. -
Sand Lightly:
Once bone dry, check the rim. If there are any sharp jagged bits, lightly sand them down with fine-grit sandpaper, wiping away the dust afterward. -
Paint the Rim:
Dip a small flat brush into terracotta or warm brown acrylic paint. Carefully paint just the outer rim and the exterior sides of the tray, leaving the interior pure white to create contrast. -
Clean Up Edges:
If any brown paint accidentally gets onto the white interior, quickly wipe it away with a damp paper towel or cotton swab before it dries. -
Seal the Project:
To protect your tray from moisture and stains, finish by applying a layer of matte spray varnish over the entire piece, front and back.
Natural Stain
Dilute brown paint with water and wash over the leaf impression, then wipe back the excess. The dark color will settle into the veins, making them pop
Place your favorite rings or small treasures in your new dish and enjoy the handmade charm on your dresser
Leaf and Flower Imprint Medallions
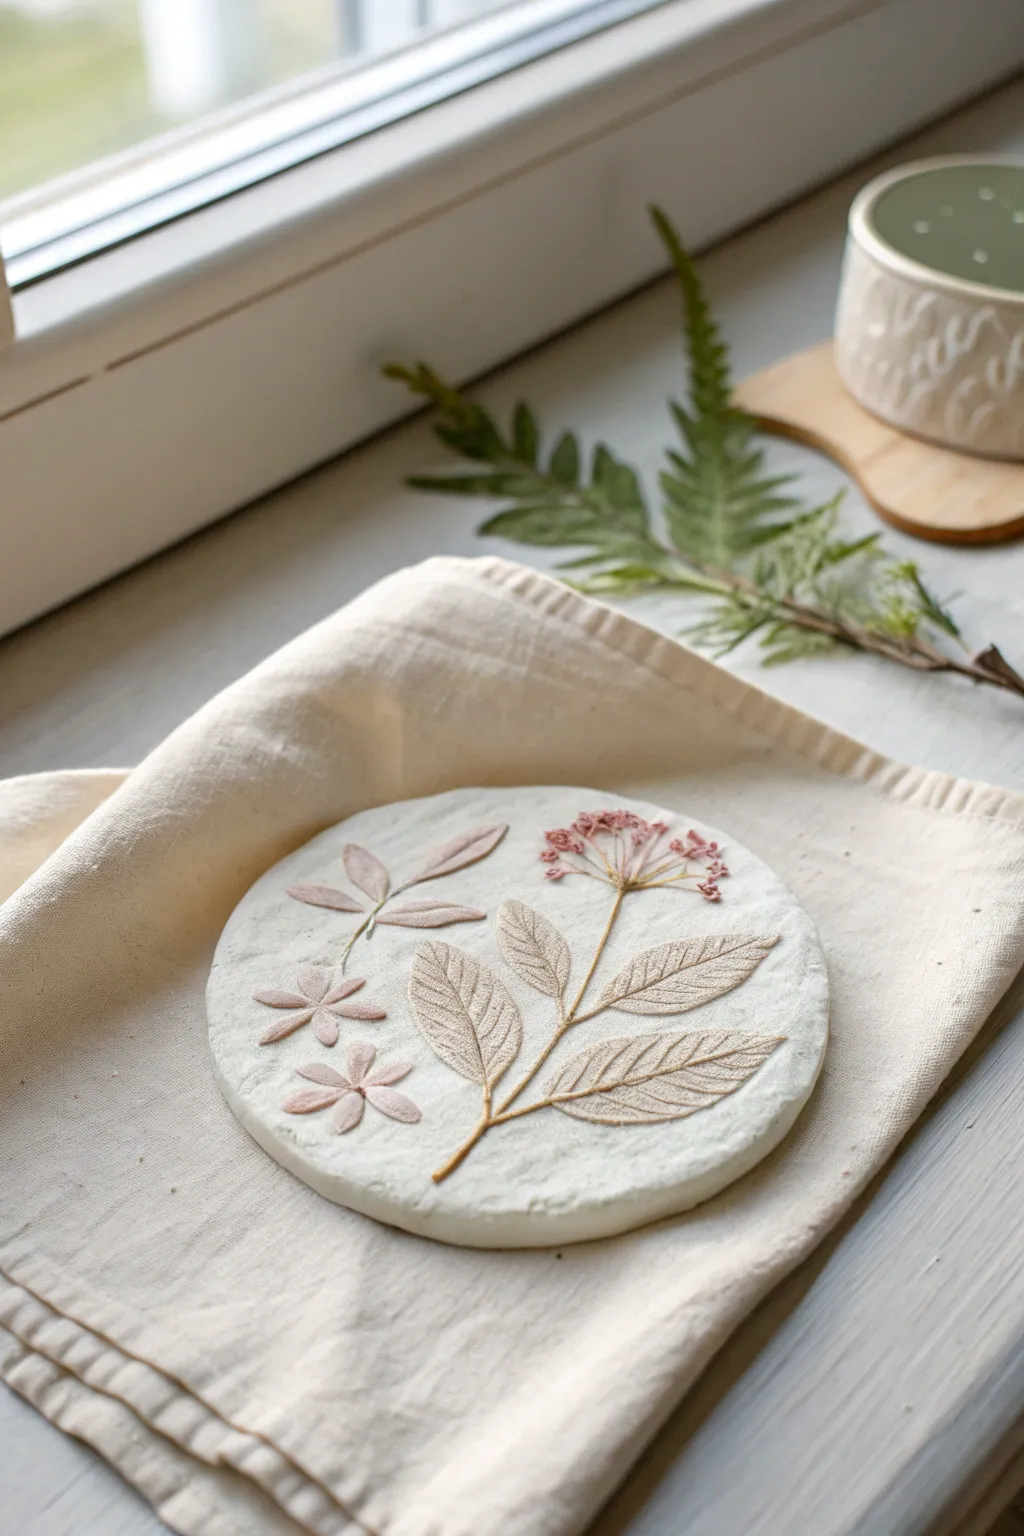
Capture the delicate beauty of nature with this elegant clay medallion project that doubles as a lasting keepsake. By pressing fresh or dried flowers directly into soft air-dry clay, you’ll create a subtle, textured relief that highlights every vein and petal.
Detailed Instructions
Materials
- White or natural air-dry clay (e.g., Das or Crayola)
- Rolling pin
- Parchment paper or non-stick craft mat
- Round cookie cutter or a bowl (approx. 4-6 inches diameter)
- Fresh or dried botanical elements (leaves with prominent veins, small flower clusters)
- Tweezers
- Small craft knife or toothpick
- Fine-grit sandpaper (optional)
- Clear matte varnish (optional for sealing)
Step 1: Preparing the Clay Base
-
Condition the clay:
Begin by taking a handful of air-dry clay and kneading it in your hands to warm it up. This conditioning process makes the clay more pliable and reduces the chance of cracks forming later. -
Roll out the slab:
Place your clay ball onto a sheet of parchment paper. Using your rolling pin, flatten the clay into an even slab that is roughly 1/4 to 1/2 inch thick. Keep the thickness consistent to prevent warping while drying. -
Cut the circle:
Press your large round cookie cutter or the rim of a bowl into the rolled clay to stamp out a perfect circle. Peel away the excess clay from the outside. -
Smooth the edges:
Dip your finger in a tiny bit of water and run it gently along the cut edge of the circle. This smooths out any harsh lines or jagged bits left by the cutter.
Clean Impressions
If the clay is too sticky and grabbing the leaves, dust the surface very lightly with cornstarch before pressing your plants down. This acts as a release agent.
Step 2: Creating the Botanical Design
-
Arrange your composition:
Before pressing anything down, lightly lay your chosen leaves and flowers on top of the clay circle to test your layout. Aim for a balanced design; I usually like to place the largest leaf slightly off-center and fill the gaps with smaller sprigs. -
Press the main stem:
Once satisfied with the placement, gently press the largest leaf into the clay. Use the rolling pin to roll *over* the leaf once with firm, even pressure. This embeds the leaf flush with the surface. -
Add delicate details:
For smaller flowers or fragile petals that might get crushed by a rolling pin, use your fingertips to press them individually into the clay surface. -
Create floating elements:
To mimic the look of falling leaves or scattered petals seen in the example, press singular petals or small leaves into the empty white space around the main stem.
Add Subtle Color
After drying, rub a tiny amount of diluted watercolor paint or mica powder into the pressed veins, then wipe the surface clean to make the details pop.
Step 3: Revealing and Finishing
-
Remove the botanicals:
This is the most satisfying part. Use a pair of tweezers to carefully grab the stem or edge of your plant material. Lift slowly to peel the plant out of the clay, leaving a perfect impression behind. -
Clean up the impressions:
If any tiny bits of plant matter get stuck in the deep crevices, gently flick them out with the tip of a toothpick or a clean, dry paintbrush. -
Initial drying phase:
Leave the medallion on the parchment paper to dry in a cool, dry place away from direct sunlight. Let it sit flat for at least 24 hours. -
Flip for even drying:
After the top surface feels dry to the touch, carefully flip the medallion over. This helps the bottom dry and prevents the edges from curling upward. -
Sanding imperfections:
Once fully cured (usually 48-72 hours), inspect the edges. If there are any rough spots, lightly buff them with fine-grit sandpaper for a professional finish. -
Optional sealing:
To protect the white clay from dust or moisture, apply a thin coat of matte varnish. This preserves the natural, stone-like appearance while adding durability.
Display your botanical relief flat on a shelf or add a hanger to the back for a natural wall accent


What Really Happens Inside the Kiln
Learn how time and temperature work together inside the kiln to transform clay into durable ceramic.
Dinosaur Fossil Impression Tiles
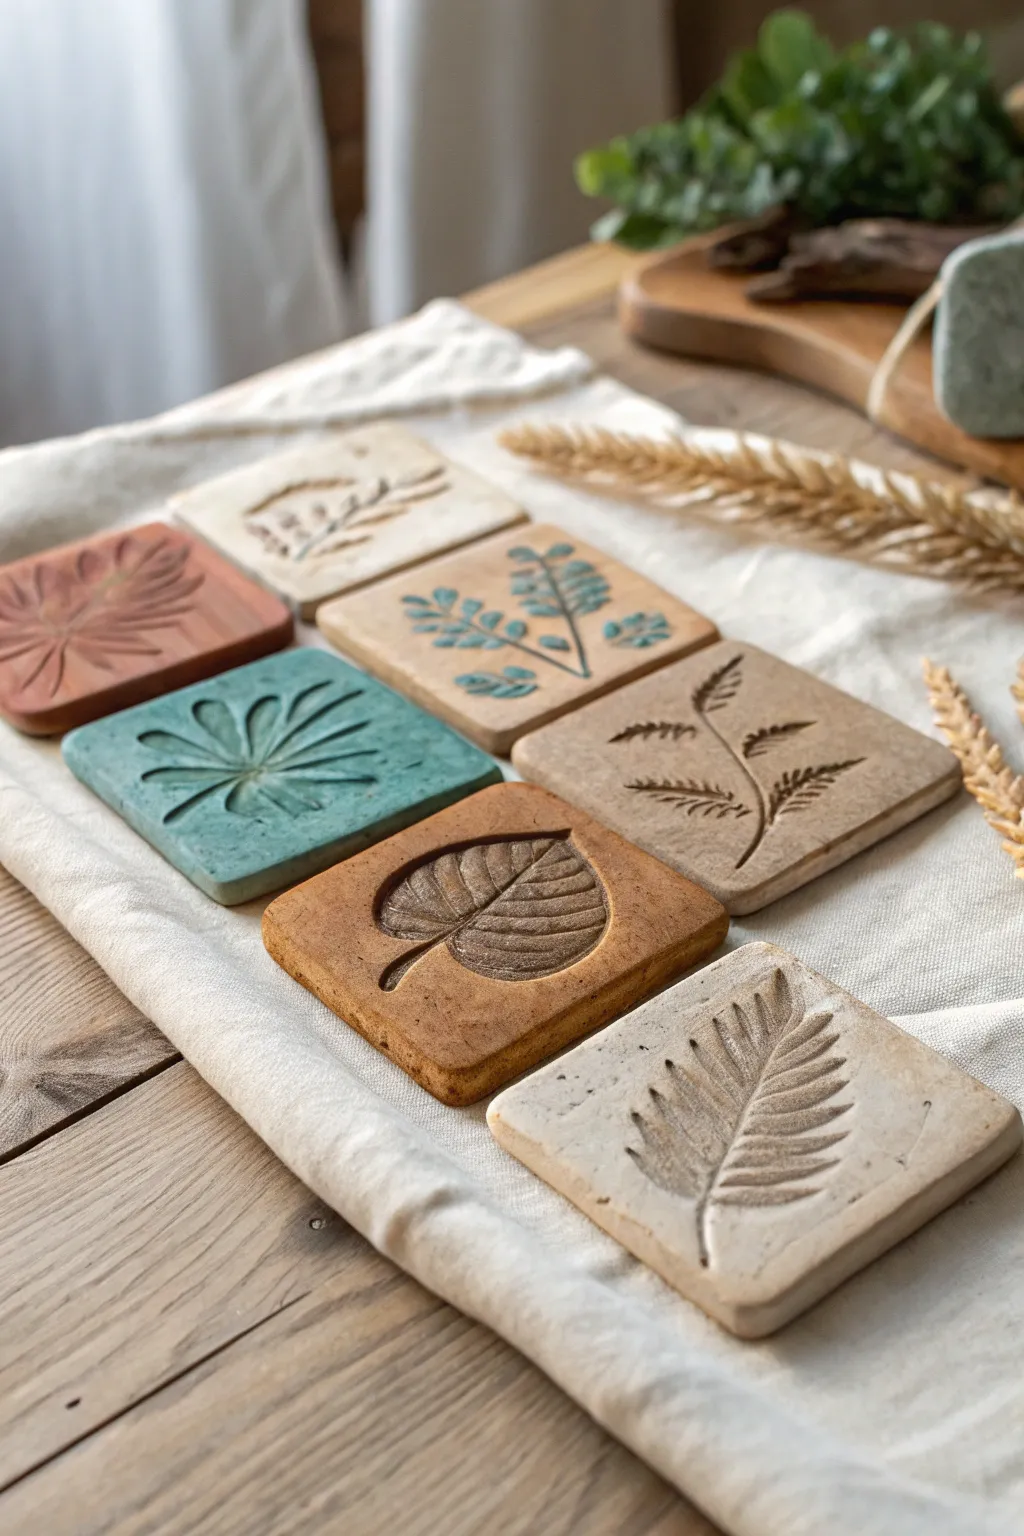
Create your own museum-worthy collection of faux fossils using little more than air-dry clay and nature’s own designs. These rustic, earthy tiles capture the delicate veins and shapes of leaves, finished with a subtle wash to make every detail pop.
Step-by-Step Guide
Materials
- Air-dry clay (white, terracotta, or stone color)
- Various fresh leaves (fern, eucalyptus, grasses, herb sprigs)
- Rolling pin
- Square cookie cutter (approx 3-4 inches) or knife and ruler
- Fine-grit sandpaper
- Acrylic paints (browns, greens, creams, burnt sienna)
- Water
- Paper towels or soft rag
- Paintbrush (small and medium flat)
- Parchment paper or canvas cloth (for working surface)
Step 1: Preparing the ‘Stone’ Slabs
-
Condition the clay:
Start by taking a handful of air-dry clay and kneading it in your hands until it feels warm and pliable. If the clay feels too stiff or dry, adding a single drop of water can help soften it up. -
Roll it out:
Place your clay on a piece of parchment paper or a canvas cloth to prevent sticking. Use a rolling pin to flatten the clay into an even slab, aiming for a thickness of about 1/4 to 1/2 inch so the tiles are sturdy. -
Cut the shapes:
Using a square cookie cutter or a ruler and a knife, cut out uniform square tiles. Reroll the scraps to make as many tiles as you need for your set. -
Smooth the edges:
Dip your finger in a little water and gently run it along the cut edges of each square to smooth out any sharpness or roughness, giving them a more tumbled, natural stone look.
Prevent Curling
To keep tiles perfectly flat, place a lightweight book on top of them once they are ‘leather hard’ (dry to touch but still cool) during the drying process.
Step 2: Creating the Fossils
-
Select your specimens:
Choose leaves that have prominent veins on the backside, as these create the deepest and clearest impressions. Ferns and stiff grasses work exceptionally well. -
Position the leaf:
Lay a leaf vein-side down onto the center of a clay square. You can center a single large leaf or arrange a sprig diagonally for a dynamic look. -
Press the design:
Gently roll over the leaf with your rolling pin. Press firm enough to embed the leaf into the clay but not so hard that you distort the square shape. -
Reveal the print:
Carefully find the stem or edge of the leaf and peel it away slowly to reveal the intricate impression left behind. -
Let them cure:
Place the tiles on a flat surface to dry completely. This usually takes 24-48 hours depending on humidity. Flip them over halfway through the drying process to ensure the bottom dries evenly and to prevent curling.
Make Ornaments
Before the clay dries, use a straw to poke a hole in the top corner. After painting, thread twine through for rustic hanging decorations.
Step 3: Finishing and Antiquing
-
Sand the surface:
Once fully dry, use fine-grit sandpaper to lightly buff the edges and surface. This removes any stray clay crumbs and gives the tile a professional finish. -
Mix an antiquing wash:
Squeeze a small amount of acrylic paint—brown for an earthy look or deep green for a mossy look—onto a palette and dilute it heavily with water until it’s the consistency of ink. -
Apply the wash:
Brush the watery paint over the entire surface of the tile, making sure it gets deep into the crevices of the leaf impression. -
Wipe back:
Immediately take a damp paper towel or rag and wipe the surface of the tile. I prefer to use a light circular motion here. The paint will wipe off the high points but stay stuck in the deep veins, highlighting the texture. -
Add detail color (optional):
If you want a multi-colored look like the turquoise tile in the image, you can paint the whole tile a base color first, let it dry, and then do a darker wash over the impression. -
Final dry:
Let the paint wash dry completely before handling or stacking your finished fossil collection.
Display your ancient botanical finds on a shelf or use them as unique coasters for your next gathering
Mini Cactus Pots for Desk Decor
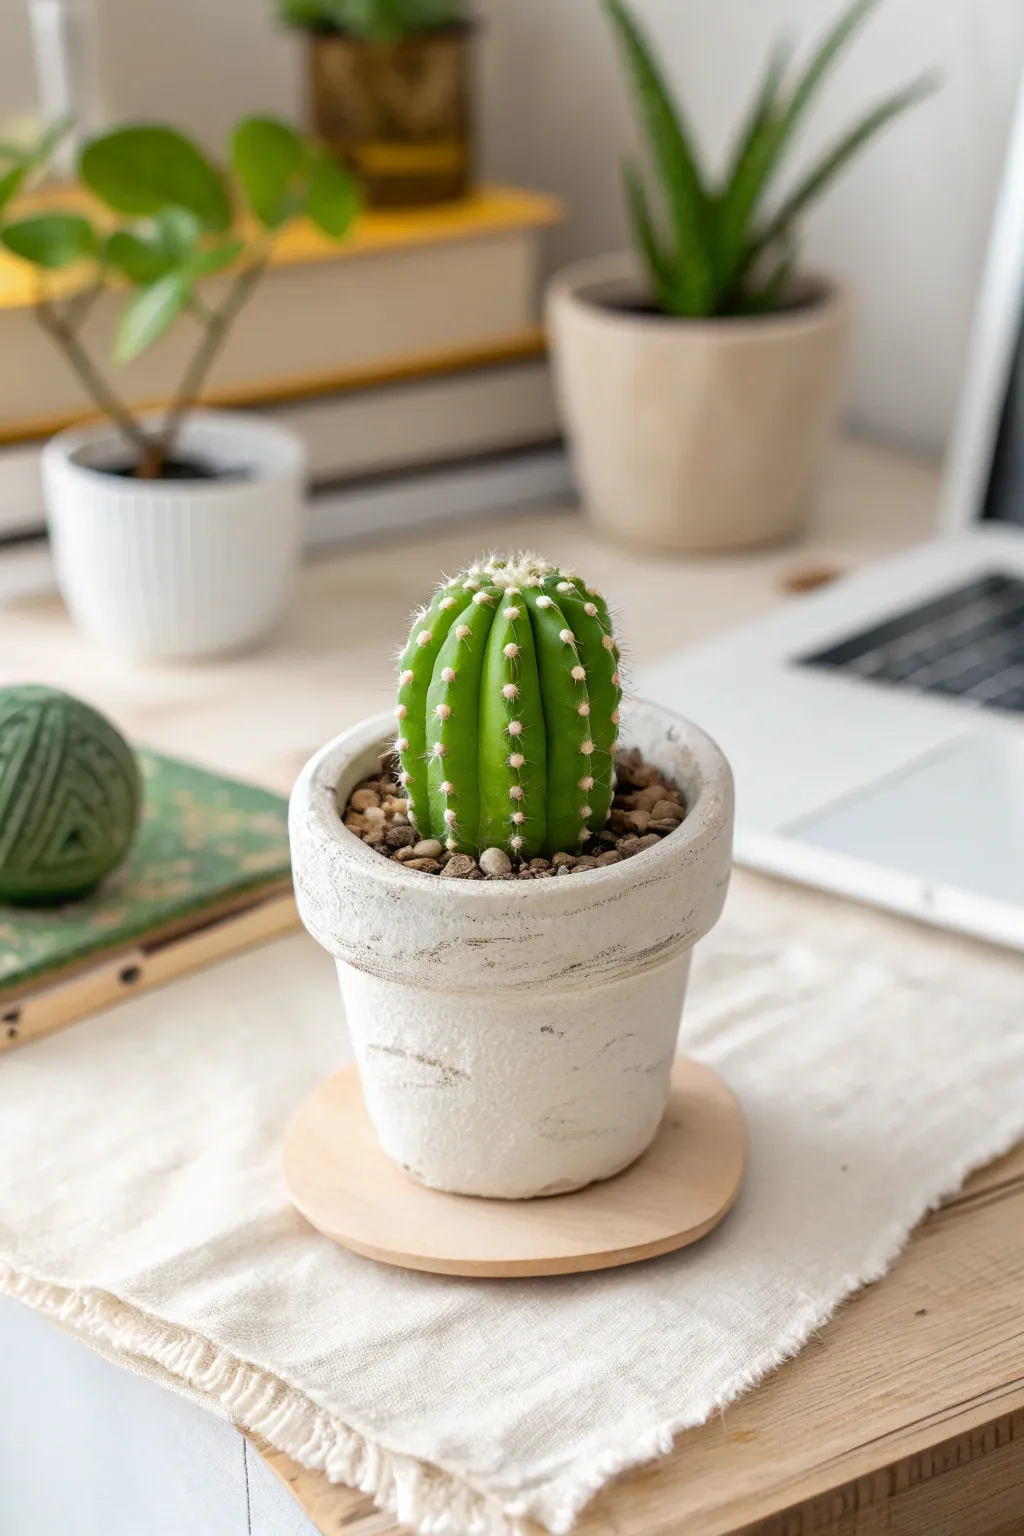
Create a charmingly weathered home for tiny succulents or cacti using simple air-dry clay. This project features a textured, distressed white finish that looks like vintage pottery, perfect for adding a touch of greenery to any desk or shelf.
How-To Guide
Materials
- White polymer or air-dry clay (about 150g)
- Small rolling pin or smooth jar
- Circle cutter or a glass (approx. 3-inch diameter)
- Craft knife or clay tool
- Small bowl of water
- Sponge or textured cloth
- Sandpaper (medium and fine grit)
- Small wooden disc coaster (optional base)
- Small cactus and decorative gravel
Step 1: Forming the Pot Base
-
Prepare the Clay:
Start by kneading your white clay until it is soft, pliable, and free of cracks. Warm clay is easier to work with, so take your time conditioning it. -
Roll out the Base:
Roll a portion of the clay into a flat slab about 1/4 inch thick. Use your circle cutter or a glass to cut out a perfect circle—this will be the bottom of your pot. -
Create the Walls:
Roll the remaining clay into a long, thick snake or coil. Alternatively, roll out a rectangular slab if you prefer the slab-building method, but coiling is great for kids. -
Build Up:
Attach the clay to the outer edge of your circular base. If using coils, stack them one on top of another. If using a slab, wrap it around the base to form a cylinder. -
Blend the Seams:
Use your thumb or a modeling tool to smudge the clay downwards, blending the walls into the base so they become one solid piece. Smooth the inside seams as well to ensure it’s watertight.
Smart Drainage Tip
Add a drainage hole! Use a straw to punch a hole in the bottom center while the clay is wet. This keeps cactus roots healthy.
Step 2: Shaping and Detailing
-
Shape the Cylinder:
Once the walls are built up to about 2-3 inches high, gently shape the pot with your hands. You want a slight taper towards the bottom, wider at the top. -
Create the Rim:
Roll a separate, slightly thicker coil of clay. Attach this to the very top edge of your pot to create a distinct, chunky rim. -
Smooth the Rim:
Use a little water on your finger to smooth the connection point of the rim. I like to leave the rim slightly uneven to enhance the rustic look. -
Add Texture:
Before the clay dries, take a crumpled piece of foil or a textured sponge and gently press it against the outside walls. This creates a weathered stone appearance. -
Refine the Shape:
Check that the pot sits flat. If the bottom is wobbly, gently tap the pot on your work surface to flatten the base.
Step 3: Finishing Touches
-
Dry Completely:
Let the pot sit in a dry area for 24-48 hours. Turn it upside down halfway through the drying process to ensure the bottom dries evenly. -
Initial Sanding:
Once bone dry, use medium-grit sandpaper to smooth out any sharp edges or unwanted bumps, focusing on the rim and the base. -
Create the Distressed Look:
Take a coarser sandpaper or a wire brush and scratch horizontal lines around the body of the pot. These scratches mimic the wear on old ceramic pots. -
Highlight the Texture:
If you want more contrast, you can lightly brush a very diluted grey or brown paint into the crevices and wipe the surface clean with a damp cloth, leaving the dark color only in the scratches. -
Seal the Pot:
Apply a matte varnish or sealant to the inside and outside. This is crucial if you plan to put a real plant inside to protect the clay from moisture. -
Planting:
Once the sealant is dry, fill the pot with cactus soil. Insert your small cactus and top it off with decorative fine gravel. -
Final Display:
Place your finished pot on a small wooden coaster disc to complete the aesthetic shown in the photo.
Level Up: Faux Stone
Mix dried tea leaves or black pepper into the wet white clay before rolling. This creates a speckled granite effect permanently.
Enjoy your new piece of handcrafted decor that brings a calming desert vibe to your workspace

TRACK YOUR CERAMIC JOURNEY
Capture glaze tests, firing details, and creative progress—all in one simple printable. Make your projects easier to repeat and improve.
Ice Cream Cone Garland Pieces
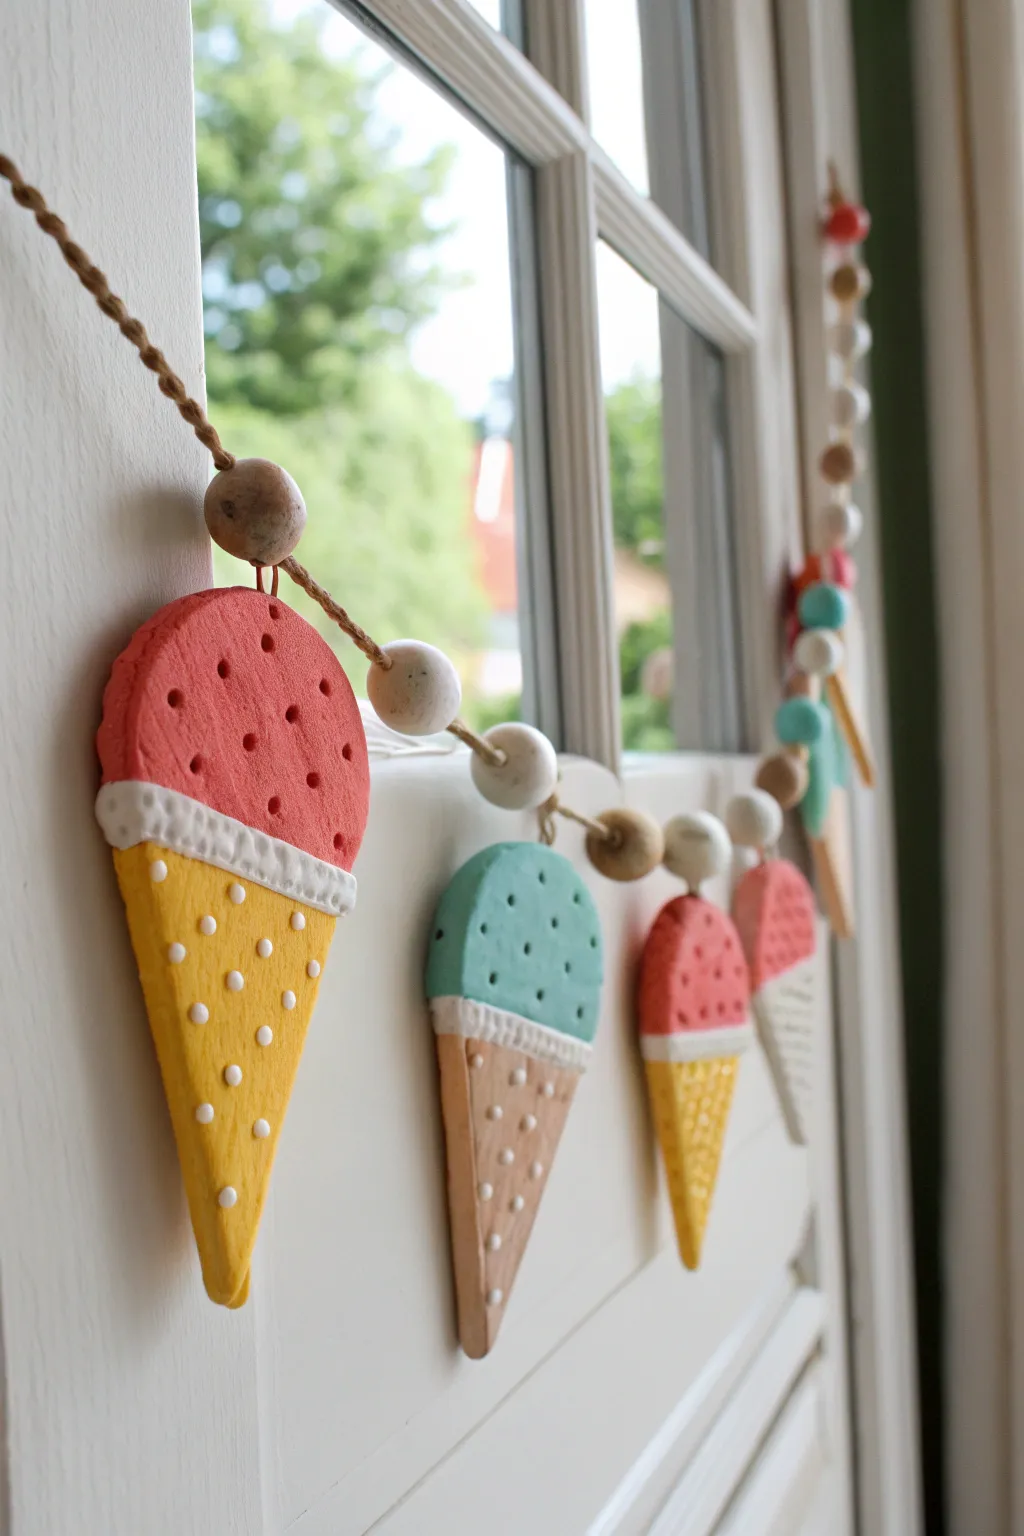
Bring a scoop of joy to any room with this adorable ice cream cone garland made from air dry clay. With its charming dotted texture and wooden bead accents, this project combines playful shapes with trendy pastel colors for decoration that looks good enough to eat.
How-To Guide
Materials
- White air dry clay
- Rolling pin
- Sharp knife or clay cutting tool
- Cardboard for templates
- Toothpick or skewer
- Acrylic paints (pink, teal, yellow, warm tan/beige, white)
- Small flat paintbrush
- Small round detail brush (or dotting tool)
- Jute twine
- Wooden beads (natural and painted)
- Sandpaper (fine grit)
Step 1: Sculpting the Cones
-
Prepare the template:
Before touching the clay, draw a simple ice cream cone shape on a piece of thin cardboard. It should look like an isosceles triangle with a semicircle on top. Cut this out to serve as your consistent guide. -
Roll out the clay:
Take a handful of air dry clay and knead it briefly until it is smooth. Roll it out on a flat surface to an even thickness of about 1/4 inch. -
Cut the shapes:
Place your cardboard template onto the rolled clay. Using your knife or clay tool, carefully trace around the template to cut out your ice cream shape. Repeat this for as many cones as you want on your garland. -
Add the scoop detail:
To define the separation between the cone and the ice cream, roll a very thin snake of clay. Press this gently across the shape where the semicircle meets the triangle. Flatten it slightly with your finger to look like the bottom ridge of a scoop. -
Texture the ice cream:
Using the blunt end of a skewer or a small rounded tool, press random indentations all over the top ‘ice cream’ portion of the shape to give it a porous, fluffy texture. -
Create hanging holes:
This is crucial: while the clay is still wet, use your skewer to poke a hole through the very top center of the ice cream scoop. Wiggle the skewer slightly to ensure the hole is large enough for your twine to pass through later. -
Dry completely:
Lay all your cut shapes on a wire rack or parchment paper. Let them dry for 24-48 hours. I find flipping them over halfway through helps them dry flat without curling.
Cracked Clay Fix
If small surface cracks appear while drying, don’t panic. Mix a tiny amount of fresh clay with water to make a paste (slip) and smooth it into the cracks with your finger, then let dry again.
Step 2: Painting and Assembly
-
Smooth the edges:
Once fully dry, gently sand any rough edges with fine-grit sandpaper to give your pieces a professional finish. -
Base coat the cones:
Paint the bottom triangle section of each piece. You can alternate between a warm tan color (to look like a waffle cone) and a bright yellow for a fun, stylized look. Let dry. -
Paint the scoops:
Paint the top semicircle section in your chosen colors—strawberry pink, minty teal, or classic red. Be careful around the raised ridge you added earlier. -
Highlight the ridge:
Paint the raised ridge strip white. This creates a clean visual break between the cone and the ice cream scoop. -
Add polka dots:
Using a small detail brush or the end of a toothpick, dip into white paint and add small polka dots all over the bottom cone section. This mimics the waffle texture in a cute, graphic way. -
Prepare the string:
Cut a length of jute twine as long as you want your garland, leaving extra length at the ends for tying loops. -
Start threading:
Thread a few wooden beads onto the twine first. Then, thread your first ice cream cone. I like to tie a simple overhand knot right above the cone’s hole so it stays in place and doesn’t slide into the beads. -
Add spacers:
Between each clay cone, add a sequence of 2-3 wooden beads. You can leave some beads natural and paint others to match your ice cream colors. -
Complete the pattern:
Continue the pattern—beads, knot, cone, knot—until all your pieces are strung. Finish by tying loops at both ends of the twine for hanging.
Make it Sparkle
Before the paint dries on the top ‘scoop’ section, sprinkle a tiny amount of iridescent glitter over it. This gives the ice cream a frosty, frozen appearance that catches the light.
Now hang your delightful creation in a sunny window or across a mantle to enjoy summer vibes all year round
Tiny Photo Holders With Cute Shapes
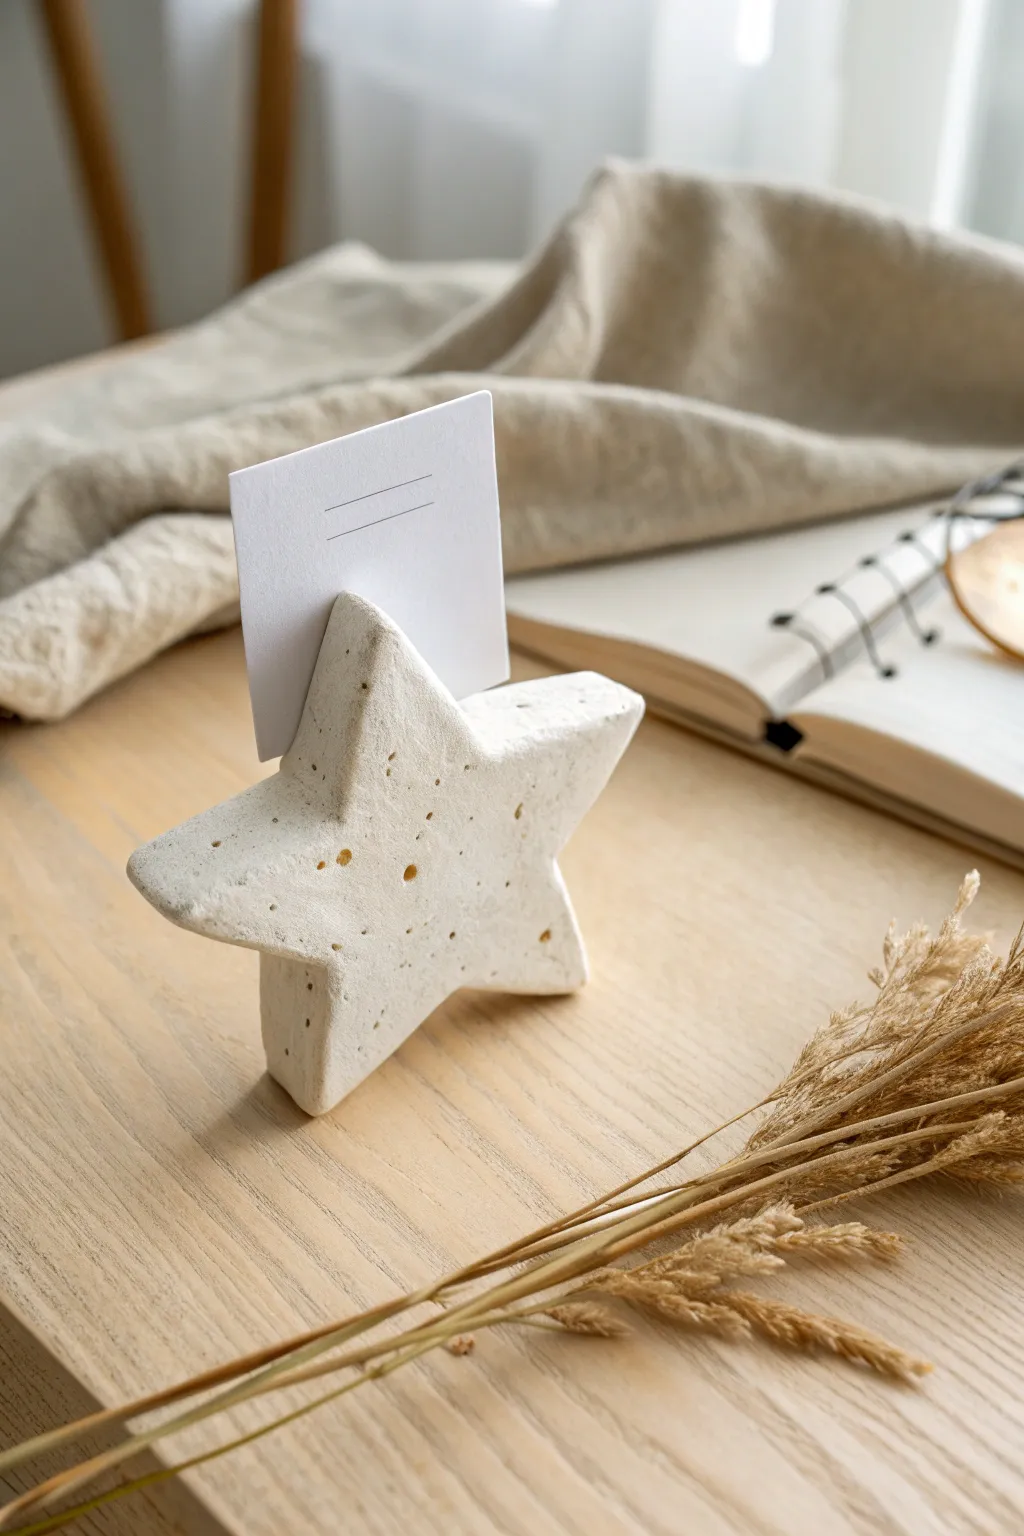
Transform simple air-dry clay into this charming, minimalist star that doubles as a functional photo or note holder. With its rustic speckled texture and chunky shape, it adds a lovely handmade touch to any desk or shelf.
Detailed Instructions
Materials
- White air-dry clay
- Rolling pin
- Star-shaped cookie cutter (medium size)
- Craft knife or plastic clay tool
- Sandpaper (fine grit)
- Old toothbrush or stiff bristle brush
- Brown acrylic paint (diluted) or coffee grounds
- Water in a small cup
- Parchment paper or craft mat
Step 1: Preparation & Shaping
-
Condition the clay:
Start by taking a handful of white air-dry clay and kneading it thoroughly in your hands until it becomes warm, soft, and pliable without any cracks. -
Flatten the base:
Place the clay on a sheet of parchment paper and gently flatten it with your palm. It needs to be quite thick to stand up on its own. -
Roll to thickness:
Use a rolling pin to smooth the surface, aiming for a consistent thickness of about 3/4 of an inch to 1 inch. Avoid rolling it too thin, or the holder won’t be stable. -
Cut the star:
Press your star-shaped cookie cutter firmly into the clay. Give it a little wiggle to ensure it cuts all the way through, then lift the cutter away. -
Remove excess clay:
Peel away the excess clay from around the star shape. Keep this scrap clay moist in a bag for future projects. -
Release the shape:
Gently push the clay star out of the cutter if it stuck inside. Be careful not to warp the points of the star as you do this.
Natural Speckles Tip
Knead dried used tea leaves directly into the wet clay before rolling it out. This creates a deeply embedded texture that looks like real granite.
Step 2: Refining & Texturing
-
Smooth the edges:
Dip your finger in a little bit of water and run it along the raw edges of the star to smooth out any roughness left by the cutter. -
Create the slot:
Using a craft knife or a thin plastic tool, carefully cut a slit into the top point of the star. Press deep enough to hold a card (about half an inch) but not so deep that it splits the clay. -
Widen the gap slightly:
Wiggle the tool very gently back and forth to widen the slot just enough to accommodate piece of cardstock. -
Create the speckled mix:
To achieve that stone-like look, mix a tiny drop of brown acrylic paint with water. Alternatively, I sometimes use a pinch of dried coffee grounds for natural texture. -
Apply the speckles:
Dip an old toothbrush into your mixture. Hold it over the clay star and run your thumb across the bristles to flick tiny specks of color onto the surface. -
Add larger indentations:
Use the tip of a toothpick or a rough stone to gently press a few larger, pitted marks into the clay to enhance the organic, faux-stone appearance. -
Check the bottom:
Stand the star up to ensure the bottom is perfectly flat. If it wobbles, tap it gently on the table to flatten the base points.
Step 3: Finishing Touches
-
Initial Drying:
Set the star aside on a flat surface to dry. Rotate it every few hours to ensure even drying and prevent curling. -
Full cure time:
Allow the project to dry fully for 24 to 48 hours. The clay will turn from a cool gray-white to a bright, bone white when completely dry. -
Sanding imperfections:
Once bone dry, take fine-grit sandpaper and lightly buff any sharp edges or unwanted bumps, being careful not to sand away your speckled texture. -
Test the holder:
Slide a small photo or note into the slot. If it’s too tight, carefully use the sandpaper to widen the opening slightly.
Slit Closed Up?
If the card slot shrinks while drying, gently sand the inside with a folded piece of emery board or sandpaper to widen it back up.
Now you have a sturdy little star ready to display your favorite mini-memories
Stamped Pattern Pencil Cups
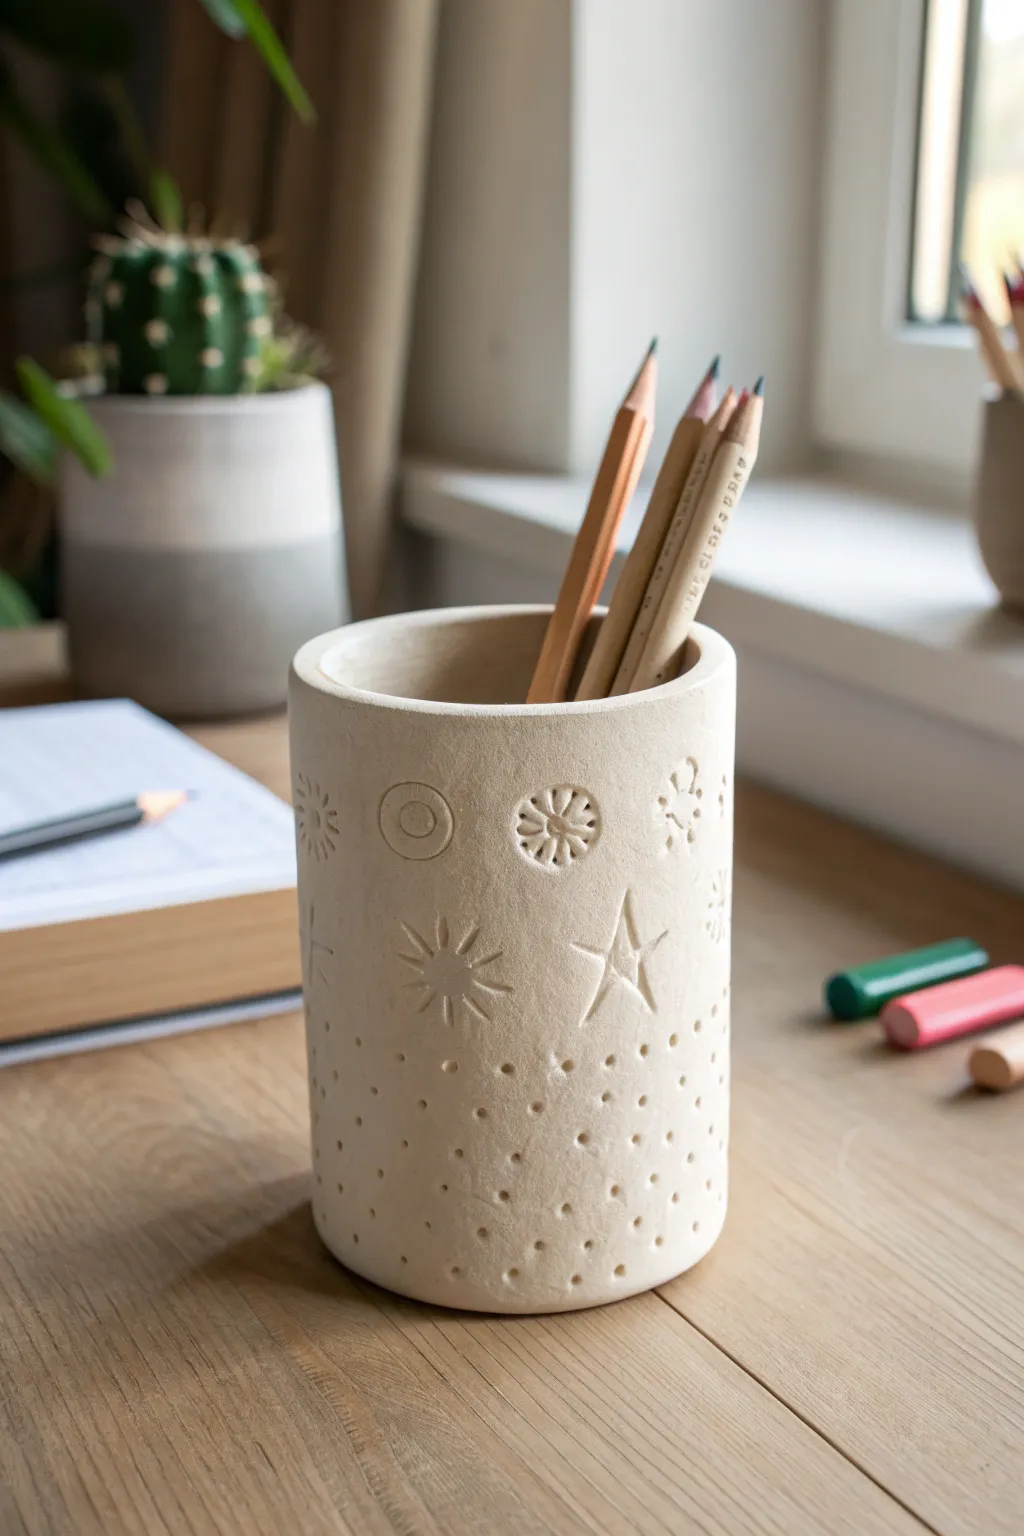
Bring a touch of the night sky to your desk with this charming, celestial-themed pencil cup made from air-dry clay. The natural, unpainted finish highlights the beautiful stamped texture of suns, stars, and tiny stippled dots.
Step-by-Step Guide
Materials
- White or natural air-dry clay (approx. 500g)
- Rolling pin
- Empty soup tin or glass jar (as a mold)
- Clay knife or craft knife
- Small bowl of water
- Parchment paper or canvas mat
- Stamping tools: cookie cutters (small star/circle), pen caps, or clay stamps
- Toothpick or skewer (for stippling)
- Fine-grit sandpaper
Step 1: Preparation and Base
-
Prepare your workspace:
Lay down parchment paper or a canvas mat to prevent sticking. This makes it easier to move your project later without warping it. -
Roll out the slab:
Take a large handful of clay and knead it briefly until pliable. Roll it out into a long rectangle, aiming for an even thickness of about 1/4 inch (6mm). -
Measure the circumference:
Take your soup tin or jar (your mold) and wrap a piece of string around it to find the circumference. Add about 1/2 inch to this measurement for the overlap. -
Cut the rectangle:
Using your clay knife and a ruler, cut your clay slab into a clean rectangle that matches the height of your tin and the length of your circumference measurement. -
Create the base:
Roll out a separate, smaller piece of clay. Place your tin on top and trace around it with a needle tool or knife to cut out a perfect circle for the bottom.
Slumping Walls?
If your clay won’t stand up, it’s too wet. Let the rolled rectangle sit flat for 15-20 minutes to ‘leather harden’ before wrapping it.
Step 2: Construction
-
Wrap the mold:
Wrap your clay rectangle loosely around the tin mold. I like to wrap the mold in a layer of parchment paper first so the clay slides off easily later. -
Score and slip:
Where the two ends of the rectangle meet, scratch the edges with a toothpick (scoring) and dab a little water on them (slip). Press them firmly together to create a seam. -
Smooth the seam:
Use your finger or a damp sponge to smooth the vertical seam until it disappears and looks seamless. Do this gently so you don’t thin the wall too much. -
Attach the base:
Score and slip the bottom edge of your cylinder and the edge of your circular base. Press them together firmly. -
Blend the edges:
Use a modeling tool or your thumb to drag a little clay from the base up onto the wall, blending the two pieces into a single unit.
Step 3: Stamping and Details
-
Plan your patterns:
While the clay is still damp but firm enough to hold its shape, decide where your celestial motifs will go. Leave the bottom third empty for the dot pattern. -
Stamp the main icons:
Press your stamps gently into the clay. Use a small circle cutter for suns (add rays with a knife), a star cutter for stars, and the textured end of a marker for flower-like bursts. -
Add hand-carved details:
For the rays on the sun or the details inside the circles, use a sharp clay tool or toothpick to carve shallow lines. -
Stipple the bottom:
Using a blunt toothpick or skewer, poke random holes around the bottom third of the cup to create a ‘starry dust’ texture. Vary the spacing for an organic look. -
Remove the mold:
Let the clay sit for about an hour so it stiffens slightly, then very carefully slide the tin or jar out. -
Smooth the rim:
Dip your finger in water and run it around the top rim to smooth out any sharp edges or cutting marks. -
Final drying:
Allow the pencil cup to dry for 24-48 hours. Keep it away from direct heat sources to prevent cracking. -
Sanding:
Once bone dry, use fine-grit sandpaper to gently buff away any rough spots or fingerprints for a professional matte finish.
Glow Up Idea
After drying, paint the inside of the stamped impressions with metallic gold acrylic paint to make the celestial patterns really shine.
Fill your new creation with your favorite colored pencils and enjoy an organized, dreamy workspace
Cutout Window Sun Catcher Shapes
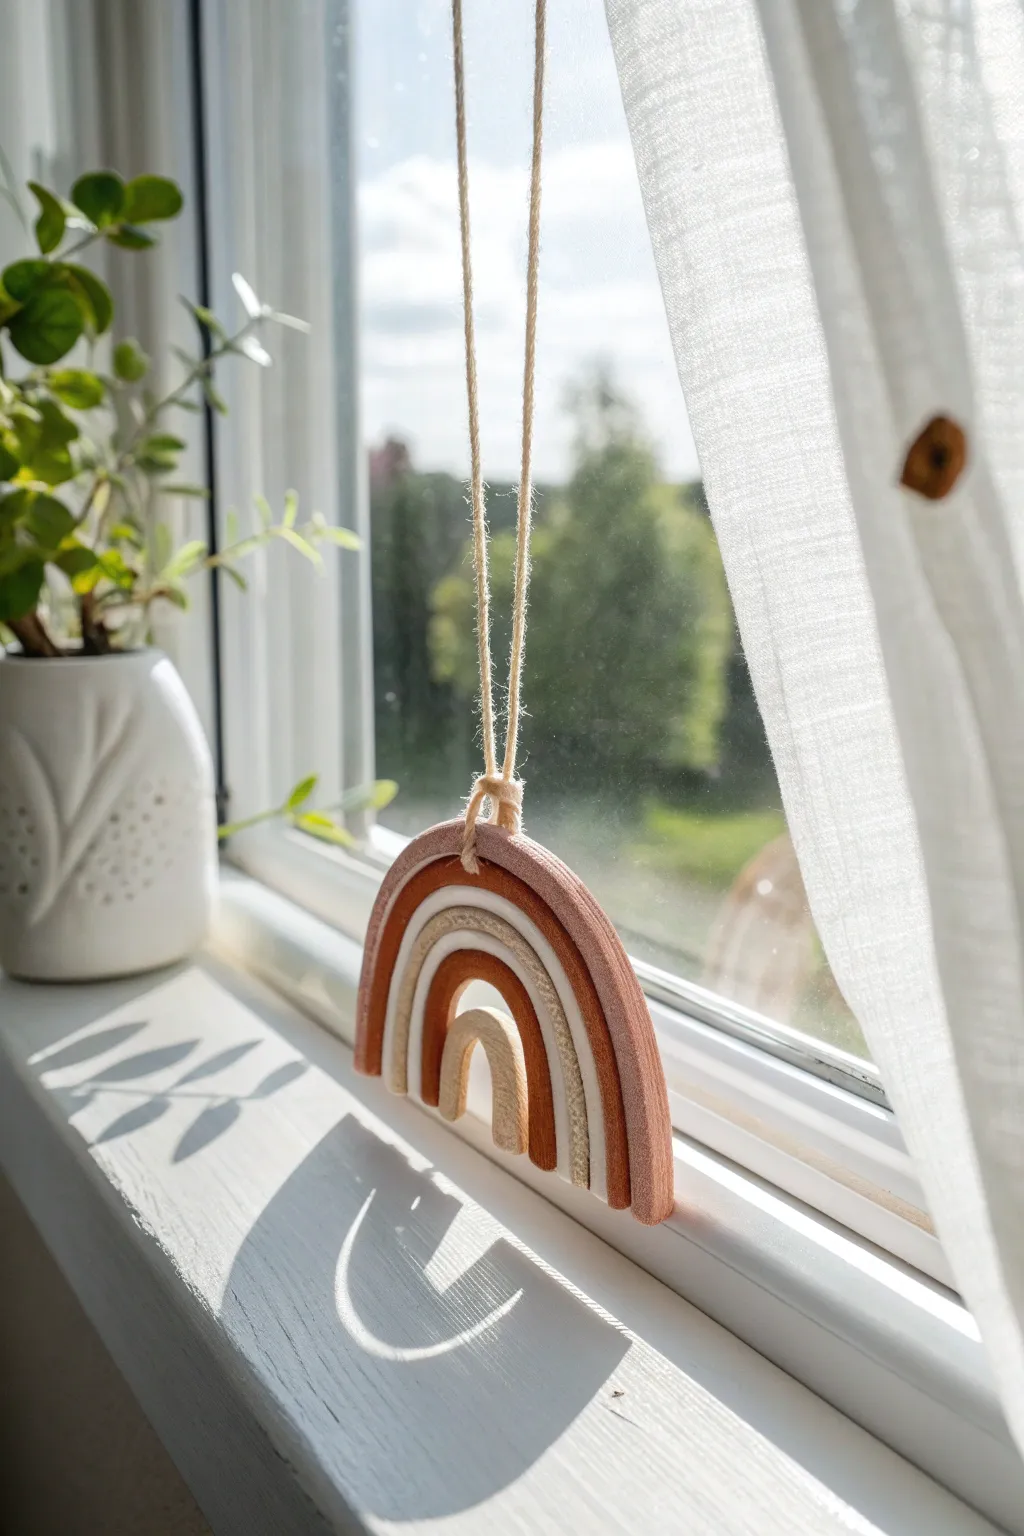
Capture the sunlight with this charming, earth-toned rainbow ornament that brings a touch of boho style to any window. Using air-dry clay, you’ll create textured arches that look lovely hanging by simple twine.
How-To Guide
Materials
- White air-dry clay
- Rolling pin
- Craft knife or clay cutter tool
- Acrylic paints (terracotta, beige, warm brown, white)
- Small flat paintbrush
- Jute twine or hemp cord
- Toothpick or skewer
- Fine-grit sandpaper (optional)
- Ruler
- Cookie sheet or parchment paper
Step 1: Shaping the Rainbow
-
Prepare your workspace:
Lay down parchment paper on a flat surface to prevent sticking. Taking a large handful of air-dry clay, knead it for a minute until it is soft and pliable. -
Roll the sheet:
Use your rolling pin to flatten the clay into an even sheet, aiming for a thickness of about 1/4 inch. Thickness consistency is key for even drying. -
Create the base:
Since this is a cutout shape rather than individual coils, you need to first cut a large semi-circle. You can trace around a bowl or cup lightly with a toothpick to get the perfect curve. -
Cut the outer arch:
Use your craft knife to cut along the outer line you just traced. Create a clean, straight cut across the bottom to form the base of your rainbow. -
Define the layers:
Inside your main semi-circle, carefully cut away thin strips of clay to create negative space between the arches. I find it easiest to start from the bottom center and work my way up. -
Finalize the shape:
You should now have about four concentric arches that are all connected or nested. If doing the nested loose style shown here, cut them completely apart so you have four separate U-shaped pieces. -
Poke a hole:
Take the largest, outermost arch. Using a skewer or toothpick, poke a hole directly in the top center. Make it large enough for your twine to thread through later. -
Smooth the edges:
Dip your finger in a little water and gently run it along any rough cut edges to smooth them out before the clay hardens.
Smooth Moves
To get perfectly smooth texture like the photo, lightly wet your finger and smooth the clay surface repeatedly before cutting your shapes.
Step 2: Drying and Painting
-
Let it dry:
Place all your clay pieces on a flat drying surface. Let them dry for 24-48 hours, flipping them once halfway through to ensure the backs dry evenly. -
Sand imperfections:
Once fully dry and hard, use a piece of fine-grit sandpaper to gently buff away any sharp jagged bits on the edges. -
Mix your palette:
Prepare your acrylic paints. Aim for an earthy palette: a deep terracotta for the outer ring, a darker brown for the third ring, and creamy beiges or whites for the others. -
Paint the arches:
Paint the front and edges of each arch. Leave the second arch unpainted (white) or paint it a soft cream for contrast. Let the paint dry completely. -
Assemble the structure:
If separate pieces were cut, arrange them back into the rainbow shape. Apply a strong craft glue to the straight bottom edges or use a backing piece of felt glued to the rear to hold them all together securely.
Step 3: Hanging
-
Prepare the hanger:
Cut a length of jute twine, about 10-12 inches long. Fold it in half to create a loop. -
Attach the twine:
Thread the folded end through the hole in the top arch, then pass the loose ends through the loop to create a lark’s head knot. -
Secure the excess:
For extra rustic charm, wrap the loose end of the twine around the base of the knot a few times before tying it off at the top. -
Finishing touch:
Double check that your knot is tight and the rainbow hangs straight. It is now ready to catch the light in your favorite window.
Glitter Glaze
Mix a tiny pinch of fine gold glitter into a clear varnish topcoat. Brush it over just one of the arches for a subtle sparkle in the sun.
Now you have a beautiful handmade decoration to brighten up any corner of your room
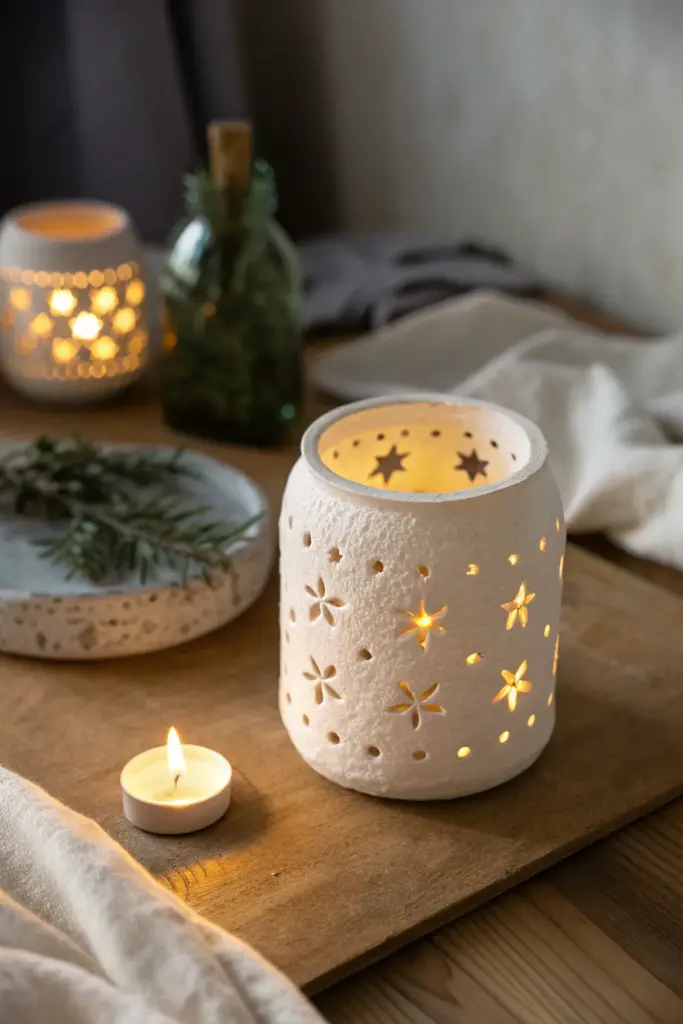
Punch-Pattern Night Lantern Wraps

Transform a simple block of air-dry clay into a glowing cylindrical lantern that casts enchanting starry patterns on your walls. The textured white surface gives it a snowy, cozy feel, while the cutout stars and flowers let the warm candlelight shine through spectacularly.
How-To Guide
Materials
- White air-dry clay (approx. 500g)
- Small rolling pin
- Rolling mat or parchment paper
- Small star-shaped cookie cutter (mini size)
- Small flower-shaped cookie cutter (mini size)
- Drinking straw or chopstick
- Large glass jar or can (to use as a mold)
- Craft knife or precision knife (for adult use)
- Sponge
- Water
- Sandpaper (fine grit)
- Tealight candle (battery-operated recommended for safety)
Step 1: Preparing the Clay Sheet
-
Knead the clay:
Start by working your air-dry clay in your hands for a few minutes. You want it warm and pliable so it doesn’t crack when you roll it out. -
Roll it out:
Place the clay on your rolling mat or parchment paper. Use the rolling pin to flatten it into a long, rectangular slab. Aim for a thickness of about 1/4 inch (6mm)—too thin and it will collapse, too thick and the light won’t shine through as well. -
Measure the length:
Take your glass jar or can that you intend to use as a form. Rolling the jar over the clay is a quick way to check if your rectangle is long enough to wrap all the way around with a little overlap. -
Trim the edges:
Use a craft knife or a ruler edge to trim the top and bottom of your clay slab so you have perfectly straight, parallel lines. This ensures the lantern stands up straight later. -
Add texture:
To achieve the snowy, stone-like texture seen in the photo, gently dab the surface of the wet clay with a coarse sponge or a crumpled ball of aluminum foil. Don’t press too hard; just roughen the surface slightly.
Step 2: Creating the Patterns
-
Plan your design:
Before cutting, visualize where your stars and flowers will go. A random scatter looks magical, but you can also do rows if you prefer order. -
Punch the stars:
Press your mini star cutter firmly into the clay slab. Wiggle it slightly to ensure a clean cut, then lift it out. Depending on the cutter, you might need to use a tool to gently pop the clay star out of the hole. -
Punch the flowers:
Repeat the process with the flower cutter. Space these out between the stars to create variety in the pattern. -
Add tiny details:
Take a drinking straw or the blunt end of a chopstick to poke small, round holes scattered among the stars and flowers. These tiny dots add a lovely sparkle when lit up. -
Clean the edges:
If the clay mushed slightly during cutting, gently pat the edges of your cutouts back into shape with your fingertip. I find a slightly damp finger works best for smoothing perfectly.
Clean Cuts Every Time
If the clay sticks inside your cookie cutters, dip the cutter into a little bit of cornstarch or baby powder before each punch. The shape will pop out effortlessly.
Step 3: Forming and Drying
-
Wrap the mold:
Wrap a piece of parchment paper around your glass jar or can. This step is crucial so the clay doesn’t stick to the mold as it dries. -
Lift the clay:
Carefully lift your patterned clay slab and wrap it around the parchment-covered jar. -
Join the seam:
Where the two ends of the clay meet, overlap them slightly. Score both touching surfaces with a fork (scratch notches into them), add a drop of water, and press them firmly together. -
Smooth the join:
Rub your finger over the seam to blend the clay so the join becomes invisible. You can re-texture this area with your sponge if it gets too smooth. -
Shape the rim:
Check the top rim of the lantern. If it looks uneven, gently tap it down or smooth it with a wet finger to create a nice, finished lip. -
Initial drying:
Let the lantern sit on the mold for about 2-3 hours until it holds its shape on its own but isn’t fully dry. -
Remove the mold:
Carefully slide the jar and parchment paper out from the center. Removing the mold now helps the inside dry evenly and prevents the clay from cracking as it shrinks slightly. -
Final drying:
Place the lantern in a cool, dry spot away from direct sunlight. Let it dry completely for 24-48 hours until it is hard and turns a chalky white color.
Colored Glow Up
Glue translucent tissue paper (in yellow, blue, or pink) on the inside of the dry lantern over the holes. When lit, the stars will glow with vibrant colors.
Step 4: Finishing Touches
-
Sand for smoothness:
Once fully dry, take a piece of fine-grit sandpaper and very gently sand the top and bottom rims to make them flat and stable. -
Light it up:
Place a battery-operated tealight inside to enjoy the warm glow safely. If using a real candle, ensure the lantern is wide enough that the flame doesn’t touch the clay sides.
Dim the lights and watch your cozy new creation transform the room with starry magic